36
2008T Hemodialysis Machine with CLiC ™ Device Training Guide
2008T Hemodialysis Machine with CLiC Device Training Guide
2008T Hemodialysis Machine with CLiC™ Device
Training Guide
Indications for Use: The CLiC device is used with the 2008T hemodialysis machine to non-invasively measure hematocrit, oxygen saturation and percent change in blood volume. The CLiC device measures hematocrit, percent change in blood volume and oxygen saturation in real time for application in the treatment of dialysis patients with the intended purpose of providing a more effective treatment for both the dialysis patient and the clinician. Based on the data that the monitor provides, the clinician/nurse, under physician direction, intervenes (i.e., increases or decreases the rate at which fluid is removed from the blood) in order to remove the maximum amount of fluid from the dialysis patient without the patient experiencing the common complications of dialysis which include nausea, cramping and vomiting. The CLiC blood chamber is a sterile, single use, disposable, optical cuvette designed for use with the CLiC monitor’s sensor clip during acute and chronic hemodialysis therapy to non-invasively measure hematocrit, percent change in blood volume and oxygen saturation. The blood chamber is connected between the arterial bloodline and the dialyzer within the extracorporeal circuit during the hemodialysis treatment. The 2008T hemodialysis machine is indicated for acute and chronic dialysis therapy.
Caution: Federal (US) law restricts these devices to sale by or on the order of a physician.
Note: Read the Instructions for Use for safe and proper use of these devices. For a complete description of hazards, contraindications, side effects and precautions, see full package labeling at www.fmcna.com.
2008T Hemodialysis Machine with CLiC Device Training Guide
1
IV
Introduction
The 2008T Hemodialysis Machine with CLiC Device Training Guide (Guide) is solely for training skilled healthcare professionals in the use of the 2008T hemodialysis machine with CLiC device. This Guide is intended to be used as a companion to the 2008T Hemodialysis Machine with CLiC User’s Guide (User’s Guide, P/N 490206), which contains detailed instructions for all machine functions.
This Guide is designed to be flexible, taking into account the various experience and skill level of the participants, the number of participants, and the amount of time available for training purposes. Similarly, this Guide recommends that participants have the opportunity to use the 2008T hemodialysis machine with CLiC device during a patient dialysis session to enhance the training experience. This hands-on experience may occur at the time of training or over several days depending on the facility, shift schedules, etc., and should be tailored to each facility, participant, and situation.
Each facility will determine who will participate in the In-Service Training. It is anticipated that participants will include nurses, patient care technicians (PCTs), and physicians, with nurses being the primary focus of the In-Service Training.
2008T Hemodialysis Machine with CLiC Device Training Guide
2
Training Prework:
In order to ensure that participants have the clinical background needed to interpret the data, all nurses must complete the following online 2008T Hemodialysis Machine with CLiC Device course prior to attending the In-Service Training:
www.crit-linetrainingcourse.com
Completion of the prework by other participants (e.g., PCTs) is at the discretion of each facility.
Training Resources:In addition to this Guide, the following materials are incorporated into the 2008T hemodialysis machine with CLiC device In-Service Training:
• 2008T Hemodialysis Machine with CLiC User’s Guide (P/N 490206)
• 2008T Hemodialysis Machine with CLiC Device Reference Guide (P/N 102111-01)
• CLiC Quickstart Guide (P/N 102445-01)
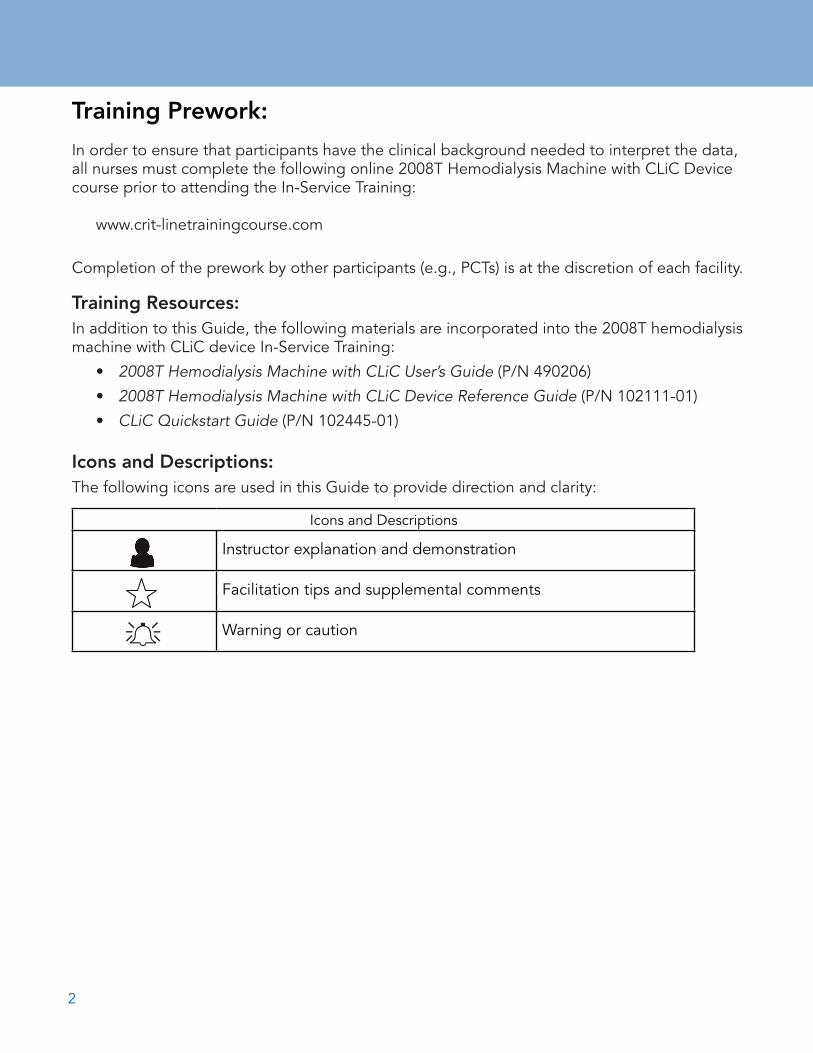
Icons and Descriptions:The following icons are used in this Guide to provide direction and clarity:
Icons and Descriptions
Instructor explanation and demonstration
Facilitation tips and supplemental comments
Warning or cautionA
3
2008T Hemodialysis Machine with CLiC Device Training Guide
Training Timeline4-6 weeks prior to training:
• Schedule participants and communicate prework requirements
4 weeks prior to training:• Ensure that the following are available at the facility for training:
- 2008T hemodialysis machine with CLiC software installed
- CLiC devices and blood chambers
- 2008T Hemodialysis Machine with CLiC Device Training Guide
- 2008T Hemodialysis Machine with CLiC User’s Guide
- 2008T Hemodialysis Machine with CLiC Device Participant Workbook (one per participant)
- 2008T Hemodialysis Machine with CLiC Device Reference Guide (P/N 102111-01)
2 weeks prior to training:• Ensure that participants are on track to complete the prework ahead of the scheduled
training day.
1 week prior to training:• Confirm receipt of training materials (follow up)
• Confirm participant attendance
Day of training:• Plan to arrive early to ensure that the 2008T hemodialysis machine with CLiC device is
available for use and the blood chambers have been located.
Training Guide Note
This Guide’s training is limited to the features and operation of the 2008T hemodialysis machine with CLiC device and does not cover other critical dialysis-related subjects or related clinical theory.
Neither this Guide, nor the In-Service Training, are intended to compromise or replace specific policies and procedures of hemodialysis providers or the treatment prescriptions of physicians. Fresenius Renal Technologies and its affiliates make no recommendations and assume no liability for the policies and procedures established in hemodialysis providers’ clinics for hemodialysis treatments.
4
Training TopicsWelcome/getting started
• Distribute and introduce 2008T Hemodialysis Machines with CLiC Device Participant Workbook
• Introduce 2008T Machine with CLiC User’s Guide
2008T hemodialysis machine with CLiC device overview• Crit-Line screen features
• Setup
• Blood chamber placement
• Sensor clip
Preparation for treatment• Verify accuracy routine
Initiation and termination of treatment• Sensor clip attachment
• Start run
• BV alert level
• O2 alert level
• Markers
• Ending a treatment
• Printing/downloading treatment results
• Cleaning
Troubleshooting• Alarms
• Review Profiles A, B, and C
Hands-on demonstration• Facility patient treatment area

5
2008T Hemodialysis Machine with CLiC Device Training Guide
Notes:
6
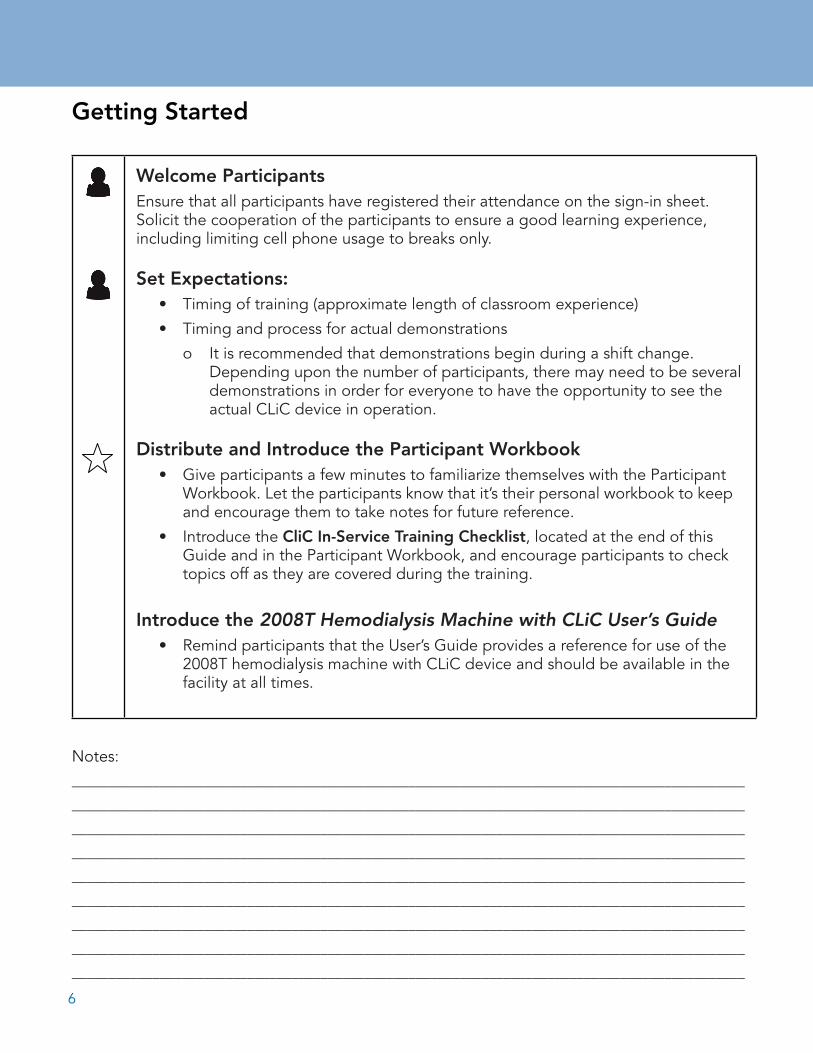
Getting Started
Welcome ParticipantsEnsure that all participants have registered their attendance on the sign-in sheet.Solicit the cooperation of the participants to ensure a good learning experience, including limiting cell phone usage to breaks only.
Set Expectations:• Timing of training (approximate length of classroom experience)
• Timing and process for actual demonstrations
o It is recommended that demonstrations begin during a shift change. Depending upon the number of participants, there may need to be several demonstrations in order for everyone to have the opportunity to see the actual CLiC device in operation.
Distribute and Introduce the Participant Workbook• Give participants a few minutes to familiarize themselves with the Participant
Workbook. Let the participants know that it’s their personal workbook to keep and encourage them to take notes for future reference.
• Introduce the CliC In-Service Training Checklist, located at the end of this Guide and in the Participant Workbook, and encourage participants to check topics off as they are covered during the training.
Introduce the 2008T Hemodialysis Machine with CLiC User’s Guide• Remind participants that the User’s Guide provides a reference for use of the
2008T hemodialysis machine with CLiC device and should be available in the facility at all times.
Notes:
____________________________________________________________________________________________
____________________________________________________________________________________________
____________________________________________________________________________________________
____________________________________________________________________________________________
____________________________________________________________________________________________
____________________________________________________________________________________________
____________________________________________________________________________________________
____________________________________________________________________________________________
____________________________________________________________________________________________
7
2008T Hemodialysis Machine with CLiC Device Training Guide
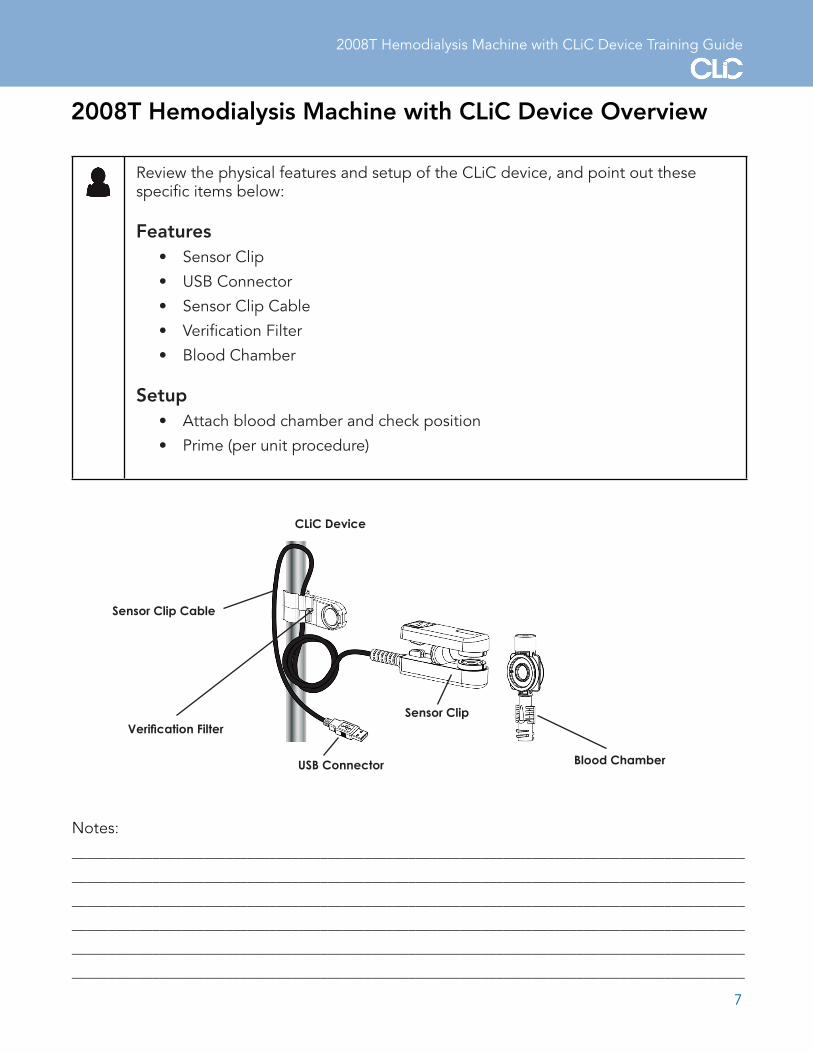
Verification Filter
USB Connector
Sensor Clip
Blood Chamber
CLiC Device
Sensor Clip Cable
2008T Hemodialysis Machine with CLiC Device Overview
Review the physical features and setup of the CLiC device, and point out these specific items below:
Features• Sensor Clip
• USB Connector
• Sensor Clip Cable
• Verification Filter
• Blood Chamber
Setup• Attach blood chamber and check position
• Prime (per unit procedure)
Notes:
____________________________________________________________________________________________
____________________________________________________________________________________________
____________________________________________________________________________________________
____________________________________________________________________________________________
____________________________________________________________________________________________
____________________________________________________________________________________________
8
Preparation for Treatment
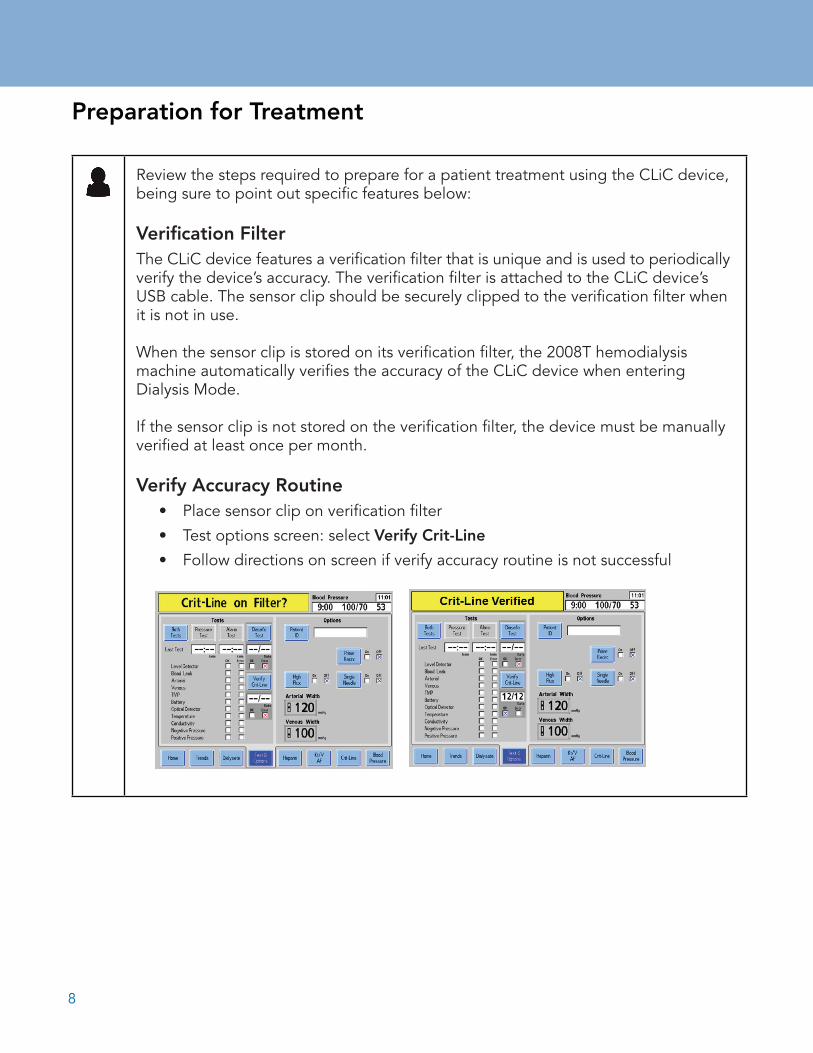
Review the steps required to prepare for a patient treatment using the CLiC device, being sure to point out specific features below:
Verification FilterThe CLiC device features a verification filter that is unique and is used to periodically verify the device’s accuracy. The verification filter is attached to the CLiC device’s USB cable. The sensor clip should be securely clipped to the verification filter when it is not in use.
When the sensor clip is stored on its verification filter, the 2008T hemodialysis machine automatically verifies the accuracy of the CLiC device when entering Dialysis Mode.
If the sensor clip is not stored on the verification filter, the device must be manually verified at least once per month.
Verify Accuracy Routine• Place sensor clip on verification filter
• Test options screen: select Verify Crit-Line
• Follow directions on screen if verify accuracy routine is not successful

9
2008T Hemodialysis Machine with CLiC Device Training Guide
Verifying the CLiC Device
Manually Verify AccuracySelecting the Test and Options tab screen allows the user to perform a manual verification on the accuracy of the CLiC device.
Note: In most cases, it is not necessary to perform a manual verification. If the sensor clip is placed onto the verification filter, the 2008T hemodialysis machine with CLiC device will automatically perform a verification test once per day, and the date of the most recent successful verification will be displayed below the Test and Option Screen.
Follow these basic steps to manually verify accuracy:
1. Place sensor clip on verification filter.
1. Hold the sensor clip such that one side is held by the index finger and the other side is held by the thumb. Squeeze the sensor clip to spread the sensor elements apart.
2. Place the sensor clip over the verification filter such that the sensor elements cover the middle portion of the verification filter.
3. Release the sensor clip to allow the sensor elements to seat on the verification filter.
4. Make certain that the sensor clip has locked securely into place on the verification filter by noting the audible and tactile click.
2. Test options screen: Select Verify Crit-Line and Confirm.
3. If verification test fails: The CLiC device is not ready to use during treatment.
10
Verifying the CLiC Device
Action StepsVerify the CLiC device:
• Place the sensor clip on the verification filter, which is attached to its USB cable.
• Wait up to one minute for the message to clear. If the message clears, the CLiC device is verified.
If the message is not cleared:• Select the Test & Options screen-button then select the Verify Crit-Line
button. This will start the verification process manually.
• Wait up to one minute for the message to clear. If the message is still not cleared, the CLiC device cannot be used for the dialysis treatment.
• Disconnect the CLiC device cable from the USB port.
• Press the RESET key to disable the CLiC device.
• Contact a qualified service technician.
11
2008T Hemodialysis Machine with CLiC Device Training Guide
Initiation and Termination of Treatment
Review key steps for initiating and terminating treatment with the CLiC device, being sure to include the following topics:
Connecting the Blood ChamberFollow these steps to attach the disposable blood chamber to the dialyzer during the extracorporeal bloodline setup before priming the bloodlines.
Note: The Crit-Line blood chamber is tinted blue in color and must be used with the CLiC device.
Note: The Crit-Line blood chamber is intended for single-use only. A new sterile blood chamber must be used for each monitoring session.
1. Inspect the Crit-Line blood chamber and packaging. Inspect the Crit-Line blood chamber and its sterile package prior to use.
Refer to the blood chamber package label to ensure that the blood chamber sterilization has not expired.
Warning: Do not use the Crit-Line blood chamber if its package has been opened or its sterility has been compromised prior to use. The viewing area of the disposable blood chamber must be kept clean and free of obstruction.
2. Connect the Crit-Line blood chamber to dialyzer. Remove the blood chamber from its sterile package and aseptically attach
the red connector to the arterial port of the dialyzer. Make sure the connection is tight.
3. Continue setting up the bloodlines. Continue to set up the bloodlines as described in Chapter 2, “Connecting the
Extracorporeal Blood Circuit” in the 2008T Hemodialysis Machine Operator’s Manual (P/N 490122).
Note: When connecting the arterial bloodline to the Crit-Line blood chamber (not the dialyzer), hold the Crit-Line blood chamber securely in one hand and aseptically attach the dialyzer end of the arterial bloodline with the other hand. Be careful that you do not cross-thread the connection. The connection of the Crit-Line blood chamber to the arterial bloodline must not leak.
Note: Make sure no air is in the Crit-Line blood chamber after priming. The accuracy of the hematocrit and oxygen saturation readings may be adversely affected if there is any air present in the Crit-Line blood chamber.
A
12
Initiation and Termination of Treatment
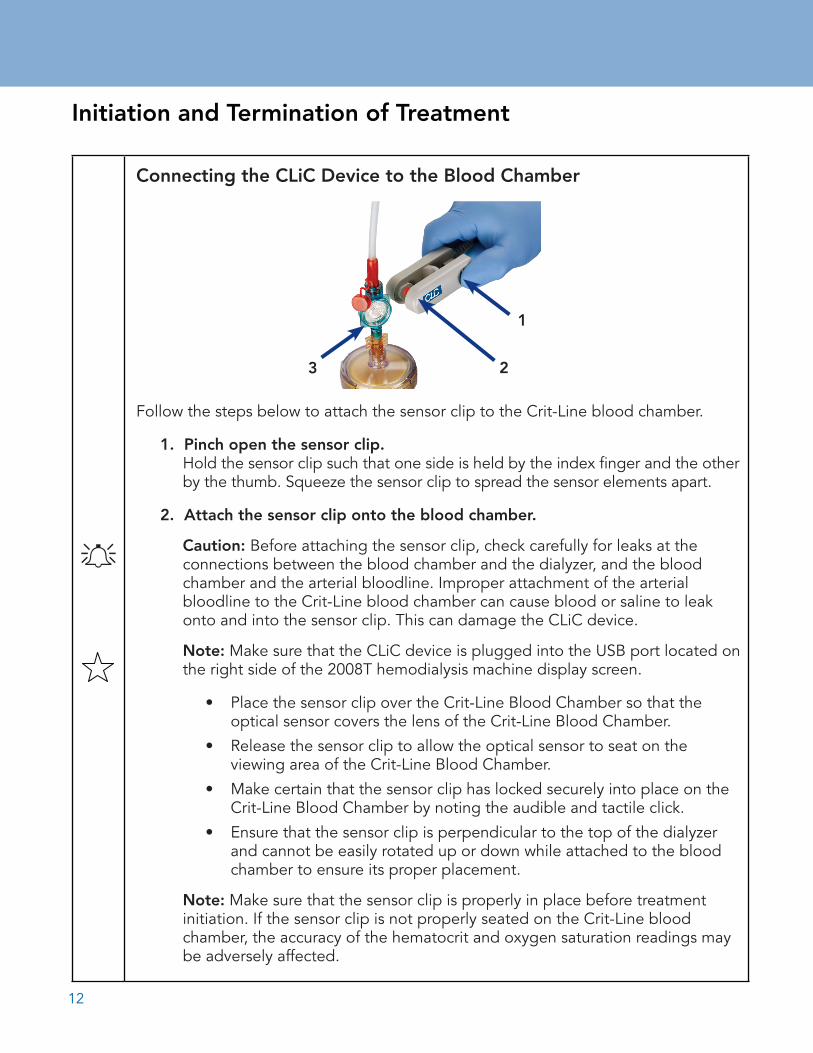
Connecting the CLiC Device to the Blood Chamber
Follow the steps below to attach the sensor clip to the Crit-Line blood chamber.
1. Pinch open the sensor clip. Hold the sensor clip such that one side is held by the index finger and the other
by the thumb. Squeeze the sensor clip to spread the sensor elements apart.
2. Attach the sensor clip onto the blood chamber.
Caution: Before attaching the sensor clip, check carefully for leaks at theconnections between the blood chamber and the dialyzer, and the blood chamber and the arterial bloodline. Improper attachment of the arterial bloodline to the Crit-Line blood chamber can cause blood or saline to leak onto and into the sensor clip. This can damage the CLiC device.
Note: Make sure that the CLiC device is plugged into the USB port located on the right side of the 2008T hemodialysis machine display screen.
• Place the sensor clip over the Crit-Line Blood Chamber so that the optical sensor covers the lens of the Crit-Line Blood Chamber.
• Release the sensor clip to allow the optical sensor to seat on the viewing area of the Crit-Line Blood Chamber.
• Make certain that the sensor clip has locked securely into place on the Crit-Line Blood Chamber by noting the audible and tactile click.
• Ensure that the sensor clip is perpendicular to the top of the dialyzer and cannot be easily rotated up or down while attached to the blood chamber to ensure its proper placement.
Note: Make sure that the sensor clip is properly in place before treatment initiation. If the sensor clip is not properly seated on the Crit-Line blood chamber, the accuracy of the hematocrit and oxygen saturation readings may be adversely affected.
A
1
23
13
2008T Hemodialysis Machine with CLiC Device Training Guide
Initiation and Termination of Treatment
3. Check for proper blood flow before selecting Tx Clock. When starting the blood pump at the beginning of treatment, visually verify prescribed blood flow in the extracorporeal circuit, including the Crit-Line blood chamber, before starting the Tx Clock.
Note: Graphing of the data begins after the CLiC device reads blood sensed, the hematocrit has been stable for sixty seconds, and the Tx Clock and blood pump are running.
Start RunExplain blood volume (BV) alert level and O2 alert level function
• Set initial BV alert level limit
BV Alert Level button Sets the BV alert level. When the current ΔBV% change drops below the set BV alert level, the 2008T hemodialysis machine stops the UF pump and displays the alert message Rel. Blood Volume Low. This message will occur until the user changes the level or sets the BV Alert Level to OFF.
Navigate ScreensReading Graphs on the Crit-Line screenThe Crit-Line screen can display either Blood Volume (BV) or Hematocrit (Hct) on the upper graph depending on the Service Mode setting.
On the lower graph, the Oxygen Saturation (O2 Sat) graph can be changed to display blood pressure—select the graph and press the CONFIRM key.
The Blood Volume (BV) and Oxygen Saturation (O2 Sat) graphs are displayed by default.
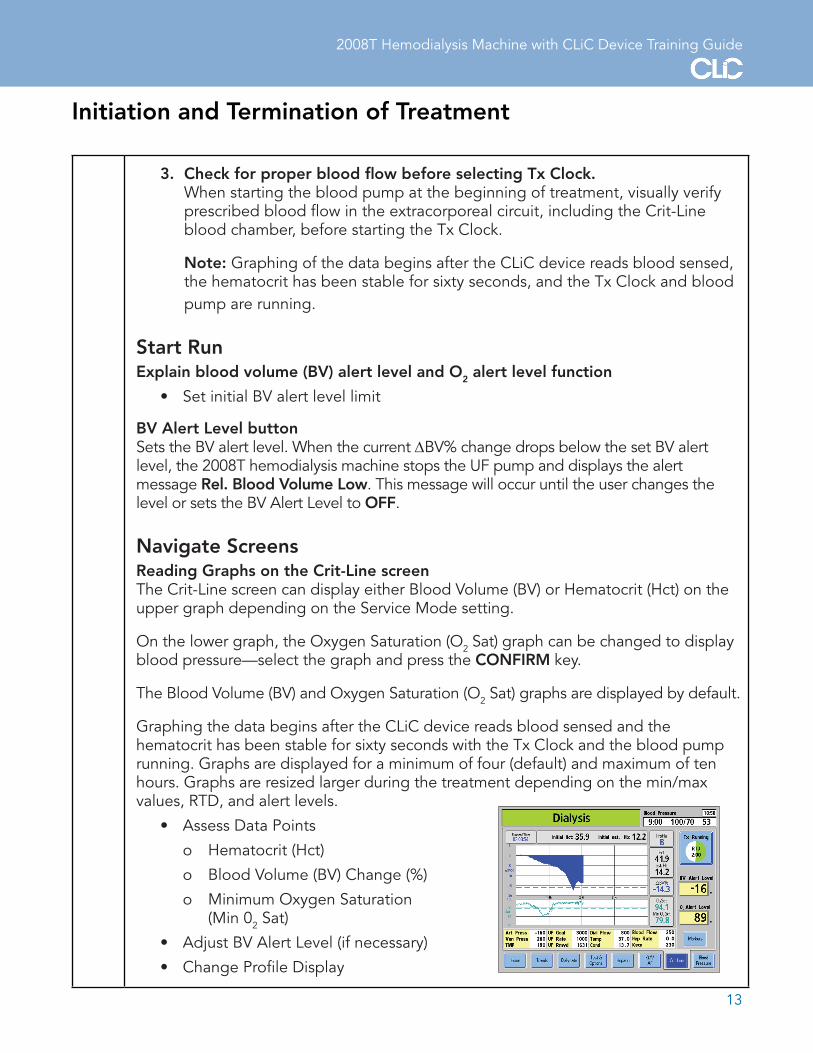
Graphing the data begins after the CLiC device reads blood sensed and thehematocrit has been stable for sixty seconds with the Tx Clock and the blood pumprunning. Graphs are displayed for a minimum of four (default) and maximum of tenhours. Graphs are resized larger during the treatment depending on the min/maxvalues, RTD, and alert levels.
• Assess Data Points
o Hematocrit (Hct)
o Blood Volume (BV) Change (%)
o Minimum Oxygen Saturation (Min 02 Sat)
• Adjust BV Alert Level (if necessary)
• Change Profile Display
14
Initiation and Termination of Treatment
Setting an Event MarkerMarker button – Selecting this button displays a menu to insert an event marker on the blood volume and oxygen saturation graphs. Use the ↑ or ↓ (up or down) keys on the keyboard to select either Symptom or Intervention. Pressing the CONFIRM key places the marker and the value on the latest point on the graph; pressing the Escape key exits the menu without placing a marker.
Marker Display Symbols
• The Symptom marker is a yellow diamond. t• The Intervention marker is a black triangle. s
• The Blood Volume graph displays the BV% change value at that data point in blue.
• The Hct graph displays the Hematocrit value at that data point in black.
• The Oxygen Saturation graph displays the Oxygen Saturation value at that data point in green.
End TreatmentWhen the treatment is complete and the Tx Clock is paused, pinch the sensor clip to spread the sensor elements apart and gently remove the sensor clip from the Crit-Line blood chamber. Store the CLiC device by attaching the sensor clip to the verification filter, which is attached to its USB cable. Discard the disposable Crit-Line blood chamber with the rest of the bloodlines.
Print Treatment ResultsPrinting a CLiC Device Treatment Report
When RTD is zero and the Tx Clock is paused, a Print button will appear on the Crit-Line screen in place of the Marker button.
Note: To clear the data on the Crit-Line screen without printing, press the New Tx key.
• Select printer method
• Marker button becomes print button when treatment completed
Note: Printing is an optional feature which requires additional hardware on the 2008T hemodialysis machine.
15
2008T Hemodialysis Machine with CLiC Device Training Guide
Initiation and Termination of Treatment
Cleaning• Sensor Clip
• Verification Filter
Cleaning and Disinfecting the CLiC DeviceThe CLiC device is a sensitive electro-optical device. Use care when cleaning the sensor clip and verification filter to prevent damage. The exterior of the sensor clip and the verification filter, must be cleaned at the end of every treatment with dilute bleach solution (1:100) or other suitable hospital disinfectant.
Freshly prepared dilute bleach solution (1:100) is currently recommended by the Center for Disease Control as a suitable disinfectant for the hepatitis virus. Because surface contamination is the general mode of transmission for this type of virus, thorough cleaning of the exterior is essential.
Caution: Wipe the CLiC device with a cloth dampened with the cleaning solution. Do not spray the solution on the CLiC device. Do not immerse the CLiC device in any type of liquid. If liquids infiltrate the sensor clip, they will damage it.
Caution: Do not use abrasive materials or solvents to clean the CLiC device. Doing so may cause damage the sensor clip.
Caution: Be careful not to scratch or damage the verification filter. If the verification filter is scratched or damaged, it may cause the CLiC device to fail verification of accuracy.
Caution: If the CLiC device becomes contaminated with blood, it must be thoroughly disinfected before the next treatment. Freshly prepared dilute bleach solution (1:100) or surface disinfectants such as Cavicide or Envirocide are recommended.
CLiC Device DisposalIf the sensor clip continues to fail verification of accuracy, even after recalibration, it is no longer suitable for clinical use. Disinfect the sensor clip before disposing it in accordance with U.S. federal regulations and appropriate state and local laws.
A
Notes:
____________________________________________________________________________________________
____________________________________________________________________________________________
____________________________________________________________________________________________
____________________________________________________________________________________________
16
Troubleshooting
It is important that participants are able to effectively troubleshoot operating alarms as well as treatment results. Review the following resources and steps:
Introduce and explain common patient profiles:
• BV Profile A
• BV Profile B
• BV Profile C
• Oxygen saturation
Points to consider when evaluating patient profiles:
• Was the treatment started correctly?
• Is Hct <30? What was it the last treatment?
• What is the O2 saturation?
• What is the patient’s access type?
• Does the patient need oxygen?
• Is the BV alert level set?
Highlight potential technical errors:
• Did not start properly
• Set up incorrectly
• Lab differences between the 2008T hemodialysis machine with CLiC device hematocrit and lab hematocrit
• Not printing
Continue working with alarms and troubleshooting during the hands-on demonstration time.
17
2008T Hemodialysis Machine with CLiC Device Training Guide
Wrapping Up/Hands-on Demonstration
Prior to continuing the training:
• Point out the In-Service Training Evaluation, located in the Participant Workbook, and ask participants to complete it at the end of the training day.
o Completing the evaluation is optional.
o Provide the fax number of your manager so that participants can return the evaluation directly (a blank space is provided on the form for the fax number).
o If the form is returned to the trainer, review and distribute internally as directed by your manager.
• If applicable, designate a “super user” to be the point person for the facility post-training.
Conduct the hands-on demonstrations so that each participant has an opportunity to see the 2008T hemodialysis machine with CLiC device in use during a patient treatment. If possible, work with patients who have a more difficult situation to allow for greater opportunities to reinforce intervention learnings.
After concluding the hands-on demonstrations, complete the In-Service Training Checklist, sign and return to the facility contact.
Conduct exit interview with facility manager:• Determine if additional follow-up and support is needed for the unit; place
on the call list as needed.
• Explain to staff what to expect during follow-up calls and record any additional information.
For 24-hour technical and clinical support, facilities may contact 1-800-227-2572

18
Notes:

19
2008T Hemodialysis Machine with CLiC Device Training Guide
2008T Machine with CLiC Device In-Service Training Sign-In Sheet(Signatureindicatesattendanceonly,notcompetenceorexpertise)
Presented by: ____________________________________, RN, Clinical In-Service Specialist
Facility: ___________________________________________ Date: ________________
Print Name Signature Title

20
21
2008T Hemodialysis Machine with CLiC Device Training Guide
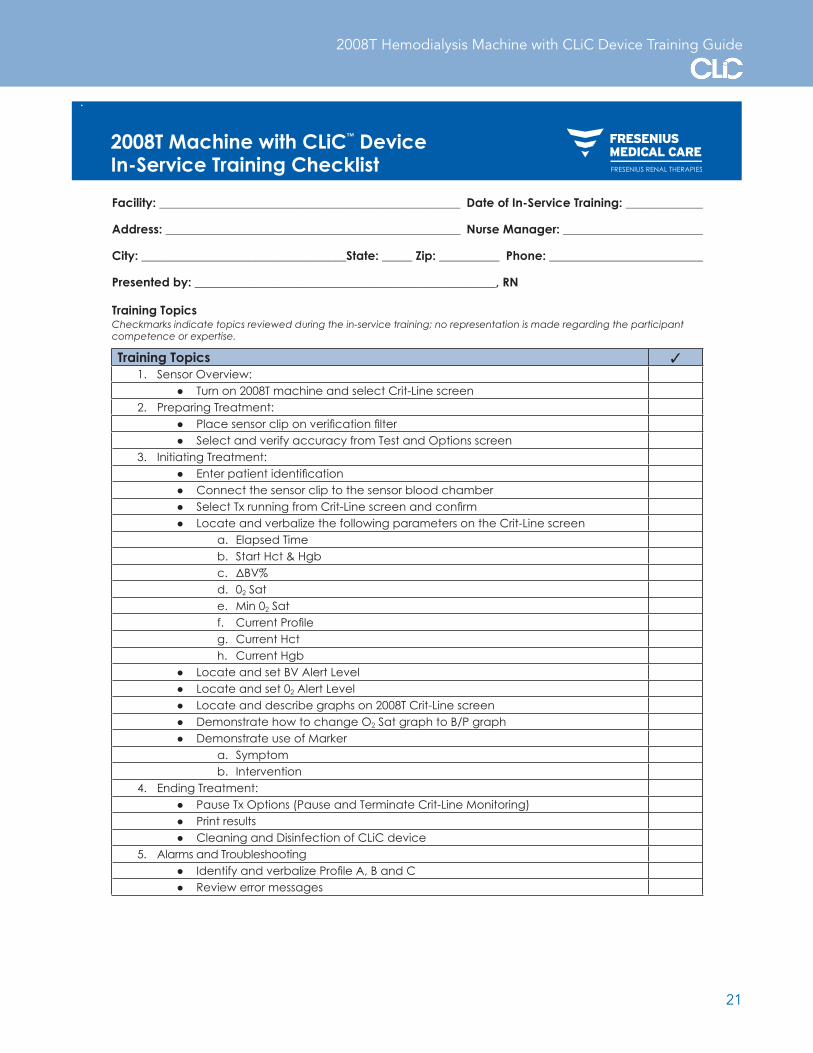
2008T Machine with CLiC™ Device In-Service Training Checklist
Facility: __________________________________________________ Date of In-Service Training: ______________
Address: _________________________________________________ Nurse Manager: ________________________
City: __________________________________State: _____ Zip: __________ Phone: __________________________
Presented by: __________________________________________________, RN
Training Topics 3
1. Sensor Overview: ● Turnon2008TmachineandselectCrit-Linescreen2. PreparingTreatment: ● Placesensorcliponverificationfilter ● SelectandverifyaccuracyfromTestandOptionsscreen3. InitiatingTreatment: ● Enterpatientidentification ● Connectthesensorcliptothesensorbloodchamber ● SelectTxrunningfromCrit-Linescreenandconfirm ● LocateandverbalizethefollowingparametersontheCrit-Linescreen a. ElapsedTime b. StartHct&Hgb c. ΔBV% d. 02Sat e. Min02Sat f. CurrentProfile g. CurrentHct h. CurrentHgb ● LocateandsetBVAlertLevel ● Locateandset02AlertLevel ● Locateanddescribegraphson2008TCrit-Linescreen ● DemonstratehowtochangeO2SatgraphtoB/Pgraph ● DemonstrateuseofMarker a. Symptom b. Intervention4. EndingTreatment: ● PauseTxOptions(PauseandTerminateCrit-LineMonitoring) ● Printresults ● CleaningandDisinfectionofCLiCdevice5. AlarmsandTroubleshooting ● IdentifyandverbalizeProfileA,BandC ● Reviewerrormessages
Training TopicsCheckmarks indicate topics reviewed during the in-service training; no representation is made regarding the participant competence or expertise.

22
23
2008T Hemodialysis Machine with CLiC Device Training Guide
Appendix
1. Case Studies (All case studies are for educational purposes only.)
2. Fluid Distribution Model
3. Frequently Asked Questions
24
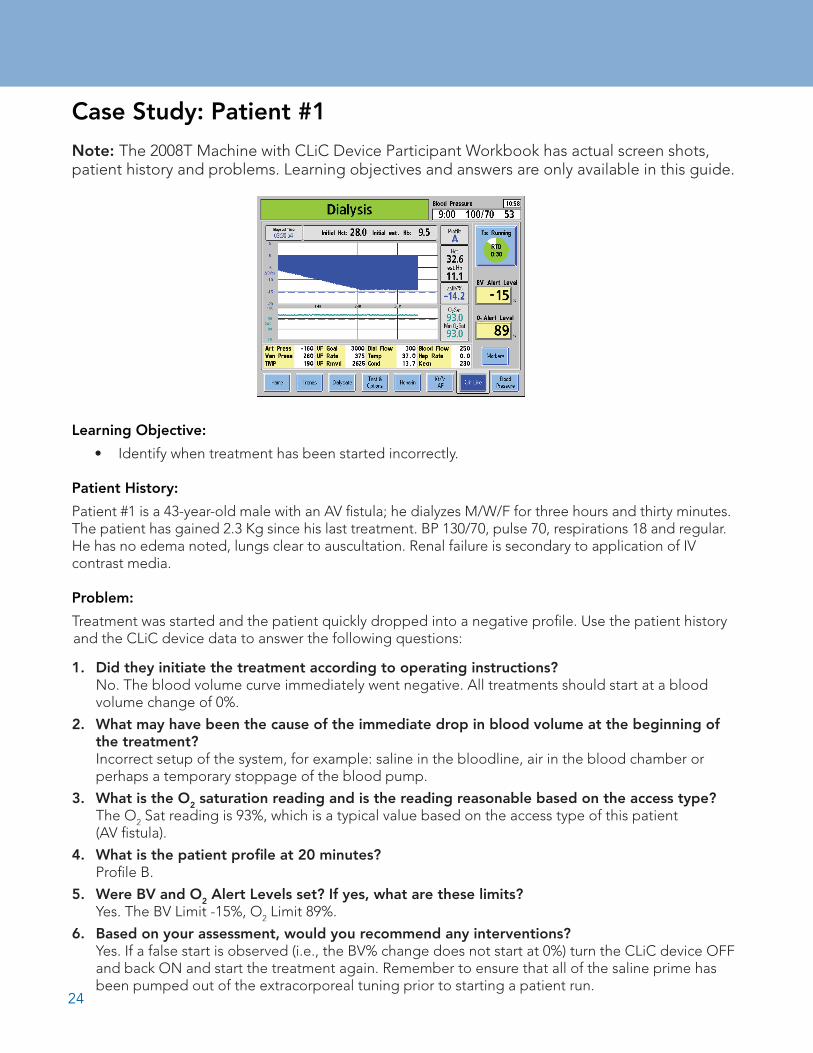
Case Study: Patient #1
Note: The 2008T Machine with CLiC Device Participant Workbook has actual screen shots, patient history and problems. Learning objectives and answers are only available in this guide.
Learning Objective:
• Identify when treatment has been started incorrectly.
Patient History:
Patient #1 is a 43-year-old male with an AV fistula; he dialyzes M/W/F for three hours and thirty minutes. The patient has gained 2.3 Kg since his last treatment. BP 130/70, pulse 70, respirations 18 and regular. He has no edema noted, lungs clear to auscultation. Renal failure is secondary to application of IV contrast media.
Problem:
Treatment was started and the patient quickly dropped into a negative profile. Use the patient history and the CLiC device data to answer the following questions:
1. Did they initiate the treatment according to operating instructions? No. The blood volume curve immediately went negative. All treatments should start at a blood
volume change of 0%.
2. What may have been the cause of the immediate drop in blood volume at the beginning of the treatment?
Incorrect setup of the system, for example: saline in the bloodline, air in the blood chamber or perhaps a temporary stoppage of the blood pump.
3. What is the O2 saturation reading and is the reading reasonable based on the access type? The O2 Sat reading is 93%, which is a typical value based on the access type of this patient
(AV fistula).
4. What is the patient profile at 20 minutes? Profile B.
5. Were BV and O2 Alert Levels set? If yes, what are these limits? Yes. The BV Limit -15%, O2 Limit 89%.
6. Based on your assessment, would you recommend any interventions? Yes. If a false start is observed (i.e., the BV% change does not start at 0%) turn the CLiC device OFF
and back ON and start the treatment again. Remember to ensure that all of the saline prime has been pumped out of the extracorporeal tuning prior to starting a patient run.
25
2008T Hemodialysis Machine with CLiC Device Training Guide
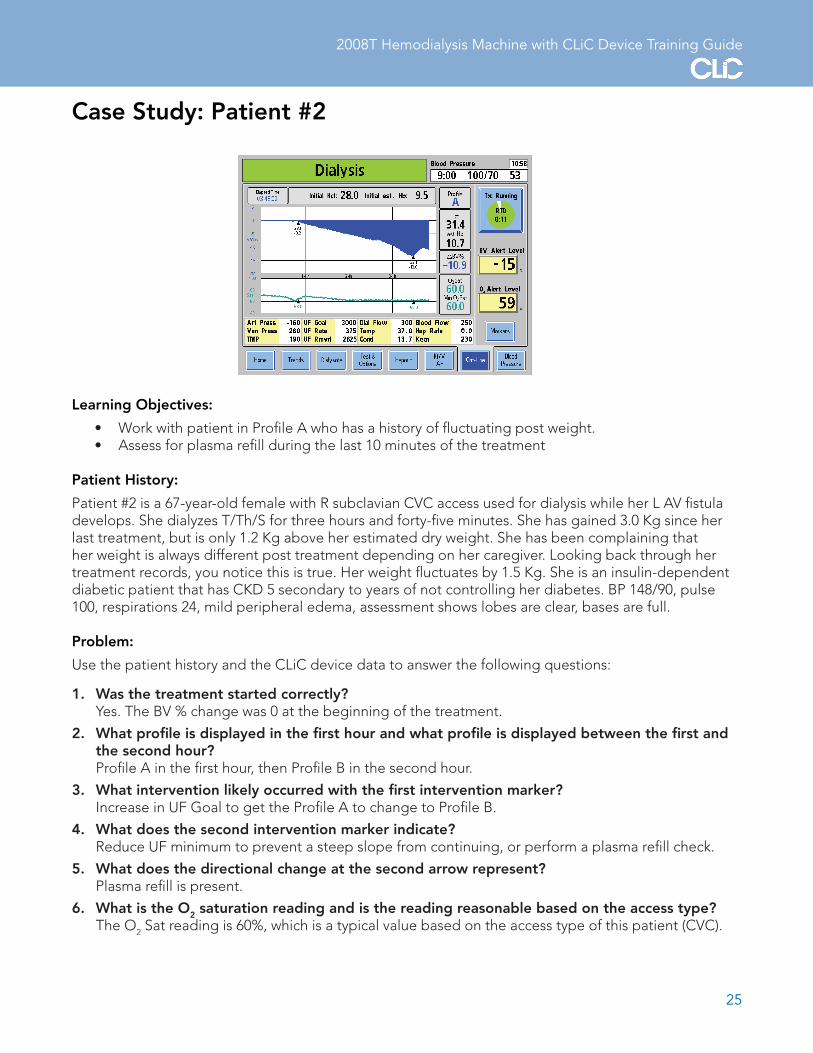
Case Study: Patient #2
Learning Objectives:
• Work with patient in Profile A who has a history of fluctuating post weight.• Assess for plasma refill during the last 10 minutes of the treatment
Patient History:
Patient #2 is a 67-year-old female with R subclavian CVC access used for dialysis while her L AV fistula develops. She dialyzes T/Th/S for three hours and forty-five minutes. She has gained 3.0 Kg since her last treatment, but is only 1.2 Kg above her estimated dry weight. She has been complaining that her weight is always different post treatment depending on her caregiver. Looking back through her treatment records, you notice this is true. Her weight fluctuates by 1.5 Kg. She is an insulin-dependent diabetic patient that has CKD 5 secondary to years of not controlling her diabetes. BP 148/90, pulse 100, respirations 24, mild peripheral edema, assessment shows lobes are clear, bases are full.
Problem:
Use the patient history and the CLiC device data to answer the following questions:
1. Was the treatment started correctly? Yes. The BV % change was 0 at the beginning of the treatment.
2. What profile is displayed in the first hour and what profile is displayed between the first and the second hour?
Profile A in the first hour, then Profile B in the second hour.
3. What intervention likely occurred with the first intervention marker? Increase in UF Goal to get the Profile A to change to Profile B.
4. What does the second intervention marker indicate? Reduce UF minimum to prevent a steep slope from continuing, or perform a plasma refill check.
5. What does the directional change at the second arrow represent? Plasma refill is present.
6. What is the O2 saturation reading and is the reading reasonable based on the access type? The O2 Sat reading is 60%, which is a typical value based on the access type of this patient (CVC).
26
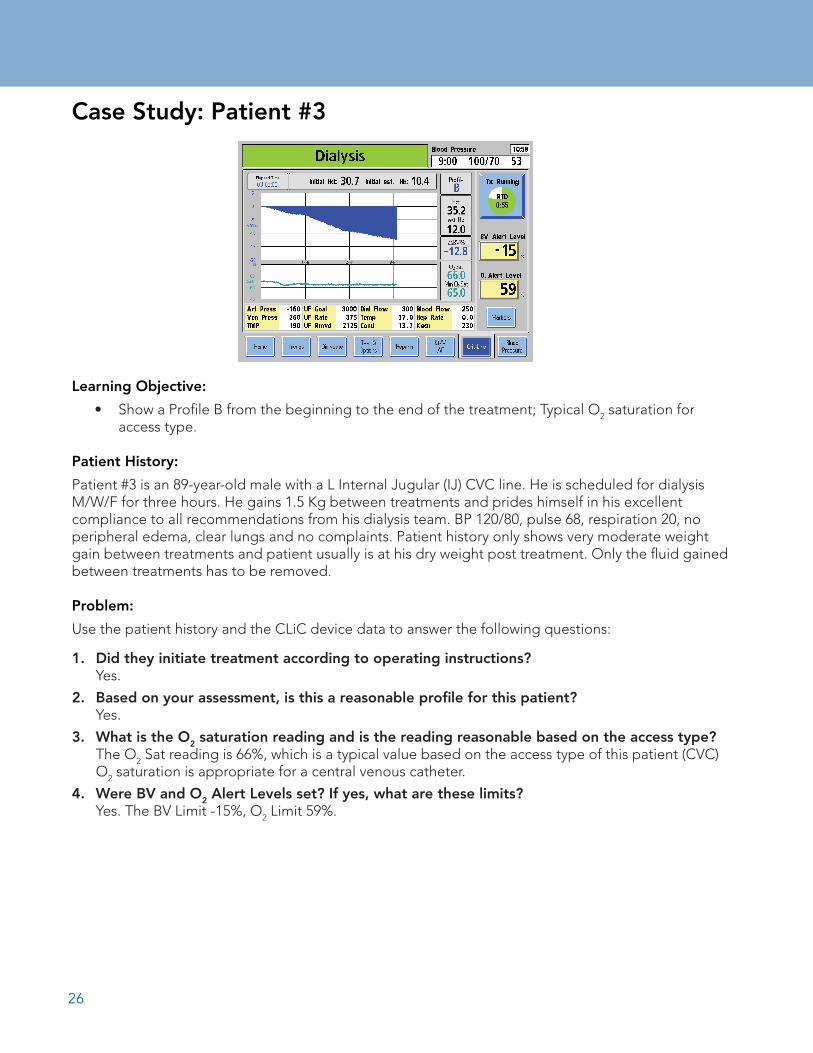
Case Study: Patient #3
Learning Objective:
• Show a Profile B from the beginning to the end of the treatment; Typical O2 saturation for access type.
Patient History:
Patient #3 is an 89-year-old male with a L Internal Jugular (IJ) CVC line. He is scheduled for dialysis M/W/F for three hours. He gains 1.5 Kg between treatments and prides himself in his excellent compliance to all recommendations from his dialysis team. BP 120/80, pulse 68, respiration 20, no peripheral edema, clear lungs and no complaints. Patient history only shows very moderate weight gain between treatments and patient usually is at his dry weight post treatment. Only the fluid gained between treatments has to be removed.
Problem:
Use the patient history and the CLiC device data to answer the following questions:
1. Did they initiate treatment according to operating instructions? Yes.
2. Based on your assessment, is this a reasonable profile for this patient? Yes.
3. What is the O2 saturation reading and is the reading reasonable based on the access type? The O2 Sat reading is 66%, which is a typical value based on the access type of this patient (CVC)
O2 saturation is appropriate for a central venous catheter.
4. Were BV and O2 Alert Levels set? If yes, what are these limits? Yes. The BV Limit -15%, O2 Limit 59%.
27
2008T Hemodialysis Machine with CLiC Device Training Guide
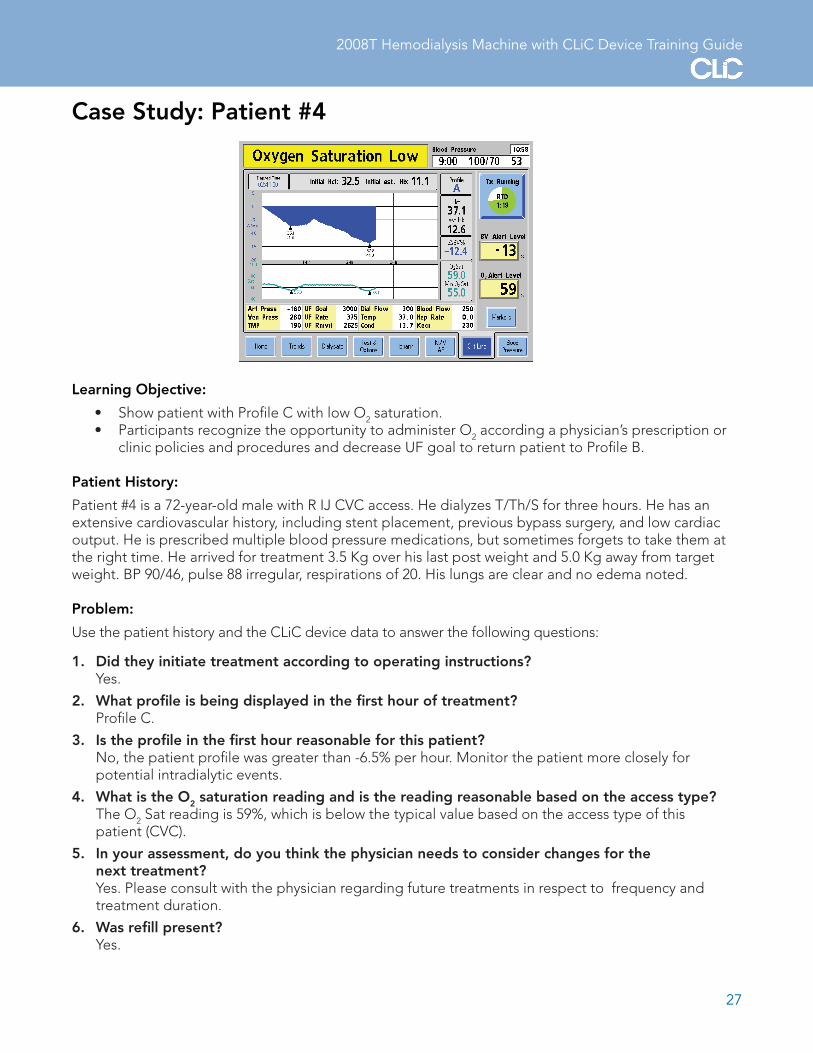
Case Study: Patient #4
Learning Objective:
• Show patient with Profile C with low O2 saturation.• Participants recognize the opportunity to administer O2 according a physician’s prescription or
clinic policies and procedures and decrease UF goal to return patient to Profile B.
Patient History:
Patient #4 is a 72-year-old male with R IJ CVC access. He dialyzes T/Th/S for three hours. He has an extensive cardiovascular history, including stent placement, previous bypass surgery, and low cardiac output. He is prescribed multiple blood pressure medications, but sometimes forgets to take them at the right time. He arrived for treatment 3.5 Kg over his last post weight and 5.0 Kg away from target weight. BP 90/46, pulse 88 irregular, respirations of 20. His lungs are clear and no edema noted.
Problem:
Use the patient history and the CLiC device data to answer the following questions:
1. Did they initiate treatment according to operating instructions? Yes.
2. What profile is being displayed in the first hour of treatment? Profile C.
3. Is the profile in the first hour reasonable for this patient? No, the patient profile was greater than -6.5% per hour. Monitor the patient more closely for
potential intradialytic events.
4. What is the O2 saturation reading and is the reading reasonable based on the access type? The O2 Sat reading is 59%, which is below the typical value based on the access type of this
patient (CVC).
5. In your assessment, do you think the physician needs to consider changes for the next treatment?
Yes. Please consult with the physician regarding future treatments in respect to frequency and treatment duration.
6. Was refill present? Yes.
28
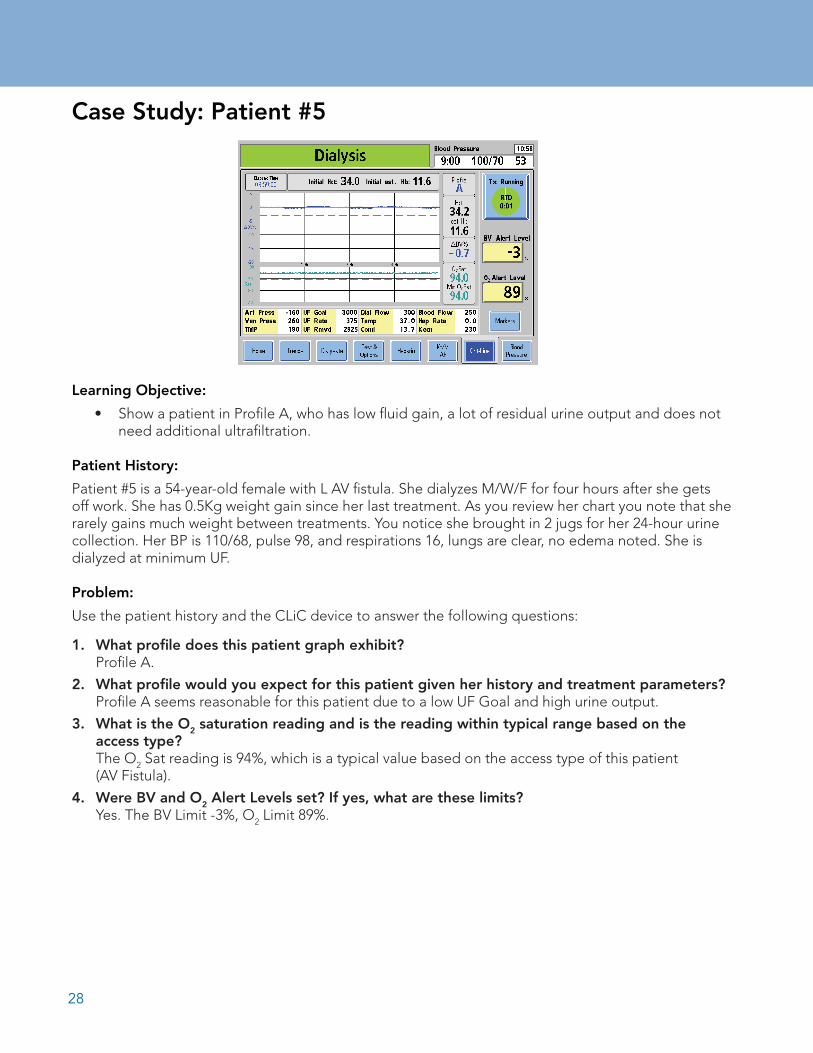
Case Study: Patient #5
Learning Objective:
• Show a patient in Profile A, who has low fluid gain, a lot of residual urine output and does not need additional ultrafiltration.
Patient History:
Patient #5 is a 54-year-old female with L AV fistula. She dialyzes M/W/F for four hours after she gets off work. She has 0.5Kg weight gain since her last treatment. As you review her chart you note that she rarely gains much weight between treatments. You notice she brought in 2 jugs for her 24-hour urine collection. Her BP is 110/68, pulse 98, and respirations 16, lungs are clear, no edema noted. She is dialyzed at minimum UF.
Problem:
Use the patient history and the CLiC device to answer the following questions:
1. What profile does this patient graph exhibit? Profile A.
2. What profile would you expect for this patient given her history and treatment parameters? Profile A seems reasonable for this patient due to a low UF Goal and high urine output.
3. What is the O2 saturation reading and is the reading within typical range based on the access type?
The O2 Sat reading is 94%, which is a typical value based on the access type of this patient (AV Fistula).
4. Were BV and O2 Alert Levels set? If yes, what are these limits? Yes. The BV Limit -3%, O2 Limit 89%.
29
2008T Hemodialysis Machine with CLiC Device Training Guide
Case Study: Patient #6
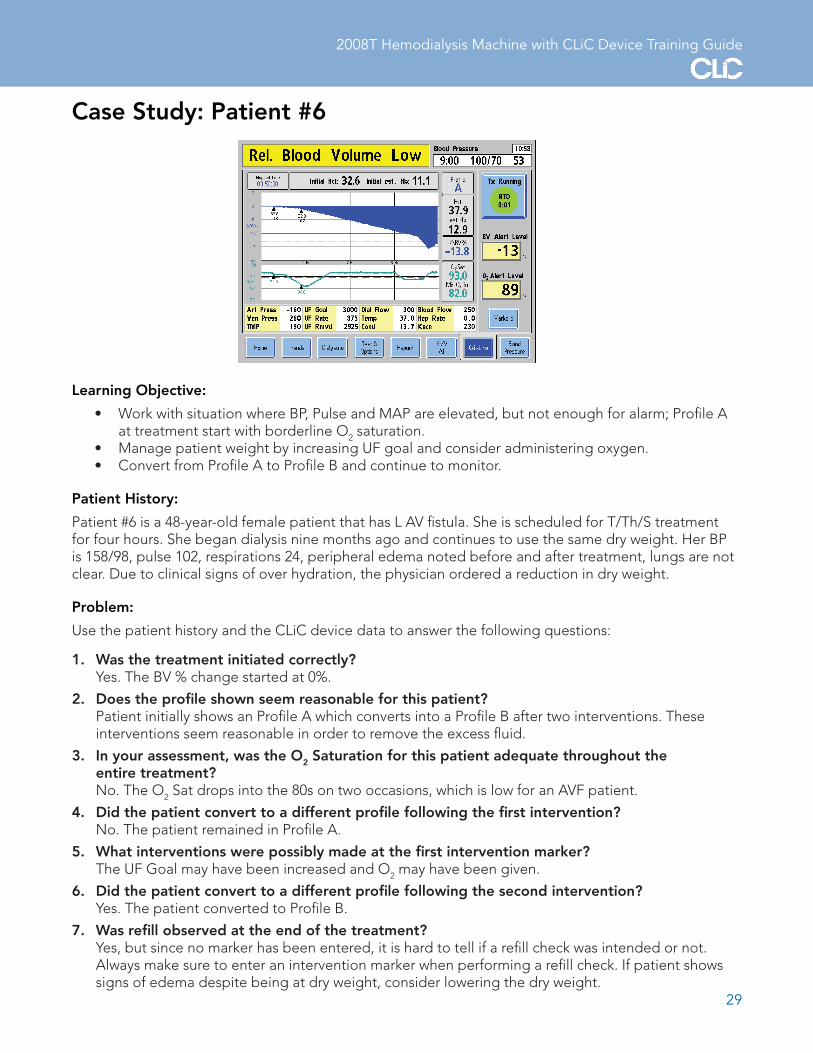
Learning Objective:
• Work with situation where BP, Pulse and MAP are elevated, but not enough for alarm; Profile A at treatment start with borderline O2 saturation.
• Manage patient weight by increasing UF goal and consider administering oxygen.• Convert from Profile A to Profile B and continue to monitor.
Patient History:
Patient #6 is a 48-year-old female patient that has L AV fistula. She is scheduled for T/Th/S treatment for four hours. She began dialysis nine months ago and continues to use the same dry weight. Her BP is 158/98, pulse 102, respirations 24, peripheral edema noted before and after treatment, lungs are not clear. Due to clinical signs of over hydration, the physician ordered a reduction in dry weight.
Problem:
Use the patient history and the CLiC device data to answer the following questions:
1. Was the treatment initiated correctly? Yes. The BV % change started at 0%.
2. Does the profile shown seem reasonable for this patient? Patient initially shows an Profile A which converts into a Profile B after two interventions. These
interventions seem reasonable in order to remove the excess fluid.
3. In your assessment, was the O2 Saturation for this patient adequate throughout the entire treatment?
No. The O2 Sat drops into the 80s on two occasions, which is low for an AVF patient.
4. Did the patient convert to a different profile following the first intervention? No. The patient remained in Profile A.
5. What interventions were possibly made at the first intervention marker? The UF Goal may have been increased and O2 may have been given.
6. Did the patient convert to a different profile following the second intervention? Yes. The patient converted to Profile B.
7. Was refill observed at the end of the treatment? Yes, but since no marker has been entered, it is hard to tell if a refill check was intended or not.
Always make sure to enter an intervention marker when performing a refill check. If patient shows signs of edema despite being at dry weight, consider lowering the dry weight.

30
Fluid Distribution Model• Intracellular fluid (without blood cell fluid)
• Interstitial fluid
• Blood
• Circulating BV
• Peripheral BV
• Ultrafiltration
• Dialysate osmolarity
• Dialysate temperature
31
2008T Hemodialysis Machine with CLiC Device Training Guide
Frequently Asked Questions
1. What are the three main measurements that are measured by the CLiC device?Hematocrit, oxygen saturation and percent change in intravascular blood volume.
2. How does the CLiC device make its measurements?The CLiC sensor clip emits multiple wavelengths of light through a disposable viewing window that is called a blood chamber. The blood chamber is indicated for use with the CLiC device. The blood is trans-illuminated by multiple wavelengths of light and the differences in blood absorption between blood constituents allow for identification and measurement of hematocrit and oxygen saturation.
3. How does the CLiC device verify that it is measuring accurately?Each CLiC device has its own verification filter that is used to periodically verify the accuracy of the CLiC device. This filter is attached to the CLiC device’s USB cable.
4. How often should you verify accuracy on the verification filter?When the sensor clip is stored on the verification filter, it automatically verifies accuracy prior to entering Patient Run Mode. When the sensor clip is not stored on the verification filter, it must be verified once per month.
5. Can the blood chamber be used more than one time?The blood chamber is intended for single-use only.
6. After priming the circuit, what should I look for before connecting the sensor clip to the blood chamber?Make sure that no air is in the blood chamber after priming. Any air present in the blood chamber will cause the hematocrit reading to be inaccurate.
7. What are the default CLiC device graphs that are displayed on the 2008T machine?The blood volume and oxygen saturation graphs are the default screens displayed.
8. What are the other screens that can be displayed?The blood volume graph can be switched to a hematocrit graph. The oxygen saturation graph can be changed to display blood pressure.
9. When does the CLiC device start to take measurements?Graphing of the data begins after the user selects Start Run, the CLiC device reads blood sensed, and the hematocrit has been stable for 60 seconds.
10. What is the difference between the intervention markers?The symptom marker is displayed as a yellow diamond. The intervention marker is displayed as a black triangle.
32
FAQs (continued)
11. What is the profile that is displayed?The profile that is displayed is the average percent blood volume change (ΔBV%) of the previous 15 minutes of data gathered. If the ΔBV% is ≤-3% per hour, the profile will be displayed as an A profile. If the ΔBV% is >-3% per hour and ≤-6.5% per hour, the profile will be displayed as a B profile. If the ΔBV% is >-6.5% per hour, the profile will be displayed as a C profile.
12. What is the estimated HB value that is displayed?The hemoglobin value that is displayed is an estimated measurement based on the measured hematocrit.
13. How is percent change in blood volume calculated?The percent change in blood volume is calculated from the following equation: ΔBV% = {(H2/H1)-1} X 100H2 = Initial Hct H1 = Current Hct
14. What is the default BV Alert Level?The default BV Alert Level is -15% and is drawn as a blue dotted line across the BV graph.
15. What is the default O2 Sat Level?The O2 Alert Level defaults to 89 and can be set from 45 to 95.
16. Can you print out the treatment profiles at the end of a treatment?Yes, treatment profiles can be printed at the end of a treatment. Additional hardware and software are necessary in order to treat patient profiles. Technical Support can be reached at 1-800-227-2572.
17. How do you clean the CLiC device?The exterior of the sensor clip and the verification filter should be cleaned after every treatment. These can be cleaned with the standard diluted bleach solution (1:100). Wipe the CLiC device clean with a cloth dampened with a cleaning solution; do not spray the solution directly onto the device or immerse the CLiC device into any type of liquid.
18. Can the CLiC device still be used if it continues to fail verification?No, if the sensor clip continues to fail verification, it is no longer suitable for clinical use. Unless it can be re-calibrated (see User’s Guide).
19. What do I do if a sensor clip fails to calibrate?The sensor clip must be taken out of service. Contact Technical Support at 1-800-227-2572.


34
2008T Hemodialysis Machine with CLiC Device Participant Workbook
CLiC
2008T HEMODIALYSIS MACHINE WITH sensor DEVICE TRAINING GUIDE© 2015, Fresenius Medical Care, All Rights Reserved. Fresenius Medical Care, the triangle logo, Fresenius Renal Technologies, Crit-Line and CLiC are trademarks of Fresenius Medical Care Holdings, Inc., and/or its affiliated companies. All other trademarks are the property of their respective owners. P/N 102065-01 Rev B 12/2015
Fresenius Renal Technologies, a division of Fresenius Medical Care North America
920 Winter Street • Waltham, MA 02451 • www.fmcna-crit-line.com
Customer Service: 800-323-5188 • Technical Support: 800-227-2572


