30
TREK-USER-0009 TREK IONizer USER GUIDE May 2021 Approved for Public Release; Distribution is Unlimited.

TREK-USER-0009
TREK
IONizer
USER GUIDE
May 2021
Approved for Public Release; Distribution is Unlimited.

TREK-USER-0009
i
TABLE OF CONTENTS
PARAGRAPH PAGE
1 Welcome ..............................................................................................................1
1.1 Getting Started......................................................................................................................................... 1
2 Technical Support ...............................................................................................1
3 Introduction ........................................................................................................1
4 Overview of the User Interface............................................................................2
4.1 Main Window.......................................................................................................................................... 2 4.2 Menus....................................................................................................................................................... 4
5 Quick Start Guides ..............................................................................................5
5.1 How to Start ION .................................................................................................................................... 5 5.2 How to Stop ION .................................................................................................................................... 7 5.3 How to Delete the ION SDR .................................................................................................................. 7 5.4 How to Clear ION Log and Process Status Messages .......................................................................... 7 5.5 How to Clear ION Output Messages ..................................................................................................... 7
6 Details ..................................................................................................................7
6.1 ION Watch Characters............................................................................................................................ 7 6.1.1 All Tab............................................................................................................................................7 6.1.2 Summary Tab.................................................................................................................................8
6.2 Application Messages ........................................................................................................................... 10 6.3 Configure Preferences........................................................................................................................... 13 6.4 Manage E-Mail and Text Settings Dialog ........................................................................................... 14 6.5 Application Settings .............................................................................................................................. 26
7 FAQ and Troubleshooting.................................................................................26
7.1 What is ION? ......................................................................................................................................... 26 7.2 What should I do if there are errors when I start ION? ...................................................................... 27

TREK-USER-0009
ii
FIGURES
FIGURE PAGE
Figure 1 Main Window (Monitor Tab)................................................................................................................. 2 Figure 2 Main Window (Output Tab) ................................................................................................................... 2 Figure 3 Main Window (Message Area) .............................................................................................................. 3 Figure 4 IONizer Console Window (Windows Only) ......................................................................................... 3 Figure 5 IONizer BP Echo Service Console Window (Windows Only)............................................................ 4 Figure 6 ION Watch Characters Dialog (All Tab)............................................................................................... 8 Figure 7 Selected ION Watch Characters............................................................................................................. 9 Figure 8 ION Watch Characters Dialog (Summary Tab) .................................................................................. 10 Figure 9 Messages Dialog ................................................................................................................................... 11 Figure 10 Configure Messages Dialog ............................................................................................................... 12 Figure 11 Clear Messages Dialog ....................................................................................................................... 12 Figure 12 Configure Preferences Dialog ............................................................................................................ 13 Figure 13 Manage E-Mail and Text Settings Dialog (Global Settings Account Tab)..................................... 15 Figure 14 Manage E-Mail and Text Settings (Export Dialog) .......................................................................... 16 Figure 15 Manage E-Mail and Text Settings Dialog (Global Settings E-Mail List Tab)................................ 17 Figure 16 Manage E-Mail and Text Settings Dialog (Global Settings Cell List Tab) .................................... 18 Figure 17 Manage E-Mail and Text Settings (Set Carrier Dialog) ................................................................... 19 Figure 18 Manage E-Mail and Text Settings Dialog (Global Settings Group List Tab)................................. 20 Figure 19 Manage E-Mail and Text Settings (Add Group Dialog) .................................................................. 20 Figure 20 Manage E-Mail and Text Settings Dialog (Application Alerts Tab)............................................... 21 Figure 21 Manage E-Mail and Text Settings (Add Alert Dialog) .................................................................... 22 Figure 22 Manage E-Mail and Text Settings Dialog (E-Mail and Text Dropboxes Tab)............................... 23 Figure 23 Manage E-Mail and Text Settings (Add Dropbox Dialog) .............................................................. 23 Figure 24 Manage E-Mail and Text Settings Dialog (Send E-Mail Tab)......................................................... 25 Figure 25 Manage E-Mail and Text Settings Dialog (Send Text Tab)............................................................. 26

TREK-USER-0009
1
1 Welcome
The Telescience Resource Kit (TReK) is a suite of software applications and libraries that can be used to monitor and control assets in space or on the ground.
The TReK IONizer application provides the capability to start, stop, and monitor Interplanetary Overlay Network (ION) software.
1.1 Getting Started
Start with the Introduction which provides an application overview. Next, try the Quick
Start Guides for “How Tos” for common functions. For help with details, reference the Details section. See the FAQ and Troubleshooting section for helpful hints and solutions to the common “gotchas”.
2 Technical Support
If you are having trouble installing the TReK software or using any of the TReK software, please contact us for technical assistance: TReK Help Desk E-Mail, Phone & Fax:
E-Mail: [email protected] Telephone: 256-544-3521 (8:00 a.m. - 4:00 p.m. Central Time) Fax: 256-544-9353
If you call the TReK Help Desk and you get a recording please leave a message and someone will return your call. E-mail is the preferred contact method for help. The e-mail message is automatically forwarded to the TReK developers and helps cut the
response time. The HOSC Help Desk (256-544-5066) can provide assistance as needed and is available 24x7.
3 Introduction
The TReK IONizer application provides the capability to start, stop and monitor a single instance of the Interplanetary Overlay Network (ION) software. If you are not familiar with Delay Tolerant Networking or the Interplanetary Overlay
Network software, please see the TReK Delay Tolerant Networking Tutorial for an introduction to these topics.

TREK-USER-0009
2
4 Overview of the User Interface
4.1 Main Window
The main window (Monitor tab) is shown in Figure 1. The Monitor tab displays messages written to the ION log and messages about ION processes.
Figure 1 Main Window (Monitor Tab)
The main window (Output tab) is shown in Figure 2. The Output tab displays messages that ION writes to standard out (stdout). This includes ION watch characters.
Figure 2 Main Window (Output Tab)
Figure 3 shows the main window configured with the main window message area. The
main window message area is hidden by default since the majority of messages of interest will be the ION messages displayed in the Monitor tab of the main window. But if you would like to display the main window message area you can turn it on using the Message Area menu item on the View menu. The message area is a dock window that
you can float or dock. To float a dock window, use your left mouse button to click and

TREK-USER-0009
3
hold the title area while dragging the window to another area of the screen. To dock, use the title bar to drag the dock window over the main window and drop.
Figure 3 Main Window (Message Area)
Figure 4 shows the IONizer console window. This window will only appear on Windows. It will be displayed when you start the IONizer application. You can safely
iconify the console window to keep it out of your way. Please be sure not to close this window, or it will shut down the IONizer application. You will not see this window if you are running on Linux.
Figure 4 IONizer Console Window (Windows Only)

TREK-USER-0009
4
One of the ION configuration parameters provides the capability to run the Bundle Protocol (BP) Echo Service. If ION is configured to run the BP Echo Service, the
console window shown in Figure 5 will be displayed when you start ION on Windows. You will not see this window on Linux, even if ION is configured to run the BP Echo Service. As noted in the window title, do not exit this window or it will shut down the BP Echo Service.
Figure 5 IONizer BP Echo Service Console Window (Windows Only)
When you stop ION on Windows, the BP Echo Service console window will close. When you exit the IONizer application on Windows, the IONizer main window and
IONizer console window will both close. Toolbars
The toolbar provides the capability to specify a run configuration, ION configuration files, start ION, stop ION, and delete the ION SDR.
4.2 Menus
The application menus are: File, View, ION, Options, and Help. Each of these menus is
described in more detail below. File Menu The File menu provides the capability to exit the application.
View Menu The View menu provides the capability to clear the main window message area and show and hide the main window message area.
TREK-USER-0009
5
ION Menu The ION menu provides the capability to specify configuration preferences, start ION,
stop ION, and delete the ION SDR. Options Menu The Options menu provides access to the Messages dialog which displays application
messages. It also provides access to set application preferences. Help Menu The Help menu provides access to on-line help and application version information.
5 Quick Start Guides
This section provides “How Tos” for common functions.
5.1 How to Start ION
The following steps explain how to start ION.
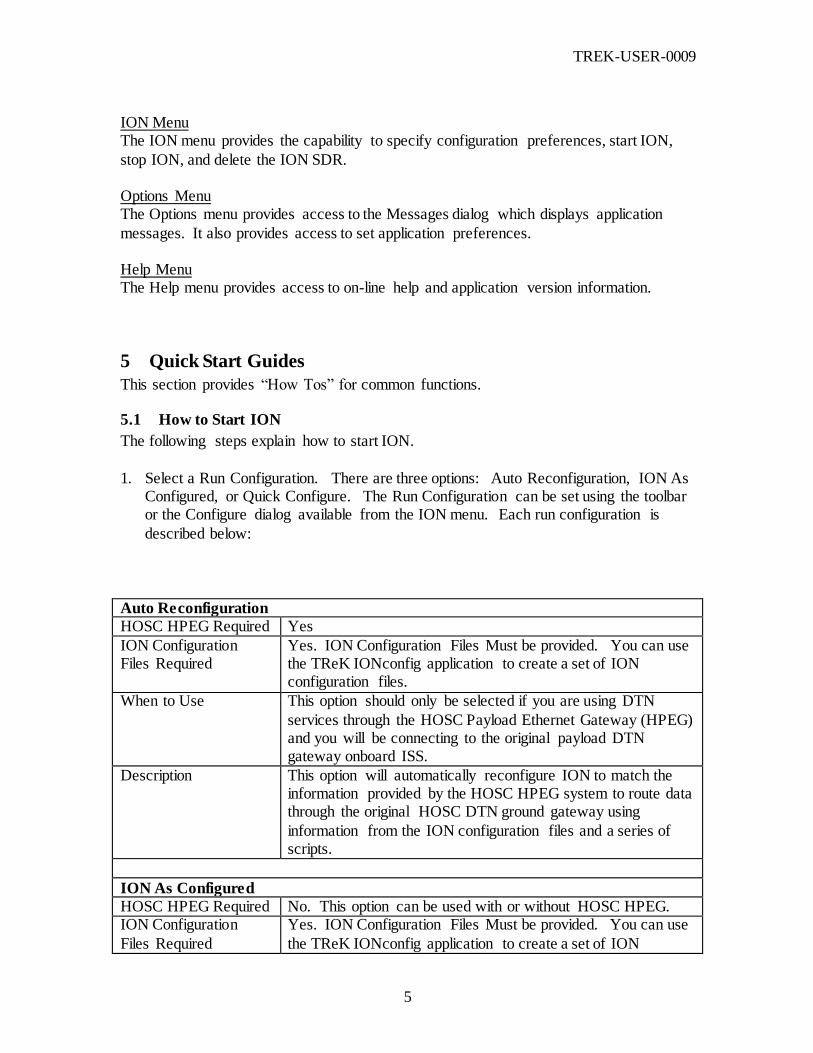
1. Select a Run Configuration. There are three options: Auto Reconfiguration, ION As
Configured, or Quick Configure. The Run Configuration can be set using the toolbar or the Configure dialog available from the ION menu. Each run configuration is
described below:
Auto Reconfiguration
HOSC HPEG Required Yes
ION Configuration Files Required
Yes. ION Configuration Files Must be provided. You can use the TReK IONconfig application to create a set of ION configuration files.
When to Use This option should only be selected if you are using DTN
services through the HOSC Payload Ethernet Gateway (HPEG) and you will be connecting to the original payload DTN gateway onboard ISS.
Description This option will automatically reconfigure ION to match the information provided by the HOSC HPEG system to route data through the original HOSC DTN ground gateway using
information from the ION configuration files and a series of scripts.
ION As Configured HOSC HPEG Required No. This option can be used with or without HOSC HPEG. ION Configuration
Files Required
Yes. ION Configuration Files Must be provided. You can use
the TReK IONconfig application to create a set of ION

TREK-USER-0009
6
configuration files. When to Use When you want to run with the configuration defined in your
ION Configuration Files.
Description ION will run with the configuration defined in the ION configuration files as is. This allows you to configure ION as needed. If you use this option with the HOSC HPEG DTN service, periodic changes to the ION configuration files may be
required. For example, there are various scenarios that could cause your ground proxy IP address to change. If your ground proxy IP address changes you will have to stop ION, update your ION configuration files, and then restart ION.
Quick Configure HOSC HPEG Required Yes.
ION Configuration Files Required
No. The ION Configuration Files will be generated automatically.
When to Use When you want to use DTN services through the HOSC HPEG. This is the recommended option for flight operations using DTN services through the HOSC.
Description This option will automatically generate ION configuration files
using information provided by the HPEG system and any quick configuration preferences defined in the IONizer Configure Preferences dialog.
2. If applicable, identify the location of the ION configuration files using the field
provided in the toolbar or the Configure dialog available from the ION menu.
3. Start ION using the Start ION button in the toolbar or the Start ION menu item on the ION menu. As the ION processes start, you will see status messages in the main
window. Note: If one or more of the required ION processes fail to start this will be reflected in the status messages. If this occurs, you will need to stop ION and review the ION log to
determine what has gone wrong. The ION log is located in the same directory as the ION configuration files and shown in the Monitor tab. If you need to ensure ION is completely cleaned up you can go to a command prompt window and type ‘killm’. This will clean up all instances of any ION processes on the computer. Use caution when
using killm. Note 2: The ION configuration files must be located on a local drive. If you attempt to use ION configuration files located on a shared drive, this can cause the IONizer
application to crash.

TREK-USER-0009
7
5.2 How to Stop ION
The following steps explain how to stop ION. 1. Use the Stop ION button in the toolbar to stop ION. As the ION processes stop, you
will see status messages in the main window.
5.3 How to Delete the ION SDR
The following steps explain how to delete the ION SDR.
1. Use the Delete ION SDR button in the toolbar to delete the SDR. ION will be
stopped and the SDR will be deleted.
Note: Be aware that deleting the SDR will delete all data ION was storing in preparation for transmitting as well as partially received data.
5.4 How to Clear ION Log and Process Status Messages
The following steps explain how to clear ION log and process status messages. 1. Use the Clear button located on the Monitor tab. Once the messages are cleared,
there is no way to recover them.
5.5 How to Clear ION Output Messages
The following steps explain how to clear ION output messages.
1. Use the Clear button located on the Output tab. Once the output is cleared, there is no way to recover it.
6 Details
This section covers various application details.
6.1 ION Watch Characters
The ION Watch Characters dialog contains two tabs: All and Summary.
6.1.1 All Tab
The All tab is shown in Figure 6. The All tab provides a list of all the ION watch characters, the protocol associated with the watch character, and a short description.

TREK-USER-0009
8
Figure 6 ION Watch Characters Dialog (All Tab)
6.1.2 Summary Tab
The Summary Tab shows summary information about the ION watch characters selected in the Main Window Output tab. The Summary Tab will be empty if you have not selected any ION watch characters in the Main Window Output Tab. Figure 7 shows the
Main Window Output tab with some ION watch characters selected.

TREK-USER-0009
9
Figure 7 Selected ION Watch Characters
Figure 8 shows what the Summary tab will look like when it is populated after you select ION watch characters in the Main Window Output Tab and push the ION Watch
Characters button. This information can be helpful when debugging.

TREK-USER-0009
10
Figure 8 ION Watch Characters Dialog (Summary Tab)
6.2 Application Messages
Various types of application messages are generated including information, progress, warning, error, and debug messages. Application messages are stored in memory and
written to a temporary log file. The temporary log file is created on application initialization and exists as long as the application is running. It is deleted when you exit the application. The log file is located in the temporary directory provided by the operating system. Only a subset of messages are stored in memory while all messages

TREK-USER-0009
11
are written to the temporary log file. The maximum number of application messages stored in memory is controlled by the message storage setting in the Configure Messages dialog. Once the maximum is reached, older messages are deleted to make room for new
messages. Setting the maximum value to a large number can impact application performance since it will increase the amount of memory used by the application. Setting this number too low can cause you to miss important messages. The application default was selected to protect against both of these scenarios. Messages stored in memory are
displayed in the Main Window Message Area and the Messages dialog. The Messages dialog is shown in Figure 9. The Main Window message area only displays Info, Warning, and Error messages. The Messages dialog displays messages based on the display preferences defined in the Configure Messages dialog. By default, the Messages
dialog will display information, progress, warning, and error messages. Columns in the Messages dialog can be sorted by clicking on the column header. The Messages dialog is available from the Options menu.
Figure 9 Messages Dialog
Configure
The Configure button provides access to the Configure Messages dialog shown in Figure 10. This dialog provides access to preferences associated with messages. Display preferences can be set to filter the types of messages (category) displayed in the Messages dialog. Export Preferences control how the time tag is added to the filename
that is created when messages are exported. See the Export section for details. Message storage defines the maximum number of messages that will be stored in memory while the application is running. Once the maximum is reached, older messages are deleted to make room for new messages. The Set to Defaults button can be used to reset these
properties to application defaults.

TREK-USER-0009
12
Figure 10 Configure Messages Dialog
Clear The Clear button provides access to the Clear Messages dialog shown in Figure 11. This dialog provides two ways to clear application messages stored in memory. You can clear all the messages or clear selected messages. Once you clear messages, the messages are
permanently deleted in all views (Main Window Message Area and the Messages dialog).
Figure 11 Clear Messages Dialog
The Export button provides the capability to save all the application messages currently
in memory to a file. When you push the Export button you will be prompted for a directory and filename. Export will save all messages in memory, not just the messages currently displayed in the Messages dialog (i.e. the Display Preferences are not applied). The name you provide for the file will be modified with a time tag that is added to the
filename. The time tag indicates the time the file was closed. The default is to append the time tag to the filename. For example: Filename Input: messages.txt
Filename Output: messages_2017-05-07_13~03~28.txt If you would like to prepend the time tag to the filename you can set this preference in the Configure Messages dialog. This would result in the following:

TREK-USER-0009
13
Filename Input: messages.txt Filename Output: 2017-05-07_13~03~28_messages.txt
Delog The Delog button provides the capability to save all application messages generated since
the application was started. Delog will retrieve the messages from the temporary log file. When you push the Delog button you will be prompted for a directory and filename. A timetag is not applied to the filename.
Filename Input: messages.txt Filename Output: messages.txt
6.3 Configure Preferences
The Configure Preferences Dialog is shown in Figure 12. This dialog provides a way to set application preferences.
Figure 12 Configure Preferences Dialog
Quick Configure Preferences
Quick Configure Preferences are used with the Quick Configure Run Configuration. These preferences will be used in the ION configuration files that are automatically generated by Quick Configure.
One or more services can be added for DTN enabled applications. The services needed to use CFDP are automatically added. So there is no need to add the CFDP service numbers (64 and 65) to the list. To add a service number, you click the “Add” button to

TREK-USER-0009
14
the right of the service list. This will place a row in the service list with a default receipt action of “queue”. Just type in the service number and change the receipt action if needed (the other option is “drop” which will drop the incoming bundle if a DTN enabled
application isn’t running to process the bundle). The SDR File Path is the directory where your data store will be located. It needs to be a directory where you have write privilege. Do not use spaces in the SDR File Path.
The Heap Words describe how large to make the data store. ION calculates the number of bytes for the data store by multiplying the value you provide here with the number of bytes in the processor. For a 64-bit computer that will be 8x250,000 or 2 million bytes if
you keep the default. You will want to increase this value for operations. The Default Gateway can be used to select a specific HOSC DTN Ground Gateway. If you want to specify a gateway enter the node number for the gateway. If you leave the
Default Gateway field blank or the node number you identify does not exist, one will be selected for you. The Set to Defaults button can be used to reset these properties to application defaults.
6.4 Manage E-Mail and Text Settings Dialog
The Manage E-Mail and Text Settings Dialog is shown in Figure 13. This dialog provides the capability to manage global e-mail and text settings, application alert settings, e-mail and text dropboxes, and the capability to send an e-mail or text.

TREK-USER-0009
15
Figure 13 Manage E-Mail and Text Settings Dialog (Global Settings Account Tab)
The TReK software’s e-mail and text capability is dependent on libcurl, an open source client-side URL transfer library developed by the cURL project. The libcurl library provides C API functions that configure the library to programmatically establish a secure connection with an email server using a Transport Layer Security (TLS) version
1.3 socket prior to logging into an email account using an email account name and password. The TReK email and text capability has been successfully tested with the Google gmail server. It is recommended that users create a new gmail account and use it to send emails
and texts to designated recipients. The TReK software does not support retrieving emails from the user's gmail account. When creating the gmail account to send emails and texts, the user must change the security settings under the "Manage your Google Account" button under the user's "Google Account" widget (found in the top right hand corner of
the user's gmail account web page). After choosing "Security" from a list of items found on the user's "Google Account" web page, the user must scroll down to the section on the web page titled "Less secure app access" and turn on this access setting. This setting enables the TReK software’s email library access to the user's gmail account using a TLS
socket that encrypts all traffic between the the TReK email library and the user's gmail account including the user's account name and password. Google will automatically turn this setting off if it’s not being used. After turning on "Less secure app access", users will receive a warning message saying their account is vulnerable to malicious activity
because of a less secure sign-in technology and recommend turning off this type of access. TReK recommends only using the account to send emails and texts using the TReK software. TReK does not recommend using the account to receive emails.

TREK-USER-0009
16
The maximum size of a text message is approximately 900 characters. However, if you send more than 900 characters your message may be broken up during transmission and
then concatenated on the recipient’s phone. The maximum length of a TReK email message is 65,000 characters or bytes. The maximum length of an email with a file attachment is generally considered to be 10MB (email message size plus file attachment size). Note, file attachments may become much larger than their original file sizes. This
is due to the encoding employed by email servers when sending non text-based information.
Global Settings
Global Settings are e-mail and text settings used in all TReK applications. They can be changed in any TReK application with a Manage E-Mail and Text Settings dialog. When you change a setting on the Global Settings tab, it will be changed for all TReK applications. Each Tab is described below.
Allow Alerts The Allow Alerts Checkbox is a global setting to turn on and off all alerts in all TReK applications. If you turn this checkbox off, no alerts will be generated in any
applications. Export The Export button provides access to the Export dialog shown Figure 14. This dialog
provides the capability to save the settings on the Global Settings tab in a TReK email configuration file that can be used with the TReK E-Mail and Text API. You also have the option to include the dropboxes defined on the E-Mail and Text Dropboxes tab.
Figure 14 Manage E-Mail and Text Settings (Export Dialog)
Account
In order to use the Alerts capability, you must have a Gmail account. The Gmail account must be configured to allow third party access. The Account tab is used to enter your Gmail account information. The TReK software only stores account information locally. The account password will be hidden by default and will always be encrypted when it is
stored. It will only be decrypted when it is used to log into the account to execute a requested function. An example of account information is shown below.

TREK-USER-0009
17
smtp_server_address: smtp.gmail.com email_account_username: [email protected] email_account_password: secretPassword [Hidden unless show checkbox is checked]
email_address: [email protected] email_name: Jane Doe The Verify Certificate Authorities checkbox is used to turn on the certificate authority
check. If you turn on the certificate authority check, you must provide the complete path to a Certificate file. The Enable Curl Debug Messages checkbox is used to turn on additional debug messages
generated by the curl software library. E-Mail List
The E-Mail List tab is used to enter e-mail addresses that will be used to populate the e-mail address list that is available when configuring alert functions or sending an e-mail. The E-Mail List tab is shown in Figure 15. The Add button is used to add a row to enter e-mail address information. The Delete button is used to delete a row.
Figure 15 Manage E-Mail and Text Settings Dialog (Global Settings E-Mail List Tab)
Cell List The Cell List tab is used to enter mobile cell phone numbers that will be used to populate the Cell list that is available when configuring alert functions or sending a text. The Cell

TREK-USER-0009
18
List tab is shown in Figure 16. The Add button is used to add a row to enter cell number information. The Delete button is used to delete a row. Cell numbers can be entered with or without dashes. The Set Carrier button is available when a Cell Carrier cell is
selected. It is shown in Figure 17 and can be used to select a carrier address. If the carrier address you need is not in the list, you can enter it directly into the cell. Note: The cell carrier list is populated from a file in the TReK install (config/cell.txt). If
you wish to edit the file and make a custom list of carriers to be displayed in the dialog, copy the cell.txt file to the root directory of the TReK workspace and make your changes. If a cell.txt file exists in the root directory of the TReK workspace, it will be used instead of the one available in the install.
Figure 16 Manage E-Mail and Text Settings Dialog (Global Settings Cell List Tab)

TREK-USER-0009
19
Figure 17 Manage E-Mail and Text Settings (Set Carrier Dialog)
Group List When configuring an application alert or sending an e-mail or text, you will have the
option to identify an e-mail address, a cell phone number, or a group as a recipient. The Group List is shown in Figure 18. You can define zero or more groups. A group can contain e-mail addresses and cell numbers. If you have a group with both e-mail addresses and cell numbers and you send an e-mail to that group, the e-mail generated
will only be sent to the e-mail addresses in the group. You can add, modify, and delete a group using the buttons on the right.

TREK-USER-0009
20
Figure 18 Manage E-Mail and Text Settings Dialog (Global Settings Group List Tab)
The Add button will display the Add Group dialog shown in Figure 19. At the top you can enter a name for the group. On the left you will see all the e-mail addresses and cell numbers you entered on the Global Settings main E-Mail List and Cell List tabs. You can add zero or more e-mail addresses and zero or more cell numbers to a group. To add
an e-mail or cell to the group, select the e-mail or cell number on the left and push the Add button to add it to the group. You can use the Delete button to delete a recipient from the group.
Figure 19 Manage E-Mail and Text Settings (Add Group Dialog)

TREK-USER-0009
21
Application Alerts
The Application Alerts tab is shown in Figure 20. It is used to configure application specific alerts.
Figure 20 Manage E-Mail and Text Settings Dialog (Application Alerts Tab)
Enable Application Alerts The Enable Application Alerts Checkbox is used to turn all alerts on or off in the current
application. If you uncheck Enable Application Alerts, no alerts will be generated in the Command application. Event List
The Event area provides the capability to identify one or more alerts to send when a specific application event occurs. You can add, modify, and delete alerts using the buttons on the right. The Add button will display the Add Alert dialog shown in Figure 21.

TREK-USER-0009
22
Figure 21 Manage E-Mail and Text Settings (Add Alert Dialog)
Event The Event is what triggers the alert. There may be one or more events in an application that can trigger an alert. The IONizer application can generate an alert for the following types of events:
ION Connection Change This event is triggered if the connection to ION changes (connects or disconnects).
Type The type of alert to send. Options are E-Mail, E-Mail and Text, or Text. Recipient
The recipient identifies who should be notified when the event is triggered. The Recipient list will be populated with applicable recipients based on Type. If you select E-Mail in the Type menu, the Recipient list will be populated with e-mails from the E-Mail List tab and groups that contain at least one e-mail address from the Group List tab. If
you select E-Mail and Text in the Type menu, the Recipient list will be populated with groups from the Group List tab that contain at least one e-mail address and one cell phone number. If you select Text in the Type menu, the Recipient list will be populated with cell phone numbers from the Cell List tab and groups that contain at least one cell phone
number from the Group List tab. Additional Text The alert will contain the name of the event that occurred and any text that is provided in
the Additional Text field. Additional Text is optional.
E-Mail and Text Dropboxes
The E-Mail and Text Dropboxes tab is shown in Figure 22. This tab can be used to define E-Mail and Text Dropboxes. It is important to remember that each E-Mail and Text Dropbox will correspond to a directory on the file system and must be unique. Using a directory for more than one dropbox will result in unexpected behavior. When

TREK-USER-0009
23
you define a dropbox using the Manage E-Mail and Text Settings dialog, the dropbox information is automatically saved with that specific application’s settings.
Figure 22 Manage E-Mail and Text Settings Dialog (E-Mail and Text Dropboxes Tab)
Dropbox List The Dropbox List is used to define zero or more dropboxes. For each dropbox you can define the Dropbox Type, the Dropbox Path, the Dropbox Success Path, a Recipient, and a State. The buttons on the right can be used to add, modify, delete, or change the state of a dropbox. The Add Dropbox dialog is shown in Figure 23.
Figure 23 Manage E-Mail and Text Settings (Add Dropbox Dialog)

TREK-USER-0009
24
Dropbox Type
There are three types of dropboxes: E-Mail, E-Mail File, and Text. An E-Mail dropbox will e-mail the contents of a text file placed in the dropbox. An E-Mail File dropbox will e-mail the file placed in the dropbox. A Text dropbox will text the contents of a text file placed in the dropbox. E-Mail and Text dropboxes only support text files. Dropping
other file types into these dropboxes will have unexpected results (e.g. send garbage). The E-Mail File dropbox supports many common file types including but not limited to text files, Portable Document Format (PDF) files, and Microsoft Office files. It does not support executable files. The E-Mail File dropbox will generate an error or fail to send
file types that are not supported. Dropbox Path The Dropbox Path identifies the local directory to be used for the dropbox. The Browse
button can be used to select a directory. Dropbox Success Path The Dropbox Success Path is optional. If the Dropbox Success Path is defined, the
dropbox will move the original file placed in the dropbox to the success directory if and only if the corresponding e-mail or text is successfully delivered to the e-mail server. If the success path is empty, the dropbox will delete the original file placed in the dropbox if and only if the corresponding e-mail or text is successfully delivered to the e-mail
server. If the dropbox fails to generate the e-mail or text, the file will be renamed with a time tagged ".droperror" extension and remain in the dropbox. The dropbox will not attempt to generate an e-mail or text for a file with a ".droperror" extension in its filename.
Recipient The Recipient identifies the designated recipient(s) for the e-mail or text. The Recipient list will be populated with applicable recipients based on the Dropbox Type. For
example, if you select E-Mail or E-Mail File in the Type menu, the Recipient list will be populated with e-mails from the E-Mail List Tab and groups with at least one e-mail address from the Group List Tab. If you select Text in the Type menu, the Recipient list will be populated with cell phone numbers from the Cell List Tab and groups with at least
one cell number from the Group List Tab. State The state controls whether the dropbox is activated. It can be set to Off or On. If the
state is set to Off, the dropbox will not be activated. If the state is set to On, the dropbox will be activated when you push the OK button. If the state is set to On when you exit the application, it will automatically be activated the next time you run the application. If you do not want the dropbox to be activated on application initialization, set the state to
Off before exiting the application.

TREK-USER-0009
25
Send E-Mail The Send E-Mail tab is shown in Figure 24. This tab can be used to send an e-mail if valid information has been entered on the Global Settings tab. Once the To, Subject,
optional File (Browse can be used to browse the local disk for a file), and Message information has been entered, press the Send button to send the e-mail. This will initiate a request to send the e-mail. Look at the main window message area for information about whether the e-mail request was successful or encountered any errors.
Figure 24 Manage E-Mail and Text Settings Dialog (Send E-Mail Tab)
Send Text
The Send Text tab is shown in Figure 25. This tab can be used to send a text if valid information has been entered on the Global Settings tab. Once the To and Message information has been entered, press the Send button to send the text. This will initiate a request to send the text. Look at the main window message area for information about
whether the text request was successful or encountered any errors.

TREK-USER-0009
26
Figure 25 Manage E-Mail and Text Settings Dialog (Send Text Tab)
6.5 Application Settings
The IONizer application saves some settings as application settings each time you exit the application. The next time you run the application, the application will initialize with the previous application settings. The following application settings are saved:
Application Window Size Run Configuration ION Configuration Files Directory Preferences
E-Mail and Text Settings
7 FAQ and Troubleshooting
This section addresses Frequently Asked Questions and provides tips for troubleshooting common gotchas.
7.1 What is ION?
The following text is from the Interplanetary Overlay Network (ION) documentation:

TREK-USER-0009
27
“The Interplanetary Overlay Network (ION) software distribution is an implementation of
Delay-Tolerant Networking (DTN) architecture as described in Internet RFC 4838. It is
designed to enable inexpensive insertion of DTN functionality into embedded systems such
as robotic spacecraft. The intent of ION deployment in space flight mission systems is to
reduce cost and risk in mission communications by simplifying the construction and
operation of automated digital data communication networks spanning space links, planetary
surface links, and terrestrial links.
A comprehensive overview of DTN is beyond the scope of this document. Very briefly,
though, DTN is a digital communication networking technology that enables data to be
conveyed between two communicating entities automatically and reliably even if one or more
of the network links in the end-to-end path between those entities is subject to very long
signal propagation latency and/or prolonged intervals of unavailability.”
7.2 What should I do if there are errors when I start ION?
Review the messages in the IONizer main window and the ION log file. The ION log file will be located in the directory with the ION configuration files. Some common
problems that can occur: a. The local IP Address has changed. If you started ION using an existing SDR file that
contained an old IP address this can cause problems. If this occurs you will need to
decide whether to modify the SDR via ION provided administrative programs to update the IP address or to delete the SDR (losing any data stored in the SDR).
b. The ION configuration files contain information that is incorrect (such as an IP
address) or missing information.
Note: When using the TReK IONconfig application to create ION configuration files it is important to ensure the entire diagram (all nodes and ducts) contain valid information or
at least no conflicting information. For example, if you use the same local IP address and port 4556 for all nodes in the diagram this will cause an error when you try to start ION. The nodes either need to use different IP addresses or different ports. Even though you may only be using the configuration files for one of the nodes, the ION configuration
files contain many interrelated parameters that are derived from information across the entire diagram.


