157
| Date post: | 21-Oct-2015 |
| Category: |
Documents |
| Upload: | mahendra-dhital-nepali |
| View: | 57 times |
| Download: | 1 times |


Trend Micro Incorporated reserves the right to make changes to this document and tothe products described herein without notice. Before installing and using the product,please review the readme files, release notes, and the latest version of the applicable userdocumentation, which are available from the Trend Micro website at:
http://docs.trendmicro.com
Trend Micro, the Trend Micro t-ball logo, OfficeScan, and TrendLabs are trademarks orregistered trademarks of Trend Micro Incorporated. All other product or companynames may be trademarks or registered trademarks of their owners.
Copyright © 2013. Trend Micro Incorporated. All rights reserved.
Document Part No. TSEM95922_130402
Release Date: July 2013

The user documentation for Trend Micro™ Mobile Security 9.0 for Enterprise 9.0introduces the main features of the product and provides installation instructions foryour production environment. Read through the documentation before installing orusing the product.
Detailed information about how to use specific features within the product is availablein the Online Help and the Knowledge Base at the Trend Micro website.
Trend Micro always seeks to improve its documentation. If you have questions,comments, or suggestions about this or any Trend Micro document, please contact us [email protected].
Please evaluate this documentation on the following site:
http://www.trendmicro.com/download/documentation/rating.asp


i
Table of ContentsPreface
Preface ............................................................................................................... vii
Audience ........................................................................................................... viii
Mobile Security Documentation ................................................................... viii
Document Conventions ................................................................................... ix
Chapter 1: IntroductionUnderstanding Mobile Threats ..................................................................... 1-2
About Trend Micro Mobile Security v9.0 ................................................... 1-2
Architecture of Mobile Security System ...................................................... 1-3
Components of Mobile Security System ..................................................... 1-3
Comparison Between Local and Cloud Communication Servers ........... 1-6
What's New in This Release (v9.0) .............................................................. 1-6
What's New in Release 8.0 SP1 .................................................................... 1-8
What's New in Release 8.0 ............................................................................ 1-9
What's New in Release 7.1 .......................................................................... 1-11
What's New in the Release 7.0 ................................................................... 1-11
Main Mobile Device Agent Features ......................................................... 1-12
Supported Mobile Device OS Features .................................................... 1-15
Chapter 2: Getting Started with Mobile SecurityAdministration Web Console ....................................................................... 2-2
Accessing the Administration Web Console ...................................... 2-2Turning Off Compatibility Mode in Internet Explorer ................... 2-4
Product License .............................................................................................. 2-4

Trend Micro Mobile Security 9.0 Administrator’s Guide
ii
Dashboard Information ................................................................................. 2-5Customizing the Dashboard ................................................................. 2-7
Administration Settings ............................................................................... 2-10Configuring Active Directory (AD) Settings ................................... 2-10Configuring Device Authentication .................................................. 2-10Configuring Database Settings ........................................................... 2-10Configuring Communication Server Settings .................................. 2-10Managing Administrator Accounts ................................................... 2-11
Command Queue Management ................................................................. 2-18
Exchange Server Integration ...................................................................... 2-19Configuring Exchange Server Integration Settings ......................... 2-19Configuring Exchange Connector ..................................................... 2-19
Managing Certificates ................................................................................... 2-20Uploading a Certificate ........................................................................ 2-20Deleting Certificate .............................................................................. 2-20
Chapter 3: Managing Mobile DevicesManaged Devices Tab .................................................................................... 3-2
Groups in Mobile Security .................................................................... 3-2Managing Groups ................................................................................... 3-3Managing Mobile Devices ..................................................................... 3-4Mobile Device Status ............................................................................. 3-9
Mobile Device Agent Tasks ........................................................................ 3-11Updating Mobile Device Agents ........................................................ 3-11Lost Device Protection ........................................................................ 3-12Resetting Password Remotely ............................................................ 3-15Exporting Data ..................................................................................... 3-17
Invited Devices Tab ..................................................................................... 3-18Viewing the Invitation List ................................................................. 3-18Resending Invitation Messages .......................................................... 3-19Canceling Active Invitations ............................................................... 3-20Remove Invitations from the List ..................................................... 3-20
Exchange ActiveSync Devices Tab ........................................................... 3-21Inviting Exchange ActiveSync Mobile Devices ............................... 3-21

Table of Contents
iii
Allowing or Blocking Access to Exchange Server .......................... 3-22Wiping a Remote ActiveSync Mobile Device .................................. 3-22Removing an ActiveSync Mobile Device ......................................... 3-23
Integration with Trend Micro Control Manager ..................................... 3-24Creating Security Policies in Control Manager ................................ 3-24Deleting or Modifying Security Policies ........................................... 3-24Security Policy Statuses on Control Manager .................................. 3-25
Chapter 4: Protecting Devices with PoliciesAbout Security Policies .................................................................................. 4-3
Managing Policies ........................................................................................... 4-4Creating a Policy ..................................................................................... 4-4Editing a Policy ....................................................................................... 4-5Assigning or Removing Policy from a Group ................................... 4-5Copying a Policy ..................................................................................... 4-6Deleting Policies ..................................................................................... 4-6
Security Policies in Mobile Security ............................................................. 4-7Common Policy ...................................................................................... 4-7Wi-Fi Policy ............................................................................................. 4-8Exchange ActiveSync Policy ................................................................. 4-9VPN Policy .............................................................................................. 4-9Global HTTP Proxy Policy .................................................................. 4-9Certificate Policy ..................................................................................... 4-9Malware Protection Policy .................................................................. 4-10Spam Prevention Policy ...................................................................... 4-11Call Filtering Policy .............................................................................. 4-14Firewall Policy ....................................................................................... 4-16Web Threat Protection Policy ............................................................ 4-17Encryption and Password Policy ....................................................... 4-19Feature Lock Policy ............................................................................. 4-23Compliance Policy ................................................................................ 4-24Application Monitor and Control Policy .......................................... 4-24Volume Purchasing Program Policy .................................................. 4-27
Chapter 5: Managing Enterprise App StoreAbout Enterprise App Store ......................................................................... 5-2

Trend Micro Mobile Security 9.0 Administrator’s Guide
iv
Managing Enterprise Applications ............................................................... 5-2Adding an Application ........................................................................... 5-2Editing Application Information ......................................................... 5-4Deleting Applications from the App Store ........................................ 5-4
Managing Application Categories ................................................................ 5-5Adding an Application Category .......................................................... 5-5Editing an Application Category .......................................................... 5-5Deleting an Application Category ........................................................ 5-6
Chapter 6: Updating ComponentsAbout Component Updates .......................................................................... 6-2
Updating Mobile Security Components ...................................................... 6-2Manual Update ........................................................................................ 6-2Scheduled Update ................................................................................... 6-4Specifying a Download Source ............................................................. 6-5
Manually Updating a local AU server .......................................................... 6-7
Chapter 7: Viewing and Maintaining LogsAbout Mobile Device Agent Logs ............................................................... 7-2
Viewing Mobile Device Agent Logs ............................................................ 7-2
Log Maintenance ............................................................................................ 7-4Scheduling Log Deleting ....................................................................... 7-4Deleting Logs Manually ......................................................................... 7-5
Chapter 8: Using Notifications and ReportsAbout Notification Messages and Reports ................................................. 8-2
Configuring Notification Settings ................................................................ 8-2Configuring Email Notifications .......................................................... 8-2Configuring SMS Sender Settings ........................................................ 8-3Handling SMS Sender Client App ....................................................... 8-6
Administrator Notifications and Scheduled Reports ................................ 8-7Configuring Administrator Notifications ........................................... 8-9

Table of Contents
v
User Notification ............................................................................................ 8-9Configuring User Notifications .......................................................... 8-10
Chapter 9: Troubleshooting and Contacting TechnicalSupport
Troubleshooting .............................................................................................. 9-2
Before Contacting Technical Support ......................................................... 9-5
Contacting Technical Support ...................................................................... 9-6
Sending Infected Files to Trend Micro ....................................................... 9-6
TrendLabs ........................................................................................................ 9-7
About Software Updates ............................................................................... 9-7Known Issues .......................................................................................... 9-8
Other Useful Resources ................................................................................. 9-9
About Trend Micro ........................................................................................ 9-9
IndexIndex .............................................................................................................. IN-1


vii
Preface
PrefaceWelcome to the Trend Micro™ Mobile Security for Enterprise version 9.0Administrator’s Guide. This guide provides detailed information about all MobileSecurity configuration options. Topics include how to update your software to keepprotection current against the latest security risks, how to configure and use policies tosupport your security objectives, configuring scanning, synchronizing policies on mobiledevices, and using logs and reports.
This preface discusses the following topics:
• Audience on page viii
• Mobile Security Documentation on page viii
• Document Conventions on page ix

Trend Micro Mobile Security 9.0 Administrator’s Guide
viii
AudienceThe Mobile Security documentation is intended for both administrators—who areresponsible for administering and managing Mobile Device Agents in enterpriseenvironments—and mobile device users.
Administrators should have an intermediate to advanced knowledge of Windows systemadministration and mobile device policies, including:
• Installing and configuring Windows servers
• Installing software on Windows servers
• Configuring and managing mobile devices (such as smartphones and Pocket PC/Pocket PC Phone)
• Network concepts (such as IP address, netmask, topology, and LAN settings)
• Various network topologies
• Network devices and their administration
• Network configurations (such as the use of VLAN, HTTP, and HTTPS)
Mobile Security DocumentationThe Mobile Security documentation consists of the following:
• Installation and Deployment Guide—this guide helps you get “up and running” byintroducing Mobile Security, and assisting with network planning and installation.
• Administrator’s Guide—this guide provides detailed Mobile Security configurationpolicies and technologies.
• Online help—the purpose of online help is to provide “how to’s” for the mainproduct tasks, usage advice, and field-specific information such as valid parameterranges and optimal values.
• Readme—the Readme contains late-breaking product information that is not foundin the online or printed documentation. Topics include a description of newfeatures, installation tips, known issues, and release history.

Preface
ix
• Knowledge Base— the Knowledge Base is an online database of problem-solving andtroubleshooting information. It provides the latest information about knownproduct issues. To access the Knowledge Base, open:
http://esupport.trendmicro.com/
Tip
Trend Micro recommends checking the corresponding link from the Download Center(http://www.trendmicro.com/download) for updates to the product documentation.
Document ConventionsThe documentation uses the following conventions.
TABLE 1. Document Conventions
CONVENTION DESCRIPTION
UPPER CASE Acronyms, abbreviations, and names of certaincommands and keys on the keyboard
Bold Menus and menu commands, command buttons, tabs,and options
Italics References to other documents
Monospace Sample command lines, program code, web URLs, filenames, and program output
Navigation > Path The navigation path to reach a particular screen
For example, File > Save means, click File and then clickSave on the interface
Note Configuration notes
Tip Recommendations or suggestions

Trend Micro Mobile Security 9.0 Administrator’s Guide
x
CONVENTION DESCRIPTION
Important Information regarding required or default configurationsettings and product limitations
WARNING! Critical actions and configuration options

1-1
Chapter 1
IntroductionTrend Micro™ Mobile Security for Enterprise v9.0 is an integrated security solution foryour mobile devices. Read this chapter to understand Mobile Security components,features and how they protect your mobile devices.
This chapter includes the following sections:
• Understanding Mobile Threats on page 1-2
• About Trend Micro Mobile Security v9.0 on page 1-2
• Architecture of Mobile Security System on page 1-3
• Components of Mobile Security System on page 1-3
• What's New in This Release (v9.0) on page 1-6
• Main Mobile Device Agent Features on page 1-12
• Supported Mobile Device OS Features on page 1-15

Trend Micro Mobile Security 9.0 Administrator’s Guide
1-2
Understanding Mobile ThreatsWith the standardization of platforms and their increasing connectivity, mobile devicesare susceptible to an increasing number of threats. The number of malware programsthat run on mobile platforms is growing and more spam messages are sent throughSMS. New sources of content, such as WAP and WAP-Push are also used to deliverunwanted material.
In addition to threats posed by malware, spam and other undesirable content, mobiledevices are susceptible to hacking and Denial of Service (DoS) attacks. Mobile devices,many of which now have the same network connectivity traditionally associated onlywith larger computing devices like notebook computers and desktops, are now targetsfor these attacks.
Additionally, the theft of mobile devices may lead to the compromise of personal orsensitive data.
About Trend Micro Mobile Security v9.0Trend Micro™ Mobile Security for Enterprise is a comprehensive security solution foryour mobile devices. Mobile Security incorporates the Trend Micro anti-malwaretechnologies to effectively defend against the latest threats to mobile devices.
The integrated firewall and filtering functions enable Mobile Security to block unwantednetwork communication to mobile devices. Some of these unwanted networkcommunications include: SMS messages, WAP push mails and data received through3G/GPRS connections.
This version of Mobile Security is independent of OfficeScan™ and can be installedseparately as a standalone application on a Windows computer.
Additionally, Mobile Security comes with a universal Encryption Module that provideslogon password protection and data encryption features for Symbian and WindowsMobile devices. This Encryption Module helps prevent data from being compromised ifa mobile device is lost or stolen.

Introduction
1-3
WARNING!Trend Micro cannot guarantee compatibility between Mobile Security and file systemencryption software. Software products that offer similar features, like anti-malwarescanning, SMS management and firewall protection may be incompatible with MobileSecurity.
Architecture of Mobile Security SystemDepending on your company needs, you can implement Mobile Security with differentclient-server communication methods. You can also choose to set up one or anycombination of client-server communication methods in your network.
Trend Micro Mobile Security supports three different models of deployment:
• Enhanced Security Model (Dual Server Installation) with Cloud CommunicationServer
• Enhanced Security Model (Dual Server Installation) with Local CommunicationServer
• Basic Security Model (Single Server Installation)
Refer to the Installation and Deployment Guide for the details.
Components of Mobile Security SystemThe following table provides the descriptions of the Mobile Security components.

Trend Micro Mobile Security 9.0 Administrator’s Guide
1-4
TABLE 1-1. Components of Mobile Security System
COMPONENT DESCRIPTIONREQUIRED OR
OPTIONAL
ManagementServer
The Management Server enables you to manageMobile Device Agents from the administrationWeb console. Once mobile devices are enrolled tothe server, you can configure Mobile Device Agentpolicies and perform updates.
Required
CommunicationServer
The Communication Server handlescommunications between the Management Serverand Mobile Device Agents.
Trend Micro Mobile Security provides two types ofCommunication Servers:
• Local Communication Server (LCS)—this is aCommunication Server deployed locally inyour network.
• Cloud Communication Server (CCS)—this isa Communication Server deployed in thecloud and you will not need to install thisserver. Trend Micro manages the CloudCommunication Server and you only need toconnect to it from the Management Server.
See Comparison Between Local and CloudCommunication Servers on page 1-6.
Required
SMS Senders You can use SMS Sender to send SMS textmessages to the users.
Optional
ExchangeConnector
Trend Micro Mobile Security uses ExchangeConnector to communicate with the MicrosoftExchange server, and detects the devices that useExchange ActiveSync service.
Optional
Mobile DeviceAgent (MDA)
The Mobile Device Agent is installed on themanaged mobile devices. The agentcommunicates with the Mobile Security server andexecutes the commands and policy settings on themobile device.
Required

Introduction
1-5
COMPONENT DESCRIPTIONREQUIRED OR
OPTIONAL
Microsoft SQLServer
The Microsoft SQL Server hosts the databases forMobile Security server.
Required
Active Directory The Mobile Security server imports users andgroups from the Active Directory.
Optional
CertificateAuthority
The Certificate Authority manages securitycredentials and public and private keys for securecommunication.
Optional
SCEP The Simple Certificate Enrollment Protocol(SCEP) works with the Certificate Authority toissue certificates in large enterprises. It handlesthe issuing and revocation of digital certificates.The SCEP and Certificate Authority can beinstalled on the same server.
Optional
APNsCertificate
The Mobile Security server communicates throughthe Apple Push Notification Service (APNs) to iOSdevices.
Required if youwant to manageiOS mobiledevices
SSL certificate Trend Micro Mobile Security requires an SSLserver certificate issued from a recognized PublicCertificate Authority for the secure communicationbetween mobile devices and CommunicationServer using HTTPS.
Required if youwant to manageiOS 5 and abovemobile devices
BES UserAdministrationTool
BES User Administration Tool is required tosupport manage BlackBerry devices thatregistered in BES server.
Required if youwant to manageBlackBerrymobile devices
SMTP Server Connect SMTP server to make sureadministrators can get reports from MobileSecurity server, and send invitations to users.
Optional

Trend Micro Mobile Security 9.0 Administrator’s Guide
1-6
Comparison Between Local and CloudCommunication Servers
The following table provides the comparison between the Local Communication Server(LCS) and the Cloud Communication Server (CCS).
TABLE 1-2. Comparison between Local and Cloud Communication Servers
FEATURESCLOUD COMMUNICATION
SERVERLOCAL COMMUNICATION
SERVER
Installation required No Yes
User authenticationmethod supported
Enrollment Key Active Directory orEnrollment Key
Agent Customization forAndroid
Not supported Supported
Manage Symbian mobiledevices
Not supported Supported
Manage Windows Mobiledevices
Not supported Supported
What's New in This Release (v9.0)The following table describes additional features that come with Trend Micro™ MobileSecurity for Enterprisev9.0.
FEATURE NAME DESCRIPTION
StandaloneManagement Server
This release of Trend Micro Mobile Securityis independent ofOfficeScan and can be installed directly on a Windowscomputer.
Introduction
1-7
FEATURE NAME DESCRIPTION
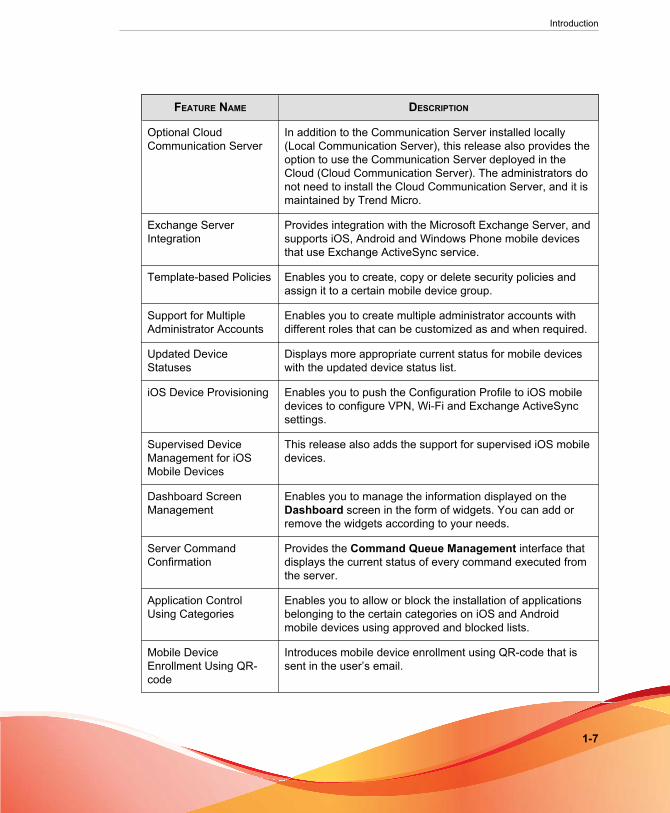
Optional CloudCommunication Server
In addition to the Communication Server installed locally(Local Communication Server), this release also provides theoption to use the Communication Server deployed in theCloud (Cloud Communication Server). The administrators donot need to install the Cloud Communication Server, and it ismaintained by Trend Micro.
Exchange ServerIntegration
Provides integration with the Microsoft Exchange Server, andsupports iOS, Android and Windows Phone mobile devicesthat use Exchange ActiveSync service.
Template-based Policies Enables you to create, copy or delete security policies andassign it to a certain mobile device group.
Support for MultipleAdministrator Accounts
Enables you to create multiple administrator accounts withdifferent roles that can be customized as and when required.
Updated DeviceStatuses
Displays more appropriate current status for mobile deviceswith the updated device status list.
iOS Device Provisioning Enables you to push the Configuration Profile to iOS mobiledevices to configure VPN, Wi-Fi and Exchange ActiveSyncsettings.
Supervised DeviceManagement for iOSMobile Devices
This release also adds the support for supervised iOS mobiledevices.
Dashboard ScreenManagement
Enables you to manage the information displayed on theDashboard screen in the form of widgets. You can add orremove the widgets according to your needs.
Server CommandConfirmation
Provides the Command Queue Management interface thatdisplays the current status of every command executed fromthe server.
Application ControlUsing Categories
Enables you to allow or block the installation of applicationsbelonging to the certain categories on iOS and Androidmobile devices using approved and blocked lists.
Mobile DeviceEnrollment Using QR-code
Introduces mobile device enrollment using QR-code that issent in the user’s email.

Trend Micro Mobile Security 9.0 Administrator’s Guide
1-8
FEATURE NAME DESCRIPTION
Feature Lock PolicyEnhancement
Adds more features and OS components to the feature locklist for the administrator to control their availability on mobiledevices.
iOS Volume PurchaseProgram Support
Enables you to import the iOS applications to the MobileSecurity administration Web console that are purchasedthrough the Apple’s Volume Purchase Program.
Updated Mobile DeviceAgent Interface
Introduces the new user interface for Android and iOS mobiledevice agents.
Integration with MARS Provides server and Android mobile device agent integrationwith Trend MicroMobile Application Reputation Service(MARS) for applications security risk and resource usage.
Administrator ReportsDownload
Enables you to download the Administrator Reports from theMobile Securityadministration Web console.
Policy Violation Log Provides Policy Violation Log for Android mobile devices.
Integration with TrendMicroControl Manager
Trend Micro Mobile Security provides integration with TrendMicroControl Manager. This integration enables ControlManager administrators to deliver corporate policies to themobile devices and allows them to view the MobileSecurityDashboard screen in Control Manager.
What's New in Release 8.0 SP1The following table describes additional features that were introduced in Trend Micro™Mobile Security for Enterprise v8.0 Service Pack 1 (SP1).
FEATURE NAME DESCRIPTION
Authentication Based onDevice Identity
Enables you to authenticate a batch of mobile devices usingtheir IMEI numbers and/or Wi-Fi MAC addresses.
Unmanaged Group forAndroid and iOS
Introduces a group "Unmanaged" for Android mobile deviceson which ’Device administrator’ is deactivated, and for iOSmobile devices on which the enrollment profiles are removed.
Introduction
1-9
FEATURE NAME DESCRIPTION
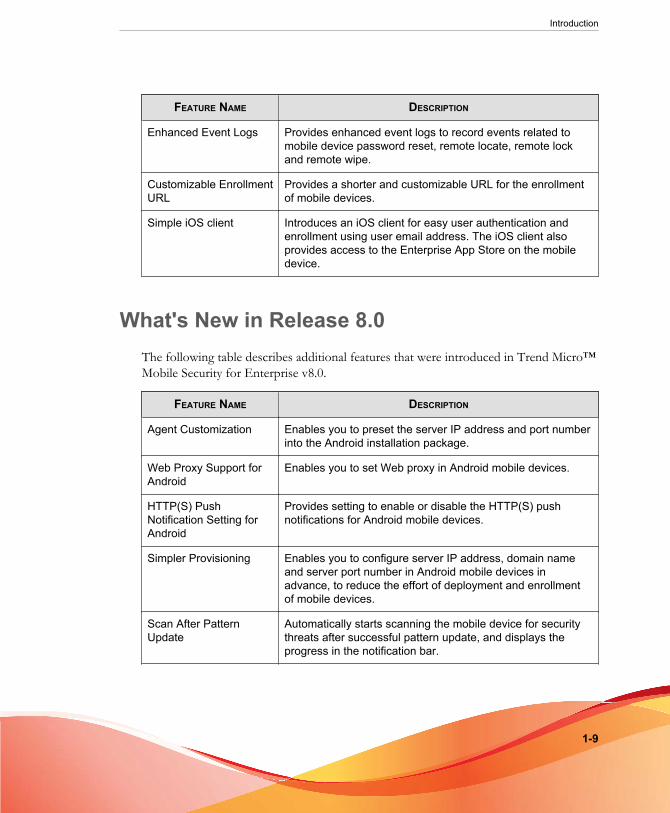
Enhanced Event Logs Provides enhanced event logs to record events related tomobile device password reset, remote locate, remote lockand remote wipe.
Customizable EnrollmentURL
Provides a shorter and customizable URL for the enrollmentof mobile devices.
Simple iOS client Introduces an iOS client for easy user authentication andenrollment using user email address. The iOS client alsoprovides access to the Enterprise App Store on the mobiledevice.
What's New in Release 8.0The following table describes additional features that were introduced in Trend Micro™Mobile Security for Enterprise v8.0.
FEATURE NAME DESCRIPTION
Agent Customization Enables you to preset the server IP address and port numberinto the Android installation package.
Web Proxy Support forAndroid
Enables you to set Web proxy in Android mobile devices.
HTTP(S) PushNotification Setting forAndroid
Provides setting to enable or disable the HTTP(S) pushnotifications for Android mobile devices.
Simpler Provisioning Enables you to configure server IP address, domain nameand server port number in Android mobile devices inadvance, to reduce the effort of deployment and enrollmentof mobile devices.
Scan After PatternUpdate
Automatically starts scanning the mobile device for securitythreats after successful pattern update, and displays theprogress in the notification bar.

Trend Micro Mobile Security 9.0 Administrator’s Guide
1-10
FEATURE NAME DESCRIPTION
Web Threat ProtectionPolicy
Enables you to manage Web threat protection policy from theMobile Security server and deploys it on Android mobiledevices. It also enables Android mobile devices to send theWeb threat protection log back to the server.
Adds SD CardRestriction for Android
Enables you to control the availability of the SD card forAndroid mobile devices.
Application Inventory Maintains the list of installed applications on mobile devicesand displays it on the device status screen.
Application Control Enables you to allow or block the installation of certainapplications on mobile devices using approved and blockedlists.
Application Push Enables you to push the application installation package orWeb link of the application to mobile devices for installation.
Selective Wipe Enables you to delete all the corporate data from the server,without deleting the user’s personal data.
Compliance Check Enables you to set the compliance criteria on the server, andchecks the mobile devices for compliance.
Optional Authenticationusing Active Directory
Enables you to set user authentication using Active Directory(AD) or Mobile Security database for Symbian, WindowsMobile, iOS and Android mobile devices for registration.
Dashboard Screen Introduces the Dashboard screen to replace the oldSummary screen on the Web console to provide the statussummary of server components and mobile devices.
Scheduled Reports Enables you to configure Mobile Security to send scheduledreports at the pre-defined intervals.
Quick ConfigurationVerification Screen
Introduces the Mobile Security Configuration andVerification screen that enables you to quickly verify MobileSecurity configuration and identifies the problems, if any. Ifthe configuration verification screen detects any wrongconfiguration setting, it provides suggestions to correct it.

Introduction
1-11
FEATURE NAME DESCRIPTION
On-Demand RemotePassword Reset for iOSand Android
Enables you to reset the password remotely for iOS andAndroid mobile devices from the Web console.
Enterprise App Store Enables you to create a list of webclips and apps for theusers to download and install on their mobile devices.
What's New in Release 7.1The following table describes additional features that were introduced in Trend Micro™Mobile Security for Enterprise v7.1.
FEATURE NAME DESCRIPTION
Support for iOS andBlackberry MobileDevices
Mobile Security v7.1 added support for iOS and Blackberrymobile devices.
Integrated with ActiveDirectory
Mobile Security v7.1 leverages the corporate’s ActiveDirectory (AD) for importing users and for performing userauthentication.
Updated Architecture In Mobile Security v7.1, single and dual server deploymentmodels are introduced. SMS Gateway is also removed inv7.1.
Provisioning Policy This version introduces the provisioning policy for mobiledevices.
What's New in the Release 7.0This section describes additional features that were introduced in Trend Micro™ MobileSecurity for Enterprise v7.0.

Trend Micro Mobile Security 9.0 Administrator’s Guide
1-12
FEATURE NAME DESCRIPTION
Support for AndroidMobile Devices
Mobile Security v7.0 added support for Android v2.1 or abovemobile devices.
Call Filtering Policies Enables the administrator to control the incoming or outgoingcalls on Android mobile devices.
Updated FeatureLocking
Enables the administrator to control the availability of certaincomponents for Android mobile devices that are within therange of certain access point(s).
Locate Remote Device Enables the administrator to locate the remote devicethrough the wireless network or by using mobile device’sGPS and displaying its location on Google Maps. This newfeature helps locate the lost, stolen or misplaced mobiledevices.
Updated Architecture In Mobile Security v7.0, SMS Gateway is added as analternate to SMS Sender to send SMS messages to mobiledevices.
Main Mobile Device Agent Features
FEATURE NAME DESCRIPTION
Anti-MalwareScanning
Mobile Security incorporates Trend Micro’s anti-malware technologyto effectively detect threats to prevent attackers from takingadvantage of vulnerabilities on mobile devices. Mobile Security isspecially designed to scan for mobile threats and enables you toquarantine and delete infected files.
Web Security As technology increases for mobile devices, the sophistication ofmobile threats is also increasing. Trend Micro Mobile Securityprovides Web Reputation and Parental Controls to protect yourmobile device from unsafe Web sites and the Web sites that maycontain objectionable material for children, teenagers and other familymembers. You can modify your Web Reputation and ParentalControls setting levels as per your desired settings. Mobile Securityalso maintains the log of the Web sites that were blocked by WebReputation or Parental Controls in their specific logs.

Introduction
1-13
FEATURE NAME DESCRIPTION
SMS Anti-Spam Mobile devices often receive unwanted messages or spam throughSMS messaging. To filter unwanted SMS messages into a spamfolder, you can specify the phone numbers from which all SMSmessages will be considered spam or you can specify a list ofapproved phone numbers and configure Mobile Security to filter allmessages from senders that are not in the approved list. You canalso filter unidentified SMS messages or messages without sendernumbers. Your mobile device will automatically store these messagesto the spam folder in your inbox.
NoteThe SMS Anti-Spam feature is not available on mobile deviceswithout phone capabilities.
Call Filtering Mobile Security enables you to filter incoming or outgoing calls fromthe server. You can configure Mobile Security to block incoming callsfrom certain phone numbers or you can specify a list of approvedphone numbers to which the calls may be made from the mobiledevice. Mobile Security also enables mobile device users to specifytheir own Blocked or Approved list to filter unwanted incoming calls.
NoteThe Call Filtering feature is not available on mobile deviceswithout phone capabilities.

Trend Micro Mobile Security 9.0 Administrator’s Guide
1-14
FEATURE NAME DESCRIPTION
WAP-PushProtection
WAP-Push is a powerful method of delivering content to mobiledevices automatically. To initiate the delivery of content, specialmessages called WAP-Push messages are sent to users. Thesemessages typically contain information about the content and serveas a method by which users can accept or refuse the content.
Malicious users have been known to send out inaccurate oruninformative WAP-Push messages to trick users into acceptingcontent that can include unwanted applications, system settings, andeven malware. Mobile Security lets you use a list of trusted sendersto filter WAP-Push messages and prevent unwanted content fromreaching mobile devices.
The WAP-Push protection feature is not available on mobile deviceswithout phone capabilities.
Authentication After installing the Mobile Device Agent a mobile device is associatedwith a user. The user must type a password (also known as thepower-on password) to log on to the mobile device.
Data Encryption Mobile Security provides dynamic data encryption for data stored onmobile devices and memory cards. You can specify the type of datato be encrypted and the encryption algorithm to use.
RegularUpdates
To protect against the most current threats, you can either updateMobile Security manually or configure it to update automatically. Tosave cost, you can also set a different update frequency for themobile devices that are in “roaming”. Updates include componentupdates and Mobile Security program patch updates.
Firewall(BlackBerry,Symbian andWindows Mobileonly)
Mobile Security includes the Trend Micro firewall module, whichcomes with predefined security levels to filter network traffic. You canalso define your own filtering rules and filter network traffic fromspecific IP addresses and on specific ports. The Intrusion DetectionSystem (IDS) enables you to prevent attempts to continually sendmultiple packets to mobile devices. Such attempts typically constitutea Denial of Service (DoS) attack and can render your mobile devicetoo busy to accept other connections.

Introduction
1-15
FEATURE NAME DESCRIPTION
Logs The following Mobile Device Agent logs are available on theManagement Server:
• malware protection log
• Web threat protection log
• encryption log
• firewall log
• event log
• violation log
You can view the following logs on mobile devices:
• Windows Mobile and Symbian:
• virus/malware logs
• firewall logs
• SMS anti-spam logs
• WAP Push protection logs
• task logs
• Android:
• malware scan history
• privacy scan history
• Web blocking history
• call blocking history
• text blocking history
• update history
Supported Mobile Device OS FeaturesThe following table shows the list of features that Trend Micro Mobile Security supportsper platform.
Trend Micro Mobile Security 9.0 Administrator’s Guide
1-16
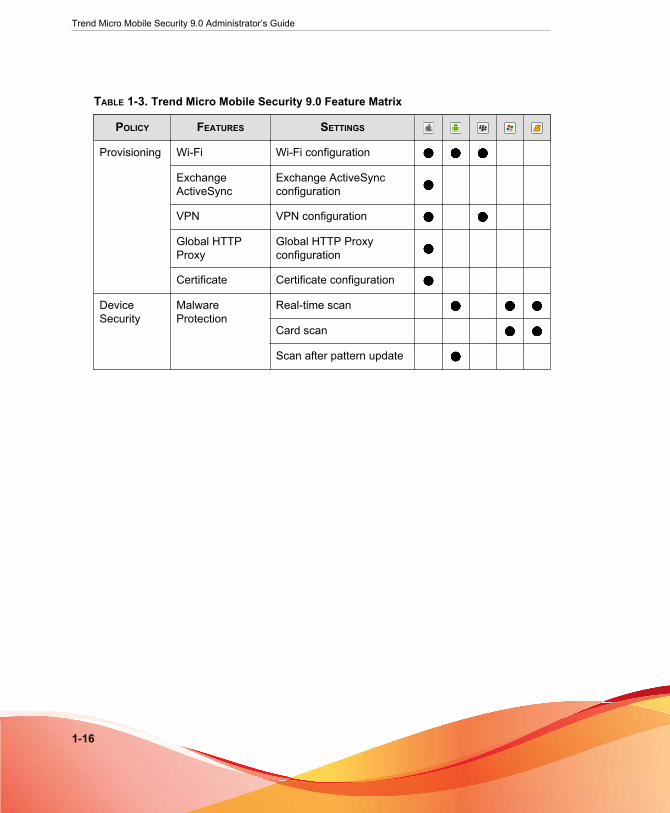
TABLE 1-3. Trend Micro Mobile Security 9.0 Feature Matrix
POLICY FEATURES SETTINGS
Provisioning Wi-Fi Wi-Fi configuration
ExchangeActiveSync
Exchange ActiveSyncconfiguration
VPN VPN configuration
Global HTTPProxy
Global HTTP Proxyconfiguration
Certificate Certificate configuration
DeviceSecurity
MalwareProtection
Real-time scan
Card scan
Scan after pattern update

Introduction
1-17
POLICY FEATURES SETTINGS
DataProtection
Spam SMSPrevention
Server-side control
Use blocked list
Use approved list
Spam WAP PushPrevention
Server-side control
Use approved list
Call Filtering Server-side control
Use blocked list
Use approved list
Firewall Enable firewall
Enable Intrusion DetectionSystem (IDS)
Web ThreatProtection
Server-side control
Use blocked list
Use approved list

Trend Micro Mobile Security 9.0 Administrator’s Guide
1-18
POLICY FEATURES SETTINGS
DataProtection
PasswordSettings
Use Password for login
Admin password
Allow simple password
Require alphanumericpassword
Minimum password length
Password expiration
Password history
Auto-lock
Password failure action
Encryption Encrypt PIM
Encrypt documents
Encrypt memory cards
Feature Lock Camera
FaceTime
Screen capture
Apps installation

Introduction
1-19
POLICY FEATURES SETTINGS
DataProtection
Feature Lock Sync while roaming
Voice dialing
In-app purchase
Multiplayer gaming
Adding game centerfriends
Game Center (SupervisedOnly)
Force encrypted backups
Explicit music, podcastand iTunes U
Passbook while device islocked
Bluetooth and Bluetoothdiscovery
Infrared
USB storage
WLAN/Wi-Fi
3G data network
Trend Micro Mobile Security 9.0 Administrator’s Guide
1-20
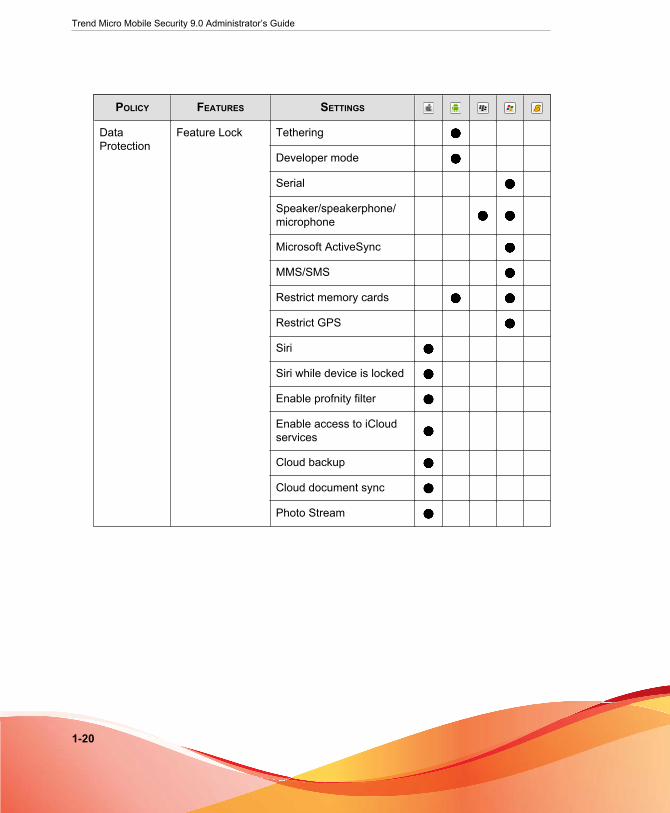
POLICY FEATURES SETTINGS
DataProtection
Feature Lock Tethering
Developer mode
Serial
Speaker/speakerphone/microphone
Microsoft ActiveSync
MMS/SMS
Restrict memory cards
Restrict GPS
Siri
Siri while device is locked
Enable profnity filter
Enable access to iCloudservices
Cloud backup
Cloud document sync
Photo Stream

Introduction
1-21
POLICY FEATURES SETTINGS
DataProtection
Feature Lock Shared Photo Streams
Diagnostic data
Accept untrustedTransport Layer Security(TLS)
Force iTunes to storepassword
YouTube
iTunes
Safari Web browser
AutoFill
JavaScript
Popups
Force fraud warning
Accept cookies
Removing apps(Supervised only)
Bookstore (Supervisedonly)

Trend Micro Mobile Security 9.0 Administrator’s Guide
1-22
POLICY FEATURES SETTINGS
DataProtection
Feature Lock Erotica (Supervised only)
Configuration ProfileInstallation (Supervisedonly)
iMessage (Supervisedonly)
Ratings region
Movies
TV Shows
Apps
Remotecontrol
Register
Update
Anti-theft Remote locate
Remote lock
Remote wipe
Reset password

2-1
Chapter 2
Getting Started with Mobile SecurityThis chapter helps you start using Mobile Security and provides you the basic usageinstructions. Before you proceed, be sure to install the Management Server,Communication Server, and the Mobile Device Agent on mobile devices.
This chapter includes the following sections:
• Accessing the Administration Web Console on page 2-2
• Dashboard Information on page 2-5
• Administration Settings on page 2-10
• Command Queue Management on page 2-18
• Exchange Server Integration on page 2-19
• Managing Certificates on page 2-20

Trend Micro Mobile Security 9.0 Administrator’s Guide
2-2
Administration Web ConsoleYou can access the configuration screens through the Mobile Security administrationWeb console.
The Web console is the central point for managing and monitoring Mobile Securitythroughout your corporate network. The console comes with a set of default settingsand values that you can configure based on your security requirements andspecifications.
You can use the Web console to do the following:
• Manage Mobile Device Agents installed on mobile devices
• Configure security policies for Mobile Device Agents
• Configure scan settings on a single or multiple mobile devices
• Group devices into logical groups for easy configuration and management
• View registration and update information
Accessing the Administration Web Console
Procedure
1. Log on to the administration Web console using the following URL structure:
https://<External_domain_name_or_IP_address>:<HTTPS_port>/mdm/web
Note
Replace <External_domain_name_or_IP_address> with the actual IP address, and<HTTPS_port> with the actual port number of the Management Server.

Getting Started with Mobile Security
2-3
The following screen appears.
FIGURE 2-1. Administration Web console login screen
2. Type a user name and password in the fields provided and click Log In.
Note
The default User Name for administration Web console is “root” and the Passwordis “mobilesecurity”.
Make sure that you change the administrator password for the user "root" after yourfirst sign in. See Editing an Administrator Account on page 2-15 for the procedure.
Important
If you are using Internet Explorer to access the administration Web console, make sure thefollowing:
• the Compatibility View for Web sites options is turned off. See Turning OffCompatibility Mode in Internet Explorer on page 2-4 for details.
• the JavaScript is enabled on your browser.

Trend Micro Mobile Security 9.0 Administrator’s Guide
2-4
Note
If you are unable to access the administration Web console in Windows 2012 usingInternet Explorer 10 in Metro mode, verify that the Enhanced Protected Mode option isdisabled in Internet Explorer.
Turning Off Compatibility Mode in Internet ExplorerTrend Micro Mobile Security does not support Compatibility View on InternetExplorer. If you are using Internet Explorer to access the Mobile Security administrationWeb console, turn off the Web browser’s Compatibility View for the Web site, if it isenabled.
Procedure
1. Open Internet Explorer and click Tools > Compatibility View settings.
The Compatibility View Settings window displays.
2. If the administration console is added to the Compatibility View list, select theWeb site and click Remove.
3. Clear Display intranet sites in Compatibility View and Display all websites inCompatibility View checkboxes, and then click Close.
Product LicenseAfter the Evaluation version license expires, all program features will be disabled. A Fulllicense version enables you to continue using all features, even after the license expires.It’s important to note however, that the Mobile Device Agent will be unable to obtainupdates from the server, making anti-malware components susceptible to the latestsecurity risks.
If your license expires, you will need to register the Mobile Security server with a newActivation Code. Consult your local Trend Micro sales representative for moreinformation.

Getting Started with Mobile Security
2-5
To download updates and allow remote management, Mobile Device Agent must enrollto the Mobile Security server. For instructions to manually enroll Mobile Device Agenton mobile devices, refer to the Installation And Deployment Guide.
To view license upgrade instructions for Management Server, click the View licenseupgrade instructions link in Mobile Security Product License screen.
Dashboard InformationThe Dashboard screen displays first when you access the Management Server. Thisscreen provides an overview of the mobile device registration status and componentdetails.
The dashboard screen is divided into five tabs:
• Summary—shows the device health status and device’s operating systemsummary.
• Health—shows the components and policy update and mobile device healthstatus. In this category, you can:
• View mobile devices’ status:
• Healthy—shows that the device is enrolled to the Mobile Securityserver and the components and policies on the mobile device are up-to-date.
• Non-Compliant—shows that the device is enrolled to the MobileSecurity server, but does not comply with the server policies.
• Out of Sync—shows that the device is enrolled to the Mobile Securityserver, but either the components or the polices are out-of-date.
• Inactive—shows that the device is not yet enrolled to the MobileSecurity server.
• View the total number of enrolled and unregistered mobile devices managedby Mobile Security.
A mobile device may remain unregistered if one of the following happens:

Trend Micro Mobile Security 9.0 Administrator’s Guide
2-6
• a connection to the Communication Server is unsuccessful
• the mobile device user has deleted the registration SMS message
• View mobile device program patch and component update status:
• Current Version—the current version number of the Mobile DeviceAgent or components on the Mobile Security server
• Up-to-date—the number of mobile device with updated Mobile DeviceAgent version or component
• Out-of-date—the number of mobile devices that are using an out-of-date component
• Update Rate—the percentage of mobile devices using the latestcomponent version
• Upgraded—the number of mobile devices using the latest MobileDevice Agent version
• Not Upgraded— the number of mobile devices that have not upgradedto use the latest Mobile Device Agent version
• Upgrade Rate—the percentage of mobile devices using the latestMobile Device Agent
• View server update status:
• Server—the name of the module
• Address—the domain name or IP address of the machine hosting themodule
• Current Version—the current version number of the Mobile Securityserver modules
• Last Updated—the time and date of the last update
• Inventory—shows mobile device operating system version summary, telephonecarriers summary, mobile device vendors summary and top 10 applications installedon mobile devices.

Getting Started with Mobile Security
2-7
• Compliance—shows the app control, encryption and jailbreak/root status ofmobile devices. In this category, you can:
• View the mobile device jailbreak/root status:
• Jailbroken/Rooted—the number of mobile devices that are jailbroken/rooted
• Not Jailbroken/Rooted—the number of mobile devices that are notjailbroken/rooted
• View the mobile device encryption status:
• Encrypted—the number of mobile devices that are encrypted
• Not Encrypted—the number of mobile devices that are not encrypted
• View the mobile device application control status:
• Compliant—the number of mobile devices that comply with the MobileSecurity’s compliance and application control policy
• Not Compliant—the number of mobile devices that do not complywith the Mobile Security’s compliance and application control policy
• Protection—shows the lists of top five (5) security threats and top five (5) blockedWeb sites.
Note
On each of the widgets on the Dashboard screen, you can either select All, or the groupname from the drop-down list to display the information of the relevant devices.
Customizing the Dashboard
Mobile Security enables you to customize the Dashboard information according toyour needs and requirements.

Trend Micro Mobile Security 9.0 Administrator’s Guide
2-8
Adding a New Tab
Procedure
1. On the Dashboard screen, click the button.
2. On the New Tab pop-up window, do the following:
• Title: type the tab name.
• Layout: select the layout for the widgets displayed on the tab.
• Auto-fit: select On or Off to enable or disable the setting for the widgets onthe tab.
3. Click Save.
Removing a Tab
Procedure
1. Click the tab, and then click the button displayed on the tab.
2. Click OK on the confirmation pop-up dialog.
Adding Widgets
Procedure
1. On the Dashboard screen, click the tab on which you want to add widgets.
2. Click Add Widgets on the top-right of the tab.
The Add Widgets screen displays.
3. Select the category from the left menu and/or type the keywords in the search fieldto display the relevant widgets list.

Getting Started with Mobile Security
2-9
4. Select the widgets that you want to add, and then click Add.
The selected widgets appear on the tab on the Dashboard.
Removing Widgets
Procedure
1. On the Dashboard screen, click the tab from which you want to remove widgets.
2. On the widget that you want to remove, click on the top-right of the widget.
Changing Widget’s Position
Procedure
1. On the Dashboard screen, click the tab whose widgets you want to rearrange.
2. Click and hold the widget title bar, then drag and drop it to the new position.
Refreshing the Information on the Widgets
Procedure
1. On the Dashboard screen, click the tab whose widget you want to refresh.
2. On the widget that you want to refresh, click on the top-right of the widget.
Viewing or Modifying Tab Settings
Procedure
1. On the Dashboard screen, click the tab whose settings you want to view ormodify.

Trend Micro Mobile Security 9.0 Administrator’s Guide
2-10
2. Click Tab Settings.
3. Modify the settings as required, and then click Save.
Administration Settings
Configuring Active Directory (AD) Settings
Trend Micro Mobile Security enables you to configure user authorization based on theActive Directory (AD). You can also add mobile devices to the device list using yourAD. Refer to the Initial Server Setup section in the Installation and Deployment Guide for thedetailed configuration steps.
Configuring Device Authentication
Trend Micro Mobile Security enables you to configure device authentication based onthe Active Directory (AD) or the Mobile Security database. You can also allow mobiledevices to enroll with the Mobile Security server without authentication. Refer to theInitial Server Setup section in the Installation and Deployment Guide for the detailedconfiguration steps.
Configuring Database Settings
Refer to the Initial Server Setup section in the Installation and Deployment Guide for thedetailed configuration steps.
Configuring Communication Server Settings
Refer to the Initial Server Setup section in the Installation and Deployment Guide for thedetailed configuration steps.

Getting Started with Mobile Security
2-11
Managing Administrator Accounts
The Administrator Account Management screen enables you to create user accountswith different access role for the Management Server.
Default Administrator Account Name and Role
The default administrator account is “root” (password: “mobilesecurity”). The rootaccount cannot be deleted and can only be modified. See Editing an Administrator Accounton page 2-15 for the detailed procedure.
TABLE 2-1. The root account properties
ROOT ACCOUNT PROPERTIES CAN BE MODIFIED?
Administrator Accounts Account name No
Full name Yes
Password Yes
Email address Yes
Mobile phone number Yes
Administrator Roles Administrator rolemodification
No
The default administrator role is Super Administrator, which has the maximum accessto all settings. The Super Administrator role cannot be deleted and can only bemodified. See Editing an Administrator Role on page 2-17 for the detailed procedure.
TABLE 2-2. The Super Administrator role properties
SUPER ADMINISTRATOR ROLE PROPERTIES CAN BE MODIFIED?
Role Details Administrator role No
Description Yes
Group Management Control Managed Groups No

Trend Micro Mobile Security 9.0 Administrator’s Guide
2-12
SUPER ADMINISTRATOR ROLE PROPERTIES CAN BE MODIFIED?
Exchange Server DomainControl
Domain selection No
TABLE 2-3. Access rights for Super Administrator and a Group Administrator
SERVERCOMPONENTS
PERMISSIONSSUPER
ADMINISTRATORGROUP
ADMINISTRATOR
Administration Updates Supported Not supported
Administrator AccountManagement
Can modify all theaccount
Can only modifyown accountinformation
Device EnrollmentSettings
Supported Not supported
Certificate Management Supported Supported
Command QueueManagement
Can manage allcommands
Can only viewcommands for therelated groups
Database Settings Supported Not supported
Communication ServerSettings
Supported Not supported
Active Directory Settings Supported Not supported
Management ServerSettings
Supported Not supported
Exchange ServerIntegration
Supported Not supported
Configuration andVerification
Supported Not supported
Product License Supported Not supported

Getting Started with Mobile Security
2-13
SERVERCOMPONENTS
PERMISSIONSSUPER
ADMINISTRATORGROUP
ADMINISTRATOR
Notification/Reports
Log Query All the groups Managed groupsonly
Log Maintenance All the groups Managed groupsonly
AdministratorNotification/Reports
Supported Not supported
User Notification Supported Not supported
Settings Supported Not supported
App Store App Store Supported Not supported
Policy Create a policy Supported Supported formanaged groupsonly
View a policy Supported Supported formanaged groupsonly
Copy a policy Supported Supported formanaged groupsonly
Delete a policy Supported Supported formanaged groupsonly

Trend Micro Mobile Security 9.0 Administrator’s Guide
2-14
SERVERCOMPONENTS
PERMISSIONSSUPER
ADMINISTRATORGROUP
ADMINISTRATOR
Devices View devices Supported Supported formanaged groupsonly
Add group Supported Supported
Invite Devices Supported Supported formanaged groupsonly
Exchange ActiveSyncDevices
Supported Supported formanaged groupsonly
Adding Administrator Accounts
Procedure
1. Log on to the Mobile Securityadministration Web console.
2. Click Administration > Administrator Account Management.
3. On the Administrator Accounts tab, click Create to add a new account.
The Create Administrator Account screen appears.
4. Under section Account Details, do one of the following:
• Select Trend Micro Mobile Security User, and specify the following useraccount details:
• Account name: name used to log on to the Management Server.
• Full name: the user’s full name.
• Password (and Confirm Password).
• Email address: the user’s email address.
• Mobile phone number: the user’s phone number.

Getting Started with Mobile Security
2-15
• Select Active Directory user, and do the following:
a. Type the user name in the search field and click Search.
b. Select the user name from the list on the left and click > to move theuser to the Selected users list on the right.
NoteTo remove the user from the Selected users list on the right, select the user nameand click <.
You can also select multiple users at the same time by holding Ctrl or Shift keys whileclicking on the username.
5. Under section Administrator Role, select the role from the Choose theadministrator role: drop-down list.
See Creating an Administrator Role on page 2-16 for the procedure for creatingadministrator roles
6. Click Save.
Editing an Administrator Account
Procedure
1. Log on to the Mobile Securityadministration Web console.
2. Click Administration > Administrator Account Management.
3. On the Administrator Accounts tab, click Create to add a new account.
The Edit Administrator Account screen appears.
4. Modify the administrator account details and access role as required.
• Account Details
• Account name: name used to log on to the Management Server.
• Full name: the user’s full name.

Trend Micro Mobile Security 9.0 Administrator’s Guide
2-16
• Email address: the user’s email address.
• Mobile phone number: the user’s phone number.
• Password: click Reset Password to change the user account password,type the new password in the New Password and Confirm Passwordfields, and click Save.
• Administrator Role
• Choose the administrator role: select the administrator role from thedrop-down list.
For the procedure to create an administrator role, see Creating anAdministrator Role on page 2-16.
5. Click Save.
Deleting an Administrator Account
Procedure
1. Log on to the Mobile Security administration Web console.
2. Click Administration > Administrator Account Management.
3. On the Administrator Accounts tab, select the administrator accounts that youwant to delete, and click Delete.
Creating an Administrator Role
Procedure
1. Log on to the Mobile Securityadministration Web console.
2. Click Administration > Administrator Account Management.
3. On the Administrator Roles tab, click Create.

Getting Started with Mobile Security
2-17
The Create Administrator Role screen appears.
4. Under section Role Details, provide the following information:
• Administrator Role
• Description
5. Under section Group Management Control select the mobile device groups thatthis administrator role can manage.
6. Click Save
Editing an Administrator Role
Procedure
1. Log on to the Mobile Securityadministration Web console.
2. Click Administration > Administrator Account Management.
3. On the Administrator Roles tab, click Create.
The Create Administrator Role screen appears.
4. Modify the role details as required and click Save.
Deleting an Administrator Role
Procedure
1. Log on to the Mobile Security administration Web console.
2. Click Administration > Administrator Account Management.
3. On the Administrator Roles tab, select the administrator role you want to delete,and click Delete.

Trend Micro Mobile Security 9.0 Administrator’s Guide
2-18
Changing Administrator Password
Refer to the topic Editing an Administrator Account on page 2-15 for the procedure ofchanging the administrator account password.
Command Queue ManagementMobile Security keeps the record of all the commands you have executed from the Webconsole and enables you to cancel or resend a command, if required. You can alsoremove the commands that have already been executed and are not required to bedisplayed on the list.
To access the Command Queue Management screen, navigate to Administration >Command Queue Management.
The following table describes all the command statuses on the Command QueueManagement screen.
COMMAND STATUS DESCRIPTION
Waiting to Send The Mobile Security server is in the process of sending thecommand to mobile device.
You can cancel the command while it is in this status.
Waiting Acknowledgment The Mobile Security server has sent the command tomobile device and is waiting for the acknowledgementfrom the mobile device.
Unsuccessful Unable to execute the command on mobile device.
Successful The command has been executed successfully on themobile device.
Canceled The command has been canceled before it was executedon the mobile device.

Getting Started with Mobile Security
2-19
Exchange Server Integration
Configuring Exchange Server Integration SettingsRefer to the topic Configuring Exchange Server Integration Settings in the Installation andDeployment Guide for the detailed configuration steps.
Configuring Exchange ConnectorYou can configure the Exchange Connector to update automatically whenever a higherversion is available.
Procedure
1. On the computer where Exchange Connector is installed, click the Show hiddenicons button in the system tray on the Windows taskbar (near the system clock).
2. Right-click the Exchange Connector icon, and then click About Trend MicroMobile Security-Exchange Connector.
About Trend Micro Mobile Security-Exchange Connector screen appears.
3. Configure the following:
• Enable automatic upgrade—when selected, the Exchange Connectorautomatically upgrades to a new version whenever it is available.
• Server Address—Mobile Security server IP address.
• HTTPS Port—Mobile Security server HTTPS port number for theadministration Web console.

Trend Micro Mobile Security 9.0 Administrator’s Guide
2-20
Managing CertificatesUse the Certificate Management screen to upload .pfx, .p12, .cer, .crt, .dercertificates to the Mobile Security server.
Uploading a Certificate
Procedure
1. Log on to the Mobile Security administration Web console.
2. Click Administration > Certificate Management.
3. Click Add.
The Add certificate window appears.
4. Click Choose File and then select a .pfx, .p12, .cer, .crt, .der certificatefile.
5. Type the certificate password in the Password field.
6. Click Save.
Deleting Certificate
Procedure
1. Log on to the Mobile Security administration Web console.
2. Click Administration > Certificate Management.
3. Select certificates that you want to delete, and then click Delete.

3-1
Chapter 3
Managing Mobile DevicesThis chapter helps you start using Mobile Security. It provides basic setup and usageinstructions. Before you proceed, be sure to install the Management Server,Communication Server, and the Mobile Device Agent on mobile devices.
The chapter includes the following sections:
• Managed Devices Tab on page 3-2
• Managing Groups on page 3-3
• Managing Mobile Devices on page 3-4
• Mobile Device Status on page 3-9
• Mobile Device Agent Tasks on page 3-11
• Updating Mobile Device Agents on page 3-11
• Lost Device Protection on page 3-12
• Resetting Password Remotely on page 3-15
• Invited Devices Tab on page 3-18
• Exchange ActiveSync Devices Tab on page 3-21
• Integration with Trend Micro Control Manager on page 3-24

Trend Micro Mobile Security 9.0 Administrator’s Guide
3-2
Managed Devices TabThe Managed Devices tab on the Devices screen enables you to perform tasks relatedto the settings, organization or searching of Mobile Device Agents. The toolbar abovethe device tree viewer lets you perform the following tasks:
• configure the device tree (such as creating, deleting, or renaming groups andcreating or deleting Mobile Device Agents)
• search for and display Mobile Device Agent status
• on-demand Mobile Device Agent component update, wipe/lock/locate remotedevice, and update policy
• configure Mobile Device Agents information
• export data for further analysis or backup
Groups in Mobile SecurityMobile Security server automatically creates a root group Mobile Devices with thefollowing two sub-groups:
• default—this group contains Mobile Device Agents that do not belong to anyother group. You cannot delete or rename the default group in the Mobile Securitydevice tree.
• unauthorized—Mobile Security server automatically creates this group if DeviceAuthentication is enabled in Device Enrollment Settings, and a list of mobiledevices is used to authenticate. If there is an enrolled mobile device that is not inthe list of mobile devices, Mobile Security moves such mobile device to theunauthorized group. Mobile Security also creates other groups and regroups allmobile devices according to the list that you use.
Note
If you enable Device Authentication in Device Enrollment Settings, and upload ablank mobile device list for authentication, Mobile Security will move all the currentenrolled mobile devices to the group "Unauthorized".

Managing Mobile Devices
3-3
NoteDevice Authentication supports Android and iOS mobile devices only.
For instructions, refer to the Mobile Security server Online Help.
Managing GroupsYou can add, edit or delete groups under the Mobile Devices root group. However,you cannot rename or delete the root group Mobile Devices and the group default.
Adding a Group
Procedure
1. Log on to the Mobile Security administration Web console.
2. Click Devices on the menu bar.
The Devices screen displays.
3. On the Managed Devices tab, click the root group Mobile Devices, and thenclick Add Group.
4. Type the Group name and select the Policy from the drop down list that youwant to apply to the group.
5. Click Add.
Renaming a Group
Procedure
1. Log on to the Mobile Security administration Web console.
2. Click Devices on the menu bar.
The Devices screen displays.

Trend Micro Mobile Security 9.0 Administrator’s Guide
3-4
3. On the Managed Devices tab, click the group that you want to rename.
4. Click Edit.
5. Modify the group name, and then click Rename.
Deleting a Group
Procedure
1. Log on to the Mobile Security administration Web console.
2. Click Devices on the menu bar.
The Devices screen displays.
3. On the Managed Devices tab, click the group that you want to delete.
4. Click Delete, and then click OK on the confirmation dialog box.
Managing Mobile DevicesYou can send invitation to mobile devices, edit mobile device information, delete mobiledevices, or change the mobile device group on the Devices screen.
Sending Invitation to Mobile Devices
Procedure
1. Log on to the Mobile Securityadministration Web console.
2. Click Devices on the menu bar.
The Devices screen displays.
3. You can now invite one mobile device, a batch of mobile devices, a user or anemail group (distribution list) from the Active Directory:

Managing Mobile Devices
3-5
• To invite a mobile device:
a. Click Invite Users > Invite Single User.
The Invite Single User window pops up.
b. On the Invite Single User window, configure the following fields:
• Phone number—type the phone number of a mobile device. Toensure that the mobile device can receive notification messagessuccessfully from an SMS sender, you may type the country code(1-5 digits long). You do not have to type the international directdialing prefix.
• Email—type the user email address to send notification mail.
• User Name—type the name of the mobile device to identify thedevice in the device tree.
• Group—select the name of the group to which the mobile devicebelongs from the drop-down list. You can always change the groupto which the mobile device agent belongs.
Tip
To invite more devices, click the button.
• To invite a batch of mobile devices:
a. Click Invite Users > Invite Batch.
b. Type the device information using the following format in the text boxon the window that displays:
Phone_number, email_address, device_name, group_name,asset_number (optional), description(optional);
NoteUse semicolon (;) or "CR" to separate each device information.
c. Click Validate to verify that the device information conforms to thespecified format.

Trend Micro Mobile Security 9.0 Administrator’s Guide
3-6
• To invite a user or an email group (distribution list) from the ActiveDirectory:
a. Click Invite Users > Invite from Active Directory.
b. Type the user information in the search field provided, and click Search.
c. Select the users from the search result, and then click Invite Devices.
4. Click Save.
Mobile Security sends invitation SMS or email to the users of the invited devices.
Editing Mobile Device Information
Procedure
1. Log on to the Mobile Security administration Web console.
2. Click Devices on the menu bar.
The Devices screen displays.
3. On the Managed Devices tab, click the mobile device from the device tree whoseinformation you want to edit.
4. Click Edit.
5. Update the information in the following fields:
• Phone Number—the phone number of the mobile device. To ensure thatthe mobile device can receive notification messages successfully from an SMSsender, you may type the country code (1-5 digits long). You do not have totype the international direct dialing prefix.
• Email—the user email address to send notification mail.
• Device Name—the name of the mobile device to identify the device in thedevice tree.
• Group—the name of the group to which the mobile device belongs from thedrop-down list.

Managing Mobile Devices
3-7
• Asset Number—type the asset number assigned to the mobile device.
• Description—any additional information or notes related to the mobiledevice or the user.
6. Click Save.
Deleting Mobile Devices
Mobile Security provides the following two options for deleting mobile devices:
• Deleting Single Mobile Device on page 3-7
• Deleting Multiple Mobile Devices on page 3-7
Deleting Single Mobile Device
Procedure
1. Log on to the Mobile Security administration Web console.
2. Click Devices on the menu bar.
The Devices screen displays.
3. On the Managed Devices tab, click the mobile device from the device tree thatyou want to delete.
4. Click Delete and then click OK on the confirmation dialog box.
The mobile device is deleted from the mobile device tree, and is no longer enrolled withthe Mobile Security server.
Deleting Multiple Mobile Devices
Procedure
1. Log on to the Mobile Security administration Web console.

Trend Micro Mobile Security 9.0 Administrator’s Guide
3-8
2. Click Devices on the menu bar.
The Devices screen displays.
3. On the Managed Devices tab, click the group from the device tree whose mobiledevices you want to delete.
4. Select the mobile devices from the list on the right pane, click Delete and thenclick OK on the confirmation dialog box.
The mobile devices are deleted from the mobile device tree, and are no longerenrolled with the Mobile Security server.
Moving Mobile Devices to Another Group
You can move mobile devices from one group to another. Mobile Security willautomatically send the notification to the user about the policies that you have applied tothe group.
Procedure
1. Log on to the Mobile Security administration Web console.
2. Click Devices on the menu bar.
The Devices screen displays.
3. On the Managed Devices tab, click the group whose mobile devices you want tomove to another group.
4. Select the mobile devices from the list on the right pane and then click Move.
The Move Devices dialog box displays.
5. From the drop-down list, select the target group and then click OK.

Managing Mobile Devices
3-9
Mobile Device Status
On the Managed Devices tab in the Devices screen, select the mobile device todisplay its status information on the right-pane. Mobile device information is dividedinto the following sections:
• Basic—includes registration status, phone number, LDAP Account, and platforminformation.
• Hardware, Operating System—shows the detailed mobile device informationincluding device and model names, operating system version, memory information,cellular technology, IMEI and MEID numbers, and firmware version information.
• Security—displays the mobile device’s encryption status and whether the mobiledevice is jail broken or not.
• Network—displays the Integrated Circuit Card ID (ICCID), bluetooth and WiFiMAC information, detailed network information including carrier network name,settings version, roaming status, and Mobile Country Codes (MCC) and MobileNetwork Codes (MNC) information.
• Policy—shows the times the configuration and the security policy were lastupdated.
• Installed Applications—displays the list of all the applications that are installedon the mobile device, and the compliance check result. This tab is available onlyfor Android and iOS mobile devices.
Basic Mobile Device Agent Search
To search for a Mobile Device Agent based on the mobile device name or phonenumber, type the information in the Devices screen and click Search. The search resultdisplays in the device tree.
Advanced Mobile Device Agent Search
You can use the Advanced search screen to specify more Mobile Device Agent searchcriteria.
Trend Micro Mobile Security 9.0 Administrator’s Guide
3-10
Procedure
1. In the Devices screen, click the Advanced search link. A pop-up windowdisplays.
2. Select the search criteria and type the values in the fields provided (if applicable):
• Device Name—descriptive name that identifies a mobile device
• Phone Number—phone number of a mobile device
• Asset Number—asset number of a mobile device
• Description— description of a mobile device
• Operating System—operating system the mobile device is running
• Group—group to which the mobile device belongs
• Agent Version—Mobile Device Agents version number on the mobiledevice
• Malware Pattern Version—Malware Pattern file version number on themobile device
• Malware Scan Engine Version—Malware Scan Engine version number ofthe mobile device
• Infected mobile device agent—confine the search to mobile devices withthe specified number of detected malware
• Device Status—confine the search to the selected mobile devices’ status(es)
3. Click Search. The search result displays in the device tree.
Device Tree View Options
If you select a group in the device tree, you can use the Column drop-down list box toselect one of the pre-defined views: General view and View all. This enables you toquickly view information presented in the device tree. The information displayed in thedevice tree varies according to the selected option.

Managing Mobile Devices
3-11
Mobile Device Agent TasksTrend Micro Mobile Security enables you to perform different tasks on the mobiledevices from the Devices screen.
Updating Mobile Device Agents
You can send the update notification to mobile devices with out-of-date components orsecurity policies from the Managed Devices tab in Devices screen.
Procedure
1. Log on to the Mobile Security administration Web console.
2. Click Devices on the menu bar.
The Devices screen displays.
3. On the Managed Devices tab, click the group whose mobile devices you want toupdate.
4. Click Update.
Mobile Security sends the update notification to all the mobile devices with out-of-datecomponents or security policies.
You can also use the Update screen to set Mobile Security to automatically send updatenotification to mobile devices with out-of-date components or policies or initiate theprocess manually.
See Updating Mobile Security Components on page 6-2 for more information.
On Windows Mobile or Symbian mobile devices, if you have not enabled the SMSmessaging feature for Mobile Security, you need to configure update schedule in theCommon Policies screen (see Common Policy on page 4-7) to periodically updatecomponents. However, on Android mobile devices, if you have not enabled the SMSmessaging feature for Mobile Security, you can also update components and syncpolicies through push instructions.

Trend Micro Mobile Security 9.0 Administrator’s Guide
3-12
Lost Device Protection
If a user loses or misplaces the mobile device, you can remotely locate, lock or delete allof the data on that mobile device.
Locating a Remote Mobile Device
You can locate the mobile device through the wireless network or by using mobiledevice’s GPS. The Mobile Security server displays the mobile device location on GoogleMaps.
This feature is available for Android mobile devices only.
Procedure
1. Log on to the Mobile Security administration Web console.
2. Click Devices on the menu bar.
The Devices screen displays.
3. On the Managed Devices tab, click the mobile device from the device tree thatyou want to locate.
4. Click Device Locate and then click OK on the confirmation dialog-box.
The Mobile Security server tries to locate the mobile device and displays theGoogle Maps link on the Remote Locate Device screen.
5. Click the Google Maps link on the Remote Locate Device screen to see themobile device’s most recent GPS location on the map.
Locking a Remote Mobile Device
You can send lock instruction from the administration Web console to remotely lock amobile device. Users will require to type the power-on password to unlock the mobiledevice.

Managing Mobile Devices
3-13
Note
This feature is supported on Android, iOS, BlackBerry and Windows Mobile devices only.
For Windows Mobile device to use this feature, the encryption must be enabled on themobile device.
Windows Mobile device can only be locked using an SMS notification message. If you wantto lock a Windows Mobile device, make sure you have configured an SMS sender. Refer tothe Installation and Deployment Guide for the configuration details.
Procedure
1. Log on to the Mobile Security administration Web console.
2. Click Devices on the menu bar.
The Devices screen displays.
3. On the Managed Devices tab, click the mobile device from the device tree thatyou want to lock.
4. Click Remote Lock and then click OK on the confirmation dialog-box.
The Success message displays on the screen if the lock command is generatedsuccessfully. To check whether the mobile device is locked successfully, you cancheck the command status in the Command Queue Management screen. SeeCommand Queue Management on page 2-18 for details.
Wiping a Remote Mobile Device
You can remotely reset the mobile device to factory settings and clear the mobile deviceinternal memory/SD card. This feature helps ensure the security of the data for lost,stolen or misplaced mobile devices. You can also choose to clear only the followingcorporate data on the mobile device:
• for Android: Exchange mail, calendar and contacts
• for iOS: MDM profiles, related policies, configurations and data
Trend Micro Mobile Security 9.0 Administrator’s Guide
3-14
WARNING!Be careful when you use this feature as the action CANNOT be undone. All data will belost and unrecoverable.
NoteThis feature is supported on Android, iOS, BlackBerry and Windows Mobile devices only.
For instructions on wiping a mobile device that uses Exchange ActiveSync, see Wiping aRemote ActiveSync Mobile Device on page 3-22.
Procedure
1. Log on to the Mobile Security administration Web console.
2. Click Devices on the menu bar.
The Devices screen displays.
3. On the Managed Devices tab, click the mobile device from the device tree thatyou want to wipe.
4. Click Remote Wipe.
The Remote Wipe Device screen displays.
5. Select the appropriate Device Name checkbox.
6. Do one of the following:
• For Android mobile device, select one of the following:
• Wipe all data to factory settings. (All applications and stored datawill be removed. The inserted memory card will be formatted. Thisaction cannot be undone.)
• Wipe email, calendar and contact list.—also known as "selectivewipe".
If you select this option, you can also select Wipe all data to factorysettings if selective wipe failed. checkbox.
Managing Mobile Devices
3-15
• For iOS mobile device, select one of the following:
• Wipe all data to factory settings. (All applications and stored datawill be removed. The inserted memory card will be formatted. Thisaction cannot be undone.)
• Wipe out all the provisioned profiles, policies, configurations, andits related data.
7. Click Remote Wipe Device.
The selected data is deleted from the mobile device and the Mobile Device Agentis unregistered from the server.
Resetting Password Remotely
If a user has forgotten the power-on password, you can remotely reset the password andunlock the mobile device from the Management Server. After the mobile device issuccessfully unlocked, the user is able to change the power-on password.
Note
This feature is supported on Android, iOS and Windows Mobile devices only.
Resetting Password for an Android Mobile Device
Procedure
1. Log on to the Mobile Security administration Web console.
2. Click Devices on the menu bar.
The Devices screen displays.
3. Select the mobile device from the tree, and then click Password Reset.

Trend Micro Mobile Security 9.0 Administrator’s Guide
3-16
4. Type and confirm the new six-digit password on the pop-up dialog box thatappears.
Removing the Password for an iOS Mobile Device
Procedure
1. Log on to the Mobile Security administration Web console.
2. Click Devices on the menu bar.
The Devices screen displays.
3. Select the mobile device from the tree, and then click Password Reset.
4. Click OK on the confirmation dialog box that appears. The power on password forthe selected iOS mobile device will be removed.
Resetting Password for a Windows Mobile Device
To reset password for a Windows Mobile device, you will need to request user togenerate a challenge code (16-digit hexadecimal number) on the mobile device beforeyou can unlock the mobile device remotely.
Procedure
1. Obtain the mobile device name and the challenge code the user generated on themobile device. Refer users to the Mobile Device Agent Help or the User’s Guide forinstructions on challenge code generation.
2. Log on to the Mobile Security administration Web console.
3. Click Devices on the menu bar.
The Devices screen displays.
4. On the Managed Devices tab, click the mobile device from the device tree whosepassword you want to reset.

Managing Mobile Devices
3-17
5. Click Password Reset and then click Select a device in the Remote Unlockscreen. The device tree displays.
6. Select the mobile device you want to unlock remotely, and click Select.
7. Type the challenge code in the field and click Generate.
8. The Mobile Security server generates the response code and displays the code on apop-up screen.
9. Instruct the user to tap Next in the Password screen on the mobile Device andtype the response code to unlock the mobile device.
Exporting Data
On the Managed Devices tab in Devices screen, you can export data for furtheranalysis or backup.
Procedure
1. Log on to the Mobile Security administration Web console.
2. Click Devices on the menu bar.
The Devices screen displays.
3. Select the mobile device group from the device tree whose data you want to export.
4. Click Export.
5. If required, click Save on the pop-up that appears to save the .zip file on yourcomputer.
6. Extract the downloaded .zip file content and open the .csv file to view themobile device information.

Trend Micro Mobile Security 9.0 Administrator’s Guide
3-18
Invited Devices TabThe Invited Devices tab in Devices screen keeps the record the invitations that MobileSecurity has sent to mobile devices for enrollment.
The default invitation email includes the following information:
• Trend Micro Mobile Security introduction
• Mobile Device Agent download URL
• Server information for mobile device to enroll
• QR code for easy enrollment
On the Invited Devices tab, you can:
• view the invitation list
• resend invitation messages to mobile devices
• cancel the current invitations
• remove the old invitation records
Viewing the Invitation List
Procedure
1. Log on to the Mobile Security administration Web console.
2. Click Devices on the menu bar.
The Devices screen displays.
3. Click the Invited Devices tab.
The following table provides the description of all the invitation statuses displayedon the Invited Devices tab.

Managing Mobile Devices
3-19
INVITATION STATUS DESCRIPTION
Active The invitation is valid and the user can use the information inthe invitation message to enroll.
Expired The invitation has expired and the user can no longer use theinformation in the invitation message to enroll.
Used The user has already used the information in the invitationmessage to enroll and the Enrollment Key has becomeinvalid.
NoteThis status will only appear when the Enrollment Keyusage limitation option is set to Use for one time inDevice Enrollment Settings.
Canceled The invitation is canceled from the server and the user cannotuse the information in the invitation message to enroll.
Resending Invitation Messages
Procedure
1. Log on to the Mobile Security administration Web console.
2. Click Devices on the menu bar.
The Devices screen displays.
3. Click the Invited Devices tab.
4. Select the mobile devices from the list whom you want to resend the invitationmessage.
5. Click Resend Invitation.

Trend Micro Mobile Security 9.0 Administrator’s Guide
3-20
Canceling Active Invitations
Procedure
1. Log on to the Mobile Security administration Web console.
2. Click Devices on the menu bar.
The Devices screen displays.
3. Click the Invited Devices tab.
4. Select the mobile devices from the list for which you want to cancel the invitation.
5. Click Cancel Invitation.
Remove Invitations from the List
Note
You can only remove the invitation message whose status is Used or Canceled.
Procedure
1. Log on to the Mobile Security administration Web console.
2. Click Devices on the menu bar.
The Devices screen displays.
3. Click the Invited Devices tab.
4. Select the mobile devices from the list whose invitation record you want toremove.
5. Click Remove Invitation.

Managing Mobile Devices
3-21
Exchange ActiveSync Devices TabAfter enabling the Exchange Server Integration on the Mobile Security server, theExchange ActiveSync Devices tab on Devices screen displays the list of mobiledevices that connect to the Exchange Server through ActiveSync service.
On the Exchange ActiveSync Devices tab, you can perform the following actions:
• Invite mobile devices
• Allow or block access to Exchange Server
• On-demand remote wipe
• Cancel remote wipe command
• Remove mobile devices from the list
Inviting Exchange ActiveSync Mobile Devices
Before inviting Exchange ActiveSync mobile devices, make sure that you haveconfigured the notification/reports settings on the Management Server. Refer to thetopic Configuring Notifications/Reports Settings in the Installation and Deployment Guide.
Procedure
1. Log on to the Mobile Security administration Web console.
2. Click Devices on the menu bar.
The Devices screen displays.
3. Click the Exchange ActiveSync Devices tab.
4. Select a mobile device that you want to invite to access Exchange ActiveSync.
5. Click Invite, and then click OK on the confirmation screen.

Trend Micro Mobile Security 9.0 Administrator’s Guide
3-22
Mobile Security sends invitation SMS and email messages to the user of the invitedmobile device. After the mobile device enrolls to the Mobile Security server, theManaged Device column displays the status of the mobile device agent.
Allowing or Blocking Access to Exchange Server
Procedure
1. Log on to the Mobile Security administration Web console.
2. Click Devices on the menu bar.
The Devices screen displays.
3. Click the Exchange ActiveSync Devices tab.
4. Select a mobile device for which you want to allow or block access to ExchangeServer.
5. Click Allow Access or Block Access and then click OK on the confirmationdialog box.
The mobile device status in the Exchange Access State column displays the newstatus after the mobile device syncs with the Exchange Server.
Wiping a Remote ActiveSync Mobile Device
You can remotely reset the ActiveSync mobile device to factory settings and clear themobile device internal memory/SD card. This feature helps ensure the security of thedata for lost, stolen or misplaced mobile devices.
WARNING!
Be careful when you use this feature as the action CANNOT be undone. All data will belost and unrecoverable.

Managing Mobile Devices
3-23
For instructions on wiping a mobile device that does not use ActiveSync, see Wiping aRemote Mobile Device on page 3-13.
Procedure
1. Log on to the Mobile Security administration Web console.
2. Click Devices on the menu bar.
The Devices screen displays.
3. Click the Exchange ActiveSync Devices tab.
4. Select the mobile device that you want to wipe.
5. Click Remote Wipe.
The Remote Wipe Device screen pops up.
6. Select the device and then click Remote Wipe Device.
Removing an ActiveSync Mobile DeviceThe mobile device that you have remotely wiped from the Mobile Security server will nolonger be able to access the Exchange Server. You can remove such mobile deviceinformation from the Exchange ActiveSync Devices tab on the Devices screen.
Note
You can only remove mobile devices that are remotely wiped from the Mobile Securityserver.
Procedure
1. Log on to the Mobile Security administration Web console.
2. Click Devices on the menu bar.
The Devices screen displays.

Trend Micro Mobile Security 9.0 Administrator’s Guide
3-24
3. Click the Exchange ActiveSync Devices tab.
4. Select the mobile device that you want to remove from the list.
5. Click Remove, and then click OK on the confirmation screen.
Integration with Trend Micro Control ManagerTrend Micro Mobile Security provides integration with Trend MicroControl Manager(also referred to as Control Manager or TMCM). This integration enables the ControlManager administrator to:
• create, edit or delete security policies for Mobile Security
• deliver security policies to enrolled mobile devices
• view Mobile SecurityDashboard screen
For the detailed information about Trend MicroControl Manager and handling MobileSecuritypolicies on Control Manager, refer to the product documentation at thefollowing URL:
http://docs.trendmicro.com/en-us/enterprise/control-manager.aspx
Creating Security Policies in Control ManagerThe Trend Micro Control Manager Web console displays the same security policies thatare available in Mobile Security. If a Control Manager administrator creates a securitypolicy for Mobile Security, Mobile Security will create a new group for this policy andmove all the target mobile devices to this group. To differentiate the policies that arecreated in Mobile Security with the policies created in Control Manager, Mobile Securityadds a prefix TMCM_ to the group name.
Deleting or Modifying Security PoliciesThe Control Manager administrator can modify a policy at any time and the policy willbe deployed to the mobile devices immediately.
Managing Mobile Devices
3-25
Trend Micro Control Manager synchronizes the policies with Trend Micro MobileSecurity after every 24 hours. If you delete or modify a policy that is created anddeployed from Control Manager, the policy will be reverted to the original settings orcreated again after the synchronization occurs.
Security Policy Statuses on Control ManagerOn the Trend Micro Control Manager Web console, the following statuses are displayedfor the security policies:
• Pending: The policy is created on the Control Manager Web console and has notyet been delivered to the mobile devices.
• Deployed: The policy has been delivered and deployed on all the target mobiledevices.

4-1
Chapter 4
Protecting Devices with PoliciesThis chapter shows you how to configure and apply security policies to mobile devicesin a Mobile Security group. You can use policies related to provisioning, device securityand data protection.
The chapter includes the following sections:
• About Security Policies on page 4-3
• Managing Policies on page 4-4
• Common Policy on page 4-7
• Wi-Fi Policy on page 4-8
• Exchange ActiveSync Policy on page 4-9
• VPN Policy on page 4-9
• Global HTTP Proxy Policy on page 4-9
• Certificate Policy on page 4-9
• Malware Protection Policy on page 4-10
• Spam Prevention Policy on page 4-11
• Call Filtering Policy on page 4-14
• Firewall Policy on page 4-16

Trend Micro Mobile Security 9.0 Administrator’s Guide
4-2
• Web Threat Protection Policy on page 4-17
• Encryption and Password Policy on page 4-19
• Feature Lock Policy on page 4-23
• Compliance Policy on page 4-24
• Application Monitor and Control Policy on page 4-24
• Volume Purchasing Program Policy on page 4-27

Protecting Devices with Policies
4-3
About Security PoliciesYou can configure security policies for a Mobile Security group on the ManagementServer. These policies apply to all mobile devices in the group. You can apply securitypolicies to all Mobile Security groups by selecting the Mobile Devices group (the rootgroup). The following table lists the security policies available in Mobile Security.
TABLE 4-1. Security Policies in Mobile Security
POLICY GROUP POLICY REFERENCE
General Common Policy See Common Policy on page 4-7.
Provisioning Wi-Fi Policy See Wi-Fi Policy on page 4-8.
Exchange ActiveSyncPolicy
See Exchange ActiveSync Policy onpage 4-9.
VPN Policy See VPN Policy on page 4-9.
Global HTTP ProxyPolicy
See Global HTTP Proxy Policy on page4-9.
Certificate Policy See Certificate Policy on page 4-9
Device Security Malware ProtectionPolicy
See Malware Protection Policy on page4-10.
Spam Prevention Policy See Spam Prevention Policy on page4-11.
Call Filtering Policy See Call Filtering Policy on page 4-14.
Firewall Policy See Firewall Policy on page 4-16.
Web Threat ProtectionPolicy
See Web Threat Protection Policy onpage 4-17.

Trend Micro Mobile Security 9.0 Administrator’s Guide
4-4
POLICY GROUP POLICY REFERENCE
Devices Encryption andPassword Policy
See Encryption and Password Policy onpage 4-19.
Feature Lock Policy See Feature Lock Policy on page4-23.
Compliance Policy See Compliance Policy on page 4-24.
ApplicationManagement
Application Monitor &Control Policy
See Application Monitor and ControlPolicy on page 4-24.
Volume PurchasingProgram Policy
See Volume Purchasing Program Policyon page 4-27.
Managing PoliciesMobile Security enables you to quickly create a policy using the default security policytemplates.
Use the Policy screen to create, edit, copy or delete security policies for mobile devices.
Creating a Policy
Procedure
1. Log on to the Mobile Security administration Web console.
2. Click Policies on the menu bar.
The Policy screen displays.
3. Click Create.
The Create Policy screen displays.
4. Type the policy name and description in their respective fields and then click Save.

Protecting Devices with Policies
4-5
Mobile Security creates a policy with the default settings. However, the policy isnot assigned to a group. To assign the policy to a group, see Assigning or RemovingPolicy from a Group on page 4-5.
Editing a Policy
Procedure
1. Log on to the Mobile Security administration Web console.
2. Click Policies on the menu bar.
The Policy screen displays.
3. In the policy list, click the policy name whose details you want to edit.
The Edit Policy screen displays.
4. Modify the policy details and then click Save.
Assigning or Removing Policy from a Group
Procedure
1. Log on to the Mobile Security administration Web console.
2. Click Policies on the menu bar.
The Policy screen displays.
3. In the Applied Groups column of a policy, click the group name. If the policy isnot assigned to a group, click None.
4. Do one of the following:
• To assign a policy to a group: from the Available groups list on the left side,select the group to which you want to apply the policy, and then click > tomove the group to the right side.

Trend Micro Mobile Security 9.0 Administrator’s Guide
4-6
• To remove policy from a group: from the group list on the right side, select agroup that you want to remove, and then click < to move the group to theAvailable groups list on the left side.
5. Click Save.
Copying a Policy
Procedure
1. Log on to the Mobile Security administration Web console.
2. Click Policies on the menu bar.
The Policy screen displays.
3. Select the policy that you want to copy, and then click Copy.
Deleting Policies
You cannot delete the Default policy and any policy that is applied to a group. Makesure to remove the policy from all the groups before deleting a policy. See Assigning orRemoving Policy from a Group on page 4-5 for the procedure.
Procedure
1. Log on to the Mobile Security administration Web console.
2. Click Policies on the menu bar.
The Policy screen displays.
3. Select the policy that you want to delete, and then click Delete.

Protecting Devices with Policies
4-7
Security Policies in Mobile SecurityThis section introduces the security policies that are available in Mobile Security.
Common Policy
Common Policy provides the common security policies for mobile devices. Toconfigure common security policy settings, click Policies, then click the policy name,and then click Common Policy.
In Common Policy you can also assign policies for BlackBerry mobile devices.
• User Privileges: You can enable or disable the feature that allows users touninstall the Mobile Device Agent. Additionally, you can select whether to allowusers to configure Mobile Security device agent settings.
The following is a list of features associated with uninstall protection:
• turn On/Off uninstall protection from the administration console
• password length must have a minimum of six (6) and a maximum of twelve(12) characters; password may contain numbers, characters or symbols.
• password can be set for each group from the administration console.
If you do not select the Allow users to configure Mobile Security clientsettings check box, users cannot change Mobile Device Agent settings. However,the filtering lists for Spam Prevention Policy, Call Filtering Policy and WebThreat Protection Policy are not affected when this option is selected. For moreinformation, see Spam SMS Prevention Policies on page 4-11, Spam WAP-PushPrevention Policies on page 4-13 and Web Threat Protection Policy on page 4-17.
• Update Settings: You can select to have the Mobile Security server notify MobileDevice Agents when a new component is available for update. Or you can selectthe auto-check option to have Mobile Device Agents periodically check for anycomponent or configuration updates on the Mobile Security server.
When you enable the wireless connection notification option, a prompt screendisplays on mobile devices before Mobile Device Agents connect to the

Trend Micro Mobile Security 9.0 Administrator’s Guide
4-8
Communication Server through a wireless connection (such as 3G or GPRS).Users can choose to accept or decline the connection request.
FIGURE 4-1. Common Policy, Update Settings section
• Log Settings: When Mobile Device Agents detect a security risk, such as aninfected file or firewall violation, a log is generated on mobile devices. If theEncryption Module is activated, the encryption logs are also generated. You can setthe mobile devices to send these logs to the Mobile Security server. Do this if youwant to analyze the number of infections or pinpoint possible network attacks andtake appropriate actions to prevent threats from spreading.
• Notification/Reports Settings: Select whether to display a prompt screen onmobile devices when a mobile device agent tries to establish a connection to theCommunication Server.
• BlackBerry Settings: Enables you to configure common policy settings forBlackBerry mobile devices.
Note
You must configure the BlackBerry Settings in the Communication Server settingsbefore you can configure the policy settings. Refer to the topic Configuring BlackBerryCommunication Server Settings in the Installation and Deployment Guide.
Wi-Fi Policy
Wi-Fi Policy enables you to deliver your organization's Wi-Fi network information toAndroid and iOS mobile devices; including the network name, security type andpassword.

Protecting Devices with Policies
4-9
To configure Wi-Fi policy settings, click Policies, then click the policy name, and thenclick Wi-Fi Policy.
Exchange ActiveSync Policy
Exchange ActiveSync Policy enables you to create an Exchange ActiveSync policy foryour organization and deliver it to iOS mobile devices.
To configure Exchange ActiveSync policy settings, click Policies, then click the policyname, and then click Exchange ActiveSync Policy.
VPN Policy
VPN policy settings enables you to create a VPN Policy for your organization anddeliver it to iOS mobile devices.
To configure VPN policy settings, click Policies, then click the policy name, and thenclick VPN Policy
Global HTTP Proxy Policy
Global HTTP Proxy Policy enables you to deliver your organization's proxy informationto mobile devices. This policy only applies to iOS mobile devices that are in supervisedmode.
To configure global HTTP proxy policy settings, click Policies, then click the policyname, and then click Global HTTP Proxy Policy
Certificate Policy
Certificate Policy enables you to import certificates that you need to deploy on iOSmobile devices.
To configure certificate policy settings, click Policies, then click the policy name, andthen click Certificate Policy.

Trend Micro Mobile Security 9.0 Administrator’s Guide
4-10
Malware Protection PolicyYou can configure threat protection policies that include: Scan type (real-time and cardscan), action taken for malware, number of compression layers to scan, and the Filetype.
To configure malware protection policy settings, click Policies, then click the policyname, and then click Malware Protection Policy.
• Scan Types: Mobile Security provides several types of scans to protect mobiledevices from malware.
• Real-time Scan: Mobile Device Agent scans files on mobile devices in realtime. If Mobile Device Agent detects no security risk, users can proceed toopen or save the file. If Mobile Device Agent detects a security risk, it displaysthe scan result, showing the name of the file and the specific security risk.Mobile Security will generate a log with the scan result on the mobile device.The scan log is sent and stored on the Mobile Security database.
• Scan after SD card insert: If you select this option in the MalwareProtection Policy screen, Mobile Security scans data on a memory card whenthe memory card is inserted to a mobile device. This prevents infected filesfrom spreading through memory cards.
• Scan after pattern update: If you select the this option in the MalwareProtection Policy screen, Mobile Security will run an automatic-scan forsecurity threats after successful pattern update on Android mobile devices.
• Scan Options
• Action on malware: When malware is detected on a mobile device, MobileSecurity can delete or quarantine the infected file. If the file is in use, theoperating system may deny access to it.
• Quarantine—renames and then moves an infected file to the mobiledevice’s quarantine directory in\TmQuarantine (for Windows Mobile)or {Disk Label}\TmQuarantine (for Symbian OS).
• Delete—removes an infected file.
When connected, Mobile Device Agents send malware logs to the MobileSecurity server.

Protecting Devices with Policies
4-11
Note
Scan actions only apply to Real-time scan.
• Compression layers to scan: For ZIP or CAB files, you can specify thenumber of compression layers to scan. If the number of compression in aZIP/CAB file exceeds this number, Mobile Security will not scan the file.Mobile Security will take no further action unless the appropriate number ofcompression layers are specified.
You can select to have Mobile Security scan executable, ZIP/CAB files, or allfiles on mobile devices.
• Scan Location: For Android mobile devices, select whether to scan mobiledevice’s internal memory and/or the inserted SD card. For SymbianMobileSecurity scans both the mobile device’s internal memory and the inserted SDcard.
• File type: Select the file types to scan on mobile devices.
Spam Prevention Policy
The spam prevention policy in Mobile Security provides protection against spam WAP-push and SMS text messages.
To configure spam prevention policy settings, click Policies, then click the policy name,and then click Spam Prevention Policy.
Spam SMS Prevention Policies
This feature provides you server-side control of SMS spam prevention policies. Thefollowing features are available when configuring the SMS Spam Prevention Policies:
• enable or disable spam SMS prevention for mobile device
• configure the mobile device to use a blocked list, approved list or disable the SMSanti-spam feature for mobile device.
• configure an approved list from the administration console
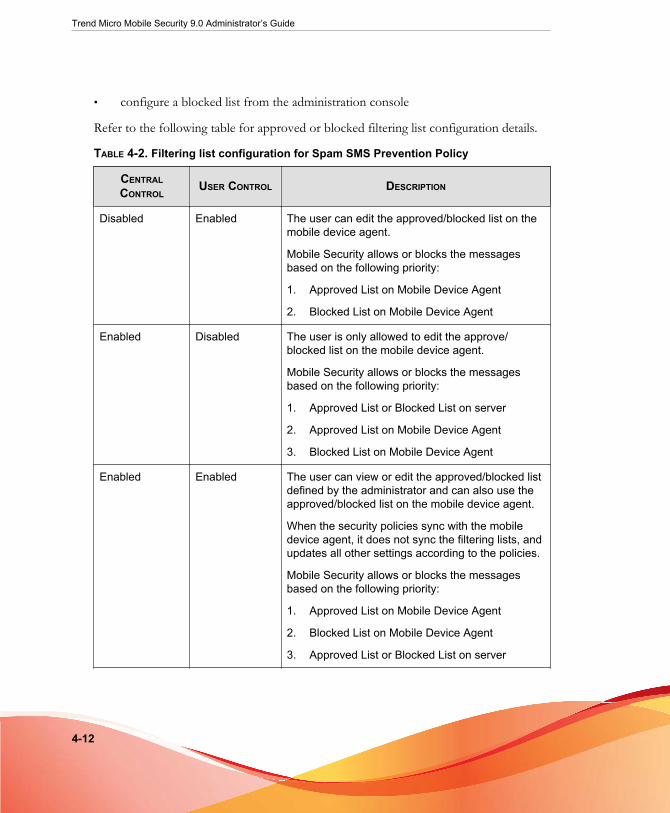
Trend Micro Mobile Security 9.0 Administrator’s Guide
4-12
• configure a blocked list from the administration console
Refer to the following table for approved or blocked filtering list configuration details.
TABLE 4-2. Filtering list configuration for Spam SMS Prevention Policy
CENTRALCONTROL
USER CONTROL DESCRIPTION
Disabled Enabled The user can edit the approved/blocked list on themobile device agent.
Mobile Security allows or blocks the messagesbased on the following priority:
1. Approved List on Mobile Device Agent
2. Blocked List on Mobile Device Agent
Enabled Disabled The user is only allowed to edit the approve/blocked list on the mobile device agent.
Mobile Security allows or blocks the messagesbased on the following priority:
1. Approved List or Blocked List on server
2. Approved List on Mobile Device Agent
3. Blocked List on Mobile Device Agent
Enabled Enabled The user can view or edit the approved/blocked listdefined by the administrator and can also use theapproved/blocked list on the mobile device agent.
When the security policies sync with the mobiledevice agent, it does not sync the filtering lists, andupdates all other settings according to the policies.
Mobile Security allows or blocks the messagesbased on the following priority:
1. Approved List on Mobile Device Agent
2. Blocked List on Mobile Device Agent
3. Approved List or Blocked List on server

Protecting Devices with Policies
4-13
Note
The SMS approved and blocked list must use the format: "[name1:]number1;[name2:]number2;...".
The 'name' length should not exceed 30 characters, while phone number should bebetween 4 and 20 characters long and can contain the following: 0-9, +, -, #, (, ) andspaces. The maximum number of entries should not exceed 200.
Spam WAP-Push Prevention Policies
This feature provides you server-side control of WAP-Push Protection. If enabled, youcan select whether to use a WAP approved list. The following features is a list offeatures available when configuring WAP-Push Protection policies:
• enable or disable WAP-Push protection for mobile device
• configure the mobile device to use an approved list or disable WAP-Pushprotection on the mobile device
• configure an approved list from the administration console
• if the administrator has enabled server-side control, the user will be unable tochange the WAP-Push protection type defined by the administrator
• if the administrator has disable server-side control, and allowed users to configureMobile Security settings on mobile device, the user will be unable to view or editthe WAP-Push protection list configured by the administrator, and may edit thepersonal WAP-Push protection list on the mobile device side
The personal settings will be cleared after server policy is delivered to a mobile device.
Note
The WAP approved list must use the format: "[name1:]number1;[name2:]number2;...".
The 'name' length should not exceed 30 characters, while phone number should bebetween 4 and 20 characters long and can contain the following: 0-9, +, -, #, (, ) andspaces. The maximum number of entries should not exceed 200.

Trend Micro Mobile Security 9.0 Administrator’s Guide
4-14
NoteThe users’ personal settings for spam messages will be cleared after the spam preventionpolicy is applied on the Mobile Device Agents.
Call Filtering PolicyThis feature provides you server-side control of call filtering policies. To configure callfiltering policy settings, click Policies, then click the policy name, and then clickFiltering Policy.
The following features are available when configuring the Call Filtering Policies:
• enable or disable call filtering for mobile device
• configure the mobile device to use a blocked list or an approved list
• configure an approved list from the administration console
• configure a blocked list from the administration console
Refer to the following table for approved or blocked filtering list configuration details.
TABLE 4-3. Filtering list configuration for Call Filtering Policy
CENTRALCONTROL
USER CONTROL DESCRIPTION
Disabled Enabled The user can edit the approved/blocked list on themobile device agent.
Mobile Security allows or blocks the URLs basedon the following priority:
1. Approved List on Mobile Device Agent
2. Blocked List on Mobile Device Agent

Protecting Devices with Policies
4-15
CENTRALCONTROL
USER CONTROL DESCRIPTION
Enabled Disabled The user is only allowed to edit the approved/blocked list on the mobile device agent.
Mobile Security allows or blocks the incoming callsbased on the following priority:
1. Blocked List on server
2. Approved List on Mobile Device Agent
3. Blocked List on Mobile Device Agent
You can also configure server-side control foroutgoing calls on Android mobile devices.
Enabled Enabled The user can view or edit the approved/blocked listdefined by the administrator and can also use theapproved/blocked list on the mobile device agent.
When the security policies sync with the mobiledevice agent, it does not sync the filtering lists, andupdates all other settings according to the policies.
Mobile Security allows or blocks the incoming callsbased on the following priority:
1. Approved List on Mobile Device Agent
2. Blocked List on Mobile Device Agent
3. Blocked List on server
You can also configure server-side control foroutgoing calls on Android mobile devices.
NoteThe call filtering approved and blocked list must use the format: "[name1:]number1;[name2:]number2;...".
The 'name' length should not exceed 30 characters, while phone number should bebetween 4 and 20 characters long and can contain the following: 0-9, +, -, #, (, ) andspaces. The maximum number of entries should not exceed 200.

Trend Micro Mobile Security 9.0 Administrator’s Guide
4-16
Firewall Policy
The Mobile Security firewall protects mobile devices on the network using statefulinspection, high performance network traffic control and the intrusion detection system(IDS). You can create rules to filter connections by IP address, port number, orprotocol, and then apply the rules to mobile devices in specific Mobile Security groups.
Note
Trend Micro recommends uninstalling other software-based firewall applications on mobiledevices before deploying and enabling Mobile Security firewall. Multiple vendor firewallinstallations on the same computer may produce unexpected results.
To configure firewall policy settings, click Policies, then click the policy name, and thenclick Firewall Policy.
A firewall policy includes the following:
• Firewall Policy: Enable/Disable the Mobile Security firewall and the IDS. Alsoincludes a common policy that blocks or allows all inbound and/or all outboundtraffic on mobile devices
• Enable Intrusion Detection System (IDS): The Mobile Security firewallintegrates the Intrusion Detection System (IDS) and helps prevent SYNFlood attacks (a type of Denial of Service attack) where a program sendsmultiple TCP synchronization (SYN) packets to a computer, causing themobile device to continually send synchronization acknowledgment (SYN/ACK) responses. This can exhaust system resource and may leave mobiledevices unable to handle other requests.
• Security level: The Mobile Security firewall comes with three pre-definedsecurity levels that allow you to quickly configure firewall policies. Thesesecurity levels limit network traffic based on traffic directions.
• Low—allow all inbound and outbound traffic.
• Normal—allow all outbound traffic but block all inbound traffic.
• High—block all inbound and outbound traffic.

Protecting Devices with Policies
4-17
• Exception: Exception rules include more specific settings to allow or blockdifferent kinds of traffic based on mobile device port number(s) and IP address(es).The rules in the list override the Security level policy.
Exception rule settings include the following:
• Action—blocks or allows/logs traffic that meets the rule criteria
• Direction—inbound or outbound network traffic on mobile devices
• Protocol—type of traffic: TCP, UDP, ICMP
• Port(s)—ports on the mobile devices on which to perform the action
• IP addresses—IP addresses of network devices to which the traffic criteriaapply
Web Threat Protection PolicyEnables you to manage Web threat protection policy from the Mobile Security serverand deploys it on Android mobile devices. It also enables Android mobile devices tosend the Web threat protection log back to the server.
This feature provides you the server-side control of Web threat protection policies andprovides three pre-defined security levels: Low, Normal, and High. It also providesblocked and approved lists to block or allow certain URLs. Mobile Security will block allthe URLs that you add in the Blocked List, and allow all URLs that are in the ApprovedList.
NoteThe Web threat protection policy only supports Google Chrome and Android’s defaultWeb browser on mobile devices.
Refer to the following table for approved or blocked filtering list configuration details.

Trend Micro Mobile Security 9.0 Administrator’s Guide
4-18
TABLE 4-4. Filtering list configuration for Web Threat Protection policy
SERVER CONTROL USER CONTROL DESCRIPTION
Disabled Enabled The user can edit the approved/blocked list on themobile device agent.
Mobile Security allows or blocks the URLs basedon the following priority:
1. Approved List on Mobile Device Agent
2. Blocked List on Mobile Device Agent
Enabled Disabled The user is only allowed to edit the approved/blocked list on the mobile device agent.
Mobile Security allows or blocks the URLs basedon the following priority:
1. Approved List on server
2. Blocked List on server
3. Approved List on Mobile Device Agent
4. Blocked List on Mobile Device Agent
Enabled Enabled The user can view or edit the approved/blocked listdefined by the administrator and can also use theapproved/blocked list on the mobile device agent.
When the security policies sync with the mobiledevice agent, it does not sync the filtering lists, andupdates all other settings according to the policies.
Mobile Security allows or blocks the URLs basedon the following priority:
1. Approved List on Mobile Device Agent
2. Blocked List on Mobile Device Agent
3. Approved List on server
4. Blocked List on server

Protecting Devices with Policies
4-19
Note
The call filtering approved and blocked lists must use the following format: [URL1] [URL2][URL3], with a blank space or a line break between two URLs.
To configure Web Threat Protection Policy settings, click Policies, then click the policyname, and then click Web Threat Protection Policy.
Encryption and Password Policy
The encryption and password module provides password authenticating and dataencryption on mobile devices. These features prevent unauthorized access to data onmobile devices.
To configure encryption and password policy settings, click Policies, then click thepolicy name, and then click Encryption and Password Policy from the left-menu.
Password Security Settings
When Mobile Device Agent is installed, each mobile device is associated with a user.The user must type the correct power-on password to log on to the mobile device.When a user has forgotten the power-on password, you can type the administratorpassword to unlock a mobile device.
The following table describes the power-on password policies you can configure:
OPTION DESCRIPTION
Password type Passwords must contain only numbers or alphanumericcharacters.
Minimum password length Passwords must be longer than the number of charactersspecified.
Password complexity For alphanumeric passwords, users must configurepasswords that contain upper case, lower case, specialcharacters, or numbers to make passwords harder toguess.

Trend Micro Mobile Security 9.0 Administrator’s Guide
4-20
OPTION DESCRIPTION
Initial Mobile Device Agentpassword
Password that allows users to log on to their WindowsMobile devices after installing the Mobile Device Agent andthe Encryption Module. The default is "123456".
Admin password Password used by an administrator to unlock a mobileDevice.
Expiry period The number of days a logon password is valid. After thepassword expires, the user must configure a new passwordto log on.
Inactivity timeout The number of minutes of no user activity before the mobiledevice automatically goes into secure mode and display thelogon screen.
Limit logon attempts Limit the number of logon attempts to prevent brute forcepassword attack. Possible actions when the limit isreached:
• Soft reset—restarts the mobile device.
• Admin access only—requires logon using theadministrator password.
• Hard reset—resets the mobile device back to thefactory default policies.
• Clear all data—resets the mobile device back to thefactory default policies and deletes all the data on themobile device and the inserted memory card.
WARNING!After a "Clear all data" action, users need to reformatthe memory card to use it again for storing data.
Change initial power-onpassword
Request users to change the initial password after the firstlogon.
Forgotten passwordquestions
If a user has forgotten the power-on password, this featureallows the user to unlock mobile devices and configure anew password by answering the selected question.

Protecting Devices with Policies
4-21
NoteWhen specifying the characters for the initial or admin password, keep in mind the inputmethod used by mobile devices. Otherwise, the device user may not be able to unlock thedevice after encryption is enabled.
Encryption Settings
Mobile Device Agent provides on-the-fly data encryption function to secure data onmobile devices. Two encryption algorithms are available: Advanced EncryptionStandard (AES, with 128-bit, 192-bit, or 256-bit keys) and XTS-Advanced EncryptionStandard (AES).
NoteMobile Security can only manage the data security policy on Windows Mobile devices.
You can select specific file types to encrypt on Windows Mobile devices, the encryptionalgorithm to use, trusted applications that are allowed to access encrypted data, or applydata encryption on memory cards inserted on mobile devices.
Mobile Device Agent does not encrypt Dynamic Link Library (*.DLL) files. MobileDevice Agent only encrypts files that a user has modified. Reading a file and closing itwithout any modifications does not result in the file being encrypted.
After the Encryption Module is enabled, certain file types and PIM information areencrypted. These file types and PIM Information are listed in the following table.

Trend Micro Mobile Security 9.0 Administrator’s Guide
4-22
ENCRYPTED INFORMATION TYPES
File Types • doc
• txt
• ppt
• pxl
• xls
• psw
• docx
PIM Information • Contacts
• Tasks
• Calendar
• SMS
• MMS
The Encryption Module only allows trusted applications to access encrypted data.Therefore, you must add these applications to the trusted application list. To addsoftware to the trusted application list, add the full software path to the appropriate listunder: "Allow more applications to access encrypted data".

Protecting Devices with Policies
4-23
Note
For advanced configuration, you can set Mobile Security to encrypt other file types. Toenable encryption of custom file types, set the parameter Enable_Custom_Extension to1 in the file TmOMSM.ini (located in \Trend Micro\Mobile Security). When theparameter is set to "1" in the file TmOMSM.ini, the Encrypt other file types field displaysin the Data Security Policies screen. Specify the file types in this field.
To disable this feature, set the parameter Enable_Custom_Extension to 0. When theparameter is set to "0" in the file TmOMSM.ini, the Encrypt other file types field is notavailable in the Data Security Policies screen.
After making the change in the TmOMSM.ini file, restart Mobile Security ManagementModule Service service for the change to take effect.
WARNING!
Trend Micro does not recommend customizing file types for encryption. You cannotencrypt certain files types (for example, .exe, .cert, .dll, etc.). If you set MobileSecurity to encrypt file types that should not be encrypted, unexpected system errors mayoccur.
Feature Lock Policy
With this feature, you can restrict (disable) or allow (enable) the use of certain mobiledevice features/components. For example, you can disable the camera for all mobiledevices in a particular group.
To configure Feature Lock Policy settings, click Policies, then click the policy name,and then click Feature Lock Policy from the left-menu.
See Supported Mobile Device OS Features on page 1-15 for the list of supported features/components.
Note
The Feature Lock Policy is NOT available for Symbian mobile devices.

Trend Micro Mobile Security 9.0 Administrator’s Guide
4-24
WARNING!Use caution while disabling WLAN/WIFI and/or Microsoft ActiveSync. The mobiledevice may not be able to communicate with the server if both these options areunavailable.
For Android mobile devices, you can also add access point(s) to control the availabilityof the device components within the range of those access point(s).
NoteWindows Mobile devices may need to reboot for changes to take effect.
Compliance PolicyCompliance policy enables you to set the compliance criteria for the mobile devices. Ifany mobile device does not match the criteria, Mobile Security displays its non-compliant status on the server UI. Mobile Security also sends an email to the non-compliant iOS mobile device, while it displays a notification on non-compliant Androidmobile devices. The compliance check list includes:
• Rooted/Jailbroken—checks whether the mobile device is rooted/jailbroken ornot.
• Unencrypted—checks whether the encryption is enabled on the mobile device ornot
• OS version check—checks whether the OS version matches the defined criteriaor not.
To configure compliance policy settings, click Policies, then click the policy name, andthen click Compliance Policy.
Application Monitor and Control PolicyApplication monitor and control policies provide you server-side control of theapplications installed on mobile devices and push the required applications to the mobiledevices.

Protecting Devices with Policies
4-25
To configure application monitor and control policy settings, click Policies, then clickthe policy name, and then click Application Monitor and Control Policy.
• Required Applications—selecting this option will push all the applications thatyou add in the list, to the mobile devices.
• Permitted Applications—control the applications installed on mobile devices byusing approved and blocked lists.
For iOS mobile devices, Mobile Security sends notification to administrator andthe user for any application that does not comply with the policy.
For Android mobile devices, Mobile Security blocks the application that does notcomply with the policy and will allow all others.
• Enable system apps blocking (Android only):
if selected, Mobile Security will block all the system apps on Android mobiledevices.
• Enable Application Category: select the application category that you wantto enable or disable on mobile devices. You can also make the exception byadding the applications that belong to these categories to the approved orblocked list. For example, if you have disabled a category type Games, MobileSecurity will block all the applications that belong to this category, unless anysuch application exists in the approved list.
Mobile Security allows or blocks the applications according to the followingpriority:
1. Approved List—Mobile Security allows applications that are in theapproved list even if they belong to the category that you have disabled.
2. Blocked List—Mobile Security blocks applications that are in theblocked list even if they belong to the category that you have enabled.
3. Application permissions—Mobile Security allows or blocksapplications according to your selected permission status for the categorythat they belong to.
• Enable Application Permissions (for Android only): select the applicationservices that you want to enable or disable on Android mobile devices. You

Trend Micro Mobile Security 9.0 Administrator’s Guide
4-26
can also make the exception by adding the applications that use these servicesto the approved or blocked list. For example, if you have disabled service typeRead Data, Mobile Security will block all the applications that use the ReadData service, unless any such application exists in the approved list.
Mobile Security allows or blocks the applications according to the followingpriority:
1. Approved List—Mobile Security allows applications that are in theapproved list even if they use the services that you have disabled.
2. Blocked List—Mobile Security blocks applications that are in theblocked list even if they use the services that you have enabled.
3. Application permissions—Mobile Security allows or blocksapplications according to your selected permission status for the servicesthat they use.
• Only allow the following applications: add the applications to theapproved list that you want to allow users to use on their mobile devices. Ifenabled:
• Mobile Security displays a pop-up warning message on Android mobiledevices if it detects applications that are not in the approved list.
• On iOS mobile devices, if Mobile Security detects any application that isnot in the approved list, Mobile Security sends an email notification tothe user.
• Only block the following applications: add the applications to the blockedlist that you do not want users to use on their mobile devices. If enabled:
• Mobile Security displays a pop-up warning message on Android mobiledevices if it detects applications that are in the blocked list.
• On iOS mobile devices, if Mobile Security detects any application that isin the blocked list, Mobile Security sends an email notification to theuser.
• Lock to App (for Supervised Mode Only)—restrict the iOS mobile deviceto the specified application.
Mobile Security checks for restricted applications and sends email alert to the users:

Protecting Devices with Policies
4-27
• automatically according to the Information Collection Frequency settings inAdministration > Communication Server Settings > Common Settings (tab),or
• when you update the Information Collection Frequency settings inAdministration > Communication Server Settings > Common Settings (tab).
Volume Purchasing Program PolicyThis policy enables the administrator to import the iOS applications to the MobileSecurity administration Web console that are purchased through the Apple’s VolumePurchase Program. Mobile Security will push all the applications in the VolumePurchasing Program List to mobile devices in a group.
To configure Volume Purchasing Program policy:
1. Add applications to the Enterprise App Store. See Adding an Application on page5-2 for the procedure.
2. Click Policies, then click the policy name, and then click Volume PurchasingProgram Policy.
3. Click Import and then select applications to import from the Enterprise AppStore.
4. Click Save to push all the applications to the iOS mobile devices.


5-1
Chapter 5
Managing Enterprise App StoreThis chapter shows you how to manage the store for enterprise applications for iOS andAndroid mobile devices.
The chapter includes the following sections:
• About Enterprise App Store on page 5-2
• Managing Enterprise Applications on page 5-2
• Managing Application Categories on page 5-5

Trend Micro Mobile Security 9.0 Administrator’s Guide
5-2
About Enterprise App StoreThe Enterprise App Store enables you to create a list of webclips and apps for the usersto download and install on their Android or iOS mobile devices.
You can also upload iOS applications purchased through Apple's Volume PurchaseProgram to the Enterprise App Store on the Mobile Security administration Webconsole.
Managing Enterprise Applications
Adding an Application
Procedure
1. Log on to the Mobile Security administration Web console.
2. Click App Store on the menu bar.
The Enterprise App Store screen displays.
3. Click the iOS Applications tab or Android Applications tab.
4. Click Add.
The Add Application window displays.
5. You can now add an application to the list using one of the following options:
• Add from local computer—select an installation file for Android or iOSmobile devices.
• Add a Webclip—type the application’s URL and the application's icon willappear on the home screen of user's mobile device, and the link will open inthe default Web browser on the mobile device.
• (Android) Add from external application store—type the link to theapplication in an external app store. The application's icon will appear on the
Managing Enterprise App Store
5-3
home screen of user's mobile device, and the link will open in the default Webbrowser on the mobile device.
• (iOS) Please input search keyword—type the name of the VPP applicationyou want to search and select a country to search the application in its Appleapp store, and then select the application you want to add from the searchresults. Once added, the VPP application is only available in the App Storeon Mobile Security administration Web console. To push the application tomobile devices, you will need to add the application to the VolumePurchasing Program Policy. See Volume Purchasing Program Policy on page 4-27for the procedure.
6. Click Continue.
The Edit Application screen displays.
7. Configure the following:
• Application name: type a name for the application.
• Application icon: if the application icon does not appear, click Upload appicon to select and upload the application icon.
• Application ID: if the application ID does not appear, type the applicationID.
• VPP codes file: For iOS VPP application, upload the Volume Purchase Codefiles that you have received from Apple.
• Category: select a category for the application.
Note
You must select a category from the drop-down list. To add or delete acategory, click the Category button.
• Description: type the description for the application.
• Publish: select one of the following:
• Do not publish—to upload the application on the server, but keephidden from the mobile devices.

Trend Micro Mobile Security 9.0 Administrator’s Guide
5-4
• Publish as production version—to upload the application on theserver, and publish it for mobile devices to download.
• Publish as beta version—to upload the application on the server, andpublish it as a beta version for mobile devices to download.
• Screenshots: select and upload application screenshots.
8. Click Continue.
The application appears in the applications list.
Editing Application Information
Procedure
1. Log on to the Mobile Security administration Web console.
2. Click App Store on the menu bar.
The Enterprise App Store screen displays.
3. Click the iOS Applications tab or Android Applications tab.
4. Click the application name whose information you want to edit.
The EditApplication window displays.
5. Modify the details on the screen.
6. Click Continue.
Deleting Applications from the App Store
Procedure
1. Log on to the Mobile Security administration Web console.
2. Click App Store on the menu bar.

Managing Enterprise App Store
5-5
The Enterprise App Store screen displays.
3. Click the iOS Applications tab or Android Applications tab.
4. Select the applications that you want to delete.
5. Click Delete and then click OK on the confirmation dialog box.
Managing Application Categories
Adding an Application Category
Procedure
1. Log on to the Mobile Security administration Web console.
2. Click App Store on the menu bar.
The Enterprise App Store screen displays.
3. Click the iOS Applications tab or Android Applications tab.
4. Click Manage Category.
5. Click Add.
The Add Category window displays.
6. Type the category name and description and then click Save.
Editing an Application Category
Procedure
1. Log on to the Mobile Security administration Web console.
2. Click App Store on the menu bar.

Trend Micro Mobile Security 9.0 Administrator’s Guide
5-6
The Enterprise App Store screen displays.
3. Click the iOS Applications tab or Android Applications tab.
4. Click Manage Category.
5. Click the category name that you want to edit.
The Edit Category window displays.
6. Modify the category details, and then click Save.
Deleting an Application Category
Procedure
1. Log on to the Mobile Security administration Web console.
2. Click App Store on the menu bar.
The Enterprise App Store screen displays.
3. Click the iOS Applications tab or Android Applications tab.
4. Click Manage Category.
5. Select the categories that you want to delete, click Delete, and then click OK onthe confirmation dialog box.

6-1
Chapter 6
Updating ComponentsThis chapter shows you how to configure scheduled and manual server updates andthen specify the update source for ActiveUpdate. You will also learn to performcomponent updates on specific Mobile Device Agents.
The chapter includes the following sections:
• About Component Updates on page 6-2
• Manual Update on page 6-2
• Scheduled Update on page 6-4
• Manually Updating a local AU server on page 6-7

Trend Micro Mobile Security 9.0 Administrator’s Guide
6-2
About Component UpdatesIn Mobile Security, the following components or files are updated throughActiveUpdate, the Trend Micro Internet-based component update feature:
• Mobile Security Server—program installation package for Mobile Security server.
• Malware Pattern—file containing thousands of malware signatures, and determinesMobile Security’s ability to detect these hazardous files. Trend Micro updatespattern files regularly to ensure protection against the latest threats.
• Malware Scan Engine—component that performs the actual scanning and cleaningfunctions. The scan engine employs pattern-matching technology, using signaturesin the pattern file to detect malware. Trend Micro occasionally issues a new scanengine to incorporate new technology.
• Mobile Device Agents installation program—program installation package for theMobile Device Agents.
• Mobile Device Agent program patch—program patch file that includes the latestupdates to the Mobile Device Agent program installed on mobile devices.
Updating Mobile Security ComponentsYou can configure scheduled or manual component updates on the Mobile Securityserver to obtain the latest component files from the ActiveUpdate server. After a newerversion of a component is downloaded on Mobile Security server, the Mobile Securityserver automatically notifies mobile devices to update components.
Manual Update
You can perform a manual server and Mobile Device Agent update in the Manual tabon Updates screen. You should have already configured the download source in theSource screen (see Specifying a Download Source on page 6-5 for more information).

Updating Components
6-3
Procedure
1. Log on to the Mobile Security administration Web console.
2. Click Administration > Updates.
The Updates screen displays.
3. Click the Manual tab.
FIGURE 6-1. The Manual tab on Updates screen
4. Select the check box of the component you want to update. Select the Anti-Malware Components, Program and/or Program Installation Package checkbox(es) to select all components in that group. This screen also displays the currentversion of each component and the time the component was last updated. SeeAbout Component Updates on page 6-2 for more information on each updatecomponent.
5. Click Update to start the component update process.

Trend Micro Mobile Security 9.0 Administrator’s Guide
6-4
Scheduled UpdateScheduled updates allow you to perform regular updates without user interaction;thereby, reducing your workload. You should have already configured the downloadsource in the Source screen (refer to Specifying a Download Source on page 6-5 for moreinformation).
Procedure
1. Log on to the Mobile Security administration Web console.
2. Click Administration > Updates.
The Updates screen displays.
3. Click the Scheduled tab.
FIGURE 6-2. The Scheduled tab on Updates screen
4. Select the check box of the component you want to update. Select the Anti-Malware Components, Agent Update Packages, Agent Installation Packagesand/or Server Version check box(es) to select all components in that group. This

Updating Components
6-5
screen also displays each component’s current version and the time the componentwas last updated.
5. Under Update Schedule, configure the time interval to perform a server update.The options are Hourly, Daily, Weekly, and Monthly.
• For weekly schedules, specify the day of the week (for example, Sunday,Monday, and so on.)
• For monthly schedules, specify the day of the month (for example, the firstday, or 01, of the month and so on).
NoteThe Update for a period of x hours feature is available for the Daily,Weekly, and Monthly options. This means that your update will take placesometime within the x number of hours specified, following the time selected inthe Start time field. This feature helps with load balancing on the ActiveUpdateserver.
• Select the Start time when you want Mobile Security to initiate the updateprocess.
6. Click Save to save the settings.
Specifying a Download SourceYou can set Mobile Security to use the default ActiveUpdate source or a specifieddownload source for server update.
Procedure
1. Log on to the Mobile Security administration Web console.
2. Click Administration > Updates.
The Updates screen displays. For more information about the update see ManualUpdate on page 6-2 or for scheduled update see Scheduled Update on page 6-4.
3. Click the Source tab.

Trend Micro Mobile Security 9.0 Administrator’s Guide
6-6
FIGURE 6-3. The Source tab on Updates screen
4. Select one of the following download sources:
• Trend Micro ActiveUpdate server—the default update source.
• Other update source—specify HTTP or HTTPS Web site (for example,your local Intranet Web site), including the port number that should be usedfrom where Mobile Device Agents can download updates.
Note
The updated components have to be available on the update source (Webserver). Provide the host name or IP address, and directory (for example,https://12.1.123.123:14943/source).
• Intranet location containing a copy of the current file—the local intranetupdate source. Specify the following:
• UNC path: type the path where the source file exists.
• Username and Password: type the username and password if thesource location requires authentication.

Updating Components
6-7
Manually Updating a local AU serverIf the Server/Device is updated through a Local AutoUpdate Server, but the MobileSecurity Management Server. cannot connect to the Internet; then, manually update thelocal AU Server before doing a Server/Device Update.
Procedure
1. Obtain the installation package from your Trend Micro representative.
2. Extract the installation package.
3. Copy the folders to the local AutoUpdate Server.
NoteWhen using a local AutoUpdate Server, you should check for updates periodically.


7-1
Chapter 7
Viewing and Maintaining LogsThis chapter shows you how to view Mobile Device Agent logs on the Mobile Securityadministration Web console and configure log deletion settings.
The chapter includes the following sections:
• About Mobile Device Agent Logs on page 7-2
• Viewing Mobile Device Agent Logs on page 7-2
• Log Maintenance on page 7-4

Trend Micro Mobile Security 9.0 Administrator’s Guide
7-2
About Mobile Device Agent LogsWhen Mobile Device Agents generate a malware protection log, Web threat protectionlog, firewall log, encryption log, policy violation log or an event log, the log is sent to theMobile Security server. This enables Mobile Device Agent logs to be stored on a centrallocation so you can assess your organization's protection policies and identify mobiledevices at a higher risk of infection or attack.
Note
You can view SMS anti-spam, WAP-push protection, and call filtering logs on the mobiledevices.
Viewing Mobile Device Agent LogsYou can view Mobile Device Agent logs on mobile devices or view all Mobile DeviceAgent logs on Mobile Security server. On the Mobile Security server, you can view thefollowing Mobile Device Agent logs:
• Malware Protection Log—Mobile Device Agent generates a log when a malware isdetected on the mobile device. These logs allow you to keep track of the malwarethat were detected and the measures taken against them.
• Web Threat Protection Log—Mobile Security Agent generates a log when it blocksa dangerous or malware-infected Web page, and upload the log to server.
• Firewall Log—these logs are generated when a firewall rule is matched or when thefirewall feature (such as the predefined security level or IDS) blocks a connection.
• Encryption Log—include information such as successful user logon attempts andactions taken after reaching the logon attempt limit.
• Event Log—these logs are generated when certain actions are taken by the serverand the Mobile Device Agent.
• Policy Violation Log—these logs include information about the policy compliantstatus of Mobile Device Agents.

Viewing and Maintaining Logs
7-3
Procedure
1. Log on to the Mobile Security administration Web console.
2. Click Notifications & Reports > Log Query.
The Log Query screen displays.
FIGURE 7-1. Log Query screen
3. Specify the query criteria for the logs you want to view. The parameters are:
• Log types—select the log type from the drop down menu.
• Category—select the log category from the drop down menu.
• Admin name—type the administrator name whose generated logs you wantto search.
• Time period—select a predefined date range. Choices are: All, Last 24hours, Last 7 days, and Last 30 days. If the period you require is notcovered by the above options, select Range and specify a date range.
• From—type the date for the earliest log you want to view. Click the iconto select a date from the calendar.
• To—type the date for the latest log you want to view. Click the icon toselect a date from the calendar.
• Sort by—specify the order and grouping of the logs.

Trend Micro Mobile Security 9.0 Administrator’s Guide
7-4
4. Click Query to begin the query.
Log MaintenanceWhen Mobile Device Agents generate event logs about security risk detection, the logsare sent and stored on the Mobile Security Management Module. Use these logs toassess your organization's protection policies and identify mobile devices that face ahigher risk of infection or attack.
To keep the size of your Mobile Device Agent logs from occupying too much space onyour hard disk, delete the logs manually or configure Mobile Security administrationWeb console to delete the logs automatically based on a schedule in the LogMaintenance screen.
Scheduling Log Deleting
Procedure
1. Log on to the Mobile Security administration Web console.
2. Click Notifications & Reports > Log Maintenance.
The Log Maintenance screen displays.
3. Select Enable scheduled deletion of logs.
4. Select the log types to delete: Malware, Firewall, Encryption, Event or PolicyViolation.
5. Select whether to delete logs for all the selected log types or those older than thespecified number of days.
6. Specify the log deletion frequency and time.
7. Click Save.

Viewing and Maintaining Logs
7-5
Deleting Logs Manually
Procedure
1. Log on to the Mobile Security administration Web console.
2. Click Notifications & Reports > Log Maintenance.
The Log Maintenance screen displays.
3. Select the log types to delete.
4. Select whether to delete logs for all the selected log types or only older than thespecified number of days.
5. Click Delete Now.


8-1
Chapter 8
Using Notifications and ReportsThis chapter shows you how to configure and use notifications and reports in MobileSecurity.
The chapter includes the following sections:
• About Notification Messages and Reports on page 8-2
• Configuring Notification Settings on page 8-2
• Configuring Email Notifications on page 8-2
• Configuring SMS Sender Settings on page 8-3
• Handling SMS Sender Client App on page 8-6
• Administrator Notifications and Scheduled Reports on page 8-7
• User Notification on page 8-9

Trend Micro Mobile Security 9.0 Administrator’s Guide
8-2
About Notification Messages and ReportsYou can configure Mobile Security to send notifications via email or SMS text messageto the administrator(s) and/or users.
• Administrator Notifications/Reports—sends email notifications and reports tothe administrator in case any system abnormality occurs.
• User Notifications—sends email and/or a text message to notify mobile devicesto download and install Mobile Device Agent.
Configuring Notification Settings
Configuring Email NotificationsIf you want to send email message notifications to the users, then you must configurethese settings.
Procedure
1. Log on to the Mobile Security administration Web console.
2. Click Notifications & Reports > Settings.
The Notifications/Reports Settings screen displays.
3. Under Email Settings section, type the From email address, the SMTP server IPaddress and its port number.
4. If the SMTP server requires authentication, select Authentication, and then typethe username and password.
5. Click Save.
Related information
➥ Configuring SMS Sender List

Using Notifications and Reports
8-3
Configuring SMS Sender Settings
The Management Server controls and monitors SMS Senders connected to the server.The SMS Senders send messages to mobile devices to perform Mobile Device Agentinstallation, registration, component update, security policy setting, and remote wipe/lock/locate.
Use the SMS Sender Settings to:
• configure SMS sender phone numbers
• view SMS sender connection status
• set Mobile Device Agent installation message
• configure SMS sender disconnect notification
SMS Sender List
You need to configure SMS sender device phone numbers before the ManagementServer can instruct SMS senders to send messages to mobile devices.
Note
If you do not configure the phone number of an SMS sender in the SMS sender list, theManagement Server prevents the SMS sender from sending messages to mobile devices.
Procedure
1. Log on to the Mobile Security administration Web console.
2. Click Notifications & Reports > Settings.
The Notifications/Reports Settings screen displays. In SMS Sender Settingssection, the list of SMS sender phone numbers and the connection status aredisplayed. If the SMS sender is connected to the Management Server successfully,the Status field displays: Connected.

Trend Micro Mobile Security 9.0 Administrator’s Guide
8-4
Note
After three (3) failed attempts to send an SMS message(s), the mobile device willdisplay "disconnected".
Configuring SMS Sender List
Specify the phone number of an SMS sender to enable the Mobile Security server tomanage the SMS senders. SMS senders send messages to notify mobile devices to:
• download and install Mobile Device Agent
• register to the Mobile Security Management Module
• unregister from the Mobile Security Management Module
• update Mobile Device Agent components
• synchronize security policy settings with the Mobile Security Management Module
• remote wipe the mobile device
• remote lock the mobile device
• remote locate the mobile device
Procedure
1. Log on to the Mobile Security administration Web console.
2. Click Notifications & Reports > Settings.
The Notifications/Reports Settings screen displays.
3. In SMS Sender Settings section, click Add, type the phone number of an SMSsender and click Save. The SMS sender appears in the list.
4. Check that the Status field displays "Connected" for the number you haveconfigured. If the Status field displays "Disconnected", make sure the SMSsender device is connected to the Management Server.

Using Notifications and Reports
8-5
NoteExisting SMS senders can be modified by clicking the phone number.
Monitoring SMS Senders
Mobile Security can monitor the status of SMS Senders and send out email notificationsif any of the SMS Senders is disconnected for more than ten minutes. Additionally, theSMS Sender device also displays the connection status: Agent stopped, Agent running,Agent not in use, or Agent disconnected. See Administrator Notifications and ScheduledReports on page 8-7 for the configuration details.
Editing an SMS Sender
Procedure
1. Log on to the Mobile Security administration Web console.
2. Click Notifications & Reports > Settings.
The Notifications/Reports Settings screen displays.
3. In SMS Sender Settings section, click the phone number that you want to edit.
A dialog box displays.
4. Edit the phone number in the field provided, and then click Save.
5. Click Save to save settings.
Deleting an SMS Sender
Procedure
1. Log on to the Mobile Security administration Web console.
2. Click Notifications & Reports > Settings.

Trend Micro Mobile Security 9.0 Administrator’s Guide
8-6
The Notifications/Reports Settings screen displays.
3. In SMS Sender Settings section, select the SMS Sender you want to delete, andclick Delete.
4. Click Save to save settings.
Handling SMS Sender Client App
Setting up SMS Sender Client App
Procedure
1. Open the SMS Sender app on the Android mobile device.
2. Tap Settings, and then tap the following to configure:
• Server Address: type the Management Server name or IP address and tapOK.
• Server Port: type the administration Web console port number and tap OK.
• Phone Number: type the phone number for the SMS Sender.
• Protocol Type: select HTTP or HTTPS protocol for sending messages.
3. Tap Start to start the SMS Sender.
Stopping SMS Sender
Procedure
1. Open the SMS Sender app on the Android mobile device.
2. Tap Stop to stop the SMS Sender.
Using Notifications and Reports
8-7
SMS Sender Status
Mobile Security updates the status of the SMS Sender on the mobile device. Dependingon the connection status, the following status will appear on the device:
• Normal: SMS Sender is connected to the Management Server
• Stopped: SMS Sender is currently stopped.
• Not in use: the settings on the SMS Sender app does not match with the settingson the Mobile Security server.
Viewing SMS Sender History
Procedure
1. Open the SMS Sender app on the Android mobile device.
2. Tap History to view the messages that are sent to mobile devices.
Viewing SMS Sender Running Logs
Procedure
1. Start the SMS Sender app on the Android mobile device.
2. Tap Running Logs to view the SMS Sender running event logs.
Administrator Notifications and ScheduledReports
Use the Administrator Notifications/Reports screen to configure the following:
• Notifications:

Trend Micro Mobile Security 9.0 Administrator’s Guide
8-8
• System Error—sends email notification to the administrator in case anysystem abnormality occurs. Token variables <%PROBLEM%>, <%REASON%>and <%SUGGESTION%> will be replaced by the actual problem, reason and thesuggestion to resolve the problem.
• Deactivated Device Administrator for Mobile Security—sends emailnotification to administrator when Mobile Security is disabled in the Deviceadministrators list on any Android mobile device. Token variable <%DEVICE%> will be replaced by the mobile device’s name in the email.
• APNS Certificate Expired Warning—sends email notification toadministrator when the APNs certificate expires.
• Reports:
• Devices Inventory Report—is the comprehensive report of all the mobiledevices managed by Mobile Security.
• Compliance Violation Report—is the report of all the mobile devicesmanaged by Mobile Security that do not comply with the configured policy.
• Malware Detection Report—is the report of all the security threats detectedon mobile devices managed by Mobile Security.
• Web Threat Protection Report—is the report of all the unsafe URLsaccessed on mobile devices managed by Mobile Security.
• Application Inventory Report—is the report of all the apps installed onmobile devices managed by Mobile Security.
• Devices Enrollment Report—is the report of mobile devices enrollmentinformation managed by Mobile Security.
• Devices Decommission Report—is the report of mobile devicesdecommission information managed by Mobile Security.
• Policy Violation Report—is the report of mobile devices that violate thesecurity policies.

Using Notifications and Reports
8-9
Configuring Administrator Notifications
Procedure
1. Log on to the Mobile Security administration Web console.
2. Click Notifications & Reports > Settings.
The Notifications/Reports Settings screen displays.
3. Select the notifications and reports you want to receive via email, and then click onindividual notifications and reports to modify their contents.
Note
When you select reports that you want to receive, you can also adjust theirfrequencies individually from the drop-down list after each report.
Note
While editing the Message field in email notification messages, make sure to includethe token variables <%PROBLEM%>, <%REASON%> and <%SUGGESTION%>, which willbe replaced by the actual values in the email message.
4. Click Save when done, to return back to the Administrator Notifications/Reports screen.
User NotificationUse the User Notifications screen to configure the following email and/or SMS textmessage notification:
• Mobile Device Enrollment—sends email and/or a text message to notify mobiledevices to download and install Mobile Device Agent. Token variable <%DOWNLOADURL%> will be replaced by the actual URL of the setup package.

Trend Micro Mobile Security 9.0 Administrator’s Guide
8-10
• Policy Violation—sends email notification to mobile devices if the compliancecriteria is not met. Token variables <%DEVICE%> and <%VIOLATION%> will bereplaced by the mobile device’s name in the email, and the policies that it violates.
Configuring User Notifications
Procedure
1. Log on to the Mobile Security administration Web console.
2. Click Notifications & Reports > Settings.
The Notifications/Reports Settings screen displays.
3. Select the notifications you want to send to user via email or text message, and thenclick on individual notifications to modify their contents.
• To configure email notification messages, update the following details asrequired:
• Subject: The subject of the email message.
• Message: The body of the email message.
Note
While editing the Message field, make sure to include the token variables <%DOWNLOADURL%> or <%DEVICE_NAME%> and <%VIOLATION%>, which willbe replaced by the actual URLs in the email message.
• To configure text notification messages, update the body of the message inthe Message field.
Note
While editing the Message field, make sure to include the token variables <%DOWNLOADURL%>, which will be replaced by the actual URL in the textmessage.

Using Notifications and Reports
8-11
4. Click Save when done, to return back to the User Notifications screen.


9-1
Chapter 9
Troubleshooting and ContactingTechnical Support
Here you will find answers to frequently asked questions and you learn how to obtainadditional Mobile Security information.
The chapter includes the following sections:
• Troubleshooting on page 9-2
• Before Contacting Technical Support on page 9-5
• Contacting Technical Support on page 9-6
• Sending Infected Files to Trend Micro on page 9-6
• TrendLabs on page 9-7
• About Software Updates on page 9-7
• Other Useful Resources on page 9-9
• About Trend Micro on page 9-9

Trend Micro Mobile Security 9.0 Administrator’s Guide
9-2
TroubleshootingThis section provides tips for dealing with issues you may encounter when using MobileSecurity.
• User cannot input nanoscale passwords on their devices.
Mobile device keypads can only support a certain set of characters. Mobile Securityrecommends that the administrator compile a list of characters supported by thedevices. After compiling the list of supported characters, the administrator can thenset the uninstall protection password from the management console using the listof supported characters.
• The Mobile Device Agent cannot receive the server's SMS notification orconnect to the server via the public DNS name.
The version of Mobile Device Agent supporting a DNS name should be higherthan 5.0.0.1099 for Windows Mobile platform and higher than 5.0.0.1061 forSymbian OS 9.x S60 3rd Edition platform. Previous versions can connect via IPaddress only.
• Application(s) fail to function after enabling Encryption Module.
When a user uses the Encryption Module on a device, some existing applicationsmay not function. The reason is that these existing applications may be not becontained in the trusted list. After the Encryption Module is enabled, certain filetypes will be encrypted (for example, doc, txt, ppt, pdf, xls and etc). TheEncryption Module only allows trusted applications to access encrypted data.Therefore, the administrator must add these applications to the trusted applicationlist. For more information see Encryption Settings on page 4-21.
• After canceling the Communication Server uninstallation process, theCommunication Server fails to function normally.
If the uninstallation process started deleting the files and services that areimportant for the Communication Server’s normal operation before the processwas stopped, the Communication Server may not function normally. To resolvethis issue, install and configure the Communication Server again.
• iOS mobile devices cannot enroll successfully to the Management Server,and displays "Unsupported URL" error message.

Troubleshooting and Contacting Technical Support
9-3
This issue may happen if the system clock of SCEP server is set to the incorrecttime or the Simple Certificate Enrollment Protocol (SCEP) certificate is notobtained by Trend Micro Mobile Security. Make sure that the system clock ofSCEP server is set to the correct time. If the issue persists, perform the followingsteps:
1. Log on to the Mobile Security administration Web console.
2. Click Administration > Communication Server Settings.
3. Without changing the settings, click Save.
• The Management Server cannot receive policy from the BlackBerryEnterprise Server (BES).
The Communication Server cannot receive the policy from the BlackBerryEnterprise Server (BES) if the policy name contains special characters. Check if thepolicy name contain any special characters and replace them with alphabets andnumbers.
• Unable to save Database Settings if you use SQL Server Express.
If you are using SQL Server Express, use the following format in the Serveraddress field: <SQL Server Express IP address>\sqlexpress.
Note
Replace <SQL Server Express IP address> with the IP address of SQLServer Express.
• Unable to connect to SQL Server 2005 or SQL Server 2005 Express.
This problem may occur when SQL Server 2005 is not configured to accept remoteconnections. By default, SQL Server 2005 Express Edition and SQL Server 2005Developer Edition do not allow remote connections. To configure SQL Server2005 to allow remote connections, complete all the following steps:
1. Enable remote connections on the instance of SQL Server that you want toconnect to from a remote computer.
2. Turn on the SQL Server Browser service.

Trend Micro Mobile Security 9.0 Administrator’s Guide
9-4
3. Configure the firewall to allow network traffic that is related to SQL Serverand to the SQL Server Browser service.
• Unable to connect to SQL Server 2008 R2.
This problem may occur if Visual Studio 2008 is not installed in the defaultlocation and therefore, the SQL Server 2008 setup cannot find devenv.exe.configconfiguration file. To resolve this issue, perform the following steps:
1. Go to <Visual Studio installation folder>\MicrosoftVisual Studio 9.0\Common7\IDE folder, find and copydevenv.exe.config file and paste it to the following folder (you may needto enable display extensions for known file types in folder options):
• For 64-bit Operating System:
C:\Program Files (x86)\Microsoft Visual Studio9.0\Common7\IDE
• For 32-bit Operating System:
C:\Program Files\Microsoft Visual Studio9.0\Common7\IDE
2. Run the SQL Server 2008 setup again and add BIDS feature to the existinginstance of SQL Server 2008.
• Unable to export the client device list in Device Management.
This may occur if the downloading of encrypted files is disabled in the InternetExplorer. Perform the following steps to enable the encrypted files download:
1. On your Internet Explorer, go to Tools > Internet options, and then clickthe Advanced tab on the Internet Options window.
2. Under Security section, clear Do not save encrypted pages to disk.
3. Click OK.
• The status of certain Android mobile device is always Out of Sync.
This is because the Mobile Security device administrator is not activated on thatmobile device. If the user does not activate Mobile Security in the Device

Troubleshooting and Contacting Technical Support
9-5
administrators list, then the Mobile Security cannot synchronize server policieswith the mobile device, and displays its status as Out of Sync.
• The content on the Policy pop-up window does not display and is blockedby Internet Explorer.
This happens if your Internet Explorer is configured to use a .pac automaticconfiguration file. In that case, the Internet Explorer will block the access to asecure Web site that contains multiple frames. To resolve this issue, add the MobileSecurity server address to the Trusted sites security zone in Internet Explorer. Todo this, perform the following steps:
1. Start Internet Explorer.
2. Go to Tools > Internet options.
3. On the Security tab, click Trusted sites, and then click Sites.
4. In the Add this Web site to the zone text field, type the Mobile Securityserver URL, and then click Add.
5. Click OK.
For more details on this issue, refer to the following URL:
http://support.microsoft.com/kb/908356
Before Contacting Technical SupportBefore contacting technical support, here are two things you can quickly do to try andfind a solution to your problem:
• Check your documentation—The manual and online help providecomprehensive information about Mobile Security. Search both documents to seeif they contain your solution.
• Visit our Technical Support Web site—Our Technical Support Web site, calledKnowledge Base, contains the latest information about all Trend Micro products.The support Web site has answers to previous user inquiries.
To search the Knowledge Base, visit

Trend Micro Mobile Security 9.0 Administrator’s Guide
9-6
http://esupport.trendmicro.com
Contacting Technical SupportTrend Micro provides technical support, pattern downloads, and program updates forone year to all registered users, after which you must purchase renewal maintenance. Ifyou need help or just have a question, please feel free to contact us. We also welcomeyour comments.
• Get a list of the worldwide support offices at http://esupport.trendmicro.com
• Get the latest Trend Micro product documentation at http://docs.trendmicro.com
In the United States, you can reach the Trend Micro representatives through phone, fax,or email:
Trend Micro, Inc. 10101 North De Anza Blvd., Cupertino, CA 95014 Toll free: +1 (800) 228-5651 (sales) Voice: +1 (408) 257-1500 (main) Fax: +1 (408) 257-2003 Web address: http://www.trendmicro.com Email: [email protected]
Sending Infected Files to Trend MicroYou can send malware and other infected files to Trend Micro. More specifically, if youhave a file that you think is some kind of malware but the scan engine is not detecting itor cleaning it, you can submit the suspicious file to Trend Micro using the followingaddress:
http://esupport.trendmicro.com/srf/srfmain.aspx
Please include in the message text a brief description of the symptoms you areexperiencing. Our team of malware engineers will “dissect” the file to identify and

Troubleshooting and Contacting Technical Support
9-7
characterize any malware it may contain and return the cleaned file to you, usually within48 hours.
TrendLabsTrend Micro TrendLabs℠ is a global network of antivirus research and product supportcenters providing continuous, 24 x 7 coverage to Trend Micro customers worldwide.
Staffed by a team of more than 250 engineers and skilled support personnel, theTrendLabs dedicated service centers worldwide ensure rapid response to any virusoutbreak or urgent customer support issue, anywhere in the world.
The TrendLabs modern headquarters earned ISO 9002 certification for its qualitymanagement procedures in 2000. TrendLabs is one of the first antivirus research andsupport facilities to be so accredited. Trend Micro believes that TrendLabs is the leadingservice and support team in the antivirus industry.
For more information about TrendLabs, please visit:
http://us.trendmicro.com/us/about/company/trendlabs/
About Software UpdatesAfter a product release, Trend Micro often develops updates to the software, to enhanceproduct performance, add new features, or address a known issue. There are differenttypes of updates, depending on the reason for issuing the update.
The following is a summary of the items Trend Micro may release:
• Hot fix—A hot fix is a workaround or solution to a single customer-reportedissue. Hot fixes are issue-specific, and therefore not released to all customers.Windows hot fixes include a Setup program, while non-Windows hot fixes do not(typically you need to stop the program daemons, copy the file to overwrite itscounterpart in your installation, and restart the daemons).
• Security Patch—A security patch is a hot fix focusing on security issues that issuitable for deployment to all customers. Windows security patches include a Setupprogram, while non-Windows patches commonly have a setup script.

Trend Micro Mobile Security 9.0 Administrator’s Guide
9-8
• Patch—A patch is a group of hot fixes and security patches that solve multipleprogram issues. Trend Micro makes patches available on a regular basis. Windowspatches include a Setup program, while non-Windows patches commonly have asetup script.
• Service Pack—A service pack is a consolidation of hot fixes, patches, and featureenhancements significant enough to be considered a product upgrade. BothWindows and non-Windows service packs include a Setup program and setupscript.
Check the Trend Micro Knowledge Base to search for released hot fixes:
http://esupport.trendmicro.com
Consult the Trend Micro Web site regularly to download patches and service packs:
http://www.trendmicro.com/download
All releases include a readme file with the information needed to install, deploy, andconfigure your product. Read the readme file carefully before installing the hot fix,patch, or service pack file(s).
Known Issues
Known issues are features in Mobile Security that may temporarily require aworkaround. Known issues are typically documented in the Readme document youreceived with your product. Readmes for Trend Micro products can also be found in theTrend Micro Download Center:
http://www.trendmicro.com/download/
Known issues can be found in the technical support Knowledge Base:
http://esupport.trendmicro.com
Trend Micro recommends that you always check the Readme text for information onknown issues that could affect installation or performance, as well as a description ofwhat’s new in a particular release, system requirements, and other tips.
Troubleshooting and Contacting Technical Support
9-9
Other Useful ResourcesMobile Security offers a host of services through its Web site, http://www.trendmicro.com.
Internet-based tools and services include:
• Virus Map– monitor malware incidents around the world
• Virus risk assessment– the Trend Micro online malware protection assessmentprogram for corporate networks.
About Trend MicroManagement Server, Inc. is a global leader in network anti-malware and Internet contentsecurity software and services. Founded in 1988, Trend Micro led the migration ofmalware protection from the desktop to the network server and the Internet gateway–gaining a reputation for vision and technological innovation along the way.
Today, Trend Micro focuses on providing customers with comprehensive securitystrategies to manage the impacts of risks to information, by offering centrally controlledserver-based malware protection and content-filtering products and services. Byprotecting information that flows through Internet gateways, email servers, and fileservers, Trend Micro allows companies and service providers worldwide to stopmalware and other malicious code from a central point, before they ever reach thedesktop.
For more information, or to download evaluation copies of Trend Micro products, visitour award-winning Web site:
http://www.trendmicro.com


IN-1
IndexAadministration Web console, 2-2, 2-4
operations, 2-2URL, 2-2username and password, 2-3
Administrator Reports download, 1-8agent customization, 1-9anti-malware scanning, 1-12application control, 1-7, 1-10application inventory, 1-10application push, 1-10authentication based on device identity, 1-8
Ccall filtering, 1-13
filtering list configuration, 4-14filtering list format, 4-15policies, 1-12
clearing corporate data on mobile devices,3-13command statuses, 2-18Compatibility View, 2-4compliance check, 1-10compliance policy
check list, 4-24component updates
about, 6-2download sources, 6-6local AU server, 6-7manual, 6-2scheduled, 6-4
corporate certificates, 1-7customizable enrollment URL, 1-9
DDashboard
application control status, 2-7encryption status, 2-7information management, 1-7jailbreak/root status, 2-7mobile device status, 2-5patch and component update status, 2-6screen, 1-10server update status, 2-6
data encryption, 1-14
Eencryption and password
encryption algorithms, 4-21file types, 4-21PIM information, 4-21power-on password policies, 4-19trusted application list, 4-22
enhanced event logs, 1-9enterprise app store, 1-11
about, 5-2Exchange ActiveSync Devices tab, 3-21Exchange Server integration, 1-7
Ffirewall, 1-14firewall policy
exception rule settings, 4-17IDS, 4-16security levels, 4-16SYN Flood attack, 4-16
Full license version, 2-4
Trend Micro Mobile Security 9.0 Administrator’s Guide
IN-2
GGeneral Policy
Blackberry settings, 4-8log settings, 4-8notification/report settings, 4-8uninstall protection features, 4-7update settings, 4-7
HHTTP(S) push notification setting, 1-9
Iintegrated with Active Directory, 1-11Invited Devices tab, 3-18
invitation email information, 3-18invitation statuses, 3-18
iOS device provisioning, 1-7
KKnowledge Base, 9-5known issues, 9-8
Llatest documentation, 9-6locating remote device, 1-12locking a Windows Mobile device, 3-13lock policy enhancement, 1-8
MMalware Protection Policy
scan options, 4-10scan types, 4-10
Managed Devices tab, 3-2MARS, 1-8MDA logs
about, 7-2Encryption Log, 7-2Event Log, 7-2
Firewall Log, 7-2log types, 7-2Malware Protection Log, 7-2manual deletion, 7-5Policy Violation Log, 7-2query criteria, 7-3scheduled deletion, 7-4Web Threat Protection Log, 7-2
mobile device authentication, 1-14mobile device enrollment, 1-7Mobile Security
about, 1-2Active Directory, 1-5architecture, 1-3Basic Security Model, 1-3BES User Administration Tool, 1-5certificate
APNs certificate, 1-5authority, 1-5management, 2-20public and private keys, 1-5SCEP, 1-5security credentials, 1-5SSL certificate, 1-5
Cloud Communication Server, 1-4communication methods, 1-3Communication Server, 1-4Communication Server types, 1-4components, 1-3deployment models, 1-3Encryption Module, 1-2encryption software compatibility, 1-3Enhanced Security Model
Cloud Communication Server, 1-3Local Communication Server, 1-3
Exchange Connector, 1-4

Index
IN-3
Local Communication Server, 1-4Management Server, 1-4Microsoft SQL Server, 1-5Mobile Device Agent, 1-4OfficeScan, 1-2SMS Sender, 1-4SMTP server, 1-5sub-groups, 3-2unwanted network communications, 1-2
mobile threats, 1-2DoS attacks, 1-2spam messages, 1-2
multiple administrator accounts, 1-7
Nnotifications and reports
about, 8-2notifications, 8-7reports, 8-8SMS Agent Status, 8-7SMS Sender, 8-3text message configuration, 8-9token variables, 8-9, 8-10
OOfficeScan, 1-6optional authentication, 1-10optional Cloud Communication Server, 1-7
Ppassword
challenge code, 3-16reset password, 1-11, 3-15uninstall protection, 9-2
Policy Violation Log, 1-8provisioning policy, 1-11
QQR-code, 1-7Quick Configuration Verification screen,1-10
Rregular updates, 1-14resources
Internet-based tools and services, 9-9root account properties, 2-11
Sscan after pattern update, 1-9scheduled reports, 1-10SD card restriction, 1-10selective wipe, 1-10send email alert, 4-26server command confirmation, 1-7simple iOS client, 1-9simpler provisioning, 1-9SMS anti-spam, 1-13software update
about, 9-7readme file, 9-8release items, 9-7
spamSMS, 4-11
filtering list configuration, 4-12filtering list format, 4-13
WAP-Push, 4-13approved list format, 4-13
standalone management server, 1-6Super Administrator role properties, 2-11supervised device management, 1-7support for Android mobile devices, 1-12support for Blackberry mobile devices, 1-11support for iOS mobile devices, 1-11

Trend Micro Mobile Security 9.0 Administrator’s Guide
IN-4
TTechnical Support Web site, 9-5template-based policies, 1-7TrendLabs, 9-7Trend Micro
about, 9-9troubleshooting tips, 9-2
.pac automatic configuration file, 9-5BES, 9-3client device list, 9-4Communication Server, 9-2devenv.exe.config configuration file, 9-4Encryption Module, 9-2Out of Sync, 9-4SCEP certificate, 9-3SQL Server 2005, 9-3SQL Server 2008 R2, 9-4SQL Server Express, 9-3system clock, 9-3
UUnmanaged group for Android and iOS, 1-8updated architecture, 1-11, 1-12updated device statuses, 1-7updated feature locking, 1-12updated MDA interface, 1-8user account details, 2-14
VVolume Purchase Program, 1-8
WWAP-Push protection, 1-14Web proxy support, 1-9Web security, 1-12Web threat
filtering list configuration, 4-17
filtering list format, 4-19Web threat protection policy, 1-10what’s new
7.0, 1-117.1, 1-118.0, 1-98.0 SP1, 1-8v9.0, 1-6
widgets, 1-7worldwide support offices, 9-6


