Page 1
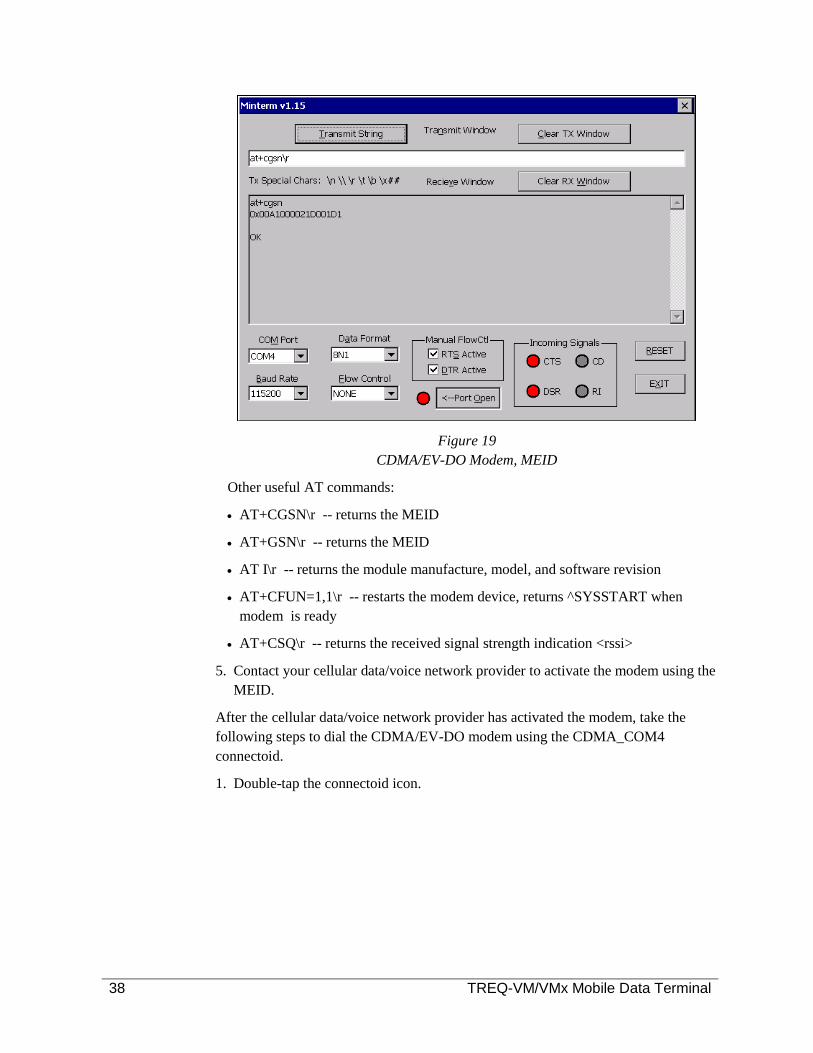
TREQ®-VM/VMx USER MANUAL
M01-073-00 Rev 02
BEIJER ELECTRONICS
Headquarters
Beijer Electronics Products AB
P.O. Box 426
201 24 Malmö, Sweden
Phone +46 40 35 86 00
Web http://www.beijerelectronics.com
US Office
Beijer Electronics Inc
1865 West 2100 South
Salt Lake City, Utah 84119-1303
USA
Phone 801-466-8770
Fax 801-466-8792
Email [email protected]
Web http://www.beijerinc.com
Support http://www.beijerinc.com/support
Page 2
Copyright © 2012 Beijer Electronics. Printed in the USA. All rights reserved. No part of this publication may be reproduced, in any form or by
any means without prior written permission from Beijer Electronics.
TREQ is a registered trademark of Beijer Electronics.
Microsoft, Windows, Windows NT, Windows 2000, Windows XP, Vista, ActiveSync and their respective logos are registered trademarks of
Microsoft Corporation in the United States and other countries.
All other brand and product names used in this manual are trademarks or registered trademarks of their respective companies.
Manual updated 28 August 2013.
Page 3
FCC Compliance Information
This equipment has been tested and found to comply with the limits for a Class A digital device, pursuant
to part 15 subpart B of the FCC Rules. These limits are designed to provide reasonable protection against
harmful interference when the equipment is operated in a commercial environment.
This equipment generates, uses and can radiate radio frequency energy and, if not installed and used in
accordance with the instruction manual, may cause harmful interference to radio communications.
Operation of this equipment in a residential area is likely to cause harmful interference in which case the
user will be required to correct the interference at his own expense.
Modifications not expressly approved by the manufacturer could void the user's authority to operate the
equipment under FCC rules.
Beijer Electronics does not recommend any specific type of antenna for use with the cellular modem.
However specifications are given for these antennas that may be used. OEM integrators must reference
the appropriate section in this manual for the cellular modem for these specific requirements. The grants
given for the cellular modem are valid only when the devices are sold to OEM integrators and the OEM
integrators are instructed to ensure that the end user has no manual instructions to remove or install the
device.
Additionally, the TREQ-VM/VMx may contain the following FCC module-certified components
depending on product configuration:
Wi-Fi Module:
Ralink: FCC ID YVK-802NRUMSVQ
Cellular Modems:
Cinterion BGS3 2G GSM/GPRS: FCC ID QIPBGS3
Cinterion PVS8 3G CDMA/EV-DO: FCC ID QIPPVS8
Cinterion PHS8-P 3G UMTS/HSPA+: FCC ID QIPPH8SP
Page 4
IMPORTANT BATTERY SAFETY INSTRUCTIONS AND WARNINGS
WARNING
Please read this before using or charging the battery in your new TREQ-VM/VMx.
Charging of the TREQ-VM/VMx is covered in section 3.4, “Charging the TREQ-
VM/VMx”.
NOTE TREQ-VM/VMx battery is shipped at approximately 50% of a full charge.
All TREQ-VM/VMx systems contain a Lithium Polymer battery which is volatile.
Failure to read and follow these instructions may result in fire, personal injury and
damage to property if charged or used improperly.
NOTE The TREQ-VM/VMx system (including the internal battery pack) is not user-serviceable.
Please contact Beijer Electronics Service group for service or repair (including battery
service or replacement).
DO NOT attempt to remove the battery pack from the terminal housing.
DO NOT puncture, bend, or place mechanical strain on the battery pack.
DO NOT attempt to charge the battery pack by any means other than the battery charge
circuitry included in the TREQ-VM/VMx.
NOTE The operating temperature range of the TREQ-VM/VMx is limited to -20°C to +60°C;
however, charging of the internal battery is limited to 0°C to +35°C. The TREQ-VM/VMx
automatically detects out-of-range temperature situations and stops the charge/discharge
of the battery.
TREQ-VM/VMx Support
Beijer Electronics Customer Support group prides itself on its support. If you run into problems
developing for your TREQ-VM/VMx or have questions as to the best way to tackle a problem, do not
hesitate to contact our Customer Support group ([email protected] ). For online help and support,
visit www.beijerinc.com/support.If you suspect that your TREQ-VM/VMx may require service repairs,
first visit our online support and follow the instructions on how to troubleshoot the suspected issue or
contact our Customer Support group. Then go to www.beijerinc.com/support/contact/rma_request.php to
submit an online RMA.
Page 5
TREQ-VM/VMx Mobile Data Terminal i
Contents
CHAPTER 1 Introduction ......................................................................................... 1
CHAPTER 2 Product Features ................................................................................. 3
2.1 Hardware ............................................................................................................ 3
2.1.1 User Interface .............................................................................................. 4
2.1.2 Processor ..................................................................................................... 4
2.1.3 System and Application Memory ................................................................ 5
2.1.4 EIA COM Ports ........................................................................................... 5
2.1.5 J1708/J1939 (CANbus) Ports ...................................................................... 6
2.1.6 USB Ports .................................................................................................... 7
2.1.7 Ethernet (Wired and Wireless) .................................................................... 7
2.1.8 Cellular Modem ........................................................................................... 7
2.1.9 Speaker and Microphone ............................................................................. 8
2.1.10 GPIO Signals ............................................................................................. 9
2.1.11 GPS .......................................................................................................... 10
2.1.12 Camera..................................................................................................... 10
2.1.13 Ignition Sense .......................................................................................... 11
2.1.14 Dock Detect ............................................................................................. 11
2.1.15 Input Power ............................................................................................. 12
2.1.16 Internal Battery ........................................................................................ 12
2.1.17 Real Time Clock ...................................................................................... 14
2.1.18 Housing ................................................................................................... 14
2.1.19 Main Connectors ..................................................................................... 14
2.1.20 Developer’s Kit ....................................................................................... 15
2.2 Bootloader ........................................................................................................ 16
2.3 Software ........................................................................................................... 16
2.3.1 Windows CE.............................................................................................. 16
2.3.2 Device Drivers ........................................................................................... 18
2.3.3 System Settings ......................................................................................... 19
2.3.4 Applications............................................................................................... 19
CHAPTER 3 Getting Started .................................................................................. 21
3.1 Docking and Undocking the TREQ-VM/VMx ................................................ 21
3.2 Connecting Power to the TREQ-VM/VMx ...................................................... 22
3.3 Power On/Off/Reset ......................................................................................... 22
3.3.1 Turn On the TREQ-VM/VMx ................................................................... 22
3.3.2 Turn Off the TREQ-VM/VMx .................................................................. 23
3.3.3 Reset the TREQ-VM/VMx ....................................................................... 24
3.4 Charging the TREQ-VM/VMx ........................................................................ 24
3.5 Touch Screen .................................................................................................... 25
3.5.4 Touch Screen Care .................................................................................... 25
3.5.5 Touch Screen Use ...................................................................................... 25
Page 6
ii TREQ-VM/VMx Mobile Data Terminal
3.6 System Setting .................................................................................................. 26
3.7 Installing Third-Party or Custom Software ...................................................... 26
3.8 Run Third-Party Software ................................................................................ 27
3.9 Build Your Own Software ................................................................................ 27
3.10 TREQ-VM/VMx Support............................................................................... 27
CHAPTER 4 System Settings .................................................................................. 28
4.1 Control Panel .................................................................................................... 28
4.1.1 Stylus ......................................................................................................... 28
4.1.2 PC Connection ........................................................................................... 30
4.1.3 Keyboard ................................................................................................... 31
4.1.4 Date/Time .................................................................................................. 31
4.1.5 Volume and Sounds ................................................................................... 33
4.1.6 Network and Dial-up Connections ............................................................ 34
4.1.7 Storage Manager ........................................................................................ 41
4.1.8 Bluetooth Manager .................................................................................... 44
4.1.9 Cradle Power Control ................................................................................ 45
4.1.10 WiFi Power Control ................................................................................ 45
4.1.11 Power Properties ...................................................................................... 46
4.2 TREQ Panel ...................................................................................................... 46
4.2.1 Keyboard ................................................................................................... 47
4.2.2 Backlight Intensity .................................................................................... 47
4.2.3 Audio ......................................................................................................... 47
4.2.4 Touch Screen ............................................................................................. 47
4.2.5 Power Timeouts (Battery and External) .................................................... 47
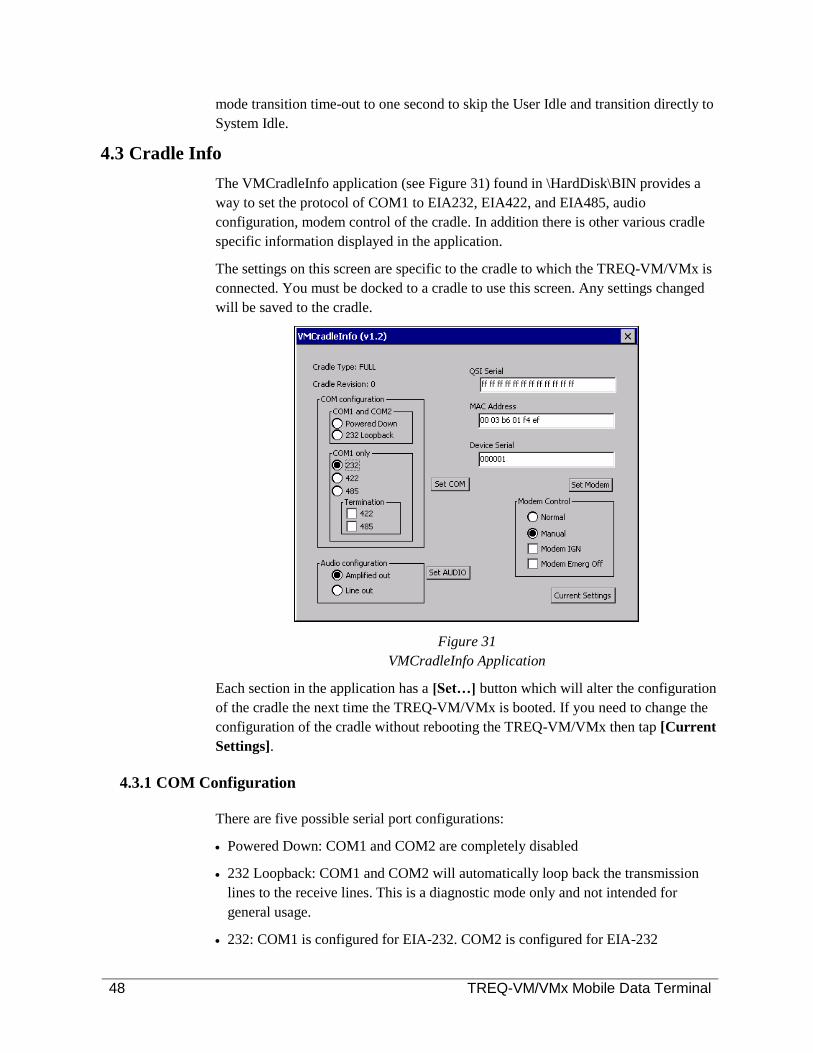
4.3 Cradle Info ........................................................................................................ 48
4.3.1 COM Configuration .................................................................................. 48
4.3.2 Audio Configuration .................................................................................. 49
4.3.3 Modem Control ......................................................................................... 49
4.3.4 Current Settings ......................................................................................... 49
4.3.5 Cradle Information .................................................................................... 50
4.4 Registry ............................................................................................................ 51
4.5 File System Filter ............................................................................................. 51
4.6 System Path ...................................................................................................... 52
4.7 Boot-up Configuration ..................................................................................... 52
4.8 Applications ..................................................................................................... 54
4.8.1 Microsoft ................................................................................................... 54
4.8.2 Beijer Electronics ...................................................................................... 54
CHAPTER 5 Connect To A PC Via ActiveSync ................................................... 57
5.1 Introduction ...................................................................................................... 57
5.2 Connect the Serial Cable .................................................................................. 57
5.3 Enable PC Connection...................................................................................... 58
5.4 Download/Install ActiveSync ........................................................................... 59
5.5 Set the TREQ-VM/VMx Baud Rate................................................................. 59
Page 7
TREQ-VM/VMx Mobile Data Terminal iii
5.6 Connect the PC and TREQ-VM/VMx ............................................................. 60
5.6.1 Select the COM Port Manually ................................................................. 62
CHAPTER 6 Application Development ................................................................. 63
6.1 Introduction ...................................................................................................... 63
6.1.1 Glossary ..................................................................................................... 63
6.1.2 Related Documents .................................................................................... 63
6.2 Setup ................................................................................................................. 64
6.2.1 Prerequisites .............................................................................................. 64
6.2.2 SDK Installation ........................................................................................ 64
6.2.3 Target Setup .............................................................................................. 65
6.2.4 Microsoft Visual Studio 2005/2008 .......................................................... 65
6.2.5 Remote Tools ............................................................................................ 69
6.3 Software Drivers............................................................................................... 70
6.3.1 Display....................................................................................................... 70
6.3.2 Backlight ................................................................................................... 72
6.3.3 OS Build Version ...................................................................................... 74
6.3.4 Dock Driver ............................................................................................... 75
6.3.5 System Serial Numbers ............................................................................. 77
6.3.6 “Unidentified USB device” ....................................................................... 77
6.3.7 Battery ....................................................................................................... 78
6.3.8 Temperature Sensor ................................................................................... 79
6.3.9 Modem....................................................................................................... 80
6.3.10 GPIO ........................................................................................................ 80
6.3.11 Power ....................................................................................................... 81
6.3.12 Serial Ports .............................................................................................. 83
6.3.13 Network ................................................................................................... 83
6.3.14 Power Transition on Ignition ................................................................... 84
6.3.15 Power Button Action ............................................................................... 87
6.3.16 Watchdog................................................................................................. 88
6.3.17 1708/J1939 .............................................................................................. 88
6.3.18 Camera..................................................................................................... 97
6.3.19 GPS Intermediate Driver (GPSID) ........................................................ 100
6.3.20 Audio Gateway Service (Bluetooth) ..................................................... 100
6.3.21 Radio Interface Layer (RIL) .................................................................. 100
CHAPTER 7 Optional Peripherals ....................................................................... 101
7.1 USB ................................................................................................................ 101
7.2 Bluetooth ........................................................................................................ 101
7.2.1 Pairing ..................................................................................................... 102
7.2.2 qbtCE ....................................................................................................... 104
7.2.3 Virtual Serial Port .................................................................................... 105
7.2.4 Personal Area Network ........................................................................... 108
7.2.5 Human Interface Device .......................................................................... 111
7.2.6 Headset Profile ........................................................................................ 112
Page 8
iv TREQ-VM/VMx Mobile Data Terminal
CHAPTER 8 Electrical .......................................................................................... 113
8.1 Absolute Maximum Rating ............................................................................ 113
8.2 Operating Conditions ..................................................................................... 113
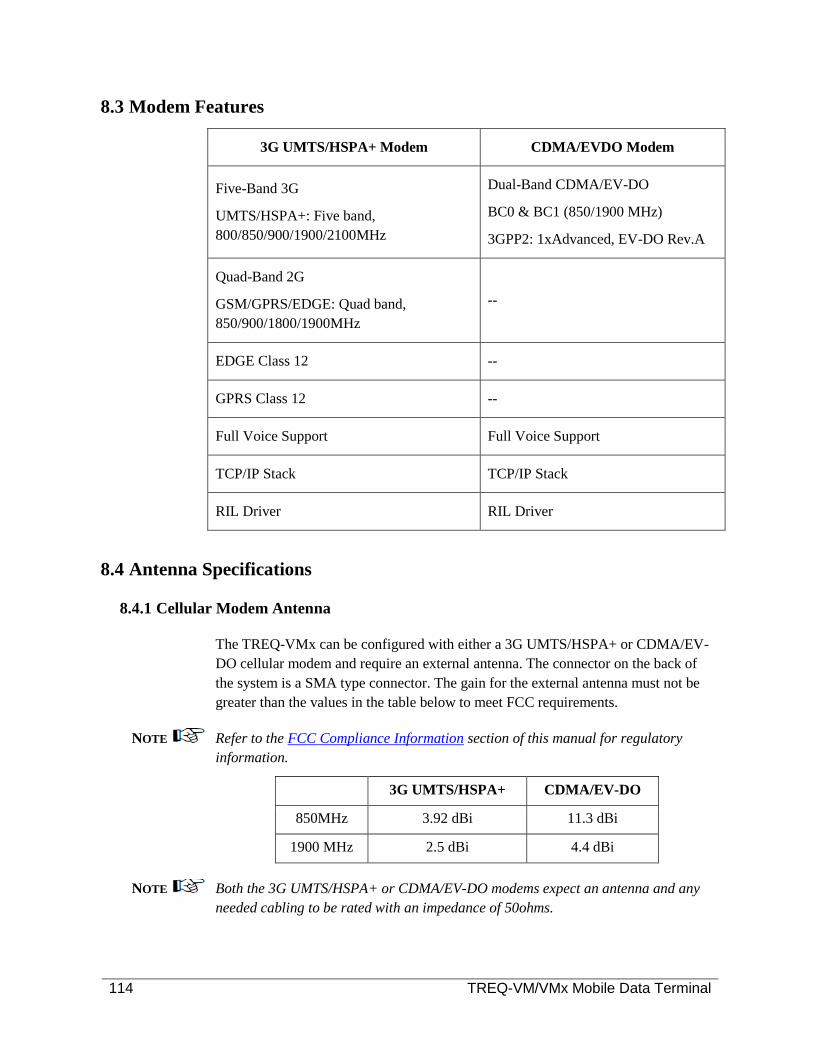
8.3 Modem Features ............................................................................................. 114
8.4 Antenna Specifications ................................................................................... 114
8.4.1 Cellular Modem Antenna ........................................................................ 114
8.4.2 GPS Antenna ........................................................................................... 115
CHAPTER 9 Mechanical ....................................................................................... 116
9.1 Removable TREQ-VM/VMx Layout and Dimensions .................................. 116
9.2 Fixed TREQ-VM/VMx Dimensions .............................................................. 117
9.3 HD D-Sub Connectors.................................................................................... 118
9.4 RAM Mount ................................................................................................... 119
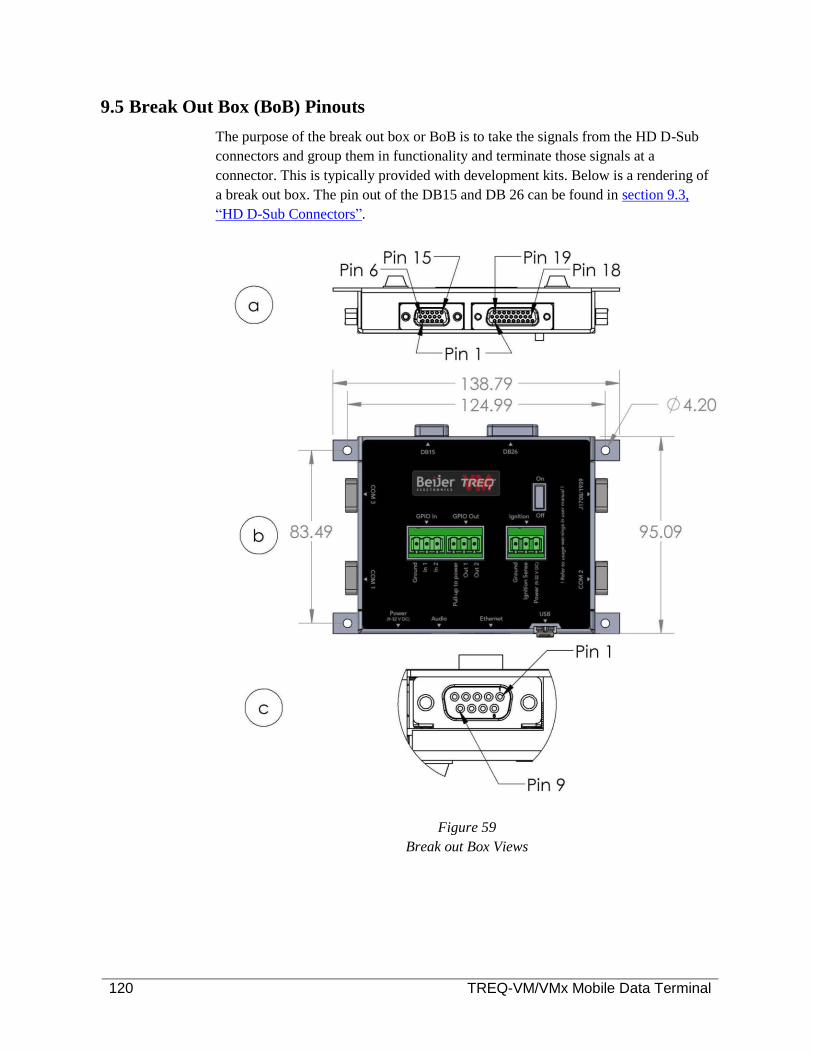
9.5 Break Out Box (BoB) Pinouts ........................................................................ 120
9.5.1 Power Connector Pinout .......................................................................... 121
9.5.2 Audio Connector Pinout .......................................................................... 121
9.5.3 Ethernet (RJ45) Connector Pinout........................................................... 121
9.5.4 USB Connector Pinout ............................................................................ 121
9.5.5 Com Port 1 Connector Pinout.................................................................. 122
9.5.6 Com Port 2 Connector Pinout.................................................................. 122
9.5.7 Com Port 3 Connector Pinout.................................................................. 122
9.5.8 J1708 / J1939 Connector Pinout .............................................................. 123
CHAPTER 10 Software Upgrades ........................................................................ 124
10.1 Software Upgrades ....................................................................................... 124
10.2 Operating System ......................................................................................... 124
10.3 Bootloader .................................................................................................... 127
10.4 QBridge ........................................................................................................ 127
10.4.1 GUI Method .......................................................................................... 127
10.4.2 Console Method .................................................................................... 128
10.5 Making a MicroSD card bootable ................................................................ 128
10.6 System Backup and Recovery ...................................................................... 129
Page 9
TREQ-VM/VMx Mobile Data Terminal 1
CHAPTER 1
INTRODUCTION
The TREQ-VM and TREQ-VMx are the next-generation mobile data terminals.
These terminals were created to address harsh environment demands and offer an
upgrade path for the TREQ-DX and TREQ-L products. The TREQ-VM and TREQ-
VMx provide new features such as faster performance, additional modem options,
digital camera, biometric sensor and battery-backed portability. The TREQ-
VM/VMx can be configured as a fixed-mount single piece system or a removable
two piece system consisting of a terminal and a cradle.
The terminal is the removable part which houses the user interface electronics. It
includes a commercial operating system to run application software. The terminal
has a rechargeable battery and a Wi-Fi interface.
The cradle is intended to be permanently mounted and includes mechanical elements
to securely retain the terminal while docked. It allows for easy one-handed
attachment and detachment of the terminal. This allows the user to detach the
terminal from the cradle for a walk-around Driver Vehicle Inspection (DVI) or
similar application. The cradle provides industry standard communications interfaces
(wired and wireless) for a variety of applications. The cradle provides industry
standard high density connectors to interface to wiring harnesses.
The main features of the TREQ-VM/VMx terminal are:
Color TFT 7” diagonal (177 mm) LCD with integrated touch screen, 400 nits
typical brightness
Marvell® XScale™ PXA166 processor running at 800 MHz (with graphic
acceleration)
256 MBytes DDR3 SDRAM memory
4 GBytes non-volatile mass storage (NAND)
MicroSD connection for expandable storage (up to 32 GBytes)
Windows CE 6.0 R3 operating system
Internal rechargeable battery supporting 1+ hours of active operation while
undocked
Front-mounted internal speakers and microphone
Robust cradle-dock connector on terminal back (power, USB, ignition and dock
sense signals)
Front and side-facing USB host connectors (Type A)
802.11 b/g/n Wi-Fi with internal antenna
Page 10
2 TREQ-VM/VMx Mobile Data Terminal
Optional rear-mounted VGA camera
Rugged molded bumpers to withstand shock and drop on the removable version
The main features of the TREQ-VM/VMx cradle are:
Small mechanical profile (essentially hidden when terminal is docked)
Two available models
Three high-speed USB host ports (one on cable connector, two on side with
locking Type A connectors)
Wired 10/100 BaseT Ethernet
Two EIA-232 serial ports (with third port available on TREQ-VMx)
Optional support for EIA-422 and EIA-485 on COM1
Ignition sense input
SAE J1708 and J1939 serial bus ports (TREQ-VMx only)
GPS module (TREQ-VMx only)
3G UMTS/HSPA+ or CDMA/EV-DO cellular modem and SIM card socket
(TREQ-VMx only)
Audio line out/amplified out (TREQ-VMx only)
4 GPIO (TREQ-VMx only)
All signals available on HD 26 pin D-Sub connector (both models) and HD 15 pin
D-Sub connector (TREQ-VMx only)
Other Features of the TREQ-VM/VMx
Wide operating temperature of -20 to 60 °C, storage temperature of -40 to 75 °C
and CHARGING only occurs from 0 °C to 35 °C ambient
8 to 32 VDC input voltage range
Built-in protection from power transients and spikes (SAE J1455 compliant)
Support for application development with industry standard tools such as
Microsoft® Visual Studio 2005 and 2008
Optional TREQ-VM/VMx Developer’s Kit that includes: TREQ-VM/VMx, Break
Out Box (BoB), power supply, RAM mount and stand base, USB flash drive with
the Software Developer’s Kit, a penta-band antenna, and necessary cables and
adapters
Page 11
TREQ-VM/VMx Mobile Data Terminal 3
CHAPTER 2
PRODUCT FEATURES
2.1 Hardware
The TREQ-VM/VMx mobile data terminal has a touch screen user interface and runs
the Windows CE 6.0 R3 operating. The communication between the terminal and the
cradle is a single high-speed USB interface. The cradle utilizes the hierarchical USB
architecture to distribute this channel to all communication interfaces, including
serial, USB, Ethernet, serial, vehicle serial bus (J1708/J1939), GPS, cellular modem,
Wi-Fi, GPIO and audio.
The table below outlines the available options of the TREQ-VM/VMx.
Options TREQ-VM TREQ-VMx
COM 1
COM 2
COM 3
J1708/J1939
5 High-speed USB ports
Wired Ethernet
Wi-Fi
Cellular Modem
Speakers
Microphone
GPIO
GPS
Camera (Optional)
TRS headphone jack for cellular modem voice I/O
TRS headphone jack for speaker out
Real Time Clock
There is no communication between the terminal and the cradle when the terminal is
undocked.
Page 12
4 TREQ-VM/VMx Mobile Data Terminal
NOTE The removable TREQ-VM/VMx terminal can be undocked from the charging cradle.
When the terminal is undocked, it will lose communication with the cradle-based
peripherals (cradle USB ports, wired Ethernet, cellular modem, GPS, all serial ports
and the J1709 / J1939 (CAN) controller).
NOTE If the TREQ-VM/VMx loses its external power source it will be powered by its
internal battery. The internal battery does not power the cradle, so if external power
is lost, cradle-based peripherals and cradle USB ports will no longer function until
power is restored. This applies to all TREQ-VM/VMx devices, not just the removable
configuration.
2.1.1 User Interface
Display
The TREQ-VM/VMx features a 7” (178 mm) color TFT color display. The screen
resolution is WVGA or 800 x 480 pixels. The typical brightness of the display is
400 nits.
Touch Screen
A 4-wire analog-resistive touch screen covers the entire display area and is the
primary input device.
External Peripherals
Two high-speed USB ports are available on the side of the TREQ-VM/VMx cradle.
Both USB ports on the cradle feature a locking mechanism for a more secure
connection. Two additional high-speed powered USB ports can be found on the
side and front of the TREQ-VM/VMx terminal for easy access. A fifth high-speed
USB port in the High Density, or HD, 15 pin D-Sub connector is also provided.
These ports can be used to add many other devices, such as a keyboard, mouse, or a
Bluetooth dongle. Please contact Beijer Electronics Customer Support group for
more information on additional device support.
Additional Features
Features available only on the TREQ-VMx are a cellular modem, modem voice
I/O, headphone audio, GPS receiver, GPIO, J1708/J1939 (CAN) vehicle bus and an
additional serial port.
2.1.2 Processor
The TREQ-VM/VMx uses the Marvell PXA166 processor (ARMV5TE),
incorporating Marvell® XScale technology running at 800 MHz.
Page 13
TREQ-VM/VMx Mobile Data Terminal 5
2.1.3 System and Application Memory
DRAM
The TREQ-VM/VMx includes 256 Mbytes of DDR3 SDRAM.
NAND Flash
The TREQ-VM/VMx uses an internal (on board) 4 Gbytes NAND flash to store the
Windows CE operating system and provide non-volatile storage for user
applications and data.
Expansion
The TREQ-VM/VMx has a MicroSD connector that can be used for adding
additional storage. The MicroSD card slot is accessible via the screw-secured door
on the back of terminal. The system supports MicroSD and MicroSDHC with
maximum capacities of 32 GB. The TREQ-VM/VMx supports booting to a
properly formatted MicroSDHC class 4 type card. Please contact Beijer Electronics
Customer Support group for more information.
2.1.4 EIA COM Ports
The TREQ-VM has two serial ports, designated COM1 and COM2 that can
communicate up to 3.6 MBaud. The TREQ-VMx has an additional COM port
designated COM3 that can also communicate up to 3.6 MBaud.
The COM ports are accessed through the HD 26 pin D-Sub connector. Refer to
section 9.3, “HD D-Sub Connectors” for the pin definition of the High Density D-
Sub connectors.
COM1 can be configured in software for one of the following:
EIA-232 with hardware flow control (supporting RX, TX, RTS, and CTS),
Half duplex EIA-485, or
Full duplex EIA-422.
In addition there is software-selectable EIA-485 termination and software-selectable
EIA-422 RX termination on this COM port.
COM2 is an EIA-232 only port without hardware flow control (RX and TX only).
COM3 is an EIA-232 only port with hardware flow control (supporting RX, TX,
RTS, and CTS). This is a TREQ-VMx only option.
Several of the internal peripherals are accessed through internal COM ports. The
table below shows these COM ports and the connected peripheral. (The Windows CE
application MinTernCE.exe may be used to communicate with these devices using
the internal COM ports.)
Page 14
6 TREQ-VM/VMx Mobile Data Terminal
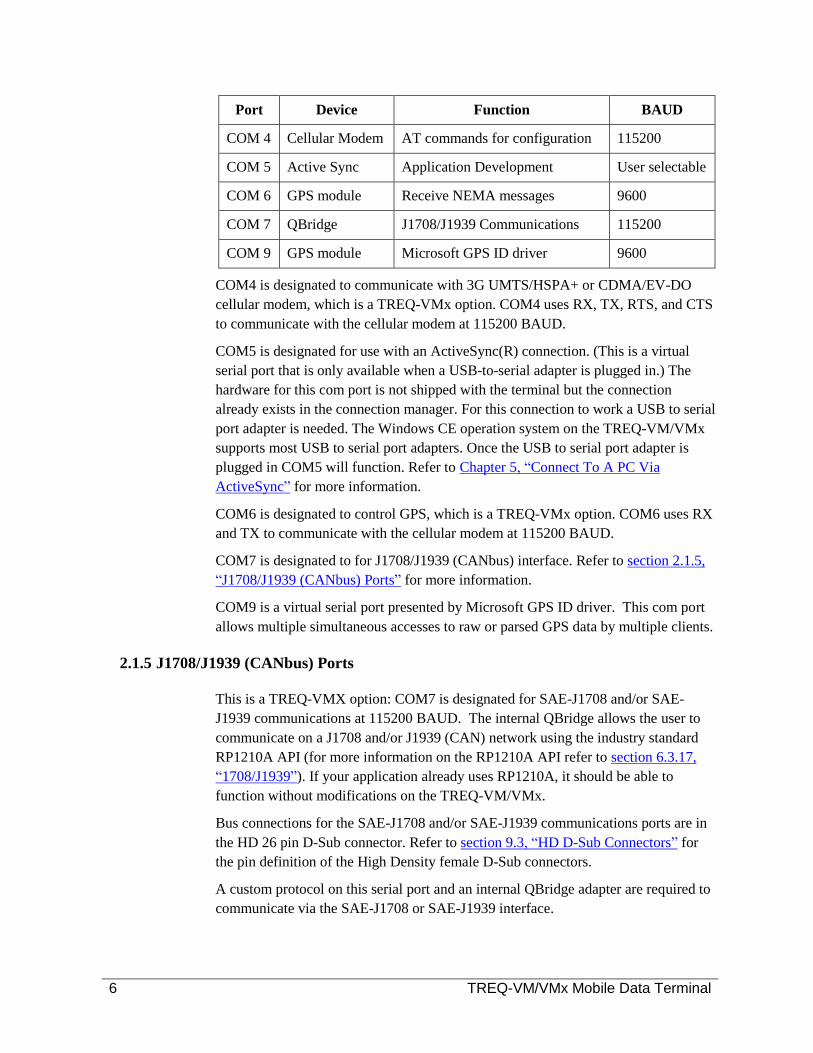
Port Device Function BAUD
COM 4 Cellular Modem AT commands for configuration 115200
COM 5 Active Sync Application Development User selectable
COM 6 GPS module Receive NEMA messages 9600
COM 7 QBridge J1708/J1939 Communications 115200
COM 9 GPS module Microsoft GPS ID driver 9600
COM4 is designated to communicate with 3G UMTS/HSPA+ or CDMA/EV-DO
cellular modem, which is a TREQ-VMx option. COM4 uses RX, TX, RTS, and CTS
to communicate with the cellular modem at 115200 BAUD.
COM5 is designated for use with an ActiveSync(R) connection. (This is a virtual
serial port that is only available when a USB-to-serial adapter is plugged in.) The
hardware for this com port is not shipped with the terminal but the connection
already exists in the connection manager. For this connection to work a USB to serial
port adapter is needed. The Windows CE operation system on the TREQ-VM/VMx
supports most USB to serial port adapters. Once the USB to serial port adapter is
plugged in COM5 will function. Refer to Chapter 5, “Connect To A PC Via
ActiveSync” for more information.
COM6 is designated to control GPS, which is a TREQ-VMx option. COM6 uses RX
and TX to communicate with the cellular modem at 115200 BAUD.
COM7 is designated to for J1708/J1939 (CANbus) interface. Refer to section 2.1.5,
“J1708/J1939 (CANbus) Ports” for more information.
COM9 is a virtual serial port presented by Microsoft GPS ID driver. This com port
allows multiple simultaneous accesses to raw or parsed GPS data by multiple clients.
2.1.5 J1708/J1939 (CANbus) Ports
This is a TREQ-VMX option: COM7 is designated for SAE-J1708 and/or SAE-
J1939 communications at 115200 BAUD. The internal QBridge allows the user to
communicate on a J1708 and/or J1939 (CAN) network using the industry standard
RP1210A API (for more information on the RP1210A API refer to section 6.3.17,
“1708/J1939”). If your application already uses RP1210A, it should be able to
function without modifications on the TREQ-VM/VMx.
Bus connections for the SAE-J1708 and/or SAE-J1939 communications ports are in
the HD 26 pin D-Sub connector. Refer to section 9.3, “HD D-Sub Connectors” for
the pin definition of the High Density female D-Sub connectors.
A custom protocol on this serial port and an internal QBridge adapter are required to
communicate via the SAE-J1708 or SAE-J1939 interface.
Page 15
TREQ-VM/VMx Mobile Data Terminal 7
NOTE Undocking the terminal from the cradle will abruptly terminate J1708 and J1939
communications. For recommended undocking procedures refer to section 3.1,
“Docking and Undocking the TREQ-VM/VMx”.
2.1.6 USB Ports
The TREQ-VM/VMx also has four powered (500 mA per port) high-speed USB host
ports that are USB 2.0 compliant. There are two ports are located on the side of the
cradle. There is one on the side and one of the front of the terminal. The TREQ-
VM/VMx also supports a fifth USB port in the HD female 26 pin D-Sub connector.
Refer to section 9.3, “HD D-Sub Connectors” for the pin definition of the High
Density D-Sub connectors.
NOTE All USB ports can independently source 500mA per port. If a USB device draws more
than 500mA then the power to that port is removed. In order to restore power to the
port the offending device needs to be removed.
NOTE Undocking the terminal from the cradle will abruptly terminate communication with
cradle-connected USB devices. For recommended undocking procedures refer to
section 3.1, “Docking and Undocking the TREQ-VM/VMx”.
NOTE Power to the cradle USB connectors is disabled when power to the cradle is
removed.
NOTE Connecting external power to the USB ports will damage the TREQ-VM/VMx.
2.1.7 Ethernet (Wired and Wireless)
The TREQ-VM/VMx has an internal 10/100Base-T wired Fast Ethernet adapter. It
supports twisted pair crossover detection and auto-correction (HP Auto-MDIX). The
connection for the wired Ethernet is in the HD 26 pin D-Sub connector. Refer to
section 9.3, “HD D-Sub Connectors” for the pin definition of the High Density D-
Sub connectors.
The TREQ-VM/VMx has a 2.4 GHz 802.11b/g/n Ethernet adapter with internal
antenna. The Wi-Fi adapter is compatible with IEEE 802.11b and IEEE 802.11g/n
high data rate standards to provide wireless speed up to 150Mbps data rate. In
addition 64/128 WEP, WPA, AES security is supported.
NOTE Undocking the terminal from the cradle will abruptly terminate J1708 and J1939
communications. For recommended undocking procedures refer to section 3.1,
“Docking and Undocking the TREQ-VM/VMx”.
2.1.8 Cellular Modem
Refer to section 8.4.1, “Cellular Modem Antenna” for antenna gain requirements.
Page 16
8 TREQ-VM/VMx Mobile Data Terminal
The TREQ-VMx can be configured with a 2G GSM/GPRS, 3G UMTS/HSPA+ or
CDMA/EV-DO cellular modem. The 3G UMTS/HSPA+ option allows speeds up to
14.4 Mbps for downlink and 5.7 Mbps for uplink. The CDMA/EV-DO option allows
for EV-DO data rates up to 3.1Mbps. Refer to section 8.3, “Modem Features” for
detailed specifications.
For the 2G GSM/GPRS or 3G UMTS/HSPA+ internal modems, you will need a SIM
card and the APN (Access Point Name) information before attempting to connect to a
cellular data/voice network. (Refer to section 4.1.6.1, “2G and 3G UMTS/HSPA+
Modem” for information on activating the modem.)
For the CDMA/EV-DO, after the TREQ-VM/VMx is received, you need to contact
your cellular data/voice network provider to activate your modem. (Refer to section
4.1.6.2, “3G CDMA/EV-DO Modem” for information on activating the modem.)
NOTE Undocking the terminal from the cradle will abruptly terminate cellular data and
voice communications. For recommended undocking procedures refer to section 3.1
“Docking and Undocking the TREQ-VM/VMx”.
An SMA connector is provided on the back of the TREQ-VM/VMx for connection to
an antenna of your choice.
NOTE If you don’t have a cellular phone account, you will need to contact a cellular
network carrier to set it up. For most carriers, you will need to provide billing
information and possibly a business ID.
NOTE For voice calls, including a 911 emergency call, the TREQ-VMx needs to be
configured to use a wired headset or a Bluetooth headset needs to be paired with the
TREQ-VMx.
2.1.9 Speaker and Microphone
Speaker
The TREQ-VM/VMx includes two internally mounted 14 x 20 mm speaker,
providing the ability to play a variety of audio, including audible feedback,
warnings, messages, and media clips. Audio out is also available in the HD 15 pin
D-Sub connector. The audio out can be configured via software as line-out or as an
amplified output. Refer to section 9.3, “HD D-Sub Connectors” for the pin
definition of the High Density D-Sub connectors.
Microphone
TREQ-VM/VMx has a 6mm omnidirectional electret condenser microphone
located below the terminals display. This microphone does not connect to the
modem and cannot be used for voice communication.
Page 17
TREQ-VM/VMx Mobile Data Terminal 9
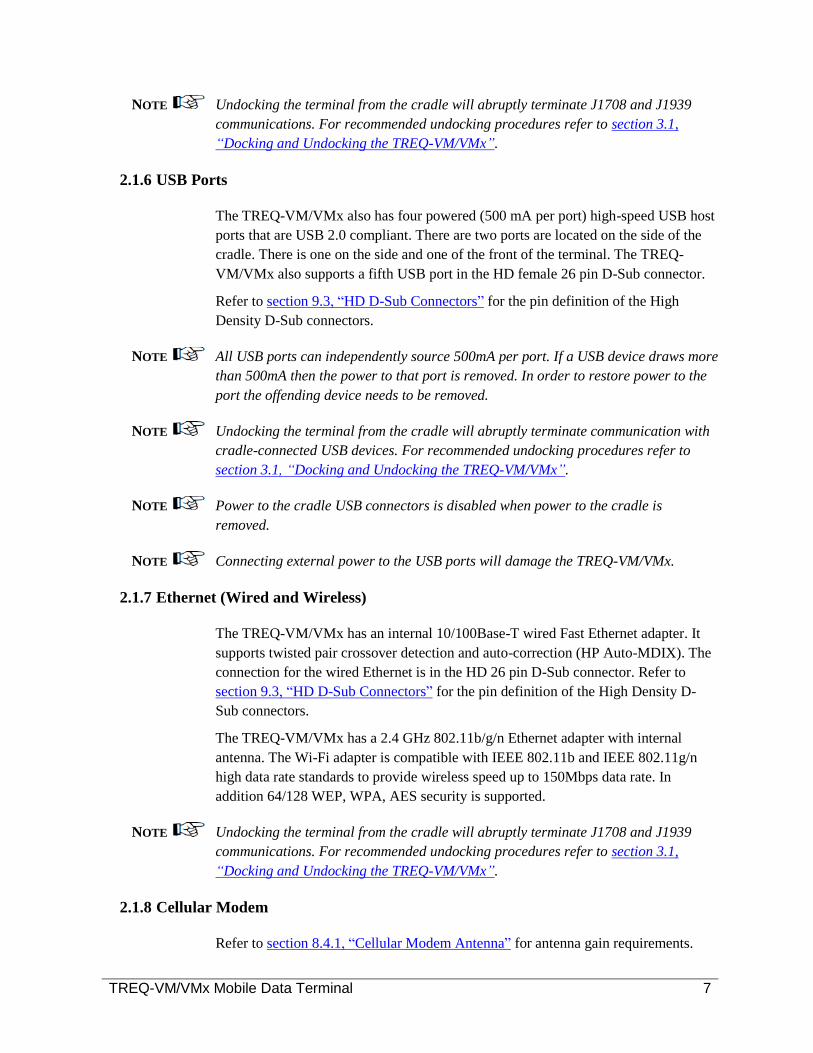
3.5mm TSR Headphone Jack Connector on back of Cradle
TREQ-VMx terminals have a 3.5 mm TRS (Tip, Ring, Sleeve) headphone jack
located on the back of the cradle. This jack can be configured for cellular modem
voice I/O or as speaker out. (The default configuration is the cellular modem voice
I/O. If speaker out is required please order it through the Beijer Electronics Sales
group.) The jack is located on back of the cradle. See Figure 1for the location of the
TRS headphone jack.
Figure 1
Location of the TSR Headphone Jack
Section of TRS
connector
Cellular Voice I/O Speaker Out
Tip Audio in to Modem Audio -
Ring Audio out of Modem Audio +
Sleeve Audio GND Audio GND
2.1.10 GPIO Signals
Four general purpose signals for input or output are accessible in the HD 26 pin D-
Sub connector. The inputs are 3.3 V compatible. The outputs are 3.3 V and 5 V
compatible. The outputs are configured as open drain.
3.5 mm TSR
Headphone Jack
Page 18
10 TREQ-VM/VMx Mobile Data Terminal
Refer to section 9.3, “HD D-Sub Connectors” for the pin definition of the High
Density D-Sub connectors and section 8.1, “Absolute Maximum Rating” for the
GPIO pins.
NOTE Undocking the terminal from the cradle will abruptly terminate connection to the
GPIO pins. For recommended undocking procedures refer to section 3.1, “Docking
and Undocking the TREQ-VM/VMx”.
2.1.11 GPS
Refer to section 8.4.2, “GPS Antenna” for antenna requirements.
The GPS receiver is a 20-channel GPS that reports position data over a standard
serial port (COM6) at 115200 baud. The GPS receiver also uses the standard NMEA-
0183 format, and supports Wide Area Augmentation System (WAAS).
The GPS antenna must have a standard SMA interface. An active external antenna is
required. The current on the SMA to the GPS antenna is limited to 75mA, and can
supply from 1.8V up to 5.5V). The antenna impedance and any cabling needed needs
to be 50ohms.
The GPS receiver has the following features:
NMEA-0183 compliant protocol
20 parallel channels
DGPS (WAAS, EGNOS) support
SiRF Star III single chip technology
The Windows CE application MinTermCE (refer to section 4.8.2, “Beijer
Electronics”) can be used to receive data from the GPS receiver by setting the COM
port to COM6, the baud rate to 115200 bps with 8 data bits, no start bit and 1 stop bit
(8N1). After opening the COM port, NMEA messages from the GPS receiver will be
displayed in the MinTermCE receive window.
A-GPS (Assisted GPS) is also supported on the TREQ-VMx. However the
ephemerides XTRA.bin file will need to be downloaded and programmed into the
TREQ-VMx prior to use. Contact the Beijer Electronics Customer Support group for
more information on downloading XTRA.bin and enabling the A-GPS functionality.
NOTE Undocking the terminal from the cradle will abruptly terminate the connection to the
GPS module. For recommended undocking procedures refer to section 3.1, “Docking
and Undocking the TREQ-VM/VMx”.
2.1.12 Camera
The TREQ-VM/VMx may be equipped with an optional built-in rear-facing camera
that can capture VGA images (640 x 480 pixels). The camera window is on back of
Page 19
TREQ-VM/VMx Mobile Data Terminal 11
the terminal (see Figure 2 below) which is exposed when the removable terminal is
undocked from the cradle. For more info on driver and application development,
refer to section 6.3.18, “Camera”.
Figure 2
Location of the Camera
For more details of camera driver architecture, refer to following sites. Beijer
Electronics may implement some functions differently.
http://msdn.microsoft.com/en-us/library/ee481681%28v=winembedded.60%29
http://msdn.microsoft.com/en-us/library/ee486313%28v=winembedded.60%29.aspx
2.1.13 Ignition Sense
The TREQ-VM/VMx has an ignition sense pin in the HD 26 pin D-Sub connector.
This can be used to change the power state of the TREQ-VM/VMx. Refer to section
9.3, “HD D-Sub Connectors” for the pin definition of the High Density D-Sub
connectors and section 6.3.11, “Power” for more information on power states.
2.1.14 Dock Detect
The TREQ-VM/VMx has a dock detect signal in the dock connecter that goes
between the terminal and cradle portions of the TREQ-VM/VMx. This can be used to
determine if the terminal is docked to the cradle.
NOTE If the cradle is not powered, the terminal will report back that it is undocked even if
the terminal is docked in the cradle.
Camera
Page 20
12 TREQ-VM/VMx Mobile Data Terminal
2.1.15 Input Power
The TREQ-VM/VMx has an 8 to 32-volt input range and can be powered directly
from a 12- or 24-volt power supply. The terminal includes circuitry to protect against
normal variations such as transients and spikes (SAEJ1455 compliant). When power
is applied to the TREQ-VM/VMX it will boot automatically.
The TREQ-VM/VMx can operate on a supply voltage as low as six volts (measured
at the terminal) temporarily in order to withstand occasional low-voltage dips. Three
power pins and three ground pin have been provided in the HD D-Sub connecter to
allow for adequate current flow. A minimum of 26 AWG on each pin is required, it is
suggested that 22 AWG be used.
Occasional voltage dips can occur, for example, due to the effects of cold cranking
on a vehicle battery. Attached USB devices and the speaker (internal or external) will
temporarily lose power and the display backlight may dim (in order to save power) as
the supply voltage dips below about seven volts. TREQ-VM/VMx driver software
will restore these functions as the input voltage stabilizes to a higher voltage. An
Under Voltage Lock-Out (UVLO) detection circuit provides the capability for the
operating system to notify application software of a reduction and restoration of input
supply voltage level. Refer to section 6.3.11, “Power” for more details.
The TREQ-VM/VMx uses 10-12 watts during typical use. The power use can peak at
16-17 watts while charging the internal battery.
NOTE The TREQ-VM/VMx has a 5 Amp internal fuse that is not user serviceable. An inline
4A "Fast Blow" fuse with fuse holder for HHC/HHD blade-type fuses should be
added to the power cable.
NOTE If your solution requires that the TREQ-VM/VMx turn on as the vehicle is started
connect the ignition pin to the ignition signal from the vehicle.
NOTE The TREQ-VM/VMx is not shipped with mating cables for the cradle so the necessary
cabling will need to be added for your solution.
2.1.16 Internal Battery
WARNING
Please read the IMPORTANT BATTERY SAFETY INSTRUCTIONS AND
WARNINGS at the beginning of this manual before using or charging the battery
in your new TREQ-VM/VMx. Charging of the TREQ-VM/VMx is covered in
section 3.4, “Charging the TREQ-VM/VMx”.
The TREQ-VM/VMx provides an internal battery to:
Support the device functionality in the removable configuration.
Provide power backup if the main power source is disconnected.
Page 21
TREQ-VM/VMx Mobile Data Terminal 13
The TREQ-VM/VMx automatically manages power and battery recharging control to
provide the most effective battery service. However, the developers of removable
applications need to:
Consider the power limitations of this mode.
Manage significant power consuming features, such as: wireless communication
interfaces, USB devices, and so on.
The operation time of the TREQ-VM/VMx while powered by the internal battery is
dependent on the peripherals and applications being used. Nevertheless, the estimated
time of continued operation for standard applications is ~1 hour.
The TREQ-VM/VMx is shipped with the battery charged to 50% of capacity. In this
case, the shelf lifetime of the battery is about six months. If the TREQ-VM/VMx is
not used during this period, the battery must be recharged up to 50% of capacity
again to continue the storage.
The operating system contains Control Panel applets to indicate the current charge
level of the battery, power source (external or battery), and other information. Refer
to section 4.1.11, “Power Properties” for more details.
Power may be connected to the TREQ-VM/VMx at any time. When external power
is detected, the TREQ-VM/VMx will use external power instead of the battery for
operation. The internal battery is charged by connecting an 8V to 32V DC to the
power pins of the terminal.
NOTE The TREQ-VM/VMx internal battery pack is not user-serviceable. Please contact
Beijer Electronics Service group for battery service or replacement.
DO NOT attempt to remove the battery pack from the terminal housing.
DO NOT puncture, bend, or place mechanical strain on the battery pack.
DO NOT attempt to charge the battery pack by any means other than the battery
charge circuitry included in the TREQ-VM/VMx.
NOTE The operating temperature range of the TREQ-VM/VMx is limited to -20°C to
+60°C; however, charging of the internal battery is limited to 0°C to +35°C. The
TREQ-VM/VMx automatically detects out-of-range temperature situations and stops
the charge/discharge of the battery.
The battery on the TREQ-VM/VMx can be over depleted and cause the system to not
boot. On the system the green LED on the power button will light up and the screen
will come on with a mostly white screen or stay black in color.
If that is the case, connect power to the TREQ-VM/VMx so that the system will start
charging the battery. Make sure that the TREQ-VM/VMx is powered down by
holding the power button for 8 seconds.
Page 22
14 TREQ-VM/VMx Mobile Data Terminal
After the TREQ-VM/VMx has been charging for a while, press the power button to
turn on the system. If the system still does not boot then power it down and let the
system charge longer.
Continue this process until the system boots.
If the TREQ-VM/VMx still does not boot, contact Beijer Electronics Customer
Support group for further help.
2.1.17 Real Time Clock
The real time clock (RTC) has a separate coin-cell battery for operation. This
additional battery provides reliable RTC operation regardless of the main battery
charge state.
The real time clock battery should have a life of approximately 10 years. If the
terminal no longer keeps accurate time please contact Beijer Electronics Service
group for RTC battery service.
2.1.18 Housing
The TREQ-VM/VMx housing is made of a tough industrial polycarbonate resin that
is designed to withstand everyday use in commercial mobile environments.
A four-bolt stud pattern on the back of the case allows installation of the TREQ-
VM/VMx using industry-standard mounts such as RAM Mount products.
A custom logo may be pad printed on the front of the case. The standard options for
pad printing are the TREQ-VM/VMx logo or no printing (blank). Please contact
Beijer Electronics Sales group about the logo configuration.
2.1.19 Main Connectors
The TREQ-VM/VMx does not have an integral cable on the back. Instead there are
two possible HD female D-Sub connectors on the TREQ-VM/VMx system. The
TREQ-VM has only the HD female 26 pin D-Sub connector. The TREQ-VMx has
both a HD female 26 pin D-Sub connector and a HD female 15 pin D-Sub connector.
The HD female 26 pin D-Sub connector includes power in, ground, signals for
COM1, signals for COM2, one wired Ethernet, J1708 bus, J1939/Can bus, ignition
sense, and one USB port.
The HD female 15 pin D-Sub connector includes 2x general purpose inputs, 2x
general purpose outputs, signals for COM3, audio out.
For referencing grounds to signal, be advised of the following:
There is no dedicated ground reference for the serial communication signals, but
you may reference them to power return pins 11, 23, and 24.
The RAM mount studs are not connected to any other conductor and are floating.
Page 23
TREQ-VM/VMx Mobile Data Terminal 15
Drain ground on pin 25 is not connected (floating) and is meant to be optionally
connected to power return or chassis ground at the customer equipment end of the
TREQ-VM/VMx cable for shielding.
USB host ground pin 10 is meant to be a power return for cable-powered USB
clients. If a USB client device does not require USB host power (pin 19), you may
reference the USB D+/D- signals to TREQ-VM/VMx power return; i.e., connect
your USB client device ground to pin 11, 23, or 24.
The built-in USB host port grounds and shields are connected to the same ground
as USB host ground on pin 10. This ground is used internally to the TREQ-
VM/VMx as a digital ground. It is a filtered (via common-mode choke) version of
the power return ground on pins 11, 23 and 24. Avoid connecting the USB grounds
to the power return ground, as this will defeat the purpose of the filter (e.g.,
spike/transient reduction on the TREQ-VM/VMx’s power supply) and could
introduce unwanted noise into the TREQ-VM/VMx circuitry.
Refer to section 9.3, “HD D-Sub Connectors” for the pin definition of the High
Density female D-Sub connectors.
2.1.20 Developer’s Kit
The TREQ-VM/VMx Developer’s Kit includes all of the hardware and software tools
necessary for developing applications on the TREQ-VM/VMx mobile data terminal.
Please contact Beijer Electronics Sales group to purchase a Developer’s kit. These
include the following:
Break Out Box with power supply. This device is used to power the TREQ-
VM/VMx and break out all signals in the HD D-Sub connectors to standard type
connector. Refer to Chapter 6, “Application Development” for more information on
setting up the TREQ-VM/VMx to debug and develop applications over an Ethernet
connection. Refer to section 9.5, “Break Out Box (BoB) Pinouts” for pinout and
connection information.
USB to serial converter and null modem serial cable. These items can be used to
set up an ActiveSync® connection between the TREQ-VM/VMx and a PC. An
ActiveSync connection can be used to download and debug applications written for
the TREQ-VM/VMx. Refer to Chapter 6, “Application Development” and Chapter
5, “Connect To A PC Via ActiveSync” for additional information.
USB memory drive. This device may be inserted into one of the TREQ-
VM/VMx‘s USB ports and used as an external hard disk. The drive contains the
TREQ-VM/VMx user guide, software development kit (SDK), and demo
application source code.
The SDK provides support for developing applications for the TREQ-VM/VMx in
the form of libraries and header files. Refer to section 6.2.2, “SDK Installation” for
more information on the software development kit.
Page 24
16 TREQ-VM/VMx Mobile Data Terminal
Source code and a Microsoft Visual Studio 2008 solution are provided for the
demo application preinstalled on TREQ-VM/VMx terminals with the Developer’s
Kit. The demo is a .NET-based application that is written in C# and provides
several examples of how to interface with the TREQ-VM/VMx hardware.
RAM mount. Refer to section 9.1, “Removable TREQ-VM/VMx Layout and
Dimensions” and section 9.4, “RAM Mount” for mechanical dimensions.
Refer to the “Getting Started” insert included with the TREQ-VM/VMx Developer’s
Kit for a drawing and quick start instructions.
2.2 Bootloader
The TREQ-VM/VMx has a Bootloader that executes on boot-up, loads the Windows
CE kernel into memory, and boots the kernel. A customizable splash screen is loaded
within three seconds of the power button being pressed. The Bootloader displays a
green progress bar towards the bottom of the splash screen to indicate boot progress.
The boot time of the TREQ-VM/VMx is typically 14 seconds.
The splash screen is a hidden system file that can be replaced with any BMP type
image that has 24-bit color and is 800 by 480 pixels. The name of the file must be
NK.BMP for the normal Windows CE OS or SOS.BMP for the recovery image in
order for the bootloader to load it.
If the logo is not being displayed verify that NK.BMP or the SOS.BMP exists and is
located in \HardDisk\. It is possible that the Windows Explorer view options have
been set hide protected operating system files and to not show hidden files and
folders. Under [View], [Options…] uncheck ‘Do not show hidden files and folders’
and ‘Hide protected operating systems files’.
There is not a way to view the image on the TREQ-VM/VMx but the files can be
copied to a USB drive and viewed on a PC.
If file is missing or corrupt, copy NK.BMP or SOS.BMP from another device or an
OS image to \HardDisk\. Refer to section 10.6, “System Backup and Recovery” for
additional information.
2.3 Software
2.3.1 Windows CE
The TREQ-VM/VMx runs the Windows Embedded CE 6.0 R3 operating system.
Windows CE is a resource-constrained and scalable version of Microsoft Windows
for embedded hardware that offers broad support for third-party application
development, software, and hardware.
The TREQ-VM utilizes the Core or Professional (optional) version of Windows CE.
The TREQ-VMx utilizes the Professional version of Windows CE only. Windows
CE includes application support libraries, graphical shell (Windows Explorer), and
other items. The Core version does not include Windows Media Player (CODECs are
Page 25
TREQ-VM/VMx Mobile Data Terminal 17
included) and Internet Explorer. For a complete list of differences, refer to the
comparison chart available from the following Web site:
http://www.microsoft.com/windowsembedded/en-us/develop/windows-embedded-ce-6-os-
components.aspx
NOTE There is a Windows CE recovery image named SOS.bin located in the \HardDisk
directory as well. The recovery image will execute if NK.bin is missing or corrupt.
The recovery image can also be loaded upon request to perform certain operations
that are difficult to do from the normal image.
WARNING
Do not modify or delete SOS.bin. If SOS.bin is missing or corrupted, you cannot
enter the recovery mode. Refer to section 10.6, “System Backup and Recovery”.
The graphical shell contains program management and control panel routines.
Following are some of the components that are included with the TREQ-VM/VMx:
Active Template Library
Microsoft Foundation Classes
.NET Compact Framework v3.5
ActiveSync
Local Area Networking
Wide Area Networking
Peer-to-Peer Networking
BlueTooth
Microsoft Cellular Core (Professional version)
Power Management
Hive-based (persistent) Registry
Direct Draw video graphics engine
Command Shell
Graphical Shell
Soft Keyboard
The professional version of Windows CE on the TREQ-VM/VMx uses about 36
Mbytes of disk space in the form of an image file named NK.BIN in the \HardDisk
directory. (The core version of Windows CE uses 26Mbytes of disk space.) This file
contains all of the above components and the code required to set up and operate
TREQ-VM/VMx hardware (device drivers). The operating system may need to be
Page 26
18 TREQ-VM/VMx Mobile Data Terminal
upgraded for future releases. Contact Beijer Electronics Customer Support group for
details on how to upgrade the TREQ-VM/VMx system package.
2.3.2 Device Drivers
The TREQ-VM/VMx contains hardware peripherals that require additional support
beyond that provided by Windows CE to set up and operate. Beijer Electronics
provides software device drivers for these peripherals as part of the standard
operating system installation. Following is a list of some peripherals requiring Beijer
Electronics-provided support.
LCD display
Display backlight
Audio codec/controller
Touch screen
RP1210A API for J1708/J1939 vehicle bus communications
Serial ports
Ethernet interface
USB host ports
Battery Management
Power management
Docking state
Real time clock
Power transition state based on ignition input
GPS Intermediate Driver (GPSID)
Audio Gateway Service
Radio Interface Layer (RIL) / MUX driver (Professional version)
Device drivers are included in the operating system as dynamically linked libraries.
They are loaded and initialized at boot-up and provide run-time interfaces for
application programming.
A standard driver application interface allows you to dynamically configure the
hardware without detailed knowledge about the components. For example, you can
set the display and keypad backlight intensities. See Chapter 6, “Application
Development” for details on the device driver program interfaces and how they can
be used in user applications.
Page 27
TREQ-VM/VMx Mobile Data Terminal 19
2.3.3 System Settings
Control Panel applets provide a graphical user interface for controlling some of the
TREQ-VM/VMx hardware peripherals. These applets utilize the device driver
interfaces described in the previous section. Display the control panel in Windows
CE by tapping the Start menu and then Settings, Control Panel (see Figure 3).
The TREQ Panel desktop shortcut provides a convenient central location to access
most of the commonly used hardware controls. Refer to Chapter 4, “System Settings”
for detailed information about the TREQ Panel and other control panel applets that
control the TREQ-VM/VMx hardware.
Figure 3
Windows CE Control Panel
2.3.4 Applications
Windows CE comes with several user applications (refer to section Chapter 1,
“Introduction”). In addition, there are a variety of utility applications available with
Windows CE. These applications are located either in the \Windows directory or on
the developer’s flash drive in the \HardDisk\BIN directory. Beijer Electronics
provides applications to supplement the Windows CE applications, including
RegEditCE.exe for editing the registry. These applications are located on the flash
drive. In addition, you can write your own applications for the TREQ-VM/VMx.
These applications must be compiled for Windows CE running on an ARM platform.
See Chapter 6, “Application Development” for application development setup
instructions and code samples.
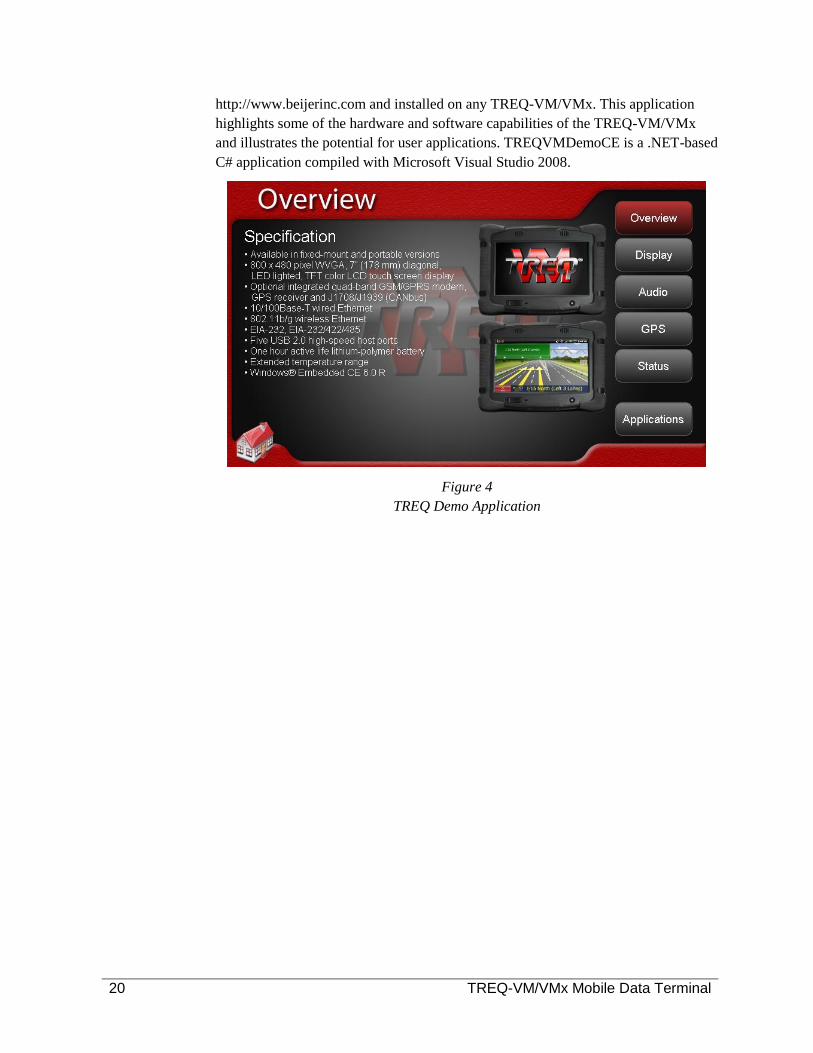
The TREQ-VM/VMx Developer’s Kit includes a special application called “TREQ
Demo” (see Figure 4). The demo application is available as a desktop shortcut. The
demo application and complete source code can be downloaded online from
Page 28
20 TREQ-VM/VMx Mobile Data Terminal
http://www.beijerinc.com and installed on any TREQ-VM/VMx. This application
highlights some of the hardware and software capabilities of the TREQ-VM/VMx
and illustrates the potential for user applications. TREQVMDemoCE is a .NET-based
C# application compiled with Microsoft Visual Studio 2008.
Figure 4
TREQ Demo Application
Page 29
TREQ-VM/VMx Mobile Data Terminal 21
CHAPTER 3
GETTING STARTED
3.1 Docking and Undocking the TREQ-VM/VMx
Some TREQ-VM/VMx systems are considered ‘removable’. This means that the
terminal can be removed from their charging cradle. To undock the terminal from the
cradle, pull the cradle latch towards the terminal then pivot the terminal down while
holding the latch in the release position.
Figure 5
Undocking the Terminal from the Cradle
The cradle contains many of the system’s peripherals, including wired Ethernet, GPS,
cellular modem, serial ports and vehicle bus connections. If the TREQ-VM/VMx is
removed from the cradle, it will lose communication with those devices. So it is very
important that the programmer manage the removability aspect of the peripherals.
Things the programmer needs to consider:
Wired Ethernet, GPS, cellular modem and serial ports and vehicle bus connections
go away.
What happens during a file download either through the cellular modem interface
or the wired Ethernet connection when the terminal is undocked?
What programmed settings to the cellular modem need to be re-initialized after a
dock event?
Cradle Latch
Page 30
22 TREQ-VM/VMx Mobile Data Terminal
Are there are files opened when the terminal is undocked?
What happens on a voice call when the terminal is undocked?
Most USB devices (i.e. mouse and keyboard) will be functional again after a dock
event without re-initialization.
In addition, if the TREQ-VM/VMx loses its external power source it will be powered
by its internal battery. The internal battery does not power the cradle, so if external
power is lost, cradle-based peripherals will no longer function until external power is
restored. This applies to all TREQ-VM/VMx systems, not just removable ones.
3.2 Connecting Power to the TREQ-VM/VMx
Apply power to all the power pins (pins 20, 21, 22 for high side voltage and pins 23
and 24 for ground or power return; pin 25 is an optional ground pin). Refer to section
9.3, “HD D-Sub Connectors” for the pin definition of the High Density female D-Sub
connectors.
The TREQ-VM/VMx will start to boot as power is connected to the cradle. If the
system is removable then the terminal must be docked so that the TREQ-VM/VMx
will start to boot as power is applied to the cradle. The green LED on the power
button will light up indicating the boot process has started.
There are three high side power pins and two power return pins. It is recommended
that all the power pins are connected. Each pin can carry 2 amps of current, most pins
support 22 AWG wire.
3.3 Power On/Off/Reset
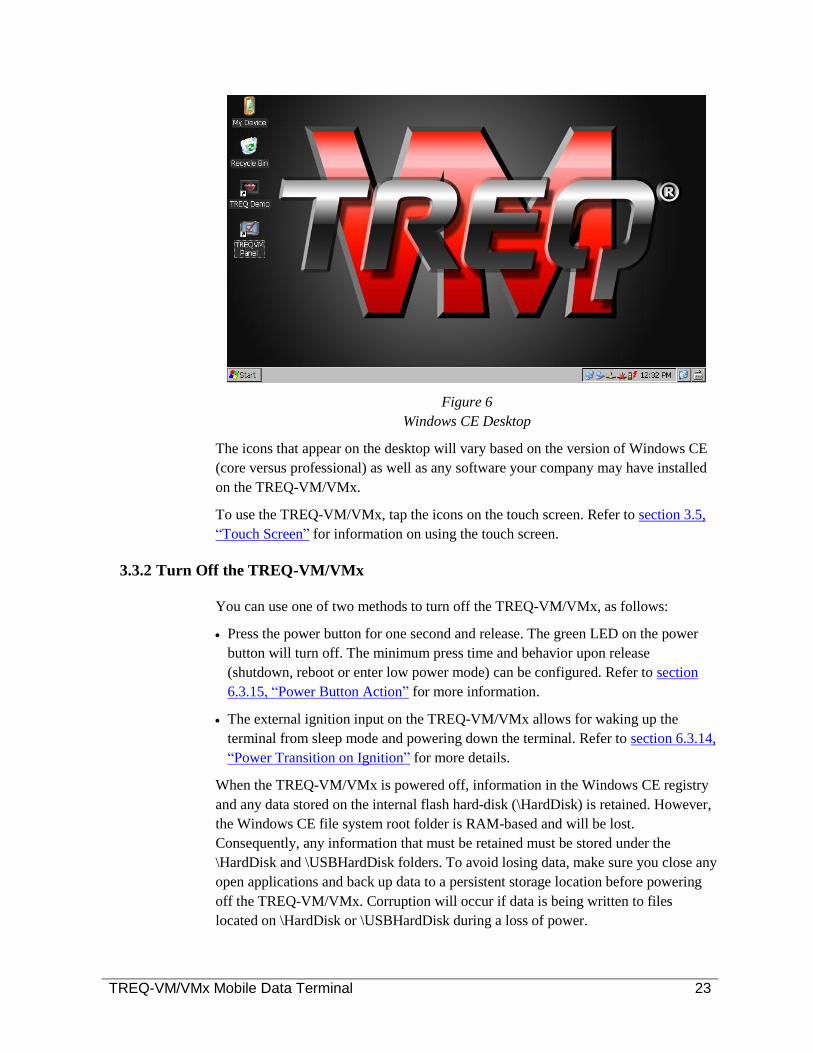
3.3.1 Turn On the TREQ-VM/VMx
To turn on the TREQ-VM/VMx, briefly press and release the power button on the
front of the terminal. If the TREQ-VM/VMx is docked you can apply power to the
power pins (pins 20, 21, 22 for power supply and pins 23 and 24 for return) of the
HD female 26 pin D-Sub connector to turn the system on. The green LED on the
power button of the TREQ-VM/VMx will turn on as it boots and loads the operating
system, as shown in Figure 6.
Page 31
TREQ-VM/VMx Mobile Data Terminal 23
Figure 6
Windows CE Desktop
The icons that appear on the desktop will vary based on the version of Windows CE
(core versus professional) as well as any software your company may have installed
on the TREQ-VM/VMx.
To use the TREQ-VM/VMx, tap the icons on the touch screen. Refer to section 3.5,
“Touch Screen” for information on using the touch screen.
3.3.2 Turn Off the TREQ-VM/VMx
You can use one of two methods to turn off the TREQ-VM/VMx, as follows:
Press the power button for one second and release. The green LED on the power
button will turn off. The minimum press time and behavior upon release
(shutdown, reboot or enter low power mode) can be configured. Refer to section
6.3.15, “Power Button Action” for more information.
The external ignition input on the TREQ-VM/VMx allows for waking up the
terminal from sleep mode and powering down the terminal. Refer to section 6.3.14,
“Power Transition on Ignition” for more details.
When the TREQ-VM/VMx is powered off, information in the Windows CE registry
and any data stored on the internal flash hard-disk (\HardDisk) is retained. However,
the Windows CE file system root folder is RAM-based and will be lost.
Consequently, any information that must be retained must be stored under the
\HardDisk and \USBHardDisk folders. To avoid losing data, make sure you close any
open applications and back up data to a persistent storage location before powering
off the TREQ-VM/VMx. Corruption will occur if data is being written to files
located on \HardDisk or \USBHardDisk during a loss of power.
Page 32
24 TREQ-VM/VMx Mobile Data Terminal
3.3.3 Reset the TREQ-VM/VMx
Reset the TREQ-VM/VMx if the operating system stops operating. Press and hold
the power button (bottom-right) for eight seconds. The green LED on the power
button on the TREQ-VM/VMx will turn on as the TREQ-VM/VMx reboots. If the
TREQ-VM/VMx does not restart, verify that power is connected to the HD female
D-Sub 26 connector. The TREQ-VM/VMx can also be reset through software or
ignition control.
If the operating system is responding, the registry can be modified to change the
power button response. Refer to section 6.3.15, “Power Button Action” for more
information.
3.4 Charging the TREQ-VM/VMx
WARNING
Please read the IMPORTANT BATTERY SAFETY INSTRUCTIONS AND
WARNINGS section at the beginning of this manual before using or charging the
battery in your new TREQ-VM/VMx.
The TREQ-VM/VMx is shipped with the battery charged to 50% of capacity. To
charge the battery, place the TREQ-VM/VMx on the cradle. Power is supplied
through the HD female 26 pin D-Sub connecter located on the back of the TREQ-
VM/VMx. Refer to section 9.3, “HD D-Sub Connectors” for the pin definition of the
High Density female D-Sub connectors.
The battery icon in the Windows CE taskbar indicates the charging status of the
battery. When charging, the battery icon will display a thunderbolt; if device is
running off battery then it will show two batteries instead.
Once the device is fully charged you will see an icon with a power outlet in the
taskbar:
If the battery voltage is low you will see an icon with battery and an exclamation
point.
Page 33
TREQ-VM/VMx Mobile Data Terminal 25
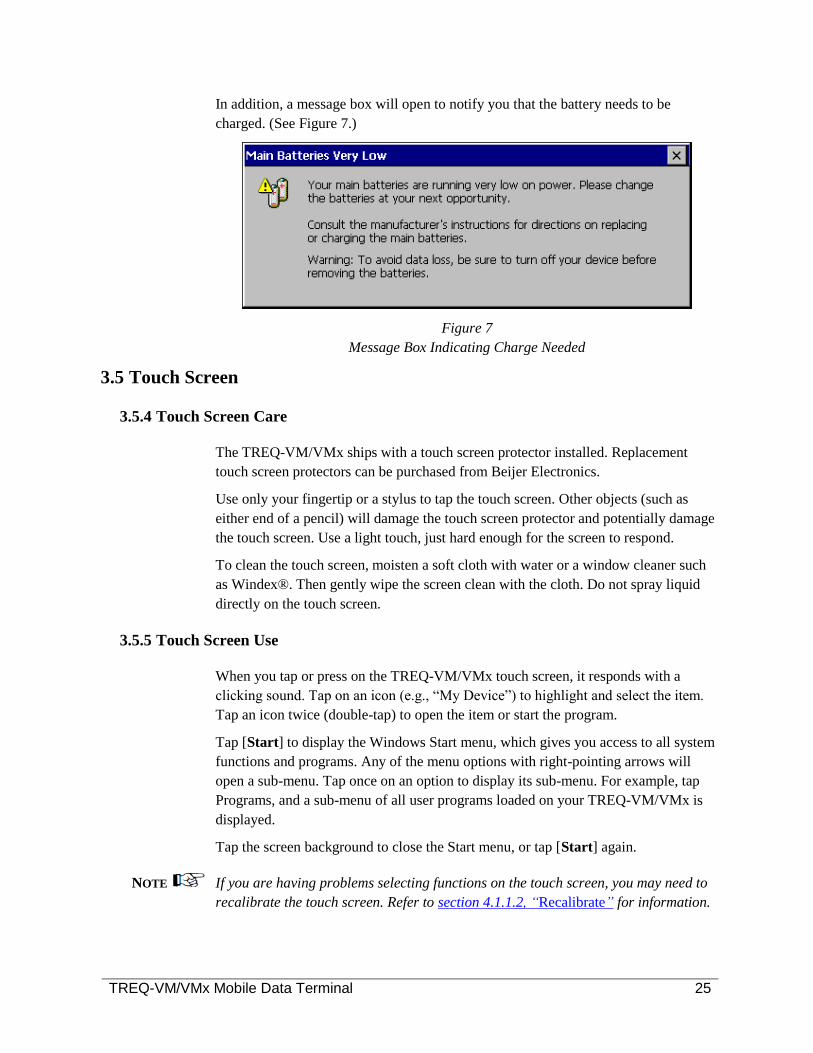
In addition, a message box will open to notify you that the battery needs to be
charged. (See Figure 7.)
Figure 7
Message Box Indicating Charge Needed
3.5 Touch Screen
3.5.4 Touch Screen Care
The TREQ-VM/VMx ships with a touch screen protector installed. Replacement
touch screen protectors can be purchased from Beijer Electronics.
Use only your fingertip or a stylus to tap the touch screen. Other objects (such as
either end of a pencil) will damage the touch screen protector and potentially damage
the touch screen. Use a light touch, just hard enough for the screen to respond.
To clean the touch screen, moisten a soft cloth with water or a window cleaner such
as Windex®. Then gently wipe the screen clean with the cloth. Do not spray liquid
directly on the touch screen.
3.5.5 Touch Screen Use
When you tap or press on the TREQ-VM/VMx touch screen, it responds with a
clicking sound. Tap on an icon (e.g., “My Device”) to highlight and select the item.
Tap an icon twice (double-tap) to open the item or start the program.
Tap [Start] to display the Windows Start menu, which gives you access to all system
functions and programs. Any of the menu options with right-pointing arrows will
open a sub-menu. Tap once on an option to display its sub-menu. For example, tap
Programs, and a sub-menu of all user programs loaded on your TREQ-VM/VMx is
displayed.
Tap the screen background to close the Start menu, or tap [Start] again.
NOTE If you are having problems selecting functions on the touch screen, you may need to
recalibrate the touch screen. Refer to section 4.1.1.2, “Recalibrate” for information.
Page 34
26 TREQ-VM/VMx Mobile Data Terminal
3.6 System Setting
To access the system settings (calibration, double-click (double-tap), backlight,
keyboard, TREQ panel, date/time, volume and sounds, and more) through the
Windows CE control panel, select Start, Settings, and Control Panel as shown below
in Figure 8.
Figure 8
Windows CE Start Menu
Refer to Chapter 4, “System Settings” for information on the control panel settings.
3.7 Installing Third-Party or Custom Software
You can install any software application on the TREQ-VM/VMx that is compatible
with Windows CE, has been compiled for the ARM platform, and does not exceed
the system requirements of your TREQ-VM/VMx. You can download it from a
network or the Internet (depending on your interface setup), or you can use
ActiveSync (refer to Chapter 5, “Connect To A PC Via ActiveSync” for
information).
Third-party software applications are typically packaged in a Microsoft CAB file
format, which are then packaged in a PC-side installer executable or Microsoft MSI
file. The bare CAB files can be copied to the TREQ-VM/VMx and installed
manually, or the MSI file can be executed on a PC and the included CAB file
downloaded and installed via ActiveSync.
For applications installed via ActiveSync, execute the downloaded installation file
from Windows Explorer on a PC. The application installer should automatically
launch ActiveSync, download a CAB file to the TREQ-VM/VMx, and initiate
installation of the CAB file on the TREQ-VM/VMx .
Page 35
TREQ-VM/VMx Mobile Data Terminal 27
A CAB file can be downloaded directly to the TREQ-VM/VMx without ActiveSync.
For this type of installation, double-tap the CAB file from a Windows Explorer
session on the TREQ-VM/VMx to initiate the installation process.
NOTE It is recommended that the destination of the CAB file installation files be in the
HardDisk directory because that storage location is on the internal persistent
storage, otherwise the installation will be lost after a power cycle. See section 3.3.2,
“Turn Off the TREQ-VM/VMx” for more details.
NOTE See section 10.2, “Operating System” for information about UpgradeCE.exe, a
Beijer Electronics package manager program that can be used similarly to the
Windows CE CAB installer. UpgradeCE.exe software application packages and
settings are retained even after system firmware upgrades.
3.8 Run Third-Party Software
Third-party or custom software installed on the TREQ-VM/VMx may be listed in the
Start menu under “Programs”. Tap a program name in the menu to run the program.
A program may also have an icon on the desktop, if so, double-tap the icon to start
the program.
3.9 Build Your Own Software
You can write your own applications using Microsoft programming tools. Refer to
Chapter 6, “Application Development” for more information.
3.10 TREQ-VM/VMx Support
Beijer Electronics prides itself on its support. If you run into problems developing for
your TREQ-VM/VMx or have questions as to the best way to tackle a problem, do
not hesitate to contact our Customer Support group ([email protected] ). For
online help and support, visit www.beijerinc.com/support.
If you suspect that your TREQ-VM/VMx may require service repairs, first visit our
online support and follow the instructions on how to troubleshoot the suspected issue
or contact our Customer Support group. Then go to
www.beijerinc.com/support/contact/rma_request.php and submit an online RMA.
Page 36
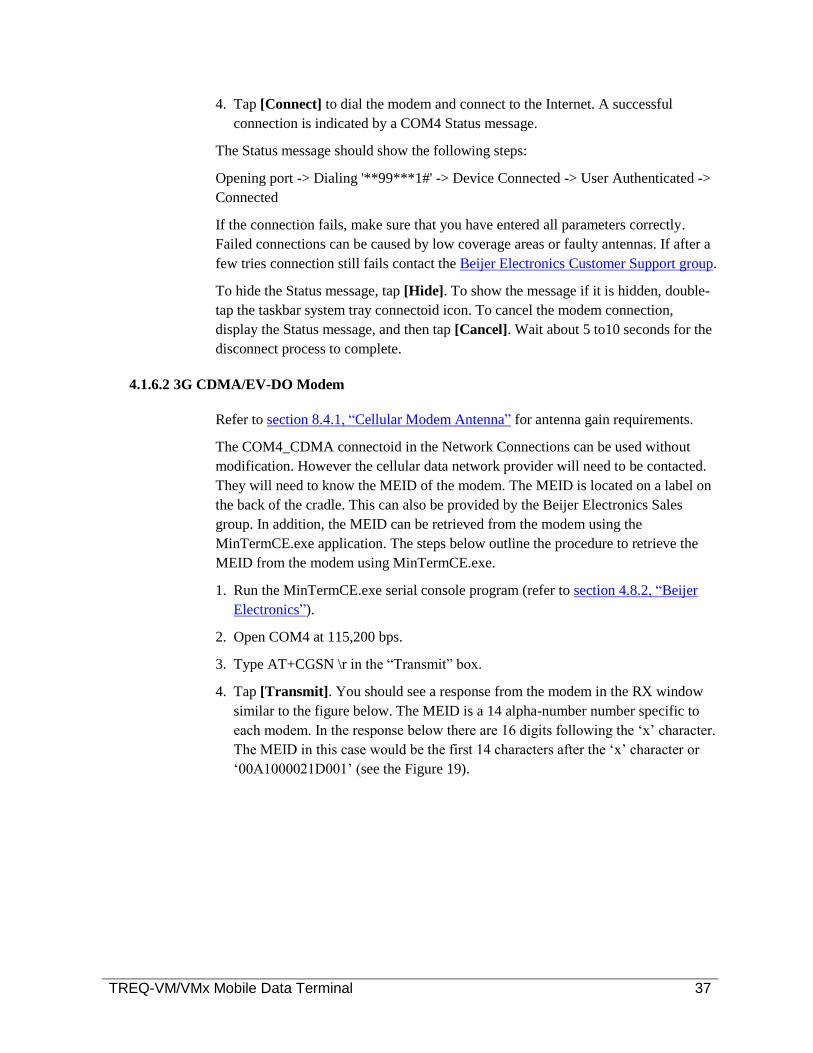
28 TREQ-VM/VMx Mobile Data Terminal
CHAPTER 4
SYSTEM SETTINGS
4.1 Control Panel
Many of the system settings can be adjusted through the Windows CE control panel.
To access the control panel, select Start, Settings, and Control Panel.
Figure 9
Windows CE Control Panel
Applets on the control panel that are used to configure TREQ-VM/VMx settings
include the following (see Figure 9 for the Windows CE Control Panel):
Stylus
PC Connection
Keyboard
Date/Time
Volume and Sounds
Network and Dial-up Connections
Storage Manager
4.1.1 Stylus
Use the Stylus applet to set the double-tap speed and spacing or to recalibrate the
touch screen. You should recalibrate any time it becomes difficult to make selections
or to double-tap items on the screen. Double-tap the Stylus icon on the control panel,
and the Stylus Properties dialog box is displayed.
Page 37
TREQ-VM/VMx Mobile Data Terminal 29
4.1.1.1 Double-Tap
To set the speed and distance between double-taps, tap the Double-Tap tab, as shown
below.
Figure 10
Stylus Properties, Double Tap
On the checkered grid at the top, tap the grid twice (double-tap) using a tap speed that
is comfortable for you. The tap speed should be quick, but not so quick that it
becomes difficult to do.
Below the checkered grid is an image of a “director’s” sign. Double-tap on the image
to test your new setting. The top of the sign should lift up or drop down with each
double-tap. If it does not, reset the double-tap action on the checkered grid.
You can keep resetting the double-tap until it is right for you. Tap [OK] to save any
changes and exit. Tap [X] to exit the dialog box without saving.
4.1.1.2 Recalibrate
To recalibrate the touch screen, tap the Calibration tab, as shown below.
Figure 11
Stylus Properties, Calibration
Tap [Recalibrate], and a large “+” symbol is displayed on the screen. Tap and hold
briefly as close to the center of the symbol as possible. When you lift the stylus, the
Page 38
30 TREQ-VM/VMx Mobile Data Terminal
symbol moves to another location on the screen. Tap and hold the center of the
symbol again; lift the stylus, and the symbol moves again. In order to fully calibrate
the touch screen, you must continue this process until you have tapped the center of
the symbol five times. These five taps are used to calculate the horizontal and vertical
offset parameters of the touch screen. If the symbol continues to move after the fifth
tap, the calibration was unsuccessful and you must repeat the five taps. An
unsuccessful calibration results when the offset calculated for one calibration point
differs from another. If the calibration is successful, the “+” symbol is no longer
visible. Tap the touch screen one more time, or press [Enter] on a connected USB
keyboard, to save the calibration settings. Press [ESC] on a connected USB keyboard
at any time during the calibration process to discard new calibration settings and exit
the recalibration process.
Touch screen calibration data is stored in the persistent registry (refer to section 4.4,
“Registry” for more information). After the system has been calibrated once, the
calibration data is retained between re-boots. The touch screen calibration screen
automatically appears when you boot the system if there is no calibration data present
in the registry.
4.1.2 PC Connection
Use the PC Connection control panel applet to enable or disable remote connections
with a desktop PC (ActiveSync). Refer to Chapter 5, “Connect To A PC Via
ActiveSync” for more information about setting up an ActiveSync connection. Select
the checkbox labeled, “Allow connection with desktop computer when device is
attached” to enable remote PC connections with the TREQ-VM/VMx (see Figure
12).
Figure 12
PC Connection Properties
The default device used for remote connection is the USB-to-serial converter, which
appears in Windows CE as the serial port device on COM5 (“USB COM5”).
Tap [OK] to save any changes and exit. Tap [X] to exit the dialog box without
saving.
Page 39
TREQ-VM/VMx Mobile Data Terminal 31
4.1.3 Keyboard
Use the Keyboard applet to set the repeat delay and repeat rate for keyboard keys.
These parameters apply to any connected USB keyboard. Double-tap the Keyboard
icon on the control panel, and the Keyboard Properties dialog box is displayed, as
shown below.
Figure 13
Keyboard Properties
Enable Character Repeat
Select this option to turn the key repeat feature on or off. If enabled, a key entry
repeats as you hold down the key on the keyboard.
Repeat Delay
If you enabled “character repeat,” use this function to select the delay time that you
want between when a key is pressed and when it begins to repeat automatically. Tap
and hold the slider and slide it up or down the slider bar to set the delay, or tap the
left or right arrow button at the ends of the slider bar to move by smaller increments.
Repeat Rate
If you enabled “character repeat,” use this function to select the time that you want
between each repeat when a key begins to repeat automatically. Tap and hold the
slider and slide it up or down the slider bar to set the delay, or tap the left or right
arrow button at the ends of the slider bar to move by smaller increments.
Tap in the data entry box at the bottom of the dialog box, and press a key to test the
repeat delay and repeat rate. You can reset the delay and rate until the settings are
right for you.
Tap [OK] to save any changes and exit. Tap [X] to exit the dialog box without
saving.
4.1.4 Date/Time
Use this applet to set the time and date on the TREQ-VM/VMx. Tap the Date/Time
icon on the control panel, or tap the clock on the task bar (see Figure 14).
Page 40
32 TREQ-VM/VMx Mobile Data Terminal
Figure 14
Date/Time Properties
To change the year, continuously change the month to successive or prior months
until the desired year is reached. Alternatively, tap the year display, and type the year
using the on-screen soft keyboard or an attached USB keyboard.
To change the month, tap the left-pointing arrow at the top of the calendar to select
the previous month, or tap the right-pointing arrow to select the next month.
Alternatively, tap the month display, and select the desired month from the pop-up
list.
To select a date in a month, tap the date in the calendar.
To change the time, in the “Current Time” box, tap the hour, minute, or AM/PM
position to select it, and then tap the selection arrows to increase or decrease the
number. Alternatively, tap the time display to select the hours, minutes, seconds, or
“AM/PM” field, and enter the time using the on-screen soft keyboard or an attached
USB keyboard.
To select a different time zone, tap the drop-down arrow for the “Time Zone” box
and then tap the correct time zone in the drop-down list.
The checkbox “Automatically adjust clock for daylight saving” is selected by default.
If the TREQ-VM/VMx will be used in an area that does not follow daylight savings
time, deselect this option.
NOTE The TREQ-VM/VMx has been updated to be compliant with the latest dates for
daylight savings time changes (per the U.S. daylight savings time zones and dates
change for 2008).
Tap [Apply] to apply changes in the settings without exiting the dialog box. Tap
[OK] to apply the changes and exit. Tap [X] to exit the dialog box without saving
your settings.
NOTE Changes to the Date/Time will be automatically saved to the RTC. These changes are
persistent across reboots and power shutdowns.
Page 41
TREQ-VM/VMx Mobile Data Terminal 33
4.1.5 Volume and Sounds
Use this applet to adjust the volume of system responses and to specify for which
screen actions the TREQ-VM/VMx will respond with a sound. Tap the Volume &
Sounds icon on the control panel to display the Volume & Sounds Properties dialog
box, as shown below.
Figure 15
Volume & Sounds Properties
To enable sounds and adjust the volume, tap the Volume tab.
Enable sounds for:
Events
If you want a sound emitted when the system gives a warning or a system event
occurs, select this option.
Applications
If you want sounds generated by programs, select this option.
Notifications
If you want sounds emitted for alarms, appointments, and reminders, select this
option.
Enable clicks and taps for:
Key clicks
Select this option if you want to hear clicks when you press a key on either the
keypad or an external keyboard. If you select key clicks, also select whether you
want the click sound to be [Loud] or [Soft].
Screen taps
Select this option if you want to hear a sound when you tap the screen. If you select
this option, also select whether you want the tap sound to be [Loud] or [Soft].
Page 42
34 TREQ-VM/VMx Mobile Data Terminal
System Volume
Use the slider at the left-hand side of the dialog box to select the overall volume of
system sounds. Tap and hold the slider and slide it up or down the slider bar to
adjust the sounds louder or softer, or tap the Soft or Loud arrows to adjust it in
smaller increments. A sound is emitted as you make each adjustment so you can
monitor the setting.
Tap [OK] to save the settings and exit the dialog box. Tap [X] to exit the dialog
box without saving your settings.
4.1.6 Network and Dial-up Connections
The Network and Dial-up Connections control panel applet launches a Network
Connections application (see Figure 16), which is used to set up and configure
remote connections. An icon is created for each connection (connectoid). Once
configured, the connectoid can be launched to initiate the remote connection.
Figure 16
Network Connections
The default connectoids for TREQ-VM/VMx remote connections are USB COM5,
GSM_COM4, CDMA_COM4, AX88772B1 and RT28701.
•USB COM5
This connection uses a USB-to-serial converter to establish a new serial port
(COM5), which is used for ActiveSync communication. The USB COM5 connection
is automatic. Once an ActiveSync connection is established, a new connectoid
appears to reflect the new connection: USB SERIAL CABLE – COM5. The
properties of this connection indicate the IP address of the TREQ-VM/VMx for this
connection.
Page 43
TREQ-VM/VMx Mobile Data Terminal 35
GSM_COM4
The GSM COM4 connectoid establishes a link with a GSM/UMTS/HSPA+
network.
CDMA_COM4
The GSM COM4 connectoid establishes a link with a CDMA/EV-DO network.
AX88772B1
The AX88772B1 uses the wired Ethernet connection. It automatically obtains IP
configuration (address, subnet mask, and gateway) if DHCP is enabled. Right-
click, or select File, Properties from the menu for the AX88772B1 connectoid to
configure DHCP or static values, as well as name servers for this connection.
DHCP is enabled by default.
The connection status is reflected in a system tray icon, which may be double-
tapped to view detailed network information. The AX88772B1 connection uses the
internal 10/100 Ethernet adapter to provide a standard TCP/IP interface.
RT28701
The RT28701 connection uses the wireless Ethernet to connect to a wireless access
point. The connectoid name reflects the TREQ-VM/VMx wireless Ethernet chipset.
Run ‘ipConfig’ from the command shell (Start > Programs > Command Prompt)
to list detailed information for all the TREQ-VM/VMx network connections.
4.1.6.1 2G and 3G UMTS/HSPA+ Modem
Refer to section 8.4.1, “Cellular Modem Antenna” for antenna gain requirements.
The GSM_COM4 connectoid in the Network Connections can be used without
modification. However a provisioned SIM card will need to be installed prior to
attempting to connect to the cellular data network. (Refer to section 4.1.6.4,
“Installing a SIM Card”.) It is possible that the ‘Extra Settings’ string will need to be
modified (see Figure 17). These parameters are specific to the cellular data network
provider, who should provide the APN (Access Point Name) along with the cellular
SIM card.
Take the following steps to configure the COM4 connectoid.
1. Select the connectoid by tapping the connectoid icon.
2. Open the Properties dialog box for the connectoid by selecting File and then
Properties from the menu, or tap and hold the icon, and select Properties from the
shortcut menu.
3. Select Configure from the Properties dialog box. The Device Properties dialog
box is displayed in Figure 17.
Page 44
36 TREQ-VM/VMx Mobile Data Terminal
Figure 17
3G UMTS/HSPA+ Modem, Device Properties
4. Select the Call Options tab.
5. In the “Extra Settings” edit box, replace “ISP.CINGULAR” with the APN
provided by the ISP.
6. Select [OK] to exit the Device Properties dialog box, and then select [OK] at the
COM4 Properties dialog box to save the APN setting.
Take the following steps to dial a 2G or 3G UMTS/HSPA+ modem using the COM4
connectoid.
1. Double-tap the connectoid icon.
Figure 18
2G and 3G UMTS/HSPA+ Modem, Dial-up Connection
2. Type in the user name and password provided by the ISP.
NOTE It may be possible to make a connection without the user name and password as long
as the connection string is correct.
NOTE If you dock the terminal to a cradle other than the one the connectoid was created on
you will need to update the username for the Dial-Up connection to work.
3. Select Save password to avoid retyping the password in the future.
Page 45
TREQ-VM/VMx Mobile Data Terminal 37
4. Tap [Connect] to dial the modem and connect to the Internet. A successful
connection is indicated by a COM4 Status message.
The Status message should show the following steps:
Opening port -> Dialing '**99***1#' -> Device Connected -> User Authenticated ->
Connected
If the connection fails, make sure that you have entered all parameters correctly.
Failed connections can be caused by low coverage areas or faulty antennas. If after a
few tries connection still fails contact the Beijer Electronics Customer Support group.
To hide the Status message, tap [Hide]. To show the message if it is hidden, double-
tap the taskbar system tray connectoid icon. To cancel the modem connection,
display the Status message, and then tap [Cancel]. Wait about 5 to10 seconds for the
disconnect process to complete.
4.1.6.2 3G CDMA/EV-DO Modem
Refer to section 8.4.1, “Cellular Modem Antenna” for antenna gain requirements.
The COM4_CDMA connectoid in the Network Connections can be used without
modification. However the cellular data network provider will need to be contacted.
They will need to know the MEID of the modem. The MEID is located on a label on
the back of the cradle. This can also be provided by the Beijer Electronics Sales
group. In addition, the MEID can be retrieved from the modem using the
MinTermCE.exe application. The steps below outline the procedure to retrieve the
MEID from the modem using MinTermCE.exe.
1. Run the MinTermCE.exe serial console program (refer to section 4.8.2, “Beijer
Electronics”).
2. Open COM4 at 115,200 bps.
3. Type AT+CGSN \r in the “Transmit” box.
4. Tap [Transmit]. You should see a response from the modem in the RX window
similar to the figure below. The MEID is a 14 alpha-number number specific to
each modem. In the response below there are 16 digits following the ‘x’ character.
The MEID in this case would be the first 14 characters after the ‘x’ character or
‘00A1000021D001’ (see the Figure 19).
Page 46
38 TREQ-VM/VMx Mobile Data Terminal
Figure 19
CDMA/EV-DO Modem, MEID
Other useful AT commands:
AT+CGSN\r -- returns the MEID
AT+GSN\r -- returns the MEID
AT I\r -- returns the module manufacture, model, and software revision
AT+CFUN=1,1\r -- restarts the modem device, returns ^SYSSTART when
modem is ready
AT+CSQ\r -- returns the received signal strength indication <rssi>
5. Contact your cellular data/voice network provider to activate the modem using the
MEID.
After the cellular data/voice network provider has activated the modem, take the
following steps to dial the CDMA/EV-DO modem using the CDMA_COM4
connectoid.
1. Double-tap the connectoid icon.
Page 47
TREQ-VM/VMx Mobile Data Terminal 39
Figure 20
CDMA/EV-DO Modem Dial-Up Connection
2. Enter your user name and password. The user name is the 10-digit phone number
supplied by Verizon followed by @vzw3g.com. The password is always vzw (all
lower case).
Example username: [email protected]
Password: vzw
NOTE It may be possible to make a connection without the user name and password as long
as the connection string is correct.
NOTE If you dock the terminal to a cradle other than the one the connectoid was created on
you will need to update the username for the Dial-Up connection to work.
3. Tap [Connect] to dial the modem and connect to the Internet. A successful
connection is indicated by a COM4 Status message.
The Status message should show the following steps:
Opening port -> Dialing '#777' -> Device Connected -> User Authenticated ->
Connected
If the connection fails, make sure that you have entered all parameters correctly. It is
also possible that the modem is still not provisioned. Failed connections can be
caused by low coverage areas or faulty antennas. If after a few tries connection still
fails contact the Beijer Electronics Customer Support group.
To hide the Status message, tap [Hide]; to show the message if it is hidden, double-
tap the taskbar system tray connectoid icon. To cancel the modem connection,
display the Status message, and then tap [Cancel]. Wait about 5 to10 seconds for the
disconnect process to complete.
4.1.6.3 Make a Voice Call
With either the GSM/GPRS, UMTS/HSPA+ or the CDMA/EV-DO modem the
TREQ-VMx can make a voice call. A wired-headset or a Bluetooth head set is
required to make a voice call.
Page 48
40 TREQ-VM/VMx Mobile Data Terminal
There is a 3.5mm TSR headphone jack connector on back of cradle for use with a
wired headset. Refer to section 2.1.9, “Speaker and Microphone” for more
information on the headphone jack connector.
A sample application (see Figure 21) for making a voice call has been developed.
Contact the Beijer Electronics Customer Support group for more information on the
application and source code.
The VM Cell Test application window displays the 10-digit phone number
programmed into the modem, the type of modem in the TREQ-VMx and the MEID
or the IMEI of the modem. Typically the settings located on the Setup screen of the
VM Cell Test application do not need to be changed. Some SMS functionality is
build in to the VM Cell Test application.
Figure 21
VM Cell Test Application
To make a voice call:
1. Launch the VM Cell Test application.
2. Tap [Audio Device] to select the audio device. (Select either a Wired Headset or a
Bluetooth headset.)
3. Tap the 10-digit phone number using the application keypad.
4. Tap [CALL].
If everything is set up correct a voice call will then be placed.
NOTE If you don’t have a cellular phone account, you will need to contact a cellular
network carrier to set it up. For most carriers, you will need to provide billing
information and possibly a business ID.
Page 49
TREQ-VM/VMx Mobile Data Terminal 41
NOTE For voice calls, including a 911 emergency call, the TREQ-VMx needs to be
configured to use a wired headset or a Bluetooth headset needs to be paired with the
TREQ-VMx.
4.1.6.4 Installing a SIM Card
In the back of the TREQ-VMx cradle there is a removable cover for getting to the
SIM card slot bay (see Figure 22). The removable cover is held in position with one
Philips screw. Use a Phillips screw to remove the screw and access the bay. Slide the
SIM card connector to the bottom of the TREQ-VMx to unlock the connector. Once
unlocked, the top edge of the connector will pivot up allowing the SIM card to be
removed or installed in the connector.
To lock the SIM card connector pivot, the connector down and slide it up. (There is
an arrow molded into the plastic connector indicating the direction it needs to slide to
unlock it.)
Figure 22
SIM Card Cover Removal
There is another similar cover on the back of the TREQ-VM/VMx terminal. This is
for a MicroSD card used for OS recovery.
4.1.7 Storage Manager
Use the Storage Manager applet to administer the TREQ-VM/VMx’s internal and
external storage devices.
SIM Card
Cover Screw
Page 50
42 TREQ-VM/VMx Mobile Data Terminal
The contents of the removable MicroSD card are located \HardDisk2 if using it as
expandable storage. If the MicroSD card was used to boot the TREQ-VM/VMx then
it will appear as \HardDisk and the internal storage drive will be located in
\HardDisk2.
The contents of \USBHardDisk, \USBHardDisk2, and so on, are located on external
USB memory drives. These devices may be formatted, scanned, and defragmented
using the Storage Manager utility.
Figure 23 shows the Storage Manager applet on a TREQ-VM/VMx with an SD-type
internal flash memory.
Figure 23
Storage Manager, Internal Flash Drive
Figure 24 shows the Storage Manager applet on a TREQ-VM/VMx with a USB
memory drive inserted.
Figure 24
Storage Properties, USB Drive
Figure 25 shows the results of a scan disk operation on the internal flash storage
device.
Page 51
TREQ-VM/VMx Mobile Data Terminal 43
Figure 25
Storage Properties, Internal Flash Drive Scan Disk
The storage device must be dismounted before formatting, scanning, or
defragmenting. For the internal flash device, it is recommended that these operations
be performed only from the recovery Windows CE image (refer to section 10.6,
“System Backup and Recovery”). The main Windows CE operating system image
actively accesses files on the internal flash device. This access is interrupted by
storage administration operations. Re-mounting the device will fail and it must be
rebooted to return it to a working state.
Figure 26 shows the Storage Manager’s Format dialog box launched from the
recovery image for the internal flash storage. You can use the touchscreen, an
attached USB keyboard or mouse or the on-screen soft keyboard to initiate the
format. Press the <Tab> key to cycle the active focus or simply press <Enter> to start
as the [Start] button will be activated by default.
Figure 26
Storage Properties, Format Drive
FAT32 Quick Format is recommended for reformatting operations on the internal
storage. Sometimes a full format may be desired, but allow several minutes for
Page 52
44 TREQ-VM/VMx Mobile Data Terminal
completion. Note that the eXFAT format option is selected by default; FAT32 must
be manually selected from the drop-down box.
WARNING
Beijer Electronics recommends formatting the internal flash device only as a last
resort! Doing so will clear the optimized flash factory formatting. Also do not
cycle power immediate because the system is non-bootable until the system files
are copied to the internal drive.
WARNING
Use caution when formatting the internal flash device! The result will be a
complete loss of user data, user applications, and main operating system package.
A recovery procedure will be required to restore the TREQ-VM/VMx to a usable
state. Refer to section 10.6, “System Backup and Recovery” for more information.
Other operations such as [Scan] and [Defrag] are found under the [Properties] for a
particular partition or storage type.
NOTE Beijer Electronics recommends that the partition configuration be left intact for
storage devices. Do not remove partitions or create new partitions as this may cause
data on the devices to be irretrievable.
4.1.8 Bluetooth Manager
If the TREQ-VM/VMx has a USB Bluetooth dongle plugged in, the Bluetooth
Manager applet is a simple utility that can be used to scan for other Bluetooth
devices. Figure 27 shows the results of a scan that includes several services from the
same cell phone.
Figure 27
Bluetooth Manager
To pair Bluetooth devices, select a device in the “Untrusted” box, and tap [-->] to
move it to the “Trusted” box. The pairing process is mutual; the other Bluetooth
devices must consider the TREQ-VM/VMx a trusted device to complete the pairing.
Page 53
TREQ-VM/VMx Mobile Data Terminal 45
Tap [OK] to save any changes and exit. Tap [X] to exit the dialog box without
saving.
Refer to section 7.2, “Bluetooth” for more information on recommended Bluetooth
dongles and on managing TREQ-VM/VMx Bluetooth device connections.
4.1.9 Cradle Power Control
This applet (see Figure 28) allows you to see if the terminal is docked. It also allows
you to turn power on or off to the cradle.
Figure 28
Cradle Power Control Applet
4.1.10 WiFi Power Control
This applet (see Figure 29) allows you to turn power on or off to the Wi-Fi adapter.
Figure 29
Wi-Fi Power Control Applet
Page 54
46 TREQ-VM/VMx Mobile Data Terminal
4.1.11 Power Properties
This applet allows you to view information such as: current charge level of the
battery, power source path (external or battery), set power schemes and other
information.
The battery status will show whether device is charging the batteries, running off
external or battery power and percentage of power left in the battery.
There are two power schemes available for configuration: Battery power and AC
power. By default both power schemes will go into user idle after 1 minute of user
inactivity and into System Idle after 5 minutes of user inactivity. Suspend state is not
supported on the TREQ-VM/VMx and there will be no effect if this value is changed.
Refer to section 6.3.2, “Backlight” for setting these values programmatically.
Device status allows you to see the available device names and their respective power
levels. There are no settings that can be adjusted on this tab. Please refer to section
6.3.11, “Power” for information about the power level codes and adjusting the power
for individual devices.
4.2 TREQ Panel
The TREQ panel provides quick access to all of the TREQ-VM/VMx hardware
controls, including those for the display, touch screen, speaker, and power
saving/screen saver modes.
To open the TREQ Panel (see Figure 30), tap the desktop shortcut.
Figure 30
TREQ Panel
Tap [OK] to save any changes and exit. Tap [X] to exit the dialog box without
saving.
Page 55
TREQ-VM/VMx Mobile Data Terminal 47
4.2.1 Keyboard
The Enable Character Repeat, Repeat, and Delay controls are identical to those found
in the Keyboard Control Panel applet. Refer to section 4.1.3, “Keyboard” for more
information on these controls.
4.2.2 Backlight Intensity
Use the Backlight controls to adjust the intensity of the display and keypad backlight.
Tap and hold the slider and slide it up or down the slider bar to set the intensity from
0 to 100%.
4.2.3 Audio
Tap and hold the slider to increase or decrease the speaker volume. Use this control
for more precision for the volume setting than the Volume and Sounds Control Panel
applet provides.
4.2.4 Touch Screen
Tap the Touch Screen Calibration button to initiate the calibration procedure. Refer
to section 4.1.1.2, “Recalibrate” for more details.
4.2.5 Power Timeouts (Battery and External)
The power saving controls affect the transition times from full on to User Idle and
System Idle power states when the TREQ-VM/VMx is not in use when running on
either battery or external power. (In the TREQ-VM panel there are drop down boxes
for User Idle and System Idle for both Battery Power and External Power.)
In User Idle mode, the display backlight intensity is dimmed to a low level. In
System Idle mode, it is disabled. Touch screen or USB keyboard/mouse activity will
cause the TREQ-VM/VMx to transition out of an idle state. Refer to section 6.3.11,
“Power” for more details about the TREQ-VM/VMx power states.
Tap the drop-down arrow for the User Idle or System Idle settings to select the
number of seconds or minutes after which the TREQ-VM/VMx will enter the
selected power mode. The User Idle and System Idle time-outs can be adjusted to a
continuous range of time values by typing a number in the drop-down box or via a
programmatic interface (refer to section 6.3.11, “Power”).
Disable the transition to User Idle or System Idle power states by removing the
checkmark from the “User Idle mode after” or “System Idle mode after” check
boxes, respectively. You can also type 0 in either drop-down box to disable the
transition.
Disabling the User Idle mode transition automatically disables the System Idle
transition, regardless of the System Idle time-out or check box. Set the User Idle
Page 56
48 TREQ-VM/VMx Mobile Data Terminal
mode transition time-out to one second to skip the User Idle and transition directly to
System Idle.
4.3 Cradle Info
The VMCradleInfo application (see Figure 31) found in \HardDisk\BIN provides a
way to set the protocol of COM1 to EIA232, EIA422, and EIA485, audio
configuration, modem control of the cradle. In addition there is other various cradle
specific information displayed in the application.
The settings on this screen are specific to the cradle to which the TREQ-VM/VMx is
connected. You must be docked to a cradle to use this screen. Any settings changed
will be saved to the cradle.
Figure 31
VMCradleInfo Application
Each section in the application has a [Set…] button which will alter the configuration
of the cradle the next time the TREQ-VM/VMx is booted. If you need to change the
configuration of the cradle without rebooting the TREQ-VM/VMx then tap [Current
Settings].
4.3.1 COM Configuration
There are five possible serial port configurations:
Powered Down: COM1 and COM2 are completely disabled
232 Loopback: COM1 and COM2 will automatically loop back the transmission
lines to the receive lines. This is a diagnostic mode only and not intended for
general usage.
232: COM1 is configured for EIA-232. COM2 is configured for EIA-232
Page 57
TREQ-VM/VMx Mobile Data Terminal 49
422: COM1 is configured for EIA-422. COM2 is configured for EIA-232
485: COM1 is configured for EIA-485. COM2 is configured for EIA-232
The radio buttons and check boxes are empty when the terminal is not docked with a
cradle.
4.3.2 Audio Configuration
This is an option on the TREQ-VMx. The audio out of the HD female 15 pin D-sub
connector of the cradle can be set to amplified differential out or line-out. Refer to
section 9.3, “HD D-Sub Connectors” for the pin definition of the High Density
female D-Sub connectors.
NOTE If a TREQ-VM Break out Box (or BoB) is used then the appropriate jumpers on the
BoB need to be set for these setting to work correctly. Please contact Beijer
Electronics Customer Support group for more information on the BoB.
This area is grayed out if the cradle does not include this functionality.
4.3.3 Modem Control
This is an option for the TREQ-VMx. This sets up the power-up control to the
modem. It can be done automatically on dock or set to manual mode. It in manual
mode, the Modem IGN and Modem Emerg Off control lines need to be toggled
correctly in order for the modem to power up. Please contact Beijer Electronics
Customer Support group for specifics on manual power up of the modem.
This area is grayed out if the cradle does not include this functionality.
4.3.4 Current Settings
Tap [Current Setting] to display the current protocol for COM1 and COM2 and the
output audio setting as shown in the figure below. The controls on the screen shown
below allow the user to change the TREQ-VM/VMx settings instantly. Tap [X] to
close this window.
Page 58
50 TREQ-VM/VMx Mobile Data Terminal
Figure 32
Cradle Control, Current Settings
4.3.5 Cradle Information
In the upper left and right hand corner of the application is displayed the following
information.
4.3.5.1 Cradle Type
This displays the type of cradle that the terminal is docked to.
FULL – TREQ-VMx
LIGHT – TREQ-VM
This displays the word ‘not’ when a terminal is not docked to a cradle.
4.3.5.2 Cradle Revision
This is a hard ware version of the cradle.
This is blank when a terminal is not docked to a cradle.
4.3.5.3 QSI Serial
This is a unique cradle serial number that is programmed in during production
This is blank when a terminal is not docked to a cradle.
4.3.5.4 MAC Address
This is the MAC address of the wired Ethernet adapter that is located in the cradle.
The MAC address is programmed in during production.
This is blank when a terminal is not docked to a cradle.
Page 59
TREQ-VM/VMx Mobile Data Terminal 51
4.3.5.5 Device Serial
This field is reserved for future use. Currently this will return the value of 1.
This is blank when a terminal is not docked to a cradle.
In the upper left and right hand corner of the application is displayed the following
information.
4.4 Registry
Windows CE uses a registry to store system settings and run-time configuration data.
The TREQ-VM/VMx supports a hive-based registry, meaning that the settings in the
registry are maintained between power cycles. The hive registry is stored in special
system files on the internal flash hard-disk. The memory resident registry is
periodically (every few seconds) written to the hive files. You can modify the
registry in several ways.
Windows CE provides an API (RegOpenKeyEx or RegQueryValueEx) and a C++
wrapper class (CReg via creg.hxx provided in the TREQ-VM/VMx SDK) for use
in applications as a programmatic interface.
You can run the RegEditCE.exe registry editing application on the TREQ-
VM/VMx.
Microsoft Visual Studio 2008 and Microsoft Visual Studio 2005 each come with a
suite of remote debugging tools, including remote registry editors. Refer to Chapter
6, “Application Development” for information on setting up a host PC to use these
tools.
NOTE The registry in SOS or recovery mode is stored in volatile RAM, so when the TREQ-
VM/VMx is powered down any registry changes are lost.
4.5 File System Filter
Certain system files included on the internal flash hard-disk are critical to the
functioning of the TREQ-VM/VMx system. In order to reduce the possibility of
accidental deletion or corruption, Beijer Electronics has developed and installed a file
system filter, which is a special device driver that prevents write access to a list of
files specified in a registry key. The default contents of this registry key are as
follows:
[HKEY_LOCAL_MACHINE\System\StorageManager\LockFiles]
"Lock"=dword:00000001
"Files"=multi_sz:"\\HardDisk\\nk.bin",
"\\HardDisk\\BIN\\boot.bat",
"\\HardDisk\\BIN\\ftdi_ser.dll",
"\\HardDisk\\system.mfs",
"\\HardDisk\\MFS"
The file system filter can be enabled or disabled by setting or clearing, respectively,
the “Lock” registry value. The “Files” multi-string registry value contains the list of
Page 60
52 TREQ-VM/VMx Mobile Data Terminal
locked files and directories. Directories in the list are locked along with all sub-files
and subdirectories.
One example of the reason for the file system filter is that if the \HardDisk\nk.bin
file—the Windows CE operating system image—is corrupted or deleted, the TREQ-
VM/VMx will not boot or will boot to a recovery image. This filter protects against
inadvertent delete operations.
NOTE The TREQ-VM/VMx has been provided with a boot recovery image. When booted to
the recovery image, you can restore the NK.bin file or other lost files (refer to section
10.6, “System Backup and Recovery” for more details on emergency recovery).
The \HardDisk\BIN\LockCE.exe program can be used from a command prompt shell
to lock or unlock the files/directories in the list. LockCE 0 unlocks; LockCE 1 locks.
4.6 System Path
The default Windows CE system paths on the TREQ-VM/VMx are
\Windows;\HardDisk\BIN;\HardDisk\fonts. Windows will search the \Windows
directory first, then the \HardDisk\BIN directory for executables and supporting
dynamically-linked libraries. For example, when explorer.exe is executed from the
root directory in the command shell, Windows will find \Windows\explorer.exe.
The system path can be modified via a registry setting. Following is an example of
the registry key in which two directories have been added to the default path.
[HKEY_LOCAL_MACHINE\Loader]
"SystemPath"=multi_sz:"\\HardDisk\\BIN\\",
"\\HardDisk\\fonts\\"
"\\HardDisk\\Programs\\"
"\\Temp\\"
4.7 Boot-up Configuration
The TREQ-VM/VMx customizable splash screen can be replaced with any BMP type
image that has 24-bit color and is 800 by 480 pixels. The name of the file must be
NK.BMP for the bootloader to load it.
There is also a SOS.BMP that is displayed while the special recovery image known
as the SOS (Small Operating System) image is loaded and launched. This splash
screen can also be replaced with any BMP type image that has 24-bit color and is 800
by 480 pixels. The name of the file must be SOS.BMP for the bootloader to load it.
There are two methods of configuring the TREQ-VM/VMx to automatically launch
applications or scripts at boot time after Windows CE has be loaded and launched by
the boot leader.
The first method of auto-launching applications is managed by a program called
BootUpCE.exe that is launched when Windows CE boots. BootUpCE initiates touch
screen calibration (if necessary), then launches a command shell and executes the
batch file \HardDisk\BIN\BOOT.BAT. This batch file can be used to launch an
Page 61
TREQ-VM/VMx Mobile Data Terminal 53
application or run a custom boot-up script. For example, to launch WinVerCE after
boot, boot.bat should look something like the following:
@echo Launching WinVerCE
start \HardDisk\BIN\WinVerCE.exe
Because \HardDisk\BIN\boot.bat is on the locked files list (refer to section 4.5, “File
System Filter”), it must be unlocked before writing a modified version.
Executing boot.bat may cause a text window to briefly appear on the display. If this
is not desired you can add \harddisk\BIN\boot.exe. Boot.exe is any valid executable
file and if present will be executed at startup. You might create a trivial boot.exe that
launches your primary application.
The second and more advanced method of configuring Windows CE to launch one or
more applications in a specific order uses the [HKEY_LOCAL_MACHINE\Init]
registry key. The following MSDN articles describe this method in detail.
http://msdn.microsoft.com/en-us/library/ee482627.aspx
http://msdn.microsoft.com/en-us/library/aa448482.aspx
http://msdn.microsoft.com/en-us/library/ee482627%28v=winembedded.60%29.aspx
For reference, HKEY_LOCAL_MACHINE\init contains the following default value
on the TREQ-VM/VMx:
[HKEY_LOCAL_MACHINE\init]
"Launch20"="device.dll"
"Launch30"="gwes.dll"
"Depend30"=hex:14,00
"Launch50"="explorer.exe"
"Depend50"=hex:14,00,1e,00
"Launch60"="servicesStart.exe"
"Depend60"=hex:14,00
"Launch70"="bootupCE.exe"
"Depend70"=hex:14,00,1e,00,32,00
As the above registry values illustrate, the Windows CE graphical shell is launched
as part of this boot-up procedure (explorer.exe). The “Launch50” registry value can
be modified to point to an alternate program in order to launch a custom shell or to
run a program without a shell.
NOTE If you choose to launch your application via the HKEY_LOCAL_MACHINE\init
registry key, you MUST call the SignalStarted API as part of your application start.
If your application is .NET based you must p/Invoke this API. It is critical that this
API be called, or portions of the TREQ-VM/VMx startup sequence may not execute,
resulting in intermittent unusual errors.
Page 62
54 TREQ-VM/VMx Mobile Data Terminal
4.8 Applications
4.8.1 Microsoft
Microsoft applications that come with the TREQ-VM/VMx include, but are not
limited to, the following:
Application Description Path
Windows
Explorer
Standard graphical shell \Windows\explorer.exe
Command Prompt Command-line shell \Windows\cmd.exe
Media Player1 Video and audio decoder/player \Windows\ceplayer.exe
Internet Explorer1 Web browser \Windows\iesample.exe
ActiveSync Host PC synchronization and
communication server
\Windows\repllog.exe
Control Panel Device configuration utilities \Windows\ctlpnl.exe
Windows CE
Load
CAB file installer \Windows\wceload.exe
1. Included in professional license Windows Embedded CE versions only.
4.8.2 Beijer Electronics
Applications written and provided by Beijer Electronics include the following:
Application Description Path
CleanHiveCE Causes the persistent registry to
revert to factory defaults. Reboot
TREQ-VM/VMx after
executing.
\HardDisk\BIN\CleanHiveCE.exe
LockCE Locks/unlocks protected files
(refer to section 4.5, “File
System Filter”). Single
command line parameter either 0
(unlock) or 1 (lock).
\HardDisk\BIN\LockCE.exe
MinTermCE Serial port console and test
program.
\HardDisk\BIN\MinTermCE.exe
PolygonsCE Display test program. \HardDisk\BIN\PolygonsCE.exe
Page 63
TREQ-VM/VMx Mobile Data Terminal 55
Application Description Path
QEditCE Small, simple graphical editor \HardDisk\BIN\QEditCE.exe
RegEditCE Local registry editor tool
(similar to Remote Registry
Editor).
\HardDisk\BIN\RegEditCE.exe
SleepCE Causes a delay of N milliseconds
for the calling batch file where
the number N is passed to the
program as a command line
parameter.
\HardDisk\BIN\SleepCE.exe
TREQVMDemoCE Application written to
demonstrate TREQ-VM/VMx
functionality and features.
Source code for this application
can be found online from Beijer
Electronics Customer support
portal.
\HardDisk\demo\TREQVMDemoCE.exe
TREQPanelCE Refer to section 4.2, “TREQ
Panel”.
\HardDisk\BIN\TREQVMPanelCE.exe
WinVerCE Displays the current version of
the Windows CE kernel,
firmware, and release date.
\HardDisk\BIN\WinVerCE.exe
VMCradleInfo Displays information about the
TREQ-VM/VMx cradle
(docking station). In addition is
allows various settings of the
cradle to be controlled such as
COM1 protocol, modem power
up and audio configuration.
\HardDisk\BIN\VM_CradleInfo.exe
WaveRecCE Records 5 seconds of audio from
the default wave device and
saves it to the file 1.wav in the
MyDevice folder.
\HardDisk\BIN\WaveRecCE.exe
RecSndCE Records 5 seconds of audio from
the selected wave device and
then plays it back to another
selected wave device.
\HardDisk\BIN\ RecSndCE.exe
Page 64
56 TREQ-VM/VMx Mobile Data Terminal
Application Description Path
VM_cell_test Dials a voice call using a wired
headset or a Bluetooth headset.
There is some text functionality.
\HardDisk\BIN\VM_cell_test.exe
SMSCE Sends and receives text
messages.
\HardDisk\BIN\SMSCE.exe
qbtCE Bluetooth device service
discovery, scanning, and signal
strength test utility.
\HardDisk\BIN\Bluetooth\qbtCE.exe
QBridgeTestCE Sends and receives data over the
J1708/J1939 bus.
\HardDisk\BIN\QBridge\QBridgeTestCE.exe
QBridgeUpCE QBridge tool to flash the
firmware.
\HardDisk\BIN\QBridge\QBridgeUpCE.exe
Page 65
TREQ-VM/VMx Mobile Data Terminal 57
CHAPTER 5
CONNECT TO A PC VIA ACTIVESYNC
5.1 Introduction
You can use Microsoft ActiveSync to communicate directly between the TREQ-
VM/VMx and a PC computer. To set up an ActiveSync connection between your
TREQ-VM/VMx and a PC computer, do the following:
Connect a null modem serial cable to the TREQ-VM/VMx and to the PC. Be sure
to turn off power to both devices before connecting the cable (refer to section 5.2,
“Connect the Serial Cable”).
Load ActiveSync on the PC to which the TREQ-VM/VMx will be connected
(refer to section 5.4, “Download/Install ActiveSync”).
Verify that the baud rate on the TREQ-VM/VMx is optimal for the cable length
(refer to section 5.5, “Set the TREQ-VM/VMx Baud Rate”).
Make sure the connections to the PC are enabled (refer to section 4.1.2, “PC
Connection”).
Start ActiveSync on the PC and on the TREQ-VM/VMx (refer to section 5.6,
“Connect the PC and TREQ-VM/VMx”).
5.2 Connect the Serial Cable
You need to use a “null modem” RS232 serial cable to make an ActiveSync
connection between a PC and the TREQ-VM/VMx. You can also use a standard
serial cable with a null modem adapter. The TREQ-VM/VMx connection uses a
female DB9 connector. Verify the serial connection used by the PC.
Following are the DB9 pin assignments for the TREQ-VM/VMx connector. Verify
that the serial cable and/or null modem adapter has the needed pin connections for
ActiveSync. The following table lists the RS232 signals required by ActiveSync.
RS232 Signal First DB9 Pin # Second DB9 Pin #
DCD 1 4
RX 2 3
TX 3 2
DTR 4 1 and 6
GND 5 5
DSR 6 4
RTS 7 8
CTS 8 7
RI 9 No connection
Page 66
58 TREQ-VM/VMx Mobile Data Terminal
For best results, the cable should not exceed six feet in length for communications at
115200 baud.
The serial cable is wired symmetrically—either end of the cable can be connected to
the TREQ-VM/VMx (assuming the connectors match). Connect one end of the serial
cable to COM5 on the TREQ-VM/VMx. COM5 is available via the USB-to-serial
converter. Connect the other end of the serial cable to a free port on the PC. If
possible, note the name of the port you use (e.g., COM1, COM2, etc.). Refer to
Figure 33.
Figure 33
ActiveSync Connections
NOTE The USB extension cable (item 2 in Figure 33) is not strictly required, although it
makes the USB-to-serial adapter/TREQ-VM/VMx connection more convenient.
5.3 Enable PC Connection
Before you can install ActiveSync, the TREQ-VM/VMx must be configured to allow
connection to a PC. Use the PC Connection control panel applet to enable remote
connection with a desktop PC (ActiveSync). Select the checkbox labeled, “Allow
connection with desktop computer when device is attached” to enable remote PC
Page 67
TREQ-VM/VMx Mobile Data Terminal 59
connection with the TREQ-VM/VMx. Refer to section 4.1.2, “PC Connection” for
information.
5.4 Download/Install ActiveSync
Download ActiveSync from the Microsoft Web site and install it on your PC as
follows.
1. On your PC, open your Web browser, and navigate to the Microsoft Download
Center at http://www.microsoft.com/downloads/Search.aspx?displaylang=en.
2. Type ActiveSync in the search box and begin the search.
3. ActiveSync 4.2 and 4.5 are the two latest versions as of January 2009. Both will
work with the TREQ-VM/VMx. Follow the appropriate link and download the
desired version.
4. Install ActiveSync on your PC by executing the downloaded installer file or
executable and following the instructions.
5. When the installation is finished, ActiveSync automatically launches the “Get
Connected” wizard that will search the PC’s serial ports for a connection. If you
are not ready to connect to the TREQ-VM/VMx, cancel this option.
5.5 Set the TREQ-VM/VMx Baud Rate
The baud rate is the rate at which data is sent between the PC and the TREQ-
VM/VMx. Normally, you will want to set the baud rate to the highest rate supported
by your hardware and cable length (see section 5.2, “Connect the Serial Cable” for
cable length restrictions).
When connected, ActiveSync identifies the baud rate used by the TREQ-VM/VMx.
The default baud rate for the TREQ-VM/VMx ports is 115200 bps.
NOTE If you have communication problems with an ActiveSync connection, try selecting a
slower baud rate.
To verify or change the baud rate for the TREQ-VM/VMx, do the following on the
TREQ-VM/VMx.
1. Tap [Start] to display the Start menu, then tap Settings and Network & Dial-up
Connections. The Network Connections dialog box is displayed.
2. Tap USB COM5. Select File, Properties from the menu.
3. Tap [Configure].
4. To change the baud rate, tap the down arrow to display a list of possible settings,
and tap the baud rate that you want to use.
Page 68
60 TREQ-VM/VMx Mobile Data Terminal
5.6 Connect the PC and TREQ-VM/VMx
With the cable connected (refer to section 5.2, “Connect the Serial Cable”) and
ActiveSync installed on your PC (refer to section 5.4, “Download/Install
ActiveSync”), do the following to establish a connection between the PC and the
TREQ-VM/VMx.
1. On your PC, start ActiveSync.
2. On the PC, open the File menu and select Get Connected, or select Connection
Settings and then click [Connect].
3. On the PC, Click [Next]. The TREQ-VM/VMx automatically responds to the
PC’s ActiveSync connection request (see Figure 34).
The first time you connect, the PC scans all available serial ports for the ActiveSync
connection, which can take some time. For this reason, the TREQ-VM/VMx or the
PC may time out before the connection is found. It is typical to have to re-run one or
both ActiveSync programs a few times before they find each other. This is especially
true if your PC has several serial ports. Once ActiveSync identifies the port, all future
connections will occur quickly.
Figure 34
ActiveSync, Get Connected
NOTE If you know to which serial port on the PC the TREQ-VM/VMx is connected, you can
select the port in ActiveSync on the PC and save the scanning time. Refer to section
5.6.1, “Select the COM Port Manually”.
4. When the “Connecting to Host” message appears on the TREQ-VM/VMx and the
ActiveSync window on the PC displays “Connecting.....”
Page 69
TREQ-VM/VMx Mobile Data Terminal 61
The ActiveSync window on the PC then displays “Connected” (see Figure 35).
Figure 35
ActiveSync, Connected
5. On the PC, You can now browse the TREQ-VM/VMx file system by selecting the
Explore icon or the Explore option on the PC’s ActiveSync File menu (see Figure
36).
Figure 36
ActiveSync, Explorer Device
Page 70
62 TREQ-VM/VMx Mobile Data Terminal
5.6.1 Select the COM Port Manually
You can save scanning time during the initial connection if you know to which serial
port on the PC the TREQ-VM/VMx is connected. Do the following to select the port.
1. In the ActiveSync program on the PC, select the Connection Settings option on
the File menu (see Figure 37).
Figure 37
ActiveSync, Connection Settings
2. Enable the “Allow connections to one of the following:” option, and select the
appropriate COM port.
3. Click [OK] to save the settings.
Page 71
TREQ-VM/VMx Mobile Data Terminal 63
CHAPTER 6
APPLICATION DEVELOPMENT
6.1 Introduction
This chapter describes the process of developing and debugging applications for the
TREQ-VM/VMx and assumes familiarity with the C programming language and
Windows application remote debugging procedures. (If necessary, consult the
Microsoft MSDN library for a refresher on remote debugging.) This information is
intended for integrators and application developers as a guide in setting up the
TREQ-VM/VMx for application development and as a reference for programmatic
interfaces (API) to software drivers for various terminal peripherals.
The TREQ-VM/VMx is a Windows CE-based computer with specialized hardware
peripherals that make it suitable for vehicular applications. Application development
and debugging procedures for the TREQ-VM/VMx, as well as the software driver
API, are similar to other Windows CE-based devices. This chapter provides
instructions and references for TREQ-VM/VMx-specific functionality. For example,
the TREQ-VM/VMx has a serial port, but the serial port driver interface is not
documented in this manual because the interface is a standard, well-known API.
6.1.1 Glossary
API
Application Program Interface
SDK
Software Development Kit
IDE
Integrated Development Environment
6.1.2 Related Documents
Microsoft Visual Studio 2005 MSDN Library
Microsoft Visual Studio 2008 MSDN Library
Windows Embedded CE 6.0 Documentation
http://msdn.microsoft.com/en-us/library/ee504812.aspx
Shared Windows Mobile 6 and Windows Embedded CE 6.0 Library
http://msdn.microsoft.com/en-us/library/bb158484.aspx
Page 72
64 TREQ-VM/VMx Mobile Data Terminal
6.2 Setup
6.2.1 Prerequisites
The following are required before setting up the TREQ-VM/VMx for application
development. Either an Ethernet or Serial connection is required (both are included
here for completeness).
Ethernet connection:
The host can communicate with the TREQ-VM/VMx during a remote debugging
session over an Ethernet network. The TREQ-VM/VMx should be connected to the
same network and on the same subnet as the host.
The network can be established using either the internal 10/100 Ethernet adapter or
the internal Wi-Fi adapter. Use the AX88772B1 connectoid to configure the internal
Ethernet connection. Use the RT28701 connectoid to configure the internal Wi-Fi
connection. Refer to section 4.1.6, “Network and Dial-up Connections”. (An external
USB 10/100 Ethernet adapter can be used to establish a network connection.
Serial connection:
The host can communicate with the TREQ-VM/VMx during a remote debugging
session via ActiveSync over a serial connection. The connection must be a “full”
serial port, meaning that all of the following serial protocol signals must be
connected to and supported by the host PC: RX, TX, RTS, CTS, DTR, DSR, and
DCD. The TREQ-VM/VMx Developer’s Kit includes a USB-to-serial converter that
can be used for the ActiveSync connection.
Software Development Kit:
The SDK is an MSI installable file distributed by Beijer Electronics. The SDK should
be installed so that the host IDE knows how to connect to the TREQ-VM/VMx. The
SDK also provides headers and libraries that correspond to the available services and
features included in the TREQ-VM/VMx Windows CE image.
Integrated Development Environment:
Microsoft Visual Studio 2005 and/or Microsoft Visual Studio 2008 should be
installed as a development environment for the TREQ-VM/VMx application. These
programs are used to compile and remotely debug the application. The latest service
packs and updates for these Microsoft programs must be installed.
6.2.2 SDK Installation
The latest Software Development Kit is available from the Beijer Electronics Web
site (http://www.beijerinc.com). The SDK and Windows CE image release dates
should match to ensure that all features and services in the image correspond to those
offered in the SDK. Use the latest available SDK version if the release date of the
most recent Windows CE image supersedes that of the SDK.
Page 73
TREQ-VM/VMx Mobile Data Terminal 65
To install the SDK on your PC host, download the MSI file from the Beijer
Electronics Web site, right-click the file name, and select Install. After the
installation is complete, verify that “TREQ-VM” appears in the Tools, Connect to
Device dialog box in Microsoft Visual Studio 2005 and Microsoft Visual Studio
2008.
6.2.3 Target Setup
6.2.3.1 ActiveSync
You can use the ActiveSync protocol to establish a remote debugging connection
with the Integrated Development Environment. Refer to Chapter 5, “Connect To A
PC Via ActiveSync” for ActiveSync setup instructions.
6.2.3.2 Manual Server
If you do not use ActiveSync, you must set up a manual Ethernet client server on the
TREQ-VM/VMx. You must configure this server to respond to debug or download
connection requests from the host PC's IDE. ActiveSync has the advantage of easier
setup because the IP address of the target is negotiated automatically; however, it
also uses a slower connection over the serial port.
At a TREQ-VM/VMx command prompt window, navigate to \HardDisk\BIN\client.
Instructions for using conmanclient2.exe and cmaccept.exe can be found online at
http://msdn.microsoft.com/en-us/library/ms228708%28v=vs.90%29.aspx. These
instructions apply to both Microsoft Visual Studio 2005 and Microsoft Visual Studio
2008.
6.2.4 Microsoft Visual Studio 2005/2008
Take the following steps to configure Visual Studio to connect with the TREQ-
VM/VMx target. (Refer to Figure 38)
1. From the Visual Studio Tools menu, select Options, Device Tools, Devices.
2. Select TREQ-VM/VMx from the “Show devices for platform” drop-down box.
“TREQ-VM/VMx ARMV4I Device” should be the only device listed in the
“Devices” box.
3. Select Properties.
4. From the “Default output location on device” drop-down box, select the desired
location for deploying the Visual Studio project executables and libraries. Select
Root folder if you want to download to \HardDisk. The path to the directory in the
root location is specified in the Visual Studio Project Properties dialog box.
5. Click [Configure].
6. If using ActiveSync, select Obtain an IP address automatically using ActiveSync.
Page 74
66 TREQ-VM/VMx Mobile Data Terminal
If using the ConMan Ethernet client (manual server), select Use specific IP address,
and type in the IP address of the TREQ-VM/VMx. Detailed instructions are available
online at http://msdn2.microsoft.com/en-us/library/ms228708(VS.80).aspx.
Figure 38
TREQ-VM/VMx Device Connection with Visual Studio
7. Verify the device connection. From the Tools menu, select Connect to Device.
(Refer to Figure 39)
Figure 39
Visual Studio, Connection
Page 75
TREQ-VM/VMx Mobile Data Terminal 67
8. Make sure the selected platform is “TREQ-VM” and the device is “TREQ-VM
ARMV4I Device”.
The status bar at the bottom of the Visual Studio workspace window should indicate
a successful connection.
You can use Visual Studio to construct sample native and managed applications to
test the Build, Deploy, and Debug process. Take the following steps.
6.2.4.1 Native C++ Application Development
1. From the Visual Studio File menu, select New Project.
2. Select Visual C++, Smart Device, and MFC Smart Device Application in the
window on the right.
3. Name the project and select a directory, and click [OK].
4. Click [Next]. Move the “TREQ-VM SDK” to the “Selected SDKs” column. It
should be the only selected SDK (move any others to the left).
5. Continue to configure the application with the next few dialog boxes as desired.
6. Enable the Device toolbar from the View, Toolbars menu.
7. Make sure that the “Target Device” drop-down list shows “TREQ-VM ARMV4I
Device”. If not, click [Device Options] (next to the drop-down list), and select
TREQ-VM from the “Show devices for platform” drop-down list.
8. Right-click the project from the Solution Explorer window, and select Properties
to bring up the Property Pages for the project.
9. In Configuration Properties, Debugging and Deployment, set the Remote
Executable and Remote Directory parameters, respectively (see Figure 40). These
parameters determine the path in the TREQ-VM file system where the executable
will be deployed and executed.
Page 76
68 TREQ-VM/VMx Mobile Data Terminal
Figure 40
Visual Studio, Native Project Properties
6.2.4.2 Managed Application Development
The TREQ-VM/VMx comes with the .NET Compact Framework v3.5 pre-installed.
Most applications targeting the .NET Compact Framework v2.0 are compatible with
v3.5.
Visual Studio 2005 will deploy, install, and debug with the .NET Compact
Framework v2.0 by default, if “Deploy the latest version of the .NET Compact
Framework” is checked (see Figure 41). Uncheck this box to debug with the
preinstalled version (v3.5). Visual Studio 2005 does not have an option to deploy and
install v3.5.
Visual Studio 2008 offers a selection between v2.0 and v3.5 at the time of project
creation (refer to step 2 below). If “Deploy the latest version of the .NET Compact
Framework” is checked (see Figure 41), Visual Studio will deploy, install, and debug
with the selected version.
1. From the Visual Studio File menu, select New Project.
2. In Visual Studio 2005, select Other Languages, Visual C#, Smart Device,
Windows CE 5.0, and Device Application in the window on the right.
In Visual Studio 2008, select Visual C#, Smart Device, and Smart Device Project in
the window on the right. In the “Add New Smart Device Project” dialog box, select
Windows CE as the target platform, the desired .NET Compact Framework version
(v3.5 is installed by default on the TREQ-VM/VMx), and Device Application from
Templates.
Page 77
TREQ-VM/VMx Mobile Data Terminal 69
3. Select a directory for the project, and click [OK].
4. Enable the Device toolbar from the View, Toolbars menu.
5. Make sure that the “Target Device” drop-down list shows “TREQ-VM ARMV4I
Device”. If not, click [Device Options] (next to the drop-down list), and select
TREQ-VM from the “Show devices for platform” drop-down list.
6. Right-click the project from the Solution Explorer window, and select Properties
to bring up the Property Pages for the project.
7. In Devices, select TREQ-VM ARMV4I Device from the Target device drop-down
list.
8. In Devices, select the desired Output file folder (see Figure 41). This parameter
determines the path in the TREQ-VM/ file system where the executable will be
deployed and executed.
Figure 41
Visual Studio, Managed Project Properties
6.2.5 Remote Tools
Microsoft provides several remote tools with the Visual Studio 2005/2008
installation, such as Remote Registry Editor and Remote Zoom In (for screen
capture). These tools work over an established remote debugging connection. Follow
the procedures outlined in sections 6.2.1 through 6.2.3 to set up this connection.
Page 78
70 TREQ-VM/VMx Mobile Data Terminal
Note that there may be a delay the first time a remote tool requests to connect to the
TREQ-VM/VMx target. The platform manager framework copies required libraries
and executables for running the remote tool during this time. Subsequent connection
requests will not have this delay unless the TREQ-VM/VMx has been rebooted since
the last request.
Refer to the following MSDN links for additional information about the Microsoft
remote tools:
http://msdn.microsoft.com/en-us/library/ee480961.aspx
http://msdn.microsoft.com/en-us/library/ee479862.aspx
6.3 Software Drivers
Software access and control of specialized hardware peripherals on the TREQ-VM
are provided through device driver and registry interfaces. These interfaces utilize the
standard Windows stream driver API (e.g., CreateFile, WriteFile, ReadFile, and
DeviceIoControl) and registry access API (RegOpenKeyEx, RegQueryValueEx,
etc.). The primary access and control mechanism is the DeviceIoControl function,
which provides flexibility via custom IOCTL codes. Refer to Microsoft
documentation for a detailed description of the driver and registry API functions.
The following sections outline the behavior, supported IOCTL codes, and registry
keys/values for each peripheral.
IOCTL codes are described in the form of sample C code and in-line comments. The
inputs and outputs of each IOCTL are described. Sample calls are provided to
illustrate proper usage for each IOCTL. IOCTL defines and enumeration values for
input and output parameters to the DeviceIoControl function are described in the file
qsiCE.h that is included in the software development kit distribution (\Program
Files\Windows CE Tools\wce600\TREQ-VM/VMx\Include\Armv4i\qsiCE.h).
Registry keys/values are listed in a standard [key] “value” format. These keys/values
may be queried or set programmatically via the registry access API or by using a
utility program like RegEditCE.exe (refer to section 4.8.2, “Beijer Electronics” on
page 54).
NOTE The code in the following sections is included “as is” for illustration purposes only.
It is recommended that the application developer check the return value for success
or failure of device driver API calls.
6.3.1 Display
The display on the TREQ-VM/VMx can be configured to run in landscape and
portrait modes. The configuration can be done at boot up by setting a registry key or
at run time programmatically.
Page 79
TREQ-VM/VMx Mobile Data Terminal 71
[HKEY_LOCAL_MACHINE\System\GDI\ROTATION]
Key Data
Type
Default
Value
Description
Angle DWORD 0 Defines the rotation angle of the
display that is used when Windows
CE starts up.
Angle
Defines the rotation angle of the display that is used when Windows CE starts up.
These values are as follows
0 - 0° (landscape mode)
90 - 90° clockwise (Portrait mode)
180 - 180° (upside down landscape mode)
270 - 90° counter-clockwise (Portrait mode)
If the registry is changed it requires a reboot for the changes to take effect.
Screen rotation is supported on the TREQ-VM/VMx and can be set
programmatically. Microsoft provides the function ChangeDisplaySettingsEx to
rotate the screen. For more information refer to the MSDN website.
http://msdn.microsoft.com/en-us/library/ee505713.aspx
Below is some sample code for rotating the screen. The use of the DEVMODE
structure is heavily documented by Microsoft
http://msdn.microsoft.com/en-us/library/ee506078.aspx
// Set current angle of screen
bool CRotateScreen::SetCurrentAngle(int DMDO_ANGLE) {
DEVMODE DevMode;
memset(&DevMode, 0, sizeof (DevMode));
DevMode.dmSize = sizeof (DevMode);
DevMode.dmFields = DM_DISPLAYORIENTATION;
DevMode.dmDisplayOrientation = DMDO_ANGLE;
if (DISP_CHANGE_SUCCESSFUL == ChangeDisplaySettingsEx(NULL,
&DevMode, NULL, CDS_RESET, NULL))
return true;
else
return false;
}
It is important to note that rotating the screen using this function will not persist
across reboots. To maintain the screen orientation across reboots, the registry key
must be set with the desired angle.
Page 80
72 TREQ-VM/VMx Mobile Data Terminal
Return Values
Value Description
DISP_CHANGE_SUCCESSFUL 0 The display settings change was
successful
DISP_CHANGE_FAILED -1 The display settings change not
supported
Parameters
Value Description
DMDO_0 0 Rotate screen by 0°
DMDO_1 1 Rotate screen by 90°
DMDO_2 2 Rotate screen by 180°
DMDO_4 4 Rotate screen by 270°
The transparency/alpha graphics can render slowly. It has been determined that
adjusting the color depth from 24-bit to 16-bit can provide a boost in performance
without sacrificing color quality.
6.3.2 Backlight
The backlight driver is responsible for enabling/disabling and setting the intensity
levels of the display and keypad backlights. The user may control these operations
programmatically or via a user interface.
The intensities of the display and keypad can be independently controlled via driver
DeviceIoControl calls or the registry. The TREQ-VM Panel application also includes
slider controls for these settings (refer to section 4.2, “TREQ Panel”).
The Windows CE power manager contains timers that can be used to enable power-
down and/or power-off modes for the display backlight after a specified time has
elapsed. The power-down and power-off modes correspond to User Idle and System
Idle system power states. Set timers for User Idle and System Idle state transitions via
driver DeviceIoControl calls, the TREQ Panel application (refer to section 4.2.5,
“Power Timeouts (Battery and External)” for more information on TREQ Panel
power state controls), or registry values. Set the power state timer values to 0 to
disable transition to User Idle and/or System Idle states. The TREQ –VM/VMx will
go directly to System Idle when User Idle is disabled.
A transition to User Idle causes the display to dim to the specified intensity. This
intensity level can be set via a DeviceIoControl call. Any user activity will cause the
power manager to transition out of User Idle to a full on state, and thus restore the
prior backlight intensity levels. Examples of user activity are pressing the touch
screen and using a USB mouse or keyboard (specifically, when the event defined in
the [HKLM\System\GWE\ActivityEvent] registry key is signaled).
Page 81
TREQ-VM/VMx Mobile Data Terminal 73
A transition to System Idle causes the display backlight and the LCD display to be
disabled. Any user activity will cause the power manager to transition out of System
Idle to a full on state, and thus restore the prior backlight intensity levels.
API, described via code examples:
HANDLE hBacklightDevice;
hBacklightDevice = CreateFile(TEXT("BLT1:"), GENERIC_READ, 0, NULL,
OPEN_EXISTING, 0, NULL);
// set/get backlight intensity
int intensity = 50; // 0 to 100%
DeviceIoControl(hBacklightDevice, IOCTL_BACKLIGHT_SET_INTENSITY,
&intensity, sizeof(intensity), NULL, 0, NULL, NULL);
DeviceIoControl(hBacklightDevice, IOCTL_BACKLIGHT_GET_INTENSITY,
NULL, 0, &intensity, sizeof(intensity), NULL, NULL);
// set or get the backlight power down or power off timeout value
int pwrTime; // seconds
// set power down (User Idle transition timer)
DeviceIoControl(hBacklightDevice, IOCTL_BACKLIGHT_SET_POWERDOWN,
&pwrTime, sizeof(pwrTime), NULL, 0, NULL, NULL);
DeviceIoControl(hBacklightDevice, IOCTL_BACKLIGHT_GET_POWERDOWN,
NULL, 0, &pwrTime, sizeof(pwrTime), NULL, NULL);
// set power off (System Idle transition timer)
DeviceIoControl(hBacklightDevice, IOCTL_BACKLIGHT_SET_POWEROFF,
&pwrTime, sizeof(pwrTime), NULL, 0, NULL, NULL);
DeviceIoControl(hBacklightDevice, IOCTL_BACKLIGHT_GET_POWEROFF,
NULL, 0, &pwrTime, sizeof(pwrTime), NULL, NULL);
CloseHandle(hBacklightDevice);
[HKEY_LOCAL_MACHINE\Drivers\BuiltIn\Backlight]
Key Data
Type
Default
Value
Description
BacklightIntensity DWORD 0064 (100%) Specifies the
backlight intensity
BacklightKeypadIntensity DWORD 0064 (100%) Not supported on the
TREQ-VM/VMx.
BacklightPowerDownIntensity DWORD 0002 (2%) Backlight intensity in
user idle state.
Page 82
74 TREQ-VM/VMx Mobile Data Terminal
[HKEY_LOCAL_MACHINE\SYSTEM\CurrentControlSet\Control\Power\Timeouts]
Key Data
Type
Default Value Description
ACSuspend DWORD 0000 (never) Not supported on the TREQ-
VM/VMx.
ACUserIdle DWORD 60 (seconds) Specifies how much user
inactivity time must elapse
before the user idle state is
trigger.
ACSystemIdle DWORD 300 (5 minutes) Specifies how much user
inactivity time must elapse
before the system idle state is
trigger.
BATTSuspend DWORD 0 (never) Not supported on the TREQ-
VM/VMx.
BATTUserIdle DWORD 60 (seconds) Specifies how much user
inactivity time must elapse
before the user idle state is
trigger.
BATTSystemIdle DWORD 300 (5 minutes) Specifies how much user
inactivity time must elapse
before the system idle state is
trigger.
Changes to these registry settings take effect only after a reboot.
6.3.3 OS Build Version
Registry keys allow an application to get operating system build date and version
number
[HKEY_LOCAL_MACHINE\Build]
Key Data
Type
Description
BuildNumber SZ Displays the date (day month year).
KernelVersion SZ Displays the license of Windows CE.
OSBuildDate SZ Displays date of os build (day month
year).
Page 83
TREQ-VM/VMx Mobile Data Terminal 75
Key Data
Type
Description
OSVersion SZ Displays the version (may be
different than "projectVersion" which
is the whole system (os + utilities +
???).
ProjectVersion SZ Displays the project version.
6.3.4 Dock Driver
The dock driver automatically detects when the TREQ-VM/VMx is placed on the
cradle. DeviceIoControl calls can retrieve the docking state and cradle configuration.
The docking state is determined by the physical connection of the TREQ-VM/VMx
to the cradle. The cradle must also be connected to a power source via the DB26.
API, described via code examples:
HANDLE hDOCK;
hDOCK = CreateFile(TEXT("DOC1:"), GENERIC_READ, 0, NULL,
OPEN_EXISTING, 0, NULL);
// Get docking state. Value of 1 indicates VM is docked, 0 is
undocked.
bool isDocked = false;
DWORD ds = 0;
if(DeviceIoControl(hDOCK, IOCTL_DOCK_GET_IS_DOCKED, NULL, 0, &ds,
sizeof(ds), NULL, FALSE))
{
if(ds == 1)
isDocked = true;
}
CloseHandle(hDOCK);
return 0;
Registry keys also allow an application to get current dock status.
[HKEY_LOCAL_MACHINE\Drivers\BuiltIn\DOC]
Key Data
Type
Default
Value
Description
CradleGen DWORD No default
value
Specifies cradle hardware revision.
isDocked DWORD No default
value
Value of 0 or 1 indicates device is in
undocked or docked state, respectively.
IOCTL_OIO_GET_CRADLE_CONFIG
Page 84
76 TREQ-VM/VMx Mobile Data Terminal
This IOCTL retrieves manufacturer cradle information
// Get Cradle Information
HANDLE hOIO;
hOIO = CreateFile( L"OIO1:", NULL, NULL, NULL, OPEN_EXISTING, 0,
NULL);
// Use structure to store output buffer
sCRADLE_CONFIG myConfig;
myConfig.cbSize = sizeof(myConfig);
// Store cradle information into myConfig
DeviceIoControl( hOIO, IOCTL_OIO_GET_CRADLE_CONFIG, NULL, 0,
&myConfig, sizeof(myConfig), NULL, NULL);
The sCRADLE_CONFIG structure is defined below:
typedef struct{
DWORD cbSize;
CRADLE_TYPE cradle_type;
DWORD cradle_revision;
CRADLE_COM com_config;
CRADLE_AUDIO audio_config;
BOOL term485;
BOOL term422;
CRADLE_MODEM_CONTROL modem_control;
}sCRADLE_CONFIG;
Struct Member Description
cbSize Structure size, in bytes.
cradle_type Specifies the cradle type. Points to the CRADLE_TYPE
enum.
cradle_revision Specifies the hardware revision of the cradle.
com_config Specifies the COM configuration. Points to the
CRADLE_COM enum.
audio_config Specifies the audio configuration. Points to the
AUDIO_CONFIG enum.
term485 Specifies termination on RS485 connection.
term422 Specifies termination on RS422 connection.
modem_control Specifies the modem controls for the cradle. Points to
CRADLE_MODEM_CONTROL enum.
Page 85
TREQ-VM/VMx Mobile Data Terminal 77
6.3.5 System Serial Numbers
The TREQ-VM/VMx has the serial number programmed into the device during
production. There is a unique serial number in the cradle and a unique serial number
in the terminal. Both of which can be queried. See the IOCTL descriptions below.
For the Terminal:
IOCTL_OIO_GET_SERIAL_NUMBER
This IOCTL retrieves the serial number of the terminal.
// Get Terminal Information
HANDLE hOIO;
hOIO = CreateFile( L"OIO1:", NULL, NULL, NULL, OPEN_EXISTING, 0,
NULL);
BYTE serial[20];
DWORD length = 0;
// Get serial number and number of digits
DeviceIoControl( hOIO, IOCTL_OIO_GET_SERIAL_NUMBER, NULL, 0, serial,
sizeof(serial), &length, NULL);
For the Cradle:
IOCTL_OIO_GET_CRADLE_SERIAL_NUMBER
This IOCTL retrieves the serial number of the cradle.
// Get Cradle Information
HANDLE hOIO;
hOIO = CreateFile( L"OIO1:", NULL, NULL, NULL, OPEN_EXISTING, 0,
NULL);
BYTE serial[20];
DWORD length = 0;
// Get serial number and number of digits
DeviceIoControl( hOIO, IOCTL_OIO_GET_CRADLE_SERIAL_NUMBER, NULL, 0,
serial, sizeof(serial), &length, NULL);
6.3.6 “Unidentified USB device”
When an unidentified USB device is inserted in a TREQ-VM/VMx USB port a
prompt can be opened requesting that the user install the drivers for the new device.
(The default action is to display the prompt.) A key in the registry can be set to
determine if the prompt is displayed.
[HKEY_LOCAL_MACHINE\Drivers\USB\LoadClients]
Key Data
Type
Default
Value
Description
DoNotPromptUser DWORD 0 Prompts user to install drivers.
Page 86
78 TREQ-VM/VMx Mobile Data Terminal
DoNotPromptUser State:
The value determines if Window CE will prompt user when an unidentified USB
device is detected.
0 – Prompts user to install drivers.
1 – Disables the prompt.
NOTE Drivers will still need to be installed for device to function properly on the TREQ-
VM/VMx.
6.3.7 Battery
In addition to the standard Windows CE battery / power interface there are some
customized IOCTL that allow the application to suspend and resume charging. The
functions and IOCTL codes are defined in qsiCE.h.
IOCTL_BATTERY_SET_SUSPEND_CHARGING
This IOCTL suspends or resume the charging of the battery when external power is
applied. By default the battery will charge when sufficient external power is
applied to the device.
IOCTL_BATTERY_SET_POWER_PATH
This IOCTL sets the power path that the TREQ-VM/VMx uses when external and
battery are both available. By default the power path will use external power when
available and battery power when device is in an undocked state. Setting path to
battery power when external power is applied will affect devices located on the
breakout box and cradle. This is equivalent to undocking the terminal from the
cradle, refer to section 3.1“Docking and Undocking the TREQ-VM/VMx” for more
information about which devices are affected.
IOCTL_BATTERY_GET_STATUS
This IOCTL gets the battery charging status, temperature protection settings and
power path.
API, described via code examples:
// Access battery device
HANDLE hBatt;
hBatt = CreateFile( L"BAT1:", NULL, NULL, NULL, OPEN_EXISTING, 0,
NULL);
// Suspend battery charging when external power is applied.
DWORD inv = BATTERY_SUSPEND_CHARGING;
DeviceIoControl(hBatt, IOCTL_BATTERY_SET_SUSPEND_CHARGING, &inv,
sizeof(inv), NULL, 0, NULL, NULL);
// Use battery power even though external power is available.
inv = BATTERY_POWER_PATH_BATTERY_POWER;
Page 87
TREQ-VM/VMx Mobile Data Terminal 79
bool pass = DeviceIoControl(hBatt, IOCTL_BATTERY_SET_POWER_PATH,
&inv, sizeof(inv), NULL, 0, NULL, NULL);
// Retrieve battery status and store into structure
BATTERY_STATUS bst;
DeviceIoControl(hBatt, IOCTL_BATTERY_GET_STATUS, NULL, 0, &bst,
sizeof(bst), NULL, NULL);
// Resume battery charging
inv = BATTERY_RESUME_CHARGING;
DeviceIoControl(hBatt, BATTERY_RESUME_CHARGING, &inv, sizeof(inv),
NULL, 0, NULL, NULL);
// Revert to using external power.
inv = BATTERY_POWER_PATH_EXTERNAL_POWER;
bool pass = DeviceIoControl(hBatt, IOCTL_BATTERY_SET_POWER_PATH,
&inv, sizeof(inv), NULL, 0, NULL, NULL);
Refer to the following MSDN link for additional information regarding functions for
getting battery voltage, life (percentage), temperature and current:
http://msdn.microsoft.com/en-us/library/ee499341
6.3.8 Temperature Sensor
The TREQ-VM/VMx includes temperatures sensors for the internal lithium battery,
PMIC junction and CPU. Refer to section 6.3.7, “Battery” for information on
retrieving the battery temperature.
IOCTL_OIO_GET_TEMPERATURE
This IOCTL returns the temperature of the external and internal of the CPU on the
TREQ-VM/VMx device
// Access temperature sensor
HANDLE hOIO;
DWORD mode; // Internal CPU, External CPU or PMIC temperature
float temp; // Celsius
hOIO = CreateFile( L"OIO1:", GENERIC_READ|GENERIC_WRITE, 0, NULL,
OPEN_EXISTING, 0, NULL );
// Get temperature reading
mode = 0; // Temperature from internal CPU sensor
float temp;
DeviceIoControl(hOIO, IOCTL_OIO_GET_TEMPERATURE, &mode,
sizeof(mode), &temp, sizeof(temp), NULL, NULL);
mode = 1; // Temperature from external CPU sensor
DeviceIoControl(hOIO, IOCTL_OIO_GET_TEMPERATURE, &mode,
sizeof(mode), &temp, sizeof(temp), NULL, NULL);
mode = 5; // PMIC junction temperature
DeviceIoControl(hOIO, IOCTL_OIO_GET_TEMPERATURE, &mode,
sizeof(mode), &temp, sizeof(temp), NULL, NULL);
Page 88
80 TREQ-VM/VMx Mobile Data Terminal
6.3.9 Modem
The modem driver will automatically detect which cellular modem is present. The
driver will configure and enable the modem and route the COM4 serial port to
interface properly. There are several technologies that add support for connection the
TREQ-VMx to a remote network. Below are references to Cellular Radio (CellCore)
and Remote Access Service (RAS). For a complete list of network technologies
please visit the MSDN website.
http://msdn.microsoft.com/en-us/library/ee483162%28v=winembedded.60%29
The cellular core (CellCore) platform on the TREQ-VMx provides a basic set of
wireless services for cellular modems, including voice calls and data connections.
Using the Radio Interface Layer (RIL) provides an interface to handle the
communication between CellCore and the modem hardware. To add this feature to
your OS please contact Beijer Electronics Customer Support group for the Radio
Interface Layer (RIL) installer package. For more information on the RIL interface
please refer to the documentation provided on the MSDN website.
http://msdn.microsoft.com/en-us/library/ee498057
Dial-up data connections can also be made using Remote Access Service (RAS).
RAS provides remote access capabilities for client application on the TREQ-VMx.
There are several low-level functions for starting a RAS connection; third-party
libraries may provide better solutions for application integration. For more
information regarding RAS please refer to the documentation provided on MSDN
website.
http://msdn.microsoft.com/en-us/library/ee496658
6.3.10 GPIO
The GPIO driver gets or sets the individual GPIO line values that are included on the
HD female 15 pin D-Sub connector of the TREQ-VM/VMx. DeviceIoControl calls
are used to get/set the GPIO values (low/high).
HANDLE hGPIO;
hGPIO = CreateFile( L"GPI1:", GENERIC_READ|GENERIC_WRITE, NULL,
NULL, OPEN_EXISTING, 0, NULL);
WORD myio, myval;
myio = 0; // GP Input 0
// The state is stored into myval, 0 indicates cleared and 1
// indicates set
DeviceIoControl(hGPIO, IOCTL_GPIO_GET, &myio, sizeof(myio), &myval,
sizeof(myval), NULL, NULL );
myio = 1; // GP Input 1
// The state is stored into myval, 0 indicates cleared and 1
// indicates set
DeviceIoControl(hGPIO, IOCTL_GPIO_GET, &myio, sizeof(myio), &myval,
sizeof(myval), NULL, NULL );
Page 89
TREQ-VM/VMx Mobile Data Terminal 81
DWORD io = 0x10; // An invalid value
io = 2 | ((1)<<16); // GP Output 0 Set
io = 2; // GP Output 0 Clear
io = 3 | ((1)<<16); // GP Output 1 Set
io = 3; // GP Output 1 Clear
// Set or clear the GPIO
DeviceIoControl(hGPIO, IOCTL_GPIO_SET, &io, sizeof(io), NULL, 0,
NULL, NULL );
6.3.11 Power
The Power Management driver can be used to control power state transitions for the
TREQ-VM/VMx system or for specific peripherals. User applications may use the
Windows CE Power Management API (e.g., the SetSystemPowerState,
SetDevicePower, and DevicePowerNotify functions) to control and set system or
device power states. The power states for the system are specified via specific strings,
for example, “useridle”. The power states for peripherals are specified with the
Windows CE power state enumerations D0 – D4.
Refer to the Power Management functions documentation on the MSDN website.
http://msdn.microsoft.com/en-us/library/ee497756.aspx
Also refer to the pm.h header file that is included in the SDK (\Program
Files\Windows CE Tools\wce600\TREQ-VM\Include\Armv4i\pm.h), and the
CEDEVICE_POWER_STATE enumeration on the MSDN website.
http://msdn.microsoft.com/en-us/library/ee497766.aspx
The following table shows the available TREQ-VM/VMx system power states,
specified as both strings and enumerations (when available).
psState Parameter
String Value
Description
“on” Full power mode. All peripherals fully
powered and enabled. The power manager may
still cause the system to transition to a low
power idle mode during periods of reduced and
no activity.
“useridle” Reduced/low power mode. Display backlight
and keypad backlight are dimmed. The TREQ-
VM/VMx consumes about one-half the power
required when in the “on” state.
Page 90
82 TREQ-VM/VMx Mobile Data Terminal
psState Parameter
String Value
Description
“systemidle” Reduced/low power mode. LCD, display
backlight, and keypad backlight are disabled.
The TREQ-VM/VMx consumes about one-
third to one-half the power required when in
the “on” state.
“suspend”
“resuming”
Not supported. Using this parameter with the
SetSystemPowerState function will have no
effect and will return failure.
“off”
“shutdown”
Causes an orderly shutdown of the TREQ-
VM/VMx.
“reboot”
“coldreboot”
Causes an orderly shutdown of the TREQ-
VM/VMx, followed by a soft reboot.
The following are examples illustrating how to put the system and backlight, display,
and USB peripheral devices into a specific power state.
The SetSystermSettingState function requires the psState parameter to be the string
value as indicated in the table above. Attempting to use the StateFlags DWORD on
the MSDN website will be ignored by the power manager.
// Be sure to check return values for Power Management functions
#include <pm.h>
// Define peripheral devices
#define BACKLIGHT_DEVICE_NAME PMCLASS_GENERIC_DEVICE TEXT("\\BLT1:")
#define DISPLAY_DEVICE_NAME PMCLASS_DISPLAY TEXT("\\zylonite_lcd")
#define USB_DEVICE_NAME PMCLASS_GENERIC_DEVICE TEXT("\\HCD1:")
DWORD dwDummy;
CEDEVICE_POWER_STATE cps;
// buf contains the current power state string, e.g. "on"
TCHAR buf[50];
// Get system power state and store into buf
GetSystemPowerState(buf, 50, &dwDummy);
// Perform a soft reset using the Power Manager API
//SetSystemPowerState(L"reboot", 0, 0x0);
// Put the TREQ-VM/VMx system in the user idle state
SetSystemPowerState(L"useridle", 0, 0x0);
// Go back to the on state
SetSystemPowerState(L"on", 0, 0x0);
// Get the current state of the backlight, store into cps
GetDevicePower(BACKLIGHT_DEVICE_NAME, POWER_NAME, &cps);
Page 91
TREQ-VM/VMx Mobile Data Terminal 83
// Set the backlight driver's power state to D2 "standby" state.
// The backlight is dimmed, but not off in D2
SetDevicePower(BACKLIGHT_DEVICE_NAME, POWER_NAME, D2);
// Get the current state of the display, store into cps
GetDevicePower(DISPLAY_DEVICE_NAME, POWER_NAME, &cps);
// Set the display driver's power state to D4 "off" state,
// which turns the display off.
SetDevicePower(DISPLAY_DEVICE_NAME, POWER_NAME, D4);
// Get the current state of the USB device, store into cps
GetDevicePower(USB_DEVICE_NAME, POWER_NAME, &cps);
// Set the USB driver's power state to D4 "off" state,
// which disables bus power to any connected USB devices.
SetDevicePower(USB_DEVICE_NAME, POWER_NAME, D4);
6.3.12 Serial Ports
Refer to the following MSDN Web site regarding programming serial connections
for information about and examples of the Windows CE serial port API:
http://msdn.microsoft.com/en-us/library/ee484080.aspx
The serial port driver uses the stream driver interface. COM1 through COM9drivers
have port names of COM1:, … COM9:, which can be passed to the
CreateFile(‘COMX:’) (where X represents the com number) function to open these
ports. (COM numbers above 10 require difference syntax. Refer to the Microsoft web
page for more information.) COM5 is only used as a virtual COM port that is
available when a USB-to-serial converter is attached.
The MinTermCE.exe is a simple terminal program (refer to section 4.8.2, “Beijer
Electronics”) that can be used to test communications over the TREQ-VM/VMx
serial ports.
Refer to section 2.1.4, “EIA COM Ports” for information on which port numbers are
in use.
6.3.13 Network
Windows CE provides a standard API called Winsock for programming with
TCP/IP-based network connections. Network connections are available for multiple
interfaces and peripherals on the TREQ-VM/VMx, such as internal 10/100Base-T
wired Ethernet, external USB-to-wired Ethernet adapter, external USB to Wi-Fi
adapter, and internal Bluetooth Personal Area Network adapter. Refer to section
4.1.6, “Network and Dial-up Connections” and Chapter 7, “Optional Peripherals” for
additional information on these interfaces and peripherals.
Page 92
84 TREQ-VM/VMx Mobile Data Terminal
Refer to the following MSDN articles for detailed information and programming
reference for the Winsock Windows CE API:
http://msdn.microsoft.com/en-us/library/ee494522.aspx
http://msdn.microsoft.com/en-us/library/ee493304.aspx
Refer to the following MSDN article for Winsock programming samples:
http://msdn.microsoft.com/en-us/library/ee493104.aspx
Following are some MSDN articles describing networking, connectivity, and using
sockets with the .NET Compact Framework:
http://msdn.microsoft.com/en-us/library/8y3swehx.aspx
http://msdn.microsoft.com/en-us/library/b6xa24z5.aspx
6.3.14 Power Transition on Ignition
Using the registry keys in Ignition Pin Options, the external ignition input on the
TREQ-VM/VMx allows for waking up the terminal from sleep mode and powering
down the terminal.
Much of the functionality is programmable so as to be customized by the end user
application. These controls are specified thru registry values. Note that in this case, a
change to the registry does not require a restart of the system for the change to take
effect. This is because the registry value is read on a state transition.
The following registry settings need to be implemented to perform this task for
turning on or off the terminal on the rising or falling edge of the external ignition
input:
[HKEY_LOCAL_MACHINE\Drivers\BuiltIn\TreqPM\Ignition Pin Options]
Key Data
Type
Default
Value
Description
IGNPRising target
state
DWORD 0 The value passed to the
SetSystemPowerState function on
a rising edge of the ignition signal.
See valid values below
IGNPFalling target
state
DWORD 1 The value passed to the
SetSystemPowerState function on
a falling edge of the ignition signal.
Page 93
TREQ-VM/VMx Mobile Data Terminal 85
Key Data
Type
Default
Value
Description
IGNPDebounce DWORD C8 (200) Specifies the number of
milliseconds to wait to ensure the
signal transition is valid and not
just a glitch. This is a software
debounce and is in addition to a
non-programmable hardware
debounce.
IGNPWake control DWORD 3 Determines boot/wake (from deep
sleep) behavior.
IGNPRising target state:
The value passed to the SetSystemPowerState function on a rising edge of the
ignition signal. Valid values are listed below and in the pm.h header file that is
included in the SDK (\Program Files\Windows CE Tools\wce600\TREQ-
VM\Include\Armv4i\pm.h),
0 – POWER_STATE_ON (full power, bright screen)
1 – POWER_STATE_USERIDLE (half power, dim screen)
2 – POWER_STATE_SYSTEMIDLE (screen powered off)
4 – POWER_STATE_OFF (system devices are powered off)
6 – POWER_STATE_REBOOT (reset/restart the system)
Any other value will be ignored, no action will be taken on a rising edge.
IGNPFalling target state:
The value passed to the SetSystemPowerState function on a falling edge of the
ignition signal.
NOTE Undocking the terminal from the cradle while the ignition pin is in an ‘ON’ state will
set the power state of the ignition pin to a falling target state.
Valid values are (as documented in the SDK):
0 – POWER_STATE_ON (full power, bright screen)
1 – POWER_STATE_USERIDLE (half power, dim screen)
2 – POWER_STATE_SYSTEMIDLE (screen powered off)
4 – POWER_STATE_OFF (system devices are powered off)
6 – POWER_STATE_REBOOT (reset/restart the system)
Any other value will be ignored; no action will be taken on a rising edge.
Page 94
86 TREQ-VM/VMx Mobile Data Terminal
IGNPDebounce:
Specifies the number of milliseconds to wait to ensure the signal transition is valid
and not just a glitch. This is a software debounce and is in addition to a non-
programmable hardware debounce.
IGNPWake control:
Determines boot/wake (from deep sleep) behavior and can have the following
values:
0 – Wake only when either power button is pressed or external power is applied.
1 – Wake only when ignition is asserted.
NOTE This is a software option. The hardware will wake the processor if power applied or
power button is pressed but the boot code will see that ignition is not asserted and
immediately “resleep”.
2 – Wake only when power button is pressed.
3 – Wake only when either power button is pressed or ignition asserted. This
allows the terminal to be powered up even if ignition is not asserted by pressing the
power button. It will also wake on assertion of the ignition.
4 – Wake only when power button is pressed and ignition is asserted.
5 – Wake when any power-on event occurs (power applied, ignition assertion, or
power button pressed).
NOTE Ignition is NOT required to be asserted.
Any of the above values may also be used in connection with bit 7 being set which
will invert the polarity of ignition. Normally we think of ignition assertion meaning
the external signal is at a high level. By setting bit 7 of this value, ignition will be
considered asserted if the external signal is at a low level.
Any of the above values may also be used together with bit 6 being set which will
cause the system to wake immediately after power down if the ignition signal
asserted after bit 6 was set but prior to being shut down. This bit is intended to solve
a problem where ignition asserts during the shutdown process and the system would
not wake-up until ignition had deasserted and reasserted.
Using any other value than those described here can lead to unknown behavior.
These values have to be mapped to hardware registers in order to facilitate waking
the system from a deep sleep state. A best guess is attempted, but using values other
than those described above may cause undesired behavior.
The current ignition pin value can be read from the registry by reading the following:
[HKEY_LOCAL_MACHINE\Drivers\BuiltIn\TreqPM\Ignition Pin]
"Level"=dword:0
Page 95
TREQ-VM/VMx Mobile Data Terminal 87
This registry value is updated each time a change is detected on the ignition pin. The
value in this registry is always “positive logic”. 1 means asserted, 0 means
deasserted.
6.3.15 Power Button Action
The power button control is specified through registry values. A change to this
registry does not require a restart of the system for the change to take effect. This is
because the registry value is read on a state transition.
HKEY_LOCAL_MACHINE\Drivers\BuiltIn\DOC]
Key Data
Type
Default
Value
Description
PowerButtonPressTime DWORD 450 Specifies the number of
milliseconds the power button
must be pressed and held
continuously until power state
is activated.
PowerButtonTargetState DWORD 4 The power state that will result
from holding down the power
button.
PowerButtonPressTime
Holding the pwer button down for more than 5000ms will result in a hardware
shutdown. Setting this value to greater than 4500ms is not recommended since this
will shorten the gap between hardware and software shutdown, which can cause
race conditions.
The system will shut down after the power button is pressed and held continuously
for 5 seconds. This procedure is used if the operating system is locked up to
prevent the TREQ-VM/VMx from draining the battery. There is no way to bypass
this hardware feature.
PowerButtonTargetState
The state is specified with a single integer. These values are as follows
1 - User Idle State
2 - System idle
4 - Shutdown
6 - Same as shutdown except the TREQ-VM/VMx boots up after orderly
shutdown.
Page 96
88 TREQ-VM/VMx Mobile Data Terminal
6.3.16 Watchdog
A watchdog driver is included in the WinCE OS for the TREQ-VM/VMx. The
watchdog used is a hardware watchdog that is available via the processor peripherals
of the device controller. This is a hardware watchdog that once started cannot be
stopped (i.e. it has a write once enable), it must constantly be “tickled” to avoid
having it reset the system. Thus, if the software gets hung or stops responding the
system will restart. As implemented, the watchdog is not enabled unless/until the
customer application opens the driver and starts the watchdog via an IOCTL. This
allows for backwards compatibility with all existing software and allows to choose
whether to use the watchdog or not. By having the application “tickle” the watchdog
(instead of the OS), the watchdog will protect against both an application hang and an
operating system hang. The following shows how to “open the watchdog” driver.
myWDG = CreateFile(L"WDG1:", GENERIC_READ | GENERIC_WRITE, 0, 0,
OPEN_EXISTING, FILE_ATTRIBUTE_NORMAL, 0);
Once opened, the following IOCTLS are available to control the watchdog
IOCTL_WATCHDOG_START:
Enables the hardware watchdog. This ioctl requires no parameters. It may be
called before SET_TIME or after. If called before, a default time of 10 seconds
will be used. If this ioctl is invoked again after having already started, this will
have the same effect as using the tickle IOCTL.
IOCTL_WATCHDOG_SET_TIME:
Sets the duration of the watchdog. The duration is specified in increments of 1
second. The desired duration should be passed to this IOCTL as a DWORD
pointed to by lpInBuffer with a size of 4 specified in nInBufferSize.
The value must be between 1 and 1320 (22 minutes). Values outside this range will
result in “Invalid Parameter” error.
IOCTL_WATCHDOG_TICKLE:
Keeps the watchdog from expiring until the duration set above has expired. There
is no minimum time on how often the watchdog can be tickled (i.e. back to back
tickle will not cause reset).
Requires no parameters.
6.3.17 1708/J1939
The TREQ-VMx implements the industry standard RP1210A API for communicating
on a J1708 or J1939 network. If your application already uses RP1210A, it should be
able to function without modification on the TREQ-VMx.
NOTE The standard bit time on the J1939 bus is 4us or 250kbit/s.
Page 97
TREQ-VM/VMx Mobile Data Terminal 89
NOTE The standard bit time on the J1708 bus is approximately 0.104ms or 9600bit/s.
The J1708/J1939 interface can be controlled and tested with the Windows CE
application QBridgeTestCE (refer to section 4.8.2, “Beijer Electronics”).
QBridgeTestCE allows you to set up the connection to the QBridge processor on
COM7, enable or disable data filters for J1708/J1939, send data through the
J1708/J1939 buses, and obtain the firmware version of the QBridge processor
through the [Inq] button (see Figure 42). Data can be typed into the QBridge window
and sent or received on the bus by pressing the labeled buttons.
Figure 42
QBridgeTestCE Application for Testin J1708 and J1939
If you are writing your own application, you can use the following API to
communicate over the J1708/J1939 network. This reference assumes that you are
familiar with the Win32 API, as well as J1708 and/or J1939 communications.
This API is implemented in the file QBRDGE32.dll located on the TREQ-VMx in
the \HardDisk\BIN\QBridge folder. QBRDGE32.h is available to include in your
source code file. This header is located in the SDK distribution at\Program
Files\Windows CE Tools\wce600\TREQ-VM\Include\Armv4i. Use LoadLibrary and
GetProcAddress to get pointers to the functions described.
Function short WINAPI RP1210_ClientConnect (HWND hwndClient, short nDeviceID,
char far* fpchProtocol, long lTxBufferSize, long lRcvBufferSize,
short nIsAppPacketizingIncomingMsgs)
Description
This function opens a connection with the QBridge. You must open a connection
before you can use any of the other functions that operate on a connection.
Page 98
90 TREQ-VM/VMx Mobile Data Terminal
Return Value
On success, returns a client identifier in the range of 0 – 127, which will be used
for other communication messages. On failure, returns an error code from the list at
the end of this section.
Parameters
hwndClient A window handle in which any messages
regarding errors and received data are sent.
While you can receive notification via
Windows messages, it is recommended to
pass NULL for this parameter, and use the
blocking version of the send and receive
functions in a separate thread(s) from the
main one.
nDeviceID A short indicating the serial port to which the
QBridge is connected. Should be
QBRIDGE_COM7.
fpchProtocol The protocol to use. Should be
QBRIDGE_J1708_PROTOCOL or
QBRIDGE_J1939_PROTOCOL.
lTxBufferSize Ignored, use 0.
lRcvBufferSize Ignored, use 0.
nIsAppPacketizingIncomingMsgs Ignored, use 0.
Function short WINAPI RP1210_ClientDisconnect (short nClientID);
Description
Closes an option connection with the QBridge. Call this function when you are
done with it to free up internal resources. Once closed, the connection cannot be
used again but must be reopened with a call to RP1210_ClientConnect().
Return Value
This function returns 0 upon success. On failure, it returns a code from the list at
the end of this section.
Parameters
nClientID A client identifier that was opened by
RP1210_ClientConnect()
Page 99
TREQ-VM/VMx Mobile Data Terminal 91
Function short WINAPI RP1210_SendMessage (short nClientID, char far*
fpchClientMessage, short nMessageSize, short nNotifyStatusOnTx,
short nBlockOnSend)
Description
Transmits a message over the J1708/J1939 network.
NOTE (For J1708 only) The QBridge is limited to J1708 packets of 21 bytes or fewer
(including the MID). Also the J1708 exception permitting larger packets when the
vehicle is stopped and the engine off is not supported. See below for the packet
structure.
Priority, 1 byte (0-7)
J1708 MID, 1 byte
Message data, 1-19 bytes. This is inclusive of the MID byte
Return Value
If the nNotifyStatusOnTx parameter is non-zero, the return value is in the range of
1 – 127, indicating that a future message will be sent to your window with the
status of the message. Otherwise, if nBlockOnSend is 0, then this function returns
zero if it is able to add the message to the QBridge transmission queue. If
nBlockOnSend is 1, this function returns 0 if the message is successfully sent. In
any case, if an error is detected, one of the error codes form the list at the end of
this section is returned.
Parameters
nClientID A client identifier that was opened by
RP1210_ClientConnect().
fpchClientMessage The data that is to be transmitted. If this message is to
be sent over a J1708 network, the buffer should be in
the following format:
Priority, 1 byte (0-7)
J1708 MID, 1 byte
Message data, 1-21 bytes
If the message is a J1939 message, the data should be
in the following format:
Parameter Group Number (PGN), 3 bytes
How / Priority, 1 byte (High order bit flags whether
the data is a broadcast or a directed message. The
low three bits signal the priority. All other bits
should be zero.)
Source Address, 1 byte
Destination Address, 1 byte
Data, 0-1785 bytes
Page 100
92 TREQ-VM/VMx Mobile Data Terminal
nMessageSize The size of the buffer provided in the
fpchClientMessage parameter.
nNotifyStatusOnTx If set to zero, no notification message is sent when the
message is placed on the network. When using the
recommended communication method of calling
SendMessage in its own thread and blocking, this
value should be zero. If set to one, the return value of
this function is a message identifier between 1 and
127. When the QBridge successfully transmits this
message, or fails for whatever reason, it sends your
window an WM_RP1210_ERROR_MESSAGE
message indicating the status of the message and the
message identifier.
nBlockOnSend If set to zero, this function returns immediately. If
nonzero, this function blocks until the message has
been placed on the network or until a network failure
prevents the message from being set.
Function short WINAPI RP1210_ReadMessage (short nClientID, char far*
fpchAPIMessage, short nBufferSize, short nBlockOnRead)
Description
Retrieves a message from the J1708/J1939 network if one is available.
Return Value
If a read is successful, this function returns the number of bytes read. If no data was
present (and this function didn’t block), the return value is zero. If an error occurred,
this value returns an error code less than zero. This error code is the negative of one
of the error codes in the list at the end of this section. For example, if this function
returns -142, the error condition 142 (ERR_HARDWARE_NO_RESPONDING)
exists.
Parameters
nClientID A client identifier that was opened by
RP1210_ClientConnect()
Page 101
TREQ-VM/VMx Mobile Data Terminal 93
fpchAPIMessage A buffer to receive the message data. This should be large
enough to accommodate any data packet from the network.
The first four bytes are populated with a time stamp, and the
message follows. The time stamp is a little endian 4-byte
integer representing milliseconds. It is used to compare
when the relative time messages were received and should
not be mapped to an absolute time.
For J1708 message, the receive data format is:
Time stamp, 4 bytes
MID, 1 byte
Message data, 1-21 bytes
For J1939 messages the receive data format is:
Time stamp, 4 bytes
Parameter Group Number (PGN), 3 bytes
How / Priority, 1 byte (High order bit flags whether the
data is a broadcast message.)
Source Address, 1 byte
Destination Address, 1 byte
Data, 0-1785 bytes
nBufferSize The capacity of fpchAPIMessage, in bytes.
nBlockOnRead If zero, the function returns immediately if no data is
present. If nonzero, the function blocks until data is
available or the client connection has been closed from
another thread.
Function short WINAPI RP1210_SendCommand (short nCommandNumber, short
nClientID, char far* fpchClientCommand, short nMessageSize)
Description
Performs a command on the QBridge hardware. Typically used to enable or disable
filtering. See “Error! Reference source not found.” on page Error! Bookmark
not defined. for specifics on the individual commands that may be sent.
Return Value
Depends on the command that is specified.
Parameters
nCommandNumber The command that is to be sent to the QBridge.
nClientID A client identifier that was opened by
RP1210_ClientConnect().
fpchClientCommand A buffer that is command specific.
Page 102
94 TREQ-VM/VMx Mobile Data Terminal
nMessageSize The size of the buffer provided in the
fpchClientMessage parameter.
Details
The following commands are supported:
CMD_RESET_DEVICE
Resets the QBridge interface. The client connection is automatically closed and
must be reopened for further communication. fpchClientCommand and
nMessageSize are ignored.
CMD_ALL_FILTERS_PASS
Configures the driver to pass all messages to the application, discarding none. By
default, when a connection is opened, no filters are set to pass and all messages are
discarded. fpchClientCommand and nMessageSize are ignored.
Supported for both J1708 and J1939 communication.
CMD_SET_J1939_FILTERING
Configures the driver to pass certain J1939 messages through while discarding
others. Subsequent calls to this command add additional filters to pass additional
messages rather than replace existing filters. To replace existing filters, send a
CMD_ALL_FILTERS_DISCARD prior to calling
CMD_SET_J1939_FILTERING.
fpchClientCommand defines one or more filter records using the following
structure:
Byte 1: Filter flags
Specifies which later field(s) in this structure will be used. This may be a bitwise
combination of one or more of the following values:
FILTER_PGN (0x01): Filter by PGN
FILTER_PRIORITY (0x02): Filter by message priority
FILTER_SOURCE (0x04): Filter by source address
FILTER_DESTINATION (0x08): Filter by destination address
Bytes 2-4: PGN
Specifies a PGN to pass through the filters. Ignored unless byte 1 specifies
FILTER_PGN.
Byte 5: Priority
Specifies a priority to pass through the filters. Ignored unless byte 1 specifies
FILTER_PRIORITY.
Page 103
TREQ-VM/VMx Mobile Data Terminal 95
Byte 6: Source Address
Specifies a source address to pass through the filters. Ignored unless byte 1
specifies FILTER_SOURCE.
Byte 7: Destination Address
Specifies a destination address to pass through the filters. Ignored unless byte 1
specifies FILTER_DESTINATION.
The fpchClientCommand parameter may define more than one filter. Subsequent
filters should be placed on seven byte intervals in the buffer. The number of filters
is determined by the nMessageSize parameter.
Applies to J1939 communication only.
CMD_SET_J1708_FILTERING
Configures the driver to pass certain J1708 messages through while discarding
others. Subsequent calls to this command add additional filters to pass additional
messages rather than replace existing filters. To replace existing filters, send a
CMD_ALL_FILTERS_DISCARD prior to calling
CMD_SET_J708_FILTERING
fpchClientCommand defines one or more MID filters. Each byte in the buffer
specifies an MID whose messages should be passed through the QBridge.
nMessageSize specifies the number of filters in this command.
Applies to J1708 communication only.
CMD_ALL_FILTERS_DISCARD
Configures the driver to discard all messages. This effectively resets the filter
states. In order to receive messages a filter needs to be installed or the
CMD_ALL_FILTERS_PASS command issued. This is the default state of a new
connection.
Applies to both J1708 and J1939 communication.
CMD_SET_MESSAGE_RECEIVE
Provides a means to temporarily disable the receipt of messages without resetting
the filter state of a connection. By default, receiving messages is enabled.
The fpchClientCommand parameter is a pointer to a single byte containing a zero
or a one. Zero will disable receive, non-zero will enable it.
Applies to both J1708 and J1939 communication.
Page 104
96 TREQ-VM/VMx Mobile Data Terminal
CMD_PROTECT_J1939_ADDRESS
Claims a J1939 client address. This address can be released if you claim a second
address or if you claim a global one. If the address is lost due to a higher priority
device claiming it, a WM_RP1210_ERROR_MESSAGE is generated (if a window
handle was passed in when establishing the connection). If any pending
RP1210_SendMessage commands are active, they are released with an error.
An application may be required to use this command to perform certain types of
J1939 communication.
fpchClientCommand contains the address you wish to claim. The first byte is the 8-
bit address to be claimed. The subsequent eight bytes define the 8-byte network
name of the client. The final byte should be one of these three values:
0 // block
1 // Post Message
2 // Return before completion
Applies to J1939 communication only.
Function void WINAPI RP1210_ReadVersion (char far* fpchDLLMajorVersion, char
far* fpchDLLMinorVersion, char far* fpchAPIMajorVersion, char far*
fpchAPIMinorVersion);
Description
Returns the version number of the API and driver DLL.
Return Value
None
Parameters
fpchDLLMajorVersion Pointer to a single byte to receive the major version
number of the DLL.
fpchDLLMinorVersion Pointer to a single byte to receive the minor version
number of the DLL.
fpchAPIMajorVersion Pointer to a single byte to receive the major version
number of the API.
fpchAPIMinorVersion Pointer to a single byte to receive the minor version
number of the API
Function short WINAPI RP1210_GetErrorMsg (short nErrorCode, char far*
fpchDescription);
Description
Page 105
TREQ-VM/VMx Mobile Data Terminal 97
Formats an error message returned from one of the RP1210 API functions to a
human-readable string.
Return Value
Zero if successful. ERR_CODE_NOT_FOUND if the error code requested is
unknown.
Parameters
None
6.3.18 Camera
At the physical layer, the TREQ-VM’s camera driver uses the PXA166’s CMOS
Camera Interface Controller (CCIC) interface to communicate with built-in camera
module. The module is configured to send RGB 5:6:5 raw bitmap data to processor.
There is no compression capability in the module.
For the OS and the application, the camera driver follows the standard Windows CE
6.0 Video Camera Device Driver Interface. Camera applications should not
communicate directly with the camera driver but only use the middleware layer
provided by the DirectShow video capture infrastructure.
A demonstration application is included with the OS as a hidden system file. The
name of the application is CameraDshowApp.exe and is found in the \Windows
folder. To see the application set the Windows Explorer view options to show the
hidden files. Source code of it can be provided upon request from the contact Beijer
Electronics Customer Support group.
Here are some excerptions on how it works.
During boot up, if camera module is found and initialized successfully, a camera
device “CAM1:” is added to active device list. Use of the following sample can be
found on the PC after installed Windows The following code is used to create the
handle to the camera:
SelectCameraDevice(L“CAM1:”);
Or
SelectCameraDevice(0);
A series of calls to the OS COM component functions need to be made to set the
interface and filter correctly:
if(SUCCEEDED(hr = CoInitialize( NULL )))
{
m_bCoInitialized = TRUE;
// create all of the components we're going to use
if(SUCCEEDED(hr = CoCreateComponents()))
// adding interfaces must happen after the components are created
if(SUCCEEDED(hr = AddInterfaces()))
Page 106
98 TREQ-VM/VMx Mobile Data Terminal
// initializing the property bag must happen after the interfaces
are added.
if(SUCCEEDED(hr = InitFilters()))
// adding filters needs to be done after the interfaces are added.
if(SUCCEEDED(hr = AddFilters()))
// finding interfaces on the graph must be done after the filters
are added to the graph.
if(SUCCEEDED(hr = FindInterfaces()))
// if the user pre-set some stream formats for us to use, set them
now before rendering
if(SUCCEEDED(hr = InitializeStreamFormats()))
// render the graph once everything is set up.
if(SUCCEEDED(hr = RenderGraph()))
if(SUCCEEDED(hr = InsertDiagnosticsFilters()))
m_bInitialized = TRUE;
if(m_bOutputFilterInformation)
DisplayFilters();
}
After interface and filters are set up the following functions can be used:
Function:
CCaptureFramework::RunGraph()
Description:
Starts the interface to data from camera is received.
Function:
CCaptureFramework::StopGraph()
Description:
Stops the interface so data is not being received and powers down the camera.
Function:
CCaptureFramework::PauseGraph()
Description:
Stops the interface so data is not being received. The camera is not powered off but
data is not being processed.
Function:
CDShowEventSink::ProcessMediaEvents()
Description:
The interface will process the video events from the data stream. The incoming
image stream can be displayed as a preview in the demo application.
Function:
CCaptureFramework::CaptureStillImage()
Description:
Captures a still image from the camera. Below is some sample code demonstrating
this behavior and saving the image to a file.
Page 107
TREQ-VM/VMx Mobile Data Terminal 99
CCaptureFramework::CaptureStillImage()
{
HRESULT hr = S_OK;
// move the file name before everything, so the current file name
is the capture in progress
// until a new one starts. See if the name exists, if it exists
already, then move on to the next
// name. A picture number less than -1 indicates that the picture
number isn't used
hr = m_EventSink.Purge();
if(FAILED(hr))
{
FAIL(TEXT("CCaptureFramework: Failed to cleanout media events
before still trigger”.));
}
hr = TriggerStillImage();
if(FAILED(hr))
{
FAIL(TEXT("CCaptureFramework: Failed to trigger the still image
capture”.));
goto cleanup;
}
DShowEvent dse;
dse.Code = EC_CAP_FILE_COMPLETED;
dse.FilterFlags = EVT_EVCODE_EQUAL;
hr = m_EventSink.WaitOnEvent(&dse, MEDIAEVENT_TIMEOUT);
if(FAILED(hr))
{
FAIL(TEXT("CCaptureFramework: Failed to retrieve the event
indicating the capture completed”.));
OutputMissingEventsInformation(EC_CAP_FILE_COMPLETED);
goto cleanup;
}
cleanup:
return hr;
}
In the demo app, the DirectShow infrastructure compresses raw camera data into
JPEG file. Although it could also compress video data to ASF, it would require a
faster storage device for raw data and faster CPU to process. Beijer Electronics
doesn’t formally support the video capture function on TREQ-VM/VMx.
For more details of camera driver architecture, refer to following sites.
http://msdn.microsoft.com/en-US/library/ee481670(v=winembedded.60)
http://msdn.microsoft.com/en-US/library/ee493997(v=winembedded.60)
Page 108
100 TREQ-VM/VMx Mobile Data Terminal
6.3.19 GPS Intermediate Driver (GPSID)
The GPS Intermediate Driver (GPSID) works by injecting itself between applications
and GPS hardware. To an application, the GPSID appears like GPS hardware. To
GPS hardware, the GPSID appears like a single client. The driver parses the GPS
data and presents the data in an easy to use way. For more information about the
GPSID see the following MSDN articles.
http://msdn.microsoft.com/en-us/library/bb201942.aspx
6.3.20 Audio Gateway Service (Bluetooth)
Microsoft® Windows® CE supports Headset Profile and the Hands-Free Profile by
providing the Audio Gateway (AG) service that links Bluetooth devices by using the
Winsock interface to the Bluetooth Protocol Stack.
The AG service is implemented as a DLL and can be controlled by external modules
through IOCTLsded by Services.exe. For more information about the Audio Gateway
Service see the following MSDN articles.
http://msdn.microsoft.com/en-us/library/ms898941.aspx
6.3.21 Radio Interface Layer (RIL)
The Radio Interface Layer (RIL) provides an interface that handles the
communication between the CellCore system software and the Bluetooth hardware.
The RIL driver layer is implemented as a Windows Embedded CE device driver that
is managed by the Device Manager (Device.exe). The RIL driver services system
requests for radio functionality, including voice, data, and Short Message Service
(SMS). For more information about the Radio Interface Layer see the following
MSDN articles.
http://msdn.microsoft.com/en-us/library/ee498004(v=WinEmbedded.60).aspx
Page 109
TREQ-VM/VMx Mobile Data Terminal 101
CHAPTER 7
OPTIONAL PERIPHERALS
7.1 USB
USB mass storage devices may be accessed programmatically via the standard C file
I/O routines (e.g., fopen, fwrite, etc.) or the Windows API functions: CreateFile,
ReadFile, WriteFile, and so on. Refer to MSDN documentation for more information.
The USB-to-serial converter used for the ActiveSync connection described in
Chapter 5, “Connect To A PC Via ActiveSync” is an optional USB peripheral. This
device uses an FTDI chipset for the USB to serial conversion. The TREQ-VM/VMx
includes driver support for this chipset. USB-to-serial converters with other chipsets
are not natively supported and will require additional third-party Windows CE
drivers. The standard COM port interface described in section 6.3.12, “Serial Ports”
can be used to interface with this device.
Many other optional USB device peripherals may be attached to the TREQ-
VM/VMx. The OS supports mass storage, USB-to-serial converter, keyboard/mouse
human interface, and hub devices. Other devices may be attached and used provided
there are available Windows CE 6.0 drivers that will run on an ARM platform. APIs
for these devices must be provided by a third party or from custom drivers.
NOTE All USB ports can independently source 500mA per port. If a USB device draws more
than 500mA then the power to that port is removed. In order to restore power to the
port the offending device needs to be removed.
NOTE Do not connect external power to the USB connectors on the TREQ-VM/VMx. The
TREQ-VM/VMx is not designed to be powered in this manner. This causes abnormal
behavior with the possibility of damage to the TREQ-VM/VMx.
7.2 Bluetooth
The TREQ-VM/VMx provides several connectivity options when a USB Bluetooth
dongle is plugged into the system. The Ezurio BRBLU03 (also known as the Laird
BRBLU03) dongle has been extensively tested and recommended for use with the
TREQ-VM/VMx. Virtual serial port, personal area network, human interface device,
and headset connectivity options are described in detail in this section. These options
have some native application support that allows use and testing of the Bluetooth
connection. Other options are available via APIs and Bluetooth Profiles provided by
Windows CE. Refer to the following MSDN articles for more information about
these topics:
http://msdn.microsoft.com/en-us/library/aa916530.aspx
http://msdn.microsoft.com/en-us/library/aa915866.aspx
Page 110
102 TREQ-VM/VMx Mobile Data Terminal
7.2.1 Pairing
Use the Bluetooth Manager Control Panel applet to pair Bluetooth devices (refer to
section 4.1.8, “Bluetooth Manager”).
Figure 43
Bluetooth Manager
Initiate pairing as follows.
1. Select one of the “Untrusted” entries, and then press --> to move the selected
device to the “Trusted” window. A prompt appears asking if you need to
authenticate the device with which you are trying to pair.
2. First try pairing with a device without authenticating. Tap [No] at the prompt. If
successful, the pairing operation will finish by adding the device entry to the
“Trusted” window.
3. Now try to pair with authentication by tapping [Yes] when prompted for
authentication. A PIN code dialog box appears as shown in Figure 44. This is the
security code that is used for authentication and encryption with the other
Bluetooth device.
Page 111
TREQ-VM/VMx Mobile Data Terminal 103
In the example illustrated, a USB to Bluetooth adapter was used on the PC to pair
with a TREQ-VM/VMx terminal.
Figure 44
Bluetooth Manager Requesting Pairing Autentication
4. Enter a code of your choice. It is recommended to use at least eight random
characters. The device with which you are trying to pair should open a similar
dialog box prompting for a security code.
Figure 45
PC Requesting Pairing Authentication
Page 112
104 TREQ-VM/VMx Mobile Data Terminal
5. Enter the same code on the remote device immediately. The two devices should be
paired at this point. Pairing is confirmed when the Bluetooth Manager moves the
“Untrusted” device to the “Trusted” window.
7.2.2 qbtCE
Beijer Electronics provides a utility called qbtCE.exe (refer to section 4.8.2, “Beijer
Electronics”) that can be used for a number of Bluetooth troubleshooting and
development tasks involving service discovery and scanning operations. This
application also contains a built-in test feature that may be used for characterizing
throughput and signal strength when the application is executed on two connected
TREQ-VM/VMx terminals. Figure 46 shows the qbtCE application after running
device and service scans. In this example, the TREQ-VM/VMx has detected a USB
Bluetooth adapter on a PC advertising a serial port service.
Figure 46
qbtCE Bluetooth Utility Application
To test throughput and signal strength, do the following.
1. On one TREQ-VM/VMx terminal, start the qbtCE.exe application located in
\HardDisk\BIN \Bluetooth.
2. Perform a scan by tapping [Scan for Devices].
3. Highlight the other terminal in the “Detected” window, and then tap [Test]. The
Bluetooth Connection Test control panel is displayed.
4. Follow the same steps on another TREQ-VM/VMx terminal by scanning and
selecting the first terminal and then opening the Bluetooth Connection Test
control panel.
5. Once both systems are ready to start the connection test, configure one of the
systems to operate as a server by tapping the [Server/Client] toggle button until
“Server” appears.
6. Tap [Connect].
Page 113
TREQ-VM/VMx Mobile Data Terminal 105
7. Configure the remaining terminal as a client by tapping [Server/Client] until
“Client” appears.
8. Tap [Connect] on the client terminal.
Figure 47 shows the Connection Test and Test Settings dialog boxes.
Figure 47
qbtCE Connection Test and Test Settings
As the connection test runs, the received signal strength (RSSI) and throughput are
displayed in both bar graph and decimal form. The Test Settings dialog box allows
configuration of the data block transfer size. The default is a four Kbyte payload.
7.2.3 Virtual Serial Port
The TREQ-VM/VMx’s Bluetooth device can be used to establish a virtual serial port
connection with another Bluetooth device (such as a PC with a Bluetooth adapter).
1. First scan and pair with a remote device that supports the serial port profile. The
serial port service is identified by an icon consisting of a blue circle enclosing two
arrows that appear to chase one another.
2. After moving this service to the “Trusted” window in the Bluetooth Manager,
right-click on the service, and select the Active option from the resulting menu
(see Figure 48). This registers a virtual COM port or Bluetooth serial port on the
terminal, and it assigns the new serial port a device name with the prefix BSP. At
this point, the index associated with this prefix is unknown to the user.
Page 114
106 TREQ-VM/VMx Mobile Data Terminal
Figure 48
Activation Bluetooth Serial Port Service
3. Launch the MinTermCE program on the TREQ-VM/VMx (refer to section 4.8.2,
“Beijer Electronics”).
4. Select a new serial port from the COM port drop-down list that starts with “BSP.”
The Bluetooth Manager does not identify which index is assigned to the new
virtual serial port (suffix). If this is the first Bluetooth serial port created on the
device, the index is one, thus the desired port would be “BSP1.” You will need to
use trial-and-error in MinTermCE to find the correct Bluetooth serial port because
invalid ports cause an error. Figure 49 shows an active virtual serial port
connection using MinTermCE.
Figure 49
Bluetooth Virtual Serial Port Connection in MinTermCE
You can also check the HKEY_LOCAL_MACHINE\Drivers\Active registry keys for
a “BSP#” device to determine the correct port. Figure 50 shows how the RegEditCE
program (refer to section 4.8.2, “Beijer Electronics”) can be used to check these keys.
Page 115
TREQ-VM/VMx Mobile Data Terminal 107
Figure 50
Examining Active Driver Registry Key with RegEditCE
5. After selecting the correct serial port in MinTermCE, activate the port by pressing
the Port Open icon. This connects the serial port service of the terminal with the
serial port service of the remote device. Follow the steps required by the remote
device to accept the virtual serial port connection.
6. Open a terminal emulator on the remote device (such as HyperTerm on a PC), and
select the proper serial port for the remote device’s Bluetooth serial port.
7. Once the terminal emulator is connected, type some test messages and send them
to the terminal. Do the same on the terminal to ensure that the terminal can both
send and receive messages over the Bluetooth serial port. Figure 51 shows an
example session from a terminal emulation program running on a PC’s Bluetooth
serial port (COM22).
Page 116
108 TREQ-VM/VMx Mobile Data Terminal
Figure 51
Bluetooth PC Virtual Port Connection
Without a specialized application, the terminal will only act as a client that initiates
these Bluetooth serial port connections.
The standard COM port interface described in section 6.3.12, “Serial Ports” can be
used to programmatically interface with the Bluetooth serial port device. Use BSP#:
as the driver port name instead of COM#.
7.2.4 Personal Area Network
The TREQ-VM/VMx’s Bluetooth device can be used to establish a Personal Area
Network (PAN) connection with another Bluetooth device (such as a PC with a
Bluetooth adapter).
1. First scan and pair with a remote device that supports the Personal Area
Networking profile. The PAN service is identified by an icon consisting of two PC
monitors with a drawn wire connection.
2. After moving this service to the “Trusted” window in the Bluetooth Manager,
right-click the service, and select the Active option from the resulting menu (see
the third service icon in Figure 40 above). This registers a new network
connection with Windows CE.
3. The Network and Dial-up Connections Control Panel applet contains an additional
connectoid called “BTPAN1” that reflects the newly registered network
connection. Use the Properties dialog box for this connectoid to set IP
configuration parameters. Refer to section 4.1.6, “Network and Dial-up
Connections” for a description of this Control Panel applet and instructions on
how to set up IP configuration parameters. Figure 52 illustrates the Properties for
Page 117
TREQ-VM/VMx Mobile Data Terminal 109
the Bluetooth connectoid and some sample IP parameters. This example shows a
connection with a static IP address.
Figure 52
Bluetooth Connectoid IP Configuration
4. Follow a similar setup on the paired device. On a PC running Windows XP, use
the Bluetooth Network Connections dialog box to set up IP configuration
parameters. This dialog box is accessible from the Network Connections Control
Panel application. Figure 53 illustrates this setup. This example shows a
connection with a static IP address that is on the same subnet as the TREQ-
VM/VMx device.
Page 118
110 TREQ-VM/VMx Mobile Data Terminal
Figure 53
Bluetooth PC Connection IP Configuration and Ping Test
5. Use the ping program to test the PAN connection. Figure 53 and Figure 54 show a
successful ping test.
Page 119
TREQ-VM/VMx Mobile Data Terminal 111
Figure 54
Ping Test of the PAN connection of the TREQ-VM/VMx
The standard Winsock API can be used to programmatically interface with paired
Bluetooth devices over a PAN connection. Refer to section 4.1.6, “Network and Dial-
up Connections” for more details.
7.2.5 Human Interface Device
The TREQ-VM/VMx’s Bluetooth device can be used to support Bluetooth-enabled
mice, keyboards, and other Human Interface Devices (HID).
1. First enable a keyboard and mouse for discovery, and then perform a scan
operation in the Bluetooth Manager. This scan should produce entries in the
“Untrusted” window.
2. Pair with the HID devices by selecting them one at a time and moving them to the
“Trusted” window.
During the pairing operation, the selection of whether or not to use authentication
will depend on the keyboard or mouse that is being paired. The behavior of these
devices varies. This is because there is no method for entering a security code of your
choice on the remote device. Often, these devices will have some means for
providing a secure authentication but the TREQ-VM/VMx may not support this. If
you are unsure, use an unauthenticated pairing procedure.
3. Once paired, right-click on the device in the “Trusted” window of the Bluetooth
Manager and select Active. This should perform the operations needed to use the
service specified by the entry in the “Trusted” window. Perform these steps for
each HID device.
4. Move the mouse, or type on the keyboard to ensure that the Bluetooth devices are
working properly with the TREQ-VM/VMx.
Page 120
112 TREQ-VM/VMx Mobile Data Terminal
7.2.6 Headset Profile
The TREQ-VM/VMx’s Bluetooth device can be used with audio headsets that
support the Bluetooth Headset Profile (HSP).
1. First enable a headset for discovery, and then perform a scan operation in the
Bluetooth Manager. This scan should produce entries in the “Untrusted” window.
2. Pair with the HSP device by selecting it and moving it to the “Trusted” window.
During the pairing operation, the selection of whether or not to use authentication
will depend on the headset that is being paired. The behavior of these devices varies.
This is because there is no method for entering a security code of your choice on the
remote device. Often, these devices will have some means for providing a secure
authentication but the TREQ-VM/VMx may not support this. If you are unsure, use
an unauthenticated pairing procedure.
3. Once paired, right-click on the device in the “Trusted” window of the Bluetooth
Manager and select Active. This will perform the operations needed to use the
service specified by the entry in the “Trusted” window. Perform these steps for the
HSP device you wish to use.
4. On the TREQ-VM/VMx terminal, start the BTAGMicVolCE.exe application
(refer to section 4.8.2, “Beijer Electronics”), which will open the Bluetooth Audio
Gateway and allow you to change the headset microphone volume. The headset
microphone volume ranges from 0 to 15 and the suggested setting is a value of 7
or less.
5. You can now record the audio from the headset to a file on the TREQ-VM/VMx
(default output is 1.wav saved to the MyDevice folder) by running the application
WaveRecCE.exe or RecSndCE.exe, both of which are described in section 4.8.2,
“Beijer Electronics”. RecSndCE.exe will record up to 5 seconds of audio on the
TREQ-VM/VMx and then play it back through the speaker if the “In Device” box
on RecSndCE is set to 0, and it will play back through the headset if the “In
Device” box is set to 1.
Page 121
TREQ-VM/VMx Mobile Data Terminal 113
CHAPTER 8
ELECTRICAL
8.1 Absolute Maximum Rating
All pins have +/-15kV ESD Protection (IEC 61000-4-2 Air Gap)
Signal Names Max
Power Pins 8-32 VDC
Ignition 3.3 V with 5V tolerant
(24 V input from ignition)
Audio 3.0 V
General Purpose
Outputs Open drain input 50 V drain to source
General Purpose
Inputs 3.3V with 5V tolerant
Wired Ethernet 3.3V with 5V tolerant
J1708 -7 V to +12 V
J1939 (CANbus) 4 V to 16 V
COM Ports - -15 V to +15 V
USB 5.5V on any pin
8.2 Operating Conditions
The operating temperature range of the TREQ-VM/VMx including the battery option
is limited to -20°C to +60°C; however, charging is limited to 0°C to +35°C. The
TREQ-VM/VMx automatically detects out-of-range temperature situations and stops
the charge/discharge of the battery to prevent degradation.
Page 122
114 TREQ-VM/VMx Mobile Data Terminal
8.3 Modem Features
3G UMTS/HSPA+ Modem CDMA/EVDO Modem
Five-Band 3G
UMTS/HSPA+: Five band,
800/850/900/1900/2100MHz
Dual-Band CDMA/EV-DO
BC0 & BC1 (850/1900 MHz)
3GPP2: 1xAdvanced, EV-DO Rev.A
Quad-Band 2G
GSM/GPRS/EDGE: Quad band,
850/900/1800/1900MHz
--
EDGE Class 12 --
GPRS Class 12 --
Full Voice Support Full Voice Support
TCP/IP Stack TCP/IP Stack
RIL Driver RIL Driver
8.4 Antenna Specifications
8.4.1 Cellular Modem Antenna
The TREQ-VMx can be configured with either a 3G UMTS/HSPA+ or CDMA/EV-
DO cellular modem and require an external antenna. The connector on the back of
the system is a SMA type connector. The gain for the external antenna must not be
greater than the values in the table below to meet FCC requirements.
NOTE Refer to the FCC Compliance Information section of this manual for regulatory
information.
3G UMTS/HSPA+ CDMA/EV-DO
850MHz 3.92 dBi 11.3 dBi
1900 MHz 2.5 dBi 4.4 dBi
NOTE Both the 3G UMTS/HSPA+ or CDMA/EV-DO modems expect an antenna and any
needed cabling to be rated with an impedance of 50ohms.
Page 123
TREQ-VM/VMx Mobile Data Terminal 115
8.4.2 GPS Antenna
The antenna for the GPS receiver requires an active external antenna. The connector
on the back of the system is a SMA type connector. The antenna interface current is
limited to 75mA and can supply from 1.8V up to 5.5V.
Page 124
116 TREQ-VM/VMx Mobile Data Terminal
CHAPTER 9
MECHANICAL
9.1 Removable TREQ-VM/VMx Layout and Dimensions
Figure 55
Removable TREQ-VM/VMx Front View
Figure 56
Removable TREQ-VM/VMx Back View
Page 125
TREQ-VM/VMx Mobile Data Terminal 117
Figure 57
Removable TREQ-VM/VMx Side View
9.2 Fixed TREQ-VM/VMx Dimensions
Figure 58
Fixed TREQ-VM/VMx Back view
Page 126
118 TREQ-VM/VMx Mobile Data Terminal
9.3 HD D-Sub Connectors
There are two possible HD female D-Sub connectors on the TREQ-VM/VMx
terminals. The TREQ-VM has only one which is the HD female 26 pin D-Sub
connector. The TREQ-VM/VMx has both a HD female 26 pin D-Sub connector and
a HD female 15 pin D-Sub connector.
The HD female 26 pin D-Sub connector includes power in, ground, signals for
COM1, signals for COM2, one wired Ethernet, J1708 bus, J1939/Can bus, ignition
sense, and one USB port.
The HD female 15 pin D-Sub connector includes 2x general purpose inputs, 2x
general purpose outputs, signals for COM3, audio out.
The tables below list the pins and functionality of the HD 26 pin and the HD female
15 pin D-Sub connectors. See Figure 59.a and Figure 59.b for pin ordering and
location.
HD Female 26 pin D-Sub connector
Pin # Function Pin # Function
1 USB- 14 ETH_Rx+
2 USB + 15 ETH_Rx-
3 COM1_RTS/Tx+/RTx+ 16 COM2_Rx
4 COM1_Tx/Tx-/RTx- 17 J1708_RTx+
5 COM1_CTS/Rx- 18 J1708_RTx-
6 COM1_Rx/Rx+ 19 USB VCC (5V and 500mA)
7 COM2_Tx 20 VIN (8-32V)
8 J1939_RTx+ 21 VIN (8-32V)
9 J1939_RTx- 22 VIN (8-32V)
10 USB GND* 23 GND (Power Return)
11 Chasis GND* 24 GND (Power Return)
12 ETH_Tx+ 25 Optional GND (Power Return)
13 ETH_Tx- 26 Ignition Pin
Page 127
TREQ-VM/VMx Mobile Data Terminal 119
HD Female 15 pin D-Sub connector
Pin # Function Pin # Function
1 General Purpose Input 1 9 Not Used
2 General Purpose Input 2 10 COM3 RTS (
3 General Purpose Output 1 11 COM3 TX
4 General Purpose Output 2 12 COM3 CTS
5 AUDIO OUT 13 COM3 RX
6 GND 14 Audio -
7 GND 15 Not Used
8 Not Used
* For referencing grounds to signal, be advised of the following:
There is no dedicated ground reference for the serial communication signals, but
you may reference them to power return pins 11, 23, and 24.
The RAM mount studs are not connected to any other conductor and are floating.
Drain (or Optional) ground on pin 25of the HD 26 pin D-Sub connector is not
connected (floating) and is meant to be optionally connected to power return or
chassis ground at the customer equipment end of the TREQ-VM/VMx cable for
shielding.
USB host ground pin 10 is meant to be a power return for cable-powered USB
clients. If a USB client device does not require USB host power (pin 19), you may
reference the USB D+/D- signals to TREQ-VM/VMx power return; i.e., connect
your USB client device ground to pin 11, 23, or 24.
The built-in USB host port grounds and shields are connected to the same ground
as USB host ground on pin 10. This ground is used internally to the TREQ-
VM/VMx as a digital ground. It is a filtered (via common-mode choke) version of
the power return ground on pins 11, 23 and 24. Avoid connecting the USB grounds
to the power return ground, as this will defeat the purpose of the filter (e.g.,
spike/transient reduction on the VM’s power supply) and could introduce unwanted
noise into the TREQ-VM/VMx circuitry.
9.4 RAM Mount
The studs on the back of the cradle are M5 x 13 mm long mounting studs. The bolt
pattern on the back of the cradle is for RAM Mount 202 or B-202 spacing. Figure 57,
“Removable TREQ-VM/VMx Side View”, shows the hole pattern and bolt size and
pitch.
Page 128
120 TREQ-VM/VMx Mobile Data Terminal
9.5 Break Out Box (BoB) Pinouts
The purpose of the break out box or BoB is to take the signals from the HD D-Sub
connectors and group them in functionality and terminate those signals at a
connector. This is typically provided with development kits. Below is a rendering of
a break out box. The pin out of the DB15 and DB 26 can be found in section 9.3,
“HD D-Sub Connectors”.
Figure 59
Break out Box Views
Page 129
TREQ-VM/VMx Mobile Data Terminal 121
9.5.1 Power Connector Pinout
Pin Function Pin Function
Center Pin Power
(9-32 VDC) Sleeve Return Power
(GND)
NOTE This connector requires a jack with an I.D. of 2.1mm and an O.D. of 5.5mm.
9.5.2 Audio Connector Pinout
Pin Function Pin Function
Tip Audio Plus or Audio
Out Sleeve
Audio Minus or
GND
NOTE This requires a mono plug type with an O.D. of 1/8in (3.18mm).
9.5.3 Ethernet (RJ45) Connector Pinout
Pin Function Pin Function
1 TX+ 5 N.C.
2 TX- 6 RX-
3 RX+ 7 N.C.
4 N.C. 8 N.C.
NOTE This is the standard pin out for a 10/100 Base-T X RJ45.
9.5.4 USB Connector Pinout
Pin Function Pin Function
1 USB Power 3 D+
2 D- 4 Signal GND
NOTE This is the standard pin out for a Type A Male connector.
Page 130
122 TREQ-VM/VMx Mobile Data Terminal
9.5.5 Com Port 1 Connector Pinout
Pin Function Pin Function
232 422 485 232 422 485
1 N.C. 6 N.C.
2 Tx Tx- RTx- 7 CTS Rx- N.U.
3 Rx Rx+ N.U. 8 RTS Tx+ RTx+
4 N.C. 9 N.C.
5 Signal GND Shell Chassis GND
See Figure 59.c for pin ordering and Figure 59.b location.
9.5.6 Com Port 2 Connector Pinout
Pin Function Pin Function
1 N.C. 6 N.C.
2 Transmit (Tx) 7 N.C.
3 Receive (Rx) 8 N.C.
4 N.C. 9 N.C.
5 Signal Ground Shell Chassis GND
See Figure 59.c for pin ordering and Figure 59.b location.
9.5.7 Com Port 3 Connector Pinout
Pin Function Pin Function
1 N.C. 6 N.C.
2 Transmit (Tx) 7 CTS
3 Receive (Rx) 8 RTS
4 N.C. 9 N.C.
5 Signal GND Shell Chassis GND
See Figure 59.c for pin ordering and Figure 59.b location.
Page 131
TREQ-VM/VMx Mobile Data Terminal 123
9.5.8 J1708 / J1939 Connector Pinout
Pin Function Pin Function
1 J1708 RTx+ 6 N.C.
2 J1708 RTx- 7 J1939 RTx-
3 N.C. 8 J1939 RTx+
4 N.C. 9 N.C.
5 Signal GND Shell Chassis GND
See Figure 59.c for pin ordering and Figure 59.b location.
Page 132
124 TREQ-VM/VMx Mobile Data Terminal
CHAPTER 10
SOFTWARE UPGRADES
10.1 Software Upgrades
This section provides instructions to install future software releases for the TREQ-
VM/VMx. You can obtain the latest releases of TREQ-VM/VMx firmware and
Windows CE operating system software from either of the following Beijer
Electronics Web sites:
http://www.beijerinc.com/support/files
A USB keyboard is required for the following upgrade operations.
10.2 Operating System
The TREQ-VM/VMx Windows CE-based operating system is contained in an image
file called NK.bin. This file is packaged along with several other files and directories
to form a system package distribution. The TREQ-VM/VMx has an internal flash-
based hard drive that is programmed at the factory with the system package
distribution. Periodically, Beijer Electronics creates new versions of the operating
system image (NK.bin) and the recovery image (SOS.bin), other files/directories in
the distribution, or the directory structure of the distribution. Revisions to any of
these results in a new release of the system package distribution. Upgrading the
system package is the only way to install new versions of items in the package,
including the operating system image.
Beijer Electronics has developed an update and package manager application called
UpgradeCE.exe. This program can be used to upgrade the system package with
updates from the Beijer Electronics Web site, as well as to install custom application
packages. One advantage of using UpgradeCE.exe rather than a CAB file or other
update/install method is that registry settings are preserved, even after installation of
a new operating system image (normally, installing a new NK.bin causes registry
settings to revert to factory defaults).
For more information about CAB files and the Wceload process refer to the
following Microsoft’s Web site.
http://msdn.microsoft.com/en-us/library/ee504595.aspx
Contact the Beijer Electronics Customer Support group for more details about the
UpGradeCE.exe application
The WinVerCE.exe utility (refer to section 4.8.2, “Beijer Electronics”) can be used to
determine the current system package version. Run WinVerCE.exe from the Start
Menu on the TREQ-VM/VMx task bar in the Beijer Electronics shortcut folder. The
“Project Version” and “Build Date” fields indicate the version and build date of the
system package, respectively (see Figure 60). These fields are updated when a new
Page 133
TREQ-VM/VMx Mobile Data Terminal 125
version of the system package is installed. “Kernel Version” refers to the Windows
CE kernel version and license level.
Figure 60
WinVerCE Window
NOTE During an operating system upgrade or backup make sure that the TREQ-VM/VMx is
powered through the 26 pin HD D-Sub connecter. This will insure that the cradle is
powered and that the battery is being charged. It is possible that the operating system
upgrade or backup will not be successful if the system is operating on battery power
alone. A low battery could cause the system to operate improperly.
To upgrade the TREQ-VM/VMx system package, take the following steps.
1. Download the latest system package zip file. This file is available on the Beijer
Electronics Web site.
www.beijerinc.com/support/files
The zip file contains the latest version of UpgradeCE.exe, the system package
distribution, and release notes.
NOTE Be sure to read the release notes for the system package distribution! It is important
to be aware of changes to the system that could potentially affect applications and
general behavior before upgrading. The release notes can also be found on the
support website.
2. Unzip the system package zip file to a USB memory drive. Retain any directory
structure.
3. Make sure the TREQ-VM/VMx is powered on and any applications are closed.
4. Insert the USB memory drive and attach a USB keyboard to the TREQ-VM/VMx.
Make sure these are the only USB devices attached.
5. Open a command prompt window and type:
cd \usbharddisk
UpgradeCE
Page 134
126 TREQ-VM/VMx Mobile Data Terminal
This will initiate the system package upgrade process (refer to Figure 61).
UpgradeCE displays a status line for each file in the package, indicating whether that
file is up-to-date or needs to be updated. Larger files that need to be updated (e.g.,
NK.bin) will take longer and display multiple status lines indicating copy progress.
Figure 61
System Package Upgrade
6. Once complete, UpgradeCE will indicate success and ask for confirmation to
reboot (see Figure 62). Answer ‘y’ or ‘n’. The installation is not complete
and UpgradeCE is disabled for further upgrades until after a reboot.
Figure 62
System Package Upgrade Complete
Page 135
TREQ-VM/VMx Mobile Data Terminal 127
UpgradeCE will request a reboot only if files requiring an update are in use or if
the NK.bin operating system image needs to be updated. It is common for the
NK.bin image to require updating in system package upgrades.
7. After rebooting the TREQ-VM/VMx, run the WinVerCE.exe program to
verify that the system package was successfully upgraded.
10.3 Bootloader
Important: This procedure should not be attempted without the guidance of from the
Beijer Electronics Customer Support group, and could render the TREQ-VM/VMx
nonfunctional if done improperly.
The TREQ-VM/VMx boot loader upgrade procedure involves reprogramming the
internal non-volatile storage (NAND flash). A utility is available to upgrade the boot
loader. Please contact Beijer Electronics Customer Support group for this utility.
10.4 QBridge
The internal QBridge adapter that is used for J1708/J1939 serial communications
contains firmware that may need to be upgraded in the future when new versions are
released.
NOTE The QBridge firmware update applies only to TREQ-VMx configurations that
support J1708/J1939 serial communications.
WARNING
Ensure that the TREQ-VMx remains powered on during the QBridge upgrade
procedure. Interrupting the upgrade may cause the QBridge to become
unresponsive and may need to be returned to Beijer Electronics for maintenance.
The firmware may be flashed using GUI application names QBridgeUpCE.exe There
is also support for command-line arguments. Both methods are listed below. Take the
following steps to upgrade the QBridge firmware:
10.4.1 GUI Method
1. Close any applications actively running on the TREQ-VMx. Navigate to
\HardDisk\BIN\QBridge and double-tap QBridgeUpCE.exe to launch the
application (see Figure 63).
2. Tap [Browse …] and select the location of the firmware file. The file may be
loaded from an external USB device or HardDisk. QBridge firmware files can be
associated by the SREC extension. After the firmware is selected the file name
textbox will populate with the full filepath.
3. The QBridge interfaces with COM7 on the TREQ-VMx. Choosing any other
serial port will result in an error. Select COM7 (VM internal QBridge) from the
drop down list and tap [Upgrade].
Page 136
128 TREQ-VM/VMx Mobile Data Terminal
4. The firmware generally takes 30 seconds – 1 minute to upgrade, progress is
indicated by the blue bar. Please do not use the TREQ-VMx during this process. A
message box will indicate whether upgrade was successful or not.
Figure 63
QBridge Firmware Upgrader Application
10.4.2 Console Method
1. Command line support was added in version 1.02 of the QBridge firmware
upgrade tool (see application window). Attempting to use these parameters in a
previous version will only result in the GUI launching.
2. The usage instructions below can be viewed at any time by typing
QBridgeUpCE /?
Usage: QBridgeUpCE [COMPORT] [FILEPATH] [/i]
(e.g. QBridgeUpCE 7 \USBHardDisk\QBridge\v1_009.srec)
No args Displays the graphics user interface (GUI)
COMPORT Required parameter. Specify the COM port number or name to
open
FILEPATH Required parameter. Specify the path and file name of the
QBridge firmware. (e.g. \USBHardDisk\v1_009.srec)
/i Optional parameter. Displays the GUI and automates the
upgrade using the specified parameters.
3. The console window will display the current progress of the update. Do not close
the window until upgrade is complete.
Please contact Beijer Electronics Customer Support group for the latest QBridge
firmware and update tool.
10.5 Making a MicroSD card bootable
A MicroSD card can be formatted to be bootable. A utility is available to format the
MicroSD card. Please contact Beijer Electronics Customer Support group for this
utility. This bootable MicroSD card can also be used to recover a corrupted main
non-volatile storage (NAND flash).
Page 137
TREQ-VM/VMx Mobile Data Terminal 129
10.6 System Backup and Recovery
The TREQ-VM/VMx contains a special recovery image known as the SOS (Small
Operating System) image. This is a stripped down version of the main Windows CE
operating system. It is loaded on the main non-volatile storage labeled \HardDisk
(NAND flash) with the full version of the Windows CE operating system. The full
version is called NK.bin and the SOS version is called SOS.bin. The SOS Windows
CE image can access NAND flash storage. The SOS image also provides access to
inserted USB memory devices (similar to the main image). Thus the SOS image
allows for backing up the main flash storage to a USB device as well as restoring the
main flash storage from a USB device.
If the main Windows CE operating system (or any other system critical file that
prevents proper booting) becomes corrupted, you will be able to access the main
storage and repair the corruption by booting to the recovery image. In addition, if the
boot loader detects a boot failure of the main operating system image due to a
corruption, it will automatically boot the recovery image.
NOTE During an operating system upgrade or backup make sure that the TREQ-VM/VMx is
powered through the HD D-Sub connecter. This will insure that the cradle is
powered and that the battery is being charged. It is possible that the operating system
upgrade or backup will not be successful if the system is operating on battery power
alone. A low battery could cause the system to operate improperly.
To manually boot the TREQ-VM/VMx to the SOS image, take the following steps.
1. Press and release the power button to start the boot process of the TREQ-
VM/VMx.
2. While the progress bar is advancing press and hold the power button again until
the screen flashes red. Then the image in Figure 65 will be displayed as the system
boots into recovery mode. Once the screen flashes red release the power button. A
progress bar will begin to advance from start as the recovery image is loaded.
Page 138
130 TREQ-VM/VMx Mobile Data Terminal
Figure 64
Recovery Boot Screen
3. The system will continue to boot. The SOS image will boot to the touch screen
calibration screen.
If main power cannot easily be removed and reapplied, use the reset procedure
described in section 3.3.3, “Reset the TREQ-VM/VMx”. Hold down the power
button for five seconds until the system shuts off, release the button, then
momentarily press the power button again to boot.
The SOS image will always boot to the touch screen calibration screen, even if it has
been calibrated on a previous boot. This is because the SOS maintains no persistent
registry (or other) information. Calibrate the touch screen to proceed to the recovery
image desktop (see Figure 65). Pressing the ESC key on a USB keyboard will bypass
the touch calibration screen, but the touchscreen will be calibrated incorrectly so it
will not be usable. However a USB mouse is usable.
Page 139
TREQ-VM/VMx Mobile Data Terminal 131
Figure 65
Recovery Image Desktop
The Windows CE display color scheme for the recovery image is high contrast with a
white background to help distinguish the recovery from the main image. The
Windows Explorer view options have also been set to show hidden files to aid
backup operations (see Figure 66).
Figure 66
Windows Explorer View Option
To backup the main flash storage, take the following steps.
1. Boot to the SOS recovery image and calibrate the touch screen. (Follow steps
from previous pages.)
Page 140
132 TREQ-VM/VMx Mobile Data Terminal
2. Insert an empty USB memory drive and verify that USBHardDisk appears in
Windows Explorer.
3. Ensure that the Windows Explorer view options have been set as shown in Figure
66.
4. Use Windows Explorer to select and copy all of the files from \HardDisk and
paste to \USBHardDisk. Figure 67 illustrates the select and copy operation.
Figure 67
Select and Copy Operation
To restore the main flash storage, take the following steps.
1. Insert a USB memory drive that contains files generated from the backup
procedure (described above).
2. Verify that USBHardDisk appears in Windows Explorer and that its contents are
the main OS files (e.g., NK.bin, NK.bmp, SOS.bin, SOS.bmp, system.hv, and
other files and folders).
3. Ensure that the Windows Explorer view options have been set as shown in Figure
66.
4. Use Windows Explorer to select and delete all files from \HardDisk. It is possible
that the directory \HardDisk\MFS cannot be deleted. If so, verify that the
\HardDisk\MFS folder is empty and delete all of the other files and folders from
\HardDisk.
5. Optional step: Use the Storage Manager, Control Panel applet to administer the
main flash storage. The flash may be scanned and/or defragmented with this
Windows CE utility to help treat corruption of the file system tables. Other
operations such as [Scan] and [Defrag] are found under the [Properties] for a
Page 141
TREQ-VM/VMx Mobile Data Terminal 133
particular partition or storage type. Refer to section 4.1.7, “Storage Manager” for
more details. Incorrect file sizes and remaining free space are two indications of
this kind of corruption.
WARNING
Beijer Electronics recommends formatting the internal flash device only as a last
resort! Doing so will clear the optimized flash factory formatting.
6. Copy all files and directories from \USBHardDisk and paste to \HardDisk.
7. Reboot and verify that the main image boots and loads the correct application.
8. Recalibrate the touch screen. Refer to section 4.1.1.2, “Recalibrate” for
information on calibrating the touch screen. This is necessary because the main
flash backup files may have been obtained from a different TREQ-VM/VMx.
Each TREQ-VM/VMx touch screen requires custom calibration, so the calibration
data must be regenerated for the system being restored.
NOTE Beijer Electronics recommends creating a backup copy of the main flash storage
using this procedure after end user applications are installed and configured. This
will reduce time and effort spent trying to restore systems that encounter corruption
issues.