UNIVERSITY OF MALTA FACULTY OF MEDICINE & SURGERY PHARMACY DEPARTMENT Ref. No. SOP/PD/223_01 STANDARD OPERATING PROCEDURE CLINITEK STATUS ® ANALYSER Valid for: 2 years from approval Page 1 of 29
Transcript
UNIVERSITY OF MALTA
FACULTY OF MEDICINE & SURGERY
PHARMACY DEPARTMENT Ref. No. SOP/PD/223_01
STANDARD OPERATING PROCEDURE
CLINITEK STATUS® ANALYSER
Valid for:
2 years from
approval
Page 1 of 29
UNIVERSITY OF MALTA
FACULTY OF MEDICINE & SURGERY
PHARMACY DEPARTMENT Ref. No. SOP/PD/223_01
STANDARD OPERATING PROCEDURE
CLINITEK STATUS® ANALYSER
Valid for:
2 years from
approval
Page 2 of 29
1. Scope
This Standard Operating Procedure (SOP) applies to the staff and students using the
Clinitek Status®
Analyser in the Pharmacy Practice Resource Unit (PPRU) at the
Pharmacy Department, University of Malta.
2. Objective
To describe the procedure for the setup, configuration, operation, recording and
recalling of results, quality control, maintenance and troubleshooting of the Clinitek
Status® Analyser.
3. Definitions
3.1. Clinitek Status® Analyser: A portable device used to analyse Siemens®
urinalysis strips and Clinitest® immunoassay cassettes. It is used for the semi-
quantitative detection of albumin, bilirubin, blood (occult), creatinine, glucose,
ketones, leukocytes, nitrite, pH, protein, specific gravity and urobilinogen in urine
samples. It is also used for the detection of human Chorionic Gonadotropin (hCG) in
urine samples, when Clinitest®
hCG Cassette Tests are used.
3.2. Full Test: A test which allows the user to enter an Operator ID, Patient Name
and/or Patient ID prior to inserting a strip or cassette.
3.3. On/Off Button: A button located on the front of the device, which must be
pressed for 2 seconds in order to switch the device on and off.
3.4. Quality Control Test: Performed each time a new reagent bottle is opened
when using Siemens® branded urinalysis reagent strips. This test is also performed
for immunoassay cassette testing when opening a new reagent box.
3.5. Quick Test: A test that does not require any operator or patient information.
The test will be identified by a sequential test number when the results are displayed
or printed.
3.6. Start-Up Wizard: A quick set-up procedure that is performed when the
device is being used for the first time.
3.7. Results Format: An option which allows you to select the format in which
you would like the results to be displayed and printed.
UNIVERSITY OF MALTA
FACULTY OF MEDICINE & SURGERY
PHARMACY DEPARTMENT Ref. No. SOP/PD/223_01
STANDARD OPERATING PROCEDURE
CLINITEK STATUS® ANALYSER
Valid for:
2 years from
approval
Page 3 of 29
3.8. Test Table: A piece of apparatus that is required to hold the test table insert in
place so as to be inserted just halfway into the analyser.
3.9. Test Table Insert: A piece of apparatus that is required to hold the test strip
or cassette on the test table. One end is adapted to hold a reagent strip, while the
other opposite end is adapted to hold an immunoassay cassette.
3.10. White Calibration Bar: A white strip found on test table from which
reference readings are taken.
4. Responsibility
4.1. The members of the Department of Pharmacy (staff and students) are
responsible for following this SOP.
4.2. The designated Laboratory Officer or Laboratory Assistant is responsible for
ensuring that this SOP is followed.
5. Procedure
5.1 Diagram of Clinitek Status® analyser
1 Clinitek Status® analyser
2 Test table
3 Test table insert
4 Power supply
5 Paper roll
UNIVERSITY OF MALTA
FACULTY OF MEDICINE & SURGERY
PHARMACY DEPARTMENT Ref. No. SOP/PD/223_01
STANDARD OPERATING PROCEDURE
CLINITEK STATUS® ANALYSER
Valid for:
2 years from
approval
Page 4 of 29
5.2 Set-up
5.2.1. Installation
1.2.1.1 Place the device on a level work surface.
1.2.1.2 Plug the power cord into the power inlet socket of the device. Plug
the other end of the power cord into an AC electrical wall outlet or
remove the battery cover and insert six new AA batteries if device
is to be operated via a battery supply and replace battery cover.
5.2.1. Test Strip Table Insertion for the First Time
5.2.2.1. Insert the test strip table into the device by holding it by the
end opposite the white calibration bar and with the white bar
facing up.
5.2.2.2. Push the test table into the device just over halfway through.
5.2.2. Loading Test Table Insert
5.2.2.1. Use either the side for a strip test or the other side for a
cassette test.
5.2.4. Loading the Printer Paper or Label Roll
5.2.4.1. Pull up the tab to open printer cover.
5.2.4.2. Press the tab down and pull out to open paper roll
compartment cover
5.2.4.3. Lift paper holding arm into the open, upright position.
5.2.4.4. Place new paper roll into the printer paper compartment
5.2.4.5. Feed paper up along wall and through printer.
Approximately 10 cm of paper are to be passed through the
printer.
5.2.4.6. Feed edge of paper through printer cover.
5.2.4.7. Push paper holding arm down into the closed position.
5.2.4.8. Close printer and paper roll covers.
5.2.5. Powering up the device
5.2.5.1. Press the on/off button located on the front of the device.
5.2.5.2. Wait until an automatic system diagnostic test is performed.
5.2.5.3. A quick set-up procedure (Start-Up Wizard) will follow to
select basic functions of the device.
5.2.5.4. Check that no test strip or cassette is present on the test table.
UNIVERSITY OF MALTA
FACULTY OF MEDICINE & SURGERY
PHARMACY DEPARTMENT Ref. No. SOP/PD/223_01
STANDARD OPERATING PROCEDURE
CLINITEK STATUS® ANALYSER
Valid for:
2 years from
approval
Page 5 of 29
5.2.6. Powering down the device
5.2.6.1. Press the on/off button.
Wait for the Test table to retract into the analyser.
5.2.6.2. The test table will be pushed out and the analyser will switch
off, if a strip or cassette is present on the test table.
5.2.6.3. Turn the analyser on, and then off (without a strip or cassette
on the test table) to retract the test table into the analyser.
5.2.6.4. The door will close and the analyser will switch off if no
strip or cassette is present on the test table.
5.3 Performing a Test
5.3.1 Choosing between a Full or Quick Urinalysis Strip Test
5.3.1.1 Press instrument setup.
5.3.1.2 Select [Operator and Patient Information].
5.3.1.3 Select [Full Test] or [Quick Test].
5.3.1.4 Press [Next].
5.3.1.5 Press [Done].
5.3.1.6 Press [Done] again on Settings Screen.
5.3.2 Performing a Urinalysis Strip Test
5.3.2.1 Press the on/off button to switch on the device.
5.3.2.2 Press Strip Test from the [Main Select] screen.
5.3.2.3 Wait for the [Prepare Test] screen to be displayed.
5.3.2.4 Check that the test table insert has the reagent strip holder
facing upwards.
5.3.2.5 Take a test strip, urine sample and paper.
5.3.2.6 Dip the reagent strip into the urine sample, ensuring that all
pads are wet.
5.3.2.7 Immediately remove the reagent strip from the urine sample.
5.3.2.8 Drag the edge of the reagent strip against the side of the sample
container to remove any excess urine.
5.3.2.9 Blot the edge of the strip to the paper to remove excess urine.
5.3.2.10 Place the reagent strip in the channel of the table with the test
pads facing up.
5.3.2.11 Slide the reagent strip to the end of the channel of the test table.
5.3.2.12 Wait for the test table and strip to be automatically pulled into
the analyser.
UNIVERSITY OF MALTA
FACULTY OF MEDICINE & SURGERY
PHARMACY DEPARTMENT Ref. No. SOP/PD/223_01
STANDARD OPERATING PROCEDURE
CLINITEK STATUS® ANALYSER
Valid for:
2 years from
approval
Page 6 of 29
5.3.2.13 Press the START button to start the test.
5.3.2.14 Wait for the eight second timer to be displayed for the
following steps to be completed.
5.3.2.15 A timer will display the remaining time to analyse the strip
results.
5.3.2.16 The [Printing] screen will be displayed until the print out is
completed if the analyser is previously set up to automatically
print the results.
5.3.2.17 The [Results] screen will appear if the analyser is not previously
set up to automatically print the results.
5.3.2.18 Wait for the test table and strip to be automatically pushed out
of the analyser.
5.3.2.19 Press More on the screen to view the remaining test results.
5.3.2.20 Press Print to print the results if the analyser has not been set up
to automatically print the test results. (The results will
automatically be sent to the connected PC if this option is set up
in the analyser).
5.3.2.21 Remove and dispose of the used reagent strip.
5.3.2.22 Wipe the table insert, if necessary.
5.3.2.23 Press Done to complete the test and return to the main [Select]
screen.
5.3.2.24 Press the on/off button to switch off the device.
5.3.3 Performing a Cassette Test
5.3.3.1 Press the on/off button to switch On the device.
5.3.3.2 Press Cassette Test from the main [Select] screen.
5.3.3.3 Press the Clinitest hCG cassette button.
5.3.3.4 Ensure that the test table insert is in the correct position for a
cassette test.
5.3.3.5 Remove a test cassette from its foil package.
5.3.3.6 Draw a urine sample to the line marked on the pipette
(approximately 0.2 mL).
5.3.3.7 Add the entire contents of the pipette into the sample well of the
test cassette.
5.3.3.8 Wait for the test table and cassette to be automatically pulled
into the analyser.
5.3.3.9 Place the cassette test on the test table.
5.3.3.10 Press the START button.
5.3.3.11 Wait for an eight second timer to be displayed for the following
step to be completed.
5.3.3.12 A timer will display the time remaining in analysing the results.
UNIVERSITY OF MALTA
FACULTY OF MEDICINE & SURGERY
PHARMACY DEPARTMENT Ref. No. SOP/PD/223_01
STANDARD OPERATING PROCEDURE
CLINITEK STATUS® ANALYSER
Valid for:
2 years from
approval
Page 7 of 29
5.3.3.13 The [Printing] screen will be displayed until the print out is
completed if the analyser is previously set up to automatically
print the results.
5.3.3.14 The [Results] screen will appear if the analyser is not previously
set up to automatically print the results.
5.3.3.15 The first page of the test results are displayed on the screen and
the test table and cassette are automatically pushed out of the
analyser.
5.3.3.16 Press More on the screen to view the remaining test results.
5.3.3.17 Press Print to print results (The results will automatically be
sent to the connected PC if this option is set up in the analyser)
if the analyser has not been set up to automatically print the test
results.
5.3.3.18 Remove and dispose of the used cassette.
5.3.3.19 Press Done to complete the test and return to the main [Select]
screen. Press the on/off button for at least 2 seconds to switch
Off the device.
5.3.4 Performing a Full Urinalysis Strip Test
5.3.4.1 Press the on/off button to switch On the device.
5.3.4.2 Press Strip Test to conduct urinalysis strip test.
5.3.4.3 Wait for the [Operator ID] screen to be displayed.
5.3.4.4 Choose between the Two options that are available under
Operator ID i.e.: Last Operator or Enter New Operator ID.
5.3.4.5 The last operator that entered his/her ID will be displayed on
the screen if Last Operator option is enabled.
5.3.4.6 Press the Enter New Operator ID button to enter the
information for a new operator if user is a new operator.
5.3.4.7 Use the keyboards to enter Operator ID using a maximum of
thirteen characters.
5.3.4.8 Press Enter when finished entering the ID to move to the next
screen.
5.3.4.9 Wait for the [Patient Information] screen to be displayed.
5.3.4.10 Choose between the two options that are available i.e. Recall
Patient or Enter New Patient.
5.3.4.11 Press Recall Patient to look up previous patients.
5.3.4.12 A list of up to 200 patient results will appear on the screen if
previous patient identification has been entered.
5.3.4.13 Press the Up and Down arrow buttons to scroll through the list
of patients. The most recently performed test will be shown at
the top.
5.3.4.14 Highlight the chosen patient.
UNIVERSITY OF MALTA
FACULTY OF MEDICINE & SURGERY
PHARMACY DEPARTMENT Ref. No. SOP/PD/223_01
STANDARD OPERATING PROCEDURE
CLINITEK STATUS® ANALYSER
Valid for:
2 years from
approval
Page 8 of 29
5.3.4.15 Press Select button.
5.3.4.16 Press Enter New Patient button to enter the information for a
new patient.
5.3.4.17 Use the keyboards to enter Patient Name using a maximum of
20 characters.
5.3.4.18 Press Enter when finished entering the patient’s name to
proceed to the [Patient Identification] screen.
5.3.4.19 Use the keyboards to enter Patient Identification using a
maximum of 13 characters.
5.3.4.20 Press Enter when finished entering the patient’s ID to proceed
to the [Prepare Test] screen.
5.3.4.21 Insert a reagent strip in the test table facing upwards.
5.3.4.22 Get hold of test strip, urine sample and paper towel.
5.3.4.23 Dip the reagent strip into the urine sample, wetting all pads.
5.3.4.24 Immediately remove the strip from urine.
5.3.4.25 Drag edge of the strip against side of the sample container.
5.3.4.26 Blot edge of the strip to the paper towel to remove any excess
urine.
5.3.4.27 Place reagent strip in the channel of the table with the test pads
facing up.
5.3.4.28 Slide strip to end of the channel.
5.3.4.29 When the 8 second countdown finishes, the test table and strip
will automatically be pulled into the analyser.
5.3.4.30 Press START button.
5.3.4.31 Wait for the eight second timer to be displayed for the
following steps to be completed.
5.3.4.32 A timer will display the time remaining in analysing the results.
5.3.4.33 A [Select Appearance] screen will be displayed while the strip
is being analysed.
5.3.4.34 Visualise the urine sample and select the appropriate colour and
clarity.
5.3.4.35 Press the Yellow and Clear button if the urine sample is yellow
and clear
5.3.4.36 Press the Other button if the urine sample is not yellow and
clear.
5.3.4.37 Choose the appropriate colour by touching the circle button that
corresponds to the correct description. If the Other button is
selected,
5.3.4.38 Select clarity by touching the circle that corresponds to the
correct description.
5.3.4.39 Press Next.
5.3.4.40 the time remaining for the completion of strip analysis is
indicated by a time indicator on the [Select Appearance] screen.
UNIVERSITY OF MALTA
FACULTY OF MEDICINE & SURGERY
PHARMACY DEPARTMENT Ref. No. SOP/PD/223_01
STANDARD OPERATING PROCEDURE
CLINITEK STATUS® ANALYSER
Valid for:
2 years from
approval
Page 9 of 29
5.3.4.41 After colour and clarity have been selected the next screens
displayed are either.
5.3.4.42 Analysing – if the strip is still being analysed.
5.3.4.43 Results – if the strip has been analysed completely.
5.3.4.44 A [Printing] screen will be displayed until the print out is
completed if Automatic results printing has been set up.
5.3.4.45 The [Results] screen will appear if Automatic results printing
has not been set up.
5.3.4.46 Wait for the first page of the test results to be displayed and the
test table and strip to be automatically pushed out of the
analyser.
5.3.4.47 Press More on the screen to view the remaining test results.
5.3.4.48 Press Print to print results if the analyser has not been set up to
automatically print the test results.
5.3.4.49 Results will automatically be sent to the connected PC if this
option is set up in the analyser.
5.3.4.50 Remove and dispose of the used urinalysis strip in a biohazard
container.
5.3.4.51 Wipe the table insert, if necessary.
5.3.4.52 Press Done to complete the test and return to the main [Select]
screen.
5.3.4.53 Press the on/off button to switch Off the device.
5.3.5 Performing a Full Urinalysis cassette Test (for Pregnancy)
5.3.5.1 Press the on/off button to switch on the device.
5.3.5.2 Press Cassette test to conduct hCG pregnancy test.
5.3.5.3 Wait for the [Operator ID] screen to appear.
5.3.5.4 Choose between the two options available under Operator ID
i.e. Last Operator or Enter New Operator ID.
5.3.5.5 The last operator that entered his/her ID will be displayed on
the screen if Last Operator option is enabled.
5.3.5.6 Press Enter New operator ID to enter the information for a new
operator if New Operator
5.3.5.7 Wait for the [Enter Operator ID] screen to be displayed.
5.3.5.8 Use the keyboards to enter Operator ID using a maximum of
thirteen characters.
5.3.5.9 Press Enter when finished entering the ID to move to the next
screen.
5.3.5.10 Wait for the [Patient Information] screen to be displayed.
5.3.5.11 Choose between the two options available under Patient
Information i.e. Recall Patient or Enter New Patient.
5.3.5.12 Press Recall Patient to look up previous patients.
UNIVERSITY OF MALTA
FACULTY OF MEDICINE & SURGERY
PHARMACY DEPARTMENT Ref. No. SOP/PD/223_01
STANDARD OPERATING PROCEDURE
CLINITEK STATUS® ANALYSER
Valid for:
2 years from
approval
Page 10 of 29
5.3.5.13 A list of up to 200 patient results will appear on the screen if
previous patient identification has been entered.
5.3.5.14 Press the Up or Down arrow buttons to scroll through the list of
patients.
5.3.5.15 The most recently performed test will be shown at the top.
5.3.5.16 Highlight the desired patient.
5.3.5.17 Select the Select button displayed on touch screen.
5.3.5.18 To enter the information for a new patient, press [Enter New
Patient] button.
5.3.5.19 Wait for the [Enter Patient Name] screen to be displayed.
5.3.5.20 Use the keyboards to enter Patient Name using a maximum of
20 characters.
5.3.5.21 Press Enter when finished entering the patient’s name to
proceed to the next screen.
5.3.5.22 Wait for the [Patient Identification] screen to be displayed.
5.3.5.23 Use the keyboards to enter Patient Identification using a
maximum of 13 characters.
5.3.5.24 Press Enter when patient’s ID has been entered.
5.3.5.25 Wait for the [Prepare Test] screen to be displayed.
5.3.5.26 Insert the reagent strip in test table insert facing upwards.
5.3.5.27 Get hold of a test strip, urine sample and paper towel.
5.3.5.28 Draw the urine sample to the line marked on the pipette
(approximately 0.2 mL).
5.3.5.29 Add entire contents of the pipette into the sample well of the
test cassette.
5.3.5.30 At the end of the 8 second countdown, test table and cassette
will automatically be pulled into the analyser.
5.3.5.31 Press START button.
5.3.5.32 An eight second timer is displayed showing how much time is
left to complete the following steps.
5.3.5.33 A timer will display the time remaining in analysing the results.
5.3.5.34 The [Printing] screen will be displayed until the print out is
completed if Automatic results printing has been set up.
5.3.5.35 The [Results] screen will appear if Automatic results printing
has not been set up.
5.3.5.36 The first page of the test results are displayed on the screen and
the test table and cassette are automatically pushed out of the
analyser.
5.3.5.37 Press More on the screen To view the remaining test results
5.3.5.38 Press Print to print results if the analyser has not been set up to
automatically print the test results.
5.3.5.39 Results will automatically be sent to the connected PC if this
option is set up in the analyser.
UNIVERSITY OF MALTA
FACULTY OF MEDICINE & SURGERY
PHARMACY DEPARTMENT Ref. No. SOP/PD/223_01
STANDARD OPERATING PROCEDURE
CLINITEK STATUS® ANALYSER
Valid for:
2 years from
approval
Page 11 of 29
5.3.5.40 Remove and disposed of the used cassette.
5.3.5.41 Press Done to complete the test and return to main [Select]
screen.
5.3.5.42 Press on/off button.
5.3.6 Performing a Urine Test for Microalbumin
5.3.6.1 See section 5.3.4
5.3.7 Recall Results
5.3.7.1 Press Recall Results from the main [Select] screen.
5.3.7.2 Wait for the test results to be displayed in chronological order.
(The most recent test result is displayed at the top of the
screen).
5.3.7.3 Use the up and down arrow keys to scroll through the list of
patient tests.
5.3.7.4 Highlight the desired patient.
5.3.7.5 Press the Select button to view patient result details.
5.3.7.6 Press the Print button, if you would like to print the results.
5.3.7.7 Press Done, to return to the [Select Text Results] screen.
5.3.7.8 Press Exit, to return to the main [Select] screen.
5.3.7.9 Press the Send all data button, in order to send all results to the
connected computer.
5.4 Quality Control
5.4.1. Quality Control Testing
5.4.1.1. Perform a quality control test with each new reagent bottle
opened.
5.4.1.2. Verify if the results of the quality control test performed are
positive, see Section 8 of the Clinitek® Status Analyser
Manual, which contains Summary tables of the results from
the waiver studies and physician office studies.
5.5 Maintenance
5.5.1. Cleaning of test table insert
5.5.1.1. Remove test table insert and thoroughly clean by rinsing
both of its sides under running water.
UNIVERSITY OF MALTA
FACULTY OF MEDICINE & SURGERY
PHARMACY DEPARTMENT Ref. No. SOP/PD/223_01
STANDARD OPERATING PROCEDURE
CLINITEK STATUS® ANALYSER
Valid for:
2 years from
approval
Page 12 of 29
5.5.1.2. Dry and re-insert test table insert.
5.5.2. Cleaning of test table
5.5.2.1. Slowly pull out the test table.
5.5.2.2. Lift the test table insert from the test table.
5.2.2.3. Drain the drip tray if necessary.
5.5.2.4. Wet a cotton-tipped stick with water and carefully clean test
table (except for white calibration bar).
5.5.2.5. Dry the test table thoroughly (except for the white
calibration bar) with a soft cloth or lint-free tissue.
5.5.2.6. Reinsert the test table into the device by holding the table at
the end opposite the white calibration bar, with the white
calibration bar facing upwards.
5.5.2.7. Push the test table firmly but slowly, just over halfway into
the device.
5.5.2.8. Replace the test table insert.
5.5.3 Disinfecting the test table and test table insert
5.5.3.1 Wipe with an alcohol swab and air dry.
5.5.4 Cleaning the White Calibration Bar
5.5.4.1. Remove the insert from the test table.
5.5.4.2. Remove the test table by pulling it slowly out of the device.
5.5.4.3. Check the white calibration bar on the test table for dirt or
discolouration.
5.5.4.4. If the calibration bar is dirty or discoloured, wipe and clean it
with a new cotton-dipped stick or lint-free cloth wetted with
distilled water.
5.5.4.5. Leave the calibration bar to air dry.
5.5.4.6. Inspect the surface for dust, scratches or any other foreign
material.
5.5.4.7. Obtain a new test table if the calibration bar cannot be
cleaned or is still marked.
5.5.4.8. Reinsert the test table by holding the table at the end
opposite the white calibration bar, with the calibration bar
facing upwards.
UNIVERSITY OF MALTA
FACULTY OF MEDICINE & SURGERY
PHARMACY DEPARTMENT Ref. No. SOP/PD/223_01
STANDARD OPERATING PROCEDURE
CLINITEK STATUS® ANALYSER
Valid for:
2 years from
approval
Page 13 of 29
5.5.5 Cleaning the Outside of the Analyser
5.5.5.1. Press the on/off button, to turn Off the device.
5.5.5.2. Wipe the outside (including the display) with a damp (not
wet) cloth and a mild detergent.
5.6 Troubleshooting
Display Message Cause/s Solution/s
E01 Low battery power - Replace batteries
“E10” or “E48” Loss of test results
- Press the on/off button
- Switch the device on again, by re-
pressing the button
- Repeat the test
E11
Failure of test table
- Ensure test table is in place
- Slightly move test table in or out of
the analyser to re position the test
table
- If error is still present, with the
analyser powered on, unplug the
power cord from rear of the device
and plug back in
- Press the grey power button to turn
the device on
- If the error remains, contact local
supplier
E23 Low battery power
- Replace batteries
- Press Error Report selection area to
view the instructions on display
E24 No printer paper
- Replace printer paper
- Press Error Report selection area, to
view the instructions on display
E25, E64 or E65 Failure of automatic
calibration
- Clean calibration strip.
- If the error persists, contact local
supplier
E27 Set up failure
- Press on/off button to switch off the
device
- Press the on/off button again to
switch on the device
E28 Printer error - Lift printer cover and push paper
holding arm back into position
UNIVERSITY OF MALTA
FACULTY OF MEDICINE & SURGERY
PHARMACY DEPARTMENT Ref. No. SOP/PD/223_01
STANDARD OPERATING PROCEDURE
CLINITEK STATUS® ANALYSER
Valid for:
2 years from
approval
Page 14 of 29
E50 Incorrect strip type
- Ensure that correct strip type
selected in Instrument Set Up is
being used
- If correct type of strip is being used,
check the instrument operation by
running another test using: a) a
yellow and clear sample, or b)
Chek-Stix®
E52 Invalid barcode - Repeat test using a Siemens®
cassette
E53 Strip Test selected
but cassette detected
- Repeat test using the Cassette Test
routine
E54 Cassette test selected - Repeat test using the Strip Test
routine
E56 Incorrect test table
size
- Repeat test using the correct test
table
E57 Missing strip or
cassette
- Repeat test ensuring that strip or
cassette is positioned on the test
table
E58 Misplaced strip
- Repeat test ensuring that strip is
correctly positioned on test table
- If error persists and you are testing a
urine dip strip, examine test table
insert to ensure that the white
calibration bar is present and not
damaged.
- If this white line is damaged or
missing contact local supplier
E59
Inverted strip
positioned on the test
table
- Repeat test to ensure that strip is
correctly positioned on test table
E60 Tilted strip - Repeat test ensuring that the strip is
correctly positioned on the test table
E61 Dry strip - Repeat test ensuring that the strip
has been in contact with the sample
E63 Failure to find end of
strip
- Repeat the test ensuring that the
strip is correctly positioned on the
test table
E67 or E68 Insufficient sample
- A sample flow issue with the
cassette test may have been
detected.
- One or more of the test indicator
UNIVERSITY OF MALTA
FACULTY OF MEDICINE & SURGERY
PHARMACY DEPARTMENT Ref. No. SOP/PD/223_01
STANDARD OPERATING PROCEDURE
CLINITEK STATUS® ANALYSER
Valid for:
2 years from
approval
Page 15 of 29
lines may be missing or not clearly
noticeable from the background, or
not enough sample was applied to
the cassette.
- Repeat test ensuring that pipette is
correctly filled and the correct
volume of sample is placed into the
cassette.
E02 Failure of calibration
data - Contact local supplier
E12 Failure of LED - Contact local supplier
E20 Failure of clock - Contact local supplier
E62 Light Ingress - Contact local supplier
E03, E04, E05, E06,
E07, E08, E21, E22,
E90, E91, E92 or E93
Failure of computer
software - Contact local supplier
UNIVERSITY OF MALTA
FACULTY OF MEDICINE & SURGERY
PHARMACY DEPARTMENT Ref. No. SOP/PD/223_01
STANDARD OPERATING PROCEDURE
CLINITEK STATUS® ANALYSER
Valid for:
2 years from
approval
Page 16 of 29
5.7 Flow Charts
5.7.1. Set-Up – powering up, start up wizard
Press on/off button
End
Start-up wizard will be displayed if it is the first time the instrument is turned on
Choose one of the following settings: Language
Date and time
Preferred test sequence (e.g. Quick Test or Full Test)
Type of urinalysis strip
Results format
After selecting your choice, the analyser displays a Confirmation screen
Ensure that no strip or cassette is present on the test table and that the
table and insert are clean before turning off the instrument
Press on/off button
If a strip or cassette is present on the test table, the test table will be
pushed out and the analyser will switch off
To retract the test table into the analyser, turn the analyser on, and then
off (without a strip or cassette on the test table)
Start
UNIVERSITY OF MALTA
FACULTY OF MEDICINE & SURGERY
PHARMACY DEPARTMENT Ref. No. SOP/PD/223_01
STANDARD OPERATING PROCEDURE
CLINITEK STATUS® ANALYSER
Valid for:
2 years from
approval
Page 17 of 29
5.7.2. Operation
5.7.2.1. Quick or Full Urinalysis Strip Test
Yes No
Yes No
Start
1
Carry out a
Full Urinalysis
Strip Test
Press Strip Test from the
Main Select screen
[Operator ID] screen will appear.
Two options are available under Operator ID:
Last Operator or Enter New Operator ID
Need to select the
Last Operator
2 3
Press on/off button
Select The Preferred Test
Sequence choosing Quick Test
Select The Preferred Test
Sequence choosing Full Test
Press Strip Test from the
Main Select screen
UNIVERSITY OF MALTA
FACULTY OF MEDICINE & SURGERY
PHARMACY DEPARTMENT Ref. No. SOP/PD/223_01
STANDARD OPERATING PROCEDURE
CLINITEK STATUS® ANALYSER
Valid for:
2 years from
approval
Page 18 of 29
Yes No
The last operator that entered
his/her ID will be displayed on
the screen. Press the Last
Operator button to proceed
If you are a new operator, press
the Enter New Operator ID
button to enter the information
for a new operator
Use the displayed keyboards to
enter Operator ID using a
maximum of thirteen
characters
Press Enter
Need to select
Recall Patient
Ca? Press the up and down arrow
buttons to scroll through the
list of patient then highlight
the chosen patient
Press Enter New
Patient button
Use the keyboards to enter
Patient Name, then press
Enter. Enter the patients ID
number, then press Enter
Insert reagent strip in test table
insert facing upwards
Have a test strip, urine sample
and paper towel ready
4
2 1 3
UNIVERSITY OF MALTA
FACULTY OF MEDICINE & SURGERY
PHARMACY DEPARTMENT Ref. No. SOP/PD/223_01
STANDARD OPERATING PROCEDURE
CLINITEK STATUS® ANALYSER
Valid for:
2 years from
approval
Page 19 of 29
Press START button.
4
Dip the reagent strip into the urine sample,
wetting all pads
Immediately remove the strip from urine
Drag edge of the strip against side of the sample
container
Slide strip to end of the channel
At the end of the 8 second countdown, test table
and strip will automatically be pulled into the
device
Blot edge of the strip to the paper towel to
remove excess urine
Place reagent strip in channel of the table with
the test pads facing up
While the strip is being analysed, a [Select
Appearance] screen will be displayed
The urine sample must be visually observed and
the appropriate colour and clarity must be selected
Select the appropriate corresponding colour and
clarity then press Next
5
UNIVERSITY OF MALTA
FACULTY OF MEDICINE & SURGERY
PHARMACY DEPARTMENT Ref. No. SOP/PD/223_01
STANDARD OPERATING PROCEDURE
CLINITEK STATUS® ANALYSER
Valid for:
2 years from
approval
Page 20 of 29
Press More to view the remaining results
5
If not set up to print automatically, touch Print to print
results
Remove and dispose of the used urinalysis strip and wipe
test table insert, if necessary
Press Done to complete test and return to main [Select]
screen
Press on/off button
End
UNIVERSITY OF MALTA
FACULTY OF MEDICINE & SURGERY
PHARMACY DEPARTMENT Ref. No. SOP/PD/223_01
STANDARD OPERATING PROCEDURE
CLINITEK STATUS® ANALYSER
Valid for:
2 years from
approval
Page 21 of 29
5.7.2.2. Quick or Full Urinalysis Cassette Test
Yes No
Yes No
Start
Carry out a
Full Urinalysis
Cassette Test
Press on/off button
Select The Preferred Test
Sequence choosing Full Test
Select The Preferred Test
Sequence choosing Quick Test
Press Cassette Test from the
Main Select screen
Press Cassette Test from
the Main Select screen
[Operator ID] screen will appear.
Two options are available under Operator ID:
Last Operator or Enter New Operator ID
Need to select
the Last
Operator
The last operator that entered
his/her ID will be displayed on
the screen. Touch the Last
Operator button to proceed
If you are a new operator,
touch the Enter New Operator
ID button to enter the
information for a new operator
Use the displayed keyboards to
enter Operator ID using a
maximum of 13 characters
1
2 3
UNIVERSITY OF MALTA
FACULTY OF MEDICINE & SURGERY
PHARMACY DEPARTMENT Ref. No. SOP/PD/223_01
STANDARD OPERATING PROCEDURE
CLINITEK STATUS® ANALYSER
Valid for:
2 years from
approval
Page 22 of 29
Yes No
1 2
Press Enter
Need to
select Recall
Patient
Press Enter New
Patient button
Enter Patient Name, then press
Enter. Enter the patients ID number,
then press Enter
3
Press the up and down arrow
buttons to scroll through the
list of patient then highlight
the chosen patient
Press START button. You have
8 seconds to complete the
following steps:
Draw the urine sample to the line marked on
the pipette (approximately 0.2 mL)
Add entire contents of the pipette into the
sample well of the test cassette. At the end of
the 8 second countdown, test table and
cassette will automatically be pulled into the
analyser
The first page of the test results are displayed
on the screen and the test table and cassette
are automatically pushed out of the analyser
Press More on the screen to view the
remaining test results
4
Press Select button
UNIVERSITY OF MALTA
FACULTY OF MEDICINE & SURGERY
PHARMACY DEPARTMENT Ref. No. SOP/PD/223_01
STANDARD OPERATING PROCEDURE
CLINITEK STATUS® ANALYSER
Valid for:
2 years from
approval
Page 23 of 29
4
If not set up to print automatically, press Print to
print results
The results will automatically be sent to the
connected PC if this option is set up in the
analyser
Remove and dispose of the used cassette
Press Done to complete the test
Press on/off button
End
UNIVERSITY OF MALTA
FACULTY OF MEDICINE & SURGERY
PHARMACY DEPARTMENT Ref. No. SOP/PD/223_01
STANDARD OPERATING PROCEDURE
CLINITEK STATUS® ANALYSER
Valid for:
2 years from
approval
Page 24 of 29
5.7.3 Quality Control
Yes No
Yes No
Start
Perform a quality control test including
negative and positive controls with each new
reagent bottle opened
Water should NOT be used as a negative
control. Contact your Siemens®
Healthcare representative for more
information on performing QC testing
Refer to the quality control product insert
for expected values for each analyte
Need to perform a
quality control
test for Urinalysis
Cassettes
Refer to the Clinitek
hCG cassette test
package insert for
appropriate quality
control material
End
Need to perform a
quality control
test for Urinalysis
Strips
UNIVERSITY OF MALTA
FACULTY OF MEDICINE & SURGERY
PHARMACY DEPARTMENT Ref. No. SOP/PD/223_01
STANDARD OPERATING PROCEDURE
CLINITEK STATUS® ANALYSER
Valid for:
2 years from
approval
Page 25 of 29
5.7.4 Maintenance
Yes
No
Yes
No
Start
Dry and replace insert
Need to routinely
clean test table insert
Remove insert and clean
by rinsing both sides of the
table insert under running
water
Need to periodically
clean test table insert
Remove the test table by
pulling it out slowly. Lift
the test table insert from the
test table, drain the drip tray
if necessary
Wet a cotton-tipped stick with water and
carefully clean test table (except for
white calibration bar)
Dry the test table (except for the white
calibration bar) with a soft cloth or lint-
free tissue
Reinsert the test table into the analyser by
holding the table at the end opposite the
white calibration bar, with the white
calibration bar facing upwards
Push the test table into the analyser
Replace the test table insert when required
1
UNIVERSITY OF MALTA
FACULTY OF MEDICINE & SURGERY
PHARMACY DEPARTMENT Ref. No. SOP/PD/223_01
STANDARD OPERATING PROCEDURE
CLINITEK STATUS® ANALYSER
Valid for:
2 years from
approval
Page 26 of 29
Yes
No
1
Need to disinfect
the test table and
insert
Use Isopropyl alcohol (70%-
80%) swabs and air dry
Do not use swabs on the
white calibration bar
Remove the insert from test
table after pulling out the test
table from the analyser
Check the white calibration bar on the
test table for dirt or discolouration
2
UNIVERSITY OF MALTA
FACULTY OF MEDICINE & SURGERY
PHARMACY DEPARTMENT Ref. No. SOP/PD/223_01
STANDARD OPERATING PROCEDURE
CLINITEK STATUS® ANALYSER
Valid for:
2 years from
approval
Page 27 of 29
Yes No No
Yes No
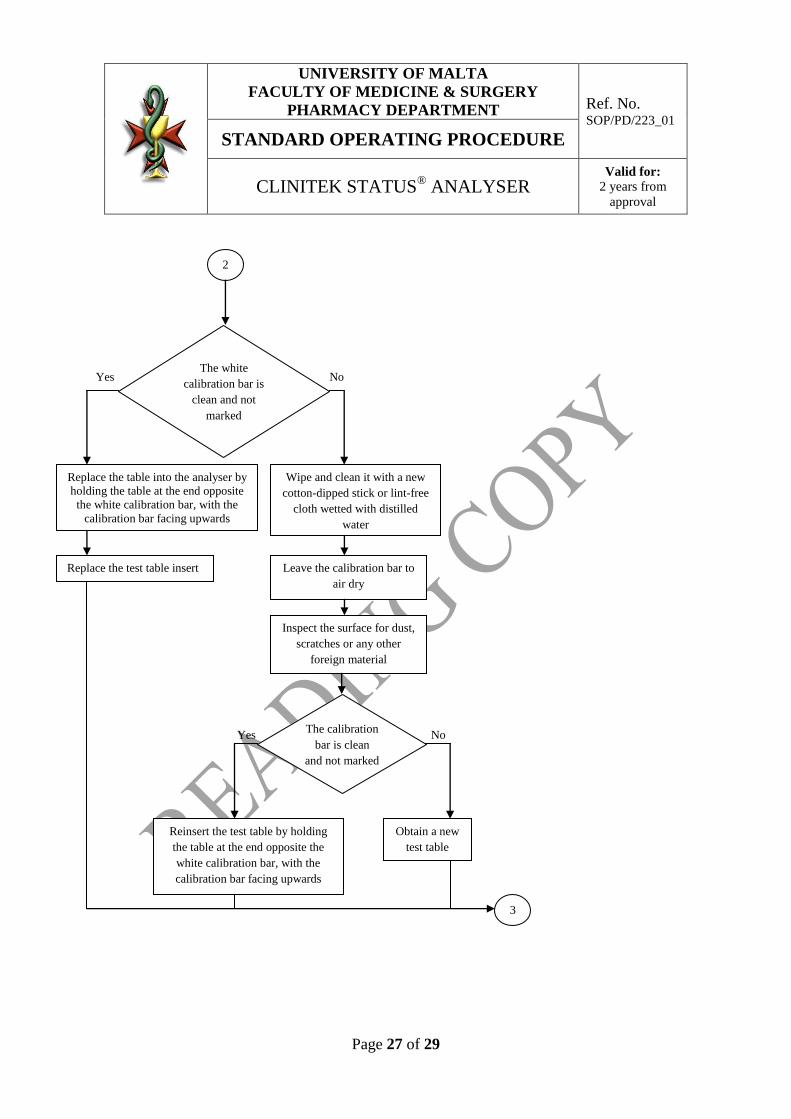
2
The white
calibration bar is
clean and not
marked
Replace the table into the analyser by
holding the table at the end opposite
the white calibration bar, with the
calibration bar facing upwards
Replace the test table insert
Wipe and clean it with a new
cotton-dipped stick or lint-free
cloth wetted with distilled
water
Leave the calibration bar to
air dry
Inspect the surface for dust,
scratches or any other
foreign material
The calibration
bar is clean
and not marked
Obtain a new
test table Reinsert the test table by holding
the table at the end opposite the
white calibration bar, with the
calibration bar facing upwards
3
UNIVERSITY OF MALTA
FACULTY OF MEDICINE & SURGERY
PHARMACY DEPARTMENT Ref. No. SOP/PD/223_01
STANDARD OPERATING PROCEDURE
CLINITEK STATUS® ANALYSER
Valid for:
2 years from
approval
Page 28 of 29
Yes
No
Yes
No
Need to clean
the outside of the
analyser
3
Press the on/off button to
turn the analyser off
Wipe the outside
(including the display)
with a damp cloth and a
mild detergent
Need to
change the
batteries
Remove the test table from
the analyser
Place the analyser on its side
and remove the battery cover
by pressing down on the tab
and pulling out
Remove current batteries
Place 6 new AA-size batteries
into the analyser
Replace the battery
cover
End
UNIVERSITY OF MALTA
FACULTY OF MEDICINE & SURGERY
PHARMACY DEPARTMENT Ref. No. SOP/PD/223_01
STANDARD OPERATING PROCEDURE
CLINITEK STATUS® ANALYSER
Valid for:
2 years from
approval
Page 29 of 29
6. Precautions
6.1. The device should be used at a temperature between 22°C and 26°C (72°F and
79°F).
6.2. Do not place the device near windows, ovens, hot plates, or radiators.
6.3. Do not remove the Check Cassette from its foil packaging. The Check Cassette
should be available if the need to call local supplier for assistance with a
device error arises.
6.4. Store cassette in the pocket located inside the back cover of the Operator’s
Manual.
6.5. Push the test table half-way
6.6. into the analyser, but just half way, as the test table may become jammed.
6.7. Ensure that the test table and test table insert are clean before turning off the
instrument.
6.8. Avoid touching the white calibration bar.
6.9. Do not use any solvents apart from distilled water to clean the white
calibration bar.
6.10. Do not use anything hard or pointed to press the screen as this may cause