Page 1
Upgrading to Microsoft SharePoint Server 2010
Microsoft Corporation
Published: November 2010
Author: Microsoft Office System and Servers Team ([email protected] )
Abstract
This book is designed to guide administrators and IT professionals through the process of upgrading to
Microsoft SharePoint Server 2010 from Microsoft Office SharePoint Server 2007.
The content in this book is a copy of selected content in the SharePoint Server 2010 technical library
(http://go.microsoft.com/fwlink/?LinkId=181463) as of the publication date. For the most current content,
see the technical library on the Web.
Page 2
ii
This document is provided “as-is”. Information and views expressed in this document, including URL
and other Internet Web site references, may change without notice. You bear the risk of using it.
Some examples depicted herein are provided for illustration only and are fictitious. No real association
or connection is intended or should be inferred.
This document does not provide you with any legal rights to any intellectual property in any Microsoft
product. You may copy and use this document for your internal, reference purposes.
© 2010 Microsoft Corporation. All rights reserved.
Microsoft, Access, Active Directory, Backstage, Excel, Groove, Hotmail, InfoPath, Internet Explorer,
Outlook, PerformancePoint, PowerPoint, SharePoint, Silverlight, Windows, Windows Live, Windows
Mobile, Windows PowerShell, Windows Server, and Windows Vista are either registered trademarks or
trademarks of Microsoft Corporation in the United States and/or other countries.
The information contained in this document represents the current view of Microsoft Corporation on the
issues discussed as of the date of publication. Because Microsoft must respond to changing market
conditions, it should not be interpreted to be a commitment on the part of Microsoft, and Microsoft
cannot guarantee the accuracy of any information presented after the date of publication.
Page 3
iii
Contents
Getting help ........................................................................................................................................ xi
Upgrading to SharePoint Server 2010 ................................................................................................ 1
About the upgrade process (SharePoint Server 2010) ....................................................................... 3
What's new in upgrade (SharePoint Server 2010) .............................................................................. 4
Upgrade requirements ........................................................................................................................ 4
Hardware requirement: 64-bit ....................................................................................................... 4
Operating system requirement: Windows Server 2008 or Windows Server 2008 R2 ................. 5
Database requirement: 64-bit SQL Server 2005 SP3 or SQL Server 2008 SP1 ......................... 6
Pre-upgrade checker ........................................................................................................................... 6
Windows PowerShell command to check databases before attaching .............................................. 7
Visual Upgrade .................................................................................................................................... 7
Feature Upgrade ................................................................................................................................. 7
New options for reducing downtime during upgrade ........................................................................... 8
Changes in key features between versions ........................................................................................ 8
Upgrade process overview (SharePoint Server 2010)...................................................................... 12
In-place upgrade ............................................................................................................................... 12
Database attach upgrade .................................................................................................................. 14
Hybrid approach 1: Read-only databases ......................................................................................... 15
Hybrid approach 2: Detach databases .............................................................................................. 17
How search features are affected by upgrade (SharePoint Server 2010) ........................................ 21
How other services are affected by upgrade (SharePoint Server 2010) .......................................... 22
Updated services infrastructure for SharePoint Server 2010 ........................................................... 22
In-place upgrade with services .......................................................................................................... 23
Before in-place upgrade ............................................................................................................. 24
During in-place upgrade ............................................................................................................. 24
After in-place upgrade ................................................................................................................ 29
Database attach upgrade with services ............................................................................................ 29
Before database attach upgrade ................................................................................................ 29
During database attach upgrade ................................................................................................ 30
After database attach upgrade ................................................................................................... 30
Considerations for specific services .................................................................................................. 31
User profiles ................................................................................................................................ 31
My Site Web sites ....................................................................................................................... 32
Office SharePoint Server Search ............................................................................................... 32
Page 4
iv
Windows SharePoint Services Search ....................................................................................... 33
InfoPath Forms Services ............................................................................................................ 33
Excel Services ............................................................................................................................ 33
Business Data Catalog ............................................................................................................... 34
Single sign-on ............................................................................................................................. 34
About upgrading farms that share services (parent and child farms) (SharePoint Server 2010) ..... 35
About upgrading parent and child farms ........................................................................................... 35
Considerations for upgrading parent and child farms ....................................................................... 36
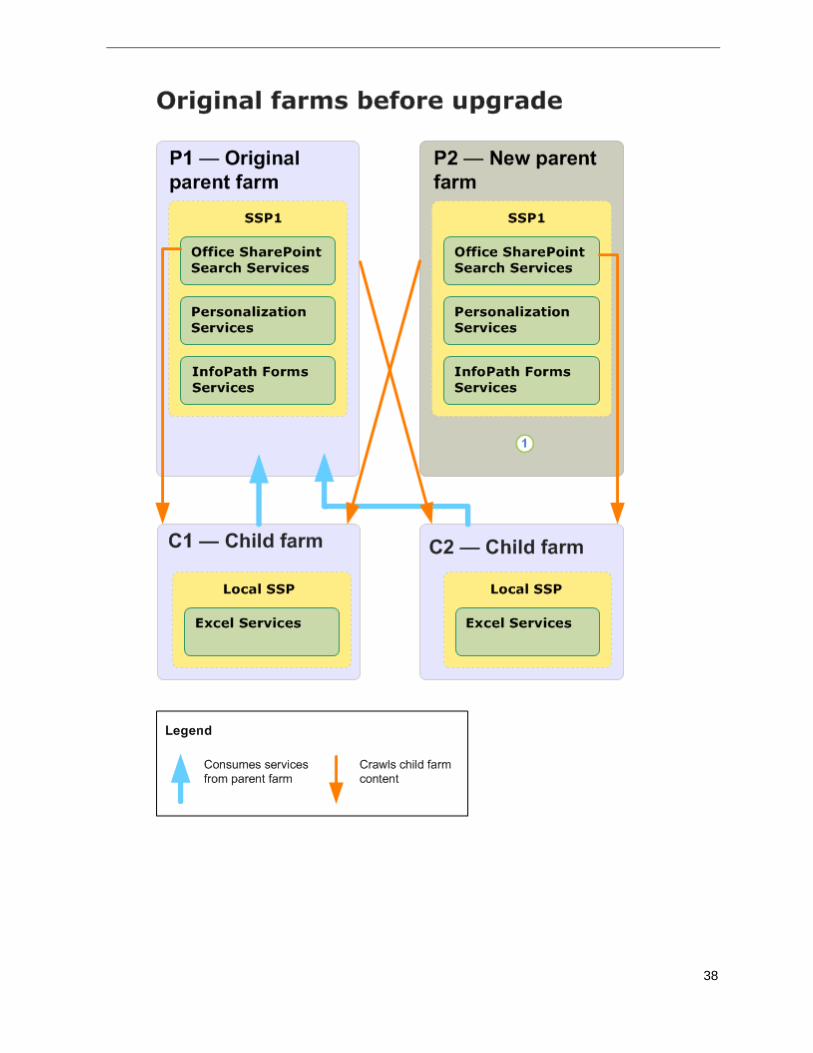
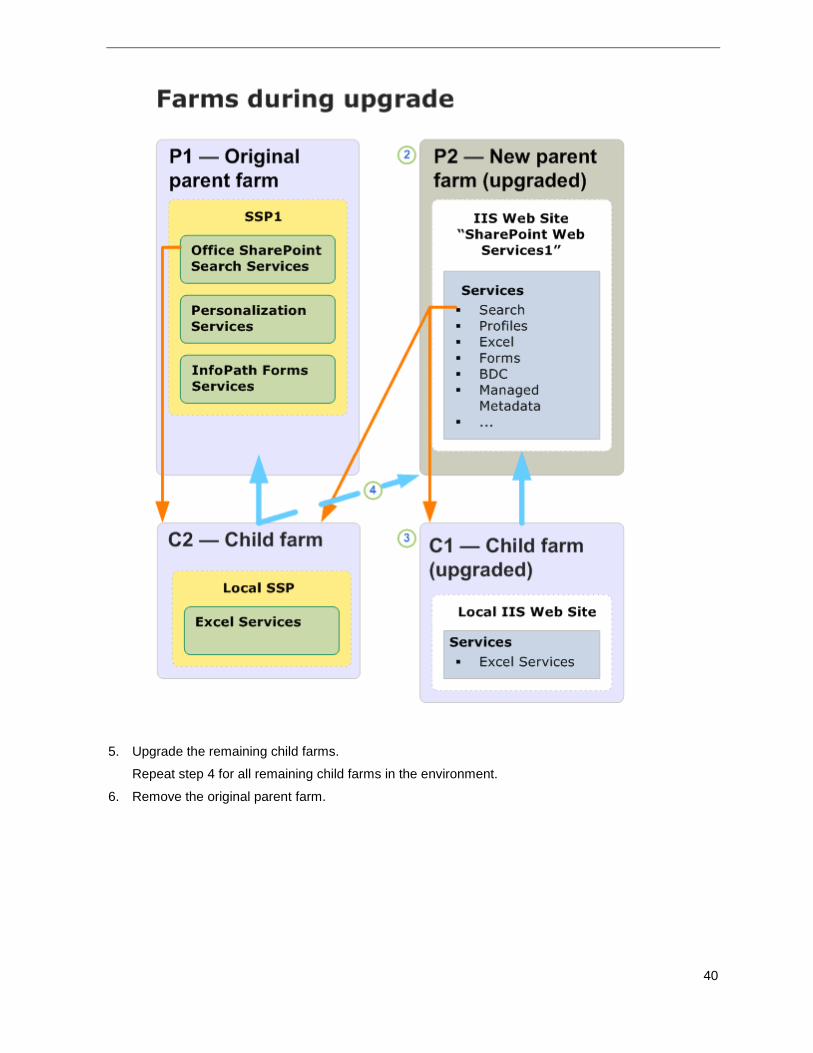
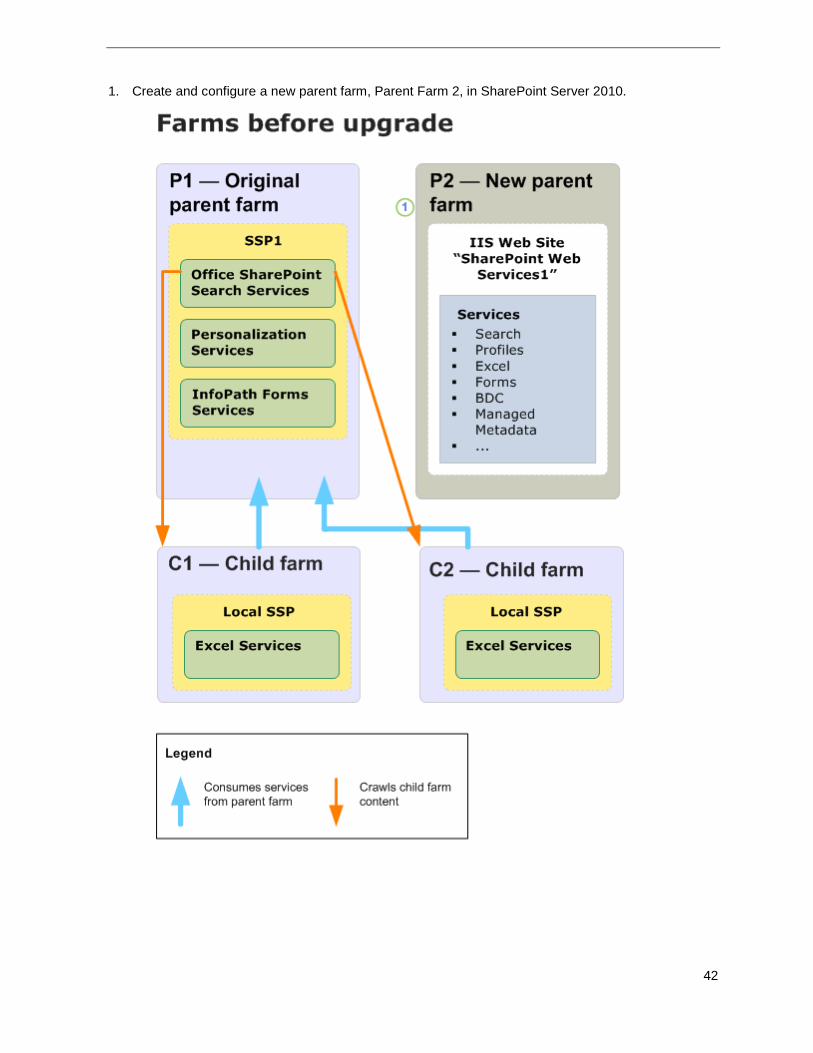
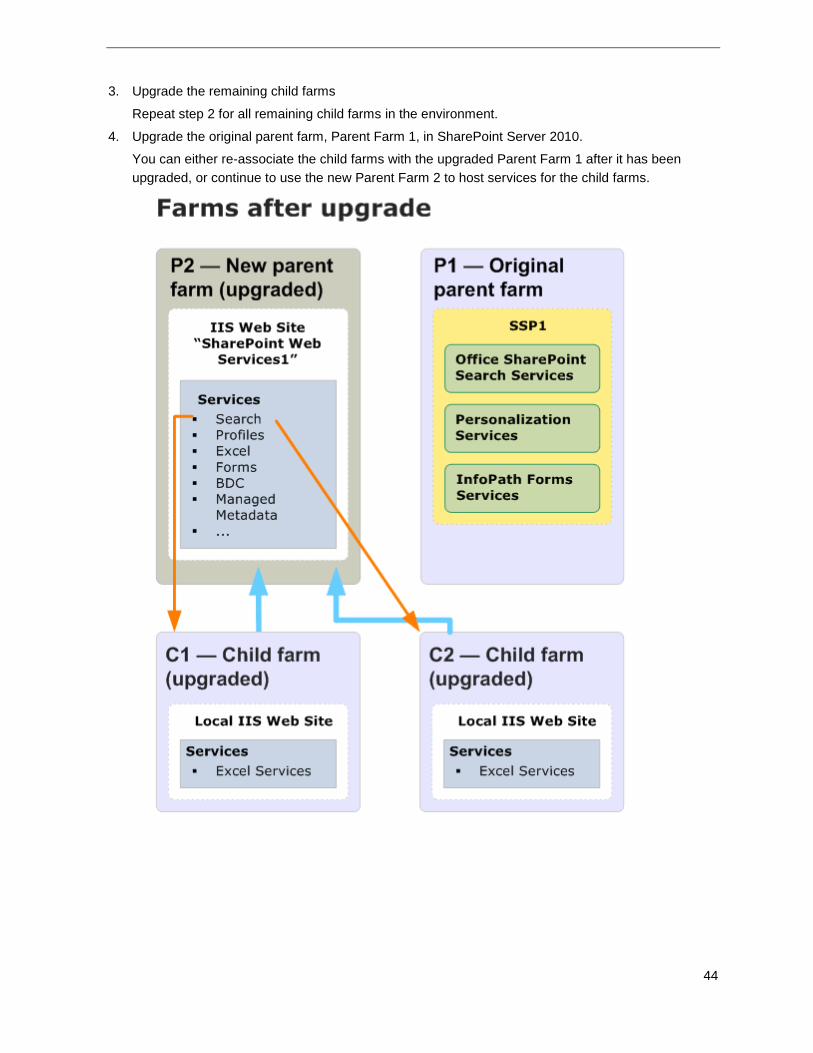
Process overview: Upgrading a duplicate parent farm ..................................................................... 36
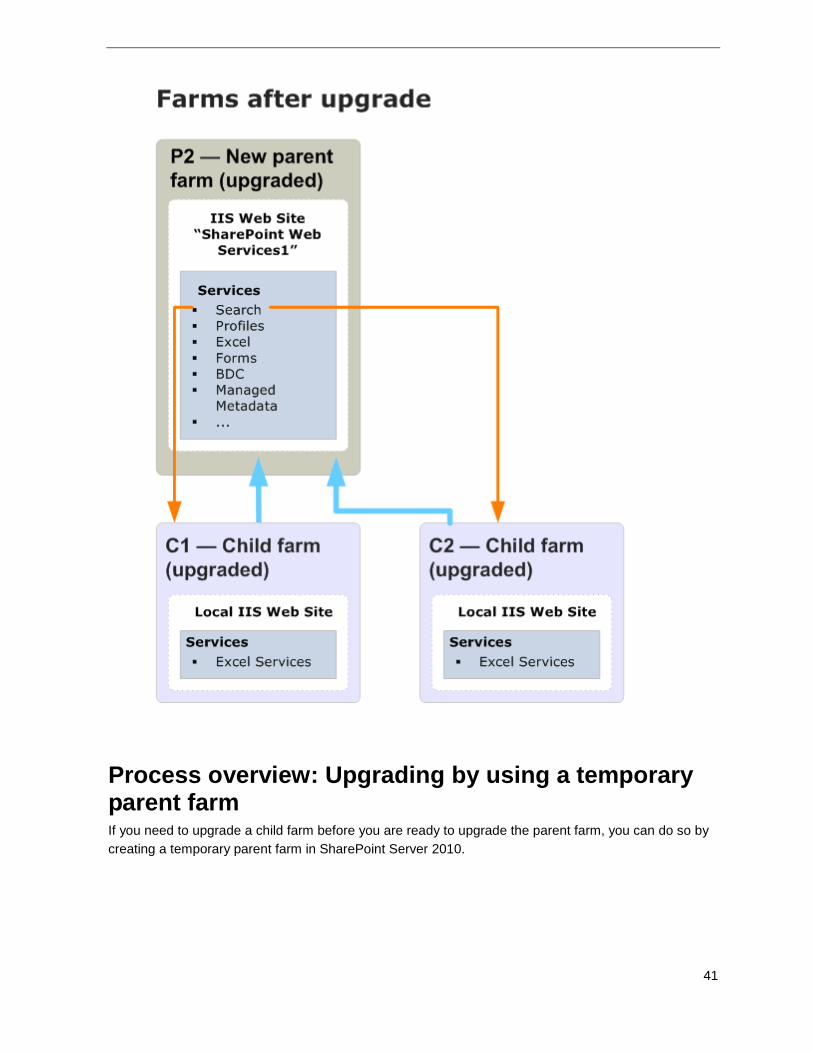
Process overview: Upgrading by using a temporary parent farm ..................................................... 41
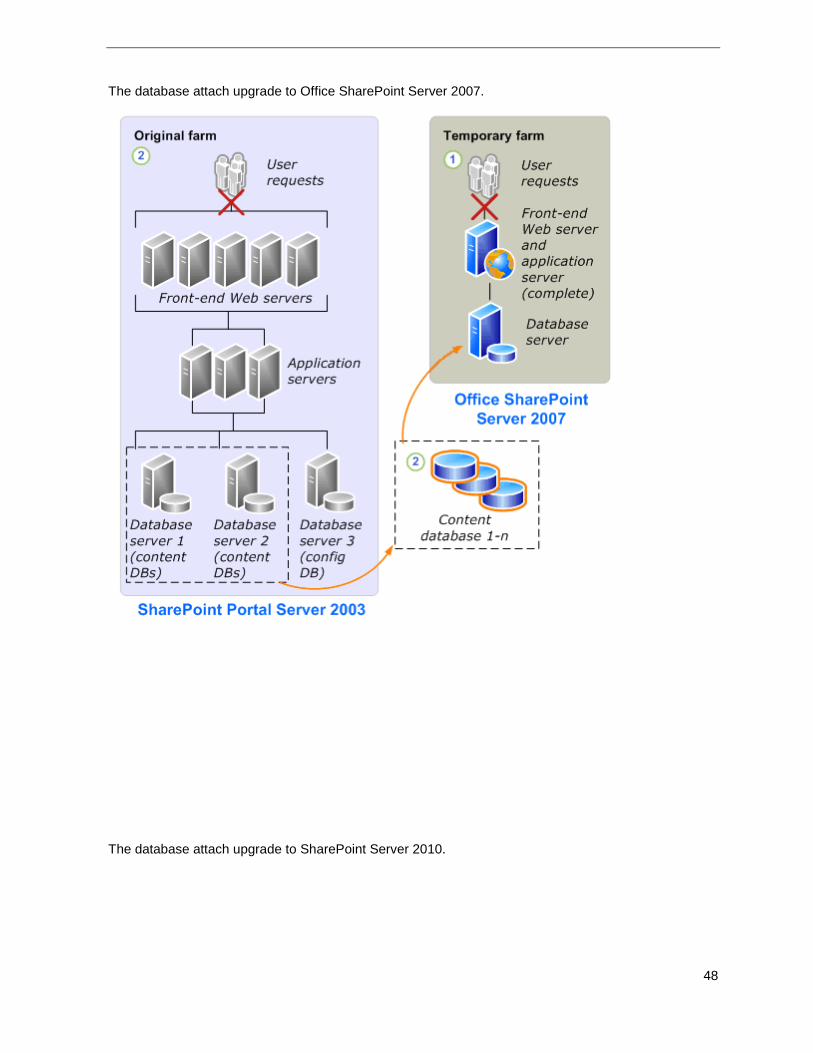
Upgrading from SharePoint Portal Server 2003 to SharePoint Server 2010 .................................... 46
Process overview .............................................................................................................................. 46
Upgrade sequence ..................................................................................................................... 47
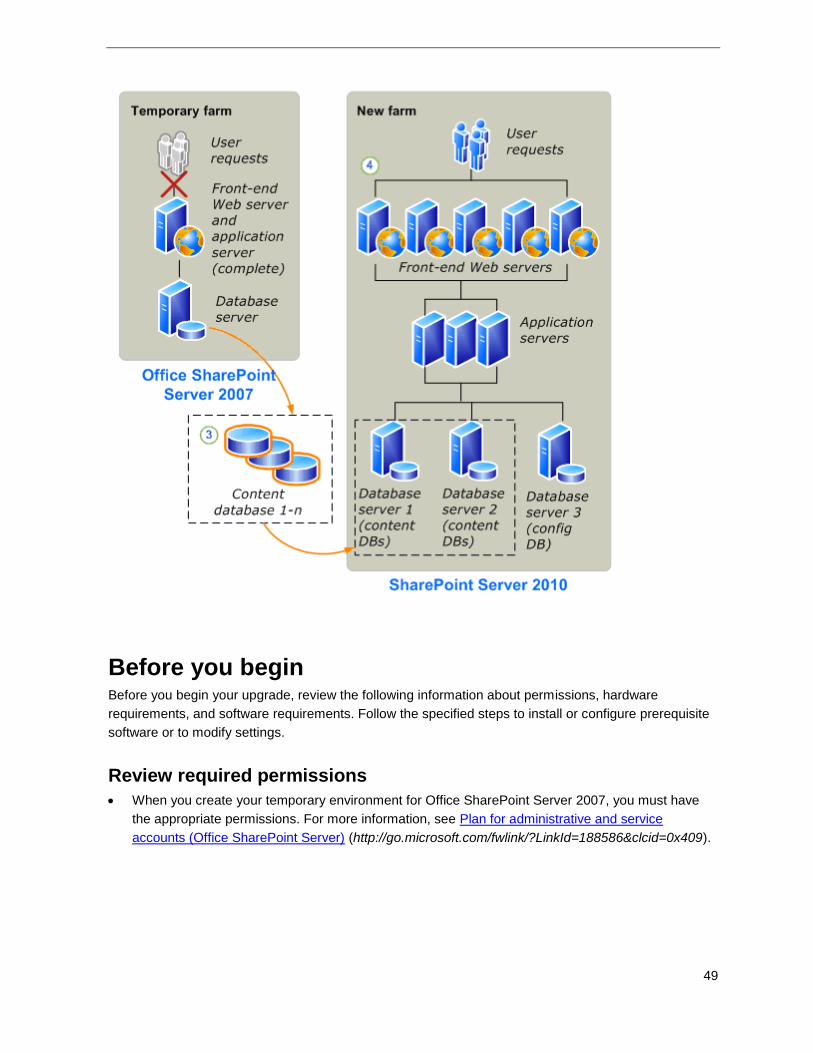
Before you begin ............................................................................................................................... 49
Review required permissions ..................................................................................................... 49
Review required hardware and software .................................................................................... 50
Prepare to upgrade ........................................................................................................................... 50
Prepare your farms............................................................................................................................ 51
Perform the first upgrade .................................................................................................................. 52
Verify the first upgrade ...................................................................................................................... 53
Perform the second upgrade ............................................................................................................. 53
Verify the second upgrade ................................................................................................................ 54
Plan and prepare for upgrade (SharePoint Server 2010) ................................................................. 55
Determine upgrade approach (SharePoint Server 2010) ................................................................. 56
Choose an upgrade approach ........................................................................................................... 56
Special cases .................................................................................................................................... 59
Review upgrade best practices (SharePoint Server 2010) ............................................................... 63
Review supported and unsupported upgrade paths (SharePoint Server 2010) ............................... 66
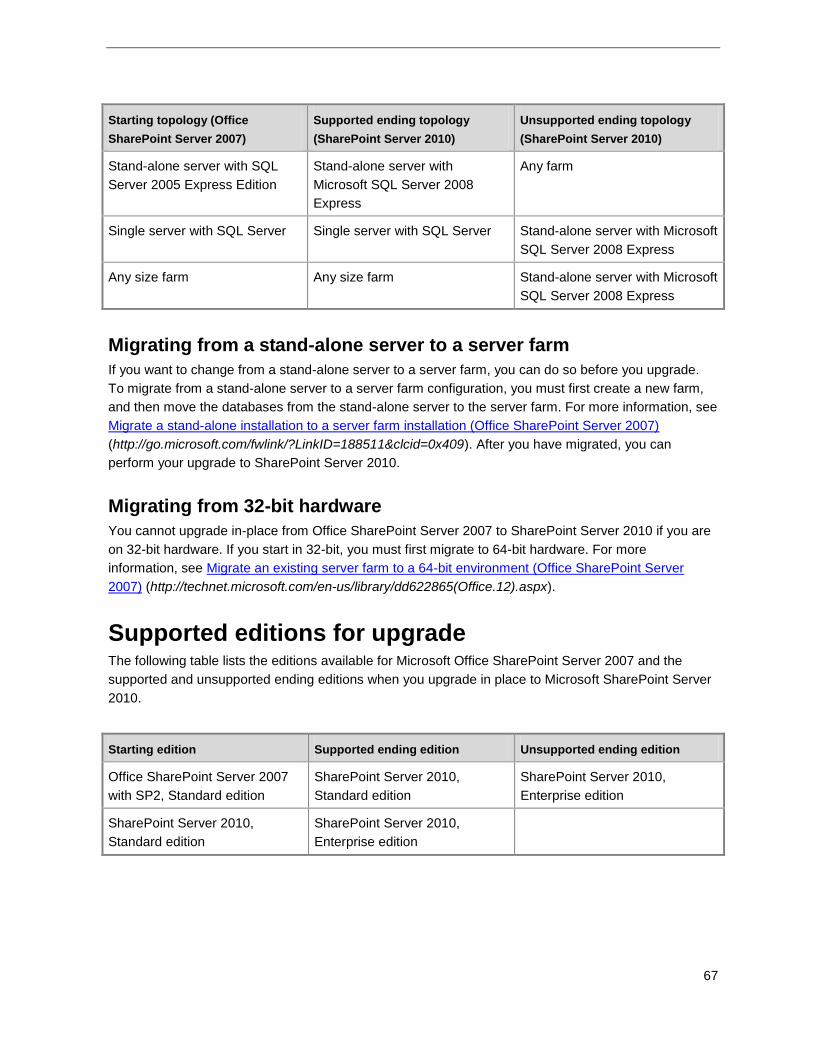
Review supported topologies for upgrade ........................................................................................ 66
Physical topology guidance ........................................................................................................ 66
Supported topologies .................................................................................................................. 66
Migrating from a stand-alone server to a server farm ................................................................ 67
Migrating from 32-bit hardware ................................................................................................... 67
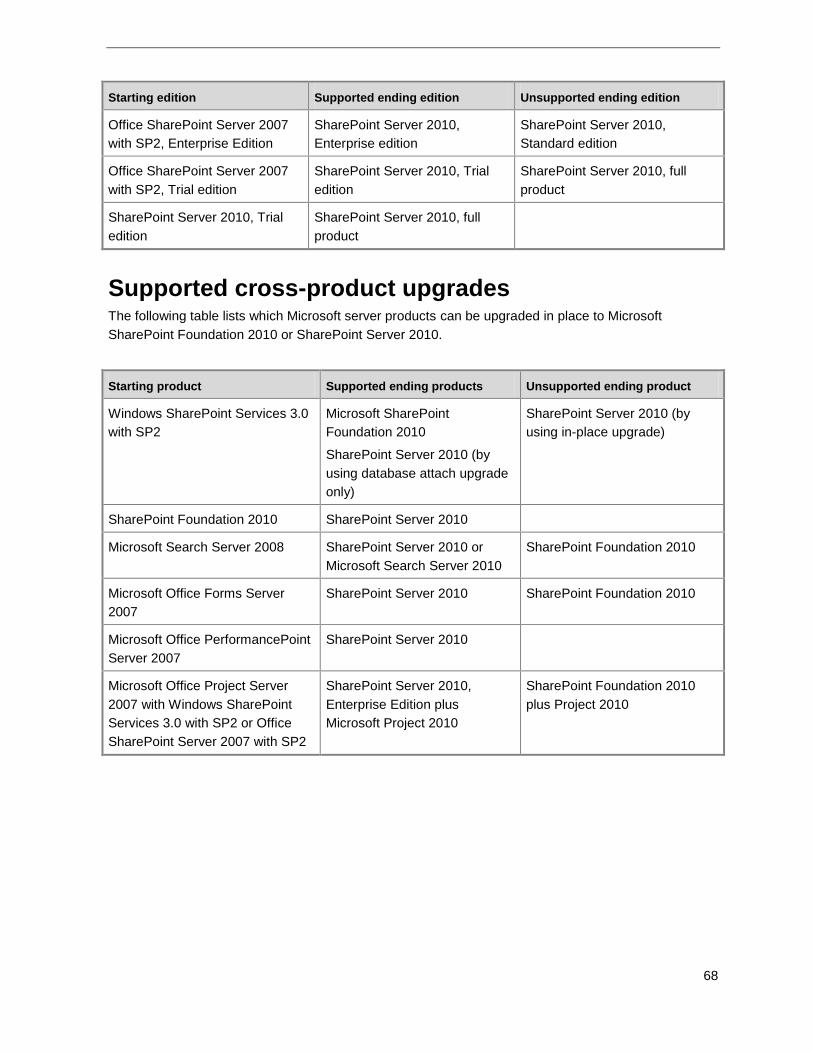
Supported editions for upgrade ......................................................................................................... 67
Supported cross-product upgrades ................................................................................................... 68
Review system requirements for upgrade (SharePoint Server 2010) .............................................. 69
About these requirements ................................................................................................................. 69
Page 5
v
Determine how to handle customizations (SharePoint Server 2010) ............................................... 71
Identify customizations in your environment ..................................................................................... 71
Evaluate the customizations ............................................................................................................. 71
Considerations for specific customizations ....................................................................................... 72
Ensure that future customizations follow best practices ................................................................... 75
Create a communication plan (SharePoint Server 2010) ................................................................. 76
Who is on the upgrade team? ........................................................................................................... 76
When and what to communicate to the upgrade team ..................................................................... 77
When and what to communicate to site users .................................................................................. 78
Plan to upgrade to Business Connectivity Services (SharePoint Server 2010) ............................... 79
The Business Data Catalog, Application Registry, and Business Data Connectivity service ........... 79
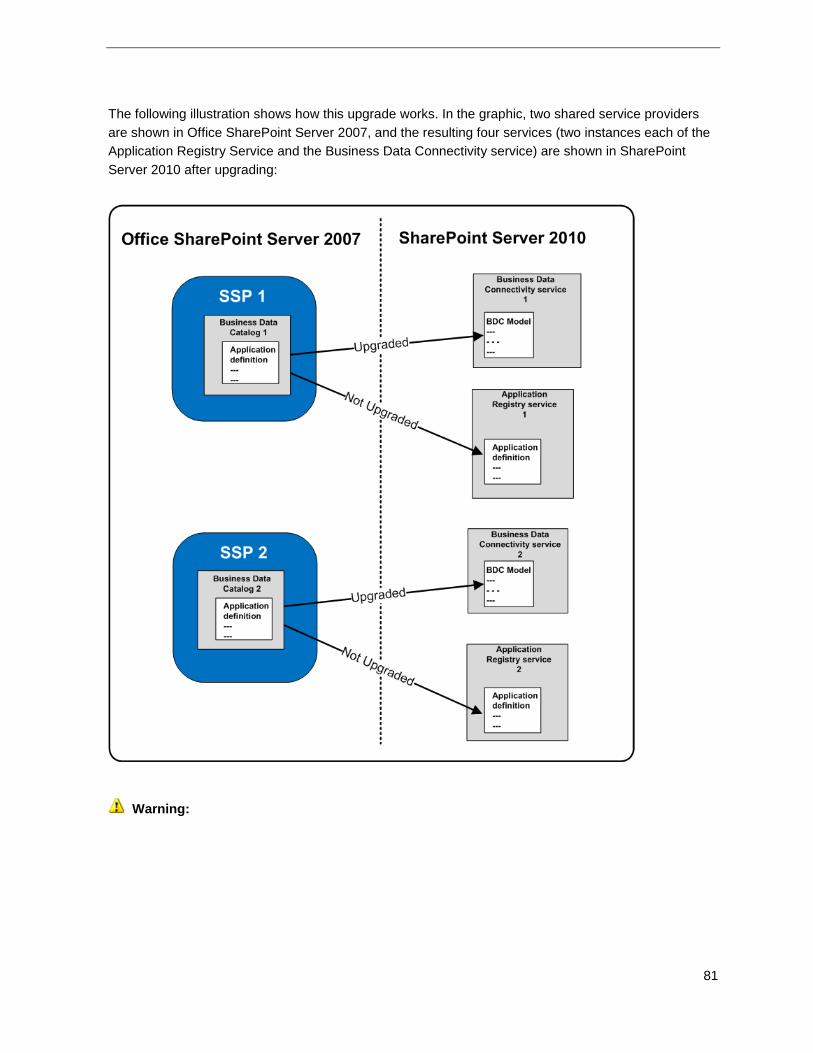
How Business Connectivity Services upgrade works ....................................................................... 80
Upgrading by using database attach................................................................................................. 82
Solution-specific upgrade considerations ......................................................................................... 82
Models ........................................................................................................................................ 82
Web Parts ................................................................................................................................... 83
Search......................................................................................................................................... 84
Single sign-on ............................................................................................................................. 84
Maintaining service databases on separate servers .................................................................. 84
Maintaining parent and child farm relationships ......................................................................... 84
Plan to upgrade form templates during an upgrade to SharePoint Server 2010 .............................. 86
About upgrading forms during an upgrade to SharePoint Server 2010 ............................................ 86
Upgrade form templates during a database attach upgrade to SharePoint Server 2010 ................. 87
Export and import administrator-approved form template files between configuration databases
................................................................................................................................................. 88
Update form template links to the server .................................................................................... 88
Upgrade form templates during an in-place upgrade to SharePoint Server 2010 ............................ 89
Plan visual upgrade (SharePoint Server 2010) ................................................................................. 90
Key planning phase of visual upgrade .............................................................................................. 90
Preserving the existing user interface ........................................................................................ 90
Upgrading to the new user interface ........................................................................................... 91
Training site collection owners and site owners ................................................................................ 91
Known issues .................................................................................................................................... 92
Testing and troubleshooting upgrade (SharePoint Server 2010) ..................................................... 93
Best practices for testing upgrade (SharePoint Server 2010) .......................................................... 95
Use a trial upgrade to find potential issues (SharePoint Server 2010) ............................................. 97
Set up a test environment ................................................................................................................. 98
Page 6
vi
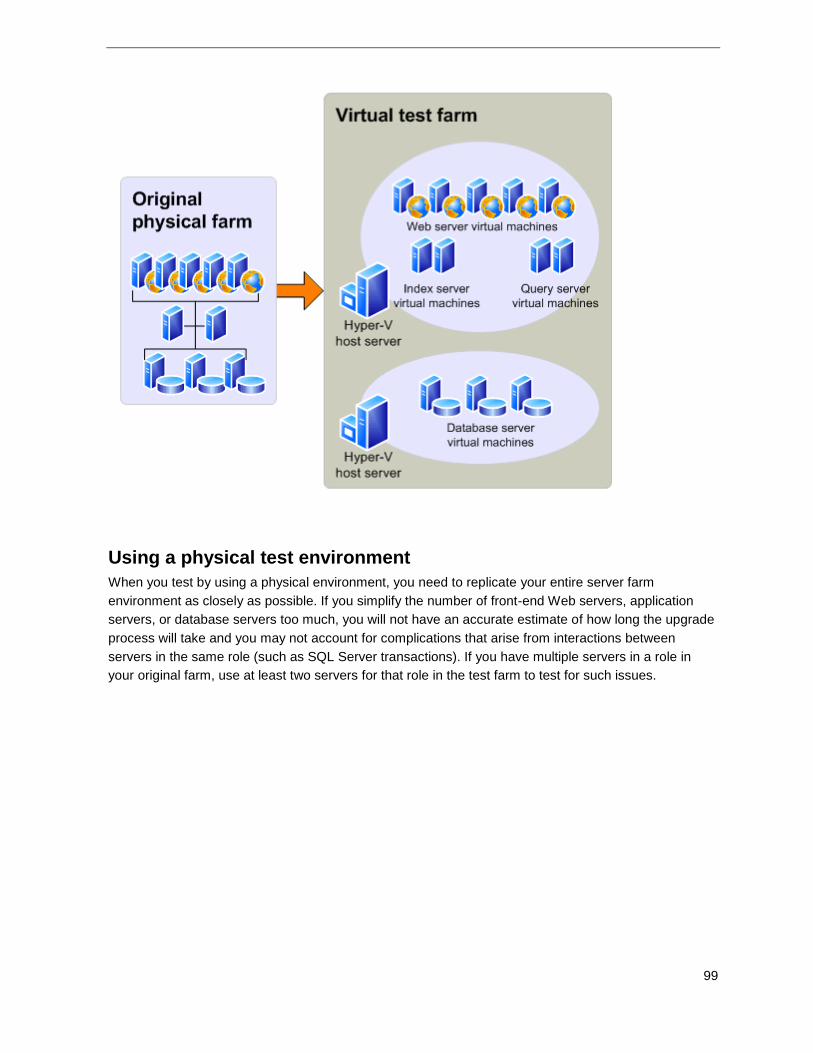
Using a virtual test environment ................................................................................................. 98
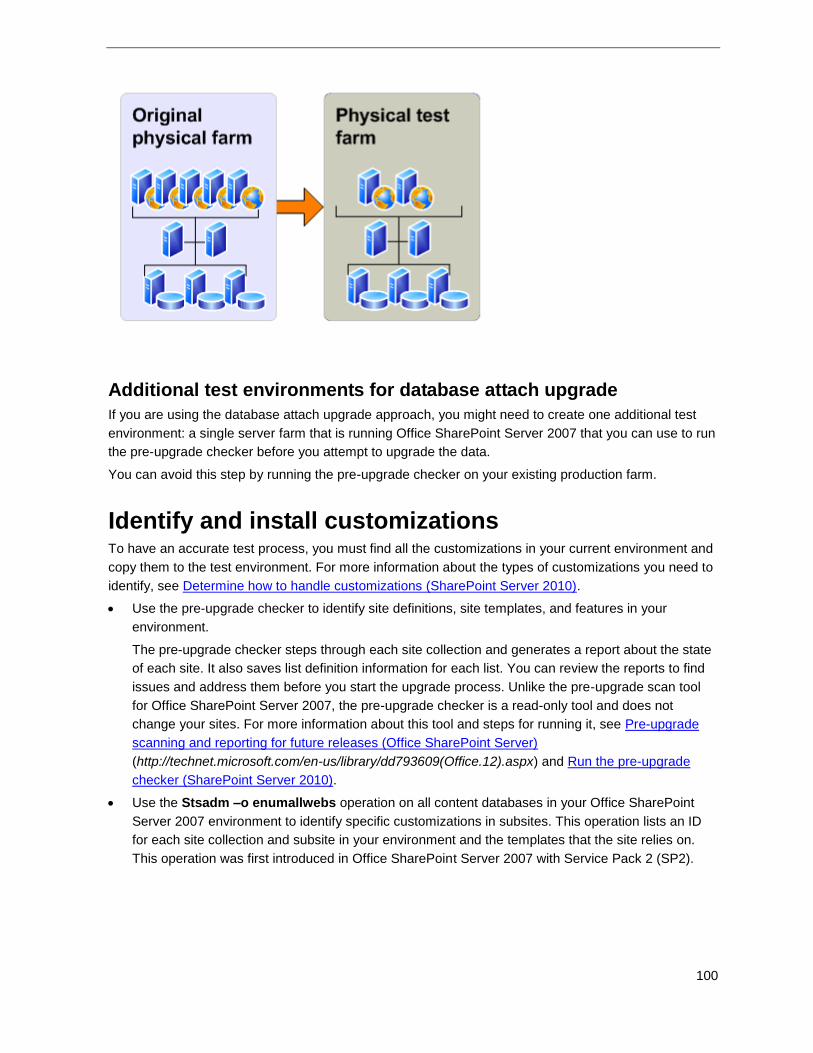
Using a physical test environment .............................................................................................. 99
Additional test environments for database attach upgrade ...................................................... 100
Identify and install customizations ................................................................................................... 100
Copy real data to the test environment and try the upgrade ........................................................... 101
Try in-place upgrade ................................................................................................................. 102
Try a database attach upgrade ................................................................................................. 102
Review your results ......................................................................................................................... 103
Review the log files ................................................................................................................... 103
Restart upgrade, if necessary ................................................................................................... 104
Review upgraded sites ............................................................................................................. 104
Adjust your plans and test again ..................................................................................................... 104
Estimate how long the upgrade process will take and the space that you need (SharePoint Server
2010) ............................................................................................................................................ 105
Estimate the space that you need for the upgrade ......................................................................... 105
Estimate how long the upgrade will take ......................................................................................... 106
Cleaning up your environment before upgrade (SharePoint Server 2010) .................................... 110
Items to clean up ............................................................................................................................. 110
Delete unused or underused site collections and subwebs ..................................................... 110
Address large lists .................................................................................................................... 110
Address large numbers of site collections in a content database ............................................ 111
Address large ACLs .................................................................................................................. 111
Remove extraneous document versions .................................................................................. 111
Remove unused templates, features, and Web Parts .............................................................. 111
Repair data issues .................................................................................................................... 112
Making structural changes .............................................................................................................. 113
Troubleshoot upgrade issues (SharePoint Server 2010) ................................................................ 114
General principles for identifying issues.......................................................................................... 114
First, check upgrade status and log files .................................................................................. 114
Then, address issues in order .................................................................................................. 115
Common issues ............................................................................................................................... 115
Missing or deprecated server-side files or customizations ....................................................... 116
Incorrectly configured or missing settings for server farm, Web application, or services ........ 116
Inconsistent or incorrect update levels ..................................................................................... 117
Missing global navigation for blogs ........................................................................................... 117
Data issues ............................................................................................................................... 117
UI changes ................................................................................................................................ 118
Lack of space ............................................................................................................................ 118
Forms-based authentication ..................................................................................................... 118
Security and permissions.......................................................................................................... 118
Page 7
vii
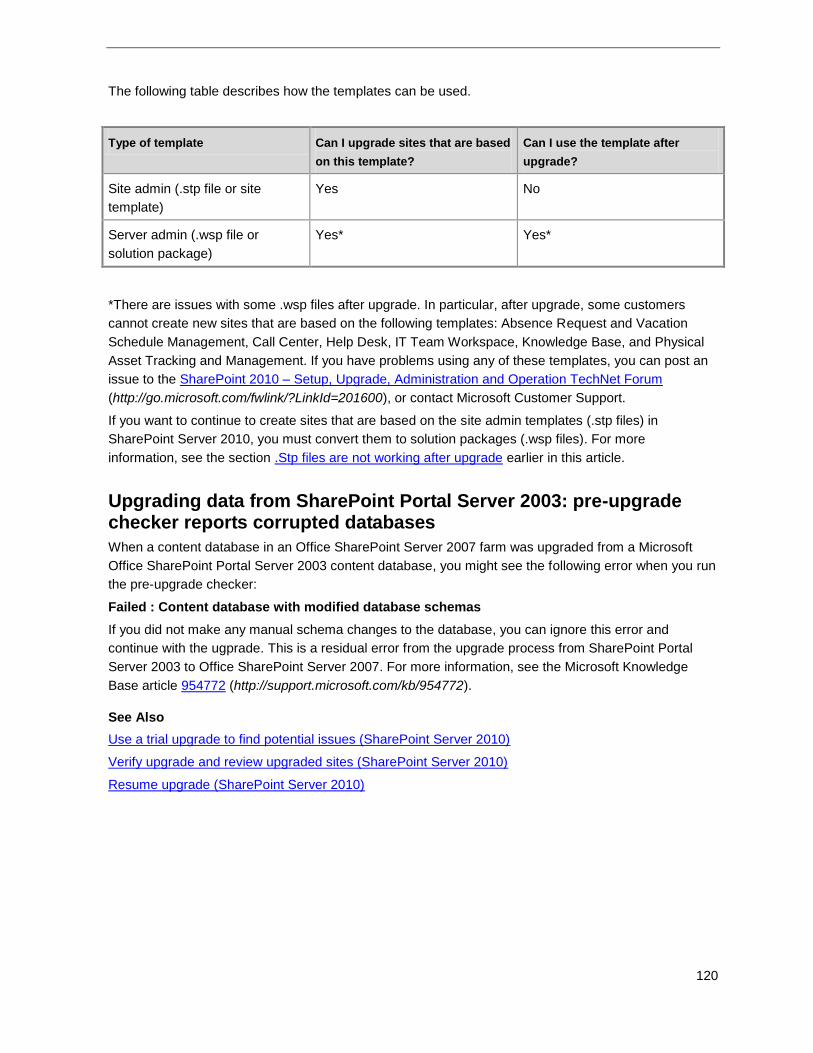
.Stp files are not working after upgrade .................................................................................... 119
Cannot find new versions of the Fabulous 40 application templates ....................................... 119
Upgrading data from SharePoint Portal Server 2003: pre-upgrade checker reports corrupted
databases .............................................................................................................................. 120
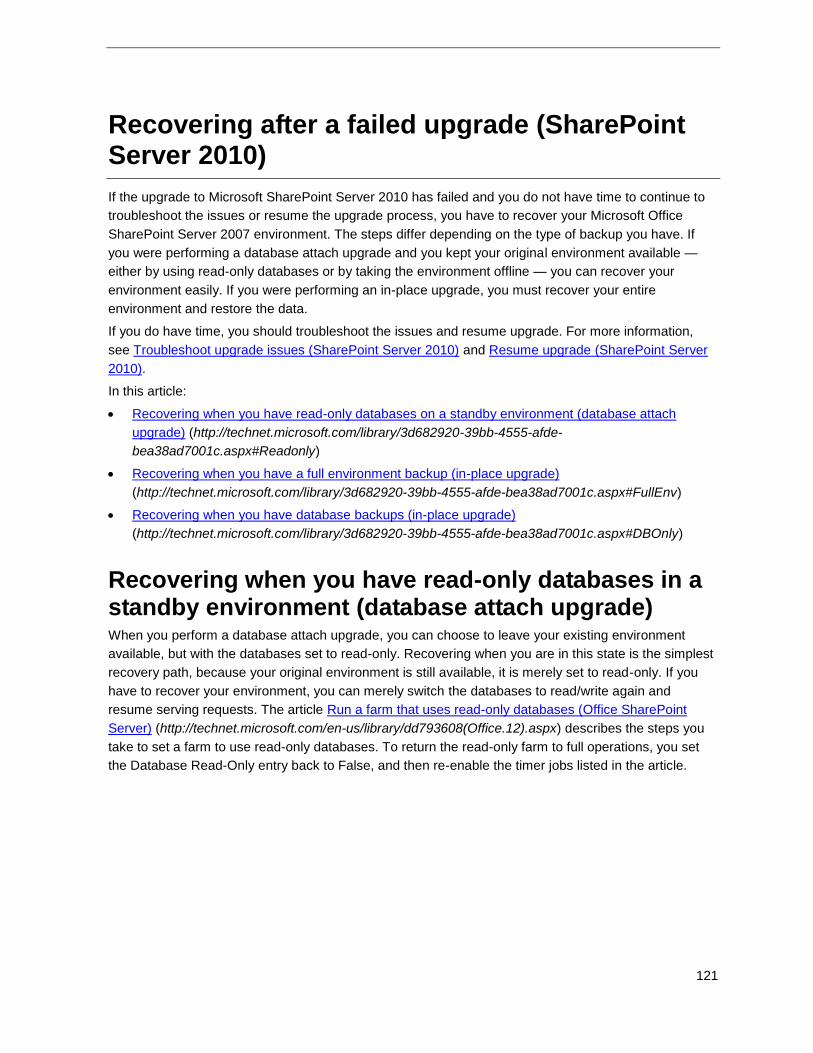
Recovering after a failed upgrade (SharePoint Server 2010) ......................................................... 121
Recovering when you have read-only databases in a standby environment (database attach
upgrade) ....................................................................................................................................... 121
Recovering when you have a full environment backup (in-place upgrade) .................................... 122
Recovering when you have database backups (in-place upgrade) ................................................ 122
Resume upgrade (SharePoint Server 2010) ................................................................................... 123
Restart upgrade for a server farm by using Psconfig.exe ............................................................... 123
Restart upgrade for a database by using Windows PowerShell ..................................................... 124
Perform pre-upgrade steps (SharePoint Server 2010) ................................................................... 125
Run the pre-upgrade checker (SharePoint Server 2010) ............................................................... 126
About the pre-upgrade checker report ............................................................................................ 126
Run the pre-upgrade checker ......................................................................................................... 128
Back up the entire environment before an in-place upgrade (SharePoint Server 2010) ................ 129
Back up the environment ................................................................................................................ 129
Test the backups ............................................................................................................................. 129
Perform an in-place upgrade (SharePoint Server 2010) ................................................................ 130
Checklist for in-place upgrade (SharePoint Server 2010) .............................................................. 131
Prepare for upgrade ........................................................................................................................ 131
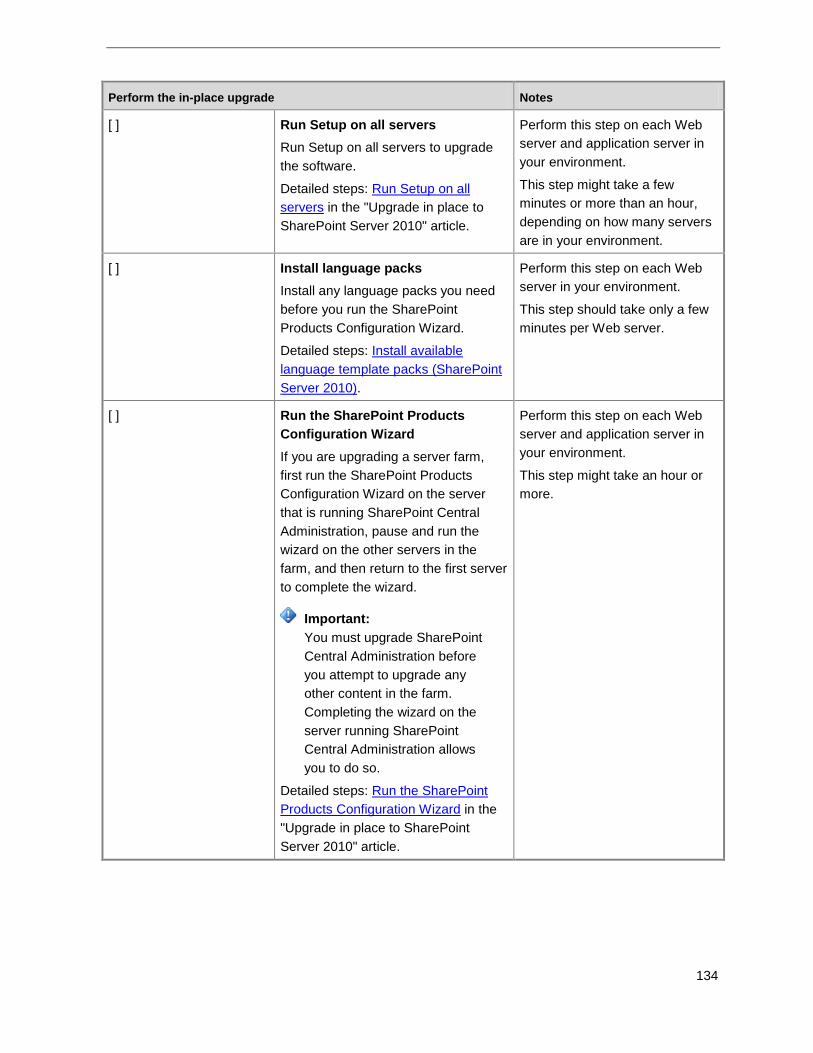
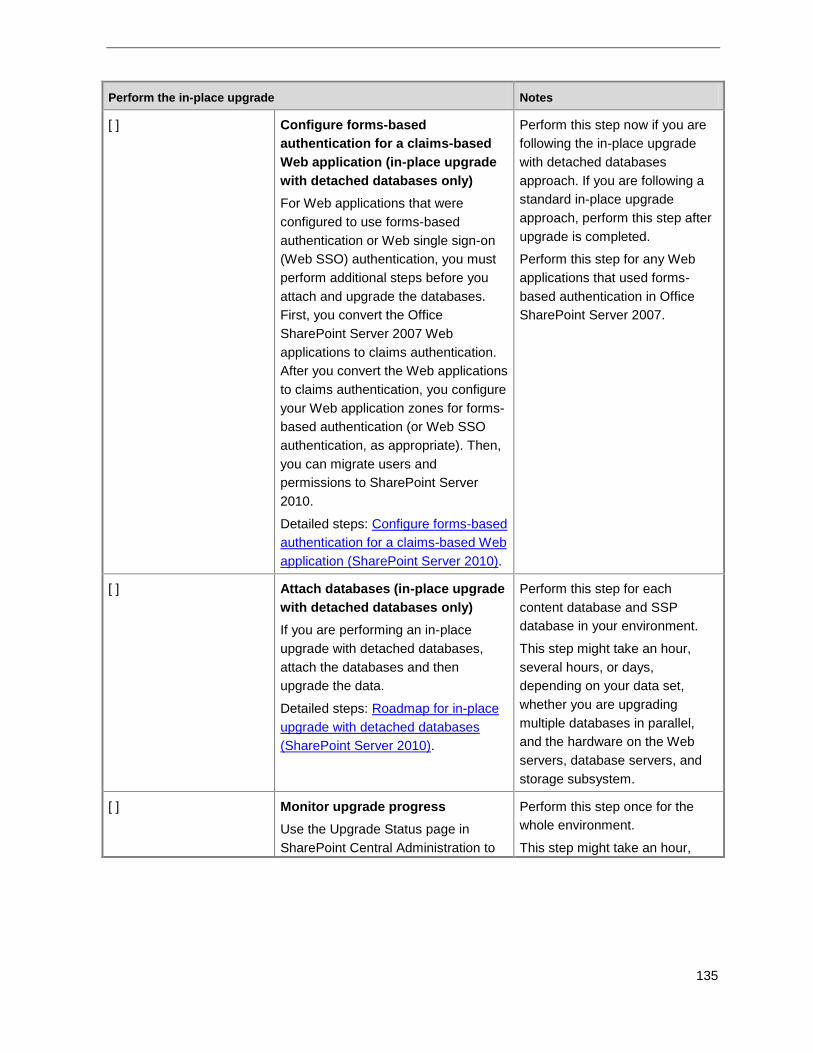
Perform the upgrade ....................................................................................................................... 133
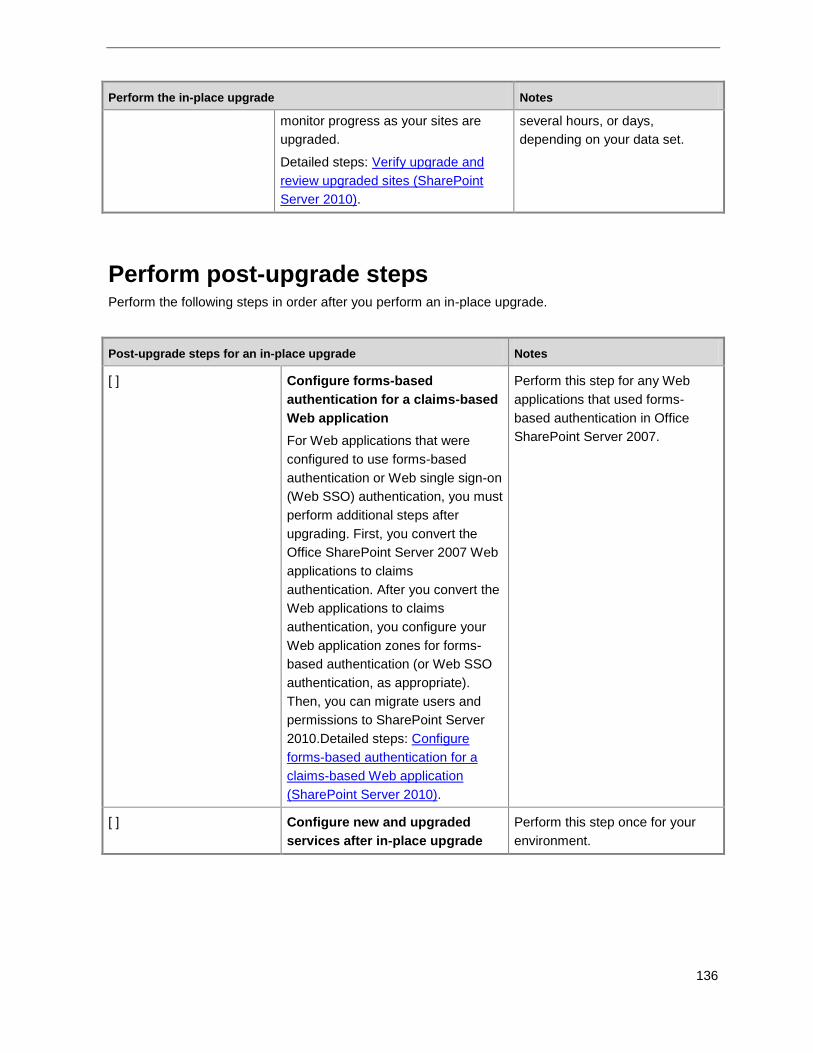
Perform post-upgrade steps ............................................................................................................ 136
Upgrade in place to SharePoint Server 2010 ................................................................................. 140
Process overview ............................................................................................................................ 141
Before you begin ............................................................................................................................. 142
Install prerequisites ......................................................................................................................... 142
Run Setup on all servers ................................................................................................................. 143
Run the SharePoint Products Configuration Wizard ....................................................................... 143
Check upgrade status for sites ........................................................................................................ 145
Verification ....................................................................................................................................... 146
Additional steps ............................................................................................................................... 146
Roadmap for in-place upgrade with detached databases (SharePoint Server 2010) .................... 147
Process overview ............................................................................................................................ 148
Before you begin ............................................................................................................................. 148
Page 8
viii
To detach databases and upgrade them in parallel on the same farm ........................................... 149
To detach databases and upgrade them in parallel on a temporary small farm ............................. 149
Verification ....................................................................................................................................... 151
Additional steps ............................................................................................................................... 151
Install available language template packs (SharePoint Server 2010) ............................................ 152
About installing language packs and upgrading sites ..................................................................... 152
About changing languages .............................................................................................................. 152
Moving from a fully localized product to a language pack .............................................................. 153
Changing languages to a new language pack ................................................................................ 153
Perform a database attach upgrade to SharePoint Server 2010 .................................................... 155
Checklist for database attach upgrade (SharePoint Server 2010) ................................................. 156
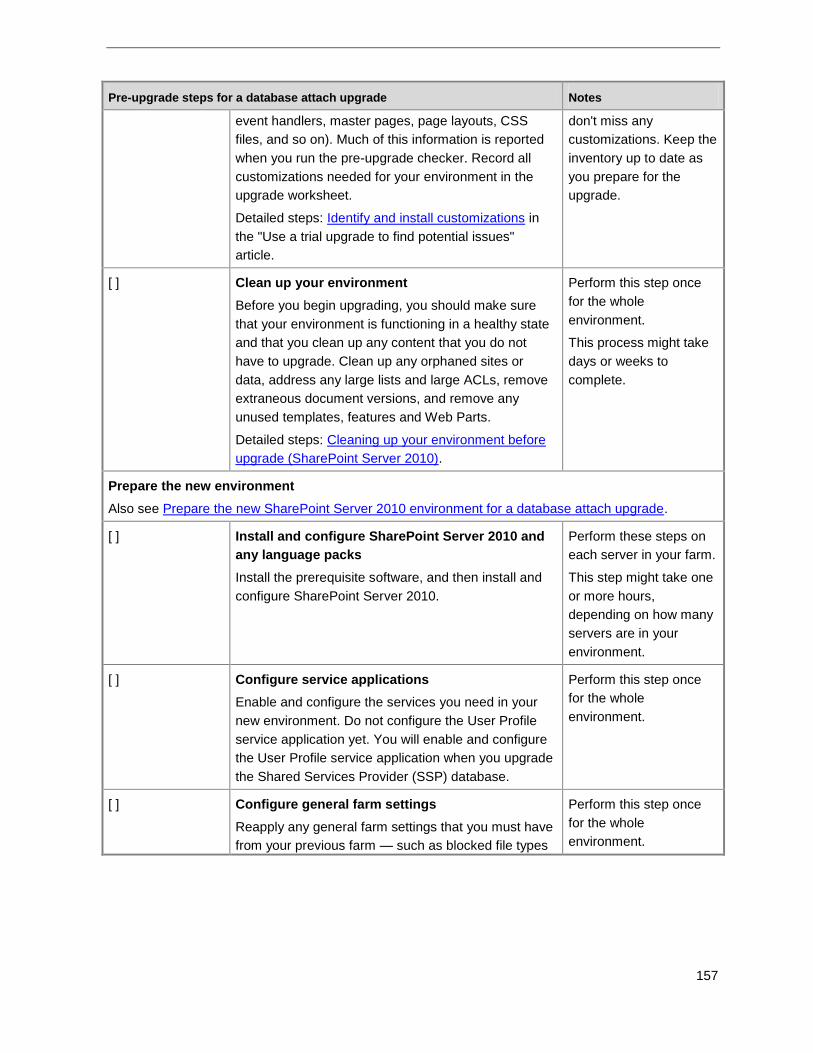
Prepare for upgrade ........................................................................................................................ 156
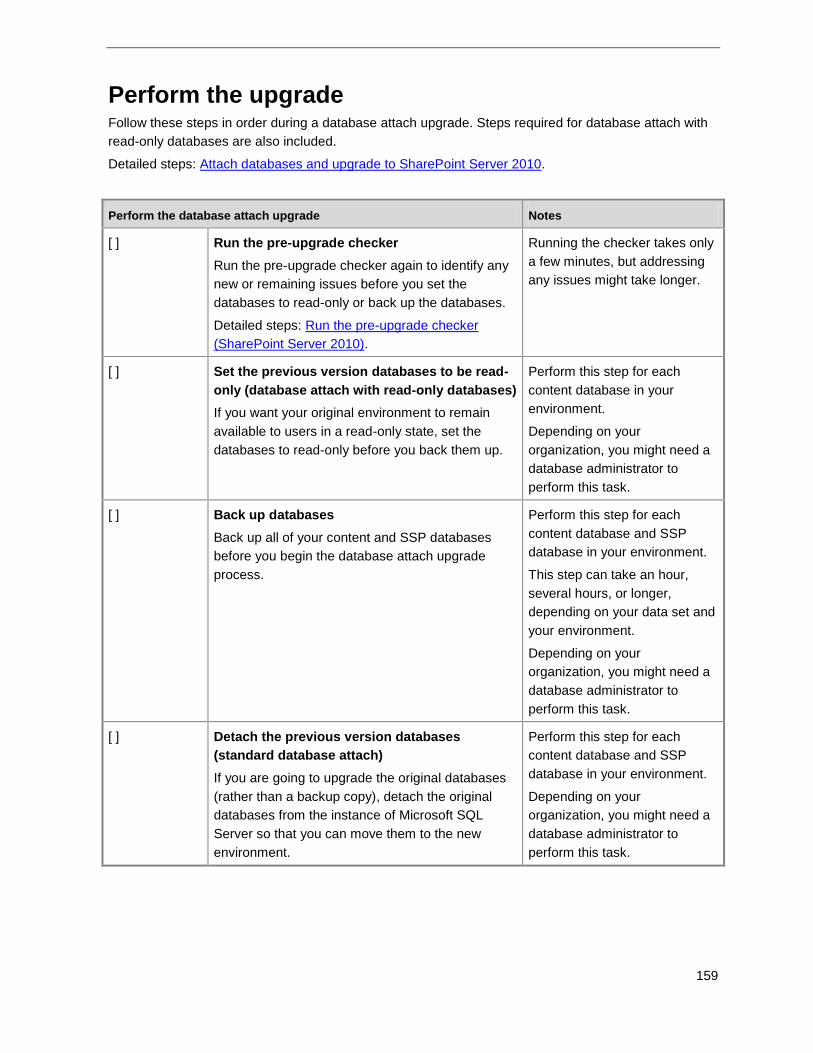
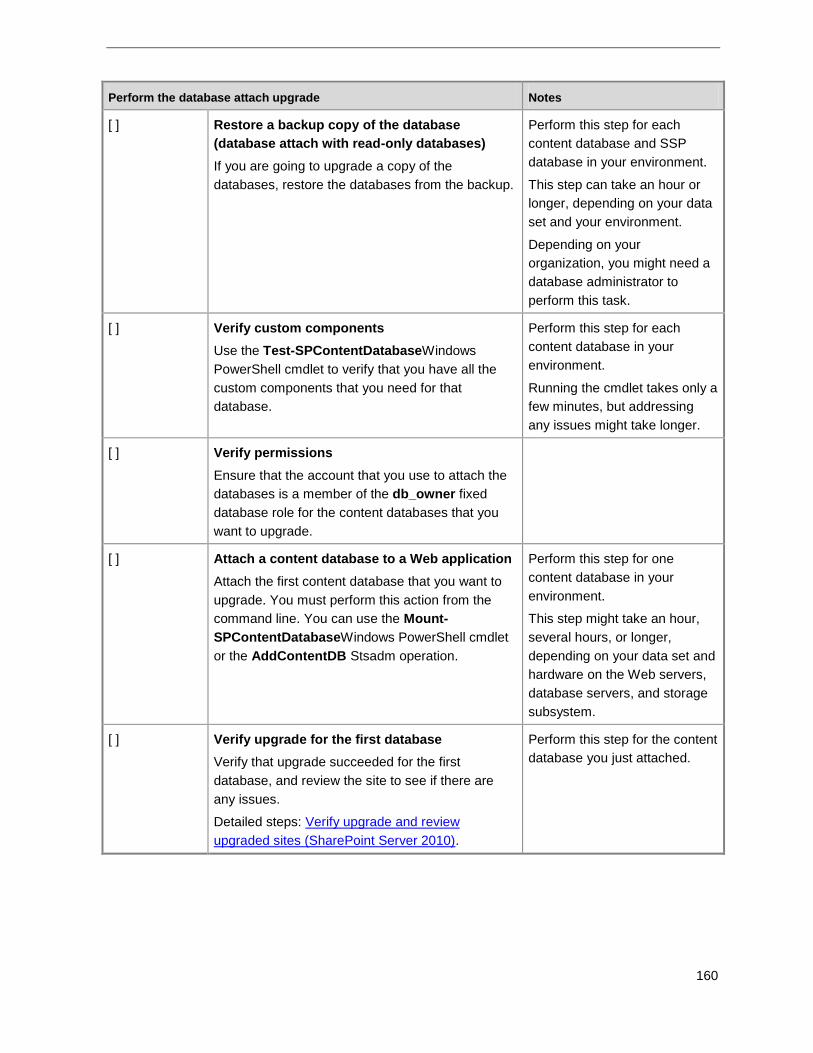
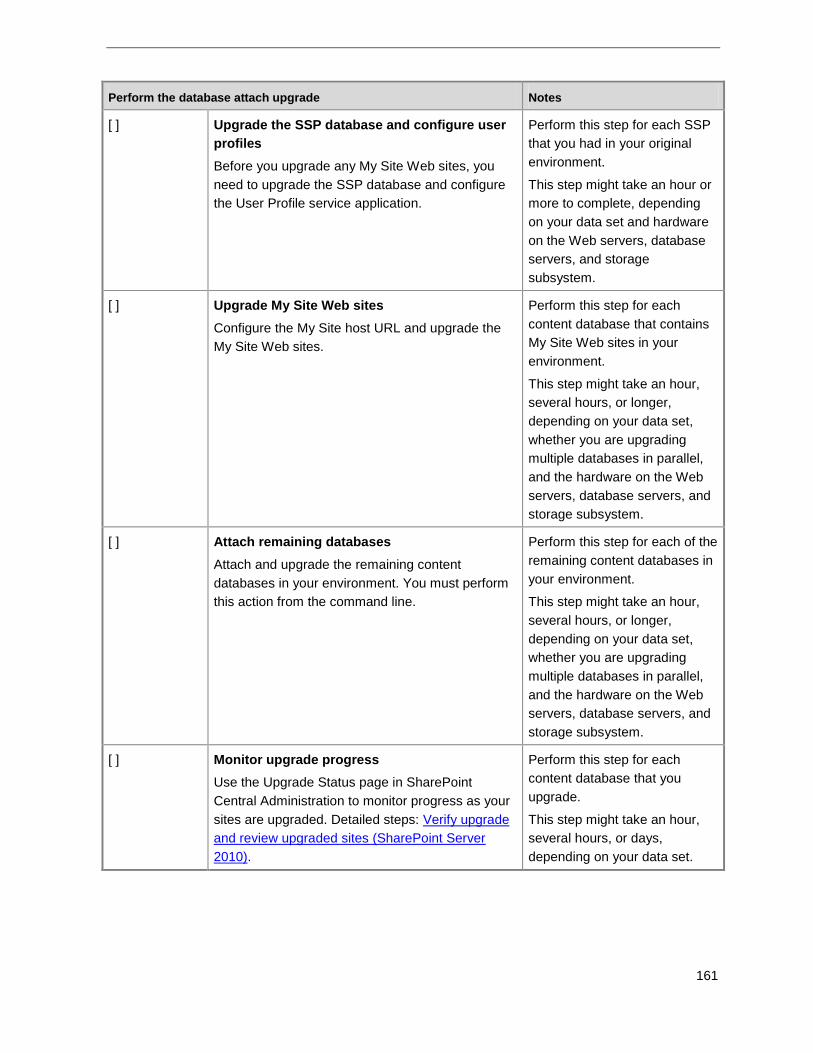
Perform the upgrade ....................................................................................................................... 159
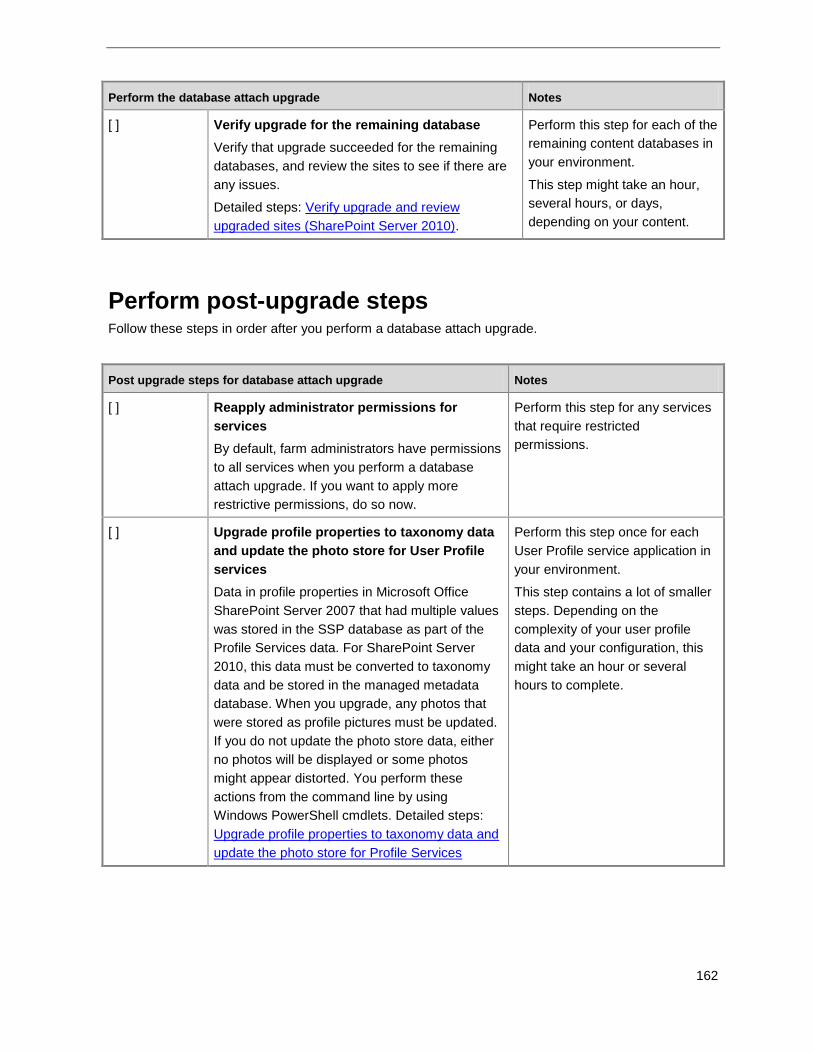
Perform post-upgrade steps ............................................................................................................ 162
Prepare the new SharePoint Server 2010 environment for a database attach upgrade ................ 165
Before you begin ............................................................................................................................. 165
Create and configure the new environment .................................................................................... 166
Install......................................................................................................................................... 166
Configure service applications .................................................................................................. 167
Configure general farm settings ............................................................................................... 168
Create and configure Web applications .................................................................................... 169
Reapply customizations ............................................................................................................ 170
Verify the new environment ............................................................................................................. 171
Perform the upgrade ....................................................................................................................... 171
Attach databases and upgrade to SharePoint Server 2010 ........................................................... 172
Process overview ............................................................................................................................ 173
Before you begin ............................................................................................................................. 173
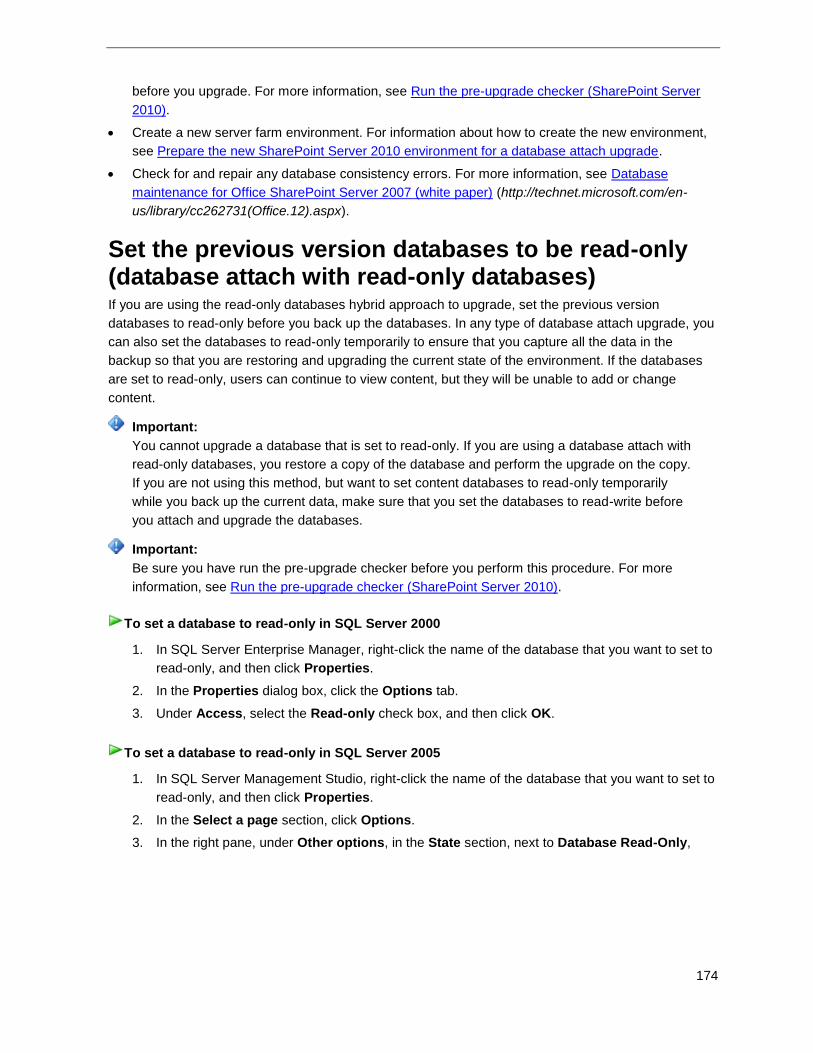
Set the previous version databases to be read-only (database attach with read-only databases) 174
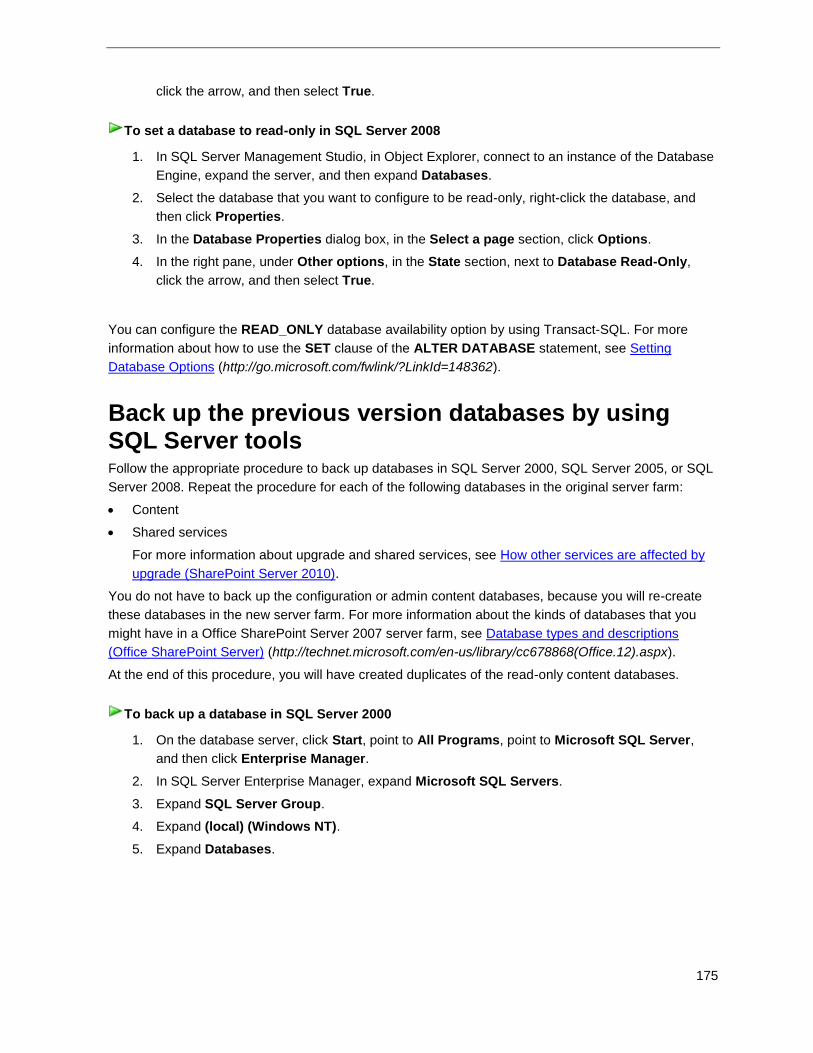
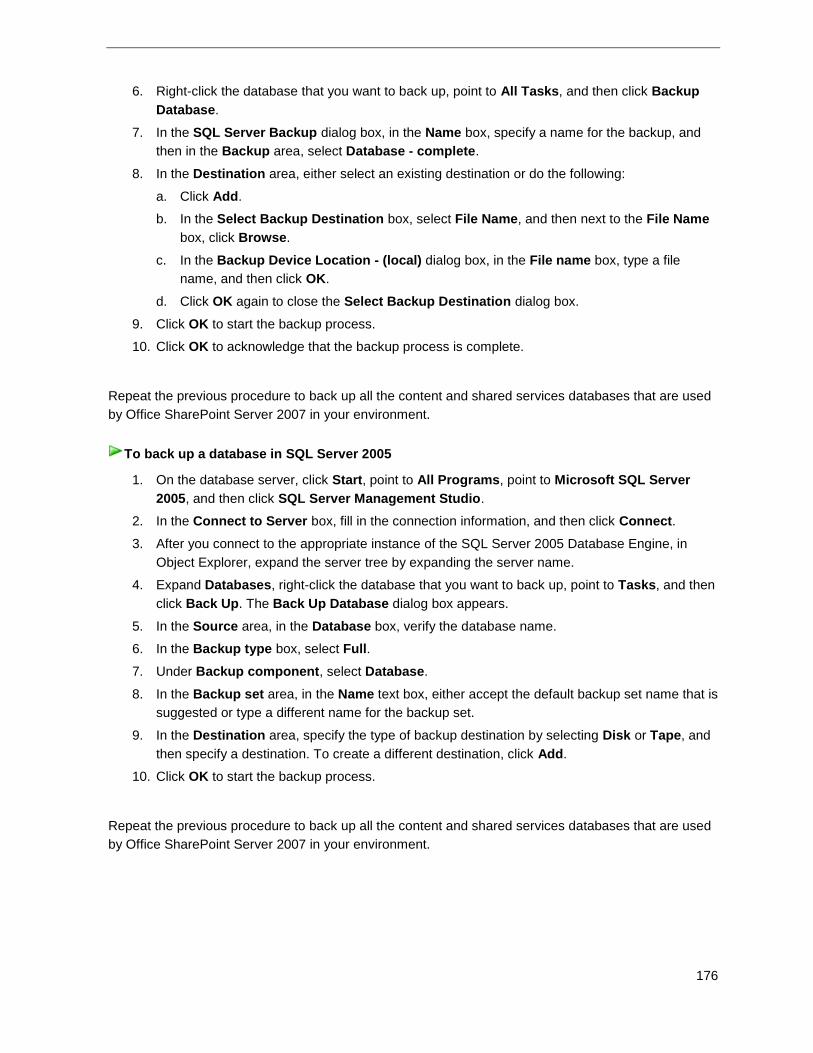
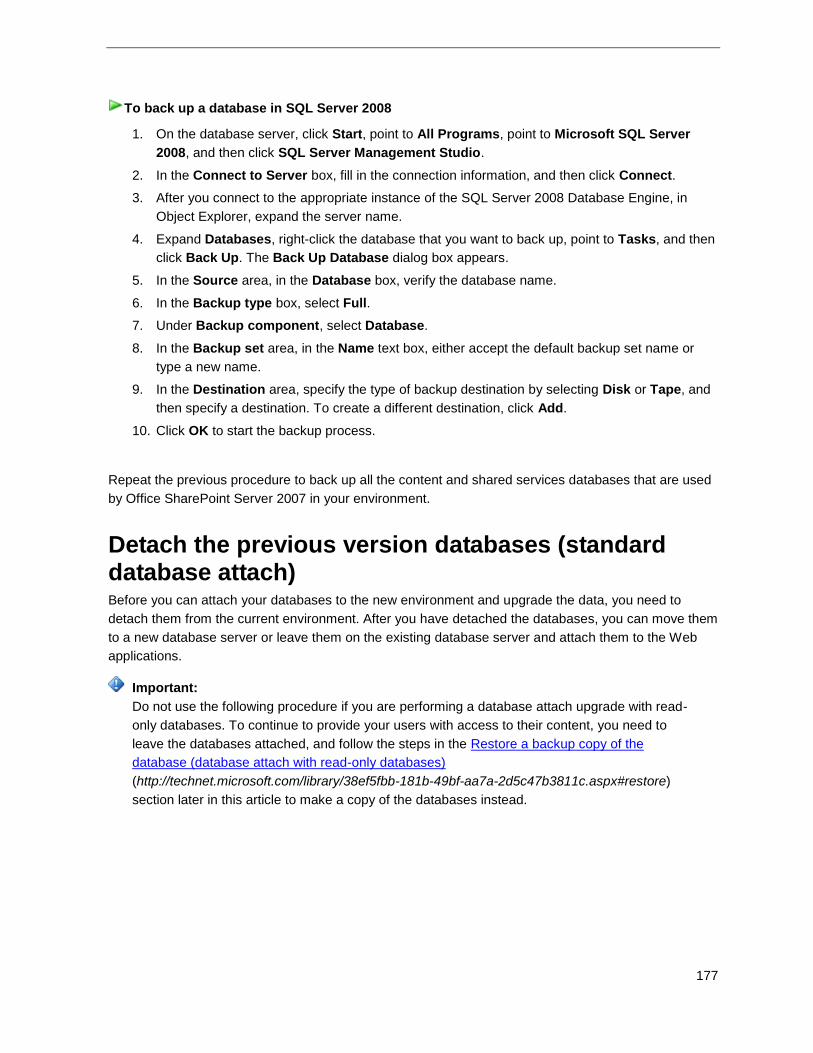
Back up the previous version databases by using SQL Server tools ............................................. 175
Detach the previous version databases (standard database attach).............................................. 177
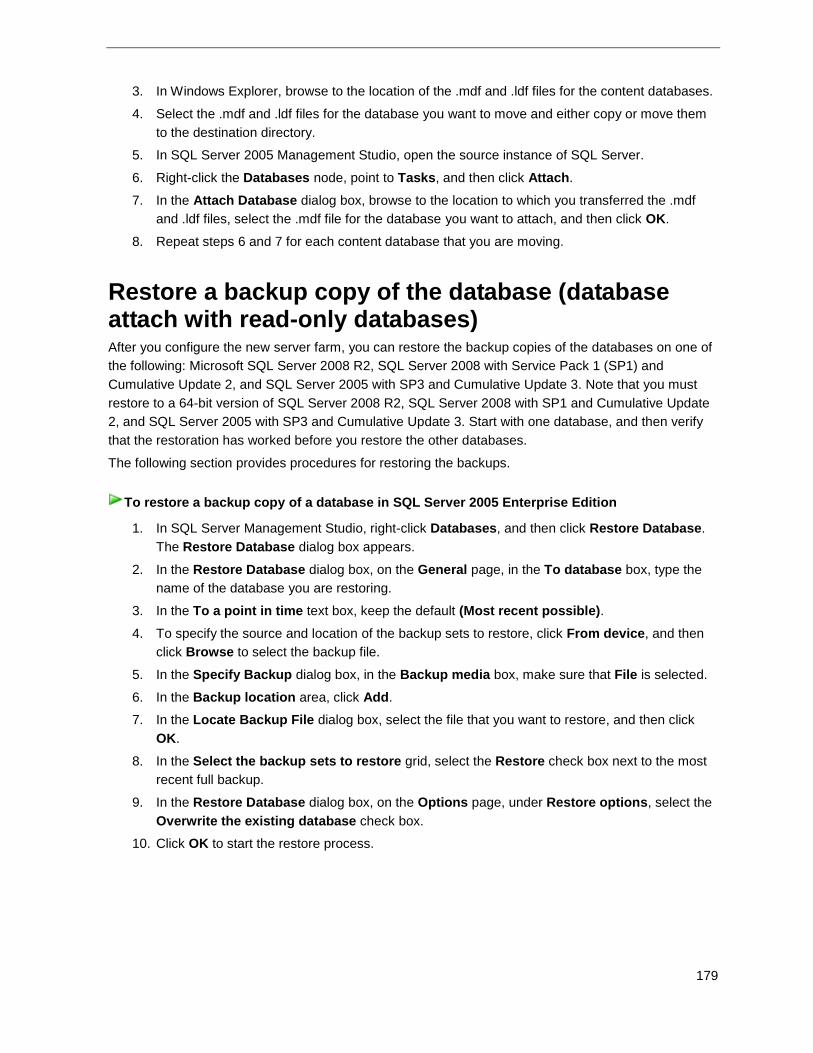
Restore a backup copy of the database (database attach with read-only databases) ................... 179
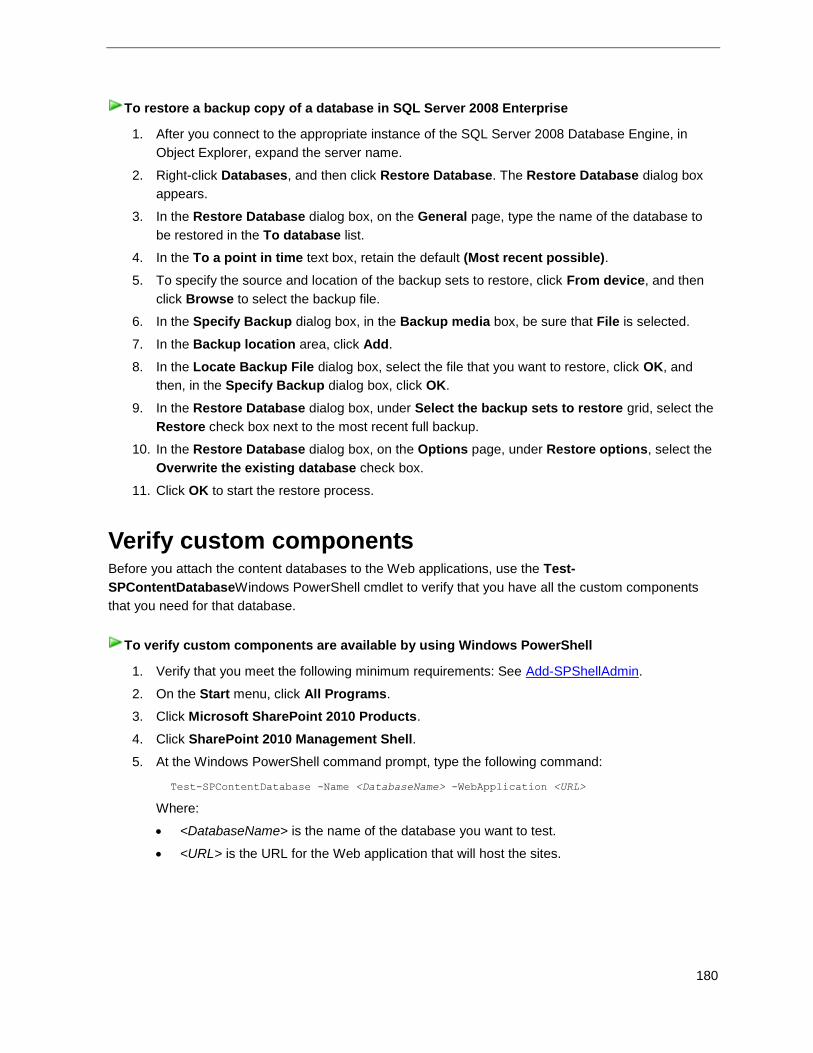
Verify custom components .............................................................................................................. 180
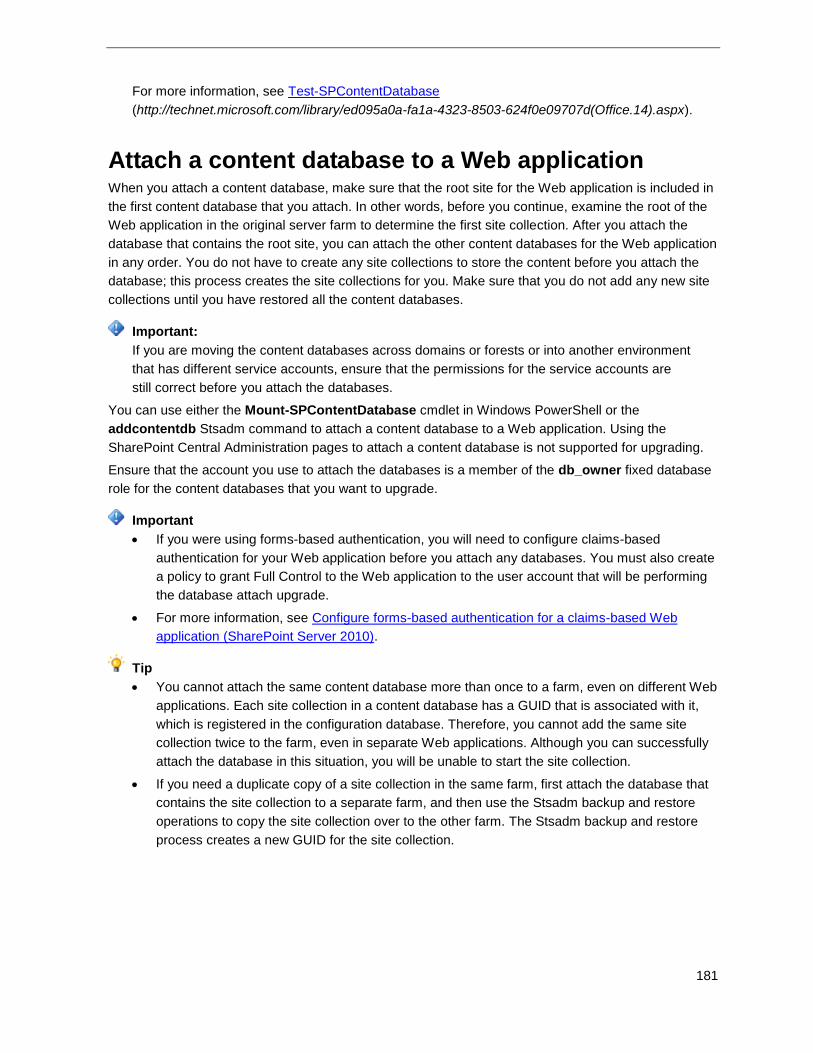
Attach a content database to a Web application ............................................................................. 181
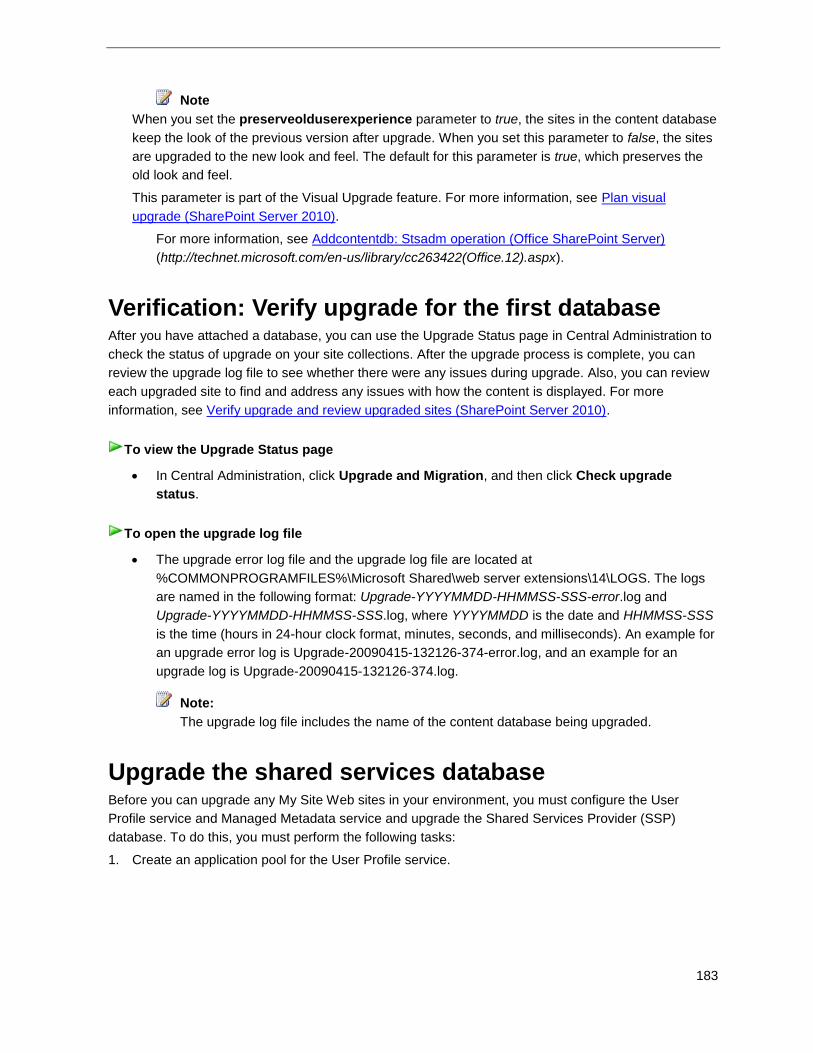
Verification: Verify upgrade for the first database ........................................................................... 183
Upgrade the shared services database .......................................................................................... 183
Upgrade My Site Web sites ............................................................................................................. 187
Attach the remaining databases ...................................................................................................... 187
Verification: Verify upgrade for additional databases...................................................................... 187
Page 9
ix
Additional steps ............................................................................................................................... 188
Perform post-upgrade steps (SharePoint Server 2010).................................................................. 189
Perform post-upgrade steps for an in-place upgrade (SharePoint Server 2010) ........................... 190
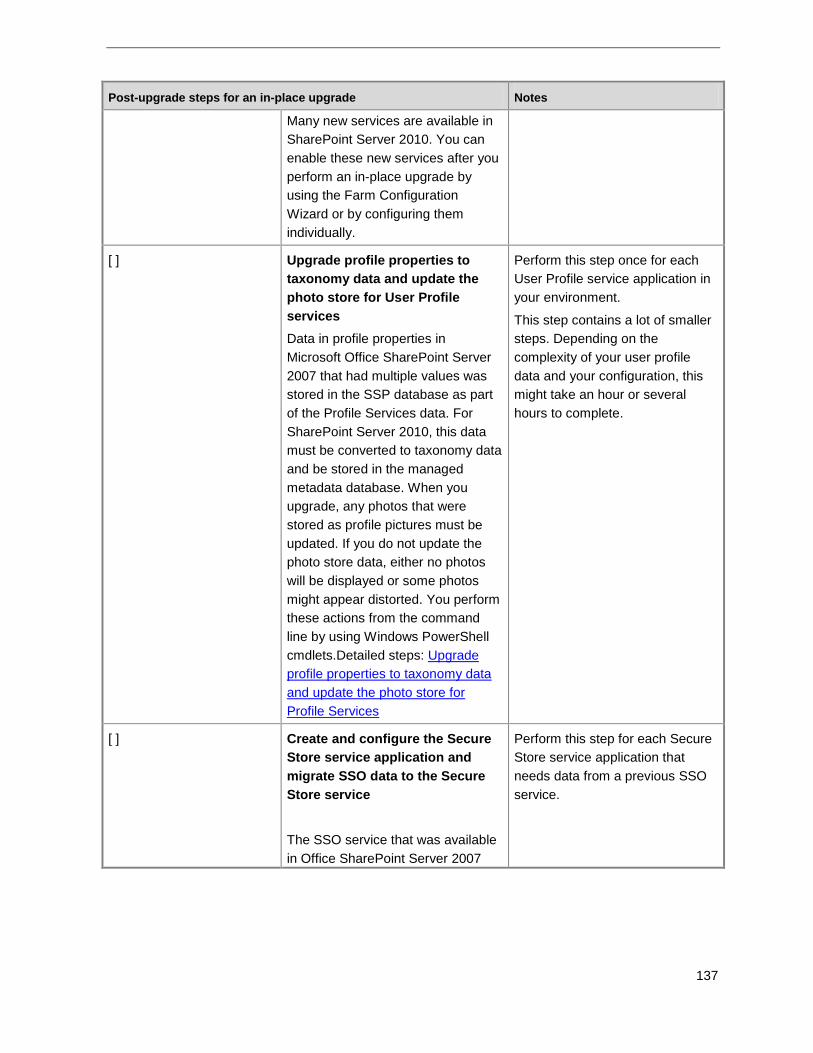
Configure new and upgraded services after in-place upgrade ....................................................... 190
Upgrade profile properties to taxonomy data and update the photo store for Profile Services ...... 190
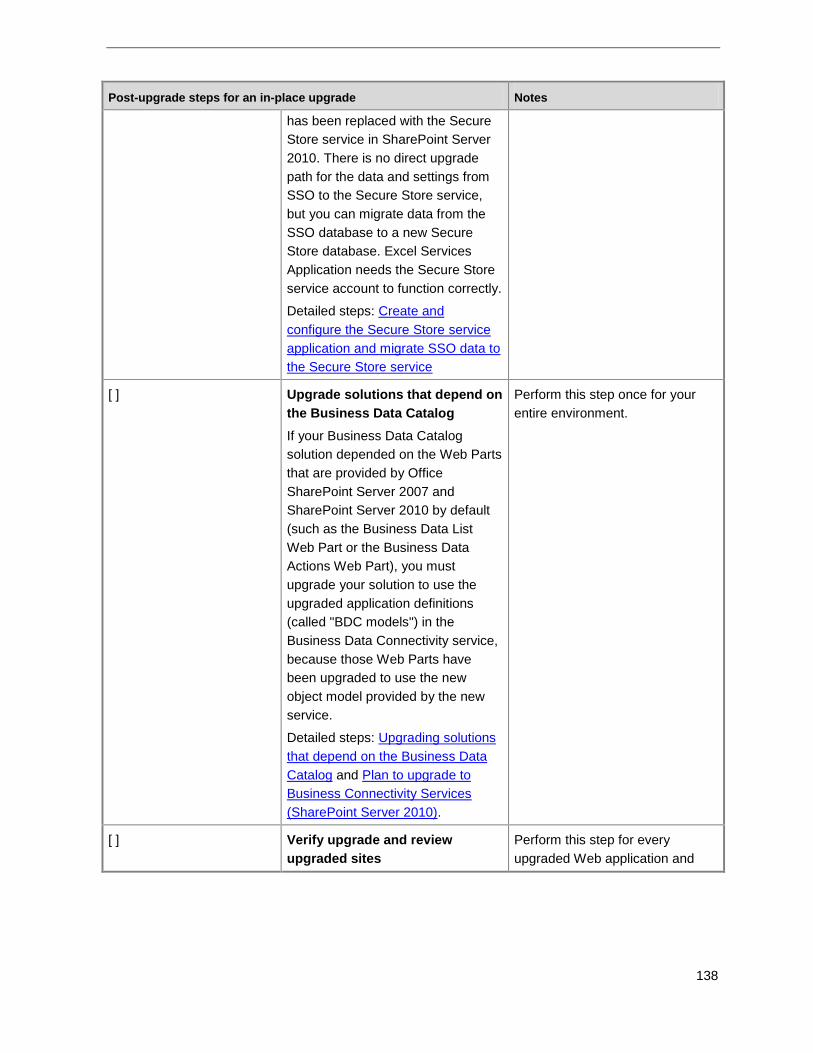
Create and configure the Secure Store service application and migrate SSO data to the Secure
Store service ................................................................................................................................ 193
Upgrading solutions that depend on the Business Data Catalog ................................................... 195
Have users migrate private My Links to private tags (Optional) ..................................................... 195
Perform post-upgrade steps for a database attach upgrade (SharePoint Server 2010) ................ 196
Reapply administrator permissions for services ............................................................................. 196
Upgrade profile properties to taxonomy data and update the photo store for Profile Services ...... 196
Create and configure the Secure Store service application and migrate SSO data to the Secure
Store service ................................................................................................................................ 199
Upgrading solutions that depend on the Business Data Catalog ................................................... 200
Update links that are used in any upgraded InfoPath form templates ............................................ 201
Have users migrate private My Links to private tags (Optional) ..................................................... 201
Configure forms-based authentication for a claims-based Web application (SharePoint Server
2010) ............................................................................................................................................ 203
Configure a forms-based Web application to use an LDAP provider by using Central Administration
..................................................................................................................................................... 203
Configure the LDAP Web.Config files ............................................................................................. 203
Configure a forms-based Web application to use an LDAP provider by using Windows PowerShell
..................................................................................................................................................... 208
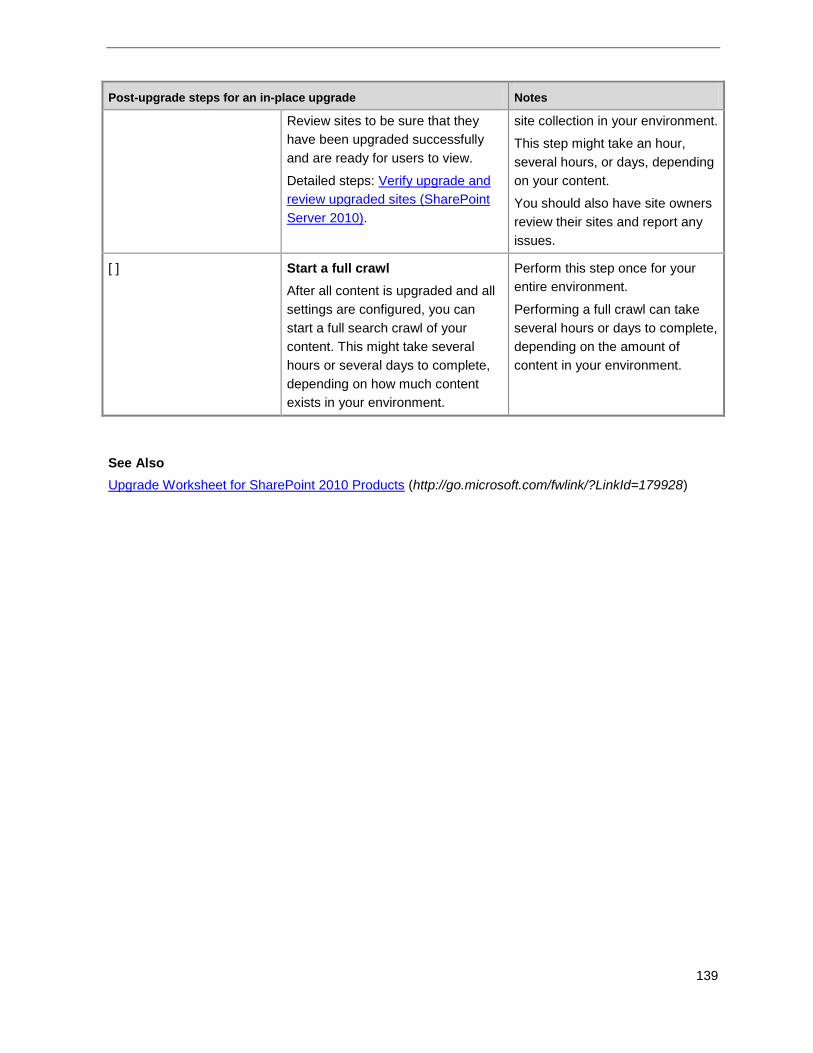
Verify upgrade and review upgraded sites (SharePoint Server 2010) ............................................ 210
Verify upgrade status ...................................................................................................................... 210
Review the log files ................................................................................................................... 210
Verify the version number ......................................................................................................... 212
Check upgrade status for sites ................................................................................................. 212
Validate the upgraded environment ................................................................................................ 213
Review upgraded sites .................................................................................................................... 214
Web Parts ................................................................................................................................. 214
Large lists ................................................................................................................................. 216
Styles and appearance ............................................................................................................. 216
Permissions .............................................................................................................................. 217
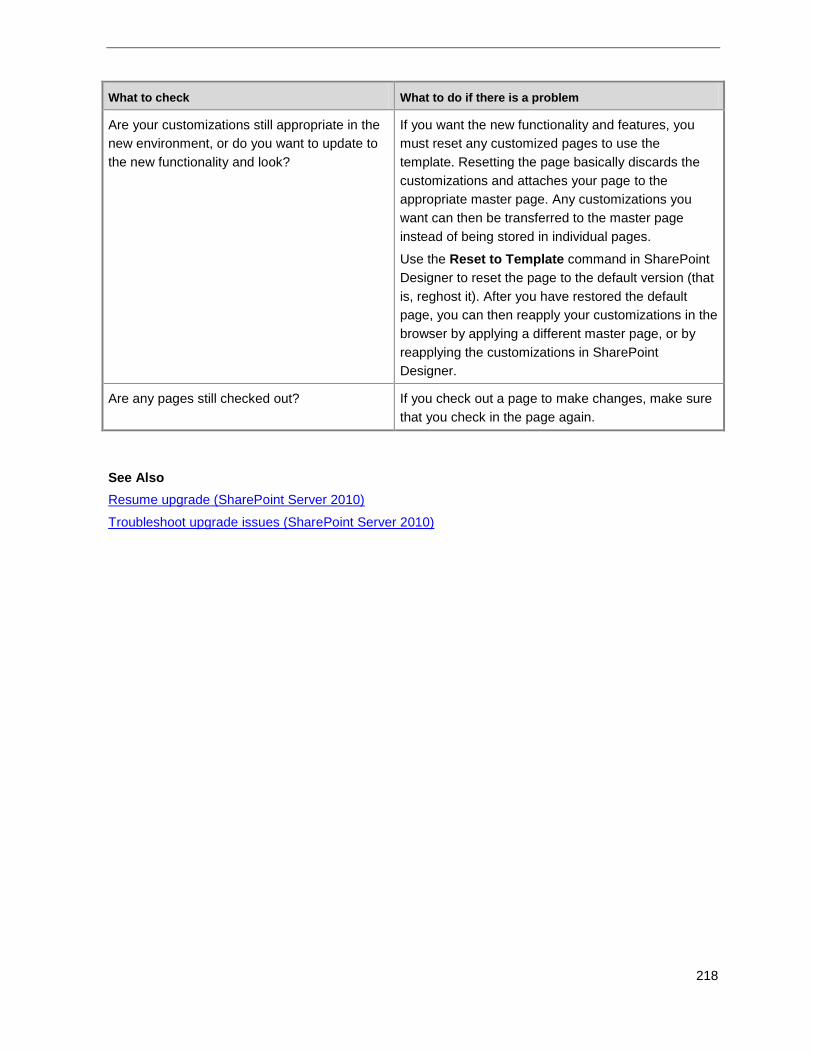
Customized (unghosted) pages ................................................................................................ 217
Manage visual upgrade (SharePoint Server 2010) ......................................................................... 219
About using Visual Upgrade ............................................................................................................ 219
Page 10
x
View status of current user interface ............................................................................................... 219
Revert sites to previous user interface ............................................................................................ 220
Force an upgrade to the new user interface ................................................................................... 221
Site owner options for visual upgrade ............................................................................................. 221
Using AAM URL redirection as part of the upgrade process (SharePoint Server 2010) (white paper)
..................................................................................................................................................... 223
Page 11
xi
Getting help
Every effort has been made to ensure the accuracy of this book. This content is also available online in
the Office System TechNet Library, so if you run into problems you can check for updates at:
http://technet.microsoft.com/office
If you do not find your answer in our online content, you can send an e-mail message to the Microsoft
Office System and Servers content team at:
[email protected]
If your question is about Microsoft Office products, and not about the content of this book, please
search the Microsoft Help and Support Center or the Microsoft Knowledge Base at:
http://support.microsoft.com
Page 12
1
Upgrading to SharePoint Server 2010
Welcome to the upgrade guide for Microsoft SharePoint Server 2010. The articles in this guide help you
plan for and perform an upgrade from Microsoft Office SharePoint Server 2007 to SharePoint Server
2010.
For a graphical overview of the upgrade process, and information about how to plan and test upgrade,
see the following upgrade models:
Upgrade planning (http://go.microsoft.com/fwlink/?LinkId=178376)
Upgrade approaches (http://go.microsoft.com/fwlink/?LinkId=178377)
Upgrade services (http://go.microsoft.com/fwlink/?LinkId=178379)
Test your upgrade process (http://go.microsoft.com/fwlink/?LinkId=178378)
In this guide:
About the upgrade process (SharePoint Server 2010)
Learn about what's new in upgrade and how the upgrade process works.
Plan and prepare for upgrade (SharePoint Server 2010)
Determine which approach you should take to upgrade to SharePoint Server 2010 and plan your
upgrade process.
Testing and troubleshooting upgrade (SharePoint Server 2010)
Learn how to test your upgrade process ahead of time to understand what issues you might face in
your actual upgrade, and determine the time and space you will need for upgrade. Also, learn how
to troubleshoot issues that come up during the actual upgrade.
Perform pre-upgrade steps (SharePoint Server 2010)
Find out what steps you need to take before upgrading, including information about how to run the
pre-upgrade checker.
Perform an in-place upgrade (SharePoint Server 2010)
Follow the steps in this section if you are upgrading in-place to SharePoint Server 2010. When you
upgrade in-place, you install SharePoint Server 2010 on the same hardware, and then upgrade the
content and settings on the server or server farm as part of a single process.
Perform a database attach upgrade to SharePoint Server 2010
Follow the steps in this section if you are using the database attach upgrade method to upgrade to
SharePoint Server 2010. When you use the database attach upgrade method, you upgrade the
content for the environment on a separate farm.
Perform post-upgrade steps (SharePoint Server 2010)
Find out how to tell whether upgrade was completed successfully and what steps you need to
perform after the upgrade to get your environment ready for users again.
Page 13
2
Upgrade from other versions or other products (http://technet.microsoft.com/library/74e1c006-11fa-
47f5-adf7-a598bb83bc12(Office.14).aspx)
Articles in this section contain information about how to upgrade to Microsoft SharePoint Server
2010 from related SharePoint products.
Migrate from forms-based authentication to claims-based authentication (SharePoint Server 2010)
(http://technet.microsoft.com/library/95a7fcfc-0b5e-46eb-acd4-2b1a910131c4(Office.14).aspx)
This article provides guidance to help you migrate existing Microsoft Office SharePoint Server 2007
Web applications, which were configured to use forms-based authentication, to work in a Microsoft
SharePoint Server 2010 environment as claims-based Web applications.
Migrate from classic-mode to claims-based authentication (SharePoint Server 2010)
(http://technet.microsoft.com/library/e3e3d0b8-8ba0-4495-8650-e2e9dfb5fa6a(Office.14).aspx)
The procedures in this article provide guidance to help you migrate existing Microsoft SharePoint
Server 2010 Web applications, which were configured to use classic-mode authentication, to use
claims-based authentication.
See Also
Using AAM URL redirection as part of the upgrade process (SharePoint Server 2010) (white paper)
Page 14
3
About the upgrade process (SharePoint Server 2010)
The first step in any upgrade process is to learn about the process itself so that you can plan and
prepare appropriately. This section of the upgrade guide contains articles that help you understand how
upgrade works and how the services in Microsoft Office SharePoint Server 2007 are affected when you
upgrade to Microsoft SharePoint Server 2010.
In this section:
What's new in upgrade (SharePoint Server 2010)
Find out about new requirements, approaches, and features that are available for upgrade to
Microsoft SharePoint Server 2010.
Upgrade process overview (SharePoint Server 2010)
Get a visual overview of the steps involved in each upgrade approach.
How search features are affected by upgrade (SharePoint Server 2010)
Learn what can and cannot be upgraded for Search in Office SharePoint Server 2007, and
understand additional steps that must be performed to upgrade Search to SharePoint Server 2010.
How other services are affected by upgrade (SharePoint Server 2010)
Office SharePoint Server 2007 included several shared services. The services model is different for
SharePoint Server 2010, which means that you must configure services that can be upgraded and
you must migrate data or information for the services that cannot be upgraded. Find out which
approach can upgrade which services and what steps that you must take before, during, and after
upgrade for your existing shared services.
About upgrading farms that share services (parent and child farms) (SharePoint Server 2010)
In Office SharePoint Server 2007, it was possible to configure parent farms and child farms to
share services. In such an environment, the parent farm hosts one or more Shared Services
Providers (SSPs) from which one or more child farms consume services. Learn how to approach
upgrading these environments.
Page 15
4
What's new in upgrade (SharePoint Server 2010)
Microsoft SharePoint Server 2010 has been designed for scale and performance and as such requires
new hardware and software requirements that are described in this article. These requirements apply to
both the in-place and the database attach upgrade approaches. For more information, see Determine
upgrade approach (SharePoint Server 2010).
In order to facilitate a predictable upgrade and minimize the impact of customization and environmental
issues that may prevent a successful upgrade, you can use the Windows PowerShelltest-
spcontentdatabase cmdlet, the new Visual Upgrade option, or the preupgradecheck Stsadm
operation.
In this article:
Upgrade requirements
Pre-upgrade checker
Windows PowerShell command to check databases before attaching
Visual Upgrade
Feature Upgrade
New options for reducing downtime during upgrade
Changes in key features between versions
Upgrade requirements Before you can perform an in-place upgrade or database attach upgrade to SharePoint Server 2010,
your existing Office SharePoint Server 2007 environment or new SharePoint Server 2010 environment
must meet the following minimum requirements.
For more information about general system requirements for SharePoint Server 2010, see
Hardware and software requirements (SharePoint Server 2010)
(http://technet.microsoft.com/library/4d88c402-24f2-449b-86a6-6e7afcfec0cd(Office.14).aspx.)
For more information about upgrade requirements, see Review system requirements for
upgrade (SharePoint Server 2010).
Hardware requirement: 64-bit
SharePoint Server 2010 can only run on a 64-bit edition of the Windows Server 2008 R2 or Windows
Server 2008 with SP2 operating system. If you plan an in-place upgrade, your Office SharePoint Server
2007 installation must be running in a 64-bit Windows Server 2008 environment. If your Office
Note:
Page 16
5
SharePoint Server 2007 installation is currently in a 32-bit environment, you cannot perform an in-place
upgrade on the existing server or server farm. You must install SharePoint Server 2010 on a different
server or farm that supports 64-bit applications, and then move your data to that server or farm by using
database attach upgrade.
To more easily discover and address any issues in the migration and upgrade processes, we
recommend that you do not combine the actions of migrating to a 64-bit environment and upgrading in-
place to SharePoint Server 2010. Because you must have a 64-bit environment to be able to upgrade in
place to SharePoint Server 2010, you must migrate to a 64-bit operating system before you perform an
in-place upgrade. If you are using a database attach upgrade, you can migrate to 64-bit as part of your
upgrade process.
Before you migrate to a 64-bit environment:
Update Office SharePoint Server 2007 to the same service pack or software update level on all
computers in the source farm.
Find out whether you have to recompile existing 32-bit applications and custom assemblies — for
example, Web Parts and event receivers — to run in the 64-bit environment. (Some applications
can run in both environments and do not have to be recompiled.) If the existing applications are
third-party applications, check with the third-party vendor about 64-bit versions and compatibility.
For more information about how to plan and perform a migration to a 64-bit environment, see the article
Migrate an existing server Farm to a 64-bit environment (Office SharePoint Server 2007)
(http://go.microsoft.com/fwlink/?LinkId=155576) on TechNet
Operating system requirement: Windows Server 2008 or Windows Server 2008 R2
SharePoint Server 2010 must be run on a 64-bit edition of Windows Server 2008 R2 or Windows
Server 2008 with Service Pack 2 (SP2). If you are currently running Office SharePoint Server 2007 on
Windows Server 2003 and intend to upgrade to SharePoint Server 2010, you must plan to have a
sufficient number of Windows Server licenses for the deployment on the newer operating system.
To more easily discover and address any issues in the migration and upgrade processes, we
recommend that you do not combine the actions of upgrading or migrating to Windows Server 2008 or
Windows Server 2008 R2 with the process of upgrading to SharePoint Server 2010. You can combine
migration to 64-bit hardware with migration to Windows Server 2008 or Windows Server 2008 R2.
If you are already running 64-bit hardware, you can upgrade from Windows Server 2003 to
Windows Server 2008 or Windows Server 2008 R2. For more information about how to perform an
in-place upgrade to Windows Server 2008, see the article Upgrading to Windows Server 2008 for
Windows SharePoint Services 3.0 with SP1 (http://go.microsoft.com/fwlink/?LinkId=155575) on
TechNet If you are migrating to 64-bit hardware, take the opportunity to also migrate to Windows
Server 2008 or Windows Server 2008 R2 at the same time. For more information about how to
install Windows Server 2008 on Windows Server 2008, see the article Deploy a simple farm on the
Windows Server 2008 Operating System (Office SharePoint Server)
(http://go.microsoft.com/fwlink/?LinkID=145932) on TechNet.
Page 17
6
Database requirement: 64-bit SQL Server 2005 SP3 or SQL Server 2008 SP1
SharePoint Server 2010 requires that its database server must be a 64-bit version of one of the
following: Microsoft SQL Server 2008 R2, SQL Server 2008 with Service Pack 1 (SP1) and Cumulative
Update 2, or SQL Server 2005 with SP3 and Cumulative Update 3. If your current Office SharePoint
Server 2007 installation uses SQL Server 2000, you must upgrade to one of these versions before you
can upgrade to SharePoint Server 2010.
To more easily discover and address any issues in the migration and upgrade processes, we
recommend that you do not combine the actions of migrating to 64-bit SQL Server with the process of
upgrading to SharePoint Server 2010. You can combine the migration to 64-bit SQL Server with the
overall process of migration to 64-bit hardware.
If you are combining the migration to SQL Server 2005 SP3 or SQL Server 2008 on 64-bit
hardware with an overall migration to a 64-bit environment, follow the guidance about how to
migrate to a 64-bit environment earlier in this article.
For more information about how to migrate all databases, see the article Move all databases (Office
SharePoint Server 2007) (http://go.microsoft.com/fwlink/?LinkId=159761) on TechNet.
If you already have 64-bit hardware, but have to upgrade to SQL Server 2005 SP3 or SQL Server
2008, follow the guidance in the SQL Server documentation.
Pre-upgrade checker The pre-upgrade checker is a command-line tool that you run in a Office SharePoint Server 2007
environment to find any potential issues for upgrade and to review recommendations and best
practices.
STSADM.exe –o preupgradecheck
By using the pre-upgrade checker, you can find information such as the following:
A list of all servers and components in the farm, and whether the servers meet the following
requirements for upgrading: 64-bit hardware and the Windows Server 2008 operating system.
The alternate access mapping URLs that are being used in the farm.
A list of all site definitions, site templates, features, and language packs that are installed in the
farm.
Whether there are customizations in the farm that are not supported (such as database schema
modifications).
Whether there are any database or site orphans in the farm.
Whether there are missing or invalid configuration settings in the farm (such as a missing
Web.config file, invalid host names, or invalid service accounts).
Whether the databases meet the requirements for upgrade — for example, databases are set to
read/write, and any databases and site collections that are stored in Windows Internal Database
are not larger than 4 GB.
Page 18
7
The pre-upgrade checker is available with Office SharePoint Server 2007 Service Pack 2 and has been
updated in the October 2009 Cumulative Update for Windows SharePoint Services 3.0 and Office
SharePoint Server 2007. You can download and install the October 2009 Cumulative Update from
October 2009 Cumulative Update Packages for SharePoint Server 2007 and Windows SharePoint
Services 3.0 are published (http://go.microsoft.com/fwlink/?LinkID=169179). For more information about
how to use the pre-upgrade checker, see the following articles on TechNet:
Preupgradecheck: Stsadm operation (Office SharePoint Server)
(http://go.microsoft.com/fwlink/?LinkID=149848)
Pre-upgrade scanning and reporting for future releases (Office SharePoint Server)
(http://go.microsoft.com/fwlink/?LinkID=148375)
Run the pre-upgrade checker (SharePoint Server 2010)
Windows PowerShell command to check databases before attaching You can use the Windows PowerShell cmdlet test-spcontentdatabase before you attach a content
database to SharePoint Server 2010 to determine whether any server-side customizations are missing
from the environment. For more information, see Attach databases and upgrade to SharePoint Server
2010 and Test-SPContentDatabase (http://technet.microsoft.com/library/ed095a0a-fa1a-4323-8503-
624f0e09707d(Office.14).aspx).
Visual Upgrade A new feature that is available with upgrade allows the server administrator or site owner to determine
when and if the new look for SharePoint Server 2010 is used for a particular site collection. Server
administrators can choose to adopt the new look and feel for all sites during upgrade, let site owners
make the choice after upgrade, or keep the old look and feel for all sites.
If the server administrator lets the site owners decide, after a site is upgraded by using an in-place
upgrade, a preview option is available in the site user interface. This option provides a preview of the
SharePoint Server 2010 look for the site:
If the owner likes how the site looks and functions, the owner can accept the visual upgrade.
If the owner wants the site to keep the old look and feel, the owner can revert to the Office
SharePoint Server 2007 look.
By default, the Office SharePoint Server 2007 look is retained. For more information, see Plan visual
upgrade (SharePoint Server 2010).
Feature Upgrade SharePoint Foundation 2010 provides new members and types that make it possible for you to upgrade
custom Features through versioning and declarative upgrade actions. You can update any Features
Page 19
8
you created for Office SharePoint Server 2007 to work with SharePoint Server 2010 by using these
members. For more information, see Upgrading Features
(http://go.microsoft.com/fwlink/?LinkId=188458&clcid=0x409).
New options for reducing downtime during upgrade Depending on the environment and the complexity and number of SharePoint sites, the upgrade
process can take a long time. To reduce downtime during this process, SharePoint Server 2010
supports the following options:
Upgrade multiple databases at the same time (parallel upgrade) When you upgrade to
SharePoint Server 2010, you can manually initiate upgrade for multiple databases at the same time
by using the detach databases hybrid approach for upgrade. In Office SharePoint Server 2007, only
one upgrade process could run at a time, so that each database needed to be processed
sequentially. There is a performance impact when you run the upgrade on multiple databases
instead of on a single database, but it may be faster to upgrade multiple databases at the same
time than to upgrade them sequentially. The number of databases that can be upgraded in parallel
will depend on the hardware in your environment and on the structure of the content within the
databases. For more information, see Roadmap for in-place upgrade with detached databases
(SharePoint Server 2010).
Use read-only databases to provide continuous access to data If you perform a database
attach upgrade — and if you set the original databases to read-only mode — the old farm can
continue to serve content to users while you upgrade a copy of the databases on a new farm. If you
do this, users can continue to access the data, although they cannot add new data or update the
data. When the new farm is ready and all content has been successfully upgraded, users can be
switched over to the new live farm.
For more information about read-only databases, see the article Run a farm that uses read-only
databases (Office SharePoint Server) (http://go.microsoft.com/fwlink/?LinkID=148373).
For more information about these techniques to reduce downtime, see the article Determine upgrade
approach (SharePoint Server 2010).
Changes in key features between versions SharePoint Server 2010 has a new architecture and includes many new capabilities. The following
tables list some of the key changes to terminology and features that immediately affect the
administration and site management process after upgrading. For more information, see Evaluation
guide for SharePoint Server 2010 (white paper) (http://technet.microsoft.com/library/7bf1551b-bb75-
4f19-8aad-c1910a171871(Office.14).aspx).
Page 20
9
Concept, term, or feature New or changed Comments
Pre-upgrade checker New The pre-upgrade checker is an Stsadm command-line
operation that you run in an Office SharePoint Server
2007 environment to find any potential issues for
upgrade and to review recommendations and best
practices.
Unlike the pre-upgrade scan tool (Prescan.exe) that
was used when upgrading to Office SharePoint
Server 2007, the pre-upgrade checker does not make
any changes to your environment. For more
information, see Run the pre-upgrade checker
(SharePoint Server 2010).
SharePoint Central
Administration Web site
Changed The Central Administration Web site has been
redesigned with such new available options and
functionality as the following:
The ribbon makes it easier for you to view or
change details about a Web application by
supplying all the options on the same page. For
more information about Web applications, see
Web applications management (SharePoint
Server 2010)
(http://technet.microsoft.com/library/1ad49d4e-
598d-446c-aabd-de4a8f6ad391(Office.14).aspx).
Configuration Wizards have been added to make
the configuration process easier by guiding you
through the steps to configure the server farm.
For more information, see Deploy a single server
with SQL Server (SharePoint Server 2010)
(http://technet.microsoft.com/library/356d3a0b-
fc26-455c-9afb-6d2ffdceef84(Office.14).aspx).
You can now perform a backup from the Backup
and Restore page. For more information, see
Backup (SharePoint Server 2010)
(http://technet.microsoft.com/library/79d47308-
a90a-4c51-a1ae-93567e978236(Office.14).aspx).
You now use the Central Administration Web site to
manage services, instead using a separate
administration site.
Page 21
10
Concept, term, or feature New or changed Comments
Ribbon New The ribbon user interface has been introduced to
ensure a consistent user experience and to make it
easier for you to work with SharePoint sites. The
ribbon is contextual so that you only see the options
that are relevant to the tasks that you want to
perform. The ribbon is also customizable.
Service applications New New services architecture allows you to effectively
manage and centralize services. Individual services
can be configured independently and third-party
companies can add services to the platform. For more
information, see Configure services (SharePoint
Server 2010)
(http://technet.microsoft.com/library/2258fc12-68ad-
4175-9735-812768a80093(Office.14).aspx).
Master pages Changed A site owner can now apply branding to their site,
independent of other sites, and administrators can
specify whether the system pages in the _Layouts
folder are rendered by using the site master pages
provided by site owners or by default master pages
available across the system. Also, it is possible to use
Windows PowerShell to specify a customer master
page to system error pages, login pages, confirmation
pages, and other non-site-specific pages.
Themes Changed SharePoint Server 2010 has changed the way
themes work, making them easier to customize. You
can import Microsoft PowerPoint 2010 themes directly
into SharePoint Server 2010. Additionally, themes
can now be applied to all subsites from this interface.
For more information, see Plan for using themes
(SharePoint Server 2010)
(http://technet.microsoft.com/library/bab1595f-4a73-
4f46-be9f-831c46ae4805(Office.14).aspx).
Business Connectivity
Services (BCS)
New Business Connectivity Services (BCS) builds on the
Business Data Catalog functionality available in the
previous product version to provide access to external
systems from SharePoint-based solutions. BCS
supports interacting with external systems using
SharePoint lists and Web Parts, and also supports
Page 22
11
Concept, term, or feature New or changed Comments
interacting with data from rich Office clients. For more
information, see Business Connectivity Services
overview (SharePoint Server 2010)
(http://technet.microsoft.com/library/02f10b70-d634-
41ae-914e-5de337c8b408(Office.14).aspx).
Claims-based
authentication
New Claims-based authentication is a new, more powerful
and flexible authentication model that works with any
corporate identity system, including Active Directory
Domain Services (AD DS), LDAP-based directories,
application-specific databases, and new user-centric
identity models such as LiveID. For more information,
see Configure forms-based authentication for a
claims-based Web application (SharePoint Server
2010).
Throttling and list controls New Throttling and list controls are two new performance
controls. Throttling provides a way to control server
resources and is designed so that the server can be
protected from overload during peak business hours.
SharePoint Server 2010 also provides several
different settings that will restrict the queries that can
be run against a large list. These settings can be
configured for each Web application.
SharePoint Designer Changed SharePoint Server 2010 gives administrators added
control over how SharePoint Designer is used in each
Web application; for example, administrators control
whether site administrators are allowed to customize
master pages and layout pages, and whether site
administrators can manage the URL structure of their
site.
Developer dashboard New This is a new addition to server diagnostics and
displays detailed information for each page load and
therefore helps troubleshoot performance issues.
Sandboxed solutions New You can now enable site administrators to upload
custom user code by using sandboxed solutions. For
more information, see Plan for sandboxed solutions
(SharePoint Server 2010)
(http://technet.microsoft.com/library/9a96fa5e-2361-
4b81-a0ca-fc4d0513cbf4(Office.14).aspx).
Page 23
12
Upgrade process overview (SharePoint Server 2010)
You can choose between two basic upgrade approaches when you upgrade from Microsoft Office
SharePoint Server 2007 to Microsoft SharePoint Server 2010: in-place upgrade and database attach
upgrade. An in-place upgrade is used to upgrade all Microsoft SharePoint sites on the same hardware.
A database attach upgrade enables you to move your content to a new farm or new hardware. You can
also combine these two types of upgrade in hybrid approaches that reduce downtime during an
upgrade.
For more information about these approaches, see Determine upgrade approach (SharePoint Server
2010).
This article helps you understand the steps that are involved in performing upgrades by using these
approaches so that you can plan your upgrade process. For detailed information about how to use one
of these upgrade processes, see the following topics:
Upgrade in place to SharePoint Server 2010
Attach databases and upgrade to SharePoint Server 2010
In this article:
In-place upgrade
Database attach upgrade
Hybrid approach 1: Read-only databases
Hybrid approach 2: Detach databases
It is important that the server administrator communicate with site owners and users about what
to expect during an upgrade. The administrator should inform them about downtime and the
risk that the upgrade may take longer than expected or that some sites may need some rework
after upgrade. For more information, see Create a communication plan (SharePoint Server
2010).
In-place upgrade An in-place upgrade takes place on the same hardware as your previous version installation. When you
run an in-place upgrade, the process upgrades the complete installation in a fixed order.
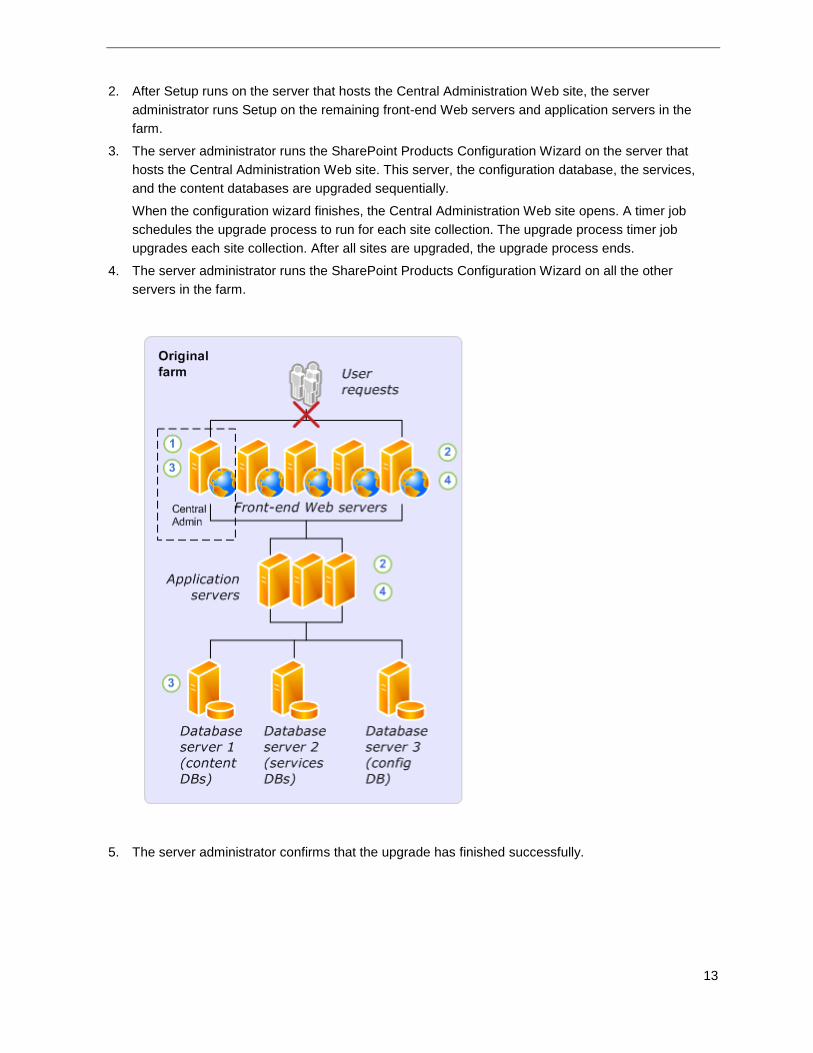
The following steps explain what happens as the in-place upgrade process runs:
1. After the server administrator performs all pre-upgrade steps, the administrator runs Setup for
SharePoint Server 2010 on the server that runs the SharePoint Central Administration Web site.
Because the previous version was installed, an in-place upgrade is automatically selected.
Important:
Page 24
13
2. After Setup runs on the server that hosts the Central Administration Web site, the server
administrator runs Setup on the remaining front-end Web servers and application servers in the
farm.
3. The server administrator runs the SharePoint Products Configuration Wizard on the server that
hosts the Central Administration Web site. This server, the configuration database, the services,
and the content databases are upgraded sequentially.
When the configuration wizard finishes, the Central Administration Web site opens. A timer job
schedules the upgrade process to run for each site collection. The upgrade process timer job
upgrades each site collection. After all sites are upgraded, the upgrade process ends.
4. The server administrator runs the SharePoint Products Configuration Wizard on all the other
servers in the farm.
5. The server administrator confirms that the upgrade has finished successfully.
Page 25
14
6. If Visual Upgrade is being used, the server administrator or site owner previews sites in the
Microsoft SharePoint Server 2010 look. When the administrator or site owner is ready, he or she
completes the change to the SharePoint Server 2010 look.
Database attach upgrade A database attach upgrade enables you to move to new hardware or a new farm. During a database
attach upgrade, you detach all the content databases from an existing farm and then attach the
databases to a new server farm installation. When you attach the databases to the new server farm, the
upgrade process runs and upgrades the data in place.
The following steps explain what happens during a database attach upgrade:
1. The server administrator sets up and configures a new SharePoint Server 2010 farm. The
administrator transfers all customizations to the new farm and tests the environment.
For more information about how to configure the new environment, see Prepare the new
SharePoint Server 2010 environment for a database attach upgrade.
2. The server administrator detaches the content databases from the old Office SharePoint Server
2007 farm and takes the old farm offline (for example, by changing the load balancer or IIS Web
applications to stop service requests, or by turning off all the components and services on each
server computer in the farm).
3. The server administrator attaches the content databases to the new farm and upgrades the
content.
Page 26
15
4. The server administrator confirms that the upgrade has finished successfully and then configures
the new farm to start serving requests at the new URL.
Hybrid approach 1: Read-only databases This approach gives users continuous read-only access to their data while you upgrade. The content
databases in the original farm are set to read-only, and copies of the databases are upgraded on a new
farm.
The following steps explain what happens during a database attach upgrade with read-only databases:
1. The server administrator sets up and configures a new SharePoint Server 2010 farm. The
administrator transfers all customizations to the new farm and tests the environment.
Page 27
16
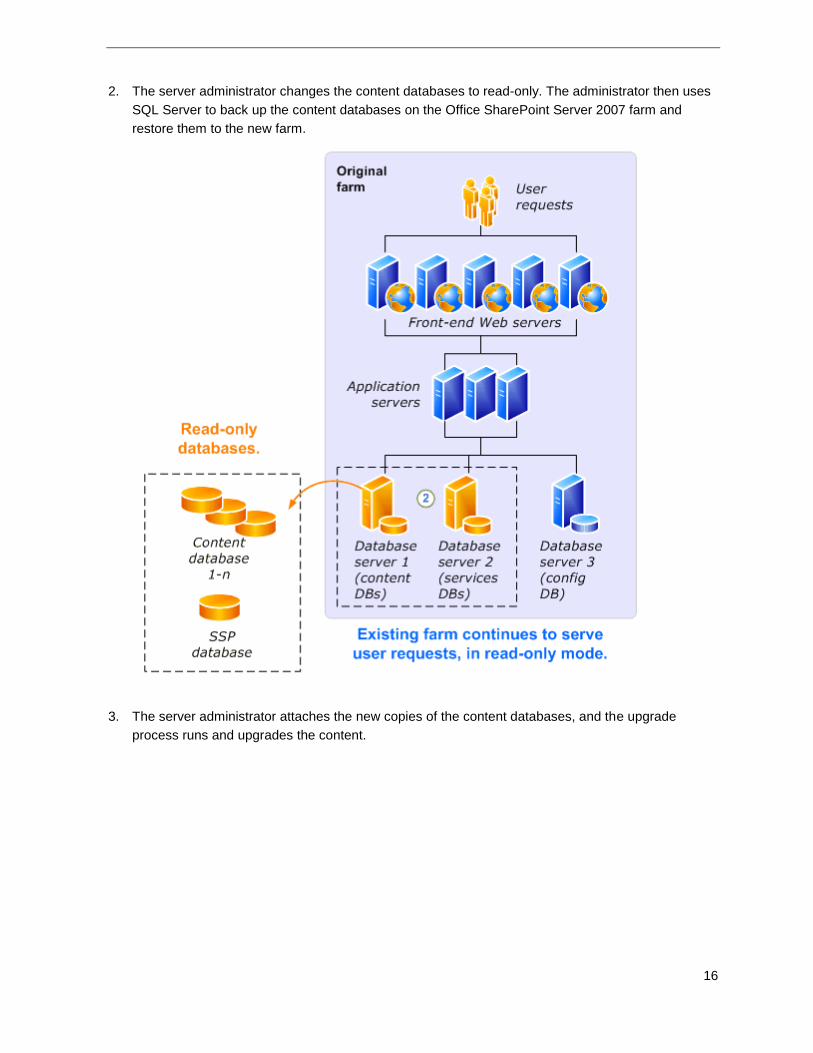
2. The server administrator changes the content databases to read-only. The administrator then uses
SQL Server to back up the content databases on the Office SharePoint Server 2007 farm and
restore them to the new farm.
3. The server administrator attaches the new copies of the content databases, and the upgrade
process runs and upgrades the content.
Page 28
17
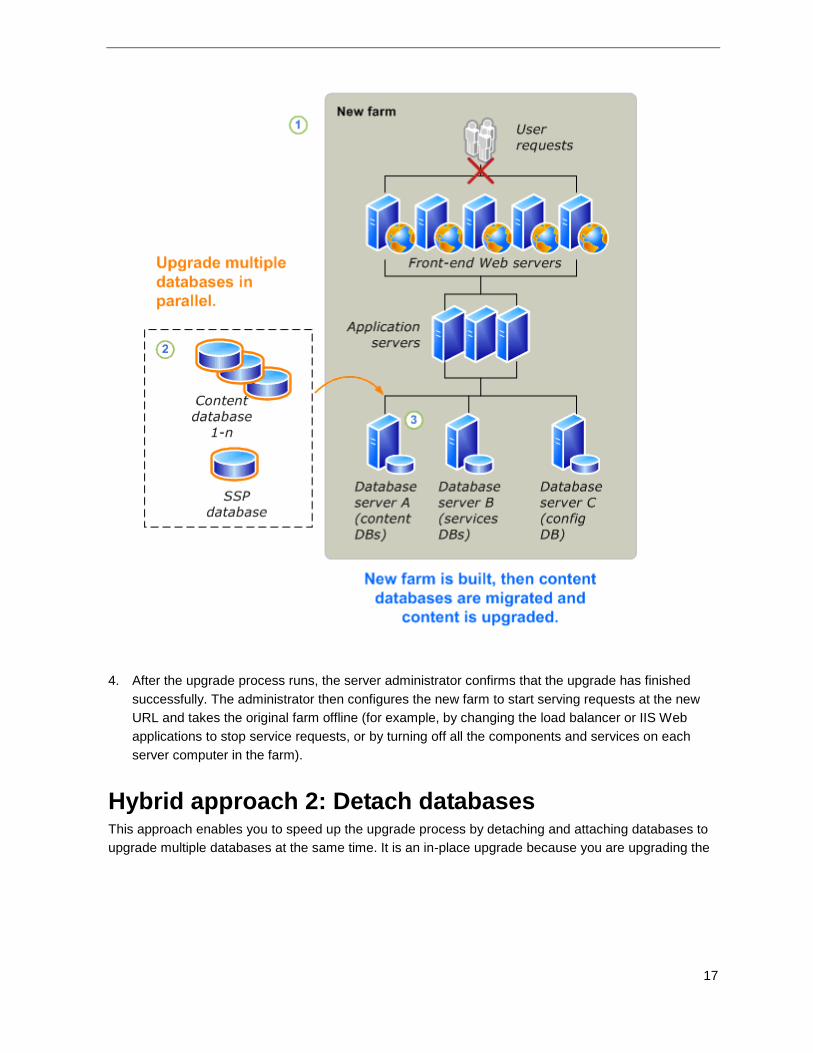
4. After the upgrade process runs, the server administrator confirms that the upgrade has finished
successfully. The administrator then configures the new farm to start serving requests at the new
URL and takes the original farm offline (for example, by changing the load balancer or IIS Web
applications to stop service requests, or by turning off all the components and services on each
server computer in the farm).
Hybrid approach 2: Detach databases This approach enables you to speed up the upgrade process by detaching and attaching databases to
upgrade multiple databases at the same time. It is an in-place upgrade because you are upgrading the
Page 29
18
original farm; however, you can also use another farm to perform the upgrade and then attach the
upgraded databases to your original farm. Note that the original farm cannot serve requests during the
upgrade process. As in a standard in-place upgrade, users cannot access their content while the
upgrade is in progress.
The following steps explain what happens during an in-place upgrade with detached databases:
1. The server administrator takes the original farm offline (for example, by changing the load balancer
or IIS Web applications to stop service requests, or by turning off all of the components and
services on each server computer in the farm).
2. The server administrator detaches the content databases from the original farm.
3. The server administrator runs an in-place upgrade on the original farm servers, services, and
configuration database.
4. The server administrator attaches the content databases to the original farm and upgrades the
content.
Page 30
19
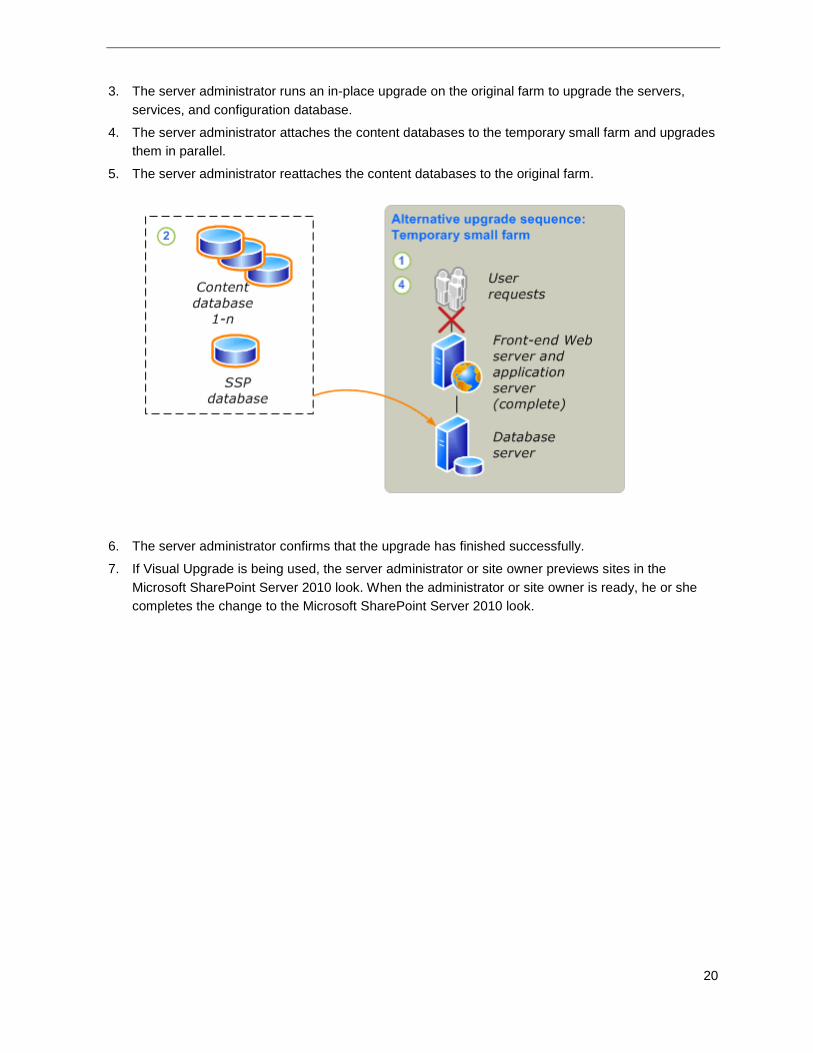
Alternatively, you can use a separate, temporary small farm to perform the upgrade. In this approach,
you attach the databases to the original farm after they have been upgraded.
The following steps explain what happens during an in-place upgrade with detached databases and a
temporary small farm to upgrade the content databases:
1. The server administrator sets up a temporary small farm that is running the new version. Then the
administrator takes the original farm offline (for example, by changing the load balancer or IIS Web
applications to stop service requests, or by turning off all the components and services on each
server computer in the farm).
2. The server administrator detaches the content databases from the original farm.
Page 31
20
3. The server administrator runs an in-place upgrade on the original farm to upgrade the servers,
services, and configuration database.
4. The server administrator attaches the content databases to the temporary small farm and upgrades
them in parallel.
5. The server administrator reattaches the content databases to the original farm.
6. The server administrator confirms that the upgrade has finished successfully.
7. If Visual Upgrade is being used, the server administrator or site owner previews sites in the
Microsoft SharePoint Server 2010 look. When the administrator or site owner is ready, he or she
completes the change to the Microsoft SharePoint Server 2010 look.
Page 32
21
How search features are affected by upgrade (SharePoint Server 2010)
When you upgrade from Microsoft Office SharePoint Server 2007 to Microsoft SharePoint Server 2010,
several aspects of the search system are affected. The following articles describe effects of product
upgrade on the search system:
How search system architecture is affected by upgrade (SharePoint Server 2010)
(http://technet.microsoft.com/library/d2827517-8394-4326-8f2d-c119d2681ba8(Office.14).aspx)
This article describes how the following features or functions are affected by upgrade:
Search service
Search service configuration dependencies
Databases
Crawling
Serving queries
Content index
Propagation of content index
Shared Services Provider (SSP) and Search service application naming
How Search Center sites are affected by upgrade (SharePoint Server 2010)
(http://technet.microsoft.com/library/6751ccb3-98a6-4630-9968-88d444e793e4(Office.14).aspx)
Search Center sites that an administrator creates in SharePoint Server 2010 have a new look
compared to the look of sites created in Office SharePoint Server 2007. During product upgrade, a
server administrator can upgrade old sites to the new look. After upgrade, site owners can upgrade
old sites one at a time.
Page 33
22
How other services are affected by upgrade (SharePoint Server 2010)
When you upgrade from Microsoft Office SharePoint Server 2007 to Microsoft SharePoint Server 2010,
you have the opportunity to take advantage of new features and new configuration options. In
SharePoint Server 2010, the services infrastructure has been updated to give you more flexibility in how
you configure services, and there are many more services than were available in Office SharePoint
Server 2007. Because of this architectural change, upgrading your services data requires planning and
thought beforehand. You need to understand the new services infrastructure, how services upgrade
works, and the considerations to think about for specific services that you want to upgrade to the new
version.
In this article:
Updated services infrastructure for SharePoint Server 2010
In-place upgrade with services
Database attach upgrade with services
Considerations for specific services
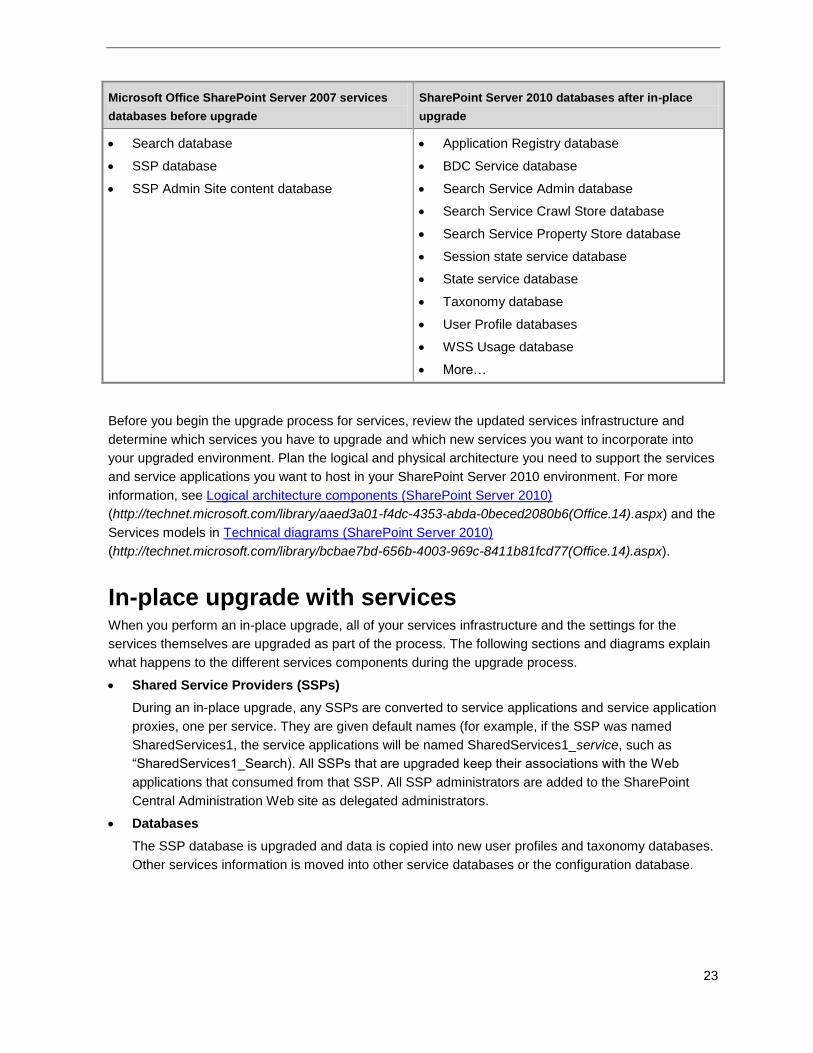
Updated services infrastructure for SharePoint Server 2010 In SharePoint Server 2010, services are no longer contained in a Shared Services Provider (SSP).
Instead, the infrastructure for hosting services moves into Microsoft SharePoint Foundation 2010 and
the configuration of service offerings is much more flexible. Individual services can be configured
independently, and third-party companies can add services to the platform. Many services that stored
data in the SSP database have their own databases — in some cases, several databases. When you
enable new services, new databases are also created to store the data for those services. The following
table lists services databases in your pre-upgrade and post-upgrade environments. This list is only an
example. The list of databases will vary depending on which services are enabled in your environment.
Page 34
23
Microsoft Office SharePoint Server 2007 services
databases before upgrade
SharePoint Server 2010 databases after in-place
upgrade
Search database
SSP database
SSP Admin Site content database
Application Registry database
BDC Service database
Search Service Admin database
Search Service Crawl Store database
Search Service Property Store database
Session state service database
State service database
Taxonomy database
User Profile databases
WSS Usage database
More…
Before you begin the upgrade process for services, review the updated services infrastructure and
determine which services you have to upgrade and which new services you want to incorporate into
your upgraded environment. Plan the logical and physical architecture you need to support the services
and service applications you want to host in your SharePoint Server 2010 environment. For more
information, see Logical architecture components (SharePoint Server 2010)
(http://technet.microsoft.com/library/aaed3a01-f4dc-4353-abda-0beced2080b6(Office.14).aspx) and the
Services models in Technical diagrams (SharePoint Server 2010)
(http://technet.microsoft.com/library/bcbae7bd-656b-4003-969c-8411b81fcd77(Office.14).aspx).
In-place upgrade with services When you perform an in-place upgrade, all of your services infrastructure and the settings for the
services themselves are upgraded as part of the process. The following sections and diagrams explain
what happens to the different services components during the upgrade process.
Shared Service Providers (SSPs)
During an in-place upgrade, any SSPs are converted to service applications and service application
proxies, one per service. They are given default names (for example, if the SSP was named
SharedServices1, the service applications will be named SharedServices1_service, such as
―SharedServices1_Search). All SSPs that are upgraded keep their associations with the Web
applications that consumed from that SSP. All SSP administrators are added to the SharePoint
Central Administration Web site as delegated administrators.
Databases
The SSP database is upgraded and data is copied into new user profiles and taxonomy databases.
Other services information is moved into other service databases or the configuration database.
Page 35
24
Sites
The SSP Admin site is upgraded as a mostly blank site except for the Business Data Catalog
profile pages. The site can be deleted after upgrade if it is not needed for Business Data Catalog
pages.
Before in-place upgrade
Collect any settings that must be reapplied, such as scheduled timer job settings.
Review your services architecture and determine what, if any, changes to make after upgrade.
For detailed information about steps to perform before you begin an in-place upgrade, see Upgrade in
place to SharePoint Server 2010.
During in-place upgrade
If you have a single SSP, all proxies for service applications are added to the default proxy group. The
following diagrams show the changes to your farm that are made during in-place upgrade.
Page 36
25
Services infrastructure before upgrade:
Page 37
26
Services infrastructure after upgrade:
Page 38
27
If you have multiple SSPs, they will all be upgraded together, and you will have multiple proxy groups
after the upgrade. The following diagrams show the changes to your farm that are made during in-place
upgrade.
Services infrastructure before upgrade:
Page 39
28
Services infrastructure after upgrade:
Page 40
29
For more information and detailed steps for performing an in-place upgrade, see Upgrade in place to
SharePoint Server 2010.
After in-place upgrade
Configure new and upgraded services
Many new services are available in SharePoint Server 2010. You can enable these new services
after you perform an in-place upgrade.
You must create service applications to host any new services. You can use the Farm
Configuration Wizard to quickly select and enable several new services in your farm, or you can
configure the services manually.
You can also add proxies for any service applications that you want to use with different Web
applications.
For Profile Services, upgrade any taxonomy data manually.
For Excel Services, provision a new unattended service account for the Secure Store Service.
For Business Data Catalog, consider migrating the Business Data Catalog profile pages to a new
location.
For detailed information about post-upgrade steps for services, see Perform post-upgrade steps for an
in-place upgrade (SharePoint Server 2010).
Database attach upgrade with services Most services settings will need to be reconfigured when you upgrade via database attach. When you
move your databases to a new farm and upgrade the content, you must create your services
infrastracture in the new farm, and configure the services appropriately for your new farm and new
version. You can attach the SSP databases from your old farm, but only the profile information in that
database will be upgraded — any search information or other services settings will not be upgraded.
You cannot upgrade Search databases by using the database attach upgrade approach.
If you are using the database attach approach for upgrading to SharePoint Server 2010, there are
several steps to perform before, during, and after the upgrade to successfully reconfigure the services
infrastructure.
Before database attach upgrade
When you configure the new farm, you must also configure the new service applications and
service application proxies for the farm, and configure the settings for all services that you want to
use.
If you are using Profile Services, and you have taxonomy data in your database, configure the
Managed Metadata service before you upgrade. That way, you can upgrade any taxonomy data
from the shared services database when you attach that database.
Page 41
30
For InfoPath Forms Services, export any administrator-deployed form templates (.xsn files) and
data connection files (.udcx files) from your Office SharePoint Server 2007 farm by using the
following command:
Stsadm.exe -o exportipfsadminobjects -filename<path to export CAB>
For InfoPath Forms Services, import any administrator-deployed form templates and data
connection files to your new farm before you attach the content databases. Use the Import-
SPIPAdministrationFilesWindows PowerShell cmdlet to import the forms.
For more information about how to configure your new environment before you perform a database
attach upgrade, see Prepare the new SharePoint Server 2010 environment for a database attach
upgrade.
During database attach upgrade
When you attach and upgrade the content databases, you also attach and upgrade the SSP database,
which upgrades the profile information in the database. The following table provides an example of the
services databases that exist before and after upgrade.
Microsoft Office SharePoint Server 2007 services
databases that can be upgraded by using the
database attach approach
SharePoint Server 2010 databases after a database
attach upgrade
SSP database SSP database
Only contains user profile data, no search or
other services data. Note that the name does
not change during a database attach upgrade.
Taxonomy database
If the Managed Metadata service was
configured before upgrading, and if taxonomy
data existed in the SSP database, this
database contains that data.
For more information and procedures for performing a database attach upgrade, see Attach databases
and upgrade to SharePoint Server 2010.
After database attach upgrade
Reapply administrator permissions for services. By default, farm administrators have permissions to
all services when you perform a database attach upgrade.
For Excel Services, you must provision a new unattended service account that uses the Secure
Store Service to interact with Excel Services.
Page 42
31
For InfoPath Forms Services, update any links that are used in the upgraded form templates by
using the Update-SPInfoPathAdminFileURLWindows PowerShell cmdlet.
For Profile Services, upgrade any taxonomy data. You use the Move-
SPProfileManagedMetadataPropertyWindows PowerShell cmdlet to upgrade profile taxonomy
data manually to the Taxonomy database and reconnect the data to the Managed Metadata and
User Profiles service applications. The User Profiles service and Managed Metadata service must
be in the same proxy group to upgrade and use the data.
For Business Data Catalog, consider migrating the Business Data Catalog profile pages to a new
location.
For detailed information about post-upgrade steps for services, see Perform post-upgrade steps for a
database attach upgrade (SharePoint Server 2010).
Considerations for specific services The following services were available in Office SharePoint Server 2007 and can be upgraded to
SharePoint Server 2010. Changes in the services infrastructure mean that there are additional things to
consider when planning and performing an upgrade for an environment where these services are
present.
User profiles
Services
Two services are now used for user profiles and taxonomy information: the User Profile service and
the Managed Metadata service. During in-place upgrade, these two services are automatically
enabled and configured. If you are using the database attach upgrade approach, you can enable
and configure the Managed Matadata service before you upgrade the User Profile service to
upgrade the taxonomy data as part of the upgrade.
Databases
During in-place upgrade, user profile data from Office SharePoint Server 2007 is upgraded
from the SSP database into a new user profile database. Any taxonomy data is upgraded, and
you can copy the taxonomy data into a Taxonomy database for use by the Managed Metadata
service after upgrade is complete by using the Move-
SPProfileManagedMetadataPropertyWindows PowerShell cmdlet.
During a database attach upgrade, user profile and taxonomy data from the SSP database is
upgraded when the SSP database is attached, but the database is not copied and renamed.
You can copy the taxonomy data into a Taxonomy database for use by the Managed Metadata
service after upgrade is complete by using the Move-
SPProfileManagedMetadataPropertyWindows PowerShell cmdlet.
Any scheduled timer jobs will need to be reconfigured after upgrade. During upgrade, they are set
back to their default times. Be sure to record your timer job schedules before upgrade so you can
reapply the times.
Page 43
32
Persisted properties that relate to the profiles (such as the MySite Host URL) are preserved during
an in-place upgrade, but are not upgraded when you use database attach because they are stored
in the configuration database, not the services database.
The following properties are preserved during in-place upgrade, but not during a database attach
upgrade:
MySiteHostURL
SearchCenterURL
EnablePersonalFeaturesforMultipleDeployments
ProfileStoreLanguage
ProfileStoreLanguagePacksApplied
ProfileStoreCollationID
DaysWorthOfEventsToKeep
My Site Web sites
Upgrade the My Site host at the same time that you upgrade the profile services. You do not need to
upgrade the My Site Web sites themselves at the same time. For best results, upgrade My Site Web
sites (or at least the My Site host) at the same time as your main intranet site.
Office SharePoint Server Search
Before you perform an in-place upgrade, you should review and adjust your Search topology after
upgrade to suit the new recommendations and requirements. For more information, see Plan search
(Office SharePoint Server) (http://technet.microsoft.com/en-us/library/cc263400.aspx) and the Search
models in Technical diagrams (SharePoint Server 2010) (http://technet.microsoft.com/library/bcbae7bd-
656b-4003-969c-8411b81fcd77(Office.14).aspx).
You cannot upgrade search data by using the database attach method for upgrading. If you are using
database attach upgrade, you must configure Search in your new farm separately from (either before or
after) you upgrade your other content.
Service applications
During upgrade, for each SSP that hosts the Search service in your Office SharePoint Server 2007
farm, a new service application is created in your SharePoint Server 2010 farm.
The application server that was serving as the index server becomes the crawl component on the
same server.
Any query servers become query components on the same servers, all in the same index partition.
Databases
In SharePoint Server 2010, the Search service uses three databases:
Search administration database (new): contains Search administration settings that were stored
in the SSP database in Office SharePoint Server 2007.
Page 44
33
Search Service Crawl Store database (new): contains crawl history information that was stored
in the SSP database in Office SharePoint Server 2007.
Search Service Property Store database (reused Search database): contains the metadata for
search.
Index files
Before upgrade, index files are stored on the index server and the query servers. After upgrade,
only servers that have query components will store index files.
Upgrade will be faster if you scale down to one query server before you upgrade. With only one
server, there is less data to copy. You can scale out again after upgrade to multiple mirrored
query components.
Windows SharePoint Services Search
The Windows SharePoint Services Search service has been re-architected in SharePoint Server 2010.
During an in-place upgrade, the Windows SharePoint Services Search service is stopped and
reprovisioned. Windows SharePoint Services Search stores index files on the application server in
Office SharePoint Server 2007 and also has a database (WSS_Search, one per server in your farm).
During an in-place upgrade, the database is restructured and reused. The old data is not kept and is not
upgraded.
InfoPath Forms Services
When you upgrade by using the database attach upgrade approach, you must export any administrator-
deployed form templates (.xsn files) and data connection files (.udcx files) before you perform the
database attach, and then import them to the new farm by using the Export-
SPInfoPathAdministrationFilesWindows PowerShell cmdlet. If the URL of the new server differs from
the URL of the previous server, you can run the Update-SPInfoPathAdminFileUrlWindows
PowerShell cmdlet to update links that are used in the upgraded form templates.
For more information about how to upgrade forms and form templates, see Plan to upgrade form
templates during an upgrade to SharePoint Server 2010.
Excel Services
Excel Services remains a local service for SharePoint Server 2010 — this means that you need to
run the service in the same farm that consumes it.
For in-place upgrade, any configuration information stored in the SSP database for Excel Services
is upgraded and moved into the configuration database. For the database attach upgrade
approach, you must reconfigure Excel Services in your new farm.
After upgrade (either in-place or database attach), you must provision a new unattended service
account that uses the Secure Store Service to interact with Excel Services.
Tip:
Page 45
34
Business Data Catalog
During an in-place upgrade, data that was stored in the SSP database is moved and upgraded to a
separate database. New service applications are created for the SharePoint Server 2010 service. A
new service, the Application Registry Backwards-compatible service, is used to manage the old
Business Data Catalog connections.
The Business Data Catalog is not upgraded when you use the database attach upgrade method.
For more information, see Plan to upgrade to Business Connectivity Services (SharePoint Server
2010).
Single sign-on
The Single Sign-On (SSO) service is being replaced with the Secure Store Service in SharePoint
Server 2010. You can use Windows PowerShell cmdlets to upgrade application definitions from SSO to
the Secure Store Service. Note that passwords are not upgraded. After you upgrade the application
definitions, you can make the Secure Store Service the default SSO provider. For more information,
see Perform post-upgrade steps for an in-place upgrade (SharePoint Server 2010).
Page 46
35
About upgrading farms that share services (parent and child farms) (SharePoint Server 2010)
In Microsoft Office SharePoint Server 2007, it was possible to configure parent farms and child farms to
share services. In such an environment, the parent farm hosts one or more Shared Services Providers
(SSPs) from which one or more child farms consume services. You can choose one of two approaches
to upgrade farms that share services. The recommended approach is to upgrade a duplicate of the
parent farm (the farm that hosts the shared services). If you need additional time to complete the
upgrade of all farms, you can use a temporary parent farm to upgrade the child farms (the farms that
consume shared services) until the original parent farm can be fully upgraded. Both approaches require
you to create an additional parent farm: In the first case, this parent farm is a duplicate of the original
parent farm that you immediately upgrade; in the second case, this parent farm is a new parent farm
built on Microsoft SharePoint Server 2010.
When you upgrade parent and child farms, you must perform the upgrade steps in a specific order so
that your services (such as Search or User Profile) can continue to work as required. This article
describes considerations to keep in mind while you plan to upgrade parent and child server farms, and
contains high-level illustrations of the upgrade processes.
Before you begin, make sure that you have reviewed the general upgrade information available in
About the upgrade process (SharePoint Server 2010).
In this article:
About upgrading parent and child farms
Considerations for upgrading parent and child farms
Process overview: Upgrading a duplicate parent farm
Process overview: Upgrading by using a temporary parent farm
Information in this article is also available in a downloadable poster, "Upgrading Parent and Child
Farms‖ (http://go.microsoft.com/fwlink/?LinkId=190984). This Visio diagram is also available in PDF
(http://go.microsoft.com/fwlink/?LinkId=190985) or XPS (http://go.microsoft.com/fwlink/?LinkId=190986)
format.
About upgrading parent and child farms The following list describes the two approaches to upgrading parent and child farms, and the
advantages of each:
Minimal downtime: Duplicate parent farm (recommended) With this approach, you duplicate
and upgrade the original parent farm, and then upgrade each child farm individually. After each
child farm is upgraded, you configure it to consume services from the upgraded parent farm. After
all child farms have been upgraded, you can remove the original parent farm.
Page 47
36
This approach is optimized for minimal downtime during the upgrade process. Because the original
parent farm is still available to host services for any child farms that are not yet upgraded, your
users can continue to work with sites on those farms.
Child first: Temporary parent farm With this approach, you create a new parent farm, and then
upgrade child farms individually and configure them to consume services from the new parent. After
all child farms have been upgraded, you can upgrade or remove the original parent farm.
This approach is optimized for allowing individual child farms to be upgraded over time. Whenever
a child farm is ready to be upgraded, it can be upgraded and start to consume services from the
new parent farm without affecting the original parent farm or other child farms.
Considerations for upgrading parent and child farms As you plan for and perform an upgrade for parent and child farms that share services, you must take
the following considerations into account:
Authentication types cannot be changed during upgrade.
Because both parent farms need to be able to crawl the same content, you should not change
authentication types until all farms have been upgraded. If you plan to change the authentication
type in the upgraded farm, complete the upgrade and then make the change.
You need to plan to upgrade your services before you begin either type of upgrade.
Search, User Profiles, Business Data Catalog, and other services have specific steps that must be
performed before, during, and after upgrade. For more information, see How search features are
affected by upgrade (SharePoint Server 2010), How other services are affected by upgrade
(SharePoint Server 2010), Plan to upgrade form templates during an upgrade to SharePoint Server
2010 and Plan to upgrade to Business Connectivity Services (SharePoint Server 2010).
Child farms that have not been upgraded will not have access to the Web analytics available in
SharePoint Server 2010.
This might not matter in the short term, but — depending on how long your farms are in a mixed
upgrade state — the data could be skewed because it is split between two analytics systems and
will not be combined.
For more information about how to plan your upgrade, see Plan and prepare for upgrade (SharePoint
Server 2010).
Process overview: Upgrading a duplicate parent farm To provide maximum uptime during the upgrade process, you want to keep the original parent farm
running until all the child farms have been upgraded to SharePoint Server 2010. However, because a
SharePoint Server 2010 farm cannot consume services from a Office SharePoint Server 2007 farm, this
means that you must create another SharePoint Server 2010 farm to provide services to the child farms
until the whole environment is upgraded.
Page 48
37
In this approach, you duplicate the parent farm, upgrade the duplicate version, and then upgrade the
child farms. After upgrade, you continue with the duplicated parent and turn off the original parent farm.
1. Duplicate the original parent farm.
a. Back up the original parent farm (Parent Farm 1).
b. Restore Parent Farm 1 to a new farm, Parent Farm 2.
Page 50
39
2. Upgrade the new parent farm.
a. Upgrade Parent Farm 2 to SharePoint Server 2010.
b. Optional: Configure user profile synchronization for Parent Farm 1 and Parent Farm 2.
The synchronization steps are optional, but will ensure that the child farms have a smooth
experience with minimal loss of services configuration or content as they move from the Office
SharePoint Server 2007 parent farm to the SharePoint Server 2010 parent farm. The next
version of the Administrative Toolkit will contain a tool called the Profile Replication Engine that
you can use to synchronize profiles between Office SharePoint Server 2007 and SharePoint
Server 2010.
3. Publish the service applications that will be used by child farms (at a minimum, these include
Search, Business Data Catalog, and User Profiles).
4. Upgrade the first child farm.
a. Upgrade the first child farm, Child Farm 1, to SharePoint Server 2010.
b. Ensure that local service applications (such as Excel Services) are configured and working on
Child Farm 1.
c. Configure Child Farm 1 to start to consume services from Parent Farm 2.
Page 51
40
5. Upgrade the remaining child farms.
Repeat step 4 for all remaining child farms in the environment.
6. Remove the original parent farm.
Page 52
41
Process overview: Upgrading by using a temporary parent farm If you need to upgrade a child farm before you are ready to upgrade the parent farm, you can do so by
creating a temporary parent farm in SharePoint Server 2010.
Page 53
42
1. Create and configure a new parent farm, Parent Farm 2, in SharePoint Server 2010.
Page 54
43
2. Upgrade the first child farm.
a. Upgrade the first child farm, Child Farm 1, to SharePoint Server 2010.
b. Ensure that local service applications (such as Excel Services) are configured and working on
Child Farm 1.
c. Configure Child Farm 1 to start consuming services from Parent Farm 2.
Page 55
44
3. Upgrade the remaining child farms
Repeat step 2 for all remaining child farms in the environment.
4. Upgrade the original parent farm, Parent Farm 1, in SharePoint Server 2010.
You can either re-associate the child farms with the upgraded Parent Farm 1 after it has been
upgraded, or continue to use the new Parent Farm 2 to host services for the child farms.
Page 56
45
See Also
Publish a service application (SharePoint Server 2010) (http://technet.microsoft.com/library/46e0f7e7-
cd69-41a5-9988-bd0e7db564d9(Office.14).aspx)
Manage service applications (SharePoint Server 2010) (http://technet.microsoft.com/library/0a785758-
694c-4c5c-abe6-70a17b490c6e(Office.14).aspx)
User Profile Replication Engine (Office SharePoint Server) (http://technet.microsoft.com/en-
us/library/cc663011(Office.12).aspx)
Page 57
46
Upgrading from SharePoint Portal Server 2003 to SharePoint Server 2010
You cannot upgrade directly from Microsoft Office SharePoint Portal Server 2003 to Microsoft
SharePoint Server 2010.
The changes between versions are too great, and the hardware requirements differ so much between
versions that a direct, in-place upgrade is not possible or supported. You can, however, perform a
series of database attach upgrades to first upgrade your content to Microsoft Office SharePoint Server
2007 and then to SharePoint Server 2010. This article describes the process of performing this double-
database attach upgrade.
During this entire process, your old environment should be offline, to prevent users from
making changes in the old environment while you are upgrading. After you have finished and
validated the upgrade, you can grant access to your users again in the SharePoint Server 2010
environment.
In this article:
Process overview
Before you begin
Prepare to upgrade
Prepare your farms
Perform the first upgrade
Perform the second upgrade
Process overview Because this upgrade approach combines two upgrade processes that have already been documented,
this article describes how the steps from each process fit together into the overall process. It does not
provide details for every step, because those steps are available in the following articles:
Deploy a new server farm, then migrate content databases (Upgrade)
(http://go.microsoft.com/fwlink/?LinkId=188501)
Attach databases and upgrade to SharePoint Server 2010
These articles, combined with this roadmap, give you the information you need to perform the double-
database attach upgrade.
Note:
Important
Page 58
47
Make sure that you try out this entire process in a test environment before you attempt to
upgrade your actual live content. For more information about how to test your upgrade
processes, see the following content:
Upgrade sequence
To upgrade your content across the two versions, follow these steps.
1. Prepare to upgrade
a. Prepare your original farm by running the pre-upgrade scan tool and making an inventory of all
of your customizations.
b. Set up a small, temporary farm that is running Office SharePoint Server 2007.
c. Set up your full SharePoint Server 2010 farm, and verify that it is configured and running
correctly.
2. First upgrade: Upgrade the content to Office SharePoint Server 2007
a. Detach the content databases from the old farm, and then take that farm offline.
Alternatively, you can leave the databases attached and make a copy of the databases if you
want to ensure that your original farm can be restored to use quickly.
b. Attach the content databases to the Office SharePoint Server 2007 farm and upgrade them.
c. Verify that the content has been upgraded and that the Office SharePoint Server 2007 farm is
working correctly.
3. Second upgrade: Upgrade the content to SharePoint Server 2010
a. Detach the content databases from the Office SharePoint Server 2007 farm.
b. Attach the content databases to the SharePoint Server 2010 farm and upgrade them
(optionally, you can upgrade them in parallel).
c. Verify that the content has been upgraded and that the SharePoint Server 2010 farm is working
correctly.
4. Start serving requests on the SharePoint Server 2010 farm.
The following diagrams illustrate this process:
Page 59
48
The database attach upgrade to Office SharePoint Server 2007.
The database attach upgrade to SharePoint Server 2010.
Page 60
49
Before you begin Before you begin your upgrade, review the following information about permissions, hardware
requirements, and software requirements. Follow the specified steps to install or configure prerequisite
software or to modify settings.
Review required permissions
When you create your temporary environment for Office SharePoint Server 2007, you must have
the appropriate permissions. For more information, see Plan for administrative and service
accounts (Office SharePoint Server) (http://go.microsoft.com/fwlink/?LinkId=188586&clcid=0x409).
Page 61
50
When you create and configure your destination SharePoint Server 2010 farm, you must have the
appropriate permissions. For more information, see Administrative and service accounts required
for initial deployment (SharePoint Server 2010) (http://technet.microsoft.com/library/06765032-fedb-
4b73-a019-f096b48cd2a8(Office.14).aspx).
Review required hardware and software
When you create your temporary environment for Office SharePoint Server 2007, you must meet
specific hardware and software requirements. For more information, see Determine hardware and
software requirements (Office SharePoint Server)
(http://go.microsoft.com/fwlink/?LinkId=188589&clcid=0x409).
When you create and configure your destination SharePoint Server 2010 farm, you must meet
different hardware and software requirements. For more information, see Hardware and software
requirements (SharePoint Server 2010) (http://technet.microsoft.com/library/4d88c402-24f2-449b-
86a6-6e7afcfec0cd(Office.14).aspx).
In some environments, you must coordinate the procedures for moving databases to a separate farm
with the database administrator. Make sure that you follow any applicable policies and guidelines for
handling databases.
Prepare to upgrade Because you are performing two upgrades, you need to understand all of the steps involved both in
upgrading to Office SharePoint Server 2007 and to SharePoint Server 2010. The following content is
available to help you understand these upgrade processes:
Preparing to upgrade to Office SharePoint Server 2007
Read the Plan and prepare for upgrade
(http://go.microsoft.com/fwlink/?LinkId=188588&clcid=0x409) chapter on TechNet. In particular,
read the following articles:
How the upgrade process works (Office SharePoint Server)
(http://go.microsoft.com/fwlink/?LinkId=188583&clcid=0x409)
Determine how to handle customizations (Office SharePoint Server)
(http://go.microsoft.com/fwlink/?LinkId=188594&clcid=0x409)
Develop new custom site definitions and create upgrade definition files (Office SharePoint
Server) (http://go.microsoft.com/fwlink/?LinkId=188584&clcid=0x409)
Read the Perform pre-upgrade steps (http://go.microsoft.com/fwlink/?LinkId=188587&clcid=0x409)
chapter on TechNet. You must perform the following steps for a database attach upgrade (called
database migration in this version):
Install Service Pack 3 for Windows SharePoint Services 2.0 and SharePoint Portal Server 2003
(http://technet.microsoft.com/en-us/library/cc262283(Office.12).aspx)
Page 62
51
Run the pre-upgrade scan tool (Office SharePoint Server) (http://technet.microsoft.com/en-
us/library/cc262231(Office.12).aspx)
You follow these steps on your existing SharePoint Portal Server 2003 farm.
Preparing to upgrade to SharePoint Server 2010
Plan and prepare for upgrade. Read the following article on TechNet:
Upgrade process overview (SharePoint Server 2010)
Perform pre-upgrade steps. Read the following article on TechNet:
Run the pre-upgrade checker (SharePoint Server 2010)
You perform these steps on your temporary Office SharePoint Server 2007 farm.
Prepare your farms In this step, you follow the pre-upgrade steps on your existing farm, create your temporary farm for the
upgrade to Office SharePoint Server 2007, and create your destination SharePoint Server 2010 farm.
Use the following steps and related content when preparing your farm for the upgrades.
Create the temporary Office SharePoint Server 2007 farm
In a virtual or physical environment, create a temporary small farm that is running Office SharePoint
Server 2007 with Service Pack 2 (SP2) and the October 2009 Cumulative Update. You will use this
farm to upgrade your content to Office SharePoint Server 2007 on the way to SharePoint Server 2010.
For best results, it is recommended that you apply the latest updates to the environment. The
October 2009 Cumulative Update includes changes to the pre-upgrade checker that can help
identify issues before upgrade. For a list of available updates, see Update Center for Microsoft
Office, Office Servers, and Related Products (http://go.microsoft.com/fwlink/?LinkID=181115).
For more information about applying updates, see Updates Resource Center for SharePoint
Products and Technologies (http://go.microsoft.com/fwlink/?LinkID=181116).
1. Download the software for the temporary farm.
You can use the trial version of Microsoft Office SharePoint Server 2007 in this temporary
environment if you do not have a license agreement for the full product. The trial version can be
used for 180 days. Download the trial version at one of the following links:
x86 version: Download details: SharePoint Server 2007 Trial Version
(http://go.microsoft.com/fwlink/?LinkID=120683)
x64 version: Download details: SharePoint Server 2007 Trial Version (x64)
(http://go.microsoft.com/fwlink/?LinkID=120684)
Important:
Important:
Tip:
Page 63
52
2. Install any language template packs needed for your sites. For more information, see Install
available language template packs (Office SharePoint Server)
(http://go.microsoft.com/fwlink/?LinkId=188590&clcid=0x409).
3. Configure the farm by using the appropriate farm settings for your environment and reapplying all of
the customizations needed by your content. Make sure that you deploy the customizations and the
upgrade definition files needed for any custom site definitions that might exist in your environment.
You must create Web applications on the temporary farm for every virtual server that you had in
your original farm. The URL for the new Web applications should match either the source farm
URLs or the destination farm URLs, otherwise you risk adding references to additional temporary
URLs to the content. Ideally, you should use the same URLs for the source farm and destination
farm, so that the temporary farm URLs are exactly the same as well, including the port numbers
used.
For more information about configuring the farm, see Prepare the new Microsoft Office SharePoint
Server 2007 environment (http://go.microsoft.com/fwlink/?LinkId=188593&clcid=0x409). For more
information about deploying custom site definitions and upgrade definitions, see Deploy upgrade
definition files and new site definitions (Office SharePoint Server)
(http://go.microsoft.com/fwlink/?LinkId=188595&clcid=0x409).
Set up your full SharePoint Server 2010 farm
This is the farm you will use for your production environment eventually, so make sure that you plan
your infrastructure appropriately to support the solution you are hosting. For more information about
how to plan your server farm, see Plan for server farms and environments (SharePoint Server 2010)
(http://technet.microsoft.com/library/fd081152-5fdd-4e47-9afb-c887fbf1ce22(Office.14).aspx).
1. Create your farm on 64-bit hardware with database servers that are running a 64-bit version of
Microsoft SQL Server 2008 with Service Pack 1 (SP1) and Cumulative Update 2. For more
information, see Multiple servers for a three-tier farm (SharePoint Server 2010)
(http://technet.microsoft.com/library/4982a861-ad5c-43e4-a49f-958afd4370aa(Office.14).aspx).
2. Install any language template packs needed for your sites. For more information, see Install
available language template packs (SharePoint Server 2010).
3. Configure the farm by using the appropriate farm settings for your environment and reapplying all of
the customizations needed by your content. Again, you must create Web applications on the
destination farm for every virtual server that you had in your original farm.
For more information about how to create and configure a server farm for a database attach
upgrade, see Prepare the new SharePoint Server 2010 environment for a database attach
upgrade.
Perform the first upgrade With your farms set up and configured, you are ready to upgrade your content databases to Office
SharePoint Server 2007.
Page 64
53
Make sure that you have run the pre-upgrade scan tool on your original farm before you detach
the databases. The upgrade process will not run if you have not scanned the databases. For
more information, see Run the pre-upgrade scan tool (Office SharePoint Server)
(http://technet.microsoft.com/en-us/library/cc262231(Office.12).aspx).
To perform a database attach upgrade (called database migration for this version), follow these steps:
1. Back up the content databases.
Content databases are any databases that use the suffix "_site".
2. Restore the backed-up copies to your temporary farm.
3. Add the databases to the Web applications to start the upgrade process.
For complete information and steps to follow, see Migrate databases
(http://go.microsoft.com/fwlink/?LinkID=116076&clcid=0x409).
After upgrade, you also need to import the profile information. For more information, see the section
"User profiles: start a full import" in Perform post-upgrade steps for an in-place upgrade
(http://go.microsoft.com/fwlink/?LinkId=188592&clcid=0x409).
Verify the first upgrade To verify the upgrade, do the following:
Review the upgrade log file. For more information, see Migrate databases
(http://go.microsoft.com/fwlink/?LinkID=116076&clcid=0x409).
Review the upgraded sites to make sure that they still work as expected and that your Web Parts
and other custom elements work correctly.
Perform the second upgrade After you have verified that your sites work correctly, you can begin the upgrade to SharePoint Server
2010.
Run the pre-upgrade checker and review the report so that you can address any potential
issues on your temporary farm before you upgrade the content. For more information, see Run
the pre-upgrade checker (SharePoint Server 2010).
To perform the database attach upgrade, follow these steps:
1. Back up the content databases.
2. Restore the backed-up copies to your destination farm.
3. Add the databases to the Web applications to start the upgrade process. In SharePoint Server
2010, you can attach databases in parallel to speed up the upgrade process.
Important:
Important:
Page 65
54
For complete information and steps to follow, see Attach databases and upgrade to SharePoint Server
2010.
Verify the second upgrade To verify the upgrade, do the following:
Review the upgrade log file.
Review the upgraded sites to make sure that they still work as expected and that your Web Parts
and other custom elements work correctly.
For more information, see Verify upgrade and review upgraded sites (SharePoint Server 2010).
Page 66
55
Plan and prepare for upgrade (SharePoint Server 2010)
Now that you have learned how the upgrade process works by reading the articles in About the
upgrade process (SharePoint Server 2010), you can begin your upgrade planning. This section
contains articles that help you plan and prepare for upgrading from Microsoft Office SharePoint Server
2007 to Microsoft SharePoint Server 2010.
In this section:
Determine upgrade approach (SharePoint Server 2010)
Learn about the different upgrade approaches and choose the one that is best suited to your
environment.
Review upgrade best practices (SharePoint Server 2010)
Avoid problems during the upgrade process by following these best practices.
Review supported and unsupported upgrade paths (SharePoint Server 2010)
Understand which topologies, editions, and other products can be upgraded to SharePoint Server
2010.
Review system requirements for upgrade (SharePoint Server 2010)
Review the requirements to help ensure that your environment can be upgraded to SharePoint
Server 2010.
Determine how to handle customizations (SharePoint Server 2010)
Learn how to identify and evaluate the customizations in your environment, and determine whether
you will upgrade them, and how.
Create a communication plan (SharePoint Server 2010)
Create a plan to coordinate and communicate with the upgrade team, site owners and users, and
stakeholders.
Plan to upgrade to Business Connectivity Services (SharePoint Server 2010)
Describes how upgrading from the Office SharePoint Server 2007 Business Data Catalog to the
Microsoft Business Connectivity Services in SharePoint Server 2010 works and provides guidance
about how to upgrade various types of solutions that use the Business Data Catalog.
Plan to upgrade form templates during an upgrade to SharePoint Server 2010
Find out what to do before, during, and after upgrade to keep your form templates working in the
new version.
Plan visual upgrade (SharePoint Server 2010)
Learn about the different visual upgrade options and how to choose the option that best suits your
business needs.
A worksheet is available so you can record information about your environment while you prepare for
upgrade. Download the worksheet from http://go.microsoft.com/fwlink/?LinkId=179928
(http://go.microsoft.com/fwlink/?LinkId=179928).
Page 67
56
Determine upgrade approach (SharePoint Server 2010)
Before you run any process to upgrade from Microsoft Office SharePoint Server 2007 to Microsoft
SharePoint Server 2010, you have to determine which upgrade approach to take. Use the information
in this article to help compare the pros and cons for each approach and to review information about
special cases that might influence your approach. In addition to the information in this article, be sure to
read Review supported and unsupported upgrade paths (SharePoint Server 2010) to understand
exactly which upgrade situations are valid and lead to successful upgrades.
To perform an upgrade, you must have installed Office SharePoint Server 2007 with Service
Pack 2 (SP2).
In this article:
Choose an upgrade approach
Special cases
Choose an upgrade approach There are two basic approaches to upgrade: in-place and database attach. In addition, there are
various techniques you can use to combine aspects of these basic approaches to mitigate downtime or
potentially improve performance.
The following table compares the in-place and database attach approaches.
Approach Description Pros Cons
In-place upgrade You can install
SharePoint Server
2010 on the same
hardware. You can also
upgrade the content
and settings in the
server farm as part of a
single process.
Farm-wide settings are
preserved and upgraded.
Customizations are
available in the
environment after the
upgrade, although
manual steps may be
required to upgrade or
rework them.
Servers and farms are
offline while the upgrade
is in progress. The
upgrade proceeds
continuously.
Consequently, you must
allocate enough time for
all content to be
upgraded in sequence.
Database attach
upgrade
You can upgrade the
content for the
environment on a
You can upgrade multiple
content databases at the
same time, which results
The server and farm
settings are not
upgraded. You must
Note:
Page 68
57
Approach Description Pros Cons
separate farm. The
result is that you do not
upgrade any of the
services or farm
settings. You can
upgrade the databases
in any order and
upgrade several
databases at the same
time. While each
database is being
upgraded, the content
in that database is not
available to users.
in faster upgrade times
overall than an in-place
upgrade. You can use a
database attach upgrade
to combine multiple farms
into one farm.
manually transfer
settings that you want to
preserve from the old
farm to the new farm.
Any customizations must
also be transferred to the
new farm manually. Any
missing customizations
may cause unintended
losses of functionality or
user experience issues.
Copying databases over
a network takes time and
bandwidth. You must
plan for that. You need
direct access to the
database servers.
For more information about how in-place and database attach upgrades work, see Upgrade process
overview (SharePoint Server 2010).
The following table lists the downtime mitigation techniques that you can use during upgrade to reduce
the amount of time that users cannot access their content or to potentially increase upgrade
performance.
Technique Description Pros Cons
Parallel upgrade You can attach and
upgrade multiple
databases at a time to
speed up the upgrade
process overall. The
maximum number of
parallel upgrades
depends on your
hardware. This
technique works for
either in-place or
database attach
upgrades.
Faster upgrade times for
your overall environment.
This is a manual process
that requires additional
steps and monitoring.
Page 69
58
Technique Description Pros Cons
Hybrid approach 1:
Database attach with
read-only databases
Lets you continue to
provide read-only
access to content
during the upgrade
process. For this
approach, you set the
databases to read-only
while the upgrade is in
progress on another
farm. This method
reduces perceived
downtime for your
users.
The existing farm can
continue to host non-
upgraded sites (in read-
only mode) while you
upgrade the content. As a
result, there is minimal
downtime for users.
You can upgrade multiple
content databases at the
same time, which results
in faster upgrade times
overall than an in-place
upgrade.
You can upgrade
hardware in addition to
software.
The server and farm
settings are not
upgraded. You must
manually transfer settings
that you want to preserve
from the old farm to the
new farm.
Any customizations must
also be transferred and
upgraded manually. Any
missing customizations
may cause unintended
losses of functionality or
user experience issues.
Copying databases over
a network takes time and
bandwidth. You must
plan for that.
You need direct access
to the database servers.
Hybrid approach 2: In-
place upgrade with
detached databases
Lets you take
advantage of an in-
place upgrade's ability
to upgrade content
and settings, while
adding the speed of a
database attach
upgrade. For this
approach, you use an
in-place upgrade to
upgrade the farm and
settings, and to detach
and upgrade multiple
databases in parallel
(on the same farm or a
separate farm).
Farmwide settings can be
preserved and upgraded.
Customizations are
available in the
environment after
upgrade, although
manual steps may be
required to upgrade or
rework them.
You can upgrade multiple
content databases at the
same time, which results
in faster upgrade times
overall than an in-place
upgrade.
Copying databases over
a network takes time and
bandwidth. You must
plan for that.
You need direct access
to the database servers.
Page 70
59
Be aware that you can also combine these techniques. For example, you can set your original farm to
read-only mode, create a copy of the farm and upgrade it without the content databases, use parallel
upgrade to rapidly upgrade all the user content, and then finally switch users to the new farm after
upgrade is completed. For more information about these downtime mitigation techniques work, see
Upgrade process overview (SharePoint Server 2010).
Another option to consider if you are facing an overly long outage window is to use Alternate Access
Mapping URL Redirection with a database attach approach, so that you temporarily redirect users to an
existing farm while you upgrade the content on a new farm. This is an advanced method and should not
be used unless other downtime mitigation techniques are not sufficient. For more information, see
Using AAM URL redirection as part of the upgrade process (SharePoint Server 2010) (white paper).
Special cases You might have other requirements or additional goals that you want to achieve when you perform an
upgrade. The following table lists special cases and describes which upgrade approach is appropriate
for each case.
Case Upgrade approach
Upgrading from a 32-bit to a 64-bit edition
of SQL Server?
If you are running a 32-bit edition of SQL Server, you must
migrate to a 64-bit edition. We recommend that you
perform this migration before you upgrade to SharePoint
Server 2010 to ensure best performance benefits. Ensure
that you perform only one kind of upgrade or migration at
a time to avoid upgrade failure. For more information, see
Migrate an existing server farm to a 64-bit environment
(Office SharePoint Server 2007)
(http://technet.microsoft.com/en-
us/library/dd622865(Office.12).aspx).
The following are two options for upgrading from a 32-bit
to a 64-bit edition of SQL Server:
You can back up the whole set of databases for the
farm, perform the upgrade, and then restore the
databases. (This option is supported and
recommended because you will have a full backup,
and after you restore the databases, you do not have
to change anything within SharePoint Server 2010).
You can move the SQL Server databases that you
want to upgrade to a different 64-bit edition of SQL
Server. You must add the different 64-bit edition, and
then run a command to the computers running
Page 71
60
Case Upgrade approach
SharePoint Server 2010 to point them to the new 64-
bit edition of SQL Server. (This option is supported but
not recommended because it requires more work in
SharePoint Server 2010 when, for example, the
databases change location).
Note:
If you upgrade a SQL Server version — for
example, from SQL Server 2005 SP2 to SQL
Server 2008 — you can perform this upgrade
before, during, or after you upgrade from a 32-bit
to a 64-bit edition of SQL Server.
Upgrading from a 32-bit operating system
to a 64-bit operating system?
If you are using a 32-bit operating system, you must
migrate to a 64-bit operating system before you upgrade.
For more information, see Migrate an existing server farm
to a 64-bit environment (Office SharePoint Server 2007)
(http://technet.microsoft.com/en-
us/library/dd622865(Office.12).aspx).
Upgrading an environment that uses
forms-based authentication?
Additional steps are required to upgrade when you are
using forms-based authentication. For more information,
see Configure forms-based authentication for a claims-
based Web application (SharePoint Server 2010).
Upgrading very large databases? In general, very large databases — particularly databases
that have a large number or large size of document
versions inside them — take longer to upgrade than
smaller databases. However, the complexity of the data
determines how long it takes to upgrade, not the size of
the database itself. If the upgrade process times out, it is
usually because of connection issues. In Office
SharePoint Server 2007, the upgrade process often timed
out because of the time needed to execute a process, but
this is rarely the case with SharePoint Server 2010. For
more information about how long upgrade might take for
your environment, see Estimate how long the upgrade
process will take and the space that you need (SharePoint
Server 2010).
Upgrading databases with a large number
of site collections?
If you have 5,000 or more site collections in a database,
consider breaking them out into multiple databases. In
Office SharePoint Server 2007, there was a default
Page 72
61
Case Upgrade approach
warning at 9,000 site collections and a hard limit at 15,000
site collections. In SharePoint Server 2010, these values
change to 2,000 site collections for the warning and 5,000
site collections for the limit. To avoid errors during
upgrade or broken sites after upgrade, we recommend
that you move some site collections into separate
databases. If you have multiple content databases, you
can also speed up your upgrade process by upgrading
multiple databases in parallel.
For more information about site collection limits, see
SharePoint Server 2010 capacity management: Software
boundaries and limits
(http://technet.microsoft.com/library/6a13cd9f-4b44-40d6-
85aa-c70a8e5c34fe(Office.14).aspx). For more
information about moving site collections to a new
database,
see Move site collections to a new database (split a
content database) (Office SharePoint Server 2007)
(http://technet.microsoft.com/en-
us/library/cc825328(office.12).aspx).
Upgrading from SharePoint Portal Server
2003?
Use a database attach upgrade method to upgrade to
Microsoft Office SharePoint Server 2007, and then
upgrade to SharePoint Server 2010. For more information
about this upgrade process, see Upgrading from
SharePoint Portal Server 2003 to SharePoint Server 2010.
Upgrading from Windows SharePoint
Services 3.0?
Use the database attach upgrade approach to attach and
upgrade the content databases from Windows SharePoint
Services 3.0 to SharePoint Server 2010. This process
upgrades the data in the content databases, but does not
transfer any farm settings.
Upgrading Microsoft Office Forms Server
2007 to SharePoint Server 2010
Office Forms Server 2007 is no longer available for
purchase. However, the capabilities of Office Forms
Server 2007 have been integrated into SharePoint Server
2010. If you want to use forms, you must upgrade to
SharePoint Server 2010 by using a database attach
upgrade method.
For more information, see Perform a database attach
upgrade to SharePoint Server 2010 and Plan to upgrade
Page 73
62
Case Upgrade approach
form templates during an upgrade to SharePoint Server
2010.
Note:
Before you upgrade Office Forms Server 2007,
ensure that you have installed The 2007 Microsoft
Office Servers Service Pack 2 (SP2)
(http://go.microsoft.com/fwlink/?LinkId=192132).
Changing languages? You have two choices, depending on whether a single site
or your entire environment is changing languages:
To change the language for a specific site, upgrade in
the same language, and then install the new language
pack and change to that language.
Caution
You must have the appropriate language packs
installed to upgrade any sites based on a
localized site definition. If you do not have the new
language pack, the sites will not be accessible.
Wait for the new language packs to be released
before attempting to upgrade those sites.
Also, you must have any language packs you
used for Office SharePoint Server 2007 installed
before you can perform an in-place upgrade.
To change the installation language for your servers,
use the database migration approach to migrate your
data from the old version and language to the new
version and language.
Using internationalized domain names? Although Office SharePoint Server 2007 supported
internationalized domain names (IDNs), SharePoint
Server 2010 does not. If you currently use IDNs with
Office SharePoint Server 2007 and you plan to upgrade or
migrate to SharePoint Server 2010, you must stop using
IDNs, delete any IDN settings, and set up a non-IDN
environment before doing so. For more information, see
Plan for multilingual sites (SharePoint Server 2010)
(http://technet.microsoft.com/library/22d5dc9c-66bd-40d7-
8c60-2a2a066db224(Office.14).aspx).
Page 74
63
Review upgrade best practices (SharePoint Server 2010)
To ensure a smooth upgrade from Microsoft Office SharePoint Server 2007 to Microsoft SharePoint
Server 2010, follow these best practices:
1. Update your servers to Service Pack 2 (SP2) of Microsoft Office SharePoint Server 2007 or later.
Your environment must be updated to Service Pack 2 of Office SharePoint Server 2007 to run the
upgrade process, either for an in-place or database attach upgrade. We recommend that you install
the October 2009 Cumulative Update because it includes improvements to the pre-upgrade
checker tool. For more information about how to install service packs and updates, see the Updates
Resource Center for SharePoint Products and Technologies (http://technet.microsoft.com/en-
us/office/sharepointserver/bb735839.aspx). For a list of all available updates, see Update Center
for Microsoft Office, Office Servers, and Related Products (http://technet.microsoft.com/en-
us/office/sharepointserver/ee748587.aspx).
2. Ensure that the environment is fully functioning before you perform an upgrade.
An upgrade does not solve any problems that might already exist in your environment. Therefore,
ensure that the environment is fully functioning before you perform an upgrade. For example, if you
have Web applications that are no longer being used, unextend them before you upgrade. If you
want to delete a Web application in Internet Information Services (IIS), unextend the Web
application before you delete it; otherwise, SharePoint Server 2010 will try to upgrade the Web
application even though it does not exist, and the upgrade will fail. If you find and solve problems
beforehand, you are more likely to meet the upgrade schedule that you have estimated.
3. Before you try an in-place upgrade, migrate to 64-bit servers. Upgrade your operating system to a
64-bit version of Windows Server 2008 R2 or Windows Server 2008 with Service Pack 2 (SP2). If
you are using SQL Server, upgrade or migrate to a 64-bit version of Microsoft SQL Server 2008 R2,
SQL Server 2008 with Service Pack 1 (SP1) and Cumulative Update 2, or SQL Server 2005 with
SP3 and Cumulative Update 3.
Do not try to combine these operations with your upgrade process. You cannot perform an in-place
upgrade unless your system already runs on a supported operating system and platform. For more
information, see What's new in upgrade (SharePoint Server 2010).
4. Run the pre-upgrade checker to look for potential issues.
The pre-upgrade checker reports missing customizations and issues with orphaned sites, and
more, so that you can address these issues before you perform your upgrade. For more
information, see Run the pre-upgrade checker (SharePoint Server 2010).
5. Perform a trial upgrade on a test farm first.
Back up the live farm, restore to test servers, and then perform the upgrade. Examine the results to
set expectations for what the live upgraded sites will look like, to determine how much post-upgrade
Page 75
64
customization will have to be done, and to estimate how long the upgrade will take. Try a full search
indexing crawl. For more information, see Use a trial upgrade to find potential issues (SharePoint
Server 2010).
6. Plan for capacity.
Ensure that you have disk, processor, and memory capacity sufficient to handle upgrade
requirements. For more information about system requirements, see Review system requirements
for upgrade (SharePoint Server 2010). For more information about how to plan the disk space that
is required for upgrade, see Estimate how long the upgrade process will take and the space that
you need (SharePoint Server 2010). For more information about how to plan for capacity, see
Performance and capacity management (SharePoint Server 2010)
(http://technet.microsoft.com/library/8dd52916-f77d-4444-b593-1f7d6f330e5f(Office.14).aspx).
7. Back up your environment.
Perform a full backup of your environment before upgrading. That way, you can recover your
environment if you must roll back from an upgrade. For more information, see Back up the entire
environment before an in-place upgrade (SharePoint Server 2010).
8. Optimize your environment before upgrade.
A few key limits have changed in SharePoint Server 2010, such as query throttling on large lists
and lower limits on the number of site collections allowed per content database (from 5,000 warning
and 15,000 limit to 2,000 warning and 5,000 limit). Be sure to optimize your Office SharePoint
Server 2007 environment to meet these limits or restrictions before upgrade to mitigate errors
during the upgrade process or broken lists or sites after upgrade. For more information about the
site collection limit, see SharePoint Server 2010 capacity management: Software boundaries and
limits (http://technet.microsoft.com/library/6a13cd9f-4b44-40d6-85aa-
c70a8e5c34fe(Office.14).aspx). For more information about large lists and addressing the lower
limit on site collections, see Cleaning up your environment before upgrade (SharePoint Server
2010).
9. (Optional) If you are using the database attach upgrade method, set the original databases to read-
only.
If you expect a long outage window while you perform a database attach upgrade, you can set the
databases in the original environment to be read-only so that users can continue to access their
data without changing it. For more information, see Attach databases and upgrade to SharePoint
Server 2010.
10. Do not add any servers to your server farm after you begin the upgrade process.
Running the SharePoint Products Configuration Wizard upgrades the configuration database. The
configuration database contains the list of servers in the farm. Servers added to the farm after the
configuration wizard has been run are not included in the database. Therefore, servers added after
the wizard runs do not appear in the upgraded version topology. If you need to add servers to your
farm, do so either before you start the upgrade or after you have completed the upgrade process.
Page 76
65
11. After upgrade, review the Upgrade Status page and upgrade logs to determine whether there are
issues that must be addressed. Then review the upgraded sites.
The Upgrade Status page reports on the upgrade progress, and the upgrade logs list any errors or
warnings that occurred during the upgrade process. You should verify all of the sites and test them
before you consider the upgrade complete. For more information, see Verify upgrade and review
upgraded sites (SharePoint Server 2010).
Page 77
66
Review supported and unsupported upgrade paths (SharePoint Server 2010)
When you plan your upgrade process, make sure that you verify that the upgrade path you want to
pursue is supported. This article describes supported and unsupported upgrade paths for an in-place
upgrade, and covers which specific topologies, editions, and products can be upgraded in place to
Microsoft SharePoint Server 2010.
In this article:
Review supported topologies for upgrade
Supported editions for upgrade
Supported cross-product upgrades
Review supported topologies for upgrade When you upgrade, you must upgrade to the same kind of installation: stand-alone to stand-alone, or
server farm to server farm. You cannot migrate from stand-alone to farm or vice versa during an in-
place upgrade process. However, either before or after you upgrade, you can change the size and
scale of a server farm to suit your requirements. Or, if you perform a database attach upgrade, you can
attach the databases to a different installation type.
Physical topology guidance
The Microsoft SQL Server topology — in addition to your network, physical storage, and caching — can
significantly affect system performance. In planning your hardware, remember that for in-place upgrade,
the server or server farm that you upgrade must be running a 64-bit version of Windows Server 2008
R2 or Windows Server 2008 with Service Pack 2 (SP2). For server farms, you must also be running a
64-bit version of Microsoft SQL Server 2008 R2, SQL Server 2008 with Service Pack 1 (SP1) and
Cumulative Update 2, or SQL Server 2005 with SP3 and Cumulative Update 3. To learn more about
mapping your solution design to the farm size and hardware that will support your business goals, see
Performance and capacity management (SharePoint Server 2010)
(http://technet.microsoft.com/library/8dd52916-f77d-4444-b593-1f7d6f330e5f(Office.14).aspx). For
more information about upgrade requirements, see Review system requirements for upgrade
(SharePoint Server 2010).
Supported topologies
The following table lists the supported starting topologies in Microsoft Office SharePoint Server 2007,
and the supported and unsupported ending topologies when you upgrade in place to SharePoint Server
2010.
Page 78
67
Starting topology (Office
SharePoint Server 2007)
Supported ending topology
(SharePoint Server 2010)
Unsupported ending topology
(SharePoint Server 2010)
Stand-alone server with SQL
Server 2005 Express Edition
Stand-alone server with
Microsoft SQL Server 2008
Express
Any farm
Single server with SQL Server Single server with SQL Server Stand-alone server with Microsoft
SQL Server 2008 Express
Any size farm Any size farm Stand-alone server with Microsoft
SQL Server 2008 Express
Migrating from a stand-alone server to a server farm
If you want to change from a stand-alone server to a server farm, you can do so before you upgrade.
To migrate from a stand-alone server to a server farm configuration, you must first create a new farm,
and then move the databases from the stand-alone server to the server farm. For more information, see
Migrate a stand-alone installation to a server farm installation (Office SharePoint Server 2007)
(http://go.microsoft.com/fwlink/?LinkID=188511&clcid=0x409). After you have migrated, you can
perform your upgrade to SharePoint Server 2010.
Migrating from 32-bit hardware
You cannot upgrade in-place from Office SharePoint Server 2007 to SharePoint Server 2010 if you are
on 32-bit hardware. If you start in 32-bit, you must first migrate to 64-bit hardware. For more
information, see Migrate an existing server farm to a 64-bit environment (Office SharePoint Server
2007) (http://technet.microsoft.com/en-us/library/dd622865(Office.12).aspx).
Supported editions for upgrade The following table lists the editions available for Microsoft Office SharePoint Server 2007 and the
supported and unsupported ending editions when you upgrade in place to Microsoft SharePoint Server
2010.
Starting edition Supported ending edition Unsupported ending edition
Office SharePoint Server 2007
with SP2, Standard edition
SharePoint Server 2010,
Standard edition
SharePoint Server 2010,
Enterprise edition
SharePoint Server 2010,
Standard edition
SharePoint Server 2010,
Enterprise edition
Page 79
68
Starting edition Supported ending edition Unsupported ending edition
Office SharePoint Server 2007
with SP2, Enterprise Edition
SharePoint Server 2010,
Enterprise edition
SharePoint Server 2010,
Standard edition
Office SharePoint Server 2007
with SP2, Trial edition
SharePoint Server 2010, Trial
edition
SharePoint Server 2010, full
product
SharePoint Server 2010, Trial
edition
SharePoint Server 2010, full
product
Supported cross-product upgrades The following table lists which Microsoft server products can be upgraded in place to Microsoft
SharePoint Foundation 2010 or SharePoint Server 2010.
Starting product Supported ending products Unsupported ending product
Windows SharePoint Services 3.0
with SP2
Microsoft SharePoint
Foundation 2010
SharePoint Server 2010 (by
using database attach upgrade
only)
SharePoint Server 2010 (by
using in-place upgrade)
SharePoint Foundation 2010 SharePoint Server 2010
Microsoft Search Server 2008 SharePoint Server 2010 or
Microsoft Search Server 2010
SharePoint Foundation 2010
Microsoft Office Forms Server
2007
SharePoint Server 2010 SharePoint Foundation 2010
Microsoft Office PerformancePoint
Server 2007
SharePoint Server 2010
Microsoft Office Project Server
2007 with Windows SharePoint
Services 3.0 with SP2 or Office
SharePoint Server 2007 with SP2
SharePoint Server 2010,
Enterprise Edition plus
Microsoft Project 2010
SharePoint Foundation 2010
plus Project 2010
Page 80
69
Review system requirements for upgrade (SharePoint Server 2010)
Before you can upgrade your environment from Microsoft Office SharePoint Server 2007 to Microsoft
SharePoint Server 2010, your servers must meet the following minimum requirements:
The hardware and software must meet or exceed the minimum system requirements to run the new
version.
This includes the requirement for 64-bit hardware and 64-bit versions of the operating system and
Microsoft SQL Server. Before you begin the upgrade process, make sure that your system meets
or exceeds the minimum requirements in Hardware and software requirements (SharePoint Server
2010) (http://technet.microsoft.com/library/4d88c402-24f2-449b-86a6-
6e7afcfec0cd(Office.14).aspx). Before upgrading, determine how much production capacity you
have to have in your upgraded environment and identify the hardware that you must have for your
upgrade based on that information. For more information, see Performance and capacity
management (SharePoint Server 2010) (http://technet.microsoft.com/library/8dd52916-f77d-4444-
b593-1f7d6f330e5f(Office.14).aspx).
Office SharePoint Server 2007 must be updated to Service Pack 2
Your environment must be updated to at least Service Pack 2 of Office SharePoint Server 2007 to
run the upgrade process, either for an in-place or database attach upgrade. We recommend that
you install the October 2009 Cumulative Update because it includes improvements to the pre-
upgrade checker tool. For more information about how to install service packs and updates, see the
Updates Resource Center for SharePoint Products and Technologies
(http://technet.microsoft.com/en-us/office/sharepointserver/bb735839.aspx). For a list of all
available updates, see Update Center for Microsoft Office, Office Servers, and Related Products
(http://technet.microsoft.com/en-us/office/sharepointserver/ee748587.aspx).
About these requirements It is important that your hardware meet at least the minimum requirements that are listed in the article
Hardware and software requirements (SharePoint Server 2010)
(http://technet.microsoft.com/library/4d88c402-24f2-449b-86a6-6e7afcfec0cd(Office.14).aspx);
otherwise, you might encounter issues during the upgrade process. For example, if your database
server has insufficient memory or processor power, it may be unable to keep up with the number of
transactions that occur during the upgrade process, and the upgrade may fail.
We recommend that you use a trial upgrade to determine exactly what hardware capacity you must
have for an acceptable upgrade experience. For more information, see Use a trial upgrade to find
potential issues (SharePoint Server 2010). If you experience capacity problems with your hardware
Page 81
70
during the trial upgrade, you can increase the capacity and repeat the upgrade until you are satisfied
that you have found the optimal level of upgrade performance.
It is important to track the following three resource components for a server that is running SQL
Server: CPU, memory, and I/O subsystem. When one or more of these components seems to
have reached capacity, analyze the appropriate strategy based on the current and projected
work load, and determine whether to add more resources or to scale out to a new server that is
running SQL Server. In general, we recommend that you consider scaling out, in addition to
adding more resources.
Important:
Page 82
71
Determine how to handle customizations (SharePoint Server 2010)
If you have extensively customized your sites based on Microsoft Office SharePoint Server 2007, you
must determine how you want to handle your customized sites when you upgrade to Microsoft
SharePoint Server 2010. Your approach will vary based on the extent of the customizations, the kind of
customization, the complexity of your site, and your goals for upgrading. Before you upgrade, you must
identify and then evaluate the customizations in your environment and determine whether you will
upgrade them, and how.
In this article:
Identify customizations in your environment
Evaluate the customizations
Considerations for specific customizations
Ensure that future customizations follow best practices
Identify customizations in your environment As part of your upgrade testing process, you should create an inventory of the server-side
customizations in your environment (solutions, features, Web Parts, event handlers, master pages,
page layouts, CSS files, and so on). For more information about how to identify customizations, see
Use a trial upgrade to find potential issues (SharePoint Server 2010). You can use the Upgrade
Planning worksheet to list specific customizations and then record the results of your evaluation in the
next section. Download the worksheet from http://go.microsoft.com/fwlink/?LinkId=179928
(http://go.microsoft.com/fwlink/?LinkId=179928).
Evaluate the customizations After you have identified the customizations, you can decide what to do about them. The following
questions can help you evaluate the customizations:
Is the customization still valuable?
Does it serve a useful business need?
Is it widely deployed and used?
Is the customization well-designed?
Is it built on supported, predefined site definitions?
Does it follow best practices for customizations?
Is it a supported kind of customization, or does it introduce risk into your environment?
Page 83
72
As you evaluate each individual customization, you can also think about your overall approach for
customizations. You can choose from among these options:
1. Keep the customizations Use Visual Upgrade to continue to use the previous version's user
experience for specific sites. Although you can use this approach to keep the same functionality,
you will not be able to take advantage of the new visuals — such as the Fluent user interface (UI),
also called the ribbon — and capabilities that are available in the new version.
2. Replace or redo the customizations If you want to use new functionality, plan to redesign your
sites, or are significantly changing the information architecture, the upgrade is your opportunity to
start over with new features, a new look, or a new organization. When you replace or redo
customizations, you can take advantage of the new capabilities, modify your design slightly if you
want, or move to a more manageable design.
For more information about redoing and redeploying solutions, see Redeploying Customizations
and Solutions in SharePoint Foundation 2010 and SharePoint Server 2010
(http://go.microsoft.com/fwlink/?LinkId=182335).
3. Discard the customizations Replace the customizations by using default functionality. You can
reset pages to the default site definitions and remove any Web Parts or features that you no longer
want to support. If you decide to discard any customizations, you must fix any issues that result
from removing the customizations in the sites that used them. You can use your customizations
inventory to determine which sites require this kind of attention before or after upgrade.
Considerations for specific customizations In addition to your overall decision about how to treat customizations in your environment during
upgrade, you must examine specific types of customizations to determine whether you must perform
any additional actions to make them work in the upgraded environment.
The following table lists some common customizations and a recommendation for addressing that kind
of customization.
Customization type Recommendation
Site templates (.stp files) Site templates (.stp files) are a deprecated feature in
SharePoint Server 2010. New site templates in
SharePoint Server 2010 are saved as .wsp files (solution
packages).
A site that was provisioned by using a site template will
be upgraded, but you will be unable to create new sites
that are based on that template. If you want to be able to
create new sites, you can create and deploy a solution
package instead. For more information, see Troubleshoot
upgrade issues (SharePoint Server 2010).
Page 84
73
Customization type Recommendation
Site definition Migrate sites to a supported, predefined site definition,
then apply custom features by using solution
deployment.
You can also continue to use a custom site definition.
You do not have to create a new site definition that is
based on SharePoint Server 2010.
However, if you must perform custom upgrade actions for
the definition, you might have to create an upgrade
definition file for that site definition. For more information,
see Upgrade Definition Files
(http://go.microsoft.com/fwlink/?LinkId=182339) on
MSDN.
"Fabulous 40" application templates Microsoft is not creating new versions of these templates.
Sites that are based on these templates can be
upgraded, but make sure that you test each site before
you upgrade the production environment. For more
information, see Troubleshoot upgrade issues
(SharePoint Server 2010).
Feature Evaluate, then redesign or redeploy if necessary.
Workflows and server controls Depends on the solution. Contact the vendor to find out
whether there is an updated solution. If a workflow is
compatible with the new version, redeploy.
Event handler Rewrite and redeploy as a feature.
Managed paths (inclusions/exclusions) Re-create inclusions for a database attach upgrade.
Exclusions are assumed and do not have to be re-
created.
Themes Because of the extensive changes to the UI, custom
themes that are based on Office SharePoint Server 2007
will not work in SharePoint Server 2010. Use Visual
Upgrade to continue to use the sites in the old user
experience until you can create and apply a new theme
that is based on SharePoint Server 2010.
Toolbar actions Move to the ribbon (Fluent UI).
Master pages and CSS files Rework to accommodate the new user experience.
Page 85
74
Customization type Recommendation
JavaScript Test to determine whether any actions are required. In
some cases, you might have to adjust the scripts to work
with the new page model. Verify that it works on an
upgraded site, and in both Visual Upgrade modes.
Search provider or security trimmer Test to determine whether any actions are required.
Web Parts Test to determine whether any actions are required. You
might have to adjust the Web Parts to work with strict
XHMTL mode.
If a Web Part is located on a page but not in a Web Part
Zone (so that it is, basically, HTML code embedded
directly in a page), it will not work if you revert the page
to the default template.
Services Test to determine whether any actions are required.
Redesign or adjust code, as needed.
Authentication providers Test to determine whether any actions are required.
Redeploy the provider on a test farm and ensure that it
works correctly with claims authentication.
The following kinds of customizations are not supported. If you have any of these customizations in
your environment, you must replace them by using a supported kind of customization before you can
upgrade. Otherwise, you might experience upgrade issues that cannot be fixed:
Predefined files, features, or site definitions that have been modified.
Some predefined file types — such as document icons or actions — can be modified and
although they will not be upgraded, their changes can be carried forward in a supportable
way. Modifications to other predefined files, such as server-side ASPX pages, will be lost
during upgrade if you revert to the site template. Depending on the files that have been
changed and the extent of these changes, the upgrade experience can vary significantly.
The best practice is to revert all changes in all files on the disk.
SharePoint databases that have been modified, either by directly changing data or changing the
schema, including adding or removing triggers, tables, views, or indexes.
If you have any of these kinds of customizations, remove them and replace them with supported
customizations before you attempt to upgrade. This is a best practice for helping to ensure that not only
your current upgrade will work, but any future upgrades will go more smoothly. Changing predefined
files and databases will remain unsupported.
Warning:
Page 86
75
Ensure that future customizations follow best practices Ensure that your environment performs well and follows best practices. Deploy only those
customizations that follow the best practices described in the following articles on MSDN and TechNet:
Best Practices: Using Disposable Windows SharePoint Services Objects
(http://go.microsoft.com/fwlink/?LinkId=105945&clcid=0x409).
Development Tools and Techniques for Working with Code in Windows SharePoint Services 3.0
(Part 1 of 2) (http://go.microsoft.com/fwlink/?LinkID=101494&clcid=0x409).
Best Practices: Common Coding Issues When Using the SharePoint Object Model
(http://go.microsoft.com/fwlink/?LinkId=105946&clcid=0x409).
SharePoint Products and Technologies customization policy
(http://go.microsoft.com/fwlink/?LinkId=105947&clcid=0x409).
Page 87
76
Create a communication plan (SharePoint Server 2010)
It is important that you communicate with your users during the upgrade process from Microsoft Office
SharePoint Server 2007 to Microsoft SharePoint Server 2010. Site users need to know what to expect
when they visit their sites again after upgrade, and site owners need to know how they can help
prepare for upgrade and what they will have to do after upgrade. Both site users and site owners need
to know when the upgrade will occur. As part of the planning process, determine the following:
Who are the members of your upgrade team, what other stakeholders are involved, and who will be
affected by the upgrade.
What information must the upgrade team have, and when.
What information must site users and other stakeholders have, and when.
This article describes how to create your communication plan so that your upgrade team, your
stakeholders, and your users know what to expect before, during, and after the upgrade.
In this article:
Who is on the upgrade team?
When and what to communicate to the upgrade team
When and what to communicate to site users
Who is on the upgrade team? For small deployments in which sites have not been customized to any great degree, the upgrade team
might consist of only one person. For larger deployments, on the other hand, several people with
different roles can be required, as described in the following list:
Server administrators The server administrator performs most of the upgrade tasks. There must
be at least one server administrator on the upgrade team because running the Setup wizard
requires someone who is a member of the local Administrators group on each front-end Web
server.
Farm administrators might not be local administrators for the server.
Database administrators If you have a separate database administration team, you must
coordinate with them to schedule the upgrade and perform the upgrade, especially if you plan to
use the database attach upgrade method.
Server security teams You must coordinate with your security teams, such as the Active
Directory directory services team, to verify accounts and permissions or to take advantage of the
new policy settings you can apply for SharePoint Server 2010.
Note:
Page 88
77
Client deployment team Communicate with client deployment teams to coordinate deployments
of new client and server applications. Client deployment might have to occur before you upgrade,
or it could be an option available to users after their sites have been upgraded.
Services administrators For Office SharePoint Server 2007, you must communicate with the
administrators for shared services, such as the Search service, to make sure that they are ready for
the upgrade and they can configure the appropriate settings in the new version.
Site collection owners You must notify site collection owners when the upgrade process is
about to occur, and warn them about any issues that you find when you run the pre-upgrade
checker or when you upgrade their sites. If you are using Visual Upgrade, you must also
communicate with site collection owners about the change to the new user interface and whether
the farm administrators or site collection administrators will be completing that change.
Site designers and developers If you have custom templates, Web Parts, Web services, or
other custom elements associated with your sites, you must work with the people responsible for
developing or customizing those elements to ensure that you can create new versions of these
custom elements or verify that these elements have been upgraded correctly. For more information
about potential issues with custom elements, see Use a trial upgrade to find potential issues
(SharePoint Server 2010).
Site users Although you do not have to include site users in making decisions about the upgrade
process, you must tell site users when it will happen and what they should expect.
Sponsors and other stakeholders You might have other people in your organization involved in
the upgrade planning process. Make sure that you include them in your communication plan
appropriately.
An upgrade team can include one or more members in each role, depending on your
organization.
When and what to communicate to the upgrade team In general, the server administrators and shared services administrators set the timeline for upgrade,
and site owners are notified only when the process is about to begin. However, because team members
have their own tasks to perform at particular points in the overall upgrade process, it is critical that you
have a solid plan to communicate the progress of the upgrade to all team members so that everyone
knows when it is time to perform their particular tasks.
The whole upgrade team needs to work together to determine the following:
The upgrade approach to use The Determine upgrade approach (SharePoint Server 2010)
article contains information to help you decide which kind of upgrade to perform. The report
generated by the pre-upgrade checker is also important to consider when you make this decision.
Dates and times to perform the upgrade We recommend (especially for an in-place upgrade)
that you upgrade when site usage is low. For small single-server deployments, upgrade may be
completed in less than a day. For larger deployments, such as server farms with large amounts of
Note:
Page 89
78
data, the database attach upgrade method or the in-place upgrade with detached databases
method can be used to distribute the upgrade process over several outage windows. There is no
way to determine the precise length of time that will be required to upgrade any particular site
collection. Because of this, it is very important to communicate with other team members involved
in the upgrade process in addition to end users. The day or days that you choose for upgrading
should be far enough in the future that the upgrade team has enough time to complete all of the
preliminary steps. When you plan the timeline, make sure that you schedule time to validate the
upgraded sites and time to implement any changes or do any work to re-brand sites.
It is important to communicate with site owners, designers, and developers at the following points
during the upgrade process:
Before the process begins, so that they know the general timeline and what their roles in the
process will be.
After the pre-upgrade checker has been run, so that they can address any issues that have been
identified by the checker. For more information about the pre-upgrade checker, see Run the pre-
upgrade checker (SharePoint Server 2010). For example, issues such as customized site
templates or custom Web Parts should be reported to the appropriate site owner, designer, or
developer before you schedule the upgrade, to give them time to investigate the issues and take
preliminary steps. Or a developer might decide that it would be prudent to rebuild a Web Part
before the upgrade occurs. And site owners might want to note any customizations that have been
done to their sites, including site templates and changes to core Active Server Page Extension
(ASPX) files.
After their sites have been upgraded, so that they can review the sites and make any changes that
are needed.
When and what to communicate to site users It is equally important to communicate with the users of the sites to tell them about the following issues:
When their sites will be upgraded In the case of an in-place upgrade, they must also be
informed that their sites will be unavailable during the upgrade.
When to expect their upgraded sites to be ready This means that the upgrade team has not
only upgraded, but also verified the functionality of, the upgraded sites.
How the upgrade might affect them and what they should know about the new
environment For example, the site will look different and function slightly differently in the new
user interface. If you are using Visual Upgrade, inform your users whether they will see the new or
old user experience and what to expect. You can also point them to available content, such as
What's New articles or training materials, to learn about the new version. For more information
about feature changes and visual upgrade, see Plan visual upgrade (SharePoint Server 2010) and
Changes in key features between versions in the article "What's New in Upgrade".
How to get help If they find an issue with their site after upgrade, where can they go to address
it?
Page 90
79
Plan to upgrade to Business Connectivity Services (SharePoint Server 2010)
This article describes how upgrading from the Microsoft Office SharePoint Server 2007 Business Data
Catalog to the Microsoft Business Connectivity Services in Microsoft SharePoint Server 2010 works
and provides guidance about how to upgrade various types of solutions that use the Business Data
Catalog.
The Business Data Catalog, Application Registry, and Business Data Connectivity service
How Business Connectivity Services upgrade works
Upgrading by using database attach
Solution-specific upgrade considerations
The Business Data Catalog, Application Registry, and Business Data Connectivity service This section introduces the three services involved in an upgrade from the Business Data Catalog to
SharePoint Server 2010.
In Office SharePoint Server 2007, the Business Data Catalog integrates external data into solutions.
The Business Data Catalog was implemented as a shared service in the context of the Shared Services
Provider framework. The Business Data Catalog stored application definitions, which are similar, but
not identical, to BDC models in SharePoint Server 2010.
In SharePoint Server 2010, a new service, the Business Data Connectivity service, integrates external
data into solutions. This service is implemented in the new shared services framework of SharePoint
Server 2010. For an overview of the new shared services framework, see Services architecture
planning (SharePoint Server 2010) (http://technet.microsoft.com/library/e9874ee4-6f34-46c1-8516-
a7b8af300820(Office.14).aspx). The new Business Data Connectivity service is part of the Microsoft
Business Connectivity Services, which is a set of client and server capabilities that includes a full set of
read-write capabilities with external systems, integration with Microsoft Office 2010 clients, and a rich
set of development tools. The object model of the Business Data Connectivity service is not backward
compatible with the object model that the Business Data Catalog uses, although the object models are
similar.
Another service in SharePoint Server 2010, the Application Registry Service, directly replaces the
Business Data Catalog from Office SharePoint Server 2007 and supports the backward compatibility of
solutions that are based on the Business Data Catalog. Because the Application Registry Service
supports the object model of the Business Data Catalog, the Application Registry Service can support
solutions that depend on the Business Data Catalog object model. The Application Registry service can
Page 91
80
support applications originally created in Office Microsoft Office SharePoint Server 2007 that include
one or more of the following elements:
Custom Web Parts
Custom code
Searching
All of these depend on the object model or metadata schema of the Business Data Catalog and will
continue to work in SharePoint Server 2010 by using the Application Registry Service.
The Web Parts that were provided by Office SharePoint Server 2007, such as the Business Data List
Web Part and the Business Data Association Web Part, are upgraded in SharePoint Server 2010 to run
against the Business Data Connectivity service and do not run against the Application Registry Service.
For more information, see Web Parts.
Note that the Application Registry Service is deprecated and exists only to support the
backward compatibility of solutions that are based on the Office SharePoint Server 2007
Business Data Catalog. Do not build new solutions that depend on the deprecated Application
Registry Service. Build new solutions on the Business Data Connectivity service.
How Business Connectivity Services upgrade works During upgrade from Office SharePoint Server 2007 to SharePoint Server 2010 , the following occurs:
1. For each Business Data Catalog that is running in the context of a Shared Service Provider (SSP)
in Office SharePoint Server 2007, two services are created in SharePoint Server 2010:
An Application Registry Service to store application definitions that are compatible with the
Office SharePoint Server 2007 Business Data Catalog object model.
A Business Data Connectivity service to store BDC models, which are compatible with the
SharePoint Server 2010 Business Data Connectivity Services object model. The new object
model supports the new features in the Business Data Connectivity service.
2. A copy of each application definition in the Business Data Catalog is placed in the Application
Registry service and, an upgraded version that is based on the new object model is placed in the
Business Data Connectivity service.
Important:
Page 92
81
The following illustration shows how this upgrade works. In the graphic, two shared service providers
are shown in Office SharePoint Server 2007, and the resulting four services (two instances each of the
Application Registry Service and the Business Data Connectivity service) are shown in SharePoint
Server 2010 after upgrading:
Warning:
Page 93
82
Only in-place upgrading is supported for upgrading solutions that are based on the Office
SharePoint Server 2007 Business Data Catalog. For general information about in-place
upgrading, see Perform an in-place upgrade (SharePoint Server 2010).
Upgrading by using database attach There are two approaches to upgrading from Office SharePoint Server 2007 to SharePoint Server
2010: in-place upgrade and database attach upgrade. For more information, see Upgrade process
overview (SharePoint Server 2010). If you use the database attach method to upgrade and you want to
continue to use the external data that is accessed through one or more application definitions, you must
complete the following tasks:
1. Export application definitions that the solution requires from the Office SharePoint Server 2007
Business Data Catalog. For more information, see Export application definition
(http://go.microsoft.com/fwlink/?LinkId=189010&clcid=0x409).
2. After upgrading, update the solution to use the object model and features of the Microsoft Business
Connectivity Services. This includes updating the application definitions to become BDC models,
which are compatible with Microsoft Business Connectivity Services. For information about the
Business Data Connectivity service object model, see Microsoft SharePoint 2010 Software
Development Kit (http://go.microsoft.com/fwlink/?LinkId=166117&clcid=0x409).
3. Import the updated BDC models into the Business Data Connectivity service. For more information,
see Manage BDC models (SharePoint Server 2010) (http://technet.microsoft.com/library/7b6fced6-
c8a9-4d79-a11a-8cf3445c52bf(Office.14).aspx).
For more information about database attach upgrading, see Prepare the new SharePoint Server 2010
environment for a database attach upgrade and Perform post-upgrade steps for a database attach
upgrade (SharePoint Server 2010).
Solution-specific upgrade considerations This section contains recommendations about how to manage specific aspects of solutions that are
upgraded to run in SharePoint Server 2010.
Models
Web Parts
Search
Single sign-on
Maintaining parent and child farm relationships
Models
As described in a previous section, when you upgrade from the Office SharePoint Server 2007
Business Data Catalog to Microsoft Business Connectivity Services, two versions of each application
definition in the Business Data Catalog are created in SharePoint Server 2010. One identical copy of
Page 94
83
the application definition is stored in the Application Registry service; another version of the application
definition file is upgraded to the Microsoft Business Connectivity Services metadata schema and, now
called a ―BDC model,‖ is stored in the new Business Data Connectivity service.
When application definitions are upgraded to BDC models and stored in the Business Data
Connectivity service, all errors or warnings that are related to the conversion process are
written to the upgrade log. For information about the upgrade log, see Verify upgrade and
review upgraded sites (SharePoint Server 2010).
We recommend that you use the upgraded BDC model in the Business Data Connectivity service for
future development of the solution. However, if you do additionally develop the original application
definition in the Application Registry service, you should make similar changes on the updated BDC
model that is stored in the Business Data Connectivity service. This is so that features that rely on the
new object model, such as the Web Parts that are included in SharePoint Server 2010, will provide a
consistent user experience. Also, because the Application Registry Service is deprecated, you ensure
that a solution will be available for future upgrades to subsequent product versions if you develop on
the BDC model.
Web Parts
Office SharePoint Server 2007 included the following Web Parts for building solutions that use the
Business Data Catalog:
Business Data List Web Part
Business Data Association Web Part
Business Data Actions Web Part
Business Data Details Web Part
Business Data Catalog Filter Web Part
The Web Parts that were provided by Office SharePoint Server 2007 are upgraded in SharePoint
Server 2010 to run against the Business Data Connectivity service. Such Web Parts that you used in a
Office SharePoint Server 2007 solution will continue to work after upgrade by using the upgraded Web
Parts and the Business Data Connectivity service. Custom Web Parts in a Office SharePoint Server
2007 solution, however, will run against the Application Registry Service after upgrade. For data
consistency, we recommend that you obtain new versions of custom Web Parts that can run against the
Business Data Connectivity service.
These Web Parts have been upgraded in SharePoint Server 2010 to work on BDC models in the new
Business Data Connectivity service. If a solution in Office SharePoint Server 2007 depends on one or
more of these Web Parts, you should upgrade the solution to the Microsoft Business Connectivity
Services object model and use the new versions of the Web Parts to interact with it. They are not
available to run directly on application definitions in the Application Registry service.
Important:
Page 95
84
Search
To search external data in Office SharePoint Server 2007, you create a content source that points to an
application definition in the Business Data Catalog. If you search content in this manner in Office
SharePoint Server 2007, you can continue to search the same external data after upgrading to
SharePoint Server 2010 BY using the Application Registry Service. No modification to the content
source is required on upgrade for search to work. It is recommended that you also create a new content
source definition that points to the Business Data Connectivity service.
Single sign-on
In Office SharePoint Server 2007, some authentication modes for solutions that use the Business Data
Catalog also use the Single Sign-On service, which provides storage and mapping of credentials such
as account names and passwords. Application definitions in the Business Data Catalog that depended
on the Single Sign-On service included information that references the service.
The Secure Store Service replaces the Single Sign-On service in SharePoint Server 2010. For more
information, see Plan the Secure Store Service (SharePoint Server 2010)
(http://technet.microsoft.com/library/e1196de0-1eb9-4c50-aeca-93e0eba7be0d(Office.14).aspx). After
you upgrade to SharePoint Server 2010, application definitions that were upgraded to the Application
Registry service and to the Business Data Connectivity service will be updated to refer to the Secure
Store Service. For information about how to migrate data from the Single-Sign-on service to the Secure
Store Service, see Perform post-upgrade steps for an in-place upgrade (SharePoint Server 2010)
If you used a custom Single Sign-On provider in Office SharePoint Server 2007, then you will
need to upgrade the provider in SharePoint Server 2010 and update the BDC models and
application definitions manually in the Application Registry service and the Business Data
Connectivity service.
Maintaining service databases on separate servers
In Office SharePoint Server 2007, the database that the Shared Services Provider uses can optionally
be on a separate server from the SharePoint content database. After you upgrade to SharePoint Server
2010, the databases for both the Business Data Connectivity service and the Application Registry
service will always be on the same server as the content databases. If you want to maintain separate
databases for these services, you will have to do this as a post upgrade step by backing up each
service’s database and then restoring the databases to a separate server.
Maintaining parent and child farm relationships
In Office SharePoint Server 2007, the Shared Services Provider that includes the Business Data
Catalog could be in a farm that services one or more child farms that use the shared services. If you
want this service to be available to child farms after you upgrade to the Application Registry service,
Important:
Page 96
85
you will have to use the CreateDelegatedApplicationProxy Windows PowerShell command to create a
new proxy that connects to the Application Registry Service’s database on the parent farm.
The following sample script illustrates the use of this command for this purpose:
$proxy=[Microsoft.Office.Server.ApplicationRegistry.SharedService.ApplicationRegistryServiceApp
licationProxy]::CreateDelegatedApplicationProxy("<NAME>", "Data Source=<SQLserverName>;Initial
Catalog=<ApplicationRegistry DB NAME>;Integrated Security=true")
For the Business Data Connectivity service, this operation can be done using SharePoint Central
Administration.
See Also
Plan for Business Connectivity Services (SharePoint Server 2010)
(http://technet.microsoft.com/library/ff364add-e18d-4d1c-824f-f0ea549fe904(Office.14).aspx)
Page 97
86
Plan to upgrade form templates during an upgrade to SharePoint Server 2010
This article describes the additional steps that are required to upgrade form templates when you
upgrade InfoPath Forms Services from the version in Microsoft Office SharePoint Server 2007 and
Microsoft Office Forms Server 2007 to the version in Microsoft SharePoint Server 2010.
In this article:
About upgrading forms during an upgrade to SharePoint Server 2010
Upgrade form templates during a database attach upgrade to SharePoint Server 2010
Upgrade form templates during an in-place upgrade to SharePoint Server 2010
About upgrading forms during an upgrade to SharePoint Server 2010 When you upgrade from Office SharePoint Server 2007 or Microsoft Office Forms Server 2007 to
SharePoint Server 2010, InfoPath Forms Services is also upgraded.
The following upgrade and migration scenarios are relevant for InfoPath Forms Services in SharePoint
Server 2010:
Database attach upgrade
Upgrades forms and form templates from InfoPath Forms Services in Microsoft Office SharePoint
Server 2007 or from Microsoft Office Forms Server 2007 to another server that is running
SharePoint Server 2010. Existing administrator-approved form templates and data connections
must be migrated to the new deployment and upgraded to work with InfoPath Forms Services in
Microsoft SharePoint Server 2010.
A database attach upgrade is the only way to upgrade Microsoft Office Forms Server 2007
to SharePoint Server 2010.
In-place upgrade
Upgrades forms and form templates from InfoPath Forms Services for Microsoft Office SharePoint
Server 2007 to SharePoint Server 2010 on the same server. All forms and form templates are
upgraded automatically during an in-place upgrade.
For more information about how to upgrade from Office SharePoint Server 2007 to SharePoint Server
2010, see Upgrading to SharePoint Server 2010.
Note:
Page 98
87
Upgrade form templates during a database attach upgrade to SharePoint Server 2010 A database attach upgrade enables you to move your content to a new farm or new hardware. During a
database attach upgrade, you detach all the content databases from an existing farm and then attach
the databases to a new server farm installation. When you attach the databases to the new server farm,
the upgrade process runs and upgrades the data in place. A database attach upgrade is the only way to
upgrade Microsoft Office Forms Server 2007 to SharePoint Server 2010.
The content database contains only some files that are used by InfoPath forms. These files include the
following:
User form templates (.xsn), which are form templates that are deployed by non-administrators.
They do not require full trust and do not use data connections that are managed by an
administrator. User form templates (.xsn) can be published to lists and form libraries by individual
contributors.
Data connection files (.udcx) for user form templates.
Content from filled-out forms (.xml) in lists and form libraries.
These files are upgraded automatically when you perform a database attach upgrade.
On the other hand, administrator-approved form templates and data connection files in the Central
Administration libraries are stored in the configuration database and must be migrated separately.
These files include the following:
Administrator-approved form templates (.xsn files) that are uploaded to the Manage Form
Templates library on the Central Administration site.
Data connection files (.udcx files) that are uploaded to the Manage Data Connection Files library on
the Central Administration site.
If you copy and attach the content database before these files have been imported, the sites that
contain content that depend on administrator-approved forms will produce errors during import.
To avoid these errors, we recommend that you follow these steps in the order listed:
1. Perform the prerequisite steps for upgrading to SharePoint Server 2010.
2. Install and configure SharePoint Server 2010 on the new server.
3. Export administrator-approved form templates and data connection files from the configuration
database on the original server that is running Office SharePoint Server 2007 or Microsoft Office
Forms Server 2007. For more information about how to export and import administrator-approved
forms, form templates, and data connection files between configuration databases, see the Export
and import administrator-approved form template files between configuration databases section
later in this article.
4. Import the files to the configuration database on the new server that is running SharePoint Server
2010.
5. Follow the steps in Attach databases and upgrade to SharePoint Server 2010 to attach and
upgrade the databases from the original server to the new SharePoint Server 2010 server.
Page 99
88
6. If the URL of the new server differs from the URL of the previous server, run a Windows
PowerShell 2.0 cmdlet to update links that are used in the upgraded forms and form templates. For
more information about how to update the links that are used in upgraded forms and form
templates, see the Update form template links to the server section later in this article.
Export and import administrator-approved form template files between configuration databases
The forms data in the content database includes only the files that are used by user forms, form
templates, and data connection files that are uploaded to lists and document libraries. It does not
include administrator-approved form templates and data connection files that are uploaded to the
Central Administration site.
To avoid problems when you upgrade form templates, export the content in the configuration database
of the original server that is running Office SharePoint Server 2007 or Microsoft Office Forms Server
2007 and import it to the new server that is running SharePoint Server 2010.
To export administrator-approved form templates and data connection files that are stored in the Office
SharePoint Server 2007 or Microsoft Office Forms Server 2007 configuration database, use the -o
exportipfsadminobjects command in the Stsadm command-line tool.
To import administrator-approved form templates and data connection files to the configuration
database on the new server, use the Windows PowerShell 2.0Import-SPInfoPathAdministrationFiles
(http://technet.microsoft.com/library/6d75660c-b641-4651-9b3c-baa9c760b18a(Office.14).aspx) cmdlet.
Data-connection time-out settings and other settings on the Configure InfoPath Forms Services
administration page are not migrated and must be configured on the new server.
For more information about how to use the Stsadm command-line tool, see Stsadm command-line tool
(Office SharePoint Server) (http://go.microsoft.com/fwlink/?LinkId=186993).
Update form template links to the server
During upgrades or content migrations, it is common to change the URL of the server that contains
forms and form templates. If the URL of the new server differs from the URL of the previous server,
links that forms and form templates use might have to be updated to the URL of the new server. These
include links in the form data to the form template file location, or links in the form template to data
connection files or other resource files.
Both user form templates and administrator-approved templates can be affected.
To update links that are used in user form templates and data connection files, run the Update-
SPInfoPathUserFileUrl (http://technet.microsoft.com/library/576349fa-386d-44cb-bbad-
329fa81dbd8c(Office.14).aspx) cmdlet.
To update links that are used in administrator-approved form templates and data connection files, run
the Update-SPInfoPathAdminFileUrl (http://technet.microsoft.com/library/0d3991ec-dfff-406b-b35d-
d452a51dfc6c(Office.14).aspx) cmdlet.
Page 100
89
These cmdlets update the name of the server in URLs that form templates and data connection files
use. They do not update links in forms that are moved between libraries by users, or in other forms
content that is stored in the content database. Users can fix those links by using the Relink All
command that is available in the form library settings. Forms and form templates that are upgraded or
migrated by using the database attach process are relinked automatically.
Upgrade form templates during an in-place upgrade to SharePoint Server 2010 Form templates for InfoPath Forms Services are upgraded automatically as part of any in-place
upgrade of SharePoint Server.
For more information about how to upgrade in place to SharePoint Server 2010, see Upgrade in place
to SharePoint Server 2010.
Page 101
90
Plan visual upgrade (SharePoint Server 2010)
This article discusses the new visual upgrade feature in Microsoft SharePoint Server 2010. If your
organization plans to perform an upgrade of Microsoft Office SharePoint Server 2007, you can take
advantage of this new feature. By default, the look and feel of sites is preserved during an upgrade from
Office SharePoint Server 2007. Site owners can switch to the new user interface permanently, or they
can choose to preview the new user interface for their SharePoint sites. By using the visual upgrade
feature, you can choose to move all sites to the new user interface. If you select the latter option, you
override the user interface for site collection owners and site owners. You can also choose to either
preserve customized pages or you can choose to reset all customized pages. Both choices will update
the look and feel of template pages, but the latter option deletes modifications from customized pages
and cannot be undone.
The visual upgrade feature is not available if you are performing an upgrade on a single server
with built-in database through the SharePoint Products Configuration Wizard. However, the
visual upgrade feature is still available if you use the PSConfig command-line tool for upgrade.
This article lists key considerations for planning to use visual upgrade, and it also discusses known
issues. For more information, see Manage visual upgrade (SharePoint Server 2010).
In this article:
Key planning phase of visual upgrade
Training site collection owners and site owners
Known issues
Key planning phase of visual upgrade Visual upgrade is a feature that is part of the upgrade process. Before you perform the upgrade, ensure
that you know about the effects of choosing between the two different options visual upgrade has to
offer.
Preserving the existing user interface
If you choose to preserve the look and feel of existing SharePoint sites, you give site collection owners
control over their site collections and site owners control over their sites. All the data and settings from
the original sites are preserved, and layout, command organization, and styles preserve the previous
user interface. Regardless of the type of farm upgrade that you select, you receive all the infrastructure
benefits of Microsoft SharePoint Server 2010 including improved reliability, scalability, and
manageability. Preserving the previous user interface reduces the likelihood that customized content
will cease to function. This ensures that you and the users can continue to use existing SharePoint sites
until all upgrade work, including troubleshooting and updating customizations, has been completed.
Note:
Page 102
91
Upgrading to the new user interface
If you choose to change all the existing SharePoint sites to the new user interface, site collection
owners and site owners have no control over the upgrade. All the data and settings from the existing
SharePoint sites are upgraded to the new user interface. You might want to choose this option if there
are no customizations or if you have tested any customizations that you need before the upgrade. Even
if you choose this option, you still have the option of either preserving customized pages or resetting
customized pages. If you need to keep customizations, or if you are unsure whether to keep
customizations, you should choose to preserve customized pages. Resetting the customized pages
removes customizations and cannot be undone. Choose this option if you do not need the
customizations any longer and if you know that no important data will be lost. For more information, see
Determine how to handle customizations (SharePoint Server 2010), Use a trial upgrade to find potential
issues (SharePoint Server 2010), and Redeploying Customizations and Solutions in SharePoint
Foundation 2010 and SharePoint Server 2010 (http://go.microsoft.com/fwlink/?LinkId=186372).
Training site collection owners and site owners It is important that you train users about the effects of either preserving the look and feel of existing
SharePoint sites or upgrading all sites to the new user interface. Educated users are prepared and
know what to expect, which will minimize helpdesk support and frustrations.
If you upgrade all sites to the new user interface, inform users about changes and new features, such
as the ribbon, the new page editing interface, and interactive calendars. Also, let them know about
possible issues that they can expect. For instance, they might have issues with customizations, such as
pages not displaying correctly. For information about general upgrade issues, see Troubleshoot
upgrade issues (SharePoint Server 2010).
If you choose to preserve the look and feel of existing SharePoint sites, explain to site collection owners
and site owners that the user interface will not change during upgrade, and tell them about the choices
they can make.
By default, site owners have control over their sites. They can use the Preview New Visuals option
(under Site Settings) to preview the new user interface and then switch between the previous and new
user interface. This gives them time to ensure that everything works correctly, and they can fix any
issues with their pages that appeared after upgrade. When site owners are ready, they can update their
sites to the new user interface. However, site collection owners can choose to finalize the new user
interface, which overrides the control that site owners have over visual upgrade for their sites. If site
collection owners want to keep the previous user interface for their site collection, they also have an
option to hide visual upgrade settings from site owners.
Site owners also need to know that if they make changes in the new user interface while they are in
preview mode and then switch back to the previous user interface, this information may not display
correctly.
We recommend that you have a plan and set a time limit for how long the previous user interface
should be used in your SharePoint deployment. For example, each site collection administrator may be
given 90 days to work with his or her site owners to transition from the previous to the new user
Page 103
92
interface. This time limit ensures that users are given a reasonable time to become familiar with the
new user interface and to resolve any issues that might have occurred during the upgrade. Ensure that
you communicate the time limit to the users, and that they know you can force through an upgrade of all
sites. Also, you can view the current status of the user interface of upgraded sites to monitor the
progress of these sites. For more information, see Manage visual upgrade (SharePoint Server 2010).
If site collection owners decide to use the new user interface for all sites within their site collection, they
cannot change their minds. However, as a farm administrator, you can change these settings by
reverting sites to the previous user interface with Windows PowerShell or SharePoint Object Model. For
more information, see Manage visual upgrade (SharePoint Server 2010).
It is important to tell site collection owners and site owners that as long as sites use the previous user
interface, new features—such as the ribbon, in-place editing for Wiki pages, interactive calendars, and
list relationships—will not be available. However, once sites switch to the new user interface,
application features automatically appear. Also, it is important to note that all new sites created after the
upgrade use the new user interface by default.
Known issues There are a few known issues to consider:
Because of the social networking enhancements in Microsoft SharePoint Server 2010, existing My
Site templates default to the new user interface after upgrade with the preserve the existing user
interface option selected. However, all subpages have the user interface specified by visual
upgrade.
Project Web Access (PWA) sites, which are used to track project data in Microsoft Project Server
2010, require the new user interface and do not follow visual upgrade settings.
In Excel Services Web Parts, the new SharePoint Server 2010 Web Part properties are exposed
once an upgrade is complete, but before sites have been moved to the new user interface.
Therefore, some properties can be set, but will not do anything until the page is updated to the new
UI.
If you use SharePoint Server 2010, ensure that you use the same version and service pack of
SharePoint Designer.
See Also
Upgrade in place to SharePoint Server 2010
Attach databases and upgrade to SharePoint Server 2010
Upgrading to SharePoint Server 2010
Page 104
93
Testing and troubleshooting upgrade (SharePoint Server 2010)
Before you upgrade from Microsoft Office SharePoint Server 2007 to Microsoft SharePoint Server
2010, you should take time to test your upgrade process and understand what issues you might face in
your actual upgrade. This section includes information about how to test upgrade and use the
information from that test to predict how much time and how much space you will need for upgrade, and
what steps you can take to clean up your environment before you perform your actual upgrade.
During and after upgrade, use the articles in this section to address any issues and resume the upgrade
process.
In this section:
Best practices for testing upgrade (SharePoint Server 2010)
Follow these best practices to get the most out of your upgrade testing.
Use a trial upgrade to find potential issues (SharePoint Server 2010)
Find out how to plan for success by testing upgrade by using your actual data in either a physical or
virtual environment.
Estimate how long the upgrade process will take and the space that you need (SharePoint Server
2010)
Use your test information to understand how long your upgrade will take.
Cleaning up your environment before upgrade (SharePoint Server 2010)
Upgrade runs more smoothly when you prepare your environment by cleaning up extra sites or
data. This article lists common things that you should consider cleaning up before you start the
upgrade process.
Troubleshoot upgrade issues (SharePoint Server 2010)
Follow these recommendations to troubleshoot any issues that occur during upgrade. You can also
look up common issues and find out how to address them.
Recovering after a failed upgrade (SharePoint Server 2010)
If you created a backup of your environment and databases before you began an in-place upgrade,
or if you set your environment to read-only before you began a database attach upgrade, you can
recover your environment if the upgrade process fails.
Resume upgrade (SharePoint Server 2010)
If you encounter errors during upgrade, you can address them by using the troubleshooting article,
and then use this article to restart or resume upgrade.
Page 105
94
In addition, the following resources can be helpful when you test your upgrade process:
SharePoint Products 2010 Upgrade Worksheet
Use this worksheet to record information about your environment while you test your upgrade.
Download the worksheet from http://go.microsoft.com/fwlink/?LinkId=179928
(http://go.microsoft.com/fwlink/?LinkId=179928).
Microsoft SharePoint 2010 Products - Test Your Upgrade Process model
This poster has a visual display of information about how to test your upgrade process. Download
the poster from http://go.microsoft.com/fwlink/?LinkId=166303
(http://go.microsoft.com/fwlink/?LinkId=166303).
Page 106
95
Best practices for testing upgrade (SharePoint Server 2010)
To understand your environment before you try to perform an upgrade, and to plan accurately for the
time that an upgrade will require, you should perform one or more trial upgrades. The goal of testing
upgrade is to find issues early and address them so that you can have confidence in your process and
the outcome when you perform the real upgrade. To perform an accurate and useful test of the upgrade
process from Microsoft Office SharePoint Server 2007 to Microsoft SharePoint Server 2010, follow
these best practices:
1. Make your test environment as similar as possible to your real environment.
If possible, use the same kind of hardware and configure it by using the same settings, the same
URLs, and so on. The more you can minimize the differences between your test environment and
your real environment, the better. The more differences you introduce, the more time that you are
likely to spend time tracking down unrelated issues to make sure that they will not occur during the
actual upgrade.
2. Know what is in your environment. Do a full survey first.
Take the time to document the hardware and software that is present in your environment, what
server-side customizations are installed and used, and where, and what settings you need. This will
help you plan more fully, and also help you recover if upgrade fails. A worksheet is available so that
you can record information about your environment while you prepare for upgrade. Download the
worksheet from http://go.microsoft.com/fwlink/?LinkId=179928
(http://go.microsoft.com/fwlink/?LinkId=179928).
3. Use real data.
Use copies of your actual databases to run the tests. When you test by using real data, you can
identify any trouble areas and also determine your upgrade performance. It also gives you the
opportunity to measure how long different upgrade sequences and actions take on different kinds of
data. If you cannot test all the data, test a representative subset of the data to make sure that you
have uncovered any issues with the different kinds and sizes of sites, lists, libraries, and
customizations that are present in your environment.
4. Run multiple tests.
A single test can tell you whether you will encounter big problems, but multiple tests will help
ensure that you have uncovered all the issues that you might face and can also give you a more
accurate timeline for the process. By running multiple tests, you can determine which upgrade
approaches will work best for your environment, which downtime mitigation techniques you should
plan to use, and how the process or performance may change after you address the issues that
you uncovered in your first tests. Your final test pass can help you validate whether you have
addressed all of the errors and are ready to upgrade your production environment.
Page 107
96
5. Do not ignore warnings.
Even though it is not an error, a warning can lead to problems later in the upgrade process. Work
through errors, yes, but also investigate any warnings to make sure that you know what the effect
of that warning might be.
6. Test the upgraded environment, not just the upgrade process.
Check your service applications and services. Run a search crawl and review the log files. Verify
that the My Site Web sites are working.
7. Verify sites in both Visual Upgrade modes.
Do not assume that because the site can be previewed well in one mode that it will work correctly in
the other mode. Check both the previous version and new version user experience.
8. Consider a preview environment.
You can create a preview environment in which your users can verify their sites after a test
upgrade, so that they can help you verify the upgrade and find issues. You can use a read-only
environment, or you can let your users make changes but warn them that any changes they make
will not be saved. Consider limiting this preview environment to a small set of representative sites,
and limiting access to interested parties only, to reduce the time that you will need to host the
preview environment and the amount of feedback you receive.
For more information about how to test upgrade, see Use a trial upgrade to find potential issues
(SharePoint Server 2010) and the "Test your upgrade process" poster available at
http://go.microsoft.com/fwlink/?LinkId=166303 (http://go.microsoft.com/fwlink/?LinkId=166303).
Page 108
97
Use a trial upgrade to find potential issues (SharePoint Server 2010)
Before you begin the process of upgrading from Microsoft Office SharePoint Server 2007 to Microsoft
SharePoint Server 2010, you will want to test the upgrade process to make sure that you know exactly
what you have to do to have a successful upgrade. By using a trial upgrade to test the process, you can
find out:
What customizations you have in your environment, so that you can plan for how to deal with them
during upgrade.
Whether you should upgrade your hardware to make your upgrade run more efficiently and more
quickly.
The timing for your upgrade, or how long upgrade will take for your environment.
What you need to plan for, operationally — for example, resources to have available.
In addition, you can use the trial upgrade to become familiar with the upgrade tools and the process
itself, so that you know what to expect when you go through the actual process. Through testing, you
can find out:
Which special cases apply to your environment and which upgrade approach will be most efficient
for you?
What does the upgrade user interface look like? How do you know when you have finished one
phase and are moving through another?
Where are the log files, and how do you read them? What information do they provide?
Which techniques can you use to mitigate downtime?
This article provides basic steps for testing upgrade, and it gives recommendations for reviewing the
results and adjusting your upgrade plans based on what you learn during the tests.
In this article:
Set up a test environment
Identify and install customizations
Copy real data to the test environment and try the upgrade
Review your results
Adjust your plans and test again
In addition, the following resources can be helpful when you test your upgrade process:
SharePoint Products 2010 Upgrade Worksheet
Use this worksheet to record information about your environment while you test your upgrade.
Download the worksheet from http://go.microsoft.com/fwlink/?LinkId=179928
(http://go.microsoft.com/fwlink/?LinkId=179928).
Page 109
98
Microsoft SharePoint 2010 Products - Test Your Upgrade Process model
This poster has a visual display of information about testing your upgrade process. Download the
poster from http://go.microsoft.com/fwlink/?LinkId=166303
(http://go.microsoft.com/fwlink/?LinkId=166303).
Set up a test environment You can use either virtual or physical hardware to test the upgrade process. Every environment is
unique, so there are no general guidelines for how long upgrade will take or how difficult a particular
customization will be to upgrade. The best way to gauge how your upgrade will go is to perform a series
of trial upgrades.
When you create your test environment:
Make your test farm as similar as possible to your real farm — for example, hardware, software,
and space available.
Use the same URLs in your test farm as in your real farm. (Otherwise, you will waste time
diagnosing issues relating to the URLs that will not come up in the real upgrade.)
Be sure that you transfer all of your settings and customizations to the test environment. The
section Identify and install customizations provides information about gathering this information.
Using a virtual test environment
When you test by using a virtualized environment, you do not need a lot of hardware. You can replicate
your environment by using just two servers that are running Hyper-V. One server has images for the
front-end Web servers and application servers, and the other server has images for the database
servers.
Page 110
99
Using a physical test environment
When you test by using a physical environment, you need to replicate your entire server farm
environment as closely as possible. If you simplify the number of front-end Web servers, application
servers, or database servers too much, you will not have an accurate estimate of how long the upgrade
process will take and you may not account for complications that arise from interactions between
servers in the same role (such as SQL Server transactions). If you have multiple servers in a role in
your original farm, use at least two servers for that role in the test farm to test for such issues.
Page 111
100
Additional test environments for database attach upgrade
If you are using the database attach upgrade approach, you might need to create one additional test
environment: a single server farm that is running Office SharePoint Server 2007 that you can use to run
the pre-upgrade checker before you attempt to upgrade the data.
You can avoid this step by running the pre-upgrade checker on your existing production farm.
Identify and install customizations To have an accurate test process, you must find all the customizations in your current environment and
copy them to the test environment. For more information about the types of customizations you need to
identify, see Determine how to handle customizations (SharePoint Server 2010).
Use the pre-upgrade checker to identify site definitions, site templates, and features in your
environment.
The pre-upgrade checker steps through each site collection and generates a report about the state
of each site. It also saves list definition information for each list. You can review the reports to find
issues and address them before you start the upgrade process. Unlike the pre-upgrade scan tool
for Office SharePoint Server 2007, the pre-upgrade checker is a read-only tool and does not
change your sites. For more information about this tool and steps for running it, see Pre-upgrade
scanning and reporting for future releases (Office SharePoint Server)
(http://technet.microsoft.com/en-us/library/dd793609(Office.12).aspx) and Run the pre-upgrade
checker (SharePoint Server 2010).
Use the Stsadm –o enumallwebs operation on all content databases in your Office SharePoint
Server 2007 environment to identify specific customizations in subsites. This operation lists an ID
for each site collection and subsite in your environment and the templates that the site relies on.
This operation was first introduced in Office SharePoint Server 2007 with Service Pack 2 (SP2).
Page 112
101
For more information, see Enumallwebs: Stsadm operation (Office SharePoint Server)
(http://go.microsoft.com/fwlink/?LinkId=188520&clcid=0x409).
Use a tool such as WinDiff (a tool that is provided with most Microsoft operating systems) to
compare your production environment servers with your test farm servers. You can use this tool to
see which files exist on your servers and the differences between them.
Check the web.config files for any changes, and look in the SafeControls element to find any
custom controls.
Use the SharePoint Diagnostics Tool (SPDiag) to find deployed solutions. For more information,
see SharePoint Diagnostics Tool (SPDiag)
(http://go.microsoft.com/fwlink/?LinkId=188519&clcid=0x409).
Create a list of all customizations that you find. Identify the source of the customizations, if possible.
For example, are there third-party add-ins or templates that were customized in-house? After you
identify the source, you can then check for updated or upgraded versions of the customizations. A
worksheet is available that you can use to fill in information about your environment, based on the
data you find in the results from the pre-upgrade checker and in your research on your
customizations. Download the worksheet from http://go.microsoft.com/fwlink/?LinkId=179928
(http://go.microsoft.com/fwlink/?LinkId=179928) and customize it to suit your needs.
Whom do you contact about customizations that you did not create?
After you identify all the customizations, copy them to the appropriate servers in your test farm. You can
use the Windows PowerShell cmdlet test-spcontentdatabase before you attach a database to
SharePoint Server 2010 to determine whether any customizations are missing from the environment.
Run this command for each database after you restore the databases to your database server, but
before you run the upgrade. Note that this cmdlet runs silently — it will not return any output unless
there is an error.
Copy real data to the test environment and try the upgrade You cannot achieve your testing goals unless you use your actual data. You can use the following
methods to create a copy of your data:
For in-place upgrade, create a farm backup and then restore it to the test environment. For more
information, see Back up and restore an entire farm (Office SharePoint Server 2007)
(http://go.microsoft.com/fwlink/?LinkId=188512&clcid=0x409).
For database attach upgrade, you need to use the Microsoft SQL Server backup and restore tools
to create a copy of your content databases and any other databases that you want to upgrade. For
more information, see Back up and restore databases (Office SharePoint Server)
(http://go.microsoft.com/fwlink/?LinkId=188518&clcid=0x409).
Tip
Page 113
102
There is no better way to tell what may come up during upgrade than to perform the test on a copy of all
of your data; however, this might not always be a realistic option for initial testing. You can phase the
testing by testing one database at a time (if the databases are large) so that you can make sure you
test whatever is unique about that data set, or you can assemble a subset of data from representative
sites in your environment. If you want to first test by using a subset of your data, be sure that the subset
has the following characteristics:
The data subset contains sites that are typical of the sites you support in your environment.
The size and complexity of the data subset is very similar to the actual size and complexity of your
environment.
Testing a subset of your data does not produce a valid benchmark for how long it will take to
process the entire volume of data for your environment.
After copying the data, take a first pass through the upgrade process to see what happens. This is just
the preliminary round.
Try in-place upgrade
If you want to try an in-place upgrade approach, use the following steps to try out the upgrade process:
1. Create a backup of your farm.
2. Restore the backup to your test farm.
For more information, see Back up and restore an entire farm (Office SharePoint Server 2007)
(http://go.microsoft.com/fwlink/?LinkId=188512&clcid=0x409).
3. Run the pre-upgrade checker. Make note of any issues it finds. You will want to address these
issues in your original environment before you run the actual upgrade on your product farm. For
more information, see Run the pre-upgrade checker (SharePoint Server 2010).
4. Follow the steps in Perform an in-place upgrade (SharePoint Server 2010) to try the in-place
upgrade.
5. Review the results.
Try a database attach upgrade
1. Create a SQL Server backup of your content databases and Shared Services Provider (SSP)
databases.
2. Use SQL Server to restore the backups into your single-server test farm and attach the content
databases to that environment.
For more information, see Back up and restore databases (Office SharePoint Server)
(http://go.microsoft.com/fwlink/?LinkId=188518&clcid=0x409).
3. Run the pre-upgrade checker. Make note of any issues it finds and any changes it makes. You will
want to address these issues and make these changes in your original environment before you run
Important:
Page 114
103
the actual upgrade on your product farm. For more information, see Run the pre-upgrade checker
(SharePoint Server 2010).
4. Follow the steps in Prepare the new SharePoint Server 2010 environment for a database attach
upgrade to configure the test environment for a database attach upgrade.
5. Follow the steps in Attach databases and upgrade to SharePoint Server 2010 to try the database
attach upgrade process.
Review your results After your test upgrade has been completed, you can review the results and revisit your plans. Look at
the log files, look at the upgraded sites, and check out your customizations. How did upgrade work for
your environment? What did you find out? What do you need to rethink about your upgrade plan?
Review the log files
Review the following log files:
The pre-upgrade checker log file.
The log files for the pre-upgrade checker (stsadm -o preupgradecheck) are located at
%COMMONPROGRAMFILES%\Microsoft Shared\Web server extensions\12\LOGS. The log files
are named in the following format: PreUpgradeCheck_YYYYMMDD-HHMMSS-SSS-random-
number.log, where YYYYMMDD is the date and HHMMSS-SSS is the time (hours in 24-hour clock
format, minutes, seconds, and milliseconds) and the random number is used to differentiate
between possible simultaneous attempts to run the pre-upgrade checker.
The SharePoint Products Configuration Wizard (Psconfig.exe) log file (generated when you run this
wizard as part of your trial in-place upgrade).
The PSCDiagnostics log files are located at %COMMONPROGRAMFILES%\Microsoft
Shared\Web server extensions\14\LOGS.
The upgrade log file and the upgrade error log file (generated when you run the upgrade).
The upgrade log file (.log) and the upgrade error log file (.err) are located at
%COMMONPROGRAMFILES%\Microsoft Shared\Web server extensions\14\LOGS. The log files
are named in the following format: Upgrade-YYYYMMDD-HHMMSS-SSS.log, where YYYYMMDD
is the date and HHMMSS-SSS is the time (hours in 24-hour clock format, minutes, seconds, and
milliseconds).
To review the log files to find and troubleshoot issues. start at the top of the files. Errors or warnings
may be repeated if they occur for several site collections in the environment, or if they block the
upgrade process altogether. For example, if you cannot connect to the configuration database, the
upgrade process will try (and fail) several times and these attempts will be listed in the log file.
Search, or visually scan, for the following entries:
Finished upgrading SPFarm Name=<Name of Configuration Database>
Page 115
104
In-place upgrade session finishes. Root object = SPFarm=<Name of Configuration Database>,
recursive = True. 0 errors and 0 warnings encountered.
If you find these entries, the installation was successful.
If you do not find the entries from the previous step, you can identify specific issues that may have
contributed to the failure by searching, or visually scanning, through the Upgrade.log file for the
following terms:
Search for ERROR in the log files to find any failures (such as failing components or faulty
database connections).
Search for WARNING to find issues such as missing features or components.
To find upgrade issues, you may find it useful to use a log parser to run queries against the log files.
Restart upgrade, if necessary
During a database attach upgrade, any sites that cannot be upgraded will be skipped. During an in-
place upgrade, if the server restarts or the upgrade fails, you will need to restart the upgrade process to
upgrade the remaining sites.
To see whether any sites were missed or skipped during upgrade, run the following Stsadm operation
stsadm -o localupgradestatus on every front-end Web server in your SharePoint Server 2010 server
farm. For more information about this operation, see Localupgradestatus: Stsadm operation (Office
SharePoint Server) (http://go.microsoft.com/fwlink/?LinkId=188516&clcid=0x409).
If the upgrade skipped any site collections, you can restart the upgrade process for the database that
contains that site collection by using the following Windows PowerShell cmdlet: upgrade-
spcontentdatabase -id <GUID>. For more information about this cmdlet, see Upgrade-
SPContentDatabase (http://technet.microsoft.com/library/9c7f1a52-02a7-452d-9746-
a4e89aa54874(Office.14).aspx).
For more information, see Resume upgrade (SharePoint Server 2010).
Review upgraded sites
Review your upgraded sites to identify any issues that need to be addressed before you run the
upgrade process on your production environment. For more information about specific things to look
for, see Verify upgrade and review upgraded sites (SharePoint Server 2010).
Adjust your plans and test again Repeat the testing process until you are sure that you have found all the issues that you may face and
that you know how to deal with them. Your goal is to know what your plan is if it is 4:00 P.M. on
Sunday, you have to be back online Monday morning, and it is not going well. Is there a point of no
return? Test your rollback plan and make sure that it works before you begin your real upgrade.
Page 116
105
Estimate how long the upgrade process will take and the space that you need (SharePoint Server 2010)
An important part of planning your upgrade from Microsoft Office SharePoint Server 2007 to Microsoft
SharePoint Server 2010 is determining how long the upgrade process will take and how much storage
space will be required. Every environment is unique and includes different hardware capabilities and
different site characteristics. The space and the length of time that you need to run an upgrade will vary
greatly depending on your environment. The best way to estimate these factors is to perform a trial
upgrade, and then review the space and time that it took. For more information about how to perform a
trial upgrade, see Use a trial upgrade to find potential issues (SharePoint Server 2010).
In this article:
Estimate the space that you need for the upgrade
Estimate how long the upgrade will take
Estimate the space that you need for the upgrade During both the in-place upgrade and database attach upgrade approaches, the databases might
expand during upgrade. Also, many transactions take place while the upgrade process runs, so you
must make sure that the log files have room to expand to accommodate the changes that are occurring.
You have to plan for growth in both the databases and the log files.
When planning your upgrade, make sure that your current environment follows the best practices for
storage for Office SharePoint Server 2007 so that you have the best experience and performance
during upgrade. For more information, see Physical storage recommendations (Office SharePoint
Server) (http://technet.microsoft.com/en-us/library/cc298801.aspx). You should also review the best
practices for SharePoint Server 2010 and make any adjustments needed to your upgraded
environment.
Because of the changes in table structures in the new version, the databases grow temporarily while
the data is reorganized. This space can be recovered after upgrade, but you should ensure that there is
room for the databases to grow up to 50 percent larger than their current sizes during either an in-place
or database attach upgrade (be aware that after upgrade, you can reduce the database again to
recover much of this space). You should also make sure that there is room on your database servers
for your databases to grow over time with typical use. To find out how large your databases currently
are, use Enterprise Manager in Microsoft SQL Server. In addition to database space, you also must
have room for the following items:
Page 117
106
The temporary databases. Ensure that you have enough database space to enable quick growth of
the temporary databases. If you have insufficient space, the upgrade process might time out and
the upgrade will fail.
The upgrade log files.
The transaction log files for the databases. These log files must grow quickly to accommodate the
number of changes occurring in the databases.
In very large environments, there is a possibility that the default growth rate for the
transaction log files (10 percent) is not enough to keep up with the upgrade process; this
can cause a time-out. Again, a trial upgrade is the best way to determine whether the
transaction log files can keep up with the upgrade process. If your environment is very
large, or if the process timed out during a trial upgrade, consider expanding the SQL Server
transaction log files beforehand to make sure you have room for the number of transactions
that must be processed. For more information about how to expand the SQL Server
transaction logs, see Expanding a Database (SQL Server 2005)
(http://go.microsoft.com/fwlink/?LinkId=182619) or Expanding a Database (SQL Server
2008) (http://go.microsoft.com/fwlink/?LinkId=182620).
Estimate how long the upgrade will take With your disk space estimates in hand, and some testing under your belt, you can now calculate a
rough estimate of how long the actual upgrade process will take. Upgrade times vary widely among
environments. The performance for an upgrade depends greatly on the hardware being used, the
complexity of the sites, and the particular characteristics of your implementation. For example, if you
have many large document libraries, these may take longer to upgrade than a simpler site.
Factors that influence performance are described in the following table.
Content factors Hardware factors
The number of:
Site collections
Subwebs
Lists
Document versions (number and size)
Documents
Links
Plus the overall database size itself.
SQL Server disk input/output per second
SQL Server database to disk layout
SQL Server temporary database optimizations
SQL Server CPU and memory characteristics
Web server CPU and memory characteristics
Network bandwidth and latency
Note:
Page 118
107
How your data is structured can affect how long it takes to upgrade it. For example, 10,000 lists with 10
items each will have a longer upgrade time than 10 lists with 10,000 items. The actions required to
upgrade the list infrastructure must be performed for each list, regardless of the number of items;
therefore, more lists equals more actions. The same goes for most of the items in the "content factors"
column in the table above.
The structure of your hardware can also have a big effect on performance. Generally, the database
server performance is more important than Web server performance, but underpowered hardware or
connectivity issues at either tier can significantly affect upgrade performance.
The upgrade approach you have chosen will also make a big difference in how long the process will
take. Performing a database attach upgrade is the quickest method (however, the pre-upgrade and
post-upgrade steps for this approach take longer than for in-place upgrade). An in-place upgrade takes
a little more time because you are upgrading the environment in addition to the sites, but you do not
have as many pre-upgrade and post-upgrade steps when you use this approach.
The best way to estimate overall time is to do a trial upgrade of a small part or all of the data, and then
review the upgrade log files. The log files contain the duration for your upgrade — look for Total
Elapsed Time at the bottom of the upgrade log file. Use this time to project a duration for your full set of
content. You can also use the log files to check your progress during the upgrade process. The
upgrade.log file is located at %COMMONPROGRAMFILES%\Microsoft Shared\web server
extensions\14\LOGS.
The estimate you arrive at based on your trial upgrade is for the actual upgrade process for the data; it
does not include all of the steps that you have to perform before and after this step, which can take
more time than the upgrade of the data itself. When estimating how long the upgrade will take, in
addition to the time that is required for data to be processed, you must also estimate how long the
activities during the pre-upgrade and post-upgrade phases will take.
For pre-upgrade steps, consider the following factors:
Creating custom elements Upgrading Web Parts or re-doing custom templates to take
advantage of new features will take some time. The process of creating custom elements should
begin early, during the evaluation phase of your project.
Backing up the databases For in-place upgrade, you must perform a full backup — not a
differential backup — of your entire environment to make sure that you can recover in the remote
possibility that the upgrade fails and you must rebuild your server farm. For large environments, this
step can take a significant amount of time. In particular, if you are backing up to a network location,
network latency issues can slow this process down.
For post-upgrade steps, consider the following factors:
Verifying sites and making changes Allow enough time for users to validate their sites after the
upgrade. This may take several days. For more information, see Verify upgrade and review
upgraded sites (SharePoint Server 2010).
Creating service applications and configuring services This step only applies during a
database attach upgrade (during an in-place upgrade, the service applications are created as part
of the upgrade process). Creating service applications and configuring services does not take long;
Page 119
108
however, if you need to contact a database administrator to pre-create the databases for you, you
might need a day or two of lead time.
Converting profile properties to taxonomy data and updating the photo store for User Profile
services You must convert user profile properties that include choice lists to use taxonomy
features provided by the Managed Metadata service. Depending on the number of user profiles in
your environment, these steps can add one or more hours to the upgrade process.
Running a people crawl For large organizations, this step can take more than 24 hours.
Running a search crawl on all content For large sites, this step can take more than 24 hours.
Additional factors in your environment can also contribute to longer upgrade times, including the
following:
Very large document libraries A document library with more than 250,000 documents all in the
root of the document library (instead of in folders) will take a long time to upgrade, and the upgrade
might not be successful. Following the Microsoft Office SharePoint Server 2007 guidelines for using
folders to break up large document libraries can help you manage the library size. For example, if
you rearrange the same document library so that the 250,000 documents are divided into 125
folders, it should upgrade more easily.
Very large databases Databases larger than 100 GB can take a long time to upgrade.
If you have content databases that are larger than 100 GB and include mixed site types (such
as My Site Web sites and team sites together with published sites), we recommend that you
divide them up into smaller databases that contain a consistent type of data before you run the
upgrade. Larger databases not only take longer to upgrade, but they can make it harder to
recover if the upgrade is not completed successfully.
You can use the mergecontentdbs or the backup and restore operations in Stsadm.exe to
move sites between databases. For more information, see Mergecontentdbs: Stsadm operation
(Office SharePoint Server) (http://technet.microsoft.com/en-
us/library/cc262923(Office.12).aspx) and Backup and restore: Stsadm operations (Office
SharePoint Server) (http://technet.microsoft.com/en-us/library/cc263431(Office.12).aspx).
If you have a very large database (more than 100 GB) that you cannot break up because most of
the content is in a single site collection, you may want to reconsider your upgrade approach. A
database attach upgrade approach is more difficult with very large databases, because backing up
and restoring such large databases is problematic.
Be sure that you are following the capacity planning guidelines from the previous and new
versions before you attempt the upgrade. If you have exceeded the guidelines for best
performance, the upgrade process might take longer, or it might not succeed (for example,
the process might time out repeatedly on the same large document library). If your
deployment does not meet the recommended capacity guidelines, consider whether you
need to do some work to meet those guidelines before you try the upgrade. Again, a trial
upgrade can help you with that decision.
Note
Caution:
Page 120
109
Communications requirements
You need to notify your users and your team of the upgrade schedule, and give them time to do
their tasks. For more information, see Create a communication plan (SharePoint Server 2010).
Managing system center alerts and alarms
You need to monitor system performance during upgrade, but you will not need to monitor specific
features. Pause any unnecessary alarms and alerts from Microsoft Systems Center Operations
Manager or Microsoft Operations Manager, and then turn them on again after upgrade.
Turning SQL mirroring and log shipping on/off
You should turn off mirroring and log shipping before you upgrade, and then turn them on again
after you are sure that your environment is running correctly after the upgrade. We recommend that
you do not run mirroring or log shipping during upgrade, because this creates additional load on the
servers running SQL Server and also wastes resources mirroring or shipping temporary data.
Test your upgrade process to find out how long it may take, then create a schedule for your upgrade
operations and test that to determine your timeline. You should include the time that you need to do the
pre-upgrade and post-upgrade steps in your operations timeline: If it takes 5 hours to back up your
environment before you start, you need to include that time in your outage window. Also include buffer
time in case you need to restore or recover — you should determine both your planned outage (realistic
case) and your emergency outage (worst case) timelines.
Page 121
110
Cleaning up your environment before upgrade (SharePoint Server 2010)
Before you begin upgrading from Microsoft Office SharePoint Server 2007 to Microsoft SharePoint
Server 2010, you should make sure that your environment is functioning in a healthy state and that you
clean up any content that you do not have to upgrade. You can also take the time to remove or
rearrange content so that you will have the structure that you want after you perform the upgrade.
In this article:
Items to clean up
Making structural changes
Items to clean up Many of these items can be removed or repaired by using Stsadm.exe commands.
To run the Stsadm command-line tool, you must be a member of the Administrators group on
the local computer.
Delete unused or underused site collections and subwebs
You do not want to upgrade content that you do not have to keep. If it has been unused for a long time
and will not be needed in the future, back it up, and then delete it to free storage and administrative
resources, improve upgrade performance, and reduce upgrade risk. Be sure to communicate with site
owners or organizational contacts regarding the site status — you want to make sure that the site is not
needed before you delete it (for example, you do not want to delete sites that are required for
compliance, such as emergency procedures, even though they may not be updated frequently).
For more information about how to delete site collections and subwebs, see:
Deletesite: Stsadm operation (Office SharePoint Server) (http://technet.microsoft.com/en-
us/library/cc261873(Office.12).aspx)
Deleteweb: Stsadm operation (Office SharePoint Server) (http://technet.microsoft.com/en-
us/library/cc262877(Office.12).aspx)
Address large lists
By default, large list query throttling is applied after an upgrade to SharePoint Server 2010. If a list is
very large, and users use a view or perform a query that exceeds the limit or throttling threshold, the
view or query will not be permitted. Check any large lists in your environment and have the site owner
or list owner address the issue before upgrade. For example, they can create indexed columns by using
Important:
Page 122
111
filtered views, organize items into folders, set an item limit on the page for a large view, or use an
external list. For more information about how to address issues with large lists, see Manage lists and
libraries with many items (http://go.microsoft.com/fwlink/?LinkId=182370) on Office Online.
Address large numbers of site collections in a content database
If you have 5,000 or more site collections in a database, consider breaking them out into multiple
databases. In Office SharePoint Server 2007, there was a default warning at 9,000 site collections and
a hard limit at 15,000 site collections. In SharePoint Server 2010, these values change to 2,000 site
collections for the warning and 5,000 site collections for the limit. To avoid errors during upgrade or
broken sites after upgrade, we recommend that you move some site collections into separate
databases. If you have multiple content databases, you can also speed up your upgrade process by
upgrading multiple databases in parallel.
For more information about site collection limits, see SharePoint Server 2010 capacity management:
Software boundaries and limits (http://technet.microsoft.com/library/6a13cd9f-4b44-40d6-85aa-
c70a8e5c34fe(Office.14).aspx). For more information about moving site collections to a new database,
see Move site collections to a new database (split a content database) (Office SharePoint Server 2007)
(http://technet.microsoft.com/en-us/library/cc825328(office.12).aspx).
Address large ACLs
Using item-level permissions frequently can result in large access control list (ACL) entries, which can
in turn create performance problems on your servers. For information about this issue and for tips on
how to handle lots of users, see Knowledge Base Article 953132: How to add lots of users to a site, to a
list, or to a document library in Windows SharePoint Services 3.0 and in SharePoint Server 2007
(http://go.microsoft.com/fwlink/?LinkId=182327)
Remove extraneous document versions
Large numbers of document versions can slow down an upgrade significantly. If you do not have to
keep multiple versions, you can have users delete them manually or use the object model to find and
remove them. For more information about how to programmatically remove extraneous versions, see
Versions Web Service (http://go.microsoft.com/fwlink/?LinkId=182330) on MSDN.
Remove unused templates, features, and Web Parts
First, verify that no sites are using the template, feature, or Web Part. You can use the pre-upgrade
checker (Stsadm -o preupgradecheck) and the Stsadm -o EnumAllWebs operation to identify these
customizations in your environment. Both of these operations were updated in the October 2009
Cumulative Update (CU) and now identify Web Parts, features, event handlers, and setup files that are
being used in your environment. The pre-upgrade checker specifies which server-side files exist in your
environment and how many times they are used. The EnumAllWebs command specifies which files
are used by which sites.
Page 123
112
For more information about how to identify customizations in your environment, see Use a trial upgrade
to find potential issues (SharePoint Server 2010). If customizations are not being used, delete them.
For more information about how to manage these kinds of customizations, see Features and Templates
(http://go.microsoft.com/fwlink/?LinkId=182338) and Solutions and Web Part Packages
(http://go.microsoft.com/fwlink/?LinkId=182332) on MSDN.
Repair data issues
Make sure that you repair any issues in your databases or site content before you upgrade. In
particular, check the following items:
Check databases for corrupted data
Clean up your databases to remove any orphaned sites or other corrupted data, such as a
corrupted list. Consider defragmenting if you have removed sites or subsites from the database.
For more information, see:
Databaserepair: Stsadm operation (Office SharePoint Server) (http://technet.microsoft.com/en-
us/library/cc263282(Office.12).aspx)
Forcedeletelist: Stsadm operation (Office SharePoint Server) (http://technet.microsoft.com/en-
us/library/cc262609.aspx)
Check databases for duplicate or orphaned site collections
Make sure that site collections exist in only one content database. Occasionally, site collections can
leave behind duplicate or orphaned references in old content databases if they are moved to new
ones, or if a duplicate copy of a database was attached to the farm, or if there was an error when a
site collection was provisioned. If a site collection is referenced in more than one content database
or there is more than one instance of the site collection in a content database, it can cause issues
when you upgrade by using the database attach upgrade method. If you upgrade a duplicate
version of the site collection first, the site map in your configuration database might end up pointing
to that version of the site rather than the current version.
Before you upgrade, use the pre-upgrade checker tool to identify all site collections and look for any
duplicate or orphaned sites – any sites with the same URL or the same GUID as another site. For
more information, see Run the pre-upgrade checker (SharePoint Server 2010). Also, use the
enumallwebs operation in Stsadm.exe to find out which sites are in which content databases and
compare the results. For more information, see Enumallwebs: Stsadm operation (Office SharePoint
Server) (http://technet.microsoft.com/en-us/library/dd789634(office.12).aspx). If you find duplicate
or orphaned sites, you can use the deletesite operation in Stsadm.exe to remove the duplicate or
orphaned sites from the database. To delete a site from a specific content database, use the
following command:
Stsadm -o deletesite -force -siteid <SiteID> -database <databasename> –databaseserver
<Servername>
For more information, see Deletesite: Stsadm operation (Office SharePoint Server)
(http://technet.microsoft.com/en-us/library/cc261873(office.12).aspx).
Page 124
113
Check variations
In publishing environments, check for any variations that must be fixed. For more information, see
Variationsfixuptool: Stsadm operation (Office SharePoint Server) (http://technet.microsoft.com/en-
us/library/dd789658(Office.12).aspx).
Making structural changes If you want to make structural changes to your environment, such as moving site collections around or
changing how your databases are allocated, you can use the following methods:
Stsadm -o mergecontentdbs Use this to move site collections between databases. Upgrade is
most efficient when databases contain similar data. Therefore, it is best if any site collections that
share a content database are similar types. You can also use this operation to divide large
databases if they contain multiple site collections. This can also help increase upgrade efficiency.
For more information, see Mergecontentdbs: Stsadm operation (Office SharePoint Server)
(http://technet.microsoft.com/en-us/library/cc262923(Office.12).aspx).
Export and import sites Use this method to move subwebs or site collections within a farm or
between farms. For more information, see Import and export: Stsadm operations (Office SharePoint
Server) (http://technet.microsoft.com/en-us/library/cc262465(Office.12).aspx).
Page 125
114
Troubleshoot upgrade issues (SharePoint Server 2010)
Even after you test the upgrade process to identify potential issues, you might experience unexpected
issues during an upgrade from Microsoft Office SharePoint Server 2007 to Microsoft SharePoint Server
2010. If you experience issues after upgrade, the sooner you detect and fix them, the better the end-
user experience will be.
This article describes general principles for identifying and addressing upgrade issues, and includes a
list of common issues. After you have identified and addressed the issues, you can resume upgrade.
For more information about how to resume upgrade, see Resume upgrade (SharePoint Server 2010).
In this article:
General principles for identifying issues
Common issues
Missing or deprecated server-side files or customizations
Incorrectly configured or missing settings for server farm, Web application, or services
Inconsistent or incorrect update levels
Missing global navigation for blogs
Data issues
UI changes
Lack of space
Forms-based authentication
Security and permissions
.Stp files are not working after upgrade
Cannot find new versions of the Fabulous 40 application templates
Upgrading data from SharePoint Portal Server 2003: pre-upgrade checker reports corrupted
databases
General principles for identifying issues Start by checking the upgrade status to see where upgrade stopped (if it did stop), and check log files
to find any errors or warnings. Next, address the issues that you find before you resume the upgrade.
First, check upgrade status and log files
Upgrade status indicators and log files should give you an indication of what went wrong during the
upgrade process. We recommend that you carefully review all the errors that were logged in the
Page 126
115
upgrade log files. Warnings might not always indicate an issue, but you should review them all to
determine whether any of them are likely to cause even more issues.
1. Check upgrade status by doing one or both of the following:
Review the Upgrade Status page in the SharePoint Central Administration Web site.
Use the Stsadm.exe operation localupgradestatus to check upgrade status.
For more information about how to check upgrade status, see Verify upgrade and review upgraded
sites (SharePoint Server 2010).
2. Review the following log files:
The Setup.exe log file.
The SharePoint Products Configuration Wizard (Psconfig.exe) log file.
The upgrade error log file and the upgrade log file (which contains more detailed information
than the upgrade error log file).
ULS or trace log files.
These files are stored in the %COMMONPROGRAMFILES%\Microsoft Shared\Web Server
Extensions\14\LOGS folder and are named Servername_YYYYMMDD-MMSS.log.
The application event log file.
This file can be viewed by using the Event Viewer.
For more information about the Setup.exe, PSconfig.exe, and upgrade log files, see Verify upgrade
and review upgraded sites (SharePoint Server 2010). For more information about the trace log file,
see Trace Logs (http://go.microsoft.com/fwlink/?LinkId=182380) on MSDN.
Then, address issues in order
Some issues have more effect than others. For example, a missing server-side file can cause many
seemingly unrelated errors at the site level.
Address issues in the following order:
1. Missing server-side files or customizations, such as features or Web Parts.
2. Configuration issues in the server farm, Web application, or services, such as managed paths or
services that are not started.
3. Additional issues that you discover on a site-by-site basis, starting with high-impact, high-profile
sites.
As you identify and fix the top-level issues, you can try running upgrade again to see whether any
issues further along in the upgrade process have also been fixed.
Common issues Check to see whether any of the following issues are causing an upgrade error or warning.
Page 127
116
Missing or deprecated server-side files or customizations
One common error during upgrade is missing server-side files — either files that were installed with
Office SharePoint Server 2007 or customized files. When you prepared for upgrade, you should have
created an inventory of the server-side customizations (such as site definitions, templates, features,
Web Parts, assemblies) that your sites required. (The pre-upgrade checker can help identify these
items.) Check this inventory to make sure that all the files that are needed for your customizations are
installed in your upgrade environment.
If you are performing a database attach upgrade, you can use the test-spcontentdatabaseWindows
PowerShell cmdlet before you upgrade the database to identify any missing files. You can also use the
enumallwebs operation in Stsadm.exe to identify server-side customizations that are being used.
In the upgrade log files, you may see errors such as the following:
ERROR Found Reference Count web(s) using missing web template Site Template Identifier (lcid:
Site Template Language Code) in ContentDatabase Content Database Name.
ERROR Found a missing feature Id = [Feature Identifier]
ERROR File [Relative File Path] is referenced [Reference Count] times in the database, but is not
installed on the current farm.
WARNING WebPart class [Web Part Identifier] is referenced [Reference Count] times in the
database, but is not installed on the current farm.
WARNING Assembly [Assembly Path] is referenced in the database, but is not installed on the
current farm.
WARNING Feature could not be upgraded. Exception: Feature definition id 'Feature Identifier' could
not be found.
If you can obtain a missing server-side file or dependency, install it and then run upgrade again for the
affected sites. If the file or dependency (such as a Web Part) has been deprecated, you have to
investigate whether you want to rebuild the site, page, or Web Part to use a different template, feature,
or Web Part. If you can redo the customization by using dependencies that have not been deprecated,
you can run upgrade again for the affected sites. If you cannot remove the dependency, you cannot
upgrade the site.
After you install the missing file or dependency, use the test-SPContentDatabaseWindows PowerShell
cmdlet on a test server to determine whether any other files for that database are missing. If you only
run the pre-upgrade checker or run upgrade again, the error might not appear in the log files, even
though it might still be occurring.
Incorrectly configured or missing settings for server farm, Web application, or services
Verify your farm and Web application settings, and create and start any missing services.
Verify that any managed paths (included or excluded paths) are configured correctly for each Web
application.
Page 128
117
In the upgrade log files, you may see errors such as the following:
ERROR Template Template Id: SPSite Id=Site Id could not be accessed due to exception. Skipping
SPWeb Id=Web Id for template upgrade. Exception: System.IO.FileNotFoundException: The site
with the id Site Id could not be found.
This error indicates that a managed path is missing. Add the managed path for the site collection
into the Web application and restart upgrade for the content database that contains this site
collection.
Inconsistent or incorrect update levels
You must be running Office SharePoint Server 2007 with Service Pack 2 to run upgrade. If you do not
meet this minimum requirement, you will see an error and upgrade will not run.
In addition, your servers must be updated correctly. For example, if you have applied the Windows
SharePoint Services 3.0 version of an update, but not the Office SharePoint Server 2007 version of the
update, upgrade will not run. The version number for Windows SharePoint Services 3.0 is displayed on
the Servers in Farm page in SharePoint Central Administration. The version number for Office
SharePoint Server 2007 is the version number of the file Microsoft.SharePoint.portal.dll in the
%COMMONPROGRAMFILES%\Microsoft Shared\Web server extensions\12\ISAPI folder. The version
numbers on the Servers in Farm page and for the Microsoft.SharePoint.portal.dll files must match, and
must be at 12.0.6420.1000 or higher to upgrade. For more information, see Deploy software updates
for Office SharePoint Server 2007 (http://technet.microsoft.com/en-
us/library/cc263467(Office.12).aspx).
Missing global navigation for blogs
Another common error is the global navigation is missing for upgraded blogs. This occurs because the
MySiteNavigation (6adff05c-d581-4c05-a6b9-920f15ec6fd9) feature is not enabled during the upgrade.
To enable this feature, run the Enable-SPFeatureWindows PowerShell 2.0 cmdlet.
For more information, see Enable-SPFeature (http://technet.microsoft.com/library/9b68c192-b640-
4cb8-8a92-a98008169b27(Office.14).aspx).
Data issues
The following data issues can cause errors or warnings during upgrade:
Connectivity to data sources. If your servers cannot connect to the databases, they cannot be
upgraded.
Orphaned sites or lists, or other database corruptions. For more information, see Cleaning up your
environment before upgrade (SharePoint Server 2010).
Hidden column data. If the upgrade process adds a column to a list, and a custom column that has
that same name already exists in the list, the custom column is renamed. After upgrade, you might
have to readjust your views to include the renamed column.
Page 129
118
In the upgrade log files, you may see errors such as the following:
WARNING The orphaned sites could cause upgrade failures.
ERROR Database [Content Database Name] contains a site (Id = [Site Collection Identifier], Url =
[Site Collection URL]) that is not found in the site map.
Fix any orphaned items or database corruptions, and then run upgrade again.
UI changes
Changes to the user interface (UI), such as the addition of the Fluent UI (also known as the ribbon) or
adherence to XHTML standards, can cause problems in sites. Occasionally, custom elements (such as
a content type) may have a name that conflicts with a name in the new version. You may also have
pages that must be reverted to the standard site definition, or large lists for which you have to create
new views.
For more information about how to review UI issues in sites, see Verify upgrade and review upgraded
sites (SharePoint Server 2010).
In the upgrade log files, you may see errors such as the following:
Failed to activate site collection features on site Site Url. Exception: A duplicate content type name
"name" was found.
This error indicates that a 3rd party "Summary Info" content type was added to the specified site in
o12 and during upgrade to o14 it name conflicts with our out of the box "Summary Info" content
type. Delete or rename the 3rd party content type in the specified site to something other than
"Summary Info" and re-run upgrade.
Lack of space
If you run out of space (for example, for transaction log files on your database servers), upgrade cannot
continue. Free some space, or increase the size of the transaction log file before you resume upgrade.
For more information, see Managing the Size of the Transaction Log File
(http://go.microsoft.com/fwlink/?LinkID=124882).
Forms-based authentication
Additional steps are necessary if you are upgrading an environment that uses forms-based
authentication. Follow the steps in Configure forms-based authentication for a claims-based Web
application (SharePoint Server 2010) to upgrade forms-based authentication providers.
Security and permissions
If you receive an error about an unknown account, or if a database is not upgraded, verify the following:
For an in-place upgrade, make sure that the account that you use to run the SharePoint Products
Configuration Wizard is a member of the db_owner fixed database role for all the databases that
Page 130
119
you want to upgrade. If it is not a member of this role, you might see an error about an unknown
user account when the wizard starts to upgrade the databases.
For a database attach upgrade, if you are moving databases between instances of SQL Server,
make sure that you verify that security is configured correctly. Check that the accounts that you are
using have the appropriate fixed roles and permissions on the databases, and that they will still be
valid accounts if you are upgrading across domains.
.Stp files are not working after upgrade
Site templates (.stp files) are deprecated in SharePoint Server 2010 and cannot be used to create new
sites. Existing sites that are based on .stp files will continue to function as usual. Solution packages
(.wsp files) are the supported method for creating sites that are based on a template in SharePoint
Server 2010. You can convert an .stp file to a .wsp file to continue to use the template after upgrade.
1. In Office SharePoint Server 2007, create a site that is based on the template, and then upgrade
the site to SharePoint Server 2010.
2. In SharePoint Server 2010, on the Site Actions menu in the upgraded site, click Site Settings.
3. On the Site Settings page, under Site Actions, click Save site as template.
4. On the Save as Template page, enter a File name and Template name, and then click OK.
The site template is saved as a .wsp file to the Solutions Gallery for that site collection and you
can create new sites that are based on that solution.
Cannot find new versions of the Fabulous 40 application templates
Many people have used the "Fabulous 40" templates that were created for Windows SharePoint
Services 3.0. Some of these templates were created as site admin templates (.stp files) and some were
created as server admin templates (.wsp files). Microsoft is not releasing new versions of these
templates for SharePoint 2010 Products. Also, .stp files are deprecated and cannot be used to create
new sites when you upgrade to SharePoint Server 2010.
You can upgrade sites that are based on these templates. However, you should try to upgrade these
sites in a test environment before you upgrade the production environment so that you can discover
any potential issues. Use the pre-upgrade checker to discover any issues. (Some people have seen
problems with custom workflows or CAML-based views in the templates.) Note that after upgrade, you
will be unable to use .stp files to create new templates.
To convert an .stp file to a .wsp file
Page 131
120
The following table describes how the templates can be used.
Type of template Can I upgrade sites that are based
on this template?
Can I use the template after
upgrade?
Site admin (.stp file or site
template)
Yes No
Server admin (.wsp file or
solution package)
Yes* Yes*
*There are issues with some .wsp files after upgrade. In particular, after upgrade, some customers
cannot create new sites that are based on the following templates: Absence Request and Vacation
Schedule Management, Call Center, Help Desk, IT Team Workspace, Knowledge Base, and Physical
Asset Tracking and Management. If you have problems using any of these templates, you can post an
issue to the SharePoint 2010 – Setup, Upgrade, Administration and Operation TechNet Forum
(http://go.microsoft.com/fwlink/?LinkId=201600), or contact Microsoft Customer Support.
If you want to continue to create sites that are based on the site admin templates (.stp files) in
SharePoint Server 2010, you must convert them to solution packages (.wsp files). For more
information, see the section .Stp files are not working after upgrade earlier in this article.
Upgrading data from SharePoint Portal Server 2003: pre-upgrade checker reports corrupted databases
When a content database in an Office SharePoint Server 2007 farm was upgraded from a Microsoft
Office SharePoint Portal Server 2003 content database, you might see the following error when you run
the pre-upgrade checker:
Failed : Content database with modified database schemas
If you did not make any manual schema changes to the database, you can ignore this error and
continue with the ugprade. This is a residual error from the upgrade process from SharePoint Portal
Server 2003 to Office SharePoint Server 2007. For more information, see the Microsoft Knowledge
Base article 954772 (http://support.microsoft.com/kb/954772).
See Also
Use a trial upgrade to find potential issues (SharePoint Server 2010)
Verify upgrade and review upgraded sites (SharePoint Server 2010)
Resume upgrade (SharePoint Server 2010)
Page 132
121
Recovering after a failed upgrade (SharePoint Server 2010)
If the upgrade to Microsoft SharePoint Server 2010 has failed and you do not have time to continue to
troubleshoot the issues or resume the upgrade process, you have to recover your Microsoft Office
SharePoint Server 2007 environment. The steps differ depending on the type of backup you have. If
you were performing a database attach upgrade and you kept your original environment available —
either by using read-only databases or by taking the environment offline — you can recover your
environment easily. If you were performing an in-place upgrade, you must recover your entire
environment and restore the data.
If you do have time, you should troubleshoot the issues and resume upgrade. For more information,
see Troubleshoot upgrade issues (SharePoint Server 2010) and Resume upgrade (SharePoint Server
2010).
In this article:
Recovering when you have read-only databases on a standby environment (database attach
upgrade) (http://technet.microsoft.com/library/3d682920-39bb-4555-afde-
bea38ad7001c.aspx#Readonly)
Recovering when you have a full environment backup (in-place upgrade)
(http://technet.microsoft.com/library/3d682920-39bb-4555-afde-bea38ad7001c.aspx#FullEnv)
Recovering when you have database backups (in-place upgrade)
(http://technet.microsoft.com/library/3d682920-39bb-4555-afde-bea38ad7001c.aspx#DBOnly)
Recovering when you have read-only databases in a standby environment (database attach upgrade) When you perform a database attach upgrade, you can choose to leave your existing environment
available, but with the databases set to read-only. Recovering when you are in this state is the simplest
recovery path, because your original environment is still available, it is merely set to read-only. If you
have to recover your environment, you can merely switch the databases to read/write again and
resume serving requests. The article Run a farm that uses read-only databases (Office SharePoint
Server) (http://technet.microsoft.com/en-us/library/dd793608(Office.12).aspx) describes the steps you
take to set a farm to use read-only databases. To return the read-only farm to full operations, you set
the Database Read-Only entry back to False, and then re-enable the timer jobs listed in the article.
Page 133
122
Recovering when you have a full environment backup (in-place upgrade) If you created a full backup of your environment before you started the upgrade process, you can
restore that full backup to recover your environment. For more information about how to restore from a
full backup, see Restore a farm by using built-in tools (Office SharePoint Server 2007)
(http://technet.microsoft.com/en-us/library/cc262426(Office.12).aspx).
Recovering when you have database backups (in-place upgrade) If you only created backups of your content and Shared Services Provider (SSP) databases, you can
still recover your environment, but it will take longer and involve more steps. You basically have to build
out your environment again and then restore the database backups. For more information about how to
recover an environment and restore backed up content databases, see Restore a farm after a
configuration database problem (Office SharePoint Server) (http://technet.microsoft.com/en-
us/library/cc512815(Office.12).aspx).
Page 134
123
Resume upgrade (SharePoint Server 2010)
In some cases, you might have to restart upgrade to finish upgrading your sites from Microsoft Office
SharePoint Server 2007 to Microsoft SharePoint Server 2010. For example:
During an in-place upgrade, if the server restarts or the upgrade fails, you must restart the upgrade
process by using Psconfig.exe to upgrade the remaining sites.
During a database attach upgrade, any sites that cannot be upgraded will be skipped. After you
have corrected any issues in the sites (such as a missing template or language pack, or the site
being set to read-only or having exceeded its quota), you can restart upgrade by using a Windows
PowerShell command to upgrade just the skipped sites.
One frequent cause of failures during upgrade is that the environment is missing customized
features, solutions, or other elements. Be sure that any custom elements that you need are
installed on your front-end Web servers before you begin the upgrade process. You can use
the pre-upgrade checker — and, for a database attach upgrade, the test-
spcontentdatabaseWindows PowerShell cmdlet — to identify any custom elements that your
sites might be using. For more information, see Identify and install customizations in the article
"Use a trial upgrade to find potential issues."
In this article:
Restart upgrade for a server farm by using Psconfig.exe
Restart upgrade for a database by using Windows PowerShell
Restart upgrade for a server farm by using Psconfig.exe If you determine that upgrade stopped or failed before the SharePoint Products Configuration Wizard
was completed, you can restart the upgrade from that point by running the SharePoint Products
Configuration Wizard again or by using a command line operation. This process is also known as
forcing a software upgrade. Be sure to research and address the problem that caused the failure or
stoppage before you restart upgrade.
1. Verify that you have the following administrative credentials:
To use Psconfig.exe, you must be a member of the local Administrators group on the
server.
2. Open a Command Prompt window and navigate to the following directory:
Note:
To restart upgrade for the server farm
Page 135
124
%COMMONPROGRAMFILES%\Microsoft shared\Web server extensions\14\Bin\
3. Type the following command:
psconfig -cmd upgrade -inplace v2v -passphrase <passphrase> -wait
There is an optional parameter, -force, that can force the upgrade to continue if the command
does not work. Add -force to the end of the command string to force the upgrade process to
continue.
You can enable Windows Installer logging before you start the software upgrade installation
again. To enable logging for Windows Installer, see Microsoft Knowledge Base article 99206:
How to enable Windows Installer logging (http://go.microsoft.com/fwlink/?LinkID=99206).
Restart upgrade for a database by using Windows PowerShell If the upgrade skipped any site collections during in-place upgrade or database attach upgrade, you
can restart the upgrade process for the database that contains that site collection by using a Windows
PowerShell cmdlet.
1. Verify that you meet the following minimum requirements: See Add-SPShellAdmin.
2. On the Start menu, click All Programs.
3. Click Microsoft SharePoint 2010 Products.
4. Click SharePoint 2010 Management Shell.
5. At the Windows PowerShell command prompt (PS C:\>), type the following command:
upgrade-spcontentdatabase -id <GUID>
Where GUID is the identifier for the database. You can run the following cmdlet to find the
GUID for a content database:
Get-SPContentDatabase -Identity<content_database_name>
For more information, see Upgrade-SPContentDatabase
(http://technet.microsoft.com/library/9c7f1a52-02a7-452d-9746-a4e89aa54874(Office.14).aspx).
Note:
To restart upgrade for a database by using Windows PowerShell
Page 136
125
Perform pre-upgrade steps (SharePoint Server 2010)
After you have planned your upgrade process to Microsoft SharePoint Server 2010, you can start the
upgrade process by following the required pre-upgrade steps.
In this section:
Run the pre-upgrade checker (SharePoint Server 2010)
The pre-upgrade checker identifies potential upgrade issues in your environment. Run this as you
plan your upgrade and before you start the upgrade process, so that you can address these issues.
Back up the entire environment before an in-place upgrade (SharePoint Server 2010)
Create a full backup of your environment to ensure that you can recover if upgrade does not go as
planned.
Page 137
126
Run the pre-upgrade checker (SharePoint Server 2010)
You can use the pre-upgrade checker to report on the status of your environment and SharePoint sites
before you upgrade to Microsoft SharePoint Server 2010. We highly recommend that the server
administrator run the pre-upgrade checker and resolve as many problems as possible before
scheduling the upgrade.
The pre-upgrade checker is an Stsadm operation that you run in a Microsoft Office SharePoint Server
2007 environment to find any potential issues for upgrade and to review recommendations and best
practices. The operation is available with Office SharePoint Server 2007 Service Pack 2 and has been
updated in the October 2009 Cumulative Update for Windows SharePoint Services 3.0 and Office
SharePoint Server 2007. You can download and install the October 2009 Cumulative Update from
October 2009 Cumulative Update Packages for SharePoint Server 2007 and Windows SharePoint
Services 3.0 are published (http://go.microsoft.com/fwlink/?LinkID=169179).
You might need to run the pre-upgrade checker more than once. For example, if you run the
tool to evaluate your server farm but do not perform the upgrade for a few weeks, you can run
the tool again just before you perform the upgrade to scan any new sites and to ensure that no
additional issues have appeared in the meantime.
In this article:
About the pre-upgrade checker report
Run the pre-upgrade checker
One frequent cause of failures during upgrade is that the environment is missing customized
features, solutions, or other elements. Be sure that any custom elements you need are installed
on your front-end Web servers before you begin the upgrade process. You can use the pre-
upgrade checker — and, for a database attach upgrade, the test-spcontentdatabaseWindows
PowerShell cmdlet — to identify any custom elements that your sites might be using. For more
information, see Identify and install customizations in the article "Use a trial upgrade to find
potential issues."
About the pre-upgrade checker report The pre-upgrade checker reports information about the status of your environment and the SharePoint
sites in that environment, including:
Upgrade readiness and supported paths Returns a list of all servers and components in the
farm and information about whether the servers meet requirements for upgrading.
Note:
Note:
Page 138
127
Alternate access mapping settings Returns a list of the alternate access mapping URLs that
are being used in the farm.
Installed elements Returns a list of all site definitions, site templates, features, and language
packs that are installed in the farm. You need to know which site templates have been installed or
used so that you can verify that they are available after an upgrade or database attach. You also
need to know which elements have been customized so you can verify the customizations again
after the upgrade. For example, you need to know whether a site depends on a language pack for
Office SharePoint Server 2007 that does not exist yet for SharePoint Server 2010, so you can plan
how to handle that site during upgrade.
Unsupported customizations Reports whether any server-side customizations that are not
supported (such as database schema modifications) exist in the farm.
Orphaned objects Lists any database or site orphans in the farm. Objects such as list items, lists,
documents, Web sites, and site collections can become orphaned — that is, the objects exist but
are not associated with a particular site. Because orphaned objects do not work in the previous
version, they won’t work after the upgrade. If you perform an in-place upgrade, the orphaned items
will still exist, but will not work. We recommend that you repair any orphaned objects before
upgrading.
Members of the Administrators group on the front-end Web servers can repair orphaned
items before the upgrade by following the steps in Knowledge Base article 918744,
Description of a new command-line operation that you can use to repair content databases
in Windows SharePoint Services
(http://go.microsoft.com/fwlink/?linkid=69958&clcid=0x409).
Valid configuration settings Reports any missing or invalid configuration settings (such as a
missing Web.config file, invalid host names, or invalid service accounts) that exist in the farm.
Database requirements Reports whether the databases meet the requirements for upgrade —
for example, databases are set to read/write, and any databases and site collections that are stored
in the Windows Internal Database are not larger than 4 GB.
Use the information gathered from the pre-upgrade checker to determine:
Whether to perform an in-place upgrade or a database attach upgrade.
Determine upgrade approach (SharePoint Server 2010) provides information to help you decide
which type of upgrade to perform. It is important to consider the report generated by the pre-
upgrade checker when you make this decision. If your servers do not meet the requirements for in-
place upgrade, you need to consider performing a database attach upgrade.
Whether to upgrade some or all site collections that contain customized sites.
Which sites need to have customizations reapplied or redone after upgrade and therefore might
take longer than others in the review stage.
Tip:
Page 139
128
A worksheet is available so you can record information about your environment while you prepare for
upgrade. Download the worksheet from http://go.microsoft.com/fwlink/?LinkId=179928
(http://go.microsoft.com/fwlink/?LinkId=179928).
Run the pre-upgrade checker Before you perform this procedure, confirm that:
Your system is running Office SharePoint Server 2007 with Service Pack 2
1. Verify that you have the following administrative credentials:
To use Stsadm, you must be a member of the local Administrators group on the server.
2. Click Start, right-click Command Prompt, and then click Run as administrator.
3. In the Command Prompt window, navigate to the following directory:
%COMMONPROGRAMFILES%\Microsoft Shared\Web Server Extensions\12\bin
4. Type the following command and press ENTER:
STSADM.EXE -o preupgradecheck
This command checks both the local server and your farm-level settings. For a list of other
parameters you can use with this operation, see Preupgradecheck: Stsadm operation (Office
SharePoint Server) (http://technet.microsoft.com/en-us/library/dd789638(Office.12).aspx). For a
list of rules included in the pre-upgrade checker, see Pre-upgrade scanning and reporting for
future releases (Office SharePoint Server) (http://technet.microsoft.com/en-
us/library/dd793609(Office.12).aspx).
After you run the pre-upgrade checker, the report automatically opens in your default browser. You can
also view the report by opening it from its location in the %COMMONPROGRAMFILES%\Microsoft
Shared\Web Server Extensions\12\LOGS directory. The report is named in the following format:
PreUpgradeCheck_YYYYMMDD-HHMMSS-SSS-random-number.htm, where YYYYMMDD is the date
and HHMMSS-SSS is the time (hours in 24-hour clock format, minutes, seconds, and milliseconds),
and the random number is used to differentiate between possible simultaneous attempts to run the pre-
upgrade checker. There are also TXT and XML versions of the report in the same location.
Use the report to find and troubleshoot issues. You can also share the relevant results with other
members of the upgrade team. For example, you can report issues such as customized site templates
or custom Web Parts to the appropriate site owner, Web designer, or developer before scheduling the
upgrade, to give them time to resolve the issues.
To run the pre-upgrade checker
Page 140
129
Back up the entire environment before an in-place upgrade (SharePoint Server 2010)
To ensure that you can recover the existing environment in case something goes wrong during the
upgrade process, you must back up the Microsoft Office SharePoint Server 2007 environment before
you run the upgrade process.
If you are running Office SharePoint Server 2007 in a Hyper-V virtual environment, see Using
SharePoint Products and Technologies in a Hyper-V virtual environment
(http://go.microsoft.com/fwlink/?LinkID=125834&clcid=0x409).
Back up the environment You can do a full backup of the Office SharePoint Server 2007 environment. We recommend that you
perform a full backup of the farm before upgrading.
To back up the Office SharePoint Server 2007 environment, use the procedures described in Back up a
farm by using built-in tools (Office SharePoint Server 2007)
(http://go.microsoft.com/fwlink/?LinkID=105986&clcid=0x409).
If you have deployed customizations, you must also back up the customizations. For more information,
see Back up and restore customizations (Office SharePoint Server 2007)
(http://go.microsoft.com/fwlink/?LinkId=186626).
Test the backups You have to be sure that these backups are valid so that you can recover if there is a hardware failure
or data corruption during the upgrade process. To test the backups, set up a non-production Office
SharePoint Server 2007 farm, restore the backups and install any customizations (such as site
definitions, Web Parts, and so on), and then verify that the restored backup is functional.
To do this, use the procedures described in Restore a farm by using built-in tools (Office SharePoint
Server 2007) (http://go.microsoft.com/fwlink/?LinkID=105987&clcid=0x409).
See Also
Back up and restore a farm (Office SharePoint Server 2007)
(http://go.microsoft.com/fwlink/?LinkId=186629&clcid=0x409)
Page 141
130
Perform an in-place upgrade (SharePoint Server 2010)
Now that you have learned about the upgrade process by reading the articles in About the upgrade
process (SharePoint Server 2010), and planned for your upgrade by following the steps in the articles in
Plan and prepare for upgrade (SharePoint Server 2010), you are ready to perform the in-place upgrade
to Microsoft SharePoint Server 2010. You can use the steps in this section for both a trial upgrade and
your actual in-place upgrade on your production farm.
In this section:
Checklist for in-place upgrade (SharePoint Server 2010)
Use this checklist to make sure that you follow all necessary steps as you prepare for upgrade,
perform the upgrade, and perform post-upgrade steps.
Upgrade in place to SharePoint Server 2010
Get all the steps that you need to perform an in-place upgrade, from installing prerequisites to
upgrading sites.
Roadmap for in-place upgrade with detached databases (SharePoint Server 2010)
Understand the process for using the detach databases hybrid approach to upgrade. This approach
combines an in-place upgrade with the efficiency and speed of upgrading multiple databases at the
same time.
Install available language template packs (SharePoint Server 2010)
Install any language packs that you need for your environment, after you run Setup and before you
run the SharePoint Products Configuration Wizard.
Page 142
131
Checklist for in-place upgrade (SharePoint Server 2010)
This article contains a checklist you can use to make sure that you followed all necessary steps as you
prepare for upgrade, perform the upgrade, and perform post-upgrade steps.
In this article:
Prepare for upgrade
Perform the upgrade
Perform post-upgrade steps
Some of the steps include notes about the amount of time the steps might take. These are rough
estimates only, to give you a relative idea of the duration of the step. To find out how much time each
step will take for your environment, we recommend that you perform trial upgrades in a test
environment. For more information, see Estimate how long the upgrade process will take and the space
that you need (SharePoint Server 2010) and Use a trial upgrade to find potential issues (SharePoint
Server 2010).
Prepare for upgrade Follow these steps in order before you begin an in-place upgrade:
Pre-upgrade steps for an in-place upgrade Notes
[ ] Run the pre-upgrade checker
Run the pre-upgrade checker and
address any issues. Use the report
that is generated by the tool to fill
out the Upgrade planning
worksheet.
Detailed steps: Run the pre-
upgrade checker (SharePoint
Server 2010).
Perform this step multiple times
as you clean up your environment
and test your upgrade process.
Running the checker takes only a
few minutes, but addressing any
issues might take days or weeks.
[ ] Clean up your environment
Before you begin the upgrade,
make sure that your environment
functions in a healthy state and that
you clean up any content that you
do not have to keep. Remove or
Perform this step once for the
whole environment.
This process might take days or
weeks to complete.
Page 143
132
Pre-upgrade steps for an in-place upgrade Notes
repair any orphaned sites or data,
address any large lists or large
access control lists (ACLs), remove
extraneous document versions, and
remove any unused templates,
features, or Web Parts.
Detailed steps: Cleaning up your
environment before upgrade
(SharePoint Server 2010).
[ ] Record settings for user profile
synchronization
Record the settings used for user
profile synchronization in your
previous environment in the
upgrade worksheet. You will apply
them to your new environment
when you create and enable the
User Profile Synchronization
service. Record settings for
connections, property mappings,
and filters.
Perform this step once for the
whole environment.
[ ] Record blocked file types
Blocked file types are not
preserved during upgrade. Copy
the list of blocked file types and
save the list in the upgrade
worksheet so you can reapply the
settings after upgrade.
Perform this step once for the
whole environment.
[ ] Back up your environment
Back up your entire environment to
ensure that you can recover the
existing environment in case
something goes wrong during the
upgrade process.
Detailed steps: Back up the entire
environment before an in-place
upgrade (SharePoint Server 2010).
Perform this step once for the
whole environment.
This step can take an hour,
several hours, or longer,
depending on your data set and
your environment.
Page 144
133
Perform the upgrade Follow these steps in order during an in-place upgrade. Steps required for in-place upgrade with
detached databases are also included.
Perform the in-place upgrade Notes
[ ] Run the pre-upgrade checker
Run the pre-upgrade checker again to
identify any new or remaining issues
before you start the upgrade.
Detailed steps: Run the pre-upgrade
checker (SharePoint Server 2010).
Running the checker takes only a
few minutes, but addressing any
issues might take longer.
[ ] Install prerequisites on all servers
Before you can upgrade, you must run
the prerequisite installer successfully
on each Web server that has Office
SharePoint Server 2007 installed.
Detailed steps: Install prerequisites in
the "Upgrade in place to SharePoint
Server 2010" article.
Perform this step on each Web
server and application server in
your environment.
[ ] Detach databases (in-place upgrade
with detached databases only)
If you are performing an in-place
upgrade with detached databases,
detach the databases before you run
Setup.
Detailed steps: Roadmap for in-place
upgrade with detached databases
(SharePoint Server 2010).
Perform this step for each
content database and Shared
Services Provider (SSP)
database in your environment.
[ ] Disconnect users
If you are upgrading a server farm,
disconnect all the users from the
server farm by stopping the World
Wide Web Publishing Service
(W3SVC) on all Web servers.
Perform this step on each Web
server in your environment.
Page 145
134
Perform the in-place upgrade Notes
[ ] Run Setup on all servers
Run Setup on all servers to upgrade
the software.
Detailed steps: Run Setup on all
servers in the "Upgrade in place to
SharePoint Server 2010" article.
Perform this step on each Web
server and application server in
your environment.
This step might take a few
minutes or more than an hour,
depending on how many servers
are in your environment.
[ ] Install language packs
Install any language packs you need
before you run the SharePoint
Products Configuration Wizard.
Detailed steps: Install available
language template packs (SharePoint
Server 2010).
Perform this step on each Web
server in your environment.
This step should take only a few
minutes per Web server.
[ ] Run the SharePoint Products
Configuration Wizard
If you are upgrading a server farm,
first run the SharePoint Products
Configuration Wizard on the server
that is running SharePoint Central
Administration, pause and run the
wizard on the other servers in the
farm, and then return to the first server
to complete the wizard.
Important:
You must upgrade SharePoint
Central Administration before
you attempt to upgrade any
other content in the farm.
Completing the wizard on the
server running SharePoint
Central Administration allows
you to do so.
Detailed steps: Run the SharePoint
Products Configuration Wizard in the
"Upgrade in place to SharePoint
Server 2010" article.
Perform this step on each Web
server and application server in
your environment.
This step might take an hour or
more.
Page 146
135
Perform the in-place upgrade Notes
[ ] Configure forms-based
authentication for a claims-based
Web application (in-place upgrade
with detached databases only)
For Web applications that were
configured to use forms-based
authentication or Web single sign-on
(Web SSO) authentication, you must
perform additional steps before you
attach and upgrade the databases.
First, you convert the Office
SharePoint Server 2007 Web
applications to claims authentication.
After you convert the Web applications
to claims authentication, you configure
your Web application zones for forms-
based authentication (or Web SSO
authentication, as appropriate). Then,
you can migrate users and
permissions to SharePoint Server
2010.
Detailed steps: Configure forms-based
authentication for a claims-based Web
application (SharePoint Server 2010).
Perform this step now if you are
following the in-place upgrade
with detached databases
approach. If you are following a
standard in-place upgrade
approach, perform this step after
upgrade is completed.
Perform this step for any Web
applications that used forms-
based authentication in Office
SharePoint Server 2007.
[ ] Attach databases (in-place upgrade
with detached databases only)
If you are performing an in-place
upgrade with detached databases,
attach the databases and then
upgrade the data.
Detailed steps: Roadmap for in-place
upgrade with detached databases
(SharePoint Server 2010).
Perform this step for each
content database and SSP
database in your environment.
This step might take an hour,
several hours, or days,
depending on your data set,
whether you are upgrading
multiple databases in parallel,
and the hardware on the Web
servers, database servers, and
storage subsystem.
[ ] Monitor upgrade progress
Use the Upgrade Status page in
SharePoint Central Administration to
Perform this step once for the
whole environment.
This step might take an hour,
Page 147
136
Perform the in-place upgrade Notes
monitor progress as your sites are
upgraded.
Detailed steps: Verify upgrade and
review upgraded sites (SharePoint
Server 2010).
several hours, or days,
depending on your data set.
Perform post-upgrade steps Perform the following steps in order after you perform an in-place upgrade.
Post-upgrade steps for an in-place upgrade Notes
[ ] Configure forms-based
authentication for a claims-based
Web application
For Web applications that were
configured to use forms-based
authentication or Web single sign-on
(Web SSO) authentication, you must
perform additional steps after
upgrading. First, you convert the
Office SharePoint Server 2007 Web
applications to claims
authentication. After you convert the
Web applications to claims
authentication, you configure your
Web application zones for forms-
based authentication (or Web SSO
authentication, as appropriate).
Then, you can migrate users and
permissions to SharePoint Server
2010.Detailed steps: Configure
forms-based authentication for a
claims-based Web application
(SharePoint Server 2010).
Perform this step for any Web
applications that used forms-
based authentication in Office
SharePoint Server 2007.
[ ] Configure new and upgraded
services after in-place upgrade
Perform this step once for your
environment.
Page 148
137
Post-upgrade steps for an in-place upgrade Notes
Many new services are available in
SharePoint Server 2010. You can
enable these new services after you
perform an in-place upgrade by
using the Farm Configuration
Wizard or by configuring them
individually.
[ ] Upgrade profile properties to
taxonomy data and update the
photo store for User Profile
services
Data in profile properties in
Microsoft Office SharePoint Server
2007 that had multiple values was
stored in the SSP database as part
of the Profile Services data. For
SharePoint Server 2010, this data
must be converted to taxonomy data
and be stored in the managed
metadata database. When you
upgrade, any photos that were
stored as profile pictures must be
updated. If you do not update the
photo store data, either no photos
will be displayed or some photos
might appear distorted. You perform
these actions from the command
line by using Windows PowerShell
cmdlets.Detailed steps: Upgrade
profile properties to taxonomy data
and update the photo store for
Profile Services
Perform this step once for each
User Profile service application in
your environment.
This step contains a lot of smaller
steps. Depending on the
complexity of your user profile
data and your configuration, this
might take an hour or several
hours to complete.
[ ] Create and configure the Secure
Store service application and
migrate SSO data to the Secure
Store service
The SSO service that was available
in Office SharePoint Server 2007
Perform this step for each Secure
Store service application that
needs data from a previous SSO
service.
Page 149
138
Post-upgrade steps for an in-place upgrade Notes
has been replaced with the Secure
Store service in SharePoint Server
2010. There is no direct upgrade
path for the data and settings from
SSO to the Secure Store service,
but you can migrate data from the
SSO database to a new Secure
Store database. Excel Services
Application needs the Secure Store
service account to function correctly.
Detailed steps: Create and
configure the Secure Store service
application and migrate SSO data to
the Secure Store service
[ ] Upgrade solutions that depend on
the Business Data Catalog
If your Business Data Catalog
solution depended on the Web Parts
that are provided by Office
SharePoint Server 2007 and
SharePoint Server 2010 by default
(such as the Business Data List
Web Part or the Business Data
Actions Web Part), you must
upgrade your solution to use the
upgraded application definitions
(called "BDC models") in the
Business Data Connectivity service,
because those Web Parts have
been upgraded to use the new
object model provided by the new
service.
Detailed steps: Upgrading solutions
that depend on the Business Data
Catalog and Plan to upgrade to
Business Connectivity Services
(SharePoint Server 2010).
Perform this step once for your
entire environment.
[ ] Verify upgrade and review
upgraded sites
Perform this step for every
upgraded Web application and
Page 150
139
Post-upgrade steps for an in-place upgrade Notes
Review sites to be sure that they
have been upgraded successfully
and are ready for users to view.
Detailed steps: Verify upgrade and
review upgraded sites (SharePoint
Server 2010).
site collection in your environment.
This step might take an hour,
several hours, or days, depending
on your content.
You should also have site owners
review their sites and report any
issues.
[ ] Start a full crawl
After all content is upgraded and all
settings are configured, you can
start a full search crawl of your
content. This might take several
hours or several days to complete,
depending on how much content
exists in your environment.
Perform this step once for your
entire environment.
Performing a full crawl can take
several hours or days to complete,
depending on the amount of
content in your environment.
See Also
Upgrade Worksheet for SharePoint 2010 Products (http://go.microsoft.com/fwlink/?LinkId=179928)
Page 151
140
Upgrade in place to SharePoint Server 2010
When you run an in-place upgrade from Microsoft Office SharePoint Server 2007 to Microsoft
SharePoint Server 2010, the configuration data for the farm and all the content in the farm is upgraded
on the existing hardware, in a fixed order. When you start the in-place upgrade process, Setup takes
the Web server offline and the Web sites are unavailable until the upgrade is finished, and then Setup
restarts the Web server. After you begin an in-place upgrade, you cannot pause the upgrade or roll
back to the previous version.
One frequent cause of failures during upgrade is that the environment is missing customized
features, solutions, or other elements. Be sure that any custom elements you have to have are
installed on your front-end Web servers before you begin the upgrade process. You can use
the pre-upgrade checker to identify any custom elements that your sites might be using. For
more information, see Identify and install customizations in the article "Use a trial upgrade to
find potential issues."
If you are running a stand-alone installation of SharePoint Server 2010, the User Profile
Synchronization service is not available. If you need to synchronize user profiles with directory
sources such as Active Directory, you must uninstall and reinstall in server farm mode.
You can also use many of the procedures in this article to perform a detach databases hybrid approach
to upgrade, where you upgrade the server and infrastructure in place but upgrade the content
databases by detaching and attaching them in parallel. For information about the detach databases
process, see Roadmap for in-place upgrade with detached databases (SharePoint Server 2010). For
more information about how to choose an upgrade approach, see Determine upgrade approach
(SharePoint Server 2010) and Upgrade process overview (SharePoint Server 2010).
You must be running Service Pack 2 (SP2) of Office SharePoint Server 2007 in a 64-bit
Windows Server 2008 environment to perform an in-place upgrade to SharePoint Server 2010.
If you are in a server farm environment, you must also be running a 64-bit version of Microsoft
SQL Server 2008 R2, SQL Server 2008 with Service Pack 1 (SP1) and Cumulative Update 2,
or SQL Server 2005 with SP3 and Cumulative Update 3.
In this article:
Process overview
Before you begin
Install prerequisites
Run Setup on all servers
Note:
Important:
Important:
Page 152
141
Run the SharePoint Products Configuration Wizard
Check upgrade status for sites
Verification
Additional steps
Process overview By using the procedures in this article, you install SharePoint Server 2010 and upgrade all of the
SharePoint sites in the environment. We recommend that you try out the upgrade process on a test
environment before you attempt to upgrade your production environment. For more information, see
Use a trial upgrade to find potential issues (SharePoint Server 2010).
When you upgrade a server farm, install and configure the new version to the servers in the following
order:
1. Install SharePoint Server 2010 on all servers in the server farm.
2. Install any language packs for SharePoint Server 2010 that you need. For more information, see
Install available language template packs (SharePoint Server 2010).
3. Run the SharePoint Products Configuration Wizard on the front-end Web server that contains the
SharePoint Central Administration Web site.
To determine which server is running SharePoint Central Administration, open the Servers in Farm
page (http://server_name:adminport/_admin/farmservers.aspx) and note which server or servers
have Central Administration services running. Perform this step before you install SharePoint
Server 2010, while SharePoint Central Administration for Office SharePoint Server 2007 is still
available.
If you have multiple servers that are running SharePoint Central Administration, pick one
and use that as the initial server on which to run upgrade. After you have completed the
process on that one, you can continue with any other servers that are running SharePoint
Central Administration.
4. Run the SharePoint Products Configuration Wizard on the remaining front-end Web servers and
application servers in the farm in any order.
For an overview and diagrams of the each upgrade approach, see Upgrade process overview
(SharePoint Server 2010).
If you are using the detach databases hybrid approach for upgrading, the process you follow is
similar, but you detach all content databases before you run Setup, and then attach them again
after you run the SharePoint Products Configuration Wizard. For more information about the
detach databases upgrade approach, see Roadmap for in-place upgrade with detached
databases (SharePoint Server 2010).
Note:
Note:
Page 153
142
Before you begin Before you begin the in-place upgrade, review the following information about permissions, hardware
requirements, and software requirements and steps to perform before beginning the process.
Make sure that you have run the pre-upgrade checker tool (stsadm -o preupgradecheck,
available in Office SharePoint Server 2007 Service Pack 2 and updated in the October 2009
Cumulative Update) and addressed any issues before you begin the upgrade process. For more
information, see Run the pre-upgrade checker (SharePoint Server 2010).
We recommend that you back up your environment before you begin the upgrade process. For
more information, see Back up the entire environment before an in-place upgrade (SharePoint
Server 2010).
Ensure that you have met all hardware and software requirements. You must have a 64-bit version
of Windows Server 2008 or Windows Server 2008 R2. For server farms, you must also have a 64-
bit version of SQL Server 2005 or SQL Server 2008. For more information about these
requirements (such as specific updates that you must install), see Determine hardware and
software requirements (SharePoint Server 2010).
Ensure that you are prepared to set up the required accounts by using appropriate permissions. For
detailed information, see Administrative and service accounts required for initial deployment
(SharePoint Server 2010).
Ensure that the account that you use to run the SharePoint Products Configuration Wizard is a
member of the db_owner fixed database role for all the databases that you want to upgrade.
Install prerequisites Before you can upgrade, you must run the prerequisite installer successfully on each Web server that
has Office SharePoint Server 2007 installed. A prerequisite installer is available to install software
needed to support SharePoint Server 2010.
1. From the product disc, open the installation folder and run PrerequisiteInstaller.exe.
The Microsoft SharePoint Products Preparation Tool opens.
2. Click Next.
3. On the License Terms page, select the I accept the terms of the License Agreement(s)
check box, and then click Next.
The tool runs, installing and configuring required software.
4. Click Next.
5. On the Installation Complete screen, verify that each prerequisite is listed as successfully
installed or already installed.
6. Click Finish to close the wizard.
To run the prerequisite installer
Page 154
143
Run Setup on all servers After all of the prerequisites are installed, you can run Setup.exe on all Web servers in your server farm.
If you are using the detach databases hybrid approach for upgrading, you should detach your
content databases before you run Setup. For more information about how to detach databases,
see Roadmap for in-place upgrade with detached databases (SharePoint Server 2010).
If you are running an in-place upgrade on a server farm, disconnect all the users from the
server farm by stopping the World Wide Web Publishing Service (W3SVC) on all front-end Web
servers. If you allow users in a server farm to connect after the files and databases have been
updated on one Web server, but before the other Web servers have been updated, users will
not be able to browse the Web sites.
1. Run Setup.exe.
2. On the Enter your Product Key page, type your product key, and then click Continue.
3. On the Read the Microsoft Software License Terms page, review the terms, select the I accept
the terms of this agreement check box, and then click Continue.
4. On the Upgrade earlier versions page, click Install Now.
5. Setup runs and installs SharePoint Server 2010.
On the completion page, clear the Run the SharePoint Products Configuration Wizard now
check box, and then click Close.
Before you run the SharePoint Products Configuration Wizard, install any language template packs for
SharePoint Server 2010. For more information, see Install available language template packs
(SharePoint Server 2010).
Run the SharePoint Products Configuration Wizard If you are upgrading a single server, you can run the SharePoint Products Configuration Wizard on only
that server and start to upgrade content. If you are upgrading a server farm, first run the SharePoint
Products Configuration Wizard on the server that is running SharePoint Central Administration, pause
and run the wizard on the other servers in the farm, and then return to the first server to complete the
wizard. It is important to upgrade SharePoint Central Administration before you attempt to upgrade any
other content in the farm, and completing the wizard on the server that is running SharePoint Central
Administration allows you to do so.
Note:
Important:
To install the new version
Page 155
144
Ensure that the account you use to run the SharePoint Products Configuration Wizard is a
member of the db_owner fixed database role for all the databases that you want to upgrade. If
it is not, you might see an error about an unknown user account when the wizard starts to
upgrade the databases.
Be sure that you have installed any language template packs before you run the SharePoint Products
Configuration Wizard.
After you run the SharePoint Products Configuration Wizard, Office SharePoint Server 2007 will
no longer be available. You cannot pause or roll back the setup and upgrade process. Be sure
that you have a current and valid backup of your environment before you proceed with installing
SharePoint Server 2010.
1. Click Start, point to All Programs, point to Administrative Tools, and then click SharePoint
Products Configuration Wizard.
2. In the SharePoint Products Configuration Wizard, on the Welcome to SharePoint Products
page, click Next.
A message appears, notifying you that Internet Information Services (IIS), the SharePoint
Administration Services v4, and the SharePoint Timer Service v4 may need to be restarted or
reset during configuration.
3. Click Yes to continue with the wizard.
4. On the Specify Farm Settings page, in the Passphrase box, type a passphrase and in the
Confirm passphrase box, type the same passphrase.
The passphrase should consist of at least eight characters and should contain characters from
at least three of the following four groups:
English uppercase characters (from A through Z)
English lowercase characters (from a through z)
Numerals (from 0 through 9)
Nonalphabetic characters (such as !, $, #, %)
5. On the Visual Upgrade page, select one of the following options:
Change existing SharePoint sites to use the new user experience. Administrators
control the user experience for end users.
This option allows you to change all sites over to the new user experience without
previewing that experience first. If you select this option, you can also choose between the
following two options:
Preserve customized pages, but update template and application pages to use the
new UI.
Important:
Caution:
To run the SharePoint Products Configuration Wizard
Page 156
145
Reset all customized pages to their original templates. This option will delete
modifications from customized pages and cannot be undone.
Preserve the look and feel of existing SharePoint sites, and allow end users to
update their sites’ user experience.
This is the default option. This option allows the site owners to preview their sites in the
new user experience and determine when they are ready to switch the sites over to the
new user experience permanently.
6. On the Completing the SharePoint Products Configuration Wizard page, verify the settings, and
then click Next.
The SharePoint Products Configuration Wizard runs and configures the configuration database
and SharePoint Central Administration for SharePoint Server 2010.
7. A message appears, notifying you that if you have a server farm with multiple servers, you must
run Setup on each server to install new binary files before you continue the SharePoint
Products Configuration Wizard.
If this is the only server in your farm, or if you have already run Setup on all the servers in
your farm, click OK to continue with the wizard.
If you have not yet run Setup on all the servers in your farm, run Setup on the remaining
servers now, and then return to this server and click OK to continue with the wizard.
The SharePoint Products Configuration Wizard continues the upgrade process by setting up
the configuration database and installing SharePoint Central Administration.
8. On the Configuration Successful, Upgrade in Progress page, review the settings that have
been configured, and then click Finish.
The SharePoint Products Configuration Wizard closes and the Upgrade Status page opens.
You might be prompted to enter your user name and password before the Upgrade Status
page will open. The upgrade process might take awhile to complete, depending on how much
data you have in your farm.
Note:
If you are following the detach databases hybrid approach for upgrade, you can now
begin to attach content databases to upgrade them. For more information, see
Roadmap for in-place upgrade with detached databases (SharePoint Server 2010).
9. If you are upgrading a server farm, you can now complete the SharePoint Products
Configuration Wizard on the other servers in the farm.
Check upgrade status for sites After the SharePoint Products Configuration Wizard has finished, you can monitor the upgrade process
for each site from the Upgrade Status page in SharePoint Central Administration or by using the
localupgradestatus operation in Stsadm.exe. For more information, see Verify upgrade and review
upgraded sites (SharePoint Server 2010).
Page 157
146
After upgrade is completed successfully for all sites, if you stopped the World Wide Web Publishing
Service (W3SVC) on all front-end Web servers before the upgrade, manually start the World Wide Web
Publishing Service on the front-end Web servers to make the Web servers available to users.
Search results might be incomplete or might not be returned for a few minutes after upgrade.
This is because the Search Synchronization Timer job must run after upgrade, and search
results are not available until the job has finished.
Verification If upgrade fails or reports issues, you can refer to the log and error files for more information. For more
information about how to review the log files and how to restart upgrade after a failure, see Verify
upgrade and review upgraded sites (SharePoint Server 2010). If you are using Visual Upgrade, for
more information about previewing sites and changing to the new user interface, see Manage visual
upgrade (SharePoint Server 2010).
Additional steps After you have completed the upgrade, there are several steps that you should take to complete the
configuration for your upgraded farm. For more information, see Perform post-upgrade steps for an in-
place upgrade (SharePoint Server 2010).
See Also
Troubleshoot upgrade issues (SharePoint Server 2010)
Note:
Page 158
147
Roadmap for in-place upgrade with detached databases (SharePoint Server 2010)
When you upgrade from Microsoft Office SharePoint Server 2007 to Microsoft SharePoint Server 2010,
you can perform an in-place upgrade or a database attach upgrade, or you can combine certain
aspects of both approaches to increase availability or throughput during the upgrade process. This
article describes how to perform a hybrid approach that combines in-place upgrade with detaching and
attaching databases so that you can upgrade multiple databases at the same time, possibly even on
separate hardware. You can use this approach to upgrade two or more content databases at a time,
and therefore upgrade more quickly than if you used a standard in-place upgrade (which upgrades
individual content databases and site collections serially). This approach uses the following hybrid
techniques:
Use an in-place upgrade to upgrade the farm and settings.
Detach and upgrade multiple databases in parallel.
Alternative upgrade sequence: Upgrade databases on a temporary small farm.
Note that if you decide to use a temporary small farm to perform the actual upgrade, you must have
direct access to the database servers to copy the databases from. Copying databases over the network
takes time and bandwidth — make sure you test this process to determine whether you have the
resources you need to use a temporary small farm.
For more information about the pros and cons of the different upgrade approaches, see Determine
upgrade approach (SharePoint Server 2010). For a brief overview and graphical description of the
steps you take for each approach, see Upgrade process overview (SharePoint Server 2010).
One frequent cause of failures during upgrade is that the environment is missing customized
features, solutions, or other elements. Be sure that any custom elements you need are installed
on your front-end Web servers before you begin the upgrade process. You can use the pre-
upgrade checker — and, for a database attach upgrade, the test-spcontentdatabaseWindows
PowerShell cmdlet — to identify any custom elements that your sites might be using. For more
information, see Identify and install customizations in the article "Use a trial upgrade to find
potential issues."
In this article:
Process overview
Before you begin
To detach databases and upgrade them in parallel on the same farm
To detach databases and upgrade them in parallel on a temporary small farm
Verification
Additional steps
Note:
Page 159
148
You must be running Service Pack 2 (SP2) of Office SharePoint Server 2007 in a 64-bit
Windows Server 2008 environment to perform an in-place upgrade to SharePoint Server 2010.
If you are in a server farm environment, you must also be running a 64-bit version of one of the
following: Microsoft SQL Server 2008 R2, SQL Server 2008 with Service Pack 1 (SP1) and
Cumulative Update 2, and SQL Server 2005 with SP3 and Cumulative Update 3.
Process overview Because this upgrade approach is a hybrid of the techniques used for in-place upgrade and database
attach upgrade, this article describes how the steps from each approach fit together into the hybrid
process. It does not provide details for every step in the process, because those steps are available in
the following articles:
Upgrade in place to SharePoint Server 2010
Attach databases and upgrade to SharePoint Server 2010
These articles, combined with this roadmap, give you the information you need to perform this hybrid
upgrade.
There are two ways in which you can perform this type of hybrid upgrade: using one farm throughout or
using a temporary small farm to perform the actual upgrade. The sections below provide the steps you
need to take to perform the upgrade by using each of these methods.
Before you begin Before you begin the in-place upgrade, review the following information about permissions, hardware
requirements, and software requirements and steps to perform before beginning the process.
Be sure you have run the pre-upgrade checker tool (stsadm -o preupgradecheck, available in
Office SharePoint Server 2007 Service Pack 2 and updated in the October 2009 Cumulative
Update) and addressed any issues before you begin the upgrade process. For more information,
see Run the pre-upgrade checker (SharePoint Server 2010).
We recommend that you back up your environment before you begin the upgrade process. For
more information, see Back up the entire environment before an in-place upgrade (SharePoint
Server 2010).
Ensure that you have met all hardware and software requirements. You must have a 64-bit version
of Windows Server 2008 or Windows Server 2008 R2. For server farms, you must also have a 64-
bit version of SQL Server 2005 or SQL Server 2008. For more information about these
requirements (such as specific updates that you must install), see Determine hardware and
software requirements (SharePoint Server 2010).
Ensure that you are prepared to set up the required accounts by using appropriate permissions. For
detailed information, see Administrative and service accounts required for initial deployment
(SharePoint Server 2010).
Important:
Page 160
149
To detach databases and upgrade them in parallel on the same farm This section describes the steps to take to use the detach databases upgrade approach on a single
farm.
Process for upgrading in-place with detached databases (same farm)
Detach databases
1. Use the following operation to detach the content databases:
Stsadm.exe -o deletecontentdb -url http://servername-databasenameContentDatabaseName
For more information about this operation, see Deletecontentdb: Stsadm operation (Office
SharePoint Server) (http://technet.microsoft.com/en-us/library/cc262449(Office.12).aspx).
Upgrade the farm in place
1. Install all prerequisites to all servers in the farm.
2. Run Setup on all servers in the farm.
3. Run the SharePoint Products Configuration Wizard on all servers in the farm.
For detailed procedures that describe these steps, see Upgrade in place to SharePoint Server 2010.
Attach the databases and upgrade the content
1. Add the content databases to the Web applications.
Use the following Windows PowerShell cmdlet to add and upgrade the content databases:
Mount-SPContentDatabase -Name <DatabaseName> -DatabaseServer <ServerName> -
WebApplication <URL> [-Updateuserexperience]
2. Verify upgrade for the first database.
3. Repeat the restore-and-add-database procedures for remaining databases in parallel.
For detailed procedures that describe these steps, see Perform a database attach upgrade to
SharePoint Server 2010.
To detach databases and upgrade them in parallel on a temporary small farm This section describes the steps to take to use the detach databases upgrade approach on two farms:
the original farm and a temporary small farm.
Process for upgrading in-place with detached databases (temporary small farm)
Set up a temporary small farm to use in upgrading the databases
For detailed procedures that describe these steps, see Prepare the new SharePoint Server 2010
environment for a database attach upgrade.
Page 161
150
Process for upgrading in-place with detached databases (temporary small farm)
2 - Detach databases from the original farm
1. Back up the previous version databases by using SQL Server tools.
For detailed procedures about backing up the databases, see Perform a database attach upgrade
to SharePoint Server 2010.
2. Use the following operation to detach the content databases:
Stsadm.exe -o deletecontentdb -url http://servername-databasenameContentDatabaseName
For more information about this operation, see Deletecontentdb: Stsadm operation (Office
SharePoint Server) (http://technet.microsoft.com/en-us/library/cc262449(Office.12).aspx).
Upgrade the original farm in place
1. Install all prerequisites to all servers in the farm.
2. Run Setup on all servers in the farm.
3. Run the SharePoint Products Configuration Wizard on all servers in the farm.
For detailed procedures that describe these steps, see Perform an in-place upgrade (SharePoint Server
2010).
Attach the databases to the temporary small farm and upgrade the content
1. Restore the backup copy to the new farm.
2. Add the content databases to the Web applications.
Use the following Windows PowerShell cmdlet to add and upgrade the content databases:
Mount-SPContentDatabase -Name <DatabaseName> -DatabaseServer <ServerName> -
WebApplication <URL> [-Updateuserexperience]
3. Verify upgrade for the first database.
4. Repeat the restore-and-add-database procedures for remaining databases in parallel.
For detailed procedures that describe these steps, see Perform a database attach upgrade to
SharePoint Server 2010.
Back up the databases from the temporary small farm and attach them to the original farm
1. Back up the upgraded databases by using SQL Server tools.
2. Restore the backup copy to the original farm.
3. Add the upgraded content databases to the original Web applications.
This is basically the same process as the previous step; however, you are moving the databases from
the temporary small farm back to the original farm. The same procedures apply as in the previous
steps.
Page 162
151
Verification If upgrade fails or reports issues, you can refer to the log and error files for more information. For more
information about reviewing the log files, and about restarting upgrade after a failure, see Verify
upgrade and review upgraded sites (SharePoint Server 2010).
Additional steps After you have completed the upgrade, there are several steps that you should take to complete the
configuration for your new farm. For more information, see Perform post-upgrade steps for an in-place
upgrade (SharePoint Server 2010).
Page 163
152
Install available language template packs (SharePoint Server 2010)
Before you can upgrade any sites that are based on a language pack for the previous version, you have
to install the language pack for the new version.
In this article:
About installing language packs and upgrading sites
About changing languages
Moving from a fully localized product to a language pack
Changing languages to a new language pack
About installing language packs and upgrading sites If you want to install a language pack for Microsoft SharePoint Server 2010, do so after running Setup
and before running the SharePoint Products Configuration Wizard. This way, you can upgrade any sites
based on a language pack for a previous version along with the other sites during the upgrade process.
For more information about installing language packs, see Deploy language packs (SharePoint Server
2010) (http://technet.microsoft.com/library/26c07867-0150-463d-b21a-a6d42aecf05a(Office.14).aspx)
in the Deployment Guide.
You can also install a language pack after you have run the SharePoint Products Configuration Wizard,
and after you have upgraded the sites in your environment that are not based on a language pack. If
you choose this option, you must then use the PSConfig command-line tool to upgrade the sites based
on the newly installed language pack.
About changing languages Generally, a cross-language upgrade is not supported. You must upgrade from and to the same
language. For example, if you are running U.S. English in the previous version, you need to upgrade to
U.S. English in the new version. If you want to change languages, you must first perform the upgrade
and then change the language for the site.
However, this process is complicated in some cases — for example, when the previous version had a
fully localized product for a particular language but the new version only has a language pack, or when
the new version has a language pack for a new language that was not available in the previous version.
Page 164
153
Moving from a fully localized product to a language pack Use the following procedure on each Web server to upgrade from a language that was supported with a
fully localized product in the previous version, but that is only supported by a language pack in the new
version:
1. Verify that the user account that is performing this procedure is a member of the Farm
Administrators SharePoint group.
2. Choose a language to install for the new version (for example, English). This is the language
that the SharePoint Central Administration Web site will use.
3. In the SharePoint Products Configuration Wizard, when you are prompted to install language
packs, stop the wizard and install the appropriate language pack.
If you had additional previous-version language packs installed, install the corresponding
SharePoint Server 2010 language packs now by canceling the wizard, and then running the
appropriate Setup programs to install the language packs.
Note:
You must be a member of the Administrators group on the local computer to perform
this step.
For more information about installing language packs, see Deploy language packs (SharePoint
Server 2010) (http://technet.microsoft.com/library/26c07867-0150-463d-b21a-
a6d42aecf05a(Office.14).aspx) in the Deployment Guide.
4. Start the configuration wizard again to complete the upgrade process.
Changing languages to a new language pack Use the following process to upgrade from a language in the previous version to a different language in
the new version (for example, if the language you want was not available in the previous version, but is
now available as a language pack in the new version).
1. Verify that the user account performing the next two steps is a member of the Administrators
group on the local computer.
2. Upgrade to the new version in the same language that you used for the previous version.
3. After the upgrade is complete, install the new language pack.
4. Verify that the user account performing the next two steps is a member of the Farm
Administrators SharePoint group.
To move from a fully localized product to a language pack
To change languages to a new language pack
Page 165
154
5. Create new sites based on the new language pack.
6. Manually move your content to the new sites.
See Also
Deploy language packs (SharePoint Server 2010) (http://technet.microsoft.com/library/26c07867-0150-
463d-b21a-a6d42aecf05a(Office.14).aspx)
Page 166
155
Perform a database attach upgrade to SharePoint Server 2010
Now that you have learned about the upgrade process by reading the articles in About the upgrade
process (SharePoint Server 2010), and planned for your upgrade by following the steps in the articles in
Plan and prepare for upgrade (SharePoint Server 2010), you are ready to perform a database attach
upgrade to Microsoft SharePoint Server 2010. You can follow the steps in this section for both a trial
upgrade and your actual in-place upgrade on your production farm.
In this section:
Checklist for database attach upgrade (SharePoint Server 2010)
Use this checklist to make sure that you follow all necessary steps as you prepare for upgrade,
perform the upgrade, and perform post-upgrade steps.
Prepare the new SharePoint Server 2010 environment for a database attach upgrade
Before you can attach and upgrade your databases, you must fully configure your new
environment.
Attach databases and upgrade to SharePoint Server 2010
After your new environment is fully configured, follow these steps to attach the databases and
upgrade your SharePoint sites.
Page 167
156
Checklist for database attach upgrade (SharePoint Server 2010)
This article contains a checklist you can use to make sure that you followed all necessary steps as you
prepare for upgrade, perform the upgrade, and perform post-upgrade steps.
In this article:
Prepare for upgrade
Perform the upgrade
Perform post-upgrade steps
Some of the steps include notes about the amount of time the steps might take. These are rough
estimates only, to give you a relative idea of the duration of the step. To find out how much time each
step will take for your environment, we recommend that you perform trial upgrades in a test
environment. For more information, see Estimate how long the upgrade process will take and the space
that you need (SharePoint Server 2010) and Use a trial upgrade to find potential issues (SharePoint
Server 2010).
Prepare for upgrade Follow these steps in order before you begin a database attach upgrade:
Pre-upgrade steps for a database attach upgrade Notes
Prepare for upgrade
[ ] Run the pre-upgrade checker
Run the pre-upgrade checker and address any issues.
Use the report that is generated by the tool to fill out
the Upgrade planning worksheet.
Detailed steps: Run the pre-upgrade checker
(SharePoint Server 2010).
Perform this step
multiple times as you
clean up your
environment and test
your upgrade process.
Running the checker
takes only a few minutes,
but addressing any
issues might take days
or weeks.
[ ] Create an inventory of server-side customizations
in the environment
Create an inventory of the server-side customizations
in your environment (solutions, features, Web Parts,
Perform this step for the
whole environment.
Check each Web server
to make sure that you
Page 168
157
Pre-upgrade steps for a database attach upgrade Notes
event handlers, master pages, page layouts, CSS
files, and so on). Much of this information is reported
when you run the pre-upgrade checker. Record all
customizations needed for your environment in the
upgrade worksheet.
Detailed steps: Identify and install customizations in
the "Use a trial upgrade to find potential issues"
article.
don't miss any
customizations. Keep the
inventory up to date as
you prepare for the
upgrade.
[ ] Clean up your environment
Before you begin upgrading, you should make sure
that your environment is functioning in a healthy state
and that you clean up any content that you do not
have to upgrade. Clean up any orphaned sites or
data, address any large lists and large ACLs, remove
extraneous document versions, and remove any
unused templates, features and Web Parts.
Detailed steps: Cleaning up your environment before
upgrade (SharePoint Server 2010).
Perform this step once
for the whole
environment.
This process might take
days or weeks to
complete.
Prepare the new environment
Also see Prepare the new SharePoint Server 2010 environment for a database attach upgrade.
[ ] Install and configure SharePoint Server 2010 and
any language packs
Install the prerequisite software, and then install and
configure SharePoint Server 2010.
Perform these steps on
each server in your farm.
This step might take one
or more hours,
depending on how many
servers are in your
environment.
[ ] Configure service applications
Enable and configure the services you need in your
new environment. Do not configure the User Profile
service application yet. You will enable and configure
the User Profile service application when you upgrade
the Shared Services Provider (SSP) database.
Perform this step once
for the whole
environment.
[ ] Configure general farm settings
Reapply any general farm settings that you must have
from your previous farm — such as blocked file types
Perform this step once
for the whole
environment.
Page 169
158
Pre-upgrade steps for a database attach upgrade Notes
and e-mail and quota settings — and add users or
groups to the Farm Administrators group. Configure
new settings such as usage and health data
collection, diagnostic logging, and mobile accounts.
Important:
If you had disabled the Workflow Auto
Cleanup timer job in your Office SharePoint
Server 2007 environment, make sure that you
disable this timer job in your new environment
also. If this timer job is enabled in the new
environment and disabled in the previous
version environment, you might lose workflow
associations when you upgrade. For more
information about this timer job, see Disable
preservation of workflow history (SharePoint
Server 2010)
(http://technet.microsoft.com/library/1cbc2ed6-
4e14-4cd5-83a4-
076437e984c4(Office.14).aspx).
[ ] Create and configure Web applications
Create a Web application for each Web application
that existed in the old environment.
Perform this step once
for the whole
environment.
[ ] Reapply server-side customizations
Manually transfer all server-side customizations into
your new farm. Refer to the inventory you created in
the upgrade worksheet to make sure that you install
any components that your sites depend on to work
correctly.
Make sure that you
reapply customizations
to all Web servers in the
farm.
[ ] Verify the new environment
After you set up the new environment, you can
perform tests to make sure it contains all the
components you have to have before you upgrade
your data.
Perform this step once
for the whole
environment.
Page 170
159
Perform the upgrade Follow these steps in order during a database attach upgrade. Steps required for database attach with
read-only databases are also included.
Detailed steps: Attach databases and upgrade to SharePoint Server 2010.
Perform the database attach upgrade Notes
[ ] Run the pre-upgrade checker
Run the pre-upgrade checker again to identify any
new or remaining issues before you set the
databases to read-only or back up the databases.
Detailed steps: Run the pre-upgrade checker
(SharePoint Server 2010).
Running the checker takes only
a few minutes, but addressing
any issues might take longer.
[ ] Set the previous version databases to be read-
only (database attach with read-only databases)
If you want your original environment to remain
available to users in a read-only state, set the
databases to read-only before you back them up.
Perform this step for each
content database in your
environment.
Depending on your
organization, you might need a
database administrator to
perform this task.
[ ] Back up databases
Back up all of your content and SSP databases
before you begin the database attach upgrade
process.
Perform this step for each
content database and SSP
database in your environment.
This step can take an hour,
several hours, or longer,
depending on your data set and
your environment.
Depending on your
organization, you might need a
database administrator to
perform this task.
[ ] Detach the previous version databases
(standard database attach)
If you are going to upgrade the original databases
(rather than a backup copy), detach the original
databases from the instance of Microsoft SQL
Server so that you can move them to the new
environment.
Perform this step for each
content database and SSP
database in your environment.
Depending on your
organization, you might need a
database administrator to
perform this task.
Page 171
160
Perform the database attach upgrade Notes
[ ] Restore a backup copy of the database
(database attach with read-only databases)
If you are going to upgrade a copy of the
databases, restore the databases from the backup.
Perform this step for each
content database and SSP
database in your environment.
This step can take an hour or
longer, depending on your data
set and your environment.
Depending on your
organization, you might need a
database administrator to
perform this task.
[ ] Verify custom components
Use the Test-SPContentDatabaseWindows
PowerShell cmdlet to verify that you have all the
custom components that you need for that
database.
Perform this step for each
content database in your
environment.
Running the cmdlet takes only a
few minutes, but addressing
any issues might take longer.
[ ] Verify permissions
Ensure that the account that you use to attach the
databases is a member of the db_owner fixed
database role for the content databases that you
want to upgrade.
[ ] Attach a content database to a Web application
Attach the first content database that you want to
upgrade. You must perform this action from the
command line. You can use the Mount-
SPContentDatabaseWindows PowerShell cmdlet
or the AddContentDB Stsadm operation.
Perform this step for one
content database in your
environment.
This step might take an hour,
several hours, or longer,
depending on your data set and
hardware on the Web servers,
database servers, and storage
subsystem.
[ ] Verify upgrade for the first database
Verify that upgrade succeeded for the first
database, and review the site to see if there are
any issues.
Detailed steps: Verify upgrade and review
upgraded sites (SharePoint Server 2010).
Perform this step for the content
database you just attached.
Page 172
161
Perform the database attach upgrade Notes
[ ] Upgrade the SSP database and configure user
profiles
Before you upgrade any My Site Web sites, you
need to upgrade the SSP database and configure
the User Profile service application.
Perform this step for each SSP
that you had in your original
environment.
This step might take an hour or
more to complete, depending
on your data set and hardware
on the Web servers, database
servers, and storage
subsystem.
[ ] Upgrade My Site Web sites
Configure the My Site host URL and upgrade the
My Site Web sites.
Perform this step for each
content database that contains
My Site Web sites in your
environment.
This step might take an hour,
several hours, or longer,
depending on your data set,
whether you are upgrading
multiple databases in parallel,
and the hardware on the Web
servers, database servers, and
storage subsystem.
[ ] Attach remaining databases
Attach and upgrade the remaining content
databases in your environment. You must perform
this action from the command line.
Perform this step for each of the
remaining content databases in
your environment.
This step might take an hour,
several hours, or longer,
depending on your data set,
whether you are upgrading
multiple databases in parallel,
and the hardware on the Web
servers, database servers, and
storage subsystem.
[ ] Monitor upgrade progress
Use the Upgrade Status page in SharePoint
Central Administration to monitor progress as your
sites are upgraded. Detailed steps: Verify upgrade
and review upgraded sites (SharePoint Server
2010).
Perform this step for each
content database that you
upgrade.
This step might take an hour,
several hours, or days,
depending on your data set.
Page 173
162
Perform the database attach upgrade Notes
[ ] Verify upgrade for the remaining database
Verify that upgrade succeeded for the remaining
databases, and review the sites to see if there are
any issues.
Detailed steps: Verify upgrade and review
upgraded sites (SharePoint Server 2010).
Perform this step for each of the
remaining content databases in
your environment.
This step might take an hour,
several hours, or days,
depending on your content.
Perform post-upgrade steps Follow these steps in order after you perform a database attach upgrade.
Post upgrade steps for database attach upgrade Notes
[ ] Reapply administrator permissions for
services
By default, farm administrators have permissions
to all services when you perform a database
attach upgrade. If you want to apply more
restrictive permissions, do so now.
Perform this step for any services
that require restricted
permissions.
[ ] Upgrade profile properties to taxonomy data
and update the photo store for User Profile
services
Data in profile properties in Microsoft Office
SharePoint Server 2007 that had multiple values
was stored in the SSP database as part of the
Profile Services data. For SharePoint Server
2010, this data must be converted to taxonomy
data and be stored in the managed metadata
database. When you upgrade, any photos that
were stored as profile pictures must be updated.
If you do not update the photo store data, either
no photos will be displayed or some photos
might appear distorted. You perform these
actions from the command line by using
Windows PowerShell cmdlets. Detailed steps:
Upgrade profile properties to taxonomy data and
update the photo store for Profile Services
Perform this step once for each
User Profile service application in
your environment.
This step contains a lot of smaller
steps. Depending on the
complexity of your user profile
data and your configuration, this
might take an hour or several
hours to complete.
Page 174
163
Post upgrade steps for database attach upgrade Notes
[ ] Create and configure the Secure Store
service application and migrate SSO data to
the Secure Store service
The SSO service that was available in Office
SharePoint Server 2007 has been replaced with
the Secure Store service in SharePoint Server
2010. There is no direct upgrade path for the
data and settings from SSO to the Secure Store
service, but you can migrate data from the SSO
database to a new Secure Store database. Excel
Services Application needs the Secure Store
service account to function correctly.
Detailed steps: Create and configure the Secure
Store service application and migrate SSO data
to the Secure Store service
Perform this step for each Secure
Store service application that
needs data from a previous SSO
service.
[ ] Upgrade solutions that depend on the
Business Data Catalog
If you used the database attach method to
upgrade and you want to continue to use the
external data that is accessed through one or
more application definitions, you perform several
additional tasks.
Detailed steps: Upgrading solutions that depend
on the Business Data Catalog
Perform this step once for your
entire environment.
[ ] Update links that are used in any upgraded
InfoPath form templates
For a database attach upgrade, you exported
and imported any InfoPath form templates in
your environment when you created the new
environment. After upgrade, you can now update
the links that are used in those upgraded form
templates to point to the correct URLs by using a
Windows PowerShell cmdlet.
Detailed steps: Update links that are used in any
upgraded InfoPath form templates
Perform this step once for your
entire environment.
[ ] Verify upgrade and review upgraded sites Perform this step for every
Page 175
164
Post upgrade steps for database attach upgrade Notes
Review sites to be sure that they have been
upgraded successfully and are ready for users to
view.
Detailed steps: Verify upgrade and review
upgraded sites (SharePoint Server 2010).
upgraded database and site
collection in your environment.
This step might take an hour,
several hours, or days, depending
on your content.
You should also have site owners
review their sites and report any
issues.
[ ] Start a full crawl
After all content is upgraded and all settings are
configured, you can start a full search crawl of
your content. This might take several hours or
several days to complete, depending on how
much content exists in your environment.
Perform this step once for your
entire environment.
Performing a full crawl can take
several hours or days to complete,
depending on the amount of
content in your environment.
See Also
Upgrade Worksheet for SharePoint 2010 Products (http://go.microsoft.com/fwlink/?LinkId=179928)
Page 176
165
Prepare the new SharePoint Server 2010 environment for a database attach upgrade
When you upgrade from Microsoft Office SharePoint Server 2007 to Microsoft SharePoint Server 2010
by using the database attach approach, you upgrade only the content for your environment and not the
configuration settings. Using a database attach upgrade is useful when you are changing hardware or
want to reconfigure your server farm topology as part of the upgrade process. For more information
about how to choose an upgrade approach, see Determine upgrade approach (SharePoint Server
2010).
Before you can upgrade the data, you must configure a new server or server farm by using SharePoint
Server 2010. This article explains the elements you need to configure to create that new environment.
For more information about the general process of upgrading by using the database attach upgrade
approach, see Upgrade process overview (SharePoint Server 2010).
To perform the steps in this article, you must have administrator rights on the local server
computer. For more information, see Administrative and service accounts required for initial
deployment (SharePoint Server 2010) (http://technet.microsoft.com/library/06765032-fedb-
4b73-a019-f096b48cd2a8(Office.14).aspx).
In this article:
Before you begin
Create and configure the new environment
Verify the new environment
Perform the upgrade
Before you begin Before you begin to create the new environment for a database attach upgrade, review the following
information about permissions, hardware requirements, and software requirements.
Ensure that you have met all hardware and software requirements. You must have a 64-bit version
of Windows Server 2008 or Windows Server 2008 R2. For server farms, you must also have a 64-
bit version of SQL Server 2005 or SQL Server 2008. For more information about these
requirements (such as specific updates that you must install), see Determine hardware and
software requirements (SharePoint Server 2010).
Ensure that you are prepared to set up the required accounts by using appropriate permissions. For
detailed information, see Administrative and service accounts required for initial deployment
(SharePoint Server 2010).
Important:
Page 177
166
Run the pre-upgrade checker on your original environment. The pre-upgrade checker identifies
potential upgrade issues in your environment so that you can address them before you upgrade. It
can also help you identify settings that you need in your new environment. For more information,
see Run the pre-upgrade checker (SharePoint Server 2010).
Create and configure the new environment The process of creating and configuring the new environment contains several steps, which must be
performed in the correct sequence. These steps are:
1. Install SharePoint Server 2010 on the server or servers.
2. Configure service applications.
3. Configure general farm settings.
4. Create and configure Web applications.
5. Reapply customizations.
The remainder of this section describes these steps and provides links to other articles that contain
step-by-step instructions for performing them. After you have performed these steps, you can verify the
environment and then perform the upgrade.
Install
The first step in creating your new environment is to install SharePoint Server 2010 and configure your
new server or server farm. You must do the following:
1. Run the Microsoft SharePoint Products Preparation Tool to install all required software.
2. Run Setup to install the product.
3. Install any language packs that you need in your environment.
4. Run the SharePoint Products Configuration Wizard to configure your server or servers.
The following articles provide step-by-step instructions for performing these tasks.
Install and configure the product
Follow the steps in one of the following articles to install and configure SharePoint Server 2010 on
a single server or server farm:
Deploy a single server with SQL Server (SharePoint Server 2010)
(http://technet.microsoft.com/library/356d3a0b-fc26-455c-9afb-6d2ffdceef84(Office.14).aspx)
Multiple servers for a three-tier farm (SharePoint Server 2010)
(http://technet.microsoft.com/library/4982a861-ad5c-43e4-a49f-958afd4370aa(Office.14).aspx)
For more deployment scenarios (such as installing in a stand-alone environment with SQL
Express), see Deployment scenarios (SharePoint Server 2010)
(http://technet.microsoft.com/library/47db8aed-7e2b-4ccb-b248-d71df3bffa99(Office.14).aspx).
Page 178
167
Install and configure language packs
Follow the steps in Deploy language packs (SharePoint Server 2010)
(http://technet.microsoft.com/library/26c07867-0150-463d-b21a-a6d42aecf05a(Office.14).aspx) to
install and configure any language packs that are needed for the sites in your environment.
Configure service applications
You must create the services settings on your new farm before you upgrade the data in a database
attach upgrade. The steps included in the deployment scenarios articles listed above describe how to
use the Initial Farm Configuration Wizard to enable all services. After running the wizard, you must
transfer any custom settings from your original environment to your new environment and configure any
additional services and settings you need.
Use the Initial Farm Configuration Wizard to enable the following service applications:
Business Data Connectivity service
Data from the Business Data Catalog service is not upgraded to the Business Data Connectivity
service when you perform a database attach upgrade. If you want to continue to use the external
data that is accessed through one or more application definitions, you must complete the following
tasks:
In your original environment, export any application definitions (models) that are required by
your solution from the Office SharePoint Server 2007 Business Data Catalog. For more
information, see Export application definition (http://technet.microsoft.com/en-
us/library/cc816952(Office.12).aspx).
Update the solution to use the object model and features of the Microsoft Business Connectivity
Services. This includes updating the application definition file to be compatible with Microsoft
Business Connectivity Services. For information about the Business Data Connectivity service
object model, see Microsoft SharePoint 2010 Software Development Kit
(http://go.microsoft.com/fwlink/?LinkId=166117).
In your new environment, configure the Business Data Connectivity service application.
After upgrade, import the updated model into the Business Data Connectivity service. For more
information, see Manage BDC models (SharePoint Server 2010)
(http://technet.microsoft.com/library/7b6fced6-c8a9-4d79-a11a-8cf3445c52bf(Office.14).aspx).
Excel Services Application
You must reconfigure this service application when you perform a database attach upgrade. Make
sure that you re-create any trusted data connections. For more information, see Excel Services
administration (SharePoint Server 2010) (http://technet.microsoft.com/library/a96cfa2d-87f8-4991-
801c-fd5482d49d0b(Office.14).aspx).
Managed Metadata service
This is a new service in SharePoint Server 2010. Before you can upgrade user profile data in a
database attach upgrade, you must enable and configure this service application. For more
Page 179
168
information, see Create, update, publish, or delete a managed metadata service application
(SharePoint Server 2010) (http://technet.microsoft.com/library/be30ab95-f6bf-41e1-93ac-
2f5c78ac703b(Office.14).aspx).
Search service application
Search settings are not preserved during a database attach upgrade. You must manually
reconfigure Search before you upgrade. For more information about how to configure Search, see
Post-installation steps for search (SharePoint Server 2010)
(http://technet.microsoft.com/library/c2fab560-bdc2-4093-a6a5-979dcda5bc4d(Office.14).aspx).
Secure Store service
You need to enable and configure this service application so that you can upgrade Excel Services
Application and Business Data Catalog data. For more information, see Create and configure the
Secure Store service application and migrate SSO data to the Secure Store service in the article
Perform post-upgrade steps for a database attach upgrade (SharePoint Server 2010).
Do not enable and configure the User Profile service application by using the Initial Farm
Configuration Wizard. Although you must have configured this service application and the User
Profile Synchronization service before you upgrade the SSP database, specific steps are
required to configure these services. The steps required to configure these services and
upgrade the SSP database are included in the Upgrade the shared services database section
of the article "Attach databases and upgrade to SharePoint Server 2010."
You must also enable and configure the following service:
InfoPath Forms Service
Configure InfoPath Forms Services by using the Configure InfoPath Forms Services link on the
General Application Settings page in SharePoint Central Administration. Export any
administrator-deployed form templates (.xsn files) and data connection files (.udcx files) from your
Office SharePoint Server 2007 environment, and then import them to your new SharePoint Server
2010 environment. For more information, see Configure InfoPath Forms Services (SharePoint
Server 2010) (http://technet.microsoft.com/library/3728d1fa-c1db-4445-8d00-
e26f9015dd95(Office.14).aspx)and Plan to upgrade form templates during an upgrade to
SharePoint Server 2010.
Configure general farm settings
The next step in creating the new environment is to apply general farm settings. You must manually
reapply configuration settings from your previous version farm, including the following:
Incoming and outgoing e-mail settings
Any farm–level security and permission settings, such as adding user or group accounts to the
Farm Administrators group.
Blocked file types
Important:
Page 180
169
Quota templates
And you must configure any new farm-level settings that you want to use, such as the following:
Usage and health data collection
Diagnostic logging
Mobile accounts
For more information about how to configure these settings, see Configure farm settings (SharePoint
Server 2010) (http://technet.microsoft.com/library/069bcdb5-f9bb-4346-8304-
5be2f768e3dc(Office.14).aspx).
If you had disabled the Workflow Auto Cleanup timer job in your Office SharePoint Server 2007
environment, make sure that you disable this timer job in your new environment also. If this
timer job is enabled in the new environment and disabled in the previous version environment,
you might lose workflow associations when you upgrade. For more information about this timer
job, see Disable preservation of workflow history (SharePoint Server 2010)
(http://technet.microsoft.com/library/1cbc2ed6-4e14-4cd5-83a4-
076437e984c4(Office.14).aspx).
Create and configure Web applications
Create a Web application for each Web application that existed in the original environment. For each
Web application, do the following:
Use the same URL and configure any alternate-access mapping settings.
If you use a different URL, Microsoft Office applications might not be redirected correctly to
the new URLs and any bookmarks to the old URLs will not work.
Use the same authentication method.
If you were using forms-based authentication, you will need to configure claims-based
authentication instead. You must also create a Web application policy to grant Full Control to
the user account that will be performing the database attach upgrade.
For more information, see Configure forms-based authentication for a claims-based Web
application (SharePoint Server 2010).
Re-create included paths (such as /Sites).
Enable self-service site creation for any Web application that used it in the previous environment.
For more information about how to configure Web applications and authentication, see the following
articles:
For classic authentication: Create a Web application (SharePoint Server 2010)
(http://technet.microsoft.com/library/121c8d83-a508-4437-978b-303096aa59df(Office.14).aspx)
Important:
Note:
Important
Page 181
170
For claims-based authentication: Create a Web application that uses Windows-claims
authentication (SharePoint Server 2010) (http://technet.microsoft.com/library/83496762-172a-44a4-
bf57-1d7ea8008d7d(Office.14).aspx) and Configure forms-based authentication for a claims-based
Web application (SharePoint Server 2010)
Reapply customizations
One frequent cause of failures during upgrade is that the environment is missing customized features,
solutions, or other elements. Make sure that any custom elements you have to have are installed on
your front-end Web servers before you begin the upgrade process. You can use the pre-upgrade
checker to compile a list of server-side customizations in your environment. For more information, see
Identify and install customizations in the article "Use a trial upgrade to find potential issues."
In this step, you manually transfer all customizations into your new farm. Make sure to install any
components that your sites depend on to work correctly, including the following:
Custom site definitions
If the site definition was created in Office SharePoint Server 2007, you can copy it over to
the new environment as-is. If, however, it was created in Microsoft Office SharePoint Portal
Server 2003, you might have to create an upgrade definition file to map the site definition to
the new features in Office SharePoint Server 2007. For more information, see Develop new
custom site definitions and create upgrade definition files (Office SharePoint Server)
(http://technet.microsoft.com/en-us/library/cc263404(Office.12).aspx) and Deploy upgrade
definition files and new site definitions (Office SharePoint Server)
(http://technet.microsoft.com/en-us/library/cc263228(Office.12).aspx).
Custom style sheets, including cascading style sheets, and images
Custom Web Parts
Custom Web services
Custom features and solutions
Custom assemblies
Web.config changes (such as security)
Ensure that you transfer any unique settings from the Web.config files for each Web application to
the new servers.
Administrator-approved form templates (.xsn files) and data connection files (.udcx files) for
InfoPath
You must export form templates and data connection files from the original environment and then
import them to the new environment. For more information, see Plan to upgrade form templates
during an upgrade to SharePoint Server 2010 and Perform post-upgrade steps for a database
attach upgrade (SharePoint Server 2010).
Any other components or files on which your sites depend.
Note:
Page 182
171
For more information about how to update customizations for use in SharePoint Server 2010, see:
Redeploying Customizations and Solutions in SharePoint Foundation 2010 and SharePoint Server
2010 (http://msdn.microsoft.com/en-us/library/ee662217(office.14).aspx). For more information about
how to deploy customizations to your environment, see Deploy customizations - overview (SharePoint
Server 2010) (http://technet.microsoft.com/library/be4ca20f-520e-4fd7-9c42-
140af800cbc8(Office.14).aspx).
Verify the new environment After you have set up the new environment, you can perform tests to make sure it contains all the
components you need before you upgrade your data. To test your new environment, you can use the
following methods:
Create a new Web application and then use the Windows PowerShellTest-SPContentDatabase
cmdlet to verify that all the server-side customizations that are needed for that content database
are present in the new environment. Do not attach or upgrade the database. For more information,
see Test-SPContentDatabase (http://technet.microsoft.com/library/ed095a0a-fa1a-4323-8503-
624f0e09707d(Office.14).aspx).
You can also run this command on the original content database, but the database should
not be in active use at the time.
Use the enumallwebs Stsadm operation in your Office SharePoint Server 2007 environment to see
which template each site is associated with and then verify whether the template is installed in your
SharePoint Server 2010 environment. The October Cumulative Update includes improvements to
the enumallwebs operation that can help you find customizations in use. For more information
about this operation, see Enumallwebs: Stsadm operation (Office SharePoint Server)
(http://technet.microsoft.com/en-us/library/dd789634(Office.12).aspx).
Perform the upgrade After you finish preparing the new environment, you can attach and upgrade the databases.
Follow the steps in Attach databases and upgrade to SharePoint Server 2010 to attach and upgrade
the databases from the Office SharePoint Server 2007 server or server farm to the new SharePoint
Server 2010 server or server farm.
Note:
Page 183
172
Attach databases and upgrade to SharePoint Server 2010
When you upgrade from Microsoft Office SharePoint Server 2007 to Microsoft SharePoint Server 2010
by using the database attach upgrade approach, you upgrade only the content for your environment
and not the configuration settings. Using a database attach upgrade approach is useful when you are
changing hardware or want to reconfigure your server farm topology as part of the upgrade process.
For more information about how to choose an upgrade approach, see Determine upgrade approach
(SharePoint Server 2010). The first step in the process is to set up a new environment to host the
upgraded content. If you have not yet set up and configured the new environment, follow the steps in
Prepare the new SharePoint Server 2010 environment for a database attach upgrade to do so.
After you set up the new environment, you can use the procedures in this article to detach and then
reconnect the databases to perform the actual upgrade. This article contains the steps required to
perform a standard database attach upgrade and a database attach upgrade with read-only databases.
In this article:
Process overview
Before you begin
Set the previous version databases to be read-only (database attach with read-only databases)
Back up the previous version databases by using SQL Server tools
Detach the previous version databases (standard database attach)
(http://technet.microsoft.com/library/38ef5fbb-181b-49bf-aa7a-2d5c47b3811c.aspx#Detach)
Restore a backup copy of the database (database attach with read-only databases)
Verify custom components (http://technet.microsoft.com/library/38ef5fbb-181b-49bf-aa7a-
2d5c47b3811c.aspx#VerifyCustom)
Attach a content database to a Web application
Verification: Verify upgrade for the first database
Upgrade the shared services database
Upgrade My Site Web sites
Attach the remaining databases
Verification: Verify upgrade for additional databases
One frequent cause of failures during upgrade is that the environment is missing customized
features, solutions, or other elements. Be sure that any custom elements you have to have are
installed on your front-end Web servers before you begin the upgrade process. Use the pre-
upgrade checker — and, for a database attach upgrade, also use the test-
spcontentdatabaseWindows PowerShell cmdlet — to identify any custom elements that your
sites might be using. For more information, see Identify and install customizations in the article
"Use a trial upgrade to find potential issues."
Note:
Page 184
173
For more information about the general process of upgrading by using the database attach upgrade
approach, see Upgrade process overview (SharePoint Server 2010).
Process overview When you upgrade by using database attach upgrade, you detach the databases in the old farm and
then attach them to the new farm. When you attach a database to the new farm, the upgrade process
runs and upgrades the whole database. The database attach upgrade process is similar to the in-place
upgrade process. The difference is that the database attach upgrade process is performed manually,
and is performed in a separate environment.
If you want to preserve your original farm and allow users to continue to access their data, you must set
the databases to read-only and then attach a backup copy of the databases.
You can attach and upgrade databases from either Microsoft Office SharePoint Server 2007 or
Windows SharePoint Services 3.0 to a new Microsoft SharePoint Server 2010 environment. For both
sources, the steps to set up and attach databases to the new environment are the same.
The part of the process in this article that is specific to moving a database from one computer
that is running Microsoft SQL Server to a different computer that is running SQL Server is
known as planned relocation. For more information about planned relocation, see Moving User
Databases (http://go.microsoft.com/fwlink/?LinkId=148425).
For a general overview of the upgrade process, see Upgrade process overview (SharePoint Server
2010).
Before you begin Before you begin the database attach upgrade, review the following information about permissions,
hardware requirements, and software requirements. Follow the specified steps to install or configure
prerequisite software or to modify settings.
Ensure that you have met all hardware and software requirements. You must have a 64-bit version
of Windows Server 2008 or Windows Server 2008 R2. For server farms, you must also have a 64-
bit version of SQL Server 2005 or SQL Server 2008. For more information about these
requirements (such as specific updates that you must install), see Determine hardware and
software requirements (SharePoint Server 2010).
Ensure that you are prepared to set up the required accounts by using appropriate permissions. For
detailed information, see Administrative and service accounts required for initial deployment
(SharePoint Server 2010).
Ensure that the account you use to attach the databases is a member of the db_owner fixed
database role for the content databases that you want to upgrade.
Run the pre-upgrade checker tool on the sites that are stored in the databases. The pre-upgrade
checker identifies potential upgrade issues in your environment so that you can address them
Note:
Page 185
174
before you upgrade. For more information, see Run the pre-upgrade checker (SharePoint Server
2010).
Create a new server farm environment. For information about how to create the new environment,
see Prepare the new SharePoint Server 2010 environment for a database attach upgrade.
Check for and repair any database consistency errors. For more information, see Database
maintenance for Office SharePoint Server 2007 (white paper) (http://technet.microsoft.com/en-
us/library/cc262731(Office.12).aspx).
Set the previous version databases to be read-only (database attach with read-only databases) If you are using the read-only databases hybrid approach to upgrade, set the previous version
databases to read-only before you back up the databases. In any type of database attach upgrade, you
can also set the databases to read-only temporarily to ensure that you capture all the data in the
backup so that you are restoring and upgrading the current state of the environment. If the databases
are set to read-only, users can continue to view content, but they will be unable to add or change
content.
You cannot upgrade a database that is set to read-only. If you are using a database attach with
read-only databases, you restore a copy of the database and perform the upgrade on the copy.
If you are not using this method, but want to set content databases to read-only temporarily
while you back up the current data, make sure that you set the databases to read-write before
you attach and upgrade the databases.
Be sure you have run the pre-upgrade checker before you perform this procedure. For more
information, see Run the pre-upgrade checker (SharePoint Server 2010).
1. In SQL Server Enterprise Manager, right-click the name of the database that you want to set to
read-only, and then click Properties.
2. In the Properties dialog box, click the Options tab.
3. Under Access, select the Read-only check box, and then click OK.
1. In SQL Server Management Studio, right-click the name of the database that you want to set to
read-only, and then click Properties.
2. In the Select a page section, click Options.
3. In the right pane, under Other options, in the State section, next to Database Read-Only,
Important:
Important:
To set a database to read-only in SQL Server 2000
To set a database to read-only in SQL Server 2005
Page 186
175
click the arrow, and then select True.
1. In SQL Server Management Studio, in Object Explorer, connect to an instance of the Database
Engine, expand the server, and then expand Databases.
2. Select the database that you want to configure to be read-only, right-click the database, and
then click Properties.
3. In the Database Properties dialog box, in the Select a page section, click Options.
4. In the right pane, under Other options, in the State section, next to Database Read-Only,
click the arrow, and then select True.
You can configure the READ_ONLY database availability option by using Transact-SQL. For more
information about how to use the SET clause of the ALTER DATABASE statement, see Setting
Database Options (http://go.microsoft.com/fwlink/?LinkId=148362).
Back up the previous version databases by using SQL Server tools Follow the appropriate procedure to back up databases in SQL Server 2000, SQL Server 2005, or SQL
Server 2008. Repeat the procedure for each of the following databases in the original server farm:
Content
Shared services
For more information about upgrade and shared services, see How other services are affected by
upgrade (SharePoint Server 2010).
You do not have to back up the configuration or admin content databases, because you will re-create
these databases in the new server farm. For more information about the kinds of databases that you
might have in a Office SharePoint Server 2007 server farm, see Database types and descriptions
(Office SharePoint Server) (http://technet.microsoft.com/en-us/library/cc678868(Office.12).aspx).
At the end of this procedure, you will have created duplicates of the read-only content databases.
1. On the database server, click Start, point to All Programs, point to Microsoft SQL Server,
and then click Enterprise Manager.
2. In SQL Server Enterprise Manager, expand Microsoft SQL Servers.
3. Expand SQL Server Group.
4. Expand (local) (Windows NT).
5. Expand Databases.
To set a database to read-only in SQL Server 2008
To back up a database in SQL Server 2000
Page 187
176
6. Right-click the database that you want to back up, point to All Tasks, and then click Backup
Database.
7. In the SQL Server Backup dialog box, in the Name box, specify a name for the backup, and
then in the Backup area, select Database - complete.
8. In the Destination area, either select an existing destination or do the following:
a. Click Add.
b. In the Select Backup Destination box, select File Name, and then next to the File Name
box, click Browse.
c. In the Backup Device Location - (local) dialog box, in the File name box, type a file
name, and then click OK.
d. Click OK again to close the Select Backup Destination dialog box.
9. Click OK to start the backup process.
10. Click OK to acknowledge that the backup process is complete.
Repeat the previous procedure to back up all the content and shared services databases that are used
by Office SharePoint Server 2007 in your environment.
1. On the database server, click Start, point to All Programs, point to Microsoft SQL Server
2005, and then click SQL Server Management Studio.
2. In the Connect to Server box, fill in the connection information, and then click Connect.
3. After you connect to the appropriate instance of the SQL Server 2005 Database Engine, in
Object Explorer, expand the server tree by expanding the server name.
4. Expand Databases, right-click the database that you want to back up, point to Tasks, and then
click Back Up. The Back Up Database dialog box appears.
5. In the Source area, in the Database box, verify the database name.
6. In the Backup type box, select Full.
7. Under Backup component, select Database.
8. In the Backup set area, in the Name text box, either accept the default backup set name that is
suggested or type a different name for the backup set.
9. In the Destination area, specify the type of backup destination by selecting Disk or Tape, and
then specify a destination. To create a different destination, click Add.
10. Click OK to start the backup process.
Repeat the previous procedure to back up all the content and shared services databases that are used
by Office SharePoint Server 2007 in your environment.
To back up a database in SQL Server 2005
Page 188
177
1. On the database server, click Start, point to All Programs, point to Microsoft SQL Server
2008, and then click SQL Server Management Studio.
2. In the Connect to Server box, fill in the connection information, and then click Connect.
3. After you connect to the appropriate instance of the SQL Server 2008 Database Engine, in
Object Explorer, expand the server name.
4. Expand Databases, right-click the database that you want to back up, point to Tasks, and then
click Back Up. The Back Up Database dialog box appears.
5. In the Source area, in the Database box, verify the database name.
6. In the Backup type box, select Full.
7. Under Backup component, select Database.
8. In the Backup set area, in the Name text box, either accept the default backup set name or
type a new name.
9. In the Destination area, specify the type of backup destination by selecting Disk or Tape, and
then specify a destination. To create a different destination, click Add.
10. Click OK to start the backup process.
Repeat the previous procedure to back up all the content and shared services databases that are used
by Office SharePoint Server 2007 in your environment.
Detach the previous version databases (standard database attach) Before you can attach your databases to the new environment and upgrade the data, you need to
detach them from the current environment. After you have detached the databases, you can move them
to a new database server or leave them on the existing database server and attach them to the Web
applications.
Do not use the following procedure if you are performing a database attach upgrade with read-
only databases. To continue to provide your users with access to their content, you need to
leave the databases attached, and follow the steps in the Restore a backup copy of the
database (database attach with read-only databases)
(http://technet.microsoft.com/library/38ef5fbb-181b-49bf-aa7a-2d5c47b3811c.aspx#restore)
section later in this article to make a copy of the databases instead.
To back up a database in SQL Server 2008
Important:
Page 189
178
1. In Central Administration, on the Application Management page, in the SharePoint Web
Application Management section, click Content databases.
2. On the Manage Content Databases page, click the content database you want to detach.
Note:
If the content database does not appear, it might be associated with another Web
application. To select another Web application, on the Web Application menu, click
Change Web Application.
3. On the Manage Content Database Settings page, in the Remove Content Database section,
select the Remove content database check box, and then click OK.
Note:
Removing the content database does not delete the database; it only removes the
association of the database with the Web application.
4. Repeat steps 2 and 3 for each content database that you want to detach.
You can also use the deletecontentdb Stsadm operation to detach a content database from a Web
application. For more information, see Deletecontentdb: Stsadm operation (Office SharePoint Server)
(http://technet.microsoft.com/en-us/library/cc262449(Office.12).aspx).
If you are moving the databases to a different database server, you must also detach the databases
from the instance of SQL Server before you move them and attach them to the new instance of SQL
Server after you move them.
If you move your databases to a different instance of SQL Server, make sure to verify that
security is configured correctly. Check that the accounts you use have the appropriate fixed
roles and permissions on the databases, and that they will still be valid accounts if you are
moving across domains.
1. In SQL Server 2005 Management Studio, open the source instance of SQL Server, and then
expand the Databases node.
2. Right-click the content database, point to Tasks, and then click Detach. Repeat this step for
each content database that you want to detach and move.
Note:
Use this procedure to move only content databases. Do not detach any other
databases.
To detach a content database from a Web application
Important:
To detach a database from an instance of SQL Server and move it to another instance of SQL Server
Page 190
179
3. In Windows Explorer, browse to the location of the .mdf and .ldf files for the content databases.
4. Select the .mdf and .ldf files for the database you want to move and either copy or move them
to the destination directory.
5. In SQL Server 2005 Management Studio, open the source instance of SQL Server.
6. Right-click the Databases node, point to Tasks, and then click Attach.
7. In the Attach Database dialog box, browse to the location to which you transferred the .mdf
and .ldf files, select the .mdf file for the database you want to attach, and then click OK.
8. Repeat steps 6 and 7 for each content database that you are moving.
Restore a backup copy of the database (database attach with read-only databases) After you configure the new server farm, you can restore the backup copies of the databases on one of
the following: Microsoft SQL Server 2008 R2, SQL Server 2008 with Service Pack 1 (SP1) and
Cumulative Update 2, and SQL Server 2005 with SP3 and Cumulative Update 3. Note that you must
restore to a 64-bit version of SQL Server 2008 R2, SQL Server 2008 with SP1 and Cumulative Update
2, and SQL Server 2005 with SP3 and Cumulative Update 3. Start with one database, and then verify
that the restoration has worked before you restore the other databases.
The following section provides procedures for restoring the backups.
1. In SQL Server Management Studio, right-click Databases, and then click Restore Database.
The Restore Database dialog box appears.
2. In the Restore Database dialog box, on the General page, in the To database box, type the
name of the database you are restoring.
3. In the To a point in time text box, keep the default (Most recent possible).
4. To specify the source and location of the backup sets to restore, click From device, and then
click Browse to select the backup file.
5. In the Specify Backup dialog box, in the Backup media box, make sure that File is selected.
6. In the Backup location area, click Add.
7. In the Locate Backup File dialog box, select the file that you want to restore, and then click
OK.
8. In the Select the backup sets to restore grid, select the Restore check box next to the most
recent full backup.
9. In the Restore Database dialog box, on the Options page, under Restore options, select the
Overwrite the existing database check box.
10. Click OK to start the restore process.
To restore a backup copy of a database in SQL Server 2005 Enterprise Edition
Page 191
180
1. After you connect to the appropriate instance of the SQL Server 2008 Database Engine, in
Object Explorer, expand the server name.
2. Right-click Databases, and then click Restore Database. The Restore Database dialog box
appears.
3. In the Restore Database dialog box, on the General page, type the name of the database to
be restored in the To database list.
4. In the To a point in time text box, retain the default (Most recent possible).
5. To specify the source and location of the backup sets to restore, click From device, and then
click Browse to select the backup file.
6. In the Specify Backup dialog box, in the Backup media box, be sure that File is selected.
7. In the Backup location area, click Add.
8. In the Locate Backup File dialog box, select the file that you want to restore, click OK, and
then, in the Specify Backup dialog box, click OK.
9. In the Restore Database dialog box, under Select the backup sets to restore grid, select the
Restore check box next to the most recent full backup.
10. In the Restore Database dialog box, on the Options page, under Restore options, select the
Overwrite the existing database check box.
11. Click OK to start the restore process.
Verify custom components Before you attach the content databases to the Web applications, use the Test-
SPContentDatabaseWindows PowerShell cmdlet to verify that you have all the custom components
that you need for that database.
1. Verify that you meet the following minimum requirements: See Add-SPShellAdmin.
2. On the Start menu, click All Programs.
3. Click Microsoft SharePoint 2010 Products.
4. Click SharePoint 2010 Management Shell.
5. At the Windows PowerShell command prompt, type the following command:
Test-SPContentDatabase -Name <DatabaseName> -WebApplication <URL>
Where:
<DatabaseName> is the name of the database you want to test.
<URL> is the URL for the Web application that will host the sites.
To restore a backup copy of a database in SQL Server 2008 Enterprise
To verify custom components are available by using Windows PowerShell
Page 192
181
For more information, see Test-SPContentDatabase
(http://technet.microsoft.com/library/ed095a0a-fa1a-4323-8503-624f0e09707d(Office.14).aspx).
Attach a content database to a Web application When you attach a content database, make sure that the root site for the Web application is included in
the first content database that you attach. In other words, before you continue, examine the root of the
Web application in the original server farm to determine the first site collection. After you attach the
database that contains the root site, you can attach the other content databases for the Web application
in any order. You do not have to create any site collections to store the content before you attach the
database; this process creates the site collections for you. Make sure that you do not add any new site
collections until you have restored all the content databases.
If you are moving the content databases across domains or forests or into another environment
that has different service accounts, ensure that the permissions for the service accounts are
still correct before you attach the databases.
You can use either the Mount-SPContentDatabase cmdlet in Windows PowerShell or the
addcontentdb Stsadm command to attach a content database to a Web application. Using the
SharePoint Central Administration pages to attach a content database is not supported for upgrading.
Ensure that the account you use to attach the databases is a member of the db_owner fixed database
role for the content databases that you want to upgrade.
If you were using forms-based authentication, you will need to configure claims-based
authentication for your Web application before you attach any databases. You must also create
a policy to grant Full Control to the Web application to the user account that will be performing
the database attach upgrade.
For more information, see Configure forms-based authentication for a claims-based Web
application (SharePoint Server 2010).
You cannot attach the same content database more than once to a farm, even on different Web
applications. Each site collection in a content database has a GUID that is associated with it,
which is registered in the configuration database. Therefore, you cannot add the same site
collection twice to the farm, even in separate Web applications. Although you can successfully
attach the database in this situation, you will be unable to start the site collection.
If you need a duplicate copy of a site collection in the same farm, first attach the database that
contains the site collection to a separate farm, and then use the Stsadm backup and restore
operations to copy the site collection over to the other farm. The Stsadm backup and restore
process creates a new GUID for the site collection.
Important:
Important
Tip
Page 193
182
1. Verify that you meet the following minimum requirements: See Add-SPShellAdmin.
2. On the Start menu, click All Programs.
3. Click Microsoft SharePoint 2010 Products.
4. Click SharePoint 2010 Management Shell.
5. At the Windows PowerShell command prompt, type the following command:
Mount-SPContentDatabase -Name <DatabaseName> -DatabaseServer <ServerName> -
WebApplication <URL> [-Updateuserexperience]
Where:
<DatabaseName> is the name of the database you want to upgrade.
<ServerName> is server on which the database is stored.
<URL> is the URL for the Web application that will host the sites.
Updateuserexperience is the choice to update to the new user experience or stay in the old
user experience (part of Visual Upgrade). When you include this parameter, the site is set
to preview the new user experience. Omit this parameter if you want the site to remain in
the old user experience after upgrade. For more information, see Plan visual upgrade
(SharePoint Server 2010).
For more information, see Mount-SPContentDatabase
(http://technet.microsoft.com/library/20d1bc07-805c-44d3-a278-e2793370e237(Office.14).aspx).
Note:
We recommend that you use Windows PowerShell when performing command-line
administrative tasks. The Stsadm command-line tool has been deprecated, but is included
to support compatibility with previous product versions.
1. On the drive on which SharePoint Products and Technologies is installed, change to the
following directory: %COMMONPROGRAMFILES%\Microsoft shared\Web server
extensions\12\Bin.
2. Type the following command, and then press ENTER:
stsadm -o addcontentdb -url<URL> -databasename<DatabaseName>
[-databaseserver<ServerName>] [-databaseuser<UserName>]
[-databasepassword<Password>] [-sitewarning<SiteWarningCount>]
[-preserveolduserexperiencetrue/false]
[-sitemax<SiteMaxCount>]
[-assignnewdatabaseid][-clearchangelog]
To attach a content database to a Web application by using Windows PowerShell
To attach a content database to a Web application by using the Stsadm command-line tool
Page 194
183
Note
When you set the preserveolduserexperience parameter to true, the sites in the content database
keep the look of the previous version after upgrade. When you set this parameter to false, the sites
are upgraded to the new look and feel. The default for this parameter is true, which preserves the
old look and feel.
This parameter is part of the Visual Upgrade feature. For more information, see Plan visual
upgrade (SharePoint Server 2010).
For more information, see Addcontentdb: Stsadm operation (Office SharePoint Server)
(http://technet.microsoft.com/en-us/library/cc263422(Office.12).aspx).
Verification: Verify upgrade for the first database After you have attached a database, you can use the Upgrade Status page in Central Administration to
check the status of upgrade on your site collections. After the upgrade process is complete, you can
review the upgrade log file to see whether there were any issues during upgrade. Also, you can review
each upgraded site to find and address any issues with how the content is displayed. For more
information, see Verify upgrade and review upgraded sites (SharePoint Server 2010).
In Central Administration, click Upgrade and Migration, and then click Check upgrade
status.
The upgrade error log file and the upgrade log file are located at
%COMMONPROGRAMFILES%\Microsoft Shared\web server extensions\14\LOGS. The logs
are named in the following format: Upgrade-YYYYMMDD-HHMMSS-SSS-error.log and
Upgrade-YYYYMMDD-HHMMSS-SSS.log, where YYYYMMDD is the date and HHMMSS-SSS
is the time (hours in 24-hour clock format, minutes, seconds, and milliseconds). An example for
an upgrade error log is Upgrade-20090415-132126-374-error.log, and an example for an
upgrade log is Upgrade-20090415-132126-374.log.
Note:
The upgrade log file includes the name of the content database being upgraded.
Upgrade the shared services database Before you can upgrade any My Site Web sites in your environment, you must configure the User
Profile service and Managed Metadata service and upgrade the Shared Services Provider (SSP)
database. To do this, you must perform the following tasks:
1. Create an application pool for the User Profile service.
To view the Upgrade Status page
To open the upgrade log file
Page 195
184
2. Verify that the Managed Metadata service is enabled.
3. Enable the User Profile service and upgrade the SSP database.
When you upgrade the SSP database, the audience information is also upgraded.
4. Create a new proxy for the User Profile service application and associate it with the default proxy
group.
The following procedures provide the steps for these tasks.
The steps in the following sections assume that you have not yet enabled the User Profile
service application or the User Profile Synchronization service. If you have already enabled
these services, follow these steps to create a separate instance of the User Profile service
application. You can associate your existing User Profile Synchronization service with the new
User Profile service application.
1. Verify that you meet the following minimum requirements: See Add-SPShellAdmin.
2. On the Start menu, click All Programs.
3. Click Microsoft SharePoint 2010 Products.
4. Click SharePoint 2010 Management Shell.
5. To create the application pool, at the Windows PowerShell command prompt, type the following
command:
New-SPServiceApplicationPool -Name <ApplicationPoolName>
-Account <DOMAIN\username>
Where:
<ApplicationPoolName> is the name you want to use for the application pool.
<DOMAIN\username> is a valid account. You can use a domain account, or you can use
the name of a managed account in the farm. Use the Get-SPManagedAccount cmdlet to
view the existing managed account in the farm.
For more information, see New-SPServiceApplicationPool
(http://technet.microsoft.com/library/2d653742-d173-4aeb-8c6c-78f32c711e59(Office.14).aspx).
1. In SharePoint Central Administration, on the Application Management page, click Manage
service applications.
2. Verify that the Managed Metadata service is started.
For more information about how to enable and manage this service, see Managed metadata
Note:
Important:
To create an application pool for the User Profile service by using Windows PowerShell
To verify that the Managed Metadata service is enabled
Page 196
185
administration (SharePoint Server 2010) (http://technet.microsoft.com/library/d62ebc00-9252-
483e-94db-2b52b2cdb2c8(Office.14).aspx).
1. Verify that you meet the following minimum requirements: See Add-SPShellAdmin.
2. On the Start menu, click All Programs.
3. Click Microsoft SharePoint 2010 Products.
4. Click SharePoint 2010 Management Shell.
5. To enable the User Profile service and upgrade the SSP database, at the Windows PowerShell
command prompt, type the following command:
New-SPProfileServiceApplication -applicationpool <ApplicationPoolName> -Name
<ServiceApplicationName> -Profiledbname <DatabaseName> [-Profiledbserver
<ServerName>]
Where:
<ApplicationPoolName> is the application pool name that you created in the previous step.
<ServiceApplicationName> is the service application name you want to use.
<DatabaseName> is the name of the database that contains the profile information.
<ServerName> is the name of the server to which you are attaching the database.
For more information, see New-SPProfileServiceApplication
(http://technet.microsoft.com/library/acf51379-1811-4ffe-b5a0-a660d7a58f10(Office.14).aspx).
1. Verify that you meet the following minimum requirements: See Add-SPShellAdmin.
2. On the Start menu, click All Programs.
3. Click Microsoft SharePoint 2010 Products.
4. Click SharePoint 2010 Management Shell.
5. To configure the proxy for the User Profile service, at the Windows PowerShell command
prompt, type the following command:
New-SPProfileServiceApplicationProxy -ServiceApplication
<ProfileServiceApplicationID> -Name <ProxyName> -DefaultProxyGroup
Where:
<ProfileServiceApplicationID> is the GUID of the service application you created in the
previous step.
<ProxyName> is the proxy name you want to use.
To enable the User Profile service and upgrade your SSP database by using Windows PowerShell
To create the proxy for the User Profile service and associate it with the default proxy group by using Windows PowerShell
Page 197
186
DefaultProxyGroup specifies that the User Profile service application proxy be added to the
default proxy group for the local farm.
For more information, see New-SPProfileServiceApplicationProxy
(http://technet.microsoft.com/library/3019f2e5-451e-4af7-a434-3661319dd3c0(Office.14).aspx).
Make sure that your farm administration account has Full Control of the Use Profile service. Use the
following procedure to grant the farm administration account full control.
1. In SharePoint Central Administration, on the Application Management page, click Manage
Service Applications.
2. Click the User Profile Service Application row (not the link) and then, on the ribbon, click
Administrators.
3. In the Administrators for User Profile Service Application dialog box, in the To add an
account, or group, type or select it below and click 'Add' box, type the farm administrator
account and the account you are using to run the User Profile service, and then click Add.
4. In the Permissions for <account name> box, select the Full Control check box, and then
click OK.
1. In SharePoint Central Administration, on the System Settings page, click Manage Services on
Server.
2. Next to the User Profile Synchronization service, click Start.
3. In the Select the User Profile Application dialog box, select the application you just created.
4. In the Service Account Name and Password section, type and confirm the password for the
service account.
5. Click OK.
After you have enabled the User Profile Synchronization service, you can reapply the settings
that you used for User Profile Synchronization from your Office SharePoint Server 2007
environment in your new environment. Reapply settings such as connections, property
mappings, and filters. For more information about how to configure this service, see Configure
profile synchronization (SharePoint Server 2010) (http://technet.microsoft.com/library/144e5f6e-
0c9c-4f01-9b1f-26190d527e85(Office.14).aspx).
Note that the User Profile Synchronization service is not available in a stand-alone
environment. You must have a server farm installation to use this service.
Now you are ready to upgrade the My Site Web sites.
Update permissions on the User Profile service
Start the User Profile Synchronization service
Important
Page 198
187
Upgrade My Site Web sites If you have My Site Web sites with your environment, you can upgrade them after you have upgraded
the Shared Services Provider (SSP) database. You should have created the My Site host Web
application when you created your new environment. To upgrade the My Site Web sites, you configure
the My Site host URL, and then upgrade the content databases that contain the My Site Web sites.
1. In Central Administration, on the Manage Service Applications page, click the User Profile
service application that you want to associate with My Site Web sites.
2. On the Manage Profile Service: User Profile Service page, click Setup My Sites.
3. Enter the information to set up My Site Web sites, including the new My Site host location and
personal site location.
The My Site host is a site collection on the content database, which will have a URL like http://
Fabrikam/my. The personal site path is the managed path at which all My Site Web sites will be
created. If you entered "personal" in the Location box, My Site Web sites would be created at
http:// Fabrikam/personal/username).
4. After you set up My Site Web sites, you must reset Internet Information Services (IIS) by
opening a Command Prompt window and typing iisreset /noforce at the command prompt.
Now that you have created the My Site host URL, you can upgrade the My Site Web sites. Follow the
steps in Add the content databases to the Web applications
(http://technet.microsoft.com/library/38ef5fbb-181b-49bf-aa7a-2d5c47b3811c.aspx#AddDB) later in this
article to attach and upgrade the database or databases that contain My Site Web sites. You can
upgrade the My Site Web sites at any time after you have upgraded the SSP database and configured
the My Site host URL.
Attach the remaining databases After you restore the first content database and verify the upgrade by reviewing the upgrade log file,
you can continue by restoring and upgrading the next database or databases. You can attach multiple
databases at the same time in separate Command Prompt windows to run multiple upgrades at one
time. After you successfully restore and upgrade all the sites, content databases, and SSP databases,
you can review the sites to make sure that they were upgraded correctly.
Verification: Verify upgrade for additional databases After upgrading any additional databases, view the Upgrade Status page to monitor progress and verify
that the upgrade process is complete. Review the log file to identify any other issues, and then review
each upgraded site to find and address any issues with how the content is displayed. For more
To configure the My Site host URL
Page 199
188
information, see Verify upgrade and review upgraded sites (SharePoint Server 2010) and Manage
visual upgrade (SharePoint Server 2010).
Additional steps After you have completed the upgrade, there are several steps that you should take to complete the
configuration for your upgraded farm. For more information, see Perform post-upgrade steps for a
database attach upgrade (SharePoint Server 2010).
See Also
Troubleshoot upgrade issues (SharePoint Server 2010)
Page 200
189
Perform post-upgrade steps (SharePoint Server 2010)
After you have performed an in-place upgrade or a database attach upgrade to Microsoft SharePoint
Server 2010, you can verify your upgrade and follow the necessary configuration steps to get your
environment ready for your users again.
In this section:
Perform post-upgrade steps for an in-place upgrade (SharePoint Server 2010)
Before you give your users access to the upgraded environment, perform these steps to make sure
everything is working as planned. This article contains steps specific to an in-place upgrade.
Perform post-upgrade steps for a database attach upgrade (SharePoint Server 2010)
Similar to the article described above, this article contains steps for making sure that everything is
working as planned after a database attach upgrade.
Configure forms-based authentication for a claims-based Web application (SharePoint Server
2010)
Upgrade existing Microsoft Office SharePoint Server 2007 Web applications that were configured to
use forms-based authentication to work with SharePoint Server 2010.
Verify upgrade and review upgraded sites (SharePoint Server 2010)
Find out how to tell whether upgrade was completed successfully (both from the software
standpoint and from a visual review of your sites) or any issues remain to address. If you must
restart upgrade after a failure, you will find the steps to do so in this article.
Recovering after a failed upgrade (SharePoint Server 2010)
Follow these steps if the upgrade to Microsoft SharePoint Server 2010 has failed and you do not
have time to continue to troubleshoot the issues or resume the upgrade process.
Page 201
190
Perform post-upgrade steps for an in-place upgrade (SharePoint Server 2010)
After you have upgraded the content in your environment to Microsoft SharePoint Server 2010, you
must perform some additional steps to make sure that the infrastructure supporting that content is ready
to start servicing user requests again. This article describes how to complete these tasks.
In this article:
Configure new and upgraded services after in-place upgrade
Upgrade profile properties to taxonomy data and update the photo store for Profile Services
Create and configure the Secure Store service application and migrate SSO data to the Secure
Store service
Upgrading solutions that depend on the Business Data Catalog
Have users migrate private My Links to private tags (Optional)
Configure new and upgraded services after in-place upgrade Many new services are available in SharePoint Server 2010. You can enable these new services after
you perform an in-place upgrade. You must create service applications to host any new services. You
can use the Farm Configuration Wizard to quickly select and enable new services in your farm, or you
can configure the services manually. You can also add proxies for any service applications that you
want to use with different Web applications. For more information, see Manage service applications
(SharePoint Server 2010) (http://technet.microsoft.com/library/0a785758-694c-4c5c-abe6-
70a17b490c6e(Office.14).aspx).
Be sure to configure the Document Conversions Load Balancer service and the Document Conversions
Launcher service, and enable document conversions for your Web applications. By default, these
services are disabled after upgrade and you must enable them before your users can use document
conversions. For more information, see Manage document conversions (SharePoint Server 2010)
(http://technet.microsoft.com/library/0bfcaa61-50fd-430f-ba57-c304603401c6(Office.14).aspx).
Upgrade profile properties to taxonomy data and update the photo store for Profile Services Multi-value profile properties data from Microsoft Office SharePoint Server 2007 was stored in the
Shared Services Provider (SSP) database as part of the Profile Services data. For SharePoint Server
2010, this data must now be converted to taxonomy data and be stored in the managed metadata
database. To move and upgrade the data, you must have created a service application for the
Page 202
191
Managed Metadata service. After that is complete, you can use a Windows PowerShell cmdlet to
upgrade the profile and taxonomy data and move it to the Taxonomy database. This cmdlet reconnects
the data to the Managed Metadata and User Profile service applications. You must run this cmdlet for
each Managed Metadata property that you want to upgrade; there is no option to specify all properties.
Note that the Managed Metadata service does not accept certain characters (such as semicolons,
angle brackets, pipes, quotation marks, or tab characters) that were allowable in user profile properties
based on choice lists in Office SharePoint Server 2007. If a term or term set uses a character that is no
longer accepted, the character is removed and replaced with a space when it is upgraded.
To upgrade and use taxonomy data, the User Profile service application proxy and Managed
Metadata service application proxy must be in the same proxy group.
Before you upgrade the taxonomy data, look up the ID for the User Profile service application proxy
(called the SPServiceApplicationProxyPipeBand in Windows PowerShell), locate the list of the
managed metadata properties, and then choose the properties you want to upgrade.
1. Verify that you meet the following minimum requirements: See Add-SPShellAdmin.
2. On the Start menu, click All Programs.
3. Click Microsoft SharePoint 2010 Products.
4. Click SharePoint 2010 Management Shell.
5. At the Windows PowerShell command prompt, type the following command:
Get-SPServiceApplicationProxy
This returns a list of service application proxies. Copy the ID for the User Profile service
application proxy.
For more information, see Get-SPServiceApplicationProxy
(http://technet.microsoft.com/library/77f3b00a-ae45-4b51-b9dc-8a2faa5dd358(Office.14).aspx).
1. On the SharePoint Central Administration Home page, click Application Management.
2. Under Service Applications, click Manage Service Applications.
3. Click the User Profile service application for your environment to open the Manage Profile
Service: Service name page.
4. Under People, click Manage User Properties.
5. Click a property name, and then click Edit.
6. Copy the string from the Name box.
This is the name to use as the identity for the managed metadata property when you upgrade
the taxonomy data.
Important:
To find the User Profile service application proxy ID by using Windows PowerShell
To view the name of a managed metadata property
Page 203
192
You must be an administrator for the Managed Metadata to upgrade taxonomy data. You use
the Move-SPProfileManagedMetadataProperty cmdlet to upgrade the taxonomy data. This
cmdlet can take a long time to run, depending on how many profiles are in your environment.
1. Verify that you meet the following minimum requirements: See Add-SPShellAdmin. You must
also be a member of the Term store administrator role for the Managed Metadata service. For
more information, see Managed metadata roles (SharePoint Server 2010)
(http://technet.microsoft.com/library/859634ac-d227-40bc-97ec-
ee9706594cc4(Office.14).aspx).
2. On the Start menu, click All Programs.
3. Click Microsoft SharePoint 2010 Products.
4. Click SharePoint 2010 Management Shell.
5. At the Windows PowerShell command prompt, type the following command:
Move-SPProfileManagedMetadataProperty –ProfileServiceApplicationProxy
<SPServiceApplicationProxyPipeBind> -Identity <Identity> [-AvailableForTagging
Yes] [-TermSetName]
Where
<SPServiceApplicationProxyPipeBind> is the ID for the User Profile service application
proxy
<Identity> is the name of the managed metadata property you want to move
AvailableForTagging determines whether the terms in the resulting term set can be used
for managed metadata tagging. The default value is No. Do not mark term sets that include
more than 20,000 terms with this property. This is because terms marked as available for
tagging are cached on the client side and if you have thousands or millions of terms
marked as available for tagging, it can significantly reduce client performance.
TermSetName specifies whether to create the term set name. If this parameter is not
specified, the property is mapped to the Keywords term set.
For more information, see Move-SPProfileManagedMetadataProperty
(http://technet.microsoft.com/library/ad0b82ea-cfce-4e88-9bc1-ecae82f31c0b(Office.14).aspx).
When you upgrade, any photos that were stored as profile pictures must be updated. If you do not
update the photo store data, either no photos will be displayed or some photos might appear distorted.
To update the photo store, you use the Update-SPProfilePhotoStoreWindows PowerShell cmdlet.
This cmdlet might take a long time to run if you have many profiles and many photos. The cmdlet
copies the user photos from wherever they are stored (usually in the Shared Pictures library on their My
Site Web site) and puts them in the User Photos library on the My Site host. The process also
Important:
To upgrade taxonomy data by using Windows PowerShell
Page 204
193
generates small, medium, and large thumbnail sizes of the pictures that are the correct sizes to be used
in the various controls and Web Parts for My Site profile photos. Before you run this cmdlet, check the
quotas for your My Site Web sites and make sure there is plenty of space available for storing the
photos — you must have at least 10 KB of space per user.
1. Verify that you meet the following minimum requirements: See Add-SPShellAdmin. You must
also be a site collection administrator for the My Site host, and you must be a User Profile
service application administrator with the Manage Profiles permission.
2. On the Start menu, click All Programs.
3. Click Microsoft SharePoint 2010 Products.
4. Click SharePoint 2010 Management Shell.
5. At the Windows PowerShell command prompt, type the following command:
Update-SPProfilePhotoStore –MySiteHostLocation <URL of the My Site Host>
For more information, see Update-SPProfilePhotoStore
(http://technet.microsoft.com/library/023652c5-e25d-493e-91a3-df5a0dc1b166(Office.14).aspx).
Create and configure the Secure Store service application and migrate SSO data to the Secure Store service The Single Sign-on (SSO) service that was available in Office SharePoint Server 2007 has been
replaced with the Secure Store service in SharePoint Server 2010. There is no direct upgrade path for
the data and settings from SSO to the Secure Store service, but you can migrate data from the SSO
database to a new Secure Store database. Excel Services Application must have the Secure Store
service account to function correctly. To upgrade SSO data to the Secure Store service for use with
Excel Services Application and Business Data Connectivity services, you perform the following steps:
1. Provision a Secure Store service application and provision the new, unattended service account for
use with Excel Services Application.
You must provision the Secure Store service before you can upgrade data from the SSO service.
And you must configure an unattended service account for Excel Services Application to function
correctly. For detailed steps to create and configure the Secure Store service application and
create the unattended service account, see Configure Secure Store Service for Excel Services
(http://technet.microsoft.com/library/2d11e10c-c224-46a6-8c03-07913b38c13e(Office.14).aspx).
2. Use the Windows PowerShellUpgrade-SPSingleSignOnDatabase cmdlet to migrate the
application definitions from the SSO database to the Secure Store database as target applications.
3. Use the Windows PowerShellDisable-SPSingleSignOn cmdlet to disable the SSO service on an
upgraded farm server (in-place upgrade only).
To update photo store data by using Windows PowerShell
Page 205
194
1. Verify that you meet the following minimum requirements: See Add-SPShellAdmin. You must
have read access to both the old SSO database and the new Secure Store service database to
run this cmdlet.
2. On the Start menu, click All Programs.
3. Click Microsoft SharePoint 2010 Products.
4. Click SharePoint 2010 Management Shell.
5. At the Windows PowerShell command prompt, type the following command:
Upgrade-SPSingleSignOnDatabase -SSOConnectionString <SSOConnectionstring> -
SecureStoreConnectionString <SecureStoreConnectionstring> –SecureStorePassphrase
Passphrase>
Where:
<SSOConnectionString> is a valid connection string to the SSO database.
<SecureStoreConnectionstring> is a valid connection string to the Secure Store database.
<Passphrase> is the passphrase to use when connecting to the Secure Store service.
For more information, see Upgrade-SPSingleSignOnDatabase
(http://technet.microsoft.com/library/b7b7d9fe-548f-4059-bfe5-c771e54a697c(Office.14).aspx).
1. Verify that you meet the following minimum requirements: See Add-SPShellAdmin.
2. On the Start menu, click All Programs.
3. Click Microsoft SharePoint 2010 Products.
4. Click SharePoint 2010 Management Shell.
5. At the Windows PowerShell command prompt, type the following command:
Disable-SPSingleSignOn –ServerName <ServerName>
Where:
<ServerName> is the name of the server running the SSO service.
For more information, see Disable-SPSingleSignOn (http://technet.microsoft.com/library/a6abed95-
1e3d-449f-a319-4f41a49e1fd0(Office.14).aspx).
To upgrade SSO data to the Secure Store service by using Windows PowerShell
To disable the SSO service by using Windows PowerShell (in-place upgrade only)
Page 206
195
Upgrading solutions that depend on the Business Data Catalog During upgrade from Office SharePoint Server 2007 to SharePoint Server 2010, for each Business
Data Catalog service running in Office SharePoint Server 2007, two services are instantiated in
SharePoint Server 2010:
An Application Registry service to store application definitions that are compatible with the Office
SharePoint Server 2007 Business Data Catalog object model.
A Business Data Connectivity service to store BDC models, which are compatible with the new
SharePoint Server 2010 Business Data Connectivity services object model.
For each application definition in the Business Data Catalog, a copy of it is placed in the Application
Registry service and an upgraded version of it, based on the new object model, is placed in the
Business Data Connectivity service.
Solutions that used custom Web Parts, custom search connectors, and other custom code that
depended on application definitions in Office SharePoint Server 2007 will continue to work in
SharePoint Server 2010 by using the Application Registry service. However, if your solution depends
on the Web Parts that are provided by Office SharePoint Server 2007 and SharePoint Server 2010 by
default (such as the Business Data List Web Part or the Business Data Actions Web Part), you must
upgrade your solution to use the upgraded application definitions (called "BDC models") in the Business
Data Connectivity service, because those Web Parts have been upgraded to use the new object model
provided by the new service.
For more information about upgrading the Business Data Catalog service to SharePoint Server 2010,
see Plan to upgrade to Business Connectivity Services (SharePoint Server 2010).
Have users migrate private My Links to private tags (Optional) The My Site feature in Office SharePoint Server 2007 included a bookmarking feature known as My
Links. In SharePoint Server, this functionality is replaced by private tags. Users can continue to use the
My Links Web Part, or they can migrate their links manually to their set of private tags. This is a manual
process that each user can perform on his or her My Site.
1. Navigate to the following URL: http://my_site_url/_layouts/myquicklinks.aspx.
2. Select the check box next to the link or links that you want to convert.
3. Click Create Tag from Link.
To view the tags, on your Profile page (http://my_site_url/Person.aspx), click Tags and Notes, and then
under Refine by type, click Private.
To convert a private link to a private tag
Page 207
196
Perform post-upgrade steps for a database attach upgrade (SharePoint Server 2010)
After you have upgraded the content in your environment to Microsoft SharePoint Server 2010, you
must perform some additional steps to make sure that the infrastructure supporting that content is ready
to start servicing user requests again. This article describes how to complete these tasks.
In this article:
Reapply administrator permissions for services
Upgrade profile properties to taxonomy data and update the photo store for Profile Services
Create and configure the Secure Store service application and migrate SSO data to the Secure
Store service
Upgrading solutions that depend on the Business Data Catalog
Update links that are used in any upgraded InfoPath form templates
Have users migrate private My Links to private tags (Optional)
Reapply administrator permissions for services By default, farm administrators have permissions to all services when you perform a database attach
upgrade. If you want to apply more restrictive permissions, do so now.
Upgrade profile properties to taxonomy data and update the photo store for Profile Services Multi-value profile properties data from Microsoft Office SharePoint Server 2007 was stored in the
Shared Services Provider (SSP) database as part of the Profile Services data. For SharePoint Server
2010, this data must now be converted to taxonomy data and be stored in the managed metadata
database. To move and upgrade the data, you must have created a service application for the
Managed Metadata service. After that is complete, you can use a Windows PowerShell cmdlet to
upgrade the profile and taxonomy data and move it to the Taxonomy database. This cmdlet reconnects
the data to the Managed Metadata and User Profile service applications. You must run this cmdlet for
each Managed Metadata property that you want to upgrade; there is no option to specify all properties.
Note that the Managed Metadata service does not accept certain characters (such as semicolons,
angle brackets, pipes, quotation marks, or tab characters) that were allowable in user profile properties
based on choice lists in Office SharePoint Server 2007. If a term or term set uses a character that is no
longer accepted, the character is removed and replaced with a space when it is upgraded.
Important:
Page 208
197
To upgrade and use taxonomy data, the User Profile service application proxy and Managed
Metadata service application proxy must be in the same proxy group.
Before you upgrade the taxonomy data, look up the ID for the User Profile service application proxy
(called the SPServiceApplicationProxyPipeBand in Windows PowerShell), locate the list of the
managed metadata properties, and then choose the properties you want to upgrade.
1. Verify that you meet the following minimum requirements: See Add-SPShellAdmin.
2. On the Start menu, click All Programs.
3. Click Microsoft SharePoint 2010 Products.
4. Click SharePoint 2010 Management Shell.
5. At the Windows PowerShell command prompt, type the following command:
Get-SPServiceApplicationProxy
This returns a list of service application proxies. Copy the ID for the User Profile service
application proxy.
For more information, see Get-SPServiceApplicationProxy
(http://technet.microsoft.com/library/77f3b00a-ae45-4b51-b9dc-8a2faa5dd358(Office.14).aspx).
1. On the SharePoint Central Administration Home page, click Application Management.
2. Under Service Applications, click Manage Service Applications.
3. Click the User Profile service application for your environment to open the Manage Profile
Service: Service name page.
4. Under People, click Manage User Properties.
5. Click a property name, and then click Edit.
6. Copy the string from the Name box.
This is the name to use as the identity for the managed metadata property when you upgrade
the taxonomy data.
You must be an administrator for the Managed Metadata to upgrade taxonomy data. You use
the Move-SPProfileManagedMetadataProperty cmdlet to upgrade the taxonomy data. This
cmdlet can take a long time to run, depending on how many profiles are in your environment.
To find the User Profile service application proxy ID by using Windows PowerShell
To view the name of a managed metadata property
Important:
To upgrade taxonomy data by using Windows PowerShell
Page 209
198
7. 0.1. Verify that you meet the following minimum requirements: See Add-SPShellAdmin. You
must also be a member of the Term store administrator role for the Managed Metadata service.
For more information, see Managed metadata roles (SharePoint Server 2010)
(http://technet.microsoft.com/library/859634ac-d227-40bc-97ec-
ee9706594cc4(Office.14).aspx).
2. On the Start menu, click All Programs.
3. Click Microsoft SharePoint 2010 Products.
4. Click SharePoint 2010 Management Shell.
5. At the Windows PowerShell command prompt, type the following command:
Move-SPProfileManagedMetadataProperty -ProfileServiceApplicationProxy
<SPServiceApplicationProxyPipeBind> -Identity <Identity> [-AvailableForTagging
Yes] [-TermSetName]
Where
<SPServiceApplicationProxyPipeBind> is the ID for the User Profile service application
proxy
<Identity> is the name of the managed metadata property you want to move
AvailableForTagging determines whether the terms in the resulting term set can be used
for managed metadata tagging. The default value is No. Do not mark term sets that include
more than 20,000 terms with this property. This is because terms marked as available for
tagging are cached on the client side and if you have thousands or millions of terms
marked as available for tagging, it can significantly reduce client performance.
TermSetName specifies whether to create the term set name. If this parameter is not
specified, the property is mapped to the Keywords term set.
For more information, see Move-SPProfileManagedMetadataProperty
(http://technet.microsoft.com/library/ad0b82ea-cfce-4e88-9bc1-ecae82f31c0b(Office.14).aspx).
When you upgrade, any photos that were stored as profile pictures must be updated. If you do not
update the photo store data, either no photos will be displayed or some photos might appear distorted.
To update the photo store, you use the Update-SPProfilePhotoStoreWindows PowerShell cmdlet.
This cmdlet might take a long time to run if you have many profiles and many photos. The cmdlet
copies the user photos from wherever they are stored (usually in the Shared Pictures library on their My
Site Web site) and puts them in the User Photos library on the My Site host. The process also
generates small, medium, and large thumbnail sizes of the pictures that are the correct sizes to be used
in the various controls and Web Parts for My Site profile photos. Before you run this cmdlet, check the
quotas for your My Site Web sites and make sure there is plenty of space available for storing the
photos — you must have at least 10 KB of space per user.
To update photo store data by using Windows PowerShell
Page 210
199
1. Verify that you meet the following minimum requirements: See Add-SPShellAdmin. You must
also be a site collection administrator for the My Site host, and you must be a User Profile
service application administrator with the Manage Profiles permission.
2. On the Start menu, click All Programs.
3. Click Microsoft SharePoint 2010 Products.
4. Click SharePoint 2010 Management Shell.
5. At the Windows PowerShell command prompt, type the following command:
Update-SPProfilePhotoStore -MySiteHostLocation <URL of the My Site Host>
For more information, see Update-SPProfilePhotoStore
(http://technet.microsoft.com/library/023652c5-e25d-493e-91a3-df5a0dc1b166(Office.14).aspx).
Create and configure the Secure Store service application and migrate SSO data to the Secure Store service The Single Sign-on (SSO) service that was available in Office SharePoint Server 2007 has been
replaced with the Secure Store service in SharePoint Server 2010. There is no direct upgrade path for
the data and settings from SSO to the Secure Store service, but you can migrate data from the SSO
database to a new Secure Store database. Excel Services Application must have the Secure Store
service account to function correctly. To upgrade SSO data to the Secure Store service for use with
Excel Services Application and Business Data Connectivity services, you perform the following steps:
1. Provision a Secure Store service application and provision the new, unattended service account for
use with Excel Services Application.
You must provision the Secure Store service before you can upgrade data from the SSO service.
And you must configure an unattended service account for Excel Services Application to function
correctly. For detailed steps to create and configure the Secure Store service application and
create the unattended service account, see Configure Secure Store Service for Excel Services
(http://technet.microsoft.com/library/2d11e10c-c224-46a6-8c03-07913b38c13e(Office.14).aspx).
2. Use the Windows PowerShellUpgrade-SPSingleSignOnDatabase cmdlet to migrate the
application definitions from the SSO database to the Secure Store database as target applications.
3. Use the Windows PowerShellDisable-SPSingleSignOn cmdlet to disable the SSO service on an
upgraded farm server (in-place upgrade only).
1. Verify that you meet the following minimum requirements: See Add-SPShellAdmin. You must
have read access to both the old SSO database and the new Secure Store service database to
run this cmdlet.
2. On the Start menu, click All Programs.
To upgrade SSO data to the Secure Store service by using Windows PowerShell
Page 211
200
3. Click Microsoft SharePoint 2010 Products.
4. Click SharePoint 2010 Management Shell.
5. At the Windows PowerShell command prompt, type the following command:
Upgrade-SPSingleSignOnDatabase -SSOConnectionString <SSOConnectionstring> -
SecureStoreConnectionString <SecureStoreConnectionstring> -SecureStorePassphrase
Passphrase>
Where:
<SSOConnectionString> is a valid connection string to the SSO database.
<SecureStoreConnectionstring> is a valid connection string to the Secure Store database.
<Passphrase> is the passphrase to use when connecting to the Secure Store service.
For more information, see Upgrade-SPSingleSignOnDatabase
(http://technet.microsoft.com/library/b7b7d9fe-548f-4059-bfe5-c771e54a697c(Office.14).aspx).
1. Verify that you meet the following minimum requirements: See Add-SPShellAdmin.
2. On the Start menu, click All Programs.
3. Click Microsoft SharePoint 2010 Products.
4. Click SharePoint 2010 Management Shell.
5. At the Windows PowerShell command prompt, type the following command:
Disable-SPSingleSignOn -ServerName <ServerName>
Where:
<ServerName> is the name of the server running the SSO service.
For more information, see Disable-SPSingleSignOn (http://technet.microsoft.com/library/a6abed95-
1e3d-449f-a319-4f41a49e1fd0(Office.14).aspx).
Upgrading solutions that depend on the Business Data Catalog If you used the database attach method to upgrade and you want to continue to use the external data
that is accessed through one or more application definitions, you must complete the following tasks:
1. In your previous environment, export the application definitions (models) that are required by your
solution from the Office SharePoint Server 2007 Business Data Catalog. For more information, see
Export application definition (http://technet.microsoft.com/en-us/library/cc816952(Office.12).aspx).
To disable the SSO service by using Windows PowerShell (in-place upgrade only)
Page 212
201
2. Update the solution to use the object model and features of the Microsoft Business Connectivity
Services. This includes updating the application definition file to be compatible with Microsoft
Business Connectivity Services. For information about the Business Data Connectivity service
object model, see Microsoft SharePoint 2010 Software Development Kit
(http://go.microsoft.com/fwlink/?LinkId=166117&clcid=0x409).
3. In your new environment, after upgrade, import the updated model into the Business Data
Connectivity service. For more information, see Manage BDC models (SharePoint Server 2010)
(http://technet.microsoft.com/library/7b6fced6-c8a9-4d79-a11a-8cf3445c52bf(Office.14).aspx).
Update links that are used in any upgraded InfoPath form templates For a database attach upgrade, you exported and imported any InfoPath form templates in your
environment when you created the new environment. After upgrade, you can now update the links that
are used in those upgraded form templates to point to the correct URLs by using a Windows
PowerShell cmdlet. Note that this cmdlet does not update any links that were hard-coded into scripts,
data connections, or assemblies.
1. Verify that you meet the following minimum requirements: See Add-SPShellAdmin.
2. On the Start menu, click Administrative Tools.
3. Click SharePoint 2010 Management Shell.
4. At the Windows PowerShell command prompt), type the following command:
Update-SPInfoPathAdminFileURL -find <OldUURLtoReplace> -replace <NewURL>
For more information, see Update-SPInfoPathAdminFileUrl
(http://technet.microsoft.com/library/0d3991ec-dfff-406b-b35d-d452a51dfc6c(Office.14).aspx).
Have users migrate private My Links to private tags (Optional) The My Site feature in Office SharePoint Server 2007 included a bookmarking feature known as My
Links. In SharePoint Server, this functionality is replaced by private tags. Users can continue to use the
My Links Web Part, or they can migrate their links manually to their set of private tags. This is a manual
process that each user can perform on his or her My Site.
1. Navigate to the following URL: http://my_site_url/_layouts/myquicklinks.aspx.
To update InfoPath form template links by using Windows PowerShell
To convert a private link to a private tag
Page 213
202
2. Select the check box next to the link or links that you want to convert.
3. Click Create Tag from Link.
To view the tags, on your Profile page (http://my_site_url/Person.aspx), click Tags and Notes, and then
under Refine by type, click Private.
Page 214
203
Configure forms-based authentication for a claims-based Web application (SharePoint Server 2010)
The procedures in this article provide guidance to enable you to configure forms-based authentication
for a Microsoft SharePoint Server 2010 claims-based Web application. Perform the steps in the
following procedures to configure a forms-based Web application to use an LDAP provider.
Configure a forms-based Web application to use an LDAP provider by using Central Administration
Configure the LDAP Web.Config files
Configure a forms-based Web application to use an LDAP provider by using Windows PowerShell
Configure a forms-based Web application to use an LDAP provider by using Central Administration Perform the steps in the following procedure to use Central Administration to configure forms-based
authentication for a claims-based Web application.
1. Verify that the user account that is performing this procedure is a site collection administrator.
2. In Central Administration, in the Application Management section, click Manage web
applications.
3. In the Contribute group of the ribbon, click New.
4. In the Authentication section of the Create New Web Application dialog box, click Claims
Based Authentication.
5. In the Claims Authentication Types section, select Enable Forms Based Authentication
(FBA).
6. Type a membership provider name and a role manager name. In the example Web.Config file
depicted in this article, the name of the membership provider is membership, and the name of
the role manager is rolemanager.
7. Click OK to create the Web application.
Configure the LDAP Web.Config files After you have successfully created the Web application (described in the preceding procedure), modify
the following Web.Config files:
To configure forms-based authentication for a claims-based Web application by using Central Administration
Page 215
204
The Central Administration Web application Web.Config file
The Security Token Service Web.Config file
The forms-based authentication claims-based Web application Web.Config file
1. Start IIS Manager by typing INETMGR at a command prompt.
2. Go to the SharePoint Central Administration site in IIS.
3. Right-click SharePoint Central Administration and then click Explore.
4. Open the Web.Config file.
5. Find the <Configuration> <system.web> section and add the following entry:
<membership defaultProvider="AspNetSqlMembershipProvider">
<providers>
<add name="membership"
type="Microsoft.Office.Server.Security.LdapMembershipProvider,
Microsoft.Office.Server, Version=14.0.0.0, Culture=neutral, PublicKeyToken=71e9bce111e9429c"
server="yourserver.com"
port="389"
useSSL="false"
userDNAttribute="distinguishedName"
userNameAttribute="sAMAccountName"
userContainer="OU=UserAccounts,DC=internal,DC=yourcompany,DC= distinguishedName
(of your userContainer)"
userObjectClass="person"
userFilter="(ObjectClass=person)"
scope="Subtree"
otherRequiredUserAttributes="sn,givenname,cn" />
</providers>
</membership>
<roleManager enabled="true" defaultProvider="AspNetWindowsTokenRoleProvider" >
<providers>
<add name="roleManager"
type="Microsoft.Office.Server.Security.LdapRoleProvider, Microsoft.Office.Server,
Version=14.0.0.0, Culture=neutral, PublicKeyToken=71e9bce111e9429c"
server="yourserver.com"
To configure the Central Administration Web.Config file
Page 216
205
port="389"
useSSL="false"
groupContainer="DC=internal,DC=yourcompany,DC= distinguishedName (of your
groupContainer)"
groupNameAttribute="cn"
groupNameAlternateSearchAttribute="samAccountName"
groupMemberAttribute="member"
userNameAttribute="sAMAccountName"
dnAttribute="distinguishedName"
groupFilter="((ObjectClass=group)"
userFilter="((ObjectClass=person)"
scope="Subtree" />
</providers>
</roleManager>
After you have added the preceding entry, save and close the Web.Config file.
1. Start IIS Manager by typing INETMGR at a command prompt.
2. Go to the SharePoint Web Services site.
3. Go to the SecurityTokenServiceAppliction sub-site.
4. Right-click SecurityTokenServiceAppliction and then click Explore.
5. Open the Web.Config file.
6. Find the <Configuration> <system.webServer> section and add the following entry:
<membership>
<providers>
<add name="membership"
type="Microsoft.Office.Server.Security.LdapMembershipProvider,
Microsoft.Office.Server, Version=14.0.0.0, Culture=neutral, PublicKeyToken=71e9bce111e9429c"
server="yourserver.com"
port="389"
useSSL="false"
userDNAttribute="distinguishedName"
userNameAttribute="sAMAccountName"
Important:
To configure the Security Token Service Web.Config file
Page 217
206
userContainer="OU=UserAccounts,DC=internal,DC=yourcompany,DC=com"
userObjectClass="person"
userFilter="(&(ObjectClass=person))"
scope="Subtree"
otherRequiredUserAttributes="sn,givenname,cn" />
</providers>
</membership>
<roleManager enabled="true" >
<providers>
<add name="rolemanager"
type="Microsoft.Office.Server.Security.LdapRoleProvider, Microsoft.Office.Server,
Version=14.0.0.0, Culture=neutral, PublicKeyToken=71e9bce111e9429c"
server="yourserver.com"
port="389"
useSSL="false"
groupContainer="DC=internal,DC=yourcompany,DC=com"
groupNameAttribute="cn"
groupNameAlternateSearchAttribute="samAccountName"
groupMemberAttribute="member"
userNameAttribute="sAMAccountName"
dnAttribute="distinguishedName"
groupFilter="(&(ObjectClass=group))"
userFilter="(&(ObjectClass=person))"
scope="Subtree" />
</providers>
</roleManager>
After you have added the preceding entry, save and close the Web.Config file.
1. Start IIS Manager by typing INETMGR at a command prompt.
2. Go to the Claims Forms site.
3. Right-click Claims Forms and then click Explore.
Important:
To configure the forms-based authentication claims-based Web application Web.Config file
Page 218
207
4. Open the Web.Config file.
5. Find the <Configuration> <system.web> section.
6. Find the <membership defaultProvider="i"> section and add the following entry:
<add name="membership"
type="Microsoft.Office.Server.Security.LdapMembershipProvider,
Microsoft.Office.Server, Version=14.0.0.0, Culture=neutral, PublicKeyToken=71e9bce111e9429c"
server="yourserver.com"
port="389"
useSSL="false"
userDNAttribute="distinguishedName"
userNameAttribute="sAMAccountName"
userContainer="OU=UserAccounts,DC=internal, DC=yourcompany,DC=com"
userObjectClass="person"
userFilter="(&(ObjectClass=person))"
scope="Subtree"
otherRequiredUserAttributes="sn,givenname,cn" />
Find the <roleManager defaultProvider="c" enabled="true" cacheRolesInCookie="false"> section and
add the following entry:
<add name="roleManager"
type="Microsoft.Office.Server.Security.LdapRoleProvider, Microsoft.Office.Server,
Version=14.0.0.0, Culture=neutral, PublicKeyToken=71e9bce111e9429c"
server="yourserver.com"
port="389"
useSSL="false"
groupContainer="DC=internal,DC=yourcompany,DC=com"
groupNameAttribute="cn"
groupNameAlternateSearchAttribute="samAccountName"
groupMemberAttribute="member"
userNameAttribute="sAMAccountName"
dnAttribute="distinguishedName"
groupFilter="(&(ObjectClass=group))"
userFilter="(&(ObjectClass=person))"
scope="Subtree" />
Page 219
208
After you have added the preceding entry, save and close the Web.Config file.
Do not overwrite any existing entries in this Web.Config file.
Configure a forms-based Web application to use an LDAP provider by using Windows PowerShell Perform the steps in the following procedure to use Windows PowerShell to configure forms-based
authentication for a claims-based Web application.
1. Verify that you meet the following minimum requirements: See Add-SPShellAdmin.
2. On the Start menu, click All Programs.
3. Click Microsoft SharePoint 2010 Products.
4. Click SharePoint 2010 Management Shell.
5. From the Windows PowerShell command prompt, type the following:
$ap = New-SPAuthenticationProvider -Name "ClaimsForms" -ASPNETMembershipProvider
"membership" -ASPNETRoleProviderName "rolemanager"
$wa = New-SPWebApplication -Name "Claims Windows Web App" -ApplicationPool "Claims
App Pool" -ApplicationPoolAccount "internal\appool"
-Url http://servername -Port 80 -AuthenticationProvider $ap
Note:
The value of the ApplicationPoolAccount parameter must be a managed account on
the farm.
6. After you have successfully created an authentication provider and a Web application, modify
the following Web.Config files by using the sample entries provided in the Configure the LDAP
Web.Config files section of this article:
To configure the Central Administration Web.Config file
To configure the Security Token Service Web.Config file
To configure the forms-based authentication claims-based Web application Web.Config file
7. After you have modified the Web.Config files, create a SPClaimsPrincipal and a site collection,
as shown in the following example:
$cp = New-SPClaimsPrincipal -Identity "membership:SiteOwner" -IdentityType
FormsUser
Important:
Warning:
To configure a forms-based Web application to use an LDAP provider by using Windows PowerShell
Page 220
209
$sp = New-SPSite http://servername:port -OwnerAlias $cp.Encode() -Template "STS#0"
For more information, see New-SPClaimsPrincipal
(http://technet.microsoft.com/library/0831e64b-3ec0-4016-8128-
639991530172(Office.14).aspx).
Note:
We recommend that you use Windows PowerShell when performing command-line
administrative tasks. The Stsadm command-line tool has been deprecated, but is included
to support compatibility with previous product versions.
See Also
Migrate from forms-based authentication to claims-based authentication (SharePoint Server 2010)
(http://technet.microsoft.com/library/95a7fcfc-0b5e-46eb-acd4-2b1a910131c4(Office.14).aspx)
Page 221
210
Verify upgrade and review upgraded sites (SharePoint Server 2010)
After you have performed either an in-place upgrade or a database attach upgrade to Microsoft
SharePoint Server 2010, you must verify that the content was successfully upgraded to the new
version. You can verify the status of the upgrade (is it still in progress, or has it been completed
successfully or with errors or failures?) and then also review the upgraded sites to see whether any
issues remain for you to address. When you follow these steps as part of a trial upgrade, you can use
them to identify customizations that have to be reworked before you attempt to upgrade your production
environment. When you upgrade your production environment, it is even more critical that you know
when the upgrade was completed, which sites have been upgraded successfully, and which sites
require additional work before you allow users access to them again.
In some cases, you might have to restart upgrade to finish upgrading your sites. For more information
about how to restart upgrade, see Resume upgrade (SharePoint Server 2010).
In this article:
Verify upgrade status
Validate the upgraded environment
Review upgraded sites
Verify upgrade status The upgrade process has several phases. For in-place upgrade, you run Setup.exe to install the new
software, and then run the SharePoint Products Configuration Wizard to upgrade the configuration
database and the admin content database, and then the SharePoint Central Administration Web site
opens. At this point, the content upgrade process starts. There are different ways to check the status of
the upgrade process during each of these phases: You can review log files for Setup.exe, for the
SharePoint Products Configuration Wizard, and for the content upgrade. In SharePoint Central
Administration, you can view the version number to make sure that it is correct for the version that you
upgraded to. Also, you can use the Upgrade Status page in SharePoint Central Administration or the
localupgradestatus operation in Stsadm to find out which sites have been — or are currently being —
upgraded. If upgrade was not successfully completed, you can view the log files to find the issues,
address them, and then restart the upgrade process.
Review the log files
To verify that upgrade has succeeded, you can review the following log and error files:
The Setup.exe log file for SharePoint Server 2010.
Page 222
211
The Setup log file is stored in the temp directory for the user account that is running Setup
(%USERTEMP% or %WINDIR%\Users\user account\AppData\Local\Temp). It is named
SharePoint Server Setup(YYYYMMDDHHMMSSSSS).log, where YYYYMMDD is the date and
HHMMSSSSS is the time (hours in 24-hour clock format, minutes, seconds, and milliseconds).
The SharePoint Products Configuration Wizard (Psconfig.exe) log file.
The Psconfig.exe log files are located at %COMMONPROGRAMFILES%\Microsoft Shared\Web
server extensions\14\LOGS. The logs are named in the following format:
PSCDiagnostics_MM_DD_YYYY_HH_MM_SS_SSS_randomnumber.log, where MM_DD_YY is
the date and HH_MM_SS_SSS is the time (hours in 24-hour clock format, minutes, seconds, and
milliseconds), and the random number is used to differentiate between possible simultaneous
attempts to run the Psconfig.exe program.
The upgrade log file and the upgrade error log file.
The upgrade log file and the upgrade error log file are located at
%COMMONPROGRAMFILES%\Microsoft Shared\Web server extensions\14\LOGS. The logs are
named in the following format: Upgrade-YYYYMMDD-HHMMSS-SSS.log, where YYYYMMDD is
the date and HHMMSS-SSS is the time (hours in 24-hour clock format, minutes, seconds, and
milliseconds). The upgrade error log file combines all errors and warnings into a shorter file and is
named Upgrade-YYYYMMDD-HHMMSS-SSS-error.log.
To review the log files to find and troubleshoot issues, start at the top of the files. Errors or warnings
may be repeated if they occur for several site collections in the environment, or if they block the
upgrade process completely. For example, if you cannot connect to the configuration database, the
upgrade process will try (and fail) several times and these attempts will be listed in the log file.
1. Verify that you have the following administrative credentials:
To view the log files, you must be a member of the local Administrators group on the
server.
2. In Windows Explorer, change to the directory that contains the log file that you want to view.
3. Use a text editor to open the log file.
4. In the upgrade log file, search, or visually scan, for the following entry:
Upgrade session finished successfully!
If you find this entry, the installation was successful.
5. If you do not find the entries from the previous step in the upgrade log file, or if you are
reviewing one of the other log files, you can identify specific issues that may have contributed
to a failure by searching, or visually scanning, through the file for the following terms:
Search for ERROR in the log files to find any failures (such as failing components and
faulty database connections).
Search for WARNING to find issues such as missing features or components.
To review the log files
Page 223
212
To find issues, you may find it useful to use a log parser to run queries against the log files.
If you find blocking issues in the log file, you can resolve the issues and then restart upgrade to
continue with the process.
Verify the version number
In addition to viewing the upgrade log file, you can verify that the upgrade was successful by using the
SharePoint Central Administration Web site to view the version number on the Servers in Farm page.
1. Verify that you have the following administrative credentials:
To use SharePoint Central Administration, you must be a member of the Farm
Administrators group.
2. On the Central Administration Home page, under System Settings, click Manage servers in
this farm.
3. Under Farm Information, next to Configuration database version, verify that the number
starts with "14".
Check upgrade status for sites
To find out which sites have been upgraded or are currently being upgraded, you can use either the
Upgrade Status page in SharePoint Central Administration or the localupgradestatus operation in
Stsadm.exe.
The Upgrade Status page lists the upgrade sessions and gives details about the state of each
session — whether it succeeded or failed, and how many errors or warnings occurred for each server.
The Upgrade Status page also includes information about the log and error files for the upgrade
process and suggests remedies for issues that might have occurred.
To see which sites were missed or skipped during upgrade, you can use the localupgradestatus
operation in Stsadm.exe. You must run the command on every front-end Web server in a server farm.
1. Verify that you have the following administrative credentials:
To use SharePoint Central Administration, you must be a member of the Farm
Administrators group.
2. On the Central Administration Home page, under Upgrade and Migration, click Check
upgrade status.
To verify the version number on the Servers in Farm page
To view upgrade status in SharePoint Central Administration
Page 224
213
1. Verify that you have the following administrative credentials:
To use Stsadm, you must be a member of the local Administrators group on the server.
2. Click Start, right-click Command Prompt, and then click Run as administrator.
3. In the Command Prompt window, navigate to the following directory:
%COMMONPROGRAMFILES%\Microsoft Shared\Web Server Extensions\14\bin
4. Type the following command and press ENTER:
Stsadm -o localupgradestatus
For more information about the localupgradestatus operation, see Localupgradestatus: Stsadm
operation (Office SharePoint Server) (http://go.microsoft.com/fwlink/?LinkID=188516&clcid=0x409).
Validate the upgraded environment After you have determined that upgrade was completed successfully, take time to validate your
environment. Review the following items:
Service applications
Are they configured correctly?
Are the service application proxies configured the way that you want?
Do you have to create new connections between farms?
My Site Web sites
Are all the Web Parts working?
Are all features associated with the My Site Web sites working?
Can users access the sites, or are they seeing "Access Denied" errors?
If the My Site host that they are visiting is not the default My Site host, they may see this error.
Check that the service application and proxy associations are correct, and then check that the
My Site host is referenced correctly in the User Profile service application. Reset Internet
Information Services (IIS) to apply any changes.
Search
Run a crawl, and review the log files.
Run search queries, and verify that the queries work as expected and provide appropriate
results. Twenty-four hours later, view the query reports and look for issues.
Search for people and profiles.
Check any Search customizations to make sure that they work as expected.
To view upgrade status from the command line
Page 225
214
Review upgraded sites Review your upgraded sites to identify any issues that must be addressed before you run the upgrade
process on your production environment. If you performed an in-place upgrade and chose to use Visual
Upgrade, you can use the Visual Upgrade feature to preview the sites in the new user interface. For
more information about previewing sites using Visual Upgrade, see Manage visual upgrade (SharePoint
Server 2010).
If you want to verify basic functionality, you can create a new site collection by using a representative
set of lists, libraries, Web Parts, and so on. Review the new site to make sure that the common, basic
elements of your sites are working.
If pages are not rendered, you can check the Site Settings page by going directly to the URL (http://
siteurl/_layouts/settings.aspx). If the Site Settings page works and the upgrade has succeeded, there
might be issues with the master page or home page. If the Site Settings page does not work, go to the
log file to see whether you can get more information about the problem.
Begin by validating high-impact or high-profile sites, and then move on to lower-priority sites. As part of
the planning process, you should have identified which sites are high-impact and high-profile and
require immediate attention, and which can wait a bit longer.
Use the following checklists to review your upgraded sites and look for issues.
Web Parts
The following table lists issues with Web Parts that can occur after upgrade and how to address them.
To test your Web Parts quickly, you can build a new Web Part page that contains all of your
custom Web Parts before you test your upgrade, and then review the page for any missing or
broken Web Parts after the trial upgrade.
What to check What to do if there is a problem
Do all the Web Parts from your original site
appear in your upgraded site?
If a Web Part zone exists in a customized (unghosted)
page, but not in the site definition, the Web Parts from
that Web Part zone may have been moved into the
bottom zone on the page during the upgrade.
Either in Edit Mode for the page in the browser or in
Microsoft SharePoint Designer 2010, look for missing
Web Parts in the bottom zone or other zones, or check
to see whether the Web Parts have been closed. For
more information about how to work with Web Parts
and Web Part zones in SharePoint Designer 2010, see
the SharePoint Designer Help system.
Tip:
Page 226
215
What to check What to do if there is a problem
Are the Web Parts displayed correctly (in the
correct zone, location, and size)?
Either in Edit Mode for the page in the browser or in
SharePoint Designer 2010, drag the Web Part into the
correct zone or modify the Web Part properties to
correct any sizing or positioning problems.
Are there any extra or missing Web Parts? Open the page either in Edit Mode for the page in the
browser or in SharePoint Designer 2010. If you see
extra Web Parts on your page, look for closed or
inactive Web Parts on the original version of the page.
Were the closed or inactive Web Parts opened by the
upgrade process? If so, you can modify the Web Part
properties to close these Web Parts.
If Web Parts are missing, look for errors in SharePoint
Designer 2010 such as "Error Rendering Control" or
"Missing Assembly." These errors indicate that the
Web Part was not installed or was configured
incorrectly for the new environment and must be
reinstalled or reconfigured.
Do the Web Parts work correctly? Open the page either in Edit Mode for the page in the
browser or in SharePoint Designer 2010, and look for
errors that indicate that a component or service is
missing. Make sure that any components or services
that the Web Parts rely on exist in the upgraded site.
Particularly for the database attach upgrade approach,
you must make sure that you have installed all the
components or services that you must have for your
Web Parts, and that you have configured them
correctly (for example, you have configured the
Web.config Safe Controls list).
Update and redeploy any Web Parts that exist but no
longer function correctly.
Are any Web Parts pages still checked out?
If you check out a page to make changes, make sure
that you check in the page again.
Are your Excel Web Access Web Parts
working correctly? Did you re-create your
connections correctly? Are external data
sources still working?
Verify all connections and external data sources.
Page 227
216
If you have problems with a Web Part, append contents=1 to the end of the URL syntax (http://
siteurl/default.aspx?contents=1), and then press ENTER. This opens the Web Part
Maintenance page where you can remove and repair the broken Web Part.
Large lists
By default, large list query throttling is applied after an upgrade to SharePoint Server 2010. If a list is
very large, and users use a view or perform a query that exceeds the limit or throttling threshold, the
view or query will not be permitted. Check any large lists in your environment and have the site owner
or list owner address the issue. For example, they can create indexed columns with filtered views,
organize items into folders, set an item limit on the page for a large view, or use an external list.
Styles and appearance
The following table lists common issues with the style and appearance of your Web site after upgrade
and how to address them.
Most of the issues in this section can be solved by correcting the links to an item.
What to check What to do if there is a problem
Are all the images on your pages displayed
correctly?
Verify or fix the links to the images.
Are the appropriate cascading style sheet colors
and styles used in the appropriate locations?
Verify or fix the links to the cascading style sheet
file. Verify the link on the master page.
Does the theme that you applied to your site still
look the same?
Your site's home page, or other pages on your
site, may look different after the site is upgraded.
You may have to re-create or revise a theme and
reapply it.
Do you have any scripted controls that are not
working?
Verify or fix the links to the controls.
Are your pages displayed correctly in Windows
Internet Explorer 8?
Verify that any HTML on the page is in strict
XHTML mode.
Are any script errors displayed on any pages? Verify the scripts and links, and verify that any
HTML is in strict XHTML mode.
Tip:
Tip:
Page 228
217
Permissions
Do the appropriate people and groups still have the correct level of permissions to sites, pages, lists,
and items?
You can use the Check Permissions button in the Permission Tools section of the ribbon to see who
has permissions to which items in a site or subsite.
Customized (unghosted) pages
Customized (unghosted) pages are pages that have been edited and are now unique versions of the
pages, instead of the default template pages. The following table lists issues with customized pages
that can occur after upgrade and how to address them.
What to check What to do if there is a problem
Are your customizations still in the correct
locations?
Determine whether you have only one issue or a
larger problem with the whole page.
If you added a brand new page to your original site
(for example, if you replaced Default.aspx with a
different file instad of changing the existing
Default.aspx file), the new page has no association
with the site definition. Therefore, it might not
resemble the other pages on the upgraded site — nor
can it be reset to resemble them. If you want your
customized page to have the same look and feel as
the other pages on your site, consider creating a
brand-new page that is based on the site definition
and then transferring your customizations to that new
page.
Can you still access the editing controls on the
pages?
If you customized the editing controls (for example,
the Site Actions link or the Edit Page link), check
whether they still appear. If they don't appear, you
can replace them with the editing controls of the new
version by resetting the page to the default version.
Use the Reset to Template command in SharePoint
Designer to reset the page to the default version (also
known as reghosting). After you have restored the
default page, you can then reapply your
customizations in the browser by applying a different
master page, or by reapplying the customizations in
SharePoint Designer.
Page 229
218
What to check What to do if there is a problem
Are your customizations still appropriate in the
new environment, or do you want to update to
the new functionality and look?
If you want the new functionality and features, you
must reset any customized pages to use the
template. Resetting the page basically discards the
customizations and attaches your page to the
appropriate master page. Any customizations you
want can then be transferred to the master page
instead of being stored in individual pages.
Use the Reset to Template command in SharePoint
Designer to reset the page to the default version (that
is, reghost it). After you have restored the default
page, you can then reapply your customizations in the
browser by applying a different master page, or by
reapplying the customizations in SharePoint
Designer.
Are any pages still checked out? If you check out a page to make changes, make sure
that you check in the page again.
See Also
Resume upgrade (SharePoint Server 2010)
Troubleshoot upgrade issues (SharePoint Server 2010)
Page 230
219
Manage visual upgrade (SharePoint Server 2010)
This article provides procedures related to the Visual Upgrade feature. When you upgrade from
Microsoft Office SharePoint Server 2007 to Microsoft SharePoint Server 2010, you can choose to use
the Visual Upgrade feature to give site collection owners and site owners the opportunity to preserve
the previous user interface temporarily. This allows them to update customizations to work in the new
user interface. For a full description of Visual Upgrade and related choices, see Plan visual upgrade
(SharePoint Server 2010).
In this article:
About using Visual Upgrade
View status of current user interface
Revert sites to previous user interface
Force an upgrade to the new user interface
Site owner options for visual upgrade
About using Visual Upgrade When you upgrade, either by using in-place upgrade or by using the database attach upgrade method,
you can choose to use Visual Upgrade.
During an in-place upgrade, you make the choice to use Visual Upgrade as a step in the SharePoint
Products Configuration Wizard. The visual upgrade feature is not available in the SharePoint Products
Configuration Wizard if you are performing an upgrade on a stand-alone server with built-in database.
However, the Visual Upgrade feature is available in this case from the Psconfig command-line tool. You
can then use the syntax: psconfig.exe -cmd upgrade [–preserveolduserexperience <true|false>].
During a database attach upgrade, the choice to update to the new user experience or stay in the old
user experience is accomplished by using either:
The Updateuserexperience parameter of the Mount-SPContentDatabase Windows PowerShell
cmdlet.
The preserveolduserexperience parameter of the addcontentdatabase Stsadm operation.
For additional information about using these parameters during an upgrade, see Attach databases and
upgrade to SharePoint Server 2010.
View status of current user interface You can view the current user interface status by generating a list of all Web sites in a site collection
and their corresponding visual upgrade data. This is useful if you have set a time limit by which site
Page 231
220
owners must have prepared their sites for the new user interface and you want to monitor their
progress. The following procedure shows you how to view the current user interface status.
1. Verify that you meet the following minimum requirements: See Add-SPShellAdmin.
2. On the Start menu, click All Programs.
3. Click Microsoft SharePoint 2010 Products.
4. Click SharePoint 2010 Management Shell.
5. At the Windows PowerShell command prompt, type the following command:
$sc = Get-SPSite http://machinename/sites/collectionname; $sc.GetVisualReport() |
Format-Table
For more information, see Get-SPSite (http://technet.microsoft.com/library/f3422bf4-0f9b-4f22-
94c8-2a0606a31b16(Office.14).aspx).
Revert sites to previous user interface If a site collection owner or site owner finalizes the new user interface by mistake, or if they have a
problem that they cannot solve, you can revert back to the previous user interface by using Windows
PowerShell. This procedure shows you how to revert one or all sites in a site collection to the previous
user interface.
1. Verify that you meet the following minimum requirements: See Add-SPShellAdmin.
2. On the Start menu, click All Programs.
3. Click Microsoft SharePoint 2010 Products.
4. Click SharePoint 2010 Management Shell.
5. To revert a specific site in a site collection to the previous UI, at the Windows PowerShell
command prompt, type the following command:
Get-SPSite http://machinename/sites/V3UI | Get-SPWeb "webname" |
Foreach{$_.UIVersionConfigurationEnabled=1;$_.UIVersion=3;$_.Update();}
To reverts all sites in a site collection to the previous user interface, at the Windows PowerShell
command prompt, type the following command:
Get-SPSite http://machinename/sites/V3UI | Foreach{$_.
UIVersionConfigurationEnabled=1;$_.UIVersion=3;$_.Update();}
For more information, see Get-SPSite (http://technet.microsoft.com/library/f3422bf4-0f9b-4f22-
94c8-2a0606a31b16(Office.14).aspx).
To view status of current user interface by using Windows PowerShell
To revert sites to the previous user interface by using Windows PowerShell
Page 232
221
Force an upgrade to the new user interface If you want to forcibly apply the new user interface after an upgrade has taken place, you might first
want to give site collection owners and site owners a specified time during which they can preview the
new user interface and fix any issues they might have. When you force an upgrade to the new user
interface, you can use a script or use the SharePoint Products Configuration Wizard during the initial
upgrade. For information about upgrade and the SharePoint Products Configuration Wizard, see Run
the SharePoint Products Configuration Wizard. The following procedure shows you how to
programmatically upgrade all site collections and all sites to the new user interface.
1. Verify that you meet the following minimum requirements: See Add-SPShellAdmin.
2. On the Start menu, click All Programs.
3. Click Microsoft SharePoint 2010 Products.
4. Click SharePoint 2010 Management Shell.
5. At the Windows PowerShell command prompt, type the following command:
$webapp = Get-SPWebApplication http://sitename
foreach ($s in $webapp.sites)
{$s.VisualUpgradeWebs() }
For more information, see Get-SPWebApplication (http://technet.microsoft.com/library/11d6521f-
f99c-433e-9ab5-7cf9e953457a(Office.14).aspx)
To upgrade a single site collection to the new user interface, type the following commands at the
Windows PowerShell command prompt:
$site = Get-SPSite http://server
$site.VisualUpgradeWebs()
To upgrade a single site to the new user interface, type the following commands at the Windows
PowerShell command prompt:
$web = Get-SPWeb http://server/site
$web.UIVersion = 4
$web.UIVersionConfigurationEnabled = 0
$web.Update()
Site owner options for visual upgrade The site owner can use the Site Setting user interface to toggle between the Use the previous user
interface and Preview the updated user interface options. Once the site owner is satisfied with how
the site looks, the new UI can be finalized by selecting the Update the user interface option.
To force through an upgrade to the new user interface by using Windows PowerShell
Page 233
222
The following table describes the different upgrade options that are available for the site owner to
choose for their sites. The upgrade modes are available from the Site Settings page in the Title,
Description, and Icon section.
Mode type Description
Use the previous user interface Site owners use this mode to have all their sites
use the interface from Microsoft Office SharePoint
Server 2007.
Preview the updated user interface Site owners use this mode to evaluate how their
sites will look and function in the new interface.
When this mode is chosen, features from the
previous version interface will not be available.
Update the user interface Site owners use this option when they are satisfied
with the changes and are ready to switch to the
new user interface. If needed, an administrator
can restore the user interface to the previous
version interface.
See Also
Plan visual upgrade (SharePoint Server 2010)
Page 234
223
Using AAM URL redirection as part of the upgrade process (SharePoint Server 2010) (white paper)
This white paper describes the planning activities that you need to successfully deploy and use the
alternate access mapping (AAM) URL redirection feature in Microsoft SharePoint Server 2010 to help
mitigate downtime during a server computer or server farm upgrade. It also describes the procedures
necessary to successfully complete the configuration of this feature by modifying existing Microsoft
Office SharePoint Server 2007 server computers.
The process described in this white paper is an advanced technique for avoiding downtime
during upgrade. It should only be used if other techniques, such as read-only databases and
upgrade in-place with detached databases, would cause an unacceptably long period of
downtime for your users. Do not consider using this technique unless you know your upgrade
process will take more than a long weekend. If your upgrade is not likely to take that long, you
won't save any time by performing the procedures in this paper. For more information about
other approaches to upgrade, see Determine upgrade approach (SharePoint Server 2010).
Download this white paper as a Microsoft Word document (.doc).
(http://go.microsoft.com/fwlink/?LinkId=168857)
Download this white paper as a PDF file. (http://go.microsoft.com/fwlink/?LinkId=168858)
Important: