210
USER GUIDE Copyright © 2004 Nokia. All rights reserved.
1
Copyright © 2004 Nokia. All rights reserved.US ER GU ID E
Copyright © 2004 Nokia. All rights reserved.

C
The wireless device descnetworks.
LEGAL INFORMATIOPart No. 9310037, IssuCopyright © 2004 NokiaNokia, N-Gage, N-Gage are trademarks or registmentioned herein may bElectronic file created MUS Patent No 5818437, T9 text input software C
Bluetooth is a registeredIncludes RSA B
Java is a tradem
This product includes soare trademarks of Symb of Sun Microsystems, InThe information containoperates a policy of ongproducts described in th
ribed in this guide is approved for the use in GSM 850 and GSM 1900
N e No. 1. All rights reserved.QD, Nokia Connecting People, and the Nokia Original Enhancements logos ered trademarks of Nokia Corporation. Other company and product names e trademarks or trade names of their respective owners.arch 12, 2004.5953541, 6011554 and other pending patents.
2opyright © 2004 Nokia. All rights reserved.
opyright ©1999-2004. Tegic Communications, Inc. All rights reserved.
trademark of Bluetooth SIG, Inc.SAFE cryptographic or security protocol software from RSA Security.
ark of Sun Microsystems, Inc.
ftware licensed from Symbian Ltd © 1998-2004. Symbian and Symbian OS ian Ltd.c.ed in this user guide was written for the Nokia N-Gage QD product. Nokia oing development. Nokia reserves the right to make changes to any of the is document without prior notice.
C
UNDER NO CIRCUMSTANINCOME OR ANY SPECIAHOWSOEVER CAUSED. THE CONTENTS OF THIS LAW, NO WARRANTIES OTO, THE IMPLIED WARRAARE MADE IN RELATIONNOKIA RESERVES THE RIPRIOR NOTICE.
EXPORT CONTROLS This device may contain contrary to law is prohib
FCC/INDUSTRY CANYour device may cause Tproximity to receiving eqtelephone if such interfeservice facility. This devicondition that this devic
CES SHALL NOKIA BE RESPONSIBLE FOR ANY LOSS OF DATA OR L, INCIDENTAL, AND CONSEQUENTIAL OR INDIRECT DAMAGES
DOCUMENT ARE PROVIDED "AS IS." EXCEPT AS REQUIRED BY APPLICABLE F ANY KIND, EITHER EXPRESS OR IMPLIED, INCLUDING, BUT NOT LIMITED NTIES OF MERCHANTABILITY AND FITNESS FOR A PARTICULAR PURPOSE, TO THE ACCURACY AND RELIABILITY OR CONTENTS OF THIS DOCUMENT. GHT TO REVISE THIS DOCUMENT OR WITHDRAW IT AT ANY TIME WITHOUT
commodities, technology, or software subject to US export laws. Diversion
3opyright © 2004 Nokia. All rights reserved.
ited.
ADA NOTICE V or radio interference (for example, when using a telephone in close uipment). The FCC or Industry Canada can require you to stop using your rence cannot be eliminated. If you require assistance, contact your local ce complies with part 15 of the FCC rules. Operation is subject to the e does not cause harmful interference.
4
Patents
Copyright © 2004 Nokia. All rights reserved.
Manufactured or sold under one or more of the following US Patents. Asterisk (*) indicates design patents pending.
4868846 4945633 5001372 5053928 5083240 5101175
5124672 5151946 5152004 5173927 5212834 5230091
5241583 5266782 5271056 5311151 5317283 5331638
5335362 5341149 5353328 5371481 5378935 5378935
5384782 5390223 5392460 5396657 5400949 5408504
5416435 5430740 5442521 5444816 5446364 5446422
5477422 5479476 5487084 5526366 5534878 5548616
5551067 5553125 5557639 5565821 5566201 5570369
5581244 5594797 5600708 5606548 5613235 5625274
5640395 5664053 5675611 5677620 5692032 5697074
5699482 5701392 5722074 5729541 5754976 5760568
5787341 5794142 5797102 5802465 5805301 5809413
5819165 5821891 5822366 5827082 5835858 5835889
5839101 5842141 5844884 5845219 5850607 5857151
5859843 5862178 5870683 5884103 5884190 5889770
5898775 5898925 5903832 5903839 5907823 5912570
5914690 5914796 5917868 5920826 5926147 5926769
5929813 5930233 5946651 5953665 5956332 5956625
5
5956625 5956633 5960354 5960389 5963901 5966378
5977887 5983081 5987137 5987137 5987639 5991857
Copyright © 2004 Nokia. All rights reserved.
6005857 6006114 6009328 6011853 6011971 6014113
6014551 6014573 6025802 6026161 6028567 6031827
6035189 6035194 6038238 6043760 6047196 6049796
6050415 6054954 6054966 6055439 6060193 6069923
6072787 6073001 6079993 6081732 6084471 6084855
6084920 6084962 6088746 6094587 6097964 6105784
6112099 6112099 6115617 6118775 6119002 6119180
6121846 6122498 6128322 6128509 6130650 6133884
6137789 6138091 6140966 6144243 6144676 6148209
6151485 6151507 6163609 6164547 6167038 6167248
6167273 6170073 6171127 6178535 6182101 6184592
6185295 6185302 6185422 6188909 6195338 6199035
6201712 6201876 6202109 6219560 6223037 6223059
6230020 6240076 6249584 6259312 6262735 6266321
6266330 6269126 6271794 6272361 6282436 6285888
6292668 6295286 6307512 6308084 6311054 6314166
6317083 6324389 6324412 6333716 6347218 6356759
6359865 6359904 6363259 6370362 6370389 6377803
6377820 6381468 6385254 6385451 6392605 6392660
6400958 6417817 6430163 6434133 6437711 6438370
6445932 6453179 6456237 6456826 6463278 6470470

6
6487397 6510148 6522670 6591116 6606508 481674
29177166* 29180899* 29180898* 29180900* 29180901*
Copyright © 2004 Nokia. All rights reserved.

7
Contents 14 . 16 . 17 . 17 . 17 . 18 . 19 20 . 20 . 23 . 24 . 26 . . 28 . . 28 . 28 . 29 . 31 . 31 . . 32 . . 33 . 33
Copyright © 2004 Nokia. All rights reserved.
1. For your safety . . . . . . . . . . . . . . . . . . . . . . . . . .About your device . . . . . . . . . . . . . . . . . . . . . . . . . . . . . . .Network services . . . . . . . . . . . . . . . . . . . . . . . . . . . . . . . .Register your device. . . . . . . . . . . . . . . . . . . . . . . . . . . . . .E-newsletters. . . . . . . . . . . . . . . . . . . . . . . . . . . . . . . . . . .Chargers, batteries, and enhancements . . . . . . . . . . . . . . .Shared memory . . . . . . . . . . . . . . . . . . . . . . . . . . . . . . . . .
2. Getting started . . . . . . . . . . . . . . . . . . . . . . . . . .Installing the SIM card and battery . . . . . . . . . . . . . . . . . .Charging the battery . . . . . . . . . . . . . . . . . . . . . . . . . . . . .Switch the game deck on . . . . . . . . . . . . . . . . . . . . . . . . . .Keys and parts . . . . . . . . . . . . . . . . . . . . . . . . . . . . . . . . . .About the display. . . . . . . . . . . . . . . . . . . . . . . . . . . . . . . .Accessing applications in the menu . . . . . . . . . . . . . . . . . .Keypad lock (Keyguard) . . . . . . . . . . . . . . . . . . . . . . . . . . .Inserting a game or memory card. . . . . . . . . . . . . . . . . . . .Ejecting a memory card . . . . . . . . . . . . . . . . . . . . . . . . . . .Playing a game. . . . . . . . . . . . . . . . . . . . . . . . . . . . . . . . . .
Saving power when playing. . . . . . . . . . . . . . . . . . . . . . . . . . . .Starting a multiplayer game . . . . . . . . . . . . . . . . . . . . . . . . . .
Tips for efficient use . . . . . . . . . . . . . . . . . . . . . . . . . . . . .
8
3. Your game deck. . . . . . . . . . . . . . . . . . . . . . . . . . 35Personalizing your game deck . . . . . . . . . . . . . . . . . . . . . . . 35
. 36 . 39 . . 39 . 40 . 41 42 . 42 . . 43 . . 44 . 45 . . 45 47 . . 47 . . 48 . . 48 . . 49 . 49 . . 49 . . 50 51
. 52
. 53 . 53
Copyright © 2004 Nokia. All rights reserved.
Shortcuts in the standby mode. . . . . . . . . . . . . . . . . . . . . .Volume control . . . . . . . . . . . . . . . . . . . . . . . . . . . . . . . . .
Loudspeaker . . . . . . . . . . . . . . . . . . . . . . . . . . . . . . . . . . . . . .Installing software . . . . . . . . . . . . . . . . . . . . . . . . . . . . . . .Removing software . . . . . . . . . . . . . . . . . . . . . . . . . . . . . .
4. Your phone . . . . . . . . . . . . . . . . . . . . . . . . . . . . .Making a call . . . . . . . . . . . . . . . . . . . . . . . . . . . . . . . . . . .Making a conference call (network service) . . . . . . . . . . .Answering or declining a call . . . . . . . . . . . . . . . . . . . . . .Call waiting (network service) . . . . . . . . . . . . . . . . . . . . . .Options during a call . . . . . . . . . . . . . . . . . . . . . . . . . . . . .
5. N-Gage QD Arena launcher . . . . . . . . . . . . . . . . .Connect to N-Gage Arena . . . . . . . . . . . . . . . . . . . . . . . . .Getting started . . . . . . . . . . . . . . . . . . . . . . . . . . . . . . . . .
Connection settings . . . . . . . . . . . . . . . . . . . . . . . . . . . . . . . . .Updating Arena launcher . . . . . . . . . . . . . . . . . . . . . . . . .Registration and login . . . . . . . . . . . . . . . . . . . . . . . . . . . .
Registering from your game deck . . . . . . . . . . . . . . . . . . . . . . .Registering from your PC . . . . . . . . . . . . . . . . . . . . . . . . . . . . .
6. Contacts . . . . . . . . . . . . . . . . . . . . . . . . . . . . . . .Saving names and numbers—Creating and editing contact cards . . . . . . . . . . . . . . . . . . . . . . . . . . . . . . . . . . .Copying contacts between the SIM card and device memory . . . . . . . . . . . . . . . . . . . . . . . . . . . . . .Adding a ringing tone for a contact card or group . . . . . . .
9
Voice dialing . . . . . . . . . . . . . . . . . . . . . . . . . . . . . . . . . . . . . 54Adding a voice tag to a phone number . . . . . . . . . . . . . . . . . . . . . 55
. . 57 . . 57 58 . 58 . 59 61 . 62 . . 62 . . 62 . . 65 . . 67 . . 68 . . 71 . . 76 . . 77 79 . 80 . . 80 . . 82 . . 84 . . 85 . 88 . 89 . 90
Copyright © 2004 Nokia. All rights reserved.
Creating contact groups . . . . . . . . . . . . . . . . . . . . . . . . . .Removing members from a group . . . . . . . . . . . . . . . . . . . . . . .
7. Calendar . . . . . . . . . . . . . . . . . . . . . . . . . . . . . . .Creating calendar entries . . . . . . . . . . . . . . . . . . . . . . . . . .Calendar view . . . . . . . . . . . . . . . . . . . . . . . . . . . . . . . . . .
8. Instant messaging (IM) . . . . . . . . . . . . . . . . . . . . .Getting started . . . . . . . . . . . . . . . . . . . . . . . . . . . . . . . . .
User ID and password . . . . . . . . . . . . . . . . . . . . . . . . . . . . . . . .First login and service settings . . . . . . . . . . . . . . . . . . . . . . . . .Chat sessions . . . . . . . . . . . . . . . . . . . . . . . . . . . . . . . . . . . . . .Chat history . . . . . . . . . . . . . . . . . . . . . . . . . . . . . . . . . . . . . . .IM contacts. . . . . . . . . . . . . . . . . . . . . . . . . . . . . . . . . . . . . . . .Group chat . . . . . . . . . . . . . . . . . . . . . . . . . . . . . . . . . . . . . . .Settings . . . . . . . . . . . . . . . . . . . . . . . . . . . . . . . . . . . . . . . . . .Log off service . . . . . . . . . . . . . . . . . . . . . . . . . . . . . . . . . . . . .
9. Messaging . . . . . . . . . . . . . . . . . . . . . . . . . . . . . .Writing text. . . . . . . . . . . . . . . . . . . . . . . . . . . . . . . . . . . .
Traditional text input . . . . . . . . . . . . . . . . . . . . . . . . . . . . . . . .Predictive text input . . . . . . . . . . . . . . . . . . . . . . . . . . . . . . . . .Copying text to clipboard . . . . . . . . . . . . . . . . . . . . . . . . . . . . .Writing and sending messages . . . . . . . . . . . . . . . . . . . . . . . . .
Settings needed for multimedia messaging. . . . . . . . . . . . .Settings needed for e-mail. . . . . . . . . . . . . . . . . . . . . . . . .Inbox . . . . . . . . . . . . . . . . . . . . . . . . . . . . . . . . . . . . . . . . .

10
Viewing multimedia objects . . . . . . . . . . . . . . . . . . . . . . . . . . . . . 90Receiving smart messages . . . . . . . . . . . . . . . . . . . . . . . . . . . . . . . 91
. . 92 . 92 . 93 . . 93 . . 94 . . 96 . . 97 . . 98 . 98 . 99 . . 99 . . 99 . 100107
. 107 . 108 . 108 . 108 . 109 110 . 110 . 111 . 111 . 112
Copyright © 2004 Nokia. All rights reserved.
Receiving web messages . . . . . . . . . . . . . . . . . . . . . . . . . . . . . .My folders . . . . . . . . . . . . . . . . . . . . . . . . . . . . . . . . . . . . .Mailbox . . . . . . . . . . . . . . . . . . . . . . . . . . . . . . . . . . . . . . .
Opening the mailbox . . . . . . . . . . . . . . . . . . . . . . . . . . . . . . . .Retrieving e-mail messages from the mailbox . . . . . . . . . . . . . .Disconnecting from mailbox . . . . . . . . . . . . . . . . . . . . . . . . . . .Outbox — messages waiting to be sent . . . . . . . . . . . . . . . . . . .Viewing messages on a SIM card. . . . . . . . . . . . . . . . . . . . . . . .
Cell broadcast (network service) . . . . . . . . . . . . . . . . . . . .Service command editor. . . . . . . . . . . . . . . . . . . . . . . . . . .Messaging settings . . . . . . . . . . . . . . . . . . . . . . . . . . . . . .
Settings for text messages . . . . . . . . . . . . . . . . . . . . . . . . . . . .Settings for multimedia messages . . . . . . . . . . . . . . . . . . . . . .
10. Web . . . . . . . . . . . . . . . . . . . . . . . . . . . . . . . . .Basic steps for accessing Web . . . . . . . . . . . . . . . . . . . . . .
Receiving settings in a smart message . . . . . . . . . . . . . . . . . . .Keying in the settings manually . . . . . . . . . . . . . . . . . . . . . . . .Bookmarks view . . . . . . . . . . . . . . . . . . . . . . . . . . . . . . . . . . . .
Making a connection . . . . . . . . . . . . . . . . . . . . . . . . . . . .Connection security . . . . . . . . . . . . . . . . . . . . . . . . . . . . . .Browsing . . . . . . . . . . . . . . . . . . . . . . . . . . . . . . . . . . . . . .
Ending a connection . . . . . . . . . . . . . . . . . . . . . . . . . . . . . . . .Emptying the cache . . . . . . . . . . . . . . . . . . . . . . . . . . . . . . . . .
Settings for Web . . . . . . . . . . . . . . . . . . . . . . . . . . . . . . .
11
11. Extras . . . . . . . . . . . . . . . . . . . . . . . . . . . . . . . . 113Images—Viewing images. . . . . . . . . . . . . . . . . . . . . . . . . . . 113
. 114 . 115 . 116 . 116 . 117 . 118 . 118 . 118 . 119 . 119 . 120 . 121 . 122 . 123 . 124 . 124 . 125 . 126 . 129 . 129 . 130131
. 131 . 132 . 132
Copyright © 2004 Nokia. All rights reserved.
Screen capture . . . . . . . . . . . . . . . . . . . . . . . . . . . . . . . . .Changing Screen capture settings . . . . . . . . . . . . . . . . . . . . . . .
Video player. . . . . . . . . . . . . . . . . . . . . . . . . . . . . . . . . . . .Receive a video clip in a message . . . . . . . . . . . . . . . . . . . . . . .
Calculator . . . . . . . . . . . . . . . . . . . . . . . . . . . . . . . . . . . . .Clock . . . . . . . . . . . . . . . . . . . . . . . . . . . . . . . . . . . . . . . .
Setting an alarm . . . . . . . . . . . . . . . . . . . . . . . . . . . . . . . . . . .Turning off the alarm . . . . . . . . . . . . . . . . . . . . . . . . . . . . . . .
Notes . . . . . . . . . . . . . . . . . . . . . . . . . . . . . . . . . . . . . . . . .Applications . . . . . . . . . . . . . . . . . . . . . . . . . . . . . . . . . . . .
Applications (Java™) . . . . . . . . . . . . . . . . . . . . . . . . . . . . . . . . .Applications main view . . . . . . . . . . . . . . . . . . . . . . . . . . . . . . .Applications settings. . . . . . . . . . . . . . . . . . . . . . . . . . . . . . . . .
Recorder . . . . . . . . . . . . . . . . . . . . . . . . . . . . . . . . . . . . . .To-do—task list . . . . . . . . . . . . . . . . . . . . . . . . . . . . . . . . .Converter—Converting measures . . . . . . . . . . . . . . . . . . . .
Setting a base currency and exchange rates . . . . . . . . . . . . . . .Composer . . . . . . . . . . . . . . . . . . . . . . . . . . . . . . . . . . . . . .Go to . . . . . . . . . . . . . . . . . . . . . . . . . . . . . . . . . . . . . . . . .
Adding shortcuts . . . . . . . . . . . . . . . . . . . . . . . . . . . . . . . . . . .Help . . . . . . . . . . . . . . . . . . . . . . . . . . . . . . . . . . . . . . . . . .
12. Tools. . . . . . . . . . . . . . . . . . . . . . . . . . . . . . . . . .Game manager. . . . . . . . . . . . . . . . . . . . . . . . . . . . . . . . . .
Grouping and sorting files. . . . . . . . . . . . . . . . . . . . . . . . . . . . .Check memory . . . . . . . . . . . . . . . . . . . . . . . . . . . . . . . . . . . . .
12
Game file types. . . . . . . . . . . . . . . . . . . . . . . . . . . . . . . . . . . . . . 133Backing up and restoring game data. . . . . . . . . . . . . . . . . . . . . . 133
. 134 . 134 . 134 . 134 . 135 . 135 . 136 . 138 . 138 . 138 . 140 . 141 . 148 . 149 . 154 . 154 . 155 . 155 . 159 . 159 . 160 . 161 . 162 . 164
Copyright © 2004 Nokia. All rights reserved.
Manager . . . . . . . . . . . . . . . . . . . . . . . . . . . . . . . . . . . . . .Installing and removing Symbian software . . . . . . . . . . . . . . . .
Forward . . . . . . . . . . . . . . . . . . . . . . . . . . . . . . . . . . . . . . .Call forwarding (network service) . . . . . . . . . . . . . . . . . . . . . . .
Profiles . . . . . . . . . . . . . . . . . . . . . . . . . . . . . . . . . . . . . . .Changing the profiles . . . . . . . . . . . . . . . . . . . . . . . . . . . . . . . .Customizing profiles . . . . . . . . . . . . . . . . . . . . . . . . . . . . . . . . .
Settings . . . . . . . . . . . . . . . . . . . . . . . . . . . . . . . . . . . . . . .Changing settings . . . . . . . . . . . . . . . . . . . . . . . . . . . . . . . . . . .Device settings . . . . . . . . . . . . . . . . . . . . . . . . . . . . . . . . . . . . .Call settings . . . . . . . . . . . . . . . . . . . . . . . . . . . . . . . . . . . . . . .Connection settings . . . . . . . . . . . . . . . . . . . . . . . . . . . . . . . . .Date and time. . . . . . . . . . . . . . . . . . . . . . . . . . . . . . . . . . . . . .Security . . . . . . . . . . . . . . . . . . . . . . . . . . . . . . . . . . . . . . . . . .Network . . . . . . . . . . . . . . . . . . . . . . . . . . . . . . . . . . . . . . . . .Enhancement settings. . . . . . . . . . . . . . . . . . . . . . . . . . . . . . . .
Log . . . . . . . . . . . . . . . . . . . . . . . . . . . . . . . . . . . . . . . . . .Call log and general log . . . . . . . . . . . . . . . . . . . . . . . . . . . . . .
Voice mail . . . . . . . . . . . . . . . . . . . . . . . . . . . . . . . . . . . . .Calling your voice mailbox (network service) . . . . . . . . . . . . . .
Bluetooth connection. . . . . . . . . . . . . . . . . . . . . . . . . . . . .Bluetooth settings . . . . . . . . . . . . . . . . . . . . . . . . . . . . . . . . . .Sending data using Bluetooth connectivity . . . . . . . . . . . . . . . .Pairing devices . . . . . . . . . . . . . . . . . . . . . . . . . . . . . . . . . . . . .

13
Receiving data using Bluetooth connectivity. . . . . . . . . . . . . . . . 165Disconnecting Bluetooth . . . . . . . . . . . . . . . . . . . . . . . . . . . . . . . 165
. 166 . 166 . 166 . 167 . 167 . 168 . 169 . 169 . 170 . 171 . 171 . 172 . 173 . 174 . 175
187194198205
Copyright © 2004 Nokia. All rights reserved.
Connecting your game deck to a computer . . . . . . . . . . . . . . . .Using the CD-ROM . . . . . . . . . . . . . . . . . . . . . . . . . . . . . . . . . .
Memory . . . . . . . . . . . . . . . . . . . . . . . . . . . . . . . . . . . . . . .View memory consumption . . . . . . . . . . . . . . . . . . . . . . . . . . . .Free memory. . . . . . . . . . . . . . . . . . . . . . . . . . . . . . . . . . . . . . .Memory card tool . . . . . . . . . . . . . . . . . . . . . . . . . . . . . . . . . . .Format a memory card . . . . . . . . . . . . . . . . . . . . . . . . . . . . . . .Back up and restore information on a memory card . . . . . . . . .Lock the memory card . . . . . . . . . . . . . . . . . . . . . . . . . . . . . . .
1-touch dialing . . . . . . . . . . . . . . . . . . . . . . . . . . . . . . . . .SIM directory . . . . . . . . . . . . . . . . . . . . . . . . . . . . . . . . . . .Fixed dial . . . . . . . . . . . . . . . . . . . . . . . . . . . . . . . . . . . . . .Call restrictions (network service) . . . . . . . . . . . . . . . . . . .
Battery information . . . . . . . . . . . . . . . . . . . . . . . . . . . . . . . . .Enhancements . . . . . . . . . . . . . . . . . . . . . . . . . . . . . . . . . . . . .
Nokia 90-Day Limited Warranty . . . . . . . . . .Appendix A Message from the CTIA . . . . . . . Appendix B Message from the FDA . . . . . . . . Index . . . . . . . . . . . . . . . . . . . . . . . . . . . . .

14
1. For your safety
illegal.
r when
icle safety.
affect
nt.
aircraft.
Copyright © 2004 Nokia. All rights reserved.
Read these simple guidelines. Not following them may be dangerous or Read the complete user guide for further information.
SWITCH ON SAFELY Do not switch the device on when wireless phone use is prohibited oit may cause interference or danger.
ROAD SAFETY COMES FIRSTObey all local laws. Always keep your hands free to operate the vehwhile driving. Your first consideration while driving should be road
INTERFERENCEAll wireless devices may be susceptible to interference, which couldperformance.
SWITCH OFF IN HOSPITALSFollow any restrictions. Switch the device off near medical equipme
SWITCH OFF IN AIRCRAFTFollow any restrictions. Wireless devices can cause interference in

15
SWITCH OFF WHEN REFUELINGDon't use the device at a refueling point. Don't use near fuel or chemicals.
rogress.
tation.
ect
of all
r oducts.
Copyright © 2004 Nokia. All rights reserved.
SWITCH OFF NEAR BLASTINGFollow any restrictions. Don't use the device where blasting is in p
USE SENSIBLYUse only in the normal position as explained in the product documenDon't touch the antenna unnecessarily.
QUALIFIED SERVICEOnly qualified personnel may install or repair this product.
ENHANCEMENTS AND BATTERIESUse only approved enhancements and batteries. Do not connincompatible products.
BACKUP COPIESRemember to make backup copies or keep a written record important information.
CONNECTING TO OTHER DEVICESWhen connecting to any other device, read its user guide fodetailed safety instructions. Do not connect incompatible pr
16
EMERGENCY CALLSEnsure the device is switched on and in service. Press as many
creen. ation. y calls
850 ation
cy and
larm ce on
Copyright © 2004 Nokia. All rights reserved.
times as needed to clear the display and return to the main sEnter the emergency number, then press . Give your locDo not end the call until given permission to do so. Emergenccannot be made in Offline mode.
About your deviceThe wireless device described in this guide is approved for use on GSMand GSM 1900 networks. Contact your service provider for more informabout networks.
When using this features in this device, obey all laws and respect privalegitimate rights of others.
Warning: To use any features in this device, other than the aclock, the device must be switched on. Do not switch the deviwhen wireless phone use may cause interference or danger.

17
Network services. Many ork to or you fore
ve you ly.
work
led or menu.
better
Nokia your
Copyright © 2004 Nokia. All rights reserved.
To use the phone you must have service from a wireless service providerof the features in this device depend on features in the wireless netwfunction. These network services may not be available on all networksmay have to make specific arrangements with your service provider beyou can utilize network services. Your service provider may need to giadditional instructions for their use and explain what charges will appSome networks may have limitations that affect how you can use netservices. For instance, some networks may not support all language-dependent characters and services.Your service provider may have requested that certain features be disabnot activated in your device. If so, they will not appear on your device Contact your service provider for more information.
Register your deviceMake sure to register your device at www.warranty.nokiausa.com or 1-888-NOKIA-2U (1-888-665-4228) so that we can serve your needsif you should need to call the center or have your device repaired.
E-newslettersWhen you register your device, you can sign up for Nokia's e-newsletterConnections if you would like. You will receive tips and tricks on usingdevice, accessory information, and special offers.
18
Chargers, batteries, and enhancementshis and
roved r types us.
e with
aler.
ull the
Copyright © 2004 Nokia. All rights reserved.
Check the model number of any charger before use with this device. Tdevice is intended for use when supplied with power from the ACP-12LCH-12.
Warning: Use only batteries, chargers and enhancements appby Nokia for use with the particular model. The use of any othemay invalidate any approval or warranty, and may be dangero
The BL-6C battery is the only battery approved by Nokia for usthis device.
For availability of approved enhancements, please check with your de
When you disconnect the power cord of any enhancement, grasp and pplug, not the cord.

19
Shared memoryts, text ™, ore of tures e all of ory is me of
n unt of
Copyright © 2004 Nokia. All rights reserved.
The following features in this device may share memory: games, contacmessages, multimedia messages, images and ringing tones, RealPlayercalendar and to-do notes, and downloaded applications. Use of one or mthese features may reduce the memory available for the remaining feasharing memory. For example, saving many multimedia messages may usthe available memory. Your phone may display a message that the memfull when you try to use a shared memory feature. In this case, delete sothe information or entries stored in shared memory features before continuing. Some of the features, such as contacts, may have a certaiamount of memory specifically allotted to them in addition to the amomemory shared with other features.

20
2. Getting started
nd . This
er and e ents
k with
Copyright © 2004 Nokia. All rights reserved.
Installing the SIM card and batteryKeep all SIM cards out of the reach of small children. For availability ainformation on using SIM card services, contact your SIM card vendormay be the service provider, network operator, or other vendor.
Note: Before removing the covers, always switch off the powdisconnect the Nokia N-Gage QD™ mobile game deck from thcharger or any other device. Avoid touching electronic componwhile changing the covers. Always store and use the game decthe covers attached.
1 With the back of the game deck facing you, press the release button (1) and slide the cover in the direction of the arrow.

21
2 To release the SIM card holder, slide the holder in the direction of the arrow (2).
Copyright © 2004 Nokia. All rights reserved.
3 Open it (3).
4 Insert the SIM card into the holder (4). Make sure that the bevelled corner on the SIM card is facing outward from the holder and that the golden contact area on the card is facing downwards.

22
5 Close the SIM card holder (5).
6 Lock it into place (6).
Copyright © 2004 Nokia. All rights reserved.
7 Insert the battery (7). Replace the back cover.

23
Charging the battery
Copyright © 2004 Nokia. All rights reserved.
1 Connect the charger to a wall outlet.
2 Open the latch marked with . Connect the charger plug into the jack in the game deck (1). The battery indicator bar starts scrolling. The game deck can be used while charging. If the battery is completely discharged, it may take up to a few minutes before the charging indicator is shown.
3 When the battery is fully charged, the bar stops scrolling. Disconnect the charger from the game deck, then from the outlet.

24
Switch the game deck onne use
Copyright © 2004 Nokia. All rights reserved.
Warning: Do not switch on the game deck when wireless phois prohibited or when it may cause interference or danger.
1 Press and hold the power key .
2 If the game deck requests a PIN code, key in the code (displayed as ****) and press
OK. The PIN code is usually supplied with the SIM card
3 If the game deck requests a lock code, key in the lock code (displayed as *****) and press OK. The factory setting for the lock code is 12345. See Device and SIM.

25
TIPS ON EFFICIENT OPERATION: Your game deck has a built-in antenna (grey
Copyright © 2004 Nokia. All rights reserved.
area shown in the picture). As with any other radio transmitting device, do not touch the antenna unnecessarily when the game deck is switched on. Contact with the antenna affects call quality and may cause the game deck to operate at a higher power level than otherwise needed. Avoiding contact with the antenna area when operating the phone optimizes the antenna performance and the battery life.
NORMAL POSITION: Hold the game deck (as shown in the picture) with the antenna pointed up and over your shoulder.

26
Keys and parts
Copyright © 2004 Nokia. All rights reserved.

27
1 Microphone is on the back.
2 Controller key for playing games and menu navigation.
is key
y, Cut,
o hear any
Copyright © 2004 Nokia. All rights reserved.
3 OK key selects, accepts, or activates. In standby mode, press thto start a game.
4 Menu key opens the main menu.
5 Loudspeaker is on the back.
6 Slot for memory or game cards.
7 and are the main game keys.
8 Power key is at the side.
9 Earpiece.
10 Edit key opens a list of commands for text editing such as Copand Paste.
11 Clear key for deleting text and items.
12 Charger connector.
13 Headset connector.
Warning: Using a dual-bud headset may affect your ability tsounds around you. Do not use headsets in situations that mendanger your safety.

28
About the displayhe ay .
e the ct and open
ed.
en the
phone
Copyright © 2004 Nokia. All rights reserved.
A small number of missing, discolored, or bright dots may appear on tscreen. This is a characteristic of this type of display. Some displays mcontain pixels or dots that remain on or off. This is normal, not a fault
Accessing applications in the menuIn standby mode, press the Menu key to open the main menu. UsController key to navigate to different menu applications. To seleopen a menu, press the OK key. Use the same method to select andother menus and folders.
To quickly return to standby mode and make a phone call, press .
Keypad lock (Keyguard)Use the keypad lock to prevent the keys from being accidentally press
• To lock: In standby mode, first press and then press . Whkeys are locked, appears on the display. Or, press once, select Lock keypad and press OK.
• To unlock: Press , and then press .
When the keyguard is on, to answer a call, press . During a call, thecan be operated in the normal way.
29
Note: When Keyguard is on, calls may be possible to the emergency number programed into your phone (for example, 911). Just key in the
y after
rd, the
t the
f small
all ations
ory card
6 MB
Copyright © 2004 Nokia. All rights reserved.
emergency number and press . The number is displayed onlyou have keyed in its last digit.
If you choose to start games automatically when you insert a game cakeypad is unlocked when a game starts. Select Tools > Settings > Device > General > Game auto-start > On to seauto-start.
Inserting a game or memory cardImportant: Keep all game and memory cards out of the reach ochildren.
Important: Before inserting or removing a memory card, saveunsaved data. Inserting a memory card causes all open applicto close. Unsaved data is lost when applications are closed.
Important: Use only MMC cards with this device. Other memcards, such as secure digital (SD) cards, do not fit in the MMCslot and are not compatible with this device.
Your game deck supports compatible MMC cards with memory from 1up to 1 GB.

30
It is important not to add stickers or any type of adhesive to the MMC card. This may cause the MMC card not to fit the card slot and can corrupt the card
mode ireless all
ame ation s.
Copyright © 2004 Nokia. All rights reserved.
or cause loss of data. See Memory card tool.
If you do not want to be interrupted while playing, press in standbyand switch to Offline profile. When Offline profile is active, all GSM wphone signals to and from the device are prevented. See Profiles and Cforwarding (network service).
1 Open the card slot (1).
2 Insert a game or a memory card (2).
3 Close the card slot.
If you inserted a game card, the game starts automatically. Also, the gicon is automatically added as the last item of the main menu. Informstored on a memory card is indicated with in different application

31
Ejecting a memory cardration ng a all oving
cause
un in
ve the
o get
vice is
Copyright © 2004 Nokia. All rights reserved.
Important: Do not remove the card in the middle of an opewhen the indicator is blinking. Before inserting or removimemory card, close all applications by pressing Exit and save unsaved data. All applications are closed when inserting or remthe card. Removing the card in the middle of an operation maydata loss, or the card may become corrupted.
Pressing the key does not close applications, but allows them to rthe background.
Press the power key and select Remove mem. card (available only if amemory card is inserted).
Wait until Memory card can be removed now text appears and remocard.
Visit www.n-gage.com for more information on available games and tgame service settings.
Playing a gameInsert a game card, see Inserting a game or memory card. When the deswitched on, the game starts automatically.
Exit a game before removing a game card from the game deck.
32
To start a game when a game card is inserted, press in standby mode. You can also start games by selecting the game’s icon in the menu.
Other plied
e
s
Each C). The ot on
your
und
Copyright © 2004 Nokia. All rights reserved.
You can use the primary game keys and for playing games. keys may be used depending on the game. Follow the instructions supwith the game.
Games can usually be paused and unpaused with . Check the gammanual for details.
Playing games consumes power and the game deck’s operating time ireduced.
You can purchase a variety of N-Gage QD games for your game deck. N-Gage QD game is supplied on a separate read-only game card (MMgame data, such as high scores, is saved to the game deck’s memory, nthe N-Gage QD game card. For availability of different games contactNokia approved Games supplier or visit www.n-gage.com.
Saving power when playing• Reduce display brightness:
Select Tools > Settings > Device > Display > Brightness. Select Options > Change.
• Use the headset to listen to the game tones while playing.
• Switch off the Bluetooth connection when you are not using it.
• To save battery power, do not leave games running in the backgrowhile you are not playing.
33
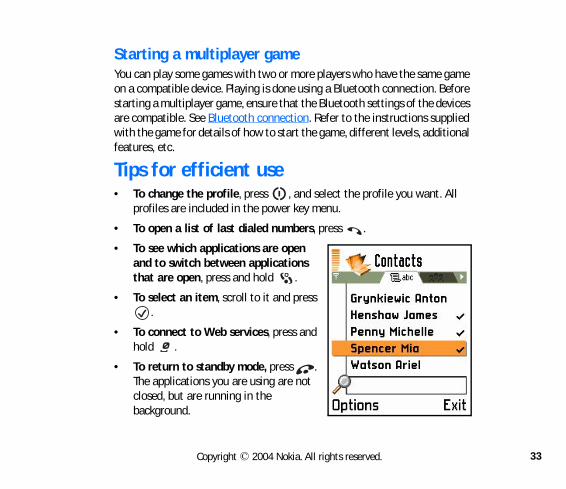
Starting a multiplayer gameYou can play some games with two or more players who have the same game
Before evices pplied itional
. All
Copyright © 2004 Nokia. All rights reserved.
on a compatible device. Playing is done using a Bluetooth connection. starting a multiplayer game, ensure that the Bluetooth settings of the dare compatible. See Bluetooth connection. Refer to the instructions suwith the game for details of how to start the game, different levels, addfeatures, etc.
Tips for efficient use• To change the profile, press , and select the profile you want
profiles are included in the power key menu.
• To open a list of last dialed numbers, press .
• To see which applications are open and to switch between applications that are open, press and hold .
• To select an item, scroll to it and press .
• To connect to Web services, press and hold .
• To return to standby mode, press . The applications you are using are not closed, but are running in the background.

34
• To select multiple items, press and hold and at the same time press or . A check mark is placed next to the selected items. To end the
e . elete
tions
Copyright © 2004 Nokia. All rights reserved.
selection, stop the scrolling with the controller key and then releasAfter you have selected all the items you want, you can move or dthem.
• In some situations, when you press the controller key, a shorter oplist appears listing the main commands available in the view.
Note: If memory is getting low, the game deck may close someapplications. The game deck saves any unsaved data before anapplication is closed, unless power is lost abruptly.

35
3. Your game deck
ne rmal, e
gital.
Copyright © 2004 Nokia. All rights reserved.
Personalizing your game deck• To change the ringing tones, select Tools > Profiles. You can defi
different ringing tones for each profile. The standard profile is Noand the current date is displayed instead of the profile name in thnavigation bar. See Profiles.
• To change the image shown as the the standby mode background, select Tools > Settings > Device > Standby mode > Wallpaper.
• To change the color palette in your phone, select Tools > Settings > Device > Display > Color palette.
• To change shortcuts assigned for the selection keys in the standby mode, select Tools > Settings > Device > Standby mode > Left selection key or Right selection key.
• To change the clock shown in the standby mode, select Tools > Settings > Date and time settings > Clock type > Analog or Di

36
• To change the welcome note, image, or animation, select Tools > Settings > Device > General > Welcome note or logo.
ngs >
the
Move,
ten to
.
ps for
Copyright © 2004 Nokia. All rights reserved.
• To change what is shown in the screen saver, select Tools > SettiDevice > Display > Screen saver.
• To adjust the volume of the ringing tone, select Audio volume in profile.
• To give an individual ringing tone to a friend, select Contacts > Options > Open > Options > Ringing tone.
• To rearrange the main menu, in the main menu, select Options > New folder, or Move to folder. You can move more rarely used applications in folders and place applications that you use more ofthe main menu.
Shortcuts in the standby mode• To switch between applications that are open, press and hold
• To change the profile, press and select a profile.
• To lock the keypad, first press and then press .
• To start a game when a game card is inserted, press .
• To open the last dialed numbers list, press once.
• To start a connection to the Web, press and hold . See Basic steaccessing Web
37
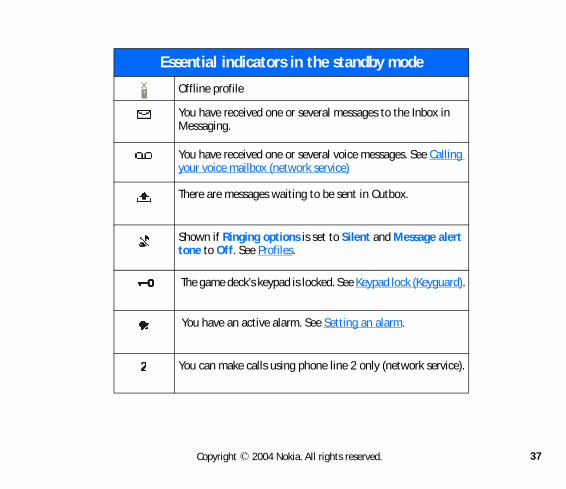
Essential indicators in the standby mode
in
lling
alert
uard).
vice).
Copyright © 2004 Nokia. All rights reserved.
Offline profile
You have received one or several messages to the InboxMessaging.
You have received one or several voice messages. See Cayour voice mailbox (network service)
There are messages waiting to be sent in Outbox.
Shown if Ringing options is set to Silent and Message tone to Off. See Profiles.
The game deck’s keypad is locked. See Keypad lock (Keyg
You have an active alarm. See Setting an alarm.
You can make calls using phone line 2 only (network ser

38
er. If first
n the tive
ple,
sing
Essential indicators in the standby mode
Copyright © 2004 Nokia. All rights reserved.
All calls to the game deck are forwarded to another numbyou have two phone lines, the forward indicator for the line is and for the second line .
A memory card is being read or written to.
or A headset or loopset is connected to the phone.
A data call is active.
Shown instead of the signal strength indicator (shown itop left corner in the standby mode) when there is an acGPRS connection. See GPRS.
Shown when the GPRS connection is on hold, for examduring voice calls.
A fax call is active.
Bluetooth is active. Note that, when data is transmitted uBluetooth, is shown.

39
Volume control to
te the
d
using
Copyright © 2004 Nokia. All rights reserved.
When you have an active call or are listening to a sound, press or increase or decrease the volume level, respectively.
LoudspeakerThe loudspeaker allows you to speak and listen to the game deck from a short distance without having to hold the game deck to your ear, for example, having it on a table nearby. The navigation bar shows which speaker is in use. To localoudspeaker, see Keys and parts.
To start using the loudspeaker during an already active call, selectOptions > Activate loudsp.. Sound applications such as Composer anRecorder use the loudspeaker by default.
Important: Do not hold the game deck near to your ear whilethe loudspeaker because the volume may be extremely loud.
To turn off the loudspeaker, when you have an active call or audio application playing, select Options > Activate handset.
40
Installing softwarestalled
air to cation of the , first from
ersion
details
at has essage
ce).
Copyright © 2004 Nokia. All rights reserved.
Select Options > View log to see what software packages have been inor removed and when.
See Manager and Applications (Java™).
Important: If you install a file that contains an update or repan existing application, you can only restore the original appliif you have the original installation file or a full back-up copyremoved software package. To restore the original applicationremove the application and then install the application againthe original installation file or the back-up copy.
1 Open Manager, scroll to an installation package, and select:• Options > View details to view information such as the type, v
number and the supplier or manufacturer of the application.
• Options > View certificate to display the security certificate of the application. See Certificate management.
2 Select Options > Install to start installation.
To send your installation log to a help desk so that they can see whbeen installed or removed, select Options > Send log > Via text mor Via e-mail (available only if the correct e-mail settings are in pla

41
3 When the game deck asks whether to install or update the application or software, press Yes to proceed with installation.
ntinue curity
guage o
to
nal If you ents
u
Copyright © 2004 Nokia. All rights reserved.
If the game deck displays a security warning and you choose to coinstallation, you are given the option to view the details and the secertificate of the software package.
During installation, you may be able to choose the installation lanand select which components of the software package you want tinstall.
4 The game deck informs you when installation is complete.
Removing softwareScroll to a software package and select Options > Remove. Press Yesconfirm.
If you remove software, you can only re-install it if you have the origisoftware package or a full back-up of the removed software package.remove a software package, you may no longer be able to open documcreated with that software.
If another software package depends on the software package that yoremoved, the other software package may stop working. Refer to the documentation of the installed software package for details.

42
4. Your phone
crease
. Press for the cess nd the
be
ctive.
rs you to
lect the
Copyright © 2004 Nokia. All rights reserved.
Making a callTo adjust the volume during a call, press to increase and to dethe volume level.
1 In standby mode, key in the phone number, including the area code to remove a number. For international calls, press twice
international prefix (the + character replaces the international accode) and then key in the country code, the area code without 0, aphone number.
Note: Calls described here as international may in some casesmade between regions of the same nation.
2 Press to call the number.
3 Press to end the call (or to cancel the call attempt).
Pressing will always end a call, even if another application is a
In standby mode, press once, to access a list of the 20 last numbecalled or attempted to call. Scroll to the number you want and press call the number.
To change the phone number of your voice mailbox, press and seTools > Voice mailbox and select Options > Change number. Key in number (obtained from your service provider) and press OK.

43
Making a call using ContactsPress and select Contacts. Scroll to the desired name. Or, key in the first
ress
ce)
of six
Copyright © 2004 Nokia. All rights reserved.
letters of the name to the Search field. Matching contacts are listed. P to call. See 1-touch dialing.
Making a conference call (network servi1 Make a call to the first participant.
2 Make a call to another participant, select Options > New call. Key in or search for the phone number and press OK. The first call is automatically put on hold.
3 When the new call has been answered, join the first participant in the conference call. Select Options > Conference.
• To add a new person to the call, repeat step 2 and then select Options > Conference > Add to conference. You can make a conference call with a maximumparticipants, including yourself.

44
• To have a private conversation with one of the participants: Select Options > Conference > Private. Scroll to the desired participant
game call. ns >
all.
“line
end a
er or
lls, for rward
Copyright © 2004 Nokia. All rights reserved.
and press Private. The conference call is put on hold on your deck. The other participants can still continue the conferenceOnce you have finished the private conversation, select OptioAdd to conference to return to the conference call.
• To drop a participant, select Options > Conference > Drop participant, then scroll to the participant and press Drop.
4 To end the active conference call, press .
Answering or declining a callTo answer an incoming call, press and press to end the c
If you do not want to answer a call, press . The caller will hear abusy” tone.
If a compatible headset is connected to the phone, you can answer andcall by pressing the headset key.
If you press Silence, only the ringing tone is muted. Then either answdecline the call.
If you have activated the Call forward > If busy function to forward caexample, to your voice mailbox, declining an incoming call will also fothe call. See Call forwarding (network service).
45
Call waiting (network service)you of ttings,
for
is put
. Press ute,
rivate,
to
Copyright © 2004 Nokia. All rights reserved.
If you have activated the Call waiting service, the network will notify a new incoming call while you have a call in progress. To change the sePress and select Tools > Settings > Call > Call waiting.
To adjust the game deck tones for different environments and events,example, when you want your game deck to be silent, see Profiles.
1 During a call, press to answer the waiting call. The first callon hold.
To switch between the two calls, press Swap.
2 To end the active call, press .
Options during a call Many of the options that you can use during a call are network servicesOptions during a call for some of the following options: Mute or UnmEnd active call, End all calls, Hold or Unhold, New call, Conference, PDrop participant, Send touch tones, Answer, and Decline.
Swap to switch between the active call and the call on hold, Transferconnect an incoming call or a call on hold with an active call and to disconnect yourself from the calls.

46
You can add touch tones to the Phone number or Touch tones fields in a contact card.
r bank acts. o
Copyright © 2004 Nokia. All rights reserved.
Send touch tones to send touch tone strings, for example, passwords oaccount numbers. Key in the touch tone string or search for it in ContPress repeatedly to produce: *, p (pause), or w (wait). Press tproduce #. Press OK to send the tone.

47
5. N-Gage QD Arena launcher
o ng. In and Arena , game
vider
rk ctions
.
Copyright ©2004 Nokia. All rights reserved.
Arena launcher is an application on your game deck that allows you tconnect to N-Gage Arena, an online, world-wide community for gamiN-Gage Arena, you can compete with other gamers in global rankingstournaments, and communicate with gamers across the globe. N-Gagealso has additional content for your games such as background imagesmovies, and news about events and new games.
Connect to N-Gage ArenaBefore you can start the N-Gage Arena, you must choose a service proand make sure that your game deck can establish a mobile Internet connection.
Check the availability of services, pricing, and tariffs with your netwooperator and service provider. Service providers will also give you instruon how to use their network services.
You must also register with the N-Gage Arena to set up your account
There are three ways to connect to N-Gage Arena:
• Use the Arena launcher on your game deck. Press and select Arena.
• Select the N-Gage Arena website from your PC. http://arena.n-gage.com

48
• While you are playing a game, select N-Gage Arena from the game menu.
ific to
ust
Arena.
ternet
or.
s are
S e.
Copyright ©2004 Nokia. All rights reserved.
The in-game menus provide access to select features and content specthe game you are playing.
Getting startedNote: To connect to N-Gage Arena with your game deck, you msubscribe to GPRS service. Check with your service provider foravailability of service.
Connection settingsYour Internet access point must be configured to connect to N-Gage Your service provider may have preconfigured the access point.
1 You can check the settings by selecting Tools > Settings > Connection > Access points.
If there is no predefined Internet access point, you can order the Insettings on the N-Gage website.
2 Select http://support.n-gage.com and use the Settings Configurat
3 Choose the Internet settings for your service provider. The settingsent to your game deck in a text message.
Note: Accessing N-Gage Arena from your game deck uses GPRservice. Check with your service provider about costs for servic
49
Updating Arena launcher to the , the ou will Arena
ut you
cation
oose a obile a our
. If you tering
Copyright ©2004 Nokia. All rights reserved.
N-Gage Arena launcher is pre-installed on your game deck, but updatesapplication are released regularly. Each time you open Arena launcherapplication version is checked. If there is a optional update available, ybe asked if you want to download the update. Some updates to Arenalauncher are not optional, but must be downloaded to continue usinglauncher. You are notified when the update is required.
If you do not download the new version, Arena launcher still operates, bare not able to use the latest functions.
When you choose to update, only the files necessary to update the appliare downloaded on your game deck.
Registration and loginTo use the Arena launcher application on your game deck, you must chservice provider and make sure that your game deck can establish a mInternet connection before you create an account. You can register asmember of the N-Gage Arena community by creating an account on ygame deck, or on your PC.
Registering from your game deck1 To use your game deck for registration, press and select Arena
are already a member of the N-Gage Arena community, login by enyour username and password.

50
2 If you are not a member, login and register by entering your date of birth, a username, password, e-mail address, and other personal date in the
other
rd,
other
ord. Yes
Copyright ©2004 Nokia. All rights reserved.
appropriate fields. You cannot create an account without an e-mail address.
The username you choose is the name that appears in your rankings andN-Gage Arena community listings.
Registering from your PC1 Connect to http://arena.n-gage.com from your PC.
2 Select Register and enter your date of birth, a username, passwoe-mail address, and other personal date in the appropriate fields.You cannot create an account without an e-mail address.
The username you choose is the name that appears in your rankings andN-Gage Arena community listings.
Tip: When you login to N-Gage Arena, you can save your passwHighlight the Save password? button. You can toggle betweenand No by pressing the OK key.

51
6. Contacts
ark/
to a send add ry.
evices.
e deck o use nction
Copyright © 2004 Nokia. All rights reserved.
Options in the Contacts directory: Open, Call, Create message, Newcontact, Edit, Delete, Duplicate, Add to group, Belongs to groups, MUnmark, Send, Contacts info, Help, and Exit.
You can add a personal ringing tone, voice tag, or a thumbnail image contact card. You can also create contact groups, which allow you to text messages or e-mail to many recipients at the same time. You canreceived contact information (business cards) to your Contacts directoSee Receiving smart messages.
Contact information can only be sent to or received from compatible d
You can move contacts from many different Nokia phones to your gamusing the Data Import application of the PC Suite for Nokia N-Gage. TPC Suite, your PC must support Bluetooth. Refer to the PC Suite help fufor instructions.
52
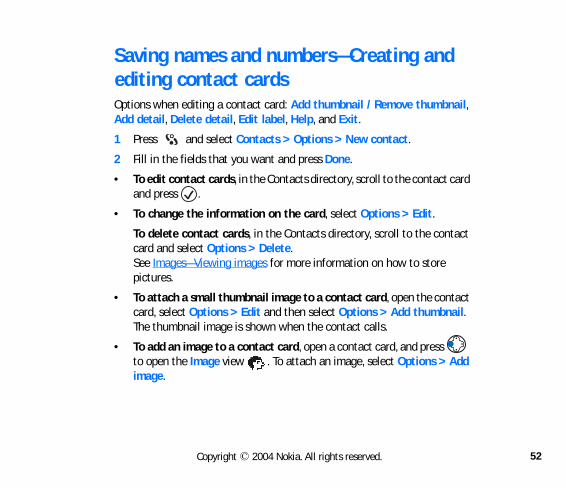
Saving names and numbers—Creating and
bnail,
ct card
ontact
e
ontact bnail.
s > Add
Copyright © 2004 Nokia. All rights reserved.
editing contact cardsOptions when editing a contact card: Add thumbnail / Remove thumAdd detail, Delete detail, Edit label, Help, and Exit.
1 Press and select Contacts > Options > New contact.
2 Fill in the fields that you want and press Done.
• To edit contact cards, in the Contacts directory, scroll to the contaand press .
• To change the information on the card, select Options > Edit.
To delete contact cards, in the Contacts directory, scroll to the ccard and select Options > Delete. See Images—Viewing images for more information on how to storpictures.
• To attach a small thumbnail image to a contact card, open the ccard, select Options > Edit and then select Options > Add thumThe thumbnail image is shown when the contact calls.
• To add an image to a contact card, open a contact card, and presto open the Image view . To attach an image, select Options image.

53
Copying contacts between the SIM card and
press t to
SIM er, and
roll to ssage, place) using
or
hosen your
ct a
Copyright © 2004 Nokia. All rights reserved.
device memory• To copy names and numbers from a SIM card to your game deck,
and select Tools > SIM directory. Select the names you wancopy and select Options > Copy to Contacts.
• To copy a telephone, fax, or pager number from Contacts to your card, select Contacts and open a contact card. Scroll to the numbselect Options > Copy to SIM direct.
Tip: To send contact information, in the Contacts directory, scthe card you want to send. Select Options > Send > Via text meVia e-mail (available only if the correct e-mail settings are in or Via Bluetooth. See the Messaging chapter, and Sending dataBluetooth connectivity.
Adding a ringing tone for a contact cardgroupWhen a contact or group member calls you, the game deck plays the cringing tone (if the caller’s telephone number is sent with the call andgame deck recognizes it).
1 Press to open a contact card or select the Groups list and selecontact group.
2 Select Options > Ringing tone. A list of ringing tones opens.

54
3 Scroll to the ringing tone you wish to use for the contact or group and press Select.
nging
as inging f the
to a ce
e
e calls
ilar
corded during in all
Copyright © 2004 Nokia. All rights reserved.
To remove the ringing tone, select Default tone from the list of ritones.
For an individual contact, the game deck uses the ringing tone that wassigned last. So, if you first change a group ringing tone and then the rtone of a single contact that belongs to that group, the ringing tone osingle contact is used.
Voice dialingYou can make a phone call by saying a voice tag that has been addedcontact card. Any spoken word(s) can be a voice tag. Before using voidialing, note that:
• Voice tags are not language dependent. They are dependent on thspeaker's voice.
• Voice tags are sensitive to background noise. Record them and makin a quiet environment.
• Very short names are not accepted. Use long names and avoid simnames for different numbers.
Note: You must say the name exactly as you said it when you reit. This may be difficult in, for example, a noisy environment or an emergency, so you should not rely solely upon voice dialing circumstances.
55
Adding a voice tag to a phone number1 In the Contacts directory, open the contact card to which you want to
.
select
le,
rly the k plays he ded to
Copyright © 2004 Nokia. All rights reserved.
add a voice tag. You can have only one voice tag per contact card
2 Scroll to the number to which you want to add the voice tag and Options > Add voice tag.
Example: You can use a person’s name for a voice tag, for examp‘John’s cell.’
3 Press Start to record a voice tag. After the starting tone, say cleaword(s) you want to record as a voice tag. Wait until the game decthe recorded tag and saves it. A symbol can be seen next to tnumber in the contact card indicating that a voice tag has been adit.
To view a list of voice tags you have defined, select Options > Contacts info > Voice tags in the Contacts directory.
You can add a voice tag to up to 25 phone numbers.

56
Making a call by saying a voice tagYou must say the voice tag exactly as you said it when you recorded it.
oll to
.
nd the
r is in ce tag
, press
active.
Copyright © 2004 Nokia. All rights reserved.
To listen to, change, or delete a voice tag, open a contact card and scrthe number that has a voice tag (indicated by ) and select Options > Voice tags. Then select either Playback, Change, or Delete
1 In the standby mode, press and hold . A short tone is played anote Speak now is displayed.
2 When you are making a call by saying a voice tag, the loudspeakeuse. Hold the game deck at a short distance away and say the voiclearly.
3 The game deck plays the original voice tag, displays the name andnumber, and dials the number of the recognized voice tag.
If the game deck plays the wrong voice tag, or to retry voice dialingRetry.
Voice dialing cannot be used when a data call or a GPRS connection is
57
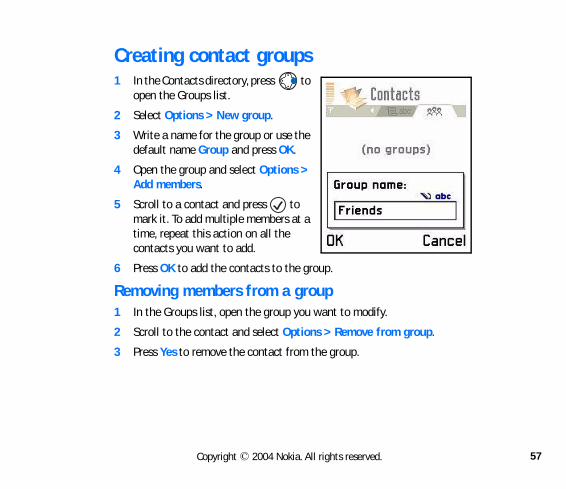
Creating contact groups
Copyright © 2004 Nokia. All rights reserved.
1 In the Contacts directory, press to open the Groups list.
2 Select Options > New group.
3 Write a name for the group or use the default name Group and press OK.
4 Open the group and select Options > Add members.
5 Scroll to a contact and press to mark it. To add multiple members at a time, repeat this action on all the contacts you want to add.
6 Press OK to add the contacts to the group.
Removing members from a group1 In the Groups list, open the group you want to modify.
2 Scroll to the contact and select Options > Remove from group.
3 Press Yes to remove the contact from the group.

58
7. Calendar
te and
sary
hones Suite h. See
ntry is .
date
Copyright © 2004 Nokia. All rights reserved.
Creating calendar entries1 Press and select Calendar.
2 Select Options > New entry and select:
• Meeting to remind you of an appointment that has a specific datime.
• Memo to write a general entry for a day.
• Anniversary to remind you of birthdays or special dates. Anniverentries are repeated every year.
3 Fill in the fields. Use the Controller key to move between fields.
You can move calendar and to-do data from many different Nokia pto your game deck or synchronize your calendar to a PC using the PCfor Nokia N-Gage. To use PC Suite, your PC must support Bluetootthe PC Suite online help.
Shortcut: Press any key ( — ) in any calendar view. A Meeting eopened and the characters you keyed in are added to the Subject field
Alarm—Select On and press to fill in the Alarm time and Alarm fields. Alarm is shown with in the Day view.

59
Stopping a calendar alarm—Press Stop to end the calendar alarm. If you press any other key, the alarm is set to snooze.
n the
an be o view access ied to
g and
the / This
dar to emind
open
Copyright © 2004 Nokia. All rights reserved.
Repeat—Press to change the entry to be repeating ( is shown iDay view).
Repeat until—You can set an ending date for the repeated entry.
Synchronization—Private—after synchronization the calendar entry cseen only by you and it will not be shown to others with online access tthe calendar. Public—the calendar entry is shown to others who have to view your calendar online. None—the calendar entry will not be copyour PC when you synchronize.
You can send calendar entries to a compatible phone. See the MessaginSending data using Bluetooth connectivity.
4 To save the entry, press Done.
If you are editing or deleting a repeated entry, choose how you want change to take effect: All occurrences—all repeated entries are deletedentry only—only the current entry will be deleted.
Example: Your weekly class has been canceled. You have set the calenremind you every week. Choose This entry only and the calendar will ryou again next week.
Calendar viewsSelect Options > Settings to change the view that is shown when youthe calendar or the starting day of the week.

60
small ed
n if
yed.
te and
—
Copyright © 2004 Nokia. All rights reserved.
In the Month view, dates that have calendar entries are marked with atriangle at the right bottom corner. Memos and Anniversaries are placbefore 8 a.m.
In the Month view, the number of the week shows in the far left columMonday is selected as the day the week starts on. Select Options > Settings > Week starts on > Monday to see the week number displa
• To select a certain date, select Options > Go to date. Write the dapress OK.
• Icons in Day and Week views: —Meeting, —Memo, and Anniversary.
• Press to jump to today.

61
8. Instant messaging (IM)
M in a even if on the ireless
way or played ou ilable
sage, screen s new .
it may for or
u may
Copyright © 2004 Nokia. All rights reserved.
You can now take text messaging to the next level by experiencing Iwireless environment. You can engage in IM with friends and family, they are on different mobile systems (compatible with your phone) orInternet, as long as you all use the same IM service. Check with your wservice provider for availability.
IM is different from using SMS or e-mail because you can have a two-group conversation where all messages within the conversation are disin one screen as an ongoing dialogue. The contact list feature shows ywhen your friends, family members, and colleagues are online and avato exchange instant messages. Simply select the name, write the mesand send it. Your message stays on the screen. The reply appears on the below your original message so that you can track the conversation. Amessages appear and the screen fills up, the older messages disappear
Note: If IM is not available from your wireless service provider,not appear in your phone menu. Contact your service providermore information about signing up for IM services and costs fservices.
Note: Due to variations in IM and wireless service providers, yonot have access to all of the features described in this guide.

62
Getting startedd. See set up.
ering r you nd
tact
ver.
ter the point
Copyright © 2004 Nokia. All rights reserved.
Before you can start using IM, you must obtain a user ID and passworUser ID and password and ensure that your default GPRS connection is
User ID and passwordBefore you can use IM, you must get a user ID and password by registover the Internet (through your computer) with the IM service provideselected. During the registration process you can create your user ID apassword.
First login and service settingsThe first time you log in to IM, you must enter the server settings. Conyour service provider for the settings.
1 From the main phone menu, select Instant messaging.
A message displays asking you to define an instant messaging ser
2 Select Yes.
3 In the New IM Server screen, scroll to each of the options and eninformation supplied by your service provider server name, accessin use, URL address, user ID, and password.
4 Select Back.
The login screen displays your user ID and password.
63
5 Select OK.
Connecting appears; then Login completed and the Instant messaging
in. If and ppear
tions:
tically sword.
r your
ot. To
ability
Copyright © 2004 Nokia. All rights reserved.
menu follow.
Set manual or automatic loginAfter you first log in, you can use either a manual or an automatic logyou log in manually, you will receive a screen prompt for your user IDpassword each time. The user ID and password you entered previously aon the login screen (the password is represented by asterisks).
From the Instant messaging menu, select Options > Settings > IM Settings > Open > Login type > Change and one of the following op
Automatic — When you select the IM application, you are automaconnected to the IM service without entering your user ID and pas
Manual — When you select the IM application, you are prompted fouser ID and password before being connected to the IM service.
Set AvailabilityYou can determine whether other users can know if you are online or nset your IM presence, perform the following steps:
From the Instant messaging menu, select Options > Settings > IM Settings > Availability and one of the following options:
Available — Others see your status as online, and you receive availinformation and messages from others.

64
Not active — Even though others see your status as offline, you receive availability information and messages from others.
s, the de. If ontact
and
Copyright © 2004 Nokia. All rights reserved.
Display and iconsNote: Since each IM service has its own display text and icondisplay on your phone may appear different from this user guiyou have questions about the various display texts and icons, cyour IM service provider.
The following list shows the IM icons and their descriptions. The iconsdisplay text may appear different for your IM service.
Contact online
Contact offline
Tracking set for contact
New unread message
IM connected
IM disconnected

65
Chat sessionsWhen you send an instant message to another person you initiate a
ir user n. See
New
K.
ble) or
nd, or
view.
sion.
Copyright © 2004 Nokia. All rights reserved.
chat session. You can send instant messages to anyone if you have theID. You can also add that person to your contact list during an IM sessioAdd a new contact during a chat session.
Start a chat session1 In the Instant messaging menu, select Conversations > Options >
conversation > Select recipient.
2 Scroll to the desired contact, and select OK.
OR
Select Enter user ID; then enter the recipient user ID, and select O
The conversation view appears with the contact nickname (if availauser ID at the top. For the first message in the IM session, the conversation view will be empty.
3 Enter your message in the text entry area; then select Options > Sepress OK.
The message is sent and displayed at the top of the conversation
4 After your contact replies, repeat step 3 to continue your chat ses
66
Start a Chat session from IM contacts
1 In the Instant messaging menu, select IM contacts.
tion.
or the ty.
d, or
sion.
in the
t the
Copyright © 2004 Nokia. All rights reserved.
2 Scroll to the desired contact, and select Options > View conversa
The conversation view appears with the contact name at the top. Ffirst message in the IM session, the conversation view will be emp
3 Enter a message in the text entry area; then select Options > Senpress OK.
The message is sent and displayed in the conversation view.
4 After your contact replies, repeat step 3 to continue your chat ses
Receive and reply to instant messagesWhen you receive an instant message, a tiny balloon icon appearsupper right corner of the screen.
Perform the following steps to access and reply to the message:
1 In the Instant messaging menu, select Conversations.
2 Scroll to the sender name, and select Options > Open.
The conversation view appears with the contact name or user ID atop.
3 Enter a reply to the message, and select Options > Send.
The reply is sent and displayed in the conversation view.

67
Quit chat sessionTo end your chat session, perform the following steps:
ions >
n, and
.
ing.
esired
w the
Copyright © 2004 Nokia. All rights reserved.
1 In the conversation view, select Options > End convers.
2 At the confirmation message, select Yes.
Chat historyYou can keep a record of your conversation or group chat session.
Save chat historyTo save your conversation or group chat, perform the following steps:
1 From the conversation view or group conversation view, select OptRecord convers.
2 In the Conversation name screen, enter a name for the conversatioselect OK.
The conversation is saved as a note under the Extras phone menu
3 To stop recording the conversation, select Options > Stop record
View or delete chat history1 In the phone main menu, select Extras > Notes; then scroll to the d
conversation.
2 To view the conversation, select Options > Open, and scroll to vieentire conversation.
3 To delete the conversation, select Options > Delete.
68
4 At the confirmation message, select Yes.
IM contacts
m you
New
in.
Copyright © 2004 Nokia. All rights reserved.
You can add to your contact list the names of other IM users with whowill be chatting frequently.
Add a new contact1 In the Instant messaging menu, select IM contacts > Options >
IM contact.
2 Enter the contact nickname in the Nickname entry area.
3 Scroll to the Name entry area, and enter the contact name.
4 Scroll to the User ID entry area, and enter the contact user ID.
5 Select Done.
The new contact is added to the contact list.
Add a new contact during a chat session1 In the conversation view, select Options > Add to IM contacts.
The New IM contact screen opens, with the user ID already filled
2 Enter the contact nickname in the Nickname entry area
3 Scroll to the Name entry area, and enter the contact name.
4 Select Done.
The new contact is added to the contact list.

69
Search for a user1 In the Instant messaging menu, select IM contacts > Options >
nd last
select
mber,
ress,
select
ct OK.
p
Copyright © 2004 Nokia. All rights reserved.
Search > Users.
2 Select one of the following:
User’s name — Enter the first few characters of the contact first aname, and select OK.
User ID — Enter the first few characters of the contact user ID, andOK.
Phone number — Enter the first few numbers of contact phone nuthen select OK.
E-mail — Enter the first few characters of the contact e-mail addthen select OK.
Search for a group1 In the Instant messaging menu, select IM contacts > Options >
Search > Groups.
2 Select one of the following:
Group name — Enter the first few characters of a group name, andOK.
Topic — Enter the first few characters of the group topic, and sele
Members — Enter the first few characters of the user ID of a groumember, and select OK.

70
Remove a contact from the contact list1 In the Instant messaging menu, select IM contacts.
s >
etting on for ability
Copyright © 2004 Nokia. All rights reserved.
2 Scroll to the contact name you want to remove and select OptionDelete.
3 At the confirmation message, select Yes.
Block messages from a contact1 In the Instant messaging menu, select IM contacts.
2 Scroll to the contact you want to block.
3 Select Options > Blocking options > Add to blocked list.
Unblock messages from a contact1 In the Instant messaging menu, select IM contacts > Options >
Blocking options > Unblock.
A list of blocked contacts is displayed.
2 Scroll to the contact that you want to unblock, and select OK.
Set and release tracking for a contactYou can keep track of whether a contact is online or offline. If the IM sReload user status is set to Automatically, and you have tracking seta contact, you will receive a notification whenever that contact’s availchanges. See IM settings for more information.
1 In the Instant messaging menu, select IM contacts.

71
2 Scroll to the desired contact, and select Options.
3 Select Switch tracking on to set tracking or Switch tracking off to
ited to yed in istory.
reate
t OK.
and o logs
efault
Copyright © 2004 Nokia. All rights reserved.
release tracking.
Group chatThe group chat feature allows you to chat with multiple participants simultaneously. You can create your own private chat groups or be invjoin a live chat in progress. During a group chat, all messages are displaone group conversation view screen. You can also save a group chat hSee Chat history.
Create chat group1 In the Instant messaging menu, select IM groups > Options > C
new group.
2 Select from the following options, and follow the prompts:
Group name — Enter a name for the new group, and select OK.
Group topic — Enter a conversation topic for the group, and selecThe default topic is General.
Welcome note — Enter a welcome note of up to 100 characters, select OK. The welcome note is displayed to any group member whin to the group.
Group size — Enter the maximum group size, and select OK. The dsize is 100 members.
72
Allow search — Determine whether search engines are allowed to show the chat group as a search result. Select either Yes or No.
iting that me. diting
o a list d only in the ation.
group either
up you
Copyright © 2004 Nokia. All rights reserved.
Editing rights — Determine which group members should have edrights to the group list. To give a member editing rights, scroll to member name and press the OK key in the middle to mark the naWhen you are finished, select OK. The Group creator always has erights and cannot be unmarked.
Group members — Determine whether to restrict the chat group tof members or to allow anyone to participate. Select either Selecte(chat group is restricted to a list of members) or All (anyone can jochat group). See Add and remove group members for more inform
Allow private msgs. — Determine whether participants in the chatare allowed to send private messages during a group chat. Select Yes or No.
3 Select Done.
4 Enter your screen name, and select OK.
You are connected to the new group conversation in the group conversation view.
Join an existing chat group1 In the Instant messaging menu, select IM groups, scroll to the gro
want to join, and select Options > Open.
2 Enter your screen name and select OK.

73
You are connected to the group conversation in the group conversation view. The name of the chat group is displayed at the top of the screen.
n add
group
st, and
emove
Copyright © 2004 Nokia. All rights reserved.
Add and remove group membersFor a chat group that is restricted to a list of selected members, you camembers to the group and remove members from the group.
1 In the group conversation view, select Options > IM group > IM settings > Group members.
2 Scroll to Selected only, and select OK.
Add member3 In the Group members screen, select Options > Add member.
4 Select IM Contact; then scroll to the desired name in the contact liselect OK.
OR
Select Enter user ID; then enter the user ID and select OK.
5 Repeat steps 3–4 to add more members to the group.
Remove member6 In the Group members screen, scroll to the member you want to r
and select Options > Remove.
7 At the confirmation message, select Yes.
8 Repeat steps 6–7 to remove more members from the group.
74
9 To remove all group members at the Group members screen, select Options > Remove all.
ion.
and
he .
ceived and
Copyright © 2004 Nokia. All rights reserved.
Send an invitation to a group chatMembers must be online before you can invite them to a group chat.
1 From the group conversation view, select Options > Send invitat
2 Scroll to the contact whom you want to invite to the group chat, select OK.
3 Enter an invitation message, and select Done.
The invitation is sent.
4 To add other members to the group, repeat steps 2–3.
When a member accepts an invitation, a message is displayed in tgroup conversation view announcing that the member has joined
Accept or reject invitations to group chatWhen you receive an invitation to a group chat, the New invitation rescreen appears with the user ID (or nickname, if available in contacts)message of the sender displayed.
To accept1 Select Accept.
The Screen name screen appears.
2 Enter your screen name, and Select OK.

75
The group conversation view appears with the name of the chat group at the top.
. The
r press
st
till ect IM
ember
msg.
e.
ey in
Copyright © 2004 Nokia. All rights reserved.
To rejectSelect Cancel.
Chat with group membersAll group chat messages are displayed in the group conversation viewsender name is displayed in front of each message.
Enter a message in the text entry area; then select Options > Send, othe OK key in the middle.
Your message is displayed in the group conversation view under the lamessage received.
If you exit from the group conversation view while the group chat is sactive, you can return to the chat. In the Instant messaging menu, selgroups; then select the name of the chat group.
Send a private messageWhile you are in a group chat, you can send a private message to one mof the group. The message cannot be seen by other group members.
1 From the group conversation view, select Options > Send private
2 Select the contact to whom you want to send the private messag
3 Enter the message; then select Options > Send, or press the OK kthe middle.
76
Leave a group chatFrom the group conversation view, select Options > Leave IM group.
service
IM
r your
e .
f you
.
t from
Copyright © 2004 Nokia. All rights reserved.
SettingsYou can customize your IM and server settings, depending upon the IM you have selected.
IM settings1 From the Instant messaging menu, select Options > Settings >
settings > Open.
2 Select from the following options, and follow the prompts:
Use screen name — Select either Yes or No. If you select Yes, entescreen name (up to 10 characters) and select OK.
IM presence — Select either Active for all or Not active. See SetAvailability for more information.
Message speed — Use the left and right selection keys to move thindicator between Slow and Fast on the speed bar; then select OK
Reload user status — Select either Automatically or Manually. Iselect Automatically, the online/offline status of your contacts isupdated automatically whenever a status changes. If you select Manually, you must update the status by selecting IM Contacts >Options > Reload user status from the Instant messaging menu
Block invitations — Select Yes to prevent invitations to group cha
77
appearing or No to allow invitations to appear.
Login type — Select either Automatic or Manual. If you select he
erver
server, tion.
menu ogged tant ur
Copyright © 2004 Nokia. All rights reserved.
Automatic, IM will log you in automatically each time you start tapplication.
3 When you are finished, select Back to save your changes.
Server settings1 From the Instant messaging menu, select Options > Settings > S
settings > Open.
2 Select from the following options, and follow the prompts:
IM server — Edit the settings for an existing server, create a new or delete a server. Contact your service provider for more informa
Server in use — Select the server you want to use.
Log off serviceWhen you log out of the IM service, you can exit the Instant messagingand return to the phone main menu, or you can remain in the Instantmessaging menu without an active connection. You can also remain lin, but return to the phone main menu. This enables you to receive insmessages and chat invitations from your contacts even when using yophone for other purposes, such as making a call or playing a game.

78
Once you are logged in to the IM service, your phone will keep you logged in even if you have not used your IM application for some time. However, if your
ple, st. The
menu
Copyright © 2004 Nokia. All rights reserved.
GPRS connection is put on hold for more than a few minutes (for examduring a phone call), GPRS is disconnected and your IM connection is lonext time you open the IM application, you will need to log in again.
Log out and return to main menuIn the Instant messaging menu, select Options > Exit.
Logging out appears, followed by a confirmation note. The phone mainappears in the display.
Log out and remain in instant messaging menuFrom the Instant messaging menu, select Options > Logout.
Logging out appears, followed by a confirmation note. The Instant messaging menu remains in the display, and the IM logo changes to disconnected mode.
Return to main menu while remaining connectedPress the key.

79
9. Messaging
ext d well as
own if n to
d a list
adcast
e your
o your r -mail.
Copyright © 2004 Nokia. All rights reserved.
In Messaging, you can create, send, receive, view, edit, and organize tmessages, multimedia messages, e-mail messages, smart messages, anspecial text messages containing data. You can also receive Bluetoothmessages and data, WAP service messages, cell broadcast messages as send service commands.
Options in the Messaging main view are Create message, Connect (shyou have defined mailbox settings)/Disconnect (shown if a connectiomailbox is active), SIM messages, Cell broadcast, Service command,Settings, Help, and Exit.
When you open Messaging, you can see the New message function anof folders:
Inbox — contains received messages except e-mail and cell bro messages. e-mail messages are stored in the Mailbox.
My folders — for organizing your messages into folders. Organiz messages by adding new folders under My folders.
Mailbox — When you open this folder, you can e-mail connect t remote mailbox to retrieve your new e-mail messages or view you
previously retrieved e-mail messages offline. See Settings for e
Drafts — stores draft messages that have not been sent.

80
Sent — stores the last 20 messages that have been sent. To change the number of messages to be saved, see Settings for the Other folder.
n are
e sent.
rt of u have
n sent
ween
text
first ill e.
Copyright © 2004 Nokia. All rights reserved.
Messages or data that have been sent using Bluetooth connectionot saved.
Outbox — is a temporary storage place for messages waiting to b
Reports — you can request the network to send you a delivery repothe text messages, smart messages, and multimedia messages yo
sent.
Receiving a delivery report of a multimedia message that has bee to an e-mail address might not be possible.
When you have opened any of the default folders, you can switch betthe folders by pressing or .
Writing textTraditional text input
is shown on the top right of the display when you are writing using traditional text input.
and indicate the selected case. means that the letter of the word, is written in upper case, and all the other letters wautomatically be written in lower case. indicates number mod

81
• Press a number key ( – ) repeatedly until the desired character appears. Note, that there are more characters available for a number key
it until key in
hold
ss
y
press
, press
Copyright © 2004 Nokia. All rights reserved.
than are printed on the key.
• To insert a number, press and hold the number key.
• To switch between letter and number mode, press and hold .
• If the next letter is located on the same key as the present one, wathe cursor appears (or press to end the time-out period), andthe letter.
• If you make a mistake, press to remove a character. Press and to clear more than one character.
• The most common punctuation marks are available under . Prerepeatedly to reach the desired punctuation mark.
• Press to open a list of special characters. Use the controller keto move through the list and press Select to select a character.
• To insert a space, press . To move the cursor to the next line, three times.
• To switch between the different character cases Abc, abc, and ABC.

82
Predictive text inputTip: To set predictive text input on or off, press twice quickly
put is hen
e.
editors when
check
Copyright © 2004 Nokia. All rights reserved.
when writing text.
You can key in any letter with a single keypress. The predictive text inbased on a built-in dictionary to which you can also add new words. Wthe dictionary becomes full, a new word replaces the oldest added on
1 To activate predictive text input, press and select Predictive text > On. This will activate predictive text input for all in the game deck. is shown on the top right of the display you are writing text using predictive text input.
2 Write the desired word by pressing the keys – . Press each key only once for one
letter. For example, to write ‘Nokia’ when English dictionary is selected, press
for N
for o
for k
for i
for a.
The word match is evolving. Wait to key in the whole word before youfor results. The word suggestion changes after each key press.
83
1 When you have finished writing the correct word, confirm it by pressing or adding a space by pressing .
ng t
in the word ord is
word
the
the
Copyright © 2004 Nokia. All rights reserved.
• If the word is not correct, press repeatedly to view the matchiwords the dictionary has found one by one, or press and selecPredictive text > Matches.
• If ? is shown after the word, the word you intended to write is notdictionary. To add a word to the dictionary, press Spell, key in the(up to 32 letters) using traditional text input, and press OK. The wadded to the dictionary. When the dictionary becomes full, a newreplaces the oldest added word.
2 Start writing the next word.
When you press , the following options appear (depending on editing mode selected):
Predictive text, Alpha mode — traditional text input
Number mode, Cut — if text has been selected
Copy — if text has been selected
Paste — when text has been cut or copied first
Insert number, Insert symbol, and Writing language — changes input language for all editors in the game deck

84
Writing compound wordsWrite the first half of a compound word, and confirm it by pressing . Write
d by
ut off
, press
Paste;
ess
Copyright © 2004 Nokia. All rights reserved.
the last part of the compound word, and complete the compound worpressing to add a space.
Turning predictive text input offPress , and select Predictive text > Off to turn predictive text inpfor all editors in the game deck.
Copying text to clipboard1 To select letters and words, press and hold . At the same time
or .
As the selection moves, text is highlighted.
2 To end the selection, stop pressing the controller key.
3 To copy the text to clipboard while still holding , press Copy.
4 To insert the text into a document, press and hold , and press press once, and select Paste.
• To select lines of text, press and hold . At the same time pr or .
• If you want to remove the selected text from the document, press .
85
Writing and sending messagesNote: This function can be used only if it is supported by your network
icture nd atures
ption select
e.
edia
es. nding
Copyright © 2004 Nokia. All rights reserved.
operator or service provider. Only devices that offer compatible pmessage, multimedia message, or e-mail features can receive adisplay these messages. Devices that do not have multimedia femay receive details of a link to a web page.
Before you can create a multimedia message, or write an e-mail, or connect to your remote mailbox, you must have the correctconnection settings in place. See Settings for e-mail and Settings for multimedia messages.
You can start to create a message from any application that has the oSend. Choose a file (an image, text) to be added to the message, and Options > Send.
1 Select New message. A list of message options opens.
2 Select Create: Text message if you want to create a text messag
Sending a multimedia message1 To send a picture message, select Options > Insert > Picture.
2 Select Create: Multimedia message if you want to send a multimmessage (MMS).
Note: Each picture message is made up of several text messagTherefore, sending one picture message may cost more than seone text message.
86
Options in the message editor are: Send, Add recipient, Insert, Attachments (e-mail), Preview message (MMS), Objects (MMS), Remove (MMS), Delete,
other image ting is e-mail r ting, g a
tones,
l
the MS or
Copyright © 2004 Nokia. All rights reserved.
Message details, Sending options, Help, and Exit.
When you are sending a multimedia message to any compatible devicethan a Nokia N-Gage game deck, it is recommended to use a smaller size and a sound clip that is no longer than 15 seconds. The default setImage size: Small. When you are sending a multimedia message to an address or another Nokia N-Gage game deck, if possible, use the large(Large) image size (network dependent). To change the image size setselect Options > Sending options > Image size when you are creatinmultimedia message.
Important: Copy protections may prevent some images, ringingand other content from being copied, modified, transferred, or forwarded.
Sending e-mail1 Select Create: e-mail to send e-mail. If you have not set up your
account, you will be prompted to do so.Scroll to a contact, and press to mark it. You can mark severarecipients at a time.
2 Press to select recipients from the contacts directory or writerecipient’s phone number or e-mail address if you are sending an Me-mail.
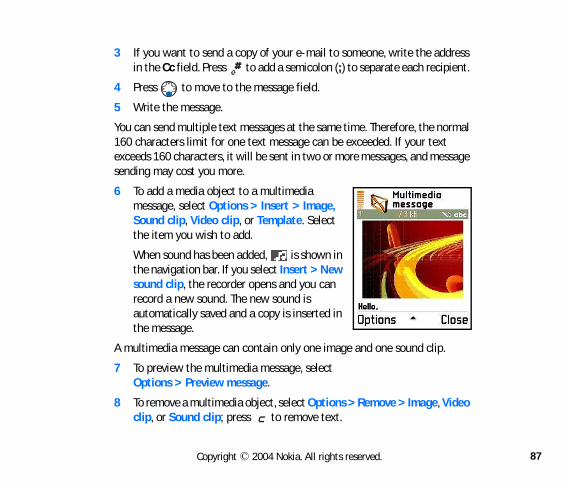
87
3 If you want to send a copy of your e-mail to someone, write the address in the Cc field. Press to add a semicolon (;) to separate each recipient.
ormal t
essage
.
Video
Copyright © 2004 Nokia. All rights reserved.
4 Press to move to the message field.
5 Write the message.
You can send multiple text messages at the same time. Therefore, the n160 characters limit for one text message can be exceeded. If your texexceeds 160 characters, it will be sent in two or more messages, and msending may cost you more.
6 To add a media object to a multimedia message, select Options > Insert > Image, Sound clip, Video clip, or Template. Select the item you wish to add.
When sound has been added, is shown in the navigation bar. If you select Insert > New sound clip, the recorder opens and you can record a new sound. The new sound is automatically saved and a copy is inserted in the message.
A multimedia message can contain only one image and one sound clip
7 To preview the multimedia message, select Options > Preview message.
8 To remove a multimedia object, select Options > Remove > Image,clip, or Sound clip; press to remove text.
88
9 If you want to add an attachment to the e-mail, select Options > Insert > Image, Sound clip, Video clip or Note.
s an
ent. If e-mail
ngerator nd ervice
ne the
d into
Copyright © 2004 Nokia. All rights reserved.
will appear in the navigation bar to indicate that the e-mail haattachment. Template adds prewritten text to the e-mail.
10 To send the message, select Options > Send, or press .
E-mail messages are automatically placed in the outbox before being ssomething goes wrong while the game deck is sending the e-mail, the is left in the outbox with the Failed status displayed.
Settings needed for multimedia messagiYou may receive the settings as a smart message from your network opor service provider. See Receiving smart messages. For availability of asubscription to data services, please contact your network operator or sprovider.
1 Select Tools > Settings > Connection > Access points, and defisettings for a multimedia messaging access point:
Connection name — Give a descriptive name for the connection.
Data bearer — Select a data connection type: GPRS or Data call.
Gateway IP address — Enter the address.
Example: Domain names such as www.nokia.com can be translateIP addresses like 192.100.124.195.

89
Homepage — Enter the address of the multimedia messaging center.
• If you selected Data call, fill in Dial-up number, a phone number for
en to
. Open e used
must
ail.
vice
Copyright © 2004 Nokia. All rights reserved.
the data call.
• If you selected GPRS, fill in Access point name, the name givyou by your service provider.
See Connection settings.
2 Select Messaging > Options > Settings > Multimedia messageAccess point in use, and select the access point you created to bas the connection. See Settings for multimedia messages.
Settings needed for e-mailTo send files other than sounds and notes as attachments, open the appropriate application and select Send > Via e-mail, if available.
Before you can send, receive, retrieve, reply to, and forward e-mail, youdo the following:
• Configure an Internet access point (IAP) correctly. See Connectionsettings.
• Define your e-mail settings correctly. See Settings needed for e-m
Follow the instructions given by your remote mailbox and Internet serprovider.

90
Inbox
.
wn in in the
ad a is
crease n to a
dia ose to , using
Copyright © 2004 Nokia. All rights reserved.
To determine the status of your inbox refer to these icons: Unread text message Unread multimedia message Data received using Bluetooth technology
When there are unread messages in the inbox, the icon changes to
When you receive a message, and the note 1 new message is shothe standby mode. Press Show to open the message. To open a messageinbox, scroll to it, and press .
When you open a multimedia message ( ), you can see an image, remessage, and hear a sound through the loudspeaker simultaneously. shown if the sound is included). If there is sound, press or to inor decrease the sound volume. To mute the sound, press Stop. To listesound again, select Options > Play sound clip.
Viewing multimedia objectsOptions in the objects view are Open, Save, Send, Help, and Exit.
To see what kinds of media objects have been included in the multimemessage, open the message, and select Options > Objects. You can chosave a multimedia object file in your game deck or send it, for exampleBluetooth connectivity technology to another compatible device.

91
Important: Multimedia message objects may contain viruses or otherwise be harmful to your game deck or PC. Do not open any
ender.
saved
is, text
es >
ve
of the
select int in
lendar.
Copyright © 2004 Nokia. All rights reserved.
attachment if you are not sure of the trustworthiness of the sSee Certificate management.
Receiving smart messagesIf you receive a vCard file that has a picture attached, the picture will beto Contacts as well.
Your game deck can receive many kinds of smart messages ( ), that messages that contain data, also called over-the-air (OTA) messages:
Picture message — To save the picture for later use in Extras > ImagPicture msgs., select Options > Save picture.
Business card — To save the contact information, select Options > Sabusiness card.
If certificates or sound files are attached, they will not be saved.
Ringing tone — To save the ringing tone to Composer, select Options > Save.
Operator logo — For the logo to be shown in the standby mode insteadnetwork operator’s own identification, select Options > Save.
To change the default access point settings for multimedia messaging,Messaging > Options > Settings > Multimedia message > Access pouse.
Calendar entry — To save the invitation, select Options > Save to Ca

92
WAP message — To save the bookmark to the Bookmarks list in Web, select Options > Save to bookmarks. If the message contains both access point
ave in
lbox gs for
gs, or
and ontact
w der,
Copyright © 2004 Nokia. All rights reserved.
settings and bookmarks, to save the data select Options > Save all.
E-mail notification — Tells you how many new e-mail messages you hyour remote mailbox. An extended notification may list more detailedinformation.
In addition, you can receive a text message service number, voice mainumber, profile settings for remote synchronization, access point settinWeb, multimedia messaging or e-mail, access point login script settine-mail settings.
Receiving web messagesWeb messages ( ) are notifications of, for example, news headlines,may contain a text message or a link. For availability and subscription, cyour service provider.
My folders You can use texts in the templates folder to avoid rewriting messages that you send often.
In My folders, you can organize your messages into folders, create nefolders, and rename and delete folders. Select Options > Move to folNew folder, or Rename folder.

93
Mailbox
places
w the nnect
if you
adings ly ction.
en you the
Copyright © 2004 Nokia. All rights reserved.
If you select Mailbox and have not set up your e-mail account, you will be prompted to do so. See Settings for e-mail.
When you create a new mailbox, the name you give to the mailbox reMailbox in Messaging. You can have several mailboxes (up to six).
Opening the mailboxWhen you open the mailbox, you can choose whether you want to viepreviously retrieved e-mail messages and e-mail headings offline or coto the e-mail server.
When you scroll to your mailbox and press , the game deck asks youwant to Connect to mailbox?
• Select Yes to connect to your mailbox and retrieve new e-mail heor messages. When you view messages online, you are continuousconnected to a remote mailbox using a data call or a GPRS conneSee also Essential indicators in the standby mode and Connectionsettings.
• Select No to view previously retrieved e-mail messages offline. Whview e-mail messages offline, your game deck is not connected toremote mailbox.
94
Retrieving e-mail messages from the mailboxIf you are offline, select Options > Connect to start a connection to a remote
and
arked.
iewing on and
rieved
een
Copyright © 2004 Nokia. All rights reserved.
mailbox.
You can use the PC Suite for Nokia N-Gage to configure access point mailbox settings. See the CD-ROM supplied in the sales package.
1 When you have an open connection to a remote mailbox, select Options > Retrieve e-mail and one of the following options:
New — to retrieve all new e-mail messages to your game deck.
Selected — to retrieve only the e-mail messages that have been m
All — to retrieve all messages from the mailbox.
To cancel retrieving, press Cancel.
2 After you have retrieved the e-mail messages, you can continue vthem online, or select Options > Disconnect to close the connectiview the e-mail messages offline.
View the E-mail status using these icons: new e-mail (offline or online mode), the content has not been ret
to your game deck (arrow outwards). new e-mail, the content has been retrieved to your game deck
(arrow inwards). e-mail message has been read. e-mail heading that has been read and the message content has b
deleted from the game deck.

95
3 To open an e-mail message, press . If the e-mail message has not been retrieved (arrow in the icon is pointing outwards) and you are
the
ent nt has lect en, or
ise be if you te
rieve ith the
emote
Copyright © 2004 Nokia. All rights reserved.
offline, you will be asked if you want to retrieve this message frommailbox.
4 To view e-mail attachments, open a message that has the attachmindicator , and select Options > Attachments. If the attachmea dimmed indicator, it has not been retrieved to the game deck, seOptions > Retrieve. In the attachments view, you can retrieve, opsave attachments. You can also send attachments using Bluetoothconnectivity.
Important: E-mail attachments may contain viruses or otherwharmful to your game deck or PC. Do not open any attachmentare not sure of the trustworthiness of the sender. See Certificamanagement.
Your mailbox uses the IMAP4 protocol, you can decide whether to rete-mail headings only, messages only, or messages and attachments. WPOP3 protocol, the options are e-mail headings only or messages and attachments. See Settings for e-mail.
Deleting e-mail messagesTo delete an e-mail from the game deck while still retaining it in the rmailbox.
• Select Options > Delete > Device only.
96
• To delete an e-mail from both the game deck as well as from the remote mailbox.
scroll
, your te the your
lders, press -mail.
ng the d from ked to the
ll or in the
Copyright © 2004 Nokia. All rights reserved.
• To cancel deleting an e-mail from both the game deck and server,to an e-mail that has been marked to be deleted during the next connection ( ), and select Options > Undelete.
The game deck mirrors the e-mail headings in the remote mailbox. Soalthough you delete the message content, the e-mail heading stays ingame deck. If you want to remove the heading as well, you have to delee-mail message from your remote mailbox and make a connection fromgame deck to the remote mailbox again to update the status.
• To copy an e-mail from the remote mailbox to a folder under My foselect Options > Copy to folder. Select a folder from the list, andOK. Select Options > Delete > Device and server to delete the e
If you are offline, the e-mail will be deleted from your game deck. Durinext connection to the remote mailbox, it will be automatically deletethe remote mailbox. If you are using the POP3 protocol, messages marbe deleted are removed only after you have closed the connection to remote mailbox.
Disconnecting from mailboxWhen you are online, select Options > Disconnect to end the data caGPRS connection to the remote mailbox. See also Essential indicatorsstandby mode.
97
Viewing e-mail messages when offlineWhen you open Mailbox the next time and you want to view and read the
y. You mail nt the
after a
utbox. ding. . ssage,
game ges to
Copyright © 2004 Nokia. All rights reserved.
e-mail messages offline, answer No to the Connect to mailbox? quercan read the previously retrieved e-mail headings and the retrieved e-messages. You can also write new, reply to, or forward e-mail to be senext time you connect to the mailbox.
Outbox — messages waiting to be sentStatus of the messages in the outbox: Sending, Waiting/Queued, Resend at, Deferred, and Failed.
Resend at (time) — The game deck will try to send the message again time-out period. Press Send to restart the sending immediately.
Deferred — You can set documents to be on hold while they are in the oScroll to a message that is being sent, and select Options > Defer senFailed — The maximum number of sending attempts has been reachedSending has failed. If you are trying to send a text message, open the meand check that the sending options are correct.
Example: Messages are placed to the outbox, for example, when yourdeck is outside network coverage. You can also schedule e-mail messabe sent the next time you connect to your remote mailbox.

98
Viewing messages on a SIM cardBefore you can view SIM messages, you need to copy them to a folder in your
ssages.
es.
t topic > Cell umber,
nd set
r gs.
Copyright © 2004 Nokia. All rights reserved.
game deck.
1 In the messaging main view, select Options > SIM messages.
2 Select Options > Mark/Unmark > Mark or Mark all to mark me
3 Select Options > Copy. A list of folders opens.
4 Select a folder, and press OK. Select the folder to view the messag
Cell broadcast (network service)You can receive messages on various topics, such as weather or traffic conditions from your service provider. For available topics and relevannumbers, contact your service provider. In Messaging, select Options broadcast. In the main view you can see the status of a topic, a topic nname, and whether it has been flagged ( ) for follow-up.
The options in Cell broadcast are Open, Subscribe/Unsubscribe, Hotmark/Unhotmark, Topic, Settings, Help, and Exit.
In Settings, you can set Reception to On/Off, select the Language, aTopic detection to On/Off.
A GPRS connection may prevent cell broadcast reception. Contact younetwork operator for the correct GPRS settings. See Connection settin

99
Service command editor
ter,
e been
g text
livery wn in
ithin vice me is
Copyright © 2004 Nokia. All rights reserved.
Select Messaging > Options > Service command. Key in and send service requests (also known as USSD commands), such as activation commands for network services, to your service provider.
Messaging settingsSettings for text messagesOptions when editing text message center settings are New msg. cenEdit, Delete, Help, and Exit.
Select Messaging > Options > Settings > Text message.
Message centers — Lists all the text message service centers that havdefined. See Adding a new text message center.
Msg. center in use — Select which message center is used for deliverinmessages.
Receive report (network service) — To request the network to send dereports on your messages. When set to No, only the status Sent is shoLog. See Log settings.
Message validity — If the recipient of a message cannot be reached wthe validity period, the message is removed from the text message sercenter. Note that the network must support this feature. Maximum tithe maximum amount of time allowed by the network.

100
Message sent as — Change this option only if you are sure that your service center is able to convert text messages into these other formats. Contact your
l GSM
eply er.
vice
roll to
ction ed for
Copyright © 2004 Nokia. All rights reserved.
network operator.
Preferred connection — You can send text messages using the normanetwork or using GPRS, if supported by the network. See GPRS.
Reply via same ctr. (network service) — Choose Yes, if you want the rmessage to be sent using the same text message service center numb
Adding a new text message center1 Open Message centers, and select Options > New msg. center.
2 Press , write a name for the service center, and press OK.
3 Press , and , and write the number of the text message sercenter. You receive the number from your service provider.
4 Press OK.
5 To take the new settings into use, go back to the settings view; scMsg. center in use, press , and select the new service center.
Settings for multimedia messagesSelect Messaging > Options > Settings > Multimedia message.
Access point in use — Select which access point is used as the conne(must be defined) for the multimedia message center. See Settings needmultimedia messaging.

101
Example: If your Access point in use uses GPRS, you may want to use GSM data call for the secondary connection. This enables you to send and receive
rts ata
ve nt in
y
ly the
eive
e been S
tion is ges or
Copyright © 2004 Nokia. All rights reserved.
multimedia messages even when you are not in a network that suppoGPRS. Contact your network operator or service provider. See About dconnections and access points.
If you receive multimedia message settings in a smart message and sathem, the received settings are automatically used for the Access poiuse. See Receiving smart messages.
Secondary conn. — Select which access point is used as the secondarconnection for the multimedia message center.
Both Access point in use and Secondary conn. must have the same Homepage setting pointing to the same multimedia service center. Ondata connection is different.
Multimedia reception — Select Only in home net. if you want to recmultimedia messages only when you are in your home network.
Important: If the settings Only in home net. or Always on havselected, your game deck can make an active data call or GPRconnection without your knowledge.
When you are outside your home network, multimedia message recepturned off. Select Always on if you want to receive multimedia messaalways. Select Off if you do not want to receive multimedia messagesadvertisements at all.

102
On receiving msg. — Select from the following options:
Retr. immediately — Retrieve multimedia messages instantly. If there are
eiving
oming
ge
e to be
t to an
ck to
ithin aging me is
Copyright © 2004 Nokia. All rights reserved.
messages with deferred status, they will be retrieved as well.
Defer retrieval —Save the message to be retrieved later. Set On recmsg. to Defer retrieval.
Decline message — Decline multimedia messages. The multimediamessaging center will delete the messages.
Allow anon. messages — Select No, if you want to decline messages cfrom an anonymous sender.
Receive ads — Define whether you want to receive multimedia messaadvertisements or not.
Receive report — Set to Yes, if you want the status of the sent messagshown in the Log.
Receiving a delivery report of a multimedia message that has been sene-mail address might not be possible.
Deny report sending — Choose Yes, if you do not want your game desend delivery reports of received multimedia messages.
Message validity — If the recipient of a message cannot be reached wthe validity period, the message is removed from the multimedia messcenter. Note that the network must support this feature. Maximum tithe maximum amount of time allowed by the network.
103
• Image size — Define the size of the image in a multimedia message. The options are Small (up to 160x120 pixels) and Large (up to 640x480
the ker or
Help,
e
mail.
lboxes hange
r the
ven to this
Copyright © 2004 Nokia. All rights reserved.
pixels).
• Default speaker — Choose Loudspeaker or Handset, if you want sounds in a multimedia message to be played through the loudspeathe earpiece. See Loudspeaker.
Settings for e-mailOptions when editing e-mail settings are Edit, New mailbox, Delete, and Exit.
Select Messaging > Options > Settings > e-mail and select from thfollowing settings:
Mailbox in use selects which mailbox you want to use for sending e-
Mailboxes opens a list of mailboxes that have been defined. If no maihave been defined, you will be prompted to do so. Select a mailbox to cthe settings:
Mailbox name — Write a descriptive name for the mailbox.
Access point in use — To choose an Internet Access Point (IAP) fomailbox (must be defined). See Connection settings.
My mail address — Write the e-mail address (must be defined) giyou by your service provider. Replies to your messages are sent toaddress.

104
Outgoing mail server — Write the IP address or host name of the computer (must be defined) that sends your e-mail.
ave o your
ur
o your
ovider.
will be te
uter
ervice
u have
Copyright © 2004 Nokia. All rights reserved.
Send message — Define how e-mail is sent from your game deck.
Immediately — A connection to the mailbox is started after you hselected Send. During next conn. sends e-mail when you connect tremote mailbox the next time.
Send copy to self — Select Yes to save a copy of the e-mail to yoremote mailbox and to the address defined in My mail address.
Include signature — Select Yes if you want to attach a signature te-mail message and to start to write or edit a signature text.
User name — Write your user name, given to you by your service pr
Password — Write your password. If you leave this field blank, you prompted for the password when you try to connect to your remomailbox.
Incoming mail server — The IP address or host name of the comp(must be defined) that receives your e-mail.
Mailbox type — Defines the e-mail protocol your remote mailbox sprovider recommends. The options are POP3 and IMAP4.
This setting can be selected only once and cannot be changed if yo saved or exited from the mailbox settings.
105
If you are using the POP3 protocol, e-mail messages are not updated automatically in online mode. To see the newest e-mail messages, you
lbox.
re the
ending lected
ments
ant to (can
hether ives
lated adcast
Copyright © 2004 Nokia. All rights reserved.
need to disconnect and then make a new connection to your mai
Security — Used with the POP3, IMAP4, and SMTP protocols to secuconnection to the remote mailbox.
APOP secure login — Used with the POP3 protocol to encrypt the sof passwords to the remote e-mail server (not shown if IMAP4 is sefor Mailbox type).
Retrieve attachment — To retrieve e-mail with or without attach(not shown if the e-mail protocol is set to POP3).
Retrieve headers — To limit the number of e-mail headers you wretrieve to your game deck. The options are All and User defined only be used with the IMAP4 protocol).
Settings for service messagesSelect Messaging > Options > Settings > Service message. Choose wor not you want to receive service messages. Authentic. needed receservice messages only from authorized sources.
Settings for Cell broadcast (network service)Check with your service provider to obtain the available topics and retopic numbers, and select Messaging > Options > Settings > Cell broto change the settings.

106
Language — All allows you to receive cell broadcast messages in all supported languages. Selected allows you to choose in which languages you wish to
ge,
ny of umber ithout
t items
to the e limit
Copyright © 2004 Nokia. All rights reserved.
receive cell broadcast messages. If you cannot find the desired languaselect Other.
Topic detection — If you receive a message that does not belong to athe existing topics, Topic detection > On allows you to save the topic nautomatically. The topic number is saved to the topic list and shown wa name. Choose Off if you do not want to save new topic numbers automatically.
Settings for the Other folderSelect Messaging and select Options > Settings > Other.
Save sent messages — Choose if you want to save a copy of every texmessage, multimedia message, or e-mail that you have sent to the Sentfolder.
No. of saved msgs. — Define how many sent messages will be saved Sent items folder at a time. The default limit is 20 messages. When this reached, the oldest message is deleted.
107
10. Web
ile se the guage not be
ay page.
rk
ant to ying in
Copyright ©2004 Nokia. All rights reserved.
Various service providers maintain pages specifically designed for mobdevices. To access these pages, press and select Web. These pages uWireless Markup Language (WML) or Extensible Hypertext Markup Lan(XHTML). Web pages using the Hypertext Markup Language (HTML) canviewed on your phone.
The Web icon may not be seen in all phones. Some service providers mreplace the icon in the main menu with a shortcut to a specific XHTMLCheck with your service provider for details.
Check the availability of services, pricing, and tariffs with your netwooperator and/or service provider. Service providers will also give you instructions on how to use their services.
Basic steps for accessing Web• Save the settings that are needed to access the service that you w
use. See the sections Receiving settings in a smart message and Kethe settings manually.
• Make a connection to the Web. See Making a connection.
• Start browsing the pages. See Browsing.
• End the connection to Web. See Ending a connection.

108
Receiving settings in a smart messageSettings may be available, for example, on the web site of a network operator
alled ers the t your
e the
kmark
kmark sword.
r sites hese e.
Copyright ©2004 Nokia. All rights reserved.
or service provider.
You may receive Web service settings in a special text message, a so-csmart message, from the network operator or service provider that offWeb page. See Receiving smart messages. For more information, contacnetwork operator or service provider.
Keying in the settings manuallyFollow the instructions given to you by your service provider.
1 Select Tools > Settings > Connection > Access points and definsettings for an access point. See Connection settings.
2 Select Web > Options > Add bookmark. Write a name for the booand the address of the page defined for the current access point.
Bookmarks viewGlossary: A bookmark consists of an Internet address (mandatory), bootitle, access point, and if the Web page requires, a user name and pas
Note: Your phone may have some pre-installed bookmarks fonot affiliated with Nokia. Nokia does not warrant or endorse tsites. If you choose to access them, you should take the sameprecautions, for security or content, as you would with any sit

109
The starting page defined for the access point. If you use another access point for browsing, the starting page is changed accordingly.
, the visited
ark.
Go to rvice me,
.
ss the
o
t
Copyright ©2004 Nokia. All rights reserved.
The last visited page. When the phone is disconnected from Webaddress of the last visited page is kept in memory until a new page is during the next connection.
Any bookmark showing the title or Internet address of the bookm
Options in the Bookmarks view: Open, Download, Back to page, Send,web address / Find bookmark, Add bookmark, Edit, Delete, Read semsgs., Disconnect, Move to folder, New folder, Mark/Unmark, RenaClear cache, Details, Add to ‘Go to’, Settings, Help and Exit.
Making a connectionShortcut: To start a connection, press and hold in standby mode
Once you have stored all the required connection settings, you can accepages.
Select a page or a bookmark, or write the address, press to start tdownload the page.
To send a bookmark, scroll to it and select Options > Send > Via texmessage.

110
Connection security
o
d,
d) n
.
ve se ks
Copyright ©2004 Nokia. All rights reserved.
If the security indicator is displayed during a connection, the data transmission between the phone and the internet gateway or server is encrypted and secure.
Options when browsing: Open, Service options, Bookmarks, History, Go tweb address, View image, Read service msgs., Save as bookmark, Send bookmark, Reload, Disconnect, Show images, Clear cache, Save page, FinDetails, Session, Security, Settings, Help, and Exit.
The security icon does not indicate that data transmission between the gateway and the content server (place where the requested resource is storeis secure. It is up to the service provider to secure data transmission betweethe gateway and the content server.
Browsing• To go to the previous page while browsing, press Back. If Back is not
available, select Options > History to view a chronological list of the pages you have visited during a browsing session. The history list is cleared each time a session is closed.
• To retrieve the latest content from the server, select Options > Reload
• To save a bookmark, select Options >Save as bookmark.
• To save a page, while browsing select Options > Save page. You can sapages either to the game deck’s memory or on a memory card and browthem when offline. To access the pages later, press in the Bookmarview.
111
To access the Bookmarks view while browsing, press and hold down . To return to the browser view again, select Options > Back to page.
age,
ogos
e is
nd arded.
ct ages).
g and
emory ta
Copyright ©2004 Nokia. All rights reserved.
• To open a sublist of commands or actions for the currently open pselect Options > Service options.
• You can download items such as ringing tones, images, operator land video clips. Downloaded items are saved in the respective applications on your game deck, for example, a downloaded imagsaved in Images.
Note: Copy protections may prevent some images, ringtones aother content from being copied, modified, transferred or forw
• To download and view new service messages while browsing, seleOptions > Read service msgs. (shown only if there are new messSee also Receiving smart messages.
Ending a connectionSelect Options > Disconnect, or press and hold to quit browsinto return to standby mode.
Emptying the cacheThe information or services you have accessed are stored in the cache mof the game deck. A cache is a buffer memory that is used to store datemporarily.
112
If you have tried to access or have accessed confidential information requiring passwords (for example, your bank account), empty the cache of your game
e.
o open
wsing
to
s
re the
Copyright ©2004 Nokia. All rights reserved.
deck after each use. To empty the cache, select Options > Clear cach
Settings for WebDefault access point—To change the default access point, press ta list of available access points. See Connection settings.
Show images—If you choose No, you can later load images during broby selecting Options > Show images.
Text wrapping— Choose Off if you don’t want the text in a paragraphautomatically wrap, or On if you do.
Font size—Choose text size.
Cookies—Enable or disable the receiving and sending of cookies.
Default encoding—To make sure your browser displays text charactercorrectly, select the appropriate language type.
Conf. touch tone sending—Choose whether you want to confirm befogame deck sends touch tones during a voice call. See Options during a call.

113
11. Extras
dia or tivity. emory ssages
from
.
e the top of
Copyright © 2004 Nokia. All rights reserved.
Images—Viewing imagesOptions in Images: Open, Image uploader, New folder, Update thumbnails, Help, and Exit.
Images can be saved from Screen capture or sent to you in a multimepicture message, as an e-mail attachment, or using Bluetooth connecAfter receiving an image in Inbox, you need to save it in the phone mor on a memory card. You can save graphics sent to you in picture meto the Picture messages folder.
1 Press and select Extras > Images. Press or to move
one memory tab to another. To browse the images, press and
2 Press , to open an image. When the image is open, you can sename of the image and the number of images in the folder on thethe display.
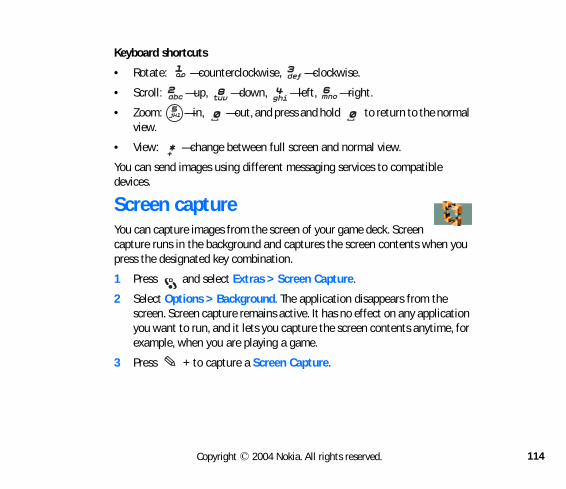
114
Keyboard shortcuts
• Rotate: —counterclockwise, —clockwise.
ormal
n you
e cation e, for
Copyright © 2004 Nokia. All rights reserved.
• Scroll: —up, —down, —left, —right.
• Zoom: —in, —out, and press and hold to return to the nview.
• View: —change between full screen and normal view.
You can send images using different messaging services to compatibledevices.
Screen captureYou can capture images from the screen of your game deck. Screen capture runs in the background and captures the screen contents whepress the designated key combination.
1 Press and select Extras > Screen Capture.
2 Select Options > Background. The application disappears from thscreen. Screen capture remains active. It has no effect on any appliyou want to run, and it lets you capture the screen contents anytimexample, when you are playing a game.
3 Press + to capture a Screen Capture.
115
You can capture a screen while playing a game, or start Screen Capture before you start the game. If you have already started playing a game, press
on and
me n
with.
ng the ge
Copyright © 2004 Nokia. All rights reserved.
to return to the standby mode. Open the Screen Capture applicatireturn to the game by pressing and holding . Select the game you have open and press + .
Note: If memory is getting low, the game deck may close soapplications. The game deck saves any unsaved data before aapplication is closed, unless power is lost abruptly.
Changing Screen capture settingsSelect Options > Settings to change:
• Shot shortcut—Select a key combination to take Screen captures
• Folder name, Image name, Save as,
• Ask for image name—Select Yes if you want to save the image usiname you entered in the Image name option. Select No to set anindividual name for every image (the name you entered in the Imaname option is displayed by default).

116
Video player. card,
n your .
Open.
select ipient. imum video onds.
dia ew the bjects.
if you
Copyright © 2004 Nokia. All rights reserved.
Options in the main view: Open, Delete, Edit clip name, Move to memSend, Add to ‘Go to’, Settings, and Exit.
Press and select Extras > Video player to play video clips stored ophone or on a memory card. The file types supported are 3GP and NIM
• To play a video clip, scroll to it and press or select Options >
• To adjust the volume, press or .
• To send a video clip, scroll to the video clip you want to send andOptions > Send > Via multimedia or Via Bluetooth. Select a recThe video clip is moved to Outbox for sending. Because of the maxsize of the multimedia message is 95 KB, the length of the recordedclip is limited to 95 KB which usually means approximately 15 sec
Receive a video clip in a message• When you receive a video clip in a supported format in a multime
message, go to Messaging and open the multimedia message. To vimessage as text and to play the video or save it, select Options > O
• When you receive a video clip in a supported format as an e-mailattachment, open the message and select Options > Attachmentswant to play the video or save it.
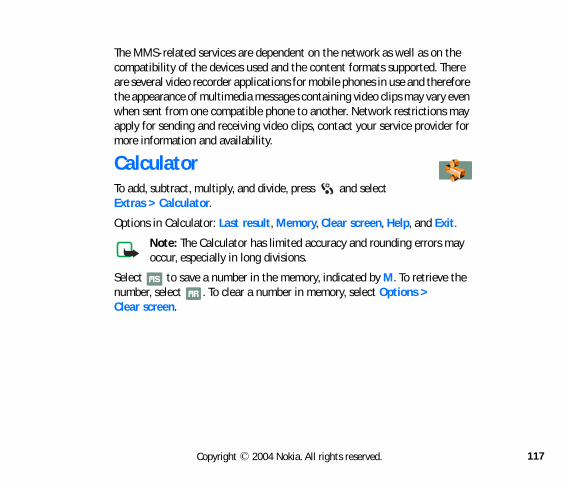
117
The MMS-related services are dependent on the network as well as on the compatibility of the devices used and the content formats supported. There
refore y even s may
der for
xit.
may
e the
Copyright © 2004 Nokia. All rights reserved.
are several video recorder applications for mobile phones in use and thethe appearance of multimedia messages containing video clips may varwhen sent from one compatible phone to another. Network restrictionapply for sending and receiving video clips, contact your service provimore information and availability.
CalculatorTo add, subtract, multiply, and divide, press and select Extras > Calculator.
Options in Calculator: Last result, Memory, Clear screen, Help, and E
Note: The Calculator has limited accuracy and rounding errorsoccur, especially in long divisions.
Select to save a number in the memory, indicated by M. To retrievnumber, select . To clear a number in memory, select Options > Clear screen.

118
Clock
ct mode, log or
rm for f five
Copyright © 2004 Nokia. All rights reserved.
Options in Clock: Set alarm, Reset alarm, Remove alarm, Settings, Help, and Exit.
Press and select Extras > Clock. To change the time or date, seleOptions > Settings in Clock. To change the clock shown in the standbyscroll down in the Date and time settings and select Clock type > AnaDigital.
Setting an alarm1 To set a new alarm, select Options > Set alarm.
2 Enter the alarm time and press OK. When the alarm is active, theindicator is shown.
The alarm clock works even if the game deck is switched off.
To cancel an alarm, go to clock and select Options > Remove alarm.
Turning off the alarmPress Stop to turn off the alarm.
When the alarm tone sounds, press any key or Snooze to stop the alafive minutes, after which it will resume. You can do this a maximum otimes.

119
If the alarm time is reached while the game deck is switched off, the game deck switches itself on and starts sounding the alarm tone. If you press Stop,
alls. Do not
t) that
one to
eck:
AD or eck as
ments ion.
Copyright © 2004 Nokia. All rights reserved.
the game deck asks whether you want to activate the game deck for cPress No to switch off the game deck or Yes to make and receive calls. press Yes when wireless device use is prohibited or when it may causeinterference or danger.
NotesPress and select Extras > Notes. You can link notes to ’Go to’ and send them to other compatible devices. Plain text files (TXT formayou receive can be saved to Notes.
Press ( — ) to start to write. Press to clear letters. Press Dsave. See Writing text.
ApplicationsYou can install two types of applications and software to your game d
• Java™ applications are installed in Applications. Your game decksupports J2Micro Edition™ Java applications with the extension .J.JAR. Do not download PersonalJava™ applications to your game dthey cannot be installed. See Applications (Java™).
Example: If you have received the installation file as an e-mail attachment, go to your mailbox, open the e-mail, open the Attachview, scroll to the installation file, and press to start installat

120
• Symbian applications specifically intended for the Nokia N-Gage QD game deck or suitable for the Symbian operating system.
files tware.
tible ia
uate
to be arried
cation, e sure
p, and
Install
Copyright © 2004 Nokia. All rights reserved.
These applications are installed in Manager, and their installationhave the extension .SIS. See Installing and removing Symbian sof
Installation files may be transferred to your game deck from a compacomputer, downloaded during browsing, or sent to you in a multimedmessage, as an e-mail attachment, or using Bluetooth connectivity.
Important: Only install software from sources that offer adeqprotection against viruses and other harmful software.
During installation, the game deck checks the integrity of the packageinstalled. The game deck shows information about the checks being cout, and you are given options whether to continue with or cancel theinstallation.
If you are installing an application without a digital signature or certifithe game deck displays a warning. Continue installation only if you arof the origins and content of the application.
Applications (Java™) Installing a Java applicationOptions in the Install view: Install, Delete, View details, Settings, HelExit.
1 Press and select Extras > Applications. Press to open the view with a list of Java installation files.

121
2 Scroll to an installation file and select Options > Install.
3 When the game deck asks whether to install or update the application,
ck may
ading access the
it
URL
ve.
ailable
t the if
Copyright © 2004 Nokia. All rights reserved.
press Yes to proceed with installation.
The .JAR file is required for installation. If it is missing, the game deask you to download it. If there is no access point defined for Applications, you will be asked to select one. When you are downlothe JAR file, you may need to enter a user name and password to the server. You obtain these from the supplier or manufacturer ofapplication.
While browsing, you can download an installation file and install without closing the connection.
4 The game deck informs you when installation is complete.
Applications main viewOptions in the Applications main view: Open, Remove, Update, Go toaddress, View details, Settings, Help, and Exit.
• To start an application, scroll to it and press .
• To uninstall an application, scroll to it and select Options > Remo
• To start a network connection and to check if there is an update avfor the application, scroll to it and select Options > Update.
• To start a network connection and to view extra information abouapplication, scroll to it and select Options > Go to URL address, available.
122
• To view information such as the type, version number and the supplier or manufacturer of an application, scroll to it and select Options > View
cation efault
to a e
.
on.
t a
.
Copyright © 2004 Nokia. All rights reserved.
details.
Applications settingsTo define a default access point for downloading applications and applicomponents, select the Install view and select Options > Settings > Daccess point.
Some Java applications may require a network connection to be madespecific access point for downloading extra data or components. In thApplications main view, scroll to an application and select Options > Settings > Settings, and then select:
For more information on creating access points, see the Access points
• Access point to select an access point to be used by the applicati
• Network connection—The options are:
• Allowed—Connections for the application are allowed withounotification.
• Ask first—You will be asked before the application makes a connection.
• Not allowed—Connections for the application are not allowed
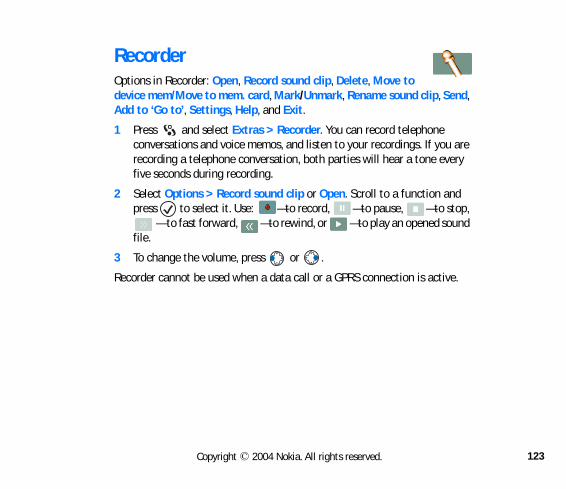
123
Recorder
, Send,
e ou are every
and o stop, sound
tive.
Copyright © 2004 Nokia. All rights reserved.
Options in Recorder: Open, Record sound clip, Delete, Move to device mem/Move to mem. card, Mark/Unmark, Rename sound clipAdd to ‘Go to’, Settings, Help, and Exit.
1 Press and select Extras > Recorder. You can record telephonconversations and voice memos, and listen to your recordings. If yrecording a telephone conversation, both parties will hear a tone five seconds during recording.
2 Select Options > Record sound clip or Open. Scroll to a functionpress to select it. Use: —to record, —to pause, —t
— to fast forward, —to rewind, or —to play an openedfile.
3 To change the volume, press or .
Recorder cannot be used when a data call or a GPRS connection is ac
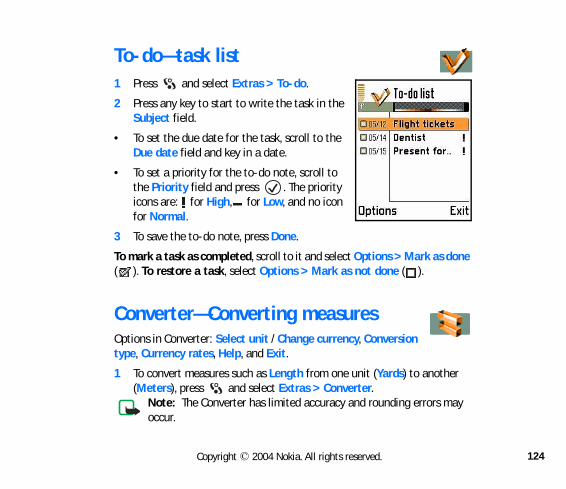
124
To-do—task list
s done
ther
may
Copyright © 2004 Nokia. All rights reserved.
1 Press and select Extras > To-do.
2 Press any key to start to write the task in the Subject field.
• To set the due date for the task, scroll to the Due date field and key in a date.
• To set a priority for the to-do note, scroll to the Priority field and press . The priority icons are: for High, for Low, and no icon for Normal.
3 To save the to-do note, press Done.
To mark a task as completed, scroll to it and select Options > Mark a( ). To restore a task, select Options > Mark as not done ( ).
Converter—Converting measuresOptions in Converter: Select unit / Change currency, Conversion type, Currency rates, Help, and Exit.
1 To convert measures such as Length from one unit (Yards) to ano(Meters), press and select Extras > Converter.
Note: The Converter has limited accuracy and rounding errorsoccur.
125
2 Scroll to the Type field and press to open a list of measures. Scroll to the measure you want to use and press OK.
ch you ct the
nvert. rted
ature),
field.
ays 1. cies.
ee the
Copyright © 2004 Nokia. All rights reserved.
3 Scroll to the first Unit field and press . Select the unit from whiwant to convert and press OK. Scroll to the next Unit field and seleunit to which you want to convert.
4 Scroll to the first Amount field and key in the value you want to coThe other Amount field changes automatically to show the convevalue.
5 Press to add a decimal and press for the +, - (for temperand E (exponent) symbols.
Setting a base currency and exchange ratesTo change the conversion order, write the value in the second AmountThe result is shown in the first Amount field.
Before you can make currency conversions, you need to choose a basecurrency and add exchange rates. The rate of the base currency is alwThe base currency determines the conversion rates of the other curren
1 Select Currency as the measure type and select Options > Currency rates. A list of currencies opens and you can scurrent base currency at the top.
2 To change the base currency, scroll to the currency, and select Options > Set as base curr..

126
To rename a currency, select the Currency rates view, scroll to the currency, and select Options > Rename currency.
hat is, cy you
ake
ct alled
osing. t
select
me,
Copyright © 2004 Nokia. All rights reserved.
Note: When you change the base currency, all previously set exchange rates are set to 0 and you need to key in new rates.
3 Add exchange rates. Scroll to the currency, and key in a new rate, thow many units of the currency equal one unit of the base currenhave selected.
4 After you have inserted all the needed exchange rates, you can mcurrency conversions.
ComposerOptions in the Composer main view: Open, New tone, Delete, Mark/Unmark, Rename, Duplicate, Help, and Exit.
1 To create your own, customized ringing tones, press and seleExtras > Composer. Note that it is not possible to edit a pre-instringing tone.
2 Select Options > New tone to open the editor and to start compUse the keys to add notes and rests (see the table below), or selecOptions > Insert symbol. The default duration for a note is 1/4.
3 To listen to the tone, select Options > Play. To adjust the volumeOptions > Volume before you start to play the tone.
Options when composing are: Play, Insert symbol, Style, Tempo, VoluHelp, and Exit.

127
• To adjust the tempo, select Options > Tempo. To increase or decrease the tempo gradually, press or , respectively. Tempo is measured in
notes layed
and
e note
Copyright © 2004 Nokia. All rights reserved.
beats per minute.
• To apply different playing styles, select Options > Style > Legato—are played in a smooth and even manner or Staccato—notes are pseparately to produce short sharp sounds.
• To select many notes or rests at the same time, press and hold press and hold or at the same time.
• To move note(s) up or down on the staff by a half step, scroll to thand press or .
• To produce C#, press and hold together with .
4 Press Back to save the tone.

128
Key Note Key and function
tted)
Copyright © 2004 Nokia. All rights reserved.
c Shortens the duration of the selected notes/rests in steps.
d Lengthens the duration of the selected notes/rests in steps.
e Inserts a rest.
f Press to open a list of notes and rests.
g Switches octaves, all selected notes or rests are moved to the next octave.
a Deletes selected notes.
b A long press of — produces a lengthened (donote or rest or shortens a lengthened note.

129
Go to
so on,
, and
es. Not
s
Copyright © 2004 Nokia. All rights reserved.
Default shortcuts:
opens Calendar
opens Inbox
opens Notes
To select shortcuts, links to your favorite images, notes, bookmarks, andpress and select Extras > Go to.
Options in Go to: Open, Edit shortcut name, Move, Grid view, HelpExit.
Adding shortcutsShortcuts can be added only from the individual applications, like Imagall applications have this functionality.
1 Open an application.
2 Select the item you want to add as a shortcut.
3 Select Options > Add to Go to.
A shortcut in Go to is automatically updated if you move the item it ipointing to, for example, from one folder to another.

130
Help
can select
Copyright © 2004 Nokia. All rights reserved.
Your game deck has a help function that you can access from any application by selecting Options > Help.
Example: To view instructions on how to create a contact card, press and select Extras > Help > Contacts > Creating contact cards. Youaccess the same Help topic when you start to create a contact card andOptions > Help.
131
12. Tools
kup,
elated d files and
to the to
, scroll
her
details other
Copyright © 2004 Nokia. All rights reserved.
Game managerOptions in Game manager main view: File details, Delete, Send, BacRestore from card, Mark/Unmark, Settings, Help, and Exit.
Press , and select Tools > Game mgr. to view and manage game-rfiles. You can delete files that you no longer need to free memory, sento other compatible devices using Bluetooth connectivity, and back uprestore files to and from a memory card.
• To view game data file details such as the file type and size, scrolldesired file and select Options > File details, or press and scroll through the details.
• To delete a file, scroll to the file and select Options >Delete.
• To send a file to a compatible device using Bluetooth connectivityto the file, and select Options >Send >Via Bluetooth.
Copy protections may prevent some images, ringing tones, and otcontent from being copied, modified, transferred, or forwarded.
Some copy-protected files are marked as Not portable in the file and cannot be used on other devices. Portable files may be used oncompatible devices.

132
• To change the appearance of Game manager and choose how files are grouped and sorted, press Options > Settings.
ays.
t by >
>
ns on e he list switch
game t show s how
Copyright © 2004 Nokia. All rights reserved.
Grouping and sorting filesYou can manage game files by grouping and sorting them in several w
1 To free memory, sort files by size: Select Options > Settings > SorFile size.
2 If you want to know which files are the oldest, select Options > Settings > Sort by > Date and time.
3 If you want to see which files belong to one game, select OptionsSettings > Sort by > Similar games.
Tip: Select Game manager > Style > N-Gage to see two icothe bottom right of the status bar that show how your files argrouped and sorted. The same icons are used as attributes in tof files. Press 5 to switch on grouping and sorting, or press 7 to off grouping and sorting.
Check memorySelect Game manager > Style > N-Gage to check memory left on thedeck and the memory card. Icons on the top of the status bar to the righdevice memory and memory card memory. The bar at the bottom showmuch memory is free and how much is used.
133
Information about the device memory is shown when you are in your list of game-related files. Information about the memory on the card is shown when
ur der
card, ackup.
mory, want
Copyright © 2004 Nokia. All rights reserved.
you select Options > Restore from card.
Select Style > Standard to show how much memory is still free on yodevice. Information about free memory on the card appears in the heawhen you select Options > Restore from card.
Game file types• Game data — Files required to play a game, such as game sounds.
• Game extensions — Optional game files, such as extra levels.
• User data — Files saved when playing, such as high scores and checkpoints you have reached.
Backing up and restoring game data• To back up game data from your game deck memory to a memory
scroll to the file that you want to back up, and select Options > B
• To restore game data from the memory card to the game deck meselect Options > Restore from the card. Scroll to the file that youto restore, and select Options > Restore.
134
Manager
ove,
by
ou
lect
voice ls.
o set rd is ds. See
Copyright © 2004 Nokia. All rights reserved.
Installing and removing Symbian softwareOptions in Manager are: View details, View certificate, Install, RemView log, Send log, Device memory, Help, and Exit.
Press , and select Tools > Manager to see the following lists:
• Applications and software that you can install (no indicator icon)
• Installed applications and software that you can remove, indicated
• Applications and software whose installation was canceled or interrupted, indicated by . You cannot use these applications. Yshould either remove them or try to re-install them.
ForwardCall forwarding (network service)1 To direct your incoming calls to another number, press , and se
Tools > Forward. For details, contact your service provider.
2 Select one of the forward options, for example, If busy, to forwardcalls when your number is busy or when you decline incoming cal
3 Select Options > Activate to set the forward setting on, Cancel tthe forward setting off, Check status to check whether the forwaactivated or not, or Cancel all forwards to cancel all active forwarEssential indicators in the standby mode.
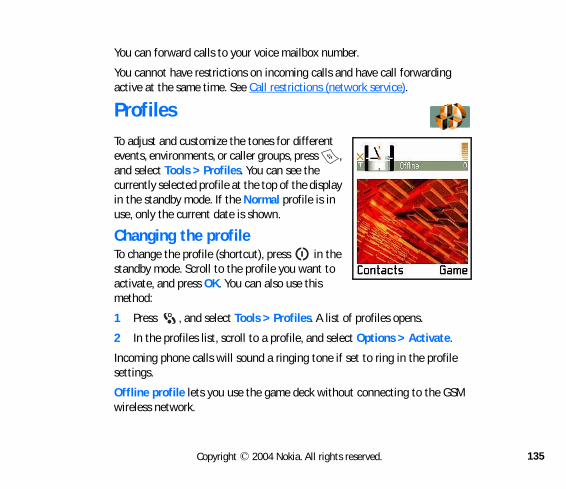
135
You can forward calls to your voice mailbox number.
You cannot have restrictions on incoming calls and have call forwarding
te.
file
GSM
Copyright © 2004 Nokia. All rights reserved.
active at the same time. See Call restrictions (network service).
ProfilesTo adjust and customize the tones for different events, environments, or caller groups, press , and select Tools > Profiles. You can see the currently selected profile at the top of the display in the standby mode. If the Normal profile is in use, only the current date is shown.
Changing the profileTo change the profile (shortcut), press in the standby mode. Scroll to the profile you want to activate, and press OK. You can also use this method:
1 Press , and select Tools > Profiles. A list of profiles opens.
2 In the profiles list, scroll to a profile, and select Options > Activa
Incoming phone calls will sound a ringing tone if set to ring in the prosettings.
Offline profile lets you use the game deck without connecting to thewireless network.
136
Warning: In the Offline profile you cannot make any calls, including emergency calls, or use other features that require network coverage.
e GSM l GSM
some .
ine tooth
ect
he
nging n next
Copyright © 2004 Nokia. All rights reserved.
When you activate the Offline profile, the game deck restarts, and this turned off, as indicated by the in the signal strength indicator. Alwireless phone signals to and from the device are prevented.
Note: There may be restrictions on using Bluetooth devices inlocations. Check with your local authorities or service provider
To leave the Offline profile, select some other profile, and Options >Activate. > Yes. The game deck restarts and re-enables GSM wirelesstransmissions (providing there is sufficient signal strength).
If Bluetooth connectivity is turned off as a result of entering the Offlprofile you must re-enable Bluetooth connectivity manually. See Bluesettings.
Customizing profiles1 To modify a profile, scroll to the profile in the profiles list, and sel
Options > Customize. A list of profile settings opens.
2 Scroll to the setting you want to change, and press to open tchoices:
Ringing tone — To set the ringing tone for voice calls, choose a ritone from the list. Tones stored on a memory card have the icoto the tone name.
137
When you scroll through the ringing tone list, you can stop on a tone to listen to it before you make your selection. Press any key to stop the
dding
starts .
age
e calls
ple,
ne ing
e ). See
iles
Copyright © 2004 Nokia. All rights reserved.
sound.
You can change ringing tones in two places: Profiles or Contacts. See Aa ringing tone for a contact card or group.
Ringing options — When Ascending is selected, the ringing volumefrom level one and increases level by level to the set volume level
Sound volume — To set the volume level for the ringing and messalert tones.
Message alert tone — To set the tone for messages.
Vibrating alert — To set the game deck to vibrate at incoming voicand messages.
Keypad tones — To set the volume level for keypad tones.
Warning tones — The game deck sounds a warning tone, for examwhen the battery is running out of power.
Alert for — To set the game deck to ring only upon calls from phonumbers that belong to a selected contact group. Phone calls comfrom people outside the selected group will have a silent alert. Thchoices are All calls (list of contact groups, if you have created themCreating contact groups.
Profile name — To rename a profile. The Normal and Offline profcannot be renamed.

138
Settings
n.
game tors ording y text
cts e until
d
Copyright © 2004 Nokia. All rights reserved.
Changing settings1 Press , and select Tools > Settings.
2 Scroll to a setting group, and press to open it.
3 Scroll to a setting you want to change, and press .
Device settingsGeneralGame auto-start — To allow a game to start automatically when a compatible read-only game card is inserted in the game deck, select O
Device language — Changing the language of the display texts in yourdeck will also affect the format used for date and time and the separaused, for example, in calculations. Automatic selects the language accto the information on your SIM card. After you have changed the displalanguage, the game deck restarts.
Changing the settings for Device language or Writing language affeevery application in your game deck, and the change remains effectivyou change these settings again.
Writing language — Changing the language affects the characters anspecial characters available when writing text and the predictive textdictionary used.

139
Predictive text — To set the predictive text input On or Off for all editors in the game deck.
y each mage, oto or
iginal , the
ode.
s that mode.
Copyright © 2004 Nokia. All rights reserved.
The predictive text dictionary is not available for all languages. Welcome note or logo — The welcome note or logo is displayed briefltime you switch on the game deck. Select Default to use the default iText to write a welcome note (up to 50 letters), or Image to select a phpicture from Images.
Orig. device settings — You can reset some of the settings to their orvalues. To do this, you need the lock code. After resetting the settingsgame deck may take a longer time to power on. See PIN code/PIN2 code/Lock code.
All documents and files that you have created are left as they are.
Standby modeWallpaper — Select Yes to set a background image for the standby m
Left selection key and Right selection key — To change the shortcutappear over the left and right selection keys in the standbyNote that you cannot have a shortcut to an application that you haveinstalled.
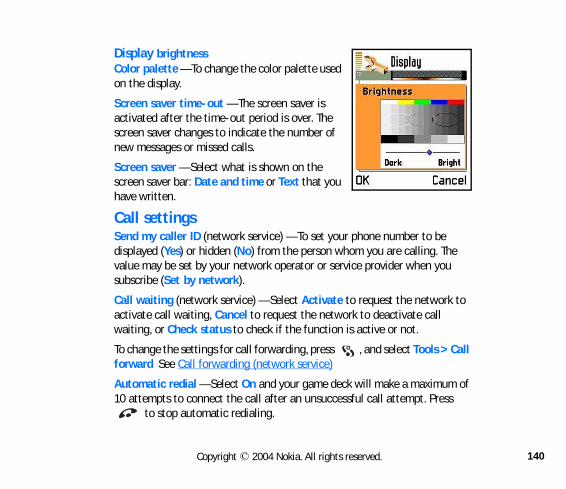
140
Display brightness To change the Color palette — To change the color palette used
e The ou
ork to l
> Call
um of ess
Copyright © 2004 Nokia. All rights reserved.
on the display.
Screen saver time-out — The screen saver is activated after the time-out period is over. The screen saver changes to indicate the number of new messages or missed calls.
Screen saver — Select what is shown on the screen saver bar: Date and time or Text that you have written.
Call settingsSend my caller ID (network service) — To set your phone number to bdisplayed (Yes) or hidden (No) from the person whom you are calling. value may be set by your network operator or service provider when ysubscribe (Set by network).
Call waiting (network service) — Select Activate to request the netwactivate call waiting, Cancel to request the network to deactivate calwaiting, or Check status to check if the function is active or not.
To change the settings for call forwarding, press , and select Toolsforward. See Call forwarding (network service).
Automatic redial — Select On and your game deck will make a maxim10 attempts to connect the call after an unsuccessful call attempt. Pr
to stop automatic redialing.

141
Summary after call — Activate this setting if you want the game deck to briefly display the duration of the last call. To show costs, the Call cost limit
e).
ch y.
briefly
ard h . Calls
y your
mode.
cribed
.4 Kb/s.
Copyright © 2004 Nokia. All rights reserved.
needs to be activated for your SIM card. See Call costs (network servic
1-touch dialing — Select On, and the numbers assigned to the 1-toudialing keys ( – ) can be dialed by pressing and holding the ke
Anykey answer — Select On, and you can answer an incoming call by pressing any key, except , , and .
Line in use (network service) — This setting is shown only if the SIM csupports two subscriber numbers, that is, two phone lines. Select whicphone line you want to use for making calls and sending text messageson both lines can be answered irrespective of the selected line.
To prevent line selection, select Line change > Disable if supported bSIM card. To change this setting, you need the PIN2 code.
To switch between the phone lines, press and hold in the standby
You will not be able to make calls if you select Line 2 and have not substo this network service.
Connection settingsA GSM data call enables data transmission rates to a maximum of 14
142
About data connections and access pointsYour game deck supports two kinds of data connections: a GSM data call ( )
mode. three
ge
oint tion to r or m and
ings > he ained imum
tion to
Copyright © 2004 Nokia. All rights reserved.
and GPRS connection ( ). See also Essential indicators in the standbyA data connection is required to connect to an access point. There aredifferent kinds of access points that you can define:
• MMS access point to send and receive multimedia messages
• Access point for Web to view WML or XHTML pages
• Internet access point (IAP) to send and receive e-mail or use N-GaArena for games services. See N-Gage QD Arena launcher.
Check with your service provider to determine the kind of an access pneeded for the service you wish to access. For availability and subscripdata call and GPRS connection services, contact your network operatoservice provider. Most setting are available on http://support.n-gage.cocan be sent to your game deck as a text message.
Settings to make a data callTo insert a set of very basic GSM data call settings, select Tools > SettConnection > Access points > Options > New access point. Fill in tfollowing information: Data bearer: Data call, Dial-up number: obtfrom service provider, User name, Data call type: Analog, and Maxdata speed: Automatic.
Settings to make a GPRS connectionYou need to subscribe to the GPRS service. For availability and subscripGPRS, contact your network operator or service provider.

143
Select Tools > Settings > Connection > Access points > Options > New access point.
name: access
e QD also your
equire d text k
ice k. You
ccess
Copyright © 2004 Nokia. All rights reserved.
Fill in the following information: Data bearer: GPRS and Access point (enter the name given to you by your service provider). See Creating an point.
Pricing for GPRS and applicationsThe settings wizard program included in the PC Suite for Nokia N-Gagcan help you to configure access point and mailbox settings. You can copy existing settings, for example, from your compatible computer togame deck. See the CD-ROM supplied in the sales package.
Both the active GPRS connection and the applications used over GPRS ra fee, for example, when using services, sending and receiving data, anmessages. For more detailed information on fees, contact your networoperator or service provider. See also GPRS counter.
Creating an access pointYou may receive access point settings in a smart message from a servprovider, or you may have preset access point settings in your game deccan also receive settings from http://support.n-gage.com. See Receiving smart messages.
To create a new access point, select Tools > Settings > Connection > Apoints.

144
If you already have access points, to create a new one, select Options > New access point > Use default settings or Use existing settings, make the
p, and
ata teway
ttings,
ertain ned or en
t
d to int
Copyright © 2004 Nokia. All rights reserved.
needed changes, and press Back to save the settings.
Options in Access points list are: Edit, New access point, Delete, HelExit.
Access pointsStart to fill in the settings from the top because depending on what dconnection you select (Data bearer) or whether you need to insert a GaIP address, only certain setting fields are available.
Options when editing access point settings are: Change, Advanced seHelp, and Exit.
Follow the instructions given to you by your service provider.
Connection name — Give a descriptive name for the connection.
Data bearer — Depending on what data connection you select, only csetting fields are available. Fill in all fields marked with Must be defiwith a red asterisk. Other fields can be left empty, unless you have beinstructed otherwise by your service provider.
To be able to use a data connection, the network service provider mussupport this feature, and if necessary, activate it for your SIM card.
Access point name (for GPRS only) — The access point name is needeestablish a connection to the GPRS network. You obtain the access poname from your network operator or service provider.

145
Dial-up number (for GSM data and high speed data only) — The modem telephone number of the access point. This option is shown when Data call is
n and
log on eck,
nd is nsitive.
ervice
uses.
is used t to a
Copyright © 2004 Nokia. All rights reserved.
selected as the Data bearer.
See also Settings needed for multimedia messaging, Settings needed for e-mail, and Basic steps for accessing Web.
User name — The user name may be needed to make a data connectiois usually provided by the service provider. The user name is often case-sensitive.
Prompt password — If you must key in a new password every time youto a server, or if you do not want to save your password to the game dchoose Yes.
Password — A password may be needed to make a data connection, ausually provided by the service provider. The password is often case-se
Authentication — Normal / Secure.
Homepage — Depending on what you are setting up, write either the saddress, or the address of the multimedia messaging center.
Gateway IP address — The IP address that the required WAP gateway
Connection security — Choose whether transport layer security (TLS) for the connection. Use the TLS protocol anytime you need to connecsecure site, for example, your bank, or an online merchant.
146
Data call type (for GSM data) - Defines whether the game deck uses an analog or digital connection. This setting depends on both your GSM network
rks do ur ISP.
e deck nd as
u have
ain 95
server e IP
cond. resses.
Copyright © 2004 Nokia. All rights reserved.
operator and Internet Service Provider (ISP), because some GSM netwonot support certain types of ISDN connections. For details, contact yo
ISDN connections are a way to establish a data call between your gamand your access point. ISDN connections are digital from end to end asuch offer quicker set-up times and faster data rates than analog connections.
Maximum data speed — The options for GSM data depend on what yochosen in Session mode and Data call type.
Network conditions can affect operating speed of your connection.
Advanced settingsDNS - domain name service. is an Internet service that translates domnames such as www.nokia.com into IP addresses like 192.100.124.1
Device IP address — The IP address of your game deck. Primary name is the IP address of the primary DNS server. Second. name server is thaddress of the secondary DNS server.
If you need to enter the Device IP address, Primary name server, or Sename server, contact your Internet service provider to obtain these add
147
The following settings are shown if you have selected GSM data as the Data bearer when starting to create the access point:
have ervice.
se.
he dial f your
ata ith
ovider
ript in
ol that ctly to
e deck your
Copyright © 2004 Nokia. All rights reserved.
Use callback — This option allows a server to call you back once you made the initial call. Contact your service provider to subscribe to this s
Callback type — Ask your service provider for the correct setting to u
Callback number — Key in your game deck data phone number which tback server uses. Usually this number is the data call phone number ogame deck.
Use PPP compression — When set to Yes, this option speeds up the dtransfer, if supported by the remote PPP server. If you have problems westablishing a connection, try setting this to No. Contact your service prfor guidance.
To insert a login script, select Use login script > Yes. Insert the login scLogin script.
PPP (point-to-point protocol) is a common networking software protocenables any computer with a modem and a phone line to connect direthe Internet.
Modem initialization — Modem initialization string controls your gamusing modem AT commands. If required, enter characters specified byGSM network service provider or Internet service provider.
148
GPRSThe GPRS settings affect all access points using a GPRS connection.
twork ending
elect tart an
game
e your
tically e) or
n your Select ndby
Copyright © 2004 Nokia. All rights reserved.
GPRS connection — If you select When available and you are in a nethat supports GPRS, the game deck registers to the GPRS network and stext messages will be done using GPRS. Also, starting an active GPRS connection is quicker, for example, to send and receive e-mail If you sWhen needed, the game deck will use a GPRS connection only if you sapplication or action that needs it.
If there is no GPRS coverage and you have chosen When available, thedeck will periodically try to establish a GPRS connection.
Access point — The access point name is needed when you want to usgame deck as a GPRS modem to your computer.
Data callThe data call settings affect all access points using a data call.
Online time — If there are no actions, the data call is dropped automaafter a time-out period. The options are User defined (you enter a timUnlimited.
Date and timeThe date and time settings allow you to define the date and time used igame deck, as well as change the date and time format and separators.Clock type > Analog or Digital to change the clock shown in the sta

149
mode. Select Auto time update if you want the mobile phone network to update time, date, and time zone information to your game deck (network
rts.
r SIM e SIM is in. See
access
orized
use of a safe
to not your
Copyright © 2004 Nokia. All rights reserved.
service).
For the Auto time update setting to take effect, the game deck resta
SecurityDevice and SIMPIN (personal identification number) code (4 to 8 digits) protects youcard against unauthorized use. The PIN code is usually supplied with thcard. After three consecutive incorrect PIN code entries, the PIN code blocked, and you must unblock it before you can use the SIM card agathe information about the PUK code.
PIN2 code (4 to 8 digits) supplied with some SIM cards, is required to some functions, such as call cost counters.
Lock code (5 digits) can be used to lock the game deck to avoid unauthuse.
The factory setting for the lock code is 12345. To avoid unauthorized your game deck, change the lock code. Keep the new code secret and inplace separate from your game deck.
PUK (personal unblocking key) and PUK2 codes (8 digits) are requiredchange a blocked PIN code or PIN2 code, respectively. If the codes aresupplied with the SIM card, contact the operator whose SIM card is ingame deck.

150
The PUK and PUK2 codes are not seen in the menu unless the PIN or PIN2 code is blocked.
ed on. ards.
n only
11, to
is d. Key
the
Select
e keys eck is
Copyright © 2004 Nokia. All rights reserved.
PIN code request When active, the code is requested each time the game deck is switchDeactivating the PIN code request may not be allowed by some SIM c
PIN code/PIN2 code/Lock codeYou can change the lock code, PIN code, and PIN2 code. These codes cainclude the numbers from 0 to 9.
Avoid using access codes similar to the emergency numbers, such as 9prevent accidental dialing of the emergency number.
Autolock period You can set an autolock period, a time-out after which the game deckautomatically locked, that is used only if the correct lock code is enterein a number for the time-out (in minutes), or select None to turn off autolock period.
To lock the game deck manually, press . A list of commands opens.Lock device.
Lock keys appears in the list of commands after Lock device. Locking thdoes not require a code. Select Lock device to make sure your game dsecure.
To unlock the game deck, key in the lock code.
151
Note: When the game deck is locked, calls may be possible to the emergency number programed into your game deck (for example, 911).
e SIM
, select to use
be
ing a
Trust
pages of the
Copyright © 2004 Nokia. All rights reserved.
Lock if SIM changedThe game deck maintains a list of SIM cards that are recognized as thowner’s cards. Set the game deck to ask for the lock code when a newcard is inserted into your game deck.
Closed user group (network service) To specify a group of people to whom you can call and who can call youDefault to activate the specified group with the network operator, Onanother group (you need to know the group index number), or Off.
Note: When calls are limited to Closed User Groups, calls maypossible to certain emergency numbers in some networks (forexample, 911).
Confirm SIM services (network service)Set the game deck to display confirmation messages when you are usSIM card service.
Certificate managementOptions in Certificate management are: Certificate details, Delete,settings, Mark/Unmark, Help, and Exit.
Digital certificates are used to verify the origin of the XHTML or WMLand installed software. However, they can only be trusted if the origincertificate is known to be authentic.
152
In the Certificate management main view, you can see a list of authority certificates that have been stored in your game deck. Press to see a list
bank
r
he cates
rver
ver or ificate
>
owing
Copyright © 2004 Nokia. All rights reserved.
of personal certificates, if available.
Digital certificates should be used if you want to connect to an onlineor another site or remote server for actions that involve transferring confidential information, or want to reduce the risk of viruses or othemalicious software and be sure of the authenticity of software when downloading and installing software.
The existence of a certificate does not offer any protection by itself; tcertificate manager must contain correct, authentic, or trusted certififor increased security to be available.
Certificate details and authenticityYou can only be sure of the correct identity of a WAP gateway or a sewhen the signature and the period of validity of a gateway or server certificate have been checked.
You will be notified on the game deck display if the identity of the sergateway is not authentic, or if you do not have the correct security certin your game deck.
To check certificate details, scroll to a certificate, and select Options Certificate details. When you open certificate details, Certificate management checks the validity of the certificate and one of the follnotes may appear:

153
• Certificate not trusted — You have not set any application to use the certificate. See ‘Changing the trust settings’.
ected
un for
the
icate at the
. e
of new
ervers.
re that elongs
Copyright © 2004 Nokia. All rights reserved.
• Expired certificate — The period of validity has ended for the selcertificate.
• Certificate not valid yet — The period of validity has not yet begthe selected certificate.
• Certificate corrupted — The certificate cannot be used. Contact certificate issuer.
Certificates have a restricted lifetime. If Expired certificate or Certifnot valid yet is shown, even if the certificate should be valid, check thcurrent date and time in your game deck are correct.
Changing the trust settingsScroll to an authority certificate, and select Options > Trust settingsDepending on the certificate, a list of the applications that can use thselected certificate is shown and include the following:
Services: Yes — the certificate is able to certify sites.
Application manager: Yes — the certificate is able to certify the origin software.
Internet: Yes — the certificate is able to certify e-mail and imaging s
Important: Before changing these settings, you must make suyou trust the owner of the certificate and that the certificate bto the listed owner.

154
NetworkA roaming agreement is an agreement between two or more network service
s of
h for, ork
lected select t with e deck.
is used gy and
profile ement ame
inging use.
Copyright © 2004 Nokia. All rights reserved.
providers to enable the users of one service provider to use the serviceother service providers.
Network selection — Select Automatic to set the game deck to searcand select one of the networks available, or Manual to select the netwmanually from a list of networks. If the connection to the manually senetwork is lost, the game deck will sound an error tone and ask you toa network again. The selected network must have a roaming agreemenyour home network, that is, the operator whose SIM card is in your gam
Cell info display — Select On to set the game deck to indicate when it in a cellular network based on micro cellular network (MCN) technoloto activate cell info reception.
Enhancement settingsIndicators shown in the standby mode:
A headset is connected. A loopset is connected.
Enhancement in use — Select the enhancement you are using.
Headset/ Loopset/ TTY/ Handsfree — Select Default profile to set the you want to be activated each time when you connect a certain enhancto your game deck. See Profiles. Select Automatic answer to set the gdeck to answer an incoming call automatically after 5 seconds. If the Roptions is set to Beep once or Silent, automatic answer cannot be in
155
Log
nt.
by the eneral on the
HTML eral
ow to r, and
In the point.
Copyright © 2004 Nokia. All rights reserved.
Call log and general logTo view a list of sent messages, press , and select Messaging > Se
To monitor phone calls, text messages, or data connections registered game deck, press , select Log, and press . You can filter the glog to view just one type of event, and create new contact cards based log information.
Connections to your remote mailbox, multimedia messaging center, or Xor WML pages are shown as data calls or GPRS connections in the gencommunications log.
When you see a note in the standby mode about missed calls, press Shaccess the list of missed calls. To call back, scroll to a name or numbepress .
Indicators shown in the standby mode:
incoming calls
outgoing calls
missed communication events
To open the general log, press , select Tools > Log, and press .general log, for each communication event, you can see the sender orrecipient name, phone number, name of the service provider, or access

156
Recent calls registerTo monitor the phone numbers of missed, received, and dialed calls, press
issed en the
recent nt to en a
select
calls,
er may g, and
e. See
Copyright © 2004 Nokia. All rights reserved.
, and select Tools > Log > Recent calls. The game deck registers mand received calls only if the network supports these functions, and whgame deck is on and located within the network service area.
Erasing recent call lists To clear all recent call lists, select Options > Clear recent calls in the calls main view. To clear one of the call logs, open the register you waerase, and select Options > Clear list. To clear an individual event, opregister, scroll to the event, and press .
Call durationIf you want to see the call duration timer while you have an active call,Options > Settings > Show call duration > Yes.
To monitor the approximate duration of your incoming and outgoing press , and select Tools > Log > Call timers.
Note: The actual time invoiced for calls by your service providvary, depending upon network features, rounding-off for billinso forth.
Clearing call duration timersSelect Options > Clear timers. For this activity, you need the lock codSecurity. To clear an individual event, scroll to it, and press .

157
Call cost limit is the preset credit limit. Calls can only be made as long as that limit is not exceeded and you are in a network that supports call cost limit.
by is
h SIM
ice off for
nt of ion on
nter
Copyright © 2004 Nokia. All rights reserved.
The number of remaining units is shown during a call and in the standmode. When the charging units have expired, Call cost limit reacheddisplayed.
Call costs (network service)To check the cost of the last call or all calls, press , and select Tools > Log > Call costs. The call costs are displayed separately for eaccard.
Note: The actual invoice for calls and services from your servprovider may vary, depending upon network features, rounding-billing, taxes, and so forth.
Call costs limit set by a service providerYour service provider can limit the cost of your calls to a certain amoucharging units or currency. Contact your service provider for informatthe limited charging mode and charging unit prices. To change the Show costs in setting, you may need the PIN2 code.
Setting a call cost limit for yourself1 Select Options > Settings > Call cost limit > On.
2 Enter the limit in units. For this you may need the PIN2 code.
When the charging limit you have set yourself is reached, the coustops at its maximum value, and Reset all calls' cost counter is displayed.

158
3 To be able to make calls, select Options > Settings > Call cost limit > Off. For this you need the PIN2 code.
clear
, calls your
ns, ay be
ceived.
RS
ent. e deck This is ended ith
lect.
Copyright © 2004 Nokia. All rights reserved.
Clearing call cost counters
Select Options > Clear counters. For this you need the PIN2 code. Toan individual event, scroll to it, and press .
Note: When no more charging units or currency units are leftmay only be possible to the emergency number programed intogame deck (for example, 911).
GPRS counterTo check the amount of data sent and received during GPRS connectiopress , and select Tools > Log > GPRS counter. For example, you mcharged for your GPRS connections by the amount of data sent and re
Subevents, such as a text message sent in more than one part and GPconnections are logged as one communication event.
Note: When sending messages, your game deck may display SThis is an indication that the message has been sent by your gamto the message center number programed into your game deck.not an indication that the message has been received at the intdestination. For more details about messaging services, check wyour service provider.
To filter the log, select Options > Filter. Scroll to a filter, and press Se
159
To erase all the log contents, recent calls register, and messaging delivery reports permanently, select Options > Clear log. Press Yes to confirm.
d how tgoing ls.
set ory.
d Call
gister,
ur
Copyright © 2004 Nokia. All rights reserved.
GPRS counter and connection timerTo view how much data, measured in kilobytes, has been transferred anlong a certain GPRS connection has lasted, scroll to an incoming or ouevent with the access point icon , and select Options > View detai
Log settingsSelect Options > Settings.
Log duration — The log events remain in the game deck memory for anumber of days after which they are automatically erased to free mem
For Call duration, Show costs in, Call cost limit, see Call duration ancosts (network service).
Note: If you select No log, all the log contents, recent calls reand messaging delivery reports are permanently deleted.
Voice mailCalling your voice mailbox (network service)To call your voice mailbox, press and hold in the standby mode.
If the game deck asks for the voice mailbox number (obtained from yoservice provider), key it in, and press OK. See Call forwarding (networkservice). Each phone line may have its own voice mailbox number.

160
Bluetooth connection
tween nology
ation each
to-PC tween etooth
Copyright © 2004 Nokia. All rights reserved.
Note: The Nokia N-Gage game deck is compliant with and adopts Bluetooth Specification 1.1. However, interoperability bethe game deck and other products with Bluetooth wireless techis not guaranteed and depends on compatibility. For more informon the compatibility between Bluetooth devices, please reviewproduct's user information or check with the manufacturer.
Bluetooth connectivity in the Nokia N-Gage QD can be used in device-connectivity (dial-up or data synchronization) and object exchange betwo enabled terminals (business cards, images, and game playing). Bluprofiles supported by the Nokia N-Gage QD are:
• generic access profile
• serial port profile
• dial-up networking profile
• fax profile
• generic object exchange profile
• object push profile
• file transfer profile
• hands-free profile

161
Bluetooth connectivity enables cost-free wireless connections for playing games, sending images,
when ictions
to you
found und by
Copyright © 2004 Nokia. All rights reserved.
texts, or to connect wirelessly to other compatible devices with Bluetooth technology.
Since Bluetooth devices communicate using radio waves, your game deck, and the other Bluetooth device do not need to be in direct line-of-sight. The two devices only need to be within a radius of 32 feet (10 meters), although the connection can be subject to interference from obstructions such as walls or from other electronic devices. Using Bluetooth connectivity consumes the battery and the game deck operating time will be reduced. Take this into account performing other operations with your game deck. There may be restron using Bluetooth devices. Check with your local authorities.
Press , and select Tools > Bluetooth. You are asked to give a namedevice.
Bluetooth settingsBluetooth — Select On or Off.
My device's visibility — Select Shown to all so your game deck can beby other Bluetooth devices, or Hidden so your game deck cannot be foother devices.
My device’s name — Define a name for your game deck.

162
When searching for devices, some devices may show only the unique addresses (device addresses). To find out what the unique address of your
ice's other
the
ia
Copyright © 2004 Nokia. All rights reserved.
game deck is, enter *#2820# in the standby mode.
After you have activated Bluetooth connectivity and changed My devvisibility to Shown to all, your game deck and this name can be seen byBluetooth device users.
Sending data using Bluetooth connectivityThere can be only one active Bluetooth connection at a time.
Icons for different Bluetooth connectivity devices are:
Computer
Phone
Headset
Carkit
Other
Unknown
1 Open an application where the item you wish to send is stored.
For example, to send an image to another compatible device, openImages application.
2 Select the item (for example, an image), and Options > Send > VBluetooth.

163
To send text using Bluetooth connectivity (instead of text messages), select Notes, write the text, and select Options > Send > via Bluetooth.
evices u can me.
u can
list of ew list is
lect.
ould r both rface
tted, a
e with . A
Copyright © 2004 Nokia. All rights reserved.
The game deck starts to search for devices within range. Enabled dthat are within range start to appear on the display one by one. Yosee a device icon, the device’s name, the device type, or a short na
3 To interrupt the search, press Stop. The device list freezes, and yostart to form a connection to one of the devices already found.
If you have searched for Bluetooth connectivity devices earlier, a the devices that were found previously is shown first. To start a nsearch, select More devices. If you switch off the game deck, thecleared.
4 Scroll to the device with which you want to connect, and press Se
5 Pairing (if not required by the other device, see step 6).
Pairing means authentication. The users of the enabled devices shagree together what the passcode is and use the same passcode fodevices in order to pair them. Devices that do not have a user intehave a factory set passcode.
• If the other device requires pairing before data can be transmitone sounds, and you are asked to enter a passcode.
• Create your own passcode (1–16 numeric characters), and agrethe owner of the other Bluetooth device to use the same codepasscode is used only once.
164
• After pairing, the device is saved to the paired devices view.
6 When the connection has been established, Sending data is shown.
lder in ivity.
active.
other
ive.
rtain , scroll evices
in t of
e deck ange
Copyright © 2004 Nokia. All rights reserved.
If sending fails, the message or data will be deleted. The Drafts foMessaging does not store messages sent using Bluetooth connect
Check the status of the Bluetooth connection by looking for theseindicators:
When is shown in the standby mode, Bluetooth connectivity is
When is blinking, your game deck is trying to connect to the device.
When is shown continuously, the Bluetooth connection is act
Pairing devicesTo define a short name (nickname or alias) to help you recognize a cedevice during device search or when a device is requesting a connectionto the device, and select Options > Assign short name in the paired dview.
Paired devices are easier to recognize because, they are indicated by the device search. In the Bluetooth main view, press to open a lispaired devices ( ).
• To pair with a device, select Options > New paired device. The gamstarts a device search. Scroll to the device, and press Select. Exchpasscodes, see step 5 (Pairing).

165
• To cancel a pairing, scroll to the device, and select Options > Delete. If you want to cancel all pairings, select Options > Delete all.
airing ection
e, and ame parate n trust.
s view. device
d you n, and rough
r
Copyright © 2004 Nokia. All rights reserved.
Note: If you are currently connected to a device and delete the pwith that device, pairing is removed immediately but the connwill remain active.
• To set a device to be authorized or unauthorized, scroll to a devicselect Options > Set as authorized. Connections between your gdeck and this device can be made without your knowledge. No seacceptance or authorization is needed. Use this status for your owdevices, for example, your PC or devices that belong to someone youThe icon is added next to authorized devices in the Paired deviceSet as unauthorized requires that connection requests from this must be accepted separately every time.
Receiving data using Bluetooth connectivityWhen you receive data using Bluetooth connectivity, a tone sounds, anare asked if you want to accept the message. If you accept, is showthe item is placed in the Inbox folder in Messaging. Messages sent thBluetooth connectivity are indicated by . See Inbox.
Disconnecting BluetoothA Bluetooth connection is disconnected automatically after sending oreceiving data.
166
Connecting your game deck to a computerFor further information on how to install the PC Suite for Nokia N-Gage, make
nd use Suite
drive orer,
tones, he saved
ame card.
cards
Copyright © 2004 Nokia. All rights reserved.
a connection to a compatible computer using Bluetooth connectivity, athe PC Suite for Nokia N-Gage QD, see the Installation Guide for PCon the CD-ROM in the ‘Install’ section and the PC suite Help.
Using the CD-ROMThe CD-ROM launches itself after you have inserted it into the CD-ROMof your compatible PC. If not, proceed as follows: Open Windows Explright-click the CD-ROM drive, and select Autorun.
MemoryMany features of the game deck consume memory as they store data. These features include games, contacts, messages, images and ringingcalendar and to-do notes, documents, and downloaded applications. Tamount of free memory available depends on how much data is alreadyon the game deck memory.
You can use a memory card as extra storage space. Memory cards arerewritable, so you can delete and save data on a memory card. If the gdeck memory is getting low, you can move different files to a memory
You cannot save any data on a game card as they are read-only. Gamecontain data that cannot be overwritten.

167
View memory consumptionTo view what kind of data you have in the game
of the g low. f the g low,
st on to
Copyright © 2004 Nokia. All rights reserved.
deck and how much memory the different data groups consume, select Tools > Manager > Options > Device memory. Select Free memory to view the amount of free memory in the game deck.
If you have a memory card inserted in the game deck, select Tools > Memory > Options > Memory details to view the memory consumption of different data groups and the amount of free memory on the card.
Free memoryInstalling many games or saving many images can use a large amountavailable memory. The game deck notifies you when memory is gettinIn this case, additional data may not be saved until you delete some ogames, images, or other entries to free memory. To avoid memory gettinyou should regularly delete or transfer data to a memory card.
You can delete contact information, calendar notes, call timers, call cotimers, game scores, or any other data. Select the respective applicatiremove the data.
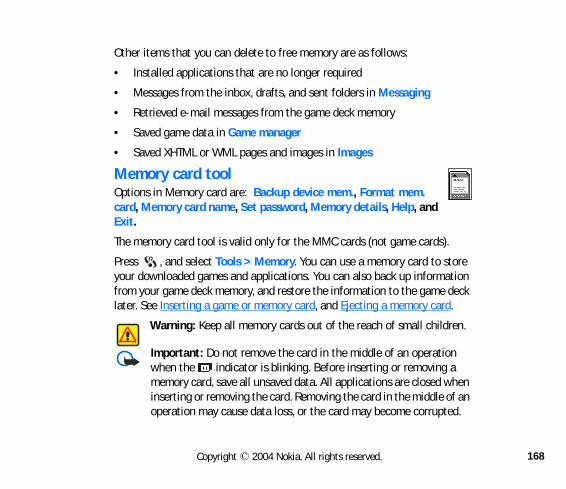
168
Other items that you can delete to free memory are as follows:
• Installed applications that are no longer required
s).
store ation
e deck rd.
ldren.
tion g a when e of an ted.
Copyright © 2004 Nokia. All rights reserved.
• Messages from the inbox, drafts, and sent folders in Messaging
• Retrieved e-mail messages from the game deck memory
• Saved game data in Game manager
• Saved XHTML or WML pages and images in Images
Memory card toolOptions in Memory card are: Backup device mem., Format mem. card, Memory card name, Set password, Memory details, Help, and Exit.
The memory card tool is valid only for the MMC cards (not game card
Press , and select Tools > Memory. You can use a memory card toyour downloaded games and applications. You can also back up informfrom your game deck memory, and restore the information to the gamlater. See Inserting a game or memory card, and Ejecting a memory ca
Warning: Keep all memory cards out of the reach of small chi
Important: Do not remove the card in the middle of an operawhen the indicator is blinking. Before inserting or removinmemory card, save all unsaved data. All applications are closedinserting or removing the card. Removing the card in the middloperation may cause data loss, or the card may become corrup

169
Note: Use only compatible multimedia cards (MMC) with this device. Other memory cards, such as secure digital (SD) cards, do not fit in the
an ell as
y lost.
emory
ing is
emory
rdy card,
emory,
Copyright © 2004 Nokia. All rights reserved.
MMC card slot and are not compatible with this device. Usingincompatible memory card may damage the memory card as wthe device, and data stored on the incompatible card may be corrupted.
Format a memory cardWhen a memory card is formatted, all data on the card is permanentl
Some memory cards are supplied preformatted, while others require formatting. Consult your retailer to find out if you must format the mcard before you can use it.
Select Options > Format mem. card > Yes to confirm. When formattcomplete, key a name for the memory card, and press OK.
To rename a memory card, select Options > Memory card name in Mcard.
Back up and restore information on a memory ca• To backup information from your game deck memory to a memor
select Options > Backup device mem.
• To restore information from the memory card to the game deck mselect Options > Restore from card.

170
Lock the memory cardYou can set a password to protect your memory card against unauthorized
er it f you for the
rd. For 8
s sword.
ck, you
Copyright © 2004 Nokia. All rights reserved.
use.
The password is stored in your game deck, and you do not have to entagain while you are using the memory card on the same game deck. Iwant to use the memory card on another game deck, you will be asked password.
Select Options > Set password, Change password, or Remove passwoevery option you are asked to enter and confirm your password (up tocharacters).
Important: Once the password is removed, the memory card iunlocked and can be used on another game deck without a pas
Unlocking a memory cardIf you insert another password protected memory card in your game dewill be prompted to enter the password of the card.
To unlock the card, select Options > Unlock memory card.
171
1-touch dialing
one of e voice
y until
Exit.
your er.
mbers mbers
, and vice nd
Copyright © 2004 Nokia. All rights reserved.
1-touch dialing is a quick way to call frequently called numbers. You can assign 1-touch dialing keys to eight phone numbers.
1 Press , select Tools > 1-touch, and assign a phone number tothe 1-touch dialing keys ( – ). Number 1 is reserved for thmailbox.
2 Select Tools > Settings > Call, and set 1-touch dialing to On.
3 To call in the standby mode, press and hold the 1-touch dialing kethe call is started.
SIM directoryOptions in the SIM directory are Open, Call, New SIM contact, Edit, Delete, Copy to Contacts, My numbers, SIM details, Help, and
For availability, rates, and information on using SIM services, contact SIM card vendor, for example, your network operator, or service provid
Press , and select Tools > SIM directory to see the names and nustored on the SIM card. In SIM directory you can add, edit, or copy nuto Contacts, and you can make calls.
To access additional services that your SIM card may provide, press select Tools. See also: Copying contacts between the SIM card and dememory, Confirm SIM services (network service), Memory card tool, aViewing messages on a SIM card.

172
Fixed dial
d by nction e fixed t.
ertain
lect
Copyright © 2004 Nokia. All rights reserved.
Options in Fixed dialing are Open, Call, New contact, Edit, Delete, Add to Contacts, Add from Contacts, Help, and Exit.
You can restrict outgoing calls to selected phone numbers if supporteyour SIM card. You need the PIN2 code for this function. When this fuis active, you can only call those phone numbers that are included in thdialing list or begin with the same digits as a phone number on the lis
Note: When Fixed Dialing is set on, calls may be possible to cemergency numbers in some networks (for example, 911).
To view the list of fixed dialing numbers, press , and select Tools > Fixed dialing. To add new numbers to the fixed dialing list, seOptions > New contact or Add from Contacts.

173
Call restrictions (network service)s with rom
ave rvice)
ate to lected ted or
n
in
Copyright © 2004 Nokia. All rights reserved.
Call restrictions allows you to restrict the making and receiving of callyour game deck. For this function, you need the restriction password fyour service provider.
Call restriction affects all calls, including data calls.
You cannot have restriction of incoming calls and call forwarding or hfixed dialing active at the same time. See Call forwarding (network seFixed dial.
• Scroll to one of the restriction options, and select Options > Activrequest the network to set call restriction on, Cancel to set the secall restriction off, or Check status to check if the calls are restricnot.
• Select Options > Edit restrictions passw. to change the restrictiopassword.
• Select Options > Cancel all restrictions to cancel all active call restrictions.
Note: When calls are restricted, calls may be possible to certaemergency numbers in some networks (for example, 911).
174
Reference Information
a new les. The wear
a new Nokia
. Do not . If left es can
that is
etallic nd y.) This urse. ct.
winter eep the battery rmance
Copyright © 2004 Nokia. All rights reserved.
Battery informationCharging and dischargingYour game deck is powered by a rechargeable battery. The full performance of battery is achieved only after two or three complete charge and discharge cycbattery can be charged and discharged hundreds of times but it will eventuallyout. When the talk and standby times are noticeably shorter than normal, buybattery. Use only Nokia approved batteries, and recharge your battery only withapproved chargers designated for this game deck.
Unplug the charger from the electrical plug and the game deck when not in useleave the battery connected to a charger. Overcharging may shorten its lifetimeunused, a fully charged battery will lose its charge over time. Temperature extremaffect the ability of your battery to charge.
Use the battery only for its intended purpose. Never use any charger or batterydamaged.
Do not short-circuit the battery. Accidental short-circuiting can occur when a mobject such as a coin, clip, or pen causes direct connection of the positive (+) anegative (-) terminals of the battery. (These look like metal strips on the battermight happen, for example, when you carry a spare battery in your pocket or pShort-circuiting the terminals may damage the battery or the connecting obje
Leaving the battery in hot or cold places, such as in a closed car in summer or conditions, will reduce the capacity and lifetime of the battery. Always try to kbattery between 59°F and 77°F (15°C and 25°C). A game deck with a hot or coldmay not work temporarily, even when the battery is fully charged. Battery perfois particularly limited in temperatures well below freezing.
175
Do not dispose of batteries in a fire! Dispose of batteries according to local regulations. Please recycle when possible. Do not dispose as household waste.
are
able for
ct your
Copyright © 2004 Nokia. All rights reserved.
EnhancementsA few practical rules about accessories and enhancements:
• Keep all accessories and enhancements out of the reach of small children.
• When you disconnect the power cord of any accessory or enhancement, grasp and pull the plug, not the cord.
• Check regularly that enhancements installed in a vehicle are mounted andoperating properly.
• Installation of any complex car enhancements must be made by qualifiedpersonnel only.
If you want to enhance phone functionality, a range of enhancements are availyou. You can select any of these items to help accommodate your specific communication needs. For availability of these and other enhancements, contadealer.
Miscellaneous• N-Gage game cards
• X-press-onTM Cover (Black, Light Blue)
• Carry cases
• Phone adapter (HDA-9)
Power• Extended 1070 mAh Li-Ion Battery (BL-6C)
• Travel charger (ACP-12)
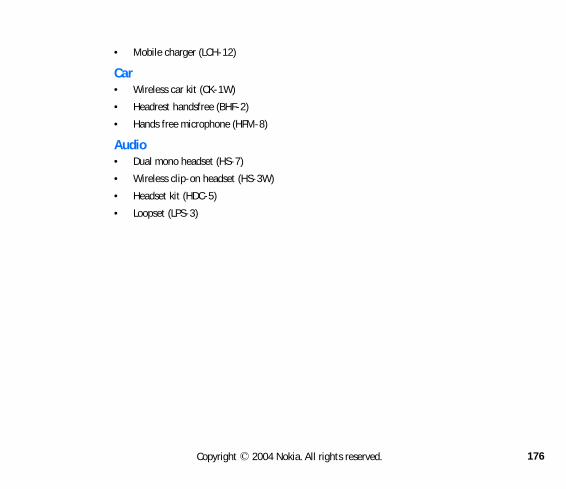
176
• Mobile charger (LCH-12)
Car
Copyright © 2004 Nokia. All rights reserved.
• Wireless car kit (CK-1W)
• Headrest handsfree (BHF-2)
• Hands free microphone (HFM-8)
Audio• Dual mono headset (HS-7)
• Wireless clip-on headset (HS-3W)
• Headset kit (HDC-5)
• Loopset (LPS-3)

177
CARE AND MAINTENANCEbe verage
f small
oisture es get
acing it.nd
e life of
l uit
ide.ternal
an the
proper
d may
Copyright © 2004 Nokia. All rights reserved.
Your game deck is a product of superior design and craftsmanship and should treated with care. The suggestions below will help you protect your warranty coand enjoy your device for many years.
• Keep the game deck and all its parts and enhancements out of the reach ochildren.
• Keep the game deck dry. Precipitation, humidity, and all types of liquids or mcan contain minerals that will corrode electronic circuits. If your device dowet, remove the battery and allow the device to dry completely before repl
• Do not use or store the game deck in dusty, dirty areas. Its moving parts aelectronic components can be damaged.
• Do not store the game deck in hot areas. High temperatures can shorten thelectronic devices, damage batteries, and warp or melt certain plastics.
• Do not store the game deck in cold areas. When it warms up (to its normatemperature), moisture can form inside which may damage electronic circboards.
• Do not attempt to open the game deck other than as instructed in this gu• Do not drop, knock, or shake the game deck. Rough handling can break in
circuit boards and fine mechanics. • Do not use harsh chemicals, cleaning solvents, or strong detergents to cle
game deck. • Do not paint the game deck. Paint can clog the moving parts and prevent
operation.• Use only the supplied or an approved replacement antenna. Unauthorized
antennas, modifications, or attachments could damage the game deck anviolate regulations governing radio devices.

178
All of the above suggestions apply equally to your device, battery, charger, or any enhancement. If any device is not working properly, take it to the nearest authorized service facility for service.
ackup .
itch off danger. ce with r use lways
y sult a
quately device u to do nsitive
Copyright © 2004 Nokia. All rights reserved.
Note: Before sending your device to a service facility, create a bof data you want to keep such as contacts and calendar notes
ADDITIONAL SAFETY INFORMATIONOperating environmentRemember to follow any special regulations in force in any area and always swyour game deck when its use is prohibited or when it may cause interference or Use the game deck only in its normal operating positions. To maintain complianradio frequency exposure guidelines only use accessories approved by Nokia fowith this game deck. When the game deck is on and being worn on the body, ause an approved carrying case.
Medical devicesOperation of any radio transmitting equipment, including wireless devices, mainterfere with the functionality of inadequately protected medical devices. Conphysician or the manufacturer of the medical device to determine if they are adeshielded from external RF energy or if you have any questions. Switch off yourin health care facilities when any regulations posted in these areas instruct yoso. Hospitals or health care facilities may be using equipment that could be seto external RF energy.

179
PACEMAKERSPacemaker manufacturers recommend that a minimum separation of 6 in (15.3 cm) be
ference ent ze the
r when
r game
ference
ystems ntilock)
or any
k in a y vice
carry e game er that ortable
Copyright © 2004 Nokia. All rights reserved.
maintained between a wireless device and a pacemaker to avoid potential interwith the pacemaker. These recommendations are consistent with the independresearch by and recommendations of Wireless Technology Research. To minimipotential for interference, persons with pacemakers should
• Always keep the game deck more than 6 in (15.3 cm) from their pacemakethe game deck is switched on
• Not carry the game deck in a breast pocket• Hold the game deck to the ear opposite the pacemakerIf you have any reason to suspect that interference is taking place, switch off youdeck immediately.
HEARING AIDSome digital wireless game decks may interfere with some hearing aids. If interoccurs, consult your service provider.
VehiclesRF signals may affect improperly installed or inadequately shielded electronic sin motor vehicles such as electronic fuel injection systems, electronic antiskid (abraking systems, electronic speed control systems, air bag systems. For more information, check with the manufacturer or its representative of your vehicleequipment that has been added.
Only qualified personnel should service the game deck, or install the game decvehicle. Faulty installation or service may be dangerous and may invalidate anwarranty that may apply to the game deck. Check regularly that all wireless deequipment in your vehicle is mounted and operating properly. Do not store or flammable liquids, gases, or explosive materials in the same compartment as thdeck, its parts, or enhancements. For vehicles equipped with an air bag, rememban air bags inflate with great force. Do not place objects, including installed or p
180
wireless equipment in the area over the air bag or in the air bag deployment area. If in-vehicle wireless equipment is improperly installed and the air bag inflates, serious injury could result.
certain games. sed games. ered
ing
se watch ults to educed . If you before
laying tion or of t in the
Copyright © 2004 Nokia. All rights reserved.
Safety information about video gamesAbout photosensitive seizures
A very small percentage of people may experience a seizure when exposed to visual images, including flashing lights or patterns that may appear in videoEven people who have no history of seizures or epilepsy may have an undiagnocondition that can cause photosensitive epileptic seizures while watching videoThese seizures may have a variety of symptoms, including lightheadedness, altvision, eye or face twitching, jerking or shaking of arms or legs, disorientation,confusion, or momentary loss of awareness. Seizures may also cause loss of consciousness or convulsions that can lead to injury from falling down or striknearby objects.
Immediately stop playing and consult a doctor if you experience any of thesymptoms. Adults who allow teenagers (or children) to play the games shouldfor or ask their children about these symptoms as they are more likely than adexperience these seizures. The risk of photosensitive epileptic seizures may be rby playing in a well-lit room and by not playing when you are drowsy or fatiguedor any of your relatives have a history of seizures or epilepsy, consult a doctor playing.
Play safely. Take a break from playing games at least every half hour. Stop pimmediately if you begin to feel tired of if you experience an unpleasant sensapain in your hands and/or arms. If the condition persists, consult a doctor. Usevibration can aggravate injuries. Do not turn vibration on if you have any ailmenbones or joints of your fingers, hands, wrists, or arms.
181
Potentially explosive environmentsSwitch off your game deck when in any area with a potentially explosive atmosphere
areas such
Switch ns. . Areas d. They
sing ontains
e of rcraft,
hone
dio
sential
Copyright © 2004 Nokia. All rights reserved.
and obey all signs and instructions. Potentially explosive atmospheres include where you would normally be advised to turn off your vehicle engine. Sparks inareas could cause an explosion or fire resulting in bodily injury or even death. off the game deck at refueling points such as near gas pumps at service statioObserve restrictions on the use of radio equipment in fuel depots, storage, anddistribution areas, chemical plants or where blasting operations are in progresswith a potentially explosive atmosphere are often but not always clearly markeinclude below deck on boats, chemical transfer or storage facilities, vehicles uliquefied petroleum gas (such as propane or butane), and areas where the air cchemicals or particles such as grain, dust or metal powders.
FCC regulations prohibit using your wireless game deck while in the air. The uswireless telephones in an aircraft may be dangerous to the operation of the aidisrupt the wireless telephone network, and may be illegal.
Failure to observe these instructions may lead to suspension or denial of telepservices to the offender, legal action, or both.
EMERGENCY CALLSImportant: Wireless phones, including this device, operate using rasignals, wireless networks, landline networks, and user-programmed functions. Because of this, connections in all conditions cannot be guaranteed. You should never rely solely on any wireless phone for escommunications like medical emergencies.
182
To make an emergency call:
1 If the device is not on, switch it on. Check for adequate signal strength. Some ice.
ady the
y
ore you making . Your cident.
Copyright © 2004 Nokia. All rights reserved.
networks may require that a valid SIM card is properly inserted in the dev
2 Press the key as many times as needed to clear the display and redevice for calls.
3 Key in the official emergency number for your present location. Emergencnumbers vary by location.
4 Press the key.
If certain features are in use, you may first need to turn those features off befcan make an emergency call. Consult this guide or your service provider. When an emergency call, give all the necessary information as accurately as possiblewireless phone may be the only means of communication at the scene of an acDo not end the call until given permission to do so.

183
CERTIFICATION INFORMATION (SAR)THIS MODEL DEVICE MEETS THE GOVERNMENT'S REQUIREMENTS FOR EXPOSURE TO
actured t by the part of eneral endent studies. y of all
ent 1.6W/y the
ed r level,
mum ls so as are to
ertified opted ns (for del.
for use in this ls,
Copyright © 2004 Nokia. All rights reserved.
RADIO WAVES.
Your wireless device is a radio transmitter and receiver. It is designed and manufnot to exceed the emission limits for exposure to radio frequency (RF) energy seFederal Communications Commission of the U.S. Government. These limits arecomprehensive guidelines and establish permitted levels of RF energy for the gpopulation. The guidelines are based on standards that were developed by indepscientific organizations through periodic and thorough evaluation of scientific The standards include a substantial safety margin designed to assure the safetpersons, regardless of age and health.
The exposure standard for wireless mobile devices employs a unit of measuremknown as the Specific Absorption Rate, or SAR. The SAR limit set by the FCC iskg.* Tests for SAR are conducted using standard operating positions accepted bFCC with the device transmitting at its highest certified power level in all testfrequency bands. Although the SAR is determined at the highest certified powethe actual SAR level of the device while operating can be well below the maxivalue. This is because the device is designed to operate at multiple power leveto use only the power required to reach the network. In general, the closer youa wireless base station antenna, the lower the power output.
Before a device model is available for sale to the public, it must be tested and cto the FCC that it does not exceed the limit established by the government-adrequirement for safe exposure. The tests are performed in positions and locatioexample, at the ear and worn on the body) as required by the FCC for each mo
The highest SAR value for this model device as reported to the FCC when testedwith GSM 850 at the ear is 0.60 W/kg, and when worn on the body, as describeduser guide, is 1.03 W/kg. (Body-worn measurements differ among device modedepending upon available enhancements and FCC requirements).

184
While there may be differences between the SAR levels of various devices and at various positions, they all meet the government requirement. The FCC has granted an Equipment Authorization for this model device with all reported SAR levels evaluated
model n of
posure nd that er carry
vice at hen the
public
public ding on other
Copyright © 2004 Nokia. All rights reserved.
as in compliance with the FCC RF exposure guidelines. SAR information on thisdevice is on file with the FCC and can be found under the Display Grant sectiohttp://www.fcc.gov/oet/fccid after searching on FCC ID OW3RH-47.
For body worn operation, this device has been tested and meets the FCC RF exguidelines for use with a carry case, belt clip, or holder that contains no metal apositions the handset a minimum of 7/8 inch (2.2 cm) from the body. Use of othcases, belt clips, or holders may not ensure compliance with FCC RF exposure guidelines. If you do not use a body-worn accessory and are not holding the dethe ear, position the handset a minimum of 7/8 inch (2.2 cm) from your body wdevice is switched on.
*In the United States and Canada, the SAR limit for mobile devices used by theis 1.6 watts/kilogram (W/kg) averaged over one gram of tissue. The standard incorporates a substantial margin of safety to give additional protection for theand to account for any variations in measurements. SAR values may vary depennational reporting requirements and the network band. For SAR information inregions please look under product information at www.nokia.com.

185
TECHNICAL INFORMATION
Copyright © 2004 Nokia. All rights reserved.
Feature Specification
Weight 5.0 oz with BL-6C 1070 mAh Li-lon battery
Size 124 cc
Frequency Range Lowband
824—849 MHz (TX) 869—894 MHz (RX)
Highband
1850—1910 MHz (TX) 1930—1990 MHz (RX)
Transmitter Output Power
850 MHz Up to 2 W/33dBm
1900 MHz Up to 1 W/30 dBm
Battery Voltage 3.7 V nominal
Operating Temperature 14°F to + 131°F
-10°C to + 55°C

186
Feature Specification
Copyright © 2004 Nokia. All rights reserved.
Talk time
Standby time
Game time
Up to 5 hours
Up to 11 days
Up to 10 hours
Phone numbers Up to 500 contacts with multiple phone numbers and text entries per contact
187
Nokia 90-Day Limited Warranty e from ring
on the d by under
er”) of nt
e
t operly
t items
ng the
ming,
Copyright © 2004 Nokia. All rights reserved.
Nokia Inc. (“Nokia”) warrants that this cellular device (“Product”) is fredefects in material and workmanship that result in Product failure dunormal usage, according to the following terms and conditions:
1 The limited warranty for the Product extends for 90 days beginning date of the purchase of the Product. This 90-day period is extendeeach whole day that the Product is out of your possession for repairthis warranty.
2 The limited warranty extends only to the original purchaser (“Consumthe Product and is not assignable or transferable to any subsequepurchaser/end-user.
3 The limited warranty extends only to Consumers who purchase thProduct in the United States of America.
4 During the limited warranty period, Nokia will repair, or replace, aNokia’s sole option, any defective parts, or any parts that will not properate for their intended use with new or refurbished replacemenif such repair or replacement is needed because of product malfunction or failure during normal usage. No chargewill be made to the Consumer for any such parts. Nokia will also pay for the labor charges incurred by Nokia in repairing or replacidefective parts. The limited warranty does not cover defects in appearance, cosmetic, decorative or structural items, including fra
188
and any non-operative parts. Nokia’s limit of liability under the limited warranty shall be the actual cash value of the Product at the time the
aid by Nokia re the
e mized
a in t back
d
d
ss, orized
luding
llision tning,
an Act
Copyright © 2004 Nokia. All rights reserved.
Consumer returns the Product for repair, determined by the price pthe Consumer for the Product less a reasonable amount for usage.shall not be liable for any other losses or damages. These remedies aConsumer’s exclusive remedies for breach of warranty.
5 Upon request from Nokia, the Consumer must prove the date of thoriginal purchase of the Product by a dated bill of sale or dated itereceipt.
6 The Consumer shall bear the cost of shipping the Product to NokiMelbourne, Florida. Nokia shall bear the cost of shipping the Producto the Consumer after the completion of service under this limitewarranty.
7 The Consumer shall have no coverage or benefits under this limitewarranty if any of the following conditions are applicable:
a) The Product has been subjected to abnormal use, abnormal conditions, improper storage, exposure to moisture or dampneunauthorized modifications, unauthorized connections, unauthrepair, misuse, neglect, abuse, accident, alteration, improper installation, or other acts which are not the fault of Nokia, incdamage caused by shipping.
b) The Product has been damaged from external causes such as cowith an object, or from fire, flooding, sand, dirt, windstorm, lighearthquake or damage from exposure to weather conditions,

189
of God, or battery leakage, theft, blown fuse, or improper use of any electrical source, damage caused by computer or internet viruses,
the ection
ged s after
s been
f the nal o the
he , the
se for
Copyright © 2004 Nokia. All rights reserved.
bugs, worms, Trojan Horses, cancelbots or damage caused by connection to other products not recommended for interconnby Nokia.
c) Nokia was not advised in writing by the Consumer of the alledefect or malfunction of the Product within fourteen (14) daythe expiration of the applicable limited warranty period.
d) The Product serial number plate or the accessory data code haremoved, defaced or altered.
e) The defect or damage was caused by the defective function ocellular system or by inadequate signal reception by the exterantenna, or viruses or other software problems introduced intProduct.
8 Nokia does not warrant uninterrupted or error-free operation of tProduct. If a problem develops during the limited warranty periodConsumer shall take the following step-by-step procedure:
a) The Consumer shall return the Product to the place of purcharepair or replacement processing.
190
b) If “a” is not convenient because of distance (more than 50 miles) or for other good cause, the Consumer shall ship the Product prepaid
umber f of ed to er this
overed any
in 30 airs a at its hase me air of ted at
Copyright © 2004 Nokia. All rights reserved.
and insured to: Nokia Inc., Attn: Repair Department 5650 Alliance Gateway Zone 4 Ft. Worth, TX. 76177
c) The Consumer shall include a return address, daytime phone nand/or fax number, complete description of the problem, proopurchase and service agreement (if applicable). Expenses relatremoving the Product from an installation are not covered undlimited warranty.
d) The Consumer will be billed for any parts or labor charges not cby this limited warranty. The Consumer will be responsible forexpenses related to reinstallation of the Product.
e) Nokia will repair the Product under the limited warranty withdays after receipt of the Product. If Nokia cannot perform repcovered under this limited warranty within 30 days, or after areasonable number of attempts to repair the same defect, Nokioption, will provide a replacement Product or refund the purcprice of the Product less a reasonable amount for usage. In sostates the Consumer may have the right to a loaner if the repthe Product takes more than ten (10) days. Please contact theCustomer Service Center at Nokia at the telephone number lis
191
the end of this warranty if you need a loaner and the repair of the Product has taken or is estimated to take more than ten (10) days.
ut the ed and ve the mer. If lect. If ranty sumer
bished een ce and
A ON OF
G BUT S OF F USE
Copyright © 2004 Nokia. All rights reserved.
f) If the Product is returned during the limited warranty period, bproblem with the Product is not covered under the terms andconditions of this limited warranty, the Consumer will be notifigiven an estimate of the charges the Consumer must pay to haProduct repaired, with all shipping charges billed to the Consuthe estimate is refused, the Product will be returned freight colthe Product is returned after the expiration of the limited warperiod, Nokia’s normal service policies shall apply and the Conwill be responsible for all shipping charges.
9 You (the Consumer) understand that the product may consist of refurequipment that contains used components, some of which have breprocessed. The used components comply with Product performanreliability specifications.
10 ANY IMPLIED WARRANTY OF MERCHANTABILITY, OR FITNESS FORPARTICULAR PURPOSE OR USE, SHALL BE LIMITED TO THE DURATITHE FOREGOING LIMITED WRITTEN WARRANTY. OTHERWISE, THE FOREGOING LIMITED WARRANTY IS THE CONSUMER’S SOLE AND EXCLUSIVE REMEDY AND IS IN LIEU OF ALL OTHER WARRANTIES, EXPRESS OR IMPLIED. NOKIA SHALL NOT BE LIABLE FOR SPECIAL,INCIDENTAL, PUNITIVE OR CONSEQUENTIAL DAMAGES, INCLUDINNOT LIMITED TO LOSS OF ANTICIPATED BENEFITS OR PROFITS, LOSSAVINGS OR REVENUE, LOSS OF DATA, PUNITIVE DAMAGES, LOSS O
192
OF THE PRODUCT OR ANY ASSOCIATED EQUIPMENT, COST OF CAPITAL, COST OF ANY SUBSTITUTE EQUIPMENT OR FACILITIES, DOWNTIME, THE
JURY
H OF
SUCH G G THE
nty f ations rranty o have
er or ability ty e
ings,
Copyright © 2004 Nokia. All rights reserved.
CLAIMS OF ANY THIRD PARTIES, INCLUDING CUSTOMERS, AND INTO PROPERTY, RESULTING FROM THE PURCHASE OR USE OF THE PRODUCT OR ARISING FROM BREACH OF THE WARRANTY, BREACCONTRACT, NEGLIGENCE, STRICT TORT, OR ANY OTHER LEGAL OR EQUITABLE THEORY, EVEN IF NOKIA KNEW OF THE LIKELIHOOD OFDAMAGES. NOKIA SHALL NOT BE LIABLE FOR DELAY IN RENDERINSERVICE UNDER THE LIMITED WARRANTY, OR LOSS OF USE DURINPERIOD THAT THE PRODUCT IS BEING REPAIRED.
11 Some states do not allow limitation of how long an implied warralasts, so the 90 day warranty limitation may not apply to you (theConsumer). Some states do not allow the exclusion or limitation oincidental and consequential damages, so certain of the above limitor exclusions may not apply to you (the Consumer). This limited wagives the Consumer specific legal rights and the Consumer may alsother rights which vary from state to state.
12 Nokia neither assumes nor authorizes any authorized service centany other person or entity to assume for it any other obligation or libeyond that which is expressly provided for in this limited warranincluding the provider or seller of any extended warranty or servicagreement.
13 This is the entire warranty between Nokia and the Consumer, andsupersedes all prior and contemporaneous agreements or understand
193
oral or written, relating to the Product, and no representation, promise or condition not contained herein shall modify these terms.
tween
within
Copyright © 2004 Nokia. All rights reserved.
14 This limited warranty allocates the risk of failure of the Product bethe Consumer and Nokia. The allocation is recognized by the Consumer and is reflected in the purchase price.
15 Any action or lawsuit for breach of warranty must be commenced eighteen (18) months following purchase of the Product.
16 Questions concerning this limited warranty may be directed to: Nokia Inc. Attn: Customer Service 7725 Woodland Center Blvd., Ste. 150 Tampa, FL 33614 Telephone: 1-888-NOKIA-2U (1-888-665-4228) Facsimile: (813) 249-9619 TTY/TDD Users Only: 1-800-24-NOKIA (1-800-246-6542)

194
Appendix A
Phone:
Copyright © 2004 Nokia. All rights reserved.
Message from the CTIA (Cellular Telecommunications & Internet Association) to all users of mobile phones.
© 2001 Cellular Telecommunications & Internet Association. All Rights Reserved.1250 Connecticut Avenue, NW Suite 800, Washington, DC 20036.(202) 785-0081

195
Safety is the most important call you will ever make.
A Guide to Safe and Responsible Wireless Phone Use
nation ly, the st
m their
less A at all
s, r head other d limit.
s a call nd the r lives,
. .
ould be
al. ble ork to
Copyright © 2004 Nokia. All rights reserved.
Tens of millions of people in the U.S. today take advantage of the unique combiof convenience, safety and value delivered by the wireless telephone. Quite simpwireless phone gives people the powerful ability to communicate by voice--almoanywhere, anytime--with the boss, with a client, with the kids, with emergencypersonnel or even with the police. Each year, Americans make billions of calls frowireless phones, and the numbers are rapidly growing.But an important responsibility accompanies those benefits, one that every wirephone user must uphold. When driving a car, driving is your first responsibility.wireless phone can be an invaluable tool, but good judgment must be exercised times while driving a motor vehicle--whether on the phone or not.The basic lessons are ones we all learned as teenagers. Driving requires alertnescaution and courtesy. It requires a heavy dose of basic common sense---keep youup, keep your eyes on the road, check your mirrors frequently and watch out fordrivers. It requires obeying all traffic signs and signals and staying within the speeIt means using seatbelts and requiring other passengers to do the same.But with wireless phone use, driving safely means a little more. This brochure ito wireless phone users everywhere to make safety their first priority when behiwheel of a car. Wireless telecommunications is keeping us in touch, simplifying ouprotecting us in emergencies and providing opportunities to help others in needWhen it comes to the use of wireless phones, safety is your most important call
Wireless Phone "Safety Tips"
Below are safety tips to follow while driving and using a wireless phone which sheasy to remember. 1 Get to know your wireless phone and its features such as speed dial and redi
Carefully read your instruction manual and learn to take advantage of valuafeatures most phones offer, including automatic redial and memory. Also, w

196
memorize the phone keypad so you can use the speed dial function without taking your attention off the road.
2 When available, use a hands free device. A number of hands free wireless phone nted f these
ireless es from your
t the call in be ay
g an ou are tion to
oving p or d light
ple tip-
g. cting u are hich
eatest s--with local
Copyright © 2004 Nokia. All rights reserved.
accessories are readily available today. Whether you choose an installed moudevice for your wireless phone or a speaker phone accessory, take advantage odevices if available to you.
3 Position your wireless phone within easy reach. Make sure you place your wphone within easy reach and where you can grab it without removing your eythe road. If you get an incoming call at an inconvenient time, if possible, let voice mail answer it for you.
4 Suspend conversations during hazardous driving conditions or situations. Leperson you are speaking with know you are driving; if necessary, suspend theheavy traffic or hazardous weather conditions. Rain, sleet, snow and ice canhazardous, but so is heavy traffic. As a driver, your first responsibility is to pattention to the road.
5 Do not take notes or look up phone numbers while driving. If you are readinaddress book or business card, or writing a "to do" list while driving a car, ynot watching where you are going. It’s common sense. Don’t get caught in adangerous situation because you are reading or writing and not paying attenthe road or nearby vehicles.
6 Dial sensibly and assess the traffic; if possible, place calls when you are not mor before pulling into traffic. Try to plan your calls before you begin your triattempt to coincide your calls with times you may be stopped at a stop sign, reor otherwise stationary. But if you need to dial while driving, follow this sim-dial only a few numbers, check the road and your mirrors, then continue.
7 Do not engage in stressful or emotional conversations that may be distractinStressful or emotional conversations and driving do not mix--they are distraand even dangerous when you are behind the wheel of a car. Make people yotalking with aware you are driving and if necessary, suspend conversations whave the potential to divert your attention from the road.
8 Use your wireless phone to call for help. Your wireless phone is one of the grtools you can own to protect yourself and your family in dangerous situationyour phone at your side, help is only three numbers away. Dial 9-1-1 or other

197
emergency number in the case of fire, traffic accident, road hazard or medical emergency. Remember, it is a free call on your wireless phone!
9 Use your wireless phone to help others in emergencies. Your wireless phone provides ou see re in s to do
ber
ut you hicle ere no ce or
ard to
nform s we s of drive
=85
d.1250 081
Copyright © 2004 Nokia. All rights reserved.
you a perfect opportunity to be a "Good Samaritan" in your community. If yan auto accident, crime in progress or other serious emergency where lives adanger, call 9-1-1 or other local emergency number, as you would want otherfor you.
10 Call roadside assistance or a special wireless non-emergency assistance numwhen necessary. Certain situations you encounter while driving may require attention, but are not urgent enough to merit a call for emergency services. Bstill can use your wireless phone to lend a hand. If you see a broken-down veposing no serious hazard, a broken traffic signal, a minor traffic accident whone appears injured or a vehicle you know to be stolen, call roadside assistanother special non-emergency wireless number.
Careless, distracted individuals and people driving irresponsibly represent a hazeveryone on the road. Since 1984, the Cellular Telecommunications Industry Association and the wireless industry have conducted educational outreach to iwireless phone users of their responsibilities as safe drivers and good citizens. Aapproach a new century, more and more of us will take advantage of the benefitwireless telephones. And, as we take to the roads, we all have a responsibility tosafely.
The wireless industry reminds you to use your phone safely when driving.For more information, please call 1-888-901-SAFE. For updates: http://www.wow-com.com/consumer/issues/driving/articles.cfm?ID
© 2001 Cellular Telecommunications & Internet Association. All Rights ReserveConnecticut Avenue, NW Suite 800, Washington, DC 20036. Phone: (202) 785-0

198
Appendix B Message from the FDA (U.S. all
Copyright © 2004 Nokia. All rights reserved.
Food and Drug Administration) tousers of mobile phones.
July 18, 2001.......... For updates: http://www.fda.gov/cdrh/phones

199
Consumer Update on Wireless PhonesU.S. Food and Drug Administration
using s phones ey also e health
uses no ological gs have lty in
as ver, the gy (RF) wireless e hazard
wireless
ireless
ecessary
ossible
y for agencies
Copyright © 2004 Nokia. All rights reserved.
1. Do wireless phones pose a health hazard?The available scientific evidence does not show that any health problems are associated withwireless phones. There is no proof, however, that wireless phones are absolutely safe. Wirelesemit low levels of radio frequency energy (RF) in the microwave range while being used. Themit very low levels of RF when in the stand-by mode. Whereas high levels of RF can produceffects (by heating tissue), exposure to low level RF that does not produce heating effects caknown adverse health effects. Many studies of low level RF exposures have not found any bieffects. Some studies have suggested that some biological effects may occur, but such findinnot been confirmed by additional research. In some cases, other researchers have had difficureproducing those studies, or in determining the reasons for inconsistent results. 2. What is FDA's role concerning the safety of wireless phones?Under the law, FDA does not review the safety of radiation-emitting consumer products suchwireless phones before they can be sold, as it does with new drugs or medical devices. Howeagency has authority to take action if wireless phones are shown to emit radio frequency enerat a level that is hazardous to the user. In such a case, FDA could require the manufacturers of phones to notify users of the health hazard and to repair, replace or recall the phones so that thno longer exists.Although the existing scientific data do not justify FDA regulatory actions, FDA has urged thephone industry to take a number of steps, including the following:• Support needed research into possible biological effects of RF of the type emitted by w
phones;• Design wireless phones in a way that minimizes any RF exposure to the user that is not n
for device function; and• Cooperate in providing users of wireless phones with the best possible information on p
effects of wireless phone use on human health.FDA belongs to an interagency working group of the federal agencies that have responsibilitdifferent aspects of RF safety to ensure coordinated efforts at the federal level. The following belong to this working group:• National Institute for Occupational Safety and Health• Environmental Protection Agency• Federal Communications Commission• Occupational Safety and Health Administration

200
• National Telecommunications and Information AdministrationThe National Institutes of Health participates in some interagency working group activities, as well.FDA shares regulatory responsibilities for wireless phones with the Federal Communications
ety estions ly upon. e RF n those ns
n called e radio hese RF veloped ted at xposure ich have levels,
m flaws rgy (RF) be of RF ies that
reated F s are not tainty
, the brain emia, or
Copyright © 2004 Nokia. All rights reserved.
Commission (FCC). All phones that are sold in the United States must comply with FCC safguidelines that limit RF exposure. FCC relies on FDA and other health agencies for safety quabout wireless phones. FCC also regulates the base stations that the wireless phone networks reWhile these base stations operate at higher power than do the wireless phones themselves, thexposures that people get from these base stations are typically thousands of times lower thathey can get from wireless phones. Base stations are thus not the subject of the safety questiodiscussed in this document. 3. What kinds of phones are the subject of this update?The term wireless phone refers here to hand-held wireless phones with built-in antennas, oftecell mobile or PCS phones. These types of wireless phones can expose the user to measurablfrequency energy (RF) because of the short distance between the phone and the user’s head. Texposures are limited by Federal Communications Commission safety guidelines that were dewith the advice of FDA and other federal health and safety agencies. When the phone is locagreater distances from the user, the exposure to RF is drastically lower because a person's RF edecreases rapidly with increasing distance from the source. The so-called cordless phones; wha base unit connected to the telephone wiring in a house, typically operate at far lower powerand thus produce RF exposures far below the FCC safety limits. 4. What are the results of the research done already?The research done thus far has produced conflicting results, and many studies have suffered froin their research methods. Animal experiments investigating the effects of radio frequency eneexposures characteristic of wireless phones have yielded conflicting results that often cannotrepeated in other laboratories. A few animal studies, however, have suggested that low levelscould accelerate the development of cancer in laboratory animals. However, many of the studshowed increased tumor development used animals that had been genetically engineered or twith cancer-causing chemicals so as to be pre-disposed to develop cancer in the absence of Rexposure. Other studies exposed the animals to RF for up to 22 hours per day. These conditionsimilar to the conditions under which people use wireless phones, so we don’t know with cerwhat the results of such studies mean for human health.Three large epidemiology studies have been published since December 2000. Between themstudies investigated any possible association between the use of wireless phones and primarycancer, glioma, meningioma, or acoustic neuroma, tumors of the brain or salivary gland, leuk

201
other cancers. None of the studies demonstrated the existence of any harmful health effects from wireless phone RF exposures. However, none of the studies can answer questions about long-term exposures, since the average period of phone use in these studies was around three years.
less
reless uld be reliable t is rovide me of many ctual RF ch as the
ts of
s around ns about
agnetic he research n
perative DA cademic ors. The RADA
esearch
an get
Copyright © 2004 Nokia. All rights reserved.
5.What research is needed to decide whether RF exposure from wirephones poses a health risk?A combination of laboratory studies and epidemiological studies of people actually using wiphones would provide some of the data that are needed. Lifetime animal exposure studies cocompleted in a few years. However, very large numbers of animals would be needed to provideproof of a cancer promoting effect if one exists. Epidemiological studies can provide data thadirectly applicable to human populations, but 10 or more years follow-up may be needed to panswers about some health effects, such as cancer. This is because the interval between the tiexposure to a cancer-causing agent and the time tumors develop - if they do - may be many, years. The interpretation of epidemiological studies is hampered by difficulties in measuring aexposure during day-to-day use of wireless phones. Many factors affect this measurement, suangle at which the phone is held, or which model of phone is used.6.What is FDA doing to find out more about the possible health effecwireless phone RF?FDA is working with the U.S. National Toxicology Program and with groups of investigatorthe world to ensure that high priority animal studies are conducted to address important questiothe effects of exposure to radio frequency energy (RF).FDA has been a leading participant in the World Health Organization International ElectromFields (EMF) Project since its inception in 1996. An influential result of this work has been tdevelopment of a detailed agenda of research needs that has driven the establishment of new programs around the world. The Project has also helped develop a series of public informatiodocuments on EMF issues.FDA and the Cellular Telecommunications & Internet Association (CTIA) have a formal CooResearch and Development Agreement (CRADA) to do research on wireless phone safety. Fprovides the scientific oversight, obtaining input from experts in government, industry, and aorganizations. CTIA-funded research is conducted through contracts to independent investigatinitial research will include both laboratory studies and studies of wireless phone users. The Cwill also include a broad assessment of additional research needs in the context of the latest rdevelopments around the world. 7. How can I find out how much radio frequency energy exposure I cby using my wireless phone?
202
All phones sold in the United States must comply with Federal Communications Commission (FCC) guidelines that limit radio frequency energy (RF) exposures. FCC established these guidelines in consultation with FDA and the other federal health and safety agencies. The FCC limit for RF exposure
(1.6 W/ical and rement. s that
e to the C nline
from
d for handsets
ended y Due to est ers. The ology is
on the e whole
.
nergy
bly very steps to uch duce RF
more atically ur body
Copyright © 2004 Nokia. All rights reserved.
from wireless telephones is set at a Specific Absorption Rate (SAR) of 1.6 watts per kilogramkg). The FCC limit is consistent with the safety standards developed by the Institute of ElectrElectronic Engineering (IEEE) and the National Council on Radiation Protection and MeasuThe exposure limit takes into consideration the body’s ability to remove heat from the tissueabsorb energy from the wireless phone and is set well below levels known to have effects.Manufacturers of wireless phones must report the RF exposure level for each model of phonFCC. The FCC website (http://www.fcc.gov/oet/rfsafety) gives directions for locating the FCidentification number on your phone so you can find your phone’s RF exposure level in the olisting. 8. What has FDA done to measure the radio frequency energy comingwireless phones?The Institute of Electrical and Electronic Engineers (IEEE) is developing a technical standarmeasuring the radio frequency energy (RF) exposure from wireless phones and other wireless with the participation and leadership of FDA scientists and engineers. The standard, RecommPractice for Determining the Spatial-Peak Specific Absorption Rate (SAR) in the Human BodWireless Communications Devices: Experimental Techniques, sets forth the first consistent tmethodology for measuring the rate at which RF is deposited in the heads of wireless phone ustest method uses a tissue-simulating model of the human head. Standardized SAR test methodexpected to greatly improve the consistency of measurements made at different laboratories same phone. SAR is the measurement of the amount of energy absorbed in tissue, either by thbody or a small part of the body. It is measured in watts/kg (or milliwatts/g) of matter. This measurement is used to determine whether a wireless phone complies with safety guidelines 9. What steps can I take to reduce my exposure to radio frequency efrom my wireless phone?If there is a risk from these products--and at this point we do not know that there is--it is probasmall. But if you are concerned about avoiding even potential risks, you can take a few simpleminimize your exposure to radio frequency energy (RF). Since time is a key factor in how mexposure a person receives, reducing the amount of time spent using a wireless phone will reexposure.If you must conduct extended conversations by wireless phone every day, you could placedistance between your body and the source of the RF, since the exposure level drops off dramwith distance. For example, you could use a headset and carry the wireless phone away from yoor use a wireless phone connected to a remote antenna.

203
Again, the scientific data do not demonstrate that wireless phones are harmful. But if you are concerned about the RF exposure from these products, you can use measures like those described above to reduce your RF exposure from wireless phone use.
n and easures time of ce RF e
ingdom vidence
tion to vidence
For this EMI) of now part AAMI). , was kers and from of ance n uses a d by the
dical he
Copyright © 2004 Nokia. All rights reserved.
10. What about children using wireless phones?The scientific evidence does not show a danger to users of wireless phones, including childreteenagers. If you want to take steps to lower exposure to radio frequency energy (RF), the mdescribed above would apply to children and teenagers using wireless phones. Reducing the wireless phone use and increasing the distance between the user and the RF source will reduexposure.Some groups sponsored by other national governments have advised that children bdiscouraged from using wireless phones at all. For example, the government in the United Kdistributed leaflets containing such a recommendation in December 2000. They noted that no eexists that using a wireless phone causes brain tumors or other ill effects. Their recommendalimit wireless phone use by children was strictly precautionary; it was not based on scientific ethat any health hazard exists. 11. What about wireless phone interference with medical equipment?Radio frequency energy (RF) from wireless phones can interact with some electronic devices.reason, FDA helped develop a detailed test method to measure electromagnetic interference (implanted cardiac pacemakers and defibrillators from wireless telephones. This test method is of a standard sponsored by the Association for the Advancement of Medical instrumentation (The final draft, a joint effort by FDA, medical device manufacturers, and many other groupscompleted in late 2000. This standard will allow manufacturers to ensure that cardiac pacemadefibrillators are safe from wireless phone EMI. FDA has tested hearing aids for interferencehandheld wireless phones and helped develop a voluntary standard sponsored by the InstituteElectrical and Electronic Engineers (IEEE). This standard specifies test methods and performrequirements for hearing aids and wireless phones so that no interference occurs when a persocompatible phone and a accompanied hearing aid at the same time. This standard was approveIEEE in 2000.FDA continues to monitor the use of wireless phones for possible interactions with other medevices. Should harmful interference be found to occur, FDA will conduct testing to assess tinterference and work to resolve the problem. 12. Where can I find additional information?For additional information, please refer to the following resources:• FDA web page on wireless phones
http://www.fda.gov/cdrh/phones/index.html
204
• Federal Communications Commission (FCC) RF Safety Program http://www.fcc.gov/oet/rfsafety
• International Commission on Non-Ionizing Radiation Protection
Copyright © 2004 Nokia. All rights reserved.
http://www.icnirp.de• World Health Organization (WHO) International EMF Project
http://www.who.int/emf• National Radiological Protection Board (UK)
http://www.nrpb.org.uk/
July 18, 2001For updates: http://www.fda.gov/cdrh/phones

205
Index 163
163
163
Copyright © 2004 Nokia. All rights reserved.
AAccess codes 149Access points 141
Settings 144Settings, Advanced 146
AlarmsAlarm clock 118Calendar alarms 59
Applications, Java 119, 120Arena launcher
Getting started 48Registration and login 49
BBacking up and restoring game data 133Bluetooth
Connection requests 163Connection status
indicators 164Device address 162Disconnecting 165
Factory set passcodePairing 163Pairing requests 163Pairing, glossary
explanationPasscode, glossary
explanationBookmark, glossary explanation 108CCache 111Calendar
Alarm 58Sending entries 59Stopping a calendar
alarm 59Using PC Suite 58
Call registerSee Log
CallsCost limit 157

206
Dialed numbers 156Duration 156
GSM data call 36Connection settings 141
es 5446
e SIM one
ce,
Copyright © 2004 Nokia. All rights reserved.
International 42Received 156Settings 140Settings for call
forwarding 134Transferring 45
CD-ROM 166Cell broadcast messagesCertificates 151Changing between applications 33Clear screen
See Standby modeClock
Alarm 118Settings 118Snooze 118
Computer connections 166Connection indicators
Bluetooth 164GPRS 36
Connections settings 48Contact cards
Inserting pictures 52Removing ringing tonStoring Touch tones
CopyingContacts between th
card and phmemory 53
Text 84Cutting
Text 84DData connections
Indicators 36Date
Settings 148Definition of terms 185DNS, Domain Name ServiGlossary explanation 146

207
EE-mail 86
Data counter 159Pricing 143
card
ndby
Copyright © 2004 Nokia. All rights reserved.
Offline 97Remote mailbox 93Retrieving from mailbox
94Viewing attachments 95
FFile formats
SIS file 120Fixed dialing 172GGame card 32Game file types 133Game manager 131
Grouping and sorting files 132
GamesMultiple players 33Offline profile 135Starting a game 31
Glossary 185GPRS
Settings 148HHandsfree
See LoudspeakerIIdle state
See Standby modeImages
Adding to a contact 52
Indicators and icons in stamode 36Info service
See Cell broadcast messages.
Instant messaging (IM)chat sessions 65definition 61group chat 71logout 77settings 76
208
Internet access points (IAP)See Access points
Password 170Unlocking 170
167
s 85
Copyright © 2004 Nokia. All rights reserved.
IP address, glossary explanation 146ISDN, glossary explanation 146JJava
See Applications.LLock code 149Log
Erasing contents 159Filtering 158
Loudspeaker 39Activating 39Turning off 39
MMailbox 93Manager
Installing and removing Symbian software 134
Memory card 32, 168
Memory lowViewing memory
consumptionMenu
Rearranging 36Messaging
Multimedia messageWriting e-mail 86
Multimedia messages 85Playing sounds 90Re-playing sounds 90
NN-Gage Arena 48
connecting to 47PPasting
Text 84PC
Connecting 166PC Suite
Calendar data 58
209
PicturesViewing 113
Access codes 149Access points 144
122
1
e
nter
Copyright © 2004 Nokia. All rights reserved.
PIN code 149Prepaid SIM cards 157RRecording voice tags 55Reminder
See Calendar, AlarmRemote mailbox 93Ringing tones
Adding a personal ringing tone 53
Receiving in a smart mes-sage 91
Settings 135SSafety 14Safety information
Video games 180Services
Access points, see Access points
Settings
Applications (Java™)Bluetooth 161Calendar 59Call forwarding 134Call restrictions 173Certificates 151Data connections 14Date and time 148Display 140Language 138Lock code 149Log 159Original settings 139Personalizing the gam
deckPIN code 149Screen saver 140Sounds 135
Short message service ce100Shortcuts

210
in Favorites 129in Images 114
Adding new 100Thumbnails
oice
Copyright © 2004 Nokia. All rights reserved.
in Standby mode 36SIM card
Copying names and numbers 53
Messages 98Messages on SIM 171Names and numbers 171
SIS file 120SMS center 100Snooze
Alarm clock 118Calendar alarm 59
SoundsMuting a ringing tone 44Recording sounds 123Removing a personal
ringing tone 54Settings 135
Standby mode 35TText message service center
In a contact card 52Time
Settings 148UUSSD commands 99VVideo recorder 116Viewing images 113Voice dialing 54Voice mailbox 159
Forwarding calls to vmailbox 134
Voice messages 159Voice tags 54
Adding 55Making calls 56
Volume controlDuring a call 42Loudspeaker 39


