68
User Manual Version 5.0 (Document Revision 1)

User Manual
Version 5.0
(Document Revision 1)

SongBook+ User Manual 2
Table of contents
1 SongBook+ settings ................................................................................................... 5
2 Inserting files into SongBook+ (iPad and iPhone) ........................................................ 6 2.1 Using the Finder (Mac computer) ............................................................................................... 6 2.2 Using iTunes (Windows PC and older Mac computers) .............................................................. 7 2.3 Using Wi-Fi transfer (Windows PC, Mac computer) ................................................................... 8 2.4 Without using any additional computer, via “Import files”........................................................ 9 2.5 Without additional computer, using the “Files” app ................................................................ 10 2.6 Importing files from mail or other applications ........................................................................ 11 2.7 Acquiring data from another SongBook ................................................................................... 12
3 Adding files to SongBook+ (Mac version).................................................................. 13 3.1 Using the Finder ........................................................................................................................ 13 3.2 Using “Import files” ................................................................................................................... 13 3.3 Using Wi-Fi transfer................................................................................................................... 13 3.4 Acquiring data from another SongBook ................................................................................... 13
4 Inserting unused files into the song list .................................................................... 15 4.1 Inserting files manually ............................................................................................................. 15 4.2 Inserting files automatically ...................................................................................................... 16
5 Using the song list ................................................................................................... 17
6 Editing song details .................................................................................................. 18
7 Displaying a PDF document and scrolling in the document ....................................... 19
8 Preselecting next song without closing the current song........................................... 20
9 Using the metronome .............................................................................................. 21
10 Use of night colors ................................................................................................... 22
11 Recording scrolls automatically ................................................................................ 23
12 Recording finger pointers in the “Karaoke style” ...................................................... 24
13 Inserting/editing/deleting annotations .................................................................... 25 13.1 Inserting annotations ................................................................................................................ 26 13.2 Delete annotations .................................................................................................................... 27 13.3 Editing Notes ............................................................................................................................. 27 13.4 Copying annotations ................................................................................................................. 28 13.5 Saving frequently used annotations ......................................................................................... 29 13.6 Using saved annotations again ................................................................................................. 29 13.7 Action button annotations ........................................................................................................ 30
14 Using playlists.......................................................................................................... 31 14.1 Selecting an existing playlist ..................................................................................................... 31 14.2 Adding a new playlist ................................................................................................................ 32 14.3 Renaming or deleting playlists .................................................................................................. 33 14.4 Editing the content of the playlist ............................................................................................. 34 14.5 Live playlists .............................................................................................................................. 35
15 Sharing songs or files (export) .................................................................................. 36
16 Importing lyrics and chords ...................................................................................... 37 16.1 Importing song lyrics and chords from MP3 files ..................................................................... 37

SongBook+ User Manual 3
16.1.1 Adding a song without PDF and selecting MP3 ............................................................... 37 16.1.2 Create PDF from lyrics in MP3 .......................................................................................... 38
16.2 Importing song lyrics and chords from MIDI files ..................................................................... 38 16.3 Importing song lyrics and chords from LRC files ....................................................................... 38 16.4 Importing song lyrics and chords from ChordPro files ............................................................. 38
17 Transpose chords..................................................................................................... 39
18 Scanning lyrics on paper with built-in camera .......................................................... 40
19 Using the MIDI features ........................................................................................... 41 19.1 Connecting iPad to MIDI ........................................................................................................... 41
19.1.1 MIDI adapter and devices with USB MIDI interface ......................................................... 41 19.1.2 MIDI adapter directly connected to the iPad ................................................................... 42 19.1.3 Wirelessly via Bluetooth or Wi-Fi ..................................................................................... 42
19.2 Playing back MIDI files .............................................................................................................. 43 19.2.1 Opening song text on incoming MIDI commands ............................................................ 44
19.3 Sending MIDI commands when song text is opened ................................................................ 45 19.3.1 Sending the configured BankSelect/ProgramChange commands ................................... 45 19.3.2 Sending the contents of a MIDI file upon opening the song ............................................ 46 19.3.3 Sending other configurable MIDI commands ................................................................... 46
19.4 Sending MIDI commands when the song is started ................................................................. 46 19.4.1 Sending the contents of a MIDI file upon starting the song ............................................. 46 19.4.2 Sending MIDI Start when the song is started ................................................................... 46 19.4.3 Sending other configurable MIDI commands ................................................................... 46
19.5 Sending MIDI commands when the song is stopped ................................................................ 47 19.5.1 Sending the contents of a MIDI file upon stopping the song ........................................... 47 19.5.2 Sending MIDI Stop when the song is stopped .................................................................. 47 19.5.3 Sending other configurable MIDI commands ................................................................... 47
19.6 Sending MIDI commands at a button touch ............................................................................. 47
20 Using foot pedals ..................................................................................................... 48 20.1 Foot pedals that simulate an external keyboard ...................................................................... 48 20.2 Foot pedals that send MIDI commands .................................................................................... 49
21 Connecting multiple iPads with SongBook+ .............................................................. 50 21.1 Synchronizing via code .............................................................................................................. 51 21.2 Synchronizing via MIDI information .......................................................................................... 51
22 Using multiple books ............................................................................................... 52
23 Backing up and restoring your data .......................................................................... 53 23.1 Backing up your data via the new backup feature ................................................................... 53 23.2 Other ways of backing up data ................................................................................................. 54
23.2.1 Preparation ....................................................................................................................... 54 23.2.2 Backing up your data with the Finder (Mac Computer) ................................................... 55 23.2.3 Backing up your data with iTunes (Windows PC and older Mac Computers) .................. 55 23.2.4 Backing up your data using Wi-Fi transfer. ...................................................................... 56 23.2.5 Backing up your data with the “Files” App ....................................................................... 56
23.3 Restoring Your Files ................................................................................................................... 58 23.3.1 Restoring via the new restore feature .............................................................................. 58 23.3.2 Restoring a .sbkbkp backup file ........................................................................................ 59 23.3.3 Other ways to restore ....................................................................................................... 60
24 Quitting SongBook+ or other apps completely ......................................................... 61
25 Individual audio outputs with external hardware ..................................................... 62

SongBook+ User Manual 4
26 Multi-client support with subdirectories .................................................................. 63
27 Playing “Jingles” ...................................................................................................... 64
28 Position markers and Loop funktion ......................................................................... 65
29 Supported file formats ............................................................................................. 67 29.1 Files for text or note display ..................................................................................................... 67 29.2 Music files.................................................................................................................................. 67 29.3 Midi files .................................................................................................................................... 67 29.4 Video files .................................................................................................................................. 67 29.5 ChordPro files ............................................................................................................................ 67 29.6 LRC files ..................................................................................................................................... 67 29.7 MP3 files with embedded text .................................................................................................. 67
30 Contribution ............................................................................................................ 68
31 Contact information ................................................................................................ 68

SongBook+ User Manual 5
1 SongBook+ settings
1. Press this button to go to settings.
2. Some important settings can be found right at the top of the first section.
3. Other settings grouped by the topic can be found below.
4. When you switch on the “Live Mode” switch, most of the settings will be hidden and many controls not necessary during live operation will be deactivated. This way SongBook is secured against accidental editing during the gig.
SongBook + automatically adjusts the language to the language set in the iPad. If you prefer a different language, you will find a corresponding setting in the ‘Other’ section.

SongBook+ User Manual 6
2 Inserting files into SongBook+ (iPad and iPhone) Before getting started, the files (PDF, TXT, ChordPro, music, midi or video files) that you want to use in SongBook+ have to be copied into the SongBook+. Several ways of copying files to SongBook+ on an iPad or iPhone are provided in this chapter. (For the Mac version of SongBook+, please refer to Chapter 3 instead.)
2.1 Using the Finder (Mac computer) On newer Mac computers (after introduction of the macOS 10.15 “Catalina” operating system version) the “Finder” program is used for inserting the files into the SongBook+. If you have a Windows PC or a Mac with an older operating system, please see in the next chapter how it is done using “iTunes”.
1. Connect the iPad to your Mac using the USB cable and start the “Finder” on your Mac
2. Press on the iPad/iPhone.
4. Open “SongBook” by clicking on the arrow icon.
5. Drag the desired files from another Finder window to this area.
3. Select “files”.

SongBook+ User Manual 7
2.2 Using iTunes (Windows PC and older Mac computers) With Windows PC or older Mac computers, you can use the iTunes program to insert files into SongBook+ as follows:
2. Press on iPad/iPhone.
3. Select “File Sharing”.
4. Select “SongBook”
5. Press “Add...” and then select the files on your computer that you want to add.
1. Connect the iPad to your Mac using the USB cable and start the iTunes program on your computer

SongBook+ User Manual 8
2.3 Using Wi-Fi transfer (Windows PC, Mac computer) You can temporarily share the SongBook+ folder via Wi-Fi and then wirelessly access it from a computer without iTunes on it.

SongBook+ User Manual 9
2.4 Without using any additional computer, via “Import files” Using the “Import files” function, files can be imported into the SongBook from a USB stick, your preferred cloud app or even a server directly from SongBook+.
1. Press the “...” button.
2. Select “Import files”.
3. Press “Browse”.
4. Navigate to and select the desired file. The file will then be copied to SongBook+.
Note on the use of USB sticks: Depending on the iPad model and USB stick, you may receive an error message that the USB stick requires too much power and cannot be used. In such cases, an active USB hub with power supply may be used.
SongBook+ User Manual 10
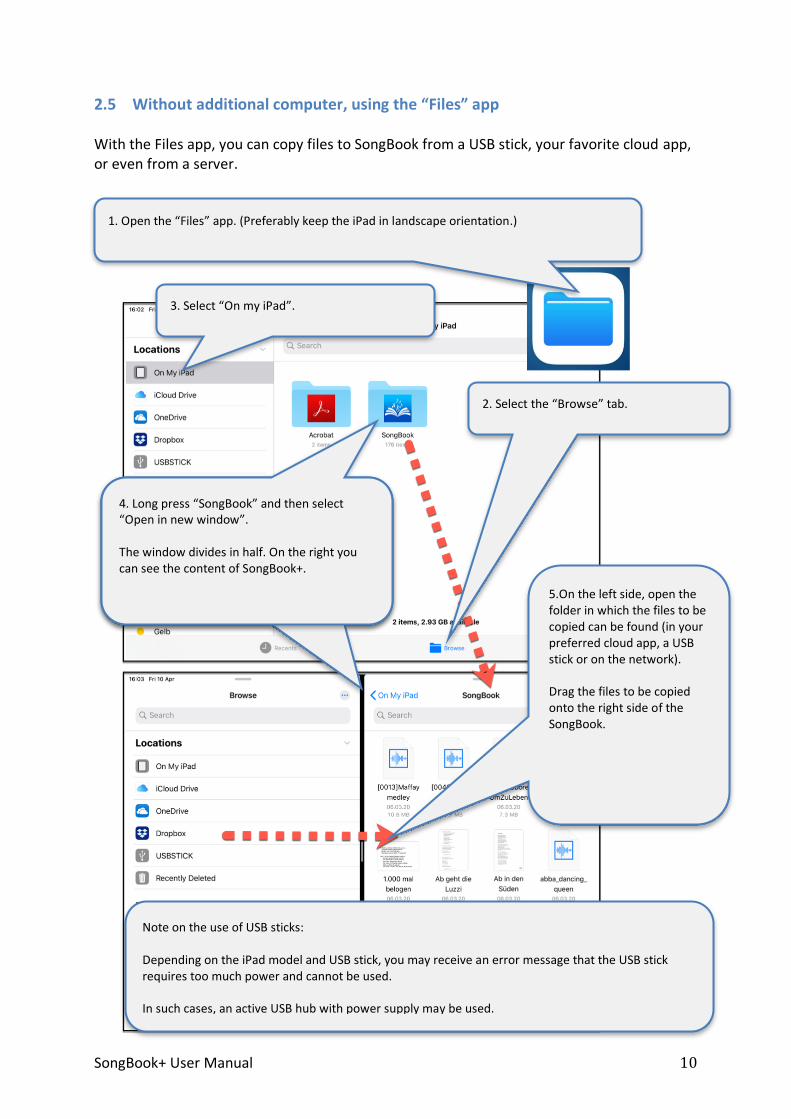
2.5 Without additional computer, using the “Files” app With the Files app, you can copy files to SongBook from a USB stick, your favorite cloud app, or even from a server.
1. Open the “Files” app. (Preferably keep the iPad in landscape orientation.)
2. Select the “Browse” tab.
3. Select “On my iPad”.
5.On the left side, open the folder in which the files to be copied can be found (in your preferred cloud app, a USB stick or on the network). Drag the files to be copied onto the right side of the SongBook.
Note on the use of USB sticks: Depending on the iPad model and USB stick, you may receive an error message that the USB stick requires too much power and cannot be used. In such cases, an active USB hub with power supply may be used.
4. Long press “SongBook” and then select “Open in new window”. The window divides in half. On the right you can see the content of SongBook+.

SongBook+ User Manual 11
2.6 Importing files from mail or other applications You can import PDF, music, or video files from any other apps that can create or download such files and use “Open in...” to transfer it to another app. The following illustration shows as an example how you can import a PDF from an mail attachment:
1. Press on the PDF continually until a popup appears; then select “Open in SongBook”.
2. SongBook+ appears. Change the file name if necessary and then press “Import”.
3. The imported file appears in the “Unused files” section.
Note: If SongBook is already running in the background, it should be in normal list view and should not show a song or a dialog window!

SongBook+ User Manual 12
2.7 Acquiring data from another SongBook If you already have SongBook+ on one device and want to transfer the same data to another device, you can create a SongBook+ data backup on one device and restore this backup on another device. There is a variety of ways of making a SongBook+ data backup and restoring it. Please refer to Chapter Error! Reference source not found.. If the same Apple ID is used on both devices and they have Internet access, the easiest way to do it is using iCloud.

SongBook+ User Manual 13
3 Adding files to SongBook+ (Mac version) Before you get started, copy to SongBook+ the files (PDF, TXT, ChordPro, music, MIDI or video files) that you want to use in SongBook+. Below are several ways of copying files to SongBook+ on Mac. (For the iPhone or iPad version of SongBook+, please refer to Chapter 2.
3.1 Using the Finder The Finder provides direct access to the SongBook+ files. The SongBook+ folder is located on the Mac under the path below: /Users/[username]/Library/Containers/ch.baum-software.songbook/Data/Documents
SongBook+ can also help you find this folder. The “Open folder in the Finder” menu item serves this purpose. If you select it, SongBook+ will copy the corresponding path to the clipboard. Now open the Finder and select “Go to folder” in the “Go to” menu and paste the path using the [cmd⌘] + V key combination or right-click on the text field and click “Paste”.
3.2 Using “Import files” If you select the “Import files” menu item, the operating system will open a dialog window for you to browse for a file. The file is then copied to the SongBook+ folder and appears in the “Unused files” section.
3.3 Using Wi-Fi transfer You can temporarily share the SongBook+ folder via Wi-Fi and then wirelessly access it from a computer. It works exactly the same as with the iPhone or iPad. For more information, please see Chapter 2.3.
3.4 Acquiring data from another SongBook If you already have SongBook+ on one device and want to transfer the same data to your Mac, you can create a SongBook+ data backup on the other device and restore the backup in SongBook on the Mac. (Of course, it is also possible to do the same vice versa from the Mac to another device.) There is a variety of ways of making a SongBook+ data backup and restoring it. Please refer to Chapter Error! Reference source not found..

SongBook+ User Manual 14
If the same Apple ID is used on both devices and they have Internet access, the easiest way to do it is using iCloud.

SongBook+ User Manual 15
4 Inserting unused files into the song list After inserting PDF, music or video files into SongBook, they appear as “Unused Files”.
4.1 Inserting files manually By following the steps below you can transfer them into the song list and provide additional information like title, artist, genre and MP3 file to play in the background.
1. Press “Edit”.
9. Insert another song using the “+” sign or press “Done” to finish.
2. Press the “+” sign.
7. If you want to playback one or more audio files, and/or a midi or video file, select them here.
3. If necessary, change the title.
4. If you have numbered your songs, enter their numbers here.
6. Enter the name of the artist and the genre or select the existing ones from the list.
5. You can enter here some short additional information that, for example, will be displayed during the preview of this song.
8. Press “Save”.

SongBook+ User Manual 16
4.2 Inserting files automatically If you have copied many new files to the SongBook+ and you do not want to add them to the song list individually, SongBook+ can also automatically add them to the song list. The file name is then used as the title. All other fields remain empty and can be edited later.
Press here to start the process. After asking if you really want to do this, song entries are created from all unused files.
After the process, the song list will be sorted by date so that the songs you have just added appear at the top and you can see them.
After that you can of course switch back to your preferred sorting method.

SongBook+ User Manual 17
5 Using the song list
If you type text into the search bar, only songs containing this text in the title are displayed.
Tap here to select the order of the song list.
The section “Unused Documents” contains PDF documents added with iTunes but not yet added to the song list.
The other sections contain the song list grouped depending on the selected order (first letter of the title, artist or genre).
The index on the right side allows quick scrolling and quick alphabetical access in the song list. Tip: Try to tap and move your finger here.
You can use the “+” to toggle between “Unused Documents” and “All Documents”.
Press and hold a line for a long time to open a context menu with actions that can be performed on the selected entry.

SongBook+ User Manual 18
6 Editing song details
2. Tap the song you want to edit in the list.
3. Edit the song details.
4. Press “Save”.
5. Tap another song to edit or press “Done” to finish editing.
1. Press “Edit”.

SongBook+ User Manual 19
7 Displaying a PDF document and scrolling in the document
Tap a song in the list with your finger and the PDF will be displayed. Press the “Play” button to
play recorded page turns, finger pointer or mp3.
Tap the “...” button to see the menu for more options like recording page turns or finger pointer.
Tap the „X“ button to go back to the song list.
Swipe your finger(s) to the right (or down): One finger: Go to previous page. Two fingers: (*) Press “Stop” button. Three fingers: (*) Go back to the song list.
Zoom in and out using two fingers. Double tap to go back to original size. Use the small preview images to scroll at a faster pace.
Swipe your finger(s) to the left (or up): One finger: Go to next page. Two fingers: (*) Press “Play” button. Three fingers: (*) Go to next song in play list
Tap anywhere in the document to show or hide the toolbar (button bar).
(*) The swipe gestures with two or three fingers can be changed in the settings. In addition, there are customizable gestures for tapping with two or three fingers.

SongBook+ User Manual 20
8 Preselecting next song without closing the current song
Tapping this button opens a list with the same content in the same order as selected in the song list in the main overview.
If the next song is already known, it is displayed in the first line of the table and in this button in the toolbar. In addition, it is highlighted blue and marked with a pause icon in the list. The currently playing song is highlighted green and marked with a play icon in the list. If you are using playlists, the next song is automatically set to the next song in the playlist. (Optionally, this can be disabled.) When you select a song in the list, the list disappears and the button in the toolbar is set to this song. You can then jump to the next song by pressing this button. Depending on the settings, the next song will open automatically when the playback of the current song ends.
It is also possible to sort, filter and select a playlist here.
When you are in a playlist, you can toggle between the playlist and the overall list by pressing this button to select also a song that is not in the current playlist yet.

SongBook+ User Manual 21
9 Using the metronome
You can enter the desired values directly in the text fields.
The metronome settings can be changed in two places: In the edit window with the song details or in the menu with the song opened.
Tap here to the beat of the music in order to learn the speed.
Press here to listen to the result.

SongBook+ User Manual 22
10 Use of night colors
The “Night mode” option allows you to toggle between normal colors and inverted colors for a dark stage.

SongBook+ User Manual 23
11 Recording scrolls automatically
Press the “Stop” button to stop recording.
Use the arrow buttons or swipe your finger to scroll. You can also use a foot pedal to show the next page. Important note: Page turns are always recorded in full page, even if you have configured SongBook+ for scrolling instead of page turns. SongBook+ then calculates the right speed for scrolling.
Confirm and start recording using this button.
In the document display, first press the “...” button, then select “Page / Finger pointer” and finally press “Record scrolls”.

SongBook+ User Manual 24
12 Recording finger pointers in the “Karaoke style”
Press the “Stop” button to stop recording.
Point with a finger where you want to see later the red dot during playback. You can define a small offset between your finger and the red dot in the settings.
Confirm and start recording using this button.
In the document display, first press the “...” button, then select “Page / Finger pointer” and finally press “Record finger pointer”.

SongBook+ User Manual 25
13 Inserting/editing/deleting annotations
Press “Edit annotations” to begin inserting/editing/ deleting annotations.
Press “x” to finish editing the annotations.
You can move the toolbar to this bar and then position it left, right or at the top.

SongBook+ User Manual 26
13.1 Inserting annotations
First, select what you want to add as an annotation and then insert it at the desired position in the document.
There are several variants of annotations for marking text and for drawing shapes. (You can tell that from the small arrow in the corner of the button.) If you press and hold the button, a menu will open where you can select the desired variant.

SongBook+ User Manual 27
13.2 Delete annotations
13.3 Editing Notes
1. If any button is still active, press it again so that none is active anymore.
2. Tap anywhere on the annotation to open the associated menu.
3. Press the waste bin button to delete the note.
1. If any button is still active, press it again so that none is active anymore.
2. Tap anywhere on the annotation to open the associated menu.
3. Press “Properties” to open a window with the properties (color, font, etc.).
Tip: If you want to delete several annotations at once, you can use this marker tool.
3b. Handwritten annotations can be corrected later also using the eraser.
SongBook+ User Manual 28
Tip for chord annotations: If you adjust a chord annotation this way (color, size, etc.), make sure that all other chord annotations in the same song look the same.
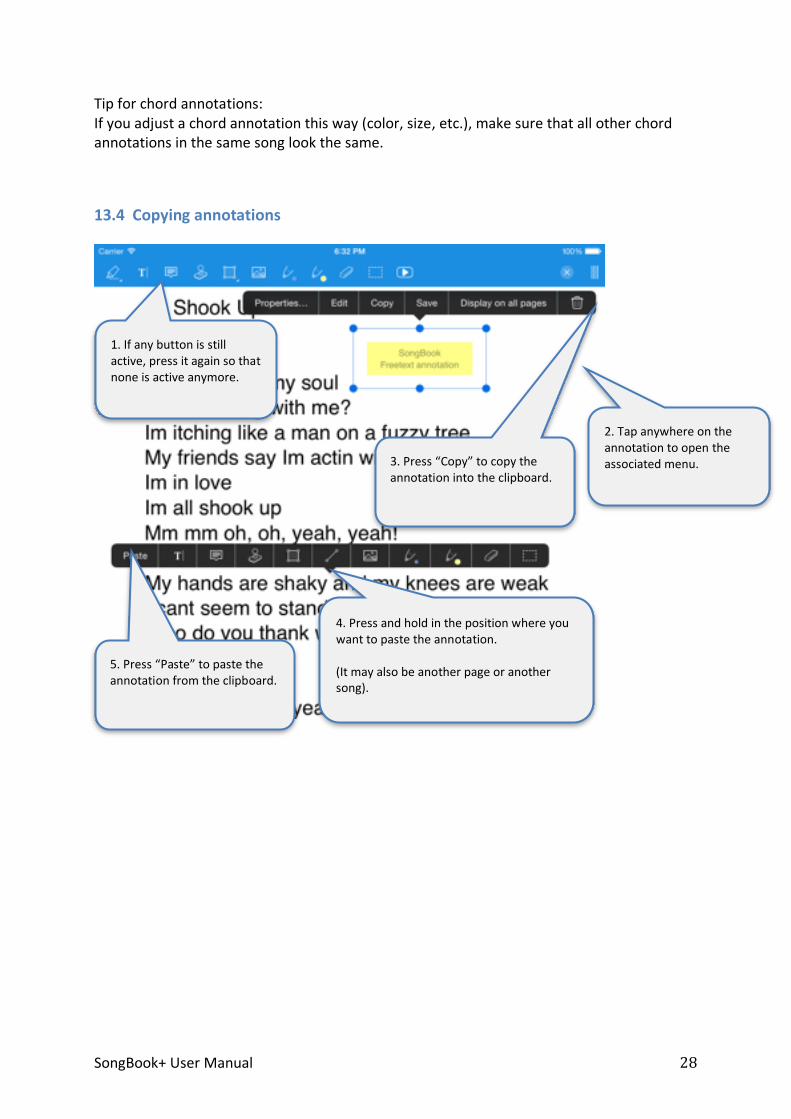
13.4 Copying annotations
1. If any button is still active, press it again so that none is active anymore.
2. Tap anywhere on the annotation to open the associated menu.
3. Press “Copy” to copy the annotation into the clipboard.
4. Press and hold in the position where you want to paste the annotation. (It may also be another page or another song).
5. Press “Paste” to paste the annotation from the clipboard.

SongBook+ User Manual 29
13.5 Saving frequently used annotations
13.6 Using saved annotations again
You can save an annotation by pressing the “Save” button to be able to use it again later on another page or in another song.
If you want to insert a saved annotation elsewhere, you can retrieve it using the “Stored annotations” stamp.
SongBook+ User Manual 30
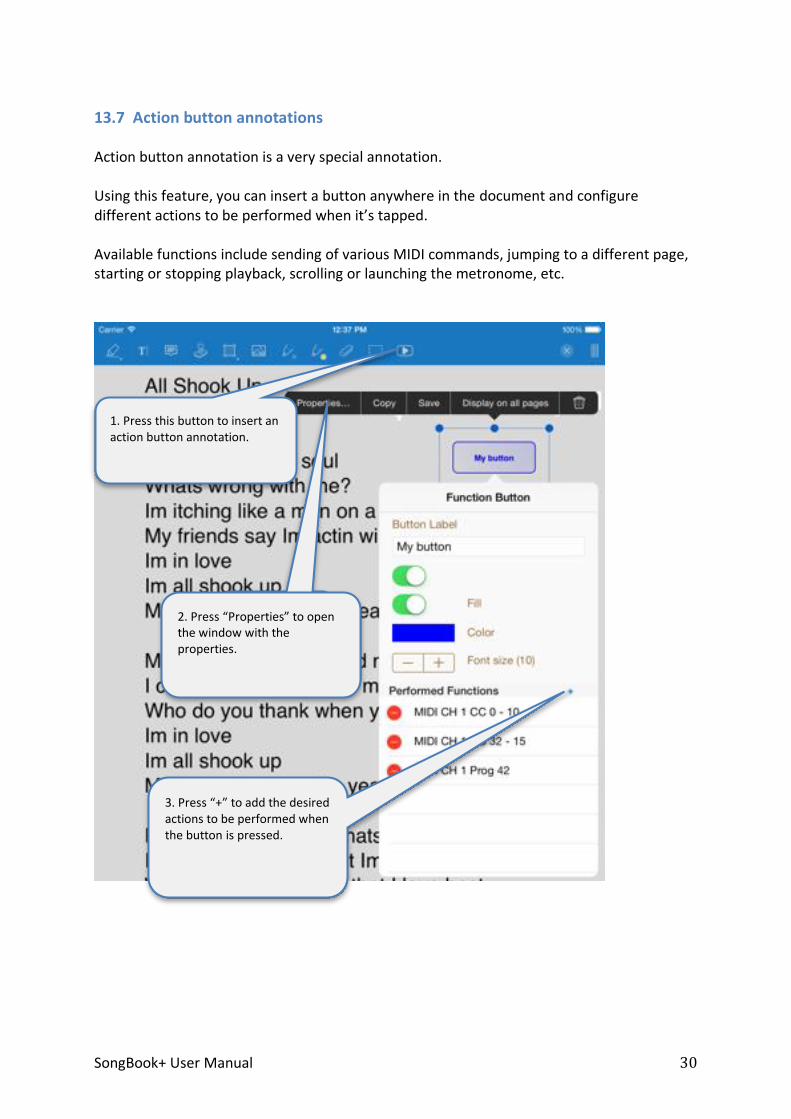
13.7 Action button annotations Action button annotation is a very special annotation. Using this feature, you can insert a button anywhere in the document and configure different actions to be performed when it’s tapped. Available functions include sending of various MIDI commands, jumping to a different page, starting or stopping playback, scrolling or launching the metronome, etc.
1. Press this button to insert an action button annotation.
3. Press “+” to add the desired actions to be performed when the button is pressed.
2. Press “Properties” to open the window with the properties.

SongBook+ User Manual 31
14 Using playlists
14.1 Selecting an existing playlist
Attention: If a playlist is selected, the “Edit” button is no longer used to edit the songs but to edit the content of the playlist!
1. Press this button to open the playlists menu.
2. Select the playlist you want to use.
3. The title of the selected playlist is displayed here.
4. The list contains only the songs of the selected playlist.
5. If your songs have a playing time, the playlist total playing time is displayed here.
SongBook+ User Manual 32
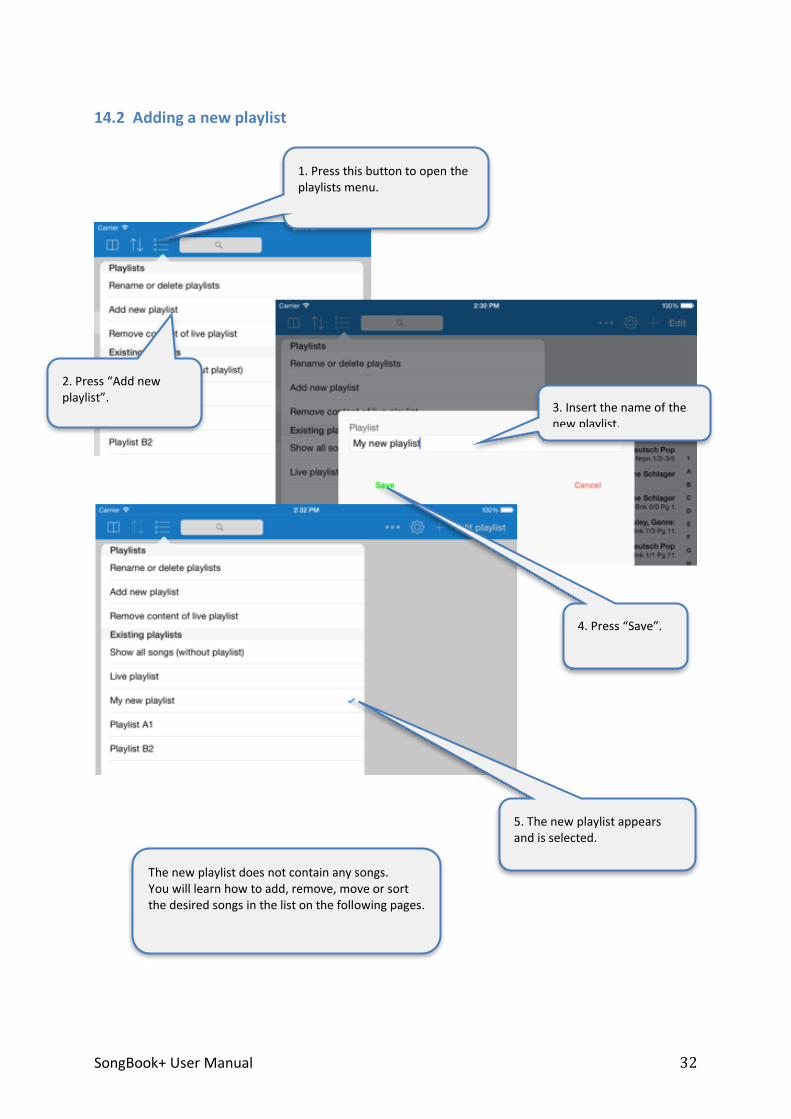
14.2 Adding a new playlist
2. Press “Add new playlist”.
3. Insert the name of the new playlist.
4. Press “Save”.
5. The new playlist appears and is selected.
1. Press this button to open the playlists menu.
The new playlist does not contain any songs. You will learn how to add, remove, move or sort the desired songs in the list on the following pages.

SongBook+ User Manual 33
14.3 Renaming or deleting playlists
2. Press “Rename or delete playlists”.
3a. To delete an existing playlist press the red button.
4. When finished, press “End rename or delete”.
1. Press this button to open the playlists menu.
3b. To rename an existing playlist, tap the playlist, then edit the name and press “Save”.

SongBook+ User Manual 34
14.4 Editing the content of the playlist
Press “Edit playlist” to start editing when the playlist is active.
Press “Done” when you finished editing.
Press the red “minus” button to remove a song from the playlist.
While editing the songs in the playlist, you can sort and filter the existing songs to find the songs you want to add to the list.
Press the green “plus” button to add a song to the playlist. The “plus” button disappears and the song appears as the last song in the playlist above.
To change the order of the songs, drag and drop a song on this symbol.
The songs already included in this playlist are highlighted green. The songs in another playlist are highlighted blue.

SongBook+ User Manual 35
14.5 Live playlists
If live playlists are activated in the SongBook+ settings, the first playlist to appear is the live playlist. It is a special playlist that cannot be deleted or renamed. Only its content can be changed, deleted or copied from another playlist. A live playlist is used, for example, to plan the next dancing round during the pause. If SongBook+ is configured for synchronous changeover of songs on multiple iPads, the live playlist can also be automatically synchronized to the other iPads in the same way.

SongBook+ User Manual 36
15 Sharing songs or files (export) Using the “Share songs” feature, the whole song (.sbk) or single files as well (.pdf, .mp3, .mid, ...) can be:
- used as an attachment in an email - transferred directly to another app (e.g., Dropbox, iBooks, ...) - transferred to another Songbook in the range
SongBook+ User Manual 37
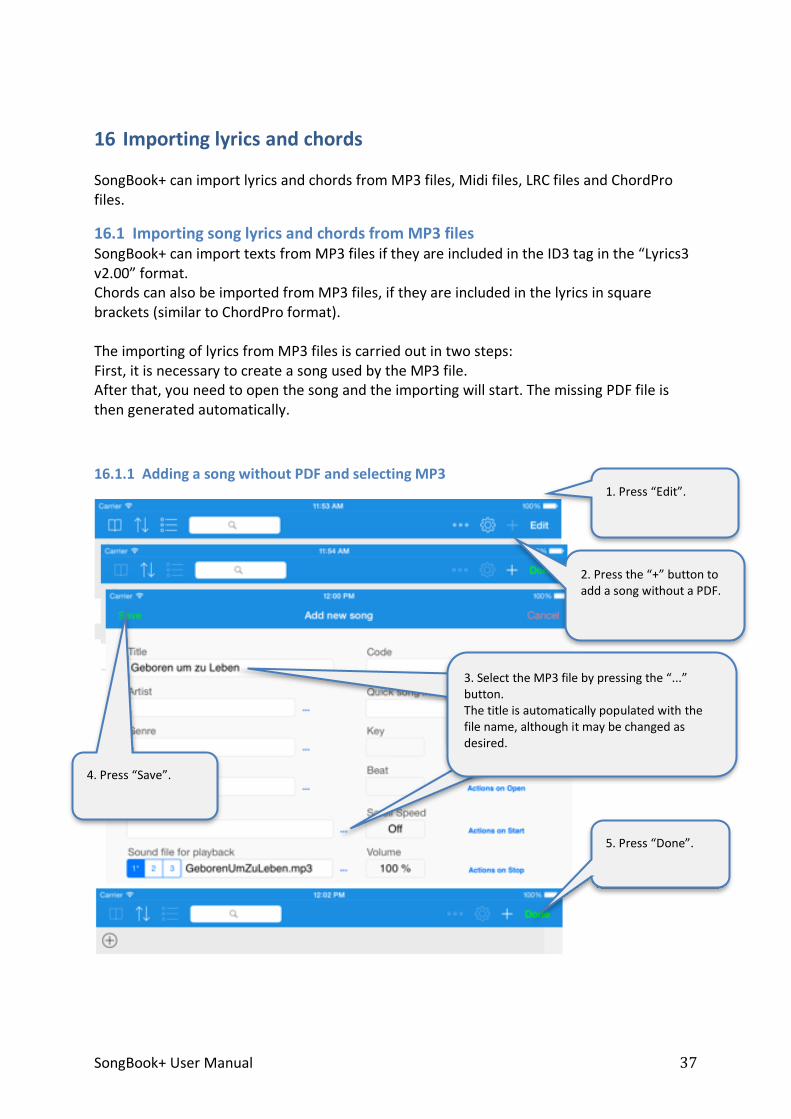
16 Importing lyrics and chords SongBook+ can import lyrics and chords from MP3 files, Midi files, LRC files and ChordPro files.
16.1 Importing song lyrics and chords from MP3 files SongBook+ can import texts from MP3 files if they are included in the ID3 tag in the “Lyrics3 v2.00” format. Chords can also be imported from MP3 files, if they are included in the lyrics in square brackets (similar to ChordPro format). The importing of lyrics from MP3 files is carried out in two steps: First, it is necessary to create a song used by the MP3 file. After that, you need to open the song and the importing will start. The missing PDF file is then generated automatically.
16.1.1 Adding a song without PDF and selecting MP3
3. Select the MP3 file by pressing the “...” button. The title is automatically populated with the file name, although it may be changed as desired.
1. Press “Edit”.
2. Press the “+” button to add a song without a PDF.
4. Press “Save”.
5. Press “Done”.

SongBook+ User Manual 38
16.1.2 Create PDF from lyrics in MP3 If you then open the song for the first time and find SongBook+ text to import, you will be asked if you want to import the text. Alternatively, you can start the import manually as before, as described in the following steps.
16.2 Importing song lyrics and chords from MIDI files The importing of lyrics from MIDI files works just as described for MP3 files above. The only difference is that there is an own box for the selection of each MIDI file.
16.3 Importing song lyrics and chords from LRC files The importing of lyrics from LRC files works in a similar way as described for MP3 files above. However, the LRC is not directly selected in the song. SongBook+ is rather searching for a file with the LRC extension which either has the same name as the lyrics or the assigned MP3 or MIDI file.
16.4 Importing song lyrics and chords from ChordPro files Firstly, ChordPro files are entered in SongBook as usual text files or PDF files. After opening, indicate the unformatted original content of ChordPro file. Using the “Import ChordPro file” menu item, it can be imported similar to MP3 files. The PDF file is generated then.
2. Confirm that you want to import the lyrics and overwrite the PDF, if it already exists.
1. Press the “...” button when the song is open and select menu item “Import lyrics from MP3 file”.
If the “Import lyrics from MP3 file” menu item is inactive, it means that the MP3 file contains the text not in the supported format.

SongBook+ User Manual 39
17 Transpose chords Chord symbols inserted using the annotation feature (see page 25) or imported from Midi/LRC/ChordPro (see page 37), can be transposed later. Tip: You can also subsequently change the appearance of chord notes (color, size, etc.). If you customize only one of the chord notes in a song, all other notes in the same song take over the same look.
Press the “...” button, then “Transpose chords annotations” in the PDF document viewer. If a key is already set in the song, you can select the target key or the number of semitone steps used in transposition.

SongBook+ User Manual 40
18 Scanning lyrics on paper with built-in camera
1. While in the song list, tap the “...” button and select “Photo to PDF”.
2. Add pictures using the built-in camera or select them from your library. Each picture will become a new page for the PDF file.
3. Change the name of the PDF file to be created.
4. Press “Save”.
If you use a device running iOS 13 or later, you can crop the photo of the document after it was taken. It is even possible to take a photo of the document at an angle, then mark its corners and straighten this way the document photographed at an angle.

SongBook+ User Manual 41
19 Using the MIDI features
19.1 Connecting iPad to MIDI There are several ways to connect the iPad with MIDI.
19.1.1 MIDI adapter and devices with USB MIDI interface Many MIDI adapters and some devices (keyboards, etc.) have a USB interface for MIDI. Since the iPad innately has no USB port, it an adapter to extend the iPad with a USB interface. Apple calls these adapters “iPad Camera Connection Kit”. Then, USB MIDI adapters and USB MIDI devices can be connected if they are compatible with Apple. Attention: With the USB adapter connected, the iPad cannot be supplied with power at the same time! If the MIDI adapter (or the USB MIDI device) itself has no power supply, it even consumes the power to operate from the battery of the iPad, which can result in a short battery life or even an unreliable MIDI connection. To prevent this, it is additionally advisable to use an active USB hub with power supply.

SongBook+ User Manual 42
19.1.2 MIDI adapter directly connected to the iPad Some MIDI adapters can connect to the iPad directly. Some examples of those are:
- iConnectMIDI2+ by iConnectivity - iRig MIDI Version 1+2 by IK Multimedia - ioDock by Alesis - iStudio is202 by Behringer - ...
Using these adapters, the iPad can be partially supplied with power in MIDI operation (all the above except iRig MIDI version 2). Also, there is anumber of simple, small MIDI keyboards that can be connected directly to the iPad.
19.1.3 Wirelessly via Bluetooth or Wi-Fi In the meantime, there are even wireless MIDI adapters that use Radio communication like Bluetooth or Wi-Fi to connect to the iPad. Some examples of those are:
- mi.1 by QuiccoSound (Bluetooth) - PUC wireless MIDI interface (Wi-Fi) - Yamaha Tyros 5 keyboard with Wi-Fi stick - Yamaha MD-BT01 - Yamaha UT-BT01 - Zivix PUC+

SongBook+ User Manual 43
19.2 Playing back MIDI files SongBook+ is able to play back normal MIDI files, but it does not have an integrated synthesizer to create sounds from. In order to generate sounds from the MIDI files, additional external hardware connected via MIDI (such as a keyboard or an expander) or a third-party synthesizer app is required, running in the background and receiving the signals from SongBook via “Virtual MIDI”. “bismark bs-16i” is an app that can be used to generate sounds directly on the iPad. If this app is running in the background with “Virtual MIDI” activated, you can listen to the music directly on the iPad, without any external hardware.

SongBook+ User Manual 44
19.2.1 Opening song text on incoming MIDI commands SongBook+ can listen for ProgramChange commands on the MIDI interface and then open a song. These commands normally select an instrument. A typical use of this feature is that ProgramChange commands are sent from within a MIDI style, from within a played MIDI file, or from the keyboard when a registration was selected. SongBook+ then opens the corresponding song text. (A MIDI style can resend the same ProgramChange over and over again while looping; this will not lead to a problem.) SongBook+ opens a song text, if it received BankSelect commands and a ProgramChange command as configured in the “Edit song details” window. Please note that SongBook+ uses values from 0 to 127. If your keyboard uses numbers from 1 to 128 instead, you must subtract 1 to get the value to configure in SongBook+.
Please use the built-in MIDI monitor to find out what is actually received by the MIDI interface if it doesn’t work as expected.
With these settings, the song will open if a MIDI device sends the command to select instrument 16 on bank 1 / 5 on MIDI channel 1.
In the MIDI monitor window you can see the following if these MIDI commands are received.
Use this button if you want to learn a command instead of configuring it using the wheels.

SongBook+ User Manual 45
19.3 Sending MIDI commands when song text is opened You can also enable SongBook to send MIDI commands when you open a song text. A typical use of this feature is to configure external devices like a keyboard upon selecting a song. There are different ways to send MIDI commands:
19.3.1 Sending the configured BankSelect/ProgramChange commands SongBook+ sends the BankSelect and ProgramChange commands as configured in the “Edit song details” window, if the “Send MIDI command on open” switch is set to on. The MIDI channel that SongBook+ is sending these commands on is the same as configured for the MIDI input.
With these settings a BankSelect High 1, a BankSelect Low 5 and a Program Change 16 message will be sent on MIDI output on Channel 1 as configured in the program settings.

SongBook+ User Manual 46
19.3.2 Sending the contents of a MIDI file upon opening the song SongBook sends the contents of a MIDI file upon opening the song, if a .mid file with exactly the same name as the .pdf file extended with “_open.mid” exists. (e.g. MySong.pdf MySong_open.mid) Only type 0 MIDI files (single track) are allowed. All commands are sent at once, timing information is ignored and therefore this feature cannot be used to send music to the MIDI output, but only commands to configure the environment
19.3.3 Sending other configurable MIDI commands Using the “Actions upon opening” button in the editing window of the song, you can define optional MIDI commands to be sent upon opening the song.
19.4 Sending MIDI commands when the song is started
19.4.1 Sending the contents of a MIDI file upon starting the song SongBook sends the contents of a MIDI file upon starting the song, if a .mid file with the same name as the .pdf file extended with “_start.mid” exists. (e.g. MySong.pdf MySong_start.mid) Only type 0 MIDI files (single track) are allowed. All commands are sent at once, timing information is ignored and therefore this feature cannot be used to send music to the MIDI output, but only commands to configure the environment
19.4.2 Sending MIDI Start when the song is started You can configure in the settings, if SongBook should send MIDI Start upon starting the song.
19.4.3 Sending other configurable MIDI commands Using the “Actions upon starting” button in the editing window of the song, you can define optional MIDI commands to be sent upon starting the song.

SongBook+ User Manual 47
19.5 Sending MIDI commands when the song is stopped
19.5.1 Sending the contents of a MIDI file upon stopping the song SongBook sends the contents of a MIDI file upon stopping the song, if a .mid file with the same name as the .pdf file extended with “_stop.mid” exists. (e.g. MySong.pdf MySong_stop.mid) Only type 0 MIDI files (single track) are allowed. All commands are sent at once, timing information is ignored and therefore this feature cannot be used to send music to the MIDI output, but only commands to configure the environment
19.5.2 Sending MIDI Stop when the song is stopped You can configure in the settings, if SongBook should send MIDI Stop upon stopping the song.
19.5.3 Sending other configurable MIDI commands Using the “Actions upon stopping” button in the editing window of the song, you can define optional MIDI commands to be sent upon stopping the song.
19.6 Sending MIDI commands at a button touch You can also send freely configurable MIDI commands from the song lyrics or musical notes at a single button touch with the help of the special “Action button” annotation. To learn how you can insert and configure an action button annotation, see chapter 13.7.

SongBook+ User Manual 48
20 Using foot pedals
20.1 Foot pedals that simulate an external keyboard SongBook+ supports all foot pedals that are able to simulate an external keyboard and can send one or more of the following keys:
In the application settings, you can enable the use of foot pedals and assign the keys to the following actions:
- Do nothing - Go one page forward/backward - Press the Start/Stop/Pause/Continue button - Jump to the next song - Jump back to the song list - Open song preselection list - Start/pause/continue scrolling - Scroll faster/slower - Go the whole/half/third/quarter page forward or backward - Turn automatic playback on/off/toggle - Start/stop the metronome
You can see in the Midi and Bluetooth monitor which keys your foot pedal is sending. To use this feature, you can use e.g. the following foot pedals:
- BT-105/BT-106/DIGIT/QUAD/DUO/PED/PEDpro/BT200S-x by Airturn (www.airturn.com) connected via Bluetooth
- Cicada/Firefly/Dragonfly/Butterfly by PageFlip (www.pageflip.com) connected via Bluetooth
- iRig BlueTurn by IK Multimedia (www.ikmultimedia.com) connected via Bluetooth - BT-FP2 by Strich Music

SongBook+ User Manual 49
20.2 Foot pedals that send MIDI commands SongBook+ supports all foot pedals that can send one or more of the following MIDI commands:
- MIDI Start (used by Alesis io Dock pedal 1) - MIDI Stop (used by Alesis io Dock pedal 2) - MIDI Pause - MIDI Continue - MIDI Control-Change 63 to value (used by Alesis io Dock pedal 2) - MIDI Control-Changes to an arbitrary value
In the application settings, you can enable the use of MIDI foot pedals (*) and assign the keys to the following actions:
- Do nothing - Go one page forward/backward - Press the Start/Stop/Pause/Continue button - Jump to the next song - Jump back to the song list - Open song preselection list - Start/pause/continue scrolling - Scroll faster/slower - Go the whole/half/third/quarter page forward or backward - Turn automatic playback on/off/toggle - Start/stop the metronome
Remark on Alesis io Dock: The Alesis io Dock alternately sends MIDI Start and MIDI Stop on the first foot pedal. If you use this foot pedal you should assign in SongBook+ the same action for MIDI Start and MIDI Stop. Remark on Alesis io Dock 2: Alesis io Dock 2 alternately sends the value 0 or 127 on the controller 14 (first pedal) or 15 (second pedal) with the pedals. If a pedal always performs the same action each time it is pressed, you must use two of the optionally configurable ControlChanges per pedal in SongBook+, one to respond when changing to 0, and another to respond when changing to 127, and assign the same action to both of them. Remark iRig BlueBoard: The iRig BlueBoard alternately sends ControlChanges on the value 0 or 127. If a button always performs the same action each time it is pressed, you must use two of the optionally configurable ControlChanges per button in SongBook+, one to respond when changing to 0, and another to respond when changing to 127, and assign the same action to both of them.
You can see in the Midi and Bluetooth monitor which commands your foot pedal is sending.
(*) Of course, the MIDI commands do not entirely have to come from a foot pedal. They can be sent by any connected MIDI device.

SongBook+ User Manual 50
21 Connecting multiple iPads with SongBook+ You can connect multiple iPads with SongBook+, either via Bluetooth, Wi-Fi, MIDI (cable) or Wireless MIDI (wirelessly). If you want to use the simple “short-haul connection”, select the “Server in short-haul connection” connection mode in “SongBook to SongBook connection” on one device and “Client in short-haul connection” on all the other ones. Depending on availability, the operating system automatically chooses either Bluetooth or Wi-Fi for connection. If you want to force a more reliable Wi-Fi connection, you can turn Bluetooth off completely in the general settings of the iPad. If you want to establish a MIDI connection (wireless or wired MIDI), select option “MIDI connection” as the connection mode in “SongBook to SongBook connection” on all devices. For wireless MIDI, you additionally need to configure one MIDI device as a wireless MIDI Server and the other one as a wireless MIDI client in the settings. After this has been done, the following actions can be synchronized between SongBooks:
- Selecting a song - Preselecting a song - Scrolling: - Start button - Stop button - Live playlist
If you want to build multiple SongBook groups using short-haul connection or protect yourself against connections from external SongBooks, you can set a common connection key. The devices connect automatically when you start SongBook+ if the feature is activated in the settings.

SongBook+ User Manual 51
There are 2 methods to link the two associated songs on the various iPads via the code or the MIDI information of the song. Select the sync method to be used in the settings of “SongBook to SongBook connection” as “Key field for synchronization”.
21.1 Synchronizing via code Starting from SongBook+ version 2.1, a new method is available to provide an easier option to synchronously open songs on multiple devices. The content of the song's box “Code” is sent to the other iPads and a song with the same code is searched there.
21.2 Synchronizing via MIDI information If you already use SongBook+ as remote control via MIDI with a keyboard or another external device, you can use the same MIDI settings to sync with other iPads. The 3 digits from the MIDI settings are sent to the other iPads and a song with the same 3 digits is searched there.

SongBook+ User Manual 52
22 Using multiple books If you want to use multiple books, press “Edit search” on the SongBook+ cover. Then toggle the “Use multiple books” switch. You will then see a list of 15 books on the cover. If you are no longer in the edit mode, tap to select the desired Book.
The database, the directory with the files and the list of the artists and genres entered are shared among all books. An even stronger data separation can be achieved by means of multi-client support with subdirectories. For more information, see chapter 26.
Switch to book selection. The button also displays the title of the currently opened book.
If you want to copy or move an existing song to another book, press and hold the song for a long time until a menu with the corresponding selections appears.
Book titles can be directly changed here. You can easily change the order of the books by dragging their icons on the right side. Using the “...” button in the menu, you can delete or copy all books.

SongBook+ User Manual 53
23 Backing up and restoring your data The following chapters show how you can back up your data to your computer and how you can copy the backed-up data back to your SongBook+ (or to another device).
23.1 Backing up your data via the new backup feature
1. Press the “...” button.
2. Select “Back up data”.
3. Select the location for the data backup. The easiest way is to back up to “iCloud Drive”.
4. Select the data to back up. The “All files” option backs up everything and is recommended. The “Database only” option only backs up the files below:
- SongBookMidi.settings - SongBookMidi.sqlite - SongBookMidi.sqlite-shm - SongBookMidi.sqlite-wal
5. Start the backup.
If you use the client function of SongBook+ (see
Chapter26), you can also decide whether only the current client or all clients should be backed up.

SongBook+ User Manual 54
23.2 Other ways of backing up data
23.2.1 Preparation Always quit SongBook+ completely before backing-up or restoring your files (unless you are using Wi-Fi transfer)! If you don't do that beforehand ...
• ... the database files may not contain the most up-to-date data when backing-up or may be incorrect.
• ... copying back the database files will be ineffective when restoring
The most important files that you should definitely back up are the following 4 files:
- SongBookMidi.settings - SongBookMidi.sqlite - SongBookMidi.sqlite-shm - SongBookMidi.sqlite-wal
They contain all the data and settings that you made directly in SongBook (song titles, artists, genres, notes, recorded scrolling and finger pointers, MIDI commands for sending, ...). If one of the two files SongBookMidi.sqlite-shm or SongBookMidi.sqlite-wal has the size 0, it does not need to be saved. When copying the backup back to an iPad, this missing file must then be deleted on the target iPad. If you used the Photo-to-PDF function of SongBook+ or imported texts from MIDI files, ChordPro files, MP3 files etc., SongBook+ also created PDF files for you. In this case, you should also save all PDF files
To quit SongBook +, press the “...” button and then “Quit SongBook +”.

SongBook+ User Manual 55
23.2.2 Backing up your data with the Finder (Mac Computer) Quit SongBook+ before saving the files in order that that all changes be saved in the database files. Please see chapter 2.1 how to use the Finder to access SongBook+ files. Select the files you want to save (at least the 4 files listed above). Multiple files can be selected with the mouse while holding the “Command” key on the keyboard. All files can be selected with the key combination “Command+A” on the keyboard. Drag these files to another Finder window in the prepared folder where you want to save the files.
23.2.3 Backing up your data with iTunes (Windows PC and older Mac Computers) Quit SongBook+ before saving the files so that all changes will be saved in the database files. Please see chapter 2.2 how to access SongBook+ files with iTunes. Select the files you want to save (at least the 4 files listed above). Multiple files can be selected with the mouse while holding the “Command” key on the keyboard. All files can be selected with the key combination “Command + A” on the keyboard. (On a Windows PC, the “Command” key is called “Ctrl” or “Ctrl” instead.) Then press “Save As…”. Select a destination folder on your computer where you want to save your data.

SongBook+ User Manual 56
23.2.4 Backing up your data using Wi-Fi transfer. Please see chapter 2.3 for how to access SongBook+ files using Wi-Fi transfer. Select the files you want to save (at least the 4 files listed above). Multiple files can be selected with the mouse while holding the “Command” key on the keyboard. All files can be selected with the key combination “Command + A” on the keyboard. (On a Windows PC, the “Command” key is called “Ctrl” or “Ctrl” instead.) Drag these files into the prepared destination folder on your computer where you want to back up the files.
23.2.5 Backing up your data with the “Files” App
Quit SongBook+ before saving the files in order for all changes to be saved in the database files. With the Files app, you can copy files to a USB stick, your preferred cloud app, or even a server on the local network. First create a new, appropriately named folder with the files app at the desired destination (in your cloud app or on the USB stick), e.g. SongBook-Backup-1 where you want to save the backed-up files. In the example on the following page, we show how you can back up the entire SongBook folder including all files. If you only want to save the 4 files mentioned above, you can do this 4x with the individual files.

SongBook+ User Manual 57
4. Now select in the “Files” app. Then continually press on the SongBook folder and then select “Copy” in the menu.
5. Then open the previously prepared, still empty destination folder (in your preferred cloud app or on the USB stick). Press and hold an empty space in this folder until a menu appears and select the “Insert” function. Copying begins, wait for the files to finish copying
1. Open the “Files” app
2. Select the “Browse” tab.
3. Select “On my iPad”.

SongBook+ User Manual 58
23.3 Restoring Your Files
23.3.1 Restoring via the new restore feature If you have backed up data using the built-in backup feature, you can easily restore it via the “Manage backups” menu item. A list will open featuring all available cloud backups of all your devices that use the same Apple ID.
1. Press the “...” button.
2. Select “Manage backups”.
Restore backup.
Delete backup locally. It still remains in the cloud and, if necessary, can be downloaded again.
Download backup from the cloud.
Delete backup permanently. It will be deleted both from the device and the cloud.
The buttons for restore or permanent deletion are only active when the backup has been downloaded.
When pressed, all these buttons first display a message describing their action and asking if the user is sure about taking that action now.

SongBook+ User Manual 59
When the Restore button is pressed, this window with additional information about the backup and the restore process appears first. You can check there the content of the backup and decide whether you want to restore the backup or cancel.
23.3.2 Restoring a .sbkbkp backup file SongBook+ backup files have the .sbkbkp extension (SongBook backup). If you click such a file in the Files app or transfer it to SongBook+ from another app via “Open in...”, SongBook+ launches and displays the window for restoring the backup (see above). You can check there the content of the backup and decide whether you want to restore the backup or cancel. (On a Mac, you can drag the backup file over the SongBook+ app icon to restore it.)

SongBook+ User Manual 60
23.3.3 Other ways to restore If you have not backed up the data using the SongBook+ backup feature, but copied the files manually instead, you can also copy them back to SongBook+ manually. Quit SongBook+ before restoring the backup, otherwise copying back the database files will have no effect (unless you use the Wi-Fi transfer)! The backed-up files will be copied back to SongBook+ in the same way as normal files will be copied to SongBook+. Therefore, please see chapter 2 on how to copy files into the SongBook+ and proceed with your saved files. If one of the two files SongBookMidi.sqlite-shm or SongBookMidi.sqlite-wal was not saved because it was 0, this missing file must also be deleted beforehand on the target iPad. The folder “Inbox” cannot and must not be copied back! It does not contain any required data, though.

SongBook+ User Manual 61
24 Quitting SongBook+ or other apps completely If you close an app using the Home button, it continues to run in the background and still requires memory that other apps may lack. Therefore, it is highly recommended, especially before operations, to quit all these apps completely including SongBook+ and then restart SongBook+ only so that it could use as much free memory as possible.
Note: SongBook+ also has a menu item “Exit SongBook+” at the button “...”, with which it can be completely closed.
1. Double click the Home button on your iPad. For an iPad or iPhone without a “Home” button, slide your finger to the bottom of the screen, briefly stop there and release.
2. If you don’t see the app, you can scroll until you see the desired app.
3. Slide the app to the top and out of the screen.

SongBook+ User Manual 62
25 Individual audio outputs with external hardware External audio hardware can be connected to the iPad using individual audio outputs. Some examples of those are:
- iConnectAudio2+ - Behringer X18 - ESI Gigaport HD+
If you want to route the channels (left/right) of the 3 audio players in SongBook+ to the specific audio outputs of the external hardware, you can do this in the SongBook MediaPlayer settings. It is useful, for example, if you want to play a synchronous click track for the drummer that can be heard by him only.

SongBook+ User Manual 63
26 Multi-client support with subdirectories If you want to copy another musician’s data into your SongBook+ without overwriting your own data, you can now create subdirectories in SongBook+ with completely separated data. Each of these directories contains a separate database (SongBookMidi.sqlite, SongBookMidi.sqlite-shm, SongBookMidi.sqlite-wal files), custom settings (SongBookMidi.settings file) and your own files (PDF, MP3, ...). Unfortunately, it is not possible to create and access such subdirectories via iTunes, but only via Wi-Fi transfer from the SongBook+ folder or via the “Files” app. You can find more information about access via Wi-Fi transfer or the “Files” app in chapters 2.3. and 2.4. Simply create directories with names having “SBDATA_” at the beginning, e.g.
- SBDATA_My Data - SBDATA_Thomas’ Data - SBDATA_Sandra's Data
You can easily change the current folder in the settings later. After selecting another folder, SongBook+ will close and must be restarted.
SongBook+ User Manual 64
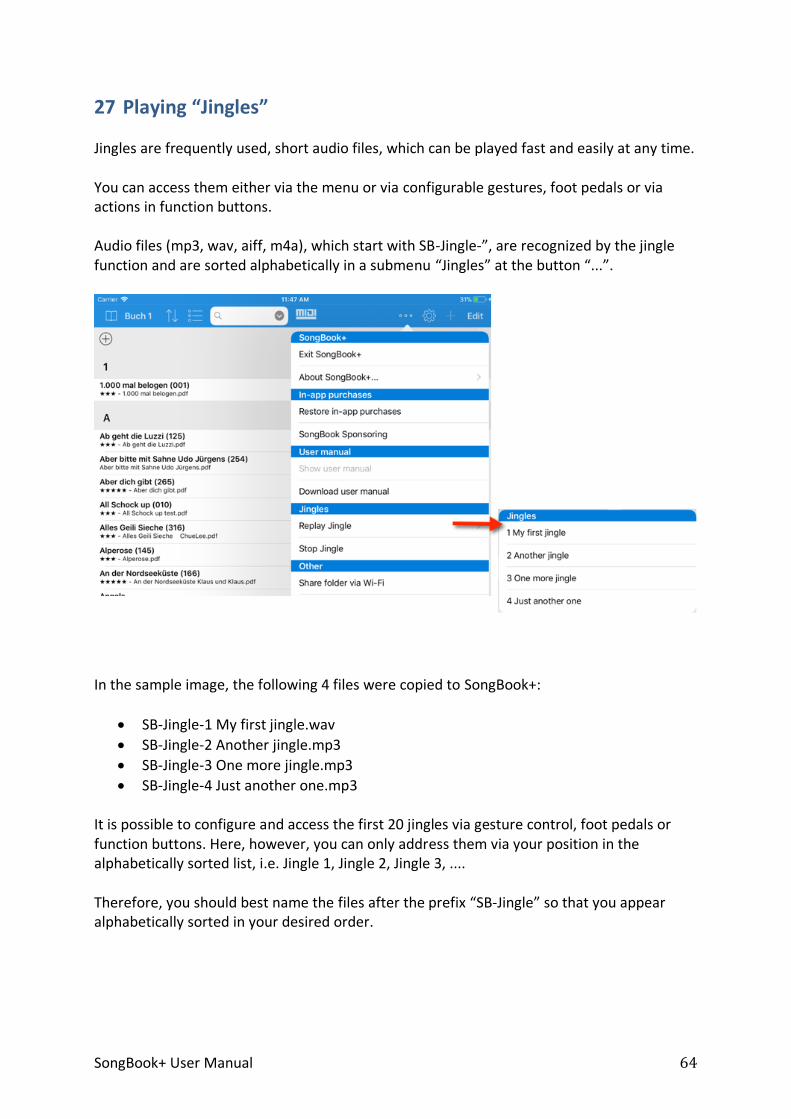
27 Playing “Jingles” Jingles are frequently used, short audio files, which can be played fast and easily at any time. You can access them either via the menu or via configurable gestures, foot pedals or via actions in function buttons. Audio files (mp3, wav, aiff, m4a), which start with SB-Jingle-”, are recognized by the jingle function and are sorted alphabetically in a submenu “Jingles” at the button “...”.
In the sample image, the following 4 files were copied to SongBook+:
• SB-Jingle-1 My first jingle.wav
• SB-Jingle-2 Another jingle.mp3
• SB-Jingle-3 One more jingle.mp3
• SB-Jingle-4 Just another one.mp3 It is possible to configure and access the first 20 jingles via gesture control, foot pedals or function buttons. Here, however, you can only address them via your position in the alphabetically sorted list, i.e. Jingle 1, Jingle 2, Jingle 3, .... Therefore, you should best name the files after the prefix “SB-Jingle” so that you appear alphabetically sorted in your desired order.

SongBook+ User Manual 65
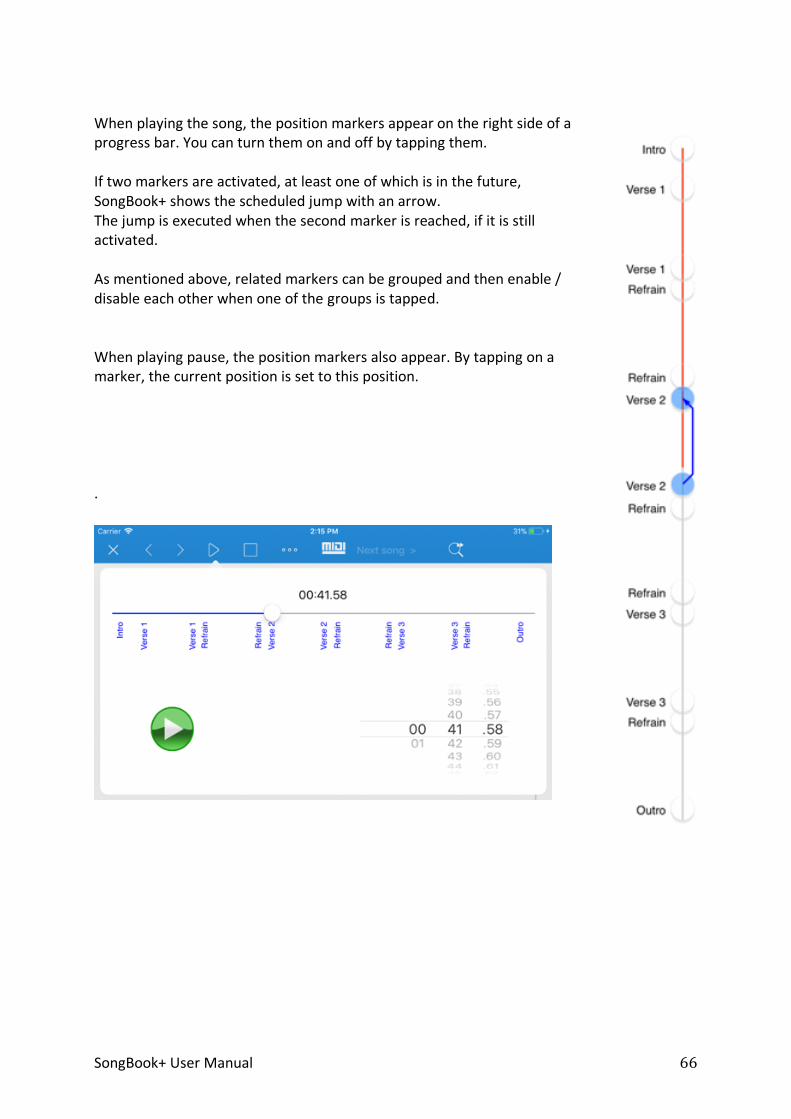
28 Position markers and Loop funktion
Open the editor for position markers here.
To edit a position marker, first select it by tapping directly or by using the buttons next or previous. You can either move it with your finger or adjust the time with the ‘wheel’.
Here you insert a new marker or delete the currently selected marker.
To check the exact position, you can listen to the last seconds before or the first seconds after the point.
Associating markers can be assigned to the same group. They can then be activated / deactivated later by tapping one marker only.
SongBook+ User Manual 66
When playing the song, the position markers appear on the right side of a progress bar. You can turn them on and off by tapping them. If two markers are activated, at least one of which is in the future, SongBook+ shows the scheduled jump with an arrow. The jump is executed when the second marker is reached, if it is still activated. As mentioned above, related markers can be grouped and then enable / disable each other when one of the groups is tapped. When playing pause, the position markers also appear. By tapping on a marker, the current position is set to this position. .

SongBook+ User Manual 67
29 Supported file formats
29.1 Files for text or note display Files with file extensions PDF, PNG, JPG, JPEG, GIF, TXT are used for displaying song lyrics or musical notes.
29.2 Music files Files with file extensions MP3, WAV, AIFF, M4A can be used for music playback.
29.3 Midi files Files with file extensions MID, MIDI, SMF can be used for MIDI output.
29.4 Video files Files with file extensions MOV, MP4, MPV, 3GP, M4V and the following compression standards can be used for video output directly to the iPad itself or to an external monitor or projector:
- H.264 Baseline profile level 3.0 video up to 640x480 at 30 fps - MPEG-4 Part 2 video (Simple Profile)
29.5 ChordPro files ChortPro files with the .chopro extension can be imported to display texts and chords.
29.6 LRC files LRC files with the .lrc extension can be imported to display texts and chords.
29.7 MP3 files with embedded text SongBook+ can import texts from MP3 files if they are included in the ID3 tag in the “Lyrics3 v2.00” format.

SongBook+ User Manual 68
30 Contribution MIDI communication: The MIDI communication is based on sample code by Pete Goodliffe. Thank you, Pete, for publishing your sample code on the Internet. Further details can be found here: http://goodliffe.blogspot.com/2010/10/using-coremidi-in-ios-example.html Musical symbols: The musical symbols inserted using the annotation feature come from Linkware Graphics. Many thanks to Shirley Kaiser for publishing these symbols. Further details can be found here: http://linkwaregraphics.com/music/ In-app settings: The settings integrated in the app were implemented using “InAppSettingsKit”. Many thanks to Luc Vandal and Ortwin Gentz for development and publication. Further details can be found here: http://www.inappsettingskit.com OpenSSL: SongBook+ uses OpenSSL. Under the license terms, the following sentence must be mentioned: “This product includes software developed by the OpenSSL Project for use in the OpenSSL Toolkit (http://www.openssl.org/).”
31 Contact information If you have any questions or feedback about SongBook+, please visit us at http://www.songbookplus.com You can find a contact form here to send us a message, a list of frequently asked questions, download links for the App Store, video tutorials, the latest version of this document and more.
![PDA r Baum Station] Baum Station 24 -Y BOX 55 mm 1.8 0.2 0 ...](https://static.documents.pub/doc/80x56/61954e85387cb674053f254c/pda-r-baum-station-baum-station-24-y-box-55-mm-18-02-0-.jpg)


![[Baum Whiteman] 2013trends](https://static.documents.pub/doc/80x56/5451d6cbb1af9f7a248b4aba/baum-whiteman-2013trends.jpg)


