USER MANUAL 12+ 1 MAIN FEATURES X 720P POSITIONING AERIAL DRONE WITH ADJUSTABLE CAMERA 5UW-D ●Utilizes the 4-axis structure, enabling the drone to be even more flexible and speedy. It suitable for both spacious indoor & outdoor areas. ●Built-in 6-axis gyro stabilizer, barometer and optical flow sensor to ensure the accuracy of inflight position. ●Be capable of 360°stunt flip function. ●Headless function makes it easier for directional control. ●Auto take-off and landing function make it easier and safer to control. ●HD adjustable camera with real-time transmission function for getting the fun of aerial photography. ●Smartphone control is available. GYRO REMOTE CONTROL SERIES
Transcript
USER MANUAL
12+
1
MAIN FEATURES
X720P POSITIONING AERIAL DRONE WITH ADJUSTABLE CAMERA
5UW-D
●Utilizes the 4-axis structure, enabling the drone to be even more flexible and speedy. It suitable for both spacious indoor & outdoor areas.●Built-in 6-axis gyro stabilizer, barometer and optical flow sensor to ensure the accuracy of inflight position.●Be capable of 360°stunt flip function.●Headless function makes it easier for directional control.●Auto take-off and landing function make it easier and safer to control.●HD adjustable camera with real-time transmission function for getting the fun of aerial photography.●Smartphone control is available.
GYRO REMOTE CONTROL SERIES
Damjan
Textbox
NAVODILA ZA UPORABO
Damjan
Textbox
Safety Guide 1.Please store the small sized drone accessories in the place that is out of the reach of children. 2.This drone is very powerful. For all first-time flights, the left joystick must be slowly pushed up in order to prevent the drone from ascending too fast to avoid unnecessary collision and possible damage and injury. 3.When you finish the fly, please firstly turn off the power of the remote control, then turn off the power of the drone. 4. Keep the batteries out of high temperature / heat areas. 5. Take extra pre-caution to ensure the drone is with a minimum height of 15 feet from the pilot, crowd, or animals in order to avoid any injury during the flight operation. A minimum separation distance of 20cm must be maintained between the pilot and the device under any conditions. 6. This drone is recommended for user ages 12+. It should always under the visual of the pilot (or instructor) to ensure safety fly. 7. Non-rechargeable batteries should not be recharged; Batteries should be inserted with a correct polarity; Different types of batteries, new or used batteries should not be mixing. 8. When the drone is not in use, please remove the batteries from the remote control. 9. The supply terminals should not be short-circuited.10. To maximize the battery life, discharge the battery level to 40-50% (upon fully charged, use for flying for half of the total estimated flying time) if the drone will not be used for 10 days or more.11.Please keep a safe distance from the spinning propellers to avoid injury.12.To ensure the electromagnetic environment requirement of the aviation radio (station), it is forbidden to fly the drone in a radius of about 5000m against the circle centre. All users should also follow the regulation or rules set by the government within the territory.13.Only use the recommended transformer for the aircraft, and it is not part of the aircraft. Therefore, disconnect the transformer from the aircraft before cleaning. Check the cord, plug, enclosure and other parts of the transformer regularly. If any damages are found, please stop using it immediately unless it is repaired.14.Never look steadily at the laser beam due to the laser radiation.15.Attention: Drone assembly under adult supervision.16.Pilot should be taking the responsible for the safe operation: keep the safe distance from the crowds, property, other aircrafts users, and shall never fly the drone on top of the crowds. (> 12 persons)17.Open the battery cover of the toy with screwdriver.18.The packing has to be kept since it contains important information.
Repair and Maintenance1.Use dry and soft cloth to clean this product.2.Avoid exposing this product to heat.3.Do not immerse this product in water, otherwise, the electronic parts will be damaged.
-1-
Damjan
Textbox
VARNOST
Damjan
Textbox
POZOR! TA DALJINSKO VODENI KVADROKOPTER NI IGRAČA IN NI PRIMEREN ZA OTROKE MLAJŠE OD 14 LET! VARNOSTNA NAVODILA IN OPOZORILA Ker nimamo vpliva ali nadzora nad uporabo in vzdrževanjem izdelka, ne moremo sprejeti fizične, finančne ali teoretične odgovornosti, za morebitne poškodbe ali škodo na stvareh ali/in osebah, ki bi nastala s posredno ali neposredno uporabo izdelka! V PRIMERU TRČENJA ALI DOTIKA ROTORJEV S KAKŠNIM PREDMETOM TAKOJ IZKLJUČITE MOTOR QUADROKOPTERJA. KO SE ROTOJI PRISILNO USTAVIJO MED DELOVANJEM MOTORJA, SE MOTOR PREGREJE IN S TEM POŠKODUJE - TE POŠKODBE NISO IN NE MOREJO BITI PREDMET GARANCIJE ALI REKLAMACIJE!
Damjan
Textbox
VZDRŽEVANJE DRONA
Damjan
Textbox
1. Dron čistite samo s suho in mehko krpo. 2. Ne izpostavljajte drona vročini. 3. Ne izpostavljajte ga vlagi ali vodi, ker se lahko poškoduje elektronika drona. 4. Redno pregledujte dron. V primeru poškodb, drona ne smete uporabljati ampak ga prinesite na servis. Rezervni deli za vaš dron so na voljo.
The following items can be found Inside this product package:
4.Transformer used with the aircraft should be examined regularly, such as the cord, plug, enclosures and other parts. In case of any damages is found, please stop using it unless it is repaired or replaced.
Installation of Protective Gear
Insert the protective gear into the drone as shown.
Camera’s Installation and Dismantling Methods
Camera’s installation procedures:
1.Connect the camera’s wire connector to the drone.
2.Place the camera into the drone and rotate the camera counterclockwise to lock.
Camera’s dismantling procedures:
1.Rotate the camera in the clockwise direction.
2.Take out the camera upward and disconnect the wire connector from the drone.
USER MANUAL
12+
1
MAIN FEATURES
X720P POSITIONING AERIAL DRONE WITH ADJUSTABLE CAMERA
5UW-D
Utilizes the 4-axis structure, enabling the drone to be even more flexible and speedy. It can fly indoor as well as outdoor.
Built-in 6-axis gyro and barometer stabilizer to ensure accurate positioning in-flight.
Be capable of 360°stunt flip function.Headless function makes it easy for directional control.Auto take-off and landing function makes it more easy and safe
to control.HD adjustable camera with real-time transmission function for getting
the fun of aerial photography.With flight-track function, the drone can fly in accordance with the
route which tapped on the screen when controlled by mobile phone.
GYRO REMOTE CONTROL SERIES
Package Description
-2-
Pisarna-BTC
Textbox
Pisarna-BTC
Textbox
VSEBINA PAKETA
Pisarna-BTC
Textbox
V PAKETU SE NAHAJAJO NASLEDNJI IZDELKI:
Pisarna-BTC
Textbox
Vgradnja zaščite rotorjev
Pisarna-BTC
Textbox
Montirajte zaščite rotorjev kot kaže slika na levi.
Pisarna-BTC
Textbox
MONTAŽA IN DEMONTAŽA KAMERE DRONA
Pisarna-BTC
Textbox
MONTAŽA KAMERE
Pisarna-BTC
Textbox
DEMONTAŽA KAMERE
Pisarna-BTC
Textbox
Priključite kamero na dron.
Pisarna-BTC
Textbox
Vstavite kamero v dron in jo zavrtite za 90 stopinj.
Pisarna-BTC
Textbox
Zavrtite kamero za 90 stopinj, da se loči od drona.
Pisarna-BTC
Textbox
Odklopite kamero od drona in jo odstranite.
Installation of Mobile Phone Retaining Clip
Mobile phone retaining clip’s attachment method:
1.Pull up the phone clip cover from behind the remote control.
3. Press the handles to adjust the jaws.
2.Insert the phone clip holder into the connector at the top of the remote control.
Battery Changing and Charging Methods for Drone
4.After charging completed, replace the battery into the drone.
1.Press the power button on the top of the drone to make sure the drone is “OFF”.
2.Press the fixed components at the bottom of the battery and pull out the battery.
3.Connect the battery power cord to the USB Charging Cable, then connect the USB interface to the computer. (The indicator light of the drone will turn on while charging, and turn off when charging completed. It takes about 130 minutes to completely charge the battery.)
-3-
Pisarna-BTC
Textbox
MONTAŽA DRŽALA ZA TELEFON
Damjan
Textbox
DEMONTAŽA IN MONTAŽA
Damjan
Textbox
1. Potegnite nosilec za telefon z daljinskega upravljalnika kot kaže slika.
Pisarna-BTC
Textbox
2. Vstavite držalo za telefon v luknjo na vrhu daljinca.
Pisarna-BTC
Textbox
3. Za namestitev telefona stisnite ščipalke na držalu in namestite telefon.
Damjan
Textbox
MENJAVA BATERIJE DRONA IN POLNJENJE BATERIJE DRONA
Damjan
Textbox
1. Preverite, da je dron res izključen.
Damjan
Textbox
2. Pritisnite na baterijo z obeh strani in jo potegnite ven iz drona.
Damjan
Textbox
3. Povežite USB polnilec z baterijo in na drugi strani priključek polnica z USB vhodom na računalniku ali polnilcu mobilnega telefona. Med polnjenjem sveti LED lučka na polnilcu. Ko je baterija polna LED lučka ugasne. Čas polnjenja prazne baterije znaša okoli 130 minut.
Damjan
Textbox
4. Ko napolnete baterijo jo ponovno vstavite v dron.
Understanding Your Remote Control
Remote control’s button function description:
Mobile Phone Retaining Clip
Power ON/OFF
Right joystickPress and hold to enter/exit headless mode.Press to change high/low speed.
Left joystick Keep pushing in until
trimming control finished. To clear all the trimming
setting,keep pushing and press the power
button at the same time.
The charging time is about 130 minutes, hover flight time is approximately 7 minutes.
Precautions as follows during charging of battery: - Avoid placing the active batteries in places with direct exposure, sunlight and high temperatures. For example, naked light or electrical equipment installations; otherwise it may cause damages or explosions. - Avoid immersing the batteries in the water. The batteries shall be stored in a cool and dry place. - Avoid dismantling the batteries. - During the charging of battery, avoid leaving the charging place. - Rechargeable batteries should be removed from the toy before being charged. - Rechargeable batteries are only to be charged under adult supervision. - Exhausted batteries are to be removed from the toy. - Caution: Risk of explosion if battery replaced by an incorrect type, dispose of used batteries according to the instructions.
Upper adjustmentcamera angle
Down adjustment camera angle
360°Stunt flip
Auto take-off and landing
Photo
Video
-4-
Damjan
Textbox
ČAS POLNJENJA BATERIJE DRONA JE OKOLI 130 MINUT, ČAS LETENJA DRONA PA OKOLI 7 - 8 MINUT.
Pisarna-BTC
Textbox
DODATNI NAPOTKI PRI POLNJENJU BATERIJE: Nikoli ne postavite baterije direktno na sonce ali je izpostavite vročini, ker se lahko baterija poškoduje in skrajnem primeru tudi eksplodira. Pazite, da baterija nikoli ne pride v stik z vlago ali vodo. Shranjujte baterije v suhem in hladnem prostoru. Nikoli ne poskušajte odpreti ali razstaviti baterije. Med polnjenjem imejte baterijo vedno pod nadzorom. Pri neuporabi drona, vedno odstranite baterijo in jo tudi napolnite. Polnjenje baterije naj izvaja samo odrasla oseba.
Pisarna-BTC
Textbox
DALJINSKI UPRAVLJALNIK
Damjan
Textbox
Pisarna-BTC
Textbox
Držalo za mobilni telefon
Pisarna-BTC
Textbox
VKLOP / IZKLOP
Pisarna-BTC
Textbox
Desna ročka - letenje levo / desno; naprej / nazaj. S pritiskom na ročko za 3 sekunde dobimo headless način letenja; S kratkim pritiskom na ročko spremenimo hitrost letenja ( en pisk počasno letnje / dva piska hitro letenje )
Pisarna-BTC
Textbox
Leva ročka - ročka za plin in za nastavitve letenja.
Pisarna-BTC
Textbox
Fotografija
Pisarna-BTC
Textbox
Nastavitev kota kamere navzdol.
Pisarna-BTC
Textbox
Nastavitev kota kamere navzgor.
Pisarna-BTC
Textbox
Gumb za luping
Pisarna-BTC
Textbox
S pritiskom na ta gumb dron samodejno vzleti / pristane.
Battery installation for remote control:
Battery cover
4 x AA Batteries
Battery Installation Method: Open up the battery cover at the back of the remote control. Correctly place 4 x AA alkaline batteries in the battery box in strict adherence to the polarity instructions ( batteries are not included).
1. During the battery installation, it must be ensured that the polarities of the batteries are matched with that of the battery box. No battery shall be installed with the opposite polarity.2. Please do not use new and old batteries together.3. Please do not use different types of batteries together.4. Do not use rechargeable batteries.
Flight Preparation and Turning the Drone ON and OFF
1. Flight preparation
1:Press the power button of the remote control.
2:Install the drone battery in place.
Step
Step
-5-
Pisarna-BTC
Textbox
VSTAVLJANJE BATERIJ V DALJINCA:
Pisarna-BTC
Textbox
Pokrov za baterije
Pisarna-BTC
Textbox
AA Alkalne baterije
Pisarna-BTC
Textbox
Vstavljanje baterij v daljinca: na zadnji strani daljinca doprite pokrov z baterije. Pravilno vstavite 4 x AA 1,5V alkalne baterije in pri tem pazite na polariteto. (AA alkalne baterije niso priložene!)
Pisarna-BTC
Textbox
1. Pazite na polariteto pri vstavljanu baterij v daljinski upravljalnik. Če jih ne boste vstavili pravilno, daljinec ne bo deloval. 2. Ne mešajte starih in novih baterij. 3. Ne mešajte različnih tipov baterij. 4. NIKOLI ne uporabljajte polnilnih baterij!
Damjan
Textbox
Priprava na letenje in vklop / izklop drona
Damjan
Textbox
Priprava na letenje
Damjan
Textbox
1. Vklopite daljinec
Damjan
Textbox
2. Vstavite baterijo v dron.
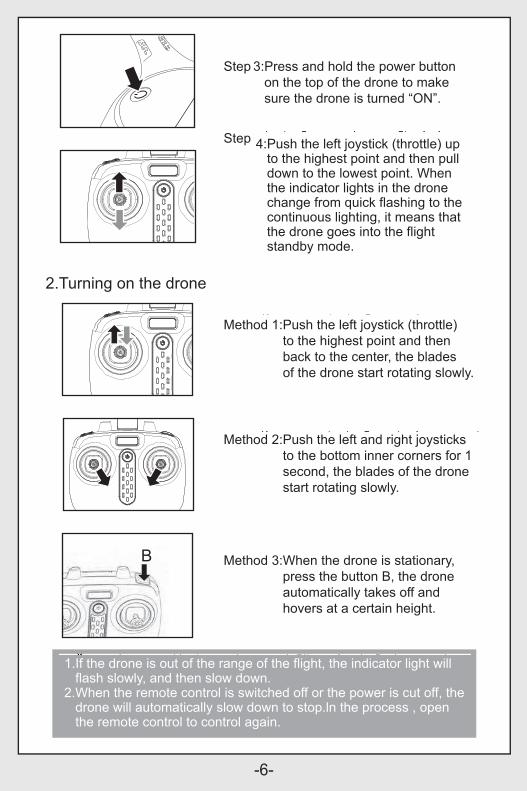
4:Push the left joystick (throttle) up to the highest point and then pull down to the lowest point. When the indicator lights in the drone change from quick flashing to the continuous lighting, it means that the drone goes into the flight standby mode.
3:Press and hold the power button on the top of the drone to make sure the drone is turned “ON”.
Method 1:Push the left joystick (throttle) to the highest point and then back to the center, the blades of the drone start rotating slowly.
2.Turning on the drone
Method 2:Push the left and right joysticks to the bottom inner corners for 1 second, the blades of the drone start rotating slowly.
Method 3:When the drone is stationary, press the button B, the drone automatically takes off and hovers at a certain height.
B
Step
Step
1.If the drone is out of the range of the flight, the indicator light will flash slowly, and then slow down.2.When the remote control is switched off or the power is cut off, the drone will automatically slow down to stop.ln the process , open the remote control to control again.
-6-
Damjan
Textbox
3. Vključite dron, tako da držite gumb pritisnjen ca. 2 sekundi. Dron je prižgan, ko utripajo LED lučke.
Damjan
Textbox
4. Potisnite levo ročko za plin do konca naprej in do konca nazaj. Ko LEd lučke na dronu prenehajo utripati, sta dron in daljinec povezana in dron je pripravljen za letenje.
Damjan
Textbox
Zagon rotorjev
Damjan
Textbox
1. Možnost: potisnite levo ročko na daljincu do konca naprej in do konca nazaj in rotorji se bodo pričeli počasi vrteti.
Damjan
Textbox
2. Možnost: Potisnite levo in desno ročico za 1 sekundo kot kaže slika in rotorji se bodo pričeli počasi vrteti.
Damjan
Textbox
3. Možnost: Pritisnite gumb B in dron se bo avtomatsko vključil in dvignil na določeno višino ter tam lebdel.
Damjan
Textbox
1. Če se dron znajde izven dosega daljinca, bodo lučke na njem pričele utripati in dron bo sam počasi pristal. 2. Če izključite daljinca med letom, bo dron sam od sebe pristal.
Method 2:Push the left and right joysticks to the bottom inner corners for 1 second, and the drone can be turned off.
3. Turning off the drone
Method 1:Push the left joystick (throttle) to the lowest level and hold for 2 to 3 seconds, the drone can then be turned off.
Method 3:When the drone is in flight, press the button B, the drone will descend to the ground and lands.
B
Drone Controlling Diagram
Ascending and descending control Forward and backward control
Operting direction
When the left joystick (throttle) is pushed upwards or downwards, the drone will ascend or descend correspondingly.
When the right joystick (rudder) is pushed upwards or downwards, the drone will fly forward or backward correspondingly.
-7-
Damjan
Textbox
Zaustavitev rotorjev
Damjan
Textbox
1. Možnost: Levo ročko na daljincu potisnite do konca navzdol in držite 2 - 3 sekunde in rotorji se bodo prenehali vrteti.
Damjan
Textbox
2. Možnost: Potisnite levo in desno ročko navzdol kot kaže slika za 1 sekundo in rotorji se bodo zaustavili.
Damjan
Textbox
3. Možnost: Med letom lahko pritisnete gumb B in dron bo sam od sebe pristal in rotorji se bodo zaustavili.
Damjan
Textbox
NAVODILA ZA LETENJE Z DRONOM
Damjan
Textbox
FUNKCIJE
Damjan
Textbox
Dviganje in spuščanje drona
Damjan
Textbox
Letenje naprej / nazaj
Damjan
Textbox
Leva ročka na daljincu: potisk naprej se dron dviguje / potisk k sebi - dron se spušča.
Damjan
Textbox
Desna ročka na daljincu: potisk naprej pomeni da bo dron letel naprej in obratno če potisnemo ročko k sebi.
Left turning and right turning control
Left side flying and right side flying control
When the left joystick (throttle) is pushed towards the left or right, the drone will turn left or right correspondingly.
When the right joystick (rudder) is pushed towards the left or right, the drone will fly sideways on the left or right correspondingly.
Trimming operation
Left/right side flight trim control
Left/right side turning trim control
If the drone automatically flies forward/backward while hovering, press in the left joystick and at the same time push the right joystick backward/forward slightly to fine tune the direction. Don’t release the left joystick until the drone is flying in a stable state.
If the drone automatically flies towards the left/right side while hovering, press in the left joystick and at the same time push the right joystick right/left slightly to fine tune the direction. Don’t release the left joystick until the drone is flying in a stable state.
If the drone automatically rotates and flies towards the left/right side while hovering, press in the left joystick and at the same time move it to the right/left slightly to fine tune the direction. Don’t release the left joystick until the drone is flying in a stable state.
Forward and backward trim control
-8-
Damjan
Textbox
Vrtenje okoli svoje osi
Damjan
Textbox
Bočno letenje levo / desno
Damjan
Textbox
Leva ročka na daljincu: če jo potisnemo v levo se bo dron zavrtel levo okoli svoje osi in obratno če jo potisnemo v desno.
Damjan
Textbox
Desna ročka na daljincu: če jo potisnemo v levo bo dron bočno letel v levo. če jo potisnemo v desno pa bo letel bočno desno.
Damjan
Textbox
TRIMANJE DRONA
Damjan
Textbox
Trimanje naprej / nazaj
Damjan
Textbox
Če dron ne lebdi na mestu ampak se sam od sebe premika naprej, to nastavimo tako da pritisnemo levo ročko navzdol (ne spustimo ročke dokler dron ne lebdi na mestu) in istočasno večkrat potisnemo levo ročko k sebi, dokler dron ne lebdi na mestu. Obratno naredimo, če dron sam od sebe leti nazaj.
Damjan
Textbox
Trimanje levo / desno
Damjan
Textbox
Če se dron samo od sebe premika levo / desno, to nastavimo tako, da pritisnemo levo ročko in jo držimo pritisnjeno, obenem pa pomikamo desno ročko v levo ali desno, dokler dron ne lebdi na mestu.
Damjan
Textbox
Trimanje vrtenja levo /desno
Damjan
Textbox
Če se dron sam od sebe vrti okoli svoje osi v levo / desno, potem pritisnite levo ročko, jo držite pritisnjeno in obenem jo pomaknite v levo ali desno dokler se vrtenje drona ustavi. Ko ste zadovoljni z nastavitvijo spustite levo ročko.
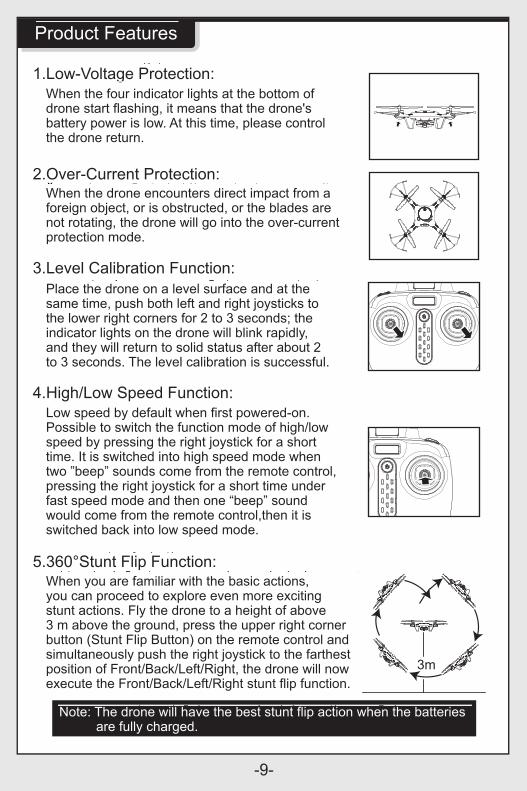
Product Features
1.Low-Voltage Protection:When the four indicator lights at the bottom of drone start flashing, it means that the drone's battery power is low. At this time, please control the drone return.
2.Over-Current Protection:When the drone encounters direct impact from a foreign object, or is obstructed, or the blades are not rotating, the drone will go into the over-current protection mode.
3.Level Calibration Function:Place the drone on a level surface and at the same time, push both left and right joysticks to the lower right corners for 2 to 3 seconds; the indicator lights on the drone will blink rapidly, and they will return to solid status after about 2 to 3 seconds. The level calibration is successful.
Low speed by default when first powered-on. Possible to switch the function mode of high/low speed by pressing the right joystick for a short time. It is switched into high speed mode when two ”beep” sounds come from the remote control, pressing the right joystick for a short time under fast speed mode and then one “beep” sound would come from the remote control,then it is switched back into low speed mode.
4.High/Low Speed Function:
Note: The drone will have the best stunt flip action when the batteries are fully charged.
3m
5.360°Stunt Flip Function:When you are familiar with the basic actions, you can proceed to explore even more exciting stunt actions. Fly the drone to a height of above 3 m above the ground, press the upper right corner button (Stunt Flip Button) on the remote control and simultaneously push the right joystick to the farthest position of Front/Back/Left/Right, the drone will now execute the Front/Back/Left/Right stunt flip function.
-9-
Pisarna-BTC
Textbox
DRON
Pisarna-BTC
Textbox
1. Napetostna zaščita
Pisarna-BTC
Textbox
Kadar zadnji dve lučki na dronu pričneta utripati, pomeni da je baterija skoraj prazna. V tem primeru pripeljite dron nazaj. Dron bo sam od sebe pristal preden mu zmanjka elektrike.
Pisarna-BTC
Textbox
2. Zaščita pregretja
Pisarna-BTC
Textbox
Če se dron zaleti v kakšno oviro in se rotorji prisilno ustavijo, se bo dron sam prestavil v zaščitjo pregretja, da ne pride do okvare motorjev.
Pisarna-BTC
Textbox
3. Kalibracija drona
Pisarna-BTC
Textbox
Postavite dron na ravna tla in nato potisnite obe ročki v levi spodnji kot za 2 - 3 sekunde: LED lučke na dronu pričnejo hitro utripati, po ca. 2 - 3 sekundah se dron povrne v normalni status. Kalibracija je končana.
Pisarna-BTC
Textbox
4. Hitro / Počasi funkcija
Pisarna-BTC
Textbox
Ko prvič prižgete dron in daljinca, je le ta v "počasnem" stanju. Če na kratko pritisnete desno ročko na daljincu, zaslišite 1 x pisk ali 2 x pisk. En pisk je počasni modus in dva piska pomeni hiter modus. Se pravi, kadarkoli na kratko pritisnete na desno ročko, zamenjate hitrost drona, odvisno od piskov, ki jih slišite.
Pisarna-BTC
Textbox
5. 360° Luping funkcija
Pisarna-BTC
Textbox
Pri izvajanju lupingov, svetujemo, da je dron vsaj 3 metre nad tlemi. Pritisnite gumb na daljincu, ki se nahaja spredaj desno - spodnji. nato potisnite desno ročko v katerokoli smer želite, da dron naredi luping in dron bo sam od sebe naredil luping.
Pisarna-BTC
Textbox
POZOR: Lupinge delajte samo, ko je baterija napolnjena.
6.Photo/ Video Shooting Function:①Photo shooting function: Press the Photo button, the drone indicator and the red indicator light on the camera will flash once when the photo has been taken.
②Video shooting function: Press the Video button, the drone indicator and the indicator light on the camera will flash twice, and then turn long bright, it indicates the video is recording, press the Video button again, the indicator light on the drone is long bright, indicating the recording is complete.
7.Adjustable function of camera
As shown on the right, press the button A or B to adjust the camera angle in corresponding upward or downward.
After using the left joystick (throttle) to control the ascending/descending flight of the drone, release the left joystick (throttle) and the drone will hover at that height when the joystick is released.
8.Optical Flow Hover & Auto Hover Function:①Optical flow hover function:
②Auto hover function:
When the drone is turned on, the drone will automatically start the optical flow positioning function when hovering in the air, and the drone will remain stationary at a certain point.Note:1.Achieve fixed-point accuracy of about 0.5 meters. 2.If the light is dark, the ground reflects, the height is greater than 12 meters, or the wind is above level 2, the optical flow positioning will influenced under these conditions, at this time the indicator light of the drone will be flashing three times.
A
B
-10-
Damjan
Textbox
Snemanje fotografij in videa
Damjan
Textbox
1. Če na daljincu pritisnete gumb Foto, bo lučka na dronu zasvetila enkrat kar pomeni, da je kamera posnela fotografijo. 2. Če pritisnete gumb Video, bo lučka na dronu 2x utripnila in nato konstantno gorela dokler snemate video.
Pisarna-BTC
Textbox
NASTAVITVE KAMERE
Pisarna-BTC
Textbox
Kot kaže leva slika lahko premikate kot kamere s pritiski na gumb A in B; gor in dol.
Pisarna-BTC
Textbox
OPTIČNO LEBDENJE IN AVTOMATSKO LEBDENJE V ZRAKU
Pisarna-BTC
Textbox
OPTIČNO LEBDENJE
Pisarna-BTC
Textbox
Ko je dron vključen, je optično lebdenje avtomatsko vklopljeno. To pomeni, da bo dron lebdel na določeni točki, ki jo določi optično.
Pisarna-BTC
Textbox
1. Točnost optičnega lebdenja na določeni točki je +- 0,5m. 2. Če je svetloba slaba, dron je nad 12 metri in veter je močnejši od stopnje 2, bo to vplivalo na optično lebdenje. V tem primeru vas dron opozori na to s tem, da luči utripajo 3x.
Pisarna-BTC
Textbox
AVTOMATSKO LEBDENJE
Pisarna-BTC
Textbox
Ko dvignete dron na želeno višino, spustite levo ročko in dron bo sam od sebe lebdel na tej višini.
●Push the left joystick (throttle) on the remote control up to the farthest position and then pull down to the farthest position. When the remote control issues a long “beep” sound, it means the frequency and defining forward direction functions are completed.
②Toggling between headless function and normal function:
9.Headless Function:
①Defining forward direction:
●Press on the power button of the remote control.
●Connect the battery to the drone, press the power button of the drone, and adjust the specified direction of the drone’s head under the headless mode as the new forward direction.
●After the drone is matched with the corresponding frequency, the drone would be in normal pattern by default. At this time the indicator light on the drone would be in a state of on for a long time. After pressing in on the right joystick of the remote control for 2 seconds, the remote control would make a sound of “beep, beep, beep” to show that it has entered into a state of headless mode. Press in the right joystick for 2 seconds then a long sound of “beep” would be heard to show an exit status. (When under the state of headless mode, four indicator lights on the drone flash slowly once every four seconds).
Front
Back
Left Right
-11-
Pisarna-BTC
Textbox
Headless funkcija
Pisarna-BTC
Textbox
Določanje funkcije naprej:
Pisarna-BTC
Textbox
Pritisnite gumb za vklop/izklop na daljincu.
Damjan
Textbox
Pritisnite gumb za vklop/izklop drona za dve sekundi, da se dron prižge in določite glavo drona pod headless funkcijo, kot novo glavo drona.
Damjan
Textbox
Potisnite ročko za plin na daljincu do konca naprej in do konca nazaj. Ko zaslišite daljši pisk na daljincu pomeni, da se je dron povezal z daljincem in določil smer naprej.
Damjan
Textbox
Menjava normalne in headless funkcije na daljincu
Damjan
Textbox
Ko povežemo dron in daljinec je dron vedno v normalnem stanju in LED lučke gorijo brez utripanja. Če pritisnemo na desno ročko na daljincu za 2 sekundi, bo daljinec 3 x zapiskal, kar pomeni, da je dron v headless modusu in LED lučke na dronu utripnejo vsake 4 sekunde. Da dron povrnemo v normalno stanje ponovno pritisnemo na desno ročko za 2 sekundi in ko zaslišimo daljši pisk je dron ponovno v normalnem stanju.
Right
Back
Front
Left
③Calibration for the definition of the front:
10.Wireless Real-Time Transmission Function
Front
Back
Left Right
①Downloading the installation software
For Android phones,download and install the SYMA FLY APP by visitingthe www.symatoys.com or by scanning the QR code.For IOS Apple phones,download and install the SYMA FLY APP by visitingthe App Store or by scanning the QR code.
Tips: QR codes are provided on the packaging box and at the bottom of the user manual. Please visit website www.symatoys.com or the App Store/Google Play to obtain the newest SYAM FLY App.
②For more information on the connection, see the APP operating instructions.
When the drone encounters a direct impact with foreign objects in the headless mode, if there is an occurrence of deviation of the defined direction, it is only required to push both the left and right joysticks to the bottom left corners simultaneously after placing the flying direction of the drone in the correction position. When the LED indicator of the drone turn to solid after slowly flashing for 3 seconds, it indicates the calibration is complete.
●Under the headless mode, the operator does not need to differentiate the head position of the drone, and only needs to control the drone’s direction front/ back/left/right by using the right joystick direction on the remote control.
-12-
Damjan
Textbox
Headless modus pomeni, da bo dron vedno, kadar boste potisnili desno ročko naprej letel stran od vas neglede v katero smer bo obrnjen. Torej tudi če je z glavo / kamero obrnjen proti vam in pritisnete desno ročko naprej, se ne bo pomikal proti vam ampak bo letel stran od vas.
Damjan
Textbox
Kalibracija drona pri definiciji naprej
Damjan
Textbox
Kadar pride to trka drona z predmetom v headless modusu in pride do motnje v smeri leta drona, potem to popravimo tako, da obe ročki na daljincu potisnemo levo navzdol, po tem ko smo dronu popravili smer letenja. Ko LED lučke na dronu utripajo 3 sekunde in potem zopet normalno svetijo, pomeni da je kalibracija končana.
Damjan
Textbox
BREZŽIČNI PRENOS SLIKE NA MOBILNI TELEFON
Damjan
Textbox
Prenos aplikacije iz interneta na telefon
Damjan
Textbox
Za telefone z OS Android namestite aplikacijo SYMA FLY APP na www.symatoys.com ali poskenirajte QR kodo na škatli. Za IOS Apple telefone namestite SYMA FLY APP v App Store ali poskenirajte QR kodo na škatli.
Damjan
Textbox
Opomnik: QR kode so na škatli v kateri je bil vaš dron in na koncu navodil za uporabo. Obiščite www.symatoys.com ali App Store/Google Play, za najnovejšo SYMA GO aplikacijo.
Pisarna-BTC
Textbox
Za več informacij prosimo poglejte navodila v APP aplikaciji.
QR code for androidsystem
QR code for appleiOS system
The company has the right of final interpretation of this instruction manual statement.
Sell area:Europe
ManufacturerGuangdong Syma Model drone Industrial Co., Ltd.
The Crossing of No.2 West Xingye Road and North Xingye Road,Laimei.Industrial Park Chenghai District Shantou City Guangdong China.