23
Model S660 Sound Level Analyzer Users Manual

Model S660
Sound Level Analyzer
Users Manual

Table Of Contents S660 Users Manual
www.anaheimscientific.com i
Introduction ��������������������������������������������������������������� 1
Safety Precautions ���������������������������������������������������������1
Windscreen �������������������������������������������������������������������2
Product Contents and Inspection ��������������������������������������2
Optional Accessories �������������������������������������������������������2
Instrument Controls ���������������������������������������������������� 3
Input Interface ����������������������������������������������������������� 4
Microphone �������������������������������������������������������������������4
Microphone Extension Cables �������������������������������������������4
Output Interface ��������������������������������������������������������� 5
AC Output ���������������������������������������������������������������������5
DC Output���������������������������������������������������������������������5
ON / OFF / Display Contrast ����������������������������������������� 6
Measurement Parameters �������������������������������������������� 6
Measurement Parameter Table �����������������������������������������7
Non-Integrating Noise Measurement ������������������������������� 10
Integrating Noise Measurement ������������������������������������� 10
Large Font Display ������������������������������������������������������� 12
Integrating Measurement Time Settings �������������������������� 12
A, C, Z Weightings ������������������������������������������������������� 13
Maintenance ������������������������������������������������������������ 13
General Information ����������������������������������������������������� 13
Battery Replacement ���������������������������������������������������� 13
S660 User Manual_without cover.indd 1 9/20/2010 11:41:24 AM

S660 Users Manual Table Of Contents
Anaheim Scientific ii
Cleaning ��������������������������������������������������������������������� 14
End of Life ������������������������������������������������������������������ 14
Technical Specifications ��������������������������������������������� 14
Service ������������������������������������������������������������������� 16
Storage ���������������������������������������������������������������������� 16
Non-Warranty Service ��������������������������������������������������� 16
Warranty �������������������������������������������������������������������� 17
Calibration ��������������������������������������������������������������� 18
Acoustic Calibration Mode���������������������������������������������� 18
Acoustical Calibration with CAL610 ��������������������������������� 19
S660 User Manual_without cover.indd 2 9/20/2010 11:41:25 AM

S660 Users Manual
www.anaheimscientific.com1
IntroductionAnaheim Scientific’s Model S660 is a Class 1 Integrating Sound Level
Meter. This superior Class 1 Sound Meter offers a wider frequency range and a tighter tolerance over a Class 2 unit. This integrating meter sums the frequency-weighted noise to give sound exposure levels. Designed specifically for measuring environmental, occupational and product noise.
Model S660 meets the current International standard for sound level meter performance IEC 61672-1:2002 Class 1. This standard directs the inclusion of an A-frequency-weighting filter and frequency weightings of C and Z (zero) frequency weightings.
Safety PrecautionsAvoid taking measurements in hot, humid or wet places. Be sure the
temperature and humidity is within the limits indicated in the Technical Specification section of this manual.
Avoid making measurements in the presence of explosive gas, combustible gas, steam or excessive dust.
The following symbols are used in this manual:
Caution: refer to the instruction manual; improper usage may damage the analyzer or its components
Meter is in compliance to the CE mark standards
Note: Read the recommendation which follows this symbol and the instructions in this manual:
CAUTIONIf the user does not observe this warning and/or operation instruction, it is possible to either damage the instrument components or the user.
Do not operate the instrument in a hot temperature or humid environment outside its specifications. Refer to Technical Specification page.
S660 User Manual_without cover.indd 1 9/20/2010 11:41:25 AM

S660 Users Manual
Anaheim Scientific 2
WindscreenWind blowing across the microphone can potentially add extraneous
noise to a measurement. Position the provided windscreen on the microphone to prevent undesirable signals.
Keep the microphone dry and avoid severe vibration.
Figure 1
Product Contents and InspectionThis instrument has been checked mechanically and electrically
prior to shipment. Confirm the instrument is undamaged. If damage is suspected, submit a claim to the dealer immediately. Check the packaged contents according to this list:
Model S660 Sound Level Meter
User’s manual
Switching AC/DC power supply:
100V ~ 240V AC to DC 5V/1A
Carrying case
4 batteries 1.5 V
LR6 – AA – AM3 – MN 1500
60mm diameter windscreen
Optional AccessoriesModel CAL601: Sound level calibrator, 94 and 114dB
Model RSCBL3: RS-232 cable
Model MC15: 5 m (15 ft) microphone extension cable
Model MC60: 20 m (60 ft) microphone extension cable
Figure 2
S660 User Manual_without cover.indd 2 9/20/2010 11:41:32 AM

S660 Users Manual
www.anaheimscientific.com3
Instrument Controls
1. Microphone 1A. Preamplifier.
2� Turns on the power (press a
second more) or carries on the reset to the
instrument�
3� Turns off power to the unit.
4� Deletes the current measurement
result�
5� Press the this button once to turn
on the LCD backlight. The LCD backlight
automatically turns off after 15 seconds.
6. Liquid Crystal Display.
7� Enter the next menu or confirm the
current input
8� Exit to the upper menu from the
current interface
9� Output stops current measurements
10� Start or pause the integrated
measurement
11� Increase the parameter where the
cursor is located by 1. Press it to increase the
parameter upwards continually
12� Decrease the parameter where the
cursor is located by 1. Press it to decrease the
parameter downwards continually
13� Move the cursor to the right. Press it
to move the cursor right continually
14� Move the cursor to the left. Press it to
move the cursor left continually
15� Set up the auto backlight shut-off
time. Change from 5 to 95 secondsFigure 3
S660 User Manual_without cover.indd 3 9/20/2010 11:41:34 AM

S660 Users Manual
Anaheim Scientific 4
Input Interface
MicrophoneThe input uses an X9-6Z signal input receptacle. The receptacle pins
are arranged as shown below. The pins have the following functions:
Pin 1 Power supply
Pin 2 Null
Pin 3 Signal input
Pin 4 Null
Pin 5 Signal ground
Pin 6 Null
On the input receptacle, pin 1 is the power supply pin that the analyzer uses to transmit power to the sensor (36 V, 2 mA max.). Inside this power supply, a 2 kΩ current limiting resistor is connected in series. The signal input pin receives the input electrical signal, in which a DC isolated capacitor is connected (Maximum input voltage: 10 V (RMS), input impedance: 150 kΩ, input capacitor: ≤100 pF). Two optional extension cables are available to place the microphone away from the unit: up to 5m (15 ft) Model MC15 or up to 20m (60 ft) Model MC60.
Microphone Extension CablesTwo optional microphone extension cables are available. Use these
to place the microphone strategically to avoid measurement deviation caused by possible reflection effects. The cable extends the microphone for exact placement for correct measurements.
1. Turn the power off to the Model S660.
2. Turn the preamplifier and microphone counterclockwise to be separated from the main body.
3. Connect the extension cable to the microphone and main body.
Figure 4
Figure 5
S660 User Manual_without cover.indd 4 9/20/2010 11:41:35 AM

S660 Users Manual
www.anaheimscientific.com5
Output Interface
AC OutputThe AC signal output corresponds to the frequency weighting (Figure
6)
Output voltage: 1Pa sound pressure=15mV.
Output impedance: approx. 1kΩ
Load impedance: more than 100kΩ
Load capacitance: less than 100 pF
DC OutputThe DC signal’s output is corresponding to the frequency weighting
(Figure 6)Output voltage: Approx. 20mV/dB
DC output is provided by the second PIN of RJ45, pin definition is shown in Figure 5.
DC OUT: the output is same as the bargraph display.
Output pin definition is as following:
Pin number position from right to left (1~8).
Pin 1 is Ground
Pin 2 is Signal
Pin 3~8 null
Signal
Ground
output receptacle 3.5mm output plugFigure 7Figure 6
S660 User Manual_without cover.indd 5 9/20/2010 11:41:36 AM

S660 Users Manual
Anaheim Scientific 6
ON / OFF / Display ContrastPress power button more than one second to turn on the
instrument. Model S660 starts up in initial list display mode. Select or key to enter into either Measurement or Calibrate mode. Press
the pushbutton to confirm measurement or calibration. To return
to the display mode of initial display, press the pushbutton.
Press the pushbutton to set the backlight timing between 5~95
seconds.
LCD contrast setup: Press or pushbuttons to set the LCD contrast between 0 ~ 25.
Measurement ParametersModel S660 is a high performance unit that conforms to international
IEC61672 Class 1 Integrating Sound Level Meter standards. It performs the time-weighting measures of Fast (F), Slow (S) and Impulse (I). As well as the Frequency weighting measurements of A, C Z which can be performed simultaneously.
Plus it also measures: Lxyi, Lxyp, Lxeq, Lxmax, Lxmin, LAE, Lcpeak, Lzpeak using A, C, Z frequency weights as well as F, S, I time weightings. These can be performed simultaneously to survey many kinds of targets.
Figure 8
S660 User Manual_without cover.indd 6 9/20/2010 11:41:38 AM
S660 Users Manual
www.anaheimscientific.com7
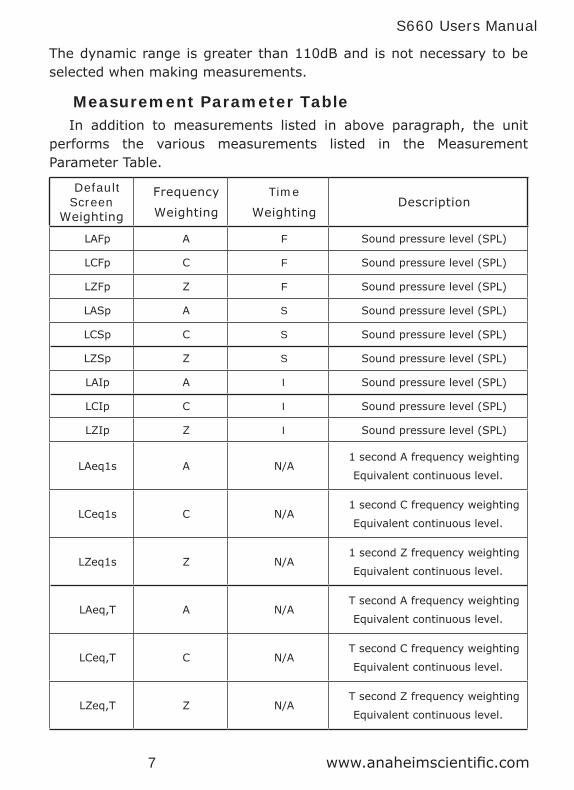
The dynamic range is greater than 110dB and is not necessary to be selected when making measurements.
Measurement Parameter Table In addition to measurements listed in above paragraph, the unit
performs the various measurements listed in the Measurement Parameter Table.
Default Screen
Weighting
Frequency
Weighting
Time
WeightingDescription
LAFp A F Sound pressure level (SPL)
LCFp C F Sound pressure level (SPL)
LZFp Z F Sound pressure level (SPL)
LASp A S Sound pressure level (SPL)
LCSp C S Sound pressure level (SPL)
LZSp Z S Sound pressure level (SPL)
LAIp A I Sound pressure level (SPL)
LCIp C I Sound pressure level (SPL)
LZIp Z I Sound pressure level (SPL)
LAeq1s A N/A1 second A frequency weighting
Equivalent continuous level.
LCeq1s C N/A1 second C frequency weighting
Equivalent continuous level.
LZeq1s Z N/A1 second Z frequency weighting
Equivalent continuous level.
LAeq,T A N/AT second A frequency weighting
Equivalent continuous level.
LCeq,T C N/AT second C frequency weighting
Equivalent continuous level.
LZeq,T Z N/AT second Z frequency weighting
Equivalent continuous level.
S660 User Manual_without cover.indd 7 9/20/2010 11:41:39 AM

S660 Users Manual
Anaheim Scientific 8
Default Screen
Weighting
Frequency
Weighting
Time
WeightingDescription
LAeq A N/AEquivalent continuous level for
the duration of the measurement.
LCeq C N/AEquivalent continuous level for
the duration of the measurement.
LCeq Z N/AEquivalent continuous level for
the duration of the measurement.
LAFmax A FMax. LAFp value detected
within the elapsed time.
LAFmax C FMax. LCFp value detected
within the elapsed time.
LAFmax Z FMax. LZFp value detected
within the elapsed time.
LAFmax A SMax. LASp value detected
within the elapsed time.
LAFmax C SMax. LCSp value detected
within the elapsed time.
LAFmax Z SMax. LZSp value detected
within the elapsed time.
LAFmax A IMax. LAIp value detected
within the elapsed time.
LAFmax C IMax. LCIp value detected
within the elapsed time.
LAFmax Z IMax. LZIp value detected
within the elapsed time.
LAFmin A FMin. LAFp value detected within
the elapsed time.
S660 User Manual_without cover.indd 8 9/20/2010 11:41:39 AM

S660 Users Manual
www.anaheimscientific.com9
Default Screen
Weighting
Frequency
Weighting
Time
WeightingDescription
LAFmin C FMin. LCFp value detected within
the elapsed time.
LAFmin Z FMin. LZFp value detected within
the elapsed time.
LAFmin A SMin. LASp value detected
within the elapsed time.
LAFmin C SMin. LCSp value detected
within the elapsed time.
LAFmin Z SMin. LZSp value detected
within the elapsed time.
LAFmin A IMin. LAIp value detected within
the elapsed time.
LAFmin C IMin. LCIp value detected within
the elapsed time.
LAFmin Z IMin. LZIp value detected within
the elapsed time.
LAE A N/A
Frequency weighted sound
exposure level for the duration of
the measurement�
Lcpeak C N/A Instantaneous C peak level.
Lzpeak Z N/A Instantaneous Z peak level.
When the unit is entered into measurement mode after being turned on, press down the Return pushbutton to choose between the
three different types of displays. Non-Integral sound pressure level is Page0, Integrating measurement is Page1, and Manual “Large font display” measurement mode is Page2. These three types of display modes can operate simultaenously. Continue to press the Return pushbutton to toggle between the three display modes.
S660 User Manual_without cover.indd 9 9/20/2010 11:41:39 AM

S660 Users Manual
Anaheim Scientific 10
When the Start/Pause pushbutton is pressed, All three types
of measurements are in integrating measurement mode simultaneously.
Non-Integrating Noise MeasurementThis first display called Page0 is for Sound Pressure Level, Lxyp and
Equivalent Continuous Level, Lxeq1s measurements.
When Page0 LCD is selected, it displays simultaneously A, C, Z frequency weightings, and F, S, I time weightings for the sound pressure level. At the bottom of the display is a bargraph version. Press the or pushbuttons to have the cursor will change to LASi, LAIi, LZFi, LZSi, LZIi, LCFi, LCSi, LCIi or LAFi. (For Lxyp and Lxeq1s refer to the Measurement Parameter Table)
Page 0: Non-integral measurement. Utilize to display measurement immediately.
Integrating time setup
Bargraph
Integrating measurementaccumulation time
Press to enable “Ready” mode.Press again for “Run” mode. Press again to “Pause”.
When cursor flashes, press or to change to LASi, LAIi, LZFi, LZSi, LZIi, LCFi, LCSi, LCIi, LAFi
Integrating Noise MeasurementThe second display is called Page1 for integrating noise measurement.
To set up the integrating measurement time , set “Ts” first. Press the key, to set up measuring time Ts from 10 seconds, 1 minute, 5
minutes, 10 minutes, 20 minutes, 30 minutes, 1 hour, 2 hours, 4 hours, 8 hours, 16 hours, to 24 hours. Manual is the measurement time in “00h00m00s”. When Model S660 is powered down, it will automatically
Figure 9
S660 User Manual_without cover.indd 10 9/20/2010 11:41:40 AM

S660 Users Manual
www.anaheimscientific.com11
store the Ts setting value.
Page1 LCD displays Lxeq, LAE, Lcpeak, Lzpeak, Lxmax, Lxmin simultaneously when the measurement time “Ts” is set. Press the
key, the instrument starts the integrating measurement and “RUN” is displayed on the bottom right corner of the display. The measurement’s accumulation time “Tm” will start counting. When the measurement accumulation time reaches the setup time, the measurement will end (Tm = Ts). During the measurement process, Press the
pushbutton to suspend the measurement. “PAUSE” will be displayed on the bottom right corner of the LCD and the integrating measurement is suspended. To erase the measurement value, if desired, press �
To continue the measurement, press the pushbutton.
Under this Page1 display mode, press the or pushbuttons to move
the cursor to WEI: presses the or pushbuttons to change the time weighting F, S, I.
Page 1: Integrating measurement. Press for measurement value.
Integrating time setup
Bargraph
Integrating measurementaccumulation time
When cursor flashes, press or to change to LASi, LAIi, LZFi, LZSi, LZIi, LCFi, LCSi, LCIi, LAFi
Position cursor, press to change to F, I or S
Press or to change to WEI:F or LAFi
Press to enable “Ready” mode.Press again for “Run” mode. Press again to “Pause”.
Figure 10
S660 User Manual_without cover.indd 11 9/20/2010 11:41:42 AM

S660 Users Manual
Anaheim Scientific 12
Large Font DisplayThe third display, Page2, is a large font display. This mode provides
two large font values. Press the or pushbuttons to change the
cursor to “LAFi”, “LCFp” or “LAFp”. When the cursor is on the “LAFi” icon, press the or pushbuttons to change to the analog bargraph
measuring mode. With the cursor on the “LCFp” or “LAFp” icon, press the or key to change the measurement mode.
When Model S660 is set up for measuring LZFp, LZSp, LZIp, LCFp, LCIp, LAFp, LASp, LAIp, LAeq1s, LCeq1s, or LZeq1s, the value will be expressly displayed.
When set up for the integrating measurement function for these values: LAeq,T; LCeq,T; LZeq,T; LZFmax; LZFmin; LZSmax; LZSmin; LZImax; LZImin; LCFmax; LCFmin; LCSmax; LCSmin; LCImax; LCImin; LAFmax; LAFmin; LASmax; LASmin; LAImax; LAImin; LAE; LCpeak; Lzpeak, the measurement must be started to see the display value. Press the pushbutton. If the memory does not save the previous
value it will display —.— .
Page 2: Menu measurement page. Large Font. Press for measurement value.
Integrating time setup
Bargraph
Integrating measurementaccumulation time
When cursor flashes, press or to change to LASi, LAIi, LZFi, LZSi, LZIi, LCFi, LCSi, LCIi, LAFi
Press to enable “Ready” mode.Press again for “Run” mode. Press again to “Pause”.
Menu measurement item, 36 items (Large font option)
Integrating Measurement Time SettingsThe integrating measurment time is Ts. The integrating accumulation
Figure 11
S660 User Manual_without cover.indd 12 9/20/2010 11:41:43 AM

S660 Users Manual
www.anaheimscientific.com13
time is Tm. To revise the Ts time, press down the Start/Pause
pushbutton.Ts is in “00h00m00s”. Push the same Start/Pause pushbutton to finish the setting. This same Start/Pause pushbutton starts the integrating measurement. Also to pause the measurement. While in the Pause mode, press the Cancel pushbutton to erase the data if
desired.
A, C, Z WeightingsA: The A weighting curve is based on 40 Phon Fletcher-Munson Equal
Loudness Contour, use3d for general noise sound level for humans.
C: The C weighting is essentially smooth used for measuring sound level of acoustic material control in various environeme4nts. C weighting is usually used for peak frequency measurements.
Z: The Z weighting is a flat frequency response. A flat measurement with equal emphasis of all frequencies. It is a linear signal not processed through a filter.
MAINTENANCE
General InformationThis is a precision instrument. To guarantee its performances be sure
to use it or keep it stored within suitable environmental conditions. Do not expose it to high temperatures, humidity or direct sunlight. Be sure to turn it off after use. If the instrument is not expected to be used for a long period of time, remove the batteries to avoid any damage to its inner components.
Battery Replacement
The low battery icon “ ” will be displayed when the batteries need to be replaced.
Turn off the instrument. Remove the battery cover. Remove all the batteries from the battery holder.
Insert four new batteries of the same type with respect to the polarity signs.
S660 User Manual_without cover.indd 13 9/20/2010 11:41:43 AM

S660 Users Manual
Anaheim Scientific 14
Install the battery cover.
Follow local laws and regulations to dispose of used batteries properly.
Figure 12 : Opening and closing of battery cover
CleaningTo clean the instruments use a soft dry cloth. Never use a wet cloth,
solvents or water.
End of Life
Caution: this symbol indicates that instrument and its accessories should be subject to a separate collection and correct disposal.
TECHNICAL SPECIFICATIONSSpecifications (temperature 23 °C ± 5°C, relative humidity < 80%)
EMC
This tester was designed in accordance with EMC stan-
dards in force and its compatibility has been tested in accordance with EN61326-1 (2006)
Design standards
This S665 instrument complies with IEC 61672 (2002) class 1 and CNS 7129 Class 1. IEC60651:1979 TYPE 1, IEC60804:1985 TYPE 1, ANSI S1.4:1983 Type1.
S660 User Manual_without cover.indd 14 9/20/2010 11:41:46 AM

S660 Users Manual
www.anaheimscientific.com15
Microphone1/2” pre-polarized with built-in preamplifier. Sensitivity: 40 mV/Pa, frequency range: 10 Hz~16 kHz, heat noise: <20 dB(A)
Frequency range 10 Hz ~ 16 kHzMax Peak C Weighting 70 ~ 133 dB
Sampling frequency 20.8 µs (48 kHz)
Time weightingParallel (simultaneous) F (Fast), S (Slow), I (Impulse), Peak C+, Peak C-
Frequency weightingParallel (simultaneous) A, C, Z. Realized by digital filter-ing
Measuring parameters Lxyi, Lxyp, Lxeq, Lxmax, Lxmin, LAE, Lcpeak, Lzpeak
Measurement range
30dB to 130dB (A)35dB to 130dB (C)40dB to 130dB (Z)
Integrate Time setupRandom, 10 s, 1 min, 5 min, 10 min, 20 min, 30 min, 1 hr, 2 hr, 4 hr, 8 hr, 16 hr, 24 hr
Starting time < 10 s
CalibrationUse Model CAL601 or a Class 1 Calibrator with 1000 Hz ± 1 %, harmonic distortion < 1 %
DisplayType 240×160 matrix LCD, with LED backlight with real-time clock: Year, Month, Minute
Display refresh 1 Hz for value; 10 Hz for graphInput connection X9-6Z signal input receptacle
PowerBattery: 4 batteries 1.5 V – LR6 – AA–AM3–MN 1500100 V ~ 240 VAC to 5 VDC Adapter: 5V/1A
Low Battery indicationWhen battery voltage becomes too low a battery icon appears
Battery life Approximately 8 hoursEnvironmental For inside use
Operating max height 2000m
Operating temperature 5 ~ 40 °C (40 ~ 104 °F)Relative humidity <80% RH
Storage temperature -10 ~ 60 °C (14 ~ 140 °F)Storage humidity <70%
Dimensions 285(l) x 90(w) x 39(h) mm (11.2x3.5x1.5”)Weight (with batteries) Approx 500g (1.1 lb)
S660 User Manual_without cover.indd 15 9/20/2010 11:41:46 AM

S660 Users Manual
Anaheim Scientific 16
SERVICE
StorageIt is possible the S660 may be stored in extreme environmental
conditions exceeding the limits mentioned in Technical Specifications. It is recommended to allow the instrument to return to normal measuring conditions before using it for accurate results.
Non-Warranty ServiceReturn the product in the original packaging to the address below.
Clearly state in writing the performance problem and return any leads, probes, connectors and accessories that you are using with the device. Customers not on open account must include payment in the form of a money order or credit card. For the most current repair charges please visit www.anaheimscientific.com and click on “service/repair”.
Return all merchandise to Anaheim Scientific with pre-paid shipping. The flat-rate repair charge for Non-Warranty Service does not include return shipping. Return shipping to locations in North American is included for Warranty Service. For overnight shipments and non-North American shipping fees please contact Anaheim Scientific.
Anaheim Scientific
22820 Savi Ranch Parkway
Yorba Linda, CA 92887
www.anaheimscientific.com
714-921-9095
Include with the returned instrument your complete return shipping address, contact name, phone number and description of problem.
S660 User Manual_without cover.indd 16 9/20/2010 11:41:46 AM

S660 Users Manual
www.anaheimscientific.com17
WarrantyLimited Two-Year Warranty. Anaheim Scientific warrants to the original
purchaser that its products and the component parts thereof, will be free from defects in workmanship and materials for a period of two years from date of purchase.
Anaheim Scientific will, without charge, repair or replace, at its option, defective product or component parts. Returned product must be accompanied by proof of the purchase date in the form of a sales receipt.
To obtain warranty coverage in the U.S.A., this product must be registered by completing a warranty registration form on www.anaheimscientific.com within fifteen (15) days of purchase.
Exclusions: This warranty does not apply in the event of misuse or abuse of the product or as a result of unauthorized alterations or repairs. The warranty is void if the serial number is altered, defaced or removed.
Anaheim Scientific shall not be liable for any consequential damages, including without limitation damages resulting from loss of use. Some states do not allow limitations of incidental or consequential damages. So the above limitation or exclusion may not apply to you.
This warranty gives you specific rights and you may have other rights, which vary from state-to-state.
Anaheim Scientific
22820 Savi Ranch Parkway
Yorba Linda, CA 92887
www.anaheimscientific.com
714-921-9095
S660 User Manual_without cover.indd 17 9/20/2010 11:41:47 AM

S660 Users Manual
Anaheim Scientific 18
CalibrationThe instrument complies with the technical specifications contained in
this manual and such compliance is guaranteed for 1 year. It is possible Model S660 may need recalibration after one year.
Anaheim Scientific offers optional accessory Model
Acoustic Calibration Mode InstructionsOn the main menu move the cursor to the “CALIBRATE” icon and
press the Return pushbutton. The display will show:
Figure 13
Line is the microhphone serial number that is set by the factory.
LIne 2 is the microphone’s free field correction, which is set according to the type of microphone. Model S660 uses 1/2” free field microphone. Its correction between sound pressure field and free field is 0.15 dB at the frequency of 1 kHz.
Line 3 is the microphone’s sensitivity level. This is the sensitivity output level of the preamplifier when the preamplifier is connected to the microphone. The microphone should be calibrated to get a new sensitivity level if the preamplifier is ever replaced, as each preamplifier has its own certain input capacitance and gain.
Line 4 is the calibrator’s sound pressure level, which is the actual sound pressure level after the sound level calibrator is checked.
Line 5 is LpC: when the analyzer is calibrated by C weight and LpX: which indicates the microphone’s current sensitivity level
Line 6 is the Upper and Lower limts of Sound Pressure Levels.
S660 User Manual_without cover.indd 18 9/20/2010 11:41:48 AM

S660 Users Manual
www.anaheimscientific.com19
The last bottom row in the display is the menu. The “LIST” button is used to view calibration records. “Cal” button is used to start the sound calibration procedure. “App” button is used to store calibration results and use the new sensitivity level for future measurements. “Mod” button allows the user to adjust the free field correction, the microphone sensitivity level and the calibration sound pressure level.
Acoustical Calibration with CAL610For the first acoustical calibration, set the calibrator sound pressure
level according to the verification certificate of Anaheim Scientific’s Model CAL610 Sound Level Calibrator. In general, the sound level calibrator’s sound pressure level is 94.0 dB. When the measured sound pressure level is not 94.0 dB, calibrate by the actual result. For example, if the result is 94.2 dB, move the cursor to “Mod” button, press the RETURN pushbutton. Use the or pushbuttons to move the
cursor to Line 4, SPL. Press the or pushbuttons to adjust the value to 94.2. Press the or pushbuttons once, the value will increase/decrease by 0.01 dB. When the or pushbuttons are pressed continuously, the value will increase/decrease by 1 dB. Move the cursor to ”Mod” button, and press pushbutton to store the microphone’s new sensitivity level.
The above step is carried only when the indicated calibrator’s sound pressure
is different from that of the working sound level calibrator.
S660 User Manual_without cover.indd 19 9/20/2010 11:41:49 AM

22820 Savi Ranch Parkway, Yorba Linda, California 92887 Phone: 714.921.9095 | www.anaheimscientific.com
© 2010 Anaheim Scientific
Information and specification are subject to change without notice.


