Pega Robotic Automation Best Practices: Using Match Rules 1 USING MATCH RULES Every time an application runs, a new user interface is rendered by the underlying program. To users, the interface appears the same because certain characteristics, such as the type and position of user interface elements like labels, buttons, and drop-down lists, remain the same. However, from a technical perspective, the user interface elements are different for every instance of the application. To automate an application, a Studio developer must identify a user interface element across multiple application instances, just as a user would. Additionally, the developer must distinguish between unchanging or persistent data that should be used to identify an element, and changing or transient data that should be ignored. Studio provides an advanced matching system that uniquely identifies user interface elements across multiple instances of an application using a set of rules that capture the necessary persistent data. You can customize matching behavior by adding, removing, or modifying these rules. This document includes these topics: • “Controls, targets, and match rules” on page 2 • “Matching behavior” on page 5 • “Understanding the control life cycle” on page 8 • “Using RefreshMatching” on page 11 • “Matching triggers” on page 12 • “Matching optimizations” on page 14 • “Match rules best practices” on page 16 • “More resources” on page 18
Transcript
Pega Robotic Automation Best Practices: Using Match Rules 1
USING MATCH RULES
Every time an application runs, a new user interface is rendered by the underlying program. To users, the interface appears the same because certain characteristics, such as the type and position of user interface elements like labels, buttons, and drop-down lists, remain the same. However, from a technical perspective, the user interface elements are different for every instance of the application.
To automate an application, a Studio developer must identify a user interface element across multiple application instances, just as a user would. Additionally, the developer must distinguish between unchanging or persistent data that should be used to identify an element, and changing or transient data that should be ignored.
Studio provides an advanced matching system that uniquely identifies user interface elements across multiple instances of an application using a set of rules that capture the necessary persistent data. You can customize matching behavior by adding, removing, or modifying these rules.
This document includes these topics:
• “Controls, targets, and match rules” on page 2• “Matching behavior” on page 5• “Understanding the control life cycle” on page 8• “Using RefreshMatching” on page 11• “Matching triggers” on page 12• “Matching optimizations” on page 14• “Match rules best practices” on page 16• “More resources” on page 18
Using Match Rules | Controls, targets, and match rules
Pega Robotic Automation Best Practices: Using Match Rules 2
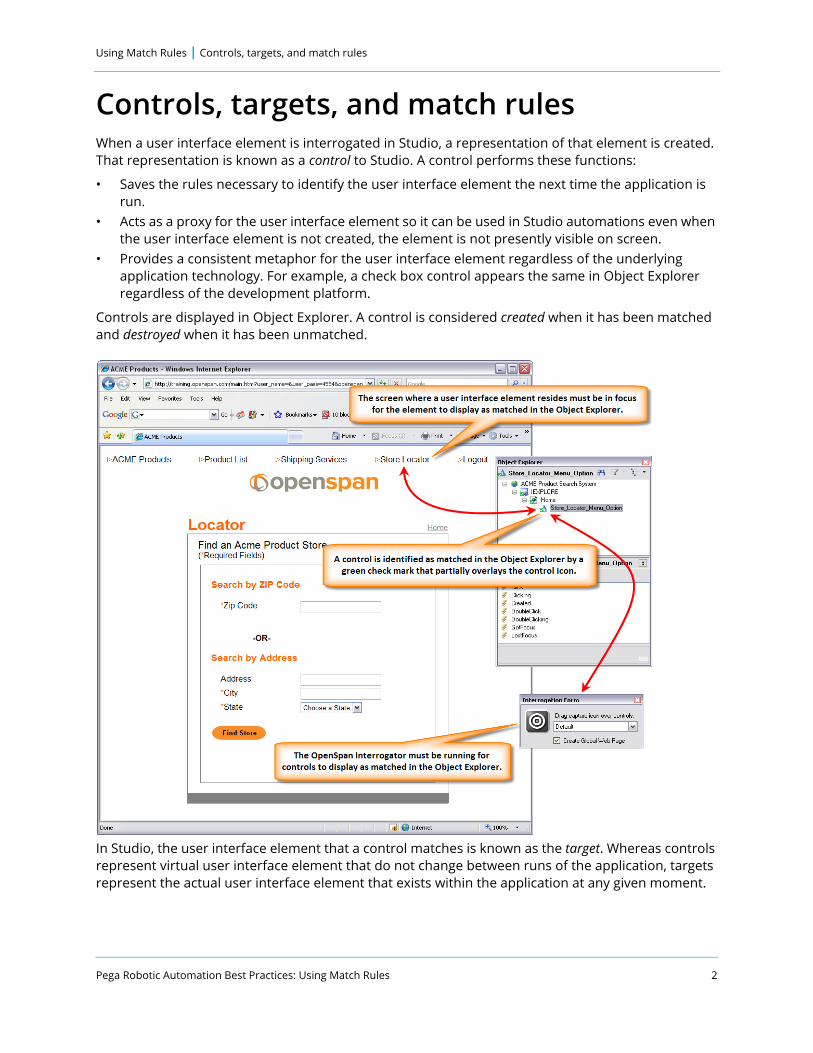
Controls, targets, and match rulesWhen a user interface element is interrogated in Studio, a representation of that element is created. That representation is known as a control to Studio. A control performs these functions:
• Saves the rules necessary to identify the user interface element the next time the application is run.
• Acts as a proxy for the user interface element so it can be used in Studio automations even when the user interface element is not created, the element is not presently visible on screen.
• Provides a consistent metaphor for the user interface element regardless of the underlying application technology. For example, a check box control appears the same in Object Explorer regardless of the development platform.
Controls are displayed in Object Explorer. A control is considered created when it has been matched and destroyed when it has been unmatched.
In Studio, the user interface element that a control matches is known as the target. Whereas controls represent virtual user interface element that do not change between runs of the application, targets represent the actual user interface element that exists within the application at any given moment.
Pega Robotic Automation Best Practices: Using Match Rules 3
Using Match Rules | Controls, targets, and match rules
Targets are created and destroyed when user interface elements are created and destroyed. Targets are platform specific and encapsulate the necessary logic to automate and monitor user interface elements. This means the text box control can interact with any target that implements the text box interface, such as a Windows text box, a Java text box, or an HTML text box.
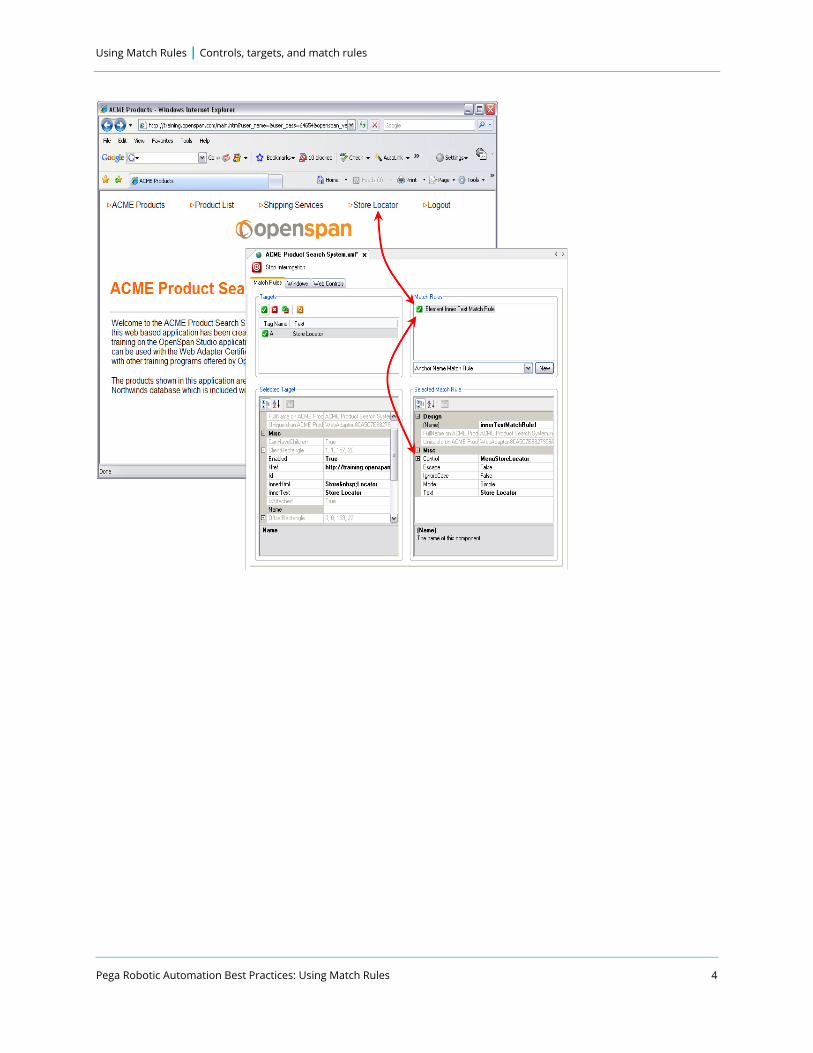
The rules a control uses to match targets are known as match rules. Each match rule evaluates a specific property or characteristic of a target. For example, a text match rule with a value of Hello would match a target whose text is Hello but not a target whose text is Goodbye. Similarly, an index match rule with a value of 5 would match the fifth text box that appears on a web page, but not the sixth.
Match rules can also support more complicated criteria. For example, a text match rule might have a value of Hello and an operation of Contains. In this case, the match rule would match a target with Hello or Hello World as text, but not a target with Help as text. For a control to be matched, all of its match rules must match.
Match rules are displayed in the Project Item Design pane:
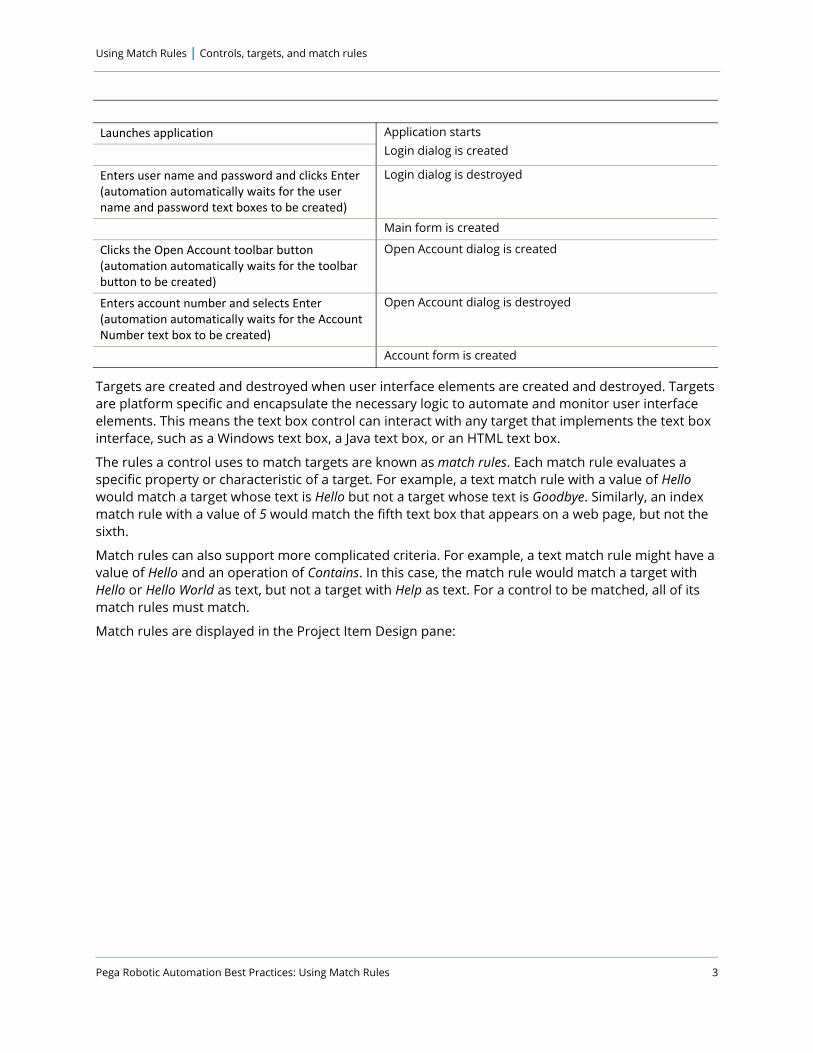
Automation Target System ResponseLaunches application Application starts
Login dialog is created
Enters user name and password and clicks Enter (automation automatically waits for the user name and password text boxes to be created)
Login dialog is destroyed
Main form is created
Clicks the Open Account toolbar button (automation automatically waits for the toolbar button to be created)
Open Account dialog is created
Enters account number and selects Enter (automation automatically waits for the Account Number text box to be created)
Open Account dialog is destroyed
Account form is created
Using Match Rules | Controls, targets, and match rules
Pega Robotic Automation Best Practices: Using Match Rules 4
Pega Robotic Automation Best Practices: Using Match Rules 5
Using Match Rules | Matching behavior
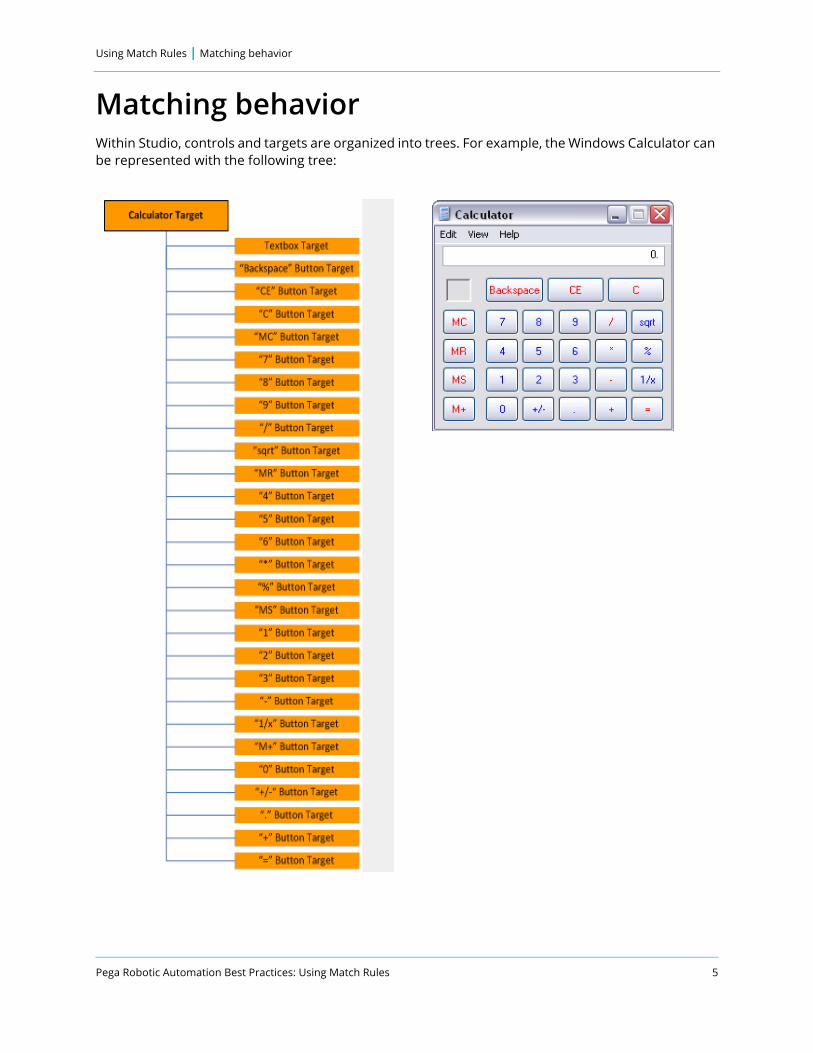
Matching behaviorWithin Studio, controls and targets are organized into trees. For example, the Windows Calculator can be represented with the following tree:
Using Match Rules | Matching behavior
Pega Robotic Automation Best Practices: Using Match Rules 6
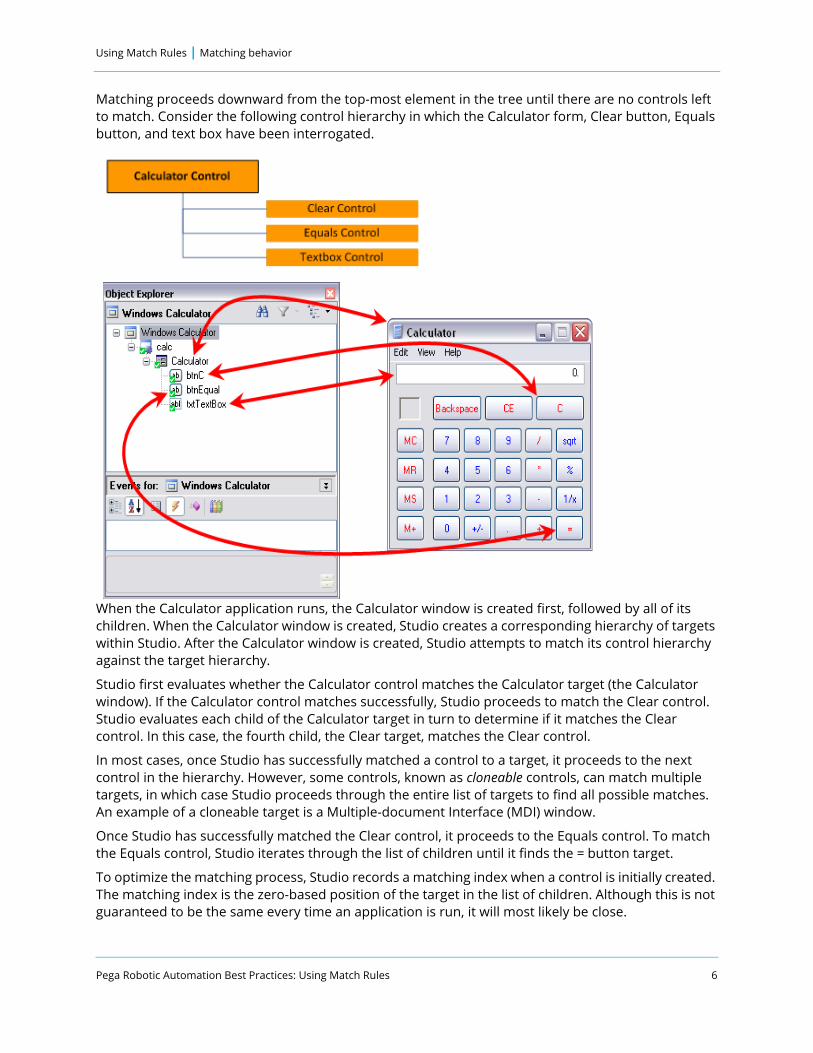
Matching proceeds downward from the top-most element in the tree until there are no controls left to match. Consider the following control hierarchy in which the Calculator form, Clear button, Equals button, and text box have been interrogated.
When the Calculator application runs, the Calculator window is created first, followed by all of its children. When the Calculator window is created, Studio creates a corresponding hierarchy of targets within Studio. After the Calculator window is created, Studio attempts to match its control hierarchy against the target hierarchy.
Studio first evaluates whether the Calculator control matches the Calculator target (the Calculator window). If the Calculator control matches successfully, Studio proceeds to match the Clear control. Studio evaluates each child of the Calculator target in turn to determine if it matches the Clear control. In this case, the fourth child, the Clear target, matches the Clear control.
In most cases, once Studio has successfully matched a control to a target, it proceeds to the next control in the hierarchy. However, some controls, known as cloneable controls, can match multiple targets, in which case Studio proceeds through the entire list of targets to find all possible matches. An example of a cloneable target is a Multiple-document Interface (MDI) window.
Once Studio has successfully matched the Clear control, it proceeds to the Equals control. To match the Equals control, Studio iterates through the list of children until it finds the = button target.
To optimize the matching process, Studio records a matching index when a control is initially created. The matching index is the zero-based position of the target in the list of children. Although this is not guaranteed to be the same every time an application is run, it will most likely be close.
Pega Robotic Automation Best Practices: Using Match Rules 7
Using Match Rules | Matching behavior
Matching proceeds from the matching index and fans outward. Thus, in the Calculator example, the Clear control has a matching index of three, and begins matching at the fourth child in the list. If, for some reason the C button is not the fourth child in the list, Studio proceeds outward from the fourth item in the list, evaluating the fifth item, then the third item, the sixth item, then the second item. Matching concludes when all of the controls in the hierarchy have been matched.
Using Match Rules | Understanding the control life cycle
Pega Robotic Automation Best Practices: Using Match Rules 8
Understanding the control life cycleWhen a Studio project is started, all of the automations, adapters and controls within the project are instantiated and populated with data. This process is known as deserialization. At this point, all of the controls within an adapter exist, but have not been matched. Because the controls exist, they are available for use within automations.
After the automations, adapters, and controls have been deserialized, each adapter within the project is started. You can control whether an adapter starts when a project is run using the StartOnProjectStart property. Use the StartOnProject property to control when an adapter starts after a project is run. While an application runs, controls may be matched and unmatched multiple times depending on activity in the application. For example, a pop-up dialog used to enter account information will appear multiple times when interacting with multiple accounts in succession. When a project is stopped, all of the automations, adapters, and controls within the project are disposed with and removed from memory.
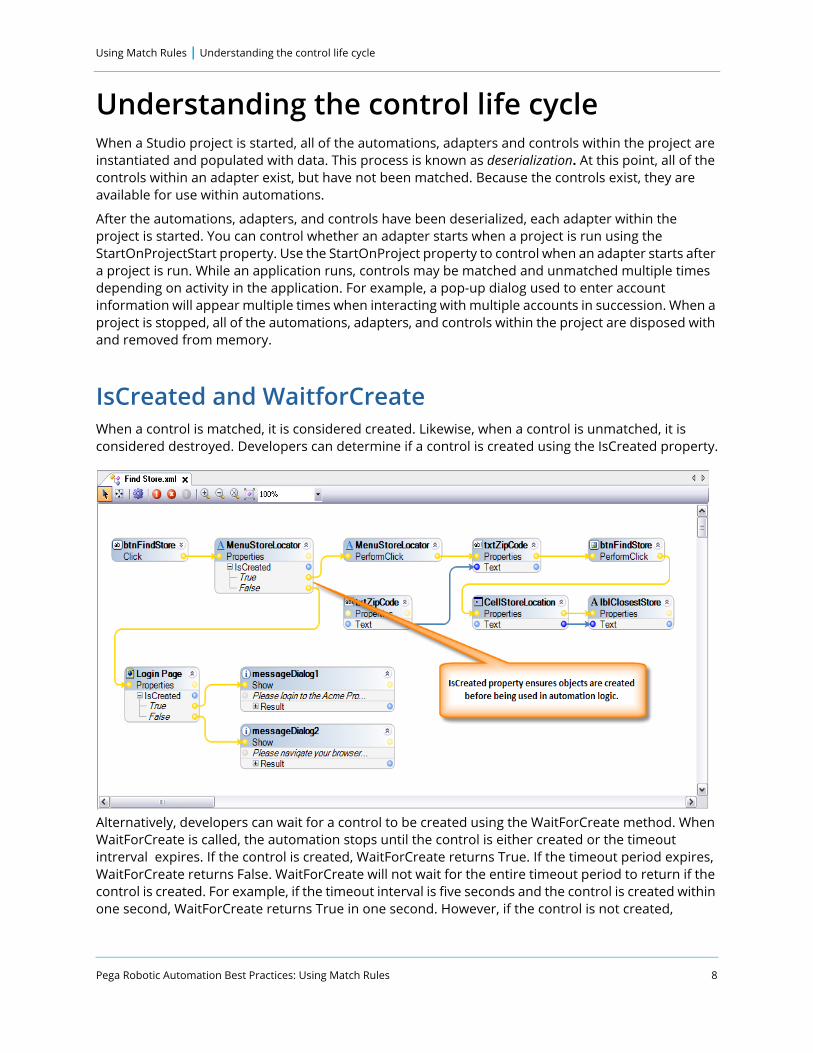
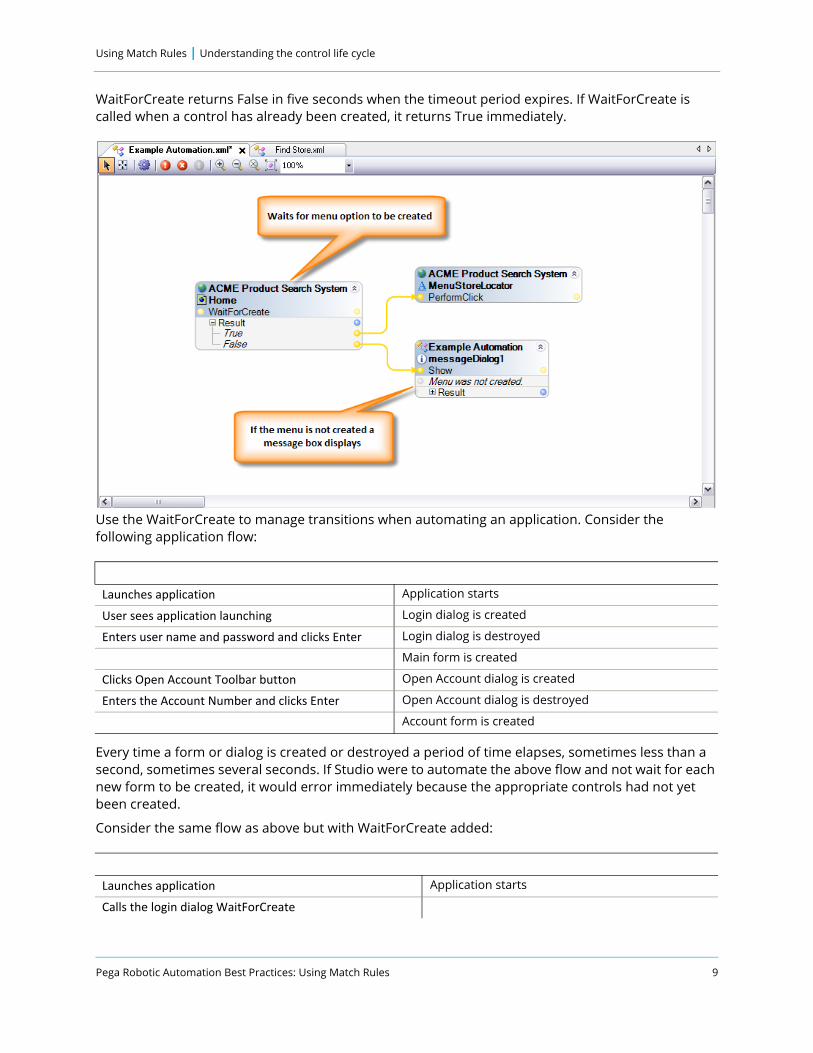
IsCreated and WaitforCreateWhen a control is matched, it is considered created. Likewise, when a control is unmatched, it is considered destroyed. Developers can determine if a control is created using the IsCreated property.
Alternatively, developers can wait for a control to be created using the WaitForCreate method. When WaitForCreate is called, the automation stops until the control is either created or the timeout intrerval expires. If the control is created, WaitForCreate returns True. If the timeout period expires, WaitForCreate returns False. WaitForCreate will not wait for the entire timeout period to return if the control is created. For example, if the timeout interval is five seconds and the control is created within one second, WaitForCreate returns True in one second. However, if the control is not created,
Pega Robotic Automation Best Practices: Using Match Rules 9
Using Match Rules | Understanding the control life cycle
WaitForCreate returns False in five seconds when the timeout period expires. If WaitForCreate is called when a control has already been created, it returns True immediately.
Use the WaitForCreate to manage transitions when automating an application. Consider the following application flow:
Every time a form or dialog is created or destroyed a period of time elapses, sometimes less than a second, sometimes several seconds. If Studio were to automate the above flow and not wait for each new form to be created, it would error immediately because the appropriate controls had not yet been created.
Consider the same flow as above but with WaitForCreate added:
User Action System ResponseLaunches application Application starts
User sees application launching Login dialog is created
Enters user name and password and clicks Enter Login dialog is destroyed
Main form is created
Clicks Open Account Toolbar button Open Account dialog is created
Enters the Account Number and clicks Enter Open Account dialog is destroyed
Account form is created
Automation Action System ResponseLaunches application Application starts
Calls the login dialog WaitForCreate
Using Match Rules | Understanding the control life cycle
Pega Robotic Automation Best Practices: Using Match Rules 10
To simplify automations, most control methods and properties implicitly perform WaitForCreate. This means that when a method or property is invoked in an automation, the control automatically waits to be created. For example, if an automation attempts to set the text property of a text box before the text box is created, the automation automatically waits for the text box to be created before proceeding and setting the text. If the text box is not created within the time out interval, the automation throws an exception (ControlNotCreatedException).
Consider the flow again when using implicit WaitForCreate:
When you use the implicit WaitForCreate functionality, automations are considerably less verbose.
Login dialog WaitForCreate returns True Login dialog is created
Enters the user name and Password and selects Enter Login dialog is destroyed
Calls the main form WaitForCreate
Main form WaitForCreate returns True Main form is created.
Automation clicks Open Account toolbar button
Calls the Account dialog WaitForCreate
Account dialog WaitForCreate returns True Open Account dialog is created
Enters account number and selects Enter Open Account dialog is destroyed
Account form is created
Automation Action System ResponseLaunches application Application starts
Login dialog is created
Enters user name and password and clicks Enter (automation automatically waits for the user name and password text boxes to be created)
Login dialog is destroyed
Main form is created
Clicks the Open Account toolbar button (automation automatically waits for the toolbar button to be created)
Open Account dialog is created
Enters account number and selects Enter (automation automatically waits for the Account Number text box to be created)
Open Account dialog is destroyed
Account form is created
Automation Action System Response
Pega Robotic Automation Best Practices: Using Match Rules 11
Using Match Rules | Using RefreshMatching
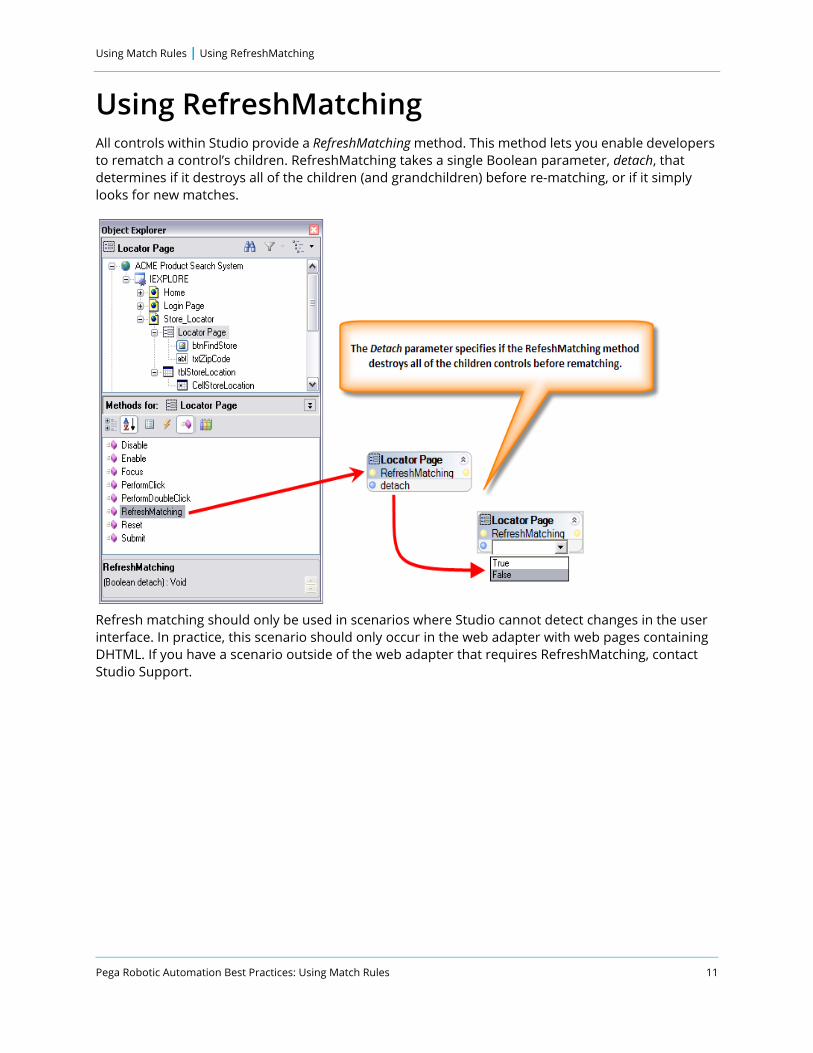
Using RefreshMatchingAll controls within Studio provide a RefreshMatching method. This method lets you enable developers to rematch a control’s children. RefreshMatching takes a single Boolean parameter, detach, that determines if it destroys all of the children (and grandchildren) before re-matching, or if it simply looks for new matches.
Refresh matching should only be used in scenarios where Studio cannot detect changes in the user interface. In practice, this scenario should only occur in the web adapter with web pages containing DHTML. If you have a scenario outside of the web adapter that requires RefreshMatching, contact Studio Support.
Using Match Rules | Matching triggers
Pega Robotic Automation Best Practices: Using Match Rules 12
Matching triggersStudio automatically matches in response to events within the target applications. The events that Studio uses to determine when and if to match are known as match triggers. Match triggers are different for each Studio adapter.
Windows adapterWithin the Windows adapter, matching occurs whenever the target application becomes idle. Idleness is defined as a certain period of time that has elapsed in which the application has not received any messages to create, destroy, or update controls. Only visible controls are available for matching. However, if a matched control is subsequently made non-visible, Studio does not un-match it until the control is destroyed. When idleness occurs, Studio attempts to match only those controls that have raised the following events:
• Created• Shown• Activated• Text Changed• Parent Changed
Web adapterWithin the web adapter, matching occurs whenever a new web page is loaded into the browser. When a web page is loaded it goes through stages:
Because some web pages may take several minutes to load completely, the web adapter matches when the page becomes interactive and again when the page becomes complete.
Java adapterLike the Windows adapter, matching occurs within the Java adapter whenever the target application becomes idle. When idleness occurs, Studio attempts to match controls that have been recently added to the Java control hierarchy.
Pega Robotic Automation Best Practices: Using Match Rules 13
Using Match Rules | Matching triggers
Host adapterWithin the Host adapter, matching occurs whenever the emulator or console presentation space has been updated. The Host adapter first determines if the current screen has been modified, but not unloaded. If the current screen has been unloaded, the Host adapter attempts to match the new screen.
Using Match Rules | Matching optimizations
Pega Robotic Automation Best Practices: Using Match Rules 14
Matching optimizationsAs mentioned previously, Studio only matches in response to events within an application to ensure good performance. Additionally, Studio performs a number of other matching optimizations.
Matching indexWhen a child control is created within Studio, the system automatically persists the index at which the target was found. Subsequently when matching, Studio begins at this index to find the control.
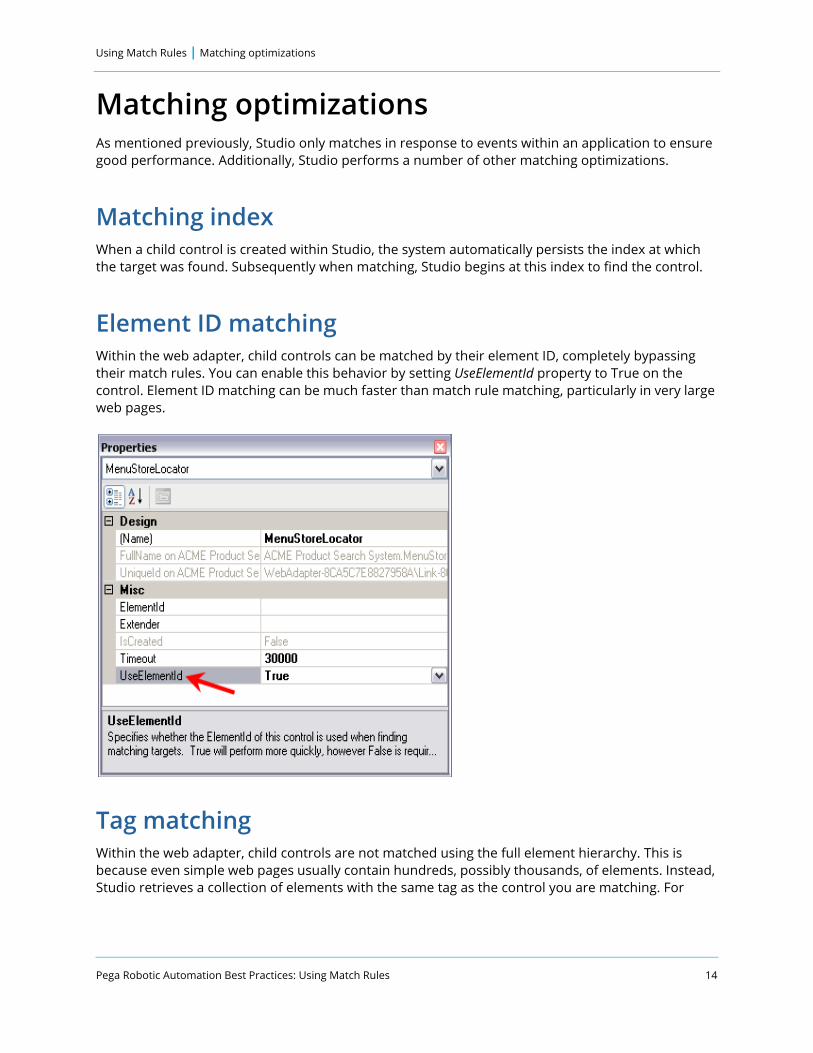
Element ID matchingWithin the web adapter, child controls can be matched by their element ID, completely bypassing their match rules. You can enable this behavior by setting UseElementId property to True on the control. Element ID matching can be much faster than match rule matching, particularly in very large web pages.
Tag matchingWithin the web adapter, child controls are not matched using the full element hierarchy. This is because even simple web pages usually contain hundreds, possibly thousands, of elements. Instead, Studio retrieves a collection of elements with the same tag as the control you are matching. For
Pega Robotic Automation Best Practices: Using Match Rules 15
Using Match Rules | Matching optimizations
example, if Studio is matching a text box, it retrieves all <input> elements to iterate and match against.
Using Match Rules | Match rules best practices
Pega Robotic Automation Best Practices: Using Match Rules 16
Match rules best practices
Understanding the applicationTo use Studio effectively, you must understand the application you are interrogating and automating. For matching, this means paying attention to where controls are used and when they match. During interrogation, you should always check the object hierarchy after each transition (window created, screen changed, web page loaded) to make sure that a control is not erroneously matching a target that it should not.
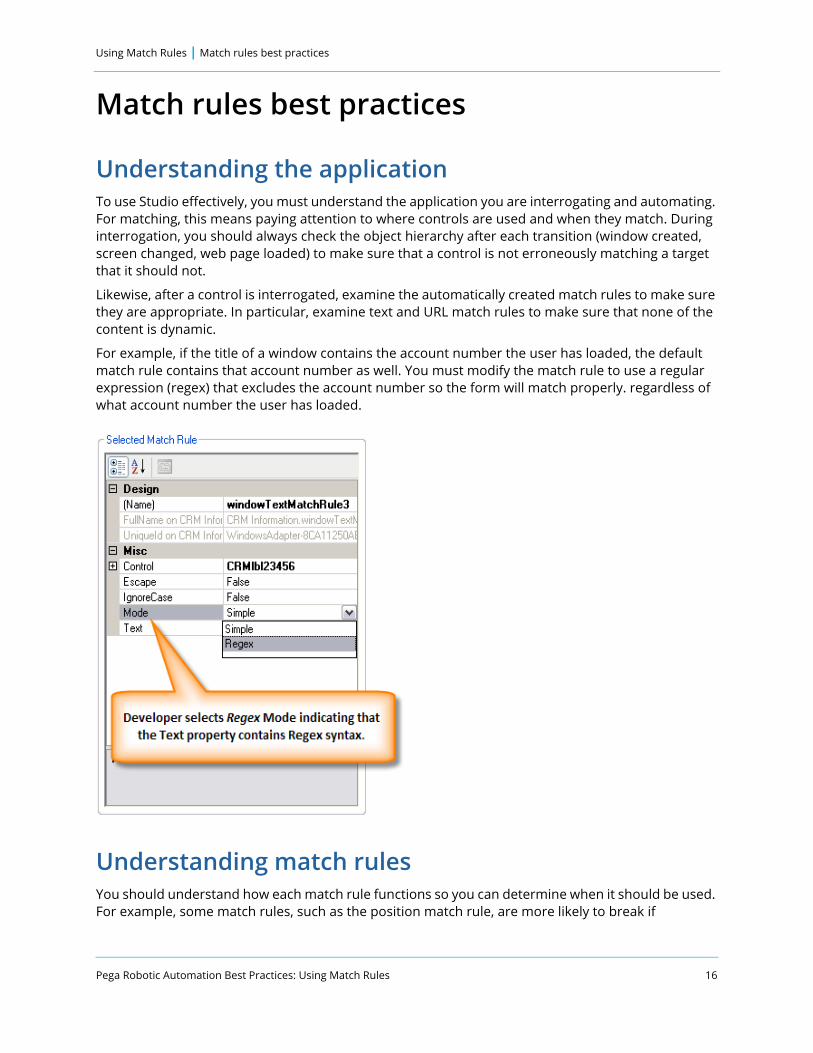
Likewise, after a control is interrogated, examine the automatically created match rules to make sure they are appropriate. In particular, examine text and URL match rules to make sure that none of the content is dynamic.
For example, if the title of a window contains the account number the user has loaded, the default match rule contains that account number as well. You must modify the match rule to use a regular expression (regex) that excludes the account number so the form will match properly. regardless of what account number the user has loaded.
Understanding match rulesYou should understand how each match rule functions so you can determine when it should be used. For example, some match rules, such as the position match rule, are more likely to break if
Pega Robotic Automation Best Practices: Using Match Rules 17
Using Match Rules | Match rules best practices
applications change their layout dynamically. Likewise, if a web page changes its content depending on the user, the element index match rule make be more likely to break.
Testing matching in multiple scenariosYou should always run through multiple scenarios in an interrogation to test matching. It is particularly important to use a variety of test data to make sure that any presentation changes that occur due to different data are addressed.
When to use refresh matchingRefresh matching should be used with extreme caution and only when absolutely necessary. There are two situations in which refresh matching should never be used:
• In a loop or to poll for the creation of a control as this can severely degrade performance.• On a control that may be in the process of destruction as this may lead to exceptions or
deadlocks.
Refresh matching should be used in response to specific trigger events within a web page. Typically, DHTML updates a web page in response to user activity, such as clicking a link or a button. Automations should be organized so refresh matching is called in response to these actions. For example, web controls have an InnerHtmlChanged event that fires when JavaScript uses the InnerHtml property to update the contents of a web control. You can wait for the InnerHtmlChanged event to occur before calling refresh matching.
Refresh matching should always be called at the lowest level possible to ensure good performance. Because refresh matching can have negative side effects, it should only be used by advanced Studio users with an in depth understanding of HTML and JavaScript.
Use as few match rules as possibleYou should use as few match rules as possible to create a unique match. Each match rule has a performance cost associated with it, however small. If Studio only has to test one match rule rather than two, it will perform better. The number of match rules can be particularly important in large applications.
Multiple matches are not always badStudio attempts to create the appropriate set of match rules for each object. This means adding match rules to a control until it matches uniquely. In some cases, multiple matches are not always bad. Consider a web page with two links that go to the same place, one in the header and one in the footer. Studio automatically adds an Element Index Match Rule to distinguish between the two. However, these two targets are equivalent. You should remove redundant match rules in this circumstance so matching is as simple as possible.
Using Match Rules | More resources
Pega Robotic Automation Best Practices: Using Match Rules 18
More resources
Studio HelpTo access material regarding match rules within Studio, go to Studio/Runtime Help and select the Match Rules Overview topic.