Using Word Documents as Evidence For some of your benchmarks you may need to use Word documents you created as evidence. These may be items like lesson plans or parent newsletters. This tutorial will walk you through a couple different options of how to do that. Paste Special Use this option when you have a short document (1‐2 pages), no graphics, and simple formatting. This allows you to paste your text and keep your formatting. Steps: 1. Open your Word document. (You should already have Dreamweaver setup and an Evidence page created.)
Transcript
Using Word Documents as Evidence
For some of your benchmarks you may need to use Word documents you created as evidence. These may be items like lesson plans or parent newsletters. This tutorial will walk you through a couple different options of how to do that.
Paste Special
Use this option when you have a short document (1‐2 pages), no graphics, and simple formatting. This allows you to paste your text and keep your formatting.
Steps:
1. Open your Word document. (You should already have Dreamweaver setup and an Evidence page created.)
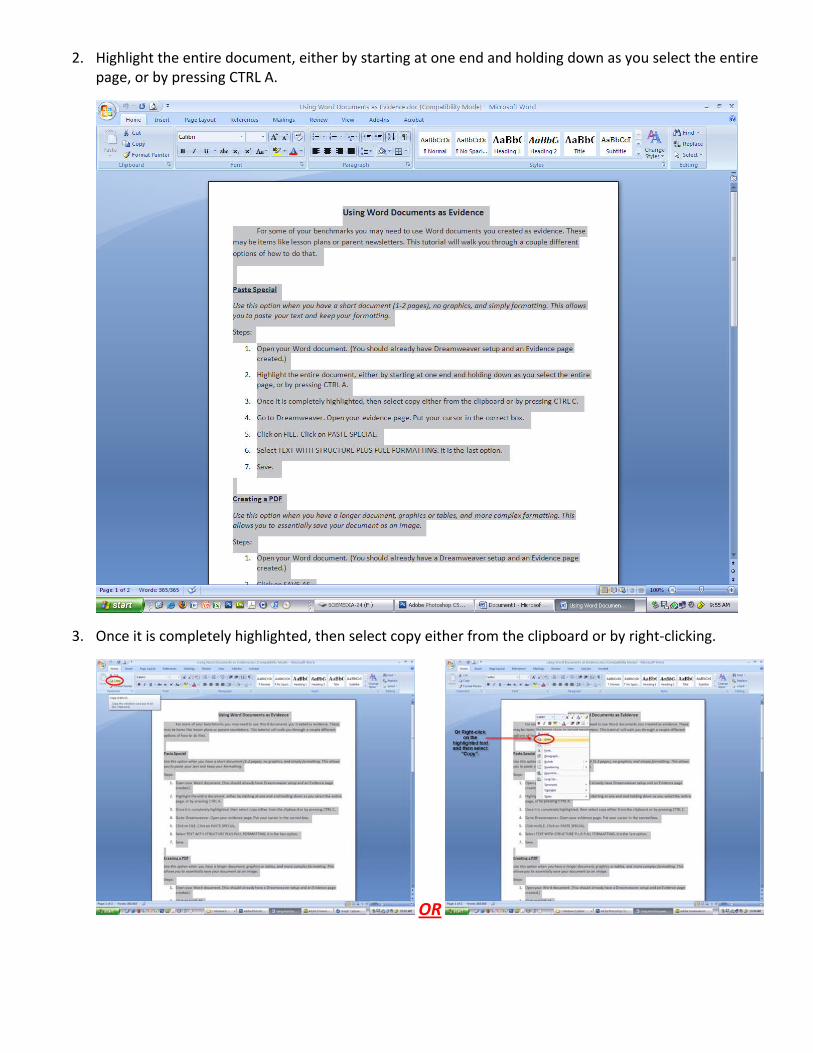
2. Highlight the entire document, either by starting at one end and holding down as you select the entire page, or by pressing CTRL A.
3. Once it is completely highlighted, then select copy either from the clipboard or by right‐clicking.
OR
4. Go to Dreamweaver. Open your evidence page. Put your cursor in the correct box.
5. Click on EDIT. Click on PASTE SPECIAL.
6. Select TEXT WITH STRUCTURE PLUS FULL FORMATTING. It is the last option.
7. Save.
Creating a PDF
Use this option when you have a longer document, graphics or tables, and more complex formatting. This allows you to essentially save your document as an image.
Steps:
1. Open your Word document. (You should already have a Dreamweaver setup and an Evidence page created.)
2. Click on PRINT.
3. Choose the ADOBE PDF for the printer.
4. Save in your benchmark folder. Select your flash drive. Within your e‐folio folder, open the benchmark folder that this piece of evidence goes with. Save it using the file name “BM*_EV*.jpeg”. Replace the * with the number of the benchmark you are going to use the image in, and with the number of the evidence page you are using it for.
A. B.
C. D.
5. Go to Dreamweaver. Open your evidence page. Put your cursor in the correct box.
6. Click on evidence you want to insert. (It should be saved in the appropriate benchmark folder.)
7. Click on INSERT.
8. Select MEDIA.
9. Select PLUGIN.
10. Select the benchmark folder your evidence is in.
11. Select your evidence (which is saved as a pdf)
12. After you have selected your evidence and clicked “OK”, a box with a puzzle piece should appear.
13. You can use the sizing handles to enlarge your evidence. Simply click and drag to desired size.
14. To preview your evidence and make sure everything is working correctly, click on the Globe and select “Preview in IExplore”
a.
b. c.
d. e. 15. Add caption to briefly describe evidence if desired. (Main description should be in your narrative page.)