12
Telephone’s Analogue Adapter – UTStarcom iAN-02EX (V1.8.2.17a) – Operating Manual pag.1 UTStarcom iAN-02EX TELEPHONE’S ANALOGUE ADAPTER INSTALLATION GUIDE Release V1.8.2.17a
Telephone’s Analogue Adapter – UTStarcom iAN-02EX (V1.8.2.17a) – Operating Manual pag.1
UTStarcom iAN-02EX
TELEPHONE’S ANALOGUE ADAPTER
INSTALLATION GUIDE
Release V1.8.2.17a

Telephone’s Analogue Adapter – UTStarcom iAN-02EX (V1.8.2.17a) – Operating Manual pag.2
SUMMARY SKYPHO VOIP SERVICE....................................................................................................3 iAN-02EX UTStarcom PACKAGE CONTENT .....................................................................3 EQUIPMENT PHYSICAL CONNECTION............................................................................4 ACCESS TO THE ADAPTER ..............................................................................................5 Access to ATA when the DHCP service is working .............................................................5 Access to ATA when the DHCP is not working....................................................................6 ATA CONFIGURATION.......................................................................................................7 WAN parameters .................................................................................................................7 NTP parameters ..................................................................................................................7 LAN parameters...................................................................................................................8 VoIP parameters..................................................................................................................9 Save configuration .............................................................................................................11 CONFIGURATION PARAMETERS OF UTStarcom IAN-02EX ATA EQUIPMENT ...........12

Telephone’s Analogue Adapter – UTStarcom iAN-02EX (V1.8.2.17a) – Operating Manual pag.3
SKYPHO VOIP SERVICE
The use of the SKYPHO’s voice service on IP (VoIP) is simple and quick. You need only an Internet access, a traditional telephone (analogue) and a PC, and with few “clicks” you could use the new telephone line with quality equal to the traditional landline.
To use the SKYPHO’s VOIP service, you need:
- One computer with an Ethernet port;
- One modem/router with a LAN port
- One Internet access;
- One Username and one Password (account SIP).
The SIP account is the registration made on SKYPHO’s server that allows the access the VoIP services provided by the server itself. It is composed by a Username, coincident with the telephone number you have been assigned and a Password (confidential access code) by which you can access the telephone services of Eutelia.
ATTENTION! The confidentiality of these data is necessary in order to guarantee that services will be accessed only by you. For your major safety, you can choose a new password by accessing on Eutelia’s registration site.
iAN-02EX UTStarcom PACKAGE CONTENT
One iAN-02EX telephone adapter
One telephone cable (rj-11)
One Ethernet cable (rj-45)
One power adapter
One user manual
Telephone’s Analogue Adapter (ATA)
Easy Start Manual
Ethernet cable (rj-45)
Telephone cable (rj-11)
Telephone’s Analogue Adapter – UTStarcom iAN-02EX (V1.8.2.17a) – Operating Manual pag.4
EQUIPMENT PHYSICAL CONNECTION
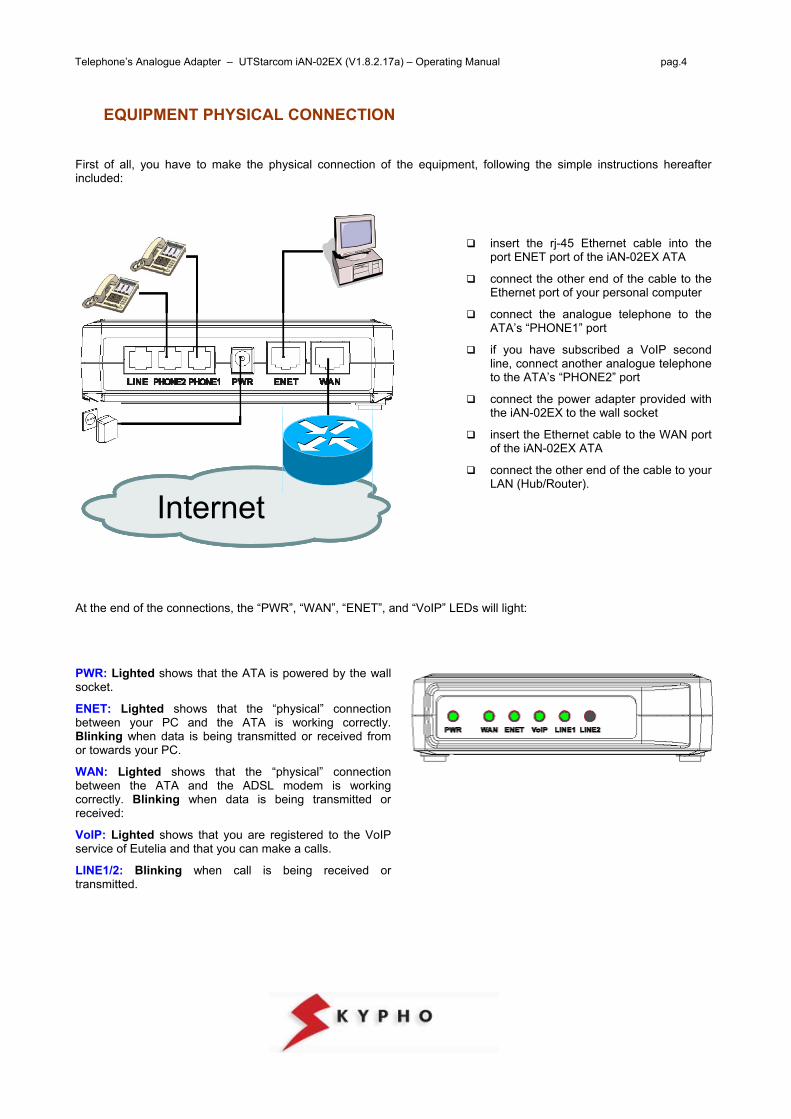
First of all, you have to make the physical connection of the equipment, following the simple instructions hereafter included:
InternetInternet
insert the rj-45 Ethernet cable into the port ENET port of the iAN-02EX ATA
connect the other end of the cable to the Ethernet port of your personal computer
connect the analogue telephone to the ATA’s “PHONE1” port
if you have subscribed a VoIP second line, connect another analogue telephone to the ATA’s “PHONE2” port
connect the power adapter provided with the iAN-02EX to the wall socket
insert the Ethernet cable to the WAN port of the iAN-02EX ATA
connect the other end of the cable to your LAN (Hub/Router).
At the end of the connections, the “PWR”, “WAN”, “ENET”, and “VoIP” LEDs will light:
PWR: Lighted shows that the ATA is powered by the wall socket.
ENET: Lighted shows that the “physical” connection between your PC and the ATA is working correctly. Blinking when data is being transmitted or received from or towards your PC.
WAN: Lighted shows that the “physical” connection between the ATA and the ADSL modem is working correctly. Blinking when data is being transmitted or received:
VoIP: Lighted shows that you are registered to the VoIP service of Eutelia and that you can make a calls.
LINE1/2: Blinking when call is being received or transmitted.

Telephone’s Analogue Adapter – UTStarcom iAN-02EX (V1.8.2.17a) – Operating Manual pag.5
ACCESS TO THE ADAPTER
When you finished the connections, you can proceed with the iAN-02EX ATA configuration. Before proceeding with the ATA configuration it is necessary to verify if in your router the DHCP service is working, (this means that in your LAN are used IP addresses in a dynamic way), or if the DHCP service is not working, (this means that in your LAN are used IP addresses in a static way). Based on what mentioned above, please proceed with the suitable instructions that follow.
Access to ATA when the DHCP service is working 1. verify that the LAN port of your PC is configured in order to obtain an IP address automatically.
Click on “Start \ Settings\ Network connections“, double click on “Local area connections (LAN)” . In the new window click on “Properties” and then double click on “Internet Protocol (TCP/IP)”. Verify that the option “Obtain an IP address automatically” is activated or modify the setting and press “OK” . At the end, you can close all the opened windows.
2. verify which IP address has been assigned to your iAN-02EX ATA.
Access your router in configuration mode and in the status information about the “LAN” or on “DHCP client” check which IP address has been assigned to your iAN-02EX ATA and write it down.
3. start your Web Browser (i.e. Internet Explorer), insert the IP address of your iAN-02EX ATA and press “GO”.
4. It will appear the window prompt for “Network Password” in which you have to insert “supervisor” as User name and your personal Password, received from Eutelia, as Password (if you didn’t receive any indication, use the “Eutelia” password). Attention! The confidentiality of these data is necessary in order to guarantee that the equipment configuration is accessible only by you. We suggest to proceed with the configuration password change and to write down the new one.
5. After few moments, the “System Status” of your iAN-02EX
ATA.will appear on the left of your window. Clicking on the items of the menu you can change the parameters configuration of your iAN-02EX, as explained in the following chapter.
IMPORTANT: the changes made are not going to be effective before “Save” and “Reboot” of the ATA, as indicate in the following pages.

Telephone’s Analogue Adapter – UTStarcom iAN-02EX (V1.8.2.17a) – Operating Manual pag.6
Access to ATA when the DHCP is not working 1. configure the static IP address on the LAN port of your PC.
Click on “Start \ Settings\ Network connections“, double click on “Local area connections (LAN)” . In the new window click on “Properties” and then double click on “Internet Protocol (TCP/IP)”. Verify that the option “Use the following IP address” is activated, or modify the setting and fill in the following fields:: IP address: 192.168.0.x (in the example of the right site,
it is used the address 172.25.25.100) Subnet mask: 255.255.255.0 Default gateway: 192.168.0.1 For DNS servers should be used the IP addresses provided by the Internet Service Provider. Once finished the configuration, press “OK” and close all the opened windows.
2. start your Web Browser (i.e. Internet Explorer), insert the IP address 192.168.0.1 and press “GO”.
6. It will appear the window prompt for “Network Password” in which you have to insert “supervisor” as User name and your personal Password, received from Eutelia, as Password (if you didn’t receive any indication, use the “Eutelia” password). Attention! The confidentiality of these data is necessary in order to guarantee that the equipment configuration is accessible only by you. We suggest to proceed with the configuration password change and to write down the new one.
3. After few moments, the “System Status” of your iAN-
02EX ATA.will appear on the left of your window. Clicking on the items of the menu you can change the parameters configuration of your iAN-02EX, as explained in the following chapter.
IMPORTANT: the changes made are not going to be effective before “Save” and “Reboot” of the ATA, as indicate in the following pages.

Telephone’s Analogue Adapter – UTStarcom iAN-02EX (V1.8.2.17a) – Operating Manual pag.7
ATA CONFIGURATION
Before proceeding with the configuration of your iAN-02EX ATA via WEB Browser, it is important that you have at your disposal the Eutelia’s username and password for the VoIP service that you obtained during registration or those you have modified on the Eutelia’s site.
WAN parameters Click on “WAN IP” menu, then select “DHCP", insert the text “UTSTAR” and click on OK
Note: If in your LAN are used static IP addresses it is necessary to select the option“Static IP Address” and insert the values of “IP, Mask, Gateway, etc...” to avoid conflicts on the network.
NTP parameters Click on “NTP” menu, then insert the following values and choose OK
Telephone’s Analogue Adapter – UTStarcom iAN-02EX (V1.8.2.17a) – Operating Manual pag.8
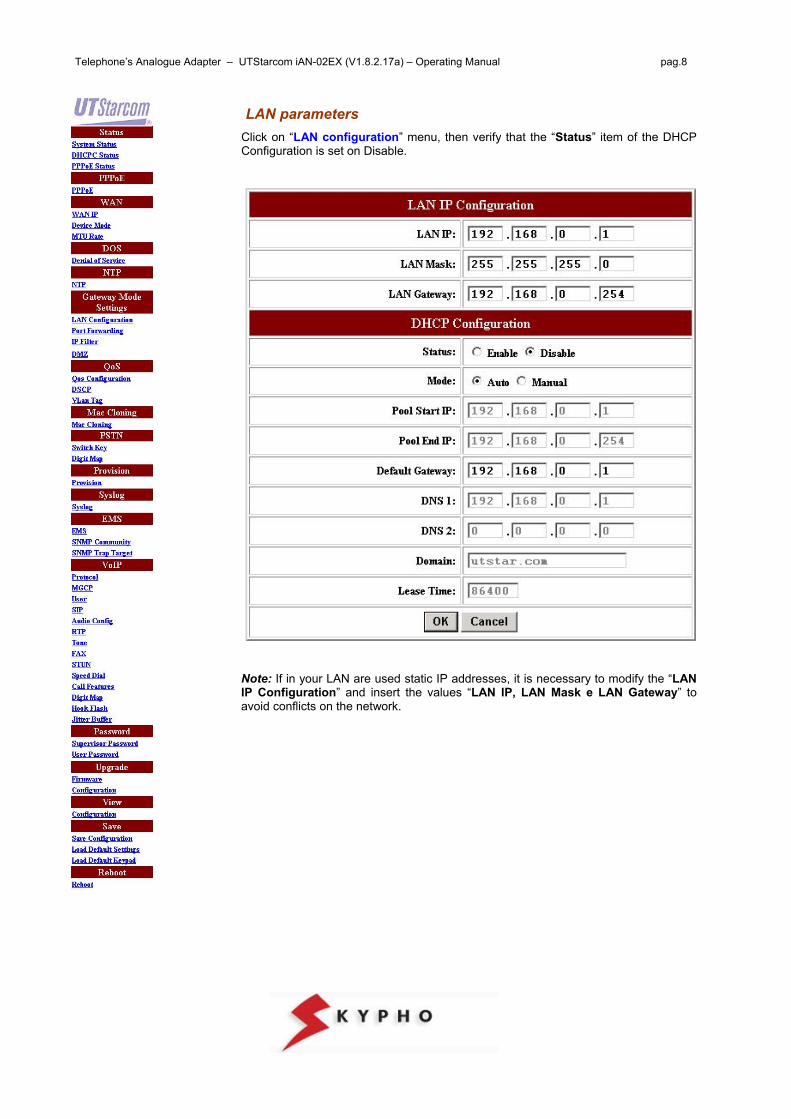
LAN parameters Click on “LAN configuration” menu, then verify that the “Status” item of the DHCP Configuration is set on Disable.
Note: If in your LAN are used static IP addresses, it is necessary to modify the “LAN IP Configuration” and insert the values “LAN IP, LAN Mask e LAN Gateway” to avoid conflicts on the network.

Telephone’s Analogue Adapter – UTStarcom iAN-02EX (V1.8.2.17a) – Operating Manual pag.9
VoIP parameters 1. click on “User” menu, then select user0 and insert the values of your SIP
account provided by Eutelia during registration:
Username = Telephone Number Assigned by Eutelia Password = Password of the SIP Account Displayname = Telephone Number Assigned by Eutelia Login ID = Telephone Number Assigned by Eutelia and click on OK
NOTE: The SIP account is the subscription registered on Eutelia’s server that allows to access to the VoIP services provided by the server itself. It is composed by a User name, coincident with the telephone number you have been assigned and aPassword (confidential access code) by which you can access the telephoneservices of Eutelia. User name and Password will be provided directly by Eutelia at the activation of the service.
If you have subscribed the Eutelia’s VoIP service with two telephone lines, you needto repeat the same configuration for user1, filling in the values of User name andPassword of the second SIP account assigned to you.
Note that the user0 corresponds to the physical port indicated as “PHONE1” on the adapter, while user1 corresponds to “PHONE2” port.
Telephone’s Analogue Adapter – UTStarcom iAN-02EX (V1.8.2.17a) – Operating Manual pag.10
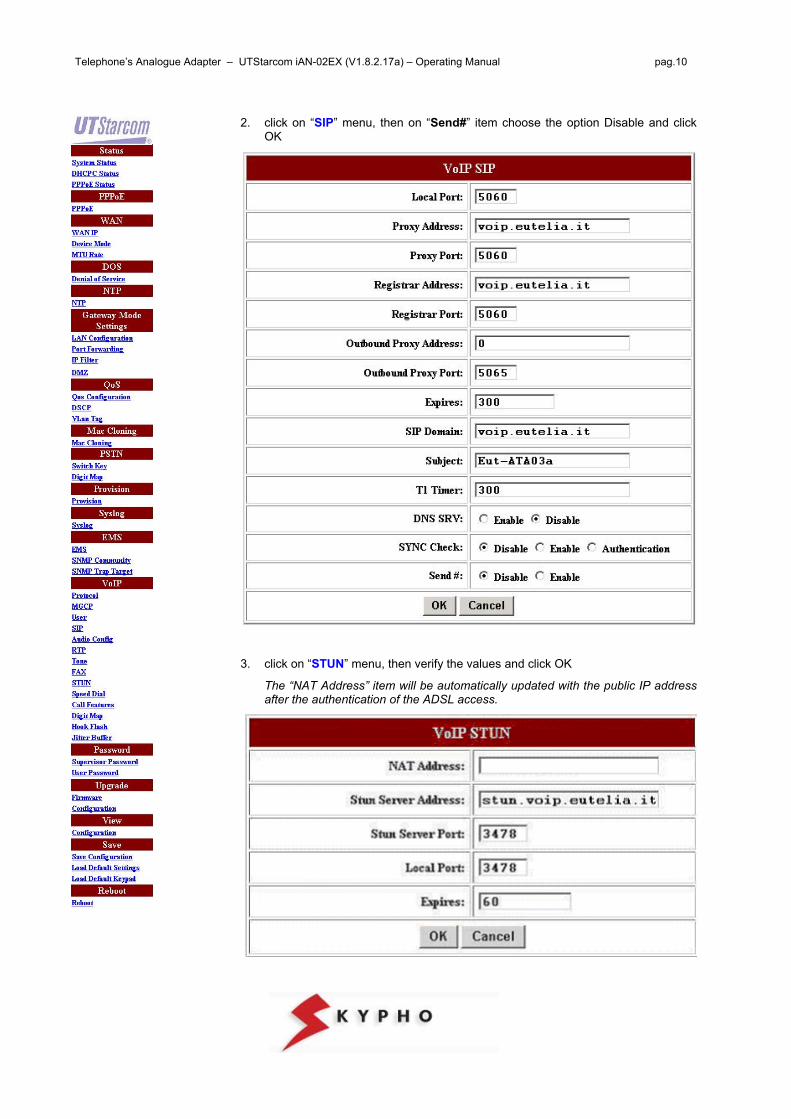
2. click on “SIP” menu, then on “Send#” item choose the option Disable and click OK
3. click on “STUN” menu, then verify the values and click OK
The “NAT Address” item will be automatically updated with the public IP addressafter the authentication of the ADSL access.
Telephone’s Analogue Adapter – UTStarcom iAN-02EX (V1.8.2.17a) – Operating Manual pag.11
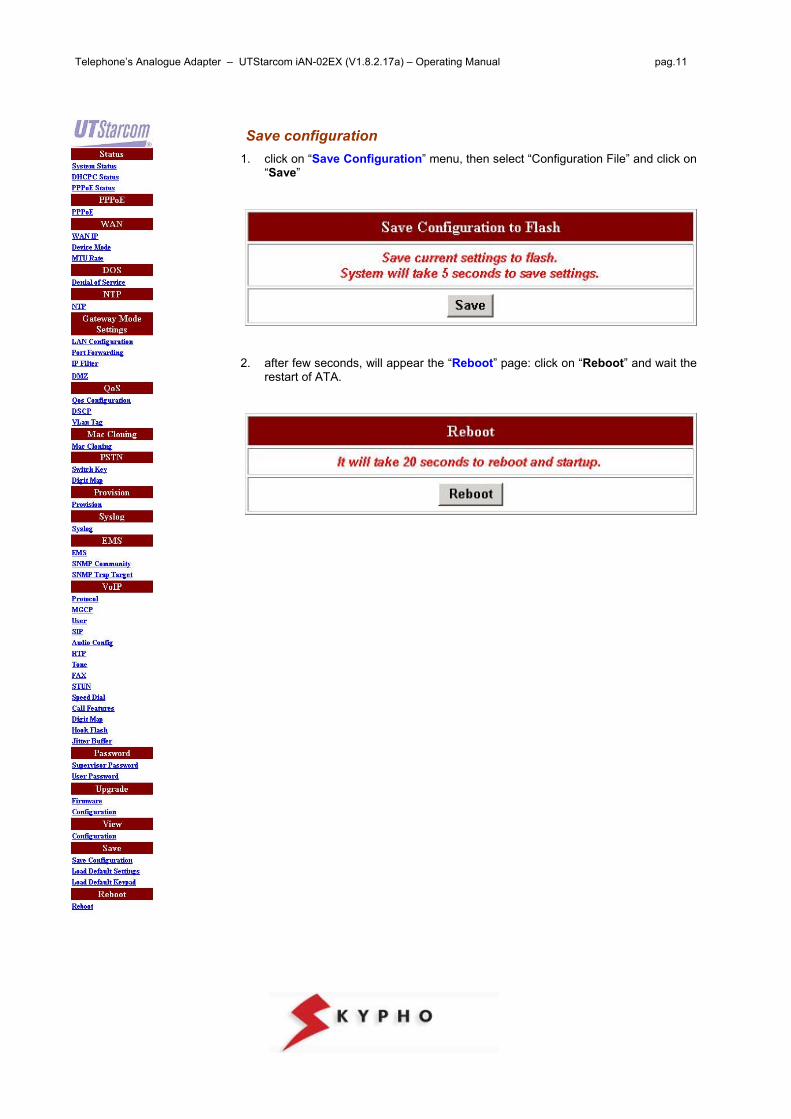
Save configuration 1. click on “Save Configuration” menu, then select “Configuration File” and click on
“Save”
2. after few seconds, will appear the “Reboot” page: click on “Reboot” and wait the restart of ATA.

Telephone’s Analogue Adapter – UTStarcom iAN-02EX (V1.8.2.17a) – Operating Manual pag.12
CONFIGURATION PARAMETERS OF UTStarcom IAN-02EX ATA EQUIPMENT Access parameters to the equipment:
IP address: verify on ADSL modem User name: supervisor Password: Assigned by Eutelia
LAN/WAN PARAMETERS
WAN Configuration
DHCP on, for obtaining an IP address automatically
WAN Provisioning Configuration Status: on
Device Mode Configuration Device Mode: Bridge
MTU Rate Setting MTU Rate: 1460
NTP Configuration NTP Server: 62.94.7.9 Expires: 86400 Time Zone: +1
LAN Configuration
LAN IP: 192.168.0.1 LAN Mask:255.255.255.0 LAN Gateway: 192.168.0.254
DHCP Configuration
Status: Enable Mode: Auto Pool Start IP: 192.168.0.1 Pool End IP: 192.168.0.254 Default Gateway: 192.168.0.1 DNS 1: 192.168.0.1 DNS 2: 0.0.0.0 Domain: eutelia.it Least time: 86400
VOIP PARAMETERS
VoIP Protocol: SIP (MGCP not_used) VoIP User (User0)
Username: telephone number Password: assigned by Eutelia or modified via WEB Displayname: telephone number Login Id: telephone number
VoIP User (User1) if subscribed Username: 2° telephone number Password: assigned by Eutelia or modified via WEB Displayname: 2° telephone number Login Id: 2° telephone number
VoIP SIP Local Port: 5060 Proxy Address : voip.eutelia.it Proxy Port : 5060 Registration address: voip.eutelia.it Registration port: 5060 Outbound Proxy Address: 0 Outbound Proxy Port: 5065 Expires: 300 SIP Domain: voip.eutelia.it Subject: Eut-ATA03a
VoIP Audio Config (Port 1 & 2)
Codec Rate: 30 Preferred Codec : G.729A VAD: Enable DTMF Tx Method: RFC-2833 Enable
VoIP RTP
RTP Port: 13456 VoIP Tone
Country Tone: Custom Specific Tone Rx Gain (db): 0 Tx Gain (db): 0 Ring: 1000, 4000 Dial Tone: 0, 0, 450, 0 Busy Tone: 350, 350, 450, 0 Ring back Tone: 1000, 4000, 450, 0 Call Waiting tone: 4000, 4000, 450, 0
VoIP FAX
T.38 Fax: enable T.38 Port: 49170
VoIP STUN
NAT Address: ()1 STUN Server Address: stun.voip.eutelia.it STUN Server Port: 3478 Local Port: 3478 Expires: 60
Speed Dial (not used) Call Features (not used)
Port1: all services in off Port2: all services in off
1 The “NAT Address” item will be updated automatically with the public IP address following the authentication of the ADSL access.


