32
Veeam Deployment Guide for NetApp SteelStore
Veeam Deployment Guide for NetApp SteelStore

Veeam Deployment Guide for NetApp SteelStore
2© 2015 Veeam Software
SummaryVeeam® Backup & Replication™ unifies backup and replication in a single solution—increasing
the value of backup and reinventing data availability for VMware® vSphere and Microsoft® Hyper-V
virtual environments. Veeam’s agentless design provides multiple backup options to meet your
needs. Features such as source-side deduplication and compression, changed block tracking, parallel
processing, and automatic load balancing provide the fastest, most efficient backups possible.
The NetApp® SteelStore™ cloud-integrated appliance enables users to leverage public and private
cloud as part of their data protection strategy. With built-in compression and deduplication, SteelStore
reduces the amount of space required to meet retention requirements.
Figure 1: NetApp SteelStore storage appliance
Veeam, together with the NetApp SteelStore storage appliance enable a data protection strategy that satisfies
requirements for offsite disaster recovery as well as the need for high-speed recoveries on premises.
Deployment RecommendationsSimplified deployment helps streamline your data protection strategy. Veeam Backup & Replication can
be installed on any Windows server–whether physical or virtual with the following recommendations:
• Modern quad-core processor or better
• 16GB base RAM + 4GB RAM per concurrent Veeam job
• 2GB of disk space for product installation plus 10GB per 100 virtual machines (VMs) for file system catalog
• 64-bit Windows OS
Veeam Deployment Guide for NetApp SteelStore
3© 2015 Veeam Software
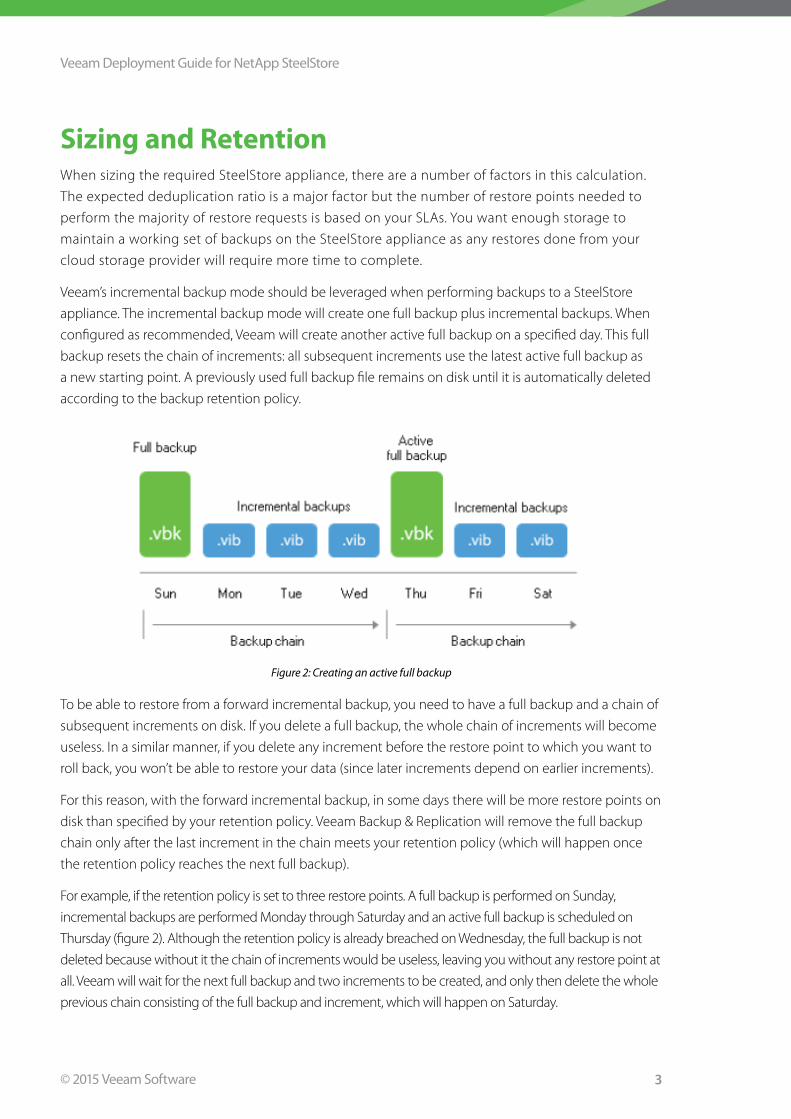
Sizing and RetentionWhen sizing the required SteelStore appliance, there are a number of factors in this calculation.
The expected deduplication ratio is a major factor but the number of restore points needed to
perform the majority of restore requests is based on your SLAs. You want enough storage to
maintain a working set of backups on the SteelStore appliance as any restores done from your
cloud storage provider will require more time to complete.
Veeam’s incremental backup mode should be leveraged when performing backups to a SteelStore
appliance. The incremental backup mode will create one full backup plus incremental backups. When
configured as recommended, Veeam will create another active full backup on a specified day. This full
backup resets the chain of increments: all subsequent increments use the latest active full backup as
a new starting point. A previously used full backup file remains on disk until it is automatically deleted
according to the backup retention policy.
Figure 2: Creating an active full backup
To be able to restore from a forward incremental backup, you need to have a full backup and a chain of
subsequent increments on disk. If you delete a full backup, the whole chain of increments will become
useless. In a similar manner, if you delete any increment before the restore point to which you want to
roll back, you won’t be able to restore your data (since later increments depend on earlier increments).
For this reason, with the forward incremental backup, in some days there will be more restore points on
disk than specified by your retention policy. Veeam Backup & Replication will remove the full backup
chain only after the last increment in the chain meets your retention policy (which will happen once
the retention policy reaches the next full backup).
For example, if the retention policy is set to three restore points. A full backup is performed on Sunday,
incremental backups are performed Monday through Saturday and an active full backup is scheduled on
Thursday (figure 2). Although the retention policy is already breached on Wednesday, the full backup is not
deleted because without it the chain of increments would be useless, leaving you without any restore point at
all. Veeam will wait for the next full backup and two increments to be created, and only then delete the whole
previous chain consisting of the full backup and increment, which will happen on Saturday.

Veeam Deployment Guide for NetApp SteelStore
4© 2015 Veeam Software
Figure 3
To properly size for the desired backup repository, you must also take into account the size of the incremental
backup. Incremental size is based on the data change rate in the environment, if the daily change rate is
unknown, Veeam ONE™ can provide this information through a change rate report. Once all of the above has
been determined, the following formula can be used to calculate the repository size needed:
X=number of full backups
Y=number of incremental backups
F=size of full backups
I=size of incremental backups
D=deduplication ratio of SteelStore, NetApp uses 30x for their technical specs, ratios will vary
[(X*F)+(Y*I)] / D = space needed on SteelStore CIFS repository
Note: Make sure to include one extra of full plus incremental backups on top of the desired retention policy.
This will account for the space needed for an entire chain to expire.
Veeam Deployment Guide for NetApp SteelStore
5© 2015 Veeam Software
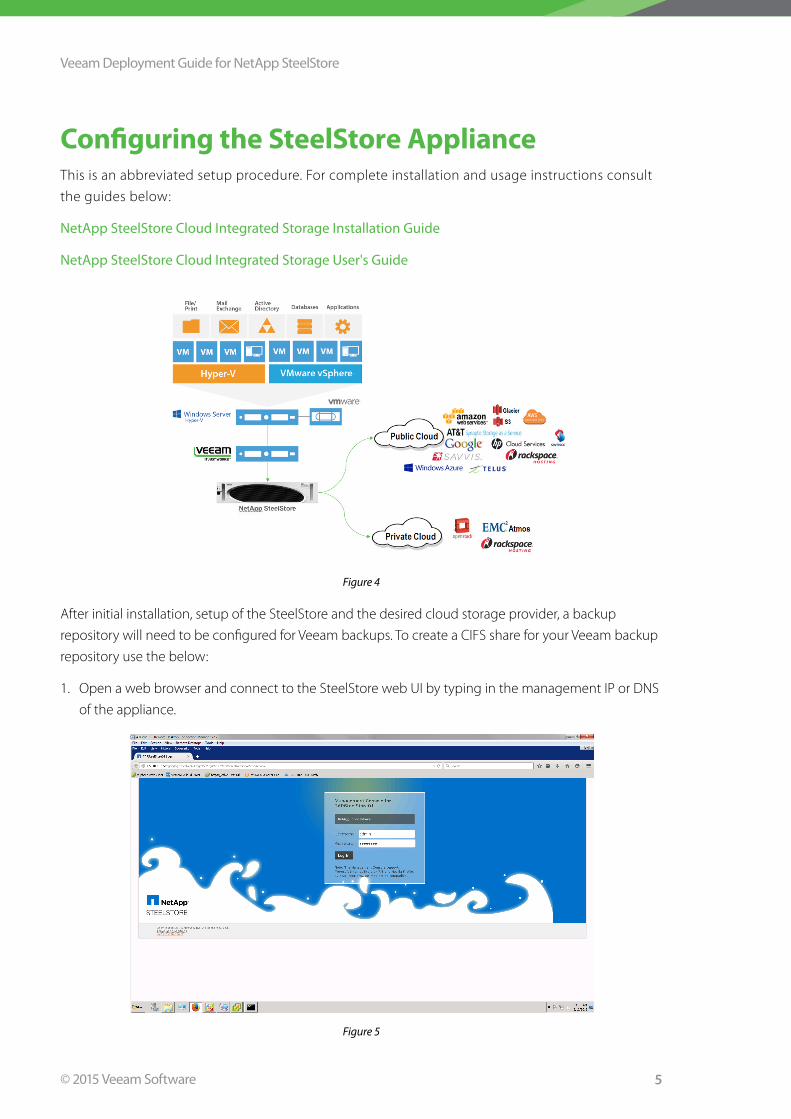
Configuring the SteelStore ApplianceThis is an abbreviated setup procedure. For complete installation and usage instructions consult
the guides below:
NetApp SteelStore Cloud Integrated Storage Installation Guide
NetApp SteelStore Cloud Integrated Storage User's Guide
Figure 4
After initial installation, setup of the SteelStore and the desired cloud storage provider, a backup
repository will need to be configured for Veeam backups. To create a CIFS share for your Veeam backup
repository use the below:
1. Open a web browser and connect to the SteelStore web UI by typing in the management IP or DNS
of the appliance.
Figure 5
Veeam Deployment Guide for NetApp SteelStore
6© 2015 Veeam Software
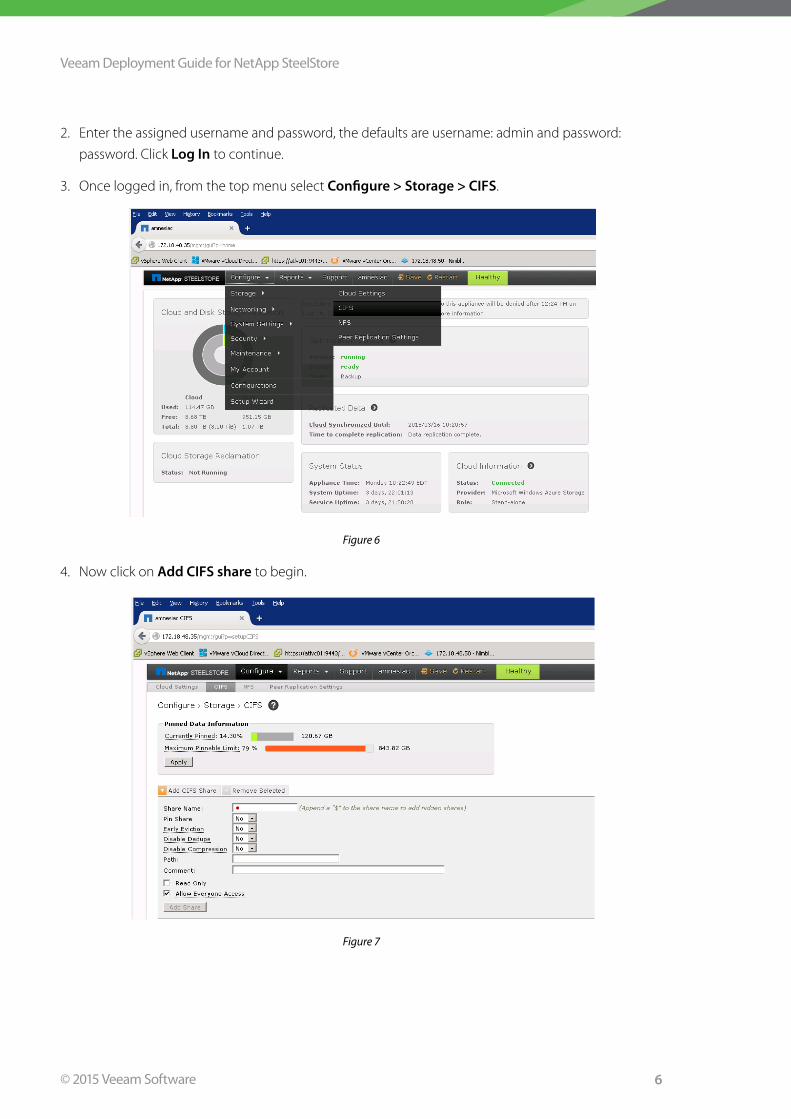
2. Enter the assigned username and password, the defaults are username: admin and password:
password. Click Log In to continue.
3. Once logged in, from the top menu select Configure > Storage > CIFS.
Figure 6
4. Now click on Add CIFS share to begin.
Figure 7
Veeam Deployment Guide for NetApp SteelStore
7© 2015 Veeam Software
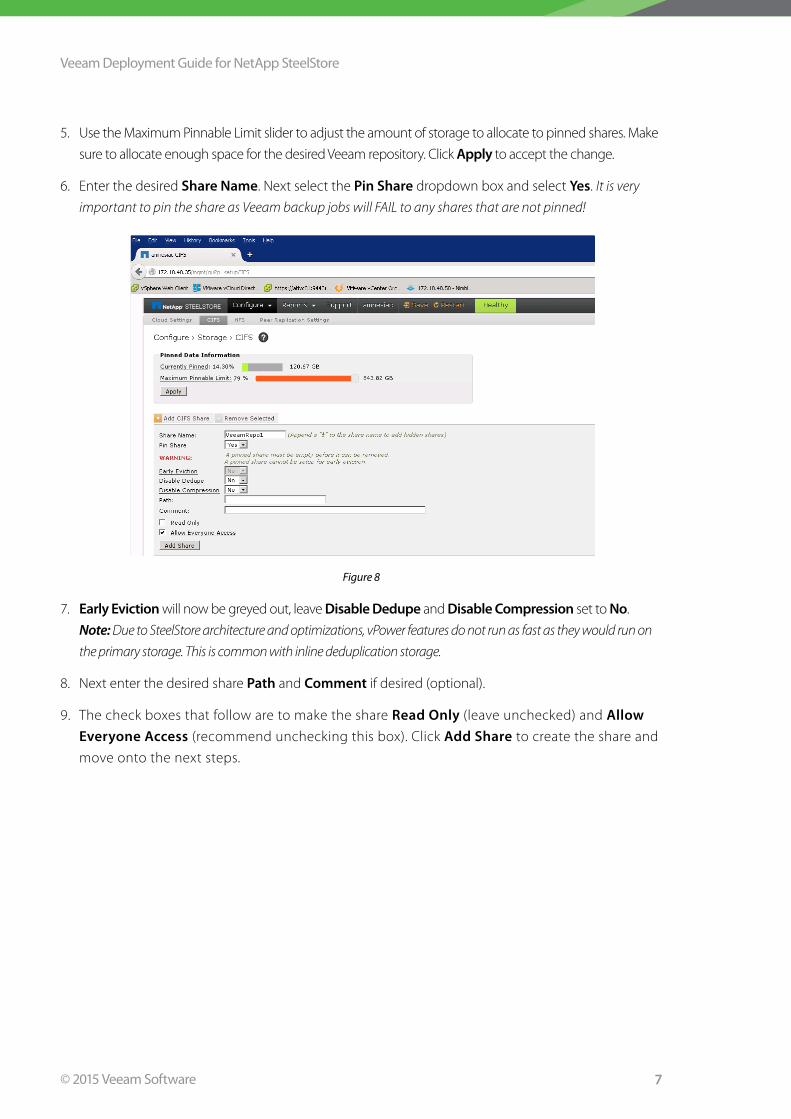
5. Use the Maximum Pinnable Limit slider to adjust the amount of storage to allocate to pinned shares. Make
sure to allocate enough space for the desired Veeam repository. Click Apply to accept the change.
6. Enter the desired Share Name. Next select the Pin Share dropdown box and select Yes. It is very
important to pin the share as Veeam backup jobs will FAIL to any shares that are not pinned!
Figure 8
7. Early Eviction will now be greyed out, leave Disable Dedupe and Disable Compression set to No.
Note: Due to SteelStore architecture and optimizations, vPower features do not run as fast as they would run on
the primary storage. This is common with inline deduplication storage.
8. Next enter the desired share Path and Comment if desired (optional).
9. The check boxes that follow are to make the share Read Only (leave unchecked) and Allow Everyone Access (recommend unchecking this box). Click Add Share to create the share and
move onto the next steps.

Veeam Deployment Guide for NetApp SteelStore
8© 2015 Veeam Software
10. If Allow Everyone Access was unchecked during the share creation, users will have to be added
and access allowed to the share. There are two options to add users. Option 1, if you have an Active
Directory (AD) domain, you can join the SteelStore to the domain and allow domain users to access
the share. Option 2, create users on the SteelStore appliance and allow them access. For option 1
continue to the next step, for option 2 skip to step 12.
Figure 9
11. To join an existing domain, enter the Domain Name, Username and Password. Then click Join Domain. Skip to step 13.
Veeam Deployment Guide for NetApp SteelStore
9© 2015 Veeam Software
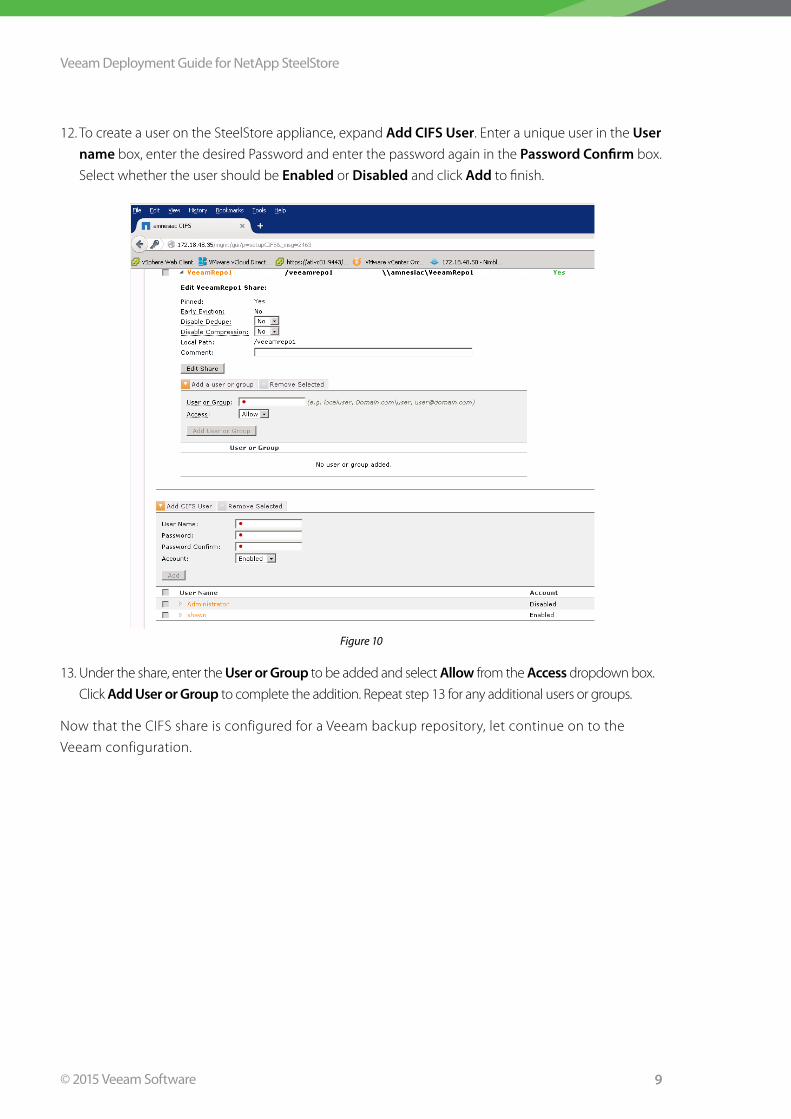
12. To create a user on the SteelStore appliance, expand Add CIFS User. Enter a unique user in the User name box, enter the desired Password and enter the password again in the Password Confirm box.
Select whether the user should be Enabled or Disabled and click Add to finish.
Figure 10
13. Under the share, enter the User or Group to be added and select Allow from the Access dropdown box.
Click Add User or Group to complete the addition. Repeat step 13 for any additional users or groups.
Now that the CIFS share is configured for a Veeam backup repository, let continue on to the
Veeam configuration.

Veeam Deployment Guide for NetApp SteelStore
10© 2015 Veeam Software
Installing and Configuring Veeam Backup & ReplicationThis is an abbreviated setup procedure. For complete installation and usage instructions consult
the guides below:
Veeam Backup & Replication 8 for vSphere User Guide
Veeam Backup & Replication 8 for Hyper-V User Guide
To install Veeam Backup & Replication v8, follow these steps:
1. Log into the designated backup server (refer to deployment recommendations on page 1) as a user
with Local Administrator privileges.
2. Mount the installation image using disk image emulation software, or burn the ISO image to a
blank CD/DVD.
3. After you mount or insert the disk with Veeam Backup & Replication setup, Autorun will open a splash
screen with installation options. If Autorun is not available or disabled, run the Setup.exe file from the
CD/DVD disk. Alternatively, you can right-click the new disk in My Computer and select Execute Veeam Backup & Replication Autorun, or simply double-click the new disk to launch the splash screen.
Figure 11
4. Click the Install link in the Veeam Backup & Replication section of the splash screen.
5. On the Welcome step of the wizard, click Next to start the installation.
Veeam Deployment Guide for NetApp SteelStore
11© 2015 Veeam Software
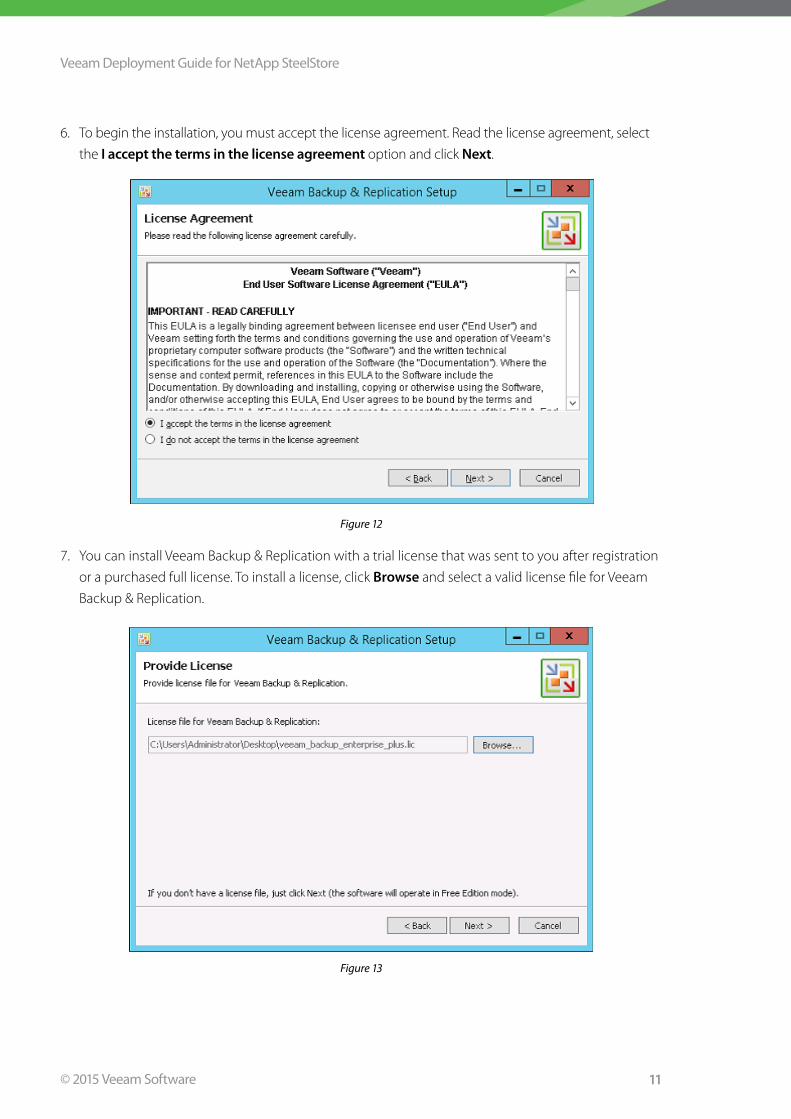
6. To begin the installation, you must accept the license agreement. Read the license agreement, select
the I accept the terms in the license agreement option and click Next.
Figure 12
7. You can install Veeam Backup & Replication with a trial license that was sent to you after registration
or a purchased full license. To install a license, click Browse and select a valid license file for Veeam
Backup & Replication.
Figure 13
Veeam Deployment Guide for NetApp SteelStore
12© 2015 Veeam Software
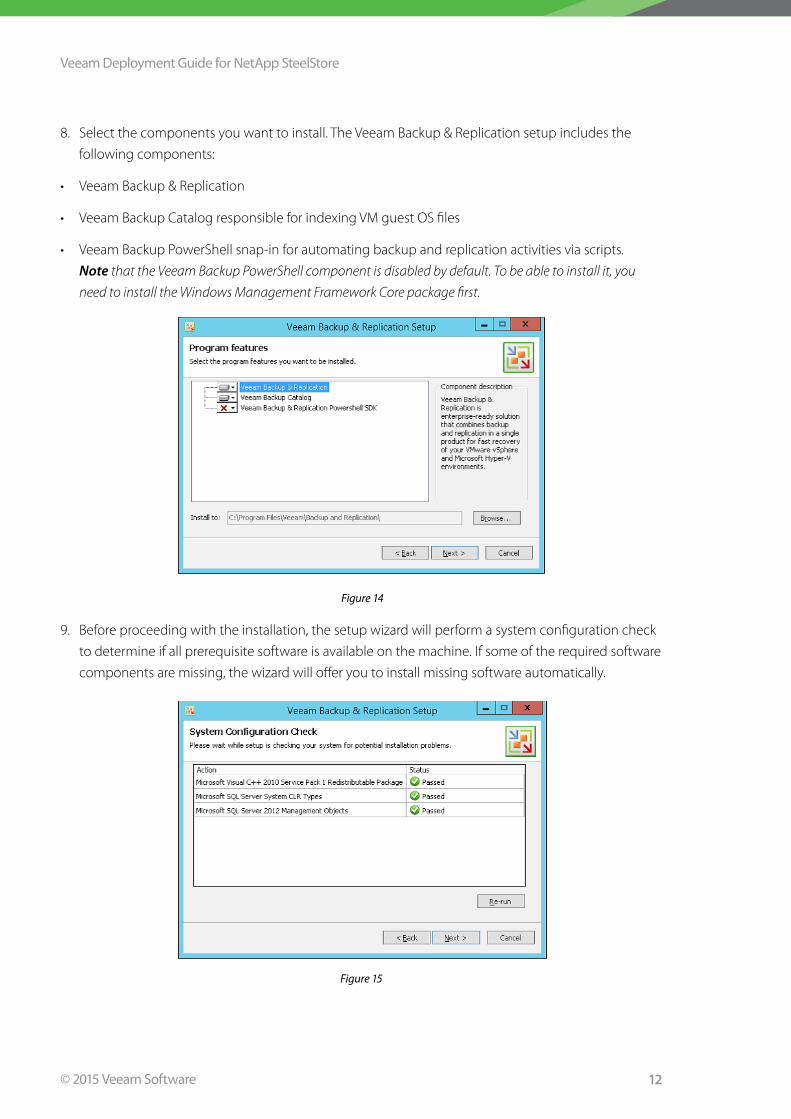
8. Select the components you want to install. The Veeam Backup & Replication setup includes the
following components:
• Veeam Backup & Replication
• Veeam Backup Catalog responsible for indexing VM guest OS files
• Veeam Backup PowerShell snap-in for automating backup and replication activities via scripts.
Note that the Veeam Backup PowerShell component is disabled by default. To be able to install it, you
need to install the Windows Management Framework Core package first.
Figure 14
9. Before proceeding with the installation, the setup wizard will perform a system configuration check
to determine if all prerequisite software is available on the machine. If some of the required software
components are missing, the wizard will offer you to install missing software automatically.
Figure 15
Veeam Deployment Guide for NetApp SteelStore
13© 2015 Veeam Software
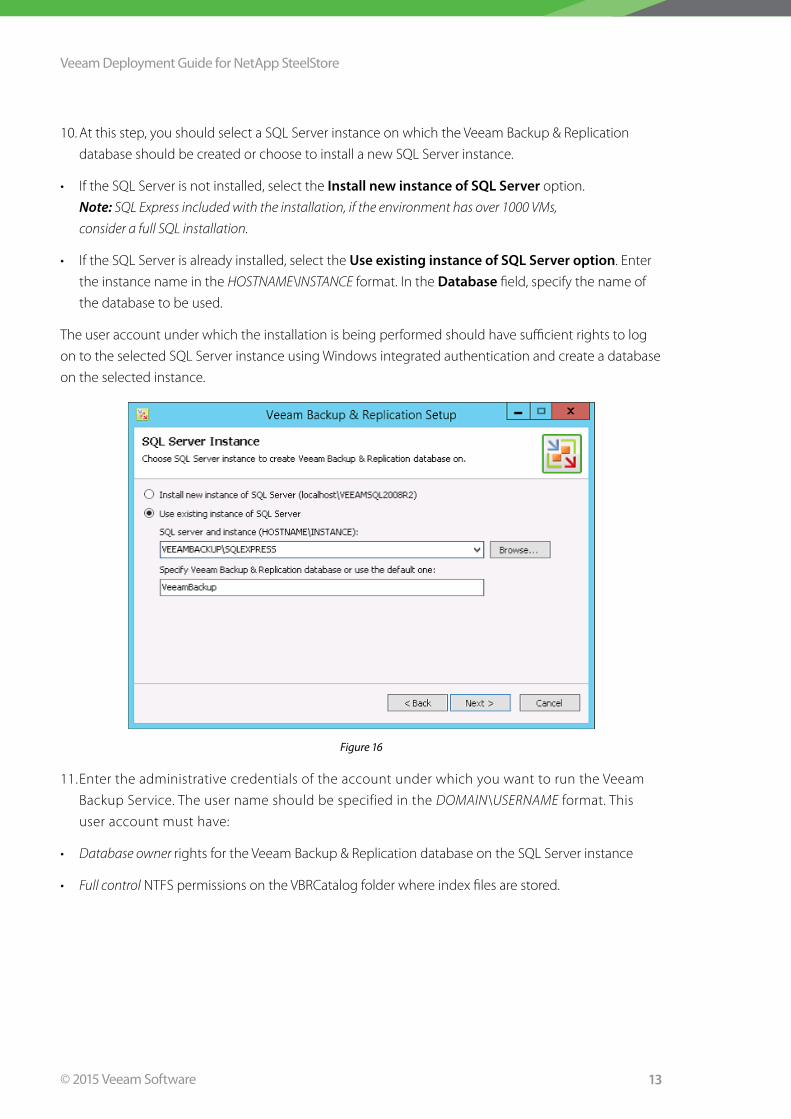
10. At this step, you should select a SQL Server instance on which the Veeam Backup & Replication
database should be created or choose to install a new SQL Server instance.
• If the SQL Server is not installed, select the Install new instance of SQL Server option.
Note: SQL Express included with the installation, if the environment has over 1000 VMs,
consider a full SQL installation.
• If the SQL Server is already installed, select the Use existing instance of SQL Server option. Enter
the instance name in the HOSTNAME\INSTANCE format. In the Database field, specify the name of
the database to be used.
The user account under which the installation is being performed should have sufficient rights to log
on to the selected SQL Server instance using Windows integrated authentication and create a database
on the selected instance.
Figure 16
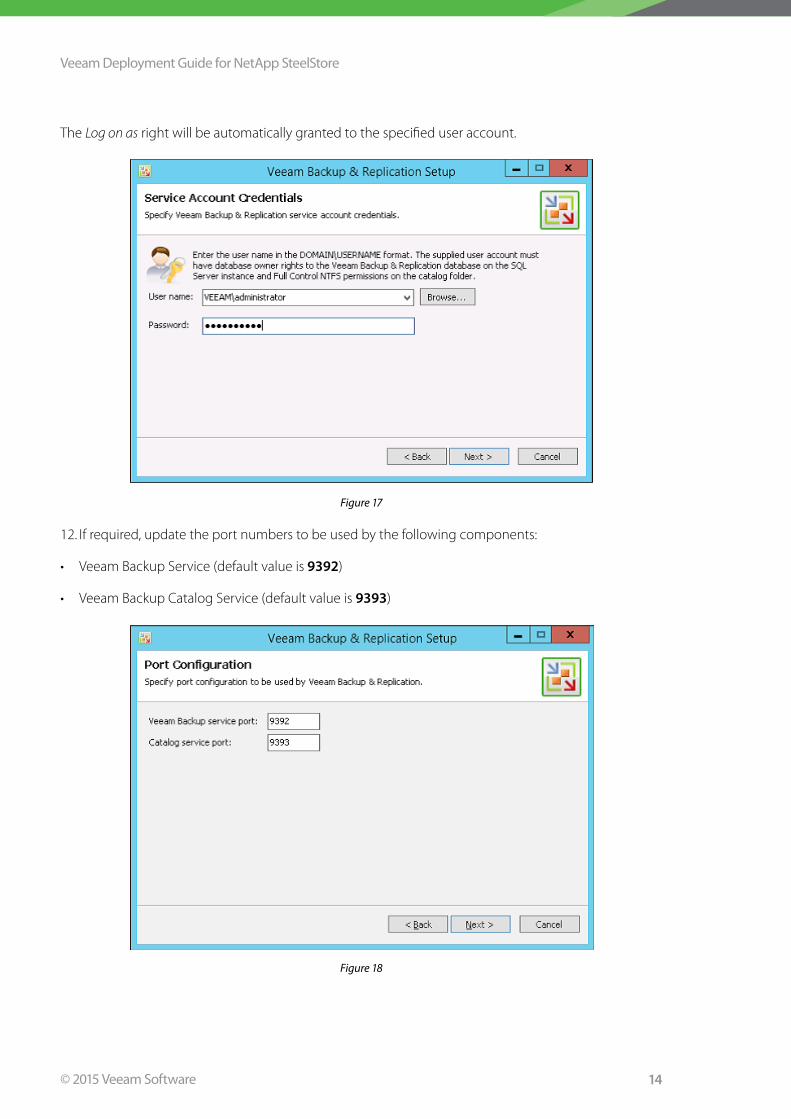
11. Enter the administrative credentials of the account under which you want to run the Veeam
Backup Service. The user name should be specified in the DOMAIN\USERNAME format. This
user account must have:
• Database owner rights for the Veeam Backup & Replication database on the SQL Server instance
• Full control NTFS permissions on the VBRCatalog folder where index files are stored.
Veeam Deployment Guide for NetApp SteelStore
14© 2015 Veeam Software
The Log on as right will be automatically granted to the specified user account.
Figure 17
12. If required, update the port numbers to be used by the following components:
• Veeam Backup Service (default value is 9392)
• Veeam Backup Catalog Service (default value is 9393)
Figure 18

Veeam Deployment Guide for NetApp SteelStore
15© 2015 Veeam Software
13. In the vPower NFS section, specify the folder to which instant VM recovery write cache will be
stored. The default location is C:\ProgramData\Veeam\Backup\NfsDatastore. Please note that the
selected volume should have at least 10 GB of free disk space.
14. Specify the name and destination for the catalog folder where index files should be stored. The
default location is C:\VBRCatalog. Note: The catalog requires 10GB per 100 VMs being indexed.
Figure 19
15. Finally, review the installation settings. You can go back, review and modify previous steps using
the Back button. If you are sure that all settings are configured correctly, click Install to begin the
installation. When the installation completes, click Finish to exit the setup wizard. You can now start
Veeam Backup & Replication.
Figure 20

Veeam Deployment Guide for NetApp SteelStore
16© 2015 Veeam Software
Veeam Backup & Replication ConfigurationNow that Veeam Backup & Replication is installed, launch the application directly from the desktop
icon. Once launched, the following configurations are required:
• Backup Infrastructure including vSphere / Hyper-V infrastructure and backup repositories.
Adding the Virtual Infrastructure1. For building your backup infrastructure in a VMware vSphere environment, Veeam Backup &
Replication supports the following types of servers:
• VMware Server
• Microsoft Windows Server
• Linux Server
• vCloud Director
Veeam Backup & Replication allows you to connect both vCenter servers and standalone ESX(i)
hosts. If possible, avoid adding ESX(i) hosts which are part of the vCenter Server hierarchy. Add the
corresponding vCenter Server instead. Adding the vCenter Server facilitates management of the
backup infrastructure and can be a recommended condition for certain types of operations (such as
Quick Migration). Note: Free ESXi is not supported.
Figure 21
For building your backup infrastructure in a Microsoft Hyper-V environment, Veeam Backup &
Replication supports the following types of servers:
• Microsoft Hyper-V Server
• Microsoft Windows Server
• Linux Server
• SMB3 Server
Veeam Deployment Guide for NetApp SteelStore
17© 2015 Veeam Software
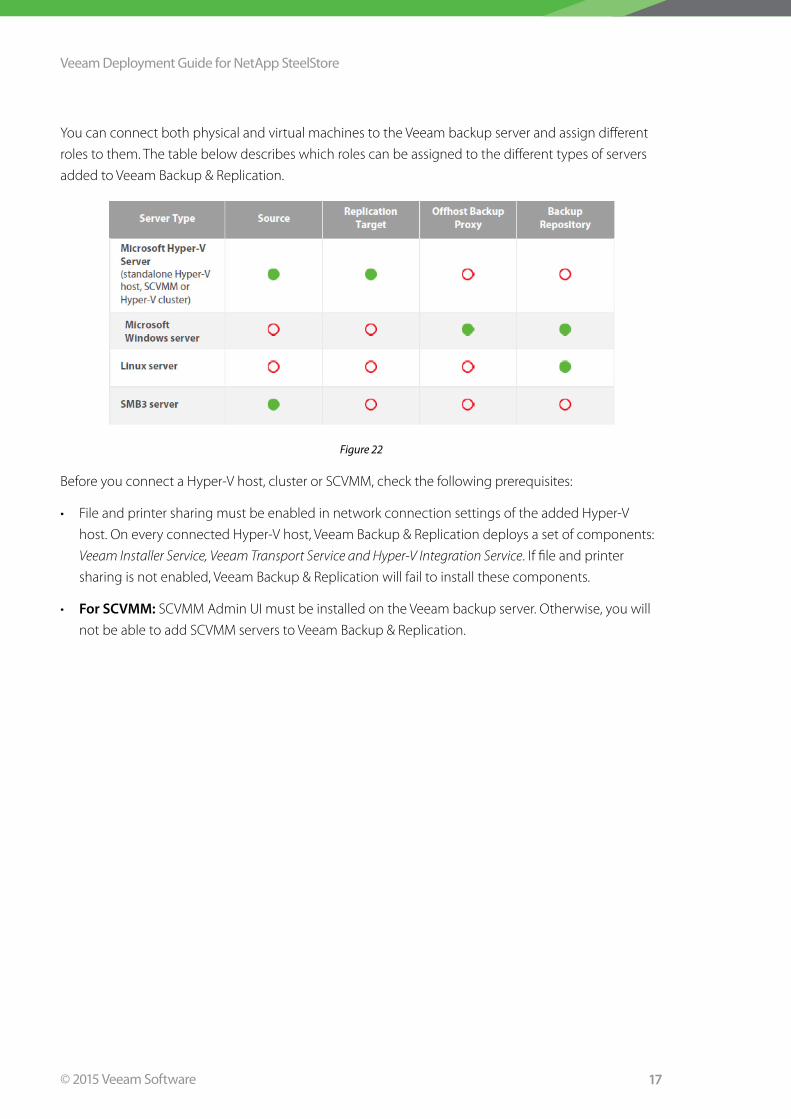
You can connect both physical and virtual machines to the Veeam backup server and assign different
roles to them. The table below describes which roles can be assigned to the different types of servers
added to Veeam Backup & Replication.
Figure 22
Before you connect a Hyper-V host, cluster or SCVMM, check the following prerequisites:
• File and printer sharing must be enabled in network connection settings of the added Hyper-V
host. On every connected Hyper-V host, Veeam Backup & Replication deploys a set of components:
Veeam Installer Service, Veeam Transport Service and Hyper-V Integration Service. If file and printer
sharing is not enabled, Veeam Backup & Replication will fail to install these components.
• For SCVMM: SCVMM Admin UI must be installed on the Veeam backup server. Otherwise, you will
not be able to add SCVMM servers to Veeam Backup & Replication.

Veeam Deployment Guide for NetApp SteelStore
18© 2015 Veeam Software
2. To add a Server, open the Backup Infrastructure view and launch the Add Server wizard.
Figure 23
3. Once the Add Server wizard is launched, select the desired option for VMware vSphere or
Microsoft Hyper-V.
Figure 24
Veeam Deployment Guide for NetApp SteelStore
19© 2015 Veeam Software
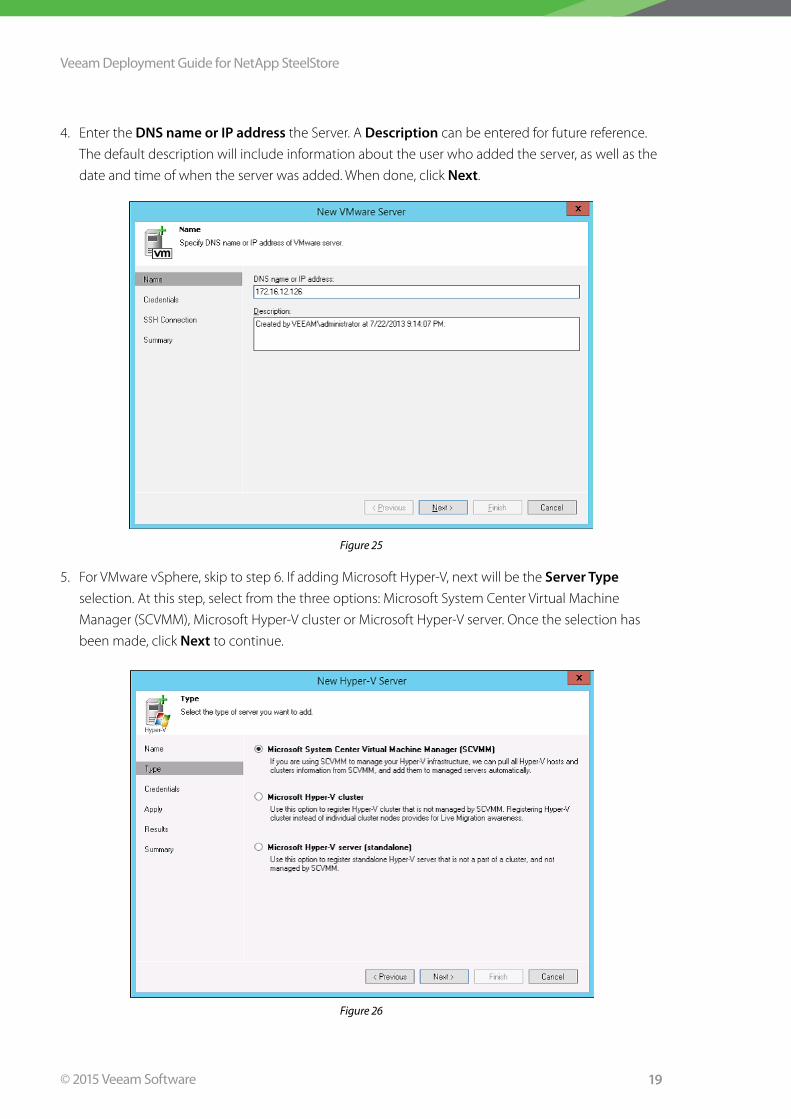
4. Enter the DNS name or IP address the Server. A Description can be entered for future reference.
The default description will include information about the user who added the server, as well as the
date and time of when the server was added. When done, click Next.
Figure 25
5. For VMware vSphere, skip to step 6. If adding Microsoft Hyper-V, next will be the Server Type
selection. At this step, select from the three options: Microsoft System Center Virtual Machine
Manager (SCVMM), Microsoft Hyper-V cluster or Microsoft Hyper-V server. Once the selection has
been made, click Next to continue.
Figure 26

Veeam Deployment Guide for NetApp SteelStore
20© 2015 Veeam Software
6. Next is the Credentials. On this screen click Add to input new credentials. For VMware, it is
recommended that vCenter Admin be used if adding a vCenter Server and root credentials are
needed for standalone ESX(i) hosts. Note: The username of the account should be provided in the
DOMAIN\USERNAME format. Click Next to proceed.
Figure 27
7. On the Summary screen, review the configuration information and click Finish to exit the wizard.
8. You can repeat these steps for any additional servers you need to add. Note: The steps for servers
other than VMware vSphere or Microsoft Hyper-V are not identical, but are very similar. At this point,
add any Windows or Linux servers you wish to use as a backup repository (backup repositories are
the locations where you wish to house your backup files).

Veeam Deployment Guide for NetApp SteelStore
21© 2015 Veeam Software
Creating a new Veeam Backup RepositoryBy default, Veeam automatically creates a local backup repository on the C:\ drive of the Veeam Backup
& Replication server. We will create a new backup repository so that we are storing backups on the
SteelStore appliance. The following steps will outline how to create the backup repository.
1. Select Backup Infrastructure from the lower left pane.
2. Right click on Backup Repositories and select Add Backup Repository.
Figure 28
3. The New Backup Repository wizard will launch, the first screen is Name. Give the new backup
repository a name, the Description will be prepopulated but you can optionally edit this field. Click
Next to move on to Type.
Figure 29
Veeam Deployment Guide for NetApp SteelStore
22© 2015 Veeam Software
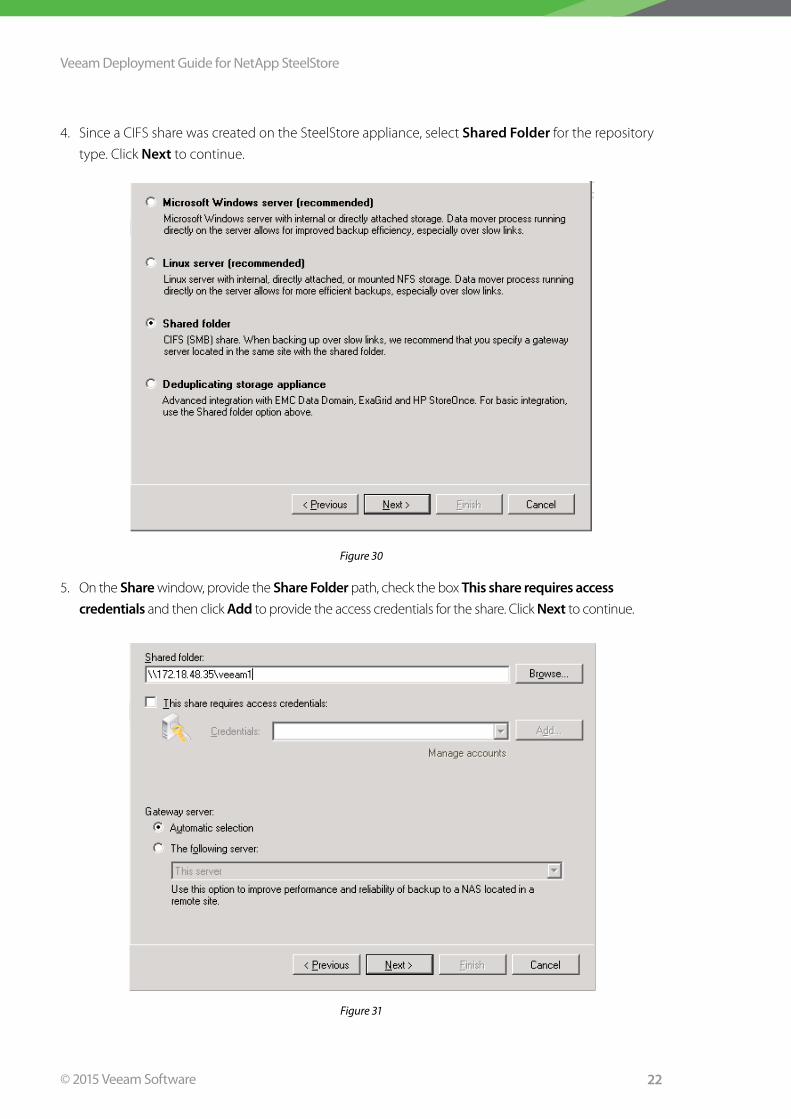
4. Since a CIFS share was created on the SteelStore appliance, select Shared Folder for the repository
type. Click Next to continue.
Figure 30
5. On the Share window, provide the Share Folder path, check the box This share requires access credentials and then click Add to provide the access credentials for the share. Click Next to continue.
Figure 31

Veeam Deployment Guide for NetApp SteelStore
23© 2015 Veeam Software
6. On the Repository window, the Limit maximum concurrent task to box is already check and
by default set to 4. This the maximum number of tasks a backup proxy can send to this particular
share. The default number is a good starting point for this share, it can be adjusted after the backup
repository has been created, if needed. Click Next to continue.
Figure 32
7. On the vPower NFS window, the Enable vPower NFS server is already check. Leave this setting check as
Veeam will leverage vPower for recoveries as well as recovery verification. Click Next to continue.
Figure 33
Veeam Deployment Guide for NetApp SteelStore
24© 2015 Veeam Software
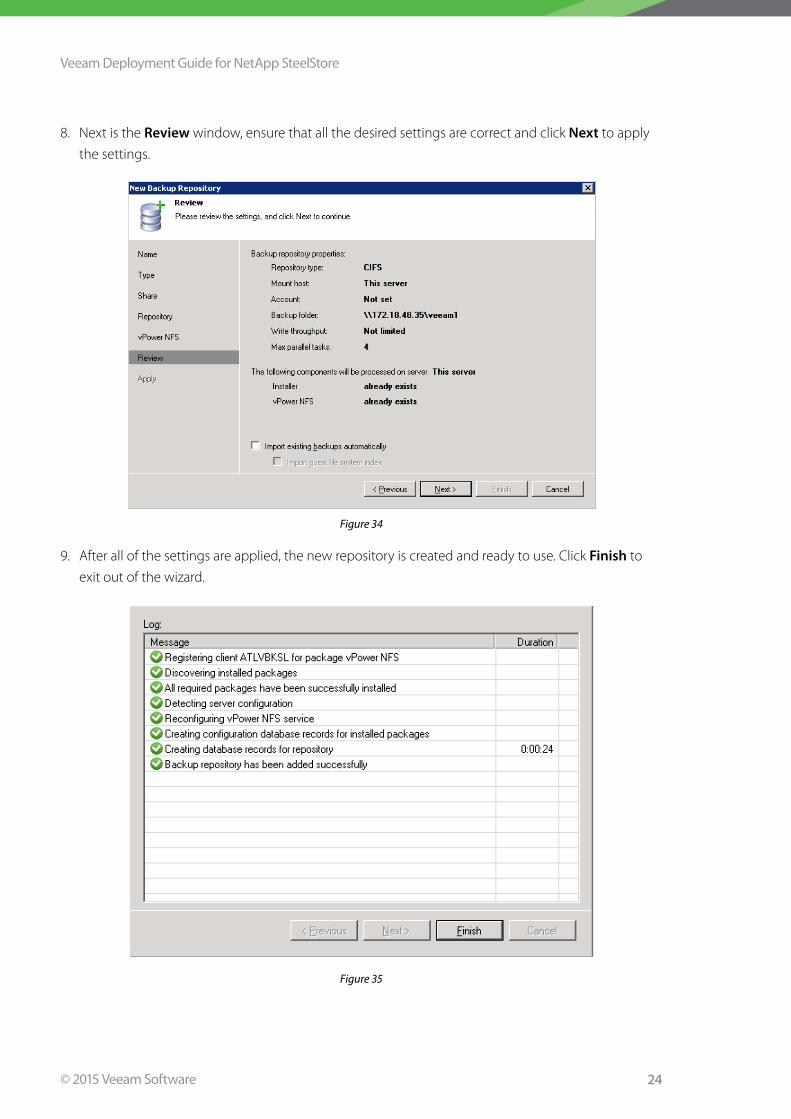
8. Next is the Review window, ensure that all the desired settings are correct and click Next to apply
the settings.
Figure 34
9. After all of the settings are applied, the new repository is created and ready to use. Click Finish to
exit out of the wizard.
Figure 35

Veeam Deployment Guide for NetApp SteelStore
25© 2015 Veeam Software
Creating a new Veeam Backup JobNow that the SteelStore appliance is configured and setup as a Veeam Backup Repository, it can be
used within a backup job as a target. To create a new backup job and leverage the SteelStore appliance
as the target, use the following procedure:
1. Select Backup & Replication from the lower left pane.
2. Click on Backup Job and select VMware or Hyper-V depending on the type of job you wish to create.
Figure 36
Veeam Deployment Guide for NetApp SteelStore
26© 2015 Veeam Software
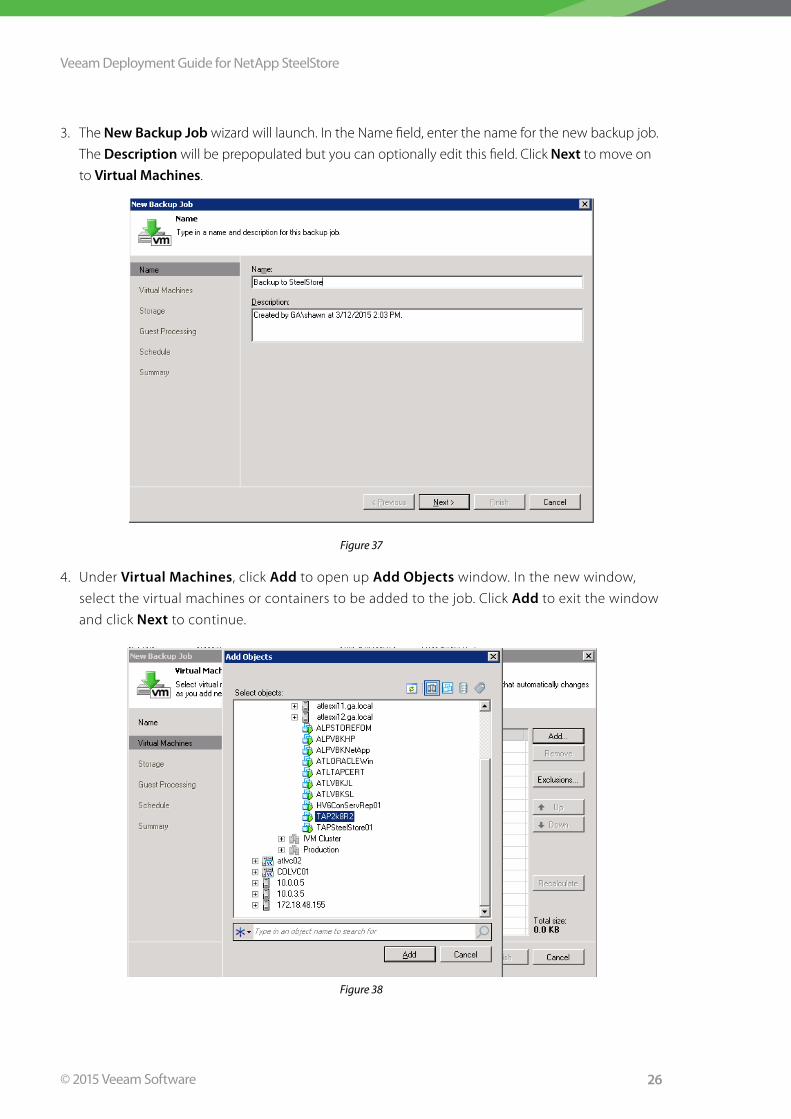
3. The New Backup Job wizard will launch. In the Name field, enter the name for the new backup job.
The Description will be prepopulated but you can optionally edit this field. Click Next to move on
to Virtual Machines.
Figure 37
4. Under Virtual Machines, click Add to open up Add Objects window. In the new window,
select the virtual machines or containers to be added to the job. Click Add to exit the window
and click Next to continue.
Figure 38
Veeam Deployment Guide for NetApp SteelStore
27© 2015 Veeam Software
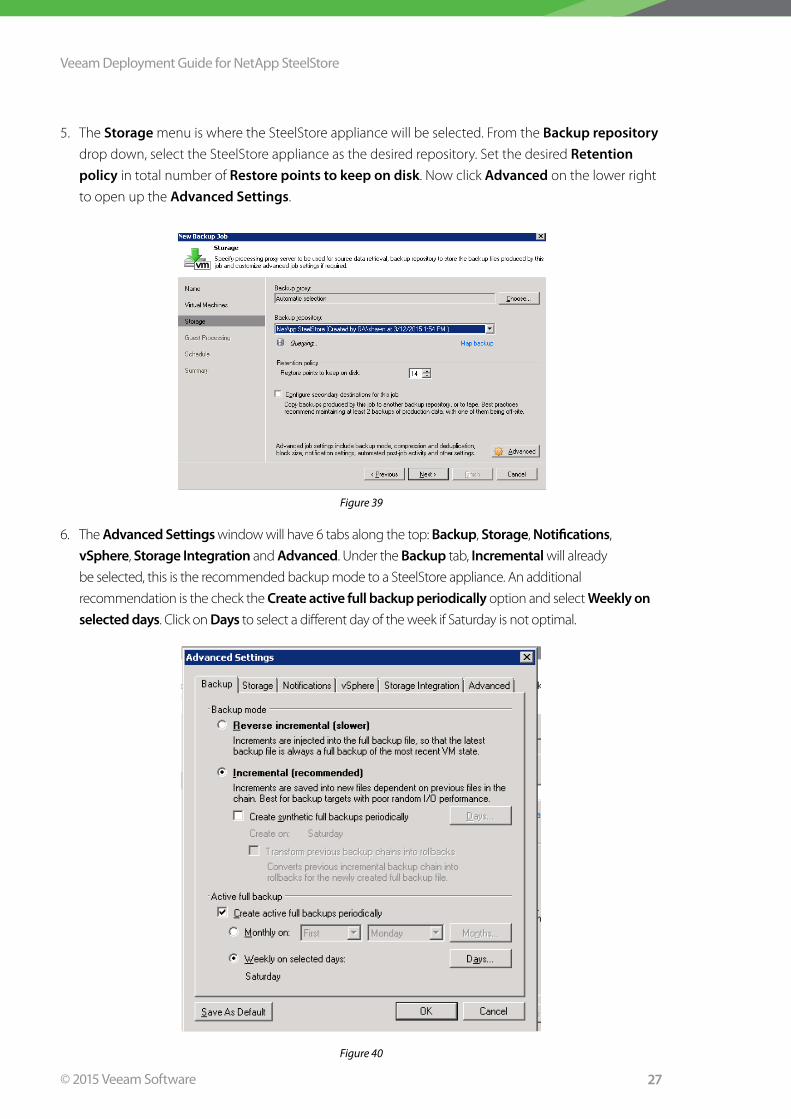
5. The Storage menu is where the SteelStore appliance will be selected. From the Backup repository
drop down, select the SteelStore appliance as the desired repository. Set the desired Retention policy in total number of Restore points to keep on disk. Now click Advanced on the lower right
to open up the Advanced Settings.
Figure 39
6. The Advanced Settings window will have 6 tabs along the top: Backup, Storage, Notifications,
vSphere, Storage Integration and Advanced. Under the Backup tab, Incremental will already
be selected, this is the recommended backup mode to a SteelStore appliance. An additional
recommendation is the check the Create active full backup periodically option and select Weekly on selected days. Click on Days to select a different day of the week if Saturday is not optimal.
Figure 40

Veeam Deployment Guide for NetApp SteelStore
28© 2015 Veeam Software
7. Click on the Storage tab, the settings here are very important! Using non-recommended
settings can negatively impact performance and adversely affect the deduplication and
compression offered by the SteelStore appliance. Under Data reduction, uncheck Enable inline data deduplication. Under the Compression level drop down, select None. Storage optimization should be set to LAN target using the drop down.
Note: If the network where the CIFS share is located is congested, the Enable inline data deduplication can be left
on but keep in mind this will result in lower deduplication ratios experienced on the SteelStore appliance.
Figure 41
8. Optionally, the Notifications tab can be leveraged to receive emails on job status. Click OK to
continue and exit out of the Advanced Settings window and click Next to continue.

Veeam Deployment Guide for NetApp SteelStore
29© 2015 Veeam Software
9. Next is the Guest Processing menu, this menu provides options to achieve application level
consistency as well as the option to index the guest file system. Check the Enable application-aware processing for application consistent backups. Guest OS credentials will have to be
provided for this option. Additionally, check the Enable guest file system indexing option if a
catalog of guest files is desired. The catalog can be leveraged to search across backup files for a
specific file to restore. Click Next to continue.
Note: catalog search function requires the installation of Veeam Backup Enterprise Manager.
Figure 42
10. The Schedule menu is where the scheduling for the job can be created. Check the Run the job automatically box to enable the scheduling option. Options for scheduling include: Daily,
Monthly, Periodically and After this job. Click Next after the desired schedule is in place.
Figure 43
Veeam Deployment Guide for NetApp SteelStore
30© 2015 Veeam Software
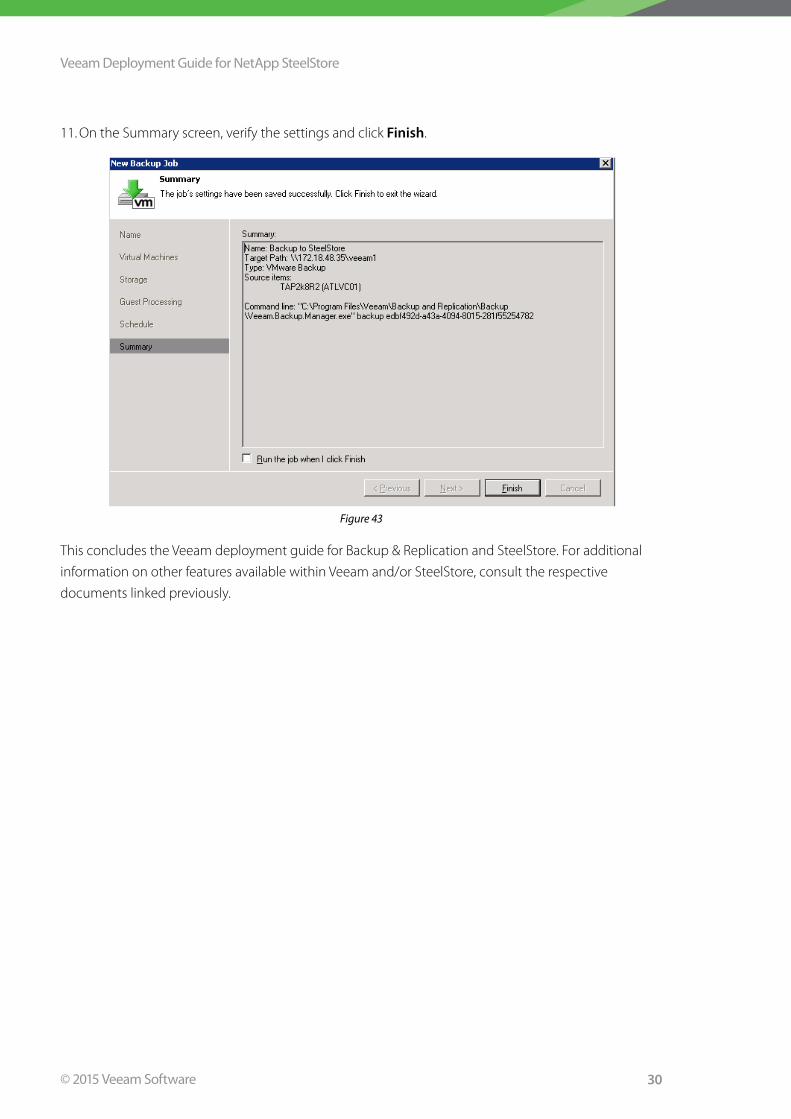
11. On the Summary screen, verify the settings and click Finish.
Figure 43
This concludes the Veeam deployment guide for Backup & Replication and SteelStore. For additional
information on other features available within Veeam and/or SteelStore, consult the respective
documents linked previously.
Veeam Deployment Guide for NetApp SteelStore
31© 2015 Veeam Software
About Veeam Software Veeam® recognizes the new challenges companies across the globe face in enabling the Always-
On Business™, a business that must operate 24/7/365. To address this, Veeam has pioneered a
new market of Availability for the Modern Data Center™ by helping organizations meet recovery
time and point objectives (RTPO™) of less than 15 minutes for all applications and data, through
a fundamentally new kind of solution that delivers high-speed recovery, data loss avoidance,
verified protection, leveraged data and complete visibility Veeam Availability Suite™, which
includes Veeam Backup & Replication™, leverages virtualization, storage, and cloud technologies
that enable the modern data center to help organizations save time, mitigate risks, and
dramatically reduce capital and operational costs.
Founded in 2006, Veeam currently has 29,000 ProPartners and more than 135,000 customers
worldwide. Veeam’s global headquarters are located in Baar, Switzerland, and the company has
offices throughout the world. To learn more, visit http://www.veeam.com.
About NetApp Leading organizations worldwide count on NetApp® for software, systems and services to
manage and store their data. Customers value our teamwork, expertise and passion for helping
them succeed now and into the future. www.netapp.com
Veeam Deployment Guide for NetApp SteelStore
32© 2015 Veeam Software


![Veeam Backup & Replication - Integra Group · Veeam Agent za fizičke servere [RTM] Veeam Agent for Microsoft Windows 2.0 • Free, Workstation and Server editions • Veeam Backup](https://static.documents.pub/doc/80x56/5ec8f4917e3eb61a633b269f/veeam-backup-replication-integra-group-veeam-agent-za-fizike-servere-rtm.jpg)


