18
2012 ERPWebTutor 1/12/2012 Vendor Site Entry WebADI
| Date post: | 31-Jan-2018 |
| Category: |
Documents |
| Upload: | truonghuong |
| View: | 220 times |
| Download: | 2 times |

2012
ERPWebTutor
1/12/2012
Vendor Site Entry WebADI

Vendor Site Entry WebADI
Vendor Site Entry WebADI ERPWebTutor Confidential Page 2
Contents 1. Background ................................................................................................................................................................ 3
2. Solution Approach ..................................................................................................................................................... 3
3. Prerequisites .............................................................................................................................................................. 3
4. Steps to Create the Custom WebADI ......................................................................................................................... 3
4.1 Create the Integrator: ......................................................................................................................................... 4
4.2 Create LOV Components ..................................................................................................................................... 7
4.4 Create the Layout ................................................................................................................................................ 8
5. Create Document ..................................................................................................................................................... 10
6. Additional Security Settings ..................................................................................................................................... 11
6.1 Browser settings for Desktop Integrator: .......................................................................................................... 11
6.2 Maco level Security Settings for Excel: .............................................................................................................. 13
7. Create a Hint on the Layout ..................................................................................................................................... 14
7.1 Create the custom Attribute ............................................................................................................................. 14
7.2 Add the custom attribute to the layout ............................................................................................................ 16
8. Make the integrator available from the custom AP responsibility .......................................................................... 17

Vendor Site Entry WebADI
Vendor Site Entry WebADI ERPWebTutor Confidential Page 3
1. Background
XX Company uses Oracle Payables to main supplier/supplier sites information. While creating supplier site, the user has to navigate to multiple screens to complete the supplier site setup. The goal is to minimize the user navigation and use a simple spreadsheet to upload the information into Oracle.
2. Solution Approach
This will be achieved using Web ADI. Custom integrators and layouts will be created to load the data into Oracle.
3. Prerequisites
In R12, Oracle has provided a GUI to create custom integrators. Make sure you have the following patches: Patch 9055234 DIF: NEW RESPONSIBILITY AND FUNCTION FOR DESKTOP INTEGRATION MANAGER Customers who are on R12.1.1 version of apps, please apply patch 10107918:R12.BNE.B
4. Steps to Create the Custom WebADI
1. Create an Integrator (Resp = Desktop Integration Manager) Table or API to insert into: Integrator, Interface, Content, Uploader, Importer
2. Create a Component (optional) (Resp = Desktop Integration Manager) List of Values to be used by the Integrator 3. Create a Layout (Resp = Desktop Integrator) The display characteristics of the columns from the Integrator
4. Create a Document (Resp = Desktop Integrator) This is the actual Web ADI Template Optionally Save as a Menu
Function
You can use the old PL/SQL API method to define your Integrator PL/SQL Procedure BNE_INTEGRATOR_UTILS CREATE_INTEGRATOR CREATE_INTERFACE_FOR_API CREATE_DEFAULT_LAYOUT UPDATE_INTERFACE_COLUMN_TEXT CREATE_TABLE_LOV or You can use the new User Interface (Wizards) Integrator & Interface Responsibility: Desktop Integration Manager Layout Responsibility: Desktop Integration
In this case, we will use the wizard based UI method of creating these.
The Integrator is the essentially the name that holds all of the meta data together for you spreadsheet integration
The Interface is how the data is uploaded from the desktop appication to the Oracle E-Business Suite. We have the following interface types:
Table PL/SQL API Procedure PL/SQL API Function

Vendor Site Entry WebADI
Vendor Site Entry WebADI ERPWebTutor Confidential Page 4
4.1 Create the Integrator:
Navigation: Desktop Integration Manager > Create Integrator
Integrator Fields
Integrator Name – name you will see if the forms
Internal Name – keep this name short
Application – create under your custom application name
Enabled – this appears to be the only way to disable an integrator
Display in Create Document Page – I allow this, more on this later
Integrator Parameters – you can create a parameters page required to specify constraints on a download document
Security Rule – We can create my own function and assign this, along with the seeded Desktop Integration – Create Document which allows the users to use the Create Document Page. For this scenario we will skip this.
Enter Integrator Information
Integrator Name XXCC Vendor Site Entry Integrator
Internal Name XXCCVEND1
Application C&C Custom Application
Reporting Only
Enabled Yes
Display in Create Document Page Y
Integrator Parameters
Upload Server
Parameter
Document Parameter
Session Parameter
Security Rules
Function
Selected Functions
Click Next.

Vendor Site Entry WebADI
Vendor Site Entry WebADI ERPWebTutor Confidential Page 5
Interface Fields – step 1
Interface Name – name you will see if the forms, keep this name short (6 to 8 characters) since it is used by the wizard (or PL/SQL API) to autocreate column definitions
Interface Type – select an interface type Table
o Table Name API – Procedure
o Package Name o Procedure/Function Name o API Returns
API – Function o Package Name o Procedure/Function Name o API Returns
Enter Integrator Information
Interface Name XXCC1
Interface Type API - Procedure
Package Name XXCC_WEBADI_PKG
Procedure/Function Name CREATE_VEND_SITE
API Returns
Click Apply Note: The code for the interface package will added.

Vendor Site Entry WebADI
Vendor Site Entry WebADI ERPWebTutor Confidential Page 6
The following screen appears when you click on Select Interface Name radio button:
Note: It takes a few seconds for the bottom part to appear once you click the radio button. Interface Fields – step 2
Attribute Name –from the PL/SQL Parameter, or table column name
Prompt Left – left hand prompt in the document
Data Type – from the parameter or column definition
Enabled – should the attribute be used
Displayed – should the attribute be displayed
Default Type – Constant, Environment Variable, Parameter, Profile Option, SQL Query, Lookup
Attribute Type –describing where it originated from Click Submit. This will create the integrator.

Vendor Site Entry WebADI
Vendor Site Entry WebADI ERPWebTutor Confidential Page 7
4.2 Create LOV Components
For this we need to use the BNE_INTEGRATOR_UTILS package. The following codes will create the two LOV’s for the columns P_VENDOR_NO and P_COUNTRY.
Code for Vendor LOV
DECLARE
BEGIN
BNE_INTEGRATOR_UTILS.CREATE_TABLE_LOV
(P_APPLICATION_ID => 20003, -- your application id
P_INTERFACE_CODE => 'XXCCVEND1_XINTG_INTF1', --your interface name
P_INTERFACE_COL_NAME => 'P_VENDOR_NO', -- your column name from
bne_inetrface_cols_b column
P_ID_COL => 'SEGMENT1', -- LOOKUP CODE UPLOADED --
P_MEAN_COL => 'SEGMENT1', -- Shown in sheet --
P_DESC_COL => 'VENDOR_NAME',
P_TABLE => 'PO_VENDORS',
P_ADDL_W_C => '1=1',
P_WINDOW_CAPTION => 'Vendors',
P_WINDOW_WIDTH => 450,
P_WINDOW_HEIGHT => 300,
P_TABLE_BLOCK_SIZE => 10,
P_TABLE_SORT_ORDER => 'SEGMENT1', -- sortable by meaning, not description-
-
P_USER_ID => 1562,
P_POPLIST_FLAG => 'N'
);
END;
Code for Country LOV
DECLARE
BEGIN
BNE_INTEGRATOR_UTILS.CREATE_TABLE_LOV
(P_APPLICATION_ID => 20003, -- your application id
P_INTERFACE_CODE => 'XXCCVEND1_XINTG_INTF1', --your interface name
P_INTERFACE_COL_NAME => 'P_COUNTRY', -- your column name from
bne_inetrface_cols_b column
P_ID_COL => 'TERRITORY_CODE', -- LOOKUP CODE UPLOADED --
P_MEAN_COL => 'TERRITORY_CODE', -- Shown in sheet --

Vendor Site Entry WebADI
Vendor Site Entry WebADI ERPWebTutor Confidential Page 8
P_DESC_COL => 'TERRITORY_SHORT_NAME',
P_TABLE => 'FND_TERRITORIES_VL',
P_ADDL_W_C => '1=1',
P_WINDOW_CAPTION => 'Countries',
P_WINDOW_WIDTH => 450,
P_WINDOW_HEIGHT => 300,
P_TABLE_BLOCK_SIZE => 10,
P_TABLE_SORT_ORDER => 'TERRITORY_CODE', -- sortable by meaning, not
description--
P_USER_ID => 1562,
P_POPLIST_FLAG => 'N'
);
END;
4.4 Create the Layout
Layouts define how the Integrator will look in the Desktop Document
An Integrator can have multiple Layouts, this allows you to create user business process specific Web ADI’s Examples:
One for Payables SubLedger Accounting Journal Entries One for Receivables SubLedger Accounting Journal Entries One for a each External System
You can easily duplicate an existing Layout then make the changes you need
This is can easily be done by a non-technical user Navigation: Desktop Integrator > Create Layout
Step 1: Select your Integrator and click Go to go the layout creation page.
Step 2: Click Create to create a new layout

Vendor Site Entry WebADI
Vendor Site Entry WebADI ERPWebTutor Confidential Page 9
Step 3: Make the following entries and click Next. Layout Name: XXCC Vendor Site Entry Layout Number of Headers: 1
In the following screen Specify which Fields of the Interface go in which section of the document Header or Lines and specify the Default Values and Default Type. In our case every attribute will be at the line level.

Vendor Site Entry WebADI
Vendor Site Entry WebADI ERPWebTutor Confidential Page 10
Click Apply to save the layout definition.
5. Create Document
Next we need to check the upload process for our integrator. Navigation: Desktop Integrator > Create Document From the list, select your integrator and click ‘Next’.
Select the Viewer. (In our case it Excel 2007) and click Next.

Vendor Site Entry WebADI
Vendor Site Entry WebADI ERPWebTutor Confidential Page 11
Click ‘Create Document’ and it will open an Excel Spreadsheet
Enter data in the columns and upload the information.
6. Additional Security Settings
VERY VERY IMPORTANT Note:
6.1 Browser settings for Desktop Integrator:
Enable 'Allow status bar updates via script'. (For Microsoft Excel 7 or 8)
Vendor Site Entry WebADI
Vendor Site Entry WebADI ERPWebTutor Confidential Page 12
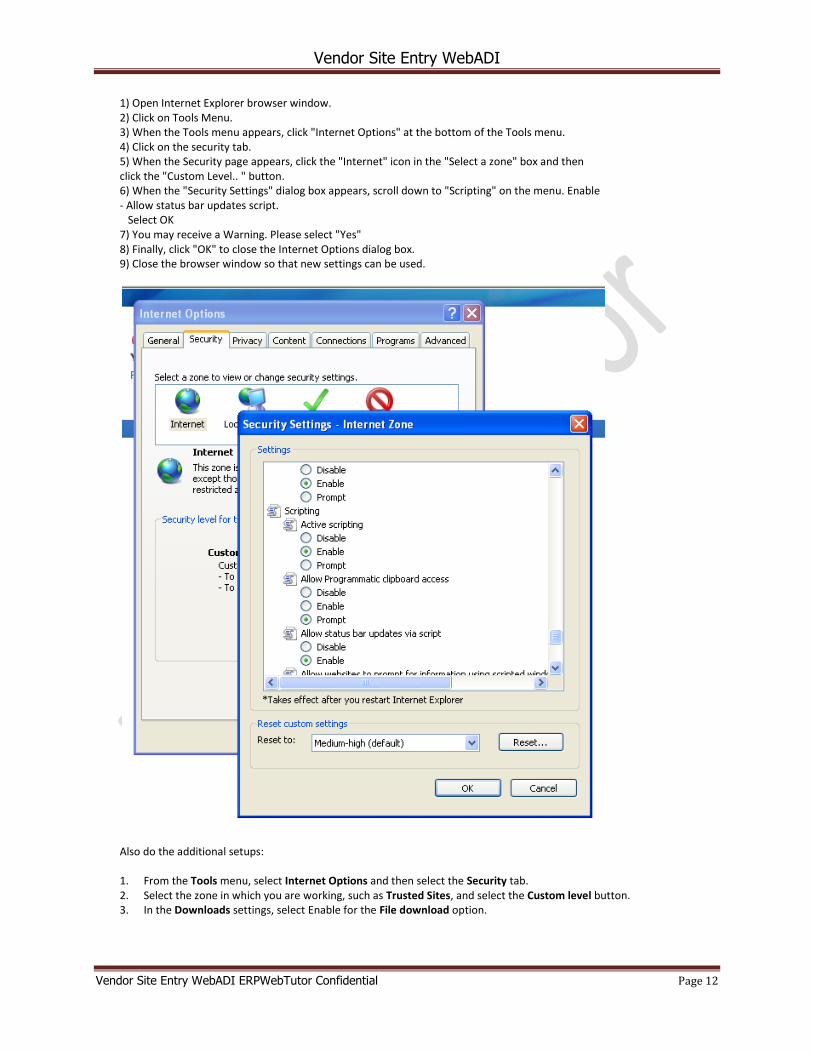
1) Open Internet Explorer browser window. 2) Click on Tools Menu. 3) When the Tools menu appears, click "Internet Options" at the bottom of the Tools menu. 4) Click on the security tab. 5) When the Security page appears, click the "Internet" icon in the "Select a zone" box and then click the "Custom Level.. " button. 6) When the "Security Settings" dialog box appears, scroll down to "Scripting" on the menu. Enable - Allow status bar updates script. Select OK 7) You may receive a Warning. Please select "Yes" 8) Finally, click "OK" to close the Internet Options dialog box. 9) Close the browser window so that new settings can be used.
Also do the additional setups: 1. From the Tools menu, select Internet Options and then select the Security tab. 2. Select the zone in which you are working, such as Trusted Sites, and select the Custom level button. 3. In the Downloads settings, select Enable for the File download option.

Vendor Site Entry WebADI
Vendor Site Entry WebADI ERPWebTutor Confidential Page 13
6.2 Maco level Security Settings for Excel:
For Microsoft Excel 2002 or 2003: 1. From the Tools menu, select Macro, then Security, and then Security Level. 2. In the Security Level tab, select the Medium option. 3. In the Trusted Sources tab, select the Trust access to Visual Basic Project option. For Microsoft Excel 2007: 1. Choose the Microsoft Office button, and then choose Excel Options. In the Trust Center category, choose Trust
Center Settings, and then the Macro Settings category. 2. Select the Disable all macros with notification option. 3. Select the Trust access to the VBA project object model option.

Vendor Site Entry WebADI
Vendor Site Entry WebADI ERPWebTutor Confidential Page 14
7. Create a Hint on the Layout
In this section we will display some hint columns on the layout that will provide some instructions to the user that may be relevant during the uploading process.
7.1 Create the custom Attribute
Navigation: Desktop Integration Manager > Manage Integrator
Click Next and select the interface. In a few seconds the attributes will appear.
Vendor Site Entry WebADI
Vendor Site Entry WebADI ERPWebTutor Confidential Page 15
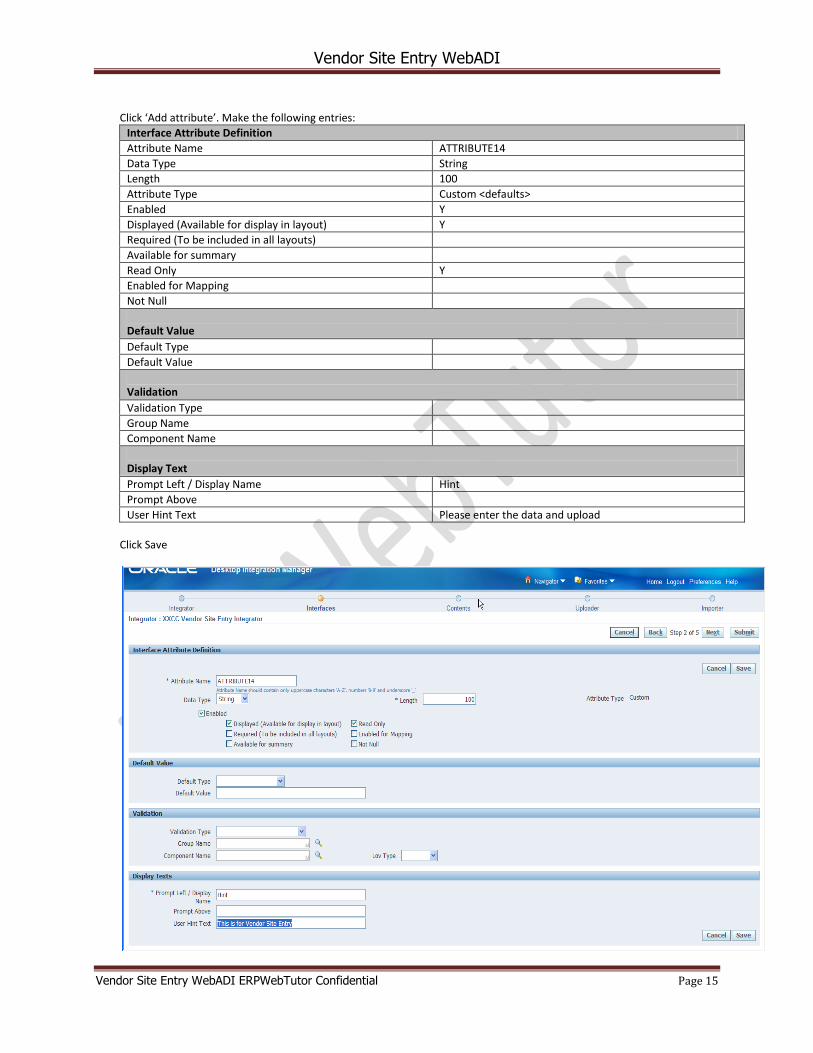
Click ‘Add attribute’. Make the following entries:
Interface Attribute Definition
Attribute Name ATTRIBUTE14
Data Type String
Length 100
Attribute Type Custom <defaults>
Enabled Y
Displayed (Available for display in layout) Y
Required (To be included in all layouts)
Available for summary
Read Only Y
Enabled for Mapping
Not Null
Default Value
Default Type
Default Value
Validation
Validation Type
Group Name
Component Name
Display Text
Prompt Left / Display Name Hint
Prompt Above
User Hint Text Please enter the data and upload
Click Save

Vendor Site Entry WebADI
Vendor Site Entry WebADI ERPWebTutor Confidential Page 16
Click Submit to save the Integrator.
7.2 Add the custom attribute to the layout
Navigation: Desktop Integrator > Define Layout Query for the integrator and click update layout.
Click Next. The custom attribute will appear under the ‘Optional Fields’ section. Make sure the enabled checkbox is checked and make the placement to ‘Header’ and click ‘Apply’ .

Vendor Site Entry WebADI
Vendor Site Entry WebADI ERPWebTutor Confidential Page 17
You can open the document and verify that the column is appearing correctly.
8. Make the integrator available from the custom AP responsibility
After the integrator is setup we need to make the integrator available from the responsibility which the user will use and also make sure we can the user can directly go to the viewer option without having to choose the integrator from a list hundreds of other integrators. Run the following query to get some relevant information: SELECT INTEGRATOR_APP_ID || ':' || INTEGRATOR_CODE INTEGRATORS,
APPLICATION_ID || ':' || LAYOUT_CODE LAYOUTS
FROM BNE_LAYOUTS_B
WHERE INTEGRATOR_APP_ID = 20003
ORDER BY 1, 2
Identify your integrator. Step 1: Create function
Function: XXCCVENDORSITEADI
User Function Name
Description Context Dependence Type Maintenance Mode
XXCC Create Vendor Site Entry WebADI Responsibility SSWA servlet function None
Parameters bne:page=BneCreateDoc&bne:integrator=20003:XXCCVEND1_XINTG&bne:layout=20003:XXCCVENDORSITEENTRYLAYOUT
Note the hint
appears on the
header
section
Vendor Site Entry WebADI
Vendor Site Entry WebADI ERPWebTutor Confidential Page 18
HTML Call BneApplicationService
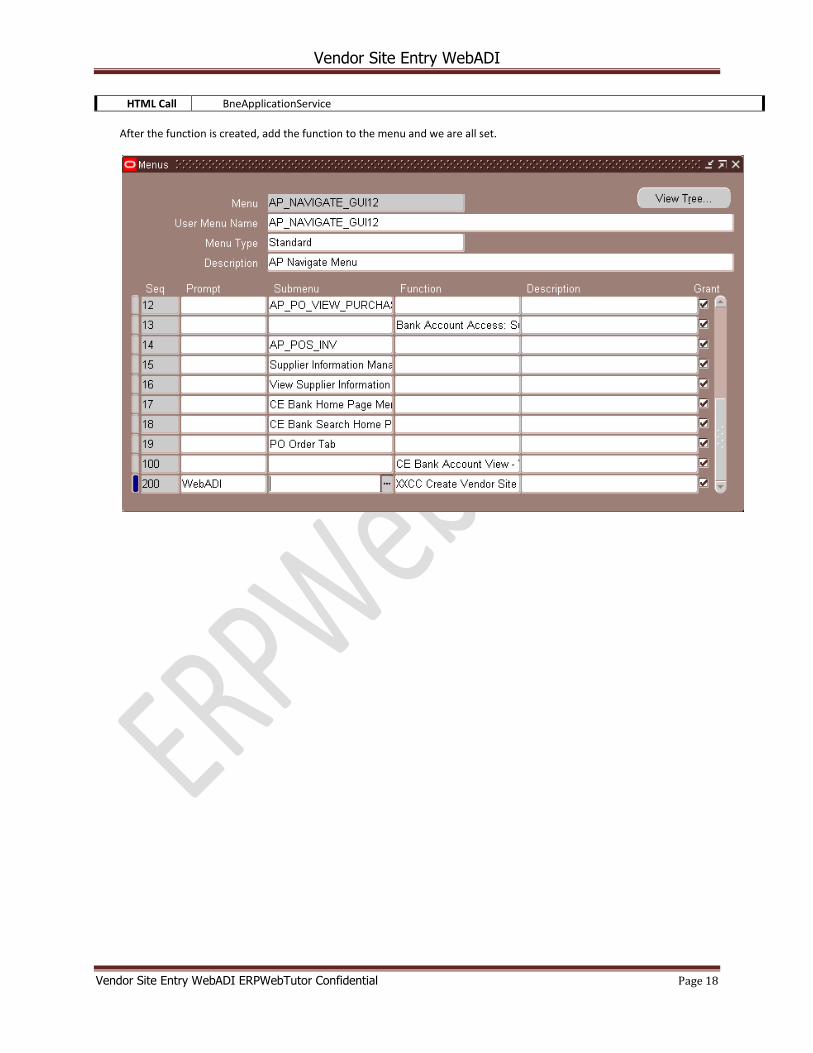
After the function is created, add the function to the menu and we are all set.


