40
November 2002 N09329G VERITAS Cluster Server Enterprise Agent ™ 3.5 for NetBackup Installation and Configuration Guide HP-UX
VERITAS Cluster ServerEnterprise Agent™ 3.5for NetBackup
Installation and Configuration Guide
HP-UX
November 2002N09329G
Disclaimer
The information contained in this publication is subject to change without notice.VERITAS Software Corporation makes no warranty of any kind with regard to thismanual, including, but not limited to, the implied warranties of merchantability andfitness for a particular purpose. VERITAS Software Corporation shall not be liable forerrors contained herein or for incidental or consequential damages in connection with thefurnishing, performance, or use of this manual.
Copyright
Copyright © 1998-2002 VERITAS Software Corporation. All rights reserved. VERITAS,VERITAS Software, the VERITAS logo, and all other VERITAS product names and slogansare trademarks of VERITAS Software Corporation in the USA and/or other countries.Other product names and/or slogans mentioned herein may be trademarks or registeredtrademarks or their respective companies.
VERITAS Software Corporation350 Ellis StreetMountain View, CA 94043U.S.A.Phone 650–527–8000Fax 650–527–2908www.veritas.com
Contents
Preface . . . . . . . . . . . . . . . . . . . . . . . . . . . . . . . . . . . . . . . . . . . . . . . . . . . . . . . . . . . . . .vii
Technical Support . . . . . . . . . . . . . . . . . . . . . . . . . . . . . . . . . . . . . . . . . . . . . . . . . . . . . . . . .vii
Conventions . . . . . . . . . . . . . . . . . . . . . . . . . . . . . . . . . . . . . . . . . . . . . . . . . . . . . . . . . . . . . viii
Chapter 1. Introduction . . . . . . . . . . . . . . . . . . . . . . . . . . . . . . . . . . . . . . . . . . . . . . . . . .1
Supported Version and Operating System . . . . . . . . . . . . . . . . . . . . . . . . . . . . . . . . . . . . . 1
Setting Up NetBackup in a VCS Cluster Environment . . . . . . . . . . . . . . . . . . . . . . . . . . . 1
About the NetBackup Enterprise Agent . . . . . . . . . . . . . . . . . . . . . . . . . . . . . . . . . . . . . . . . 2
Detecting an Application Failure . . . . . . . . . . . . . . . . . . . . . . . . . . . . . . . . . . . . . . . . . . . 2
Chapter 2. Installing NetBackup Software in a Cluster . . . . . . . . . . . . . . . . . . . . . . . .3
Typical NetBackup Configuration in a VCS Cluster . . . . . . . . . . . . . . . . . . . . . . . . . . . . . 3
Prerequisites . . . . . . . . . . . . . . . . . . . . . . . . . . . . . . . . . . . . . . . . . . . . . . . . . . . . . . . . . . . . . . . 4
Configuring the Hardware for NetBackup in a VCS Cluster . . . . . . . . . . . . . . . . . . . . . . 4
Shared Robotic Control . . . . . . . . . . . . . . . . . . . . . . . . . . . . . . . . . . . . . . . . . . . . . . . . . . . 4
Shared Tape Drives . . . . . . . . . . . . . . . . . . . . . . . . . . . . . . . . . . . . . . . . . . . . . . . . . . . . . . 5
Example: Creating Symbolic Links to a Shared Tape Device . . . . . . . . . . . . . . . . 5
Migrating a Single Node NetBackup to a VCS Cluster . . . . . . . . . . . . . . . . . . . . . . . . . . . 7
Setting Up the NetBackup Software in the Cluster . . . . . . . . . . . . . . . . . . . . . . . . . . . . . . . 7
Installing NetBackup Client Software on Local Disks . . . . . . . . . . . . . . . . . . . . . . . . . 8
Editing the bp.conf File on Local Nodes . . . . . . . . . . . . . . . . . . . . . . . . . . . . . . . . . . . . . 9
Mounting Shared Storage Device to /usr/openv . . . . . . . . . . . . . . . . . . . . . . . . . . . . . 9
Setting Up NetBackup DataCenter Server Software on Shared Disk . . . . . . . . . . . . 10
Editing the bp.conf File for Shared Disk . . . . . . . . . . . . . . . . . . . . . . . . . . . . . . . . . . . . . . . 11
iii
Configuring NetBackup Software in the Cluster . . . . . . . . . . . . . . . . . . . . . . . . . . . . . . . 12
Editing /etc/services File . . . . . . . . . . . . . . . . . . . . . . . . . . . . . . . . . . . . . . . . . . . . . . . . 12
Removing NetBackup Startup and Shutdown Scripts . . . . . . . . . . . . . . . . . . . . . . . . 12
Verifying Virtual Hostname Configured in robotic_def File . . . . . . . . . . . . . . . . . . 13
Editing nbj.conf File . . . . . . . . . . . . . . . . . . . . . . . . . . . . . . . . . . . . . . . . . . . . . . . . . . . . 14
Stop NetBackup DataCenter Processes . . . . . . . . . . . . . . . . . . . . . . . . . . . . . . . . . . . . 14
Chapter 3. Installing the Agent . . . . . . . . . . . . . . . . . . . . . . . . . . . . . . . . . . . . . . . . . . 15
Prerequisites . . . . . . . . . . . . . . . . . . . . . . . . . . . . . . . . . . . . . . . . . . . . . . . . . . . . . . . . . . . . . . 15
Installing the Agent Software . . . . . . . . . . . . . . . . . . . . . . . . . . . . . . . . . . . . . . . . . . . . . . . 15
Chapter 4. Configuring the NetBackup Agent . . . . . . . . . . . . . . . . . . . . . . . . . . . . . . 17
Configuring the Agent . . . . . . . . . . . . . . . . . . . . . . . . . . . . . . . . . . . . . . . . . . . . . . . . . . . . . 17
Prerequisite . . . . . . . . . . . . . . . . . . . . . . . . . . . . . . . . . . . . . . . . . . . . . . . . . . . . . . . . . . . . . . 17
Before Configuring the Agent . . . . . . . . . . . . . . . . . . . . . . . . . . . . . . . . . . . . . . . . . . . . . . . 17
NetBackup Resource Type . . . . . . . . . . . . . . . . . . . . . . . . . . . . . . . . . . . . . . . . . . . . . . . 18
Attribute Definitions . . . . . . . . . . . . . . . . . . . . . . . . . . . . . . . . . . . . . . . . . . . . . . . . . . . . 18
Sample Dependency Graphs . . . . . . . . . . . . . . . . . . . . . . . . . . . . . . . . . . . . . . . . . . . . . 19
Configuring the NetBackup Agent with the Java Console . . . . . . . . . . . . . . . . . . . . . . . 20
Importing the NetBackupTypes.cf File . . . . . . . . . . . . . . . . . . . . . . . . . . . . . . . . . . . . 20
Adding the Service Group for NetBackup Using the Wizard . . . . . . . . . . . . . . . . . 20
Creating an NetBackup Service Group . . . . . . . . . . . . . . . . . . . . . . . . . . . . . . . . . 21
Editing the Resource attributes . . . . . . . . . . . . . . . . . . . . . . . . . . . . . . . . . . . . . . . . 22
Configuring NetBackup Agent by Editing the main.cf File . . . . . . . . . . . . . . . . . . . . . . 23
Chapter 5. Administering the NetBackup Agent . . . . . . . . . . . . . . . . . . . . . . . . . . . . 25
Modifying the Agent Configuration . . . . . . . . . . . . . . . . . . . . . . . . . . . . . . . . . . . . . . . . . 25
Changing Resource Attribute Values . . . . . . . . . . . . . . . . . . . . . . . . . . . . . . . . . . . . . . 25
Additional Monitoring . . . . . . . . . . . . . . . . . . . . . . . . . . . . . . . . . . . . . . . . . . . . . . . . . . . . . 25
Disabling the Agent . . . . . . . . . . . . . . . . . . . . . . . . . . . . . . . . . . . . . . . . . . . . . . . . . . . . . . . 26
Removing the Agent . . . . . . . . . . . . . . . . . . . . . . . . . . . . . . . . . . . . . . . . . . . . . . . . . . . . . . . 26
iv VCS Enterprise Agent for NetBackup Installation and Configuration Guide
Chapter 6. Upgrading the Agent . . . . . . . . . . . . . . . . . . . . . . . . . . . . . . . . . . . . . . . . .27
Upgrading to the VCS NetBackup 3.5 Agent . . . . . . . . . . . . . . . . . . . . . . . . . . . . . . . . . . . 27
Appendix A. Sample Configuration File . . . . . . . . . . . . . . . . . . . . . . . . . . . . . . . . . . .29
Sample Configuration File for NetBackup . . . . . . . . . . . . . . . . . . . . . . . . . . . . . . . . . . . . . 29
Index . . . . . . . . . . . . . . . . . . . . . . . . . . . . . . . . . . . . . . . . . . . . . . . . . . . . . . . . . . . . . . . .31
Contents v

vi VCS Enterprise Agent for NetBackup Installation and Configuration Guide
Preface
This document provides instructions on how to install and configure the VERITAS ClusterServer Agent for NetBackup. For information about VCS, refer to the VERITAS ClusterServer User’s Guide.
If this document is dated more than six months prior to the date you are installing yourenterprise agents, contact VERITAS Technical Support to confirm you have the latestsupported versions of the application and operating system.
Technical SupportU.S. and Canada: Call 1-800-342-0652. You may also contact Technical Support via emailat [email protected].
Europe, the Middle East, or Asia: Visit the Technical Support web site athttp://support.veritas.com for a list of each country’s contact information.
Software updates, TechNotes, product alerts, and hardware compatibility lists, are alsoavailable from http://support.veritas.com.
To learn more about VERITAS and its products, visit http://www.veritas.com.
vii
Conventions
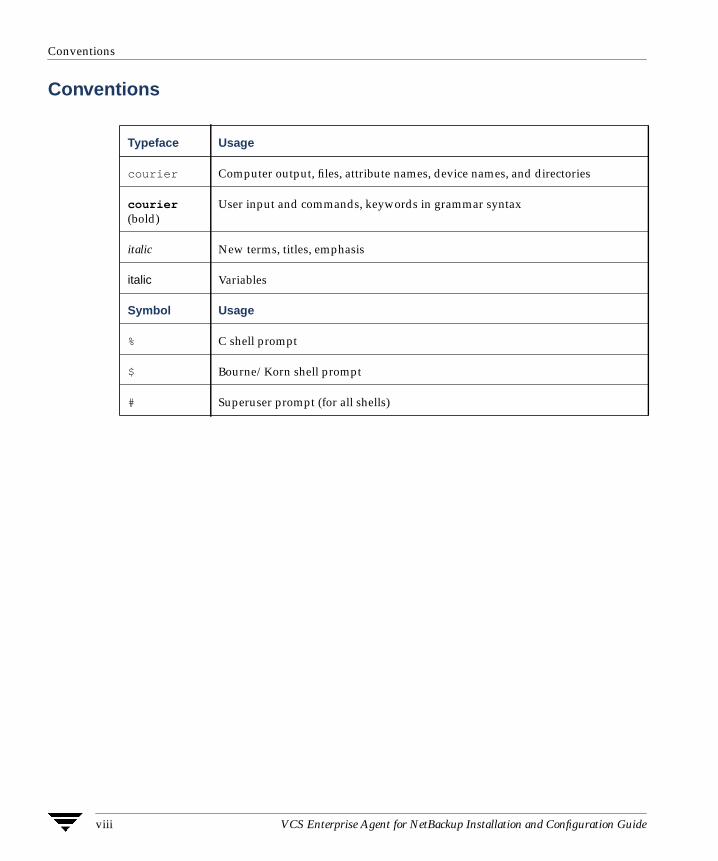
Conventions
Typeface Usage
courier Computer output, files, attribute names, device names, and directories
courier(bold)
User input and commands, keywords in grammar syntax
italic New terms, titles, emphasis
italic Variables
Symbol Usage
% C shell prompt
$ Bourne/Korn shell prompt
# Superuser prompt (for all shells)
viii VCS Enterprise Agent for NetBackup Installation and Configuration Guide
Introduction
1 The NetBackup enterprise agent monitors specific NetBackup resources within anenterprise application, determines the status of these resources, and starts or stops themaccording to external events. The process of monitoring is common to all agents, but theway they are performed varies according to the enterprise application being monitored.The agent includes VCS type declarations and agent executables, and is represented bythe NetBackup resource type. When the agent detects an application failure, theNetBackup service group is failed over to another system in the cluster.
Supported Version and Operating System
The VCS enterprise agent for NetBackup, version 3.5, supports NetBackup 3.4 and 4.5,including 64-bit versions. The agent runs with VCS version 1.3.1 and 3.5 on the HP-UX11.0 and 11i operating systems.
Setting Up NetBackup in a VCS Cluster EnvironmentSetting up NetBackup in a VCS Cluster environment involves the following major steps:
✔ Configuring the disks, tape drives, and storage libraries to be accessible from eachnode using the same device path (see Chapter 2)
✔ Installing and configuring NetBackup (see Chapter 2 and the NetBackup for HP-UXdocumentation)
✔ Installing the VCS enterprise agent for NetBackup (see Chapter 3) or upgrading theVCS enterprise agent (see Chapter 6)
✔ Configuring the VCS enterprise agent for NetBackup (see Chapter 4)
✔ Verifying NetBackup configuration and failover (see Chapter 5)
1
About the NetBackup Enterprise Agent
About the NetBackup Enterprise AgentThe NetBackup agent monitors the NetBackup processes. Specific agent operationsinclude:
◆ Online—Executes the commands ltid and initbprd on the NetBackup server. Forthe NBUMaster, moves SERVER = NBUMaster_hostname to the first line in/user/openv/netbackup/bp.conf.
◆ Offline—Executes the following command:
/usr/openv/netbackup/bin/goodies/netbackup stop
◆ Monitor—Scans the process table for ltid, vmd, avrd, bprd, and bpdbm. Thespecific processes to be monitored can be configured by the ServerType attribute(see “NetBackup Resource Type” on page 18). Note that the bpdbm and bprdprocesses run only on the NetBackup Master server.
◆ Clean—Stops all NetBackup or Media Manager daemons after detecting anunexpected offline, or an ineffective online.
Detecting an Application FailureBy default, the agent reports Netbackup is not running if the monitor cannot locate ltid,vmd, avrd, bprd, or bpdbm in the process table.
2 VCS Enterprise Agent for NetBackup Installation and Configuration Guide
Installing NetBackup Software in a Cluster
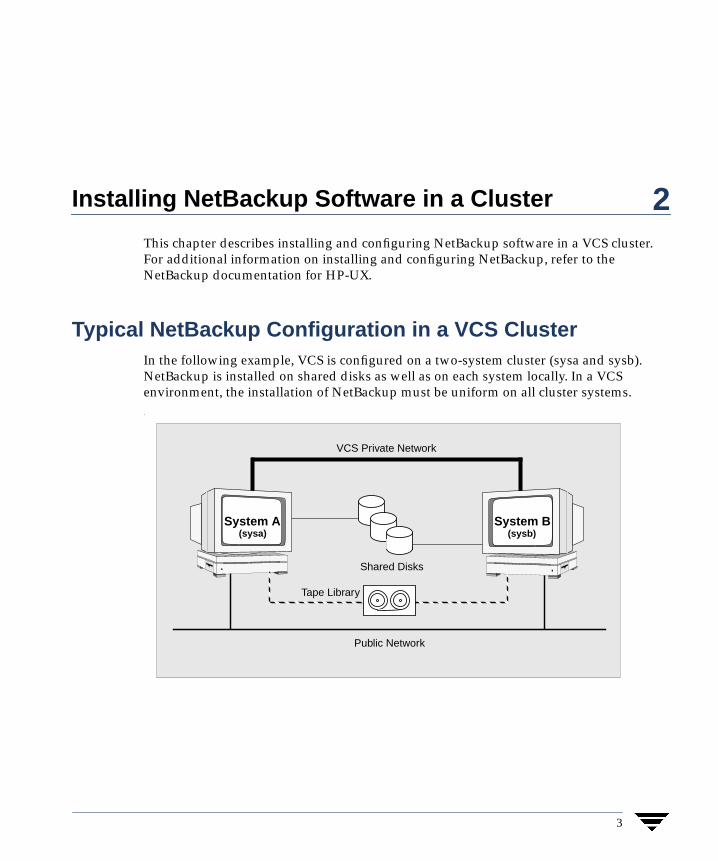
2 This chapter describes installing and configuring NetBackup software in a VCS cluster.For additional information on installing and configuring NetBackup, refer to theNetBackup documentation for HP-UX.Typical NetBackup Configuration in a VCS ClusterIn the following example, VCS is configured on a two-system cluster (sysa and sysb).NetBackup is installed on shared disks as well as on each system locally. In a VCSenvironment, the installation of NetBackup must be uniform on all cluster systems..
Shared Disks
Public Network
VCS Private Network
System A System B(sysa) (sysb)
Tape Library
3
Prerequisites
PrerequisitesThe following are the prerequisites for installing NetBackup.
✔ Verify that all systems have enough resources, such as shared memory, to runNetBackup and VCS.
✔ Configure shared storage. Refer to the VERITAS Cluster Server Installation Guide.
✔ Verify that the network supports the TCP/IP protocol.
✔ Install VCS. Refer to the VERITAS Cluster Server Installation Guide.
✔ Install and configure the application in the cluster, using this chapter as a guide. (Ifnecessary, review the NetBackup HP-UX documentation.)
✔ Verify that the NetBackup account is valid and identical on all UNIX systems that areto run NetBackup.
Configuring the Hardware for NetBackup in a VCS ClusterA few hardware configuration settings must be considered before installing andconfiguring VCS and NetBackup. The shared disk to be used by NetBackup must beaccessible from all nodes of the cluster. The disk can be controlled by VERITAS VolumeManager or it can be configured using HP-UX Logical Volume Manager (LVM).
Note The shared disk must not be in the /etc/fstab file. VCS must control themounting and un-mounting of the device.
Shared Robotic ControlWhen VCS is used to control the NetBackup Media Manager, whether as an NBU Master(NBUMaster) with Media server or as an NBU Media server only(NBUSlave), the roboticcontrol must be configured to function from any possible failover node. Therefore, therobotic definition file (robotic_def) must reference the virtual hostname used by theNetBackup service group. This is typically done during NetBackup software installation,but needs to be verified; after installing NetBackup, refer to “Verifying Virtual HostnameConfigured in robotic_def File” on page 13.
4 VCS Enterprise Agent for NetBackup Installation and Configuration Guide
Configuring the Hardware for NetBackup in a VCS Cluster
Shared Tape DrivesFor a SCSI configuration, ongoing backup jobs on the Master server may be disrupted ifthe standby system is booted. This disruption is caused by a SCSI bus reset signal. Tocounter this, we recommend you use a multiplexer or fibre switches to connect to theshared tape drives instead of direct SCSI connections.
Note Contact VERITAS Technical Support for assistance with StorageTek tape librariesusing Automated Cartridge System Library Software (ACSLS).
Tape drives and the storage library must be configured to be seen using the same path oneach node. If the path names do not match on each system, use symbolic links (see thefollowing example).
Example: Creating Symbolic Links to a Shared Tape Device
The following example shows output from the ioscan command used to displayinformation about a tape device. The command is given from two systems, SysA andSysB. Note that the same tape drive is seen as using controller “c7” on SysA and “c3” onSysB:
From SysA:
# ioscan -funC tapeClass I H/W Path Driver S/W State H/W Type Description======================================================================tape 2 10/1/3/0.8.0.0.0.2.0 stape CLAIMED DEVICEQUANTUM DLT8000 /dev/rmt/2m/dev/rmt/2mnb /dev/rmt/c7t2d0BESTn /dev/rmt/2mb/dev/rmt/c7t2d0BEST /dev/rmt/c7t2d0BESTnb
/dev/rmt/2mn /dev/rmt/c7t2d0BESTb
From SysB:
# ioscan -funC tapeClass I H/W Path Driver S/W State H/W Type Description======================================================================tape 0 10/1/3/0.8.0.0.0.2.0 stape CLAIMED DEVICEQUANTUM DLT8000 /dev/rmt/0m/dev/rmt/0mnb /dev/rmt/c3t2d0BESTn /dev/rmt/0mb/dev/rmt/c3t2d0BEST /dev/rmt/c3t2d0BESTnb
/dev/rmt/0mn /dev/rmt/c3t2d0BESTb
Chapter 2, Installing NetBackup Software in a Cluster 5
Configuring the Hardware for NetBackup in a VCS Cluster
Because NetBackup stores the path to the tape device as the path from one of the systems,SysA, for example, the NetBackup configuration cannot successfully come online on SysB,because it has a different path to the device. This incompatibility can be resolved bysymbolically linking the tape device paths on each system to a symbolic device.
Note This example discusses two nodes sharing a single tape device. If other shared tapedevices have different paths, create symbolic links for them as well.
For example:
1. On SysA, create a directory in which to place the symbolic link and set thepermissions:
# mkdir /dev/nbu# chmod 755 /dev/nbu
2. Create a link from the device to the symbolic device, tape1:
# ln -s /dev/rmt/c7t2d0BESTnb /dev/nbu/tape1
3. Verify this link:
# ls -l /dev/nbutotal 0lrwxrwxr-x 1 root sys 21 Oct 16 13:11 tape1 ->/dev/rmt/c7t2d0BESTnb
4. Test the drive.
# mt -f /dev/nbu/tape1 statusDrive: QUANTUM DLT8000Format:Status: [0]File: 0Block: 0
5. Repeat step 1 through step 4 for SysB. Both systems should use /dev/nbu/tape1.
Note that the NetBackup auto discovery tools do not work with symbolic links. Therefore,you must manually configure NetBackup to use devices accessed by symbolic links.
6 VCS Enterprise Agent for NetBackup Installation and Configuration Guide
Migrating a Single Node NetBackup to a VCS Cluster
Migrating a Single Node NetBackup to a VCS Cluster
Note You may skip this section if you are installing NetBackup for the first time in acluster.
If you are currently running NetBackup on a single node, you can create a VCS clusterthat includes the existing node and new nodes.
After configuring the existing node and the new nodes for shared storage and shared tapedevices, you need to move the NetBackup DataCenter software currently in /usr/openvon the local node to a directory on shared storage for use by the cluster. To move theexisting NetBackup DataCenter software, do the following:
1. Stop NetBackup on the existing system:
# /usr/openv/netbackup/bin/goodies/netbackup stop
2. Mount the shared storage to /mnt.
# mount /dev/vg01/lvol01 /mnt
3. Move the contents of /usr/openv to /mnt.
# mv /usr/openv /mnt
4. Verify /usr/openv is empty.
# ls /usr/openv
5. Unmount /mnt.
# umount /mnt
Now install the NetBackup client binaries on the existing node as well as the new node in/usr/openv. See “Installing NetBackup Client Software on Local Disks” on page 8.
Setting Up the NetBackup Software in the ClusterWhen you install the NetBackup Server software, use /usr/openv as the mount point toaccess the shared disks. It is recommended you install the client software on each node in/usr/openv so that cluster nodes not running the NetBackup resource can be backed up.When a cluster node does not have the NetBackup service group running, the clientbinaries are available locally in the /usr/openv directory. When the cluster node isrunning the NetBackup service group, /usr/openv is the mount point for the shareddisk, where the binaries used are available.
Chapter 2, Installing NetBackup Software in a Cluster 7
Setting Up the NetBackup Software in the Cluster
Installing NetBackup Client Software on Local DisksUse the following procedure when:
◆ You are installing NetBackup client software for the first time to a local disk on thenodes in a cluster
◆ You are migrating NetBackup from a single node and need to install NetBackup clientsoftware on the disks of the existing node and of the new nodes in the new cluster
To install NetBackup client software, do the following:
1. Insert the NetBackup DataCenter Installation CD into the CD-ROM drive of onecluster node and start the installation. Refer to the NetBackup on HP-UXdocumentation for mounting instructions.
2. From the main menu of the installation script, choose:
2) NetBackup Client Software
3. Choose Yes when asked whether to install the client software on the local node:
Do you want to install the NetBackup client software for thisclient? (y/n) [y]
4. When presented with the Platform Client Options menu, choose the HP system thatapplies.
5. Choose the appropriate HP-UX operating system when presented with the choice ofoperating system options.
6. When you prompted to enter the name of the NetBackup server,
Enter the name of the NetBackup server :
enter the hostname associated with the virtual IP address to be used for theNetBackup resource in the cluster.
7. When prompted, enter the name of the local client node:
Enter the name of this NetBackup client :
8. After the installation script copies client files to the local system and completes theinstallation, repeat step 1 through step 7 on the next cluster node.
8 VCS Enterprise Agent for NetBackup Installation and Configuration Guide
Setting Up the NetBackup Software in the Cluster
Editing the bp.conf File on Local NodesEdit the file /usr/openv/netbackup/bp.conf on each node. The bp.conf file shouldcontain:
◆ A SERVER entry for the virtual hostname of the NetBackup resource
◆ A SERVER entry for each cluster node
◆ A FAILOVER_RESTORE_MEDIA_SERVERS entry if the tape drive is accessed througha shared bus (dual-hosted SCSI or fibre-attached).
For example, if vcs-roam is the hostname for the NetBackup resource, vcs-node1 andvcs-node2 are the hostnames of the first and second nodes of the cluster, the file/usr/openv/netbackup/bp.conf on each node should resemble:
On vcs-node1:
SERVER = vcs-roamSERVER = vcs-node1SERVER = vcs-node2FAILOVER_RESTORE_MEDIA_SERVERS = vcs-node1, vcs-node2CLIENT_NAME = vcs-node1
On vcs-node2:
SERVER = vcs-roamSERVER = vcs-node1SERVER = vcs-node2FAILOVER_RESTORE_MEDIA_SERVERS = vcs-node1, vcs-node2CLIENT_NAME = vcs-node2
Mounting Shared Storage Device to /usr/openvFrom one system in the cluster, mount the shared storage device to /usr/openv. Forexample:
# mount /dev/vg01/lvol01 /usr/openv
Use the -o option for any other parameters needed when mounting the disk.
◆ If you are migrating an existing single-node NetBackup installation to a new cluster,and you have moved the existing NetBackup DataCenter software to /usr/openv (see“Migrating a Single Node NetBackup to a VCS Cluster” on page 7), you are ready toconfigure NetBackup for the cluster. Skip to “Configuring NetBackup Software in theCluster” on page 12.
◆ If you are installing NetBackup in a new cluster, go to the next section “Setting UpNetBackup DataCenter Server Software on Shared Disk.”
Chapter 2, Installing NetBackup Software in a Cluster 9
Setting Up the NetBackup Software in the Cluster
Setting Up NetBackup DataCenter Server Software on SharedDisk
If you are installing NetBackup in a new cluster, install the NetBackup DataCenter serversoftware on the shared disk. The shared disk must be mounted on one system only at themount point /usr/openv.
1. With the shared disk mounted at /usr/openv, insert the NetBackup DataCenterInstallation CD into the CD-ROM drive of one cluster node and start the installation.Refer to the documentation for NetBackup on HP-UX for mounting and installationinstructions.
2. As you proceed with the installation, be sure to do the following:
a. When prompted for the host that is to store the global device configuration, enterthe hostname assigned to the virtual IP address for the NetBackup resource if thisis a clustered master server. If this is a clustered media server (NBUSlave), enterthe hostname of the existing NBU master server.
b. Answer “Y” when prompted to start the NetBackup processes, which arerequired for the installation and configuration of client processes.
3. Configure the NetBackup software to use the shared robotic tape drive configuredwith a shared path. Refer to the NetBackup on HP-UX documentation.
Proceed to the next section, “Editing the bp.conf File for Shared Disk.”
10 VCS Enterprise Agent for NetBackup Installation and Configuration Guide
Editing the bp.conf File for Shared Disk
Editing the bp.conf File for Shared DiskEdit the file /usr/openv/netbackup/bp.conf on the shared disk. The bp.conf fileshould contain:
◆ A SERVER entry for the virtual hostname of the NetBackup resource
◆ A SERVER entry for each cluster node
◆ A FAILOVER_RESTORE_MEDIA_SERVERS entry if the tape drive is accessed througha shared bus (dual-hosted SCSI or fibre-attached).
For example, if vcs-roam is the hostname for the NetBackup resource, vcs-node1 andvcs-node2 are the hostnames of the first and second nodes of the cluster, the file/usr/openv/netbackup/bp.conf on the shared disk resemble:
SERVER = vcs-roamSERVER = vcs-node1SERVER = vcs-node2FAILOVER_RESTORE_MEDIA_SERVERS = vcs-node1, vcs-node2
Note The VCS enterprise agent for NetBackup changes the SERVER entries in thebp.conf file so that the actual hostname of the node on which NetBackup is beingbrought online is the first SERVER entry.
Chapter 2, Installing NetBackup Software in a Cluster 11
Configuring NetBackup Software in the Cluster
Configuring NetBackup Software in the ClusterPerform the configuration procedures described in the following sections to complete theset up of NetBackup software in the cluster.
Editing /etc/services FileOn all other nodes of the cluster, edit the /etc/services file by adding the servicesassociated with the NetBackup server. Add the following entries:
bpdbm 13721/tcp bpdbmvmd 13701/tcp vmdacsd 13702/tcp acsdtl8cd 13705/tcp tl8cdtldcd 13711/tcp tldcdts8d 13709/tcp ts8dodld 13706/tcp odldvtlcd 13708/tcp vtlcdtl4d 13713/tcp tl4dtsdd 13714/tcp tsddtshd 13715/tcp tshdtlmd 13716/tcp tlmdtlhcd 13717/tcp tlhcdlmfcd 13718/tcp lmfcdrsmd 13719/tcp rsmd
Removing NetBackup Startup and Shutdown ScriptsRemove the startup and shutdown scripts for NetBackup that were installed with theNetBackup server software. VCS must control startup and shutdown of the NetBackupprocesses. On the node where the NetBackup server installation was performed, issue thefollowing commands:
For NBU 3.4:
# rm /sbin/rc2.d/S777netbackup# rm /sbin/rc0.d/K777netbackup
For NBU 4.5:
# rm /sbin/rc2.d/S777netbackup# rm /sbin/rc0.d/K777netbackup# rm /sbin/init.d/netbackup
12 VCS Enterprise Agent for NetBackup Installation and Configuration Guide
Configuring NetBackup Software in the Cluster
Verifying Virtual Hostname Configured in robotic_def File
1. Verify the virtual hostname is configured in the robotic_def file. Use the stringscommand. For example:
# strings /usr/openv/volmgr/database/robotic_def | grepvirtual_hostname
Where virtual_hostname represents the name of the virtual host. If the virtualhostname is not configured in the robotic_def file, perform step 2 through step 9.
2. Make a backup copy of the current robotic_def file:
# cp /usr/openv/volmgr/database/robotic_def/usr/openv/volmgr/database/robotic_def.old
3. On one system, temporarily change the local hostname to the virtual hostname:
# uname -S virtual_hostname# nodename virtual_hostname
4. Start the tpconfig utility:
# /usr/openv/volmgr/bin/tpconfig
The tpconfig utility starts by displaying a warning that, in case the Media Managerdevice daemon is active, you must stop and start it to put into effect any changes youmake with the tpconfig utility. Press any key to continue.
5. From the Device Management Configuration Utility menu, select Volume DatabaseHost Configuration (“3”).
6. After the currently defined volume database hosts are displayed, select Update (“1”)from the Volume Database Host Configuration menu. Change the “host” field forboth the Standalone drives and the Robotic devices, specifying the virtual hostname.
7. Exit the tpconfig utility.
8. Verify the robotic_def file contains the correct hostname.
# strings /usr/openv/volmgr/database/robotic_def | grepvirtual_hostname
9. After the virtual hostname is set in the robotic_def file, revert the hostname to itsoriginal local hostname:
# uname -S local_hostname# nodename local_hostname
Chapter 2, Installing NetBackup Software in a Cluster 13

Configuring NetBackup Software in the Cluster
Editing nbj.conf FileOn the shared storage master node, edit the /usr/openv/java/nbj.conf file such thatthe SERVER_HOST points to the virtual hostname of the NetBackup resource. This sets thedefault host for the NetBackup Administration GUI to the virtual hostname.
Stop NetBackup DataCenter ProcessesStop any NetBackup processes initiated during the NetBackup server installation andunmount the shared disk before proceeding to the next step:
# /usr/openv/netbackup/bin/goodies/bp.kill_all# umount /usr/openv
14 VCS Enterprise Agent for NetBackup Installation and Configuration Guide
Installing the Agent
3 The VCS enterprise agent for NetBackup is installed from the VERITAS Storage Solutionssoftware disc.Prerequisites✔ Install and configure VCS. For more information, see the VERITAS Cluster Server
Installation Guide.
✔ Install and configure NetBackup and the Media Manager software for HP-UX,referring to Chapter 2. If necessary, review the NetBackup documentation and releasenotes.
✔ Verify that the VERITAS high availability engine (had) is running on all systems in thecluster.
✔ If a previous version of the agent is installed, you can upgrade it. Refer to “Upgradingthe Agent” on page 27.
Installing the Agent SoftwareTo access the VCS enterprise agent software on the VERITAS Storage Solutions softwaredisc, you must mount the disc:
1. Insert the software disc in the CD-ROM drive installed on your local system.
2. Log in as root.
3. Set the display permission on your workstation. For example, if “myws” is themachine name, enter:
# xhost +myws
15
Installing the Agent Software
4. Configure the shell environment variable DISPLAY on your workstation. Forexample, if your workstation has the name “myws,” type:
For Bourne or Korn shell (sh or ksh):
# DISPLAY=myws:0.0# export DISPLAY
For C shell (csh or tcsh):
# setenv DISPLAY myws:0.0
Setting the DISPLAY environment variable in this way enables you to use the SD-UXgraphical interface.
5. Create a mount point directory, /cdrom, if it does not exist. The directory must haveread/write permissions.
6. Determine the block device file for the CD-ROM drive. The device file should havethe form /dev/dsk/c#t#d#. Enter:
# ioscan -fnC disk
For example, the listing may indicate the CD-ROM drive’s block device is/dev/dsk/c1t2d0; make a note of the device file as it applies to your system.
7. Run the following commands to start PFS (Portable File System):
# nohup pfs_mountd &# nohup pfsd &
8. Mount the software disc. For example, to mount the disc to the mount point /cdrom,enter:
# /usr/sbin/pfs_mount -t rrip /dev/dsk/clt2d0 /cdrom
Where /dev/dsk/c1t2d0 is the drive’s block device file.
9. Type the following command to install the agent:
swinstall -s /cdrom/netbackup_agent/VRTSvcsnb
10. Repeat step 1 through step 9 on each system in the cluster.
16 VCS Enterprise Agent for NetBackup Installation and Configuration Guide
Configuring the NetBackup Agent
4 Configuring the AgentYou can configure the NetBackup agent using three methods:
◆ By using VCS Cluster Manager (Java Console) to edit a service group template for theNetBackup agent. See “Configuring the NetBackup Agent with the Java Console” onpage 20.
◆ By using VCS commands. Refer to the VERITAS Cluster Server User’s Guide forinformation about configuring VCS from the command line.
◆ By editing the main.cf file directly, using the types configuration file and referring tothe sample main.cf file supplied with the NetBackup agent (see “ConfiguringNetBackup Agent by Editing the main.cf File” on page 23). This method requires thatVCS be stopped and restarted before the configuration takes effect.
PrerequisiteInstall and configure NetBackup identically on all cluster systems. (For more information,see Chapter 2.)
Before Configuring the AgentBefore configuring the agent, review the NetBackup resource type and its attributedefinitions on the next page, and review the sample agent configuration file, main.cf,shown in Appendix A. The resource type represents the VCS configuration definition ofthe agent, and specifies how an agent is defined in the configuration file main.cf. TheAttribute Definitions table explains the attributes associated with the agent. The sampleconfiguration graphically depicts the resource types, resources, and the resourcedependencies required to create the NetBackup service group.
17
Before Configuring the Agent
NetBackup Resource Typetype NetBackup (
str ServerTypestr RobotDaemonstr MonScriptstatic int OnLineRetryLimit = 1static int OnLineWaitLimit = 1static int RestartLimit = 2NameRule = group.Name + "_" + resource.ServerTypestatic str ArgList[] = { ServerType, RobotDaemon, MonScript }
)
Attribute DefinitionsThis table describes attribute values for the NetBackup agent.
Attributes Type andDimension
Definition
ServerType string-scalar The agent will monitor processes as specified by the value ofServerType. The values for ServerType and the processesmonitored for each are:
◆ NBUSlave: vmd, ltid, avrd
◆ NBUMaster: bprd, bpdbm, vmd, ltid, avrd
◆ NBUMasterwoMM: bprd, bpdbm (this is the equivalentof NBUMaster without Media Manager)
RobotDaemon(optional)
string-scalar Name of the executable file for the robotic device controldaemon. File must be located in the directory:
/usr/openv/volmgr/bin
MonScript
(optional)
string-scalar Full path and filename of in-depth monitor script. (See page25 for details on in-depth monitoring.)
18 VCS Enterprise Agent for NetBackup Installation and Configuration Guide
Before Configuring the Agent
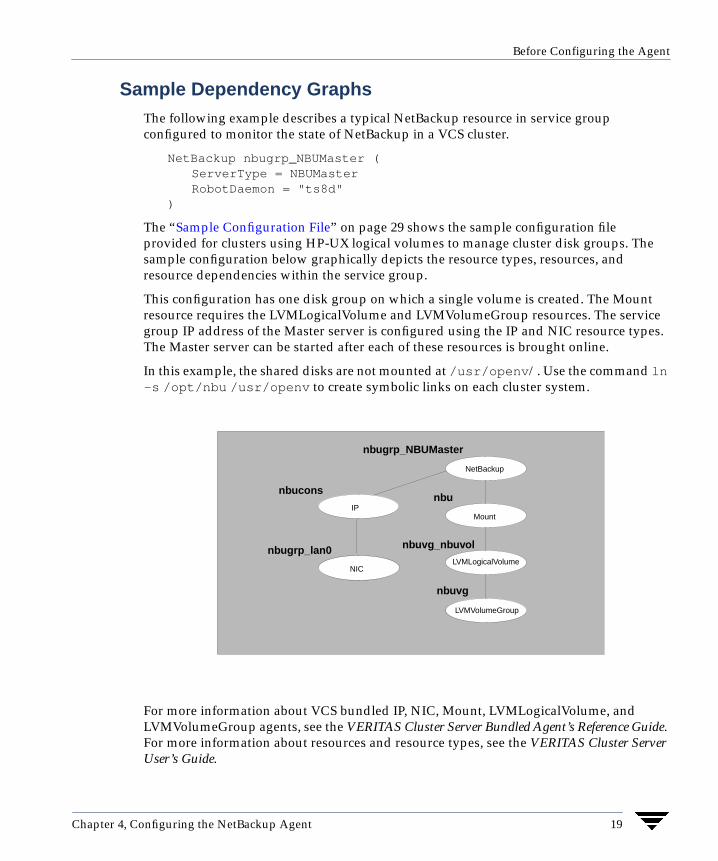
Sample Dependency GraphsThe following example describes a typical NetBackup resource in service groupconfigured to monitor the state of NetBackup in a VCS cluster.
NetBackup nbugrp_NBUMaster (ServerType = NBUMasterRobotDaemon = "ts8d"
)
The “Sample Configuration File” on page 29 shows the sample configuration fileprovided for clusters using HP-UX logical volumes to manage cluster disk groups. Thesample configuration below graphically depicts the resource types, resources, andresource dependencies within the service group.
This configuration has one disk group on which a single volume is created. The Mountresource requires the LVMLogicalVolume and LVMVolumeGroup resources. The servicegroup IP address of the Master server is configured using the IP and NIC resource types.The Master server can be started after each of these resources is brought online.
In this example, the shared disks are not mounted at /usr/openv/. Use the command ln-s /opt/nbu /usr/openv to create symbolic links on each cluster system.
For more information about VCS bundled IP, NIC, Mount, LVMLogicalVolume, andLVMVolumeGroup agents, see the VERITAS Cluster Server Bundled Agent’s Reference Guide.For more information about resources and resource types, see the VERITAS Cluster ServerUser’s Guide.
nbucons
nbugrp_lan0
NIC
Mount
LVMLogicalVolume
LVMVolumeGroup
nbugrp_NBUMaster
nbu
nbuvg_nbuvol
nbuvg
IP
NetBackup
Chapter 4, Configuring the NetBackup Agent 19
Configuring the NetBackup Agent with the Java Console
Configuring the NetBackup Agent with the Java ConsoleA template for the NetBackup resource groups is automatically installed when you installthe NetBackup enterprise agent. Using the VCS Cluster Manager (Java Console), you canview the template, which displays the NetBackup service group, its resources and theirattributes. You can dynamically modify the attribute values as necessary for yourconfiguration.
Importing the NetBackupTypes.cf FileTo use the NetBackup template, import the NetBackupTypes.cf file to the VCS engineby using Cluster Manager:
1. Start Cluster Manager.
# hagui&
2. Log into the cluster. When you receive a message asking if you want to use a wizardto add service groups, answer “No” because you must first import theNetBackupTypes.cf file.
3. Click on the File menu and select Import Types. Switch to read-write mode ifprompted.
4. In the Import Types dialog box, select the file:
/etc/VRTSvcs/conf/sample_nbu/NetBackupTypes.cf
5. Import the types file for NetBackup.
6. Save the configuration.
At this point, the NetBackup types have been imported to the VCS engine. TheNetBackup agent can be configured without interrupting or stopping VCS.
Refer to the VERITAS Cluster Server User’s Guide for information on the VCS Java Console.
Adding the Service Group for NetBackup Using the WizardTo create a new service group, import the NetBackupTypes.cf file and then downloadthe NetBackupGroup template by starting the Service Group Configuration Wizard fromthe Cluster Manager.
20 VCS Enterprise Agent for NetBackup Installation and Configuration Guide
Configuring the NetBackup Agent with the Java Console
Creating an NetBackup Service Group
1. Launch the cluster configuration wizard in one of the following ways:
- Select Tools>Configuration wizard from the Cluster Explorer menu.
- If no service groups exist on the system, the Cluster Explorer prompts you tolaunch the Cluster Configuration wizard. Click Yes when prompted.
The Loading Templates Information window appears and launches the wizard.
2. Read the Welcome screen and click Next.
3. Specify the name of the service group and the target systems on which it is to beconfigured.
a. Enter the name of the service group.
b. In the Available Systems box, select the systems in the cluster on which you wantto configure the service group.
c. Click the right arrow to move the selected systems to the Systems for ServiceGroup table. To remove a system from a table, select the system and click the leftarrow.
d. Indicate whether you want the service group to become online automaticallywhen VCS starts, by clicking on the Startup checkbox beside the system name.Specify the order in which you want the systems to fail over by assigningpriorities to the cluster systems.
e. Click Next.
4. In the Would you like the service group to be based on a template? window, clickNext.
5. In the Select Templates dialog box, select the NetBackup template (NetBackupGroup)on which to base the service group.
If the names that you specified for some resources for the new service group arealready in use, a window opens notifying you of this. This window also includes a listof alternative names. You can select an alternative name, or modify the name. ClickNext after resolving the name clashes.
Chapter 4, Configuring the NetBackup Agent 21
Configuring the NetBackup Agent with the Java Console
6. Click Next to create the service group based on the selected template. A windowopens indicating that the commands are being sent to add the group, its resources,and the attributes and dependencies specified in the template. A progress indicatordisplays the percentage of the commands issued. The actual commands are displayedat the top of the indicator.
7. Click Next when prompted that the service group has been successfully created.
8. A window opens listing the service group’s resources and their associated attributes.Click Finish to accept the default values and complete the configuration.
You can modify the default values of the resources according to your specificconfiguration requirements. For details see the following section.
Editing the Resource attributes
This section describes the procedure to edit attributes using the Cluster Manager. Fora list of attributes that must be configured for the NetBackup service group, refer toattribute definitions for the NetBackup resource type on page 18.
1. Select a resource from the list on the left. Its attributes appear in the right pane.
2. Select the attribute to be modified.
3. Click the edit icon in the Edit column.
4. Enter attribute values in the Edit Attribute window. To modify the scope of theattributes, select either Global or Local option. For non-scalar values, use the + or theX buttons to add or delete values, respectively.
5. Click OK.
6. Repeat the procedure for each resource and its attributes and click Finish. Edit theattributes for all the resources according to your configuration.
7. Follow the wizard instructions to complete the configuration. Click Finish to quit thewizard.
22 VCS Enterprise Agent for NetBackup Installation and Configuration Guide
Configuring NetBackup Agent by Editing the main.cf File
Configuring NetBackup Agent by Editing the main.cf FileThe VCS enterprise agent for NetBackup comes with a sample configuration file that canbe used as reference to directly modify your present configuration file. When you use thismethod, you must stop and restart VCS to implement the configuration.
Follow the instructions below to configure the agent using the sample configuration file:
1. Log in to sysa as root.
2. Ensure that all changes to the existing configuration have been saved and that furtherchanges are prevented while you modify main.cf:
# haconf -dump -makero
3. To ensure that VCS is not running while you edit main.cf, issue the followingcommand to stop the VCS engine on all systems and leave the resources available:
# hastop -all -force
4. Make a backup copy of the main.cf file:
# cd /etc/VRTSvcs/conf/config# cp main.cf main.cf.orig
5. Edit the main.cf file. The file /etc/VRTSvcs/conf/sample_nbu/main.cf can beused for reference (see the “Sample Configuration File” on page 29):
a. Add an “include” line for the NetBackupTypes.cf file:
include "NetBackupTypes.cf"
b. Create the a service group for NetBackup resources. Refer to the “SampleConfiguration File for NetBackup” on page 29.
c. Include all resources in the service group, including the NetBackup, IP, NIC,Mount, LVMLogicalVolume, and LVMVolumeGroup resources, and assign valuesto the attributes for the resources to match the parameters of your configuration.
Refer to the table of “Attribute Definitions” on page 18 as well as the sampleconfiguration file. Refer also to the VERITAS Cluster Server Bundled AgentsReference Guide for information about the IP, NIC, Mount, LVMLogicalVolume,and LVMVolumeGroup resources.
d. Assign dependencies to the newly created resources. See the VCS User’s Guide formore information on assigning dependencies.
6. Save and close the file.
Chapter 4, Configuring the NetBackup Agent 23
Configuring NetBackup Agent by Editing the main.cf File
7. Copy the NetBackup types configuration file into place:
# cp /etc/VRTSvcs/conf/sample_nbu/NetBackupTypes.cf/etc/VRTSvcs/conf/config/NetBackupTypes.cf
8. Verify the syntax of the file /etc/VRTSvcs/conf/config/main.cf:
# hacf -verify config
9. Start the VCS engine on sysa:
# hastart
10. Type the command hastatus:
# hastatus
11. When “Local_Build” is listed in the message column, you can start sysb:
# hastart
12. Verify that all NetBackup service group resources are brought online:
# hagrp -display
13. Take the service group offline and verify that all resources are stopped:
# hagrp -offline service_group -sys system_name# hagrp -display
14. Bring the service group online again and verify that all resources are available:
# hagrp -online service_group -sys system_name# hagrp -display
15. Switch the NetBackup service group to sysb:
# hagrp -switch service_group -to sysb
16. Verify that all NetBackup service group resources are brought online on sysb:
# hagrp -display
17. On all the systems, look at the following log files for any errors or status:
/var/VRTSvcs/log/engine_A.log/var/VRTSvcs/log/NetBackup_A.log
24 VCS Enterprise Agent for NetBackup Installation and Configuration Guide
Administering the NetBackup Agent
5 Modifying the Agent ConfigurationTo dynamically configure the VCS enterprise agent for NetBackup, see the chapter onreconfiguring VCS from the command line in the VERITAS Cluster Server User’s Guide.
Changing Resource Attribute ValuesIt may be necessary to change the values of the resource attributes. For example, thedefault values for the OnlineTimeout and OfflineTimeout resource attributes may not besufficient for your configuration. To change the values of these attributes, refer to theVERITAS Cluster Server User’s Guide.
Additional MonitoringThe VCS enterprise agent for NetBackup provides two levels of application monitoring:shallow and in-depth. The shallow level monitors the NetBackup daemon processes toverify that they are continuously active.
The in-depth level runs a script for further testing. The full path and filename to the script,which must have execute permissions for root, is defined by the MonScript attribute ofthe NetBackup agent. A return value of 100 indicates that the test failed and that theresource is offline. A return value of 101–110 indicates that the test was successful and thatthe resource is online. Other values of the resource state are undefined. (For moreinformation, see the chapter on implementing entry points using scripts in the VERITASCluster Server Agent Developer’s Guide.)
25
Disabling the Agent
Disabling the AgentTo disable the agent on a system, you must first switch the NetBackup service group to anOFFLINE state. You can stop the application completely, or switch the agent to anothersystem.
1. You can determine if the service group is online by entering:
# hagrp -state service_group -sys system_name
2. If the service group is online, take it offline by entering:
# hagrp -switch service_group -to system_name
or:
# hagrp -offline service_group -sys system_name
3. Stop the NetBackup agent on the system:
# haagent -stop agent
When you get the message “Please look for messages in the log file,” checkthe file /var/VRTSvcs/log/engine_A.log for a message confirming the agenthas stopped.
You can also use the ps command to confirm the agent is stopped.
You can now remove the system, service group, or resource type from the VCSconfiguration. See the chapter on reconfiguring VCS from the command line in theVERITAS Cluster Server User’s Guide.
Removing the AgentType the following command on each system to remove the agent. Answer promptsaccordingly:
# swremove VRTSvcsnb
26 VCS Enterprise Agent for NetBackup Installation and Configuration Guide
Upgrading the Agent
6 Upgrading to the VCS NetBackup 3.5 AgentIf you are currently running an earlier version of the VCS NetBackup enterprise agent,you can upgrade to the VCS NetBackup 3.5 agent. Use the following procedure, in whichSystem A and System B are examples:
1. Log in to System A as root.
2. Save your existing configuration to prevent any changes while you upgrade.
# haconf -dump -makero
3. Stop the VCS engine on all systems and leave the resources available. Use the hastopcommand:
# hastop -all -force
4. Remove the NetBackup agent:
# swremove VRTSvcsnb
5. Install the VCS NetBackup 3.5 agent on System A. Refer to“Installing the AgentSoftware” on page 15 for information on installing the agent.
6. Copy the NetBackup types configuration file into place:
# cp /etc/VRTSvcs/conf/sample_nbu/NetBackupTypes.cf/etc/VRTSvcs/conf/config/NetBackupTypes.cf
7. Log in to System B as root, and repeat step 4 through step 6 on System B.
8. Start VCS on System A:
# hastart
9. Type the command hastatus:
# hastatus
27
Upgrading to the VCS NetBackup 3.5 Agent
10. When “LOCAL_BUILD” is listed in the message column, start VCS on System B:
# hastart
28 VCS Enterprise Agent for NetBackup Installation and Configuration Guide
Sample Configuration File
A Sample Configuration File for NetBackupAfter the agent is installed, the sample configuration file can be found in the file:/etc/VRTSvcs/conf/sample_nbu/main.cf. This file contains a service groupconfigured for NetBackup. See “Configuring the Agent” on page 17.
include "types.cf" include "NetBackupTypes.cf"
cluster vcs
system sysa
system sysb
group nbugrp ( SystemList = { sysa, sysb } AutoStartList = { sysa } )
LVMVolumeGroup nbuvg ( VolumeGroup = nbuvg )
LVMLogicalVolume nbuvg_nbuvol ( LogicalVolume = nbuvol VolumeGroup = nbuvg )
IP nbucons ( Device = lan0 Address = "192.2.40.21" NetMask = "255.255.255.0" )
NIC nbugrp_lan0 ( Device = lan0
29
Sample Configuration File for NetBackup
NetworkType = "ether" NetworkHosts = "10.188.2.1" )
Mount nbu ( MountPoint = "/nbu" BlockDevice = "/dev/nbuvg/nbuvol" FSType = vxfs MountOpt = rw FsckOpt = "-y" )
NetBackup nbugrp_NBUMaster ( ServerType = NBUMaster RobotDaemon = "ts8d" )
nbugrp_NBUMaster requires nbu nbu requires nbuvg_nbuvol nbuvg_nbuvol requires nbuvg nbugrp_NBUMaster requires nbucons nbucons requires nbugrp_lan0
30 VCS Enterprise Agent for NetBackup Installation and Configuration Guide
Index
Symbols/etc/services file 12
AAgent
disabling 26removing 26stopping 26
Agent operations 2Attributes
definitions 18editing values for 22
Bbp.conf file 9, 11
CCD-ROM, mounting 16Clean operation 2Commands
ioscan 5, 16ln 6, 19mount 9nohup 16pfs_mount 16setenv 16swinstall 16swremove 26xhost 15
Configuring the agentediting main.cf file 23prerequisites 17reviewing attributes 17using Java Console 20
DDependencies among resources
graphically depicted 19DISPLAY variable, setting 16
EEditing attributes 22Enterprise agents
about 1definition 1
FFiles
/etc/services 12bp.conf 9, 11log files 24main.cf
editing 23nbj.conf 14NetBackupTypes.cf 23robotic_def 4, 13
IIn-depth monitoring
configuring 25Installing NetBackup
prerequisites 4Installing the agent
from CD-ROM 15prerequisites 15
ioscan command 5, 16IP resource
depends on NIC resource 19
JJava Console
starting 20using to configure service group 20
LLinks, symbolic, creating 5ln command 6, 19Log files 24LVMLogicalVolume resource
requires LVMVolumeGroup 19
31
LVMVolumeGroup resourceLVMLogicalVolume requires 19
Mmain.cf file
adding NetBackup service group 23example NetBackup configuration 29
Migrating NBU to cluster 7Monitor operation 2Monitoring
description 2shallow and in-depth 25
MonScript attribute, defined 18mount command 9Mount resource
requires LVMLogicalVolume 19Mounting the CD-ROM 16
Nnbj.conf file 14NBU Media server (NBUSlave) 4NBUMaster server type 4, 18NBUMasterwoMM server type 18NBUSlave server type 4, 18NetBackup agent
installing 16operations 2
NetBackup resourcedepends on Mount and IP resources 19
NetBackup resource type 18NetBackup software
installing client software 8installing on shared disk 10
NetBackupTypes.cfimported for Cluster Manager 20including in main.cf file 23
NIC resourceIP resource depends on 19
nohup command 16
OOffline operation 2Online operation 2Operating System, supported OS 1Operations, NetBackup agent 2
Ppfs_mount command 16Prerequisites
for installing NetBackup 4for installing the agent 15
RResource attributes, editing 22Resource type, NetBackup 18RobotDaemon attribute, defined 18Robotic control 4Robotic definition file 4robotic_def file 13
SServerType attribute, defined 18Service group
adding using wizard 20creating in main.cf file 23creating with Java Console 21
setenv command 16Shared robotic control 4Shared tape drives, configuring 5Shutdown scripts 12Startup scripts 12Supported operating system 1swinstall command 16swremove command 26Symbolic links, creating for paths 5
WWizard, using to configure service group 20
Xxhost command 15
32 VCS Enterprise Agent for NetBackup Installation and Configuration Guide


