Veritas Operations Manager - Get the most from your Storage Foundation and Veritas Cluster Server investment Hands-On Lab Description Veritas Operations Manager (VOM) is a comprehensive management and reporting platform for Storage Foundation, Veritas Dynamic Multipathing, Veritas Cluster Server, and ApplicationHA environments. It will help you optimize your data center assets, centralize visibility and control, ensure availability, scale operations, increase storage utilization, and maintain compliance. This lab will give you a detailed look into some of the capabilities of VOM, which should allow you to better understand its complete potential and how it can help unlock additional value of Storage Foundation, .
Transcript
Veritas Operations Manager - Get the most from your Storage Foundation and Veritas Cluster Server investment
Hands-On Lab
Description Veritas Operations Manager (VOM) is a comprehensive management and reporting platform for Storage Foundation, Veritas Dynamic Multipathing, Veritas Cluster Server, and ApplicationHA environments. It will help you optimize your data center assets, centralize visibility and control, ensure availability, scale operations, increase storage utilization, and maintain compliance.
This lab will give you a detailed look into some of the capabilities of VOM, which should allow you to better understand its complete potential and how it can help unlock additional value of Storage Foundation, .
2 of 110
At the end of this lab, you should be able to
Use VOM to help minimize risks in the Data Center
Improve your operational efficiency with advanced operations and Virtual Business Services
Maximize Storage Utilization with detailed reports and Storage Foundation operations
Maintain compliance with license reporting and keyless
Notes It is not intended that you will be able to complete all of the exercises here-in. As some of the material may have been completed by you previously, you should feel free to perform the exercises in the lab that will benefit you the most. Some of the exercises are dependent on information from previous exercises. These are grouped together by Number and Letter (e.g. 2a and 2b). You need to perform 2a in order to perform 2b.
The lab content and the environment should be available to access after the lab is complete so you can complete any items you didn‟t get to on your own time.
Be sure to ask your instructor any questions you may have.
3 of 110
Topics and estimated times:
Primary Exercises:
Minimize Risk
o Get notified: Exercise 1 (5 min)
o Preventing problems: Exercise 2 (10 min)
o VCS Activity Reports: Exercise 3 (5 min)
o Thin Pool Reporting: Exercise 4a (5 min)
o Thin Pool Monitoring : Exercise 4b (5 min)
Scale Operations
o Virtual Business Services: Exercise 5 (5 min)
o Rule Based Tiering: Exercise 6a (5 min)
o Storage Template Provisioning: Exercise 6b (8 min)
Maximize Storage Utilization
o Identify Storage Waste: Exercise 7 (5 min)
o Application to Spindle: Exercise 8 (5 min)
o Thin Reclamation: Exercise 9 (7 min)
o SF Operations: Exercise 10 (5 min)
Maintain Compliance
o License Reporting: Exercise 11a (5 min)
o Keyless Licensing: Excercise11b (5 min)
Appendix (Additional Exercises):
Setup and Deployment
o Managed Host Configuration: Exercise 12 (7 min)
o Business Entity Configuration: Exercise 13a (4 min)
o Security: Access and Roles: Exercise 13b (5 min)
SFHA Configuration and Management
o VCS Operations: Exercise 14 (10 min)
Virtualization
o Server Virtualization: Exercise 15 (10 min)
Keeping up to date
o Patches and Hotfixes: Exercise 16 (5 min)
More VOM Add-ons
o Distribution: Exercise 17a (10 min)
o Scripting: Exercise 17b (10 min)
o VCS Password Change: Exercise 18 (3 min)
Thank you for attending our lab session!
4 of 110
Login to the VOM Console
Action: To begin the exercises, open the „VOM MS‟ link on the desktop and login:
1) Enter Username: vomadm
2) Enter Password: symc4now
3) Click Login
Lab Exercise 1
Topic – Get notified Duration = 5 minutes
VOM collects information about SF and VCS configurations including active issues in the environment. This includes messages around things like Veritas DMP Paths being down, High File System Utilization, as well as VCS Service Group Faults. In addition to showing these items in the VOM Management Console, you can externalize the notification by using Email and SNMP as well as trigger scripts to be executed in response.
In this exercise we‟ll explore the different types of faults and risks that VOM discovers, take a look at the historical alert log, and learn how to configure rules to respond to the conditions as they are raised.
Action: Click Monitor -> Fault Definitions
This will show you the various Fault and Risk conditions that VOM reports on. You can search and filter this view easily from the left hand side of the page.
5 of 110
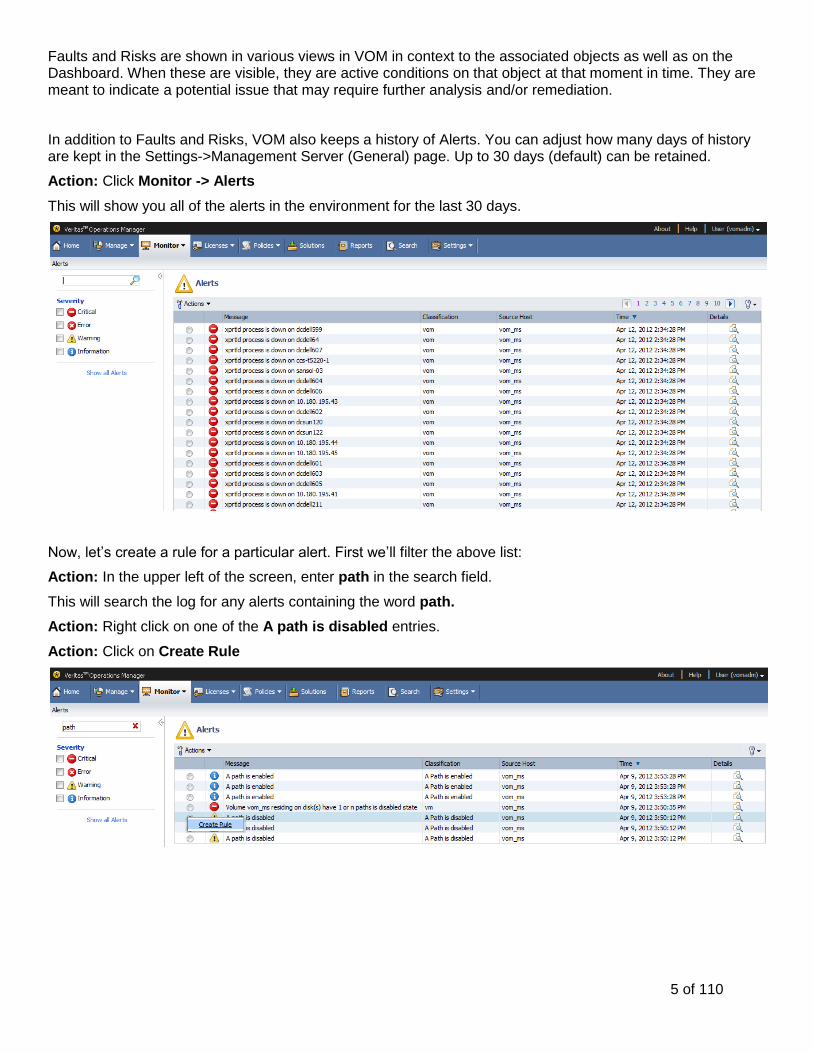
Faults and Risks are shown in various views in VOM in context to the associated objects as well as on the Dashboard. When these are visible, they are active conditions on that object at that moment in time. They are meant to indicate a potential issue that may require further analysis and/or remediation.
In addition to Faults and Risks, VOM also keeps a history of Alerts. You can adjust how many days of history are kept in the Settings->Management Server (General) page. Up to 30 days (default) can be retained.
Action: Click Monitor -> Alerts
This will show you all of the alerts in the environment for the last 30 days.
Now, let‟s create a rule for a particular alert. First we‟ll filter the above list:
Action: In the upper left of the screen, enter path in the search field.
This will search the log for any alerts containing the word path.
Action: Right click on one of the A path is disabled entries.
Action: Click on Create Rule
6 of 110
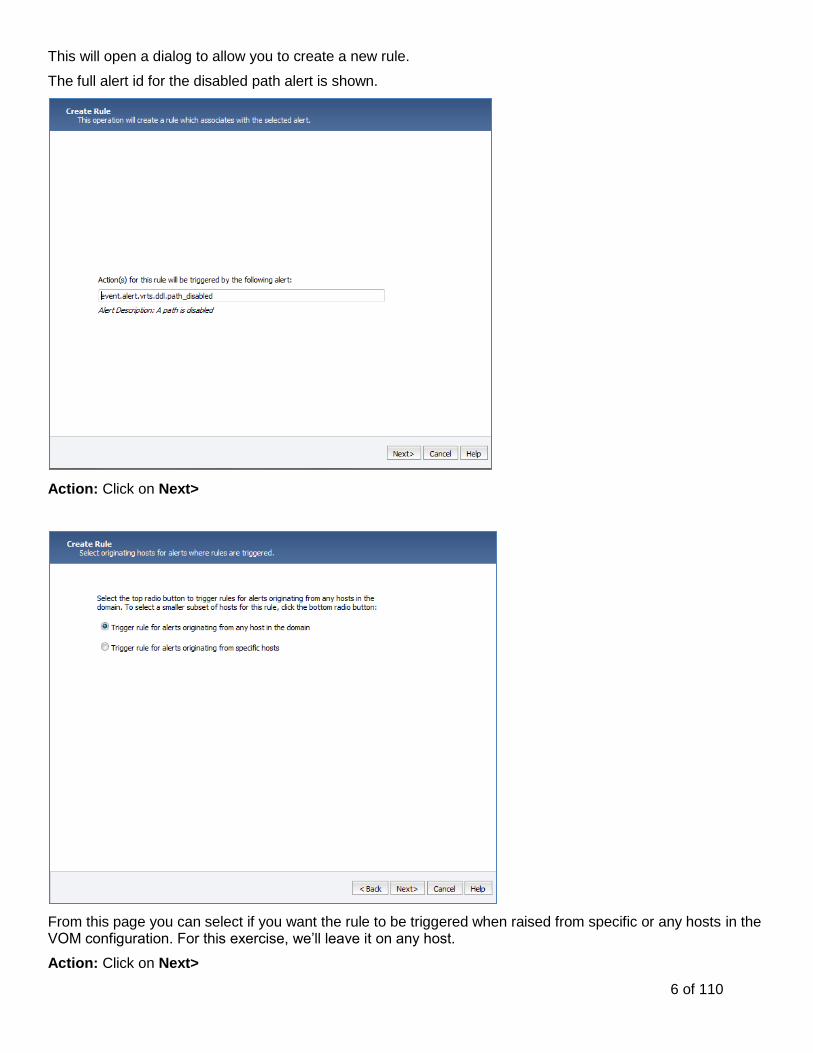
This will open a dialog to allow you to create a new rule.
The full alert id for the disabled path alert is shown.
Action: Click on Next>
From this page you can select if you want the rule to be triggered when raised from specific or any hosts in the VOM configuration. For this exercise, we‟ll leave it on any host.
Action: Click on Next>
7 of 110
From here you will be able to define what actions are taken when this rule is triggered. You have the option to forward to Email, trigger an SNMP trap, or launch a Script (either locally on the VOM MS or on any host in the VOM Configuration). For this exercise, we‟ll choose the Email option.
Action: Check the Email checkbox
Action: Type [email protected] (or whatever the valid email address/list would be) in the To: field.
If instead of receiving individual notifications, you‟d only like a digest for what occurred that day, select the „Send email as daily digest‟ option.
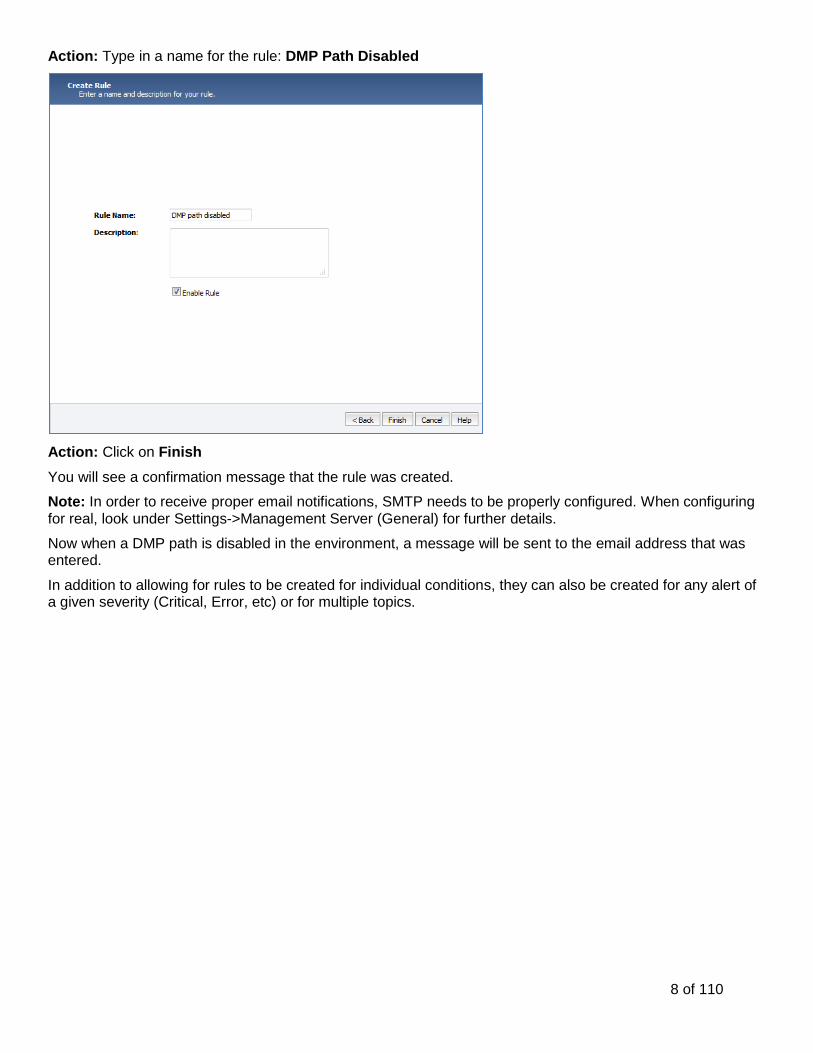
Action: Type in a name for the rule: DMP Path Disabled
Action: Click on Finish
You will see a confirmation message that the rule was created.
Note: In order to receive proper email notifications, SMTP needs to be properly configured. When configuring for real, look under Settings->Management Server (General) for further details.
Now when a DMP path is disabled in the environment, a message will be sent to the email address that was entered.
In addition to allowing for rules to be created for individual conditions, they can also be created for any alert of a given severity (Critical, Error, etc) or for multiple topics.
9 of 110
Lab Exercise 2
Topic – Preventing problems Duration = 10 minutes
In addition to notifying you of configuration issues as they occur, VOM includes some capability to help alert you to potential problems or misconfigurations before they cause significant errors our outages in your environment.
First we will explore the Health Check feature of VOM. This includes over 50 signatures around Availability, Utilization, and Best Practices for Storage Foundation, Veritas Cluster Server, and Veritas Dynamic Multipathing.
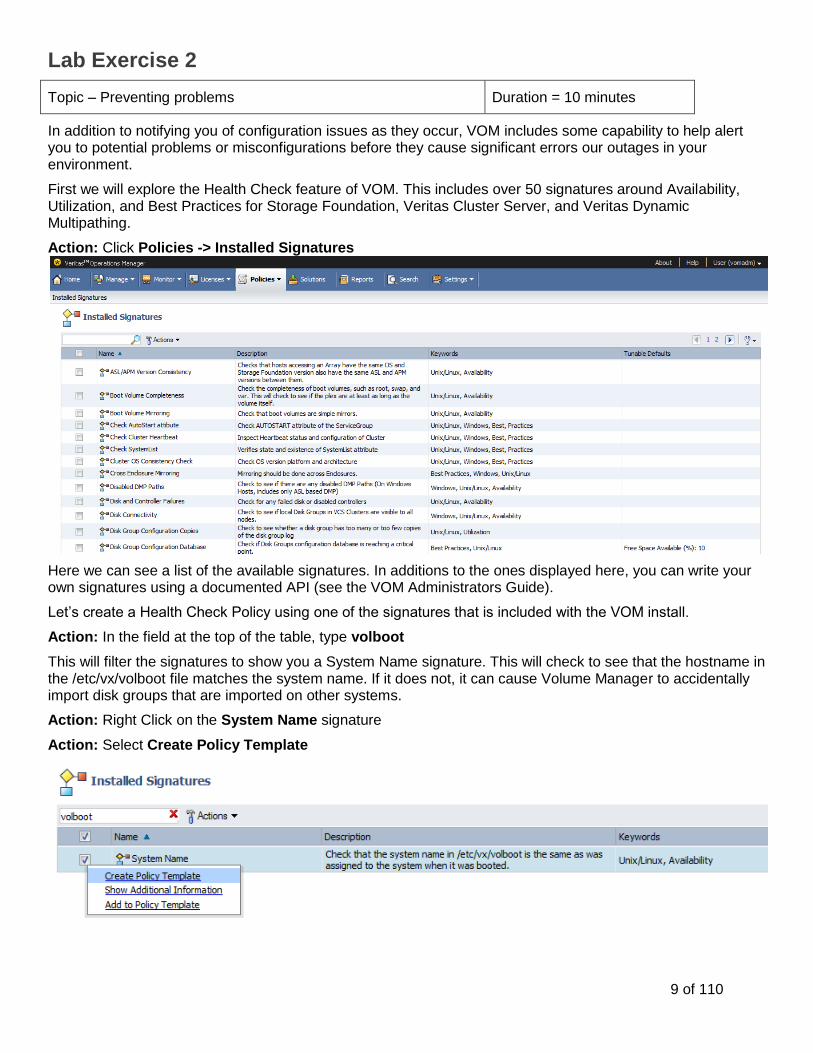
Action: Click Policies -> Installed Signatures
Here we can see a list of the available signatures. In additions to the ones displayed here, you can write your own signatures using a documented API (see the VOM Administrators Guide).
Let‟s create a Health Check Policy using one of the signatures that is included with the VOM install.
Action: In the field at the top of the table, type volboot
This will filter the signatures to show you a System Name signature. This will check to see that the hostname in the /etc/vx/volboot file matches the system name. If it does not, it can cause Volume Manager to accidentally import disk groups that are imported on other systems.
Action: Right Click on the System Name signature
Action: Select Create Policy Template
10 of 110
This will show you a wizard, where we will specify some additional options
Action: Give the signature a name Check System Name
Action: Select the scope: Scan hosts associated with a Business Entity
Action: Select live hosts from the drop down list
Note: You can optionally specify a description and an Email address to send the resulting report to.
Action: Click Next>
Here you will see the System Name signature has already been selected.
Action: Click Next>
11 of 110
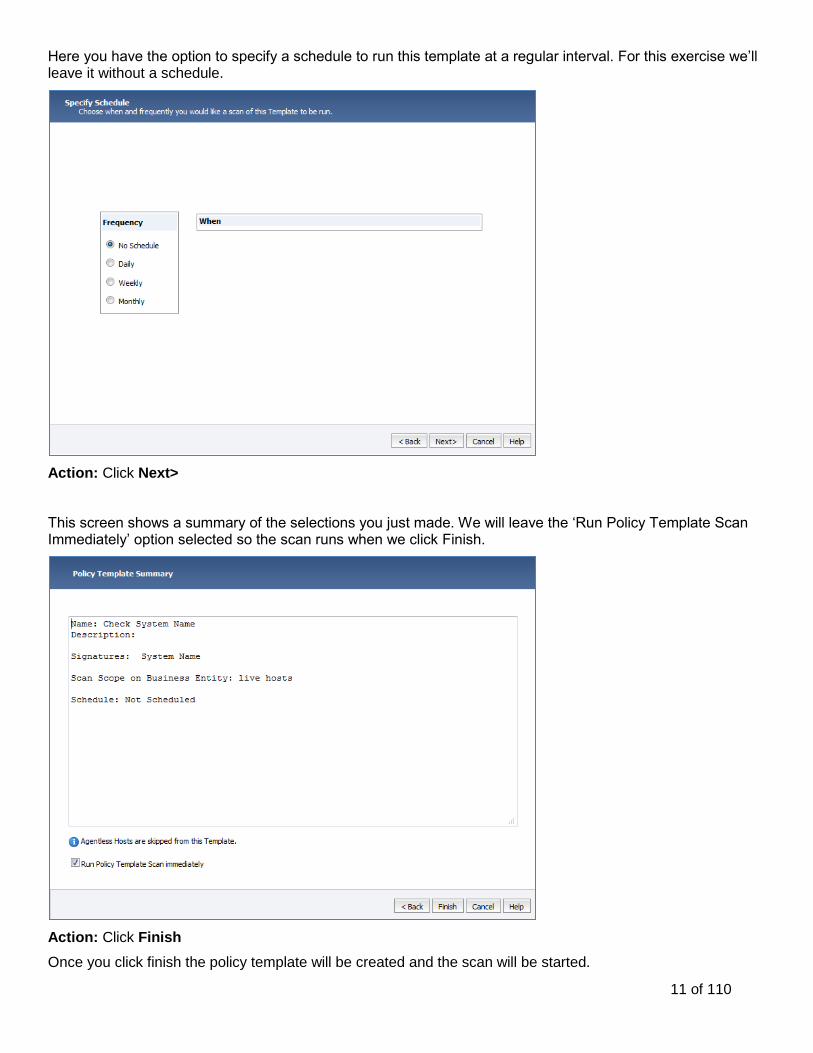
Here you have the option to specify a schedule to run this template at a regular interval. For this exercise we‟ll leave it without a schedule.
Action: Click Next>
This screen shows a summary of the selections you just made. We will leave the „Run Policy Template Scan Immediately‟ option selected so the scan runs when we click Finish.
Action: Click Finish
Once you click finish the policy template will be created and the scan will be started.
12 of 110
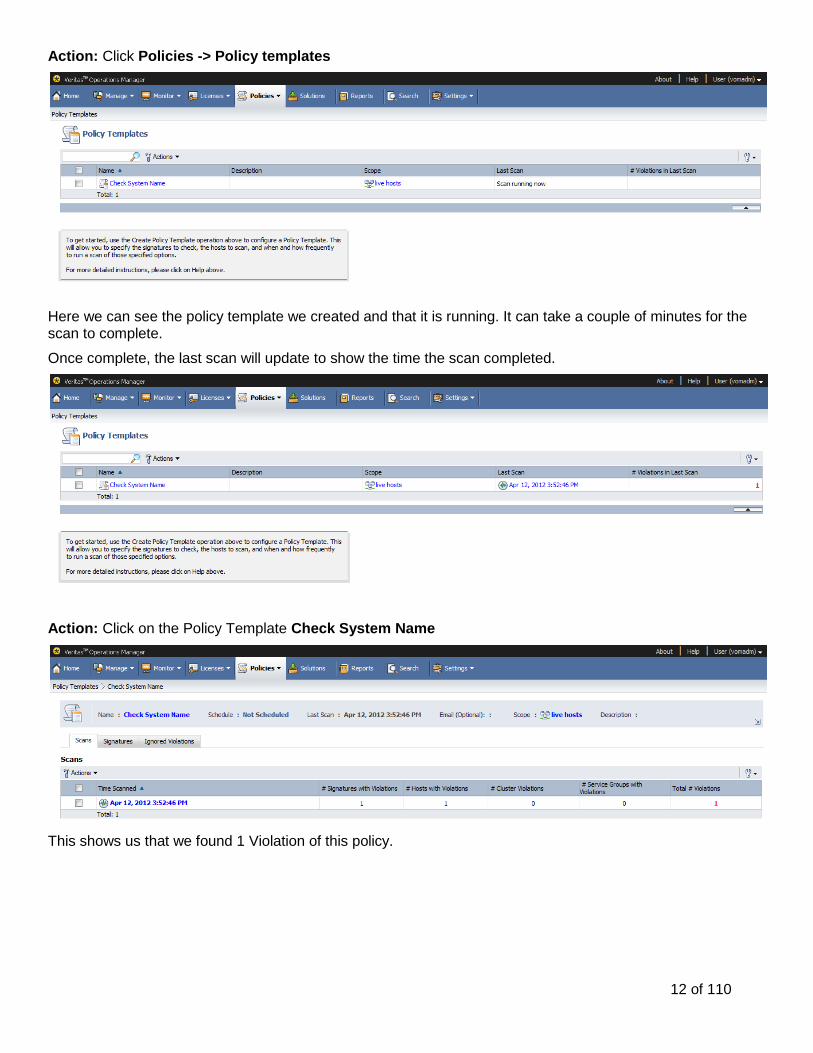
Action: Click Policies -> Policy templates
Here we can see the policy template we created and that it is running. It can take a couple of minutes for the scan to complete.
Once complete, the last scan will update to show the time the scan completed.
Action: Click on the Policy Template Check System Name
This shows us that we found 1 Violation of this policy.
13 of 110
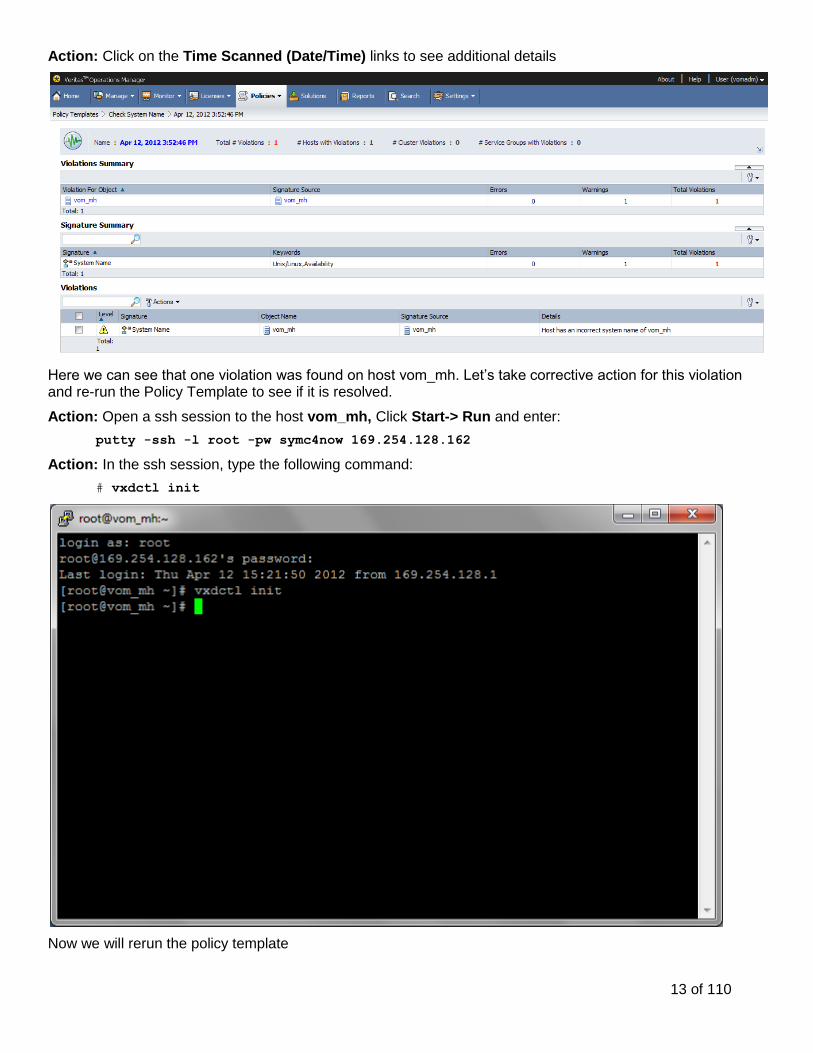
Action: Click on the Time Scanned (Date/Time) links to see additional details
Here we can see that one violation was found on host vom_mh. Let‟s take corrective action for this violation and re-run the Policy Template to see if it is resolved.
Action: Open a ssh session to the host vom_mh, Click Start-> Run and enter:
putty -ssh -l root -pw symc4now 169.254.128.162
Action: In the ssh session, type the following command:
# vxdctl init
Now we will rerun the policy template
14 of 110
Action: Click Policies -> Policy templates
Action: Select Scan Now
This will show you a simple confirmation dialog
Action: Click Yes
A scan will be run again.
Action: Click on the policy template link Check System Name to see the details
Here you should see that the new scan is running. Once complete it will show the completed time.
15 of 110
From here we can see that the total number of violations has gone from 1 to 0.
VOM also provides the ability to schedule VCS HA and DR Fire Drills. This feature of VCS is a way to automate the testing of your HA and DR configuration without actually needing to failover your services. It runs a collection of rules to verify that certain configuration dependencies are in place and setup correctly. In this exercise, we‟ll run a simple HA Fire Drill.
Action: Click Policies -> Fire Drills
Action: Click Actions and select Run HA Fire Drill
16 of 110
A Dialog will appear showing a list of available VCS Clusters.
Action: Select vomclus from the list and Click Next>
Action: Select demosg and Click Next >
17 of 110
For this exercise we‟ll specify No schedule
Action: Click Next>
Action: On the Summary Page Click Finish
You should see a confirmation saying that the Fire Drill started successfully.
Action: Click OK to dismiss the dialog.
You will see the Fire Drill is In Progress
After a couple of minutes it should complete
18 of 110
Action: Click to get additional details
In the demo environment we actually created the same disk group, volume, and file system configuration, but it isn‟t on the same (shared) storage. When we look at the details, we‟ll see that the fire drill failed because the storage for the disk group wasn‟t accessible on all nodes of the cluster as the disk group vcsdg is created on different local storage for each node in the cluster.
19 of 110
Lab Exercise 3
Topic – VCS Activity Reports Duration = 5 minutes
VOM also tracks configuration changes to the VCS configuration and has reports that details these changes and when they occurred. All of these reports can be run against individual clusters, groups of clusters, or the entire VOM configuration, as well as allow you to specify the time period to analyze.
In this exercise, we‟ll look at a few of these reports in depth:
Uptime Analysis – calculates the amount of time service groups have been in particular state (online, faulted, or partial)
Resource Fault Trending – looks at when and where different faults occurred.
Failover Summary – shows when and how (user or VCS initiated) failovers occurred.
Action: Click Reports
Action: Select Trend/Activity from the filter on the left
20 of 110
Action: Click Run under Uptime Analysis
Action: Select Date Range from: 4/10/2012 to 4/17/2012
Action: Select Entire Domain and Click Finish
Action: When the report appears, select cluster: vomclus
Here you can see the service groups in the vomclus cluster, and information about the current state and what state the various groups have been in between the specified time period. This is visualized further down the page in the Uptime box, and when faults occurred is highlighted under the Faults Box.
21 of 110
Action: Click Back in the web browser window
Action: Click Run under Resource Fault Trending
Action: Select Date Range from: 4/10/2012 to 4/17/2012
Action: Select Entire Domain and Click Finish
Action: When the report appears, select cluster: vomclus
Here you can see a breakdown of the resource types in the vomclus cluster, the number of faults, and when those faults occurred.
Further down the page you‟ll see a list of when the faults occurred and on what system.
22 of 110
Action: Click Back in the web browser window
Action: Click Run under Failover Summary
Action: Select Date Range from: 4/10/2012 to 4/17/2012
Action: Select Entire Domain and Click Finish
In this report you can see a breakdown of the types of failovers:
Planned – user\admin initiated
Unplanned Automatic – VCS detected the fault and failed over successfully
Unplanned Manual – VCS detected the fault and a user\admin needed to get involved to bring the service online.
Further down the page, you‟ll see a distribution of when the failovers occurred, as well as what service groups were most frequently impacted.
23 of 110
Lab Exercise 4a
Topic – Thin Pool Reporting Duration = 5 minutes
The Storage Insight Add-on for VOM discovers details of the array configuration by communicating directly to the array vendor utilities. One of the elements that it provides is reporting on overall Thin Pool utilization across arrays. This can be useful for understanding what Pools may be at risk as well as indentifying those that are not utilized as effectively as they could be.
Action: Click Reports
Action: Enter Search: Thin
This will return a couple of results and two reports that we will be looking at today.
24 of 110
Thin Pool Usage Report
Action: Click Run under Thin Pool Usage
Action: Select Entire Domain and Click Finish
Wait a few seconds and you should see a report that lists a summary of all the Thin Pools discovered by Storage Insight. For detailed information, Click on the Details tab
25 of 110
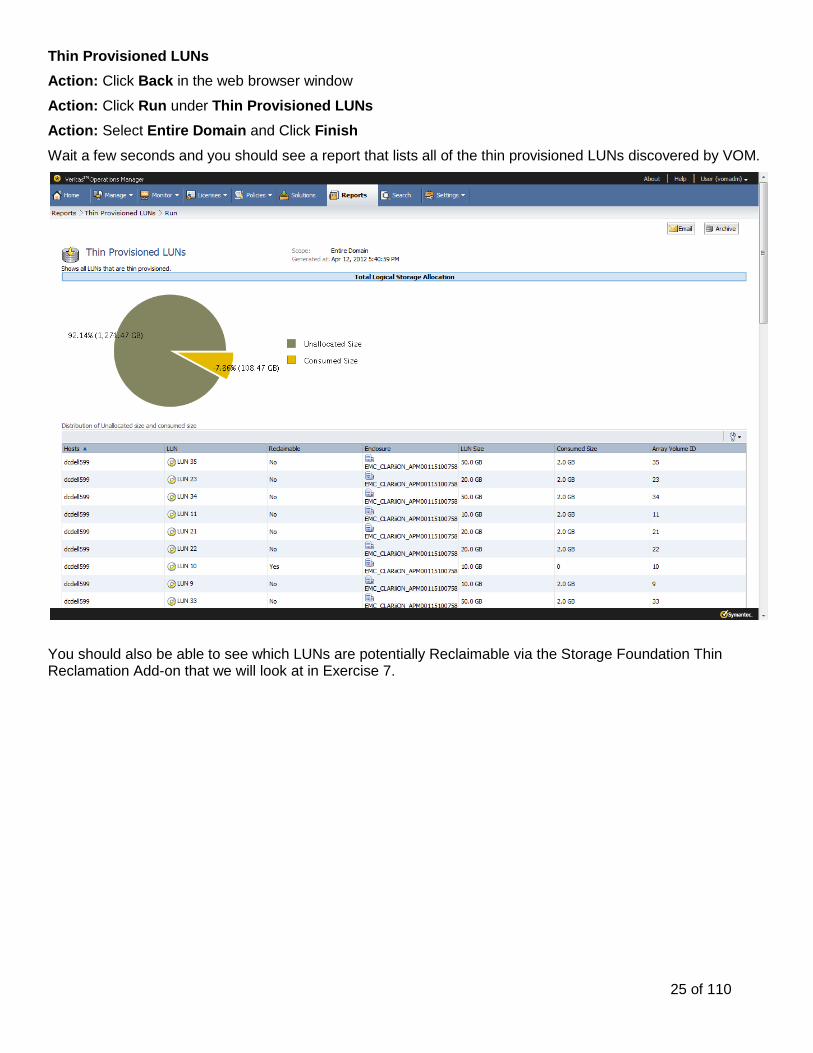
Thin Provisioned LUNs
Action: Click Back in the web browser window
Action: Click Run under Thin Provisioned LUNs
Action: Select Entire Domain and Click Finish
Wait a few seconds and you should see a report that lists all of the thin provisioned LUNs discovered by VOM.
You should also be able to see which LUNs are potentially Reclaimable via the Storage Foundation Thin Reclamation Add-on that we will look at in Exercise 7.
26 of 110
Lab Exercise 4b
Topic – Thin Pool Monitoring Duration = 5 minutes
With the details from the Thin Pool configuration, VOM has the ability to monitor the subscribed and consumed sizes of thin pools discovered by the Storage Insight Add-on. The ability to be notified when an oversubscribed configuration is close to exhausting its physical resources helps reduce the risk of a potential outage.
Action: Click Manage -> Enclosures
Action: Click on sflab_xiv
Here you‟ll see some details about this IBM XIV array as discovered by the VOM Storage Insight Add-on. VOM also discovers information from the host and server virtualization perspectives to populate details about the logical volumes, file systems, and connectivity to this array.
27 of 110
Action: Click on the Thin Pools tab
Here we can see a list of the thin pools that are configured on this array. You‟ll see similar information for other thin capable arrays such as Hitachi USP-V and EMC VMAX.
Action: Right click on pune_lx3_lx4
Action: Select Monitor Thin Pool(s)
28 of 110
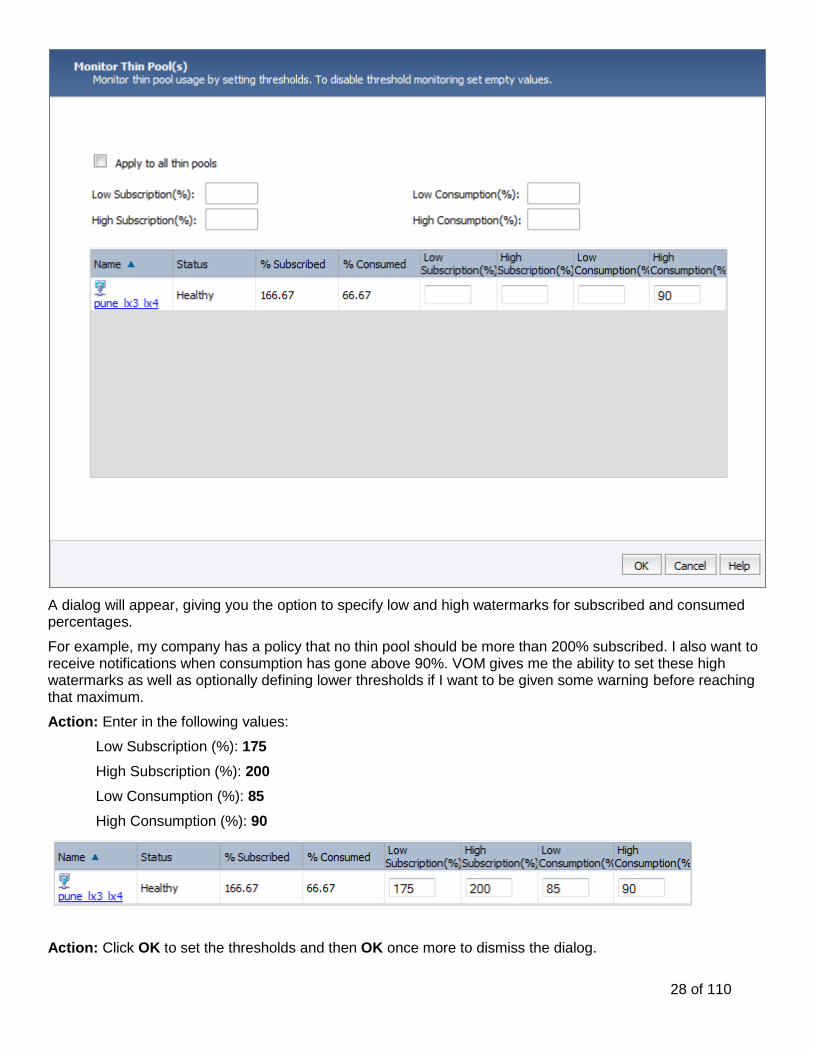
A dialog will appear, giving you the option to specify low and high watermarks for subscribed and consumed percentages.
For example, my company has a policy that no thin pool should be more than 200% subscribed. I also want to receive notifications when consumption has gone above 90%. VOM gives me the ability to set these high watermarks as well as optionally defining lower thresholds if I want to be given some warning before reaching that maximum.
Action: Enter in the following values:
Low Subscription (%): 175
High Subscription (%): 200
Low Consumption (%): 85
High Consumption (%): 90
Action: Click OK to set the thresholds and then OK once more to dismiss the dialog.
29 of 110
As the consumed and subscribed sizes change, VOM will monitor those thresholds and raise fault or a risk condition corresponding to the Low or High threshold.
To see what these look like:
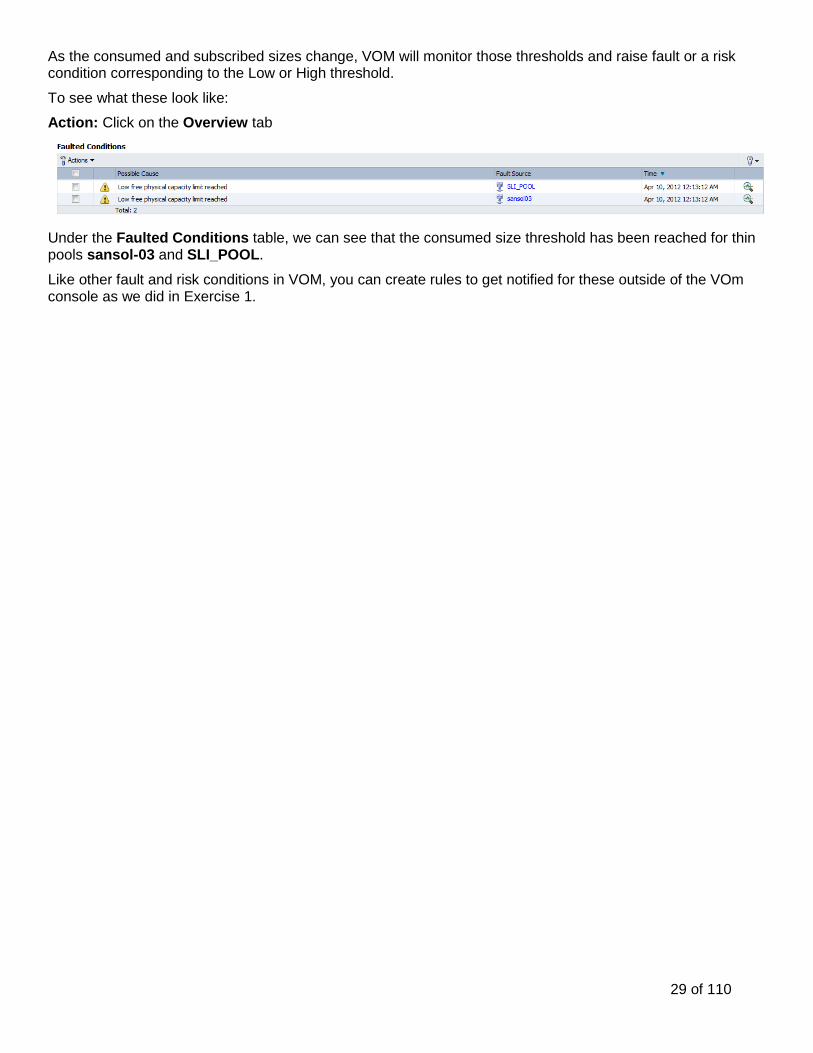
Action: Click on the Overview tab
Under the Faulted Conditions table, we can see that the consumed size threshold has been reached for thin pools sansol-03 and SLI_POOL.
Like other fault and risk conditions in VOM, you can create rules to get notified for these outside of the VOm console as we did in Exercise 1.
30 of 110
Lab Exercise 5
Topic – Virtual Business Services Duration = 10 minutes
Complex services that are made up of many individual applications running across different operating environments with some virtualized servers and some traditional physical servers are becoming commonplace in many organizations. This model helps companies achieve better resource utilization, improves flexibility, and can lower implementation costs. A typical example of this is a three-tier application with a web server farm or cluster front end, an application server cluster in the middle, all backed by a database server cluster.
There are many challenges to bringing these pieces together so they can truly be understood and managed as a single entity. In addition to facilitating access rights and scoping reports, Business Entities also allow you to associate multiple applications to form a truly singular concept of a multitier application called a Virtual Business Service (VBS).
VBS provides continuous high availability and reduces frequency and duration of service disruptions for multi-tier business applications running across OS platforms and multivendor virtualization technologies. VOM is the central point through which you can configure, manage, and monitor each VBS. VOM will help you understand the relationship between the applications that make up the VBS, as well as notify you of any issues with an underlying component or the VBS as a whole. You can also perform operations that were once potentially very complicated, like starting or stopping the entire multitier application in the correct order or coordinating a DR failover, all of which can be achieved through VOM with just a few simple clicks.
We could dedicate an entire lab session to exploring this feature of VOM, VCS, and ApplicationHA. In our limited time here, we‟ll introduce the basic concept of creating a VBS in VOM and perform a simple start and stop operation on the VBS.
We have already created the service group configuration and the business entity to demonstrate this feature. In an actual implementation these service groups would exist across multiple clusters and may include pieces from both VCS and ApplicationHA.
What you‟ll need to do is define the relationship between the services.
Action: Click Manage -> Business Entities
Action: Right Click on Store Front and select VBS Availability -> Configure Service Group Dependencies
31 of 110
You are going to configure a dependency tree between the Service Groups in the Business Entity.
Action: storefront_sg1 is parent to weblogic_sg1 (Restart dependency)
Action: storefront_sg2 is parent to weblogic_sg2 (Restart dependency)
Action: weblogic_sg1 is parent to ora_sg (Firm dependency)
Action: weblogic_sg2 is parent to ora_sg (Firm dependency)
You can click on the help link to get more information on the dependency types. What we are defining here is that when the Oracle DB (ora_sg) faults, we should bring down the WebLogic services (weblogic_sg1 and weblogic_sg2). When the Oracle DB comes back online we should bring the WebLogic services back online and restart the StoreFront (storefront_sg1 and storefront_sg2) services.
Action: Click Next>
32 of 110
This will summarize our selections
Action: Click Finish and then OK
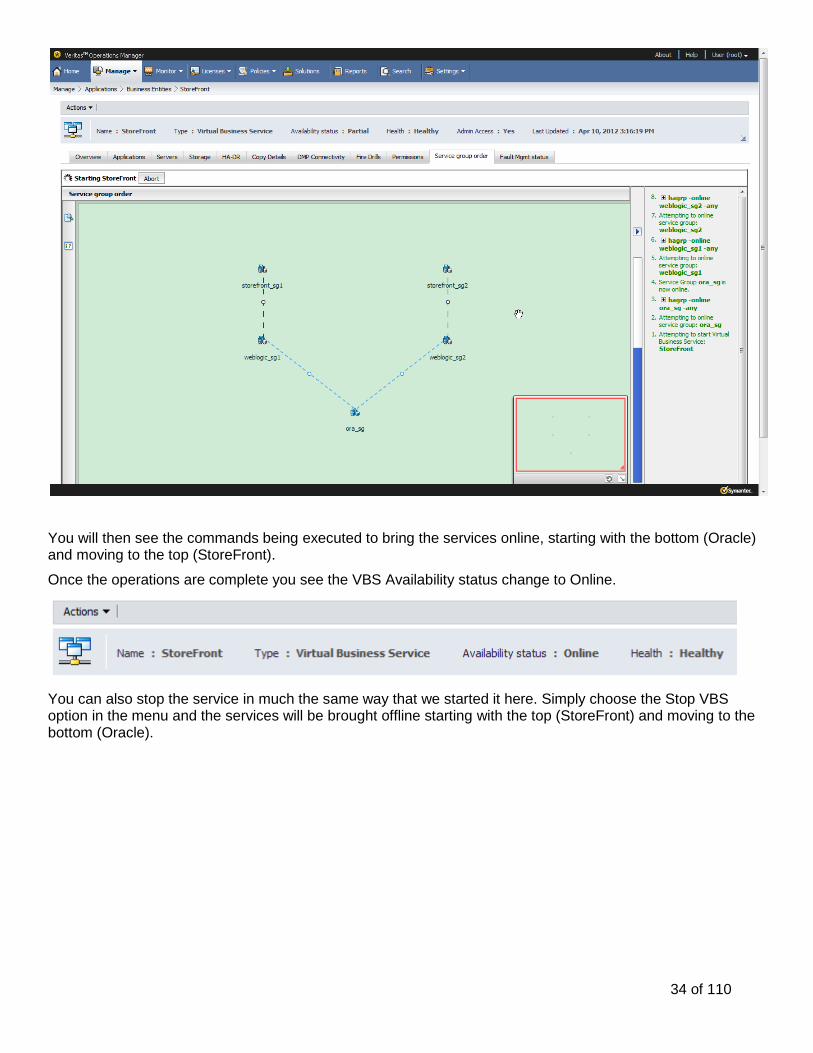
You should see a dependency tree that looks like the above image. If you hover over the circles on the connections , you will see the Dependency Type.
You‟ll notice in the overview panel that the VBS Availability status is currently offline
You will then see the commands being executed to bring the services online, starting with the bottom (Oracle) and moving to the top (StoreFront).
Once the operations are complete you see the VBS Availability status change to Online.
You can also stop the service in much the same way that we started it here. Simply choose the Stop VBS option in the menu and the services will be brought offline starting with the top (StoreFront) and moving to the bottom (Oracle).
35 of 110
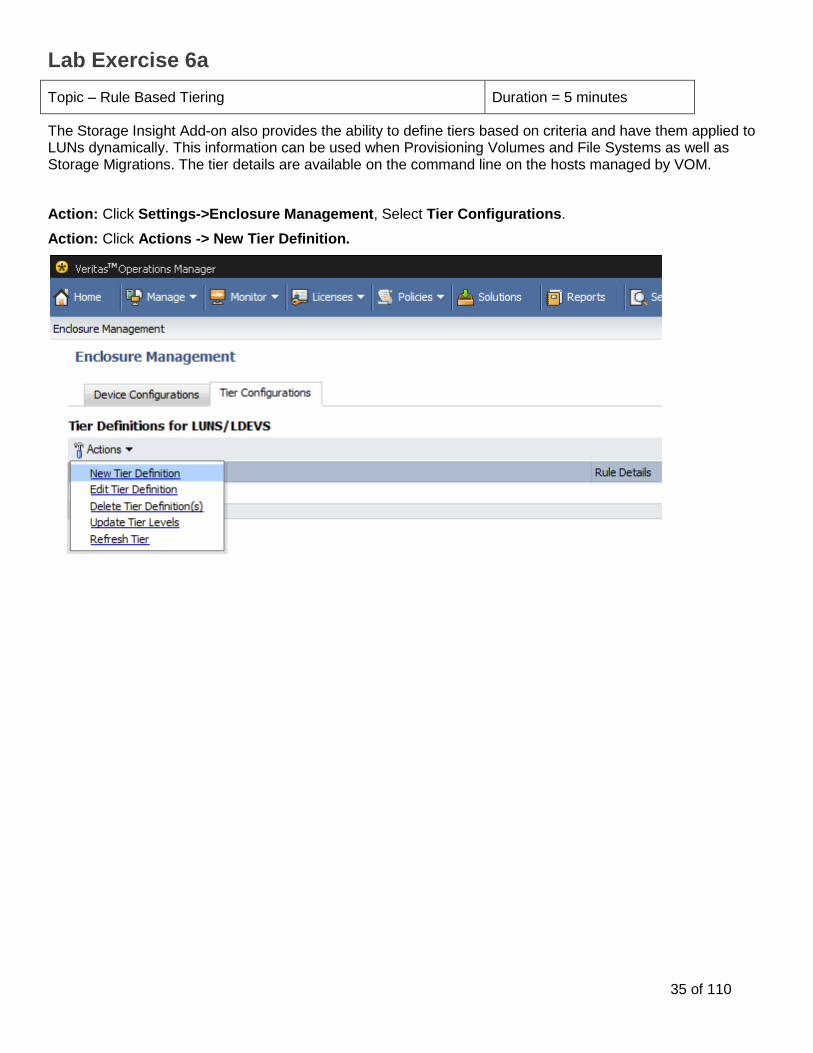
Lab Exercise 6a
Topic – Rule Based Tiering Duration = 5 minutes
The Storage Insight Add-on also provides the ability to define tiers based on criteria and have them applied to LUNs dynamically. This information can be used when Provisioning Volumes and File Systems as well as Storage Migrations. The tier details are available on the command line on the hosts managed by VOM.
Action: Enter values for Tier Label: Tier_1, Select Enclosure [email protected] from the enclosure list, and specify RAID 5/6 as the Raid Level
Action: Click Save to save the Tier Definition and the OK to dismiss the dialog
Now we will view the tiering information as it is applied in the VOM views.
Action: Click Manage->Enclosures
37 of 110
Action: Select [email protected] (Enclosure in which you created the Tier info)
Action: Select LDEVs and view the associated tier information (can take a couple of minutes before all LUNs/Devices are updated with the Tier information)
In a live environment, you would also be able to view the tiering information from the Managed Host as well. You could go to the command line and run:
# /opt/VRTSsfmh/bin/vxlist lun <lun_name>
To see output like:
The tier information as it is defined in VOM is shown above on the MH command line using vxlist.
Template provisioning is part of the Storage Provisioning Add-on, it allows users to quickly create storage templates based off of existing configurations and easily deploy them to other hosts. In this exercise we will use an existing Storage Foundation file system and volume as a base for our template. We can then easily deploy a file system and volume just like it elsewhere in the environment. The example here is exceedingly simple, but you can associate multiple file systems and volumes with a single template as well as create SmartTier (DST) configurations.
Action: In the VOM console, navigate to: Solutions
Action: Click on Manage Storage Templates
Action: Click on Create Storage Template
We are going to build a new template out of an existing vxfs file system.
39 of 110
Action: Leave the default selections and click Next>
Action: Filter hostname by vom_, select vom_ms, select sfdg, select /template_base, and click Next>
40 of 110
Action: Enter test_template as the name of the template.
Action: Select the item template_base below test_template on the left
Action: Select the Parameters tab and check the Ask box next to size.
41 of 110
By specifying the Ask option, we are allowing the person who actually uses this template to provision storage to specify an alternative size when the provisioning takes place. The value shown (100MB) will be the default size. Action: Select the item template_base below test_template on the left
Action: Select the Parameters tab and review what volume details have been automatically imported
I‟m just showing the details here so you can see some of the options that are possible. In this context, you can specify the storage to be used for volume creation. This includes specifying storage by the tiers we created in exercise 5a.
42 of 110
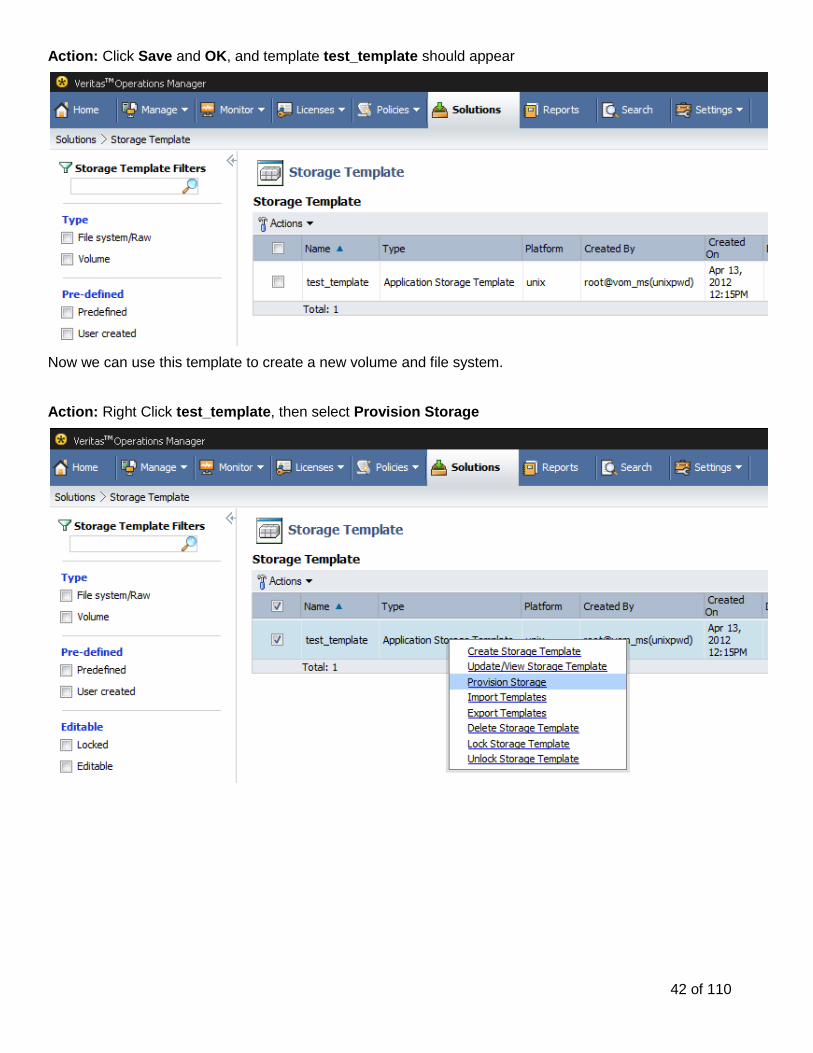
Action: Click Save and OK, and template test_template should appear
Now we can use this template to create a new volume and file system.
Action: Right Click test_template, then select Provision Storage
43 of 110
Action: Enter vom_ in the host name filter, Select vom_ms, Select sfdg, and Click Next>
Note: We are actually provisioning a new volume and file system on the same host created the template from. In most real world examples you would probably use the template you created to provision on other hosts.
44 of 110
Action: You can see that the 100MB is shown by default. We can change that here. Enter 150 MB as the size, and Click Next>
Action: Review the selections that you have made and click Submit. Then Click OK
45 of 110
Action: After a few seconds you should see the task has completed successfully.
Action: Click on the link on the name of the provisioning task.
46 of 110
Action: Click on the link on the Completed state and you should see the commands that were actually executed and the output
Let‟s go take a look at our newly created volume and file system
Action: Navigate to Manage->Hosts
Action: Select vom_ms
Action: Select the Volumes tab
Action: Filter the volume view by template_base
We can see the two relevant volumes here: /template_base – what we created our template off of /template_base_0 – what we created when we used that template to provision a new volume and file system
We have shown some of the details collected by the Storage Insight Add-on for VOM from the arrays as well as the details that are collected host side from the VOM Agent. All of this information is put together into a variety of consumable views and reports. For this exercise, we‟ll take a look at a few of the reports that focus on identifying potential storage waste. For more extensive Storage Reporting, please look at the VOM Advanced Enterprise server which builds on the data collected in the VOM Management Server that we are looking at in this lab, but also provide a great deal of flexibility around creating custom reports.
Action: In the VOM console, navigate to: Reports
Action: Check the Storage Reclamation Filter on the left hand side
We will run a few different reports from this screen
48 of 110
Action: Click Run for the Underutilized LUNs managed by Storage Foundation
Action: Select to run the report for the Entire Domain and click Finish
From this view we can see LUNs that are managed by Storage Foundation, but less than 20% of the storage space is actually occupied by logical volumes. These could be potential targets for reclamation.
Action: Click the Back button in the browser
Action: Click Run for the LUNs not Part of a Disk Group
Action: Select to run the report for the Entire Domain and click Finish
Here we can see LUNs discovered by VOM that aren‟t part of a Disk Group. This includes 3rd party Volume Managers as well. These could be partitioned directly or they may be orphaned disks that can be reclaimed.
49 of 110
Action: Click the Back button in the browser
Action: Click Run for the Underutilized File Systems
Action: Select to run the report for the Entire Domain and click Finish
This view shows the file systems discovered by VOM that have less than 20% utilization. Some of these are Storage Foundation configurations and could potentially be shrunk using the SF Management capabilities of VOM.
50 of 110
Lab Exercise 8
Topic – Application to Spindle Duration = 5 minutes
VOM discovers information from the applications, servers, and storage arrays in the datacenter. This wealth of information is put together in a variety of views and reports that can be viewed in the VOM Management Server console. One of these is seeing the details of Database applications and their relationship to the underlying server and storage configuration. In this exercise, we‟ll take a look at this view for an Oracle Database.
Action: In the VOM console, navigate to: Manage -> Databases
Action: Type demo3 in the search field on the left
Here we can see an oracle database DEMO3 running on host dcdell605.
Action: Click DEMO3 and then click on the Tablespaces tab
Here we can see details about the internal Oracle configuration including how much storage space is being used by each configured tablespace.
51 of 110
Action: Click the Files tab
Here we can see the files associated with this database, some size information, as well as the storage that those files are sitting on.
Action: Click the File Systems tab
Here we can see the file systems (CFS in this case) in use by this database as well as the associated logical volume configuration. Similar details are shown in the Volumes tab, but this would also include information about any volume level snapshots.
Action: Click the Disks tab
Here we can see the disks backing those file systems mentioned earlier, some size and usage characteristics as well as the information about the associated LUN.
52 of 110
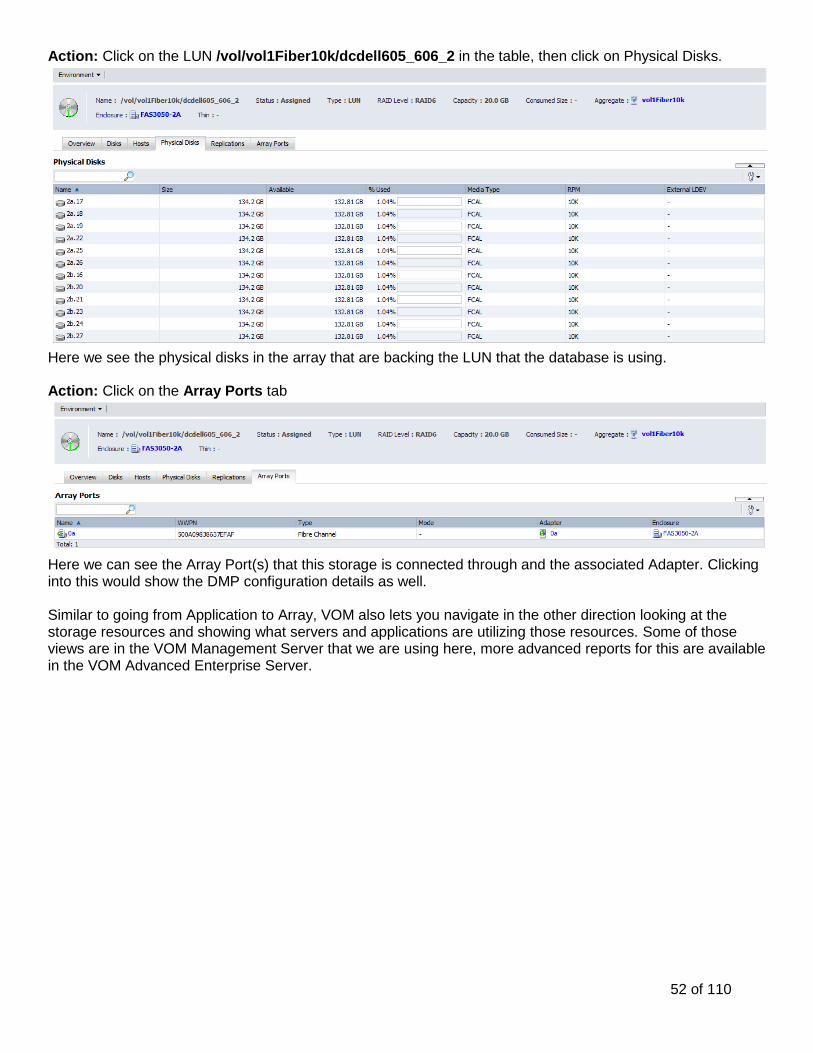
Action: Click on the LUN /vol/vol1Fiber10k/dcdell605_606_2 in the table, then click on Physical Disks.
Here we see the physical disks in the array that are backing the LUN that the database is using. Action: Click on the Array Ports tab
Here we can see the Array Port(s) that this storage is connected through and the associated Adapter. Clicking into this would show the DMP configuration details as well. Similar to going from Application to Array, VOM also lets you navigate in the other direction looking at the storage resources and showing what servers and applications are utilizing those resources. Some of those views are in the VOM Management Server that we are using here, more advanced reports for this are available in the VOM Advanced Enterprise Server.
53 of 110
Lab Exercise 9
Topic – Thin Reclamation Duration = 10 minutes
Using the Thin Provisioning Reclamation Add-on, you can configure reclamation processes from different perspectives to regularly run and keep your thin storage utilization optimized. In this exercise we will create a scenario where storage can be reclaimed, configure a reclamation process, and reclaim the storage.
Action: Open a ssh session to the VOM Management Server, Click Start-> Run and enter:
putty -ssh -l root -pw symc4now 169.254.128.160
Action: In the ssh session, type the following command:
# df –h /thinfs
# vxdisk –o thin list
54 of 110
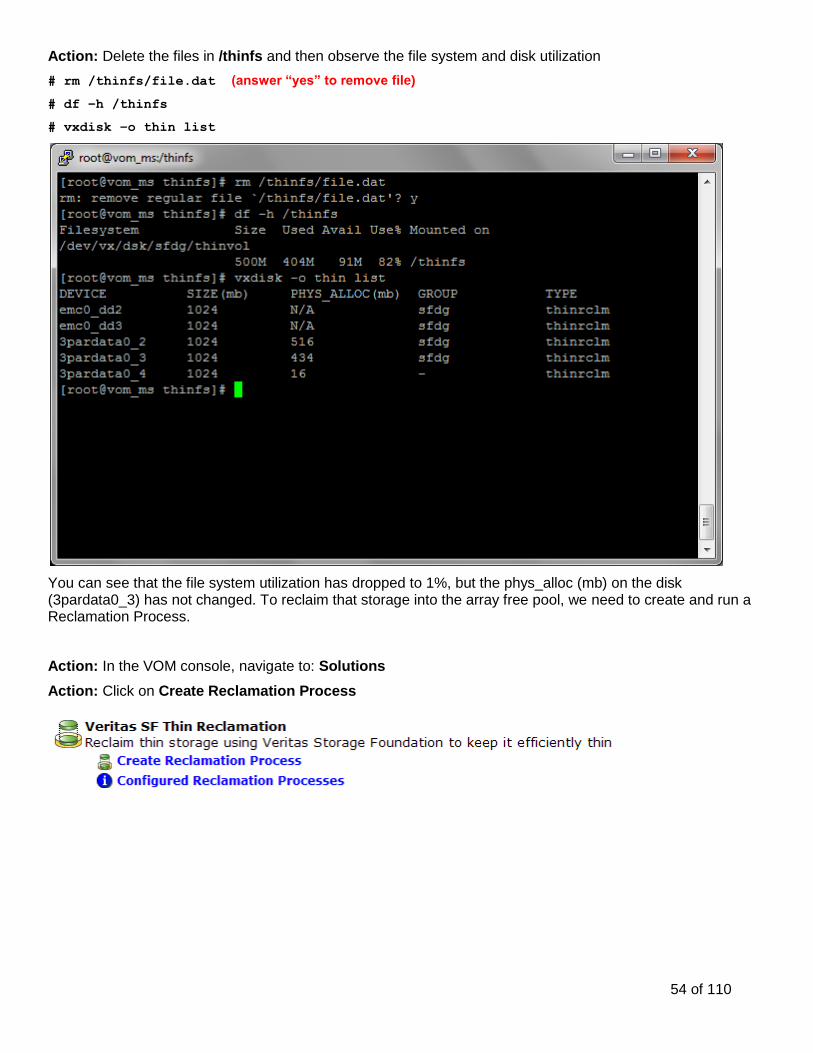
Action: Delete the files in /thinfs and then observe the file system and disk utilization
# rm /thinfs/file.dat (answer “yes” to remove file)
# df –h /thinfs
# vxdisk –o thin list
You can see that the file system utilization has dropped to 1%, but the phys_alloc (mb) on the disk (3pardata0_3) has not changed. To reclaim that storage into the array free pool, we need to create and run a Reclamation Process.
Action: In the VOM console, navigate to: Solutions
Action: Click on Create Reclamation Process
55 of 110
Action: Enter thinfs for the Process Name, Select Host (File System) for Reclaim By, and Click Next>
Action: Select vom_ms from the Select Hosts table and click Next>
56 of 110
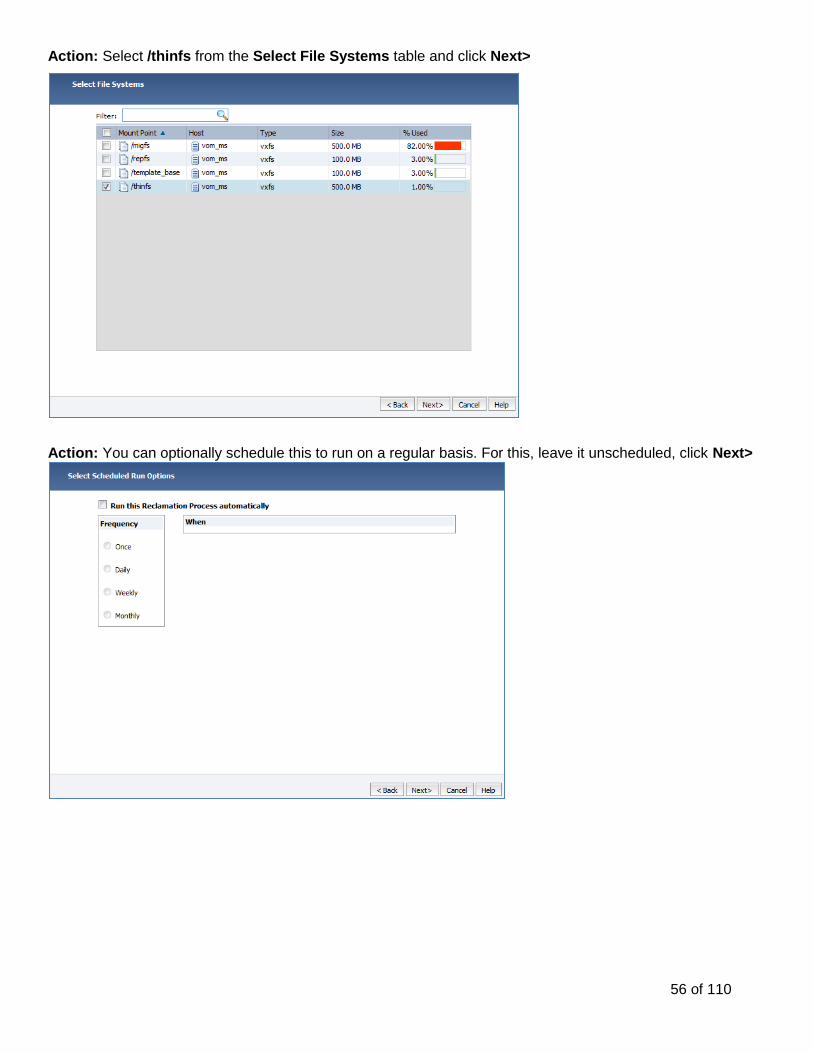
Action: Select /thinfs from the Select File Systems table and click Next>
Action: You can optionally schedule this to run on a regular basis. For this, leave it unscheduled, click Next>
57 of 110
Action: Review your selections and click Finish then click OK
Action: After a few moments you should see the Reclamation start (Reclamation running now…). It will take a couple of minutes to complete.
Action: Once complete, click on the Reclamation Process Name thinfs.
You can see that approximately 400MB of space was reclaimed.
58 of 110
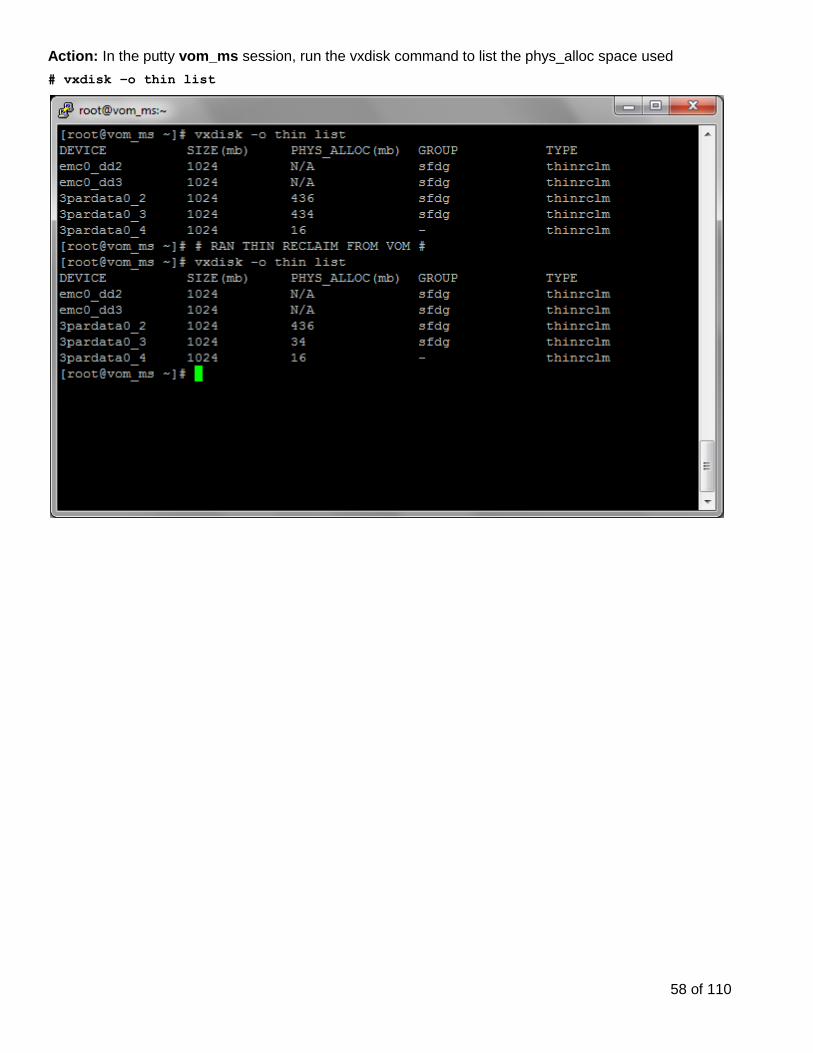
Action: In the putty vom_ms session, run the vxdisk command to list the phys_alloc space used
# vxdisk –o thin list
59 of 110
bove, you will see that the phys_alloc (mb) for 3pardata0_3 (used by thinvol) has reduced significantly. This space has been put back into the free pool for other allocations when needed.
60 of 110
Lab Exercise 10
Topic – Storage Foundation Operations Duration = 10 minutes
VOM can be used to manage both SF and VCS configurations. This exercise will show you what needs to be enabled to utilize these features. The functionality shown in this exercise is part of the SF Administration features as well as the Storage Foundation Administration for UNIX Add-on.
There are dozens of Storage Foundation operations that are accessible through VOM. The idea of this exercise is to simply show how they are accessed and the general look and feel of the operations.
These operations can be used to shrink Storage Foundation volumes that are underutilized while remaining online and available to the application using it.
Action: In the VOM console, navigate to: Manage -> Hosts -> vom_ms
Action: Click on the Volumes tab
Action: Select the volume thinvol and select Resize
61 of 110
Action: Select Shrink By option, Enter 50%, and Click Next>
Action: Review the impact analysis and Click Next >
62 of 110
Action: Review your selections and click Finish
We can then see the command line executed and the volume size will be updated in the Volumes table.
63 of 110
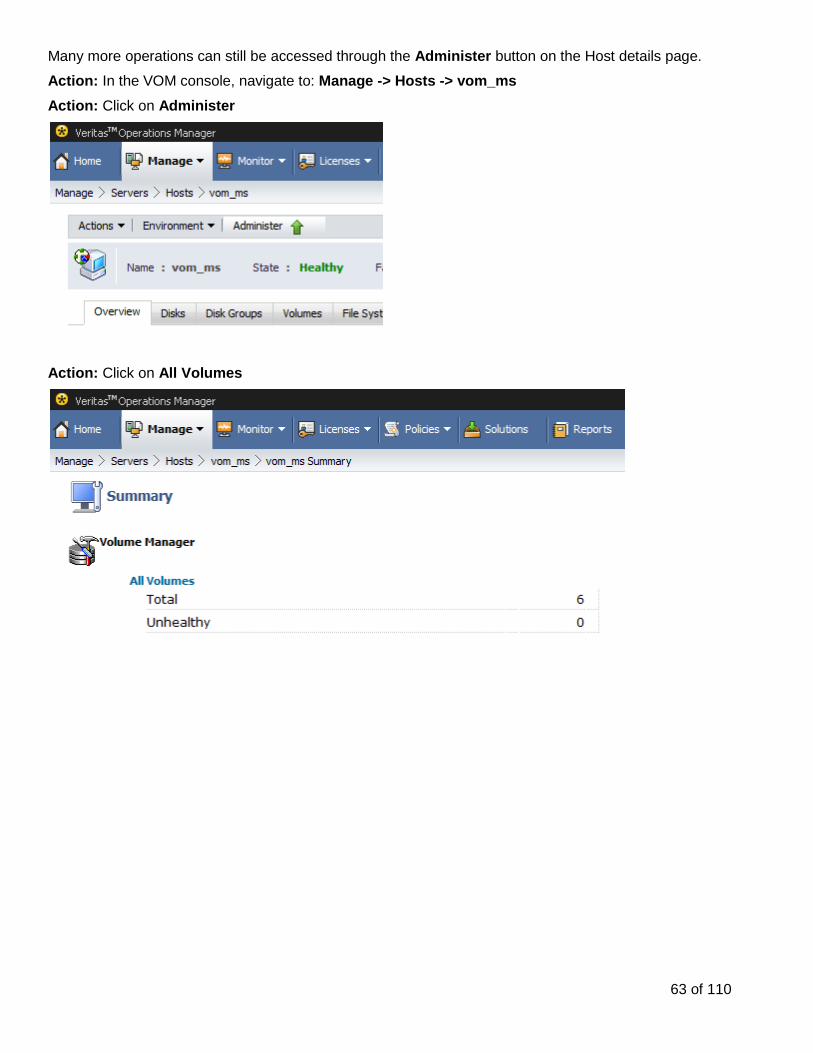
Many more operations can still be accessed through the Administer button on the Host details page.
Action: In the VOM console, navigate to: Manage -> Hosts -> vom_ms
Action: Click on Administer
Action: Click on All Volumes
64 of 110
Action: Select test_vol and select More->Rename
65 of 110
Action: Enter newname_vol in the Name: field
Action: Click Next> review your settings, click Finish, and then click OK.
66 of 110
Action: You should see the volume name change to newname_vol
67 of 110
Lab Exercise 11a
Topic – License Reporting Duration = 10 minutes
License information of the hosts in the VOM environment is accessed under Licenses. This includes information about keyless licenses, expired licenses, license lifecycle, deployment policies, as well as what features of the product license are actually being utilized on a given VOM Managed Host. It also includes the ability to scope the report by Business Entity.
Action: Navigate to: Licenses->Deployment Summary
68 of 110
Action: Click on Total deployments
This view shows the individual licenses as they relate to each host in the environment.
69 of 110
Action: Click on the Licenses tab
This shows the data from a License perspective. It will show you how many times a particular license key is deployed across hosts. If keyed licenses are not Site licenses, they may show as verification needed if they are deployed on multiple hosts.
70 of 110
Action: Click on the Hosts tab
This shows the information from the Host perspective. It details the Tier information of each host as well as how many licenses (unique, expired, keyless) are deployed on the host
71 of 110
Action: Click on the Product Evidence for vom_ms
This will show you some interesting information about the features of the licensed product that are being used and how frequently.
72 of 110
Create Policy
Action: Navigate to: Licenses->Deployment Policy
73 of 110
Action: Click Actions -> Create Policy
Action: Enter values shown in the dialog below to create a policy, Click Next>, and then Finish.
This will create a license policy. When the lower threshold is crossed, it will raise a Risk condition. When the higher threshold is crossed it will raise a Fault condition. This can be configured to ensure you remain in compliance.
74 of 110
Action: Navigate to: Reports
Action: Look at Environment reports
License Lifecycle Report
Action: Click Run under License Lifecycle report
Action: Select Entire Domain and Click Finish
This report shows license keys as they enter the environment. It also tracks when the host enters and exits the VOM configuration.
75 of 110
Product Usage Report
Action: Click Run under Product Usage Report
Action: Select Entire Domain and Click Finish
76 of 110
Lab Exercise 11b
Topic – Keyless Licensing Duration = 5 minutes
In order for customers to make use of keyless licensing, they need to have those hosts reporting into the VOM Management server. In this exercise, we will enable keyless on a managed host that is already reporting into VOM and see how it is reflected in the report.
Action: Open a ssh session to vom_ms, Click Start -> Run and enter:
putty -ssh -l root -pw symc4now 169.254.128.160
Action: In the ssh session, type the following command:
# vxkeyless display
Using this command line we could change the license for the host and upgrade or downgrade the enabled capabilities (using vxkeyless set).
Upon changing the effective license, VOM would pick up the change in its next license scan (once per day). Alternatively, if you wanted to see the change reflected immediately, you could manually run the license discovery process using:
After the VOM Management Server is installed, adding hosts to the environment is one of the most common tasks. This exercise will show you one of the methods to add managed hosts into the VOM environment.
Note: In addition to the host based discovery see here, VOM Advanced also allows for host discovery agentlessly (using SSH and WMI) for reporting purposes. This option for VOM Advanced is only available on hosts that aren‟t running Storage Foundation, Veritas Cluster Server, Veritas Dynamic Multipathing, or ApplicationHA.
Removing a Host from VOM
For sake of example, we are going to remove a host that is already part of the domain. When adding a new host in a real environment, this part of the process would be omitted.
Action: Go to the Settings -> Host Management
Action: Choose vom_mh, right click and Select Remove Host
Action: Click OK on the confirmation dialog. The host should be removed and no longer be listed in the Hosts table.
Adding the Host back into VOM
There are a 2 primary ways to add hosts into the VOM Management Server.
1) Use the GUI Add Host(s) option in Settings -> Host Management 2) Use a perl script run from the Managed Host. It is non-interactive and essentially points the agent to the
VOM Server. This script is available by: a. Downloading the AutoConfigure script from Settings -> Host Management b. Using gendeploy.pl on the VOM Management Server to generate a script
For this exercise we are going to use option 1.
79 of 110
Action: Go to the Settings -> Host Management
Action: Choose Actions -> Add Host(s)
Action: Enter vom_mh for Host, root for User Name, and symc4now for Password
Action: Click Next> to add the host back into the domain
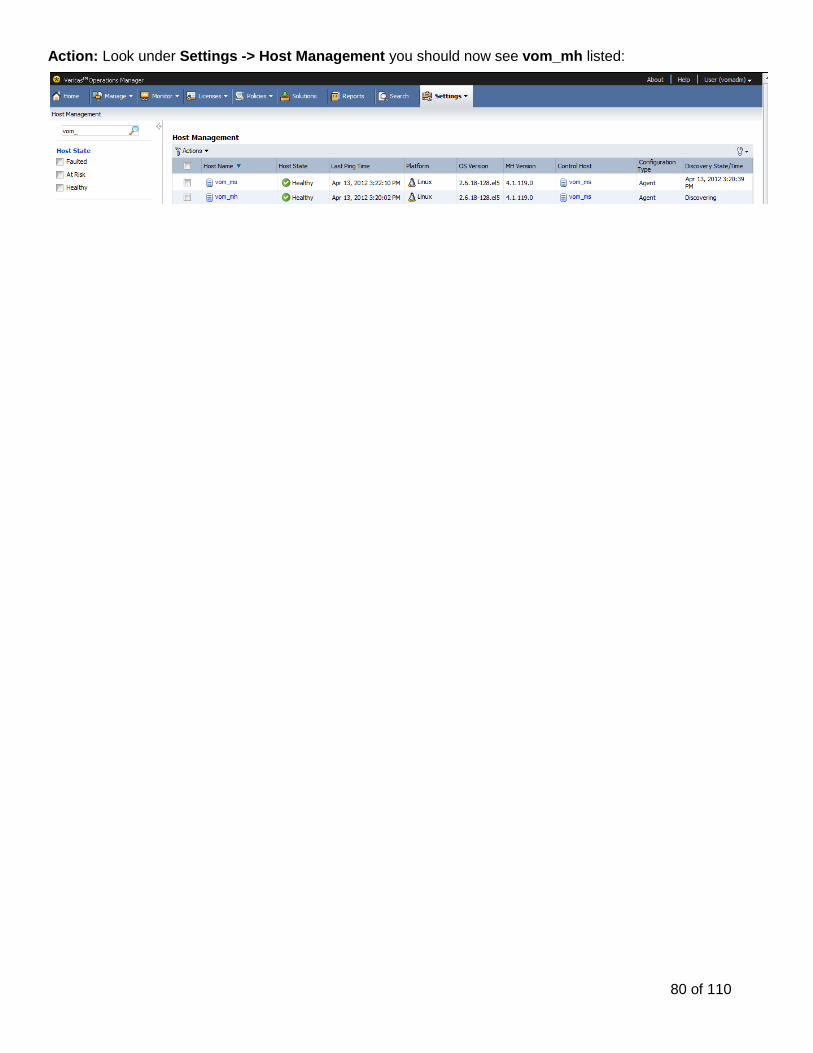
80 of 110
Action: Look under Settings -> Host Management you should now see vom_mh listed:
81 of 110
Lab Exercise 13a
Topic – Business Entity Configuration Duration = 5 minutes
Business Entities are the basis for setting up role based access in VOM as well as facilitating the scoping of reporting. This exercise will show you how to setup a Business Entity for this purpose.
Action: Go to the Manage -> Business Entities
Action: Click on Actions -> Create Business Entity (VBS/OE)
82 of 110
Action: Enter Name: Test Lab Admins and Description: Administrators for the Test Lab, choose Type: Organization, and click Next>
Action: Select Hosts vom_ms and vom_mh and click Next
83 of 110
Action: Review the Summary, click Finish, then click OK
Action: You should see you Business Entity appear in the table
84 of 110
Lab Exercise 13b
Topic – Security: Access and Roles Duration = 5 minutes
VOM has a flexible mechanism for defining access and user roles. This exercise will demonstrate configuring VOM to utilize Unix OS Groups to assign these roles to user accounts. A very similar set of steps is followed to create Security Groups for LDAP/Active Directory Domains connected to VOM.
I have created a group (/etc/group) on the VOM Management Server called testlabadmins. User bob is a member of testlabadmins and has bob as his password. Feel free to go take a look at user bob as configured on the VOM Management Server.
We will configure VOM to associate testlabadmins OS Group with the Business Entity we created in Exercise 2a.
Action: Go to the Settings -> Security Groups
Action: Click on Actions -> New Security Group
85 of 110
Action: Type in the OS Group Name (testlabadmins) for the Name. Click on Check to verify the OS Group exists on the system.
Select Domain: vom_ms (unixpwd)
Select Role: Admin
Select Scope: Selected Business Entities and Select Test Lab Admins Business Entity
Click Ok to create the Security Group
We left the “Allow access to storage views and operations (Entire Domain)” unchecked. By not selecting this, users in the group testlabadmins will not be able to see the additional deep array details discovered by the Storage Insight add-on.
86 of 110
You should now be able to log in using user bob. Let‟s give it a try.
Action: Click User (vomadm) -> Logout in the upper right hand corner of the VOM Console.
Action: Enter Username: bob and Password: bob and Click Login.
You should now be logged in as user bob. You can see what roles this user has to what objects in a couple of different ways.
Action: Click Settings->Roles to see a list of roles for user bob and what Business Entities he has access to.
87 of 110
Action: Click Manage->Business Entities and look at the Admin Access column to see what Business Entities bob has Admin level access to.
Action: Click Test Lab Admins to see what hosts are associated with that Business Entity. These are the hosts that bob has admin access to.
Make sure you logout as bob and login as vomadm before proceeding with additional exercises!
Action: Click Logout in the upper right hand corner of the VOM Console.
Action: Enter Username: vomadm and Password: symc4now and Click Login.
88 of 110
Lab Exercise 14
Topic – VCS Operations Duration = 10 minutes
VOM can be used to manage both SF and VCS configurations. The functionality shown in this exercise is part of the VCS Administration Add-on which is included (pre-bundled) as a part of the base VOM installation.
VCS Administration is accessed in the Cluster and Service Group views in VOM under Manage.
There are dozens of VCS operations that are accessible through VOM. The idea of this exercise is to simply show how they are accessed and the general look and feel of the operations.
For this exercise, we will perform a basic Service Group switch operation.
Action: In the VOM Console, navigate to Manage -> Clusters
Action: Click on the vomclus Cluster and navigate to the Service Groups tab
Action: Click on the demosg Service Group to see the Details.
89 of 110
Action: From the Actions menu, select the Switch option.
Action: Confirm that the host selected is the node that the Service Group is not online on.
90 of 110
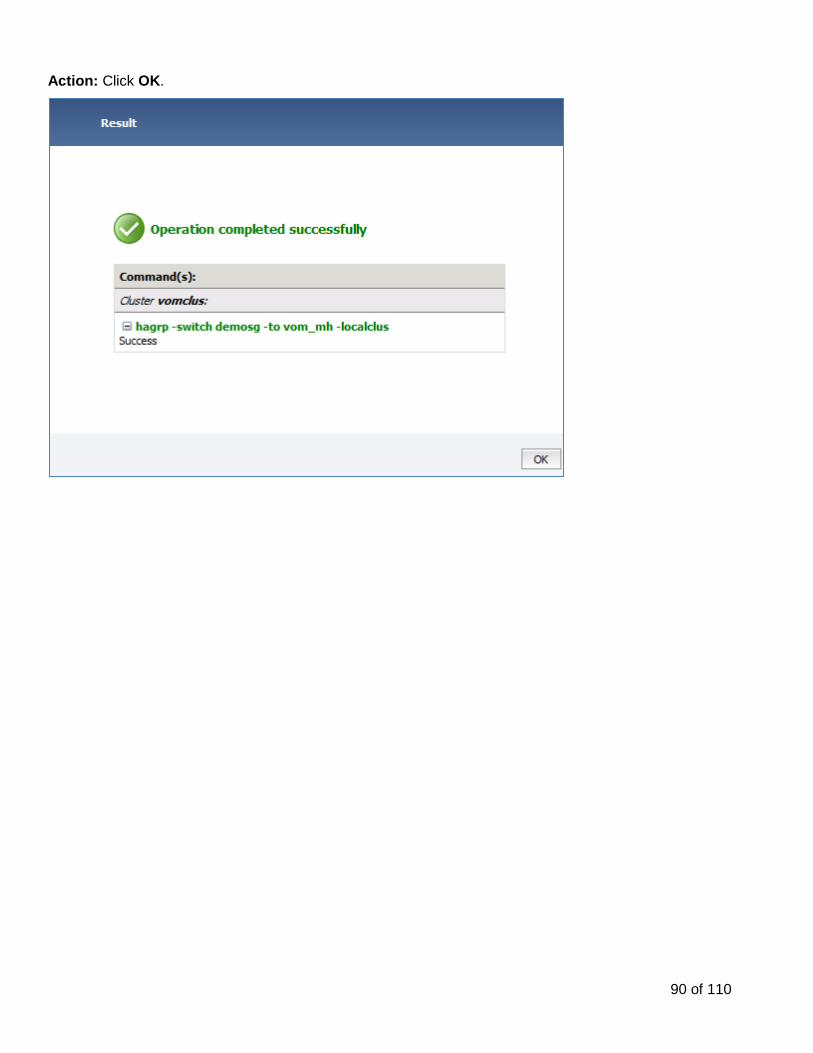
Action: Click OK.
91 of 110
After closing the previous dialog, you should observe the Service Group state going offline on one node and then coming online on the other node. The State of the associated hosts should also change accordingly.
You can then see the Service group went from being online on vom_ms to being online on vom_mh.
92 of 110
Lab Exercise 15
Topic – Server Virtualization Duration = 10 minutes
VOM discovers details about many Server Virtualization platforms including VMware ESX, Oracle Solaris Containers (Zones), Oracle VM Server for SPARC (LDOMs), AIX Logical Partitions (LPARs), and Linux KVM with support for other solutions on the roadmap. There are a number of views and details to show you how applications in the guest are mapped to the storage through the virtualization server to the array. This exercise will show you the type of information that VOM is discovering here.
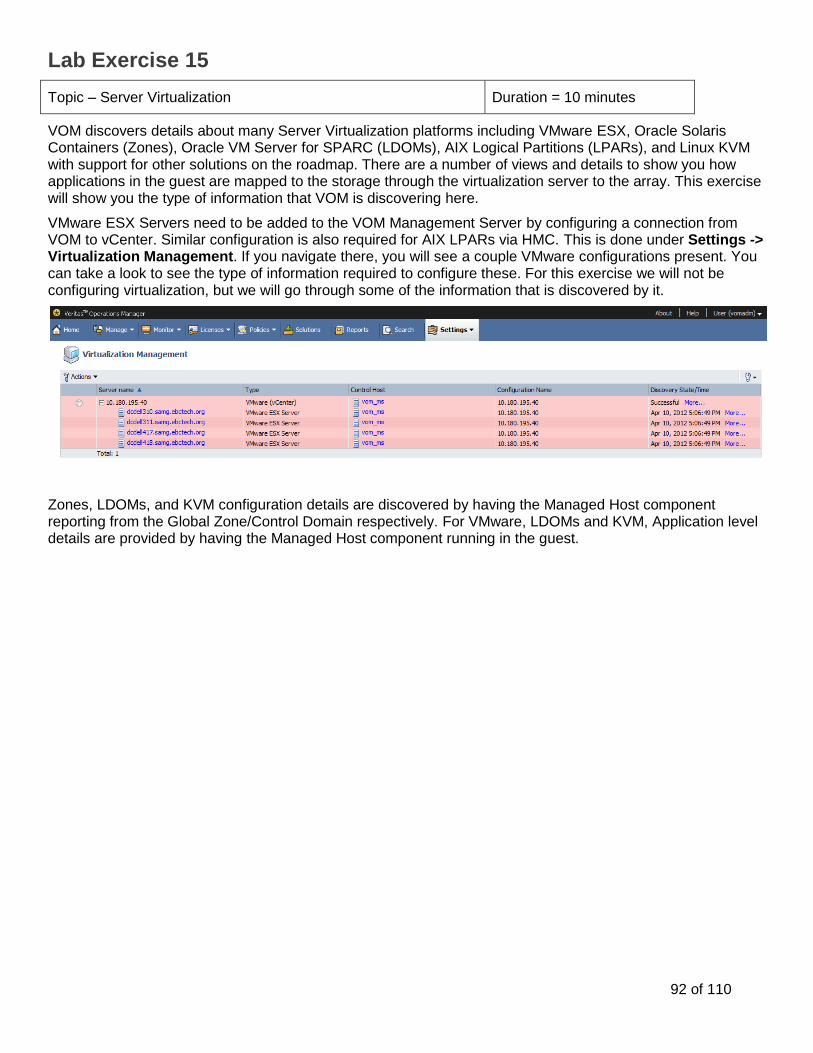
VMware ESX Servers need to be added to the VOM Management Server by configuring a connection from VOM to vCenter. Similar configuration is also required for AIX LPARs via HMC. This is done under Settings -> Virtualization Management. If you navigate there, you will see a couple VMware configurations present. You can take a look to see the type of information required to configure these. For this exercise we will not be configuring virtualization, but we will go through some of the information that is discovered by it.
Zones, LDOMs, and KVM configuration details are discovered by having the Managed Host component reporting from the Global Zone/Control Domain respectively. For VMware, LDOMs and KVM, Application level details are provided by having the Managed Host component running in the guest.
93 of 110
Action: In the VOM console, navigate to: Manage->Virtualization Servers
Here you will see examples of VMware ESX, Zones, and LDOM configurations. Take some times to click through each type of Virtualization Server configuration and see the types of information that is shown.
Note: The lab environment does not have complete end-to-end data for many of these environments. In a completely configured environment you would see the storage mapping from the array side and how the guest and applications in the guest are utilizing that storage.
94 of 110
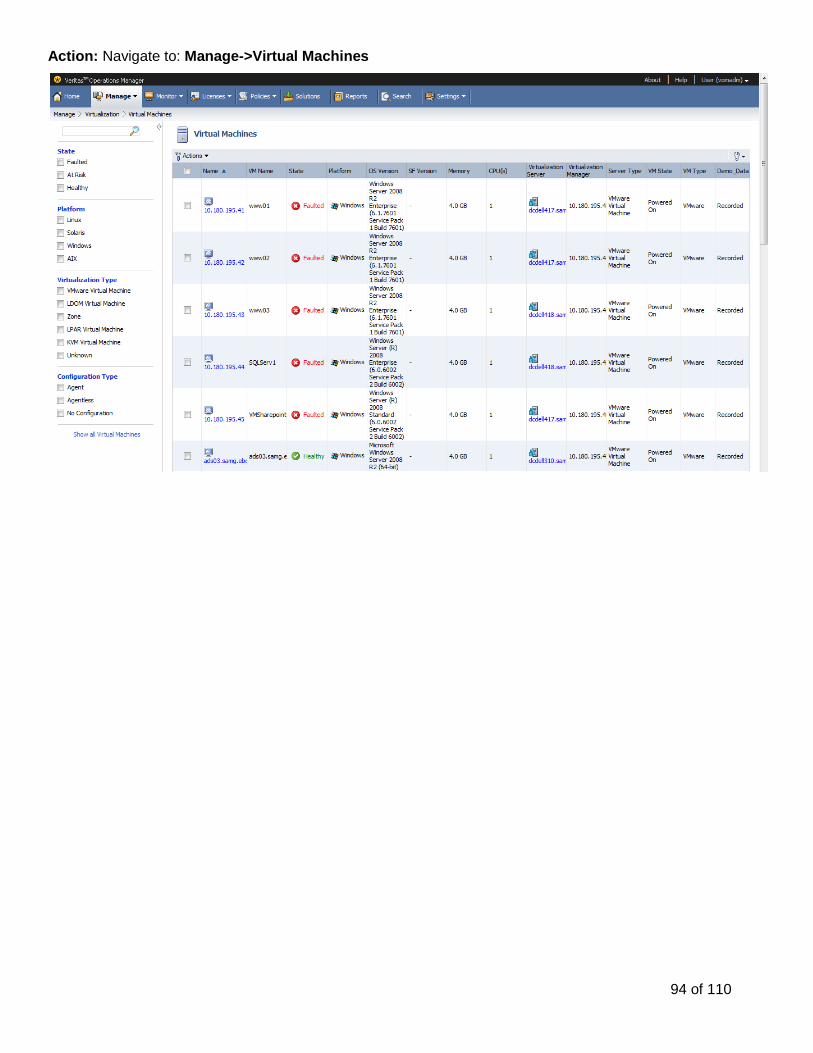
Action: Navigate to: Manage->Virtual Machines
95 of 110
There are also some reports relating to the Virtualization details being discovered in VOM. Similar to other Inventory reports, these list all of the Virtualization Servers and Virtual Machines VOM has discovered
Action: Navigate to: Reports and enter Virtual in the Search field
96 of 110
Action: Click Run under All Virtualization Servers and select Entire Domain and Finish
97 of 110
Action: Click back in the Browser
Action: Click Run under All Virtual Machines and select Entire Domain and click Finish
98 of 110
Lab Exercise 16
Topic – Patches and Hotfixes Duration = 5 minutes
VOM has the capability to connect to SORT (Symantec Operations Readiness Tools) to reports on the latest patches and hotfixes that are available and relevant to your environment. On a weekly basis, VOM will contact SORT and download its database. This information is correlated to what VOM knows about your environment to tell you what updates are available for your servers.
Action: Navigate to: Reports
Action: Enter Search: Patch
99 of 110
Patch Report
Action: Click Run under Patch Report and select Entire Domain
This report is the correlation of the information downloaded from the SORT site about all the latest patches that are available from Symantec with the products that VOM has discovered in its local environment. The links will take you to more information about the patches and allow you to download them to your local machine.
Note: VOM only supports distribution of VOM specific patches and hotfixes through Deployment Manager. VOM does not support deployment of SFHA patches and hotfixes through VOM at this time. That said, you can use the Scripting and Distribution Manager Add-ons to install patches and hotfixes on machines in the VOM configuration.
SF Product Version Report
Action: Click Reports
Action: Enter Search: Patch
Action: Click Run under SF Product Version and select Entire Domain
This report shows the specific Storage Foundation and Veritas Cluster Server versions and patch levels for the hosts discovered by VOM.
100 of 110
Lab Exercise 17a
Topic – Distribution Manager Duration = 10 minutes
The Distribution Manager Add-on allows you to build Solutions that can be deployed through the VOM Deployment Management interface. You simply define a setup script, an unsetup script, and a payload and you can then push this out to multiple hosts of different platforms for execution or installation.
This Add-on is installed like any other Add-on, through Settings->Deployment Management screen.
Action: In the VOM console, navigate to: Settings->Deployment Management
Action: Select Actions -> Create
101 of 110
The files needed for this exercise can be found on the Desktop in the folder:
VOM Lab Materials\Distribution Manager Sample
We will need to enter in some information in the wizard:
Name: hello world
Version: 1.0
Description: My first sample VOM distributable
Type: Linux
Setup Script: Browse and point it to the setup.pl from the directory above.
UnSetup Script: Browse and point it to the unsetup.pl from the directory above.
Additional Files: Browse and point it to the hello.rpm from the directory above.
Action: Click Upload next to each file specified above
Action: Click Finish to create the Solution
102 of 110
You should now see the hello world Solution listed in the deployment management table:
Now we will install the solution to a couple of our live Managed Hosts:
Action: Select the hello world solution and click Install to launch the installation wizard
Action: Type vom_ in the filter text field to limit the selection and select vom_ms and vom_mh.
Action: Click Install to start the installation, then click OK to dismiss the wizard.
103 of 110
You should be navigated to a page that shows the installation status of the hello world solution. It will quickly update to show you that the installation has complete successfully:
Congratulations, you have successfully pushed out the hello world solution. In the next exercise, we will actually run a command that was part of that solution via the Scripting Add-on.
104 of 110
Lab Exercise 17b
Topic – Scripting Duration = 10 minutes
The Scripting Add-on allows users to upload new or existing scripts to be managed and executed from a single central location, the VOM Management Server. Instances of scripts can be customized to define different parameters and values, and be scheduled for regular execution. Scripts can be in many forms such as shell (.sh), perl (.pl), or batch (.bat)\PowerShell (.ps1) for Windows.
This Add-on is installed like any other Add-on, through Settings -> Deployment Management screen.
Here we will be running a command that we pushed out in the previous exercise using the Distribution Manager.
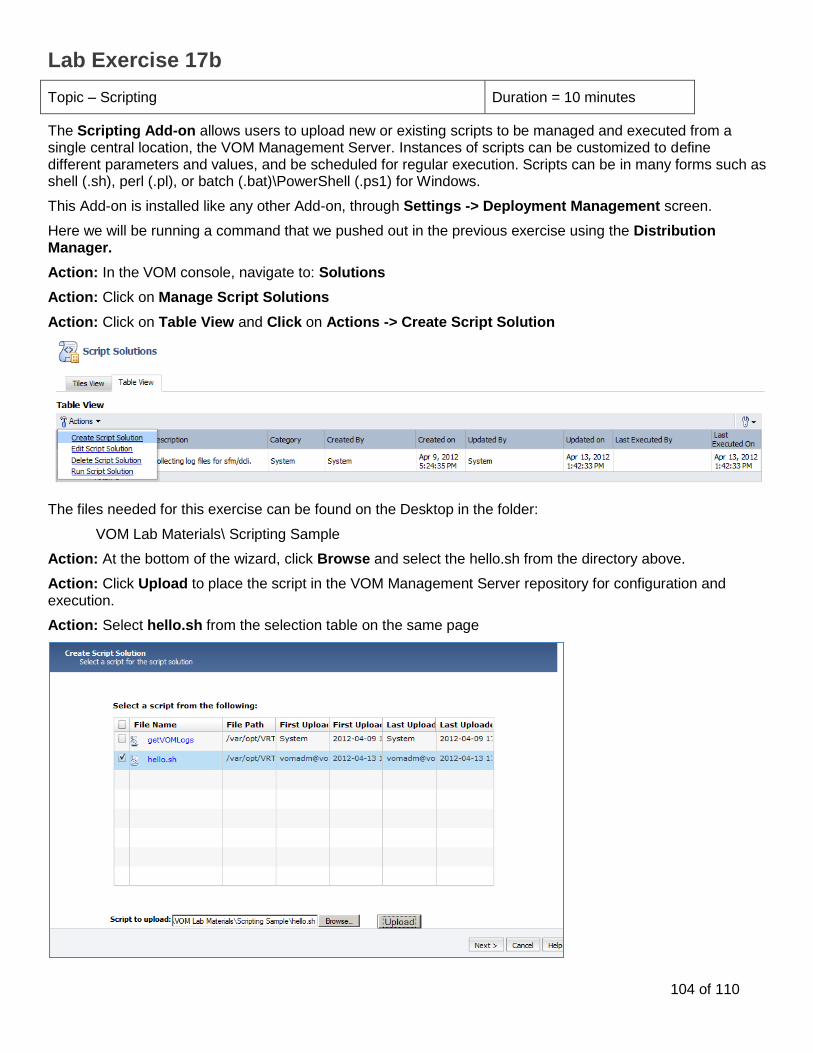
Action: In the VOM console, navigate to: Solutions
Action: Click on Manage Script Solutions
Action: Click on Table View and Click on Actions -> Create Script Solution
The files needed for this exercise can be found on the Desktop in the folder:
VOM Lab Materials\ Scripting Sample
Action: At the bottom of the wizard, click Browse and select the hello.sh from the directory above.
Action: Click Upload to place the script in the VOM Management Server repository for configuration and execution.
Action: Select hello.sh from the selection table on the same page
105 of 110
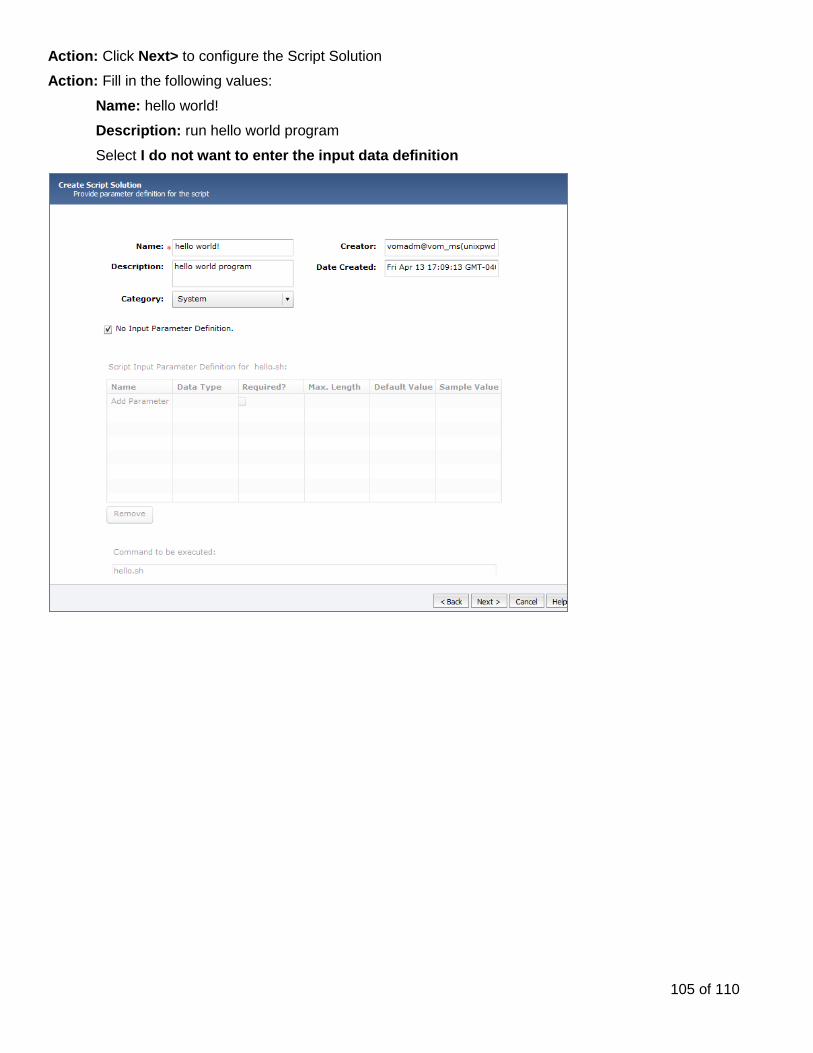
Action: Click Next> to configure the Script Solution
Action: Fill in the following values:
Name: hello world!
Description: run hello world program
Select I do not want to enter the input data definition
106 of 110
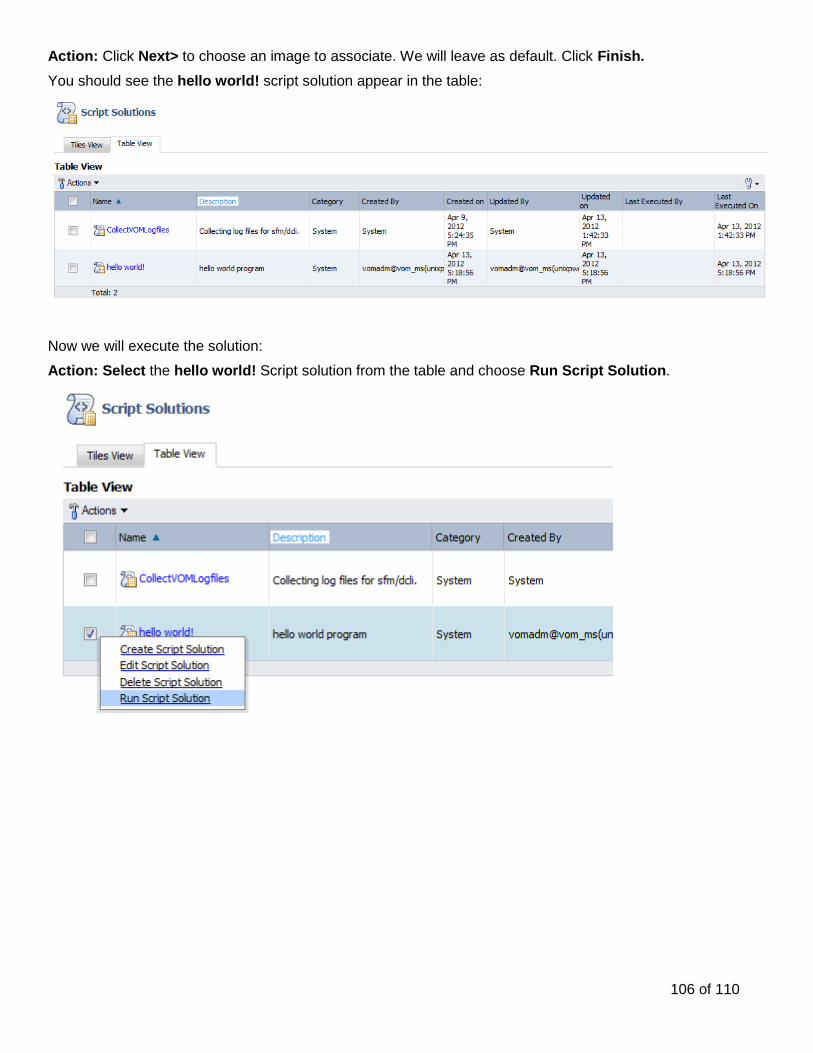
Action: Click Next> to choose an image to associate. We will leave as default. Click Finish.
You should see the hello world! script solution appear in the table:
Now we will execute the solution:
Action: Select the hello world! Script solution from the table and choose Run Script Solution.
107 of 110
If this command had specifiable arguments, we could specify them here. This particular script is VERY simple, and has no additional arguments. So, we are just going to run it as is.
Action: Click Next> to go to select where we will run this.
Action: Select Specific hosts and Type in vom_ in the Filter text field. Select hosts vom_ms and vom_mh
Action: Click Next> to go to specify Schedule options. We will only run this once, so leave defaults.
Action: Click Next> to go to the summary page. Click Execute to run the script and OK to dismiss the dialog
This will take you to a status page which will show you that the solution is Running. After a few moments, the Job Status will update to Completed and we will be able to see the results.
108 of 110
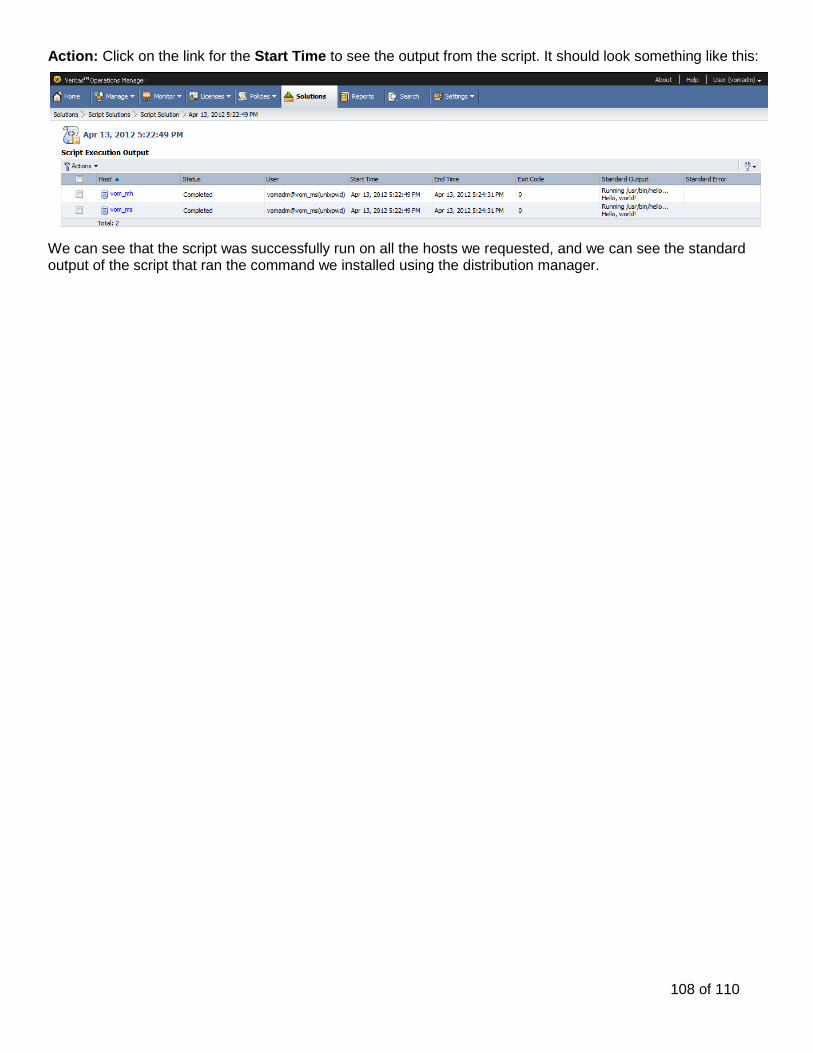
Action: Click on the link for the Start Time to see the output from the script. It should look something like this:
We can see that the script was successfully run on all the hosts we requested, and we can see the standard output of the script that ran the command we installed using the distribution manager.
109 of 110
Lab Exercise 18
Topic – VCS Password Change Duration = 3 minutes
The VCS Password Change Add-on allows a Cluster Administrator to change user passwords for multiple clusters. This supports non-secured VCS Clusters only, and you can only change the password for a single user at a time.
This Add-on is installed like any other Add-on, through Settings->Deployment Management screen.
Action: In the VOM console, navigate to: Manage->Clusters
Action: Right Click on vomclus and choose Change Password for cluster
110 of 110
Action: From this screen you will be able to change the username and password for a cluster user. Just type in the Username, Password, and confirm the password. Click OK to execute the Password change.