52
Kofax Front Office Server Administrator's Guide Version: 4.3.0 Date: 2019-12-09

Kofax Front Office ServerAdministrator's GuideVersion: 4.3.0
Date: 2019-12-09

© 2019 Kofax. All rights reserved.
Kofax is a trademark of Kofax, Inc., registered in the U.S. and/or other countries. All other trademarksare the property of their respective owners. No part of this publication may be reproduced, stored, ortransmitted in any form without the prior written permission of Kofax.
Table of ContentsPreface...........................................................................................................................................................6
Related Documentation...................................................................................................................... 6Training............................................................................................................................................... 6Getting help with Kofax products.......................................................................................................7
Chapter 1: Overview................................................................................................................................... 8Integration with Kofax Capture...........................................................................................................8
User authentication..................................................................................................................8Licensing.................................................................................................................................. 8Shared folder in Kofax Capture server files location.............................................................. 9Validation................................................................................................................................10
Chapter 2: Starting the Kofax Front Office Server applications.......................................................... 11Starting the Administration Console.................................................................................................11Starting the Administration Console from a browser....................................................................... 11Starting the Thin Client from a browser...........................................................................................12Identify URLs for Kofax Front Office Server applications................................................................ 12Security settings for server operating systems................................................................................13Stop and restart Kofax Front Office Server..................................................................................... 13
Chapter 3: About database encryption...................................................................................................14Chapter 4: About single sign on.............................................................................................................15
Enabling single sign on.................................................................................................................... 15Registering a DNS entry....................................................................................................... 15Security with the Encrypting File System (EFS)................................................................... 16Registering SPN.................................................................................................................... 16
Examples of possible configurations................................................................................................17Single server installation (department or enterprise)............................................................ 17Enterprise cluster with proxy server......................................................................................18Enterprise cluster with NLB...................................................................................................19
Chapter 5: Integrating with a RightFax phone book.............................................................................21Chapter 6: Backing up and restoring configurations........................................................................... 22
Backing up departmental configurations.......................................................................................... 22Restoring departmental configurations.............................................................................................22Backing up enterprise configurations...............................................................................................23Restoring enterprise configurations..................................................................................................23
Chapter 7: Changing system configuration........................................................................................... 25
3

Kofax Front Office Server Administrator's Guide
Changing SQL Server database authentication...............................................................................25Changing host names...................................................................................................................... 25Using the Database Utility................................................................................................................26
Chapter 8: Setting preferences for the Thin Client............................................................................... 27Scanning directly from the Thin Client.............................................................................................27
Chapter 9: Data validation and field lookup customization................................................................. 29Kofax Capture validation script customization................................................................................. 29
Chapter 10: Setting up Kofax Capture................................................................................................... 32Setting up user accounts................................................................................................................. 32Active Directory configuration...........................................................................................................32
Enable Active Directory Forest query................................................................................... 33Disable Active Directory Forest query...................................................................................33
Setting up batch classes, document classes, and form types.........................................................33Information updates to Kofax Capture values..................................................................................34
Batch Names......................................................................................................................... 36Macros....................................................................................................................................37
Setting up masked fields..................................................................................................................38Adding fax number and email address lookup fields.......................................................................39
Database table lookup...........................................................................................................39Active Directory lookup..........................................................................................................40Contacts list lookup............................................................................................................... 40RightFax phone book lookup................................................................................................ 40
Chapter 11: Advanced notification configuration for Kofax Capture.................................................. 41Implementing the properties.............................................................................................................41
Chapter 12: Configure retries.................................................................................................................. 43Configuring retries for failed scan jobs............................................................................................ 43Configuring database retries............................................................................................................ 43Configuring retries to storage destinations...................................................................................... 44
Chapter 13: Troubleshooting and maintenance.................................................................................... 45Troubleshooting for failed batches................................................................................................... 45Important information about validation failure.................................................................................. 45Getting job history............................................................................................................................ 46Turning off verbose error messages................................................................................................ 49Troubleshooting for submission errors.............................................................................................49Bar code support..............................................................................................................................50Changing default VRS settings........................................................................................................ 50Log files............................................................................................................................................ 51
Changing folders for log files................................................................................................ 51
4

Kofax Front Office Server Administrator's Guide
Free drive space...............................................................................................................................52Request blocking when drive space is limited...................................................................... 52
5
Preface
This guide is intended for the administrator who will configure and maintain the Kofax Front Office Serverinstallation.
Related DocumentationIn addition to this guide, Kofax Front Office Server includes the following documentation:
Kofax Front Office Server Installation GuideThe Kofax Front Office Server Installation Guide provides installation instructions and other informationthat helps you successfully set up Kofax Front Office Server.
Multifunction Peripheral (MFP) Administrator's GuidesThese guides show how to make Kofax Front Office Server features available from MFP front panels.Administrator's guides are available for each brand of MFP supported by the product. See the TechnicalSpecifications on the Kofax website for supported brands and models.
Help for Kofax Front Office Server ApplicationsHelp for Kofax Front Office Server Thin Client (also referred to as the Thin Client) and the Kofax FrontOffice Server Administration Console (also referred to as the Administration Console) describes howto use the application. To view the Help from the interface, click the Help icon. The Help appears in aseparate browser window.
Release NotesRelease notes provides late-breaking product information that may not be included in other Kofax FrontOffice Server documentation. The release notes are available for viewing or downloading from the Kofaxwebsite.
Kofax Capture DocumentationKofax Front Office Server is designed to work with Kofax Capture. See the Kofax Capture documentationfor instructions about using Kofax Capture features.
TrainingKofax offers both classroom and computer-based training to help you make the most of your Kofax FrontOffice Server solution. Visit the Kofax website at www.kofax.com for details about the available trainingoptions and schedules.
6

Kofax Front Office Server Administrator's Guide
Getting help with Kofax productsThe Kofax Knowledge Base repository contains articles that are updated on a regular basis to keep youinformed about Kofax products. We encourage you to use the Knowledge Base to obtain answers to yourproduct questions.
To access the Kofax Knowledge Base, go to the Kofax website and select Support on the home page.
Note The Kofax Knowledge Base is optimized for use with Google Chrome, Mozilla Firefox or MicrosoftEdge.
The Kofax Knowledge Base provides:• Powerful search capabilities to help you quickly locate the information you need.
Type your search terms or phrase into the Search box, and then click the search icon.• Product information, configuration details and documentation, including release news.
Scroll through the Kofax Knowledge Base home page to locate a product family. Then click a productfamily name to view a list of related articles. Please note that some product families require a validKofax Portal login to view related articles.
• Access to the Kofax Customer Portal (for eligible customers).Click the Customer Support link at the top of the page, and then click Log in to the Customer Portal.
• Access to the Kofax Partner Portal (for eligible partners).Click the Partner Support link at the top of the page, and then click Log in to the Partner Portal.
• Access to Kofax support commitments, lifecycle policies, electronic fulfillment details, and self-servicetools.Scroll to the General Support section, click Support Details, and then select the appropriate tab.
7
Chapter 1
Overview
Kofax Front Office Server enables documents from a variety of sources—including multifunctionperipherals (MFPs), scanners, and mobile devices—to be delivered to email and fax recipients, contentmanagement systems such as Microsoft SharePoint, network folders, Kofax Capture, and otherdestinations. Users can work with documents in a browser-based Thin Client application. They can alsoinstall a local version of the Thin Client so they can continue working when the connection with KofaxFront Office Server is not available and synchronize data when the connection is restored.
Integration with Kofax CaptureKofax Front Office Server integrates with Kofax Capture and takes advantage of the following features.
User authenticationKofax Front Office Server uses the Kofax Capture user profile and group membership authentication onMFP devices and in both the Thin Client and the Administration Console applications. You can configureKofax Front Office Server so that once users have logged on to the computer where they launch thebrowser, users will not have to log on to either the Thin Client or the Administration Console (this is alsocalled single sign on). Kofax Front Office Server supports single sign on for Kofax Capture linked users.For details, see About single sign on.
Note Access to the Administration Console is restricted to Kofax Capture users who have rights to theKofax Capture Administration module. All Kofax Capture users can be assigned permission to accessthe Thin Client without special Kofax Capture rights.
LicensingKofax Front Office Server integrates with the Kofax Capture centralized license management scheme.• System Licenses
• Kofax Front Office ServerSystem license to run Kofax Front Office Server standard installations using the Microsoft SQLServer Express or Standard database.
• Kofax Front Office Server EnterpriseSystem license to run Kofax Front Office Server Enterprise installations using a SQL ServerEnterprise or Oracle database.
8

Kofax Front Office Server Administrator's Guide
• Station Licenses• Kofax Front Office Server Thin Client
Limits the number of concurrent open sessions of the Thin Client. When no more station licensesare available, users cannot log on. You can either have current users log off, or purchase additionallicenses.
• Kofax Front Office Server DeviceLimits the number of devices that can be connected to the Administration Console. When nomore device licenses are available, no more devices can be connected. You can either remove orinactivate devices, or purchase additional licenses.
• Kofax Mobile DeviceLimits the number of mobile devices that can be connected to Kofax Front Office Server. When nomore device licenses are available, no more devices can be added. You can either remove devices,or purchase additional licenses.
• Kofax Mobile Device - ConcurrentLimits the number of concurrent mobile devices that can be connected to Kofax Front Office Server.When no more licenses are available, users cannot connect. After a period of inactivity, licenses maybe released and become available, or you can purchase additional licenses.
Note You cannot mix mobile licenses: licensing for a Kofax Front Office Server installation must be allregular or all concurrent.
Volume licensing and MFPsVolume licensing for the following Kofax Capture licenses is not affected (the page count is notdecremented) for any documents that are scanned at an MFP and come through Kofax Front OfficeServer directly to Kofax Capture or through the Thin Client:• Scan/Import page count• Kofax PDF Image+Text page count
Documents scanned or imported directly into the Thin Client and then submitted to Kofax Capture dodecrement page count.
If documents scanned at an MFP are merged, page count is not decremented. However, if any importedpages are added to a scanned MFP document, page count is decremented only for the additional pagesthat were added.
Volume licensing is still affected by activity from any custom Web services client.
Shared folder in Kofax Capture server files locationThe Kofax Front Office Server installation detects the location of the Kofax Capture server files, andcreates a \KFS<version> subfolder where images, MFP support files, and configuration files (amongother items) are stored.
9
Kofax Front Office Server Administrator's Guide
ValidationKofax Capture batch class information is used to validate batches submitted to Kofax Capture from MFPsor the Thin Client.
10

Chapter 2
Starting the Kofax Front Office Serverapplications
Before starting either of the applications, complete the installation and make sure that the Kofax FrontOffice Server service has started.
Starting the Administration ConsoleYou can start the Administration Console from the Kofax Capture Administration module, or from abrowser by entering the URL.
Before starting the Administration Console, do the following:• Make sure that the Web browser is certified by Kofax Front Office Server.• Enable the browser to use cookies and JavaScript.• Make sure that Kofax Front Office Server is properly installed and currently running.
Once you start the Administration Console, you can click the Help button for information about theparticular tab you are on, and from there you can access the entire Help system or select other items. TheIntroduction to the Administration Console topic is a good place to start, because it outlines the generalsteps to configure MFPs and describes the tasks you can perform.
If you install the Administration Console Plug-In, you can access the Administration Console moduledirectly from the Kofax Capture Administration module.
1. Start the Kofax Capture Administration module, and select the Kofax Front Office Server tab.2. On the Kofax Front Office Server tab, in the Menu Items group, click the item that corresponds to
the settings you want to access.The Administration Console appears.
3. Update the settings or click other items on the navigation panel to create destinations, shortcuts, adddevices, or perform other Kofax Front Office Server management tasks.
Starting the Administration Console from a browser1. Be sure your computer can connect to the server where Kofax Front Office Server is installed.
11

Kofax Front Office Server Administrator's Guide
2. Start the Administration Console by doing either of the following:• Open a certified Web browser and type the URL for Kofax Front Office Server Administration
Console. For the URL, See Identify URLs for Kofax Front Office Server applications .• If you are at the server, on the Start menu, navigate to Kofax Front Office Server and click
Administration Console.
The Administration Console Log On screen appears. If automatic log on (also called single-sign on)does not occur, the Administration Console Log On screen appears.
Tip Bookmark the Administration Console Log On screen to make it convenient to start each time.
3. Type your Kofax Capture user ID and password. Passwords are case-sensitive.After you have logged on successfully, the Administration Console appears.
4. Click any item on the navigation panel to create destinations, shortcuts, add devices, or performother Kofax Front Office Server management tasks.
Starting the Thin Client from a browserBefore you can log on to the Thin Client, you need the following:• The URL of the Thin Client. For the URL, see Identify URLs for Kofax Front Office Server applications .• A user name and password if you are prompted for log on credentials.• A Web browser supported by the Thin Client.• Cookies and JavaScript enabled on the browser.
Tip Bookmark the Thin Client Log On page to make it convenient to start each time.
1. In the browser’s Address field, type the URL for the Thin Client. If automatic log on (also called singlesign on) does not occur, the Thin Client Log On screen appears.
2. Click Log On.3. Type your Kofax Capture user ID and password and click Log On. Passwords are case-sensitive.
After you are logged on successfully, the Thin Client appears.
Identify URLs for Kofax Front Office Server applicationsProvide all users of Kofax Front Office Server applications with the URL they need to connect from a Webbrowser.
For Kofax Front Office Server Administration Console, type the URL as follows:• If security is not enabled with an SSL certificate:http://<server>/Kofax/KFS/Admin
• If security is enabled with an SSL certificate:https://<server>:443/Kofax/KFS/Admin
12
Kofax Front Office Server Administrator's Guide
For Kofax Front Office Server Thin Client, type the URL as follows:• If security is not enabled with an SSL certificate:http://<server>/Kofax/KFS/ThinClient
• If security is enabled with an SSL certificate:https://<server>:443/Kofax/KFS/ThinClient
Where:
<server> is the IP address or host name of:• The computer with a departmental or Enterprise installation of Kofax Front Office Server• An NLB cluster or IIS server in an Enterprise installation
Note the following:
Note Use the default ports for the type of protocol, 80 for http and 443 for https.
Security settings for server operating systemsDepending on your browser version and security settings, you may need to add Kofax Front Office Serverapplications and Help to the Trusted Sites zone.
Stop and restart Kofax Front Office ServerYou may need to stop and restart Kofax Front Office Server for some specific reason or for routinemaintenance. The process depends on which type of installation and configuration you use, and theinstructions are in the Kofax Front Office Server Installation Guide.
13

Chapter 3
About database encryption
By default, index data and images stored in the database are encrypted. Encryption is set by two values inthe Administration Console Settings - General tab:• Encrypt Image Data: When selected, images in the database are encrypted.• Encrypt Index Data: When selected, index data in the database is encrypted. (Other data remains
unencrypted.)
If you change a setting, it is applied to new images or index data. The encryption setting of existing dataand images is not affected.
Encryption requires the key file key3.bin in the \KFS<version>\Config folder. If this file is lost, youcannot access encrypted images and index data. Be sure to back up this file as shown in Backing up andrestoring configurations.
If the key3.bin file or the database has been compromised, generate new keys by running the DatabaseUtility (Kofax.KFS.DatabaseUtility.exe). Go to the folder where Kofax Front Office Server is installed,navigate to the kfsService folder, and run the following command:
Kofax.KFS.DatabaseUtility.exe /REGENERATEKEYS=1
14
Chapter 4
About single sign on
Kofax Front Office Server supports single sign on for Kofax Capture linked users. If users log on to acomputer using a user account that is linked in Kofax Capture and have the appropriate access rights,users can start the Administration Console or the Thin Client without being prompted to log on. Whenauthentication fails, or if the user is not authorized to log on, a log on screen appears to allow users tomanually enter credentials. This section assumes you are familiar with Group Policy configuration andusing and registering a Service Principal Name (SPN).
To use the single sign-on feature, the following conditions have to be met:• If using IIS, the IIS authentication method must be set to "Enable anonymous access."• Clients must use a supported browser as documented in the Kofax Front Office Server 4.3.0 Technical
Specification.• Internet Explorer must have the Enable Integrated Windows Authentication option turned on.• If users are using the Fully Qualified Domain Name (FQDN), Internet Explorer must have the Kofax
Front Office Server computer added to the "Local intranet" zone or the Trusted zone. To avoid settingthis up for each user individually, your domain administrator can create a Group Policy and add it to thedesired organizational units.
Important When adding to the Trusted zone, the IE Security Settings option "User Authentication,Logon" must be set to "Automatic logon with current user name and password."
• The user you specify with SPN must be in the Administrators group on the computer registered withDNS.
Enabling single sign on1. In the Administration Console, click Settings on the Navigation panel.2. Click the General tab.3. Select the Integrated Windows Authentication option.4. Click Save.
The change takes effect automatically in less than a minute.
Registering a DNS entryIn the section Examples of possible configurations, there are some additional configuration tasks listed inthe tables to register DNS and SPN. Although it is expected that system administrators will know how toperform those tasks, we include the following instructions.
Use this procedure to register a DNS entry pointing to a machine hosting the physical server.
15
Kofax Front Office Server Administrator's Guide
Note Complete this procedure before you register the SPN because you need to use the URL that youwill create as part of the SPN command line entry when you register SPN. Note also that you mustcreate a DNS entry for all configurations, including a standalone (Departmental), that will not use thehost name in the URL.
1. On your domain controller, open Administrative Tools and select DNS.2. Expand Forward Lookup Zones, select your domain, and then right-click to select New Host (A).3. In the Name field, type a name that will be the first part of the URL (for example, wwwkfs). This will
be the URL address. Be sure the name you enter is not already used on the domain.4. In the IP address field, enter your standalone IP or the IP of your proxy IIS, IBM HTTP for
WebSphere, or NLM cluster host.5. Click Add Host.
Security with the Encrypting File System (EFS)A number of Kofax Front Office Server capabilities rely on access to local and network resources. If youencrypt files using EFS, there is the potential to prevent Kofax Front Office Server from accessing criticalresources. This inability may cause unexpected errors.
The Kofax Front Office Server service user account must have privileges to decrypt all data used byKofax Front Office Server and the Kofax Capture share, including the Kofax Capture database location.In addition, the Kofax Capture Service user account must have privileges to decrypt to all Kofax Capturedata including the Kofax Capture database location.
We recommend either of the following configurations:• Configure EFS at the domain level, and include the Kofax Front Office Server and Kofax Capture
Server services user accounts as members of the group allowed to decrypt encrypted files.• Encrypt all files with EFS using the Kofax Front Office Server service name and run the Kofax Capture
Service with the same user account.
Registering SPNUse this procedure to register SPN (Service Principal Name) under the user account running the KofaxFront Office Server service.
The intent is to enable Kerberos authentication: you are using a domain account to run the KofaxFront Office Server service, and that domain user must be registered. (The Local System account isautomatically registered by the server.)
1. On the domain controller machine (where directory service runs), open a Command Prompt and run:Setspn -A <http/DNS name> <domain>\<user>
For example, in an domain named domain01 for the account Kfs-service-user, you would run:Setspn -A http/www-kfs domain01\Kfs-service-user
This registers SPN for Kfs-service-user.2. Change the log on account for all your Kofax Front Office Server services to the account you just
registered.
16

Kofax Front Office Server Administrator's Guide
Examples of possible configurationsThis section provides examples and lists any additional configuration needed for different installations, logon accounts to run Kofax Front Office Server service, and URLs used to log on to the Thin Client (used inthe examples) and the Administration Console.
Single server installation (department or enterprise)The figure illustrates a single server installation on a domain (kofax.com). Both the server (named kfs-svr)and client (named Mike-xp-wks) are on the same domain. A domain account Kfs-serviceuser has beencreated to be used instead of the built-in Local System account. Clients access the server using eitherhost name or a DNS name.
URL Entered by Mike on Mike-xp-wks
Log on Account for Kofax FrontOffice Server Service
Additional Configuration Requiredby a Domain Administrator
http://www-kfs/Kofax/KFS/ThinClient
Local System1 None
http://kfs-svr.kofax.com/Kofax/KFS/ThinClient
Local System1 Add the FQDN (kfs-svr.kofax.com) tothe Intranet zone or Trusted zone inInternet Explorer. This can be doneindividually on each client browser,or it can be done on the domaincontroller with Group Policies so thatthe setting will be applied to all clientsin the domain.Note that the DNS and SPN stepsin the following configurations arenot necessary since they are doneautomatically for server host names.
1 If you need to use a domain user account, then you must use a DNS name. See the next table for information.
Clients can also connect to a server using a DNS name.
17
Kofax Front Office Server Administrator's Guide
URL Entered by Mike on mike-xp-wks
Log on Account for Kofax FrontOffice Server Service
Additional Configuration Requiredby a Domain Administrator
http://kfs-svr/Kofax/KFS/ThinClient
Kfs-service-user NoneOn the domain controller,register DNS entry pointing www-kfs.kofax.com to host machine kfs-svr.On the domain controller, registerSPN HTTP/ www-kfs-svr.kofax.comunder user account Kfs-service-user.Then, configure the computer to useKfs-service-user as the KofaxServicelog on account.
http://www-kfs.kofax.com/Kofax/KFS/ThinClient
Kfs-service-user Same two steps above plus:Add the FQDN (kfs-svr.kofax.com) tothe Intranet zone or Trusted zone inInternet Explorer. This can be doneindividually on each client browser,or it can be done on the domaincontroller with Group Policies so thatthe setting will be applied to all clientsin the domain.
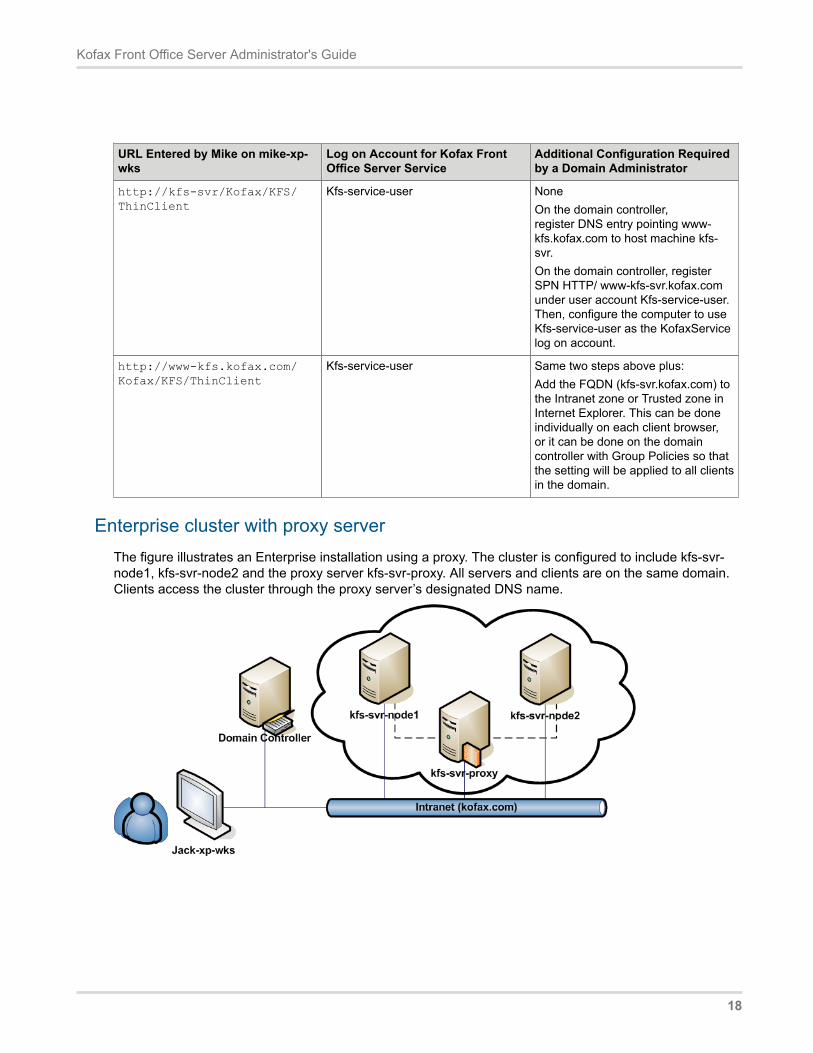
Enterprise cluster with proxy serverThe figure illustrates an Enterprise installation using a proxy. The cluster is configured to include kfs-svr-node1, kfs-svr-node2 and the proxy server kfs-svr-proxy. All servers and clients are on the same domain.Clients access the cluster through the proxy server’s designated DNS name.
18

Kofax Front Office Server Administrator's Guide
URL Entered by Jack on Jack-xp-wks
Log on Account for Kofax FrontOffice Server Service
Additional Configuration Requiredby a Domain Administrator
http://www-kfs/Kofax/KFS/ThinClient
Kfs-service-user On the domain controller,register DNS entry pointing www-kfs.kofax.com to host machine kfs-svr-proxy.On the domain controller, registerSPN HTTP/www-kfs.kofax.com underuser account Kfs-service-user. Then,configure every Kofax Front OfficeServer in the cluster to use Kfs-service-user as the KofaxService logon account
http://www-kfs.kofax.com/Kofax/KFS/ThinClient
Kfs-service-user Same two steps above plus:Add the FQDN (kfs-svr-proxy.kofax.com) to the Intranet zoneor Trusted zone in Internet Explorer.This can be done individually on eachclient browser, or it can be done onthe domain controller with GroupPolicies so that the setting will beapplied to all clients in the domain.
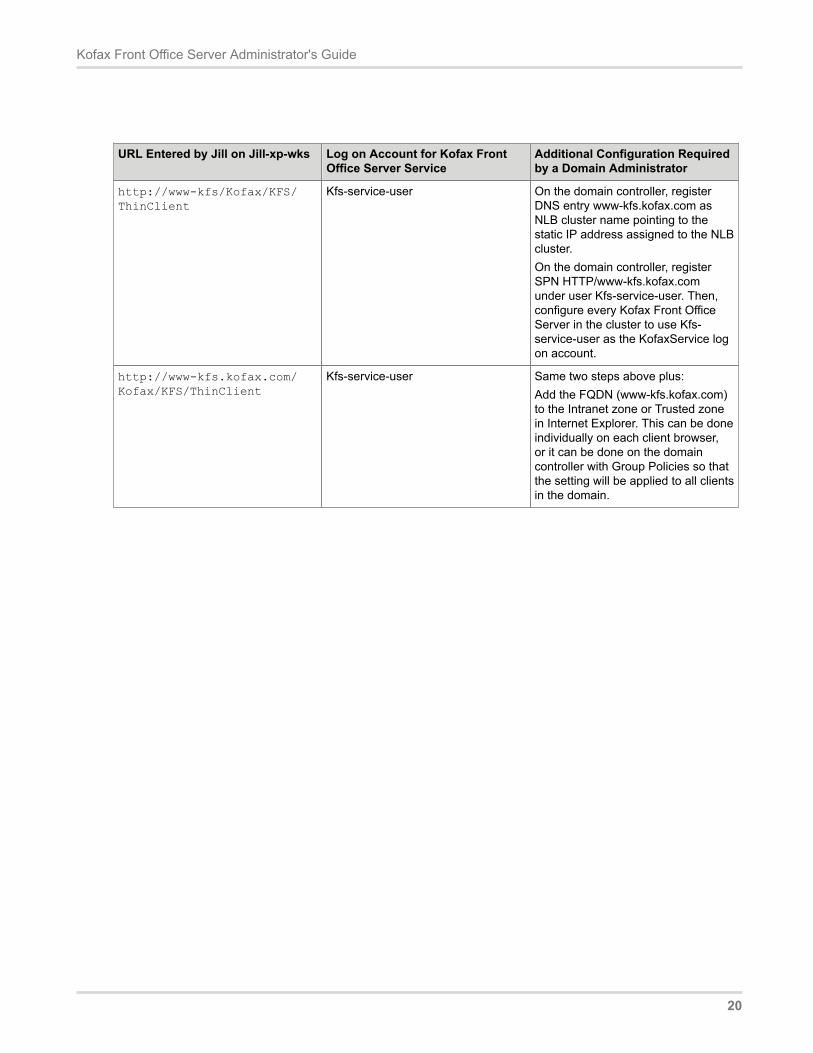
Enterprise cluster with NLBThis figure illustrates an enterprise installation using NLB. The NLB cluster is configured to include kfs-svr-worker1 and kfs-svr-worker2. The cluster name is www-kfs.kofax.com. All servers and clients are on thesame domain. Clients access the cluster through the cluster’s DNS name.
19
Kofax Front Office Server Administrator's Guide
URL Entered by Jill on Jill-xp-wks Log on Account for Kofax FrontOffice Server Service
Additional Configuration Requiredby a Domain Administrator
http://www-kfs/Kofax/KFS/ThinClient
Kfs-service-user On the domain controller, registerDNS entry www-kfs.kofax.com asNLB cluster name pointing to thestatic IP address assigned to the NLBcluster.On the domain controller, registerSPN HTTP/www-kfs.kofax.comunder user Kfs-service-user. Then,configure every Kofax Front OfficeServer in the cluster to use Kfs-service-user as the KofaxService logon account.
http://www-kfs.kofax.com/Kofax/KFS/ThinClient
Kfs-service-user Same two steps above plus:Add the FQDN (www-kfs.kofax.com)to the Intranet zone or Trusted zonein Internet Explorer. This can be doneindividually on each client browser,or it can be done on the domaincontroller with Group Policies so thatthe setting will be applied to all clientsin the domain.
20

Chapter 5
Integrating with a RightFax phone book
You can enable users to look up entries in their RightFax phone book. Follow this procedure to set up usercredentials and configure the batch class and Kofax Front Office Server to integrate with RightFax.
Important For Kofax Front Office Server to make a connection to the RightFax server to retrieve useraddress information, the RightFax Client Software version 16 must be installed and configured on theKofax Front Office Server computer.
1. Set up the credentials for RightFax users. When specifying user identification, do the following:• For Active Directory users: Select Use Integrated Windows NT Security? and specify the
domain user account. Then, enter a user ID in the User ID field. This does not need to match theKofax Capture user ID. Because the RightFax ID is associated with the user's domain account,RightFax authentication automatically takes place when the user logs on to the MFP or ThinClient.
• For Kofax Capture users who are not on a domain: Enter the Kofax Capture user ID in the User IDfield. These IDs must match.
2. In Kofax Capture, create a batch class with a Fax Lookup field. See Adding fax number and emailaddress lookup fields for instructions.
3. In the Kofax Front Office Server Administration Console, on the Settings - RightFax tab, enter theinformation for your RightFax server, select Enable RightFax Integration, and save the settings.
21
Chapter 6
Backing up and restoring configurations
The steps to back up and restore your data depend on whether you have a departmental or enterpriseconfiguration.
Backing up departmental configurationsYou may want to back up important data before upgrading, and regularly to be able to restore a failedsystem to a certain state.
Make sure that you have your original Kofax Front Office Server installation media (or installation media ofthe same version) before proceeding.
1. In the Services console, stop the appropriate service.• SQL Server (KOFAXKFS): For SQL Server.• Kofax Front Office Server: For the standard database.
2. Create backup copies of the following folders and all subfolders and files contained in them:• <root of installation drive>\ProgramData\Kofax\Front Office Server
• <installation path>\Kofax\Front Office Server <version>
• <shared folder>\CaptureSV\KFS<version>
• <root of installation drive>\ProgramData\Kofax\KFS (created if jobs were runthrough Kofax VRS)
3. Back up the database using the appropriate database utility.4. Verify that the backup was successful, and store in a safe location.5. Restart the service you stopped in step 1.
Restoring departmental configurations1. Remove the non-functional Kofax Front Office Server installation from the computer. This can be
done by uninstalling the software or restoring the computer to a state before Kofax Front OfficeServer was installed. Be sure that all Kofax Front Office Server software is removed from thecomputer.
2. Install the same version of Kofax Front Office Server as you previously backed up, because theinstaller versions must match. If possible, install to the same path as the original installation.
3. In the Services console, stop the following services:• Kofax Front Office Server• SQL Server (KOFAXKFS)
22
Kofax Front Office Server Administrator's Guide
4. Delete the following folders:• <root of installation drive>\ProgramData\Kofax\Front Office Server
• <installation path>\Kofax\Front Office Server <version>
• <shared folder>\CaptureSV\KFS<version>
• <root of installation drive>\ProgramData\Kofax\KFS (created if jobs were runthrough Kofax VRS)
5. Replace the deleted folders with the backup data folders.6. Set the Security permissions to grant Full Control to the Windows user that was specified for the
Kofax Front Office Server service during installation:• <root of installation drive>\ProgramData\Kofax\Front Office Server
• <installation path>\Kofax\Front Office Server <version>
• <shared folder>\CaptureSV\KFS<version>
• <root of installation drive>\ProgramData\Kofax\KFS (created if jobs were runthrough Kofax VRS)
7. In the Services console, start the following services:• Kofax Front Office Server• SQL Server (KOFAXKFS)
Backing up enterprise configurationsYou may want to back up important data before upgrading, and regularly to be able to restore a failedsystem to a certain state.
Make sure that you have your original Kofax Front Office Server installation media (or installation media ofthe same version) before proceeding.
1. Create backup copies of the following folders and all subfolders and files contained in them:• <root of installation drive>\ProgramData\Kofax\Front Office Server
• <installation path>\Kofax\Front Office Server
• <shared folder>\CaptureSV\KFS<version>
• <root of installation drive>\ProgramData\Kofax\KFS (created if jobs were runthrough Kofax VRS)
2. Back up the database using the appropriate database utility.3. Verify that the backup was successful, and store in a safe location.
Restoring enterprise configurations1. Remove the non-functional Kofax Front Office Server installation from all computers in the cluster.
This can be done by uninstalling the software or restoring the computers a state before Kofax FrontOffice Server was installed. Be sure that all Kofax Front Office Server software is removed from thecomputer.
2. Install the same version of Kofax Front Office Server as you previously backed up, because theinstaller versions must match. If possible, install to the same path as the original installation.
23

Kofax Front Office Server Administrator's Guide
3. In the Services console, stop the Kofax Front Office Server service.4. Delete the following folders:
• <root of installation drive>\ProgramData\Kofax\Front Office Server
• <installation path>\Kofax\Front Office Server
• <shared folder>\CaptureSV\KFS<version>
• <root of installation drive>\ProgramData\Kofax\KFS (created if jobs were runthrough Kofax VRS)
5. Replace the deleted folders with the backup data folders.6. Set the Security permissions of the following folders to grant Full Control to the Windows user that
was specified for the Kofax Front Office Server service during installation:• <shared folder>\CaptureSV\KFS<version>
• <root of installation drive>\ProgramData\Kofax\Front Office Server
• <root of installation drive>\ProgramData\Kofax\KFS (created if jobs were runthrough Kofax VRS)
7. Restore your backed-up SQL Server or Oracle database state.8. In the Services console, start the Kofax Front Office Server service.
24
Chapter 7
Changing system configuration
You can change several system configuration options.
Changing SQL Server database authenticationIf your SQL Server database authentication username or password is changed after installation, you needto change the database authentication credentials in Kofax Front Office Server.
1. In the database management console, make the changes to the database credentials.2. For Kofax Front Office Server, do the following:
a. Stop the Kofax Front Office Server service on the local host and, if you have a clusterinstallation, all other hosts in the cluster.
b. On the local host or any host machine in a cluster, go to the folder where Kofax Front OfficeServer is installed, navigate to the kfsService folder, and run Kofax.KFS.DatabaseUtility.exe.
c. The connection to the database cannot be made, so the Kofax Front Office Server Utilities- Database Authentication screen appears, where you enter the new database accesscredentials.
d. Click OK.A message that the credentials have been changed briefly appears.
e. Restart Kofax Front Office Server on the local host and, if you have a cluster installation, allother hosts in the cluster.
Changing host namesThe host name of a computer should not be changed after Kofax Front Office Server has been installed.Changing the host name may cause problems connecting to MFPs or other devices. You can restoreconnections by changing the host name back to the one you used when you licensed Kofax Front OfficeServer.
The host name of an MFP or device also should not be changed after it has been added to Kofax FrontOffice Server. Because the Administration Console does not recognize that the device’s host name haschanged, it instead recognizes it as a different device. If you add the device with the new host name, theAdministration Console will have two records and use two device licenses for the same device.
25

Kofax Front Office Server Administrator's Guide
Using the Database UtilityThe Database Utility is run automatically during an installation or upgrade so that you can set up orupgrade a database. You can also run it by itself to migrate data from one database type to another, suchas migrating from a Microsoft SQL Server database to Oracle RAC.
Before migrating data, note the following:• If you had installed Kofax Front Office Server with a non-standard database and want to move to the
Standard database, you need to install SQL Server Express manually before using the Database Utility.To install SQL Server Express, run SQLEXPR_ENU.exe. The file is in the Prerequisites folderin the Kofax Front Office Server product files. Specify the database instance name and credentialsyou want. When you run the Database Utility, select SQL Server and specify the information for thedatabase.
• If you have deployed at least one Local Client, you cannot use the Database Utility to migrate toanother database. Contact Kofax Technical Support for assistance.
Run the Database Utility as follows:1. Stop Kofax Front Office Server on the local host and, if you have a cluster installation, all other hosts
in the cluster.2. On the local host or any host machine in a cluster, go to the folder where Kofax Front Office Server is
installed, navigate to the kfsService folder, and run Kofax.KFS.DatabaseUtility.exe.3. If prompted, log on with your Kofax Capture user name and password. You must have the "Allow
admin utility usage" right in Kofax Capture to use the Database Utility.The Database Utility window appears.
4. The utility comes with its own Help system. Click Help and follow the instructions for the task youwant to perform.
26

Chapter 8
Setting preferences for the Thin Client
You can use the Administration Console to set preferences related to the Thin Client. On theAdministration Console, use the Settings-Advanced tab to locate the kfsportal.properties namespace, andthen edit the applicable values, as described in the following table.
If you make changes, they go into effect with the next new session of the Thin Client.
See the Administration Console Help for details about accessing the Settings-Advanced tab.
kfsportal.properties namespaceProperty
Description
paging.page.size Sets the number of documents that display at one time in the Inbox. If thenumber of documents in the Inbox exceeds a defined maximum, you canview additional entries on the list. Valid range is 1 to 150.
client.session.timeout Sets the number of minutes of inactivity before the Thin Client session timesout. If the user accesses the Thin Client using single sign on, the Thin Clientredirects to the single sign on page. The user clicks on the provided link, theKofax Front Office Server uses single sign on again automatically.
thumbnail.generator.threads Sets the number of threads used to generate a thumbnail for each userin the Thin Client. You can increase the number of threads to generatethumbnails more quickly, or decrease the number if thumbnail generationslows down other processes in Kofax Front Office Server. The value must bea whole number greater than 0. Default is 4.
thumbnail.generator.priority Sets the priority at which thumbnails are generated, relative to otherprocesses. The value must be entered in all capital letters. Select one of thefollowing values, which are listed from highest to lowest:HIGHABOVENORMALNORMALBELOWNORMALLOWYou can increase the priority to generate thumbnails more quickly, or reducethe priority if thumbnail generation slows down other processes in KofaxFront Office Server. Default is BELOWNORMAL.
Scanning directly from the Thin ClientUsers can scan directly from the Thin Client from a TWAIN compatible scanner that is connected directlyto their computer. When they scan the document, it appears in the Thin Client Active Jobs list.
27
Kofax Front Office Server Administrator's Guide
See the Thin Client Help for instructions on setting up to scan from the Thin Client.
28
Chapter 9
Data validation and field lookup customization
For the Thin Client and MFPs, any data entered for index fields is validated for an appropriate data typeand data length as follows.• Field validation and selection: Each field value is validated as soon as it has been changed. You can
determine which fields to validate, and whether other fields are filled in automatically or provide aselection list after successful validation. For selection lists, you can additionally define whether usershave to select a value from the list or whether they can also type a value which is not in the list.
• Form validation: All the field values of a form and their interdependencies can be validated.
You can customize validation and a variety of field lookup options for Kofax Front Office Server by usingfiles located in the \DeveloperResources\DataValidation\sample.NET folder.
Kofax Capture validation script customizationYou can create or edit a Visual Basic .NET or Visual C# .NET validation script in Kofax Capture to validatedata provided for index fields in the Thin Client or supported MFPs. The data is validated for index fieldsfor documents in a particular Kofax Capture document class. Validation occurs when the user exits theindex fields.
The validation script implemented in Kofax Capture is used for both Kofax Capture and Kofax Front OfficeServer. The validation script determines in which context it was called (Kofax Capture or Kofax FrontOffice Server), and in which context for Kofax Front Office Server it was called (the Thin Client or anMFP). Kofax Front Office Server supports a subset of the Kofax Capture validation scripting API. For afull listing of supported properties, see the README.txt file in the sample.NET folder where Kofax FrontOffice Server is installed.
See the Kofax Capture API Reference Guide for more information about custom scripting.
To create or edit a Visual Basic .NET or Visual C# .NET validation script, go to the Kofax CaptureAdministration module. Then, on the Scripts menu, select Document Validation. (For additionalinformation, see the Kofax Capture user documentation.)
When preparing the validation script, note the following:• For the scripting language, be sure Visual Basic .NET or Visual C# .NET is selected.• The Visual Basic .NET or Visual C# .NET project for the validation script contains the following:
• A class that inherits from Kofax.AscentCapture.Scripting.DocumentValidationScript• Members for each field in the document class, tagged with an attribute indicating the field name it
represents.• Create or edit the validation script using a sample validation script, and the API reference and Readme.
29

Kofax Front Office Server Administrator's Guide
• To build the existing Kofax Capture 10.2 for Kofax Capture 11, do the following:• Set the project to target .NET Framework 4.6.1 or later since the referenced Kofax Capture Scripting
Interface (ScriptInterface.dll) in KC 11 is built with .NET Framework 4.6.1. Targeting an earlier .NETFramework version will result in the following project build failure:The primary reference "ScriptInterface, Version=6.0.0.0, Culture=neutral, PublicKeyToken=2a06c44ecf114f0f, processorArchitecture=MSIL" could not be resolved because it was built against the ".NETFramework,Version=v4.6.1" framework. This is a higher version than the currently targeted framework ".NETFramework,Version=v4.6
• Add a reference to Kofax.AscentCaptureModule.Interop (C:\Program Files (x86)\Kofax\CaptureSS\ServLib\Bin\Kofax.AscentCaptureModule.Interop.dll).
• Make sure the default constructor exists.• References must maintain the Copy Local property, to ensure that other validation stations can perform
properly if the appropriate version of Kofax Capture is not installed.• Add the attribute KFSIndexFieldAttribute to each field, specifying the following parameters:
Validate (true or false)ReadOnly (true or false)For an example of how to use the KFSIndexFieldAttribute type, see the validation scripts included witheither the CitiesSample or the Order Forms sample batch classes located in the sample.NET folderwhere you installed Kofax Front Office Server.
• Add an AssemblyResolve event handler function to the script. This function must return the locationof the KFSValidation library. Register the handler in the script’s New subroutine. For an example ofhow to create an AssemblyResolve event handler, see the validation scripts included with either theCitiesSample or the Order Forms sample batch classes. The code from these examples can be copiedinto your own script as is.
• Optionally, use a static property in the ValidationContext class that indicates if the script is calledthrough Kofax Front Office Server or Kofax Capture validation. For an example of how to use theValidationContext class, see the Country_FieldPostProcessing method of the validation script includedwith the CitiesSample batch class.
• Be aware that only FieldPostProcessing is called from within Kofax Front Office Server.FieldPreProcessing is ignored. For an example of a FieldPostProcessing method, see theItem_Number_FieldPostProcessing method of the validation script included with the Order Forms batchclass.
• Optionally, implement an event handler from one or both of the following:• DocumentPreProcessing: Called each time a new document is opened. See the
Cities_DocumentPreProcessing method of the validation script included with the CitiesSample batchclass for an example.
• DocumentPostProcessing: Called when a document is closed. See theCatalog_Orders_DocumentPostProcessing method of the validation script included with the OrderForms batch class for an example.
• When FatalErrorException or RejectAndSkipDocumentException is encountered in yourvalidation script, the exception is handled the same as ValidationErrorException. For anexample of a ValidationErrorException being thrown to indicate validation failure, see theItem_Number_FieldPostProcessing method of the validation script included with the Order Forms batchclass.
• Unique to Kofax Front Office Server, a utility method is provided that allows you to specify value listsfor a given field. Currently, dynamic value lists are supported for Kofax Front Office Server only, and
30

Kofax Front Office Server Administrator's Guide
not Kofax Capture. For an example of using the CreateDynamicValueList utility method to create adynamic value list, see the Country_FieldPostProcessing method of the validation script included withthe CitiesSample batch class.
• Be aware of the following about batch fields:• You cannot populate or read batch field values in the validation script.• In Kofax Front Office Server, the validation script cannot detect that the value of a batch field has
changed in Kofax Capture.• Validation will not perform as desired if a batch field and document index field have the same name.
31

Chapter 10
Setting up Kofax Capture
If you have defined index fields for a document class, they are retrieved by Kofax Front Office Server.Users can enter values for them in the Thin Client or at the MFP front panel. If you have defined valuesfor these fields, users can select them from a drop-down field in the Thin Client. If you have hidden indexfields, they are also hidden in Kofax Front Office Server.
If you are creating global shortcuts in the Administration Console, you can enter default values for theindex fields that display when users send documents through a shortcut.
Setting up user accountsKofax Front Office Server uses user accounts and groups defined in Kofax Capture user profiles. Inthe Administration Console, you can assign these users or groups to Thin Client Permissions to controlaccess to Kofax Front Office Server features. If you remove a user from Kofax Capture, the user’s accessto Kofax Front Office Server is also removed, but the user’s active jobs are not deleted.
For instructions on adding users and groups, including how to link to those from Active Directory, seethe Kofax Capture documentation. For information about assigning Thin Client permissions, see theAdministration Console Help.
Note The following characters cannot be used in user IDs: / \ "
Active Directory configurationMake sure that the Active Directory is properly configured. When there are issues, such as when asubdomain is down, logging onto Kofax Front Office Server with a domain user may fail or be delayed.In situations when the forest configuration cannot be corrected, Active Directory Forest Query can bedisabled so that users can continue logging on. Limitations with SafeCom SSO may occur when ActiveDirectory Forest Configuration is disabled. When the issue has been resolved, enable Active DirectoryForest Query again.
Note Disabling Active Directory Forest Query prevents SafeCom SSO to search for user names insubdomains. Users need to include the domain name when logging on in the first format: SUBDOMAIN\username.
32

Kofax Front Office Server Administrator's Guide
Enable Active Directory Forest query1. Open the Kofax Front Office Server file, which is located in the following path:
• For Kofax Capture Server/Workstation: \\<Kofax Capture server computer name>\CaptureSV\KFS4.3\Config
• For Kofax Capture Standalone: C:\ProgramData\Kofax\Capture\KFS4.3\Config2. Create the kfslib.properties file if it does not already exist.3. Open kfslib.properties with a text editor.4. Insert or add the following setting:
kfs.security.forest.query=true
5. Save and close the file.6. Restart the Kofax Front Office Server service and IIS.7. Check the webapp.log file, which is in C:\ProgramData\Kofax\Front Office Server\Log
\WebApp\. It should contain the following:kfslib.properties/kfs.security.forest.query=True
Disable Active Directory Forest query1. Open the Kofax Front Office Server file, which is located in the following path:
• For Kofax Capture Server/Workstation: \\<Kofax Capture server computer name>\CaptureSV\KFS4.3\Config
• For Kofax Capture Standalone: C:\ProgramData\Kofax\Capture\KFS4.3\Config2. Create the kfslib.properties file if it does not already exist.3. Open kfslib.properties with a text editor.4. Insert or add the following setting:
kfs.security.forest.query=false
5. Save and close the file.6. Restart the Kofax Front Office Server service and IIS.7. Check the webapp.log file, which is in C:\ProgramData\Kofax\Front Office Server\Log
\WebApp\. It should contain the following:kfslib.properties/kfs.security.forest.query=False
Setting up batch classes, document classes, and form typesNote the following when setting up batch classes, document classes, and form types in Kofax Capture:• When configuring a batch class, select "Allow import of eDocument files" on the Batch Class Properties
- Advanced tab if you are using documents in formats other than TIFF.• On the Batch Class Properties - Advanced tab, the "Treat imported PDF files as TIFF images" check
box should not be selected for PDF files with text. This may cause Kofax Capture to generate an errorwhen it processes a PDF file that contains text.
• Do not use DataStore or Formtype as index field names.
33
Kofax Front Office Server Administrator's Guide
• Do not use the following characters in the names of batch classes, document classes, and form types: /\ "
• If you have defined fields for a batch or document class, they are retrieved by Kofax Front OfficeServer. Users can enter values for them at the MFP or in the Thin Client. If you have defined valuesfor these fields, users can select them from drop-down fields. Some field types may work differentlyfrom one MFP to another. For example, if you configure a field with a data type of "DOUBLE" with amaximum of 15 digits, you may be able to type more than 15 digits on a Ricoh MFP (once the batch isexported to Kofax Capture, the value is displayed at 15 characters). On an HP MFP, you are restrictedto typing 15 characters for the same field.
Important If your batch class has single document processing enabled with automatic documentseparation, be sure to only send documents using loose pages. This will prevent users from enteringindex field data that would be removed if automatic document separation occurs.
If your batch class uses Kofax Fixed Pages for automatic document separation, be sure to only senddocuments using loose pages. This will prevent users from entering index field data that would beremoved if a user scans more pages than is configured for fixed page separation and automaticdocument separation occurs.
The form type name appears in the Administration Console and the Thin Client as follows:• If a form type exists in only one batch class, only the form type name appears.• If a form type exists in multiple batch classes, the batch class name appears in parentheses after the
form type name, such as "Form Type (Batch Class)."• Loose pages, used for submitting documents directly to a batch class, appear as follows: "[Loose
Pages] (Batch Class)."
Information updates to Kofax Capture valuesIn Kofax Capture, you can view and/or use information about scan jobs that are processed by Kofax FrontOffice Server. These scan jobs are for documents that are scanned from an MFP or submitted from theThin Client to Kofax Capture.
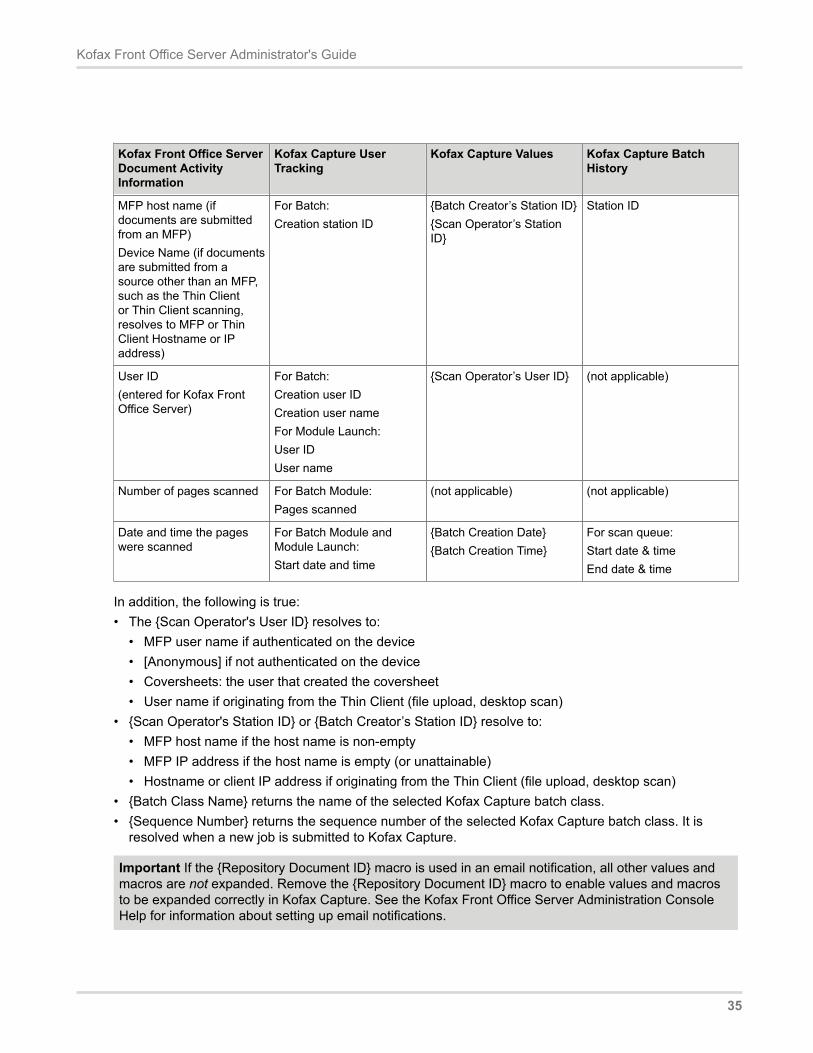
The following information generated by document activity in Kofax Front Office Server is updated to thefollowing information in Kofax Capture.
34
Kofax Front Office Server Administrator's Guide
Kofax Front Office ServerDocument ActivityInformation
Kofax Capture UserTracking
Kofax Capture Values Kofax Capture BatchHistory
MFP host name (ifdocuments are submittedfrom an MFP)Device Name (if documentsare submitted from asource other than an MFP,such as the Thin Clientor Thin Client scanning,resolves to MFP or ThinClient Hostname or IPaddress)
For Batch:Creation station ID
{Batch Creator’s Station ID}{Scan Operator’s StationID}
Station ID
User ID(entered for Kofax FrontOffice Server)
For Batch:Creation user IDCreation user nameFor Module Launch:User IDUser name
{Scan Operator’s User ID} (not applicable)
Number of pages scanned For Batch Module:Pages scanned
(not applicable) (not applicable)
Date and time the pageswere scanned
For Batch Module andModule Launch:Start date and time
{Batch Creation Date}{Batch Creation Time}
For scan queue:Start date & timeEnd date & time
In addition, the following is true:• The {Scan Operator's User ID} resolves to:
• MFP user name if authenticated on the device• [Anonymous] if not authenticated on the device• Coversheets: the user that created the coversheet• User name if originating from the Thin Client (file upload, desktop scan)
• {Scan Operator's Station ID} or {Batch Creator’s Station ID} resolve to:• MFP host name if the host name is non-empty• MFP IP address if the host name is empty (or unattainable)• Hostname or client IP address if originating from the Thin Client (file upload, desktop scan)
• {Batch Class Name} returns the name of the selected Kofax Capture batch class.• {Sequence Number} returns the sequence number of the selected Kofax Capture batch class. It is
resolved when a new job is submitted to Kofax Capture.
Important If the {Repository Document ID} macro is used in an email notification, all other values andmacros are not expanded. Remove the {Repository Document ID} macro to enable values and macrosto be expanded correctly in Kofax Capture. See the Kofax Front Office Server Administration ConsoleHelp for information about setting up email notifications.
35
Kofax Front Office Server Administrator's Guide
If you are upgrading to Kofax Front Office Server from a previous version, and there are existingdocuments in the Thin Client, information for these documents is not updated to Kofax Capture when thedocuments are submitted following the upgrade.
Note For tracking user information in Kofax Capture, be sure that User Tracking is enabled in KofaxCapture. For more information, see the Kofax Capture documentation.
Batch NamesBatches are created from documents that are submitted from the Thin Client and MFPs. By default,batches are named in the following formats:• For documents submitted from the Thin Client:
• [User name]-[Thin Client host name (or IP address if host name is unavailable)]-[YYYY/MM/DDHH:MM:SS.ms (UTC offset)]
• For documents submitted from an MFP:• If user is logged on or a coversheet is used:
[User name]-[MFP host name]-[YYYY/MM/DD HH:MM:SS.ms (UTC offset)]• If there is no user logged on:
-[MFP host name]-[YYYY/MM/DD HH:MM:SS.ms (UTC offset)]
If you use a coversheet, [User name] indicates the user who created the coversheet.
The time stamp is based on the local time zone of the server where Kofax Front Office Server is installed.The time is followed by the local time UTC offset, such as (-5:00). The time is shown to the nearestmillisecond.
For example, if a document is sent from host name "myserver" by user "jill" at 2:45 p.m. on August 18,2009, the batch is named as follows:
[jill]-[myserver]-[2009/08/18 2:45:00.234 PM (-8:00)]
If a user name is not provided (such as if you use a global shortcut at an MFP without logging on), it isomitted from the batch name as shown:
-[MFP hostname]-[2009/08/18 2:45:00.234 PM (-8:00)]
Documents submitted from an MFP to the Thin Client, then from the Thin Client to a final destination aretreated as MFP documents, and will have the MFP hostname.
Custom Batch NamesYou can also define your own batch names by setting property values in the Kofax Front Office ServerAdministration Console Settings - Advanced tab namespace kc.properties values for:• batchname.kofaxcapture.usedefault
If this value is set to true, batches are named using the Kofax Capture batch name format (whichdefaults to false). If this property is enabled, the document tracking entries for backenddocumentid areblank, so for reporting statistics, use Kofax Capture User Tracking.
36
Kofax Front Office Server Administrator's Guide
• batchname.indexfield
In Kofax Capture, create an index field where users can enter the name for the generated batch. Assignthe index field to the batch class, and use the index field name as the value for this property. Note thatthis property is ignored if batchname.kofaxcapture.usedefault is set to true.
Important If the batch class contains a batch field with the same name as an index field, the batch fieldvalue is used for the batch name instead of the index value.
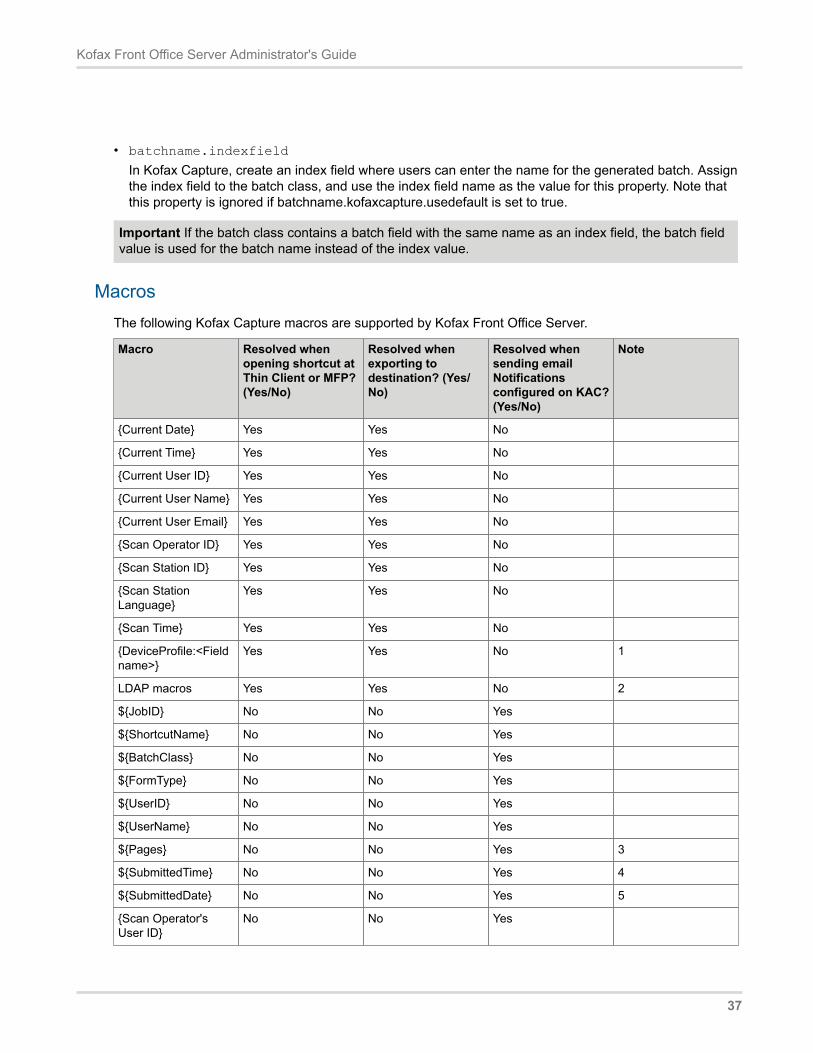
MacrosThe following Kofax Capture macros are supported by Kofax Front Office Server.
Macro Resolved whenopening shortcut atThin Client or MFP?(Yes/No)
Resolved whenexporting todestination? (Yes/No)
Resolved whensending emailNotificationsconfigured on KAC?(Yes/No)
Note
{Current Date} Yes Yes No
{Current Time} Yes Yes No
{Current User ID} Yes Yes No
{Current User Name} Yes Yes No
{Current User Email} Yes Yes No
{Scan Operator ID} Yes Yes No
{Scan Station ID} Yes Yes No
{Scan StationLanguage}
Yes Yes No
{Scan Time} Yes Yes No
{DeviceProfile:<Fieldname>}
Yes Yes No 1
LDAP macros Yes Yes No 2
${JobID} No No Yes
${ShortcutName} No No Yes
${BatchClass} No No Yes
${FormType} No No Yes
${UserID} No No Yes
${UserName} No No Yes
${Pages} No No Yes 3
${SubmittedTime} No No Yes 4
${SubmittedDate} No No Yes 5
{Scan Operator'sUser ID}
No No Yes
37
Kofax Front Office Server Administrator's Guide
Macro Resolved whenopening shortcut atThin Client or MFP?(Yes/No)
Resolved whenexporting todestination? (Yes/No)
Resolved whensending emailNotificationsconfigured on KAC?(Yes/No)
Note
{Scan Operator'sStation ID}
No No Yes
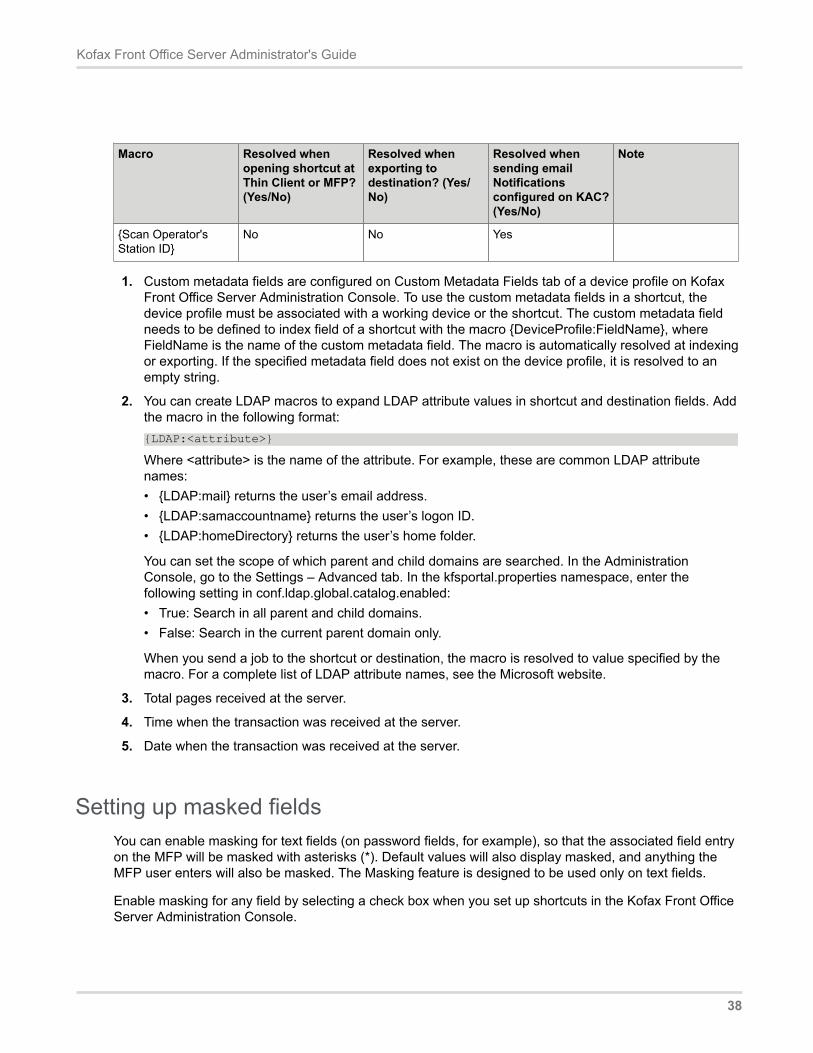
1. Custom metadata fields are configured on Custom Metadata Fields tab of a device profile on KofaxFront Office Server Administration Console. To use the custom metadata fields in a shortcut, thedevice profile must be associated with a working device or the shortcut. The custom metadata fieldneeds to be defined to index field of a shortcut with the macro {DeviceProfile:FieldName}, whereFieldName is the name of the custom metadata field. The macro is automatically resolved at indexingor exporting. If the specified metadata field does not exist on the device profile, it is resolved to anempty string.
2. You can create LDAP macros to expand LDAP attribute values in shortcut and destination fields. Addthe macro in the following format:{LDAP:<attribute>}
Where <attribute> is the name of the attribute. For example, these are common LDAP attributenames:• {LDAP:mail} returns the user’s email address.• {LDAP:samaccountname} returns the user’s logon ID.• {LDAP:homeDirectory} returns the user’s home folder.
You can set the scope of which parent and child domains are searched. In the AdministrationConsole, go to the Settings – Advanced tab. In the kfsportal.properties namespace, enter thefollowing setting in conf.ldap.global.catalog.enabled:• True: Search in all parent and child domains.• False: Search in the current parent domain only.
When you send a job to the shortcut or destination, the macro is resolved to value specified by themacro. For a complete list of LDAP attribute names, see the Microsoft website.
3. Total pages received at the server.
4. Time when the transaction was received at the server.
5. Date when the transaction was received at the server.
Setting up masked fieldsYou can enable masking for text fields (on password fields, for example), so that the associated field entryon the MFP will be masked with asterisks (*). Default values will also display masked, and anything theMFP user enters will also be masked. The Masking feature is designed to be used only on text fields.
Enable masking for any field by selecting a check box when you set up shortcuts in the Kofax Front OfficeServer Administration Console.
38

Kofax Front Office Server Administrator's Guide
Adding fax number and email address lookup fieldsFax number and email addresses fields can be configured so that they are lookup fields in the Thin Clientand MFPs (see the following figure for an example of the Thin Client email Lookup list with returned data).
Important When you create index fields in Kofax Capture, be sure that the size definition (numberof characters) is sufficient to hold the largest fax or email description and number in your informationsource.
The Lookup fields retrieve email addresses and/or fax numbers from these sources as follows:• The customemailfaxlookup table in the Kofax Front Office Server database: users whose records
contain data for the particular search (either email address or fax number) will be returned in the resultslist. This search is automatically enabled: no configuration is needed.
• Users and groups in a connected directory service: records that contain data for the particular search(either email address or fax number) will be returned in the results list. This search is automaticallyenabled: no configuration is needed.
• The Microsoft Outlook Contacts list of the logged on user: Contacts whose records contain data for theparticular search (either email address or fax number) will be returned in the results list. To enable theContacts search, follow the instructions in Contacts List Lookup below.
• The RightFax Phone Book: when integrated correctly, the user's personal address book is includedin the search and the fax numbers will be returned in the results list. See Integrating with a RightFaxphone book for instructions.
The data retrieved from the Kofax Front Office Server database, directory service, Contacts list, andRightFax phone book is combined to create the results list that appears in the Thin Client and MFPs.
1. In the Kofax Capture Administration module, create a new field type. See the Kofax Capturedocumentation for instructions.
2. As you complete the information for your field type, select either CHAR or VARCHAR as the datatype, depending on which data type you use in your target database.
3. Enter the maximum number of characters in the "Number of characters" field.4. In the Subtype field, select Email Address or Fax Number.5. When you are finished defining the field type, click Save. See the Kofax Capture documentation for
instructions on using the field type with batch class or document class fields.
Database table lookupYou can use the custom lookup table to add email and fax lookup information that is automaticallyincluded in searches.• For enterprise installations:
As a database administrator, you can either manually edit the customemailfaxlookup table or use a toolto import email addresses and fax numbers.
• For departmental installations:When SQL Express is installed, a database user LookupMgr is created, assigned the passwordkofax123, and given read and write permissions to the database lookup table.
39

Kofax Front Office Server Administrator's Guide
The following figure shows the table columns.
Active Directory lookupWhen searching an Active Directory, the lookup will return user and group entries that contain either emailaddresses or fax numbers (depending on which one was searched for).
Contacts list lookupIf Contacts search is enabled, users can search their Microsoft Exchange Contacts list if the user islogged on using their directory service account. When the user attempts to submit or send a document,a log on is attempted using the current credentials used to log on to the Thin Client or MFP. If thosecredentials fail authentication, the search will not include Contacts.
For example, user Max James logs on to the Thin Client using his sAMAccount name mjames, and hiscompany’s Microsoft Exchange log on also uses the sAMAccount name. His Lookup List search willinclude his Contacts. However, if his company uses the first.last convention for user name, then thesearch will not include his Contacts. Of course if user mjames were to log on to the Thin Client usinganother user’s credentials, a Lookup List search would not include Max's Contacts list, but would insteadinclude any Contacts from the other user account that is currently logged on.
Note For the Contacts list lookup to work, Outlook must be configured with the Microsoft ExchangeServer account type, and Use Cached Exchange Mode must be enabled. Any newly added Contacts willbecome available the next time the user’s Outlook client synchronizes with the Exchange Server. Alsonote that this feature is not available for users who authenticate using single sign on.
1. Start the Administration Console as described in Starting the Administration Console. Log on as auser with administrator rights.
2. On the Settings - Advanced tab, in the namespace kfsportal.properties, modify the following Names:conf.exchange.domainconf.exchange.server
3. Click Save.
RightFax phone book lookupWhen searching the RightFax phone book, the lookup will return entries from the personal address bookof the user who is logged on.
40

Chapter 11
Advanced notification configuration for KofaxCapture
The Kofax Capture component of the Kofax Front Office Server notification feature has additionalconfiguration settings that can be included in the ACConfig.xml file located in the CaptureSV\Configfolder where Kofax Capture is installed.
Configuration information is optional, and overrides information found in a form type or shortcut that hasnotifications enabled. Configuration information is read once when the application starts.
KFSService HostHost, protocol, port, and path information of the Kofax Front Office Server installation where the KofaxFront Office Server service is running.If either protocol or port is specified, both protocol and port must be specified.The path attribute defines the path of the notification Web service relative to the Kofax Front Office Server.
RetryBackoffSecondsRetryBackOffSeconds overrides the default 5 minute (300 seconds) failure back-off time listed in item 5above. Values can be 0 or greater.
EnabledAllows the administrator to disable the sending of notifications from Kofax Capture to Kofax Front OfficeServer. Values can be true or false.
RetryCountThe number of notification sending errors which can occur before halting the sending of notifications.Once RetryBackoffSeconds have passed, the software will once again attempt to send new notifications.Values can be 0 or greater.
ConfigurationUpdateSecondsThe number of seconds to wait between checks for changes to the ACConfig file. Values can be 0 orgreater.
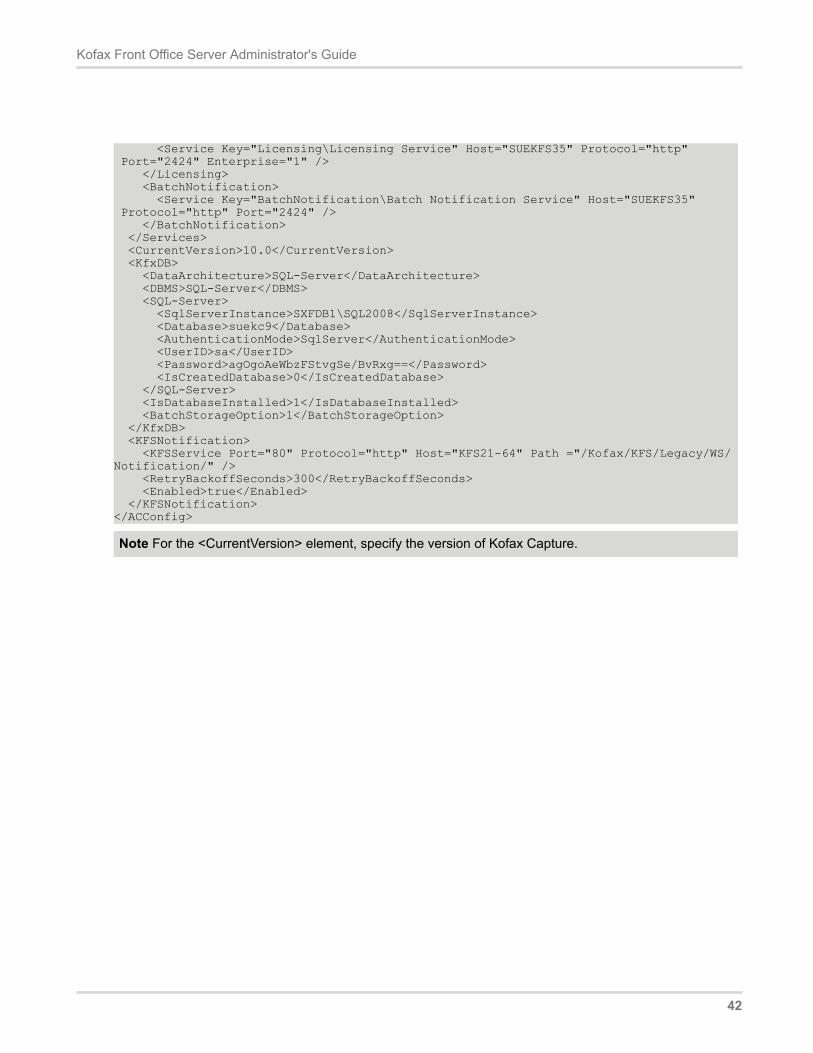
Implementing the propertiesAdd properties to the ACConfig.xml file as a child <KFSNotification> element of <ACConfig>, as shown inthe following example:<?xml version="1.0" encoding="utf-8" standalone="yes"?><ACConfig> <Services> <Licensing>
41
Kofax Front Office Server Administrator's Guide
<Service Key="Licensing\Licensing Service" Host="SUEKFS35" Protocol="http" Port="2424" Enterprise="1" /> </Licensing> <BatchNotification> <Service Key="BatchNotification\Batch Notification Service" Host="SUEKFS35" Protocol="http" Port="2424" /> </BatchNotification> </Services> <CurrentVersion>10.0</CurrentVersion> <KfxDB> <DataArchitecture>SQL-Server</DataArchitecture> <DBMS>SQL-Server</DBMS> <SQL-Server> <SqlServerInstance>SXFDB1\SQL2008</SqlServerInstance> <Database>suekc9</Database> <AuthenticationMode>SqlServer</AuthenticationMode> <UserID>sa</UserID> <Password>agOgoAeWbzFStvgSe/BvRxg==</Password> <IsCreatedDatabase>0</IsCreatedDatabase> </SQL-Server> <IsDatabaseInstalled>1</IsDatabaseInstalled> <BatchStorageOption>1</BatchStorageOption> </KfxDB> <KFSNotification> <KFSService Port="80" Protocol="http" Host="KFS21-64" Path ="/Kofax/KFS/Legacy/WS/Notification/" /> <RetryBackoffSeconds>300</RetryBackoffSeconds> <Enabled>true</Enabled> </KFSNotification></ACConfig>
Note For the <CurrentVersion> element, specify the version of Kofax Capture.
42
Chapter 12
Configure retries
This section contains instructions on how to configure retries related to processing and failover.
Configuring retries for failed scan jobsIf a scan job fails, a series of retries begins. If you are using the default settings, the retries continue every30 seconds for a maximum of 3 tries. If a scan job fails on all retries, it is moved to an Errors subfolderin the \scanjobs folder. To retry failed scan jobs, move the folder for the scan job files from the \Errorssubfolder to the \Unprocessed folder. (For Konica Minolta MFPs, copy the scan job files back to the FTPserver for the MFP.) Kofax Front Office Server then starts processing the scan job.
You can change the properties for retry frequency and the maximum number of retries.1. Start the Administration Console and log on as a user with administrator rights.2. On the Settings - Advanced tab, in the namespace shared_resource.properties, modify the following
Names:scanjob.server.retry.frequencyscanjob.server.retry.limit
3. Click Save.
Configuring database retriesThe database retry applies when a database operation (such as insert, query, and update) fails. Based onthe retry settings, the failed operation is retried.
You can change the properties for the maximum number of retries and for retry frequency, and you canalso change those values specifically for the Thin Client transactions (you may want to make the valuessmaller so you limit any possible wait time for the Thin Client users.
1. Start the Administration Console as described in Starting the Administration Console. Log on as auser with administrator rights.
2. On the Settings - Advanced tab, in the namespace shared_resource.properties, modify the followingNames:db.failover.retry.countdb.failover.retry.intervalkfs.db.failover.retry.countkfs.db.failover.retry.interval
3. Click Save.
43

Kofax Front Office Server Administrator's Guide
Configuring retries to storage destinationsIf a destination folder is not available to receive a document or file, by default a series of retries beginsand continues every 500 milliseconds for 30000 milliseconds.
You can change properties for the retry timeout and the interval between retries.1. Start the Administration Console as shown in Starting the Administration Console. Log on as a user
with administrator rights.2. On the Settings - Advanced tab, in the namespace shared_resource.properties, modify the following
Names:filesys.retry.timeout.millisfilesys.retry.wait.millis
3. Click Save.
44

Chapter 13
Troubleshooting and maintenance
There are several areas where you can perform troubleshooting tasks, and maintain system processingcapabilities.
Troubleshooting for failed batchesIf a batch is not generated from documents submitted from the Thin Client or the MFP, check therelease_errors.log file in C:\ProgramData\Kofax\Front Office Server\log folder. The fileincludes messages that indicate the type of error. Errors may be caused by the following:• Users changing batch classes in Kofax Capture while other users are submitting documents in Kofax
Front Office Server. For example, a user can delete a batch class or change an index field from optionalto required. This would cause a document to fail even if it passed validation at the Thin Client. Werecommend that changes to Kofax Capture batch classes take place when users are not activelysubmitting documents.
• Faint pages being deleted from documents when blank page removal is enabled. Kofax Front OfficeServer cannot create a batch for a document without images. If a page is too faint to be detected, it willbe deleted by blank page removal and could generate a document without images. If you have faintpages to scan, adjust the image quality of the device or disable blank page removal.
Important information about validation failureUnder certain conditions, Kofax Capture Values will fail validation. Any fields that fail validation are clearedof content and appear blank. However, it is important to note that the Kofax Capture Value link will stillremain intact and therefore the field will still resolve to the value of the linked Kofax Capture Value.
To understand why a Kofax Capture Value can fail validation, it is necessary to know that Kofax FrontOffice Server will interpret Kofax Capture Values as literal strings. For example, the name of the KofaxCapture Value {Site ID} contains 9 characters. If the Field Type defined for the index field limited thenumber of characters to less than 9, validation would fail, and the value would be cleared in the field asit appears when creating shortcuts in the Administration Console, viewing shortcuts on an MFP, or in theThin Client indexing panel. However, as mentioned above, the Kofax Capture Value link will still remainintact and the field will still resolve to the value of the linked Kofax Capture Value when the document issubmitted to Kofax Capture.
Examples of other cases where you would see Kofax Capture Values failing validation:• Kofax Capture Value name exceeds the length of the Field Type defined for the index field• Kofax Capture Value is linked to an index field defined as Numeric, Decimal, Integer, or Small Integer
Field Types
45
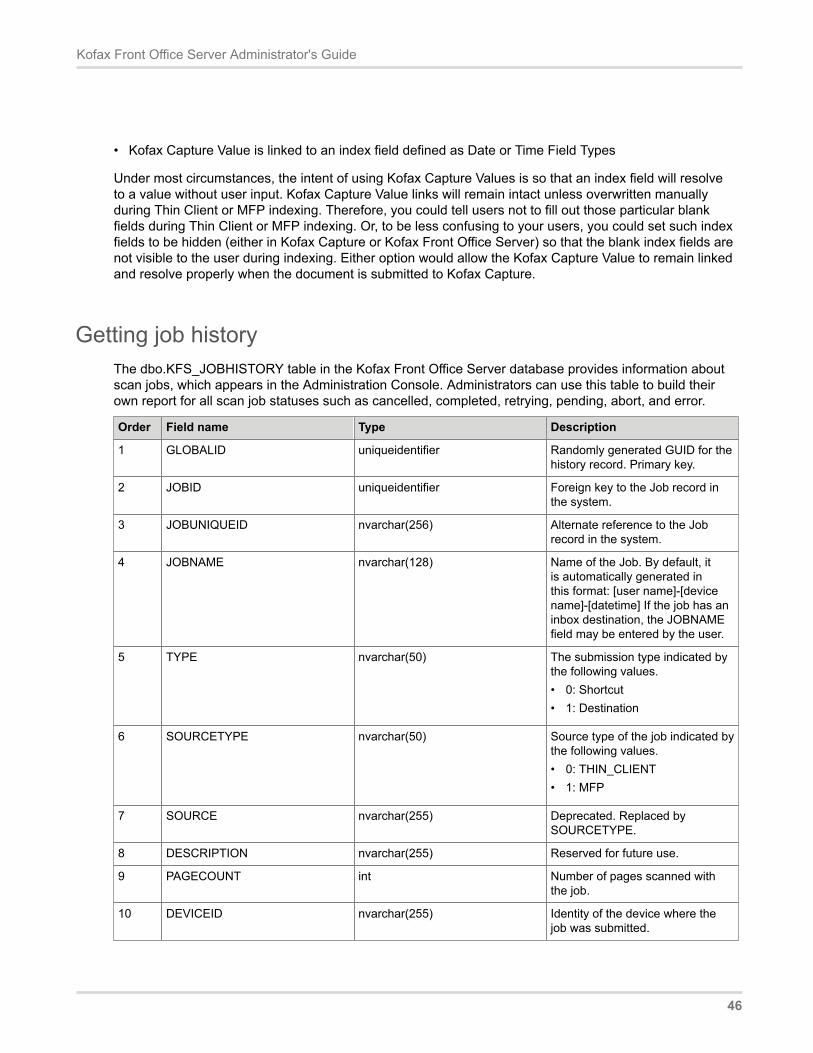
Kofax Front Office Server Administrator's Guide
• Kofax Capture Value is linked to an index field defined as Date or Time Field Types
Under most circumstances, the intent of using Kofax Capture Values is so that an index field will resolveto a value without user input. Kofax Capture Value links will remain intact unless overwritten manuallyduring Thin Client or MFP indexing. Therefore, you could tell users not to fill out those particular blankfields during Thin Client or MFP indexing. Or, to be less confusing to your users, you could set such indexfields to be hidden (either in Kofax Capture or Kofax Front Office Server) so that the blank index fields arenot visible to the user during indexing. Either option would allow the Kofax Capture Value to remain linkedand resolve properly when the document is submitted to Kofax Capture.
Getting job historyThe dbo.KFS_JOBHISTORY table in the Kofax Front Office Server database provides information aboutscan jobs, which appears in the Administration Console. Administrators can use this table to build theirown report for all scan job statuses such as cancelled, completed, retrying, pending, abort, and error.
Order Field name Type Description
1 GLOBALID uniqueidentifier Randomly generated GUID for thehistory record. Primary key.
2 JOBID uniqueidentifier Foreign key to the Job record inthe system.
3 JOBUNIQUEID nvarchar(256) Alternate reference to the Jobrecord in the system.
4 JOBNAME nvarchar(128) Name of the Job. By default, itis automatically generated inthis format: [user name]-[devicename]-[datetime] If the job has aninbox destination, the JOBNAMEfield may be entered by the user.
5 TYPE nvarchar(50) The submission type indicated bythe following values.• 0: Shortcut• 1: Destination
6 SOURCETYPE nvarchar(50) Source type of the job indicated bythe following values.• 0: THIN_CLIENT• 1: MFP
7 SOURCE nvarchar(255) Deprecated. Replaced bySOURCETYPE.
8 DESCRIPTION nvarchar(255) Reserved for future use.
9 PAGECOUNT int Number of pages scanned withthe job.
10 DEVICEID nvarchar(255) Identity of the device where thejob was submitted.
46

Kofax Front Office Server Administrator's Guide
Order Field name Type Description
11 STATUS int Job status with values:• -1: Error. A server-side error
has occurred processing thejob. The job should appear inan error state in TransactionReview in the administrationconsole. See related Retrystate.
• 0: Unknown. Internal use only -this value should not appear atruntime.
• 1: Pending. The server isaware of a job being created,but has not received any datafor the job yet. Currently thisstate is only applicable to XeroxMFP devices.
• 2: Uploading. A local client hasinitiated a job upload to theserver. This does not apply toMFP devices.
• 3: Queued. The job has beenqueued on the server forprocessing.
• 4: Processing. The server isactively processing the job.
• 5: Inbox. The job is waitingfor user input in an inbox. Analternative to Completed state.
• 6: Merged. The job wasmerged into another job andno longer exists as a separateentity.
• 7: Completed. The job wassuccessfully sent to its finaldestination and is no longer inthe system.
• 8: Retry. The job encounteredan error when processing onthe server and will be retriedautomatically. If the job has notsucceeded after the configurednumber of attempts, it is set toError state.
• 9: Deleted. The job has beeneither deleted by the user fromtheir Thin Client inbox, deletedby an administrator from theTransaction Review screen inthe Administration Console,
47
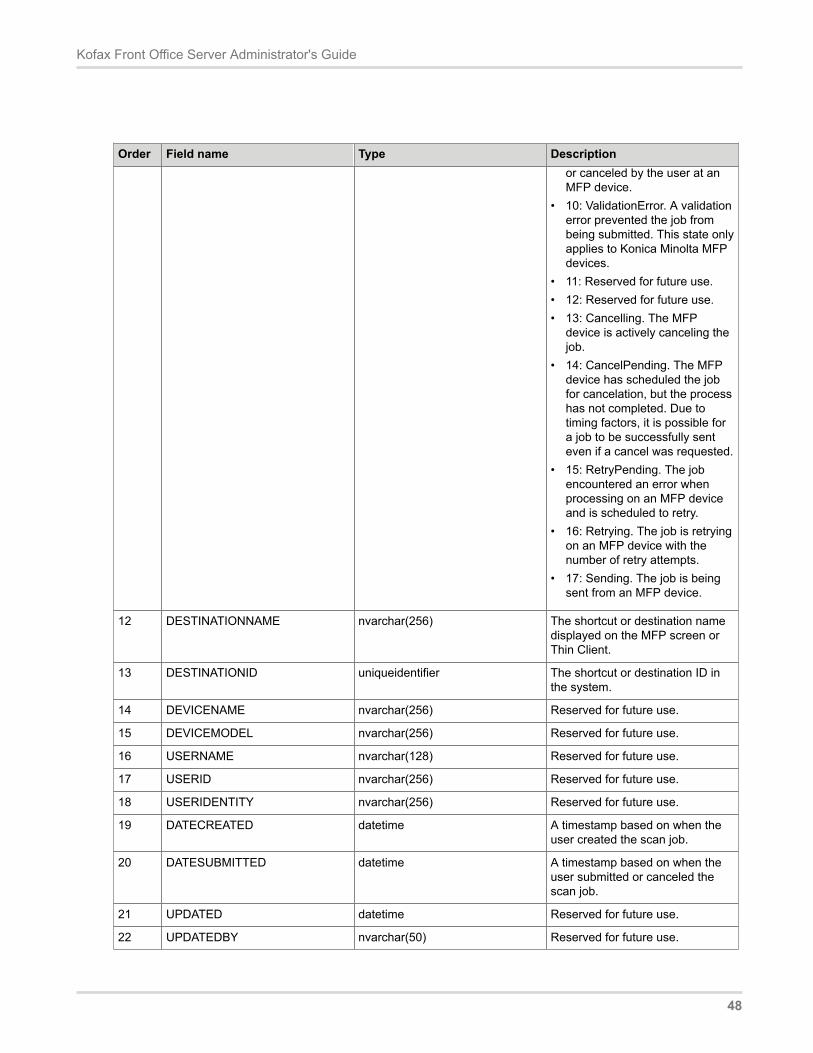
Kofax Front Office Server Administrator's Guide
Order Field name Type Descriptionor canceled by the user at anMFP device.
• 10: ValidationError. A validationerror prevented the job frombeing submitted. This state onlyapplies to Konica Minolta MFPdevices.
• 11: Reserved for future use.• 12: Reserved for future use.• 13: Cancelling. The MFP
device is actively canceling thejob.
• 14: CancelPending. The MFPdevice has scheduled the jobfor cancelation, but the processhas not completed. Due totiming factors, it is possible fora job to be successfully senteven if a cancel was requested.
• 15: RetryPending. The jobencountered an error whenprocessing on an MFP deviceand is scheduled to retry.
• 16: Retrying. The job is retryingon an MFP device with thenumber of retry attempts.
• 17: Sending. The job is beingsent from an MFP device.
12 DESTINATIONNAME nvarchar(256) The shortcut or destination namedisplayed on the MFP screen orThin Client.
13 DESTINATIONID uniqueidentifier The shortcut or destination ID inthe system.
14 DEVICENAME nvarchar(256) Reserved for future use.
15 DEVICEMODEL nvarchar(256) Reserved for future use.
16 USERNAME nvarchar(128) Reserved for future use.
17 USERID nvarchar(256) Reserved for future use.
18 USERIDENTITY nvarchar(256) Reserved for future use.
19 DATECREATED datetime A timestamp based on when theuser created the scan job.
20 DATESUBMITTED datetime A timestamp based on when theuser submitted or canceled thescan job.
21 UPDATED datetime Reserved for future use.
22 UPDATEDBY nvarchar(50) Reserved for future use.
48

Kofax Front Office Server Administrator's Guide
Order Field name Type Description
23 CREATED datetime Reserved for future use.
24 CREATEDBY nvarchar(50) Reserved for future use.
Turning off verbose error messagesIf the sent data does not match the content type, a long error message is displayed that includes thestacktrace. If you would rather include that message in the log, modify web.config for the Kofax FrontOffice Server as follows.
1. Change the includeExceptionDetailInFaults setting to False. If this setting does not appear inweb.config, add the following line:<serviceDebug includeExceptionDetailInFaults="False" />
2. Make sure that the server log is enabled. If not, change the settings as shown or add these lines ifthey are not in web.config:<system.serviceModel> <diagnostics> <messageLogging logEntireMessage=”true” logMalformedMessages=”true” logMessagesAtServiceLevel=”true” logMessagesAtTransportLevel=”true” /> </diagnostics> </system.serviceModel> <system.diagnostics> <sources> <source name=”System.ServiceModel” switchValue=”Information, ActivityTracing” propagateActivity=”true”> <listeners> <add name=”traceListener” type=”System.Diagnostics.XmlWriterTraceListener” initializeData= “C:\Temp\SvcLog\Traces.svclog” /> </listeners> </source> </sources> </system.diagnostics>
Troubleshooting for submission errorsIf there is an error submitting a batch, an XML file containing the description of the error andthe batch information is created in the \ProgramData\Kofax\Front Office Server\Log\Service\Release_Error and \ProgramData\Kofax\Front Office Server\Log\WebApp\Release_Error folders, along with subfolders containing any document images.
The XML file is readable by the Kofax Capture XML Import Connector, which can be used to import thebatch after any errors are corrected.
To run the XML Import Connector, the user must have rights to the Scan module and the batch classeslisted in the XML file. The Scan module must also be added to the batch class. In addition, one of thefollowing must be true:• You are logged on to the computer as one of the linked users.
49

Kofax Front Office Server Administrator's Guide
• You add the UserID and Password attributes of a Kofax Capture local user to the <ImportSession>element in the XML file.
The example below illustrates the second bullet above: adding an Admin user credentials to the element.
<ImportSession xmlns:xsi="http://www.w3.org/2001/XMLSchema-instance"xmlns:xsd="http://www.w3.org/2001/XMLSchema" DeleteBatchOnError="1"UserID="Admin" Password="">
Bar code supportKofax Front Office Server recognizes page-level bar codes on documents sent from MFPs to shortcuts orto the Inbox. If you set up an index field for a page-level bar code, the value of the bar code can be readwhen the document is scanned.
When indexing on the MFP, the bar code values do not display on the front panel because scanning takesplace after indexing. If the user enters a value for an index field with a page-level bar code, the user-entered value is used instead of the recognized bar code value. If the user does not change the defaultvalue or clear the index field, the recognized bar code value will be populated at the server.
In the Thin Client, the recognized value of the bar code is displayed and can be changed by the user. Aswith the MFP, the user-supplied value takes precedence over any recognized bar code value.
To enable bar code support, in the Settings - Advanced tab, set BarEnable in the vrs-default.propertiesnamespace to the appropriate value for the bar code you are using. See the Kofax Capturedocumentation for more information.
Changing default VRS settingsDocuments scanned into the Thin Client using the scanning component use the settings specified in theScanner Settings window. Documents scanned or imported using other methods are processed by KofaxVirtualReScan (VRS) based on settings in the vrs-default.properties namespace.
VRS settings also affect the bar codes used on coversheets. Note the following:• Different bar code types can be used on any page by adding the values specifying the type. For
example, to use a Code 128 bar code with a value of 4 and PDF417 with a value of 2048, enter 2052 (4+ 2048).
• Coversheet bar codes must include PDF417 as one of the bar code types. Therefore, the value for thebarcode type on the coversheet must be at least 2048.
Important Bitonal images will always remain in the DPI that the image is scanned at the MFP. Inother words, if the MFP user changes the DPI settings directly at the MFP, that setting will override thesettings selected in the shortcut.
1. Start the Administration Console as described in Starting the Administration Console. Log on as auser with administrator rights.
50
Kofax Front Office Server Administrator's Guide
2. On the Settings - Advanced tab, in the namespace vrs-default.properties, modify the values ofthe properties you want to change. Acceptable values for each property are documented in thecomments for each property directly in the Help. For example, the ColorMode property controls thecolor format of the image:# Specifies the color format of the output image.# 1=color, 2=grayscale, 3=black/white (Bitonal)ColorMode=3So, if you want to change to color scanning and your scanner supports color, change the value to 1.
3. Click Save. The changes are applied to the next scan.
Log filesKofax Front Office Server generates log files when certain events occur. Besides the log files generatedduring installation (and mentioned in the Kofax Front Office Server Installation Guide), log files aregenerated and updated during processing.
The log files are located in C:\ProgramData\Kofax\Front Office Server\Log in the Serviceand WebApp folders. Log files can be viewed in any text editor.
The primary log file is kfs.log. It includes a list of activities performed by Kofax Front Office Server.Additional log files are created to track database activities, communication with MFPs (which are locatedin the WebApp folder), and processes. If there is a system failure, see kfs.log and the log files that weremost recently updated for any error messages.
Changing folders for log filesYou can change the folders where log files are located. We recommend storing log files on a separatepartition from the application and rotate paths regularly.
1. In the Services application, shut down the Kofax Front Office Server service.2. In Internet Information Services (IIS) Manager, shut down the Kofax Front Office Server app pool.3. Navigate to the C:\Program Files (x86)\Kofax\Front Office Server 4.3\bin folder
and open the following configuration files in a text editor:• log4net.config• log4net.worker.config
4. Locate the following line in each of these files:<file type="log4net.Util.PatternString" value="%property{LogFolder}/%property{LogFile}" />
Where %property{LogFolder} is a variable used by Kofax Front Office Server to pass thefolder name, and %property{ErrorLogFile} is the variable for the log file name. When you arefinished, save the file.Example To store logs in D:\ServerLogs, change the value as follows:<file type="log4net.Util.PatternString" value="D:\ServerLogs/%property{LogFile}" />
5. Make the same change to the other configuration file.6. In Internet Information Services (IIS) Manager, restart the Kofax Front Office Server app pool.
51

Kofax Front Office Server Administrator's Guide
7. In the Services application, restart the Kofax Front Office Server service.
Free drive spaceThe Kofax Front Office Server database expands in size as it accumulates logs and data. If destinationtypes go offline for a prolonged period of time, requests are queued on the server, which also consumeshard drive space. If the hard drive runs out of space, Kofax Front Office Server may operate unpredictably.
Tip You can monitor log files for any drive space errors.
Request blocking when drive space is limitedWhen drive space reaches a minimum threshold (the default minimum threshold is 5 GB), Kofax FrontOffice Server blocks requests until more drive space is made available. You can adjust this amount byediting the properties in the system.resource.checker.properties namespace in the Administration ConsoleSettings - Advanced tab.
52


