Overview This document provides information about version 1.1.3 of the Hirsch Video Integration, which is a separately licensed software product that provides the interface between Velocity 3.6 and a digital video recorder (DVR) or network video recorder (NVR). The following plug-ins are available to support a particular manufacturer's model of DVR or NVR:
• The Aventura plug-in supports an Aventura Technologies Hybrid DVR which is controlled by version 8.5.1.14194 or later of Aventura's Video Management System, and uses version 8.5.1.14080 or later of Aventura's SDK. (Velocity 3.6 requires version 1.1.3.1 of this plug-in.)
• The American Dynamics plug-in supports either an Intellex DVR which is controlled by version 5.02 or later of American Dynamics's Intellex Video Management System and Network Client and uses version 9.0.597.79 or later of American Dynamics's SDK, or a VideoEdge NVR which is controlled by version 4.5.0.698 or later of American Dynamics's Victor Video Management System and uses version 9.0.597.79 or later of American Dynamics's SDK. (Velocity 3.6 requires version 1.1.3.4 of this plug-in.)
After you license and install this integration, it extends the Velocity user interface to include numerous features which are documented in a context-sensitive help system that is delivered in a file named VideoIntegration.chm. Be sure to read that help system for important information about how to configure and use this integration.
NOTE: Because there are no new features or bug fixes in this release of this integration, its help file has not been updated.
In this document, there is information about:
• System Requirements
• Licensing and Installing this product
• the Known Issues in this release
System Requirements Besides this Hirsch Video Integration (and either the Aventura plug-in or the American Dynamics plug-in), your system must include the following components:
• A physical access control system with various hardware components controlled by version 3.6 of the Hirsch Velocity security management system software
• A video surveillance system with cameras connected to either:
an Aventura DVR that is controlled by version 8.5.1.14194 of Aventura’s Video Management System software (and uses version 8.5.1.14080 of Aventura’s SDK)
Page 2 of 16
an Intellex DVR which is controlled by version 5.02 or later of American Dynamics's Intellex Video Management System and Network Client and uses version 9.0.597.79 or later of American Dynamics's SDK
a VideoEdge NVR which is controlled by version 4.5.0.698 or later of American Dynamics's Victor Video Management System and uses version 9.0.597.79 or later of American Dynamics's SDK
Licensing and Installing this Product Before you can install the Hirsch Video Integration (and a DVR plug-in) on your Velocity Server, you must obtain a separate license and activate it using Velocity’s License Manager. After installing the integration, you must also perform a few configuration and setup tasks.
NOTE: The Hirsch Video Integration (and a DVR plug-in) only needs to be installed on your Velocity Server. Any remote Velocity Clients will automatically try to be updated the next time they are restarted and connect to the updated Velocity Server. However, the client update will fail with an “Access Denied” message unless the Velocity operator is both a member of the Velocity Administrators group and has the Windows local Administrator privilege to install software on that computer.
Licensing the Hirsch Video Integration and DVR Plug-in Prerequisites: To license version 1.1.3 of the Hirsch Video Integration, you will need a licensed Velocity 3.6 system, and a personal computer with email access so you can provide Identiv with information about your Velocity system and receive a lengthy license key.
1. Contact Identiv’s Sales department to purchase a license for this video integration (and a DVR plug-in).
2. They should ask you to send them an email message containing the Server ID of your Velocity Server. (Exchanging this information via email instead of by phone ensures that it is correct, and provides us with an email address so we can send you the license key.) The Server ID is obtained from the Velocity License Manager.
A. Open the Velocity License Manager.
• If the Velocity Service Control Manager icon is displayed in the Windows taskbar, right-click on it and choose Velocity License Manager from the pop-up menu.
• If the Velocity Service Control Manager icon is not displayed in the Windows taskbar, click the upwards-pointing triangle on the left side of the taskbar to show the hidden icons for additional programs.
Page 3 of 16
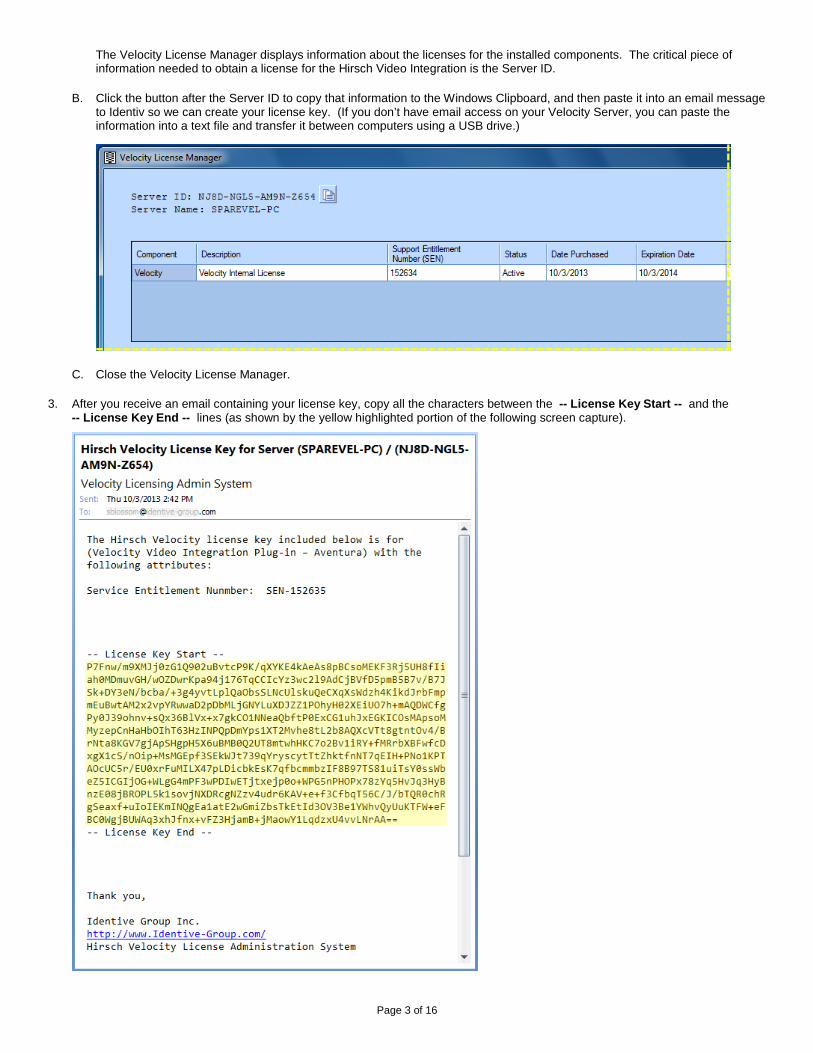
The Velocity License Manager displays information about the licenses for the installed components. The critical piece of information needed to obtain a license for the Hirsch Video Integration is the Server ID.
B. Click the button after the Server ID to copy that information to the Windows Clipboard, and then paste it into an email message to Identiv so we can create your license key. (If you don’t have email access on your Velocity Server, you can paste the information into a text file and transfer it between computers using a USB drive.)
C. Close the Velocity License Manager.
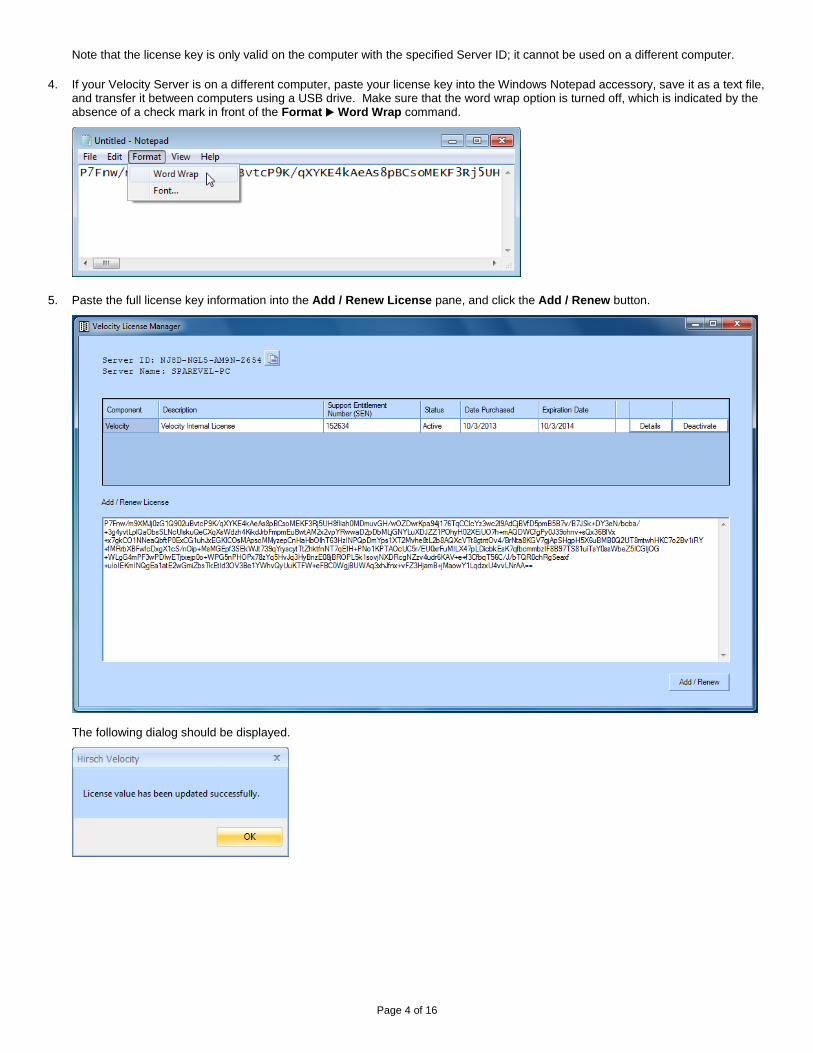
3. After you receive an email containing your license key, copy all the characters between the -- License Key Start -- and the -- License Key End -- lines (as shown by the yellow highlighted portion of the following screen capture).
Page 4 of 16
Note that the license key is only valid on the computer with the specified Server ID; it cannot be used on a different computer.
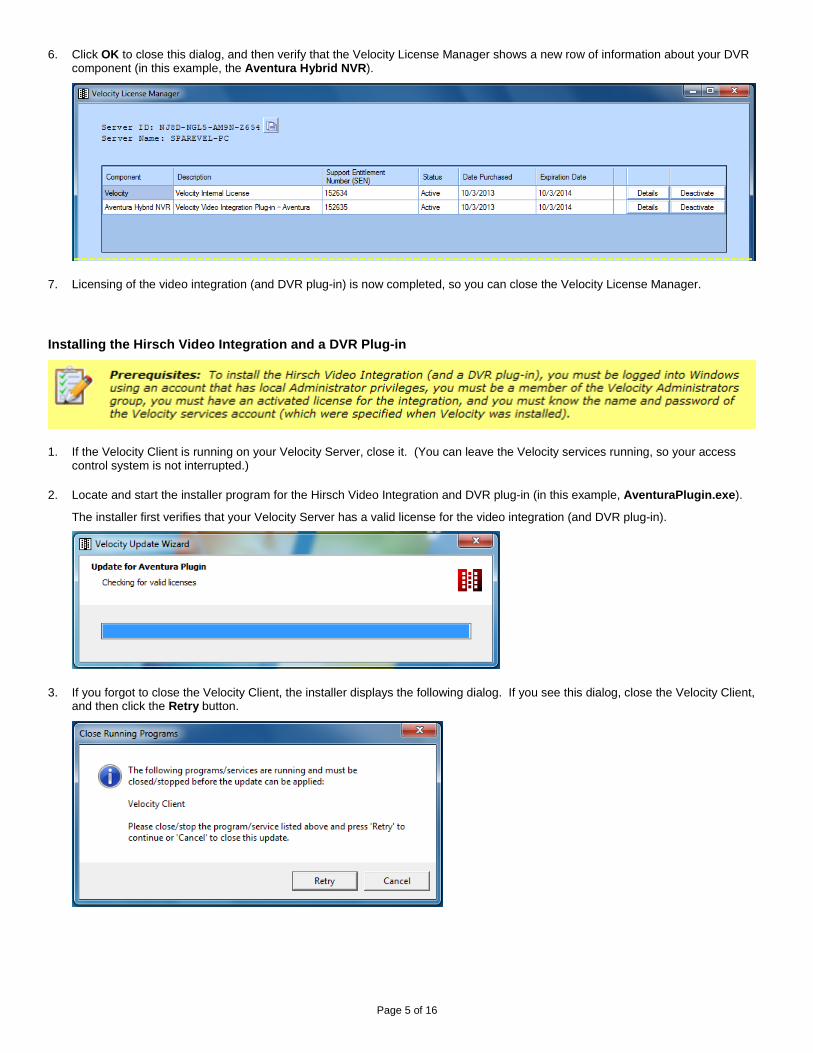
4. If your Velocity Server is on a different computer, paste your license key into the Windows Notepad accessory, save it as a text file, and transfer it between computers using a USB drive. Make sure that the word wrap option is turned off, which is indicated by the absence of a check mark in front of the Format ▶ Word Wrap command.
5. Paste the full license key information into the Add / Renew License pane, and click the Add / Renew button.
The following dialog should be displayed.
Page 5 of 16
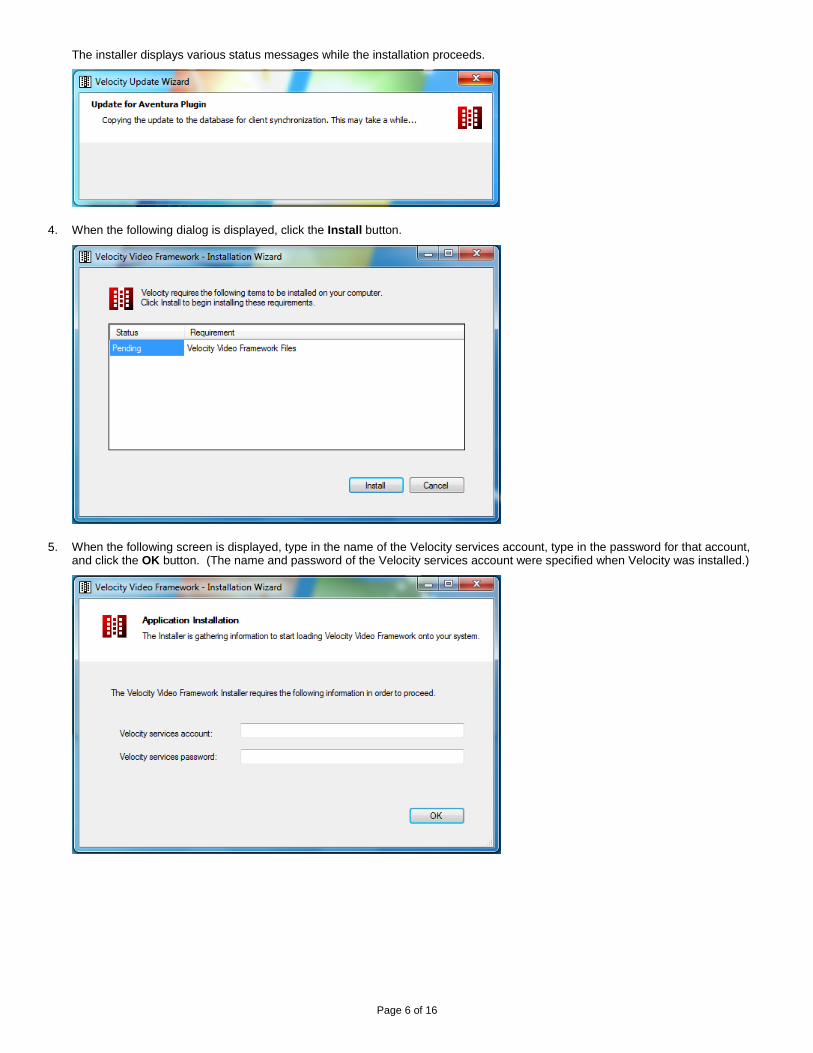
6. Click OK to close this dialog, and then verify that the Velocity License Manager shows a new row of information about your DVR component (in this example, the Aventura Hybrid NVR).
7. Licensing of the video integration (and DVR plug-in) is now completed, so you can close the Velocity License Manager.
Installing the Hirsch Video Integration and a DVR Plug-in
1. If the Velocity Client is running on your Velocity Server, close it. (You can leave the Velocity services running, so your access control system is not interrupted.)
2. Locate and start the installer program for the Hirsch Video Integration and DVR plug-in (in this example, AventuraPlugin.exe).
The installer first verifies that your Velocity Server has a valid license for the video integration (and DVR plug-in).
3. If you forgot to close the Velocity Client, the installer displays the following dialog. If you see this dialog, close the Velocity Client, and then click the Retry button.
Page 6 of 16
The installer displays various status messages while the installation proceeds.
4. When the following dialog is displayed, click the Install button.
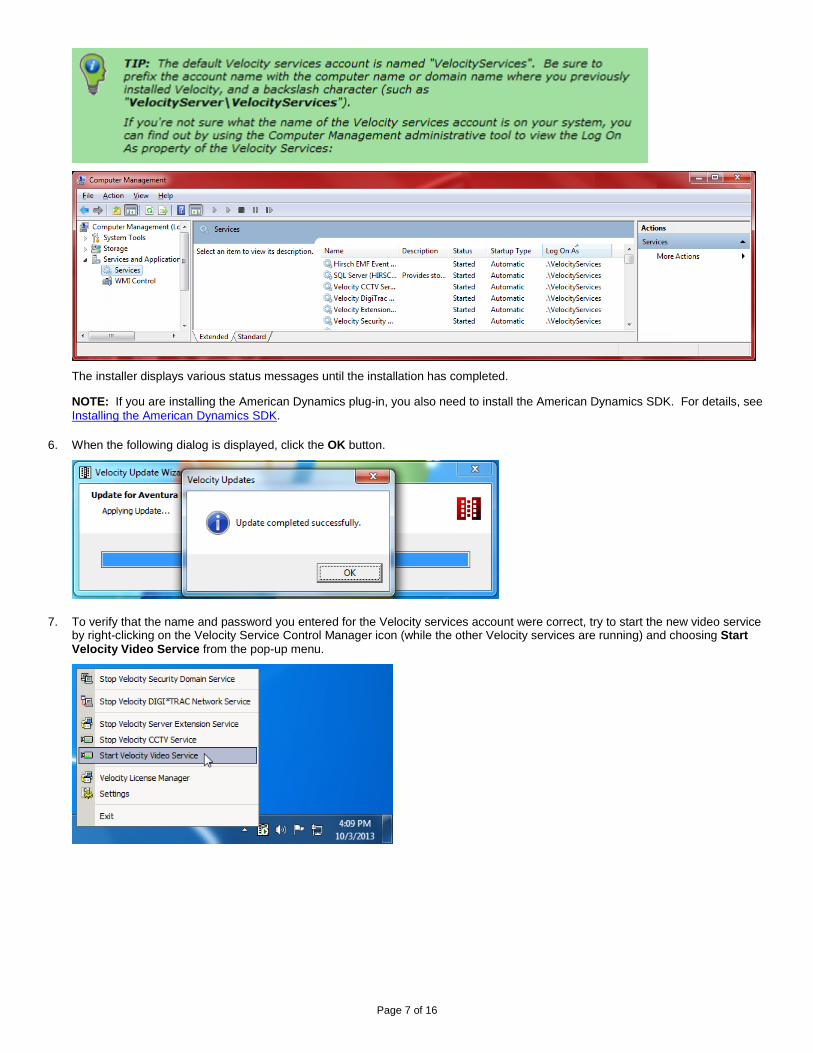
5. When the following screen is displayed, type in the name of the Velocity services account, type in the password for that account, and click the OK button. (The name and password of the Velocity services account were specified when Velocity was installed.)
Page 7 of 16
The installer displays various status messages until the installation has completed.
NOTE: If you are installing the American Dynamics plug-in, you also need to install the American Dynamics SDK. For details, see Installing the American Dynamics SDK.
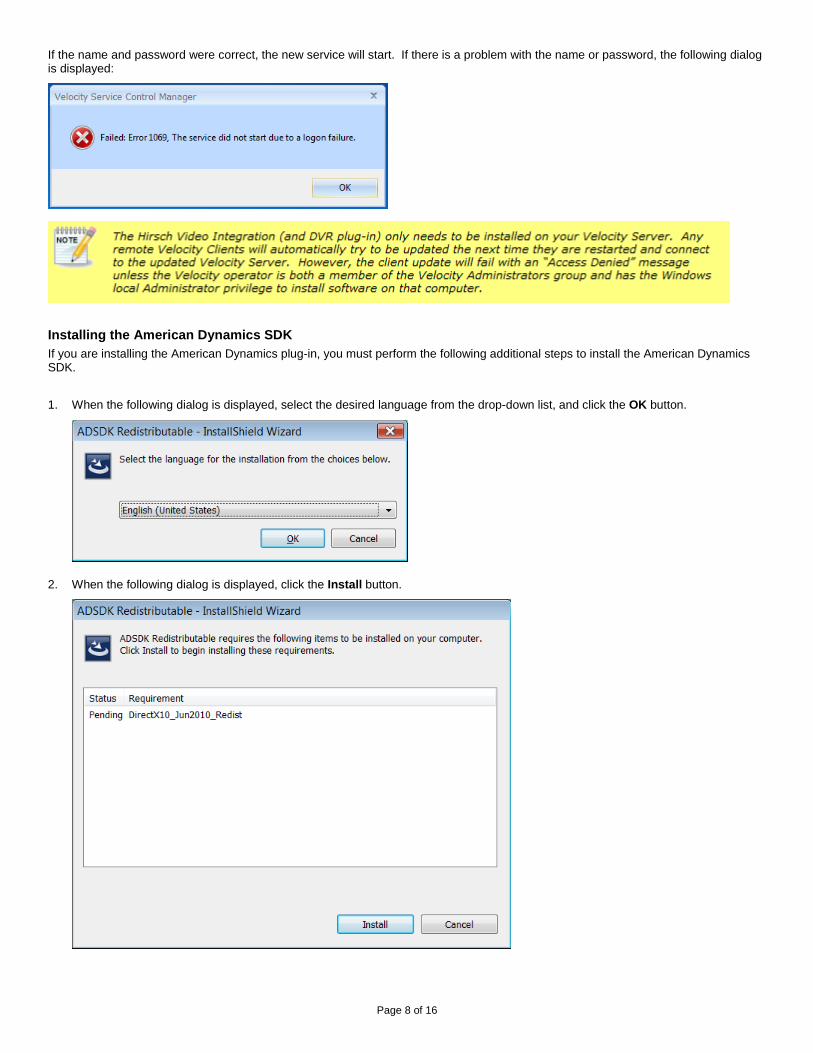
6. When the following dialog is displayed, click the OK button.
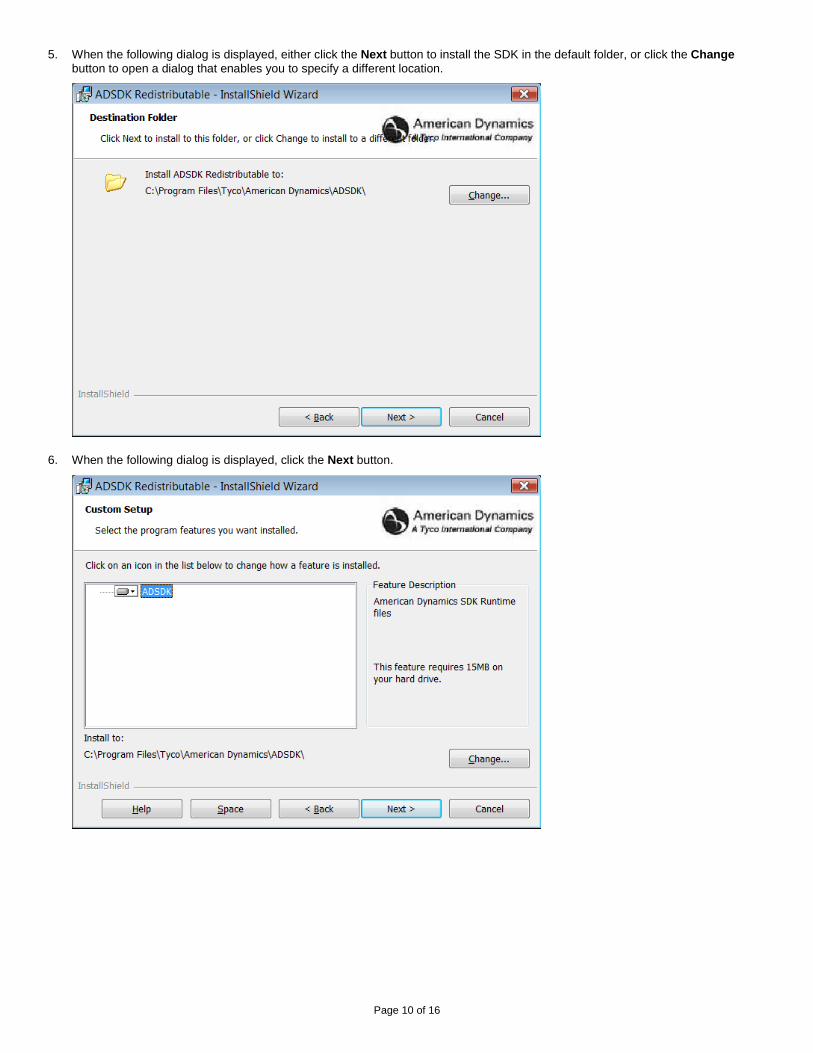
7. To verify that the name and password you entered for the Velocity services account were correct, try to start the new video service by right-clicking on the Velocity Service Control Manager icon (while the other Velocity services are running) and choosing Start Velocity Video Service from the pop-up menu.
Page 8 of 16
If the name and password were correct, the new service will start. If there is a problem with the name or password, the following dialog is displayed:
Installing the American Dynamics SDK If you are installing the American Dynamics plug-in, you must perform the following additional steps to install the American Dynamics SDK.
1. When the following dialog is displayed, select the desired language from the drop-down list, and click the OK button.
2. When the following dialog is displayed, click the Install button.
Page 9 of 16
3. When the following dialog is displayed, click the Next button.
4. When the following dialog is displayed, select the “I accept the terms in the license agreement” option, and click the Next button.
Page 10 of 16
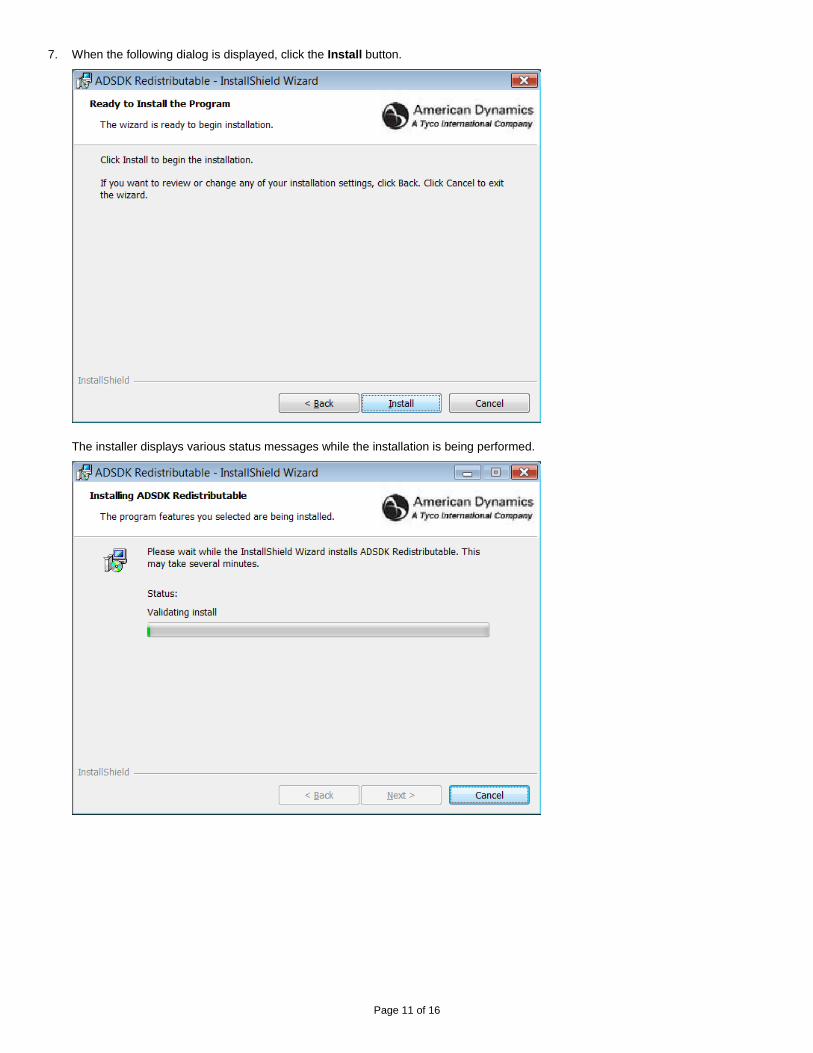
5. When the following dialog is displayed, either click the Next button to install the SDK in the default folder, or click the Change button to open a dialog that enables you to specify a different location.
6. When the following dialog is displayed, click the Next button.
Page 11 of 16
7. When the following dialog is displayed, click the Install button.
The installer displays various status messages while the installation is being performed.
Page 12 of 16
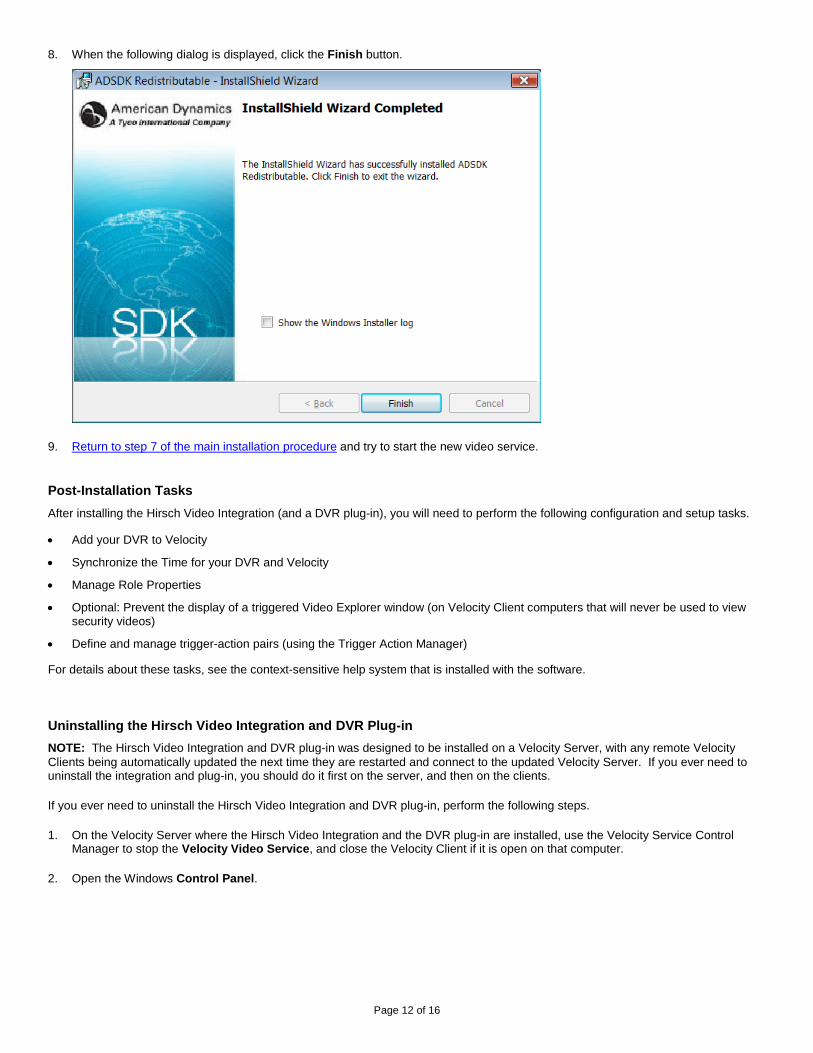
8. When the following dialog is displayed, click the Finish button.
9. Return to step 7 of the main installation procedure and try to start the new video service.
Post-Installation Tasks After installing the Hirsch Video Integration (and a DVR plug-in), you will need to perform the following configuration and setup tasks.
• Add your DVR to Velocity
• Synchronize the Time for your DVR and Velocity
• Manage Role Properties
• Optional: Prevent the display of a triggered Video Explorer window (on Velocity Client computers that will never be used to view security videos)
• Define and manage trigger-action pairs (using the Trigger Action Manager)
For details about these tasks, see the context-sensitive help system that is installed with the software.
Uninstalling the Hirsch Video Integration and DVR Plug-in NOTE: The Hirsch Video Integration and DVR plug-in was designed to be installed on a Velocity Server, with any remote Velocity Clients being automatically updated the next time they are restarted and connect to the updated Velocity Server. If you ever need to uninstall the integration and plug-in, you should do it first on the server, and then on the clients.
If you ever need to uninstall the Hirsch Video Integration and DVR plug-in, perform the following steps.
1. On the Velocity Server where the Hirsch Video Integration and the DVR plug-in are installed, use the Velocity Service Control Manager to stop the Velocity Video Service, and close the Velocity Client if it is open on that computer.
2. Open the Windows Control Panel.
Page 13 of 16
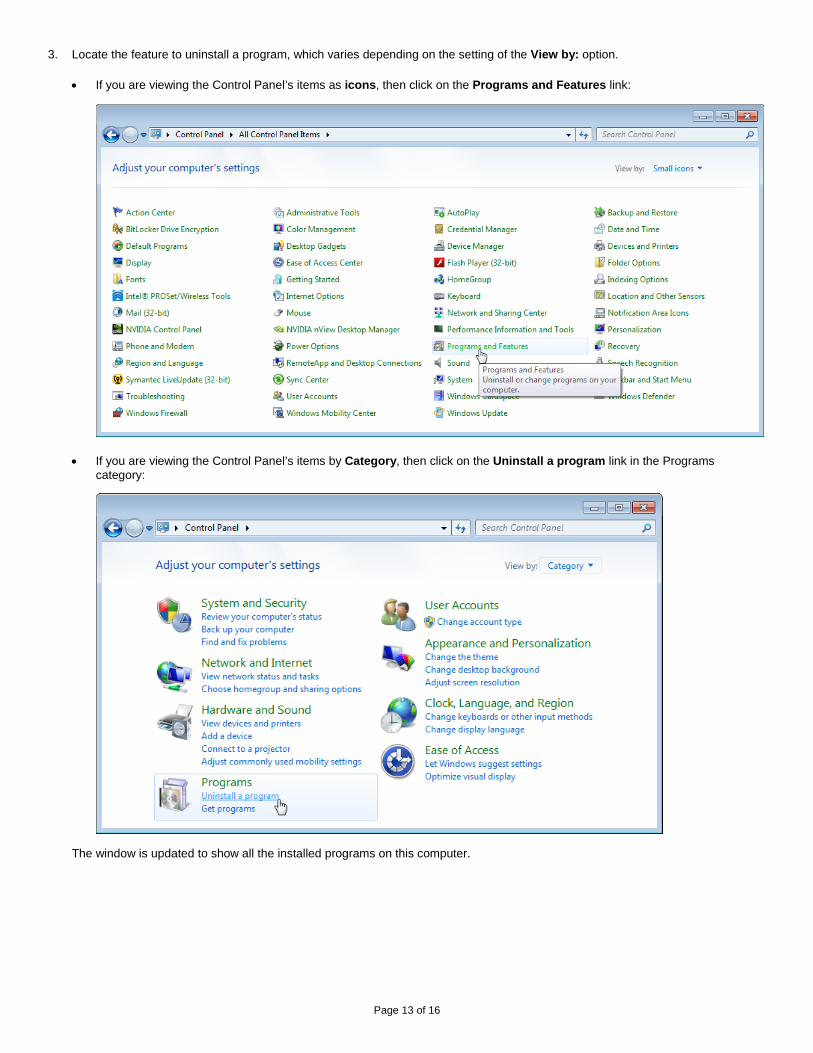
3. Locate the feature to uninstall a program, which varies depending on the setting of the View by: option.
• If you are viewing the Control Panel’s items as icons, then click on the Programs and Features link:
• If you are viewing the Control Panel’s items by Category, then click on the Uninstall a program link in the Programs category:
The window is updated to show all the installed programs on this computer.
Page 14 of 16
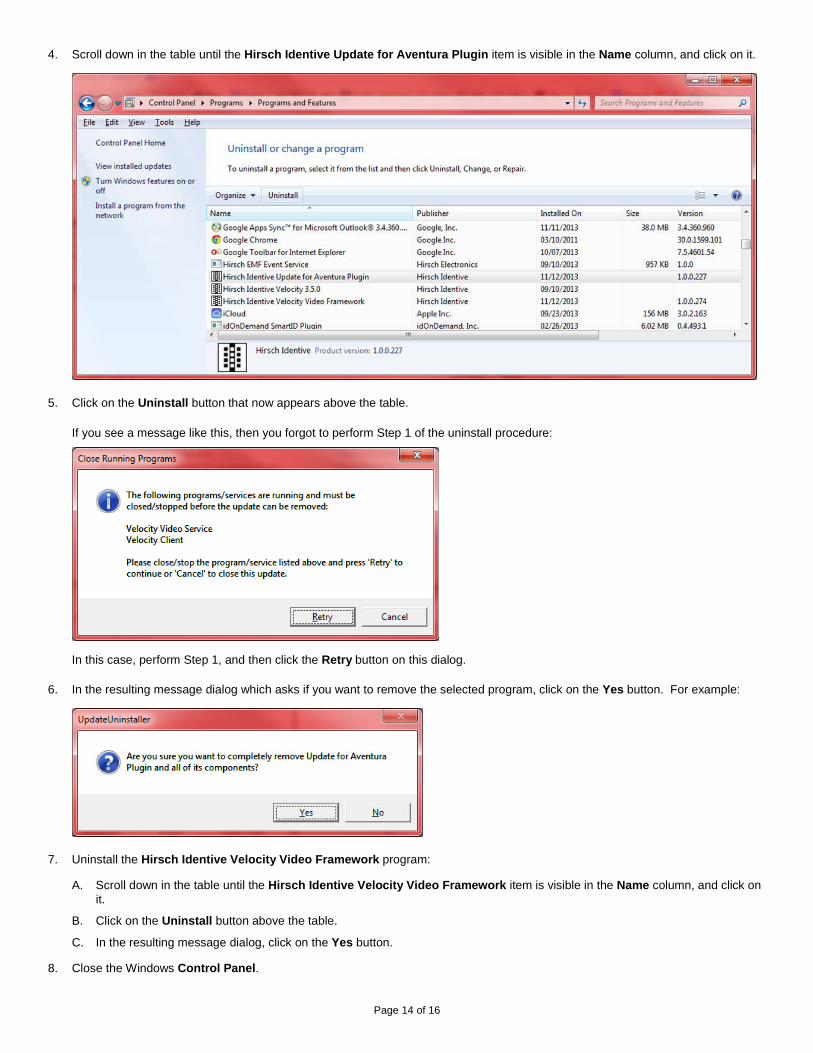
4. Scroll down in the table until the Hirsch Identive Update for Aventura Plugin item is visible in the Name column, and click on it.
5. Click on the Uninstall button that now appears above the table.
If you see a message like this, then you forgot to perform Step 1 of the uninstall procedure:
In this case, perform Step 1, and then click the Retry button on this dialog.
6. In the resulting message dialog which asks if you want to remove the selected program, click on the Yes button. For example:
7. Uninstall the Hirsch Identive Velocity Video Framework program:
A. Scroll down in the table until the Hirsch Identive Velocity Video Framework item is visible in the Name column, and click on it.
B. Click on the Uninstall button above the table.
C. In the resulting message dialog, click on the Yes button.
8. Close the Windows Control Panel.
Page 15 of 16
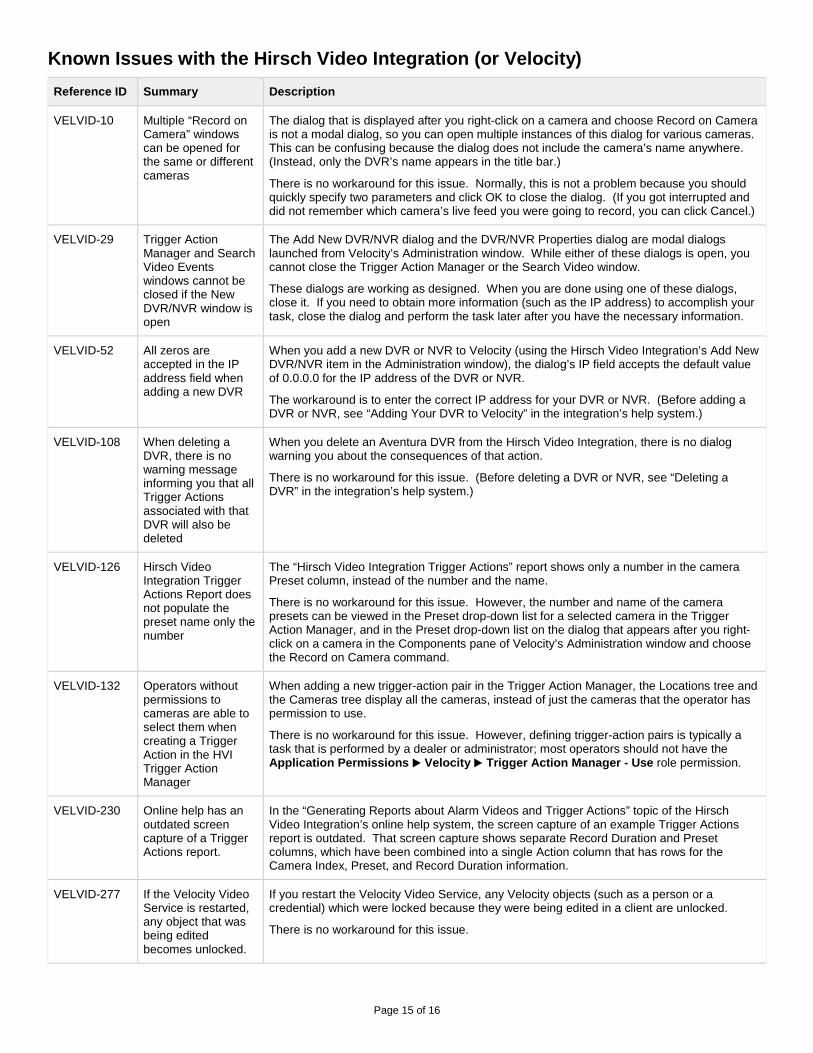
Known Issues with the Hirsch Video Integration (or Velocity) Reference ID Summary Description
VELVID-10 Multiple “Record on Camera” windows can be opened for the same or different cameras
The dialog that is displayed after you right-click on a camera and choose Record on Camera is not a modal dialog, so you can open multiple instances of this dialog for various cameras. This can be confusing because the dialog does not include the camera’s name anywhere. (Instead, only the DVR’s name appears in the title bar.)
There is no workaround for this issue. Normally, this is not a problem because you should quickly specify two parameters and click OK to close the dialog. (If you got interrupted and did not remember which camera’s live feed you were going to record, you can click Cancel.)
VELVID-29 Trigger Action Manager and Search Video Events windows cannot be closed if the New DVR/NVR window is open
The Add New DVR/NVR dialog and the DVR/NVR Properties dialog are modal dialogs launched from Velocity’s Administration window. While either of these dialogs is open, you cannot close the Trigger Action Manager or the Search Video window.
These dialogs are working as designed. When you are done using one of these dialogs, close it. If you need to obtain more information (such as the IP address) to accomplish your task, close the dialog and perform the task later after you have the necessary information.
VELVID-52 All zeros are accepted in the IP address field when adding a new DVR
When you add a new DVR or NVR to Velocity (using the Hirsch Video Integration’s Add New DVR/NVR item in the Administration window), the dialog’s IP field accepts the default value of 0.0.0.0 for the IP address of the DVR or NVR.
The workaround is to enter the correct IP address for your DVR or NVR. (Before adding a DVR or NVR, see “Adding Your DVR to Velocity” in the integration’s help system.)
VELVID-108 When deleting a DVR, there is no warning message informing you that all Trigger Actions associated with that DVR will also be deleted
When you delete an Aventura DVR from the Hirsch Video Integration, there is no dialog warning you about the consequences of that action.
There is no workaround for this issue. (Before deleting a DVR or NVR, see “Deleting a DVR” in the integration’s help system.)
VELVID-126 Hirsch Video Integration Trigger Actions Report does not populate the preset name only the number
The “Hirsch Video Integration Trigger Actions” report shows only a number in the camera Preset column, instead of the number and the name.
There is no workaround for this issue. However, the number and name of the camera presets can be viewed in the Preset drop-down list for a selected camera in the Trigger Action Manager, and in the Preset drop-down list on the dialog that appears after you right-click on a camera in the Components pane of Velocity’s Administration window and choose the Record on Camera command.
VELVID-132 Operators without permissions to cameras are able to select them when creating a Trigger Action in the HVI Trigger Action Manager
When adding a new trigger-action pair in the Trigger Action Manager, the Locations tree and the Cameras tree display all the cameras, instead of just the cameras that the operator has permission to use.
There is no workaround for this issue. However, defining trigger-action pairs is typically a task that is performed by a dealer or administrator; most operators should not have the Application Permissions ▶ Velocity ▶ Trigger Action Manager - Use role permission.
VELVID-230 Online help has an outdated screen capture of a Trigger Actions report.
In the “Generating Reports about Alarm Videos and Trigger Actions” topic of the Hirsch Video Integration’s online help system, the screen capture of an example Trigger Actions report is outdated. That screen capture shows separate Record Duration and Preset columns, which have been combined into a single Action column that has rows for the Camera Index, Preset, and Record Duration information.
VELVID-277 If the Velocity Video Service is restarted, any object that was being edited becomes unlocked.
If you restart the Velocity Video Service, any Velocity objects (such as a person or a credential) which were locked because they were being edited in a client are unlocked.
There is no workaround for this issue.
Page 16 of 16
Reference ID Summary Description
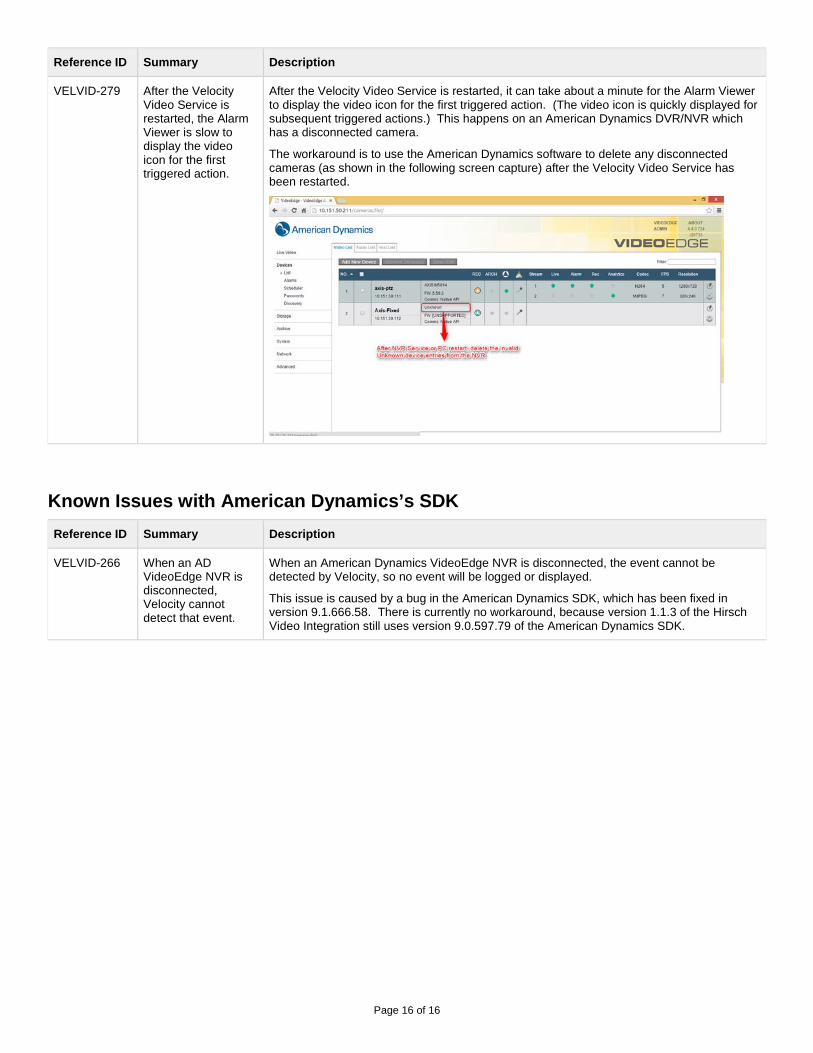
VELVID-279 After the Velocity Video Service is restarted, the Alarm Viewer is slow to display the video icon for the first triggered action.
After the Velocity Video Service is restarted, it can take about a minute for the Alarm Viewer to display the video icon for the first triggered action. (The video icon is quickly displayed for subsequent triggered actions.) This happens on an American Dynamics DVR/NVR which has a disconnected camera.
The workaround is to use the American Dynamics software to delete any disconnected cameras (as shown in the following screen capture) after the Velocity Video Service has been restarted.
Known Issues with American Dynamics’s SDK Reference ID Summary Description
VELVID-266 When an AD VideoEdge NVR is disconnected, Velocity cannot detect that event.
When an American Dynamics VideoEdge NVR is disconnected, the event cannot be detected by Velocity, so no event will be logged or displayed.
This issue is caused by a bug in the American Dynamics SDK, which has been fixed in version 9.1.666.58. There is currently no workaround, because version 1.1.3 of the Hirsch Video Integration still uses version 9.0.597.79 of the American Dynamics SDK.