27
Department Art Video Pre/Post Production Reference Guide
| Date post: | 29-Jun-2018 |
| Category: |
Documents |
| Upload: | truongnhan |
| View: | 220 times |
| Download: | 0 times |

Depar tment Ar t
Video Pre/Post Product ion
Reference Guide

The Department of Art Media Research Lab (DAMRL) offers
students access to the equipment necessary to realise both
production and post-produciton aspects of time based audio/
video projects. This handbook is intended as a very general
indicator of (and introduction to) some of the many things to
be considered about the processes involved. Though some
information may seem like good old fashioned common sense it is
worth noting that a little extra care and attention during each of
the stages of production will save a considerable amount of time
in the long run.
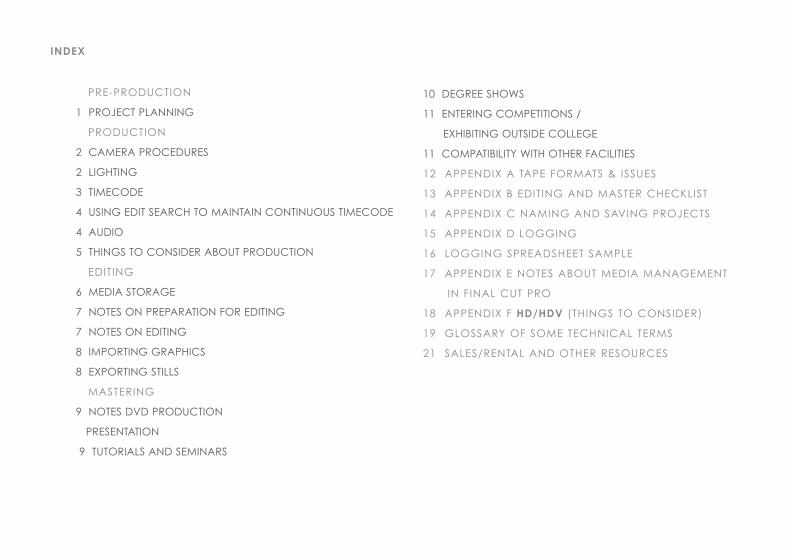
index
PRe-PRoDucTion
1 PRojecT PLAnning
PRoDucTion
2 cAMeRA PRoceDuRes
2 LighTing
3 TiMecoDe
4 using eDiT seARch To MAinTAin conTinuous TiMecoDe
4 AuDio
5 Things To consiDeR AbouT PRoDucTion
eDiTing
6 MeDiA sToRAge
7 noTes on PRePARATion foR eDiTing
7 noTes on eDiTing
8 iMPoRTing gRAPhics
8 exPoRTing sTiLLs
MAsTeRing
9 noTes DvD PRoDucTion
PResenTATion
9 TuToRiALs AnD seMinARs
10 DegRee shows
11 enTeRing coMPeTiTions /
exhibiTing ouTsiDe coLLege
11 coMPATibiLiTy wiTh oTheR fAciLiTies
12 APPenDix A TAPe foRMATs & issues
13 APPenDix b eDiTing AnD MAsTeR checkLisT
14 APPenDix c nAMing AnD sAving PRojecTs
15 APPenDix D Logging
16 Logging sPReADsheeT sAMPLe
17 APPenDix e noTes AbouT MeDiA MAnAgeMenT
in finAL cuT PRo
18 APPenDix f Hd/HdV (Things To consiDeR)
19 gLossARy of soMe TechnicAL TeRMs
21 sALes/RenTAL AnD oTheR ResouRces

• Make a list of the type of equipment required: eg. camera, tripod, microphone, lighting, etc.
• Determine how many tapes will be required for recording (an xtra one or two can’t hurt).
• calculate how much time you will need to shoot the footage / record the audio.
• check out the location for your shoot to ensure that extraneous ambient sounds will not adversely effect the audio of your
final piece. check whether the location has enough power outlets to run your equipment (lights etc.), or that everything
you need is powered by an independent source (e.g batteries etc). Also check the position of the power outlets to
ascertain the potential need for extension cords etc.
• The demand for borrowing college equipment is extremely high, please try to be flexible with your shooting schedule and
booking times.
• Allow adequate time to produce a project, the process very often takes longer than expected.
PRe-PROdUCTiOn
PROjeCT Planning
SOme ReleVanT qUeSTiOnS
• what are the conditions for the shoot (indoor/outdoor)?
• will extra lighting be required?
• what type of microphone will you need?
• have you obtained the consent of the people you are filming (a model release form may be required) ?
• Do you need a permit or permission to use the chosen location?
• is it a singular temporal event or will multiple takes, or multiple camera angles, be required?
1

• DAMRL cameras record in various formats: Mini Dv, hDv, full hD and Tapeless.
• if using tape for Dv or hDv put the lens cap on and record 30 seconds of black. This ‘leader’ allows the vTR to properly
‘preroll’ during editing allowing all of the recorded footage to potentially be used.
• Let the camera record for 10 seconds before and after shooting the scene/activity you want to capture. This again ensures
that no footage will be functionally unusable during the editing process.
• use manual focus as much as possible to avoid unwanted temporary image blurring that can occur in auto-focus mode.
• set the white balance correctly by pointing the camera to a white card (or other white surface) and manipulating the
white balance controls as described in the camera manual. The white card should be under the same type of light as that
of the subject you will be shooting. if the type of lighting or the lighting conditions change or the camera has been restarted
you need to reset your white balance.
• use manual controls whenever possible. in subdued lighing conditions manual exposure can often make the difference
between visually rich or grainy darks. Manual settings can also achieve effective ‘looks’ for footage (e.g washed out etc.).
• use proper lens tissue to clean the lens or use a camera brush to blow off the dust (the lab can supply these). Any other
seemingly soft tissue such as kleenex will scratch the lens.
• ensure that the batteries are fully charged.
• keep the camera dry. Try to avoid shooting in the rain, but if you must, ensure the camera is extremely well covered.
• Do not leave any equipment unattended, especially in your studio space. Do not leave it in your studio locker overnight.
• for indoor shoots, you will generally get the best results if you use a proper lighting kit (available from the Mec).
• Try to avoid mixing different lighting sources (ie. tungsten lights with daylight etc.).
• consider using white cards/paper to bounce light into darker areas, or filters & gels to diffuse and/or alter the light quality
2PROdUCTiOn
CameRa PROCedUReS
ligHTing

One of the singularly most important considerations with regards to project management, particularly in the editing stage,
is keeping continuous timecode on the dV tapes when recording original footage. Cameras, and subsequently editing
programs, understand how to locate footage on tapes by timecode.
• During recording the camera records essential information on the edge of the tape beyond the video image. At 25
frames per second the recorder assigns every frame a sequential time based number: eg. 00:05:20:24 (houRs: MinuTes:
seconDs: fRAMes @ 25/second). This number is called timecode.
(note: some view finders may only display hour:minutes:seconds, but the tape itself is still recording the frame rate version of
timecode).
• if recorded properly an hour long tape should have a timecode reading 00:00:00:00 at the beginning and 01:00:00:00 at
the end . This is called continuous timecode.
• if the camera starts recording on a part of the tape where there is no recording, and therefore no timecode, the counter
will start agin from 0 even if it is the middle of the tape. This is called broken timecode.
• The timecode will automatically stay continuous if Dv cameras are kept in ‘camera’ mode, and only used with the
record/standby button (even if the power is switched on and off). Do not feel restricted by this, there is a way to review
your footage and continue with unbroken timecode. (note: Remember to record 10 – 20 seconds of extra footage at the
beginning and end of each shot.)
• in Player mode, the camera is just like a vcR, so you can easily check what has been shot, the key is to reposition the
tape to just before the end of the last recorded timecode. if you go past it and start recording you will have broken
timecode which will make project management and editing difficult later on. in the media lab we ask people with broken
timecode tapes to make dub copies on to a new blank tape so the copy has continuous timecode (which would then be
used in editing).
• even after reviewing footage it is possible to keep the timecode continuos by using the edit search button feature.
3TimeCOde

• check audio levels using the camera’s meter and use headphones to monitor the sound being recorded. unwanted
sound can generally not be removed later, try to obtain a clean, balanced recording on location.
• consider using an external microphone as built in camera microphones often pick up the sound of the camera
mechanism.
• To minimise unwanted sounds, turn off any unnecessary electrical equipment in the room (fridges, fluorescent lighting,
electrical heaters and fans are particularly notorious noise producers). be aware that aircraft constantly fly over London
and the noise can be picked up during both exterior and interior shoots. Also beware of slamming doors and hammering
in the shared studio spaces of the college. Always monitor the audio with headphones.
• Place the microphone as closely as possible to the selected sound source (be careful while handling the microphone as
changing hand grips or moving cables can produce sounds that the microphone will pick up). Make sure the microphone
is not in frame.
4
aUdiO
USing ediT SeaRCH TO mainTain COnTinUOUS TimeCOde
• After viewing your material in Player mode switch back to camera mode.
• in camera mode, while looking through the viewfinder, use the edit search (+/-) (sometimes called rec search) button to
find the end of the last shot and position your tape a few seconds before the blank area of the tape begins (you should still
see the timecode in the viewfinder). essentially the edit search button momentarily turns the recording camera into a vcR
so you can see what’s recorded even though you are in record mode. when the button is released however the camera is
immediately ready to record. (note: Any material after this current tape position will be recorded over.)
• because the camera can now detect recorded timecode you can start recording again and the timecode will be
continuous!
• if you have broken timecode we advise you to dub your tape prior to comencing your editing. This is done by using the
copy Rack, please ask lab staff for assistance.
5
• your original tapes are the only link between the finished project and the editing program, take care of them. if, for
example, the media recorded on the computer becomes corrupted, lost or is accidentally deleted your edited project can
easily be rebuilt from the program information provided you still have your original tapes. dO nOT ReCORd OVeR ORiginal
FOOTage.
• Continuous timecode is important.
• Do not rely on post-production (i.e. editing or special effects software) to fix problems with the original footage. while
some simple qualities can be corrected (for example: colour changes), the quality of the footage you shoot is the basis
for the editing process and will essentiailly be evident throughout. Take a few extra steps and a little extra time to ensure
that the original camera shoot has the best set-up possible (white balance, lighting, exposure, focus etc.). (note: The Lab
occassionally offers classes on camera usage, and technicians are always available to answer questions.)
• Record 2 - 3 minutes of ambient (atmospheric) sound after shooting the intended material (this is extremely useful during
sound editing). every interior space has it’s own ‘room tone’ that can be adversely affected by the sound of the camera
motor, fluorescent lights, air-conditioning, boilers etc. ensure you have ‘quiet on the set’ while recording.
• Additional sound (music, fx etc.) can be mixed together during editing.
• A seperate audio recorder is also useful for recording audio on location and can easily be added to video material later.
The benefit of using a separate audio recorder is that you can concentrate the audio recording on subjects farther away
from the camera.
• Voiceovers can be recorded in the video Lab using the sound recording booth.
• note: it is difficult to remove unwanted sounds from sound recordings and it is therefore advisable to make sure that the
original audio recording is as clean as possible. A few extra minutes of preparation or trouble shooting at the recording
stage can save a great deal of time later in the editing processes.
THingS TO COnSideR abOUT PROdUCTiOn

6
• by it’s very nature video information requires a subtantial amount of computer storage space. before beginning the
editing process certain decisions should be made regarding the media storage settings the editing program assigns to each
individual project. if the project is very long or requires using a lot of footage settings will be different than a project that is
only afew minutes in duration (the difference between online and off line editing). Lab staff will discuss the nature of each
project with the individual student to determine the appropriate settings.
• Media should always be stored on a drive separate (either external or internal) from the computer’s main drive.you can
use your own hard drive provided it spins at at least 7200 rpm (so it should have a mains power plug).
• As all the lab’s editing stations are networked to a central media storage drive projects & media can be stored temporarily
on the lab server and transferred between editing stations. Projects not worked on for more than 31 days may be deleted
without notice.
• All media will be cleared from the drives at the end of each term (this is to allow for system maintenance). Therefore all
project edits need to be saved on to tape (cd for project files) before the end of each term.
ediTingmedia STORage (alSO See aPPendix e)
• unlike a still camera, footage shot on a video camera turned sideways will only appear upright if the television monitor
on which it is viewed is also turned sideways (which is not particularly good for the monitor) or if the footage is alternately
processed (which takes time and affects the look of the image). Think twice before turning the video camera sideways.
• As with video the overall quality of your initial audio remains the foundation from which any alterations or editing are
built. if the audio recording is noisy or unclear to begin with it will be much more difficult to clean up at a later date. giving
footage a ‘degraded’ quality is easier than trying to clean up a degrade image or audio file.
• if recording a number of different projects / programs on the same tape, or if source footage from a number of different
shoots is being recorded on the same tape and you want them to be demonstrably separate, record sections of black (i.e.
with the lens cap on) to separate the sequences. Do not fast forward the tape to a new position as this will only serve to
create a complex timecode issue.
nOTeS On PRePaRaTiOn FOR ediTing
• it is a good idea, and good practice, to preview footage even if it is hD tapeless. to determine which sections are needed
for the project. A copy of the footage on vhs tape or DvD that will show the tape’s actual timecode (‘burnt-in’) is an
easy way to look at the same tape many times without degrading the quality of the original Dv. This will allow you to log
(notate, see Appendix D) sections to be used during editing and speed up the capturing process. This logging procedure is
particularly useful if the project uses pieces from a number of tapes.
• video footage recorded on s-vhs, vhs, 8mm, hi8 and Digital 8 must be transferred to Mini Dv or DvcAM format prior to
editing. for 8mm, hi8 & Digital 8 formats, you will need to bring in your own camera to make the transfer.
• we recommed transferring audio on digitally or to Dv tape though this is not essential.
7
• if you want to keep a version of your edited sequence (timeline) before making alterations, duplicae and re-name your
sequence within the same project. This allows you the possibility of returning to an earlier version.
• before the end of each session, make a vhs/DvD copy (or digital file if showing on a laptop) of your work-in-progress. This
will allow you to review your work before the next editing session, or to get input from others.
• Please note: perfectly synchronised frame specific images to be shown on separate monitors/ projectors require
professional equipment not available through the college. Regular DvD or vhs players will slowly shift out of synch.
• Remember to SaVe your project often, especially after doing something difficult or complex (particularly when using
special effects programs such as After effects). Do not assume that the software will automatically save your work.
• back up your Personal Project Folder onto memory stick or rewritable cD as often as possible. As mentioned earlier it is
possible to rebuild your work from the notations embedded in the editing program’s project files should anything happen to
your media (audio/video files recorded in the computer). it is also helpful to regularly make a playable copy of your work in
progress.
nOTeS On ediTing

8
Mastering refers to the final hard copy version (MiniDv or full Quality Digital file) of the finished program from which either
tape copies, digital files, or future DvDs can subsequently be made. The master is the highest quality record you will have of
your final program, you should never leave a project without making a master.
• Decide which format you will be mastering to (MiniDv or Digital file) and purchase the appropriate tapes if required.
• you might have to re-digitise your final program from your original footage tapes; bring all of them when mastering.
• some titles and effects may have to be rendered before you can master to tape. Rendering times vary; consult with staff
when trying determine how much time will be required for finishing a project.
• Make a clone of your master tape or file. backups are safe and sorely missed if not available.
maSTeRing
• video stills can be quickly and easily exported from editing programs for printing or digital slide burning. some further
manipulation is necessary in photoshop to make the files look right (e.g. de-interlacing, levels etc.) before printing. staff can
advise and demonstrate the necessary procedures.
exPORTing STillS
• you can import a variety of still image file formats.
• The size of your canvas when working in Photoshop or any other image manipulation software will need to end up being
720 x 576 pixels @ 72 dpi for standard Definition Dv (1920x1080 forhD). Photoshop uses square pixels, whereas sD Dv uses
rectangular pixels (square for hD); there is a posibility of distortion occuring, please see lab staff for a way around this.
imPORTing gRaPHiCS

9nOTeS On dVd PROdUCTiOn
• Producing interactive programmable DvDs requires a computer to convert an already digitised (stored in computer
memory via an editing program) video into a different type of compressed digital file (mPeg 2). The resulting files are
then used to create DvDs using dVd authoring software such as DvD studio Pro. This process takes time and can be a bit
involved, always leave slightly more time than originally anticipated to complete this process.
• however, a domestic dVd recorder is available in the lab for making quick (real time) transfer copies direct from tape.
These DvD’s are ideal for tutorials or showing to colleagues and peers.
• MPegs are produced from either a Dv tape, tape master or directly from a program timeline.
• blank DvD’s may be purchased at the college from the student union shop, the library as well as the Digital Media Lab.
They are also available at numerous outlets such as electronic shops, music stores, and often newsagents.
• bluRay discs are much more expensive to produce and require specialist playback equipment that the college may not
have. however they are the only way to put hD on a d disc format. ensure you have access to the necessary equipment if
making bluRay.
• Please note that dVd’s are not universal, home made DvDs can be made without a region code but region codes are
different than video standards(e.g. PAL or nTsc). A DvD for north America must still be in nTsc format meaning you will
need to convert the files in order to make a new format DvD. sending PAL (european format) DvD’s to north America
relies on the DvD player being able to play both formats and the television/projector to recognise both video stndards. it is
PReSenTaTiOn
TUTORialS and SeminaRS
• watch all tapes and DvD’s in advance of a seminar, tutorial or exhibition to check for any problems or technical flaws.
• A/v presentation equipment is available from the Media equipment centre (Mb 181) in the main building.
• Laptops are notoriously bad DvD players. if using a DvD try to get a proper DvD/Monitor setup. if using a laptop make a
digital file instead of a DvD. The digital file will play back poperly on a computer/laptop and image quality will not suffer.
• The college does not have any advanced playback equipment that allows for two or more perfectly synchronised

10
• check with your course leader to see what equipment will be made available for the show (this is usually decided
several months in advance). Please note: The DMLab does not lend equipment out for the Degree show.
• we have a list of companies and art organisations from whom students have hired equipment in the past. (note: if you
hire equipment, check whether the company provides the proper connecting cables.)
• if you are showing DvD’s make sure the DvD player you use can play DvD-R format discs.
• if you are using an hD television but standard definition DvDs make sure the DvD player you use can ‘up-convert’ the
video signal otherwise the picture may look significantly worse.
• hD monitors will require either a bluRay disc player, computer tower, media player, or multi-media hub with a hard drive.
• check the dates of not only the degree show but also of the examination period preceding the show as you will need
the equipment for the extra days.
• security: never leave any unlocked equipment unattended, even momentarily. Try to make, or have made, a locking
bracket, cage or enclosed plinth to secure any equipment you will be using. This will help to prevent theft.
• Allow for as much ventilation as possible within any security enclosure - if the equipment overheats, it will shut-down
automatically. it may also get damaged or create a fire hazard. Projectors, in particular, are very sensitive to heat and will
cut off if they need cooling down.
degRee SHOwS
images to be shown on separate monitors/projectors. you can easily use two players to show works simultaneously however
normal/domestic or college equipment will slowly shift out of synch. you can also create an independent ‘split screen’
video with two images side by side on one monitor/television.
• Test your work on different types of (college) equipment, as there will be differences in image quality and slight variations
in frame size. Do tests before getting to the presentation stage.
• Tutorials and seminars may not be conducted in the lab as they are disruptive to other students. work can be previewed
in the Lab but discussions should take place outside (e.g. individual studios, cafeteria, library etc.).

• check the media format they require (DvD? Digital file?), and if sending tapes internationally, find out the video standard
of that country (PAL?, nTsc?, secAM?). The lab has equipment that can convert international standars back and forth.
• only send A coPy of your work to any selection panel or curator. if an exhibitor needs a master tape to create an
exhibition copy, never ever send your original Master tape or a full res quicktime file. Make instead a clone (an identical
copy - with no loss of quality) using the copy Rack.
• send copies of DvD’s making sure that you retain at least one copy in your possession. exact copies of your existing
DvD’s can be made on any computer with a DvD burner, keeping one in reserve ensures you do not need access to DvD
authoring software.
enTeRing COmPeTiTiOnS / exHibiTing OUTSide THe COllege11
• Media files can be transferred between art lab facilities, but check first as to which format the files need to be created
and saved in. files saved in the wrong format may not be usable.
media Services Centre in the library
• Media services have several editing stations using final cut Pro and Adobe Premiere however you will need to save your
project and media on to a hard drive in order to move the project between facilities. note as well that the centre does not
always have available technical assistance.
working at home or using facilities outside of the College
• if working at home or at an outside production facility, check with the technicians to see what format your work must be
saved in, in order to allow you to transfer it to DAMRL. you cannot transfer media files from other editing systems (e.g iMovie)
you may however be able to re-create your program from an eDL list. Ask staff for more information if you need to do this.
Again if the other facility is using Adobe Premiere you can tranfer the project and media on a separate hard drive (again
one that spins at atleast 7200 rpm and has a separate mains plug in).
COmPaTibiliTY wiTH OTHeR FaCiliTieS

12
• do not record dVCam format on minidV tapes, many machines will have problems playing back tapes recorded in this
manner causing random pixellation and other picture anomalies. you cAn record hDv on MiniDv tapes but can only play
back on an hDv camera or hDv deck (some hDv cameras are quite specific as to how they record on to tape and therefore
other players my potentially have difficulties playing the tapes, it is often a good idea to bring your camera with you to the
lab).
• when buying Dv tapes, be sure to ask for a tape without a ‘chip’ (it will not be recognised by Media Lab decks).
aPPendix a TaPe FORmaTS & iSSUeS
TaPe CaRe• MiniDv and DvcAM tapes despite their name are still based on magnetic tape which plays through the heads of a
player/recorder. The tape is subject to damage if it is overplayed just like any analogue tape. Record heads on decks and
cameras can become worn out. only use your Master tape to make copies, which are then exhibited.
• store tapes away from heat, direct sunlight, dust, moisture, and magnetic fields (including the magnets in headphones,
speakers, telephones and monitors). it is also a good idea to fast-forward and rewind stored tapes once a year.
• clearly label tapes with your name, the project title, and the date.
• neveR send your master tape to anyone - always send a copy.
minidV / dVCam / HdV aUdiO
dVCam - minidV - HdV COmPaTibiliTY
• Audio can be recorded on the Dv tapes at different frequencies, 32khz (12 bit), 44.1khz and 48khz (16 bit). some cameras
allow you to select the rate – the key is to be consistent (48khz is the highest quality).
• The editing system will detect and warn you if your tapes have different audio frequencies.The problem can be easily
resolved through manual settings in th editing program, but the tapes remain unchanged. Ask a technician for assistance.

13
aPPendix b ediTing and maSTeRing CHeCkliST
THe maSTeR TaPe
THe maSTeR TaPe SeqUenCe
• your final sequence should be prepared as follows:
• begin with at least 60 seconds of bars and tone followed by a countdown before your program starts. some editing
programs have pre-sets to facilitate this others may require that you construct them in your timeline. bars and tone allow
for monitors to be callibrated, and audio levels to be adjsuted. The countdown confirms the actual beginning of the work.
These are not intended for exhibition but to ensure that any and all copies are consistent and as you intend them to be.
• Add 10 - 30 secs of black at the beginning of your completed program, before you Master to Tape.
• Record several minutes of black after your program has finished.
• you can put as amany project masters on to onetape as you wish realising the tape can only hold an hour’s worth of
footage.
• use a new tape not an old tape that has been erased
• before recording, fast forward and rewind the tape once. This will ensure that the tape has even tension throughout.
PRePaRaTiOn
The following is a guide to the minimum number of tapes/ discs needed before you start editing:
(2) DvDs (1 for logging (to burn-in timecode copied from your rushes) and 1 to record your work in progress.).
(1) cD-Rw or memory stick for storing and transferring logging sheets and project files.
(1) MiniDv tape or hard Drive for your master.
• extra DvDs are always recommended.
• we recommend that you always bring extra tapes with you in case you encounter any problems.

14
• because of the large number of students using the computers, we follow a specific file and project naming protocol.
• The file name must contain: your first name and the initial of your surname followed by a brief project name (one word if
possible or abbreviation) followed by the date.
example
if your details are:
student name: kate Price
Project name: hydra
Digitising date: 12 november 2007
you would label your project files as follows:
PRojecT foLDeR: kateP-hydra-12nov
PRojecT: kateP-hydra-12nov
• Always check that scratch disks have been set to the correct project folder and that each new project is given its own
project folder and scratch disk assignment. This makes sure each project is using media located in the folder with the project
name, meaning all files associated with the project can be managed and located with ease.
• Try to avoid using the ‘save as...’ command as this will create a seperate project associated with the same media.
• creating new sequences or timelines is an effective way of saving changes or creating multiple monitor pieces within the
same project.
• Remember to keep personal backups of your project.
aPPendix C naming and SaVing PROjeCTS
15
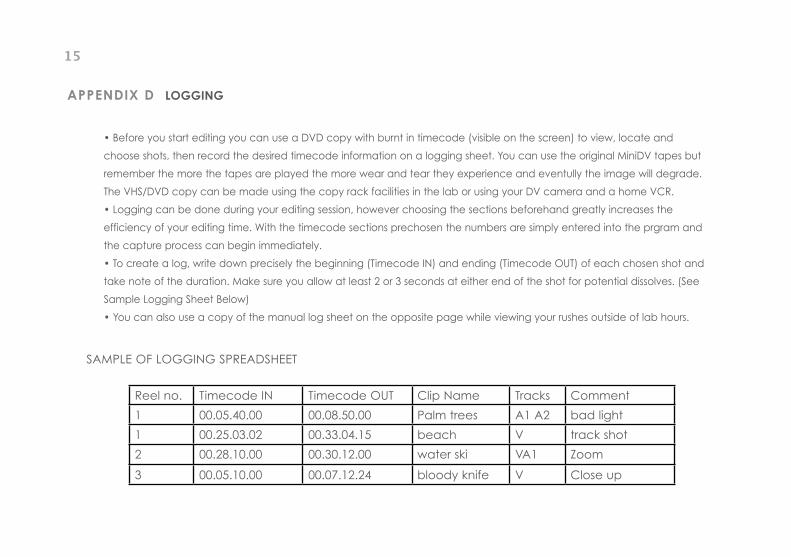
• before you start editing you can use a DvD copy with burnt in timecode (visible on the screen) to view, locate and
choose shots, then record the desired timecode information on a logging sheet. you can use the original MiniDv tapes but
remember the more the tapes are played the more wear and tear they experience and eventully the image will degrade.
The vhs/DvD copy can be made using the copy rack facilities in the lab or using your Dv camera and a home vcR.
• Logging can be done during your editing session, however choosing the sections beforehand greatly increases the
efficiency of your editing time. with the timecode sections prechosen the numbers are simply entered into the prgram and
the capture process can begin immediately.
• To create a log, write down precisely the beginning (Timecode in) and ending (Timecode ouT) of each chosen shot and
take note of the duration. Make sure you allow at least 2 or 3 seconds at either end of the shot for potential dissolves. (see
sample Logging sheet below)
• you can also use a copy of the manual log sheet on the opposite page while viewing your rushes outside of lab hours.
Reel no. Timecode in Timecode ouT clip name Tracks comment
1 00.05.40.00 00.08.50.00 Palm trees A1 A2 bad light
1 00.25.03.02 00.33.04.15 beach v track shot
2 00.28.10.00 00.30.12.00 water ski vA1 Zoom
3 00.05.10.00 00.07.12.24 bloody knife v close up
aPPendix d lOgging
sAMPLe of Logging sPReADsheeT

16
lOgging SPReadSHeeT SamPle FOR manUal lOgging
MAke PhoTocoPies of This sheeT To use foR MAnuAL Logging (use The Logging noTATion As shown on The
sAMPLe in APPenDix e)
Reel no. Timecode in Timecode ouT clip name Tracks comment

aPPendix e nOTeS abOUT media managemenT in adObe PRemieRe
•with any editing software it is important to understand how the program organises and stores any media (imported video
clips, photoshop documents, audio from cd or digital recorder, render files etc.) generated by each individual project.
• when opening Premiere for the first time set scratch disks to the folder that contains the project.
• Remeber that every time an effect (speed change, color adjustment etc) is applied to footage Premiere will generate
extra (temporary) media in the form of Render files. The program can play back certain effects without rendering but
eventually to see full quality play back (or to export movie files or MPeg2s) render files will have to be created. These files
(stored in a render file folder in the scratch disk folder) are equal in size to the original material so projects can become
very large very quickly. it is always advisable to monitor media files (capture only what you need, render only when
necessary, occassionally delete render files etc.).
• note: because the lab has a large volume of users undertaking a number of projects each there is a limit we set as to
how much full resolution material can be captured. The two choices available to students wishing to work with a lot of
material (50 mins plus) are working OFFline (capturing material at lo resolution and recapturing only the pieces used in
the final edit - when editing is completed), or students can bring their own hard drives to wok from. (Remember hard drives
should spin at 7200 rpm at least, generally this means they will come with a mains power adaptor). hD takes up space so it
is advised to use your own hard drive.
17

18
aPPendix F Hd/HdV (THingS TO COnSideR)
• hD cameras record at a much higher resolution (1920 x 1080 pixels - though there are higher resolution cameras) than
standard Definition (sD - 720 x 576 pixels) Dv cameras. working with the material involves essentially the same processes
and procedures. The only thing that changes is how the individual project is configured.
• Domestic hD camcorders record information using a variety of coDecs (compressing the files to make them small).hDv
cameras record on to MiniDv tape using an MPeg2 codec (the same compression used to make DvDs). for this reason
we reccommend that all students wishing to work with hD material should work from their own hard drives. (Remember
hard drives should spin at 7200 rpm at least, generally this means they will come with a mains power adaptor).
• The second most important consideration regarding hD material is presentation. you need access to either an hD
television monitor or projector plus a player that can handle the hD material. bluRay players require a bluRay disc to be
made which can be expensive. computer towers (laptop drives will be too slow) can play hD material but might not
hook up to all hD televisions. There are some media playing hard drives plus a variety of media hubs that can be an
intermediary between drives and monitors but you should always check for compatibility. in short the presentation of hD
material will require research and investment in to the kit that will be appropriate for individual needs.

19
24 Frames - The standard film frame rate per second.
25 Frames - The standard PAL (european / Australian) video frame rate per second. (AkA 50i)
29.97 Frames - The standard nTsc (north American / Asian)video frame rate for colour broadcasting
per second. (AkA 60i)
aiFF - Audio Interchange File Format is a file format standard used for storing audio data on PCs. The
format was co-developed by Apple based on electronic Arts interchange file format (iff) and is most
commonly used on Apple Macintosh computer systems.
bit - used to describe digital audio resolution. A bit is a binary digit representing two different states,
either on or off. The bit rate is the number of bits transmitted per second. The higher the resolution
(bit depth), the better the sound. bit resolution refers to the number of bits used to represent audio
amplitude and therefore how closely digital audio represents the sound of the actual recorded source.
bluRay - An optical disc storage medium designed to supersede the standard DvD format. its main uses
are for storing high-definition video, Playstation 3 games, and other data, with up to 25 gb per single
layered, and 50 gb per dual layered disc.
Codec - (compressor-decompressor): a software module responsible for compressing and/or
decompressing an encoded media format such as Avi digital video.
Component video - A video signal whose original elements have been retained separately.
Composite video - A video signal in which the luminance and chrominance elements have been
combined.
edl - edit Decision List.
equalisation (eq) - The process of increasing or decreasing the amplitude of specific audio frequencies
relative to the value of other audio frequencies.
Frame - one complete video imge made of two sets of alternating field lines.
Frequency - Measured in hertz (hz), cycles per second, frequency describes the rate at which a sound
glOSSaRY OF SOme TeCHniCal TeRmS

20glossary (cont’d)
wave vibrates. A cycle consists of movement from a strating point (0) through both positive and
negative amplitudes, eventually returning to the starting point. A sound’s frequency determines its
pitch: high frequency = high pitch, low frequency = low pitch.
Hdmi - (high Definition Multimedia interface) A compact audio/video interface for transmitting
uncompressed digital data. usually connecting and hD player to an hD monitor.
Hd/HdV - refers to any video system of higher resolution than standard-definition (sD) video, and most
commonly involves display resolutions of 1280×720 pixels (720p) or 1920×1080 pixels (1080i/1080p). hDv
is a format for recording and playback of high-definition video on a Dv cassette tape. it uses MPeg2
compression to accommodate the information. Two major versions of hDv are hDv 720p (hDv1 - used
by jvc) and hDv 1080i (hDv2 - used by sony and canon).
linear - Descriptive of tape recorders because they record and play back audio/video in a straight
line, physically passing the audio/video over the recording and playback heads.
mPeg2 - A compression scheme optimised for moving pictures whereby the potential for compression is
based on the similarity of successive pictures.
non-destructive editing - editing that doesn’t change, erase or delete the original material.
non-linear - non-linear audio/video systems allow instant access to any file, in any order, at any
location, at any time.
nTSC - national Tv standards committee. A 525-line 59.94hz composite analogue colour television
system at 4.2Mhz bandwidth used in the usA and japan.
OmFi - open Media framework interchange, a file exchange protocol developed by AviD for
interchanging audio, video and eDL’s among different workstations.
Pal - Phase Alternating Line, a 625-line 50hz composite analogue colour television system at 5.5Mhz
bandwidth used in europe, Australia and other parts of the world.
Rgb - The video signal components of Red, green and blue.

21
ligHTSTORm TRading lTd.chroma key Materials - sales only
5 orchard business centre, kangley bridge Rd
se26 5AQ
020 8676 7902 www.lightstormtrading.co.uk
ROSCOscreen materials, lighting gels (manufacturer not
retailer - phone for info)
blanchard works, kangley bridge Road se26 5AQ
020 8659 2300
wHiTe ligHTSchroma key materials
020 7731 3291
maPlin’S eleCTROniCSvarious outlets www.Maplin.co.uk
TAPES, DISCS, DVDS ETC.
STanleY PROdUCTiOnSMajor distributor / retailer for all your tape, disc, DvD,
service, etc. needs. very useful.
147 wardour street w1f 8wD
020 7494 4545 www.stanleysonline.com
PRO TaPeTapes, film, Discs etc.
15 Percy street w1T 1ee
020 7616 5500 www.protape.co.uk
PRODUCTION EQUIPMENT HIRE AND RETAIL
dV CameRa HiReDv/hD camera hire, steadicam jr, mounts, lights,
lenses etc
62 ean street w1D 4Qf
020 7734 0410
www.dvcamerahire,co,uk
SaleS / RenTal and OTHeR ReSOURCeS
These are suggested outlets and resources the Media Research Lab does not endorse any of these

22FILM EQUIPMENT / MATERIALS
wideSCReen CenTRefilm stock, cameras, accessories retail.
47 Dorset street w1h 3fh
020 7935 2580 www.widescreen-centre.co.uk
exCelSiOR Film and VideOsuper8 Telecine (w/ student discount)
www.videostudio.co.uk
blUe aUdiO ViSUalSfilm cameras and accessories retail.
44 Duncan street n1 8bw
020 7713 6865
www.blueaudiovisual.co.uk
PRESENTATION EQUIPMENT HIRE
adi aUdiO ViSUalPresentation equipment hire
6-8 standard Place, Rivington street ec2A 3be
020 7729 8085
www.groupadi.com
HalO
Presentation equipment (tv monitors, vhs players,
video projectors, lighting effects etc.) for hire.
98-124 brewery Road, barnsbury n79Pg
0844 844 0484 www.halo.co.uk
miTeSDvD sync hire, DvD Authoring
fAcT, 88 wood street, Liverpool, L1 4DQ
0151 707 4434
www.fact.co.uk/main/services/mites/dvd_
authoring/
SOUND EQUIPMENT AND ELECTRONICS
aSkdiReCTAudio equipment, electronic retail
248 Tottenham court Road w1T 7QZ
020 7307 8321
www.askdirect.co.uk

RESOURCES
FOUR CORneRSfilm workshop (courses, equipment, some editing
suites)
020 8981 6111 www.fourcornersfilm.co.uk
mandY.COmfilm and Television production directory
www.mandy.com
SHOOTing PeOPlefilmmakers’ network (for crew, actors, writers etc.)
www.shootingpeople.org
lUxnot-for-profit organisation. Archives, large
informational resource. some equipment hire.
18 shacklewell Lane e8 2eZ
020 7503 3980 www.lux.org.uk
Film lOndOnextensive listings of agencies and businesses
dealing with equipment hire and more
http://flamin.filmlondon.org.uk
(check: home > showing > exhibition > exhibition
equipment
21

nOTeS


