110
Volunteer Management System (VMS) User’s Guide Revised July 2018
Volunteer Management System (VMS)User’s Guide Revised July 2018
1 | P a g e
Table of Contents
Section 1 About VMS .................................................................................................................................................8
1.1 General Information about VMS ........................................................................................................................8
1.1.1 System Overview .............................................................................................................................................8
1.1.2 Volunteers and VMS .......................................................................................................................................8
1.1.3 Coordinators/Administrators and VMS ........................................................................................................8
1.2 Accessing VMS ......................................................................................................................................................9
1.2.1 The UC ANR Portal .........................................................................................................................................9
1.2.2 Accessing VMS for the first time ................................................................................................................. 10
1.2.3 Returning to VMS ......................................................................................................................................... 10
1.2.4 Accessing VMS when you’ve lost or forgotten your password .................................................................. 10
Section 2 Volunteers and VMS .............................................................................................................................. 11
Section 2.1 Volunteer Basics .................................................................................................................................. 11
2.1.1 The Banner .................................................................................................................................................... 11
2.1.2 News .............................................................................................................................................................. 11
2.1.3 Left Navigation Bar ....................................................................................................................................... 12
2.1.4 Right Information Panel ............................................................................................................................... 12
2.1.5 Edit Your Profile ............................................................................................................................................ 13
2.1.6 Add / Edit Interests ...................................................................................................................................... 13
2.1.7 Check Achievement and Status ................................................................................................................... 13
2.1.8 Electronically Resign ..................................................................................................................................... 14
2.1.9 Manage Email Preferences ........................................................................................................................... 15
2.1.10 View Roster ................................................................................................................................................. 15
2.1.11 Log Out ....................................................................................................................................................... 15
Section 2.2 Adding Hours and Reporting Contacts ............................................................................................ 16
2.2.1 Add Volunteer and/or Continuing Education Hours with or without Contacts ..................................... 16
2.2.2 Edit Volunteer and/or Continuing Education Hours with or without Contacts...................................... 17
2.2.3 Delete Volunteer and/or Continuing Education Hours with or without Contacts ................................. 18
2 | P a g e
2.2.4. Report Contacts ........................................................................................................................................... 18
2.2.5 View Volunteer and Continuing Education Hours..................................................................................... 19
2.2.6 Search Volunteer and Continuing Education Hours .................................................................................. 21
2.2.7 Pending Tasks / Alerts .................................................................................................................................. 21
Section 2.3 Volunteering for Events ...................................................................................................................... 22
2.3.1 View Calendars in VMS ................................................................................................................................ 22
2.3.2 View all Events .............................................................................................................................................. 23
2.3.3 Volunteer for an Event ................................................................................................................................. 23
2.3.4 Volunteer for a Shift at an Event ................................................................................................................. 24
2.3.5 Unvolunteer for an Event ............................................................................................................................. 25
2.3.6 To View and/or Volunteer to Bring a Resource .......................................................................................... 25
2.3.7 Unvolunteer to Bring a Resource ................................................................................................................ 26
2.3.8 View Your Calendar ..................................................................................................................................... 27
2.3.9 Export to iCalendar ...................................................................................................................................... 27
Section 2.4 Projects ................................................................................................................................................. 27
2.4.1 Project Categories ......................................................................................................................................... 28
2.4.2 View Projects .............................................................................................................................................. 29
2.4.3 Volunteer / Show Interest for a Project................................................................................................... 29
2.4.4 View Your Projects .................................................................................................................................... 29
2.4.5 Unvolunteer for a Project.......................................................................................................................... 30
Section 2.5 Messages ............................................................................................................................................... 30
2.5.1 View Messages in VMS Inbox ...................................................................................................................... 31
2.5.2 Delete Message ............................................................................................................................................. 32
2.5.3 Make a Message a Favorite .......................................................................................................................... 32
2.5.4 Un-favorite a Message .................................................................................................................................. 32
2.5.5 Send a Message through VMS ..................................................................................................................... 32
2.5.6 View Message History through VMS ........................................................................................................... 34
Section 2.6 Newsletters and Documents .............................................................................................................. 34
2.6.1 View / Print / Subscribe to Newsletter ........................................................................................................ 34
2.6.2 Unsubscribe from a Newsletter ................................................................................................................... 35
2.6.3 View / Print Documents / Presentations .................................................................................................... 35
3 | P a g e
Section 2.7 Photo Albums ...................................................................................................................................... 35
2.7.1 View / Download Photo Album .................................................................................................................. 35
2.7.2 Create a Photo Album and Upload Photos ................................................................................................ 36
2.7.3 Upload Photos to a Photo Album ............................................................................................................... 37
Section 2.8 Reappointment .................................................................................................................................... 37
2.8.1 What is Reappointment ............................................................................................................................... 38
2.8.2 VMS and Reappointment ............................................................................................................................ 38
2.8.3 Annual Reappointment Quiz for Master Food Preservers ......................................................................... 40
2.8.4 Reappointment Extras .................................................................................................................................. 40
Section 2.9 VMS Help .............................................................................................................................................. 40
2.9.1 Accessing help with VMS ............................................................................................................................. 40
2.9.2 “How-To” Video Series ................................................................................................................................. 41
2.9.3 County Level Help ........................................................................................................................................ 42
Section 3 Administrator ......................................................................................................................................... 42
3.1 VMS Administration Overview ....................................................................................................................... 42
3.1.1 Types of Administrators ............................................................................................................................... 42
3.1.2 Accessing Admin Mode ............................................................................................................................... 43
3.1.3 Left Navigation Bar for Administrator ........................................................................................................ 43
3.1.4 Right Information Panel ............................................................................................................................... 45
3.2 VMS Calendar, Events, Shifts and Resources ................................................................................................. 45
3.2.1 Admin VMS Calendar Functions ............................................................................................................ 46
3.2.2 Add a New Calendar .................................................................................................................................. 47
3.2.3 Edit a Calendar’s Name ............................................................................................................................. 47
3.2.4 Change a Calendar’s Status ....................................................................................................................... 48
3.2.5 Merge Calendars ........................................................................................................................................ 48
3.2.6 Add an Event .............................................................................................................................................. 49
3.2.7 Add a Recurring Event .............................................................................................................................. 50
3.2.8 Edit / Delete Event ........................................................................................................................................ 51
3.2.9 Add Shift(s) to an Event ............................................................................................................................ 52
3.2.10 Edit / Delete Shift(s) ................................................................................................................................ 53
3.2.11 Add Resources to an Event ..................................................................................................................... 53
4 | P a g e
3.2.12 Edit / Delete Resources for an Event ..................................................................................................... 54
3.2.13 Add / Assign a Volunteer to Event / Shift ............................................................................................ 54
3.2.14 Remove Volunteer from an Event / Shift.............................................................................................. 55
3.2.15 Assign Volunteer a Shift Resource......................................................................................................... 55
3.2.16 Delete / Remove Volunteer from a Shift Resource .............................................................................. 56
3.2.17 Export Events............................................................................................................................................ 56
3.3 Manage Projects ................................................................................................................................................ 57
3.3.1 VMS Project Categories................................................................................................................................ 58
3.3.2 View Project Lists .......................................................................................................................................... 59
3.3.3 Export Project List ........................................................................................................................................ 60
3.3.4 Add New Project .......................................................................................................................................... 61
3.3.5 Edit Project .................................................................................................................................................... 62
3.3.6 Delete a Project............................................................................................................................................. 62
3.3.7 Deactivate a Project ..................................................................................................................................... 63
3.3.8 Reactivate Project ......................................................................................................................................... 63
3.3.9 Archive a Project ........................................................................................................................................ 63
3.3.10 Merge Projects .......................................................................................................................................... 64
3.3.11 Enroll Volunteer(s) in a Project ............................................................................................................. 64
3.3.12 Email Volunteer(s) Enrolled in a Project .............................................................................................. 65
3.4 Admin Messages ................................................................................................................................................ 66
3.4.1 Send a Message through VMS .................................................................................................................. 66
3.4.2 View / Search Email History ..................................................................................................................... 68
3.4.3 Delete Email (Under Construction).......................................................................................................... 68
3.5 Newsletter / Documents .................................................................................................................................. 69
3.5.1 Add New Document Group ........................................................................................................................ 69
3.5.2 Edit / Delete Document Group Information .............................................................................................. 70
3.5.3 Add a Newsletter Issue ................................................................................................................................. 70
3.5.4 Add a Document .......................................................................................................................................... 71
3.5.5 Delete a Newsletter Issue or Document...................................................................................................... 71
3.5.6 View or Manage Subscribers ........................................................................................................................ 72
3.6 Roster .................................................................................................................................................................. 72
5 | P a g e
3.6.1 Add a New Volunteer ................................................................................................................................... 73
3.6.2 Import Volunteers ........................................................................................................................................ 74
3.6.3 Send / Resend Welcome Email .................................................................................................................... 75
3.6.4 View Volunteer Profile ................................................................................................................................. 75
3.6.5 Edit Volunteer Profile ................................................................................................................................... 76
3.6.6 Change Volunteer Status and/ or Achievement ........................................................................................ 76
3.6.7 Reinstate a Volunteer ................................................................................................................................... 79
3.6.8 Transfer Volunteer ....................................................................................................................................... 79
3.6.9 Proxy in as User ............................................................................................................................................. 80
3.6.10 Search Volunteers ....................................................................................................................................... 80
3.6.11 Reset a Volunteer’s Password .................................................................................................................... 81
3.6.12 Export Roster Data (Under Construction) ................................................................................................. 81
3.6.13 Create Mailing List ...................................................................................................................................... 82
3.7 Reports ................................................................................................................................................................ 82
3.7.1 Reports .......................................................................................................................................................... 83
3.7.2 Contacts Report ........................................................................................................................................... 83
3.7.3 Expanded Hours Report ............................................................................................................................... 85
3.7.4 Retention (duration) Report........................................................................................................................ 87
3.7.5 Roster Report ................................................................................................................................................ 87
3.7.6 Volunteer Commitment Report .................................................................................................................. 89
3.7.7 Volunteer Hours Report ............................................................................................................................... 89
3.7.8 Save a Report ................................................................................................................................................ 90
3.7.9 Make a Favorite Report ................................................................................................................................ 91
3.7.10 Delete a Saved or Favorite Report ............................................................................................................. 91
3.7.11 Legacy Retention Report ............................................................................................................................ 91
3.7.12 Legacy Category Reports ............................................................................................................................ 92
3.7.13 Legacy Hour Reports .................................................................................................................................. 92
3.7.14 Legacy Contact Reports ............................................................................................................................. 93
3.8 Manage VMS ...................................................................................................................................................... 94
3.8.1 Manage Access to VMS ................................................................................................................................ 95
3.8.2 Manage Administrators ............................................................................................................................... 95
6 | P a g e
3.8.3 Manage Home Page News ........................................................................................................................... 96
3.8.4 Manage Volunteer Options ......................................................................................................................... 96
3.8.5 Manage Home Page Links ............................................................................................................................ 97
3.8.6 Manage Program Contact Information....................................................................................................... 97
3.8.7 Manage Reappointment .............................................................................................................................. 98
3.8.8 Manage Interests .......................................................................................................................................... 98
Section 4 Reappointment ....................................................................................................................................... 99
4.0 Reappointment .................................................................................................................................................. 99
4.1.1 Reappointment ........................................................................................................................................... 100
4.1.2 Reappointment Communications ............................................................................................................ 101
4.1.3 Collect Digital Reppointment or Resignation Documents from Volunteers .......................................... 101
4.1.4 How to Submit Paper for a Volunteer ....................................................................................................... 102
4.1.5 Resigning or Inactive Volunteers ............................................................................................................... 103
4.1.6 Roster Cleanup, Final Numbers and Insurance Invoicing ........................................................................ 103
4.1.7 Annual Reappointment Quiz for Master Food Preservers ....................................................................... 103
Appendix 1 – Volunteer Frequently Asked Questions ..................................................................................... 103
Q1: How do I access VMS? ................................................................................................................................. 103
Q2: I can’t access VMS? I know I have the right password. ............................................................................. 103
Q3: How do I reset my password? ..................................................................................................................... 104
Q4: How do I find an event? .............................................................................................................................. 104
Q5: How do I unvolunteer myself for an event? ............................................................................................... 104
Q6: How do I enter my hours and/or contacts? ............................................................................................... 104
Q7: Do I have to report contact when I report my hours or can I do them separately?................................ 104
Q8: How do I edit my hours? How do I delete my hours? ............................................................................... 104
Q9: I keep entering hours and they disappear, why? ................................................................................... 104
Q10: Do I list my travel time separate from my volunteer hours? .................................................................. 104
Q11: How do I see how many hours I have? ..................................................................................................... 105
Q12: How many hours do I need to reappoint? ............................................................................................... 105
Q13: How do I verify my reappointment went through? ................................................................................ 105
Q14: Can everyone see my emergency contact information I listed in my profile? ....................................... 105
Appendix 2 – Administrator Frequently Asked Questions ............................................................................. 105
7 | P a g e
Q1: Who do I contact if I have a problem with VMS? ..................................................................................... 105
Q2: How does a program coordinator send an email to new trainees to alert them of their new VMS accounts and/or to create a new password in VMS? ........................................................................................ 106
Q3: Is there information to give to new MG trainees on what to do when they receive the “Accessing Master Gardener System” / “Accessing Master Food Preserver System” email? .......................................................... 106
Q4: Is there any training for new users to VMS? ............................................................................................... 106
Q5: How can I reset a volunteer’s password in VMS? ................................................................................. 106
Q6: How can I (coordinator) give a new supervisor access to my county VMS? ........................................... 106
Q7: Coordinator has a new training class that ends on Feb 20. They want the new volunteers to sign all the appropriate forms electronically at this time. Can VMS be set up to “Manage Reappointments” so the “Sign Your Forms” flag goes only to the new class and not whole roster? ................................................................ 106
Q8: What forms are required to give trainees to sign? ..................................................................................... 107
Q9: Does a volunteer have to have an email address to access VMS? ............................................................ 107
Q10: When a volunteers transfers from one county UC MG /MFP Program to another and they are added to the roster their hours previously logged do not come over with them on VMS. Do I need to manually add those hours and activities? ................................................................................................................................. 107
Q11: How can MGs store photos that allows other MGs to be privately and securely stored and have access those photos for appropriate use? ..................................................................................................................... 107
Q12: When a volunteer resigns and their status is changed to inactive / resigned can they be deleted from the roster? ............................................................................................................................................................ 107
Appendix 3 – Administrator Reappointment Quick Tips and Frequently Asked Questions ..................... 108
Q1: What if my volunteer doesn’t have internet access / wants a paper copy / or will be on vacation? ...... 108
Q2: What if my volunteer does not reappoint? ................................................................................................ 108
Q3: Can I delete a volunteer From VMS? ........................................................................................................... 108
Q4: What if my County Director can’t find the MG Reviews link for approving Reappointment? ............... 108
Q5: I need more help with reappointment, where do I get it? ......................................................................... 108
8 | P a g e
Volunteer Management System (VMS)3.1 Users Guide
Section 1 About VMS
1.1 General Information about VMS In this section you will learn about elements of the home page, where they are located, and how they can be used: 1.1.1 System Overview 1.1.2 Volunteers and VMS 1.1.3 Coordinators / Administrators and VMS
1.1.1 System Overview The Volunteer Management System (VMS) is an online system developed by University of California Agriculture and Natural Resources (UCANR) Communication Services and Information Technology (CSIT) team to assist volunteers in keeping accurate records of their volunteer activities. VMS allows volunteers to create a profile, log volunteer and continuing education hours, and report contacts. The program also provides a place for communication and collaboration within each county program with options to create calendar events, share photos and documents.
The system was designed to be: • User‐friendly for volunteers • Modifiable by administrators, to provide a unique site to counties • Vigorous enough to retain record tracking functions required by UC and the Statewide Master Gardener /
Food Preserver Program
1.1.2 Volunteers and VMS Volunteers use VMS to:
• View their county’s calendar • Volunteer for events • Record volunteer and continuing education hours • Report number of contacts made with the public • View the roster of volunteers • Complete Reappointment • View home page news and statewide news • View documents, presentations, newsletters • View / upload / download photos • Find useful links
1.1.3 Coordinators/Administrators and VMS As a coordinator / administrator, VMS is the most helpful tool in your possession. You’ll use it daily to accomplish the following tasks (and more!):
9 | P a g e
• View your roster of volunteers, including contact information and interests • Manage roster by adding / removing / transferring / changing status of volunteers • Communicate with volunteers through VMS messages and home page news • Create and manage volunteer projects • Create and manage volunteer calendar events • View volunteer hour / continuing education and contact reports • Upload documents, presentations, photos to share with group • Manage and deploy an internal newsletter • Manage annual reappointment process (occurs June-Aug. every year)
1.2 Accessing VMS In this section you will learn about: 1.2.1 The UC ANR Portal 1.2.2 Accessing VMS for the first time 1.2.3. Return to VMS 1.2.4 Accessing VMS when you’ve lost or forgotten your password
1.2.1 The UC ANR Portal
The Portal allows you to come to one place to access the University of California Agriculture and Natural Resources (UCANR) websites, utilities, and systems in which you are involved. Collaborative Tools, Surveys, Repository, ANR directory, IT help and VMS. The portal provides a simple yet secure way to get into important systems while only having to remember one username and password. All coordinators and UC Master Gardener / Food Preserver Volunteers have portal accounts.
To log into the portal for the first time:
• Go to: https://ucanr.edu/portal • Click on the 'New user? Forgot your password? Click here' button. • Enter your e-mail address and click the button. • If your e-mail address is in our system, an e-mail will be sent which contains a link to access the
portal. • Click on this link to enter the system. • The link will only work one time. If you forget your password again, you will need to re-submit the
access request. • Once you are in the system, you can change your password. • If you are NOT in the system, please contact your office manager or MSO.
10 | P a g e
If you are an ANR employee you must be in the ANR Directory to access the portal. First, check to see if you are in the directory, it is possible that your e-mail may not match up with the directory listing.
If you are in the directory, you will be able to have account access information sent to you. If you are not in the directory, but feel that you should be. Contact your office manager or website liaison. Ask them to add you to the ANR directory. When you are added, you will receive portal access information.
1.2.2 Accessing VMS for the first time Volunteer
1. Check your e-mail for a message with the subject line “Accessing Master Gardener system” or “Accessing Master Food Preserver system.” This e-mail will have been sent to the e-mail address given to coordinator. Click on the link in the text of the email (this link can only be used once).
2. The following page is displayed. Enter a new password.
• The password must be at least 12 characters in length with no space, not your account name or login ID and contain uppercase, lowercase, digits and symbols. The password is “case sensitive,” i.e., upper and lower case letters are recognized by VMS.
• Write down the password and keep it secure. No one including your coordinator or the statewide office will know it but you.
3. Retype the password exactly as you entered it in Step 2.
4. Select Save Password.
5. Your VMS home page is displayed, this unique to your, your hours and your county.
Coordinator
1. New coordinators will need to be added to the VMS system by someone with administrator privileges in their county (likely a Farm Advisor, County Director, or other office staff) or contact the statewide office to gain access. Use your ucanr.edu email address when signing up for your staff account, which is especially important if you were formerly a volunteer.
2. Check with your County Director or local office administrator about getting an ucanr.edu staff email address.
1.2.3 Returning to VMS 1. Access your Internet browser. Enter the web address for VMS vms.ucanr.edu/mg or access VMS through the
portal ucanr.edu/portal 2. Enter the e-mail address and password.
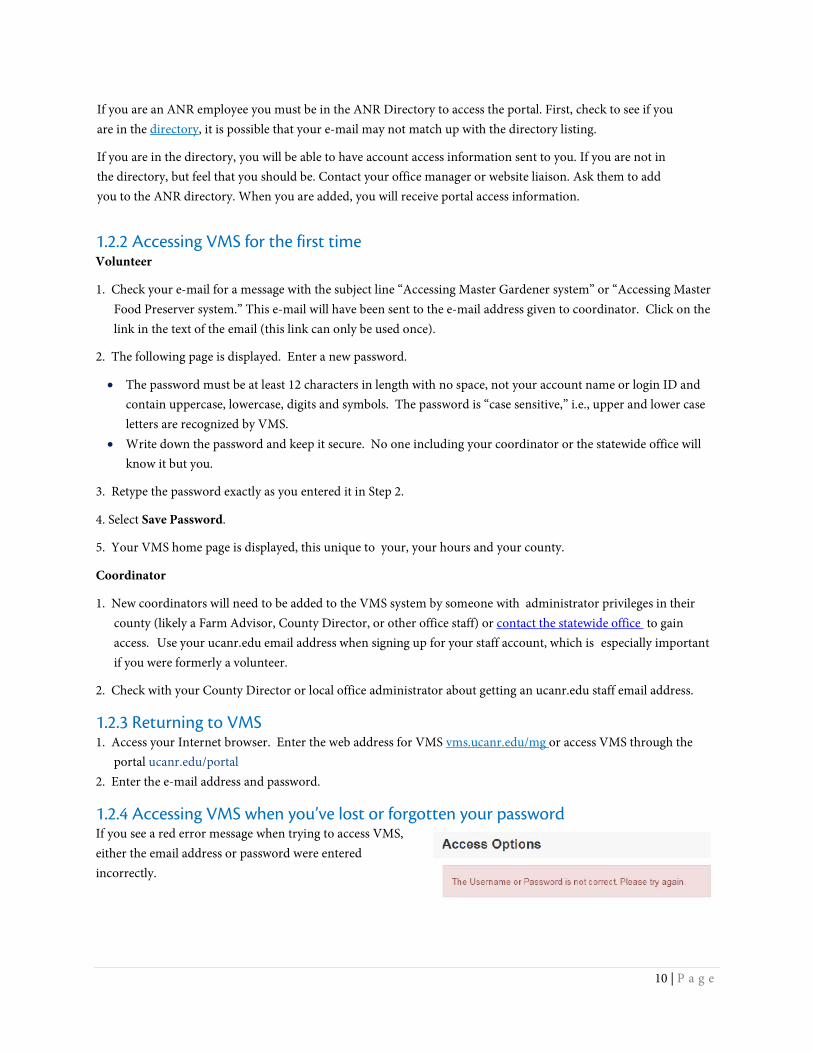
1.2.4 Accessing VMS when you’ve lost or forgotten your password If you see a red error message when trying to access VMS, either the email address or password were entered incorrectly.
11 | P a g e
Troubleshooting: • Try re-entering the e-mail address and password being especially careful about using the correct upper and
lower case letters in your password. • Make sure your Caps Lock is off.It i • Clear the cookies on the computer http://www.wikihow.com/Clear-Your-Browser's-Cookies. • Still not working? Select Forgot Password? And follow the prompts to reset your password.
Section 2 Volunteers and VMS Section 2.1 Volunteer Basics In this section you will learn how to: 2.1.1 The Banner 2.1.2 News 2.1.3 Left Navigation Bar 2.1.4 Right Information Panel 2.1.5 Edit profile 2.1.6 Add / Edit Interests 2.1.7 Check Achievement / Status or Resign 2.1.8 Manage Email Preferences 2.1.9 Electronically Resign 2.1.10 View Roster 2.1.11 Log out
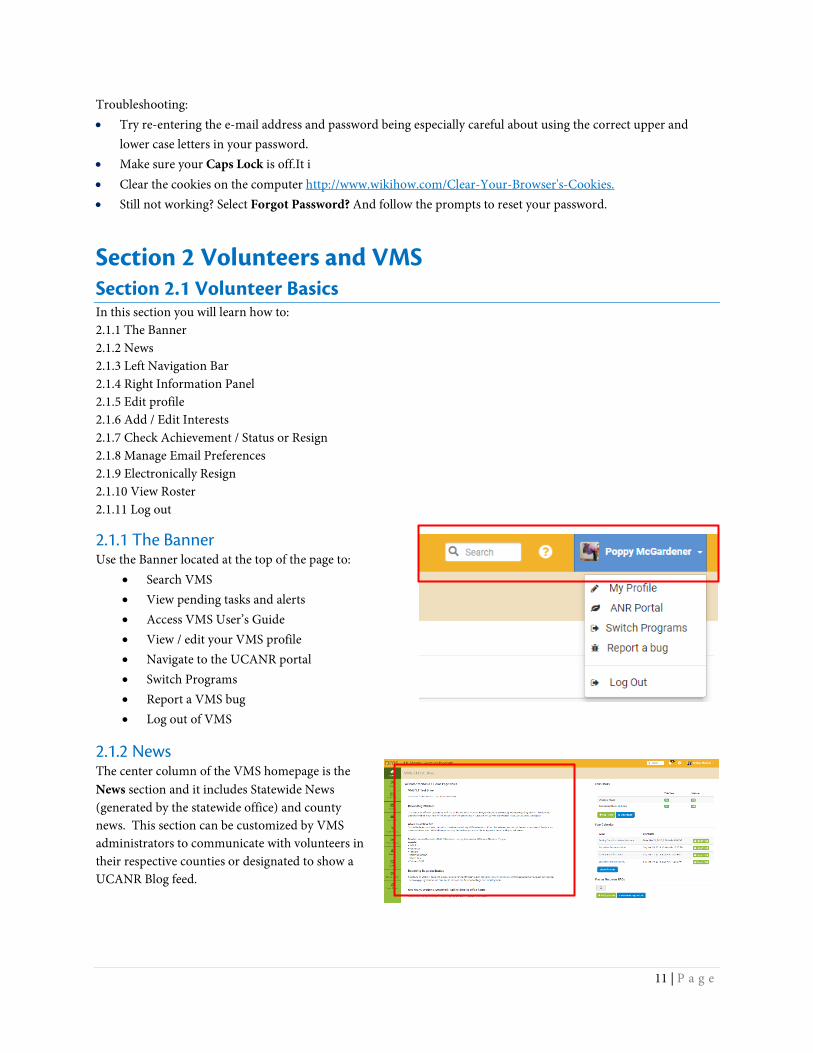
2.1.1 The Banner Use the Banner located at the top of the page to:
• Search VMS • View pending tasks and alerts • Access VMS User’s Guide • View / edit your VMS profile • Navigate to the UCANR portal • Switch Programs • Report a VMS bug • Log out of VMS
2.1.2 News The center column of the VMS homepage is the News section and it includes Statewide News (generated by the statewide office) and county news. This section can be customized by VMS administrators to communicate with volunteers in their respective counties or designated to show a UCANR Blog feed.
12 | P a g e
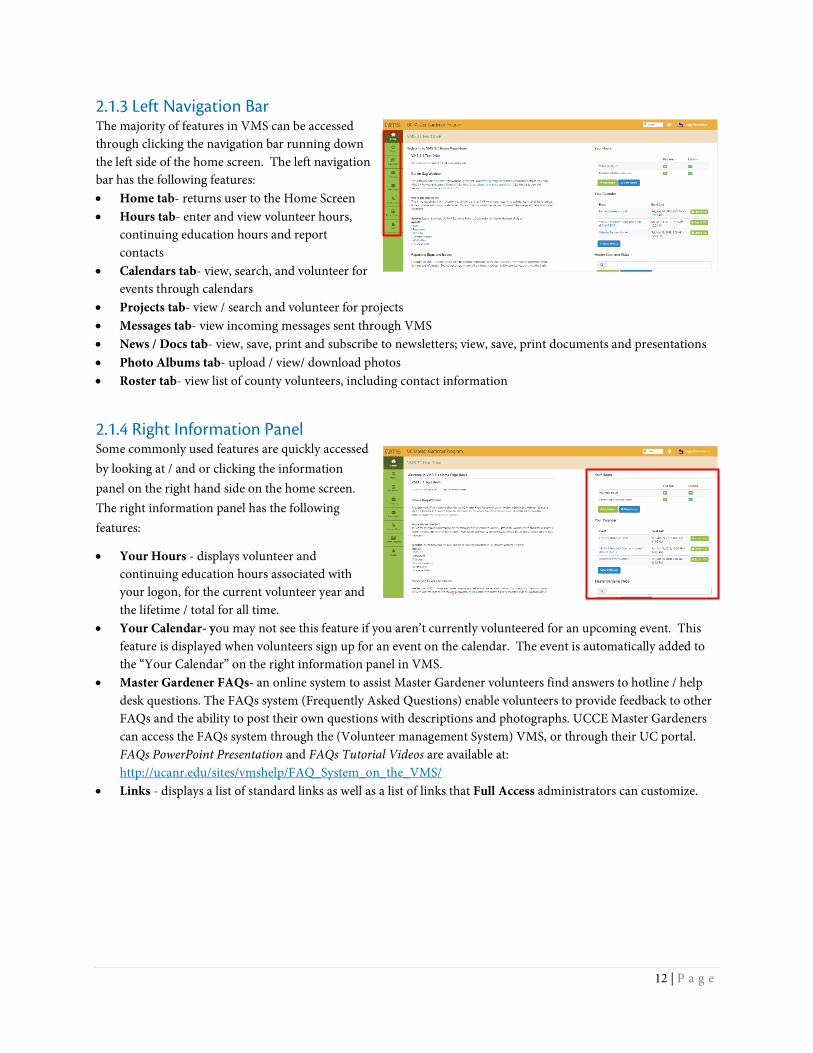
2.1.3 Left Navigation Bar The majority of features in VMS can be accessed through clicking the navigation bar running down the left side of the home screen. The left navigation bar has the following features: • Home tab- returns user to the Home Screen • Hours tab- enter and view volunteer hours,
continuing education hours and report contacts
• Calendars tab- view, search, and volunteer for events through calendars
• Projects tab- view / search and volunteer for projects • Messages tab- view incoming messages sent through VMS • News / Docs tab- view, save, print and subscribe to newsletters; view, save, print documents and presentations • Photo Albums tab- upload / view/ download photos • Roster tab- view list of county volunteers, including contact information
2.1.4 Right Information Panel Some commonly used features are quickly accessed by looking at / and or clicking the information panel on the right hand side on the home screen. The right information panel has the following features:
• Your Hours - displays volunteer and continuing education hours associated with your logon, for the current volunteer year and the lifetime / total for all time.
• Your Calendar- you may not see this feature if you aren’t currently volunteered for an upcoming event. This feature is displayed when volunteers sign up for an event on the calendar. The event is automatically added to the “Your Calendar” on the right information panel in VMS.
• Master Gardener FAQs- an online system to assist Master Gardener volunteers find answers to hotline / help desk questions. The FAQs system (Frequently Asked Questions) enable volunteers to provide feedback to other FAQs and the ability to post their own questions with descriptions and photographs. UCCE Master Gardeners can access the FAQs system through the (Volunteer management System) VMS, or through their UC portal. FAQs PowerPoint Presentation and FAQs Tutorial Videos are available at: http://ucanr.edu/sites/vmshelp/FAQ_System_on_the_VMS/
• Links - displays a list of standard links as well as a list of links that Full Access administrators can customize.
13 | P a g e
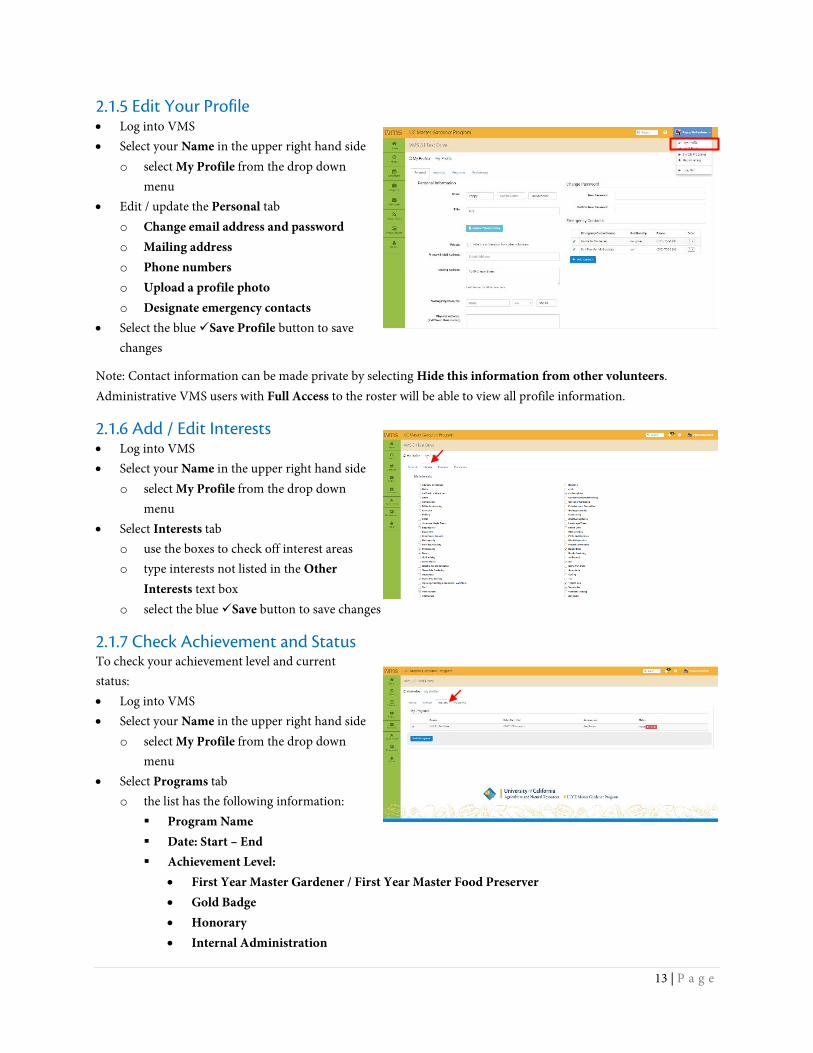
2.1.5 Edit Your Profile • Log into VMS • Select your Name in the upper right hand side
o select My Profile from the drop down menu
• Edit / update the Personal tab o Change email address and password o Mailing address o Phone numbers o Upload a profile photo o Designate emergency contacts
• Select the blue Save Profile button to save changes
Note: Contact information can be made private by selecting Hide this information from other volunteers. Administrative VMS users with Full Access to the roster will be able to view all profile information.
2.1.6 Add / Edit Interests • Log into VMS • Select your Name in the upper right hand side
o select My Profile from the drop down menu
• Select Interests tab o use the boxes to check off interest areas o type interests not listed in the Other
Interests text box o select the blue Save button to save changes
2.1.7 Check Achievement and Status To check your achievement level and current status: • Log into VMS • Select your Name in the upper right hand side
o select My Profile from the drop down menu
• Select Programs tab o the list has the following information:
Program Name Date: Start – End Achievement Level:
• First Year Master Gardener / First Year Master Food Preserver • Gold Badge • Honorary • Internal Administration
14 | P a g e
• Limited Active • Master Gardener / Master Food Preserver • Platinum Badge • Trainee • UC Staff
Status • Active • Limited Active • Inactive Resigned • Deleted
red Resign button
2.1.8 Electronically Resign You may electronically resign from the UC Master Gardener / UC Master Food Preserver Program at any time. Please note you cannot undo this action electronically. If you have done this in error please contact your coordinator for assistance. To resign: • Log into VMS • Select your Name in the upper right hand side and
o select My Profile from the drop down menu • Select Programs tab
o the list has the following information: Program Name Date: Start – End Achievement Level:
• First Year Master Gardener / First Year Master Food Preserver • Gold Badge • Honorary • Internal Administration • Limited Active • Master Gardener / Master Food Preserver • Platinum Badge • Trainee • UC Staff
Status • Active • Limited Active • Inactive Resigned • Deleted
Red Resign button • fill in the Reason for Resignation box (i.e. moving, lost interest, health reasons)
• select the blue Save button, or; • select the white Cancel button, the white Close button or the x in the top corner of the pop up
window to exit the window without saving
15 | P a g e
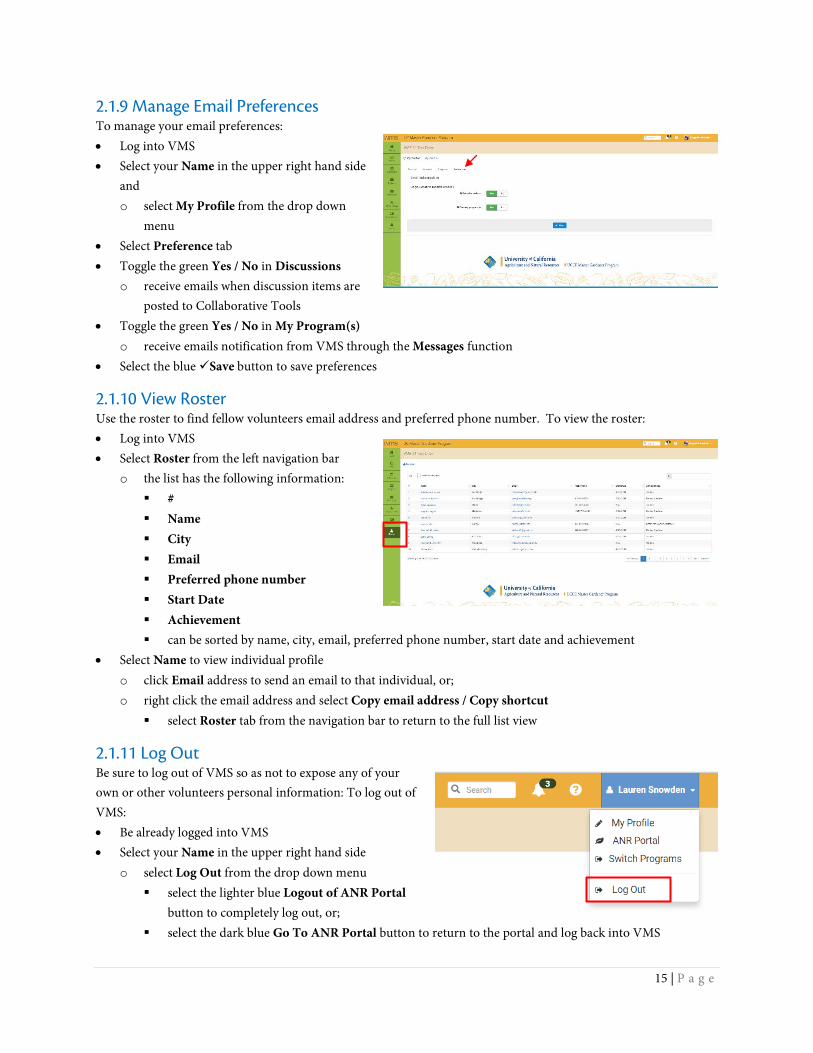
2.1.9 Manage Email Preferences To manage your email preferences: • Log into VMS • Select your Name in the upper right hand side
and o select My Profile from the drop down
menu • Select Preference tab • Toggle the green Yes / No in Discussions
o receive emails when discussion items are posted to Collaborative Tools
• Toggle the green Yes / No in My Program(s) o receive emails notification from VMS through the Messages function
• Select the blue Save button to save preferences
2.1.10 View Roster Use the roster to find fellow volunteers email address and preferred phone number. To view the roster: • Log into VMS • Select Roster from the left navigation bar
o the list has the following information: # Name City Email Preferred phone number Start Date Achievement can be sorted by name, city, email, preferred phone number, start date and achievement
• Select Name to view individual profile o click Email address to send an email to that individual, or; o right click the email address and select Copy email address / Copy shortcut
select Roster tab from the navigation bar to return to the full list view
2.1.11 Log Out Be sure to log out of VMS so as not to expose any of your own or other volunteers personal information: To log out of VMS: • Be already logged into VMS • Select your Name in the upper right hand side
o select Log Out from the drop down menu select the lighter blue Logout of ANR Portal
button to completely log out, or; select the dark blue Go To ANR Portal button to return to the portal and log back into VMS
16 | P a g e
Section 2.2 Adding Hours and Reporting Contacts In this section you will learn how to: 2.2.1 Add Volunteer and /or Continuing Education Hours with or without Contacts 2.2.2 Edit Volunteer and /or Continuing Education Hours with or without Contacts 2.2.3 Delete Volunteer and /or Continuing Education Hours with or without Contacts 2.2.4 Report Contacts 2.2.5 View Volunteer and Continuing Education Hours 2.2.6 Search Volunteer and Continuing Education Hours 2.2.7 Pending Tasks / Alerts
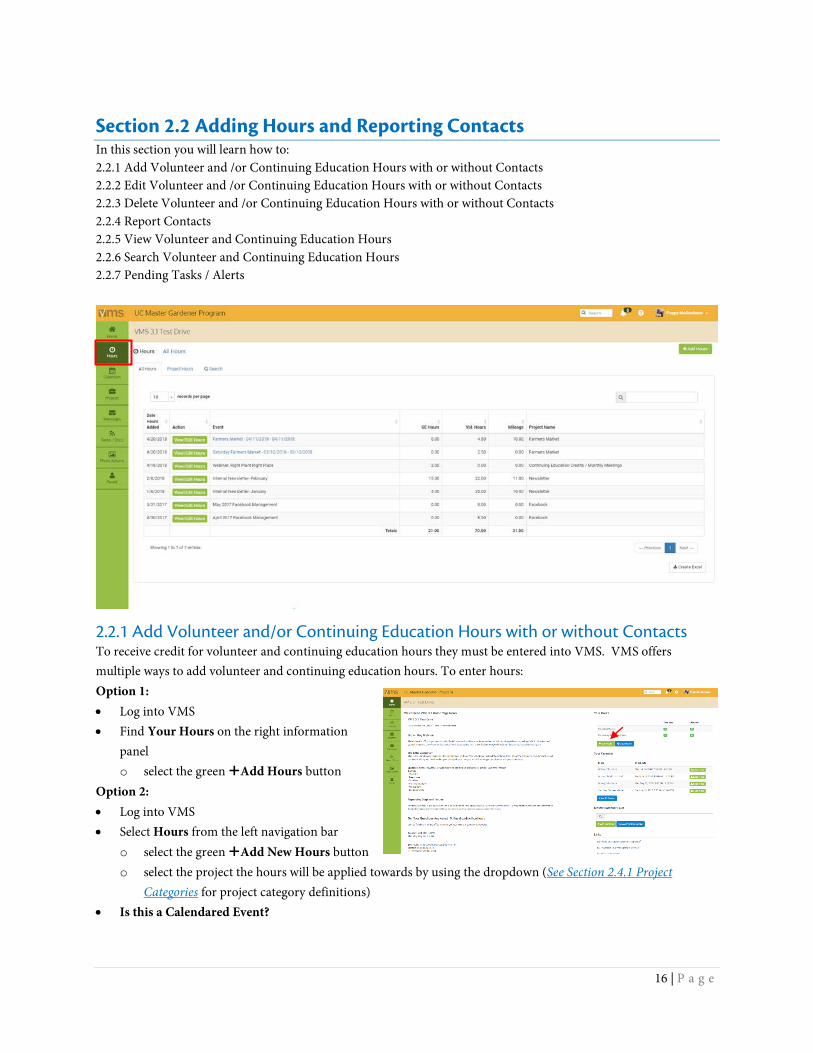
2.2.1 Add Volunteer and/or Continuing Education Hours with or without Contacts To receive credit for volunteer and continuing education hours they must be entered into VMS. VMS offers multiple ways to add volunteer and continuing education hours. To enter hours: Option 1: • Log into VMS • Find Your Hours on the right information
panel o select the green Add Hours button
Option 2: • Log into VMS • Select Hours from the left navigation bar
o select the green Add New Hours button o select the project the hours will be applied towards by using the dropdown (See Section 2.4.1 Project
Categories for project category definitions) • Is this a Calendared Event?
17 | P a g e
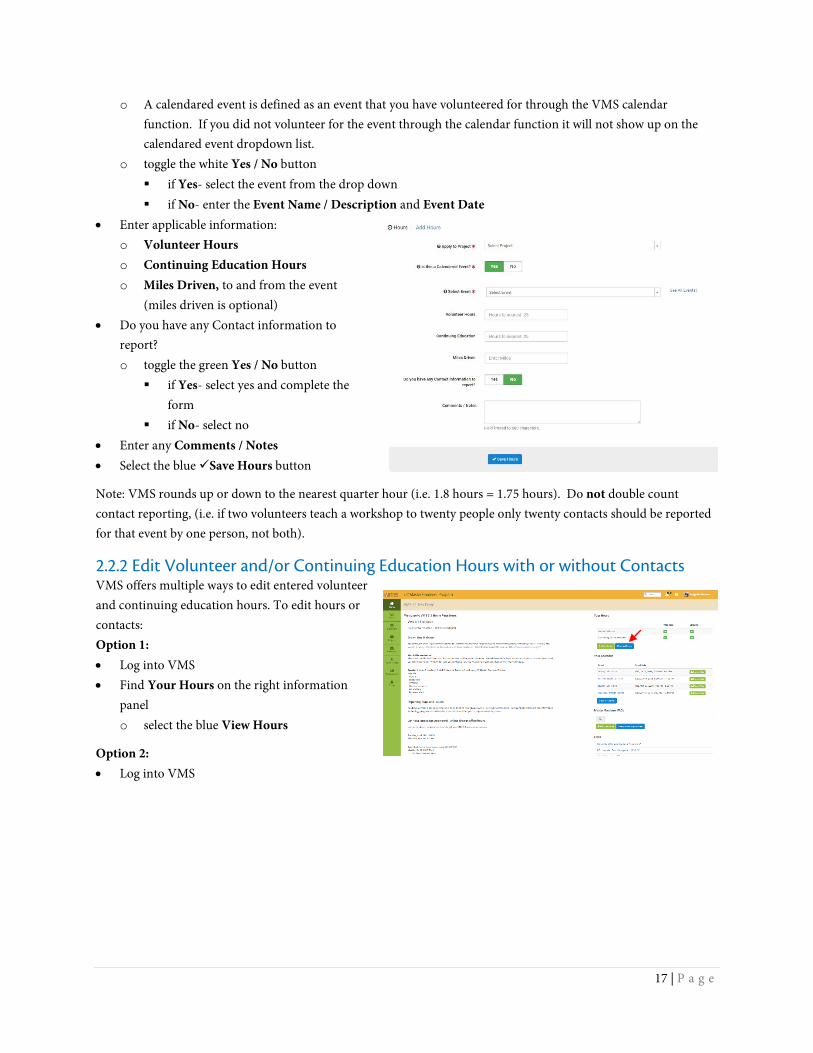
o A calendared event is defined as an event that you have volunteered for through the VMS calendar function. If you did not volunteer for the event through the calendar function it will not show up on the calendared event dropdown list.
o toggle the white Yes / No button if Yes- select the event from the drop down if No- enter the Event Name / Description and Event Date
• Enter applicable information: o Volunteer Hours o Continuing Education Hours o Miles Driven, to and from the event
(miles driven is optional) • Do you have any Contact information to
report? o toggle the green Yes / No button
if Yes- select yes and complete the form
if No- select no • Enter any Comments / Notes • Select the blue Save Hours button
Note: VMS rounds up or down to the nearest quarter hour (i.e. 1.8 hours = 1.75 hours). Do not double count contact reporting, (i.e. if two volunteers teach a workshop to twenty people only twenty contacts should be reported for that event by one person, not both).
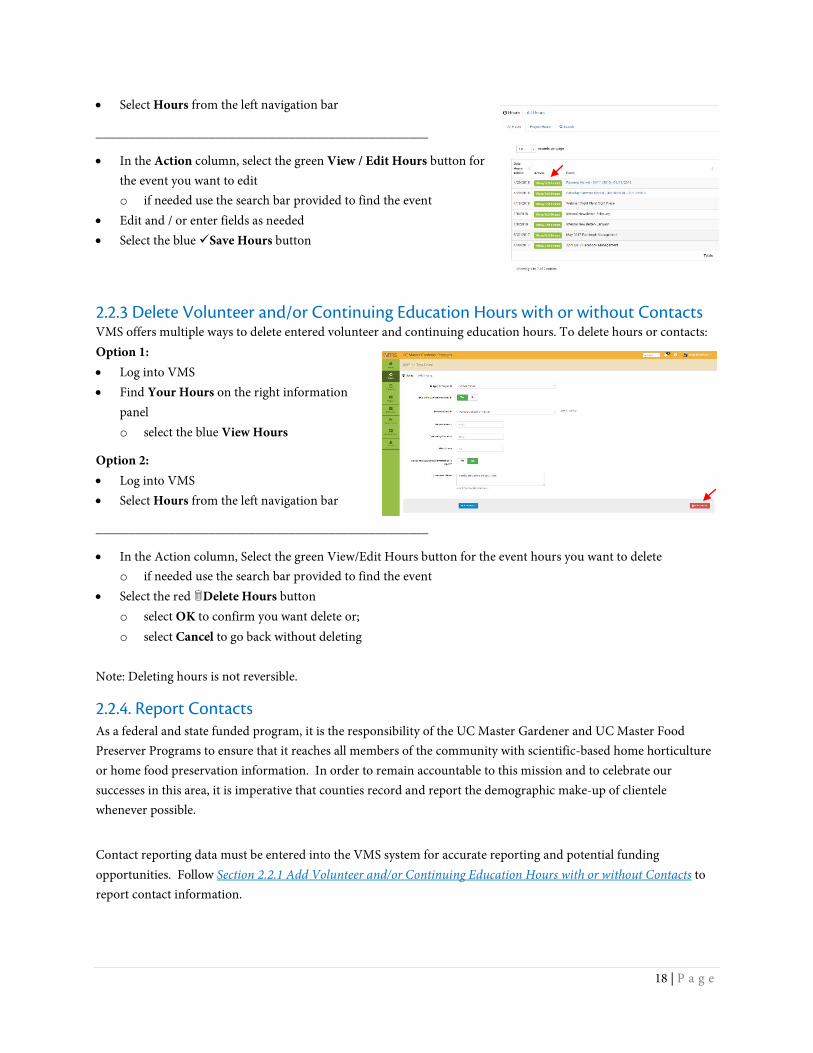
2.2.2 Edit Volunteer and/or Continuing Education Hours with or without Contacts VMS offers multiple ways to edit entered volunteer and continuing education hours. To edit hours or contacts: Option 1: • Log into VMS • Find Your Hours on the right information
panel o select the blue View Hours
Option 2: • Log into VMS
18 | P a g e
• Select Hours from the left navigation bar
__________________________________________________
• In the Action column, select the green View / Edit Hours button for the event you want to edit o if needed use the search bar provided to find the event
• Edit and / or enter fields as needed • Select the blue Save Hours button
2.2.3 Delete Volunteer and/or Continuing Education Hours with or without Contacts VMS offers multiple ways to delete entered volunteer and continuing education hours. To delete hours or contacts: Option 1: • Log into VMS • Find Your Hours on the right information
panel o select the blue View Hours
Option 2: • Log into VMS • Select Hours from the left navigation bar
__________________________________________________
• In the Action column, Select the green View/Edit Hours button for the event hours you want to delete o if needed use the search bar provided to find the event
• Select the red Delete Hours button o select OK to confirm you want delete or; o select Cancel to go back without deleting
Note: Deleting hours is not reversible.
2.2.4. Report Contacts As a federal and state funded program, it is the responsibility of the UC Master Gardener and UC Master Food Preserver Programs to ensure that it reaches all members of the community with scientific-based home horticulture or home food preservation information. In order to remain accountable to this mission and to celebrate our successes in this area, it is imperative that counties record and report the demographic make-up of clientele whenever possible.
Contact reporting data must be entered into the VMS system for accurate reporting and potential funding opportunities. Follow Section 2.2.1 Add Volunteer and/or Continuing Education Hours with or without Contacts to report contact information.
19 | P a g e
Note: Do not double count contacts, (i.e. if two volunteers teach a workshop to twenty people only twenty contacts should be reported for that event by one person, not both).
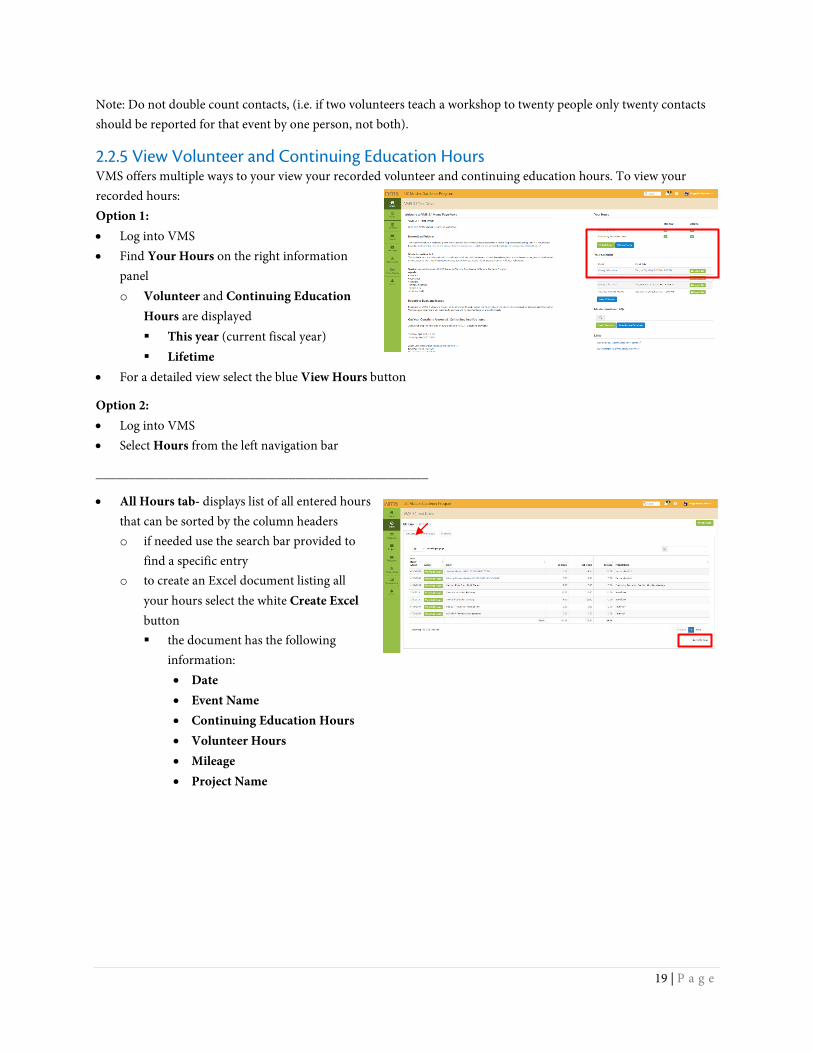
2.2.5 View Volunteer and Continuing Education Hours VMS offers multiple ways to your view your recorded volunteer and continuing education hours. To view your recorded hours: Option 1: • Log into VMS • Find Your Hours on the right information
panel o Volunteer and Continuing Education
Hours are displayed This year (current fiscal year) Lifetime
• For a detailed view select the blue View Hours button
Option 2: • Log into VMS • Select Hours from the left navigation bar
__________________________________________________
• All Hours tab- displays list of all entered hours that can be sorted by the column headers o if needed use the search bar provided to
find a specific entry o to create an Excel document listing all
your hours select the white Create Excel button the document has the following
information: • Date • Event Name • Continuing Education Hours • Volunteer Hours • Mileage • Project Name
20 | P a g e
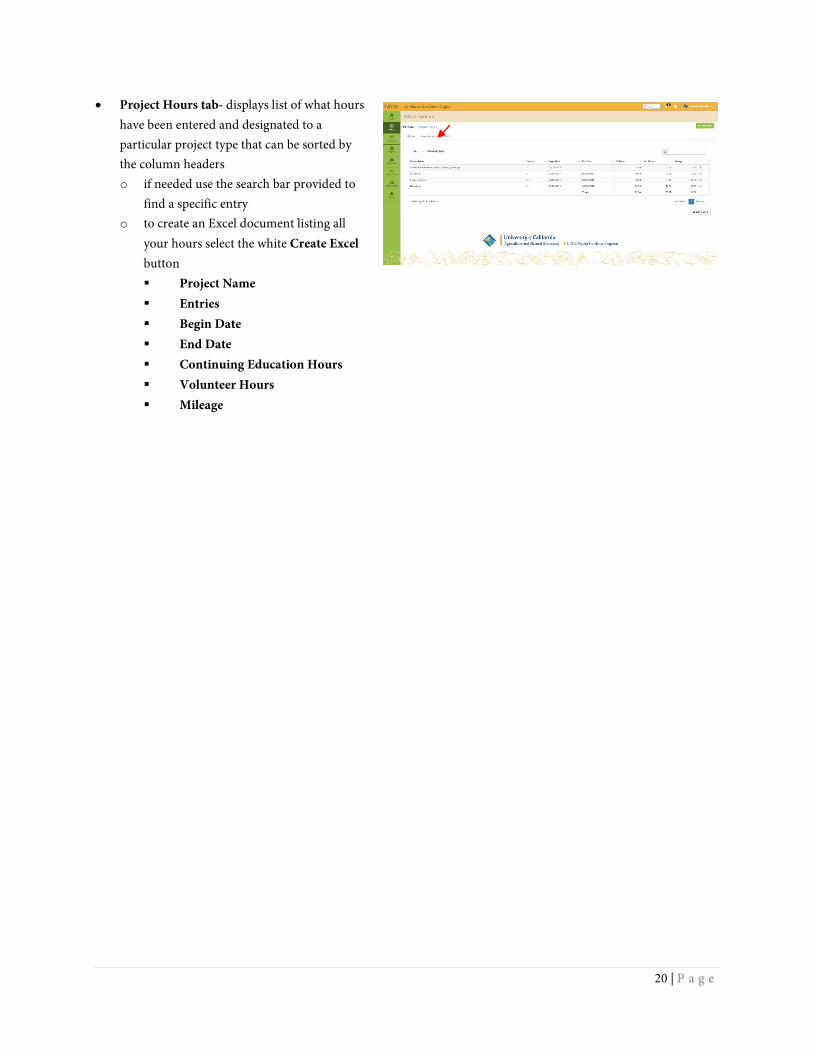
• Project Hours tab- displays list of what hours have been entered and designated to a particular project type that can be sorted by the column headers o if needed use the search bar provided to
find a specific entry o to create an Excel document listing all
your hours select the white Create Excel button Project Name Entries Begin Date End Date Continuing Education Hours Volunteer Hours Mileage
21 | P a g e
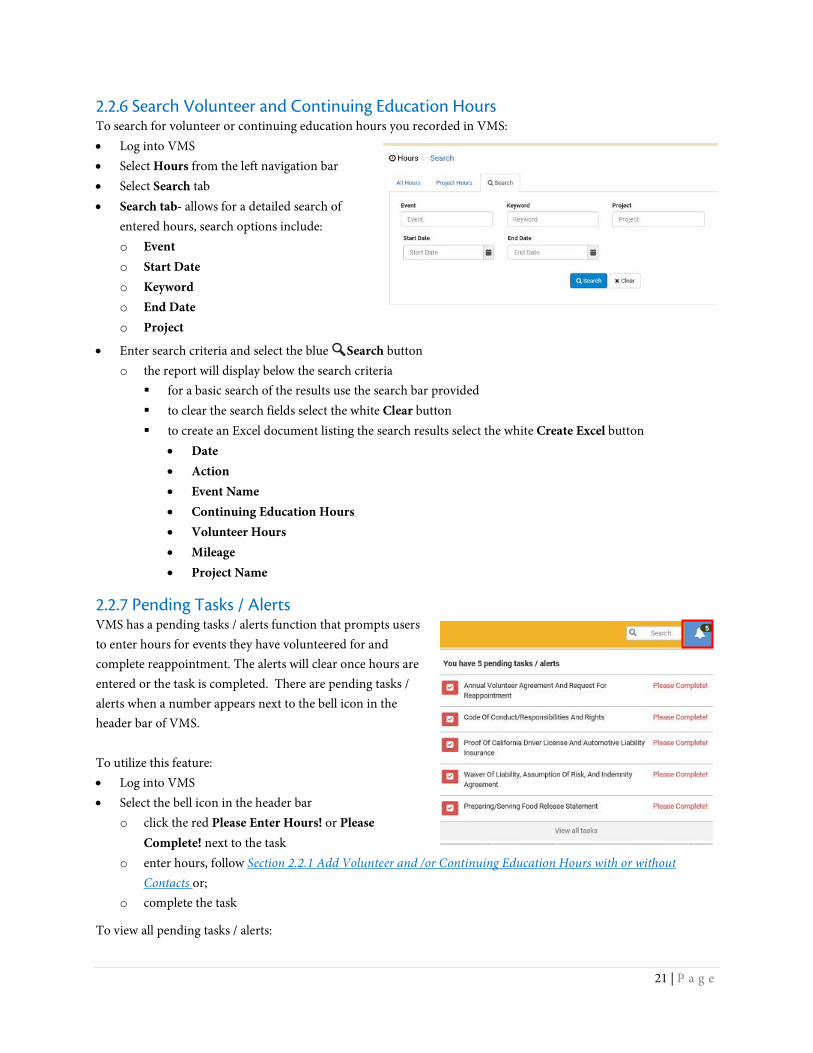
2.2.6 Search Volunteer and Continuing Education Hours To search for volunteer or continuing education hours you recorded in VMS: • Log into VMS • Select Hours from the left navigation bar • Select Search tab • Search tab- allows for a detailed search of
entered hours, search options include: o Event o Start Date o Keyword o End Date o Project
• Enter search criteria and select the blue 🔍🔍Search button o the report will display below the search criteria
for a basic search of the results use the search bar provided to clear the search fields select the white Clear button to create an Excel document listing the search results select the white Create Excel button
• Date • Action • Event Name • Continuing Education Hours • Volunteer Hours • Mileage • Project Name
2.2.7 Pending Tasks / Alerts VMS has a pending tasks / alerts function that prompts users to enter hours for events they have volunteered for and complete reappointment. The alerts will clear once hours are entered or the task is completed. There are pending tasks / alerts when a number appears next to the bell icon in the header bar of VMS. To utilize this feature: • Log into VMS • Select the bell icon in the header bar
o click the red Please Enter Hours! or Please Complete! next to the task
o enter hours, follow Section 2.2.1 Add Volunteer and /or Continuing Education Hours with or without Contacts or;
o complete the task
To view all pending tasks / alerts:
22 | P a g e
• Log into VMS • Select the bell icon in the header bar
o click View all tasks located at the bottom of the list o if needed use the search bar provided to find a specific entry o the list has the following information:
# Icon Type Title Description can be sorted by icon, type, title description
• Select Icon, Type , Title of the task to complete the action
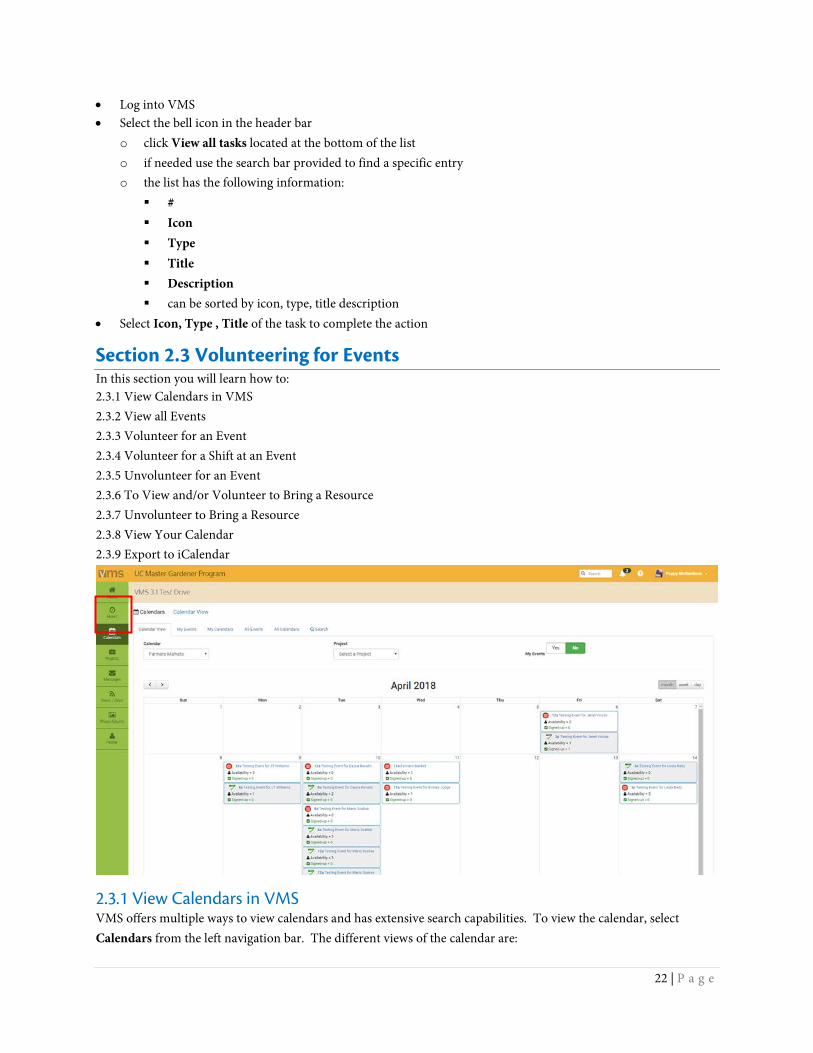
Section 2.3 Volunteering for Events In this section you will learn how to: 2.3.1 View Calendars in VMS 2.3.2 View all Events 2.3.3 Volunteer for an Event 2.3.4 Volunteer for a Shift at an Event 2.3.5 Unvolunteer for an Event 2.3.6 To View and/or Volunteer to Bring a Resource 2.3.7 Unvolunteer to Bring a Resource 2.3.8 View Your Calendar 2.3.9 Export to iCalendar
2.3.1 View Calendars in VMS VMS offers multiple ways to view calendars and has extensive search capabilities. To view the calendar, select Calendars from the left navigation bar. The different views of the calendar are:
23 | P a g e
• Calendar View- displays monthly view of all calendared events o can be sorted by calendar, project and viewed by month, week or day o can toggle the green Yes / No My Events button
• My Events- displays list view of all past and future events that you volunteered for o search bar included
• My Calendar- shows list of calendars for events that you volunteered for o search bar included
• All Events- displays list view of all past and future events of all calendars o search bar included
• All Calendars- displays list view of all of calendars o search bar included
• Search- allows for a detailed search by event, keyword, project, start date and/or end date
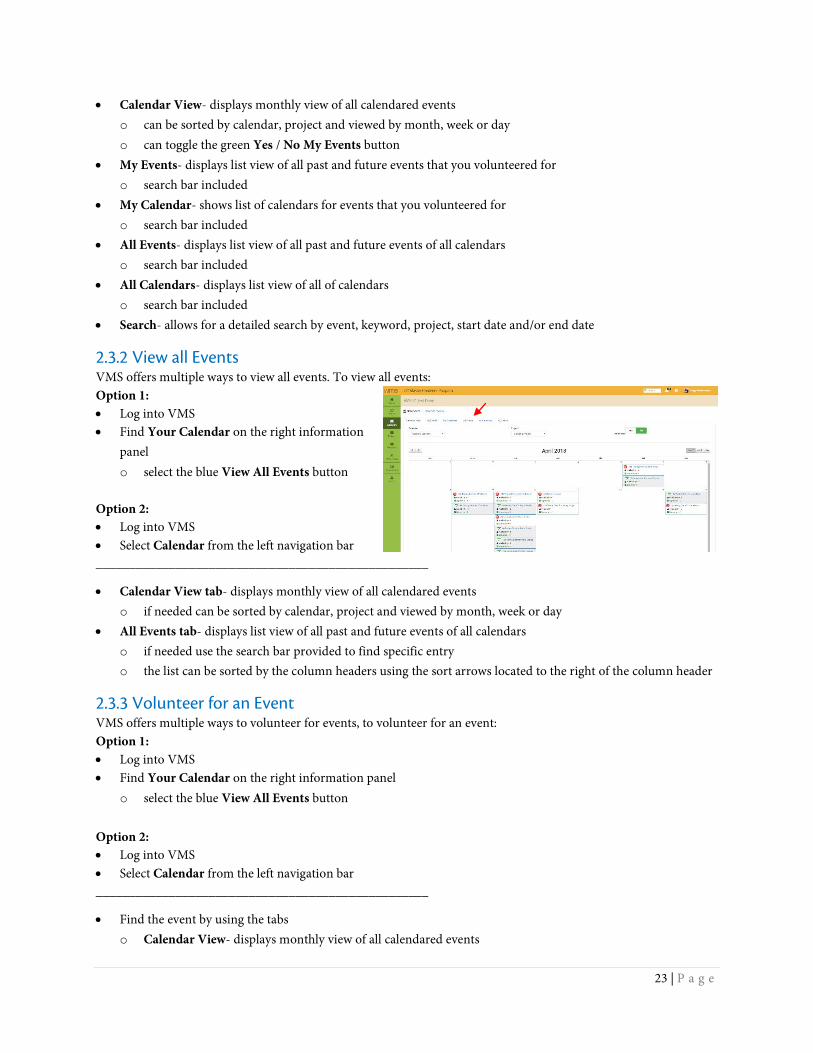
2.3.2 View all Events VMS offers multiple ways to view all events. To view all events: Option 1: • Log into VMS • Find Your Calendar on the right information
panel o select the blue View All Events button
Option 2: • Log into VMS • Select Calendar from the left navigation bar __________________________________________________
• Calendar View tab- displays monthly view of all calendared events o if needed can be sorted by calendar, project and viewed by month, week or day
• All Events tab- displays list view of all past and future events of all calendars o if needed use the search bar provided to find specific entry o the list can be sorted by the column headers using the sort arrows located to the right of the column header
2.3.3 Volunteer for an Event VMS offers multiple ways to volunteer for events, to volunteer for an event: Option 1: • Log into VMS • Find Your Calendar on the right information panel
o select the blue View All Events button Option 2: • Log into VMS • Select Calendar from the left navigation bar __________________________________________________
• Find the event by using the tabs o Calendar View- displays monthly view of all calendared events
24 | P a g e
can be sorted by calendar, project and viewed by month, week or day can toggle the green Yes / No My Events button
o All Events- displays list view of all past and future events of all calendars search bar included
o All Calendars- display list view of all of calendars search bar included
o Search- allows for a detailed search by event, keyword, project, start date and or end date
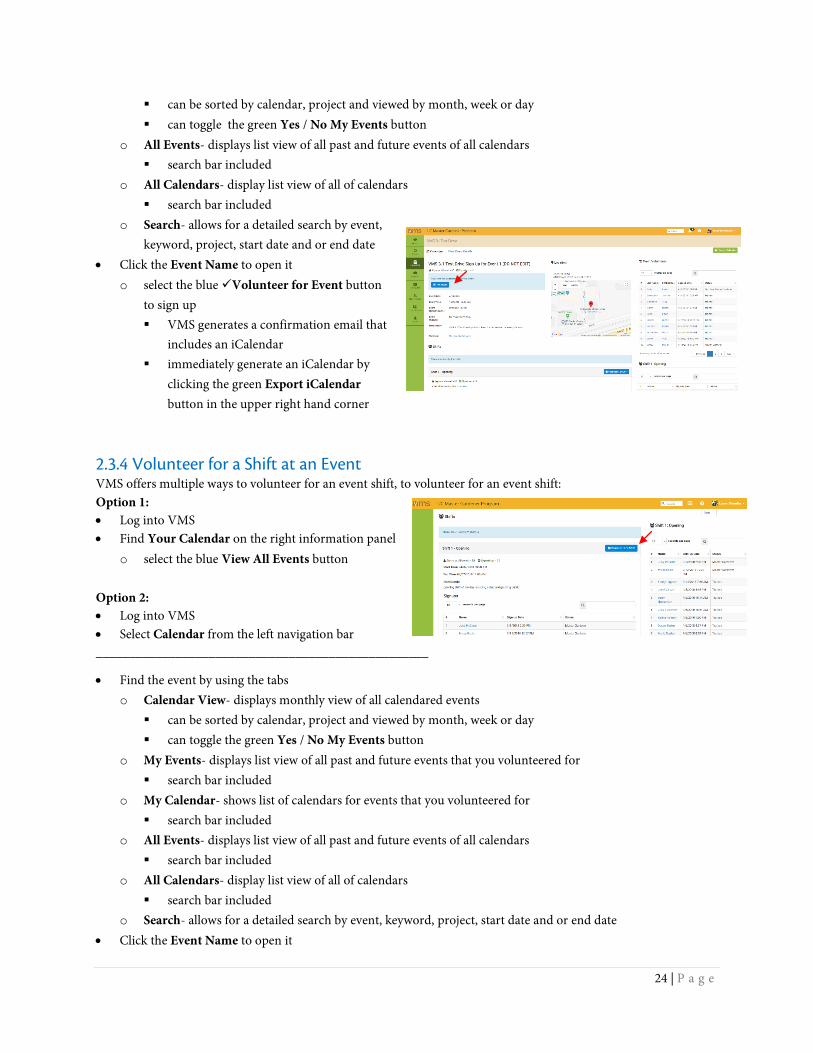
• Click the Event Name to open it o select the blue Volunteer for Event button
to sign up VMS generates a confirmation email that
includes an iCalendar immediately generate an iCalendar by
clicking the green Export iCalendar button in the upper right hand corner
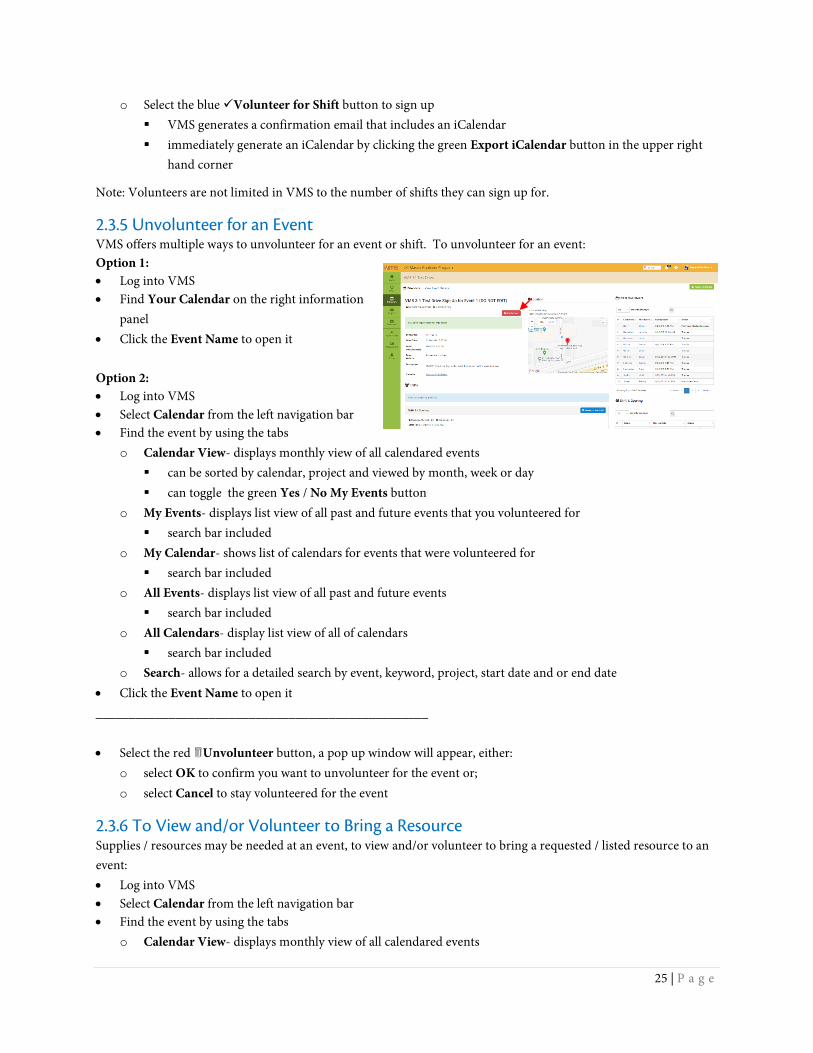
2.3.4 Volunteer for a Shift at an Event VMS offers multiple ways to volunteer for an event shift, to volunteer for an event shift: Option 1: • Log into VMS • Find Your Calendar on the right information panel
o select the blue View All Events button Option 2: • Log into VMS • Select Calendar from the left navigation bar __________________________________________________
• Find the event by using the tabs o Calendar View- displays monthly view of all calendared events
can be sorted by calendar, project and viewed by month, week or day can toggle the green Yes / No My Events button
o My Events- displays list view of all past and future events that you volunteered for search bar included
o My Calendar- shows list of calendars for events that you volunteered for search bar included
o All Events- displays list view of all past and future events of all calendars search bar included
o All Calendars- display list view of all of calendars search bar included
o Search- allows for a detailed search by event, keyword, project, start date and or end date • Click the Event Name to open it
25 | P a g e
o Select the blue Volunteer for Shift button to sign up VMS generates a confirmation email that includes an iCalendar immediately generate an iCalendar by clicking the green Export iCalendar button in the upper right
hand corner
Note: Volunteers are not limited in VMS to the number of shifts they can sign up for.
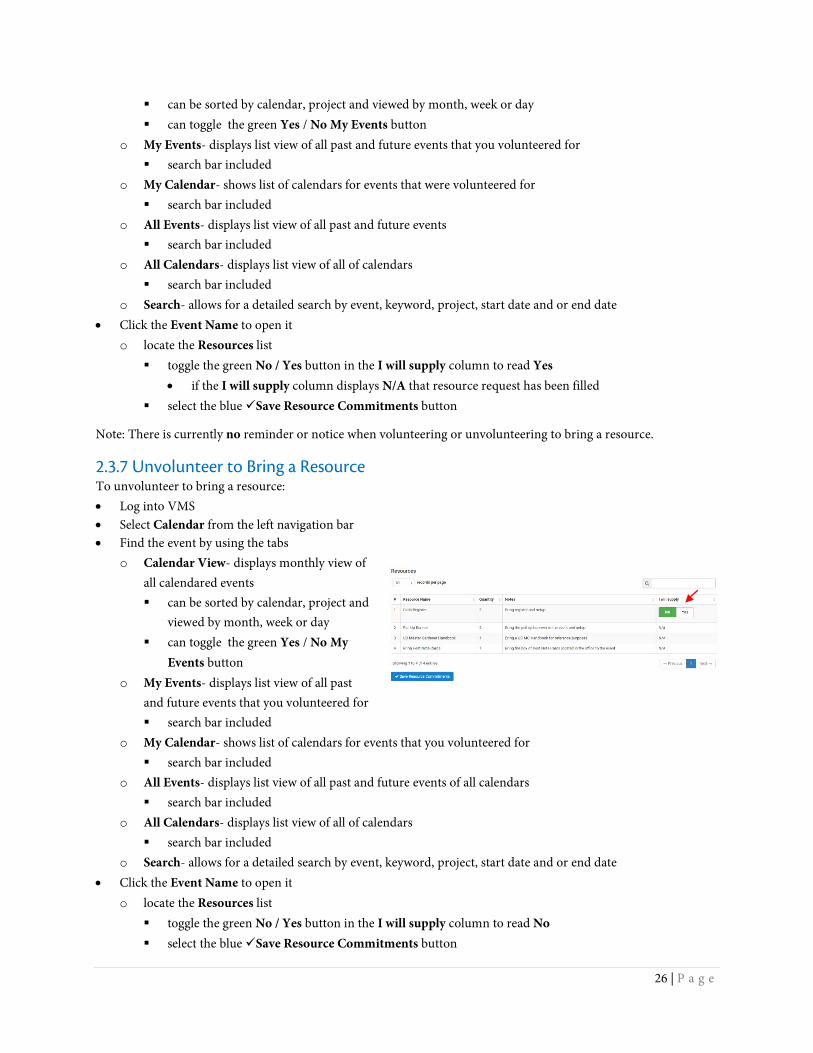
2.3.5 Unvolunteer for an Event VMS offers multiple ways to unvolunteer for an event or shift. To unvolunteer for an event: Option 1: • Log into VMS • Find Your Calendar on the right information
panel • Click the Event Name to open it Option 2: • Log into VMS • Select Calendar from the left navigation bar • Find the event by using the tabs
o Calendar View- displays monthly view of all calendared events can be sorted by calendar, project and viewed by month, week or day can toggle the green Yes / No My Events button
o My Events- displays list view of all past and future events that you volunteered for search bar included
o My Calendar- shows list of calendars for events that were volunteered for search bar included
o All Events- displays list view of all past and future events search bar included
o All Calendars- display list view of all of calendars search bar included
o Search- allows for a detailed search by event, keyword, project, start date and or end date • Click the Event Name to open it __________________________________________________ • Select the red Unvolunteer button, a pop up window will appear, either:
o select OK to confirm you want to unvolunteer for the event or; o select Cancel to stay volunteered for the event
2.3.6 To View and/or Volunteer to Bring a Resource Supplies / resources may be needed at an event, to view and/or volunteer to bring a requested / listed resource to an event: • Log into VMS • Select Calendar from the left navigation bar • Find the event by using the tabs
o Calendar View- displays monthly view of all calendared events
26 | P a g e
can be sorted by calendar, project and viewed by month, week or day can toggle the green Yes / No My Events button
o My Events- displays list view of all past and future events that you volunteered for search bar included
o My Calendar- shows list of calendars for events that were volunteered for search bar included
o All Events- displays list view of all past and future events search bar included
o All Calendars- displays list view of all of calendars search bar included
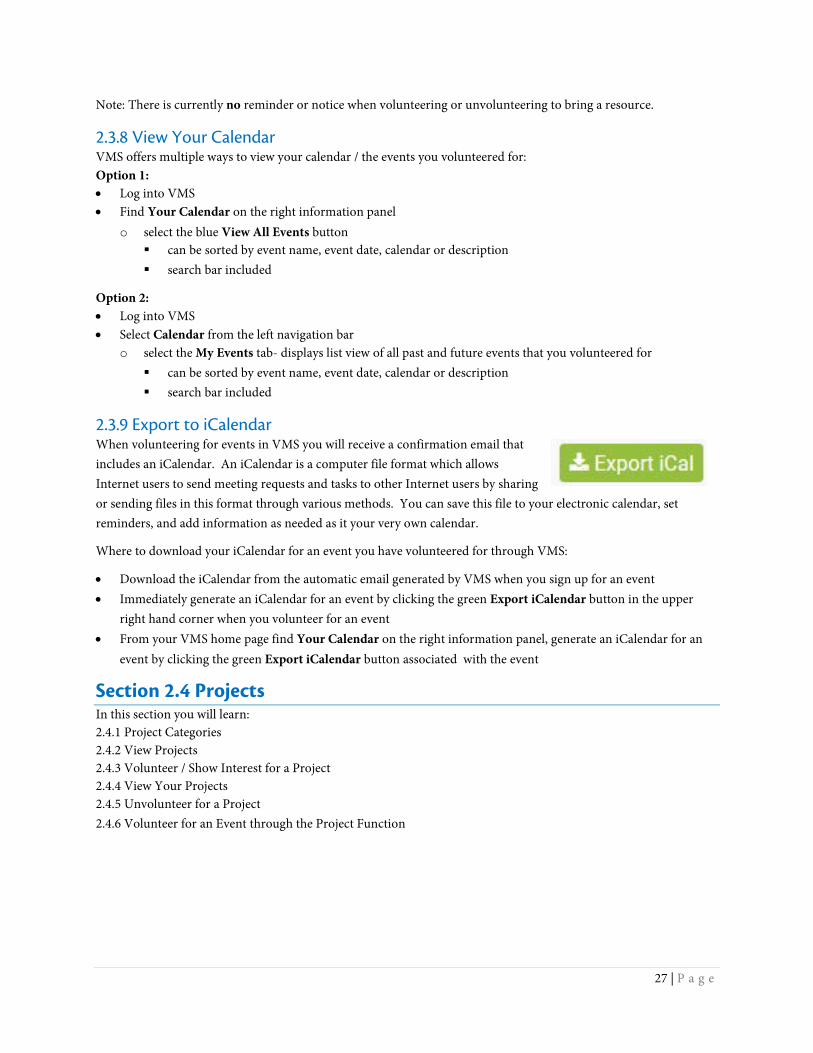
o Search- allows for a detailed search by event, keyword, project, start date and or end date • Click the Event Name to open it
o locate the Resources list toggle the green No / Yes button in the I will supply column to read Yes
• if the I will supply column displays N/A that resource request has been filled select the blue Save Resource Commitments button
Note: There is currently no reminder or notice when volunteering or unvolunteering to bring a resource.
2.3.7 Unvolunteer to Bring a Resource To unvolunteer to bring a resource: • Log into VMS • Select Calendar from the left navigation bar • Find the event by using the tabs
o Calendar View- displays monthly view of all calendared events can be sorted by calendar, project and
viewed by month, week or day can toggle the green Yes / No My
Events button o My Events- displays list view of all past
and future events that you volunteered for search bar included
o My Calendar- shows list of calendars for events that you volunteered for search bar included
o All Events- displays list view of all past and future events of all calendars search bar included
o All Calendars- displays list view of all of calendars search bar included
o Search- allows for a detailed search by event, keyword, project, start date and or end date • Click the Event Name to open it
o locate the Resources list toggle the green No / Yes button in the I will supply column to read No select the blue Save Resource Commitments button
27 | P a g e
Note: There is currently no reminder or notice when volunteering or unvolunteering to bring a resource.
2.3.8 View Your Calendar VMS offers multiple ways to view your calendar / the events you volunteered for: Option 1: • Log into VMS • Find Your Calendar on the right information panel
o select the blue View All Events button can be sorted by event name, event date, calendar or description search bar included
Option 2: • Log into VMS • Select Calendar from the left navigation bar
o select the My Events tab- displays list view of all past and future events that you volunteered for can be sorted by event name, event date, calendar or description search bar included
2.3.9 Export to iCalendar When volunteering for events in VMS you will receive a confirmation email that includes an iCalendar. An iCalendar is a computer file format which allows Internet users to send meeting requests and tasks to other Internet users by sharing or sending files in this format through various methods. You can save this file to your electronic calendar, set reminders, and add information as needed as it your very own calendar.
Where to download your iCalendar for an event you have volunteered for through VMS:
• Download the iCalendar from the automatic email generated by VMS when you sign up for an event • Immediately generate an iCalendar for an event by clicking the green Export iCalendar button in the upper
right hand corner when you volunteer for an event • From your VMS home page find Your Calendar on the right information panel, generate an iCalendar for an
event by clicking the green Export iCalendar button associated with the event
Section 2.4 Projects In this section you will learn: 2.4.1 Project Categories 2.4.2 View Projects 2.4.3 Volunteer / Show Interest for a Project 2.4.4 View Your Projects 2.4.5 Unvolunteer for a Project 2.4.6 Volunteer for an Event through the Project Function
28 | P a g e
2.4.1 Project Categories **Does not apply to UC Master Food Preserver Program**
There are 11 pre-defined categories in VMS that allow for consistent, compelling and accurate reporting across the statewide program. The data collection is important for program sustainability and is a great tool to share relevant information with stakeholders at the community, county, state and federal level. Below is a detailed description of the pre-defined project categories:
1. Admin / Office- any projects that fosters the administration of the UC Master Gardener program. Including board (or other leadership structure) meetings, and sub-committee meetings that do not belong in another category. May also include office duties completed by a volunteer at the request of program coordinator or UCCE staff person.
2. Booth Display- includes projects in which UC Master Gardeners represent the program, UCCE, or UC ANR at an event with a larger focus. Includes, but not limited to, preparation, attendance, or clean up from the following: farmer’s markets, county fair booth, table at community events, home and garden show, etc.
3. Demonstration Garden- includes, but is not limited to: school gardens, community gardens, public landscaping projects.
4. Farm Advisor Research- any research done on behalf of a UCCE farm advisor, specialist or the statewide office.
Includes PlantRight Nursery Survey.
5. Help Desk / Hotline- includes any activity in which UC Master Gardeners answer questions from the public about home horticulture and/or pests, typically on an individual basis. Hotlines, Helplines, answering “helpline” emails or phone calls, plant clinics, water walks, etc.
6. Mass Media / Communications- any communications intended for an external audience. Including, but not limited to, the development of material such as: flyers, newspaper articles, press releases, social media, blog posts, newsletters, direct mail, etc.
29 | P a g e
7. Master Gardener Continuing Education- any program coordinator-approved continuing education
opportunities.
8. Master Gardener Program Meeting- internal meetings held for UC Master Gardener volunteers. 9. Mentoring- includes projects that cater to the internal development of UC Master Gardener volunteers and
program leadership. Includes committees that facilitate new class trainings.
10. Public Education- any project in which a Master Gardener is educating the public (usually more than one at a time) on home horticulture topics. Workshops, classes, seminars, demonstrations, etc.
11. Sales / Fundraising- any project that leads to the sale of a product or fundraising opportunity. Examples: developing a county calendar for sale; plant propagation and maintenance for a plant sale; working on logistics and/or physically working in the garden preparing for a garden tour.
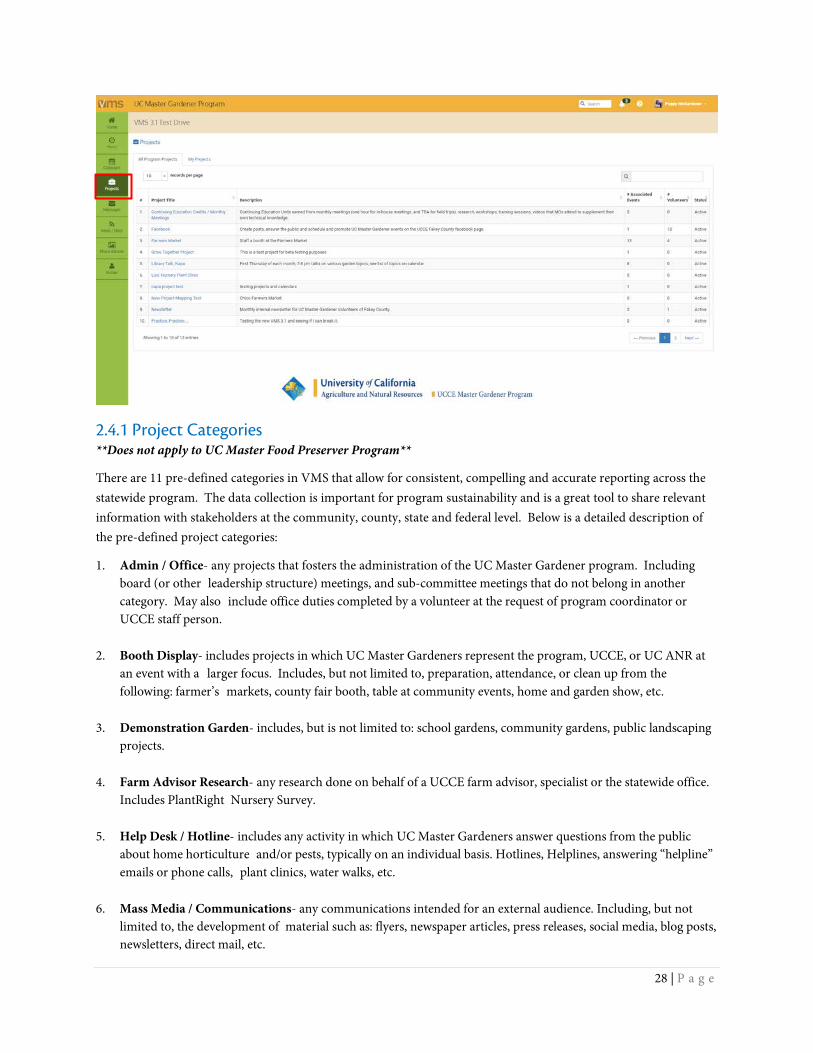
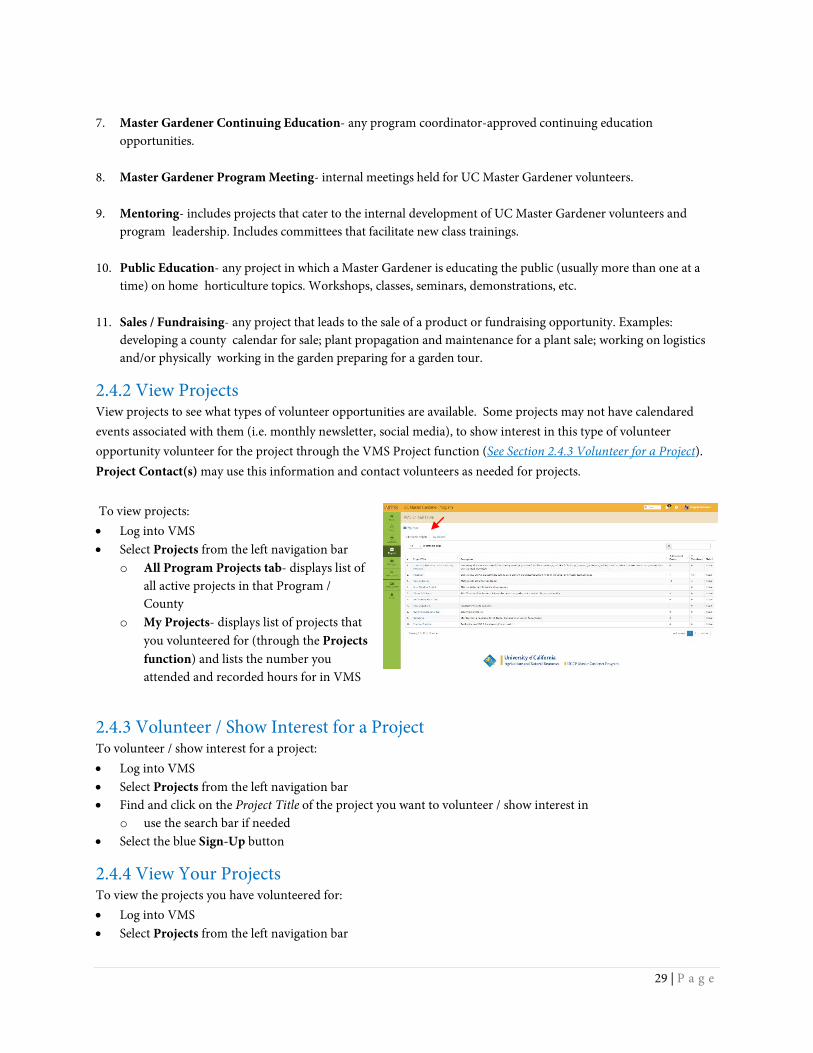
2.4.2 View Projects View projects to see what types of volunteer opportunities are available. Some projects may not have calendared events associated with them (i.e. monthly newsletter, social media), to show interest in this type of volunteer opportunity volunteer for the project through the VMS Project function (See Section 2.4.3 Volunteer for a Project). Project Contact(s) may use this information and contact volunteers as needed for projects. To view projects: • Log into VMS • Select Projects from the left navigation bar
o All Program Projects tab- displays list of all active projects in that Program / County
o My Projects- displays list of projects that you volunteered for (through the Projects function) and lists the number you attended and recorded hours for in VMS
2.4.3 Volunteer / Show Interest for a Project To volunteer / show interest for a project: • Log into VMS • Select Projects from the left navigation bar • Find and click on the Project Title of the project you want to volunteer / show interest in
o use the search bar if needed • Select the blue Sign-Up button
2.4.4 View Your Projects To view the projects you have volunteered for: • Log into VMS • Select Projects from the left navigation bar
30 | P a g e
• Select My Projects tab o displays lists of projects that you volunteered for (through the Projects function) and attended and recorded
hours for in VMS
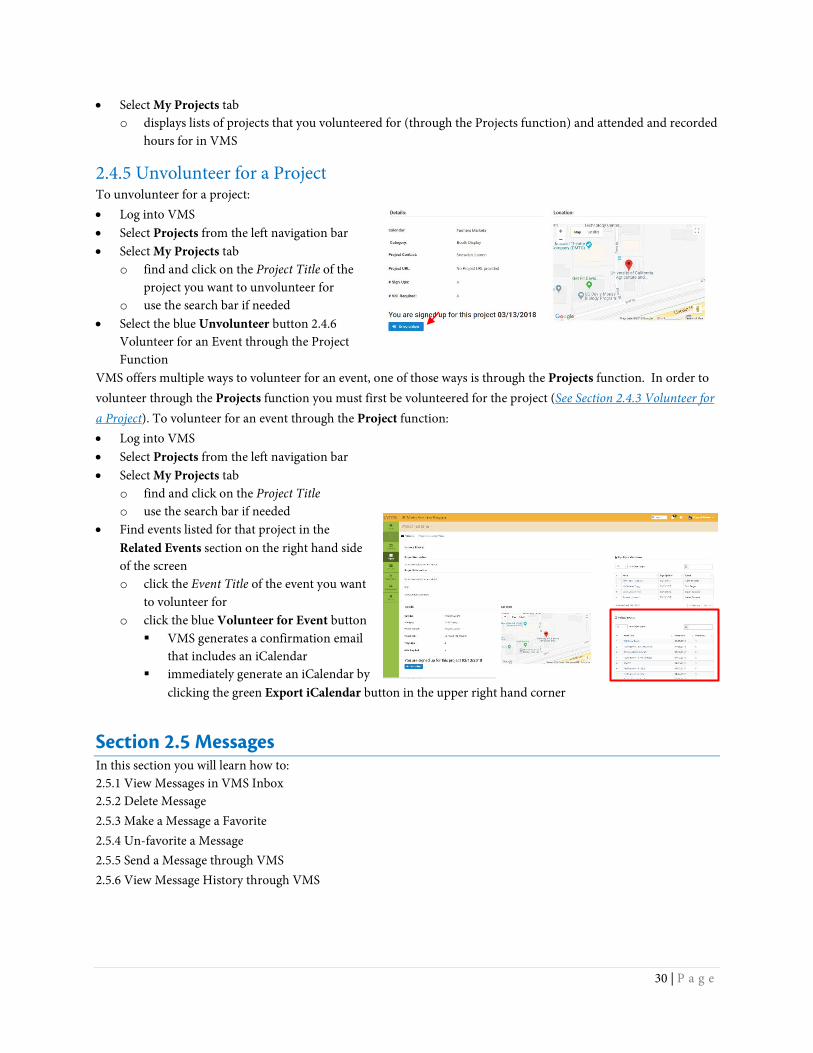
2.4.5 Unvolunteer for a Project To unvolunteer for a project: • Log into VMS • Select Projects from the left navigation bar • Select My Projects tab
o find and click on the Project Title of the project you want to unvolunteer for
o use the search bar if needed • Select the blue Unvolunteer button 2.4.6
Volunteer for an Event through the Project Function
VMS offers multiple ways to volunteer for an event, one of those ways is through the Projects function. In order to volunteer through the Projects function you must first be volunteered for the project (See Section 2.4.3 Volunteer for a Project). To volunteer for an event through the Project function: • Log into VMS • Select Projects from the left navigation bar • Select My Projects tab
o find and click on the Project Title o use the search bar if needed
• Find events listed for that project in the Related Events section on the right hand side of the screen o click the Event Title of the event you want
to volunteer for o click the blue Volunteer for Event button
VMS generates a confirmation email that includes an iCalendar
immediately generate an iCalendar by clicking the green Export iCalendar button in the upper right hand corner
Section 2.5 Messages In this section you will learn how to: 2.5.1 View Messages in VMS Inbox 2.5.2 Delete Message 2.5.3 Make a Message a Favorite 2.5.4 Un-favorite a Message 2.5.5 Send a Message through VMS 2.5.6 View Message History through VMS
31 | P a g e
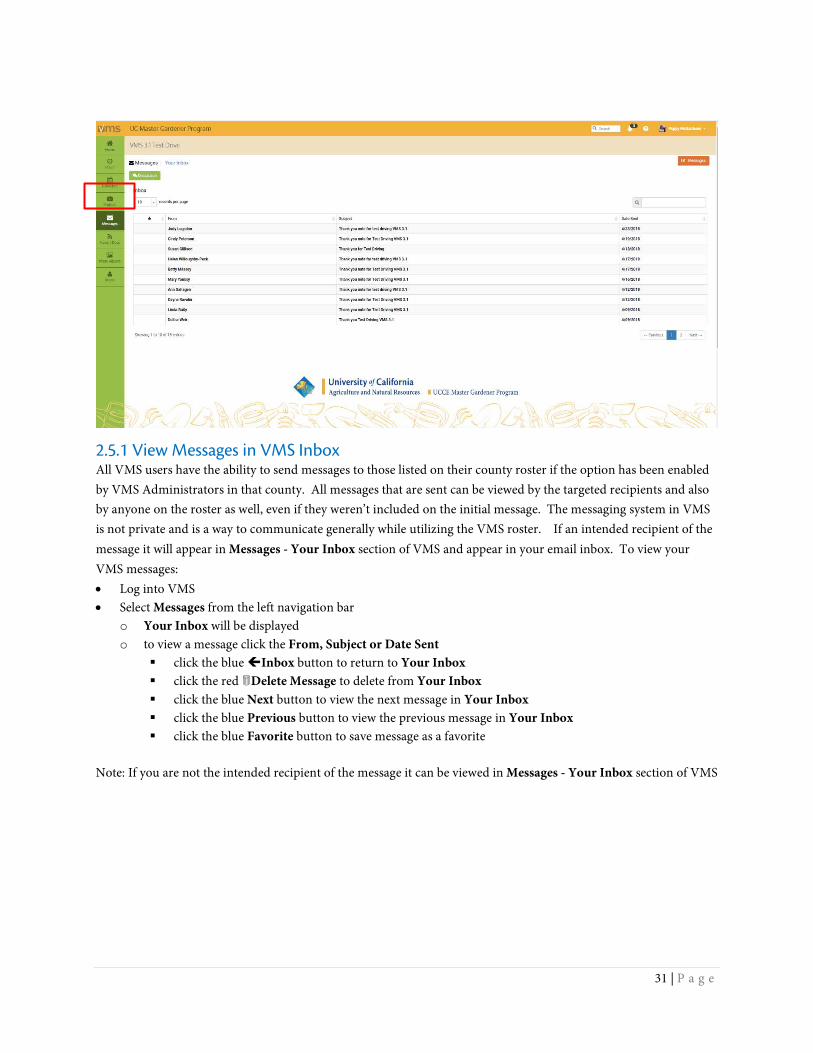
2.5.1 View Messages in VMS Inbox All VMS users have the ability to send messages to those listed on their county roster if the option has been enabled by VMS Administrators in that county. All messages that are sent can be viewed by the targeted recipients and also by anyone on the roster as well, even if they weren’t included on the initial message. The messaging system in VMS is not private and is a way to communicate generally while utilizing the VMS roster. If an intended recipient of the message it will appear in Messages - Your Inbox section of VMS and appear in your email inbox. To view your VMS messages: • Log into VMS • Select Messages from the left navigation bar
o Your Inbox will be displayed o to view a message click the From, Subject or Date Sent
click the blue Inbox button to return to Your Inbox click the red Delete Message to delete from Your Inbox click the blue Next button to view the next message in Your Inbox click the blue Previous button to view the previous message in Your Inbox click the blue Favorite button to save message as a favorite
Note: If you are not the intended recipient of the message it can be viewed in Messages - Your Inbox section of VMS
32 | P a g e
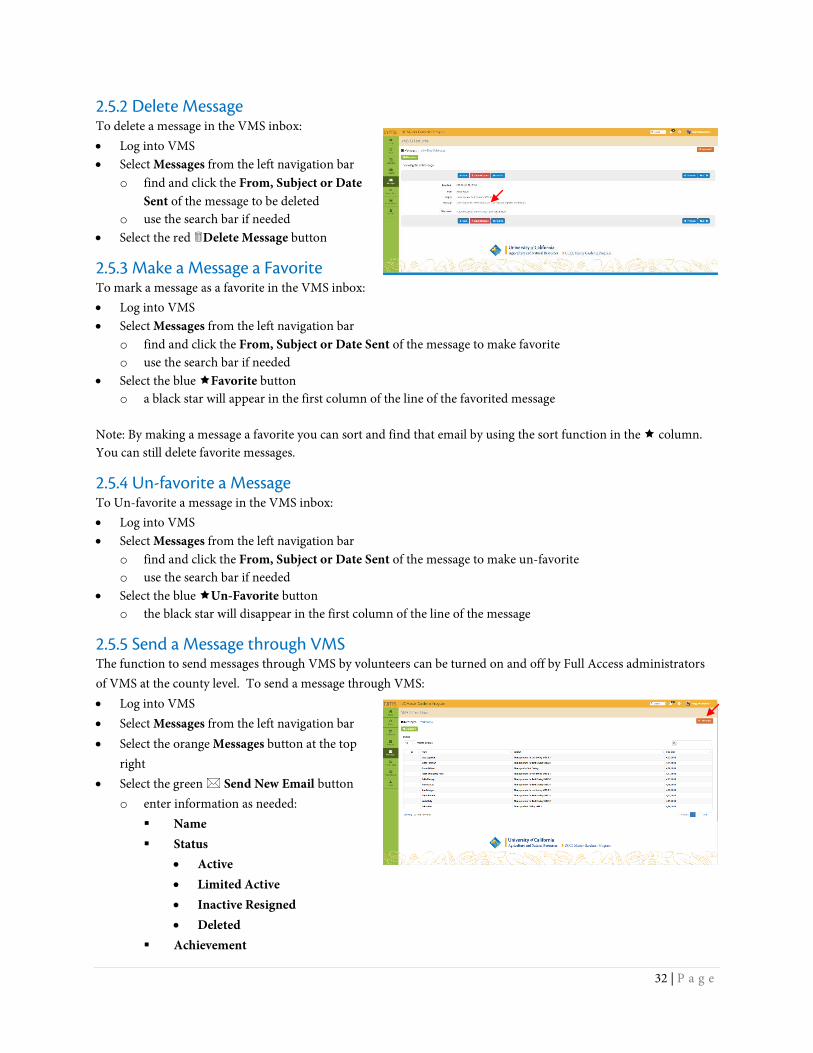
2.5.2 Delete Message To delete a message in the VMS inbox: • Log into VMS • Select Messages from the left navigation bar
o find and click the From, Subject or Date Sent of the message to be deleted
o use the search bar if needed • Select the red Delete Message button
2.5.3 Make a Message a Favorite To mark a message as a favorite in the VMS inbox: • Log into VMS • Select Messages from the left navigation bar
o find and click the From, Subject or Date Sent of the message to make favorite o use the search bar if needed
• Select the blue Favorite button o a black star will appear in the first column of the line of the favorited message
Note: By making a message a favorite you can sort and find that email by using the sort function in the column. You can still delete favorite messages.
2.5.4 Un-favorite a Message To Un-favorite a message in the VMS inbox: • Log into VMS • Select Messages from the left navigation bar
o find and click the From, Subject or Date Sent of the message to make un-favorite o use the search bar if needed
• Select the blue Un-Favorite button o the black star will disappear in the first column of the line of the message
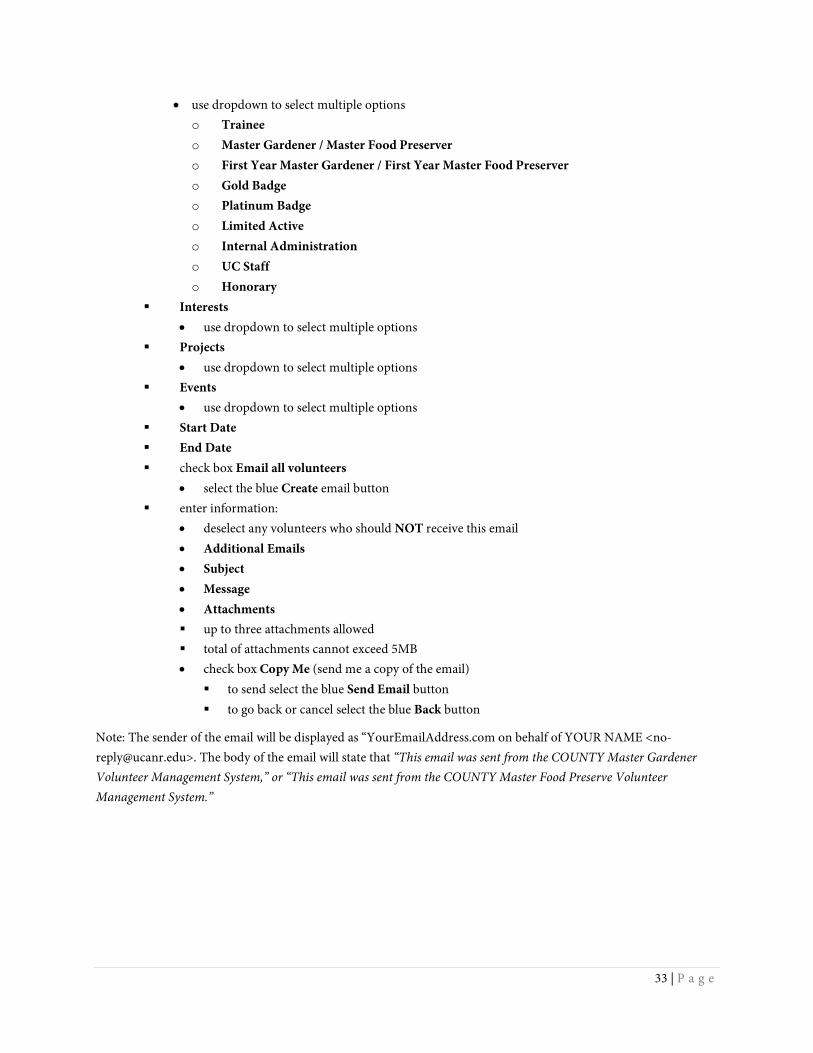
2.5.5 Send a Message through VMS The function to send messages through VMS by volunteers can be turned on and off by Full Access administrators of VMS at the county level. To send a message through VMS: • Log into VMS • Select Messages from the left navigation bar • Select the orange Messages button at the top
right • Select the green Send New Email button
o enter information as needed: Name Status
• Active • Limited Active • Inactive Resigned • Deleted
Achievement
33 | P a g e
• use dropdown to select multiple options o Trainee o Master Gardener / Master Food Preserver o First Year Master Gardener / First Year Master Food Preserver o Gold Badge o Platinum Badge o Limited Active o Internal Administration o UC Staff o Honorary
Interests • use dropdown to select multiple options
Projects • use dropdown to select multiple options
Events • use dropdown to select multiple options
Start Date End Date check box Email all volunteers
• select the blue Create email button enter information:
• deselect any volunteers who should NOT receive this email • Additional Emails • Subject • Message • Attachments up to three attachments allowed total of attachments cannot exceed 5MB • check box Copy Me (send me a copy of the email)
to send select the blue Send Email button to go back or cancel select the blue Back button
Note: The sender of the email will be displayed as “YourEmailAddress.com on behalf of YOUR NAME <[email protected]>. The body of the email will state that “This email was sent from the COUNTY Master Gardener Volunteer Management System,” or “This email was sent from the COUNTY Master Food Preserve Volunteer Management System.”
34 | P a g e
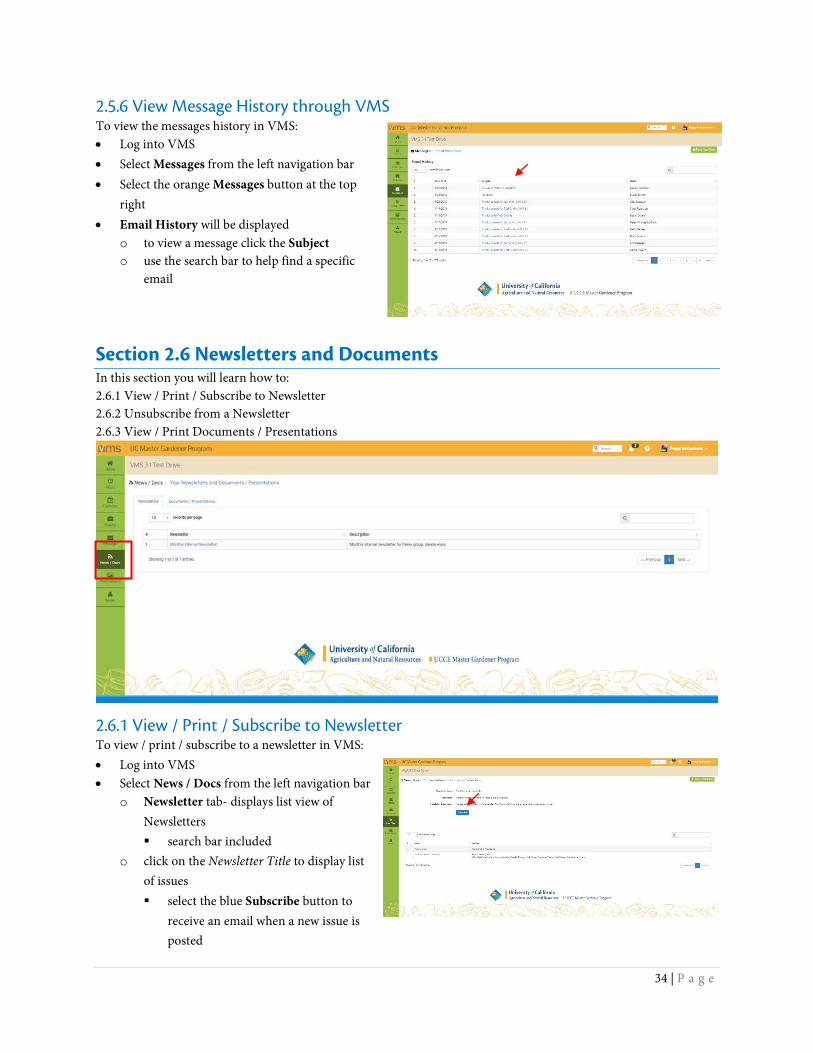
2.5.6 View Message History through VMS To view the messages history in VMS: • Log into VMS • Select Messages from the left navigation bar • Select the orange Messages button at the top
right • Email History will be displayed
o to view a message click the Subject o use the search bar to help find a specific
Section 2.6 Newsletters and Documents In this section you will learn how to: 2.6.1 View / Print / Subscribe to Newsletter 2.6.2 Unsubscribe from a Newsletter 2.6.3 View / Print Documents / Presentations
2.6.1 View / Print / Subscribe to Newsletter To view / print / subscribe to a newsletter in VMS: • Log into VMS • Select News / Docs from the left navigation bar
o Newsletter tab- displays list view of Newsletters search bar included
o click on the Newsletter Title to display list of issues select the blue Subscribe button to
receive an email when a new issue is posted
35 | P a g e
search bar included o click the Newsletter Title to open the document
view and / or print the document if not still in VMS select the back button to return to VMS
o select the green Return to Main List button
2.6.2 Unsubscribe from a Newsletter To unsubscribe from a newsletter in VMS: • Log into VMS • Select News / Docs from the left navigation bar
o Newsletter tab- displays list view of Newsletters search bar included
o click on the Newsletter Title to display list of issues select the blue Unsubscribe button to stop receiving an email when a new issue is posted
• select OK to confirm you want to unsubscribe or; • select Cancel to go back without unsubscribing
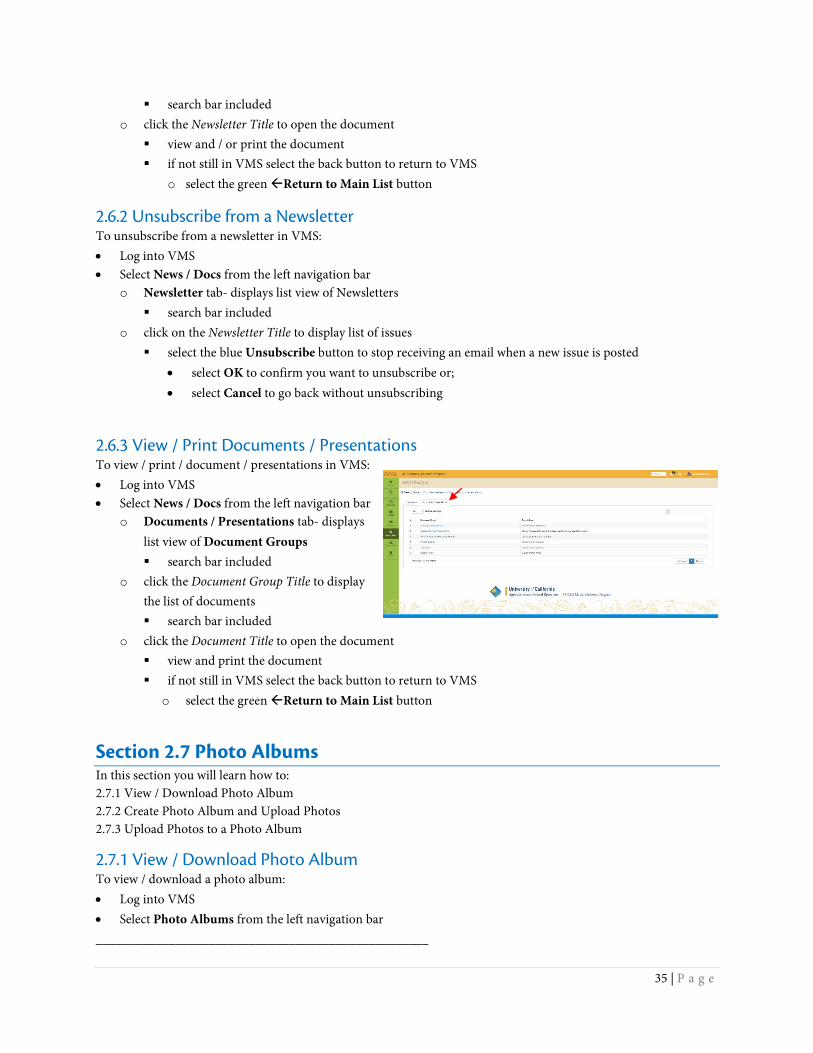
2.6.3 View / Print Documents / Presentations To view / print / document / presentations in VMS: • Log into VMS • Select News / Docs from the left navigation bar
o Documents / Presentations tab- displays list view of Document Groups search bar included
o click the Document Group Title to display the list of documents search bar included
o click the Document Title to open the document view and print the document if not still in VMS select the back button to return to VMS
o select the green Return to Main List button
Section 2.7 Photo Albums In this section you will learn how to: 2.7.1 View / Download Photo Album 2.7.2 Create Photo Album and Upload Photos 2.7.3 Upload Photos to a Photo Album
2.7.1 View / Download Photo Album To view / download a photo album: • Log into VMS • Select Photo Albums from the left navigation bar __________________________________________________
36 | P a g e
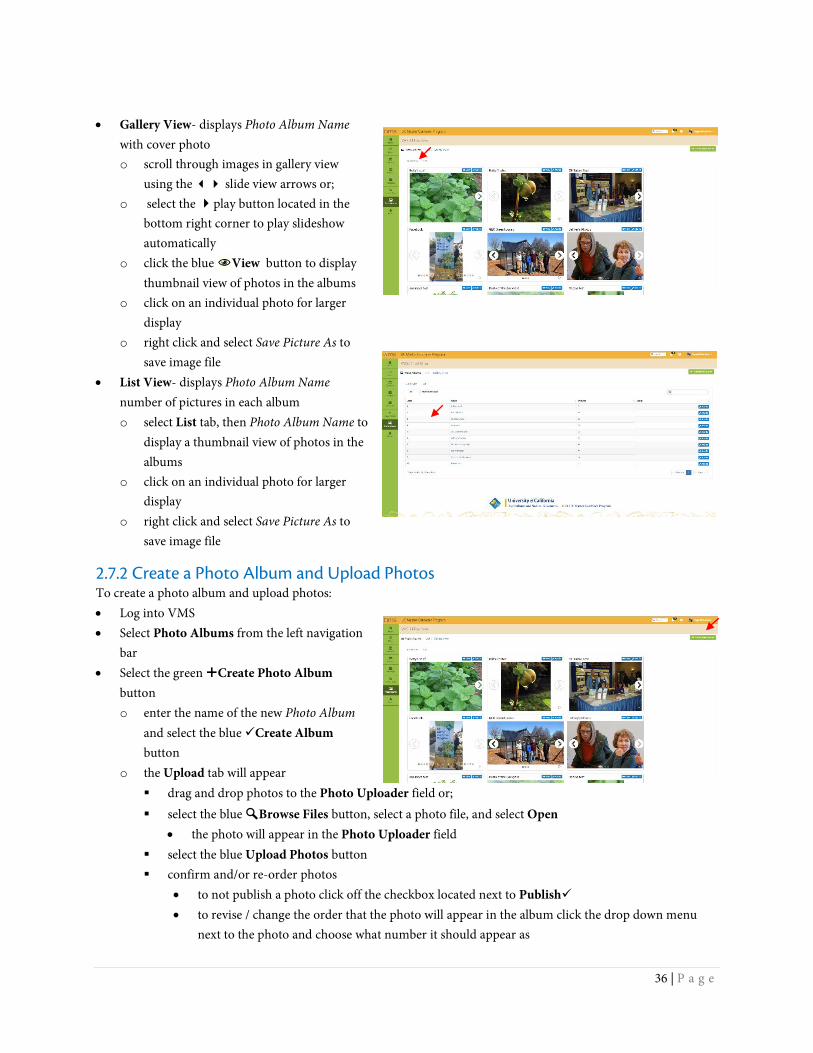
• Gallery View- displays Photo Album Name
with cover photo o scroll through images in gallery view
using the slide view arrows or; o select the play button located in the
bottom right corner to play slideshow automatically
o click the blue View button to display thumbnail view of photos in the albums
o click on an individual photo for larger display
o right click and select Save Picture As to save image file
• List View- displays Photo Album Name number of pictures in each album o select List tab, then Photo Album Name to
display a thumbnail view of photos in the albums
o click on an individual photo for larger display
o right click and select Save Picture As to save image file
2.7.2 Create a Photo Album and Upload Photos To create a photo album and upload photos: • Log into VMS • Select Photo Albums from the left navigation
bar • Select the green Create Photo Album
button o enter the name of the new Photo Album
and select the blue Create Album button
o the Upload tab will appear drag and drop photos to the Photo Uploader field or; select the blue 🔍🔍Browse Files button, select a photo file, and select Open
• the photo will appear in the Photo Uploader field select the blue Upload Photos button confirm and/or re-order photos
• to not publish a photo click off the checkbox located next to Publish • to revise / change the order that the photo will appear in the album click the drop down menu
next to the photo and choose what number it should appear as
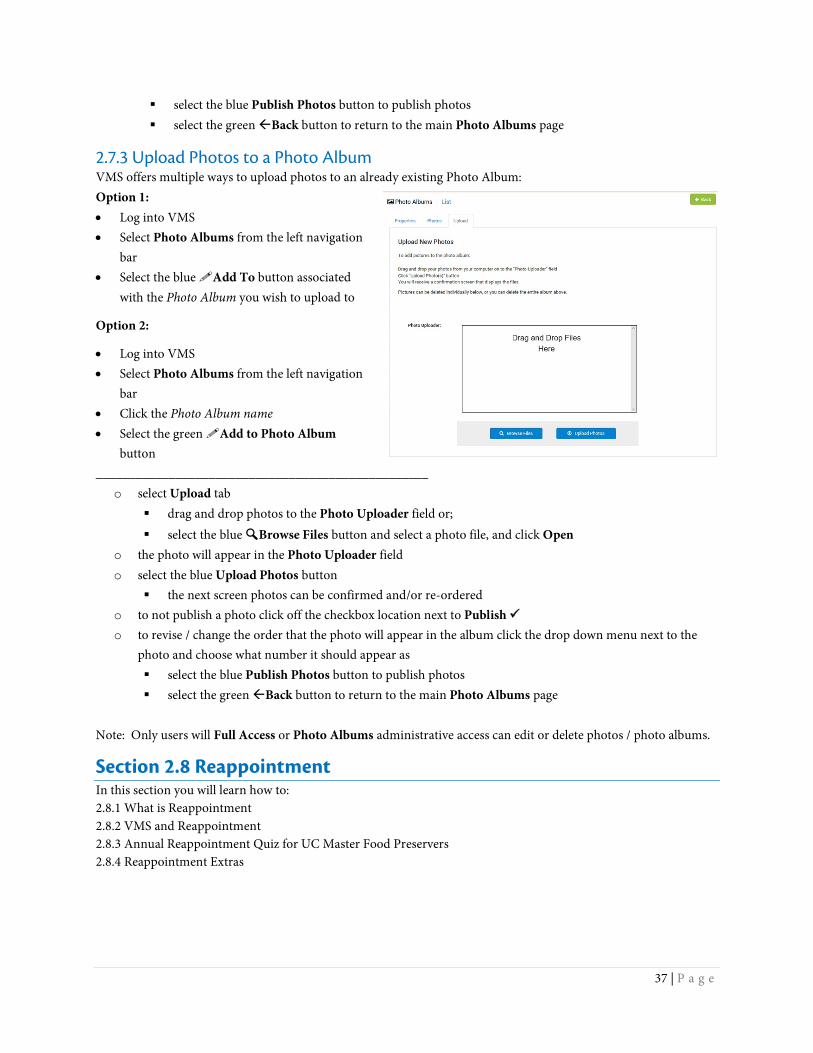
37 | P a g e
select the blue Publish Photos button to publish photos select the green Back button to return to the main Photo Albums page
2.7.3 Upload Photos to a Photo Album VMS offers multiple ways to upload photos to an already existing Photo Album: Option 1: • Log into VMS • Select Photo Albums from the left navigation
bar • Select the blue Add To button associated
with the Photo Album you wish to upload to
Option 2:
• Log into VMS • Select Photo Albums from the left navigation
bar • Click the Photo Album name • Select the green Add to Photo Album
button __________________________________________________
o select Upload tab drag and drop photos to the Photo Uploader field or; select the blue 🔍🔍Browse Files button and select a photo file, and click Open
o the photo will appear in the Photo Uploader field o select the blue Upload Photos button
the next screen photos can be confirmed and/or re-ordered o to not publish a photo click off the checkbox location next to Publish o to revise / change the order that the photo will appear in the album click the drop down menu next to the
photo and choose what number it should appear as select the blue Publish Photos button to publish photos select the green Back button to return to the main Photo Albums page
Note: Only users will Full Access or Photo Albums administrative access can edit or delete photos / photo albums.
Section 2.8 Reappointment In this section you will learn how to: 2.8.1 What is Reappointment 2.8.2 VMS and Reappointment 2.8.3 Annual Reappointment Quiz for UC Master Food Preservers 2.8.4 Reappointment Extras
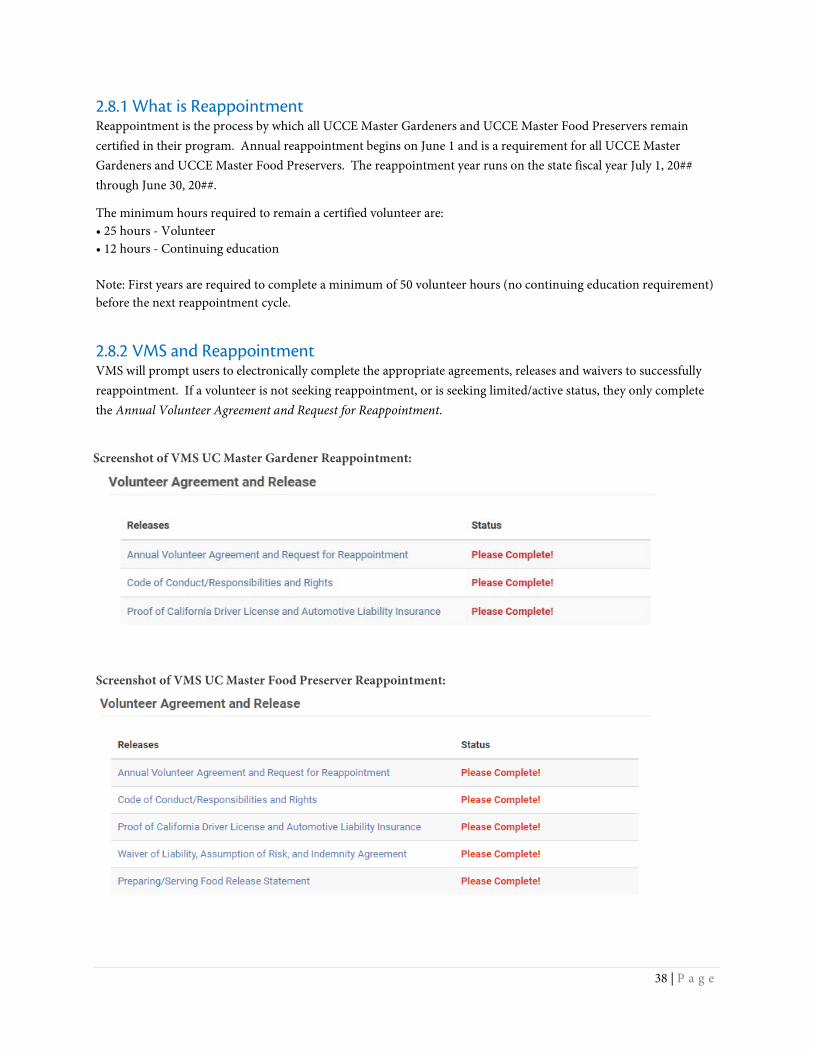
38 | P a g e
2.8.1 What is Reappointment Reappointment is the process by which all UCCE Master Gardeners and UCCE Master Food Preservers remain certified in their program. Annual reappointment begins on June 1 and is a requirement for all UCCE Master Gardeners and UCCE Master Food Preservers. The reappointment year runs on the state fiscal year July 1, 20## through June 30, 20##.
The minimum hours required to remain a certified volunteer are: • 25 hours - Volunteer • 12 hours - Continuing education Note: First years are required to complete a minimum of 50 volunteer hours (no continuing education requirement) before the next reappointment cycle.
2.8.2 VMS and Reappointment VMS will prompt users to electronically complete the appropriate agreements, releases and waivers to successfully reappointment. If a volunteer is not seeking reappointment, or is seeking limited/active status, they only complete the Annual Volunteer Agreement and Request for Reappointment.
Screenshot of VMS UC Master Gardener Reappointment:
Screenshot of VMS UC Master Food Preserver Reappointment:
39 | P a g e
To begin reappointment select any of the individual releases listed under the Volunteer Agreement and Release:
• Annual Volunteer Agreement and Request for Reappointment o from the Drop down select the type of agreement the best suits your situation
Completed Hours and Seeking Reappointment • read and click the blue I Accept the Terms Presented Here button
Not Completed Hours and Seeking Reappointment • answer the three questions and; • click the blue I Accept the Terms Presented Here button
Seeking Limited Active Status • indicate your reason for requesting limited active status in the text box • click the blue I Accept the Terms Presented Here button
Do not With to be Reappointment • click the blue I Accept the Terms Presented Here button
1st Year Volunteer • click the blue I Accept the Terms Presented Here button
• Code of Conduct / Responsibilities and Rights o read and click the blue I Accept the Terms Presented Here button
• Proof of Insurance o read and click True or False if True is selected input your California Drivers’ License Expiration Date
• click the blue I Accept the Terms Presented Here button if False is selected click the blue I Accept the Terms Presented Here button
Additional Master Food Preserver requirements:
• Waiver of Liability, Assumption of Risk, and Indemnity Agreement o read and click the blue I Accept the Terms Presented Here button
• Preparing / Serving Food Release Statement o read and click Yes or No
click the blue I Accept the Terms Presented Here button
Optional: • Print the digitally signed agreements, releases and waivers
o click View / Print Agreement to display all signed agreements, releases and waivers o click Print Complete Release to send to printer
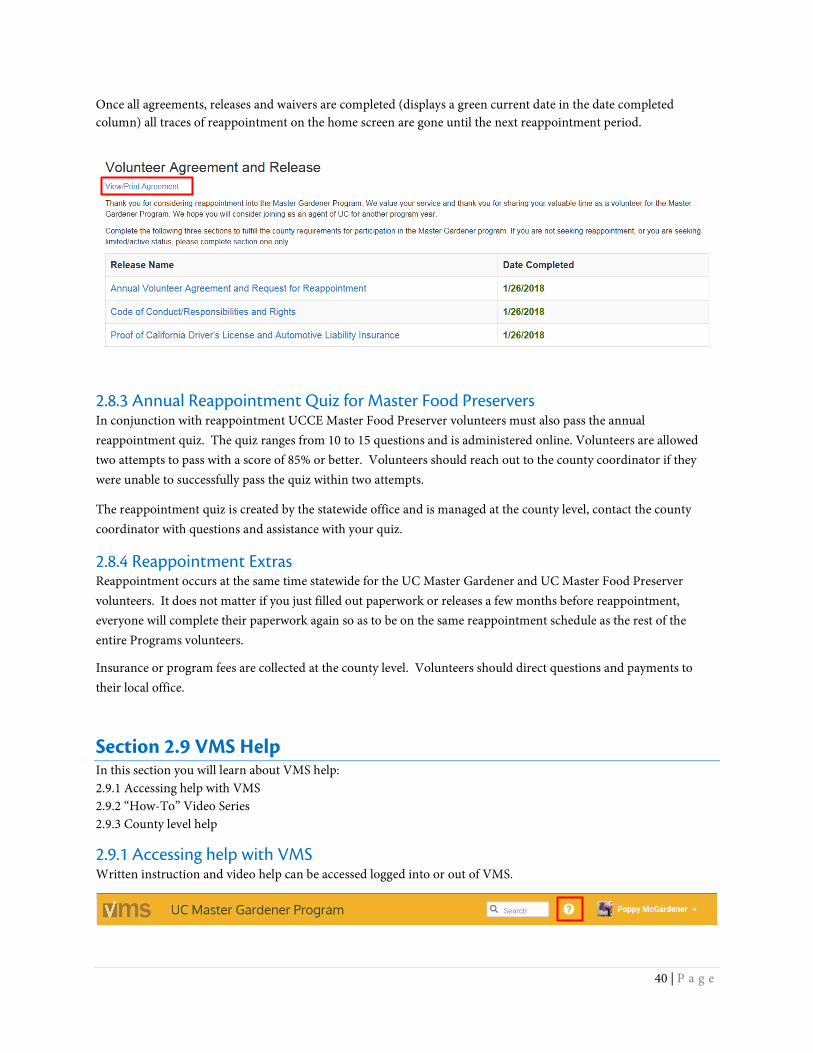
40 | P a g e
Once all agreements, releases and waivers are completed (displays a green current date in the date completed column) all traces of reappointment on the home screen are gone until the next reappointment period.
2.8.3 Annual Reappointment Quiz for Master Food Preservers In conjunction with reappointment UCCE Master Food Preserver volunteers must also pass the annual reappointment quiz. The quiz ranges from 10 to 15 questions and is administered online. Volunteers are allowed two attempts to pass with a score of 85% or better. Volunteers should reach out to the county coordinator if they were unable to successfully pass the quiz within two attempts.
The reappointment quiz is created by the statewide office and is managed at the county level, contact the county coordinator with questions and assistance with your quiz.
2.8.4 Reappointment Extras Reappointment occurs at the same time statewide for the UC Master Gardener and UC Master Food Preserver volunteers. It does not matter if you just filled out paperwork or releases a few months before reappointment, everyone will complete their paperwork again so as to be on the same reappointment schedule as the rest of the entire Programs volunteers.
Insurance or program fees are collected at the county level. Volunteers should direct questions and payments to their local office.
Section 2.9 VMS Help In this section you will learn about VMS help: 2.9.1 Accessing help with VMS 2.9.2 “How-To” Video Series 2.9.3 County level help
2.9.1 Accessing help with VMS Written instruction and video help can be accessed logged into or out of VMS.
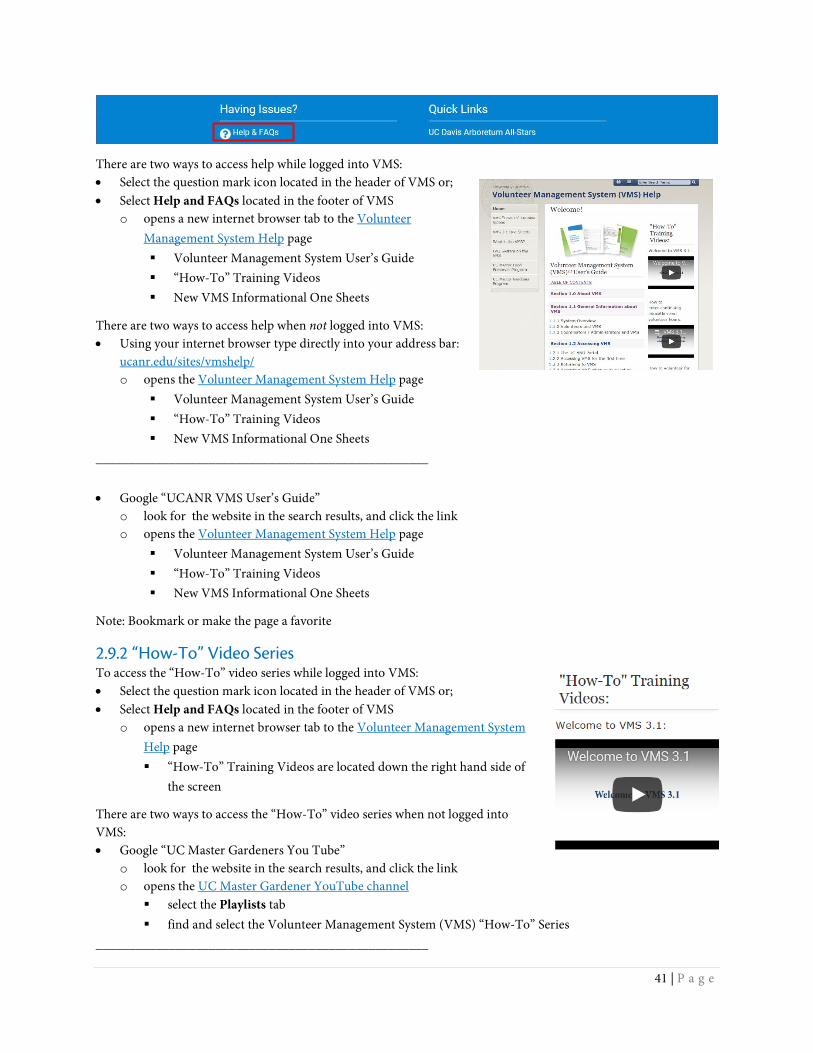
41 | P a g e
There are two ways to access help while logged into VMS: • Select the question mark icon located in the header of VMS or; • Select Help and FAQs located in the footer of VMS
o opens a new internet browser tab to the Volunteer Management System Help page Volunteer Management System User’s Guide “How-To” Training Videos New VMS Informational One Sheets
There are two ways to access help when not logged into VMS: • Using your internet browser type directly into your address bar:
ucanr.edu/sites/vmshelp/ o opens the Volunteer Management System Help page
Volunteer Management System User’s Guide “How-To” Training Videos New VMS Informational One Sheets
__________________________________________________ • Google “UCANR VMS User’s Guide”
o look for the website in the search results, and click the link o opens the Volunteer Management System Help page
Volunteer Management System User’s Guide “How-To” Training Videos New VMS Informational One Sheets
Note: Bookmark or make the page a favorite
2.9.2 “How-To” Video Series To access the “How-To” video series while logged into VMS: • Select the question mark icon located in the header of VMS or; • Select Help and FAQs located in the footer of VMS
o opens a new internet browser tab to the Volunteer Management System Help page “How-To” Training Videos are located down the right hand side of
the screen
There are two ways to access the “How-To” video series when not logged into VMS: • Google “UC Master Gardeners You Tube”
o look for the website in the search results, and click the link o opens the UC Master Gardener YouTube channel
select the Playlists tab find and select the Volunteer Management System (VMS) “How-To” Series
__________________________________________________
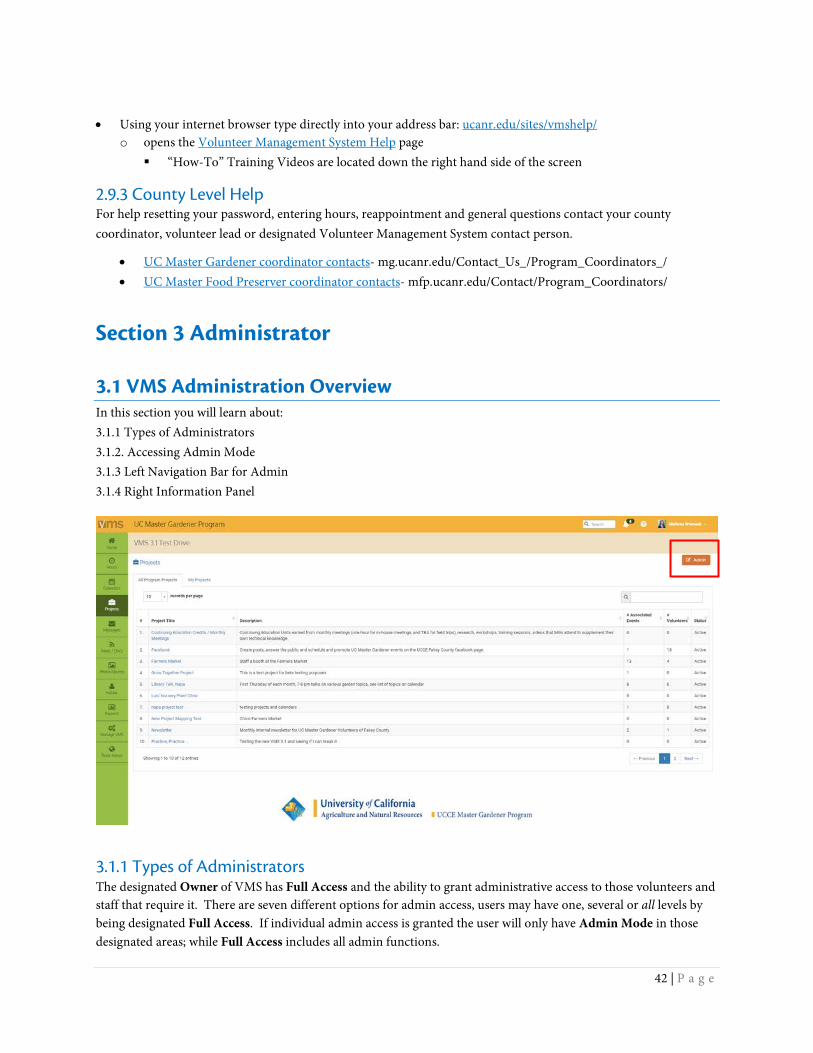
42 | P a g e
• Using your internet browser type directly into your address bar: ucanr.edu/sites/vmshelp/
o opens the Volunteer Management System Help page “How-To” Training Videos are located down the right hand side of the screen
2.9.3 County Level Help For help resetting your password, entering hours, reappointment and general questions contact your county coordinator, volunteer lead or designated Volunteer Management System contact person.
• UC Master Gardener coordinator contacts- mg.ucanr.edu/Contact_Us_/Program_Coordinators_/ • UC Master Food Preserver coordinator contacts- mfp.ucanr.edu/Contact/Program_Coordinators/
Section 3 Administrator
3.1 VMS Administration Overview In this section you will learn about: 3.1.1 Types of Administrators 3.1.2. Accessing Admin Mode 3.1.3 Left Navigation Bar for Admin 3.1.4 Right Information Panel
3.1.1 Types of Administrators The designated Owner of VMS has Full Access and the ability to grant administrative access to those volunteers and staff that require it. There are seven different options for admin access, users may have one, several or all levels by being designated Full Access. If individual admin access is granted the user will only have Admin Mode in those designated areas; while Full Access includes all admin functions.
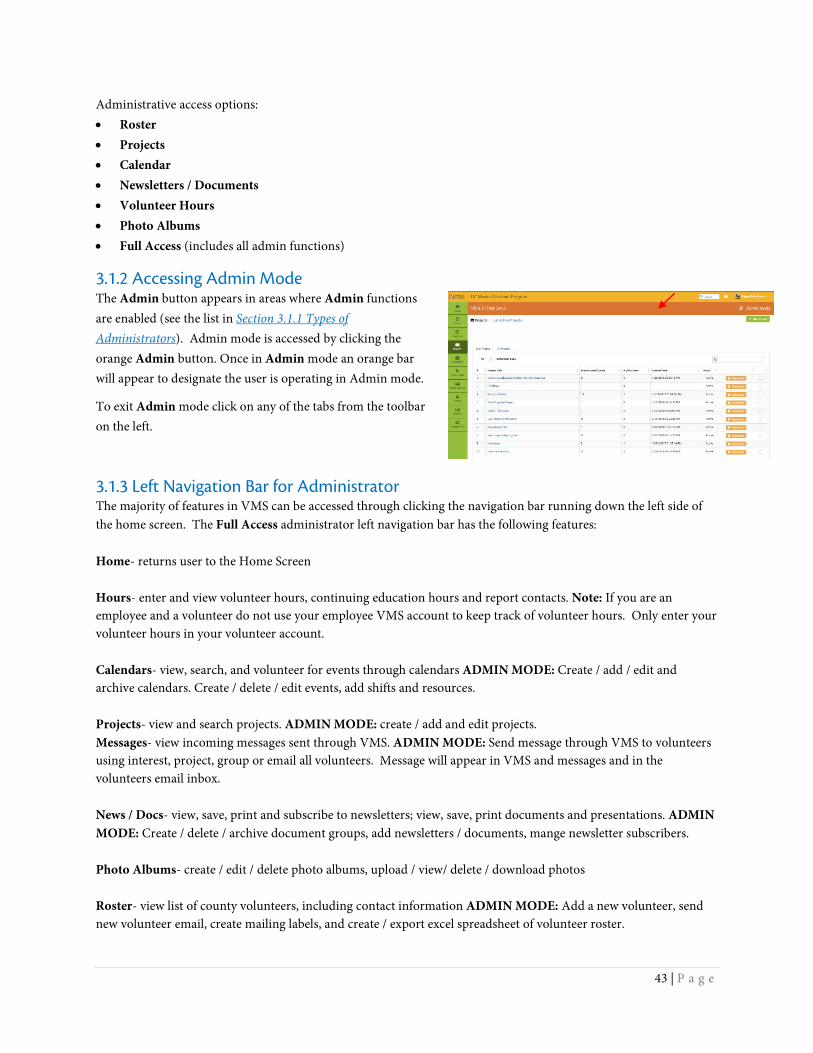
43 | P a g e
Administrative access options: • Roster • Projects • Calendar • Newsletters / Documents • Volunteer Hours • Photo Albums • Full Access (includes all admin functions)
3.1.2 Accessing Admin Mode The Admin button appears in areas where Admin functions are enabled (see the list in Section 3.1.1 Types of Administrators). Admin mode is accessed by clicking the orange Admin button. Once in Admin mode an orange bar will appear to designate the user is operating in Admin mode.
To exit Admin mode click on any of the tabs from the toolbar on the left.
3.1.3 Left Navigation Bar for Administrator The majority of features in VMS can be accessed through clicking the navigation bar running down the left side of the home screen. The Full Access administrator left navigation bar has the following features: Home- returns user to the Home Screen Hours- enter and view volunteer hours, continuing education hours and report contacts. Note: If you are an employee and a volunteer do not use your employee VMS account to keep track of volunteer hours. Only enter your volunteer hours in your volunteer account. Calendars- view, search, and volunteer for events through calendars ADMIN MODE: Create / add / edit and archive calendars. Create / delete / edit events, add shifts and resources. Projects- view and search projects. ADMIN MODE: create / add and edit projects. Messages- view incoming messages sent through VMS. ADMIN MODE: Send message through VMS to volunteers using interest, project, group or email all volunteers. Message will appear in VMS and messages and in the volunteers email inbox. News / Docs- view, save, print and subscribe to newsletters; view, save, print documents and presentations. ADMIN MODE: Create / delete / archive document groups, add newsletters / documents, mange newsletter subscribers. Photo Albums- create / edit / delete photo albums, upload / view/ delete / download photos Roster- view list of county volunteers, including contact information ADMIN MODE: Add a new volunteer, send new volunteer email, create mailing labels, and create / export excel spreadsheet of volunteer roster.
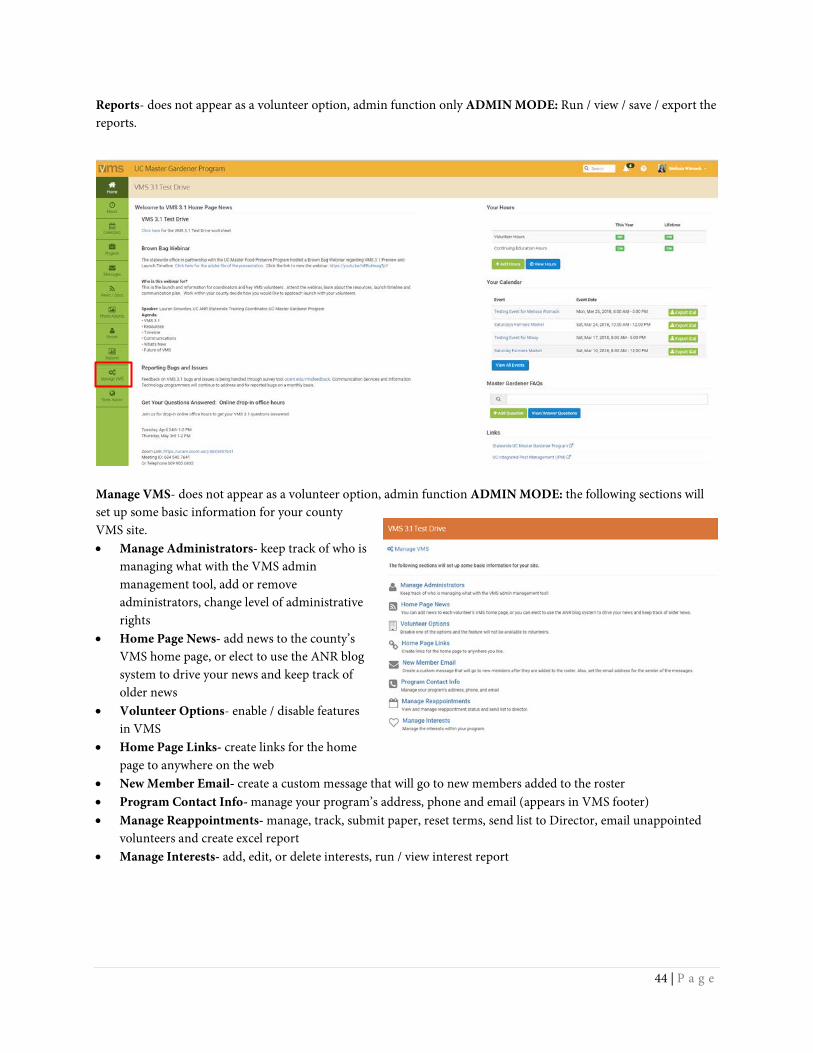
44 | P a g e
Reports- does not appear as a volunteer option, admin function only ADMIN MODE: Run / view / save / export the reports.
Manage VMS- does not appear as a volunteer option, admin function ADMIN MODE: the following sections will set up some basic information for your county VMS site. • Manage Administrators- keep track of who is
managing what with the VMS admin management tool, add or remove administrators, change level of administrative rights
• Home Page News- add news to the county’s VMS home page, or elect to use the ANR blog system to drive your news and keep track of older news
• Volunteer Options- enable / disable features in VMS
• Home Page Links- create links for the home page to anywhere on the web
• New Member Email- create a custom message that will go to new members added to the roster • Program Contact Info- manage your program’s address, phone and email (appears in VMS footer) • Manage Reappointments- manage, track, submit paper, reset terms, send list to Director, email unappointed
volunteers and create excel report • Manage Interests- add, edit, or delete interests, run / view interest report
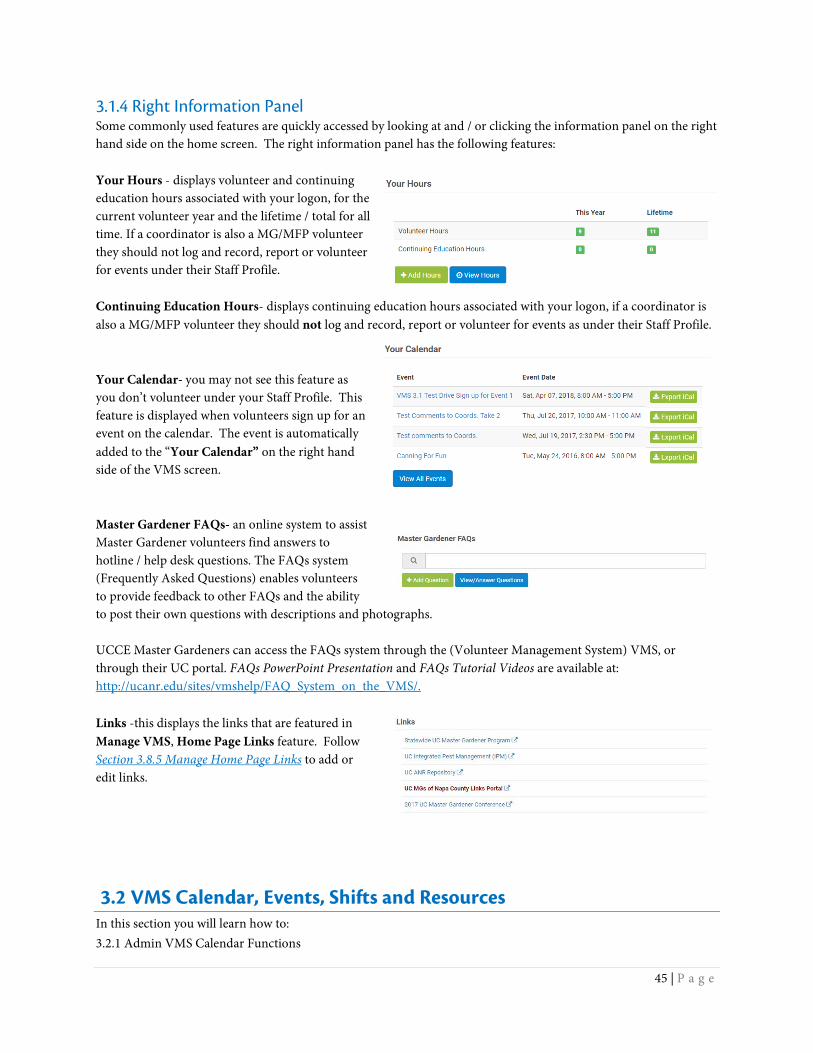
45 | P a g e
3.1.4 Right Information Panel Some commonly used features are quickly accessed by looking at and / or clicking the information panel on the right hand side on the home screen. The right information panel has the following features: Your Hours - displays volunteer and continuing education hours associated with your logon, for the current volunteer year and the lifetime / total for all time. If a coordinator is also a MG/MFP volunteer they should not log and record, report or volunteer for events under their Staff Profile. Continuing Education Hours- displays continuing education hours associated with your logon, if a coordinator is also a MG/MFP volunteer they should not log and record, report or volunteer for events as under their Staff Profile. Your Calendar- you may not see this feature as you don’t volunteer under your Staff Profile. This feature is displayed when volunteers sign up for an event on the calendar. The event is automatically added to the “Your Calendar” on the right hand side of the VMS screen. Master Gardener FAQs- an online system to assist Master Gardener volunteers find answers to hotline / help desk questions. The FAQs system (Frequently Asked Questions) enables volunteers to provide feedback to other FAQs and the ability to post their own questions with descriptions and photographs. UCCE Master Gardeners can access the FAQs system through the (Volunteer Management System) VMS, or through their UC portal. FAQs PowerPoint Presentation and FAQs Tutorial Videos are available at: http://ucanr.edu/sites/vmshelp/FAQ_System_on_the_VMS/. Links -this displays the links that are featured in Manage VMS, Home Page Links feature. Follow Section 3.8.5 Manage Home Page Links to add or edit links.
3.2 VMS Calendar, Events, Shifts and Resources In this section you will learn how to: 3.2.1 Admin VMS Calendar Functions
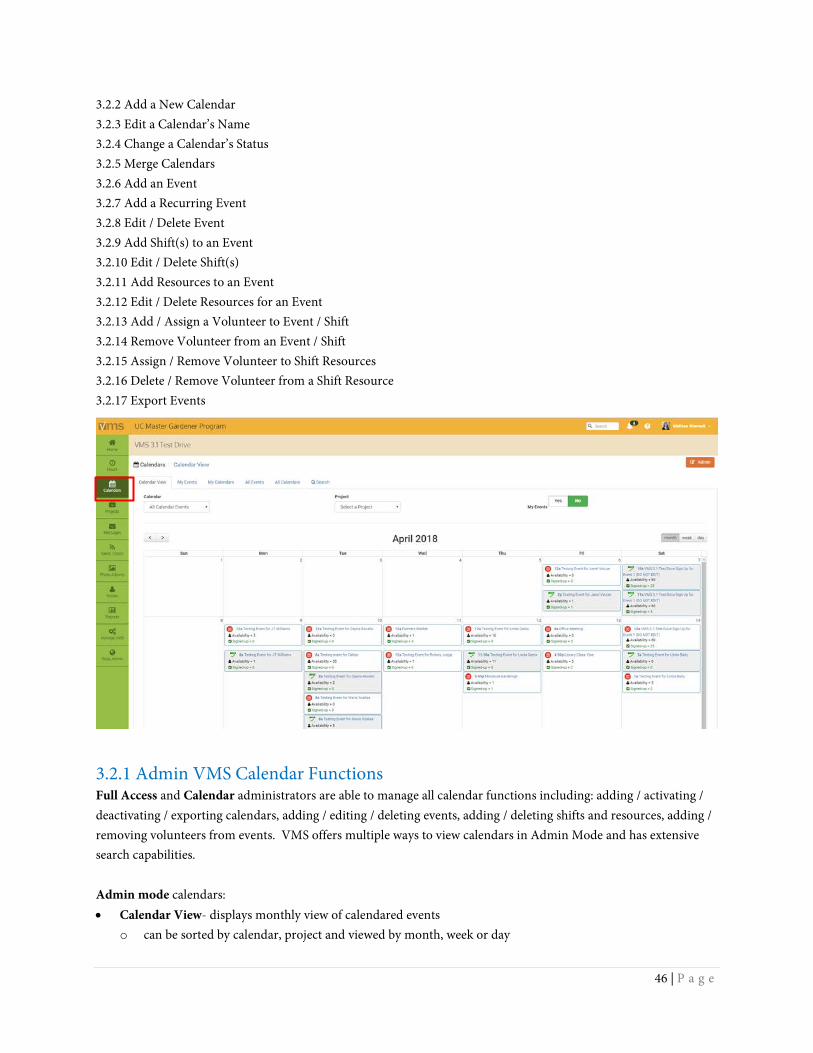
46 | P a g e
3.2.2 Add a New Calendar 3.2.3 Edit a Calendar’s Name 3.2.4 Change a Calendar’s Status 3.2.5 Merge Calendars 3.2.6 Add an Event 3.2.7 Add a Recurring Event 3.2.8 Edit / Delete Event 3.2.9 Add Shift(s) to an Event 3.2.10 Edit / Delete Shift(s) 3.2.11 Add Resources to an Event 3.2.12 Edit / Delete Resources for an Event 3.2.13 Add / Assign a Volunteer to Event / Shift 3.2.14 Remove Volunteer from an Event / Shift 3.2.15 Assign / Remove Volunteer to Shift Resources 3.2.16 Delete / Remove Volunteer from a Shift Resource 3.2.17 Export Events
3.2.1 Admin VMS Calendar Functions Full Access and Calendar administrators are able to manage all calendar functions including: adding / activating / deactivating / exporting calendars, adding / editing / deleting events, adding / deleting shifts and resources, adding / removing volunteers from events. VMS offers multiple ways to view calendars in Admin Mode and has extensive search capabilities. Admin mode calendars: • Calendar View- displays monthly view of calendared events
o can be sorted by calendar, project and viewed by month, week or day
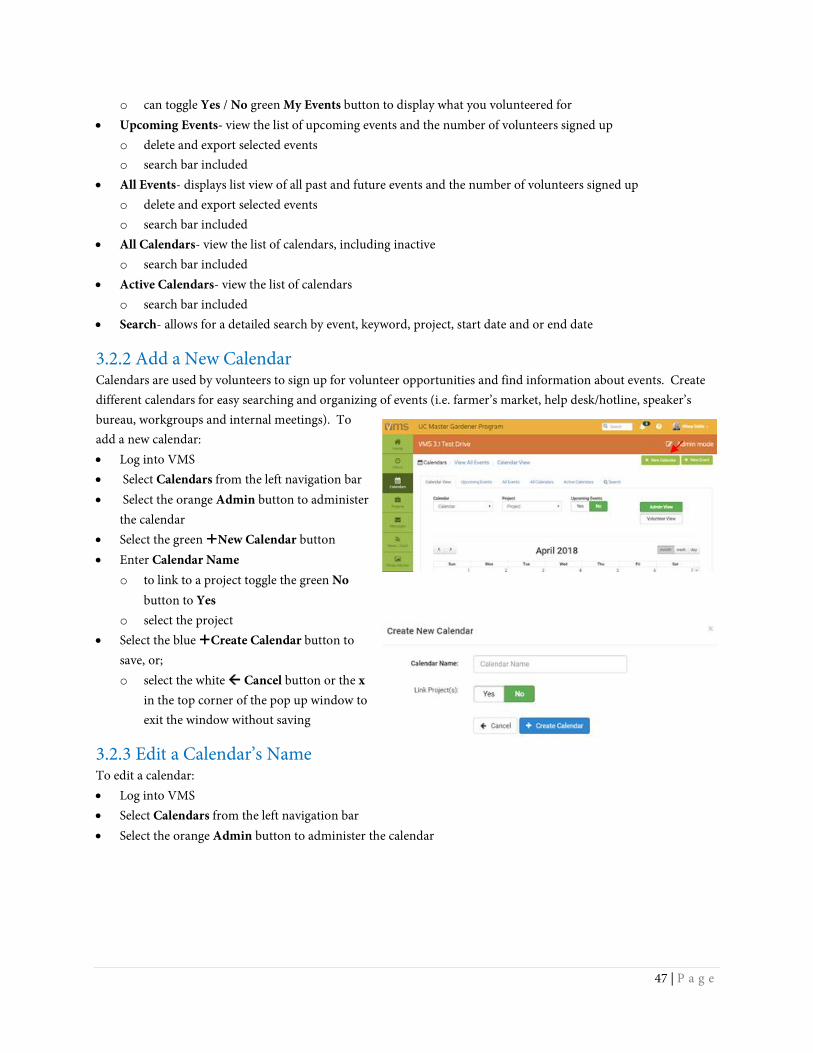
47 | P a g e
o can toggle Yes / No green My Events button to display what you volunteered for • Upcoming Events- view the list of upcoming events and the number of volunteers signed up
o delete and export selected events o search bar included
• All Events- displays list view of all past and future events and the number of volunteers signed up o delete and export selected events o search bar included
• All Calendars- view the list of calendars, including inactive o search bar included
• Active Calendars- view the list of calendars o search bar included
• Search- allows for a detailed search by event, keyword, project, start date and or end date
3.2.2 Add a New Calendar Calendars are used by volunteers to sign up for volunteer opportunities and find information about events. Create different calendars for easy searching and organizing of events (i.e. farmer’s market, help desk/hotline, speaker’s bureau, workgroups and internal meetings). To add a new calendar: • Log into VMS • Select Calendars from the left navigation bar • Select the orange Admin button to administer
the calendar • Select the green New Calendar button • Enter Calendar Name
o to link to a project toggle the green No button to Yes
o select the project • Select the blue Create Calendar button to
save, or; o select the white Cancel button or the x
in the top corner of the pop up window to exit the window without saving
3.2.3 Edit a Calendar’s Name To edit a calendar: • Log into VMS • Select Calendars from the left navigation bar • Select the orange Admin button to administer the calendar
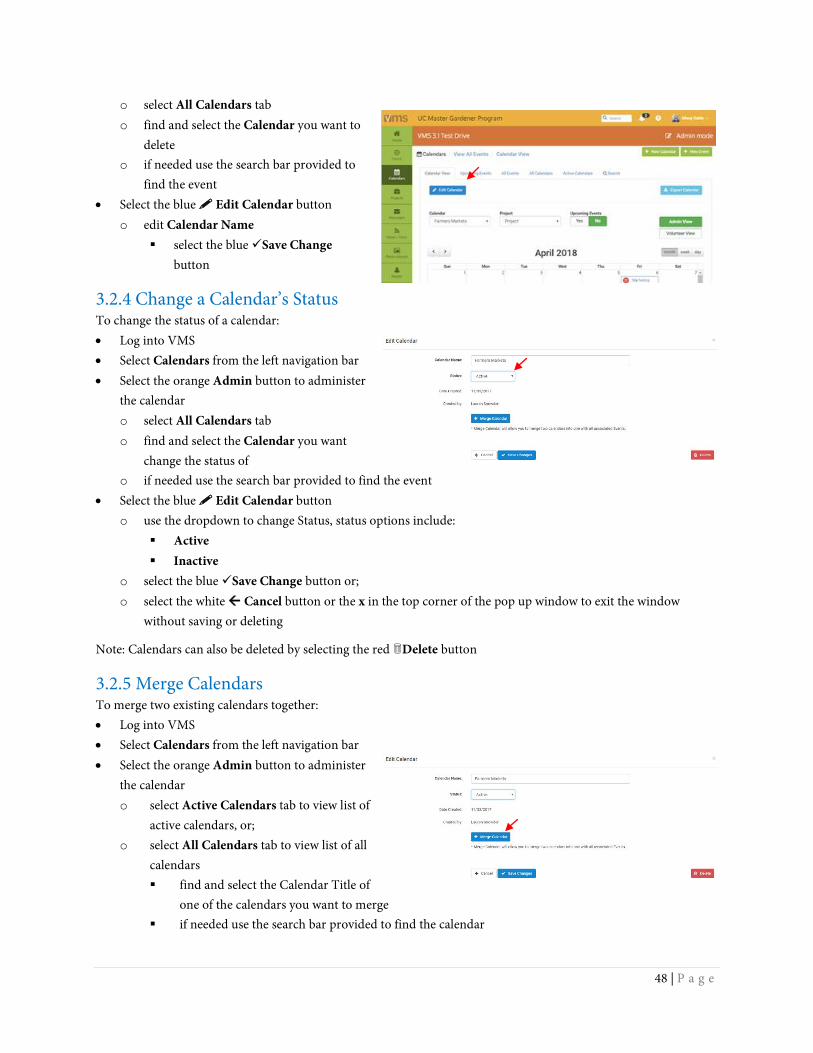
48 | P a g e
o select All Calendars tab o find and select the Calendar you want to
delete o if needed use the search bar provided to
find the event • Select the blue Edit Calendar button
o edit Calendar Name select the blue Save Change
button
3.2.4 Change a Calendar’s Status To change the status of a calendar: • Log into VMS • Select Calendars from the left navigation bar • Select the orange Admin button to administer
the calendar o select All Calendars tab o find and select the Calendar you want
change the status of o if needed use the search bar provided to find the event
• Select the blue Edit Calendar button o use the dropdown to change Status, status options include:
Active Inactive
o select the blue Save Change button or; o select the white Cancel button or the x in the top corner of the pop up window to exit the window
without saving or deleting
Note: Calendars can also be deleted by selecting the red Delete button
3.2.5 Merge Calendars To merge two existing calendars together: • Log into VMS • Select Calendars from the left navigation bar • Select the orange Admin button to administer
the calendar o select Active Calendars tab to view list of
active calendars, or; o select All Calendars tab to view list of all
calendars find and select the Calendar Title of
one of the calendars you want to merge if needed use the search bar provided to find the calendar
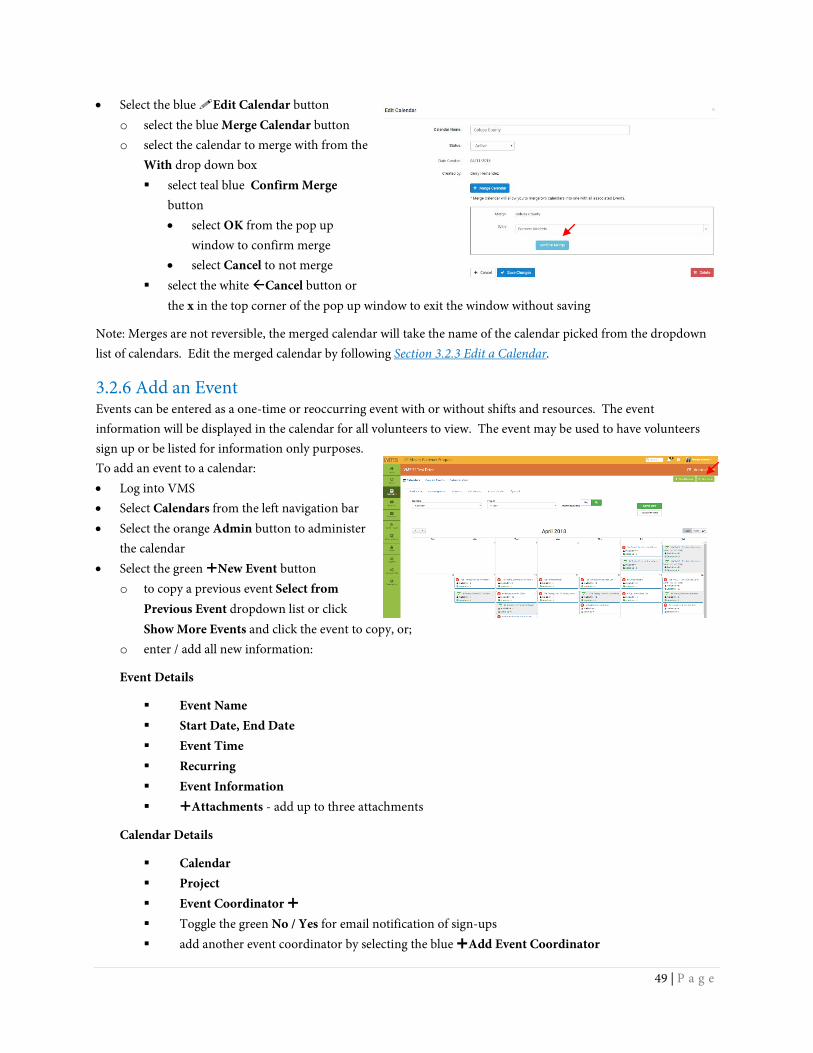
49 | P a g e
• Select the blue Edit Calendar button o select the blue Merge Calendar button o select the calendar to merge with from the
With drop down box select teal blue Confirm Merge
button • select OK from the pop up
window to confirm merge • select Cancel to not merge
select the white Cancel button or the x in the top corner of the pop up window to exit the window without saving
Note: Merges are not reversible, the merged calendar will take the name of the calendar picked from the dropdown list of calendars. Edit the merged calendar by following Section 3.2.3 Edit a Calendar.
3.2.6 Add an Event Events can be entered as a one-time or reoccurring event with or without shifts and resources. The event information will be displayed in the calendar for all volunteers to view. The event may be used to have volunteers sign up or be listed for information only purposes. To add an event to a calendar: • Log into VMS • Select Calendars from the left navigation bar • Select the orange Admin button to administer
the calendar • Select the green New Event button
o to copy a previous event Select from Previous Event dropdown list or click Show More Events and click the event to copy, or;
o enter / add all new information:
Event Details
Event Name Start Date, End Date Event Time Recurring Event Information Attachments - add up to three attachments
Calendar Details
Calendar Project Event Coordinator Toggle the green No / Yes for email notification of sign-ups add another event coordinator by selecting the blue Add Event Coordinator
50 | P a g e
• Select Event Coordinator • toggle the green No / Yes for email notification of sign-ups
Event Website Location, Street Address, City, State, Zip
Volunteer Details Total Volunteers needed toggle the green No / Yes button to turn on off the following features:
• Bring Guest(s)- Yes option allows guests and can set the number of total number of guests allowed at event
• Display Sign-Ups- Yes options shows the list of who is volunteering • Block Sign-Up / Out- Yes option shuts down signups and unvolunteering for the event X
number of days before the event • Set Event Publication Date-Yes option allows to choose a future date for the event to be
published in VMS calendars • Select the blue Save Event button to save.
3.2.7 Add a Recurring Event **Under construction and refinement as of June 28, 2018** To add a reoccurring event to a calendar: • Log into VMS • Select Calendars from the left navigation bar • Select the orange Admin button to administer the calendar • Select the green New Event button
o to copy a previous event Select from Previous Event dropdown list or click Show More Events and click the event to copy, or;
o enter / add all new information, be sure to select the blue Recurring Event button to display the recurring event options:
Event Details
Event Name Start Date- start date of recurring event End Date- end/last date of recurring event Event Time Recurring
• None • Daily
o Monday, Tuesday, Wednesday, Thursday, Friday, Saturday, Sunday • Weekly
o Every # week(s), beginning with start date • Monthly
o First, Second, Third, Fourth
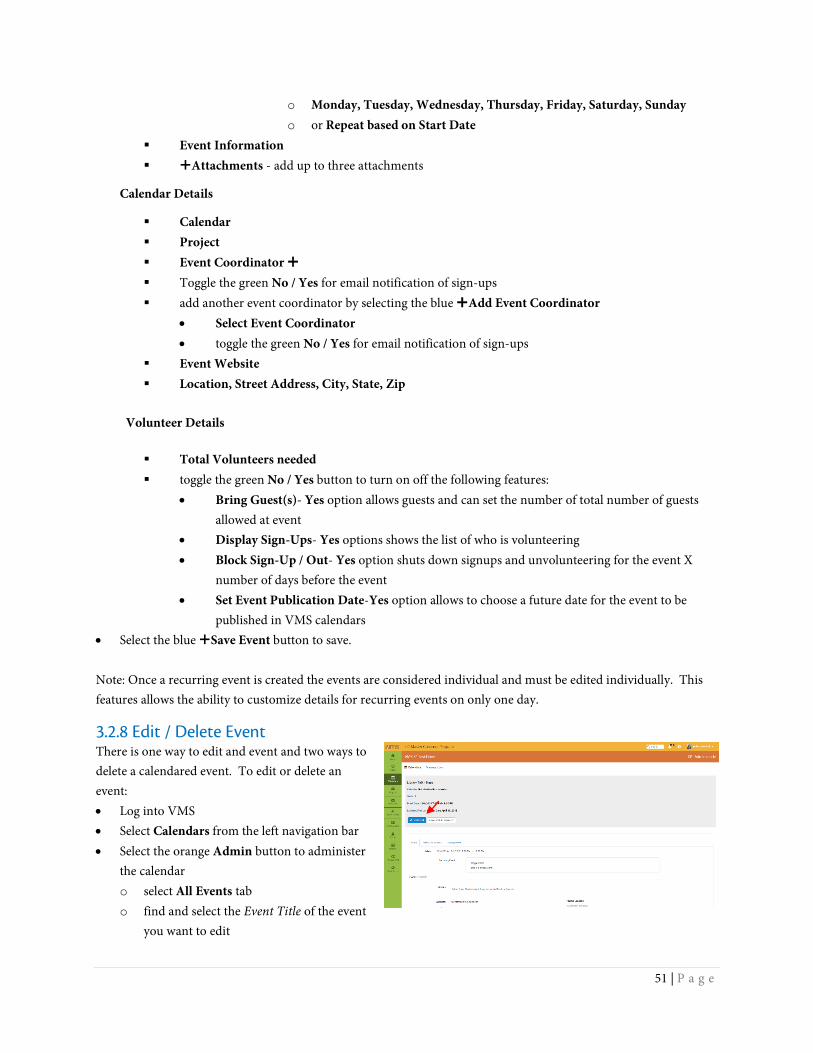
51 | P a g e
o Monday, Tuesday, Wednesday, Thursday, Friday, Saturday, Sunday o or Repeat based on Start Date
Event Information Attachments - add up to three attachments
Calendar Details
Calendar Project Event Coordinator Toggle the green No / Yes for email notification of sign-ups add another event coordinator by selecting the blue Add Event Coordinator
• Select Event Coordinator • toggle the green No / Yes for email notification of sign-ups
Event Website Location, Street Address, City, State, Zip
Volunteer Details Total Volunteers needed toggle the green No / Yes button to turn on off the following features:
• Bring Guest(s)- Yes option allows guests and can set the number of total number of guests allowed at event
• Display Sign-Ups- Yes options shows the list of who is volunteering • Block Sign-Up / Out- Yes option shuts down signups and unvolunteering for the event X
number of days before the event • Set Event Publication Date-Yes option allows to choose a future date for the event to be
published in VMS calendars • Select the blue Save Event button to save. Note: Once a recurring event is created the events are considered individual and must be edited individually. This features allows the ability to customize details for recurring events on only one day.
3.2.8 Edit / Delete Event There is one way to edit and event and two ways to delete a calendared event. To edit or delete an event: • Log into VMS • Select Calendars from the left navigation bar • Select the orange Admin button to administer
the calendar o select All Events tab o find and select the Event Title of the event
you want to edit
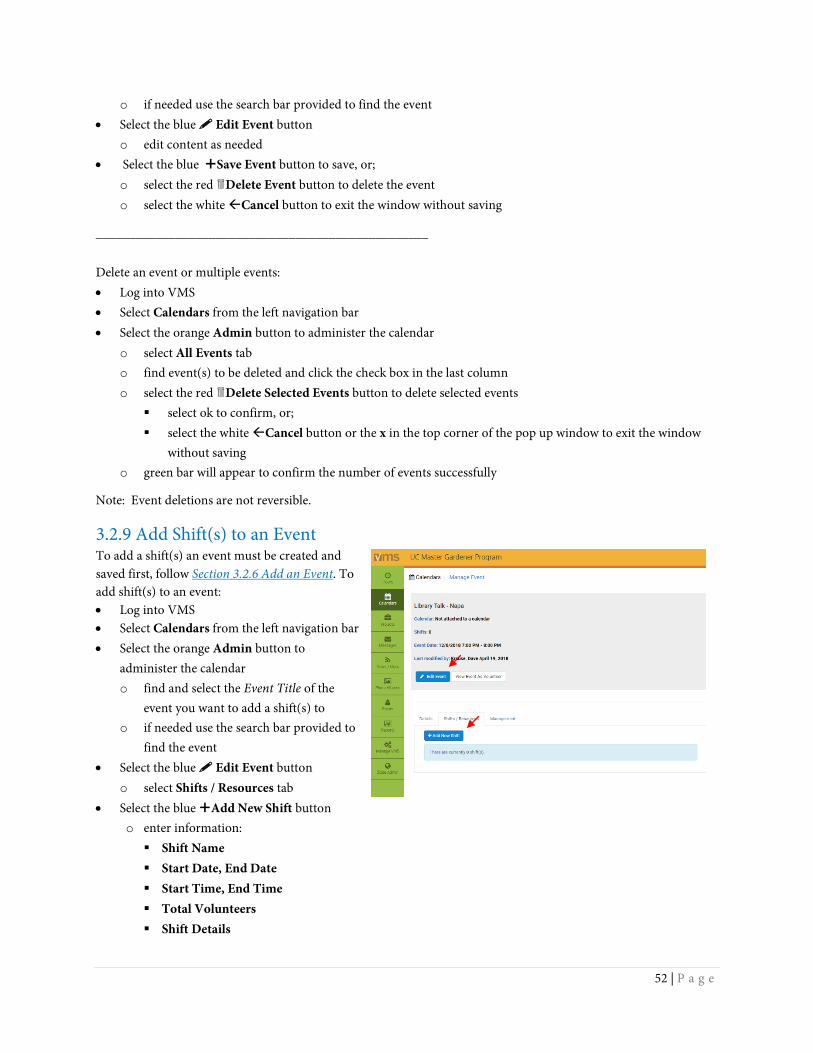
52 | P a g e
o if needed use the search bar provided to find the event • Select the blue Edit Event button
o edit content as needed • Select the blue Save Event button to save, or;
o select the red Delete Event button to delete the event o select the white Cancel button to exit the window without saving
__________________________________________________ Delete an event or multiple events: • Log into VMS • Select Calendars from the left navigation bar • Select the orange Admin button to administer the calendar
o select All Events tab o find event(s) to be deleted and click the check box in the last column o select the red Delete Selected Events button to delete selected events
select ok to confirm, or; select the white Cancel button or the x in the top corner of the pop up window to exit the window
without saving o green bar will appear to confirm the number of events successfully
Note: Event deletions are not reversible.
3.2.9 Add Shift(s) to an Event To add a shift(s) an event must be created and saved first, follow Section 3.2.6 Add an Event. To add shift(s) to an event: • Log into VMS • Select Calendars from the left navigation bar • Select the orange Admin button to
administer the calendar o find and select the Event Title of the
event you want to add a shift(s) to o if needed use the search bar provided to
find the event • Select the blue Edit Event button
o select Shifts / Resources tab • Select the blue Add New Shift button
o enter information: Shift Name Start Date, End Date Start Time, End Time Total Volunteers Shift Details
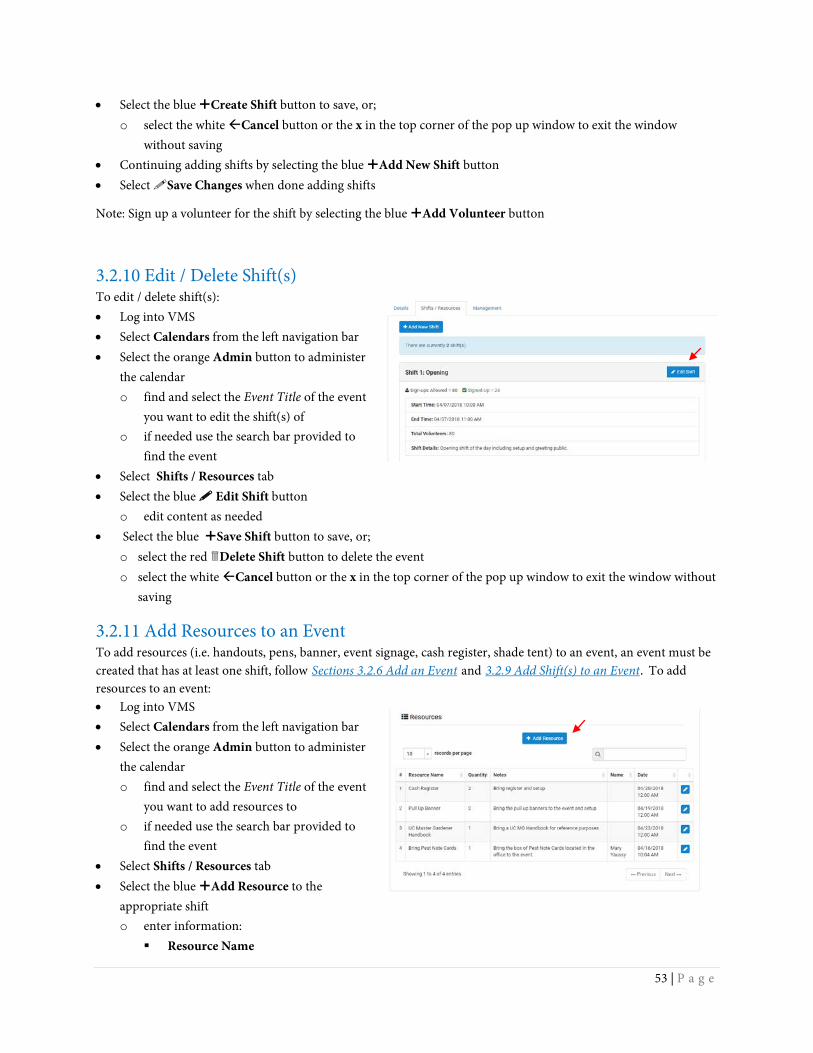
53 | P a g e
• Select the blue Create Shift button to save, or; o select the white Cancel button or the x in the top corner of the pop up window to exit the window
without saving • Continuing adding shifts by selecting the blue Add New Shift button • Select Save Changes when done adding shifts
Note: Sign up a volunteer for the shift by selecting the blue Add Volunteer button
3.2.10 Edit / Delete Shift(s) To edit / delete shift(s): • Log into VMS • Select Calendars from the left navigation bar • Select the orange Admin button to administer
the calendar o find and select the Event Title of the event
you want to edit the shift(s) of o if needed use the search bar provided to
find the event • Select Shifts / Resources tab • Select the blue Edit Shift button
o edit content as needed • Select the blue Save Shift button to save, or;
o select the red Delete Shift button to delete the event o select the white Cancel button or the x in the top corner of the pop up window to exit the window without
saving
3.2.11 Add Resources to an Event To add resources (i.e. handouts, pens, banner, event signage, cash register, shade tent) to an event, an event must be created that has at least one shift, follow Sections 3.2.6 Add an Event and 3.2.9 Add Shift(s) to an Event. To add resources to an event: • Log into VMS • Select Calendars from the left navigation bar • Select the orange Admin button to administer
the calendar o find and select the Event Title of the event
you want to add resources to o if needed use the search bar provided to
find the event • Select Shifts / Resources tab • Select the blue Add Resource to the
appropriate shift o enter information:
Resource Name
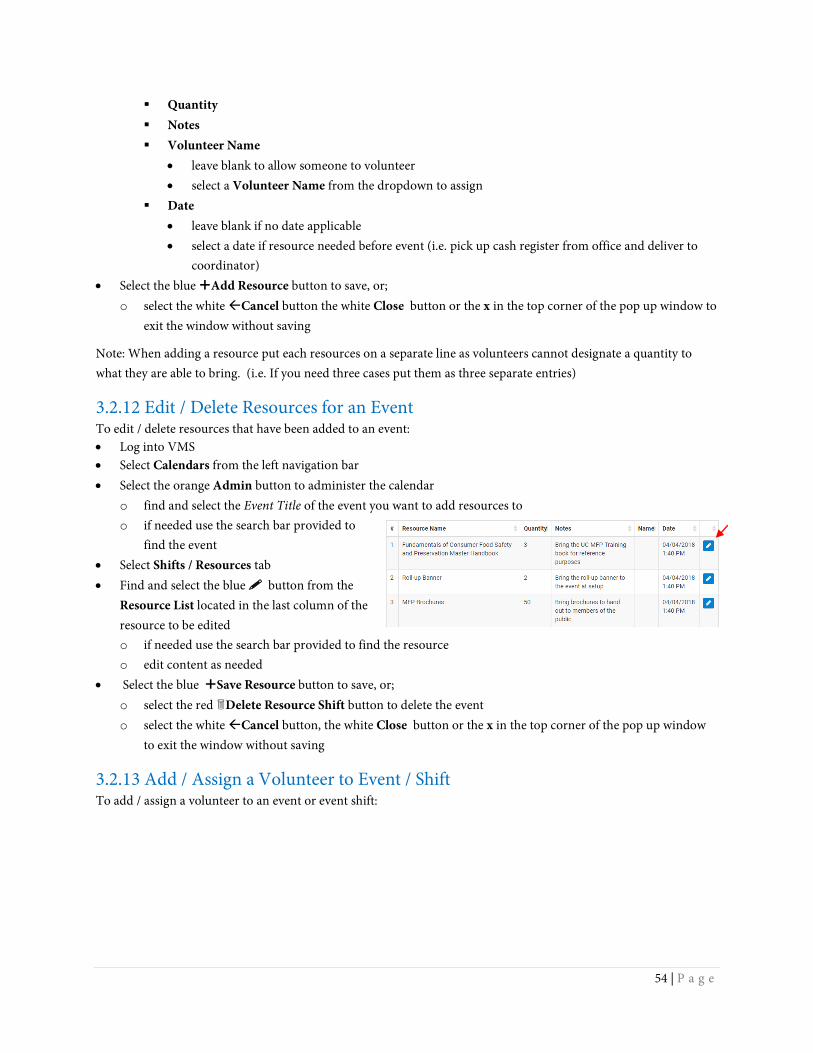
54 | P a g e
Quantity Notes Volunteer Name
• leave blank to allow someone to volunteer • select a Volunteer Name from the dropdown to assign
Date • leave blank if no date applicable • select a date if resource needed before event (i.e. pick up cash register from office and deliver to
coordinator) • Select the blue Add Resource button to save, or;
o select the white Cancel button the white Close button or the x in the top corner of the pop up window to exit the window without saving
Note: When adding a resource put each resources on a separate line as volunteers cannot designate a quantity to what they are able to bring. (i.e. If you need three cases put them as three separate entries)
3.2.12 Edit / Delete Resources for an Event To edit / delete resources that have been added to an event: • Log into VMS • Select Calendars from the left navigation bar • Select the orange Admin button to administer the calendar
o find and select the Event Title of the event you want to add resources to o if needed use the search bar provided to
find the event • Select Shifts / Resources tab • Find and select the blue button from the
Resource List located in the last column of the resource to be edited o if needed use the search bar provided to find the resource o edit content as needed
• Select the blue Save Resource button to save, or; o select the red Delete Resource Shift button to delete the event o select the white Cancel button, the white Close button or the x in the top corner of the pop up window
to exit the window without saving
3.2.13 Add / Assign a Volunteer to Event / Shift To add / assign a volunteer to an event or event shift:
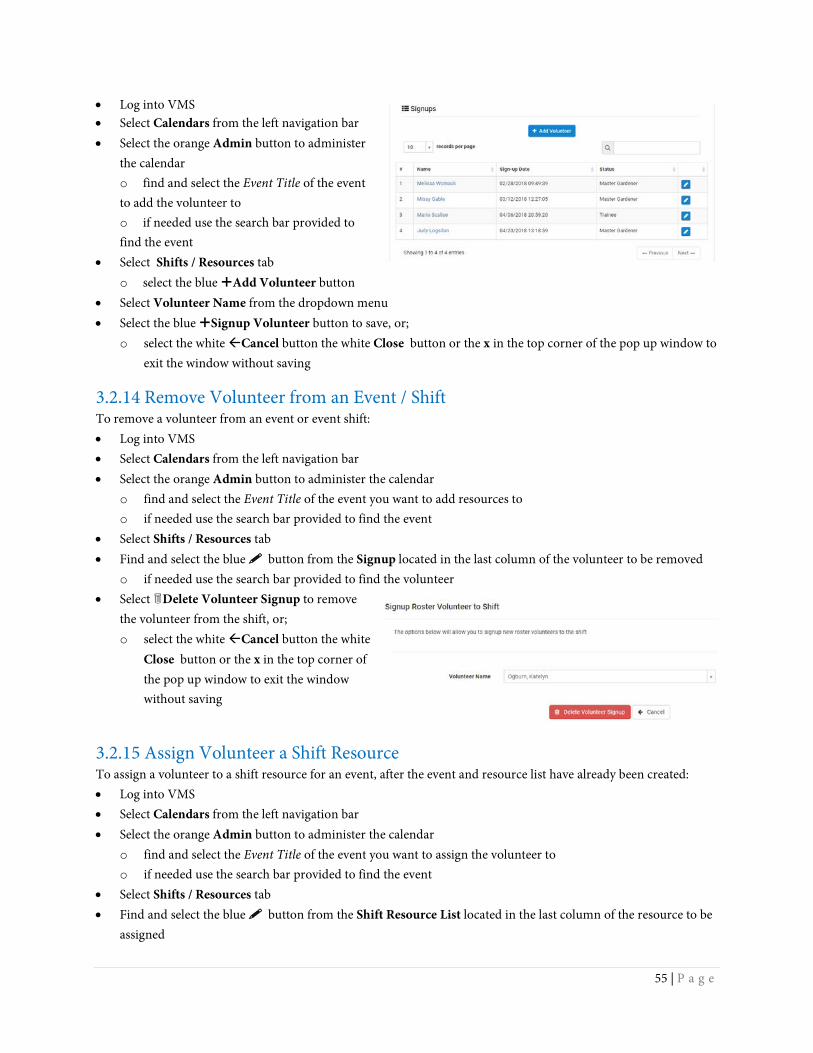
55 | P a g e
• Log into VMS • Select Calendars from the left navigation bar • Select the orange Admin button to administer
the calendar o find and select the Event Title of the event to add the volunteer to o if needed use the search bar provided to find the event
• Select Shifts / Resources tab o select the blue Add Volunteer button
• Select Volunteer Name from the dropdown menu • Select the blue Signup Volunteer button to save, or;
o select the white Cancel button the white Close button or the x in the top corner of the pop up window to exit the window without saving
3.2.14 Remove Volunteer from an Event / Shift To remove a volunteer from an event or event shift: • Log into VMS • Select Calendars from the left navigation bar • Select the orange Admin button to administer the calendar
o find and select the Event Title of the event you want to add resources to o if needed use the search bar provided to find the event
• Select Shifts / Resources tab • Find and select the blue button from the Signup located in the last column of the volunteer to be removed
o if needed use the search bar provided to find the volunteer • Select Delete Volunteer Signup to remove
the volunteer from the shift, or; o select the white Cancel button the white
Close button or the x in the top corner of the pop up window to exit the window without saving
3.2.15 Assign Volunteer a Shift Resource To assign a volunteer to a shift resource for an event, after the event and resource list have already been created: • Log into VMS • Select Calendars from the left navigation bar • Select the orange Admin button to administer the calendar
o find and select the Event Title of the event you want to assign the volunteer to o if needed use the search bar provided to find the event
• Select Shifts / Resources tab • Find and select the blue button from the Shift Resource List located in the last column of the resource to be
assigned
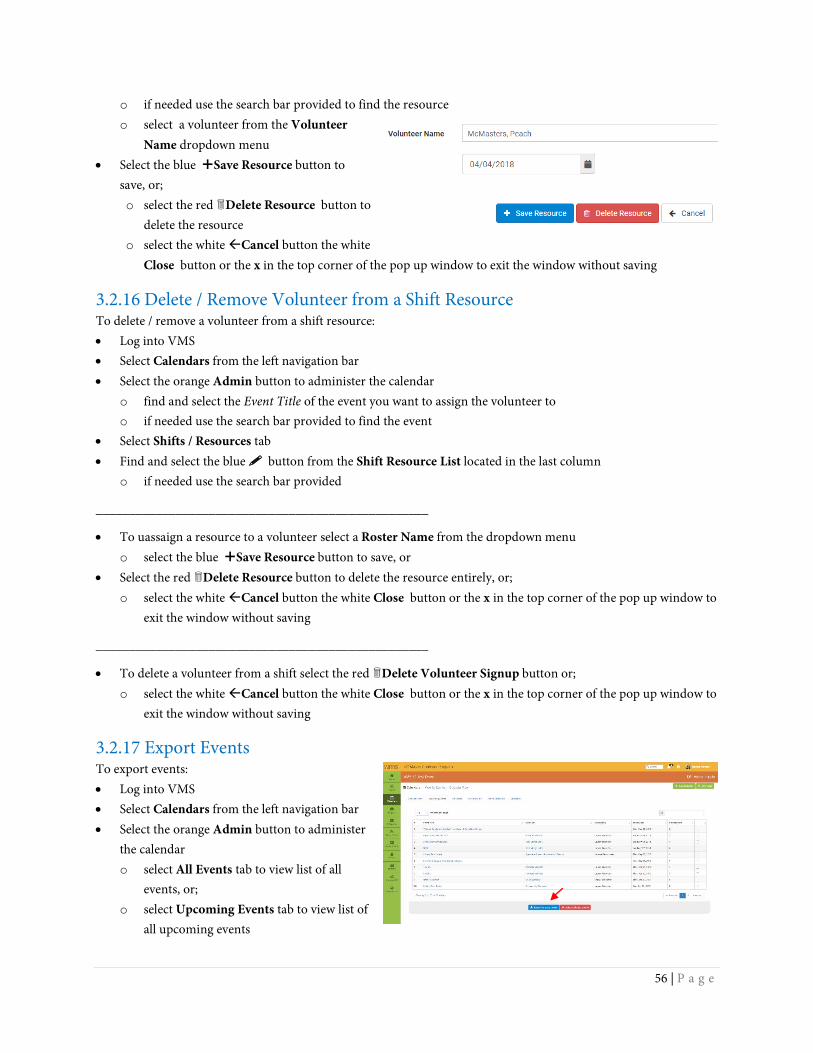
56 | P a g e
o if needed use the search bar provided to find the resource o select a volunteer from the Volunteer
Name dropdown menu • Select the blue Save Resource button to
save, or; o select the red Delete Resource button to
delete the resource o select the white Cancel button the white
Close button or the x in the top corner of the pop up window to exit the window without saving
3.2.16 Delete / Remove Volunteer from a Shift Resource To delete / remove a volunteer from a shift resource: • Log into VMS • Select Calendars from the left navigation bar • Select the orange Admin button to administer the calendar
o find and select the Event Title of the event you want to assign the volunteer to o if needed use the search bar provided to find the event
• Select Shifts / Resources tab • Find and select the blue button from the Shift Resource List located in the last column
o if needed use the search bar provided
__________________________________________________
• To uassaign a resource to a volunteer select a Roster Name from the dropdown menu o select the blue Save Resource button to save, or
• Select the red Delete Resource button to delete the resource entirely, or; o select the white Cancel button the white Close button or the x in the top corner of the pop up window to
exit the window without saving
__________________________________________________
• To delete a volunteer from a shift select the red Delete Volunteer Signup button or; o select the white Cancel button the white Close button or the x in the top corner of the pop up window to
exit the window without saving
3.2.17 Export Events To export events: • Log into VMS • Select Calendars from the left navigation bar • Select the orange Admin button to administer
the calendar o select All Events tab to view list of all
events, or; o select Upcoming Events tab to view list of
all upcoming events
57 | P a g e
o if needed use the search bar provided to find the events to export select the check box in the last column of the event or events to export
• Select the blue Export Selected button to create an Excel document o the document has the following information:
Event Title Calendar Start Date End Date Time # of Volunteers Explanation Location Address Contact
3.3 Manage Projects In this section you will learn:
3.3.1 VMS Project Categories 3.3.2 View Project List 3.3.3 Export Project List 3.3.4 Add New Project 3.3.5 Edit Project 3.3.6 Delete a Project 3.3.7 Deactivate a Project 3.3.8 Reactivate a Project 3.3.9 Archive a Project 3.3.10 Merge Projects 3.3.11 Enroll Volunteer(s) in a Project 3.3.12 Email Volunteer(s) Enrolled in a Project

58 | P a g e
3.3.1 VMS Project Categories Does not apply to UC Master Food Preserver Program
There are 11 pre-defined categories in VMS that allow for consistent, compelling and accurate reporting across the statewide program. The data collection is important for program sustainability and is a great tool to share relevant information with stakeholders at the community, county, state and federal level.
When creating a new project, simply select the category from the dropdown menu and save.
1. Admin/Office- any projects that fosters the administration of the UC Master Gardener program. Including board (or other leadership structure) meetings, and sub-committee meetings that do not belong in another category. May also include office duties completed by a volunteer at the request of program coordinator or UCCE staff person.
2. Booth Display- includes projects in which UC Master Gardeners represent the program, UCCE, or UC ANR at an event with a larger focus. Includes, but not limited to, preparation, attendance, or clean up from the following: farmer’s markets, county fair booth, table at community events, home and garden show, etc.
3. Demonstration Garden- includes, but is not limited to: school gardens, community gardens, public landscaping projects.
4. Farm Advisor Research- any research done on behalf of a UCCE farm advisor, specialist or the statewide office.
Includes PlantRight Nursery Survey.
5. Help Desk / Hotline- includes any activity in which UC Master Gardeners answer questions from the public about home horticulture and/or pests, typically on an individual basis. Hotlines, Helplines, answering “helpline” emails or phone calls, plant clinics, water walks, etc.
6. Mass Media/ Communications- any communications intended for an external audience. Including, but not limited to, the development of material such as: flyers, newspaper articles, press releases, social media, blog posts, newsletters, direct mail, etc.
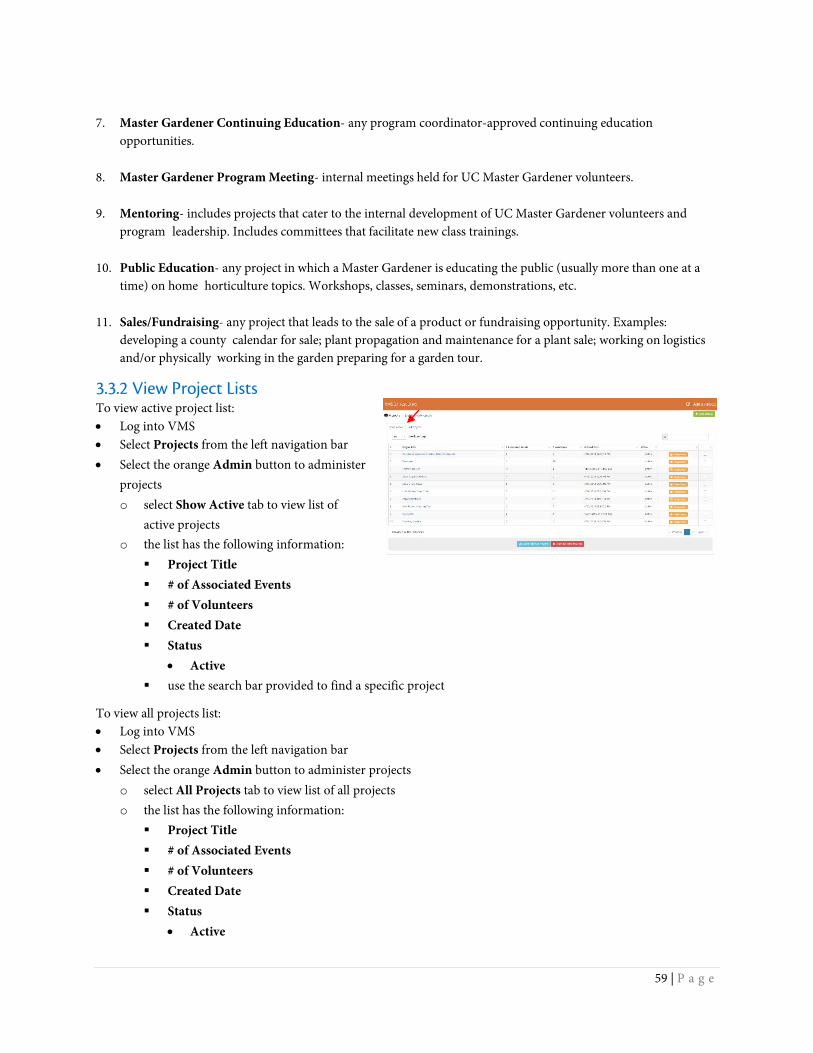
59 | P a g e
7. Master Gardener Continuing Education- any program coordinator-approved continuing education
opportunities.
8. Master Gardener Program Meeting- internal meetings held for UC Master Gardener volunteers. 9. Mentoring- includes projects that cater to the internal development of UC Master Gardener volunteers and
program leadership. Includes committees that facilitate new class trainings.
10. Public Education- any project in which a Master Gardener is educating the public (usually more than one at a time) on home horticulture topics. Workshops, classes, seminars, demonstrations, etc.
11. Sales/Fundraising- any project that leads to the sale of a product or fundraising opportunity. Examples: developing a county calendar for sale; plant propagation and maintenance for a plant sale; working on logistics and/or physically working in the garden preparing for a garden tour.
3.3.2 View Project Lists To view active project list: • Log into VMS • Select Projects from the left navigation bar • Select the orange Admin button to administer
projects o select Show Active tab to view list of
active projects o the list has the following information:
Project Title # of Associated Events # of Volunteers Created Date Status
• Active use the search bar provided to find a specific project
To view all projects list: • Log into VMS • Select Projects from the left navigation bar • Select the orange Admin button to administer projects
o select All Projects tab to view list of all projects o the list has the following information:
Project Title # of Associated Events # of Volunteers Created Date Status
• Active

60 | P a g e
• Inactive • Archived
use the search bar provided to find a specific project
3.3.3 Export Project List To export a project list: • Log into VMS • Select Projects from the left navigation bar • Select the orange Admin button to administer projects
o Select Show Active tab to view list of active projects, or;
o select All Projects tab to view list of all projects o if needed use the search bar provided to find the
project or projects to export select the check box in the last column of the
project or projects to export o if needed use the Start and End Date boxes to display results for a determined time frame
• Select the white Export Selected Projects button to create an Excel document o the document has the following information:
Project Name Description Information Location Address Address (2) City Postal Code # of Volunteer Required # of Volunteers Signed UP # of Total Volunteer Hours
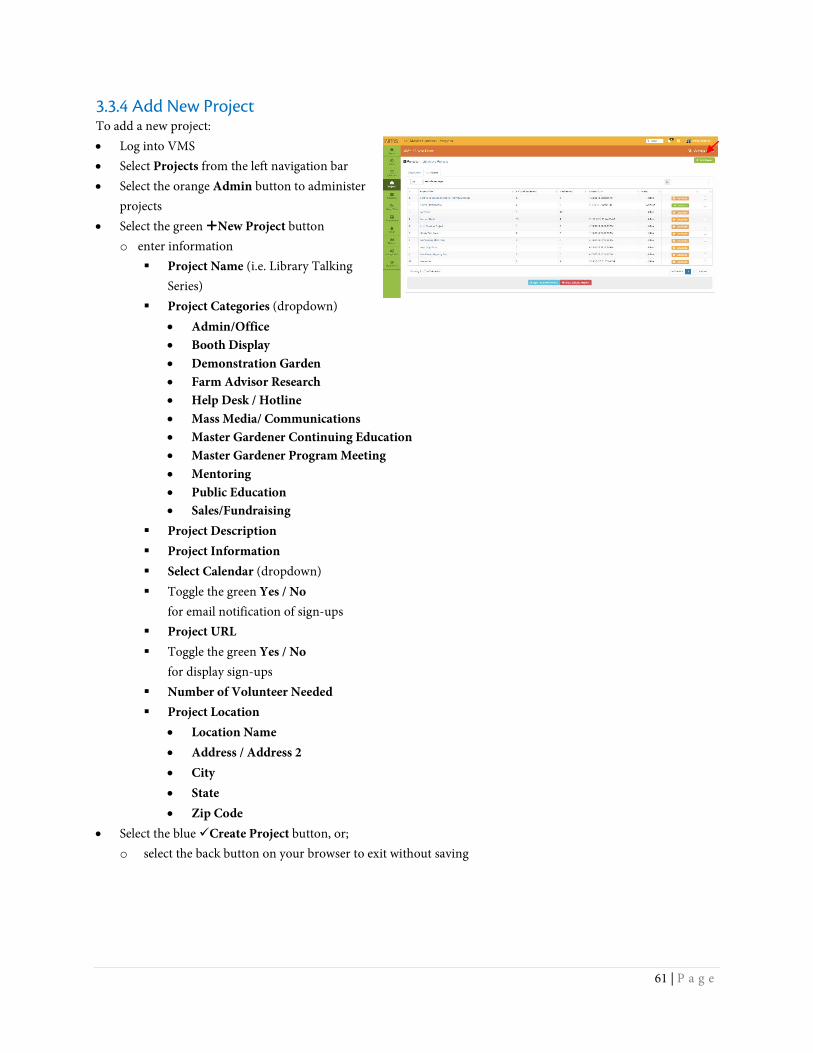
61 | P a g e
3.3.4 Add New Project To add a new project: • Log into VMS • Select Projects from the left navigation bar • Select the orange Admin button to administer
projects • Select the green New Project button
o enter information Project Name (i.e. Library Talking
Series) Project Categories (dropdown)
• Admin/Office • Booth Display • Demonstration Garden • Farm Advisor Research • Help Desk / Hotline • Mass Media/ Communications • Master Gardener Continuing Education • Master Gardener Program Meeting • Mentoring • Public Education • Sales/Fundraising
Project Description Project Information Select Calendar (dropdown) Toggle the green Yes / No
for email notification of sign-ups Project URL Toggle the green Yes / No
for display sign-ups Number of Volunteer Needed Project Location
• Location Name • Address / Address 2 • City • State • Zip Code
• Select the blue Create Project button, or; o select the back button on your browser to exit without saving

62 | P a g e
3.3.5 Edit Project To edit an existing project: • Log into VMS • Select Projects from the left navigation bar • Select the orange Admin button to administer
projects o select Show Active tab to view list of active
projects, or; o select All Projects tab to view list of all
projects find and select the Project Title of
the project you want to edit if needed, use the search bar provided to find the project
• Select the blue Edit Project button o edit content as needed
• Select the blue Save Changes button to save, or; o select the white Cancel button to exit the window without saving changes
3.3.6 Delete a Project To delete a project: • Log into VMS • Select Projects from the left navigation bar • Select the orange Admin button to administer
projects o select Show Active tab to view list of
active projects, or; o select All Projects tab to view list of all
projects find the Project Title of the project
you want to delete if needed use the search bar provided
to find the project select the check box in the last column of the
project or projects to be deleted o select the red Delete Selected Projects button
select OK from the pop up window to confirm deletion select Cancel to not delete
Note: Project deletions are not reversible.
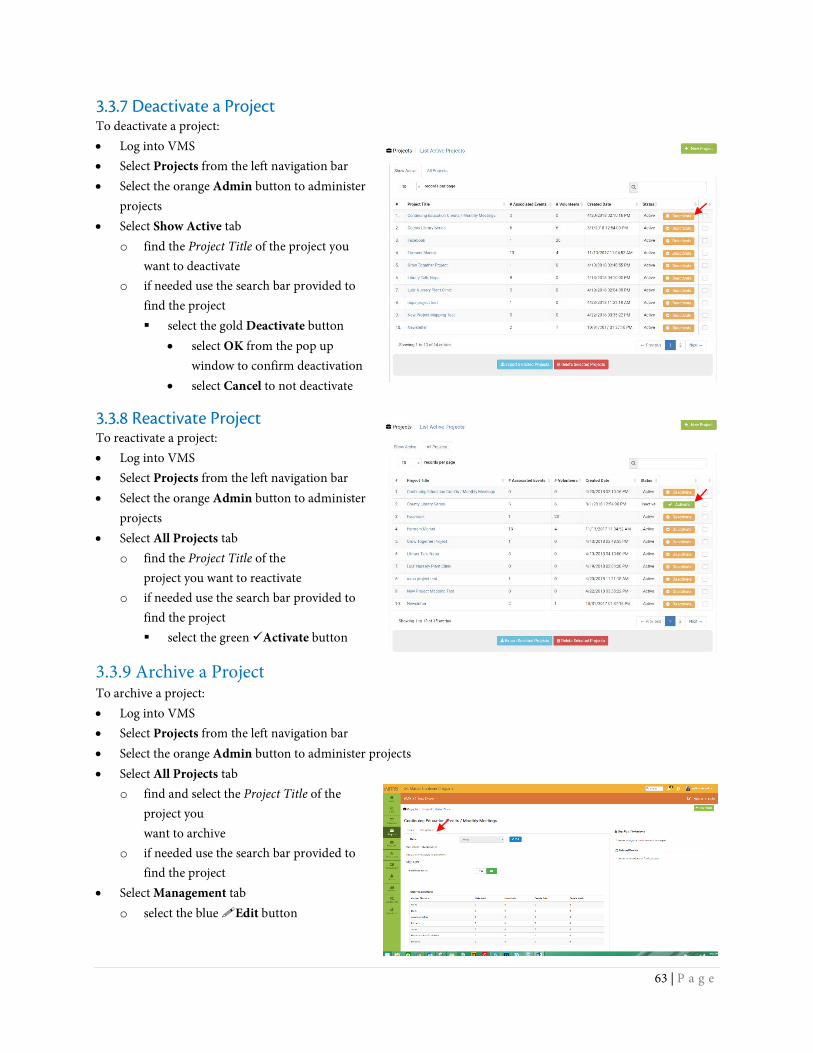
63 | P a g e
3.3.7 Deactivate a Project To deactivate a project: • Log into VMS • Select Projects from the left navigation bar • Select the orange Admin button to administer
projects • Select Show Active tab
o find the Project Title of the project you want to deactivate
o if needed use the search bar provided to find the project select the gold Deactivate button
• select OK from the pop up window to confirm deactivation
• select Cancel to not deactivate
3.3.8 Reactivate Project To reactivate a project: • Log into VMS • Select Projects from the left navigation bar • Select the orange Admin button to administer
projects • Select All Projects tab
o find the Project Title of the project you want to reactivate
o if needed use the search bar provided to find the project select the green Activate button
3.3.9 Archive a Project To archive a project: • Log into VMS • Select Projects from the left navigation bar • Select the orange Admin button to administer projects • Select All Projects tab
o find and select the Project Title of the project you want to archive
o if needed use the search bar provided to find the project
• Select Management tab o select the blue Edit button
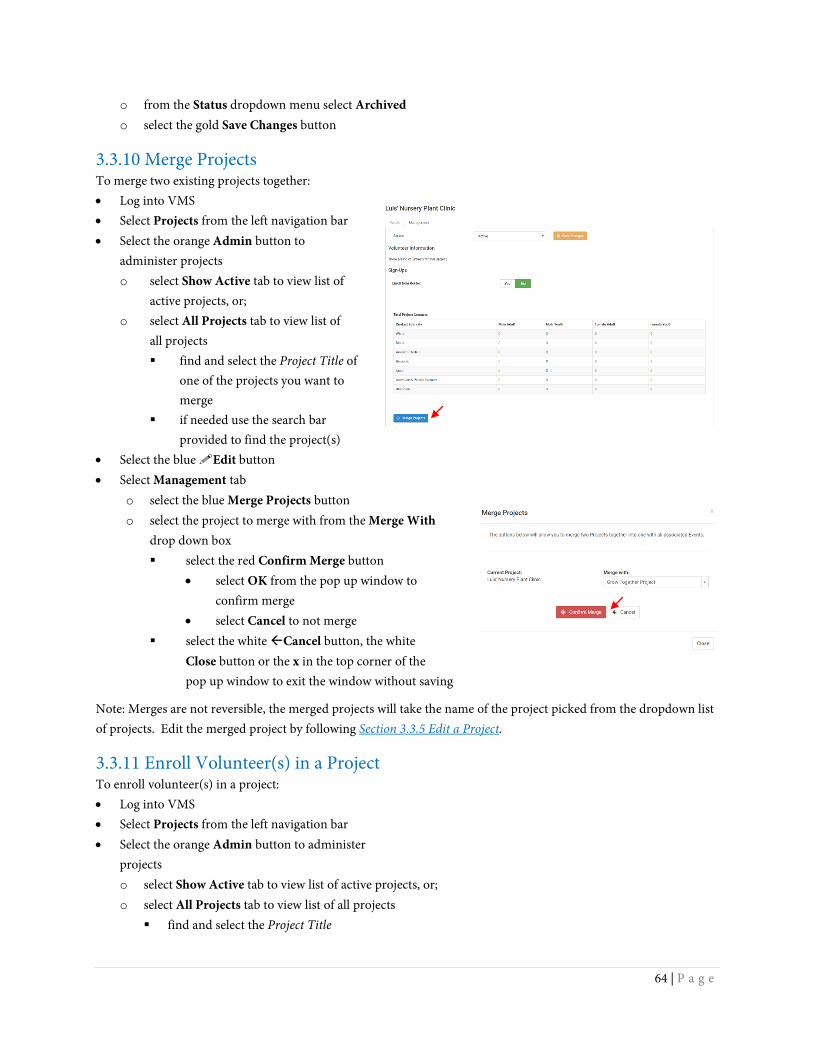
64 | P a g e
o from the Status dropdown menu select Archived o select the gold Save Changes button
3.3.10 Merge Projects To merge two existing projects together: • Log into VMS • Select Projects from the left navigation bar • Select the orange Admin button to
administer projects o select Show Active tab to view list of
active projects, or; o select All Projects tab to view list of
all projects find and select the Project Title of
one of the projects you want to merge
if needed use the search bar provided to find the project(s)
• Select the blue Edit button • Select Management tab
o select the blue Merge Projects button o select the project to merge with from the Merge With
drop down box select the red Confirm Merge button
• select OK from the pop up window to confirm merge
• select Cancel to not merge select the white Cancel button, the white
Close button or the x in the top corner of the pop up window to exit the window without saving
Note: Merges are not reversible, the merged projects will take the name of the project picked from the dropdown list of projects. Edit the merged project by following Section 3.3.5 Edit a Project.
3.3.11 Enroll Volunteer(s) in a Project To enroll volunteer(s) in a project: • Log into VMS • Select Projects from the left navigation bar • Select the orange Admin button to administer
projects o select Show Active tab to view list of active projects, or; o select All Projects tab to view list of all projects
find and select the Project Title

65 | P a g e
if needed use the search bar provided to find the project
• Select the blue Edit Project button • Select Management tab
o toggle the green Yes / No for Enroll from Roster
o select the volunteers to add to the project by checking box in the last column titled Sel if needed use the search bar provided
to find a volunteer o select the blue Enroll Selected Users
Note: There is currently not admin function to unenroll volunteers from a project, they will need to do it themselves by following the directions in Section 2.4.5 Unvolunteer for a Project.
3.3.12 Email Volunteer(s) Enrolled in a Project To email volunteer(s) enrolled in a project: • Log into VMS • Select Projects from the left navigation bar • Select the orange Admin button to administer
projects o select Show Active tab to view list of
active projects, or; o select All Projects tab to view list of all
projects find and select the Project Title, or; if needed use the search bar provided to find the project
• Select the blue Edit Project button • Select Management tab
o select the volunteers to email by checking box in the last column • Select the blue Email Volunteers button
o enter information: deselect any volunteers who should
NOT receive this email Additional Emails Subject Message Attachment check box Copy Me (send me a
copy of the email) o to send select the blue Send Email
button
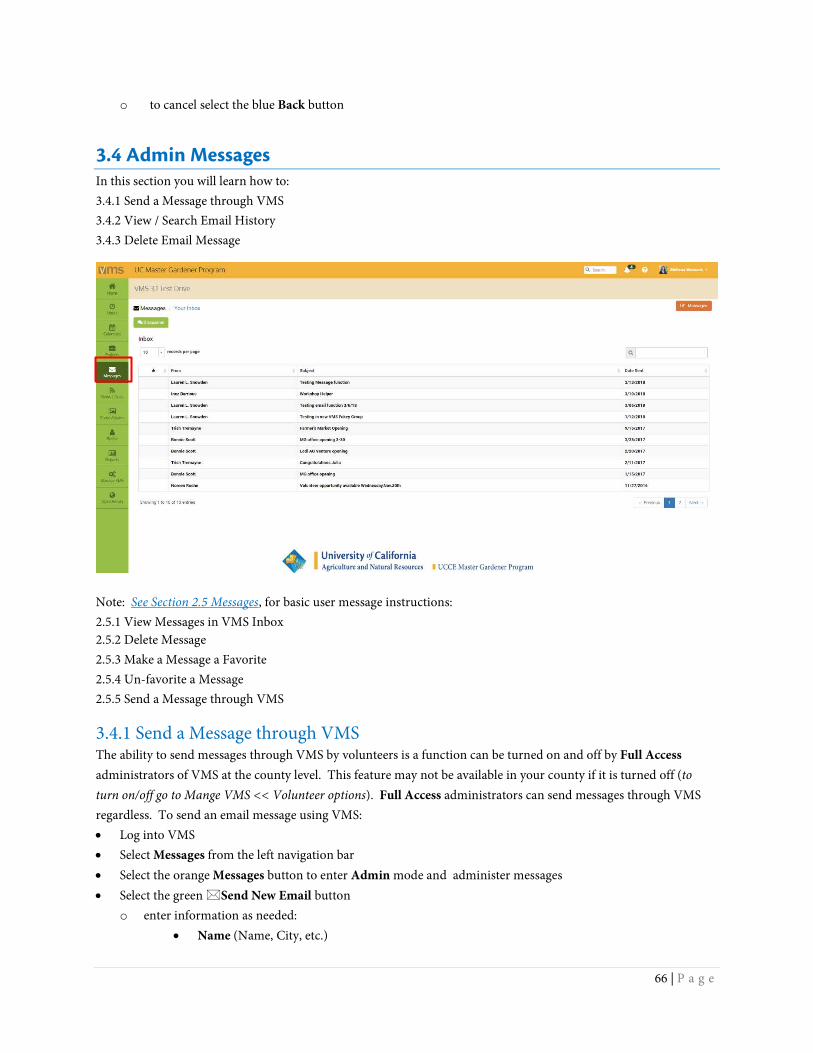
66 | P a g e
o to cancel select the blue Back button
3.4 Admin Messages In this section you will learn how to: 3.4.1 Send a Message through VMS 3.4.2 View / Search Email History 3.4.3 Delete Email Message
Note: See Section 2.5 Messages, for basic user message instructions: 2.5.1 View Messages in VMS Inbox 2.5.2 Delete Message 2.5.3 Make a Message a Favorite 2.5.4 Un-favorite a Message 2.5.5 Send a Message through VMS
3.4.1 Send a Message through VMS The ability to send messages through VMS by volunteers is a function can be turned on and off by Full Access administrators of VMS at the county level. This feature may not be available in your county if it is turned off (to turn on/off go to Mange VMS << Volunteer options). Full Access administrators can send messages through VMS regardless. To send an email message using VMS: • Log into VMS • Select Messages from the left navigation bar • Select the orange Messages button to enter Admin mode and administer messages • Select the green Send New Email button
o enter information as needed: • Name (Name, City, etc.)

67 | P a g e
• Status o Active o Limited Active o Inactive o Deleted
Achievement • use dropdown to select multiple
options o Master Gardener o First Year Master
Gardener o Gold Badge o Platinum Badge o Limited Active o Internal Administration o UC Staff o Honorary
Interests • use dropdown to select multiple options
Projects • use dropdown to select multiple options
Events • use dropdown to select multiple options
Start Date End Date check box Email all volunteers
• select the blue Create Email button enter information:
• deselect any volunteers who should NOT receive this email • Additional Emails • Subject • Message • Attachment • check box Copy Me (send me a copy of the email)
to send select the blue Send Email button to cancel select the blue Back button
Note: The sender of the email will be displayed as “YourEmailAddress.com on behalf of YOUR NAME <[email protected]>. The body of the email will state that “This email was sent from the COUNTY Master Gardener Volunteer Management System,” or “This email was sent from the COUNTY Master Food Preserve Volunteer Management System.”
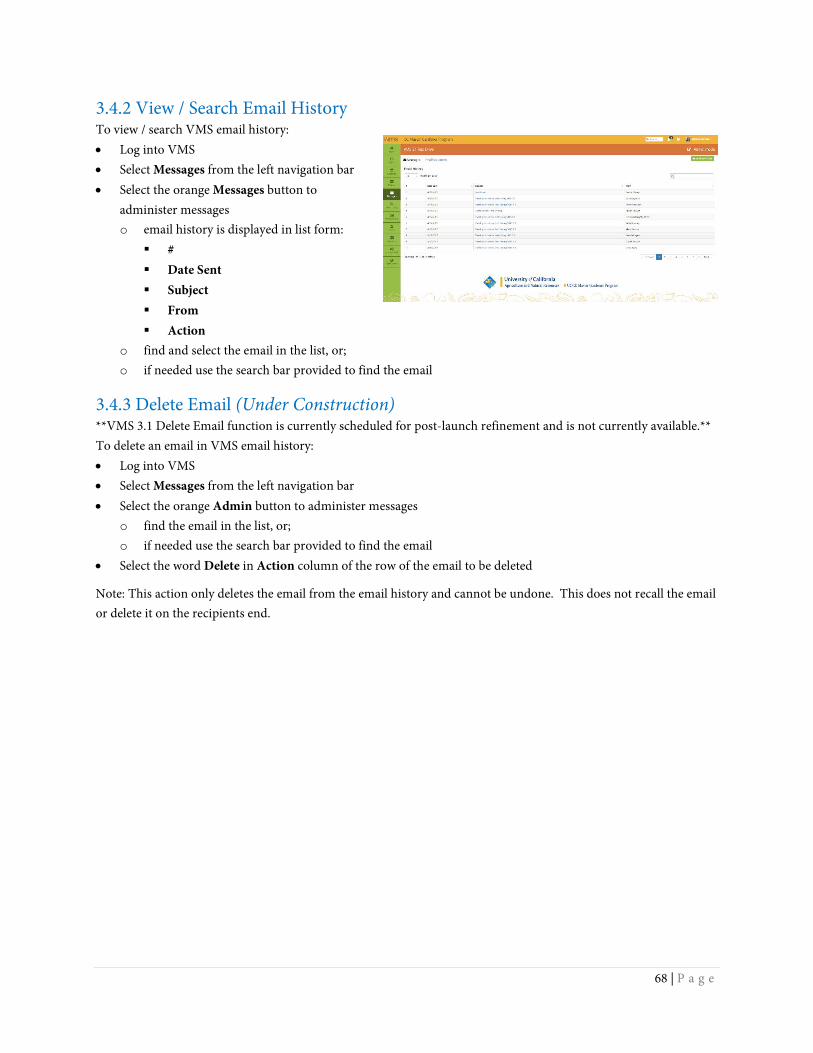
68 | P a g e
3.4.2 View / Search Email History To view / search VMS email history: • Log into VMS • Select Messages from the left navigation bar • Select the orange Messages button to
administer messages o email history is displayed in list form:
# Date Sent Subject From Action
o find and select the email in the list, or; o if needed use the search bar provided to find the email
3.4.3 Delete Email (Under Construction) **VMS 3.1 Delete Email function is currently scheduled for post-launch refinement and is not currently available.** To delete an email in VMS email history: • Log into VMS • Select Messages from the left navigation bar • Select the orange Admin button to administer messages
o find the email in the list, or; o if needed use the search bar provided to find the email
• Select the word Delete in Action column of the row of the email to be deleted
Note: This action only deletes the email from the email history and cannot be undone. This does not recall the email or delete it on the recipients end.
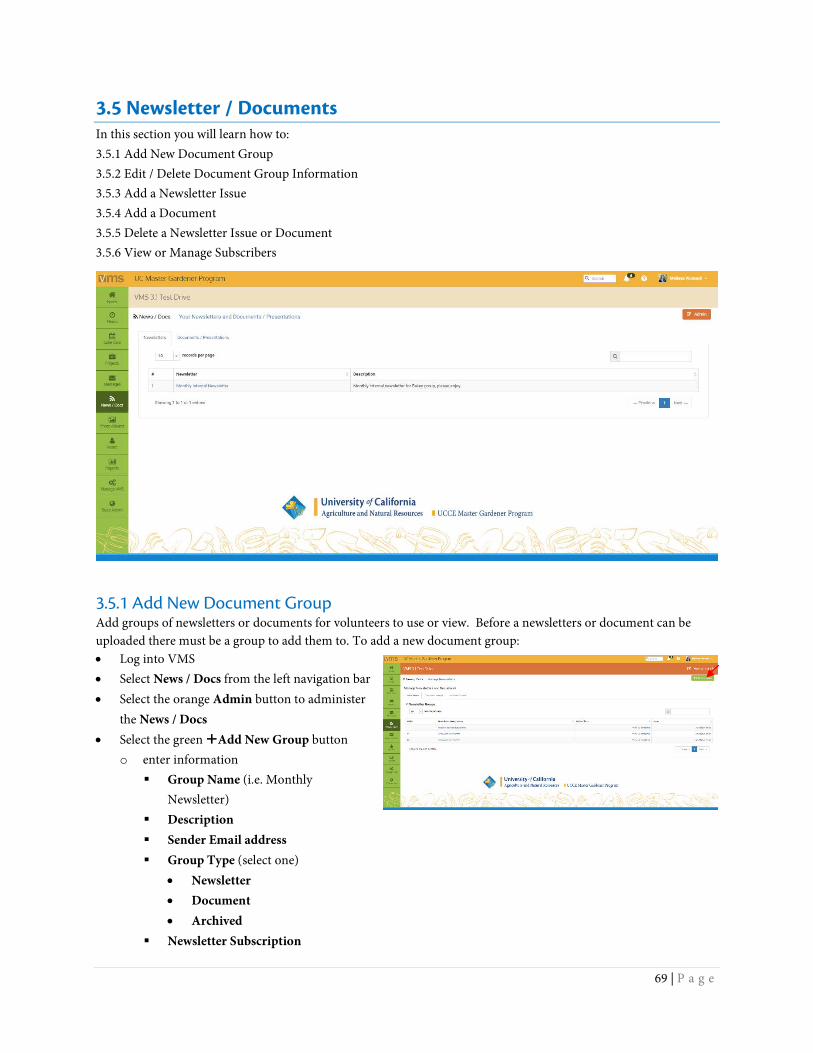
69 | P a g e
3.5 Newsletter / Documents In this section you will learn how to: 3.5.1 Add New Document Group 3.5.2 Edit / Delete Document Group Information 3.5.3 Add a Newsletter Issue 3.5.4 Add a Document 3.5.5 Delete a Newsletter Issue or Document 3.5.6 View or Manage Subscribers
3.5.1 Add New Document Group Add groups of newsletters or documents for volunteers to use or view. Before a newsletters or document can be uploaded there must be a group to add them to. To add a new document group: • Log into VMS • Select News / Docs from the left navigation bar • Select the orange Admin button to administer
the News / Docs • Select the green Add New Group button
o enter information Group Name (i.e. Monthly
Newsletter) Description Sender Email address Group Type (select one)
• Newsletter • Document • Archived
Newsletter Subscription
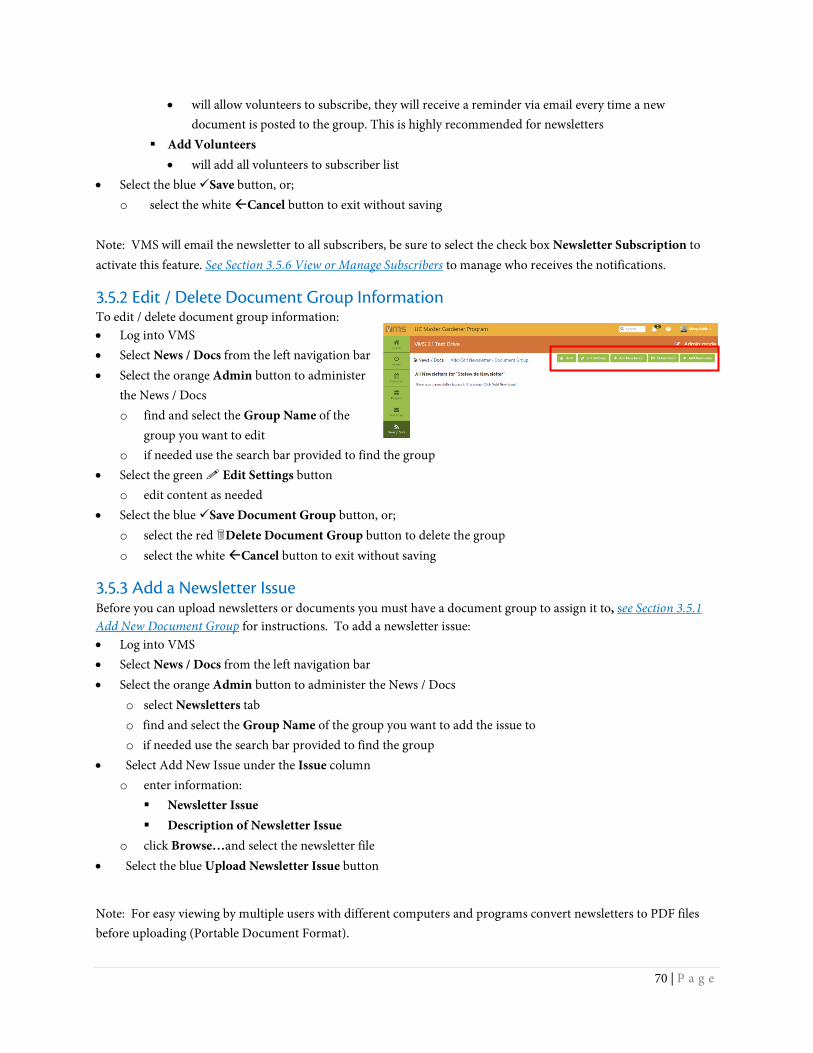
70 | P a g e
• will allow volunteers to subscribe, they will receive a reminder via email every time a new document is posted to the group. This is highly recommended for newsletters
Add Volunteers • will add all volunteers to subscriber list
• Select the blue Save button, or; o select the white Cancel button to exit without saving
Note: VMS will email the newsletter to all subscribers, be sure to select the check box Newsletter Subscription to activate this feature. See Section 3.5.6 View or Manage Subscribers to manage who receives the notifications.
3.5.2 Edit / Delete Document Group Information To edit / delete document group information: • Log into VMS • Select News / Docs from the left navigation bar • Select the orange Admin button to administer
the News / Docs o find and select the Group Name of the
group you want to edit o if needed use the search bar provided to find the group
• Select the green Edit Settings button o edit content as needed
• Select the blue Save Document Group button, or; o select the red Delete Document Group button to delete the group o select the white Cancel button to exit without saving
3.5.3 Add a Newsletter Issue Before you can upload newsletters or documents you must have a document group to assign it to, see Section 3.5.1 Add New Document Group for instructions. To add a newsletter issue: • Log into VMS • Select News / Docs from the left navigation bar • Select the orange Admin button to administer the News / Docs
o select Newsletters tab o find and select the Group Name of the group you want to add the issue to o if needed use the search bar provided to find the group
• Select Add New Issue under the Issue column o enter information:
Newsletter Issue Description of Newsletter Issue
o click Browse…and select the newsletter file • Select the blue Upload Newsletter Issue button
Note: For easy viewing by multiple users with different computers and programs convert newsletters to PDF files before uploading (Portable Document Format).
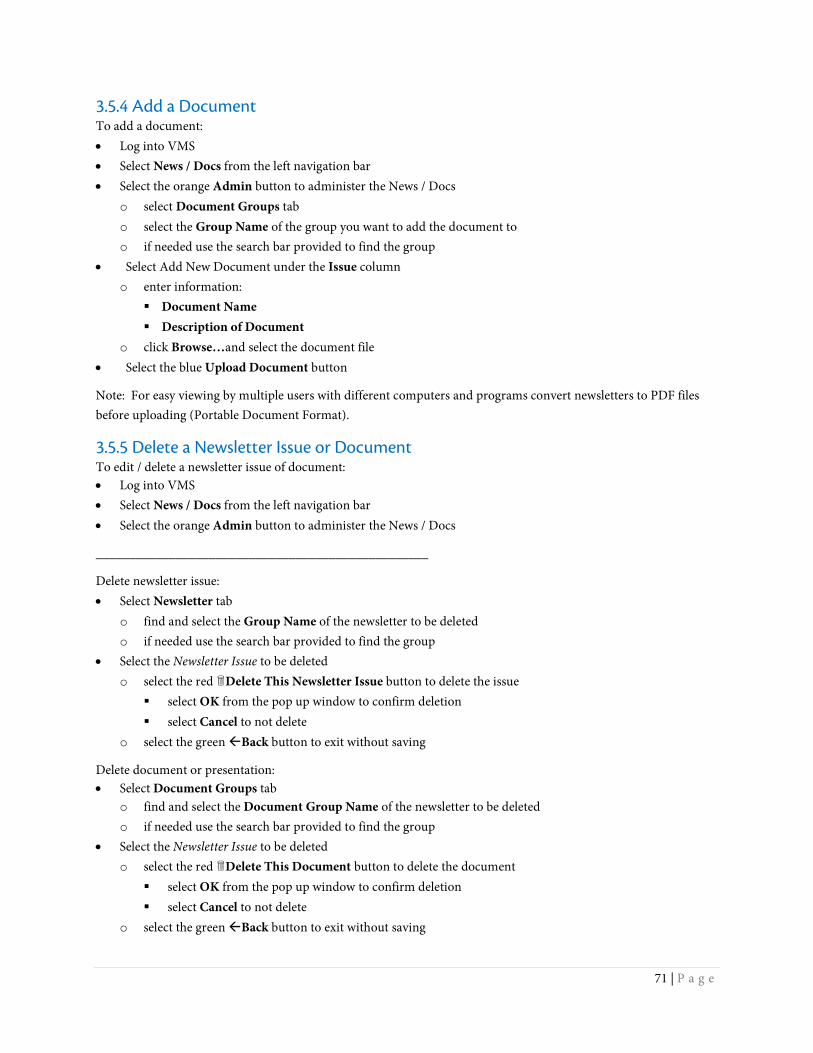
71 | P a g e
3.5.4 Add a Document To add a document: • Log into VMS • Select News / Docs from the left navigation bar • Select the orange Admin button to administer the News / Docs
o select Document Groups tab o select the Group Name of the group you want to add the document to o if needed use the search bar provided to find the group
• Select Add New Document under the Issue column o enter information:
Document Name Description of Document
o click Browse…and select the document file • Select the blue Upload Document button
Note: For easy viewing by multiple users with different computers and programs convert newsletters to PDF files before uploading (Portable Document Format).
3.5.5 Delete a Newsletter Issue or Document To edit / delete a newsletter issue of document: • Log into VMS • Select News / Docs from the left navigation bar • Select the orange Admin button to administer the News / Docs
__________________________________________________
Delete newsletter issue: • Select Newsletter tab
o find and select the Group Name of the newsletter to be deleted o if needed use the search bar provided to find the group
• Select the Newsletter Issue to be deleted o select the red Delete This Newsletter Issue button to delete the issue
select OK from the pop up window to confirm deletion select Cancel to not delete
o select the green Back button to exit without saving
Delete document or presentation: • Select Document Groups tab
o find and select the Document Group Name of the newsletter to be deleted o if needed use the search bar provided to find the group
• Select the Newsletter Issue to be deleted o select the red Delete This Document button to delete the document
select OK from the pop up window to confirm deletion select Cancel to not delete
o select the green Back button to exit without saving
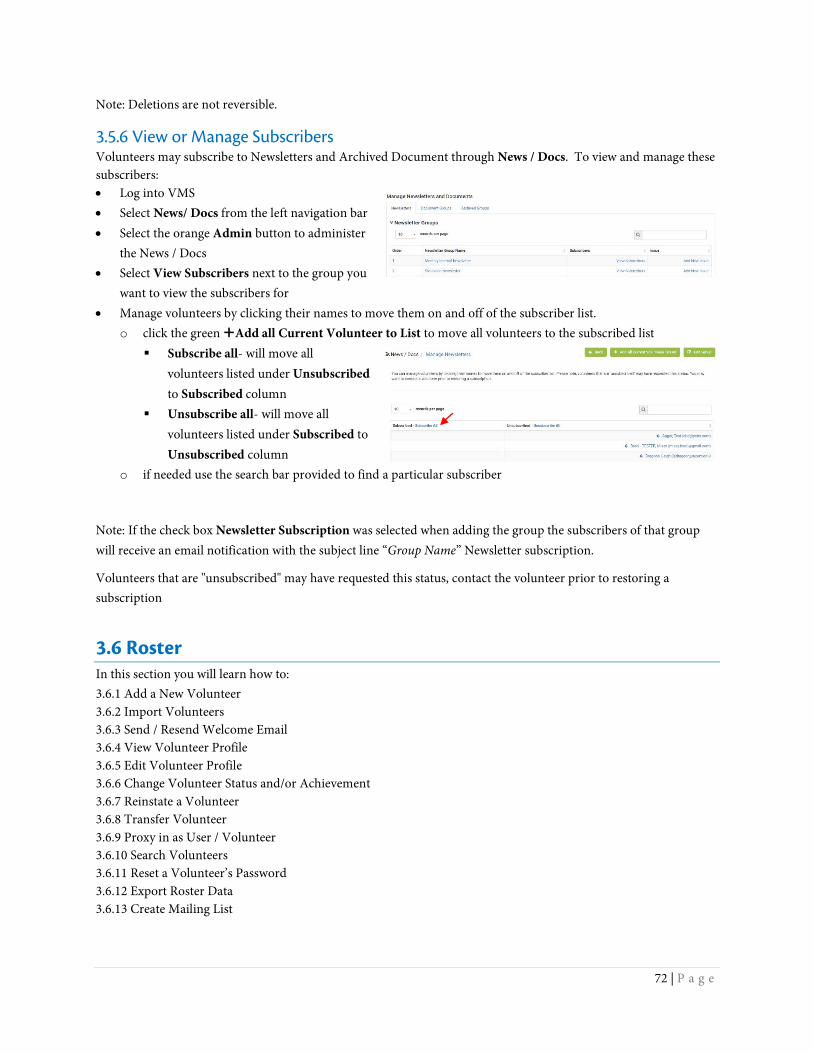
72 | P a g e
Note: Deletions are not reversible.
3.5.6 View or Manage Subscribers Volunteers may subscribe to Newsletters and Archived Document through News / Docs. To view and manage these subscribers: • Log into VMS • Select News/ Docs from the left navigation bar • Select the orange Admin button to administer
the News / Docs • Select View Subscribers next to the group you
want to view the subscribers for • Manage volunteers by clicking their names to move them on and off of the subscriber list.
o click the green Add all Current Volunteer to List to move all volunteers to the subscribed list Subscribe all- will move all
volunteers listed under Unsubscribed to Subscribed column
Unsubscribe all- will move all volunteers listed under Subscribed to Unsubscribed column
o if needed use the search bar provided to find a particular subscriber
Note: If the check box Newsletter Subscription was selected when adding the group the subscribers of that group will receive an email notification with the subject line “Group Name” Newsletter subscription.
Volunteers that are "unsubscribed" may have requested this status, contact the volunteer prior to restoring a subscription
3.6 Roster In this section you will learn how to: 3.6.1 Add a New Volunteer 3.6.2 Import Volunteers 3.6.3 Send / Resend Welcome Email 3.6.4 View Volunteer Profile 3.6.5 Edit Volunteer Profile 3.6.6 Change Volunteer Status and/or Achievement 3.6.7 Reinstate a Volunteer 3.6.8 Transfer Volunteer 3.6.9 Proxy in as User / Volunteer 3.6.10 Search Volunteers 3.6.11 Reset a Volunteer’s Password 3.6.12 Export Roster Data 3.6.13 Create Mailing List
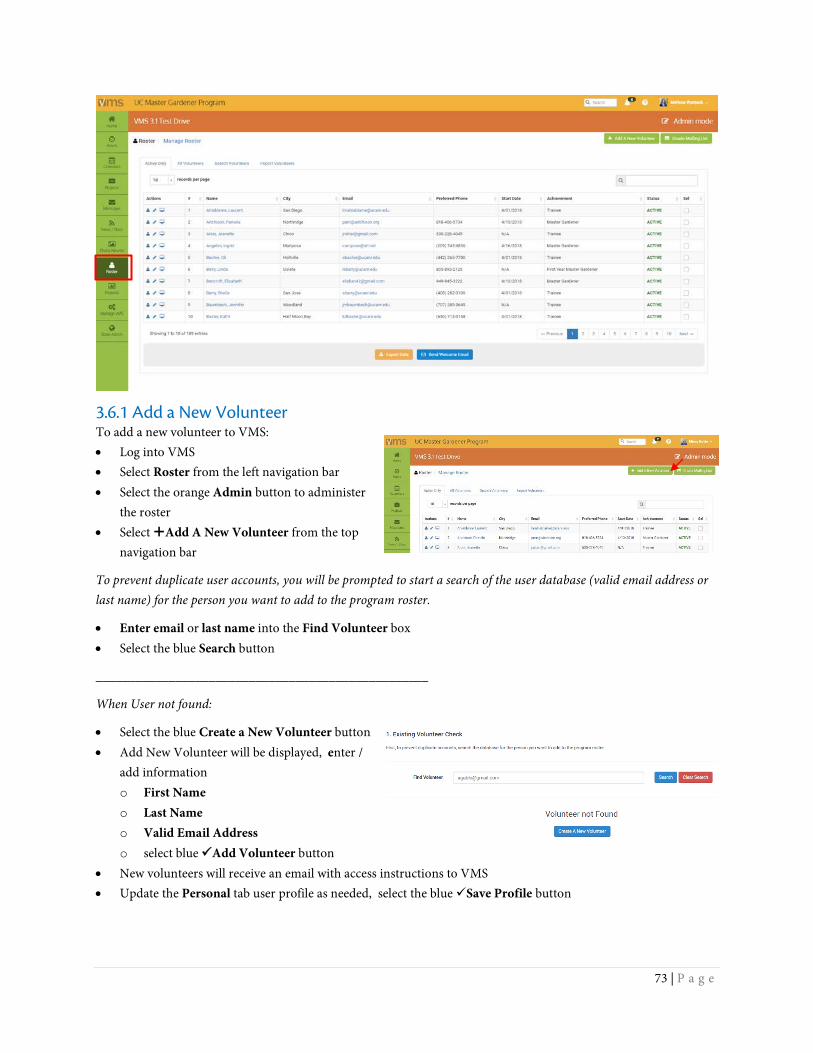
73 | P a g e
3.6.1 Add a New Volunteer To add a new volunteer to VMS: • Log into VMS • Select Roster from the left navigation bar • Select the orange Admin button to administer
the roster • Select Add A New Volunteer from the top
navigation bar
To prevent duplicate user accounts, you will be prompted to start a search of the user database (valid email address or last name) for the person you want to add to the program roster.
• Enter email or last name into the Find Volunteer box • Select the blue Search button
__________________________________________________
When User not found:
• Select the blue Create a New Volunteer button • Add New Volunteer will be displayed, enter /
add information o First Name o Last Name o Valid Email Address o select blue Add Volunteer button
• New volunteers will receive an email with access instructions to VMS
• Update the Personal tab user profile as needed, select the blue Save Profile button

74 | P a g e
When matches are found:
• A list of matches is displayed, to add a match click Add to Roster under the Action column on the line associated with the correct match. o if none of the matches are correct, select
the blue Create a New Volunteer button and follow the above instructions.
• Edit Roster Profile will be displayed o update Personal tab user profile as needed,
select the blue Save Profile button o update Program tab:
select an Achievement from the dropdown select a Status from the dropdown click the gold 💾💾Update Status button
• New volunteers will receive an email with access instructions to VMS
• Update Personal tab user profile as needed, select the blue Save Profile button
3.6.2 Import Volunteers The Import Volunteers functions allows the user to add a large group of new volunteers. The import function will comb the list and not allow duplicate entry of volunteers. Successfully imported new volunteers will have Trainee Achievement and Active Status in their profile as well as receive the new volunteer email. To import new volunteers:
• Log into VMS • Select Roster from the left navigation bar • Select the orange Admin button to administer
the roster • Select Import Volunteers tab
o select Download Excel Import Template o enter data in each column: First Name Last Name Email Start Date (format: 00/00/0000)
o save the Import Template • Click Browse…and select the Import Template
o to link to an event or project toggle the green No button to Yes o assign the event or project using the dropdown
• Select the blue Import Volunteers button o a green bar will appear at the top of the screen indicating the import was successful or not o the imported list will appear on the screen
select the white Cancel button to exit the window without saving o select the blue Confirm button to save o the confirmed list will appear with updated import status
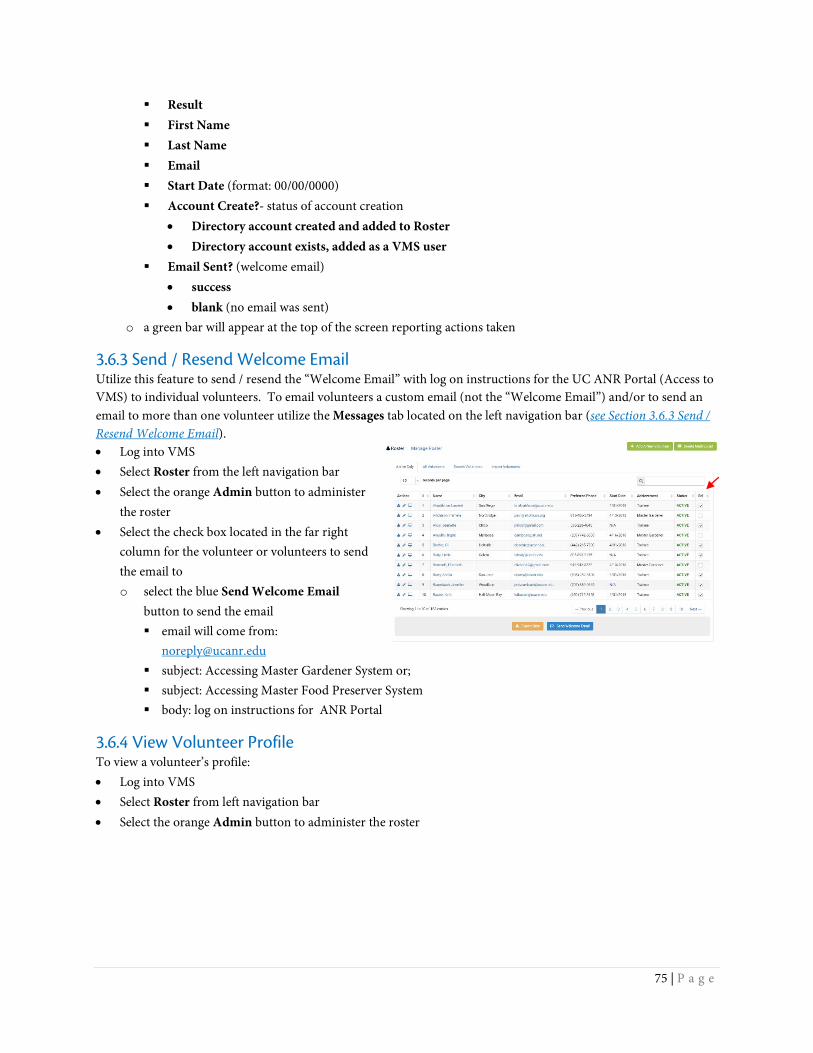
75 | P a g e
Result First Name Last Name Email Start Date (format: 00/00/0000) Account Create?- status of account creation
• Directory account created and added to Roster • Directory account exists, added as a VMS user
Email Sent? (welcome email) • success • blank (no email was sent)
o a green bar will appear at the top of the screen reporting actions taken
3.6.3 Send / Resend Welcome Email Utilize this feature to send / resend the “Welcome Email” with log on instructions for the UC ANR Portal (Access to VMS) to individual volunteers. To email volunteers a custom email (not the “Welcome Email”) and/or to send an email to more than one volunteer utilize the Messages tab located on the left navigation bar (see Section 3.6.3 Send / Resend Welcome Email). • Log into VMS • Select Roster from the left navigation bar • Select the orange Admin button to administer
the roster • Select the check box located in the far right
column for the volunteer or volunteers to send the email to o select the blue Send Welcome Email
button to send the email email will come from:
[email protected] subject: Accessing Master Gardener System or; subject: Accessing Master Food Preserver System body: log on instructions for ANR Portal
3.6.4 View Volunteer Profile To view a volunteer’s profile: • Log into VMS • Select Roster from left navigation bar • Select the orange Admin button to administer the roster
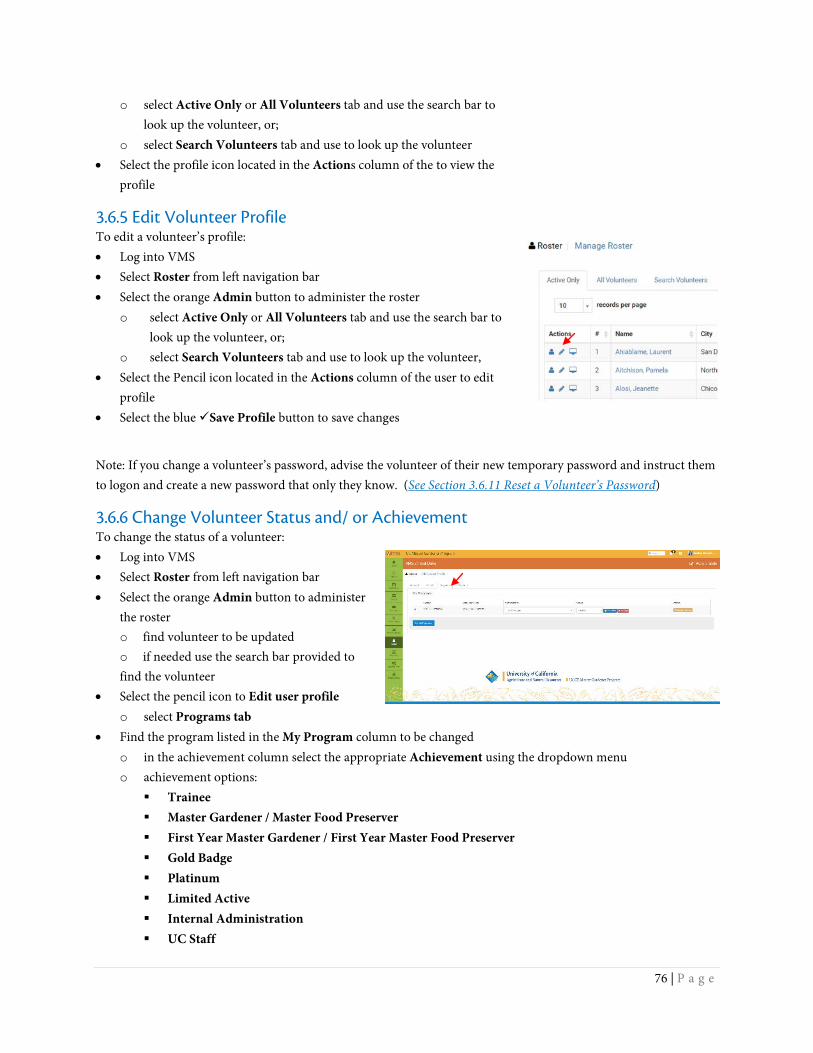
76 | P a g e
o select Active Only or All Volunteers tab and use the search bar to look up the volunteer, or;
o select Search Volunteers tab and use to look up the volunteer • Select the profile icon located in the Actions column of the to view the
profile
3.6.5 Edit Volunteer Profile To edit a volunteer’s profile: • Log into VMS • Select Roster from left navigation bar • Select the orange Admin button to administer the roster
o select Active Only or All Volunteers tab and use the search bar to look up the volunteer, or;
o select Search Volunteers tab and use to look up the volunteer, • Select the Pencil icon located in the Actions column of the user to edit
profile • Select the blue Save Profile button to save changes
Note: If you change a volunteer’s password, advise the volunteer of their new temporary password and instruct them to logon and create a new password that only they know. (See Section 3.6.11 Reset a Volunteer’s Password)
3.6.6 Change Volunteer Status and/ or Achievement To change the status of a volunteer: • Log into VMS • Select Roster from left navigation bar • Select the orange Admin button to administer
the roster o find volunteer to be updated o if needed use the search bar provided to find the volunteer
• Select the pencil icon to Edit user profile o select Programs tab
• Find the program listed in the My Program column to be changed o in the achievement column select the appropriate Achievement using the dropdown menu o achievement options:
Trainee Master Gardener / Master Food Preserver First Year Master Gardener / First Year Master Food Preserver Gold Badge Platinum Limited Active Internal Administration UC Staff
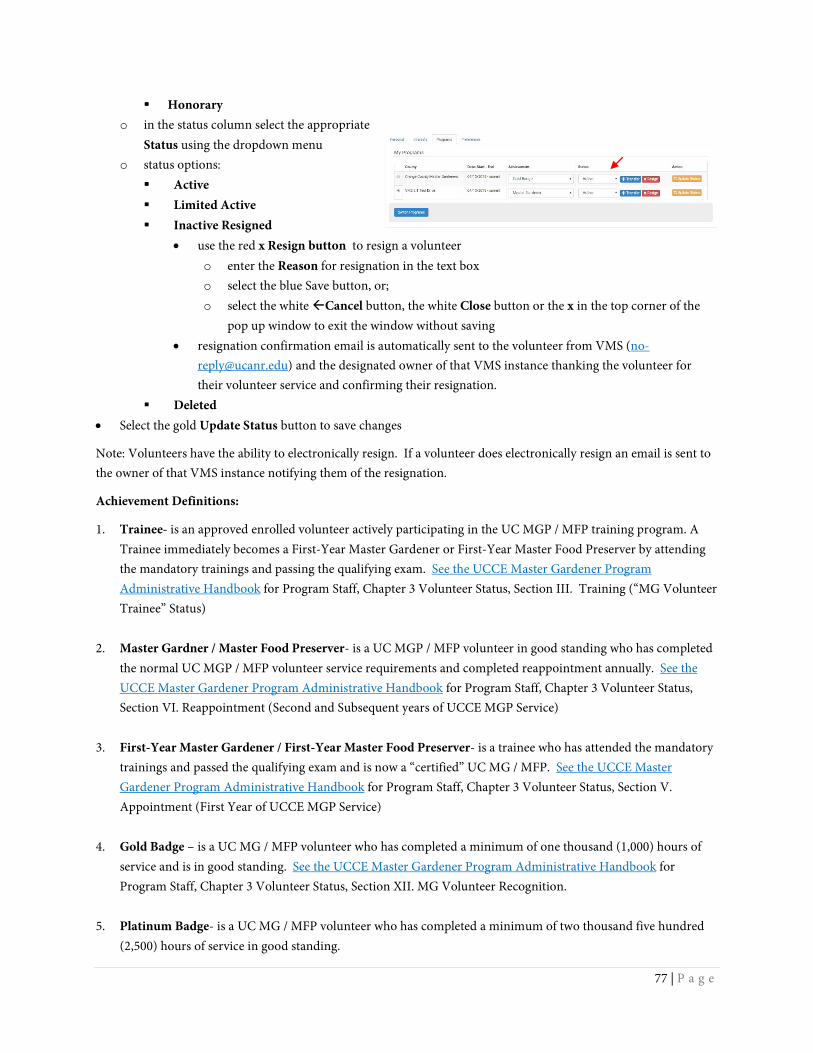
77 | P a g e
Honorary o in the status column select the appropriate
Status using the dropdown menu o status options:
Active Limited Active Inactive Resigned
• use the red x Resign button to resign a volunteer o enter the Reason for resignation in the text box o select the blue Save button, or; o select the white Cancel button, the white Close button or the x in the top corner of the
pop up window to exit the window without saving • resignation confirmation email is automatically sent to the volunteer from VMS (no-
[email protected]) and the designated owner of that VMS instance thanking the volunteer for their volunteer service and confirming their resignation.
Deleted • Select the gold Update Status button to save changes
Note: Volunteers have the ability to electronically resign. If a volunteer does electronically resign an email is sent to the owner of that VMS instance notifying them of the resignation.
Achievement Definitions:
1. Trainee- is an approved enrolled volunteer actively participating in the UC MGP / MFP training program. A Trainee immediately becomes a First-Year Master Gardener or First-Year Master Food Preserver by attending the mandatory trainings and passing the qualifying exam. See the UCCE Master Gardener Program Administrative Handbook for Program Staff, Chapter 3 Volunteer Status, Section III. Training (“MG Volunteer Trainee” Status)
2. Master Gardner / Master Food Preserver- is a UC MGP / MFP volunteer in good standing who has completed the normal UC MGP / MFP volunteer service requirements and completed reappointment annually. See the UCCE Master Gardener Program Administrative Handbook for Program Staff, Chapter 3 Volunteer Status, Section VI. Reappointment (Second and Subsequent years of UCCE MGP Service)
3. First-Year Master Gardener / First-Year Master Food Preserver- is a trainee who has attended the mandatory trainings and passed the qualifying exam and is now a “certified” UC MG / MFP. See the UCCE Master Gardener Program Administrative Handbook for Program Staff, Chapter 3 Volunteer Status, Section V. Appointment (First Year of UCCE MGP Service)
4. Gold Badge – is a UC MG / MFP volunteer who has completed a minimum of one thousand (1,000) hours of
service and is in good standing. See the UCCE Master Gardener Program Administrative Handbook for Program Staff, Chapter 3 Volunteer Status, Section XII. MG Volunteer Recognition.
5. Platinum Badge- is a UC MG / MFP volunteer who has completed a minimum of two thousand five hundred (2,500) hours of service in good standing.

78 | P a g e
6. Limited Active- is a UC MG / MFP volunteer who has requested to be put on Limited Active status to maintain
their standing as active during a period in which they are unable to complete the normal UC MG / MFP Program volunteer service requirements due to major difficulties. (May not exceed one year). See the UCCE Master Gardener Program Administrative Handbook for Program Staff, Chapter 3 Volunteer Status, Section XI. Limited Active Status Reappointment.
7. Internal Administration- VMS status reserved for program developers, and individuals with a statewide appointment (ie: CSIT, Statewide Evaluation Coordinator).
8. UC Staff- VMS status reserved for University of California or University of California Cooperative Extension staff, and County staff who support the UC MG / MFP Program.
9. Honorary- is a volunteer who has supported the principles and goals of the UC MG / MFP Program and who has made outstanding contributions to the UC MG / MFP Program and is recognized by the County Director as an Honorary UC MG / MFP. See the UCCE Master Gardener Program Administrative Handbook for Program Staff, Chapter 3 Volunteer Status, Section XII. MG Volunteer Recognition.
Status Definitions:
1. Active- is a volunteer in good standing who has completed the normal UC MG / MFP volunteer service requirements and completed reappointment annually.
2. Limited Active- is a UC MG / MFP volunteer who has requested to be put on Limited Active status to maintain their standing as active during a period in which they are unable to complete the normal UC MG / MFP Program volunteer service requirements due to major difficulties. (May not exceed one year). See the UCCE Master Gardener Program Administrative Handbook for Program Staff, Chapter 3 Volunteer Status, Section XI. Limited Active Status Reappointment
3. Inactive/Resigned-
Inactive- is a UC MG / MFP volunteer who does not fulfill the reappointment requirements, and cannot participate in UC MG / MFP Program activities. See the UCCE Master Gardener Program Administrative Handbook for Program Staff, Chapter 3 Volunteer Status, Section VII. Inactive Active Status. Note: If status is changed to inactive/resigned the UC MG / MFP volunteer still has access to the Collaborative Tools System (CTS) and will have to be managed manually in CTS to remove them from the list.
Resigned- is a UC MG / MFP volunteer who does not request and receive reinstatement after becoming inactive for thirteen months or has independently chosen to resign from the UC MG / MFP Program at any time.
4. Deleted- is for a UC MG / MFP volunteer who has transferred to another county, passed away or after thirteen months of inactive / resigned status has not returned to the program.
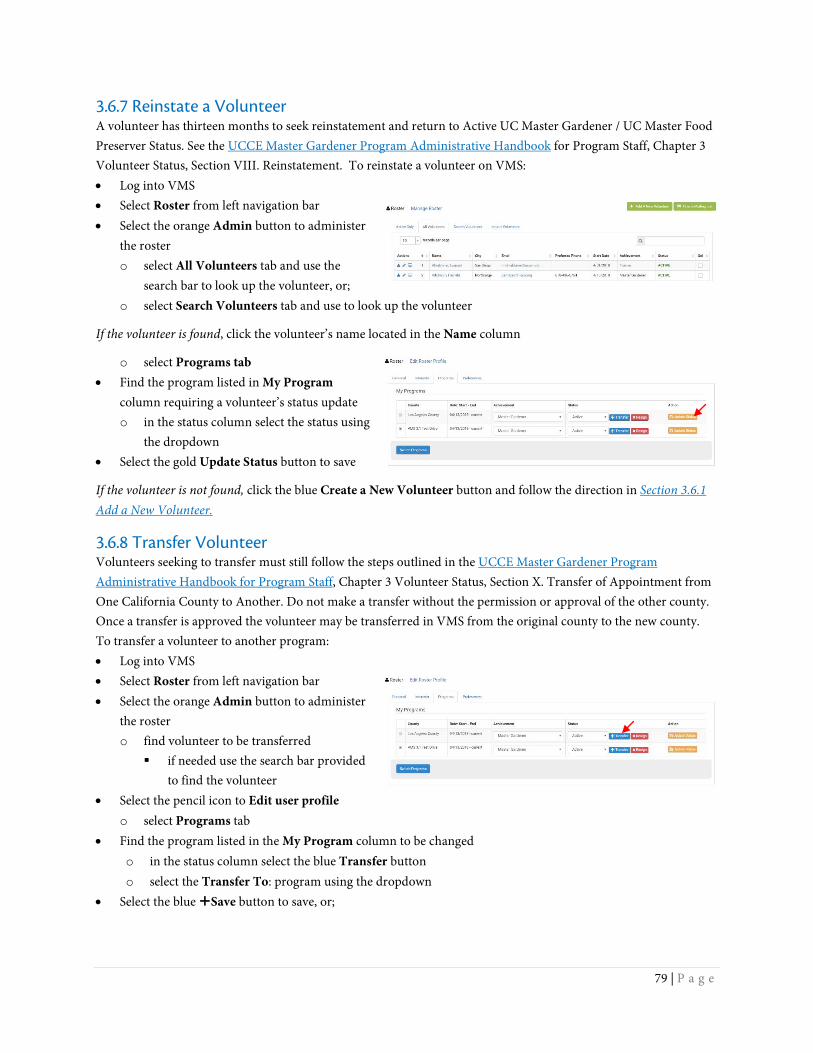
79 | P a g e
3.6.7 Reinstate a Volunteer A volunteer has thirteen months to seek reinstatement and return to Active UC Master Gardener / UC Master Food Preserver Status. See the UCCE Master Gardener Program Administrative Handbook for Program Staff, Chapter 3 Volunteer Status, Section VIII. Reinstatement. To reinstate a volunteer on VMS: • Log into VMS • Select Roster from left navigation bar • Select the orange Admin button to administer
the roster o select All Volunteers tab and use the
search bar to look up the volunteer, or; o select Search Volunteers tab and use to look up the volunteer
If the volunteer is found, click the volunteer’s name located in the Name column
o select Programs tab • Find the program listed in My Program
column requiring a volunteer’s status update o in the status column select the status using
the dropdown • Select the gold Update Status button to save
If the volunteer is not found, click the blue Create a New Volunteer button and follow the direction in Section 3.6.1 Add a New Volunteer.
3.6.8 Transfer Volunteer Volunteers seeking to transfer must still follow the steps outlined in the UCCE Master Gardener Program Administrative Handbook for Program Staff, Chapter 3 Volunteer Status, Section X. Transfer of Appointment from One California County to Another. Do not make a transfer without the permission or approval of the other county. Once a transfer is approved the volunteer may be transferred in VMS from the original county to the new county. To transfer a volunteer to another program: • Log into VMS • Select Roster from left navigation bar • Select the orange Admin button to administer
the roster o find volunteer to be transferred
if needed use the search bar provided to find the volunteer
• Select the pencil icon to Edit user profile o select Programs tab
• Find the program listed in the My Program column to be changed o in the status column select the blue Transfer button o select the Transfer To: program using the dropdown
• Select the blue Save button to save, or;
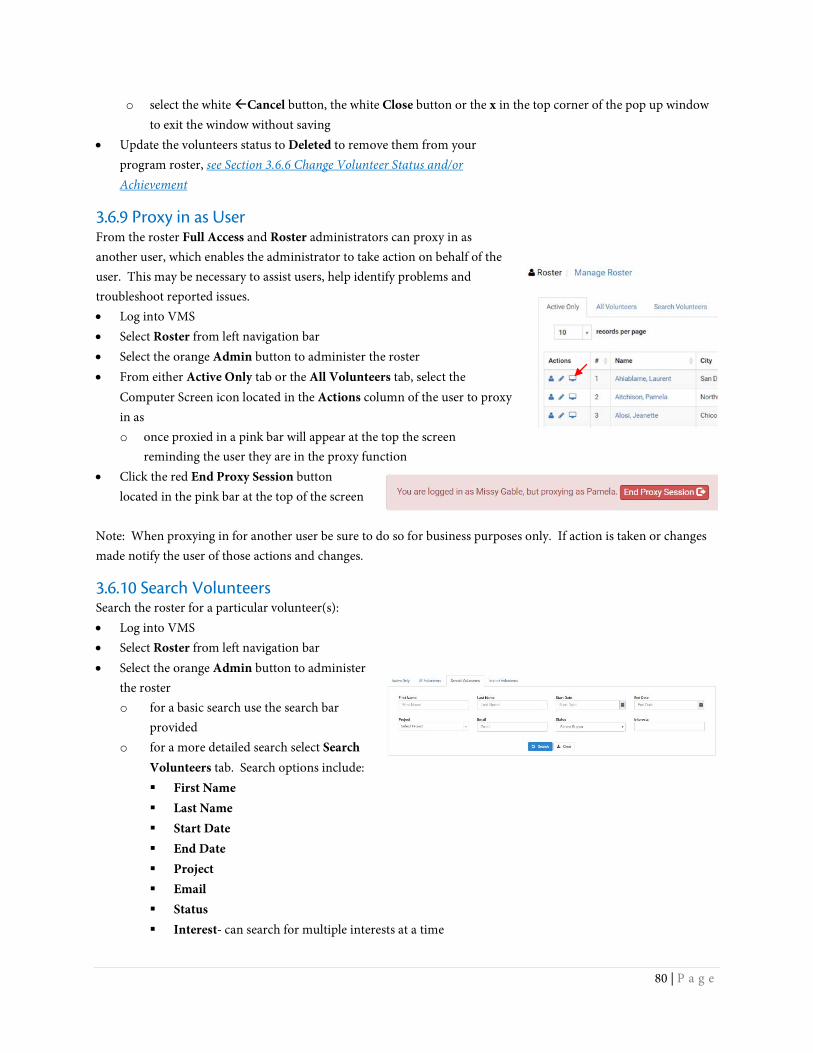
80 | P a g e
o select the white Cancel button, the white Close button or the x in the top corner of the pop up window to exit the window without saving
• Update the volunteers status to Deleted to remove them from your program roster, see Section 3.6.6 Change Volunteer Status and/or Achievement
3.6.9 Proxy in as User From the roster Full Access and Roster administrators can proxy in as another user, which enables the administrator to take action on behalf of the user. This may be necessary to assist users, help identify problems and troubleshoot reported issues. • Log into VMS • Select Roster from left navigation bar • Select the orange Admin button to administer the roster • From either Active Only tab or the All Volunteers tab, select the
Computer Screen icon located in the Actions column of the user to proxy in as o once proxied in a pink bar will appear at the top the screen
reminding the user they are in the proxy function • Click the red End Proxy Session button
located in the pink bar at the top of the screen
Note: When proxying in for another user be sure to do so for business purposes only. If action is taken or changes made notify the user of those actions and changes.
3.6.10 Search Volunteers Search the roster for a particular volunteer(s): • Log into VMS • Select Roster from left navigation bar • Select the orange Admin button to administer
the roster o for a basic search use the search bar
provided o for a more detailed search select Search
Volunteers tab. Search options include: First Name Last Name Start Date End Date Project Email Status Interest- can search for multiple interests at a time
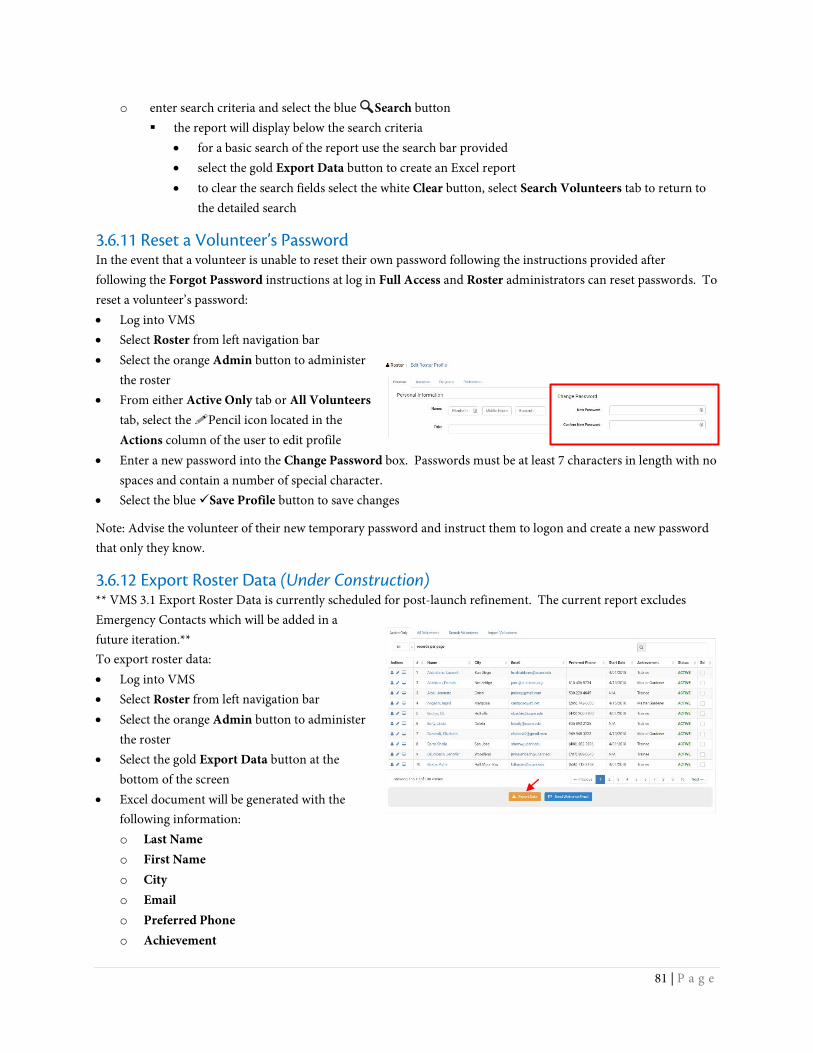
81 | P a g e
o enter search criteria and select the blue 🔍🔍Search button the report will display below the search criteria
• for a basic search of the report use the search bar provided • select the gold Export Data button to create an Excel report • to clear the search fields select the white Clear button, select Search Volunteers tab to return to
the detailed search
3.6.11 Reset a Volunteer’s Password In the event that a volunteer is unable to reset their own password following the instructions provided after following the Forgot Password instructions at log in Full Access and Roster administrators can reset passwords. To reset a volunteer’s password: • Log into VMS • Select Roster from left navigation bar • Select the orange Admin button to administer
the roster • From either Active Only tab or All Volunteers
tab, select the Pencil icon located in the Actions column of the user to edit profile
• Enter a new password into the Change Password box. Passwords must be at least 7 characters in length with no spaces and contain a number of special character.
• Select the blue Save Profile button to save changes
Note: Advise the volunteer of their new temporary password and instruct them to logon and create a new password that only they know.
3.6.12 Export Roster Data (Under Construction) ** VMS 3.1 Export Roster Data is currently scheduled for post-launch refinement. The current report excludes Emergency Contacts which will be added in a future iteration.** To export roster data: • Log into VMS • Select Roster from left navigation bar • Select the orange Admin button to administer
the roster • Select the gold Export Data button at the
bottom of the screen • Excel document will be generated with the
following information: o Last Name o First Name o City o Email o Preferred Phone o Achievement
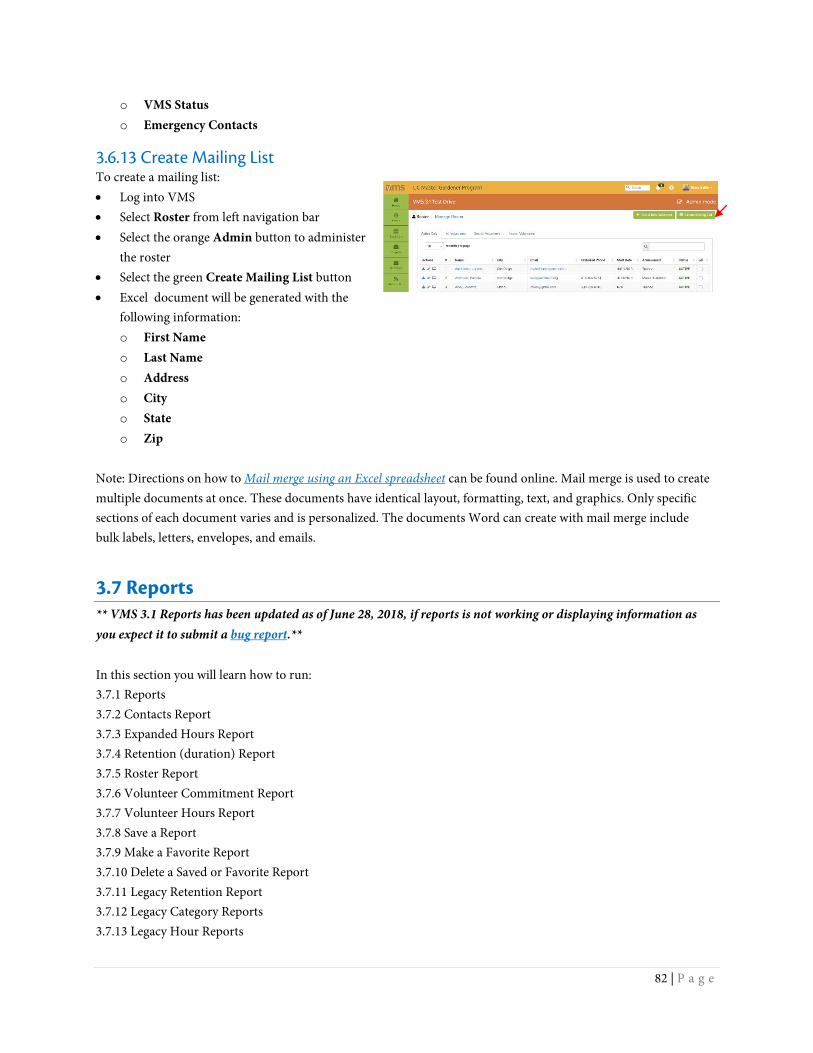
82 | P a g e
o VMS Status o Emergency Contacts
3.6.13 Create Mailing List To create a mailing list: • Log into VMS • Select Roster from left navigation bar • Select the orange Admin button to administer
the roster • Select the green Create Mailing List button • Excel document will be generated with the
following information: o First Name o Last Name o Address o City o State o Zip
Note: Directions on how to Mail merge using an Excel spreadsheet can be found online. Mail merge is used to create multiple documents at once. These documents have identical layout, formatting, text, and graphics. Only specific sections of each document varies and is personalized. The documents Word can create with mail merge include bulk labels, letters, envelopes, and emails.
3.7 Reports ** VMS 3.1 Reports has been updated as of June 28, 2018, if reports is not working or displaying information as you expect it to submit a bug report.** In this section you will learn how to run: 3.7.1 Reports 3.7.2 Contacts Report 3.7.3 Expanded Hours Report 3.7.4 Retention (duration) Report 3.7.5 Roster Report 3.7.6 Volunteer Commitment Report 3.7.7 Volunteer Hours Report 3.7.8 Save a Report 3.7.9 Make a Favorite Report 3.7.10 Delete a Saved or Favorite Report 3.7.11 Legacy Retention Report 3.7.12 Legacy Category Reports 3.7.13 Legacy Hour Reports
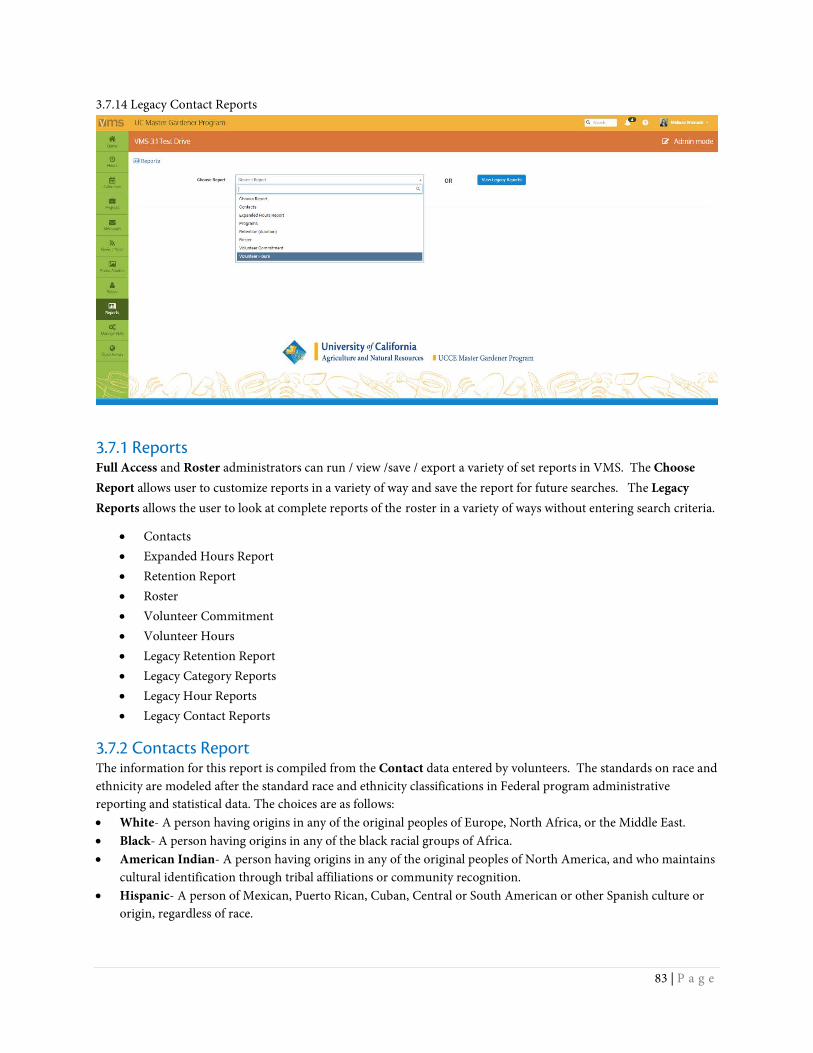
83 | P a g e
3.7.14 Legacy Contact Reports
3.7.1 Reports Full Access and Roster administrators can run / view /save / export a variety of set reports in VMS. The Choose Report allows user to customize reports in a variety of way and save the report for future searches. The Legacy Reports allows the user to look at complete reports of the roster in a variety of ways without entering search criteria.
• Contacts • Expanded Hours Report • Retention Report • Roster • Volunteer Commitment • Volunteer Hours • Legacy Retention Report • Legacy Category Reports • Legacy Hour Reports • Legacy Contact Reports
3.7.2 Contacts Report The information for this report is compiled from the Contact data entered by volunteers. The standards on race and ethnicity are modeled after the standard race and ethnicity classifications in Federal program administrative reporting and statistical data. The choices are as follows: • White- A person having origins in any of the original peoples of Europe, North Africa, or the Middle East. • Black- A person having origins in any of the black racial groups of Africa. • American Indian- A person having origins in any of the original peoples of North America, and who maintains
cultural identification through tribal affiliations or community recognition. • Hispanic- A person of Mexican, Puerto Rican, Cuban, Central or South American or other Spanish culture or
origin, regardless of race.
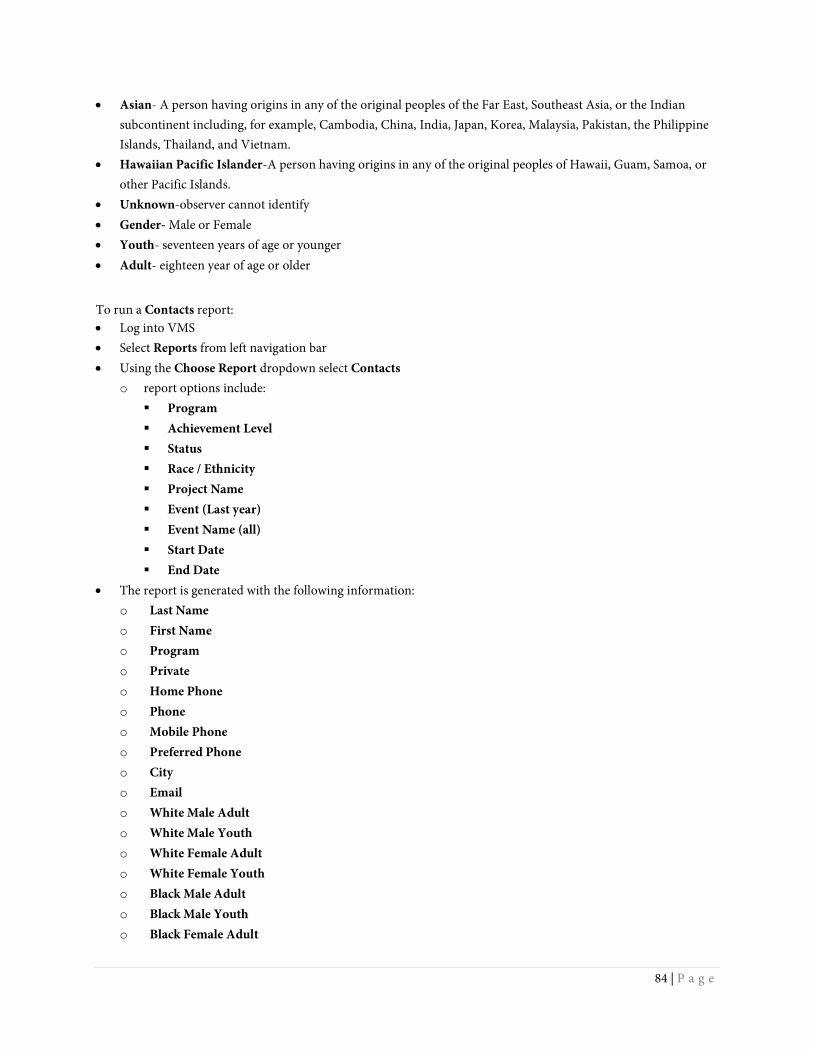
84 | P a g e
• Asian- A person having origins in any of the original peoples of the Far East, Southeast Asia, or the Indian subcontinent including, for example, Cambodia, China, India, Japan, Korea, Malaysia, Pakistan, the Philippine Islands, Thailand, and Vietnam.
• Hawaiian Pacific Islander-A person having origins in any of the original peoples of Hawaii, Guam, Samoa, or other Pacific Islands.
• Unknown-observer cannot identify • Gender- Male or Female • Youth- seventeen years of age or younger • Adult- eighteen year of age or older
To run a Contacts report: • Log into VMS • Select Reports from left navigation bar • Using the Choose Report dropdown select Contacts
o report options include: Program Achievement Level Status Race / Ethnicity Project Name Event (Last year) Event Name (all) Start Date End Date
• The report is generated with the following information: o Last Name o First Name o Program o Private o Home Phone o Phone o Mobile Phone o Preferred Phone o City o Email o White Male Adult o White Male Youth o White Female Adult o White Female Youth o Black Male Adult o Black Male Youth o Black Female Adult
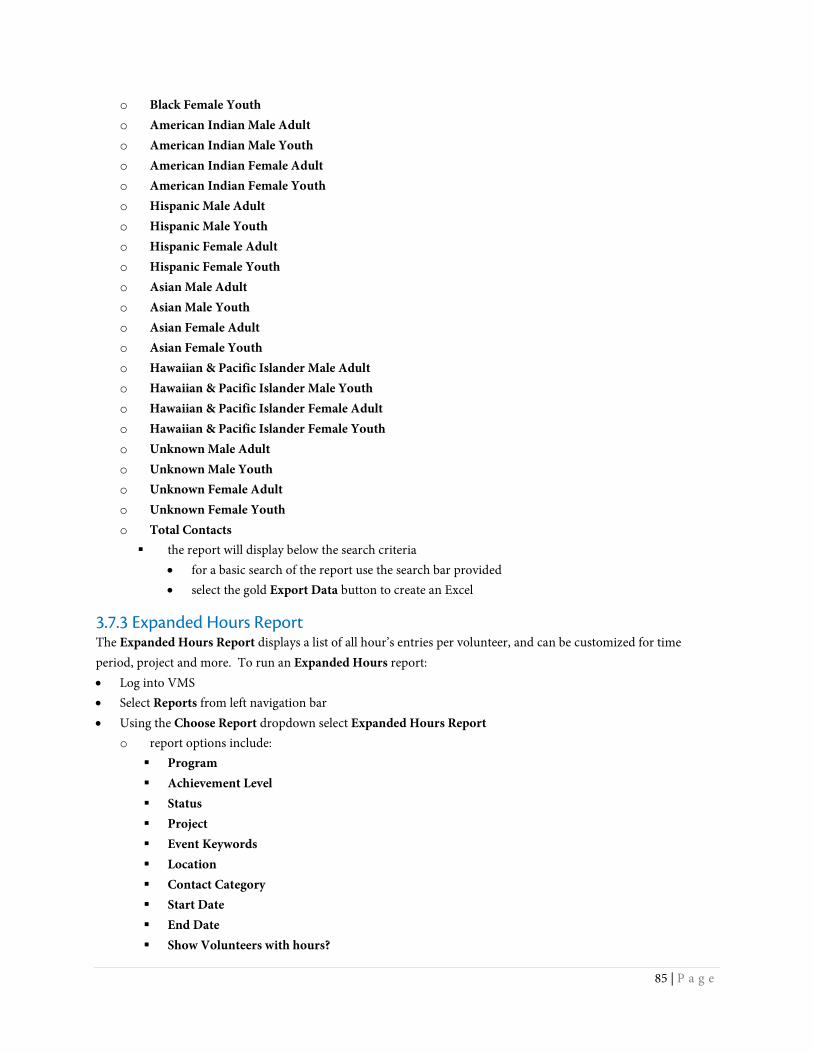
85 | P a g e
o Black Female Youth o American Indian Male Adult o American Indian Male Youth o American Indian Female Adult o American Indian Female Youth o Hispanic Male Adult o Hispanic Male Youth o Hispanic Female Adult o Hispanic Female Youth o Asian Male Adult o Asian Male Youth o Asian Female Adult o Asian Female Youth o Hawaiian & Pacific Islander Male Adult o Hawaiian & Pacific Islander Male Youth o Hawaiian & Pacific Islander Female Adult o Hawaiian & Pacific Islander Female Youth o Unknown Male Adult o Unknown Male Youth o Unknown Female Adult o Unknown Female Youth o Total Contacts the report will display below the search criteria
• for a basic search of the report use the search bar provided • select the gold Export Data button to create an Excel
3.7.3 Expanded Hours Report The Expanded Hours Report displays a list of all hour’s entries per volunteer, and can be customized for time period, project and more. To run an Expanded Hours report: • Log into VMS • Select Reports from left navigation bar • Using the Choose Report dropdown select Expanded Hours Report
o report options include: Program Achievement Level Status Project Event Keywords Location Contact Category Start Date End Date Show Volunteers with hours?
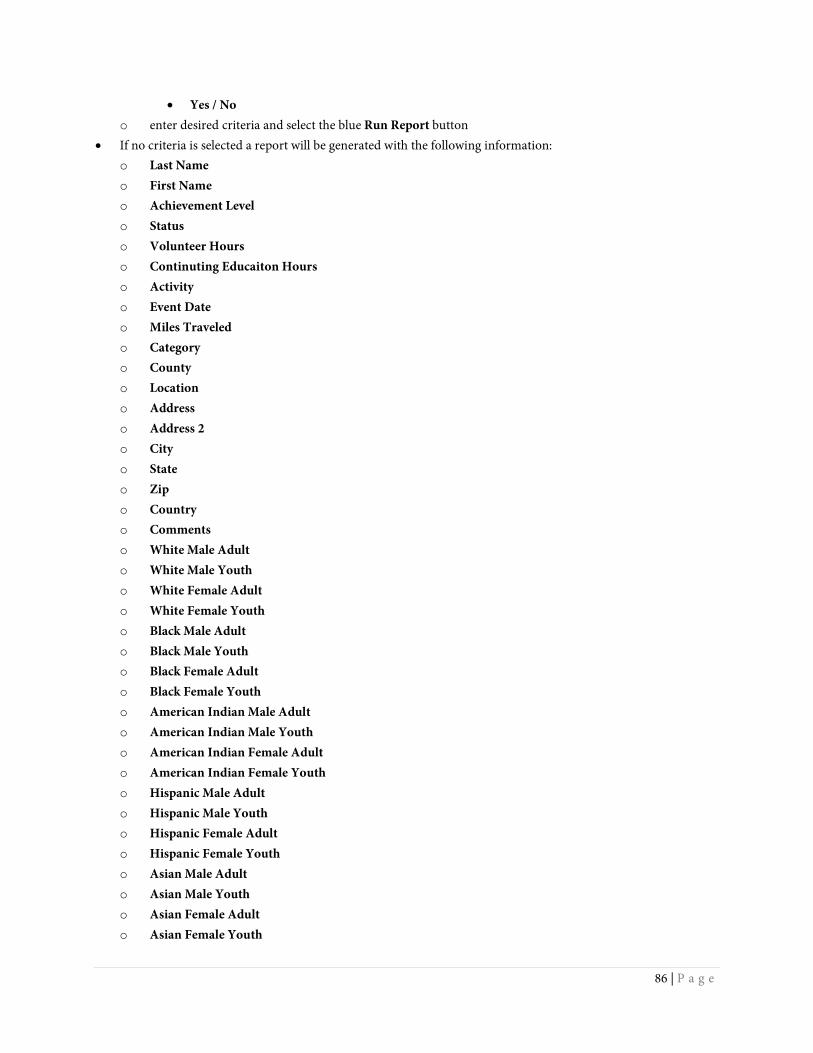
86 | P a g e
• Yes / No o enter desired criteria and select the blue Run Report button
• If no criteria is selected a report will be generated with the following information: o Last Name o First Name o Achievement Level o Status o Volunteer Hours o Continuting Educaiton Hours o Activity o Event Date o Miles Traveled o Category o County o Location o Address o Address 2 o City o State o Zip o Country o Comments o White Male Adult o White Male Youth o White Female Adult o White Female Youth o Black Male Adult o Black Male Youth o Black Female Adult o Black Female Youth o American Indian Male Adult o American Indian Male Youth o American Indian Female Adult o American Indian Female Youth o Hispanic Male Adult o Hispanic Male Youth o Hispanic Female Adult o Hispanic Female Youth o Asian Male Adult o Asian Male Youth o Asian Female Adult o Asian Female Youth
87 | P a g e
o Hawaiian & Pacific Islander Male Adult o Hawaiian & Pacific Islander Male Youth o Hawaiian & Pacific Islander Female Adult o Hawaiian & Pacific Islander Female Youth o Unknown Male Adult o Unknown Male Youth o Unknown Female Adult o Unknown Female Youth
the report will display below the search criteria • for a basic search of the report use the search bar provided • select the gold Export Data button to create an Excel report
3.7.4 Retention (duration) Report The Retention (duration) report displays the number of years a volunteer has been in the program using the start / end years recorded in VMS. The report will also show volunteer and continuing education hours. To run a Retention (duration) report: • Log into VMS • Select Reports from left navigation bar • Using the Choose Report dropdown select Retention (duration)
o report options include: Program Achievement Level Status Retention Years
• The report is generated with the following information: o Last Name o First Name o E-mail o Achievment Level o Status o # of Years o Start Year o End Year o Volunteer Hours o Continuting Educaiton Hours
the report will display below the search criteria • for a basic search of the report use the search bar provided • select the gold Export Data button to create an Excel
3.7.5 Roster Report The Roster Report will use the current county roster and return the information requested. To run a Roster report: • Log into VMS
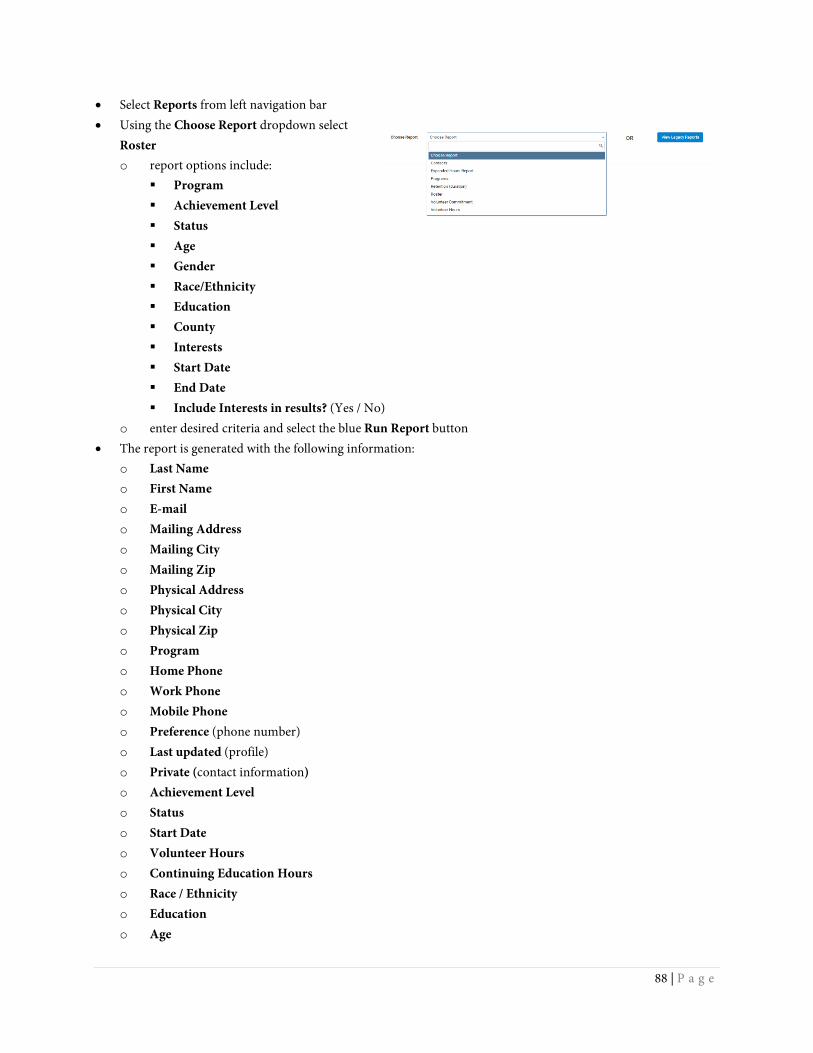
88 | P a g e
• Select Reports from left navigation bar • Using the Choose Report dropdown select
Roster o report options include:
Program Achievement Level Status Age Gender Race/Ethnicity Education County Interests Start Date End Date Include Interests in results? (Yes / No)
o enter desired criteria and select the blue Run Report button • The report is generated with the following information:
o Last Name o First Name o E-mail o Mailing Address o Mailing City o Mailing Zip o Physical Address o Physical City o Physical Zip o Program o Home Phone o Work Phone o Mobile Phone o Preference (phone number) o Last updated (profile) o Private (contact information) o Achievement Level o Status o Start Date o Volunteer Hours o Continuing Education Hours o Race / Ethnicity o Education o Age
89 | P a g e
o Comments o Emergency Contact(s)
the report will display below the search criteria • for a basic search of the report use the search bar provided • select the gold Export Data button to create an Excel report
3.7.6 Volunteer Commitment Report The Volunteer Commitment report says whether or not a volunteer met the reappointment requirements for a specific time period. Run this report for the reappointment time period (7/1/##- 6/30/##) to see who has met reappointment requirements and if not what hours they are in need of. To run a Volunteer Commitment report: • Log into VMS • Select Reports from left navigation bar • Using the Choose Report dropdown select Volunteer Commitment
o report options include: Program Achievement Level Status Start Date End Date
o enter desired criteria and selects the blue Run Report button • The report is generated with the following information:
o Last Name o First Name o Achievement Level o Status o Email o Home Phone o Work Phone o Phone Preference o Volunteer Hours o Continuting Education Hours o Achieved Requirements? (meet the reappointment requirements)
Yes / No o Disqualification Reason
Both / Volunteer Hours / Continuing Educaiton the report will display below the search criteria
• for a basice search of the report us the search bar provided • select the gold Export Data button to create and Excel report
3.7.7 Volunteer Hours Report The Volunteer Hour report display all Volunteer Hours for all time or a time frame you designate. Use this report throughout the year to check on the status of volunteer hours and continuing education credit. This is also a good indicator on whether or not volunteers are entering their hours into VMS. To run a Volunteer Hours report: • Log into VMS
90 | P a g e
• Select Reports from left navigation bar • Using the Choose Report dropdown select Volunteer Hours
o report options include: Program Status Achievement Status Hours Category Project (Global) Start Date End Date Show Vols. with hours?
• The report is generated with the following information: o Last Name o First Name o Program o Volunteer Hours o Continuing Education Hours o Total Hours o Mailing Address o Mailing City o Mailing Zip
the report will display below the search criteria • for a basic search of the report use the search bar provided • select the gold Export Data button to create an Excel
3.7.8 Save a Report Reports has the ability to save a report for future running so as not to have to customize a report that is run often. To save a report: • Log into VMS • Select Reports from left navigation bar • Using the Choose Report dropdown select report you want to run and save • In the Report Name box type the name you would like the report to have (i.e. Reappointment Year 17/18 All
Roster) o click the Save Report? check box o enter desired criteria and select the blue Run Report button
• The report is now listed in the Choose your saved report section of the reports page
To access the report in the future: • Log into VMS • Select Reports from left navigation bar • Using the Choose Report dropdown select report you to run / view
o using the Choose Saved Report dropdown select the saved report o select the blue Run Report button
the report will display below the search criteria
91 | P a g e
3.7.9 Make a Favorite Report Reports has the ability to make a report a favorite for future running so as not to have to customize a report that is run often. The favorite report will appear as its own button (only one favorite will be displayed at a time). To make a report a favorite: • Log into VMS • Select Reports from left navigation bar • Using the Choose Report dropdown select report you want to run and save • In the Report Name box type the name you would like the report to have (i.e. Reappointment Year 17/18 All
Roster) o click the Save Report? and Make Favorite Report? check boxes o enter desired criteria and select the blue Run Report button
• The report is now displayed as a button at the top the reports page
To access the favorite report in the future: • Log into VMS • Select Reports from left navigation bar • Using the Choose Report dropdown select report you to run / view
o select the button for the favorite report o select the blue Run Report button
the report will display below the search criteria
3.7.10 Delete a Saved or Favorite Report If a saved or favorite report is no longer needed they can be deleted. To delete a report: • Log into VMS • Select Reports from left navigation bar • Using the Choose Report dropdown select report you want to delete
o select the red Delete Saved Report button select OK from the pop up window to confirm deletion select Cancel to not delete
Note: Deleting a saved / favorite report is not reversible
3.7.11 Legacy Retention Report The Legacy Retention Report calculates the duration of an inactive volunteer's service by subtracting the "Start Year" field from the date the volunteer was made inactive. For active volunteers, the "Start Year" is subtracted from the current year. If the "Start Year" field was incorrectly completed or a volunteer was deleted rather than made inactive, the volunteer may not appear in the report. Also, volunteers with under one year of service will not appear on this report. To view the Legacy Retention Report:
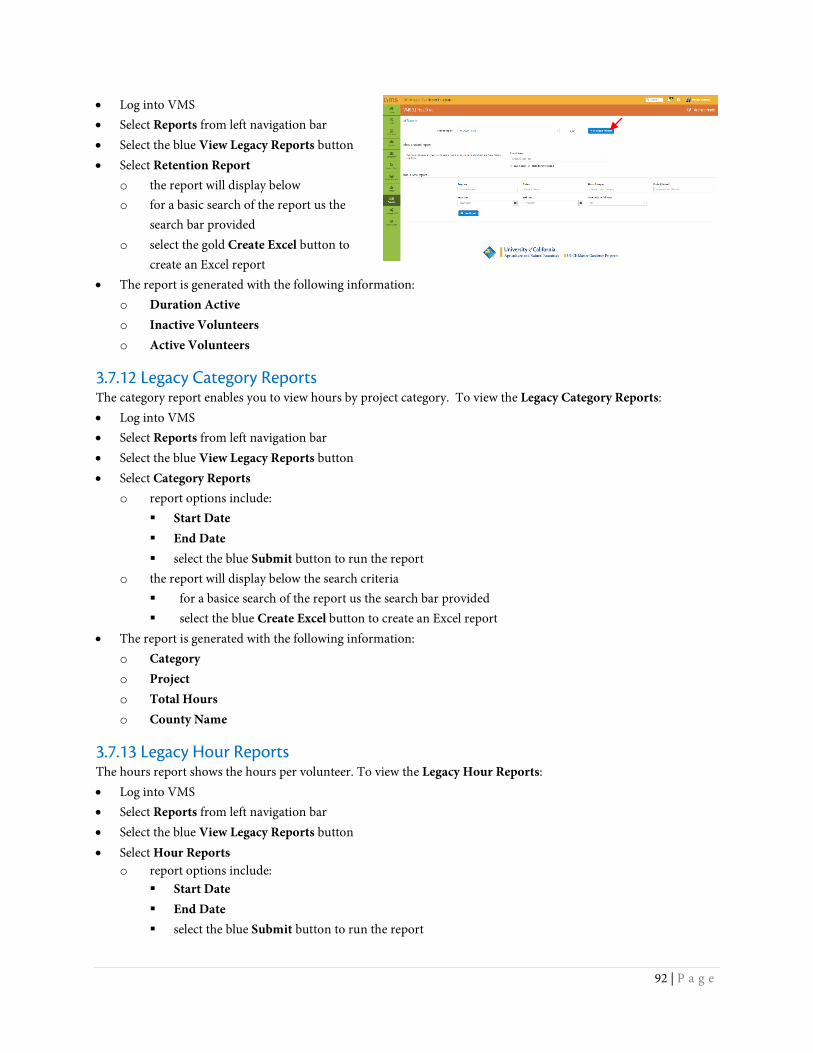
92 | P a g e
• Log into VMS • Select Reports from left navigation bar • Select the blue View Legacy Reports button • Select Retention Report
o the report will display below o for a basic search of the report us the
search bar provided o select the gold Create Excel button to
create an Excel report • The report is generated with the following information:
o Duration Active o Inactive Volunteers o Active Volunteers
3.7.12 Legacy Category Reports The category report enables you to view hours by project category. To view the Legacy Category Reports: • Log into VMS • Select Reports from left navigation bar • Select the blue View Legacy Reports button • Select Category Reports
o report options include: Start Date End Date select the blue Submit button to run the report
o the report will display below the search criteria for a basice search of the report us the search bar provided select the blue Create Excel button to create an Excel report
• The report is generated with the following information: o Category o Project o Total Hours o County Name
3.7.13 Legacy Hour Reports The hours report shows the hours per volunteer. To view the Legacy Hour Reports: • Log into VMS • Select Reports from left navigation bar • Select the blue View Legacy Reports button • Select Hour Reports
o report options include: Start Date End Date select the blue Submit button to run the report
93 | P a g e
o the report will display below the search criteria for a basice search of the report us the search bar provided select the blue Create Excel button to create an Excel report
• The report is generated with the following information: o Last Name o First Name o Phone o City o Continuing Education Hours o Volunteer Hours o Status o Mileage o Year Started
3.7.14 Legacy Contact Reports The contact report shows contacts, hours, and projects by demographics. To view the Legacy Contact Reports: • Log into VMS • Select Reports from left navigation bar • Select the blue View Legacy Reports button • Select Contact Reports
o report options include: Start Date End Date select the blue Submit button to run the report
o the report will display below the search criteria for a basice search of the report us the search bar provided select the blue Create Excel button to create an Excel report select the blue Show Hours button to show the hours the contacts are associated with
• select the blue Show Hours button to go back select the blue Show Projects button to show the contacts per project category
• select the blue Remove Projects button to go back select the blue Show Removed Volunteers button to show the contacts inactive resigned / removed
volunteers • select the blue Hide Removed Volunteers button to go back
• The report is generated with the following information: o Last Name o First Name o Project o White Male Adult o White Male Youth o White Female Adult o White Female Youth o Black Male Adult
94 | P a g e
o Black Male Youth o Black Female Adult o Black Female Youth o American Indian Male Adult o American Indian Male Youth o American Indian Female Adult o American Indian Female Youth o Hispanic Male Adult o Hispanic Male Youth o Hispanic Female Adult o Hispanic Female Youth o Asian Male Adult o Asian Male Youth o Asian Female Adult o Asian Female Youth o Hawaiian & Pacific Islander Male Adult o Hawaiian & Pacific Islander Male Youth o Hawaiian & Pacific Islander Female Adult o Hawaiian & Pacific Islander Female Youth o Unknown Male Adult o Unknown Male Youth o Unknown Female Adult o Unknown Female Youth o Volunteer Hours o Hours Date
3.8 Manage VMS In this section you will learn how to: 3.8.1 Manage Access to VMS 3.8.2 Manage Administrators 3.8.3 Manage Home Page News 3.8.4 Manage Volunteer Options 3.8.5 Manage Home Page Links 3.8.6 Manage Program Contact Information 3.8.7 Manage Reappointments 3.8.8 Manager Interests
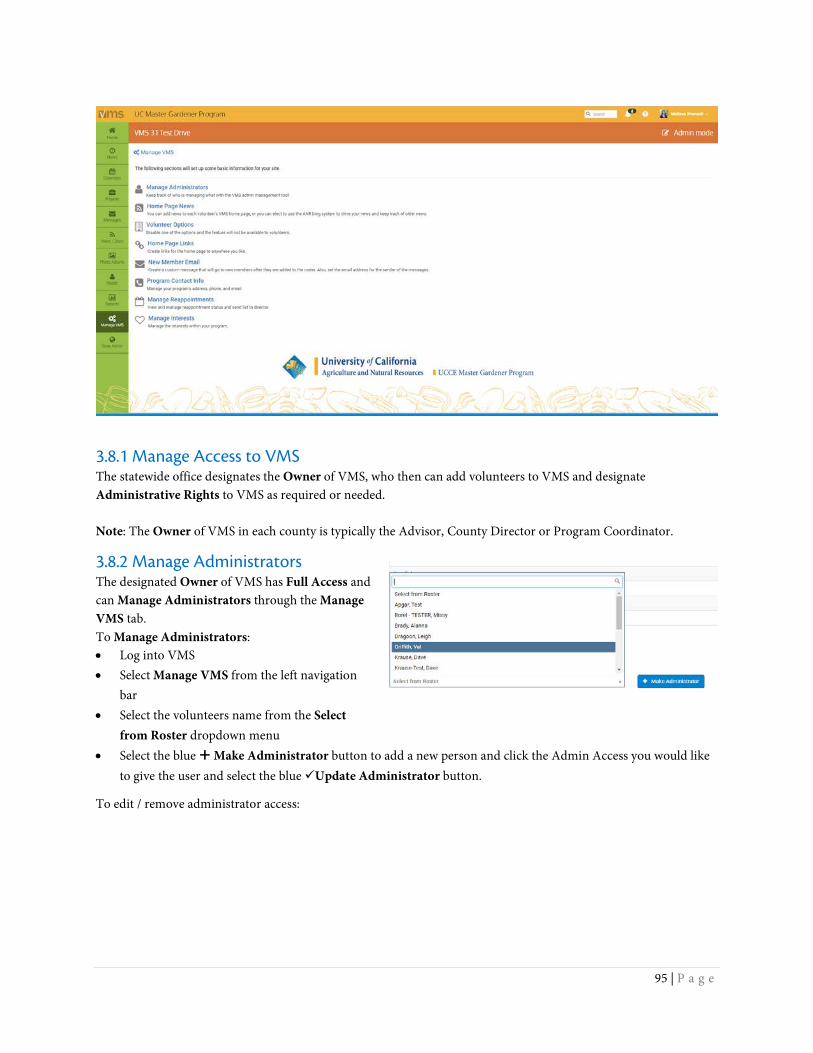
95 | P a g e
3.8.1 Manage Access to VMS The statewide office designates the Owner of VMS, who then can add volunteers to VMS and designate Administrative Rights to VMS as required or needed. Note: The Owner of VMS in each county is typically the Advisor, County Director or Program Coordinator.
3.8.2 Manage Administrators The designated Owner of VMS has Full Access and can Manage Administrators through the Manage VMS tab. To Manage Administrators: • Log into VMS • Select Manage VMS from the left navigation
bar • Select the volunteers name from the Select
from Roster dropdown menu • Select the blue Make Administrator button to add a new person and click the Admin Access you would like
to give the user and select the blue Update Administrator button.
To edit / remove administrator access:
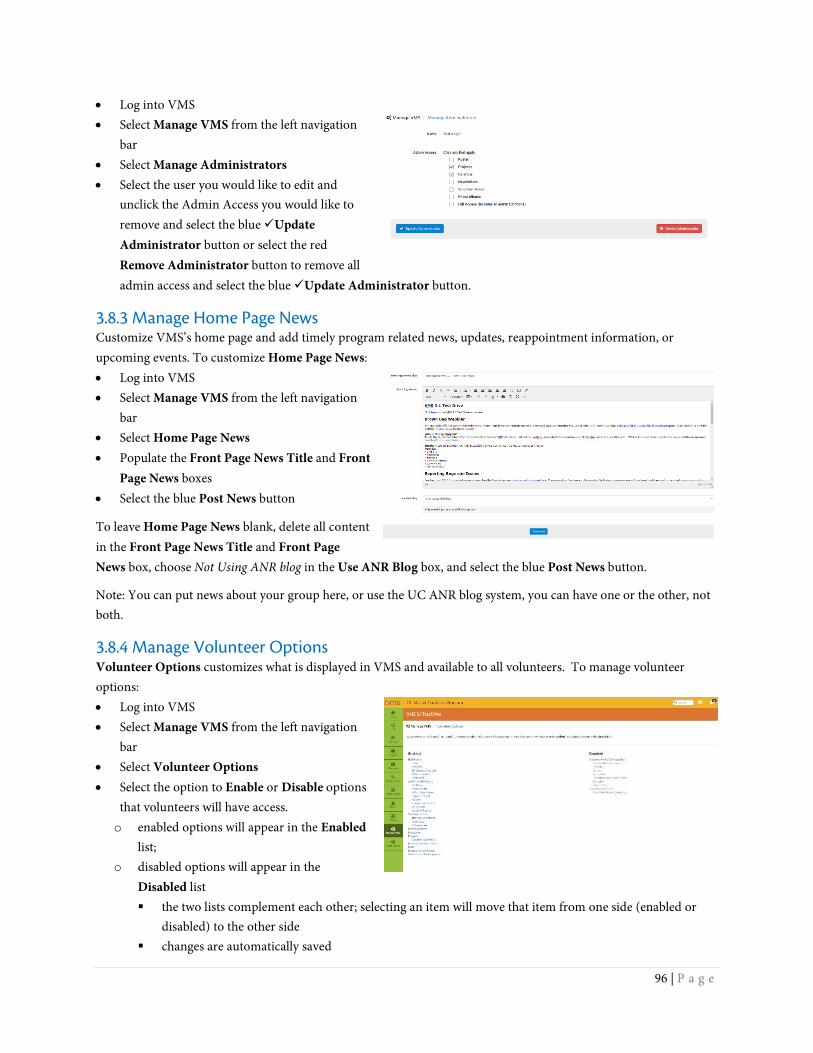
96 | P a g e
• Log into VMS • Select Manage VMS from the left navigation
bar • Select Manage Administrators • Select the user you would like to edit and
unclick the Admin Access you would like to remove and select the blue Update Administrator button or select the red Remove Administrator button to remove all admin access and select the blue Update Administrator button.
3.8.3 Manage Home Page News Customize VMS’s home page and add timely program related news, updates, reappointment information, or upcoming events. To customize Home Page News: • Log into VMS • Select Manage VMS from the left navigation
bar • Select Home Page News • Populate the Front Page News Title and Front
Page News boxes • Select the blue Post News button
To leave Home Page News blank, delete all content in the Front Page News Title and Front Page News box, choose Not Using ANR blog in the Use ANR Blog box, and select the blue Post News button.
Note: You can put news about your group here, or use the UC ANR blog system, you can have one or the other, not both.
3.8.4 Manage Volunteer Options Volunteer Options customizes what is displayed in VMS and available to all volunteers. To manage volunteer options: • Log into VMS • Select Manage VMS from the left navigation
bar • Select Volunteer Options • Select the option to Enable or Disable options
that volunteers will have access. o enabled options will appear in the Enabled
list; o disabled options will appear in the
Disabled list the two lists complement each other; selecting an item will move that item from one side (enabled or
disabled) to the other side changes are automatically saved

97 | P a g e
Note: If suddenly your VMS instance is missing features be sure to check the Volunteer Options settings, this features is controlled at the county level.
3.8.5 Manage Home Page Links Mange what links are displayed on the county’s VMS home page, use this to connect volunteers with online trainings and resources. To manage links: • Log into VMS • Select Manage VMS from the left navigation bar • Select Links • Select the green Add New Link button • Type in the name you want displayed for the link in the Link
Name box • Type the web address in the Link URL box • Select the Publish Location from the drop down box to
determine where the link is displayed on the VMS homepage: Header, Footer
• Select the blue Post Link button
Note: Check that the link works by going to the VMS home page and testing it
3.8.6 Manage Program Contact Information Mange the program’s address, phone and email displayed on the county’s VMS home page in the footer. To manage program contact information: • Log into VMS • Select Manage VMS from the left navigation
bar • Select Program Contact Info
o enter information: Contact Phone Contact Email Contact Address
• Select the blue Save Information button
To leave Program Contact Info blank:
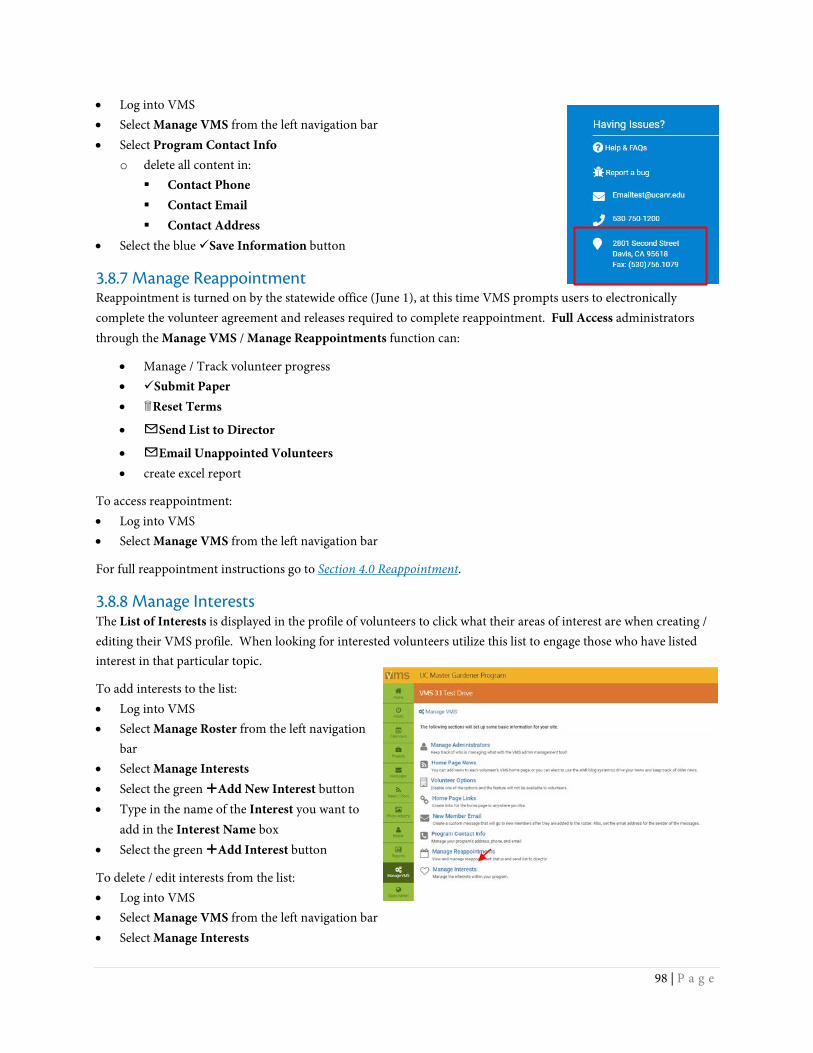
98 | P a g e
• Log into VMS • Select Manage VMS from the left navigation bar • Select Program Contact Info
o delete all content in: Contact Phone Contact Email Contact Address
• Select the blue Save Information button
3.8.7 Manage Reappointment Reappointment is turned on by the statewide office (June 1), at this time VMS prompts users to electronically complete the volunteer agreement and releases required to complete reappointment. Full Access administrators through the Manage VMS / Manage Reappointments function can:
• Manage / Track volunteer progress • Submit Paper • Reset Terms
• ✉Send List to Director
• ✉Email Unappointed Volunteers • create excel report
To access reappointment: • Log into VMS • Select Manage VMS from the left navigation bar
For full reappointment instructions go to Section 4.0 Reappointment.
3.8.8 Manage Interests The List of Interests is displayed in the profile of volunteers to click what their areas of interest are when creating / editing their VMS profile. When looking for interested volunteers utilize this list to engage those who have listed interest in that particular topic.
To add interests to the list: • Log into VMS • Select Manage Roster from the left navigation
bar • Select Manage Interests • Select the green Add New Interest button • Type in the name of the Interest you want to
add in the Interest Name box • Select the green Add Interest button
To delete / edit interests from the list: • Log into VMS • Select Manage VMS from the left navigation bar • Select Manage Interests

99 | P a g e
• Select the Interest Name to be deleted or edited from the list • Edit Interest Name
o Select the blue Update Interest button to save, or; o Select the red Delete Interest button to delete
To view report of volunteer interests: • Log into VMS • Select Manage VMS from the left navigation bar • Select Manage Interests • Select the report icon from the Report column
o a Roster Report is generated for that specific interest o select the gold Export Data button to create an Excel report
Section 4 Reappointment
4.0 Reappointment In this section you will learn about: 4.1.1 Reappointment 4.1.2 Reappointment Communications 4.1.3 Collect Digital Recertification or Resignation Documents from Volunteers 4.1.4 How to Submit Paper for a Volunteer 4.1.5 Resigning or Inactive Volunteers 4.1.6 Roster Clean-Up, Final Numbers and Insurance Invoicing
100 | P a g e
4.1.1 Reappointment 1. Annual reappointment is a requirement for all UCCE Master Gardeners / Food Preservers to remain active in
the program including: • Active • Limited Active • First-Year • Gold Badge • Platinum Badge
2. The minimum hours required to remain a certified UCCE Master Gardener / Food Preservers are:
• 25 hours - Volunteer • 12 hours - Continuing education Note: First year UCCE Master Gardeners / Food Preservers are required to complete a minimum of 50 volunteer hours (no continuing education requirement) before the next certification cycle.
3. Reappointment consists of volunteers paying any fees associated with their UC Master Gardner / Food
Preservers Program (i.e. program fee, insurance fee) and electronically signing the following documents: • Annual Agreement • Code of Conduct / Responsibilities and Rights • Proof of Insurance
Additional Master Food Preserver requirements:
• Waiver of Liability, Assumption of Risk, and Indemnity Agreement • Preparing/Serving Food Release Statement • Passing score on Reappointment Quiz
Note: All reappointments must be done digitally, only paper copies should be used as an accommodation under
special circumstances.
4. All volunteer questions regarding the appointment process go through the Program Coordinator, Advisor or County Director.
5. The reappointment year runs on the state fiscal year July 1, 20## through June 30, 20##. Reappointment officially begins and is turned on in VMS by the statewide office on June 1. • Reappointment policy as outlined in the UC Master Gardener Handbook states: “In order to retain active
status as a MG volunteer, MG volunteers must apply for reappointment within a specific sixty (60) day period as follows: Thirty (30) days before the end date of the current program year June 30, through thirty (30) days after the end date of the current program year, July 1.”
6. Coordinators are responsible for:
• Assisting volunteers in completing the reappointment process • “Send List to Director” for appointment • Verifying all volunteers have been reappointed by the Director
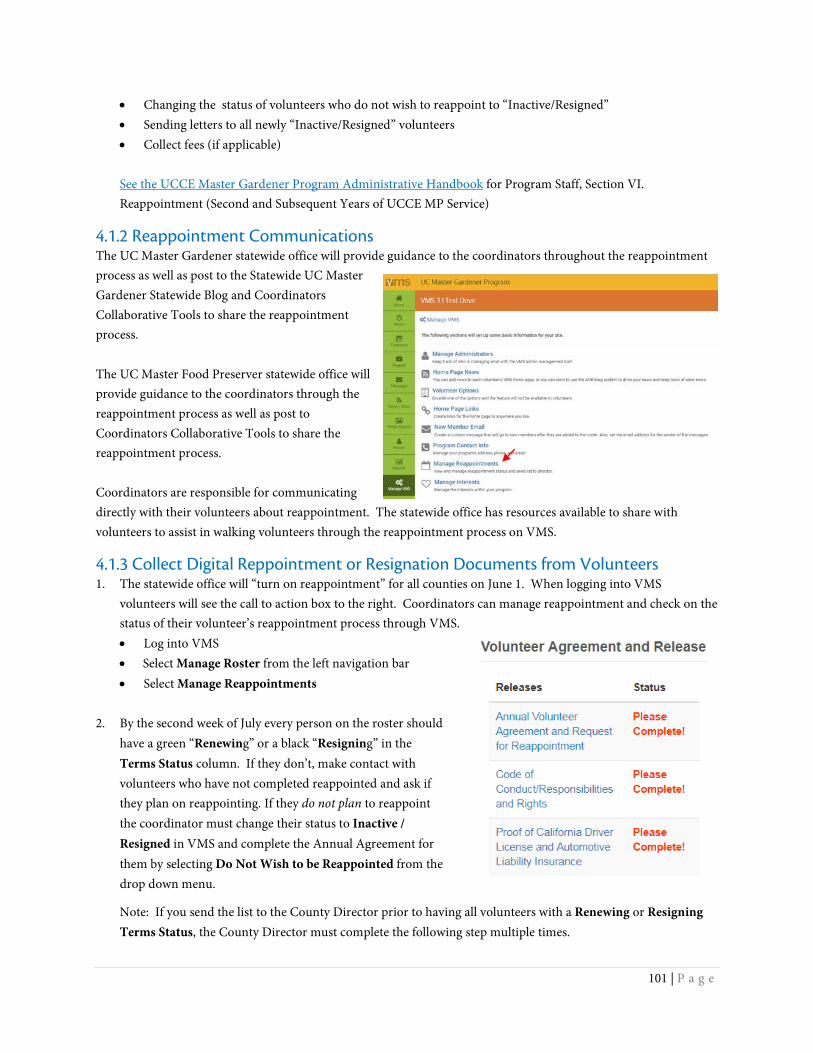
101 | P a g e
• Changing the status of volunteers who do not wish to reappoint to “Inactive/Resigned” • Sending letters to all newly “Inactive/Resigned” volunteers • Collect fees (if applicable)
See the UCCE Master Gardener Program Administrative Handbook for Program Staff, Section VI. Reappointment (Second and Subsequent Years of UCCE MP Service)
4.1.2 Reappointment Communications The UC Master Gardener statewide office will provide guidance to the coordinators throughout the reappointment process as well as post to the Statewide UC Master Gardener Statewide Blog and Coordinators Collaborative Tools to share the reappointment process. The UC Master Food Preserver statewide office will provide guidance to the coordinators through the reappointment process as well as post to Coordinators Collaborative Tools to share the reappointment process. Coordinators are responsible for communicating directly with their volunteers about reappointment. The statewide office has resources available to share with volunteers to assist in walking volunteers through the reappointment process on VMS.
4.1.3 Collect Digital Reppointment or Resignation Documents from Volunteers 1. The statewide office will “turn on reappointment” for all counties on June 1. When logging into VMS
volunteers will see the call to action box to the right. Coordinators can manage reappointment and check on the status of their volunteer’s reappointment process through VMS. • Log into VMS • Select Manage Roster from the left navigation bar • Select Manage Reappointments
2. By the second week of July every person on the roster should
have a green “Renewing” or a black “Resigning” in the Terms Status column. If they don’t, make contact with volunteers who have not completed reappointed and ask if they plan on reappointing. If they do not plan to reappoint the coordinator must change their status to Inactive / Resigned in VMS and complete the Annual Agreement for them by selecting Do Not Wish to be Reappointed from the drop down menu.
Note: If you send the list to the County Director prior to having all volunteers with a Renewing or Resigning Terms Status, the County Director must complete the following step multiple times.
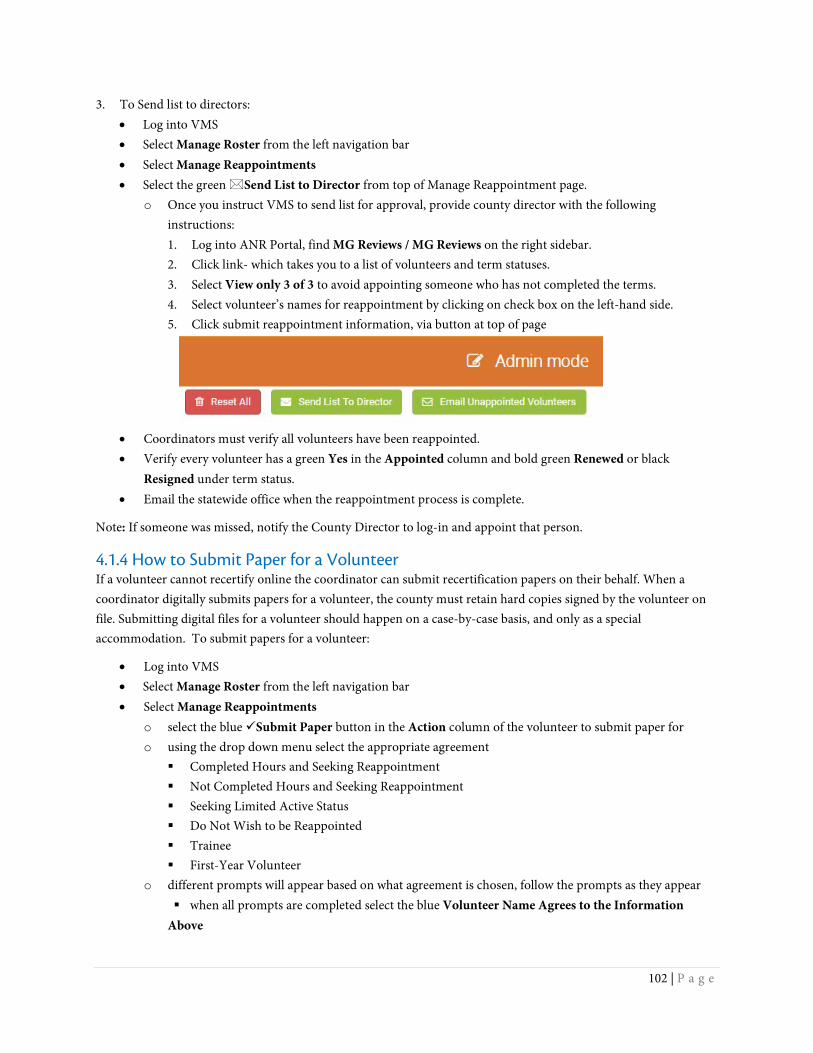
102 | P a g e
3. To Send list to directors: • Log into VMS • Select Manage Roster from the left navigation bar • Select Manage Reappointments • Select the green Send List to Director from top of Manage Reappointment page.
o Once you instruct VMS to send list for approval, provide county director with the following instructions: 1. Log into ANR Portal, find MG Reviews / MG Reviews on the right sidebar. 2. Click link- which takes you to a list of volunteers and term statuses. 3. Select View only 3 of 3 to avoid appointing someone who has not completed the terms. 4. Select volunteer’s names for reappointment by clicking on check box on the left-hand side. 5. Click submit reappointment information, via button at top of page
• Coordinators must verify all volunteers have been reappointed. • Verify every volunteer has a green Yes in the Appointed column and bold green Renewed or black
Resigned under term status. • Email the statewide office when the reappointment process is complete.
Note: If someone was missed, notify the County Director to log-in and appoint that person.
4.1.4 How to Submit Paper for a Volunteer If a volunteer cannot recertify online the coordinator can submit recertification papers on their behalf. When a coordinator digitally submits papers for a volunteer, the county must retain hard copies signed by the volunteer on file. Submitting digital files for a volunteer should happen on a case-by-case basis, and only as a special accommodation. To submit papers for a volunteer:
• Log into VMS • Select Manage Roster from the left navigation bar • Select Manage Reappointments
o select the blue Submit Paper button in the Action column of the volunteer to submit paper for o using the drop down menu select the appropriate agreement
Completed Hours and Seeking Reappointment Not Completed Hours and Seeking Reappointment Seeking Limited Active Status Do Not Wish to be Reappointed Trainee First-Year Volunteer
o different prompts will appear based on what agreement is chosen, follow the prompts as they appear when all prompts are completed select the blue Volunteer Name Agrees to the Information
Above
103 | P a g e
Note: When a coordinator digitally submits papers for a volunteer, the county must retain hard copies signed by the volunteer on file.
4.1.5 Resigning or Inactive Volunteers Once Reappointment is complete the coordinator will provide written notice to all Inactive / Resigning volunteers informing them of their new status and the procedure to be reinstated. There is a template form letter for Inactive / Resigning Volunteers located with the reappointment resources available through the Coordinator Website.
For instructions on how change the status of a volunteer see Section 3.6.6 Change Volunteer Status and or/Achievement, to reinstate a volunteer see Section 3.6.7 Reinstate a Volunteer. See the UCCE Master Gardener Program Administrative Handbook for Program Staff, Section VII. Inactive Status, Section VIII. Reinstatement
4.1.6 Roster Cleanup, Final Numbers and Insurance Invoicing The UC Master Gardener / Food Preserve Program will be charged an insurance fee based on the number of Active Master Gardener / Food Preserver volunteers listed in their roster. The term “Active Master Gardeners / Food Preserver” includes VMS classifications: “Master Gardener,” “Master Food Preserver,” “First Year Master Gardener,” “First Year Master Food Preserver,” “Gold Badge,” “Platinum Badge” and “Limited Active” as listed on roster as of July 1, 20##. This designation excludes “Trainees,” “Inactive/Resigned” and “Honorary” members.
To ensure accurate billing program coordinators should implement “Roster Cleanup” after reappointment is completed. See Section 3.6.6 Change Volunteer Status and /or Achievement. The statewide office will send invoices out to each county, confirm that the quantity being billed matches the number of “Active Volunteers” and confirm the account number to be recharged. If either the number of volunteers or the account number is wrong respond to the invoice with the correct information.
4.1.7 Annual Reappointment Quiz for Master Food Preservers In conjunction with reappointment UCCE Master Food Preserver volunteers must also pass the annual reappointment quiz. The reappointment quiz is created by the statewide office and is managed at the county level. Volunteers are directed to contact the county coordinator with questions and assistance with their quiz. Information regarding the annual reappointment quiz along with a study guide will be posted to the Coordinator Reappointment webpage before Reappointment begins on June 1.
The quiz ranges from 10 to 15 questions and is administered online, paper copies may also be given if needed. Volunteers are allowed two attempts to pass with a score of 85% or better. If volunteers are unsuccessful in passing the quiz within two attempts, it is at the discretion of the county Coordinator/Director to allow for a third attempt.
Appendix 1 – Volunteer Frequently Asked Questions
Q1: How do I access VMS? A1: See Section 1.2. Accessing VMS for directions on accessing VMS.
Q2: I can’t access VMS? I know I have the right password. A2: If you are not able to login to VMS or your UCANR portal you may need to clear your cookies and/or update your internet browser.
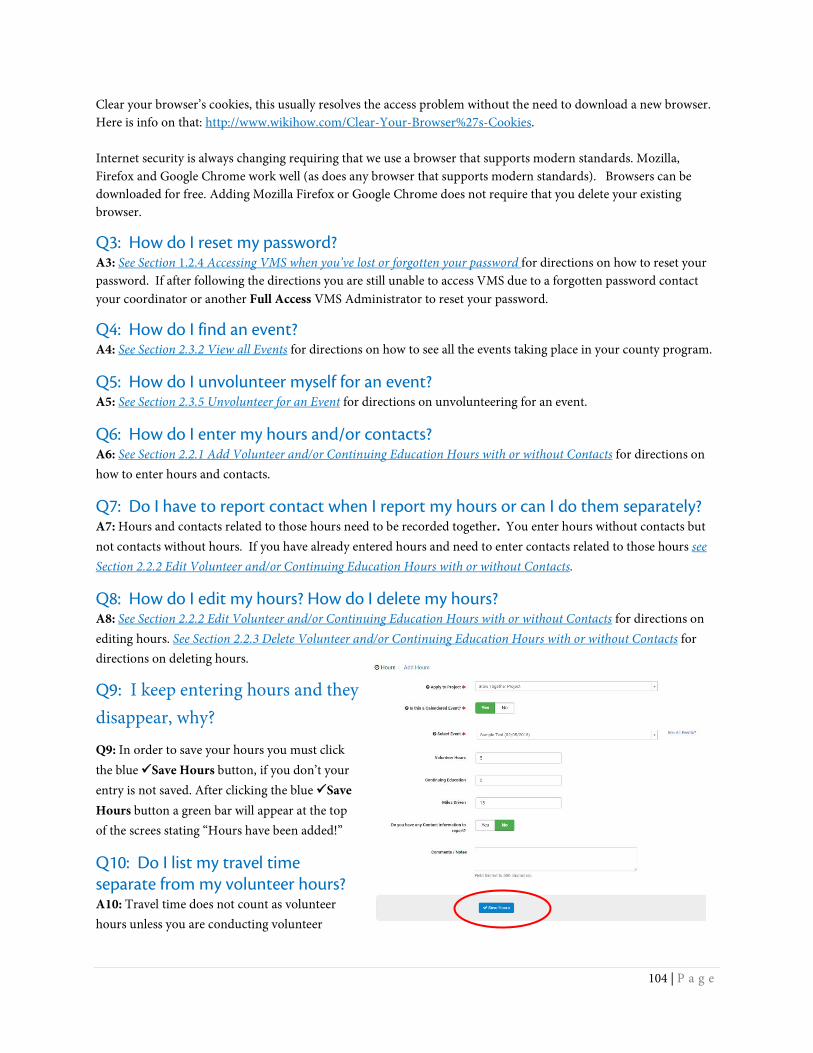
104 | P a g e
Clear your browser’s cookies, this usually resolves the access problem without the need to download a new browser. Here is info on that: http://www.wikihow.com/Clear-Your-Browser%27s-Cookies. Internet security is always changing requiring that we use a browser that supports modern standards. Mozilla, Firefox and Google Chrome work well (as does any browser that supports modern standards). Browsers can be downloaded for free. Adding Mozilla Firefox or Google Chrome does not require that you delete your existing browser.
Q3: How do I reset my password? A3: See Section 1.2.4 Accessing VMS when you’ve lost or forgotten your password for directions on how to reset your password. If after following the directions you are still unable to access VMS due to a forgotten password contact your coordinator or another Full Access VMS Administrator to reset your password.
Q4: How do I find an event? A4: See Section 2.3.2 View all Events for directions on how to see all the events taking place in your county program.
Q5: How do I unvolunteer myself for an event? A5: See Section 2.3.5 Unvolunteer for an Event for directions on unvolunteering for an event.
Q6: How do I enter my hours and/or contacts? A6: See Section 2.2.1 Add Volunteer and/or Continuing Education Hours with or without Contacts for directions on how to enter hours and contacts.
Q7: Do I have to report contact when I report my hours or can I do them separately? A7: Hours and contacts related to those hours need to be recorded together. You enter hours without contacts but not contacts without hours. If you have already entered hours and need to enter contacts related to those hours see Section 2.2.2 Edit Volunteer and/or Continuing Education Hours with or without Contacts.
Q8: How do I edit my hours? How do I delete my hours? A8: See Section 2.2.2 Edit Volunteer and/or Continuing Education Hours with or without Contacts for directions on editing hours. See Section 2.2.3 Delete Volunteer and/or Continuing Education Hours with or without Contacts for directions on deleting hours.
Q9: I keep entering hours and they disappear, why?
Q9: In order to save your hours you must click the blue Save Hours button, if you don’t your entry is not saved. After clicking the blue Save Hours button a green bar will appear at the top of the screes stating “Hours have been added!”
Q10: Do I list my travel time separate from my volunteer hours? A10: Travel time does not count as volunteer hours unless you are conducting volunteer
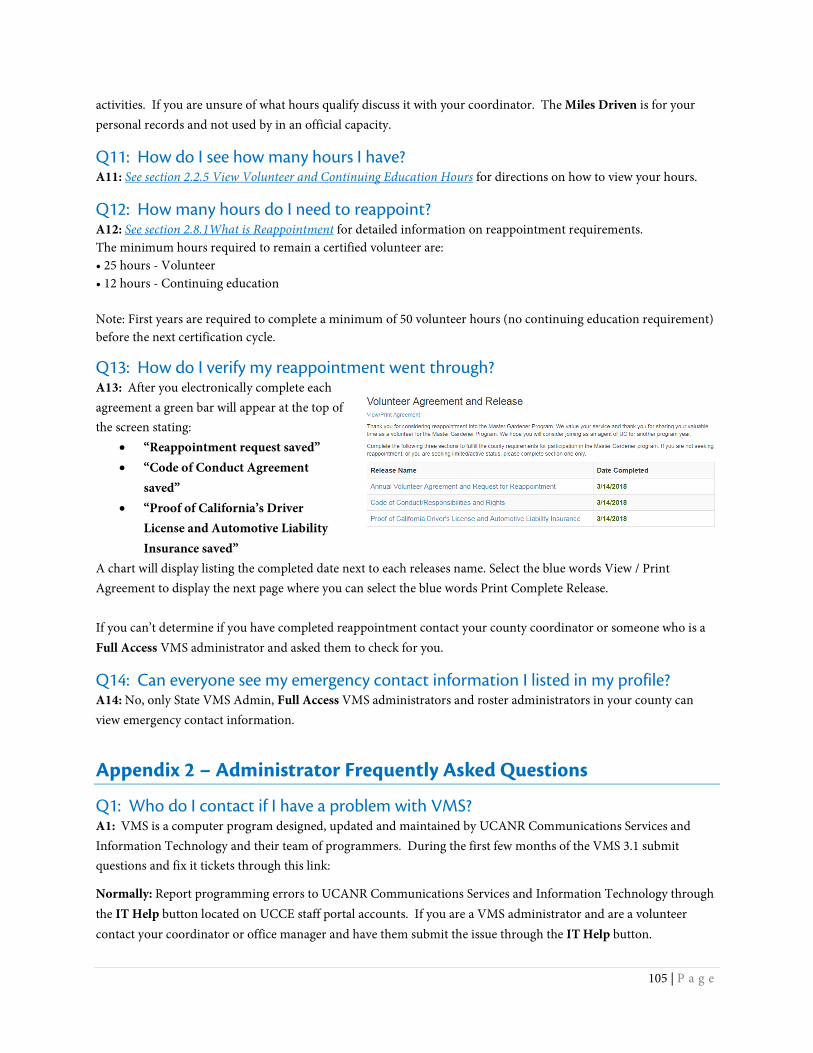
105 | P a g e
activities. If you are unsure of what hours qualify discuss it with your coordinator. The Miles Driven is for your personal records and not used by in an official capacity.
Q11: How do I see how many hours I have? A11: See section 2.2.5 View Volunteer and Continuing Education Hours for directions on how to view your hours.
Q12: How many hours do I need to reappoint? A12: See section 2.8.1What is Reappointment for detailed information on reappointment requirements. The minimum hours required to remain a certified volunteer are: • 25 hours - Volunteer • 12 hours - Continuing education Note: First years are required to complete a minimum of 50 volunteer hours (no continuing education requirement) before the next certification cycle.
Q13: How do I verify my reappointment went through? A13: After you electronically complete each agreement a green bar will appear at the top of the screen stating:
• “Reappointment request saved” • “Code of Conduct Agreement
saved” • “Proof of California’s Driver
License and Automotive Liability Insurance saved”
A chart will display listing the completed date next to each releases name. Select the blue words View / Print Agreement to display the next page where you can select the blue words Print Complete Release. If you can’t determine if you have completed reappointment contact your county coordinator or someone who is a Full Access VMS administrator and asked them to check for you.
Q14: Can everyone see my emergency contact information I listed in my profile? A14: No, only State VMS Admin, Full Access VMS administrators and roster administrators in your county can view emergency contact information.
Appendix 2 – Administrator Frequently Asked Questions
Q1: Who do I contact if I have a problem with VMS? A1: VMS is a computer program designed, updated and maintained by UCANR Communications Services and Information Technology and their team of programmers. During the first few months of the VMS 3.1 submit questions and fix it tickets through this link:
Normally: Report programming errors to UCANR Communications Services and Information Technology through the IT Help button located on UCCE staff portal accounts. If you are a VMS administrator and are a volunteer contact your coordinator or office manager and have them submit the issue through the IT Help button.
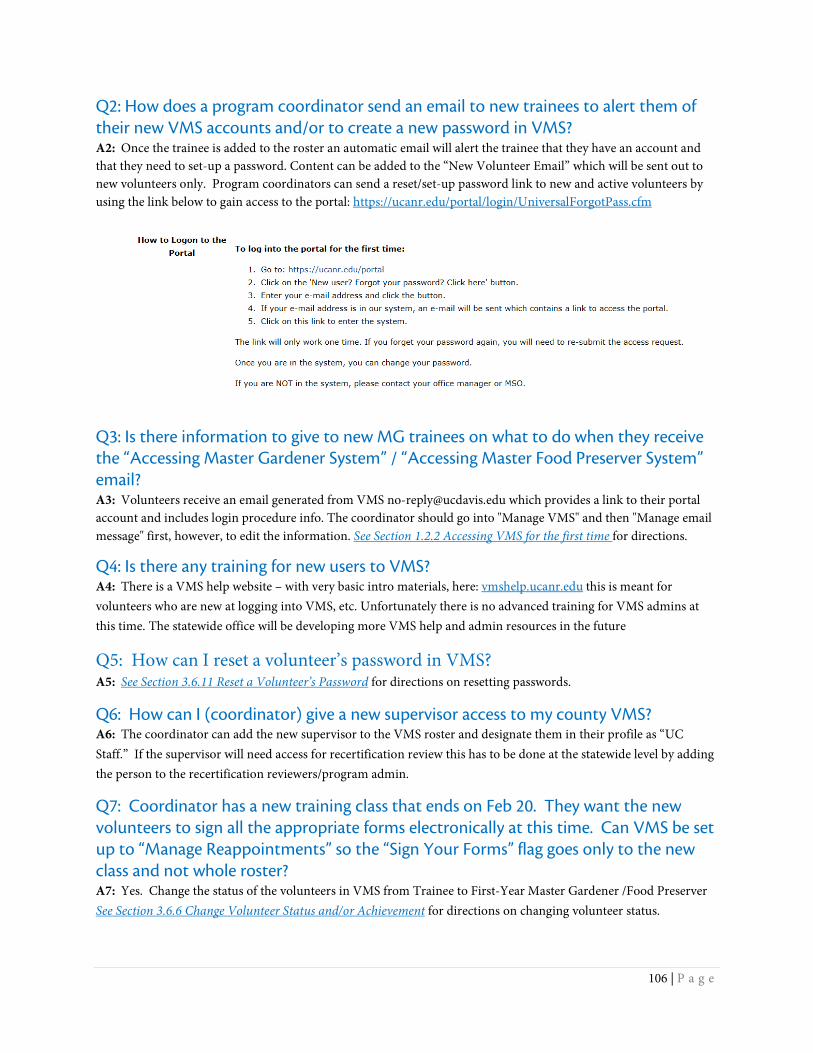
106 | P a g e
Q2: How does a program coordinator send an email to new trainees to alert them of their new VMS accounts and/or to create a new password in VMS? A2: Once the trainee is added to the roster an automatic email will alert the trainee that they have an account and that they need to set-up a password. Content can be added to the “New Volunteer Email” which will be sent out to new volunteers only. Program coordinators can send a reset/set-up password link to new and active volunteers by using the link below to gain access to the portal: https://ucanr.edu/portal/login/UniversalForgotPass.cfm
Q3: Is there information to give to new MG trainees on what to do when they receive the “Accessing Master Gardener System” / “Accessing Master Food Preserver System” email? A3: Volunteers receive an email generated from VMS [email protected] which provides a link to their portal account and includes login procedure info. The coordinator should go into "Manage VMS" and then "Manage email message" first, however, to edit the information. See Section 1.2.2 Accessing VMS for the first time for directions.
Q4: Is there any training for new users to VMS? A4: There is a VMS help website – with very basic intro materials, here: vmshelp.ucanr.edu this is meant for volunteers who are new at logging into VMS, etc. Unfortunately there is no advanced training for VMS admins at this time. The statewide office will be developing more VMS help and admin resources in the future
Q5: How can I reset a volunteer’s password in VMS? A5: See Section 3.6.11 Reset a Volunteer’s Password for directions on resetting passwords.
Q6: How can I (coordinator) give a new supervisor access to my county VMS? A6: The coordinator can add the new supervisor to the VMS roster and designate them in their profile as “UC Staff.” If the supervisor will need access for recertification review this has to be done at the statewide level by adding the person to the recertification reviewers/program admin.
Q7: Coordinator has a new training class that ends on Feb 20. They want the new volunteers to sign all the appropriate forms electronically at this time. Can VMS be set up to “Manage Reappointments” so the “Sign Your Forms” flag goes only to the new class and not whole roster? A7: Yes. Change the status of the volunteers in VMS from Trainee to First-Year Master Gardener /Food Preserver See Section 3.6.6 Change Volunteer Status and/or Achievement for directions on changing volunteer status.
107 | P a g e
Q8: What forms are required to give trainees to sign? A8: Assuming the trainees are past the application period and are ready to begin classes, many counties print out the Adult Volunteer Code of Conduct/Rights and Responsibilities form and ask trainees to sign so that they know the behavior that is expected of them while completing training and as a volunteer. Some counties also choose to have trainees sign the UCANR Photo Release Agreement, as they want to document the training with photographs. Other paperwork such as the volunteer agreements, and driving document are electronically signed at reappointment and/or when they graduate / change status from Trainee to First-Year Master Gardeners / Food Preservers in VMS.
Q9: Does a volunteer have to have an email address to access VMS? A9: Yes
Q10: When a volunteers transfers from one county UC MG /MFP Program to another and they are added to the roster their hours previously logged do not come over with them on VMS. Do I need to manually add those hours and activities? A10: Volunteer and continuing education hours don’t transfer with a volunteer from one county to another – for federal reporting purposes hours are ‘owned’ by the county in which they were given. To get a MG transfer volunteer up-to-date in a new county enter their current fiscal year (FY) volunteer and continuing education hours, their past FY’s volunteer and continuing education hours (as one big lump sum), and then their total for all time of volunteer and continuing education hours as an entry in the comments section (99 character limit) of their volunteer profile (not assigned to a generic “transfer” project). The volunteer should be responsible for tracking when they hit their program milestones.
Q11: How can MGs store photos that allows other MGs to be privately and securely stored and have access those photos for appropriate use? A11: Through VMS volunteers can upload and store images. See Section 2.7 Photo Albums for more information) UCANR has an internal system for storing images, called the ANR Repository that only staff can upload images into (ie: program coordinator / advisor) but volunteers can download from.
Q12: When a volunteer resigns and their status is changed to inactive / resigned can they be deleted from the roster? A12: Yes, although a resigned volunteer has thirteen months to seek reinstatement they can be deleted from the roster without their volunteer or continuing education hours being lost. See Section 5.4 Reinstate a Volunteer for direction on how to reinstate a volunteer.
108 | P a g e
Appendix 3 – Administrator Reappointment Quick Tips and Frequently Asked Questions
Q1: What if my volunteer doesn’t have internet access / wants a paper copy / or will be on vacation? A1: If a volunteer cannot recertify online the coordinator can submit recertification papers on their behalf. When a coordinator digitally submits papers for a volunteer, the county must retain hard copies signed by the volunteer on file. Submitting digital files for a volunteer should happen on a case-by-case basis, and only as a special accommodation. The coordinator is not signing for them - but rather telling VMS there is a hard copy version on file for these agreements. Click “Submit Papers” button on the left of volunteer’s name. This takes you to a page that asks the specifics about the type of agreement you are submitting on their behalf and whether they agree to the Code of Conduct and Driving Agreement.
Q2: What if my volunteer does not reappoint? A2: If a volunteer cannot be contacted or upon contact says they no longer wish to continue in the program their status must be changed to “Resigning” to not be billed an insurance fee. To select a volunteer as resigned - select “Submit Papers” and “Wish not to be reappointed.”
Note: Although the above action signifies a volunteer as resigning on the reappointment roster, you must also go to their profile and change status to “Inactive/Resigned” in order to remove their access to VMS, and ensure they are not counted on your roster for insurance billing. See Section 11.4 Resigning or Inactive Volunteers and Section 5.5 Change Volunteer Status for more information.
Q3: Can I delete a volunteer From VMS? A3: Yes! A volunteer can be deleted from a program's roster without losing any of the data associated with the profile. In the past it was communicated to not delete volunteers in fear of losing data, this issue has been addressed by IT and is no longer an issue.
Q4: What if my County Director can’t find the MG Reviews link for approving Reappointment? A4: If there has been a change in leadership in the past year, the new County Director may need to be added as a review-level administrator. Please contact the statewide office to have your County Director added as a review-level admin.
Q5: I need more help with reappointment, where do I get it? A5: Check out the coordinator website for updates on reappointment, useful forms, recorded trainings and assistance, mgcoord.ucanr.edu.
It is the policy of the University of California (UC) and the UC Division of Agriculture and Natural Resources (UC ANR) not to engage in discrimination against or harassment of any person in any of its programs or activities (complete nondiscrimination policy statement can be found at http://ucanr.edu/sites/anrstaff/files/187680.pdf).
Inquiries regarding UC ANR’s nondiscrimination policies may be directed to John Sims, Affirmative Action Compliance Officer, University of California, Agriculture and Natural Resources, 2801 Second Street, Davis, CA 95618, (530) 750-1397.
vmshelp.ucanr.edu


