156
IBM Cognos Virtual View Manager Version 10.1.1 Administration Guide
| Date post: | 27-Oct-2014 |
| Category: |
Documents |
| Upload: | cesar-cardorelle |
| View: | 50 times |
| Download: | 2 times |
IBM Cognos Virtual View ManagerVersion 10.1.1
Administration Guide
���

NoteBefore using this information and the product it supports, read the information in “Notices” on page 141.
Product Information
This document applies to IBM Cognos Business Intelligence Version 10.1.1 and may also apply to subsequentreleases. To check for newer versions of this document, visit the IBM Cognos Information Centers(http://publib.boulder.ibm.com/infocenter/cogic/v1r0m0/index.jsp).
Licensed Materials - Property of IBM
© Copyright IBM Corporation 2008, 2011.US Government Users Restricted Rights – Use, duplication or disclosure restricted by GSA ADP Schedule Contractwith IBM Corp.
Contents
Introduction . . . . . . . . . . . . . . . . . . . . . . . . . . . . . . . . . vii
Chapter 1. Post-installation tasks . . . . . . . . . . . . . . . . . . . . . . . . . 1Configuring IBM Cognos Virtual View Manager to display Unicode fonts . . . . . . . . . . . . . . . 1SSL management . . . . . . . . . . . . . . . . . . . . . . . . . . . . . . . . . . 2Installing and using special JDBC drivers . . . . . . . . . . . . . . . . . . . . . . . . . . 2
Installing pre-configured JDBC drivers. . . . . . . . . . . . . . . . . . . . . . . . . . 3Connecting through JDBC drivers . . . . . . . . . . . . . . . . . . . . . . . . . . . 5Adding, editing, and removing JDBC drivers . . . . . . . . . . . . . . . . . . . . . . . 8
Using the IBM Cognos Virtual View Manager ODBC driver . . . . . . . . . . . . . . . . . . . 10Using the ODBC driver on Windows operating systems . . . . . . . . . . . . . . . . . . . 10Adding ODBC data sources on Windows operating systems . . . . . . . . . . . . . . . . . . 10Overriding the configured settings. . . . . . . . . . . . . . . . . . . . . . . . . . . 11Code sample for connecting to Cognos Virtual View Manager Server . . . . . . . . . . . . . . . 11Supported and non-supported features . . . . . . . . . . . . . . . . . . . . . . . . . 12Using the ODBC driver on UNIX and Linux operating systems . . . . . . . . . . . . . . . . . 12Setting environment variables . . . . . . . . . . . . . . . . . . . . . . . . . . . . 13Creating a DSN with driverConfig. . . . . . . . . . . . . . . . . . . . . . . . . . . 13
Configuring IBM Cognos Virtual View Manager for use of a JMS Broker . . . . . . . . . . . . . . . 14Enable connection with TIBCO JMS . . . . . . . . . . . . . . . . . . . . . . . . . . 15Enable connection with Sonic JMS . . . . . . . . . . . . . . . . . . . . . . . . . . . 15Create and configure a queue and queue connection factory in JMS Broker . . . . . . . . . . . . . 15Add JMS connectors to IBM Cognos Virtual View Manager . . . . . . . . . . . . . . . . . . 15
Configuring LDAP . . . . . . . . . . . . . . . . . . . . . . . . . . . . . . . . . 17
Chapter 2. Virtual View Manager configuration . . . . . . . . . . . . . . . . . . 19Configuration rights and privileges . . . . . . . . . . . . . . . . . . . . . . . . . . . 19The Configuration window . . . . . . . . . . . . . . . . . . . . . . . . . . . . . . 19
Configuration parameters - server . . . . . . . . . . . . . . . . . . . . . . . . . . . 20Fine tuning memory . . . . . . . . . . . . . . . . . . . . . . . . . . . . . . . . 21
Paging . . . . . . . . . . . . . . . . . . . . . . . . . . . . . . . . . . . . 21Case sensitivity . . . . . . . . . . . . . . . . . . . . . . . . . . . . . . . . . . 21
Case sensitivity and trailing spaces mismatches . . . . . . . . . . . . . . . . . . . . . . 21Settings affecting query performance . . . . . . . . . . . . . . . . . . . . . . . . . . 22Dealing with settings mismatches . . . . . . . . . . . . . . . . . . . . . . . . . . . 23Impact on string comparison . . . . . . . . . . . . . . . . . . . . . . . . . . . . 23Trailing spaces . . . . . . . . . . . . . . . . . . . . . . . . . . . . . . . . . 24IBM Cognos Virtual View Manager policy . . . . . . . . . . . . . . . . . . . . . . . . 24Impact on string comparison . . . . . . . . . . . . . . . . . . . . . . . . . . . . 24Impact on server performance . . . . . . . . . . . . . . . . . . . . . . . . . . . . 24Studio locking . . . . . . . . . . . . . . . . . . . . . . . . . . . . . . . . . 25
Chapter 3. IBM Cognos Virtual View Manager domain administration . . . . . . . . . 27The Cognos domain . . . . . . . . . . . . . . . . . . . . . . . . . . . . . . . . 27Domain management . . . . . . . . . . . . . . . . . . . . . . . . . . . . . . . . 28Group management . . . . . . . . . . . . . . . . . . . . . . . . . . . . . . . . 28
Built-in groups . . . . . . . . . . . . . . . . . . . . . . . . . . . . . . . . . 28Adding groups to the Cognos domain . . . . . . . . . . . . . . . . . . . . . . . . . 29Removing groups from the Cognos domain . . . . . . . . . . . . . . . . . . . . . . . 29Removing an externally defined LDAP group . . . . . . . . . . . . . . . . . . . . . . . 29
User management . . . . . . . . . . . . . . . . . . . . . . . . . . . . . . . . . 30Built-in users and their privileges . . . . . . . . . . . . . . . . . . . . . . . . . . . 30Adding users to the Cognos domain . . . . . . . . . . . . . . . . . . . . . . . . . . 31Removing users from the Cognos domain . . . . . . . . . . . . . . . . . . . . . . . . 31Managing group membership . . . . . . . . . . . . . . . . . . . . . . . . . . . . 32
© Copyright IBM Corp. 2008, 2011 iii
View group membership . . . . . . . . . . . . . . . . . . . . . . . . . . . . . . 32Changing a password . . . . . . . . . . . . . . . . . . . . . . . . . . . . . . . . 33
Change your own password . . . . . . . . . . . . . . . . . . . . . . . . . . . . . 33Changing a user's password or setting explicit user rights . . . . . . . . . . . . . . . . . . . 33
Changing ownership of resources . . . . . . . . . . . . . . . . . . . . . . . . . . . . 33Manage user and group privileges. . . . . . . . . . . . . . . . . . . . . . . . . . . . 34
Chapter 4. LDAP domain administration . . . . . . . . . . . . . . . . . . . . . 35About the LDAP domain . . . . . . . . . . . . . . . . . . . . . . . . . . . . . . . 35Configuring LDAP properties file . . . . . . . . . . . . . . . . . . . . . . . . . . . . 35
Structure of the LDAP properties file . . . . . . . . . . . . . . . . . . . . . . . . . . 36Example of an ldap.properties file . . . . . . . . . . . . . . . . . . . . . . . . . . . 37LDAP properties file symbols and attributes . . . . . . . . . . . . . . . . . . . . . . . 39Query examples . . . . . . . . . . . . . . . . . . . . . . . . . . . . . . . . . 39
Domain administration . . . . . . . . . . . . . . . . . . . . . . . . . . . . . . . 42Adding an LDAP domain . . . . . . . . . . . . . . . . . . . . . . . . . . . . . 43Working with groups from an LDAP domain . . . . . . . . . . . . . . . . . . . . . . . 43Adding a group to an LDAP domain . . . . . . . . . . . . . . . . . . . . . . . . . . 44Removing a group from an LDAP domain . . . . . . . . . . . . . . . . . . . . . . . . 45Viewing group membership . . . . . . . . . . . . . . . . . . . . . . . . . . . . . 45Adding and removing LDAP users from a group . . . . . . . . . . . . . . . . . . . . . . 46Editing LDAP domain connection parameters . . . . . . . . . . . . . . . . . . . . . . . 46Removing an LDAP domain. . . . . . . . . . . . . . . . . . . . . . . . . . . . . 46
LDAP user management . . . . . . . . . . . . . . . . . . . . . . . . . . . . . . . 47Adding users to IBM Cognos Virtual View Manager from an LDAP domain. . . . . . . . . . . . . 47Removing LDAP users from IBM Cognos Virtual View Manager . . . . . . . . . . . . . . . . 48Adding users to groups . . . . . . . . . . . . . . . . . . . . . . . . . . . . . . 48
Chapter 5. Dynamic domain administration . . . . . . . . . . . . . . . . . . . . 51Dynamic domains . . . . . . . . . . . . . . . . . . . . . . . . . . . . . . . . . 51Domain administration . . . . . . . . . . . . . . . . . . . . . . . . . . . . . . . 51
Enabling the dynamic domain . . . . . . . . . . . . . . . . . . . . . . . . . . . . 52Group administration . . . . . . . . . . . . . . . . . . . . . . . . . . . . . . . . 52
Granting privileges to dynamic domain users . . . . . . . . . . . . . . . . . . . . . . . 52User administration . . . . . . . . . . . . . . . . . . . . . . . . . . . . . . . . 53
Adding users to the dynamic domain . . . . . . . . . . . . . . . . . . . . . . . . . 53Removing users from the dynamic domain . . . . . . . . . . . . . . . . . . . . . . . . 54Dynamic users group membership . . . . . . . . . . . . . . . . . . . . . . . . . . 54Viewing dynamic user group membership . . . . . . . . . . . . . . . . . . . . . . . . 54
Chapter 6. System monitoring. . . . . . . . . . . . . . . . . . . . . . . . . . 55Working with IBM Cognos Virtual View Manager Administrator . . . . . . . . . . . . . . . . . 55
Launching IBM Cognos Virtual View Manager Administrator . . . . . . . . . . . . . . . . . 55Using IBM Cognos Virtual View Manager Administrator . . . . . . . . . . . . . . . . . . . 56
Administrator home page . . . . . . . . . . . . . . . . . . . . . . . . . . . . . . 58Server Info panel . . . . . . . . . . . . . . . . . . . . . . . . . . . . . . . . 58Server Status panel . . . . . . . . . . . . . . . . . . . . . . . . . . . . . . . . 59Quick Links panel . . . . . . . . . . . . . . . . . . . . . . . . . . . . . . . . 59
Server Overview page . . . . . . . . . . . . . . . . . . . . . . . . . . . . . . . . 59Server status information . . . . . . . . . . . . . . . . . . . . . . . . . . . . . . 59Session and request information . . . . . . . . . . . . . . . . . . . . . . . . . . . 60Privilege, user, and repository caches . . . . . . . . . . . . . . . . . . . . . . . . . . 61Server status indicators . . . . . . . . . . . . . . . . . . . . . . . . . . . . . . 61Working with the Server Overview page . . . . . . . . . . . . . . . . . . . . . . . . 61
Cached resources . . . . . . . . . . . . . . . . . . . . . . . . . . . . . . . . . 62Working with the Cached Resources page . . . . . . . . . . . . . . . . . . . . . . . . 62The Cached Resources table . . . . . . . . . . . . . . . . . . . . . . . . . . . . . 62
Data sources . . . . . . . . . . . . . . . . . . . . . . . . . . . . . . . . . . . 63Data sources summary information . . . . . . . . . . . . . . . . . . . . . . . . . . 64Working with the Data Sources page . . . . . . . . . . . . . . . . . . . . . . . . . . 64
iv IBM Cognos Virtual View Manager Version 10.1.1: Administration Guide

The Data Sources table . . . . . . . . . . . . . . . . . . . . . . . . . . . . . . 64Requests . . . . . . . . . . . . . . . . . . . . . . . . . . . . . . . . . . . . 66
Requests summary information. . . . . . . . . . . . . . . . . . . . . . . . . . . . 66Working with the Requests page . . . . . . . . . . . . . . . . . . . . . . . . . . . 66The Requests table . . . . . . . . . . . . . . . . . . . . . . . . . . . . . . . . 67
Sessions . . . . . . . . . . . . . . . . . . . . . . . . . . . . . . . . . . . . 68Sessions summary information . . . . . . . . . . . . . . . . . . . . . . . . . . . . 69Working with the Sessions page . . . . . . . . . . . . . . . . . . . . . . . . . . . 69The Sessions table . . . . . . . . . . . . . . . . . . . . . . . . . . . . . . . . 69
Transactions . . . . . . . . . . . . . . . . . . . . . . . . . . . . . . . . . . . 70Transaction summary information . . . . . . . . . . . . . . . . . . . . . . . . . . . 70Working with the Transactions page . . . . . . . . . . . . . . . . . . . . . . . . . . 71The Transactions table . . . . . . . . . . . . . . . . . . . . . . . . . . . . . . . 71
Triggers . . . . . . . . . . . . . . . . . . . . . . . . . . . . . . . . . . . . 71Trigger summary information . . . . . . . . . . . . . . . . . . . . . . . . . . . . 72Working with the Triggers page . . . . . . . . . . . . . . . . . . . . . . . . . . . 72The Triggers table . . . . . . . . . . . . . . . . . . . . . . . . . . . . . . . . 72
Events . . . . . . . . . . . . . . . . . . . . . . . . . . . . . . . . . . . . . 73Server event attributes. . . . . . . . . . . . . . . . . . . . . . . . . . . . . . . 73Event log summary information . . . . . . . . . . . . . . . . . . . . . . . . . . . 74Working with the Event Log page . . . . . . . . . . . . . . . . . . . . . . . . . . . 74The Event Log table . . . . . . . . . . . . . . . . . . . . . . . . . . . . . . . 74
Event and log files . . . . . . . . . . . . . . . . . . . . . . . . . . . . . . . . . 75Server, monitor, and studio log files . . . . . . . . . . . . . . . . . . . . . . . . . . 75
Chapter 7. Utilities . . . . . . . . . . . . . . . . . . . . . . . . . . . . . . . 77backup_export and backup_import . . . . . . . . . . . . . . . . . . . . . . . . . . . 77
Backup program commands . . . . . . . . . . . . . . . . . . . . . . . . . . . . . 78virtualviewmanager . . . . . . . . . . . . . . . . . . . . . . . . . . . . . . . . 85
Start, stop, or restart the server . . . . . . . . . . . . . . . . . . . . . . . . . . . . 85Start, stop, or restart the monitor . . . . . . . . . . . . . . . . . . . . . . . . . . . 85Run the server as a foreground process with no monitor . . . . . . . . . . . . . . . . . . . 86Start, stop, or restart the repository that was installed during the installation . . . . . . . . . . . . 87Stopping and starting the server on Windows startup program . . . . . . . . . . . . . . . . . 87
install_services . . . . . . . . . . . . . . . . . . . . . . . . . . . . . . . . . . 87pkg_export and pkg_import . . . . . . . . . . . . . . . . . . . . . . . . . . . . . . 88
Package export command line utility . . . . . . . . . . . . . . . . . . . . . . . . . . 89Package import command line utility . . . . . . . . . . . . . . . . . . . . . . . . . 101
remove_services . . . . . . . . . . . . . . . . . . . . . . . . . . . . . . . . . 113repo_util . . . . . . . . . . . . . . . . . . . . . . . . . . . . . . . . . . . . 114server_util . . . . . . . . . . . . . . . . . . . . . . . . . . . . . . . . . . . 117
Sample commands to use server_util . . . . . . . . . . . . . . . . . . . . . . . . . 117
Chapter 8. Setting up a metadata repository . . . . . . . . . . . . . . . . . . . 119System requirements . . . . . . . . . . . . . . . . . . . . . . . . . . . . . . . . 119
Pre-requisites and limitations for database types. . . . . . . . . . . . . . . . . . . . . . 119Using Sybase ASE 12.5 as a repository database . . . . . . . . . . . . . . . . . . . . . . 119Using Oracle Call Interface (OCI) as a repository database . . . . . . . . . . . . . . . . . . 120
Creating a database for the metadata repository . . . . . . . . . . . . . . . . . . . . . . . 120Create an IBM Informix metadata repository . . . . . . . . . . . . . . . . . . . . . . . 120Create a MySQL metadata repository . . . . . . . . . . . . . . . . . . . . . . . . . 121Create a Sybase metadata repository. . . . . . . . . . . . . . . . . . . . . . . . . . 121Creating an Oracle metadata repository . . . . . . . . . . . . . . . . . . . . . . . . 122
Additional database configuration requirements . . . . . . . . . . . . . . . . . . . . . . . 123Configure the MySQL repository . . . . . . . . . . . . . . . . . . . . . . . . . . . 123Configure the Sybase repository . . . . . . . . . . . . . . . . . . . . . . . . . . . 123
Configuring the IBM Cognos Virtual View Manager metadata repository . . . . . . . . . . . . . . 125Sample repo.properties File. . . . . . . . . . . . . . . . . . . . . . . . . . . . . 125
Chapter 9. SNMP traps . . . . . . . . . . . . . . . . . . . . . . . . . . . . 129
Contents v

SNMP log settings. . . . . . . . . . . . . . . . . . . . . . . . . . . . . . . . . 129SNMP details . . . . . . . . . . . . . . . . . . . . . . . . . . . . . . . . . . 129
Notices . . . . . . . . . . . . . . . . . . . . . . . . . . . . . . . . . . . 141
Index . . . . . . . . . . . . . . . . . . . . . . . . . . . . . . . . . . . . 145
vi IBM Cognos Virtual View Manager Version 10.1.1: Administration Guide

Introduction
This guide is designed for first-time users that are not administrators and areinterested in addressing business issues presented by their disparate businesssystems.
The purpose of this guide is:v To demonstrate how you can use IBM® Cognos® Virtual View Manager to
address your business needsv To introduce the data modeling aspect of Virtual View Manager
Audience
This documentation is for information technology professionals who want to useIBM Cognos Virtual View Manager to model data resources. Knowledge ofrelational data sources, hierarchical data sources, and data modeling isrecommended.
Finding information
To find IBM Cognos product documentation on the web, including all translateddocumentation, access one of the IBM Cognos Information Centers. Release Notesare published directly to Information Centers, and include links to the latesttechnotes and APARs.
You can also read PDF versions of the product release notes and installation guidesdirectly from IBM Cognos product disks.
Accessibility features
This product does not currently support accessibility features that help users whohave a physical disability, such as restricted mobility or limited vision, to use thisproduct.
Forward-looking statements
This documentation describes the current functionality of the product. Referencesto items that are not currently available may be included. No implication of anyfuture availability should be inferred. Any such references are not a commitment,promise, or legal obligation to deliver any material, code, or functionality. Thedevelopment, release, and timing of features or functionality remain at the solediscretion of IBM.
Samples disclaimer
The Great Outdoors Company, GO Sales, any variation of the Great Outdoorsname, and Planning Sample depict fictitious business operations with sample dataused to develop sample applications for IBM and IBM customers. These fictitiousrecords include sample data for sales transactions, product distribution, finance,and human resources. Any resemblance to actual names, addresses, contactnumbers, or transaction values is coincidental. Other sample files may containfictional data manually or machine generated, factual data compiled from
© Copyright IBM Corp. 2008, 2011 vii

academic or public sources, or data used with permission of the copyright holder,for use as sample data to develop sample applications. Product names referencedmay be the trademarks of their respective owners. Unauthorized duplication isprohibited.
viii IBM Cognos Virtual View Manager Version 10.1.1: Administration Guide
Chapter 1. Post-installation tasks
This chapter describes some basic tasks that enable secure computing and clientconnections. These tasks must be performed sometime soon after installation ofIBM Cognos Virtual View Manager before serious design and resources may bepublished.
The following topics are covered in this chapter:v “Configuring IBM Cognos Virtual View Manager to display Unicode fonts”
Update Virtual View Manager to support unicode fonts.v “SSL management” on page 2
Install a Java Key Store for use with Virtual View Manager.Note that this task does not need to be done immediately. However, it isstrongly recommended that all server instances are configured with their owncertificate prior to deployment with sensitive data.
v “Installing and using special JDBC drivers” on page 2Make sure that you have installed the appropriate JDBC drivers for therelational data sources that you plan to use.You can use Virtual View Manager's JDBC driver (and edit it if necessary) orinstall a specific JDBC driver for your installation.
v “Using the IBM Cognos Virtual View Manager ODBC driver” on page 10Configure the Virtual View Manager ODBC driver to connect with ODBC datasources and to receive connections from ODBC clients. If you installed theODBC Client with Virtual View Manager then ODBC Client applications can usea 32-bit driver to connect with the server. The computer on which the ODBCclient application resides must be configured to use the Virtual View Managerdrivers to properly connect with the server.
v “Configuring IBM Cognos Virtual View Manager for use of a JMS Broker” onpage 14By default Virtual View Manager supports both Sonic and TIBCO JMS brokers,however some non-distributable JARs must be copied to the installationdirectory from the JMS installation(s) that will be used.
Configuring IBM Cognos Virtual View Manager to display Unicodefonts
IBM Cognos Virtual View Manager Server returns Unicode characters in allmessages carrying data. The server also transforms messages with other UTFencoding formats to Unicode.
To display all Unicode true type fonts, you must manually configure Virtual ViewManager.
Procedure1. On the Windows computer where Virtual View Manager is installed, create a
folder named fallback in the installation_location\jre\lib\fonts\ directory.For example, installation_location\jre\lib\fonts\fallback
© Copyright IBM Corp. 2008, 2011 1

2. From C:/Windows/fonts or C:/WINNT/fonts directory, copy the Arial UnicodeMS (TrueType) font file (ARIALUNI.TTF) to the installation_location\jre\lib\fonts\fallback directory you just created.
3. Restart Virtual View Manager.
SSL managementIBM Cognos Virtual View Manager enables specification of the Java Key Store(JKS) used to initiate and establish SSL communications over both HTTPS portsused for secured web services and secured JDBC communications.
Viewing the SSL Management page requires a user profile that has the Read AllResources right and change of any of the JKS digital certificate file location, type,or password requires the Modify All Resources right.
A generic JKS file is provided so that development and testing of Web services andJDBC secured over HTTPS ports may proceed without need for immediateinstallation of a JKS file.
You should configure all Virtual View Manager instancestheir own JKS certificateprior to deployment with sensitive data.
Obtain your JKS digital certificate(s) from a Certificate Authority (CA) or generateyour own and install it using on the SSL Management page in Virtual ViewManager Administrator.
Procedure1. In Virtual View Manager Administrator, click Configuration > SSL.2. The SSL Management page appears.3. In the New Value column, enter the absolute path to the new JKS file (X.509
compliant certificate file) on the server and click Apply.4. Change the Java Keystore File Type and the Java Keystore Password values in
the same way described above so that the values on server restart match thedigital certificate being installed.
5. Restart the server to apply the changes.
Installing and using special JDBC driversSome relational data sources require additional JDBC drivers to enable connection,introspection, and use. These data source drivers must be installed separately fromthe IBM Cognos Virtual View Manager.
The following relational data sources require additional JDBC drivers:v IBM DB2® (type 2 and type 4)v IBM DB2 (Mainframe)v IBM Informix®
v Microsoft SQL Serverv Netezza®
v Teradatav MySQLv Sybasev Neoview
2 IBM Cognos Virtual View Manager Version 10.1.1: Administration Guide

v Oracle (type 2 and type 4)
You must install the necessary driver(s) in the appropriate location(s) so that theVirtual View Manager server and the data source can interact. Each particular datasource has a directory within the Virtual View Manager installation directory,which is specified below.
Virtual View Manager provides a JDBC interface and provides methods to connectto relational data sources that may not be formally supported. Custom jars may bewritten to direct the server to connect using the custom jar. Simply specify theJDBC driver and direct the server to upload it to the system.
One driver is sufficient to connect to any number of the same type of data sources.Once uploaded, the JDBC driver will function like any other JDBC driver, such asOracle, SQL Server, or MySQL.
Virtual View Manager server assumes that JDBC drivers conform to the JDBC 2.0standard. The server does not make any accommodations for JDBC drivers thatdon't supply correct metadata about the data source. The server does not retrieveresult sets that are not consistent with the metadata supplied.
Installing pre-configured JDBC driversThis section describes how to install pre-configured JDBC drivers from specificlocations for connecting to specific data sources.
The IBM Cognos Virtual View Manager location to copy the JAR files into is:
installation_directory\apps\dlm\cis_ds_<datasource_type>\lib
For example, the location for the IBM Informix data source is c:\vvm\apps\dlm\cis_ds_informix\lib.
Installing pre-configured drivers for DB2 (Type 2 or Type 4)This section describes how to install pre-configured JDBC drivers for DB2 (Type 2or Type 4).
Procedure1. Obtain the appropriate driver file for your version of DB2.
v Use db2jcc.jar and the accompanying license file, for example,db2jcc_license_cisuz.jar or db2jcc_license_cu.jar
2. Copy the jar file, and license file, to the following Virtual View Managerdirectory:installation_directory\apps\dlm\cis_ds_db2\lib
3. Restart the server.
Installing pre-configured drivers for DB2 z/OSThis section describes how to install pre-configured JDBC drivers for DB2 z/OS®.
Procedure1. The driver for DB2 z/OS is the same as the driver for DB2 on UNIX. Obtain
db2jcc.jar, its accompanying license file, for example, db2jcc_license_cisuz.jar ordb2jcc_license_cu.jar, and common.jar.
2. Copy the files to the Virtual View Manager installation directory:installation_directory\apps\dlm\cis_ds_db2_mainframe\lib
Chapter 1. Post-installation tasks 3

3. Restart the server.
Installing pre-configured drivers for IBM InformixThis section describes how to install pre-configured JDBC drivers for IBM Informix.
Procedure1. Obtain the IBM Informix JDBC driver for your version of Infomix.2. Copy the ifxjdbc.jar driver file to the Virtual View Manager installation
directory:installation_directory\apps\dlm\cis_ds_informix\lib
3. Restart the server.
Installing pre-configured drivers for Microsoft SQL ServerThis section describes how to install pre-configured JDBC drivers for MicrosoftSQL Server.
Procedure1. Obtain the driver file for your version of Microsoft SQL Server.2. Download the driver version for the appropriate platform.3. Run the setup.exe installation program, and do the following:
v For Microsoft SQL 2000, extract mssqlserver.jar, msutil.jar, and msbase.jar to alocally accessible folder.
v For Microsoft SQL 2005, extract the sqljdbc.jar file.v For Microsoft SQL 2008, extract the sqljdbc4.jar file.
4. Copy the JAR file(s) to the Virtual View Manager directory:installation_directory\apps\dlm\cis_ds_mssql\lib
5. Restart the server.
Installing pre-configured drivers for NetezzaThis section describes how to install pre-configured JDBC drivers for Netezza.
Procedure1. Obtain the JDBC driver for Netezza from the CDs that you received with the
NPS® system or by contacting the support group at Netezza.2. Copy the nzjdbc.jar driver file to the Virtual View Manager installation
directory:installation_directory\apps\dlm\cis_ds_netezza\lib
Installing pre-configured drivers for TeradataThis section describes how to install pre-configured JDBC drivers for Teradata.
Procedure1. Obtain the JDBC driver for your version of Teradata.2. Copy the driver files named tdgssconfig.jar, tdgssjava.jar, and terajdbc4.jar to
the Virtual View Manager installation directory:installation_directory\apps\dlm\cis_ds_teradata\lib
3. Restart the server.
Installing pre-configured drivers for MySQLThis section describes how to install pre-configured JDBC drivers for MySQL.
4 IBM Cognos Virtual View Manager Version 10.1.1: Administration Guide
Procedure1. Obtain the JDBC driver for your version of MySQL.2. Copy the mysql-connector-java-3_1_10_1-bin.jar driver file to the Virtual View
Manager installation directory:installation_directory\apps\dlm\cis_ds_mysql\lib
3. Restart the server.
Installing pre-configured drivers for SybaseThis section describes how to install pre-configured JDBC drivers for Sybase.
Procedure1. Obtain the JDBC driver for your version of Sybase.2. Copy the jconn3.jar and jTDS3.jar driver files to the Virtual View Manager
installation directory:installation_directory\apps\dlm\cis_ds_sybase\lib
3. Restart the server.
Installing pre-configured drivers for NeoviewThis section describes how to install pre-configured JDBC drivers for Neoview.
Procedure1. Obtain the JDBC driver for your version of Neoview.2. Copy the driver files to the Virtual View Manager installation directory:
installation_directory\apps\dlm\cis_ds_neoview\lib3. Restart the server.
Installing pre-configured drivers for Oracle (Type 2 or Type 4)This section describes how to install pre-configured JDBC drivers for Oracle (Type2 or Type 4).
Procedure1. Obtain the JDBC driver for your version of Oracle.2. Copy the ojdbcXX.jar, xdb.jar, xmlparservX.jar driver files to the Virtual View
Manager installation directory:installation_directory\apps\dlm\cis_ds_db2\lib
3. Restart the server.
Connecting through JDBC driversIBM Cognos Virtual View Manager connects to and introspects underlying datasources so that a virtual, integrated data layer may be created, selectivelypublished, and queried as a single data source.
JDBC connection service requests are created and maintained between the end-userclient applications and the Virtual View Manager server and from the server to theunderlying data sources.
This administrative section describes the generic JDBC connection URLs betweenthe Virtual View Manager server and the native data sources. The informationcould also be generally applied to the client-server JDBC connection, though theend-user JDBC client typically connects only to the Virtual View Manager server
Chapter 1. Post-installation tasks 5

data source and not directly to the underlying data sources. There are exceptionssuch as test cases to specify additional attributes for complex transaction handlingor to verify proper driver functionality.
Defining new data sourcesWhen the required data source driver is installed and ready for use, developersmay create connections with the desired data sources.
You define new data sources in the user home directory or in any appropriatedirectory. The JDBC driver connection URL is built dynamically using a wizard.The Add Physical Data Source wizard enables selection of the data source driverto build the connection URL according to the URL format specifications of thatdriver class. Custom configurations, URL attribute additions, and implementationspecific attributes may be set using the wizard as well.
Each data source driver supports URL service requests with a specific bindingformat. The general JDBC connection URL format is:
jdbc:<jdbc-subprotocol>:[implementation specific URL attributes]
where <jdbc-sub-protocol> identifies the JDBC implementation and typicallyidentifies the JDBC driver vendor. The implementation specific URL attributes varywidely depending on the vendor data source and implementation specificconfigurations. A table listing the different data source driver JDBC URL formatsand addressable driver class names is provided in “Sample JDBC driver connectionURL formats” on page 7.
JDBC driver connection URL formatKnowing the connection URL format and driver class name enables a directconnection to the underlying data source utilizing the drivers supported by theIBM Cognos Virtual View Manager server. JDBC clients may connect directly withnew data sources mediated by the JDBC port.
The driver connection URL format is a template for data source definitions. Itcontains three literal strings:
<HOST>, <PORT>, and <DATABASE_NAME>
When you add a data source to Virtual View Manager using this driver, the serversubstitutes the literals <HOST>, <PORT>, and <DATABASE_NAME> with thevalues you supply for the host name, port number, and database name respectivelyin the Add Physical Data Source window.
The complete syntax of the URL:
jdbc:cognos:dbapi@<HOST>:<PORT>?domain=<domain>&dataSource=<DATASOURCE>[&NAME=VALUE]*
wherev HOST—valid host name or IP addressv PORT—integer setting on which Virtual View Manager and the host database
will communicatev DOMAIN—user domain (Cognos is the default domain)v DATASOURCE—data source name
6 IBM Cognos Virtual View Manager Version 10.1.1: Administration Guide

and zero or more optional NAME=<VALUE> pairs may be specified depending onthe target data source and driver. Refer to the next table to see the generic URLformat used by the Virtual View Manager server to connect to the data source.
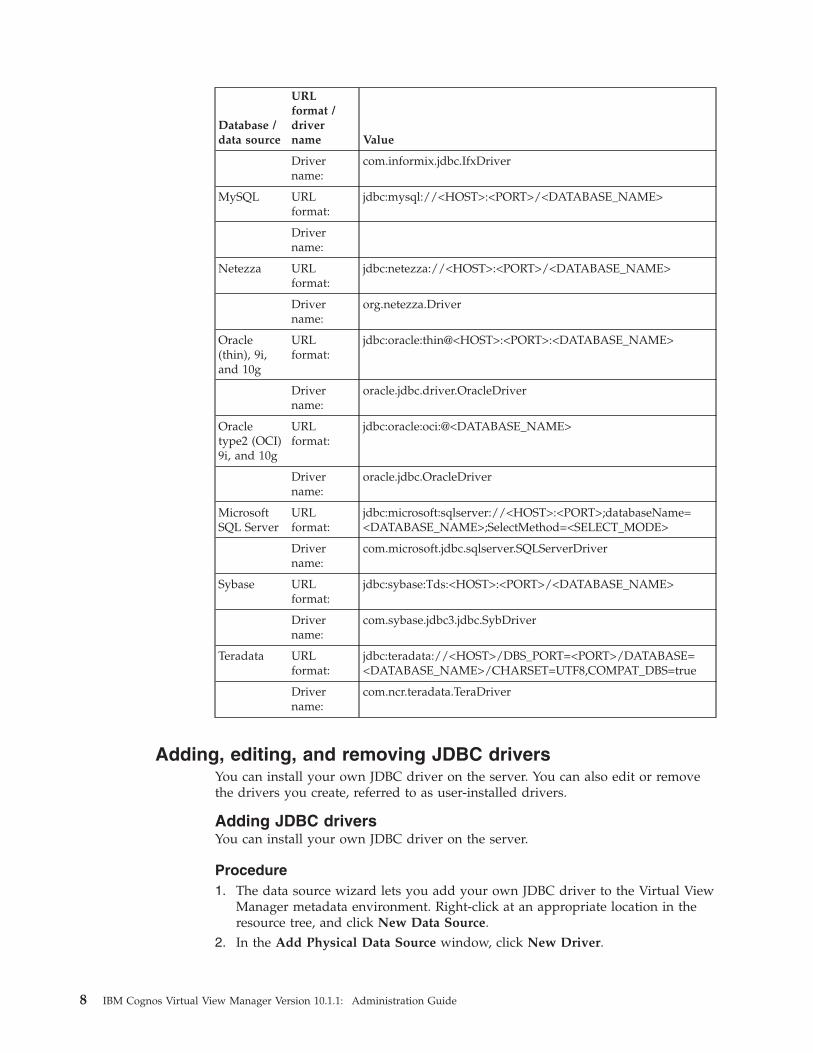
Sample JDBC driver connection URL formatsKnowing the connection URL format and driver class name enables a directconnection to the underlying data source utilizing the drivers supported by theIBM Cognos Virtual View Manager server. This section provides examples.
This table lists JDBC driver example URL formats and the corresponding driverclass names for supported data sources.
Database /data source
URLformat /drivername Value
VirtualViewManager
URLformat:
jdbc:cognos:dbapi@<HOST>:<PORT>?domain=<DOMAIN>&dataSource=<DATABASE_NAME>Normally thisis the only JDBC client connection used to establish client-serverconnections to Virtual View Manager, where cognos is thedefault <DOMAIN> value unless an LDAP or dynamic domainuser is negotiating the connection.
Drivername:
cs.jdbc.driver.CompositeDriver
DataDirectMainframe
URLformat:
jdbc:neon:; APNA=<APP_NAME>;CPFX=<CATALOG_PREFIX>; DBTY=<DBMS_TYPE>;HOST=<HOST>; PORT=<PORT>;SUBSYS=<DATABASE_NAME>; TRLT=NO; DTFM=ODBC;
Drivername:
com.neon.jdbc.Driver
Drivername:
COM.ibm.db2.jdbc.net.DB2Driver
DB2 v8(type_2)
URLformat:
jdbc:db2:<DATABASE_NAME>
Drivername:
Driver Name:
DB2 v8(type_4)
URLformat:
jdbc:db2://<HOST>:<PORT>/<DATABASE_NAME>
Drivername:
com.ibm.db2.jcc.DB2Driver
DB2 z/osv8 (type_4)mainframe
URLformat:
jdbc:db2://<HOST>:<PORT>/<DATABASE_NAME>
Drivername:
com.ibm.db2.jcc.DB2Driver
IBMInformix
URLformat: jdbc:informix-sqli://<HOST>:<PORT>/<DATABASE_NAME>:
informixserver=<IBM Informix instancename>;user=<user_name>; password=<password>
The informixserver variable is the name of the IBM Informixinstance, and not the server host name, and <user_name> and<password> are recognized by the IBM Informix server.
Chapter 1. Post-installation tasks 7
Database /data source
URLformat /drivername Value
Drivername:
com.informix.jdbc.IfxDriver
MySQL URLformat:
jdbc:mysql://<HOST>:<PORT>/<DATABASE_NAME>
Drivername:
Netezza URLformat:
jdbc:netezza://<HOST>:<PORT>/<DATABASE_NAME>
Drivername:
org.netezza.Driver
Oracle(thin), 9i,and 10g
URLformat:
jdbc:oracle:thin@<HOST>:<PORT>:<DATABASE_NAME>
Drivername:
oracle.jdbc.driver.OracleDriver
Oracletype2 (OCI)9i, and 10g
URLformat:
jdbc:oracle:oci:@<DATABASE_NAME>
Drivername:
oracle.jdbc.OracleDriver
MicrosoftSQL Server
URLformat:
jdbc:microsoft:sqlserver://<HOST>:<PORT>;databaseName=<DATABASE_NAME>;SelectMethod=<SELECT_MODE>
Drivername:
com.microsoft.jdbc.sqlserver.SQLServerDriver
Sybase URLformat:
jdbc:sybase:Tds:<HOST>:<PORT>/<DATABASE_NAME>
Drivername:
com.sybase.jdbc3.jdbc.SybDriver
Teradata URLformat:
jdbc:teradata://<HOST>/DBS_PORT=<PORT>/DATABASE=<DATABASE_NAME>/CHARSET=UTF8,COMPAT_DBS=true
Drivername:
com.ncr.teradata.TeraDriver
Adding, editing, and removing JDBC driversYou can install your own JDBC driver on the server. You can also edit or removethe drivers you create, referred to as user-installed drivers.
Adding JDBC driversYou can install your own JDBC driver on the server.
Procedure1. The data source wizard lets you add your own JDBC driver to the Virtual View
Manager metadata environment. Right-click at an appropriate location in theresource tree, and click New Data Source.
2. In the Add Physical Data Source window, click New Driver.
8 IBM Cognos Virtual View Manager Version 10.1.1: Administration Guide
3. In the New Driver Information window, enter the driver information in thefields as follows:v Name: User-defined name for the driver. Type the name. This is a
user-defined name for the driver. After adding it to the server, this name willbe listed along with other data source drivers listed on the first window ofthe Add Physical Data Source wizard.
v Type: Type of the JDBC driver. Accept Jdbc.v Jar File: Click the Browse button to locate the JAR file(s) where the driver
class is stored. You can also type the name (with path) in the Jar File field.You can only upload a JDBC driver JAR file that is visible to Virtual ViewManager. For example: installation_directory\apps\jdbc\lib\<jar_file>
v Driver Class Name: Fully-qualified name of the driver class. For example:oracle.jdbc.driver.OracleDriver
v Connection URL Pattern: Format of the URL to connect to the database. Fordetails on the connection URL format, see “Connecting through JDBCdrivers” on page 5.
JDBC drivers are installed in their respective directory, as described in thebeginning of the section “Installing and using special JDBC drivers” on page 2.For example, DB2 driver JAR files (db2jcc.jar and the accompanying license file)are installed in the following directory:installation_directory\apps\dlm\db2\lib\
4. Click OK.The driver is displayed with other data source drivers in the first window ofthe Add Physical Data Source window. You can use this driver to add JDBCtype data sources to the server.
Editing JDBC driversYou can edit user-installed JDBC drivers on the server.
Procedure1. Open the data source wizard.2. In the Select Data Source Driver section, select the user-installed driver that
you want to edit.3. Click Edit Driver.4. In the editing window, make the necessary changes, and click OK.
Use the Browse button to locate the JAR file(s) if the location of the file(s) haschanged. For example, DB2 driver JAR files are installed in the followingdirectory:installation_directory\apps\dlm\ds_db2\lib\
Removing JDBC driversYou can remove user-installed JDBC drivers on the server.
Procedure1. Open the data source wizard.2. In the Select Data Source Driver section, select the driver which you want to
remove.3. Click Delete Driver.
Chapter 1. Post-installation tasks 9
Using the IBM Cognos Virtual View Manager ODBC driverIf the option to install the ODBC driver is specified during the installation process,the driver is installed.
Using the ODBC driver on Windows operating systemsThis section provides the information you need to use the ODBC driver onWindows.
This section covers the following topics:v “Adding ODBC data sources on Windows operating systems.”v “Overriding the configured settings” on page 11.v “Code sample for connecting to Cognos Virtual View Manager Server” on page
11.v “Supported and non-supported features” on page 12.
Adding ODBC data sources on Windows operating systemsThe native Windows driver managers are supported by IBM Cognos Virtual ViewManager.
Procedure1. From the Windows Control Panel, open Administrative Tools > Data Sources
(ODBC).2. Click the User DSN tab or the System DSN tab.
A User DSN is accessible only to the current user. A System DSN is accessibleto all the users on the system and requires special permission to create andmodify.
3. Click the Add button.4. In the Create New Data Source screen, select the Virtual View Manager driver,
and then click Finish.5. In the Driver Configuration window, enter the following information that is
required for configuring the driver:v DSN Name: Name of the data source to which the clients will refer. Once a
DSN is created, its name cannot be changed.v Host: Server name (or IP address) on which Virtual View Manager is
running.v Port: TCP port used to communicate with Virtual View Manager Server,
which must match the port that the server is listening on. With defaultinstallation settings, the server listens to port 9401. To confirm the portnumber, click Virtual View Manager Server > JDBC and ODBC Drivers >Communications > Port in Virtual View Manager.
v User Name, Password, and Domain: A Virtual View Manager user name andpassword. The Password is nullable.
v Datasource: Name of the Virtual View Manager data source that the ODBCconnection will access This entry sets the default scope of client queries to aparticular datasource. Note that querying outside the scope of this datasource requires super-qualified tables or stored procedures.
v Catalog: Connects with default data-source catalog6. Use the Refresh button to retrieve the Catalogs available to this user on the
server.
10 IBM Cognos Virtual View Manager Version 10.1.1: Administration Guide

7. Use the Test button to test the settings in the configuration dialog box.8. Click OK.
The configured settings you entered are saved, and the data source is added toyour computer.
Overriding the configured settingsA client connecting to the server through the ODBC driver can override theconfigured settings on a data source by adding the appropriate parameters in theconnection string.
For example, clients can use a connection string such as
DSN=<value>;UID=<value>;PWD=<value>;DOMAIN=<value>;HOST=<value>;PORT=<value>;DATASOURCE=<value>; CATALOG=<value>;
Note that for these parameters:v The original DSN value cannot be overridden.v Upon creation of a DSN, you are prompted for a PWD entry.v HOST is the host name where the server is running.v CATALOG is optional.
Code sample for connecting to Cognos Virtual View ManagerServer
This topic provides a sample Visual Basic for Applications (VBA) Script forconnecting from a Microsoft client (such as Excel) through ADO to IBM CognosVirtual View Manager. The line rendered in bold renders the connection string.Sub demo()
On Error Resume NextErr.Cleardsn = "DS-Virtualviewmanager"Set conn = CreateObject("ADODB.Connection")conn.Open "DSN=" & dsnIf Err.Number <> 0 Then
’ process errorExit Sub
End If
Err.ClearSet rs = CreateObject("ADODB.Recordset")rs.Open "SELECT * FROM CUSTOMER", connIf Err.Number <> 0 Then
’ process errorExit Sub
End If
’ get column namesFor Each Column In rs.fields
colname = Column.NameNext
’ get first 100 rowsCount = 0maxcount = 100
Err.ClearDo While Not rs.EOF And Err.Number = 0 And Count < maxcount
Count = Count + 1For Each Record In rs.fields
Chapter 1. Post-installation tasks 11

colvalue = Record.ValueNextrs.movenext
LoopEnd Sub
Supported and non-supported featuresThis section describes the supported and non-supported features of the IBMCognos Virtual View Manager ODBC driver.
The IBM Cognos Virtual View Manager ODBC driver supports the followingfeatures:v Data types: CHAR, VARCHAR, SHORT, LONG, DOUBLE, FLOAT, TIME, DATE,
TIMESTAMPConversions (indicated by "->" below):CHAR, VARCHAR -> VARCHAR BIT, TINYINT, SMALLINT -> SMALLINTBIGINT, INT -> INT DECIMAL, REAL, FLOAT, NUMERIC -> FLOATAll other types are converted to VARCHAR.
The ODBC driver does not support the following feature:v Parameters in prepared statements.
Known issueFixed width: All CHAR and VARCHAR data types are reported by the driver to be256 characters. However, the driver supports the retrieval of longer values if theclient provides adequate memory for doing so.
Using the ODBC driver on UNIX and Linux operating systemsYou should be familiar with some details if you plan to use the ODBC driver onUNIX and Linux.
These details include:v To install the ODBC driver at anytime after server installation you can log into
the installation machine as the same user that installed the IBM Cognos VirtualView Manager server and the driver.
v To configure the ODBC driver, ensure that you have Read and Write permissionson the following files, which are in the C:\Windows directory:vvm<version>.xmlodbc.iniodbcinst.iniThe configuration is done by an interactive utility, driverConfig, which is in the<installation_directory>/apps/odbc/<platform>/bin.
v Creating a DSN is done through the configuration utility driverConfig, whichhelps users to reconfigure the driver files (in case, file-location is changed afterinstallation), and create, edit, list, or delete DSN entries.
The rest of this section describes the following tasks for using the ODBC driver onUNIX:v “Setting environment variables” on page 13v “Creating a DSN with driverConfig” on page 13
12 IBM Cognos Virtual View Manager Version 10.1.1: Administration Guide

Setting environment variablesYou must set environment variables if you plan to use the ODBC driver on UNIXand Linux.
Procedure1. Log into the installation machine as the same user that installed Virtual View
Manager.2. Set the following environment variables:
v VVM_HOMEThe location where the driver is installed. This is the full path to thetop-level installation directory for Virtual View Manager server.
v VVM_DSN_XMLThis is an optional variable. It allows you to specify an alternate location forthe DSN (Data Source Name) configuration file, so different users on thesame computer can have different sets of DSNs configured. It is the full pathto the ODBC DSN configuration file for the Virtual View Manager server.The DSN defaults to the following value, but it can be configured using thedriverConfig utility:$VVM_HOME/vvm<version>.xml
v ODBCINIodbc.ini defines the DSN entries. This value is the full path to the odbc.inifile. It is generated by the DSN configuration with driverConfig:<installation_directory>/odbc.ini
v ODBCINSTINIodbcinst.ini defines the ODBC drivers. This value is the full path to theconfiguration file odbcinst.ini, which is generated during DSN configurationwith driverConfig:<installation_directory>/odbcinst.ini
v LD_LIBRARY_PATHThis is specific to Solaris-based machines and Linux-based machines. Thispath refers to the location of the iODBC driver manager files. The defaultlocation is:<installation_directory>/apps/odbc/lib
v LIBPATHThis is specific to AIX-based computers. This path refers to the location ofthe iODBC driver manager files. The default location is:<installation_directory>/apps/odbc/lib
v SHLIB_PATHThis is specific to HP-UX-based computers. This path refers to the location ofthe iODBC driver manager files. The default location is:<installation_directory>/apps/odbc/lib
Creating a DSN with driverConfigThis section describes how to create a DSN by running the driverConfig utilityprogram on a UNIX platform.
driverConfig is located in the $VVM_HOME/apps/odbc/<platform>/bindirectory.
Chapter 1. Post-installation tasks 13

Procedure
Run driverConfig using the following command:driverConfig
Sample interactionHere is a sample interaction between the system and user.Main Menu0 Exit this utility1 Configure ODBC administrator2 View configuration and DSNs on this system3 Create/edit a DSNEnter command> 3---------Create/edit a DSN0 Return to main menu1 Create a DSN2 Edit an existing DSN3 Delete an existing DSNEnter command> 1Enter DSN name> testdsnEnter host [localhost]>Enter port [9401] (Thisis the default port setting)>Enter user> adminEnter password> adminEnter domain> cognosEnter datasource> dsEnter catalog> catKeep this information?[testdsn]host = localhostport = 9401uid = adminpassword = admindomain = cognosdatasource = dscatalog = catEnter (y)es or (n)o > y
The details for the newly created DSN are saved.
Configuring IBM Cognos Virtual View Manager for use of a JMS BrokerJMS provides a way to publish asynchronous message-based web services.
IBM Cognos Virtual View Manager supports both Sonic and TIBCO JMS brokers,but a few drivers must be copied from the JMS broker installation to the VirtualView Manager installation directory in order to properly connect the two servers.
To enable communications between Virtual View Manager and the JMS broker,several compiled library files, jars, will have to be copied to the server installationdirectory and the server will have to be restarted.
14 IBM Cognos Virtual View Manager Version 10.1.1: Administration Guide

Enable connection with TIBCO JMSThe following procedure describes how to enable connection with TIBCO JMS.
Procedure1. Find and copy the file named tibjms.jar from the TIBCO installation to the
following Virtual View Manager directory:<installation_directory>/apps/server/lib
2. Restart the Virtual View Manager server.
Enable connection with Sonic JMSThe following procedure describes how to enable connection with Sonic JMS.
Procedure1. Find and copy the file named mfcontext.jar and the all jar files that begin with
the prefix sonic_ to the following Virtual View Manager directory:<installation dir>/apps/server/lib
2. Restart the Virtual View Manager server.
Create and configure a queue and queue connection factoryin JMS Broker
The following procedure describes how to create and configure a queue and queueconnection factory in JMS Broker.
Procedure1. For either JMS broker, if you haven't already, configure your JMS broker
according to the respective manufacturer's instructions.Create a suitable Queue Connection Factory (QCF).
2. Create a suitable Queue.3. Register the Queue Connection Factory and the Queue with the JNDI.
Note: Connection to JMS via JNDI is currently supported by Virtual ViewManager. Virtual View Manager supports queues, but not JMS topic connectionfactories.
Add JMS connectors to IBM Cognos Virtual View ManagerConnectors must be configured for use by IBM Cognos Virtual View Manager. UseVirtual View Manager Administrator to create connectors so that the server canpublish JMS data services.
For more information on publishing Virtual View Manager Data Services to JMSqueues, refer to the "Publishing Resources" of the IBM Cognos Virtual ViewManager User Guide.
Procedure1. Start Virtual View Manager Administrator:2. Click Configuration > Connectors to open the Connector Management page.3. Add a Connector using the provided button.
The Add a JMS via JNDI Connector window is displayed.
Chapter 1. Post-installation tasks 15
Almost all fields in the Add a JMS via JNDI Connector window must havesome value for the Connector to function properly. Many of the fields do havedefaults.
4. Enter values in the fields displayed by the Info tab.v Connector Name—convenient, identifier label for the connectorv Group Name—connectors that share an identical group name share a
common connection pool. Connector grouping has failover connectionpooling because the connection pool is shared. If a connector instance failsother connectors in the group will be able to send and receive messagesusing the same connection pool.
v Annotation—(optional) adds notes on the JNDI connector. Annotations willbe visible on the Connector Management page.
5. Enter values in the fields displayed by the JMS via JNDI tab.v Initial Context Factory—Sonic and TIBCO context factories are supported
by default, but other context factories may be supported. Other JMScompliant brokers and their respective JNDI context factories may be used toconnect with Virtual View Manager. See the documentation for yourparticular JMS broker for specifics on what is needed to support a JNDIinitial context factory. The JNDI initial context factory is usually the classname.Type "c" to see the default, suggested string values that may be used withSonic JMS and TIBCO JMS as values for the initial context factories.For Sonic: com.sonicsw.jndi.mfcontext.MFContextFactoryFor TIBCO: com.tibco.tibjms.naming.TibjmsInitialContextFactory
v JNDI Provider URL—URL for connection with the JNDI. TCP protocol isgenerally used. TIBCO default port is 7222, and Sonic default port is 2506.Make sure the appropriate port in the firewall is opened to allow connectionswith the JNDI provider.
v JNDI User and JNDI Password—JMS JNDI user profile must have sufficientpermissions to look up JMS destinations. Passwords are not stored in cleartext.
v JMS Client ID—(optional) name the Virtual View Manager connectionswith the JMS broker.
6. Enter values for additional name-value pairs on the JNDI Properties tab.The JNDI Properties tab enables specification of additional name value pairs.Click the plus button to add name value pairs.In particular, Sonic requires specification of a domain name, while TIBCO doesnot require further specification.
7. Enter values for additional name-value pairs on the Pool tab.The Pool tab enables specification of the connection thread timeout and poolsize parameters. The default values will be generally adequate for developmentneeds.v Pool Timeout specifies the maximum waiting time (in seconds) for a new
connection. If a connection is not provided within the pool timeout periodspecified, then a check is made for an available connection using the properuser and uses that, or if that is not available then the least recently usedconnection for some other user is dropped and a new connection for therequired user is opened.
v Minimum Pool Size specifies the number of connections that should remainin the connection pool even when the pool becomes inactive.
16 IBM Cognos Virtual View Manager Version 10.1.1: Administration Guide
The connection pool is initially empty. When there is a need to connect toJMS via JNDI, the pool creates one connection based on the informationprovided in the Info panel. Connections remain available even when there isno activity because the time to negotiate new connections can add asignificant amount to the query response time.If the JMS connection pool has been inactive for a while, the connector poolsize will start to shrink based upon the connection inactivity. The MinimumPool Size specifies the minimum number of connections to remain in thepool, to maintain a minimum number of available connections.
v Maximum Pool Size specifies the number of connections (both active andidle) allowed to access the data source. When the connection pool limit isreached new incoming requests must wait until the next connection is madeavailable.The connection pool is initially empty. When there is a need to connect to thedata source, the pool creates a connection based on the information providedin the Info panel. As making new connections can take some time andresources, these connections remain available even if they become idle.Connectors with identical group names will share the same pool ofconnections.
Configuring LDAPYou can use LDAP for domain administration. You can also use LDAP as adatasource.
Procedure1. Obtain the ldapbp.jar file.2. Copy the ldapbp.jar file to the Virtual View Manager installation directory:
installation_directory\apps\common\lib3. Restart the server.
Chapter 1. Post-installation tasks 17

18 IBM Cognos Virtual View Manager Version 10.1.1: Administration Guide
Chapter 2. Virtual View Manager configuration
IBM Cognos Virtual View Manager provides a large number of configurationparameters that display configuration settings, usage data, and allow administratormodification of settings and behavior. Usually none of the configuration settingsrequire modification for development environments, but certain settings enableoptimal implementation for various production settings.
This chapter introduces some of the configuration tasks you can perform to trackinformation and control Virtual View Manager behavior.
The following topics are covered in this chapter:v “The Configuration window”v “Fine tuning memory” on page 21v “Case sensitivity” on page 21v “Case sensitivity and trailing spaces mismatches” on page 21v “Dealing with settings mismatches” on page 23v “Trailing spaces” on page 24
Configuration rights and privilegesAll IBM Cognos Virtual View Manager users (users with the Access Tools right)may display the Configuration panel from the Studio > Administration menu.
Display of all parameters in the Configuration panel requires both the Access Toolsright and the Read All Config right. If a different set of rights are held by the user,then only an appropriate subset of the available parameters will be visible asread-only settings.
Modification of configuration parameters requires the Modify All Config right inaddition to the Access Tools right.
The Configuration windowThe Configuration window provides access to all IBM Cognos Virtual ViewManager configuration parameters. You access the Configuration window byselecting Administration > Configuration.
The configuration parameters are grouped into three main categories: Virtual ViewManager Server, Data Sources, and Studio. When you open the subfolders in eachcategory and select a parameter indicated by the configuration parameter icon,studio displays the current configuration setting for that parameter along with adescription in the right pane.
All parameters, whether read-only or configurable, have a type and a descriptionthat make their function and purpose clear. Read-only parameter values are grayedout and labeled (Current). If the value may be changed with the associatedparameter is appropriately labeled (On Server Restart). Those parameters thatrequire the server to be restarted are clearly marked in the parameter description.
© Copyright IBM Corp. 2008, 2011 19

Virtual View Manager is optimized for a typical development environment wherean individual or a moderately sized team work together to prepare prototypes fortest and later for a production deployment. Some configuration settings should beassessed prior to test and production deployment so that performance for aparticular implementation environment is optimal.
Configuration parameters - serverSeveral configuration parameters are available. Configuration parameters aregrouped by type.
The configuration parameters, grouped by type, are listed in the following table.
Folder Configuration Parameters
API > Protocol Current and supported API protocol versions
Communications DN, Java Keystore file and settings
Configuration Repository, Debug, E-mail, Files, Hooks, General Info (host name,IP, version,...), License, Metadata (change log, cache sizes, purgethresholds), Monitor settings, Network (HTTPS hostnameverification, FTP, HTTP, and HTTPS proxy settings), Security(Anonymous and Dynamic logins), and transaction logging
Events and Logging Storage conditions, Event Generation (Cache, Data Source,Request, Resource, Session, Storage, System Overview, Transactionand Trigger events), and Logging (custom logger, database logger,file logger, memory, and SNMP settings)
JDBC and ODBCDrivers
Client communications settings, data fetch default, requests andsession time-outs
Memory Java heap (current and total available memory), managed memorysettings, maximum memory for a request
Runtime ProcessingInformation
I/O samples, Repository (Privilege, Resource, and User cacheusage), Requests tracking, Sessions, Storage, Transactions, Triggers,and Wait Queue settings
SQL Engine Cardinality, Query Plan, Prepared Statement, and Runtime Statscaches, Case Sensitivity, Ignore Trailing Spaces, Logging forresource usage, and query statistics, SQL optimization settings,and overrides
All parameters, whether read-only or configurable, have a type and a descriptionthat make their function and purpose clear. Read-only parameter values are grayedout and labeled (Current). If the value may be changed with the associatedparameter is appropriately labeled (On Server Restart). Those parameters thatrequire the server to be restarted are clearly marked in the parameter description.
Virtual View Manager is optimized for a typical development environment wherean individual or a moderately sized team work together to prepare prototypes fortest and later for a production deployment. Some configuration settings should beassessed prior to test and production deployment so that performance for aparticular implementation environment is optimal.
20 IBM Cognos Virtual View Manager Version 10.1.1: Administration Guide
Fine tuning memoryIf you want to change the default memory setting, (512 MB), use the Configurationwindow (Administration > Configuration menu option), and navigate to Memory(Configuration > Virtual View Manager Components > Virtual View ManagerServer > Membory). You can modify the settings for Java heap.
Consider the following to determine the configuration for optimal memory:v Queries run faster with more memory. So, giving the server as much memory as
possible is highly desirable.v However, giving the server too much memory can cause excessive paging (see
“Paging”), which can degrade performance significantly.
PagingPaging occurs if the total amount of memory of all the running applicationsexceeds the amount of physical memory.
In this situation, the operating system temporarily moves parts of the runningapplications onto the disk so that the applications won't crash when memory isexhausted. When a paged-out memory location is accessed, the operating systemwill restore that area of memory from disk and then, to make room, move someother part of memory to disk. Consequently, what should be a simple memoryaccess becomes two disk operations and performance suffers. Some amount ofpaging is fine on the client side. But on the server, where things are a lot morecontrolled and optimal performance is desired, paging must be minimized.
Case sensitivityBy default, IBM Cognos Virtual View Manager is set to be not case sensitive. Whilethe SQL specification encourages the use of case-sensitive string comparison, manydatabases default to a non-case sensitive comparison. Getting the correct resultsfrom a query requires knowledge of which type of comparison is used. Forexample, the test ('abc' = 'ABC') returns FALSE for a case sensitive comparison andTRUE for a non-case sensitive comparison.
Changing the case sensitivity setting might impact existing queries, in that theresults they return may be changed or performance may be affected.
Case sensitivity and trailing spaces mismatchesCase sensitivity and trailing space mismatches are often encountered in enterpriseenvironments with many different database systems.
With IBM Cognos Virtual View Manager, case sensitivity and trailing spacesmismatches only occur under the following conditions:v There is a mismatch between Virtual View Manager and the underlying data
source's case sensitivity and/or trailing spaces settings.v There is a WHERE clause with a CHAR or VARCHAR in the clause.
Virtual View Manager handles case sensitivity and trailing space mismatches byfollowing the conventions defined under Administration > Configuration.
These settings may be overridden on a query by query basis; however, this practiceshould be considered very carefully to avoid providing queries to clients that couldproduce unexpected results. Consider the following example.
Chapter 2. Virtual View Manager configuration 21

A client submits a simple SQL statement such as:SELECT v1.balance FROM accounts v1 WHERE v1.account_name= ’bob’
The client is aware of what case sensitivity it wants to use. If it submits this to acase sensitive database, then it expects to only get accounts with exactly 'bob' asthe name. If it submits this to a case insensitive database, it expects to get accountswith 'bob', 'BOB', and 'Bob'. If the client knows the database is case sensitive and itwants an insensitive compare then it would submit:WHERE UPPER(v1.account_name) = UPPER(’bob’)
The same is true of Virtual View Manager. However, in the case where VirtualView Manager is not case sensitive and the underlying database is case sensitive,Virtual View Manager will add the UPPER function to the SQL sent to theunderlying database. Unfortunately, doing this will invalidate an existing index—inthe previous example, the index on account_name would be invalidated, causing atable scan.
Settings affecting query performanceTo determine if your configuration settings are affecting query performance, youcan evaluate any filter nodes or the SQL underlying each FETCH node in theExecution Plan to determine if case sensitivity or trailing spaces settings areimpacting the query. Focus primarily on the WHERE clause or any filter nodes.
One of the two major issues that can come up is that some string comparisons inthe WHERE clause have RTRIM or UPPER functions applied to them which ismanifested in the FETCH node. Wrapping a column with a function such asUPPER or RTRIM will prevent the underlying system from using an index on thatcolumn. This is necessary to provide correct results, but it can affect performance.
If a filter is applied at the server level, rather than the database level, all rowsmust be returned from the underlying table which may also affect performance onlarge tables.
Review the following matrix to determine the possible impact of different casesensitivity and trailing spaces settings:
Virtual View ManagerSetting
Underlying Data SourceSetting
Virtual View ManagerQuery Behavior
case_sensitivity=true case_sensitivity=true None
case_sensitivity=true case_sensitivity=false Performs WHERE clausestring comparison in VirtualView Manager instead ofpushing down to database.
case_sensitivity=false case_sensitivity=true Adds UPPER to both sides
case_sensitivity=false case_sensitivity=false None
ignore_trailing_spaces=true ignore_trailing_spaces=true None
ignore_trailing_spaces=false ignore_trailing_spaces=true Performs WHERE clausestring comparison in VirtualView Manager instead ofpushing down to database.
ignore_trailing_spaces=false ignore_trailing_spaces=false None
22 IBM Cognos Virtual View Manager Version 10.1.1: Administration Guide

The Virtual View Manager query engine is designed to get the correct andconsistent answer regardless of the configurations of the underlying data sources.If you find an RTRIM in the WHERE clause, it is because Virtual View Manager isconfigured to ignore trailing spaces while the underlying data source does notignore them. Likewise if you find an UPPER, it means that Virtual View Manageris configured to ignore case while the underlying database is sensitive to case.
Dealing with settings mismatchesThere are two ways to deal with settings mismatches. First, the system wideconfiguration values for case sensitivity and trailing spaces can be modified via theAdministration > Configuration menu. This is only useful if the data sources arefairly homogeneous in regard to this behavior. Changes to this setting should bewell-considered or avoided as they will cause all other query plans to bere-evaluated to accommodate the new setting.
Second, if the data sources have varying policies for case sensitivity and/or trailingspaces, these values can be modified on a per-query basis by using SQL queryoptions. This facility is useful when numerous types of data sources are used withvarying case-sensitivity and/or trailing space settings.
These query hints should be used with an understanding that the global contractprovided by IBM Cognos Virtual View Manager is overridden. It must becommunicated to clients querying this published resource that the contractualbehavior has been overridden.
In the previous example, the developer would use this syntax immediately afterthe SELECT keyword:{option ignore_trailing_spaces="false", case_sensitive="true"}
Impact on string comparisonThe case-sensitive policy affects all forms of string comparison.
The impacted functions and operators include:v Comparison operators in WHERE and JOIN ON: = < <= >= > <>v REPLACE(src,pattern,escape)
The pattern is matched according to the policy.v MIN(column)
The strings ABC and abc are considered the same, so either may be chosen bythis function.
v MAX(column)The strings ABC and abc are considered the same, so either may be chosen bythis function.
v GROUP BYThe strings ABC and abc are considered the same, so the group will includeboth sets of values.
v ORDER BYThe strings ABC and abc are considered the same, so they will sort together andmay be intermixed.
Case sensitivity does not affect the actual value of strings. Case is preserved in allcases. It only affects the comparison between strings.
Chapter 2. Virtual View Manager configuration 23
Trailing spacesMost databases perform string comparisons while ignoring any spaces at the endof the string values. For example, the test ('abc' = 'abc') is TRUE. Some databasesdo make use of trailing spaces, so this test would return FALSE.
IBM Cognos Virtual View Manager policyIBM Cognos Virtual View Manager's default policy is to ignore trailing spaces.Changing the policy may affect existing queries, in that the results they return maybe changed or performance may be affected.
Impact on string comparisonThe trailing spaces policy affects all forms of string comparison. The affectedfunctions and operators include:v Comparison operators in WHERE and JOIN ON: = < <= >= > <>v LENGTH(column)
The string length returned does not count trailing spaces.v MIN(column)
he strings 'abc ' and 'abc' considered the same, so either may be chosen by thisfunction.
v MAX(column)The strings 'abc ' and 'abc' are considered the same, so either may be chosen bythis function.
v GROUP BYThe strings 'abc ' and 'abc' are considered the same, so the group will includeboth sets of values.
v ORDER BYThe strings 'abc ' and 'abc' are considered the same, so they will sort togetherand may be intermixed.
The trailing spaces policy does not affect the actual value of strings. Trailing spacesare preserved in all cases. It only affects the comparison between strings.
Impact on server performancePerformance may be impacted by the choice of policy. IBM Cognos Virtual ViewManager makes every attempt to run as much of the query as possible in theunderlying database. This is always possible when the Virtual View Managerpolicy is set to match the database's policy, but when the policies are different,some portions of the query may be executed in Virtual View Manager instead of inthe database.
Whenever possible, you should match the policy of the server to that of theunderlying database. If this is not desirable because you want to present a differentpolicy or because there are multiple underlying databases with different policies,the following performance guidelines apply:v If Virtual View Manager ignores trailing spaces and the database does not,
comparisons can only be pushed to the database if the data is known to bewithout trailing spaces for both values. You can force this condition by wrappingvalues in TRIM() or RTRIM() functions.
v If Virtual View Manager does not ignore trailing spaces and the database ignorestrailing spaces, and the data is not known to be without trailing spaces for both
24 IBM Cognos Virtual View Manager Version 10.1.1: Administration Guide

values, the server will add an RTRIM() function to both values to ensure theunderlying database performs a ignore trailing spaces compare. This should notaffect server performance.
Studio lockingA locking configuration setting can force IBM Cognos Virtual View Manager usersto acquire a lock prior to changing a resource. The server web services API doesnot honor this configuration setting.
This setting is in effect when Studio > Locking > Enabled is set to true.
Changing the configuration requires the Modify All Config and of course theAccess Tools rights.
Procedure1. From Studio, click Administration > Configuration.2. Click Studio > Locking at the bottom of the configuration window and set
Enabled to True.3. Apply the changes, and click OK.
Results
This configuration change is not immediately propagated to other instancesconnected to the server, but any attempt to save resources will force a check to seewhether the lock is enabled.
The requirement for resource locking prior to changing and saving resources maybe disabled for the entire server by any administrator with the Modify AllResources right. Disable locking by toggling of the value of Enabled to False.
Existing locks will persist regardless of whether Virtual View Manager is requiringlocks prior to modification. When locking is disabled users may still optionally useresource locks so that simultaneous changes are not made to a resource beingrevised by more than one person at a time.
Chapter 2. Virtual View Manager configuration 25

26 IBM Cognos Virtual View Manager Version 10.1.1: Administration Guide
Chapter 3. IBM Cognos Virtual View Manager domainadministration
IBM Cognos Virtual View Manager supports the Cognos, dynamic, and LDAPdomains, each of which controls a particular set of users and groups that canaccess Virtual View Manager. This chapter describes the Cognos domain and howto create and manage its users and groups.
The following topics are covered in this chapter:v “The Cognos domain.”v “Domain management” on page 28.v “Group management” on page 28.v “User management” on page 30.v “Change your own password” on page 33.v “Changing ownership of resources” on page 33.v “Manage user and group privileges” on page 34.
Configuration and management of the LDAP and dynamic domains aredocumented in the following chapters:v Chapter 4, “LDAP domain administration,” on page 35v Chapter 5, “Dynamic domain administration,” on page 51
The Cognos domainThe Cognos domain comprises users and groups defined within IBM CognosVirtual View Manager. Virtual View Manager has predefined specific users andgroups in the Cognos domain which you can use and modify as appropriate. Youcan create additional users and groups within the Cognos domain to meet yourspecific needs.
Administration of the Cognos domain involves creating new users and groups,changing user passwords, and granting privileges to users and groups to access theresources.
The main tool used to manage domain users and groups is Virtual View ManagerAdministrator. You can access Virtual View Manager Administrator in two ways:v From Virtual View Manager, click Administration > Launch Virtual View
Manager Administrator.v From a web browser using the following URL:
http://server_name:port_number/managerThe default port number is 9400.
The Users page in Virtual View Manager Administrator is where you manageusers and groups in the Cognos domain as well as in the LDAP and dynamicdomains.
© Copyright IBM Corp. 2008, 2011 27
Domain managementDomain management entails adding and removing domains and the users andgroups assigned to a domain. Two domains—cognos and dynamic—are alreadydefined for use when IBM Cognos Virtual View Manager is installed.
The Domain Management page in Virtual View Manager Administrator lists thedefined domains and provides links to view the groups and users within thoserespective domains.
The Domain Management page is used primarily for the specification of LDAPdomains and for the selection and deselection of those external groups that willhave rights and privileges to view and use defined resources.
Domain management for LDAP domain configurations are described in Chapter 4,“LDAP domain administration,” on page 35. For more information on dynamicdomain administration refer to Chapter 5, “Dynamic domain administration,” onpage 51.
Group managementYou can create groups of users who need similar rights to perform administrativetasks on the server, and groups who need access to create, view, access, and changeobjects defined with IBM Cognos Virtual View Manager. Developers, operationspersonnel, and administrators should each have their own groups to access VirtualView Manager Administrator and other tools and options.
Group rights templates enable quick assignment of rights based on an expectedlevel of interaction with Virtual View Manager. Group rights templates exist for:Administrators, Developers, Operations, Backup, Restore, Backup & Restore, andEnd Users. For more information, see "Group and User Rights Templates" in theSecurity chapter of the Virtual View Manager User Guide.
As an example, end users should belong to groups with no group rights. Typicallyend users are not allowed to change data source definitions, change serverconfiguration settings, or back up servers. End users simply use JDBC, ODBC, orweb service-enabled applications to trigger data requests and procedure calls thatget executed in the background without further user interaction or need foradditional rights.
Built-in groupsThere are three built-in groups—admin, all (cognos), and all (dynamic)—which arecreated by the system and cannot be deleted.v admin (cognos)—this group has administrative privileges. The admin user is a
system-provided member of this group. Other users can be added to or removedfrom this group by anyone with administrative privileges.
v all (cognos)—this group contains all users except for the following: anonymous,nobody, system, and users of the dynamic domain. User membership isautomatically maintained by the system.
v all (dynamic)—This group contains all users in the dynamic domain.
28 IBM Cognos Virtual View Manager Version 10.1.1: Administration Guide
Adding groups to the Cognos domainYou can add any number of groups to the Cognos domain. When you add agroup, you define the rights for that group. After you've created a group, you canadd users to it.
Procedure1. Start Virtual View Manager Administrator.2. Click the Users tab, and click Group Management.3. Click the Add Group button.4. In the Add a Group window, enter the name for the new group.5. Select the group rights template that is most appropriate for the new group.
Customize the rights as required. Refer to the IBM Cognos Virtual ViewManager User Guide description of "Group and User Rights Templates" for moreinformation on the rights and what they will allow.
6. Add notes in the Annotation field to help developers identify the users, usage,and rights associated with the group. This will help with the setting ofpermissions on new resources and other future administration.
7. Click OK.The group is added to the Group Management page.
Removing groups from the Cognos domainAdministrators with the Modify All Users and the Access Tools rights may removegroups from the Cognos domain. Removing a group deletes any associated rightsand privileges from group members.
Deletion of a Cognos domain group does not remove its member users from theVirtual View Manager.
Procedure1. In Virtual View Manager Administrator, click Users > Group Management.2. Select one or more groups using the check box and click Remove Groups.
Results
Removing LDAP groups does nothing to LDAP configurations and definitions, butit does remove LDAP users and any group associated rights and privileges fromthe Virtual View Manager system.
Removing an externally defined LDAP groupIBM Cognos users who were members of a group deleted from the Cognos domainmight still have the rights and privileges that were associated with that group. Ifthis is the case, the rights and privileges are present because of membership inother groups or the rights and privileges were explicitly assigned directly to theuser.
Deletion of a Cognos domain group does not remove its member users from theVirtual View Manager.
Procedure1. In Virtual View Manager Administrator, click Users > Domain Management.
Chapter 3. IBM Cognos Virtual View Manager domain administration 29
2. Select the LDAP domain using the left most column radio button, and clickEdit External Groups.
User managementUser administration involves adding a user to the domain, removing a user fromthe domain, adding users to a group, removing users from a group, and changingpasswords.
Built-in users and their privilegesThe Cognos domain has the following users that are automatically created: admin,anonymous, nobody, and system. These users are permanent in the system andcannot be removed.v admin—This user has privileges to access and use any resource in the system.
admin can also grant/revoke privileges to other users. The admin user cannot beremoved from the system. The admin user has a home folder (/users/admin).
v anonymous—This user is provided for anonymous login for JDBC clients andWeb service clients. By default, anonymous logins are disabled. anonymoususers must be explicitly given privileges to access IBM Cognos Virtual ViewManager resources.
v nobody—This user cannot log in or be removed. Abandoned resources ownedpreviously by a user that no longer exists in the system are given to nobody.
v system—This user cannot log in or be removed. It owns items that even theusers with administrative privileges cannot modify.
Members of the all group, meaning all Cognos users and all dynamic users, haveRead privileges for all folders created with the installation. Newly created foldersand resources do not include privileges for members of the all group. Privilegesmust be assigned by the creator/owner of the resource, or by an administrator oruser explicitly given the Grant right on that object.
All semi-editable folders, such as /shared, /services/databases and/services/webservices, have no privileges but they can be edited.
All pre-created tables/procedures have Select and Execute privileges for the allgroups (in the cognos and dynamic domains) and the anonymous user in cognos;for example, /services/databases/system, /services/webservices/system, and /lib.v By default anonymous users cannot invoke any Web services. To make Web
services available to anonymous users, grant the Read privilege to/services/webservices, then grant Read to the both the data service and the portthat you want the anonymous user to access and use.
v anonymous users cannot connect to the server using JDBC because no VirtualView Manager data service of the type database is automatically available. Toenable them, you should grant Read privileges to services/databases, the dataservice, and any catalogs or schemas that you want to make available.
v Resources in the Virtual View Manager Data Services area point to theresources in the work area. In order to access a resource in the Virtual ViewManager Data Services area, the anonymous user needs permission to read allthe folders above that item and have appropriate permission (such as SELECT,INSERT, UPDATE, DELETE, or EXECUTE) on the item to which the resourcepoints.
In order to expose a resource to either Web services or JDBC clients, you shouldgrant the Read privilege to all the folders above the resource and the appropriate
30 IBM Cognos Virtual View Manager Version 10.1.1: Administration Guide

permission to the resource itself. If the resource uses other resources, then youhave to repeat the process with those resources as well.
This is similar to what you would do for any other user, except that some foldershave the Read privilege by default for the all group and you need to overridethose folders.
The anonymous user is denied any access to the /users folder and admin cannotchange it. This means that all published resources you want anonymous to usemust reside in the /shared folder.
Adding users to the Cognos domainIBM Cognos Virtual View Manager administrators with the Modify All Users andModify All Resources rights can add users to the Cognos domain.
Procedure1. In Virtual View Manager Administrator, click Users > User Management.2. Click Add User.3. Enter the new user name and password.
The user name is the login name for the user and can only containalphanumeric characters and the underscore character.The password must be at least six characters long and it may have selectedsymbols and upper case alphanumeric characters. The following are someexamples of valid passwords:joe-./:;<=>?@[\]^_`|~123_joe!23Abcd-+23!"#$%&'{}*+
4. Select a base template to begin rights assignment and select rights asappropriate for the local security policy and the expected level of userinteraction with the server and underlying data sources.
5. Enter notes in the Annotation field to give future administrators an indicationof the user's role in the system or organization.
6. Click OK.The newly added user name is added to the Cognos domain.
Note: LDAP users are managed entirely by the LDAP server. Virtual ViewManager adds the LDAP domain and selected groups. Members of thosegroups inherit Virtual View Manager rights and privileges for tools andresources from the rights and privileges assigned to the group from theManager Group page and resources.
Removing users from the Cognos domainRemoving a user from the Cognos domain removes the user from IBM CognosVirtual View Manager.
Removing a user who is derived from an LDAP domain/group does not prohibitthe user from logging into the system again. See “Removing a group from anLDAP domain” on page 45 for more information.
Chapter 3. IBM Cognos Virtual View Manager domain administration 31
Procedure1. In IBM Cognos Virtual View Manager Administrator, click Users > User
Management.
2. Select check box to the left of the each user to be removed from the domainand click Remove User(s).
Managing group membershipA group must exist in the Cognos domain before you can try to add a user to thatgroup.
See “Adding groups to the Cognos domain” on page 29.
Procedure1. In IBM Cognos Virtual View Manager Administrator, click Users > User
Management.2. Select the link in the # Groups column for the desired user.
The Edit the User's Group Membership window is displayed.3. Select the desired groups in which the user will be a member, and click OK.
All rights and privileges are inherited by group definition and usermembership in that group. If a user belongs to multiple groups, no specialrights and privileges are gained from having duplicate rights and privileges.If a user is added to the group named admin, it means that this user obtainsadministrative privileges in Virtual View Manager. In order to use the newprivileges as an administrator, the user must log in again.
View group membershipIBM Cognos Virtual View Manager Administrator displays the groups in which aselected user belongs, and it also provides filtering to see all the members of asingle selected group.
View a user' s group membership in the Cognos domainYou can view a user's group membership in the Cognos domain.
Procedure1. In Virtual View Manager Administrator, click Users > User Management.2. If the user belongs to a single group, it is displayed in the Groups column
listing for that user. Otherwise expand the Groups column to show the groups.
View a group's membershipYou can view a group's membership.
Procedure1. In Virtual View Manager Administrator, click Users > User Management.2. Select the link in the # Users column.
The users in that group are then listed on the User Management page usingthe appropriate group filter.Alternatively, go directly to the User Management page and use the Domainand Group filters to show the groups.
32 IBM Cognos Virtual View Manager Version 10.1.1: Administration Guide

Changing a passwordIBM Cognos Virtual View Manager administrators with the Modify All Users andModify All Resources rights can also change any Cognos domain user password,whereas non-admin Cognos domain users may only change their own passwords.
Change your own passwordNon-admin Cognos domain users may only change their own passwords.
Procedure
Click File > Change Password.
Changing a user's password or setting explicit user rightsIBM Cognos Virtual View Manager administrators with the Modify All Users andModify All Resources rights can change any Cognos domain user password.
Procedure1. In Virtual View Manager Administrator, click Users > User Management.2. Select a user name.
The resulting window allows you to change the user's password and enablesassignment of rights.
Note: Changes made to the user rights profile take effect nearly immediately asVirtual View Manager checks for appropriate rights every time feature access isattempted.
Changing ownership of resourcesAdministrators can change the ownership of resources one by one or as a group ofresources within a container resource.
Abandoned resources owned previously by a user that no longer exists in thesystem are re-assigned to the nobody user. The nobody user cannot log in or beremoved. The administrator can change the ownership to a valid user.
Procedure1. In the resource tree, select a resource, and click Administration > Change
Owner of <resource>.Or, right-click a resource, and click Change Resource Owner.The current owner's user name and domain are displayed, and a list of newowners with their user names and domains is presented.Ownership cannot be changed for system-owned resources or home folders.
2. Select a new owner's user name from the User drop-down list.3. Optionally, select the Apply the change recursively check box.
The Apply the change recursively check box is checked by default if theselected resource is a container. This box is unchecked for leaf resources. It ischecked and disabled if the owner cannot be changed or if the resource is aphysical data source. All resources within a physical data source and the datasource itself are always owned by one user.The Apply the change recursively check box is enabled when the resource isnot in one's home folder.
Chapter 3. IBM Cognos Virtual View Manager domain administration 33

4. To selectively change the ownership, select the Change if the current owner isbox.
5. Click OK to see the list of resources ready to be transferred to the new owner.6. View the list of resources, and click Commit to apply the changes.
Manage user and group privilegesResource developers, owners, and users delegated Grant privilege on a resourcemay also set resource specific privileges for that object. Administrators withModify All Users or Modify All Resources privileges may also review, set, andrevoke privileges for any resources and define rights for any groups and users inVirtual View Manager.
Management of user and group privileges on resources is generally best left to thedeveloper who created and owns the resource, providing access for a securityaudit by an administrator at any time. It is more efficient to let the resourcedevelopers and owners set privileges for the native sources that they define,configure, and manage from within Virtual View Manager.
To facilitate decentralized management of specific resource privileges it is helpfulto define groups of users with similar and well-defined roles where possible.Group assignment of privileges on the resource is encouraged for any largedeployment.
See the "Privileges" section in the Security chapter of the User Guide for moredetails on access privileges.
34 IBM Cognos Virtual View Manager Version 10.1.1: Administration Guide

Chapter 4. LDAP domain administration
IBM Cognos Virtual View Manager supports the following types of domains:Cognos, LDAP, and dynamic. This chapter focuses on how to configure andadminister LDAP domains for use with Virtual View Manager.
The following topics are covered in this chapter:v “About the LDAP domain”v “Configuring LDAP properties file”v “Domain administration” on page 42v “LDAP user management” on page 47
About the LDAP domainIBM Cognos Virtual View Manager can leverage enterprise LDAP implementationsof Active Directory and iPlanet domains, groups, and users to authorize views anduse, creation and management of Virtual View Manager defined resources.
Currently supported LDAP authentication servers are:v iPlanet 5.1 sp2v Windows Server 2003 Active Directory
Virtual View Manager configuration and management for use of LDAP domainsrequires the Read and Modify All Users rights in addition to the Access Tools rightto give the administrator the ability to create and modify domains, groups, andusers. Those rights also enable specification and modification of rights given toLDAP groups and users.
Manager also enables quick configuration and provisioning of LDAP (ActiveDirectory and iPlanet) domains, groups, and users with rights and privilegesenabling use, view, and change of Virtual View Manager defined resources. LDAPconfigurations and usage are described in the next chapter.
Configuring LDAP properties fileQuery searches for retrieving user and group information are controlled by aproperties file named ldap.properties.
The ldap.properties file is located in the following installation directory:
<installation_directory>/conf/server/ldap.properties
The file contains relevant query parameters for the two supported LDAP directoryservers, Active Directory and iPlanet.
If you add LDAP domains to IBM Cognos Virtual View Manager, you shouldconfigure the ldap.properties file after a successful installation.
This section describes the structure of the LDAP properties file and also gives anexample of the default LDAP properties file.
© Copyright IBM Corp. 2008, 2011 35
Structure of the LDAP properties fileThe LDAP properties file (ldap.properties) has four sections which are described inthe following sections.
These conventions are followed when describing sections in the LDAP propertiesfile.v TYPE must be replaced with either "iplanet" or "activedirectory".v Property file variables are designated with a capital letter enclosed by angled
brackets: <A>, <B>, ..., <X>.v A description of each line in the ldap.properties file is provided.
Section 1: (used for querying all users)Section 1 of the ldap.properties file is used for querying all users.
TYPE.all.users.search.context=<A>
Search-context used to find all users.
TYPE.all.users.filter=<B>
Filter to pass to a query for finding all users.
TYPE.all.users.username.attribute=<C>
Username attribute to retrieve the name of user found from a query.
TYPE.all.users.search.timeout=<D>
Search timeout value to limit the time for infinite search. 0 (zero) means infinitetimeout, timeout is in milliseconds and should be greater than 0 (zero).
Section 2: (used for querying all groups)Section 2 of the ldap.properties file is used for querying all groups.
TYPE.all.groups.search.context=<A>
Search-context used to find all groups.
TYPE.all.groups.filter=<B>
Filter to pass to a query for finding all groups.
TYPE.all.groups.groupname.attribute=<C>
Group name attribute to retrieve the name of a group found from a query.
TYPE.all.groups.search.timeout=<D>
Search timeout value to limit the time for infinite search. 0 (zero) means infinitetimeout, timeout is in milliseconds and should be greater than 0 (zero).
Section 3: (used for authenticating LDAP users)Section 3 of the ldap.properties file is used for authenticating LDAP users.
TYPE.user.username.comparison.is.case.sensitive=<A>
36 IBM Cognos Virtual View Manager Version 10.1.1: Administration Guide
Sets the user name comparison to be case-sensitive or not. By default the value of<A> is true but it may be set to false.
TYPE.user.search.context=<B>
Search-context used to find the user attempting authentication.
TYPE.user.filter=<C>
Filter used to authenticate user in LDAP directory server. The USERNAME keywordwill be replaced at runtime with the appropriate username.
TYPE.user.username.attribute=<D>
User name attribute to retrieve the name of the user attempting authenticationfrom a query.
TYPE.user.search.timeout=<E>
Search timeout value to limit the time for infinite searches. 0 (zero) means infinitetimeout, timeout is in milliseconds and should be greater than 0 (zero).
Section 4: (used for querying all groups for a user)Section 4 of the ldap.properties file is used for querying all groups for a user.
TYPE.user.groups.search.context=<A>
Search-context used to find all the groups for a user.
TYPE.user.groups.filter=<B>
Filter to pass to a query for finding the members of a group. The USERDNkeyword will be replaced at runtime with the appropriate user distinguishedname.
TYPE.user.groups.groupname.attribute=<C>
Group name attribute for finding the name of a group to which a user belongs.
TYPE.user.groups.search.timeout=<D>
Search timeout value to limit the time for infinite searches. 0 (zero) means infinitetimeout, timeout is in milliseconds and should be greater than 0 (zero).
Example of an ldap.properties fileThis section presents an example of the operational lines in the defaultldap.properties file. Following the file is a key for the symbols and attributes thatcan be used.
iplanet.all.users.search.context=ou=people
iplanet.all.users.filter=(&(objectclass=person))
iplanet.all.users.username.attribute=uid
iplanet.all.users.search.timeout=0
Chapter 4. LDAP domain administration 37

iplanet.all.groups.search.context=ou=groups
iplanet.all.groups.filter=(&(objectclass=groupofuniquenames))
iplanet.all.groups.groupname.attribute=cn
iplanet.all.groups.search.timeout=0
iplanet.user.username.comparison.is.case.sensitive=true
iplanet.user.search.context=ou=people
iplanet.user.filter=(&(uid=USERNAME)(objectclass=person))
iplanet.user.username.attribute=uid iplanet.user.search.timeout=1000
iplanet.user.groups.search.context=ou=groups
iplanet.user.groups.filter=(&(uniquemember=USERDN)(objectclass=groupofuniquenames))
iplanet.user.groups.groupname.attribute=cn
iplanet.user.groups.search.timeout=1000
activedirectory.all.users.search.context=cn=users
activedirectory.all.users.filter=(&(objectclass=user))
activedirectory.all.users.username.attribute=samaccountname
activedirectory.all.users.search.timeout=0
activedirectory.all.groups.search.context=cn=users
activedirectory.all.groups.filter=(&(objectclass=group))
activedirectory.all.groups.groupname.attribute=cn
activedirectory.all.groups.search.timeout=0
activedirectory.user.username.comparison.is.case.sensitive=true
activedirectory.user.search.context=cn=users
activedirectory.user.filter=(&(samaccountname=USERNAME)(objectclass=user))
activedirectory.user.username.attribute=samaccountname
activedirectory.user.search.timeout=1000
activedirectory.user.groups.search.context=cn=users
activedirectory.user.groups.filter=(&(member=USERDN)(objectclass=group))
activedirectory.user.groups.groupname.attribute=cn
38 IBM Cognos Virtual View Manager Version 10.1.1: Administration Guide

activedirectory.user.groups.search.timeout=1000
LDAP properties file symbols and attributesThe following symbols can be used in an ldap.properties file.
LDAP search context symbolsThe pipe character may be used to separate multiple search context propertyvalues. This may be interpreted as a disjunction: or.
The pipe character is represented by this symbol:
|
LDAP seach filter symbolsSeveral symbols are available for various types of search filters.
& Conjunction (for example, and - all in the list must be true)
| Disjunction (for example, or - one or more alternatives must be true)
! Negation (for example, not - item being negated must not be true)
= Equality (according to the matching rule of the attribute)
~= Approximate equality (according to the matching rule of the attribute)
>= Greater than (according to the matching rule of the attribute)
<= Less than (according to the matching rule of the attribute)
=* Presence (for example, the entry must have the attribute returning whateverthat value is)
* Wildcard (indicates zero or more characters can occur in the position); usedwhen specifying attribute values to match
\ Escape (for escaping "*", "(", ")" when they occur inside an attribute value)
LDAP attribute keySeveral symbols are available for specifying LDAP attribute keys.
o = Organization
ou = Organization Unit
cn = Common Name
dn= Distinguished Name
dc = Domain Component
Query examplesThis section shows example iPlanet or Active Directory LDAP server queryexamples.
Chapter 4. LDAP domain administration 39
The iPlanet or Active Directory LDAP server configurations are similar exceptwhere the object class values, search contexts, and user/group attribute values maybe different where:
TYPE = { iplanet | activedirectory }
Search for specific groups with a group filterAll group filters can use the search filter syntax described above in the aboveSearch Filter Syntax area.
Example: Find all groups that have a prefix "cs_" in their name where "Y" is agroup object class for the domain type, and "Z" is a group name attribute:
Example solution:
TYPE.all.groups.filter=(&(objectclass=Y)(Z=cs_*))
Note: Note: This same method can be used for finding specific users also.
Specify multiple locations to find users or groupsAll search context attributes can support looking for LDAP objects in multiplesearch contexts. Use the pipe character (|) to separate multiple search contexts.
For example,
TYPE.all.groups.search.context=cn=users|cn=users2
Disable case sensitivity for LDAP authenticationBy default, IBM Cognos Virtual View Manager is case sensitive when used witheither an iPlanet or ActiveDirectory domain. However, you can change this in theldap.properties file.
For example,
TYPE.user.username.comparison.is.case.sensitive=false
When the LDAP user name comparison is not case sensitive, then the usercn=foo,ou=users,dc=domain,dc=com can login to a Virtual View Manager LDAPdomain with user name foo or FOO. All variations of the user name used to loginto Virtual View Manager tools will map to the actual user name stored in theLDAP server.
Note: If you disable case sensitive mode and have multiple users with the samename (but with variations in capitalization) login will be disabled for that username. Search context may be specified to find user attribute values thatdifferentiate the users affected. For instance in Active Directory, thesamaccountname attribute for a user object is unique in the entire LDAP server,but cn (common name) is not.
iPlanet get all usersTo start a search from the root node and get all users use a blank (null) value inthe search context.
TYPE.all.users.search.context=
To find groups that match the objectclass filter use the following:
40 IBM Cognos Virtual View Manager Version 10.1.1: Administration Guide
TYPE.all.users.filter=(&(objectclass=person))
To get user names from the user object name attribute:
TYPE.all.users.username.attribute=uid
To perform a search without a timeout:
TYPE.all.users.search.timeout=0
iPlanet get all users (under container ou=people)This search context will find only groups under container ou=people:
TYPE.all.groups.search.context=ou=people
This search will find only groups that match the objectclass filter:
TYPE.all.groups.filter=(&(objectclass=person))
This search will get group names from this group object name attribute:
TYPE.all.groups.groupname.attribute=cn
To specify a search that does not have a timeout (infinite search timeout):
TYPE.all.groups.search.timeout=0
iPlanet get all groupsUsing a null value (blank) will start search from the root node and get all groups:
TYPE.all.groups.search.context=
To find only those groups that match the objectclass filter:
TYPE.all.groups.filter=(&(objectclass=groupofuniquenames))
To get group names within this group object name attribute:
TYPE.all.groups.groupname.attribute=cn
To specify a search that does not have a timeout (infinite search timeout):
TYPE.all.groups.search.timeout=0
iPlanet get all groups (under container ou=groups)This search context will find only groups under the container ou=groups
TYPE.all.groups.search.context=ou=groups
To find only groups that match the objectclass filter
TYPE.all.groups.filter=(&(objectclass=groupofuniquenames))
To get group names from this group object name attribute:
TYPE.all.groups.groupname.attribute=cn
Chapter 4. LDAP domain administration 41

To specify a search that does not have a timeout (infinite search timeout):
TYPE.all.groups.search.timeout=0
iPlanet and Active Directory user authenticationIBM Cognos Virtual View Manager LDAP user authentication dependent on eitheriPlanet or Active Directory servers depends on several configurations prior tosuccessful user authentication through a Virtual View Manager interface.v The LDAP server must be configured for usev The LDAP domain must be configured for use in Virtual View Manager
Administratorv Specific Active Directory or iPlanet groups within the specified domain must be
authorized to use Virtual View Manager defined resources.
Note: All members of Virtual View Manager authorized LDAP groups get thebasic set of privileges granted to the all group. Other resource privileges andVirtual View Manager rights must be assigned explicitly to the LDAP group orto the individual user.
v Only users who are members of the specified domain and authorized groupsmay authenticate properly using Virtual View Manager resources.
All LDAP users trying to authenticate against an LDAP server need to use thesame username attribute value in the both settings below:
TYPE.user.filter=(&(uid=USERNAME)(objectclass=person))
TYPE.user.username.attribute=uid
For example, a Virtual View Manager log in using an iPlanet LDAP domain withgroup=‘g1‘ defined locally on the server will take this login:
username=user1 password=password domainname=iplanet_domain
and generate an LDAP authentication request as follows:
uid=user1,ou=people,dc=DOMAIN_NAME,dc=COM
The example above assumes the following:v Virtual View Manager LDAP domain "iplanet_domain" already exists where
LDAP domain "iplanet_domain" has group "g1" in its group list.v User "user1" exists in LDAP server at:
ou=people,dc=DOMAIN_NAME,dc=COM
v Group "g1" exists in LDAP server at:ou=groups,dc=DOMAIN_NAME,dc=COM
v User "user1" is a member of the group "g1"
Domain administrationLDAP domain administration involves several tasks.
These tasks include:v Adding an LDAP domain to the IBM Cognos Virtual View Manager server.v Adding users and groups to an LDAP domain.
42 IBM Cognos Virtual View Manager Version 10.1.1: Administration Guide

v Removing users or groups from an LDAP domain.v Changing the LDAP domain connection parameters.v Removing an LDAP domain.
Adding an LDAP domainYou can add more than one LDAP domain to IBM Cognos Virtual View Manager,provided that each of those domains has a unique name. The names dynamic andcognos are reserved domain names in Virtual View Manager. They cannot be usedas LDAP domain names.
Procedure1. In Virtual View Manager Administrator, click Users > Domain Management
2. Click Add Domain.3. Enter the Domain Name.
The domain name will be part of the login.When the process of adding the domain is complete, this name is displayed inthe Domain Name column and as part of the login (lower case only).
4. Specify the LDAP directory type as either Active Directory or iPlanet.5. Type the path to the LDAP server in the Server URL field using the format:
ldap://<hostname:port>/< suffix>
6. Enter an administrative LDAP user name and password.7. Click OK.
Working with groups from an LDAP domainWhen you are adding groups from an LDAP domain to IBM Cognos Virtual ViewManager, it means that you are selecting groups or users from the LDAP serverand adding them to the Virtual View Manager Server. This enables differentiatedgroup and user access, use, creation, and modification of Virtual View Managerresources as LDAP authenticated users.
LDAP domain users must belong to at least one LDAP group selected to useVirtual View Manager Server as an authenticated user enabling implicit assignmentof rights, privileges, and ownership of defined resources.
Similarly when an LDAP domain group is deselected from use with Virtual ViewManager Server, that group and all users defined exclusively by that group areremoved locally from Virtual View Manager disallowing access as an authenticateduser. The external LDAP server is unaffected by these Virtual View Managerdefinition changes.
After adding an LDAP group to Virtual View Manager, members of that group canbe authenticated with the LDAP server. Rights may be assigned to members anddata sources may define privileges for the group or individual members of thegroup to use resource definitions and data.
A security check on user rights and privileges is made every time any request ismade by Virtual View Manager and any defined resources. Authentication statuswith the LDAP domain is checked and maintained with a non-persistent session.
Authenticated users may own and use resources as defined by the rights andprivileges assigned to them either explicitly as individuals or implicitly by
Chapter 4. LDAP domain administration 43

membership in one or more groups. Members of a group defined for use withinVirtual View Manager inherit all the rights and privileges defined for that group.
When the Edit/Add External Groups window is displayed, the currently availableLDAP groups are displayed and those groups already selected for use withinVirtual View Manager are shown with a marked check box.
Adding a group to an LDAP domainAdding external groups from an LDAP domain gives the IBM Cognos Virtual ViewManager system a way to support differentiated access and use of Virtual ViewManager defined resources for selected user groups without including the entiredomain.
Note: Adding a group is the only way to add users to Virtual View Manager froman LDAP server.
User and group management is performed on the LDAP server and Virtual ViewManager rights and privileges are assigned to LDAP groups and users.
LDAP users are given rights and privileges to use Virtual View Manager resourcesby explicit addition of the groups in which those members belong. Ensure thatappropriate groupings of users will be enabled to use Virtual View Managerresources by management of users on the LDAP servers.
Procedure1. In Virtual View Manager Administrator, click Users > Domain Management.2. Select the LDAP domain., and click Edit External Groups at the bottom of the
table.The Add External Groups window displays all groups in the LDAP or iPlanetdomain.
3. Select those groups that you wish to grant access to Virtual View Managerresources.You can use the navigation arrows and page numbers at the bottom of thewindow to display additional groups. You can also change the sort order byclicking the sort icon.
4. Click OK and refer to the notes that follow.Initially no users are shown as members of the selected groups. Users from thegroups appear in the system after the initial use of any Virtual View Managerresource.Set appropriate rights and privileges for LDAP groups in the same way thatVirtual View Manager groups and users get assigned rights and privileges.Pure end-users should receive no rights but get privileges which are assignedat the individual resource level to groups and users to use data via JDBC,ODBC, or Web services clients. Unauthenticated users, anonymous, anddynamic users using pass-through authentication may be given privileges toview, access, and execute procedures on data resources, but they may notreceive rights to change Virtual View Manager definitions and settings.Groups of developers, operations users, and administrators should get explicitrights to access tools and rights to read and/or modify Virtual View Managerresources at design time.After initial Virtual View Manager use, LDAP domain users may be addeddirectly to specifically defined Virtual View Manager groups granting the userimplicit rights and privileges assigned by group membership, or they may be
44 IBM Cognos Virtual View Manager Version 10.1.1: Administration Guide

given explicit individual rights and privileges. Managing rights and privilegesby group assignment is encouraged as role based access control enables bettercontrol of large groups of users.Refer to "Rights" and "Privileges" in the User Guide for more information.To add users to LDAP domains and groups, see “Adding users to IBM CognosVirtual View Manager from an LDAP domain” on page 47, and “Adding usersto groups” on page 48.
Removing a group from an LDAP domainRemoving a group from an LDAP domain means that you are removing the LDAPgroup, all the users within that group, and all the implicit rights and privilegesgiven to that group definition for resources and uses on the IBM Cognos VirtualView Manager server.
Resource definitions for /shared resources owned by users removed by a groupdeletion retain most configurations and access privilege information for remaininggroups after the LDAP based owner is removed. Resource ownership is shifted to aspecial system user named nobody. Those data sources should be assigned a newowner and connections to those data sources should be tested and re-introspectedto ensure that the resource remains accessible.
Group deletion also removes all access privilege information for the deleted groupand affected members. Group deletion also clears any personal work spaceassociated with deleted user profiles in the /users node.
As stated earlier, the external LDAP server is unaffected by these Virtual ViewManager definition changes.
Procedure1. In Virtual View Manager Administrator, click Users > Domain Management.2. Select the LDAP domain.3. Click Edit External Groups at the bottom of the table.
The Add External Groups window displays all groups in the LDAP or iPlanetdomain.
4. Deselect those groups that you wish to remove. You can use the navigationarrows and page numbers at the bottom of the window to display additionalgroups.
5. Click OK.
Viewing group membershipThe IBM Cognos Virtual View Manager administrator with Read All Users rightmay review and monitor user group membership from the Virtual View ManagerAdministrator.
Procedure1. In Virtual View Manager Administrator, click Users > User Management.
The table of users may be filtered by domain and group, and sorted onmultiple attributes.
2. In the Groups column click the + icon to expand the list of groups to which theselected LDAP user belongs.
Chapter 4. LDAP domain administration 45

Adding and removing LDAP users from a groupYou can add or remove LDAP users from a group.
The Virtual View Manager server and Virtual View Manager Administrator do notmanage LDAP group membership. LDAP users may be added to Virtual ViewManager groups as described in the following procedure, but LDAP groups are notmodifiable from Virtual View Manager Administrator.
Procedure1. In Virtual View Manager Administrator, click Users > Group Management.
2. Click Edit Users ( ) from the group to which a user should be added orremoved.The Edit Group Membership window is displayed.
3. Add or remove users by checking or unchecking the users who should orshould not belong to the group.
Results
LDAP users get all the rights and privileges inherited from the groups in whichthey belong.
Editing LDAP domain connection parametersEditing an LDAP domain enables change of connection parameters required toconnect and read data from an LDAP authentication server. Everything but thenominal, domain name display text may be modified.
Change of the LDAP password in the Virtual View Manager domain profilerequires entry of the old password to unlock the encrypted cipher text.
Procedure1. In Virtual View Manager Administrator, click Users > Domain Management.2. Click the domain name.3. Modify any field as required and click OK.
Removing an LDAP domainRemoving an LDAP domain means that you are removing it from use by IBMCognos Virtual View Manager. When an LDAP domain is removed, all the users,groups, rights, and privileges associated with that domain are deleted andremoved from Virtual View Manager. Ownership of shared Virtual View Managerresources that were created and owned by users who will be deleted with theremoval of the LDAP instance are moved to ownership by the user named nobody.The LDAP users and groups will be untouched on the LDAP server.
Procedure1. In Virtual View Manager Administrator, click Users > Domain Management.2. Select the domain name.3. Click Remove Domain.4. Click OK.
The domain, groups and users from that domain are no longer configured foruse of Virtual View Manager resources.
46 IBM Cognos Virtual View Manager Version 10.1.1: Administration Guide

Resources that were created or owned exclusively by a deleted user areassigned to the nobody user. Privileges to utilize resources owned by nobodyremain the same for those groups and users who remain after the LDAPdomain is removed.
LDAP user managementBy default, without additional rights and privileges, all members of LDAP groupsselected for use with IBM Cognos Virtual View Manager will be able to log intoJDBC, ODBC, and Web services clients configured for use with Virtual ViewManager. Rights to use Virtual View Manager tools and to view and use otherresources must be added to group definitions or assigned explicitly to the user.
Assignment of rights and privileges to users from an LDAP domain is much thesame as assignment of rights to users from a Virtual View Manager domain.
Only a user with Read/Modify All Users, and Access Tools rights mayadd/modify an LDAP domain, add/remove groups, and clear and reset LDAPusers to group settings.
Adding users to IBM Cognos Virtual View Manager from anLDAP domain
Under most conditions, LDAP users are added indirectly by addition of the groupsto which they belong. Group management of rights and privileges may beassigned for users depending on the role performed by members of the group. Toadd users to an LDAP domain, the IBM Cognos Virtual View Manageradministrator first has to add that LDAP domain to the Virtual View ManagerServer, and then add groups to that domain.
To add a user to an LDAP domain, the user must belong to a group in the LDAPserver. See “Adding and removing LDAP users from a group” on page 46 fordetails.
When adding a user from an LDAP domain, three conditions must be satisfied toadd a user to an LDAP domain.v The entered LDAP username and password for the user are authenticated with
the LDAP server successfully. If LDAP authentication fails or the LDAP userdoes not belong to any local group definitions, the user is not added to theLDAP domain in the Virtual View Manager Server. Consequently, this LDAPuser is not allowed to log into Virtual View Manager successfully.
v The LDAP user is already a member of a group defined by the LDAP server.v That pre-existing LDAP group is defined for use by Virtual View Manager.
If these conditions are met, the user is successfully added to the Virtual ViewManager server. This user will be added to each local LDAP group as a memberwhere appropriate. The domain sync process adds or removes LDAP users eitherto or from the appropriate local LDAP groups.
Procedure
Start Virtual View Manager, and log in with a valid LDAP username, password,and domain.
Chapter 4. LDAP domain administration 47

Removing LDAP users from IBM Cognos Virtual View ManagerRemoving a user from a domain and group configured for use in IBM CognosVirtual View Manager only removes the user locally from Virtual View ManagerServer while the user may still exist in the LDAP server and possess implicit rightsand privileges given by membership in the LDAP domain and group. Simplyremoving a user who is derived from an LDAP domain/group does not prohibitthe user from logging into the system again.
Removing and preventing an LDAP user from gaining access to resources definedby Virtual View Manager requires one of three courses of action:v The LDAP group membership can be redefined at the source directory to
exclude the undesired user.v Rights and privileges for the entire LDAP group can be restricted to exclude
access to resources and permissions. If other members of that LDAP grouprequire rights and privileges, then those users may be given explicit rights andprivileges or they may be made members of a Virtual View Manager group thatgrants appropriate rights and privileges after they have been initialized into thesystem.
v The entire LDAP group can be removed from those included in the Virtual ViewManager external groups list.
In normal usage individual LDAP users may only be removed from Virtual ViewManager superficially. Virtual View Manager services are not normally used asinterfaces to manage LDAP users directly, though conceivably Virtual ViewManager could be configured and given permissions to change those tables directlyand programmatically. Almost always it is more advantageous to manage usersand group memberships using the more familiar enterprise ready Active Directoryor iPlanet interfaces. For example, if an individual LDAP Active Directory userneeds to be locked out to prevent Virtual View Manager access, then amanagement task must be performed directly on the LDAP server to change thecolumn values for memberOf to exclude that user from the group given permissionto authenticate for Virtual View Manager access.
In Virtual View Manager Administrator, users may be removed easily enough, butLDAP users selected for removal are only removed temporarily because LDAPgroup membership will continue to give implicit rights and privileges. Removingan LDAP user resets rights and privileges to those rights and privileges inheritedby group membership. Any user workspace in Virtual View Manager is alsodeleted by user removal, but that space is recreated when the use logs in again.
Some possible workarounds:v An LDAP group may be deleted to remove all group users, rights and privileges
for that group. See, “Working with groups from an LDAP domain” on page 43for more information.
v Group rights and privileges may be restricted to initially grant nothing to allmembers of the group, and then other members of the targeted group may beadded to other better defined groups of similar users with the desired set ofrights and privileges.
Adding users to groupsLDAP users are added to LDAP groups by the LDAP administrator.
LDAP and dynamic users may be added to IBM Cognos Virtual View Managergroups to enable assignment of rights and privileges by a group membership.
48 IBM Cognos Virtual View Manager Version 10.1.1: Administration Guide

Though in the case of dynamically defined users it is recommended that they arenot given any rights, nor any privileges to resources outside of the public domain.For more information refer to the chapter on the Dynamic Domain.
Add LDAP users to Virtual View Manager groups using the Group Managementpage in Virtual View Manager Administrator to add or remove users to and fromthe group.
Any users added to a group gain any additional rights and privileges associatedwith that group. Rights and privileges accumulate based upon explicit assignmentand group memberships.
Chapter 4. LDAP domain administration 49

50 IBM Cognos Virtual View Manager Version 10.1.1: Administration Guide

Chapter 5. Dynamic domain administration
IBM Cognos Virtual View Manager supports the following types of domains:Cognos, LDAP, and dynamic. This chapter focuses on how to enable andadminister dynamic domains for use with Virtual View Manager.
The following topics are covered in this chapter:v “Dynamic domains”v “Domain administration”v “Group administration” on page 52v “User administration” on page 53
Chapter 3, “IBM Cognos Virtual View Manager domain administration,” on page27, and Chapter 4, “LDAP domain administration,” on page 35 are discussed in theprevious chapters.
Dynamic domainsDynamic domains enable users to negotiate direct access to a secured data sourceby way of a IBM Cognos Virtual View Manager server pass-through login. TheVirtual View Manager system does not store the password of dynamic users; itretains only an ephemeral encrypted copy in memory available during the currentuser session (the timeout setting is configurable).
When a user requests a view or procedure that requires data from a source thathas pass-through login enabled (by using the Virtual View Manager data sourcedriver configuration setting), the user login and the parsed request for data arepassed directly to the secured data source. This pass-through allows existing datasource security structures to handle the authentication and request authorization.The dynamic domain lets the developer defer security authorization andenforcement to the data source security which is presumed to be more stringentand tightly controlled.
With the dynamic domain, the Virtual View Manager solution may be made moretransparent. The end user may use their existing login information forauthentication with a data source to gain the same permissions they had in thepast without needing to separately log into Virtual View Manager.
Note: Only one login (user name and password) is permitted for dynamic domainpass-through authentication. So, more than one pass-through-enabled data sourcemay be used for federated queries if the data sources are set to authenticate usingthe same login.
Dynamic domains also enable a potentially large user base that does not requireeither a Virtual View Manager or an LDAP domain structure.
Domain administrationAside from enabling the IBM Cognos Virtual View Manager configuration settingsto enable the dynamic domain no special user management is required to enableusers to access resources given proper privileges on resources that have beenselected for exposure to dynamic domain users.
© Copyright IBM Corp. 2008, 2011 51
User login specifying the dynamic domain using JDBC, ODBC, or Web services issufficient to dynamically create a new user profile.
For security reasons, dynamic domain users are blocked from using Virtual ViewManager utilities. Dynamic domain users and the dynamic all group are given norights by default. It is strongly recommended that no rights be assigned todynamic users or groups so that they remain pure end-users without rights forchanging the system.
The dynamic domain is disabled by default Virtual View Manager configurationsetting. Once enabled, dynamic users have default Read access to basic resourcesin Virtual View Manager. See “Granting privileges to dynamic domain users” forthe specific resources.
Enabling the dynamic domainBy default, the dynamic domain is disabled and an attempt to log in using thisdomain will fail as if the domain did not exist. This domain needs to be enabledbefore it can be used to log in.
Procedure1. In IBM Cognos Virtual View Manager, click Administration > Configuration.2. In the Configuration window, expand Virtual View Manager Server >
Configuration > Security, and select Enable Dynamic Domain Login.3. In the right panel, set the Value to True to enable the dynamic domain, and
click OK.
Group administrationThe dynamic domain has only one group named all. All dynamic users belong tothe all group. No additional dynamic groups may be created.
The dynamic domain cannot utilize groups for differentiation of user permissionsby group assignment of privileges or rights because no password is stored toauthenticate who is currently using a given user name. The data sources enabledwith pass-through login perform the authentication and authorization security.
Granting privileges to dynamic domain usersResources may be opened for use by anyone including dynamic domain users bygranting privileges to the dynamic all group on published resources.
Note: Dynamic all privileges open published resources to public access.
No rights should be given to dynamically authenticated users because anybodycan log in as a dynamic user; they are not authenticated by the IBM CognosVirtual View Manager system.
When the dynamic domain is enabled, dynamic users have default Read access tothe following basic resources in Virtual View Manager:v /servicesv /services/databasesv /services/webservicesv /services/webservices/systemv /shared
52 IBM Cognos Virtual View Manager Version 10.1.1: Administration Guide
v /lib
All other access privileges must be explicitly granted for either the dynamic allgroup or for the individual dynamic user after initial login.
Note: Dynamic users cannot be authenticated by definition as the password is notstored. Assigning resource privileges to individual dynamic users opens a resourceto any user who may utilize that user name.
Procedure1. In Virtual View Manager Administrator, click Users > Group Management.2. In the # Users column, select the number representing the count of users in the
all group row of the dynamic domain.Users in the all group of the dynamic domain are shown.
User administrationManagement of dynamic domain users is mostly passive as far as IBM CognosVirtual View Manager is concerned. Data sources enabled with a pass-throughlogin must be configured to authenticate the user and to authorize access to data.
Initial login of a dynamic domain user with a JDBC, ODBC, or Web services clientcreates a new user profile on Virtual View Manager. The new user is assigned anID and may be treated like a normal user given proper caution to avoidinadvertent exposure of sensitive resources. Dynamic domain users do not have ahome directory, hence they cannot create or own resources.
Note: Assigning resource privileges to any dynamic user exposes that resource topotential public access by any client using that user name. In sensitiveenvironments dynamic users and the dynamic all group should only get privilegesto access public resources, while data sources enabled with pass-through login mayindependently authenticate and authorize dynamic users to gain access to secureddata.
Individual users in the dynamic domain may be deleted, but the all group and thedynamic domain are protected from deletion.
Note: Deletion of a dynamic user does not prevent that user name from beingused to log in again.
The password for a dynamic domain user does not persist across sessions forlogging purposes. But the password used for the current session is kept in memoryand is passed when a request is made to data sources that have the pass-throughoption enabled.
Adding users to the dynamic domainUse these steps to add users to the dynamic domain.
Procedure1. Enable the dynamic domain as described in “Enabling the dynamic domain” on
page 52.2. Connect to Virtual View Manager through JDBC/ODBC specifying dynamic as
the domain value in the connection string.
Chapter 5. Dynamic domain administration 53

See the "Client Interfaces" chapter in the Virtual View Manager User Guide forinformation on connecting via JDBC/ODBC.The following sample command uses the JDBCSample.bat program to run fromthe command line to create a user named newuser in the dynamic domain:JdbcSample.bat system localhost 9401 newuser password dynamic "SELECT *FROM ALL_USERS"
Removing users from the dynamic domainRemoving users from the dynamic domain is mostly meaningless if the dynamicdomain is enabled for use. Dynamic users are not authenticated, nor preventedfrom accessing all resources provided by privileges granted to the dynamic allgroup.
If you were to go through the motions to remove a user from the list of usersregistered by the dynamic domain, then that would remove any groupmembership that had been assigned to the user, but the user would still be able touse a client with that same user ID for login.
Dynamic users group membershipDynamic users are created at first login. All dynamic domain users automaticallybecomes a member of the dynamic all group.
See “Adding users to the dynamic domain” on page 53 for details on adding usersto the dynamic domain.
It is not recommended to add dynamic users to Cognos domain groups unless thegroup privileges are an entirely public set of permissions and no IBM CognosVirtual View Manager rights are given.
Viewing dynamic user group membershipDynamic users should not get regular group membership because the user namemay be used by any individual using the same login name to gain access to groupresources.
Procedure1. In Virtual View Manager Administrator, click Users > User Management.2. Select the dynamic domain just above the table to filter the users.
If a user belongs to more than the dynamic all, then an integer will bedisplayed next to the icon in the #Groups column.
3. Select the link in the #Groups column to view or edit that users groupmembership.The Edit User's Group Membership Information window displays a list of thegroups to which the user belongs. Though it is not shown, all users in thedynamic domain belong to the dynamic all group.
54 IBM Cognos Virtual View Manager Version 10.1.1: Administration Guide
Chapter 6. System monitoring
IBM Cognos Virtual View Manager Administrator provides system managementcapabilities.
System management entails monitoring of system activities, system status, events,and system data and performing administrative tasks such as licensing and usermanagement. You access the system monitoring information using Virtual ViewManager Administrator. You can also access the same information from theAdministrator tab in Virtual View Manager.
Virtual View Manager Administrator displays summary views of status, serverinformation, cached resources, data sources, requests, sessions, transactions,triggers, and event logging. It also enables domain, group, and user managementincluding configuring LDAP servers and selected groups for use with Virtual ViewManager. License management, and SSL keystore management are also provided.
The following topics are covered in this chapter:v “Working with IBM Cognos Virtual View Manager Administrator”v “Administrator home page” on page 58v “Server Overview page” on page 59v “Cached resources” on page 62v “Data sources summary information” on page 64v “Requests” on page 66v “Sessions” on page 68v “Transaction summary information” on page 70v “Triggers” on page 71v “Events” on page 73v “Event and log files” on page 75
Working with IBM Cognos Virtual View Manager AdministratorIBM Cognos Virtual View Manager Administrator enables users with appropriaterights to view, monitor, and update selected summary views and status.Additionally, properly authorized users may perform some server managementtasks, and manage domains, groups, and users and their associated rights.
This section describes how to launch Virtual View Manager Administrator and useits basic features.
Launching IBM Cognos Virtual View Manager AdministratorIBM Cognos Virtual View Manager Administrator runs as a Web browser process.
Procedure1. Do one of the following:
v From Virtual View Manager, click Administration > Launch Administrator(Web).
v In a Web browser, enter:http://server_name:port_number/manager
© Copyright IBM Corp. 2008, 2011 55
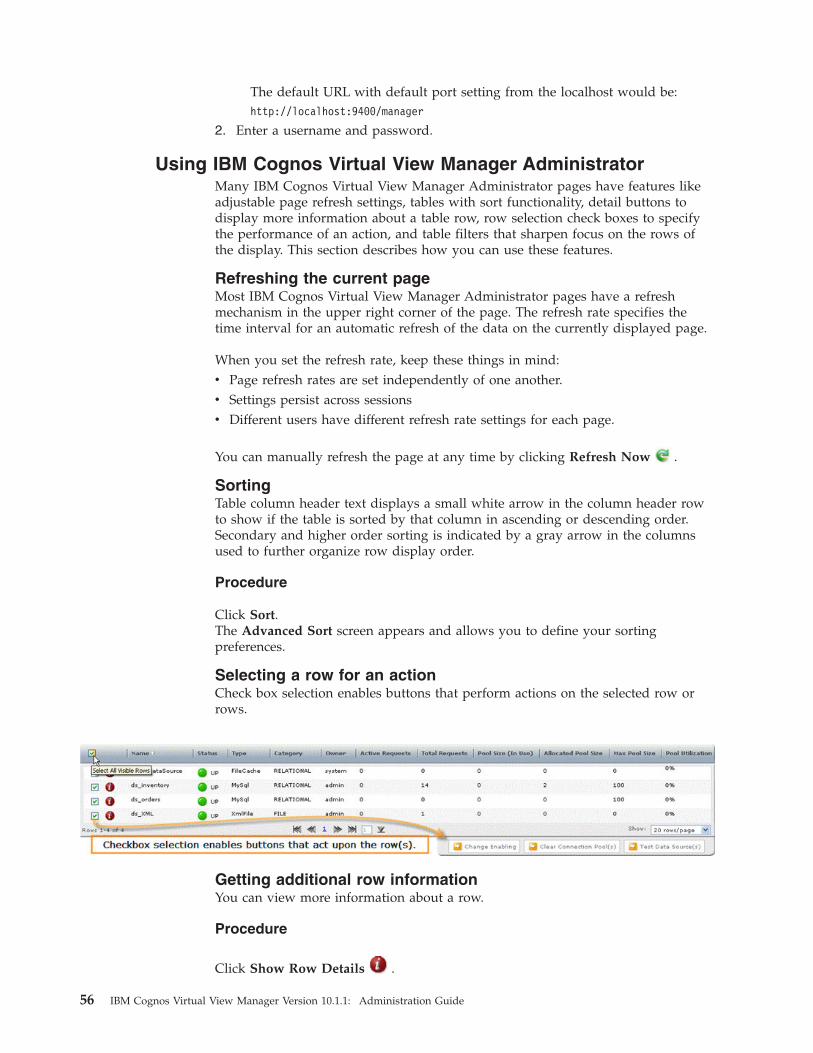
The default URL with default port setting from the localhost would be:http://localhost:9400/manager
2. Enter a username and password.
Using IBM Cognos Virtual View Manager AdministratorMany IBM Cognos Virtual View Manager Administrator pages have features likeadjustable page refresh settings, tables with sort functionality, detail buttons todisplay more information about a table row, row selection check boxes to specifythe performance of an action, and table filters that sharpen focus on the rows ofthe display. This section describes how you can use these features.
Refreshing the current pageMost IBM Cognos Virtual View Manager Administrator pages have a refreshmechanism in the upper right corner of the page. The refresh rate specifies thetime interval for an automatic refresh of the data on the currently displayed page.
When you set the refresh rate, keep these things in mind:v Page refresh rates are set independently of one another.v Settings persist across sessionsv Different users have different refresh rate settings for each page.
You can manually refresh the page at any time by clicking Refresh Now .
SortingTable column header text displays a small white arrow in the column header rowto show if the table is sorted by that column in ascending or descending order.Secondary and higher order sorting is indicated by a gray arrow in the columnsused to further organize row display order.
Procedure
Click Sort.The Advanced Sort screen appears and allows you to define your sortingpreferences.
Selecting a row for an actionCheck box selection enables buttons that perform actions on the selected row orrows.
Getting additional row informationYou can view more information about a row.
Procedure
Click Show Row Details .
56 IBM Cognos Virtual View Manager Version 10.1.1: Administration Guide

Filtering table dataA table filter determines what rows are displayed based on the rules you specifyfor the data in the table columns.
Create a new filter:
You can create a new filter for a table.
Procedure
1. Above any table in Virtual View Manager Administrator, click Filter > EditFilters.The Advanced Filter screen appears.
2. Click Add Filter .3. In the Name edit box, type a unique name for your filter.4. Specify rules for your filter:
v Filter By specifies a column in the table on which to apply the rule. Thedrop-down menu lists all the columns displayed in the table view.
v Operator specifies the operator for the rule. The drop-down lists all availableoperators for type of data in the column (numeric, text, list of values, and soon).
v Condition specifies the value or condition the data in the column mustmatch.
5. Click Add Rule to add another rule.
6. Click Remove Rule to remove a rule.7. Click Match Any Rule or Match All Rules to specify how you want the filter
to work.v Match Any Rule—the filter is applied if any one of the rule conditions are
met.v Match All Rules—the filter is applied only if all of the rule conditions are
met.8. Click OK to save the filter.The filter is saved with this table and can be applied
or edited any time the table is viewed.
Copy an existing filter:
You can copy an existing filter for a table.
Procedure
1. Above any table in Virtual View Manager Administrator, click Filter > EditFilters.The Advanced Filter screen appears.
2. Select the filter in the list box on the left.
3. Click Copy Filter .4. Edit the name of the new filter.5. Make changes to the filter as desired.6. Click OK to save the filter.
You cannot edit the default All Errors or All Warnings & Errors filters;however you can copy and add to them if so desired.
Chapter 6. System monitoring 57
Remove an existing filter:
You can remove an existing filter from a table.
Procedure
1. Above any table in Virtual View Manager Administrator, click Filter > EditFilters. The Advanced Filter screen appears.
2. Select the filter in the list box on the left.
3. Click Remove Filter .You cannot remove the default All Errors or All Warnings & Errors filters.
Navigating table dataThe arrows at the bottom of many tables enable you to quickly navigate forwardand backward through the data.
Controlling the number of rows displayedThe drop-down list in the lower right corner of many pages lets you select thenumber of rows that are displayed on each page. You can choose to display 10, 20,50, or 100 rows per page.
Administrator home pageThe IBM Cognos Virtual View Manager Administrator home page is the first pagedisplayed when you log in. The page provides a quick summary of the currentstatus.
Server Info panelThe Server Info panel shows summary information and links to the ServerOverview page.
The Server Info panel includes this information:v Server Name - the HTTP base port is displayed. All other ports are derived from
the HTTP base port as follows: base port +1 = JDBC and ODBC base port +2 =HTTP SSL base port +3 = JDBC SSL base port +6 = Monitor base port +8 =Default for Repository
v Total Memory Used
Percentage of total available Java Heap Memory (RAM) currently in use. JavaHeap Memory is a configuration setting that requires restart to change. Totalmemory is further divided into Managed and Reserved memory with a built inmargin to prevent OOM errors.
v Sessions
The number of active sessions with a theoretical estimate of the total number ofsessions that could be supported.
v Server Requests
Number of active requests made to the server. Active requests have been startedbut not yet completed. The total count is cumulative of all requests.
v Datasource Requests
Active data source requests sent to other resources and the total number ofoutgoing requests that the server has made on other resources. The totalincludes all requests completed or otherwise.
v Transactions
58 IBM Cognos Virtual View Manager Version 10.1.1: Administration Guide

Active transactions with the total number of transactions that the server hasmade on other resources.
Server Status panelYou can view simple indicators showing the current aggregate status of themodules/consoles listed.
The Server Status panel displays simple indicators showing the current aggregatestatus of the modules/consoles listed:
Status can be one of the following: OK (green), Disabled (grey), Warnings(yellow), Down or Errors (red). A single warning or critical error will change thestatus from green to yellow, or from yellow to red depending on the failureseverity and the module.
Quick Links panelThe Quick Links panel provides direct links to the Event Log and UserManagement pages.
The Quick Links panel provides direct links to the Event Log and UserManagement pages.
Server Overview pageIn IBM Cognos Virtual View Manager Administrator, you access server informationthat provides a consolidated overview of the system, and the overall status of all ofthe other system components.
You access server information from Monitoring > Server Overview. The ServerOverview page shows statistics about the server that are grouped into four areas:server status information, sessions and requests information, cache information,and server status indicators. In addition, two server overview buttons are providedat the bottom of the page. Each of these page elements are described below.
Server status informationThis section describes the server status information. Where appropriate, the relatedconfiguration parameter in IBM Cognos Virtual View Manager Administrator isalso described.
This information is available from the upper left section of the Server Overviewpage.
Status
Status reports the presence and count of errors and warnings from all pages underthe Monitoring tab.
Status can be:v OK—no errors or warnings exist.v Warnings—the total number of warnings on the server. If there are also errors,
they are shown in place of showing a count of warnings.v Errors—the total number of errors.
Chapter 6. System monitoring 59
Server name
Server Name with the HTTP base port is displayed. All other Virtual ViewManager ports are derived from the HTTP base port.
Virtual View Manager ports are derived from the HTTP base port as follows:
base port +1 = JDBC and ODBC
base port +2 = HTTP SSL
base port +3 = JDBC SSL
base port +4 = Reserved
base port +5 = Reserved
base port +6 = Monitor
base port +7 = Reserved
base port +8 = Default for Repository
Total memory used
Percentage of total available Java heap memory currently in use. Changing the Javaheap memory requires the server to be restarted. Total memory is further dividedinto Managed and Reserved memory with a built in margin to prevent Out ofMemory (OOM) errors.
Maximum viewable events
Maximum number of events that may be viewed from the Events console.
This number also controls the maximum number of rows of information displayedin the table in each console. Additional entries may be viewed in the log files.
Maximum event entries
Maximum number of events to be stored in the repository. When the number ofevents reaches this threshold the oldest events are discarded. The log files aregenerally configured to retain a more expansive archive of event entries.
Session and request informationYou can view summary information about sessions and requests.
The Server Overview page displays the following summary information.v Sessions - The number of currently connected user sessions, and the total
number of sessions started since the server started to run, including closedsessions.
v Requests - Active requests, started but not completed, and the total number ofincoming requests made to the server. Includes the requests that have beencompleted.
v Data Source Requests - Active data source requests sent to other resourcesversus the total number of outgoing requests that the server has made on other
60 IBM Cognos Virtual View Manager Version 10.1.1: Administration Guide

resources. The total is the resource cache storing resource meta data number ofresources loaded on the server.includes all requests completed or otherwise.
Privilege, user, and repository cachesYou can view summary cache information to determine usage of system caches forsecurity privileges on defined data resources, user privileges, and data sourcemetadata repository stores. These system caches are not to be confused with thedata source caches which store materialized views specifically configured at thedata source level. The system caches store data such as user session values ofprivileges, recently introspected data source meta data, and execution plans.
Summary cache information is displayed on the Server Overview page.
Access (Hits/ Accesses) displays a percentage that for all three rows should berelatively high, as it is a fair indicator of enhanced performance obtained bysystem cache usage.
Access is any request to access an object in the repository, and Hits are inquiriessent to the cache or successful cache usages.
A miss is an access attempt that was required to look beyond the cache for aparticular entity, meaning a disk access, LDAP or data source query.
Thus a high percentage of hits to total access attempts is one indicator of enhancedperformance meaning that most of the entity access attempts are hitting the cachewithout requirement of disk or source data retrieval.
The second column in the sub-section is the Capacity (Entries/Max) which showsthe amount of repository usage by each of the system caches. Each of the systemcache sizes is configurable.v Privilege Cache - Privilege cache refers to repository storage of explicit
privileges for resources.v User Cache - Current user cache data stored in the repository.v Repository Cache - Repository cache is a resource meta data store enabling
quick use of configured resources.
Server status indicatorsYou can view a summary status for other Administrator pages. The red, green, andyellow indicators give you a quick idea of the status of key system components.You can click on any of the links to go to the related page for detailed information.
The Server Status summary box displays a summary status for otherAdministrator pages which are all available for display from the Monitoring andLogging tabs.
Working with the Server Overview pageYou can start and stop a server or clear the repository cache for the server.
Start and stop a server or clear the repository cache for the server by clicking thesebuttons:v Stop - Stops the server after acknowledgement of a verification prompt.
Stopping the server requires the Modify All Status right.
Chapter 6. System monitoring 61

v Clear Repository Cache - Immediately empties the repository cache. Clearingthe repository cache requires the Modify All Status right.
Cached resourcesIn IBM Cognos Virtual View Manager Administrator, you can access cacheresources information.
You access this information by clicking Cached Resources from the Monitoringmenu. The Cached Resources page is displayed, providing information about thecached views and procedures. Summary information is displayed at the top of theCached Resources page, and information about each individual cache is displayedin the table below.
The following sections describe the data displayed in the Cached Resources tableand how you can work with this data.
Working with the Cached Resources pageYou can enable or disable cached tables and procedures and you can refresh themmanually if necessary. Each row has a check box to selectively choose the cacheyou want to enable, disable, or refresh.
After selecting the cache(s), you can click these buttons:v Change Enabling—toggles the enabled/disabled status of selected caches. You
must have the Modify All Status right.v Refresh Cache(s)—refreshes the selected caches. You must have the Write
privilege on the selected resource.
You can also change the number of rows displayed at once, quickly navigatethrough the pages using the arrows at the bottom of the table, and sort and refreshthe data. These actions are described in “Using IBM Cognos Virtual View ManagerAdministrator” on page 56.
The Cached Resources tableYou can view summary information with cache details available.
The Cached Resources table displays summary information. Click Show Row
Details button to view the Details window.v Name—the display name of the view or the procedure.v Status—current status of the cached view. The status of a cached resource can
be any one listed in the following table:
Status Event
Not Loaded Cache has not been loaded.
Up Cache has been loaded successfully.
Down Cache is not loaded and the most recentrefresh failed.
Stale Cache is loaded with valid data, but themost recent refresh failed. However, readsagainst the cache can succeed.
Disabled Cache has been disabled.
62 IBM Cognos Virtual View Manager Version 10.1.1: Administration Guide
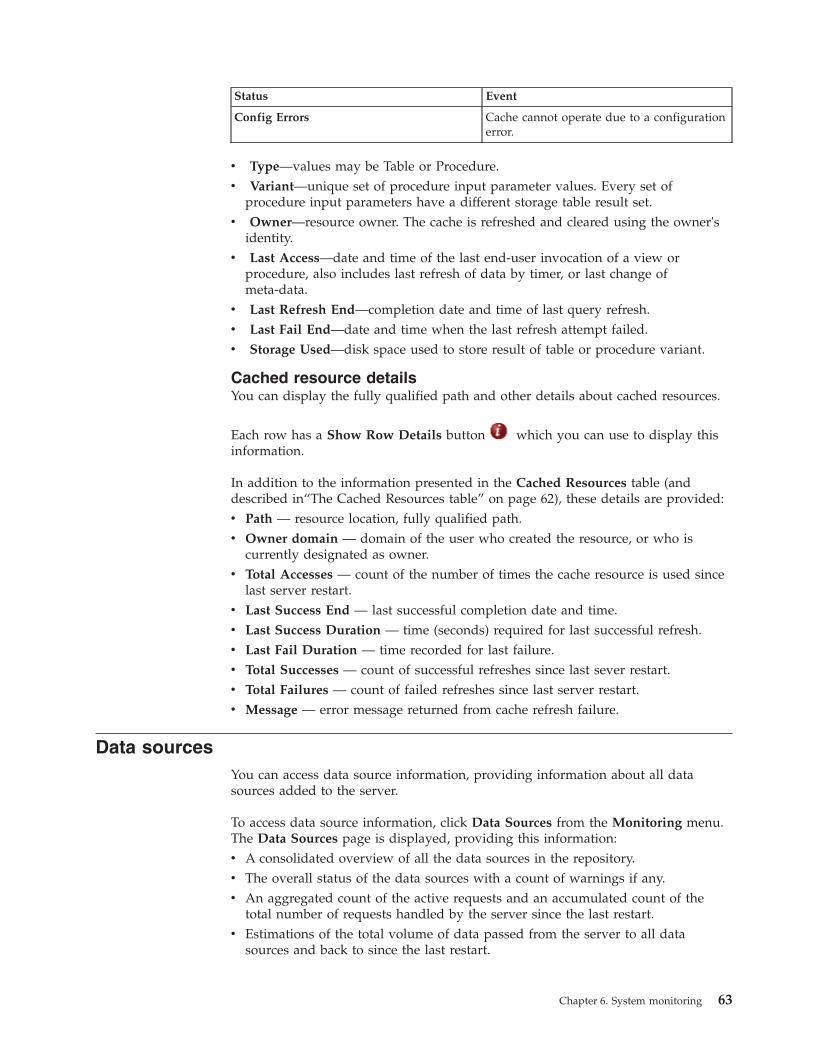
Status Event
Config Errors Cache cannot operate due to a configurationerror.
v Type—values may be Table or Procedure.v Variant—unique set of procedure input parameter values. Every set of
procedure input parameters have a different storage table result set.v Owner—resource owner. The cache is refreshed and cleared using the owner's
identity.v Last Access—date and time of the last end-user invocation of a view or
procedure, also includes last refresh of data by timer, or last change ofmeta-data.
v Last Refresh End—completion date and time of last query refresh.v Last Fail End—date and time when the last refresh attempt failed.v Storage Used—disk space used to store result of table or procedure variant.
Cached resource detailsYou can display the fully qualified path and other details about cached resources.
Each row has a Show Row Details button which you can use to display thisinformation.
In addition to the information presented in the Cached Resources table (anddescribed in“The Cached Resources table” on page 62), these details are provided:v Path — resource location, fully qualified path.v Owner domain — domain of the user who created the resource, or who is
currently designated as owner.v Total Accesses — count of the number of times the cache resource is used since
last server restart.v Last Success End — last successful completion date and time.v Last Success Duration — time (seconds) required for last successful refresh.v Last Fail Duration — time recorded for last failure.v Total Successes — count of successful refreshes since last sever restart.v Total Failures — count of failed refreshes since last server restart.v Message — error message returned from cache refresh failure.
Data sourcesYou can access data source information, providing information about all datasources added to the server.
To access data source information, click Data Sources from the Monitoring menu.The Data Sources page is displayed, providing this information:v A consolidated overview of all the data sources in the repository.v The overall status of the data sources with a count of warnings if any.v An aggregated count of the active requests and an accumulated count of the
total number of requests handled by the server since the last restart.v Estimations of the total volume of data passed from the server to all data
sources and back to since the last restart.
Chapter 6. System monitoring 63

Data sources summary informationYou can access summary information about data sources.
Summary information at the top of the Data Sources page includes:v Status—displays the current status which can be OK (green), Disabled (grey),
Warnings (yellow), Down or Errors (red). A single warning or critical error willchange the status from green to yellow, or from yellow to red depending on thefailure severity and the module.
v Requests—displays the number of active requests and the total number ofrequests since server restart.
v Bytes—displays the number of bytes sent to the data sources and number ofbytes received from the data sources.
Working with the Data Sources pageYou can perform several actions on selected data sources.
You can select one or more data sources by check box and then perform thefollowing actions those data source(s):v Enable or disable the data source
The Change Enabling button toggles the status of the data source. Enablingmakes the data source accessible via IBM Cognos Virtual View Managerdefinitions and configurations. Disabled takes the data source offline and makesit inaccessible to defined channels.
v Clear the currently allocated pool connections.The Clear Connection Pool(s) button drops the current connection pool allowingcurrent processes to restart connections when necessary.
v Verify the data source connection using the Test Data Source(s) button.
You can also test the current status all data sources by clicking the Test All button.An administrator user with the Modify All Status right may use the Test Allbutton.
The Data Sources tableFor each data source in IBM Cognos Virtual View Manager, several columns ofinformation are available.
The following columns are shown for each data source.v Name—User-defined name for the datasource.v Status—Overall status for the data source, which may be one of the following:
Status Indicates
Disabled The data source is disabled; represented by agrey circle.
Down The data source is inaccessible; representedby a red circle.
Not Tested The status of the data source has not beentested.
Up The data source is connected to the server;represented by a green circle.
64 IBM Cognos Virtual View Manager Version 10.1.1: Administration Guide
v Type—Native data source type, some of the more common supported datasources categories include: IBM DB2, Custom Java Procedure, Infirmity,FileCache, LDAP, Microsoft Access, Microsoft Excel, Microsoft SQL Server,MySQL, Netezza, Oracle, Sybase, Teradata, Virtual View Manager, Wsdl, XML,and XmlHttp
v Total Requests—Cumulative count of all requests made on data sources via theserver since the server was started.
v Active Requests—Current count of all outstanding data source requestsv Pool Size (In Use)—Current connection-pool size for relational data sourcesv Allocated Pool Size—Current number of connections allocated for the server for
a particular relational data sourcev Max Pool Size—Maximum connection-pool size for a relational data source, zero
is unlimited or not applicable.v Pool Utilization—Utilization of pool represented as a percentage where
allocated connections is divided maximum connections for a relational datasource.
Data source detailsYou can display read-only detail information for a data source in the repository.
To display the following read-only detail information for a data source in the
repository, click Show Row Details .v Name—User-defined name for the data source.v Path—Fully-qualified path to the data source. For example, if the data source
ds_orders reside in /shared/sources, the path to ds_orders would be:/shared/sources.
v Status—Current status, which can be Up, Down, or Not Tested.v Category—Category, which can be File, LDAP, Relational, WSDL, XML/HTTP.v Type—Type of the data source within the category to which it belongs.v Total Requests—Total number of requests, including active requests, made to
the server since last startup.v Active Requests—Number of in-progress requests to the server.v Bytes From Data Source (Estimated)—An estimate of the total number of bytes
of data received by the server from this data source.v Bytes Into Data Source (Estimated)—An estimate of the total number of bytes
of data sent to this data source from the server.v Pool Size (In Use)—Current connection-pool size, if the data source is relational.v Allocated Pool Size—Current number of actual connections both idle and active
allocated by the server for a particular relational data source.v Max Pool Size—Configurable setting for maximum connection-pool size used to
limit the number of connections allowed to burden a relational data source.v Pool Utilization—Utilization of pool represented in percentage, if the data
source is relational.v Number of Logins—The number of times a connection to the data source is
made in the connection pool.v Number of Logouts—The number of connections to the data source that were
manually destroyed by logout from the connection pool.
Chapter 6. System monitoring 65

RequestsYou access information about all current requests for service.
You access requests information by clicking Requests from the Monitoring menu.The Requests page provides information about all current requests for serviceincluding:v Inbound requests through a data service.v Outbound requests against physical data sources.v Internal requests against internal views.
Summary information is displayed at the top of the page, and information abouteach individual request is displayed in the table below. Operational informationabout queued, in process, and recently completed requests gives the administrativeuser an idea about what requests are taking inordinate amounts of time or memoryresources to complete.
Note that some of the information displayed on the page is controlled by theconfiguration settings in Virtual View Manager. To view these settings, openVirtual View Manager and click Administration > Configuration. You can alsoaccess request information from:v Virtual View Manager Server > Configuration > Events and Logging > Event
Generation > Request Events
v Virtual View Manager Server > Runtime Processing Information > Requests
Requests are removed from the table periodically, based upon the purge periodconfiguration setting found at Virtual View Manager Server > RuntimeProcessing Information > Requests > Request Purge Period. The default settingpurges requests every 5 minutes.
Requests summary informationYou can access summary information about requests.
The Requests page provides the following summary information:v Status—Aggregated status of all requests can be OK, Warning, Error, or
Unknown. A single warning or error supersedes display of a status of OK.Whenfailed requests or waiting requests are present, a count of those warnings orerrors will be shown.
v Waiting Requests—Current number of requests waiting in the queue due tomemory constraints.
v Waiting Requests Threshold—An event trigger threshold that causes an event.The event may be used for notification.
v Server Requests—The number of currently active requests, and the total numberof requests made to the server since the server was started.
v Data Source Requests—The number of currently active requests, and the totalnumber of requests made to the data sources since the server was started.
Working with the Requests pageYou can perform several actions for selected requests.
You can select one or more requests in the Requests table by check box and thenperform the following actions on those requests:
66 IBM Cognos Virtual View Manager Version 10.1.1: Administration Guide
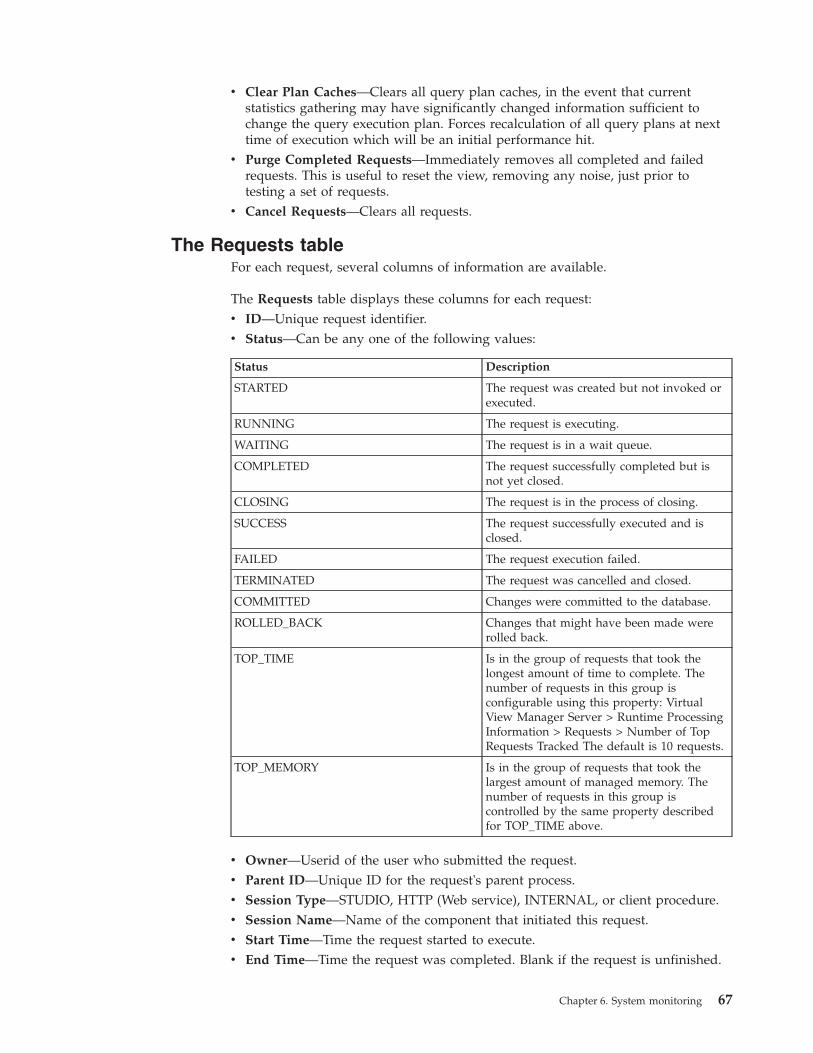
v Clear Plan Caches—Clears all query plan caches, in the event that currentstatistics gathering may have significantly changed information sufficient tochange the query execution plan. Forces recalculation of all query plans at nexttime of execution which will be an initial performance hit.
v Purge Completed Requests—Immediately removes all completed and failedrequests. This is useful to reset the view, removing any noise, just prior totesting a set of requests.
v Cancel Requests—Clears all requests.
The Requests tableFor each request, several columns of information are available.
The Requests table displays these columns for each request:v ID—Unique request identifier.v Status—Can be any one of the following values:
Status Description
STARTED The request was created but not invoked orexecuted.
RUNNING The request is executing.
WAITING The request is in a wait queue.
COMPLETED The request successfully completed but isnot yet closed.
CLOSING The request is in the process of closing.
SUCCESS The request successfully executed and isclosed.
FAILED The request execution failed.
TERMINATED The request was cancelled and closed.
COMMITTED Changes were committed to the database.
ROLLED_BACK Changes that might have been made wererolled back.
TOP_TIME Is in the group of requests that took thelongest amount of time to complete. Thenumber of requests in this group isconfigurable using this property: VirtualView Manager Server > Runtime ProcessingInformation > Requests > Number of TopRequests Tracked The default is 10 requests.
TOP_MEMORY Is in the group of requests that took thelargest amount of managed memory. Thenumber of requests in this group iscontrolled by the same property describedfor TOP_TIME above.
v Owner—Userid of the user who submitted the request.v Parent ID—Unique ID for the request's parent process.v Session Type—STUDIO, HTTP (Web service), INTERNAL, or client procedure.v Session Name—Name of the component that initiated this request.v Start Time—Time the request started to execute.v End Time—Time the request was completed. Blank if the request is unfinished.
Chapter 6. System monitoring 67
v Total Duration—Amount of time elapsed between Start Time and End Time.v Rows Affected—The number of rows affected by this request.v Max Memory—Maximum memory utilized by this request, blocks of 2MB are
initially reserved and then if additional memory is required 2MB blocks areincrementally assigned.
v Max Disk—The maximum amount of memory ever occupied by the requestv Summary—The SQL statement or procedure made by this request.
Request detailsEvery individual request has additional detailed information that might help introubleshooting failed requests. You can view read-only details for individualrequests.
To view the read-only details, click Show Row Details for the desired row.
In addition to the information presented in the Requests table (and described in“The Requests table” on page 67), these details are provided:v Request Type—Either SQL or Procedure.v Owner domain—Name of the domain to which this owner belongs.v Session Type—The type of session: STUDIO, HTTP (Web service), INTERNAL,
or client procedure.v Transaction ID—Unique ID for the request's session.v Duration—Amount of time elapsed between Start Time and End Time.v Server Duration—Represents the actual time spent by the server processing this
request. The difference between Server Duration and Total Duration is theoverhead on the server.
v Current Memory—Memory utilization of this request.v Current Disk—The amount of current memory occupied by the request.v Description—a more complete description of the summary.v Message—Displays an error message if the request caused an error.
SessionsYou can access information about the current and recently active sessions.Summary information is displayed at the top of the page, and information abouteach individual session is displayed in the table below.
You access sessions information by clicking Sessions from the Monitoring menu.
Note that some of the information displayed on the Sessions page is controlled bythe configuration settings in IBM Cognos Virtual View Manager. To view thesesettings, open Virtual View Manager and click Administration > Configuration.The following locations also have configuration settings for transactions:v Virtual View Manager Server > Configuration > Events and Logging > Event
Generation > Session Events
v Virtual View Manager Server > Runtime Processing Information > Sessions
Sessions are removed from the table periodically, based upon the configurationsetting Virtual View Manager Server > Runtime Processing Information >Sessions. The default setting purges sessions every 30 minutes.
68 IBM Cognos Virtual View Manager Version 10.1.1: Administration Guide
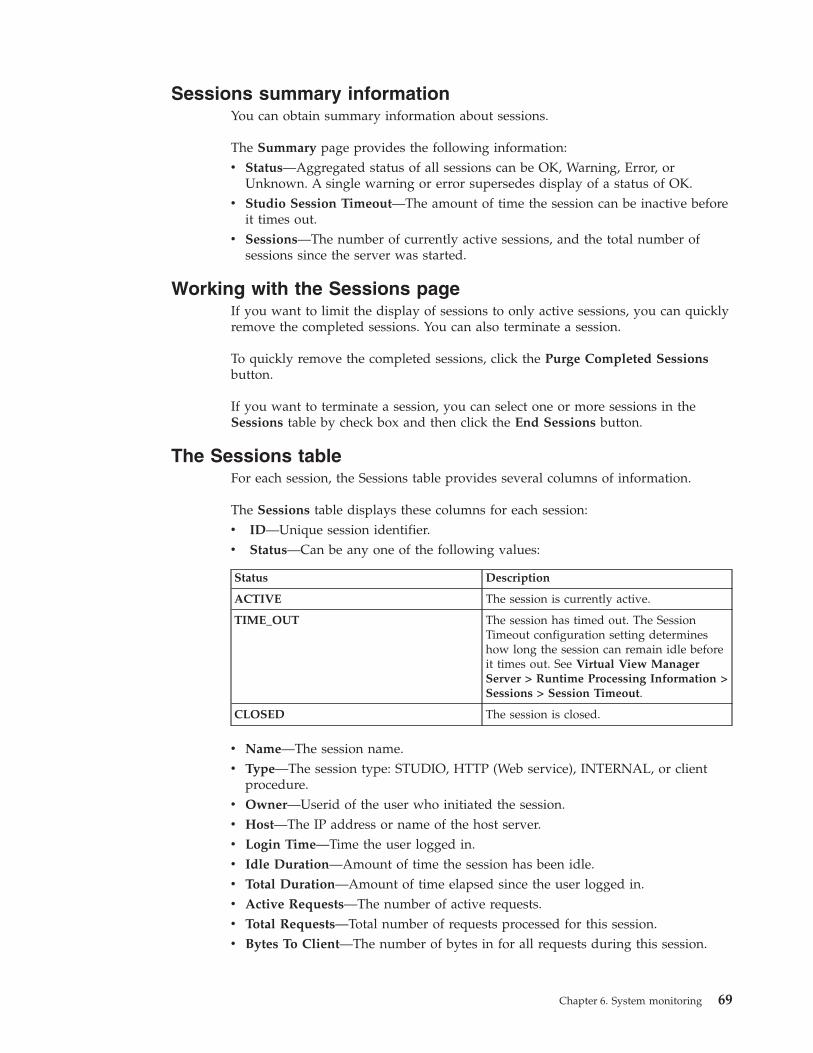
Sessions summary informationYou can obtain summary information about sessions.
The Summary page provides the following information:v Status—Aggregated status of all sessions can be OK, Warning, Error, or
Unknown. A single warning or error supersedes display of a status of OK.v Studio Session Timeout—The amount of time the session can be inactive before
it times out.v Sessions—The number of currently active sessions, and the total number of
sessions since the server was started.
Working with the Sessions pageIf you want to limit the display of sessions to only active sessions, you can quicklyremove the completed sessions. You can also terminate a session.
To quickly remove the completed sessions, click the Purge Completed Sessionsbutton.
If you want to terminate a session, you can select one or more sessions in theSessions table by check box and then click the End Sessions button.
The Sessions tableFor each session, the Sessions table provides several columns of information.
The Sessions table displays these columns for each session:v ID—Unique session identifier.v Status—Can be any one of the following values:
Status Description
ACTIVE The session is currently active.
TIME_OUT The session has timed out. The SessionTimeout configuration setting determineshow long the session can remain idle beforeit times out. See Virtual View ManagerServer > Runtime Processing Information >Sessions > Session Timeout.
CLOSED The session is closed.
v Name—The session name.v Type—The session type: STUDIO, HTTP (Web service), INTERNAL, or client
procedure.v Owner—Userid of the user who initiated the session.v Host—The IP address or name of the host server.v Login Time—Time the user logged in.v Idle Duration—Amount of time the session has been idle.v Total Duration—Amount of time elapsed since the user logged in.v Active Requests—The number of active requests.v Total Requests—Total number of requests processed for this session.v Bytes To Client—The number of bytes in for all requests during this session.
Chapter 6. System monitoring 69

v Bytes From Client—The number of bytes sent out for all requests during thissession.
Session detailsEvery individual session has additional detailed information.
To view the read-only details, click the Show Row Details button for thedesired row.
In addition to the information presented in the Session table (and described in“The Sessions table” on page 69), these details are provided:v Owner domain—Name of the domain to which the session owner belongs.v Data Service
v Logout Time—The time this session logged out.v Timeout Duration—The amount of time this session can be idle before it will
time out.v Active Transactions—The number of currently active transactions.v Total Transactions—Total number of transactions processed in this session.
TransactionsYou can access sessions information, which includes the current and recently activetransactions.
Access sessions information by choosing Transactions from the Monitoring menu.The Transaction page provides information about the current and recently activetransactions. Summary information is displayed at the top of the page, andinformation about each individual transaction is displayed in the table below.
By default, the Transactions page displays transactions that occurred within thelast 5 minutes.
Note that some of the information displayed on the Transactions page is controlledby the configuration settings in IBM Cognos Virtual View Manager. To view thesesettings, open Virtual View Manager and click Administration > Configuration.The following locations have configuration settings for transactions:v Virtual View Manager Server > Configuration > Events and Logging > Event
Generation > Transaction Events
v Virtual View Manager Server > Runtime Processing Information >Transactions
Transactions are removed from the table periodically, based upon the configurationsetting Virtual View Manager Server > Runtime Processing Information >Transactions > Transaction Purge Period.
The default setting purges transactions every 5 minutes.
Transaction summary informationYou can obtain summary information about transactions.
The Transactions page provides the following summary information:v Status—Aggregated status of all transactions can be OK, Warning, Error, or
Unknown. A single warning or error supersedes display of a status of OK.
70 IBM Cognos Virtual View Manager Version 10.1.1: Administration Guide
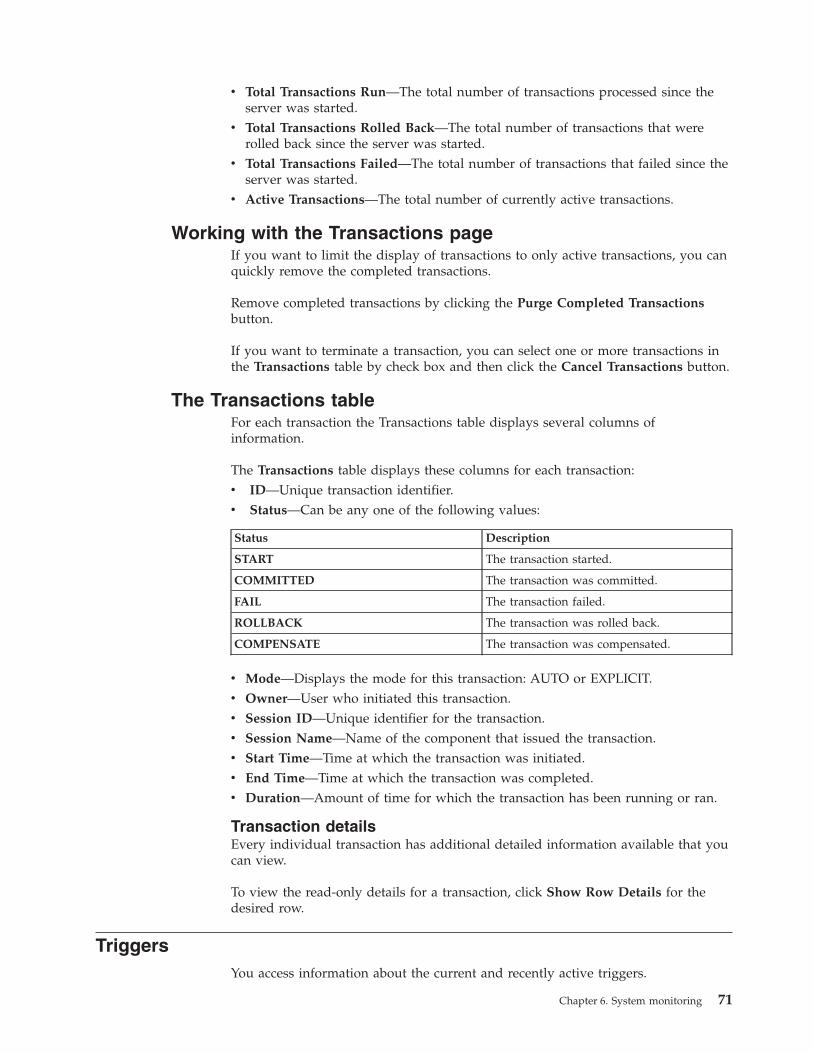
v Total Transactions Run—The total number of transactions processed since theserver was started.
v Total Transactions Rolled Back—The total number of transactions that wererolled back since the server was started.
v Total Transactions Failed—The total number of transactions that failed since theserver was started.
v Active Transactions—The total number of currently active transactions.
Working with the Transactions pageIf you want to limit the display of transactions to only active transactions, you canquickly remove the completed transactions.
Remove completed transactions by clicking the Purge Completed Transactionsbutton.
If you want to terminate a transaction, you can select one or more transactions inthe Transactions table by check box and then click the Cancel Transactions button.
The Transactions tableFor each transaction the Transactions table displays several columns ofinformation.
The Transactions table displays these columns for each transaction:v ID—Unique transaction identifier.v Status—Can be any one of the following values:
Status Description
START The transaction started.
COMMITTED The transaction was committed.
FAIL The transaction failed.
ROLLBACK The transaction was rolled back.
COMPENSATE The transaction was compensated.
v Mode—Displays the mode for this transaction: AUTO or EXPLICIT.v Owner—User who initiated this transaction.v Session ID—Unique identifier for the transaction.v Session Name—Name of the component that issued the transaction.v Start Time—Time at which the transaction was initiated.v End Time—Time at which the transaction was completed.v Duration—Amount of time for which the transaction has been running or ran.
Transaction detailsEvery individual transaction has additional detailed information available that youcan view.
To view the read-only details for a transaction, click Show Row Details for thedesired row.
TriggersYou access information about the current and recently active triggers.
Chapter 6. System monitoring 71

You access trigger information by choosing Triggers from the Monitoring menu.Summary information is displayed at the top of the Triggers page, and informationabout each individual trigger is displayed in the table below.
By default, the page displays triggers that occurred within the last 5 minutes.
Note that some of the information is controlled by the configuration settings inIBM Cognos Virtual View Manager. To view these settings, open Virtual ViewManager and choose Configuration from the Administration menu. The followinglocations have configuration settings for triggers:v Virtual View Manager Server > Configuration > Events and Logging > Event
Generation > Trigger Events
v Virtual View Manager Server > Runtime Processing Information > Triggers
Virtual View Manager provides a TestAllDataSources trigger by default.
Trigger summary informationYou can obtain summary information about triggers.
The Triggers page provides the following summary information:v Status—Aggregated status of all triggers can be OK, Warning, Error, or
Unknown. A single warning or error supersedes display of a status of OK.v Total Runs—Total number of trigger executions carried out since the server
started.v Total Failed Runs—Total number of trigger executions that failed since the
server started.
Working with the Triggers pageYou can change the status of a trigger between enabled and disabled.
If you want to change the status of a trigger between enabled and disabled, youcan select one or more triggers in the Triggers table by check box and then clickthe Change Enabling button.
The Triggers tableThe Trigger table provides information about each trigger.
The Triggers table displays these columns for each trigger:v Name—The name of the trigger.v Status—Can be any one of the following values:
Status Description
ACTIVE The trigger is processing.
DISABLED The trigger is disabled.
CONFIG ERROR The trigger is not configured correctly.
v Condition—Type of trigger. Time-event, system-event, or user-defined event.v Action—The type of action this trigger generated.v Owner—User who initiated this trigger.v Next Time—Next time when the execution will occur.v Frequency—Recurrence of execution.
72 IBM Cognos Virtual View Manager Version 10.1.1: Administration Guide

v Last Time—Last time the execution occurredv Last Success—Last time the execution was successfulv Total Attempts—Total number of times the this trigger was invoked.
EventsYou access information about the server events that have been logged for serverprocesses.
You access information about the server events that have been logged by choosingEvent Log from the Logging menu. The Event Log page shows information aboutall of the events generated by processes running on the server. Events originatefrom one of the following types of objects or processes:v cached viewsv data sourcesv requests for query executionsv schedulesv sessionsv transactions
Summary information is displayed at the top of the page, and information abouteach individual event is displayed in the table below.
Note that some of the information displayed on the Event Log page is controlledby the configuration settings in IBM Cognos Virtual View Manager. To view thesesettings, open Virtual View Manager, choose Configuration from theAdministration menu, and go to Virtual View Manager Server > Configuration >Events and Logging.
Server event attributesIBM Cognos Virtual View Manager creates SNMP events that are compliant withSNMPv1 protocol.
The tables in Chapter 9, “SNMP traps,” on page 129, contain details of these serverevents. The attributes listed are: SNMP ID, short name for the event, anddescription.
The SNMP traps in the tables have the following OID prefix 1.3.6.1.4.1.18439.2.3.
Set the generic trap to 6. Virtual View Manager Server Monitor's specific trapnumbers range between 10000 and 19999. Virtual View Manager Server's specifictrap numbers range between 20000 and 29999.
In the SNMP details tables, the SNMP ID is listed with the event name, and adescription that includes the names of the variables whose values are passed in themessage with the text description. The variable values in the description columnsare passed in the MIB message payload with an incremented, sequential numberthat follows the concatenation of the OID prefix and SNMP ID. For example, thevariables from the first MIB description are trapTime, trapServerHostName, andtrapServerPort.
The SNMP variables are sequentially assigned numbers for display in the MIBmessage payload. Hence trapTime is assigned a numeric representation of 1,
Chapter 6. System monitoring 73
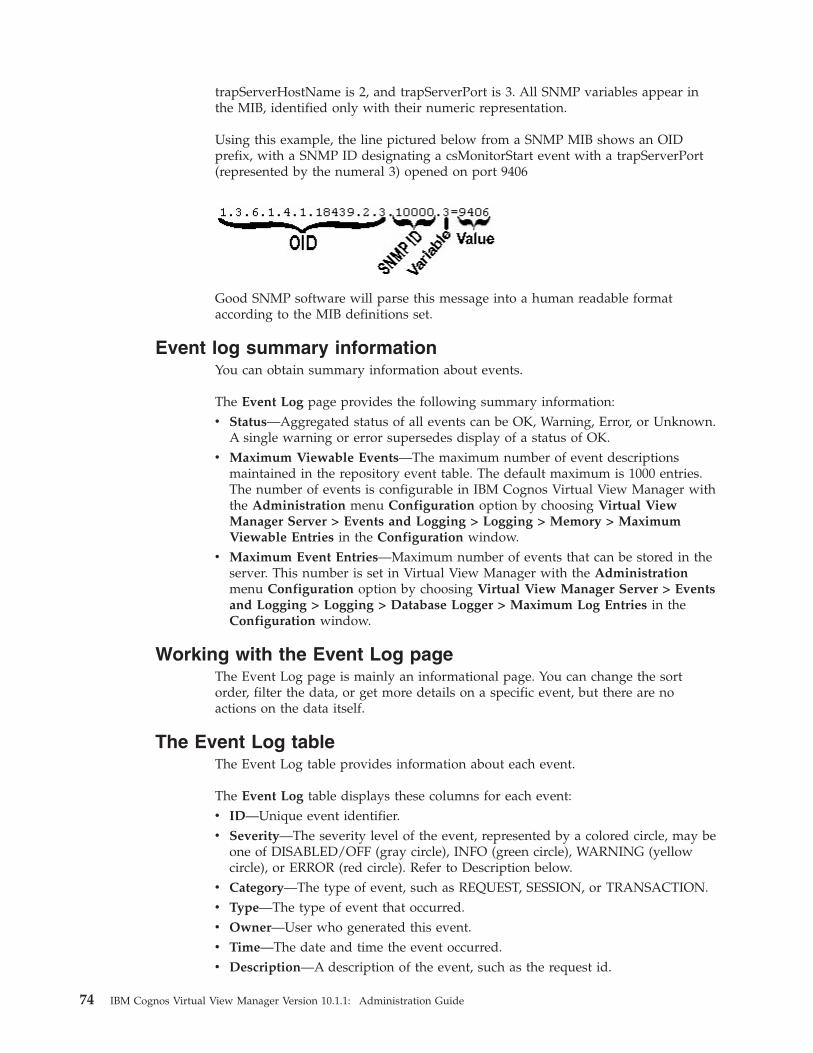
trapServerHostName is 2, and trapServerPort is 3. All SNMP variables appear inthe MIB, identified only with their numeric representation.
Using this example, the line pictured below from a SNMP MIB shows an OIDprefix, with a SNMP ID designating a csMonitorStart event with a trapServerPort(represented by the numeral 3) opened on port 9406
Good SNMP software will parse this message into a human readable formataccording to the MIB definitions set.
Event log summary informationYou can obtain summary information about events.
The Event Log page provides the following summary information:v Status—Aggregated status of all events can be OK, Warning, Error, or Unknown.
A single warning or error supersedes display of a status of OK.v Maximum Viewable Events—The maximum number of event descriptions
maintained in the repository event table. The default maximum is 1000 entries.The number of events is configurable in IBM Cognos Virtual View Manager withthe Administration menu Configuration option by choosing Virtual ViewManager Server > Events and Logging > Logging > Memory > MaximumViewable Entries in the Configuration window.
v Maximum Event Entries—Maximum number of events that can be stored in theserver. This number is set in Virtual View Manager with the Administrationmenu Configuration option by choosing Virtual View Manager Server > Eventsand Logging > Logging > Database Logger > Maximum Log Entries in theConfiguration window.
Working with the Event Log pageThe Event Log page is mainly an informational page. You can change the sortorder, filter the data, or get more details on a specific event, but there are noactions on the data itself.
The Event Log tableThe Event Log table provides information about each event.
The Event Log table displays these columns for each event:v ID—Unique event identifier.v Severity—The severity level of the event, represented by a colored circle, may be
one of DISABLED/OFF (gray circle), INFO (green circle), WARNING (yellowcircle), or ERROR (red circle). Refer to Description below.
v Category—The type of event, such as REQUEST, SESSION, or TRANSACTION.v Type—The type of event that occurred.v Owner—User who generated this event.v Time—The date and time the event occurred.v Description—A description of the event, such as the request id.
74 IBM Cognos Virtual View Manager Version 10.1.1: Administration Guide
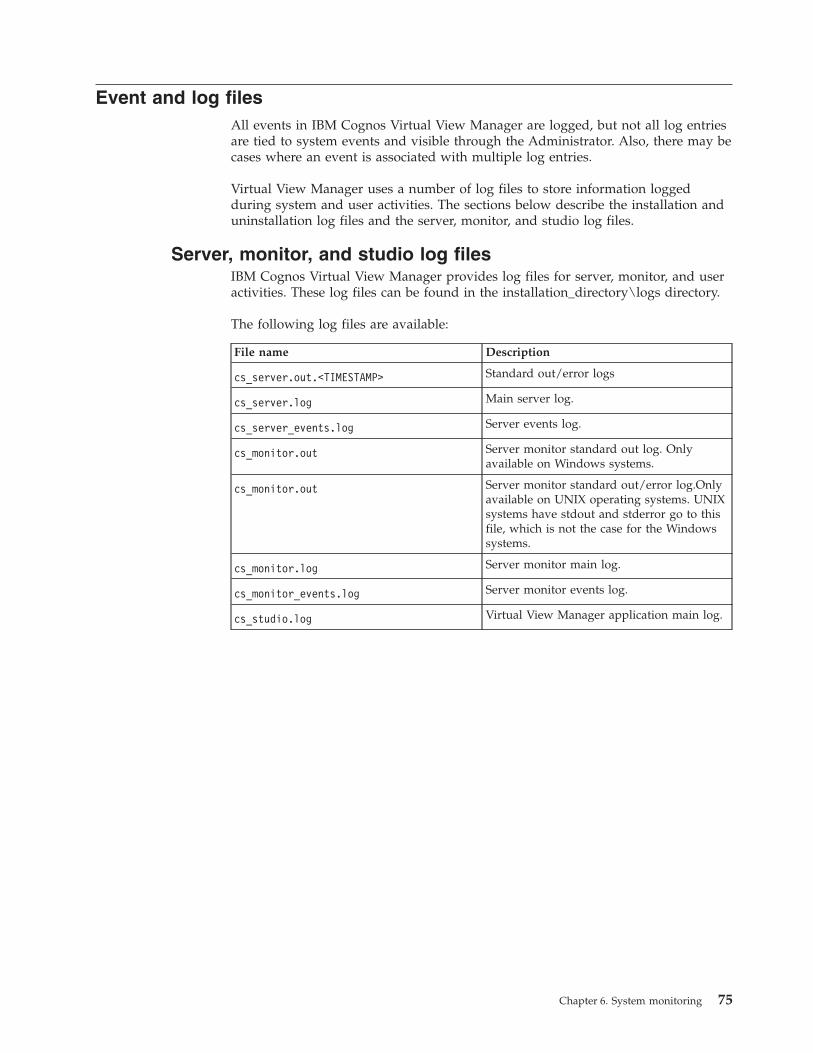
Event and log filesAll events in IBM Cognos Virtual View Manager are logged, but not all log entriesare tied to system events and visible through the Administrator. Also, there may becases where an event is associated with multiple log entries.
Virtual View Manager uses a number of log files to store information loggedduring system and user activities. The sections below describe the installation anduninstallation log files and the server, monitor, and studio log files.
Server, monitor, and studio log filesIBM Cognos Virtual View Manager provides log files for server, monitor, and useractivities. These log files can be found in the installation_directory\logs directory.
The following log files are available:
File name Description
cs_server.out.<TIMESTAMP> Standard out/error logs
cs_server.log Main server log.
cs_server_events.log Server events log.
cs_monitor.out Server monitor standard out log. Onlyavailable on Windows systems.
cs_monitor.out Server monitor standard out/error log.Onlyavailable on UNIX operating systems. UNIXsystems have stdout and stderror go to thisfile, which is not the case for the Windowssystems.
cs_monitor.log Server monitor main log.
cs_monitor_events.log Server monitor events log.
cs_studio.log Virtual View Manager application main log.
Chapter 6. System monitoring 75

76 IBM Cognos Virtual View Manager Version 10.1.1: Administration Guide

Chapter 7. Utilities
This chapter describes the command-line utility programs which are available withIBM Cognos Virtual View Manager.
These programs are available in the installation_location/bin directory. Generally touse these programs (with the exception of pkg_export, and pkg_import), you needto have administrative rights to Access Tools, Read All Resources, and Modify AllResources.
The following utility programs are described:v “backup_export and backup_import”v “virtualviewmanager” on page 85v “install_services” on page 87v “remove_services” on page 113v “repo_util” on page 114v “server_util” on page 117
backup_export and backup_importIBM Cognos Virtual View Manager provides two ways to perform a full serverbackup of an existing server instance. Either the Virtual View Manager interface orthe backup_import command line utility may be used to create or restore savedconfigurations from a full server backup CAR file. By default the backup_exportcommand exports every part of the server configuration, including domains, users,groups, all resources, security settings (ownership of resources and privileges onresources), cache configurations, scheduling, driver configurations, and server-levelsettings.
Note: For more information on how the Virtual View Manager interface can beused to export and import a full server configuration, see the Virtual ViewManager User Guide.
Use the command-line backup programs to backup and save all data sourcemetadata, user-defined resources, (published, shared, and other), and serversettings. The file generated by a full server backup export may be used to laterrestore the entire set of configurations (with the exception of local machine basedserver configuration settings), data source meta-data, and all derived and childresources.
Local computing environment based settings and configurations are excluded froma full server backup export.
Options may be specified to either include or exclude custom Java and data sourcestatistics regarding cardinality and table boundaries. Other command line utilities,namely pkg_export and pkg_import, give greater flexibility and control over whatand how aspects of the server may be exported for purposes other than backup.
The following rights are required to perform a full server backup:v Access Toolsv Read All Resources
© Copyright IBM Corp. 2008, 2011 77

v Read All Users andv Read All Config
The following rights are required to import an archive:v Access Toolsv Read and Modify All Resourcesv Read and Modify All Usersv Read and Modify All Config
The command line programs are available in the installation_location /bin directory:v backup_export.batv backup_import.batv backup_export.shv backup_import.sh
Backup program commandsThe backup program provides several commands and options.
Backup export syntaxThis topic provides the syntax for the backup_export command line program.backup_export-server <hostname> [-port <port number>] [-encrypt]-pkgfile <file name>-user <user name> -password <password> [-domain <domain>][-pkgname <name>] [-description <text>][-optfile <file name>] [-excludejars][-includeStatistics] [-verbose]
Command line options for backup_exportThe backup_export command line program provides several command-lineoptions.
Options in the following table are listed alphabetically. Syntactical order of theoptions is relevant in most cases.
Notes:
v The export does not include runtime history like log files or probe history.v The -pkgname and -description flags are optional. They let you include a name
and notes within the contents.xml to assist in later identification.
Option Optional/mandatory Comments
-description <text> optional Description of the exported archivefile set as an attribute of thecontents.xml file within the exportedCAR.
-domain <domain> optional User domain. The default value iscognos.
78 IBM Cognos Virtual View Manager Version 10.1.1: Administration Guide

Option Optional/mandatory Comments
-encrypt optional Encrypts communication betweenthe command line and the serverusing SSL sent over the dedicatedHTTPS port.
NOTE: When using the -encryptoption, the HTTPS port isautomatically used. Use the -portoption to specify the HTTP webservices base port and the commandline utility automatically switchesthe SSL connection to the dedicatedHTTPS port.
-excludejars optional Suppresses export of custom jars. Bydefault. the export does not includebinary files such as custom Javaprocedure JAR files or JDBC driverJAR files.
-includeStatistics optional Includes any known resourcecardinality statistics about datasource table boundaries, columnboundaries, and configurations whenstatistics gathering is enabled.
-optfile <file name> optional Specifies an option file providing away to pass options without usingthe command line. The options file isuseful for scripting and ensuringthat sensitive information does notdisplay on the operating systemcommand line.
The contents of the options file arethe same strings you would use onthe command line, with the additionof new lines being legal.
For example:
backup_export -server localhost-user test -password password-pkgfile sample.car
is the same as:
backup_export -optfile sample.opt
where sample.opt containsmandatory arguments and options:-server localhost -user test-password password -pkgfilesample.car
-password <password> mandatory Password of the administrative userperforming the export.
Chapter 7. Utilities 79

Option Optional/mandatory Comments
-pkgfile <file name> mandatory Specifies the path and the file namecreated as the backup archive file.The file path specified must beaccessible to the command lineclient. The server passes data to thecommand line client and then theclient writes that CAR file to thelocation specified.
-pkgname <name> optional Names an attribute in thecontents.xml within the exportedbackup file. This option is likely todeprecated in future releases.
-port <port_number> optional Specifies Web Services Base Port(HTTP) used to communicate withthe server. The default value is 9400.Specification is optional is the portsetting has not changed.
Note: Specify the Web ServicesHTTP port even if the -encryptoption is specified. If -encrypt isspecified then the tool willautomatically add two to the portnumber specified here.
-server <hostname> mandatory Target server to which the utilitywill connect.
-user <username> mandatory System administrative user name. Toproperly use backup_export theadministrative user must have atleast the following rights: AccessTools, Read All Resources, Read AllUsers, and Read All Config.
-verbose optional Generates descriptive outputdescribing the export in thecommand line window.
Backup import syntaxThis topic provides the syntax for the backup_import command line program.backup_import-server <hostname> [-port
<port number>] [-encrypt]-pkgfile <target/file name>-user<user name> -password <password>[-domain <domain>]-relocate <oldPath><newPath> ...[-optfile <filename>] ...[-set <path>
80 IBM Cognos Virtual View Manager Version 10.1.1: Administration Guide
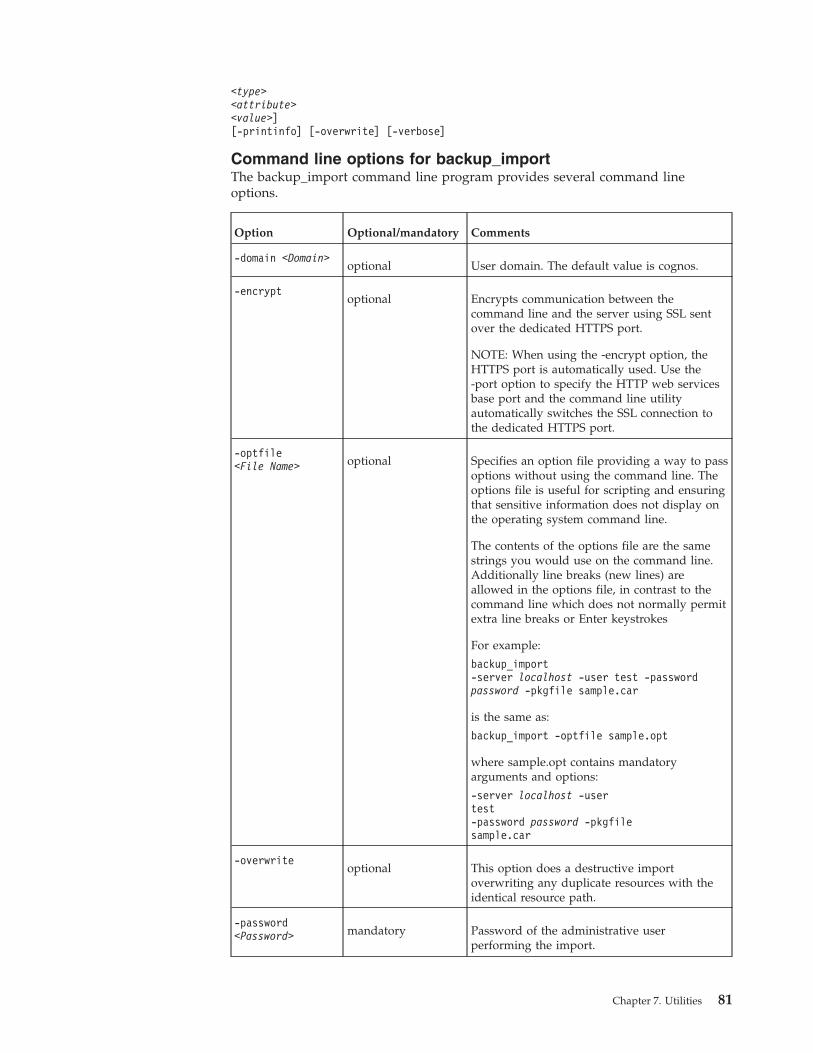
<type><attribute><value>][-printinfo] [-overwrite] [-verbose]
Command line options for backup_importThe backup_import command line program provides several command lineoptions.
Option Optional/mandatory Comments
-domain <Domain>optional User domain. The default value is cognos.
-encryptoptional Encrypts communication between the
command line and the server using SSL sentover the dedicated HTTPS port.
NOTE: When using the -encrypt option, theHTTPS port is automatically used. Use the-port option to specify the HTTP web servicesbase port and the command line utilityautomatically switches the SSL connection tothe dedicated HTTPS port.
-optfile<File Name> optional Specifies an option file providing a way to pass
options without using the command line. Theoptions file is useful for scripting and ensuringthat sensitive information does not display onthe operating system command line.
The contents of the options file are the samestrings you would use on the command line.Additionally line breaks (new lines) areallowed in the options file, in contrast to thecommand line which does not normally permitextra line breaks or Enter keystrokes
For example:
backup_import-server localhost -user test -passwordpassword -pkgfile sample.car
is the same as:
backup_import -optfile sample.opt
where sample.opt contains mandatoryarguments and options:
-server localhost -usertest-password password -pkgfilesample.car
-overwriteoptional This option does a destructive import
overwriting any duplicate resources with theidentical resource path.
-password<Password> mandatory Password of the administrative user
performing the import.
Chapter 7. Utilities 81
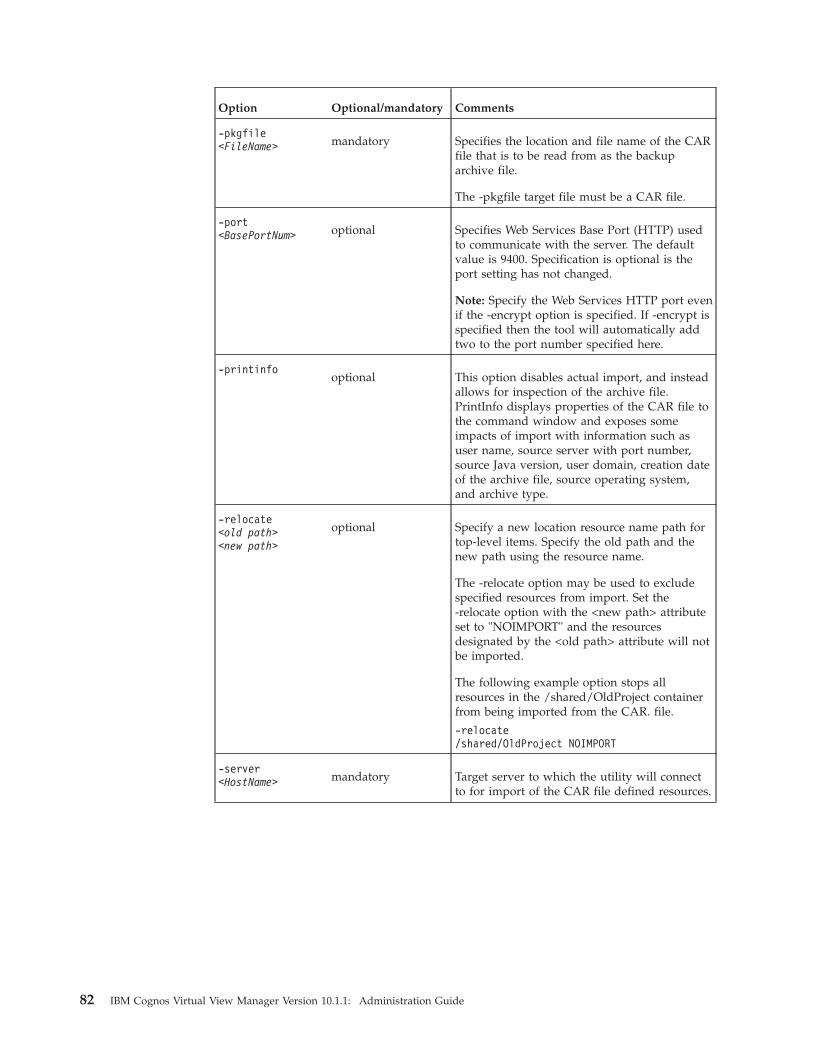
Option Optional/mandatory Comments
-pkgfile<FileName> mandatory Specifies the location and file name of the CAR
file that is to be read from as the backuparchive file.
The -pkgfile target file must be a CAR file.
-port<BasePortNum> optional Specifies Web Services Base Port (HTTP) used
to communicate with the server. The defaultvalue is 9400. Specification is optional is theport setting has not changed.
Note: Specify the Web Services HTTP port evenif the -encrypt option is specified. If -encrypt isspecified then the tool will automatically addtwo to the port number specified here.
-printinfooptional This option disables actual import, and instead
allows for inspection of the archive file.PrintInfo displays properties of the CAR file tothe command window and exposes someimpacts of import with information such asuser name, source server with port number,source Java version, user domain, creation dateof the archive file, source operating system,and archive type.
-relocate<old path><new path>
optional Specify a new location resource name path fortop-level items. Specify the old path and thenew path using the resource name.
The -relocate option may be used to excludespecified resources from import. Set the-relocate option with the <new path> attributeset to "NOIMPORT" and the resourcesdesignated by the <old path> attribute will notbe imported.
The following example option stops allresources in the /shared/OldProject containerfrom being imported from the CAR. file.
-relocate/shared/OldProject NOIMPORT
-server<HostName> mandatory Target server to which the utility will connect
to for import of the CAR file defined resources.
82 IBM Cognos Virtual View Manager Version 10.1.1: Administration Guide

Option Optional/mandatory Comments
-set<path> <type><attribute><value>
optional Enables resource attribute changes duringimport.
Use the -set option to change the data sourceattribute value(s) of classpath, host, port,database, user, or password when deploying a.car file to a new location like a productionserver.
The resource name is the <path>.
The <type> is always equal to"DATA_SOURCE" when using the set optionwith the attributes named above.
The <attribute> can be: classpath, host, port,database, user, or password.
Set <value> to a valid entry for the selectedattribute.
String values may be enclosed with doublequotes to allow for spaces in the <value>.Example:
./pkg_import.sh-pkgfile MyCustJavaDB.car
-optfile C:\X.opt -set /shared/datasources/DBCustom_JavaDATA_SOURCEclasspath "C:\Program Files\JavaDev;D:\My Documents\Java Joe"
The set option may be repeated as often as isnecessary to set different attributes.
Multiple classpaths can be set with a singlestatement. When executing backup_importfrom a Windows system use the semicolon as adelimiter where <value> could be:
C:\DevZone\ATeam\Jars\my.jar;D:\Current\Ref\classes
When executing the pkg_import from aUNIX/Linux system use colons as thedelimiter. For example:
/lib/ext/classes:/lib/src/jars
-user<UserName> mandatory System administrative user name. To properly
use backup_import the administrative usermust have at least the following rights: AccessTools, Modify All Resources, Modify All Users,and Modify All Config
-verboseoptional Generates descriptive output describing the
export in the command line window. Bydefault the verbose option is not engaged andonly error messages are displayed or logged.
Chapter 7. Utilities 83

Notes on Command line options for backup_import:
v The -pkgfile target file must be a .car file.v The -verbose option causes informational messages to be displayed after
importing. Without this option, only error messages are displayed.v The -set option allows data source connection information to be explicitly
specified or changed from the original during import.[-set<path><attribute> <value>]
This option is typically used when deploying a .car file to a production server.The properties most commonly changed are: host, port, database, user, password
Set option for command line options for backup_import:
The following attributes of the -set option may be invoked when importing datasources:v user <login> or <username> or error depending on source typev password <password> or error depending on source typev user2 <appUserName> or error if not Oracle EBSv password2 <appPassword> or error if not Oracle EBSv host <urlIP> or <dsn> or <server> or <appServer> or <url> or <root> or error
depending on the source typev port <urlPort> or <port> or error depending on source typev database <urlDatabaseName> or <enterprise> or <appServer> or error
depending on the source typev path <root> or <url> or error depending on source typev annotation
Example usage to change the password property of a data source:pkg_import mycar.car -set /shared/myDataSource DATA_SOURCEpassword myNewPassword
In this example, -set is the option; DATA_SOURCE is the type of the resourcebeing imported, and password is the property that is being changed.
Rules for importImporting follows some rules to resolve conflicts during import.
These rules are:1. If an imported resource does not exist, it is created. The person performing the
import gets appropriate privileges as the creator (such as READ|WRITE for afolder or READ|WRITE|EXECUTE for a procedure). If the user is in the admingroup and has requested -includeaccess, then the owner of the resource is set asit was before and any privileges in the import are also put in place.
2. If a resource is imported to a non-existent folder, the folder (and any parentfolders of that folder that do not yet exist) is created with the importing usergetting READ|WRITE privilege and ownership of these folders. Auto-creationof missing folders is not supported in the Virtual View Manager Data Servicesarea.
3. If a resource already exists and it is also being imported, the old version isoverwritten (assuming you have the WRITE privilege) in all ways, except thefollowing:v The owner is not changed. The original owner retains ownership.
84 IBM Cognos Virtual View Manager Version 10.1.1: Administration Guide
v Privileges for users that are not explicitly changed by the import are leftintact. For example, if abe has READ|WRITE and bob has READ|WRITE,and the import lists abe as READ but does not mention bob then abe'sprivileges are updated but bob's are left intact.
v If the resource is a folder or data source, its children resources are notremoved.
4. Restrictionsv The configuration settings (done through the Administration > Configuration
menu option) are not carried over when you export/import a resource.v You cannot create a resource in a folder where you do not have the WRITE
privilege.v You cannot overwrite a resource unless you have the WRITE privilege for
that resource.v You cannot export just part of a physical data source. It is either all or
nothing.v You cannot import just part of a physical data source. If you import, you
must include the source definition itself.v The Virtual View Manager Data Services area has strict structure rules that are
enforced.v You cannot import anything that was exported from the Virtual View Manager
Data Services area to outside of that area.v You cannot import anything that was exported from outside the Virtual View
Manager Data Services area into that area.
virtualviewmanagerThe command-line program virtualviewmanager.bat (for Windows) orvirtualviewmanager.sh (for UNIX) can be used to stop or start the server from acommand-line interface. Examples are given here using the *.sh command.
Start, stop, or restart the serverThe command-line program virtualviewmanager.bat (for Windows) orvirtualviewmanager.sh (for UNIX) can be used to stop or start the server from acommand-line interface. Examples are given here using the *.sh command.
Procedure1. Make sure that the monitor is active.2. Run the following command:
<installation_directory>/bin/virtualviewmanager.shserver <start|stop|restart> -user <username> -password<password>
Start, stop, or restart the monitorThe command-line program virtualviewmanager.bat (for Windows) orvirtualviewmanager.sh (for UNIX) can be used to stop or start the monitor from acommand-line interface. Examples are given here using the *.sh command.
Procedure1. Run the following command:
<installation_directory>/bin/virtualviewmanager.shmonitor <start|stop|restart>
Starting the monitor automatically starts the server.
Chapter 7. Utilities 85

Stopping the monitor automatically stops the server.Restarting the monitor automatically stops and restarts the server.Note: If you plan to run the monitor process manually and wish to keep themonitor process running even after you log off the system, you need to run thefollowing command:nohup<installation_directory>/bin/virtualviewmanager.shmonitor <start|restart>
2. On Windows, if you plan to run the monitor process manually and wish tokeep the monitor process running even after you log off the system, you needto set Server Ignore Signals to True, as follows:v Go to Administration > Configuration > Virtual View Manager Components >
Virtual View Manager Server > Configuration > Monitor > Server Ignore Signals(On Monitor Restart).
v Set the Value to True and the restart the monitor.
Run the server as a foreground process with no monitorThe command-line program virtualviewmanager.bat (for Windows) orvirtualviewmanager.sh (for UNIX) can be used to run the server as a foregroundprocess with no monitor from a command-line interface. Examples are given hereusing the *.sh command.
Procedure1. Stop the monitor.2. Run the following commands, as needed:
<installation_directory>/bin/virtualviewmanager.shserver <run|debug>
<installation_directory>/bin/virtualviewmanager_server.sh<run|debug>
The commands with the debug option also enable Java debugging on port8000. All those actions only output to log files. These commands may be usedin order to obtain thread dumps or debug a server issue without the monitorgetting in the way.If you are running the server with no monitor with one of the commandsabove, a monitor start will kill that server process and restart a new one in thebackground.Note: If you plan to run the server process manually and wish to keep theserver process running even after you log off the system, you need to run thefollowing command:nohup <command> &
where <command> refers to one of the commands listed above in this section.3. On Windows, if you plan to run the server process manually and wish to keep
the server process running even after you log off the system, you need setServer Ignore Signals to True, as follows:v Go to Administration > Configuration > Virtual View Manager Information Server
Components > Virtual View Manager Server > Configuration > Monitor > ServerIgnore Signals (On Monitor Restart).
v Set the Value to True and restart the monitor.
86 IBM Cognos Virtual View Manager Version 10.1.1: Administration Guide

Start, stop, or restart the repository that was installed duringthe installation
The command-line program virtualviewmanager.bat (for Windows) orvirtualviewmanager.sh (for UNIX) can be used to stop or start the repository thatwas installed during installation from a command-line interface. Examples aregiven here using the *.sh command.
Procedure
Run the following command:virtualviewmanager.shrepo <start|stop|restart> -osuser <osusername> -user <username>-password <password >
where:v osusername is the username of the account that will run the repository processv username is the repository database user namev password is the repository database user password
This command is only supported for a repository that was installed during theinstallation of Virtual View Manager.On Windows, the usage is as follows:virtualviewmanager.bat repo <start|stop|restart|install|uninstall>
Stopping and starting the server on Windows startup programOn Windows, you can manually start or stop the server through the startupprogram without a command-line interface.v To stop Virtual View Manager server manually
– From the Start menu, click IBM Cognos Virtual View Manager, Server, StopVirtual View Manager Server.
v To start Virtual View Manager server manually– From the Start menu, click IBM Cognos Virtual View Manager, Server Start
Virtual View Manager Server.
install_servicesThe install_services.sh script can be used from a command-line interface toautomatically re-start the server and the repository on UNIX.
If at anytime after installing the software you re-start the installation machine, IBMCognos Virtual View Manager and the metadata repository will not startautomatically. In order for the installation machine to automatically start or stopthe server during a re-start, run the script named install_services.sh, which wouldinstall two service files (csw.repository and csw.server) and configure them.
Running install_services.sh does not interrupt any repository or server processesthat are currently running.
Procedure1. Log into the server computer with root privileges.2. Change to the installation_directory /bin directory.3. Run the following command:
Chapter 7. Utilities 87

install_services.sh
You are prompted for a user name and other details to configure the servicefiles.
pkg_export and pkg_importUse the pkg_export and pkg_import command line utilities to export and importspecified resources from the server.
These command line utilities provide two ways of exporting and importingspecified resources from the server:v Export to and import from a CAR file (-pkgfile option)v Export to and import from a hierarchical directory (-pkgdir option)
Selected directories or individual resources may be exported to a single discreteCAR file or they may be exported to a hierarchical directory that mirrors the IBMCognos Virtual View Manager resource tree directory structure.
Advantages of exporting and importing to a single CAR file include:v Aggregates all metadata files and objects into a single filev Multiple resource files are packaged in a single compressed archive.v All resource and metadata objects may be exported/imported.
Disadvantages of CAR files include:v No incremental update available. Any changes to a resource backed up to a CAR
file requires re-creation of the CAR file to capture modifications.v Exported CAR file objects are in a proprietary format that is not easily modified.
Advantages of exporting and importing to a directory structure include:v All incremental changes (additions, modifications, and deletions) made on the
server may be captured with a single pkg_export execution that updates onlythose files affected by the changes.
v Exported files are stored in a hierarchical directory structure that mimics thestructure created, using the server.
v SQL and metadata files are stored in file formats that may be modified.v Directory and file updates compatible with many source code control systems
Disadvantages of directory package exports:v JARs, users, groups, domains, and rights in the directory export are not
supported.
The utilities, pkg_export and pkg_import, are available in the installation_location/bin directory.
On Windows, the utilities are named pkg_export.bat and pkg_import.bat. OnUNIX, they are named pkg_export.sh and pkg_import.sh.
Note: The Virtual View Manager menu option to export selected resources to CARfiles is equivalent to using the pkg_export with the -pkgfile option. For details onusing the Virtual View Manager menu option, see the Resource ManagementBasics chapter in the Virtual View Manager User Guide.
88 IBM Cognos Virtual View Manager Version 10.1.1: Administration Guide

Package export command line utilityThis utility exports specified directories and resources. The package exportcommand-line utility can be thought of as if it were two different utilities becausesome of the options that are available to each of the two primary types (CAR file-pkgfile and directory -pkgdir) of export are not interoperable.
Two sections follow to describe the various mandatory switches and optionsavailable for use with each option of the package export command-line utility:
Package export to a CAR file (-pkgfile option)For export of specified resources to a CAR file:pkg_export -pkgfile <FileName>
<NamespacePath> [...]
-server <hostname> [-port <port>][-encrypt]
-user <user> -password <password> [-domain <domain>]
[-pkgname <name>] [-description <text>]
[-optfile <filename>][...]
[-rebindable <path><description>]...
[-includeaccess] [-includecaching]
[-includesourceinfo] [-includejars]
[-includeAllUsers] [-includeUser <domain><user>]...
[-includeGroup <domain><group>]...
[-includeDomain <domain>]...
[-includeRequiredUsers] [-includeDependencies]
[-includeStatistics]
[-verbose] [-quiet]
Examples:
In the example above, myParameterizedQuery is exported with dependencies thatin this case includes the products table from the orders data source.pkg_export -pkgfile MyExport.car
shared/procedures/myParameterizedQuery
-server localhost
-user admin -password AdminPassword
-includeDependencies
-rebindable shared/sources/ds_orders/products "This needsrebinding to the production data source."
The -rebindable option is specified to notify or remind the user during an importthat the products resource will need to be rebound. During import a messageprompt and the <description> get displayed within the command prompt and theyalso appear when the resulting export CAR file is imported in Virtual ViewManager. Rebinding must be done manually after the import unless the -rebindoption specifies the new resource for rebinding during import.
Chapter 7. Utilities 89
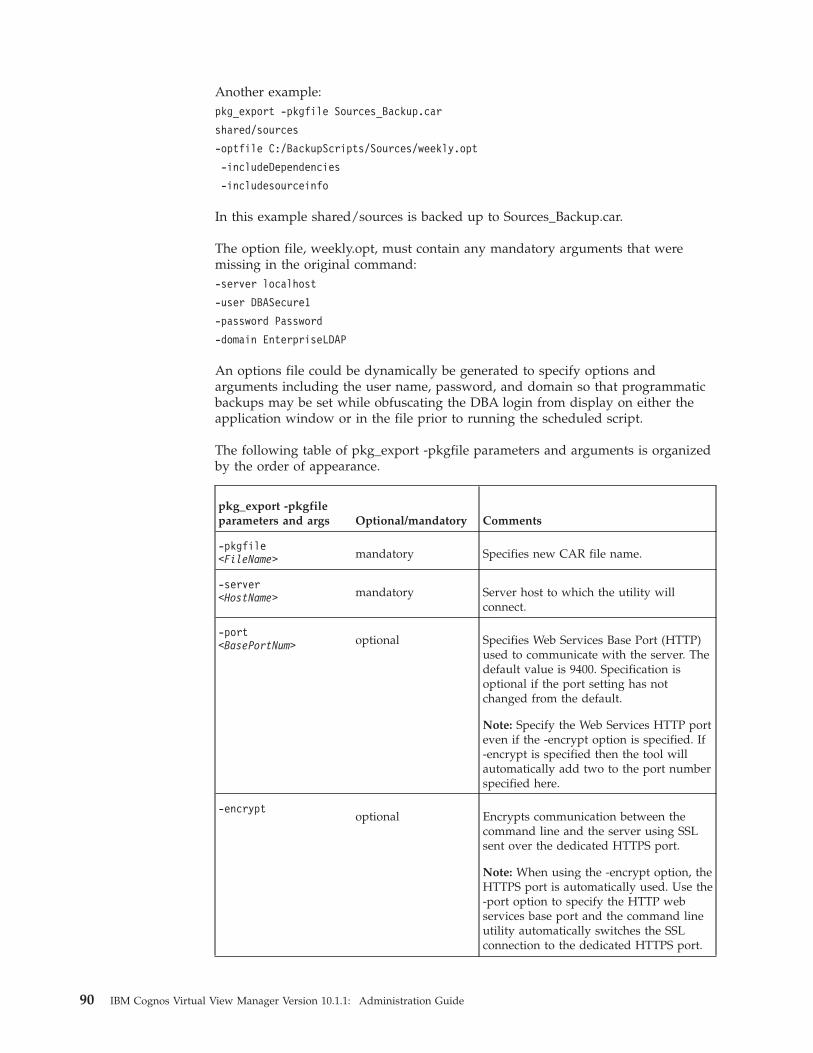
Another example:pkg_export -pkgfile Sources_Backup.car
shared/sources
-optfile C:/BackupScripts/Sources/weekly.opt
-includeDependencies
-includesourceinfo
In this example shared/sources is backed up to Sources_Backup.car.
The option file, weekly.opt, must contain any mandatory arguments that weremissing in the original command:-server localhost
-user DBASecure1
-password Password
-domain EnterpriseLDAP
An options file could be dynamically be generated to specify options andarguments including the user name, password, and domain so that programmaticbackups may be set while obfuscating the DBA login from display on either theapplication window or in the file prior to running the scheduled script.
The following table of pkg_export -pkgfile parameters and arguments is organizedby the order of appearance.
pkg_export -pkgfileparameters and args Optional/mandatory Comments
-pkgfile<FileName> mandatory Specifies new CAR file name.
-server<HostName> mandatory Server host to which the utility will
connect.
-port<BasePortNum> optional Specifies Web Services Base Port (HTTP)
used to communicate with the server. Thedefault value is 9400. Specification isoptional if the port setting has notchanged from the default.
Note: Specify the Web Services HTTP porteven if the -encrypt option is specified. If-encrypt is specified then the tool willautomatically add two to the port numberspecified here.
-encryptoptional Encrypts communication between the
command line and the server using SSLsent over the dedicated HTTPS port.
Note: When using the -encrypt option, theHTTPS port is automatically used. Use the-port option to specify the HTTP webservices base port and the command lineutility automatically switches the SSLconnection to the dedicated HTTPS port.
90 IBM Cognos Virtual View Manager Version 10.1.1: Administration Guide

pkg_export -pkgfileparameters and args Optional/mandatory Comments
-user<UserName> mandatory Virtual View Manager system
administrative user name. To properly usepkg_export the user must have ownershipof the specified resource or at least readprivilege on all the specified resourceswith: Access Tools and Read All Configrights
-password<Password> mandatory Password for user profile used to export
package.
-domain<Domain> optional User domain. The default value is cognos
and does not have to be stated unless theuser profile used for export has anothervalue.
From this row down the Parameters are listed alphabetically.
-description"<Text>" optional Package description of the archive file.
Notation appears when Virtual ViewManager is used to import the CAR.
-includeAllUsersoptional Exports all domains, groups, and users to
the export file. Requires the Read AllUsers right.
-includeUser<DomainName><UserName>
optional Includes the specified user in the exportfile. This option may be repeated toexport multiple users. Repeat the optionkeyword -includeUser with arguments forthe new domain and user as many timesas is necessary.
-includeGroup<DomainName><GroupName>
optional Exports group information about thespecified group in the export file.
-includeDomain<DomainName> optional Export the specified domain metadata to
the export file.
-includeaccessoptional Includes the current user access controls
(privilege specifications) on the resourcesin the export file.
Default setting does not include accesscontrol even when exported by anadministrator.
An error may occur if this option is usedand the exporting user is not a member ofthe admin group.
-includecachingoptional Includes the details of caching on views
and procedures in the export file.
Chapter 7. Utilities 91
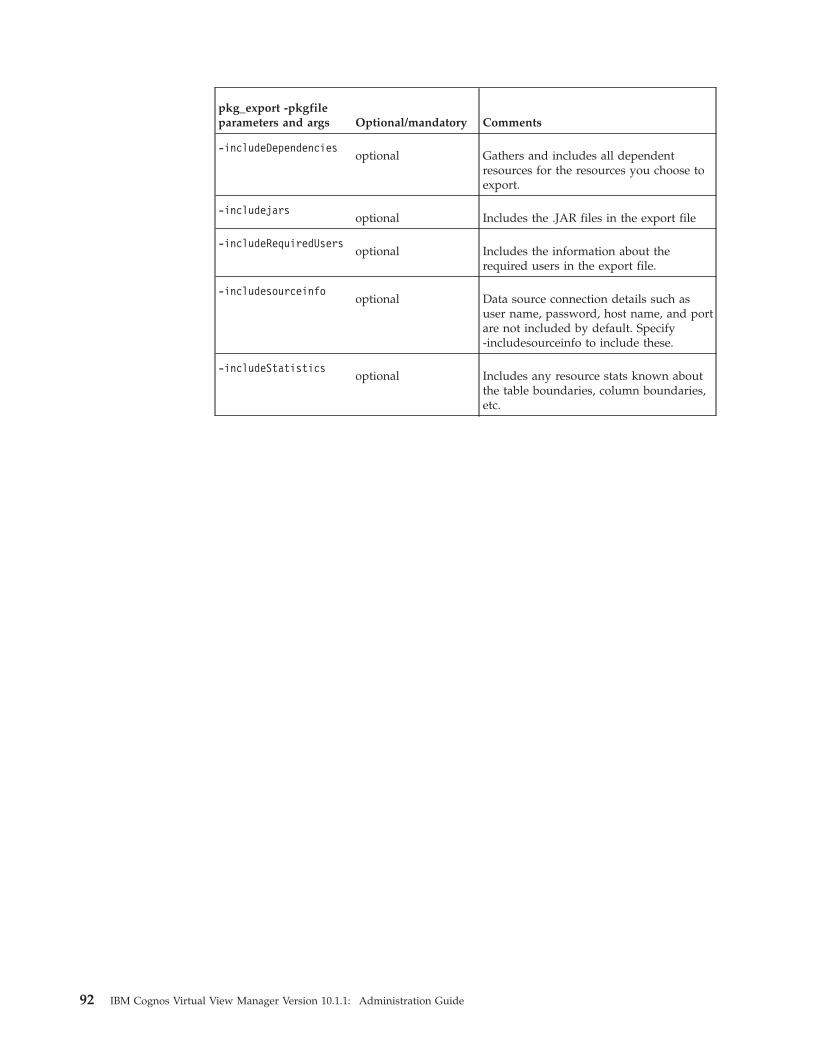
pkg_export -pkgfileparameters and args Optional/mandatory Comments
-includeDependenciesoptional Gathers and includes all dependent
resources for the resources you choose toexport.
-includejarsoptional Includes the .JAR files in the export file
-includeRequiredUsersoptional Includes the information about the
required users in the export file.
-includesourceinfooptional Data source connection details such as
user name, password, host name, and portare not included by default. Specify-includesourceinfo to include these.
-includeStatisticsoptional Includes any resource stats known about
the table boundaries, column boundaries,etc.
92 IBM Cognos Virtual View Manager Version 10.1.1: Administration Guide
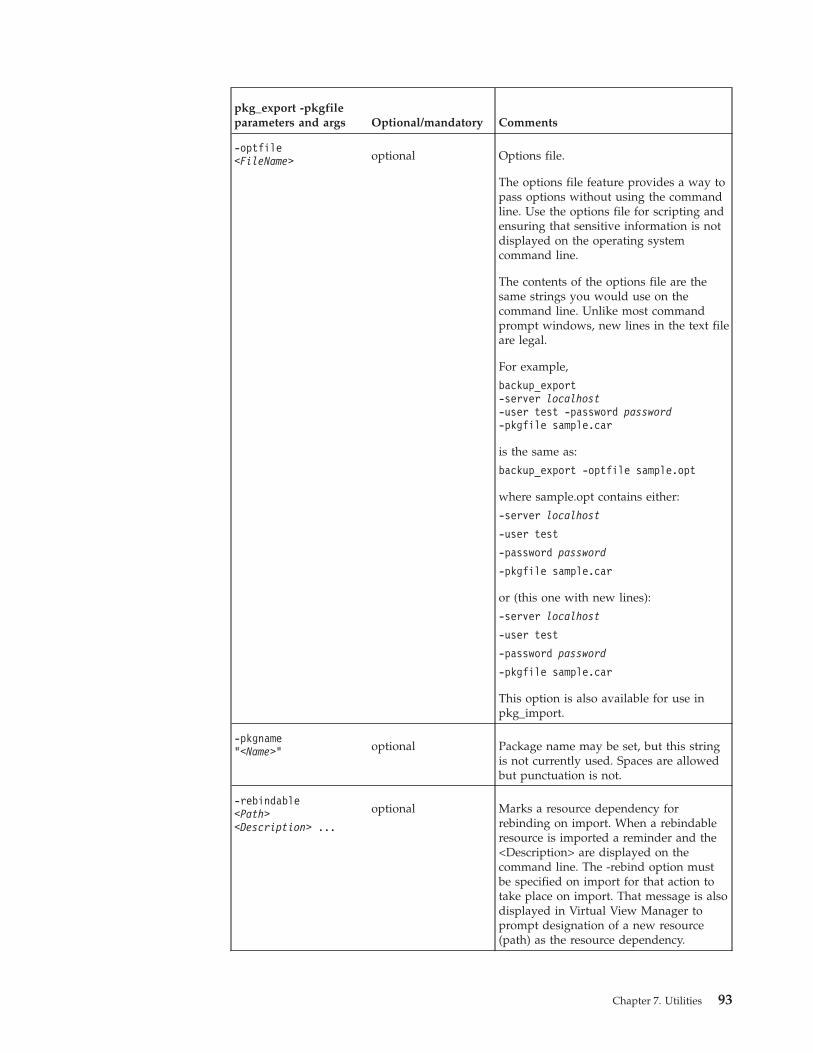
pkg_export -pkgfileparameters and args Optional/mandatory Comments
-optfile<FileName> optional Options file.
The options file feature provides a way topass options without using the commandline. Use the options file for scripting andensuring that sensitive information is notdisplayed on the operating systemcommand line.
The contents of the options file are thesame strings you would use on thecommand line. Unlike most commandprompt windows, new lines in the text fileare legal.
For example,
backup_export-server localhost-user test -password password-pkgfile sample.car
is the same as:
backup_export -optfile sample.opt
where sample.opt contains either:
-server localhost
-user test
-password password
-pkgfile sample.car
or (this one with new lines):
-server localhost
-user test
-password password
-pkgfile sample.car
This option is also available for use inpkg_import.
-pkgname"<Name>" optional Package name may be set, but this string
is not currently used. Spaces are allowedbut punctuation is not.
-rebindable<Path><Description> ...
optional Marks a resource dependency forrebinding on import. When a rebindableresource is imported a reminder and the<Description> are displayed on thecommand line. The -rebind option mustbe specified on import for that action totake place on import. That message is alsodisplayed in Virtual View Manager toprompt designation of a new resource(path) as the resource dependency.
Chapter 7. Utilities 93

pkg_export -pkgfileparameters and args Optional/mandatory Comments
-verboseoptional This option causes verbose reporting of
information much like the GUI providesinstead of the normal terse reporting.
Note: The pkg_export command exports each of the listed resources (as specifiedusing a namespace path such as /users/manager/sources or /shared/projects/pegasus). It does not include any domains, users, groups, or server settings.v This command can be used by any user. If you do not have the READ privilege
to any of the specified resources, the export will fail. If you do have the READprivilege for all of them, then all resources that are children of those resourceswill also be included as long as you have the READ privilege on those children.Users who attempt export without the READ privilege on a child resource willnot be able to export the child resource, and they will not be notified of theomission of the child from the export package.
v By default, access information (privilege settings) are not included in the export.The -includeaccess option must be provided if you want privilege settingsincluded in the archive file. The -includeaccess option is ignored if you are notlogged in as an administrator with the Read All Resources right.
v By default, no caching configurations are included in the export. The-includecaching option must be specified to include cached data frommaterialized views, configurations that include scheduling for cache refreshes.
v By default, physical data source connection details such as usernames,passwords, host names, and ports are blanked out during an export. The-includesourceinfo option must be provided if you want those details included.Note that if passwords are included, they are encrypted.
v The -pkgname and -description flags are optional. They let you include yourspecific information in the archive file for later identification.
v The -verbose option reports if problems are encountered during the export
Package export to a directory (-pkgdir option)The -pkgdir option exports resources to a directory for incremental update. Theresource definitions and file objects are externalized from the server and they maybe modified given certain precautions.
Since privilege settings and resource metadata are exported as files that may bemodified, they must be protected from intentional or inadvertent changes.
One of the primary advantages of externalizing resources with the -pkgdir optionis that exports may be quickly performed that incrementally update only thosefiles that have been created, changed, or deleted. This is great for source controlsystems that safeguard files and track version changes.v Exporting to a new directory
When a package export is made to a new directory all defined resources in thespecified directories are exported to a hierarchical directory structure matchingthe Virtual View Manager resource tree.
v Exporting to an existing externalized directoryTo incrementally update an existing externalized directory use the pkg_export-pkgdir command and exclude the resource namespace path. By default, thepackage export will incrementally update only those files that have changed
94 IBM Cognos Virtual View Manager Version 10.1.1: Administration Guide
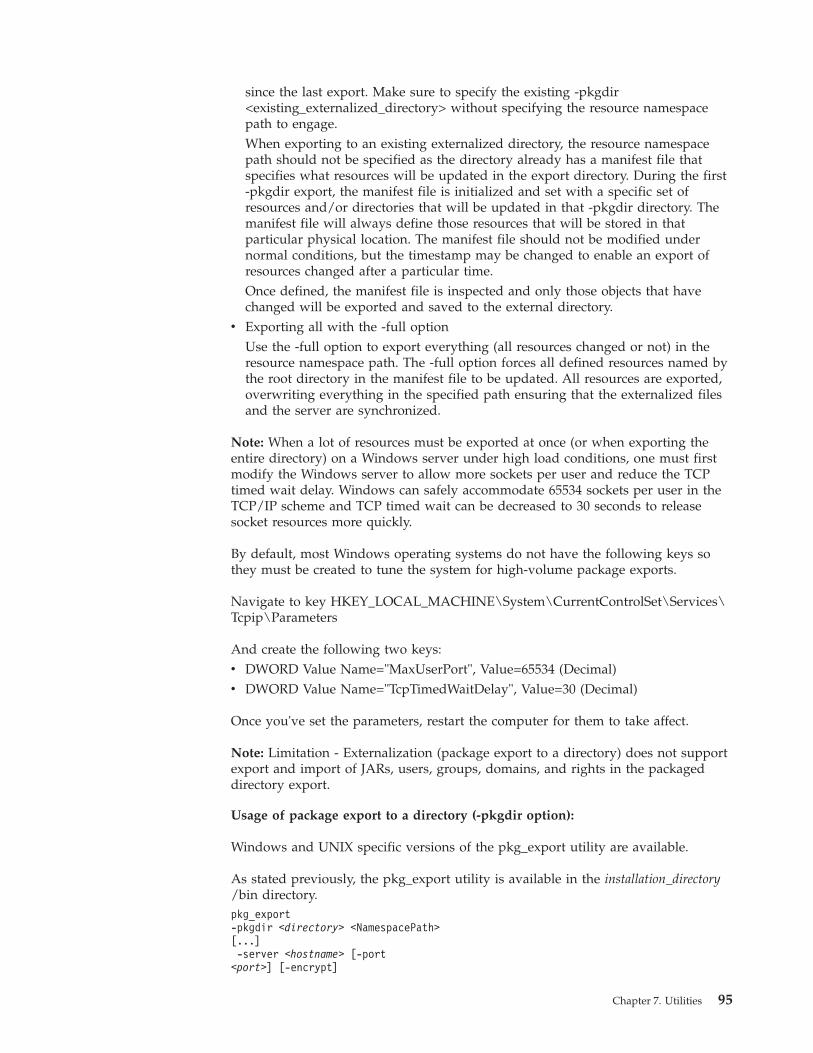
since the last export. Make sure to specify the existing -pkgdir<existing_externalized_directory> without specifying the resource namespacepath to engage.When exporting to an existing externalized directory, the resource namespacepath should not be specified as the directory already has a manifest file thatspecifies what resources will be updated in the export directory. During the first-pkgdir export, the manifest file is initialized and set with a specific set ofresources and/or directories that will be updated in that -pkgdir directory. Themanifest file will always define those resources that will be stored in thatparticular physical location. The manifest file should not be modified undernormal conditions, but the timestamp may be changed to enable an export ofresources changed after a particular time.Once defined, the manifest file is inspected and only those objects that havechanged will be exported and saved to the external directory.
v Exporting all with the -full optionUse the -full option to export everything (all resources changed or not) in theresource namespace path. The -full option forces all defined resources named bythe root directory in the manifest file to be updated. All resources are exported,overwriting everything in the specified path ensuring that the externalized filesand the server are synchronized.
Note: When a lot of resources must be exported at once (or when exporting theentire directory) on a Windows server under high load conditions, one must firstmodify the Windows server to allow more sockets per user and reduce the TCPtimed wait delay. Windows can safely accommodate 65534 sockets per user in theTCP/IP scheme and TCP timed wait can be decreased to 30 seconds to releasesocket resources more quickly.
By default, most Windows operating systems do not have the following keys sothey must be created to tune the system for high-volume package exports.
Navigate to key HKEY_LOCAL_MACHINE\System\CurrentControlSet\Services\Tcpip\Parameters
And create the following two keys:v DWORD Value Name="MaxUserPort", Value=65534 (Decimal)v DWORD Value Name="TcpTimedWaitDelay", Value=30 (Decimal)
Once you've set the parameters, restart the computer for them to take affect.
Note: Limitation - Externalization (package export to a directory) does not supportexport and import of JARs, users, groups, domains, and rights in the packageddirectory export.
Usage of package export to a directory (-pkgdir option):
Windows and UNIX specific versions of the pkg_export utility are available.
As stated previously, the pkg_export utility is available in the installation_directory/bin directory.pkg_export-pkgdir <directory> <NamespacePath>[...]-server <hostname> [-port<port>] [-encrypt]
Chapter 7. Utilities 95

-user <user> -password <password> [-domain<domain>][-pkgname <name>] [-description<text>][-optfile <filename>] ...[-full][-messagesOnly][-fileEncoding <encoding>][-listIgnored][-verbose] [-quiet]
Examples:
The default administrative user profile is used to execute the following commandwhich externalizes all resources defined by the server instance on the localhost inthe resource path /shared/examples/ds_orders. All the metadata object definitionsare exported as XML files to the C:/temp directory.pkg_export.sh -pkgdir C:/temp /shared/examples/ds_orders-server localhost -user admin -password admin
The above example establishes a manifest file in C:/temp that will reserve thedirectory for sync of all resources in /shared/examples/ds_orders path.
Later, to see what files have been changed and what would be exported the-messagesOnly option may be specified so that nothing is actually exported onexecution of the command:pkg_export.sh -pkgdir C:/temp -server localhost -useradmin -password admin -messagesOnly
To incrementally synchronize that externalized directory execute this command:pkg_export.sh -pkgdir C:/temp -server localhost -useradmin -password admin
Use the -encrypt option to securely backup a directory to some local or locallymapped drive from across an unsecured network. For example,pkg_export.sh -pkgdir Z:/Secure /shared/examples/ds_orders-server 111.123.456.99 -port 2220 -encrypt -user admin999 -passwordSecured999 -domain SomeLDAPDomain
With the above example command, an SSL/HTTPS connection with a Virtual ViewManager Server at the specified IP address is established. The specified port is thedesignated Virtual View Manager Server HTTP base port, but the -encrypt optionchanges the actual connection to use the HTTPS port. The encrypted connectionenables a secured login authentication. The Virtual View Manager Server exportsthe requested XML files securely over the SSL connection to the client applicationand the client writes those files to the designated target directory Z:/Secure.
The following table of pkg_export -pkgfile parameters and arguments is organizedby the both the order of appearance and alphabetically.
96 IBM Cognos Virtual View Manager Version 10.1.1: Administration Guide

pkg_export-pkgdir parametersand args Optional/mandatory Comments
-pkgdir<Directory> mandatory Specifies the absolute location for creation of a
directory and placement of the export files.Example:
-pkgdirC:/SourceControl/ProjectI
Mapped directories must be available to theuser on the command line client
<NamespacePath>mandatory Uses the Virtual View Manager resource name
convention to specify one or many resourcedirectories for export.
Example: /shared/examples/ds_orders
All resources within the specified Virtual ViewManager directory are exported to -pkgdirC:/Directory/specified
-server<HostName> mandatory Virtual View Manager Server host to which the
utility will connect. Default name is localhost.
-port<BasePortNum> optional Specifies Web Services Base Port (HTTP) used
to communicate with the Virtual View ManagerServer. The default value is 9400. Specificationis optional if the port setting has not changed.
Note: Specify the Web Services HTTP port evenif the -encrypt option is specified. If -encrypt isspecified then the tool will automatically addtwo to the port number specified here.
-encryptoptional Encrypts communication between the
command line and the server using SSL sentover the dedicated HTTPS port.
Note: When using the -encrypt option, theHTTPS port is automatically used. Use the-port option to specify the HTTP web servicesbase port and the command line utilityautomatically switches the SSL connection tothe dedicated HTTPS port.
-user<UserName> mandatory User name for authorization of export. User
must have Access Tools and ownership of theresources to be exported or the Read AllResources rights for proper export of allconfigurations.
-password<Password> mandatory Password for user profile used to export
package.
-domain<DomainName> optional User domain. The default value is cognos and
does not have to be stated.
Chapter 7. Utilities 97

pkg_export-pkgdir parametersand args Optional/mandatory Comments
-description<text> optional Textual description of the archive directory.
Visible when selected for import with theVirtual View Manager interface.
-fileEncoding<encoding> optional Encoding defaults to UTF-8, but a different
encoding option may be specified. Display alist of valid encoding by entering an invalidencoding value, or try to read the 8 pointbelow. Valid encoding values include thefollowing:
Big5,Big5-HKSCS,Cp1252, EUC-JP,EUC-KR, GB18030, GB2312, GBK,IBM-Thai, IBM00858,IBM01140,IBM01141, IBM01142, IBM01143,IBM01144, IBM01145, IBM01146,IBM01147, IBM01148, IBM01149,IBM037, IBM1026, IBM1047, IBM273,IBM277, IBM278,IBM280, IBM284,IBM285, IBM297, IBM420, IBM424,IBM437, IBM500, IBM775, IBM850,IBM852, IBM855, IBM857, IBM860,IBM861, IBM862, IBM863, IBM864,IBM865, IBM866, IBM868, IBM869,IBM870, IBM871, IBM918,ISO-2022-CN, ISO-2022-JP,ISO-2022-KR, ISO-8859-1,ISO-8859-13, ISO-8859-15,ISO-8859-2, ISO-8859-3,ISO-8859-4, ISO-8859-5,ISO-8859-6, ISO-8859-7,ISO-8859-8, ISO-8859-9,JIS_X0201, JIS_X0212-1990,KOI8-R, Shift_JIS, TIS-620,US-ASCII, UTF-16, UTF-16BE,UTF-16LE, UTF-8, windows-1250,windows-1251, windows-1252,windows-1253, windows-1254,windows-1255, windows-1256,windows-1257, windows-1258,
98 IBM Cognos Virtual View Manager Version 10.1.1: Administration Guide
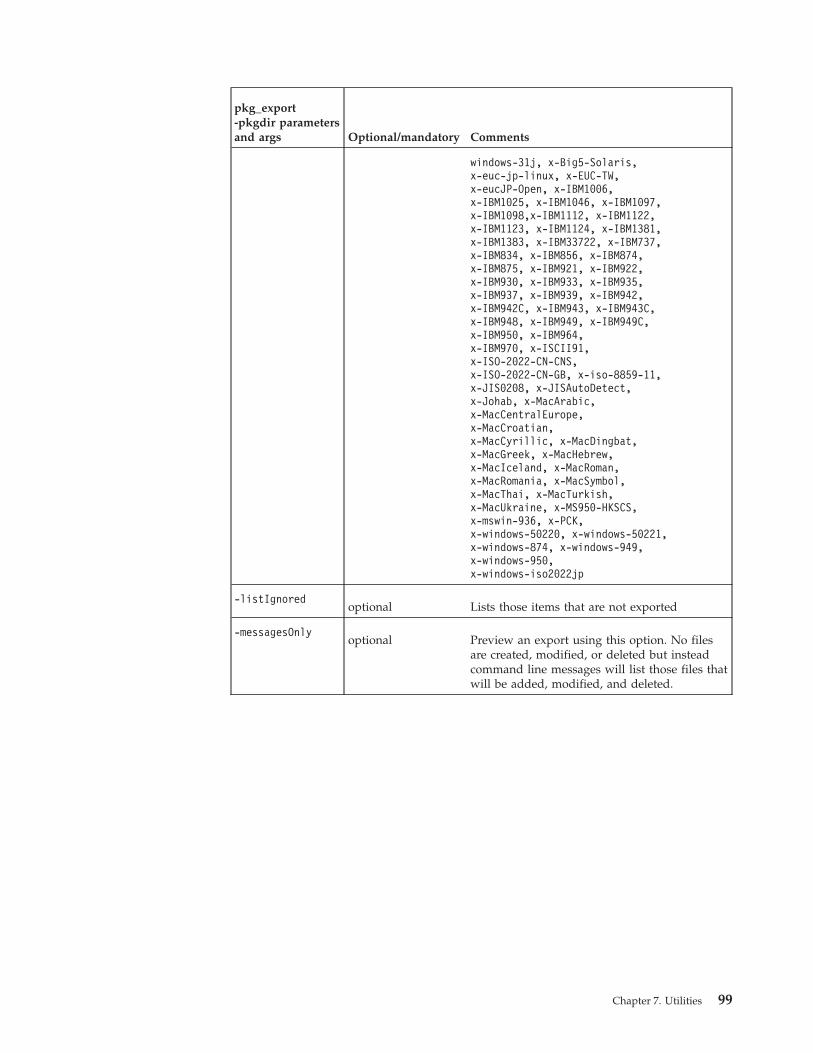
pkg_export-pkgdir parametersand args Optional/mandatory Comments
windows-31j, x-Big5-Solaris,x-euc-jp-linux, x-EUC-TW,x-eucJP-Open, x-IBM1006,x-IBM1025, x-IBM1046, x-IBM1097,x-IBM1098,x-IBM1112, x-IBM1122,x-IBM1123, x-IBM1124, x-IBM1381,x-IBM1383, x-IBM33722, x-IBM737,x-IBM834, x-IBM856, x-IBM874,x-IBM875, x-IBM921, x-IBM922,x-IBM930, x-IBM933, x-IBM935,x-IBM937, x-IBM939, x-IBM942,x-IBM942C, x-IBM943, x-IBM943C,x-IBM948, x-IBM949, x-IBM949C,x-IBM950, x-IBM964,x-IBM970, x-ISCII91,x-ISO-2022-CN-CNS,x-ISO-2022-CN-GB, x-iso-8859-11,x-JIS0208, x-JISAutoDetect,x-Johab, x-MacArabic,x-MacCentralEurope,x-MacCroatian,x-MacCyrillic, x-MacDingbat,x-MacGreek, x-MacHebrew,x-MacIceland, x-MacRoman,x-MacRomania, x-MacSymbol,x-MacThai, x-MacTurkish,x-MacUkraine, x-MS950-HKSCS,x-mswin-936, x-PCK,x-windows-50220, x-windows-50221,x-windows-874, x-windows-949,x-windows-950,x-windows-iso2022jp
-listIgnoredoptional Lists those items that are not exported
-messagesOnlyoptional Preview an export using this option. No files
are created, modified, or deleted but insteadcommand line messages will list those files thatwill be added, modified, and deleted.
Chapter 7. Utilities 99

pkg_export-pkgdir parametersand args Optional/mandatory Comments
-optfile<filename> optional Options file.
The options file feature provides a way to passoptions using a file instead of the commandline. The options file is useful for scripting andensuring that sensitive information does notdisplay on the operating system command line.
The contents of the options file are the samestrings you would use on the command line,with the addition of new lines being legal.
For example,
pkg_export -pkgdir-server localhost -userMyAdmin -passwordCleartextPassword -pkgfileBackup.car
is the same as:
backup_export -optfile sample.opt
where sample.opt contains either:
-server localhost
-user MyAdmin
-password CleartextPassword
-pkgfile Backup.car
or (this one with new lines):
-server localhost
-user test
-password password
-pkgfile Backup.car
This option is also available for use inpkg_import.
-pkgname<name> optional Package name may be set to report a name
attribute in the manifest file. Otherwise thisfield is not used. Spaces are allowed butpunctuation is not.
-quietoptional Suppresses messaging in the command line.
-rebindable<Path><Description> ...
optional Marks a resource dependency for rebinding onimport. When a rebindable resource isimported using Virtual View Manager importthe <Description> is displayed in a dialog thatenables selection of a new resource (path) asthe resource dependency.
-verboseoptional Generates descriptive output describing the
export in the command line window.
100 IBM Cognos Virtual View Manager Version 10.1.1: Administration Guide

Package import command line utilityThe package import (pkg_import) utility imports directories and resources fromeither a zipped archive (CAR) file or from an externalized directory of Virtual ViewManager resources rendered as XML files.
The pkg_import utility is located in the installation_directory /bin directory.
The package import command-line utility can be thought of as if it were twodifferent utilities because some options for import from a CAR file -pkgfile aredifferent from the options available for import from a directory using -pkgdir.
Use of the package import (pkg_import) command-line utility requires thefollowing rights to properly restore defined resources: Access Tools, Read andModify All Config, Read and Modify All Resources, Read and Modify All Users.Import generally requires the most administrative rights as it will overwrite manytypes of resource objects, directories, user privileges, and other resource definitions.
The package or directory being imported and the options employed to importthem will dictate what rights are actually needed to import, but by nature of theability to overwrite resource definitions, import generally requires full adminrights.
Two sections follow to describe the various mandatory switches and optionsavailable for use with each option of the package export command-line utility:
Package import from a CAR file (-pkgfile option)Package import from a CAR file (-pkgfile) has the following generic form:pkg_import -pkgfile <D:/directory/Path/and/File_Name.car>...-server <HostName> [-port<PortNumber>] [-encrypt]-user <UserName> -password<Password> [-domain <Domain>][-relocate <OldPath><NewPath>]...[-rebind <OldPath><NewPath>]...[-set <path><DataType><Attribute><Value>]...[-optfile <D:/directory/Path/and/File_Name>][-printinfo] [-printroots] [-printusers][-printcontents] [-printreferences][-includeaccess] [-nocaching][-excludejars] [-nosourceinfo][-overwrite] [-overrideLocks] [-messagesonly][-verbose] [-quiet]
ExamplesIn this example, set is the option; DATA_SOURCE is the type of the resource beingimported, and password is the attribute being changed:pkg_import.sh -pkgfile C:/Store/EnterpriseArchive/mycar.car-server localhost -user ProdAdmin -password AdminPassWeird -set/shared/myDataSource DATA_SOURCE password MyNewPassword
Chapter 7. Utilities 101

In the next example, only shared/procedures/myParameterizedQuery is importedwith its associated dependencies from the specified CAR file. The relocate option isused to move the query to a new directory.pkg_import -pkgfile Z:/Archive/QA_Image99999.car
shared/procedures/myParameterizedQuery -server localhost-user admin -password AdminPassword -includeDependencies-relocateshared/procedures/myParameterizedQueryshared/RestrictedUse_Procedures/myParameterizedQuery
Package import (-pkgfile) mandatory switches and optionsThis table describes the mandatory switches and options for pkg_import -pkgfile.
pkg_import -pkgfileparameters and args Optional/mandatory Comments
-pkgfile <FileName>mandatory Specifies the import CAR file. The file
name should be specified as anabsolute path from a mapped directory.Multiple CAR files may be specified.
-server <HostName>mandatory Virtual View Manager server host to
which the utility will connect.
-port <BasePortNum>optional Specifies Web Services Base Port
(HTTP) used to communicate with theserver. The default value is 9400.Specification is optional if the portsetting has not changed.
Note: Specify the Web Services HTTPport even if the -encrypt option isspecified. If -encrypt is specified thenthe tool will automatically add two tothe port number specified here.
-encryptoptional Encrypts communication between the
command line and the server usingSSL sent over the dedicated HTTPSport.
Note: When using the -encrypt option,the HTTPS port is automatically used.Use the -port option to specify theHTTP web services base port and thecommand line utility automaticallyswitches the SSL connection to thededicated HTTPS port.
-user <UserName>mandatory User name of profile used to import.
User rights specified by the targetserver instance grant permission toimport and may restrict write privilegeto import into designated directoriesonly.
-password <Password>mandatory Password for user profile used to
export package.
102 IBM Cognos Virtual View Manager Version 10.1.1: Administration Guide
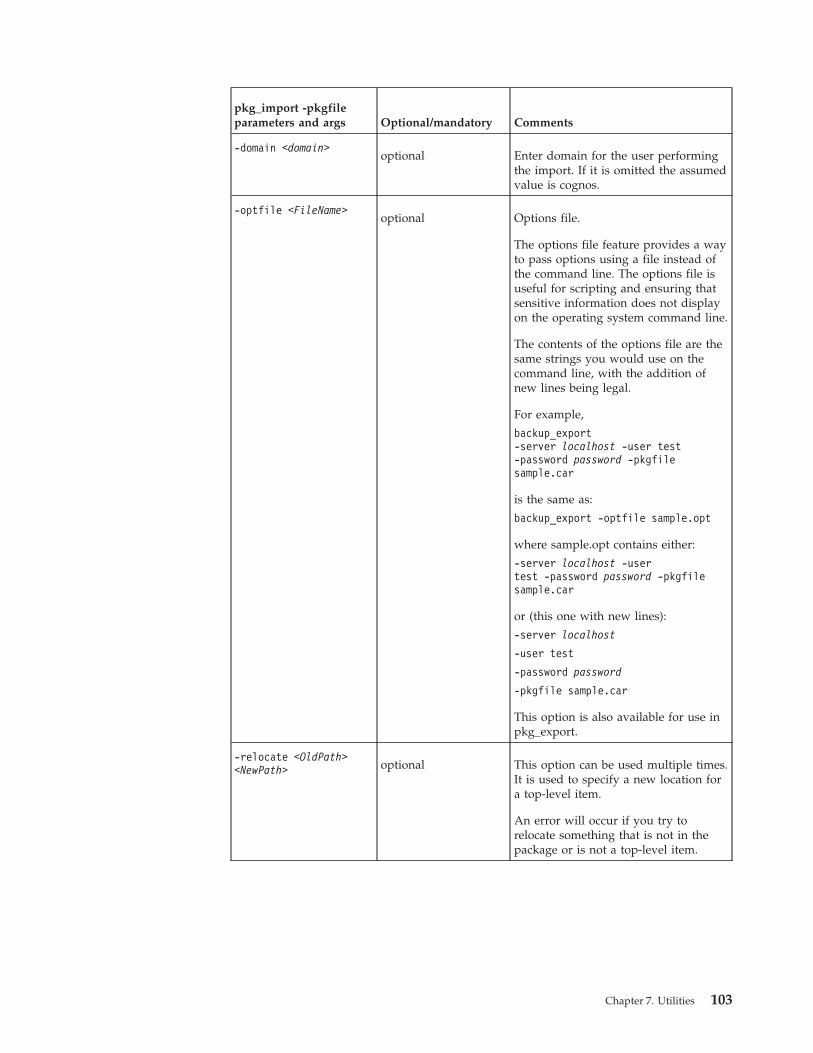
pkg_import -pkgfileparameters and args Optional/mandatory Comments
-domain <domain>optional Enter domain for the user performing
the import. If it is omitted the assumedvalue is cognos.
-optfile <FileName>optional Options file.
The options file feature provides a wayto pass options using a file instead ofthe command line. The options file isuseful for scripting and ensuring thatsensitive information does not displayon the operating system command line.
The contents of the options file are thesame strings you would use on thecommand line, with the addition ofnew lines being legal.
For example,
backup_export-server localhost -user test-password password -pkgfilesample.car
is the same as:
backup_export -optfile sample.opt
where sample.opt contains either:
-server localhost -usertest -password password -pkgfilesample.car
or (this one with new lines):
-server localhost
-user test
-password password
-pkgfile sample.car
This option is also available for use inpkg_export.
-relocate <OldPath><NewPath> optional This option can be used multiple times.
It is used to specify a new location fora top-level item.
An error will occur if you try torelocate something that is not in thepackage or is not a top-level item.
Chapter 7. Utilities 103

pkg_import -pkgfileparameters and args Optional/mandatory Comments
-rebind <OldPath><NewPath> optional Sets a new resource path for a
dependency resource. The option maybe repeated for as many dependenciesas may be necessary. Migration from adevelopment or testing environment toa production server deployment makesuse of the -rebind option.
-set <path> <type><attribute> <value> optional Changes the data source attribute
value(s) of classpath, host, port,database, user, or password whendeploying a CAR file to a new locationlike a production server.
The Virtual View Manager resourcename is the <path>.
The <type> is always equal toDATA_SOURCE when using the setoption with the attributes namedabove.
The <attribute> can be: classpath, host,port, database, user, or password.
Set <value> to a valid entry for theselected attribute.
String values may be enclosed withdouble quotes to allow for spaces inthe <value>. Example:
./pkg_import.sh-pkgfile MyCustJavaDB.car -optfileC:\X.opt -set /shared/datasources/DBCustom_JavaDATA_SOURCE classpath"C:\Program Files\JavaDev;D:\My Documents\JavaJoe"
The set option may be repeated to setdifferent attributes.
Multiple classpaths can be set with asingle statement. When executingpkg_import from a Windows systemuse the semicolon as a delimiter where<value> could be something like:
C:\DevZone\ATeam\Jars\my.jar;D:\Current\Ref\classes
When executing the pkg_import from aUNIX/Linux system use colons as thedelimiter. For example:
/lib/ext/classes:/lib/src/jars
104 IBM Cognos Virtual View Manager Version 10.1.1: Administration Guide

pkg_import -pkgfileparameters and args Optional/mandatory Comments
-printinfooptional Prints information such as user name,
source server with port number, sourceJava version, user domain, creationdate of the archive file, sourceoperating system, and archive type.
-printrootsoptional Prints the new path(s) to the imported
resources.
-printusersoptional Prints the user names of the owners of
the imported resource(s) and theirassociated user groups.
-includeusersoptional Imports all users present in the
exported package car. By defaultdomain, groups and user informationare not included in either export orimport. This option is also available foruse in pkg_export.
-printcontentsoptional This option disables actual import, and
instead allows for inspection of thearchive file. Print contents displaysproperties of the CAR file to thecommand window and exposes someimpacts of import with informationsuch as user name, source server withport number, source Java version, userdomain, creation date of the archivefile, source operating system, andarchive type.
-printreferencesoptional Prints a list of resources referred to by
the imported resource(s).
-includeaccessoptional Includes the current user access
controls on the resources in the exportfile.
It defaults to not including accesscontrol even if you are anadministrator. You get an error if youuse this flag and are not logged in as amember of the admin group.
This option is also available for use inpkg_export.
-nocachingoptional Omits caching data and all caching
configurations as if the caching of theexported resource were never set.
-excludejarsoptional Does not import the jar files.
Chapter 7. Utilities 105

pkg_import -pkgfileparameters and args Optional/mandatory Comments
-nosourceinfooptional Suppresses import of the following
pre-existing connection attributes whenan otherwise identical resource isalready present at the target: Driver,ConnectionURL, Port, Database Name,Login, Password, and Pass-throughLogin.
Supports re-import without need forexplicit "-set" options and withoutaltering original data source attributes.
-overwriteoptional This option overwrites duplicated
resources.
-messagesonlyoptional Displays the messages generated in a
package import without actuallyperforming the import.
-port <PortNumber>optional Port for the target server instance.
Default=9400
-verboseoptional This option causes verbose reporting of
information much like the GUIprovides instead of the normal tersereporting.
v The pkg_import command imports the resources in the archive file into theserver following the import rules (). If this command is used on an archivecreated using backup_export , only the resource information will be used.
v By default, access information (ownership and privileges) are not imported. Anyresources that are created as a result of the import are owned by you. Existingresources follow the import rules (). The -includeaccess option must be used ifyou want to preserve ownership and privilege information. This option isignored if you are not logged in as a member of the admin group.
v By default, caching configuration is imported. The -nocaching option must beused if you want to ignore cache configurations.
v By default, scheduling configuration is imported. The -noscheduling option mustbe used if you want to ignore scheduling configurations. Note that if you arelogged in as a member of the admin group, then all scheduling is imported. Ifnot, only the schedules owned by you are imported.
v By default, physical data source connection details such as usernames,passwords, host names, and ports are imported. The -nosourceinfo option mustbe used if you want to ignore those details. When ignoring connection detailsand importing over an existing physical data source, the previous values will beleft unmodified instead of being overwritten. When creating a new data source,these values are set to an empty string.
v By default, all resources import into the same location in the namespace theywere in when exported. The -relocate option can be used to change the locationfor the import. You can issue as many -relocate flags as desired and they areprocessed in order, with the first matching oldPath being applied to each
106 IBM Cognos Virtual View Manager Version 10.1.1: Administration Guide

resource. Relocating a resource will modify (rebind) references made by otherresources being imported, but will not modify references on resources that arenot part of the import.
v As an additional option, resources can be rebound as a group during the importprocess using the -rebind option. You can issue as many -rebind flags as desiredand they are processed in order. All imported resources will have the rebindperformed. In case of conflict between rebinds caused by the -relocate and-rebind flags, the -rebind ones are performed first.
v The -verbose option causes informational messages to be printed after importing.Without this option, only error messages are displayed.
v The -printinfo option causes the archive file to be examined and for informationabout it to be printed to the display. The archive file is not imported when thisoption is given.
v The -printcontents option causes the archive file to be examined and for the listof resources in the file to be printed to the display. The archive file is notimported when this option is given.
v The -printroots option causes the archive file to be examined and for the list oftop level resources (generally the list provided to pkg_export on the commandline) to be printed to the display. This is useful for understanding what is in thearchive without having to see the complete list. The archive file is not importedwhen this option is given.
v The -printreferences option causes the archive file to be examined and for the listof resources that are referenced within the import but are not actually part of theimport to be printed to the display. This is useful for identifying externaldependencies for the archive. The archive file is not imported when this optionis given.
v The -printusers option causes the archive file to be examined and for the list ofusers that are referenced as owners or in privileges on the resources to beprinted to the display. This is useful for identifying the users required to importwith access information intact. The archive file is not imported when this optionis given.
v The -messagesonly option causes the archive file to generate all the messages itwould generate if you actually imported it, but does not commit the import tothe server's storage.
v The -set option allows data source connection information to be explicitlyspecified or changed from the original during import.[-set<path><attribute> <value>]
This option is typically used when deploying a CAR file to a production server.The properties most commonly changed are host, port, database, user, password.The following attributes of the -set option may be invoked when importingdata sources:– user <login> or <username> or error depending on source type– password <password> or error depending on source type– user2 <appUserName> or error if not Oracle EBS– password2 <appPassword> or error if not Oracle EBS– host <urlIP> or <dsn> or <server> or <appServer> or <url> or <root> or
error depending on the source type– port <urlPort> or <port> or error depending on source type– database <urlDatabaseName> or <enterprise> or <appServer> or error
depending on the source type
Chapter 7. Utilities 107
– path <root> or <url> or error depending on source type– annotation
Example usage to change the password property of a data source:pkg_import mycar.car -set /shared/myDataSource DATA_SOURCEpassword myNewPassword
In this example, -set is the option; DATA_SOURCE is the type of the resource beingimported, and password is the property that is being changed.
Rules for importImporting follows some rules to resolve conflicts during import.
These rules are:1. If an imported resource does not exist prior to import, then it is created. The
user performing the import gets all privileges as if they were the originalcreator (such as READ|WRITE for a folder or READ|WRITE|EXECUTE for aprocedure) unless the -includeaccess option is specified.If an administrative user who has the Modify All Users right imports aresource using the -includeaccess option, then the original owner of theresource is set as the owner and any pre-existing privileges in the importpackage are also set for the newly imported resource.
2. If a resource is imported to a non-existent location, the new directory path andfolder are created with the import of the new resource. The user who performsthe import is assigned ownership of the new folders and gets READ|WRITEprivilege on the resource and new container folders.The Virtual View Manager Data Services area does not support auto-creation ofnew folders.
3. If a resource already exists and it is also being imported, the old version isoverwritten (assuming you have the WRITE privilege) in all ways, except thefollowing:v The owner is not changed. The original owner retains ownership.v Privileges for users that are not explicitly changed by the import are left
intact.For example, two users, Abe and Bob, have READ|WRITE privileges on anexisting resource that will be overwritten by an import. If the importedresource overwrites Abe resource privileges to READ only, but does notmention Bob, then Abe's privileges are updated but Bob's are left intact.
v Child resources are not removed when the imported resource is a new folderor data source.
4. Restrictionsv Server configuration settings (available in Virtual View Manager from
Administration > Configuration ) are not ported over when a resource isexported or imported.
v Import into a folder requires the WRITE privilege on the destination folderand READ privileges on the parent directory path. Importing cannot create aresource in a folder where the user does not have the WRITE privilege.
v Overwrite or deletion of a resource requires WRITE privilege on that target.v Export of a physical data source is either all or nothing. Partial export of a
data source configuration is not permitted.v You cannot import just part of a physical data source. If you import, you
must include the source definition itself.
108 IBM Cognos Virtual View Manager Version 10.1.1: Administration Guide

v The Virtual View Manager Data Services area has strict structure rules that areenforced.– You cannot import anything that was exported from the Virtual View
Manager Data Services area to outside of that area.– You cannot import anything that was exported from outside the Virtual
View Manager Data Services area into that area.
Package import from an externalized directory (-pkgdir option):
Package import from an externalized directory (pkg_import -pkgdir ) takes the XMLfiles that represent the exported output of a directory and uses those files to restorethat namespace path to the state captured by the exported files. Importing anexternalized directory will delete, overwrite, and synchronize the server directoryso that it has the same resource definitions as the externalized directory.
The manifest file in the top level of the externalized directory will dictate whatnamespace path will get updated with the XML rendered representations ofmetadata.
Overwrite of a resource requires WRITE privilege on that resource. If the importinguser does not have WRITE privileges on a resource or a folder then those resourcesin that path can not be deleted or overwritten by an import action performed bythat user. Resource locks do not impede resource overwriting by package import.
Package import to a directory (-pkgdir option):
As stated previously, the pkg_import utility is available in the installation_location/bin directory. Windows and UNIX specific versions of the utility are available.
The utility follows the following generic form:pkg_import -pkgdir <directory>
-server <hostname> [-port <port>][-encrypt]
-user <user> -password <password> [-domain<domain>]
[-optfile <filename>]...
[-messagesonly]
[-fileEncoding <encoding>]
[-listIgnored][-includeOwnership]
[-verbose] [-quiet]
Example:
In the following example the user, BackupAdmin, assesses the impact of an importfrom externalized directory that was saved to a disk. The -messagesonly,-listIgnored, and -verbose options are employed to get a full accounting of whatfiles would be replaced or ignored if the package import were to actually getexecuted. The -messagesonly option disables the import and no changes areactually made.pkg_import -pkgdir E:/DiskArchive/Jan2008 -server localhost-user BackupAdmin -password becarefulnow -messagesonly -listIgnored-verbose
Verify Package Import Impact using the -messagesonly Option:
Chapter 7. Utilities 109
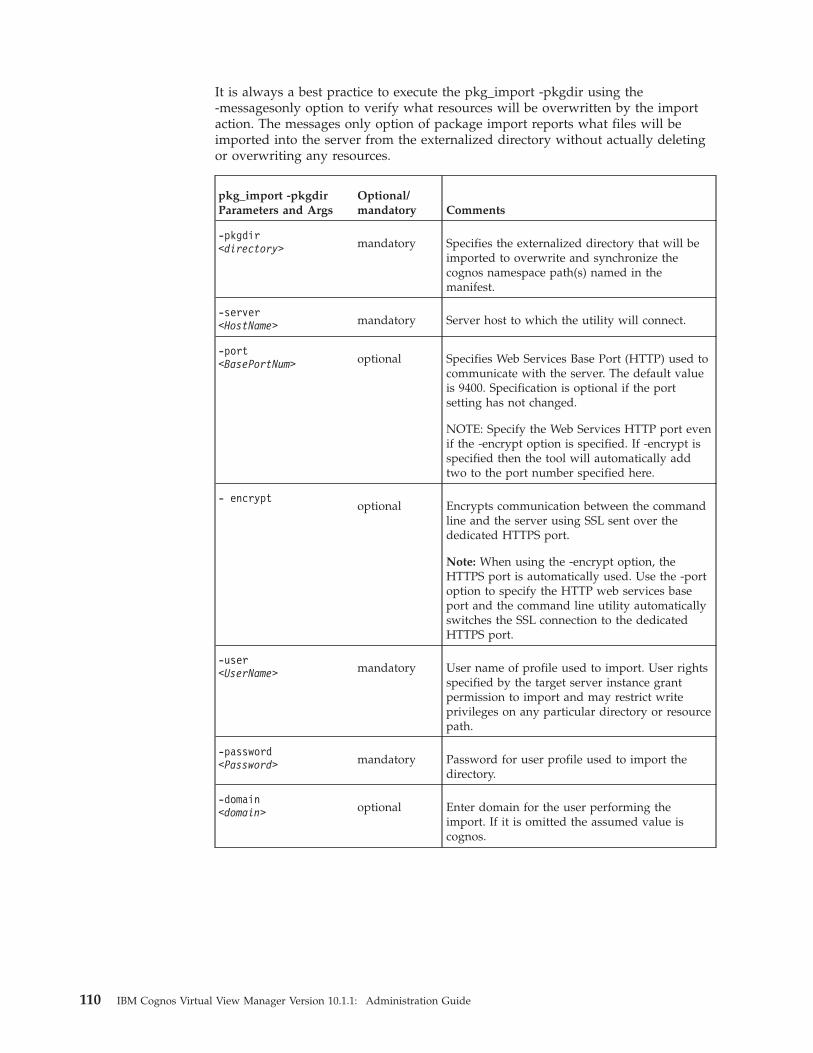
It is always a best practice to execute the pkg_import -pkgdir using the-messagesonly option to verify what resources will be overwritten by the importaction. The messages only option of package import reports what files will beimported into the server from the externalized directory without actually deletingor overwriting any resources.
pkg_import -pkgdirParameters and Args
Optional/mandatory Comments
-pkgdir<directory> mandatory Specifies the externalized directory that will be
imported to overwrite and synchronize thecognos namespace path(s) named in themanifest.
-server<HostName> mandatory Server host to which the utility will connect.
-port<BasePortNum> optional Specifies Web Services Base Port (HTTP) used to
communicate with the server. The default valueis 9400. Specification is optional if the portsetting has not changed.
NOTE: Specify the Web Services HTTP port evenif the -encrypt option is specified. If -encrypt isspecified then the tool will automatically addtwo to the port number specified here.
- encryptoptional Encrypts communication between the command
line and the server using SSL sent over thededicated HTTPS port.
Note: When using the -encrypt option, theHTTPS port is automatically used. Use the -portoption to specify the HTTP web services baseport and the command line utility automaticallyswitches the SSL connection to the dedicatedHTTPS port.
-user<UserName> mandatory User name of profile used to import. User rights
specified by the target server instance grantpermission to import and may restrict writeprivileges on any particular directory or resourcepath.
-password<Password> mandatory Password for user profile used to import the
directory.
-domain<domain> optional Enter domain for the user performing the
import. If it is omitted the assumed value iscognos.
110 IBM Cognos Virtual View Manager Version 10.1.1: Administration Guide
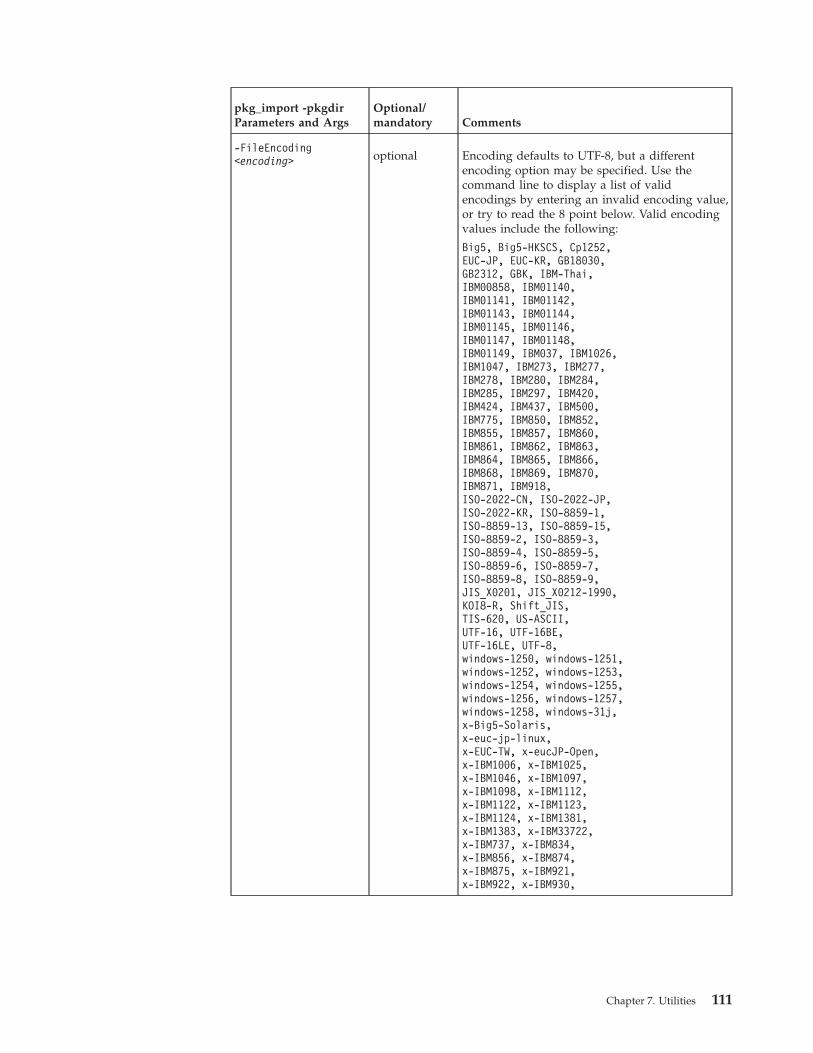
pkg_import -pkgdirParameters and Args
Optional/mandatory Comments
-FileEncoding<encoding> optional Encoding defaults to UTF-8, but a different
encoding option may be specified. Use thecommand line to display a list of validencodings by entering an invalid encoding value,or try to read the 8 point below. Valid encodingvalues include the following:
Big5, Big5-HKSCS, Cp1252,EUC-JP, EUC-KR, GB18030,GB2312, GBK, IBM-Thai,IBM00858, IBM01140,IBM01141, IBM01142,IBM01143, IBM01144,IBM01145, IBM01146,IBM01147, IBM01148,IBM01149, IBM037, IBM1026,IBM1047, IBM273, IBM277,IBM278, IBM280, IBM284,IBM285, IBM297, IBM420,IBM424, IBM437, IBM500,IBM775, IBM850, IBM852,IBM855, IBM857, IBM860,IBM861, IBM862, IBM863,IBM864, IBM865, IBM866,IBM868, IBM869, IBM870,IBM871, IBM918,ISO-2022-CN, ISO-2022-JP,ISO-2022-KR, ISO-8859-1,ISO-8859-13, ISO-8859-15,ISO-8859-2, ISO-8859-3,ISO-8859-4, ISO-8859-5,ISO-8859-6, ISO-8859-7,ISO-8859-8, ISO-8859-9,JIS_X0201, JIS_X0212-1990,KOI8-R, Shift_JIS,TIS-620, US-ASCII,UTF-16, UTF-16BE,UTF-16LE, UTF-8,windows-1250, windows-1251,windows-1252, windows-1253,windows-1254, windows-1255,windows-1256, windows-1257,windows-1258, windows-31j,x-Big5-Solaris,x-euc-jp-linux,x-EUC-TW, x-eucJP-Open,x-IBM1006, x-IBM1025,x-IBM1046, x-IBM1097,x-IBM1098, x-IBM1112,x-IBM1122, x-IBM1123,x-IBM1124, x-IBM1381,x-IBM1383, x-IBM33722,x-IBM737, x-IBM834,x-IBM856, x-IBM874,x-IBM875, x-IBM921,x-IBM922, x-IBM930,
Chapter 7. Utilities 111
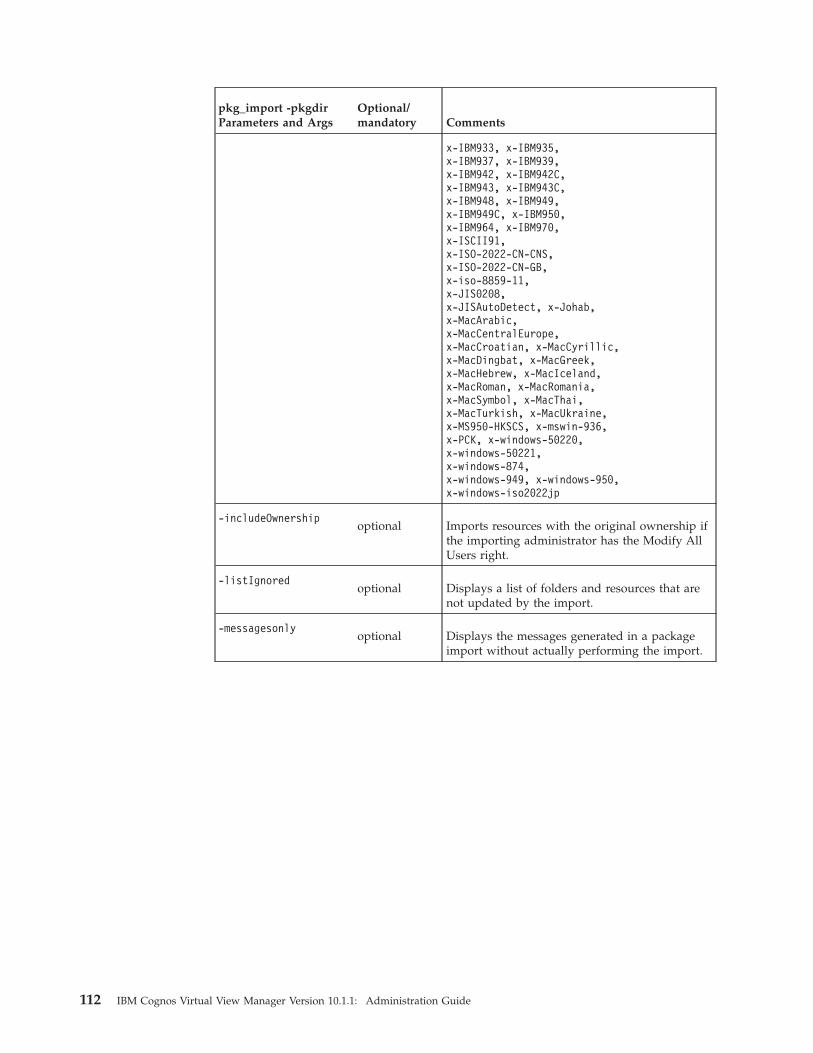
pkg_import -pkgdirParameters and Args
Optional/mandatory Comments
x-IBM933, x-IBM935,x-IBM937, x-IBM939,x-IBM942, x-IBM942C,x-IBM943, x-IBM943C,x-IBM948, x-IBM949,x-IBM949C, x-IBM950,x-IBM964, x-IBM970,x-ISCII91,x-ISO-2022-CN-CNS,x-ISO-2022-CN-GB,x-iso-8859-11,x-JIS0208,x-JISAutoDetect, x-Johab,x-MacArabic,x-MacCentralEurope,x-MacCroatian, x-MacCyrillic,x-MacDingbat, x-MacGreek,x-MacHebrew, x-MacIceland,x-MacRoman, x-MacRomania,x-MacSymbol, x-MacThai,x-MacTurkish, x-MacUkraine,x-MS950-HKSCS, x-mswin-936,x-PCK, x-windows-50220,x-windows-50221,x-windows-874,x-windows-949, x-windows-950,x-windows-iso2022jp
-includeOwnershipoptional Imports resources with the original ownership if
the importing administrator has the Modify AllUsers right.
-listIgnoredoptional Displays a list of folders and resources that are
not updated by the import.
-messagesonlyoptional Displays the messages generated in a package
import without actually performing the import.
112 IBM Cognos Virtual View Manager Version 10.1.1: Administration Guide
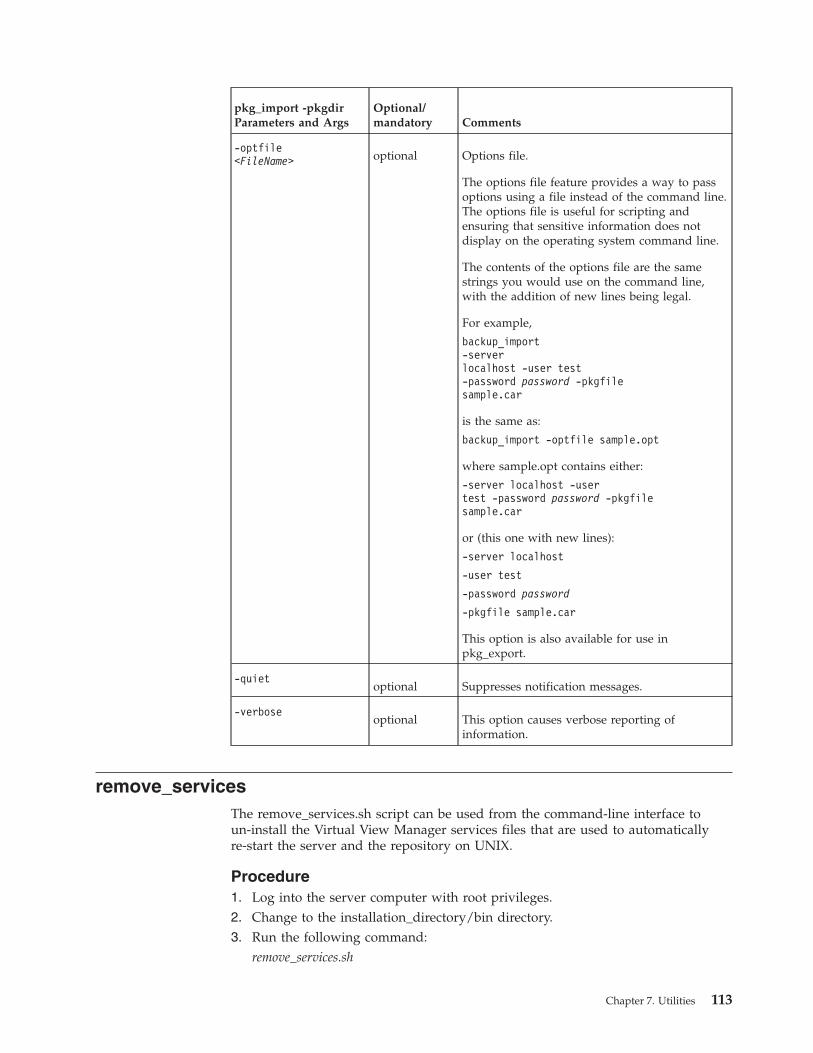
pkg_import -pkgdirParameters and Args
Optional/mandatory Comments
-optfile<FileName> optional Options file.
The options file feature provides a way to passoptions using a file instead of the command line.The options file is useful for scripting andensuring that sensitive information does notdisplay on the operating system command line.
The contents of the options file are the samestrings you would use on the command line,with the addition of new lines being legal.
For example,
backup_import-serverlocalhost -user test-password password -pkgfilesample.car
is the same as:
backup_import -optfile sample.opt
where sample.opt contains either:
-server localhost -usertest -password password -pkgfilesample.car
or (this one with new lines):
-server localhost
-user test
-password password
-pkgfile sample.car
This option is also available for use inpkg_export.
-quietoptional Suppresses notification messages.
-verboseoptional This option causes verbose reporting of
information.
remove_servicesThe remove_services.sh script can be used from the command-line interface toun-install the Virtual View Manager services files that are used to automaticallyre-start the server and the repository on UNIX.
Procedure1. Log into the server computer with root privileges.2. Change to the installation_directory/bin directory.3. Run the following command:
remove_services.sh
Chapter 7. Utilities 113

Results
This command does not interrupt any repository/server processes that arerunning, but removes the service files.
repo_utilThis section describes the usage of Virtual View Manager's command-line programrepo_util which you can use to change the repository database.
The repo_util scripts, namely repo_util.bat and repo_util.sh, are available in theinstallation_location /bin directory.
You can use this program to perform several tasks including the following:v Test the connection to the repository databasev List the current repository configuration informationv Export the repository configurationv Update the repository configurationv Create/Drop the repository schemav Print diagnostic information about the metadata repositoryv Print debugging messages
The syntax to use repo_util on Windows:repo_util.bat command [options] [database_configuration_options]
The following tables list the commands and options for running the repo_utilprogram. of commands are given at the end.
Commands for using repo_util
Commands for repo_util Description
-createSchemaCreates the repository schema.
-dropSchemaDrops the repository schema and all datacontained within it.
This will permanently delete all of theserver's data. Use with caution.
-dumpDiagnosticInfoPrints diagnostic information about therepository database.
-exportConfigExports the repository databaseconfiguration in the Java property fileformat. The output is suitable for use as arepository configuration file. See-configFile for details.
-helpPrints this help information.
-listConfigLists the repository database configurationin a human readable format.
114 IBM Cognos Virtual View Manager Version 10.1.1: Administration Guide

Commands for repo_util Description
-testConnTests the connection to the repositorydatabase.
-updateConfigChanges the repository databaseconfiguration. Use this command to changeone or more configuration options.
You may specify new configuration optionsindividually using command line argumentsor collectively, using the -configFile option.Configuration options that are not specifiedare left unchanged.
Debug options for using repo_util
Debug options Description
-debugPrints debug messages.
-forceDo not prompt for confirmation. Use withcaution.
Database options for using repo_util
Database options Description
-configFileRead database configuration options fromthis Java property file. The property namesin the file must match the database optionnames defined in this section.
Run repo_util.bat -exportConfig for anexample of the contents of this file.
-connectionUrlThe JDBC URL that is used to connect to theexternal database.
For example:
jdbc:mysql://localhost:3406/cs030101?continueBatchOnError=false&useUnicode=true
-databaseCatalogDatabase catalog that contains the schema. Itmay be blank if the database does notsupport catalogs.
-databaseSchemaDatabase schema that contains the schema.It may be blank if the database does notsupport schemas.
-databasePasswordDatabase password.
Chapter 7. Utilities 115

Database options Description
-databaseUserDatabase user name.
-driverClassThe fully qualified class name of a JDBCcompliant driver.
For example:
com.mysql.jdbc.Driver
-driverClassPathA semi-colon or colon separated list of JARfiles and directories.
For example:
/tmp/oracle40.jar:/tmp
-driverNameName of the datasource driver name. This isrequired for proper operation of the systemtables.
-driverTypeName of the data source driver type. This isrequired for proper operation of the systemtables.
-repositoryClassRepository class name.
-schemaCreateScriptSchema creation script. This script containsthe SQL commands to create the VirtualView Manager schema.
-schemaDropScriptSchema drop script. This script contains theSQL commands to drop the Virtual ViewManager schema.
-schemaInitializeScriptInitialization script. This script contains theSQL commands to initialize the Virtual ViewManager tables.
Sample commands to use repo_util
Here are some examples of commands for using the repo_util program:v To list the server configuration information:
repo_util.bat-listConfig
v To export a repository configuration file:repo_util.bat-exportConfig > repo.properties
v To update the repository database user name and password:repo_util.bat-updateConfig -databaseUser someuser -databasePassword somepassword
v To update the repository configuration using a repository configuration file,overriding the database password:repo_util.bat-updateConfig -configFile repo.properties -databasePassword somepassword
116 IBM Cognos Virtual View Manager Version 10.1.1: Administration Guide
server_utilThe server_util program is used for getting the server performance profile reportand resetting the system namespace.
Usage syntax:server_util -server <hostname> [-port<port>] [-encrypt]-user <username> -password<password> [-domain <domain>]<command> [-verbose]
where <command> refers to one of the following options:v -resetNamespace resets the server namespace to show changes to the system
namespace, such as a system table change after application of a patch.v -profile displays current server profile performance profiling data.
Server profiling is always working in the background by default. Some of thereport contents will display performance metrics once that code path has beenexercised. Some pertinent performance profiling is detailed below.
v -clearProfile clear all existing profiling data.v -regenerateFiles regenerate files that are based on configuration settings. Use
of the Configuration window Apply button and server restart generally makethis command obsolete.
v -createMemorySizeFile calculates and saves object memory sizes.v -getServerName retrieves the server name.v -setServerName -serverName <server name> sets server name, which must be a
unique display name.
Sample commands to use server_utilThe following command would list the server profile for a default installation:server_util -server HostName -useradmin -password admin-profile
The Server Performance Profile Report contains many different metrics of whichonly a few are described here:v request.setup.sql -- Time to construct the SQL sent to outside data sources.v components.archive -- Import and Export detailv request.data -- Aggregated amount of time required to send data to the
requesting client after SQL processing was underway.v internal.repository -- Repository response time for metadata information
gathering.v components.operator -- Query engine processing time for SQL that could not be
pushed to the underlying data sources during.v ds -- Aggregated time required to communicate with external data sources.
The following -clearProfile command clears the server profile information to startaggregate and average statistics data with a clean slate.server_util -server localhost -user admin -password admin-clearProfile
The following -resetNamespace command would reset the system namespace.
Chapter 7. Utilities 117

server_util -server localhost -user admin -password admin-resetNamespace
118 IBM Cognos Virtual View Manager Version 10.1.1: Administration Guide

Chapter 8. Setting up a metadata repository
You can set up an IBM Informix, MySQL, Oracle or Sybase database as the IBMCognos Virtual View Manager metadata repository. IBM Informix is the defaultdatabase for the Virtual View Manager metadata repository.
The following topics are covered in this chapter:v “System requirements”v “Creating a database for the metadata repository” on page 120v “Additional database configuration requirements” on page 123v “Configuring the IBM Cognos Virtual View Manager metadata repository” on
page 125
System requirementsEnsure that enough space is allocated for the database repository.
The following table lists the recommended space to allocate according to the sizeof your database repository.
Database size Space
Small-sized repository database 250MB
Medium-sized repository database 800MB
Large-sized repository database 2000MB (or 2GB)
Pre-requisites and limitations for database typesThere are a couple of things to consider if you plan to use Sybase or Oracle as themetadata repository for Virtual View Manager.
Using Sybase ASE 12.5 as a repository databaseIndexes are created on the IBM Cognos Virtual View Manager system tables inorder to enhance performance of querying these tables. These indexes consist ofmetadata ID-s and metadata names. By default, Sybase ASE 12.5 has page size of4K so it only allows each index to have a maximum size of 1250 bytes. Therefore,you must limit the length of the metadata names.
Metadata names can be a maximum of 200 characters. If the metadata name islonger than 200 characters, the name will be trimmed to 200 characters when it ispersisted into Sybase repository. For this reason, when you create an index youmust define each metadata name as UNIVARCHAR(200).
Example - Index sizing in a system table
In this example, an index on the system columns table comprises the following:v DATASOURCE_IDv ORDINAL_POSITION
© Copyright IBM Corp. 2008, 2011 119

v COLUMN_IDv CATALOG_NAMEv SCHEMA_NAMEv TABLE_NAME
If you set the name columns to UNIVARCHAR(200), then each UNIVARCHARcharacter requires two bytes of storage. Since three of these name fields add up to600 bytes (3 * 200 * 2 bytes = 1200 bytes), if you include the bytes forDATASOURCE_ID, COLUMN_ID, and ORDINAL_POSITION, this index barelyfits 1250 bytes. If no more columns are added to the index, the total bytes in theindex will exceed the maximum allowable size of an index. As a result, this indexwill not be created in ASE 12.5.
Using Oracle Call Interface (OCI) as a repository databaseTo use the Oracle 10g type 2 database as a metadata repository, the Oracle CallInterface (OCI) client must be installed on the computer where Virtual ViewManager is installed.
The PATH (Windows) or LD_LIBRARY_PATH (for most UNIX systems) to OCImust be specified for Virtual View Manager to properly recognize and use the OCIclient.
For more detailed information, see the Oracle Instant Client documentation.
Creating a database for the metadata repositoryThe following sections describe how to create an external database repository towork with IBM Cognos Virtual View Manager.
Create an IBM Informix metadata repositoryYou can create an IBM Informix metadata repository for IBM Cognos Virtual ViewManager.
Before you begin
If you are using an external Informix repository, you must open<vvm_install_location>//conf/repository/informix/composite_schema.sql and adda forward slash (/) after the first three SQL statements:CREATE FUNCTION PartialString(path LVARCHAR(2000)) RETURNSVARCHAR(255)WITH (NOT VARIANT);RETURN SUBSTR(path,1,255);END FUNCTION;/CREATE FUNCTION PartialString32(path VARCHAR(255)) RETURNS VARCHAR(32)WITH (NOT VARIANT);RETURN SUBSTR(path,1,32);END FUNCTION;/CREATE FUNCTION PartialString64(path VARCHAR(255)) RETURNS VARCHAR(64)WITH (NOT VARIANT);RETURN SUBSTR(path,1,64);END FUNCTION;/
120 IBM Cognos Virtual View Manager Version 10.1.1: Administration Guide

Procedure1. Connect to an Informix server instance by setting the following informix
environment parameters:set CLIENT_LOCALE=EN_US.utf8set DB_LOCALE=EN_US.utf8set SERVER_LOCALE=EN_US.utf8set DBLANG=EN_US.utf8
2. Create a database called VVM_REPO by using the following command:create database "VVM_REPO" in VVM_REPO with log
Note: You need to allow log transactions.3. Create a user for the VVM_REPO database, for example, you can create a user
called cognos.4. Grant DBA access to the cognos user by using the following command:
grant DBA to cognos
Create a MySQL metadata repositoryYou can create a MySQL metadata repository for IBM Cognos Virtual ViewManager.
Procedure1. Create a MySQL database for the metadata repository by using the following
command:CREATE DATABASE "VVM_REPO"
2. Create a user for the VVM_REPO database, for example, you can create a usercalled cognos.
3. Grant access to the cognos user by using the following command:grant usage on *.* to cognos@localhost identified by’password’
4. Grant privileges to the cognos user by using the following command:grant all privileges on VVM_REPO.* to cognos@localhost
Create a Sybase metadata repositoryYou can create a Sybase metadata repository for IBM Cognos Virtual ViewManager.
Procedure1. Create a Sybase database for the metadata repository. Use the following syntax
to create a database in Sybase ASE 12.5. Substitute the items in italics withappropriate values.create database VVM_REPO
[on {default | database_device} [= size][, database_device [= size]...]
[log on database_device [ = size ][, database_device [= size]]...]
[with {override | default_location = "pathname"}][for {load | proxy_update}]
For detailed information about the above syntax, refer to Sybase ASE 12.5documentation.
2. To configure the database after creating it, run the following system proceduressupplying appropriate values for the items in italics:
Chapter 8. Setting up a metadata repository 121

sp_dboption VVM_REPO, ’abort tran on log full’, truegosp_dboption VVM_REPO, ’trunc log on chkpt’, truego
3. Increase the size of the tempdb database to be about 20 to 25 per cent of themain database using ALTER DATABASE command.
4. Create a user to log into the newly created database, supplying appropriatevalues for the items in italics.Syntax for adding a new account to log into ASE 12.5:sp_addlogin loginame,password [, defdb]
[, deflanguage [, fullname]]]
Syntax for adding the created login to a specific database so that the newlycreated user can access the database:sp_adduser login_name [, name_in_db [, group_name]]
Results
The Sybase repository is created, and ready to be configured.
Creating an Oracle metadata repositoryThis section describes how to create a tablespace and user to use an Oraclerepository database. The examples in the steps use VVMRepo for the SID,VM_REPO for the tablespace, cognos or the user.
For a complete syntax to create a tablespace in Oracle that fits your needs, refer toOracle documentation.
Procedure1. Contact your database administrator to obtain the Oracle server SID, since the
SID is used as the value of databaseName. You need to provide the databasename and SID to create an Oracle repository database. In this example, the SIDis VVMRepo.
2. Ensure that the Oracle system supports the international character set. Set thedatabase character set to Unicode AL32UTF8, and the national character set toAL16UTF16.
3. Create a tablespace, named VVM_REPO in this example, with the followingcommand:CREATE TABLESPACE "VVM_REPO"
LOGGINGDATAFILE ’C:\ORACLE\PRODUCT\10.2.0\ORADATA\VVMRepo\VVMRep.ora’
SIZE 250M
4. Create a user named cognos using the following command:CREATE USER "cognos" PROFILE "DEFAULT"
IDENTIFIED BY "password" DEFAULT TABLESPACE "VVM_REPO"TEMPORARY TABLESPACE "TEMP"QUOTA UNLIMITEDON "VVM_REPO"ACCOUNT UNLOCK;
GRANT ALTER SESSION TO cognosGRANT CREATE ANY INDEX TO cognosGRANT CREATE PROCEDURE TO cognosGRANT CREATE TABLE TO cognosGRANT CREATE SESSION TO cognosGRANT CREATE SYNONYM TO cognos
122 IBM Cognos Virtual View Manager Version 10.1.1: Administration Guide
GRANT CREATE VIEW TO cognosGRANT DROP ANY INDEX TO cognosGRANT DROP ANY PROCEDURE TO cognosGRANT DROP ANY TABLE TO cognos;
This command creates a user named cognos that is granted access to the newlycreated tablespace, VVM_REPO, with unlimited space quota. The user is alsogranted the privileges of creating and dropping indexes, procedures, and tables.
5. Copy the ojdbc.jar file to intallation_location/VVM/apps/server/lib directoryof the computer where Virtual View Manager is installed.
Results
The cognos user can be used as the value for the properties databaseUser anddatabaseSchema described in “Configuring the IBM Cognos Virtual View Managermetadata repository” on page 125.
Additional database configuration requirementsIf you are using MySQL or Sybase as the metadata repository, then you need toperform additional configurations for your database.
Configure the MySQL repositoryYou must set up an external MySQL repository to work with Virtual ViewManager.
Procedure1. Set the following variables in the my.ini file that MySQL system uses for
initialization:set-variable=max_connections=100set-variable=lower_case_table_names=1set-variable=max_allowed_packet=16Mdefault-character-set=utf8
If you modify the my.ini file to match the required settings, you need to restartthe MySQL server for the new settings to be effective.
2. The program MySQL Administrator can be used to set/change MySQL'sstartup variables.Enable Use concurrent inserts in MyISAM parameters.Enable Activate InnoDB in InnoDB parameters.
Configure the Sybase repositoryThe default installation of Sybase ASE 12.5 is not configured for enterpriseapplications. For example, the tempdb size is 2MB. The maximum number ofconnections defaults to 25, and the default maximum network package size is only512 bytes. If you use such configuration to run IBM Cognos Virtual View Manager,certain Sybase limits will be hit, causing the Sybase system to hang. If you are notsure of your ASE 12.5 configuration, ask your Sybase DBA about it.
In order to run Virtual View Manager efficiently, Sybase ASE 12.5 needs to beconfigured appropriately.
To reconfigure ASE 12.5, you must have system administration privileges so youcan execute a set of system stored procedures.
Chapter 8. Setting up a metadata repository 123
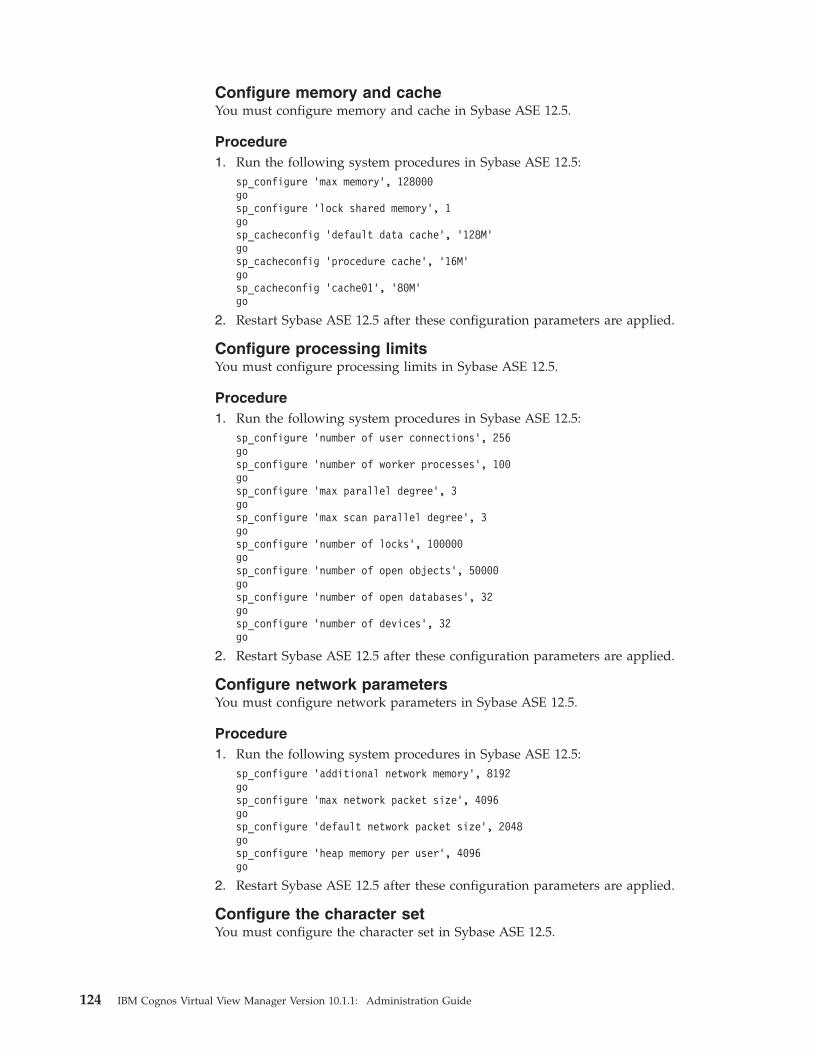
Configure memory and cacheYou must configure memory and cache in Sybase ASE 12.5.
Procedure1. Run the following system procedures in Sybase ASE 12.5:
sp_configure ’max memory’, 128000gosp_configure ’lock shared memory’, 1gosp_cacheconfig ’default data cache’, ’128M’gosp_cacheconfig ’procedure cache’, ’16M’gosp_cacheconfig ’cache01’, ’80M’go
2. Restart Sybase ASE 12.5 after these configuration parameters are applied.
Configure processing limitsYou must configure processing limits in Sybase ASE 12.5.
Procedure1. Run the following system procedures in Sybase ASE 12.5:
sp_configure ’number of user connections’, 256gosp_configure ’number of worker processes’, 100gosp_configure ’max parallel degree’, 3gosp_configure ’max scan parallel degree’, 3gosp_configure ’number of locks’, 100000gosp_configure ’number of open objects’, 50000gosp_configure ’number of open databases’, 32gosp_configure ’number of devices’, 32go
2. Restart Sybase ASE 12.5 after these configuration parameters are applied.
Configure network parametersYou must configure network parameters in Sybase ASE 12.5.
Procedure1. Run the following system procedures in Sybase ASE 12.5:
sp_configure ’additional network memory’, 8192gosp_configure ’max network packet size’, 4096gosp_configure ’default network packet size’, 2048gosp_configure ’heap memory per user’, 4096go
2. Restart Sybase ASE 12.5 after these configuration parameters are applied.
Configure the character setYou must configure the character set in Sybase ASE 12.5.
124 IBM Cognos Virtual View Manager Version 10.1.1: Administration Guide
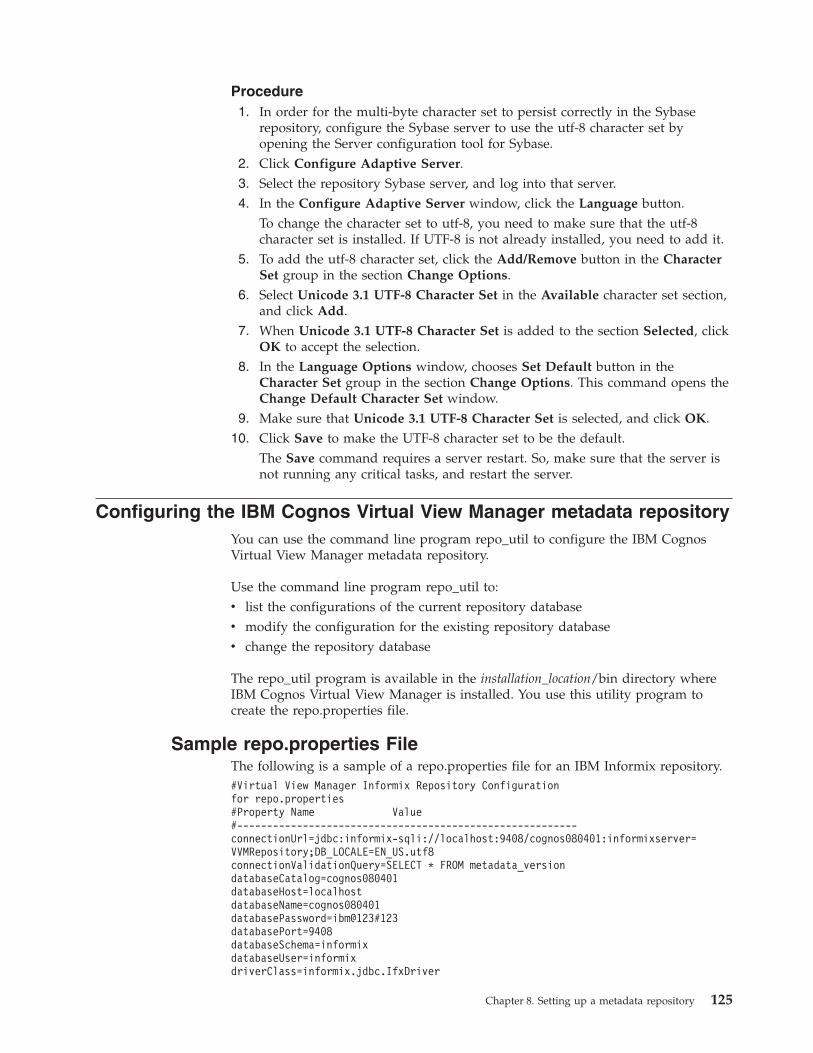
Procedure1. In order for the multi-byte character set to persist correctly in the Sybase
repository, configure the Sybase server to use the utf-8 character set byopening the Server configuration tool for Sybase.
2. Click Configure Adaptive Server.3. Select the repository Sybase server, and log into that server.4. In the Configure Adaptive Server window, click the Language button.
To change the character set to utf-8, you need to make sure that the utf-8character set is installed. If UTF-8 is not already installed, you need to add it.
5. To add the utf-8 character set, click the Add/Remove button in the CharacterSet group in the section Change Options.
6. Select Unicode 3.1 UTF-8 Character Set in the Available character set section,and click Add.
7. When Unicode 3.1 UTF-8 Character Set is added to the section Selected, clickOK to accept the selection.
8. In the Language Options window, chooses Set Default button in theCharacter Set group in the section Change Options. This command opens theChange Default Character Set window.
9. Make sure that Unicode 3.1 UTF-8 Character Set is selected, and click OK.10. Click Save to make the UTF-8 character set to be the default.
The Save command requires a server restart. So, make sure that the server isnot running any critical tasks, and restart the server.
Configuring the IBM Cognos Virtual View Manager metadata repositoryYou can use the command line program repo_util to configure the IBM CognosVirtual View Manager metadata repository.
Use the command line program repo_util to:v list the configurations of the current repository databasev modify the configuration for the existing repository databasev change the repository database
The repo_util program is available in the installation_location/bin directory whereIBM Cognos Virtual View Manager is installed. You use this utility program tocreate the repo.properties file.
Sample repo.properties FileThe following is a sample of a repo.properties file for an IBM Informix repository.#Virtual View Manager Informix Repository Configurationfor repo.properties#Property Name Value#---------------------------------------------------------connectionUrl=jdbc:informix-sqli://localhost:9408/cognos080401:informixserver=VVMRepository;DB_LOCALE=EN_US.utf8connectionValidationQuery=SELECT * FROM metadata_versiondatabaseCatalog=cognos080401databaseHost=localhostdatabaseName=cognos080401databasePassword=ibm@123#123databasePort=9408databaseSchema=informixdatabaseUser=informixdriverClass=informix.jdbc.IfxDriver
Chapter 8. Setting up a metadata repository 125

driverClassPath=driverLibraryPath=driverName=Informix 9.xdriverType=InformixpoolInitialSize=5poolMaxSize=50poolMinSize=5repositoryClass=com.compositesw.server.repository.internal.InformixRepositoryschemaCreateScript=C:\ProgramFiles\\cognos\\vvm\\8.4.0\\conf\\repository\\informix\\composite_schema.sqlschemaDropScript=C:\Program Files\\cognos\\vvm\\8.4.0\\conf\\repository\\informix\\composite_clean.sqlschemaInitializeScript=C:\ProgramFiles\\cognos\\vvm\\8.4.0\\conf\\repository\\informix\\composite_data.sql
Procedure1. Stop Virtual View Manager Server, if it is running.2. Use one of the following commands to list the current repository configuration:
repo_util.bat -listConfig (Windows command)repo_util.sh -listConfig (UNIX command)
3. Export the current configurations into the repo.properties file using one of thefollowing commands:repo_util.bat -exportConfig > repo.properties (Windows command)repo_util.sh -exportConfig > repo.properties (UNIX commands)
4. Modify the repo.properties file. Use the following table to help you modify theproperties.
Property Description
connectionUrlEnter a value for the JDBC connection.
For IBM Informix:
jdbc:informix-sqli://host_name:port_number/databasename:INFORMIXSERVER=VVMRepository;
DB_LOCALE=en_us.utf8
For MySQL:
jdbc\:mysql\://hostname\:3306/<database_name>?continueBatchOnError\=false&useUnicode\=true&characterEncoding\
=utf8&clobberStreamingResults\=true&useReadAheadInput\=true
For Sybase:
jdbc\:sybase\:Tds\://localhost\:5000/pubs2
For Oracle OCI:
jdbc\:oracle\:oci\:@localhost\:1521\:orcl
For Oracle Thin:
jdbc\:oracle\:thin\:@localhost\:1521\:orcl
126 IBM Cognos Virtual View Manager Version 10.1.1: Administration Guide

Property Description
databaseCatalogEnter a value for the database catalog. It may be blank if thedatabase does not support catalogs.
databasehostEnter the name of the database host. For example, localhost.
databaseNameEnter the name of the database for your metadatarepository.databasePassword Enter the password for thedatabase.
databaseSchemaEnter the database that contains the schema. It may be blank ifthe database does not support schemas.
driverClassEnter the driver class for your database as follows:
v For IBM Informix, enter com.informix.IfxDriver
v For MySQL, enter com.mysql.jdbc.Driver
v For Sybase, enter net.sourceforge.jtds.jdbc.Driver
v For Oracle OCI and Oracle Thin, enteroracle.jdbc.driver.OracleDriver
driverClassPathEnter location of the driver file.
driverNameEnter the name of the driver.
driverTypeEnter the type of database driver.
poolInitialSizeEnter the initial size for the buffer pool. The default value is 5.
poolMaxSizeEnter the maximum size for the buffer pool. The default value is50.
poolMinSizeEnter the minimum size for the buffer pool. The default value is25.
repositoryClassEnter the repository class for your repository using the followingformat:
com.compositesw.server.repository.internal.<database_type>Repository
For example,com.compositesw.server.repository.internal.InformixRepository
schemaCreateScriptEnter the location of the initialization script. For example:
installation_location\:\\database_type\composite_schema.sql
schemaDropScriptEnter the location of the script to delete the schema from therepository. For example:
installation_location\:\\database_type\composite_clean.sql
Chapter 8. Setting up a metadata repository 127

Property Description
schemaInitializeScriptEnter the location of the initialization script. For example:
installation_location\:\\database_type\composite_data.sql
5. Update the repository configuration. Supply the real password in a commandline as follows:repo_util.bat -updateConfig -configFile repo.properties-databasePassword password (Windows)repo_util.sh -updateConfig -configFile repo.properties -databasePasswordpassword (UNIX)
6. After the repository database configuration has been updated, restart theVirtual View Manager server.
7. Verify that the repository database is running on the database by running therepo_util command with -listConfig option.Note: You can view the server information in the cs_server.log file, located inthe installation_location/ logs directory.
128 IBM Cognos Virtual View Manager Version 10.1.1: Administration Guide
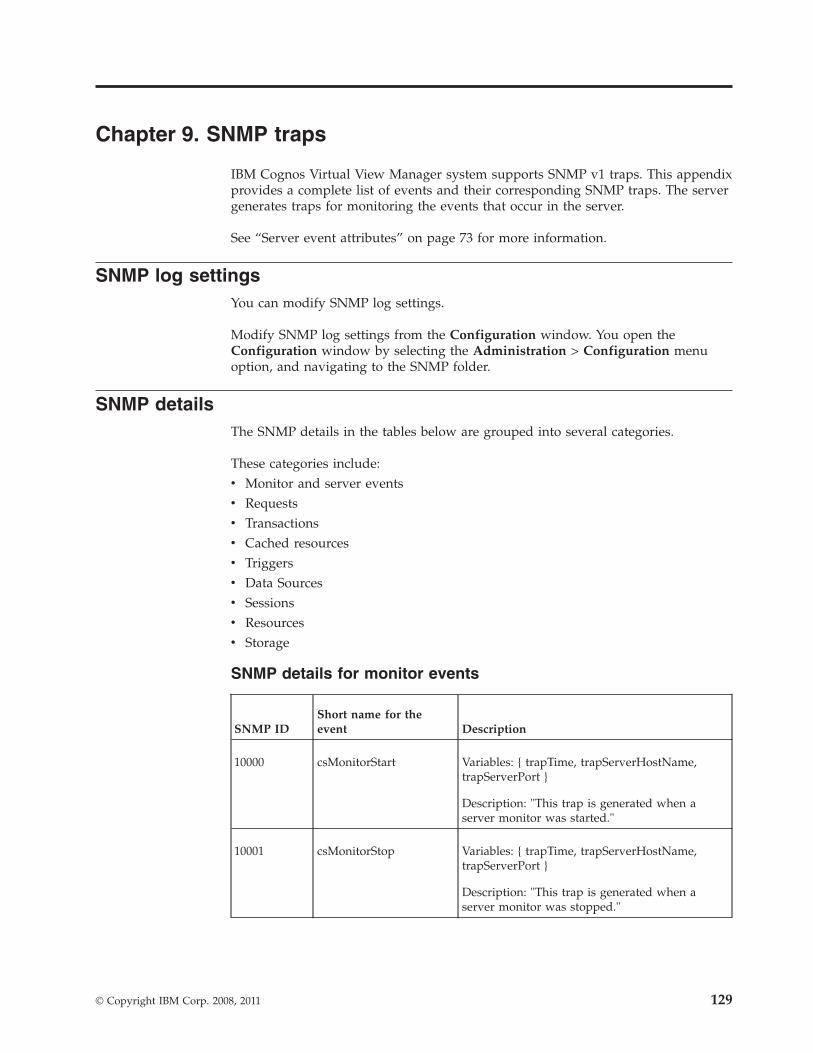
Chapter 9. SNMP traps
IBM Cognos Virtual View Manager system supports SNMP v1 traps. This appendixprovides a complete list of events and their corresponding SNMP traps. The servergenerates traps for monitoring the events that occur in the server.
See “Server event attributes” on page 73 for more information.
SNMP log settingsYou can modify SNMP log settings.
Modify SNMP log settings from the Configuration window. You open theConfiguration window by selecting the Administration > Configuration menuoption, and navigating to the SNMP folder.
SNMP detailsThe SNMP details in the tables below are grouped into several categories.
These categories include:v Monitor and server eventsv Requestsv Transactionsv Cached resourcesv Triggersv Data Sourcesv Sessionsv Resourcesv Storage
SNMP details for monitor events
SNMP IDShort name for theevent Description
10000 csMonitorStart Variables: { trapTime, trapServerHostName,trapServerPort }
Description: "This trap is generated when aserver monitor was started."
10001 csMonitorStop Variables: { trapTime, trapServerHostName,trapServerPort }
Description: "This trap is generated when aserver monitor was stopped."
© Copyright IBM Corp. 2008, 2011 129
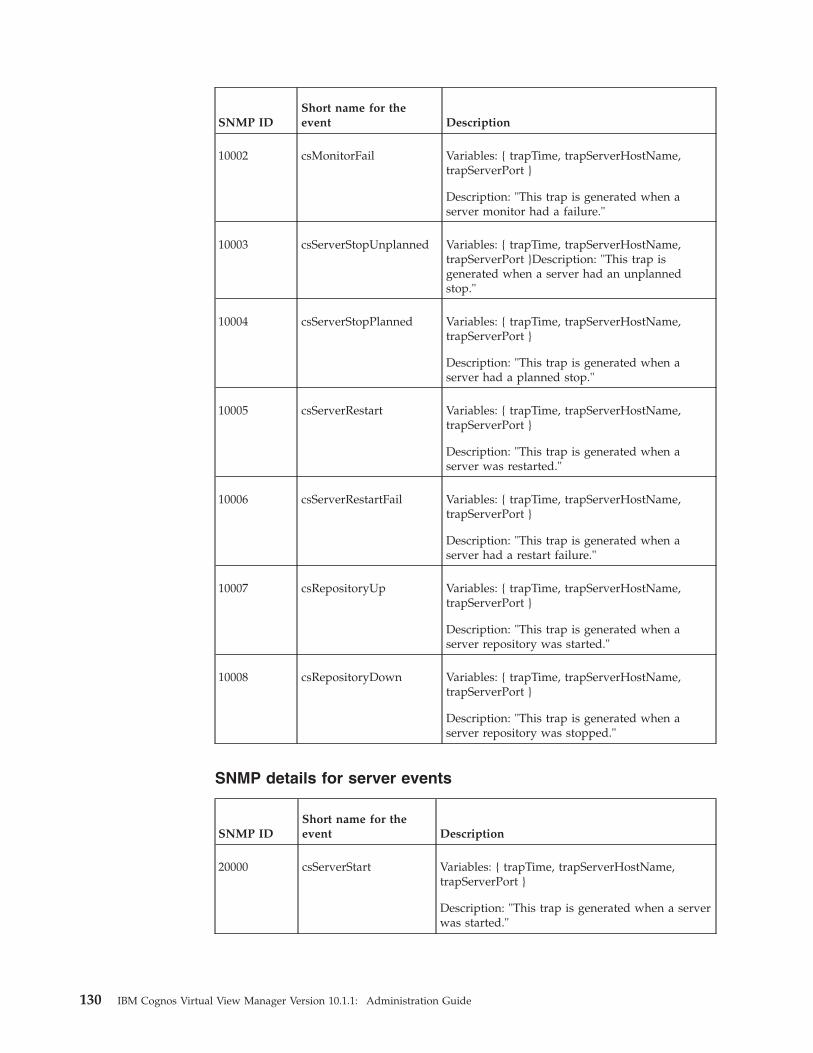
SNMP IDShort name for theevent Description
10002 csMonitorFail Variables: { trapTime, trapServerHostName,trapServerPort }
Description: "This trap is generated when aserver monitor had a failure."
10003 csServerStopUnplanned Variables: { trapTime, trapServerHostName,trapServerPort }Description: "This trap isgenerated when a server had an unplannedstop."
10004 csServerStopPlanned Variables: { trapTime, trapServerHostName,trapServerPort }
Description: "This trap is generated when aserver had a planned stop."
10005 csServerRestart Variables: { trapTime, trapServerHostName,trapServerPort }
Description: "This trap is generated when aserver was restarted."
10006 csServerRestartFail Variables: { trapTime, trapServerHostName,trapServerPort }
Description: "This trap is generated when aserver had a restart failure."
10007 csRepositoryUp Variables: { trapTime, trapServerHostName,trapServerPort }
Description: "This trap is generated when aserver repository was started."
10008 csRepositoryDown Variables: { trapTime, trapServerHostName,trapServerPort }
Description: "This trap is generated when aserver repository was stopped."
SNMP details for server events
SNMP IDShort name for theevent Description
20000 csServerStart Variables: { trapTime, trapServerHostName,trapServerPort }
Description: "This trap is generated when a serverwas started."
130 IBM Cognos Virtual View Manager Version 10.1.1: Administration Guide

SNMP IDShort name for theevent Description
20001 csServerStop Variables: { trapTime, trapServerHostName,trapServerPort }
Description: "This trap is generated when a serverwas stopped."
20002 csUserCreate Variables: { trapTime, trapServerHostName,trapServerPort, trapUserName, trapDomainName}
Description: "This trap is generated when a userwas created in a domain."
20003 csGroupCreate Variables: { trapTime, trapServerHostName,trapServerPort, trapGroupName,trapDomainName }
Description: "This trap is generated when a groupwas created in a domain."
20004 csUserDelete Variables: { trapTime, trapServerHostName,trapServerPort, trapUserName, trapDomainName}
Description: "This trap is generated when a userwas deleted from a domain."
20005 csGroupDelete Variables: { trapTime, trapServerHostName,trapServerPort, trapGroupName,trapDomainName }
Description: "This trap is generated when a groupwas deleted from a domain."
20006 csUserAddToGroup Variables: { trapTime, trapServerHostName,trapServerPort, trapUserName,trapUserDomainName, trapGroupName,trapGroupDomainName }
Description: "This trap is generated when a userwas added to a group."
20007 csUserRemoveFrom
Group
Variables: { trapTime, trapServerHostName,trapServerPort, trapUserName,trapUserDomainName, trapGroupName,trapGroupDomainName }
Description: "This trap is generated when a userwas removed from a group."
20008 csDomainCreate Variables: { trapTime, trapServerHostName,trapServerPort, trapDomainName }
Description: "This trap is generated when adomain was created."
Chapter 9. SNMP traps 131

SNMP IDShort name for theevent Description
20009 csDomainDelete Variables: { trapTime, trapServerHostName,trapServerPort, trapDomainName }
Description: "This trap is generated when adomain was deleted."
20010 csUserPasswordModify Variables: { trapTime, trapServerHostName,trapServerPort, trapUserName, trapDomainName}
Description: "This trap is generated when a userpassword was modified."
SNMP details for requests
SNMP IDShort name for theevent Description
20100 csRequestStart Variables: { trapTime, trapServerHostName,trapServerPort, trapRequestId,trapOptionalRequestParameter1,trapOptionalRequestParameter2,trapOptionalRequestParameter3,trapOptionalRequestParameter4 }
Description: "This trap is generated when arequest was started."
20101 csRequestWait Variables: { trapTime, trapServerHostName,trapServerPort, trapRequestId, trapTransactionId,trapSessionId }
Description: "This trap is generated when arequest was waiting to run."
20102 csRequestEnd Variables: { trapTime, trapServerHostName,trapServerPort, trapRequestId, trapTransactionId,trapSessionId }
Description: "This trap is generated when arequest was completed."
20103 csRequestFail Variables: { trapTime, trapServerHostName,trapServerPort, trapRequestId,trapOptionalRequestParameter1,trapOptionalRequestParameter2,trapOptionalRequestParameter3 }
Description: "This trap is generated when arequest has failed."
132 IBM Cognos Virtual View Manager Version 10.1.1: Administration Guide

SNMP IDShort name for theevent Description
20104 csRequestCancel Variables: { trapTime, trapServerHostName,trapServerPort, trapRequestId, trapTransactionId,trapSessionId }
Description: "This trap is generated when arequest was cancelled."
20105 csRequestWaitQueue
ThresholdPass
Variables: { trapTime, trapServerHostName,trapServerPort, trapRequestId, trapTransactionId,trapSessionId }
Description: "This trap is generated when arequest passed the wait queue threshold."
20106 csRequestWaitQueue
ThresholdReset
Variables: { trapTime, trapServerHostName,trapServerPort, trapRequestId, trapTransactionId,trapSessionId }
Description: "This trap is generated when arequest reset the wait queue threshold."
20107 csPreparedStatement
Success
Variables: { trapTime, trapServerHostName,trapServerPort, trapTransactionId,trapOptionalRequestParameter1,trapOptionalRequestParameter2 }
Description: "This trap is generated when aprepared statement was successfully executed."
20108 csPreparedStatementFail Variables: { trapTime, trapServerHostName,trapServerPort, trapTransactionId, trapSqlQuery,trapOptionalRequestParameter1,trapOptionalRequestParameter2 }Description:"This trap is generated when a prepared statementhas failed during execution."
SNMP details for transactions
SNMP IDShort name for theevent Description
20200 csTransactionStart Variables: { trapTime, trapServerHostName,trapServerPort, trapTransactionId, trapSessionId }
Description: "This trap is generated when atransaction was started."
20201 csTransactionCommit Variables: { trapTime, trapServerHostName,trapServerPort, trapTransactionId, trapSessionId }
Description: "This trap is generated when atransaction was committed."
Chapter 9. SNMP traps 133

SNMP IDShort name for theevent Description
20202 csTransactionFail Variables: { trapTime, trapServerHostName,trapServerPort, trapTransactionId, trapMessage,trapStackTrace, trapSessionId }
Description: "This trap is generated when atransaction has failed."
20203 csTransactionRollBack Variables: { trapTime, trapServerHostName,trapServerPort, trapTransactionId, trapSessionId }
Description: "This trap is generated when atransaction was rolled back."
20204 csTransaction
Compensate
Variables: { trapTime, trapServerHostName,trapServerPort, trapTransactionId, trapMessage,trapSessionId }
Description: "This trap is generated when atransaction was compensated for."
SNMP details for cached resources
SNMP IDShort name for theevent Description
20300 csCacheEnable Variables: { trapTime, trapServerHostName,trapServerPort, trapCacheName }
Description: "This trap is generated when a cachewas enabled."
20301 csCacheDisable Variables: { trapTime, trapServerHostName,trapServerPort, trapCacheName }
Description: "This trap is generated when a cachewas disabled."
20302 csCacheClear Variables: { trapTime, trapServerHostName,trapServerPort, trapCacheName,trapCacheParameters }
Description: "This trap is generated when a cachewas cleared."
20303 csCacheRefreshStart Variables: { trapTime, trapServerHostName,trapServerPort, trapCacheName,trapCacheParameters }
Description: "This trap is generated when a cacherefresh was started."
134 IBM Cognos Virtual View Manager Version 10.1.1: Administration Guide
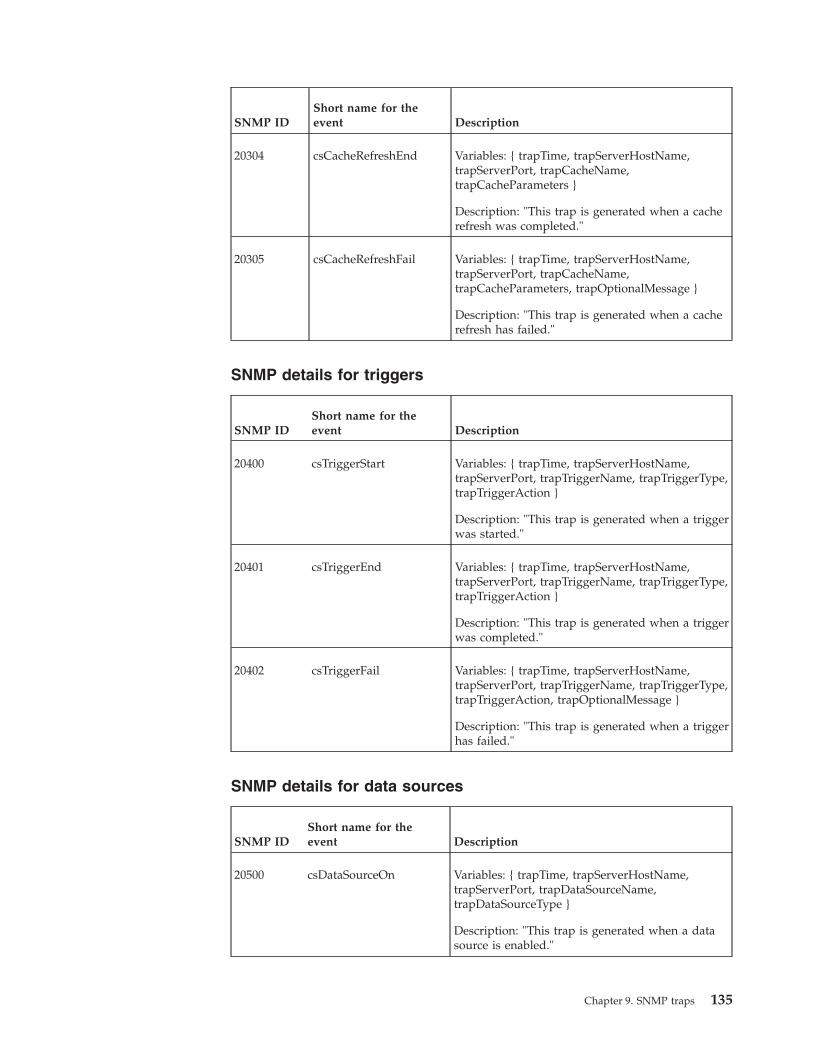
SNMP IDShort name for theevent Description
20304 csCacheRefreshEnd Variables: { trapTime, trapServerHostName,trapServerPort, trapCacheName,trapCacheParameters }
Description: "This trap is generated when a cacherefresh was completed."
20305 csCacheRefreshFail Variables: { trapTime, trapServerHostName,trapServerPort, trapCacheName,trapCacheParameters, trapOptionalMessage }
Description: "This trap is generated when a cacherefresh has failed."
SNMP details for triggers
SNMP IDShort name for theevent Description
20400 csTriggerStart Variables: { trapTime, trapServerHostName,trapServerPort, trapTriggerName, trapTriggerType,trapTriggerAction }
Description: "This trap is generated when a triggerwas started."
20401 csTriggerEnd Variables: { trapTime, trapServerHostName,trapServerPort, trapTriggerName, trapTriggerType,trapTriggerAction }
Description: "This trap is generated when a triggerwas completed."
20402 csTriggerFail Variables: { trapTime, trapServerHostName,trapServerPort, trapTriggerName, trapTriggerType,trapTriggerAction, trapOptionalMessage }
Description: "This trap is generated when a triggerhas failed."
SNMP details for data sources
SNMP IDShort name for theevent Description
20500 csDataSourceOn Variables: { trapTime, trapServerHostName,trapServerPort, trapDataSourceName,trapDataSourceType }
Description: "This trap is generated when a datasource is enabled."
Chapter 9. SNMP traps 135
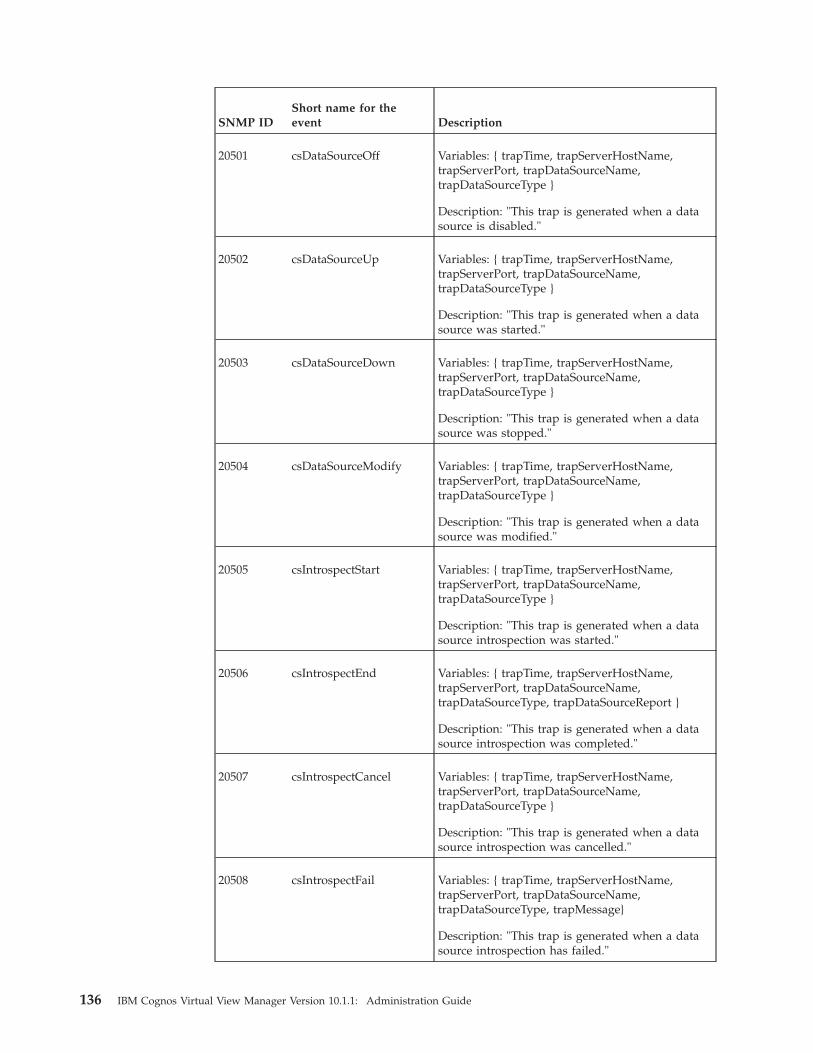
SNMP IDShort name for theevent Description
20501 csDataSourceOff Variables: { trapTime, trapServerHostName,trapServerPort, trapDataSourceName,trapDataSourceType }
Description: "This trap is generated when a datasource is disabled."
20502 csDataSourceUp Variables: { trapTime, trapServerHostName,trapServerPort, trapDataSourceName,trapDataSourceType }
Description: "This trap is generated when a datasource was started."
20503 csDataSourceDown Variables: { trapTime, trapServerHostName,trapServerPort, trapDataSourceName,trapDataSourceType }
Description: "This trap is generated when a datasource was stopped."
20504 csDataSourceModify Variables: { trapTime, trapServerHostName,trapServerPort, trapDataSourceName,trapDataSourceType }
Description: "This trap is generated when a datasource was modified."
20505 csIntrospectStart Variables: { trapTime, trapServerHostName,trapServerPort, trapDataSourceName,trapDataSourceType }
Description: "This trap is generated when a datasource introspection was started."
20506 csIntrospectEnd Variables: { trapTime, trapServerHostName,trapServerPort, trapDataSourceName,trapDataSourceType, trapDataSourceReport }
Description: "This trap is generated when a datasource introspection was completed."
20507 csIntrospectCancel Variables: { trapTime, trapServerHostName,trapServerPort, trapDataSourceName,trapDataSourceType }
Description: "This trap is generated when a datasource introspection was cancelled."
20508 csIntrospectFail Variables: { trapTime, trapServerHostName,trapServerPort, trapDataSourceName,trapDataSourceType, trapMessage}
Description: "This trap is generated when a datasource introspection has failed."
136 IBM Cognos Virtual View Manager Version 10.1.1: Administration Guide

SNMP IDShort name for theevent Description
20509 csTestStart Variables: { trapTime, trapServerHostName,trapServerPort, trapDataSourceName,trapDataSourceType }
Description: "This trap is generated when a datasource test was started."
20510 csTestSuccess Variables: { trapTime, trapServerHostName,trapServerPort, trapDataSourceName,trapDataSourceType }
Description: "This trap is generated when a datasource test was successful."
20511 csTestFail Variables: { trapTime, trapServerHostName,trapServerPort, trapDataSourceName,trapDataSourceType }
Description: "This trap is generated when a datasource test has failed."
20512 csConnPoolSizeIncrease Variables: { trapTime, trapServerHostName,trapServerPort, trapConnectionPoolId }
Description: "This trap is generated when the sizeof a connection pool has increased."
20513 csConnPoolSizeDecrease Variables: { trapTime, trapServerHostName,trapServerPort, trapConnectionPoolId }
Description: "This trap is generated when the sizeof a connection pool has decreased."
20514 csConnCheckOut Variables: { trapTime, trapServerHostName,trapServerPort, trapConnectionPoolId }
Description: "This trap is generated when aconnection was checked out a connection pool."
20515 csConnCheckIn Variables: { trapTime, trapServerHostName,trapServerPort, trapConnectionPoolId }
Description: "This trap is generated when aconnection was checked in a connection pool."
20516 csConnInvalid Variables: { trapTime, trapServerHostName,trapServerPort, trapConnectionPoolId }
Description: "This trap is generated when aconnection pool had an invalid connection."
20517 csConnFail Variables: { trapTime, trapServerHostName,trapServerPort, trapConnectionPoolId }
Description: "This trap is generated when aconnection pool had a failed connection."
Chapter 9. SNMP traps 137
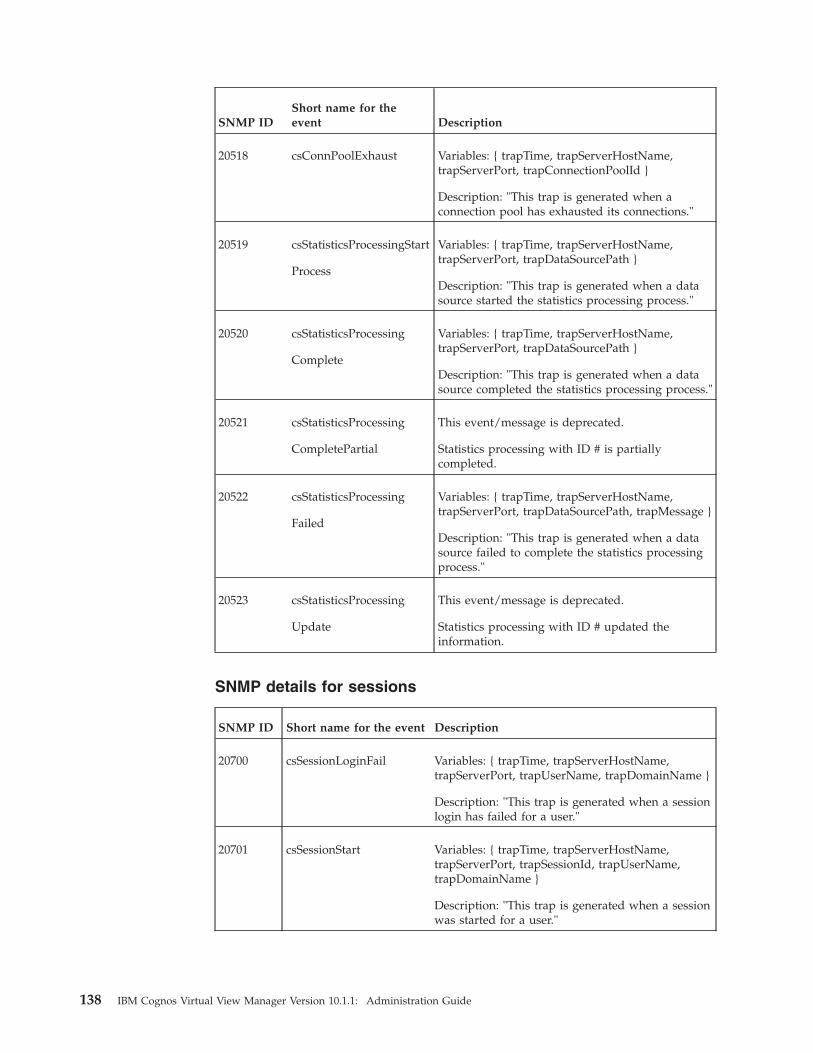
SNMP IDShort name for theevent Description
20518 csConnPoolExhaust Variables: { trapTime, trapServerHostName,trapServerPort, trapConnectionPoolId }
Description: "This trap is generated when aconnection pool has exhausted its connections."
20519 csStatisticsProcessingStart
Process
Variables: { trapTime, trapServerHostName,trapServerPort, trapDataSourcePath }
Description: "This trap is generated when a datasource started the statistics processing process."
20520 csStatisticsProcessing
Complete
Variables: { trapTime, trapServerHostName,trapServerPort, trapDataSourcePath }
Description: "This trap is generated when a datasource completed the statistics processing process."
20521 csStatisticsProcessing
CompletePartial
This event/message is deprecated.
Statistics processing with ID # is partiallycompleted.
20522 csStatisticsProcessing
Failed
Variables: { trapTime, trapServerHostName,trapServerPort, trapDataSourcePath, trapMessage }
Description: "This trap is generated when a datasource failed to complete the statistics processingprocess."
20523 csStatisticsProcessing
Update
This event/message is deprecated.
Statistics processing with ID # updated theinformation.
SNMP details for sessions
SNMP ID Short name for the event Description
20700 csSessionLoginFail Variables: { trapTime, trapServerHostName,trapServerPort, trapUserName, trapDomainName }
Description: "This trap is generated when a sessionlogin has failed for a user."
20701 csSessionStart Variables: { trapTime, trapServerHostName,trapServerPort, trapSessionId, trapUserName,trapDomainName }
Description: "This trap is generated when a sessionwas started for a user."
138 IBM Cognos Virtual View Manager Version 10.1.1: Administration Guide

SNMP ID Short name for the event Description
20702 csSessionEnd Variables: { trapTime, trapServerHostName,trapServerPort, trapSessionId, trapUserName,trapDomainName }
Description: "This trap is generated when a sessionwas ended for a user."
20703 csSessionTerminate Variables: { trapTime, trapServerHostName,trapServerPort, trapSessionId, trapUserName,trapDomainName }
Description: "This trap is generated when a sessionwas terminated for a user."
20705 csSessionMaxConnections
Exhaust
Variables: { trapTime, trapServerHostName,trapServerPort, trapUserName, trapDomainName,trapHostName, trapLocalHostName,trapLocalHostIP }
Description: "This trap is generated when a sessioncreation request was denied for a user."
SNMP details for resources
SNMP IDShort name for theevent Description
20800 csResourceCreate Variables: { trapTime, trapServerHostName,trapServerPort, trapResourceName,trapDataSourcePath, trapResourceType }
Description: "This trap is generated when aresource was created."
20801 csResourceDelete Variables: { trapTime, trapServerHostName,trapServerPort, trapResourceName,trapDataSourcePath, trapResourceType }
Description: "This trap is generated when aresource was deleted."
20802 csStatisticsResource
ProcessingStartProcess
Variables: { trapTime, trapServerHostName,trapServerPort, trapResourcePath }
Description: "This trap is generated when aresource started the statistics processing process."
20803 csStatisticsResource
ProcessingComplete
Variables: { trapTime, trapServerHostName,trapServerPort, trapResourcePath }
Description: "This trap is generated when aresource completed the statistics processingprocess."
Chapter 9. SNMP traps 139

SNMP IDShort name for theevent Description
20804 csStatisticsResource
ProcessingFailed
Variables: { trapTime, trapServerHostName,trapServerPort, trapResourcePath, trapMessage }
Description: "This trap is generated when aresource failed to complete the statistics processingprocess."
20805 csResourceLock Variables: { trapTime, trapServerHostName,trapServerPort, trapUserName, trapDomainName,trapLockTime, trapResourcePath,trapResourceType, trapResourceSubType }
Description:
"This trap is generated when a resource waslocked."
Only the top-most parent node is reported aslocked.
20806 csResourceUnlock Variables: { trapTime, trapServerHostName,trapServerPort, trapUserName, trapDomainName,trapUnlockTime, trapResourcePath,trapResourceType, trapResourceSubType,trapComment }
Description: "This trap is generated when aresource was unlocked."
Only the top-most parent node is reported asunlocked.
SNMP details for storage
SNMP IDShort name for theevent Description
21000 csStorageLowWarning Variables: { trapTime, trapServerHostName,trapServerPort }
Description: "This trap is generated when astorage low warning has occurred on a machine."
21001 csStorageLowCritical Variables: { trapTime, trapServerHostName,trapServerPort }
Description: "This trap is generated when astorage low critical event has occurred on amachine."
140 IBM Cognos Virtual View Manager Version 10.1.1: Administration Guide

Notices
This information was developed for products and services offered worldwide.
IBM may not offer the products, services, or features discussed in this document inother countries. Consult your local IBM representative for information on theproducts and services currently available in your area. Any reference to an IBMproduct, program, or service is not intended to state or imply that only that IBMproduct, program, or service may be used. Any functionally equivalent product,program, or service that does not infringe any IBM intellectual property right maybe used instead. However, it is the user's responsibility to evaluate and verify theoperation of any non-IBM product, program, or service.
IBM may have patents or pending patent applications covering subject matterdescribed in this document. The furnishing of this document does not grant youany license to these patents. You can send license inquiries, in writing, to:
IBM Director of LicensingIBM CorporationNorth Castle DriveArmonk, NY 10504-1785U.S.A.
For license inquiries regarding double-byte (DBCS) information, contact the IBMIntellectual Property Department in your country or send inquiries, in writing, to:
Intellectual Property LicensingLegal and Intellectual Property LawIBM Japan Ltd.1623-14, Shimotsuruma, Yamato-shiKanagawa 242-8502 Japan
The following paragraph does not apply to the United Kingdom or any othercountry where such provisions are inconsistent with local law: INTERNATIONALBUSINESS MACHINES CORPORATION PROVIDES THIS PUBLICATION "AS IS"WITHOUT WARRANTY OF ANY KIND, EITHER EXPRESS OR IMPLIED,INCLUDING, BUT NOT LIMITED TO, THE IMPLIED WARRANTIES OFNON-INFRINGEMENT, MERCHANTABILITY OR FITNESS FOR A PARTICULARPURPOSE. Some states do not allow disclaimer of express or implied warranties incertain transactions, therefore, this statement may not apply to you.
This information could include technical inaccuracies or typographical errors.Changes are periodically made to the information herein; these changes will beincorporated in new editions of the publication. IBM may make improvementsand/or changes in the product(s) and/or the program(s) described in thispublication at any time without notice.
Any references in this information to non-IBM Web sites are provided forconvenience only and do not in any manner serve as an endorsement of those Websites. The materials at those Web sites are not part of the materials for this IBMproduct and use of those Web sites is at your own risk.
© Copyright IBM Corp. 2008, 2011 141

IBM may use or distribute any of the information you supply in any way itbelieves appropriate without incurring any obligation to you.
Licensees of this program who wish to have information about it for the purposeof enabling: (i) the exchange of information between independently createdprograms and other programs (including this one) and (ii) the mutual use of theinformation which has been exchanged, should contact:
IBM Software GroupAttention: Licensing3755 Riverside DrOttawa, ON K1V 1B7Canada
Such information may be available, subject to appropriate terms and conditions,including in some cases, payment of a fee.
The licensed program described in this document and all licensed materialavailable for it are provided by IBM under terms of the IBM Customer Agreement,IBM International Program License Agreement or any equivalent agreementbetween us.
Any performance data contained herein was determined in a controlledenvironment. Therefore, the results obtained in other operating environments mayvary significantly. Some measurements may have been made on development-levelsystems and there is no guarantee that these measurements will be the same ongenerally available systems. Furthermore, some measurements may have beenestimated through extrapolation. Actual results may vary. Users of this documentshould verify the applicable data for their specific environment.
Information concerning non-IBM products was obtained from the suppliers ofthose products, their published announcements or other publicly available sources.IBM has not tested those products and cannot confirm the accuracy ofperformance, compatibility or any other claims related to non-IBM products.Questions on the capabilities of non-IBM products should be addressed to thesuppliers of those products.
All statements regarding IBM's future direction or intent are subject to change orwithdrawal without notice, and represent goals and objectives only.
This information contains examples of data and reports used in daily businessoperations. To illustrate them as completely as possible, the examples include thenames of individuals, companies, brands, and products. All of these names arefictitious and any similarity to the names and addresses used by an actual businessenterprise is entirely coincidental.
If you are viewing this information softcopy, the photographs and colorillustrations may not appear.
142 IBM Cognos Virtual View Manager Version 10.1.1: Administration Guide

Trademarks
IBM, the IBM logo, ibm.com, and Cognos are trademarks or registered trademarksof International Business Machines Corp., registered in many jurisdictionsworldwide. Other product and service names might be trademarks of IBM or othercompanies. A current list of IBM trademarks is available on the Web at “ Copyrightand trademark information ” at www.ibm.com/legal/copytrade.shtml.
The following terms are trademarks or registered trademarks of other companies:v Netezza is a registered trademark or trademark of Netezza Corporation, an IBM
Company.v Microsoft, Windows, Windows NT, and the Windows logo are trademarks of
Microsoft Corporation in the United States, other countries, or both.v Linux is a registered trademark of Linus Torvalds in the United States, other
countries, or both.v UNIX is a registered trademark of The Open Group in the United States and
other countries.v Java and all Java-based trademarks and logos are trademarks or registered
trademarks of Oracle and/or its affiliates.
Notices 143

144 IBM Cognos Virtual View Manager Version 10.1.1: Administration Guide

Index
Special characters-pkgdir 94
AAccess
Privilege Cache 61Access (Hits/ Accesses)
Manager Server Overview 61Active Requests
data sources 64Active Server Requests 58admin
group, cognos domain 28user 30
administrationdynamic domain 51
Advanced Filter dialog 57all
group, cognos domain 28Allocated Pool Size
data sources 64anonymous 30audience of document vii
Bbackup_export 77backup_import 77buttons
enabling 56Bytes summary
data sources 64
CCached Resources
Change Enabling button 62Last Access 62Last Fail Duration 63Last Fail End 62Last Refresh End 62Last Success Duration 63Last Success End 63Owner 62Owner domain 63Path 63Refresh Cache button 62Status 62Storage Used 62Total Accesses 63Total Failures 63Total Successes 63Type 62Variant 62
Capacity (Entries/Max)Server Overview 61
Change Enabling button 72changing ownership 33
changing password 33cognos domain
built-in groups 28built-in users, privileges 30group membership 32user 31
configuration settingstriggers 72
configuringdatabases 123MySQL repository 123Sybase repository 123Virtual View Manager metadata repository 125
connection URL 2connection URL format 6Connection URL Pattern 8copy table filter 57create table filter 57creating
database 120Informix metadata repository 120MySQL metadata repository 121Oracle metadata repository 122Sybase metadata repository 121
creating with driverConfig 14
Ddata sources 2
removing 9Data Sources
Active Requests 65Data Sources console 63database repository
system requirements 119DB2 type 2 JDBC driver 2DB2 z/OS 3DB2 z/OS JDBC driver 3description of product viidigital certificate 2Driver Class Name 8driverConfig, running 14drivers 2, 6dymanic domain
about 51enabling 52group administration 52
dymanic domain administration 51dymanic domain user administration 53
adding users 53removing users 54
dymanic domain user group membership 54dymanic domain user privledges 53
Eenabling buttons 56End Sessions button 69environment variables
setting on UNIX and Linux operating systems 13
© Copyright IBM Corp. 2008, 2011 145

event log files 75events
and logs 75exporting or importing metadata 77exporting or importing programs 77exporting or importing resources 77Externalization 94
Import 109pkg_export -pkgdir option 94
Externalized Directoryimport 109
Ffilter
create 57filter rules 57
Ggotolink 2group
removing from domain 29group privileges
managing 35group rights templates 28
HHits
Privilege Cache Hits 61
Iimporting
rules 84, 108importing or exporting full server 77indexes
Sybase 119information about rows 56Informix 4Informix JDBC driver 4Informix metadata repository
creating 120repo.properties file 126
install_services 87installing for DB2 2installing for Informix 2installing for SQL Server 2
JJava Key Store (JKS) 2Java keystore digital certificate
configuring 2JDBC 6
driver 2, 8, 9edit 9installing 8new 8remove 9
JDBC driver 3, 4, 5JDBC/ODBC secured over HTTPS 2JKS digital certificate 2JMS via JNDI Connector 15
LLDAP
attribute key 39context search symbols 39properties file 35query examples 40search filter symbols 39users, adding 48
LDAP domainadding 44adding group 43adding user 47editing 46removing 46viewing LDAP groups 45
LDAP/iPlanet users 31ldap.properties sample 37licensing 1limit the display of sessions 69log files 75logs
server, monitor, studio 75
Mmanaging privileges 35Managing User Group Membership 32manifest file 94Max Memory
requests 67Max Pool Size
data sources 64membership
LDAP groups 45memory
fine tuning 21memory, used 58, 59metadata repository 119monitor
starting or stopping or restarting 85monitor log files 75MySQL metadata repository
configuring 123creating 121
NName
cached resources 62data sources 64
navigating rows 58Netezza JDBC driver 4Netezza, installation of driver 4New Driver Information window 8nobody user 33nobody, user 30nohup, usage 85number of rows displayed 58
OODBC
adding 10data sources 10driver 10
146 IBM Cognos Virtual View Manager Version 10.1.1: Administration Guide
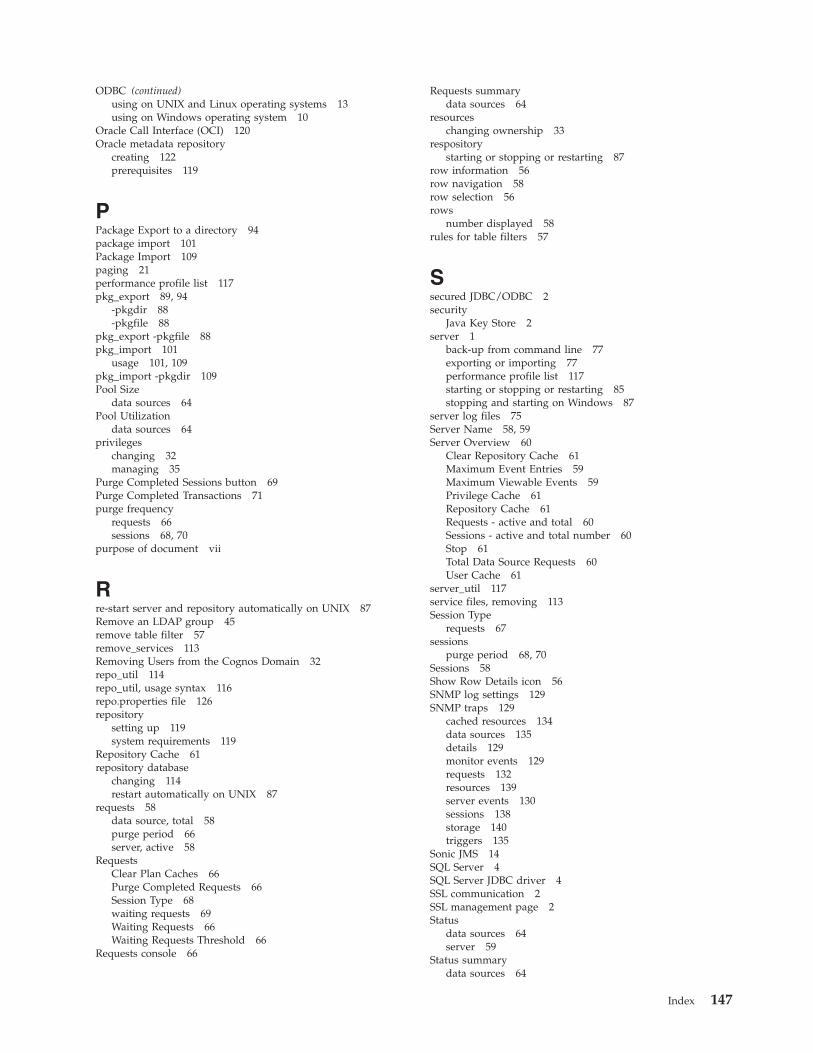
ODBC (continued)using on UNIX and Linux operating systems 13using on Windows operating system 10
Oracle Call Interface (OCI) 120Oracle metadata repository
creating 122prerequisites 119
PPackage Export to a directory 94package import 101Package Import 109paging 21performance profile list 117pkg_export 89, 94
-pkgdir 88-pkgfile 88
pkg_export -pkgfile 88pkg_import 101
usage 101, 109pkg_import -pkgdir 109Pool Size
data sources 64Pool Utilization
data sources 64privileges
changing 32managing 35
Purge Completed Sessions button 69Purge Completed Transactions 71purge frequency
requests 66sessions 68, 70
purpose of document vii
Rre-start server and repository automatically on UNIX 87Remove an LDAP group 45remove table filter 57remove_services 113Removing Users from the Cognos Domain 32repo_util 114repo_util, usage syntax 116repo.properties file 126repository
setting up 119system requirements 119
Repository Cache 61repository database
changing 114restart automatically on UNIX 87
requests 58data source, total 58purge period 66server, active 58
RequestsClear Plan Caches 66Purge Completed Requests 66Session Type 68waiting requests 69Waiting Requests 66Waiting Requests Threshold 66
Requests console 66
Requests summarydata sources 64
resourceschanging ownership 33
respositorystarting or stopping or restarting 87
row information 56row navigation 58row selection 56rows
number displayed 58rules for table filters 57
Ssecured JDBC/ODBC 2security
Java Key Store 2server 1
back-up from command line 77exporting or importing 77performance profile list 117starting or stopping or restarting 85stopping and starting on Windows 87
server log files 75Server Name 58, 59Server Overview 60
Clear Repository Cache 61Maximum Event Entries 59Maximum Viewable Events 59Privilege Cache 61Repository Cache 61Requests - active and total 60Sessions - active and total number 60Stop 61Total Data Source Requests 60User Cache 61
server_util 117service files, removing 113Session Type
requests 67sessions
purge period 68, 70Sessions 58Show Row Details icon 56SNMP log settings 129SNMP traps 129
cached resources 134data sources 135details 129monitor events 129requests 132resources 139server events 130sessions 138storage 140triggers 135
Sonic JMS 14SQL Server 4SQL Server JDBC driver 4SSL communication 2SSL management page 2Status
data sources 64server 59
Status summarydata sources 64
Index 147

Studio log files 75Sybase
indexes 119Sybase metadata repository
configuring 123creating 121prerequisites 119
systemevents and logs 75monitoring 55user 30
system requirementsdatabase repository 119
Ttable filter
copy 57create 57remove 57
table filter rules 57Teradata JDBC driver 4terminate a session 69TestAllDataSources trigger 72TIBCO JMS 14timing
changes to users 33Total Data Source Requests 58Total Memory Used 58, 59Total Requests
data sources 64trailing spaces
setting 24Transactions 58
Typedata source 64
UUser Cache 61user nobody 33user privileges
managing 35user rights profile changes 33users
adding 31membership 32
VVirtual View Manager Administrator
cached resources 62Data Sources page 63event and log files 75Event Log 73home page 58overview 55refreshing current page 56Requests page 66Server Overview page 59server status information 59Sessions page 68sorting 56starting 55Transactions page 70Triggers page 72using 56
148 IBM Cognos Virtual View Manager Version 10.1.1: Administration Guide


