21
User Manual Innovation meets elegance. The effortless, one-click mining wallet for the global IoT ecosystem. -The Global Leader in Blockchain+IoT- Waltonchain Windows Wallet

User ManualInnovation meets elegance. The effortless, one-click mining wallet for the global IoT ecosystem.
-The Global Leader in Blockchain+IoT-
Waltonchain Windows Wallet

CONTENTS
WALLET USAGE NOTICE
1 LOGIN PAGE
1.1 IMPORT WALLET
1.2 CREATE NEW WALLET
1.3 SET LOGIN PASSWORD
2 SOFTWARE FEATURES
2.1 MY WALLET
2.2 STATISTICS
2.3 LOG MESSAGE
2.4 CONTACTS
2.5 MINING
2.6 MULTIPLE WALLETS
2.7 STATUS BAR
2.8 RETURN TO LOGIN PAGE

Wallet Usage NoticeT h e W TC Wa l l et i s pa r t o f t h e Wa l to n c h a i n Pa re n t C h a i n S y ste m . P l ea s e d o n ot t ra n s fe r t h e E R C 2 0 W TC To ke n o n t h e Et h e re u m d i re ct l y to t h e W TC Wa l l et to a v o i d a n y l o s s o f a s s ets .
P l ea s e d o n ot t ra n s fe r W TCT f ro m W TC Wa l l et to a n y Et h e re u m Wa l l ets a n d Et h e re u m ba s e d E R C 2 0 W TC To ke n a d d re s s e s o n t ra d i n g p l at fo r m s to a v o i d a n y l o s s o f a s s ets b e fo re t h e o ffi c i a l to ke n s wa p.
1
2

In the figure to the right the wallet is not logged in. Note the three login methods on the right. There are also the mining and multi wallet list functions on the left where the user can either mine without credentials or log in to previously accessed wallets with a passphrase.
1 LOGIN PAGE
1.1 IMPORT WALLET
1 [ By Passphrase+keystore ]
2 [ By Private Key ]
3 [ By Mnemonic Phrase ]
Go to “Create New Wallet” page.
[ Create New Wallet ]
Three log in me thods
Enter the passphrase of the wallet and import the Keystore file to log in.
Enter the private key of the wallet and enter your new passphrase twice to log in.
Enter mnemonic words of the wallet and enter your new passphrase twice to log in.

Note: After successful account registration, the account is logged in by default. Click the left menu bar to enter the corresponding function page.
Click “Create New Wallet” to initiate new wallet creation.
The user creates a new wallet, and the page displays the account information of the newly created wallet, including the wallet passphrase, private key, public key, mnemonic phrase etc. Users need to save the information properly.
CREATE NEW WALLET1.2
1
Opera t i ng Ins t ruc t i ons

CREATE NEW WALLET1.2
Enter a passphrase for your wallet, Do it again and then click “Generate Keys” to get the new wallet account information.
Be sure to read the red text, you must record and save the account information properly. Do not lose your passphrase, public key, private key, mnemonic phrase etc.
Click “Save Key” to choose the location to save the customized Keystore file and remember the location.
Enter the name of the account in the input box and click “Save Account” to save the account name (optional).
2
3
4
5
Note: After successful account registration, the account is logged in by default. Click the left menu bar to enter the corresponding function page.

1.3 SET LOGIN PASSWORD
To ensure the safety of your assets, setting a [Login Password] is recommended.

SET LOGIN PASSWORD
As shown in the figure, after selecting “Enter password
when login”, you can set your login password.
1.3

SET LOGIN PASSWORD1.3
Next time when you open your wallet, you will need to
enter your login password first.
See the figure below -

2 SOFTWARE FEATURES
2.1 MY WALLET
As shown in the figure, My Wallet page shows your wallet account information, transaction history and the Send and Receive features.
Wa l le t Accoun t In fo rma t ion
The page displays the current wallet account balance, balance line chart, wallet account identity (MN, GMN), current USD exchange ratio and conversion ratio chart. You can also view account address, its QR code, account Private Key and Private Key QR Code.
Transac t i on H is to ry
The page shows the transaction type, time, account address, transaction status (including In Process Failed, Success) and transaction amount.

[ Send ] As shown in the figure, the Send page supports input of transfer information and gas fee setting.
2.1 MY WALLET
Gas Fee Se t t i ngs
Supported modes: Economic, Standard, Quick and Custom. Specific Gas Limit / Gas Price can be set.
Enter the amount to be transferred, the value entered must be greater than 0 and cannot exceed the account balance.Enter the receiver address and the 42-byte public key string beginning with 0x. Transactions can be performed by selecting receiver from the local address list or by scanning the address QR-code with a phone camera.To set the Gas Fee, select the Gas Fee mode, enter the Gas Limit value. Normally, Gas Price is a fixed value. Only in the Custom mode you can enter both Gas Limit and Gas Price, but the amount of transfer + Gas Limit * Gas Price cannot exceed the balance.Click “Send” to start the transfer and display the transaction status. Transaction information can also be accessed in the Transaction history list.
1
2
3
4
Opera t i ng Ins t ruc t i ons

2.1 MY WALLET
[Receive] As shown on the right, This is the Wallet page to receive payments from others. Senders may use WTC Wallet app to scan theQR code of the receiver’s address and the amount information. Receivers may also copy the public key for senders to make transfers.
Enter the amount to be received and the system will automatically update the QR code.Send the QR code to senders to scan or directly copy the public address for senders to make a transfer.
1
2
Opera t i ng Ins t ruc t i ons

2.2 STATISTICS
As shown in the figure, the Statistics page shows thestatistical data of the wallet, which includes Historical amount l ine char t , Min ing resul ts l ine char t and Geographic distribution map of WTC nodes.
Shows a changing curve of the balance on the current account.
Historical amount line chart
Shows a curve graph of the historical mining results of the current account.
Mining results line chart
Shows the distribution of WTC’s current nodes, the bigger the node icon, the more nodes are in that country.
Geographic distribution map of WTC nodes

2.3 LOG MESSAGE
As shown in the figure, the Log page list shows the messagesreceived by the current account. The Log includes messages sent by the system and transaction notifications.
Click the message to view the details and it will be marked as read.One click to mark all the messages as read is supported.
1
2
Opera t i ng Ins t ruc t i ons

2.4 CONTACTS
As shown in the figure, Contacts menu displays a list of addresses of all the accounts in the current wallet.
Please note: The address list is shared by all accounts in the current wallet, and the specific functions include transfer and adding, deleting and modifyingcontact information.
[ Add New Contact ] - Click “Add New Contact” to add a new contact.
[ Edit ] - Select the contact to be modified, click “Edit” to modify the contact's
name. It is not allowed to modify wallet addresses.
[ Delete ] - Select the contact to be deleted, click “Delete” to delete the contact.
Click “Add New Contact”.Enter the wallet address (input by scanning a QR code with phone camera is supported) and name to create a contact.After the successful creation, the contact names and wallet addresses appear on the list, contact information management (editing, deleting and transfer) is supported.
1
3
2
Opera t i ng Ins t ruc t i ons
2.5 MINING
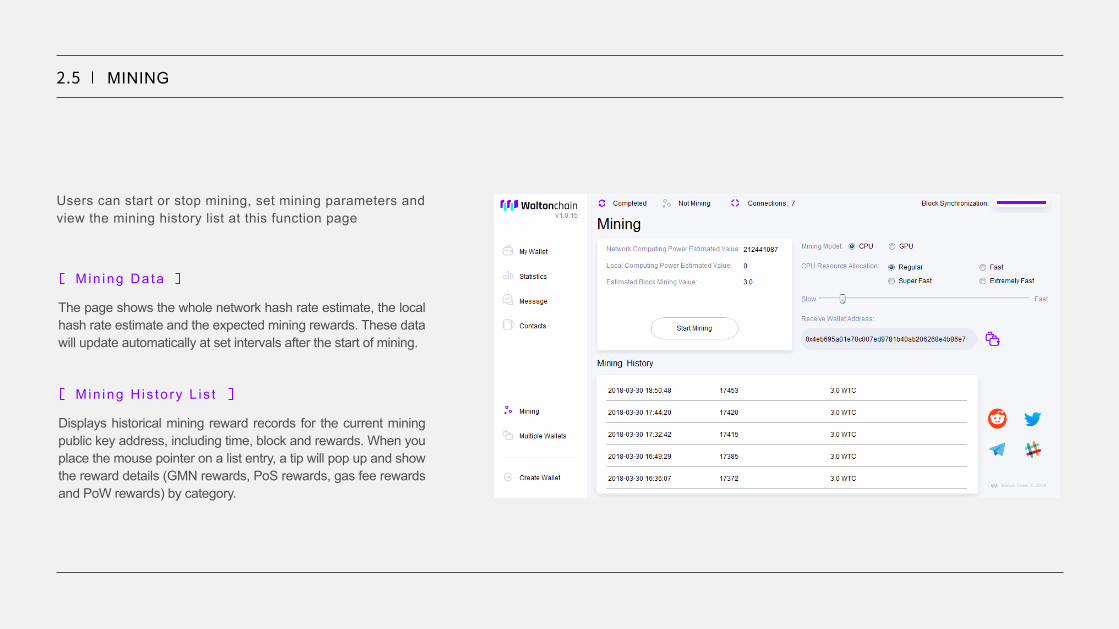
Users can start or stop mining, set mining parameters and view the mining history list at this function page
The page shows the whole network hash rate estimate, the local hash rate estimate and the expected mining rewards. These data will update automatically at set intervals after the start of mining.
M in ing Da ta
Displays historical mining reward records for the current mining public key address, including time, block and rewards. When you place the mouse pointer on a list entry, a tip will pop up and show the reward details (GMN rewards, PoS rewards, gas fee rewards and PoW rewards) by category.
M in ing H is to ry L i s t

2.5 MINING
Include Mining Mode selection, CPU Resource Allocation setting and Mining Wallet Address.
Mining Wallet Address: A 42-byte public key character string beginning with 0x, selection from the local walletlist is supported.
CPU Resource Allocation: Settings of CPU ResourceAllocation during mining including.
Mining Mode: 3 modes are supported: CPU, GPU andMiner
M in ing Paramete rs

2.6 MULTIPLE WALLETS
Click “Open” to switch to “My Wallet” page of the selected wallet.[ Open ]
Click this button to edit Wallet Name. Wallet address is noteditable.
[ Edit ]
Click this button to delete the selected account.If the current wallet is deleted, it will automatically return to “Create Wallet”page.
[ Delete ]
Click this “button” to set Login Password. If the Login Passwordis set, the Wallet will require password every time you launch the Wallet in order to import or create wallet.
[ Set Login Password ]
Click this button to switch to “Import Wallet” page. (As in 1.1)
[ Import Existing Wallet ]
Click this button to switch to “Create New Wallet” page. (As in 1.2)
[ Creat New Wallet ]
As shown in the figure, the Multiple Wallets tool helps users quickly switch accounts. Specific functions: creating a new wallet, importing wallet accounts, login to other accounts, and managing addresses.

As shown in the figure, there is a status bar of the current account at the top of the page. After login, the status bar will be displayed at the top of each Wallet page.
2.7 STATUS BAR
Includes wallet synchronization status, mining status, blockchain network node connection status, and block synchronization progress bar.
Status Bar
Synchronizing Completed
Wallet synchronization states:
Not Mining Mining
Mining states:
Blockchain network node connection status: number of nodes connected will be shown.Block synchronization progress bar: displays the synchronization progress.

As shown in the figure, click “Create Wallet” to return to the login page.
2.8 RETURN TO LOGIN PAGE

-The Global Leader in Blockchain+IoT-


