39
Web-Dispatch Agent Training Manual Buchanan Hauling & Rigging, Inc. 4625 Industrial Road Fort Wayne, IN 46825 Phone: 260-471-1877 Fax: 260-471-8878

Web-Dispatch
Agent Training Manual
Buchanan Hauling & Rigging, Inc.
4625 Industrial Road Fort Wayne, IN 46825
Phone: 260-471-1877 Fax: 260-471-8878

Go to website: www.bhriworldwide.com Will bring up the following page. On the page you will see a box for “Member Login” and box that is labeled “Guest Features” and “Documents and Forms.”
Guest Features
- Available Loads – allows the general public to view all available loads - Available Brokered Loads – allows other carriers to view loads that we can
broker. - Available Tractors – allows the general public to view where our available trucks
are located. These features anybody that visits the website can view information about what loads we have and where the trucks are. These features can be used by other carriers, drivers, and customers with out having a password. By being an agent you have access to more detailed information and have the ability to enter and dispatch loads yourself without calling central dispatch.

Documents and Forms Our truck and brokerage authority packets are located under this section. Also, we have a credit application form online to use when setting up credit. Member Login Type in “User ID” and “Password” and click on “Login.” This will take you to the “Homepage.” It is organized into four sections: Order Planning, Searches, Dispatch Reports, and Finance Reports.
Order Planning Order Planning consist of several icons relating to entering an order to dispatching a truck/carrier. Below an explanation of what each icon does. Orders: By clicking on “Orders” brings up all of the available orders in our system. This screen can be filtered many ways. You could query available loads, in progress loads, or delivered loads. I could query an individual load number or a group of loads using a specific date range. The order detail screen can be seen by clicking on the Order ID.

Orders Summary Page To filter the loads put in the criteria you want to filter by in the appropriate filed and click on the “Filter” button. For example: If you want to see all of agent 101’s loads only, put in 101 in the agent field and click on filter. To do another filter click the reset button to restore all available orders. Also, the screen can be used to view all in-progress moves by changing the status which by default is set to “Available” to “In-Progress” and clicking on filter. May be helpful in tracking your loads to be able to view all of your loads in progress.

Quick Order Entry: This screen is designed for quick posting of your available freight. This is the fastest way to post a load to the Buchanan system. No detailed information, such as shipper/consignee/customer name or price is required. Loads can be entered extremely quickly by entering just pick up/delivery cities along with the trailer type required and pick up date. You do have the option of putting in an all-inclusive price and comments such as -- No Tarp, Weight, Dimensions, etc—which I strongly recommend you enter as much information as possible and at least the following: tarps required, weight, dimensions, stop-offs, commodity.
Quick Order Entry Posting A Load: To use quick order entry to post a load the fields with a Red Asterisk have to be filled in for the record to be saved. After you enter in the city and state or zip along with the other required fields plus the optional fields that you want to fill out click on the “Validate Locations” button. A new page will come up asking you to choose a specific zip code if you put in a city and state for the shipper or consignee. Click on the zip code that you want for the shipper and consignee and click on save. If you get an order number at the top of the screen then the load posted fine. If not you will get an error message explaining what you did wrong. Just remember throughout the program if you enter a city and state you have to validate the location and then choose your specific zip code that you want, similar to PC Miler, then click on save.

Advanced Order Entry: This is the full-blown order entry screen. It will require a shipper city, consignee city, customer, trailer type, revenue code, and billing method which are the items marked with a “Red Asterisk.” After the city/state or zip code is entered click on the validate button. A box will show up with several zip code choices to choose from. Choose one of the zip codes by clicking on it. This action will highlight the zip code continue to fill in the rest of the fields.
Advanced Order Entry After you have typed in the Shipper/Consignee address along with early arrivals for each then choose the trailer type, revenue code. The revenue code that you will use depends on how you are moving the freight. Your choices are Potential Loads, Brokerage, Company Revenue, O/O Revenue, Our and Broker, and Possible Loads. Use the table below to choose the correct code.
1. Company Revenue – moved with company truck 2. O/O Revenue - moved with owner operator 3. Brokerage - brokered to outside carrier 4. Our or Broker - committed to load the can be brokered 5. Potential Load - not committed to load, but can get if have a truck 6. Possible Load - not committed to load, but can get if have a truck * If using 4,5, or 6 they have to be changed to 1,2, or 3 when dispatched.
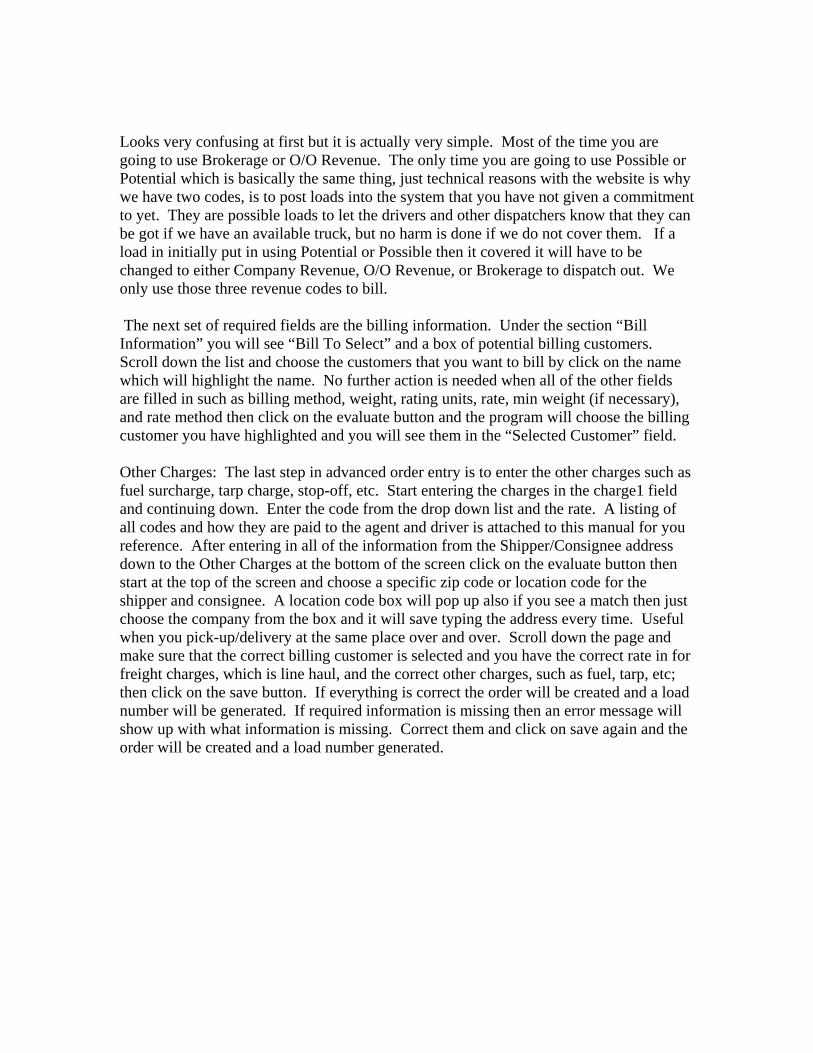
Looks very confusing at first but it is actually very simple. Most of the time you are going to use Brokerage or O/O Revenue. The only time you are going to use Possible or Potential which is basically the same thing, just technical reasons with the website is why we have two codes, is to post loads into the system that you have not given a commitment to yet. They are possible loads to let the drivers and other dispatchers know that they can be got if we have an available truck, but no harm is done if we do not cover them. If a load in initially put in using Potential or Possible then it covered it will have to be changed to either Company Revenue, O/O Revenue, or Brokerage to dispatch out. We only use those three revenue codes to bill. The next set of required fields are the billing information. Under the section “Bill Information” you will see “Bill To Select” and a box of potential billing customers. Scroll down the list and choose the customers that you want to bill by click on the name which will highlight the name. No further action is needed when all of the other fields are filled in such as billing method, weight, rating units, rate, min weight (if necessary), and rate method then click on the evaluate button and the program will choose the billing customer you have highlighted and you will see them in the “Selected Customer” field. Other Charges: The last step in advanced order entry is to enter the other charges such as fuel surcharge, tarp charge, stop-off, etc. Start entering the charges in the charge1 field and continuing down. Enter the code from the drop down list and the rate. A listing of all codes and how they are paid to the agent and driver is attached to this manual for you reference. After entering in all of the information from the Shipper/Consignee address down to the Other Charges at the bottom of the screen click on the evaluate button then start at the top of the screen and choose a specific zip code or location code for the shipper and consignee. A location code box will pop up also if you see a match then just choose the company from the box and it will save typing the address every time. Useful when you pick-up/delivery at the same place over and over. Scroll down the page and make sure that the correct billing customer is selected and you have the correct rate in for freight charges, which is line haul, and the correct other charges, such as fuel, tarp, etc; then click on the save button. If everything is correct the order will be created and a load number will be generated. If required information is missing then an error message will show up with what information is missing. Correct them and click on save again and the order will be created and a load number generated.

Tractor Dispatch: Allows user to dispatch a tractor, pre-assign an order, and create an empty move.
Dispatch Tractor To dispatch a tractor choose the tractor you want from the drop down list and click on “Look Up.” This will bring up a page with the tractor’s current load and position. The page will tell you weather the truck is on a load and whether or not one is pre-assigned. If no load is pre-assigned and the dispatch button at the bottom of the page is click on it will allow you to choose a load that is available to pre-assign the load. If the truck is in progress a button will appear to allow you to clear/stops. If the truck is empty a button will show up that will allow you to empty move the truck. Say a truck get empty in Grand Island, NE and deadheads to St. Louis, MO you could show this in the system by creating an empty move. It is not necessary that you create empty moves, but it is helpful if everybody knows where the drivers are and where they are going for the best chance of loading them. Dispatch Process: A tractor can be dispatched a couple of different ways in the Web-Dispatch program. It can be done like above going to the Dispatch Tractor button or by pre-assigning and dispatching from the order detail page. If wanting to dispatch a brokered load you have to do it from the order detail page. Pull up the order under the orders page and then click on the load number. Under the order detail page you will see a where it says assign. If you click on assign a listing of possible drivers will come up in

the order of who is closest. Also, you will see a button that says “Pre-Assign Carrier”. If you click on this button a box of approved carriers will come up. Choose a carrier and select save. The rest of the dispatch steps for a brokerage load are the same as a system truck dispatch. One exception is the load confirmation sheet is on the orders detail page can be printed out.
Dispatch Tractor

Order Planning: Order planning is designed to summarize the information from other areas of the system into one screen to give an overview of what loads and trucks are available. It is organized into two sections: available orders and tractors. This screen can be sorted many different ways. If there is an arrow at the top of the column it can be sorted. The order numbers, driver names, and agent numbers are all “links” that if clicked on will display another page with more detailed information.
Order Planning Orders can be pre-assigned using the order planning by clicking on the white circle next to the order number on the available orders screen and clicking on the white circle next to the truck that the load is to be assigned to and clicking on the “Pre-Assign” button at the top of the screen. The “Un-Assign” button removes the load from the driver.
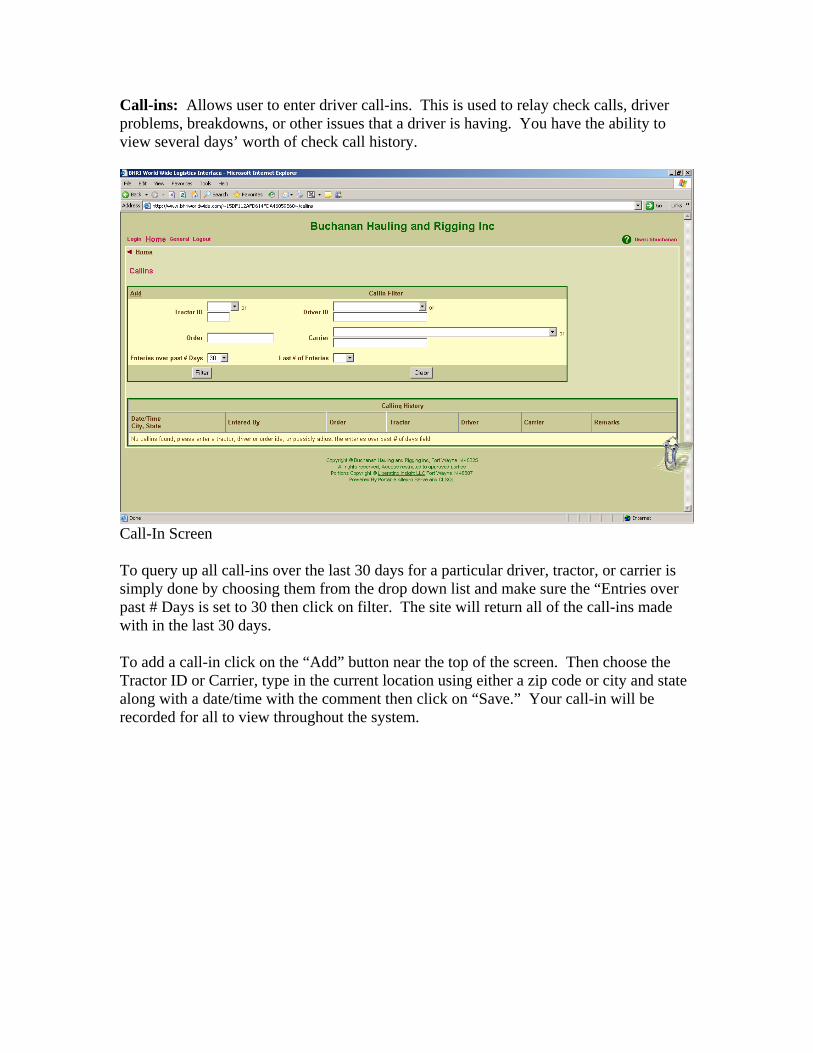
Call-ins: Allows user to enter driver call-ins. This is used to relay check calls, driver problems, breakdowns, or other issues that a driver is having. You have the ability to view several days’ worth of check call history.
Call-In Screen To query up all call-ins over the last 30 days for a particular driver, tractor, or carrier is simply done by choosing them from the drop down list and make sure the “Entries over past # Days is set to 30 then click on filter. The site will return all of the call-ins made with in the last 30 days. To add a call-in click on the “Add” button near the top of the screen. Then choose the Tractor ID or Carrier, type in the current location using either a zip code or city and state along with a date/time with the comment then click on “Save.” Your call-in will be recorded for all to view throughout the system.

Add A Location: This allows the user to add a location code. This will speed up order entry because all of the shipper/consignee name, address, and related contact information is saved into the system and can be recalled using a location code during the order entry process.
Add Location Screen To add a location code fill out the fields including the name, address, state, and zip code then click on save. For the location code name it self use 3-1-2. Meaning the first three letters of the company, first letter of the city, and the state code. If this code is used then use 2-2-2, if that code is used then 1-3-2. We encourage all to put in as much detailed information as possible especially if you will be frequenting this location like directions and hours of operation. For Example: Location Code: BUCFIN Buchanan Hauling & Rigging, Inc. 4625 Industrial Road Fort Wayne, IN 46825

Calculate Distance: Calculates mileages from zip to zip for any point in the United States or Canada. The system uses PC Miler 19 miles.
Calculate Distance To calculate distance between points enter the city and state or zip then click on look up. Choose the correct zip code from the list that will pop up then click on add. Repeat for the next city then click on “Calculate.” The mileages will be displayed like the above screen shot.

Move Trailer: Allows user to move a trailer that is not attached to a tractor. It is used to move trailers to the correct location when dispatching if trailer continuity is broken. The system tracks the movements of the all of trailers. For example: if we do a yard check and trailer number Q3345 is in the Fort Wayne yard and in the system the trailer is showing located at the Indianapolis, IN to correct this discrepancy in the system the move trailer function is used. Our system will not let you dispatch a truck originating form Fort Wayne with that trailer because it is not available in Fort Wayne if it is showing in Indianapolis. To move trailer find trailer in the drop down list enter city and state where you want to move it and click “Validate Location” then choose correct zip code. A “Re-Locate” button will then appear to move the trailer to the desired location.
Move Trailer Screen

Searches Loads For Tractor: Displays all system trucks in a list that can be sorted by truck number or by driver name. By clicking on the truck number all of the loads in the system will be matched up by distance to the trucks.
Load for a Tractor Tractor Near Location: Allow user to find available trucks in a particular location. Returns a report that returns all the trucks within the specified radius. To generate report put in city state or zip code then click on “Look Up”. Then choose the correct zip code and click “Save” a report will be generated similar to the screen shot below.
Tractor near Location

Tractor For An Order: This report is the opposite of the “Loads For Tractor” report. Show a listing of the available orders in the system. By clicking on the order number a report will be generated to show the trucks that are closest to the load.
Tractor for an Order

Dispatch Reports Tractors Near Location: Allow user to save a search location. This report is the same as the “Tractor Near Location” report in “Searches”, it allows you to save a particular city that you are looking for trucks in frequently. To save a location click on “Add” from the Tractor Near Location screen. This will bring up a screen that will ask for a city-state or zip code along with the name of the location. Enter in the city state information and then click on “Look Up.” The system will give you a list of available zip codes to choose then click on save. To run report click on the name of the location that you saved and report will generate automatically with out having to enter any data.
Tractor Near Location Loads Near Location: It allows the user to set up a fixed location that will return the loads in the system with-in a specified radius. Saving fixed locations use the same process as the “Tractor Near Location” report.
Loads Near Location

Load Pattern: This is used for informational purposes only. This report show the number of orders the originated out of each state and the number of orders that delivered in each state along with the average $/mile and length of haul. It gives you a brief overview of our most active freight lanes and the rates that we have historically billed. Finance Reports Top Customers: Report that shows your top customers and how much revenue you did with them in the specified date ranges that you chose. Monthly Revenue: Report that shows agent’s delivered revenue by month. Unsettled Order: Report that show all unpaid orders for agent. Outstanding Receivables: Shows agent outstanding receivables.

Top Tool Bar Across the top of all of the screens you will see the words “Login, Home, General, Logout.” By clicking on “Login” you go back to the page where you logged in. General will take you to a screen that contains information like a complete agent list, fuel surcharge rate, and personal setting information. Under the “Profile” icon your password can be changed. When exiting the program please use the “Logout” button.
General Information Screen
Agent List Screen

Fuel Surcharge Screen
Profile Screen

Load Cycle – Summary Of Web-Dispatch Below is a brief summary of what steps have to be completed by you the agent in the load cycle. This should help tie the whole process together. One complete load cycle is explained and accompanied with screen shots explaining how to do each step in our Web-dispatch system. This is a recap of the information already covered above. 1. Customer Credit Approval – fax or email credit request form to the credit department. Fill out credit application that is on the website under “Documents and Forms” or fax the paper form provided in your agent manual. Once credit is approved then proceed booking freight until the system notifies you of being over the credit limit then contact the credit department for increased credit. 2. Quick Order Entry – Complete basic order entry on Website. By entering your loads into the quick order entry screen they will automatically be posted to Buchanan’s internal load board, DAT, and Get Loaded.Com. 3. Truck Search BHRI – Do a search to find a truck/carrier on Buchanan’s Website and/or on DAT, GetLoaded.Com, etc. for a broker carrier. 4. Advanced Order Entry – Must complete order entry before dispatching out load with Buchanan truck or outside carrier. The order must contain the customer/rate breakdown/shipper/consignee/comments/etc. 5. Rate Confirmation – Get rate confirmation from customer. You can generate one for the customer to sign yourself by going to the order and clicking on “Rate Confirmation.” All of the information is automatically filled in off of your order entry, thus only requiring a signature by your customer. Also, get a signed “Load Confirmation” from carrier if brokering to outside carrier, this can be generated from the same page as the rate confirmation for the customer. 6. Pre – Assign – Assign Buchanan truck or carrier in Web-Dispatch. 7. Dispatch – Advance load through the computer system. 8. Forward Rate/Load Confirmations – before load delivers fax/email customer and broker carrier confirmation to home office rates line, Fax: 260-918-4443 or [email protected].

2. Quick Order Entry Load Entry – A couple of important things to remember when entering in City, State, Zip information for Pickup/Delivery locations. Enter the city then a space then the state code or zip code if you know it for both the pickup and delivery location. After filling in either the zip code or city-state hit the “Validate Locations” button. Several zip codes will come up if you typed in a city state combinations for you to choose. Click on a zip code for the pickup location and one for the delivery location then fill in the other fields and hit the “Save” button. A load number will be generated and displayed on your screen when the order has been saved/enter into the system. Below are some screen shot of the process for entering a simple “Quick Order Entry” load.
Quick Order Entry Screen

Quick Order Entry Screen Quick Order Entry – enter required information then click on “Validate Locations.” This will return the above boxes that say in red “Select Pickup Locations” and “Select Delivery Locations.” Choose the correct zip code for each and click on the “Save” button to post the load.
Quick Order Entry Screen Quick Order Entry – after the correct zip code is validated and the order is saved a load number is generated in red near the top left corner of the page along with the following message, “Your order was saved with number: 107####.”

Order Detail Screen Orders Page – Detailed information can be viewed by clicking on the order number in red on the previous image or click on the “Orders” icon from the homepage and query up your load and then click on the order number. To edit an order to add more information click on the “Edit” button near the top right corner of order detail page. This will take you to the “Advanced Order Entry” page where you can fill out all required information to dispatch an order.

Advanced Order Entry Screen 4. Advanced Order Entry – we have put a load in the “Quick Order Entry “ screen the next thing to do after we decide who is going to haul the load is to fill in the rest of the information required to dispatch out a truck. By clicking on the edit button on the order detail page (previous image) it will take you to the above image. Fill in the complete address along with other required fields that indicated with a “Red Asterisks.” After filling in the required information Shipper Address, Consignee Address, Customer, Revenue Code, Trailer Type, Billing Method, Rate, Accessorial Rates, etc. then hit “Evaluate” then chose the correct location code or corresponding zip codes then click on save.

Advanced Order Entry Screen
Order Detail Screen Advanced Order Entry – take notice that the order detail page now shows the complete address of the shipper/consignee along with all of the other information put in by the “Advanced Order Entry”

Edit Stop Screen Extra Stop – to add an extra stop us the stop/edit button off of the orders details page. Located under the stops/stop notes section on the right side of the page.
Insert Stop Screen To insert stop choose the stop type from the drop down list. Either a pick-up or delivery stop and fill-in the other fields then click on the “Validate Location” button, then choose the validated zip codes and click on the “Save” button.

Insert Stop Screen
Order Detail Page After the complete order entry has been done click on the “Rate Confirmation” button on the order detail page, the page above, to print a rate confirmation to give to you customer.

Rate Confirmation Screen Customer Rate Confirmation – once the order in the system a Rate Confirmation Agreement can be generated by clicking on the “Rate Confirmation” button near the top center of the order detail page. All of the load information along with the rate being charged is automatically filled in from the orders page. Please fax or email a copy to the customer for his/her signature authorizing price. Rate confirmations must accompany all loads unless a contract is on file. We will accept an email or customer generated rate confirmations also.
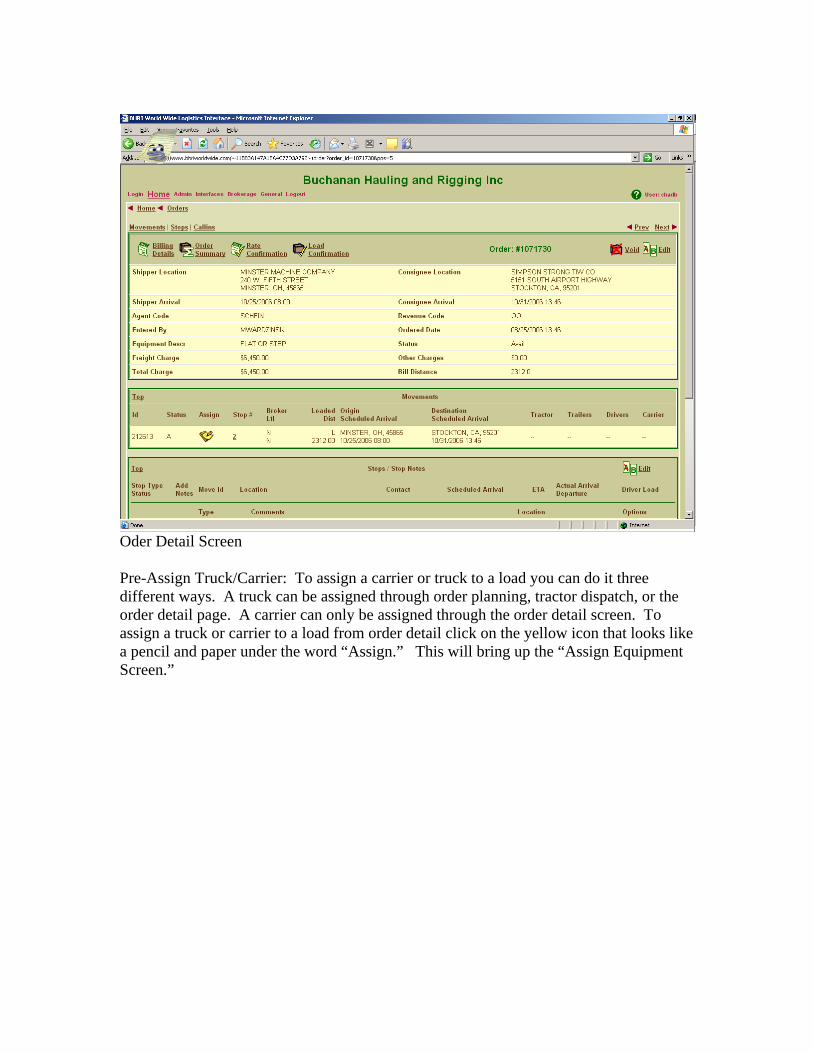
Oder Detail Screen Pre-Assign Truck/Carrier: To assign a carrier or truck to a load you can do it three different ways. A truck can be assigned through order planning, tractor dispatch, or the order detail page. A carrier can only be assigned through the order detail screen. To assign a truck or carrier to a load from order detail click on the yellow icon that looks like a pencil and paper under the word “Assign.” This will bring up the “Assign Equipment Screen.”

Assign Equipment Screen Pre-Assign Screen – to put a truck on a load or what we call pre-assigning is done through the order details screen by clicking on the assign button, which will take you the above screen. From here all of the closest trucks are listed and click on assign to assign a truck or directly type in the Tractor ID, Driver 1, and input the trailer if your truck does not show up.

Order Detail Screen Order Detail Page - Pre-Assigned order indicated by the eraser on the assign button. To un-assign a load click on the eraser.
Assign Equipment Screen Pre-Assign Carrier: To assign a carrier click on “Pre-Assign Carrier” and the above screen comes up. Choose the carrier from the list and fill out the fields and click on the “Save” button to assign.
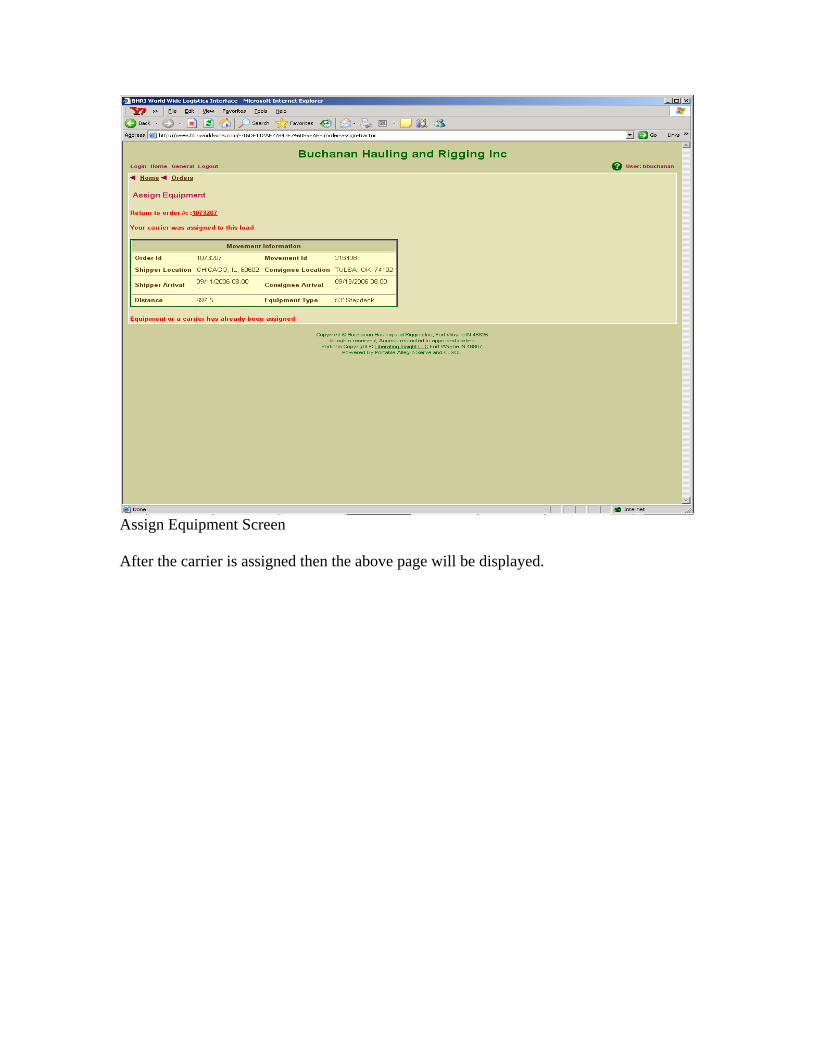
Assign Equipment Screen After the carrier is assigned then the above page will be displayed.

Tractor Dispatch Screen After entering all of the load information you will have to “Pre-Assign” a truck or carrier to the load so it can be dispatched. A load can be “Pre-Assigned” three ways: through the order detail page, the order-planning page, or the “Dispatch Tractor” page. Through the dispatch tractor page a truck can only be assigned a load if empty already. Through the order detail page a truck can always be pre-assigned just like the order planning screen. Once the order is pre-assigned to the truck/carrier the load has to be dispatched out. The load can be dispatched out through the “Dispatch Tractor “ screen by querying up the truck number and then clicking on the “Clear Stop” under the stops part of the screen. This will bring up another page.

Stop Screen To clear a stop fill in the actual arrival time and actual departure times and click on the “Save” button.
Stop Screen

Order Detail Screen Notice that after the stop is cleared that a the order detail page icon under the Stop/Stop Note section changes form Clear Stop to Cancel Cleared. This is if you make a mistake and want to reverse the stop that you cleared. If you want to clear a stop or dispatch the load through you can also do it straight from the order detail screen by hitting on the Clear Stop button and put in the times like on the previous page.
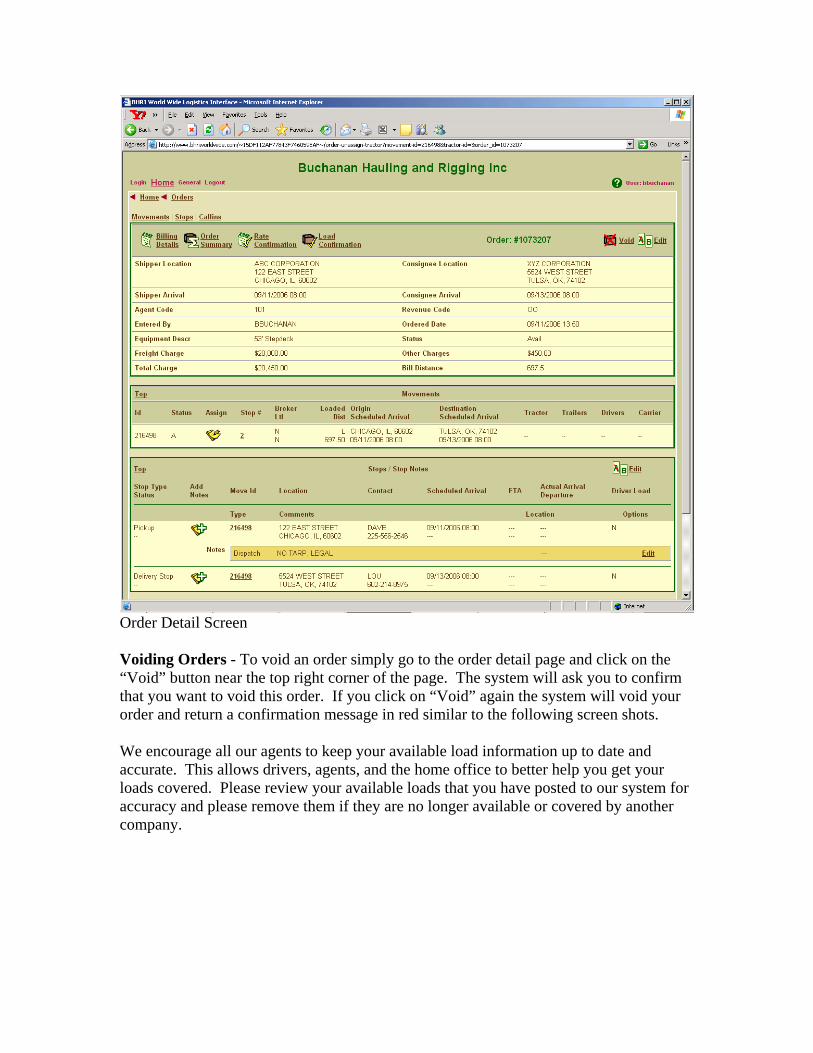
Order Detail Screen Voiding Orders - To void an order simply go to the order detail page and click on the “Void” button near the top right corner of the page. The system will ask you to confirm that you want to void this order. If you click on “Void” again the system will void your order and return a confirmation message in red similar to the following screen shots. We encourage all our agents to keep your available load information up to date and accurate. This allows drivers, agents, and the home office to better help you get your loads covered. Please review your available loads that you have posted to our system for accuracy and please remove them if they are no longer available or covered by another company.

Void Screen
Void Screen

.


