Beginner Welding information Welding types Zena welder The Makowicki Spool Gun, Custom made by Wayne Makowicki Wayne's home made welder SMAW Shielded Metal Arc Welding This is best known as Stick welding this is done with AC or DC. Constant Current welding machines are used in this type of welding. GTAW Gas Tungsten Arc Welding (TIG) AC or DC constant current is used. This uses a shielding gas with tungsten electrode, if a filler rod is used it is added much like Oxygen fuel welding. TIG produces high quality welds on Stainless Steel, Aluminum and many other metals. GMAW Gas Metal Arc Welding (MIG) DC Constant Volt only. This method uses a shielding gas around wire fed filler rod. MIG is good for thin metals and fast easy welds. This will use DCEP or reverse polarity. FCAW Flux Core Arc Welding is very much like MIG however shielding gas is not always used. The wire is flux filled and provides for shielding and molten metal protection, very easy to use. This will use DCEN or straight polarity. OxyFuel This method of welding dates back many years today it is not used nearly as much in the past. Slow weld speeds and broad heat input to the base metal make it difficult for some welds. Brazing is also done with OxyFuel Link to metal types and gauge guide There are many other types of welding procedures but this covers the most common non automated types. Machine Types (Volts = Current x Resistance) Constant current machines maintain a specific amp or amp range and the machine will hold that amp or range. If the welder changes the distance of the electrode to base metal the welding machine will change the volts to maintain an arc. This distance of electrode to work piece will change the arc length. Constant volt machines try to keep the volts or arc length at a constant while the amps will very to maintain wire burn off. This type of machine is used in MIG and Flux Core welding. Wire speed and stick out will have a large impact on weld http://www.motherearthrecycling.net/welding/welding.htm (1 of 2) [2/18/2004 8:39:16 PM]
Transcript
Beginner Welding information
Welding types
Zena welder
The Makowicki Spool Gun, Custom made by Wayne Makowicki
Wayne's home made welder
SMAW Shielded Metal Arc Welding This is best known as Stick welding this is done with AC or DC. Constant Current welding machines are used in this type of welding.
GTAW Gas Tungsten Arc Welding (TIG) AC or DC constant current is used. This uses a shielding gas with tungsten electrode, if a filler rod is used it is added much like Oxygen fuel welding. TIG produces high quality welds on Stainless Steel, Aluminum and many other metals.
GMAW Gas Metal Arc Welding (MIG) DC Constant Volt only. This method uses a shielding gas around wire fed filler rod. MIG is good for thin metals and fast easy welds. This will use DCEP or reverse polarity.
FCAW Flux Core Arc Welding is very much like MIG however shielding gas is not always used. The wire is flux filled and provides for shielding and molten metal protection, very easy to use. This will use DCEN or straight polarity.
OxyFuel This method of welding dates back many years today it is not used nearly as much in the past. Slow weld speeds and broad heat input to the base metal make it difficult for some welds. Brazing is also done with OxyFuel
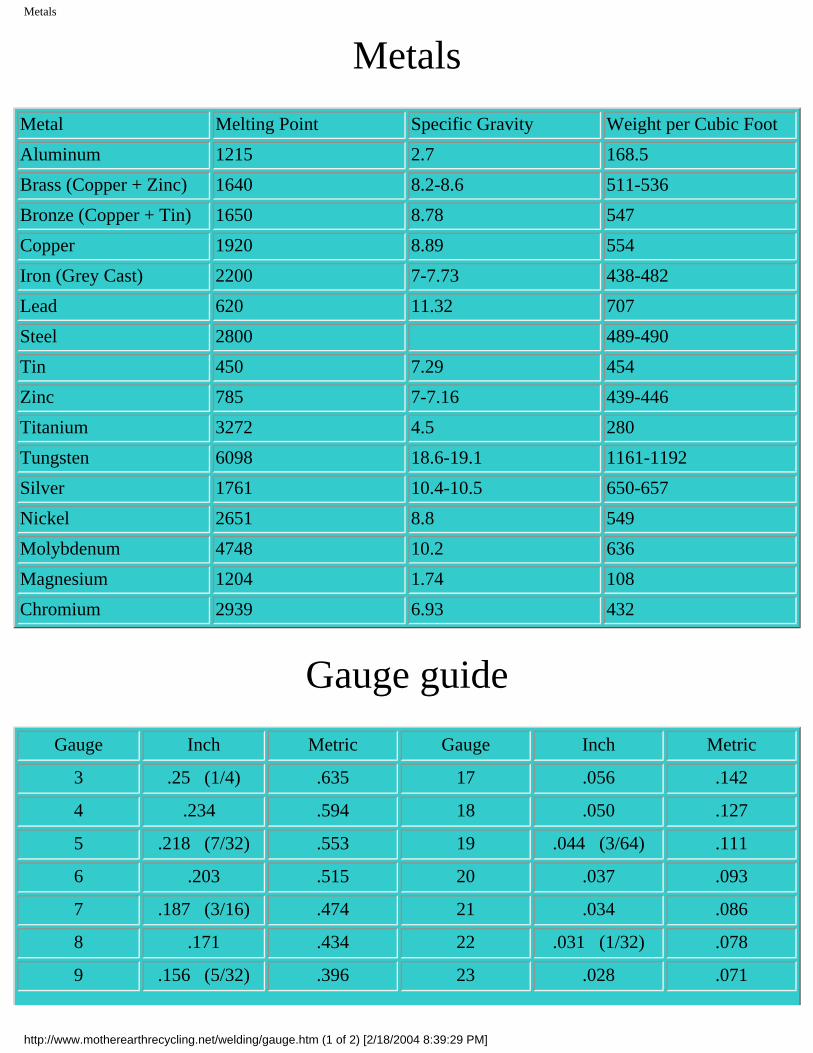
Link to metal types and gauge guide
There are many other types of welding procedures but this covers the most common non automated types.
Machine Types (Volts = Current x Resistance)
Constant current machines maintain a specific amp or amp range and the machine will hold that amp or range. If the welder changes the distance of the electrode to base metal the welding machine will change the volts to maintain an arc. This distance of electrode to work piece will change the arc length.
Constant volt machines try to keep the volts or arc length at a constant while the amps will very to maintain wire burn off. This type of machine is used in MIG and Flux Core welding. Wire speed and stick out will have a large impact on weld
http://www.motherearthrecycling.net/welding/welding.htm (1 of 2) [2/18/2004 8:39:16 PM]
With DC welding you can change polarity depending on your welding needs.
DCEN Direct Current Electrode Negative In this welding process the electrode (stick, wire or what ever) is negative. In this process electrons flow from negative to positive, or from electrode to base metal. This is know as straight polarity.
DCEP Direct Current Electrode Positive In this process the electrode is positive and the base metal is negative. Here the electrons flow from the base metal negative to the electrode positive. This is known as reverse polarity.
AC welding doesn't have the Polarity concerns that DC has.
http://www.motherearthrecycling.net/welding/welding.htm (2 of 2) [2/18/2004 8:39:16 PM]
Zena Welder
Zena Welder
Beginners guide to welding
My home made Spool gun
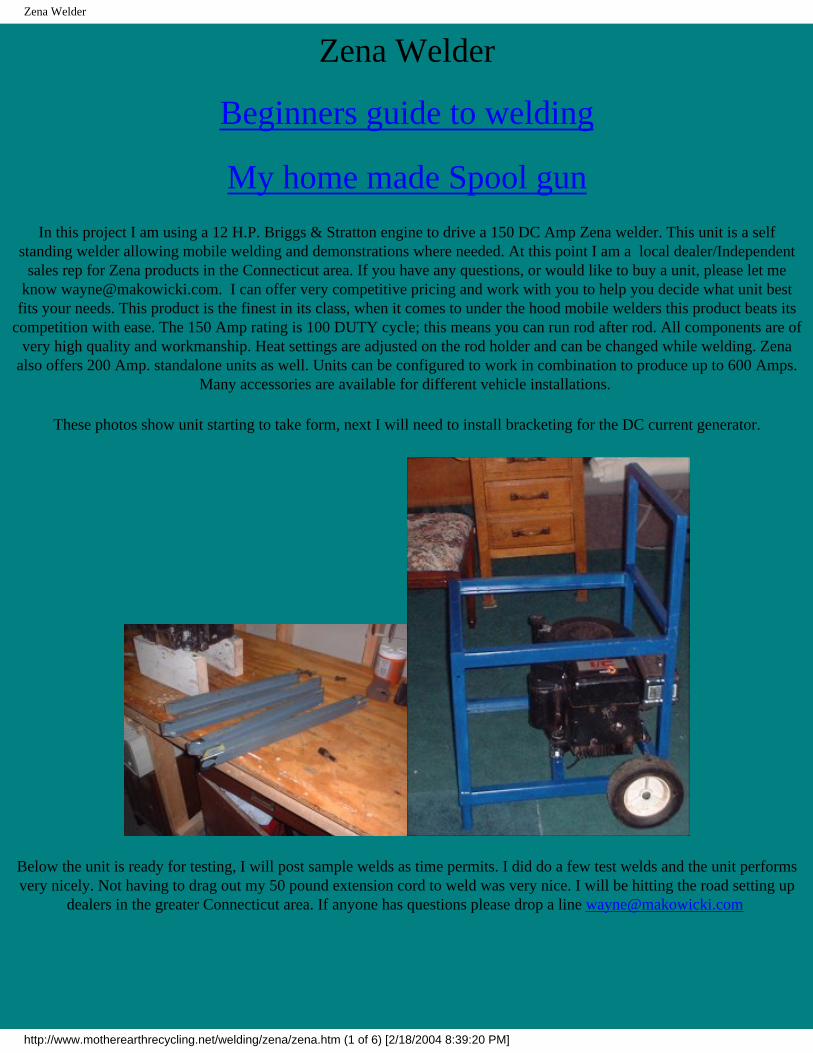
In this project I am using a 12 H.P. Briggs & Stratton engine to drive a 150 DC Amp Zena welder. This unit is a self standing welder allowing mobile welding and demonstrations where needed. At this point I am a local dealer/Independent
sales rep for Zena products in the Connecticut area. If you have any questions, or would like to buy a unit, please let me know [email protected]. I can offer very competitive pricing and work with you to help you decide what unit best
fits your needs. This product is the finest in its class, when it comes to under the hood mobile welders this product beats its competition with ease. The 150 Amp rating is 100 DUTY cycle; this means you can run rod after rod. All components are of
very high quality and workmanship. Heat settings are adjusted on the rod holder and can be changed while welding. Zena also offers 200 Amp. standalone units as well. Units can be configured to work in combination to produce up to 600 Amps.
Many accessories are available for different vehicle installations.
These photos show unit starting to take form, next I will need to install bracketing for the DC current generator.
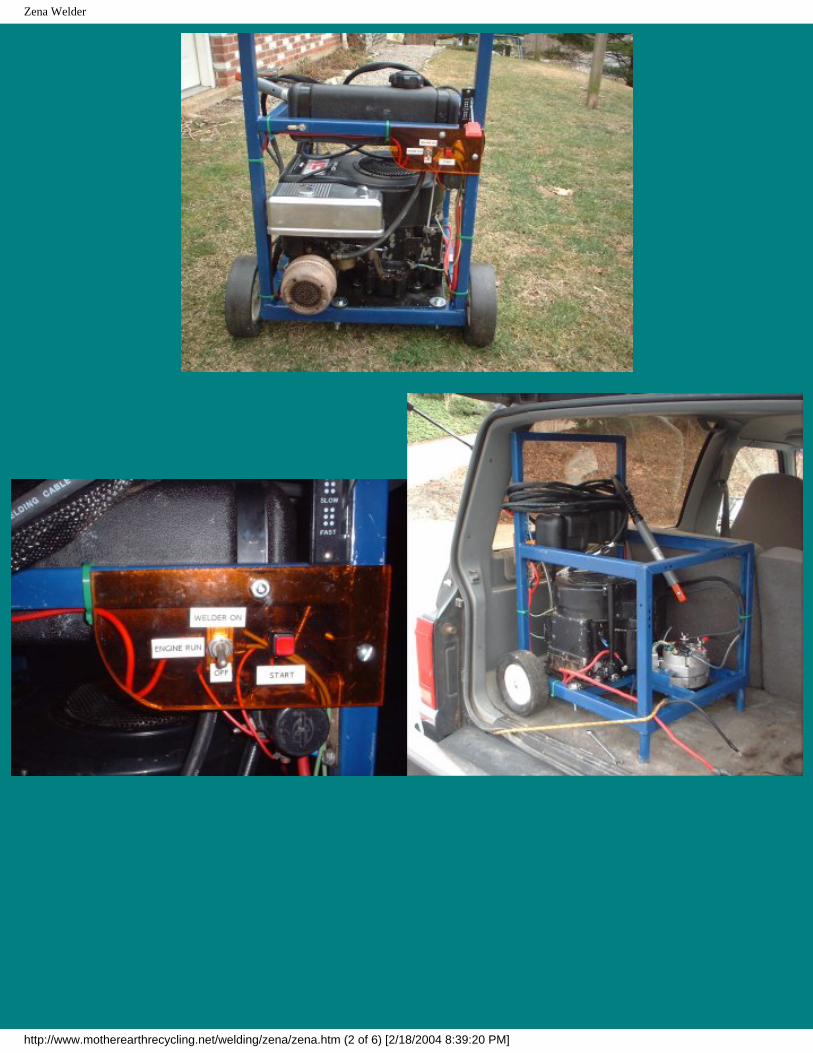
Below the unit is ready for testing, I will post sample welds as time permits. I did do a few test welds and the unit performs very nicely. Not having to drag out my 50 pound extension cord to weld was very nice. I will be hitting the road setting up
dealers in the greater Connecticut area. If anyone has questions please drop a line [email protected]
http://www.motherearthrecycling.net/welding/zena/zena.htm (1 of 6) [2/18/2004 8:39:20 PM]
http://www.motherearthrecycling.net/welding/zena/zena.htm (2 of 6) [2/18/2004 8:39:20 PM]
Zena Welder
Here are the very first welds. Please keep in mind that I have only done MIG welding in the past, using Oxyfuel welding/brazing. Stick is a bit different than MIG but it seems to work well, no big worries of wind. I had used a Lincoln 225/125 with about 15 rods and sold it while I was making this unit. In my opinion, it welds as well as, or better than, the
Lincoln. It does workout the 12 HP. If I come across a bigger motor, I will set that up. I think the motor is not letting me get the maximum welding current at full settings. It bogs it down more than I was hoping for. This damn thing can burn rod after rod for hours and it just keeps going. Anyone know the best way to get a 12 HP motor to make a little less noise? I
could burn rod until the late hours.
http://www.motherearthrecycling.net/welding/zena/zena.htm (3 of 6) [2/18/2004 8:39:20 PM]
Zena Welder
http://www.motherearthrecycling.net/welding/zena/zena.htm (4 of 6) [2/18/2004 8:39:20 PM]
Zena Welder
http://www.motherearthrecycling.net/welding/zena/zena.htm (5 of 6) [2/18/2004 8:39:20 PM]
The above unit is the newest version this model uses a separate wire feed speed, I also put the gas switch in the gun handle. This unit resulted from using an old cordless drill, and removing the battery to accommodate the gas valve and current wire. This drill was a simple on or off trigger type. I put a speed control about 15 feet down the wire. The wire drive motor uses a
cordless drill battery, which gives good steady speed even as load changes on welding machine. I also can use a constant current machine. The high open voltage has no effect on the wire drive motor. My next goal is to find a much smaller right
angle which will greatly reduce the size of gun. All works well.
Below photos and info was my first drill configuration. The spool feeder itself can be fit from 1 drill to another in no time at all. In some places I like having the speed control in the trigger. The above setup doesn't use this, but the below does.
http://www.motherearthrecycling.net/welding/spool.htm (1 of 5) [2/18/2004 8:39:22 PM]
Cordless spool gun attachment
My home built cordless drill spool gun attachment. This is a design that I have brought from my mind to a fully working prototype. At this point I have made many very successful welds, and am refining the controls and feel after each test. I will be using both trigger control and speed and dial controls to allow for different welding needs. My next gun will have increased duty cycle and be smaller. This picture shows the attachment with no welding head installed. This was designed for a very quick head change and wire change. With this design you can remove head and wire as one piece, which allows for no wire lose and no need to feed wire up through the contact tip. I can swap wire, contact tip and nozzle as one piece and I have a retaining device to keep wire from un rolling.
In this photo you can see the welding head in place with top cover off. The wire still has not been loaded into the tip. You can also see the attaching bracket for the drill. I am working to reduce the size of this piece.
http://www.motherearthrecycling.net/welding/spool.htm (2 of 5) [2/18/2004 8:39:22 PM]
Cordless spool gun attachment
In this photo roll of wire is installed and fed through the contact tip. The quick release on the wire drives makes change-overs a snap.
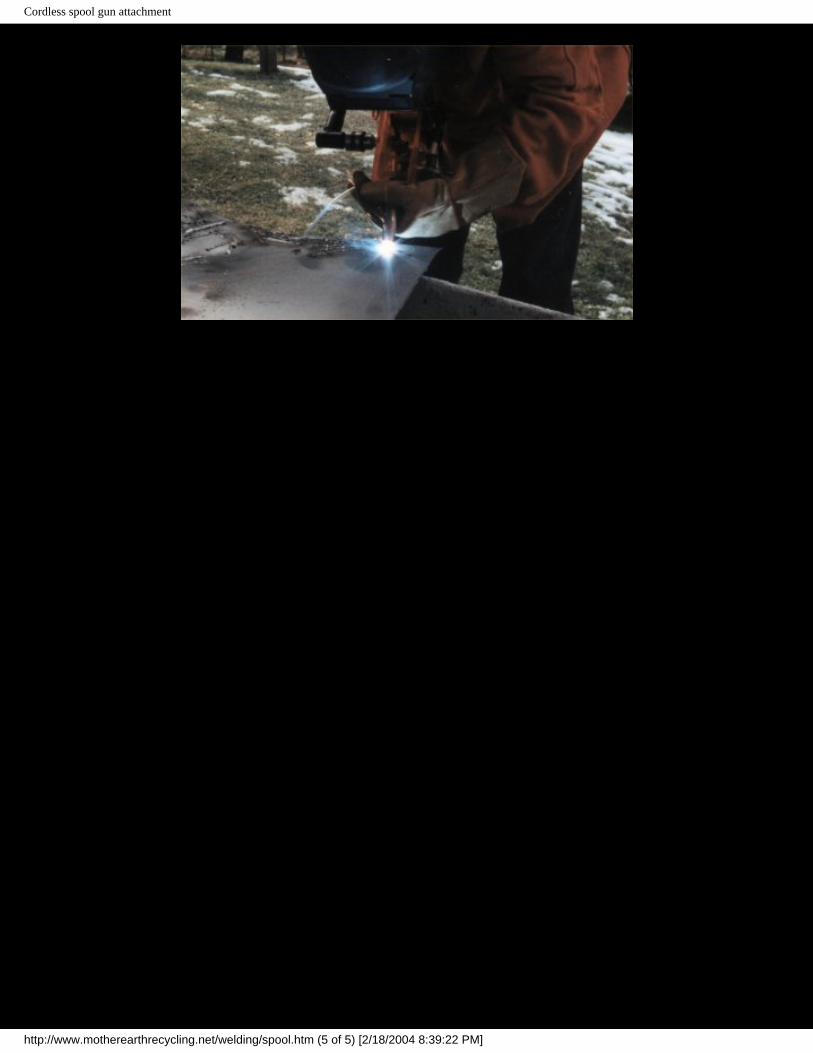
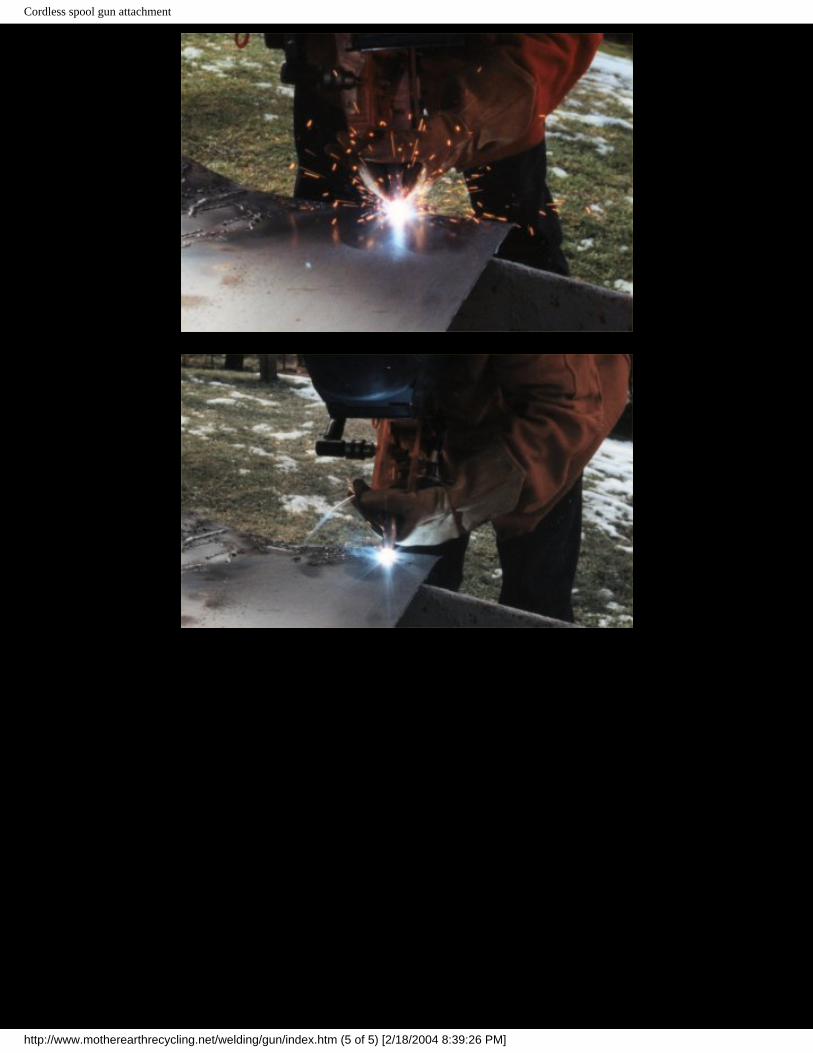
Here we are ready to go, just hook up power, gas and weld away. So far I have used a small 220 volt Lincoln Weld Pac, a
http://www.motherearthrecycling.net/welding/spool.htm (3 of 5) [2/18/2004 8:39:22 PM]
Cordless spool gun attachment
115 volt Chicago electric unit, 2 12 volt deep cycle batteries wired in series and a constant current DC stick welder. The first 3 were a breeze, the high open volt on the constant current machine was hard to start clean but I never expected it to work as well on a machine of that type anyway. I will try shortening the contact tip by 1/4" up into the cup and see what happens when time allows. I had very long welding times on the deep cycles, at least 45 minutes -- I simply ran out of wire. The trigger control worked well with stitching thin metal but takes a bit of getting used to.
This project is more for self enjoyment than anything but I have learned a bit and had great conversations with others interested in welding and handy devices. Remember, this thing can go any where you can get with your car, 4x4 or what ever can carry two 30 pound batteries, so for far off welding needs its great.
Here's some answers to common questions I've been asked
The material I used (the plastic) is Acrylic plastic Plexiglas. My father has a bunch of the stuff from when he was in college, he's 70 now so peeling the paper off was a real pain.
As for cutting/forming, I used a radial arm saw and a drill. This stuff is very easy to work with. I used a propane torch to heat and bend. This also works very good, once it gets up to temperature, it forms smoothly. As for gluing, I have found two different glues that work well. I used a two part epoxy plastic welder, but I've also seen a plastic glue specific to the material for consumer purchase. I think it is the same stuff they use on kitchen counter tops.
All the other parts are just from the hardware store or welding store. The torch I made out of 1/2" soft copper and rolled down on the contact tip end, I then threaded and put in a standard Tweco diffuser ($3.75) By doing that, the contact tips and nozzles are all standard. The drive roller is right out of a Lincoln weld pack ($4.50) and the tension bearing is out of a Lincoln weld pack also. I needed to buy a 5/16" ID bearing to hold the 5/16" shaft that drives the drive wheel ($10.00) I now have 2' 9" left over on the shaft material. I used some brass inserts to provided threads to hold the cover and bracket which connects it to the drill. The "front head", as I call it, comes out as one piece making torch changes easy, I have three different lengths I have used. I think I will make a head that uses a Tweco torch tube on the next one. I am also looking at a much smaller right angle so the whole gun can sit right on the drill. The real nice thing is that all the changes I have made just fit right onto the main piece so these changes are very easy. Drop a e-mail if you have any questions or ideas
http://www.motherearthrecycling.net/welding/spool.htm (5 of 5) [2/18/2004 8:39:22 PM]
Wayne
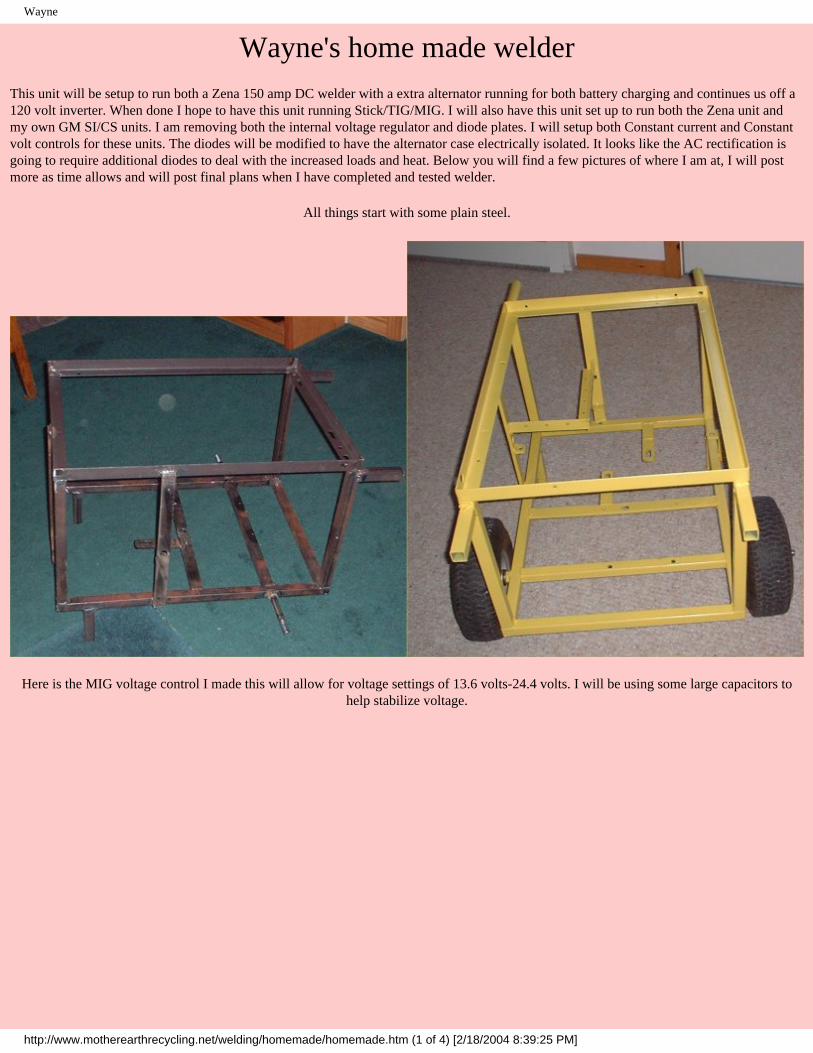
Wayne's home made welderThis unit will be setup to run both a Zena 150 amp DC welder with a extra alternator running for both battery charging and continues us off a 120 volt inverter. When done I hope to have this unit running Stick/TIG/MIG. I will also have this unit set up to run both the Zena unit and my own GM SI/CS units. I am removing both the internal voltage regulator and diode plates. I will setup both Constant current and Constant volt controls for these units. The diodes will be modified to have the alternator case electrically isolated. It looks like the AC rectification is going to require additional diodes to deal with the increased loads and heat. Below you will find a few pictures of where I am at, I will post more as time allows and will post final plans when I have completed and tested welder.
All things start with some plain steel.
Here is the MIG voltage control I made this will allow for voltage settings of 13.6 volts-24.4 volts. I will be using some large capacitors to help stabilize voltage.
http://www.motherearthrecycling.net/welding/homemade/homemade.htm (1 of 4) [2/18/2004 8:39:25 PM]
Wayne
The picture to the left is the box I started with, this was an old movie theater camera control box. I will be able to use some of the parts for the welder controller. With the light controls I will be able to have both Pre and Post gas and water flow control. The large Caps are for the CV setting this will help to stabilize the volts. The picture on the right show the control box beginning to grow. If you look to the upper left of
control box you have Main on/off, 120 volt inverter on/off, Process MIG/Stick, TIG, engine start, engine on/off. The MIG controls are on the panel below.
This next photo shows unit hocked only up to the Zena alternator, I will soon use the new frame I made above and have multiple alternators. I have both remote and panel controls for MIG gun and if I needed a set voltage charge. I also have both water and gas flow valves in the lower
left these are tripped by the remote control plug ( for MIG/TIG)
http://www.motherearthrecycling.net/welding/homemade/homemade.htm (2 of 4) [2/18/2004 8:39:25 PM]
Wayne
http://www.motherearthrecycling.net/welding/homemade/homemade.htm (3 of 4) [2/18/2004 8:39:25 PM]
Wayne
At this point I have only burned some 1/8 7014 rod and was happy with the bead. I hope to try the MIG setup in a week or so. After that I want to try the TIG control. I will have to scratch start for now. I will have to build or by a high freq start. Please let me know what you think.
Check out my home made spool gun.
As always if you try this yourself and get burned don't come to me.
The above unit is the newest version this model uses a separate wire feed speed, I also put the gas switch in the gun handle. This unit required me using an old cordless drill and removing the battery to accommodate the gas valve and current wire.
This drill was a simple on or off trigger type. I put a speed control down the wire about 15 feet. The wire drive motor uses a cordless drill battery, this gives good steady speed even as load changes on welding machine. I also can use a constant
current machine, the high open voltage has no effect on the wire drive motor. My next goal is to find a much smaller right angle which will greatly reduce the size of gun. All works well.
Bellow photos and info was my first drill configuration. The spool feeder itself can be fit from 1 drill to another in no time at all. In some places I like having the speed control in the trigger. The above setup doesn't use this but the below does.
http://www.motherearthrecycling.net/welding/gun/index.htm (1 of 5) [2/18/2004 8:39:26 PM]
Cordless spool gun attachment
My home built cordless drill spool gun attachment. This is a design that I have brought from my mind to a fully working prototype. At this point I have made many very successful welds, and am refining the controls and feel after each test. I will be using both trigger control speed and dial controls to allow for different welding needs. My next gun will have increased duty cycle and be smaller. This picture shows the attachment with no welding head installed, the why this was designed was for a very quick head change and wire change. With this design you can remove head and wire as one piece this allows for no wire lose and no need to feed wire up through the contact tip. I can swap wire, contact tip and nozzle as one piece and I have a retaining device to keep wire from un rolling.
In this photo you can see the welding head in place with top cover off. The wire still has not been loaded into the tip. You can also see the attaching bracket for the drill. I am working to reduce the size of this piece.
http://www.motherearthrecycling.net/welding/gun/index.htm (2 of 5) [2/18/2004 8:39:26 PM]
Cordless spool gun attachment
In this photo role of wire is installed and fed through the contact tip. The quick release on the wire drives makes change over's a snap.
http://www.motherearthrecycling.net/welding/gun/index.htm (3 of 5) [2/18/2004 8:39:26 PM]
Cordless spool gun attachment
Here we are ready to go, just hook up power and gas and weld away. So far I have used a small 220 volt Lincoln Weld Pac, a 115 volt Chicago electric unit, 2 12 volt deep cycle batteries wired in series and a constant current DC stick welder. the first 3 were a breeze, the high open volt on the constant current machine was hard to start clean but I never expected it to work well on a machine of that type anyway. I will try shorting the contact tip by 1/4" up into the cup and see what happens when time allows. I had very long welding times on the deep cycles, at least 45 minutes I just ran out of wire. The trigger control worked well with stitching thin metal but takes a bit of getting use to. I have a smaller setup finished, once I get my digital camera back I will post pictures. I will also setup a link to videos of the welder in action. This project is more for self enjoyment than anything but I have learned a bit and had great conversations with others interested in welding and handy devices. Remember this thing can go any where you can get your car, 4x4 or what ever can carry 2 30 pound batteries, so for far off welding needs its great.
Here's some answers to common questions I've been asked
The material I used (the plastic) is Acrylic plastic Plexiglas my father has a bunch of the stuff from when he was in college, he's 70 now so peeling the paper off was a real pain.
As for cutting/forming I used a radial arm saw and a drill, this stuff is very easy to work with. I used a propane torch to heat and bend. This also works very good, once it gets up to temp it forms smoothly. As for gluing they do sell 2 different glues that work well. I used a 2 part epoxy plastic welder, they also sell a plastic glue specific to the material. I think it is the same stuff they use on kitchen counter tops.
All the other parts are just from the hardware store or welding store. The torch I made out of 1/2" soft copper and rolled down on the contact tip end, I then threaded and put in a standard Tweco diffuser ($3.75) by doing that, the contact tips and nozzles are all standard. The drive roller is right out of a Lincoln weld pack ($4.50) and the tension bearing is out of a Lincoln weld pack also. I needed to buy a 5/16" ID bearing to hold the 5/16" shaft that drives the drive wheel ($10.00) I now have 2' 9" left over on the shaft material. I used some brass inserts to provided threads to hold cover and bracket that connects it to the drill. The front head as I call it comes out as one piece making torch changes easy, I have 3 different lengths I have used. I think I will make a head that uses a Tweco torch tube on the next one. I am also looking at a much smaller right angle so the whole gun can sit right on the drill. The real nice thing is that all the changes I have made just fit right onto the main piece so these changes are very easy. Drop a e-mail if you have any questions or ideas
http://www.motherearthrecycling.net/welding/gun/index.htm (5 of 5) [2/18/2004 8:39:26 PM]
GTAW
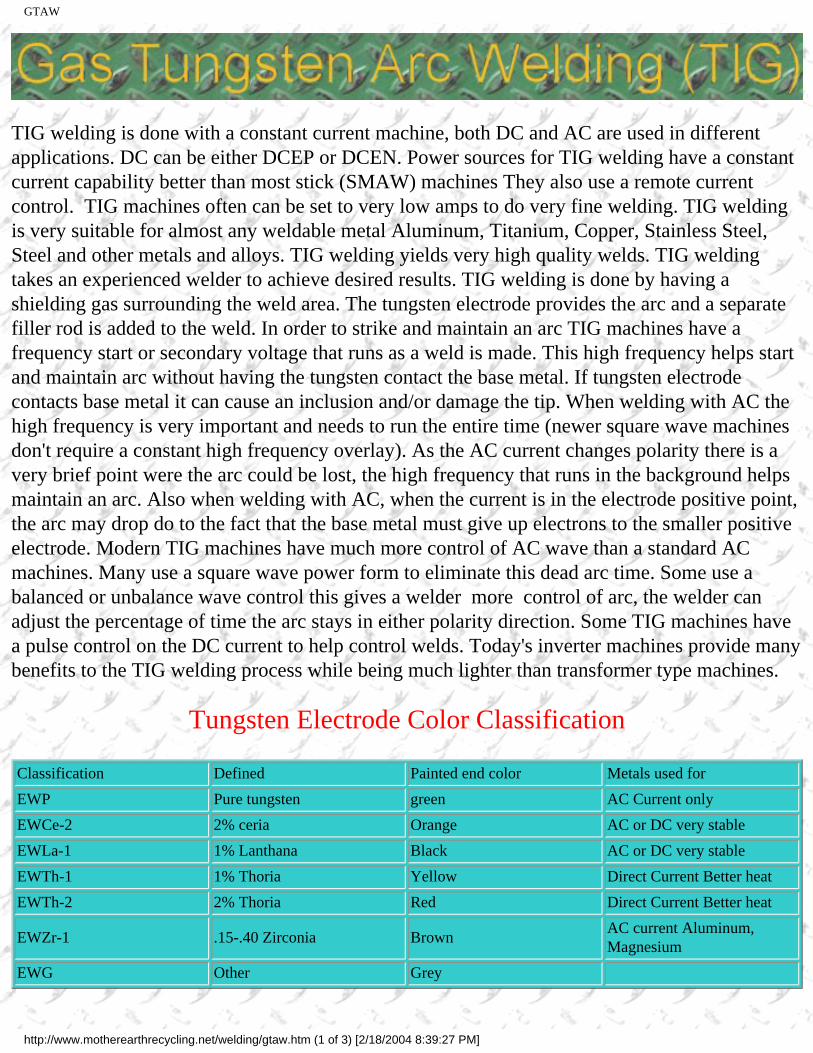
TIG welding is done with a constant current machine, both DC and AC are used in different applications. DC can be either DCEP or DCEN. Power sources for TIG welding have a constant current capability better than most stick (SMAW) machines They also use a remote current control. TIG machines often can be set to very low amps to do very fine welding. TIG welding is very suitable for almost any weldable metal Aluminum, Titanium, Copper, Stainless Steel, Steel and other metals and alloys. TIG welding yields very high quality welds. TIG welding takes an experienced welder to achieve desired results. TIG welding is done by having a shielding gas surrounding the weld area. The tungsten electrode provides the arc and a separate filler rod is added to the weld. In order to strike and maintain an arc TIG machines have a frequency start or secondary voltage that runs as a weld is made. This high frequency helps start and maintain arc without having the tungsten contact the base metal. If tungsten electrode contacts base metal it can cause an inclusion and/or damage the tip. When welding with AC the high frequency is very important and needs to run the entire time (newer square wave machines don't require a constant high frequency overlay). As the AC current changes polarity there is a very brief point were the arc could be lost, the high frequency that runs in the background helps maintain an arc. Also when welding with AC, when the current is in the electrode positive point, the arc may drop do to the fact that the base metal must give up electrons to the smaller positive electrode. Modern TIG machines have much more control of AC wave than a standard AC machines. Many use a square wave power form to eliminate this dead arc time. Some use a balanced or unbalance wave control this gives a welder more control of arc, the welder can adjust the percentage of time the arc stays in either polarity direction. Some TIG machines have a pulse control on the DC current to help control welds. Today's inverter machines provide many benefits to the TIG welding process while being much lighter than transformer type machines.
Tungsten Electrode Color Classification
Classification Defined Painted end color Metals used for
EWP Pure tungsten green AC Current only
EWCe-2 2% ceria Orange AC or DC very stable
EWLa-1 1% Lanthana Black AC or DC very stable
EWTh-1 1% Thoria Yellow Direct Current Better heat
EWTh-2 2% Thoria Red Direct Current Better heat
EWZr-1 .15-.40 Zirconia BrownAC current Aluminum, Magnesium
EWG Other Grey
http://www.motherearthrecycling.net/welding/gtaw.htm (1 of 3) [2/18/2004 8:39:27 PM]
GTAW
Polarity and its uses
Variable DCEN DCEP AC
Heat Distribution 30% Electrode 70% Base 70% Electrode 30% base 50% Electrode 50% Base
Surface oxide break up very poor excellent very good
Aluminun up to 3/32 poor good excellent
Aluminum over 3/32 poor poor excellent
Brass alloys excellent poor good
Copper alloys excellent poor good
Cast Iron excellent poor good
Dissimilar metals excellent poor good
Hard facing good poor excellent
High alloy steels excellent poor good
High carbon steels excellent poor good
Low alloy steels excellent poor good
Low carbon steels excellent poor good
Magnesium under 1/8 poor good excellent
Magnesium over 1/8 poor poor excellent
Nickel/ Ni-alloys excellent poor good
Stainless Steel excellent poor good
Silicon Bronze excellent poor good
Titanium excellent poor good
Welding currents using Argon
Mild steel DCEN
Metal thickness Tungsten Dia Filler dia amps Flow rate
1/16 1/16 1/16 60-90 15
1/8 1/16-3/32 3/32 80-110 15
3/16 3/32 1/8 115-165 20
1/4 1/8 5/32 160-210 20
Aluminum AC with High Frequency
1/16 1/16 1/16 60-90 15
http://www.motherearthrecycling.net/welding/gtaw.htm (2 of 3) [2/18/2004 8:39:27 PM]
GTAW
1/8 3/23-1/8 3/32 125-160 20
3/16 1/8-5/32 1/8 180-240 20
1/4 5/32-3/16 3/16 240-300 25
Stainless Steel DCEN
1/16 1/16 1/16 40-70 15
1/8 3/32 3/32 65-110 15
3/16 3/32 1/8 100-150 20
1/4 1/8 5/32 135-180 20
http://www.motherearthrecycling.net/welding/gtaw.htm (3 of 3) [2/18/2004 8:39:27 PM]
GMAW
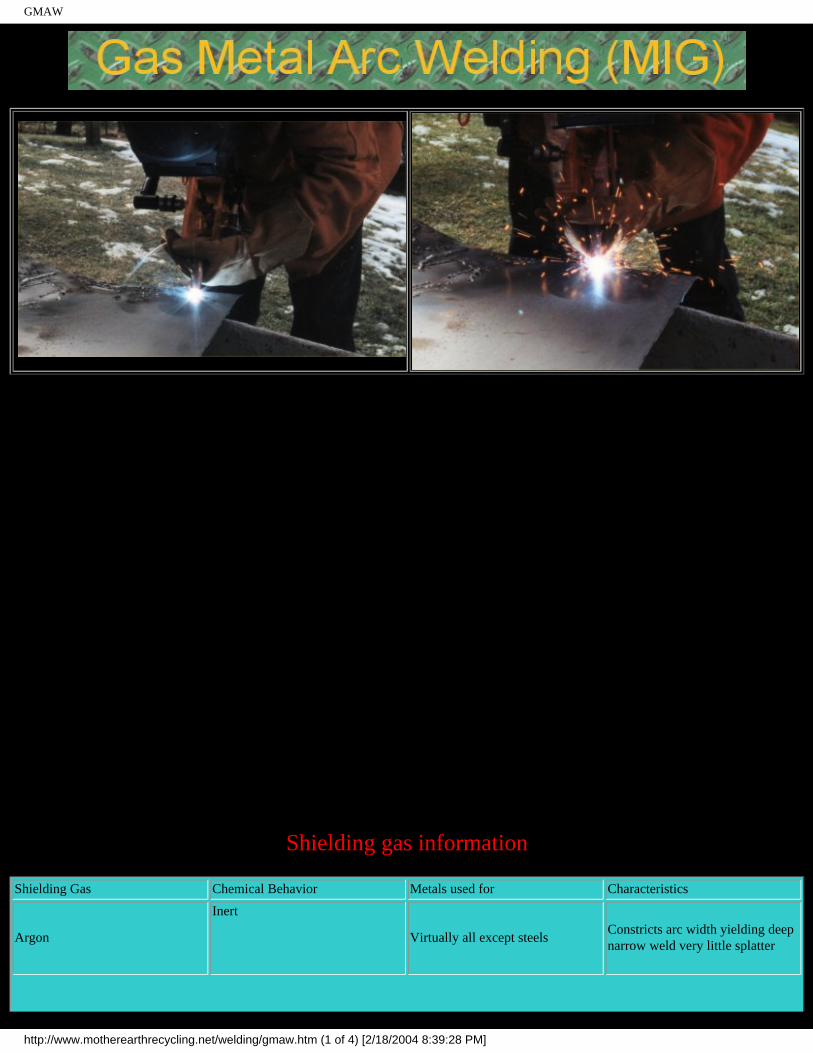
MIG welding is the fastest growing welding method today. MIG welding machines are a constant voltage type, they range from small and light 110 volt units to industrial sized 3 phase machines. Many metal types can be welded with a great deal of quality and efficiency with this process. The MIG welding machine uses a constant wire fed electrode and shielding gas. As the electrode is fed though the contact tip towards the base metal it creates the welding heat needed to melt itself and the base metal. With standard MIG welding the electrode is positive, with flux core the welding wire can be either but is usually electrode negative. The shielding gas forms a envelope around the weld area to keep out unwanted air that may weaken or contaminate the welding process. The shielding gas helps to stabilize the arc and shield the molten metal. Heat control is made with machine settings and electrode stickout (normally 3/8" -5/8"). Wire feed speed, shielding gas and travel speed will also affect the amount of heat put into the weld. The stickout gives the welder a good deal of control as a weld is made, since a constant volt machine is used, if the welder moves the torch closer to the weld the current rises. This is based on ohms law volts=amps X resistance when the torch is moved closer to weld the resistance drops so the current (amps) rises. With the good control of heat input and very thin electrode wire sheet metal can be welded with great success. The MIG process has 2 basic types of metal transfer short circuit and across the arc. With short circuit the wire electrode makes a short circuit with the base metal this happens may times per second (20-200 times) this is used with lower volt/current machines and works well in all welding positions. Across the arc is broken down into 3 groups Spray, Globular and Pulsed spray. With the across the arc methods the wire electrode jumps across the arc as the weld is made. This can sometimes be more difficult for out of position welds, it also requires more volts and current. Higher weld and deposit rates can be obtained using across the arc methods. Aluminum is very commonly welded with the spray method.
Shielding gas information
Shielding Gas Chemical Behavior Metals used for Characteristics
Argon
Inert
Virtually all except steels
Constricts arc width yielding deep narrow weld very little splatter
http://www.motherearthrecycling.net/welding/gmaw.htm (1 of 4) [2/18/2004 8:39:28 PM]
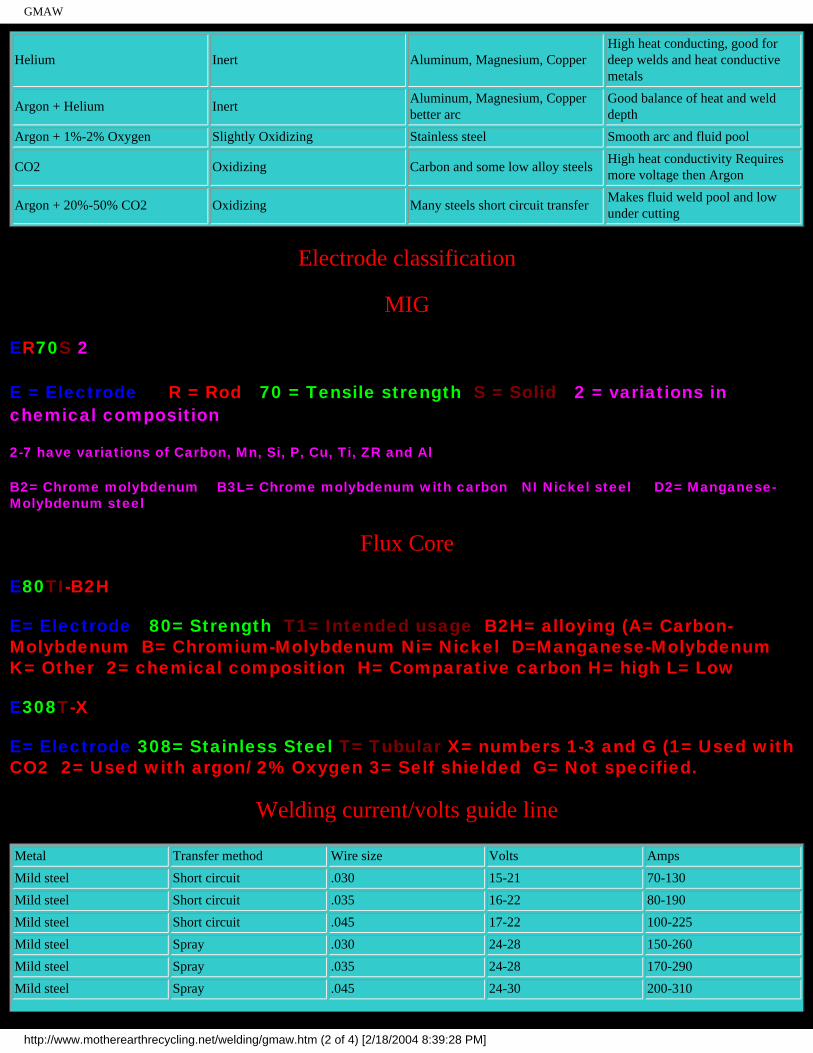
GMAW
Helium Inert Aluminum, Magnesium, CopperHigh heat conducting, good for deep welds and heat conductive metals
Argon + 1%-2% Oxygen Slightly Oxidizing Stainless steel Smooth arc and fluid pool
CO2 Oxidizing Carbon and some low alloy steelsHigh heat conductivity Requires more voltage then Argon
Argon + 20%-50% CO2 Oxidizing Many steels short circuit transferMakes fluid weld pool and low under cutting
Electrode classification
MIG
ER70S-2 (Mild Steel)
E = Electrode R = Rod 70 = Tensile strength S = Solid 2 = variations in chemical composition
2-7 have variations of Carbon, Mn, Si, P, Cu, Ti, ZR and Al
B2= Chrome molybdenum B3L= Chrome molybdenum with carbon NI Nickel steel D2= Manganese-Molybdenum steel
Flux Core
E80TI-B2H (Mild steel)
E= Electrode 80= Strength T1= Intended usage B2H= alloying (A= Carbon-Molybdenum B= Chromium-Molybdenum Ni= Nickel D=Manganese-Molybdenum K= Other 2= chemical composition H= Comparative carbon H= high L= Low
E308T-X (Stainless Steel)
E= Electrode 308= Stainless Steel T= Tubular X= numbers 1-3 and G (1= Used with CO2 2= Used with argon/ 2% Oxygen 3= Self shielded G= Not specified.
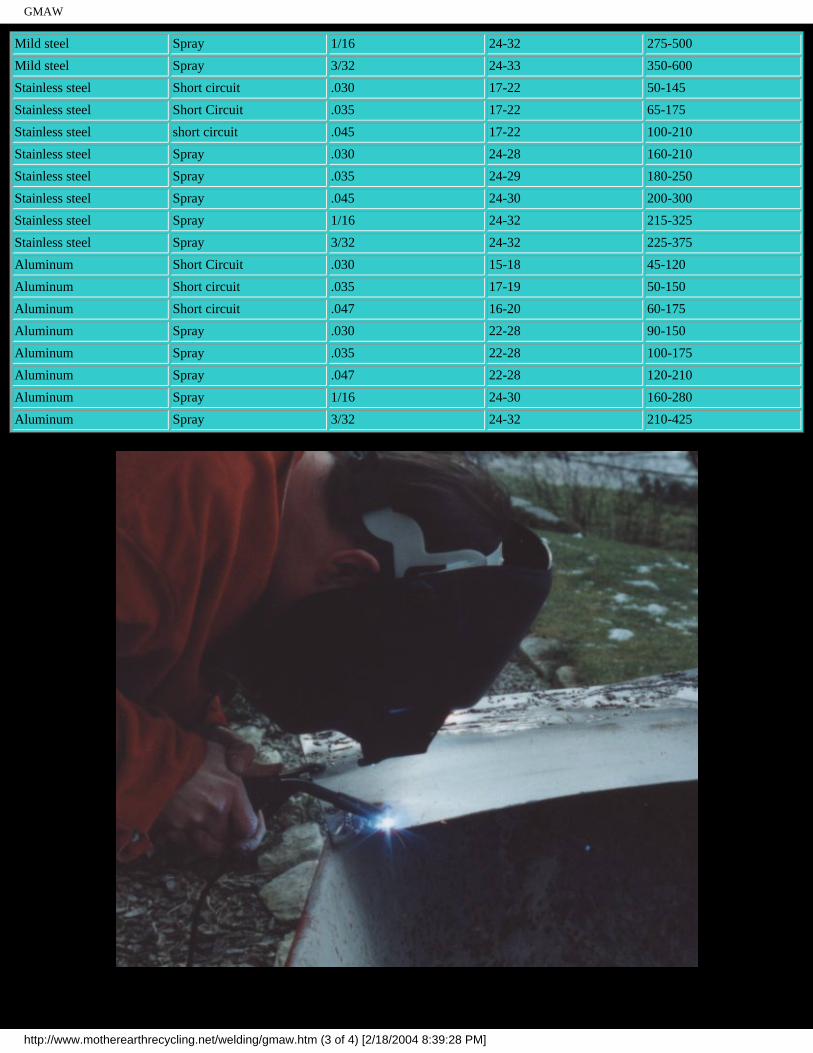
Welding current/volts guide line
Metal Transfer method Wire size Volts Amps
Mild steel Short circuit .030 15-21 70-130
Mild steel Short circuit .035 16-22 80-190
Mild steel Short circuit .045 17-22 100-225
Mild steel Spray .030 24-28 150-260
Mild steel Spray .035 24-28 170-290
Mild steel Spray .045 24-30 200-310
http://www.motherearthrecycling.net/welding/gmaw.htm (2 of 4) [2/18/2004 8:39:28 PM]
GMAW
Mild steel Spray 1/16 24-32 275-500
Mild steel Spray 3/32 24-33 350-600
Stainless steel Short circuit .030 17-22 50-145
Stainless steel Short Circuit .035 17-22 65-175
Stainless steel short circuit .045 17-22 100-210
Stainless steel Spray .030 24-28 160-210
Stainless steel Spray .035 24-29 180-250
Stainless steel Spray .045 24-30 200-300
Stainless steel Spray 1/16 24-32 215-325
Stainless steel Spray 3/32 24-32 225-375
Aluminum Short Circuit .030 15-18 45-120
Aluminum Short circuit .035 17-19 50-150
Aluminum Short circuit .047 16-20 60-175
Aluminum Spray .030 22-28 90-150
Aluminum Spray .035 22-28 100-175
Aluminum Spray .047 22-28 120-210
Aluminum Spray 1/16 24-30 160-280
Aluminum Spray 3/32 24-32 210-425
http://www.motherearthrecycling.net/welding/gmaw.htm (3 of 4) [2/18/2004 8:39:28 PM]
GMAW
http://www.motherearthrecycling.net/welding/gmaw.htm (4 of 4) [2/18/2004 8:39:28 PM]
OxyFuel welding has been around for many years
OxyFuel welding has been around for many years. It is still used today in some applications but its popularity for welding has been reduced due to advances in many other areas of welding. Cutting and brazing with OxyFuel is also still used and will be for some time. Must metals can be welded with OxyFuel with the right gases and a skilled welder. Oxygen Acetylene is the most common OxyFuel process and provides the most heat. Other Oxygen gas processes are used and each has its own characteristics. The welding of metals with OxyFuel simply heats the metal to its melting point and filler rod many or many not be added. The neutral flame will provided the weld area protection form the outside air. When adjusting the flame you want a neutral flame, this is a very accurate mixture of oxygen and fuel that forms a flame the is not carburizing (to much fuel) or oxidizing (to much oxygen). If you watch your weld pool as you weld you will see that with a neutral flame you will have a moving incandescent glow to the outer edges of the weld pool. If you have to much gas running (carburizing flame) the weld pool will have a dirty sooty look to it this type of flame will add carbon to the metal. If you are running to much oxygen (Oxidizing flame) you will have bubbling and maybe some popping to the weld this type of flame will oxidize or "burn" the metal. Oxygen Acetylene is how I started joining and cutting metal. The set up costs aren't to bad and you are very portable in where you can weld and cut.
The air we breath each day is made up of 78% Nitrogen (boiling point -320 f) 21% Oxygen (-297f) 1% other gases. In order to produce oxygen for welding or other uses there are 3 ways to separate oxygen to its pure form. The first is to compress and cool air to its liquid state. the raise the temperature to boil off the different gases. Another way is to you electrolysis. This is done buy running electricity (DC) tough water. The oxygen will bubble at the positive lead, and the hydrogen will bubble at the negative lead. This can be done with a 6 volt battery. Please keep in mind that Hydrogen is very explosive when mixed with air or oxygen. Once oxygen is separated it must be stored this and be done in a Dewar Flask in its liquid form or it can be stored in a compressed gas for. Welding cylinders are the compressed gas form. Oxygen Cylinders are a single forged piece of armor steel that is no less than 1/4" in any spot. these cylinders when full are at about 2400 PSI be careful.
Acetylene is made by putting Calcium carbide into water, the acetylene gas will rise and be captured. Acetylene is C2H2 and is very flammable. Acetylene cylinders are very different from most other compressed gases. If acetylene is compressed to over 15 PSI it is very unstable. The acetylene cylinder is first filled with a monolithic filler that forms very tiny spaces that are interconnected this allows the gas to be stored at about 220 PSI. Acetone is also added to cylinder. Acetylene will dissolve into acetone. when you are welding the acetylene boils off from the acetone. Please remember never let acetylene exceeded 15 PSI.