SOLAR PANEL INFO SOLAR PANEL INFO What is PV & how does it work? PV stands for photovoltaic. Photo = Light and Voltaic = Electricity. A solar cell converts light to electricity. A solar cell is made of silicon. Computer chips are made of this same material. Basically, when light strikes the surface of a solar cell some of it is absorbed into the silicon. This light energy bumps the electrons loose and causes energy to flow. By packaging approximately 36 solar cells together a solar panel or a solar module is created. When you have more then one solar panels you create a solar array. What makes up a PV system? What is BOS? BOS stands for Balance of System. For a complete system you will need more than just a solar panel. Here is a short list of other components that might be required for your system. • Solar Panel Mount • Inter Module Wiring • Output Cable • Charge Controller • Fusing • Battery
Transcript
SOLAR PANEL INFO
SOLAR PANEL INFO
What is PV & how does it work?
PV stands for photovoltaic. Photo = Light and Voltaic = Electricity. A solar cell converts light to electricity.
A solar cell is made of silicon. Computer chips are made of this same material. Basically, when light strikes the surface of a solar cell some of it is absorbed into the silicon. This light energy bumps the electrons loose and causes energy to flow.
By packaging approximately 36 solar cells together a solar panel or a solar module is created. When you have more then one solar panels you create a solar array.
What makes up a PV system? What is BOS?
BOS stands for Balance of System. For a complete system you will need more than just a solar panel. Here is a short list of other components that might be required for your system.
• Solar Panel Mount
• Inter Module Wiring
• Output Cable
• Charge Controller
• Fusing
• Battery
SOLAR PANEL INFO
• Low Voltage Disconnect, This is built into most charge controllers
• Inverter, For AC power
System Setup: Solar---Charge Controller---Battery---Inverter---AC Loads or Solar---Charge Controller---Battery---DC Loads What kind of inverter do I need? The type and size of inverter necessary depends on your application. To determine this you must first calculate the maximum amount of load you will be running on the inverter at one time. There are basically four size ranges of inverters. The first is 50-300 watts; these are small portable inverters. These inverters are ideal for laptops, small lights and other minimal draw AC loads. The next size range is 300-800 watts. These are also somewhat portable and still have the outlets on the front of the inverter. This size inverter is good for small microwaves and other small appliances. The third range is from 800-2000 watts. These units usually have battery chargers built into them. Your can recharge your batteries with utility power or generator power. They are also great for powering medium size AC loads, or running multiple smaller loads at one time. These units are typically permanently installed. The final inverter grouping is a permanently installed units ranging 2,000-11,000
SOLAR PANEL INFO
watts. They function much like small generators, yet are completely silent in operation. They are great for your larger loads, such as refrigerators. The other question that needs to be answered when selecting an inverter is the type of wave form. If you are running sensitive electronic equipment, like fax machines, laser printers or high tech stereo equipment you need a sine wave inverter. A sine wave inverter has a wave form that is very similar to the form of grid electricity. Other options may include modified sine wave, which is fine for items that are not supersensitive to clean power. You may experience a humming sound when powering clocks, and small radios on a modified sine wave inverter. What Kind of Battery do I need?The most common type of battery used in a solar system is a lead-acid battery. They are generally used because they have a low initial cost and are readily available. These batteries must be deep-cycle batteries. If the battery is a shallow cycle or automotive type it will not function correctly in the system. The deep cycle batteries are designed to discharge and recharge or cycle day after day for years. The next decision is whether the batteries are sealed or flooded. A sealed battery never needs water added nor does it need an equalization charge. The benefits of this battery are; the battery can be mounted in any position and are easy to transport. The one downside is that they need to be monitored closely as to not overcharge. A flooded battery also needs close attention. The water level needs to be checked often and re-filled. You will also need to perform an equalization charge, which is a long steady controlled overcharge. This removes sulfation from the battery plates. While this restores the battery's capacity, it can lessen the life of the batteries by warping the plates. So you need to decide which battery fits your specific needs. As long as the battery is taken care of you can expect a long battery life using either battery type. When do I need a charge controller and why?
SOLAR PANEL INFO
The safest way to figure out if you need a charge controller is to take Battery Amp Hour Capacity and divide this by the Solar Panel max. power amp rating. If the quotient is above 200, you don't need a controller. If the number is less than 200 than you need a controller. For example if you have a 100 amp hour battery and a 10 watt panel, you take 100 and divide it by .6 (600mA) and you get 166.6. Since this is less than 200 you need a charge controller. If you have a five-watt panel in the above example you take 100 divided by .3 (300mA) and you come up with 333.3. Since this is larger than 200 you do not need a charge controller. However you still need a blocking diode, to prevent the battery from discharging to the panel at night. So as a general rule of thumb you don't need a charge controller unless you have more than five watts of solar for every 100-amp hours of battery capacity.
How do I wire my batteries for different voltages?
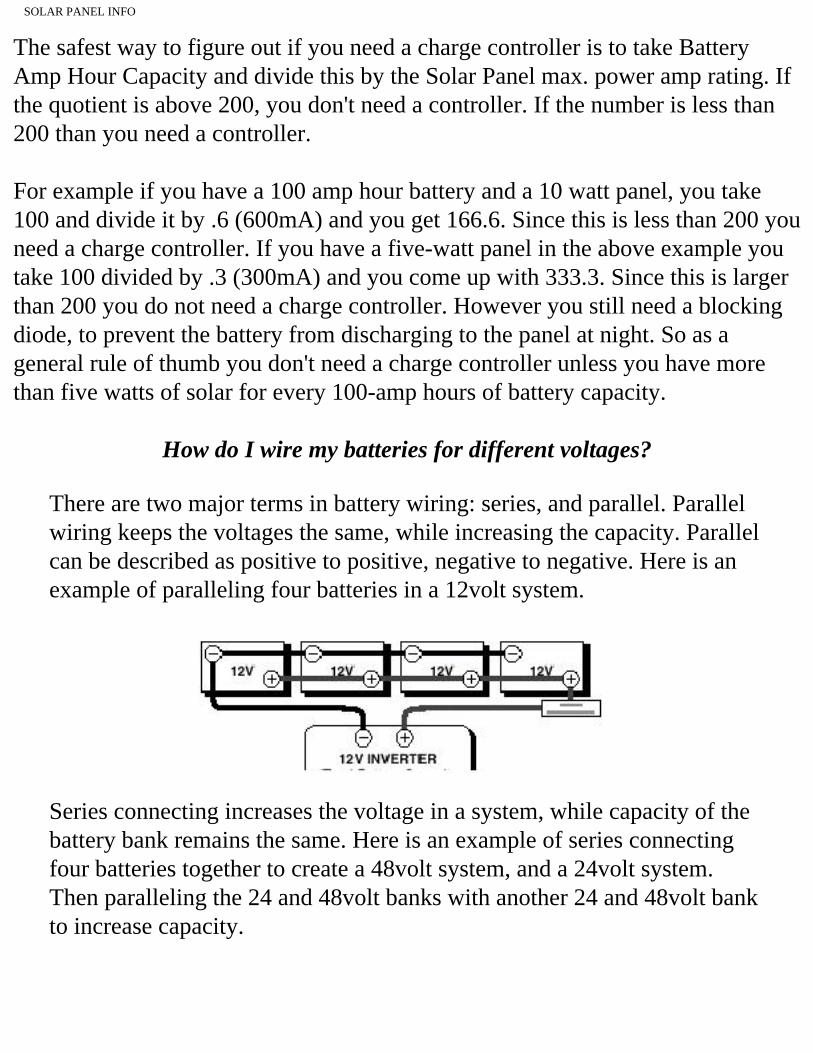
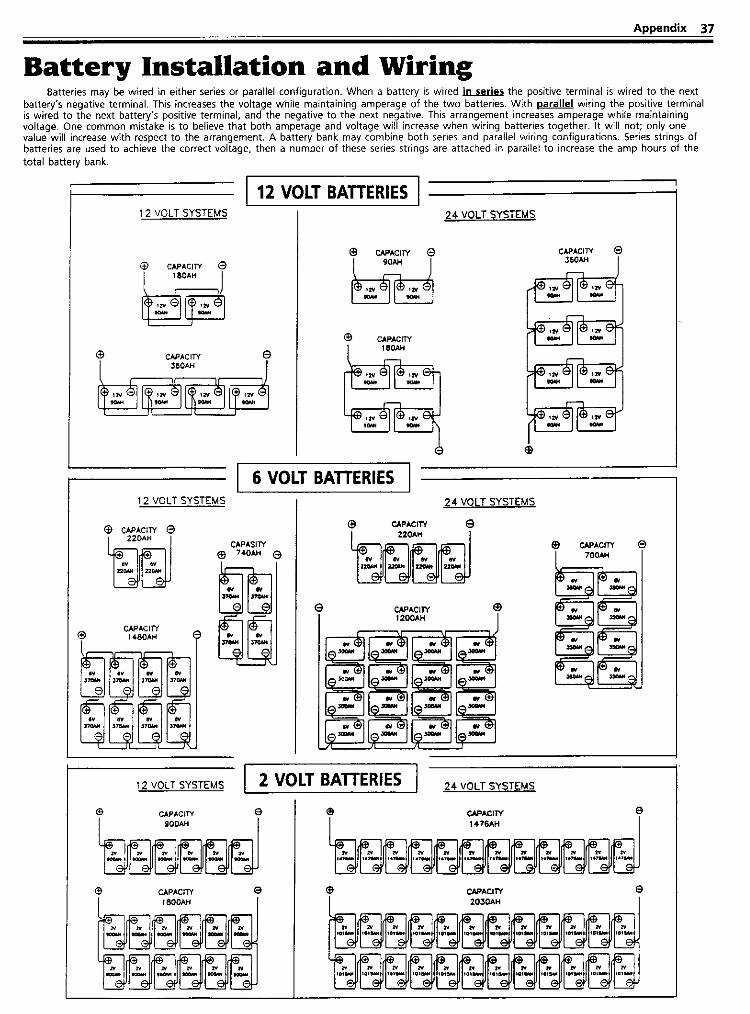
There are two major terms in battery wiring: series, and parallel. Parallel wiring keeps the voltages the same, while increasing the capacity. Parallel can be described as positive to positive, negative to negative. Here is an example of paralleling four batteries in a 12volt system.
Series connecting increases the voltage in a system, while capacity of the battery bank remains the same. Here is an example of series connecting four batteries together to create a 48volt system, and a 24volt system. Then paralleling the 24 and 48volt banks with another 24 and 48volt bank to increase capacity.
SOLAR PANEL INFO
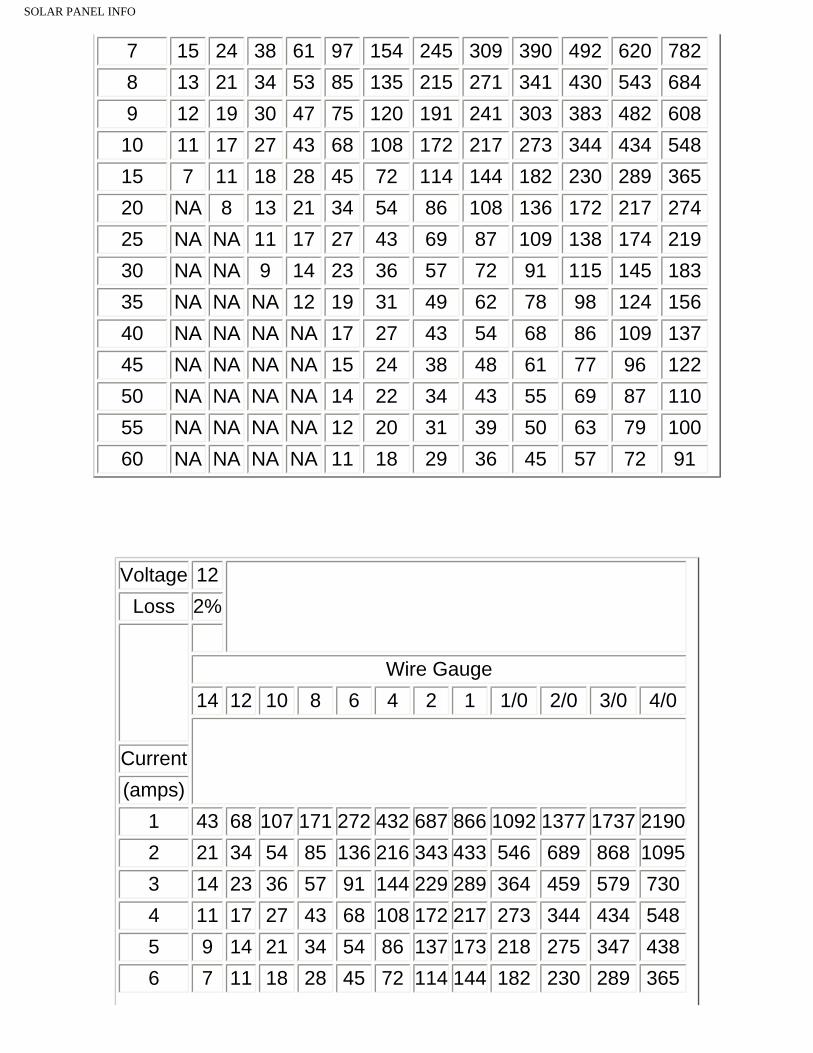
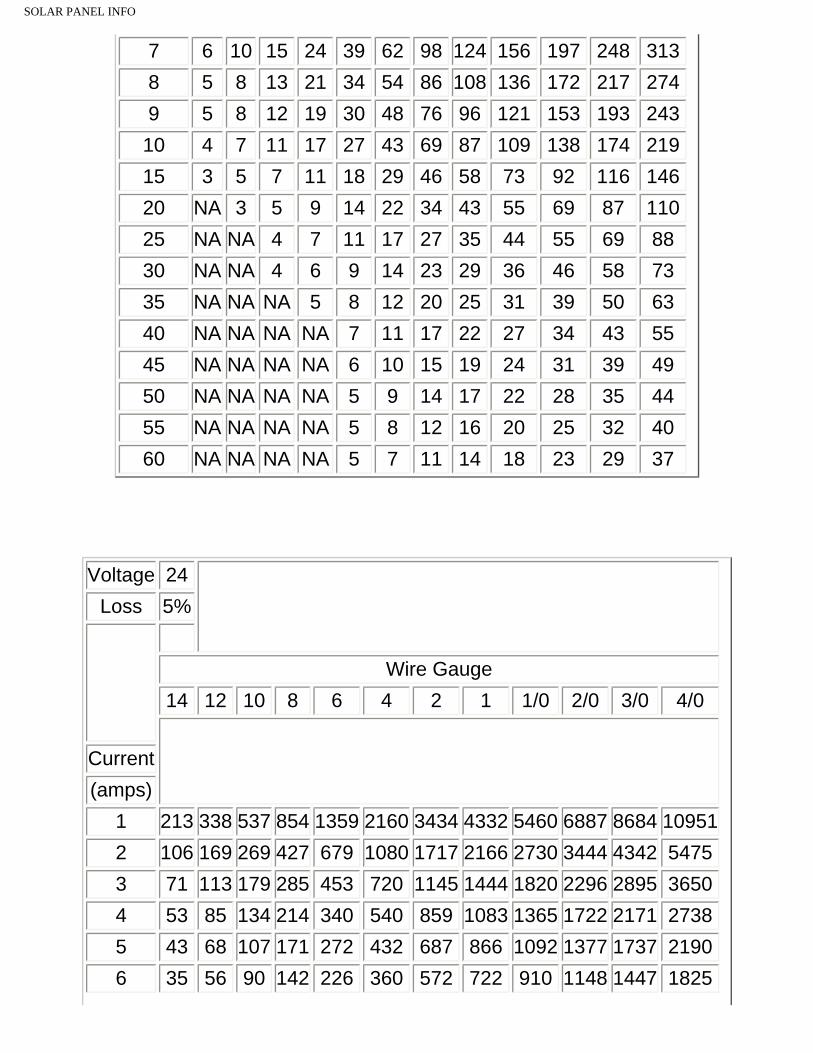
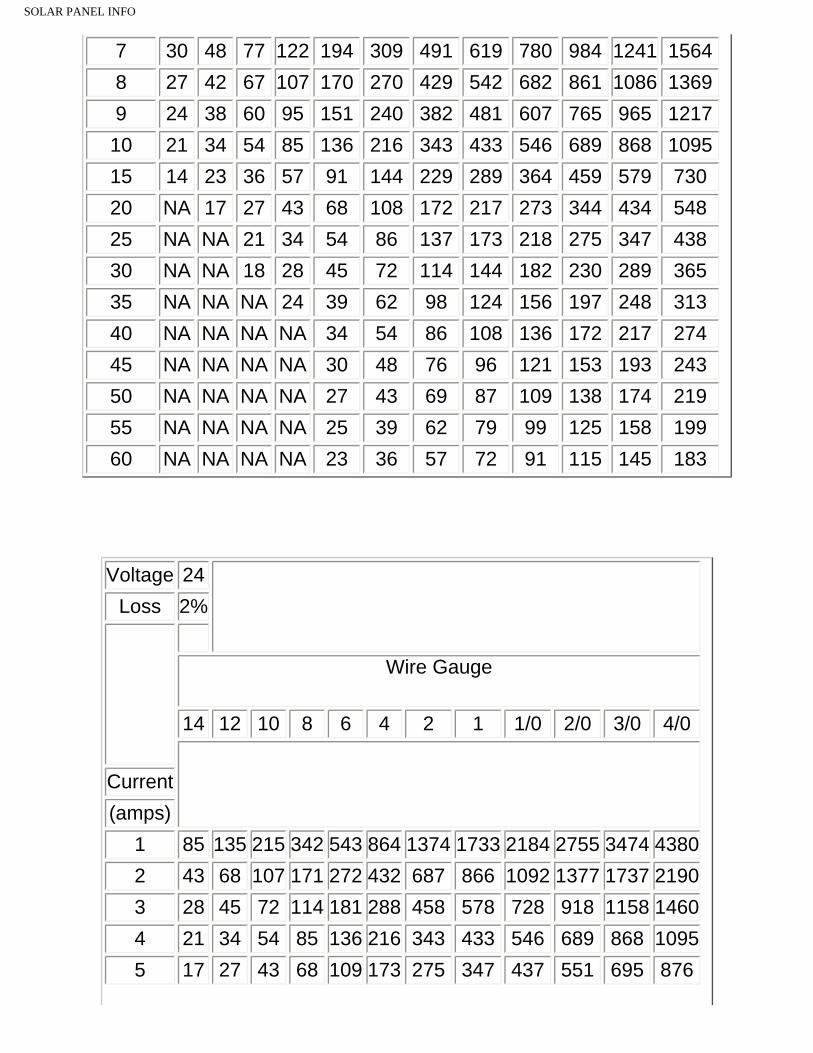
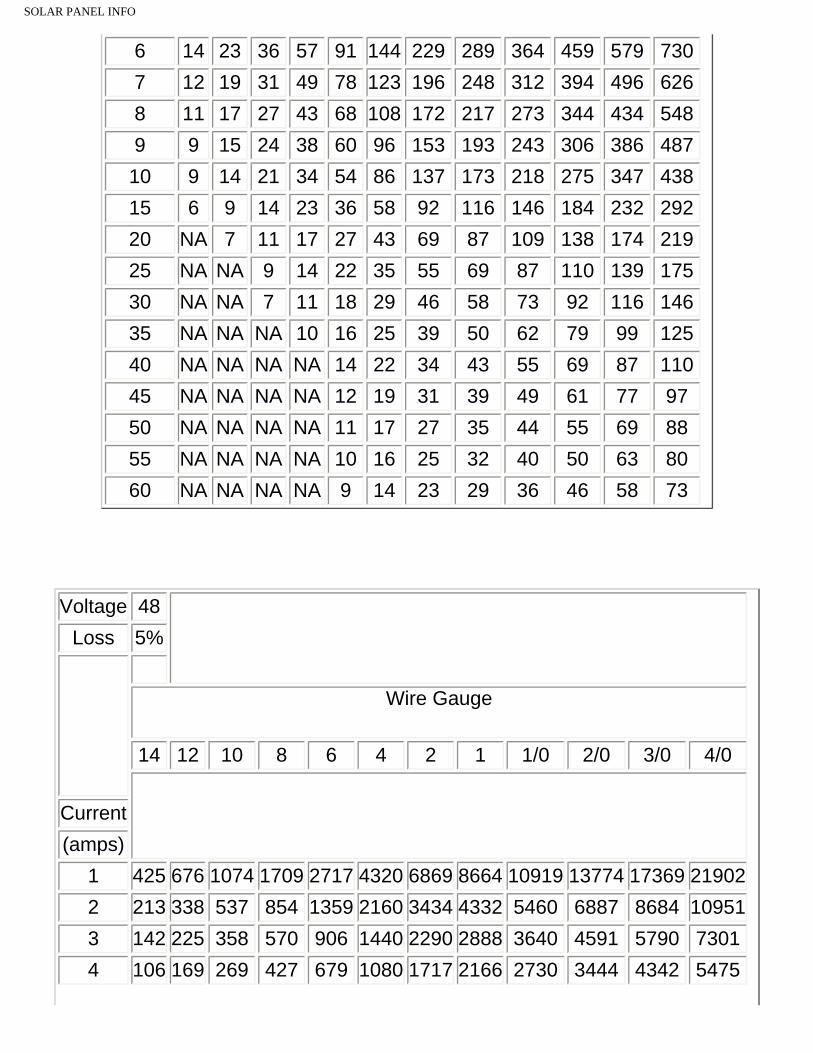
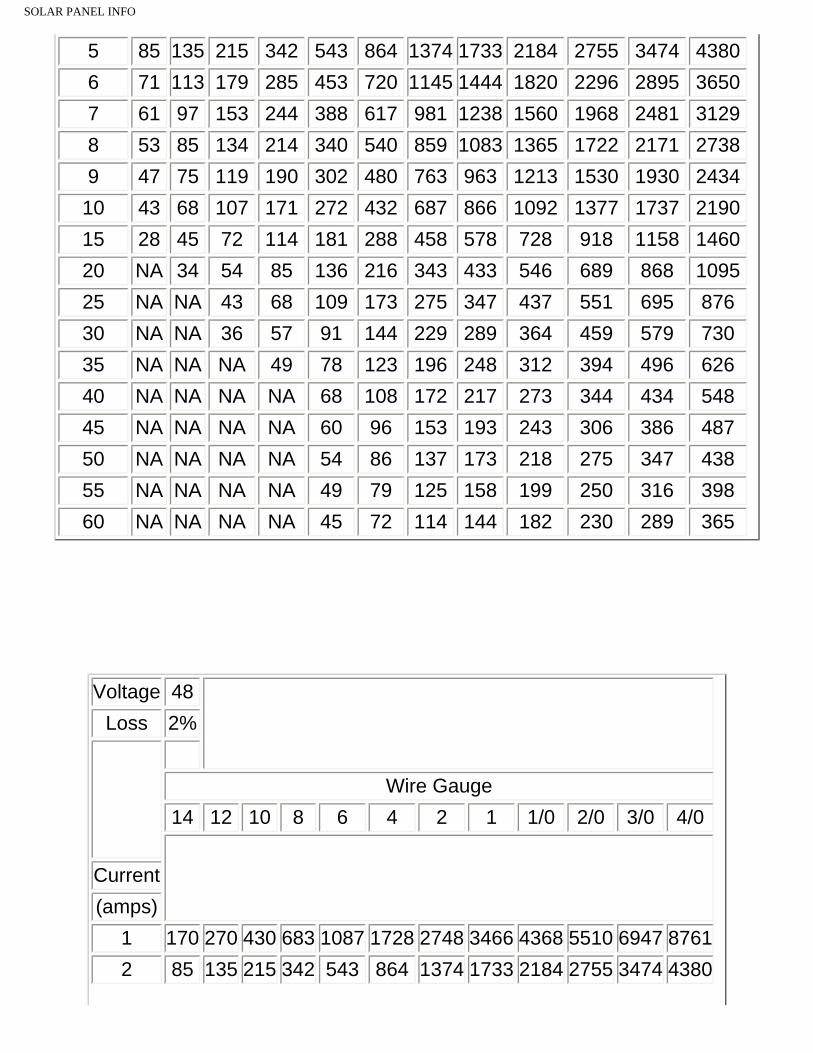
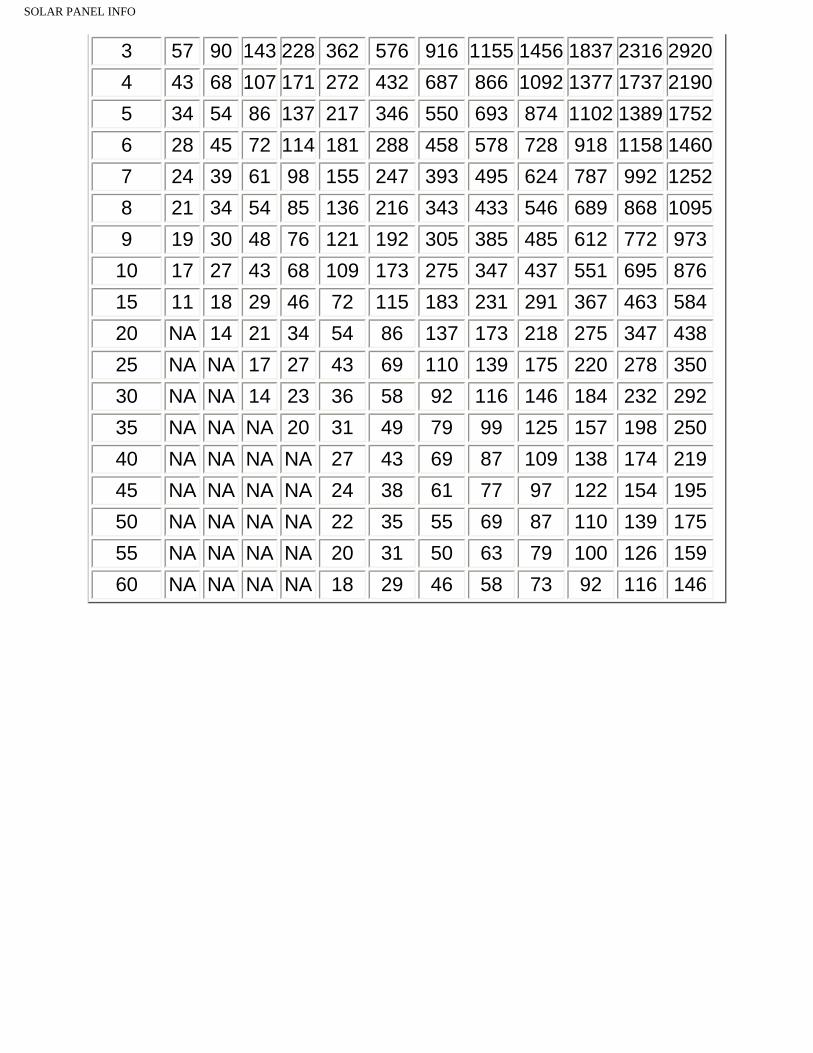
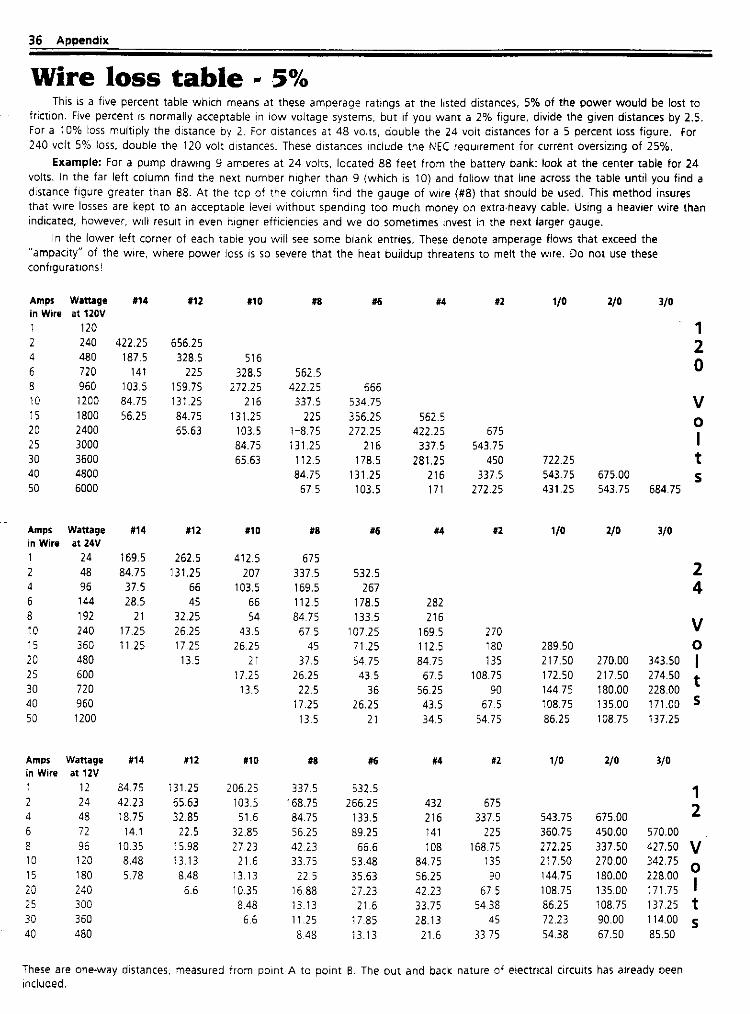
What size wire do I need?
Using the below charts, find the current in amps on the left. Follow this to the left until you see the one way length of wire you need in feet. Then look straight up to the wire size at the top. For example, I want to run a 10 amp load wire 50' with 5% losses or less at 12 volt. I will need #6 AWG wire.
3 57 90 143 228 362 576 916 1155 1456 1837 2316 2920 4 43 68 107 171 272 432 687 866 1092 1377 1737 2190 5 34 54 86 137 217 346 550 693 874 1102 1389 1752 6 28 45 72 114 181 288 458 578 728 918 1158 1460 7 24 39 61 98 155 247 393 495 624 787 992 1252 8 21 34 54 85 136 216 343 433 546 689 868 1095 9 19 30 48 76 121 192 305 385 485 612 772 973 10 17 27 43 68 109 173 275 347 437 551 695 876 15 11 18 29 46 72 115 183 231 291 367 463 584 20 NA 14 21 34 54 86 137 173 218 275 347 438 25 NA NA 17 27 43 69 110 139 175 220 278 350 30 NA NA 14 23 36 58 92 116 146 184 232 292 35 NA NA NA 20 31 49 79 99 125 157 198 250 40 NA NA NA NA 27 43 69 87 109 138 174 219 45 NA NA NA NA 24 38 61 77 97 122 154 195 50 NA NA NA NA 22 35 55 69 87 110 139 175 55 NA NA NA NA 20 31 50 63 79 100 126 159 60 NA NA NA NA 18 29 46 58 73 92 116 146
Learn to size a basic solar system
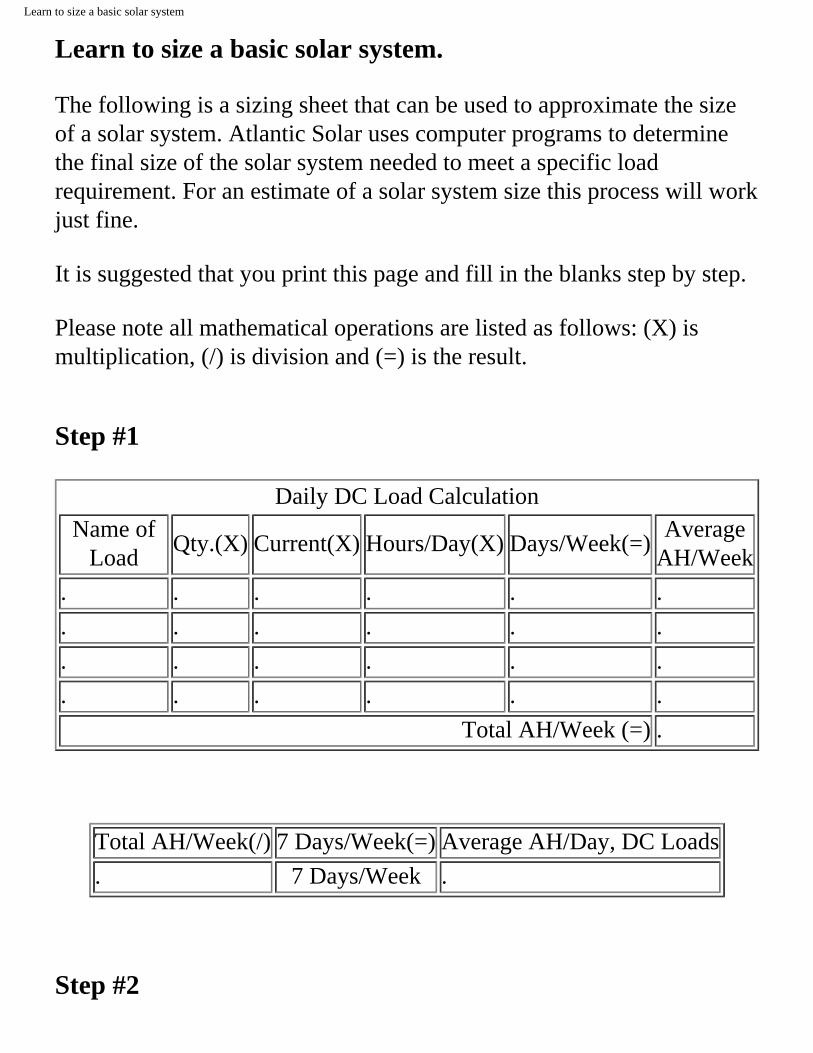
Learn to size a basic solar system.
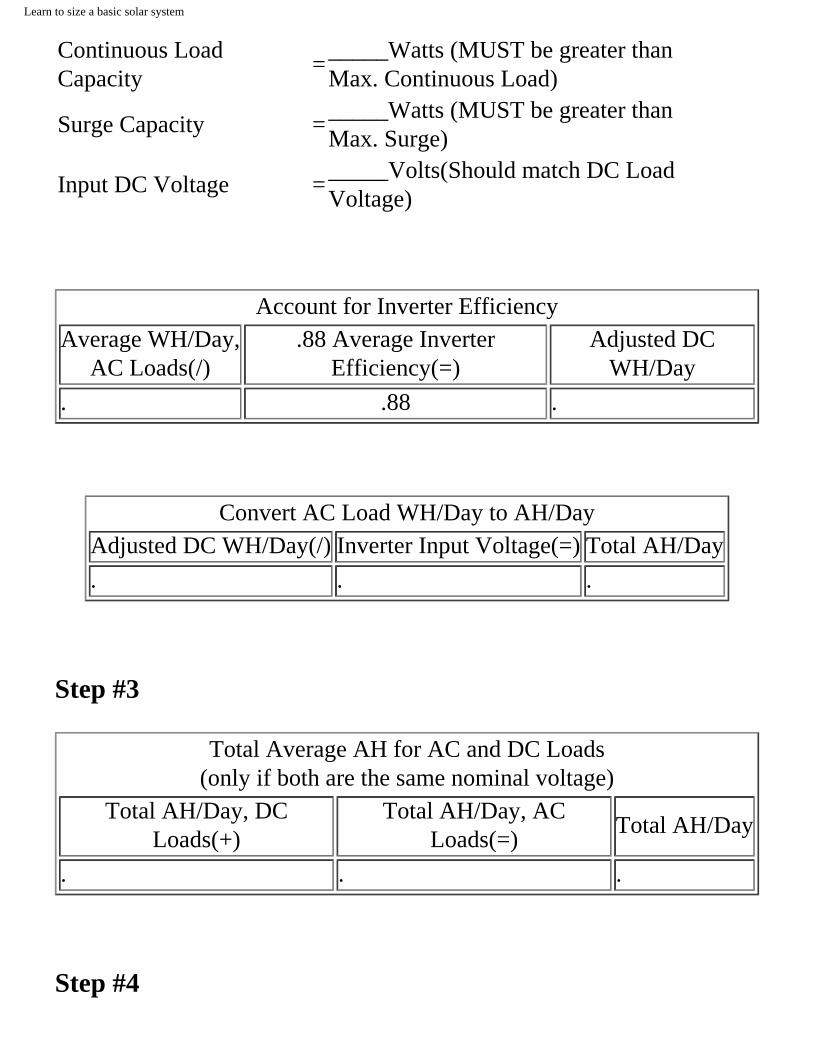
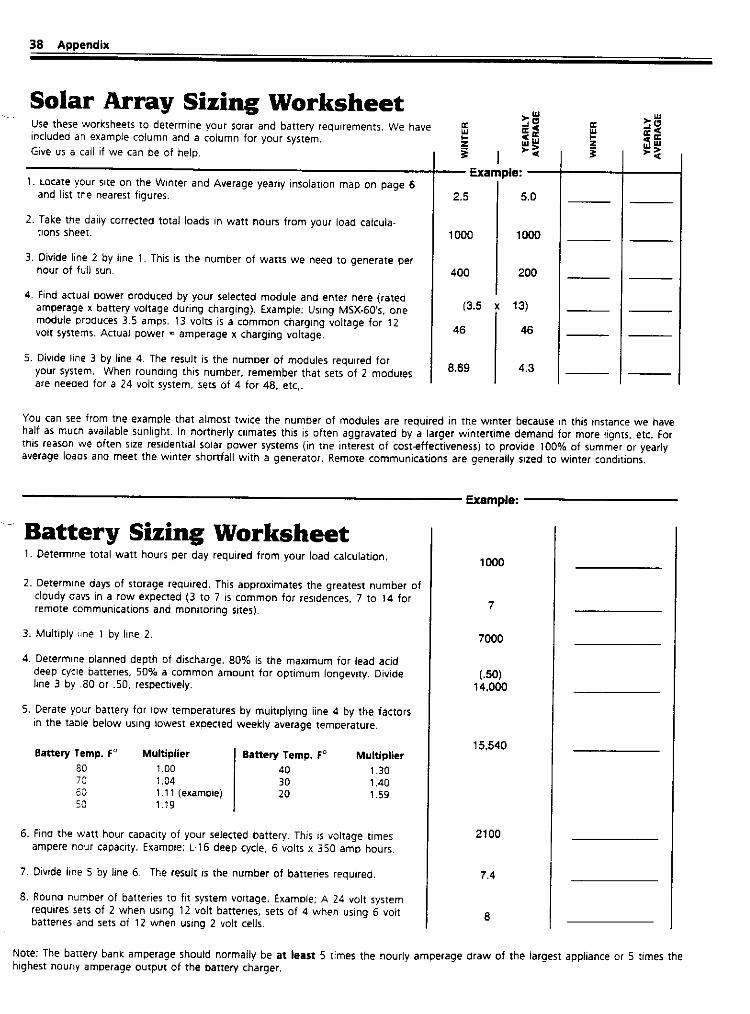
The following is a sizing sheet that can be used to approximate the size of a solar system. Atlantic Solar uses computer programs to determine the final size of the solar system needed to meet a specific load requirement. For an estimate of a solar system size this process will work just fine.
It is suggested that you print this page and fill in the blanks step by step.
Please note all mathematical operations are listed as follows: (X) is multiplication, (/) is division and (=) is the result.
Total AH/Week(/) 7 Days/Week(=) Average AH/Day, DC Loads. 7 Days/Week .
Step #2
Learn to size a basic solar system
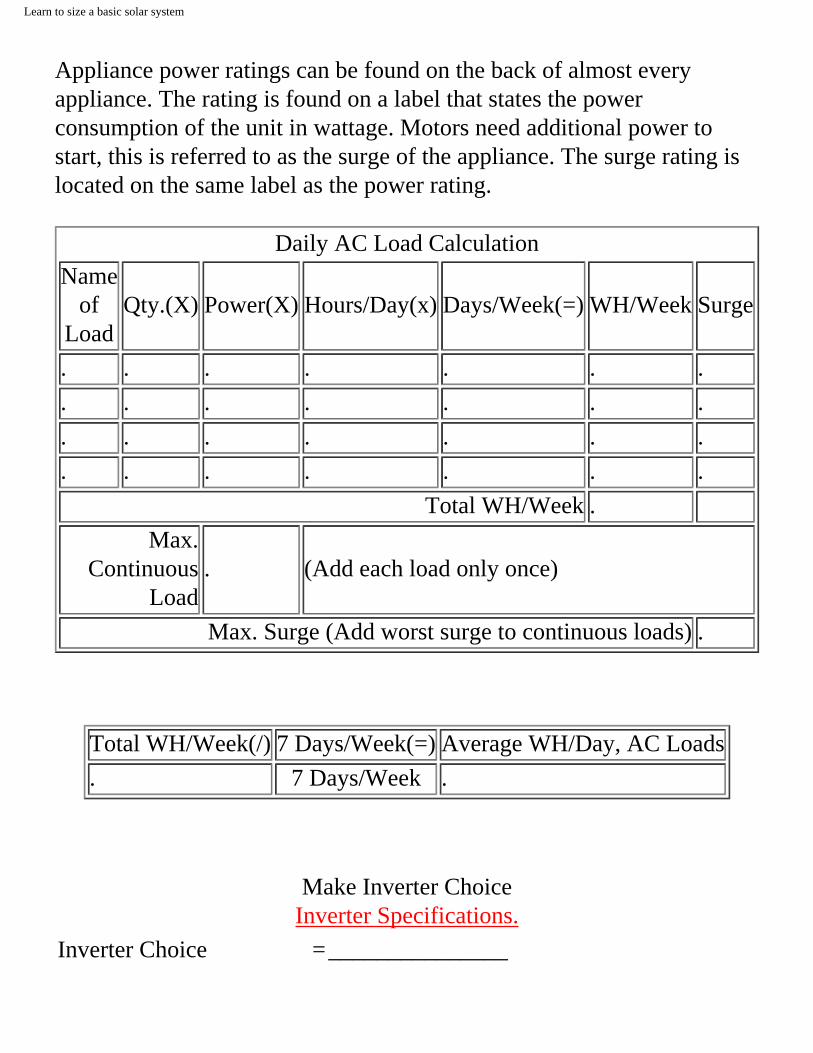
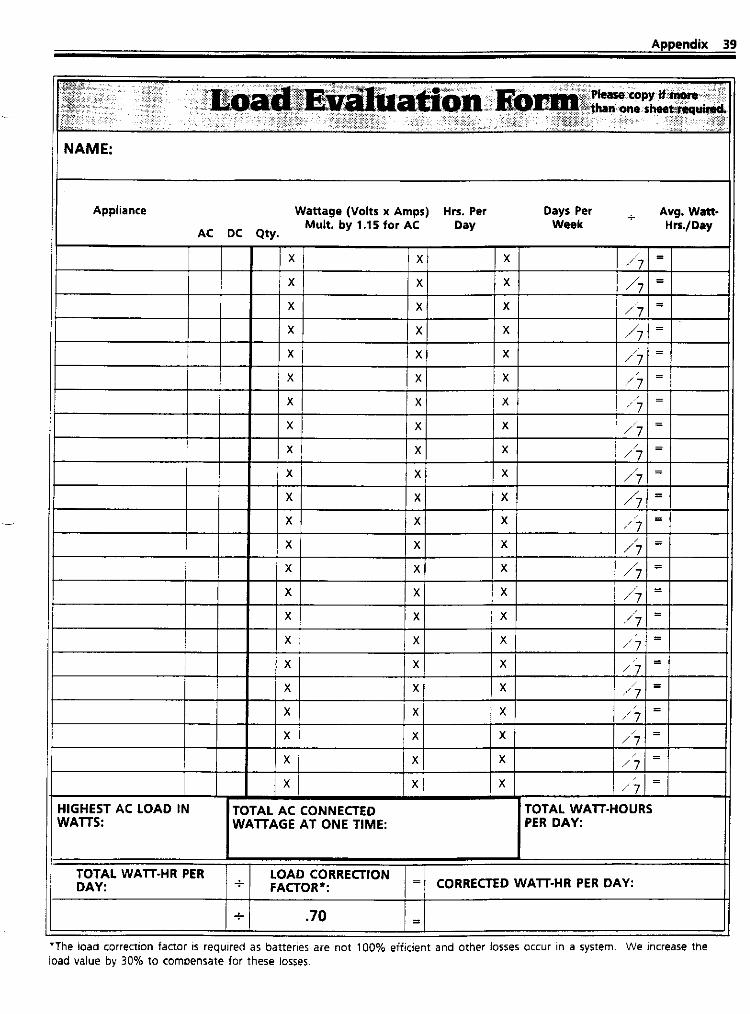
Appliance power ratings can be found on the back of almost every appliance. The rating is found on a label that states the power consumption of the unit in wattage. Motors need additional power to start, this is referred to as the surge of the appliance. The surge rating is located on the same label as the power rating.
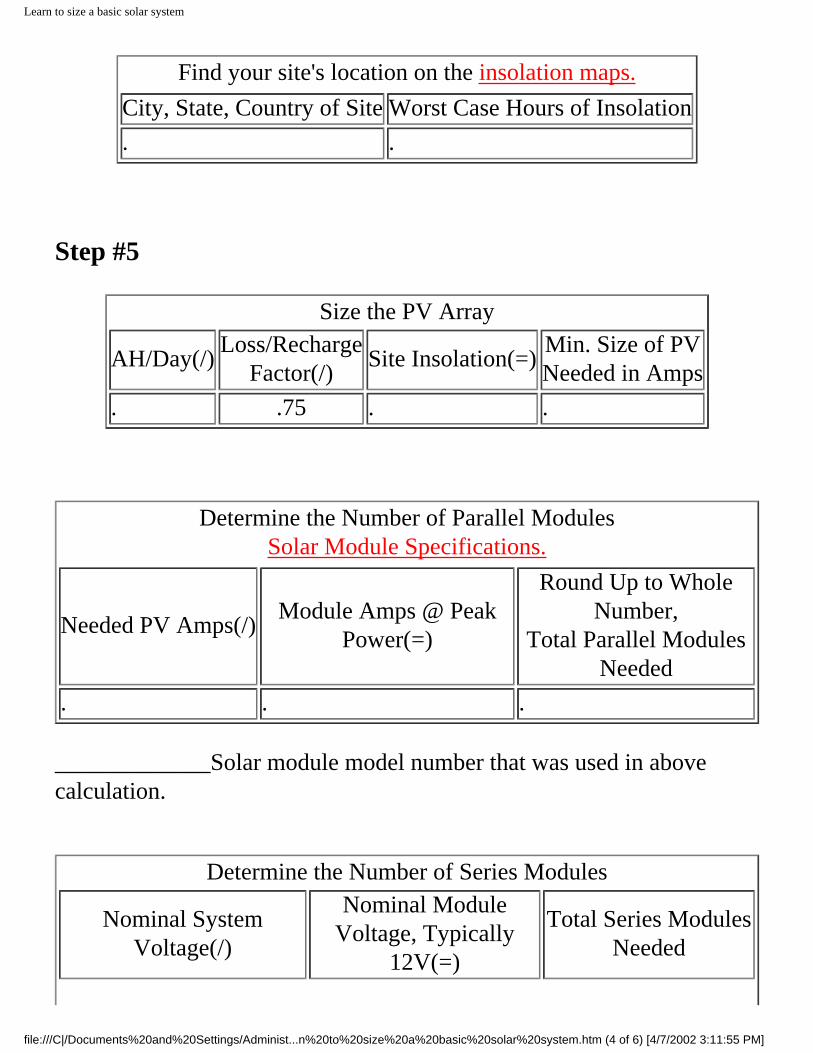
Determine the Total Number of Solar ModulesTotal Series Modules(X) Total Parallel Modules(=) Total Modules. . .
Step #6
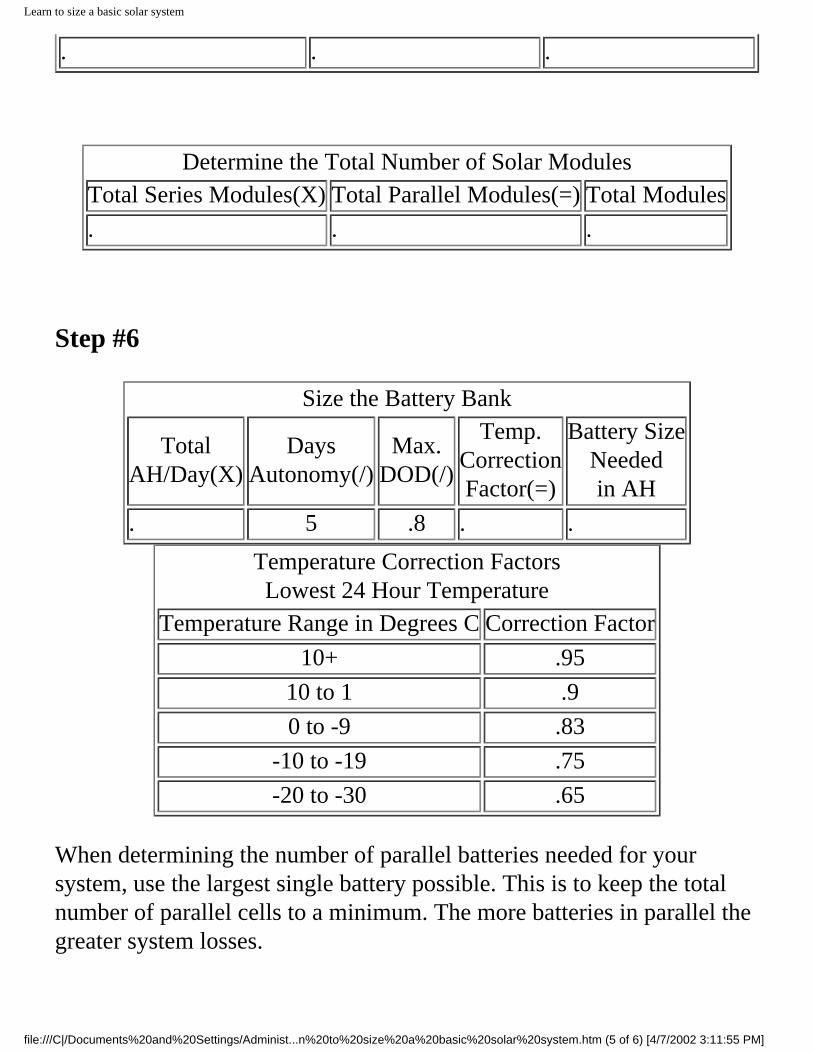
Size the Battery Bank
TotalAH/Day(X)
DaysAutonomy(/)
Max.DOD(/)
Temp.CorrectionFactor(=)
Battery SizeNeededin AH
. 5 .8 . .Temperature Correction FactorsLowest 24 Hour Temperature
Temperature Range in Degrees C Correction Factor10+ .95
10 to 1 .90 to -9 .83
-10 to -19 .75-20 to -30 .65
When determining the number of parallel batteries needed for your system, use the largest single battery possible. This is to keep the total number of parallel cells to a minimum. The more batteries in parallel the greater system losses.
file:///C|/Documents%20and%20Settings/Administ...n%20to%20size%20a%20basic%20solar%20system.htm (5 of 6) [4/7/2002 3:11:55 PM]
Learn to size a basic solar system
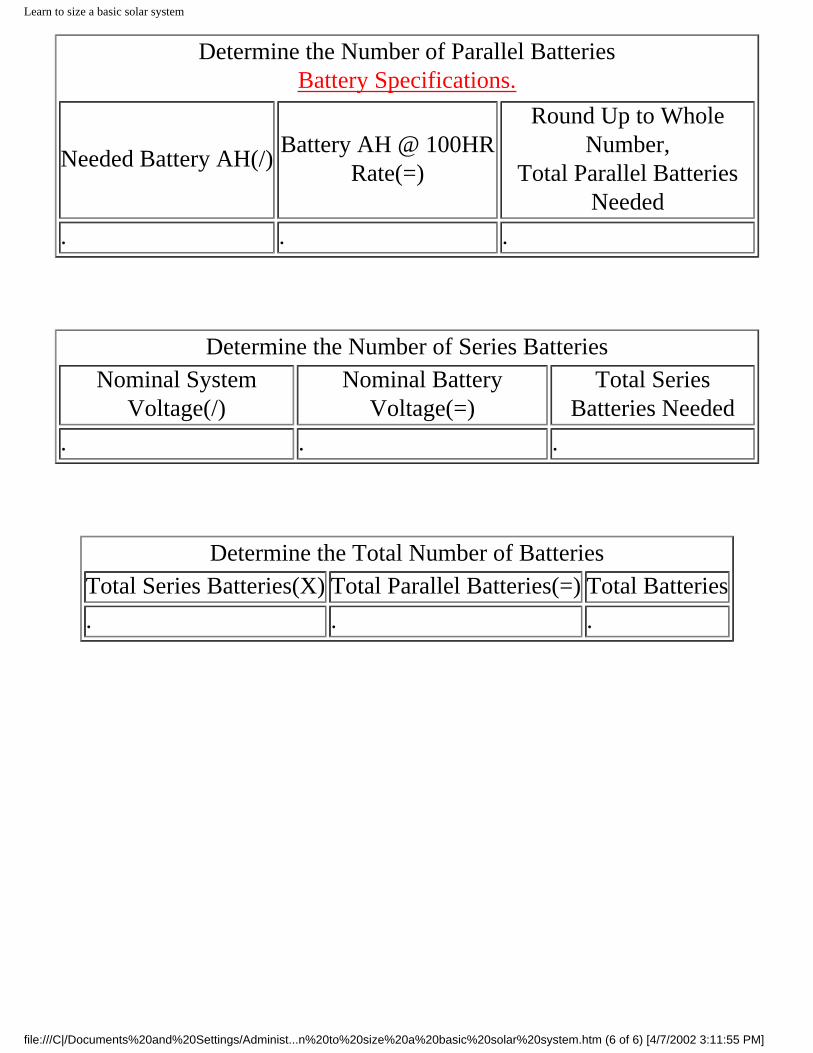
Determine the Number of Parallel BatteriesBattery Specifications.
Needed Battery AH(/) Battery AH @ 100HR Rate(=)
Round Up to Whole Number,
Total Parallel Batteries Needed
. . .
Determine the Number of Series BatteriesNominal System
Voltage(/)Nominal Battery
Voltage(=)Total Series
Batteries Needed. . .
Determine the Total Number of BatteriesTotal Series Batteries(X) Total Parallel Batteries(=) Total Batteries. . .
file:///C|/Documents%20and%20Settings/Administ...n%20to%20size%20a%20basic%20solar%20system.htm (6 of 6) [4/7/2002 3:11:55 PM]
Photovoltaic Modules will be “live” upon exposure to light. There will be a voltage present on theoutput terminals. This voltage will vary according to the type of the photovoltaic module. Thearray will generate voltages substantially higher than the system nominal voltage, thereby resultingin a shock hazard. This hazard may be minimized by completely shading the array before makingthese connections.
Extreme care should be exercised when working with batteries. Batteries contain a high dischargecurrent capacity and caustic compounds are present. Sparks, flames, smoking materials, etc. canignite the gases of some batteries. Eyes, face, and hands should be protected. Tools should beused with care.
Carefully read the installation instructions before attempting to electrically connect any part of thepower system. Most charge controllers are permanently damaged if the battery polarity is reversedwhen it is connected the controller.
1 2 3 5 64
1.0 Solar Array Wiring
Solar modules Direct mount and Multi mount frames have cords attached to them. These cordscontain a red and black wire. Red is the positive and black is the negative.
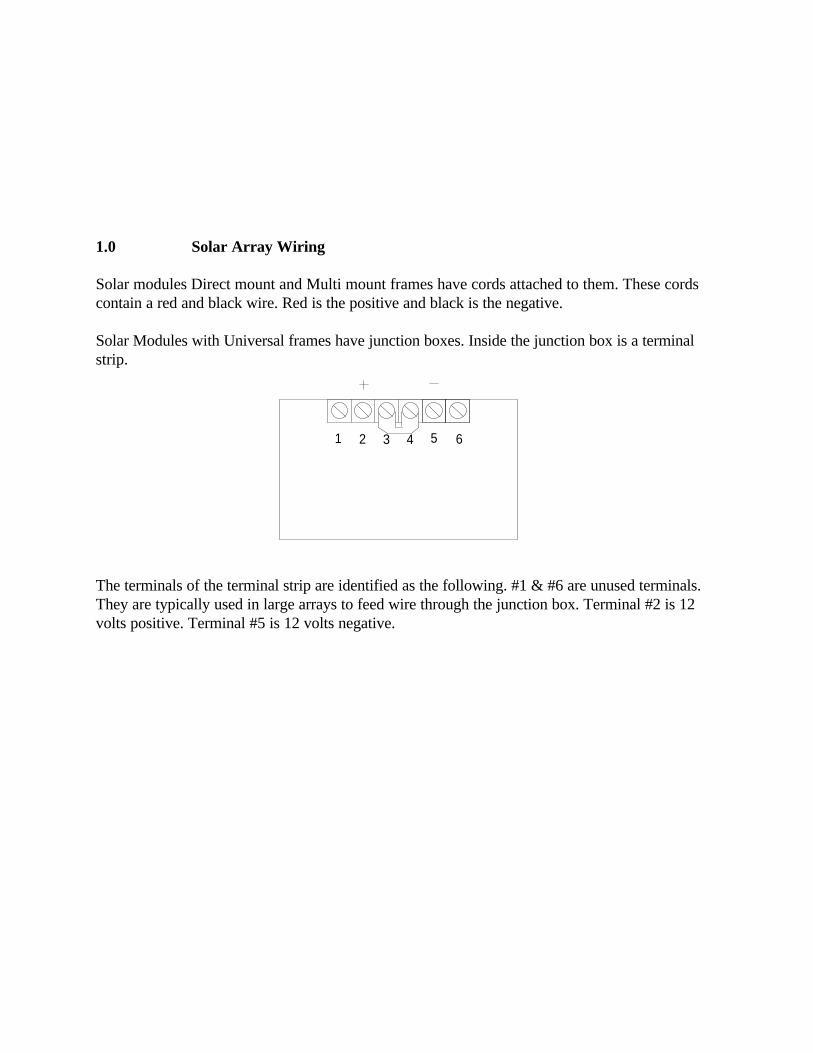
Solar Modules with Universal frames have junction boxes. Inside the junction box is a terminalstrip.
The terminals of the terminal strip are identified as the following. #1 & #6 are unused terminals.They are typically used in large arrays to feed wire through the junction box. Terminal #2 is 12volts positive. Terminal #5 is 12 volts negative.
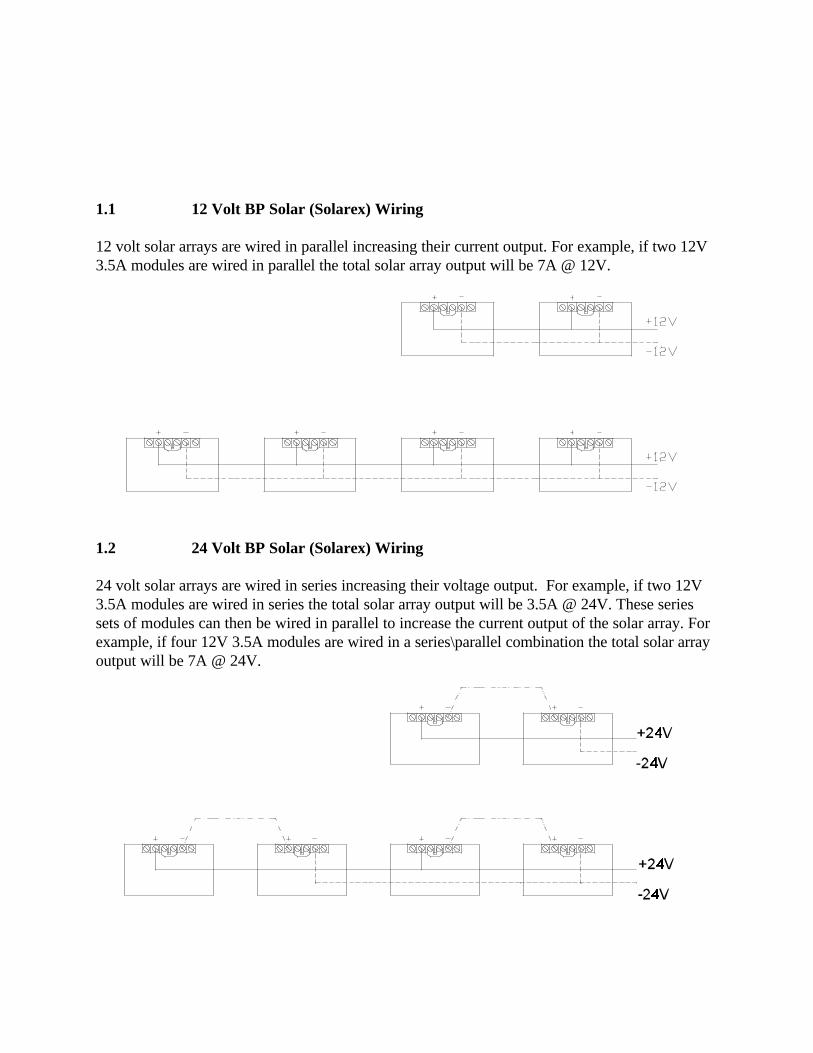
1.1 12 Volt BP Solar (Solarex) Wiring
12 volt solar arrays are wired in parallel increasing their current output. For example, if two 12V3.5A modules are wired in parallel the total solar array output will be 7A @ 12V.
1.2 24 Volt BP Solar (Solarex) Wiring
24 volt solar arrays are wired in series increasing their voltage output. For example, if two 12V3.5A modules are wired in series the total solar array output will be 3.5A @ 24V. These seriessets of modules can then be wired in parallel to increase the current output of the solar array. Forexample, if four 12V 3.5A modules are wired in a series\parallel combination the total solar arrayoutput will be 7A @ 24V.
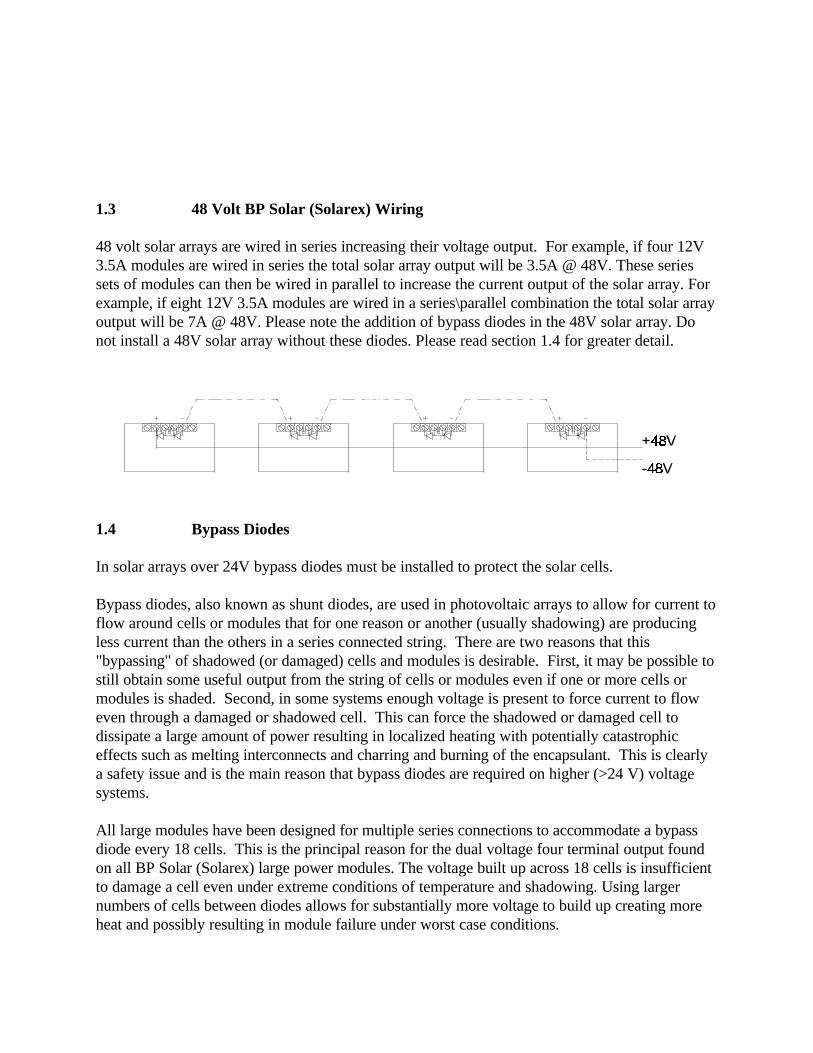
1.3 48 Volt BP Solar (Solarex) Wiring
48 volt solar arrays are wired in series increasing their voltage output. For example, if four 12V3.5A modules are wired in series the total solar array output will be 3.5A @ 48V. These seriessets of modules can then be wired in parallel to increase the current output of the solar array. Forexample, if eight 12V 3.5A modules are wired in a series\parallel combination the total solar arrayoutput will be 7A @ 48V. Please note the addition of bypass diodes in the 48V solar array. Donot install a 48V solar array without these diodes. Please read section 1.4 for greater detail.
1.4 Bypass Diodes
In solar arrays over 24V bypass diodes must be installed to protect the solar cells.
Bypass diodes, also known as shunt diodes, are used in photovoltaic arrays to allow for current toflow around cells or modules that for one reason or another (usually shadowing) are producingless current than the others in a series connected string. There are two reasons that this"bypassing" of shadowed (or damaged) cells and modules is desirable. First, it may be possible tostill obtain some useful output from the string of cells or modules even if one or more cells ormodules is shaded. Second, in some systems enough voltage is present to force current to floweven through a damaged or shadowed cell. This can force the shadowed or damaged cell todissipate a large amount of power resulting in localized heating with potentially catastrophiceffects such as melting interconnects and charring and burning of the encapsulant. This is clearlya safety issue and is the main reason that bypass diodes are required on higher (>24 V) voltagesystems.
All large modules have been designed for multiple series connections to accommodate a bypassdiode every 18 cells. This is the principal reason for the dual voltage four terminal output foundon all BP Solar (Solarex) large power modules. The voltage built up across 18 cells is insufficientto damage a cell even under extreme conditions of temperature and shadowing. Using largernumbers of cells between diodes allows for substantially more voltage to build up creating moreheat and possibly resulting in module failure under worst case conditions.
The bypass diodes are installed at the manufactured in every large module. Although diodes arerelatively reliable they can still fail. When they do fail it’s usually in a shorted or conductingcondition. This kind of failure in a bypass diode would result in the entire string of "protected"cells being shorted out and contributing no power to the array.
1.5 Blocking Diodes
Blocking diodes are different then bypass diodes. The diode in most cases is physically the same.However it is installed differently and serves a different purpose.
A blocking diode only allows current to flow in one direction. If you have a charge controller inyour system you do not need a blocking diode to prevent the solar module from discharging thebattery at night. All charge controllers have night time discharge protection built into them.Adding a diode with a charge controller to prevent battery discharge at night is redundant and willconsume power from your array during the day.
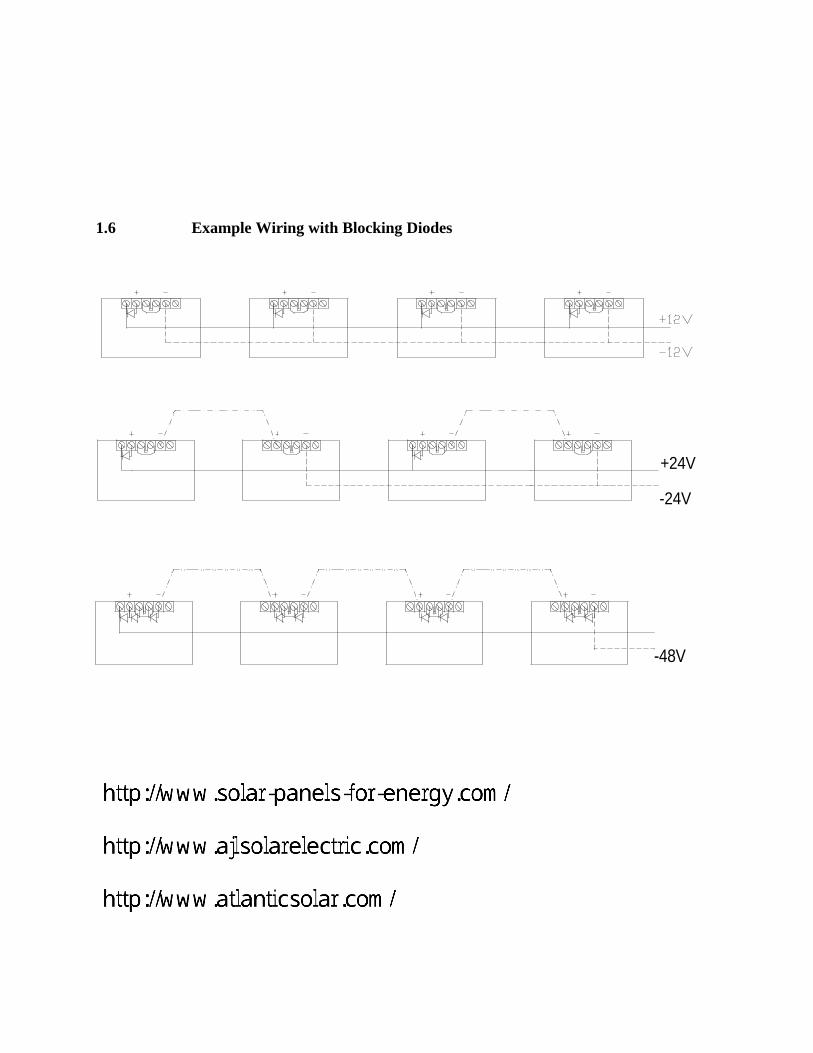
The only time a blocking diode is used is when you have an array of 2 or more modules and thearray is partially shaded. When a solar module is partially shaded its power output is drasticallyeffected. If this module is connected to another solar module. The output of both modules will beeffected even if only one of the two modules is shaded.
If you have an array with a shadow that passes over the modules one module at a time it isrecommended that a blocking diode be added to each module. An example of this might be a polethat is in front of the array. The shadow is small and will move over the array as the sun movesthrough the sky.
If the array is totally shaded at approximately the same the day then adding a diode will mostlikely consume more power then it will save you. For example, if your array a large full tree thatcasts a shadow on the total array. I would look at relocating the array or trimming the tree beforeadding a blocking diode to the system.