Walt Disney World Swan and Dolphin Resort Orlando, Florida 11/28/2005 - 8:00 am - 9:30 am Room:N. Hemispheres (Salon B/C) (Dolphin) What to Do with the New CUI The Customize User Interface (CUI), introduced in AutoCAD 2006, radically changes how you customize your environment. Along with the new dialog interface is the retirement of your .mns/.mnu files. Workspaces affect the user's interface also. How do you use this new tool? All will be discussed in this class. CP11-1 About the Speaker: R. Robert Bell - MW Consulting Engineers Robert is the network administrator for MW Consulting Engineers, a consulting firm in Spokane, Washington, where he is responsible for the network and all AutoCAD customization. Robert has been writing AutoLISP code since AutoCAD v2.5, and VBA since it was introduced in Release 14. He has customized applications for the electrical/lighting, plumbing/piping, and HVAC disciplines. Robert has also developed applications for AutoCAD as a consultant. He is on the Board of Directors for AUGI and is active on Autodesk discussion groups. [email protected]
Transcript
Walt Disney World Swan and Dolphin ResortOrlando, Florida
11/28/2005 - 8:00 am - 9:30 am Room:N. Hemispheres (Salon B/C) (Dolphin)
What to Do with the New CUI
The Customize User Interface (CUI), introduced in AutoCAD 2006, radically changes how you customize your environment. Along with the new dialog interface is the retirement of your .mns/.mnu files. Workspaces affect the user's interface also. How do you use this new tool? All will be discussed in this class.
CP11-1
About the Speaker:
R. Robert Bell - MW Consulting Engineers
Robert is the network administrator for MW Consulting Engineers, a consulting firm in Spokane, Washington, where he is responsible for the network and all AutoCAD customization. Robert has been writing AutoLISP code since AutoCAD v2.5, and VBA since it was introduced in Release 14. He has customized applications for the electrical/lighting, plumbing/piping, and HVAC disciplines. Robert has also developed applications for AutoCAD as a consultant. He is on the Board of Directors for AUGI and is active on Autodesk discussion [email protected]
What to Do with the New CUI
2
Introduction
The new Customize User Interface is a radical approach to customizing AutoCAD. Along with the changes comes some confusion. This course is intended not only to introduce how to use the CUI Editor but to discuss the possibilities for organization and migration issues.
Terminology
CUI (Customize User Interface) 1: The commands and elements, including workspaces, that makes
up the user’s interface. 2: The extension for the XML-based file that contains the
information used to present the user interface.
Main The user customizable CUI file defined in the Options dialog box.
Enterprise The CUI file defined in the Options dialog box that is not user
customizable.
Partial CUI A CUI file that is loaded into the main or enterprise CUI file.
Core CUI The CUI file that supports the application out of the box, e.g. Acad.cui.
Office CUI A term used in this course to describe the CUI file that holds office standard customizations.
Nodes Major sections of a CUI file, such as Toolbars or Mouse Buttons.
Workspace Defines visible elements of the user interface and their location.
Commands Macros that define an action and may be used throughout the nodes.
The differences between Main, Enterprise, and Partial
• A partial CUI file is one that is loaded into either the main or enterprise CUI files. These may be loaded from the CUI Editor or with the CUILoad command.
• A partial CUI file can actually be a main or enterprise CUI under a different profile.
• A partial CUI file may have many nodes populated, or only a few.
• The main CUI file is the only one to which you can directly add new commands.
• The main CUI file, and any partial CUI files loaded into it, are the only ones that you can modify.
• The enterprise CUI file, and any partial CUI files loaded into it, are read-only in the current profile. When the same CUI file is loaded as a partial to both the main and enterprise CUI files it will be read-only.
• An enterprise CUI file can be edited by modifying the Main Customization File entry in the Files tab of the Options dialog. Hint: CAD Managers can easily switch the enterprise to the main CUI file by simply creating an appropriate profile.
Service Packs and the CUI Do not even think about doing any CUI editing until you have the latest service pack installed.
What to Do with the New CUI
3
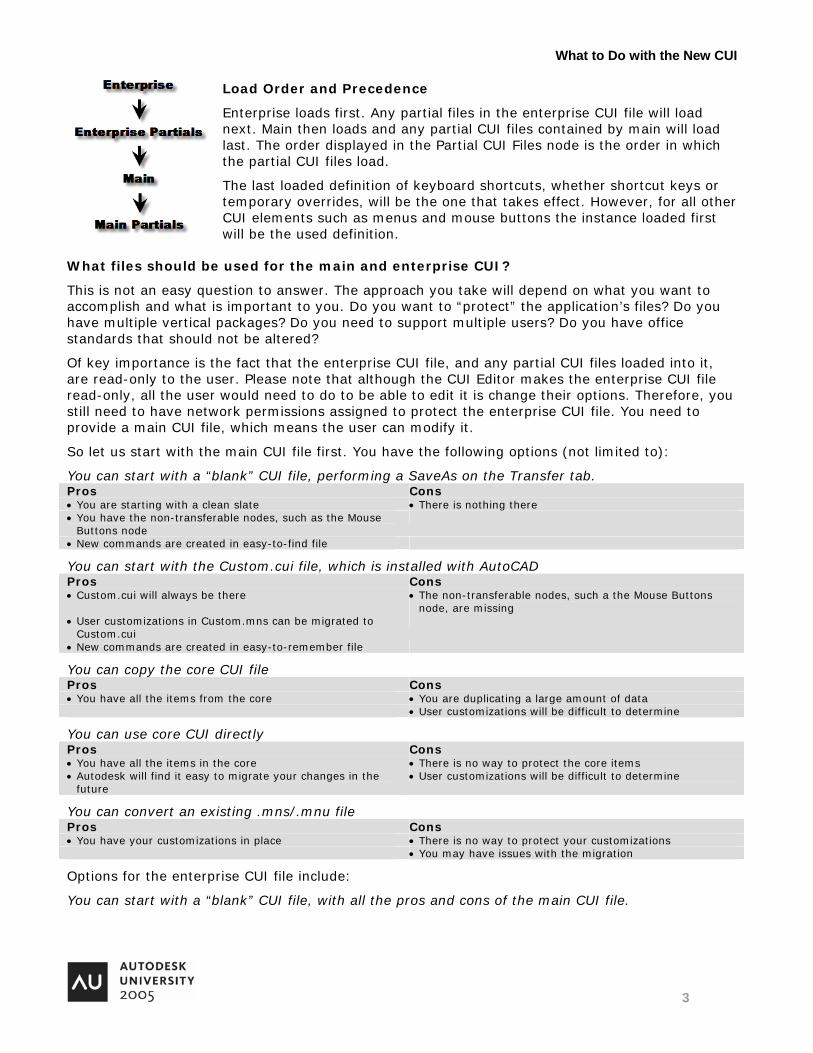
Load Order and Precedence
Enterprise loads first. Any partial files in the enterprise CUI file will load next. Main then loads and any partial CUI files contained by main will load last. The order displayed in the Partial CUI Files node is the order in which the partial CUI files load.
The last loaded definition of keyboard shortcuts, whether shortcut keys or temporary overrides, will be the one that takes effect. However, for all other CUI elements such as menus and mouse buttons the instance loaded first will be the used definition.
What files should be used for the main and enterprise CUI?
This is not an easy question to answer. The approach you take will depend on what you want to accomplish and what is important to you. Do you want to “protect” the application’s files? Do you have multiple vertical packages? Do you need to support multiple users? Do you have office standards that should not be altered?
Of key importance is the fact that the enterprise CUI file, and any partial CUI files loaded into it, are read-only to the user. Please note that although the CUI Editor makes the enterprise CUI file read-only, all the user would need to do to be able to edit it is change their options. Therefore, you still need to have network permissions assigned to protect the enterprise CUI file. You need to provide a main CUI file, which means the user can modify it.
So let us start with the main CUI file first. You have the following options (not limited to):
You can start with a “blank” CUI file, performing a SaveAs on the Transfer tab. Pros Cons • You are starting with a clean slate • There is nothing there • You have the non-transferable nodes, such as the Mouse
Buttons node
• New commands are created in easy-to-find file
You can start with the Custom.cui file, which is installed with AutoCAD Pros Cons • Custom.cui will always be there • The non-transferable nodes, such a the Mouse Buttons
node, are missing • User customizations in Custom.mns can be migrated to
Custom.cui
• New commands are created in easy-to-remember file
You can copy the core CUI file Pros Cons • You have all the items from the core • You are duplicating a large amount of data • User customizations will be difficult to determine
You can use core CUI directly Pros Cons • You have all the items in the core • There is no way to protect the core items • Autodesk will find it easy to migrate your changes in the
future • User customizations will be difficult to determine
You can convert an existing .mns/.mnu file Pros Cons • You have your customizations in place • There is no way to protect your customizations • You may have issues with the migration
Options for the enterprise CUI file include:
You can start with a “blank” CUI file, with all the pros and cons of the main CUI file.
What to Do with the New CUI
4
You can convert an existing .mns/.mnu file Pros Cons • You have your customizations in place • If you intend to have office-standard workspaces the core
CUI will need to be partial • Your customizations are protected • You may have issues with the migration • Multiple vertical products will require multiple office CUI
files
You can use the core CUI file directly Pros Cons • You have all the items in the core • Your customizations will be difficult to determine • Autodesk will find it easy to migrate your changes in the
future if in default location • Deployment could be an issue
• The core will be protected
What approach is best for you?
Do you shudder at giving someone the ability to edit the core CUI file? Yes No • Make it part of the enterprise CUI structure • Make it part of the main CUI structure
Do you need to be able to override some of the core CUI file such a shortcut menus? Yes No • Make it partial to the main or enterprise CUI file • Determine its location in the structure using other criteria
Do you have office standards that must be supported? Yes No • Make them part of the enterprise CUI structure • You do not need an office CUI file
Do you need to support multiple vertical packages? Yes No • The CUI structure will be more complicated • The CUI structure can be simplified
Sample CUI approaches
No standard workspaces Standard workspaces Standard workspaces, vertical support
What to Do with the New CUI
5
Migration
The CUI file dialog boxes can be changed to show legacy menu files. You load the menu file and it is converted into a CUI file. The CUI file will be used after the conversion, not the original menu file.
You need to make sure the icons used by the legacy menu are found on AutoCAD’s search path before you migrate the menu.
Migration of legacy files will work well if your menu files do not contain errors in them. One way to reduce errors is to use the .mns file to perform the migration instead of the .mnu file. If a migration fails, examine the source file for errors.
A very common error is to have an incorrect menu group name. The menu group name is not intended to duplicate the filename of the menu. A menu group name is limited to 32 characters and cannot contain spaces or punctuation marks.
Incorrect: ***MENUGROUP=C:\Acad Customizations\Menu\My Special Menu.mnu
Correct: ***MENUGROUP=MyMenu
You cannot have different CUI files with the same name (menu group name) loaded at the same time. Another source of errors is to use the same ID for different menu macros.
Backup
Always save a backup of your CUI files before you edit them. I simply keep a zip file in the same folder as the CUI files and drop the CUI files into the zip file before editing.
On occasion, you may find that you need to restore the original CUI files that were installed with AutoCAD. The original CUI files are available in the C:\Program Files\AutoCAD 2006\UserDataCache\Support folder. UserDataCache is a hidden folder. There is no need to reinstall AutoCAD simply to restore the original CUI files.
Create a workspace to store the interface so that you can retrieve it if needed. This will be covered in more detail in the Workspaces section.
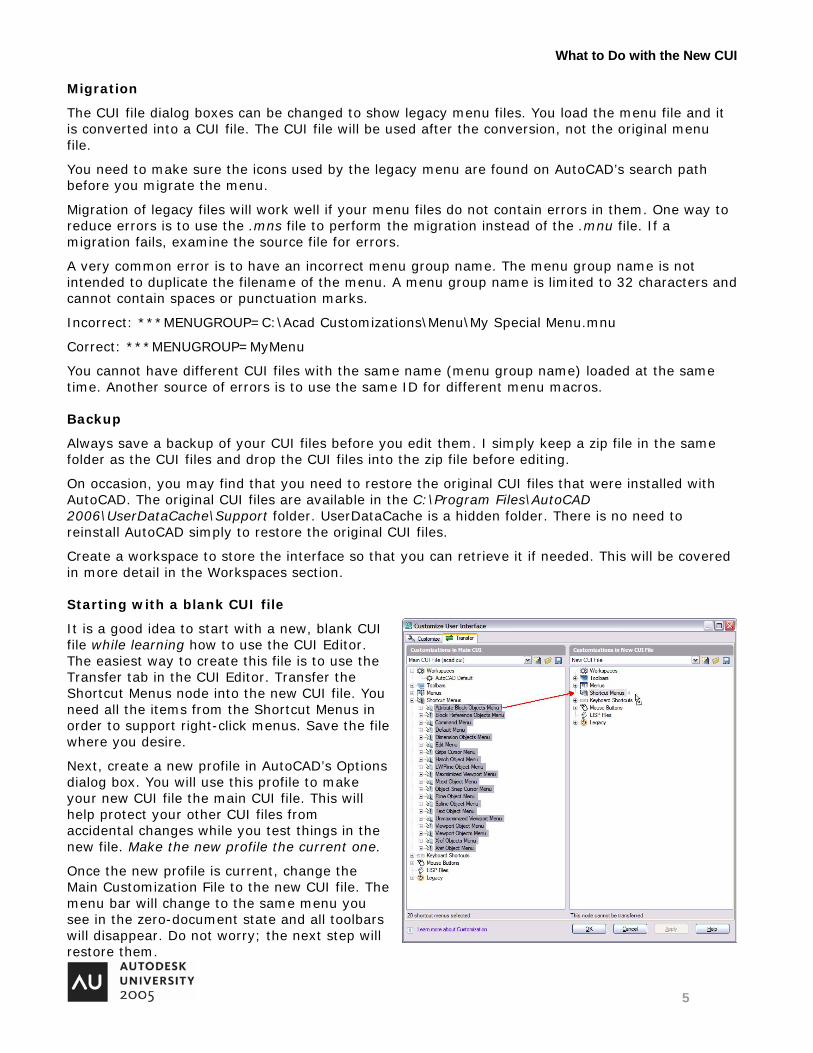
Starting with a blank CUI file
It is a good idea to start with a new, blank CUI file while learning how to use the CUI Editor. The easiest way to create this file is to use the Transfer tab in the CUI Editor. Transfer the Shortcut Menus node into the new CUI file. You need all the items from the Shortcut Menus in order to support right-click menus. Save the file where you desire.
Next, create a new profile in AutoCAD’s Options dialog box. You will use this profile to make your new CUI file the main CUI file. This will help protect your other CUI files from accidental changes while you test things in the new file. Make the new profile the current one.
Once the new profile is current, change the Main Customization File to the new CUI file. The menu bar will change to the same menu you see in the zero-document state and all toolbars will disappear. Do not worry; the next step will restore them.
What to Do with the New CUI
6
Open the CUI Editor. Select the Partial CUI Files node. Browse to your Support folder and select the Acad.cui file. The editor will display the Acad.cui file in the Customizations pane. Select the Main CUI File in the drop down list. Expand the Partial CUI Files node to verify that Acad.cui is partial to the main CUI file.
Close the CUI Editor. All of AutoCAD’s standard menus and toolbars will redisplay.
It all starts with Commands
One of the key differences of the CUI approach is how commands are obviously used in multiple places. A single command might be used by a toolbar, a menu item, and even a shortcut key. Commands are ultimately identified by their element ID. It is possible to have different commands with the same name, even in the same CUI file. Therefore, the element ID is important to uniquely identify different commands.
You can filter the list of commands. First, select just the main CUI file in the Customizations pane. Next, select Custom Commands in the Categories drop-down list in the Command List pane. Control elements may still appear in the command list. If so, simply select Custom Commands again.
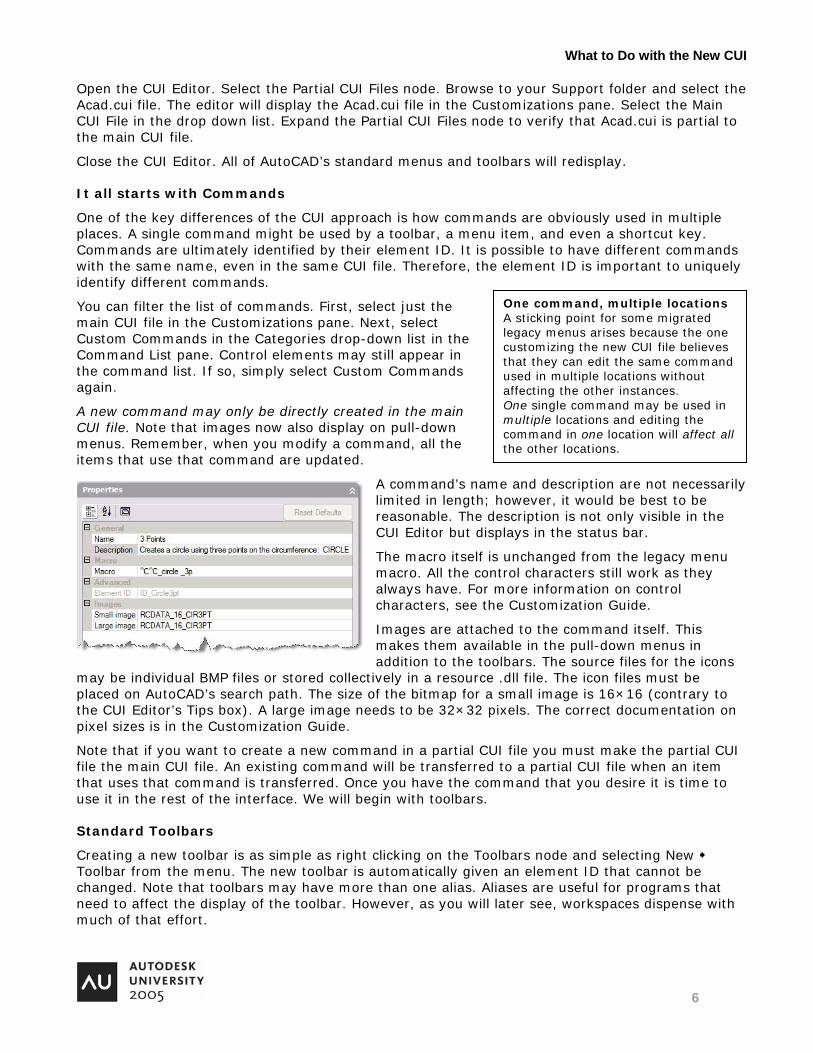
A new command may only be directly created in the main CUI file. Note that images now also display on pull-down menus. Remember, when you modify a command, all the items that use that command are updated.
A command’s name and description are not necessarily limited in length; however, it would be best to be reasonable. The description is not only visible in the CUI Editor but displays in the status bar.
The macro itself is unchanged from the legacy menu macro. All the control characters still work as they always have. For more information on control characters, see the Customization Guide.
Images are attached to the command itself. This makes them available in the pull-down menus in addition to the toolbars. The source files for the icons
may be individual BMP files or stored collectively in a resource .dll file. The icon files must be placed on AutoCAD’s search path. The size of the bitmap for a small image is 16×16 (contrary to the CUI Editor’s Tips box). A large image needs to be 32×32 pixels. The correct documentation on pixel sizes is in the Customization Guide.
Note that if you want to create a new command in a partial CUI file you must make the partial CUI file the main CUI file. An existing command will be transferred to a partial CUI file when an item that uses that command is transferred. Once you have the command that you desire it is time to use it in the rest of the interface. We will begin with toolbars.
Standard Toolbars
Creating a new toolbar is as simple as right clicking on the Toolbars node and selecting New Toolbar from the menu. The new toolbar is automatically given an element ID that cannot be changed. Note that toolbars may have more than one alias. Aliases are useful for programs that need to affect the display of the toolbar. However, as you will later see, workspaces dispense with much of that effort.
One command, multiple locations A sticking point for some migrated legacy menus arises because the one customizing the new CUI file believes that they can edit the same command used in multiple locations without affecting the other instances. One single command may be used in multiple locations and editing the command in one location will affect all the other locations.
What to Do with the New CUI
7
Once the toolbar has been created, it is simply a matter of drag-and-drop to place commands on the toolbar. Select a command from the Command List pane. Drag the selected command up to the desired toolbar. If the toolbar is currently empty, drop the command on to the toolbar name. Otherwise, drop the command in the desired location amongst the current commands on the toolbar. Reorganize the order of the icons on a toolbar by dragging-and-dropping the commands into the desired order.
The natural inclination, when you select a command on the toolbar list, is that you can
modify the command for just that instance on the toolbar. Once again, however, you must recognize that the command may be used in multiple locations.
If you drag a command from a partial or enterprise CUI file a copy of the command is created in the main CUI file. In order to see the copied command you need to exit the editor and reenter the editor. This issue will be resolved in the future.
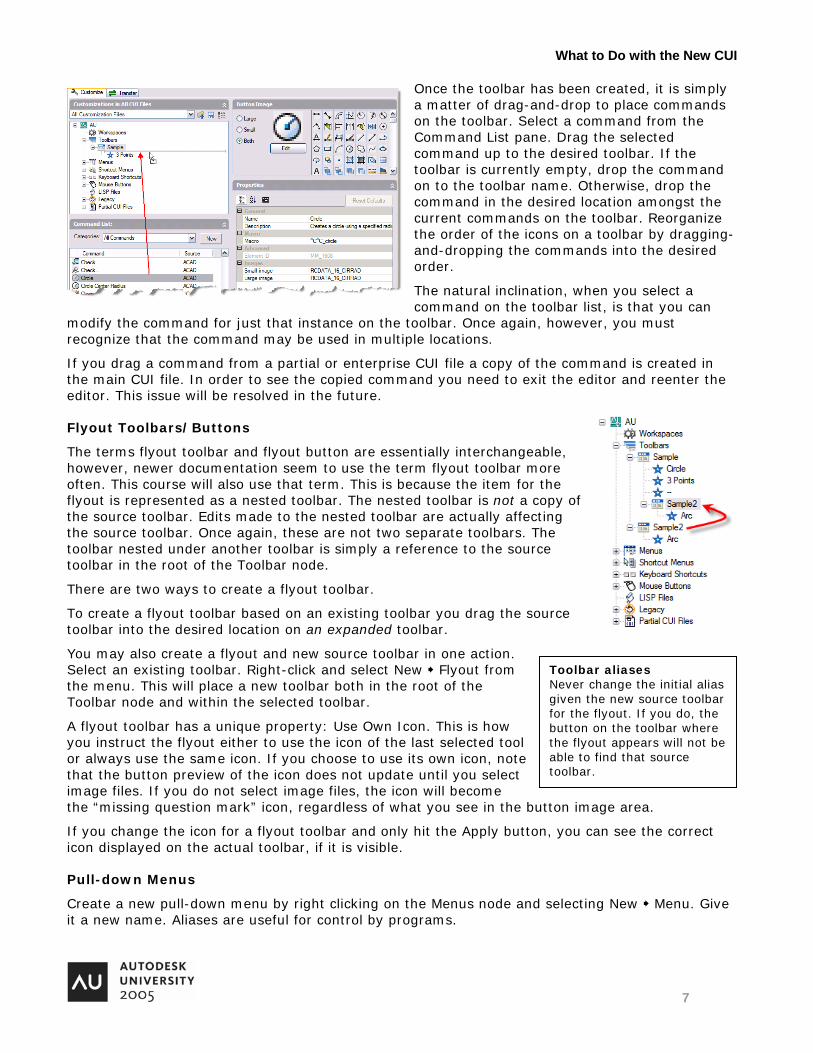
Flyout Toolbars/Buttons
The terms flyout toolbar and flyout button are essentially interchangeable, however, newer documentation seem to use the term flyout toolbar more often. This course will also use that term. This is because the item for the flyout is represented as a nested toolbar. The nested toolbar is not a copy of the source toolbar. Edits made to the nested toolbar are actually affecting the source toolbar. Once again, these are not two separate toolbars. The toolbar nested under another toolbar is simply a reference to the source toolbar in the root of the Toolbar node.
There are two ways to create a flyout toolbar.
To create a flyout toolbar based on an existing toolbar you drag the source toolbar into the desired location on an expanded toolbar.
You may also create a flyout and new source toolbar in one action. Select an existing toolbar. Right-click and select New Flyout from the menu. This will place a new toolbar both in the root of the Toolbar node and within the selected toolbar.
A flyout toolbar has a unique property: Use Own Icon. This is how you instruct the flyout either to use the icon of the last selected tool or always use the same icon. If you choose to use its own icon, note that the button preview of the icon does not update until you select image files. If you do not select image files, the icon will become the “missing question mark” icon, regardless of what you see in the button image area.
If you change the icon for a flyout toolbar and only hit the Apply button, you can see the correct icon displayed on the actual toolbar, if it is visible.
Pull-down Menus
Create a new pull-down menu by right clicking on the Menus node and selecting New Menu. Give it a new name. Aliases are useful for control by programs.
Toolbar aliases Never change the initial alias given the new source toolbar for the flyout. If you do, the button on the toolbar where the flyout appears will not be able to find that source toolbar.
What to Do with the New CUI
8
Commands are added to the menu in the same fashion that they are added to toolbars, with a drag-and-drop operation. This is, of course, only a reference back to the actual command. Any changes you make to the apparent menu item are being made to the command. Therefore, if that command is referenced anywhere else, the changes affect all instances.
However, this does not mean that you cannot control the display of the menu items. You can still disable items and/or checkmark them.
To disable a command on the pull-down menus, place a tilde (~) at the beginning of the
command name. This will not disable toolbar buttons where this command is used.
Menu commands can also be marked with a check mark or a border. A check mark will be displayed where a command does not have an image. Commands that do have an image will receive a border around the icon. Mark commands by placing an exclamation point and a period (!.) at the beginning of the command name.
Visual LISP can affect the menu item label thru the use of the menucmd function. DIESEL commands still operate correctly in a command name to affect the display of the pull-down items. DIESEL expressions are supported in the command name. For instance, the following command name, on the pull-down menu, is grayed out when a command is active.
$(if,$(getvar,CmdActive),~)3 Points
The menu access key is defined by placing an ampersand (&) in front of the character desired. This will give the user the ability to execute the menu item by using Alt+<character>.
You may also move part of the label to the right side of the menu by using “\t” in the command name.
Shortcut Menus
Shortcut menus are a commonly edited feature. However, they can also be one of the trickiest parts of the CUI editing and setup. If your main (or enterprise) CUI file does not have shortcut menus then you need to copy all the shortcut menus to the main CUI file and “wake” AutoCAD to the new additions. The Transfer tab makes this easy.
For example, assume you want to add a shortcut menu for line objects. Create a new shortcut menu. Add the alias “OBJECT_LINE” to the new menu. This will cause the menu to be added to the Edit menu when a line object is gripped. If you want the menu to appear when multiple lines are selected use the alias “OBJECTS_LINE”. Add whatever commands you desire to the new menu.
If you test your changes at this point, they would not appear. AutoCAD is still using the original context menus and will continue to do so even if you restart AutoCAD. To “wake” AutoCAD to the new context menu you need to detach the Acad.cui file and test your changes. They should appear at this time. Reattach the Acad.cui file and your edits will still be in effect.
What to Do with the New CUI
9
Keyboard Shortcuts
There are two types of keyboard shortcuts. The definitions in the Accelerator section from a legacy menu are now called Shortcut Keys. This is where you would make keystroke-based commands such as defining F4 to use an OSnap such as EndP. Temporary Override Keys are a new feature for AutoCAD 2006. For example, you would use the Shift key during a command to temporarily toggle Ortho.
Shortcut Keys
You need to use drag-and-drop to add a new shortcut key. If you right-click on the Keyboard Shortcuts or Shortcut Keys node and select New, shortcut keys are not an option. However, to create a new shortcut key all you need to do is drag-and-drop a command on to the Shortcut Keys node. You then edit the Key(s) property to assign a keystroke combination to the command. Take note of whether the keystroke combination already exists.
At times, you want to overwrite the current definition of a shortcut key. Remember that the last assignment of the keystroke combination is the one that takes precedence. Therefore, the CUI file that holds your overrides will need to load after the CUI files that contain the original definitions. This is an improvement over legacy menus, as the initial definition was the one that took precedence. Depending on the CUI file structure you have, you may decide to have a separate CUI file for just shortcut keys!
There are a few keystroke combinations that you are unable to enter in the CUI Editor, e.g. Ctrl+F1, Ctrl+F4, Ctrl+F6, and Ctrl+F10. However, a migrated .mns file with those accelerator keys defined will import correctly. Import a temporary .mns file and transfer the definitions if you want to make those definitions in the CUI Editor.
Temporary Override Keys
Temporary overrides provide a toggle while commands are active. While the keystroke combination is being pressed, the override is in effect. It is possible to make the override perform another macro when the keystroke combination is released.
Most of the typical overrides do not need the Key Up macro to reset the original condition overridden. For those cases where the override is not reset, the Key Up macro is useful.
Temporary override keys follow the same precedence rules as shortcut keys.
Mouse Buttons
Mouse buttons too are a drag-and-drop operation. Many of today’s mice sport more than two buttons (not including the wheel). However, although the CUI Editor would seem to support more than two buttons, you will find that those extra button assignments are ignored. Autodesk claims
What to Do with the New CUI
10
issues with the drivers for the mice. Whatever the real cause is, you are better off making assignments to buttons with the mouse driver rather than the CUI Editor.
LISP Files
The .mnl files load automatically with the CUI file of the same name. However, you may also load any LISP-based files along with the CUI file. This can reduce the number of autoload statements you may have had in the .mnl file.
Legacy Elements
Some features of the user interface are being depreciated. These items are still supported by the CUI Editor, but it is obvious that these elements may not be around forever. You may still need to maintain these elements so the editor provides for this.
Tablet Menus
Tablet menus will usually be migrated from a legacy menu into the CUI. However, it is still possible to create a tablet menu directly in the CUI Editor. Tablet menu commands are added in the same manner as the rest of the CUI customizations.
Tablet Buttons
Tablet buttons assignments are made in the same manner as mouse buttons. If you are having issues getting the buttons to work, be sure that the button has an alias assigned to it.
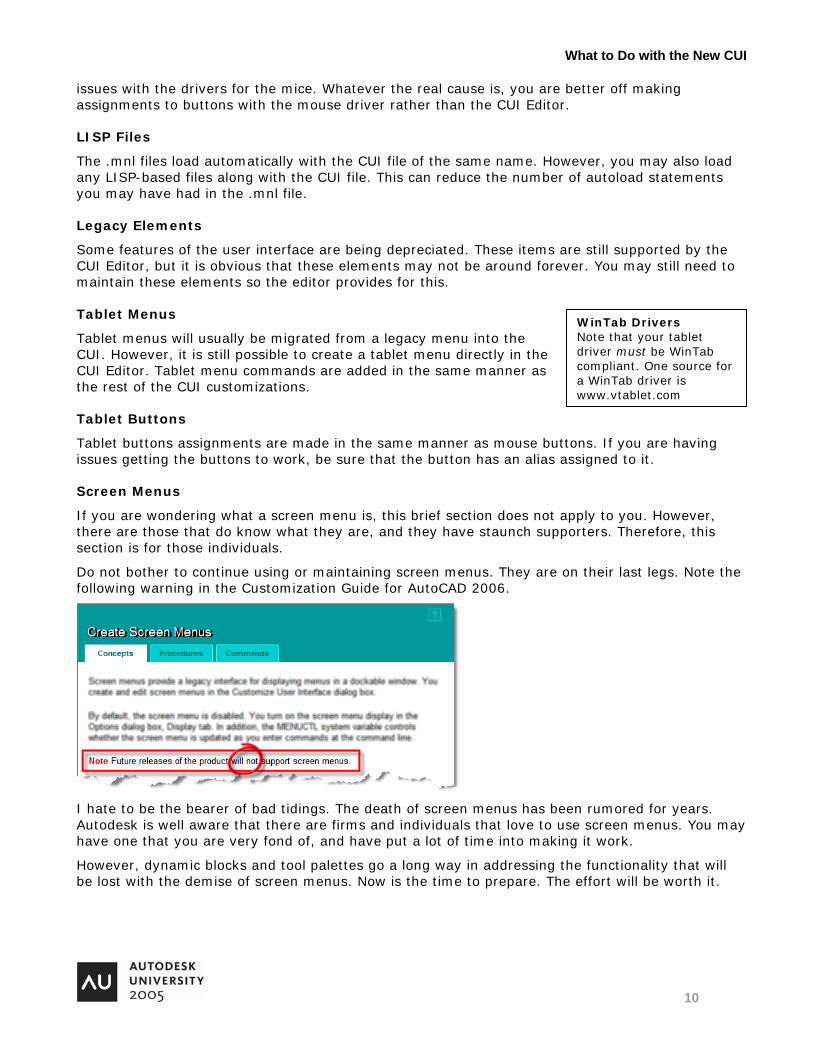
Screen Menus
If you are wondering what a screen menu is, this brief section does not apply to you. However, there are those that do know what they are, and they have staunch supporters. Therefore, this section is for those individuals.
Do not bother to continue using or maintaining screen menus. They are on their last legs. Note the following warning in the Customization Guide for AutoCAD 2006.
I hate to be the bearer of bad tidings. The death of screen menus has been rumored for years. Autodesk is well aware that there are firms and individuals that love to use screen menus. You may have one that you are very fond of, and have put a lot of time into making it work.
However, dynamic blocks and tool palettes go a long way in addressing the functionality that will be lost with the demise of screen menus. Now is the time to prepare. The effort will be worth it.
WinTab Drivers Note that your tablet driver must be WinTab compliant. One source for a WinTab driver is www.vtablet.com
What to Do with the New CUI
11
Image Tile Menus
Image tile menus are still supported. Creating a new image tile also requires a command to display the image menu from a pull-down menu or toolbar. The macro should include the menu name, which you find in the CUI Editor at root node of a CUI file. A sample macro follows, which uses “au” as the menu name:
^C^C$I=au.au_image;$I=au.*;
Unique properties of commands assigned to image tile menus are Slide library and Slide label. The slide library or slide file used for image tile menus needs to be located in either AutoCAD’s support path or the same location as the CUI file. You specify individual slide files in the Slide label property.
Working with Workspaces
Although you can modify the CUI without using workspaces, you must not ignore them. At the very least, you should create a workspace of your CUI as a default. As you edit the CUI, it is far too easy to alter the interface unintentionally such as removing menus from the menu bar. Migrating a legacy menu that used menu swapping will display all the pull-down menus on the menu bar, so a workspace is needed to control the visible menus. In addition, menus added at later periods in time will often not display automatically on the menu bar. Therefore, you need to use workspaces to manage those menus.
Workspaces may be stored in any CUI file, however, only the main and enterprise CUI file’s workspaces are available. The enterprise CUI file is the perfect place to create workspaces that need to be available on every user’s workstation.
Right click on the Workspaces node and select New Workspace. A new workspace has some unfamiliar properties. • Start On: This permits you to switch the active layout when you select the workspace. • Model/Layout tabs: Choose to display or hide the layout tabs. • Screen menus: Forget it. Lose screen menus. • Scroll bars: Why does anyone use scroll bars when we have real-time pan/zooms?
Workspaces also control Dockable Windows, such as the Properties palette. Many of properties for these windows can be set to “Do not change”. This is perfect in the case of workspaces assigned by the enterprise CUI file. When you set the properties to that option the workspace will not change
What to Do with the New CUI
12
that property from what the user has set. It is a very good idea to dock toolbars that are controlled by an enterprise workspace. If they are set to float, the user will get floating toolbars every time that workspace is made active. In addition, floating toolbars depend on the resolution of the screen, rather than the application window size.
Positioning and locking toolbars with both a main and enterprise CUI file is still problematic.
Note: If workspaces are only defined in the enterprise CUI file initially, there can be an error when the user attempts to save their first workspace to the main CUI file. You have an option to avoid the error: create the workspace in the CUI Editor.
You change the elements in the workspace using the Customize Workspace button in the Workspace Contents pane. The elements in the pane turn blue. The elements in the Customizations pane display with check boxes. Use those check boxes to add elements to the workspace. Change the display order of the chosen elements in the Workspace Contents pane using drag-and-drop.
The Workspace toolbar provides access to all your workspaces and the general settings for workspaces (the left button). This toolbar provides an excellent mechanism to switch the interface instead of using a pull-down menu to swap other pull-down menus.
Bonus: There may be cases where you want a list of the workspaces defined in a CUI file. Remember, a CUI file is simply an XML file. You can use Microsoft’s XML interface to return a list of workspaces.
Private Function GetWorkspaces(CUIFilename As String) As Variant Dim myXML As DOMDocument Set myXML = New MSXML2.DOMDocument myXML.Load CUIFilename Dim myList As MSXML2.IXMLDOMNodeList Set myList = myXML.getElementsByTagName("WorkspaceConfig") Dim myCount As Long myCount = myList.Length - 1 Dim resList As Variant ReDim resList(0 To myCount) As String Dim i As Long For i = 0 To myCount resList(i) = myList.Item(i).text Next i GetWorkspaces = resList End Function
Conclusion
The CUI will make the actual customization process a matter of drag-and-drop, as long as you understand how it works. “Do not over-think the CUI.” This course will help you use the CUI with confidence.