16
E X C L U S I V E WINTER IN THE COUNTRY by Donna Hodson
EX
CLUSIVE
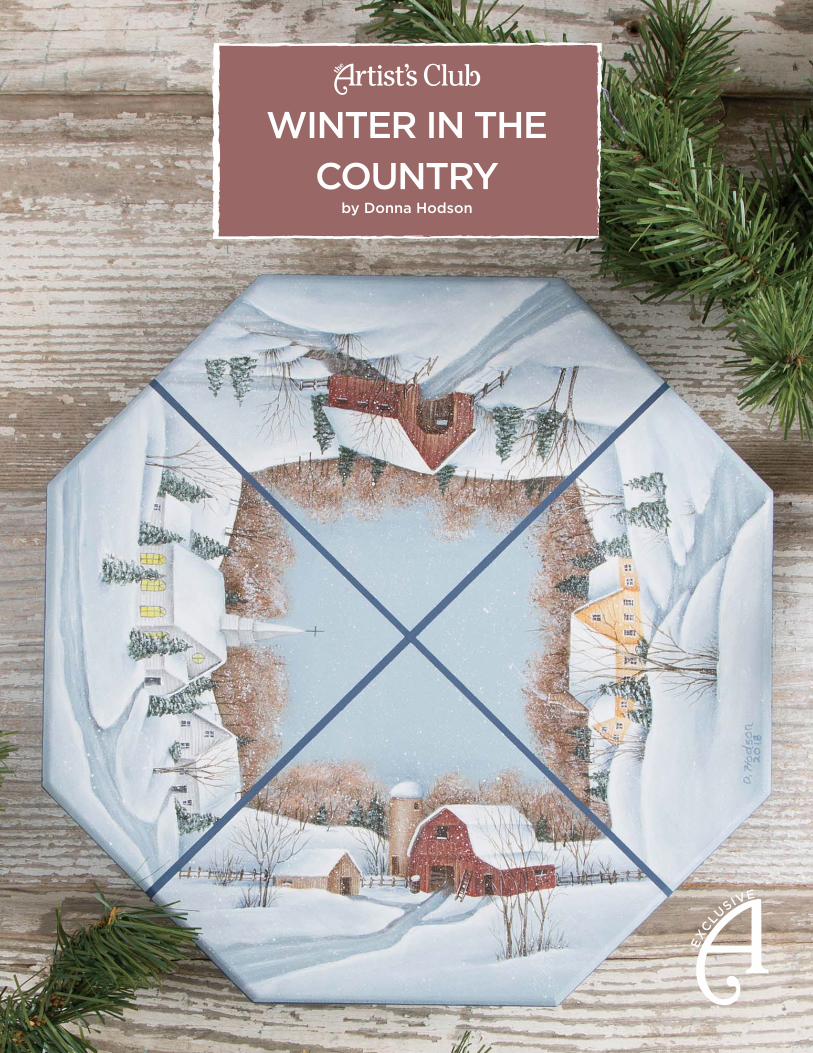
WINTER IN THE COUNTRY
by Donna Hodson

2 | artistsclub.com
PALETTEDecoArt Americana AcrylicAntique Gold #13009Burnt Sienna #13063Burnt Umber #13064Colonial Blue #13613Graphite #13161 Grey Sky #13111Heritage Brick #13219Khaki Tan #13173Midnight Green #13084Moon Yellow #13007Raw Sienna #13093Slate Grey #13068Snow (Titanium) White 8 oz #13532Traditional Burnt Umber #13221Uniform Blue #13086Winter Blue #13190Yellow Light #13144
SURFACEOcto Lazy Susan #63161
MISC. SUPPLIESWhite Graphite Paper 18x36 #70139Gray Graphite Paper 18x36 #70141Metal Palette Knife #70194Soft Grip Embossing & Stylus set of 3 #70125Pro Art Tracing Roll #83175Brush Basin #70174Royal Palette Paper—40 sheets #70560Multi Purpose Sealer #87392JoSonja Poly Matte Varnish #84104220 fi ne sandpaper3M Flexible Sandpaper (found at home improvement stores)Clear plastic rulerChalk pencil #702003/4" Scotch Magic Tape
BRUSHESPapillon by the Artist’s ClubGlaze Wash size 1 inch #20103Shader size 1 #20124Shader size 2 #20125Shader size 8 #20129Shader size 14 #20132Angular Shader size 1/2 inch #20111Script Liner size 6/0 #201381/4" to 3/8" bristle type Stipple brush (#20172) or Deerfoot (#20167)
Spatter brush of choice
PREPARATIONI unscrewed the turn mechanism from the bottom of the turntable and saved the screws.
Sand the front, back, and edges of the lazy Susan with 220 fi ne sandpaper. Sand the bottom and edges of the mechanism.
Mix Multi Purpose Sealer + Winter Blue and paint the top, sides, and bottom of the lazy Susan and the mechanism part. Dry and then sand lightly to smooth with a piece of the 3M – P320 Flexible sandpaper. Remove any residue and paint all areas again with Winter Blue without any sealer added.
Measure carefully and divide the lazy Susan top into 4 equal parts using the C-thru ruler and draw lines with the chalk pencil.
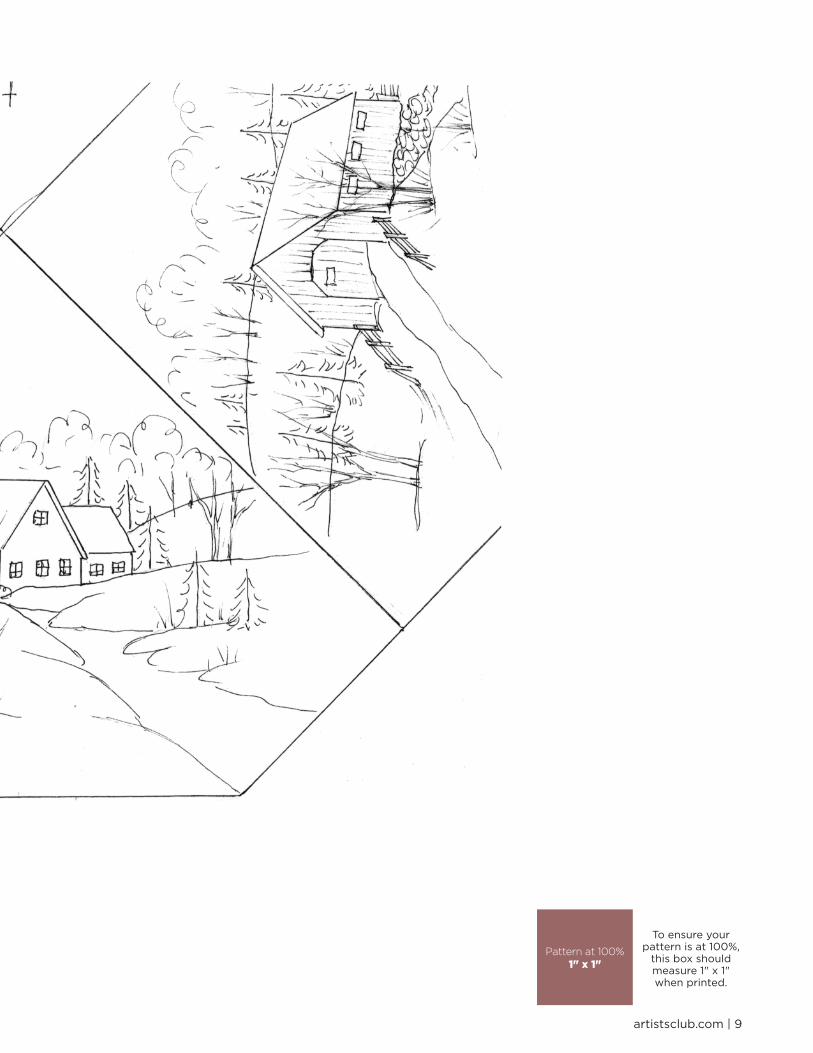
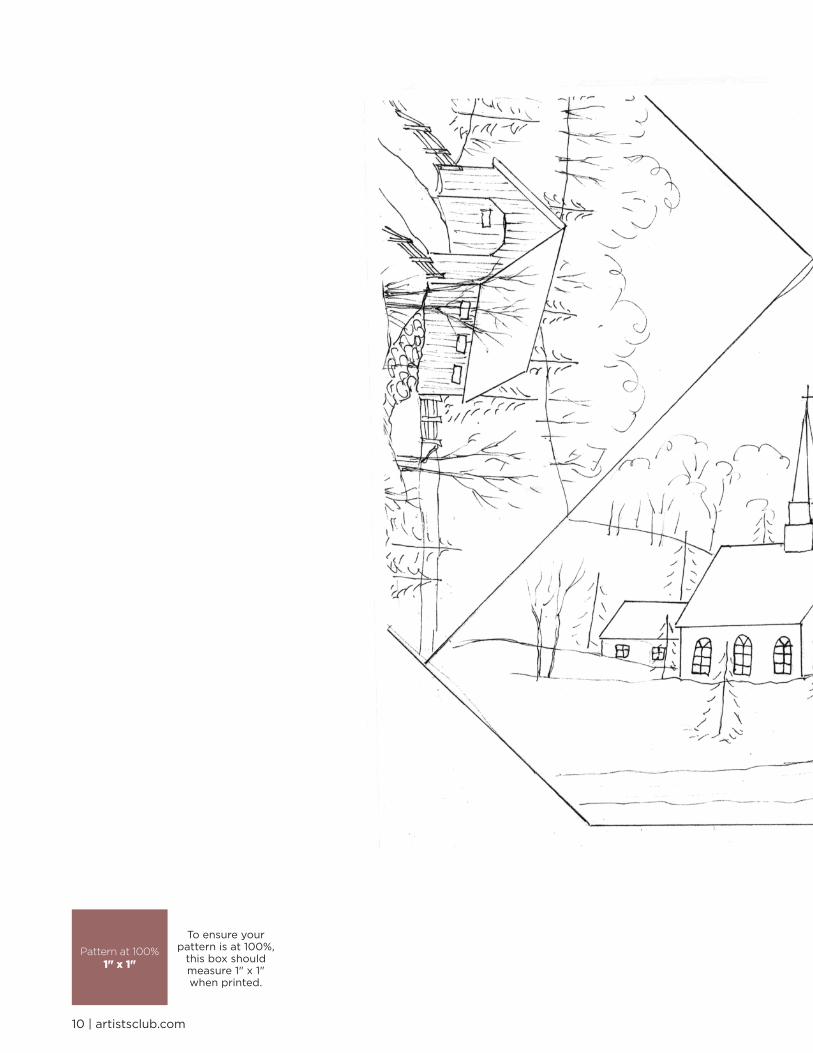
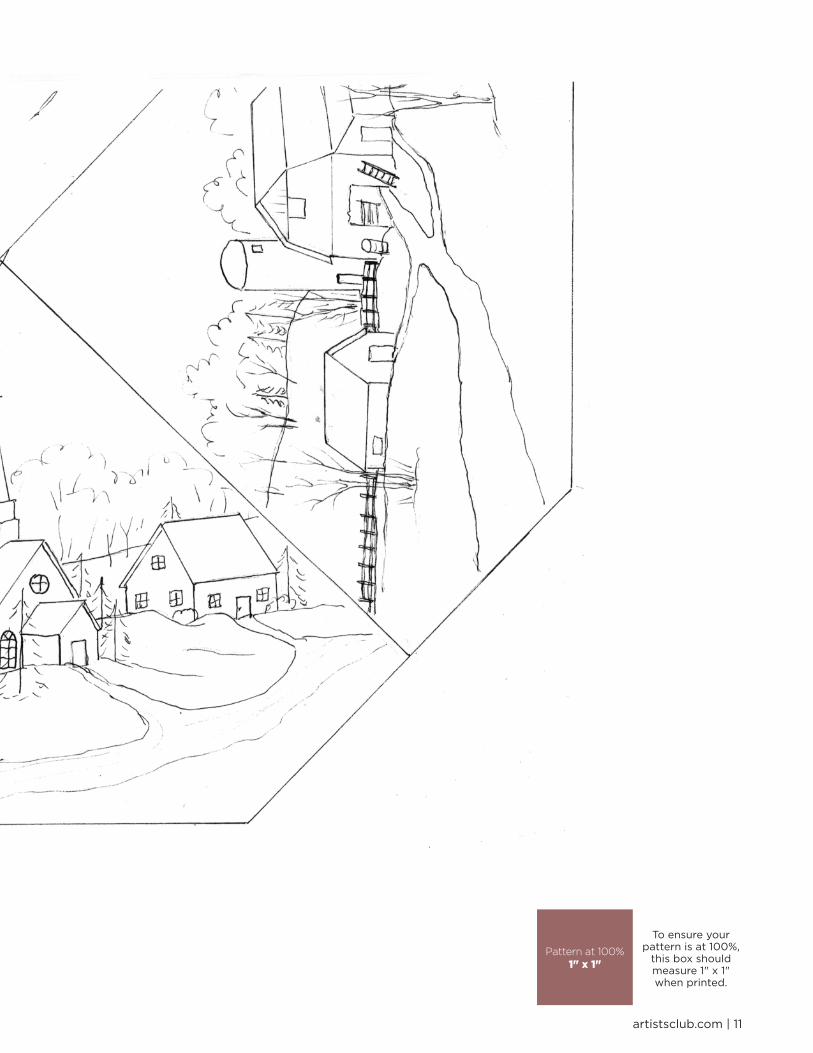
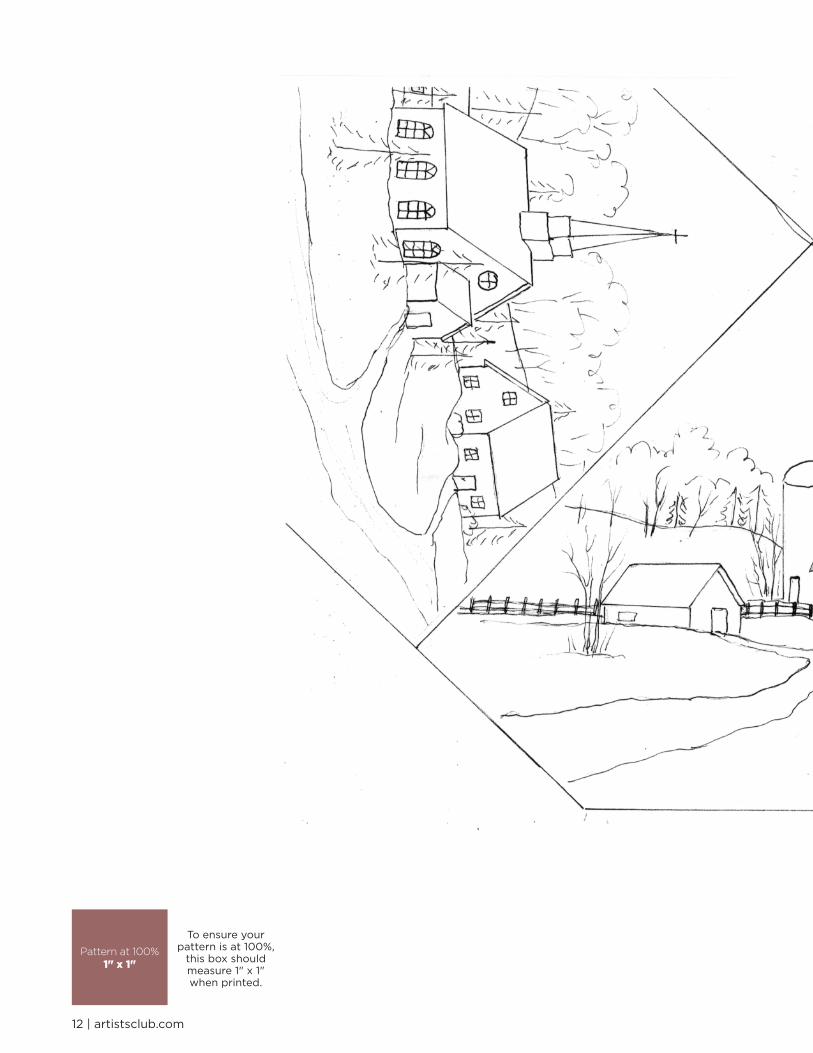
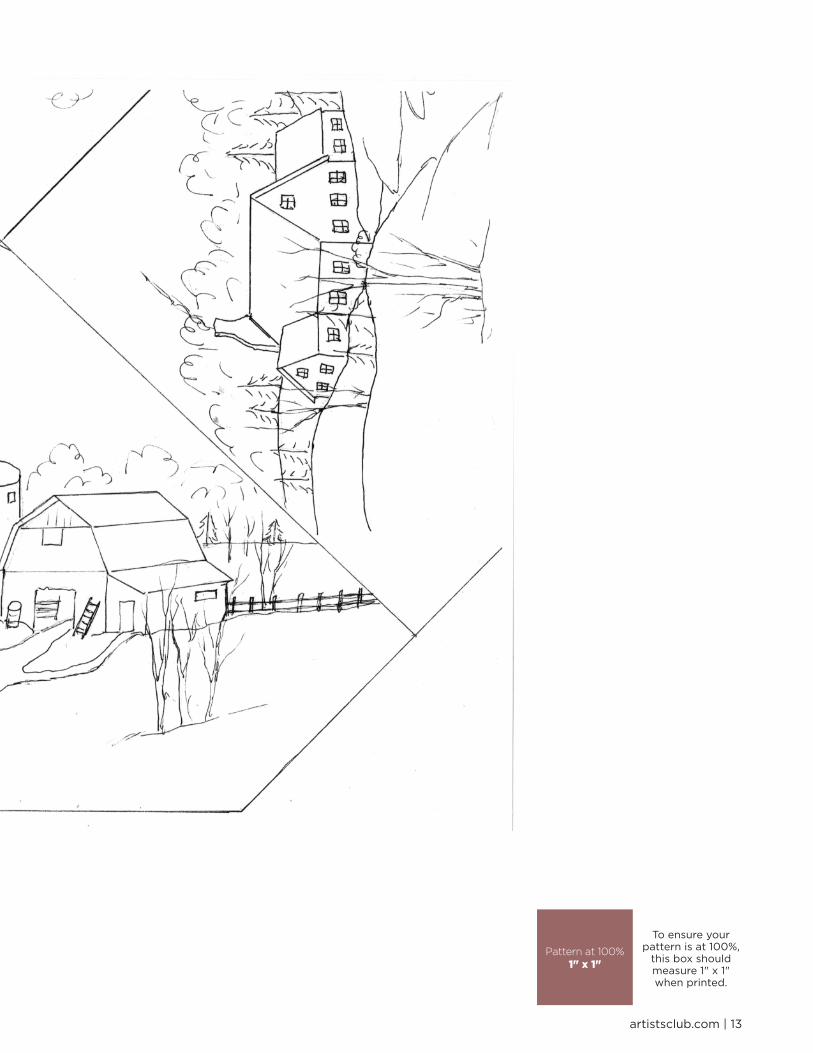
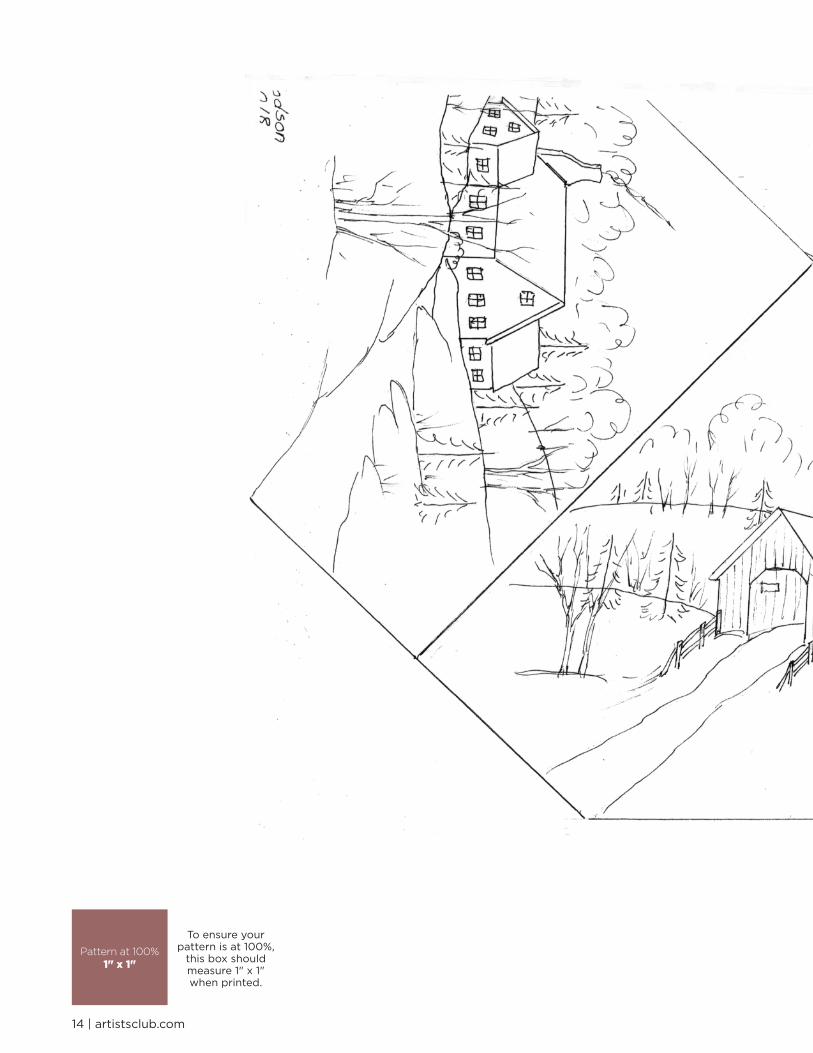
Trace the scenes on tracing paper and transfer to the surface using either white or older grey graphite with a stylus. Do not add any windows or slats on the buildings. Lightly transfer the horizon lines, hills, snow mound sections and roads or paths. Leave off the trees for now.
PAINTING INSTRUCTIONSBase CoatI base coated the buildings with one coat of paint to keep located while I painted the background trees.
1. Paint all the roofs and eaves with Snow White using the size 6 or 8 shader.
2. Paint the Barn and Bridge with one coat of Heri-tage Brick.
3. Paint the silo and out building by the barn with Khaki Tan
4. Paint the church, steeple and parsonage with a mix of Grey Sky + Snow White 1-1.
5. Paint the house with Moon Yellow
Float Colonial Blue behind the horizon lines and building roofs and walk the color up into the sky a bit. Repeat as needed.
Float this behind the snow mounds, hills, along both edges of the paths, roads, and stream. Be sure that your strokes stay horizontal with the bottom of each design on the paths, roads and especially the stream.
Winter In The Countryby Donna Hodson
artistsclub.com | 3
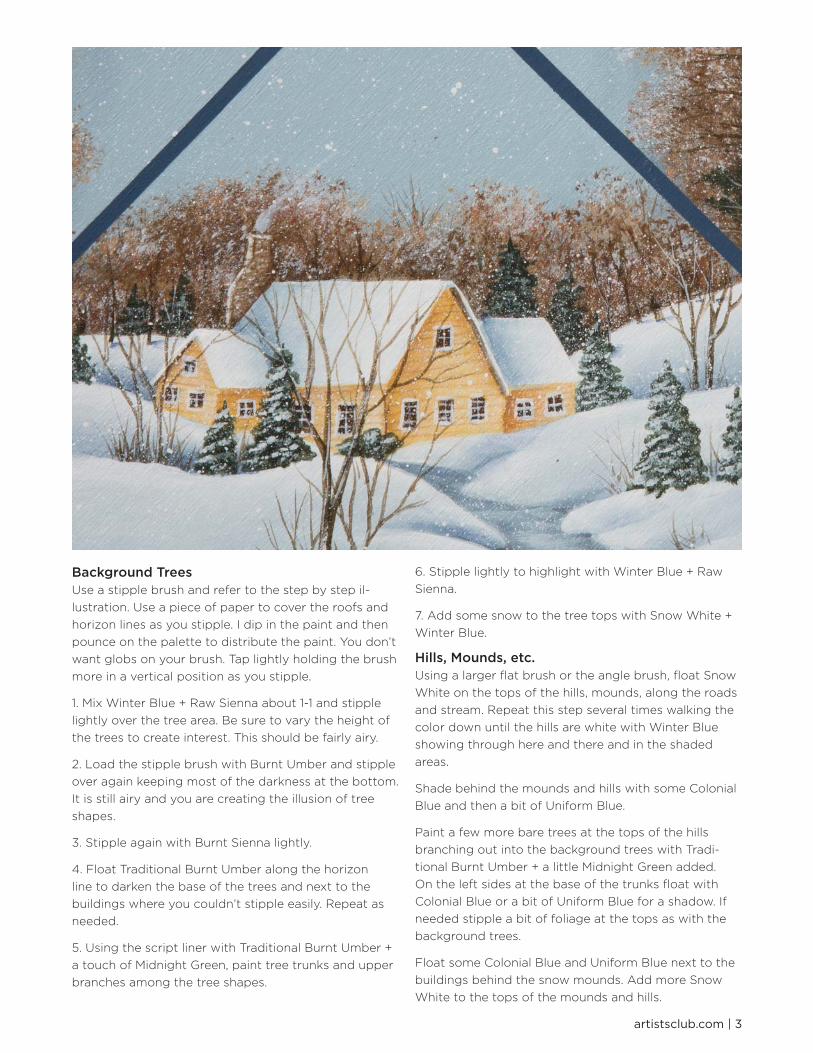
Background TreesUse a stipple brush and refer to the step by step il-lustration. Use a piece of paper to cover the roofs and horizon lines as you stipple. I dip in the paint and then pounce on the palette to distribute the paint. You don’t want globs on your brush. Tap lightly holding the brush more in a vertical position as you stipple.
1. Mix Winter Blue + Raw Sienna about 1-1 and stipple lightly over the tree area. Be sure to vary the height of the trees to create interest. This should be fairly airy.
2. Load the stipple brush with Burnt Umber and stipple over again keeping most of the darkness at the bottom. It is still airy and you are creating the illusion of tree shapes.
3. Stipple again with Burnt Sienna lightly.
4. Float Traditional Burnt Umber along the horizon line to darken the base of the trees and next to the buildings where you couldn’t stipple easily. Repeat as needed.
5. Using the script liner with Traditional Burnt Umber + a touch of Midnight Green, paint tree trunks and upper branches among the tree shapes.
6. Stipple lightly to highlight with Winter Blue + Raw Sienna.
7. Add some snow to the tree tops with Snow White + Winter Blue.
Hills, Mounds, etc.Using a larger fl at brush or the angle brush, fl oat Snow White on the tops of the hills, mounds, along the roads and stream. Repeat this step several times walking the color down until the hills are white with Winter Blue showing through here and there and in the shaded areas.
Shade behind the mounds and hills with some Colonial Blue and then a bit of Uniform Blue.
Paint a few more bare trees at the tops of the hills branching out into the background trees with Tradi-tional Burnt Umber + a little Midnight Green added. On the left sides at the base of the trunks fl oat with Colonial Blue or a bit of Uniform Blue for a shadow. If needed stipple a bit of foliage at the tops as with the background trees.
Float some Colonial Blue and Uniform Blue next to the buildings behind the snow mounds. Add more Snow White to the tops of the mounds and hills.
4 | artistsclub.com
Fir TreesUse an old size 2 fl at or brush that works for you. A few of these need to be painted after the buildings are completed.
1. Using Midnight Green, place a vertical trunk line for the tree.
2. Using a slightly downward side to side stroke, paint down from the top gradually widening the strokes as you reach the bottom of the tree. Try to have both sides match. You want the outer edges a bit irregular.
3. Repeat with the strokes of Midnight Green mak-ing sure the tree is opaque in the center and have the edges irregular. This might take two applications in the center. For the trees not behind a snow mound, create irregular branches at the bottom across the front of the
tree.
4. Mix just a bit of Snow White into Midnight Green and tap on branches again to add highlight and defi ne the branches. These aren’t bright and overlap in an irregu-lar manner but in a downward direction. For the trees in the background this might be all the highlighting needed.
5. For the trees in the foreground, mix more Snow White with Midnight Green and highlight the branches again, more on the right side. You can also add a bit of Snow White to a few in the foreground.
6. To fi nish off some of the trees, fl oat a little Uniform Blue on the ground to the right side of the trees. Pull a little Snow White on the ground and up to the trees on the left side.
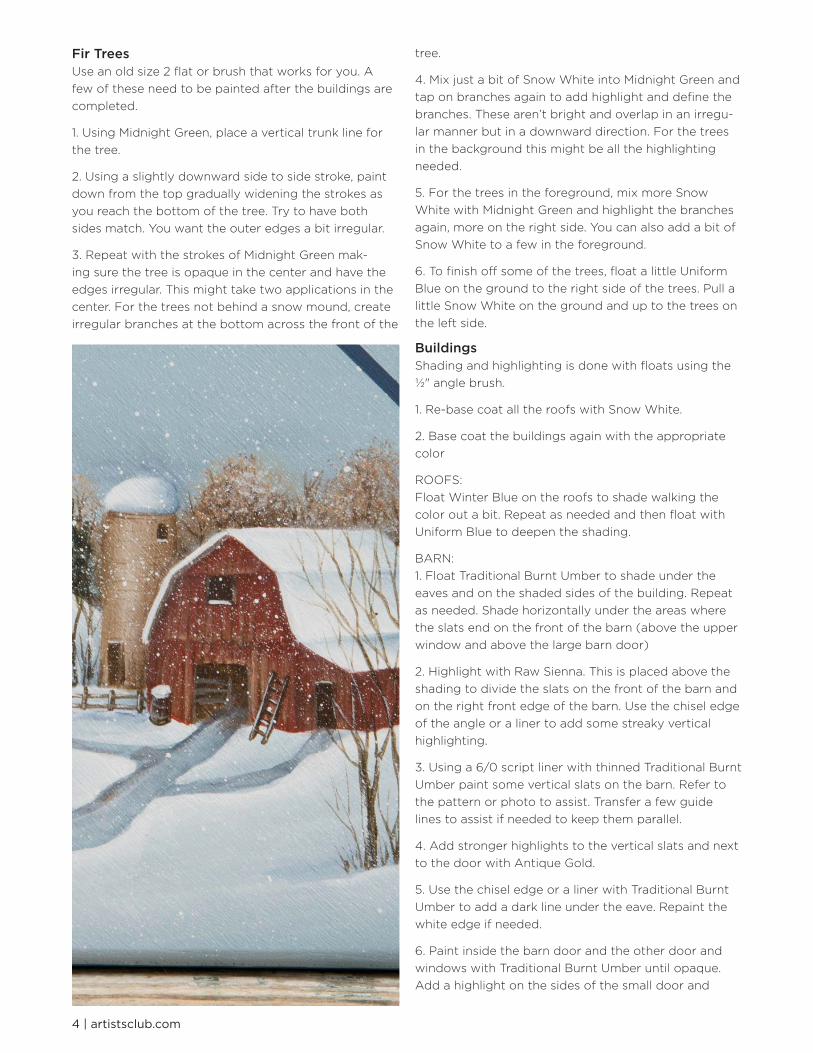
BuildingsShading and highlighting is done with fl oats using the ½" angle brush.
1. Re-base coat all the roofs with Snow White.
2. Base coat the buildings again with the appropriate color
ROOFS:Float Winter Blue on the roofs to shade walking the color out a bit. Repeat as needed and then fl oat with Uniform Blue to deepen the shading.
BARN:1. Float Traditional Burnt Umber to shade under the eaves and on the shaded sides of the building. Repeat as needed. Shade horizontally under the areas where the slats end on the front of the barn (above the upper window and above the large barn door)
2. Highlight with Raw Sienna. This is placed above the shading to divide the slats on the front of the barn and on the right front edge of the barn. Use the chisel edge of the angle or a liner to add some streaky vertical highlighting.
3. Using a 6/0 script liner with thinned Traditional Burnt Umber paint some vertical slats on the barn. Refer to the pattern or photo to assist. Transfer a few guide lines to assist if needed to keep them parallel.
4. Add stronger highlights to the vertical slats and next to the door with Antique Gold.
5. Use the chisel edge or a liner with Traditional Burnt Umber to add a dark line under the eave. Repaint the white edge if needed.
6. Paint inside the barn door and the other door and windows with Traditional Burnt Umber until opaque. Add a highlight on the sides of the small door and
artistsclub.com | 5
windows with Raw Sienna. Add a bit of snow at the bottom sill of the two windows with Winter Blue + Snow White.
7. Inside the large door, add some Khaki Tan to Tradi-tional Burnt Umber and paint a post with three stiles.
8. After the barn is fi nished, paint the barrel and ladder with Traditional Burnt Umber. Add highlights on the left sides and top of ladder stiles with Traditional Burnt Umber + Khaki Tan. Dab some Snow White + Winter Blue on top of the barrel.
OUT BUILDING AND SILO:1. Shade these with fl oats of Burnt Umber. In the deep-est shade areas add some Traditional Burnt Umber.
2. Highlight the edges of the out building with Khaki Tan + a bit of Snow White. Highlight down the silo with a back to back fl oat just left of center. Repeat these highlights as needed.
3. On the out building use the liner to paint some verti-cal slats with thinned Traditional Burnt Umber.
4. Add a few vertical and horizontal lines on the silo to indicate brick using thinned Burnt Umber. These are short strokes that cross over each other randomly.
5. Outline the doors and windows with Khaki Tan + a bit of Burnt Umber.
6. Using the liner and Traditional Burnt Umber + a touch of Midnight Green, paint some bare trees next to the silo and on the right side of the barn behind the fence. Add a few highlights to the left side of the trunks and a few of the upper branches with Winter Blue and Winter Blue + Snow White.
7. Fence: Use a liner to paint the posts and stiles with Traditional Burnt Umber + a touch of Midnight Green. Highlight the left sides of the posts and the tops of the stiles with Winter Blue + a bit of Snow White.
8. When the snow in the foreground is as light as you desire, paint additional bare trees with some scrubby grasses next to the trunks in the foreground. Shade behind these with Uniform Blue. Add some highlights to the left side of the trunks and a few upper branches with Winter Blue + Snow White.
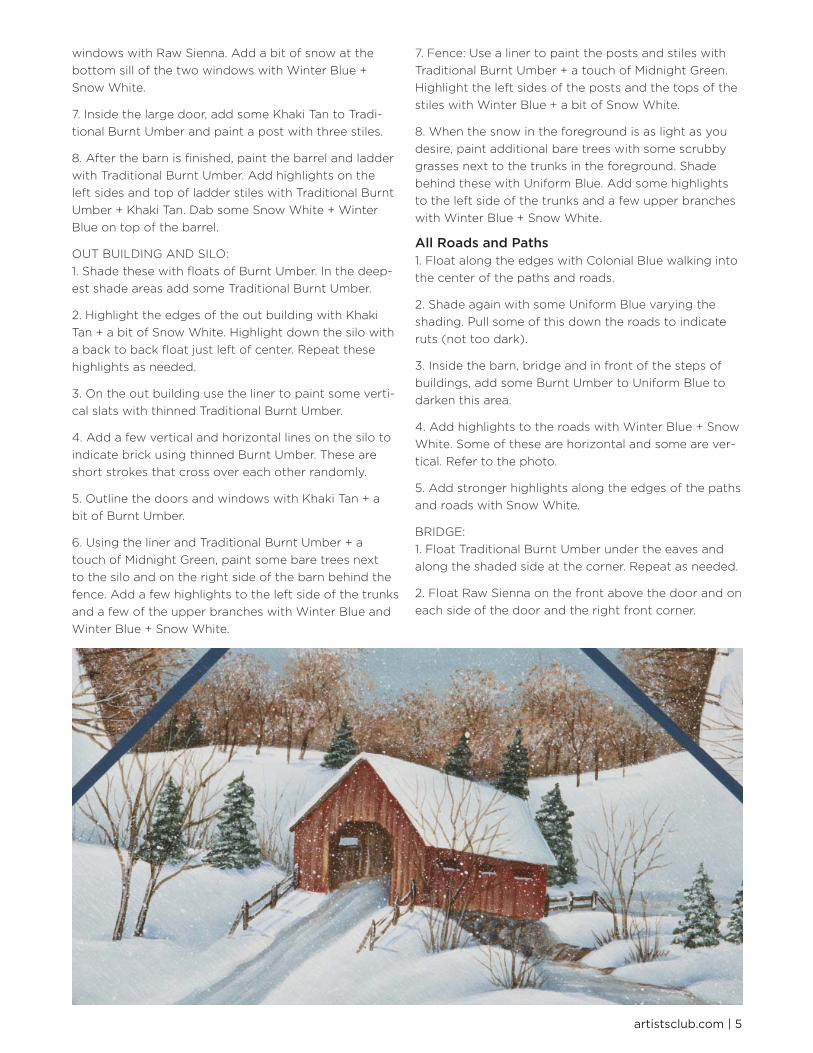
All Roads and Paths1. Float along the edges with Colonial Blue walking into the center of the paths and roads.
2. Shade again with some Uniform Blue varying the shading. Pull some of this down the roads to indicate ruts (not too dark).
3. Inside the barn, bridge and in front of the steps of buildings, add some Burnt Umber to Uniform Blue to darken this area.
4. Add highlights to the roads with Winter Blue + Snow White. Some of these are horizontal and some are ver-tical. Refer to the photo.
5. Add stronger highlights along the edges of the paths and roads with Snow White.
BRIDGE:1. Float Traditional Burnt Umber under the eaves and along the shaded side at the corner. Repeat as needed.
2. Float Raw Sienna on the front above the door and on each side of the door and the right front corner.
6 | artistsclub.com
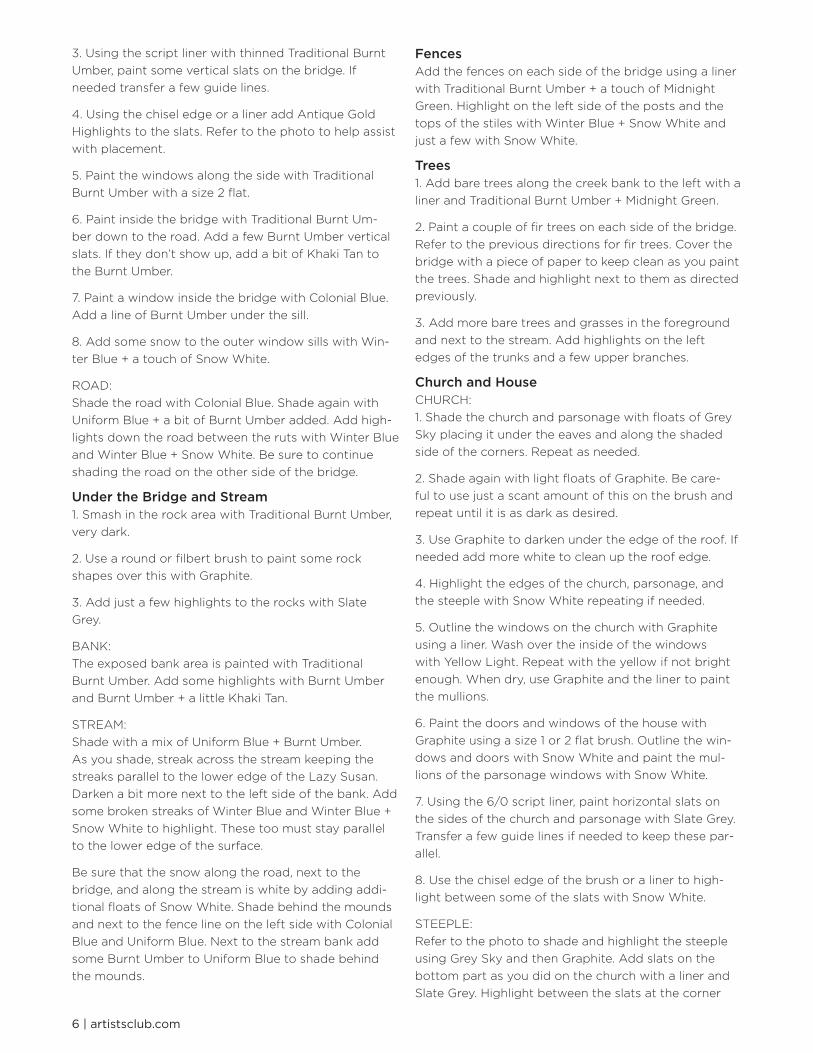
3. Using the script liner with thinned Traditional Burnt Umber, paint some vertical slats on the bridge. If needed transfer a few guide lines.
4. Using the chisel edge or a liner add Antique Gold Highlights to the slats. Refer to the photo to help assist with placement.
5. Paint the windows along the side with Traditional Burnt Umber with a size 2 fl at.
6. Paint inside the bridge with Traditional Burnt Um-ber down to the road. Add a few Burnt Umber vertical slats. If they don’t show up, add a bit of Khaki Tan to the Burnt Umber.
7. Paint a window inside the bridge with Colonial Blue. Add a line of Burnt Umber under the sill.
8. Add some snow to the outer window sills with Win-ter Blue + a touch of Snow White.
ROAD:Shade the road with Colonial Blue. Shade again with Uniform Blue + a bit of Burnt Umber added. Add high-lights down the road between the ruts with Winter Blue and Winter Blue + Snow White. Be sure to continue shading the road on the other side of the bridge.
Under the Bridge and Stream1. Smash in the rock area with Traditional Burnt Umber, very dark.
2. Use a round or fi lbert brush to paint some rock shapes over this with Graphite.
3. Add just a few highlights to the rocks with Slate Grey.
BANK:The exposed bank area is painted with Traditional Burnt Umber. Add some highlights with Burnt Umber and Burnt Umber + a little Khaki Tan.
STREAM:Shade with a mix of Uniform Blue + Burnt Umber. As you shade, streak across the stream keeping the streaks parallel to the lower edge of the Lazy Susan. Darken a bit more next to the left side of the bank. Add some broken streaks of Winter Blue and Winter Blue + Snow White to highlight. These too must stay parallel to the lower edge of the surface.
Be sure that the snow along the road, next to the bridge, and along the stream is white by adding addi-tional fl oats of Snow White. Shade behind the mounds and next to the fence line on the left side with Colonial Blue and Uniform Blue. Next to the stream bank add some Burnt Umber to Uniform Blue to shade behind the mounds.
FencesAdd the fences on each side of the bridge using a liner with Traditional Burnt Umber + a touch of Midnight Green. Highlight on the left side of the posts and the tops of the stiles with Winter Blue + Snow White and just a few with Snow White.
Trees1. Add bare trees along the creek bank to the left with a liner and Traditional Burnt Umber + Midnight Green.
2. Paint a couple of fi r trees on each side of the bridge. Refer to the previous directions for fi r trees. Cover the bridge with a piece of paper to keep clean as you paint the trees. Shade and highlight next to them as directed previously.
3. Add more bare trees and grasses in the foreground and next to the stream. Add highlights on the left edges of the trunks and a few upper branches.
Church and HouseCHURCH:1. Shade the church and parsonage with fl oats of Grey Sky placing it under the eaves and along the shaded side of the corners. Repeat as needed.
2. Shade again with light fl oats of Graphite. Be care-ful to use just a scant amount of this on the brush and repeat until it is as dark as desired.
3. Use Graphite to darken under the edge of the roof. If needed add more white to clean up the roof edge.
4. Highlight the edges of the church, parsonage, and the steeple with Snow White repeating if needed.
5. Outline the windows on the church with Graphite using a liner. Wash over the inside of the windows with Yellow Light. Repeat with the yellow if not bright enough. When dry, use Graphite and the liner to paint the mullions.
6. Paint the doors and windows of the house with Graphite using a size 1 or 2 fl at brush. Outline the win-dows and doors with Snow White and paint the mul-lions of the parsonage windows with Snow White.
7. Using the 6/0 script liner, paint horizontal slats on the sides of the church and parsonage with Slate Grey. Transfer a few guide lines if needed to keep these par-allel.
8. Use the chisel edge of the brush or a liner to high-light between some of the slats with Snow White.
STEEPLE:Refer to the photo to shade and highlight the steeple using Grey Sky and then Graphite. Add slats on the bottom part as you did on the church with a liner and Slate Grey. Highlight between the slats at the corner
artistsclub.com | 7
with Snow White. The cross is painted with a liner and Graphite.
Shade the path and roadway as directed for the barn and bridge. Add additional fi r trees behind the church and house covering them with paper to keep them clean as you paint.
Add more Snow White to the foreground snow area and add the bare trees, highlighting as needed on the left side.
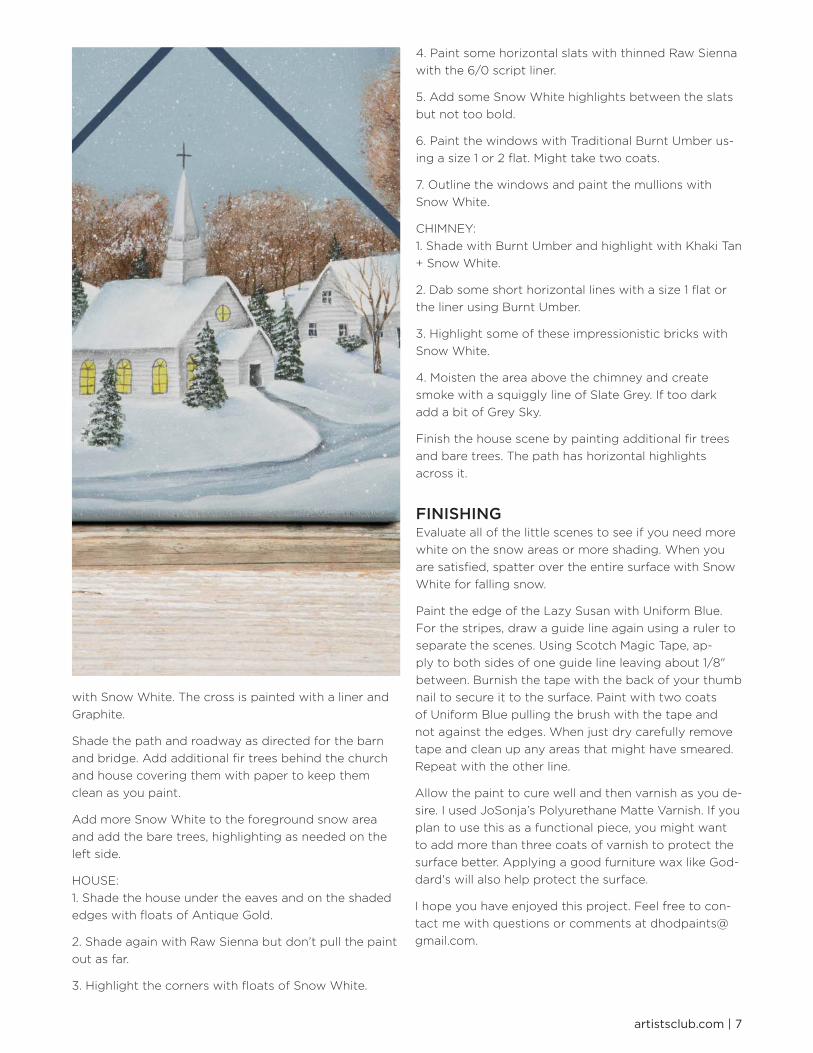
HOUSE:1. Shade the house under the eaves and on the shaded edges with fl oats of Antique Gold.
2. Shade again with Raw Sienna but don’t pull the paint out as far.
3. Highlight the corners with fl oats of Snow White.
4. Paint some horizontal slats with thinned Raw Sienna with the 6/0 script liner.
5. Add some Snow White highlights between the slats but not too bold.
6. Paint the windows with Traditional Burnt Umber us-ing a size 1 or 2 fl at. Might take two coats.
7. Outline the windows and paint the mullions with Snow White.
CHIMNEY:1. Shade with Burnt Umber and highlight with Khaki Tan + Snow White.
2. Dab some short horizontal lines with a size 1 fl at or the liner using Burnt Umber.
3. Highlight some of these impressionistic bricks with Snow White.
4. Moisten the area above the chimney and create smoke with a squiggly line of Slate Grey. If too dark add a bit of Grey Sky.
Finish the house scene by painting additional fi r trees and bare trees. The path has horizontal highlights across it.
FINISHINGEvaluate all of the little scenes to see if you need more white on the snow areas or more shading. When you are satisfi ed, spatter over the entire surface with Snow White for falling snow.
Paint the edge of the Lazy Susan with Uniform Blue. For the stripes, draw a guide line again using a ruler to separate the scenes. Using Scotch Magic Tape, ap-ply to both sides of one guide line leaving about 1/8" between. Burnish the tape with the back of your thumb nail to secure it to the surface. Paint with two coats of Uniform Blue pulling the brush with the tape and not against the edges. When just dry carefully remove tape and clean up any areas that might have smeared. Repeat with the other line.
Allow the paint to cure well and then varnish as you de-sire. I used JoSonja’s Polyurethane Matte Varnish. If you plan to use this as a functional piece, you might want to add more than three coats of varnish to protect the surface better. Applying a good furniture wax like God-dard's will also help protect the surface.
I hope you have enjoyed this project. Feel free to con-tact me with questions or comments at [email protected].

8 | artistsclub.com
Pattern at 100%1" x 1"
To ensure yourpattern is at 100%,
this box should measure 1" x 1" when printed.
artistsclub.com | 9
Pattern at 100%1" x 1"
To ensure yourpattern is at 100%,
this box should measure 1" x 1" when printed.
10 | artistsclub.com
Pattern at 100%1" x 1"
To ensure yourpattern is at 100%,
this box should measure 1" x 1" when printed.
artistsclub.com | 11
Pattern at 100%1" x 1"
To ensure yourpattern is at 100%,
this box should measure 1" x 1" when printed.
12 | artistsclub.com
Pattern at 100%1" x 1"
To ensure yourpattern is at 100%,
this box should measure 1" x 1" when printed.
artistsclub.com | 13
Pattern at 100%1" x 1"
To ensure yourpattern is at 100%,
this box should measure 1" x 1" when printed.
14 | artistsclub.com
Pattern at 100%1" x 1"
To ensure yourpattern is at 100%,
this box should measure 1" x 1" when printed.
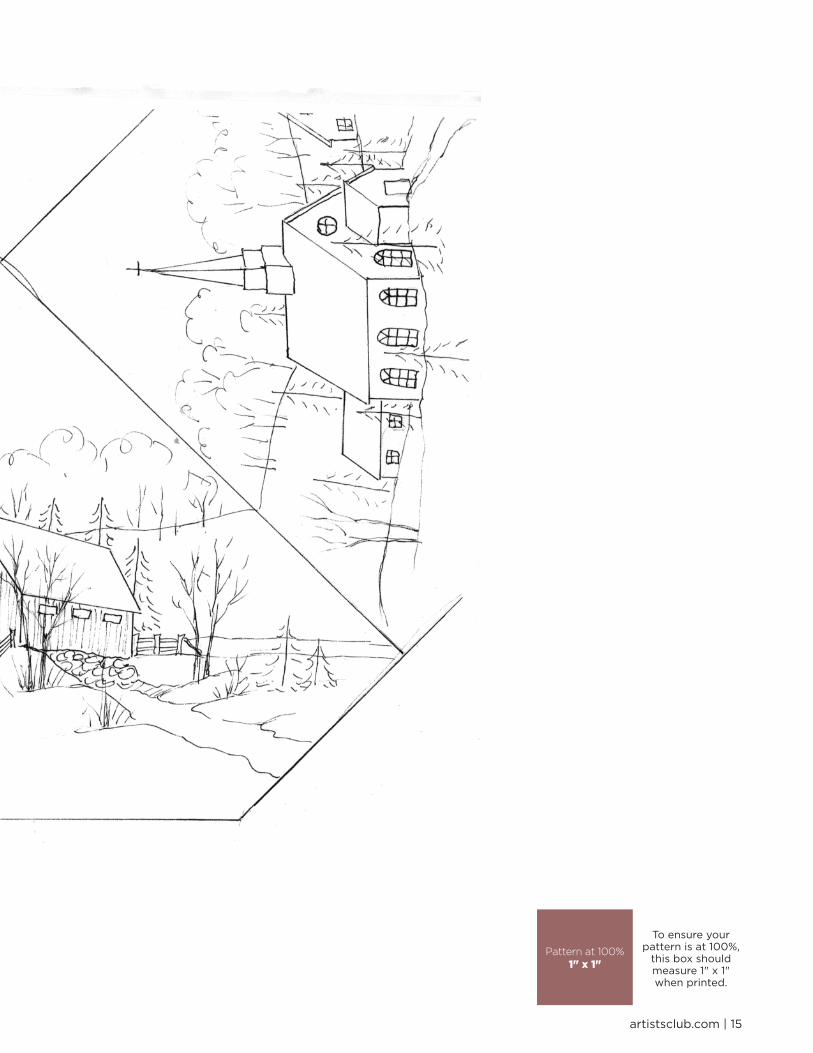
artistsclub.com | 15
Pattern at 100%1" x 1"
To ensure yourpattern is at 100%,
this box should measure 1" x 1" when printed.
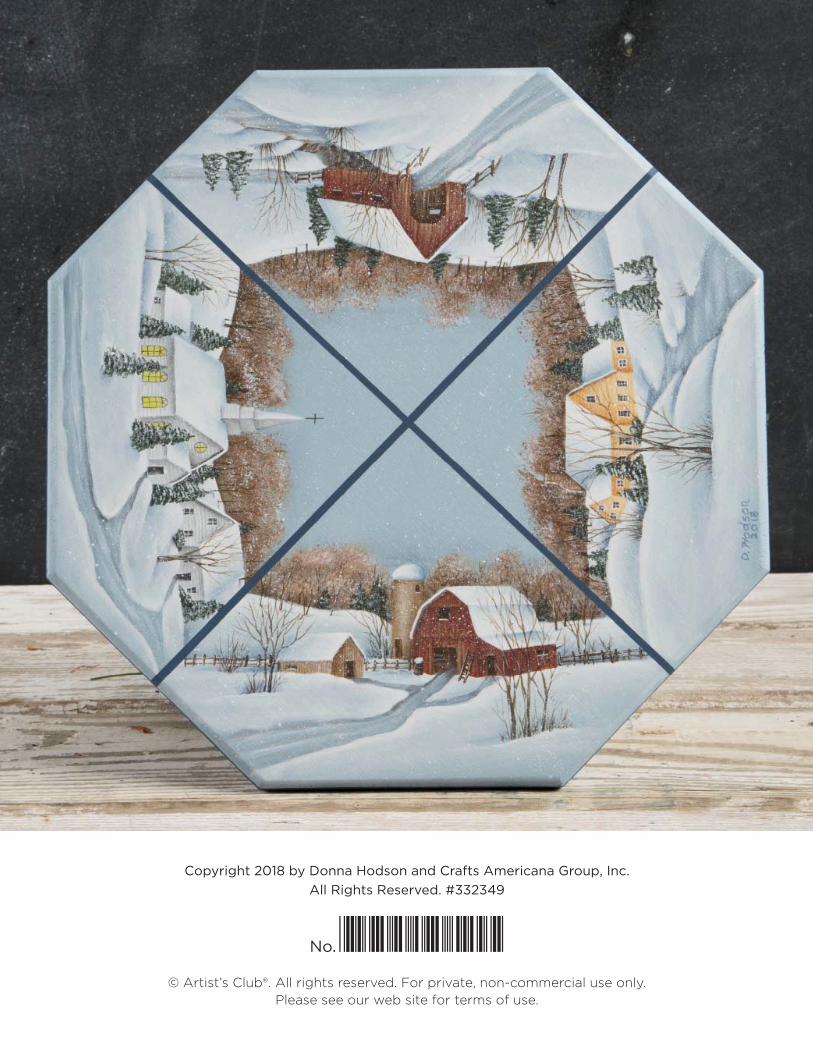
Copyright 2018 by Donna Hodson and Crafts Americana Group, Inc. All Rights Reserved. #332349
No. *A332349*© Artist’s Club®. All rights reserved. For private, non-commercial use only.
Please see our web site for terms of use.


