49
Wealth and Investment Management Intermediaries Online Banking Bulk Payments User guide
Wealth and Investment ManagementIntermediaries
Online BankingBulk PaymentsUser guide
2
Con
tent
s
Contents1. Introduction 3
2. Log in steps 4
3. Make BACS payments 5
3.1 Select BACS ‘from’ account 6
3.2 Add payment details and beneficiaries 7
3.3 Enter payment references and amounts 11
3.4 Confirm a BACS payment 13
4. View BACS payments 15
4.1 Amend or delete a saved BACS payment 16
4.2 View a submitted BACS payment 17
4.3 Cancel an ‘Execution Pending’ BACS payment 19
5. Verify/Authorise BACS payments 20
5.1 Verify a BACS payment 21
5.2 Authorise BACS payments 24
5.3 Reject a BACS payment 26
6. Import payments 27
6.1 Import a BACS payment file 29
6.2 Import MT103 payment files 31
6.3 View imported files 32
6.4 Submit an imported file 33
7. Verify/Authorise MT103 files 35
7.1 Verify an MT103 file 36
7.2 Authorise an MT103 file 39
7.3 Reject an MT103 file 42
8. Payment file conversion tool 43
8.1 MT103/BACS file upload 44
8.2 Validating the payments file 46
8.3 Payments file template creation 48
8.4 Exporting the payment file 49

3
1. I
ntro
duct
ion
1. IntroductionThe Bulk Payments functionality on Wealth Online Banking
enables users to make bulk payments to beneficiaries.
It is expected that a user of Bulk Payments is familiar with
the way in which Wealth Online Banking works and has read
the documentation regarding the use of online banking.
To use the Bulk Payments module you must be a registered
Wealth Online Banking user and your organisation must
be registered to use the module. In addition, both the user
and organisation must have the privileges necessary to use
the application.
The Bulk Payments functionality enables users to:
• Import inter-account transfers, UK same-day payments
and international payments from an MT103 format file
• Import a list of BACS beneficiaries to create a BACS
payment
• Make a BACS payment
BACS payments are managed entirely within the Bulk
Payments extension, while inter-account transfers, UK
same-day payments and international payments are
managed as usual in Wealth Online Banking once the
payments have been submitted.

4
2. L
og in
ste
ps
2. Log in steps (all users)1. Open your web browser
2. Ensure you have an Online Banking card, PIN and the
software installed on your desktop/laptop
3. Copy and paste the url below in your web browser
address bar
4. Click on ‘Login’ and enter your PIN
URL : https://www.barclayswealth.com/login/action/logon/unauthenticated/corporate/loginSigningGemplus
4. Click on ‘Login’ and enter
your PIN

5
3. M
ake
BAC
S pa
ymen
ts
3. Make BACS paymentsTo make a BACS payment to one or more beneficiaries
navigate to the ‘Banking’ tab and select ‘Make BACS
payment’ from the Payments option menu. You will then
be directed to a page where you may select the account to
make the payment from.
In each of the steps that follow you will be asked to enter
the details for the BACS payment. If you make a mistake at
any point, an error will be displayed on the page when you
attempt to continue.
Once the payment has been completed, it may need to be verified and/or approved by another user or users from your
organisation before it’s finally executed.
6
3.1
Sele
ct B
AC
S ‘fr
om’
acco
unt
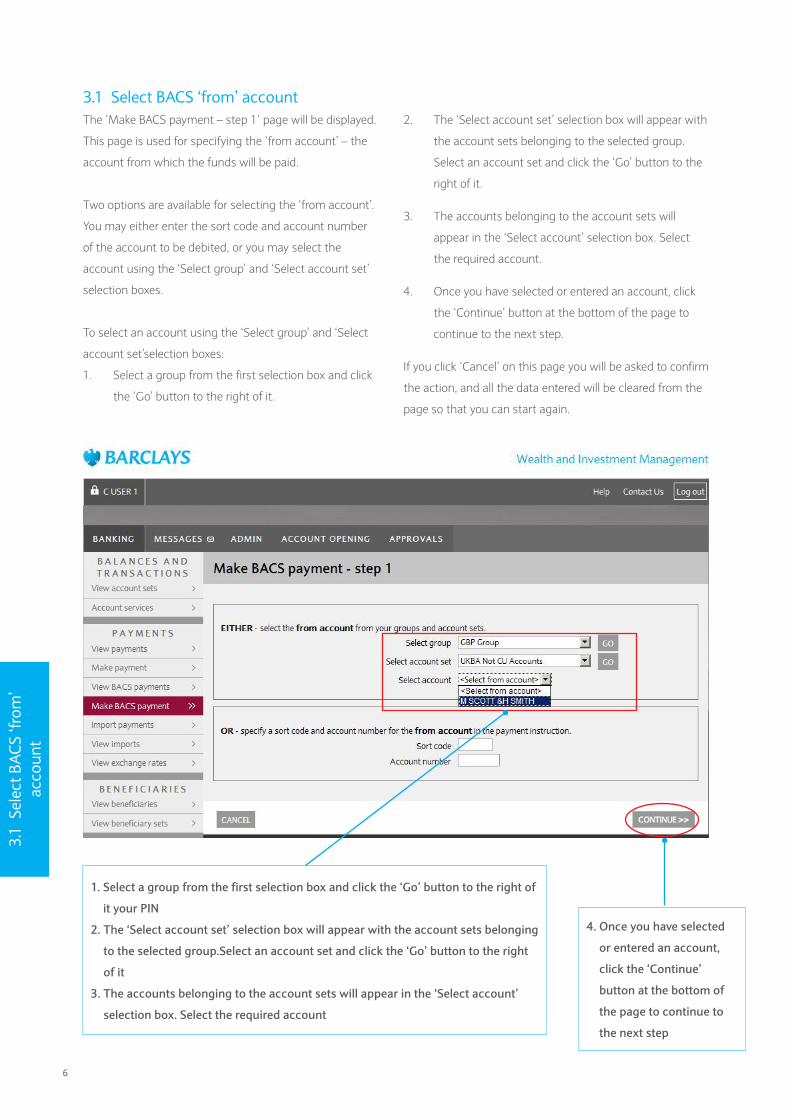
3.1 Select BACS ‘from’ accountThe ‘Make BACS payment – step 1’ page will be displayed.
This page is used for specifying the ‘from account’ – the
account from which the funds will be paid.
Two options are available for selecting the ‘from account’.
You may either enter the sort code and account number
of the account to be debited, or you may select the
account using the ‘Select group’ and ‘Select account set’
selection boxes.
To select an account using the ‘Select group’ and ‘Select
account set’selection boxes:
1. Select a group from the first selection box and click
the ‘Go’ button to the right of it.
2. The ‘Select account set’ selection box will appear with
the account sets belonging to the selected group.
Select an account set and click the ‘Go’ button to the
right of it.
3. The accounts belonging to the account sets will
appear in the ‘Select account’ selection box. Select
the required account.
4. Once you have selected or entered an account, click
the ‘Continue’ button at the bottom of the page to
continue to the next step.
If you click ‘Cancel’ on this page you will be asked to confirm
the action, and all the data entered will be cleared from the
page so that you can start again.
1. Select a group from the first selection box and click the ‘Go’ button to the right of
it your PIN
2. The ‘Select account set’ selection box will appear with the account sets belonging
to the selected group.Select an account set and click the ‘Go’ button to the right
of it
3. The accounts belonging to the account sets will appear in the ‘Select account’
selection box. Select the required account
4. Once you have selected
or entered an account,
click the ‘Continue’
button at the bottom of
the page to continue to
the next step

7
3.2
Add
pay
men
t det
ails
an
d be
nefic
iarie
s
3.2 Add payment details and beneficiariesThe next page is ‘Make BACS payment – step 2’ where you
may enter further payment details and add beneficiaries.
Note: Several of the fields on this page require you to enter
text using the valid BACS character set – this includes only
the following characters (lower case letters are converted to
upper case):
• Capital letters (A-Z)
• Digits (0-9)
• Characters (/, -, ., &)
• Space
On this page, the following payment details may be added:
1. ‘Payment Name’ (required) – the name given to this
payment which will later be displayed in the ‘View
BACS Payments’ screen. This must only contain valid
BACS characters.
2. ‘Value Date’ (required) – the date when the
beneficiary payment amounts should reach the
beneficiary’s accounts. The value date must be at
least two working days in the future – the list only
includes valid dates for the payment.
3. ‘Notes’ (optional) – information about the payment
which is not sent to BACS.
4. ‘Debit Charges From’ – indicates whether charges
for making the BACS payment will be debited from
the ‘Payment From’ account or the ‘Default Billing
Account’ for your organisation.

8
3.2
Add
pay
men
t det
ails
an
d be
nefic
iarie
s
1. ‘ Payment Name’ (required) – the name given to this payment which will later be displayed in the ‘View BACS
Payments’ screen. This must only contain valid BACS characters
2. ‘Value Date’ (required) – the date when the beneficiary payment amounts should reach the beneficiary’s
accounts. The value date must be at least two working days in the future – the list only includes valid dates for
the payment
4. ‘Debit Charges From’ – indicates whether charges for making the
BACS payment will be debited from the ‘Payment From’ account
or the ‘Default Billing Account’ for your organisation
3. ‘Notes’ (optional) –
information about the
payment which is not
sent to BACS

9
3.2
Add
pay
men
t det
ails
an
d be
nefic
iarie
s
Beneficiaries may be added by either selecting a previously
entered beneficiary reference or by typing in a beneficiary
name, sort code and account number. The beneficiary
amounts and references may be added on the next screen.
You must enter at least one beneficiary. The screen shows
up to 50 most recently added beneficiaries in two columns,
with the last added beneficiary at the top left of the list.
This is to help you keep track of where you are up to when
adding large lists of beneficiaries. In all other screens the
beneficiaries are shown in the order they are added (or
imported from a BACS file).
To add a pre-defined beneficiary:
1. Select a beneficiary set from the selection box, either
a named beneficiary set configured in Online Banking
or an ‘Unallocated’ beneficiary. Click the ‘Go’ button to
the right of it.
2. A list of pre-defined beneficiaries will appear in
the ‘Beneficiary’ selection box. Select the required
beneficiary from the selection box and click the ‘Add’
button to the right of it.
3. The beneficiary will be added to the list (appearing at
the top left).
4. To add all beneficiaries in a set, select ‘add all’ and
click ‘go’
1. Select a beneficiary set from the selection box, either a named beneficiary set configured in Online Banking or
an ‘Unallocated’ beneficiary. Click the ‘Go’ button to the right of it
2. A list of pre-defined beneficiaries will appear in the ‘Beneficiary’ selection box. Select the required beneficiary
from the selection box and click the ‘Add’ button to the right of it.
3. The beneficiary will be added to the list
(appearing at the top left)

10
To add a new beneficiary:
1. Enter the beneficiary name (using valid BACS
characters).
2. Enter the sort code and account number of the
beneficiary account.
3. If you want to save this beneficiary for use in future
payments, tick the ‘Save this Beneficiary’ box and
enter a unique Beneficiary Reference (using valid
BACS characters).
4. Click the ‘Add’ button.
5. The beneficiary will be added to the list (appearing at
the top left).
Once you have completed all of the payment details and
added the beneficiaries, you may click the ‘Continue’
button to move to the next step in the process. The system
will perform a simple validation on the information you
have entered. For instance, if the beneficiary’s account is
with Barclays, then a valid Barclays sort code and account
number must have been entered.
Alternatively, you may choose to click:
• ‘Back’ to return to the previous screen if, for example, you
realise you have selected the wrong ‘from’ account for
the payment.
• ‘Cancel’ to cancel the creation of the payment. You will
be asked to confirm the cancellation and then returned
to the ‘Step 1’ page and all the data entered so far will
be cleared.
• ‘Save’ to save the payment in its current state so that it
may be amended (or deleted) later. The information you
have entered will be validated as for ‘Continue’, then the
‘View BACS Payments’ page will be displayed including
the payment with a status of ‘Saved’.
3.2
Add
pay
men
t det
ails
an
d be
nefic
iarie
s

11
3.3
Ente
r pay
men
t ref
eren
ces
and
amou
nts
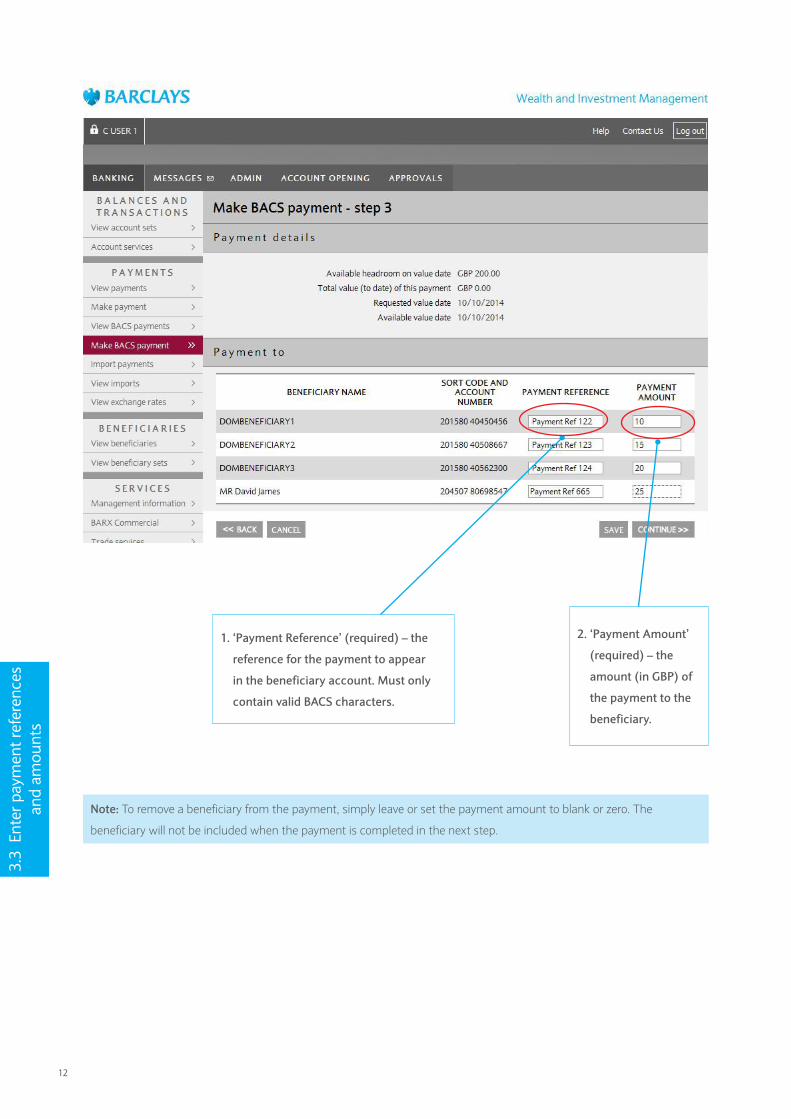
3.3 Enter payment references and amountsIf the data passes validation, the next page in the BACS
payments process is ‘Make BACS payment – step 3’ where
you will be asked to provide a reference and payment
amount for each of the beneficiaries.
The page shows the calculated headroom available for
the payment. The headroom is the difference between
the settlement risk configured for your organisation and
the BACS payments already in progress (with a status of
‘Execution Pending’ or ‘Completed’) between the two dates.
It also shows the total value of the payments added so
far (updated each time you refresh the page) and the
requested and available value dates for the payment.
Occasionally, the available value date may be different to
the requested value date if, for example, there has been
a significant delay between selecting the value date and
arriving at this screen.
On this page, the following details should be supplied for
each beneficiary:
1. ‘Payment Reference’ (required) – the reference for the
payment to appear in the beneficiary account. Must
only contain valid BACS characters.
2. ‘Payment Amount’ (required) – the amount (in GBP)
of the payment to the beneficiary.
Once you have completed all of the beneficiary details, click
the ‘Continue’ button to move on to the ‘Confirmation’
screen, the final step in the process. If there are any
validation errors in the beneficiary details, you will be
returned to the same page with explanatory error messages
at the top and highlighting any invalid beneficiaries.
Alternatively, you may choose to click:
• ‘Back’ to return to the previous screen.
• ‘Cancel’ to cancel the creation of the payment. You will
be asked to confirm the cancellation and then returned
to the ‘Step 1’ page and all the data entered so far will be
cleared.
• ‘Save’ to save the payment in its current state so that it
may be amended (or deleted) later. The information you
have entered will be validated as for ‘Continue’, then the
‘View BACS Payments’ page will be displayed including
the payment with a status of ‘Saved’.
12
3.3
Ente
r pay
men
t ref
eren
ces
and
amou
nts
1. ‘Payment Reference’ (required) – the
reference for the payment to appear
in the beneficiary account. Must only
contain valid BACS characters.
2. ‘Payment Amount’
(required) – the
amount (in GBP) of
the payment to the
beneficiary.
Note: To remove a beneficiary from the payment, simply leave or set the payment amount to blank or zero. The
beneficiary will not be included when the payment is completed in the next step.

13
3.4
Con
firm
a B
AC
S
paym
ent
3.4 Confirm a BACS paymentOnce you reach this step, you have completed all of
the details necessary to make a BACS payment. Bulk
Payments will display the ‘Make BACS payment – step 4 –
confirmation’ screen for you to confirm these details.
This screen shows the payment details you have entered
and provides the following details calculated for the
payment:
1. ‘Payment total’ – the amount of the payment
calculated by adding all of the individual
beneficiary accounts.
2. ‘Headroom available’ – the amount of headroom
(described in Section 3.3) available to make the
payment on the requested value date.
3. ‘Number of beneficiaries to be paid’ – the number of
beneficiaries with amounts greater than zero.
4. Click the ‘Display’ button to see the individual
beneficiary details.
5. ‘Execution Date’ – the calculated execution date for
the payment, usually two working days before the
available value date.
6. ‘Available Value Date’ – the calculated value date for
the payment (this will normally be the same as the
requested value date).
7. ‘Authorisation Required’ – indicates whether
verification and/or authorisation will be needed for
this payment.

14
To see the individual beneficiaries that will be included
in the payment, click the ‘Display’ button. This will show
another screen with a full list of all the beneficiaries. Click
the ‘Back’ button to return to the ‘Make BACS payment –
Step 4 – confirmation’ screen.
If the payment total is greater than the headroom available
or is greater than the maximum authorisation limit
configured for your organisation, one or more errors will be
displayed and you will not be able to submit the payment.
Once you are satisfied that the payment details are all
correct – and that there are no errors – you may click
the ‘Submit’ button to complete the payment. The ‘View
BACS payments’ page will then be displayed, including the
payment you have just submitted.
The payment may then need to be verified and/or
authorised by other users in your organisation before it
is executed. If there is no requirement for the payment to
be verified or authorised you will need to digitally sign the
payment; this is described in Section 5 - ‘Verify/authorise/
reject BACS payments’.
Alternatively, you may choose to click:
1. ‘Back’ to return to the previous screen.
2. ‘Cancel’ to cancel the creation of the payment. You
will be asked to confirm the cancellation and then
returned to the ‘Make BACS payment – step 1’ page
and all the data entered so far will be cleared.
3. ‘Save’ to save the payment in its current state so that
it may be amended (or deleted) later. The information
you have entered will be validated as for ‘Submit’,
then the ‘View BACS payments’ page will be displayed
showing the payment with a status of ‘Saved’.
3.4
Con
firm
a B
AC
S
paym
ent
15
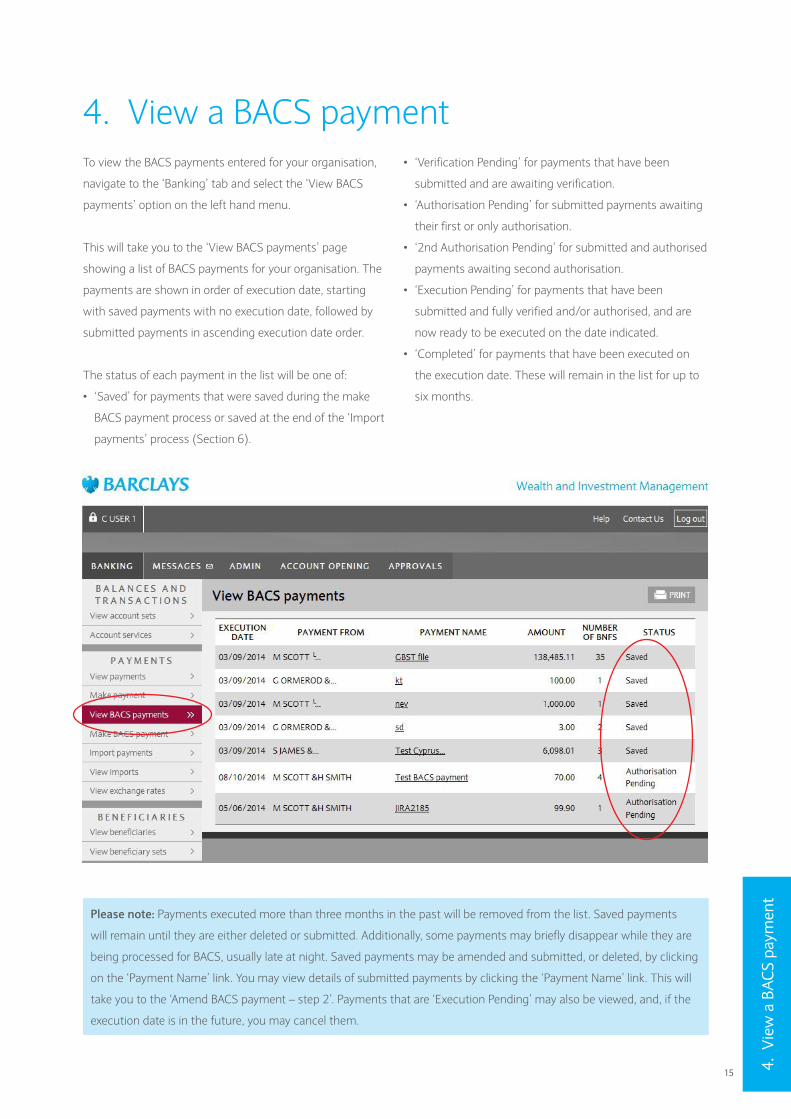
4. View a BACS paymentTo view the BACS payments entered for your organisation,
navigate to the ‘Banking’ tab and select the ‘View BACS
payments’ option on the left hand menu.
This will take you to the ‘View BACS payments’ page
showing a list of BACS payments for your organisation. The
payments are shown in order of execution date, starting
with saved payments with no execution date, followed by
submitted payments in ascending execution date order.
The status of each payment in the list will be one of:
• ‘Saved’ for payments that were saved during the make
BACS payment process or saved at the end of the ‘Import
payments’ process (Section 6).
• ‘Verification Pending’ for payments that have been
submitted and are awaiting verification.
• ‘Authorisation Pending’ for submitted payments awaiting
their first or only authorisation.
• ‘2nd Authorisation Pending’ for submitted and authorised
payments awaiting second authorisation.
• ‘Execution Pending’ for payments that have been
submitted and fully verified and/or authorised, and are
now ready to be executed on the date indicated.
• ‘Completed’ for payments that have been executed on
the execution date. These will remain in the list for up to
six months.
4. V
iew
a B
AC
S pa
ymen
t
Please note: Payments executed more than three months in the past will be removed from the list. Saved payments
will remain until they are either deleted or submitted. Additionally, some payments may briefly disappear while they are
being processed for BACS, usually late at night. Saved payments may be amended and submitted, or deleted, by clicking
on the ‘Payment Name’ link. You may view details of submitted payments by clicking the ‘Payment Name’ link. This will
take you to the ‘Amend BACS payment – step 2’. Payments that are ‘Execution Pending’ may also be viewed, and, if the
execution date is in the future, you may cancel them.

164.1
Am
end
or d
elet
e a
save
d BA
CS
paym
ent
4.1 Amend or delete a saved BACS paymentDuring the process for making a BACS payment, a user
may save a payment and resume it later. Payments may
also be imported into the ‘Saved’ status during the BACS
import process.
When you click on the ‘Payment Name’ link of a saved BACS
payment in the ‘View BACS Payments’ page, the ‘Amend
BACS payment – step 2’ screen will be displayed.
This page is similar to the ‘Make BACS payment – step 2’
screen with the following differences:
1. You may click the ‘Delete’ button here to delete the
payment. You will be asked to confirm that you wish
to delete the payment and, on confirmation, it will
be deleted and the ‘View BACS payments’ page will
be displayed.
2. If you click the ‘Cancel’ button on the Step 2, 3 and
4 pages, you will be asked for confirmation then
returned to the ‘View BACS payments’ page without
saving any changes.
In addition, if you are amending an imported payment, any
invalid beneficiaries (for example, those with an unknown
sort code or invalid account number) will be highlighted.
Clicking on the ‘Continue’ button will lead through to Steps
3 and 4 as before so that you may submit the payment
once all the details are complete, or save it again to
resume later.
1. You may click the ‘Delete’ button here to delete the payment. You will be asked to confirm that you wish to
delete the payment and, on confirmation, it will be deleted and the ‘View BACS payments’ page will be displayed

17
4.2 View a submitted BACS paymentOnce a payment has been submitted for execution via
verification and/or authorisation, it cannot be amended,
except for the notes, unless it is firstly rejected (during
verification/authorisation) or cancelled (when it has
‘Execution Pending’ status).
Click the ‘Payment Name’ link of a BACS payment on the
‘View BACS payments’ page. On this page you may add or
modify the notes associated with the payment.
You may click one of the following buttons:
1. ‘Print’ to print the displayed payment details.
2. ‘Display’ to view the beneficiaries of the payment. This
will take you to the ‘View BACS beneficiaries’ page.
3. ‘Submit’ to save any changes you have made to the
payment ‘Notes’ field and return to the ‘View BACS
Payments’ page.
4. ‘Back’ to return to the ‘View BACS payments’ page
without saving the notes.
4.2
Vie
w a
sub
mitt
ed
BAC
S pa
ymen
t
1. ‘Print’ to print the
displayed payment
details
2. ‘Display’ to view the
beneficiaries of the
payment. This will take
you to the ‘View BACS
beneficiaries’ page
4. ‘ Back’ to return to the ‘View BACS
payments’ page without saving
the notes
3. ‘Submit’ to save any changes you have made to
the payment ‘Notes’ field and return to the ‘View
BACS Payments’ page
18
4.2
Vie
w a
sub
mitt
ed
BAC
S pa
ymen
t
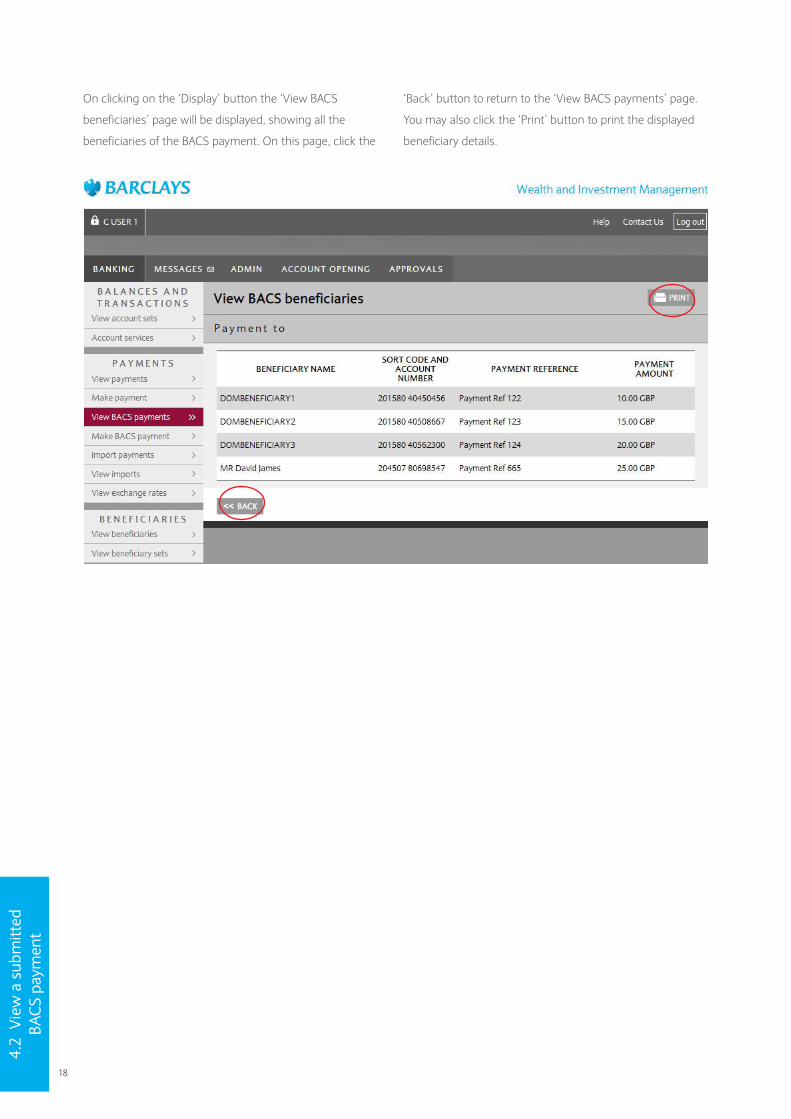
On clicking on the ‘Display’ button the ‘View BACS
beneficiaries’ page will be displayed, showing all the
beneficiaries of the BACS payment. On this page, click the
‘Back’ button to return to the ‘View BACS payments’ page.
You may also click the ‘Print’ button to print the displayed
beneficiary details.

19
4.3 Cancel an ‘Execution Pending’ BACS paymentIt is possible to cancel a fully verified and authorised
payment (in the ‘Execution Pending’ state) at any time up
to the day before the execution date of the payment.
On the ‘View Bacs payments’ page, click the ‘Payment
Name’ for the payment you wish to cancel and click the
‘Delete’ button.
The ‘Delete payment – confirmation’ page will be displayed.
When you click the ‘Confirm’ button you will be asked
to digitally sign the cancellation of the payment (see the
description of digital signatures in Section 5).
Once you have digitally signed the cancellation of the
payment, the payment status is set to ‘Saved’ and the
‘View BACS payments’ page is displayed. The payment may
then be amended or deleted. If you wish to re-submit the
payment it will need to be verified and/or authorised again
as before.
4.3
Can
cel a
n ‘E
xecu
tion
Pend
ing’
BA
CS
paym
ent
20
5. V
erify
/aut
horis
e/re
ject
BA
CS
paym
ents
5. Verify/authorise/reject BACS paymentsMost payments will need to be verified, authorised or both
– some payments will need to be authorised by two people.
The requirements for each payment will depend on the
configuration for your organisation and the total amount of
the payment.
You must have the appropriate privileges to verify or
authorise payments and these options will only be available
on the menu if you have the privileges. A user may have
‘Verify’ and/or ‘Authorise’ privileges at level ‘A’ or ‘B’. The
requirement for ‘A’ or ‘B’ authorisation (by one or two users)
depends on the value of the payment.
When verifying, authorising or rejecting payments you
will be asked to provide a secure digital signature. You
will also be asked to provide a secure digital signature
when you delete a payment with a status of ‘Execution
Pending’ (which is possible any time up to the day before
the execution date), or if you submit a payment with no
requirement for verification or authorisation.
A single user for an organisation may only perform one of ‘Submit’, ‘Verify’ or ‘Authorise’ on an individual payment.
Therefore, a payment which requires verification and two authorisations will require actions from four people before it
can be executed.
Payments awaiting verification or authorisation may be rejected, returning them to the ‘Saved’ state so that they may be
amended or deleted. If you wish to re-submit the payment it will need to be verified and/or authorised again as before.
21
5.1
Verif
y a
BAC
S pa
ymen
t
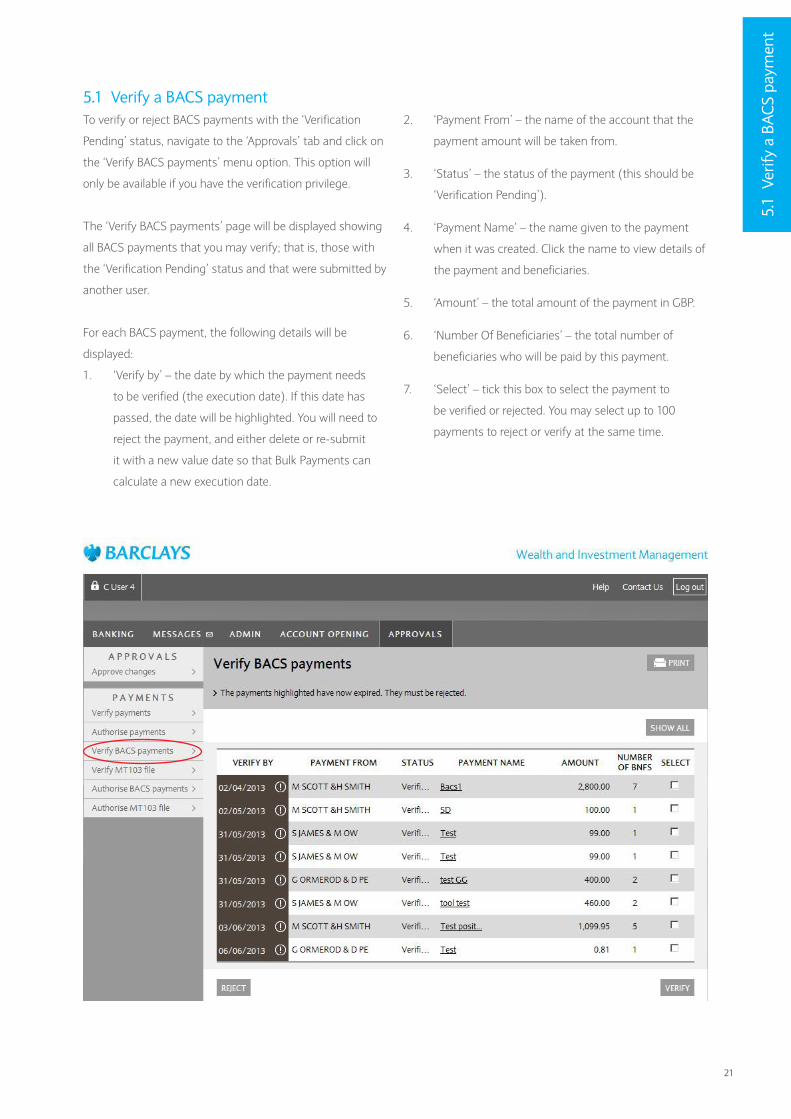
5.1 Verify a BACS paymentTo verify or reject BACS payments with the ‘Verification
Pending’ status, navigate to the ‘Approvals’ tab and click on
the ‘Verify BACS payments’ menu option. This option will
only be available if you have the verification privilege.
The ‘Verify BACS payments’ page will be displayed showing
all BACS payments that you may verify; that is, those with
the ‘Verification Pending’ status and that were submitted by
another user.
For each BACS payment, the following details will be
displayed:
1. ‘Verify by’ – the date by which the payment needs
to be verified (the execution date). If this date has
passed, the date will be highlighted. You will need to
reject the payment, and either delete or re-submit
it with a new value date so that Bulk Payments can
calculate a new execution date.
2. ‘Payment From’ – the name of the account that the
payment amount will be taken from.
3. ‘Status’ – the status of the payment (this should be
‘Verification Pending’).
4. ‘Payment Name’ – the name given to the payment
when it was created. Click the name to view details of
the payment and beneficiaries.
5. ‘Amount’ – the total amount of the payment in GBP.
6. ‘Number Of Beneficiaries’ – the total number of
beneficiaries who will be paid by this payment.
7. ‘Select’ – tick this box to select the payment to
be verified or rejected. You may select up to 100
payments to reject or verify at the same time.
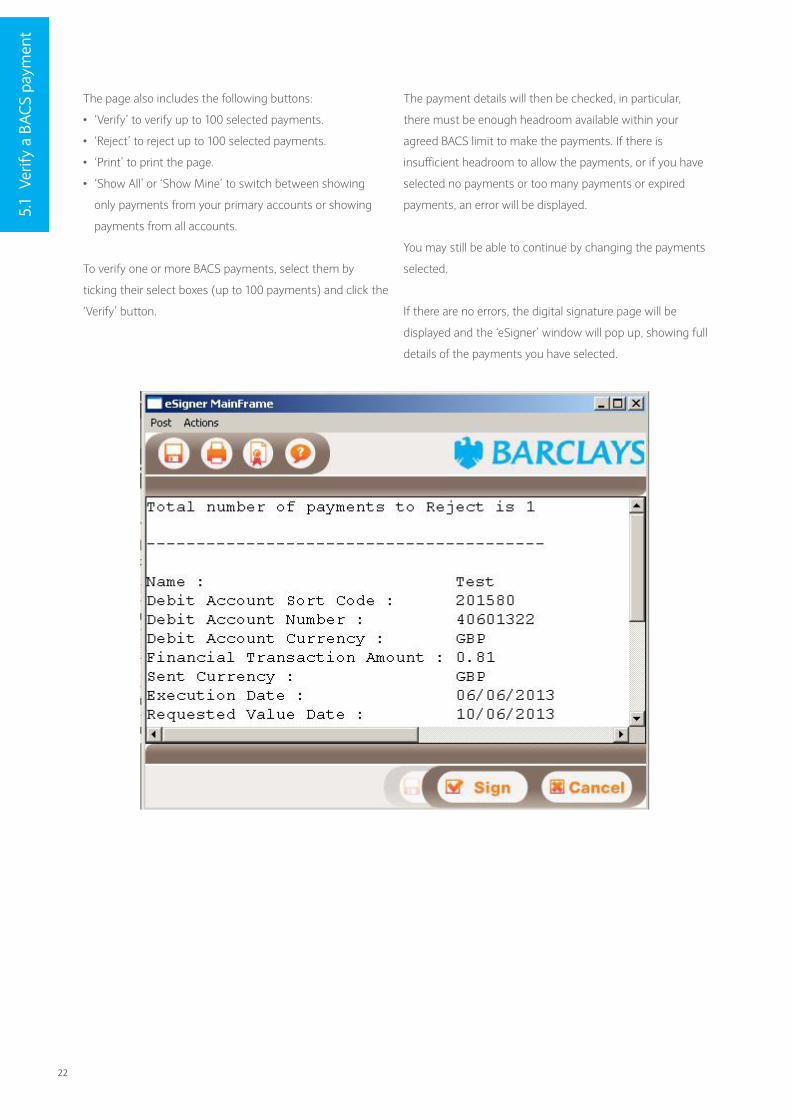
22
5.1
Verif
y a
BAC
S pa
ymen
t
The page also includes the following buttons:
• ‘Verify’ to verify up to 100 selected payments.
• ‘Reject’ to reject up to 100 selected payments.
• ‘Print’ to print the page.
• ‘Show All’ or ‘Show Mine’ to switch between showing
only payments from your primary accounts or showing
payments from all accounts.
To verify one or more BACS payments, select them by
ticking their select boxes (up to 100 payments) and click the
‘Verify’ button.
The payment details will then be checked, in particular,
there must be enough headroom available within your
agreed BACS limit to make the payments. If there is
insufficient headroom to allow the payments, or if you have
selected no payments or too many payments or expired
payments, an error will be displayed.
You may still be able to continue by changing the payments
selected.
If there are no errors, the digital signature page will be
displayed and the ‘eSigner’ window will pop up, showing full
details of the payments you have selected.

23
5.1
Verif
y a
BAC
S pa
ymen
t
You should inspect the contents of the ‘eSigner’ window
to check that they are correct. Once you are satisfied,
complete the verification process by clicking the ‘Sign’
button, ensuring that your Smart Card is in the reader. You
will be asked to enter your PIN. Once you have entered
your PIN correctly and clicked ‘OK’, the payments will be
marked as ‘Verified’ and the ‘Verify BACS payments’ page
will be displayed again without the payments you have just
verified.
Once the payments have been verified, their status will
either be ‘Authorisation Pending’ if authorisation is also
required, or ‘Execution Pending’ if it is not required. You may
select the ‘View BACS payments’ menu option to see the
payments. If the payments require authorisation, they will
need to be authorised by another user and, if you have the
privilege to authorise payments, they will not appear in the
list of payments you may authorise.
If, when the digital signature window appears, you do not
wish to complete the verification of the payments displayed
in the window (for example, if some detail is incorrect or
you cannot find your card) then click the ‘Cancel’ button.
This will return you to the ‘Verify BACS payments’ page
without verifying the selected payments.

24
5.2
Aut
horis
e BA
CS
paym
ents 5.2 Authorise BACS payments
The process for the authorisation of BACS payments is
similar to verification. To authorise BACS payments with the
‘Authorisation Pending’ status, navigate to the ‘Approvals’
tab and click on the ‘Authorise BACS payments’ menu
option. This option will only be available if you have one of
the authorisation privileges (‘A’ or ‘B’).
The ‘Authorise BACS payments’ page will be displayed
showing all BACS payments that you may authorise. These
are payments whose status is either ‘Authorisation Pending’
or ‘2nd Authorisation Pending’.
Some payments will require authorisation by a user with the
‘A’ authorisation privilege while others may be authorized
by a user with either ‘A’ or ‘B’ privileges. Also, each payment
may only be authorised by a user who has not already
submitted, verified or authorised the payment. The page
will only include payments that you are able to authorize
within these rules.
For each BACS payment, the following details will be
displayed:
1. ‘Authorise by’ – the date by which the payment needs
to be authorised (the execution date). If this date
has passed, there will be an error message displayed
when you click the verify button. You will need to
reject the payment, and either delete it or re-submit
it with a new value date so that a new execution date
can be calculated.
2. ‘Payment From’ – the name of the account that the
payment amount will be taken from.
3. ‘Status’ – the status of the payment, either
‘Authorisation Pending’ or ‘2nd Authorisation
Pending’.
4. ‘Payment Name’ – the name given to the payment
when it was created. Click the name to view details of
the payment and beneficiaries.
5. ‘Amount’ – the total amount of the payment in GBP.
6. ‘Number of Beneficiaries’ – the total number of
beneficiaries who will be paid by this payment.
7. ‘Select’ – tick this box to select the payment to be
authorised or rejected. You may select up to 100
payments at the same time.

25
5.2
Aut
horis
e BA
CS
paym
entsThe page also includes the following buttons:
• ‘Authorise’ to authorise up to 100 selected payments.
• ‘Reject’ to reject up to 100 selected payments.
• ‘Print’ to print the page.
• ‘Show All’ or ‘Show Mine’ to switch between showing
only payments from your primary accounts or showing
payments from all accounts.
To authorise payments click the box next to each of the
payments you want to authorise and click the ‘Authorise’
button. You may select up to 100 payments to authorise at
the same time.
The payment details will then be checked in particular, there
must be enough headroom available within your agreed
BACS limit to make the payments. If there is insufficient
headroom to allow the payments, or if you have selected no
payments or too many payments or expired payments, an
error will be displayed. You may still be able to continue by
changing the payments selected.
If there are no errors, the digital signature page will be
displayed and the ‘eSigner’ window will pop up, showing full
details of the payments you have selected.
You should inspect the contents of the ‘eSigner’ window
before you approve the payments. Once you are satisfied,
complete the authorisation process by clicking the ‘Sign’
button, ensuring that your Smart Card is in the reader. You
will be asked to enter your PIN. Once you have entered
your PIN correctly and clicked ‘OK’, the payments will be
authorised by you and the ‘Authorise BACS Payments’ page
will be displayed again without the payments you have just
authorised.
Once the payments have been authorised, their status
will either be ‘2nd Authorisation Pending’ if this was the
first of two required authorisations, or ‘Execution Pending’.
You may select the ‘View BACS Payments’ menu option
to see the payments. If the payments require a second
authorisation, they will need to be authorised by another
user and they will not appear in the list of payments for you
to authorise.
If, when the digital signature window appears, you do not
wish to complete the authorisation (for example, if some
detail is incorrect) then click the ‘Cancel’ button. This will
return you to the ‘Authorise BACS Payments’ page without
authorising the selected payments.
26
5.3
Reje
ct a
BA
CS
paym
ent
5.3 Reject a BACS paymentIf there is a reason why a payment should not be verified or
authorised – for example, if the execution date has passed,
there is a mistake in the payment or the reason for the
payment has gone – you will need to reject the payment.
This process is similar to verification and authorisation.
To reject payments on either the ‘Verify’ or ‘Authorise’
pages, select the payments you wish to reject (you may
select up to 100 payments at any one time) and then click
the ‘Reject’ button.
The digital signature page will be displayed and the ‘eSigner’
window will pop up showing full details of the payments
you have selected.
You should inspect the contents of the ‘eSigner’ window
to confirm that you have selected the right payments and,
when you are satisfied, complete the rejection process by
clicking the ‘Sign’ button, ensuring that your Smart Card
is in the reader. You will be asked to enter your PIN. Once
you have entered your PIN correctly and clicked ‘OK’, the
payments will be authorised by you and the ‘Verify’ or
‘Authorise BACS Payments’ page will be displayed again
without the payments you have just rejected.
Once the payments have been rejected, their status will
be ‘Saved’. You may navigate to the ‘Banking’ tab and
select the ‘View BACS Payments’ menu option to see the
payments and, by clicking on the ‘Payment Name’ link,
either delete or amend and re-submit them.
If, when the digital signature window appears, you do
not wish to complete the rejection (for example, if you
have selected the wrong payment) then click the ‘Cancel’
button. This will return you to the ‘Verify’ or ‘Authorise BACS
Payments’ page without rejecting the selected payments.

27
6. I
mpo
rt p
aym
ents
6. Import paymentsAn important feature of Online Banking is the ability
to import payments from a file generated by another
financial application.
It is possible to import the following types of file:
• ‘BACS’, a BACS file format describing the beneficiaries for
a BACS payment
• ‘MT103’, a file containing a mixture of one or more inter-
account transfers (IAT), UK same-day payments (SDP)
and international payments (IP)
The process for importing payments is similar for both
types of file. First, upload the file into the application where
the format of the file will be checked. It is important that
you do not close the browser window and do not click
any other menu options, links or buttons while this
is in progress as this will prevent the file from being
uploaded properly.
The ‘View Imports’ page will be displayed while a
background process validates the payment details and
determines if each payment should be:
• ‘Submitted’ for verification and authorisation if the
payment is valid and complete.
• ‘Saved’ for amendment or deletion if the payment is
incomplete or has minor problems.
• ‘Rejected’ if the payment is not valid.
The file status will appear as ‘Validation pending’ while it is
waiting to be validated, then ‘Validation in progress’ while
it is being validated, and finally ‘Submission pending’ once
validation is complete. This process may take a long time for
large files or when Online Banking is particularly busy.
Once the file status is shown as ‘Submission Pending’ (click
the ‘Refresh’ button occasionally to see the current status
of the file) you may view a list of payments imported for
the file by clicking the file name and choose whether to
‘Submit’, ‘Save’ or ‘Reject’ each payment before submitting
the file.
BACS payments that are ‘Saved’ or ‘Submitted’ will
appear in the list on the ‘View BACS Payments’ page
which is available from the main menu. MT103 payments
that are ‘Saved’ or ‘Submitted’ will appear in the ‘View
Payments’ screen.
Once you submit the file, its status will become ‘File
Submitted’ or, if you reject all the payments in the file, its
status becomes ‘Rejected’. These files will then be removed
from the list of imports after about two weeks.
28
6. I
mpo
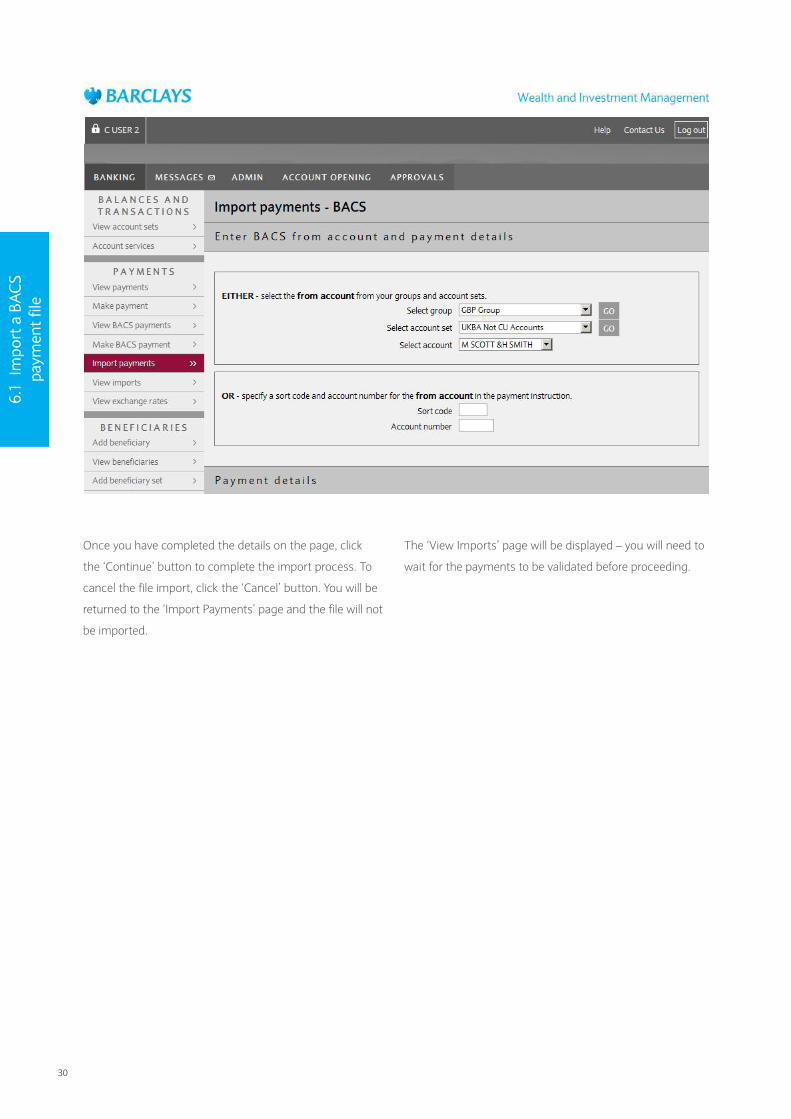
rt p
aym
ents
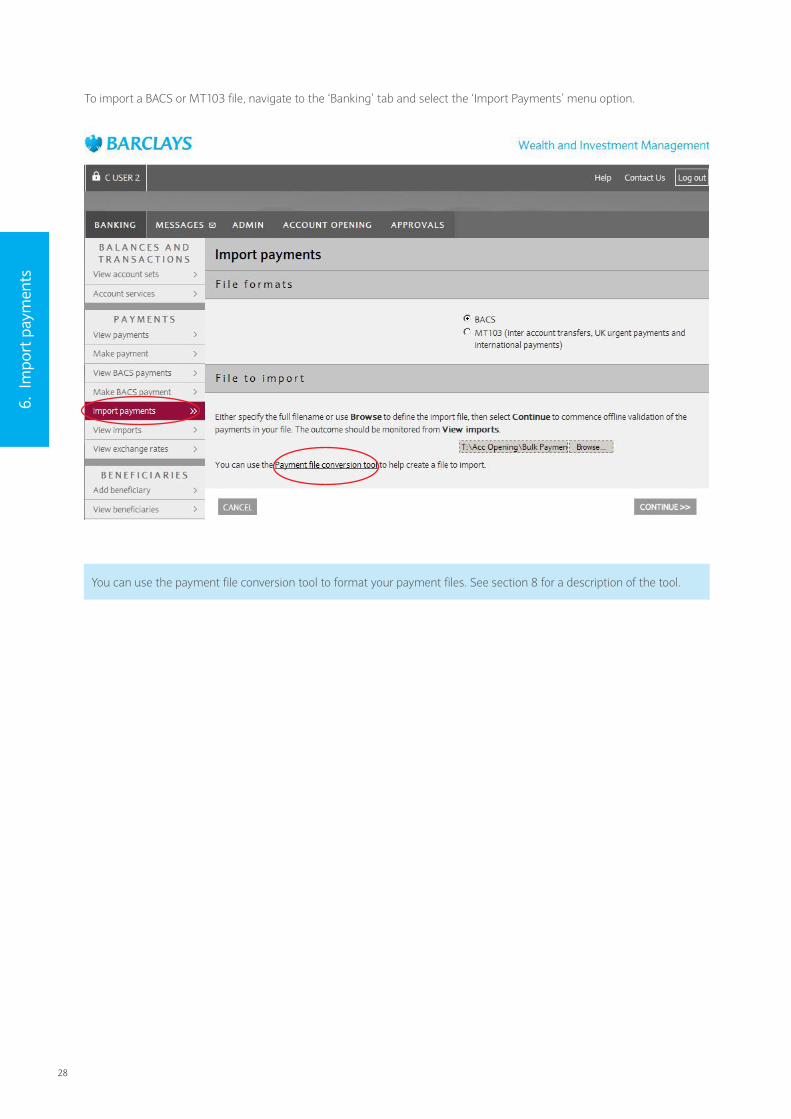
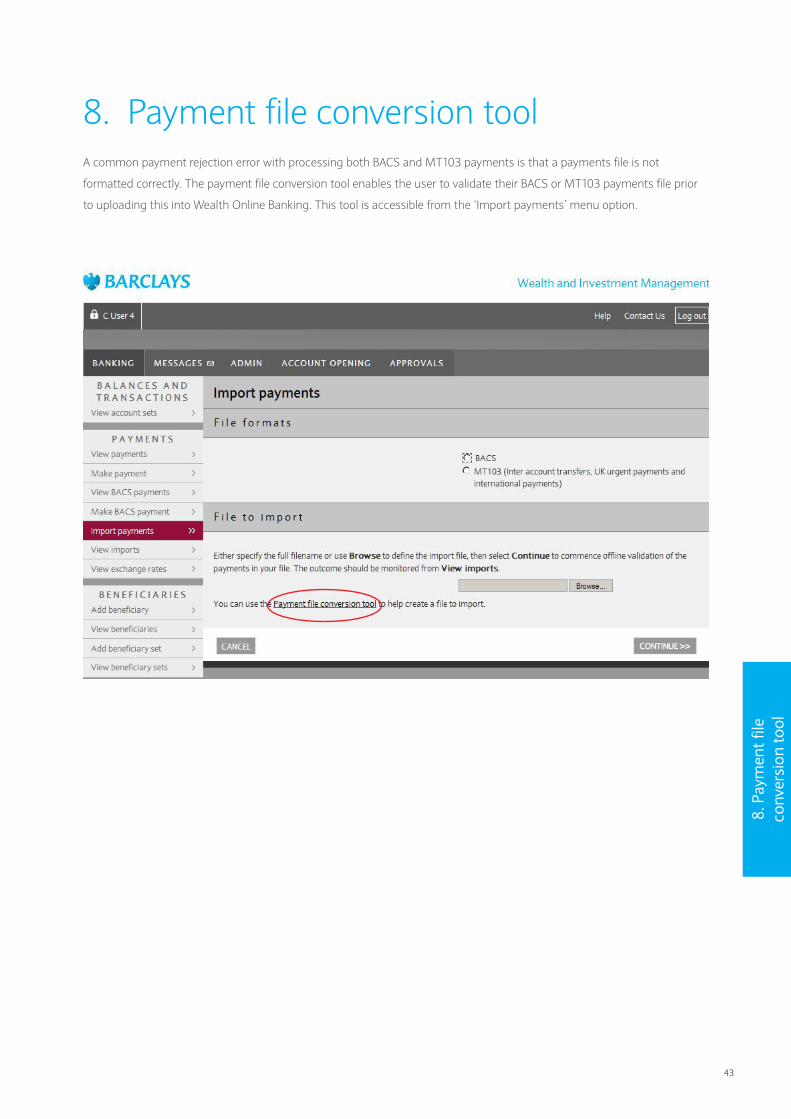
To import a BACS or MT103 file, navigate to the ‘Banking’ tab and select the ‘Import Payments’ menu option.
You can use the payment file conversion tool to format your payment files. See section 8 for a description of the tool.
29
6.1
Impo
rt a
BA
CS
paym
ent f
ile
6.1 Import a BACS payment fileTo import a BACS file, select the ‘BACS’ radio button on the
‘Import Payments’ page and enter the full file name and
path for the BACS file you wish to import. You may use the
‘Browse’ button to pick the file.
Click the ‘Continue’ button – the system will upload the
file and check that it is a properly formatted BACS file. It is
important that you do not close the browser window and
do not click any other menu options, links or buttons
while this is in progress as this will prevent the file from
being uploaded properly.
For a BACS file, only the beneficiary details are imported to
make a single BACS payment, so you will need to provide
the remaining payment details such as debit account
number and value date to complete the import.
If the file was uploaded successfully, the ‘Import Payments
– BACS’ page is displayed. If there were any errors in the file,
the ‘Import Payments’ page will be re-displayed showing
any errors found. You will need to correct the errors and
re-import the file.
On this page you will need to enter the following details:
1. ‘Payment From Account’ – select the account from
which the payment will be made.
2. ‘Payment Name’ – the name given to this payment
which will later be displayed in the ‘View BACS
Payments’ screen. This must only contain valid
BACS characters.
3. ‘Value Date’ – the date when the beneficiary payment
amounts should reach the beneficiary’s accounts.
The value date must be at least two working days
in the future – the list only includes valid dates for
the payment.
4. ‘Debit Charges From’ – indicates whether charges
for making the BACS payment will be debited from
the ‘Payment From’ account or the ‘Default Billing
Account’ for your organisation.
Enter the ‘Payment From Account’ in exactly the same way
as on the ‘Make BACS Payment – Step 1’ page by selecting
an account using the ‘Account Group’ and ‘Set’ list boxes or
by entering the sort code and account number directly.
The remaining details are entered as on the ‘Make BACS
Payment – Step 2’ page.
30
6.1
Impo
rt a
BA
CS
paym
ent f
ile
Once you have completed the details on the page, click
the ‘Continue’ button to complete the import process. To
cancel the file import, click the ‘Cancel’ button. You will be
returned to the ‘Import Payments’ page and the file will not
be imported.
The ‘View Imports’ page will be displayed – you will need to
wait for the payments to be validated before proceeding.
31
6.2
Impo
rt M
T103
pa
ymen
t file
s
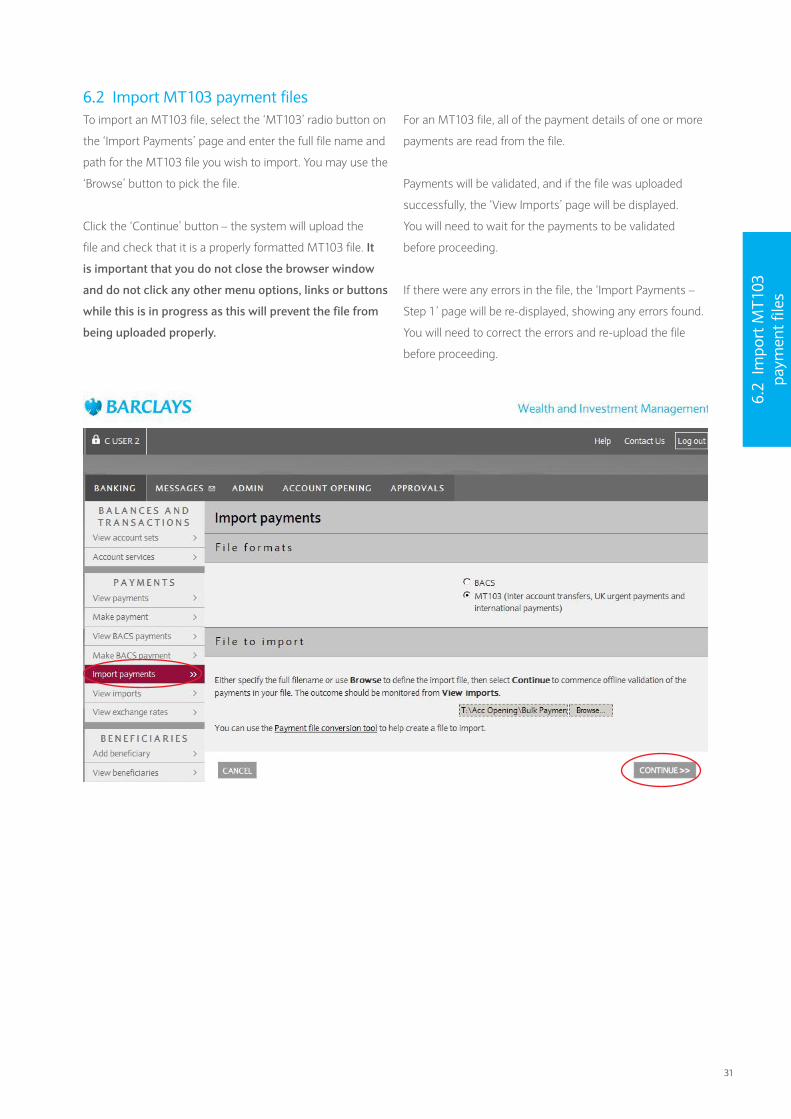
6.2 Import MT103 payment filesTo import an MT103 file, select the ‘MT103’ radio button on
the ‘Import Payments’ page and enter the full file name and
path for the MT103 file you wish to import. You may use the
‘Browse’ button to pick the file.
Click the ‘Continue’ button – the system will upload the
file and check that it is a properly formatted MT103 file. It
is important that you do not close the browser window
and do not click any other menu options, links or buttons
while this is in progress as this will prevent the file from
being uploaded properly.
For an MT103 file, all of the payment details of one or more
payments are read from the file.
Payments will be validated, and if the file was uploaded
successfully, the ‘View Imports’ page will be displayed.
You will need to wait for the payments to be validated
before proceeding.
If there were any errors in the file, the ‘Import Payments –
Step 1’ page will be re-displayed, showing any errors found.
You will need to correct the errors and re-upload the file
before proceeding.
32
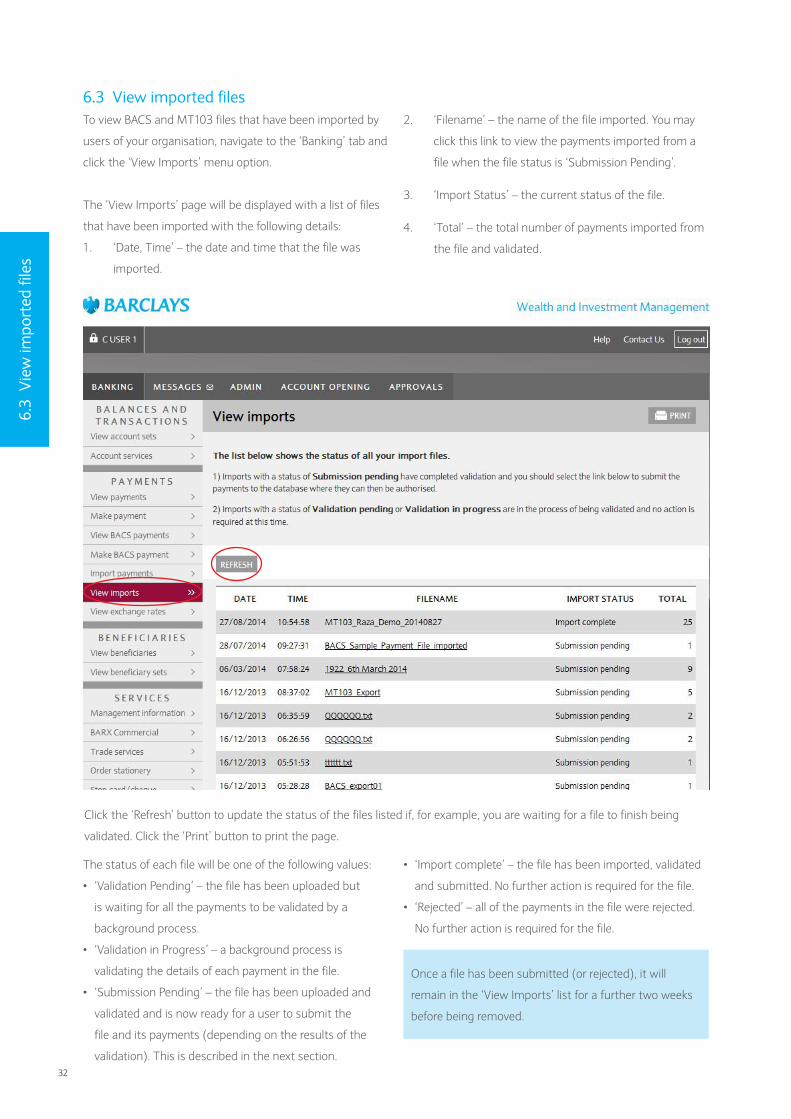
6.3
Vie
w im
port
ed fi
les
The status of each file will be one of the following values:
• ‘Validation Pending’ – the file has been uploaded but
is waiting for all the payments to be validated by a
background process.
• ‘Validation in Progress’ – a background process is
validating the details of each payment in the file.
• ‘Submission Pending’ – the file has been uploaded and
validated and is now ready for a user to submit the
file and its payments (depending on the results of the
validation). This is described in the next section.
• ‘Import complete’ – the file has been imported, validated
and submitted. No further action is required for the file.
• ‘Rejected’ – all of the payments in the file were rejected.
No further action is required for the file.
Once a file has been submitted (or rejected), it will
remain in the ‘View Imports’ list for a further two weeks
before being removed.
Click the ‘Refresh’ button to update the status of the files listed if, for example, you are waiting for a file to finish being
validated. Click the ‘Print’ button to print the page.
6.3 View imported filesTo view BACS and MT103 files that have been imported by
users of your organisation, navigate to the ‘Banking’ tab and
click the ‘View Imports’ menu option.
The ‘View Imports’ page will be displayed with a list of files
that have been imported with the following details:
1. ‘Date, Time’ – the date and time that the file was
imported.
2. ‘Filename’ – the name of the file imported. You may
click this link to view the payments imported from a
file when the file status is ‘Submission Pending’.
3. ‘Import Status’ – the current status of the file.
4. ‘Total’ – the total number of payments imported from
the file and validated.

33
6.4
Subm
it an
impo
rted
file
6.4 Submit an imported fileThe final step to import a file is to submit the imported
payments into the normal payments process.
Click on the ‘Filename’ of the payment when it is shown
with a status of ‘Submission Pending’. The ‘Import File
Results’ or ‘Import BACS File Results’ page will be displayed,
showing all of the payments imported from the file:
• BACS files will have only one BACS payment.
• MT103 files will have one or more IAT, SDP or IP
payments.
The following details are shown for each payment:
1. ‘Type’ – the type of payment imported, with one of
the following values:
− ‘BACS’ for a BACS payment
− ‘IAT’ for an inter-account transfer
− ‘SDP’ for a UK same-day payment
− ‘IP’ for an international payment
2. ‘Payment From/To’ – the name of the ‘From’ account
(for BACS payments) or the ‘Beneficiary Account’ (for
IAT, SDP and IP). Click this name to view details of
the payment.
3. ‘Amount’ – the total amount of the payment in the
payment currency.
4. ‘Ccy’ – the currency of the payment amount.
5. The action radio buttons
− ‘Reject’ – select this radio button to reject the
payment.
− ‘Save’ – select this radio button to save the
payment.
− ‘Submit’ – select this radio button to submit the
payment.
34
6.4
Subm
it an
impo
rted
file
When the page is first displayed, the radio buttons for
each payment will be selected or disabled according to the
results of the background validation process:
• ‘Submit’ – selected if the payment was complete and
successfully validated. You may also choose to have the
payment saved or rejected.
• ‘Save’ – selected if the payment was incomplete or had
only minor validation errors. You may also choose to have
the payment rejected, but not submitted.
• ‘Reject’ – selected if the payment failed validation. The
payment cannot be saved or submitted.
Once you have selected the action you require for each
of the payments, click the ‘Continue’ button. Each of the
payments will be processed according to the type and
selected action:
• ‘Reject’ (all types)’ – the payment will not be imported.
• ‘Save (BACS)’ – the payment will be imported as a
BACS payment in a ‘Saved’ state. Click on ‘View BACS
Payments’ in the main menu to view it. You may then
amend and continue the payment or delete it.
• ‘Save (IAT, SDP, IP)’ – the payment will be imported in a
saved state as an IAT, SDP or IP payment. Use the ‘View
Payments’ menu options to amend and continue the
payment or to delete it.
• ‘Submit (BACS)’ – the payment will be imported as a
BACS payment in a status of ‘Verification Pending’ or
‘Authorisation Pending’ depending on your organisation’s
configuration. If neither verification nor authorisation is
required, it will be added in ‘Saved’ status.
• ‘Submit (IAT, SDP, IP)’ – the payment will be imported
as an IAT, SDP or IP payment in a status of ‘Verification
Pending’ or ‘Authorisation Pending’ depending on your
organisation’s configuration. If neither verification nor
authorisation is required, it will be added in ‘Saved’ status.
Also, you may click on the ‘Payment From/To’ name for
a payment to view details of the payment and to add
or modify the notes associated with the payment. For
example, if you click on the ‘Payment To’ name for an
inter-account transfer (IAT) the ‘View Transfer’ page will
be displayed.
Click on the ‘Submit’ button to save any changes to the
‘Notes’ field, or click on the ‘Back’ button to discard the
changes. In either case you will return to the ‘View Import
Results’ page.
For a BACS payment, you will also be able to click on the
‘Details’ button to view the beneficiaries.
Note: Any beneficiaries whose details are not valid will be
highlighted. They will also be highlighted if the payment
is saved and you choose to amend the payment. To
complete the payment you will need to set the payment
amount for all of the invalid beneficiaries to ‘zero’ to
exclude them from the payment. Alternatively, you may
reject the payment (and the file) and correct the errors
before re-importing the file.

35
7. V
erify
/Aut
horis
e
MT1
03 fi
les
7. Verify/Authorise MT103 filesMost payments will need to be verified, authorised or both
– some payments will need to be authorised by two people.
The requirements for each payment will depend on the
configuration for your organisation and the total amount of
the payment.
A single user for an organisation may only perform one of
‘Submit’, ‘Verify’ or ‘Authorise’ on an individual payment.
Therefore, a payment which requires verification and two
authorisations will require actions from four people before it
can be executed.
Payments awaiting verification or authorisation may be
rejected, returning them to the ‘Saved’ state so that they
may be amended or deleted. If you wish to re-submit the
payment it will need to be verified and/or authorised again
as before.
You must have the appropriate privileges to verify or
authorise payments and these options will only be available
on the menu if you have the privileges. A user may have
‘Verify’ and/or ‘Authorise’ privileges at level ‘A’ or ‘B’. The
requirement for ‘A’ or ‘B’ authorisation (by one or two users)
depends on the value of the payment.
When verifying, authorising or rejecting payments you
will be asked to provide a secure digital signature. You
will also be asked to provide a secure digital signature
when you delete a payment with a status of ‘Execution
Pending’ (which is possible any time up to the day before
the execution date), or if you submit a payment with no
requirement for verification or authorisation.
Note: MT103 payments imported via the ‘Import
payments’ option can be verified, authorized and/or
rejected at either single payment level, or at import file
level. For example, if you have imported a file with 100
payments all could be verified/authorized/rejected in one
go. Or you could choose to do it on an individual basis.
36
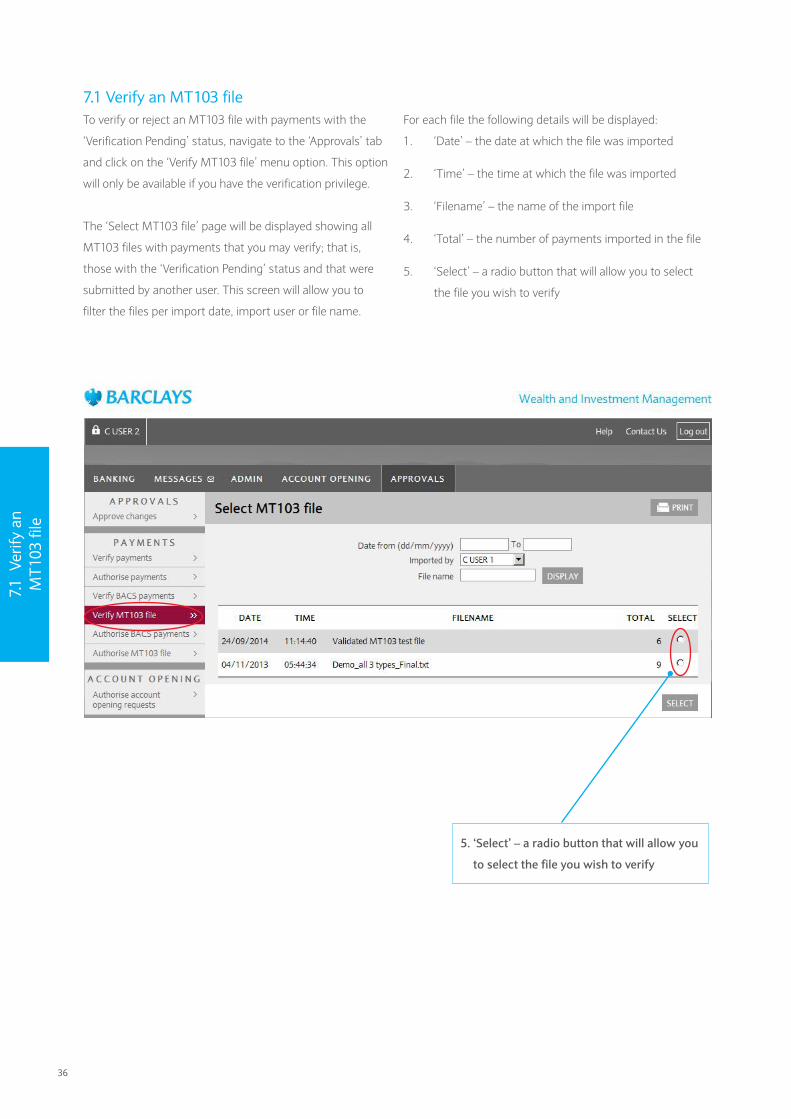
7.1 Verify an MT103 fileTo verify or reject an MT103 file with payments with the
‘Verification Pending’ status, navigate to the ‘Approvals’ tab
and click on the ‘Verify MT103 file’ menu option. This option
will only be available if you have the verification privilege.
The ‘Select MT103 file’ page will be displayed showing all
MT103 files with payments that you may verify; that is,
those with the ‘Verification Pending’ status and that were
submitted by another user. This screen will allow you to
filter the files per import date, import user or file name.
For each file the following details will be displayed:
1. ‘Date’ – the date at which the file was imported
2. ‘Time’ – the time at which the file was imported
3. ‘Filename’ – the name of the import file
4. ‘Total’ – the number of payments imported in the file
5. ‘Select’ – a radio button that will allow you to select
the file you wish to verify
7.1
Verif
y an
M
T103
file
5. ‘Select’ – a radio button that will allow you
to select the file you wish to verify
37
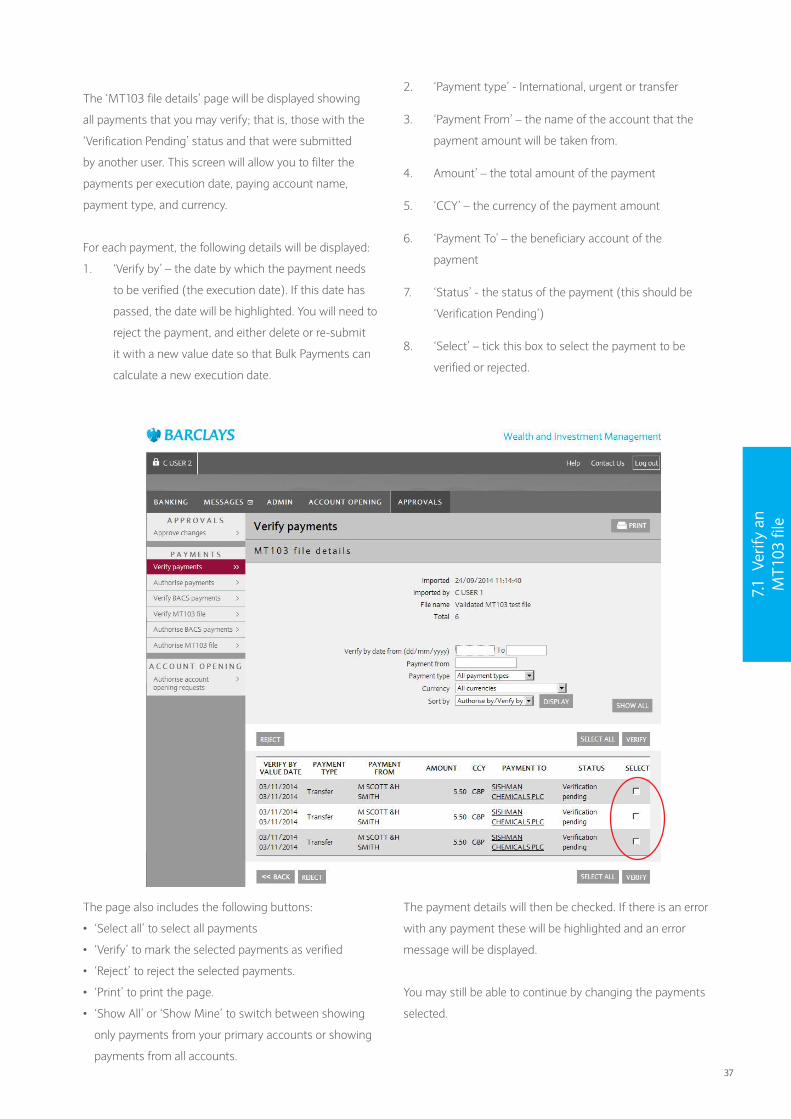
The ‘MT103 file details’ page will be displayed showing
all payments that you may verify; that is, those with the
‘Verification Pending’ status and that were submitted
by another user. This screen will allow you to filter the
payments per execution date, paying account name,
payment type, and currency.
For each payment, the following details will be displayed:
1. ‘Verify by’ – the date by which the payment needs
to be verified (the execution date). If this date has
passed, the date will be highlighted. You will need to
reject the payment, and either delete or re-submit
it with a new value date so that Bulk Payments can
calculate a new execution date.
2. ‘Payment type’ - International, urgent or transfer
3. ‘Payment From’ – the name of the account that the
payment amount will be taken from.
4. Amount’ – the total amount of the payment
5. ‘CCY’ – the currency of the payment amount
6. ‘Payment To’ – the beneficiary account of the
payment
7. ‘Status’ - the status of the payment (this should be
‘Verification Pending’)
8. ‘Select’ – tick this box to select the payment to be
verified or rejected.
7.1
Verif
y an
M
T103
file
The page also includes the following buttons:
• ‘Select all’ to select all payments
• ‘Verify’ to mark the selected payments as verified
• ‘Reject’ to reject the selected payments.
• ‘Print’ to print the page.
• ‘Show All’ or ‘Show Mine’ to switch between showing
only payments from your primary accounts or showing
payments from all accounts.
The payment details will then be checked. If there is an error
with any payment these will be highlighted and an error
message will be displayed.
You may still be able to continue by changing the payments
selected.

38
If there are no errors, the digital signature page will be displayed and the ‘eSigner’ window will pop up, showing full details
of the payments you have selected.
7.2
Aut
horis
e an
M
T103
file
You should inspect the contents of the ‘eSigner’ window
to check that they are correct. Once you are satisfied,
complete the verification process by clicking the ‘Sign’
button, ensuring that your Smart Card is in the reader. You
will be asked to enter your PIN. Once you have entered
your PIN correctly and clicked ‘OK’, the payments will be
marked as ‘Verified’ and the ‘MT103 file details’ page will
be displayed again without the payments you have just
verified.
Once the payments have been verified, their status will
either be ‘Authorisation Pending’ if authorisation is also
required, or ‘Execution Pending’ if it is not required. You
may select the ‘View payments’ menu option to see the
payments. If the payments require authorisation, they will
need to be authorised by another user and, if you have the
privilege to authorise payments, they will not appear in the
list of payments you may authorise.
If, when the digital signature window appears, you do not
wish to complete the verification of the payments displayed
in the window (for example, if some detail is incorrect or
you cannot find your card) then click the ‘Cancel’ button.
This will return you to the ‘MT103 file details’ page without
verifying the selected payments.

39
7.2
Aut
horis
e an
M
T103
file
7.2 Authorise an MT103 fileThe process for the authorisation of MT103 files is similar to
verification. To authorise the ‘Authorisation Pending’ status
payments imported on a given MT103 file, navigate to the
‘Approvals’ tab and click on the ‘Authorise MT103 file’ menu
option. This option will only be available if you have one of
the authorisation privileges (‘A’ or ‘B’).
The ‘Select MT103 file’ page will be displayed showing all
MT103 files with payments that you may authorise; that is,
those with the ‘Authorisation Pending’ or ‘2nd Authorisation
Pending’ status and that were submitted and verified by
other users. This screen will allow you to filter the files per
import date, import user or file name.
For each file the following details will be displayed:
1. ‘Date’ – the date at which the file was imported
2. ‘Time’ – the time at which the file was imported
3. ‘Filename’ – the name of the import file
4. ‘Total’ – the number of payments imported in the file
5. ‘Select’ – a radio button that will allow you to select
the file you wish to verify
5. ‘‘Select’ – a radio button that will allow
you to select the file you wish to verify

40
7.2
Aut
horis
e an
M
T103
file
The ‘MT103 file details’ page will be displayed showing all
payments that you may authorize. Some payments will
require authorisation by a user with the ‘A’ authorisation
privilege while others may be authorized by a user with
either ‘A’ or ‘B’ privileges. Also, each payment may only
be authorised by a user who has not already submitted,
verified or authorised the payment. The page will only
include payments that you are able to authorise within
these rules.
This screen will allow you to filter the payments per execution
date, paying account name, payment type, and currency.
For each payment, the following details will be displayed:
1. ‘Authorise by’ – the date by which the payment needs
to be authorised (the execution date). If this date has
passed, the date will be highlighted. You will need to
reject the payment, and either delete or re-submit
it with a new value date so that Bulk Payments can
calculate a new execution date.
2. ‘Payment type’- International, urgent or transfer
3. ‘Payment From’ – the name of the account that the
payment amount will be taken from.
4. ‘Amount’ – the total amount of the payment
5. ‘CCY’ – the currency of the payment amount
6. ‘Payment To’ – the beneficiary account of the
payment
7. ‘Status’ - the status of the payment (this should
be ‘Authorisation Pending’ or ‘2nd Authorisation
Pending’)
8. ‘Select’ – tick this box to select the payment to be
authorised or rejected.
The page also includes the following buttons:
• ‘Select all’ to select all payments
• ‘Verify’ to mark the selected payments as verified
• ‘Reject’ to reject the selected payments.
• ‘Print’ to print the page.

41
7.2
Aut
horis
e an
M
T103
file
• ‘Show All’ or ‘Show Mine’ to switch between showing
only payments from your primary accounts or showing
payments from all accounts.
The payment details will then be checked. If there is an error
with any payment these will be highlighted and an error
message will be displayed.
You may still be able to continue by changing the payments
selected.
If there are no errors, the digital signature page will be
displayed and the ‘eSigner’ window will pop up, showing full
details of the payments you have selected.
You should inspect the contents of the ‘eSigner’ window
before you approve the payments. Once you are satisfied,
complete the authorisation process by clicking the ‘Sign’
button, ensuring that your Smart Card is in the reader. You
will be asked to enter your PIN. Once you have entered
your PIN correctly and clicked ‘OK’, the payments will be
authorised by you and the ‘MT103 file details’ page will
be displayed again without the payments you have just
authorised.
Once the payments have been authorised, their status will
either be ‘2nd Authorisation Pending’ if this was the first
of two required authorisations, or ‘Execution Pending’. You
may select the ‘View Payments’ menu option to see the
payments. If the payments require a second authorisation,
they will need to be authorised by another user and they
will not appear in the list of payments for you to authorise.
If, when the digital signature window appears, you do not
wish to complete the authorisation (for example, if some
detail is incorrect) then click the ‘Cancel’ button. This will
return you to the ‘Authorise BACS Payments’ page without
authorising the selected payments.

42
7.3 Reject an MT103 fileIf there is a reason why a payment should not be verified or
authorised – for example, if the execution date has passed,
there is a mistake in the payment or the reason for the
payment has gone – you will need to reject the payment.
This process is similar to verification and authorisation.
To reject payments on either the ‘Verify’ or ‘Authorise’
pages, select the payments you wish to reject and then click
the ‘Reject’ button.
The digital signature page will be displayed and the ‘eSigner’
window will pop up showing full details of the payments
you have selected.
You should inspect the contents of the ‘eSigner’ window
to confirm that you have selected the right payments and,
when you are satisfied, complete the rejection process by
clicking the ‘Sign’ button, ensuring that your Smart Card
is in the reader. You will be asked to enter your PIN. Once
you have entered your PIN correctly and clicked ‘OK’, the
payments will have been rejected by you and the ‘Verify’ or
‘Authorise Payments’ page will be displayed again without
the payments you have just rejected.
Once the payments have been rejected, their status will be
‘Saved’. You may navigate to the ‘Banking’ tab and select
the ‘View Payments’ menu option to see the payments and,
by clicking on the ‘Payment Name’ link, either delete or
amend and re-submit them.
If, when the digital signature window appears, you do not
wish to complete the rejection (for example, if you have
selected the wrong payment) then click the ‘Cancel’ button.
This will return you to the ‘Verify’ or ‘Authorise Payments’
page without rejecting the selected payments.
7.3
Reje
ct a
n M
T103
file
43
8. Payment file conversion toolA common payment rejection error with processing both BACS and MT103 payments is that a payments file is not
formatted correctly. The payment file conversion tool enables the user to validate their BACS or MT103 payments file prior
to uploading this into Wealth Online Banking. This tool is accessible from the ‘Import payments’ menu option.
8. P
aym
ent f
ile
conv
ersi
on to
ol
44
8.1
MT1
03/B
AC
S
file
uplo
ad
8.1 MT103/BACS file uploadAs a prerequisite to using this facility the client must have at
least Java 7 update 40 installed.
The first step the user has to take is to select which type
of file they wish to validate. The user does this by clicking
on the File drop down option located in the top left of
the screen.
1. The User must select the one of the two options
displayed to continue:
• Open MT103
• Open BACS
2. Once a file type is selected a pop up box will appear
and the user should select the file that they wish
to validate. The source file must be a .CSV, an .XLS, or
an .XLSX file.
3. Once the user has selected the file they must click on
the ‘Open’ button to proceed to the next step.
2. Once a file type is selected a pop up box
will appear and the user should select
the file that they wish to validate
3. Once the user has
selected the file they
must click on the ‘Open’
button to proceed to
the next step
45
8.1
MT1
03/B
AC
S
file
uplo
ad
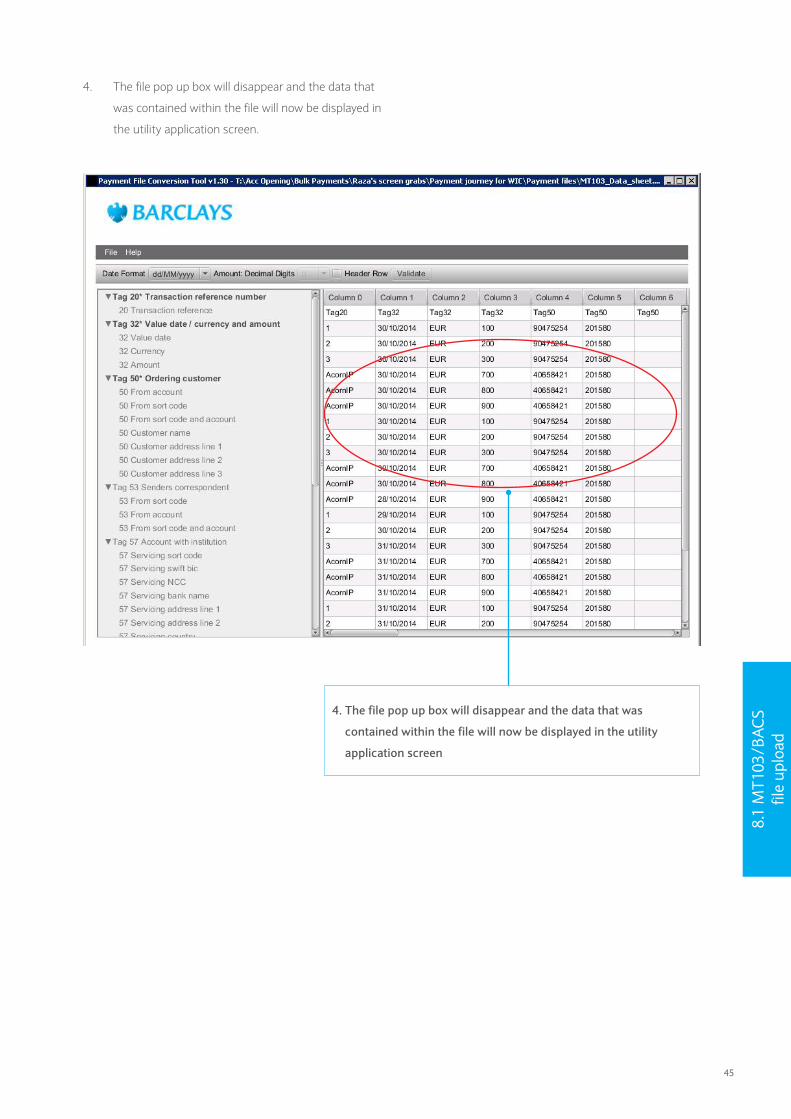
4. The file pop up box will disappear and the data that
was contained within the file will now be displayed in
the utility application screen.
4. The file pop up box will disappear and the data that was
contained within the file will now be displayed in the utility
application screen
46
8.2
Valid
atin
g th
e
paym
ents
file
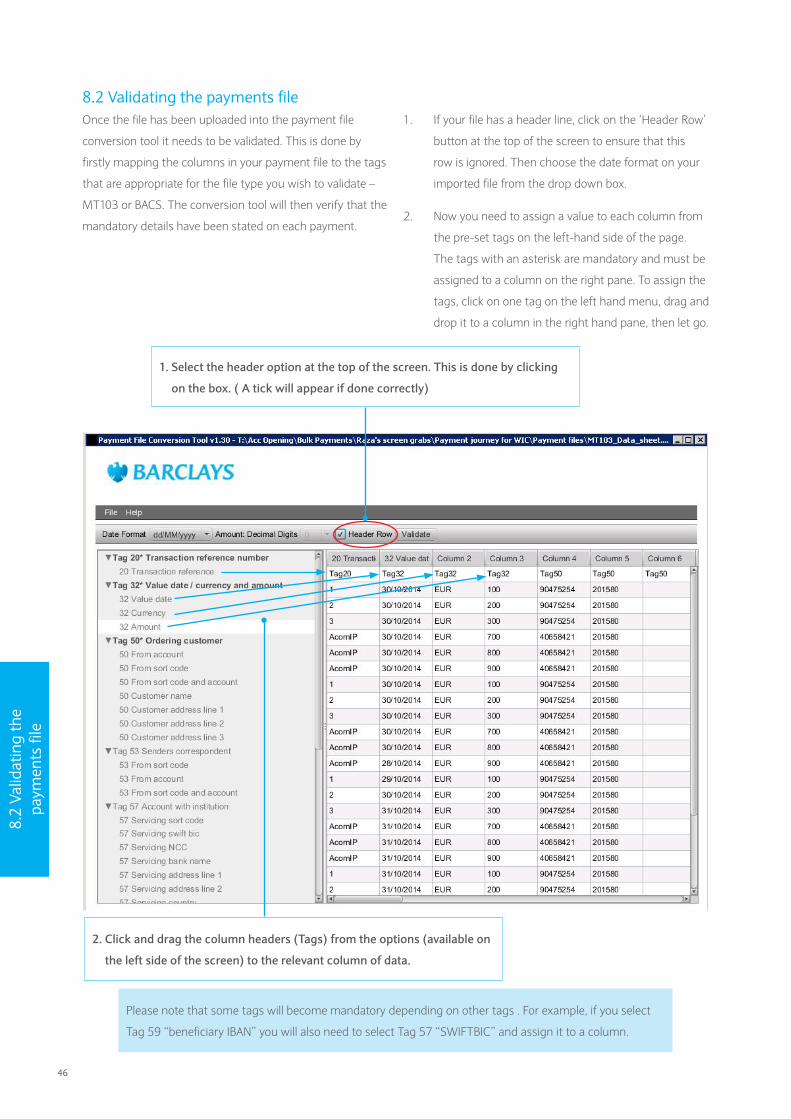
8.2 Validating the payments fileOnce the file has been uploaded into the payment file
conversion tool it needs to be validated. This is done by
firstly mapping the columns in your payment file to the tags
that are appropriate for the file type you wish to validate –
MT103 or BACS. The conversion tool will then verify that the
mandatory details have been stated on each payment.
1. If your file has a header line, click on the ‘Header Row’
button at the top of the screen to ensure that this
row is ignored. Then choose the date format on your
imported file from the drop down box.
2. Now you need to assign a value to each column from
the pre-set tags on the left-hand side of the page.
The tags with an asterisk are mandatory and must be
assigned to a column on the right pane. To assign the
tags, click on one tag on the left hand menu, drag and
drop it to a column in the right hand pane, then let go.
2. Click and drag the column headers (Tags) from the options (available on
the left side of the screen) to the relevant column of data.
Please note that some tags will become mandatory depending on other tags . For example, if you select
Tag 59 “beneficiary IBAN” you will also need to select Tag 57 “SWIFTBIC” and assign it to a column.
1. Select the header option at the top of the screen. This is done by clicking
on the box. ( A tick will appear if done correctly)
47
8.2
Valid
atin
g th
e
paym
ents
file
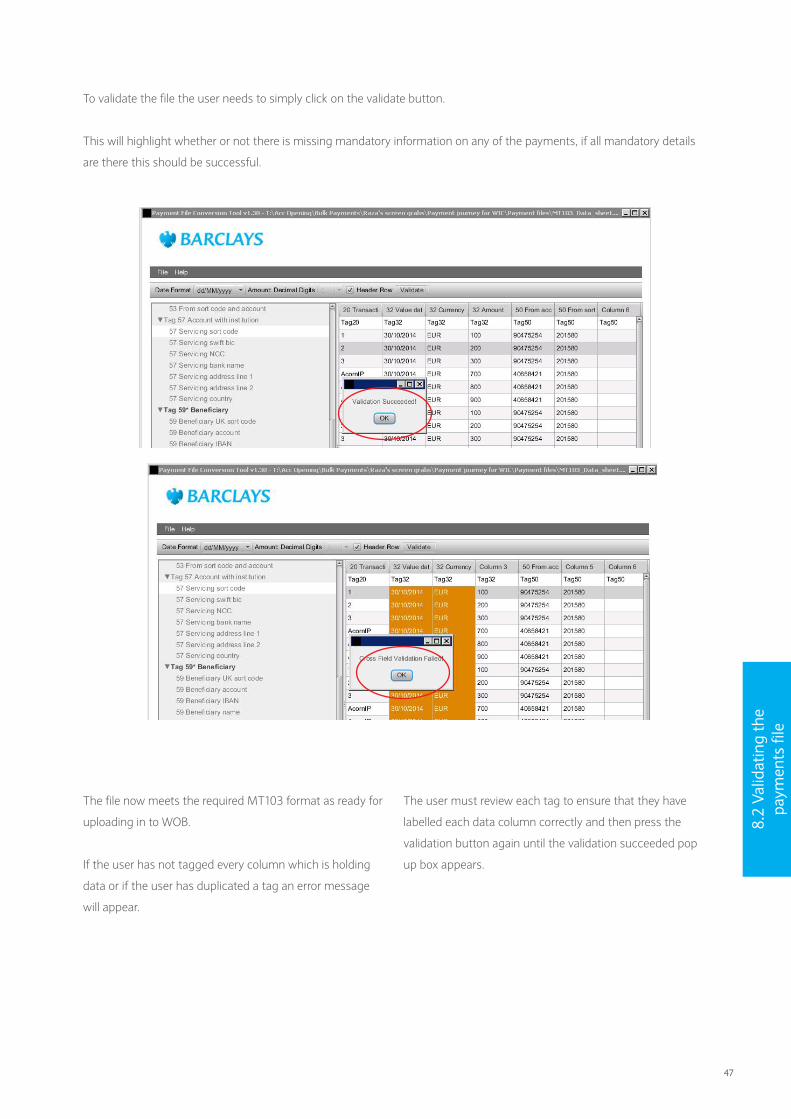
To validate the file the user needs to simply click on the validate button.
This will highlight whether or not there is missing mandatory information on any of the payments, if all mandatory details
are there this should be successful.
The file now meets the required MT103 format as ready for
uploading in to WOB.
If the user has not tagged every column which is holding
data or if the user has duplicated a tag an error message
will appear.
The user must review each tag to ensure that they have
labelled each data column correctly and then press the
validation button again until the validation succeeded pop
up box appears.
48
8.3 Payments file template creationOnce you’ve validated your file, you can create a template
which will save you time in future. The purpose of
creating templates is to save the mapping between tags
and your payment file columns. If you have payment
files that conform to different layouts you may wish to
create a template per file layout. Just click on ‘File’ and
‘Save template’.
Having saved the template, next time you wish to format a
payment file you would carry out the following steps:
1. open the source file where the payment data is
2. open the template file that holds the mapping
between your data fields and the BACS or MT103 tags
3. validate the file
4. export the validated file. It will now be in the necessary
format for import into Wealth Online Banking
8.3
Paym
ents
file
te
mpl
ate
crea
tion

8.4
Expo
rtin
g th
e
paym
ent f
ile
Item Ref: IBIM2786. October 2014
8.4 Exporting the payment fileAfter successful validation the payment file can be exported.
This will create a file that will be readily imported via the
‘Import payments’ menu option in Wealth Online Banking.
To do this click on the ‘Export formatted file’ option from
the File drop down menu and name the file. The file is ready
for import.
You can now go back to Wealth Online Banking, click on
the ‘Import Payments’ menu option on the left-hand side of
your screen and import the file you have just validated and
converted to the correct BACS or MT103 format.


![i-Wob - Hydrus Senninger i-Wob is the most innovative ... 0.70 i-Wob 0.60 0.50 0.40 0.20 0.30 0.10 Precipitation 0 ... [10.32 mm] #26 13/32 inch ...Published in: New York Times Book](https://static.documents.pub/doc/80x56/5aaf2bf27f8b9a6b308cfe03/i-wob-senninger-i-wob-is-the-most-innovative-070-i-wob-060-050-040-020.jpg)


