http://community.qlikview.com/wikis/qvwb9/default.aspx Step 1. Installation This part of the Walk Through shows hows to install the QlikView WorkBe nch installer. The InstalleThe first step is to run the !lik"iew #ok$ench Setup.exefile, which you downloaded from here. The fourth step will ask you to select what type of installation you would like. The rest of this documentation will assume that you have installed the Complete version.
This part of the Walk Through shows hows to install the QlikView WorkBench installer.
The Installe
The first step is to run the !lik"iew #ok$ench Setup.exe file, which you downloaded fromhere.
The fourth step will ask you to select what type of installation you would like. The rest of thisdocumentation will assume that you have installed the Complete version.
The QlikView WorkBench is installed to your Program iles folder, although you can change thisin the installtion wi!ard, "ut it is typically
C:\Program Files\QlikView\WorkBench
#aving installed the QlikView WorkBench, you will see the following folders at the a"ove path
The folders will "e populated depending on which features you installed. $f you installed theTemplates they will "e placed in your Visual %tudio Template folders under &y 'ocuments
We recommend that you select the complete installation as it includes everything you need tofully develop QlikView ena"led we"sites.
$nstalled features include(
&eatue 'esciption
)%P.*+T .- %erver Controls $nstalls the )ssem"ly containing the )%P.*+T .-%erver Controls component of the QlikViewWorkBench for use in the Visual %tudio +ditionsmentioned a"ove. ou will need to reference this
)ssem"ly later in the Walk Through
Visual %tudio.*+T --/ %upport0$nstalls we"site and pro1ect templates for Visual%tudio.*+T --/.
Visual %tudio.*+T --2 %upport0$nstalls we"site and pro1ect templates for Visual%tudio.*+T --2.
3eference We"site $nstalls the QlikView WorkBench 3eference We"site,which is a fully functioning we"site demonstrating 4withcode e5amples6 all of the controls in the QlikWe"WorkBench. This is highly recommended for getting toknow the controls "etter.
Themes ) collection of pre7"uilt css style sheets.
8ava%cript 9i"raries $nstalls the QlikView WorkBench 8ava%cript files whichcontain li"raries to simplify and enhancecommmunication with QlikView %erver. *ote that theseare also contained as part of the )%P.*+T .- %erverControls and %harePoint We" Parts.
%upport %hortcuts $nstalls shortcuts on the %tart 7: )ll Programs 7: menuto online support documentation, including an online
*Please note that Visual Web Developer Express only support Website templates.
+dit
%ompact$f you select to install the Compact version then the following features )3+ *;T installed(
• 3eference We"site
• 8ava%cript files
• We"site and Pro1ect templates
%ustom
#ith the custom installation( you may choose the featues that you equie
)ninstallin*
ou can uninstall the QlikView WorkBench either from the )dd<3emove Programs Console or themenu item in %tart 7: )ll Programs 7:QlikView:QlikView WorkBench.
This part of the Walk Through will show you how to create a We"site using the QlikViewWorkBench we"site template
, -ew #ebsite
;pen Visual %tudio and from the ile menu create a new We"site
ou will "e presented with a *ew We"site dialog. %elect the correct 9anguage 4such as C=6 andthe >QlikView WorkBench We"site 4C%6> Template file.
ou may "e presented with a .*+T ?.2 prompt, which you can decline unless you wish to makeuse of features supported "y .*+T ?.2 4the QlikWe" WorkBench is "uilt against the .*+Tframework .-6.
The we"site has now "een created and you can see this in the >%olution +5plorer>. $f you can@t
see the %olution +5plorer, you can "ring it up from the View menu
The %olution +5plorer shows the structure of the we"site and "ecause of the template, some key
files 4shown in the highlighted "o5es6 have "een created for you. These are(• %ome 8ava%cript files 7 this is advanced and covered elsewhere on this site
• Themes, which contains style sheets for the o"1ects only in the QlikView WorkBench
• ) full we" config file 7 this file isn@t actually used "y the we"site, "ut it does contain many
more advanced QlikView WorkBench entries, which you can copy from here and pasteinto the we" config file. #owever, this is out of the scope of this Walk Through and moreinformation can "e found elsewhere on this site
• ) we" config file 7 this file defines key glo"al properties of the site and has the "asic
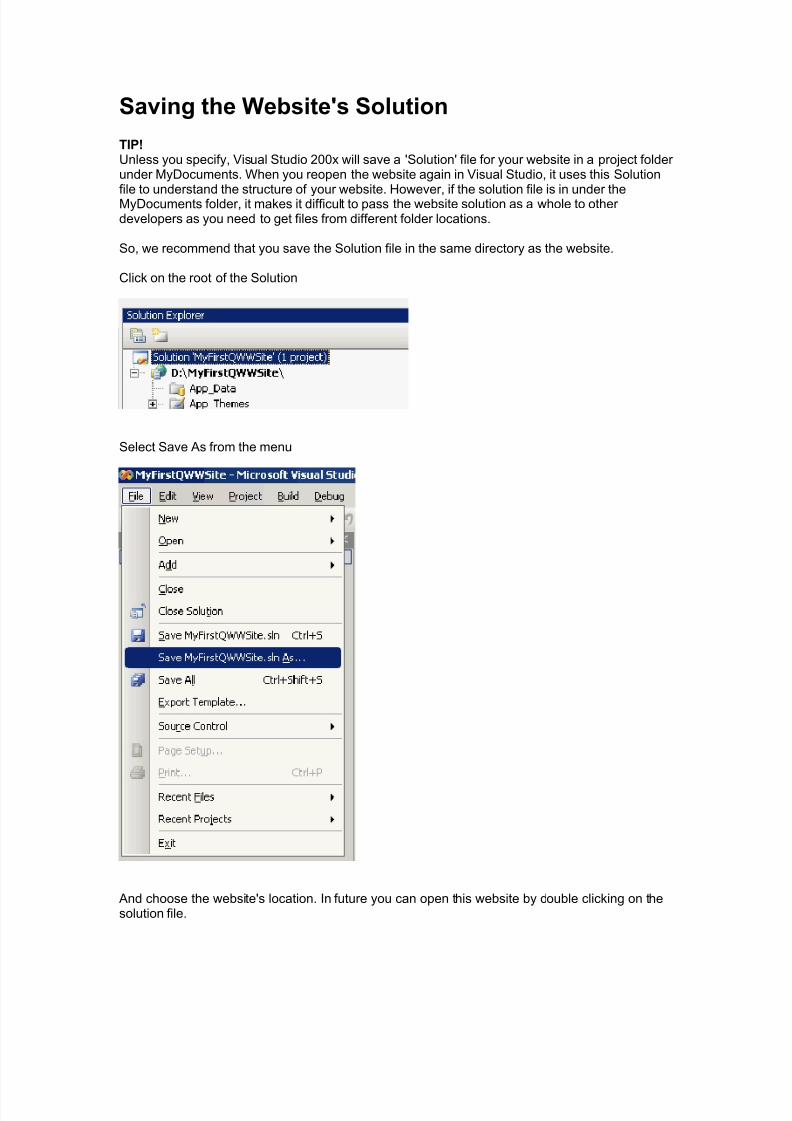
TI0Anless you specify, Visual %tudio --5 will save a @%olution@ file for your we"site in a pro1ect folder under &y'ocuments. When you reopen the we"site again in Visual %tudio, it uses this %olutionfile to understand the structure of your we"site. #owever, if the solution file is in under the&y'ocuments folder, it makes it difficult to pass the we"site solution as a whole to otherdevelopers as you need to get files from different folder locations.
%o, we recommend that you save the %olution file in the same directory as the we"site.
Click on the root of the %olution
%elect %ave )s from the menu
)nd choose the we"site@s location. $n future you can open this we"site "y dou"le clicking on thesolution file.
This step shows you how to add and confi*ue the 'ataSouce %ontol. This is aspecial contol that allows the web pa*e to communicate with !lik"iew Seve.
Bring up the 'efault.asp5 we" page in 'esign &ode. This page has some introductory te5t tohelp you get started with the QlikView WorkBench, of which a lot is covered in this walk through.%elect all the te5t and delete it.
rom the Tool"o5, select the 'ata %ource control
'rag this control onto the we" page. When you do this, you will see the 'ata %ource control anda %mart Tag. )lthough this 'ata %ource is visi"le in 'esign &ode, when you actually run the we"
page it will "e invisi"le. ) %mart Tag is a feature of Visual %tudio which presents to you the mostcommon or essential properties that you need to set on the control. To "ring up the %mart Tag atany time, click on the arrow ta" on the top right corner of the control.
%ince the 'ata %ource opens the communication with QlikView %erver, you must define theunderlying QlikView application. ou@ll see in the image a"ove that the )pplication file has not"een set.
$n this e5ample we are going to use the +ntertainment QlikView application, which is also used inthe 3eference %ite. $f you have already used the reference site, then this file should already "e inplace. $f not, then you need to locate it.
;n installing the work"ench you will see a 3eference We"site folder, normally at(
$n there is a !ip file called QlikViewWorkBench3eferenceWe"%ite.!ip
$n this !ip file there is a folder called ww and in there you will see the +ntertainment.vw file.
;n the %mart Tag, click on the small "utton to the right of the @Qv)pplicationile 4vw file6@ "o5and navigate to your application. This will typically "e in the following folder
C:\Program Files\QlikView\E$am%les\Q&s'ocuments
&equent Suppot IssuePlease ensure that the application you select is located in a folder that is accessi"le "y QlikView%erver 4in other words 7 the folder should "e defined on the @olders@ ta" of your QlikView %erverControl Panel6
ou can also 1ust type the application name in 7 you do not need to enter the @vw@ e5tention.
)ll QlikView WorkBench controls have a QlikView WorkBench section in Visual %tudio@s Property
window, which 1ust relates to properties 4for the selected control6 that can "e set, such as theapplication@s name. $n most instances these properties do not need to "e changed, "ut they doallow for more advanced configurations, which are discussed elsewhere on this we"site.
) useful feature of the QlikView WorkBench is the ;"1ect Browser, which shows the underlyingapplication@s sheet and o"1ect structure along with the o"1ect@s $'. This means that you do notneed to keep looking at the application to find the o"1ect@s $'.
%tep G will take you through the steps to create a QlikView ena"led we" page with a few o"1ects(some list"o5es, "uttons and a chart. $t will also show you how to configure some aspects of the
controls "oth in 'esign and %ource View &ode.
-on6!lik"iew %ontolsWhen you autogenerate a !ero7footprint page in QlikView, you will "e shown an interpretation ofthe actual sheet in the application. #owever, on pu"lic sites you may want to show otherinformation such as 3%% feeds and generally make the QlikView content appear fully integratedinto the we"site. This is something that the autogenerated pages can@t do, "ut which the QlikViewWorkBench can, "y letting you mi5 up content and controls.
$n the cell "elow we@ll now add a 9ist"o5. rom the QlikView WorkBench ta", select 9istBo5
and drag it on
The 9ist"o5 needs to know which 9ist"o5 it corresponds to in the underlying QlikView application. )s it@s not "een set yet, you are made aware of this with the warning te5t.
Settin* the 'atasouce
With the release of H.- it is possi"le to have multiple QlikView applications on the same we"page. This means that you can effectively mash7up QlikView applications.
The %mart Tag shows a field, >'ata%ource$'>, which is where you define which 'ata%ource 4andhence application6 the QlikView WorkBench o"1ect needs to connect to. $f you leave this "lank itwill default to the first 'ata%ource on the page.
9ike the 'ata %ource, the 9ist"o5 has a %mart Tag. $f you click the "utton ne5t to the ;"1ect$'@sentry, the ;"1ect Browser will appear, "ut this time it will "e filtered to only show 9ist"o5 o"1ects.We want the 'irector list"o5, so we navigate to this and choose it. )lternatively you can type the;"1ect$' if you know it, "ut you must ensure that you type it e5actly the same as in theapplication as they are case sensitive .
The caption area of the 9istBo5 4title, colour, functions etc6 are automatically pulled from theQlikView )pplication. 3ead here to understand more a"out the *ative QlikView ;"1ects.
'esi*ne
Being a visual design environment, you can resi!e the width of the 9ist"o5, "y gra""ing the rightside handle and moving it in
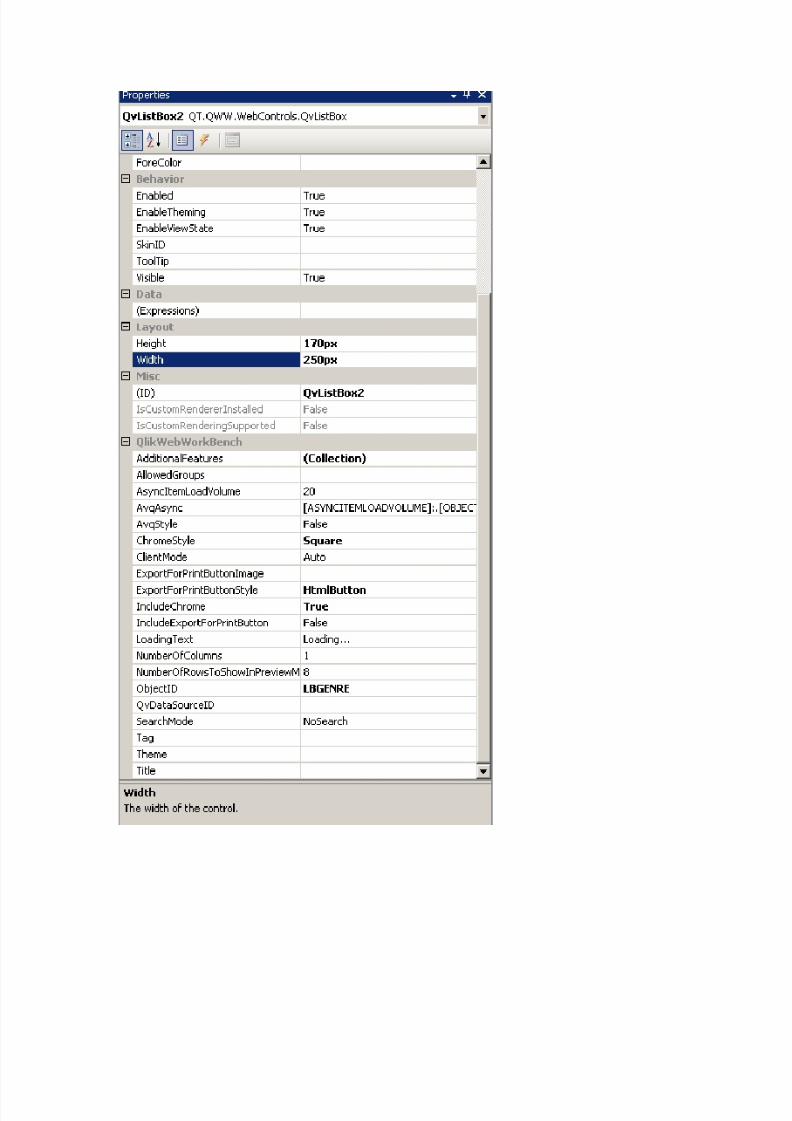
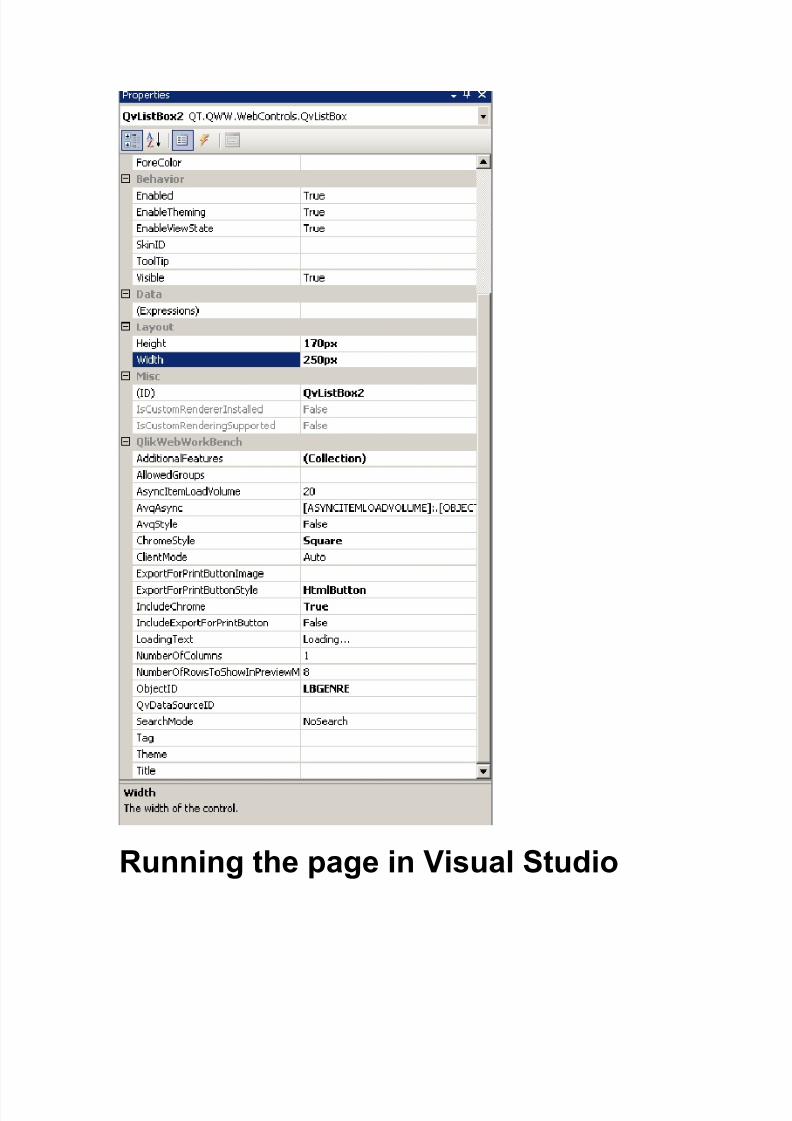
The 9ist"o5 also has a Property viewer, which is slightly different to the 'ata %ource@s as it hasdifferent properties. ou can see here that the ;"1ect$' has "een completed and so too has thewidth
The Souce "iew ) we" page can "e viewed in a 'esign View &ode, which visually shows the page or in a %ourceView &ode, which shows the actual )%P.*+T code euivalent of the 'esign &ode. %o thechanges made in one view will always "e reflected in the other. To see this, click on the %ource"utton along the "ottom the we" page
ou can see that the last 9ist"o5 added is highlighted, with the 'irector 9ist"o5 configured "elow.The 'irector 9ist"o5 entry shows the properties that we set previously such as the ;"1ect$','ata%ource and dimensions.
)s such, you can also directly type here the properties that you want to define. Because theQlikView WorkBench is fully integrated into Visual %tudio, when you "egin to type with ancontrol@s tag you get intelli7sense, that is, Visual %tudio shows you all of the availa"le propertiesand methods that the control has, as you type. This makes coding against controls much moreaccessi"le as you@re not guessing what properties you can set
ou@ll find that after using the conrols and Visual %tudio for a while that you may find that you usethe 'esign View &ode less and the %ource View &ode more as it is uicker.
$f you then go "ack into the 'esign View &ode and look at 9BI+*3+@s Property Viewer thatwhat@s 1ust "een typed out has "een correctly set
*ow that a few o"1ects are on the page we can @3un@ the we"site from Visual %tudio. ou can dothis in a num"er of ways. ou can press 2, or click the 3un "utton on the tool"ar
or from the 'e"ug menu item
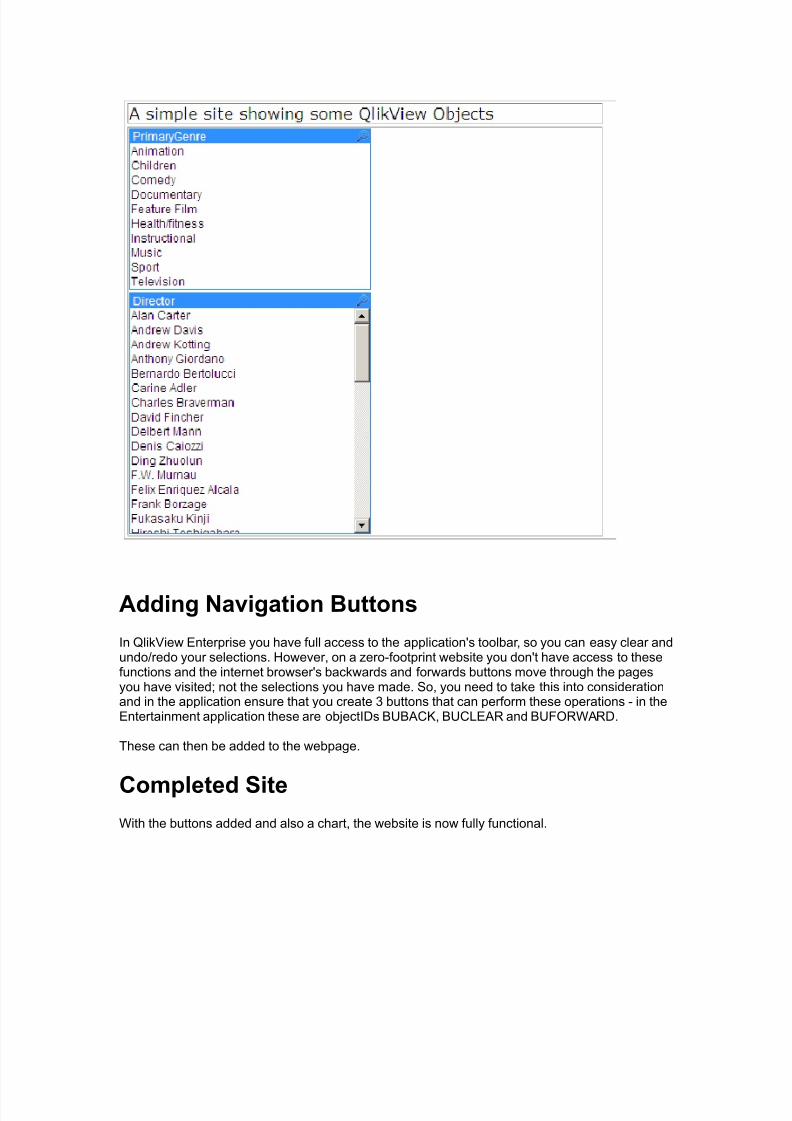
ou now have a few simple QlikView 9ist"o5es on your we"page
$n QlikView +nterprise you have full access to the application@s tool"ar, so you can easy clear andundo<redo your selections. #owever, on a !ero7footprint we"site you don@t have access to thesefunctions and the internet "rowser@s "ackwards and forwards "uttons move through the pagesyou have visitedJ not the selections you have made. %o, you need to take this into considerationand in the application ensure that you create ? "uttons that can perform these operations 7 in the+ntertainment application these are o"1ect$'s BAB)CK, BAC9+)3 and BA;3W)3'.
These can then "e added to the we"page.
%ompleted SiteWith the "uttons added and also a chart, the we"site is now fully functional.
%tep G will take you through the steps to create a QlikView ena"led we" page with a few o"1ects(some list"o5es, "uttons and a chart. $t will also show you how to configure some aspects of the
controls "oth in 'esign and %ource View &ode.
-on6!lik"iew %ontolsWhen you autogenerate a !ero7footprint page in QlikView, you will "e shown an interpretation ofthe actual sheet in the application. #owever, on pu"lic sites you may want to show otherinformation such as 3%% feeds and generally make the QlikView content appear fully integratedinto the we"site. This is something that the autogenerated pages can@t do, "ut which the QlikViewWorkBench can, "y letting you mi5 up content and controls.
$n the cell "elow we@ll now add a 9ist"o5. rom the QlikView WorkBench ta", select 9istBo5
and drag it on
The 9ist"o5 needs to know which 9ist"o5 it corresponds to in the underlying QlikView application. )s it@s not "een set yet, you are made aware of this with the warning te5t.
Settin* the 'atasouce
With the release of H.- it is possi"le to have multiple QlikView applications on the same we"page. This means that you can effectively mash7up QlikView applications.
The %mart Tag shows a field, >'ata%ource$'>, which is where you define which 'ata%ource 4andhence application6 the QlikView WorkBench o"1ect needs to connect to. $f you leave this "lank itwill default to the first 'ata%ource on the page.
9ike the 'ata %ource, the 9ist"o5 has a %mart Tag. $f you click the "utton ne5t to the ;"1ect$'@sentry, the ;"1ect Browser will appear, "ut this time it will "e filtered to only show 9ist"o5 o"1ects.We want the 'irector list"o5, so we navigate to this and choose it. )lternatively you can type the;"1ect$' if you know it, "ut you must ensure that you type it e5actly the same as in theapplication as they are case sensitive .
The caption area of the 9istBo5 4title, colour, functions etc6 are automatically pulled from theQlikView )pplication. 3ead here to understand more a"out the *ative QlikView ;"1ects.
'esi*ne
Being a visual design environment, you can resi!e the width of the 9ist"o5, "y gra""ing the rightside handle and moving it in
The 9ist"o5 also has a Property viewer, which is slightly different to the 'ata %ource@s as it hasdifferent properties. ou can see here that the ;"1ect$' has "een completed and so too has thewidth
ou can see that the last 9ist"o5 added is highlighted, with the 'irector 9ist"o5 configured "elow.The 'irector 9ist"o5 entry shows the properties that we set previously such as the ;"1ect$','ata%ource and dimensions.
)s such, you can also directly type here the properties that you want to define. Because theQlikView WorkBench is fully integrated into Visual %tudio, when you "egin to type with ancontrol@s tag you get intelli7sense, that is, Visual %tudio shows you all of the availa"le propertiesand methods that the control has, as you type. This makes coding against controls much moreaccessi"le as you@re not guessing what properties you can set
ou@ll find that after using the conrols and Visual %tudio for a while that you may find that you usethe 'esign View &ode less and the %ource View &ode more as it is uicker.
$f you then go "ack into the 'esign View &ode and look at 9BI+*3+@s Property Viewer thatwhat@s 1ust "een typed out has "een correctly set
*ow that a few o"1ects are on the page we can @3un@ the we"site from Visual %tudio. ou can dothis in a num"er of ways. ou can press 2, or click the 3un "utton on the tool"ar
or from the 'e"ug menu item
ou now have a few simple QlikView 9ist"o5es on your we"page
$n QlikView +nterprise you have full access to the application@s tool"ar, so you can easy clear andundo<redo your selections. #owever, on a !ero7footprint we"site you don@t have access to thesefunctions and the internet "rowser@s "ackwards and forwards "uttons move through the pagesyou have visitedJ not the selections you have made. %o, you need to take this into considerationand in the application ensure that you create ? "uttons that can perform these operations 7 in the+ntertainment application these are o"1ect$'s BAB)CK, BAC9+)3 and BA;3W)3'.
These can then "e added to the we"page.
%ompleted Site
With the "uttons added and also a chart, the we"site is now fully functional.
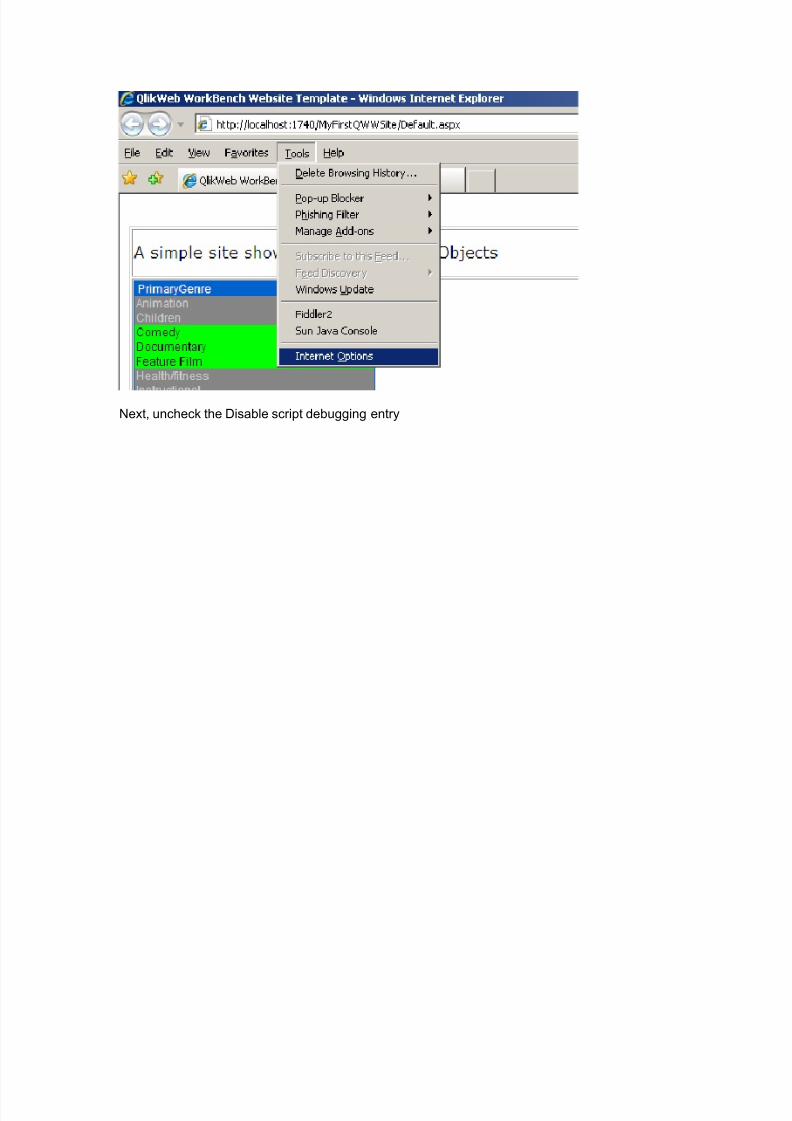
'isabled Scipt 'ebu**in* 8essa*e'epending on your $nternet Browser settings, you may get a warning a"out %cript 'e"ugging"eing disa"led. %imply click es to continue.
To stop this, in $nternet +5plorer, go to the $nternet ;ptions