Page 1
8/7/2019 Xilinx SW User Guide
http://slidepdf.com/reader/full/xilinx-sw-user-guide 1/40
Getting Started with Xilinx (ISE):
PC users, start ISE from Start menu by
selecting• Start• Programs• Xilinx ISE 6.xi
• Project Navigator.
Note: Your start-up path is set during theinstallation process and may differ from
the one above.
Page 2
8/7/2019 Xilinx SW User Guide
http://slidepdf.com/reader/full/xilinx-sw-user-guide 2/40
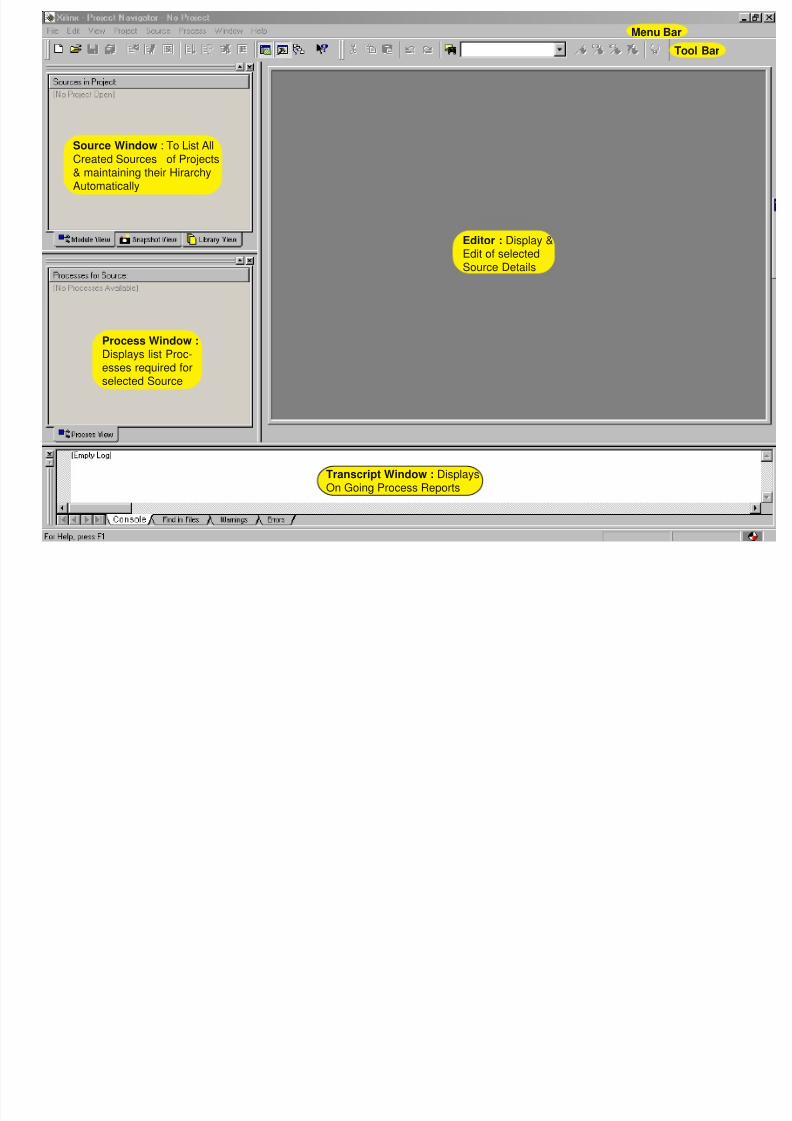
Source Window : To List All
Created Sources of Projects& maintaining their HirarchyAutomatically
Process Window :Displays list Proc-esses required forselected Source
Menu Bar
Tool Bar
Editor : Display &Edit of selectedSource Details
Transcript Window : DisplaysOn Going Process Reports
Page 3
8/7/2019 Xilinx SW User Guide
http://slidepdf.com/reader/full/xilinx-sw-user-guide 3/40
Creating a New Project:
A project in ISE is a collection of all files necessary tocreate and download a design to the selected device.
1. To create a new project:• Select File• New Project.
Page 4
8/7/2019 Xilinx SW User Guide
http://slidepdf.com/reader/full/xilinx-sw-user-guide 4/40
2. In the New Project Wizard dialog box, type the desired location in the ProjectLocation field, or browse to the directory under which you want to create your newproject directory using the browse button next to the Project Location field.
3. Use the pull-down arrow to select HDL from the Top-Level Module Type field.Click in the field to access the pull-down list.
4. Click Next
Page 5
8/7/2019 Xilinx SW User Guide
http://slidepdf.com/reader/full/xilinx-sw-user-guide 5/40
5. In the New Project Wizard Device and Design Flow dialog box, use the pull-down arrow to
select the Value for each Property Name. Click in the field to access the pull down list.Change the values as follows:
• Device Family: Spartan II• Device: XC2S 100
• Package: TQ 144
• Speed Grade: -5
• Synthesis Tool: XST (VHDL/ Verilog)
• Simulator: Modelsim
• Generated Simulation Language: VHDL
6. Click Next.
Page 6
8/7/2019 Xilinx SW User Guide
http://slidepdf.com/reader/full/xilinx-sw-user-guide 6/40
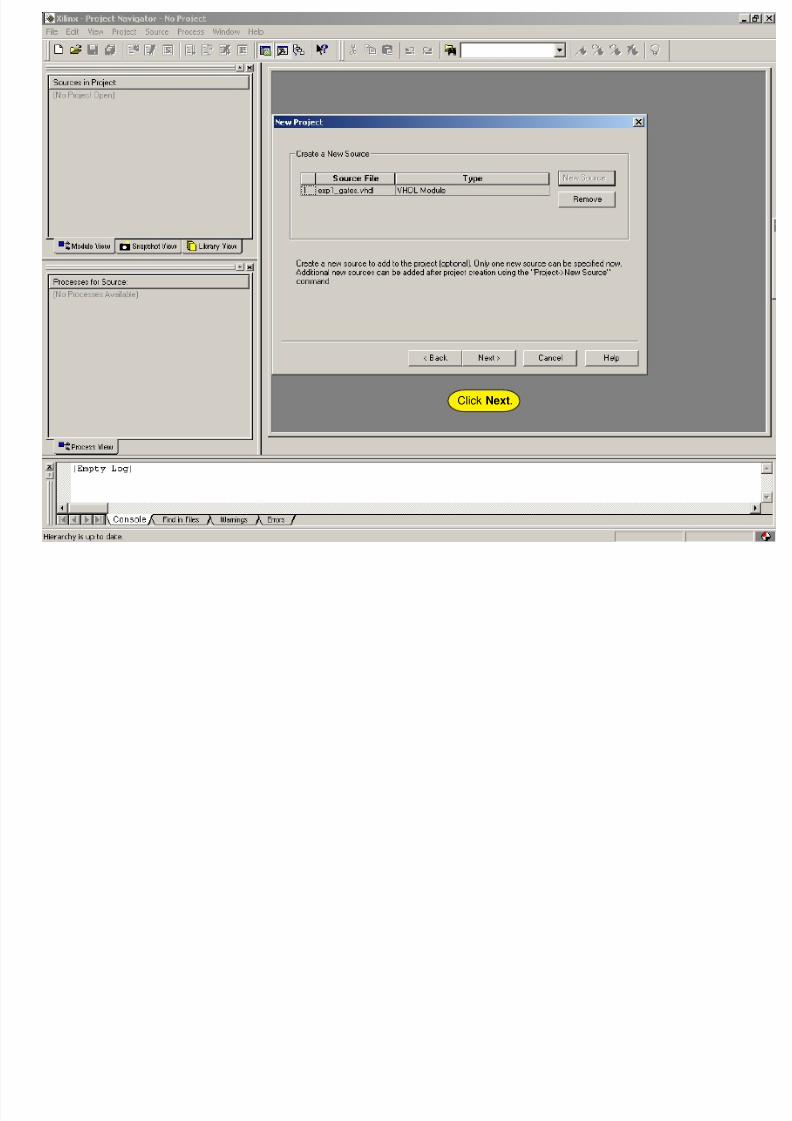
7. Click New Source in the New Project Wizard Create a New Source Dialog boxto add one new source to your project.
Page 7
8/7/2019 Xilinx SW User Guide
http://slidepdf.com/reader/full/xilinx-sw-user-guide 7/40
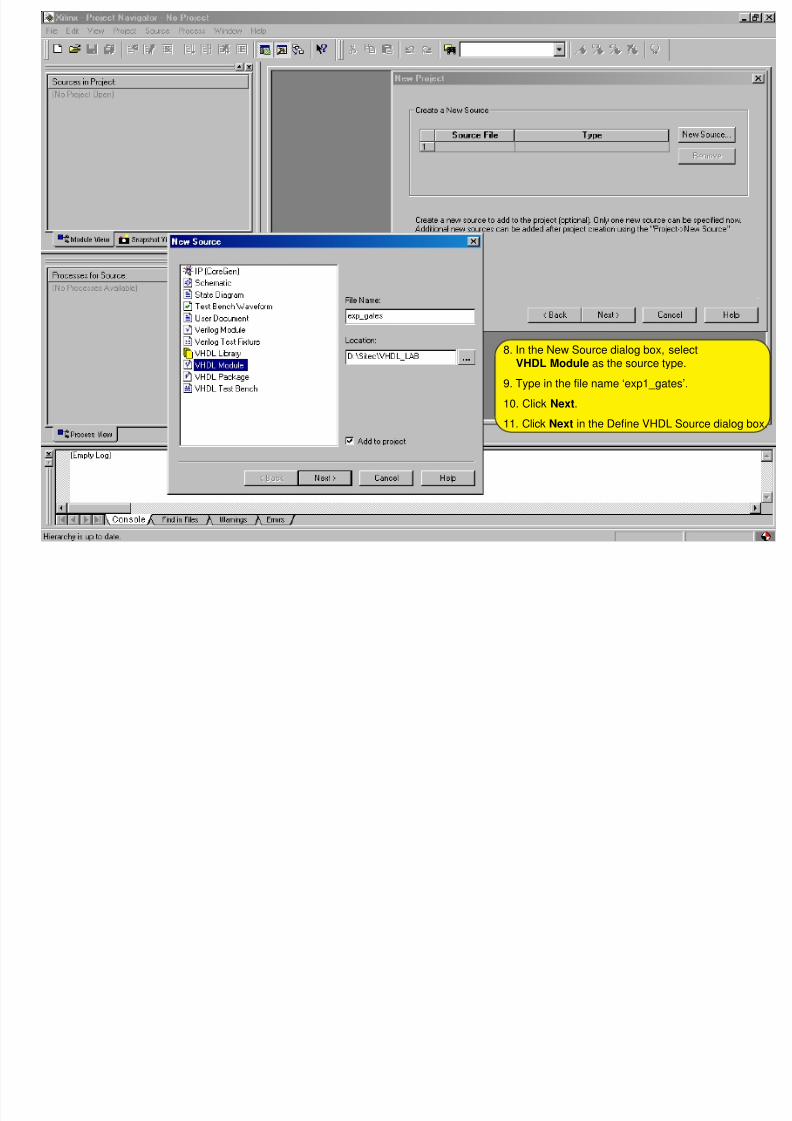
8. In the New Source dialog box, selectVHDL Module as the source type.
9. Type in the file name ‘exp1_gates’.
10. Click Next.
11. Click Next in the Define VHDL Source dialog box.
Page 8
8/7/2019 Xilinx SW User Guide
http://slidepdf.com/reader/full/xilinx-sw-user-guide 8/40
Note: You have the option of defining andadding ports from this dialog box. In thisexample, you will use pre-defined portssupplied in the Language Template.Click Next.
Page 9
8/7/2019 Xilinx SW User Guide
http://slidepdf.com/reader/full/xilinx-sw-user-guide 9/40
Click Next.
Page 10
8/7/2019 Xilinx SW User Guide
http://slidepdf.com/reader/full/xilinx-sw-user-guide 10/40
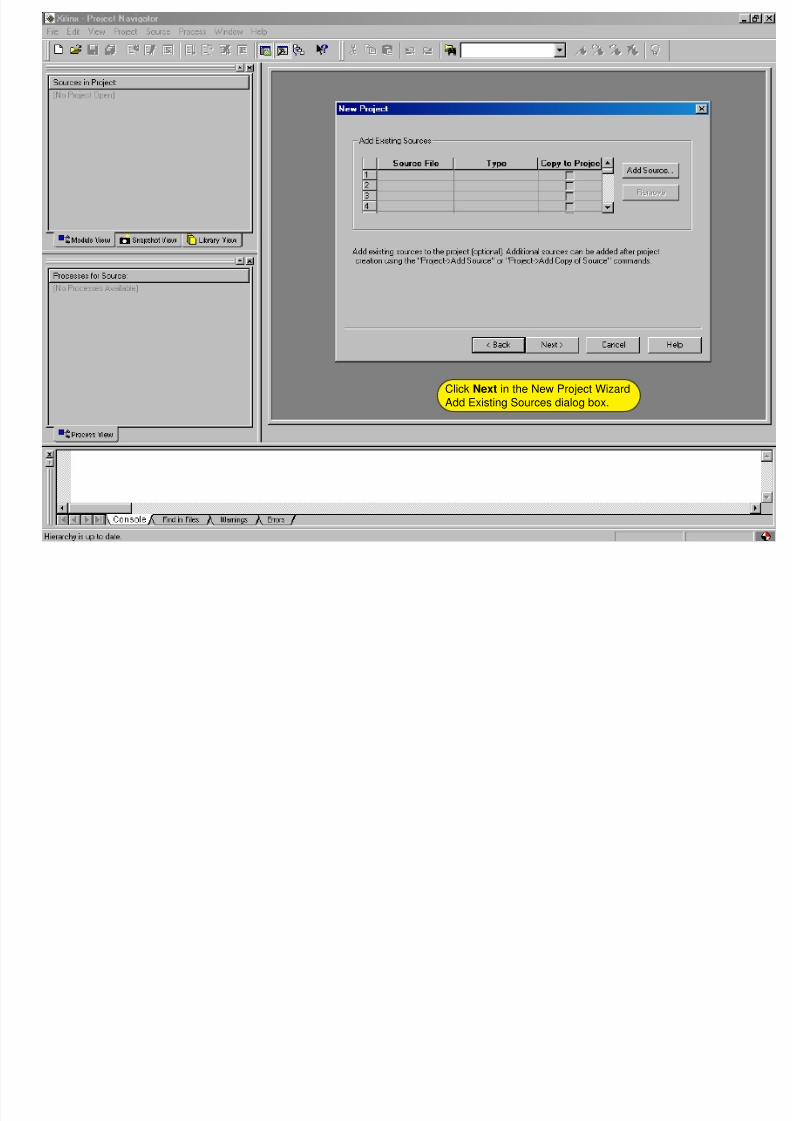
Click Next in the New Project Wizard
Add Existing Sources dialog box.
Page 11
8/7/2019 Xilinx SW User Guide
http://slidepdf.com/reader/full/xilinx-sw-user-guide 11/40
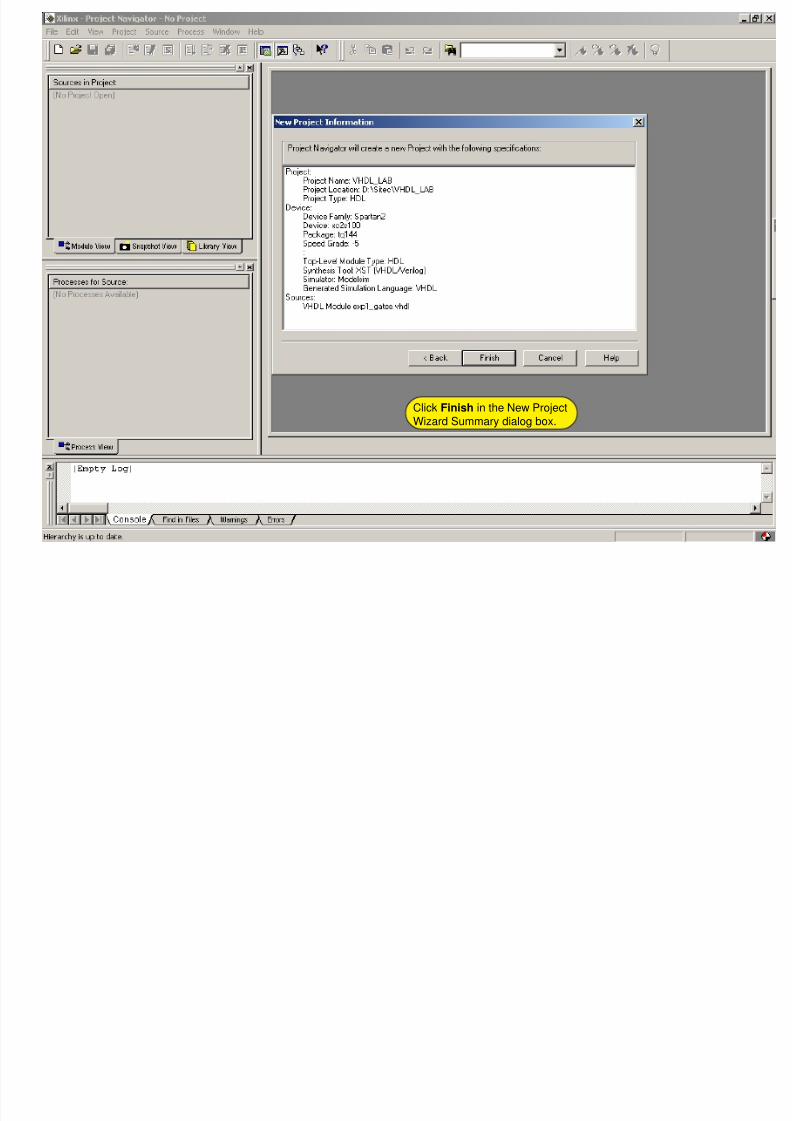
Click Finish in the New Project
Wizard Summary dialog box.
Page 12
8/7/2019 Xilinx SW User Guide
http://slidepdf.com/reader/full/xilinx-sw-user-guide 12/40
ISE creates and displays the new project in the Sources in Projectwindow, and opens the exp1_gates.vhd file in ISE TextEditor.Write the VHDL Code
Page 13
8/7/2019 Xilinx SW User Guide
http://slidepdf.com/reader/full/xilinx-sw-user-guide 13/40
Save The VHDL File &
Check the Syntax
Page 14
8/7/2019 Xilinx SW User Guide
http://slidepdf.com/reader/full/xilinx-sw-user-guide 14/40
Synthesize the Program
Page 15
8/7/2019 Xilinx SW User Guide
http://slidepdf.com/reader/full/xilinx-sw-user-guide 15/40
CLICK “View Synthesis Report” from Synthesis Optionin Process Window to see detailed synthesis report.
Page 16
8/7/2019 Xilinx SW User Guide
http://slidepdf.com/reader/full/xilinx-sw-user-guide 16/40
CLICK “View RTL Schematic” from Synthesis Option inProcess Window to see schematic equivalent of your code
Page 17
8/7/2019 Xilinx SW User Guide
http://slidepdf.com/reader/full/xilinx-sw-user-guide 17/40
CLICK “Create New Source” in Process Window to openNew Source dialog box and Select Test Bench WaveFormtype the file name and Click Next
Page 18
8/7/2019 Xilinx SW User Guide
http://slidepdf.com/reader/full/xilinx-sw-user-guide 18/40
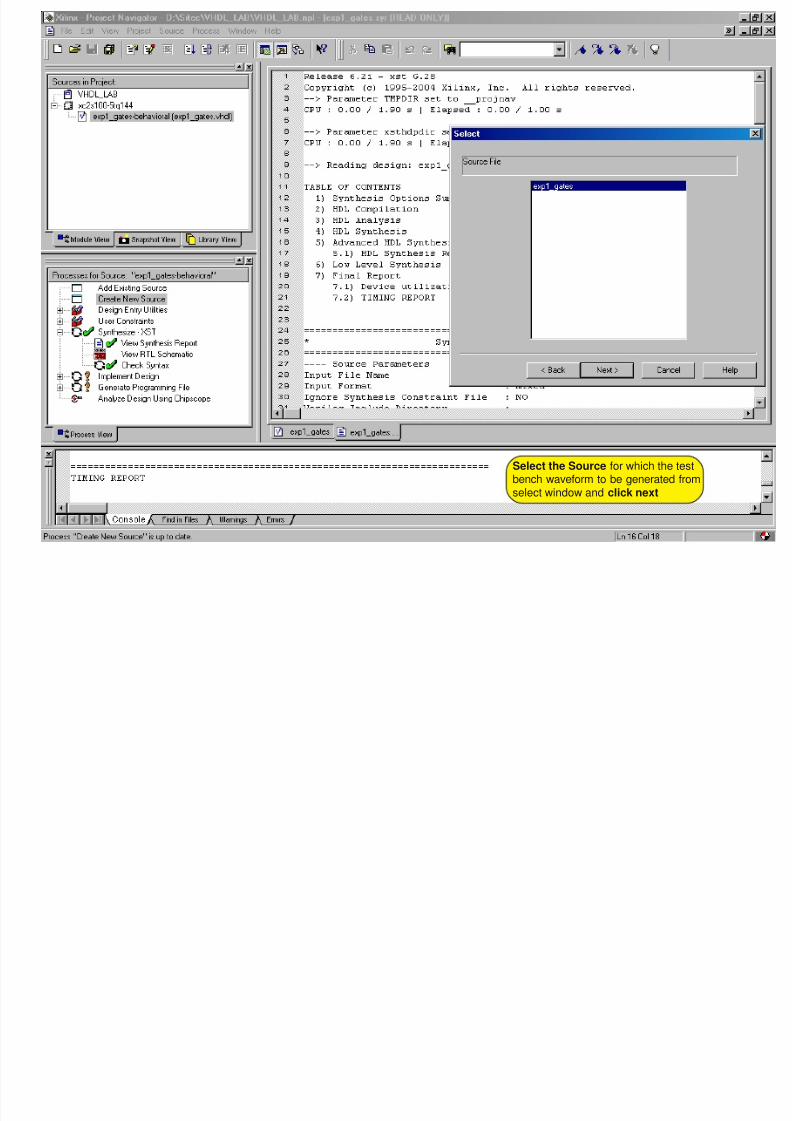
Select the Source for which the testbench waveform to be generated fromselect window and click next
Page 19
8/7/2019 Xilinx SW User Guide
http://slidepdf.com/reader/full/xilinx-sw-user-guide 19/40
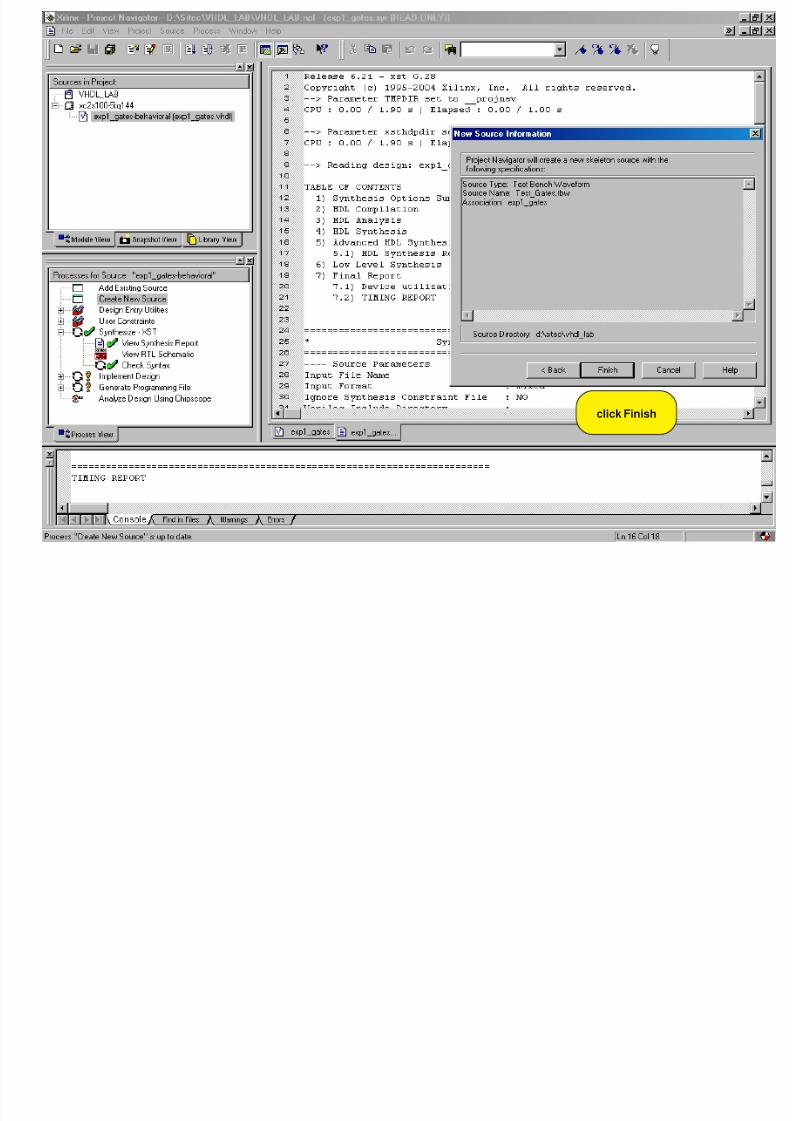
click Finish
Page 20
8/7/2019 Xilinx SW User Guide
http://slidepdf.com/reader/full/xilinx-sw-user-guide 20/40
Click OK to accept the default timing constraints.
Page 21
8/7/2019 Xilinx SW User Guide
http://slidepdf.com/reader/full/xilinx-sw-user-guide 21/40
HDL Bencher opens within the ProjectNavigator framework.
Page 22
8/7/2019 Xilinx SW User Guide
http://slidepdf.com/reader/full/xilinx-sw-user-guide 22/40
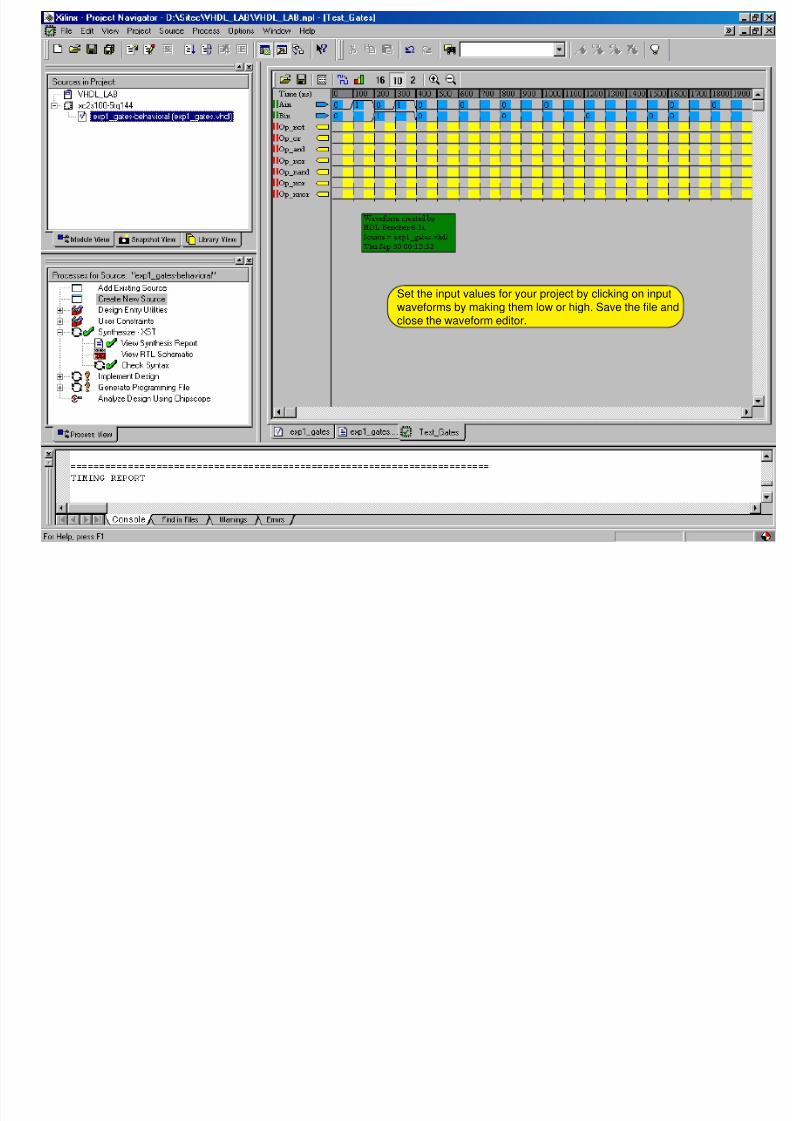
Set the input values for your project by clicking on inputwaveforms by making them low or high. Save the file andclose the waveform editor.
Page 23
8/7/2019 Xilinx SW User Guide
http://slidepdf.com/reader/full/xilinx-sw-user-guide 23/40
1. Select Test_Gates.tbw in the Sources in Project window.2. In the Processes for Source window, click the + beside
ModelSim Simulator to expand the hierarchy.3. Double-click Simulate Behavioral Model.
Page 24
8/7/2019 Xilinx SW User Guide
http://slidepdf.com/reader/full/xilinx-sw-user-guide 24/40
SIGNAL WINDOW : Displaysall I/Os of your project
Waveform Window : Displays outputwaveforms for verification
Page 25
8/7/2019 Xilinx SW User Guide
http://slidepdf.com/reader/full/xilinx-sw-user-guide 25/40
CLICK “Create New Source” in Process Window to openNew Source dialog box and Select ImplementationConstraints File, type the file name and Click Next
Page 26
8/7/2019 Xilinx SW User Guide
http://slidepdf.com/reader/full/xilinx-sw-user-guide 26/40
Select the Source for which the ImplementationConstraint File to be written, from select windowand click next
Page 27
8/7/2019 Xilinx SW User Guide
http://slidepdf.com/reader/full/xilinx-sw-user-guide 27/40
click Finish
Page 28
8/7/2019 Xilinx SW User Guide
http://slidepdf.com/reader/full/xilinx-sw-user-guide 28/40
1. Select Gates_UCF.ucf in the Sourcesin Project window.
2. In the Processes of Process window,click the + beside User Constraints toexpand the hierarchy.
3. Double-click Edit Constraints (Text).
Page 29
8/7/2019 Xilinx SW User Guide
http://slidepdf.com/reader/full/xilinx-sw-user-guide 29/40
Write User Constraint File as above & Save:Assign Pin Locations to Inputs & Outputs basedon targetted Device [FPGA & CPLD]
Page 30
8/7/2019 Xilinx SW User Guide
http://slidepdf.com/reader/full/xilinx-sw-user-guide 30/40
Double Click Implement Designin the Process Window to im-plement the Project
Page 31
8/7/2019 Xilinx SW User Guide
http://slidepdf.com/reader/full/xilinx-sw-user-guide 31/40
1. Select exp1_gates-behavioral(exp1_gates.vhdl)from Sources in Project window.
2. In the Processes of Process window, click the +
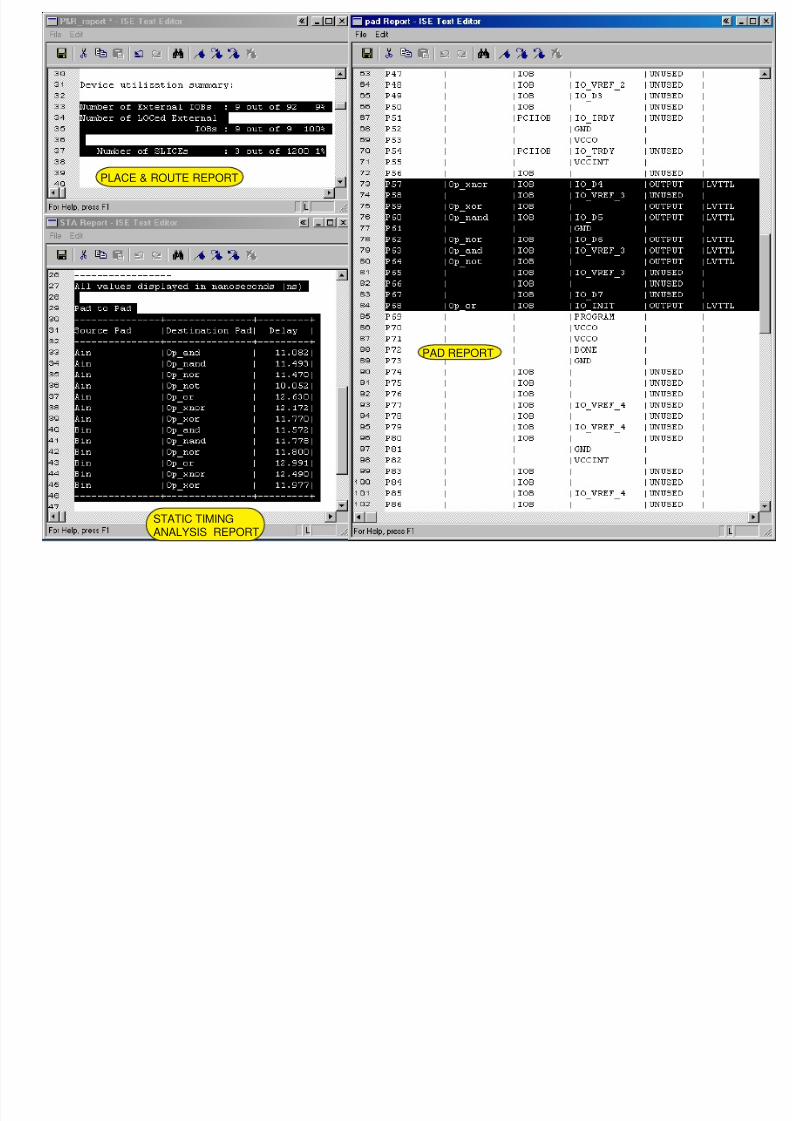
beside Place &Routeto expand the hierarchy.3. Double-click Place & Route or Pad Report orGenerate Post-Route & Route Static Timing
to see their respective detailed report4. Double Click to explore additional advanced
special features of ISE software if you want
Additonal Advanced Features :
Floor Planner - To view & edit Placed DesignFPGA Editor - To view & edit routed DesignXPower - Power Estimation of implemented DesignEtc.
Page 32
8/7/2019 Xilinx SW User Guide
http://slidepdf.com/reader/full/xilinx-sw-user-guide 32/40
PAD REPORT
PLACE & ROUTE REPORT
STATIC TIMINGANALYSIS REPORT
Page 33
8/7/2019 Xilinx SW User Guide
http://slidepdf.com/reader/full/xilinx-sw-user-guide 33/40
1. Right Click on Generate Programming File in side the Process Window2. Double Click on Properties to open Process Properties Dialog Box
Page 34
8/7/2019 Xilinx SW User Guide
http://slidepdf.com/reader/full/xilinx-sw-user-guide 34/40
Then Double Click Generate ProgrammingFile inside the Process Window
Select Startup OptionsChoose Value JTAG Clock underProperty Name FPGA Start-Up ClockClik OK
Page 35
8/7/2019 Xilinx SW User Guide
http://slidepdf.com/reader/full/xilinx-sw-user-guide 35/40
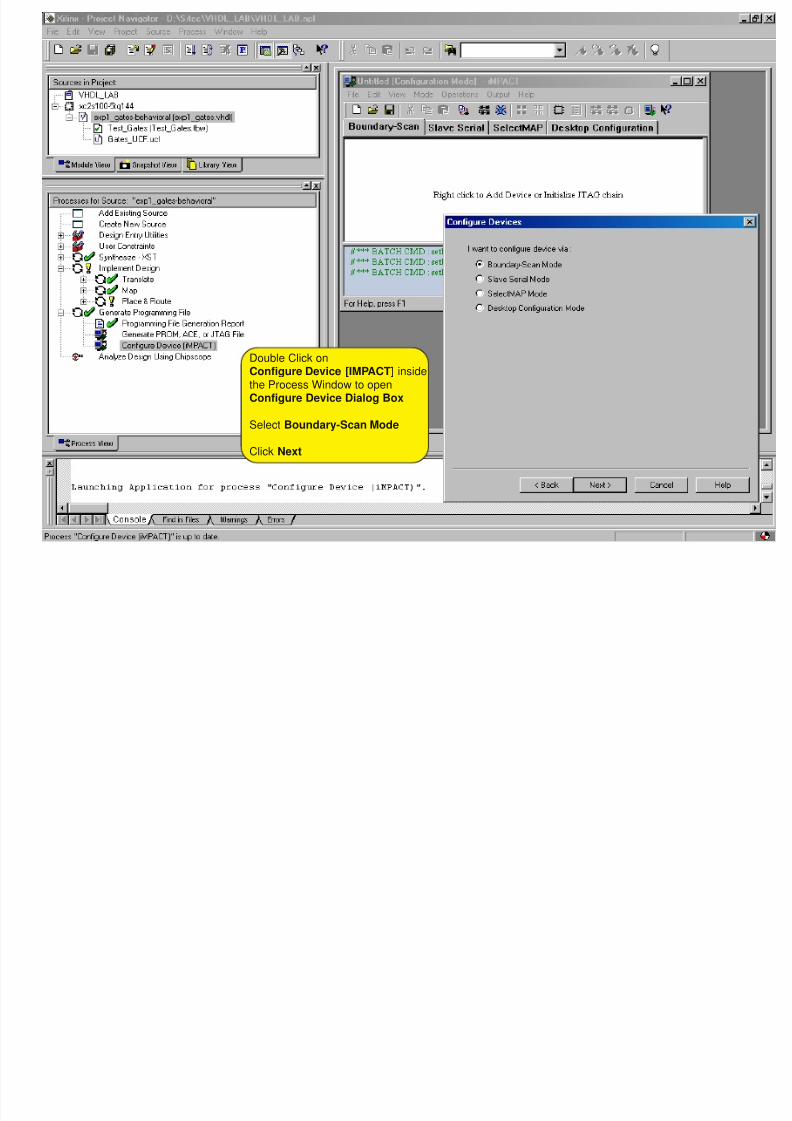
Double Click onConfigure Device [IMPACT] insidethe Process Window to openConfigure Device Dialog Box
Select Boundary-Scan Mode
Click Next
Page 36
8/7/2019 Xilinx SW User Guide
http://slidepdf.com/reader/full/xilinx-sw-user-guide 36/40
Click Finish
Page 37
8/7/2019 Xilinx SW User Guide
http://slidepdf.com/reader/full/xilinx-sw-user-guide 37/40
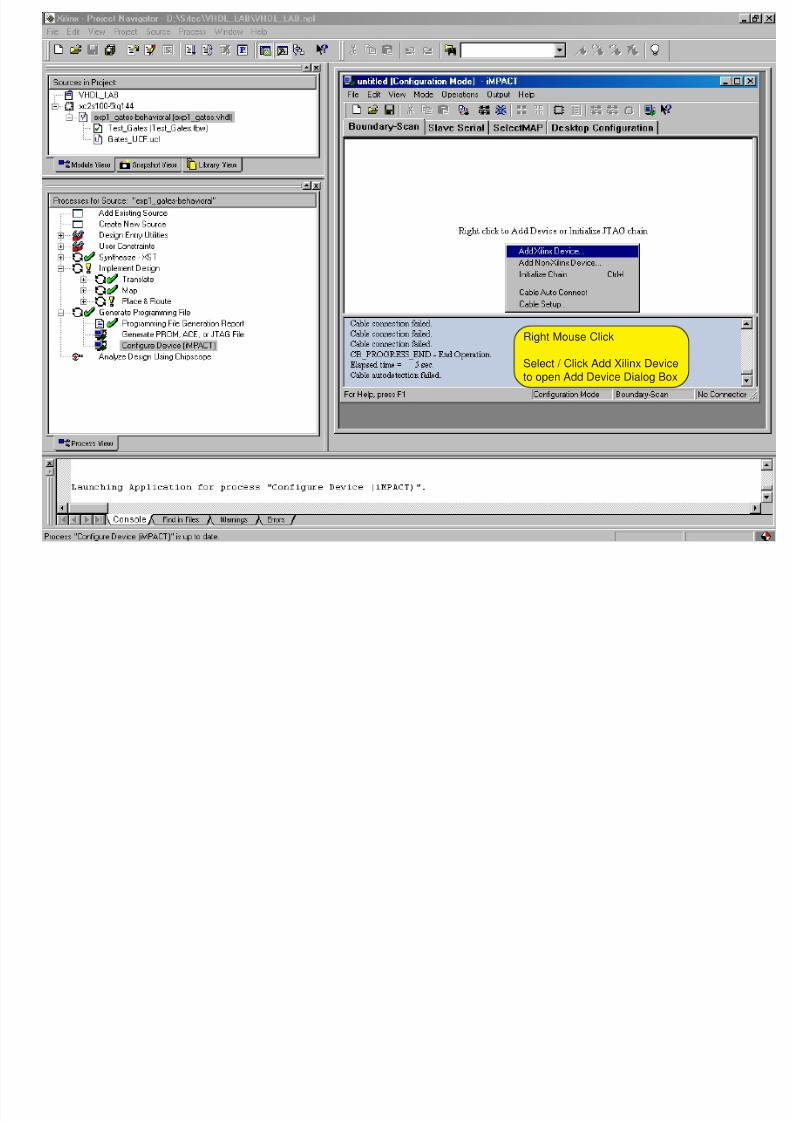
Right Mouse Click
Select / Click Add Xilinx Deviceto open Add Device Dialog Box
Page 38
8/7/2019 Xilinx SW User Guide
http://slidepdf.com/reader/full/xilinx-sw-user-guide 38/40
Browse & Select the Program bit file with .bit
extention from Add Device Dialog Box
exp1_Gates.bit
[generated & saved when Generate ProgrammingFile from Process window was double clicked]
Click Open
Page 39
8/7/2019 Xilinx SW User Guide
http://slidepdf.com/reader/full/xilinx-sw-user-guide 39/40
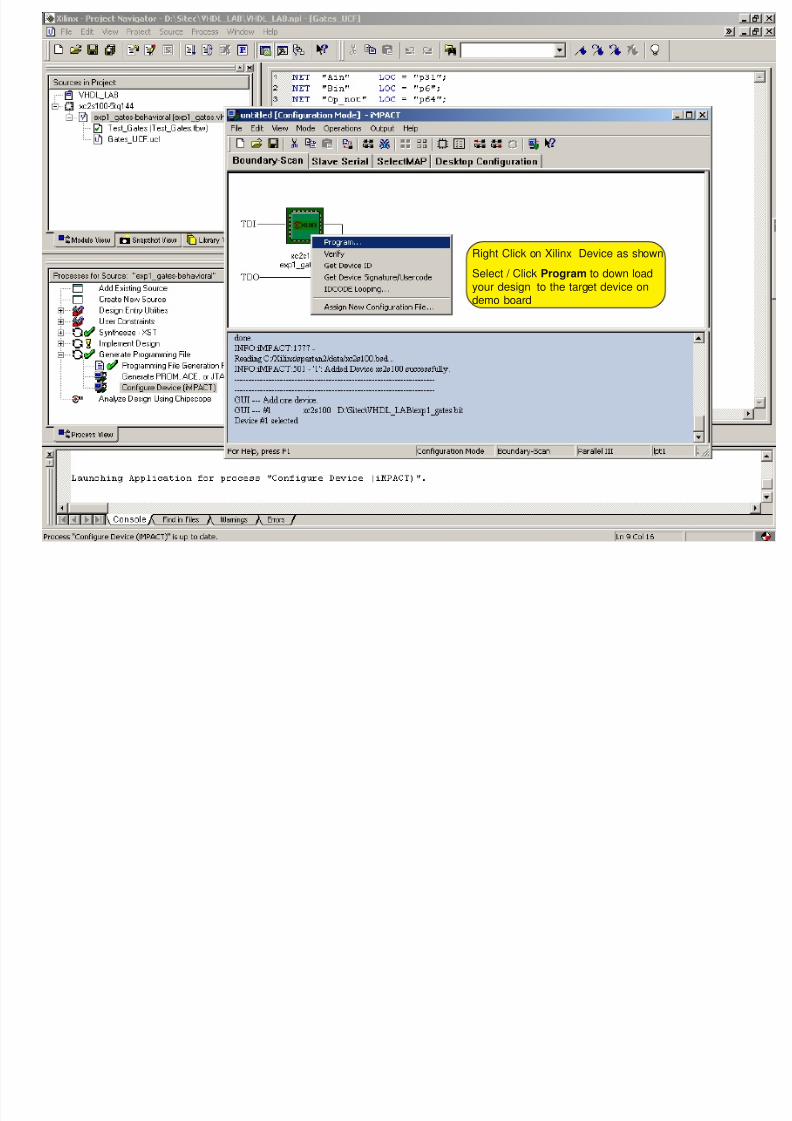
Right Click on Xilinx Device as shown
Select / Click Program to down loadyour design to the target device ondemo board
Page 40
8/7/2019 Xilinx SW User Guide
http://slidepdf.com/reader/full/xilinx-sw-user-guide 40/40
Your Design will get downloadedsuccessfully to the targetted device ifthe demo board is connected properlyto your system through parallel portusing downloading cable