Page 1
YubiKey PIV Deployment Guide © 2016 Yubico. All rights reserved. Page 1 of 27
YubiKey PIV Deployment Guide
Best Practices and Basic Setup YubiKey 4, YubiKey 4 Nano, YubiKey NEO, YubiKey NEO-n
Page 2
YubiKey PIV Deployment Guide © 2016 Yubico. All rights reserved. Page 2 of 27
Copyright
© 2016 Yubico Inc. All rights reserved.
Trademarks
Yubico and YubiKey are registered trademarks of Yubico Inc. All other trademarks are the property of
their respective owners.
Disclaimer
The contents of this document are subject to revision without notice due to continued progress in
methodology, design, and manufacturing. Yubico shall have no liability for any error or damages of any
kind resulting from the use of this document.
The Yubico Software referenced in this document is licensed to you under the terms and conditions
accompanying the software or as otherwise agreed between you or the company that you are
representing.
Contact Information
Yubico Inc
420 Florence Street, Suite 200
Palo Alto, CA 94301
USA
yubi.co/contact
Document Release Date
March 25, 2016
Page 3
YubiKey PIV Deployment Guide © 2016 Yubico. All rights reserved. Page 3 of 27
Contents
Introduction ................................................................................................................................................................... 4
PIV and YubiKeys ....................................................................................................................................................... 4
PIV Deployment ......................................................................................................................................................... 4
Getting Additional Help ............................................................................................................................................. 5
Using YubiKey PIV for Smart Card Login Documentation Set .................................................................................... 5
Before you Begin ........................................................................................................................................................... 6
Determining the Preferred Method of Enrollment ....................................................................................................... 7
Configuring a Certification Authority (CA) for Smart Card Authentication ................................................................... 8
Prerequisites ............................................................................................................................................................. 8
Creating a Certification Authority ............................................................................................................................. 8
Preparing the Certification Authority for Smart Card Login with a YubiKey................................................................ 11
Creating a Smart Card Login Template for User Self-Enrollment ............................................................................ 11
Creating a Smart Card Login Template for Enrolling on Behalf of Other Users ...................................................... 17
Publishing the Smart Card Login Templates in the Certification Authority ............................................................. 23
Changing the Behavior for Your Domain When You Remove the Smart Card ............................................................ 25
Next Steps .................................................................................................................................................................... 27
User Self Enrollment ................................................................................................................................................ 27
Enrollment on Behalf of Other Users ...................................................................................................................... 27
Advanced Enrollment .............................................................................................................................................. 27
Page 4
YubiKey PIV Deployment Guide © 2016 Yubico. All rights reserved. Page 4 of 27
Introduction
Yubico changes the game for strong authentication, providing superior security with unmatched ease-
of-use. Our core invention, the YubiKey, is a small USB and NFC device supporting multiple
authentication and cryptographic protocols. With a simple touch, it protects access to computers,
networks, and online services for the world’s largest organizations.
Our innovative keys offer strong authentication via Yubico one-time passwords (OTP), FIDO Universal
2nd Factor (U2F), and smart card (PIV, OpenPGP, OATH) — all with a simple tap or touch of a button.
YubiKeys protect access for everyone from individual home users to the world’s largest organizations.
PIV and YubiKeys
The YubiKey 4, YubiKey 4 Nano, YubiKey NEO, and YubiKey NEO-n support the Personal Identity and
Verification Card (PIV) interface specified in the National Institute of Standards and Technology (NIST),
SP 800-73 document, Cryptographic Algorithms and Key Sizes for PIV. This enables you to perform RSA
or ECC sign and decrypt operations using a private key stored on the YubiKey. Your YubiKey acts as a
smart card in this case, through common interfaces like PKCS#11.
The structure of the YubiKey as a PIV card follows the specifications defined above. PIV can also be used
for document signing, encryption, and physical access. There are four PIV slots and 20 retired slots
(YubiKey 4 only) on the YubiKey. Each slot is reserved for a specific purpose as defined by the NIST
specifications.
For more information about the slots, see the Yubico website.
For more information about the PIV specifications, see the PIV standards on the NIST website.
This document covers only slot 9a (PIV authentication).
PIV Deployment
This document covers the basic steps required to set up an Active Directory domain environment for
smart card authentication, including considerations before provisioning YubiKeys for smart card login.
We recommend that a qualified domain administrator be placed in charge of the process and that you
use these instructions as a guideline for deployment. Rather than cover the complexities inherent in a
corporate environment (for example, an Enterprise Root Certification Authority, multiple Subordinate
Certificate Authorities, Certificate Revocation Lists, and so on), these instructions cover only the basic
topics.
The following topics are covered in this document:
● Before you Begin
● Determining the Preferred Method of Enrollment
● Configuring a Certification Authority for Smart Card Authentication
● Preparing the Certification Authority for Smart Card Login with a YubiKey
Page 5
YubiKey PIV Deployment Guide © 2016 Yubico. All rights reserved. Page 5 of 27
Creating a Smart Card Login Template for User Self-Enrollment
Creating a Smart Card Login Template for Enrolling on Behalf of Other Users
Publishing the Smart Card Login Templates in the Certification Authority
Changing the Behavior for Your Domain When You Remove the Smart Card
Next Steps
Getting Additional Help
For more information, and to get help with your YubiKeys, see:
Support home page
Documentation and FAQs
Start a Support ticket
Using YubiKey PIV for Smart Card Login Documentation Set
YubiKey PIV Quick Start Guide
YubiKey PIV Deployment Guide (this document)
YubiKey PIV Manager User’s Guide
Yubico PIV Tool Command Line Guide
CSIS Enrollment Station Guide
Each of the documents is available for download on the Yubico website.
Page 6
YubiKey PIV Deployment Guide © 2016 Yubico. All rights reserved. Page 6 of 27
Before you Begin
Before performing the steps in this document, be sure your system meets these requirements:
For servers, install Microsoft Windows Server 2008 R2 or later (the examples shown in this
document are from Windows Server 2012 R2)
For clients, install Microsoft Windows 7 Pro/Enterprise/Ultimate or later (for YubiKeys to log in to
Windows)
Set up a Microsoft Windows Active Directory domain environment
If you are using Remote Desktop Connection (RDP), install both Microsoft Windows Server 2008 R2
or later and Microsoft Windows 7 Pro/Enterprise/Ultimate or later on both the source and the
destination computers
Page 7
YubiKey PIV Deployment Guide © 2016 Yubico. All rights reserved. Page 7 of 27
Determining the Preferred Method of Enrollment
Before implementing smart card authentication in an Active Directory domain environment, it is
important to consider the method of user enrollment that you will use.
The three options are:
User self-enrollment: Distribute the YubiKey PIV Manager and YubiKeys to enable users to request
their own login certificates. For more information, download YubiKey PIV Manager User's Guide
from the Yubico website.
Enrolling on behalf of other users: Using the CSIS Enrollment Station application, grant Enrollment
Agent permissions to one or more administrators. This enables the administrators you granted
permission to request enrollment on behalf of other users. For more information, download the
CSIS Enrollment Station Guide and/or the Yubico PIV Tool Command Line Guide from the Yubico
website.
Advanced enrollment: Use the Yubico PIV command line tool to write custom command line scripts
or build your own deployment application. For more information, download the Yubico PIV Tool
Command Line Guide from the Yubico website.
NOTE: The first two options can be implemented at once to provide flexibility, but be sure to set up a
separate certificate request template to cover each option.
Download all documentation from the Yubico website.
Page 8
YubiKey PIV Deployment Guide © 2016 Yubico. All rights reserved. Page 8 of 27
Configuring a Certification Authority (CA) for Smart Card
Authentication
This chapter covers the basic configuration, but you can instead accomplish this process using a
PowerShell script (not covered in this document).
NOTE: If a Certification Authority already exists in your environment, skip this chapter.
In this Chapter
Prerequisites
Creating a Certification Authority
Prerequisites
IMPORTANT: The installation should be performed by an experienced system administrator. These
instructions include steps for a basic configuration. For information about implementing advanced
configurations, see this Microsoft Technet article.
Before you create a Certification Authority (CA), be sure you set up a Microsoft Windows Active
Directory domain environment.
We recommend that you do not deploy a Root Certification Authority (CA) on a Domain Controller. As
an additional security measure, consider installing the Root CA on a standalone offline server, and use a
Subordinate CA for all certificate signing.
Creating a Certification Authority
If a Certification Authority already exists in your environment, skip this section.
To create a Certification Authority
1. Open Server Manager and choose Add roles and features, and click Next.
2. Select Role-based or feature-based installation, and click Next.
3. Select Select a server from the server pool.
4. From Server Pool, select the server on which you want to install the Certification Authority, and click Next.
5. Under Server Roles, select Active Directory Certificate Services, and click Next.
6. Click Add Features, and click Next.
7. Click Next again.
Page 9
YubiKey PIV Deployment Guide © 2016 Yubico. All rights reserved. Page 9 of 27
8. Select Certification Authority, and click Next.
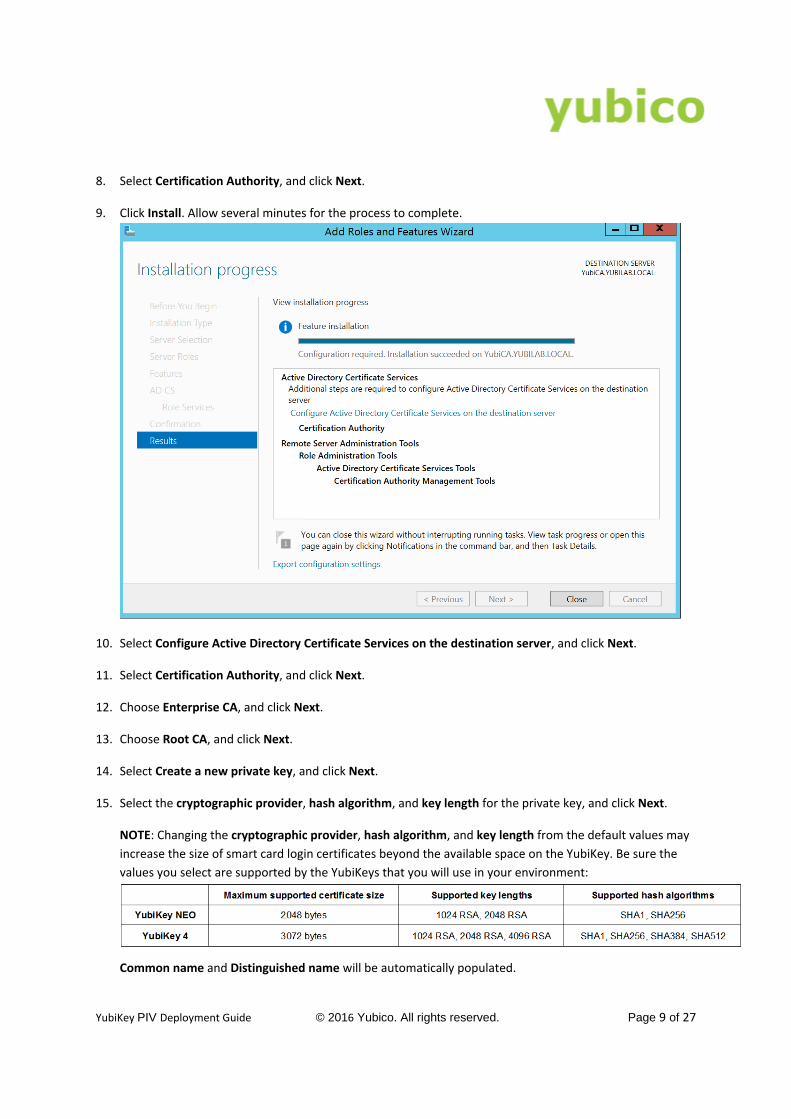
9. Click Install. Allow several minutes for the process to complete.
10. Select Configure Active Directory Certificate Services on the destination server, and click Next.
11. Select Certification Authority, and click Next.
12. Choose Enterprise CA, and click Next.
13. Choose Root CA, and click Next.
14. Select Create a new private key, and click Next.
15. Select the cryptographic provider, hash algorithm, and key length for the private key, and click Next.
NOTE: Changing the cryptographic provider, hash algorithm, and key length from the default values may
increase the size of smart card login certificates beyond the available space on the YubiKey. Be sure the
values you select are supported by the YubiKeys that you will use in your environment:
Common name and Distinguished name will be automatically populated.
Page 10
YubiKey PIV Deployment Guide © 2016 Yubico. All rights reserved. Page 10 of 27
16. Confirm the values match the server name and domain name, and click Next.
17. Select the validity period for the Certification Authority certificate, and click Next.
TIP: This period must be longer than what you set for the smart card login certificate template. We
recommend the default value of 5 years.
18. Click Next again.
19. Verify all settings match the desired values, and click Configure.
When the process completes, click Close to quit the installation wizard.
Page 11
YubiKey PIV Deployment Guide © 2016 Yubico. All rights reserved. Page 11 of 27
Preparing the Certification Authority for Smart Card Login with
a YubiKey
Before smart card login certificates can be requested and loaded to YubiKeys, several steps need to be
completed, including creating smart card login templates and publishing the templates in the
Certification Authority.
The examples in this section use Microsoft Windows Server 2012 R2. If you are using a different version
of Windows Server, modify the steps to suit your environment.
In this Chapter
Creating a Smart Card Login Template for User Self-Enrollment
Creating a Smart Card Login Template for Enrolling on Behalf of Other Users
Publishing the Smart Card Login Templates in the Enterprise Root Certification Authority
Creating a Smart Card Login Template for User Self-Enrollment
It is important to create a smart card login certificate template in the CA before distributing YubiKey PIV
Manager and YubiKeys to your users who will enroll themselves.
To create a smart card login template for user self-enrollment
1. Open Microsoft Management Console (MMC), and select File > Add/Remove Snap-in.
Page 12
YubiKey PIV Deployment Guide © 2016 Yubico. All rights reserved. Page 12 of 27
2. Under Selected snap-ins, add Certificate Templates, and click OK.
3. Double-click Certificate Templates, locate and right-click Smartcard Logon, and select Duplicate
Template.
4. Click the General tab, and make the following changes, as needed:
Page 13
YubiKey PIV Deployment Guide © 2016 Yubico. All rights reserved. Page 13 of 27
a. Select Publish certificate in Active Directory.
b. You can change the default Validity period of 1 year, but be sure that the timeframe you choose does
not exceed the restrictions for your Certification Authority.
c. We recommend that you change the Template display name and Template name to something short
and simple (such as "YubiKey").
5. Click the Compatibility tab, and make the following changes, as needed:
a. Under Certification Authority, select the operating system where the Certification Authority resides.
Page 14
YubiKey PIV Deployment Guide © 2016 Yubico. All rights reserved. Page 14 of 27
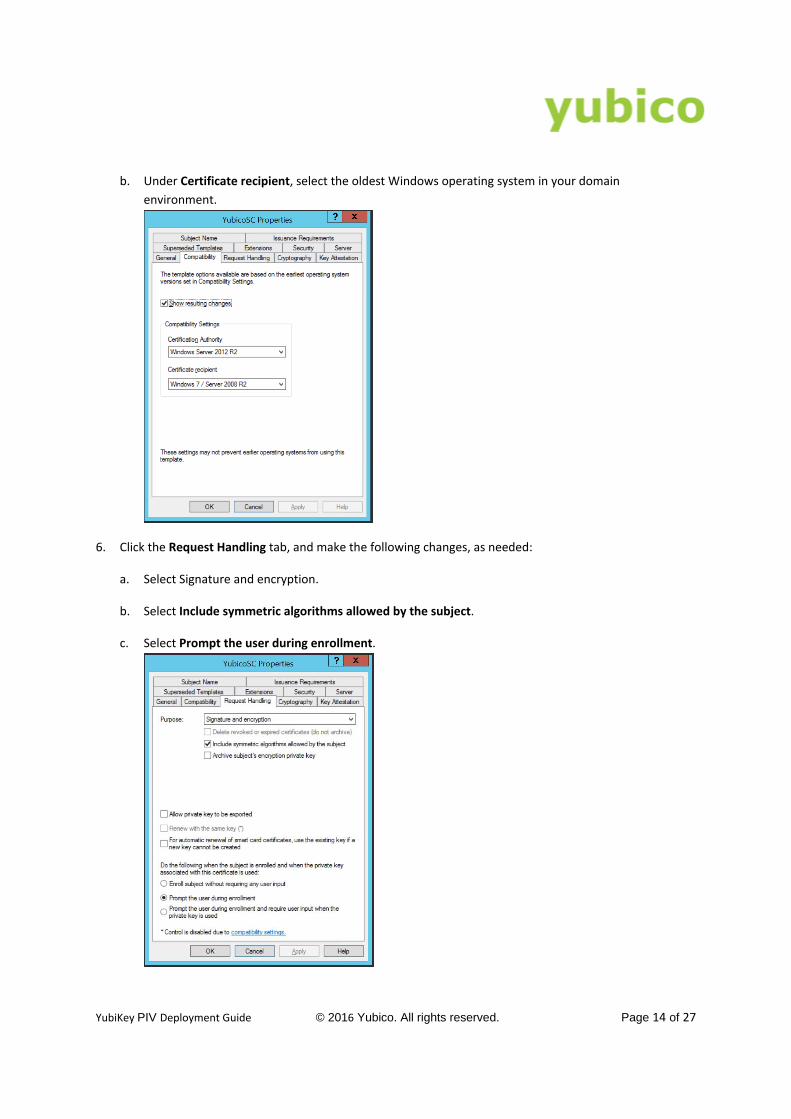
b. Under Certificate recipient, select the oldest Windows operating system in your domain
environment.
6. Click the Request Handling tab, and make the following changes, as needed:
a. Select Signature and encryption.
b. Select Include symmetric algorithms allowed by the subject.
c. Select Prompt the user during enrollment.
Page 15
YubiKey PIV Deployment Guide © 2016 Yubico. All rights reserved. Page 15 of 27
7. Click the Cryptography tab, and make the following changes, as needed:
a. We recommend that you change the Minimum key size to 2048.
b. Select Requests must use one of the following providers.
c. Select Microsoft Enhanced Cryptographic Provider v1.0.
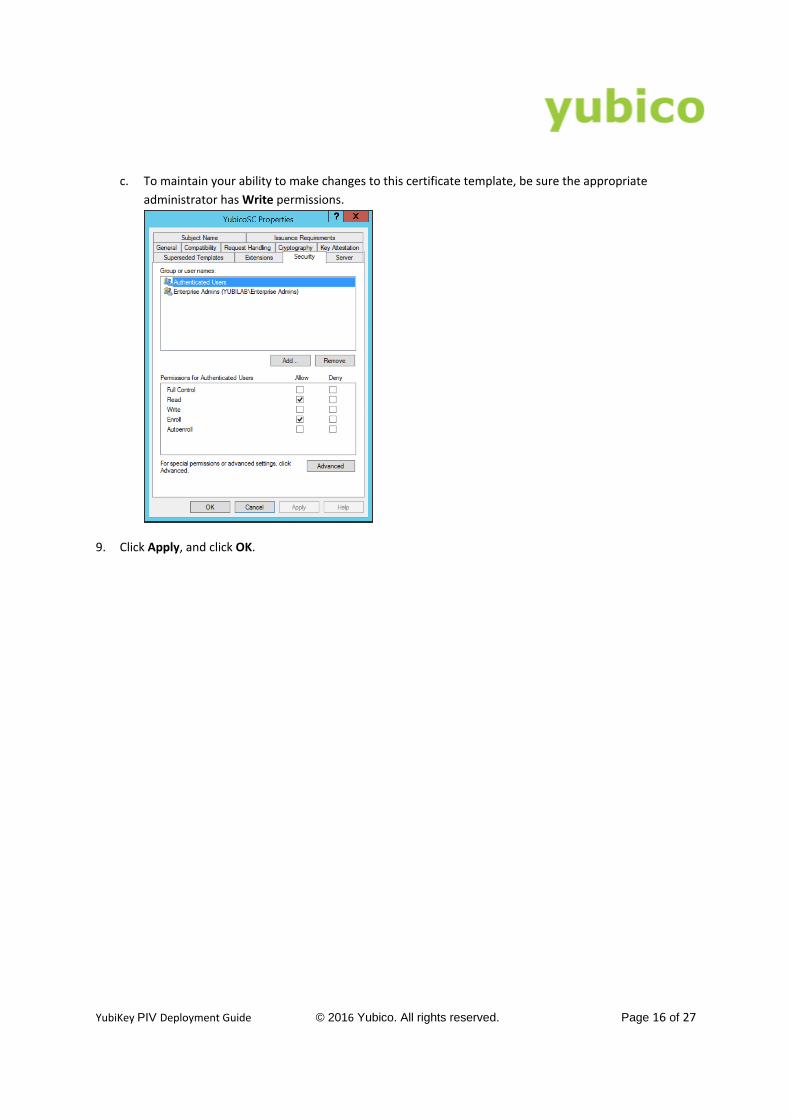
8. Click the Security tab, and make the following changes, as needed:
a. Be sure that Authenticated Users appears.
b. Select Allow for both Read and Enroll.
Page 16
YubiKey PIV Deployment Guide © 2016 Yubico. All rights reserved. Page 16 of 27
c. To maintain your ability to make changes to this certificate template, be sure the appropriate
administrator has Write permissions.
9. Click Apply, and click OK.
Page 17
YubiKey PIV Deployment Guide © 2016 Yubico. All rights reserved. Page 17 of 27
Creating a Smart Card Login Template for Enrolling on Behalf of Other Users
This section provides instructions for creating a smart card login certificate template for Enrollment
Agents in the CA, specifying permissions for the Enrollment Agents, and publishing the certificate so
that the designated Enrollment Agents can enroll on behalf of other users. These topics are described:
To create an Enrollment Agent enabled smart card certificate template
To specify the permissions for the Enrollment Agents and publish the certificate
To enroll the smart card enrollment agent certificate
To create an Enrollment Agent enabled smart card certificate template
1. Open Microsoft Management Console (MMC) and select File > Add/Remove Snap-in.
2. Under Selected snap-ins, add Certificate Templates, and click OK.
Page 18
YubiKey PIV Deployment Guide © 2016 Yubico. All rights reserved. Page 18 of 27
3. Double-click Certificate Templates, locate and right-click Smartcard Logon, and select Duplicate
Template.
4. Click the General tab, and make the following changes, as needed:
a. Select Publish certificate in Active Directory.
b. You can change the default Validity period of 1 year, but be sure that the timeframe you choose does
not exceed the restrictions for your Certification Authority.
Page 19
YubiKey PIV Deployment Guide © 2016 Yubico. All rights reserved. Page 19 of 27
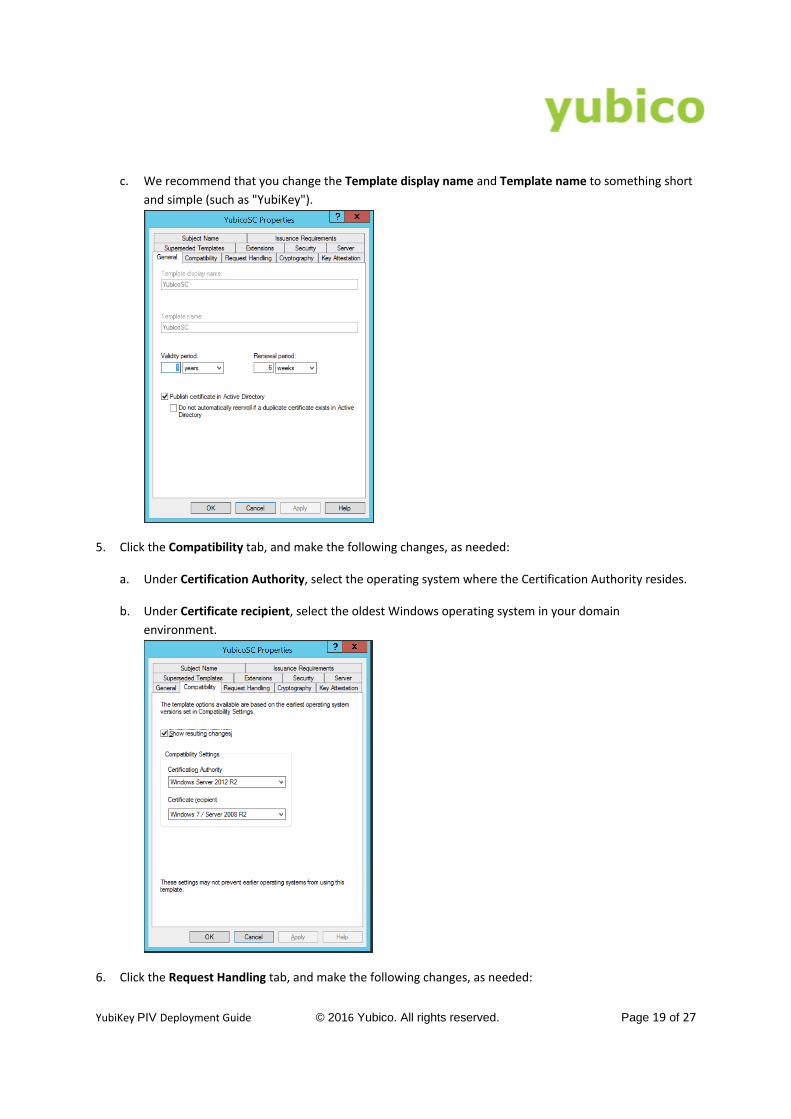
c. We recommend that you change the Template display name and Template name to something short
and simple (such as "YubiKey").
5. Click the Compatibility tab, and make the following changes, as needed:
a. Under Certification Authority, select the operating system where the Certification Authority resides.
b. Under Certificate recipient, select the oldest Windows operating system in your domain
environment.
6. Click the Request Handling tab, and make the following changes, as needed:
Page 20
YubiKey PIV Deployment Guide © 2016 Yubico. All rights reserved. Page 20 of 27
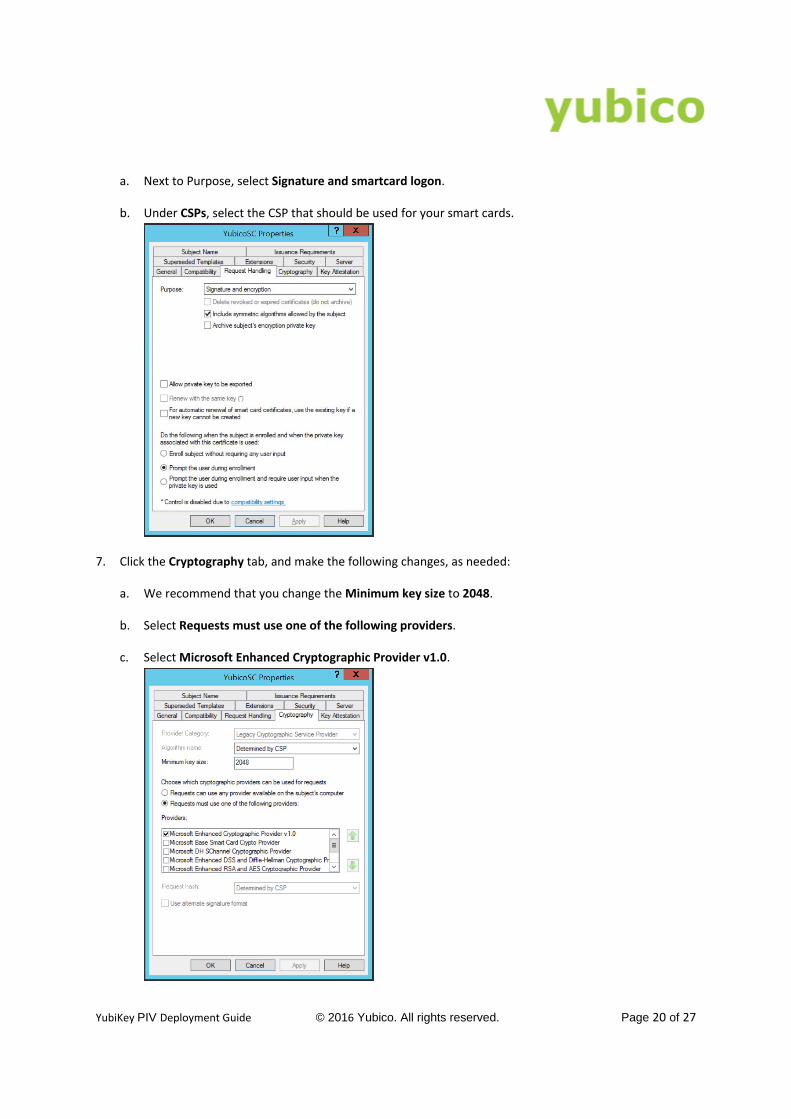
a. Next to Purpose, select Signature and smartcard logon.
b. Under CSPs, select the CSP that should be used for your smart cards.
7. Click the Cryptography tab, and make the following changes, as needed:
a. We recommend that you change the Minimum key size to 2048.
b. Select Requests must use one of the following providers.
c. Select Microsoft Enhanced Cryptographic Provider v1.0.
Page 21
YubiKey PIV Deployment Guide © 2016 Yubico. All rights reserved. Page 21 of 27
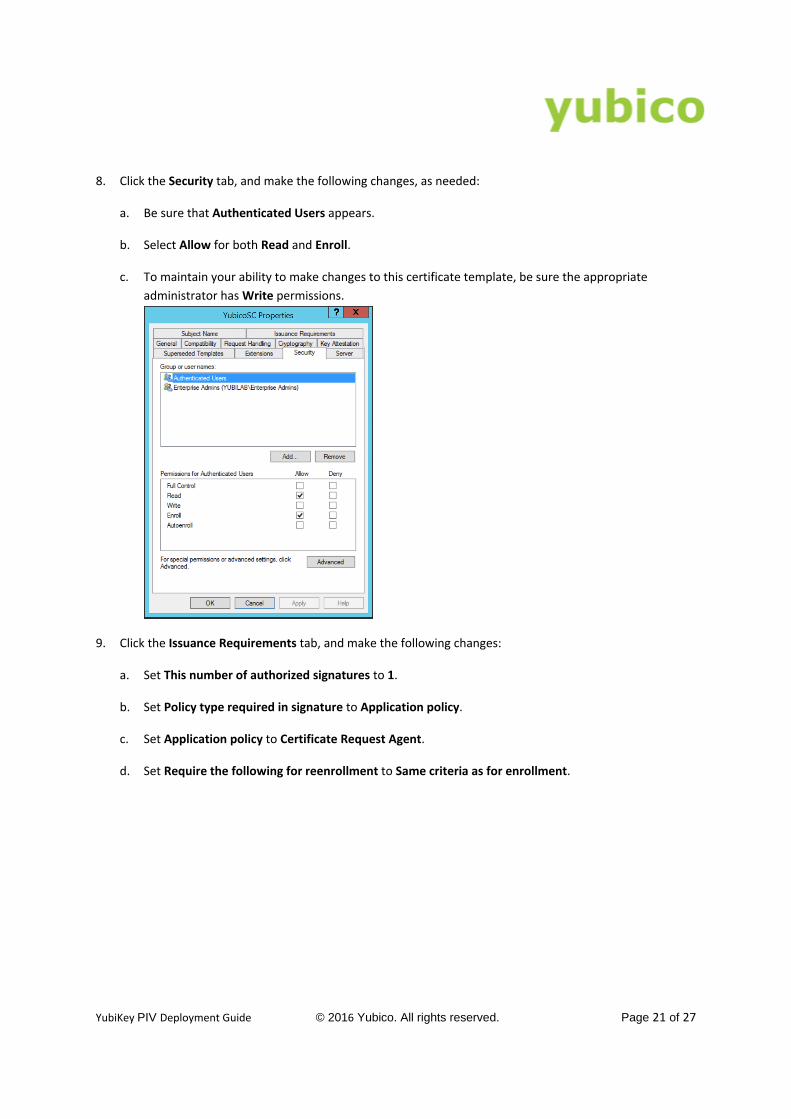
8. Click the Security tab, and make the following changes, as needed:
a. Be sure that Authenticated Users appears.
b. Select Allow for both Read and Enroll.
c. To maintain your ability to make changes to this certificate template, be sure the appropriate
administrator has Write permissions.
9. Click the Issuance Requirements tab, and make the following changes:
a. Set This number of authorized signatures to 1.
b. Set Policy type required in signature to Application policy.
c. Set Application policy to Certificate Request Agent.
d. Set Require the following for reenrollment to Same criteria as for enrollment.
Page 22
YubiKey PIV Deployment Guide © 2016 Yubico. All rights reserved. Page 22 of 27
10. Click Apply and click OK.
To specify the permissions for the Enrollment Agents and publish the certificate template
1. Open Microsoft Management Console (MMC) and select File > Add/Remove Snap-in
2. Under Selected snap-ins, add Certificate Templates, and click OK.
3. Right-click the EnrollmentAgent template, and click Properties.
4. On the Security tab, make sure the user or group designated as an Enrollment Agent has Read and Enroll
permissions on the template, and then click OK.
5. In the Certificate Authority snap-in, right-click Certificate Templates folder, and select New.
6. Select Certificate Template to Issue.
7. Select the Enrollment Agent template, and click OK. The Enrollment Agent certificate automatically saves
to the user's personal drive.
To enroll the smart card enrollment agent certificate
1. Log on to the domain with the Enrollment Agent account.
2. Open certmgr.msc to manage the current user's certificates.
3. Open the Personal folder, right-click in the right pane, and then click All Tasks.
Page 23
YubiKey PIV Deployment Guide © 2016 Yubico. All rights reserved. Page 23 of 27
4. Click Request New Certificate.
5. Complete the Certificate Request Wizard, and request an Enrollment Agent certificate.
Publishing the Smart Card Login Templates in the Certification Authority
Now that you have set up smart card login certificate templates, be sure you publish them in the
Enterprise Root Certification Authority. Until you publish your templates, users see the following error
message and the process fails when they request a smart card login certificate:
The requested certificate template is not supported by this CA […] The request
was for a certificate template that is not supported by the Active Directory
Certificate Services Policy.
To publish a smart card login certificate
1. Open Microsoft Management Console, and load the Certification Authority snap-in.
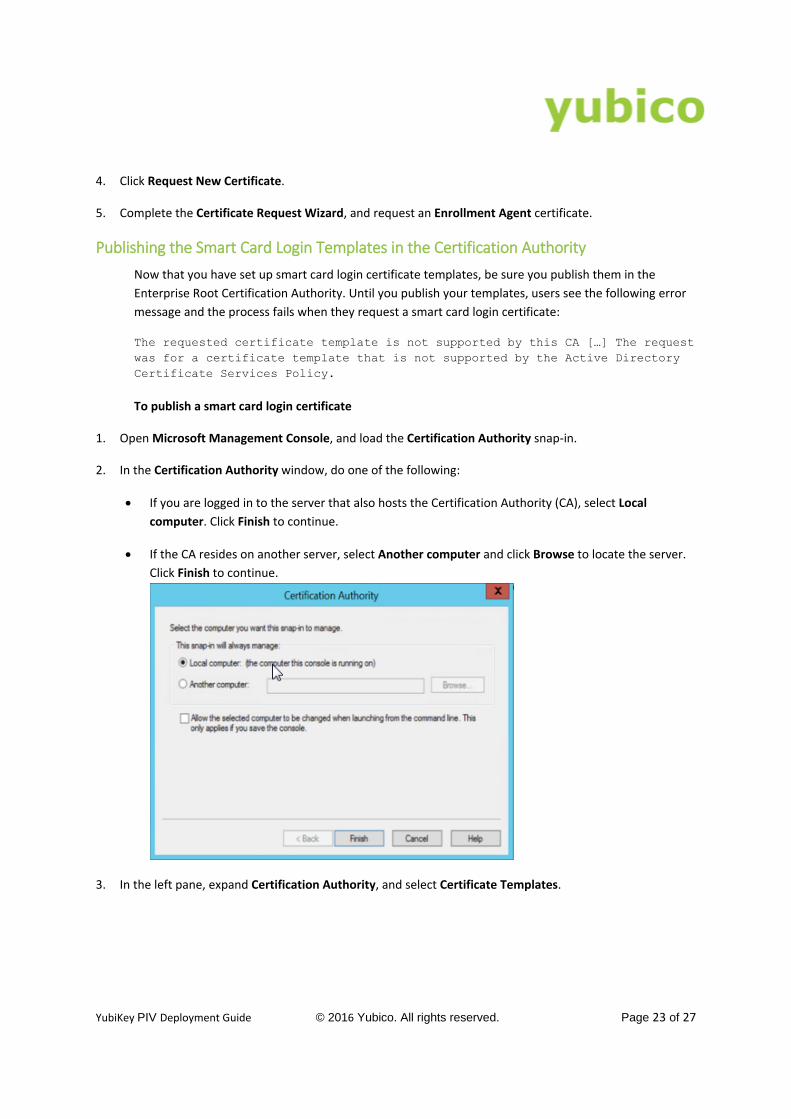
2. In the Certification Authority window, do one of the following:
If you are logged in to the server that also hosts the Certification Authority (CA), select Local
computer. Click Finish to continue.
If the CA resides on another server, select Another computer and click Browse to locate the server.
Click Finish to continue.
3. In the left pane, expand Certification Authority, and select Certificate Templates.
Page 24
YubiKey PIV Deployment Guide © 2016 Yubico. All rights reserved. Page 24 of 27
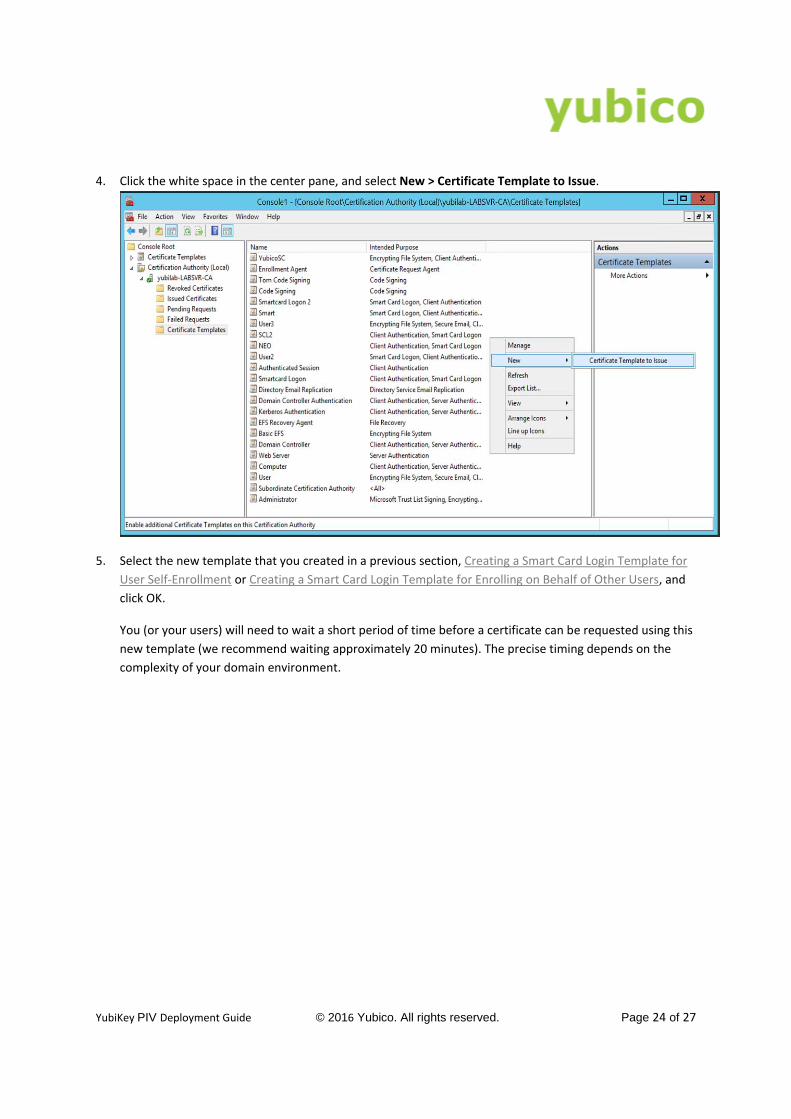
4. Click the white space in the center pane, and select New > Certificate Template to Issue.
5. Select the new template that you created in a previous section, Creating a Smart Card Login Template for
User Self-Enrollment or Creating a Smart Card Login Template for Enrolling on Behalf of Other Users, and
click OK.
You (or your users) will need to wait a short period of time before a certificate can be requested using this
new template (we recommend waiting approximately 20 minutes). The precise timing depends on the
complexity of your domain environment.
Page 25
YubiKey PIV Deployment Guide © 2016 Yubico. All rights reserved. Page 25 of 27
Changing the Behaviour for Your Domain When You Remove
the Smart Card
When a user logs into the domain account using a smart card, by default, the user can remove the
smart card at any point with no change to the login status.
For security reasons, you may want to enforce a different behavior. In Group Policy, you can specify
that Windows locks the user account, or logs out the user if the smart card is removed at any point
while the user is logged in to the account.
Important: If you are planning to implement additional functions of the YubiKey NEO (that is, U2F
protocol on one or both of the configuration slots) and in Group Policy you specified that Windows
locks the user's workstation or logs the user out, this temporarily disconnects the smart card from the
operating system and locks the workstation or logs out the user account. This is the expected behavior
for USB and smart card combination devices. This does not apply to the YubiKey 4 or YubiKey 4 Nano.
In this Chapter
To edit Group Policy to lock the user's workstation when a smart card is removed
To add a key to the Windows Registry to delay the smart card removal policy service
To edit Group Policy to lock the user's workstation when a smart card is removed
1. In Microsoft Windows Server 2012, open Group Policy Management Editor.
2. Select Computer Configuration > Policies > Windows Settings > Security Settings > Local Policies >
Security Options.
3. On the left pane, locate and right-click Interactive Logon: Smart card removal behavior, and select
Properties.
4. Click Local Security Setting, and set it to Lock Workstation or Force Logoff, depending on your
requirements.
5. Click Apply, and click OK.
To add a key to the Windows Registry to delay the smart card removal policy service
1. In Microsoft Windows Server 2012, open Group Policy Management Editor.
2. Select Computer Configuration > Preferences > Windows Settings.
3. Right-click Registry, and select New > Registry Item.
4. Set the following fields as indicated:
Page 26
YubiKey PIV Deployment Guide © 2016 Yubico. All rights reserved. Page 26 of 27
Action: Update
Hive: HKEY_LOCAL_MACHINE
Key Path: HKEY_LOCAL_MACHINE\SYSTEM\CurrentControlSet\Services\SCPolicySvc
Value name: DelayedAutoStart
Value type: REG_DWORD
Value data: 1
5. Click OK.
Page 27
YubiKey PIV Deployment Guide © 2016 Yubico. All rights reserved. Page 27 of 27
Next Steps
This section helps you determine your next steps in your YubiKey PIV deployment process.
User Self Enrollment
For users who will enroll themselves with PIV-enabled YubiKeys, the next step is to see the YubiKey PIV
Manager User's Guide, which describes the process of requesting and importing certificates to log in to
Microsoft Windows Active Directory domain environment.
Enrollment on Behalf of Other Users
For administrators who will enroll on behalf of other users, the next step is to see the CSIS Enrollment
Station Guide and/or the Yubico PIV Tool Command Line Guide. The CSIS Enrollment Station application
enables administrators to whom the Enrollment Agent is assigned to enroll YubiKeys on behalf of other
users.
The Yubico PIV Tool enables administrators to interact with the Privilege and Identification Card (PIV)
application on a YubiKey. Using the Yubico PIV Tool, you can generate keys on the YubiKey, import keys
and certificates, create certificate requests, and other operations. A shared library and a command line
tool is included.
Advanced Enrollment
For administrators who will use the Yubico PIV tool command line to write custom command line
scripts or build their own deployment application, the next step is to see the Yubico PIV Tool Command
Line Guide.