PRODUCT FEATURES • Capable of metering 114db in accordance with MIL-STD-1474D when mounted on a ZEV G17 host shooting Freedom Munitions 165gr Hush ammunition • Utilizes second generation Orion baffles for the best sound reduction available • Uses special cut pistons to limit first round pop • An industry leading 12 piston engagement points allows users to easily adjust for point of impact shift on different host firearms • The baffles and the shroud shield the tube from carbon and debris. • 1/2x28 threading for compatibility with ZEV match grade threaded barrels • Easy to remove baffles for quick user serviceability ZEV Technologies and CGS Suppressors LLC teamed up to design and produce the lightest, quietest, and most versatile 9mm handgun suppressor currently available. This silencer has a shielded baffle stack comprised of 7075 T6 Aluminum that has been Type III Hard Anodized to Military Specifications. Before using this product please take a moment to read and understand this manual, if you have any questions feel free to call us! PRODUCT SPECS • Caliber – 9mm • Mount/thread pitch – 1/2x28 RH • Length – 7.7” • Diameter – 1.375” • Weight – 9.9oz MATERIAL • Tube – 6061 T6 aluminum • Blast baffle – 17-4 stainless steel • Baffles – 7075 T6 aluminum • Piston assembly – 17-4 stainless steel • Finish – Type 3 mil spec anodized aluminum, black nitrided steel ZEV/CGS Kraken 9 AL Suppressor Manual 1051 YARNELL PLACE • OXNARD, CA 93033
Transcript
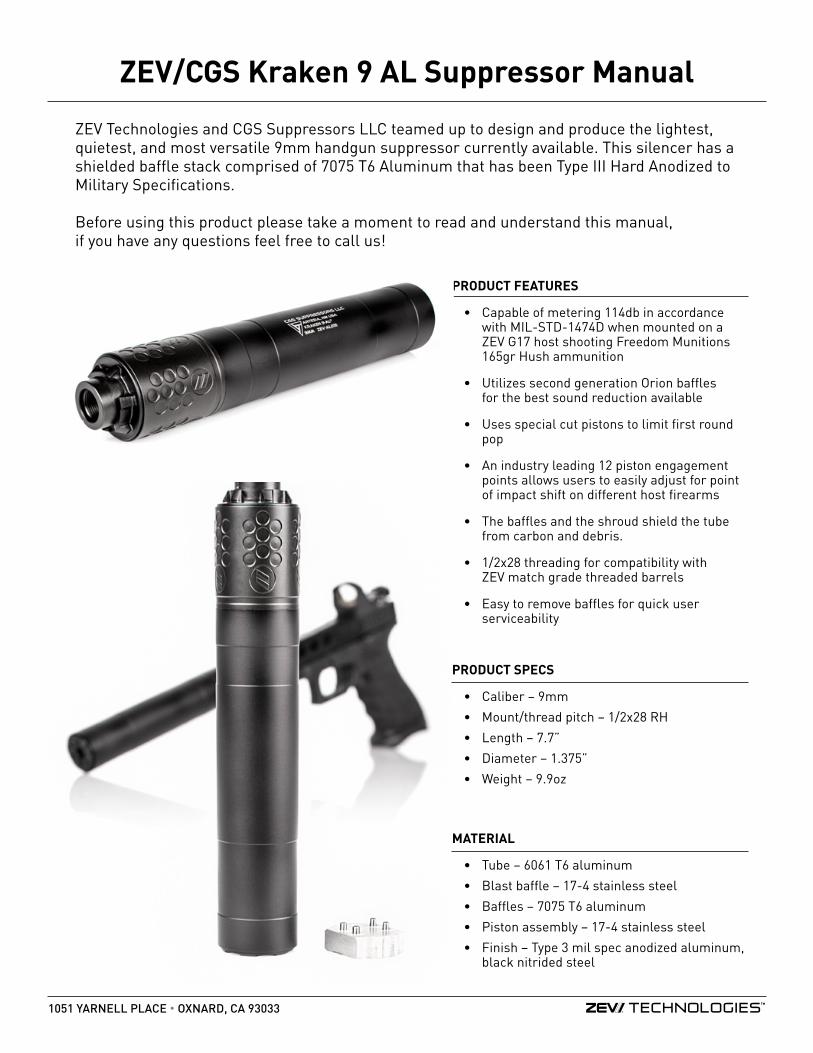
PRODUCT FEATURES
• Capable of metering 114db in accordance with MIL-STD-1474D when mounted on a ZEV G17 host shooting Freedom Munitions 165gr Hush ammunition
• Utilizes second generation Orion baffles for the best sound reduction available
• Uses special cut pistons to limit first round pop
• An industry leading 12 piston engagement points allows users to easily adjust for point of impact shift on different host firearms
• The baffles and the shroud shield the tube from carbon and debris.
• 1/2x28 threading for compatibility with ZEV match grade threaded barrels
• Easy to remove baffles for quick user serviceability
ZEV Technologies and CGS Suppressors LLC teamed up to design and produce the lightest, quietest, and most versatile 9mm handgun suppressor currently available. This silencer has a shielded baffle stack comprised of 7075 T6 Aluminum that has been Type III Hard Anodized to Military Specifications.
Before using this product please take a moment to read and understand this manual, if you have any questions feel free to call us!
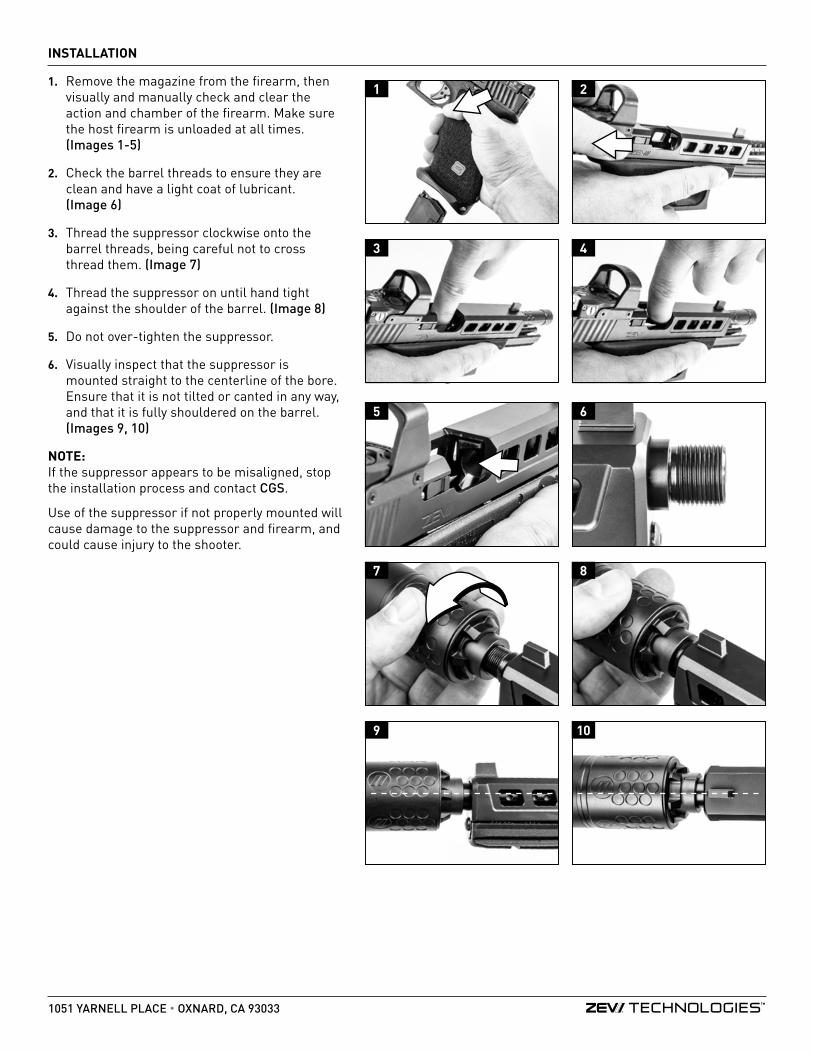
1. Remove the magazine from the firearm, then visually and manually check and clear the action and chamber of the firearm. Make sure the host firearm is unloaded at all times. (Images 1-5)
2. Check the barrel threads to ensure they are clean and have a light coat of lubricant. (Image 6)
3. Thread the suppressor clockwise onto the barrel threads, being careful not to cross thread them. (Image 7)
4. Thread the suppressor on until hand tight against the shoulder of the barrel. (Image 8)
5. Do not over-tighten the suppressor.
6. Visually inspect that the suppressor is mounted straight to the centerline of the bore. Ensure that it is not tilted or canted in any way, and that it is fully shouldered on the barrel.(Images 9, 10)
NOTE: If the suppressor appears to be misaligned, stop the installation process and contact CGS.
Use of the suppressor if not properly mounted will cause damage to the suppressor and firearm, and could cause injury to the shooter.
1
3
5 6
7 8
9 10
2
4
1051 YARNELL PLACE • OXNARD, CA 93033
ADJUSTING POINT OF IMPACT
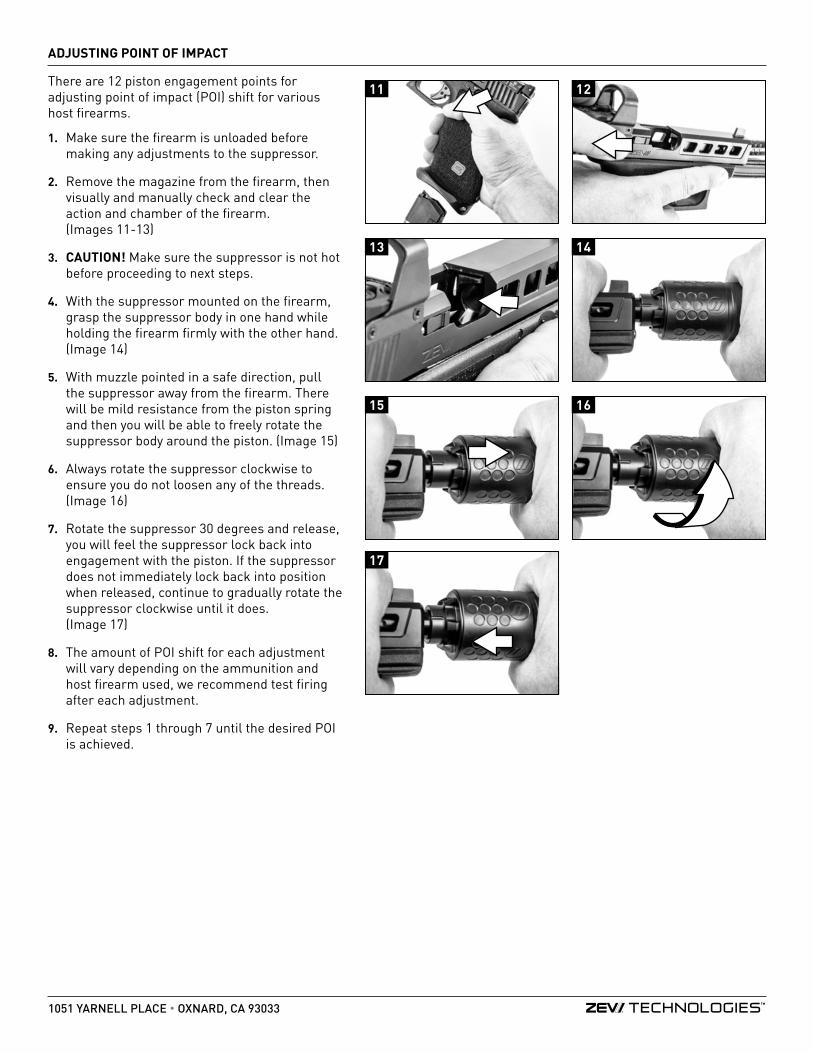
There are 12 piston engagement points for adjusting point of impact (POI) shift for various host firearms.
1. Make sure the firearm is unloaded before making any adjustments to the suppressor.
2. Remove the magazine from the firearm, then visually and manually check and clear the action and chamber of the firearm. (Images 11-13)
3. CAUTION! Make sure the suppressor is not hot before proceeding to next steps.
4. With the suppressor mounted on the firearm, grasp the suppressor body in one hand while holding the firearm firmly with the other hand. (Image 14)
5. With muzzle pointed in a safe direction, pull the suppressor away from the firearm. There will be mild resistance from the piston spring and then you will be able to freely rotate the suppressor body around the piston. (Image 15)
6. Always rotate the suppressor clockwise to ensure you do not loosen any of the threads. (Image 16)
7. Rotate the suppressor 30 degrees and release, you will feel the suppressor lock back into engagement with the piston. If the suppressor does not immediately lock back into position when released, continue to gradually rotate the suppressor clockwise until it does. (Image 17)
8. The amount of POI shift for each adjustment will vary depending on the ammunition and host firearm used, we recommend test firing after each adjustment.
9. Repeat steps 1 through 7 until the desired POI is achieved.
11
13
15
17
12
14
16
1051 YARNELL PLACE • OXNARD, CA 93033
REMOVAL
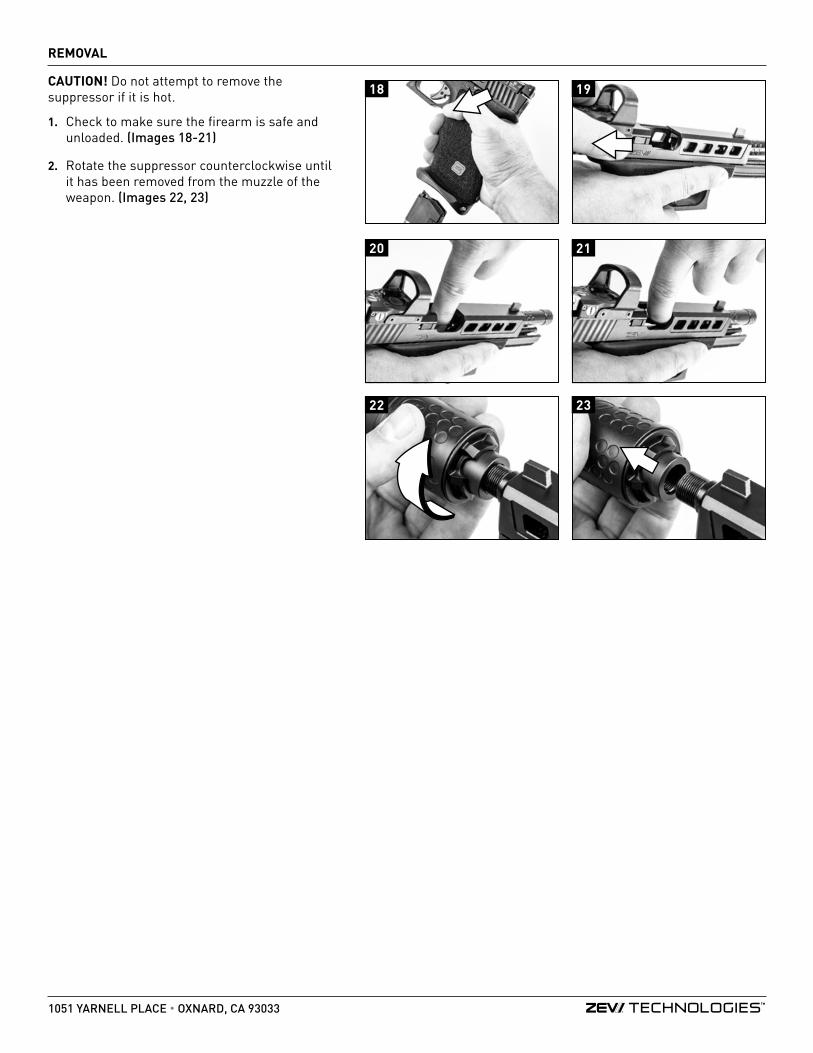
CAUTION! Do not attempt to remove the suppressor if it is hot.
1. Check to make sure the firearm is safe and unloaded. (Images 18-21)
2. Rotate the suppressor counterclockwise until it has been removed from the muzzle of the weapon. (Images 22, 23)
22 23
18
20
19
21
1051 YARNELL PLACE • OXNARD, CA 93033
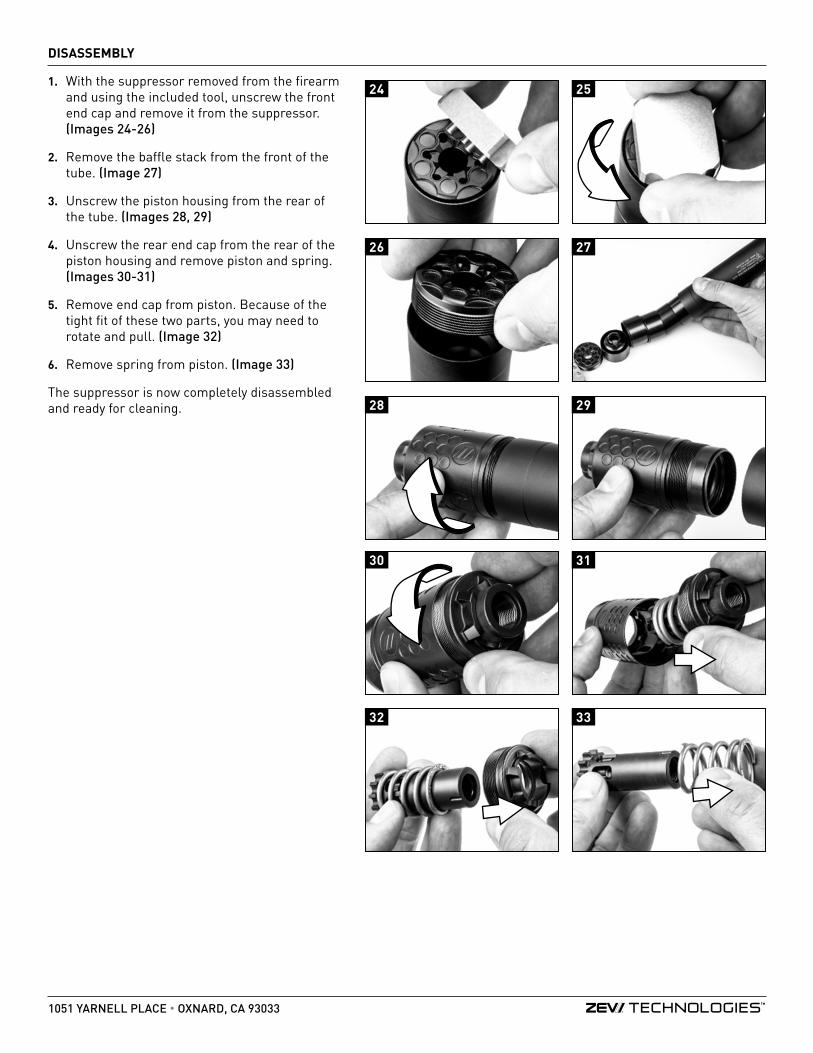
DISASSEMBLY
1. With the suppressor removed from the firearm and using the included tool, unscrew the front end cap and remove it from the suppressor. (Images 24-26)
2. Remove the baffle stack from the front of the tube. (Image 27)
3. Unscrew the piston housing from the rear of the tube. (Images 28, 29)
4. Unscrew the rear end cap from the rear of the piston housing and remove piston and spring. (Images 30-31)
5. Remove end cap from piston. Because of the tight fit of these two parts, you may need to rotate and pull. (Image 32)
6. Remove spring from piston. (Image 33)
The suppressor is now completely disassembled and ready for cleaning.
24
26
28
30
32
25
27
29
31
33
1051 YARNELL PLACE • OXNARD, CA 93033
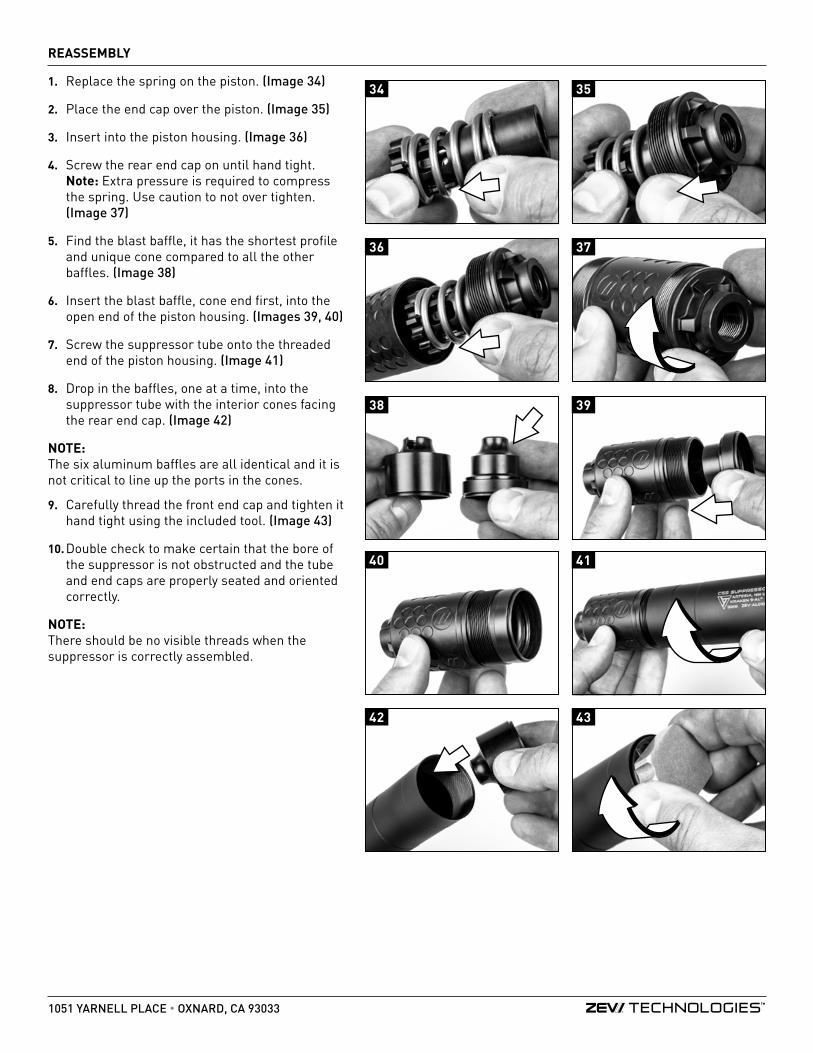
REASSEMBLY
1. Replace the spring on the piston. (Image 34)
2. Place the end cap over the piston. (Image 35)
3. Insert into the piston housing. (Image 36)
4. Screw the rear end cap on until hand tight. Note: Extra pressure is required to compress the spring. Use caution to not over tighten. (Image 37)
5. Find the blast baffle, it has the shortest profile and unique cone compared to all the other baffles. (Image 38)
6. Insert the blast baffle, cone end first, into the open end of the piston housing. (Images 39, 40)
7. Screw the suppressor tube onto the threaded end of the piston housing. (Image 41)
8. Drop in the baffles, one at a time, into the suppressor tube with the interior cones facing the rear end cap. (Image 42)
NOTE: The six aluminum baffles are all identical and it is not critical to line up the ports in the cones.
9. Carefully thread the front end cap and tighten it hand tight using the included tool. (Image 43)
10. Double check to make certain that the bore of the suppressor is not obstructed and the tube and end caps are properly seated and oriented correctly.
NOTE: There should be no visible threads when the suppressor is correctly assembled.
34
36
38
40
42
35
37
39
41
43
1051 YARNELL PLACE • OXNARD, CA 93033
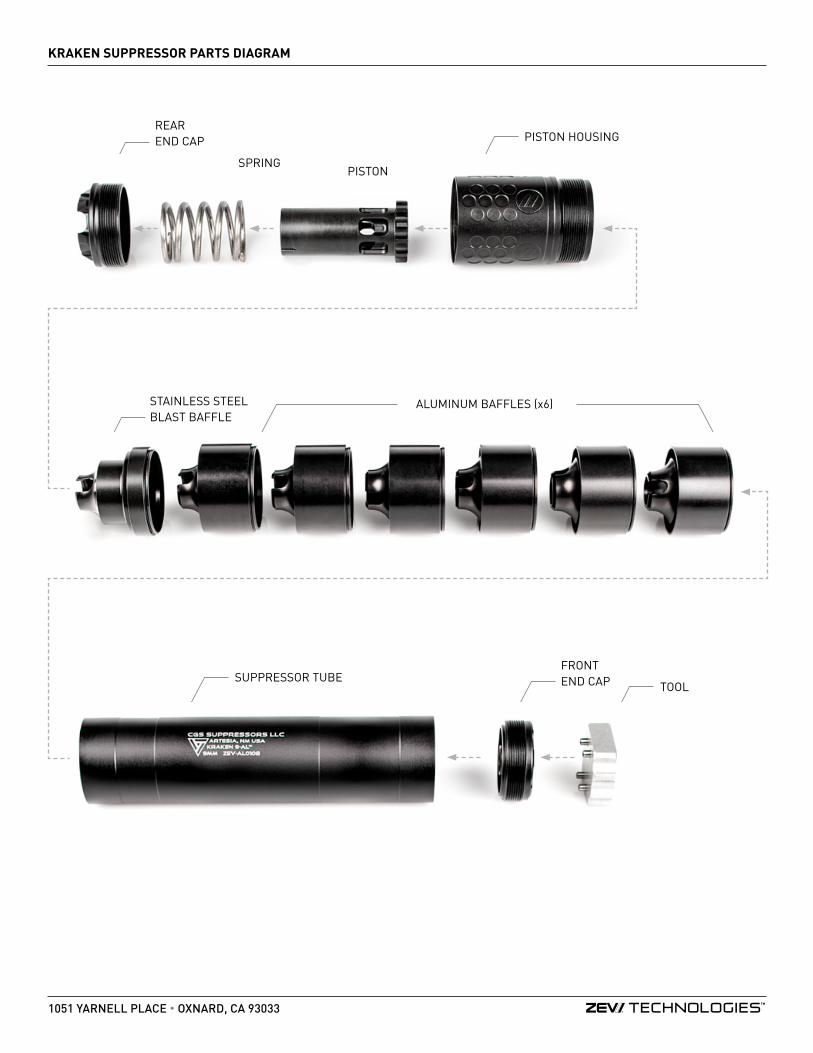
KRAKEN SUPPRESSOR PARTS DIAGRAM
1051 YARNELL PLACE • OXNARD, CA 93033
REAR END CAP
STAINLESS STEEL BLAST BAFFLE
SUPPRESSOR TUBETOOL
FRONT END CAP
ALUMINUM BAFFLES (x6)
SPRINGPISTON
PISTON HOUSING
MAINTENANCE
1. It is recommended that the suppressor be disassembled and cleaned at intervals of 300 rounds.
2. With the suppressor removed from the firearm and completely disassembled, clean each component with a hydrocarbon based solvent and nylon brush and wipe dry.
3. If you have trouble removing any part of the suppressor, soak the part in solvent to release the carbon build up.
4. Do not use a bore patch or jag to clean the suppressor.
5. After cleaning a light coat of oil should be applied the baffle stack, tube, and all threads before reassembly.
WARNINGS AND DISCLAIMERS
• Always practice the basic rules of firearms safety when using the suppressor.
• Suppressors may loosen during firing. It is important that you frequently verify that your suppressor is securely tightened during use. It is recommended that you check for tightness every 30 rounds, and use gloves or another barrier to ensure you are not burned.
• ZEV Technologies and CGS are not responsible or liable for damages or injuries resulting from the improper use of this product; it is the user’s responsibility to read and completely understand the instructions in this manual before using this product.
AMMUNITION RECOMMENDATIONS
• The Kraken was designed for semi auto firing of SAMMI 9mm Luger ammunition only.
• We recommend the use of high quality factory loaded ammunition with this product for best sound performance, accuracy, and reliability.
• Suppressors are designed to attenuate the muzzle blast of a firearm but they do not alter or suppress the sonic crack caused by supersonic projectiles as they break the sound barrier. For best sound suppression we recommend the use of subsonic ammunition.
WARRANTY
Subject to restrictions, CGS warrants this suppressor to be free from any manufacturing defects for life. In the unlikely event that you received a defective product, CGS will repair or replace the suppressor; it is at the discretion of CGS to determine if a particular defect or condition is covered by this warranty.
If a repair is necessary, please contact CGS at 575-736-2474 for a CGS representative to make arrangements for the proper and legal return of the product.
Please do not ship anything to CGS without first contacting CGS.