807
© 2021 Light-O-Rama, Inc. version 5.6.6
| Date post: | 25-Apr-2023 |
| Category: |
Documents |
| Upload: | khangminh22 |
| View: | 0 times |
| Download: | 0 times |
© 2021 Light-O-Rama, Inc.
version 5.6.6
Light-O-Rama v5.6.62
© 2021 Light-O-Rama, Inc.
Table of Contents
Part I Getting Started with Light-O-Rama 8
Part II What's New? 13
Part III Feature Comparison 61
Part IV Light-O-Rama Concepts 69
................................................................................................................................... 711 Sequences
.......................................................................................................................................................... 76Previews
.......................................................................................................................................................... 81Animation Sequences
.......................................................................................................................................................... 82Musical Sequences
.......................................................................................................................................................... 84Channels
.......................................................................................................................................................... 87Effects
.......................................................................................................................................................... 88Timings
.......................................................................................................................................................... 91Compressed Sequences
.......................................................................................................................................................... 91Protected Sequences
.......................................................................................................................................................... 92Archived Props
.......................................................................................................................................................... 94RGB Aggregates
.......................................................................................................................................................... 95Time Format
................................................................................................................................... 962 Shows
................................................................................................................................... 963 Schedules
................................................................................................................................... 974 File Locations
................................................................................................................................... 1015 Hardware
.......................................................................................................................................................... 101Light-O-Rama Controllers
.......................................................................................................................................................... 104Light-O-Rama Pixel Controllers
.......................................................................................................................................................... 104Light-O-Rama PixCon16 Devices
.......................................................................................................................................................... 104Native DMX Devices
.......................................................................................................................................................... 104LED Pixel and Node Terminology
................................................................................................................................... 1056 Unit Id Values
Part V The Light-O-Rama Software Package 112
................................................................................................................................... 1131 Registering Light-O-Rama
.......................................................................................................................................................... 114Registering Offline
................................................................................................................................... 1152 Control Panel
................................................................................................................................... 1273 S5 Sequencer
.......................................................................................................................................................... 129Menu Bar
......................................................................................................................................................... 130File Menu
......................................................................................................................................... 134New Animation Sequence Dialog
......................................................................................................................................... 137New Musical Sequence Dialog
......................................................................................................................................... 140Quick Preview
......................................................................................................................................................... 143Sequence Menu
......................................................................................................................................... 149Sequence Information Dialog
......................................................................................................................................... 151File References Dialog
3Contents
3
© 2021 Light-O-Rama, Inc.
......................................................................................................................................... 153Window s Shell Command Dialog
......................................................................................................................................... 158Manage Archived Props Dialog
......................................................................................................................................... 159Manage RGB Aggregates Dialog
......................................................................................................................................... 162Manage Picture Effects Dialog
......................................................................................................................................................... 166Tools Menu
......................................................................................................................................... 168Sequencer Preferences
................................................................................................................................... 169Tooltip Preferences
................................................................................................................................... 171Playback Preferences
................................................................................................................................... 172Motion Effect Preferences
................................................................................................................................... 174Channel Effect Preferences
................................................................................................................................... 176Preview Preferences
................................................................................................................................... 178Save Copy Preferences
................................................................................................................................... 179Video Preferences
................................................................................................................................... 180Editing Preferences
................................................................................................................................... 184Start Up Preferences
......................................................................................................................................... 184Keyboard Preferences
......................................................................................................................................... 194Themes
......................................................................................................................................... 197Zoom Preferences
......................................................................................................................................................... 197Window Menu
......................................................................................................................................................... 199Help Menu
......................................................................................................................................... 200About
.......................................................................................................................................................... 201Start Page
.......................................................................................................................................................... 203Previews Window
.......................................................................................................................................................... 206Preview Design
......................................................................................................................................................... 209Design Tab
......................................................................................................................................................... 228Channel Conflicts & Bulk Changes Tab
......................................................................................................................................................... 238Other Warnings Tab
......................................................................................................................................................... 239String Summary Tab
......................................................................................................................................................... 241Statistics Tab
......................................................................................................................................................... 242Prop Definition
......................................................................................................................................... 253Prop Shapes
......................................................................................................................................... 274Custom Grid
......................................................................................................................................................... 280Group Definition
......................................................................................................................................................... 286Copy Dialog
......................................................................................................................................................... 289Naming Strategies
......................................................................................................................................................... 291Online Prop Import
......................................................................................................................................................... 293Layout View
......................................................................................................................................................... 296Wiring View
.......................................................................................................................................................... 299Sequence Tab
......................................................................................................................................................... 301Scrolling & Zooming
......................................................................................................................................................... 304Item List
......................................................................................................................................... 306Grid Row s
......................................................................................................................................... 316Using The Item List
......................................................................................................................................... 326Grid View s
......................................................................................................................................... 327Grid View Menu
......................................................................................................................................... 331Grid View Groups
......................................................................................................................................... 335Motion Effect Row s Dialog
......................................................................................................................................... 342Insert Props And Groups Dialog
......................................................................................................................................................... 346Selecting Cells
......................................................................................................................................................... 353Intensity Range
......................................................................................................................................................... 356Adding Effects
......................................................................................................................................................... 366Modifying Effects
......................................................................................................................................................... 369Deleting Effects
......................................................................................................................................................... 370Clipboards & Cut/Copy/Paste/Repeat
Light-O-Rama v5.6.64
© 2021 Light-O-Rama, Inc.
......................................................................................................................................... 379Clipboard Management
......................................................................................................................................................... 381Toolbars
......................................................................................................................................... 386Toolbar Timing Grid Menu
......................................................................................................................................................... 392Right-Click Context Menu
......................................................................................................................................... 397Right-Click Prompt For New Effect Sub-menu
......................................................................................................................................... 400Right-Click Empty Areas (background) Sub-menu
......................................................................................................................................... 405Right-Click Existing Effects (foreground) Sub-menu
......................................................................................................................................... 418Right-Click Advanced Tools Sub-menu
......................................................................................................................................... 423Right-Click Timing Mark Sub-menu
......................................................................................................................................................... 427Freeform Play Range
......................................................................................................................................................... 428Playback
......................................................................................................................................................... 431Audio Waveform
......................................................................................................................................................... 432Audio Wizards
......................................................................................................................................... 433The Tapper Wizard
......................................................................................................................................... 436The Beat Wizard
......................................................................................................................................... 440The VU Wizard
......................................................................................................................................... 443The MIDI File Wizard
......................................................................................................................................................... 446Tooltips
......................................................................................................................................................... 446Loops in Animation Sequences
......................................................................................................................................................... 450Sharing Sequences
......................................................................................................................................................... 451Mouse Double-Click Speed
.......................................................................................................................................................... 453Motion Effect Generator
......................................................................................................................................................... 454Opening the Motion Effect Generator
......................................................................................................................................................... 455Creating an Effect
......................................................................................................................................................... 461Using the Effect Slider
......................................................................................................................................................... 465Mixing Tw o Effects
......................................................................................................................................................... 489Favorites
......................................................................................................................................................... 492Effect Length
......................................................................................................................................................... 493Bulb Size
......................................................................................................................................................... 493Motion Effect Reference
.......................................................................................................................................................... 521Playback Window
.......................................................................................................................................................... 525Effect Samples Window
.......................................................................................................................................................... 529Control Lights Window
.......................................................................................................................................................... 531Audio Settings Window
.......................................................................................................................................................... 540Customizing Window Layouts
.......................................................................................................................................................... 543Background Image Brightness
.......................................................................................................................................................... 544Keyboard Shortcut Summary
.......................................................................................................................................................... 549Map Preview To Sequence Dialog
.......................................................................................................................................................... 553Upgrading Sequences
................................................................................................................................... 5654 SuperStar Sequencer
.......................................................................................................................................................... 565Welcome
.......................................................................................................................................................... 566Overview
.......................................................................................................................................................... 568Instant Sequences
.......................................................................................................................................................... 574Custom Sequences
......................................................................................................................................................... 575Creating a Scene
......................................................................................................................................................... 578Creating a Morph
......................................................................................................................................................... 582Creating an Image Action
......................................................................................................................................................... 584Import Image
......................................................................................................................................................... 586Creating an Animation
......................................................................................................................................................... 591Creating Text
......................................................................................................................................................... 597Smooth Effects
......................................................................................................................................................... 602Auto Sequence Effects
......................................................................................................................................................... 604Auto Sequence Dialog Box
......................................................................................................................................................... 606Auto Sequence Singing Faces
5Contents
5
© 2021 Light-O-Rama, Inc.
......................................................................................................................................................... 611Move or Scale Selected Effects
......................................................................................................................................................... 613Groups of Effects
......................................................................................................................................................... 613Select One or More Row s
......................................................................................................................................................... 614Transfer Effects from One Sequence to Another
......................................................................................................................................................... 614Load/Save Clipboard
......................................................................................................................................................... 615Change to 10 Pixels per Ribbon
......................................................................................................................................................... 617"Star Rays", "Wide Grid", and "Thin Grid"
......................................................................................................................................................... 618The Layout Dialog Box
......................................................................................................................................................... 621The Preferences Dialog Box
......................................................................................................................................................... 625Configure Controller Unit IDs Using the Light-O-Rama Hardw are Utility
......................................................................................................................................................... 625Configure Controller Unit IDs in the SuperStar Sequencer
......................................................................................................................................................... 628Select All, Select All Left, and Select All Right
......................................................................................................................................................... 629Importing a Timing Grid and up to 3 Timing Channels
.......................................................................................................................................................... 629Summary of Commands and Keyboard Accelerators
......................................................................................................................................................... 629Toolbar Summary
......................................................................................................................................................... 630Toolbar Buttons that have Keyboard Modif iers
......................................................................................................................................................... 631Timeline and Effect Object Selection
......................................................................................................................................................... 631Top Part of Color Controls
......................................................................................................................................................... 631Color Picker Dialog Box
......................................................................................................................................................... 632Bottom Part of Color Controls
......................................................................................................................................................... 633Sequencing Grid Commands for Scenes
......................................................................................................................................................... 634Selection Grid Commands for Morphs
......................................................................................................................................................... 634Sequencing Grid Commands for Smooth Effects (Shockw ave, Spiral and
Fan)
......................................................................................................................................................... 635Sequencing Grid Command for Images
.......................................................................................................................................................... 635Purchased Sequences
................................................................................................................................... 6355 Show Editor
.......................................................................................................................................................... 645Interactive Groups
................................................................................................................................... 6506 Schedule Editor
.......................................................................................................................................................... 656The Weekly Schedule
.......................................................................................................................................................... 657The Calendar Schedule
................................................................................................................................... 6597 LOR Hub
.......................................................................................................................................................... 659Creating Shows and SD Cards
......................................................................................................................................................... 659Run from Your Computer
......................................................................................................................................................... 661Run from an MP3 Director
......................................................................................................................................... 661Differences Betw een MP3 Directors
......................................................................................................................................... 667How to Use Director-Link
......................................................................................................................................... 668Creating a new SD Card Show
......................................................................................................................................... 669Editing an SD Card Show
......................................................................................................................................... 674Select Sequences and Show Options for SD cards
......................................................................................................................................... 679Advanced SD Card Wizard
................................................................................................................................... 691SD Card Priority System
......................................................................................................................................... 693Throttle Parameters
.......................................................................................................................................................... 695Applying and Using MotionPaks
......................................................................................................................................................... 695LOR Sequences
......................................................................................................................................................... 695LOR Hardw are Props
......................................................................................................................................................... 695LOR MotionPaks
......................................................................................................................................................... 696Updating Sequences w ith MotionPaks
................................................................................................................................... 7018 Simple Show Builder
................................................................................................................................... 7029 Show Player
................................................................................................................................... 70210 Network Preferences
.......................................................................................................................................................... 703The LOR Tab

Light-O-Rama v5.6.66
© 2021 Light-O-Rama, Inc.
.......................................................................................................................................................... 707The DMX Tab
.......................................................................................................................................................... 711The Misc Tab
.......................................................................................................................................................... 712Export/Import
.......................................................................................................................................................... 712PixCon16 Configuration
................................................................................................................................... 72511 Comm Listener
................................................................................................................................... 72512 Hardware Utility
.......................................................................................................................................................... 726Light-O-Rama Controllers
......................................................................................................................................................... 727Selecting a Comm Port
......................................................................................................................................................... 728Setting Unit IDs
......................................................................................................................................................... 730Configuring Units
......................................................................................................................................... 739Light-O-Rama MP3 Directors
......................................................................................................................................................... 751Testing Units
......................................................................................................................................................... 755Dow nloading Sequences
......................................................................................................................................................... 759Firmw are Updates
.......................................................................................................................................................... 761Light-O-Rama Wireless Devices
.......................................................................................................................................................... 763Digital IO Boards
.......................................................................................................................................................... 763X10 Controllers
.......................................................................................................................................................... 763Light Console
.......................................................................................................................................................... 765Pixel Console
................................................................................................................................... 76813 ServoDog Utility
................................................................................................................................... 76814 Verifier
.......................................................................................................................................................... 770List of Verifier Messages
......................................................................................................................................................... 771Verif ier Messages 1-10
......................................................................................................................................... 7711: No errors or w arnings found
......................................................................................................................................... 7722: Verif ication cancelled
......................................................................................................................................... 7723: Light-O-Rama is not installed
......................................................................................................................................... 7724: No registry entry for application path
......................................................................................................................................... 7735: Application directory does not exist
......................................................................................................................................... 7736: Verif ier not running from LOR application path
......................................................................................................................................... 7747: Application f ile does not exist
......................................................................................................................................... 7748: Unlicensed LOR demo version used
......................................................................................................................................... 7749: Unsupported version of Window s Media Player
......................................................................................................................................... 77510: No registry entry for user data path
......................................................................................................................................................... 775Verif ier Messages 11-20
......................................................................................................................................... 77611: User data directory does not exist
......................................................................................................................................... 77612: No registry entry for non-media data path
......................................................................................................................................... 77713: Non-media data directory does not exist
......................................................................................................................................... 77714: No registry entry for media data path
......................................................................................................................................... 77815: Media data directory does not exist
......................................................................................................................................... 77816: Application f ile has unexpected version number
......................................................................................................................................... 77917: Weekly schedule f ile does not exist
......................................................................................................................................... 77918: Yearly schedule f ile does not exist
......................................................................................................................................... 77919: Calendar scheduling not supported
......................................................................................................................................... 78020: No show s are scheduled
......................................................................................................................................................... 780Verif ier Messages 21-30
......................................................................................................................................... 78021: Show file does not exist
......................................................................................................................................... 78122: Error reading show file
......................................................................................................................................... 78123: Sequence f ile does not exist
......................................................................................................................................... 78224: Sequence f ile cannot be loaded
......................................................................................................................................... 78225: Show has no sequences
......................................................................................................................................... 78326: Media f ile does not exist
......................................................................................................................................... 78327: Conflicting channel settings in sequence
......................................................................................................................................... 78428: Channel is completely off
7Contents
7
© 2021 Light-O-Rama, Inc.
......................................................................................................................................... 78429: Sequence is completely off
......................................................................................................................................... 78430: Channel is missing settings
......................................................................................................................................................... 785Verif ier Messages 31-40
......................................................................................................................................... 78531: Channel uses undefined comm netw ork
......................................................................................................................................... 78632: Channel in tracks of conflicting length
......................................................................................................................................... 78633: Musical f ile used in non-audio section of show
......................................................................................................................................... 78734: Subsequences not supported
......................................................................................................................................... 78735: Background sequences unsupported
......................................................................................................................................... 78836: Startup sequences unsupported
......................................................................................................................................... 78837: Shutdow n sequences unsupported
......................................................................................................................................... 78938: Interactive triggers unsupported
......................................................................................................................................... 78939: Unsupported number of tracks
......................................................................................................................................... 79040: Shell commands unsupported
......................................................................................................................................................... 790Verif ier Messages 41-50
......................................................................................................................................... 79041: Shell command map file does not exist
......................................................................................................................................... 79142: Shell command not set
......................................................................................................................................... 79143: Channel conflict
......................................................................................................................................... 79244: Old MC-P compatibility enabled
......................................................................................................................................... 79245: Channel settings conflict in sequence/intensity f ile
......................................................................................................................................... 79346: Channel settings conflict in intensity f ile
......................................................................................................................................... 79347: Intensity File Conflict
......................................................................................................................................... 79448: Channel/intensity f ile conflict
......................................................................................................................................... 79449: Intensity f ile uses undefined comm netw ork
......................................................................................................................................... 79550: Intensity f iles not supported by license level
......................................................................................................................................................... 795Verif ier Messages 51-60
......................................................................................................................................... 79551: Use Compressed Sequences disabled
......................................................................................................................................... 79652: Show Player Memory Restarts disabled
......................................................................................................................................... 79653: Trigger uses undefined netw ork
......................................................................................................................................... 79654: Trigger uses LOR Enhanced netw ork
................................................................................................................................... 79715 Sequence Compressor
................................................................................................................................... 79816 Diagnostic
................................................................................................................................... 79917 Offline Registration Utility
................................................................................................................................... 80018 Registry Wiper
Index 802
Light-O-Rama v5.6.68
© 2021 Light-O-Rama, Inc.
1 Getting Started with Light-O-Rama
Welcome to Light-O-Rama
Light-O-Rama is a computerized lighting system designed to control elaborate or simple lightingdisplays. The Light-O-Rama system can be applied to almost any lighting situation, from stand-alonecontrollers to synchronizing hundreds of controllers.
This page gives a high-level overview of how to start controlling your lights using Light-O-Rama:
· Getting Help about Light-O-Rama· Important Terms and Information· Connecting the Lights Using Light-O-Rama Controllers· Creating a Show
For more detailed information, please see Light-O-Rama Concepts and the Light-O-Rama SoftwarePackage.
Experienced users may wish to see what's new in the latest version of Light-O-Rama.
Getting Help about Light-O-Rama
This help file contains a lot of information about the Light-O-Rama Software Suite. If you need morehelp, please visit the Light-O-Rama website. Click the word "Support" at the top of the page to findlinks to more resources, including tutorials, Frequently Asked Questions, our User Forum, and ourHelp Desk.
Important Terms and Information
Companion Unit
A companion unit is a Light-O-Rama controller that receives lighting commands from anothersource - either a PC running Light-O-Rama software, or from another controller known as a directorunit.
Control Panel
The Light-O-Rama Control Panel is a program that can be used to manage the Light-O-Ramasystem on your PC. The Control Panel runs in the system tray (where the PC's clock is displayed). Light-O-Rama is made up of a number of different programs, and the Control Panel is a convenientway of accessing them. The Control Panel must be running in order to control shows from your PC.
Daisy Chain
This is the term generally used to describe the manner in which Light-O-Rama light controllers areconnected. A wire goes from the source (a PC running Light-O-Rama software or a director unit) to acompanion unit. Another wire goes from that companion unit to another companion unit, and so on,until all companion units are "chained" together.
Getting Started with Light-O-Rama 9
© 2021 Light-O-Rama, Inc.
Do not put "Y"s or forks in the data cable. Only connect the units in this daisy chain configuration.
Data Cable
Light-O-Rama controllers can be connected using both data cables and phone cables, but you mustknow which type of cable it is (for the purposes of Light-O-Rama, a cable is considered a datacable if its wires are connected straight through).
How do you know if it is a data cable? Well, most likely the only cable that you will see that is not adata cable is a wire that is intended specifically for phones. If you go to your local hardware storeand purchase a phone extension cable, then that wire is not a data cable. The distinction betweendata cables and phone cables is important, because the wires are swapped around. There areselectors or jumpers on most Light-O-Rama controllers that allow you to specify which wire type youare using.
Only the wire coming into a controller (from the previous controller or from a PC running Light-O-Rama software) should be used to determine which selector setting to use. The wire leaving acontroller (if there is one) can be of any type, and has no bearing on which selector setting should beused. For example, if a controller has a phone cable coming in from the previous controller, and adata cable leaving to the next controller, the selector should be set for "phone cable".
Director Unit
A director unit is a Light-O-Rama controller that sends lighting commands to other controllers(known as companion units). Controllers can run individually in standalone mode, but to synchronizemultiple controllers together, they must be directed either by a PC running Light-O-Rama software,or by a director unit.
Standalone sequences may contain lighting commands for a number of different units. A directorunit is a unit that is running standalone - i.e. not connected to a PC - that contains lightingcommands for other units cabled to it (the companion units). The director unit can also control itsown lights, simultaneously.
There is no difference in the hardware of a director unit and a companion unit - the only difference isthe mode that they are in.
A PC running Light-O-Rama software can also be thought of as a director unit, in that it can sendlighting commands to Light-O-Rama controllers. There must be one and only one director unit (orPC running Light-O-Rama software) on a daisy chained group of controllers.
Hardware Utility
The Light-O-Rama Hardware Utility is a program that can be used to set up and test the hardwareused to control lights, as well as download sequences to standalone controllers or director units.
Phone Cable
Light-O-Rama controllers can be connected using either data cables or phone cables, but you mustknow which type of cable you are using. See data cables for details.
Preview
Light-O-Rama v5.6.610
© 2021 Light-O-Rama, Inc.
A preview is a representation of your light display. It defines the lighting elements, how they arearranged, and what channels they use. Creating a preview is required before you can create asequence. One preview can be associated with multiple sequences. Update the preview once, andthe next time you open any sequence associated with that preview, the update will automatically beapplied. The display elements in a preview are referred to as 'props'. You must add a prop to thepreview for every display element that you want to control. A prop could be a single string of lights, awireframe, an arch, a wreath, or a tree. In fact you can model just about any lighting element in apreview.
The Sequencer program is used to create and modify previews.
Schedule
A schedule is a list of shows and the times at which those shows are to be played.
If the Light-O-Rama Control Panel is running on a PC, and its "Enable Schedule" option is turned on,then the schedule will be monitored, and its shows will be started and stopped at the appropriatetimes.
The Schedule Editor program is used to create and modify schedules.
Sequence
A sequence is a file that contains a set of lighting commands to be sent to Light-O-Ramacontrollers. There are two types of sequences: musical sequences, which have an associatedmusic or video file that is to be played at the same time, and animation sequences, which do not.
Before creating a sequence, you must create a preview. The lights you can control in the sequenceare defined by the props in the preview.
Sequences can be grouped together into shows.
The Sequencer program is used to create and modify sequences.
Show
A show is a file that contains a number of sequences, and the order in which they should be played.
A schedule can be created to specify the times at which various shows should be played.
The Show Editor program is used to create and modify shows.
Standalone
A Light-O-Rama controller can be controlled by another controller (or a PC running Light-O-Ramasoftware), or it can control itself and/or other controllers, in standalone mode. A sequence,created using the Sequencer, can be downloaded to a standalone controller using the HardwareUtility. The controller can then be set up to run this sequence whenever it has power, or, if the unitis a model with an internal clock, it can be instructed to run the sequence during a particular time.
A standalone controller whose sequence contains lighting commands for other controllers willtransmit those commands to the other controllers. In this case, the controller is known as a directorunit.
Getting Started with Light-O-Rama 11
© 2021 Light-O-Rama, Inc.
Unit
A unit is another term for a Light-O-Rama controller. Each unit has a number of circuits, each ofwhich can be used to control lights independently of each other. Each unit is identified by a unit ID.
Unit ID
Each unit has an identifier assigned to it, known as a unit ID. When a lighting command is sent toa unit, all of the units that are daisy chained together can see that command. However, thecommand contains a unit ID; only the units having that unit ID will act upon that command.
For Light-O-Rama controllers, the unit ID is a two characters, each of which can have any of thevalues 0, 1, 2, 3, 4, 5, 6, 7, 8, 9, A, B, C, D, E, and F. For example, "01", "25", "37", "5C", "BD", or"E2". However, not all possible combinations are allowed: "00" and "F1" through "FF" aredisallowed.
Controllers other than Light-O-Rama controllers use different formats for their unit IDs.
Connecting the Lights Using Light-O-Rama Controllers
To connect lights using Light-O-Rama controllers, take the following three steps:
1. Determine the serial port and hook up a controller.2. Select a unit ID.3. Test the lights.
Step 1. Determine the Serial Port and Hook Up a Controller
Insert an SC485 converter into your PC's DB9 serial connector which you plan on using for the Light-O-Rama network. If you are using a USB/RS-232 converter, then make sure that it is properlyinstalled, and that the SC485 converter is connected. If you're not sure what all this is about, simplytry to find a connector on the back of your PC that has nine pins and which will accept the SC485adaptor.
Using a cable, connect a Light-O-Rama controller to the SC485 adaptor. Make sure that the LORcontroller is powered on. The LED in the controller should be blinking.
Using the Light-O-Rama Control Panel, start the Hardware Utility program. In the Hardware Utility'sSetup Comm Port section, use the Auto Configure button. This will cause the Hardware Utility tolook for the attached controller and determine which comm port is being used.
Step 2. Select a Unit ID
If your controller has unit ID selection switches, you can select its ID by adjusting the selectors tothe desired ID. If your controller does not have these unit ID selection switches, then you will needto set its unit ID by using the Hardware Utility:
To set the unit ID using the Hardware Utility, connect one and only one unit to the PC using theSC485 adaptor and a cable. In the Set Unit IDs section, go to Set New Unit ID, select the ID thatyou wish to use for the controller, and click the Set Unit ID button. This button will only work on
Light-O-Rama v5.6.612
© 2021 Light-O-Rama, Inc.
new units that have never been assigned a unit ID (to change the unit ID of a unit that already hasone assigned, use the Change Existing ID section instead).
TIP: Assign unit IDs sequentially, starting at 01. This will make maintenance of the units faster.
Step 3. Test the Lights
With the unit connected to the PC, attach lights and power the unit on. In the Hardware Utility, clickthe Refresh button in the top center of the screen. After a short time, your unit should appear in thedropdown list to the right of the Refresh button. Select the unit, and you can then test the lightsusing the various controls in the Test Unit's Operation section of the Hardware Utility.
TIP: Before clicking Refresh, set the Hardware Utility's Max Unit ID to as low a value as possible. This is the maximum unit ID of controllers that you plan on using (you can always change it to ahigher value if you add more controllers later). Setting it to a low value makes the Hardware Utilityrun faster (though it will not find any connected units with higher unit IDs).
Creating a Scheduled Lights Display
To create a lights display and have it run at certain times, take the following steps:
1. Make your sequences.2. Make a show.3. Make a schedule.4. Turn on the Control Panel's "Enable Schedule".
Step 1. Make Your Sequences
Using the Sequencer, create the sequences that will be used in your show.
You can test how the lights will look for a sequence while in the Sequencer: Make sure ControlLights is enabled, and that you have assigned the channels in the sequence to a controller that ishooked up to your PC. Then, click the play button (which is the green arrow in the toolbar).
Step 2. Make a Show
A show is a collection of sequences. A show can be created using the Show Editor program.
Shows have several sections, each of which can have sequences:
· Background: Sequences listed in the "background" section will be played for the entireduration of the show.
· Startup: Sequences listed in the "startup" section will be played when the show first begins.· Animation and Musical: After the "startup" sequences have completed, sequences in both of
these sections will run, until it is time for the show to stop.· Shutdown: When it is time for the show to stop, the "animation" and "musical" sequences
will stop running, and the sequences in the "shutdown" section will start. Only after the"shutdown" sequences are finished will the show truly end.
In the Show Editor, you can add sequences to any of these sections by selecting the appropriatesection's tab, and hitting the big PLUS button.
Getting Started with Light-O-Rama 13
© 2021 Light-O-Rama, Inc.
After you have created your show, you should save it using the "Save" or "Save As" button. Assignthe show a meaningful name - this is the file name that you will be using in the next step.
Step 3. Make a Schedule
Unlike sequences, you cannot run a show interactively. Instead, to test a show, put that show into aschedule, using the Schedule Editor program:
In the Schedule Editor, click the Add button, and select the show file with the name that you createdin the previous step. Select a start and end time that will allow the show to start at a convenienttime for you to view it. Then click Save to save your schedule.
Step 4. Turn On the Control Panel's "Enable Schedule"
To view the scheduled show, turn on the "Enable Schedule" option in the Light-O-Rama ControlPanel. Doing this will cause the Control Panel to monitor your schedule, and start and stop yourshow at the appropriate times.
2 What's New?
What's New in the Latest Version
· What's New in Version 5.6.6· What's New in Version 5.6.4· What's New in Version 5.6.2· What's New in Version 5.6.0· What's New in Version 5.5.18· What's New in Version 5.5.16· What's New in Version 5.5.14· What's New in Version 5.5.12· What's New in Version 5.5.10· What's New in Version 5.5.8· What's New in Version 5.5.6· What's New in Version 5.5.4· What's New in Version 5.5.2· What's New in Version 5.5.0· What's New in Version 5.4.2· What's New in Version 5.4.0· What's New in Version 5.3.14· What's New in Version 5.3.12· What's New in Version 5.3.10· What's New in Version 5.3.8· What's New in Version 5.3.6· What's New in Version 5.3.4· What's New in Version 5.3.2· What's New in Version 5.3.0· What's New in Version 5.2.4· What's New in Version 5.2.2· What's New in Version 5.2.0
Light-O-Rama v5.6.614
© 2021 Light-O-Rama, Inc.
· What's New in Version 5.1.4· What's New in Version 5.1.2· What's New in Version 5.1.0
What's New in Version 5.6.6
· Sequencer Improvements· SuperStar Improvements· Bug Fixes
Sequencer Improvements
· Added new TextXY motion effect, which gives you the ability to rotate text and move it in anydirection.
· Added rotation parameter to the PictureXY motion effect.· Added "chase" option to Movement parameter of the Curtain motion effect. This option works great
for leaping arches!· In the Motion Effect Generator, changing the font for a Text, TextPE, or TextXY motion effect is
now much easier.
SuperStar Improvements
· Added ability to copy/paste a portion of an image.
Bug Fixes
· After editing effects in SuperStar, the Sequencer would misinterpret the returned data if circuit 1was not included in any unit id being edited.
· The "Move to Beats" button on the Manage Archived Props screen was not working, but is nowfixed. Also, this button is now disabled when working on an animation sequence (beat channelsare only for musical sequences).
· When doing "auto sequence singing face" in SuperStar, the sampling rate of the base file and thevoice file should be the same. If the sampling rate of the base audio file is different than the voiceaudio file, the code now puts up a message saying, "For best results the sampling rates shouldbe the same."
What's New in Version 5.6.4
Bug Fixes
· In the Sequencer, playback to actual lights did not work when a non-enhanced LOR network wasactive.
· As playback was started in the Sequencer, a warning was issued when motion effects werepresent on an LOR network that was not defined in Network Preferences.
· When importing a grid configuration into the Sequencer, there is a new check to make surechannel level effects on pixel props don't get deleted. This could happen when channel level for apixel prop is enabled in the sequence but disabled in the grid configuration import file.
What's New? 15
© 2021 Light-O-Rama, Inc.
What's New in Version 5.6.2
· Sequencer Improvements· SuperStar Improvements· Network Preferences Changes· New Pixie Firmware Version 1.07· Hardware Utility Changes· Bug Fixes
Sequencer Improvements
· Added ability to make certain bulk changes from the String Summary tab of Preview Design.Actions include setting bulb shape, and setting the dimming curve. To use, select some grid cellsby dragging the cursor or using Shift-click, then right-click and choose the action from the pop-upmenu. You can also double-click on any grid cell to edit the prop.
· Added "Outer Limit" and "Inward" parameters to the Ripple motion effect -- allowing it moveinwards as well as outwards.
· Added option to use a picture file instead of a standard shape to the Simple Shape motion effect.· Added a continuous rotation option to the Simple Shape motion effect.· Added Solid Color option to the Scanner motion effect.· Add a sparkle mode to the Twinkle effect.· Using a WMV file in a Movie effect now calculates about 7x faster.· Revamped Online Prop Import screen to make it load faster and be easier to use.· The headings on the last row of the sequence grid toolbar have been updated to improve clarity:
"Select Action" becomes "On Mouse Click". "Range" and "Slope" are now combined into "Intensity Range & Slope". "Type" becomes "Effect Type""Effect" becomes "Channel Effect""Source" for motion effects becomes "Motion Effect Source""Source for SuperStar effects becomes "SuperStar Source"
· When right-clicking on the last row of the sequence grid toolbar, 2 options have been added to thepop-up menu: "Clicking Effect Type Selects Create" and "Essential Color Buttons Only". Bothitems are toggle features and are remembered across sessions. Turning off "Clicking Effect TypeSelects Create" will leave the "Select Action" (now "On Mouse Click") selection alone when youchange Effect Type. When "Essential Color Buttons Only" is enabled, the Choose and Randomcolor buttons are hidden. In this mode, users can still click on the left or right side of the colorsample to choose colors.
· Added "Maximum number of files to display on the Start Page" option on the Start Up tab ofSequencer Preferences. Added "Clean Up" button to Start Page, which can be used to remove filenames from the Recently Used list.https://forums.lightorama.com/topic/54111-recent-sequences/
· You can now add a new motion effect to multiple rows at once. You can also select multiplemotion effect rows, right-click and select one of the Prompt For New Effect options, and thechange will be applied to all selected effects.
· When adding new motion effect rows via the Subdivide option, naming of the new motion rows hasbeen improved. There are new fields on the subdivide dialog that give you full control over thenames for the motion rows.
· States defined in an xmodel file will now be imported as additional motion effect rows.
SuperStar Improvements
· Added ability to change between normal and wrap-around in the Preferences dialog box
Light-O-Rama v5.6.616
© 2021 Light-O-Rama, Inc.
· Added the "modify stretch/shrink" check boxes in the group modify spiral, and group modify fandialog boxes
· Added SineWave effect to the smooth effects dialog box· Added ability to view the audio waveform
Network Preferences Changes
· Simple Mode has been removed. Click on a row in the LOR or DMX tab to edit it -- as you would inthe old Advanced mode.
· On the LOR tab, a check box at the top allows you to toggle between seeing just the Regularnetwork or all networks. This check box may disabled if you already have more than networkdefined (Advanced or Pro), or your license only gives you access to one network (Basic, BasicPlus, or Standard).
· When editing an LOR network, the recommended speed is always displayed and will changebased on whether the Enhanced box is checked.
· When editing an LOR network, a check box option will filter the list of comm ports to only thosecurrently attached to the computer.
· When editing a DMX network, the standard E1.31 port is clearly identified.· When editing a DMX network, you can now set up to 192 universes the same way -- in support of
the PixieLink controller.· On the DMX tab, there is now a Clear Range button, so DMX universes that are no longer in use
can be quickly erased.· Clicking the "Find/Configure PixCon16" button now opens a new PixCon16 utility. This utility has
all of the same options as the previous utility, but has an improved ability to find your controller.The new utility will NOT set your DMX universes in Network Preferences, so after configuring thePixCon16 controller, you will need to set your DMX universes on the DMX tab as a separate step.
New Pixie Firmware Version 1.07
· Firmware 1.07 has been released for Pixie controllers to support the new CMB24D emulationoption and a new Pixel IC: UCS1903.
Hardware Utility
· When configuring a Pixie that has Firmware 1.07 or higher, there is now an option to emulateCMB24D controllers with dumb RGB pixels. Pixie2/Pixie4/Pixie8 controllers can look likeCMB24D controllers to the show director with 2/4/8 dumb RGB pixel strings. The Pixie16 lookslike two CMB24D controllers with sequential unit IDs, each with 8 dumb RGB pixel strings.Sequences that use a CMB24D do not need to be updated and can be replaced with a Pixie usingthis option.
· A new Pixel IC, UCS1903, is supported by Pixies that have Firmware 1.07 or higher.· Pixies that have Firmware 1.07 or higher can recognize if the JP5 Jumper is in use and will warn
the user that the Jumper may override the configuration in the Hardware Utility.
Bug Fixes
· When creating or modifying a SuperStar effect from the Sequencer, the time that the Sequencerwaits for a SuperStar response was Increased.
· When upgrading a sequence to S5, legacy channels defined as independent red, green, and bluechannels (not inside an RGB channel), did not match up to S5 RGB channels (dumb RGB orsmart pixels).
What's New? 17
© 2021 Light-O-Rama, Inc.
· In the Sequencer, the New Musical Sequence window is now a little smaller so it fits more easilyon standard resolution laptop screens (1366x768).
· In the Sequencer, when changing the layout for a prop with a custom shape, the prop's motion rowdefaults were not updated to reflect the changes.
· In the Sequencer, the Playback and Audio Settings windows could dock in the center area (in thesame area as open sequences). This is no longer allowed.
· In the Sequencer, when importing an S4 Sequence Editor animation from the Previews window,the Sequencer would crash if the Sequence Editor file was corrupt.
· In the Sequencer, when defining preview groups with an arrangement of "Nested", "H Stack, VFill", or "V Stack, H Fill", setting orientation of a group member to anything but "normal" would notwork correctly and could cause an error.
· In the Sequencer, fixed Sphere and Cylinder shapes when the number of quarters was less than 4(less than 360 degrees around).https://forums.lightorama.com/topic/54218-12-sphere-prop-not-showing-effects-properly/
· In SuperStar, fixed a crash bug that could happen in smooth effects if aspect was small· In SuperStar, fixed a bug in rendering of spirals and fans, there were sometimes gaps in the
rendering· In SuperStar, fixed a bug where pixels would flicker when playing back to superstar screen when
there are duplicate pixels and Time Layer Priority feature is enabled. This can happen when usinga preview that uses hfill or vfill.
· In SuperStar, made the duplicate pixels on the sequencing grid be dynamic. Before it was onlyhandling one duplicate pixel.
· In SuperStar, increased the maximum channel elements for a sequence from 50,000,000 to100,000,000
· In SuperStar, increased the maximum number of pixel height for a scene from 127 to 360· In SuperStar, fixed bug where save of a .sup file didn't save groups correctly if a group was
expanded at the time of the save.· In SuperStar, made it so instant sequence themes that contained scenes work properly for grids of
length longer than 50· In SuperStar, fixed a bug where if you have an effect dialog box up that is not the scene dialog box
and you do "new" or load another sequence, then you go into scene mode, but the old dialog boxstays up and may not be functional until you click on an effect type button again.
· In SuperStar, fixed a bug where auto sequence singing faces did not work properly beyond 5:28into a sequence
· In SuperStar, fixed a bug where if you select VisEffect in the morph dialog box and deselect"Shrink visualization for visEffects" then select it again, the visualization fails to shrink
· In the Hardware Utility, when configuring a Pixie the "First Pixel as Status Indicator" check box didnot change the configuration and did not always reflect the current configuration.
What's New in Version 5.6.0
· Sequencer Improvements· SuperStar Improvements· Bug Fixes
Sequencer Improvements
· A new Audio Settings window controls which audio data is displayed for a sequence, and allowsthat data to be customized. It replaces the "Audio Filter and Scale" and "Waveform Colors"dialogs in prior versions, and does a lot more.
· In addition to the audio waveform, users with a Pro license now have the option to display theaudio as a spectrogram. Two types of spectrograms can be displayed: 1) a standard frequency

Light-O-Rama v5.6.618
© 2021 Light-O-Rama, Inc.
versus time representation, and 2) one with pitch detection applied. Pitch detection tries to find theactual notes being played in a song and eliminates many of the harmonics that clutter a typicalspectrogram. See the Audio Settings topic for examples. Users can choose whetherspectrograms are calculated for their sequence using the Audio Information field of the NewMusical Sequence dialog. The Audio Information setting can be modified using the SequenceInformation dialog.
· A new Audio motion effect is now available, which reacts to the music as it is played. It has manyoptions, including an audio equalizer type display, as well as a color organ option. Open the new5.6.0 sample sequence in your Sequences\Samples folder to see it in action.
· A new "Icicle" prop shape adds support for both traditional and pixel-based icicle strings.· The Sequencer will now run as a 64-bit application on 64-bit versions of Windows. This means it
can use more memory if necessary, allowing you to create larger sequences, control more lights,and/or have more sequences loaded at one time. 32-bit versions of Windows are still supported.
· Some of our favorite motion effects are now included with the Sequencer. These are listed in thefavorites area of the Motion Effect Generator in a separate folder called "LOR Shared Favorites".Have some favorites that you think are awesome and want to share with the Light-O-Ramacommunity? Export them and attach the export file to a Help Desk ticket. We will review them forpossible inclusion in a future update.
· In Preview Design's Layout View, a new option can display grid lines for empty cells. This can helpwhen trying to identify the row and column numbers for a pixel in a custom shape.
· In the sequence grid, timing marks now stop at the last prop in the grid.· After right-clicking on an item name in the sequence grid, "Hide Item" has been renamed "Remove
Item from This Grid View" to better reflect what it does.· In the Beats, Tapper, and VU Wizards, the list of timing grids will now only show freeform grids. If
no timing grid is selected when you click "Apply", you will be asked if you want to create one.Previously, fixed timing grids were included in the list, but these could not accept the newlycreated timings.
· You can now select files with a JPEG file extension (note the "E" in the middle) for picture effectsor the preview background image. Previously, only JPG, PNG, and BMP extensions were allowed.
· The Sequence Information screen now includes the preview revision number. For musicalsequences, it also shows the audio sample rate.
SuperStar Improvements
· Added snap to beat marks if you click in the timing marks area. Also made it so effects getdisplayed to .01 seconds instead of truncating to .05 seconds.
· In the Layout dialog box, in the Pixel Extender section, added the ability to stretch / shrink in thex direction
· For the smooth effects, added ability to stretch / shrink in the x and y direction
Bug Fixes
· In the Sequencer, using the mouse wheel to scroll the sequence grid on a secondary monitor didnot work properly and could sometimes cause a crash.
· In the Sequencer, single channel props with a custom shape would not play back in some cases.· In the Sequencer, fixed a bug in the way motion effect rows were handled when importing a grid
configuration.· In the SpinFade motion effect with style set to "circles 3d", the edges of the circles are now
transparent and have smooth edges when used with alpha blending.· While changing colors or shape in the Prop Definition window, the channel list could go empty,
which resulted in the start channel being reset to unit 01, circuit 1.· In SuperStar, the markers for the start and end of a prop in the green grid were not working, this
has been fixed

What's New? 19
© 2021 Light-O-Rama, Inc.
· In SuperStar, when launched from the S5 Sequencer previews were being displayed tall andskinny. Made it so they are stretched horizontally by a factor of 1.45.
· In SuperStar's scale part of "move or scale selected effects" improved the scaling of smootheffects
What's New in Version 5.5.18
· Sequencer Improvements· Hub Improvements· Pixie 16 Support for Props Extended to All Ports· Bug Fixes
Sequencer Improvements
· Added Revision Number to the Preview Design screen as a read-only field. Previously, the programmaintained this value but it was not visible.
· Added "Export Selected Items" to the menu when you right-click on the design canvas in PreviewDesign.
· In the Map Preview To Sequence Dialog, you can now specify the number of motion effect rowsthat will be created for new pixel props.
· Added the Circles Nested shape to Prop Definition.· In Prop Definition, increased the maximum number of pixels per string on matrix, tree and fan
shapes from 1000 to 9999. https://forums.lightorama.com/topic/53836-32-by-64-horizontal-matrix/· In the Motion Effect Generator, shift-clicking on the Reset Effect Parameters icon now sets the
effect to None.· When starting a new musical sequence and the selected media file is outside of the Light-O-Rama
audio folder, you will now be asked if you want to copy that file into the Light-O-Rama audio folder.· If a crash is caused by the graphics system, the user will now get an error message asking them
to update their display drivers.· In the help file, there is a new Motion Effect Reference page which covers all of the controls for all
of the motion effects.
Hub Improvements
· Hub will now warn the user if they attempt to create an SD Card using the 'Simple' button and anysequence in the show contains Motion Effects. In this situation, the 'Advanced' button must beused to correctly create the SD card.
· MP3 directors require SD cards be formatted as FAT16 or FAT32. Hub will now warn the user ifthe card is not formatted properly and needs to be re-formatted.
Pixie 16 Support for Props Extended to All Ports
· Previously, a Pixie 16 could control up to 4 LOR props (like singing trees) on the first 8 ports of thecontroller. It can now control up to 8 props on any of the 16 ports. Firmware version 1.06 orhigher is required.
Bug Fixes
· In Preview Design, when creating the layout for a prop with a custom shape, the Crop functionwould stop at areas that had been deleted during the current edit.

Light-O-Rama v5.6.620
© 2021 Light-O-Rama, Inc.
· In the Sequencer, fixed a possible crash when copying a list of warning messages to the clipboard(e.g. warnings displayed after opening a sequence).
· In the Sequencer, fixed the check for newer versions, which was no longer working.· In the Sequencer, fixed a crash when defining a prop with a custom shape and the number of
columns exceeds 655.· In the Sequencer, fixed a possible crash when assigning a different preview to a sequence.· In the Sequencer, if you scrolled down the sequence grid and right-clicked on a prop/channel
name, the wrong menu would be displayed in some cases.· In the Sequencer, fixed a potential crash when creating a chase by prop.· In the Sequencer, fixed a potential crash when upgrading a legacy sequence· In the Sequencer, fixed a potential crash when displaying the Layout View for a preview group· When the Sequencer opens a Light-O-Rama Store sequence in LMS format, it now downloads the
latest store sequence preview before upgrading.· In the Sequencer, when the preview for a sequence changed and new pixel-based props were
added, motion rows were not created for the new props.· In the Sequencer, when copying a prop in Preview Design, the copies were spaced far apart in the
vertical direction.· In the current version of the Sequencer, the zoom level of the playback window is saved with
each grid view in the sequence file. In the new version, a change to the zoom level will now markthe sequence as modified (asterisk is displayed in front of the file name shown on the sequencetab), and you will get prompted to save the sequence when you close it. https://forums.lightorama.com/topic/53832-sequencer-saves-preview-zoom-for-each-grid-view/
· Added support for the xmodel "circle" shape when importing props. This allows the BoscoyoMesmerizer spinner to import successfully.
· Added support for the xmodel "sphere" shape when importing props. This allows the BoscoyoChromaStar 3D to import successfully.
· When applying MotionPaks in Hub, the program will now find older base sequences that use thenaming scheme <title>-RTG-<artist> or <title>-YCM-<artist>.
· In Hub a crash could occur if ID3 information attached to the MP3 was corrupted and 'Strip MP3Header'.option was in use (which is the default for Simple mode as well)..
· In Hub the option "Copy MP3 with header stripped" was being ignored - the MP3 was alwayshaving its header stripped.
· Previously in Hub, warnings generated by the S5 sequence engine were ignored when creating anSD card. Those warnings now prevent an SD card from being created and must be correctedbefore the sequence can be written.
· In SuperStar, if after a fresh installation of the S5 software the user attempted to launch SuperStarin stand-alone mode an then attempted to create a Quick Visualization, the program could crash.
· In some cases when SuperStar is launched from within the S5 Sequencer while in Morph Mode, aright click of the mouse did not properly define the 2A and 2B points.
· In SuperStar when using "Change Orientation" within the "Move or scale selected effects" dialogbox:
§ The initial values of width and height were reversed§ If the effect had a clip rectangle, the effect would no longer render.
What's New in Version 5.5.16
· Bug Fixes· New Pixie Firmware Version 1.06
Bug Fixes
What's New? 21
© 2021 Light-O-Rama, Inc.
· In the Sequencer, background images are now stored internally with a maximum width and heightof 2000 pixels, saving on memory and improving stability. The file used for the background imageis not changed.
· In the Sequencer, fixed a potential crash when opening Sequencer Preferences.· In the Sequencer, fixed a potential crash when saving a screen image from Preview Design or the
Wiring View. You capture a screen image by clicking this icon: · In the Sequencer, when assigning a different preview to a sequence, if a prop was archived as a
result of the change, the prop's unique identifier in the original preview was mistakenly changed(affecting any other sequence associated with the original preview). Prop identifiers are used bythe program internally, but are not visible to the user.
· Fixed a potential hang when the Show Player plays a song with parentheses in the file name.· In the Hardware Utility, under some circumstances a firmware update or parameter update of a
controller can cause it to hang/crash.· In the Show Editor, allow protected sequences to be selected for triggered shows.· In the Show Editor, the default tab is now the 'Musical' tab.· In LOR Hub, creating a simple PC show with 11 or more sequences could lead to corruption of the
list of sequences to be run.
New Pixie Firmware Version 1.06
· Firmware 1.06 has been released for Pixie controllers to support the upcoming PixieLink product.
What's New in Version 5.5.14
· Sequencer Improvements· Bug Fixes
Sequencer Improvements
· In Preview Design, you can now undo the setting or clearing of the background image.
Bug Fixes
· In the Hardware Utility, loading of stand-alone sequences onto a controller has been fixed. Thisfeature was broken starting in version 5.5.8.
· In the Sequencer, background images might not display during playback after editing the previewin Preview Design, or after upgrading a legacy sequence using a preview that has a backgroundimage.
· Changing a preview's background image while upgrading a legacy sequence now works.
What's New in Version 5.5.12
· Support for PixieLink Products· Bug Fixes
Support for PixieLink Products
· The Hardware Utility can now update firmware at higher speeds. The higher speed will initially onlybe supported on the forthcoming PixieLink product.
Light-O-Rama v5.6.622
© 2021 Light-O-Rama, Inc.
· New firmware for Pixie 2/4/8/16 with performance enhancements required to support PixieLinkhigh-speed products.
· Initial firmware for PixieLink V1.02
Bug Fixes
· In the Show Editor, Protected LOR S5 sequences (.lorprot) were not being shown when "S5Sequences" was used while adding files.
· In some cases, a preview with a large background image that also had Save Image With Previewchecked would not load into Preview Design.
· In Preview Design, attempting to import online props when the computer (or web site) was offlinecould result in a crash.
· If Windows 'Controlled Folder Access' (also known as Ransomware Protection) was enabled, theSequencer would close without displaying an error message to the user.
· Existing motion effect rows will no longer be automatically removed on groups with Arrangementset to none. Motion effects on such groups cannot control lights, so the user will now receive awarning when opening a sequence where such groups exist.
· In the Sequencer, the performance of Paste Special with Repeat Horizontally set to "All the way tothe end of the sequence" has been much improved.
· In the Sequencer, you once again get a warning when you press one of the play buttons, andControl Lights is enabled, and there are channel conflicts in the preview. This check has failed towork properly since version 5.5.0.
· In the Hardware Utility, moving the main window on some high resolution monitors could cause theform size to grow.
What's New in Version 5.5.10
· Bug Fixes
Bug Fixes
· In the Sequencer, after finishing an edit to a motion effect or SuperStar effect, the program couldcrash.
· In the Sequencer, sequence windows were allowed to dock at the edges of the main window.· In Preview Design, when editing a prop's custom or advanced layout with auto-number enabled,
clicking on the row or column header of the grid would result in an error.· In the Sequencer, audio was played back at 0 volume if the playback window hadn't been opened.· In the Sequencer, a crash could occur if the sequence tab was closed while intensity data is being
calculated.· In SuperStar, the ability to use ctrl+left or right click to set/clear all pixels in a scene or in image
mode has been removed and replaced with ctl+mousedrag in image or text mode.· In SuperStar, added support for foreign characters in the song name and path and in the sequence
name and path. (when launched from the S5 Sequencer)
What's New in Version 5.5.8
· Sequencer Improvements· Bug Fixes
Sequencer Improvements
What's New? 23
© 2021 Light-O-Rama, Inc.
· When exporting as protected, you will now be prompted for a supplemental text message. When auser opens the protected sequence in the Sequencer, they will see the extra text that wasspecified during the export.
· Added a new menu option in Preview Design to delete groups with no members.· Floating windows now have a maximize button. This enables you to quickly maximize the
playback window (or other floating windows) on a second monitor.· When opening a sequence purchased from the Light-O-Rama Store (LMS file), the Sequencer now
offers to upgrade the sequence using the official preview for Light-O-Rama Store sequences,bypassing the upgrade screen.
· The error message "The following items have motion effects that cannot be played because theyare on an LOR network that is not enhanced." has been enhanced to include the LOR network thatis causing the issue.
· When creating a custom subsection in Add/Modify Motion Effect Rows, you can now flip thecustom subsection horizontally or vertically.
· After creating a custom subsection in Add/Modify Motion Effect Rows for a prop with a customshape and then subsequently changing the custom layout, it is possible to end up with nodes inthe custom subsection that are no longer on a pixel. Use the new "Delete marks not on a pixel"menu item to clean up such nodes.
Bug Fixes
· In Preview Design, when defining a preview group, clicking on the radio button for the "H Stack VFill" arrangement did not update the group size shown on the screen.
· Fixed crash when copying a prop or group in Preview Design and one or more entries in the "NewNames" list is blank.
· Fixed crash when attempting to delete props when no props were selected in the ChannelConflicts & Bulk Changes tab in Preview Design.
· Fixed potential crash when closing a sequence tab and intensity data calculations were inprogress.
· In the Sequencer, the user is now allowed to cancel out of deleting a loop level in an animationsequence.
· In Preview Design's Online Import screen, pressing the Refresh or Cancel buttons while the onlinecontent was still being downloaded would result in a crash.
· In the Motion Effect Generator, you could not save your first motion effect favorite. There was noissue if you already had one or more favorites already saved.
· When using the Motion Effect Generator with no sequences open, you could select groups with anarrangement of none. Motion effects on such groups are not allowed.
· When importing an S4 Visualizer file into a preview, RGB channels that left one or more channelsundefined now import correctly.
· In SuperStar when using the "Move or Scale Selected Effects" window, the state was notinitialized properly.
· In SuperStar when using the Scene, Morph, or Text dialog boxes, and incorrect error messagewas produced that said to use a value between 0-255. That should have been 0-100.
· When scrolling large images across a matrix In SuperStar, the program could crash.
What's New in Version 5.5.6
· Sequencer Improvements· Bug Fixes
Light-O-Rama v5.6.624
© 2021 Light-O-Rama, Inc.
Sequencer Improvements
· After enabling channel level sequencing on pixel-based props, the prop's RGB channels arelabeled with the row and column number (e.g. "r01 c01"). In order to help identify the pixelassociated with that row and column:· Row and column labels were added to the Layout View in Preview Design.· When viewing node labels on pixel props in Preview Design, you can now format the labels as
pixel numbers or row/column notation.
· On the screen that is displayed when opening a sequence and the preview has changed (the MapPreview to Sequence Dialog):· Added the preview name and its revision· Renamed the "revert" button to make it clearer what it does.· There is a new button that adds the preview stored in the sequence file as a new preview.
· The Timing Grid Import screen now allows for the import of freeform timing grids directly fromanother S5 sequence without having to export the timings first.
Bug Fixes
· In the Sequencer, fixed fire effect on props that are 1 pixel wide or 1 pixel high. This used to work,but was broken starting with version 5.4.0.
· In the Sequencer, fixed possible crash when sorting the sequence grid by physical channel.· In the Sequencer, fixed possible crash when double-clicking on a channel effect.· When changing the selected effect in the Motion Effect Generator, the controls for the new effect's
parameters (e.g. sliders) were occasionally not displayed.· In the Sequencer, fixed occasional internal error when using the Pinwheel effect with "inner and
outer" color mode.· In the Sequencer, fixed possible crash when editing the channel grid in Prop Definition.· In the Sequencer, fixed possible crash when editing Text and TextPE motion effects.· The Sequencer was not returning to the last selected grid view when a sequence was re-opened.
http://forums.lightorama.com/topic/52683-554-always-opens-sequnce-with-show-all-items-view/· In the Sequencer, DMX intensity effects were lost when upgrading a legacy sequence. This bug
was introduced in version 5.5.0. http://forums.lightorama.com/topic/52685-lost-dmx-values-from-s4-sequence-to-s5/
· In the Sequencer, when entering the spacing for a new fixed timing grid, more than 2 digits wereallowed after the decimal point, even though those digits were ignored.
· In the Sequencer, subsequences were not working correctly, and adding a new subsequencecould cause a crash.
· In the Sequencer, when defining the motion effect rows for a prop or group, deleting a row's namecould cause a crash.
What's New in Version 5.5.4
· Sequencer Improvements· Bug Fixes
Sequencer Improvements
What's New? 25
© 2021 Light-O-Rama, Inc.
· The Sequencer starts up in less time due to faster initialization of the Motion Effect Generator.Improvement will vary from 2 to 6 seconds depending on the speed of your computer - slowercomputers will see a bigger improvement.
· The Playback Window zoom and scroll bar settings are now saved with the current grid view. Sonow if you have a grid view that deals with just a portion of your display, you can zoom into it, andthat zoom setting will be restored every time you switch back to that grid view.
· Added support for node ranges specified via "face information" in Preview Design's xmodel fileimport. These node ranges become motion row defaults. Previously only node ranges specified asa sub-model were supported.
· The setting at Sequence > Smooth To Fades Level no longer applies to DMX Intensity channeleffects. The level will always be "none" for DMX Intensity effects. This ensures that if you enter aspecific DMX intensity value on a channel, it will always be that value.
Bug Fixes
· In the Sequencer, if you clicked on a cell and then immediately clicked a shortcut key, the 2actions could interact. An example is clicking on a cell then pressing the spacebar key to startplayback - playback could unexpectedly stop. http://forums.lightorama.com/topic/52567-552-glitching-with-startstop-sequence-motion-effects/
· In the Sequencer, fixed an internal error when creating a new musical or animation sequence witha license level less than Pro.
· In the Sequencer, fixed possible crash when displaying the audio waveform.· In the Sequencer, fixed possible crash when importing multiple online props at one time in Preview
Design.· In the Sequencer, fixed possible crash when updating a preview while the associated sequence is
open.· In the Sequencer, fixed possible crash when copying text to the clipboard from a pop-up message
box using Ctrl-C.· In the Sequencer, added check to see if Windows Media Player is installed, and give a specific
error message if it is missing.· In the Sequencer, fixed possible crash when displaying item names on the left side of the
sequence grid.· In the Sequencer, fixed crash if you closed a sequence tab before the audio file finished loading.· In the Sequencer, fixed crash if the toolbar options were set to Create > Motion Effect and the user
quickly pressed the Enter key multiple times.· In the Network Preferences program, some PixCon16 firmware versions could incorrectly indicate
that the LOR software was too old and needed to be updated when configuring a board.
What's New in Version 5.5.2
· Bug Fixes
Bug Fixes
· After upgrading a legacy sequence using an existing preview, you could receive the error"Parameter is not valid", or the program could crash when you try to edit the preview.
· The Sequencer could crash when editing a SuperStar effect.· When a sequence was played at 1/2 or 3/4 speed, all effects appeared as shimmer effects in the
playback window even though the actual effect commands in the Sequencer remained unchanged.Normal and 2x speed were fine. http://forums.lightorama.com/topic/52529-550-bug-shimmer-effects-at-12-and-34-speed/
Light-O-Rama v5.6.626
© 2021 Light-O-Rama, Inc.
· When a sequence with a fixed timing grid was displayed on a computer using a display driver fromAMD (e.g. Radeon graphics), the vertical lines of the timing grid might be displayed with multiplecolors. http://forums.lightorama.com/topic/52529-550-bug-shimmer-effects-at-12-and-34-speed/
· When creating a prop with a Custom shape and using copy/paste, the program could crash if theclipboard was in use by another application.
· Added option to the the Timing Grid menu that enables or disables the highlighting of timing marksthat fall on the second. http://forums.lightorama.com/topic/52547-1-second-timing-lines/
· Bug fix: When importing a channel configuration, the "Enable Channel Level on Pixel Prop" settingwas not being applied correctly. Going forward, the channel configuration export will also includethe "Hide group members" and Motion Rows Overlay/Blend settings for each item.http://forums.lightorama.com/topic/52543-crosshatched-rows-in-new-musical-sequence-in-55/
· In Preview Design, using the Copy function on a group would result in a crash. In addition, theorientation of group members was not preserved in the copy.
· Hub is now Large Address Aware which should help with creating SD cards with large sequences· Hub will now note if a sequence is protected or not not when creating an SD card. This should
help with duplicate sequences being displayed (one protected, one not).
What's New in Version 5.5.0
· Easier PixCon16 Configuration· Support for PixCon16 MKII Firmware up to and including V2.0.25· SuperStar Changes· Comm Listener Change· Sequencer Improvements· Bug Fixes
Easier PixCon16 Configuration
· In the Network Preferences program, you must now select a Network Adapter Card to use whenconfiguring PixCon16 controllers. This should make loading the configuration for a board easier asyou no longer have to properly configure routing tables/metrics in Windows on computers with 2 ormore Network Interface Cards (NICs)
Support for PixCon16 MKII Firmware up to and including V2.0.25
· For LOR PixCon16 MKII boards, the software now supports firmware versions up to and includingV2.0.25. Please note that upgrading firmware on PixCon boards is not as easy as on other LORcontrollers. Unless you are having an issue that is fixed with new firmware, please do not attemptto update your board. New Firmwares for the PixCon16 are available from support, but only afterconsulting with them about an issue.
SuperStar Changes
· New Select Effects in Clip Rectangle feature· Fixed a bug in the "Move or Scale Selected Effects" dialog box. The initial state was not always
being initialized properly.· Fixed a bug. If superstar launched from Sequencer and click on "New" button superstar crashed.
Fixed it so the "New" button is grayed out when launched from S5 Sequencer.· Fixed a bug in the Scene, Morph, and Text dialog boxes. If you typed a large value such as 500 for
a color value then it would give an error saying "enter a value between 0-255." Fixed it so it alwayssays "enter a value between 0-100"
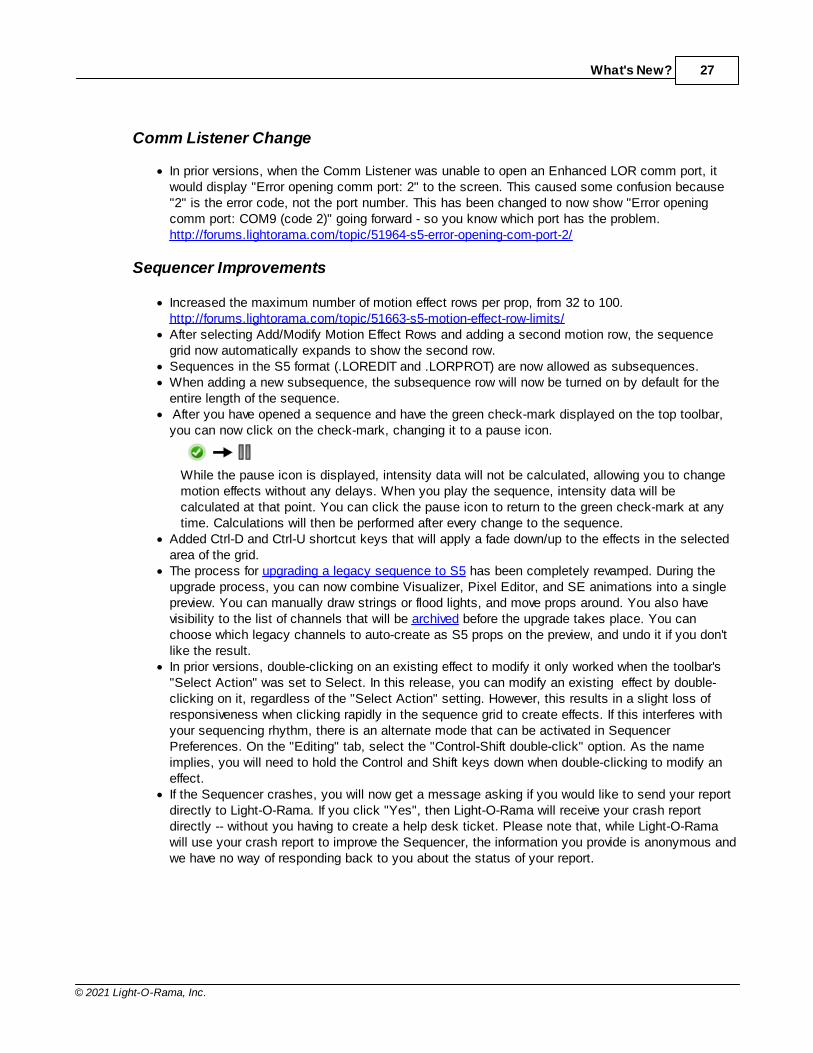
What's New? 27
© 2021 Light-O-Rama, Inc.
Comm Listener Change
· In prior versions, when the Comm Listener was unable to open an Enhanced LOR comm port, itwould display "Error opening comm port: 2" to the screen. This caused some confusion because"2" is the error code, not the port number. This has been changed to now show "Error openingcomm port: COM9 (code 2)" going forward - so you know which port has the problem.http://forums.lightorama.com/topic/51964-s5-error-opening-com-port-2/
Sequencer Improvements
· Increased the maximum number of motion effect rows per prop, from 32 to 100.http://forums.lightorama.com/topic/51663-s5-motion-effect-row-limits/
· After selecting Add/Modify Motion Effect Rows and adding a second motion row, the sequencegrid now automatically expands to show the second row.
· Sequences in the S5 format (.LOREDIT and .LORPROT) are now allowed as subsequences.· When adding a new subsequence, the subsequence row will now be turned on by default for the
entire length of the sequence.· After you have opened a sequence and have the green check-mark displayed on the top toolbar,
you can now click on the check-mark, changing it to a pause icon.
While the pause icon is displayed, intensity data will not be calculated, allowing you to changemotion effects without any delays. When you play the sequence, intensity data will becalculated at that point. You can click the pause icon to return to the green check-mark at anytime. Calculations will then be performed after every change to the sequence.
· Added Ctrl-D and Ctrl-U shortcut keys that will apply a fade down/up to the effects in the selectedarea of the grid.
· The process for upgrading a legacy sequence to S5 has been completely revamped. During theupgrade process, you can now combine Visualizer, Pixel Editor, and SE animations into a singlepreview. You can manually draw strings or flood lights, and move props around. You also havevisibility to the list of channels that will be archived before the upgrade takes place. You canchoose which legacy channels to auto-create as S5 props on the preview, and undo it if you don'tlike the result.
· In prior versions, double-clicking on an existing effect to modify it only worked when the toolbar's"Select Action" was set to Select. In this release, you can modify an existing effect by double-clicking on it, regardless of the "Select Action" setting. However, this results in a slight loss ofresponsiveness when clicking rapidly in the sequence grid to create effects. If this interferes withyour sequencing rhythm, there is an alternate mode that can be activated in SequencerPreferences. On the "Editing" tab, select the "Control-Shift double-click" option. As the nameimplies, you will need to hold the Control and Shift keys down when double-clicking to modify aneffect.
· If the Sequencer crashes, you will now get a message asking if you would like to send your reportdirectly to Light-O-Rama. If you click "Yes", then Light-O-Rama will receive your crash reportdirectly -- without you having to create a help desk ticket. Please note that, while Light-O-Ramawill use your crash report to improve the Sequencer, the information you provide is anonymous andwe have no way of responding back to you about the status of your report.
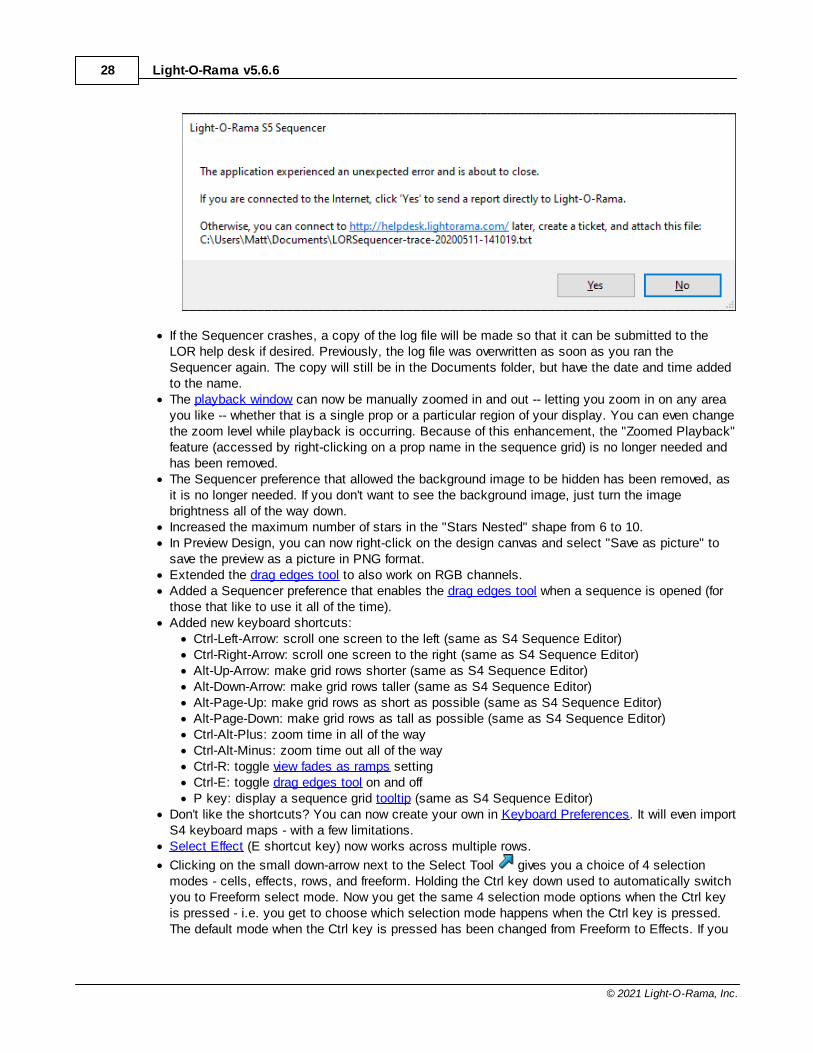
Light-O-Rama v5.6.628
© 2021 Light-O-Rama, Inc.
· If the Sequencer crashes, a copy of the log file will be made so that it can be submitted to theLOR help desk if desired. Previously, the log file was overwritten as soon as you ran theSequencer again. The copy will still be in the Documents folder, but have the date and time addedto the name.
· The playback window can now be manually zoomed in and out -- letting you zoom in on any areayou like -- whether that is a single prop or a particular region of your display. You can even changethe zoom level while playback is occurring. Because of this enhancement, the "Zoomed Playback"feature (accessed by right-clicking on a prop name in the sequence grid) is no longer needed andhas been removed.
· The Sequencer preference that allowed the background image to be hidden has been removed, asit is no longer needed. If you don't want to see the background image, just turn the imagebrightness all of the way down.
· Increased the maximum number of stars in the "Stars Nested" shape from 6 to 10.· In Preview Design, you can now right-click on the design canvas and select "Save as picture" to
save the preview as a picture in PNG format.· Extended the drag edges tool to also work on RGB channels. · Added a Sequencer preference that enables the drag edges tool when a sequence is opened (for
those that like to use it all of the time).· Added new keyboard shortcuts:
· Ctrl-Left-Arrow: scroll one screen to the left (same as S4 Sequence Editor)· Ctrl-Right-Arrow: scroll one screen to the right (same as S4 Sequence Editor)· Alt-Up-Arrow: make grid rows shorter (same as S4 Sequence Editor)· Alt-Down-Arrow: make grid rows taller (same as S4 Sequence Editor)· Alt-Page-Up: make grid rows as short as possible (same as S4 Sequence Editor)· Alt-Page-Down: make grid rows as tall as possible (same as S4 Sequence Editor)· Ctrl-Alt-Plus: zoom time in all of the way· Ctrl-Alt-Minus: zoom time out all of the way· Ctrl-R: toggle view fades as ramps setting· Ctrl-E: toggle drag edges tool on and off· P key: display a sequence grid tooltip (same as S4 Sequence Editor)
· Don't like the shortcuts? You can now create your own in Keyboard Preferences. It will even importS4 keyboard maps - with a few limitations.
· Select Effect (E shortcut key) now works across multiple rows.
· Clicking on the small down-arrow next to the Select Tool gives you a choice of 4 selectionmodes - cells, effects, rows, and freeform. Holding the Ctrl key down used to automatically switchyou to Freeform select mode. Now you get the same 4 selection mode options when the Ctrl keyis pressed - i.e. you get to choose which selection mode happens when the Ctrl key is pressed.The default mode when the Ctrl key is pressed has been changed from Freeform to Effects. If you
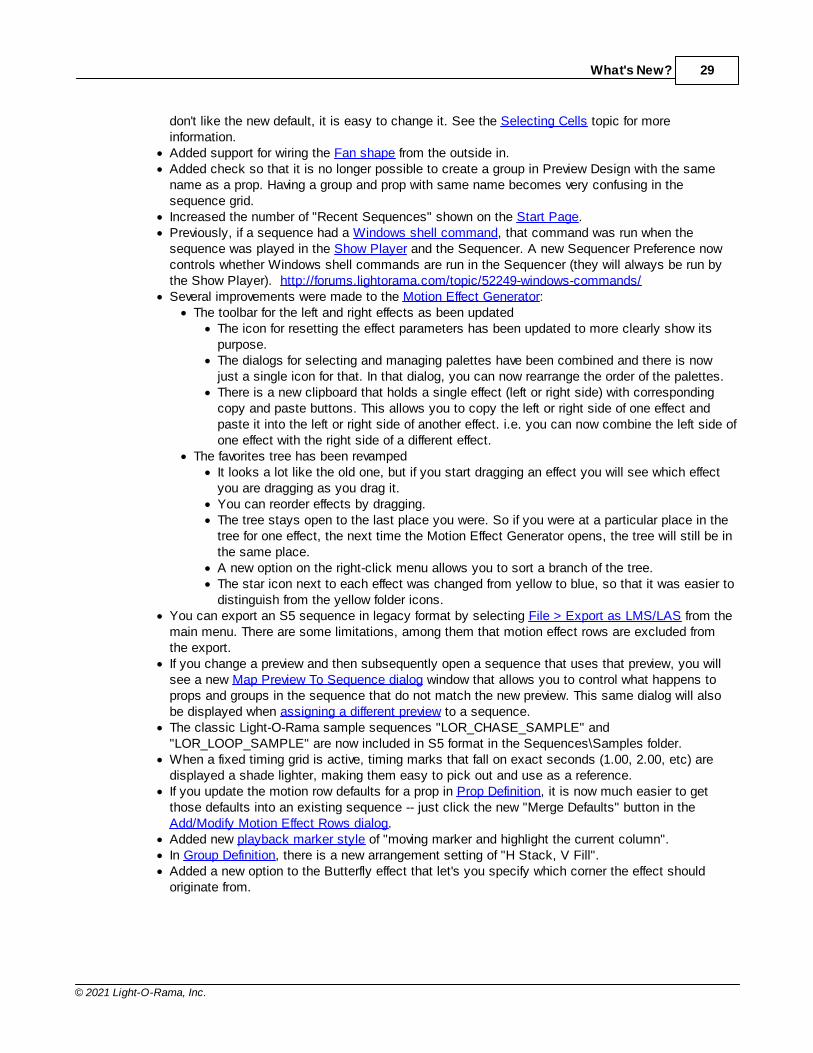
What's New? 29
© 2021 Light-O-Rama, Inc.
don't like the new default, it is easy to change it. See the Selecting Cells topic for moreinformation.
· Added support for wiring the Fan shape from the outside in.· Added check so that it is no longer possible to create a group in Preview Design with the same
name as a prop. Having a group and prop with same name becomes very confusing in thesequence grid.
· Increased the number of "Recent Sequences" shown on the Start Page.· Previously, if a sequence had a Windows shell command, that command was run when the
sequence was played in the Show Player and the Sequencer. A new Sequencer Preference nowcontrols whether Windows shell commands are run in the Sequencer (they will always be run bythe Show Player). http://forums.lightorama.com/topic/52249-windows-commands/
· Several improvements were made to the Motion Effect Generator:· The toolbar for the left and right effects as been updated
· The icon for resetting the effect parameters has been updated to more clearly show itspurpose.
· The dialogs for selecting and managing palettes have been combined and there is nowjust a single icon for that. In that dialog, you can now rearrange the order of the palettes.
· There is a new clipboard that holds a single effect (left or right side) with correspondingcopy and paste buttons. This allows you to copy the left or right side of one effect andpaste it into the left or right side of another effect. i.e. you can now combine the left side ofone effect with the right side of a different effect.
· The favorites tree has been revamped· It looks a lot like the old one, but if you start dragging an effect you will see which effect
you are dragging as you drag it. · You can reorder effects by dragging.· The tree stays open to the last place you were. So if you were at a particular place in the
tree for one effect, the next time the Motion Effect Generator opens, the tree will still be inthe same place.
· A new option on the right-click menu allows you to sort a branch of the tree.· The star icon next to each effect was changed from yellow to blue, so that it was easier to
distinguish from the yellow folder icons.· You can export an S5 sequence in legacy format by selecting File > Export as LMS/LAS from the
main menu. There are some limitations, among them that motion effect rows are excluded fromthe export.
· If you change a preview and then subsequently open a sequence that uses that preview, you willsee a new Map Preview To Sequence dialog window that allows you to control what happens toprops and groups in the sequence that do not match the new preview. This same dialog will alsobe displayed when assigning a different preview to a sequence.
· The classic Light-O-Rama sample sequences "LOR_CHASE_SAMPLE" and"LOR_LOOP_SAMPLE" are now included in S5 format in the Sequences\Samples folder.
· When a fixed timing grid is active, timing marks that fall on exact seconds (1.00, 2.00, etc) aredisplayed a shade lighter, making them easy to pick out and use as a reference.
· If you update the motion row defaults for a prop in Prop Definition, it is now much easier to getthose defaults into an existing sequence -- just click the new "Merge Defaults" button in theAdd/Modify Motion Effect Rows dialog.
· Added new playback marker style of "moving marker and highlight the current column".· In Group Definition, there is a new arrangement setting of "H Stack, V Fill".· Added a new option to the Butterfly effect that let's you specify which corner the effect should
originate from.
Light-O-Rama v5.6.630
© 2021 Light-O-Rama, Inc.
Bug Fixes
· In the Sequencer, when creating a new sequence and using the Quick Preview feature, the list ofpreviews shown in the Previews window did not update.
· In the Sequencer, if you selected an entire motion effect row that contained existing effects, thenselected "Insert Motion Effect" from the right click menu, then the new effect would overwrite thefirst effect in the selection instead of filling up the entire selection.http://forums.lightorama.com/topic/51676-s5-motion-effect-editing-issue-video-request/
· In the Sequencer, if you selected an entire motion effect row that contained existing effects, thenselected "Prompt For New Effect > Modify Existing Effects" from the right click menu, then thenew effect would only only modify the first effect in the selection instead of all selected effects.http://forums.lightorama.com/topic/51676-s5-motion-effect-editing-issue-video-request/
· In the Sequencer, if you deleted a subsequence, it was not reflected in sequence playback untilyou closed the main sequence and re-opened it.
· In the Sequencer, if a sequence was open in the Sequencer, and an LOR network was changedfrom not-enhanced to enhanced (or vice versa) in Network Preferences, then the open sequencewould no longer control lights correctly on the affected networks -- until the sequence was closedand reloaded. Now the Sequencer will update open sequences automatically without having toclose and reload them.
· In the Sequencer, in certain cases, double clicking on a motion effect would result in the MotionEffect Generator opening a second time, after the first edit was completed.
What's New? 31
© 2021 Light-O-Rama, Inc.
· In the Sequencer, Preview Design did not maintain the aspect ratio of a background image if "Saveimage with preview" was checked. http://forums.lightorama.com/topic/51890-possible-bug-in-s5-preview-version-542/
· In the Sequencer, if you had a prop which was a standard AC channel with one color and definedas "channel per color", then added the prop into a group, added a motion effect row, and added amotion effect with multiple colors, then when you played back the motion effect it turned that propon and off as expected. For example, a red prop will turn on when the color red (or another colorwhich features red in it) plays in the motion effect. However, if you changed the prop definition to"multicolor" and left everything else the same (still one color selected for the prop), the motioneffect would turn on the prop all the time at a lower intensity and it would not work as expected.
· In Preview Design, the xmodel import of custom models would sometimes fail because of incorrectdata in the file. The import process has been improved such that it now ignores some of thatincorrect data and imports the file anyway. Also, if the import fails in the new release, you shouldget a more specific message indicating the cause of the error.
· In the Sequencer, effect and row selection modes did not work when using right-click selection.· In the Sequencer, when opening the Motion Effect Generator for an effect with custom transitions,
the wrong transition could be displayed.· In the Sequencer, after double-clicking on a motion effect to edit it, playback in the Motion Effect
Generator would not start at the beginning of the effect.· In the Sequencer, modifying small intensity values in the red, green, or blue sub-channels of an
RGB channel could result in a crash.· In the Sequencer's Add/Modify Motion Effect Rows dialog, when clicking the down arrow icon, you
could not move a row to the very bottom (only second to the bottom).· When clicking on a color swatch in the Motion Effect Generator, the Color Transition dialog would
sometimes be positioned on top of the color swatch. When that happened, a double-click on thecolor swatch could result in an inadvertent click on a button in the Color Transition dialog. Now theColor Transition dialog will be placed above or below the color swatch.
· In the Sequencer's Prop Definition window, when switching a prop from another shape to theMatrix-Horizontal-Quad or Matrix-Vertical-Quad shapes, the program would display an error.
· With a Basic Plus license, the Sequencer's VU wizard would operate as a demo feature (shouldbe fully supported).
· After making changes to effects on a beat channel and then playing the sequence, the colorsamples displayed to the right of a beat channel name during playback would not reflect the latestchanges.
· The Sequencer would hang during start-up for a few users with high-end NVidia graphics cardsdriving multiple monitors. Changes have been made to address this problem, but testing hasyielded mixed results. If you experience this problem, please contact the help desk.
· In a traditional prop with a custom shape, changing the layout of the custom shape could causethe effects for that prop to be erased.
· The Curtain motion effect would sometimes render incorrectly when the curtain edge was set totop, middle, or bottom, and the movement was set to open-then-close or close-then-open.
· For many Sequencer users, when you clicked on one of the playback buttons music would startalmost immediately, but there was a 200-300 millisecond delay until the first update on theplayback window. http://forums.lightorama.com/topic/52349-dwell-at-the-beginning-of-songs/
· "Sort by Color" is no longer listed as an option when you right-click on an RGB channel in thesequence grid. Sort by Color is intended for props with traditional lights.
· When importing a Visualizer file into a preview, any fixture names with curly brackets { } wouldcause the import to fail.
· When creating SD cards in Hub, it was possible to use the same LOR network on 2 ports, butwith different protocols. This could cause some shows to fail to run.
What's New in Version 5.4.2
Light-O-Rama v5.6.632
© 2021 Light-O-Rama, Inc.
· Installation· Sequencer Motion Effects Changes and Additions· Sequencer Improvements· Bug Fixes
Installation
· Bug fix: due to a problem during installation, when the user enabled a show they might get an errorstating ”Shows cannot be enabled because of an error. ActiveX component can’t createobject/LORMonitor". Also, LORHub may crash when trying to create an SD card.
Sequencer Motion Effects Changes and Additions
· Added an option for the Text motion effect to display smooth (anti-aliased) text.· Restored the ability to left, center, or right justify text in the Text motion effect. This setting only
applies when there is more than one line of text.
Sequencer Improvements
· A light bulb icon is now displayed in the lower right corner of the Sequencer -- on the status bar. Itwill be dark when control lights is off, and bright yellow when control lights is on. This way the usercan know the light control status without having to open the Control Lights panel.
Bug Fixes
· In the Sequencer, the new Motion Effect Row "overlay" combination mode did not work on propsubsections. http://forums.lightorama.com/topic/51605-xmodel/
· When running the demo version of the Sequencer and then registering, the Control Lights panel didnot update. The Control Lights check box was still disabled and the message "Controlling lightsrequires a license" was still shown.
· After any Paste operation in the Sequencer, all of the cells that were pasted into should beselected. However, after a Paste Special with the Flip Vertical option enabled, the paste wouldwork correctly but the wrong selection would be shown.
What's New in Version 5.4.0
· New Installation Executable· Sequencer Motion Effects Changes and Additions· Sequencer Improvements· SuperStar Improvements· Bug Fixes
New Installation Executable
· The Light-O-Rama installer process and installer executable have been updated:· This should eliminate some installer errors such as files not being cleaned from the LOR
Programs directory when installing new versions.· The installer size has been reduced by approximately 20 meg.· Previously the DirectX installer was always called regardless if a machine needed DirectX 9
installed or not. Now only machines that need to have DirectX will execute the install.
What's New? 33
© 2021 Light-O-Rama, Inc.
· Additional files are now electronically signed by LOR to ensure their authenticity. This willallow Windows to prompt the user to obtain necessary permissions.
· The installer will now place a shortcut on the users desktop to start the LOR Control Panel. At the end of the install, you will be asked if you want to start the control panel. Thisshould help new users get started using the software.
· The installer will not run on older Windows machines. You must have Windows 7 or neweras per the requirements of the software. Previously the software could be installed, butsome programs would not work.
· When starting the Control Panel for the first time, users will be shown a new screen thatbriefly describes how to use the control panel and software. Again, this is an effort to helpnew users get started.
· Note: Should you have any issue with the new installer process, first uninstall any LOR programs,then run the LOR Registry Wipe and then re-install. This should fix most installer issues. Pleasecontact the help desk if needed.
Sequencer Motion Effects Changes and Additions
· New motion effects added: Spinner, Spin Fade, Archimedes Spiral, and PictureXY. Spinner, SpinFade, and Archimedes Spiral should work especially well on pixel-based stars, spinners, wheels,and snowflakes that use a Custom shape. PictureXY is a simplified picture effect that gives youdirect control over image size and placement.
· Pinwheel: the rendering quality has been improved and a new color mode has been added(multicolor arms).
· Picture: added a "Numbered Sequence" check-box. Prior to this version, image sequences weredetected automatically. Now they are indicated by checking the new box. If you have an existingsequence that uses numbered image files for an animation, your sequence will no longer work asoriginally intended until you reopen the sequence and update the applicable Picture effects.
· Color Wash: added dither and gradient options. Also, a small change was made to the "fade left toright" and "fade right to left" options, as they did not produce symmetrical results The sameapplies to the "fade top to bottom" and "fade bottom to top" options. This was only apparent onvery small props.
· Fire: fire can now emanate from any or all sides. It was also fixed so that it now works with the"Alpha Blend" mixer mode.
· When setting colors in the Motion Effect Generator, "transparent" is now an option. This is usefulin the "Alpha Blend" mixer mode and when motion rows are combined using the new "overlay"mode (see below).
Sequencer Improvements
· In the Add/Modify Motion Rows dialog, you can now specify how the rows are merged togetherduring rendering:
· Blend: the maximum brightness for each pixel is taken from the effects across all rows --backward compatible with prior versions, including the S4 Pixel Editor.
· Overlay: rows are overlaid one on top of the other using alpha blending (i.e. effects can haveareas that are transparent). The first row listed in the dialog is used as the background,then successive rows are layered on top of it. Note that you can use the dialog to changethe order of the rows, thus changing the order in which rows get overlaid.
· In the Paste Special dialog: · you now have options to flip the pasted data horizontally and/or vertically· you can now override the Paste Mode shown on the toolbar from within the dialog· the maximum number of times a clipboard can be repeated horizontally or vertically was
increased from 100 to 10,000
Light-O-Rama v5.6.634
© 2021 Light-O-Rama, Inc.
· repeating vertically to the end of the sequence is fixed· When selecting a playback range by dragging across the timeline, the Playback Window will now
display the preview at the time indicated by the cursor's location (sometimes referred to asscrubbing).
· Added the ability to embed files for the Picture Effect inside the sequence file. This makes iteasier to move sequences from one computer to another because you don't have to also transferthe associated picture files. Use the new menu item Sequence > Manage Picture Effects.
· The Skew Selection and Skew Entire Sequence dialogs now remember the last settings that wereused.
· Added the ability to import xLights model files (.xmodel) into Preview Design. This capability islimited to custom models.
· In Preview Design, bulb transparency can now be applied to any bulb shape.
SuperStar Improvements
· SuperStar now supports audio files with a sampling rate of 48,000 as well as the standard 44,100sampling rate.
Bug Fixes
· In the Sequencer, when adding new SuperStar effects to a group, the effects did not rendercorrectly.
· Closing a sequence before the initial calculations had finished (wait icon was still spinning) couldcause the Sequencer to crash.
· In the Sequencer, after importing an LPEPROP file into Preview Design, the Channel Conflicts tabwas not updated.
· In the Sequencer, removing channel level from a pixel-based prop did not cause the playback onthe screen to be recalculated.
· In the Sequencer, when selecting props for a new grid view, clicking a check-box did not highlightthe prop name; so if you subsequently used the up or down arrow keys to navigate the list, thewrong item was selected.
· In the Sequencer, after stopping playback in an animation sequence, the ribbon's Waveform buttonwould get enabled.
· In the Sequencer's Motion Effect Generator, the drop-down to select an effect would sometimespause before opening.
· In the Sequencer, when the "RGB Split" Sequencer preference was enabled, pasting into acollapsed group of RGB channels would produce the wrong result.
· In the Sequencer, when the "RGB Split" Sequencer preference was disabled, pasting from alegacy clipboard file (one created with S4 or earlier) into RGB channels would produce the wrongresult.
· When the Sequencer window was minimized and you used Windows File Explorer to open asequence that was already open, the pop-up message stating that the sequence was alreadyopen could get stuck behind another window, requiring that the Sequencer be force-closed.
· In the Sequencer, starting to play a sequence while control lights was enabled could result in amessage window being displayed that was larger than the screen (if there were props with motioneffects that used LOR networks that were not enhanced).
· The Copy function in Preview Design will no longer create props beyond the limits of the designcanvas. Also, you can now Undo the results of a Copy.
What's New in Version 5.3.14
What's New? 35
© 2021 Light-O-Rama, Inc.
· Sequencer Improvements· New N4g4MP3 (4 Port, Generation 4 MP3 Director) Firmware, V 6.7· New CTB32LN (LOR1600g3/LOR1602g3) and CTP16PCg3 Controller Firmware, V1.17/V1.10· Bug Fixes
Sequencer Improvements
· The status bar now shows the current selection mode: cells, effects, rows, or freeform.
New N4G4MP3 (4 Port, Generation 4 MP3 Director) Firmware V 6.7
· When starting a new show, there can be a slight delay of up to 2 seconds before the firstsequence starts to play. During this time, heartbeat messages were not sent to controllersallowing them to possibly loose synchronization. If the controllers lost sync, approximately thefirst second of the first sequence could be lost while the controller re-synchronized with the MP3director.
New CTB32LN (LOR1600g3/LOR1602g3) and CTB16PCg3 Controller Firmware,V1.17/V1.10
· When running in Enhanced mode, which does not support LOR Advanced commands like Twinkleand Shimmer, the controller could unexpectedly place channels into Shimmer or Twinkle mode. For LOR160xg3 controllers this is fixed in Firmware 1.17. For CTB16PCg3 controllers this is fixedin firmware V1.10. Only G3 controllers support enhanced mode, so other controllers do not needto be updated.
Bug Fixes
· When creating a Simple PC show in Hub, the time entry form incorrectly allowed for typing in astart or end time. This could lead to incorrect start/end times being displayed and scheduledshows not starting/ending properly.
· When creating an SD card show in Hub for G3 or later MP3 directors that had 2 or more ports withfirmware 5.36 or below, the files created did not have the correct extension.
· In the Hardware Utility it was still possible to configure and change both DIO boards and X-10settings. Support for both was removed for S5. The contents of these tabs has been removed,and the tabs themselves will be removed with a later release.
· On the Sequencer's Prop Definition screen, pasting invalid data into the Unit ID or Circuit fieldscould result in a weird error message or a crash.
· In the Sequencer, added a preview check to ensure only groups with arrangement of 'none' cancontain members that are groups with an arrangement of 'none'.http://forums.lightorama.com/topic/51061-arithmetic-overflow/
· The Sequence Compressor tool now handles shows that contain S5 sequences (LOREDIT files).You can also select an LOREDIT file when compressing a single sequence. This can be used toprepare an entire show for playback before its scheduled start time.
· In the Sequencer, the program could hang when inserting a SuperStar effect on top of an existingMotion Effect.
· In the Sequencer, inserting SuperStar effects on motion rows that use only some of the pixels of aprop or group (i.e. a subsection) was not working correctly.
· When playing a sequence in a show, performance was improved for channel effects on DMXnetworks. For sequences with many channel effects on DMX networks, you will want to regeneratethe playback files. Use the Sequence Compressor with the "Force Compression" option enabledto do this.
Light-O-Rama v5.6.636
© 2021 Light-O-Rama, Inc.
What's New in Version 5.3.12
· Sequencer Improvements· Bug Fixes
Sequencer Improvements
· In the Motion Effect Generator, there is a new button that allows the user to reset all of an effect'sparameters back to their default values.
· Users now get a warning if they are about to overwrite existing SuperStar effects with a newSuperStar effect.
· Users now get a warning if they try to insert a SuperStar effect that is less than 1 second long.
Bug Fixes
· When creating an SD card in Hub, you could not select S5 files for filler or starter sequences. Anoption on the open dialog has now been added.
· When creating an SD card in Hub, if any time (scheduled start or end) started with '12', the timecould be incorrectly set in the SD card configuration file. The show would not then start/stop atthe correct time.
· When creating an SD card in Hub, if you were using an S5 Filler, Hub would correctly call theconversion of the file to S4 but then would validate the 'start' sequence file name. If a start file didnot exist, Hub could then crash.
· When creating an SD card in Hub, while creating a new show on an new SD card show, if aSHOW01.CFG file existed on the SD card AND that configuration didn't actually contain anysequences, Hub would still attempt to use it even though it was not valid. Later on, Hub wouldattempt to use the bad configuration and in some instances crash.
· When creating an SD card in Hub, the program was not checking to see if any error was returnedfrom the S5 Sequencer pre-process. If an error was returned, and depending on what the erroractually was, subsequent calls to the Sequencer from Hub could be made to functions that werenot initialized and hub could crash.
· In the Sequencer, users with a demo license for SuperStar could not save effects to a motioneffect row in the Sequencer.
· In the Sequencer's Prop Definition screen, added validation when entering a start circuit/channel toprevent a crash.
· When running the Sequencer for the first time after a fresh install, the user would get thiserroneous message ‘The master list of previews, palettes or motion effect favorites has beenchanged by an external program. Restart to load the updates.’
· In the Sequencer's VU Wizard, moving the threshold slider is now more responsive· Motion effects that respond to the music (musical note icon next to the slider) worked correctly in
the Sequencer, but not in the Show Player or when written to an SD card.· In SuperStar, the name of images could revert back to "image xx" after doing "manipulate
images".· In SuperStar, a degree symbol in the image name would cause the sequencer to fail to save the
file.· In SuperStar, increased allowed DMX size from 100 to 200.· In SuperStar, added the ability to add or subtract from color values in an image by pressing the '+'
or '-' key while clicking on image pixels· In SuperStar, when servicing a SuperStar Request, if we fail to load the data file then display a
"failed to read file" error.
What's New? 37
© 2021 Light-O-Rama, Inc.
What's New in Version 5.3.10
· Bug Fixes
Bug Fixes
· On some Windows Systems, usually but not limited to Windows 7, the LOR Show Player wouldcrash upon trying to start a show. When it crashed, the LOR Control Panel would attempt torecover and restart the Show Player. This would cause the Show Player to loop on thesemachines and not actually play a show.
· In the Sequencer brightness adjustment on the Playback window was disabled when thebackground image was embedded with the preview.
· In the Sequencer the title bar of the playback window showed "Playback stopped" during playbackafter a sequence loops and continues to play back.
· In the Sequencer new sequences lose motion effect rows with "custom" subsections that weredefined in the preview. Custom subsections appear often on props loaded using the Boscoyoimport. http://forums.lightorama.com/topic/49712-motion-effect-rows-disappear-536
What's New in Version 5.3.8
· Sequencer Improvements· SuperStar Improvements· Generation 4 MP3 Director Firmware Updates (N1 & N4)· Bug Fixes
Sequencer Improvements
· In Preview Group Definition, there is a new arrangement setting of "custom". When set, 2additional columns (TOP and LEFT) will appear in the group definition grid. This allows you tospecify where each prop is placed in the effects buffer for the group. This is especially useful forSuperStar users with complex layouts. http://forums.lightorama.com/topic/47742-matrix/
· New Chase option: Same Row Type. If selected, the chase will only occur on rows of the sametype as the first row. For example, if the first row is a regular channel, any RGB channels ormotion effect rows will be skipped. If there is no check mark next to this option, then the chasewill proceed through all selected rows, regardless of type. Requested by Drew Hickman.
· Changed the way SuperStar effects are stored in the Sequencer in order to handle largerSuperStar sequences, like those created using Instant Sequencing.
SUPERSTAR EFFECTS STORED USING THIS VERSION OF THE SEQUENCER CANNOT BELOADED INTO PREVIOUS VERSIONS OF THE SEQUENCER.
SuperStar Improvements
· Added a "Change Orientation" section to the Move or Scale Selected Effects dialog. It changes asequence from vertical to horizontal or horizontal to vertical.
· Added the "Prorated" button to the "Manipulate Selected Images" dialog box. Rotation Angle,Brightness, Move, and Scale can be applied the same to all images, or can be "prorated" acrossthe selected images.
Light-O-Rama v5.6.638
© 2021 Light-O-Rama, Inc.
· Added "Clip Rectangle" as an option in "Move or Scale Selected Effects." Previously if you movedor scaled effects it did not move or scale the clip rectangle. Now, if "Clip Rectangle" is selected"Move", "Scale", and "Change Orientation" change the clip rectangle as well.
· In the "Image Setup" dialog box "Rotation" has been added as an option for an Image Action.Rotation can be 0, 90, 180, or 270.
Generation 4 MP3 Director Firmware Updates (N1 & N4)
· The firmware for the N1uMP3g4 MP3 Director (One Network, Black Plastic Case, Generation 4)has been updated to resolve an issue which caused the director to sometimes lock up on boot, aswell as an update to fix issues with trigger inputs.
· The firmware for the N4MP3g4 MP3 Director (Four Network, Linkable, Metal Case, Generation 4)has been updated to resolve an issue which caused the director to sometimes lock up on boot.
Bug Fixes
· In the Sequencer, when assigning a different preview to a sequence and there were preview groupsthat share the same name in the old and new previews, the new groups would not render effectsuntil the sequence was closed and then re-opened. Reported by Drew Hickman.
· In the Sequencer, when changing among the bulb and various line shapes of a prop in the PropDefinition screen, the points that define the shape are now preserved.
· In the Sequencer, when changing the shape of a prop in the Prop Definition screen, parametervalues will no longer revert to their default values when the parameter for the prior shape and thenew shape have the exact same meaning.
· In the Sequencer, when upgrading a legacy sequence to S5, RGB channels would not importunless the "Split RGB" Sequencer preference was enabled. Now they will import correctlyregardless of the preference setting.
· In the Sequencer, if a secondary monitor has been unplugged since the time the Sequencer waslast run, any floating windows on the secondary monitor will now be re-positioned onto one of theremaining monitors. Reported by user TitusCarnathan. http://forums.lightorama.com/topic/49700-tc-73-playback-windows-disappears/
· In the Sequencer, when a prop used the Tree 360 Up & Over shape with pixels and a startinglocation that specified a clock-wise wiring order, the pixels were offset by 180 degrees in the effectbuffer. Reported by Drew Hickman.
· In the Sequencer, when adding an LOR device in Preview Design, if you entered a name and thenchanged the device, the name you entered would get overwritten. Reported by user ndutton.http://forums.lightorama.com/topic/49762-automation-bugs-in-prop-generation/
· In the Sequencer, sorting the current grid view was including the prefix character. Now the prefixcharacter is ignored so everything sorts in alphabetical order.
· In the Sequencer, trailing spaces in prop names are now ignored when the Sequencer decideswhether to archive a prop or not.
· In the Sequencer, when you open a protected LMS file and then save it (not "save as" but "save")the file name shown on the tab goes away. Reported by Drew Hickman.
· In Superstar, fixed a bug where the Clip Rectangle was not being drawn when in Image mode. Thisbug was introduced in the previous release when drawing in image mode was optimized.
· In Superstar, fixed a bug where a large grid with 100 ribbons or more would not create a sceneusing ribbon 100
· In Superstar, fixed an issue where creating a 7 tier, 360 degree of traditional lights could cause acrash.
· In LORHub when creating SD cards, an incorrect (old) version of an S5 .LID (enhanced file) couldbe detected and incorrectly used.
· In LORHub when creating SD cards using some sequences, the MP3 file attached to thesequence was not copied to the SD card
What's New? 39
© 2021 Light-O-Rama, Inc.
· In LORHub when creating SD cards that used a trigger, the 'Normally Closed' switch option wasnot working.
What's New in Version 5.3.6
· Sequencer Improvements· SuperStar Improvements· Bug Fixes
Sequencer Improvements
· A new Sequencer Preference on the Channel Effects tab controls whether an RGB channel isdisplayed with its red / green / blue sub-channels or not. Turning this option off can save memory,allowing larger sequences to be loaded. Requested by user dougd.http://forums.lightorama.com/topic/49460-reverted-back-to-524
· You can now specify a "default paste mode" on the Startup Tab of Sequencer Preferences. TheDefault Paste Mode will be shown whenever a sequence is opened. Requested by user Userdgrant. http://forums.lightorama.com/topic/49611-editor-preferences/
· On Preview Design's Channel Conflicts & Bulk Changes tab, you can now use the "Set LORNetwork" and "Set DMX Universe" to change props from LOR to DMX or vice versa. Changes werealso made to the "Select All" check box on this tab to make it more intuitive.
· On Preview Design's Design tab, you can now choose to save the background image with thepreview (see the Background tab). If you export such a preview and send the export file(LORPREV extension) to someone else, the background image will be included. The backgroundimage will also be included if you send a sequence to another user and the sequence uses such apreview.
SuperStar Improvements
· Added "rotation angle" to the "Manipulate Selected Images" dialog box.o If one image is selected then it sets the rotation angle of that image
o If more than one image is selected, the angles get applied proportionally to each image. For
example, if you selected 4 images and apply 33 degrees, then 0, 11, 22, and 33 degreesget applied to the 4 selected images.
Bug Fixes
· When nothing was set in Network Preferences, it was possible for the Sequencer to initialize withthe Control Lights box checked and no obvious way to turn it off. Going forward, when nothing isset in Network Preferences the Control Lights button will be unchecked, and a message willremind the user "Network Preferences must be set before you can control lights". Reported byDrew Hickman.
· In the Sequencer, when you created a prop with the custom shape using version 5.3.4 and earlier,the autonumber function had a maximum value of 16,000 and would crash when it tried to insert16,001 in the custom grid. Going forward, the maximum value has been increased to 999,999 andthe program will not crash if you exceed that number. Reported by Jeff Banbor via the help desk.
· The Sequencer could crash when clicking on a motion effect in the grid or when opening theMotion Effect Generator. Reported by Jeff Banbor and others.
· In the Sequencer, in certain situations, clicking any of the play buttons on the Playback Windowwould result in a message of "Unable to Start Playback", whereas the play buttons above the
Light-O-Rama v5.6.640
© 2021 Light-O-Rama, Inc.
sequence grid would recalculate data and then start playing the sequence. Reported by userstevehoyt. http://forums.lightorama.com/topic/49605-unable-to-start-playback/
· In LOR Hub, when editing or creating a computer based simple show, the 'remove' button wouldnot remove a selected sequence properly.
· In LOR Show Editor, only legacy (.LAS, or .LMS) sequences could be selected for interactiveshows and cleanup sequences. This has been fixed to include S5 Sequencer (.loredit and .lorprot)files.
· In Superstar, if you switched to large grid and then did Instant Sequence the program would crash.· In Superstar, the progress dialog box was not updating.· In Superstar, enhanced the "Set group time range" button on the toolbar so that it proportionally
sets the start and end time of all selected effects. This is particularly useful if you have a bunch ofadjacent image actions and want to change the time range of the entire group.
What's New in Version 5.3.4
· Sequencer Enhancements· Bug Fixes
Sequencer Enhancements
· Added a text filter to the Online Prop Import dialog, so you can filter the listed props by theirdescription. Requested by Light-O-Rama.
· The timeline now uses a little less vertical space, and is displayed with a better font. Requestedby Light-O-Rama.
· Converted the "Timing" select action to a lock icon on the timing grid toolbar. This allows a user tocreate effects and adjust timing marks without having to go back and click on the toolbar.Requested by Drew Hickman.
· Added a new playback marker style: show moving marker and highlight timing marks. Selectablein the Playback tab of Sequencer Preferences. Requested by users at Christmas Expo 2019.
· The portion of the toolbar related to the timing grid can now be positioned on the left or right sideby right-clicking anywhere on the top toolbar and picking an option from the pop-up menu.Requested by users at Christmas Expo 2019.
· Clicking an effect "Type" button on the toolbar will automatically change the select action to"Create". Requested by users at Christmas Expo 2019.
Bug Fixes
· In the Sequencer, resizing the Effect Samples window when color favorites are displayed cancause the color samples to be redrawn incorrectly (stutter pattern). Reported by Light-O-Rama.
· In the Sequencer, with license levels of Advanced or below, the Color Favorites buttons at the topof the Effect Samples window do not wrap around if the window is too narrow to display them all.Reported by Light-O-Rama.
· In the Sequencer, disable the background brightness slider on the playback window when amotion effect is playing, or if the sequence's preview doesn't have a background image. Reportedby Light-O-Rama.
· In the Sequencer, tick marks on the timeline and timing marks on the sequence grid weremisaligned by 1 pixel in many cases. Reported by Light-O-Rama.
· In the Sequencer, subsequence names were not being displayed on the grid. Reported by users atChristmas Expo 2019.
· In the Sequencer, when creating color fade effects, the Slope setting is now taken into account.The "O" shortcut key simply selects the Color Fade effect type on the toolbar, it doesn't actually
What's New? 41
© 2021 Light-O-Rama, Inc.
create an effect. To create color fade effects with shortcut keys, use "A", "I", "D", and "U".Reported by users at Christmas Expo 2019.
· When playing a show or creating an SD card, fixed issue with playback file creation checking thepreview revision. As a fix, the preview revision number is now part of the playback file name.Reported by user default. http://forums.lightorama.com/topic/49511-bug-report-pm02-show-player-processes-all-files-and-updates-playback-files-every-time-it-restarts-even-if-the-base-files-have-not-changed/
· On a very limited number of computers, LOR Hub could refuse to open and/or crash with a runtimeerror 50003. This error was related to certain graphics used in the application, and those graphicshave been replaced. Many thanks to Monty C. for helping us track down this issue.
· When creating SD cards with LOR Hub using Sequencer '.loredit' files, Hub would refuse to createthe card with a generic 'There was a problem creating your SD Card' error. Hub was improved todisplay a more descriptive error, and the bug preventing the creation of the SD cards was fixed.
· When creating SD cards that use triggers and the 'Round Robin' style of play, an incorrectconfiguration was created on the SD card.
· In LOR Hub, when creating a simple PC show, S5 sequences were not sorted properly.· In Superstar, if you have two screens with the main screen in one monitor and the sequencing grid
in another monitor and the main screen is shorter in height than the grid screen, then the click anddrag drawing in image mode on the grid screen stops working when you go beyond the height ofthe main screen.
· In Superstar, scene elements with a Y coordinate beyond 128 were not working. · In Superstar, when adding images from a gif, it was not remembering the rotation angle.· In Superstar, "image" now works in group modify.· In Superstar, fixed it so you can use "large grid" in the "image setup" dialog box when superstar is
launched from the S5 Sequencer. Also allow setting the size of the "large grid".· In Superstar, optimized the "click and drag" drawing speed on the green sequencing grid so you
can more easily draw images on pixel grids with large numbers of pixels.· In Superstar, improved layout of green pixel grid so it fits onto the screen for large numbers of
pixels.· In Superstar, changed the terminology for the license level from things like "2_CCR" to
"100_pixels".
What's New in Version 5.3.2
· Bug Fixes
Bug Fixes
§ In LOR Hub, certain store web pages would generate Javascript errors. Instead of opening thesepages in Hub itself, now an external web browser is opened.
§ In the Sequencer, the user now has a choice of displaying the tool buttons along the right side ofthe grid, or immediately above it. User can right-click in the tool button area to access availabledisplay options. Reported by user PhilMassey and others.
§ In the Sequencer, a new select action of "Timing" has been added. It replaces the "Lock Timings"option that was present in a couple of menus in prior versions. The new Timing button is onlyenabled when a Freeform Timing Grid is selected. If the new Timing button is selected, then timingmarks are unlocked and right-clicking on the grid opens directly to the Timing Mark menu. For anyother Select Action, timing marks are locked, and right-clicking on the grid opens the contextmenu present in previous versions (Timing Mark is a sub-menu). Reported by user PhilMassey.http://forums.lightorama.com/topic/49037-thoughts-on-s5/
§ Sequencer bug fix: when chasing an RGB color, for example green, the chase becomes whitewhen the chase crosses from one grid view group to the next. Reported by user PhilMassey.
Light-O-Rama v5.6.642
© 2021 Light-O-Rama, Inc.
§ In the Sequencer, you can now right-click on the toolbar that includes the playback buttons to setthe maximum size of the buttons. Choices are: large, medium, and compact. Reported by DrewHickman.
§ When dragging effect edges in the Sequencer, if you drag the beginning of an effect to the rightpast the effect's end, the effect will now be deleted. Similarly, if you drag the end of an effect tothe left past the effect's beginning, the effect will be deleted. Reported by Drew Hickman.
§ In the Sequencer, when the motion effect source is set to "Samples", the Effect Samples windowwill be made visible if it is hidden. Reported by Light-O-Rama.
§ Sequencer bug fix: after modifying a preview, you might get the following error while opening asequence: "An entry with the same key already exists". Reported by NJ Malenke via the helpdesk.
What's New in Version 5.3.0
· Creating Shows/SD Cards/Controller Stand-Alone sequences with Native LOR Sequences· Support for N4G4 Linked Directors· New Firmware for N4G4 Directors· Upcoming changes to LOR Hardware Utility· Auto Sequencing of Singing Faces in Superstar· Sequencer Motion Effect Changes and Additions· Sequencer Improvements· Bug Fixes
Creating Shows/SD Cards/Controller Stand-Alone sequences with Native LORSequences
In previous versions of the software, you could not directly schedule, load to a controller (stand-alonemode), or create SD cards with native (IE .loredit) files. Instead, you first needed to create legacyfiles (IE .LMS or .LAS - sometimes referred to as 'playback files'), and then use those. The suitecan now instead take native .loredit files for all of these functions without the need for manuallycreating 'Playback' files, and use them directly.
LOR Hub, LOR Show Editor, and LOR Hardware (stand-alone loading only) can now accept nativeS5 files.
Support for G4 Linked Directors
With the newest generation of LOR MP3 directors (Generation 4), some directors have the ability tobe 'linked' together - allowing for a show with an almost unlimited number of networks or DMXuniverses to be run from these directors.
LOR Hub is required to create the SD card sets for linked directors, and you must use the AdvancedSD Card Wizard to create them. N4G4 Directors require at least firmware version 6.2 to use directorlink.
New Firmware for N4G4 directors
New firmware for N4G4 directors has been released to support Director Link mode.
Upcoming changes to LOR Hardware Utility
What's New? 43
© 2021 Light-O-Rama, Inc.
LOR Hub has now taken over all SD card creation tasks for MP3 directors. In the future, the SDcard creation process that is available in the LOR Hardware Utility will be removed. You should beusing LORHub for ALL SD card creation tasks.
Auto Sequencing of Singing Faces in SuperStar
A new feature has been added to auto-sequence singing faces in SuperStar..
Sequencer Motion Effects Changes and Additions
Added new parameter to the Meteor motion effect called "Speed Mode". Speed mode has 2 values:"pixel rate" uses the existing fall rate calculation; "scaled rate" will cause meteors to fall at a ratethat scales with the size of the prop. Requested by Light-O-Rama.
Added a new parameter to the Meteor motion effect called "Drop Mode", which adds new patterns tometeor drops (in addition to the existing random pattern). Requested by Light-O-Rama.
Added new option to fill corners on the Marquee motion effect. Requested by Steve Warner.
Added additional options to pre-scale an image in the picture effect: fit-to-width and fit-to-height --which maintain the image's aspect ratio. Also increased maximum horizontal and vertical scalevalues from 100% to 400% so images can be stretched if needed. Requested by Steve Warner.
Added movement options to the Picture and Text effects that are essentially the second half of thePeek-a-boo movement. The options are: reverse, exit_left, exit_right, exit_top, and exit_bottom.Reverse is the default and replicates the functionality of prior versions. Requested by Drew Hickmanand user Little_b.
Added ability to adjust red level, green level, and blue level independently in the picture Pictureeffect. Also added the ability to adjust transparency of the picture. Requested by Light-O-Rama.
Made picture and movie effect references stored in a sequence file relative to the sequence directory.This makes it easier to move the sequence to another computer, as long as the picture and moviefiles are stored in the sequence folder or in a sub-folder below it. Implemented in response to a helpdesk ticket.
Sequencer Improvements
You can now select S5 sequences (LOREDIT extension) when creating a show. They can also beselected when creating an SD card in LOR Hub. Playback files are now created and updatedautomatically behind the scenes. "Create Playback Files" has been removed from the SequencerFile menu, as it is no longer needed. Requested by Light-O-Rama.
The motion effect toolbar button has been combined with the motion effect selection window. Now,when the motion effect toolbar button is selected, the motion effect tool window will open; and whenanother toolbar button is selected, the window will close. This works in a similar manner to the ColorFade tool. Requested by Light-O-Rama.
Added the ability to drag the ends of channel and motion effects to adjust timing or create a fade.This feature is enabled or disabled by clicking on a new toolbar button next to the "nudge" tools.Requested by Light-O-Rama.
Light-O-Rama v5.6.644
© 2021 Light-O-Rama, Inc.
On the toolbar, the channel effect selection has been changed from a drop-down, to a series ofbuttons. A new "foreground" button allows you to change the intensity of existing effects. Requestedby Drew Hickman.
Changed the preview name on the toolbar from a drop-down menu, to a button. Now clicking on thepreview name takes you directly into Preview Design. Requested by Light-O-Rama.
The preview name is now displayed on the toolbar in a fixed width box, so that toolbar button locationwon't vary based on the length of the preview name. If the preview name is longer than the box, youcan hover your cursor over it and a tootip will the full name of the preview will be displayed.Requested by Drew Hickman.
Moved audio wizard items on the main menu from the Sequence menu to the Tools menu (to bemore consistent with the S4 Sequence Editor). Menu items have also moved one level up, so theytake one less click to access. The audio wizards can also be accessed from various context (right-click) menus -- and those remain unchanged. Requested by Drew Hickman.
Converted the right-click menu of the playback window (play, stop, and background imagebrightness) to a toolbar, to make it more user-friendly. Requested by Light-O-Rama.
Increased the number of tiers on a "Tree 360 Panels" shape from 12 to 25, and added a pixel offsetparameter for each tier. Panels with traditional lights are now supported. Requested by DrewHickman.
"Tree 360 Wedges" using traditional strings (megatrees) will now display their channels in thecorrect order when a sequence is first created. Requested by Drew Hickman.
Megatrees and segmented arches with traditional strings will now avoid the r/c nomenclature in theirnames and instead use "string" or "bundle". Requested by Light-O-Rama.
In File References, allow the user to change a file name, not just a directory. Requested by Light-O-Rama.
In prior versions, space-bar playback moved the selection when stopping, but clicking the stopbutton on the toolbar did not. Now, clicking the stop button during playback will also move theselection (like the S4 Sequence Editor). You can prevent the selection from moving by shift-clickingon the stop button. Requested by Drew Hickman.
Changed "Unit #" to "Unit ID" in Prop Definition dialog to be consistent with controller documentation.Requested by Light-O-Rama.
On the "Channel Conflicts & Bulk Changes" tab in Preview Design, renamed the "Renumber Strings"menu item to "Reorder Circuit/Channel Numbers". The new name better reflects the function.Requested by Light-O-Rama.
On the "Channel Conflicts & Bulk Changes" tab in Preview Design, added the "Add Leading Zeros ToNumbered Prop Names" menu item. Any selected props that have a number in their name will haveleading zeros added to the number. This can aid in sorting the props in the desired order on thesequence grid. Requested by Light-O-Rama.
On the "Channel Conflicts & Bulk Changes" tab in Preview Design, added the "Replace Text In PropNames" menu item. This function gives you the ability to search for and replace text in prop names,just like you would in a word processor. Requested by Light-O-Rama.
What's New? 45
© 2021 Light-O-Rama, Inc.
Added ability to sort the current grid view. Sort option is on the grid view menu. Requested by DrewHickman.
Added ability to sort channels by physical channel settings. Requested by Drew Hickman.
When opening the motion effect generator with more than one motion effect row selected, you willnow get an error message. Also, when editing a motion effect in a sequence, you can no longerchange the prop/group drop-down. Requested by Drew Hickman.
When the toolbar tool is set to Motion Effect or SuperStar, the cursor is now sensitive to the type ofrow it is over and will only display the pencil cursor when over a motion effect row. Requested byDrew Hickman.
Improved the display of Motion Effect thumbnails for the built-in effects. Requested by Light-O-Rama.
The SuperStar toolbar button now has an option to always apply the effect to the entire row.Requested by Light-O-Rama.
The "Add/Modify Motion Effect Rows" dialog is now resizable, along with other tweaks. Requestedby Light-O-Rama.
Importing Boscoyo props will now create Motion Row Defaults where they exist in the Boscoyo data(e.g. Chroma Bulbs). Requested by Light-O-Rama.
Added ability to create and edit custom motion effect subsections (subsections no longer have to berectangular). Requested by Light-O-Rama.
Made it easier to start dragging timing marks on the grid -- the mouse pointer no longer needs to bedirectly over the timing mark, it can now be within a few pixels of it. Requested by Light-O-Rama.
The motion effect and SuperStar buttons on the toolbar are now disabled when the current grid viewdoes not contain any motion rows. Requested by Drew Hickman.
If have a Pro license: after changing the preview assigned to a sequence, if there are pixel-basedprops without a motion effect row, you will be asked whether you want to add a motion effect row toeach of those props. Requested by Light-O-Rama.
The sequence file name on the tab header had an asterisk suffix when there were unsaved changesin the sequence. However, being at the end, the asterisk wasn't always visible. So the asteriskindicating unsaved changes has been moved to the front of the file name. Requested by Light-O-Rama.
When selecting a region of the grid using the mouse and you reach the grid's edge, the screen willstart automatically scrolling. Now the scroll speed will increase the further outside the grid boundaryyou get (like SE). Requested by user dgrant.http://forums.lightorama.com/topic/49296-s5-suggestions/
Bug Fixes
For LOR Sequencer:The pencil cursor now scales with Windows scaling. Reported at Expo 2018.
Light-O-Rama v5.6.646
© 2021 Light-O-Rama, Inc.
After selecting "Add/Modify Motion Effect Rows" and then changing the size of a row's subsection,then clicking OK to close the dialog, the preview did not recalculate and display effects using thenew subsection size. Reported by Light-O-Rama.
"Add/Modify Motion Effect Rows" and "Delete Motion Effect Row" (and a few other entries on theItem List's right click menu) are now disabled while calculations are running, as this could causedata corruption. Reported by Light-O-Rama.
Animated GIF images used in a Picture motion effect may flicker. Reported by user default.http://forums.lightorama.com/topic/49129-ver-524-problem-with-picture-motion-effect-animated-gifs/
Text in the title of the Playback window was changing appropriately when the window was docked tothe main form, but not when it was undocked/floating. Reported by Light-O-Rama.
When the Playback window was undocked/floating and had focus, the space bar would not startsequence playback. Reported by Drew Hickman.
When double-clicking on a cell in a motion effect row, then cancelling out of the Motion EffectGenerator, the playback window no longer displays a motion effect. Reported by Light-O-Rama.
When upgrading a sequence and using the Sequence Editor animation for the preview, for any RGBchannels in the sequence that were not in the animation, S5 created an RGB channel prop as wellas props for each of its red, green, and blue components. Now it correctly creates a single prop inthis situation. Reported by Light-O-Rama.
When creating a new preview group, sub-props (props where the "Uses the same channels as" fieldis set) were allowed to be members of the group. Reported by Drew Hickman.
If a sequence had beat channels or loop rows, it was possible for the yellow box indicating theselected area to be incorrectly drawn and overlap between fixed rows at the top and the main part ofthe grid. Reported by Light-O-Rama.
In the Motion Effect Generator, you can now mute and un-mute during the middle of effect playback.
Clipboard files (.LCB file extension) created in S4 (or earlier versions) that contain RGB channel datanow paste correctly into S5 RGB channels. Reported by Stephen Chapman via the help desk.
What's New in Version 5.2.4
§ LOR Hub now supports all SD card options§ LOR Hub can now turn off SD card schedule days if desired§ Improvements in LOR Hub for creating SD cards with PC configuration§ Simple Show Builder is being removed with the next release§ Superstar Improvements§ Sequencer Improvements§ Sequencer Bug Fixes§ Bug Fixes
LOR Hub now supports all SD card options
What's New? 47
© 2021 Light-O-Rama, Inc.
The LOR Hub program can now create SD cards with a full range of options, including triggers, fillersequences, starter sequences, etc. In a future release, SD card building will be removed from theHardware Utility and the Simple Show Builder will be removed from the suite.
LOR Hub can now turn off SD card schedule days if desired
Previously there was no way to stop an SD card show from running on a particular day, except byusing a workaround of setting the start and end times for a particular day the same. LOR Hub cannow properly turn OFF a schedule for a particular day.
Improvements in LOR Hub for creating SD cards with PC configuration
When creating an SD card in Advanced mode in Hub, a new option has been added to configure theMP3 Director's ports the same way as those ports are defined on the computer. This can help withease of setup of MP3 directors.
Simple Show Builder is being removed with the next release
LOR Hub has taken over all functions of the old Simple Show Builder program. In the next releasethis program will be removed from the suite. Instead, use LOR Hub to create your shows.
Superstar Improvements
· Added support for group modify of "average time length of effects" and "skip inactive grid squares"· Added the "Do Scene Thinning" option in the "Move or Scale Selected Effects" dialog box· Added "Orientation" setting in the Preferences dialog box· Added support to convert 6 channel star effects to white effects on RGB stars from other vendors
(previously it only worked for the standard 200 pixel RGB star)
Sequencer Improvements
All 3 windows on the Motion Effect Generator now update simultaneously, which is also aperformance improvement. Previously they could update slightly out of sync for very large props.Requested by Light-O-Rama.
If the user selects Create Playback Files from the menu and the sequence hasn't been saved, theuser is now offered a chance to save it (without having to cancel, save the sequence, then try andcreate playback files again). Requested by user ndutton.http://forums.lightorama.com/topic/48065-reduce-the-clicks/
Enhancement: when opening a sequence, archived props will automatically be un-archived if a propwith the same name has been added back to the sequence's preview since the sequence was lastopened. Same logic will also apply when you change the preview assigned to a sequence.Requested by Light-O-Rama.
Enhancement: more accurate conversion when assigning a different preview to an existing sequence.Requested by Light-O-Rama.
Performance improvements to the Picture motion effect. Requested by user jamills706.http://forums.lightorama.com/topic/48263-spinning-orange-circle-forever/
Light-O-Rama v5.6.648
© 2021 Light-O-Rama, Inc.
In the New Animation Sequence dialog, show the sequence length as words, and give a warningwhen OK is clicked and the length is more than an hour. Requested by user Rabeiler.http://forums.lightorama.com/topic/48288-animation-sequence-will-not-preview/
In the sequence grid, the drop-down list of grid views would previously display views in the order theywere created. Now, the system grid view (Show All Items) is listed first, and then user-created gridviews are listed in alphabetical order. Requested by user Jade Rymkos.http://forums.lightorama.com/topic/48687-is-there-a-way-to-reorder-grid-views/
Increased the maximum number of bulbs in a bulb shape to 999. Requested by users dibblejr andgsmith37064.http://forums.lightorama.com/topic/48682-moving-s4-to-s5/
In the Paste Special dialog, you can now specify the spacing between horizontal copies. A negativevalue yields an overlap, a positive value leaves a blank space between each copy. 0 is always thedefault value (it is not remembered between uses). Requested by user spascall.
Added new "hold" effect, which freezes the state of the prior effect. For example, you can freeze andunfreeze a spiral effect to the beat of the music by alternating spiral and hold effects on the samemotion effect row. The hold effect must be touching the prior effect to work. Requested by Light-O-Rama.
In Prop Definition, added "Arm Thickness" parameter to the Star shape. A value of 1.0 is the normalthickness. Smaller values make the arms thinner. Requested by Light-O-Rama.
New tab on Sequencer Preferences that allows the user to choose among 3 edit cursors. Previously,only the yellow pencil was available. Requested by user bdwillie.http://forums.lightorama.com/topic/48787-sequencer-pencil-pointer/
"Custom Chase" options are now available on the toolbar via a new drop-down arrow next to thechase button. The chase options will also get saved with the sequence, and recalled the next timethe sequence is opened. Requested by Jack Richter via help desk.
Add the "+" shortcut key for the Repeat function (to match SE). Requested by Light-O-Rama.
Added the Enter shortcut key to place an effect in the grid (to match SE). Requested by Light-O-Rama.
Added option in preferences (Channel Effects tab) to view fades as ramps. Requested by multipleusers.
Added option in preferences (Channel Effects tab) to adjust background color of channel rows in thegrid. Requested at Christmas Expo.
In Prop Defintion's layout tool for custom and advanced shapes, there is a new "Crop" function thatremoves extra rows and columns. Requested by Light-O-Rama.
Added Help buttons ("?" icon) to Preview Design, Prop Definition, Group Definition, and Custom Gridscreens. Requested by Light-O-Rama.
Increased the max width and height on the SimpleShape effect to 1000% in order to allow shapes toexpand beyond the prop boundaries. Requested by user Mike Baldwin.
What's New? 49
© 2021 Light-O-Rama, Inc.
Sequencer Bug Fixes
Bug fix: in the sequence grid, right-clicking on a "member props" or "member groups" node andselecting "Hide Group Members" from the pop-up menu disabled further highlighting of prop namesas the mouse pointer was moved. Reported by John Johnson Jr via help desk.
Bug fix: in rare cases the Sequencer could crash if 1) the LOR Control Panel was running when theSequencer started, and 2) a Schedule was enabled or Show on Demand was running, and 3) theoption to Control Lights when the Sequencer started was enabled. Reported by Jim Wright via helpdesk.
Bug fix: S5 Verifier checked for application files that don't exist in S5, which resulted in "MessageNumber 7" errors that were not really errors. Reported by stevehoyt, TitusCarnathan, richmuller andothers.http://forums.lightorama.com/topic/47959-tc-72-verifier-losing-its-mind/http://forums.lightorama.com/topic/47777-52-verifier-errors/
Bug fix: when using music to control a slider in the Motion Effect Generator, the audio data wasbeing pulled from the wrong part of the sequence. The effect used the correct audio data whenplaced in the sequence grid -- the error was only when the effect was displayed in the Motion EffectGenerator. Reported by Light-O-Rama.
Bug fix: when you imported an S5 prop file in Preview Design, clicked the "Set Channels" button,then changed the name of the prop while setting channels, the resulting list of props and groups tolthe left of the design canvas would no longer be in alphabetical order. Reported by user ndutton.http://forums.lightorama.com/topic/48041-preview-design-bugs-and-suggestions/
Bug fix: if a sequence gets moved to another folder or to another computer and the media file is inthe same folder as the sequence, then playback files created from the new location could point tothe wrong folder for the media file. Reported by user ndutton.http://forums.lightorama.com/topic/48059-missing-files-bugs-and-suggestions/
Bug fix: when the sequence length was changed, the sequence was not marked as containingunsaved changes. Reported by Light-O-Rama.
Bug fix: in rare cases, effects could exist in sequences past the end of the sequence. When usingplayback files for such sequences, the Show Player would refuse to play the song with the message"ERROR STARTING SEQUENCE (Invalid end centisecond for last replacement event: 78195;channel is 55210 centiseconds)". Reported by NJ Malenke and stevehoyt.
Bug fix: if Holiday Lights Designer was enabled in S4 and then the user upgraded to S5, the ShowPlayer would display errors in the log like "ERROR PLAYING SEQUENCE (Address in use Trace:UDP SetIntensity Trace: HandleIO)". Reported by Derek Flint via help desk.
Bug fix: certain combinations of removing and renaming props in a preview could leave a sequenceunable to be opened (error message "An entry with the same key already exists"). Reported byMichelle Lovering via help desk.
Fix crash when Windows policy "System cryptography: Use FIPS compliant algorithms forencryption, hashing, and signing" is enabled. Reported by Dave Webb via help deskhttps://support.microsoft.com/en-us/help/811833/system-cryptography-use-fips-compliant-algorithms-for-encryption-hashi
Light-O-Rama v5.6.650
© 2021 Light-O-Rama, Inc.
The LOR SC485 serial port adapter (not USB) now works with the S5 Sequencer. Reported byseveral users via the help desk.
Fixed the online import of "Boscoyo ChromaStar 36 3 ring". Reported by Mike Baldwin via helpdesk.
Bug fix: in the Motion Effect Generator, double-clicking on a slider did not fully unlock it. Reported byLight-O-Rama.
Bug fix: in the Motion Effect Generator, effects with alpha transparency were not displayed correctlyin the left and right windows. The combined window was correct. Reported by Light-O-Rama.
Bug fix: if the user right-clicked on a cell in the sequence grid, and then right-clicked on another cellin a different row, several cells in the clicked column would be selected. Reported by Light-O-Rama.
Bug fix: when doing Repeat, then Undo, then Redo, the Redo was done in the wrong place. Reportedby Light-O-Rama.
Fixed a bug with clipboard files, where files created as part of the "Papagayo to LOR" process couldnot be pasted. Reported by Dennis Holliday via the help desk.
Bug fix: in the Control Lights window, unchecking a box for an enhanced LOR network or for DMX,did not actually stop output from going to those networks. Reported by Light-O-Rama.
Other Bug Fixes
· In LOR Hub and Hardware Utility, sequences with DMX Fades when written to the SD card couldcause the MP3 director to go out of sync.
· LOR Hub was not able to properly create an SD Card schedule. The schedule would always revertback to the defaults instead of what the user specified.
· LOR Hub would crash if the user attempted to create an SD card show with no sequences in thecreate list.
· During installation, the Post Install process was not creating 3 new superstar visualizationsamples.
· In Superstar, text masks were not working in visualizations where some of the mask is outside ofthe matrix.
· In Superstar, fixed a bug where the white color control was not appearing if the only white thatexisted was in images.
· In Superstar, changed it so you can do "merge intensity data files" even in the demo version· In Superstar, fixed a bug where scene pixels were getting clipped out if the clip region was on the
right half of the wrap around screen
What's New in Version 5.2.2
· Updates to the Sequencer· Superstar 'Add +' button· Bug Fixes
Updates to the Sequencer
What's New? 51
© 2021 Light-O-Rama, Inc.
A "Where Used" function has been added to the File References dialog, so you can find the effectthat uses a missing reference. Requested by Michael Lenbom via help desk.
In the Prop Definition screen, when defining a "Tree 360 Up & Over" shape using pixels, the shapediagram will now indicate the location of the first pixel on each string. Requested by Light-O-Rama.
The user now has control over how "smooth to fades" is applied with a new sub-menu: Sequence >Smooth To Fade Level. This setting controls whether adjacent effects are merged together or not.Previously, the level was fixed at the "mild" setting; however, with the mild setting it is impossible tocreate DMX intensities that are 2 steps apart (for example: 65, 63, 61). Requested by DrewHickman.
Updated the pencil icon to be more visible, and moved the tip to the upper left. Requested by ErnieMcAnally via help desk.
If the user had a Pro license, when they created Playback Files an intensity data file (.LID extension)was always created. Now an intensity data file is only created if the sequence has props that useDMX or Enhanced LOR networks. Requested by Light-O-Rama.
Added a "How Do I Get Started?" link at the top of the "Start Page". Requested by Light-O-Rama.
Superstar 'Add +' button
In the "Image Setup" dialog box, a new button was added called "Add +". The "Add+" button addsthe current image to the image action, selects the next image, and bumps the time ruler selectionforward. This makes it easy to add a series of images for an animation.
Bug Fixes
· In certain circumstances, LOR Hub could create a computer show with incorrect sequenceentries. When enabling the show, LOR Show Player would not be able to find the correctsequence.
· In certain circumstances, LOR Hub could create an SD card with sequences that in the futurecould not be edited. The SD card would however work.
· If a MotionPak in LOR Hub did not have the same upper/lowercase as the base sequence, LORHub would not be able to find it.
What's New in Version 5.2.0
· New Program: LOR Hub· Updates to the Sequencer· Bug Fixes
New Program LOR Hub
A new program for the Showtime Suite has been added called 'Hub'. Hub currently has 2 mainfunctions.
1. It enables our new MotionPak technology which allows you to modify LOR SequenceStore sequences for use with props the LOR Hardware Store will sell. The first propswill be 'Singing Faces'
Light-O-Rama v5.6.652
© 2021 Light-O-Rama, Inc.
2. It is the replacement for Simple Show Builder. Simple Show Builder is still available inthis release, however it will be removed in a future release. If you previously usedSimple Show Builder you should move to Hub. Hub can create both simple computer shows, as well as SD card shows for MP3directors.
In future releases, Hub will continue to grow and will be taking over all 'show' type functionalityincluding things like the Show Editor, Show Scheduler, and Building advanced SD cards for MP3Directors from the Hardware Utility.
Updates to the Sequencer
If the content of the Start Page extends beyond the bottom of the window, the vertical scrollbar thatis displayed now spans the entire right edge of the window - making it easier to scroll. Reported byLight-O-Rama.
Bug fix: if the user made the Start Page a floating window, then selecting Window > Reset WindowLayout would close the Start Page. Reported by Light-O-Rama.
The first 4 items on the Windows menu have been renamed: "View Playback Window", "ViiewMotion Effects Window", "View Previews Window", and "View Control Lights Window". Also theseitems will only be shown if the respective window is currently hidden ("X" in the upper right corner ofthe window has been clicked). This should make it clearer what these menu items do, particularlythe Control Lights item. Reported by Light-O-Rama.
If the content of the Control Lights window extends beyond the bottom of the window, a verticalscrollbar is now displayed. Reported by Light-O-Rama.
The Start Page can now be hidden, unhidden, and floated just like the Previews and Control Lightswindows. Reported by Light-O-Rama.
Bug fix: the TextPE effect did not display the text specified by the user. Reported by user DaveTrollope via help desk.
Bug fix: if a sequence used video media and Loop At End was enabled for playback and videoplayback was set for full screen, the video window would often get resized instead of remaining fullscreen. Reported by user Bry.http://forums.lightorama.com/topic/47295-video-playback-issue-in-shows/
When you right click on the sequence grid, there is a new sub-menu under Timing Marks > InsertTiming at Selection, with options for Left, Right, and Both. This will insert timing marks at the leftand/or right edge of the grid selection. Reported by user Luke Kamp via help desk.
Bug fix: on Preview Design's Channel Conflict tab, clicking a column heading in the conflict list wouldcrash the program. Now clicking a column heading sorts the table according to the values in thatcolumn. Reported by Light-O-Rama.
On Preview Design's Channel Conflict tab, there are now fields for the user to enter text to filter thelist by name or by channel. A "Select All" checkbox was also added. Reported by Light-O-Rama.
When dragging a favorite or subfolder in the Motion Effect Generator, the favorites tree will now auto-scroll when the cursor nears the top or bottom edge. Reported by user NJ Malenke via help desk.
What's New? 53
© 2021 Light-O-Rama, Inc.
Bug fix: when moving a timing mark with "Drag events with timings" enabled, the Sequencer couldcrash in some cases. Reported by user Peter Dusaitis via help desk.
Bug fix: the "Create an empty freeform timing grid" check box on the New Animation Sequencedialog did not actually create a freeform timing grid. Reported by Light-O-Rama.
You can now right-click on the Playback Window and change the brightness of the backgroundimage (if there is one). Reported by Light-O-Rama.
RGB aggregates with one or more sub-channels (red, green, or blue) left undefined, could cause theSequencer to crash when modifying effects. Reported by user Keith Henrickson via help desk.
Added new dimming curves to the Prop Definition screen: Linear_30pct, Linear_40pct,PixelCurve_30pct, PixelCurve_40pct. Reported by user jamills706.http://forums.lightorama.com/topic/47355-dimming-curves-question/
Windows Shell Commands get shared between sequences if you use File > Save As to create anew sequence. Specifying a new command from the revised screen will only affect the sequence thatis open. Reported by user k6ccc.http://forums.lightorama.com/topic/47372-windows-command-changes-affects-multiple-sequences/
In rare cases where 2 props in a preview have the same name, the entire preview file would not loadat startup. Now the preview is loaded and a warning about duplicate names is shown on the "OtherWarnings" tab of Preview Design. Reported by Light-O-Rama.
Fixed playback issues when sequences are arranged side-by-side. Reported by user NJ Malenke viahelp desk.
A "Copy to Clipboard" function has been added to the File References dialog. For sequences withmany motion effect file references, this can allow you to paste the list of files into a spreadsheet orword processor for further analysis. Reported by user Stephen Chapman via help desk.
Bug fix: title bar of Playback Window was not showing the name of the current motion effect whenone was clicked on in the sequence grid. Reported by Light-O-Rama.
During sequence playback, the Color Fade tool is now grayed out like the rest of the toolbar.Reported by Light-O-Rama.
If a comm port is unable to be opened, added a tip to the error message: "Make sure shows aredisabled and the Hardware Utility is closed". Reported by user stevehoyt.http://forums.lightorama.com/topic/47470-problem-enabling-comm-port/
Added new menu items when right-clicking on the Preview Design canvas: Add, Modify, Copy, andDelete. Reported by Light-O-Rama.
Improvements when upgrading Pixel Editor previews and sequences to S5 for non-US customers --problem occurred on PC's configured to use a comma as the decimal separator in numbers.Reported by user Niklas Adolfsson via help desk.
Bug fix: When using the space bar in the Tapper Wizard -- if you go one tap past when the musicends, the space bar defaults to the “exit” button and closes the wizard (thus erasing all of your“beats”). Reported by user Steve Warner.
Light-O-Rama v5.6.654
© 2021 Light-O-Rama, Inc.
Bug fix: the Sequencer could crash when the toolbar channel effect was set to DMX Intensity andyou tried to add a motion effect. Reported by user Steve Warner.
Bug fix: clicking the Refresh button on the online prop import screen did not display the updated datacorrectly. Reported by Light-O-Rama.
In Archived Prop Management, added button to select all props with no effects. Reported by Light-O-Rama.
Bug Fixes· The Post Install process failed to copy 3 new examples for Superstar.· The configuration for PixCon16 MKII devices was incorrectly showing 32 ports. · In Superstar, if the preview uses horizontal orientation and you go into "floating windows" mode,
the program could crash.· In Superstar, the first time beat marks are created they are created without issue. Creating beat
marks a second time incorrectly deleted them.· In Superstar, if you changed timings the program may not prompt you to save your work. · In Superstar, when using Text Masks along with scenes or morphs, it was possible that the mask
was not applied. · In Superstar, when using a Text Mask or an Image Mask, if Layer Priority was disabled,
foreground effects would be incorrect and background effects would not be rendered.· In Superstar, if the program was launched from S5 changes would not be saved if "Save" or "Save
As" was used to save the sequence as a .sup file.· In Superstar, when using Autosequence effects, the displayed timings may be incorrectly changed
to the most recently used Autosequence settings.· In Superstar, when using Autosequence if "average the time length of effects" was selected then
the last few seconds of an autosequence effect may not generate triggers. · In Superstar, when using Autosequence if "Burst and Return" was used, there could be a compile
issue. This happens most frequently with low sensitivity settings such as 1 or 2.· In Superstar, when using Autosequence morphs with transparency set to transparent were not
being saved properly.· In Superstar, when shrinking using the pixel extender and smooth effects, the shrink did not occur
properly. · In Superstar, the "Center X,Y" control in the Smooth Effects dialog box the buttons were not
oriented properly when creating a horizontal sequencing grid.· In Superstar, if the pixel extender is enabled and a visualization with a sequencing grid was
imported with a "max length" , a crash could occur.· In Superstar, if the pixel extender is enabled and a sequence was being shunk, only half of the
effects would get applied.
What's New in Version 5.1.4
· Registry Wipe can now clean Program Files folder· Updates to the Sequencer· Updates to SuperStar
Registry Wipe can now clean Program Files folder
Some versions of the LOR S4/S5 uninstaller can leave behind unwanted programs in the user'sProgram Files(x86)\Light-O-Rama folder. This can lead to installation problems the next time theuser tries to install the software. Registry Wipe can now clean those entries up.

What's New? 55
© 2021 Light-O-Rama, Inc.
Updates to the Sequencer
Performance improvements:1. The Sequencer starts about 20% faster. Reported by Light-O-Rama.2. Improved the calculation time of Text and Picture effects. Reported by Light-O-Rama.
Countdown effect changes:1. Added a "MM:SS" display option and allow a max of at least 1 hour. Reported by Light-O-Rama.2. Text can now be positioned in both the X and Y directions. Forum request.
Changes to Preview Design:1. you can now double-click on a prop in the design area to open its Prop Defintion. Reported by
Light-O-Rama.2. The "Tree 360 Spirals" shape could display an erroneous message regarding the number of folds
when the number of revolutions was set to a large number. This message has been removed andthe revolution limit restored to 25. Reported by Drew Hickman and user ukoberon.http://forums.lightorama.com/topic/46953-spiral-360-prop-tree-issue-512/
3. Created new "Cylinder Spiral" shape for spiral-wrapped tree trunks and columns. Reported byuser jamills706. http://forums.lightorama.com/topic/46949-wrapped-tree-trunk-propmodel/
4. On the Prop Definition screen, if the diagram area was taller than it was wide, many of the shapediagrams would overflow. Now they are properly scaled. Reported by Light-O-Rama.
5. Bug fix: a prop made of pixels that uses the "Tree 360 Spiral" shape could crash the Sequencer.Reported by Light-O-Rama.
6. Bug fix: the Prop Definition window was expecting the "Arial Narrow" font to be installed, but thatfont is not on all computers. On some computers this could cause the program to show acontinual stream of error messages. The program will now check if the font is installed beforeusing it. Reported by user Norm Bowman (via help desk).
7. The "Tree 360 Up & Over" shape now supports folds in the string. When used with pixels, thelayout has been redone to represent pixel strings that go up and over the top of the tree.Reported by Drew Hickman and Jesse Tryon.
8. If there are any unsaved changes in the Preview Design screen and you click the Cancel buttonor click the Windows "X" button to close it, then you will get a message confirming that you wantto continue without saving the changes. Reported by user Gordon Varney (via help desk).
9. You can now delete props from the Channel Conflicts tab in Preview Design. Select ChangeSeleced Props > Delete Props. All of the actions on the Change Selected Props menu are alsonow available by right-clicking on the selected props in the Channel Conflict list. Reported byLight-O-Rama.
10. When copying a prop in Preview Design (Item > Copy), channels will no longer be renumbered ifthe "Uses the same channels as" field is set on the source prop. Reported by Light-O-Rama.
Changes to freeform play ranges:1. Bug fix: when you were defining a freeform range for playback and you moved the cursor to the
left - past the left edge of the grid - it cleared the selection. This made it difficult to select 0:00.00as the starting point. Reported by Drew Hickman.
2. The following menu items have been added when you right-click on the timeline or the waveform(reported by user spascall):
a. Set Play Range Start - if no freeform play range exists, it creates a range from theselected point to the end of the sequence; otherwise it moves the start point of theexisting range.
b. Set Play Range End - if no freeform play range exists, it creates a range from thebeginning of the sequence to the selected point; otherwise it moves the end point of theexisting range.
Light-O-Rama v5.6.656
© 2021 Light-O-Rama, Inc.
c. Clear Freeform Play Range - clears an existing freeform play range.
Do not allow channels to be copied in the "Show All Items" grid view. This grid view is system generated- items can be moved, but not hidden or copied. Reported by user daughjs.http://forums.lightorama.com/topic/47021-cant-delete-duplicate-channel-button/
In the sequence grid, when you right click on a channel name for a prop that has multiple strings, a new"Set Channel Name" option will appear. This capability will primarily help custom props with multiplestrings which get channel names like "Horatio Hornblower: r64 c31". The channel name will be storedwith the preview, so it will apply to all sequences that use that preview. Reported by Robert Brescia.
In the Skew All and Skew Selection commands, the maximum offset has been increased from 10seconds to 600 seconds. Also, the user will now have the option of skewing the current timing grid or allfreeform timing grids. Reported by user NJ Malenke.
Bug fix: changes made to the sequence while calculations are occurring (icon in the upper left isspinning), might not be reflected during preview playback. Reported by user k6ccc.http://forums.lightorama.com/topic/46930-modifying-motion-effects-sometimes-not-taking-the-change-until-after-opening-and-saving-the-effect/
After clicking on a slider in the Motion Effects Generator, you can now fine-tune the value using the left orright arrow keys. If the slider is unlocked, shift-left-arrow and shift-right-arrow can be used to change theending value. Reported by Drew Hickman.
When you right-click on the timeline or the waveform and select "Zoom In" from the menu, the zoomedsequence grid is now centered on where the right-click took place. Reported by Light-O-Rama.
In rare cases, a preview could get saved that had a prop with an invalid circuit number (like 0). In priorversions, this would result in a popup error message as the Sequencer opened; and if the preview weresubsequently opened in Preview Design could result in a crash. Going forward there is no popupmessage when the program is opened. The preview can then be opened in Preview Design and the errorwill be reported on the "Channel Conflicts" tab - where it can be corrected. Reported by Light-O-Rama.
Bug fix: you are no longer allowed to drag beat channels into the list of preview props and vice versa.Reported by Light-O-Rama.
The 3 versions of the chase tool (intelligent, by prop, and by row) have been condensed into 2: regularchase and custom chase. Regular chase is the same as intelligent chase (chase by prop when the firstrow is a motion row, and chase by row for anything else) with the addition that the selected area for thechase is now cleared. For a custom chase, the user is prompted whether they want to chase by row orprop, and whether the selected area should be cleared. A new keyboard shortcut shift-H initiates acustom chase. Custom chase is also accessible from the right-click menu. Reported by user spascall.
When exporting the grid configuration and "Show All Items" is the current grid view, the user will now geta warning stating that "Show All Items" is a system-generated view and will not be included in the exportfile. Reported by Drew Hickman.
In the Paste Special window, the "All the way to the end of" drop-down box now includes the last item inthe selection and the last row in the grid view. The last row in the grid view is now the default. Reportedby user spascall.
Bug fix: motion effects on props should override effects on groups that they are a member of. However,that was not happening in all cases. Reported by user John Trp (via help desk).
What's New? 57
© 2021 Light-O-Rama, Inc.
Bug fix: the Fill tool would display the message "Trying to fill between effects, but the row is empty!"when the sequence row was not empty. Reported by user lkcubsrule.http://forums.lightorama.com/topic/47070-s5-fill-error/
Bug fix: Ampersands (&) in prop names would not display correctly in the sequence grid. Reported byLight-O-Rama.
When playing back a sequence to real lights and when saving playback files, the Sequencer now checksif motion effects have been placed on props connected to an LOR network that is not enhanced. If so,then the action is cancelled until the condition is fixed. Reported by Light-O-Rama.
The music is only supposed to play one time when you click the play button in the Motion EffectGenerator. However, due to a bug, if the loop button on the toolbar for the sequence was enabled, itwould cause the music to repeat in the Motion Effect Generator as well. Reported by Light-O-Rama.
The Motion Effect Generator now has a mute button so users can turn off the music while creating theirmotion effect. Reported by NJ Malenke.
When using the Max Intensity, Min Intensity, Fade Up, or Fade Down tools, the message "'Motion effect'is selected on the toolbar, but no motion effect is currently displayed in the playback window. Would youlike to create an effect using the Motion Effect Generator?" will now only get displayed when motioneffect rows are part of the selection. If the effect shown on the toolbar is "motion effect" but only channelrows are selected, then the toolbar effect is changed to the ON effect. Reported by Drew Hickman.
The checkbox to enable or disable looping of effects in the Motion Effect Generator has been replaced bya toggle botton (press on, press off). Also, the loop icon shown there and on the sequence toolbar willnow show a red slash through it when disabled. Reported by Light-O-Rama.
Bug fix: when attempting to open a playback file (.play.lms), the program would display an errormessage, then go ahead and open the file anyway. Now no attempt is made to open the playback fileafter the error is displayed. Reported by Light-O-Rama.
Fixed the File References dialog so that long sequence names, media file names, and previewbackground file names wrap if they extend beyond the width of the window. Reported by Light-O-Rama.
Updates to SuperStar
FEATURES:
· Several new options and effects have been added to Superstar's Auto Sequence tool includingeffects 'Folding Ricochet', 'Snake Up/Down', along with options to 'Skip Inactive Grid Squares' aswell as 'Average the Time Length of Effects'.
· The Sequencer now sends the current timing grid to SuperStar when inserting a SuperStar effect.This allows SuperStar to display the same timings as the Sequencer.
BUG FIXES:
· Exporting as intensity data could cause the program to crash· Text masks and image silhouette masks were not keyed on their clip rectangle. Any effects that
fall entirely with in the mask's clip rectangle get applied to the mask.
Light-O-Rama v5.6.658
© 2021 Light-O-Rama, Inc.
· In the Auto Sequence dialog box if the user did not select one of the 8 custom colors, a messageis now displayed.
· When saving in the Demo version, the file added to the recent files dialog was incorrectly specifiedas ',supe.sup'.
· When saving in the Demo Version, the suggested filename was incorrectly defaulted to'.supe.sup'.
· In some cases, opening a valid .supe file would cause an error stating the file was not created onthis computer.
· Improved export speed of sequences that use large Visualizations· Increased the number of images allowed from 1500 to 3000.· When automatic modification of Star Scenes occurred, it was incorrectly changing the archive
status of the file.· Increased the width of every 5th long tick mark on the edge of the sequence grid· In sequences with effect groups, after a 'select all' effect groups could no longer be expanded.· Increased available memory for both 32 and 64 bit systems.· The number of channel elements has increased from 8 million to 50 million.· When using Single Step, if the stop button was pressed the first selected effect was not made
active. This could lead to a warning or error.· Writing large images could cause the program to crash.· The number of fonts has been increased to 30 to allow for user created fonts to be used.· While using the Pixel Extender, if the Layer Priority feature was active pixels were extended too
far.· When using the Move or Scale effects tools after selecting effects that have a group in the
selection, the effects would not be applied.· When using the Move or Scale effects tools while in wrap around mode, some effects were not
wrapped properly.
What's New in Version 5.1.2
· Updates to the Sequencer· Updates to SuperStar
Updates to the Sequencer
Sequence grid row height:1. Bug fix: if the user repeatedly shrunk the row height in the sequence grid, they would reach
certain sizes where some prop/channel names did not get displayed. Now names are alwaysdisplayed, regardless of the row height. Reported by user ndutton.
2. Enhancement: depending on the row height, the Sequencer would choose one of 3 font sizes todisplay prop/channel names with. Now it will choose among 4 font sizes - a new one was addedwhen the row height is extra tall. Reported by Light-O-Rama.
In Preview Design, renamed "Channel Conflicts" tab to "Channel Conflicts (and bulk change tool)" tobetter reflect its functionality. Reported by Light-O-Rama.
Audio wizard changes:1. Bug fix: when the VU Wizard was set to analyze only part of the song, it would still insert timing
marks and/or channel effects for the entire song. Reported by Light-O-Rama.2. The default timing grid shown in the Beat, VU, and Tapper wizards is now the one currently
selected in the sequence grid. Reported by Light-O-Rama.3. Improved performance when the Apply button is clicked in the Beat, VU, and Tapper wizards.
Reported by Light-O-Rama.
What's New? 59
© 2021 Light-O-Rama, Inc.
4. Bug fix: when clicking the "Start" button on the Tapper wizard, typing the space bar did notproduce taps. Reported by Drew Hickman and NJ Malenke.
Moved menu item Sequence > Audio Wizards > Add Beat Channel to Sequence > Add New > BeatChannel. On the sequence grid's right-click menu, the Audio Wizards > Add Beat Channel item wasremoved. Added item to the Grid View menu: Add New > Beat Channel. Reported by user DrewHickman.
Fixed multiple issues with the Renumber Strings dialog (accessed by going to Preview Design, ChannelConflicts tab, Change Selected Props > Renumber Strings). Also added a "Reverse Order" button to thisdialog. Reported by user k6ccc. http://forums.lightorama.com/topic/46721-editing-channel-assignments-information/
The "Other Warnings" tab in Preview Design will now display a warning when the channel assignmentsfor a master prop and sub-prop are out of sync. A sub-prop has the "Uses the same channels as" fieldpopulated in the Prop Definition screen. Reported by user k6ccc.http://forums.lightorama.com/topic/46721-editing-channel-assignments-information/
Renamed the opening "Sequences" tab page to "Start Page" to better reflect its purpose. Reported byLight-O-Rama.
Enhancements to the Prop Definition window:1. All shape parameters are now displayed in a single column list and a scroll bar will be displayed
if the list does not fit in the available space.2. There are no longer separate tabs for the "Custom" and "Advanced" shapes. The grid to edit
those shapes is now accessed from a button which opens a separate window -- giving the usermuch more screen space to edit custom props.
3. A thumbnail view is now displayed for Custom and Advanced props in the lower portion of theShape section.
4. The delete key can now be used to clear cells on the grid when editing a Custom or Advancedshape.
5. The last shape you used to create a new prop is now remembered and set as the default the nexttime you create a prop.
6. The Save and Cancel buttons were moved to the upper left corner to be consistent with thePreview Design window.
New shapes in Prop Definition:1. Tree 360 panels. This can model large commercial trees that are assembled by tiers, and those
tiers are broken into panels/branches. The shape assumes each panel has its own set ofchannels and that every panel is lit the same way. Requested by user Drew Hickman.
2. Tree 360 tiers. Also known as "Z trees". This shape does not support RGB pixels. Requested byuser spascall.
3. Sphere and Cylinder shapes. These can be configured to display 1, 2, 3, or all 4 quadrants(vertical sections). The Tree 360 Wedges shape was also updated with a parameter to choosethe number of quadrants it displays. Requested by user stevehoyt and others.http://forums.lightorama.com/topic/46771-how-to-define-prop-for-tree-shaped-like-a-globe/
If there are no existing previews, the Upgrade Sequence screen now disables the choose existingpreview option. Reported by Light-O-Rama.
The sequence upgrade process now does a better job of handling inconsistent settings on RGBchannels. Previously, some situations could cause the Sequencer to crash. Reported by user ValBennett.http://forums.lightorama.com/topic/46800-upgrading-sequence-error-from-s4-in-s5/
Light-O-Rama v5.6.660
© 2021 Light-O-Rama, Inc.
During the sequence upgrade process, warnings about subsequence channels now include the channelname. Reported by Light-O-Rama.
Adjusted the size and layout of the New Animation Sequence and New Musical Sequence dialogs sothey display correctly when the "Visual Effects" tab of Window's Performance Options dialog is set to"Adjust for best performance". Reported by user John Hall.
Adjusted the wording of items in Preview Design's "Add New Item" dialog. Reported by Light-O-Rama.
Changes to motion effects:1. Removed the align left, center, and right buttons for the Text effect -- as they did not have any
effect on actual lights. Reported by user k6ccc. http://forums.lightorama.com/topic/46834-feature-request-horizontal-position-offset-in-motion-effects/
2. Added TextPE effect that exactly replicates the S4 Pixel Editor's text effect to improvesequence upgrades. Adjustments to text effects in upgraded sequences are no longer required.Note there are now 2 text effects in S5: "Text" and "TextPE". Reported by Light-O-Rama.
3. Renamed the "Full Length" option in the Movie effect to "Movie Length Matches SequenceLength". Reported by Light-O-Rama.
4. Bug fix: when inserting a new motion effect, the Motion Effect Generator window could becalculating the effect "None" (blank screen) even though the selection in the drop-down boxshowed a different effect. This only occurred when Sequencer Preferences > Motion Effects >"When opening, initialize from the current toolbar effect and color" was unchecked. Reported byLight-O-Rama.
5. Bug fix: in some cases the bulb size slider control on the Motion Effects Generator coulddisappear. Reported by Light-O-Rama.
6. Bug fix: the scanner effect could cause an error during effect calculations and result in the playbuttons not being enabled. Reported by Chris Reynolds and Eric Brown.
7. There is no longer a delay when you first open the Motion Effects panel until thumbnail imagesappear. Reported by Light-O-Rama.
On the grid's toolbar, the Motion Effects and SuperStar tools are now only visible when the user has aPRO level license. Reported by Light-O-Rama.
Added a warning when trying to use the Fill tool on an empty row. Reported by Light-O-Rama.
If the current toolbar effect is set to "Motion Effect" when the Color Fade tool is selected, the toolbareffect is now automatically changed to "On". Reported by Light-O-Rama.
Updates to SuperStar
FEATURES:
· Added "Snake Up" and "Snake Down" as movement options in the Auto Sequence dialog box· Added "skip inactive grid squares" option in Auto Sequence dialog box· Added "Average the Time Length of Effects" option in Auto Sequence dialog box
BUG FIXES:
· Fixed a bug where an encrypted file from previous versions would not read in if it has groups ortimings in it.
What's New? 61
© 2021 Light-O-Rama, Inc.
· Added a check for "Full Range" color mode if launched from a SuperStarRequest. If in "FullRange" mode, SuperStar forces "Balanced" mode and adjusts all the color values to be 100 orless.
· Made it so every 5th long tick mark on the edges of the sequencing grid is thicker.· Fixed a bug where if you had effect groups in a sequence and you did "select all" then you could
no longer expand the effects in the effect groups· Doubled the amount of memory SuperStar can use This prevents memory errors when compiling
large sequences.· Fixed a bug where writing out a large image could cause the program to crash.· Fixed it so the Auto Sequence movement options work properly with pixel speeds other than 1.00
What's New in Version 5.1.0
Initial production release of S5 ShowTime Designer Pixels.
3 Feature Comparison
The Light-O-Rama software package must be registered, with a valid license, in order to be used to itsfull potential. Each license contains two separate types of license levels: the main license level and theSuperStar license level.
The main license level covers all of the Light-O-Rama software package except for the Light-O-RamaSuperStar Sequencer. Several different main license levels exist, each having different features: Basic,Basic Plus, Standard, Advanced, and Pro. Additionally, there is an unlicensed Demo version (which isthe same as the Basic version, except that it cannot be used to actually control lights, and hasencrypted save files).
The SuperStar license level covers the Light-O-Rama SuperStar Sequencer. Its possible levels havenames such as 2_CCR, 24_CCR, 60_CCR, and the like, indicating the number of Cosmic Color Ribbonsyou can use with SuperStar. Additionally, there is an unlicensed Demo version which does not allowexport to an actual sequence.
Any reference in this help file to a "license level" or "feature level" refers to the main license level, not tothe SuperStar license level, unless specifically noted otherwise.
You will be given a chance to register your Light-O-Rama software at the time that you install it. Toregister after that time, or to upgrade to a higher level license, please see the "Register Light-O-Rama" (or "Upgrade Light-O-Rama") menu item on the Sequencer's Help menu, or on the Control Panel's popup menu.
The following chart summarizes what features are available with each license level, with details on eachfeature listed below the chart.
If a feature is listed as "(demo mode)", it means that the feature can be used with this license to seewhat it's like, but it won't be fully supported. For example, if you try one of the Sequencer's demo modefeatures while building a sequence, you won't be able to save your changes to that sequence. Pleasesee the details for each feature for exactly what "demo mode" means for that feature.
If a feature is listed as "(S4, not S5)", it means that the feature is supported in version 4 of the Light-O-Rama Software Suite, but support has been dropped in version 5.
Any features not listed here are available with all license levels.
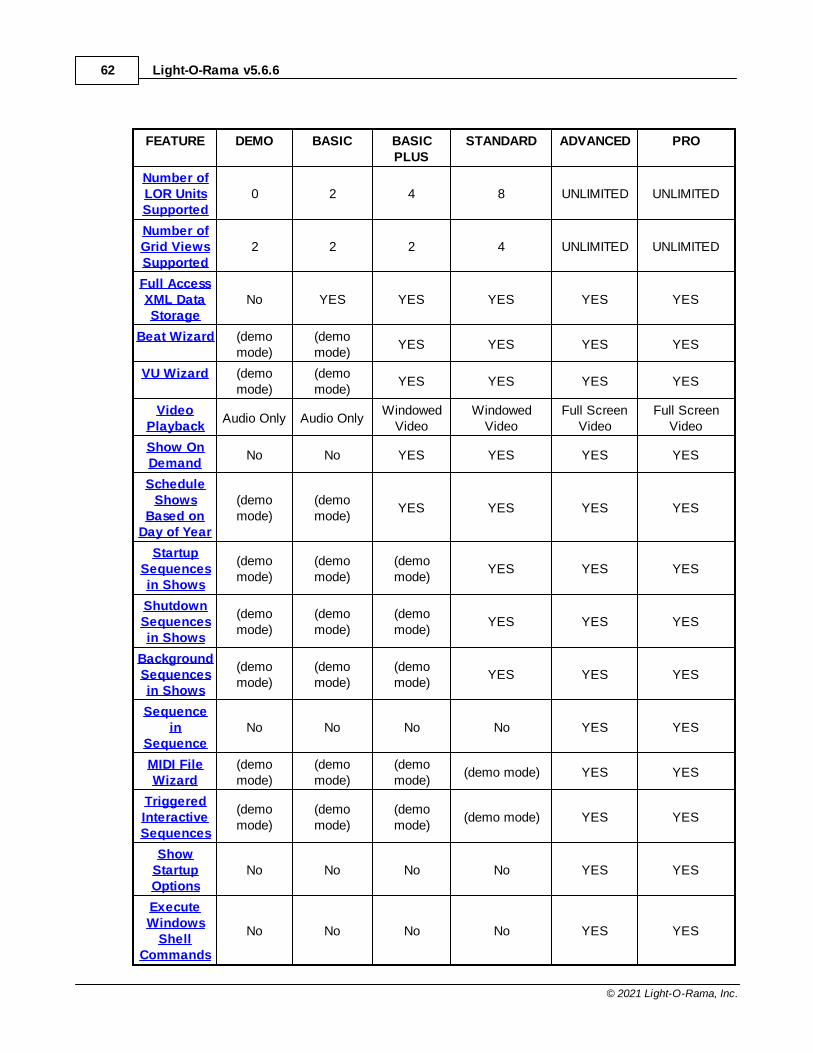
Light-O-Rama v5.6.662
© 2021 Light-O-Rama, Inc.
FEATURE DEMO BASIC BASICPLUS
STANDARD ADVANCED PRO
Number ofLOR UnitsSupported
0 2 4 8 UNLIMITED UNLIMITED
Number ofGrid ViewsSupported
2 2 2 4 UNLIMITED UNLIMITED
Full AccessXML DataStorage
No YES YES YES YES YES
Beat Wizard (demomode)
(demomode)
YES YES YES YES
VU Wizard (demomode)
(demomode)
YES YES YES YES
VideoPlayback
Audio Only Audio OnlyWindowed
VideoWindowed
VideoFull Screen
VideoFull Screen
Video
Show OnDemand
No No YES YES YES YES
ScheduleShows
Based onDay of Year
(demomode)
(demomode)
YES YES YES YES
StartupSequencesin Shows
(demomode)
(demomode)
(demomode)
YES YES YES
ShutdownSequencesin Shows
(demomode)
(demomode)
(demomode)
YES YES YES
BackgroundSequencesin Shows
(demomode)
(demomode)
(demomode)
YES YES YES
Sequencein
SequenceNo No No No YES YES
MIDI FileWizard
(demomode)
(demomode)
(demomode)
(demo mode) YES YES
TriggeredInteractiveSequences
(demomode)
(demomode)
(demomode)
(demo mode) YES YES
ShowStartupOptions
No No No No YES YES
ExecuteWindows
ShellCommands
No No No No YES YES
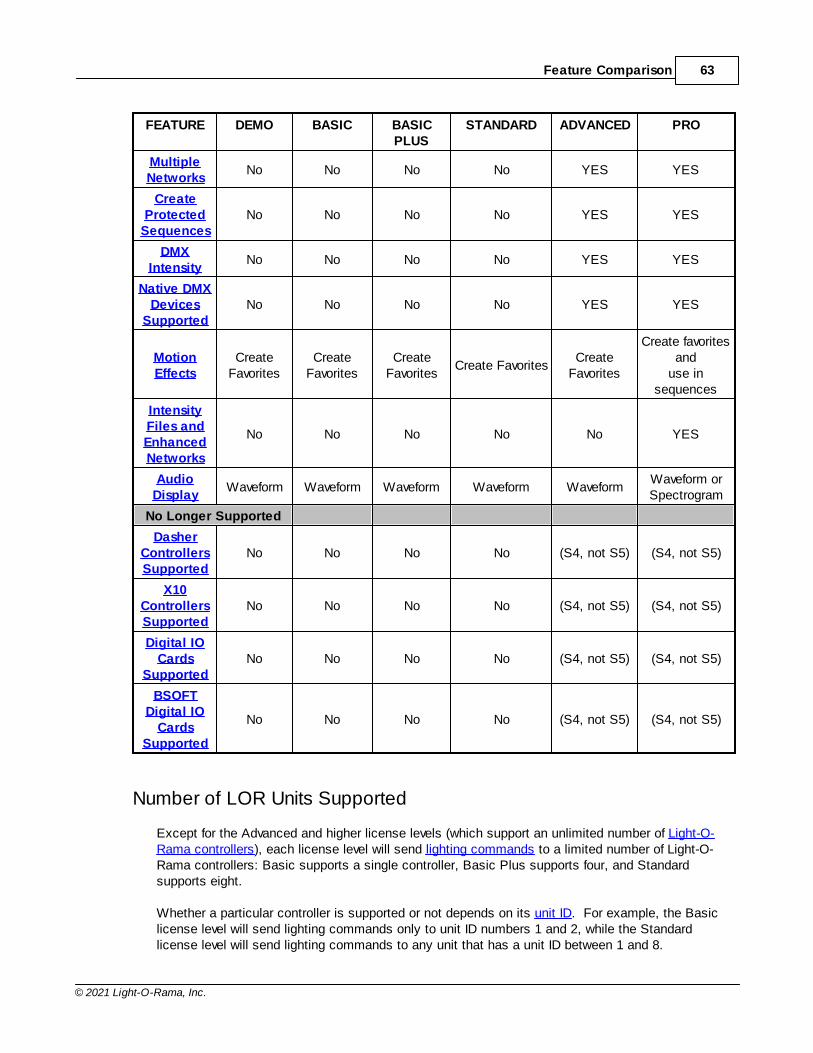
Feature Comparison 63
© 2021 Light-O-Rama, Inc.
FEATURE DEMO BASIC BASICPLUS
STANDARD ADVANCED PRO
MultipleNetworks
No No No No YES YES
CreateProtected
SequencesNo No No No YES YES
DMXIntensity
No No No No YES YES
Native DMXDevices
SupportedNo No No No YES YES
MotionEffects
CreateFavorites
CreateFavorites
CreateFavorites
Create FavoritesCreate
Favorites
Create favoritesand
use insequences
IntensityFiles andEnhancedNetworks
No No No No No YES
AudioDisplay
Waveform Waveform Waveform Waveform WaveformWaveform orSpectrogram
No Longer Supported
DasherControllersSupported
No No No No (S4, not S5) (S4, not S5)
X10ControllersSupported
No No No No (S4, not S5) (S4, not S5)
Digital IOCards
SupportedNo No No No (S4, not S5) (S4, not S5)
BSOFTDigital IO
CardsSupported
No No No No (S4, not S5) (S4, not S5)
Number of LOR Units Supported
Except for the Advanced and higher license levels (which support an unlimited number of Light-O-Rama controllers), each license level will send lighting commands to a limited number of Light-O-Rama controllers: Basic supports a single controller, Basic Plus supports four, and Standardsupports eight.
Whether a particular controller is supported or not depends on its unit ID. For example, the Basiclicense level will send lighting commands only to unit ID numbers 1 and 2, while the Standardlicense level will send lighting commands to any unit that has a unit ID between 1 and 8.

Light-O-Rama v5.6.664
© 2021 Light-O-Rama, Inc.
Regardless of whether a particular unit will be sent lighting commands, you can always use theSequencer to build sequences using that unit; Light-O-Rama simply will not control the lights for thatunit unless you upgrade to a higher license level.
The unlicensed Demo version will not send lighting commands to any controllers, so you cannot useit to actually control your lights.
Number of Grid Views Supported
A sequence may have multiple grid views; however, certain license levels will only support a limitednumber of grid views in any given sequence. The Demo, Basic, and Basic Plus levels support 2 gridviews per sequence, Standard supports 4, and Advanced and higher support an unlimited number ofgrid views per sequence. The system grid view "View All Items" is not counted toward the limit.
You will not be able to add new grid views to a sequence if it already has the maximum supportednumber. However, you can still open sequences that have more grid views (for example, a sequencethat was created by someone who has a higher license level than you do). In this case, the extragrid views can be displayed in the Sequencer, but you will not be able to modify them.
Full Access XML Data Storage
When a sequence is saved using a licensed version of Light-O-Rama, its save file uses a standardXML format, which is designed to be understandable by people. In the S5 version of the software,these files have an LOREDIT extension. Technically advanced users may feel comfortable editingthese XML-based sequence files directly with a text editor, or even building their own tools that canbe used with these files (although please be careful when doing so, as it is not terribly difficult tomake a small mistake which may render the sequence file incomprehensible to the Light-O-Ramasoftware package).
On the other hand, when a sequence is saved using the unlicensed Demo version, it is savedencrypted, and so the file itself cannot be easily understood or modified by anyone or anythingexcept the Light-O-Rama software package. Additionally, data from an encrypted sequence cannotbe copied and pasted, except on the computer that the sequence was originally encrypted on.
No matter whether a sequence is saved using the open XML format or using encryption, the Light-O-Rama software itself will still be able to use it.
If you create an encrypted sequence using the unlicensed Demo version, and later purchase alicense, you can unencrypt the sequence by resaving it on the same computer it was originallyencrypted on, using your licensed version of the software.
Beat Wizard
The Beat Wizard can be used to analyze a song to try to determine its tempo, and to automaticallyplace timings and lighting effects into a sequence based upon that tempo. It is fully supported inlicense levels Basic Plus and higher.
Feature Comparison 65
© 2021 Light-O-Rama, Inc.
It is not supported in license level Basic (nor in the unlicensed Demo version). However, you can stilltry it out in a "demo mode" to see what it is like; after trying it on a sequence, you will not be able tosave your changes. You will be given a warning about this when you try it, along with a chance toback out before committing to using it. Additionally, if you do decide to use it, and your sequencealready has unsaved changes, you will be given a chance to save them before you actually use thisfeature.
VU Wizard
The VU Wizard can be used to analyze a song to find peaks in the audio - much like a VU meter -and to automatically place timings and lighting effects into a sequence based upon those peaks. Itis fully supported in license levels Basic Plus and higher.
It is not supported in license level Basic (nor in the unlicensed Demo version). However, you can stilltry it out in a "demo mode" to see what it is like; after trying it on a sequence, you will not be able tosave your changes. You will be given a warning about this when you try it, along with a chance toback out before committing to using it. Additionally, if you do decide to use it, and your sequencealready has unsaved changes, you will be given a chance to save them before you actually use thisfeature.
Video Playback
You can build musical sequences based on audio files (such as MP3) or on video files (such asWMV). When a musical sequence is played, the sound will always play, but the actual video willonly be displayed for license levels Basic Plus and higher. License level Basic will not display video.
At the Advanced license level or higher, you can show the video in full screen mode. Basic Plus andStandard will show video inside a window.
Show On Demand
Using license level Basic Plus or above, you can cause a show to be played without havingscheduled it. This is done via the "Show On Demand" menu item of the Light-O-Rama ControlPanel's popup menu.
Schedule Shows Based on Day of Year
The Light-O-Rama Schedule Editor can be used to schedule shows to play in two different ways: bythe day of the week (such as "from 6:00 PM to 9:00 PM on Friday") or by the day of the year (suchas "from 9:00 AM to 9:00 PM on December 25th").
However, scheduling based on the day of the year is fully supported only in license levels BasicPlus, Standard, and Advanced.
Using the Basic license level, you will still be able to use the Schedule Editor based on the day ofthe year in a sort of "demo mode" to see what it is like, but the Light-O-Rama Show Player will notactually play shows that are scheduled this way - it will only play shows that were scheduled by theday of the week.
Light-O-Rama v5.6.666
© 2021 Light-O-Rama, Inc.
Startup Sequences in Shows
The Light-O-Rama Show Editor can be used to build shows with several different sections. Amongthese is the Startup Section. Sequences in the Startup Section are played immediately upon theshow starting up, one at a time, in order. After all of them have been played, the main portion of theshow (i.e. the Animation Section and the Musical Section) begins.
However, this section is fully supported only with the Standard or higher license levels.
Using the Basic and Basic Plus license levels, you will still be able to use this section in the ShowEditor in a sort of "demo mode", to see what it is like. However, the Light-O-Rama Show Player willnot actually play the sequences in a show's Startup section; instead, the show will simply begin playdirectly with the Animation Section and the Musical Section.
Shutdown Sequences in Shows
The Light-O-Rama Show Editor can be used to build shows with several different sections. Amongthese is the Shutdown Section. When the scheduled end time for the show is reached, the mainportion of the show (the Animation Section and the Musical Section) stops, and the sequences inthe Shutdown Section are then played, one at a time, in order. After they have all finished, the showis truly finished.
However, this section is fully supported only with the Standard or higher license levels.
Using the Basic and Basic Plus license levels, you will still be able to use this section in the ShowEditor in a sort of "demo mode", to see what it is like. However, the Light-O-Rama Show Player willnot actually play the sequences in a show's Shutdown section; instead, when the scheduled endtime for the show is reached, the Animation Section and the Musical section will stop, and the showwill be over.
Background Sequences in Shows
The Light-O-Rama Show Editor can be used to build shows with several different sections. Amongthese is the Background Section. All sequences in the Background Section will playsimultaneously, looping back to their starts when they reach their ends, throughout the entire courseof the show.
However, this section is fully supported only with the Standard or higher license levels.
Using the Basic and Basic Plus license levels, you will still be able to use this section in the ShowEditor in a sort of "demo mode", to see what it is like. However, the Light-O-Rama Show Player willnot actually play the sequences in a show's Background Section.
Sequence in Sequence
Sequences can themselves contain subsequences - a parent sequence containing a child sequence. The parent sequence can be set to start or stop the child sequence at any given point during play.
Feature Comparison 67
© 2021 Light-O-Rama, Inc.
However, subsequences are only fully supported with the Advanced license level or higher.
Using other license levels, you will still be able to use subsequences in a sort of "demo mode", tosee what they are like, but you will not be able to save changes to your sequence after having doneso.
MIDI File Wizard
The MIDI File Wizard can be used to automatically insert timings and lighting effects into a musicalsequence that is based upon a MIDI song. For example, it can make your lights chase each otherin time to the music, or turn certain channels on or off based upon what notes are being played.
However, the MIDI File Wizard is fully supported only with the Advanced license level or higher.
Using other license levels, you will still be able to use the MIDI File Wizard in a sort of "demo mode",to see what it is like, but you will not be able to save changes to your sequence after having doneso.
Execute Windows Shell Commands
Using the Advanced license level or higher, Light-O-Rama can optionally tell Windows to executeany arbitrary command that you specify when a particular sequence is started. An example of howthis might be used: If you broadcast the songs playing during your show over the radio, you mightset your sequences up so that they tell Windows to tell your RDS ("Radio Data System") program toalso broadcast the name of the song, allowing people with RDS-enabled radios to see the name ofthe song currently playing in your show.
Triggered Interactive Sequences
In addition to being able to control lights, some Light-O-Rama controllers can also accept input,acting as triggers to start particular sequences on demand during a show. For example, as part ofyour display, you could have several buttons for people to push, each of which will play a particularsong.
However, this feature is fully supported only with the Advanced license level.
Using other license levels, you will still be able to use this section in the Show Editor in a sort of"demo mode", to see what it is like. However, the Light-O-Rama Show Player will not actually playany sequences which are triggered during your show.
Show Startup Options
Normally, the sequences in a show will start playing immediately at the show's scheduled start time. The Advanced license level or higher allows more control over this; for example, you could hook abig red button labeled "Start the Show" up to one of your Light-O-Rama controllers, and the show willnot start until that button is pushed.
For details, please see "Show Startup Options".
Light-O-Rama v5.6.668
© 2021 Light-O-Rama, Inc.
Multiple Networks
The Light-O-Rama Software Package can send lighting commands to Light-O-Rama controllers overseveral different Comm ports simultaneously. This has several potential uses, especially for peoplewith large numbers of controllers, or lights spread out physically far from each other.
However, this is supported only in the Advanced license level or higher. Other license levels willsend lighting commands to Light-O-Rama controllers only over a single Comm port.
Create Protected Sequences
The Light-O-Rama Sequencer can be used to create protected sequences, which are sequenceswhich cannot be modified (generally speaking) or viewed in the Sequencer, but which can still beplayed, control lights, scheduled in shows, and so forth.
However, this is supported only in the Advanced license level or higher. Other license levels can useprotected sequences, but cannot create them.
DMX Intensity
Light-O-Rama allows the possible intensity of most lighting effects ranges from 0 to 100, i.e. apercentage of full intensity. DMX devices, however, are capable of taking 256 different intensities(from 0 to 255), rather than 101. Light-O-Rama supports this possibility via the DMX Intensity tool.
However, this is only supported in the Advanced license level or higher. Other license levels will nothave access to the DMX Intensity tool.
Native DMX Devices Supported
The Advanced license level or higher can send lighting commands to DMX devices, in addition toLight-O-Rama controllers. Lower license levels can only send lighting commands to Light-O-Ramacontrollers.
Motion Effects
Motion Effects can be fully used only with the Pro license level. Lower license levels can use theMotion Effect Generator to test effects and save those effects as favorites, but they cannot be usedin sequences.
Intensity Files and Enhanced Networks
Feature Comparison 69
© 2021 Light-O-Rama, Inc.
The Pro license level can use intensity files and enhanced LOR networks. These can help withdisplays involving very large numbers of independent lighting elements. Lower license levels cannotuse these features.
Audio Display
At any license level, music can be displayed as an audio waveform. At the Pro license level, you canalso view the audio as a spectrogram. See the Audio Settings topic for examples.
Dasher Controllers Supported
These controllers are not supported in the S5 version.
X10 Controllers Supported
These controllers are not supported in the S5 version.
Digital IO Cards Supported
These controllers are not supported in the S5 version.
BSOFT Digital IO Cards Supported
These controllers are not supported in the S5 version.
4 Light-O-Rama Concepts
Light-O-Rama allows your computer to control your lights and other equipment in synchronized displays. Such a display is organized into several levels:
At the lowest level, a sequence contains commands to be sent to your Light-O-Rama hardware, whichwill actually control your lights. For example, a sequence might contain a command to turn on onestring of lights while making another string twinkle, and two seconds later, fading the first string downwhile fading the second string up. A sequence can contain commands for many circuits.
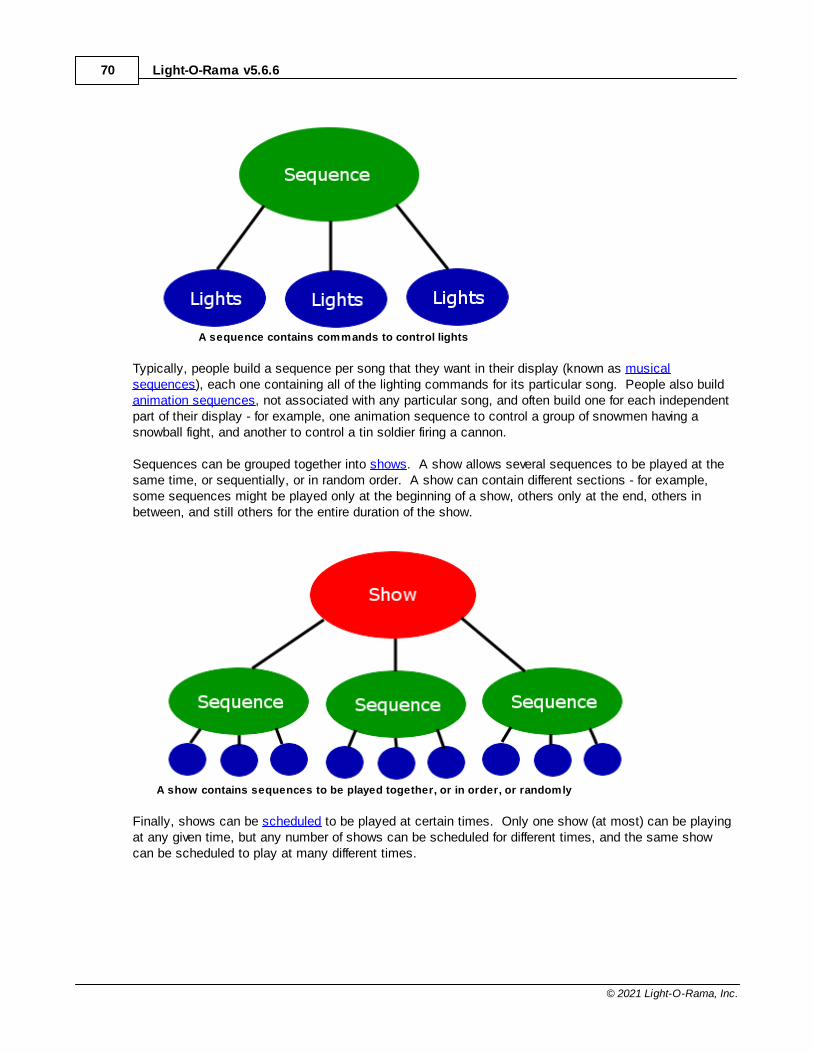
Light-O-Rama v5.6.670
© 2021 Light-O-Rama, Inc.
A sequence contains commands to control lights
Typically, people build a sequence per song that they want in their display (known as musicalsequences), each one containing all of the lighting commands for its particular song. People also buildanimation sequences, not associated with any particular song, and often build one for each independentpart of their display - for example, one animation sequence to control a group of snowmen having asnowball fight, and another to control a tin soldier firing a cannon.
Sequences can be grouped together into shows. A show allows several sequences to be played at thesame time, or sequentially, or in random order. A show can contain different sections - for example,some sequences might be played only at the beginning of a show, others only at the end, others inbetween, and still others for the entire duration of the show.
A show contains sequences to be played together, or in order, or randomly
Finally, shows can be scheduled to be played at certain times. Only one show (at most) can be playingat any given time, but any number of shows can be scheduled for different times, and the same showcan be scheduled to play at many different times.
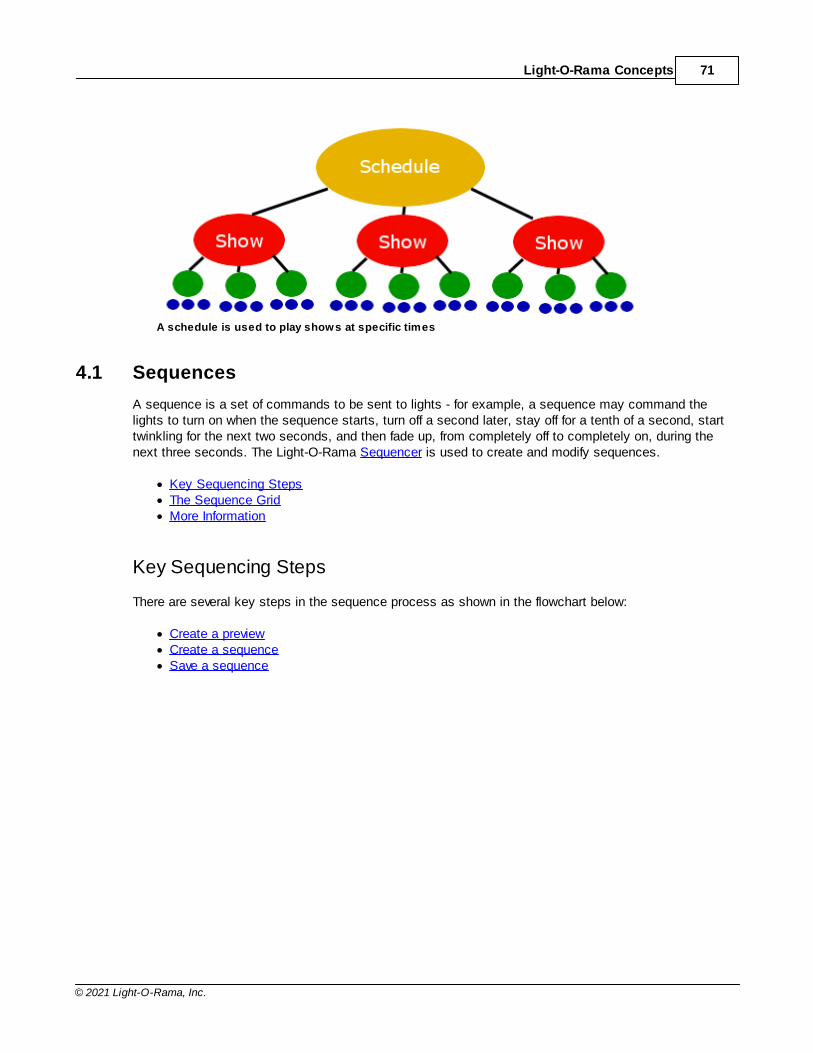
Light-O-Rama Concepts 71
© 2021 Light-O-Rama, Inc.
A schedule is used to play shows at specific times
4.1 Sequences
A sequence is a set of commands to be sent to lights - for example, a sequence may command thelights to turn on when the sequence starts, turn off a second later, stay off for a tenth of a second, starttwinkling for the next two seconds, and then fade up, from completely off to completely on, during thenext three seconds. The Light-O-Rama Sequencer is used to create and modify sequences.
· Key Sequencing Steps· The Sequence Grid· More Information
Key Sequencing Steps
There are several key steps in the sequence process as shown in the flowchart below:
· Create a preview· Create a sequence· Save a sequence
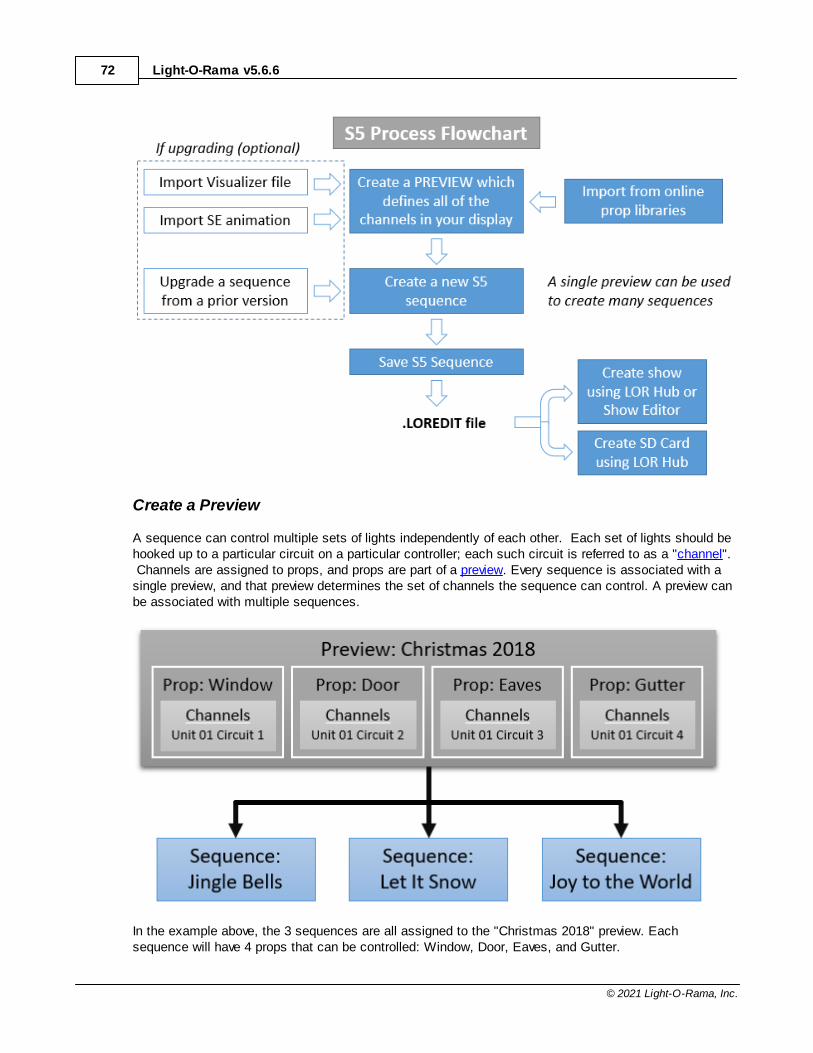
Light-O-Rama v5.6.672
© 2021 Light-O-Rama, Inc.
Create a Preview
A sequence can control multiple sets of lights independently of each other. Each set of lights should behooked up to a particular circuit on a particular controller; each such circuit is referred to as a "channel". Channels are assigned to props, and props are part of a preview. Every sequence is associated with asingle preview, and that preview determines the set of channels the sequence can control. A preview canbe associated with multiple sequences.
In the example above, the 3 sequences are all assigned to the "Christmas 2018" preview. Eachsequence will have 4 props that can be controlled: Window, Door, Eaves, and Gutter.

Light-O-Rama Concepts 73
© 2021 Light-O-Rama, Inc.
Not only do you assign channels to a prop, but you also assign a shape to each prop. This lets you drawand arrange your lights in a way that resembles your actual display. When you play a sequence in theSequencer and display its preview, the drawing will behave just like your lights will - the props in yourdrawing will turn on and off, fade up and down, and so forth.
A preview with Window, Door, Eaves, and Gutter props
Create a Sequence
There are two types of sequences: animation sequences and musical sequences. Musical sequencesare associated with songs (or sound effects, videos, etc.); the lights can be made to turn off and on (anddo other effects) in sync with the music. Animation sequences are not associated with songs. Manysequences can be played simultaneously, but at most one musical sequence can be playing at a time -all others must be animation sequences. This means that you can control some of your lights in sync toa song via a musical sequence, while simultaneously controlling other lights independently, via animationsequences.
You can create a new sequence:
· from the File Menu, · by clicking links on the Start Page, or · by right-clicking on a preview name in the Previews Window.
You can also create an S5 sequence by upgrading a sequence created in a prior version.
Save Your Sequence
It is important to save your sequence often so you don't lose any work if your computer crashes or youlose power. It is also a good idea to make backup copies of your sequences to a flash drive or to thecloud. The Sequencer's Save Copy options can be configured to make time-stamped backup copiesevery time you save.
S5 sequence files use a different file extension than prior versions:
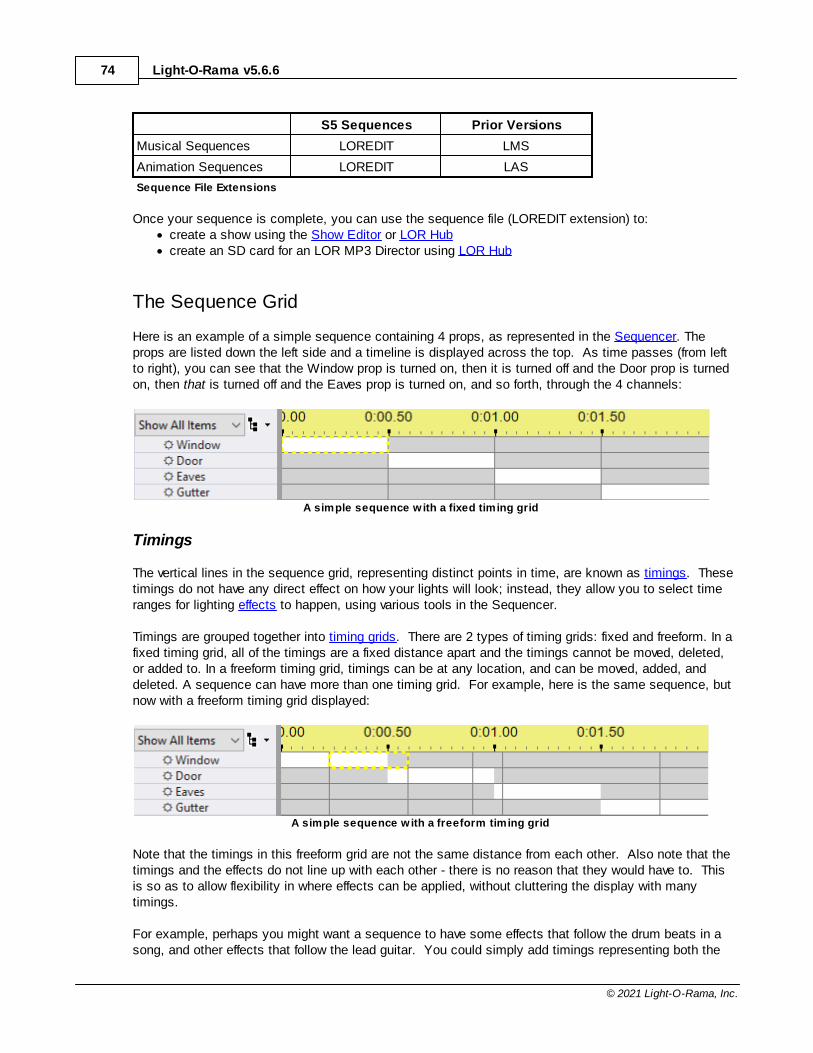
Light-O-Rama v5.6.674
© 2021 Light-O-Rama, Inc.
S5 Sequences Prior Versions
Musical Sequences LOREDIT LMS
Animation Sequences LOREDIT LAS
Sequence File Extensions
Once your sequence is complete, you can use the sequence file (LOREDIT extension) to:· create a show using the Show Editor or LOR Hub· create an SD card for an LOR MP3 Director using LOR Hub
The Sequence Grid
Here is an example of a simple sequence containing 4 props, as represented in the Sequencer. Theprops are listed down the left side and a timeline is displayed across the top. As time passes (from leftto right), you can see that the Window prop is turned on, then it is turned off and the Door prop is turnedon, then that is turned off and the Eaves prop is turned on, and so forth, through the 4 channels:
A simple sequence with a fixed timing grid
Timings
The vertical lines in the sequence grid, representing distinct points in time, are known as timings. Thesetimings do not have any direct effect on how your lights will look; instead, they allow you to select timeranges for lighting effects to happen, using various tools in the Sequencer.
Timings are grouped together into timing grids. There are 2 types of timing grids: fixed and freeform. In afixed timing grid, all of the timings are a fixed distance apart and the timings cannot be moved, deleted,or added to. In a freeform timing grid, timings can be at any location, and can be moved, added, anddeleted. A sequence can have more than one timing grid. For example, here is the same sequence, butnow with a freeform timing grid displayed:
A simple sequence with a freeform timing grid
Note that the timings in this freeform grid are not the same distance from each other. Also note that thetimings and the effects do not line up with each other - there is no reason that they would have to. Thisis so as to allow flexibility in where effects can be applied, without cluttering the display with manytimings.
For example, perhaps you might want a sequence to have some effects that follow the drum beats in asong, and other effects that follow the lead guitar. You could simply add timings representing both the
Light-O-Rama Concepts 75
© 2021 Light-O-Rama, Inc.
drum beats and the guitar to a single timing grid, but if you do, it could be difficult to remember whichtiming is for which instrument; also, the display might become cluttered with so many timings. So,instead, you could put the timings for the drums into one timing grid, and the timings for the guitar inanother timing grid, and use the drop-down box to easily switch between the two timing grids asappropriate. The effects that you add using the timing grid for the drums will not necessarily line up withthe timing grid for the guitar, nor the effects added using the timing grid for the guitar with the timing gridfor the drums, but neither should they.
Grid Views
A grid view is the group of props displayed in the sequence grid. A sequence can contain multiple gridviews. Each grid view can have its own props, or can share props with other grid views, or both. There isone system-generated grid view call "Show All Items" - it automatically shows all props in the preview.You can change the order of the props displayed in the "Show All Items" grid view, but you cannotremove items from it.
Grid Rows
The sequence grid can display several types of grid rows:
· Regular channel rows have a gray background and control a single output channel· RGB channel rows have a black background and are used for props composed of RGB lights that
can display any color· Motion effect rows are only available with a Pro license. They allow you to apply color patterns to a
prop made of RGB pixels. Motion effects can also be applied to groups of pixel props. Motioneffects can be created using the Motion Effect Generator or the SuperStar Sequencer (SuperStaris licensed separately).
· Loop rows can be used in animation sequences (but not musical sequences). When playing asequence that contains a loop, when the end of the loop is reached, the sequence will jump backto the beginning of the loop. It will do this a certain number of times (that you specify), and thenwill continue past the end of the loop. Each time that it jumps back, you can make it go throughthe loop faster, slower, or the same speed as before. There can be many loops in a sequence(set up for different time ranges), and loops can even contain other loops.
· Beat channels can be used in musical sequences, and are intended to hold effects related to thebeat of the music. They are merely a sequencing convenience and do not control lights.
· Subsequence rows point to a separate sequence file. The subsequence can be turned on or off atdifferent points in the main sequence, and its effects will play only when it is turned on.
· Archived prop rows contain effects for props that were once part of the preview, but have sincebeen deleted.
· RGB aggregate rows aid in the conversion of effects from props made of traditional lights to RGBchannels or motion effect rows.
A prefix symbol is added to certain types of grid rows to help identify them. Here is a master list ofsymbols used:
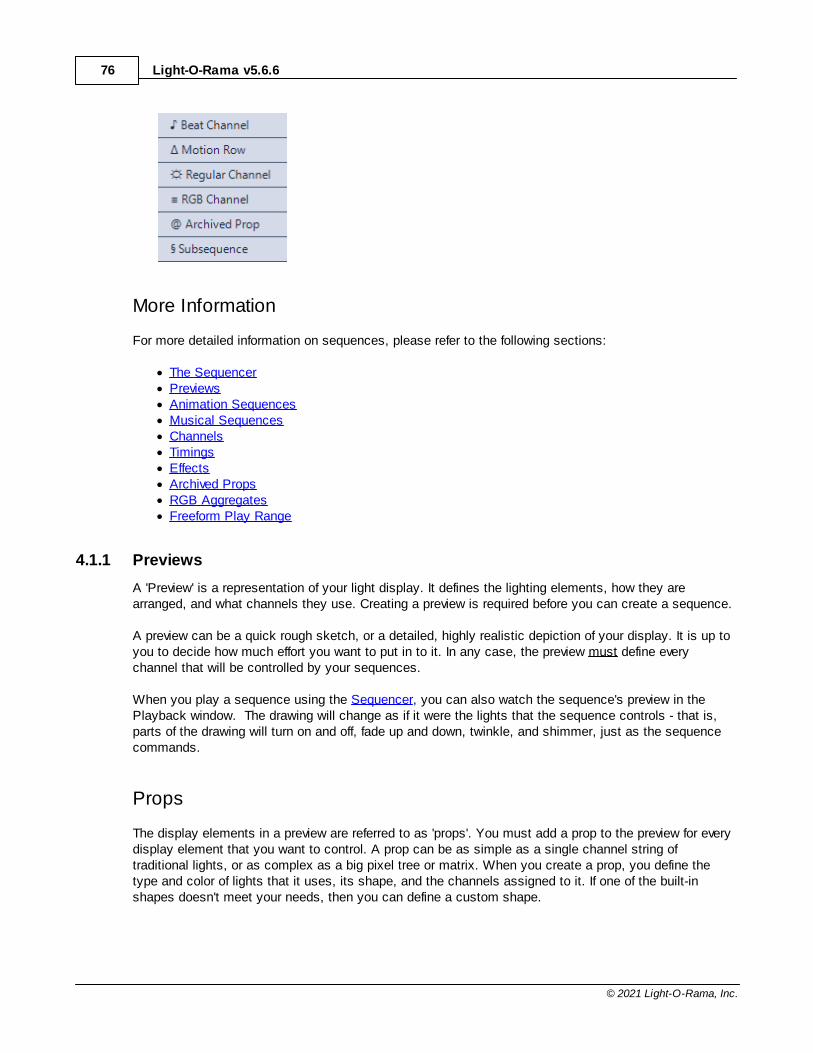
Light-O-Rama v5.6.676
© 2021 Light-O-Rama, Inc.
More Information
For more detailed information on sequences, please refer to the following sections:
· The Sequencer· Previews· Animation Sequences· Musical Sequences· Channels· Timings· Effects· Archived Props· RGB Aggregates· Freeform Play Range
4.1.1 Previews
A 'Preview' is a representation of your light display. It defines the lighting elements, how they arearranged, and what channels they use. Creating a preview is required before you can create a sequence.
A preview can be a quick rough sketch, or a detailed, highly realistic depiction of your display. It is up toyou to decide how much effort you want to put in to it. In any case, the preview must define everychannel that will be controlled by your sequences.
When you play a sequence using the Sequencer, you can also watch the sequence's preview in thePlayback window. The drawing will change as if it were the lights that the sequence controls - that is,parts of the drawing will turn on and off, fade up and down, twinkle, and shimmer, just as the sequencecommands.
Props
The display elements in a preview are referred to as 'props'. You must add a prop to the preview for everydisplay element that you want to control. A prop can be as simple as a single channel string oftraditional lights, or as complex as a big pixel tree or matrix. When you create a prop, you define thetype and color of lights that it uses, its shape, and the channels assigned to it. If one of the built-inshapes doesn't meet your needs, then you can define a custom shape.
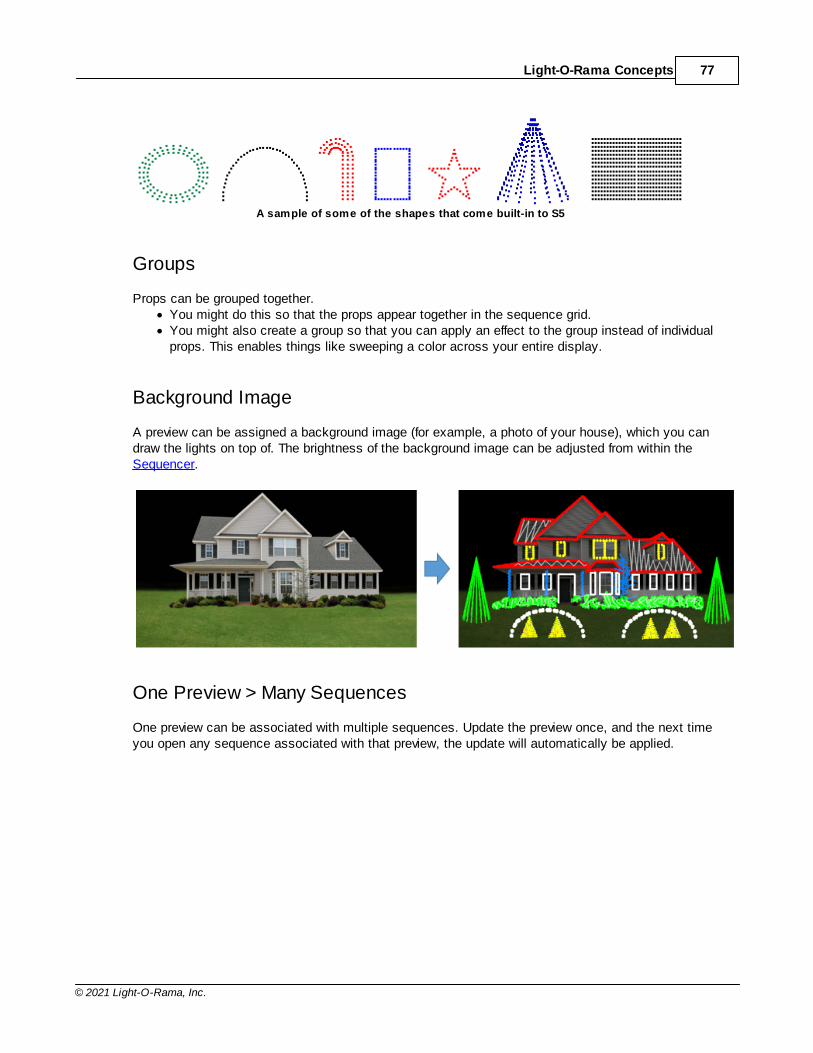
Light-O-Rama Concepts 77
© 2021 Light-O-Rama, Inc.
A sample of some of the shapes that come built-in to S5
Groups
Props can be grouped together. · You might do this so that the props appear together in the sequence grid. · You might also create a group so that you can apply an effect to the group instead of individual
props. This enables things like sweeping a color across your entire display.
Background Image
A preview can be assigned a background image (for example, a photo of your house), which you candraw the lights on top of. The brightness of the background image can be adjusted from within theSequencer.
One Preview > Many Sequences
One preview can be associated with multiple sequences. Update the preview once, and the next timeyou open any sequence associated with that preview, the update will automatically be applied.
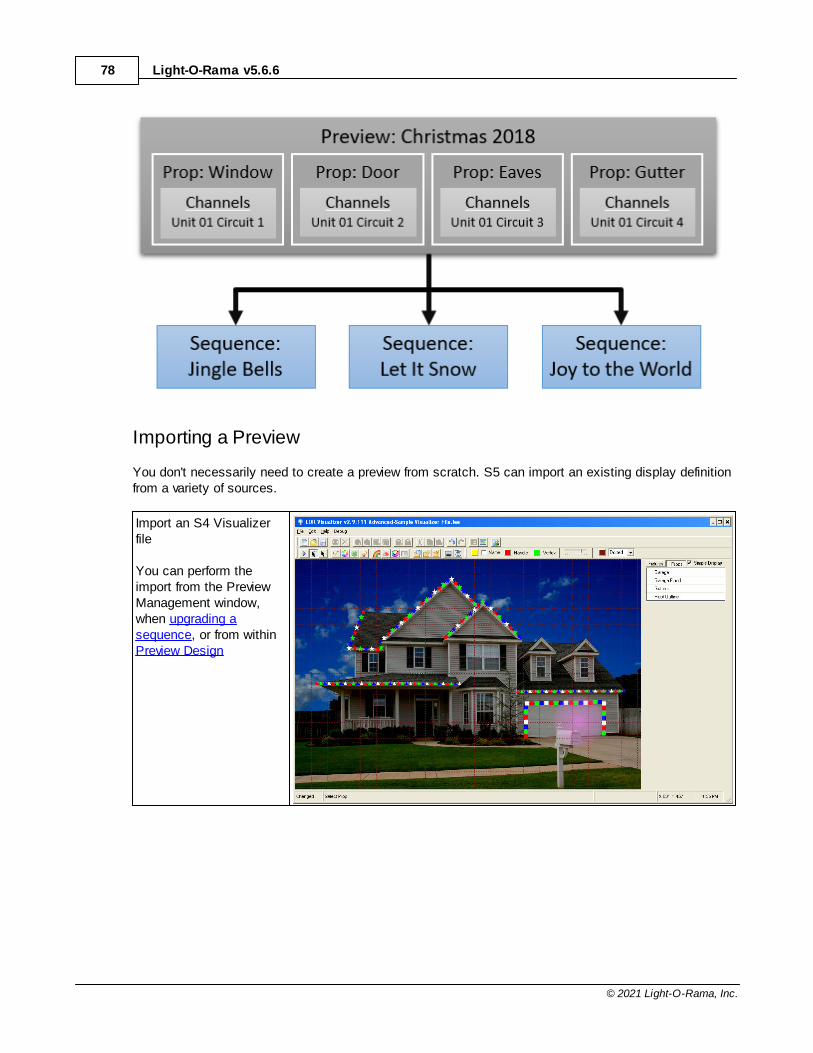
Light-O-Rama v5.6.678
© 2021 Light-O-Rama, Inc.
Importing a Preview
You don't necessarily need to create a preview from scratch. S5 can import an existing display definitionfrom a variety of sources.
Import an S4 Visualizerfile
You can perform theimport from the PreviewManagement window,when upgrading asequence, or from withinPreview Design
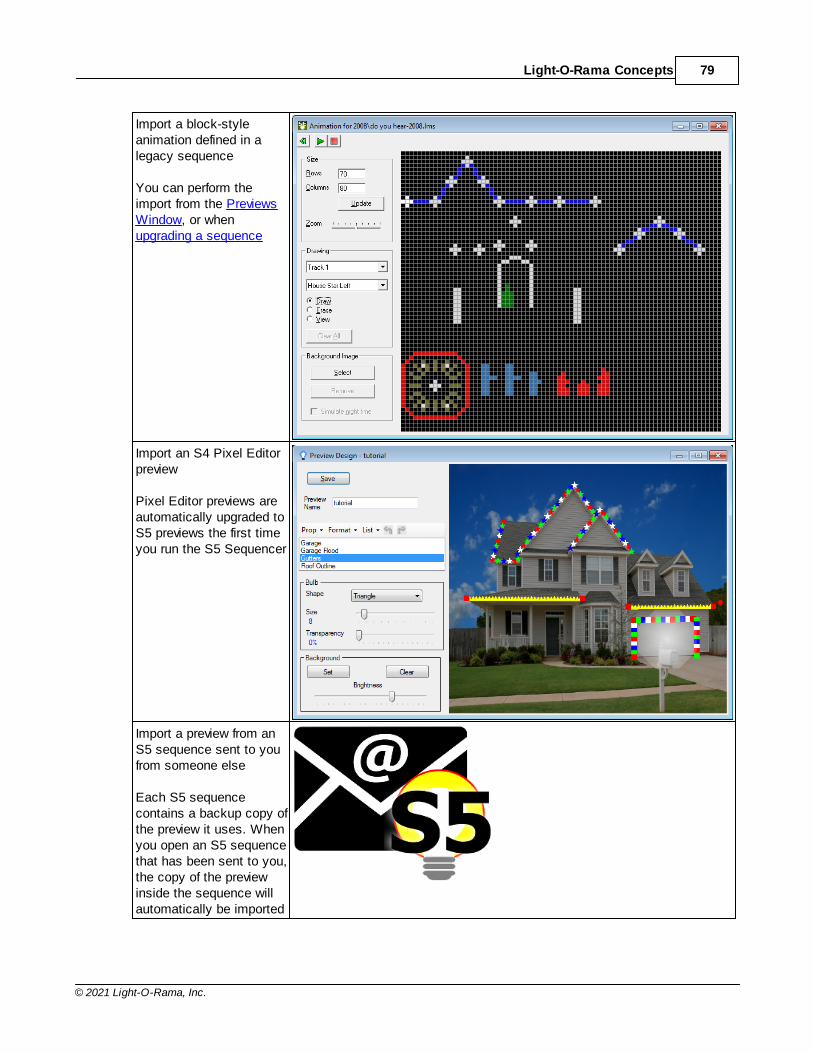
Light-O-Rama Concepts 79
© 2021 Light-O-Rama, Inc.
Import a block-styleanimation defined in alegacy sequence
You can perform theimport from the PreviewsWindow, or whenupgrading a sequence
Import an S4 Pixel Editorpreview
Pixel Editor previews areautomatically upgraded toS5 previews the first timeyou run the S5 Sequencer
Import a preview from anS5 sequence sent to youfrom someone else
Each S5 sequencecontains a backup copy ofthe preview it uses. Whenyou open an S5 sequencethat has been sent to you,the copy of the previewinside the sequence willautomatically be imported
Light-O-Rama v5.6.680
© 2021 Light-O-Rama, Inc.
Convert any legacysequence to anautomatically generatedpreview. The preview won’tlook like your house, butchannel information will beset correctly and it willallow you to get startedwith your sequencing rightaway.
You can auto-generate apreview when upgrading alegacy sequence, or byusing the Quick Previewfeature when creating anew S5 sequence.
The Preview Design Window
Previews are modified using the Preview Design window. It can be accessed several ways:
· To create a preview, go to the Previews window and click the "+" icon.· To modify a preview, go to the Previews window and double-click on a preview name.· To modify the preview for an open sequence, click the preview name on the sequence's toolbar and
select Preview Design from the drop-down menu; or you can select Preview Design from theSequence menu.
For details on how to create and modify previews, please see the Preview Design topic.
Light-O-Rama Concepts 81
© 2021 Light-O-Rama, Inc.
The Preview Design window with lights drawn on top of a background photo of a house
4.1.2 Animation Sequences
An animation sequence is a sequence that is not associated with a song (or video, or other audio file). This is as opposed to a musical sequence.
There are some other differences between animation sequences and musical sequences:
· Animation sequences can contain loops, which musical sequences cannot;· Various song-related tools such as the Beat Wizard, MIDI File Wizard, VU Wizard and Tapper
Wizard are only available for musical sequences.· Animation sequences cannot contain beat channels.· Generally speaking, only one musical sequence can be played at a time (although there is an
exception to this, described in the help page on musical sequences), whereas many animationsequences can be played simultaneously.
You can convert an animation sequence to a musical sequence by simply setting the media file viaSequence > Media File.
In S5, animation sequences and musical sequences have the same file extension (LOREDIT). This isdifferent from prior versions, where animation sequences had an LAS extension and musical sequenceshad an LMS extension.
To create an animation sequence in the Sequencer, use the New Animation dialog.
Light-O-Rama v5.6.682
© 2021 Light-O-Rama, Inc.
The New Animation dialog
4.1.3 Musical Sequences
A musical sequence is a sequence that is associated with a song (or video, or other audio file), allowingyou to synchronize the song with lighting effects. This is as opposed to an animation sequence.
There are some other differences between animation sequences and musical sequences:
· Animation sequences can contain loops, which musical sequences cannot;· Various song-related tools such as the Beat Wizard, MIDI File Wizard, VU Wizard and Tapper
Wizard are only available for musical sequences.
Light-O-Rama Concepts 83
© 2021 Light-O-Rama, Inc.
· Musical sequences can contain beat channels.· Generally speaking, only one musical sequence can be played at a time (although there is an
exception to this, noted below), whereas many animation sequences can be playedsimultaneously.
The exception to the rule that "only one musical sequence can be played at a time" is that musicalsequences put into any section of a show other than the musical section are, effectively, treated asanimation sequences. That is, their associated songs will not be played, and more than one of them canbe played simultaneously.
You can convert a musical sequence to an animation sequence with the Sequence > Convert toAnimation menu item.
In S5, animation sequences and musical sequences have the same file extension (LOREDIT). This isdifferent from prior versions, where animation sequences had an LAS extension and musical sequenceshad an LMS extension.
To create a new musical sequence in the Sequencer, use the New Musical Sequence dialog.
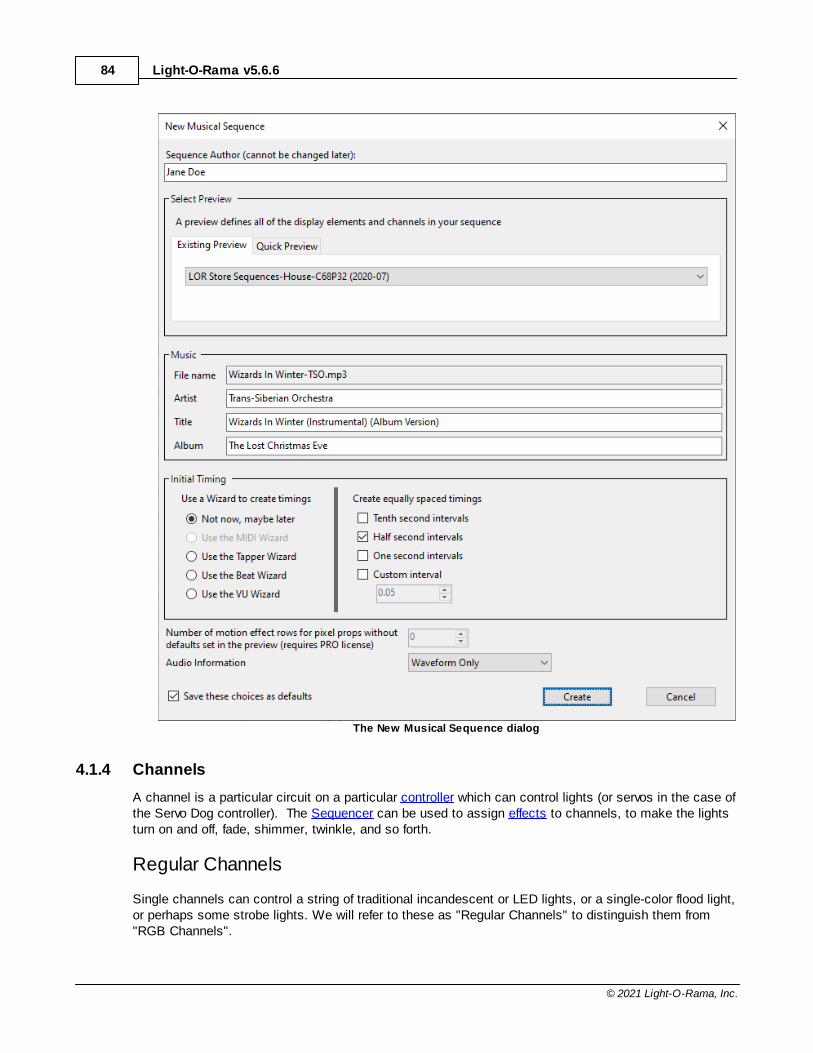
Light-O-Rama v5.6.684
© 2021 Light-O-Rama, Inc.
The New Musical Sequence dialog
4.1.4 Channels
A channel is a particular circuit on a particular controller which can control lights (or servos in the case ofthe Servo Dog controller). The Sequencer can be used to assign effects to channels, to make the lightsturn on and off, fade, shimmer, twinkle, and so forth.
Regular Channels
Single channels can control a string of traditional incandescent or LED lights, or a single-color flood light,or perhaps some strobe lights. We will refer to these as "Regular Channels" to distinguish them from"RGB Channels".
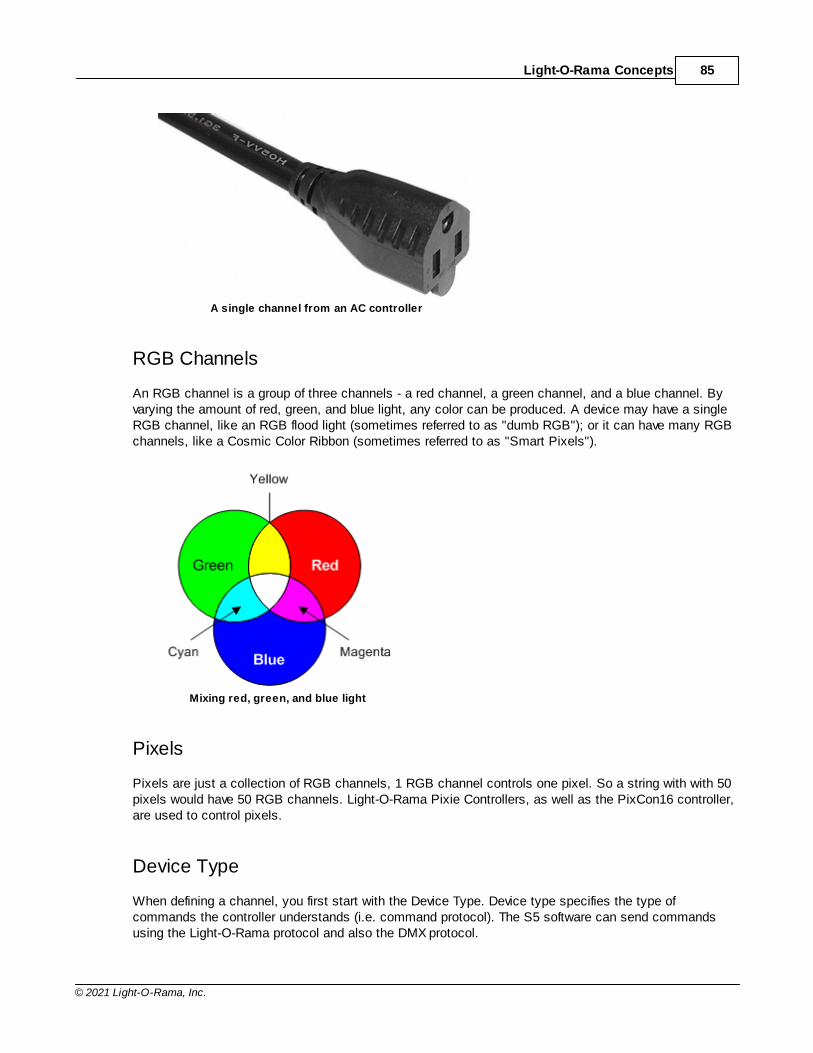
Light-O-Rama Concepts 85
© 2021 Light-O-Rama, Inc.
A single channel from an AC controller
RGB Channels
An RGB channel is a group of three channels - a red channel, a green channel, and a blue channel. Byvarying the amount of red, green, and blue light, any color can be produced. A device may have a singleRGB channel, like an RGB flood light (sometimes referred to as "dumb RGB"); or it can have many RGBchannels, like a Cosmic Color Ribbon (sometimes referred to as "Smart Pixels").
Mixing red, green, and blue light
Pixels
Pixels are just a collection of RGB channels, 1 RGB channel controls one pixel. So a string with with 50pixels would have 50 RGB channels. Light-O-Rama Pixie Controllers, as well as the PixCon16 controller,are used to control pixels.
Device Type
When defining a channel, you first start with the Device Type. Device type specifies the type ofcommands the controller understands (i.e. command protocol). The S5 software can send commandsusing the Light-O-Rama protocol and also the DMX protocol.
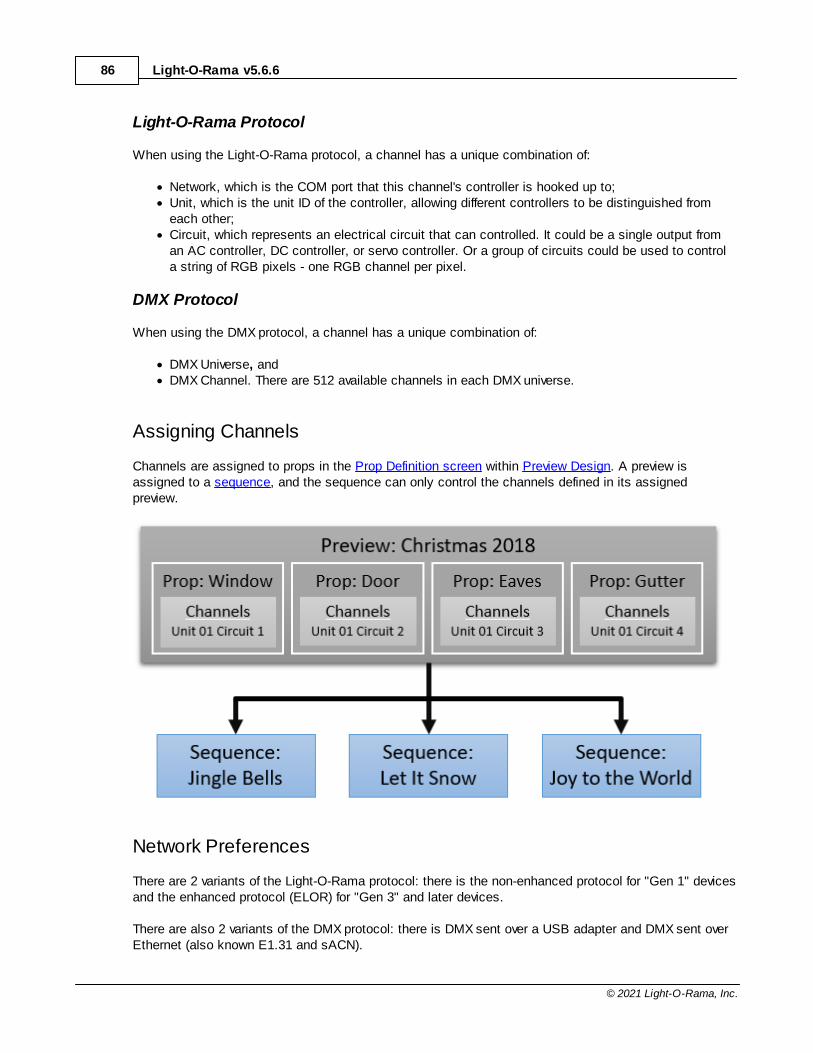
Light-O-Rama v5.6.686
© 2021 Light-O-Rama, Inc.
Light-O-Rama Protocol
When using the Light-O-Rama protocol, a channel has a unique combination of:
· Network, which is the COM port that this channel's controller is hooked up to;· Unit, which is the unit ID of the controller, allowing different controllers to be distinguished from
each other;· Circuit, which represents an electrical circuit that can controlled. It could be a single output from
an AC controller, DC controller, or servo controller. Or a group of circuits could be used to controla string of RGB pixels - one RGB channel per pixel.
DMX Protocol
When using the DMX protocol, a channel has a unique combination of:
· DMX Universe, and· DMX Channel. There are 512 available channels in each DMX universe.
Assigning Channels
Channels are assigned to props in the Prop Definition screen within Preview Design. A preview isassigned to a sequence, and the sequence can only control the channels defined in its assignedpreview.
Network Preferences
There are 2 variants of the Light-O-Rama protocol: there is the non-enhanced protocol for "Gen 1" devicesand the enhanced protocol (ELOR) for "Gen 3" and later devices.
There are also 2 variants of the DMX protocol: there is DMX sent over a USB adapter and DMX sent overEthernet (also known E1.31 and sACN).
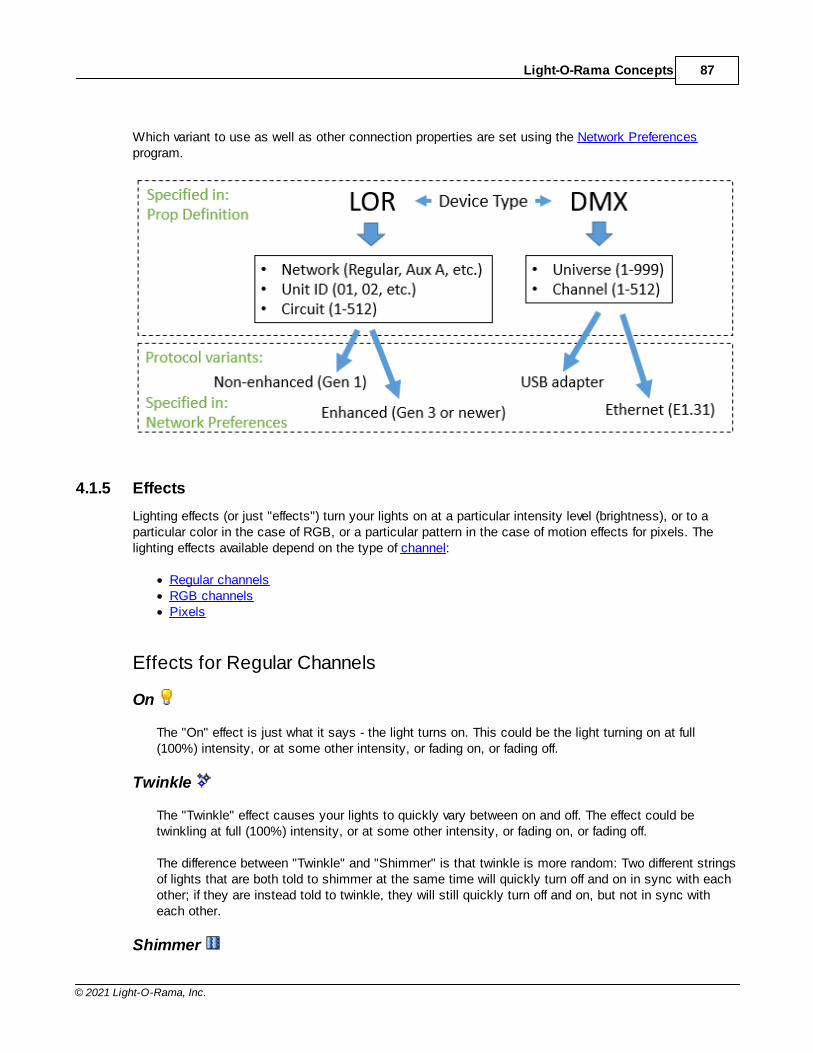
Light-O-Rama Concepts 87
© 2021 Light-O-Rama, Inc.
Which variant to use as well as other connection properties are set using the Network Preferencesprogram.
4.1.5 Effects
Lighting effects (or just "effects") turn your lights on at a particular intensity level (brightness), or to aparticular color in the case of RGB, or a particular pattern in the case of motion effects for pixels. Thelighting effects available depend on the type of channel:
· Regular channels· RGB channels· Pixels
Effects for Regular Channels
On
The "On" effect is just what it says - the light turns on. This could be the light turning on at full(100%) intensity, or at some other intensity, or fading on, or fading off.
Twinkle
The "Twinkle" effect causes your lights to quickly vary between on and off. The effect could betwinkling at full (100%) intensity, or at some other intensity, or fading on, or fading off.
The difference between "Twinkle" and "Shimmer" is that twinkle is more random: Two different stringsof lights that are both told to shimmer at the same time will quickly turn off and on in sync with eachother; if they are instead told to twinkle, they will still quickly turn off and on, but not in sync witheach other.
Shimmer
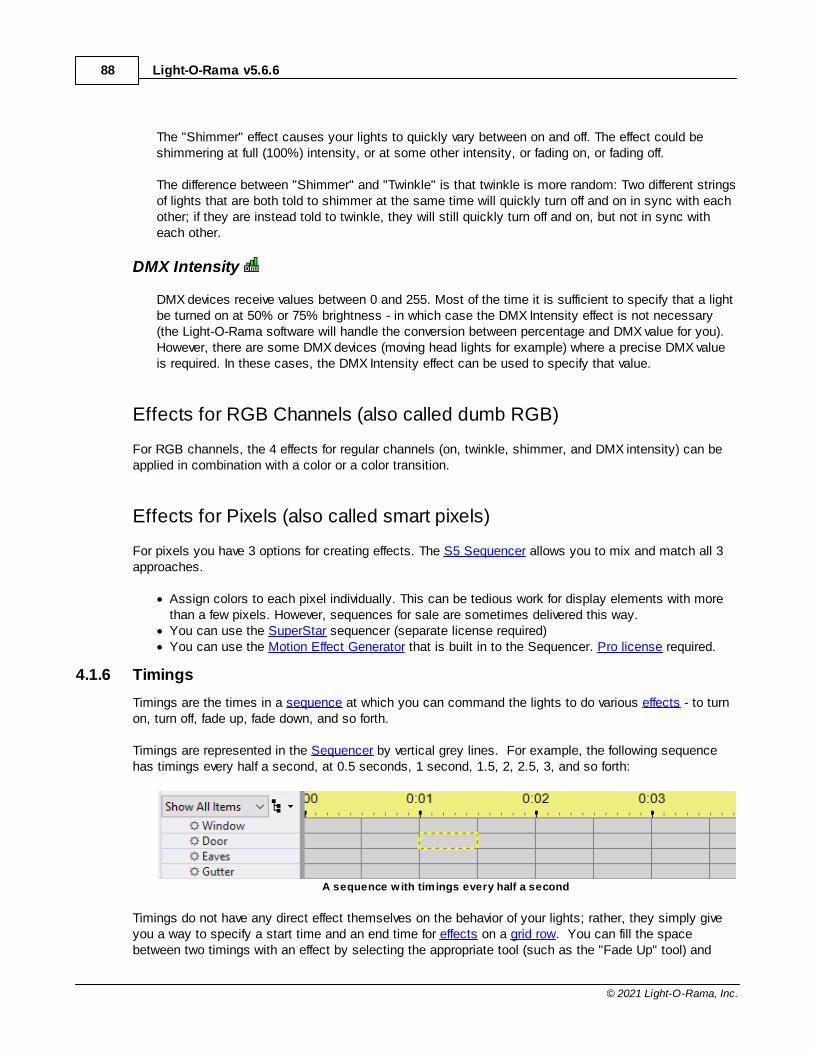
Light-O-Rama v5.6.688
© 2021 Light-O-Rama, Inc.
The "Shimmer" effect causes your lights to quickly vary between on and off. The effect could beshimmering at full (100%) intensity, or at some other intensity, or fading on, or fading off.
The difference between "Shimmer" and "Twinkle" is that twinkle is more random: Two different stringsof lights that are both told to shimmer at the same time will quickly turn off and on in sync with eachother; if they are instead told to twinkle, they will still quickly turn off and on, but not in sync witheach other.
DMX Intensity
DMX devices receive values between 0 and 255. Most of the time it is sufficient to specify that a lightbe turned on at 50% or 75% brightness - in which case the DMX Intensity effect is not necessary(the Light-O-Rama software will handle the conversion between percentage and DMX value for you).However, there are some DMX devices (moving head lights for example) where a precise DMX valueis required. In these cases, the DMX Intensity effect can be used to specify that value.
Effects for RGB Channels (also called dumb RGB)
For RGB channels, the 4 effects for regular channels (on, twinkle, shimmer, and DMX intensity) can beapplied in combination with a color or a color transition.
Effects for Pixels (also called smart pixels)
For pixels you have 3 options for creating effects. The S5 Sequencer allows you to mix and match all 3approaches.
· Assign colors to each pixel individually. This can be tedious work for display elements with morethan a few pixels. However, sequences for sale are sometimes delivered this way.
· You can use the SuperStar sequencer (separate license required)· You can use the Motion Effect Generator that is built in to the Sequencer. Pro license required.
4.1.6 Timings
Timings are the times in a sequence at which you can command the lights to do various effects - to turnon, turn off, fade up, fade down, and so forth.
Timings are represented in the Sequencer by vertical grey lines. For example, the following sequencehas timings every half a second, at 0.5 seconds, 1 second, 1.5, 2, 2.5, 3, and so forth:
A sequence with timings every half a second
Timings do not have any direct effect themselves on the behavior of your lights; rather, they simply giveyou a way to specify a start time and an end time for effects on a grid row. You can fill the spacebetween two timings with an effect by selecting the appropriate tool (such as the "Fade Up" tool) and
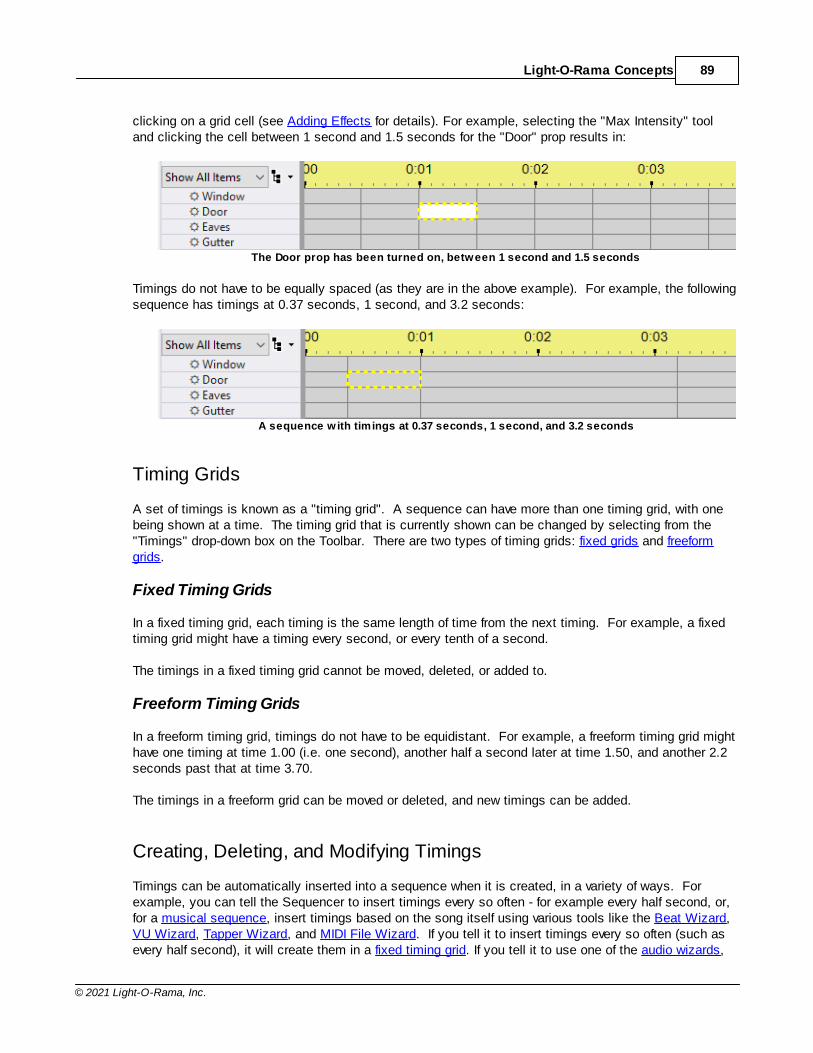
Light-O-Rama Concepts 89
© 2021 Light-O-Rama, Inc.
clicking on a grid cell (see Adding Effects for details). For example, selecting the "Max Intensity" tooland clicking the cell between 1 second and 1.5 seconds for the "Door" prop results in:
The Door prop has been turned on, between 1 second and 1.5 seconds
Timings do not have to be equally spaced (as they are in the above example). For example, the followingsequence has timings at 0.37 seconds, 1 second, and 3.2 seconds:
A sequence with timings at 0.37 seconds, 1 second, and 3.2 seconds
Timing Grids
A set of timings is known as a "timing grid". A sequence can have more than one timing grid, with onebeing shown at a time. The timing grid that is currently shown can be changed by selecting from the"Timings" drop-down box on the Toolbar. There are two types of timing grids: fixed grids and freeformgrids.
Fixed Timing Grids
In a fixed timing grid, each timing is the same length of time from the next timing. For example, a fixedtiming grid might have a timing every second, or every tenth of a second.
The timings in a fixed timing grid cannot be moved, deleted, or added to.
Freeform Timing Grids
In a freeform timing grid, timings do not have to be equidistant. For example, a freeform timing grid mighthave one timing at time 1.00 (i.e. one second), another half a second later at time 1.50, and another 2.2seconds past that at time 3.70.
The timings in a freeform grid can be moved or deleted, and new timings can be added.
Creating, Deleting, and Modifying Timings
Timings can be automatically inserted into a sequence when it is created, in a variety of ways. Forexample, you can tell the Sequencer to insert timings every so often - for example every half second, or,for a musical sequence, insert timings based on the song itself using various tools like the Beat Wizard,VU Wizard, Tapper Wizard, and MIDI File Wizard. If you tell it to insert timings every so often (such asevery half second), it will create them in a fixed timing grid. If you tell it to use one of the audio wizards,
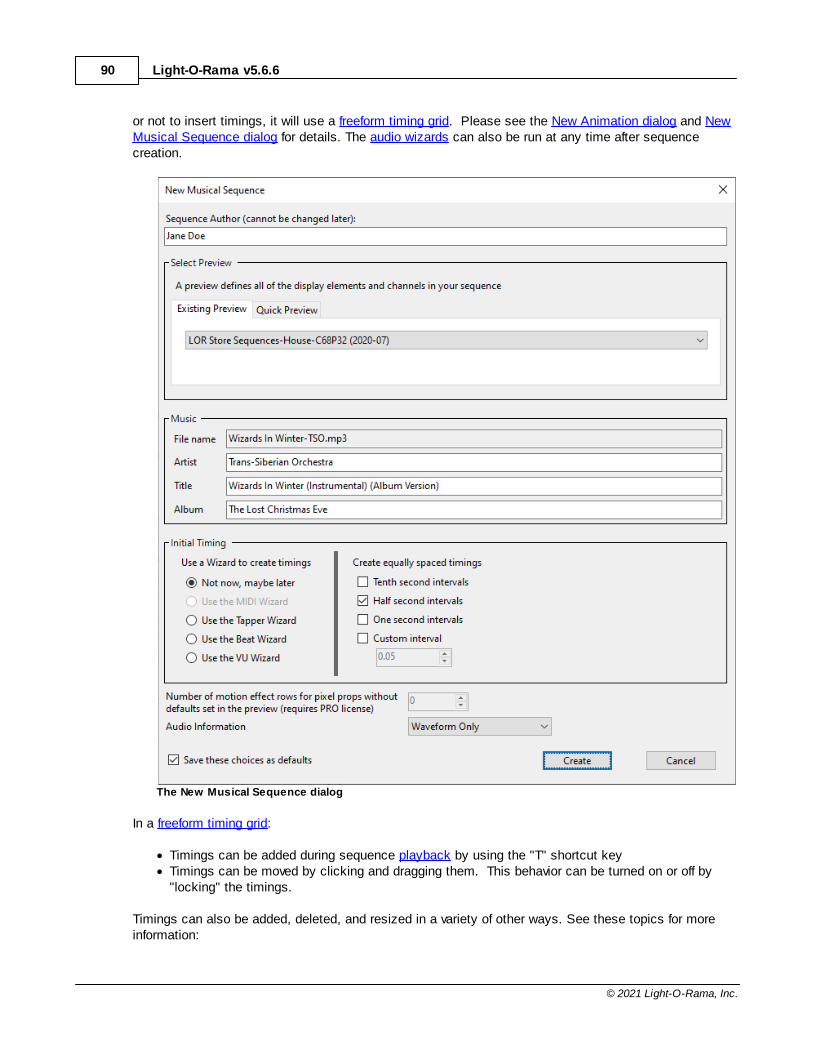
Light-O-Rama v5.6.690
© 2021 Light-O-Rama, Inc.
or not to insert timings, it will use a freeform timing grid. Please see the New Animation dialog and NewMusical Sequence dialog for details. The audio wizards can also be run at any time after sequencecreation.
The New Musical Sequence dialog
In a freeform timing grid:
· Timings can be added during sequence playback by using the "T" shortcut key· Timings can be moved by clicking and dragging them. This behavior can be turned on or off by
"locking" the timings.
Timings can also be added, deleted, and resized in a variety of other ways. See these topics for moreinformation:
Light-O-Rama Concepts 91
© 2021 Light-O-Rama, Inc.
· The toolbar's timings section· The Timing Mark sub-menu on the grid's right-click menu
4.1.7 Compressed Sequences
The layout of a Light-O-Rama sequence file is somewhat verbose. This is intended to make it easier forthird party tools which use LOR sequence files to be created. However, it has a drawback: Largesequences may be fairly slow to load. When loading a large sequence in the Sequencer, this may be aninconvenience. But the real problem is when loading a large sequence in the Show Player: It may takeseveral seconds, during which time your show is effectively paused.
To resolve this issue, Light-O-Rama supports the concept of a "compressed sequence". A compressedsequence is a separate save file, associated with a sequence but containing only enough information toplay the sequence in the Show Player, and optimized for loading speed. This can speed up loadingtimes dramatically - for example, for a certain large sequence that takes eight seconds to load on acertain computer, the associated compressed sequence only takes a small fraction of a second to loadon that same computer.
Light-O-Rama will automatically create compressed sequences whenever appropriate, and the ShowPlayer will automatically use them instead of the associated sequence file whenever they are present. So, you should not have to take any steps in order to start taking advantage of this feature. You can,however, prevent the Show Player from using compressed sequences (for example, if somethingunexpected goes wrong with them), in which case it will simply use the sequences instead. This can becontrolled through the LOR Control Panel's "Use Compressed Sequences" option.
Animation sequences which contain loops cannot be compressed. All other sequences are eligible forcompression.
It is highly recommended that you manually ensure that each of your sequences has an up-to-datecompressed sequence built before starting your show. You can do this for an entire show or schedule viathe Sequence Compressor program.
Assuming that you do not turn "Use Compressed Sequences" off, the way that the Show Player handlessequences and compressed sequences is this:
When your show calls for a certain sequence to be loaded, the Show Player will first check to see ifthere is a compressed sequence associated with that sequence. If so, and if the compressed sequenceis more recent than the sequence, it will load the compressed sequence instead of the sequence.
Otherwise, it will load the sequence. After loading the sequence, it will check whether or not acompressed sequence can be made for it, and, if so, it will create the compressed sequence. This is sothat in future runs of the show, it can simply use the compressed sequence instead of the sequence.
4.1.8 Protected Sequences
A protected sequence is a sequence which, generally speaking, cannot be modified, and whosesequence grid cannot be viewed in the Sequencer. Protected sequences can, however, be played justlike any other sequence; they can be scheduled in your shows, they can be played in the Sequencer,they can be downloaded as standalone sequences, and they will control your lights.
There are some things about a protected sequence which can be modified:
· The location of the media file (via Sequence > Media File)· The preview (via Sequence > Assign Different Preview)

Light-O-Rama v5.6.692
© 2021 Light-O-Rama, Inc.
· The Windows shell command (via Sequencer > Windows Command)
To create a protected sequence, open the sequence which you wish to protect, and then select "Exportas Protected" from the File menu. It will prompt you to select a file name for the protected sequence. InS5, protected sequences have a different file extension than regular sequences: .LORPROT versus.LOREDIT
The ability to create a protected sequence is available only with the Advanced license level or higher.
A protected sequence, as displayed in the Sequencer
4.1.9 Archived Props
What Are Archived Props?
Archived props are an inactive part of the sequence. They contain effects and can be displayed on thesequence grid (they are shown with an "@" symbol as a prefix). Each archived prop has its own propdefinition that is not part of the preview. Archived props are not shown in the playback window when thesequence is played and they cannot control real lights.
Archived props are a benefit because the sequencing on old props is preserved, allowing you to decidewhat action to take and when.
4 archived props
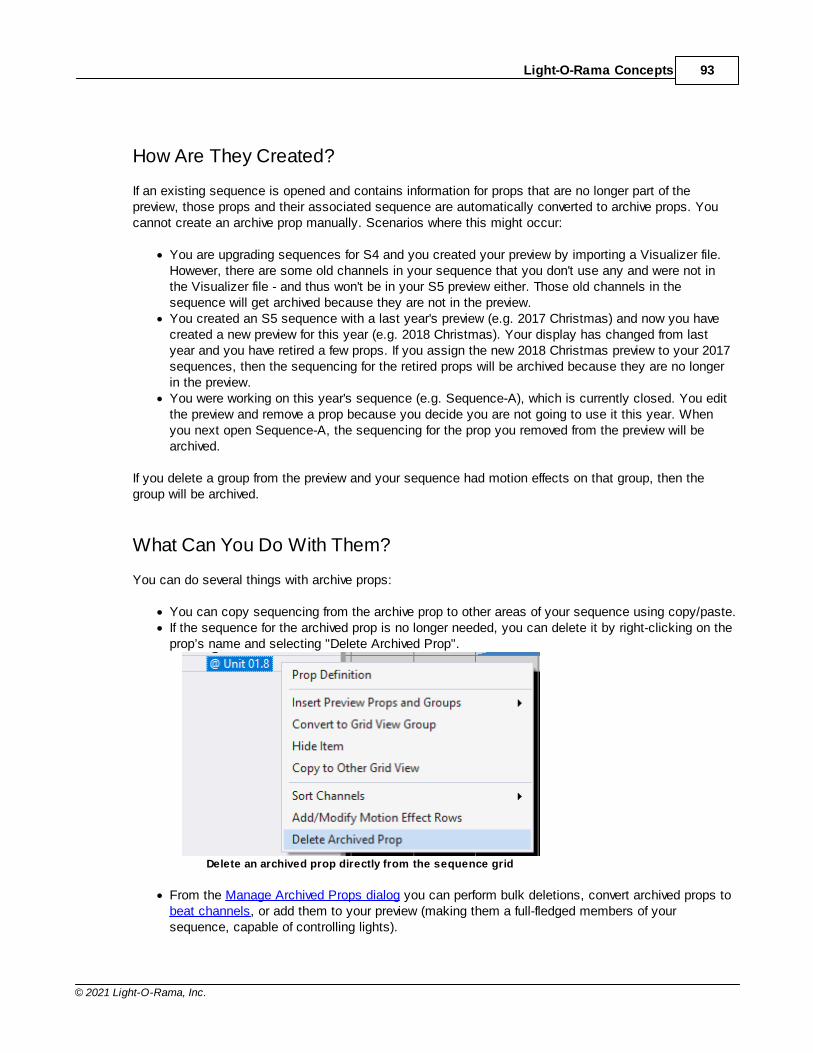
Light-O-Rama Concepts 93
© 2021 Light-O-Rama, Inc.
How Are They Created?
If an existing sequence is opened and contains information for props that are no longer part of thepreview, those props and their associated sequence are automatically converted to archive props. Youcannot create an archive prop manually. Scenarios where this might occur:
· You are upgrading sequences for S4 and you created your preview by importing a Visualizer file.However, there are some old channels in your sequence that you don't use any and were not inthe Visualizer file - and thus won't be in your S5 preview either. Those old channels in thesequence will get archived because they are not in the preview.
· You created an S5 sequence with a last year's preview (e.g. 2017 Christmas) and now you havecreated a new preview for this year (e.g. 2018 Christmas). Your display has changed from lastyear and you have retired a few props. If you assign the new 2018 Christmas preview to your 2017sequences, then the sequencing for the retired props will be archived because they are no longerin the preview.
· You were working on this year's sequence (e.g. Sequence-A), which is currently closed. You editthe preview and remove a prop because you decide you are not going to use it this year. Whenyou next open Sequence-A, the sequencing for the prop you removed from the preview will bearchived.
If you delete a group from the preview and your sequence had motion effects on that group, then thegroup will be archived.
What Can You Do With Them?
You can do several things with archive props:
· You can copy sequencing from the archive prop to other areas of your sequence using copy/paste.· If the sequence for the archived prop is no longer needed, you can delete it by right-clicking on the
prop’s name and selecting "Delete Archived Prop".
Delete an archived prop directly from the sequence grid
· From the Manage Archived Props dialog you can perform bulk deletions, convert archived props tobeat channels, or add them to your preview (making them a full-fledged members of yoursequence, capable of controlling lights).
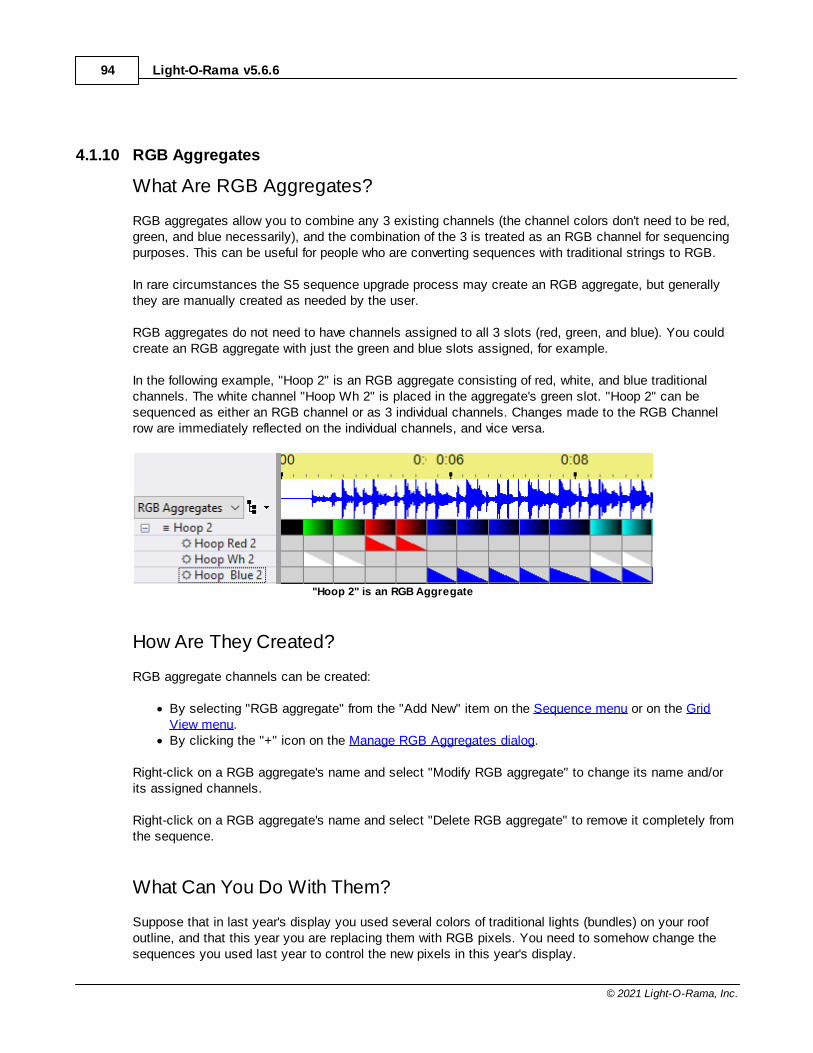
Light-O-Rama v5.6.694
© 2021 Light-O-Rama, Inc.
4.1.10 RGB Aggregates
What Are RGB Aggregates?
RGB aggregates allow you to combine any 3 existing channels (the channel colors don't need to be red,green, and blue necessarily), and the combination of the 3 is treated as an RGB channel for sequencingpurposes. This can be useful for people who are converting sequences with traditional strings to RGB.
In rare circumstances the S5 sequence upgrade process may create an RGB aggregate, but generallythey are manually created as needed by the user.
RGB aggregates do not need to have channels assigned to all 3 slots (red, green, and blue). You couldcreate an RGB aggregate with just the green and blue slots assigned, for example.
In the following example, "Hoop 2" is an RGB aggregate consisting of red, white, and blue traditionalchannels. The white channel "Hoop Wh 2" is placed in the aggregate's green slot. "Hoop 2" can besequenced as either an RGB channel or as 3 individual channels. Changes made to the RGB Channelrow are immediately reflected on the individual channels, and vice versa.
"Hoop 2" is an RGB Aggregate
How Are They Created?
RGB aggregate channels can be created:
· By selecting "RGB aggregate" from the "Add New" item on the Sequence menu or on the GridView menu.
· By clicking the "+" icon on the Manage RGB Aggregates dialog.
Right-click on a RGB aggregate's name and select "Modify RGB aggregate" to change its name and/orits assigned channels.
Right-click on a RGB aggregate's name and select "Delete RGB aggregate" to remove it completely fromthe sequence.
What Can You Do With Them?
Suppose that in last year's display you used several colors of traditional lights (bundles) on your roofoutline, and that this year you are replacing them with RGB pixels. You need to somehow change thesequences you used last year to control the new pixels in this year's display.
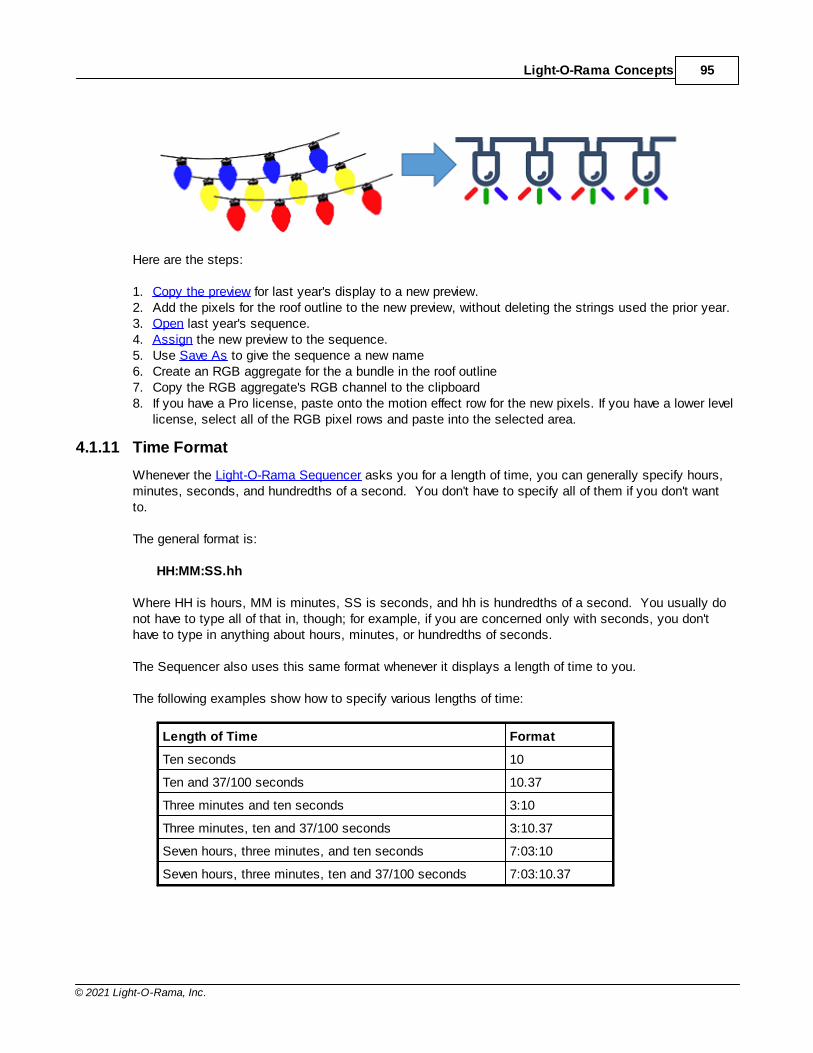
Light-O-Rama Concepts 95
© 2021 Light-O-Rama, Inc.
Here are the steps:
1. Copy the preview for last year's display to a new preview.2. Add the pixels for the roof outline to the new preview, without deleting the strings used the prior year.3. Open last year's sequence.4. Assign the new preview to the sequence.5. Use Save As to give the sequence a new name6. Create an RGB aggregate for the a bundle in the roof outline7. Copy the RGB aggregate's RGB channel to the clipboard8. If you have a Pro license, paste onto the motion effect row for the new pixels. If you have a lower level
license, select all of the RGB pixel rows and paste into the selected area.
4.1.11 Time Format
Whenever the Light-O-Rama Sequencer asks you for a length of time, you can generally specify hours,minutes, seconds, and hundredths of a second. You don't have to specify all of them if you don't wantto.
The general format is:
HH:MM:SS.hh
Where HH is hours, MM is minutes, SS is seconds, and hh is hundredths of a second. You usually donot have to type all of that in, though; for example, if you are concerned only with seconds, you don'thave to type in anything about hours, minutes, or hundredths of seconds.
The Sequencer also uses this same format whenever it displays a length of time to you.
The following examples show how to specify various lengths of time:
Length of Time Format
Ten seconds 10
Ten and 37/100 seconds 10.37
Three minutes and ten seconds 3:10
Three minutes, ten and 37/100 seconds 3:10.37
Seven hours, three minutes, and ten seconds 7:03:10
Seven hours, three minutes, ten and 37/100 seconds 7:03:10.37
Light-O-Rama v5.6.696
© 2021 Light-O-Rama, Inc.
4.2 Shows
What is a Show?
A show is a collection of sequences, to be played as a set. After creating sequences with theSequencer, you can build a show from them using the Show Editor. Shows can then be scheduledto play at certain times, using the Schedule Editor, and are then actually played by the ShowPlayer.
Assuming that your license level is at least Basic Plus, you can also cause a show to be played ondemand, without scheduling it, via the Light-O-Rama Control Panel.
There are six different parts to a show, each of which consists of sequences:
· The Background Section· The Startup Section· The Animation Section· The Musical Section· The Interactive Section· The Shutdown Section
Each of these parts is optional. For example, a show can be built having only a musical section anda shutdown section.
By default, when a show is being played in the Show Player, any given sequence in the show will notbe loaded until when it is about to be played for the first time. Depending upon the size of thesequence and the power of the computer, it may take a human-noticeable amount of time to load asequence; if so, this may cause an undesired delay between sequences, the first time they areplayed. So, optionally, you can choose to preload all sequences before any of them are played.
Additionally, if your Light-O-Rama software license is for the Advanced feature level, you can modifyexactly how your show will start up - for example, immediately at its scheduled start time, or after acertain circuit on a certain Light-O-Rama controller has been triggered (for example, by someonehitting a "start" button). See "Show Startup Options" for details.
Note that the duration of a show is not part of the show itself; rather, it is determined by theschedule.
4.3 Schedules
What Is a Schedule?
The schedule is at the top of the Light-O-Rama schedule/show/sequence hierarchy:
· The schedule is created and modified by the Light-O-Rama Schedule Editor, and played bythe Light-O-Rama Show Player.
· It consists of shows, which are created and modified by the Light-O-Rama Show Editor. Theschedule schedules these shows to be played at certain times.
· Shows consist of sequences, which are created and modified by the Light-O-RamaSequencer.
Light-O-Rama Concepts 97
© 2021 Light-O-Rama, Inc.
· Sequences are composed of commands to be sent to your lights, producing various lightingeffects.
The schedule has two parts: the weekly schedule and the calendar schedule. The weekly schedulecontains information on shows that should be played on a recurring, weekly basis - for example,every Wednesday night from 7:00 PM to 10:00 PM. The calendar schedule contains information onshows that should be played once, at a specific date and time.
When the Light-O-Rama Show Player looks at the schedule to decide whether a show should beplayed, it first checks the calendar schedule to see if it has any shows scheduled for the currentdate and time. If there are, the Show Player will play that show. Otherwise, the Show Player willcheck the weekly schedule.
Example
Suppose you have a single show which you want to play every Friday and Saturday night, from 7:00PM to 10:00 PM, except for Christmas Eve (when you want it to run from 5:00 PM to 11:00 PM) andChristmas Day (when you want it to run from 8:00 AM to 2:00 PM). Then you would put the Fridayand Saturday shows into the weekly schedule, and the Christmas Eve and Christmas Day shows inthe calendar schedule. The Light-O-Rama Show Player would then follow the weekly schedule onevery day except Christmas Eve and Christmas Day, when it would then follow the calendarschedule.
Considerations
· Unlike the Show Editor, which can be used to create many shows, and the Sequencer, which canbe used to create many sequences, the Schedule Editor only maintains a single schedule, andthe Show Player only uses that single schedule.
· The Show Player will not play any scheduled shows unless it is started and scheduled shows areenabled, via "Enable Schedule" in the Light-O-Rama Control Panel.
· After modifying your schedule in the Schedule Editor, make sure to save it. Changes to yourschedule will not be picked up by the Show Player until the schedule has been changed.
4.4 File Locations
The first time you start the Light-O-Rama software, you will be prompted for the name of the folder whereyou want to store sequences and other related files. The default choice is to create a "Light-O-Rama"sub-folder below your "Documents" folder, as shown below.
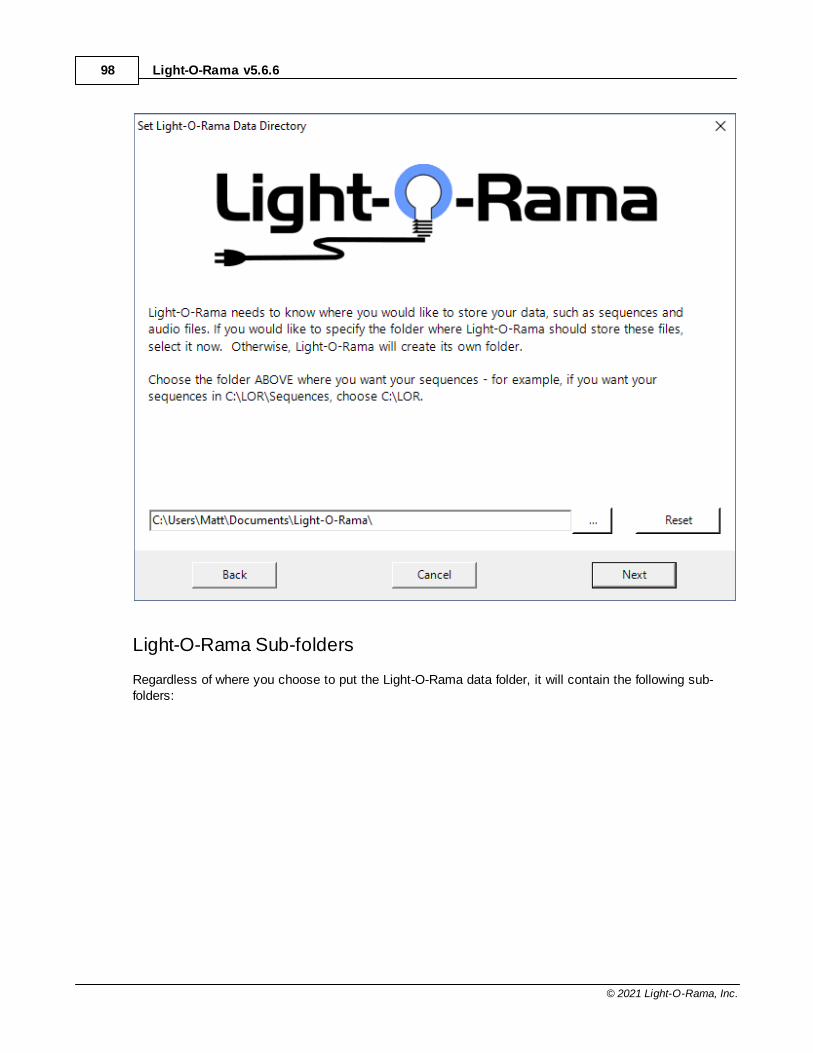
Light-O-Rama v5.6.698
© 2021 Light-O-Rama, Inc.
Light-O-Rama Sub-folders
Regardless of where you choose to put the Light-O-Rama data folder, it will contain the following sub-folders:
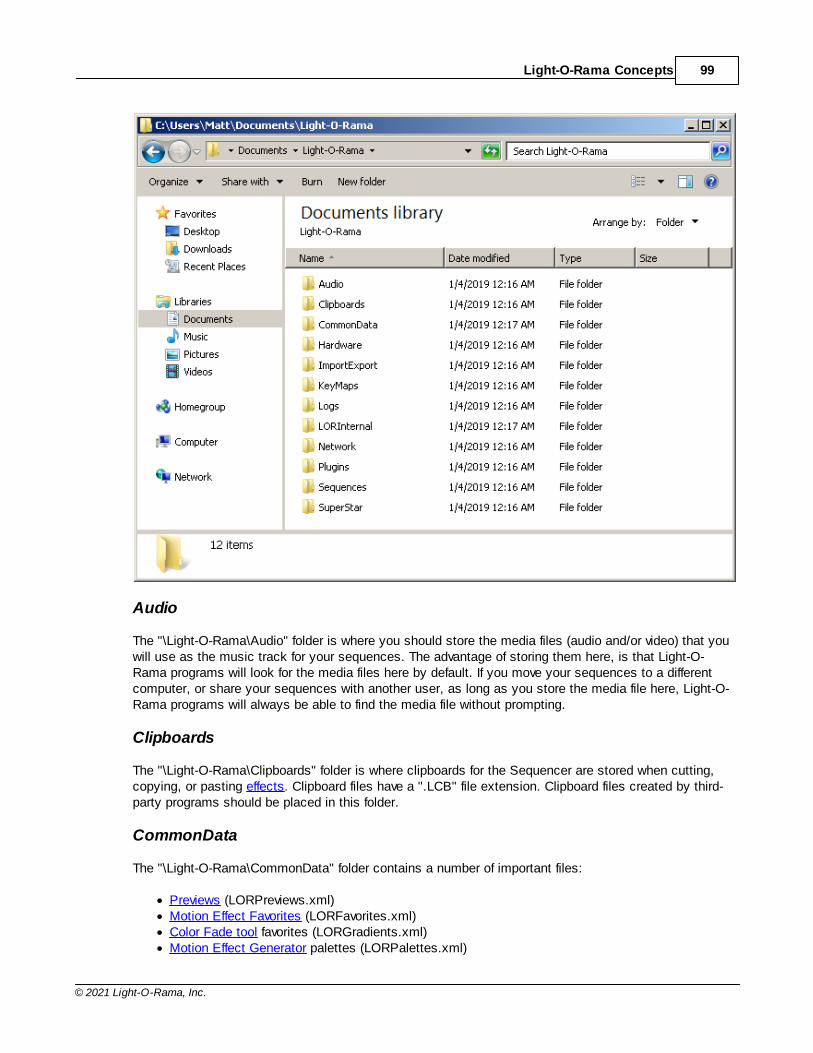
Light-O-Rama Concepts 99
© 2021 Light-O-Rama, Inc.
Audio
The "\Light-O-Rama\Audio" folder is where you should store the media files (audio and/or video) that youwill use as the music track for your sequences. The advantage of storing them here, is that Light-O-Rama programs will look for the media files here by default. If you move your sequences to a differentcomputer, or share your sequences with another user, as long as you store the media file here, Light-O-Rama programs will always be able to find the media file without prompting.
Clipboards
The "\Light-O-Rama\Clipboards" folder is where clipboards for the Sequencer are stored when cutting,copying, or pasting effects. Clipboard files have a ".LCB" file extension. Clipboard files created by third-party programs should be placed in this folder.
CommonData
The "\Light-O-Rama\CommonData" folder contains a number of important files:
· Previews (LORPreviews.xml)· Motion Effect Favorites (LORFavorites.xml)· Color Fade tool favorites (LORGradients.xml)· Motion Effect Generator palettes (LORPalettes.xml)
Light-O-Rama v5.6.6100
© 2021 Light-O-Rama, Inc.
· Custom Keyboard maps (CustomKeyMaps.xml)
Hardware
The "\Light-O-Rama\Hardware" folder stores dimming curves that can be loaded into a controller.
ImportExport
The "\Light-O-Rama\ImportExport" folder is the default location for files exported from the Sequencer,including previews, props, and motion effect favorites.
KeyMaps
The "\Light-O-Rama\KeyMaps" folder holds custom keymap files created in S4 or earlier. S5 customkeymaps are stored in CommonData.
Logs
The "\Light-O-Rama\Logs" folder is not currently used in S5.
LORInternal
The "\Light-O-Rama\LORInternal" folder is used as temporary storage by some Light-O-Rama programs.You should not make any changes to the items stored in this folder or any of its sub-folders.
Network
Below "\Light-O-Rama\Network" folder is a sub-folder called "SavedConfigurations", where exports fromNetwork Preferences are saved. These files have a ".LIV" extension.
Plugins
The "\Light-O-Rama\Plugins" folder contains sub-folders where files can be added to extend thefunctionality of the Sequencer:
· prop shapes (not yet supported)· motion effects (not yet supported)· software dimming curves
Sequences
The "\Light-O-Rama\Sequences" folder is where your sequence files should be stored. S5 Sequence fileshave a ".LOREDIT" extension.
SuperStar
The "\Light-O-Rama\SuperStar" folder contains files used by the SuperStar Sequencer.
Moving Files To A New Computer
Light-O-Rama Concepts 101
© 2021 Light-O-Rama, Inc.
If you move your Light-O-Rama software to a new computer, you should copy files in all of the sub-foldersnoted above, with the exception of Logs and LORInternal.
4.5 Hardware
Light-O-Rama can control your lights via Light-O-Rama controllers and Native DMX devices. The S5version has dropped support for: Dasher controllers, Digital IO cards, BSOFT digital IO cards, and X10controllers.
When a prop is created in a preview using the Sequencer, the kind of controller (known as "device type")is assigned in the Prop Definition window. It can also be changed on the Channel Conflicts & BulkChanges tab of Preview Design.
4.5.1 Light-O-Rama Controllers
Light-O-Rama allows your computer to control your lights via a variety of hardware controllers. Primaryamong these are Light-O-Rama controllers.
Some Light-O-Rama controllers can also act as input triggers, allowing you to start particular sequenceson demand (such as when a person pushes a button).
Unit IDs
Each Light-O-Rama controller is assigned a unit ID. A unit ID is an identifier for the controller, and istwo characters long, with each character being a digit (0-9) or a letter from A to F. For example, 37,25, 4B, C8, and DA are all valid unit IDs. Some such combinations are reserved, though, and shouldnot be used for as a unit ID. Specifically, 00, F1 through F9, and FA through FF are not valid unitIDs. See the Unit Id Values topic for a complete list.
Controllers will only react to lighting commands that are intended for their own unit ID; if twocontrollers on the same network have the same unit ID, both will react simultaneously to the samecommands. However, a unit set up to use input triggers must have its own unique unit ID, notshared with any other unit, and must not be on an LOR Enhanced network. Also, the HardwareUtility may react strangely with respect to a unit ID which has more than one unit - for example,detecting them as a single unit, or misdetecting them as some unknown controller type.
The unit ID of a controller is set in one of two ways, depending upon the type of controller:
· Most controllers have physical switches on them that allow you to set the unit ID by moving theswitches.
· Otherwise, the Hardware Utility can be used to select a unit ID for controllers without suchswitches.
It is generally a good habit to assign your unit IDs sequentially starting at 01. This is not necessary,but it will speed up some maintenance such as configuring and testing your controllers in theHardware Utility.
Circuit IDs

Light-O-Rama v5.6.6102
© 2021 Light-O-Rama, Inc.
Within a controller, each string of lights is assigned a specific circuit ID. This allows Light-O-Ramato make different lights do different effects at the same time, using the same controller.
Standalone Mode and Computer Controlled Mode
Light-O-Rama controllers can be set up in standalone mode, in which a sequence is downloaded tothem in advance via the Hardware Utility, or hooked up to your computer via a COM port, in whichcase the Light-O-Rama Show Player will send them lighting commands (during scheduled shows), orthe Light-O-Rama Sequencer will (on demand for a single sequence).
A controller in standalone mode can also send lighting commands to other controllers that arehooked up to it via phone lines or data lines, similarly to the way that the Show Player or Sequencerwould. Therefore, in standalone mode, a sequence only needs to be downloaded (via the HardwareUtility) to a single controller; the other controllers hooked up to it will receive their commands from it.
Only one source of lighting commands should be present in any group of controllers that are hookedup to each other - either the Show Player, the Sequencer, or a single controller with a downloadedsequence. Having more than one source of commands will cause unexpected and undesiredresults, as lighting commands will be missed or garbled.
Light-O-Rama Networks
The Show Player and Sequencer can control up to sixteen different networks of Light-O-Ramacontrollers, each hooked up over a different COM port. These networks are referred to as"Regular" (which is the default), "Aux A", "Aux B", "Aux C", and so on, up to "Aux O".
One main use of multiple networks is for displays with very large numbers of controllers; they enablemore lighting commands to be sent out at a single time. They also allow you to set up a sort of starnetwork centered on your PC, rather than a single long daisy chain of controllers; both of these maymake such sequences perform more smoothly.
Another use is for displays whose controllers are hooked up using wireless communications, via aLight-O-Rama Easy Light Linker. Wireless communications has a lower top speed than wired, butusing multiple wireless networks allows commands to be sent over all of them simultaneously. So,depending upon how many controllers you have and how many lighting effects you send them duringyour show, using multiple wireless networks could make your show perform more smoothly thanusing a single wireless network.
It is simplest, though, to just use a single Light-O-Rama network, and in many situations, this isperfectly sufficient.
Light-O-Rama networks can be either normal or "enhanced".
The COM ports represented by each of the networks can be set via the Light-O-Rama NetworkPreferences program. For example, the following picture shows COM3 assigned to the Regularnetwork, COM12 assigned to auxiliary network "Aux A", and the remainder of the networksunassigned, with Regular (COM3) being an enhanced network:
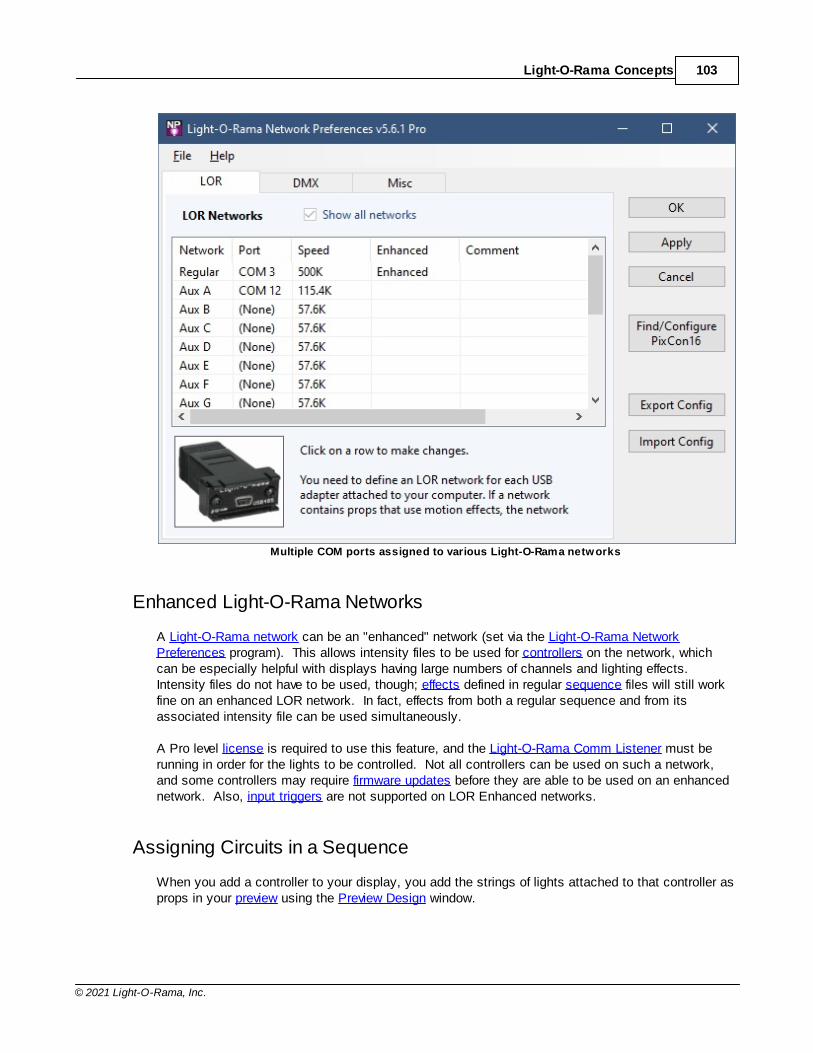
Light-O-Rama Concepts 103
© 2021 Light-O-Rama, Inc.
Multiple COM ports assigned to various Light-O-Rama networks
Enhanced Light-O-Rama Networks
A Light-O-Rama network can be an "enhanced" network (set via the Light-O-Rama NetworkPreferences program). This allows intensity files to be used for controllers on the network, whichcan be especially helpful with displays having large numbers of channels and lighting effects. Intensity files do not have to be used, though; effects defined in regular sequence files will still workfine on an enhanced LOR network. In fact, effects from both a regular sequence and from itsassociated intensity file can be used simultaneously.
A Pro level license is required to use this feature, and the Light-O-Rama Comm Listener must berunning in order for the lights to be controlled. Not all controllers can be used on such a network,and some controllers may require firmware updates before they are able to be used on an enhancednetwork. Also, input triggers are not supported on LOR Enhanced networks.
Assigning Circuits in a Sequence
When you add a controller to your display, you add the strings of lights attached to that controller asprops in your preview using the Preview Design window.
Light-O-Rama v5.6.6104
© 2021 Light-O-Rama, Inc.
4.5.2 Light-O-Rama Pixel Controllers
Light-O-Rama sells several different Pixel Controllers which support multiple different Pixel ICs. ThePixie 16, Pixie 8, and Pixie 4 controllers can support up to 100 pixels per port and fully integrate into theexisting Light-O-Rama network.
When you add a pixel controller to your display, you add the strings of pixels attached to that controlleras props in your preview using the Preview Design window.
4.5.3 Light-O-Rama PixCon16 Devices
With the introduction of the PixCon 16 controller, Light-O-Rama is now selling and supporting nativeE1.31 devices. These devices are configured from the Network Preferences program on the advancedtab. To start the configuration of LOR E1.31 devices, press the 'Find/Configure E1.31 devices' button.
When you add a PixCon 16 controller to your display, you add the strings of pixels attached to thatcontroller as props in your preview using the Preview Design window.
4.5.4 Native DMX Devices
In addition to Light-O-Rama controllers and various other types of controllers, Light-O-Rama can controlnative DMX devices, either directly over a serial port and adapter or over ethernet via E1.31.
When you add a DMX device to your display, you add the controller's channels as props in your previewusing the Preview Design window.
Several DMX universes can be used, each having a unique universe number from 1 to 999. Each shouldbe assigned a separate DMX adapter (such as an ENTTEC Open DMX USB adapter) or else E1.31settings (such as IP address and port). You can assign adapters or E1.31 settings to universes via theNetwork Preferences program.
Unlike other protocols (such as LOR), the DMX protocol requires that the LOR Control Panel be runningin order to actually control the devices. The LOR Control Panel will, in turn, start up the LOR CommListener. When a program such as the Sequencer or Show Player wants to send a command to a DMXdevice, it actually sends the command to the LOR Comm Listener, which in turn sends it out over theadapter or E1.31 address assigned to the device's specified universe.
Note that you do not have to use the "DMX Intensity" effect on DMX channels. You can, but you canalso use any other effect (such as Fade Up or Twinkle). If you use a DMX Intensity effect, it will have anatural DMX intensity range of 0 to 255. If you use any other effect, it will have a range of 0 to 100, butLight-O-Rama will automatically scale it to DMX's 0 to 255 range immediately before sending it out to theactual DMX device.
4.5.5 LED Pixel and Node Terminology
When discussing individually addressable bulbs, there are many terms that can be used. In an effort tostandardize these terms when dealing with RGB devices, Light-O-Rama defines the following:
· 'LED' (or 'Light'): A single locus (point) of light. One or more LEDs are part of a NODE. LEDs (orLIGHTs) are elemental - they can NOT be broken down further.
· 'Node': A single processor for one or more LEDs. Nodes are PHYSICAL. Think of them as theprocessor chip on every individual LED/LIGHT.

Light-O-Rama Concepts 105
© 2021 Light-O-Rama, Inc.
· 'Pixel': A pixel is a collection of one or more NODEs. Pixels are VIRTUAL, and controlled by a singleTRIPLET. All nodes that are part of a pixel will react in the same way. Pixels are the 'bridge' betweenthe physical world and the virtual (sequencing) world.
· 'Triplet': A group of 3 CHANNELs that set the color of a PIXEL. When we speak about a triplet wedo not specify the order of the CHANNELs. For example, some pixels are in RGB order, while someothers could be in GRB order. Either of those orders refer to the same triplet.
· 'Channel': A channel controls a single color of a TRIPLET. A TRIPLET consists of 3 channels: Red,Green, Blue in the order specified by the manufacturer of the string.
The number of TRIPLETs required will always be the same as the number of PIXELs. When we talkabout something that you can physically touch we use 'Pixel'. When we are talking about it otherwise,say in reference to a sequence, we use 'Triplet'.
Here are some examples to help:
A Light-O-Rama Cosmic Color Ribbon has 150 LEDs. Every 3 LEDs are attached to a single NODE. When you set the resolution of the CCR, you control how many consecutive NODES are assigned to asingle PIXEL. At a resolution of 50, each NODE is controlled by 1 PIXEL for a total of 50 PIXELs. At aresolution of 25, every two NODEs are controlled by 1 PIXEL for a total of 25. In all cases a singleTRIPLET will control a single PIXEL.
You may have a string of 170 RGB LEDs. Each one of these LEDs is attached to a single NODE. If youdo not group any of the NODEs together, you will have 170 PIXELs that are controlled by 170 TRIPLETswhich consist of 3 CHANNELs each for a total of 510 CHANNELs.
Separating the notion of Nodes from Pixels also allows virtual addressing to make more sense. Forexample, say you have 30 pixels that are arranged as a 10 x 3 matrix. When you physically constructthis matrix, you will most likely use a snake pattern as that minimizes the amount of wire/etc. YourNODES will look like this:
1 2 3 4 5 6 7 8 9 1020 19 18 17 16 15 14 13 12 1121 22 23 24 25 26 27 28 29 30
Notice how when we get to the right side, we don't start over at the left, but instead go one line lower andin reverse order. While that makes a lot of sense while building the matrix, logically the pixels are not inthe correct order. Since we read left-to-right, we'd like to see all the pixels ordered from left to right. Ifwe were to set the 'Zig-Zag' parameter on a PixCon16 to 3, the physical nodes will still be in the sameorder, however the pixels will be numbered:
1 2 3 4 5 6 7 8 9 1011 12 13 14 15 16 17 18 19 2021 22 23 24 25 26 27 28 29 30
Since NODE refers to the physical and PIXEL refers to the virtual, we now can state 'Node 18 is Pixel13', and it makes sense.
4.6 Unit Id Values
The numbers we use in everyday life are decimals, where each digit has a value between 0 and 9. Light-O-Rama unit ids are usually represented has hexadecimal numbers (aka "hex"), meaning each digit cantake on 16 values: 0 through 9, followed by A through F. The following table can be used to convertbetween the systems.
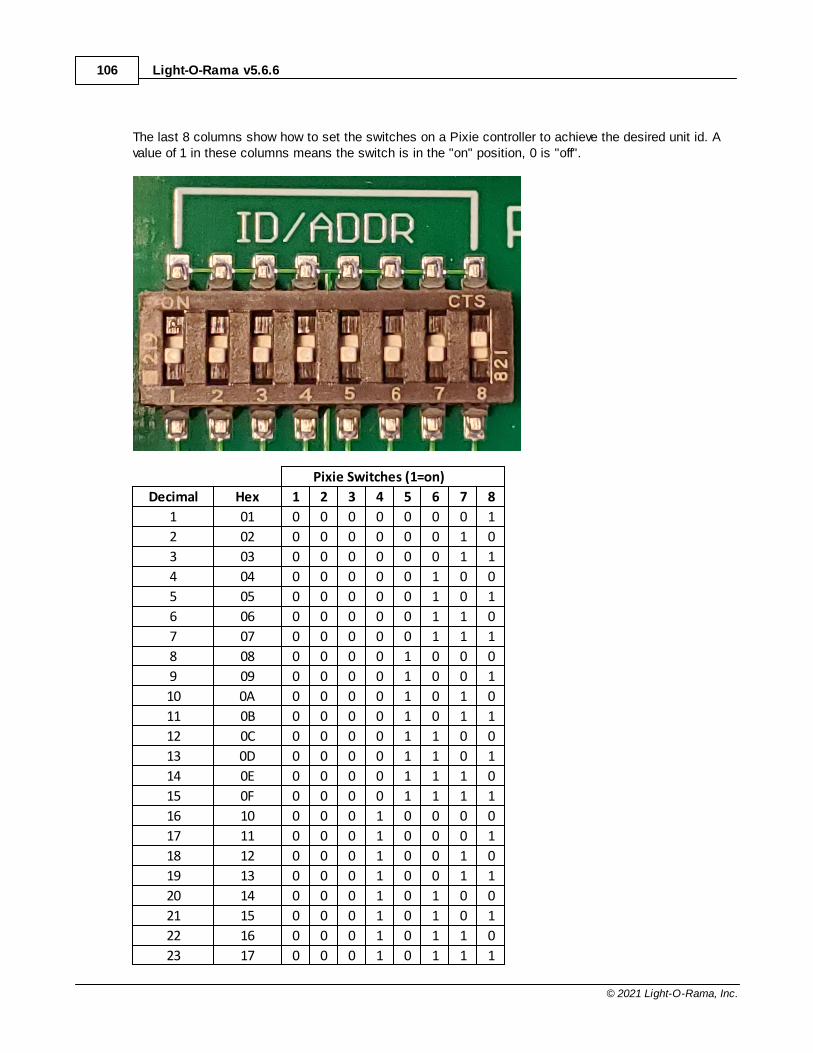
Light-O-Rama v5.6.6106
© 2021 Light-O-Rama, Inc.
The last 8 columns show how to set the switches on a Pixie controller to achieve the desired unit id. Avalue of 1 in these columns means the switch is in the "on" position, 0 is "off".
Pixie Switches (1=on)
Decimal Hex 1 2 3 4 5 6 7 8
1 01 0 0 0 0 0 0 0 1
2 02 0 0 0 0 0 0 1 0
3 03 0 0 0 0 0 0 1 1
4 04 0 0 0 0 0 1 0 0
5 05 0 0 0 0 0 1 0 1
6 06 0 0 0 0 0 1 1 0
7 07 0 0 0 0 0 1 1 1
8 08 0 0 0 0 1 0 0 0
9 09 0 0 0 0 1 0 0 1
10 0A 0 0 0 0 1 0 1 0
11 0B 0 0 0 0 1 0 1 1
12 0C 0 0 0 0 1 1 0 0
13 0D 0 0 0 0 1 1 0 1
14 0E 0 0 0 0 1 1 1 0
15 0F 0 0 0 0 1 1 1 1
16 10 0 0 0 1 0 0 0 0
17 11 0 0 0 1 0 0 0 1
18 12 0 0 0 1 0 0 1 0
19 13 0 0 0 1 0 0 1 1
20 14 0 0 0 1 0 1 0 0
21 15 0 0 0 1 0 1 0 1
22 16 0 0 0 1 0 1 1 0
23 17 0 0 0 1 0 1 1 1
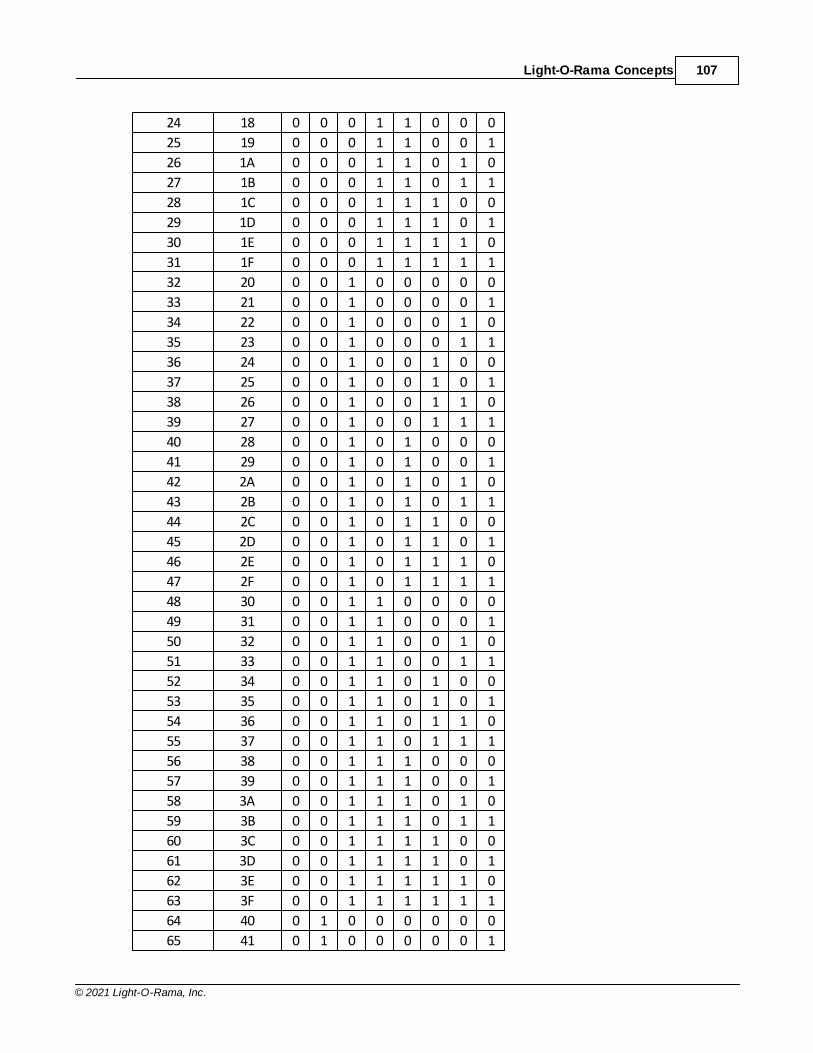
Light-O-Rama Concepts 107
© 2021 Light-O-Rama, Inc.
24 18 0 0 0 1 1 0 0 0
25 19 0 0 0 1 1 0 0 1
26 1A 0 0 0 1 1 0 1 0
27 1B 0 0 0 1 1 0 1 1
28 1C 0 0 0 1 1 1 0 0
29 1D 0 0 0 1 1 1 0 1
30 1E 0 0 0 1 1 1 1 0
31 1F 0 0 0 1 1 1 1 1
32 20 0 0 1 0 0 0 0 0
33 21 0 0 1 0 0 0 0 1
34 22 0 0 1 0 0 0 1 0
35 23 0 0 1 0 0 0 1 1
36 24 0 0 1 0 0 1 0 0
37 25 0 0 1 0 0 1 0 1
38 26 0 0 1 0 0 1 1 0
39 27 0 0 1 0 0 1 1 1
40 28 0 0 1 0 1 0 0 0
41 29 0 0 1 0 1 0 0 1
42 2A 0 0 1 0 1 0 1 0
43 2B 0 0 1 0 1 0 1 1
44 2C 0 0 1 0 1 1 0 0
45 2D 0 0 1 0 1 1 0 1
46 2E 0 0 1 0 1 1 1 0
47 2F 0 0 1 0 1 1 1 1
48 30 0 0 1 1 0 0 0 0
49 31 0 0 1 1 0 0 0 1
50 32 0 0 1 1 0 0 1 0
51 33 0 0 1 1 0 0 1 1
52 34 0 0 1 1 0 1 0 0
53 35 0 0 1 1 0 1 0 1
54 36 0 0 1 1 0 1 1 0
55 37 0 0 1 1 0 1 1 1
56 38 0 0 1 1 1 0 0 0
57 39 0 0 1 1 1 0 0 1
58 3A 0 0 1 1 1 0 1 0
59 3B 0 0 1 1 1 0 1 1
60 3C 0 0 1 1 1 1 0 0
61 3D 0 0 1 1 1 1 0 1
62 3E 0 0 1 1 1 1 1 0
63 3F 0 0 1 1 1 1 1 1
64 40 0 1 0 0 0 0 0 0
65 41 0 1 0 0 0 0 0 1
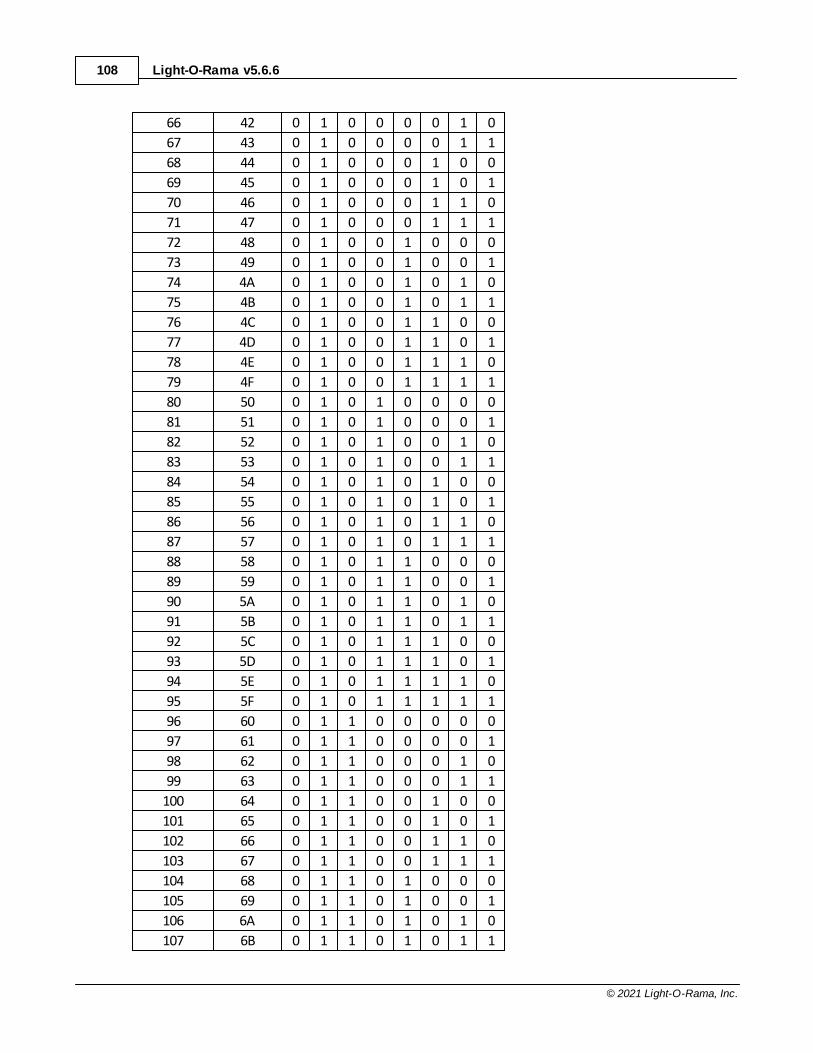
Light-O-Rama v5.6.6108
© 2021 Light-O-Rama, Inc.
66 42 0 1 0 0 0 0 1 0
67 43 0 1 0 0 0 0 1 1
68 44 0 1 0 0 0 1 0 0
69 45 0 1 0 0 0 1 0 1
70 46 0 1 0 0 0 1 1 0
71 47 0 1 0 0 0 1 1 1
72 48 0 1 0 0 1 0 0 0
73 49 0 1 0 0 1 0 0 1
74 4A 0 1 0 0 1 0 1 0
75 4B 0 1 0 0 1 0 1 1
76 4C 0 1 0 0 1 1 0 0
77 4D 0 1 0 0 1 1 0 1
78 4E 0 1 0 0 1 1 1 0
79 4F 0 1 0 0 1 1 1 1
80 50 0 1 0 1 0 0 0 0
81 51 0 1 0 1 0 0 0 1
82 52 0 1 0 1 0 0 1 0
83 53 0 1 0 1 0 0 1 1
84 54 0 1 0 1 0 1 0 0
85 55 0 1 0 1 0 1 0 1
86 56 0 1 0 1 0 1 1 0
87 57 0 1 0 1 0 1 1 1
88 58 0 1 0 1 1 0 0 0
89 59 0 1 0 1 1 0 0 1
90 5A 0 1 0 1 1 0 1 0
91 5B 0 1 0 1 1 0 1 1
92 5C 0 1 0 1 1 1 0 0
93 5D 0 1 0 1 1 1 0 1
94 5E 0 1 0 1 1 1 1 0
95 5F 0 1 0 1 1 1 1 1
96 60 0 1 1 0 0 0 0 0
97 61 0 1 1 0 0 0 0 1
98 62 0 1 1 0 0 0 1 0
99 63 0 1 1 0 0 0 1 1
100 64 0 1 1 0 0 1 0 0
101 65 0 1 1 0 0 1 0 1
102 66 0 1 1 0 0 1 1 0
103 67 0 1 1 0 0 1 1 1
104 68 0 1 1 0 1 0 0 0
105 69 0 1 1 0 1 0 0 1
106 6A 0 1 1 0 1 0 1 0
107 6B 0 1 1 0 1 0 1 1

Light-O-Rama Concepts 109
© 2021 Light-O-Rama, Inc.
108 6C 0 1 1 0 1 1 0 0
109 6D 0 1 1 0 1 1 0 1
110 6E 0 1 1 0 1 1 1 0
111 6F 0 1 1 0 1 1 1 1
112 70 0 1 1 1 0 0 0 0
113 71 0 1 1 1 0 0 0 1
114 72 0 1 1 1 0 0 1 0
115 73 0 1 1 1 0 0 1 1
116 74 0 1 1 1 0 1 0 0
117 75 0 1 1 1 0 1 0 1
118 76 0 1 1 1 0 1 1 0
119 77 0 1 1 1 0 1 1 1
120 78 0 1 1 1 1 0 0 0
121 79 0 1 1 1 1 0 0 1
122 7A 0 1 1 1 1 0 1 0
123 7B 0 1 1 1 1 0 1 1
124 7C 0 1 1 1 1 1 0 0
125 7D 0 1 1 1 1 1 0 1
126 7E 0 1 1 1 1 1 1 0
127 7F 0 1 1 1 1 1 1 1
128 80 1 0 0 0 0 0 0 0
129 81 1 0 0 0 0 0 0 1
130 82 1 0 0 0 0 0 1 0
131 83 1 0 0 0 0 0 1 1
132 84 1 0 0 0 0 1 0 0
133 85 1 0 0 0 0 1 0 1
134 86 1 0 0 0 0 1 1 0
135 87 1 0 0 0 0 1 1 1
136 88 1 0 0 0 1 0 0 0
137 89 1 0 0 0 1 0 0 1
138 8A 1 0 0 0 1 0 1 0
139 8B 1 0 0 0 1 0 1 1
140 8C 1 0 0 0 1 1 0 0
141 8D 1 0 0 0 1 1 0 1
142 8E 1 0 0 0 1 1 1 0
143 8F 1 0 0 0 1 1 1 1
144 90 1 0 0 1 0 0 0 0
145 91 1 0 0 1 0 0 0 1
146 92 1 0 0 1 0 0 1 0
147 93 1 0 0 1 0 0 1 1
148 94 1 0 0 1 0 1 0 0
149 95 1 0 0 1 0 1 0 1
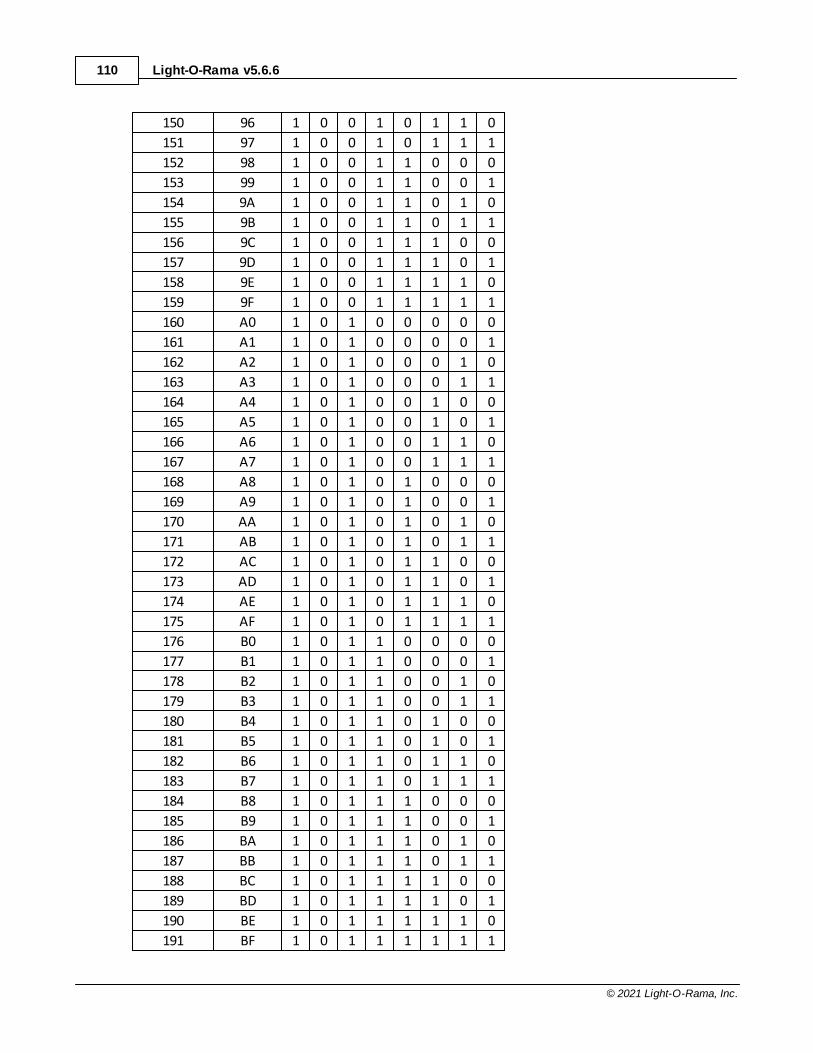
Light-O-Rama v5.6.6110
© 2021 Light-O-Rama, Inc.
150 96 1 0 0 1 0 1 1 0
151 97 1 0 0 1 0 1 1 1
152 98 1 0 0 1 1 0 0 0
153 99 1 0 0 1 1 0 0 1
154 9A 1 0 0 1 1 0 1 0
155 9B 1 0 0 1 1 0 1 1
156 9C 1 0 0 1 1 1 0 0
157 9D 1 0 0 1 1 1 0 1
158 9E 1 0 0 1 1 1 1 0
159 9F 1 0 0 1 1 1 1 1
160 A0 1 0 1 0 0 0 0 0
161 A1 1 0 1 0 0 0 0 1
162 A2 1 0 1 0 0 0 1 0
163 A3 1 0 1 0 0 0 1 1
164 A4 1 0 1 0 0 1 0 0
165 A5 1 0 1 0 0 1 0 1
166 A6 1 0 1 0 0 1 1 0
167 A7 1 0 1 0 0 1 1 1
168 A8 1 0 1 0 1 0 0 0
169 A9 1 0 1 0 1 0 0 1
170 AA 1 0 1 0 1 0 1 0
171 AB 1 0 1 0 1 0 1 1
172 AC 1 0 1 0 1 1 0 0
173 AD 1 0 1 0 1 1 0 1
174 AE 1 0 1 0 1 1 1 0
175 AF 1 0 1 0 1 1 1 1
176 B0 1 0 1 1 0 0 0 0
177 B1 1 0 1 1 0 0 0 1
178 B2 1 0 1 1 0 0 1 0
179 B3 1 0 1 1 0 0 1 1
180 B4 1 0 1 1 0 1 0 0
181 B5 1 0 1 1 0 1 0 1
182 B6 1 0 1 1 0 1 1 0
183 B7 1 0 1 1 0 1 1 1
184 B8 1 0 1 1 1 0 0 0
185 B9 1 0 1 1 1 0 0 1
186 BA 1 0 1 1 1 0 1 0
187 BB 1 0 1 1 1 0 1 1
188 BC 1 0 1 1 1 1 0 0
189 BD 1 0 1 1 1 1 0 1
190 BE 1 0 1 1 1 1 1 0
191 BF 1 0 1 1 1 1 1 1
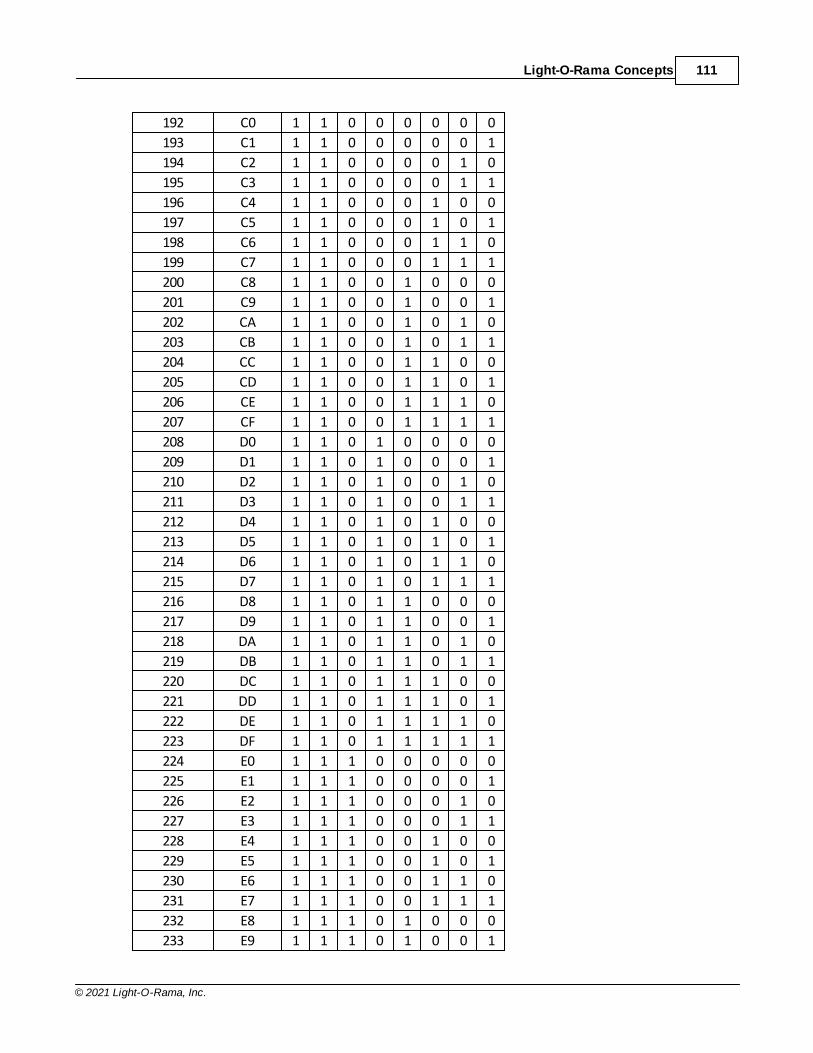
Light-O-Rama Concepts 111
© 2021 Light-O-Rama, Inc.
192 C0 1 1 0 0 0 0 0 0
193 C1 1 1 0 0 0 0 0 1
194 C2 1 1 0 0 0 0 1 0
195 C3 1 1 0 0 0 0 1 1
196 C4 1 1 0 0 0 1 0 0
197 C5 1 1 0 0 0 1 0 1
198 C6 1 1 0 0 0 1 1 0
199 C7 1 1 0 0 0 1 1 1
200 C8 1 1 0 0 1 0 0 0
201 C9 1 1 0 0 1 0 0 1
202 CA 1 1 0 0 1 0 1 0
203 CB 1 1 0 0 1 0 1 1
204 CC 1 1 0 0 1 1 0 0
205 CD 1 1 0 0 1 1 0 1
206 CE 1 1 0 0 1 1 1 0
207 CF 1 1 0 0 1 1 1 1
208 D0 1 1 0 1 0 0 0 0
209 D1 1 1 0 1 0 0 0 1
210 D2 1 1 0 1 0 0 1 0
211 D3 1 1 0 1 0 0 1 1
212 D4 1 1 0 1 0 1 0 0
213 D5 1 1 0 1 0 1 0 1
214 D6 1 1 0 1 0 1 1 0
215 D7 1 1 0 1 0 1 1 1
216 D8 1 1 0 1 1 0 0 0
217 D9 1 1 0 1 1 0 0 1
218 DA 1 1 0 1 1 0 1 0
219 DB 1 1 0 1 1 0 1 1
220 DC 1 1 0 1 1 1 0 0
221 DD 1 1 0 1 1 1 0 1
222 DE 1 1 0 1 1 1 1 0
223 DF 1 1 0 1 1 1 1 1
224 E0 1 1 1 0 0 0 0 0
225 E1 1 1 1 0 0 0 0 1
226 E2 1 1 1 0 0 0 1 0
227 E3 1 1 1 0 0 0 1 1
228 E4 1 1 1 0 0 1 0 0
229 E5 1 1 1 0 0 1 0 1
230 E6 1 1 1 0 0 1 1 0
231 E7 1 1 1 0 0 1 1 1
232 E8 1 1 1 0 1 0 0 0
233 E9 1 1 1 0 1 0 0 1
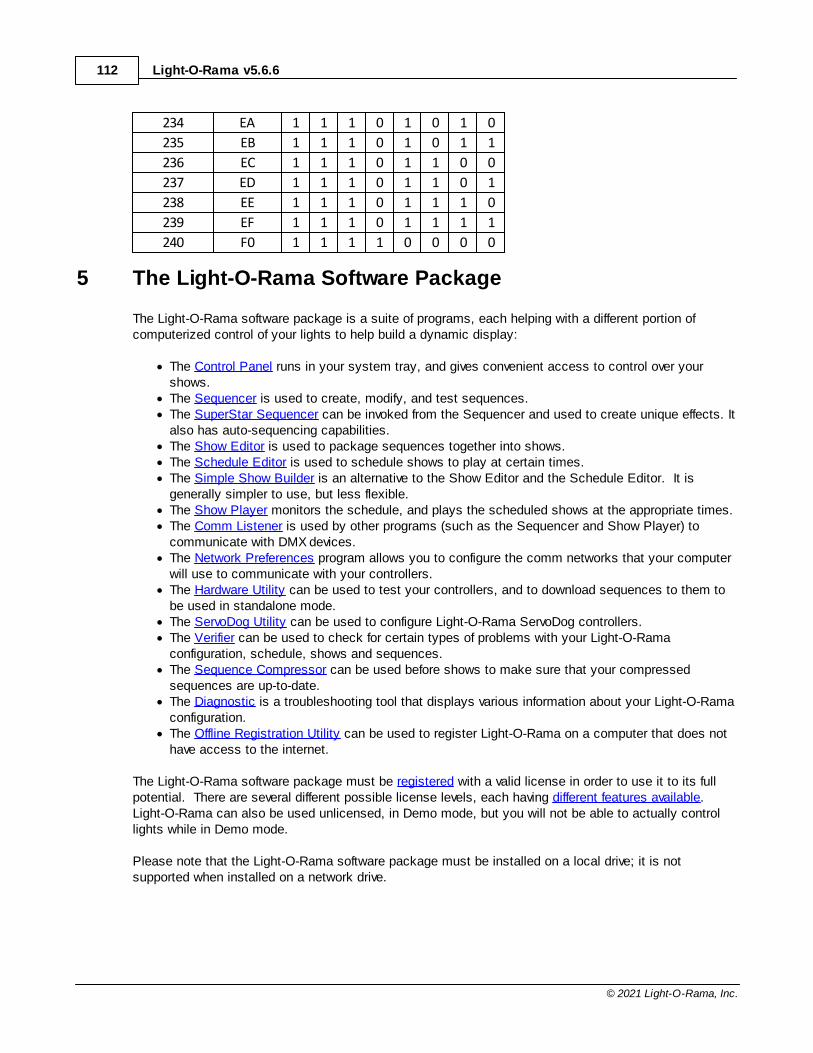
Light-O-Rama v5.6.6112
© 2021 Light-O-Rama, Inc.
234 EA 1 1 1 0 1 0 1 0
235 EB 1 1 1 0 1 0 1 1
236 EC 1 1 1 0 1 1 0 0
237 ED 1 1 1 0 1 1 0 1
238 EE 1 1 1 0 1 1 1 0
239 EF 1 1 1 0 1 1 1 1
240 F0 1 1 1 1 0 0 0 0
5 The Light-O-Rama Software Package
The Light-O-Rama software package is a suite of programs, each helping with a different portion ofcomputerized control of your lights to help build a dynamic display:
· The Control Panel runs in your system tray, and gives convenient access to control over yourshows.
· The Sequencer is used to create, modify, and test sequences.· The SuperStar Sequencer can be invoked from the Sequencer and used to create unique effects. It
also has auto-sequencing capabilities.· The Show Editor is used to package sequences together into shows.· The Schedule Editor is used to schedule shows to play at certain times.· The Simple Show Builder is an alternative to the Show Editor and the Schedule Editor. It is
generally simpler to use, but less flexible.· The Show Player monitors the schedule, and plays the scheduled shows at the appropriate times.· The Comm Listener is used by other programs (such as the Sequencer and Show Player) to
communicate with DMX devices.· The Network Preferences program allows you to configure the comm networks that your computer
will use to communicate with your controllers.· The Hardware Utility can be used to test your controllers, and to download sequences to them to
be used in standalone mode.· The ServoDog Utility can be used to configure Light-O-Rama ServoDog controllers.· The Verifier can be used to check for certain types of problems with your Light-O-Rama
configuration, schedule, shows and sequences.· The Sequence Compressor can be used before shows to make sure that your compressed
sequences are up-to-date.· The Diagnostic is a troubleshooting tool that displays various information about your Light-O-Rama
configuration.· The Offline Registration Utility can be used to register Light-O-Rama on a computer that does not
have access to the internet.
The Light-O-Rama software package must be registered with a valid license in order to use it to its fullpotential. There are several different possible license levels, each having different features available. Light-O-Rama can also be used unlicensed, in Demo mode, but you will not be able to actually controllights while in Demo mode.
Please note that the Light-O-Rama software package must be installed on a local drive; it is notsupported when installed on a network drive.
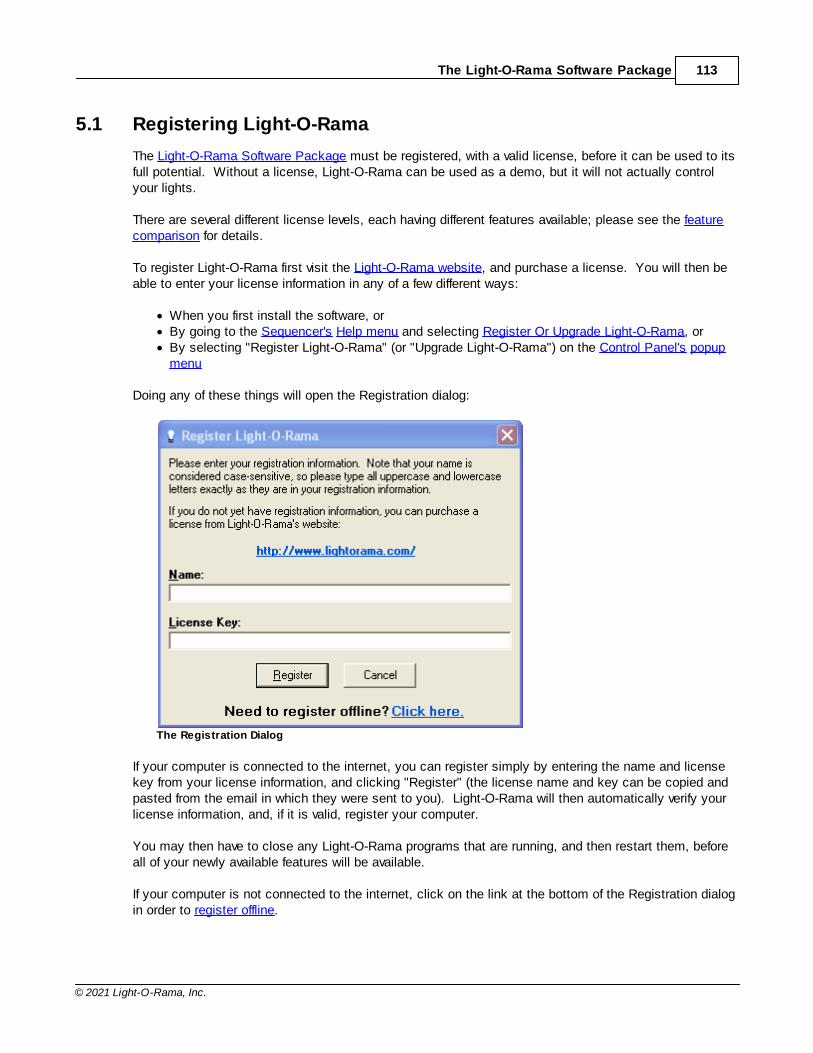
The Light-O-Rama Software Package 113
© 2021 Light-O-Rama, Inc.
5.1 Registering Light-O-Rama
The Light-O-Rama Software Package must be registered, with a valid license, before it can be used to itsfull potential. Without a license, Light-O-Rama can be used as a demo, but it will not actually controlyour lights.
There are several different license levels, each having different features available; please see the featurecomparison for details.
To register Light-O-Rama first visit the Light-O-Rama website, and purchase a license. You will then beable to enter your license information in any of a few different ways:
· When you first install the software, or · By going to the Sequencer's Help menu and selecting Register Or Upgrade Light-O-Rama, or · By selecting "Register Light-O-Rama" (or "Upgrade Light-O-Rama") on the Control Panel's popup
menu
Doing any of these things will open the Registration dialog:
The Registration Dialog
If your computer is connected to the internet, you can register simply by entering the name and licensekey from your license information, and clicking "Register" (the license name and key can be copied andpasted from the email in which they were sent to you). Light-O-Rama will then automatically verify yourlicense information, and, if it is valid, register your computer.
You may then have to close any Light-O-Rama programs that are running, and then restart them, beforeall of your newly available features will be available.
If your computer is not connected to the internet, click on the link at the bottom of the Registration dialogin order to register offline.
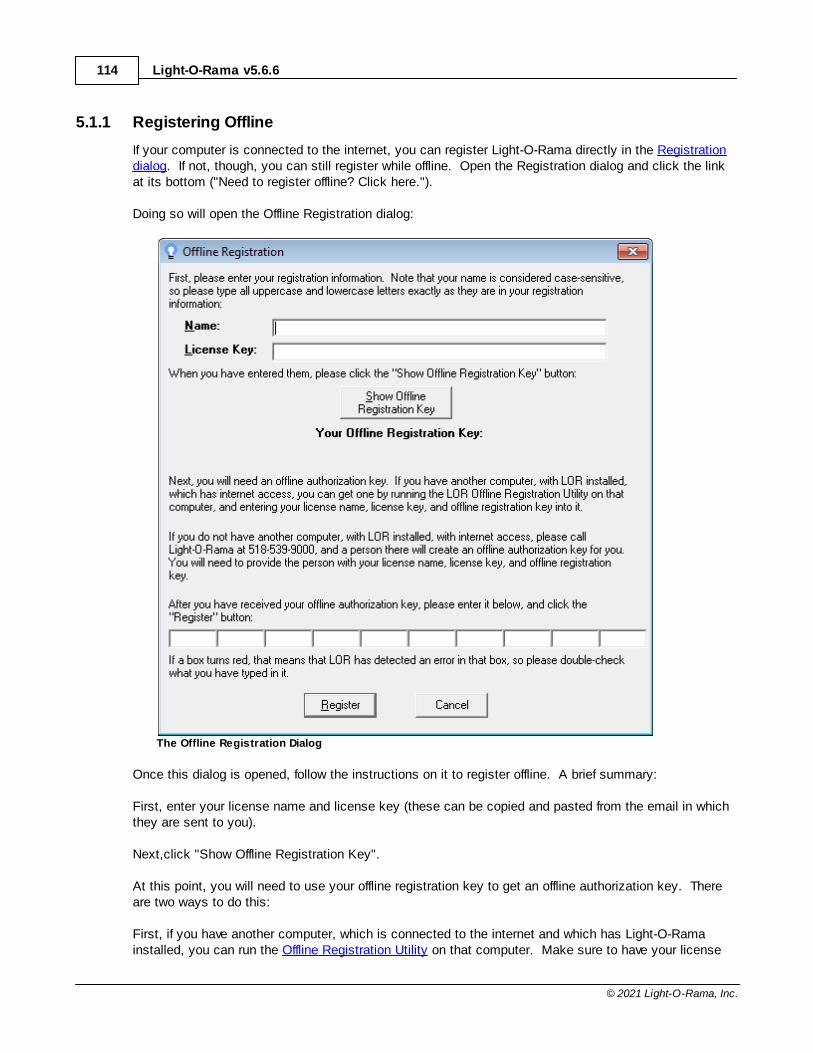
Light-O-Rama v5.6.6114
© 2021 Light-O-Rama, Inc.
5.1.1 Registering Offline
If your computer is connected to the internet, you can register Light-O-Rama directly in the Registrationdialog. If not, though, you can still register while offline. Open the Registration dialog and click the linkat its bottom ("Need to register offline? Click here.").
Doing so will open the Offline Registration dialog:
The Offline Registration Dialog
Once this dialog is opened, follow the instructions on it to register offline. A brief summary:
First, enter your license name and license key (these can be copied and pasted from the email in whichthey are sent to you).
Next,click "Show Offline Registration Key".
At this point, you will need to use your offline registration key to get an offline authorization key. Thereare two ways to do this:
First, if you have another computer, which is connected to the internet and which has Light-O-Ramainstalled, you can run the Offline Registration Utility on that computer. Make sure to have your license
The Light-O-Rama Software Package 115
© 2021 Light-O-Rama, Inc.
name, license key, and offline registration key available to enter onto that computer; the OfflineRegistration Utility will use them to create an offline authorization key.
If you do not have another computer that you can use to run the Offline Registration Utility, then you canobtain an offline authorization key by calling Light-O-Rama, at the telephone number shown on the form. Provide the person you speak to with your license name, license key, and offline registration key, andthey will provide an offline authorization key to you.
After you have obtained an offline authorization key, type it into the boxes near the bottom of the form,and click "Register".
After you have successfully registered, you may need to close any Light-O-Rama programs that arerunning and restart them before all of your newly available features can be used.
5.2 Control Panel
What is the Light-O-Rama Control Panel?
The Light-O-Rama Control Panel is an application that runs in your system tray, allowing convenientaccess to other programs in the Light-O-Rama software package, as well as control over yourdisplays.
The Light-O-Rama control panel must be running in order for the Show Player to play your scheduled shows (additionally, "Enable Schedule" must be turned on). It also must be running in order tocontrol lights on LOR Enhanced networks or on DMX networks.
Running the Light-O-Rama Control Panel
To run the Light-O-Rama Control Panel, select it from your computer's Start menu, under AllPrograms (or "All apps") / Light-O-Rama / Light-O-Rama Control Panel:
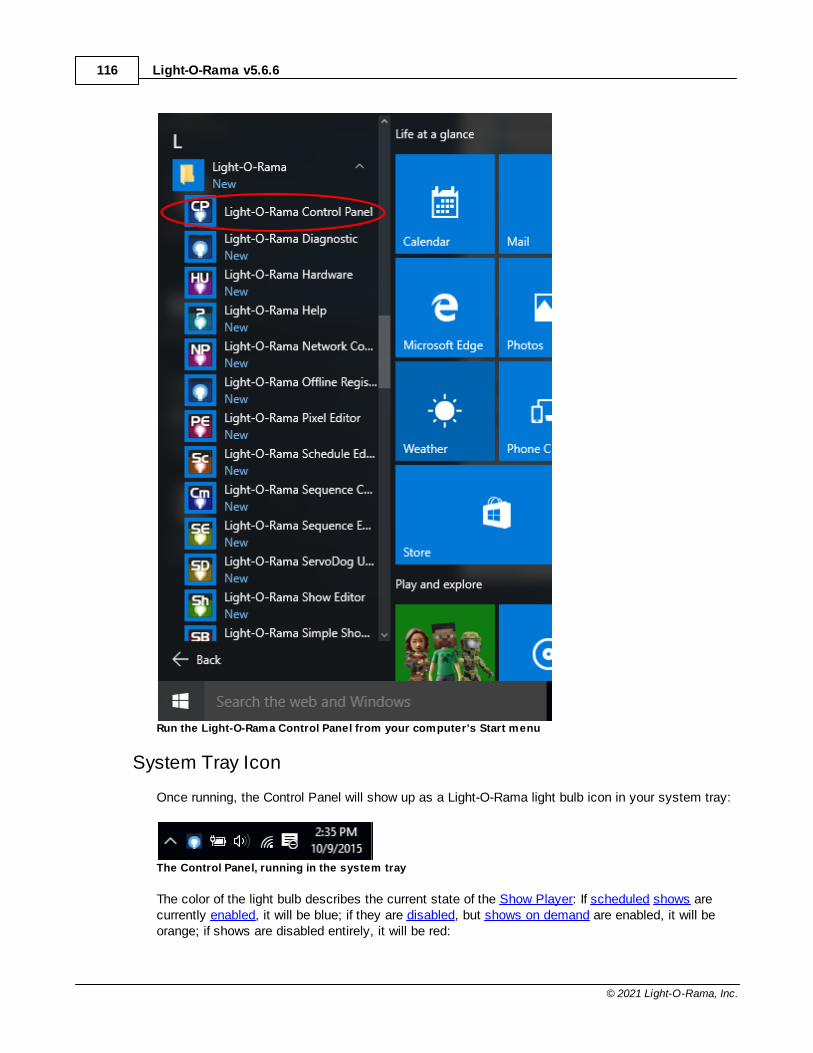
Light-O-Rama v5.6.6116
© 2021 Light-O-Rama, Inc.
Run the Light-O-Rama Control Panel from your computer's Start menu
System Tray Icon
Once running, the Control Panel will show up as a Light-O-Rama light bulb icon in your system tray:
The Control Panel, running in the system tray
The color of the light bulb describes the current state of the Show Player: If scheduled shows arecurrently enabled, it will be blue; if they are disabled, but shows on demand are enabled, it will beorange; if shows are disabled entirely, it will be red:
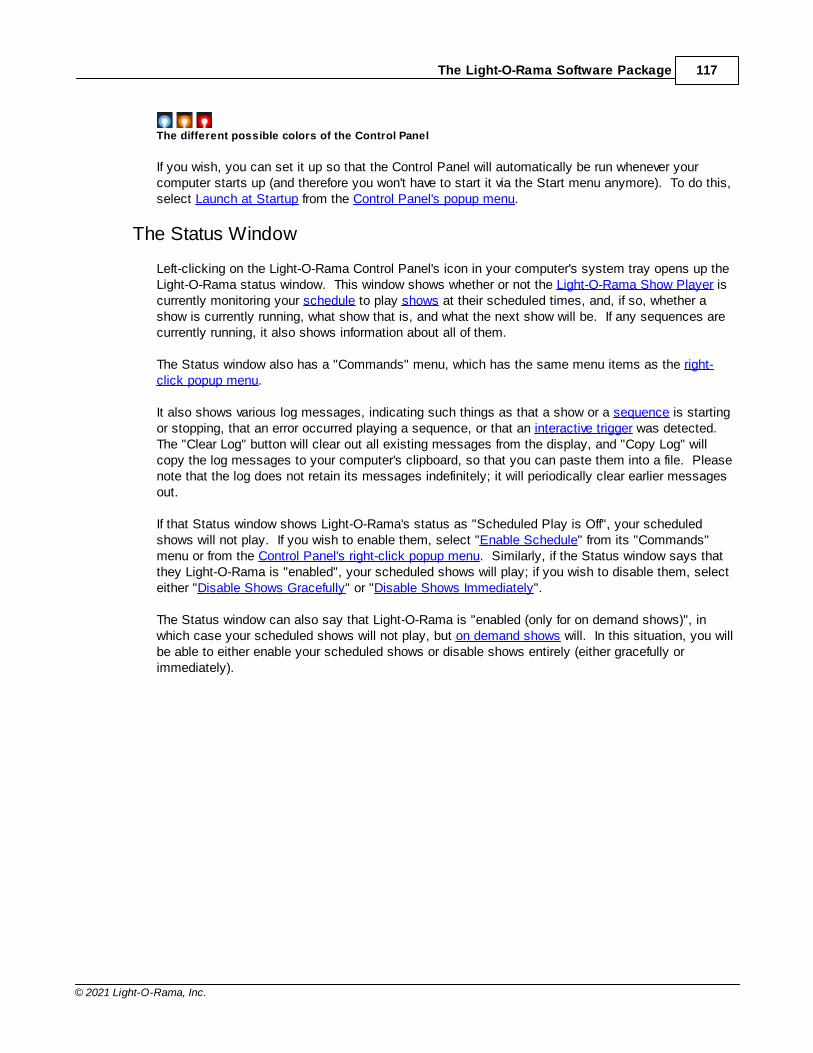
The Light-O-Rama Software Package 117
© 2021 Light-O-Rama, Inc.
The different possible colors of the Control Panel
If you wish, you can set it up so that the Control Panel will automatically be run whenever yourcomputer starts up (and therefore you won't have to start it via the Start menu anymore). To do this,select Launch at Startup from the Control Panel's popup menu.
The Status Window
Left-clicking on the Light-O-Rama Control Panel's icon in your computer's system tray opens up theLight-O-Rama status window. This window shows whether or not the Light-O-Rama Show Player iscurrently monitoring your schedule to play shows at their scheduled times, and, if so, whether ashow is currently running, what show that is, and what the next show will be. If any sequences arecurrently running, it also shows information about all of them.
The Status window also has a "Commands" menu, which has the same menu items as the right-click popup menu.
It also shows various log messages, indicating such things as that a show or a sequence is startingor stopping, that an error occurred playing a sequence, or that an interactive trigger was detected. The "Clear Log" button will clear out all existing messages from the display, and "Copy Log" willcopy the log messages to your computer's clipboard, so that you can paste them into a file. Pleasenote that the log does not retain its messages indefinitely; it will periodically clear earlier messagesout.
If that Status window shows Light-O-Rama's status as "Scheduled Play is Off", your scheduledshows will not play. If you wish to enable them, select "Enable Schedule" from its "Commands"menu or from the Control Panel's right-click popup menu. Similarly, if the Status window says thatthey Light-O-Rama is "enabled", your scheduled shows will play; if you wish to disable them, selecteither "Disable Shows Gracefully" or "Disable Shows Immediately".
The Status window can also say that Light-O-Rama is "enabled (only for on demand shows)", inwhich case your scheduled shows will not play, but on demand shows will. In this situation, you willbe able to either enable your scheduled shows or disable shows entirely (either gracefully orimmediately).
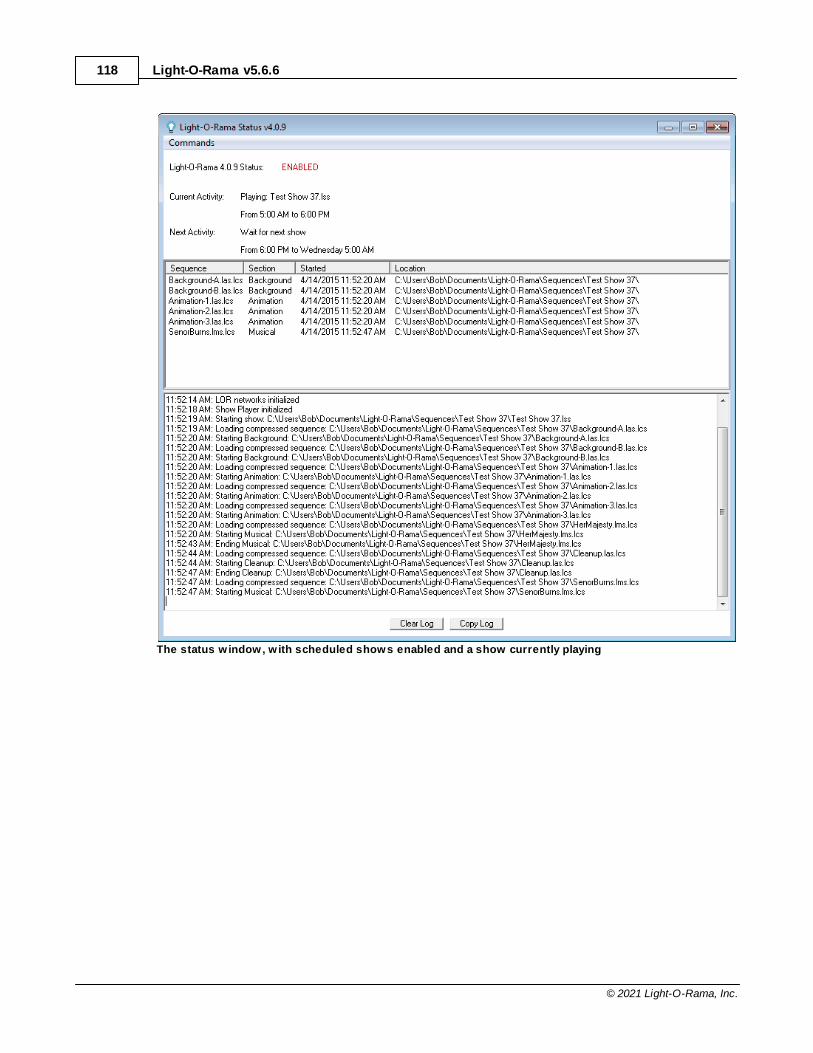
Light-O-Rama v5.6.6118
© 2021 Light-O-Rama, Inc.
The status w indow, w ith scheduled shows enabled and a show currently playing
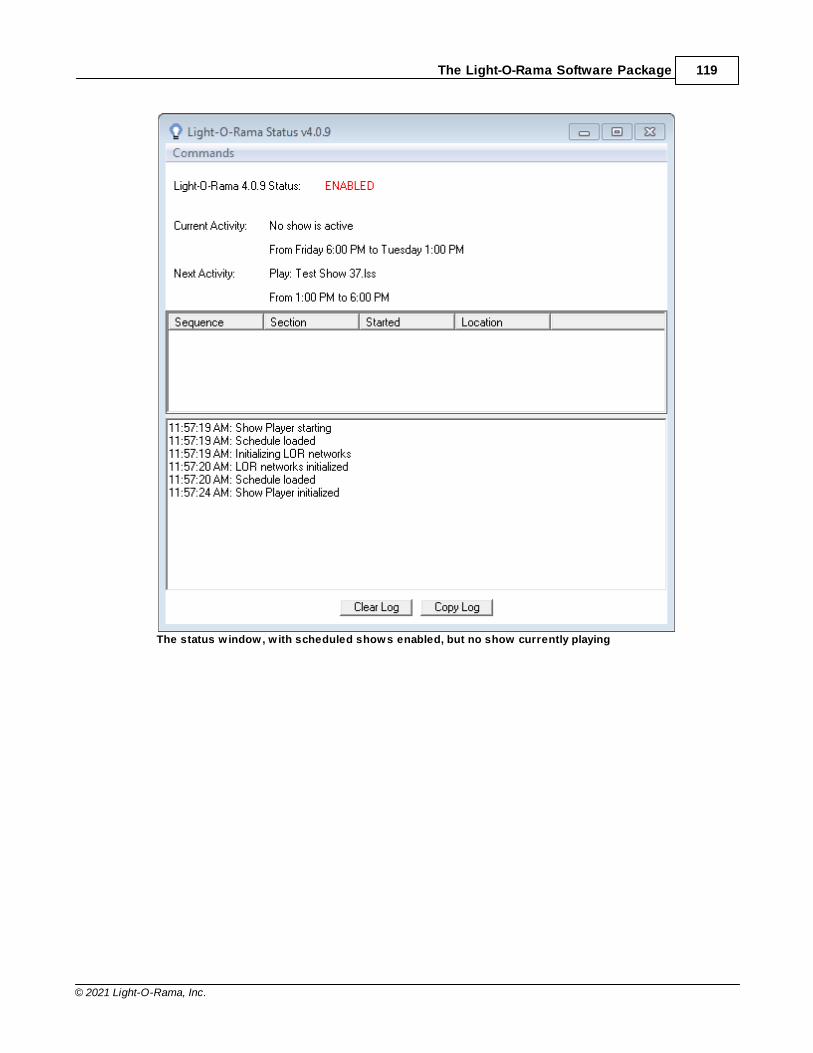
The Light-O-Rama Software Package 119
© 2021 Light-O-Rama, Inc.
The status w indow, w ith scheduled shows enabled, but no show currently playing
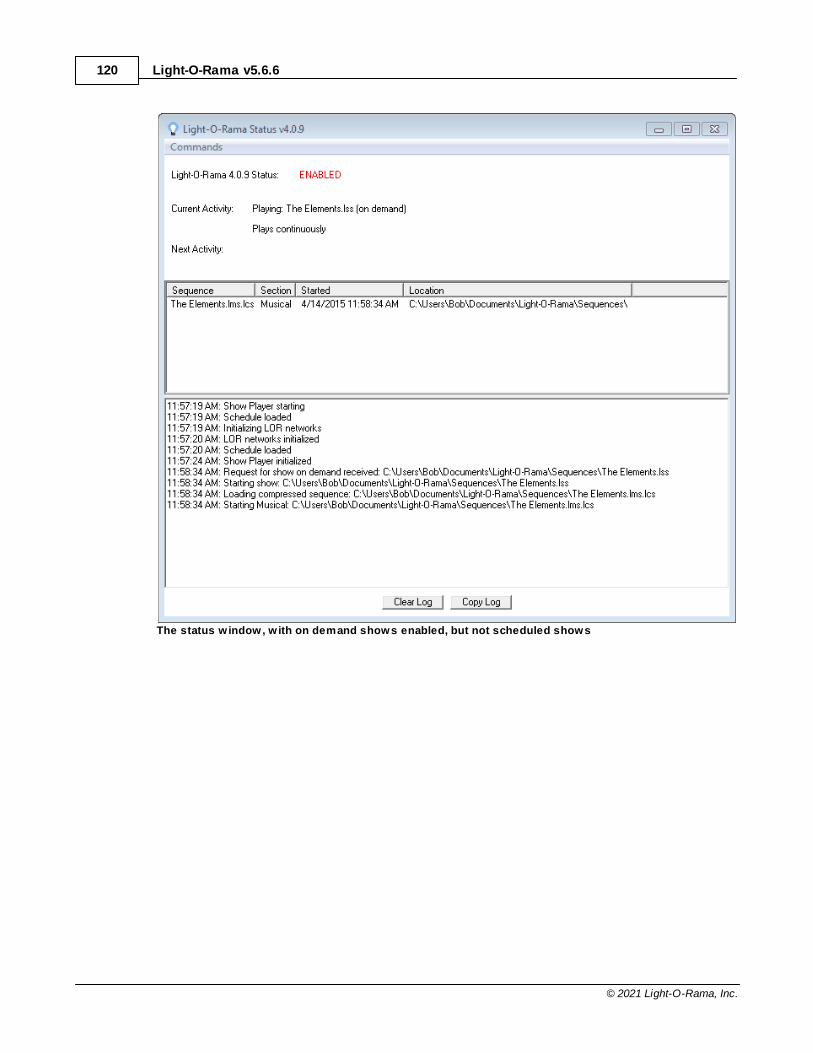
Light-O-Rama v5.6.6120
© 2021 Light-O-Rama, Inc.
The status w indow, w ith on demand shows enabled, but not scheduled shows
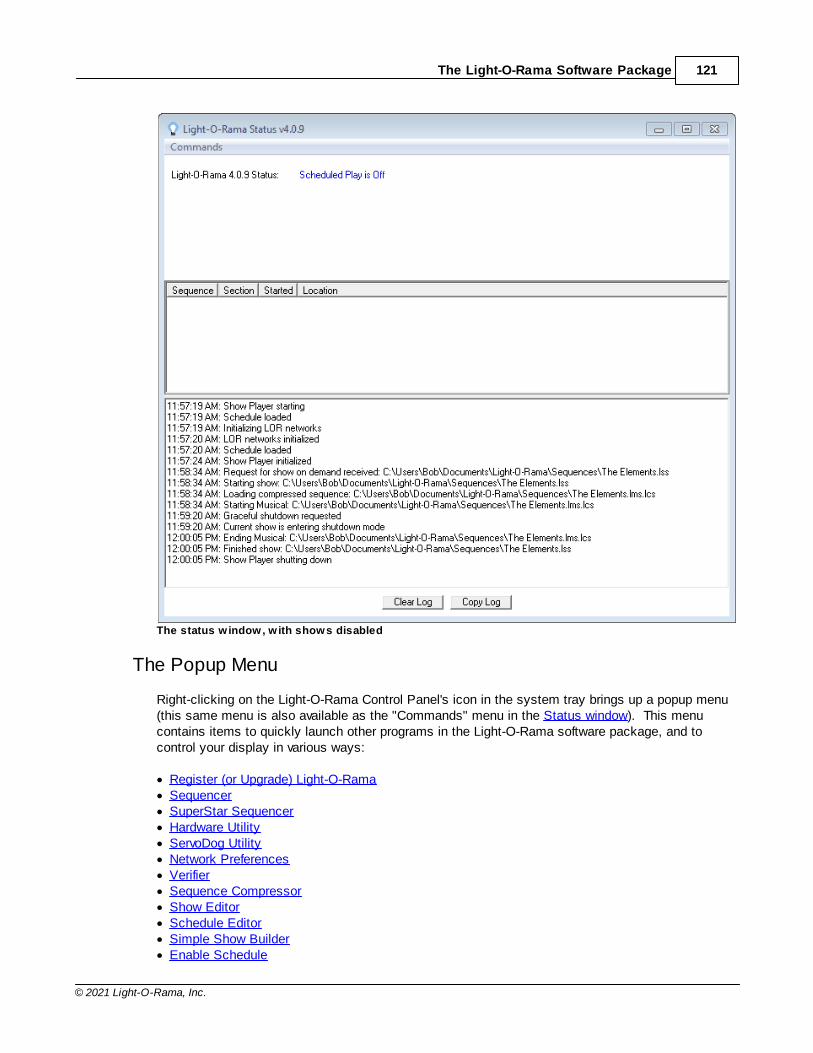
The Light-O-Rama Software Package 121
© 2021 Light-O-Rama, Inc.
The status w indow, w ith shows disabled
The Popup Menu
Right-clicking on the Light-O-Rama Control Panel's icon in the system tray brings up a popup menu(this same menu is also available as the "Commands" menu in the Status window). This menucontains items to quickly launch other programs in the Light-O-Rama software package, and tocontrol your display in various ways:
· Register (or Upgrade) Light-O-Rama· Sequencer· SuperStar Sequencer· Hardware Utility· ServoDog Utility· Network Preferences· Verifier· Sequence Compressor· Show Editor· Schedule Editor· Simple Show Builder· Enable Schedule
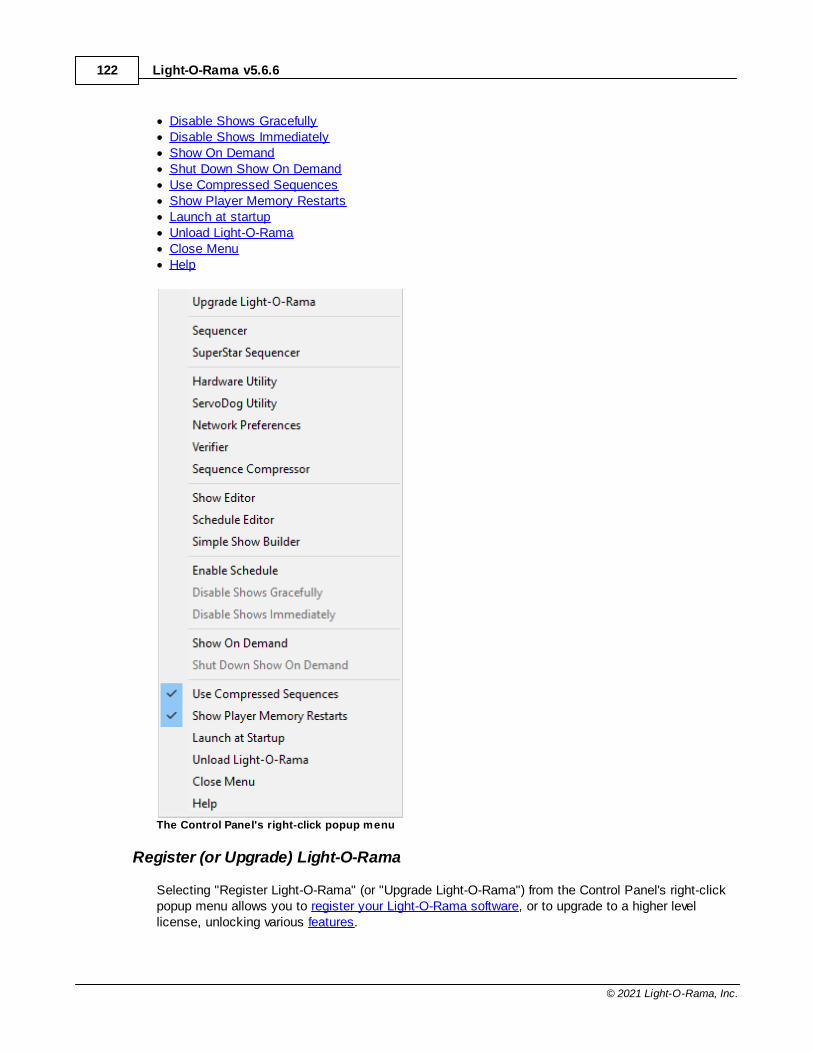
Light-O-Rama v5.6.6122
© 2021 Light-O-Rama, Inc.
· Disable Shows Gracefully· Disable Shows Immediately· Show On Demand· Shut Down Show On Demand· Use Compressed Sequences· Show Player Memory Restarts· Launch at startup· Unload Light-O-Rama· Close Menu· Help
The Control Panel's right-click popup menu
Register (or Upgrade) Light-O-Rama
Selecting "Register Light-O-Rama" (or "Upgrade Light-O-Rama") from the Control Panel's right-clickpopup menu allows you to register your Light-O-Rama software, or to upgrade to a higher levellicense, unlocking various features.
The Light-O-Rama Software Package 123
© 2021 Light-O-Rama, Inc.
This item will show up as "Register Light-O-Rama" if you are using the unlicensed Demo version ofthe software, or "Upgrade" if you are using a license, but it is not the highest possible license level. If you are using the highest possible license level, this item will not be displayed at all.
Sequencer
Selecting "Sequencer" from the Control Panel's right-click popup menu launches the Light-O-RamaSequencer, used to create, modify, and test sequences.
SuperStar Sequencer
Selecting "SuperStar Sequencer" from the Control Panel's right-click popup menu launches theLight-O-Rama SuperStar Sequencer.
Note: it is recommended to access SuperStar via the Sequencer's SuperStar Effect toolrather than opening SuperStar directly from the Control Panel menu.
Hardware Utility
Selecting "Hardware Utility" from the Control Panel's right-click popup menu launches the Light-O-Rama Hardware Utility, used for various things such as testing controllers and downloadingsequences to them for use in standalone mode.
ServoDog Utility
Selecting "ServoDog Utility" from the Control Panel's right-click popup menu launches the Light-O-Rama ServoDog Utility, used to configure Light-O-Rama ServoDog controllers.
Network Preferences
Selecting "Network Preferences" from the Control Panel's right-click popup menu launches the Light-O-Rama Network Preferences program.
Verifier
Selecting "Verifier" from the Control Panel's right-click popup menu launches the Light-O-RamaVerifier, used to check for certain problems with Light-O-Rama's configuration, schedule, scheduledshows, and scheduled sequences.
Sequence Compressor
Selecting "Sequence Compressor" from the Control Panel's right-click popup menu launches theLight-O-Rama Sequence Compressor, which can be used before shows to ensure that allcompressed sequences are up-to-date.
Show Editor
Selecting "Show Editor" from the Control Panel's right-click popup menu launches the Light-O-RamaShow Editor, used to create and modify shows.
Schedule Editor
Light-O-Rama v5.6.6124
© 2021 Light-O-Rama, Inc.
Selecting "Schedule Editor" from the Control Panel's right-click popup menu launches the Light-O-Rama Schedule Editor, used to schedule shows to be played by the Light-O-Rama Show Player.
Simple Show Builder
Selecting "Simple Show Builder" from the Control Panel's right-click popup menu launches the Light-O-Rama Simple Show Builder, which is intended as an easier to use, but less flexible, alternative tothe Show Editor and the Schedule Editor.
Enable Schedule
Selecting "Enable Schedule" from the Control Panel's right-click popup menu causes the Light-O-Rama Show Player to monitor your schedule and to play your shows at their scheduled times.
Note that on demand shows can be played regardless of whether your scheduled shows are enabledor not.
When scheduled shows are enabled, the light bulb icon in the computer's system tray will be blue.
Note: If "Enable Schedule" is greyed out, this means that it has already been selected, and theShow Player is monitoring your schedule. To stop the Show Player from monitoring your schedule,select "Disable Shows Gracefully" or "Disable Shows Immediately".
Disable Shows Gracefully
Selecting "Disable Shows Gracefully" from the Control Panel's right-click popup menu causes theLight-O-Rama Show Player to put your current show (if one is running) into shutdown mode, and tostop monitoring your schedule for shows to be played. When the show goes into shutdown mode,any song from the Musical section that is currently playing will be allowed to finish, and then theshow's Shutdown section will start.
To instead shut down your show immediately, including abruptly stopping any sequences or songthat might be playing, choose Disable Shows Immediately instead.
When shows are disabled, the light bulb icon in the computer's system tray will be red.
Note: If "Disable Shows Gracefully" is greyed out, this means that the Show Player is not monitoringyour schedule. To have the Show Player start monitoring your schedule, select "Enable Schedule".
Disable Shows Immediately
Selecting "Disable Shows Immediately" from the Control Panel's right-click popup menu causes theLight-O-Rama Show Player to immediately stop your current show (if one is running), and to stopmonitoring your schedule for shows to be played.
Stopping your show immediately will abruptly stop your sequences, including any song that happensto be playing. To have the Show Player stop your show more gracefully, choose Disable ShowsGracefully instead.
When shows are disabled, the light bulb icon in the computer's system tray will be red.
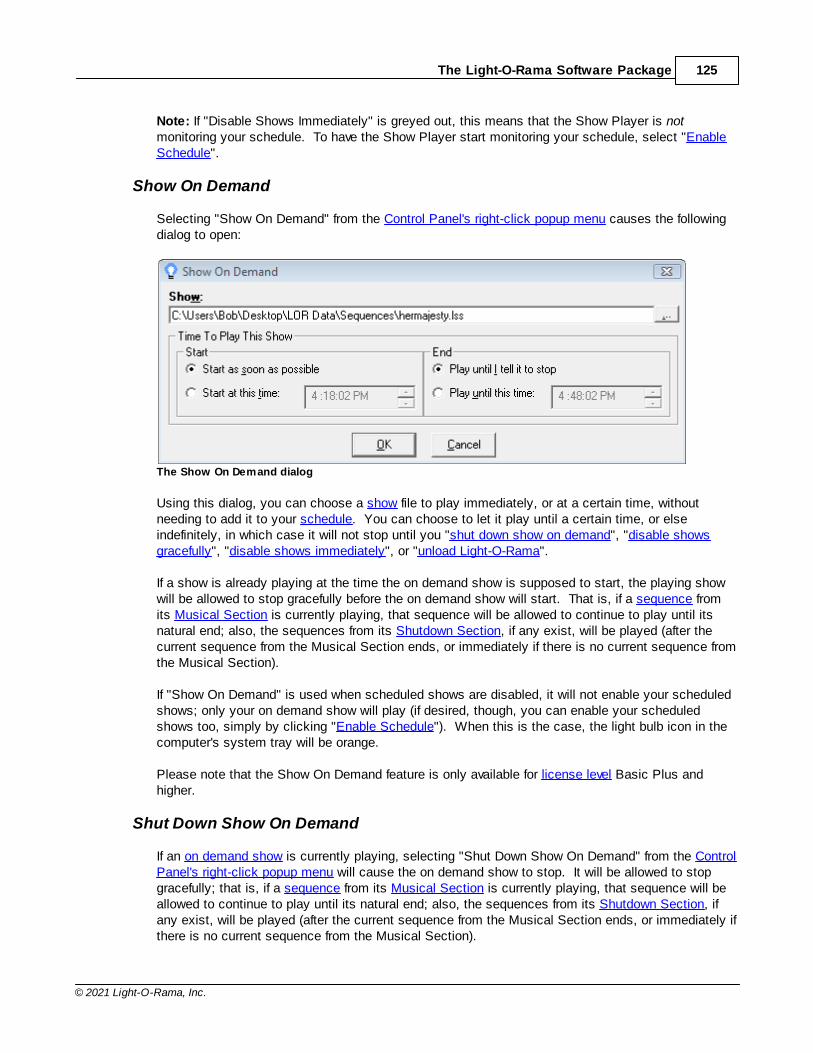
The Light-O-Rama Software Package 125
© 2021 Light-O-Rama, Inc.
Note: If "Disable Shows Immediately" is greyed out, this means that the Show Player is notmonitoring your schedule. To have the Show Player start monitoring your schedule, select "EnableSchedule".
Show On Demand
Selecting "Show On Demand" from the Control Panel's right-click popup menu causes the followingdialog to open:
The Show On Demand dialog
Using this dialog, you can choose a show file to play immediately, or at a certain time, withoutneeding to add it to your schedule. You can choose to let it play until a certain time, or elseindefinitely, in which case it will not stop until you "shut down show on demand", "disable showsgracefully", "disable shows immediately", or "unload Light-O-Rama".
If a show is already playing at the time the on demand show is supposed to start, the playing showwill be allowed to stop gracefully before the on demand show will start. That is, if a sequence fromits Musical Section is currently playing, that sequence will be allowed to continue to play until itsnatural end; also, the sequences from its Shutdown Section, if any exist, will be played (after thecurrent sequence from the Musical Section ends, or immediately if there is no current sequence fromthe Musical Section).
If "Show On Demand" is used when scheduled shows are disabled, it will not enable your scheduledshows; only your on demand show will play (if desired, though, you can enable your scheduledshows too, simply by clicking "Enable Schedule"). When this is the case, the light bulb icon in thecomputer's system tray will be orange.
Please note that the Show On Demand feature is only available for license level Basic Plus andhigher.
Shut Down Show On Demand
If an on demand show is currently playing, selecting "Shut Down Show On Demand" from the ControlPanel's right-click popup menu will cause the on demand show to stop. It will be allowed to stopgracefully; that is, if a sequence from its Musical Section is currently playing, that sequence will beallowed to continue to play until its natural end; also, the sequences from its Shutdown Section, ifany exist, will be played (after the current sequence from the Musical Section ends, or immediately ifthere is no current sequence from the Musical Section).
Light-O-Rama v5.6.6126
© 2021 Light-O-Rama, Inc.
After the on demand show stops, if scheduled shows are enabled, the Show Player will startwhatever show is scheduled for the current time (if any).
"Shut Down Show On Demand" can also be used to cancel an on demand show that has beenrequested, but not yet started (either due to its start time not having been reached, or else due toanother show still being in the process of shutting down).
Use Compressed Sequences
Checking "Use Compressed Sequences" from the Control Panel's right-click popup menu causesthe Light-O-Rama Show Player to create and use compressed sequences if possible, which shouldcut down on the time it takes to load. Unchecking it causes it to ignore compressed sequences,and instead use the regular sequences.
Show Player Memory Restarts
Checking "Show Player Memory Restarts" from the Control Panel's right-click popup menu causesthe Show Player to automatically restart in certain situations: When no show is playing, and noshow is scheduled to start playing within the next sixty seconds, if the Show Player is using morethan 100 megabytes of memory, it will automatically shut down. Assuming that the schedule isenabled, the Light-O-Rama Control Panel will then automatically restart the Show Player. Theintention of this is a preventive measure to protect against ill effects of possible memory leaks in theShow Player, which could otherwise build up over time to a point that would cause the Show Playerto crash.
Launch at Startup
Checking "Launch at Startup" from the Control Panel's right-click popup menu causes the Light-O-Rama Control Panel to automatically run whenever your computer starts up. Unchecking it causes itnot to run at startup time, in which case you can start it manually whenever you like.
Unload Light-O-Rama
Selecting "Unload Light-O-Rama" from the Control Panel's right-click popup menu will shut downboth the Light-O-Rama Control Panel and the Light-O-Rama Show Player. Your scheduled showswill not run while these are shut down.
To start the Light-O-Rama Control Panel again, run it from your computer's Start menu. Or, if"Launch at startup" has been enabled, the Control Panel will automatically run the next time thatyour computer starts up.
Close Menu
Selecting "Close Menu" from the Control Panel's right-click popup menu will close the popup menu. The Light-O-Rama control panel will still remain active.
Help
Selecting "Help" from the Control Panel's right-click popup menu will open up the Light-O-Rama helpfiles.
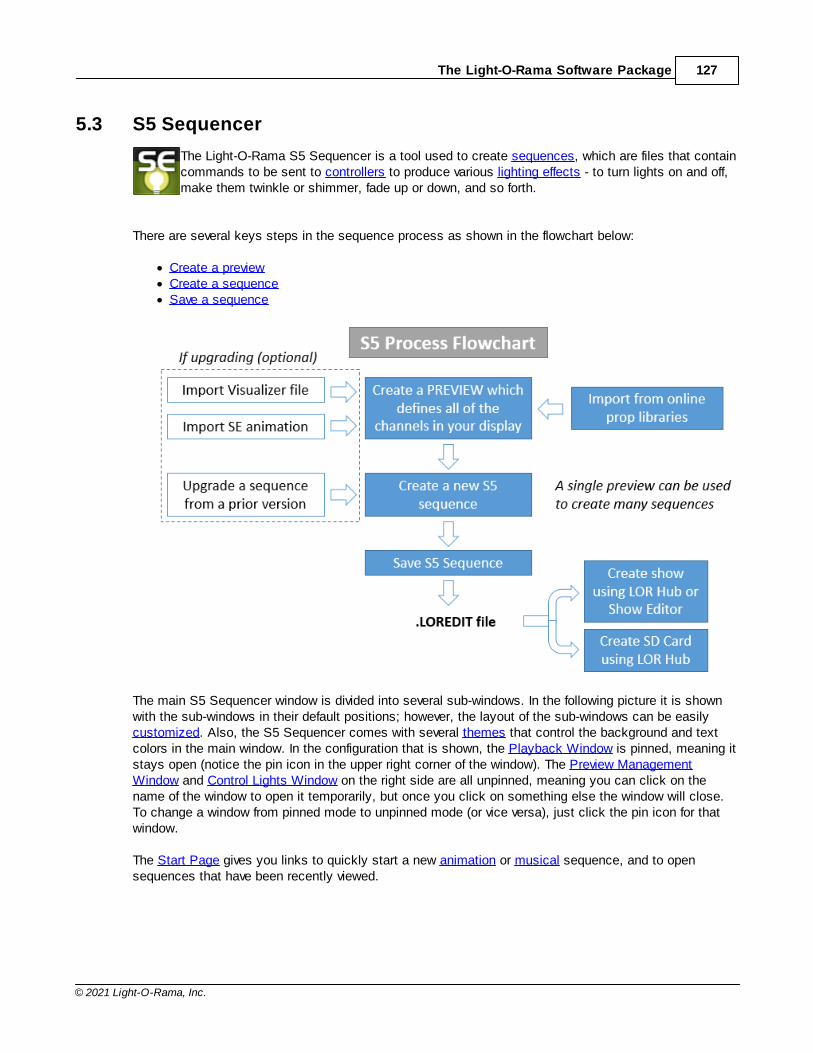
The Light-O-Rama Software Package 127
© 2021 Light-O-Rama, Inc.
5.3 S5 Sequencer
The Light-O-Rama S5 Sequencer is a tool used to create sequences, which are files that containcommands to be sent to controllers to produce various lighting effects - to turn lights on and off,make them twinkle or shimmer, fade up or down, and so forth.
There are several keys steps in the sequence process as shown in the flowchart below:
· Create a preview· Create a sequence· Save a sequence
The main S5 Sequencer window is divided into several sub-windows. In the following picture it is shownwith the sub-windows in their default positions; however, the layout of the sub-windows can be easilycustomized. Also, the S5 Sequencer comes with several themes that control the background and textcolors in the main window. In the configuration that is shown, the Playback Window is pinned, meaning itstays open (notice the pin icon in the upper right corner of the window). The Preview ManagementWindow and Control Lights Window on the right side are all unpinned, meaning you can click on thename of the window to open it temporarily, but once you click on something else the window will close.To change a window from pinned mode to unpinned mode (or vice versa), just click the pin icon for thatwindow.
The Start Page gives you links to quickly start a new animation or musical sequence, and to opensequences that have been recently viewed.

Light-O-Rama v5.6.6128
© 2021 Light-O-Rama, Inc.
Sequences are displayed in the S5 Sequencer as a grid. Rows represent regular channels, RGBchannels, motion effect rows, subsequences, beat channels or loops, and columns represent timings. Cells in the grid therefore represent the lighting effects that will happen on props at various points in timewhile the sequence is being played.
Regular channels, RGB channels, and motion effect rows are associated with props in the preview orwith archived props. Motion effect rows can also be used with preview groups.
As an example, the following sequence has four props, each with a single channel. At the start of thesequence, the first prop's channel turns on. It stays on for half a second, then turns off, and the secondprop's channel then turns on. Then it turns off, and the third turns on, and then the third turns off and thefourth turns on. This brings us two seconds into the sequence, at which point all four channels fadedown, for a second. After that, the first and fourth channels start shimmering, while the second and thirdfade up:
A sequence with four channels, and various lighting effects
Notice that one cell is highlighted with a thick yellow box - the cell of the first channel from 3 seconds to3.5 seconds. That is the currently selected cell. Various tools can be applied to the selected cell (orcells), for example to change the lighting effect used on that channel at that time.
Before proceeding, you should understand what a sequence is and what a preview is.
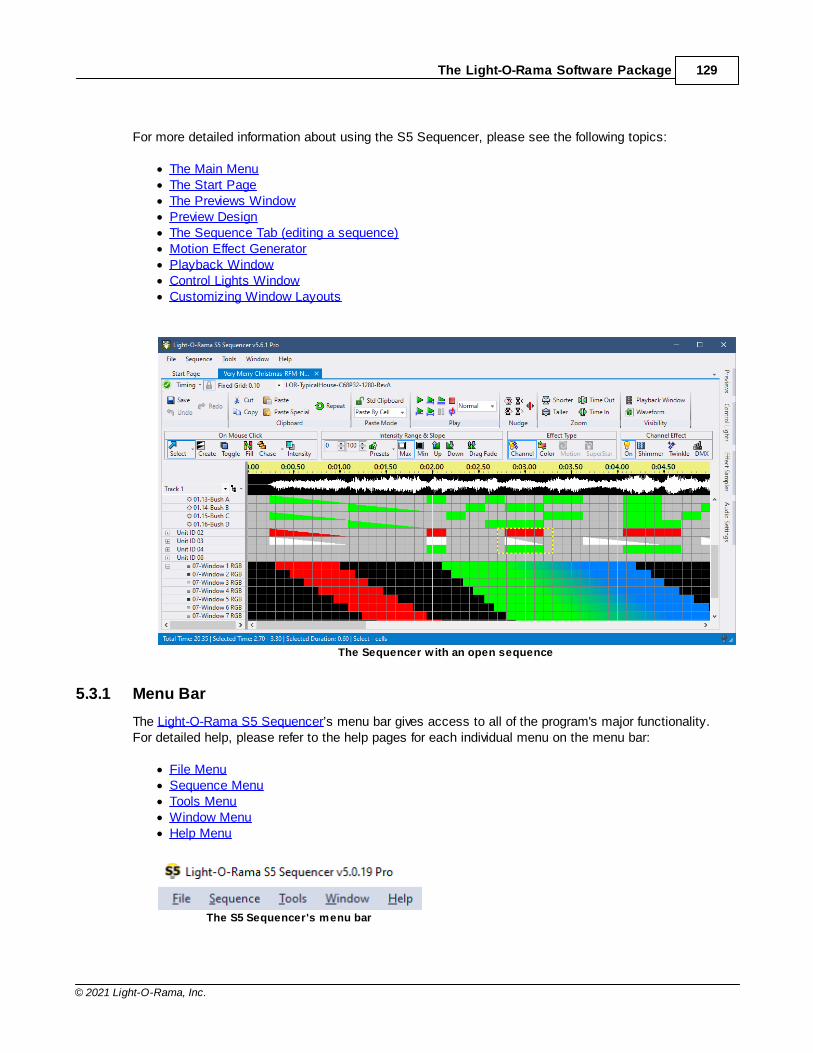
The Light-O-Rama Software Package 129
© 2021 Light-O-Rama, Inc.
For more detailed information about using the S5 Sequencer, please see the following topics:
· The Main Menu· The Start Page· The Previews Window· Preview Design· The Sequence Tab (editing a sequence)· Motion Effect Generator· Playback Window· Control Lights Window· Customizing Window Layouts
The Sequencer w ith an open sequence
5.3.1 Menu Bar
The Light-O-Rama S5 Sequencer’s menu bar gives access to all of the program's major functionality. For detailed help, please refer to the help pages for each individual menu on the menu bar:
· File Menu· Sequence Menu· Tools Menu· Window Menu· Help Menu
The S5 Sequencer's menu bar
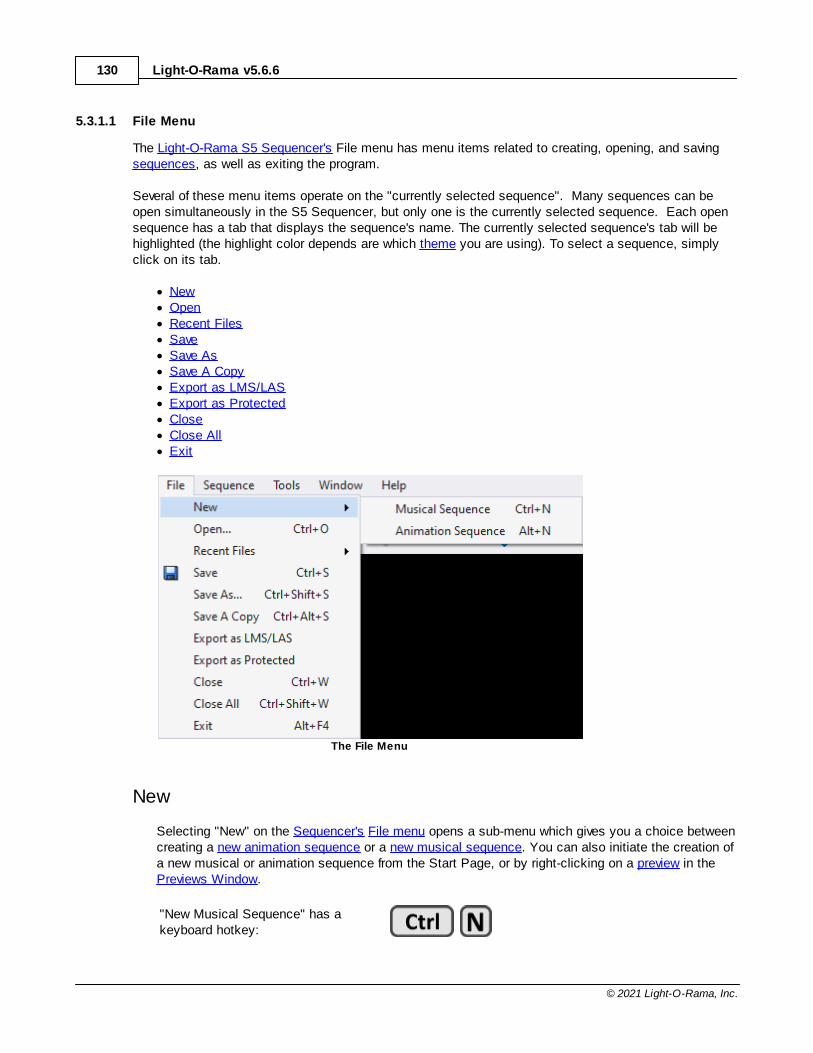
Light-O-Rama v5.6.6130
© 2021 Light-O-Rama, Inc.
5.3.1.1 File Menu
The Light-O-Rama S5 Sequencer's File menu has menu items related to creating, opening, and savingsequences, as well as exiting the program.
Several of these menu items operate on the "currently selected sequence". Many sequences can beopen simultaneously in the S5 Sequencer, but only one is the currently selected sequence. Each opensequence has a tab that displays the sequence's name. The currently selected sequence's tab will behighlighted (the highlight color depends are which theme you are using). To select a sequence, simplyclick on its tab.
· New· Open· Recent Files· Save· Save As· Save A Copy· Export as LMS/LAS· Export as Protected· Close· Close All· Exit
The File Menu
New
Selecting "New" on the Sequencer's File menu opens a sub-menu which gives you a choice betweencreating a new animation sequence or a new musical sequence. You can also initiate the creation ofa new musical or animation sequence from the Start Page, or by right-clicking on a preview in thePreviews Window.
"New Musical Sequence" has akeyboard hotkey:
The Light-O-Rama Software Package 131
© 2021 Light-O-Rama, Inc.
"New Animation Sequence" has akeyboard hotkey:
Open
Selecting "Open" on the Sequencer's File menu opens a dialog that allows you to select a sequencefile.
If you select an S5 sequence file (.LOREDIT file extension) the preview for the sequence will bechecked. If the preview has been changed since the last time the sequence was opened, the MapNew Preview To Sequence Dialog will open; and once you finish that dialog the sequence will open. Ifthe preview has not changed, the sequence will immediately open on a new tab within theSequencer.
If you choose a sequence file created in an older version like S4 (.LMS or .LAS file extension), thenthe Upgrade Legacy Sequence dialog will open, guiding you through the sequence upgrade process.
"Open" has a keyboard hotkey:
Recent Files
Selecting "Recent Files" on the Sequencer's File menu opens a sub-menu which lets you selectfrom a list of the most recently opened sequences. The list of files on the "Recent Files" sub-menuare the same ones listed on the Start Page.
Save
Selecting "Save" from the Sequencer's File menu saves the changes that you have made to thecurrently selected sequence. If the sequence was newly created and has never been saved before,Save will also prompt you for a file name to use for the new sequence.
The Save function will be followed by a Save A Copy function if specified in Save Copy Preferences.
"Save" has a keyboard hotkey:
Save As
Selecting "Save As" from the Sequencer's File menu saves the current sequence to a new file name. The old file will still exist, but will not include any of the changes that you made to the sequencesince the last time that you saved it.
Save A Copy
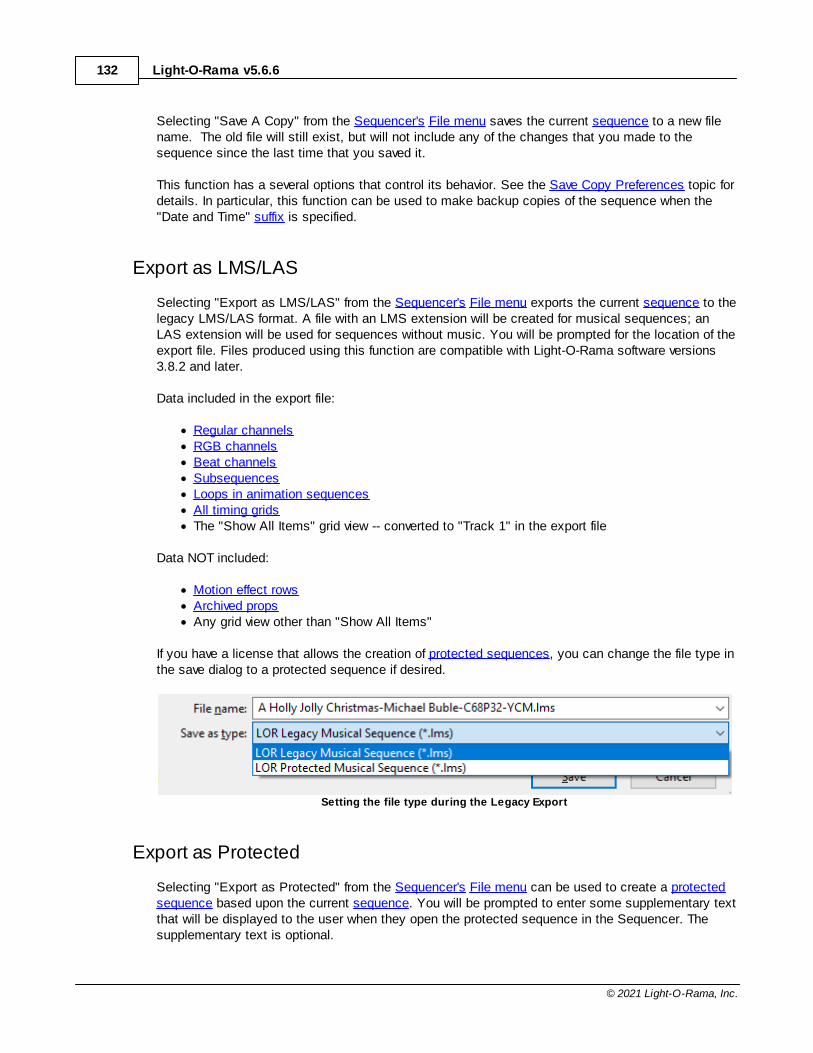
Light-O-Rama v5.6.6132
© 2021 Light-O-Rama, Inc.
Selecting "Save A Copy" from the Sequencer's File menu saves the current sequence to a new filename. The old file will still exist, but will not include any of the changes that you made to thesequence since the last time that you saved it.
This function has a several options that control its behavior. See the Save Copy Preferences topic fordetails. In particular, this function can be used to make backup copies of the sequence when the"Date and Time" suffix is specified.
Export as LMS/LAS
Selecting "Export as LMS/LAS" from the Sequencer's File menu exports the current sequence to thelegacy LMS/LAS format. A file with an LMS extension will be created for musical sequences; anLAS extension will be used for sequences without music. You will be prompted for the location of theexport file. Files produced using this function are compatible with Light-O-Rama software versions3.8.2 and later.
Data included in the export file:
· Regular channels· RGB channels· Beat channels· Subsequences· Loops in animation sequences· All timing grids· The "Show All Items" grid view -- converted to "Track 1" in the export file
Data NOT included:
· Motion effect rows· Archived props· Any grid view other than "Show All Items"
If you have a license that allows the creation of protected sequences, you can change the file type inthe save dialog to a protected sequence if desired.
Setting the file type during the Legacy Export
Export as Protected
Selecting "Export as Protected" from the Sequencer's File menu can be used to create a protectedsequence based upon the current sequence. You will be prompted to enter some supplementary textthat will be displayed to the user when they open the protected sequence in the Sequencer. Thesupplementary text is optional.
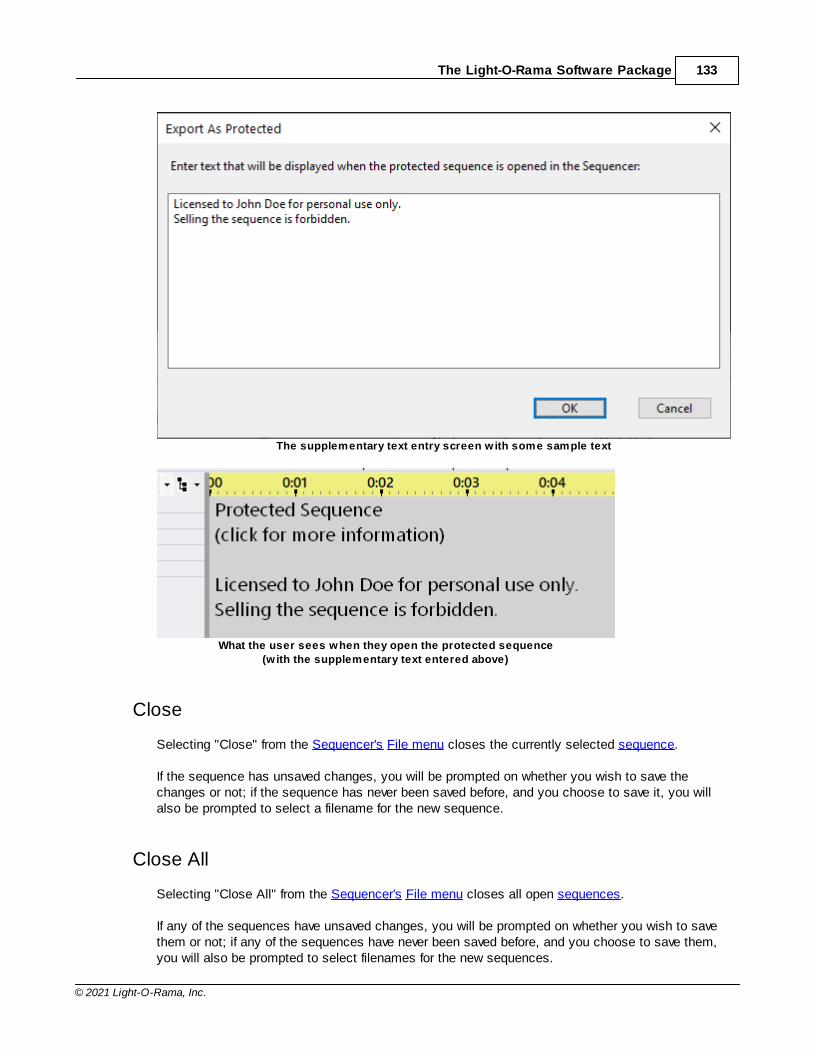
The Light-O-Rama Software Package 133
© 2021 Light-O-Rama, Inc.
The supplementary text entry screen with some sample text
What the user sees when they open the protected sequence
(with the supplementary text entered above)
Close
Selecting "Close" from the Sequencer's File menu closes the currently selected sequence.
If the sequence has unsaved changes, you will be prompted on whether you wish to save thechanges or not; if the sequence has never been saved before, and you choose to save it, you willalso be prompted to select a filename for the new sequence.
Close All
Selecting "Close All" from the Sequencer's File menu closes all open sequences.
If any of the sequences have unsaved changes, you will be prompted on whether you wish to savethem or not; if any of the sequences have never been saved before, and you choose to save them,you will also be prompted to select filenames for the new sequences.
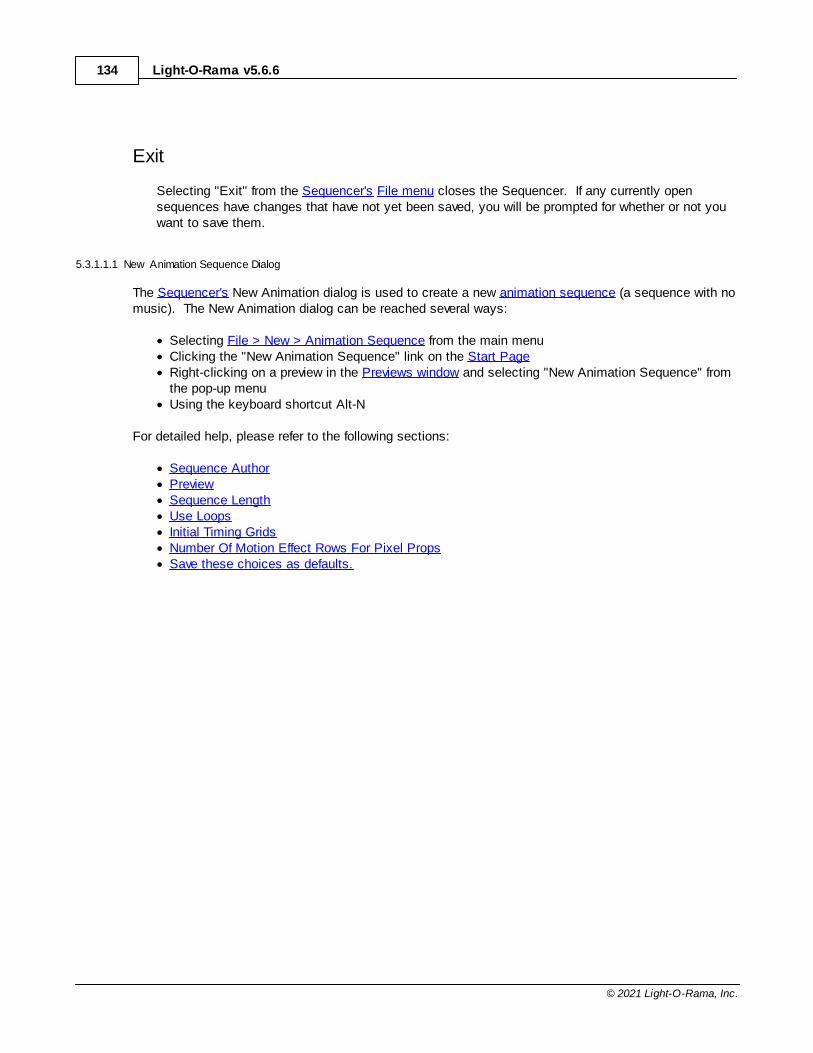
Light-O-Rama v5.6.6134
© 2021 Light-O-Rama, Inc.
Exit
Selecting "Exit" from the Sequencer's File menu closes the Sequencer. If any currently opensequences have changes that have not yet been saved, you will be prompted for whether or not youwant to save them.
5.3.1.1.1 New Animation Sequence Dialog
The Sequencer's New Animation dialog is used to create a new animation sequence (a sequence with nomusic). The New Animation dialog can be reached several ways:
· Selecting File > New > Animation Sequence from the main menu· Clicking the "New Animation Sequence" link on the Start Page· Right-clicking on a preview in the Previews window and selecting "New Animation Sequence" from
the pop-up menu· Using the keyboard shortcut Alt-N
For detailed help, please refer to the following sections:
· Sequence Author· Preview· Sequence Length· Use Loops· Initial Timing Grids· Number Of Motion Effect Rows For Pixel Props· Save these choices as defaults.
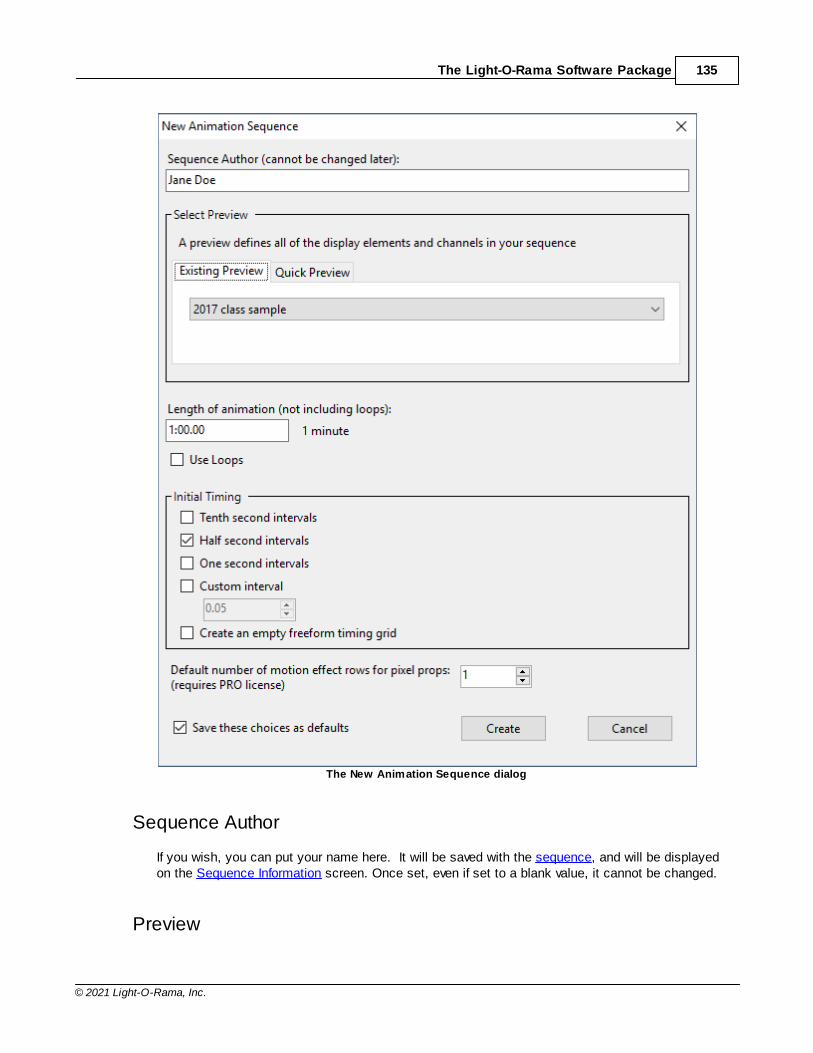
The Light-O-Rama Software Package 135
© 2021 Light-O-Rama, Inc.
The New Animation Sequence dialog
Sequence Author
If you wish, you can put your name here. It will be saved with the sequence, and will be displayedon the Sequence Information screen. Once set, even if set to a blank value, it cannot be changed.
Preview
Light-O-Rama v5.6.6136
© 2021 Light-O-Rama, Inc.
A preview is a representation of your light display. It specifies all of the props that you can applyeffects to in your sequence. It also specifies all of the channels your sequence will be able tocontrol.
Normally, you will select a preview that you have already created on the "Existing Previews" tab.However, you can use the Quick Preview feature to create a new preview on the fly.
After assigning a preview here, you may continue to update the preview and those updates will beautomatically reflected in the sequence (for example, adding a new prop). You can also later assigna different preview to the sequence; although if you do that, the new preview should be substantiallysimilar to the originally assigned preview.
Sequence Length
This allows you to specify the duration of the sequence. You will be able to change the value later,using Change Sequence Length in the Sequence menu.
The time can include hours, minutes, seconds, and hundredths of a second. For details on theformat used to specify various lengths of time, please see Time Format.
Use Loops
If you check the "Use Loops" check box, the newly created sequence will automatically include aloop level, which can be used to insert loops into the sequence.
If you create an animation sequence without having selected "Use Loops", and you later decide thatyou do want loops in the sequence, you can add a loop level by selecting "Loop Level" from the AddNew menu, available on the Sequence menu and the Grid View menu.
Initial Timing Grids
This allows you to tell the Sequencer to automatically insert timings into the new sequence. Timings are the spots in time where you can easily place lighting effects - for example, turn a stringof lights on, or have it twinkle, or have it fade down.
If you don't know how far apart you want timings to be, just take a guess. You can always insert,delete, or move timings later. Note that although the New Animation dialog only allows you to settimings up at equal lengths from each other, timings in general can be any length from each other. For example, you could later add a timing three seconds away from another, and a third timing half asecond away from that one.
If you select "Custom Interval", you can enter any length you want, rather than one of the defaults. This value must be entered using the standard Time Format.
Number Of Motion Effect Rows For Pixel Props
If you have a Pro level license, then you can use motion effects to sequence your props that utilizeRGB pixels. You can also have multiple motion effects playing on a prop at the same time. This
The Light-O-Rama Software Package 137
© 2021 Light-O-Rama, Inc.
setting specifies how many motion effect rows should be created for every pixel-based prop.Typically 1 or 2 is a good choice to start. And then you can add more rows to specific props as yoursequencing needs dictate.
Save These Choices As Defaults
If you turn this check box on, your answers to the questions in this dialog will be saved so thatwhenever you create a new animation sequence in the future, those answers will automatically showup in this dialog as the default answers.
5.3.1.1.2 New Musical Sequence Dialog
The Sequencer's New Musical Sequence dialog is used to create a new musical sequence (a sequencewith an associated audio or video file). The New Animation dialog can be reached several ways:
· Selecting File > New > Musical Sequence from the main menu· Clicking the "New Musical Sequence" link on the Start Page· Right-clicking on a preview in the Previews window and selecting "New Musical Sequence" from
the pop-up menu· Using the keyboard shortcut Ctrl-N
After doing one of these things, but before the New Musical Sequence dialog opens, you will beprompted to select the audio or video file that will be used to build the new sequence. After you selectthe file, then the New Musical Sequence dialog will open.
Behind the scenes, the Sequencer will open the media file to determine its length. When the newsequence is created, its length will match that of the media file.
For detailed help, please refer to the following sections:
· Sequence Author· Preview· Music Information· Initial Timing Grids· Number Of Motion Effect Rows For Pixel Props· Audio Information· Save These Choices As Defaults
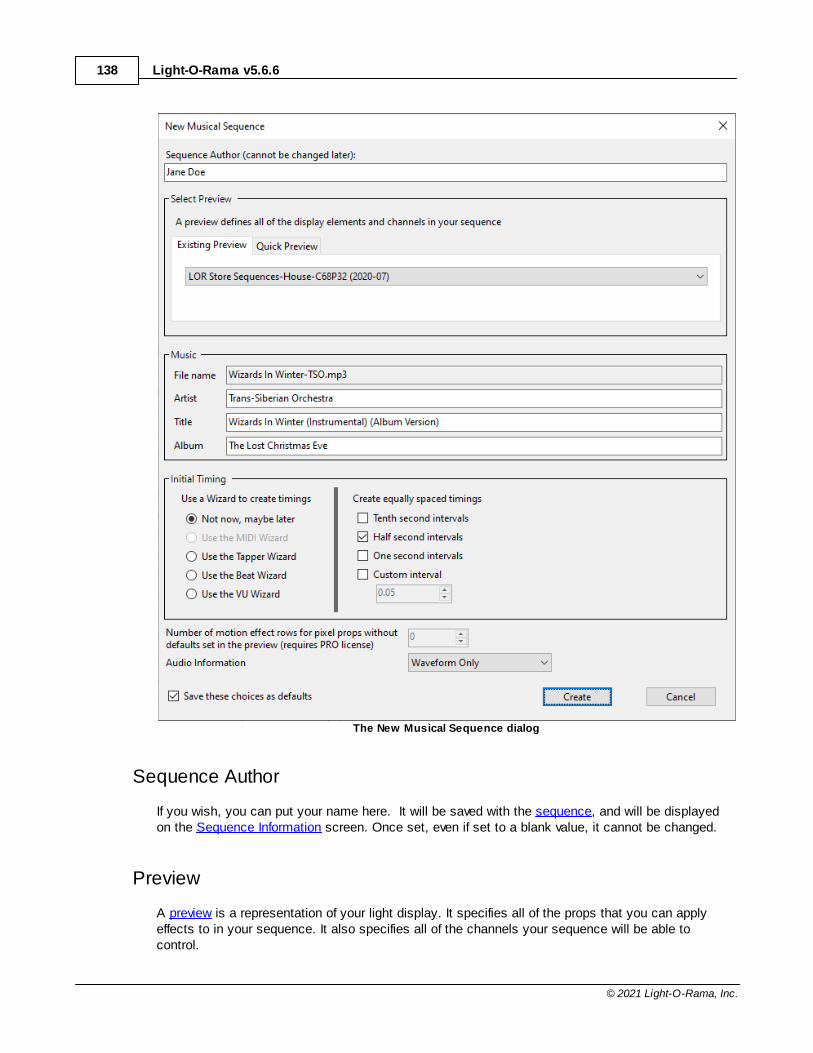
Light-O-Rama v5.6.6138
© 2021 Light-O-Rama, Inc.
The New Musical Sequence dialog
Sequence Author
If you wish, you can put your name here. It will be saved with the sequence, and will be displayedon the Sequence Information screen. Once set, even if set to a blank value, it cannot be changed.
Preview
A preview is a representation of your light display. It specifies all of the props that you can applyeffects to in your sequence. It also specifies all of the channels your sequence will be able tocontrol.
The Light-O-Rama Software Package 139
© 2021 Light-O-Rama, Inc.
Normally, you will select a preview that you have already created on the "Existing Previews" tab.However, you can use the Quick Preview feature to create a new preview on the fly.
After assigning a preview here, you may continue to update the preview and those updates will beautomatically reflected in the sequence (for example, adding a new prop). You can also later assigna different preview to the sequence; although if you do that, the new preview should be substantiallysimilar to the originally assigned preview.
Music Information
If you wish, you can put the name of the artist, song, and album of the associated song here. It willbe saved with the sequence, and will be displayed in the Sequence Information dialog.
Some media files have already been tagged with this information. If you utilize such a media file, theSequencer will automatically discover those tags and populate the fields in this section (though youcan still change or delete it if you wish).
You can change this information later in the Sequence Information dialog.
Initial Timing Grids
This allows you to tell the Sequencer to automatically insert timings into the new sequence. Timings are the spots in time where you can easily place lighting effects - for example, turn a stringof lights on, or have it twinkle, or have it fade down.
In addition to placing timings a certain length of time apart (a tenth of a second, a half second, asecond, or "Custom Interval"), add adding no timings at all ("Don't add any timings"), you caninstruct the Sequencer to use various wizards to insert timings based upon the song itself:
· The MIDI File Wizard can insert timings and effects based upon the beat of a MIDI song, aswell as based on the individual notes played by different instruments in the song.
· The Tapper Wizard allows you to tap the keyboard or mouse while the song plays, and willrecord the times at which you tap.
· The Beat Wizard attempts to determine the tempo of the song, and insert timings and effectsbased upon it.
· The VU Wizard looks for peaks in the song, much like a VU meter, and inserts timings andeffects based upon them.
Not all of these wizards are available for every type of media file; for example, the MIDI File Wizardcan only be used with MIDI files. Any wizards that cannot be used with the type of media file beingused will be greyed out.
If you select "Custom Interval", you can enter any length you want, rather than one of the defaults. For details on the format used to specify various lengths of time, please see Time Format.
If you choose to have equally spaced timings, then you will be given the option to use a fixed timinggrid or a freeform timing grid, by checking or unchecking the "Use a fixed timing grid" box. Otherwise, a freeform timing grid will be used.
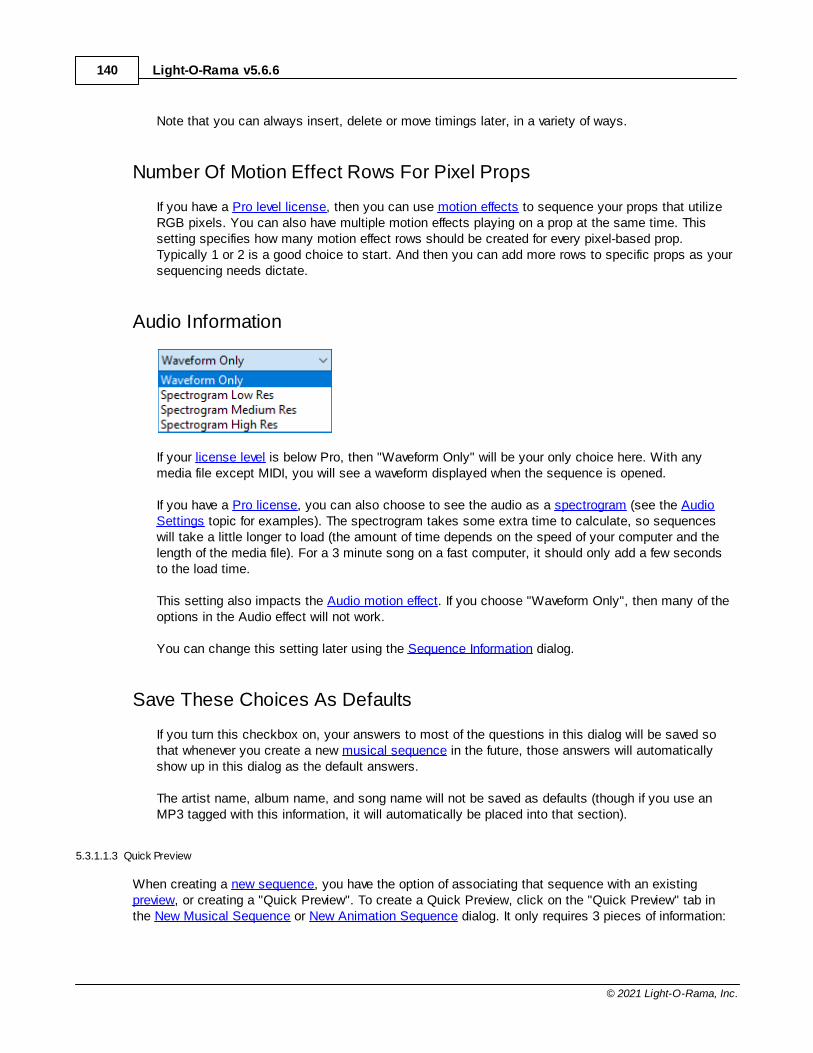
Light-O-Rama v5.6.6140
© 2021 Light-O-Rama, Inc.
Note that you can always insert, delete or move timings later, in a variety of ways.
Number Of Motion Effect Rows For Pixel Props
If you have a Pro level license, then you can use motion effects to sequence your props that utilizeRGB pixels. You can also have multiple motion effects playing on a prop at the same time. Thissetting specifies how many motion effect rows should be created for every pixel-based prop.Typically 1 or 2 is a good choice to start. And then you can add more rows to specific props as yoursequencing needs dictate.
Audio Information
If your license level is below Pro, then "Waveform Only" will be your only choice here. With anymedia file except MIDI, you will see a waveform displayed when the sequence is opened.
If you have a Pro license, you can also choose to see the audio as a spectrogram (see the AudioSettings topic for examples). The spectrogram takes some extra time to calculate, so sequenceswill take a little longer to load (the amount of time depends on the speed of your computer and thelength of the media file). For a 3 minute song on a fast computer, it should only add a few secondsto the load time.
This setting also impacts the Audio motion effect. If you choose "Waveform Only", then many of theoptions in the Audio effect will not work.
You can change this setting later using the Sequence Information dialog.
Save These Choices As Defaults
If you turn this checkbox on, your answers to most of the questions in this dialog will be saved sothat whenever you create a new musical sequence in the future, those answers will automaticallyshow up in this dialog as the default answers.
The artist name, album name, and song name will not be saved as defaults (though if you use anMP3 tagged with this information, it will automatically be placed into that section).
5.3.1.1.3 Quick Preview
When creating a new sequence, you have the option of associating that sequence with an existingpreview, or creating a "Quick Preview". To create a Quick Preview, click on the "Quick Preview" tab inthe New Musical Sequence or New Animation Sequence dialog. It only requires 3 pieces of information:

The Light-O-Rama Software Package 141
© 2021 Light-O-Rama, Inc.
1. Sequence Name. This defaults to today's date, but you can change it to whatever you want;however, it cannot be blank.
2. Tell it what kind of devices you are connecting to. This can be either be:· Light-O-Rama devices, or· DMX devices, or· "I do not know what I am connecting to yet". If you choose this option, the sequence you
create will not control any lights; but allows you to defer your decision for later. When youcome to a decision and are ready to control lights, you will need to open this preview inPreview Design and change the props to another Device Type.
3. The number of channels the sequence will control.
The Quick Preview tab
Using the choices shown above would result in the following sequence. The 16 channels are listed downthe left side. The name of the preview is shown to the right of the green check mark.
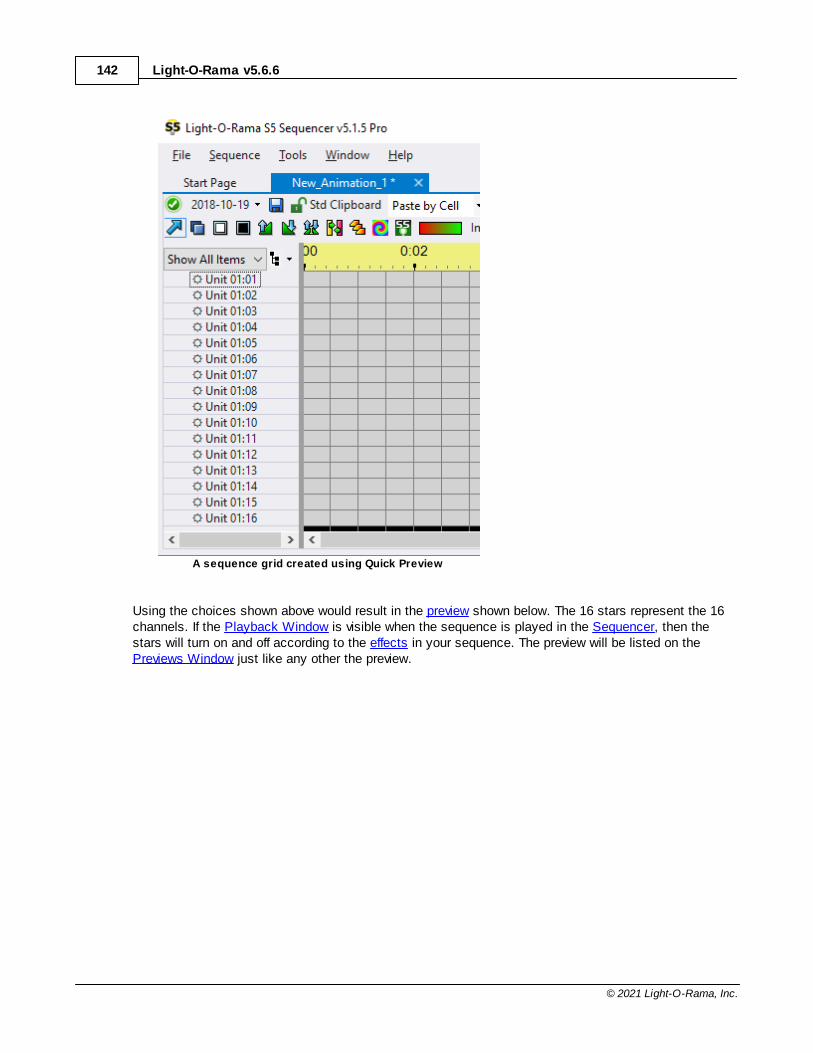
Light-O-Rama v5.6.6142
© 2021 Light-O-Rama, Inc.
A sequence grid created using Quick Preview
Using the choices shown above would result in the preview shown below. The 16 stars represent the 16channels. If the Playback Window is visible when the sequence is played in the Sequencer, then thestars will turn on and off according to the effects in your sequence. The preview will be listed on thePreviews Window just like any other the preview.
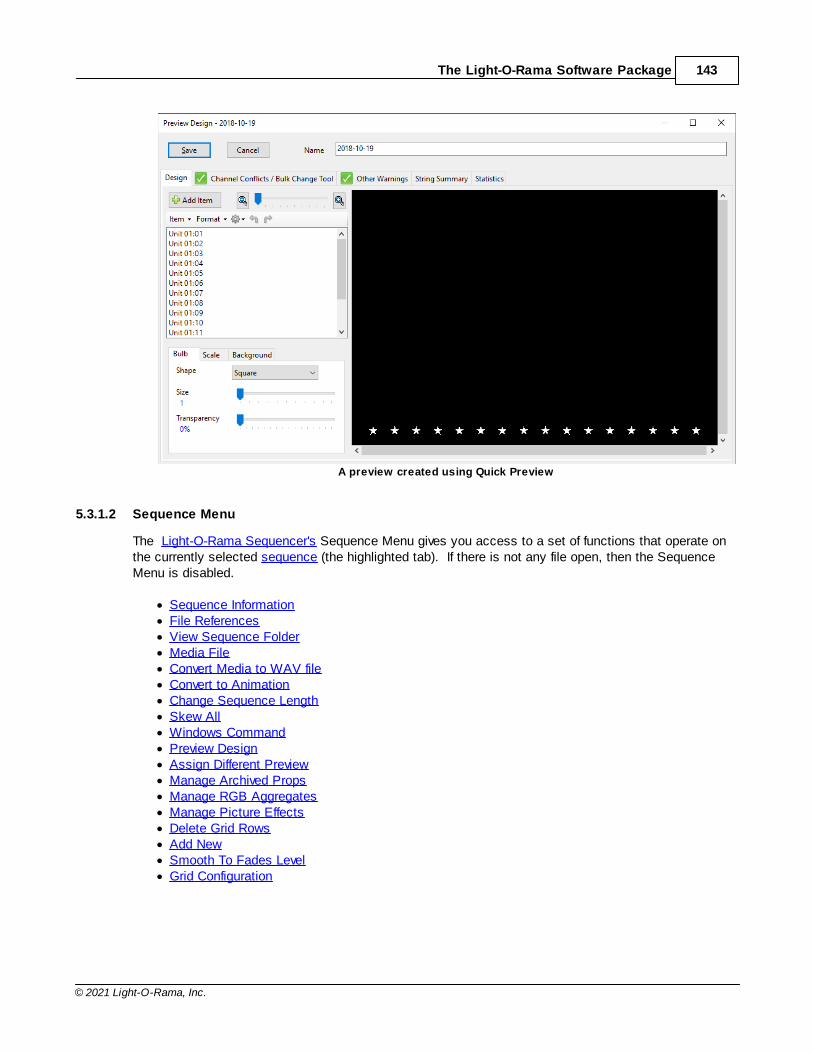
The Light-O-Rama Software Package 143
© 2021 Light-O-Rama, Inc.
A preview created using Quick Preview
5.3.1.2 Sequence Menu
The Light-O-Rama Sequencer's Sequence Menu gives you access to a set of functions that operate onthe currently selected sequence (the highlighted tab). If there is not any file open, then the SequenceMenu is disabled.
· Sequence Information· File References· View Sequence Folder· Media File· Convert Media to WAV file· Convert to Animation· Change Sequence Length· Skew All· Windows Command· Preview Design· Assign Different Preview· Manage Archived Props· Manage RGB Aggregates· Manage Picture Effects· Delete Grid Rows· Add New· Smooth To Fades Level· Grid Configuration
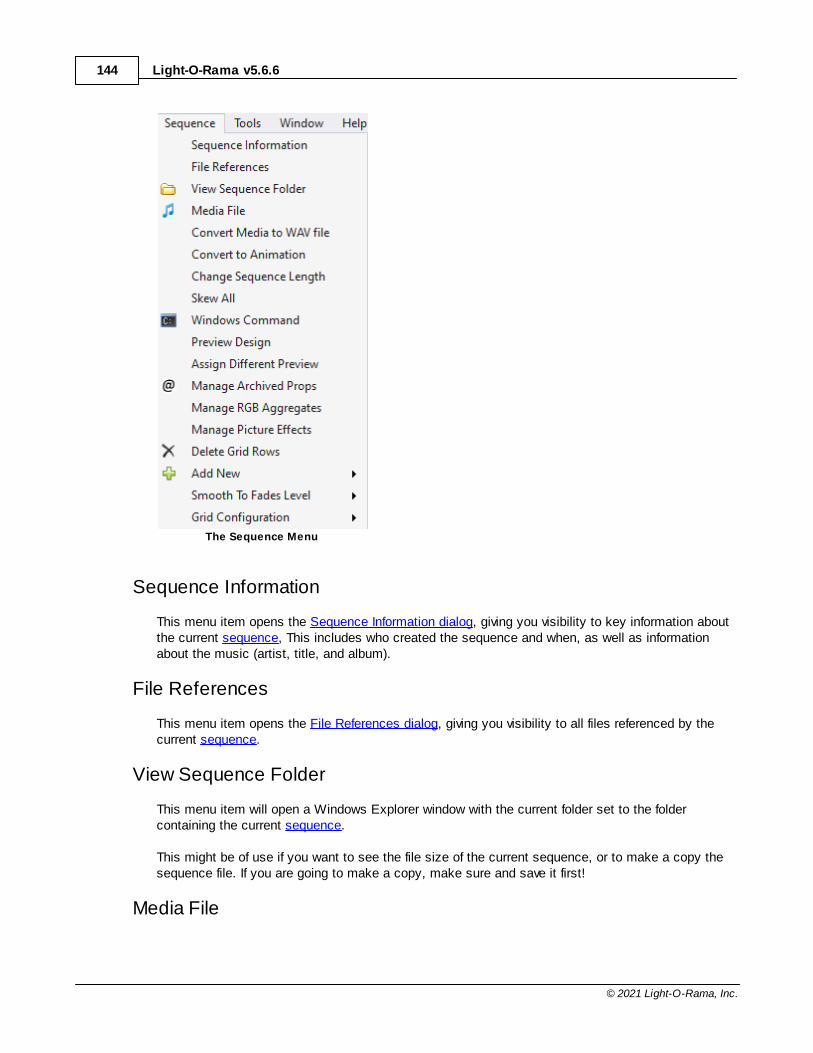
Light-O-Rama v5.6.6144
© 2021 Light-O-Rama, Inc.
The Sequence Menu
Sequence Information
This menu item opens the Sequence Information dialog, giving you visibility to key information aboutthe current sequence, This includes who created the sequence and when, as well as informationabout the music (artist, title, and album).
File References
This menu item opens the File References dialog, giving you visibility to all files referenced by thecurrent sequence.
View Sequence Folder
This menu item will open a Windows Explorer window with the current folder set to the foldercontaining the current sequence.
This might be of use if you want to see the file size of the current sequence, or to make a copy thesequence file. If you are going to make a copy, make sure and save it first!
Media File
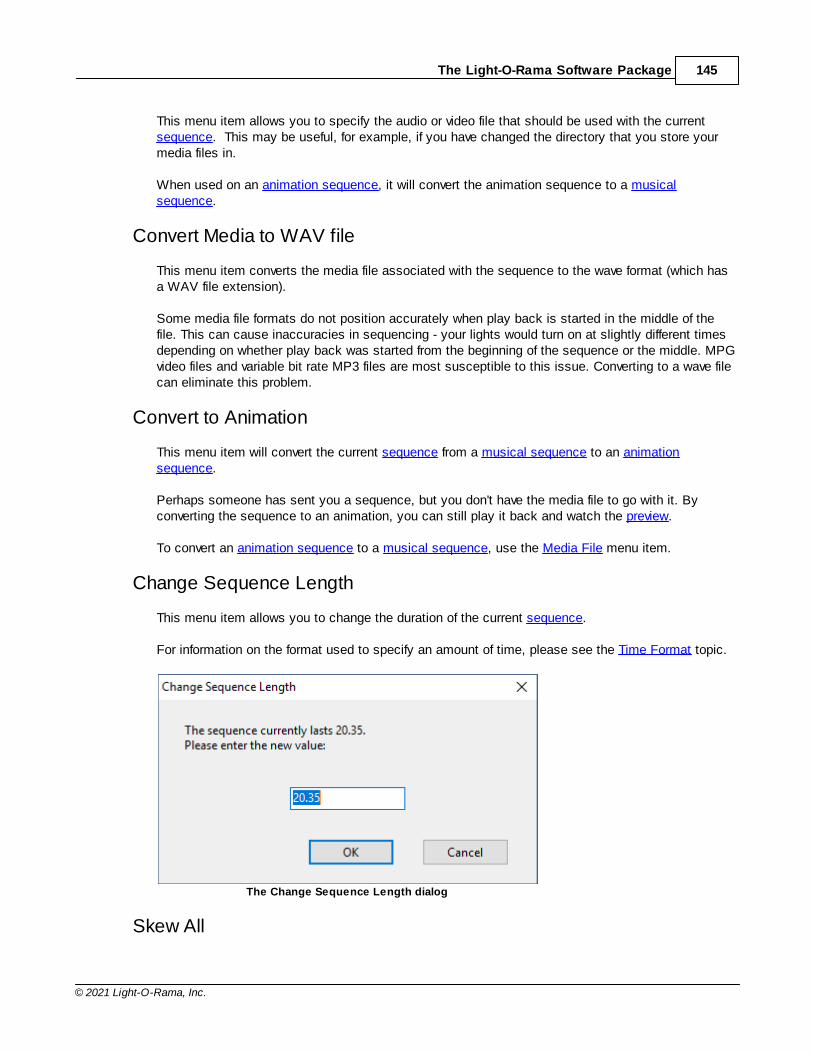
The Light-O-Rama Software Package 145
© 2021 Light-O-Rama, Inc.
This menu item allows you to specify the audio or video file that should be used with the currentsequence. This may be useful, for example, if you have changed the directory that you store yourmedia files in.
When used on an animation sequence, it will convert the animation sequence to a musicalsequence.
Convert Media to WAV file
This menu item converts the media file associated with the sequence to the wave format (which hasa WAV file extension).
Some media file formats do not position accurately when play back is started in the middle of thefile. This can cause inaccuracies in sequencing - your lights would turn on at slightly different timesdepending on whether play back was started from the beginning of the sequence or the middle. MPGvideo files and variable bit rate MP3 files are most susceptible to this issue. Converting to a wave filecan eliminate this problem.
Convert to Animation
This menu item will convert the current sequence from a musical sequence to an animationsequence.
Perhaps someone has sent you a sequence, but you don't have the media file to go with it. Byconverting the sequence to an animation, you can still play it back and watch the preview.
To convert an animation sequence to a musical sequence, use the Media File menu item.
Change Sequence Length
This menu item allows you to change the duration of the current sequence.
For information on the format used to specify an amount of time, please see the Time Format topic.
The Change Sequence Length dialog
Skew All
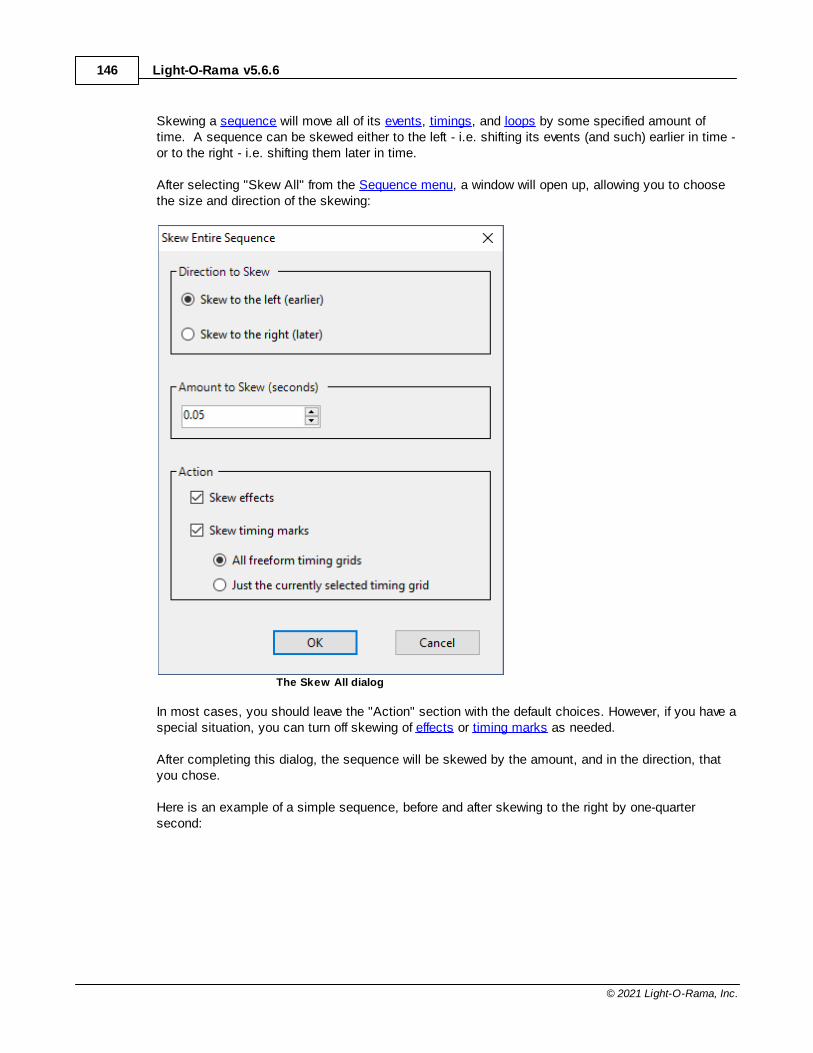
Light-O-Rama v5.6.6146
© 2021 Light-O-Rama, Inc.
Skewing a sequence will move all of its events, timings, and loops by some specified amount oftime. A sequence can be skewed either to the left - i.e. shifting its events (and such) earlier in time -or to the right - i.e. shifting them later in time.
After selecting "Skew All" from the Sequence menu, a window will open up, allowing you to choosethe size and direction of the skewing:
The Skew All dialog
In most cases, you should leave the "Action" section with the default choices. However, if you have aspecial situation, you can turn off skewing of effects or timing marks as needed.
After completing this dialog, the sequence will be skewed by the amount, and in the direction, thatyou chose.
Here is an example of a simple sequence, before and after skewing to the right by one-quartersecond:
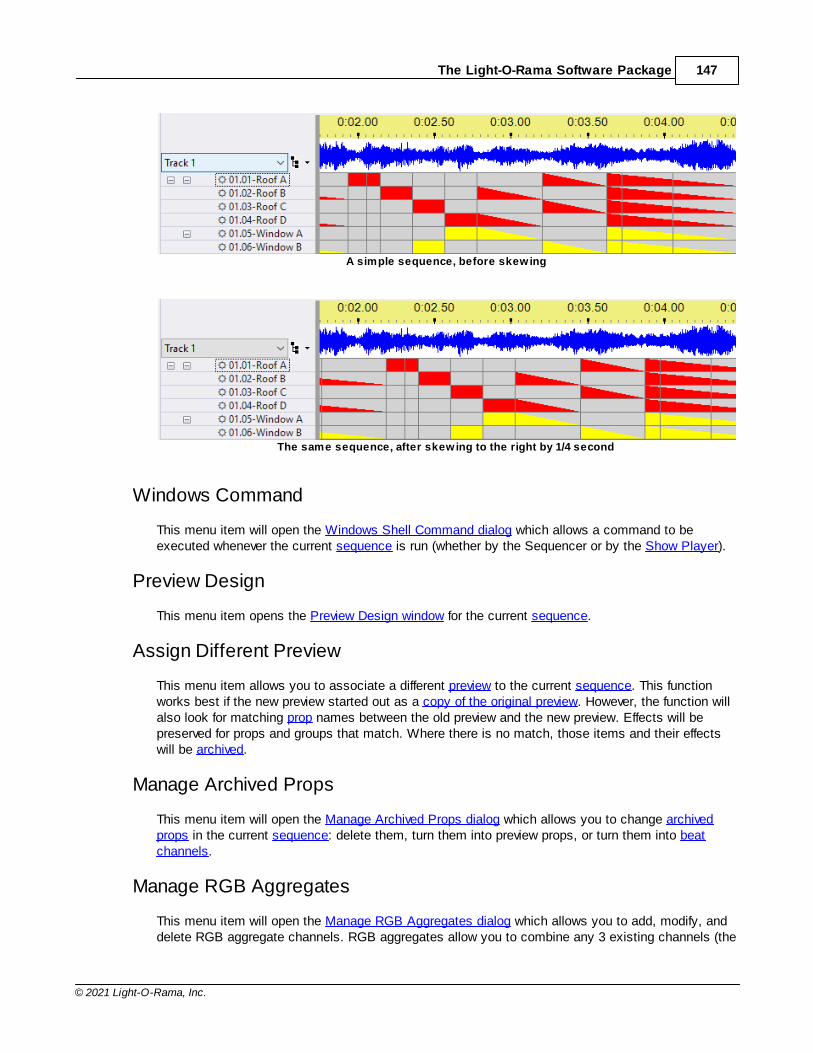
The Light-O-Rama Software Package 147
© 2021 Light-O-Rama, Inc.
A simple sequence, before skewing
The same sequence, after skewing to the right by 1/4 second
Windows Command
This menu item will open the Windows Shell Command dialog which allows a command to beexecuted whenever the current sequence is run (whether by the Sequencer or by the Show Player).
Preview Design
This menu item opens the Preview Design window for the current sequence.
Assign Different Preview
This menu item allows you to associate a different preview to the current sequence. This functionworks best if the new preview started out as a copy of the original preview. However, the function willalso look for matching prop names between the old preview and the new preview. Effects will bepreserved for props and groups that match. Where there is no match, those items and their effectswill be archived.
Manage Archived Props
This menu item will open the Manage Archived Props dialog which allows you to change archivedprops in the current sequence: delete them, turn them into preview props, or turn them into beatchannels.
Manage RGB Aggregates
This menu item will open the Manage RGB Aggregates dialog which allows you to add, modify, anddelete RGB aggregate channels. RGB aggregates allow you to combine any 3 existing channels (the
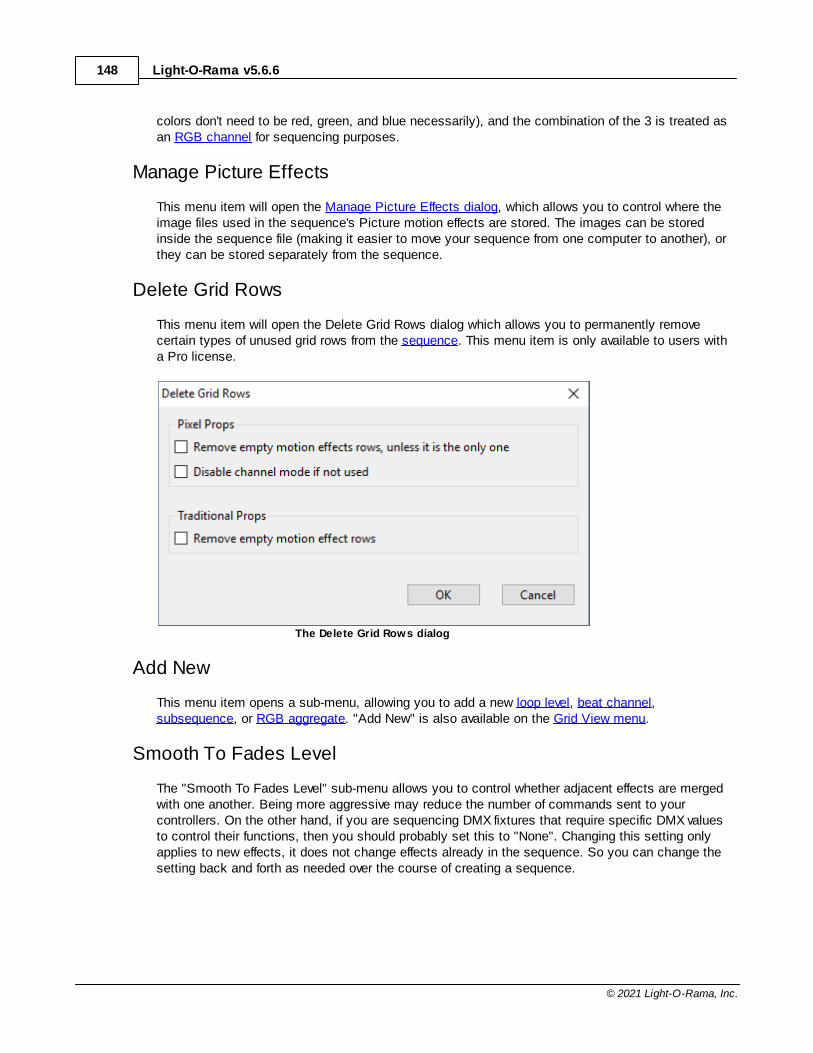
Light-O-Rama v5.6.6148
© 2021 Light-O-Rama, Inc.
colors don't need to be red, green, and blue necessarily), and the combination of the 3 is treated asan RGB channel for sequencing purposes.
Manage Picture Effects
This menu item will open the Manage Picture Effects dialog, which allows you to control where theimage files used in the sequence's Picture motion effects are stored. The images can be storedinside the sequence file (making it easier to move your sequence from one computer to another), orthey can be stored separately from the sequence.
Delete Grid Rows
This menu item will open the Delete Grid Rows dialog which allows you to permanently removecertain types of unused grid rows from the sequence. This menu item is only available to users witha Pro license.
The Delete Grid Rows dialog
Add New
This menu item opens a sub-menu, allowing you to add a new loop level, beat channel,subsequence, or RGB aggregate. "Add New" is also available on the Grid View menu.
Smooth To Fades Level
The "Smooth To Fades Level" sub-menu allows you to control whether adjacent effects are mergedwith one another. Being more aggressive may reduce the number of commands sent to yourcontrollers. On the other hand, if you are sequencing DMX fixtures that require specific DMX valuesto control their functions, then you should probably set this to "None". Changing this setting onlyapplies to new effects, it does not change effects already in the sequence. So you can change thesetting back and forth as needed over the course of creating a sequence.
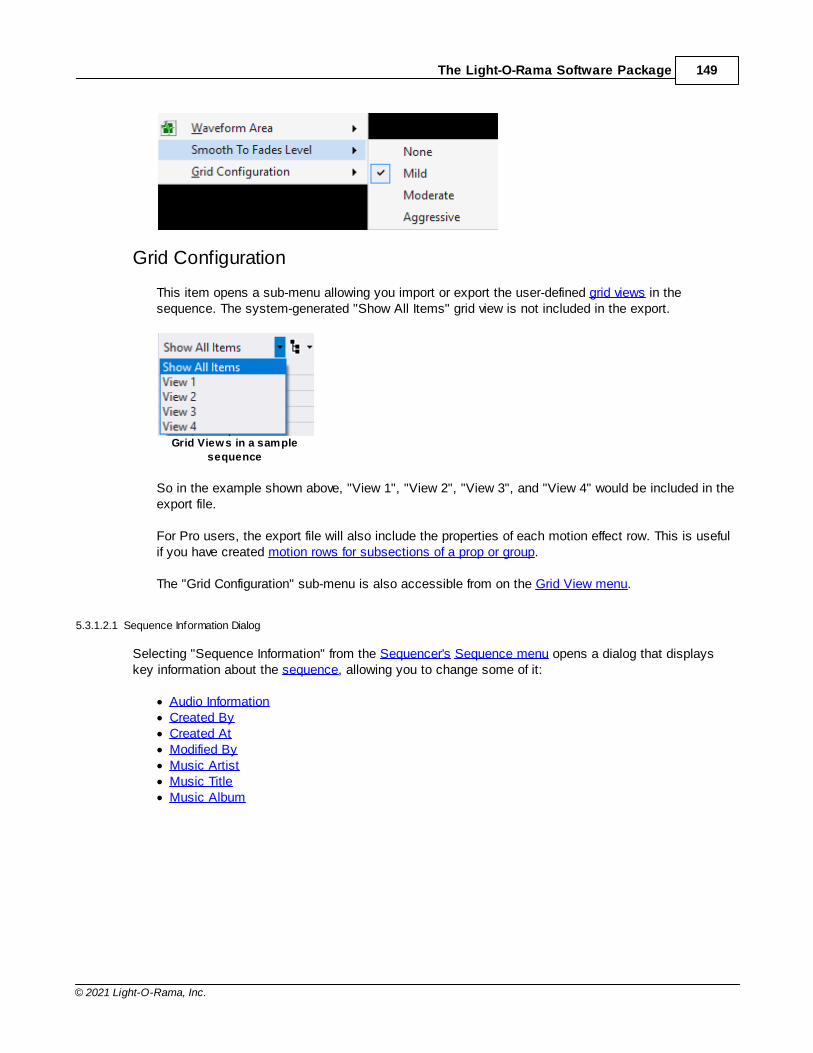
The Light-O-Rama Software Package 149
© 2021 Light-O-Rama, Inc.
Grid Configuration
This item opens a sub-menu allowing you import or export the user-defined grid views in thesequence. The system-generated "Show All Items" grid view is not included in the export.
Grid Views in a sample
sequence
So in the example shown above, "View 1", "View 2", "View 3", and "View 4" would be included in theexport file.
For Pro users, the export file will also include the properties of each motion effect row. This is usefulif you have created motion rows for subsections of a prop or group.
The "Grid Configuration" sub-menu is also accessible from on the Grid View menu.
5.3.1.2.1 Sequence Information Dialog
Selecting "Sequence Information" from the Sequencer's Sequence menu opens a dialog that displayskey information about the sequence, allowing you to change some of it:
· Audio Information· Created By· Created At· Modified By· Music Artist· Music Title· Music Album
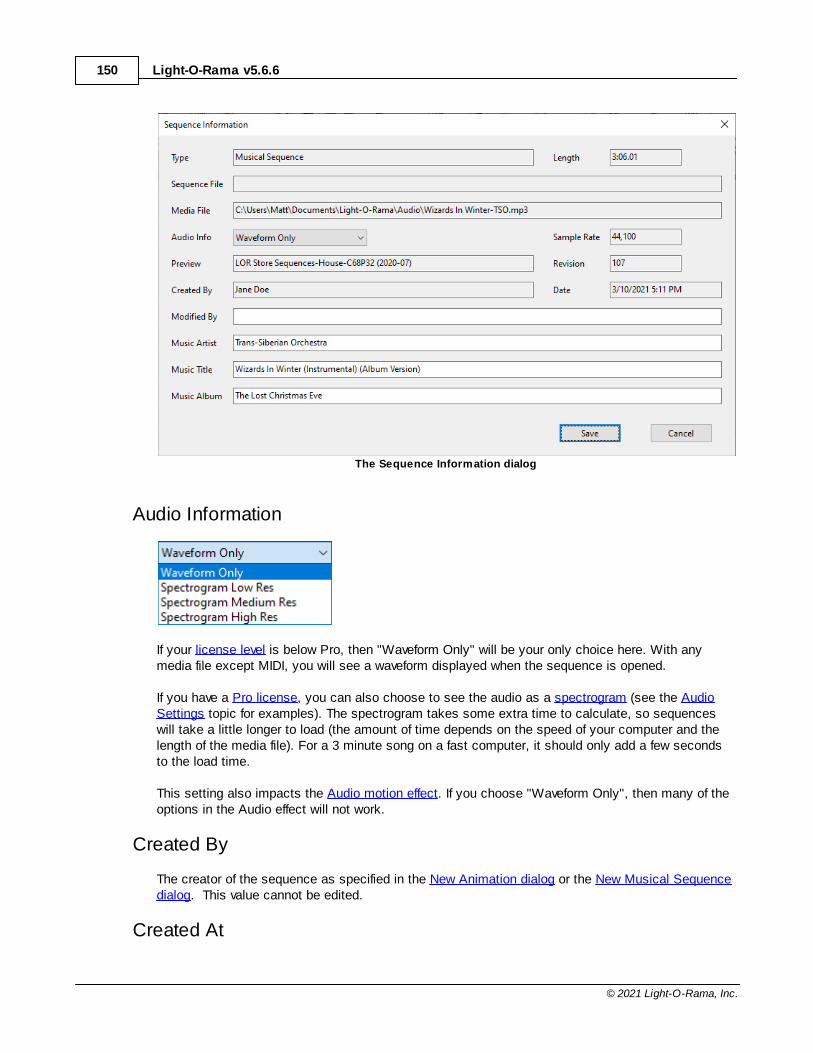
Light-O-Rama v5.6.6150
© 2021 Light-O-Rama, Inc.
The Sequence Information dialog
Audio Information
If your license level is below Pro, then "Waveform Only" will be your only choice here. With anymedia file except MIDI, you will see a waveform displayed when the sequence is opened.
If you have a Pro license, you can also choose to see the audio as a spectrogram (see the AudioSettings topic for examples). The spectrogram takes some extra time to calculate, so sequenceswill take a little longer to load (the amount of time depends on the speed of your computer and thelength of the media file). For a 3 minute song on a fast computer, it should only add a few secondsto the load time.
This setting also impacts the Audio motion effect. If you choose "Waveform Only", then many of theoptions in the Audio effect will not work.
Created By
The creator of the sequence as specified in the New Animation dialog or the New Musical Sequencedialog. This value cannot be edited.
Created At
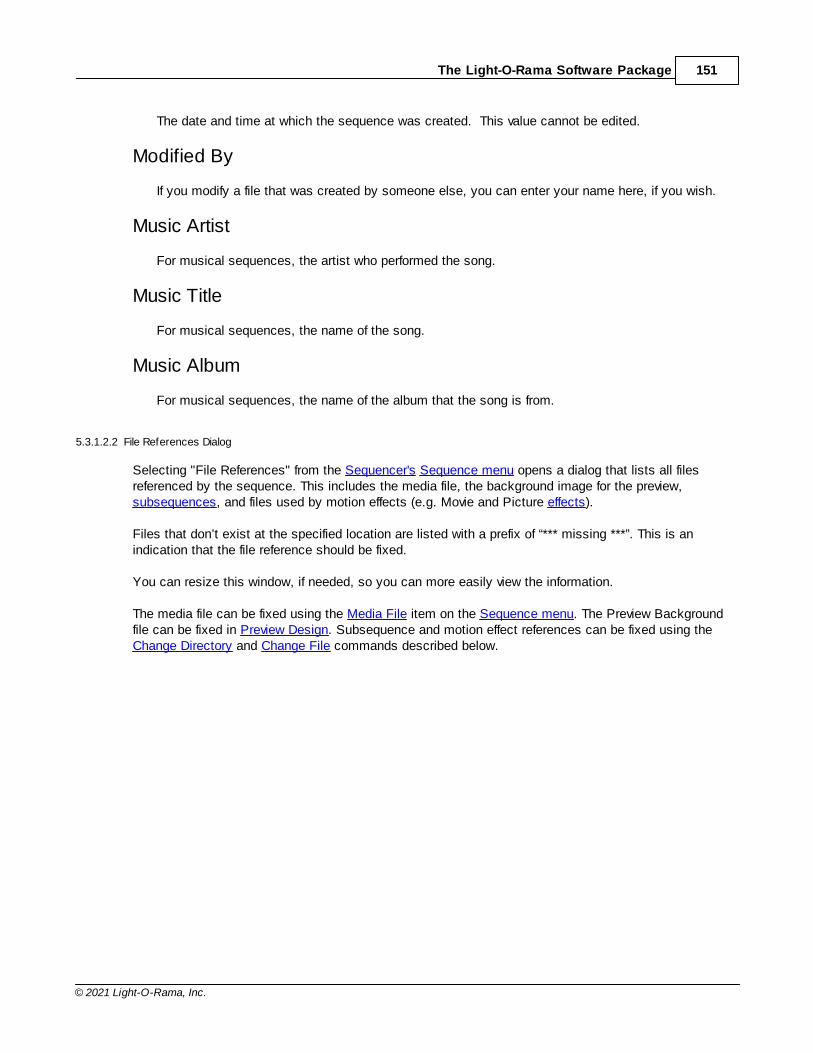
The Light-O-Rama Software Package 151
© 2021 Light-O-Rama, Inc.
The date and time at which the sequence was created. This value cannot be edited.
Modified By
If you modify a file that was created by someone else, you can enter your name here, if you wish.
Music Artist
For musical sequences, the artist who performed the song.
Music Title
For musical sequences, the name of the song.
Music Album
For musical sequences, the name of the album that the song is from.
5.3.1.2.2 File References Dialog
Selecting "File References" from the Sequencer's Sequence menu opens a dialog that lists all filesreferenced by the sequence. This includes the media file, the background image for the preview,subsequences, and files used by motion effects (e.g. Movie and Picture effects).
Files that don’t exist at the specified location are listed with a prefix of “*** missing ***”. This is anindication that the file reference should be fixed.
You can resize this window, if needed, so you can more easily view the information.
The media file can be fixed using the Media File item on the Sequence menu. The Preview Backgroundfile can be fixed in Preview Design. Subsequence and motion effect references can be fixed using theChange Directory and Change File commands described below.
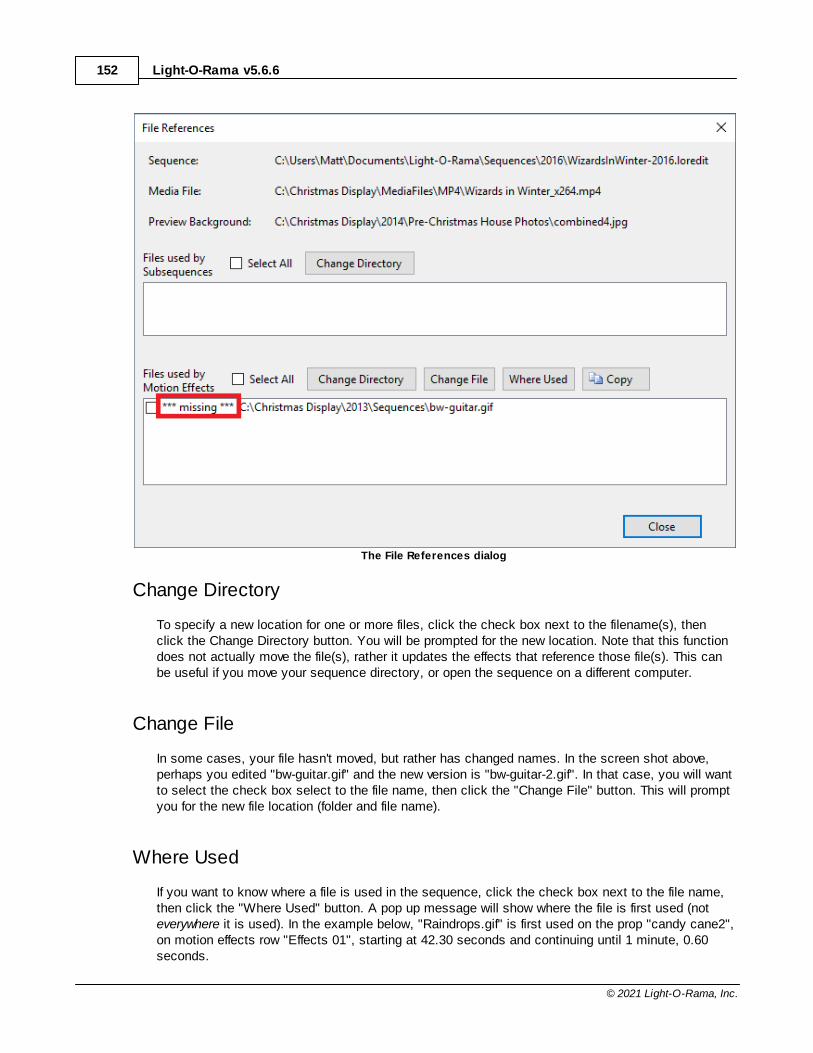
Light-O-Rama v5.6.6152
© 2021 Light-O-Rama, Inc.
The File References dialog
Change Directory
To specify a new location for one or more files, click the check box next to the filename(s), thenclick the Change Directory button. You will be prompted for the new location. Note that this functiondoes not actually move the file(s), rather it updates the effects that reference those file(s). This canbe useful if you move your sequence directory, or open the sequence on a different computer.
Change File
In some cases, your file hasn't moved, but rather has changed names. In the screen shot above,perhaps you edited "bw-guitar.gif" and the new version is "bw-guitar-2.gif". In that case, you will wantto select the check box select to the file name, then click the "Change File" button. This will promptyou for the new file location (folder and file name).
Where Used
If you want to know where a file is used in the sequence, click the check box next to the file name,then click the "Where Used" button. A pop up message will show where the file is first used (noteverywhere it is used). In the example below, "Raindrops.gif" is first used on the prop "candy cane2",on motion effects row "Effects 01", starting at 42.30 seconds and continuing until 1 minute, 0.60seconds.
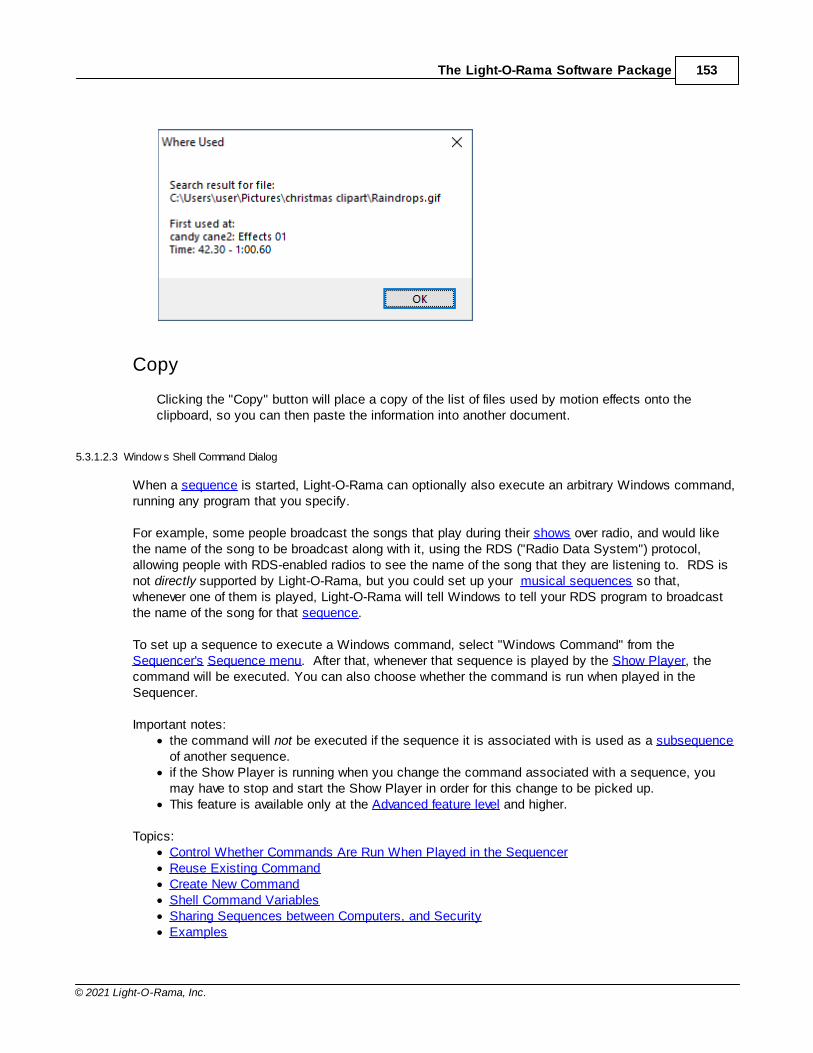
The Light-O-Rama Software Package 153
© 2021 Light-O-Rama, Inc.
Copy
Clicking the "Copy" button will place a copy of the list of files used by motion effects onto theclipboard, so you can then paste the information into another document.
5.3.1.2.3 Window s Shell Command Dialog
When a sequence is started, Light-O-Rama can optionally also execute an arbitrary Windows command,running any program that you specify.
For example, some people broadcast the songs that play during their shows over radio, and would likethe name of the song to be broadcast along with it, using the RDS ("Radio Data System") protocol,allowing people with RDS-enabled radios to see the name of the song that they are listening to. RDS isnot directly supported by Light-O-Rama, but you could set up your musical sequences so that,whenever one of them is played, Light-O-Rama will tell Windows to tell your RDS program to broadcastthe name of the song for that sequence.
To set up a sequence to execute a Windows command, select "Windows Command" from theSequencer's Sequence menu. After that, whenever that sequence is played by the Show Player, thecommand will be executed. You can also choose whether the command is run when played in theSequencer.
Important notes:· the command will not be executed if the sequence it is associated with is used as a subsequence
of another sequence.· if the Show Player is running when you change the command associated with a sequence, you
may have to stop and start the Show Player in order for this change to be picked up.· This feature is available only at the Advanced feature level and higher.
Topics:· Control Whether Commands Are Run When Played in the Sequencer· Reuse Existing Command· Create New Command· Shell Command Variables· Sharing Sequences between Computers, and Security· Examples
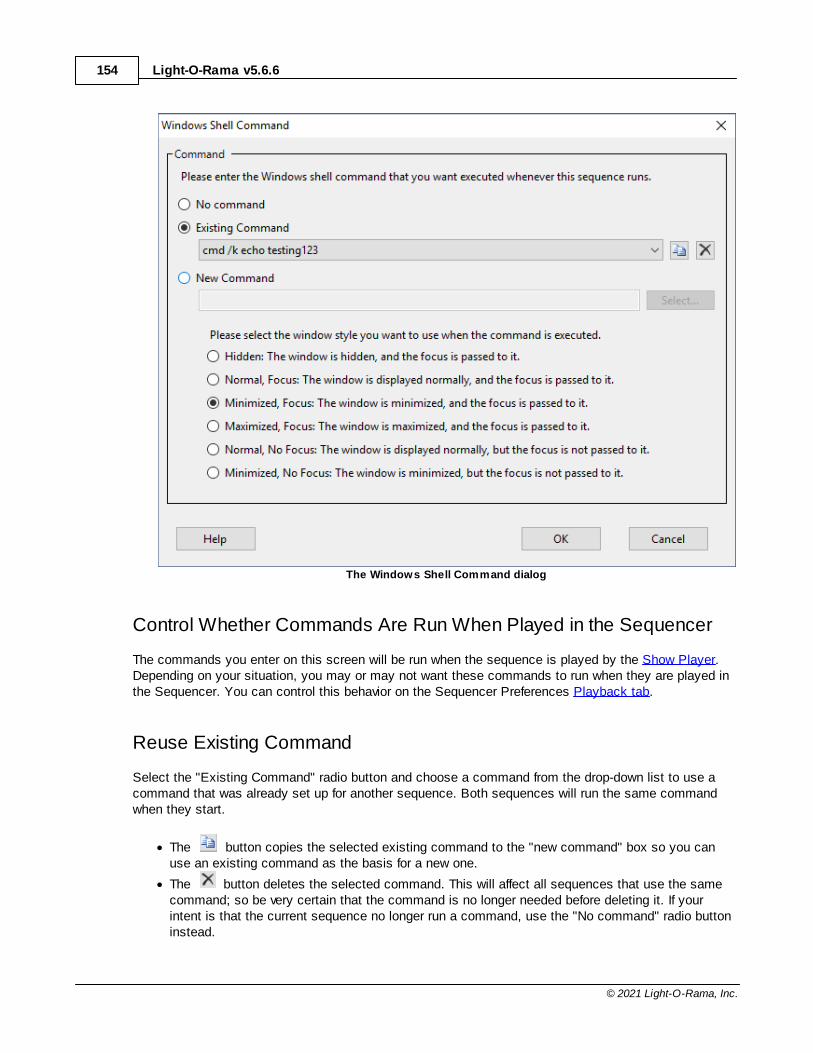
Light-O-Rama v5.6.6154
© 2021 Light-O-Rama, Inc.
The Windows Shell Command dialog
Control Whether Commands Are Run When Played in the Sequencer
The commands you enter on this screen will be run when the sequence is played by the Show Player.Depending on your situation, you may or may not want these commands to run when they are played inthe Sequencer. You can control this behavior on the Sequencer Preferences Playback tab.
Reuse Existing Command
Select the "Existing Command" radio button and choose a command from the drop-down list to use acommand that was already set up for another sequence. Both sequences will run the same commandwhen they start.
· The button copies the selected existing command to the "new command" box so you canuse an existing command as the basis for a new one.
· The button deletes the selected command. This will affect all sequences that use the samecommand; so be very certain that the command is no longer needed before deleting it. If yourintent is that the current sequence no longer run a command, use the "No command" radio buttoninstead.
The Light-O-Rama Software Package 155
© 2021 Light-O-Rama, Inc.
Create New Command
Select the "New Command" radio button for creating an entirely new command, not used by any othersequence. If your command is an executable file or batch file (.EXE, .BAT, or .CMD extension), you canuse the "Select" button to select the desired file and the full path to the file will be placed in the newcommand text box. Your command can also include special shell command variables as noted below.
Shell Command Variables
For the most part, a shell command will be executed exactly as you type it. You can, however,additionally use certain variables, which will be replaced at run-time with various information, such as thetitle of the song associated with the sequence. The following variables can be used (note: the exactresult of using any of the date/time "DT_" variables may depend upon your computer system, so trythem out if you need to rely upon an exact format):
Variable Meaning
%% A single percent character ("%")
%DT_a% Day of week, abbreviated ("Mon")
%DT_A% Day of week ("Monday")
%DT_b% Month name, abbreviated ("Aug")
%DT_B% Month name ("August")
%DT_c% Date and time ("Sunday, March 09, 2008 4:05:07 PM")
%DT_d% Day of month (01 through 31)
%DT_H% Hour, 24 hour clock (00 through 23)
%DT_I% Hour, 12 hour clock (01 through 12)
%DT_j% Day of year (001 through 366)
%DT_m% Month number (01 through 12)
%DT_M% Minute (00 through 59)
%DT_p% AM or PM
%DT_S% Second (00 through 61)
%DT_w% Day of week, number (0 through 6, Sunday being 0)
%DT_x% Date ("11/29/10")
%DT_X% Time ("16:32:37")
%DT_y% Year, two digit ("10")
%DT_Y% Year, four digit ("2010")
%ENV_something% The value of your computer's environment variable "something"; forexample, use %ENV_PATH% to get the value of your computer'sPATH environment variable
Light-O-Rama v5.6.6156
© 2021 Light-O-Rama, Inc.
%MEDIA_ALBUM% The name of the album that this sequence's media file is from (if setin your sequence)
%MEDIA_ARTIST% The name of the artist that this sequence's media file is by (if set inyour sequence)
%MEDIA_FILENAME% The name of the sequence's media file, without path information
%MEDIA_FILENAME_FULL% The name of the sequence's media file, with path information
%MEDIA_FILENAME_NO_EXT% The name of the sequence's media file, without path informationand without the file extension (such as ".mp3")
%MEDIA_TITLE% The name of the song that this sequence's media file is (if set inyour sequence)
%SEQUENCE_AUTHOR% The author of this sequence (if set in your sequence)
%SEQUENCE_CREATED_AT% The date and time at which the sequence was created
%SEQUENCE_FILENAME% The name of the sequence file, without path information
%SEQUENCE_FILENAME_FULL%
The name of the sequence file, with path information
%SEQUENCE_FILENAME_NO_EXT%
The name of the sequence file, without path information and withoutthe file extension (such as ".lms")
%SEQUENCE_MODIFIED_BY% The name of the person who has modified the sequence (if set inyour sequence)
These variables were supported in prior versions, but are no longer supported in S5
Variable Meaning
%DT_U% Week of year, with the first Sunday of the year starting week 01 (00through 53)
%DT_W% Week of year, with the first Monday of the year starting week 01 (00through 53)
%DT_Z% Time zone ("EST")
Sharing Sequences between Computers, and Security
The ability to execute an arbitrary Windows command is very powerful, and even potentially harmful - forexample, you could execute a command which will install spyware on your machine. Therefore, it wouldnot be wise to execute whatever Windows command another person chose, unless you are absolutelysure that the command they chose is safe and harmless.
For this reason, Light-O-Rama imposes a security measure: The command to be executed is not storeddirectly in the sequence file itself. Instead, the sequence file contains a key for an entry in another file("cmdmap.lcm", located in your Light-O-Rama sequences directory); that entry specifies the Windowscommand to be executed. If that file doesn't contain an entry for that key, Light-O-Rama simply doesnot execute any command when the sequence plays.
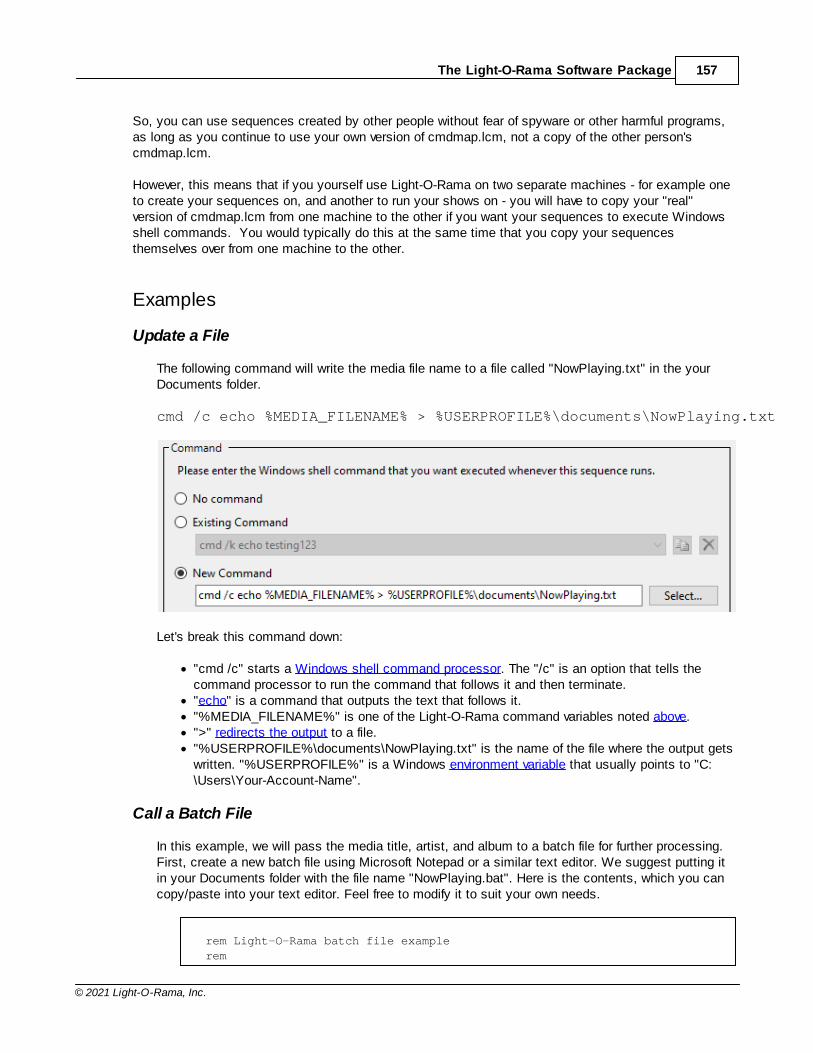
The Light-O-Rama Software Package 157
© 2021 Light-O-Rama, Inc.
So, you can use sequences created by other people without fear of spyware or other harmful programs,as long as you continue to use your own version of cmdmap.lcm, not a copy of the other person'scmdmap.lcm.
However, this means that if you yourself use Light-O-Rama on two separate machines - for example oneto create your sequences on, and another to run your shows on - you will have to copy your "real"version of cmdmap.lcm from one machine to the other if you want your sequences to execute Windowsshell commands. You would typically do this at the same time that you copy your sequencesthemselves over from one machine to the other.
Examples
Update a File
The following command will write the media file name to a file called "NowPlaying.txt" in the yourDocuments folder.
cmd /c echo %MEDIA_FILENAME% > %USERPROFILE%\documents\NowPlaying.txt
Let's break this command down:
· "cmd /c" starts a Windows shell command processor. The "/c" is an option that tells thecommand processor to run the command that follows it and then terminate.
· "echo" is a command that outputs the text that follows it.· "%MEDIA_FILENAME%" is one of the Light-O-Rama command variables noted above.· ">" redirects the output to a file.· "%USERPROFILE%\documents\NowPlaying.txt" is the name of the file where the output gets
written. "%USERPROFILE%" is a Windows environment variable that usually points to "C:\Users\Your-Account-Name".
Call a Batch File
In this example, we will pass the media title, artist, and album to a batch file for further processing.First, create a new batch file using Microsoft Notepad or a similar text editor. We suggest putting itin your Documents folder with the file name "NowPlaying.bat". Here is the contents, which you cancopy/paste into your text editor. Feel free to modify it to suit your own needs.
rem Light-O-Rama batch file examplerem
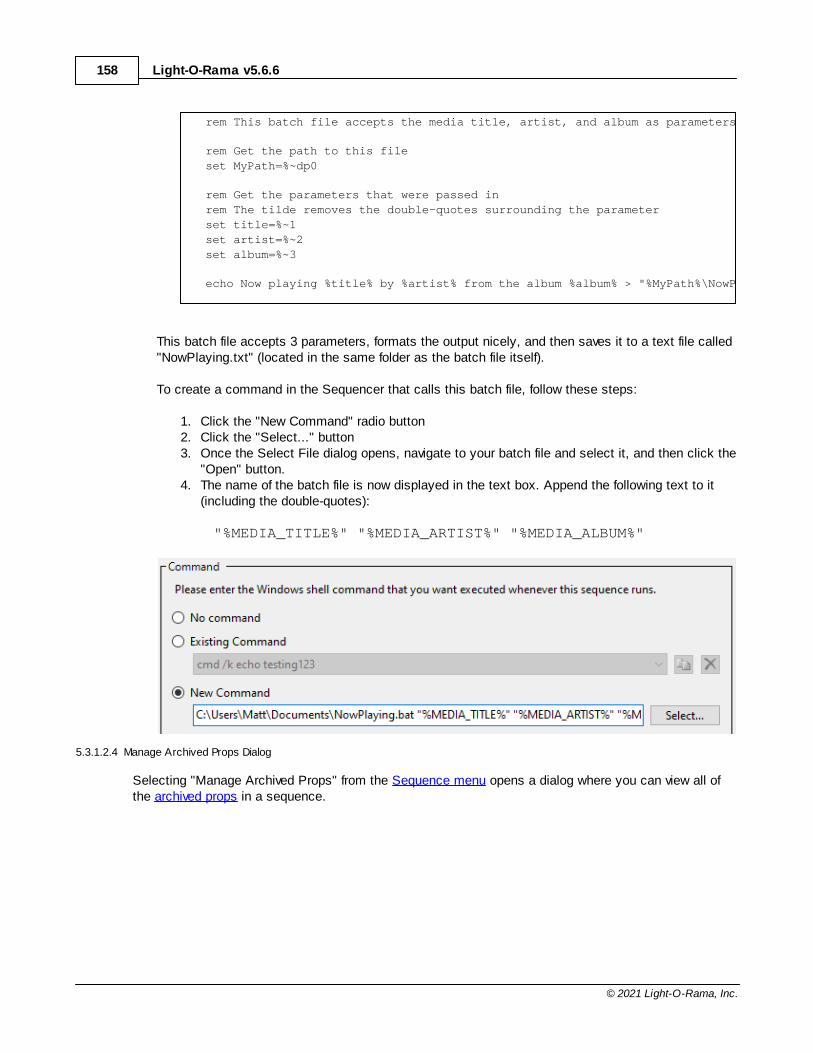
Light-O-Rama v5.6.6158
© 2021 Light-O-Rama, Inc.
rem This batch file accepts the media title, artist, and album as parameters
rem Get the path to this fileset MyPath=%~dp0
rem Get the parameters that were passed inrem The tilde removes the double-quotes surrounding the parameterset title=%~1set artist=%~2set album=%~3
echo Now playing %title% by %artist% from the album %album% > "%MyPath%\NowPlaying.txt"
This batch file accepts 3 parameters, formats the output nicely, and then saves it to a text file called"NowPlaying.txt" (located in the same folder as the batch file itself).
To create a command in the Sequencer that calls this batch file, follow these steps:
1. Click the "New Command" radio button2. Click the "Select..." button3. Once the Select File dialog opens, navigate to your batch file and select it, and then click the
"Open" button.4. The name of the batch file is now displayed in the text box. Append the following text to it
(including the double-quotes):
"%MEDIA_TITLE%" "%MEDIA_ARTIST%" "%MEDIA_ALBUM%"
5.3.1.2.4 Manage Archived Props Dialog
Selecting "Manage Archived Props" from the Sequence menu opens a dialog where you can view all ofthe archived props in a sequence.
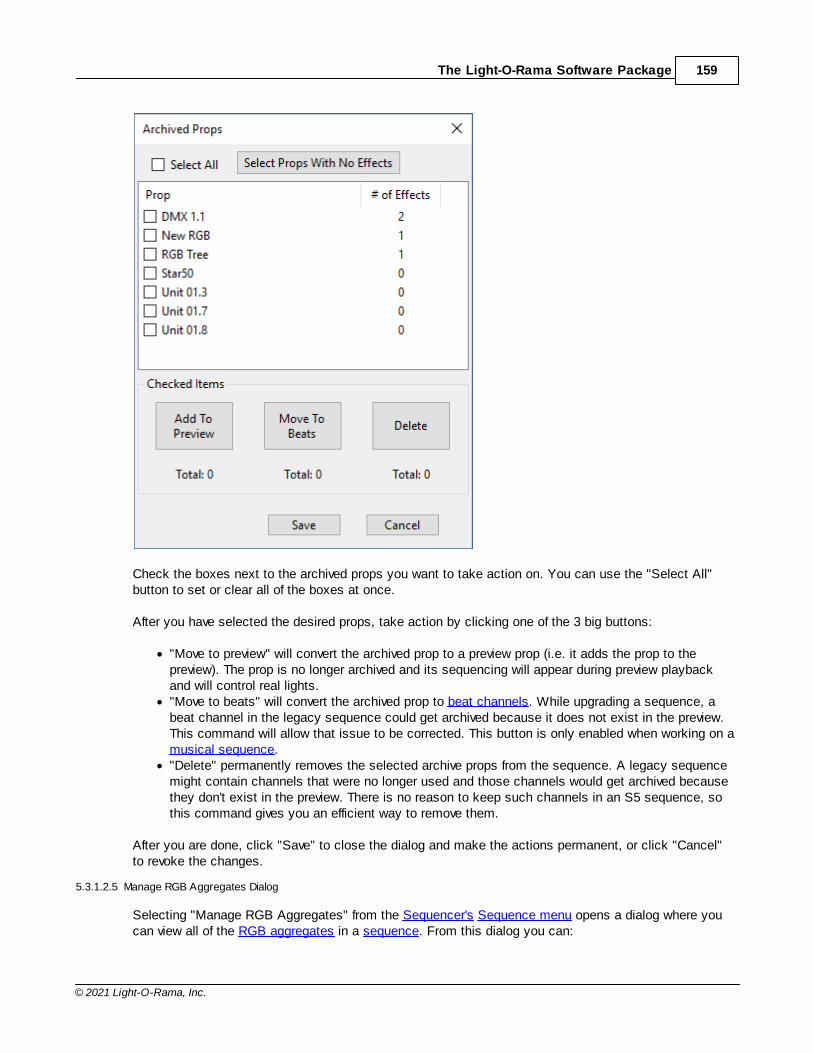
The Light-O-Rama Software Package 159
© 2021 Light-O-Rama, Inc.
Check the boxes next to the archived props you want to take action on. You can use the "Select All"button to set or clear all of the boxes at once.
After you have selected the desired props, take action by clicking one of the 3 big buttons:
· "Move to preview" will convert the archived prop to a preview prop (i.e. it adds the prop to thepreview). The prop is no longer archived and its sequencing will appear during preview playbackand will control real lights.
· "Move to beats" will convert the archived prop to beat channels. While upgrading a sequence, abeat channel in the legacy sequence could get archived because it does not exist in the preview.This command will allow that issue to be corrected. This button is only enabled when working on amusical sequence.
· "Delete" permanently removes the selected archive props from the sequence. A legacy sequencemight contain channels that were no longer used and those channels would get archived becausethey don't exist in the preview. There is no reason to keep such channels in an S5 sequence, sothis command gives you an efficient way to remove them.
After you are done, click "Save" to close the dialog and make the actions permanent, or click "Cancel"to revoke the changes.
5.3.1.2.5 Manage RGB Aggregates Dialog
Selecting "Manage RGB Aggregates" from the Sequencer's Sequence menu opens a dialog where youcan view all of the RGB aggregates in a sequence. From this dialog you can:
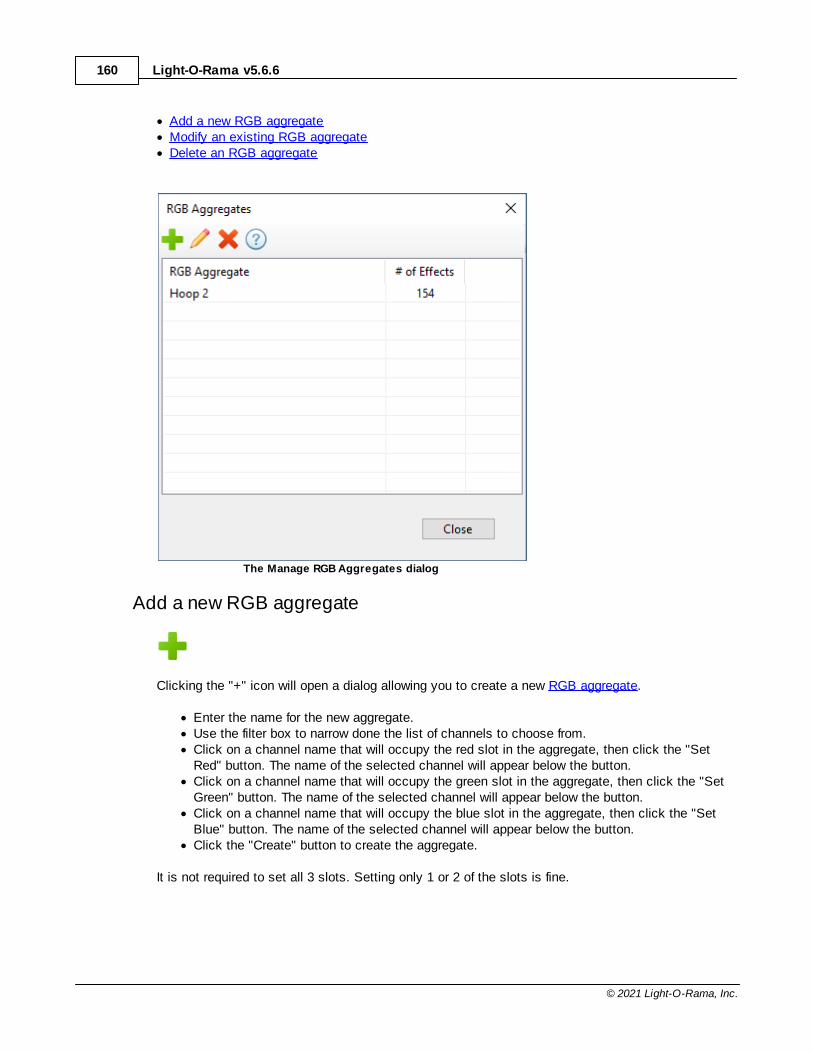
Light-O-Rama v5.6.6160
© 2021 Light-O-Rama, Inc.
· Add a new RGB aggregate· Modify an existing RGB aggregate· Delete an RGB aggregate
The Manage RGB Aggregates dialog
Add a new RGB aggregate
Clicking the "+" icon will open a dialog allowing you to create a new RGB aggregate.
· Enter the name for the new aggregate. · Use the filter box to narrow done the list of channels to choose from.· Click on a channel name that will occupy the red slot in the aggregate, then click the "Set
Red" button. The name of the selected channel will appear below the button.· Click on a channel name that will occupy the green slot in the aggregate, then click the "Set
Green" button. The name of the selected channel will appear below the button.· Click on a channel name that will occupy the blue slot in the aggregate, then click the "Set
Blue" button. The name of the selected channel will appear below the button.· Click the "Create" button to create the aggregate.
It is not required to set all 3 slots. Setting only 1 or 2 of the slots is fine.
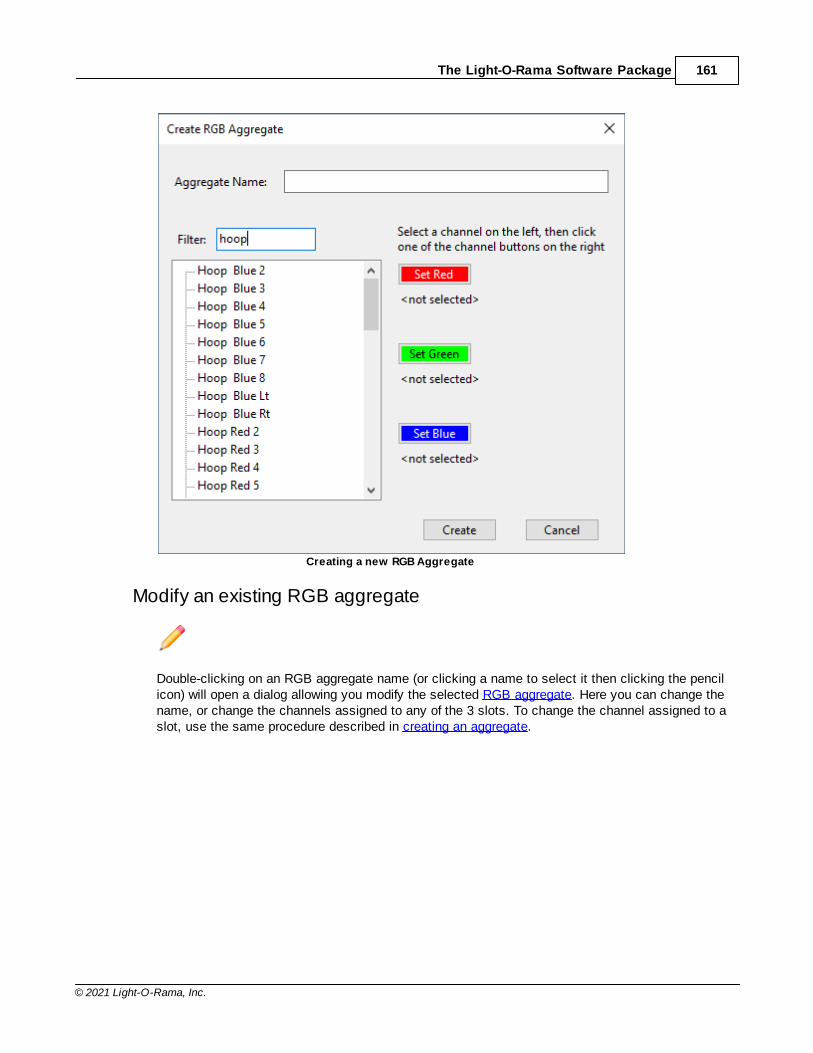
The Light-O-Rama Software Package 161
© 2021 Light-O-Rama, Inc.
Creating a new RGB Aggregate
Modify an existing RGB aggregate
Double-clicking on an RGB aggregate name (or clicking a name to select it then clicking the pencilicon) will open a dialog allowing you modify the selected RGB aggregate. Here you can change thename, or change the channels assigned to any of the 3 slots. To change the channel assigned to aslot, use the same procedure described in creating an aggregate.
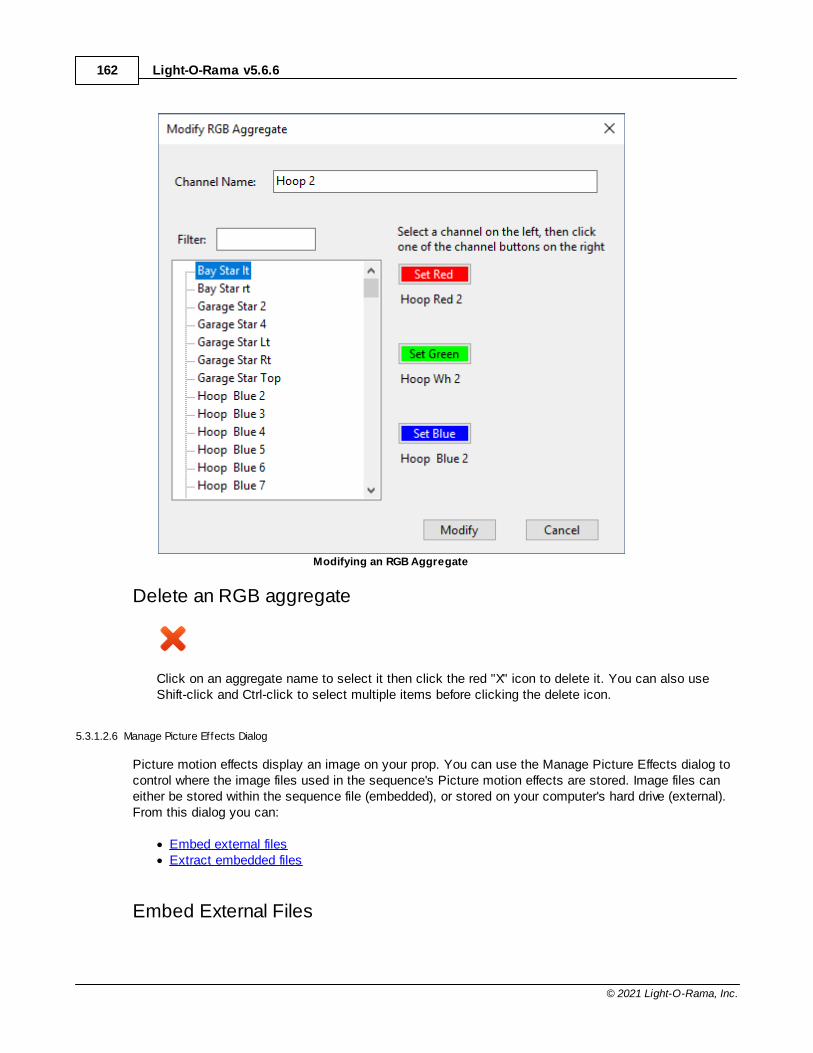
Light-O-Rama v5.6.6162
© 2021 Light-O-Rama, Inc.
Modifying an RGB Aggregate
Delete an RGB aggregate
Click on an aggregate name to select it then click the red "X" icon to delete it. You can also useShift-click and Ctrl-click to select multiple items before clicking the delete icon.
5.3.1.2.6 Manage Picture Effects Dialog
Picture motion effects display an image on your prop. You can use the Manage Picture Effects dialog tocontrol where the image files used in the sequence's Picture motion effects are stored. Image files caneither be stored within the sequence file (embedded), or stored on your computer's hard drive (external).From this dialog you can:
· Embed external files· Extract embedded files
Embed External Files
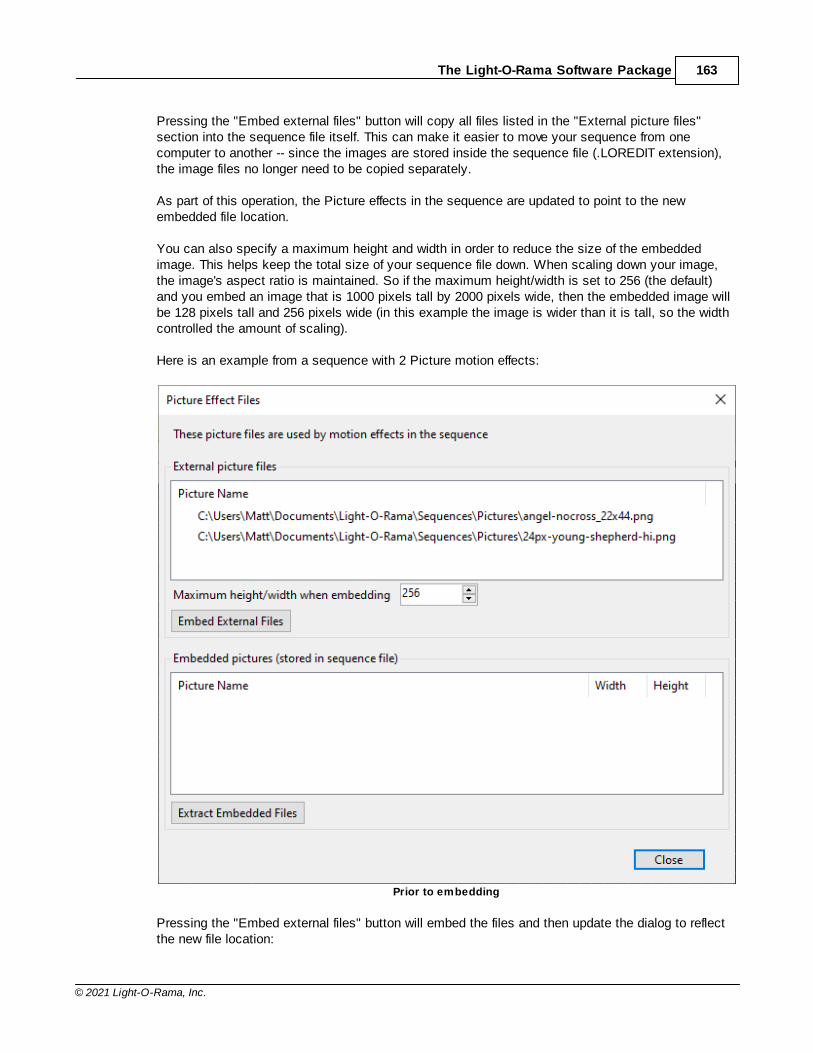
The Light-O-Rama Software Package 163
© 2021 Light-O-Rama, Inc.
Pressing the "Embed external files" button will copy all files listed in the "External picture files"section into the sequence file itself. This can make it easier to move your sequence from onecomputer to another -- since the images are stored inside the sequence file (.LOREDIT extension),the image files no longer need to be copied separately.
As part of this operation, the Picture effects in the sequence are updated to point to the newembedded file location.
You can also specify a maximum height and width in order to reduce the size of the embeddedimage. This helps keep the total size of your sequence file down. When scaling down your image,the image's aspect ratio is maintained. So if the maximum height/width is set to 256 (the default)and you embed an image that is 1000 pixels tall by 2000 pixels wide, then the embedded image willbe 128 pixels tall and 256 pixels wide (in this example the image is wider than it is tall, so the widthcontrolled the amount of scaling).
Here is an example from a sequence with 2 Picture motion effects:
Prior to embedding
Pressing the "Embed external files" button will embed the files and then update the dialog to reflectthe new file location:
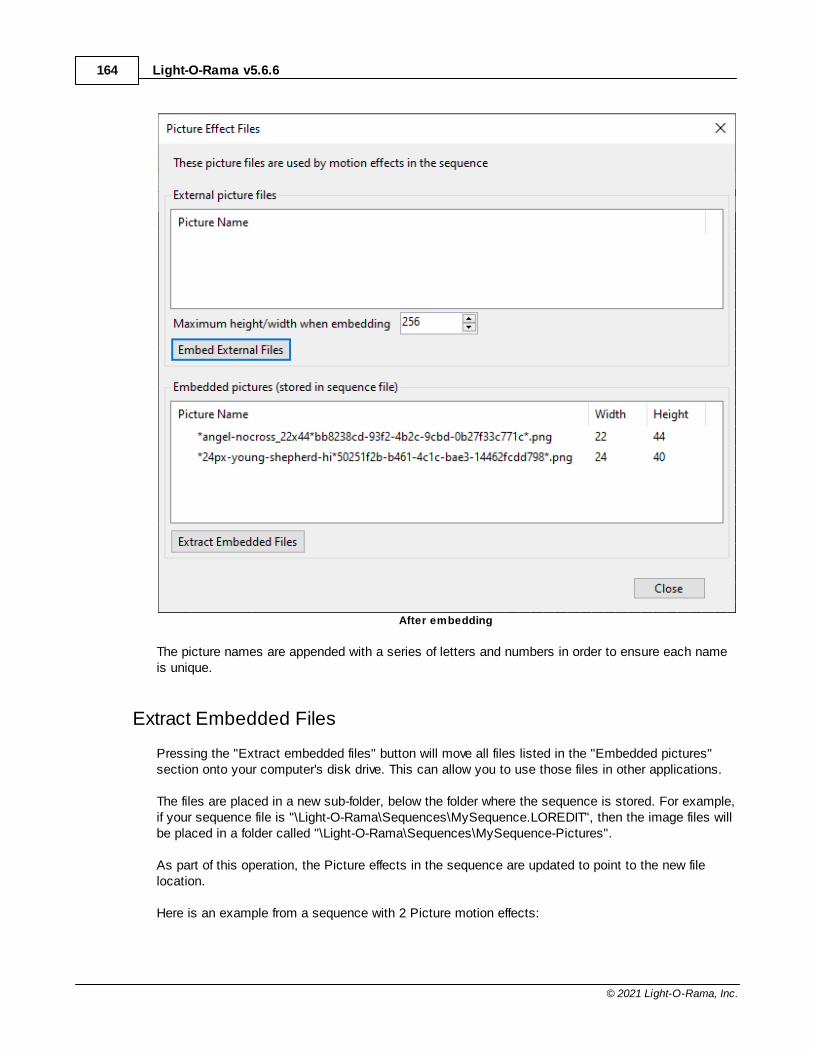
Light-O-Rama v5.6.6164
© 2021 Light-O-Rama, Inc.
After embedding
The picture names are appended with a series of letters and numbers in order to ensure each nameis unique.
Extract Embedded Files
Pressing the "Extract embedded files" button will move all files listed in the "Embedded pictures"section onto your computer's disk drive. This can allow you to use those files in other applications.
The files are placed in a new sub-folder, below the folder where the sequence is stored. For example,if your sequence file is "\Light-O-Rama\Sequences\MySequence.LOREDIT", then the image files willbe placed in a folder called "\Light-O-Rama\Sequences\MySequence-Pictures".
As part of this operation, the Picture effects in the sequence are updated to point to the new filelocation.
Here is an example from a sequence with 2 Picture motion effects:
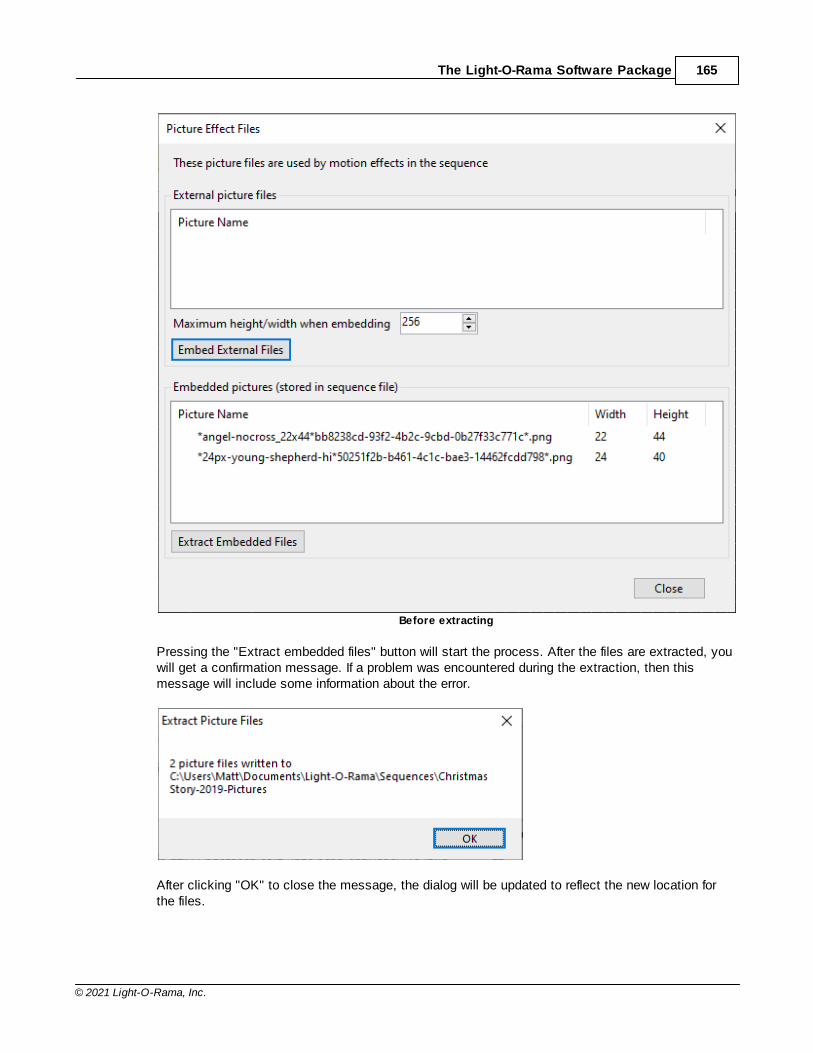
The Light-O-Rama Software Package 165
© 2021 Light-O-Rama, Inc.
Before extracting
Pressing the "Extract embedded files" button will start the process. After the files are extracted, youwill get a confirmation message. If a problem was encountered during the extraction, then thismessage will include some information about the error.
After clicking "OK" to close the message, the dialog will be updated to reflect the new location forthe files.

Light-O-Rama v5.6.6166
© 2021 Light-O-Rama, Inc.
After Extracting
5.3.1.3 Tools Menu
The Light-O-Rama S5 Sequencer's Tools Menu gives you access to a set of functions that are unrelatedto a specific sequence.
· Motion Effect Generator· Beat Wizard· MIDI File Wizard· Tapper Wizard· VU Wizard· Sequencer Preferences· Keyboard Preferences· Change User Data Directory· Theme· Zoom Preferences
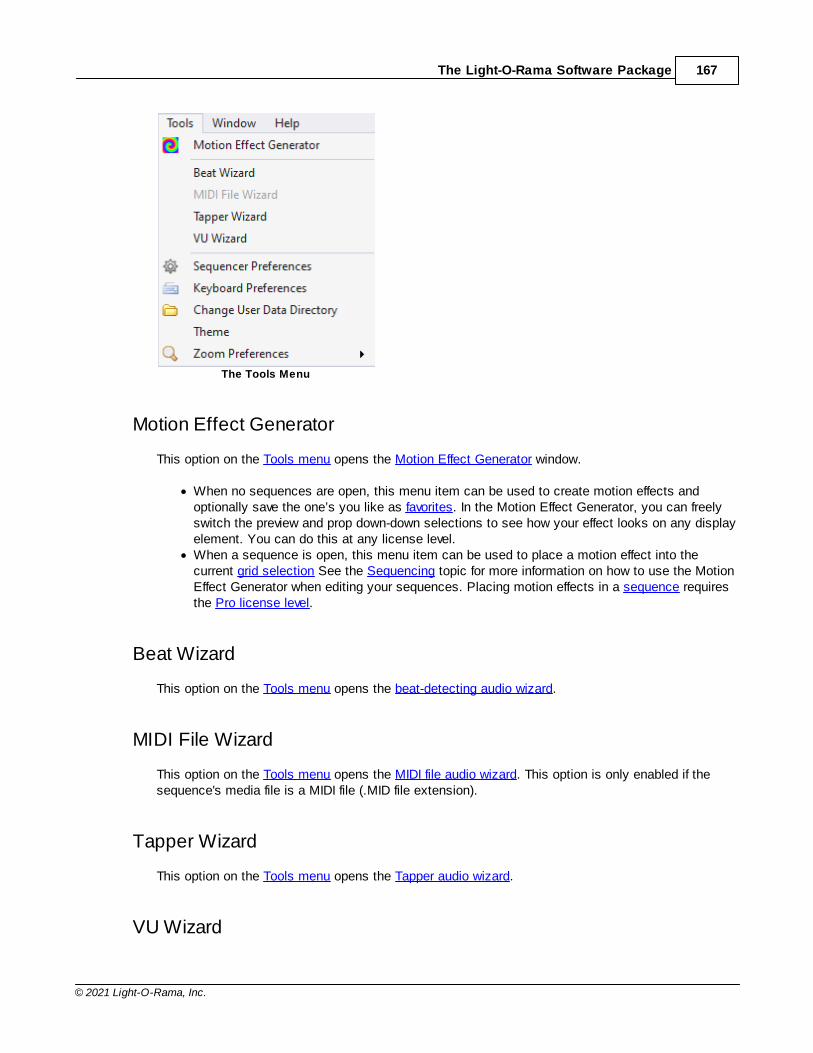
The Light-O-Rama Software Package 167
© 2021 Light-O-Rama, Inc.
The Tools Menu
Motion Effect Generator
This option on the Tools menu opens the Motion Effect Generator window.
· When no sequences are open, this menu item can be used to create motion effects andoptionally save the one’s you like as favorites. In the Motion Effect Generator, you can freelyswitch the preview and prop down-down selections to see how your effect looks on any displayelement. You can do this at any license level.
· When a sequence is open, this menu item can be used to place a motion effect into thecurrent grid selection See the Sequencing topic for more information on how to use the MotionEffect Generator when editing your sequences. Placing motion effects in a sequence requiresthe Pro license level.
Beat Wizard
This option on the Tools menu opens the beat-detecting audio wizard.
MIDI File Wizard
This option on the Tools menu opens the MIDI file audio wizard. This option is only enabled if thesequence's media file is a MIDI file (.MID file extension).
Tapper Wizard
This option on the Tools menu opens the Tapper audio wizard.
VU Wizard
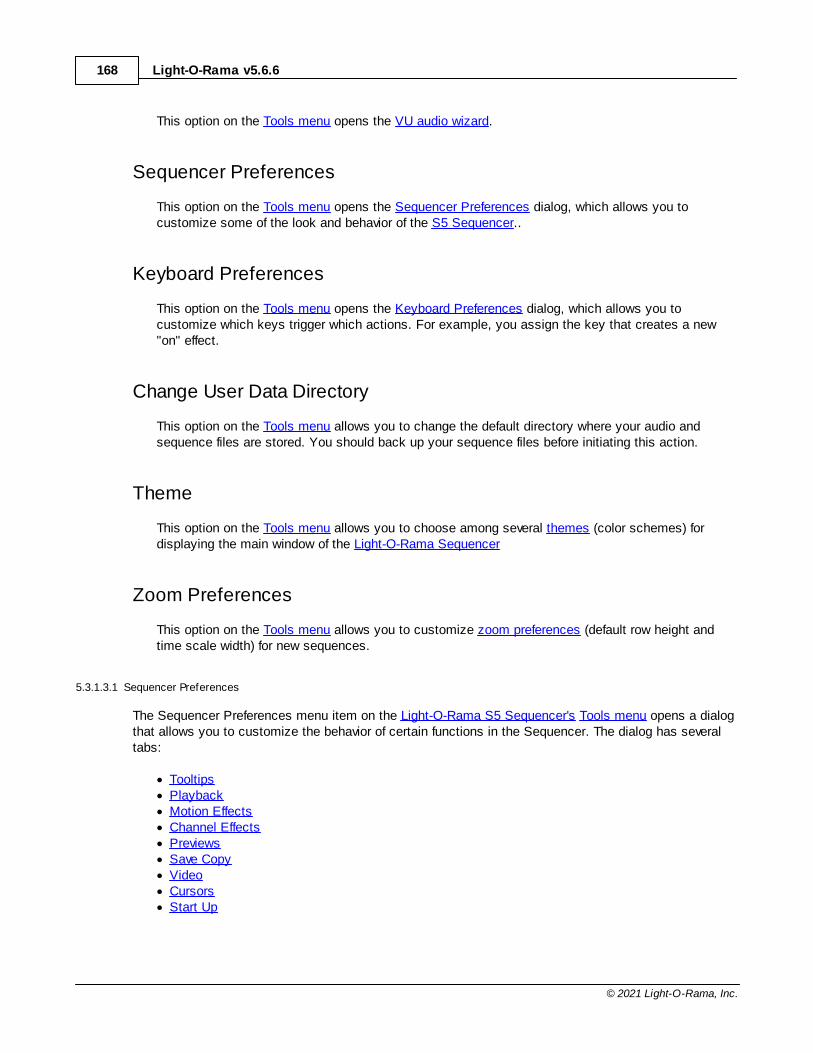
Light-O-Rama v5.6.6168
© 2021 Light-O-Rama, Inc.
This option on the Tools menu opens the VU audio wizard.
Sequencer Preferences
This option on the Tools menu opens the Sequencer Preferences dialog, which allows you tocustomize some of the look and behavior of the S5 Sequencer..
Keyboard Preferences
This option on the Tools menu opens the Keyboard Preferences dialog, which allows you tocustomize which keys trigger which actions. For example, you assign the key that creates a new"on" effect.
Change User Data Directory
This option on the Tools menu allows you to change the default directory where your audio andsequence files are stored. You should back up your sequence files before initiating this action.
Theme
This option on the Tools menu allows you to choose among several themes (color schemes) fordisplaying the main window of the Light-O-Rama Sequencer
Zoom Preferences
This option on the Tools menu allows you to customize zoom preferences (default row height andtime scale width) for new sequences.
5.3.1.3.1 Sequencer Preferences
The Sequencer Preferences menu item on the Light-O-Rama S5 Sequencer's Tools menu opens a dialogthat allows you to customize the behavior of certain functions in the Sequencer. The dialog has severaltabs:
· Tooltips· Playback· Motion Effects· Channel Effects· Previews· Save Copy· Video· Cursors· Start Up
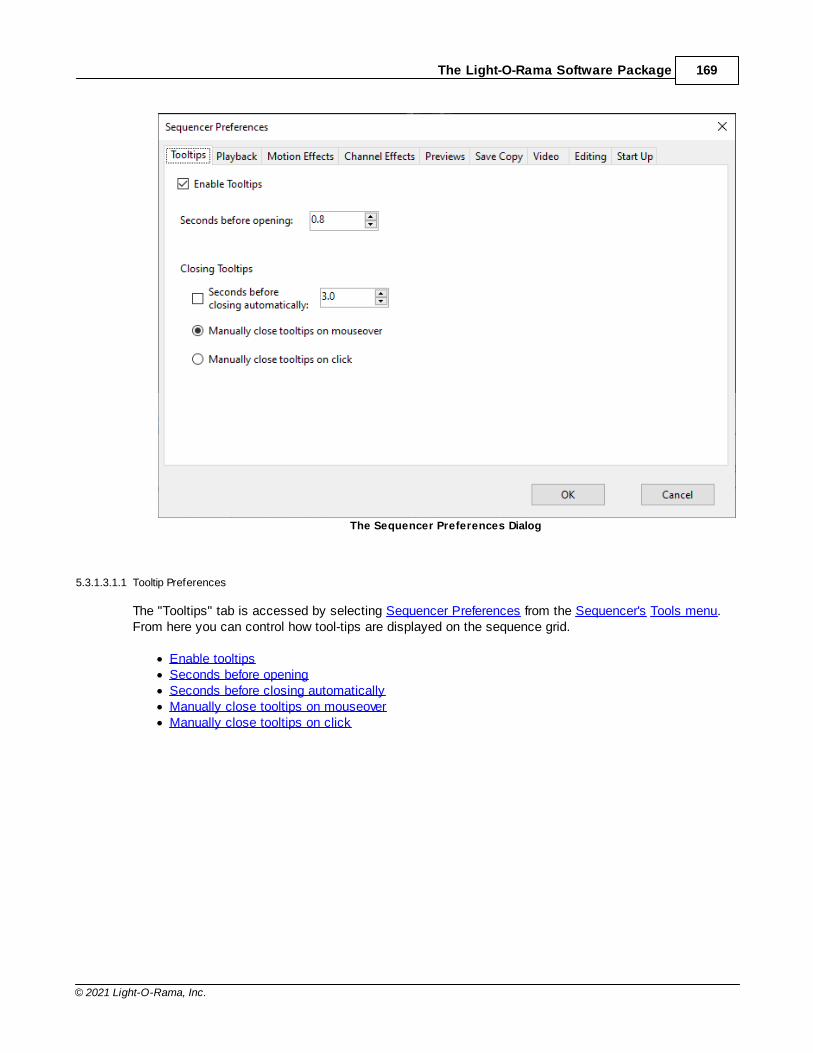
The Light-O-Rama Software Package 169
© 2021 Light-O-Rama, Inc.
The Sequencer Preferences Dialog
5.3.1.3.1.1 Tooltip Preferences
The "Tooltips" tab is accessed by selecting Sequencer Preferences from the Sequencer's Tools menu.From here you can control how tool-tips are displayed on the sequence grid.
· Enable tooltips· Seconds before opening· Seconds before closing automatically· Manually close tooltips on mouseover· Manually close tooltips on click
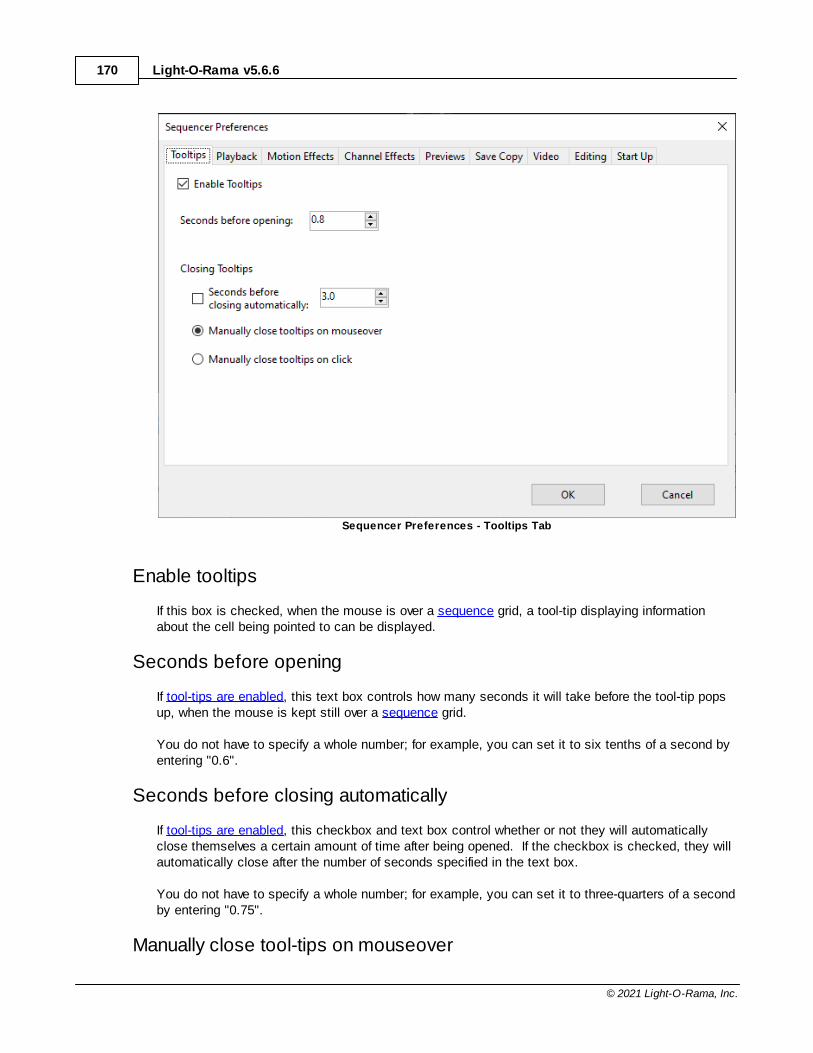
Light-O-Rama v5.6.6170
© 2021 Light-O-Rama, Inc.
Sequencer Preferences - Tooltips Tab
Enable tooltips
If this box is checked, when the mouse is over a sequence grid, a tool-tip displaying informationabout the cell being pointed to can be displayed.
Seconds before opening
If tool-tips are enabled, this text box controls how many seconds it will take before the tool-tip popsup, when the mouse is kept still over a sequence grid.
You do not have to specify a whole number; for example, you can set it to six tenths of a second byentering "0.6".
Seconds before closing automatically
If tool-tips are enabled, this checkbox and text box control whether or not they will automaticallyclose themselves a certain amount of time after being opened. If the checkbox is checked, they willautomatically close after the number of seconds specified in the text box.
You do not have to specify a whole number; for example, you can set it to three-quarters of a secondby entering "0.75".
Manually close tool-tips on mouseover
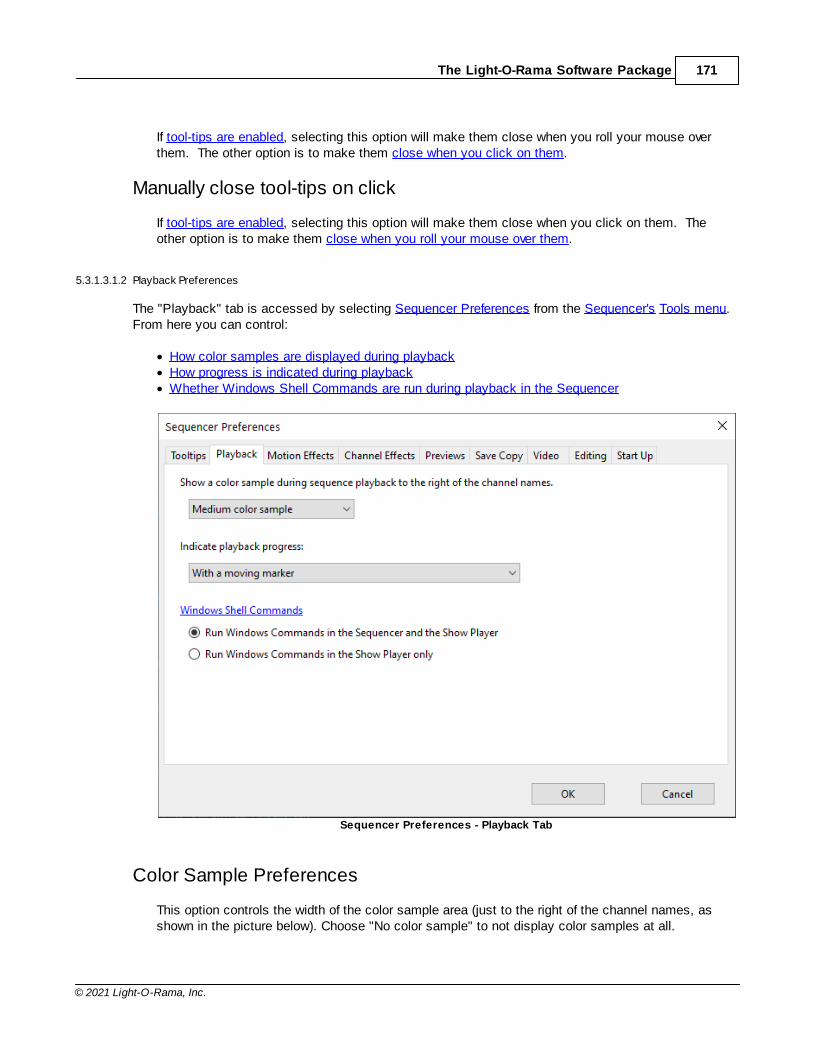
The Light-O-Rama Software Package 171
© 2021 Light-O-Rama, Inc.
If tool-tips are enabled, selecting this option will make them close when you roll your mouse overthem. The other option is to make them close when you click on them.
Manually close tool-tips on click
If tool-tips are enabled, selecting this option will make them close when you click on them. Theother option is to make them close when you roll your mouse over them.
5.3.1.3.1.2 Playback Preferences
The "Playback" tab is accessed by selecting Sequencer Preferences from the Sequencer's Tools menu.From here you can control:
· How color samples are displayed during playback· How progress is indicated during playback· Whether Windows Shell Commands are run during playback in the Sequencer
Sequencer Preferences - Playback Tab
Color Sample Preferences
This option controls the width of the color sample area (just to the right of the channel names, asshown in the picture below). Choose "No color sample" to not display color samples at all.
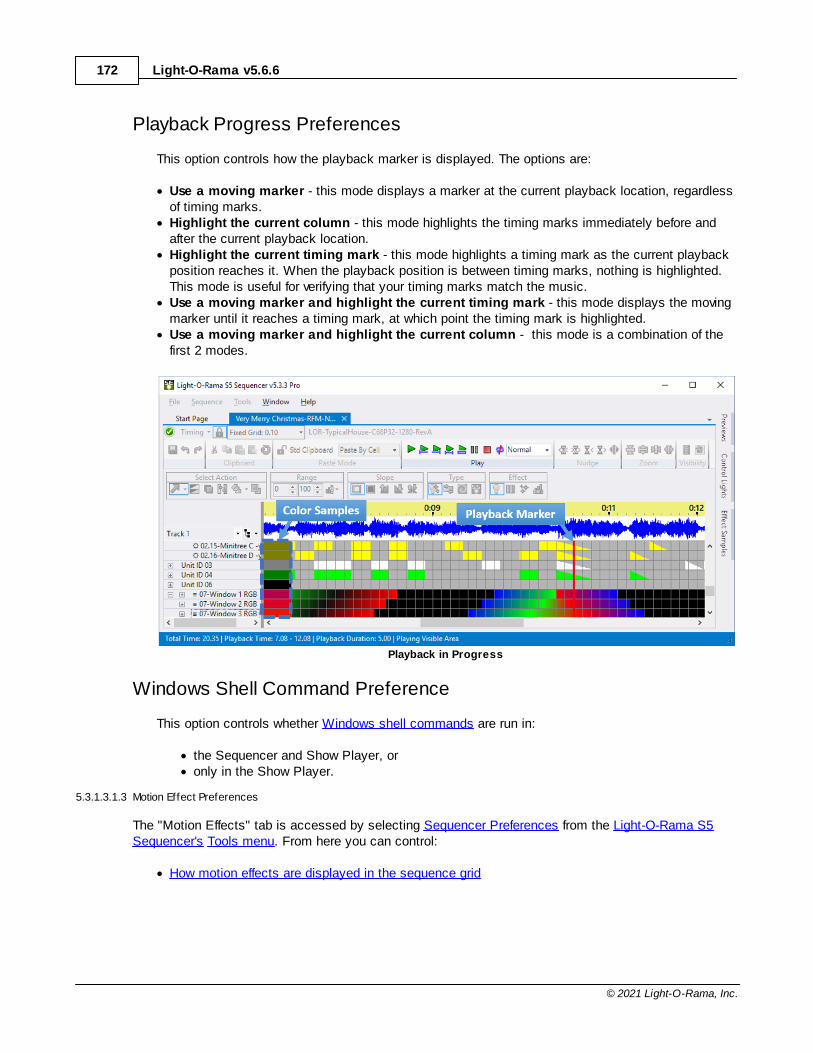
Light-O-Rama v5.6.6172
© 2021 Light-O-Rama, Inc.
Playback Progress Preferences
This option controls how the playback marker is displayed. The options are:
· Use a moving marker - this mode displays a marker at the current playback location, regardlessof timing marks.
· Highlight the current column - this mode highlights the timing marks immediately before andafter the current playback location.
· Highlight the current timing mark - this mode highlights a timing mark as the current playbackposition reaches it. When the playback position is between timing marks, nothing is highlighted.This mode is useful for verifying that your timing marks match the music.
· Use a moving marker and highlight the current timing mark - this mode displays the movingmarker until it reaches a timing mark, at which point the timing mark is highlighted.
· Use a moving marker and highlight the current column - this mode is a combination of thefirst 2 modes.
Playback in Progress
Windows Shell Command Preference
This option controls whether Windows shell commands are run in:
· the Sequencer and Show Player, or · only in the Show Player.
5.3.1.3.1.3 Motion Effect Preferences
The "Motion Effects" tab is accessed by selecting Sequencer Preferences from the Light-O-Rama S5Sequencer's Tools menu. From here you can control:
· How motion effects are displayed in the sequence grid
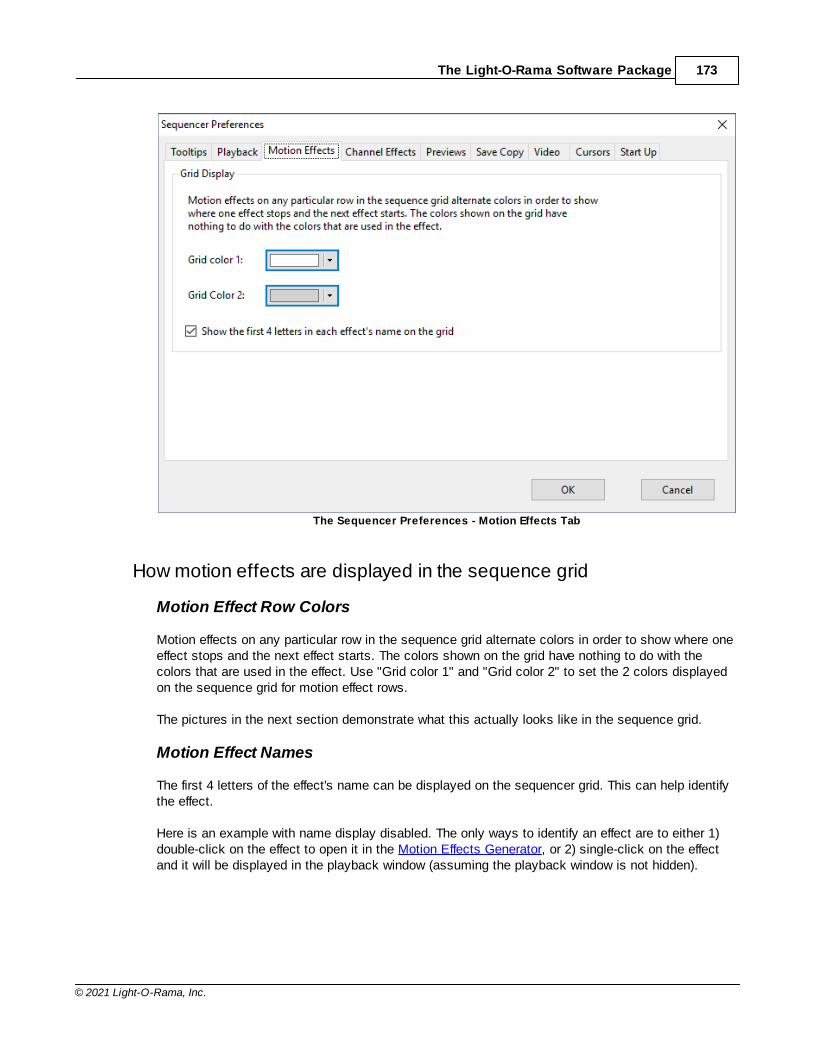
The Light-O-Rama Software Package 173
© 2021 Light-O-Rama, Inc.
The Sequencer Preferences - Motion Effects Tab
How motion effects are displayed in the sequence grid
Motion Effect Row Colors
Motion effects on any particular row in the sequence grid alternate colors in order to show where oneeffect stops and the next effect starts. The colors shown on the grid have nothing to do with thecolors that are used in the effect. Use "Grid color 1" and "Grid color 2" to set the 2 colors displayedon the sequence grid for motion effect rows.
The pictures in the next section demonstrate what this actually looks like in the sequence grid.
Motion Effect Names
The first 4 letters of the effect's name can be displayed on the sequencer grid. This can help identifythe effect.
Here is an example with name display disabled. The only ways to identify an effect are to either 1)double-click on the effect to open it in the Motion Effects Generator, or 2) single-click on the effectand it will be displayed in the playback window (assuming the playback window is not hidden).

Light-O-Rama v5.6.6174
© 2021 Light-O-Rama, Inc.
Motion effects w ith naming disabled
Here is the same example with name display enabled. You can see that the first row contains aseries of Colorwash effects, the second contains Bars effects, and the third row contains Spiraleffects.
Motion effects w ith naming enabled
5.3.1.3.1.4 Channel Effect Preferences
The "Channel Effects" tab is accessed by selecting Sequencer Preferences from the Sequencer's Toolsmenu. From here you can control how channel effects are displayed on the sequence grid.
The Sequencer Preferences - Channel Effects Tab
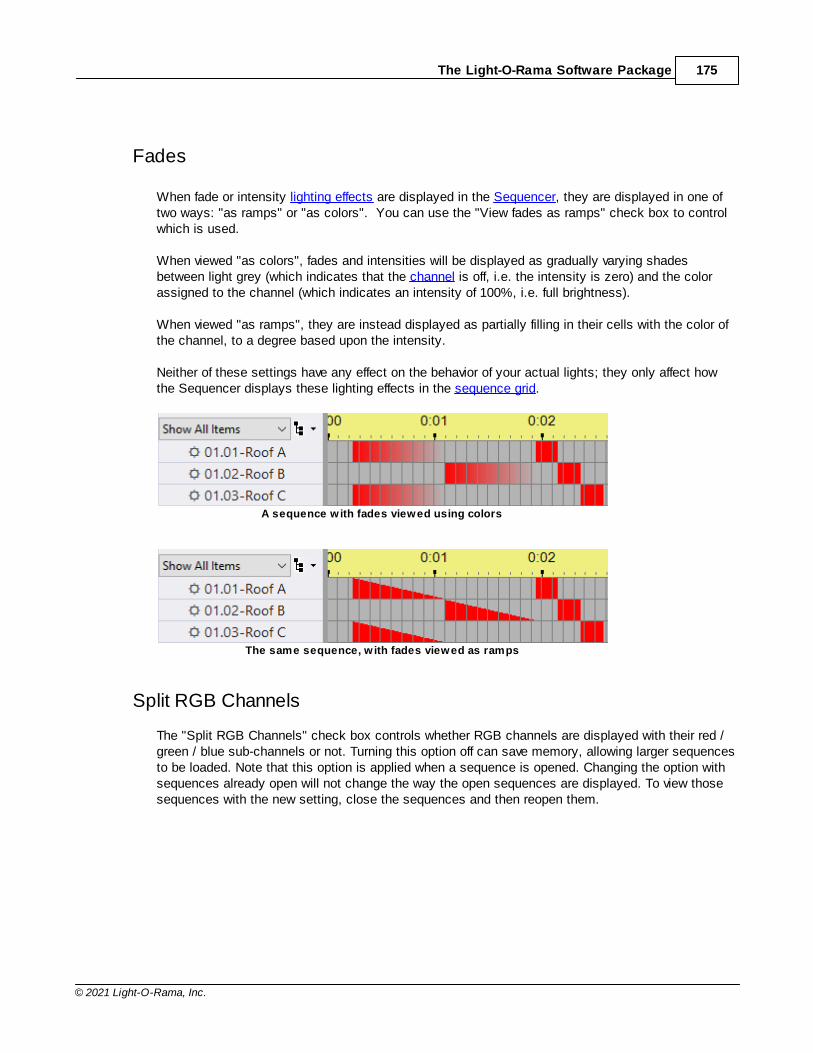
The Light-O-Rama Software Package 175
© 2021 Light-O-Rama, Inc.
Fades
When fade or intensity lighting effects are displayed in the Sequencer, they are displayed in one oftwo ways: "as ramps" or "as colors". You can use the "View fades as ramps" check box to controlwhich is used.
When viewed "as colors", fades and intensities will be displayed as gradually varying shadesbetween light grey (which indicates that the channel is off, i.e. the intensity is zero) and the colorassigned to the channel (which indicates an intensity of 100%, i.e. full brightness).
When viewed "as ramps", they are instead displayed as partially filling in their cells with the color ofthe channel, to a degree based upon the intensity.
Neither of these settings have any effect on the behavior of your actual lights; they only affect howthe Sequencer displays these lighting effects in the sequence grid.
A sequence with fades viewed using colors
The same sequence, w ith fades viewed as ramps
Split RGB Channels
The "Split RGB Channels" check box controls whether RGB channels are displayed with their red /green / blue sub-channels or not. Turning this option off can save memory, allowing larger sequencesto be loaded. Note that this option is applied when a sequence is opened. Changing the option withsequences already open will not change the way the open sequences are displayed. To view thosesequences with the new setting, close the sequences and then reopen them.
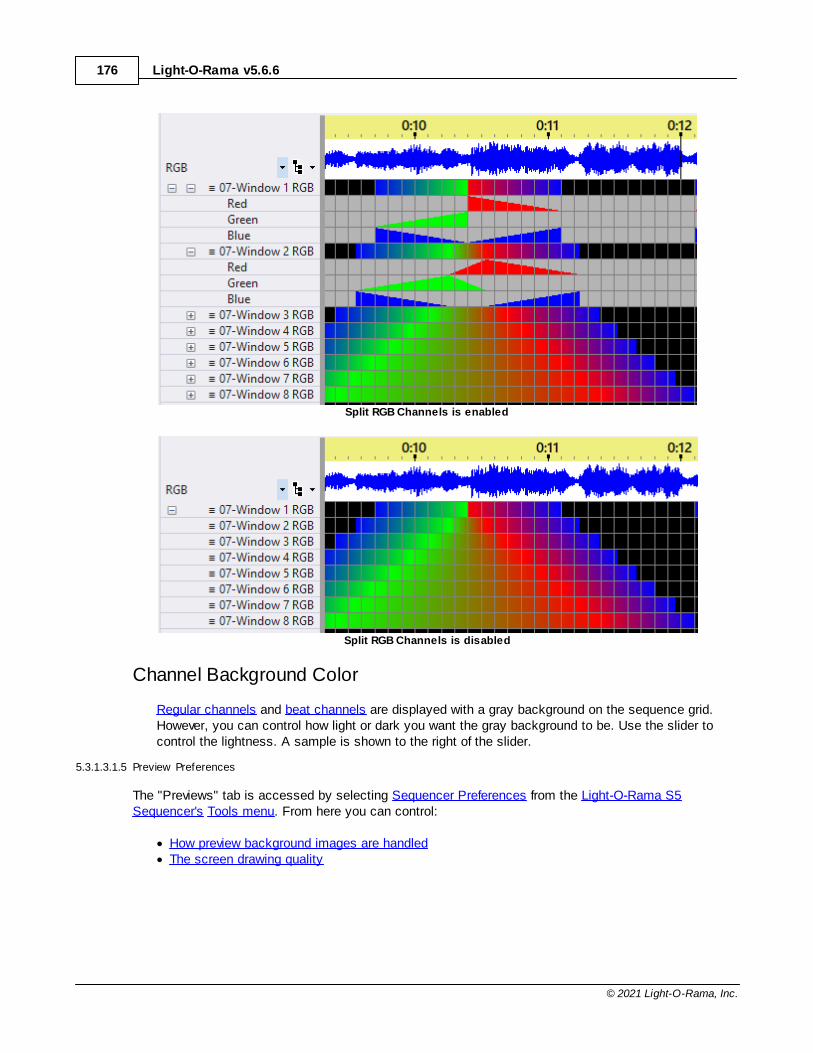
Light-O-Rama v5.6.6176
© 2021 Light-O-Rama, Inc.
Split RGB Channels is enabled
Split RGB Channels is disabled
Channel Background Color
Regular channels and beat channels are displayed with a gray background on the sequence grid.However, you can control how light or dark you want the gray background to be. Use the slider tocontrol the lightness. A sample is shown to the right of the slider.
5.3.1.3.1.5 Preview Preferences
The "Previews" tab is accessed by selecting Sequencer Preferences from the Light-O-Rama S5Sequencer's Tools menu. From here you can control:
· How preview background images are handled· The screen drawing quality
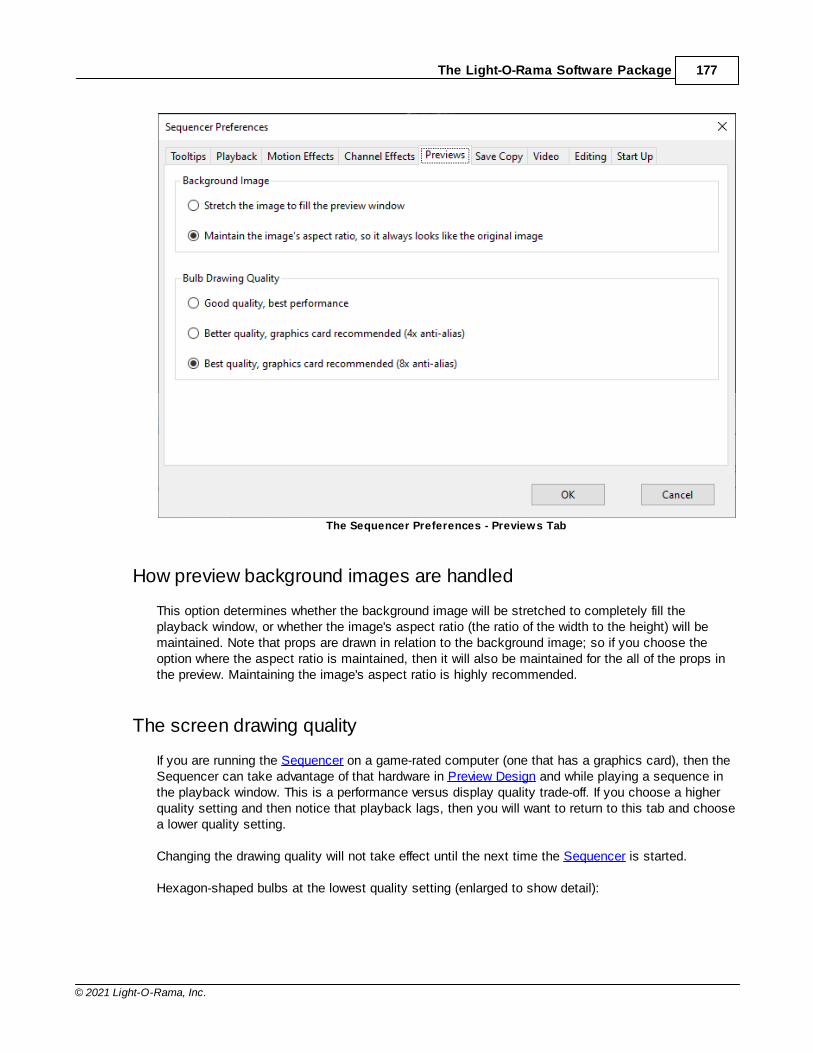
The Light-O-Rama Software Package 177
© 2021 Light-O-Rama, Inc.
The Sequencer Preferences - Previews Tab
How preview background images are handled
This option determines whether the background image will be stretched to completely fill theplayback window, or whether the image's aspect ratio (the ratio of the width to the height) will bemaintained. Note that props are drawn in relation to the background image; so if you choose theoption where the aspect ratio is maintained, then it will also be maintained for the all of the props inthe preview. Maintaining the image's aspect ratio is highly recommended.
The screen drawing quality
If you are running the Sequencer on a game-rated computer (one that has a graphics card), then theSequencer can take advantage of that hardware in Preview Design and while playing a sequence inthe playback window. This is a performance versus display quality trade-off. If you choose a higherquality setting and then notice that playback lags, then you will want to return to this tab and choosea lower quality setting.
Changing the drawing quality will not take effect until the next time the Sequencer is started.
Hexagon-shaped bulbs at the lowest quality setting (enlarged to show detail):
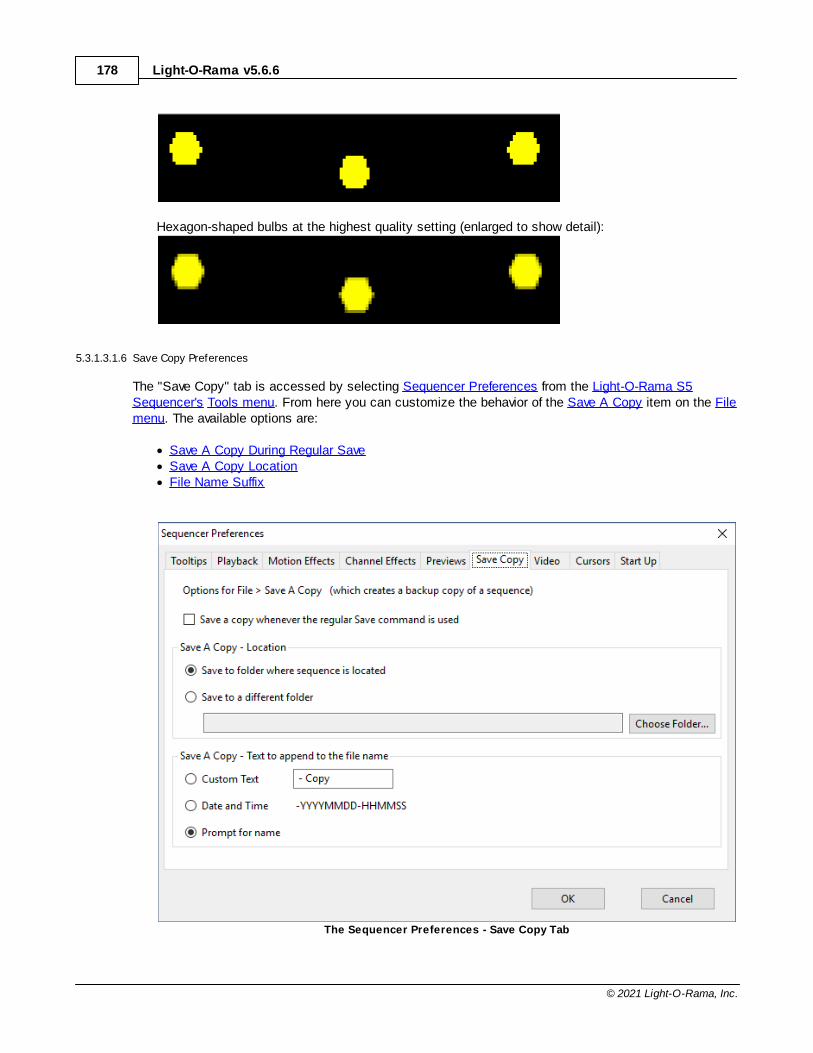
Light-O-Rama v5.6.6178
© 2021 Light-O-Rama, Inc.
Hexagon-shaped bulbs at the highest quality setting (enlarged to show detail):
5.3.1.3.1.6 Save Copy Preferences
The "Save Copy" tab is accessed by selecting Sequencer Preferences from the Light-O-Rama S5Sequencer's Tools menu. From here you can customize the behavior of the Save A Copy item on the Filemenu. The available options are:
· Save A Copy During Regular Save· Save A Copy Location· File Name Suffix
The Sequencer Preferences - Save Copy Tab
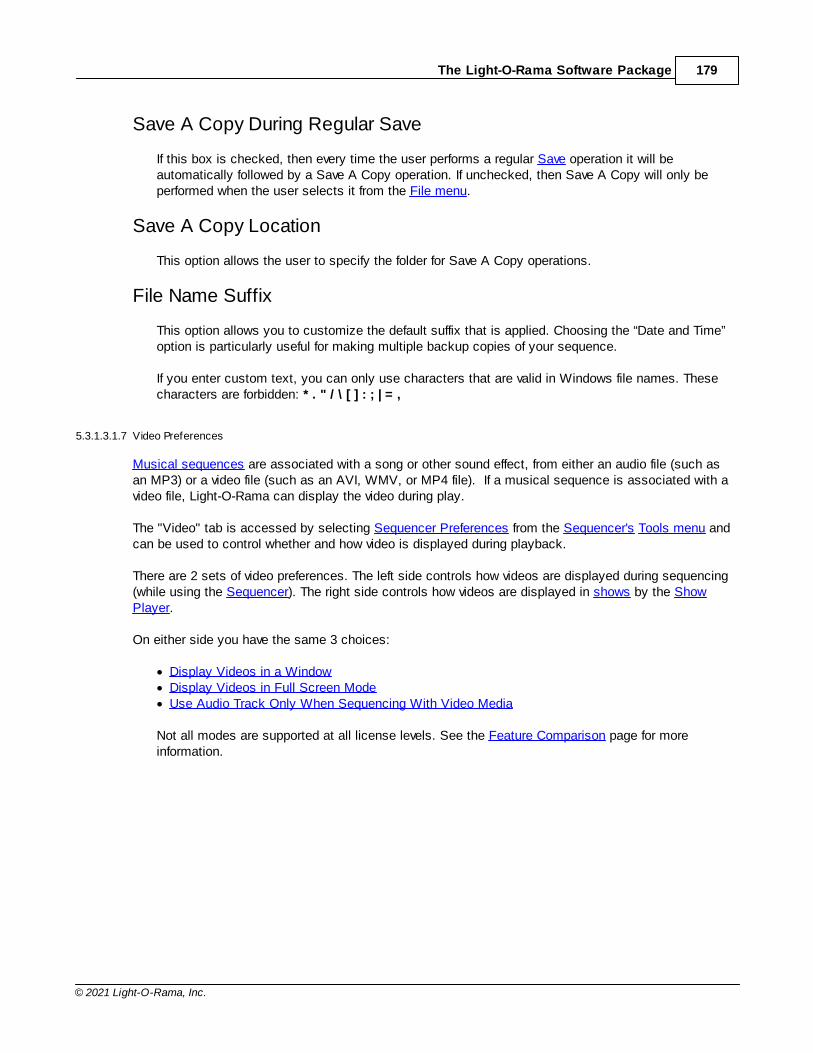
The Light-O-Rama Software Package 179
© 2021 Light-O-Rama, Inc.
Save A Copy During Regular Save
If this box is checked, then every time the user performs a regular Save operation it will beautomatically followed by a Save A Copy operation. If unchecked, then Save A Copy will only beperformed when the user selects it from the File menu.
Save A Copy Location
This option allows the user to specify the folder for Save A Copy operations.
File Name Suffix
This option allows you to customize the default suffix that is applied. Choosing the “Date and Time”option is particularly useful for making multiple backup copies of your sequence.
If you enter custom text, you can only use characters that are valid in Windows file names. Thesecharacters are forbidden: * . " / \ [ ] : ; | = ,
5.3.1.3.1.7 Video Preferences
Musical sequences are associated with a song or other sound effect, from either an audio file (such asan MP3) or a video file (such as an AVI, WMV, or MP4 file). If a musical sequence is associated with avideo file, Light-O-Rama can display the video during play.
The "Video" tab is accessed by selecting Sequencer Preferences from the Sequencer's Tools menu andcan be used to control whether and how video is displayed during playback.
There are 2 sets of video preferences. The left side controls how videos are displayed during sequencing(while using the Sequencer). The right side controls how videos are displayed in shows by the ShowPlayer.
On either side you have the same 3 choices:
· Display Videos in a Window · Display Videos in Full Screen Mode· Use Audio Track Only When Sequencing With Video Media
Not all modes are supported at all license levels. See the Feature Comparison page for moreinformation.
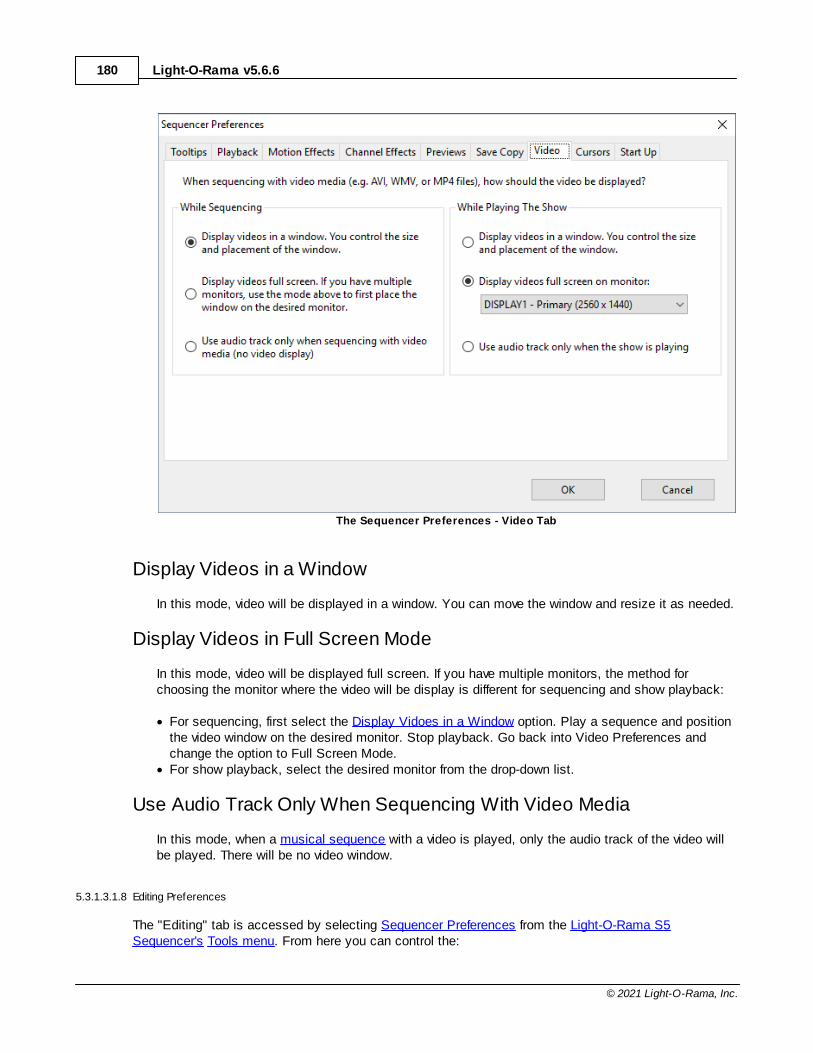
Light-O-Rama v5.6.6180
© 2021 Light-O-Rama, Inc.
The Sequencer Preferences - Video Tab
Display Videos in a Window
In this mode, video will be displayed in a window. You can move the window and resize it as needed.
Display Videos in Full Screen Mode
In this mode, video will be displayed full screen. If you have multiple monitors, the method forchoosing the monitor where the video will be display is different for sequencing and show playback:
· For sequencing, first select the Display Vidoes in a Window option. Play a sequence and positionthe video window on the desired monitor. Stop playback. Go back into Video Preferences andchange the option to Full Screen Mode.
· For show playback, select the desired monitor from the drop-down list.
Use Audio Track Only When Sequencing With Video Media
In this mode, when a musical sequence with a video is played, only the audio track of the video willbe played. There will be no video window.
5.3.1.3.1.8 Editing Preferences
The "Editing" tab is accessed by selecting Sequencer Preferences from the Light-O-Rama S5Sequencer's Tools menu. From here you can control the:
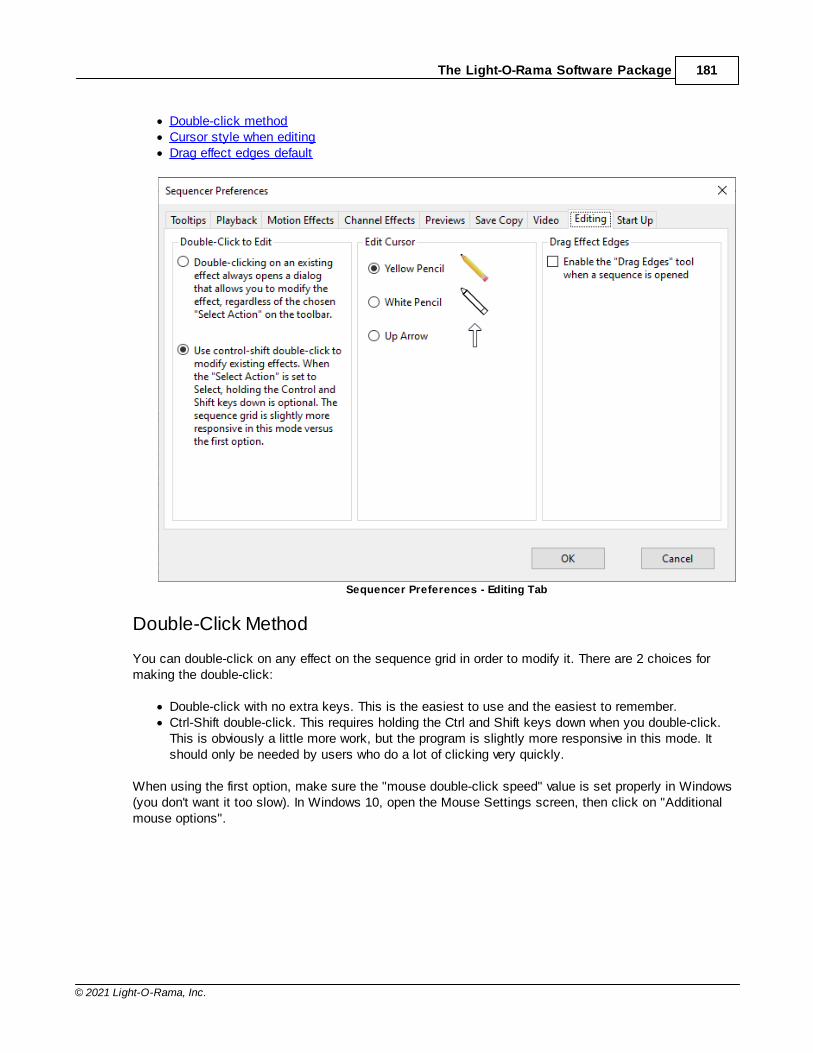
The Light-O-Rama Software Package 181
© 2021 Light-O-Rama, Inc.
· Double-click method· Cursor style when editing· Drag effect edges default
Sequencer Preferences - Editing Tab
Double-Click Method
You can double-click on any effect on the sequence grid in order to modify it. There are 2 choices formaking the double-click:
· Double-click with no extra keys. This is the easiest to use and the easiest to remember.· Ctrl-Shift double-click. This requires holding the Ctrl and Shift keys down when you double-click.
This is obviously a little more work, but the program is slightly more responsive in this mode. Itshould only be needed by users who do a lot of clicking very quickly.
When using the first option, make sure the "mouse double-click speed" value is set properly in Windows(you don't want it too slow). In Windows 10, open the Mouse Settings screen, then click on "Additionalmouse options".
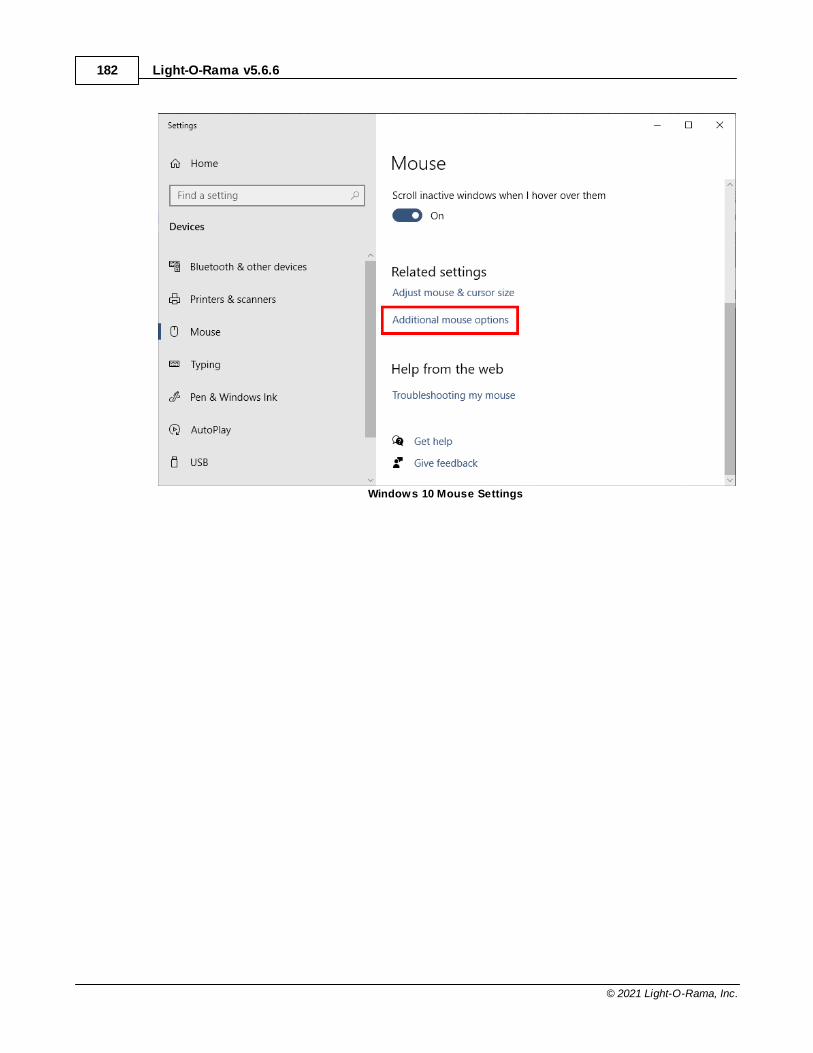
Light-O-Rama v5.6.6182
© 2021 Light-O-Rama, Inc.
Windows 10 Mouse Settings
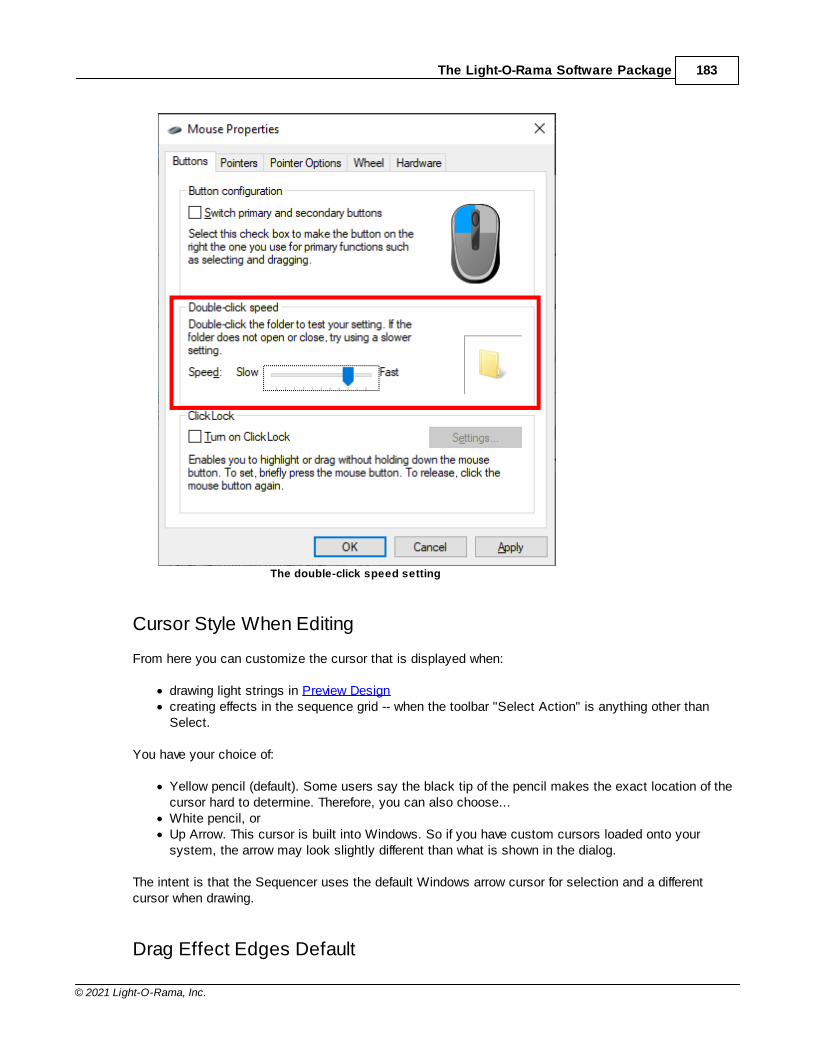
The Light-O-Rama Software Package 183
© 2021 Light-O-Rama, Inc.
The double-click speed setting
Cursor Style When Editing
From here you can customize the cursor that is displayed when:
· drawing light strings in Preview Design· creating effects in the sequence grid -- when the toolbar "Select Action" is anything other than
Select.
You have your choice of:
· Yellow pencil (default). Some users say the black tip of the pencil makes the exact location of thecursor hard to determine. Therefore, you can also choose...
· White pencil, or· Up Arrow. This cursor is built into Windows. So if you have custom cursors loaded onto your
system, the arrow may look slightly different than what is shown in the dialog.
The intent is that the Sequencer uses the default Windows arrow cursor for selection and a differentcursor when drawing.
Drag Effect Edges Default
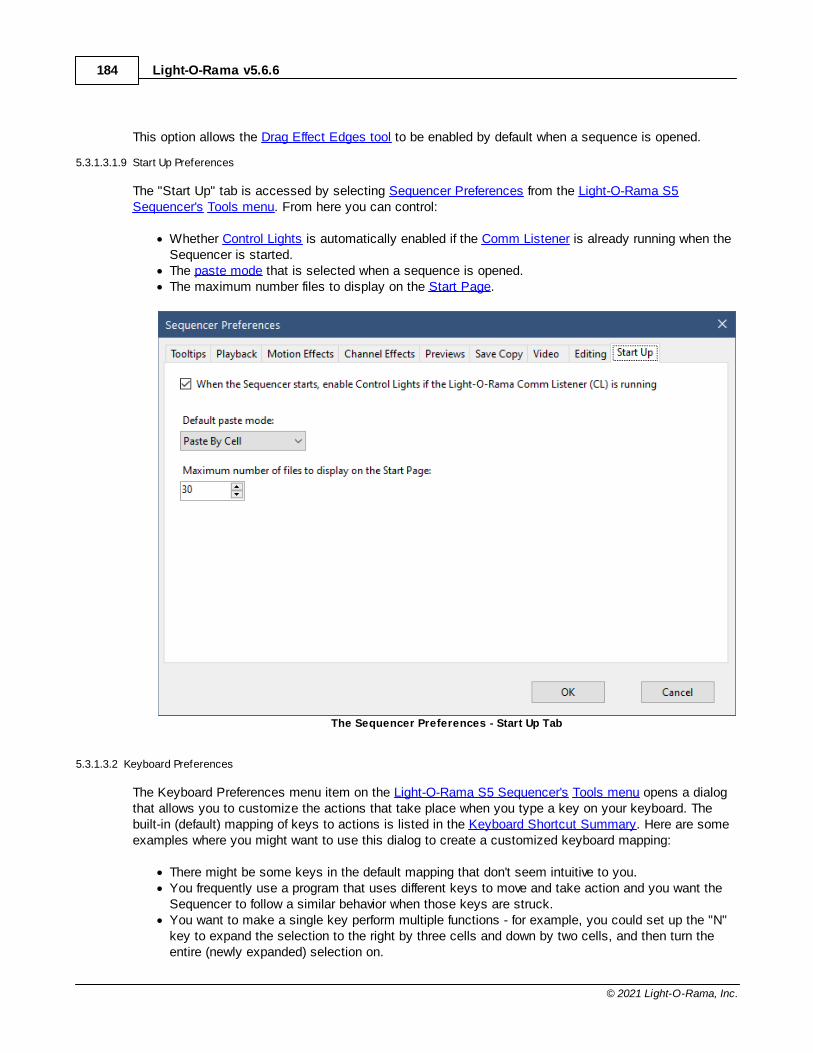
Light-O-Rama v5.6.6184
© 2021 Light-O-Rama, Inc.
This option allows the Drag Effect Edges tool to be enabled by default when a sequence is opened.
5.3.1.3.1.9 Start Up Preferences
The "Start Up" tab is accessed by selecting Sequencer Preferences from the Light-O-Rama S5Sequencer's Tools menu. From here you can control:
· Whether Control Lights is automatically enabled if the Comm Listener is already running when theSequencer is started.
· The paste mode that is selected when a sequence is opened.· The maximum number files to display on the Start Page.
The Sequencer Preferences - Start Up Tab
5.3.1.3.2 Keyboard Preferences
The Keyboard Preferences menu item on the Light-O-Rama S5 Sequencer's Tools menu opens a dialogthat allows you to customize the actions that take place when you type a key on your keyboard. Thebuilt-in (default) mapping of keys to actions is listed in the Keyboard Shortcut Summary. Here are someexamples where you might want to use this dialog to create a customized keyboard mapping:
· There might be some keys in the default mapping that don't seem intuitive to you. · You frequently use a program that uses different keys to move and take action and you want the
Sequencer to follow a similar behavior when those keys are struck. · You want to make a single key perform multiple functions - for example, you could set up the "N"
key to expand the selection to the right by three cells and down by two cells, and then turn theentire (newly expanded) selection on.
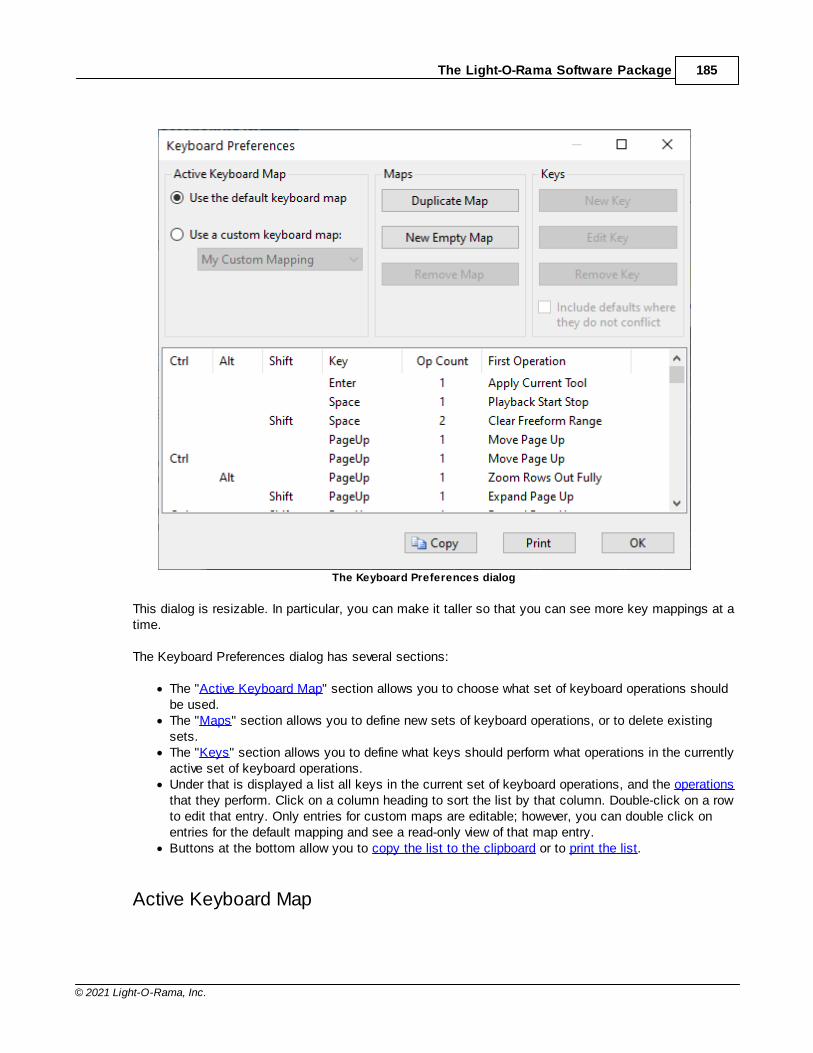
The Light-O-Rama Software Package 185
© 2021 Light-O-Rama, Inc.
The Keyboard Preferences dialog
This dialog is resizable. In particular, you can make it taller so that you can see more key mappings at atime.
The Keyboard Preferences dialog has several sections:
· The "Active Keyboard Map" section allows you to choose what set of keyboard operations shouldbe used.
· The "Maps" section allows you to define new sets of keyboard operations, or to delete existingsets.
· The "Keys" section allows you to define what keys should perform what operations in the currentlyactive set of keyboard operations.
· Under that is displayed a list all keys in the current set of keyboard operations, and the operationsthat they perform. Click on a column heading to sort the list by that column. Double-click on a rowto edit that entry. Only entries for custom maps are editable; however, you can double click onentries for the default mapping and see a read-only view of that map entry.
· Buttons at the bottom allow you to copy the list to the clipboard or to print the list.
Active Keyboard Map
Light-O-Rama v5.6.6186
© 2021 Light-O-Rama, Inc.
The "Active Keyboard Map" section allows you to choose which keyboard map should currently beused. You can choose to use the default keyboard map for the current version of software, or to usea custom keyboard map that you have defined.
Use the Default Keyboard Map
Choosing this option will cause the Sequencer to use its default keyboard map. Moreover, if youhave this option selected, and later upgrade to a new version of software which has a different defaultkeyboard map, the Sequencer will then use that new default keyboard map.
Use a Custom Keyboard Map
Choosing this option will cause the Sequencer to use a keyboard map that you yourself havedefined. Moreover, if you have this option selected, and later upgrade to a new version of softwarewhich has a different default keyboard map, the Sequencer will then continue to use the custom mapthat you have selected.
Your custom keyboard maps are automatically saved to your Light-O-Rama data directory, in the"CommonData\CustomKeyMaps.xml" file. If you would like to share your custom maps with anotheruser, you can simply give them a copy of your "CustomKeyMaps.xml" file. When they place it intotheir own "CommonData" directory, it will be available for them as a custom keyboard map.
Note that this option is not available until you have defined at least one custom keyboard map, whichyou can do through either "Duplicate Map" or "New Empty Map".
Maps
The "Maps" section allows you to create new custom keyboard maps (either duplicating the currentmap or else creating an empty map), or to remove maps that you have previously created.
Duplicate Map
Using this button, you can create a new custom keyboard map which uses the exact same keymappings as the currently selected map does. You can then modify the key mappings as youdesire, using "New Key", "Edit Key", or "Remove Key".
The new map will show up in the drop-down list under "Use a Custom Keyboard Map", and in factwill automatically be selected when you create it.
New Empty Map
Using this button, you can create a new custom keyboard map which does not contain any keymappings at all - that is, no key will cause anything to happen when you press it. You can then addkeys to it via "New Key", and later edit or remove them via "Edit Key" or "Remove Key".
The new map will show up in the drop-down list under "Use a Custom Keyboard Map", and in factwill automatically be selected when you create it.
Remove Map
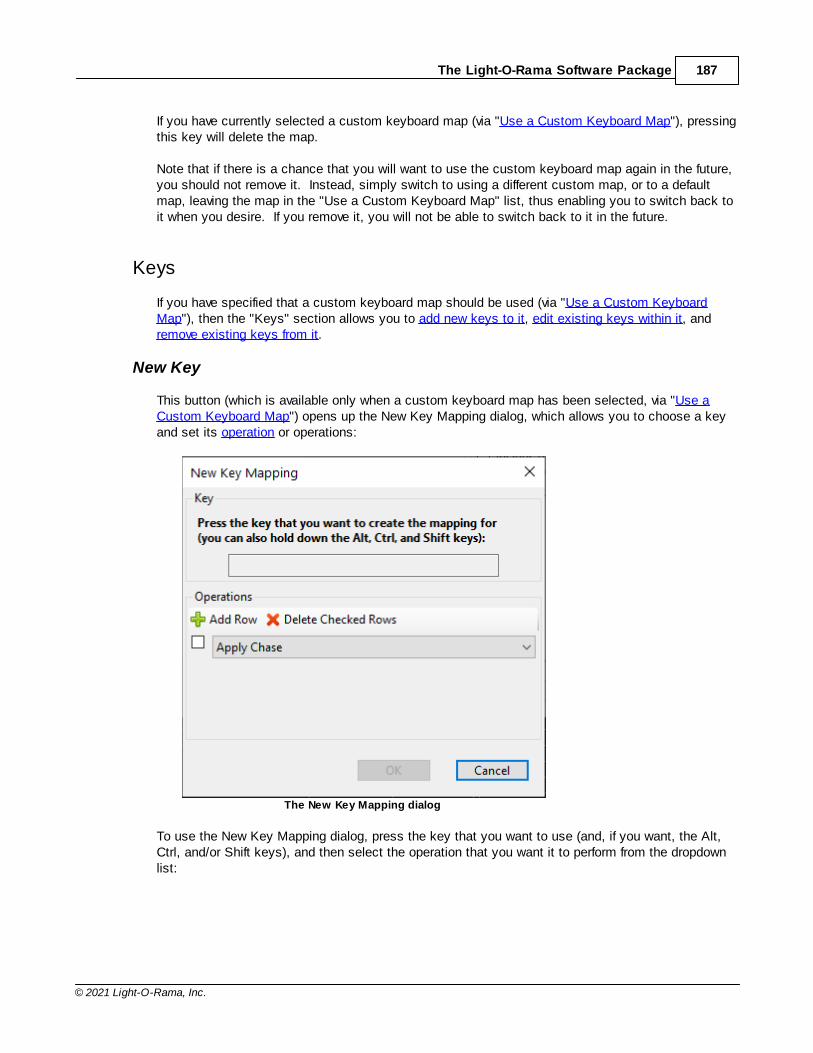
The Light-O-Rama Software Package 187
© 2021 Light-O-Rama, Inc.
If you have currently selected a custom keyboard map (via "Use a Custom Keyboard Map"), pressingthis key will delete the map.
Note that if there is a chance that you will want to use the custom keyboard map again in the future,you should not remove it. Instead, simply switch to using a different custom map, or to a defaultmap, leaving the map in the "Use a Custom Keyboard Map" list, thus enabling you to switch back toit when you desire. If you remove it, you will not be able to switch back to it in the future.
Keys
If you have specified that a custom keyboard map should be used (via "Use a Custom KeyboardMap"), then the "Keys" section allows you to add new keys to it, edit existing keys within it, andremove existing keys from it.
New Key
This button (which is available only when a custom keyboard map has been selected, via "Use aCustom Keyboard Map") opens up the New Key Mapping dialog, which allows you to choose a keyand set its operation or operations:
The New Key Mapping dialog
To use the New Key Mapping dialog, press the key that you want to use (and, if you want, the Alt,Ctrl, and/or Shift keys), and then select the operation that you want it to perform from the dropdownlist:
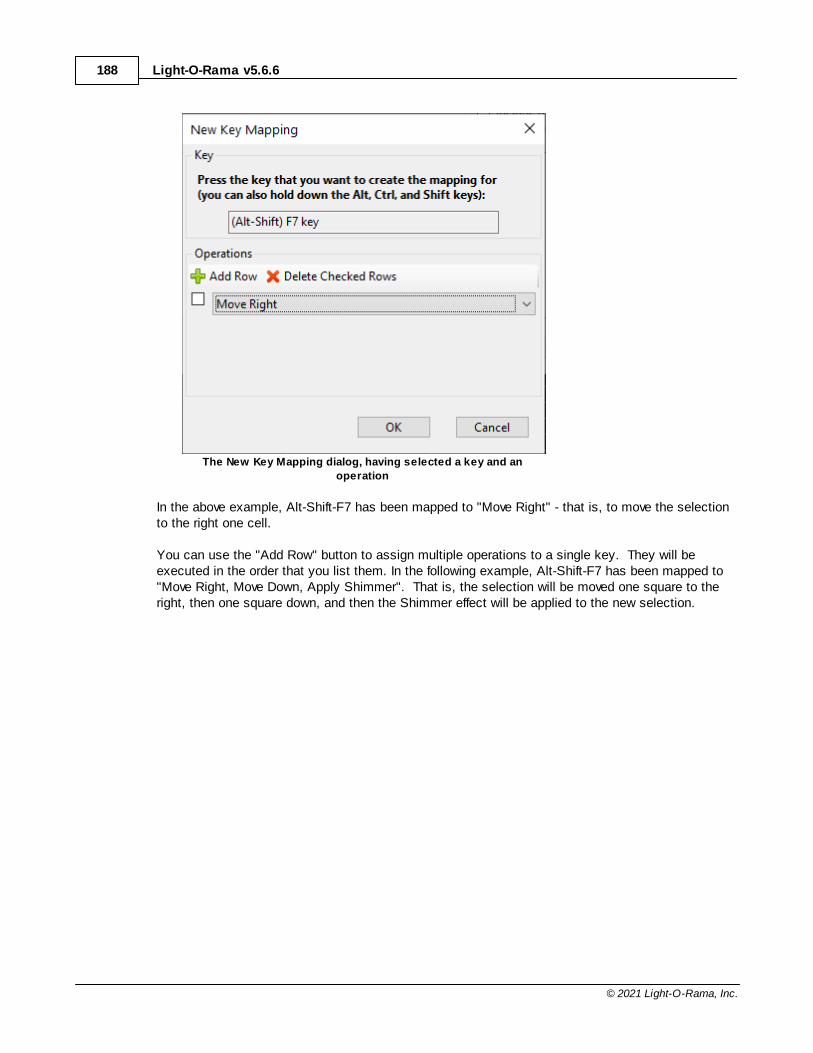
Light-O-Rama v5.6.6188
© 2021 Light-O-Rama, Inc.
The New Key Mapping dialog, having selected a key and an
operation
In the above example, Alt-Shift-F7 has been mapped to "Move Right" - that is, to move the selectionto the right one cell.
You can use the "Add Row" button to assign multiple operations to a single key. They will beexecuted in the order that you list them. In the following example, Alt-Shift-F7 has been mapped to"Move Right, Move Down, Apply Shimmer". That is, the selection will be moved one square to theright, then one square down, and then the Shimmer effect will be applied to the new selection.
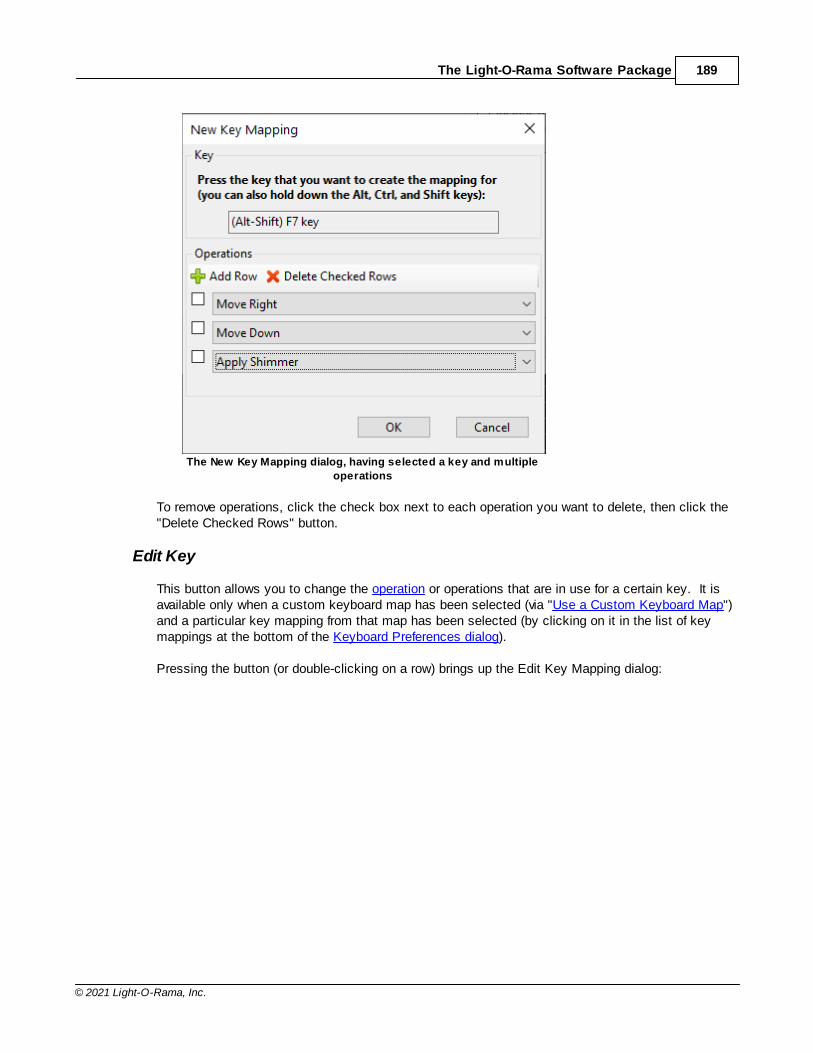
The Light-O-Rama Software Package 189
© 2021 Light-O-Rama, Inc.
The New Key Mapping dialog, having selected a key and multiple
operations
To remove operations, click the check box next to each operation you want to delete, then click the"Delete Checked Rows" button.
Edit Key
This button allows you to change the operation or operations that are in use for a certain key. It isavailable only when a custom keyboard map has been selected (via "Use a Custom Keyboard Map")and a particular key mapping from that map has been selected (by clicking on it in the list of keymappings at the bottom of the Keyboard Preferences dialog).
Pressing the button (or double-clicking on a row) brings up the Edit Key Mapping dialog:
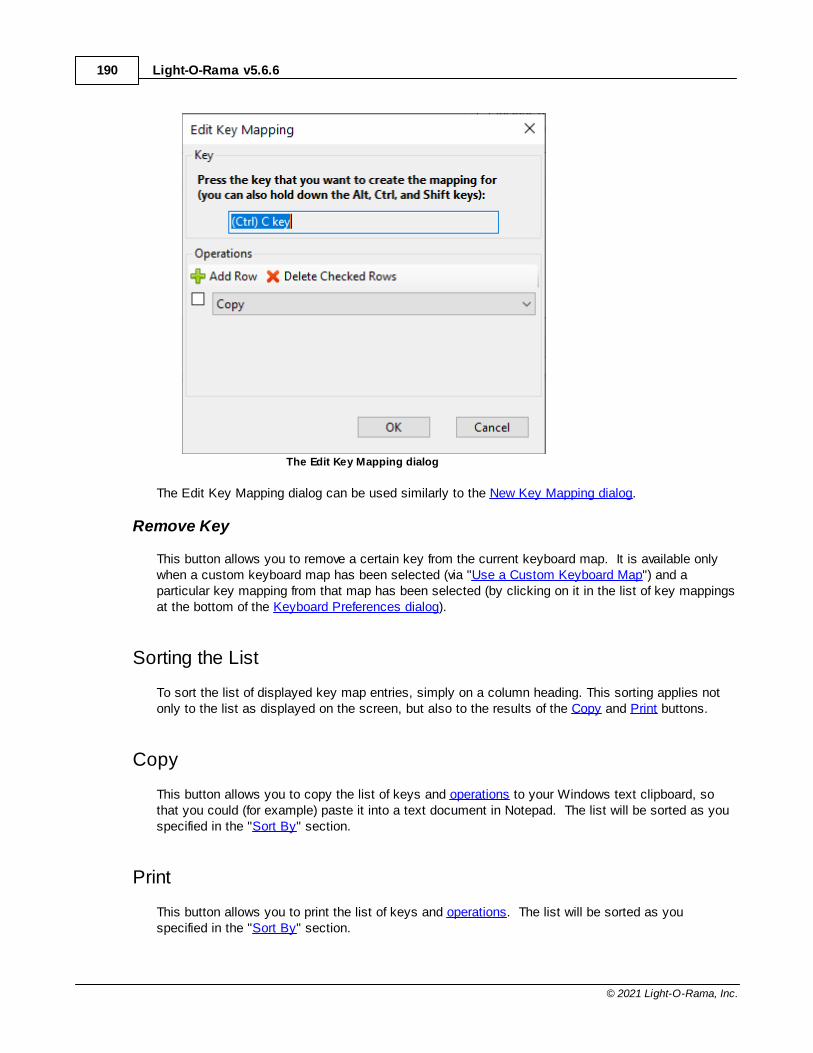
Light-O-Rama v5.6.6190
© 2021 Light-O-Rama, Inc.
The Edit Key Mapping dialog
The Edit Key Mapping dialog can be used similarly to the New Key Mapping dialog.
Remove Key
This button allows you to remove a certain key from the current keyboard map. It is available onlywhen a custom keyboard map has been selected (via "Use a Custom Keyboard Map") and aparticular key mapping from that map has been selected (by clicking on it in the list of key mappingsat the bottom of the Keyboard Preferences dialog).
Sorting the List
To sort the list of displayed key map entries, simply on a column heading. This sorting applies notonly to the list as displayed on the screen, but also to the results of the Copy and Print buttons.
Copy
This button allows you to copy the list of keys and operations to your Windows text clipboard, sothat you could (for example) paste it into a text document in Notepad. The list will be sorted as youspecified in the "Sort By" section.
This button allows you to print the list of keys and operations. The list will be sorted as youspecified in the "Sort By" section.
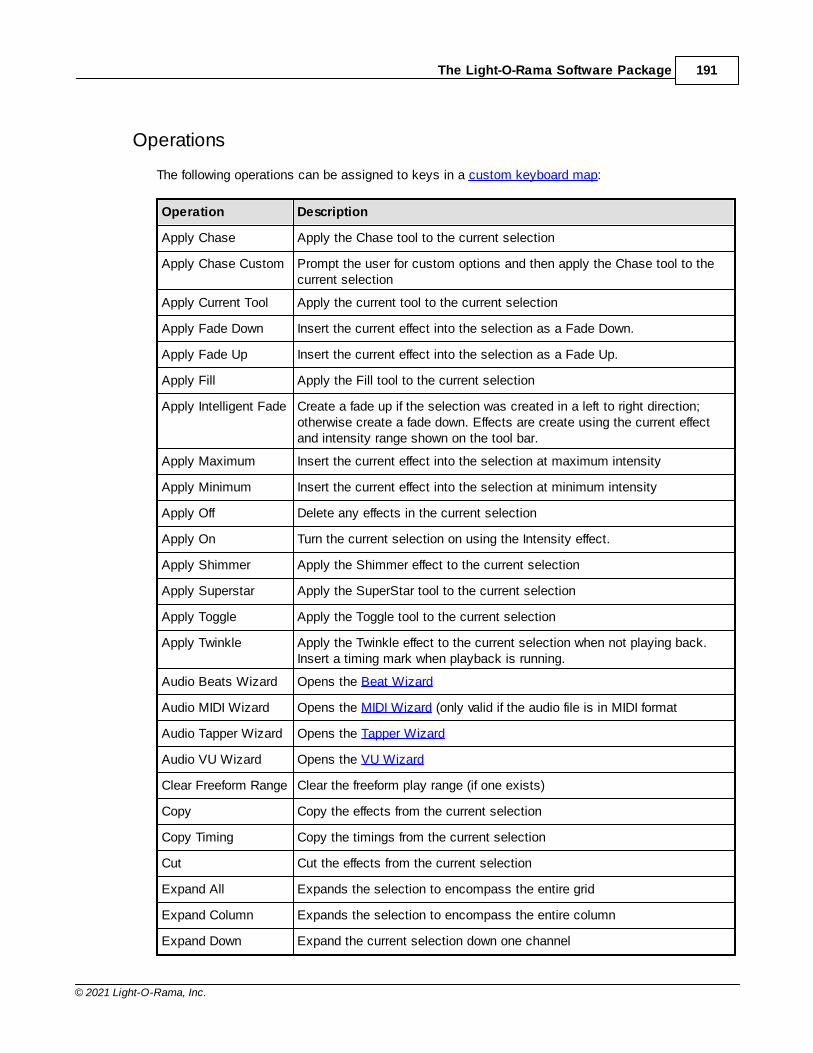
The Light-O-Rama Software Package 191
© 2021 Light-O-Rama, Inc.
Operations
The following operations can be assigned to keys in a custom keyboard map:
Operation Description
Apply Chase Apply the Chase tool to the current selection
Apply Chase Custom Prompt the user for custom options and then apply the Chase tool to thecurrent selection
Apply Current Tool Apply the current tool to the current selection
Apply Fade Down Insert the current effect into the selection as a Fade Down.
Apply Fade Up Insert the current effect into the selection as a Fade Up.
Apply Fill Apply the Fill tool to the current selection
Apply Intelligent Fade Create a fade up if the selection was created in a left to right direction;otherwise create a fade down. Effects are create using the current effectand intensity range shown on the tool bar.
Apply Maximum Insert the current effect into the selection at maximum intensity
Apply Minimum Insert the current effect into the selection at minimum intensity
Apply Off Delete any effects in the current selection
Apply On Turn the current selection on using the Intensity effect.
Apply Shimmer Apply the Shimmer effect to the current selection
Apply Superstar Apply the SuperStar tool to the current selection
Apply Toggle Apply the Toggle tool to the current selection
Apply Twinkle Apply the Twinkle effect to the current selection when not playing back.Insert a timing mark when playback is running.
Audio Beats Wizard Opens the Beat Wizard
Audio MIDI Wizard Opens the MIDI Wizard (only valid if the audio file is in MIDI format
Audio Tapper Wizard Opens the Tapper Wizard
Audio VU Wizard Opens the VU Wizard
Clear Freeform Range Clear the freeform play range (if one exists)
Copy Copy the effects from the current selection
Copy Timing Copy the timings from the current selection
Cut Cut the effects from the current selection
Expand All Expands the selection to encompass the entire grid
Expand Column Expands the selection to encompass the entire column
Expand Down Expand the current selection down one channel
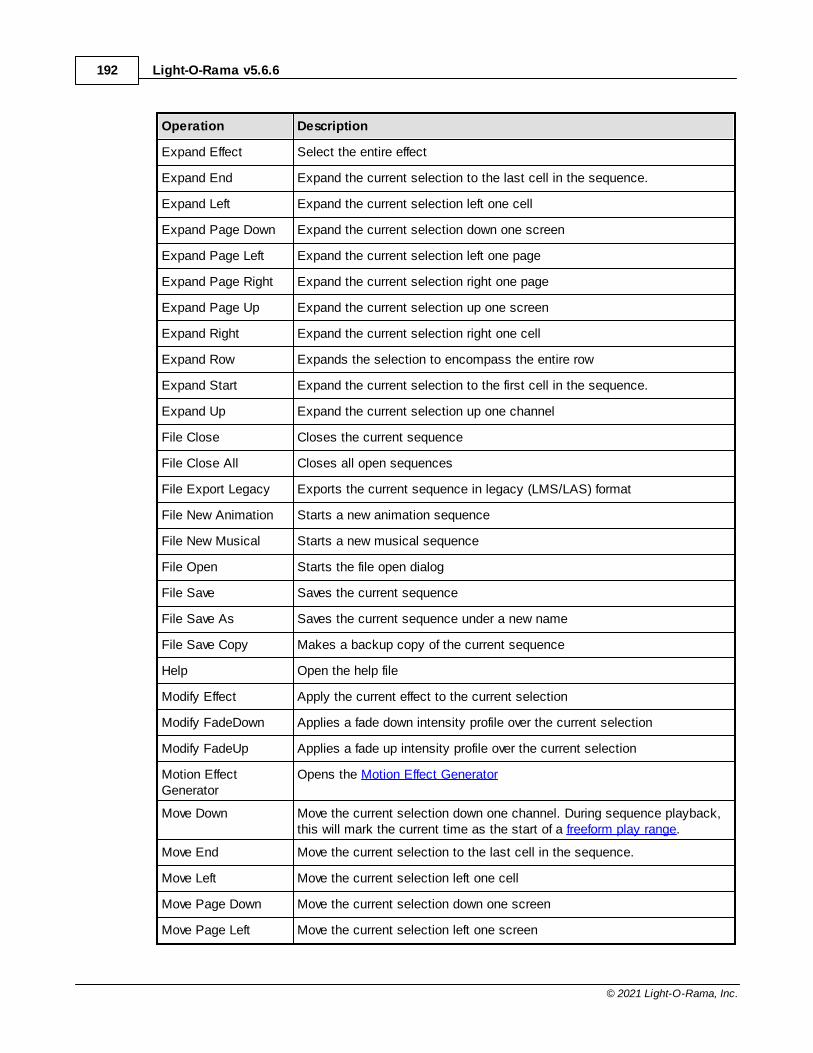
Light-O-Rama v5.6.6192
© 2021 Light-O-Rama, Inc.
Operation Description
Expand Effect Select the entire effect
Expand End Expand the current selection to the last cell in the sequence.
Expand Left Expand the current selection left one cell
Expand Page Down Expand the current selection down one screen
Expand Page Left Expand the current selection left one page
Expand Page Right Expand the current selection right one page
Expand Page Up Expand the current selection up one screen
Expand Right Expand the current selection right one cell
Expand Row Expands the selection to encompass the entire row
Expand Start Expand the current selection to the first cell in the sequence.
Expand Up Expand the current selection up one channel
File Close Closes the current sequence
File Close All Closes all open sequences
File Export Legacy Exports the current sequence in legacy (LMS/LAS) format
File New Animation Starts a new animation sequence
File New Musical Starts a new musical sequence
File Open Starts the file open dialog
File Save Saves the current sequence
File Save As Saves the current sequence under a new name
File Save Copy Makes a backup copy of the current sequence
Help Open the help file
Modify Effect Apply the current effect to the current selection
Modify FadeDown Applies a fade down intensity profile over the current selection
Modify FadeUp Applies a fade up intensity profile over the current selection
Motion EffectGenerator
Opens the Motion Effect Generator
Move Down Move the current selection down one channel. During sequence playback,this will mark the current time as the start of a freeform play range.
Move End Move the current selection to the last cell in the sequence.
Move Left Move the current selection left one cell
Move Page Down Move the current selection down one screen
Move Page Left Move the current selection left one screen
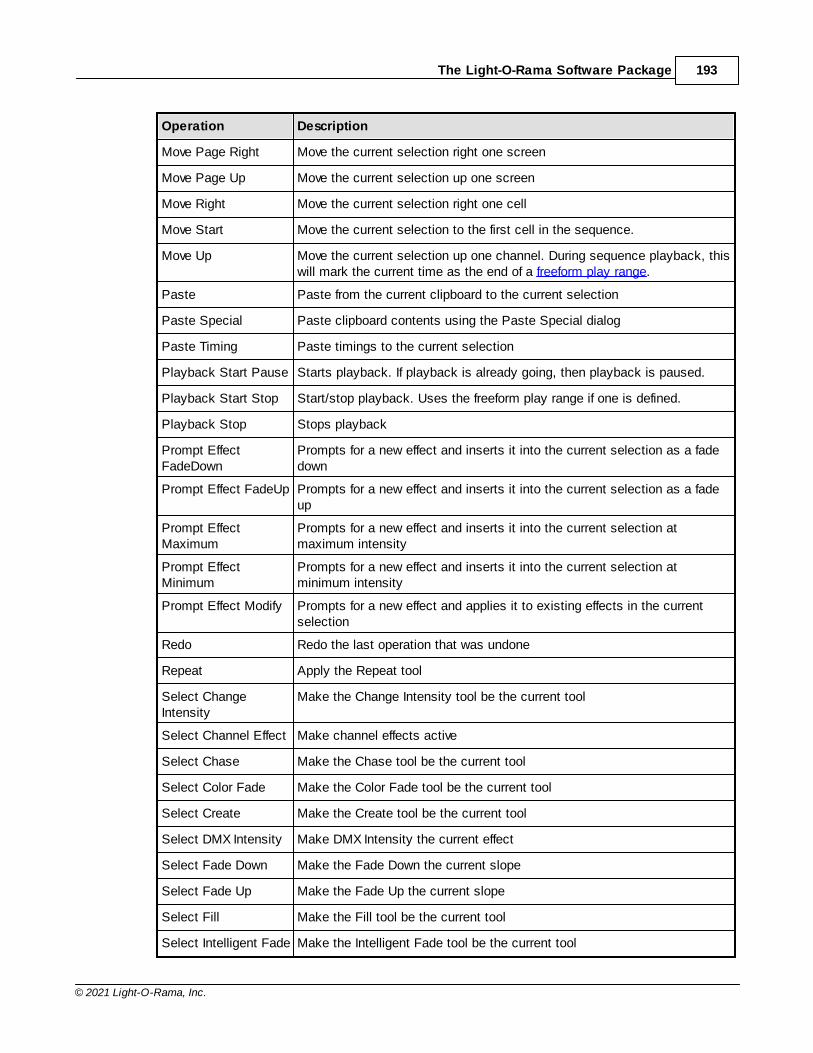
The Light-O-Rama Software Package 193
© 2021 Light-O-Rama, Inc.
Operation Description
Move Page Right Move the current selection right one screen
Move Page Up Move the current selection up one screen
Move Right Move the current selection right one cell
Move Start Move the current selection to the first cell in the sequence.
Move Up Move the current selection up one channel. During sequence playback, thiswill mark the current time as the end of a freeform play range.
Paste Paste from the current clipboard to the current selection
Paste Special Paste clipboard contents using the Paste Special dialog
Paste Timing Paste timings to the current selection
Playback Start Pause Starts playback. If playback is already going, then playback is paused.
Playback Start Stop Start/stop playback. Uses the freeform play range if one is defined.
Playback Stop Stops playback
Prompt EffectFadeDown
Prompts for a new effect and inserts it into the current selection as a fadedown
Prompt Effect FadeUp Prompts for a new effect and inserts it into the current selection as a fadeup
Prompt EffectMaximum
Prompts for a new effect and inserts it into the current selection atmaximum intensity
Prompt EffectMinimum
Prompts for a new effect and inserts it into the current selection atminimum intensity
Prompt Effect Modify Prompts for a new effect and applies it to existing effects in the currentselection
Redo Redo the last operation that was undone
Repeat Apply the Repeat tool
Select ChangeIntensity
Make the Change Intensity tool be the current tool
Select Channel Effect Make channel effects active
Select Chase Make the Chase tool be the current tool
Select Color Fade Make the Color Fade tool be the current tool
Select Create Make the Create tool be the current tool
Select DMX Intensity Make DMX Intensity the current effect
Select Fade Down Make the Fade Down the current slope
Select Fade Up Make the Fade Up the current slope
Select Fill Make the Fill tool be the current tool
Select Intelligent Fade Make the Intelligent Fade tool be the current tool
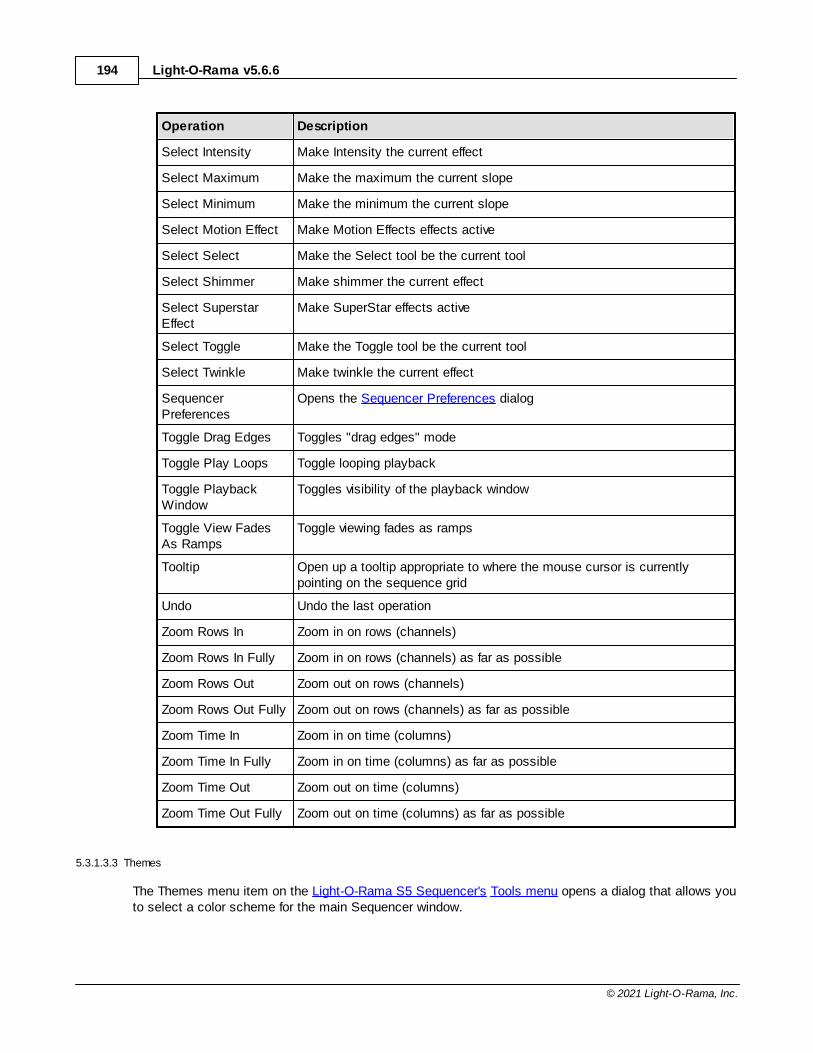
Light-O-Rama v5.6.6194
© 2021 Light-O-Rama, Inc.
Operation Description
Select Intensity Make Intensity the current effect
Select Maximum Make the maximum the current slope
Select Minimum Make the minimum the current slope
Select Motion Effect Make Motion Effects effects active
Select Select Make the Select tool be the current tool
Select Shimmer Make shimmer the current effect
Select SuperstarEffect
Make SuperStar effects active
Select Toggle Make the Toggle tool be the current tool
Select Twinkle Make twinkle the current effect
SequencerPreferences
Opens the Sequencer Preferences dialog
Toggle Drag Edges Toggles "drag edges" mode
Toggle Play Loops Toggle looping playback
Toggle PlaybackWindow
Toggles visibility of the playback window
Toggle View FadesAs Ramps
Toggle viewing fades as ramps
Tooltip Open up a tooltip appropriate to where the mouse cursor is currentlypointing on the sequence grid
Undo Undo the last operation
Zoom Rows In Zoom in on rows (channels)
Zoom Rows In Fully Zoom in on rows (channels) as far as possible
Zoom Rows Out Zoom out on rows (channels)
Zoom Rows Out Fully Zoom out on rows (channels) as far as possible
Zoom Time In Zoom in on time (columns)
Zoom Time In Fully Zoom in on time (columns) as far as possible
Zoom Time Out Zoom out on time (columns)
Zoom Time Out Fully Zoom out on time (columns) as far as possible
5.3.1.3.3 Themes
The Themes menu item on the Light-O-Rama S5 Sequencer's Tools menu opens a dialog that allows youto select a color scheme for the main Sequencer window.
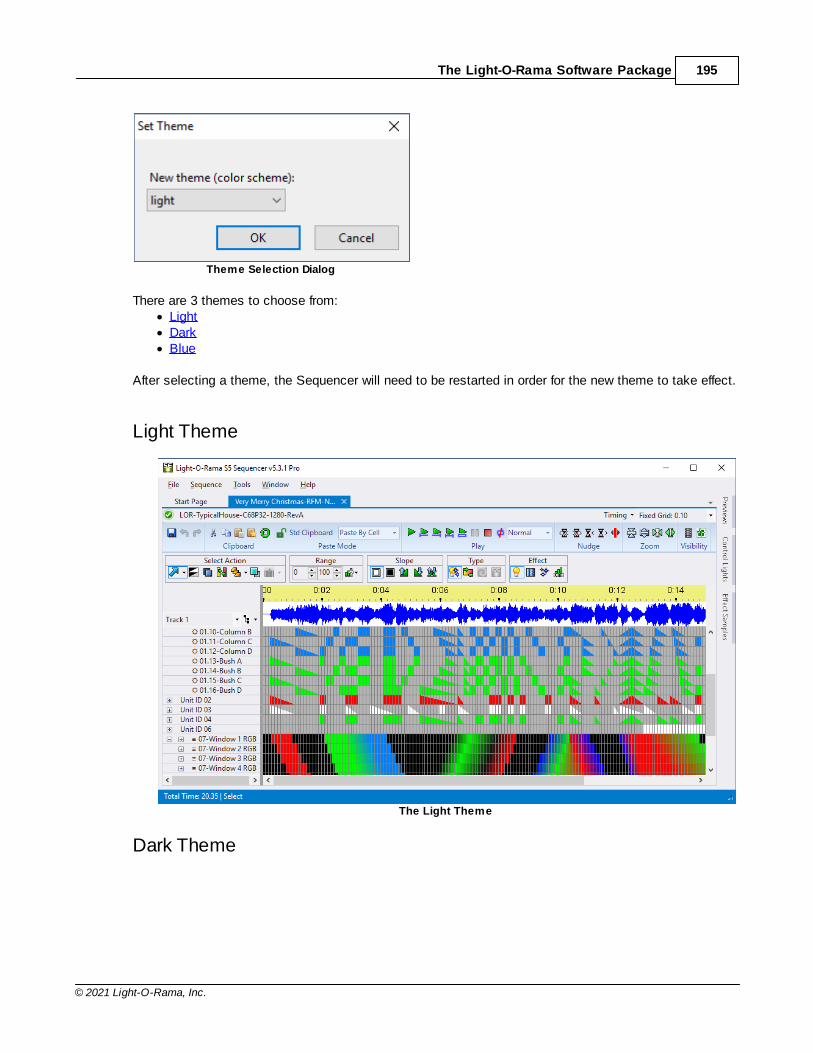
The Light-O-Rama Software Package 195
© 2021 Light-O-Rama, Inc.
Theme Selection Dialog
There are 3 themes to choose from:· Light· Dark· Blue
After selecting a theme, the Sequencer will need to be restarted in order for the new theme to take effect.
Light Theme
The Light Theme
Dark Theme
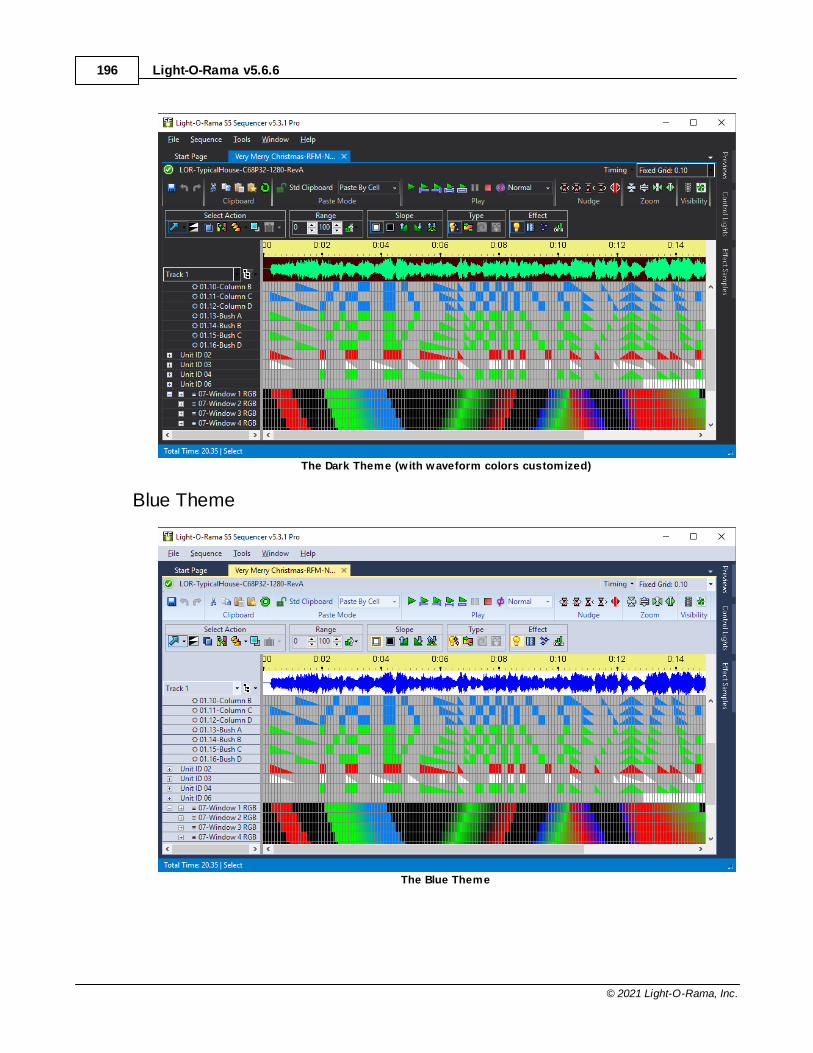
Light-O-Rama v5.6.6196
© 2021 Light-O-Rama, Inc.
The Dark Theme (w ith waveform colors customized)
Blue Theme
The Blue Theme
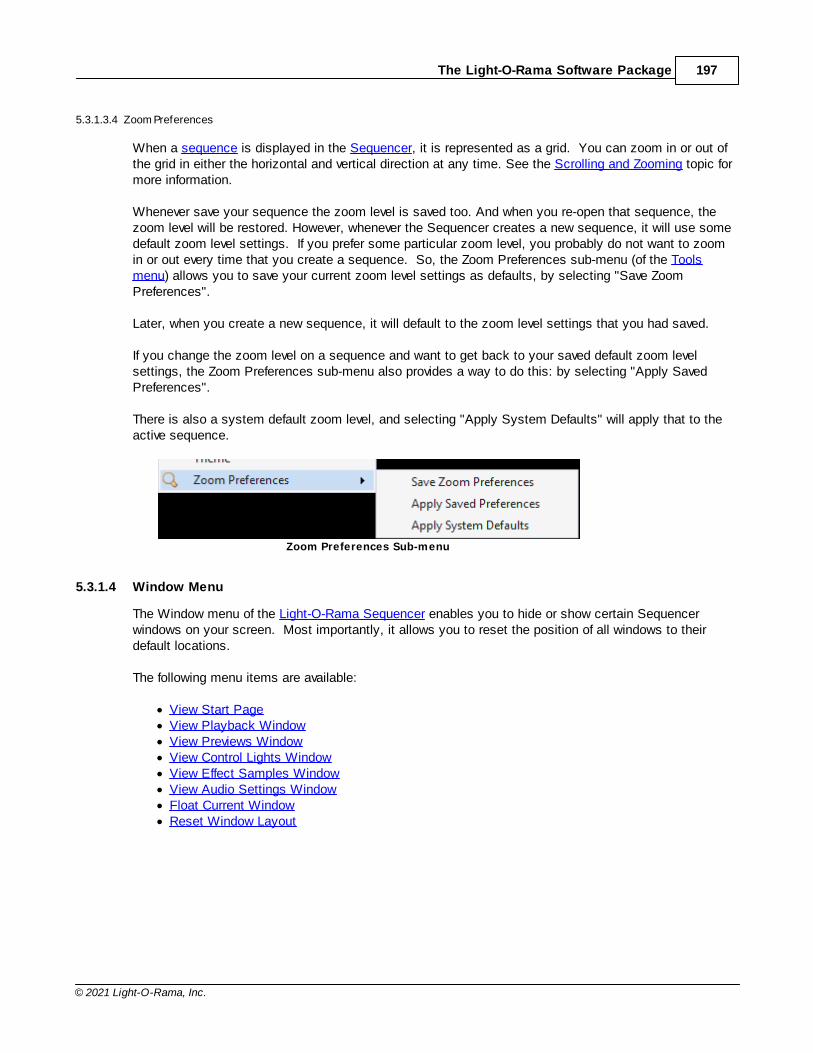
The Light-O-Rama Software Package 197
© 2021 Light-O-Rama, Inc.
5.3.1.3.4 Zoom Preferences
When a sequence is displayed in the Sequencer, it is represented as a grid. You can zoom in or out ofthe grid in either the horizontal and vertical direction at any time. See the Scrolling and Zooming topic formore information.
Whenever save your sequence the zoom level is saved too. And when you re-open that sequence, thezoom level will be restored. However, whenever the Sequencer creates a new sequence, it will use somedefault zoom level settings. If you prefer some particular zoom level, you probably do not want to zoomin or out every time that you create a sequence. So, the Zoom Preferences sub-menu (of the Toolsmenu) allows you to save your current zoom level settings as defaults, by selecting "Save ZoomPreferences".
Later, when you create a new sequence, it will default to the zoom level settings that you had saved.
If you change the zoom level on a sequence and want to get back to your saved default zoom levelsettings, the Zoom Preferences sub-menu also provides a way to do this: by selecting "Apply SavedPreferences".
There is also a system default zoom level, and selecting "Apply System Defaults" will apply that to theactive sequence.
Zoom Preferences Sub-menu
5.3.1.4 Window Menu
The Window menu of the Light-O-Rama Sequencer enables you to hide or show certain Sequencerwindows on your screen. Most importantly, it allows you to reset the position of all windows to theirdefault locations.
The following menu items are available:
· View Start Page· View Playback Window· View Previews Window· View Control Lights Window· View Effect Samples Window· View Audio Settings Window· Float Current Window· Reset Window Layout
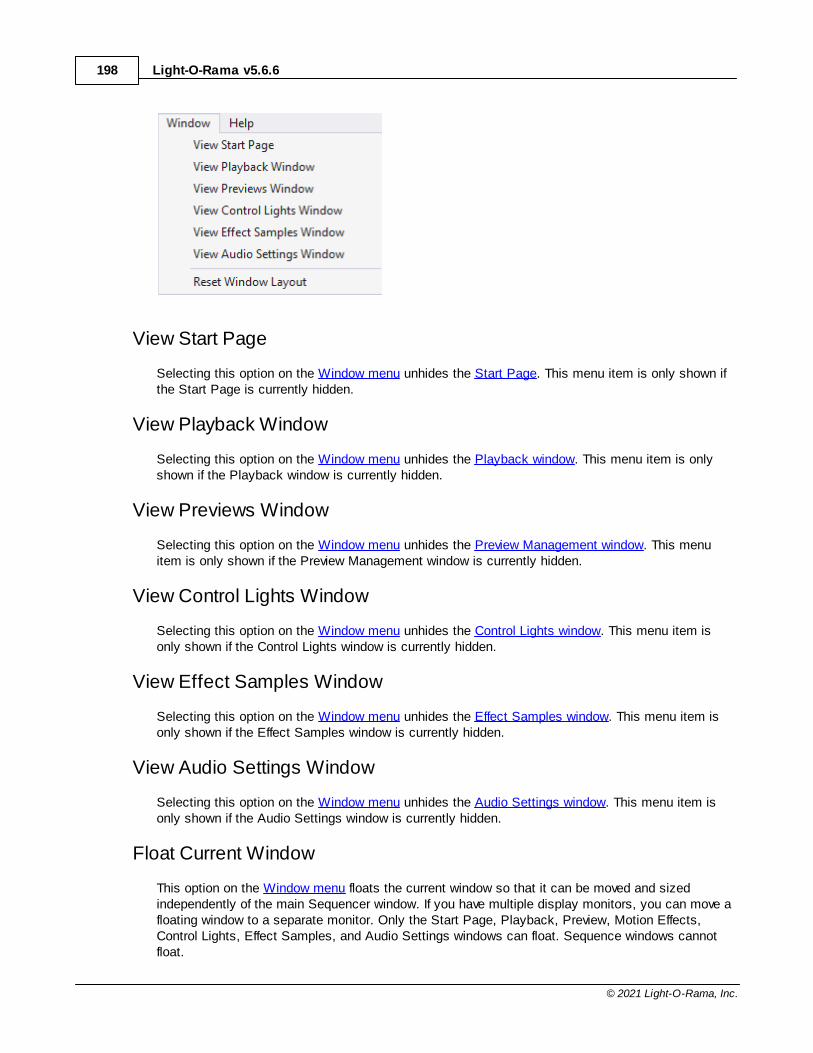
Light-O-Rama v5.6.6198
© 2021 Light-O-Rama, Inc.
View Start Page
Selecting this option on the Window menu unhides the Start Page. This menu item is only shown ifthe Start Page is currently hidden.
View Playback Window
Selecting this option on the Window menu unhides the Playback window. This menu item is onlyshown if the Playback window is currently hidden.
View Previews Window
Selecting this option on the Window menu unhides the Preview Management window. This menuitem is only shown if the Preview Management window is currently hidden.
View Control Lights Window
Selecting this option on the Window menu unhides the Control Lights window. This menu item isonly shown if the Control Lights window is currently hidden.
View Effect Samples Window
Selecting this option on the Window menu unhides the Effect Samples window. This menu item isonly shown if the Effect Samples window is currently hidden.
View Audio Settings Window
Selecting this option on the Window menu unhides the Audio Settings window. This menu item isonly shown if the Audio Settings window is currently hidden.
Float Current Window
This option on the Window menu floats the current window so that it can be moved and sizedindependently of the main Sequencer window. If you have multiple display monitors, you can move afloating window to a separate monitor. Only the Start Page, Playback, Preview, Motion Effects,Control Lights, Effect Samples, and Audio Settings windows can float. Sequence windows cannotfloat.
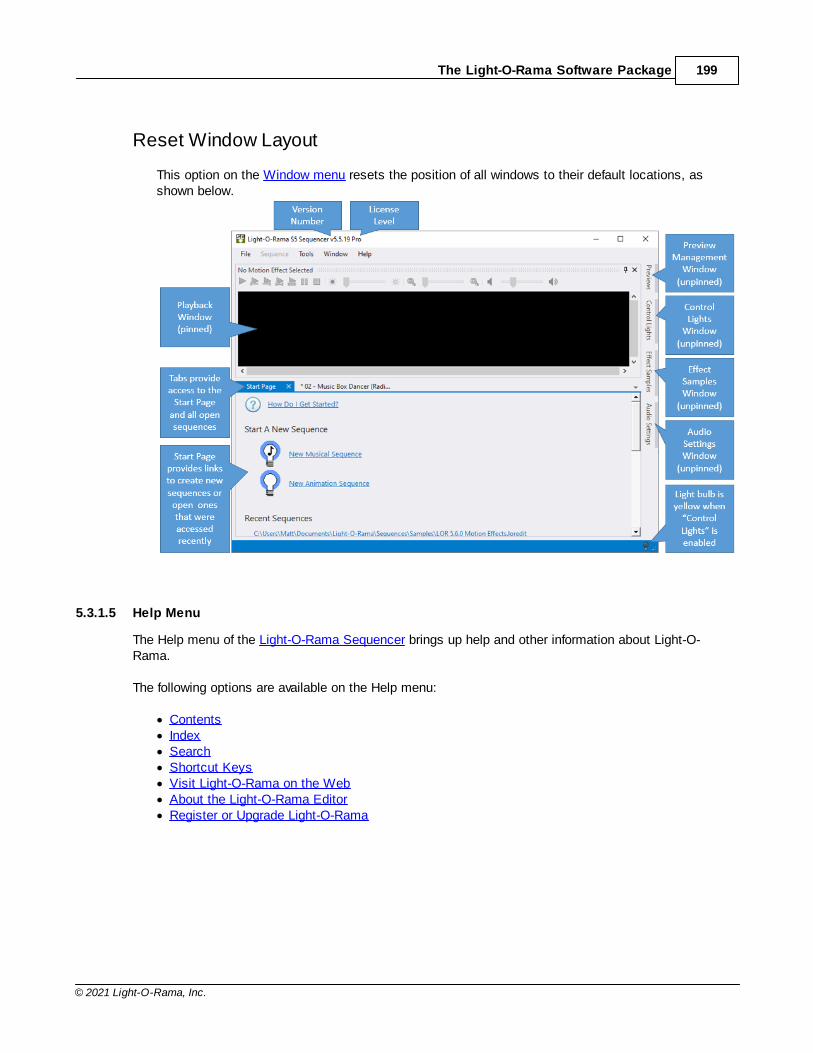
The Light-O-Rama Software Package 199
© 2021 Light-O-Rama, Inc.
Reset Window Layout
This option on the Window menu resets the position of all windows to their default locations, asshown below.
5.3.1.5 Help Menu
The Help menu of the Light-O-Rama Sequencer brings up help and other information about Light-O-Rama.
The following options are available on the Help menu:
· Contents· Index· Search· Shortcut Keys· Visit Light-O-Rama on the Web· About the Light-O-Rama Editor· Register or Upgrade Light-O-Rama
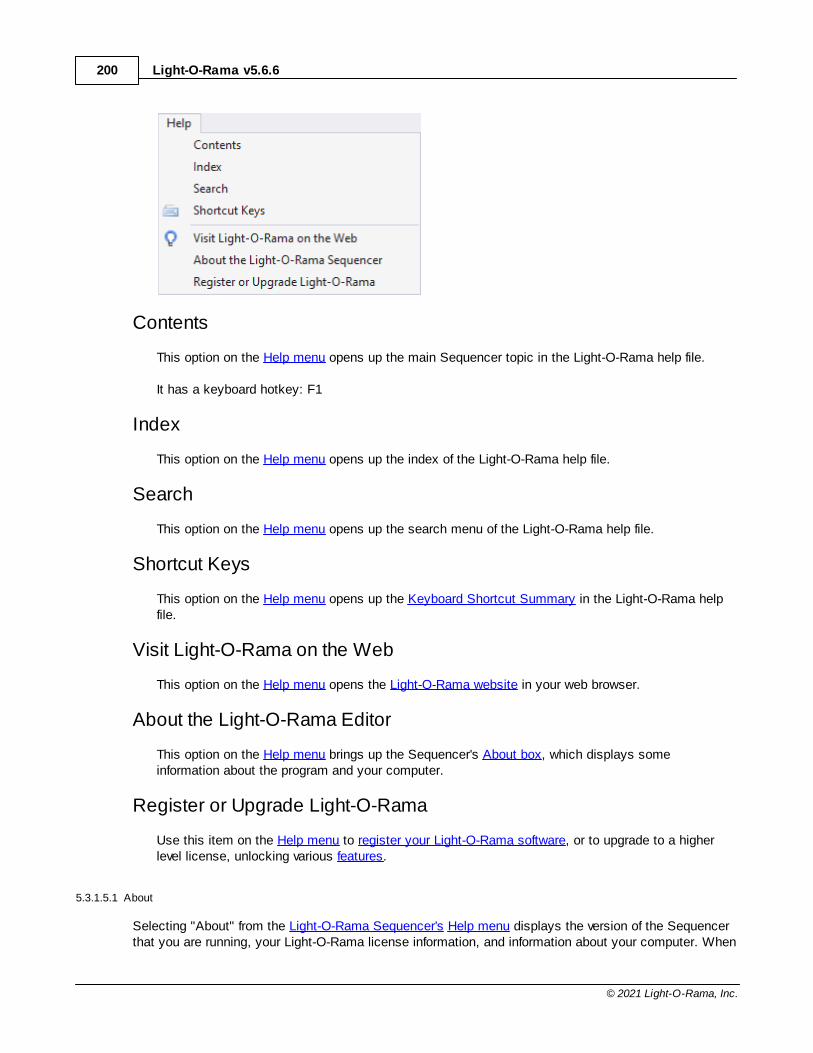
Light-O-Rama v5.6.6200
© 2021 Light-O-Rama, Inc.
Contents
This option on the Help menu opens up the main Sequencer topic in the Light-O-Rama help file.
It has a keyboard hotkey: F1
Index
This option on the Help menu opens up the index of the Light-O-Rama help file.
Search
This option on the Help menu opens up the search menu of the Light-O-Rama help file.
Shortcut Keys
This option on the Help menu opens up the Keyboard Shortcut Summary in the Light-O-Rama helpfile.
Visit Light-O-Rama on the Web
This option on the Help menu opens the Light-O-Rama website in your web browser.
About the Light-O-Rama Editor
This option on the Help menu brings up the Sequencer's About box, which displays someinformation about the program and your computer.
Register or Upgrade Light-O-Rama
Use this item on the Help menu to register your Light-O-Rama software, or to upgrade to a higherlevel license, unlocking various features.
5.3.1.5.1 About
Selecting "About" from the Light-O-Rama Sequencer's Help menu displays the version of the Sequencerthat you are running, your Light-O-Rama license information, and information about your computer. When
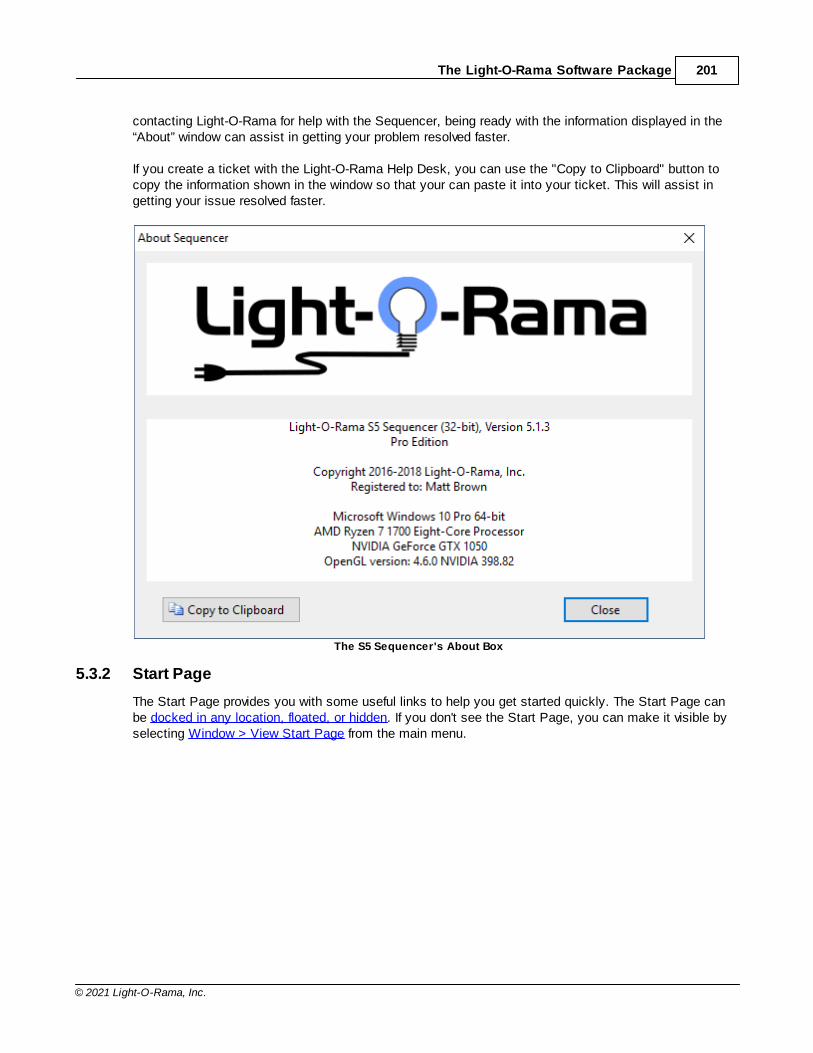
The Light-O-Rama Software Package 201
© 2021 Light-O-Rama, Inc.
contacting Light-O-Rama for help with the Sequencer, being ready with the information displayed in the“About” window can assist in getting your problem resolved faster.
If you create a ticket with the Light-O-Rama Help Desk, you can use the "Copy to Clipboard" button tocopy the information shown in the window so that your can paste it into your ticket. This will assist ingetting your issue resolved faster.
The S5 Sequencer's About Box
5.3.2 Start Page
The Start Page provides you with some useful links to help you get started quickly. The Start Page canbe docked in any location, floated, or hidden. If you don't see the Start Page, you can make it visible byselecting Window > View Start Page from the main menu.
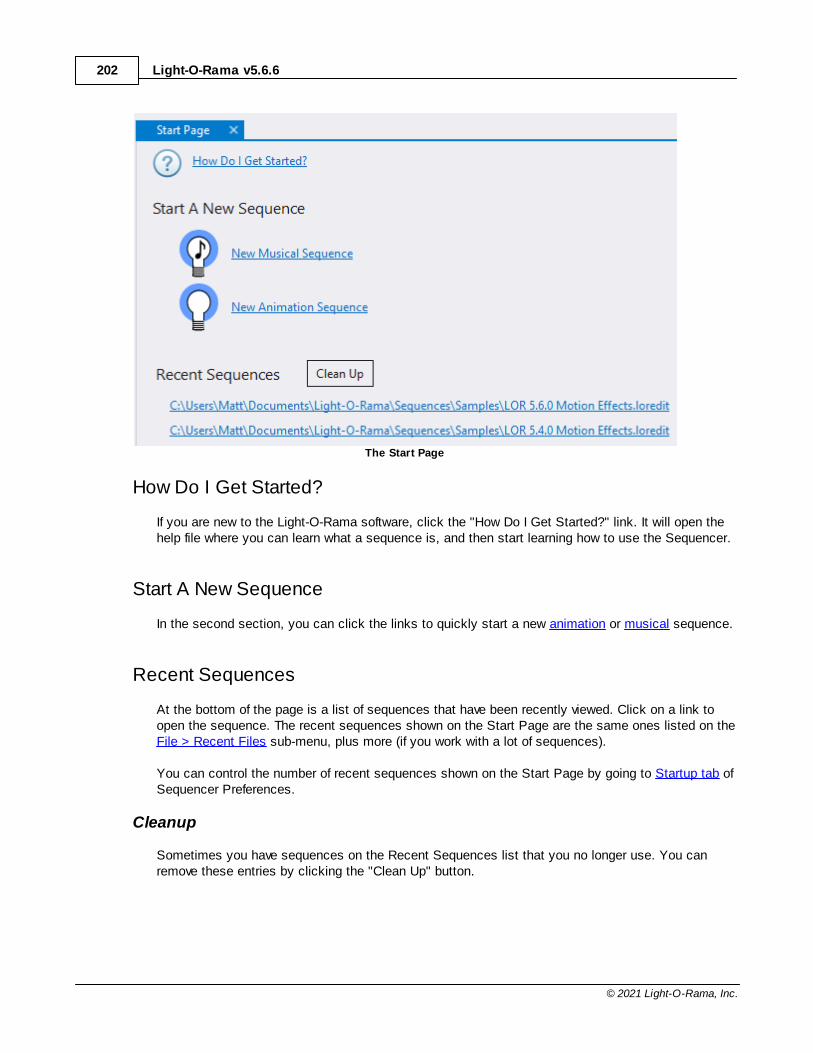
Light-O-Rama v5.6.6202
© 2021 Light-O-Rama, Inc.
The Start Page
How Do I Get Started?
If you are new to the Light-O-Rama software, click the "How Do I Get Started?" link. It will open thehelp file where you can learn what a sequence is, and then start learning how to use the Sequencer.
Start A New Sequence
In the second section, you can click the links to quickly start a new animation or musical sequence.
Recent Sequences
At the bottom of the page is a list of sequences that have been recently viewed. Click on a link toopen the sequence. The recent sequences shown on the Start Page are the same ones listed on theFile > Recent Files sub-menu, plus more (if you work with a lot of sequences).
You can control the number of recent sequences shown on the Start Page by going to Startup tab ofSequencer Preferences.
Cleanup
Sometimes you have sequences on the Recent Sequences list that you no longer use. You canremove these entries by clicking the "Clean Up" button.
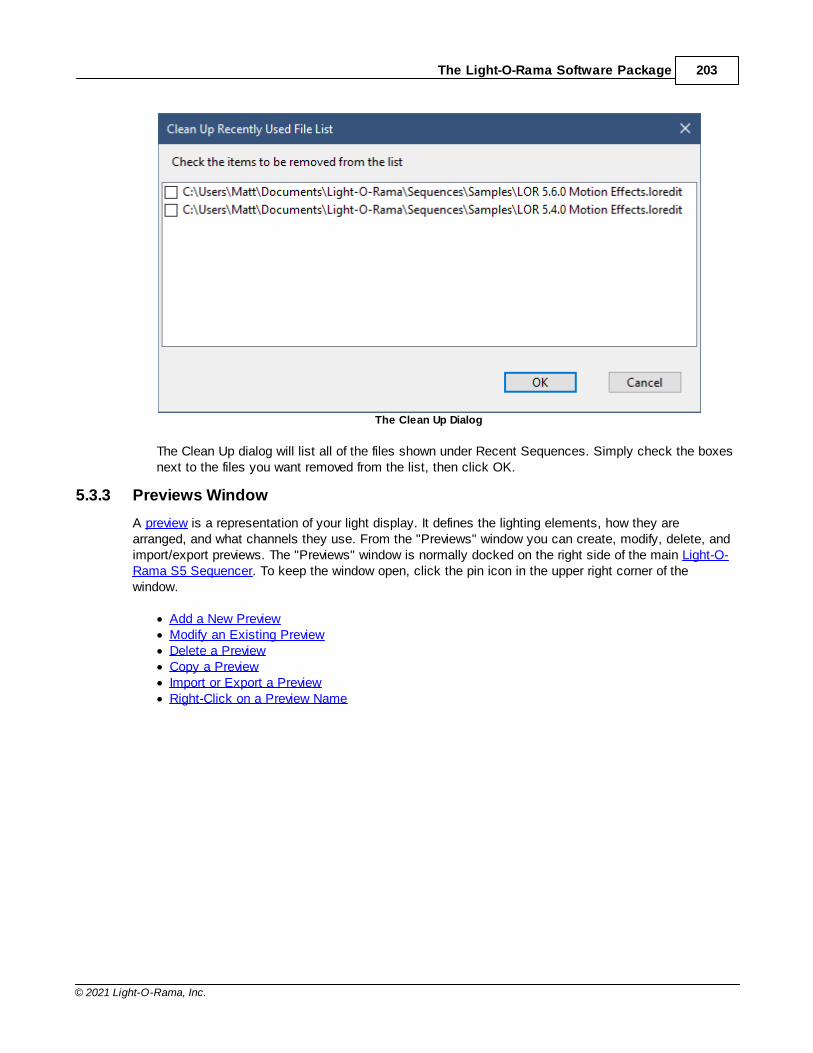
The Light-O-Rama Software Package 203
© 2021 Light-O-Rama, Inc.
The Clean Up Dialog
The Clean Up dialog will list all of the files shown under Recent Sequences. Simply check the boxesnext to the files you want removed from the list, then click OK.
5.3.3 Previews Window
A preview is a representation of your light display. It defines the lighting elements, how they arearranged, and what channels they use. From the "Previews" window you can create, modify, delete, andimport/export previews. The "Previews" window is normally docked on the right side of the main Light-O-Rama S5 Sequencer. To keep the window open, click the pin icon in the upper right corner of thewindow.
· Add a New Preview· Modify an Existing Preview· Delete a Preview· Copy a Preview· Import or Export a Preview· Right-Click on a Preview Name
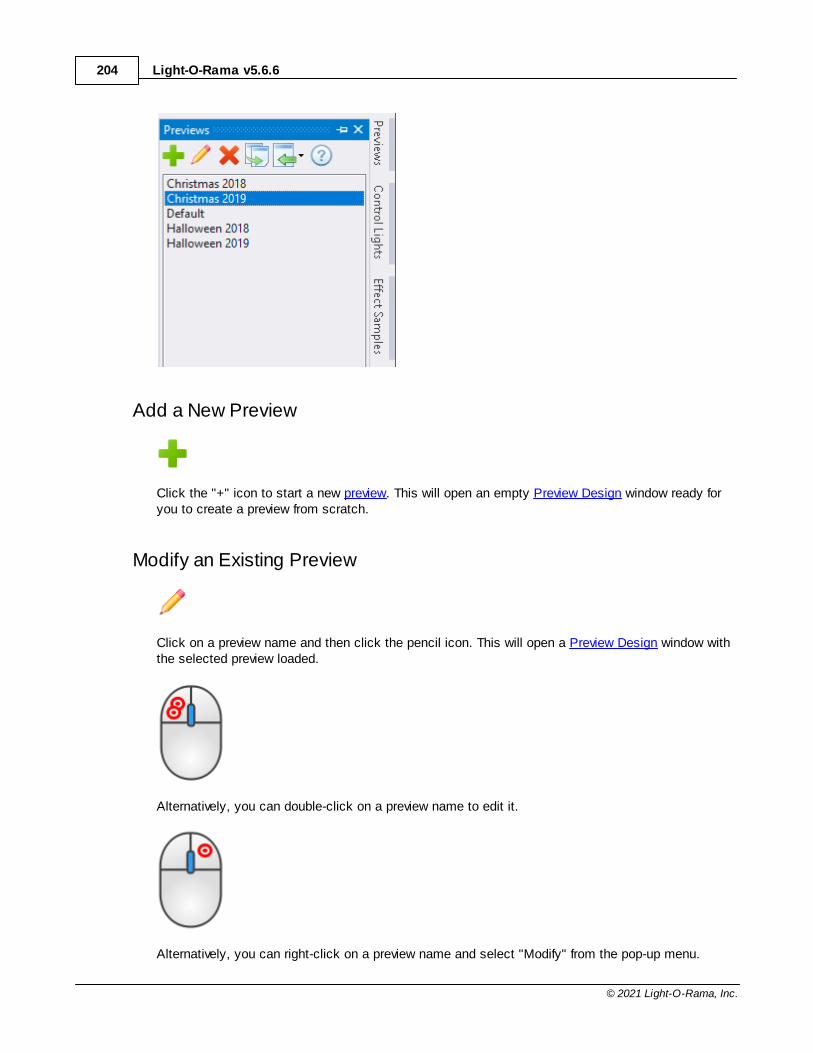
Light-O-Rama v5.6.6204
© 2021 Light-O-Rama, Inc.
Add a New Preview
Click the "+" icon to start a new preview. This will open an empty Preview Design window ready foryou to create a preview from scratch.
Modify an Existing Preview
Click on a preview name and then click the pencil icon. This will open a Preview Design window withthe selected preview loaded.
Alternatively, you can double-click on a preview name to edit it.
Alternatively, you can right-click on a preview name and select "Modify" from the pop-up menu.
The Light-O-Rama Software Package 205
© 2021 Light-O-Rama, Inc.
Delete a Preview
Click on a preview name and then click the red “X” button. You will be prompted to confirm that youwant to proceed with the deletion. Click “Yes” to delete or click “No” to cancel. If after deleting it youfind that you want to get it back, assuming you have a sequence associated with that preview youcan just open that sequence and the preview will be imported from it.
Alternatively, you can right-click on a preview name and select "Delete" from the pop-up menu.
Copy a Preview
Click on a preview name and then click the “Copy” button. You will be prompted for the name of thenew preview. If you keep a copy of a preview for each year of your display (recommended), then thisis the command you should use to copy one year's preview to the next (e.g. 2018 to 2019).
Alternatively, you can right-click on a preview name and select "Copy" from the pop-up menu.
Import or Export a Preview
The Import/Export menu
Light-O-Rama v5.6.6206
© 2021 Light-O-Rama, Inc.
Click the Import icon to open a menu that allows you to:
· Import a Visualizer (LEE) file. You will prompted to select an LEE file and it will then beimported into a new preview. During the import process, Visualizer fixtures will be converted toprops, and Visualizer props will be imported as preview groups.
· Import a Sequence Editor Animation. You will be prompted to select the LMS or LASsequence file that contains the animation.
· Export an S5 preview. You will be prompted for the file name. This creates a file with anLORPREV extension. You can also perform this action by right-clicking on a preview nameand selecting "Export" from the pop-up menu.
· Import an S5 preview. You will prompted to a select a file with an LORPREV extension.
Right-Click on a Preview Name
The right-click menu
Right-click on a preview name to open a menu that allows you to:
· Modify the selected preview in a Preview Design window.· Delete the selected preview. You will be prompted to confirm that you want to proceed with the
deletion.· Copy the selected preview. You will be prompted for the name of the new preview.· Export the selected preview. You will be prompted for the file name. This creates a file with an
LORPREV extension.· Create a new musical sequence using the selected preview.· Create a new animation sequence using the selected preview.
5.3.4 Preview Design
Creating a preview is the first step in using the Light-O-Rama S5 Sequencer. No sequencing can be donewithout a preview. While it is possible to create a preview outside of the Preview Design window (viaimport, or using the Quick Preview feature when creating a new sequence), any editing of a preview mustbe done in Preview Design.
A preview defines the lighting elements in your display and how they are arranged. It allows yoursequences to be simulated during playback. A preview can be a quick rough sketch, or a detailed, highly
The Light-O-Rama Software Package 207
© 2021 Light-O-Rama, Inc.
realistic depiction of your display. It is up to you to decide how much effort you want to put in to it. In anycase, the preview must accurately define every channel that will be controlled by your sequences.
You can access the Preview Design window from the Previews Window or by clicking the preview nameon the sequence toolbar.
Props and Groups
The display elements in a preview are referred to as 'props'. You must add a prop to the preview for everydisplay element that you want to control. A prop can be as simple as a single channel string oftraditional lights, or as complex as a big pixel tree or matrix. When you create a prop, you define thetype and color of lights that it uses, its shape, and the channels assigned to it. If one of the built-inshapes doesn't meet your needs, then you can define a custom shape.
A sample of some of the shapes that come built-in to S5
Props can be grouped together. · You might do this so that the props appear together in the sequence grid. · You might also create a group so that you can apply an effect to the group instead of individual
props. This enables things like sweeping a color across your entire display.
One Preview > Multiple Sequences
One preview can be associated with multiple sequences. Update the preview once, and the next timeyou open any sequence associated with that preview, the update will automatically be applied.
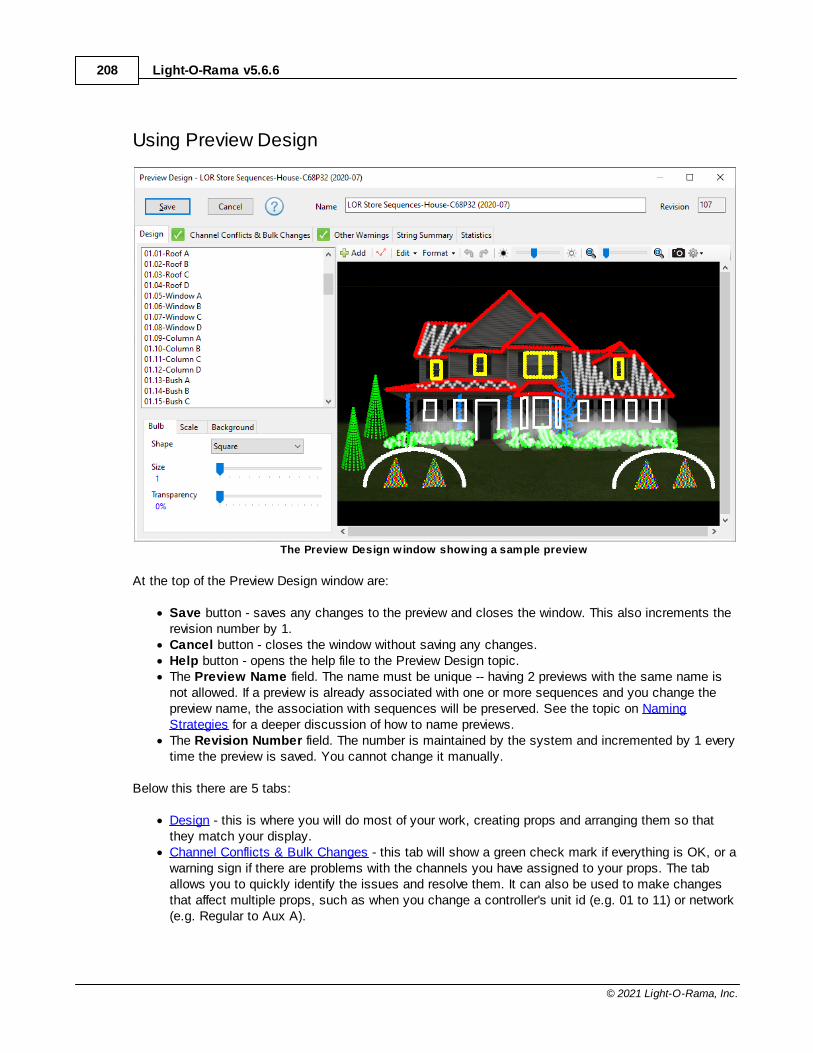
Light-O-Rama v5.6.6208
© 2021 Light-O-Rama, Inc.
Using Preview Design
The Preview Design window showing a sample preview
At the top of the Preview Design window are:
· Save button - saves any changes to the preview and closes the window. This also increments therevision number by 1.
· Cancel button - closes the window without saving any changes.· Help button - opens the help file to the Preview Design topic.· The Preview Name field. The name must be unique -- having 2 previews with the same name is
not allowed. If a preview is already associated with one or more sequences and you change thepreview name, the association with sequences will be preserved. See the topic on NamingStrategies for a deeper discussion of how to name previews.
· The Revision Number field. The number is maintained by the system and incremented by 1 everytime the preview is saved. You cannot change it manually.
Below this there are 5 tabs:
· Design - this is where you will do most of your work, creating props and arranging them so thatthey match your display.
· Channel Conflicts & Bulk Changes - this tab will show a green check mark if everything is OK, or awarning sign if there are problems with the channels you have assigned to your props. The taballows you to quickly identify the issues and resolve them. It can also be used to make changesthat affect multiple props, such as when you change a controller's unit id (e.g. 01 to 11) or network(e.g. Regular to Aux A).
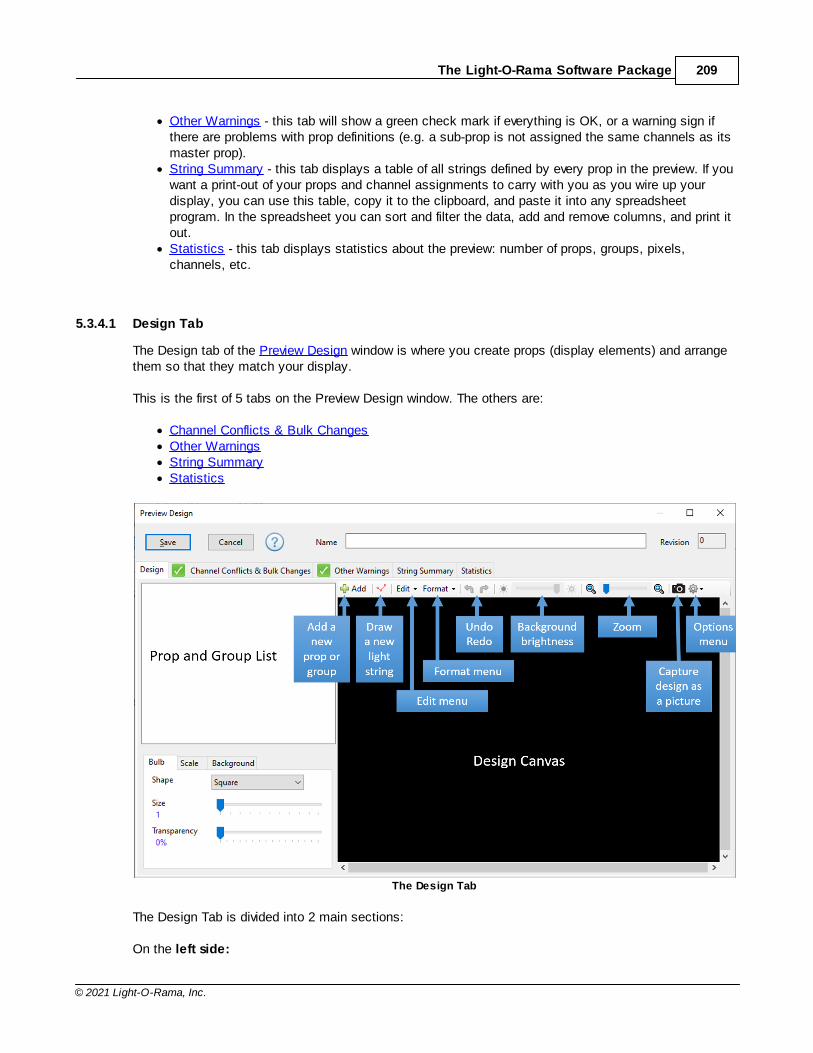
The Light-O-Rama Software Package 209
© 2021 Light-O-Rama, Inc.
· Other Warnings - this tab will show a green check mark if everything is OK, or a warning sign ifthere are problems with prop definitions (e.g. a sub-prop is not assigned the same channels as itsmaster prop).
· String Summary - this tab displays a table of all strings defined by every prop in the preview. If youwant a print-out of your props and channel assignments to carry with you as you wire up yourdisplay, you can use this table, copy it to the clipboard, and paste it into any spreadsheetprogram. In the spreadsheet you can sort and filter the data, add and remove columns, and print itout.
· Statistics - this tab displays statistics about the preview: number of props, groups, pixels,channels, etc.
5.3.4.1 Design Tab
The Design tab of the Preview Design window is where you create props (display elements) and arrangethem so that they match your display.
This is the first of 5 tabs on the Preview Design window. The others are:
· Channel Conflicts & Bulk Changes· Other Warnings· String Summary· Statistics
The Design Tab
The Design Tab is divided into 2 main sections:
On the left side:
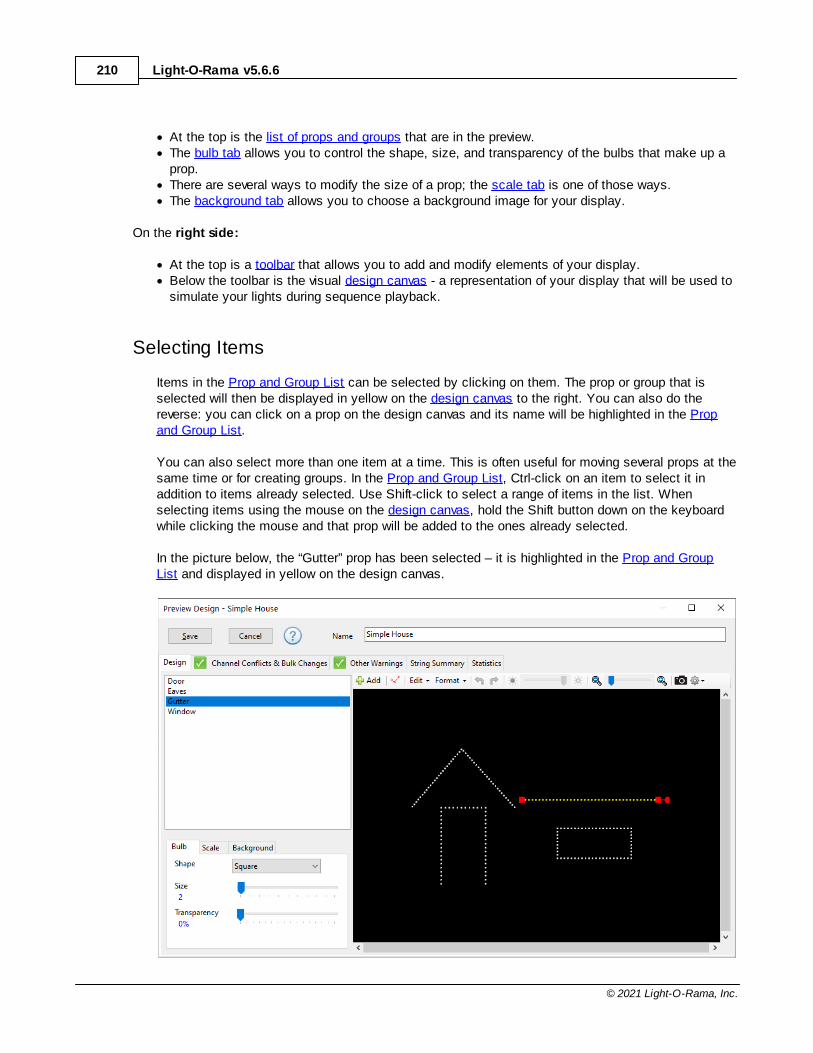
Light-O-Rama v5.6.6210
© 2021 Light-O-Rama, Inc.
· At the top is the list of props and groups that are in the preview.· The bulb tab allows you to control the shape, size, and transparency of the bulbs that make up a
prop.· There are several ways to modify the size of a prop; the scale tab is one of those ways.· The background tab allows you to choose a background image for your display.
On the right side:
· At the top is a toolbar that allows you to add and modify elements of your display. · Below the toolbar is the visual design canvas - a representation of your display that will be used to
simulate your lights during sequence playback.
Selecting Items
Items in the Prop and Group List can be selected by clicking on them. The prop or group that isselected will then be displayed in yellow on the design canvas to the right. You can also do thereverse: you can click on a prop on the design canvas and its name will be highlighted in the Propand Group List.
You can also select more than one item at a time. This is often useful for moving several props at thesame time or for creating groups. In the Prop and Group List, Ctrl-click on an item to select it inaddition to items already selected. Use Shift-click to select a range of items in the list. Whenselecting items using the mouse on the design canvas, hold the Shift button down on the keyboardwhile clicking the mouse and that prop will be added to the ones already selected.
In the picture below, the “Gutter” prop has been selected – it is highlighted in the Prop and GroupList and displayed in yellow on the design canvas.
The Light-O-Rama Software Package 211
© 2021 Light-O-Rama, Inc.
Keyboard Shortcuts
The following keyboard shortcuts can be used on the design tab:
Shortcut Action
Deletes the selected prop or group. If you delete a prop by mistake,just click the Undo button (or use the Ctrl-Z shortcut).
Selects all props and groups
Moves the selected props by a small amount
Makes the selected items larger. Hold the keys down longer toengage the keyboard auto-repeat if needed.
Makes the selected items smaller. Hold the keys down longer toengage the keyboard auto-repeat if needed.
Rotates the selected props counterclockwise
Rotates the selected props clockwise
Control-zero resets prop rotation to its default value (fixed propshapes only)
undo the last operation
redo the last operation
Prop and Group List
The Prop and Group List is displayed on the left side of the design tab. Every prop and group in yourpreview will be listed here in alphabetical order. To help distinguish groups from props, groups will belisted with blue text. In the picture below, "01.Group 1 (roof)", "01.Group 2 (windows)", "01.Group 3(columns)", and "01.Group 4 (bushes)" are groups, and the others are props. Props "02-Minitree A"through "02-Minitree D" are selected.
To select an item in the list, just click on it with the left mouse button. You can use shift-click toextend the selection, and ctrl-click to select additional items. More information is available in theSelecting Items section.
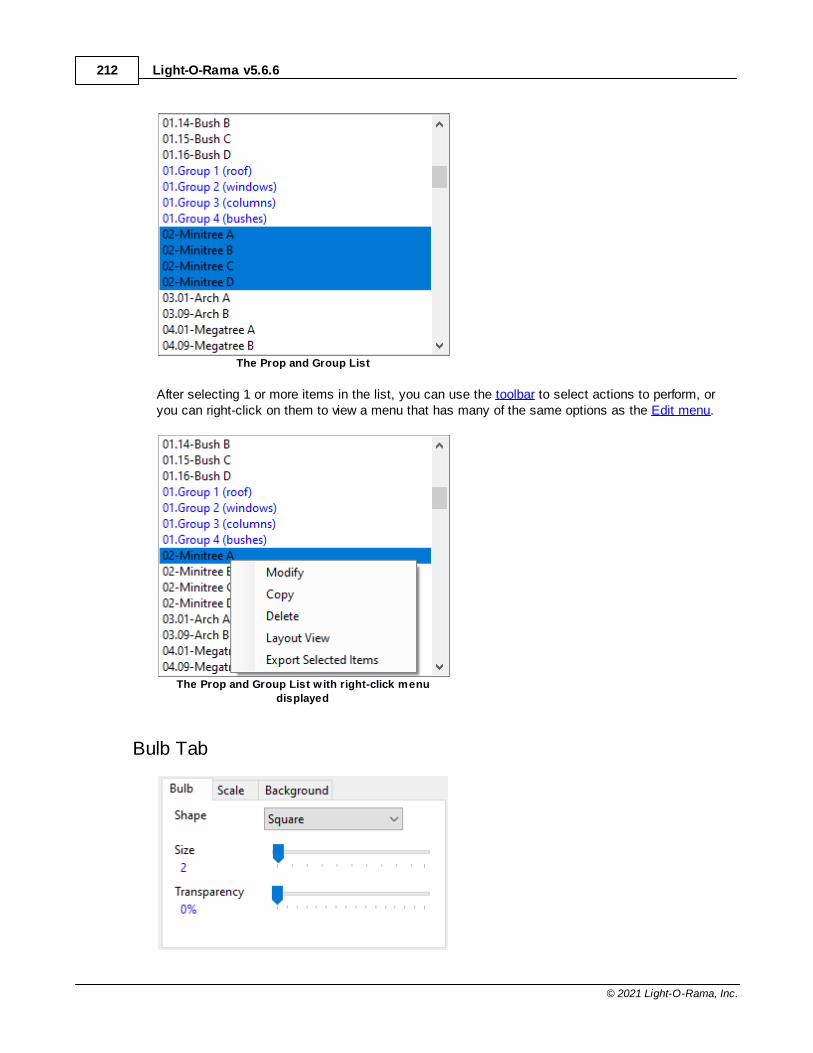
Light-O-Rama v5.6.6212
© 2021 Light-O-Rama, Inc.
The Prop and Group List
After selecting 1 or more items in the list, you can use the toolbar to select actions to perform, oryou can right-click on them to view a menu that has many of the same options as the Edit menu.
The Prop and Group List w ith right-click menu
displayed
Bulb Tab
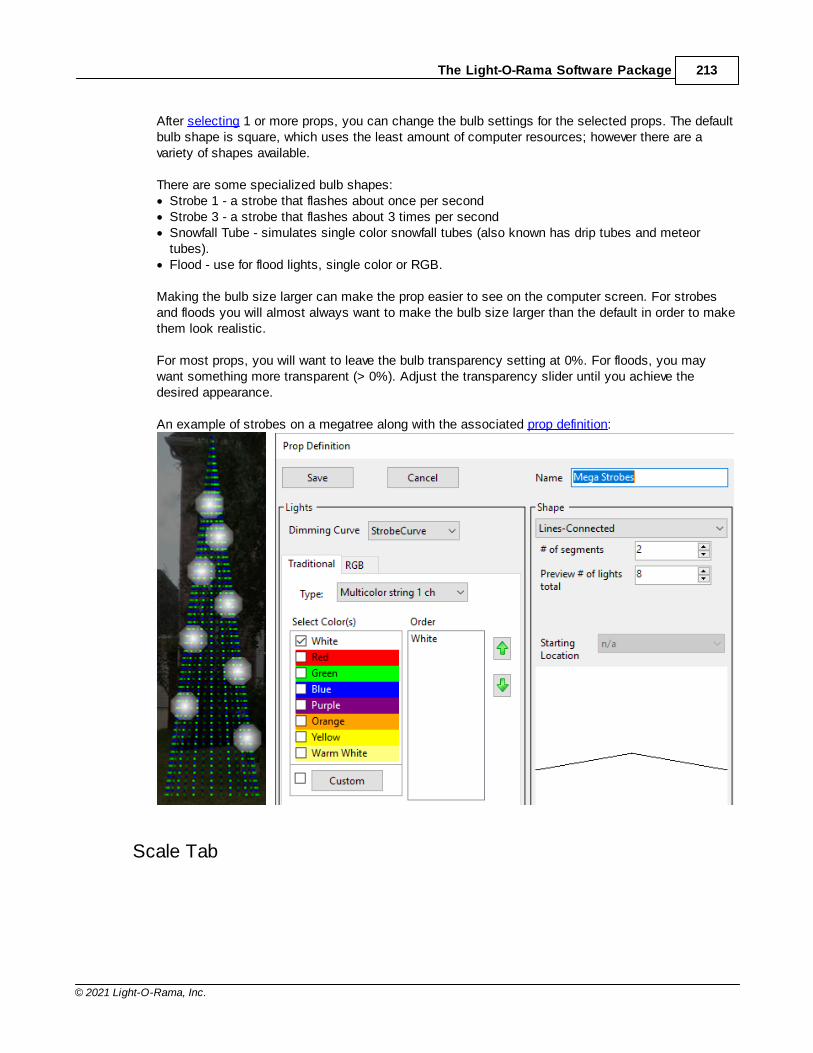
The Light-O-Rama Software Package 213
© 2021 Light-O-Rama, Inc.
After selecting 1 or more props, you can change the bulb settings for the selected props. The defaultbulb shape is square, which uses the least amount of computer resources; however there are avariety of shapes available.
There are some specialized bulb shapes:· Strobe 1 - a strobe that flashes about once per second· Strobe 3 - a strobe that flashes about 3 times per second· Snowfall Tube - simulates single color snowfall tubes (also known has drip tubes and meteor
tubes).· Flood - use for flood lights, single color or RGB.
Making the bulb size larger can make the prop easier to see on the computer screen. For strobesand floods you will almost always want to make the bulb size larger than the default in order to makethem look realistic.
For most props, you will want to leave the bulb transparency setting at 0%. For floods, you maywant something more transparent (> 0%). Adjust the transparency slider until you achieve thedesired appearance.
An example of strobes on a megatree along with the associated prop definition:
Scale Tab
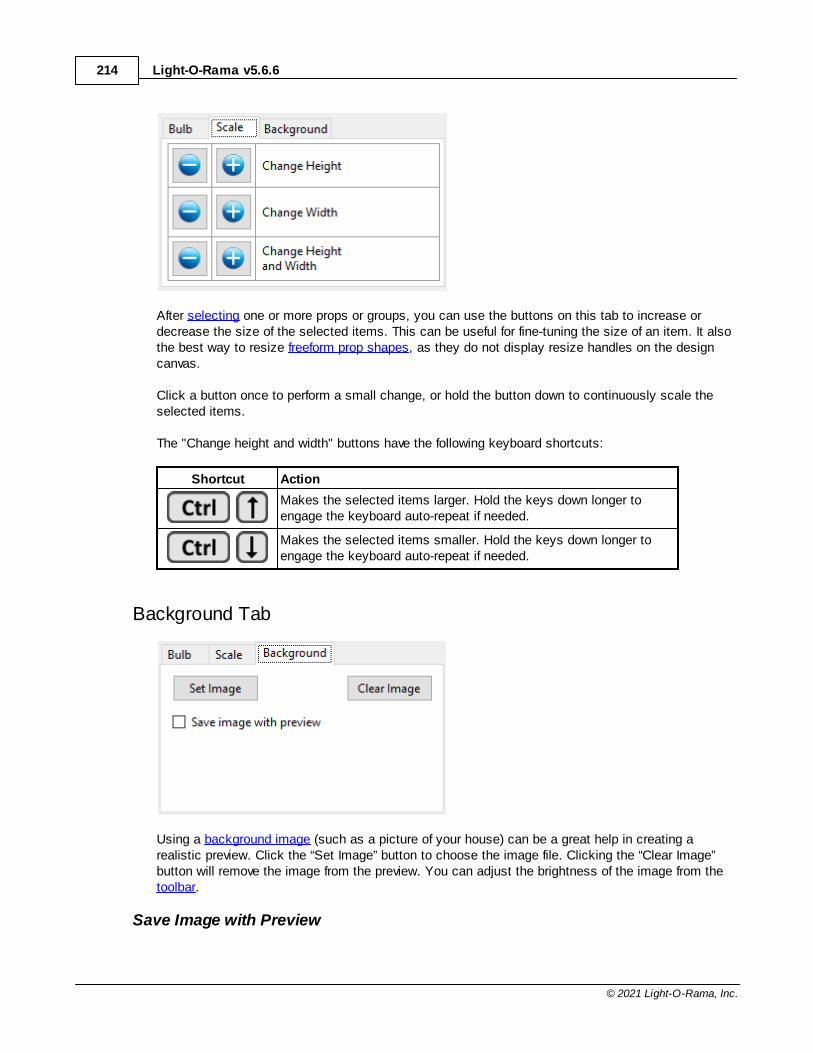
Light-O-Rama v5.6.6214
© 2021 Light-O-Rama, Inc.
After selecting one or more props or groups, you can use the buttons on this tab to increase ordecrease the size of the selected items. This can be useful for fine-tuning the size of an item. It alsothe best way to resize freeform prop shapes, as they do not display resize handles on the designcanvas.
Click a button once to perform a small change, or hold the button down to continuously scale theselected items.
The "Change height and width" buttons have the following keyboard shortcuts:
Shortcut Action
Makes the selected items larger. Hold the keys down longer toengage the keyboard auto-repeat if needed.
Makes the selected items smaller. Hold the keys down longer toengage the keyboard auto-repeat if needed.
Background Tab
Using a background image (such as a picture of your house) can be a great help in creating arealistic preview. Click the “Set Image” button to choose the image file. Clicking the “Clear Image”button will remove the image from the preview. You can adjust the brightness of the image from thetoolbar.
Save Image with Preview
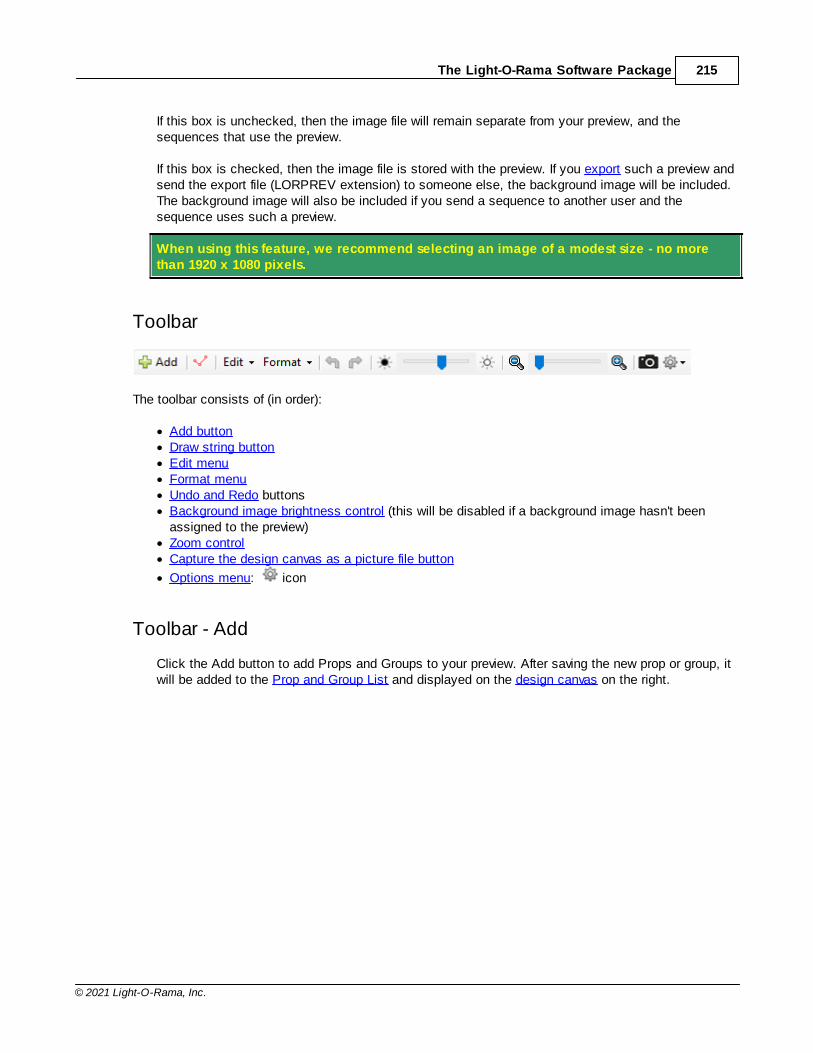
The Light-O-Rama Software Package 215
© 2021 Light-O-Rama, Inc.
If this box is unchecked, then the image file will remain separate from your preview, and thesequences that use the preview.
If this box is checked, then the image file is stored with the preview. If you export such a preview andsend the export file (LORPREV extension) to someone else, the background image will be included.The background image will also be included if you send a sequence to another user and thesequence uses such a preview.
When using this feature, we recommend selecting an image of a modest size - no morethan 1920 x 1080 pixels.
Toolbar
The toolbar consists of (in order):
· Add button· Draw string button· Edit menu· Format menu· Undo and Redo buttons· Background image brightness control (this will be disabled if a background image hasn't been
assigned to the preview)· Zoom control· Capture the design canvas as a picture file button
· Options menu: icon
Toolbar - Add
Click the Add button to add Props and Groups to your preview. After saving the new prop or group, itwill be added to the Prop and Group List and displayed on the design canvas on the right.
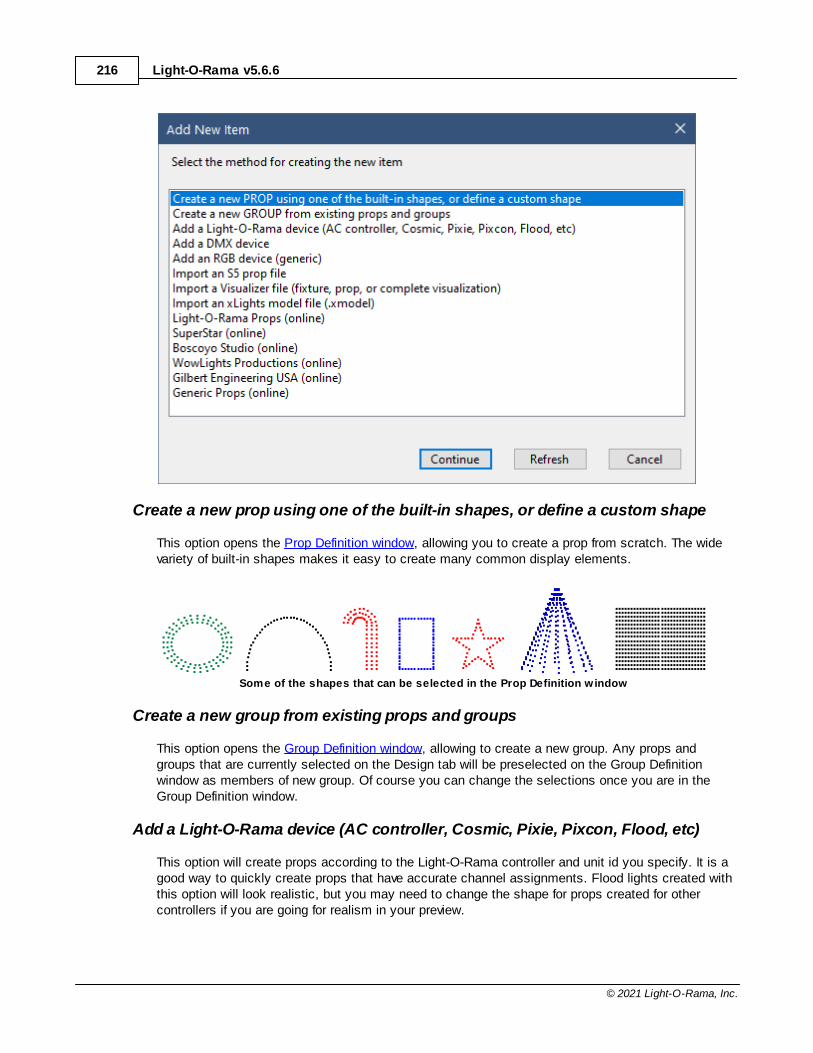
Light-O-Rama v5.6.6216
© 2021 Light-O-Rama, Inc.
Create a new prop using one of the built-in shapes, or define a custom shape
This option opens the Prop Definition window, allowing you to create a prop from scratch. The widevariety of built-in shapes makes it easy to create many common display elements.
Some of the shapes that can be selected in the Prop Definition w indow
Create a new group from existing props and groups
This option opens the Group Definition window, allowing to create a new group. Any props andgroups that are currently selected on the Design tab will be preselected on the Group Definitionwindow as members of new group. Of course you can change the selections once you are in theGroup Definition window.
Add a Light-O-Rama device (AC controller, Cosmic, Pixie, Pixcon, Flood, etc)
This option will create props according to the Light-O-Rama controller and unit id you specify. It is agood way to quickly create props that have accurate channel assignments. Flood lights created withthis option will look realistic, but you may need to change the shape for props created for othercontrollers if you are going for realism in your preview.
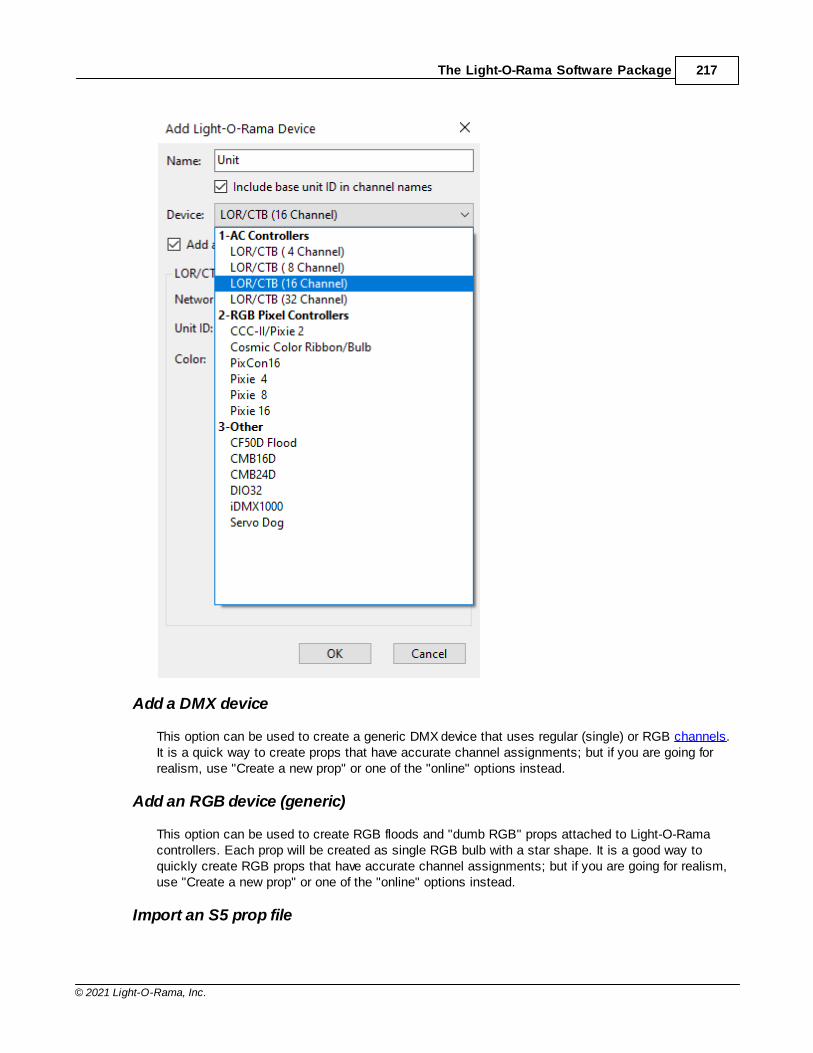
The Light-O-Rama Software Package 217
© 2021 Light-O-Rama, Inc.
Add a DMX device
This option can be used to create a generic DMX device that uses regular (single) or RGB channels.It is a quick way to create props that have accurate channel assignments; but if you are going forrealism, use "Create a new prop" or one of the "online" options instead.
Add an RGB device (generic)
This option can be used to create RGB floods and "dumb RGB" props attached to Light-O-Ramacontrollers. Each prop will be created as single RGB bulb with a star shape. It is a good way toquickly create RGB props that have accurate channel assignments; but if you are going for realism,use "Create a new prop" or one of the "online" options instead.
Import an S5 prop file
Light-O-Rama v5.6.6218
© 2021 Light-O-Rama, Inc.
This option loads props and groups into your preview from a file that had previously been exported.These files have an “.lpeprop” extension. You should review the channel assignments on anyimported props to make sure they match your controllers – this can be done by double-clicking onthe name of an imported prop to open the Prop Definition window. By default, an imported prop willbe assigned the name that it had when it was exported. However, if that name is already being usedin the preview, then a numeric suffix will be added to the name in order to make it unique.
Import a Visualizer file (fixture, prop, or complete visualization)
This option imports a file created with the S4 Visualizer. You will be prompted to select a Visualizerfixture file (.LFF extension), prop file (.LPF extension), or complete visualization file (.LEEextension). All of the fixtures and props defined in the selected file will then be loaded into thepreview. Visualizer fixtures will become S5 props. Visualizer props will become S5 groups. Youshould review the channel assignments on any imported props to make sure they match yourcontrollers.
Import an xLights model file (.xmodel)
This option allows you to import model files created by the xLights program. This feature onlysupports models that use the Custom and Star shapes. Most commercial props are modeled usingthe Custom shape.
Light-O-Rama props (online)
This option will open the Online Prop Import screen, allowing you to import props for items sold inthe Light-O-Rama store, such as pixel trees and singing faces. It is recommended that you haveinternet access when using this option so that you see the latest available content (content will likelychange over time). You should review the channel assignments on any imported props to make surethey match your controllers.
SuperStar (online)
This option will open the Online Prop Import screen, allowing you to import props that matchsequences sold by SuperStar Lights. It is recommended that you have internet access when usingthis option so that you see the latest available content (content will likely change over time). Youshould review the channel assignments on any imported props to make sure they match yourcontrollers.
Boscoyo Studio (online)
This option will open the Online Prop Import screen, allowing you to import props for items sold byBoscoyo Studio. You will need internet access when using this option so that you can retrieve thecontent. You should review the channel assignments on any imported props to make sure theymatch your controllers.
Prop definitions imported from this link were created by Boscoyo Studio. Light-O-Rama provides aconnection to the data in order to make our software easier to use, but is not responsible for thecontent.
WowLights Productions (online)
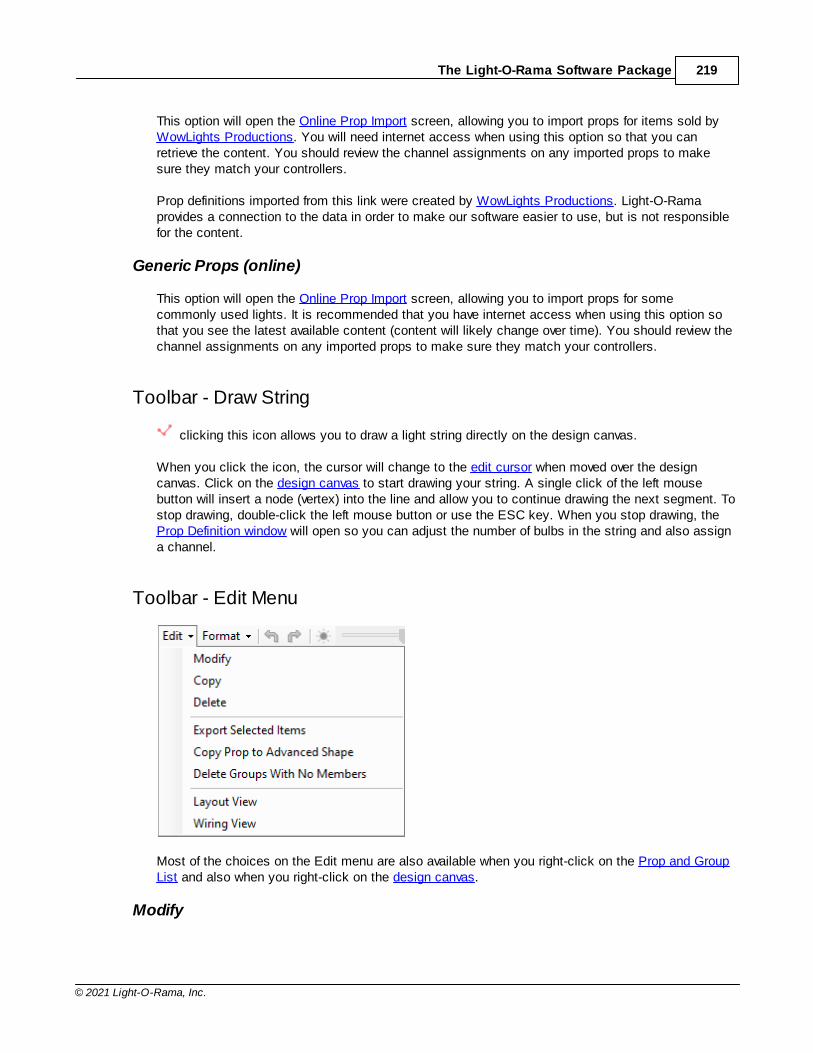
The Light-O-Rama Software Package 219
© 2021 Light-O-Rama, Inc.
This option will open the Online Prop Import screen, allowing you to import props for items sold byWowLights Productions. You will need internet access when using this option so that you canretrieve the content. You should review the channel assignments on any imported props to makesure they match your controllers.
Prop definitions imported from this link were created by WowLights Productions. Light-O-Ramaprovides a connection to the data in order to make our software easier to use, but is not responsiblefor the content.
Generic Props (online)
This option will open the Online Prop Import screen, allowing you to import props for somecommonly used lights. It is recommended that you have internet access when using this option sothat you see the latest available content (content will likely change over time). You should review thechannel assignments on any imported props to make sure they match your controllers.
Toolbar - Draw String
clicking this icon allows you to draw a light string directly on the design canvas.
When you click the icon, the cursor will change to the edit cursor when moved over the designcanvas. Click on the design canvas to start drawing your string. A single click of the left mousebutton will insert a node (vertex) into the line and allow you to continue drawing the next segment. Tostop drawing, double-click the left mouse button or use the ESC key. When you stop drawing, theProp Definition window will open so you can adjust the number of bulbs in the string and also assigna channel.
Toolbar - Edit Menu
Most of the choices on the Edit menu are also available when you right-click on the Prop and GroupList and also when you right-click on the design canvas.
Modify
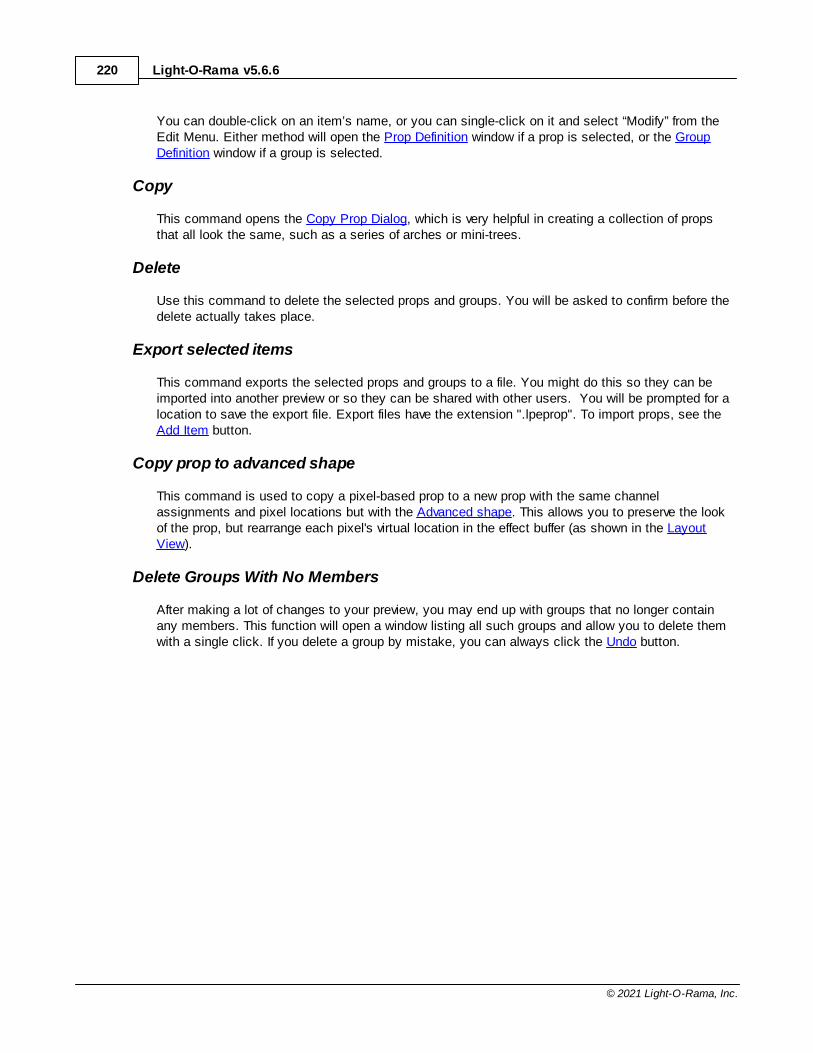
Light-O-Rama v5.6.6220
© 2021 Light-O-Rama, Inc.
You can double-click on an item’s name, or you can single-click on it and select “Modify” from theEdit Menu. Either method will open the Prop Definition window if a prop is selected, or the GroupDefinition window if a group is selected.
Copy
This command opens the Copy Prop Dialog, which is very helpful in creating a collection of propsthat all look the same, such as a series of arches or mini-trees.
Delete
Use this command to delete the selected props and groups. You will be asked to confirm before thedelete actually takes place.
Export selected items
This command exports the selected props and groups to a file. You might do this so they can beimported into another preview or so they can be shared with other users. You will be prompted for alocation to save the export file. Export files have the extension ".lpeprop". To import props, see theAdd Item button.
Copy prop to advanced shape
This command is used to copy a pixel-based prop to a new prop with the same channelassignments and pixel locations but with the Advanced shape. This allows you to preserve the lookof the prop, but rearrange each pixel's virtual location in the effect buffer (as shown in the LayoutView).
Delete Groups With No Members
After making a lot of changes to your preview, you may end up with groups that no longer containany members. This function will open a window listing all such groups and allow you to delete themwith a single click. If you delete a group by mistake, you can always click the Undo button.
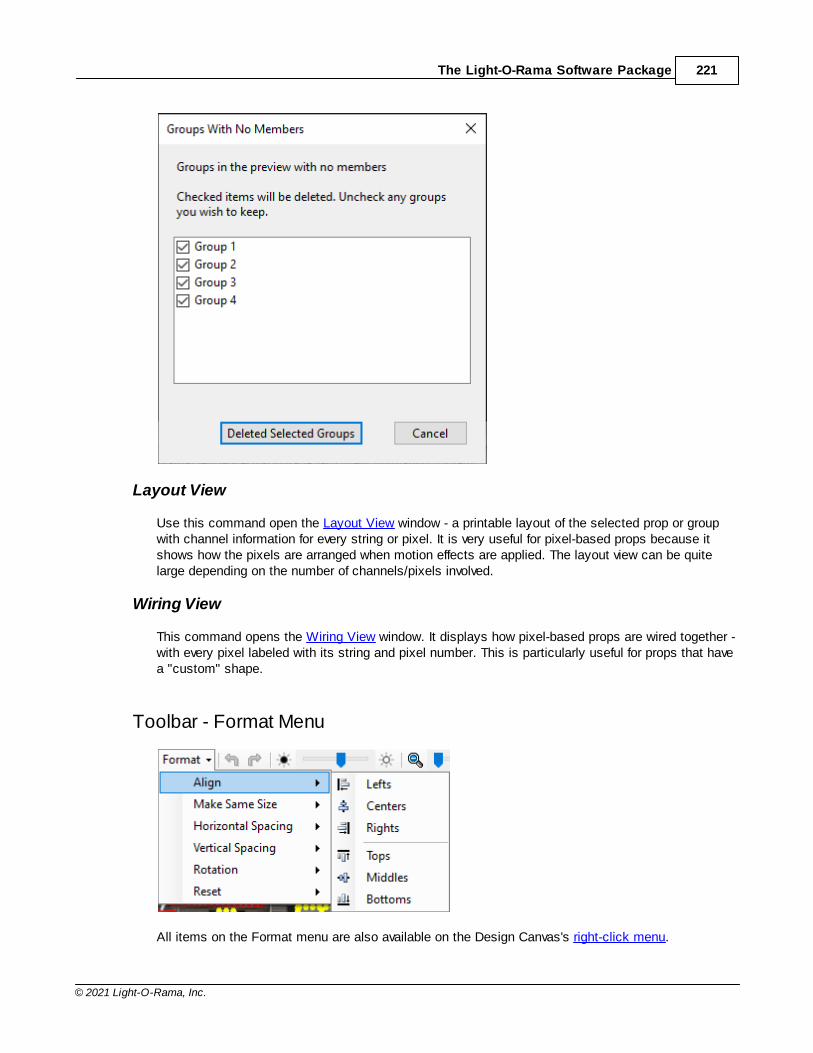
The Light-O-Rama Software Package 221
© 2021 Light-O-Rama, Inc.
Layout View
Use this command open the Layout View window - a printable layout of the selected prop or groupwith channel information for every string or pixel. It is very useful for pixel-based props because itshows how the pixels are arranged when motion effects are applied. The layout view can be quitelarge depending on the number of channels/pixels involved.
Wiring View
This command opens the Wiring View window. It displays how pixel-based props are wired together -with every pixel labeled with its string and pixel number. This is particularly useful for props that havea "custom" shape.
Toolbar - Format Menu
All items on the Format menu are also available on the Design Canvas's right-click menu.
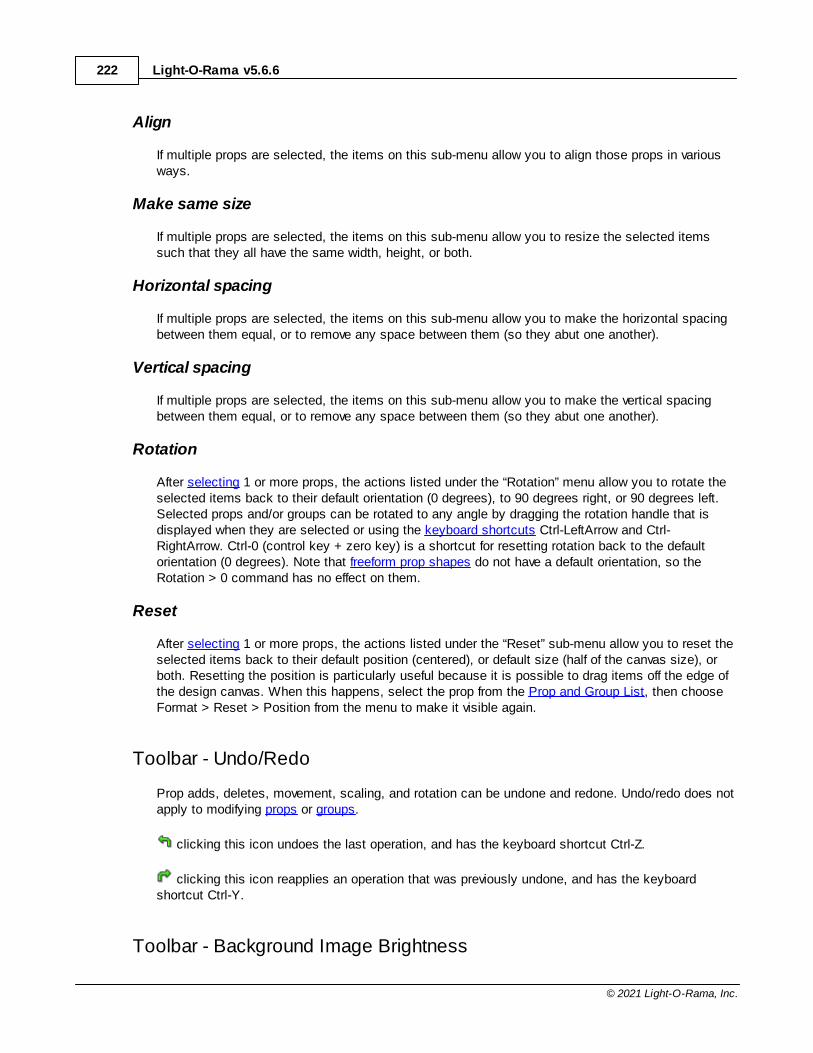
Light-O-Rama v5.6.6222
© 2021 Light-O-Rama, Inc.
Align
If multiple props are selected, the items on this sub-menu allow you to align those props in variousways.
Make same size
If multiple props are selected, the items on this sub-menu allow you to resize the selected itemssuch that they all have the same width, height, or both.
Horizontal spacing
If multiple props are selected, the items on this sub-menu allow you to make the horizontal spacingbetween them equal, or to remove any space between them (so they abut one another).
Vertical spacing
If multiple props are selected, the items on this sub-menu allow you to make the vertical spacingbetween them equal, or to remove any space between them (so they abut one another).
Rotation
After selecting 1 or more props, the actions listed under the “Rotation” menu allow you to rotate theselected items back to their default orientation (0 degrees), to 90 degrees right, or 90 degrees left.Selected props and/or groups can be rotated to any angle by dragging the rotation handle that isdisplayed when they are selected or using the keyboard shortcuts Ctrl-LeftArrow and Ctrl-RightArrow. Ctrl-0 (control key + zero key) is a shortcut for resetting rotation back to the defaultorientation (0 degrees). Note that freeform prop shapes do not have a default orientation, so theRotation > 0 command has no effect on them.
Reset
After selecting 1 or more props, the actions listed under the “Reset” sub-menu allow you to reset theselected items back to their default position (centered), or default size (half of the canvas size), orboth. Resetting the position is particularly useful because it is possible to drag items off the edge ofthe design canvas. When this happens, select the prop from the Prop and Group List, then chooseFormat > Reset > Position from the menu to make it visible again.
Toolbar - Undo/Redo
Prop adds, deletes, movement, scaling, and rotation can be undone and redone. Undo/redo does notapply to modifying props or groups.
clicking this icon undoes the last operation, and has the keyboard shortcut Ctrl-Z.
clicking this icon reapplies an operation that was previously undone, and has the keyboardshortcut Ctrl-Y.
Toolbar - Background Image Brightness
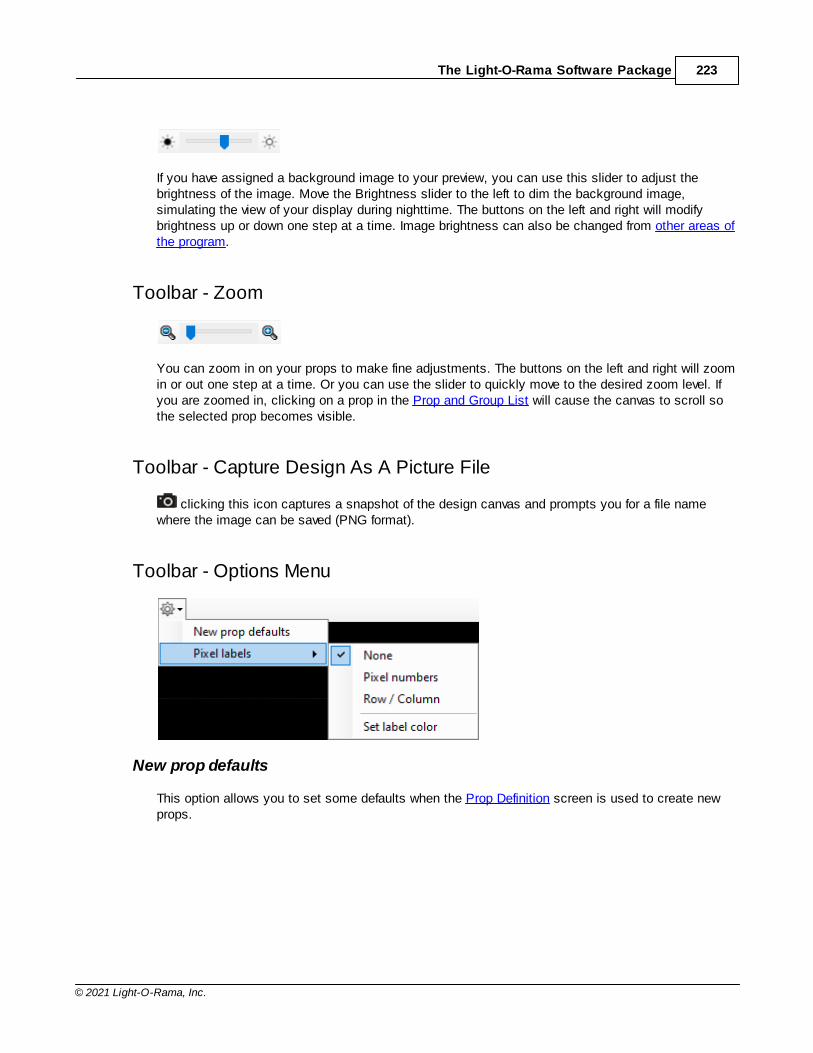
The Light-O-Rama Software Package 223
© 2021 Light-O-Rama, Inc.
If you have assigned a background image to your preview, you can use this slider to adjust thebrightness of the image. Move the Brightness slider to the left to dim the background image,simulating the view of your display during nighttime. The buttons on the left and right will modifybrightness up or down one step at a time. Image brightness can also be changed from other areas ofthe program.
Toolbar - Zoom
You can zoom in on your props to make fine adjustments. The buttons on the left and right will zoomin or out one step at a time. Or you can use the slider to quickly move to the desired zoom level. Ifyou are zoomed in, clicking on a prop in the Prop and Group List will cause the canvas to scroll sothe selected prop becomes visible.
Toolbar - Capture Design As A Picture File
clicking this icon captures a snapshot of the design canvas and prompts you for a file namewhere the image can be saved (PNG format).
Toolbar - Options Menu
New prop defaults
This option allows you to set some defaults when the Prop Definition screen is used to create newprops.
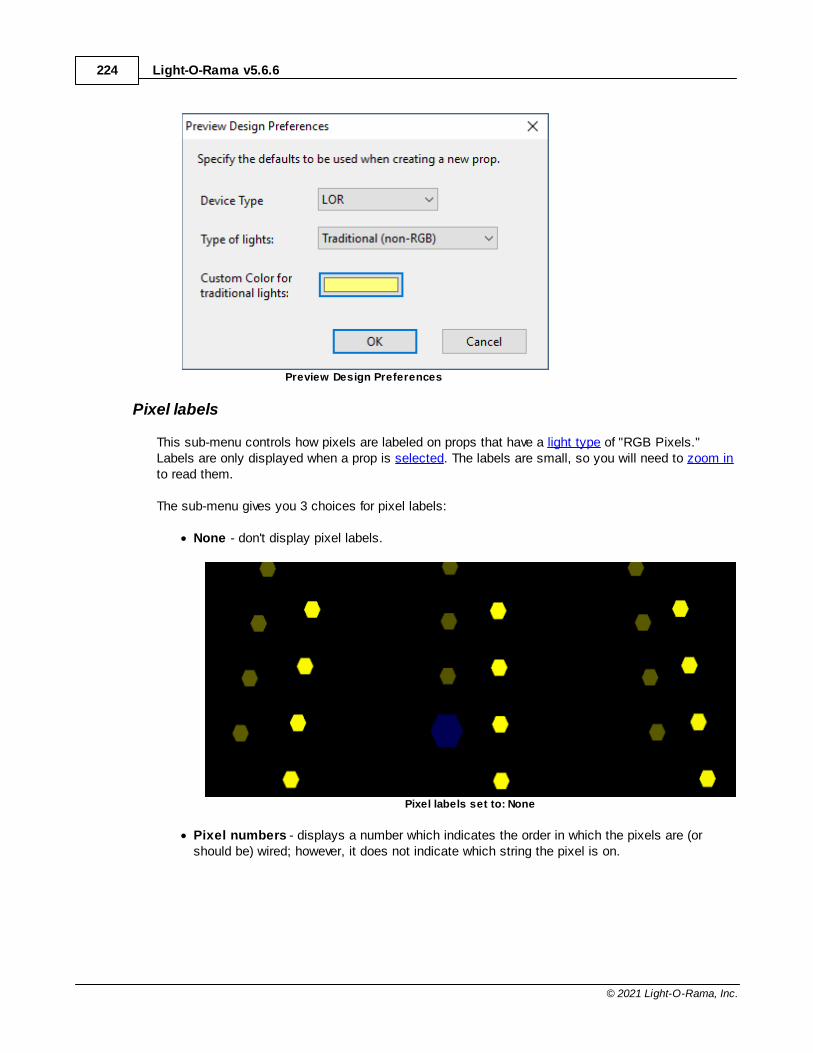
Light-O-Rama v5.6.6224
© 2021 Light-O-Rama, Inc.
Preview Design Preferences
Pixel labels
This sub-menu controls how pixels are labeled on props that have a light type of "RGB Pixels."Labels are only displayed when a prop is selected. The labels are small, so you will need to zoom into read them.
The sub-menu gives you 3 choices for pixel labels:
· None - don't display pixel labels.
Pixel labels set to: None
· Pixel numbers - displays a number which indicates the order in which the pixels are (orshould be) wired; however, it does not indicate which string the pixel is on.
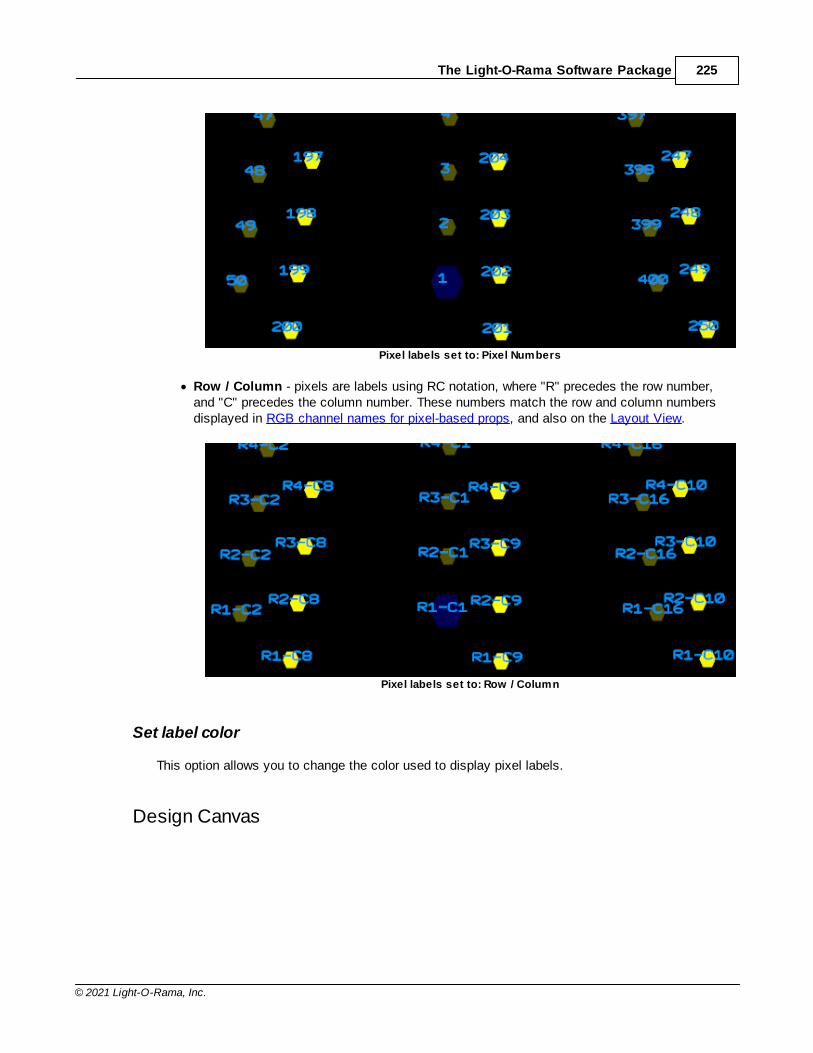
The Light-O-Rama Software Package 225
© 2021 Light-O-Rama, Inc.
Pixel labels set to: Pixel Numbers
· Row / Column - pixels are labels using RC notation, where "R" precedes the row number,and "C" precedes the column number. These numbers match the row and column numbersdisplayed in RGB channel names for pixel-based props, and also on the Layout View.
Pixel labels set to: Row / Column
Set label color
This option allows you to change the color used to display pixel labels.
Design Canvas
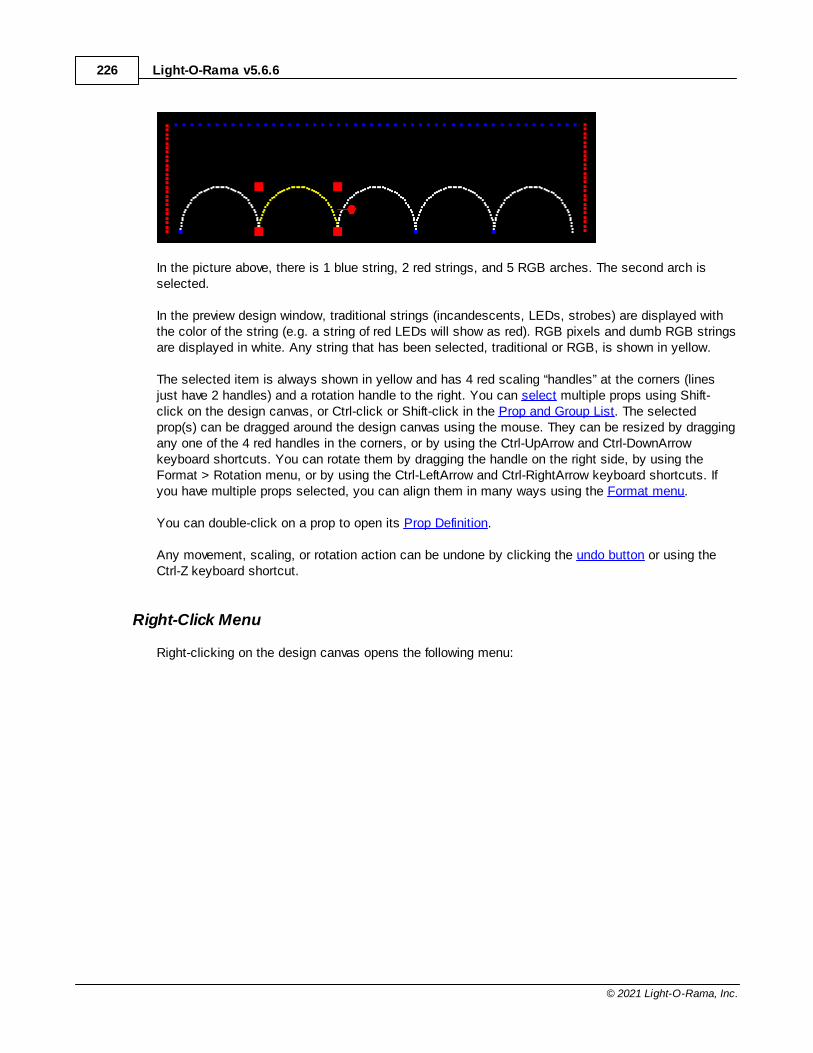
Light-O-Rama v5.6.6226
© 2021 Light-O-Rama, Inc.
In the picture above, there is 1 blue string, 2 red strings, and 5 RGB arches. The second arch isselected.
In the preview design window, traditional strings (incandescents, LEDs, strobes) are displayed withthe color of the string (e.g. a string of red LEDs will show as red). RGB pixels and dumb RGB stringsare displayed in white. Any string that has been selected, traditional or RGB, is shown in yellow.
The selected item is always shown in yellow and has 4 red scaling “handles” at the corners (linesjust have 2 handles) and a rotation handle to the right. You can select multiple props using Shift-click on the design canvas, or Ctrl-click or Shift-click in the Prop and Group List. The selectedprop(s) can be dragged around the design canvas using the mouse. They can be resized by draggingany one of the 4 red handles in the corners, or by using the Ctrl-UpArrow and Ctrl-DownArrowkeyboard shortcuts. You can rotate them by dragging the handle on the right side, by using theFormat > Rotation menu, or by using the Ctrl-LeftArrow and Ctrl-RightArrow keyboard shortcuts. Ifyou have multiple props selected, you can align them in many ways using the Format menu.
You can double-click on a prop to open its Prop Definition.
Any movement, scaling, or rotation action can be undone by clicking the undo button or using theCtrl-Z keyboard shortcut.
Right-Click Menu
Right-clicking on the design canvas opens the following menu:
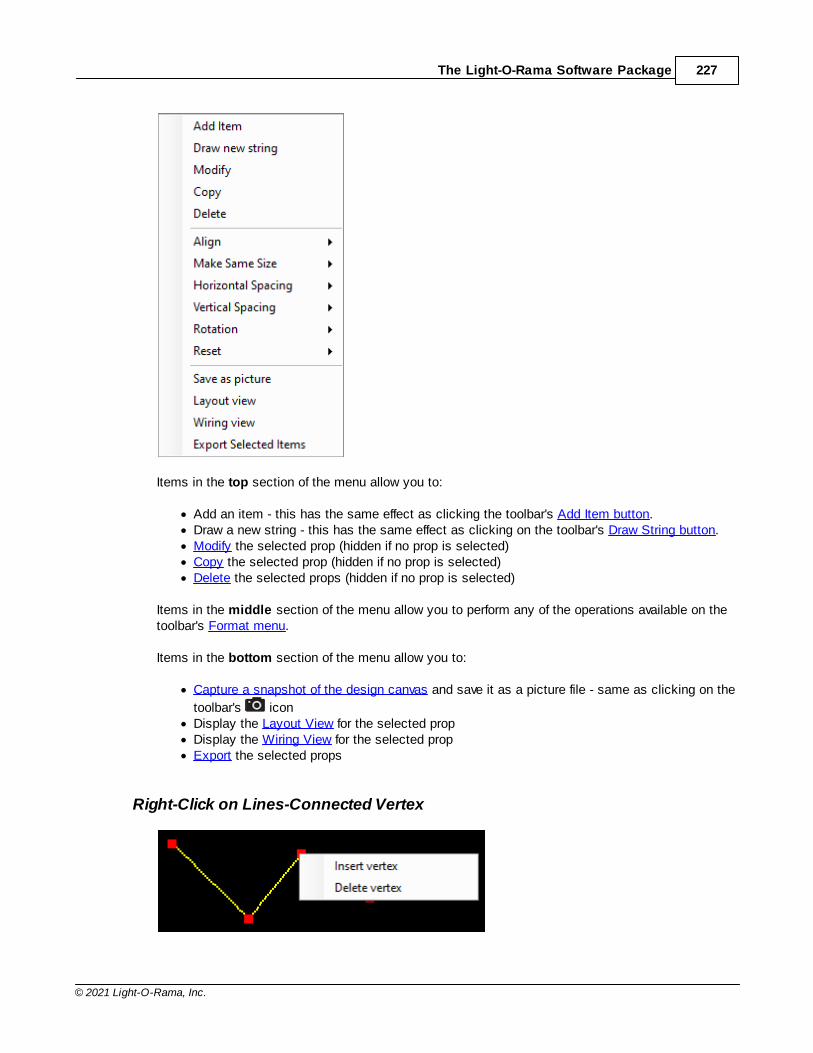
The Light-O-Rama Software Package 227
© 2021 Light-O-Rama, Inc.
Items in the top section of the menu allow you to:
· Add an item - this has the same effect as clicking the toolbar's Add Item button.· Draw a new string - this has the same effect as clicking on the toolbar's Draw String button.· Modify the selected prop (hidden if no prop is selected)· Copy the selected prop (hidden if no prop is selected)· Delete the selected props (hidden if no prop is selected)
Items in the middle section of the menu allow you to perform any of the operations available on thetoolbar's Format menu.
Items in the bottom section of the menu allow you to:
· Capture a snapshot of the design canvas and save it as a picture file - same as clicking on the
toolbar's icon· Display the Layout View for the selected prop· Display the Wiring View for the selected prop· Export the selected props
Right-Click on Lines-Connected Vertex
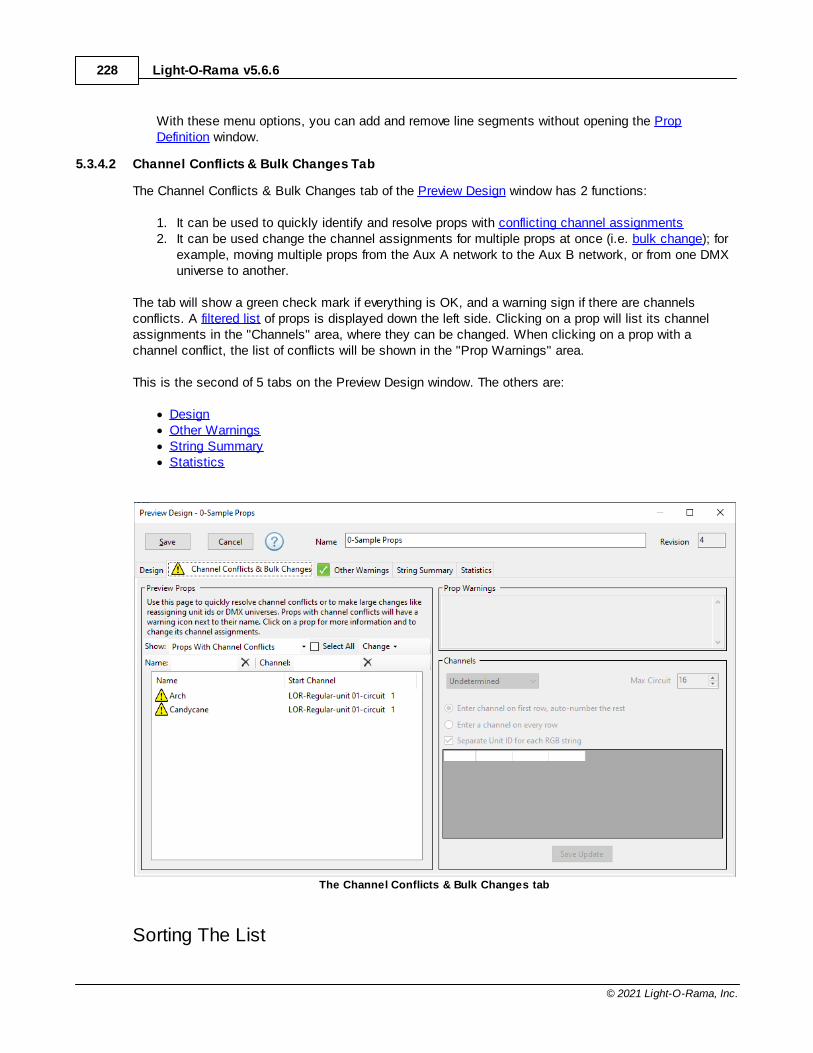
Light-O-Rama v5.6.6228
© 2021 Light-O-Rama, Inc.
With these menu options, you can add and remove line segments without opening the PropDefinition window.
5.3.4.2 Channel Conflicts & Bulk Changes Tab
The Channel Conflicts & Bulk Changes tab of the Preview Design window has 2 functions:
1. It can be used to quickly identify and resolve props with conflicting channel assignments2. It can be used change the channel assignments for multiple props at once (i.e. bulk change); for
example, moving multiple props from the Aux A network to the Aux B network, or from one DMXuniverse to another.
The tab will show a green check mark if everything is OK, and a warning sign if there are channelsconflicts. A filtered list of props is displayed down the left side. Clicking on a prop will list its channelassignments in the "Channels" area, where they can be changed. When clicking on a prop with achannel conflict, the list of conflicts will be shown in the "Prop Warnings" area.
This is the second of 5 tabs on the Preview Design window. The others are:
· Design· Other Warnings· String Summary· Statistics
The Channel Conflicts & Bulk Changes tab
Sorting The List
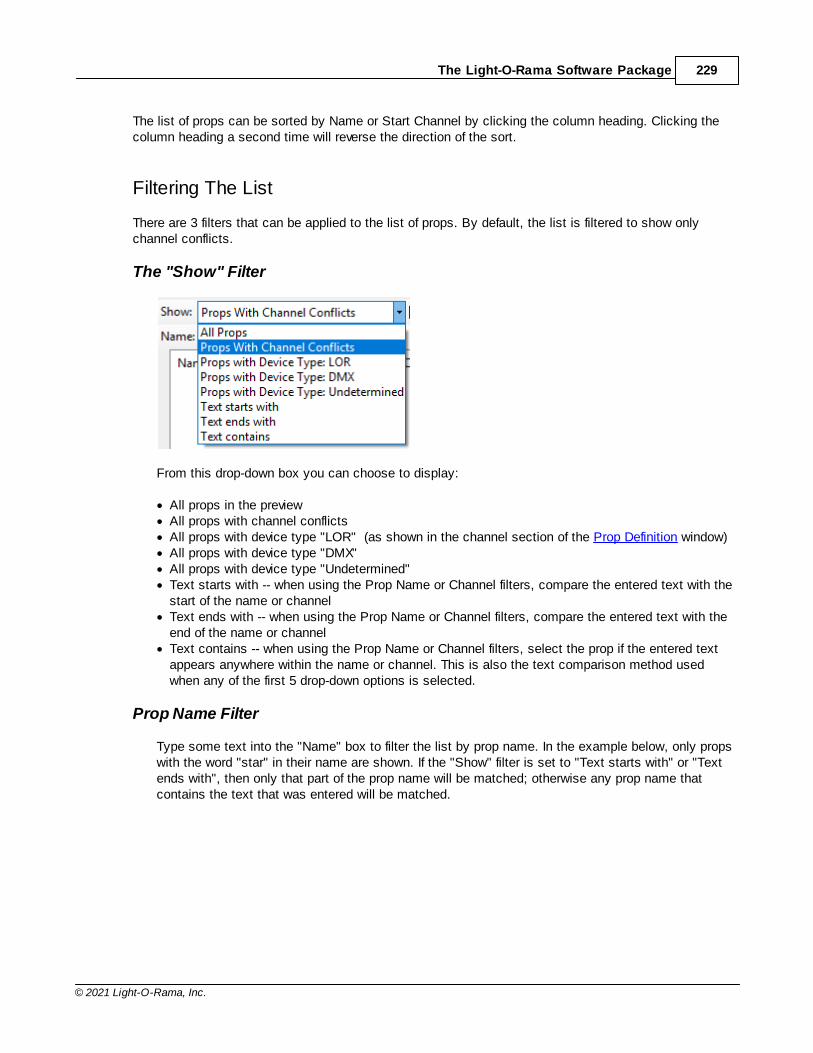
The Light-O-Rama Software Package 229
© 2021 Light-O-Rama, Inc.
The list of props can be sorted by Name or Start Channel by clicking the column heading. Clicking thecolumn heading a second time will reverse the direction of the sort.
Filtering The List
There are 3 filters that can be applied to the list of props. By default, the list is filtered to show onlychannel conflicts.
The "Show" Filter
From this drop-down box you can choose to display:
· All props in the preview· All props with channel conflicts· All props with device type "LOR" (as shown in the channel section of the Prop Definition window)· All props with device type "DMX"· All props with device type "Undetermined"· Text starts with -- when using the Prop Name or Channel filters, compare the entered text with the
start of the name or channel· Text ends with -- when using the Prop Name or Channel filters, compare the entered text with the
end of the name or channel· Text contains -- when using the Prop Name or Channel filters, select the prop if the entered text
appears anywhere within the name or channel. This is also the text comparison method usedwhen any of the first 5 drop-down options is selected.
Prop Name Filter
Type some text into the "Name" box to filter the list by prop name. In the example below, only propswith the word "star" in their name are shown. If the "Show" filter is set to "Text starts with" or "Textends with", then only that part of the prop name will be matched; otherwise any prop name thatcontains the text that was entered will be matched.
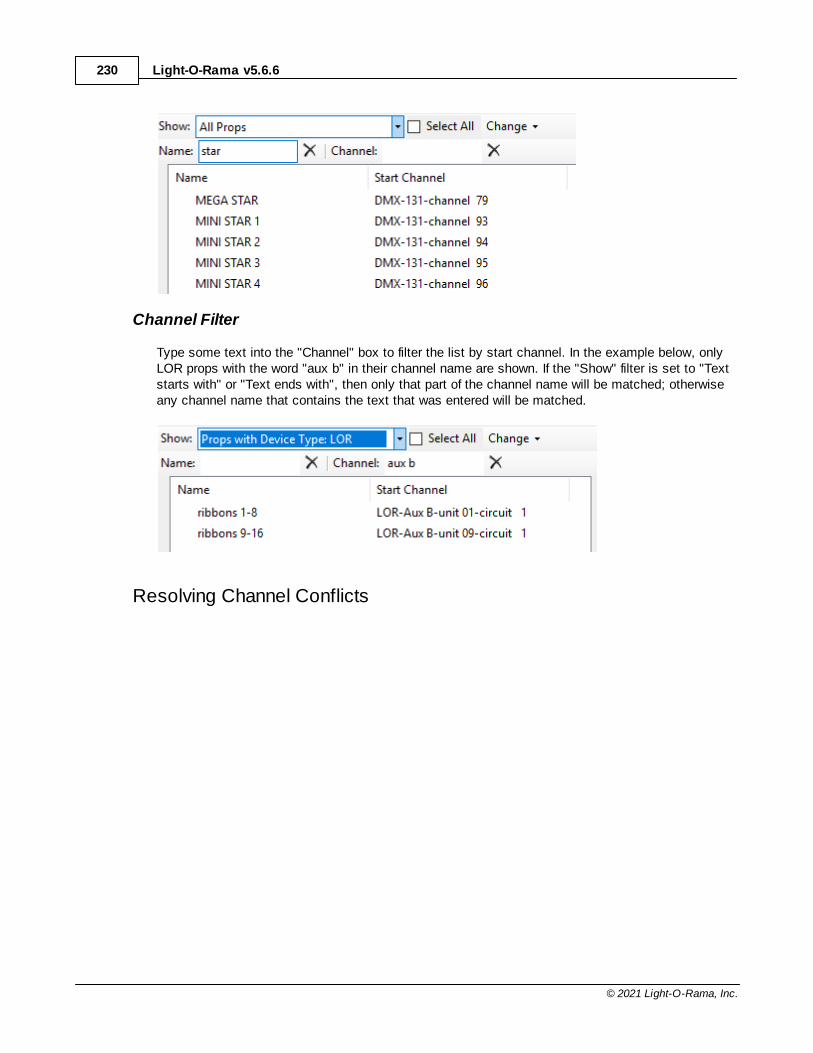
Light-O-Rama v5.6.6230
© 2021 Light-O-Rama, Inc.
Channel Filter
Type some text into the "Channel" box to filter the list by start channel. In the example below, onlyLOR props with the word "aux b" in their channel name are shown. If the "Show" filter is set to "Textstarts with" or "Text ends with", then only that part of the channel name will be matched; otherwiseany channel name that contains the text that was entered will be matched.
Resolving Channel Conflicts
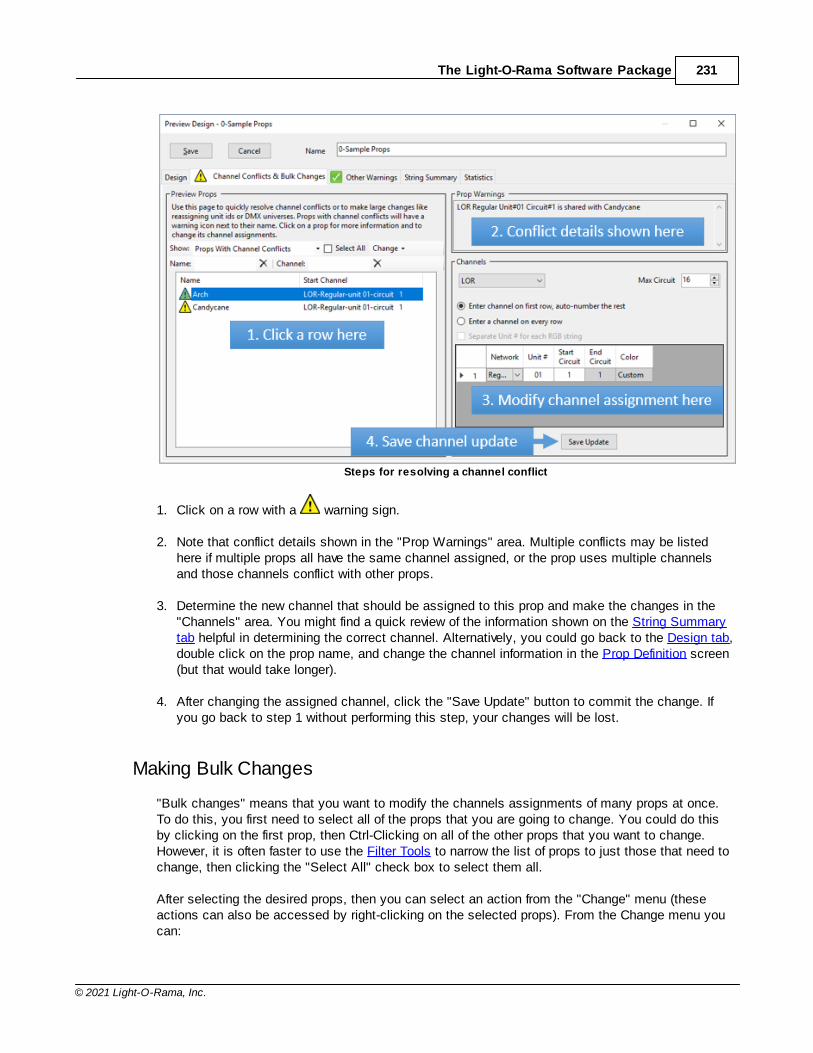
The Light-O-Rama Software Package 231
© 2021 Light-O-Rama, Inc.
Steps for resolving a channel conflict
1. Click on a row with a warning sign.
2. Note that conflict details shown in the "Prop Warnings" area. Multiple conflicts may be listedhere if multiple props all have the same channel assigned, or the prop uses multiple channelsand those channels conflict with other props.
3. Determine the new channel that should be assigned to this prop and make the changes in the"Channels" area. You might find a quick review of the information shown on the String Summarytab helpful in determining the correct channel. Alternatively, you could go back to the Design tab,double click on the prop name, and change the channel information in the Prop Definition screen(but that would take longer).
4. After changing the assigned channel, click the "Save Update" button to commit the change. Ifyou go back to step 1 without performing this step, your changes will be lost.
Making Bulk Changes
"Bulk changes" means that you want to modify the channels assignments of many props at once.To do this, you first need to select all of the props that you are going to change. You could do thisby clicking on the first prop, then Ctrl-Clicking on all of the other props that you want to change.However, it is often faster to use the Filter Tools to narrow the list of props to just those that need tochange, then clicking the "Select All" check box to select them all.
After selecting the desired props, then you can select an action from the "Change" menu (theseactions can also be accessed by right-clicking on the selected props). From the Change menu youcan:
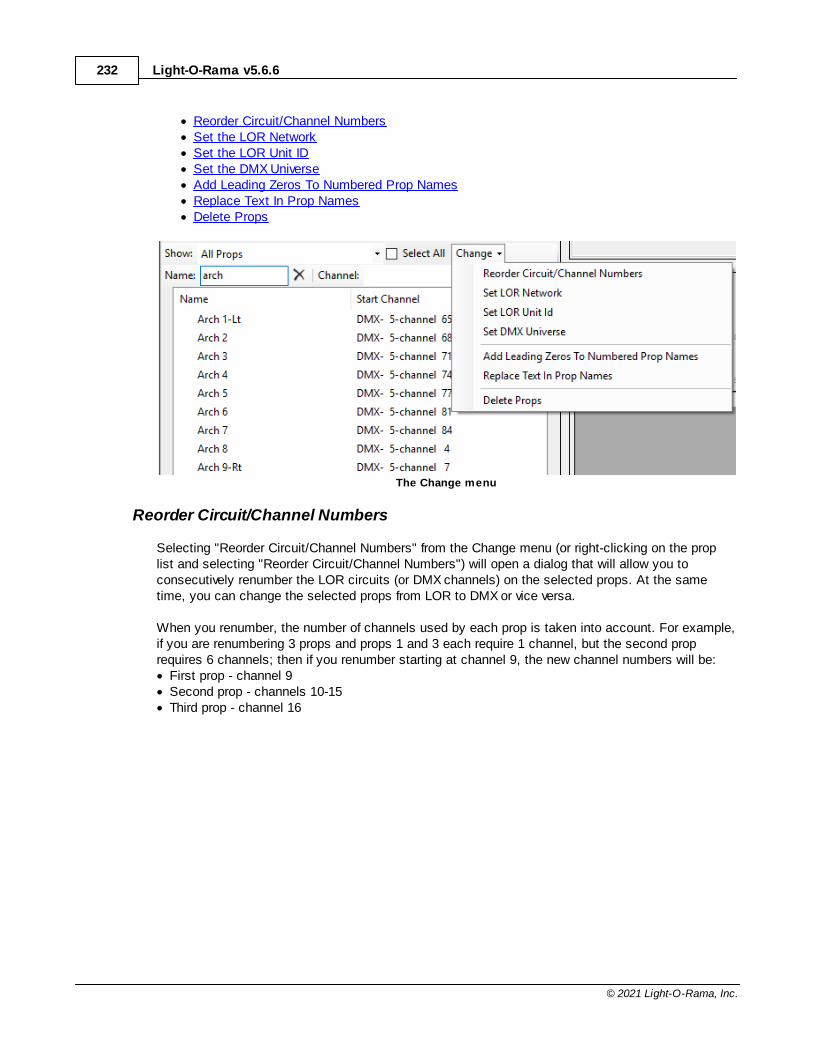
Light-O-Rama v5.6.6232
© 2021 Light-O-Rama, Inc.
· Reorder Circuit/Channel Numbers· Set the LOR Network· Set the LOR Unit ID· Set the DMX Universe· Add Leading Zeros To Numbered Prop Names· Replace Text In Prop Names· Delete Props
The Change menu
Reorder Circuit/Channel Numbers
Selecting "Reorder Circuit/Channel Numbers" from the Change menu (or right-clicking on the proplist and selecting "Reorder Circuit/Channel Numbers") will open a dialog that will allow you toconsecutively renumber the LOR circuits (or DMX channels) on the selected props. At the sametime, you can change the selected props from LOR to DMX or vice versa.
When you renumber, the number of channels used by each prop is taken into account. For example,if you are renumbering 3 props and props 1 and 3 each require 1 channel, but the second proprequires 6 channels; then if you renumber starting at channel 9, the new channel numbers will be:· First prop - channel 9· Second prop - channels 10-15· Third prop - channel 16
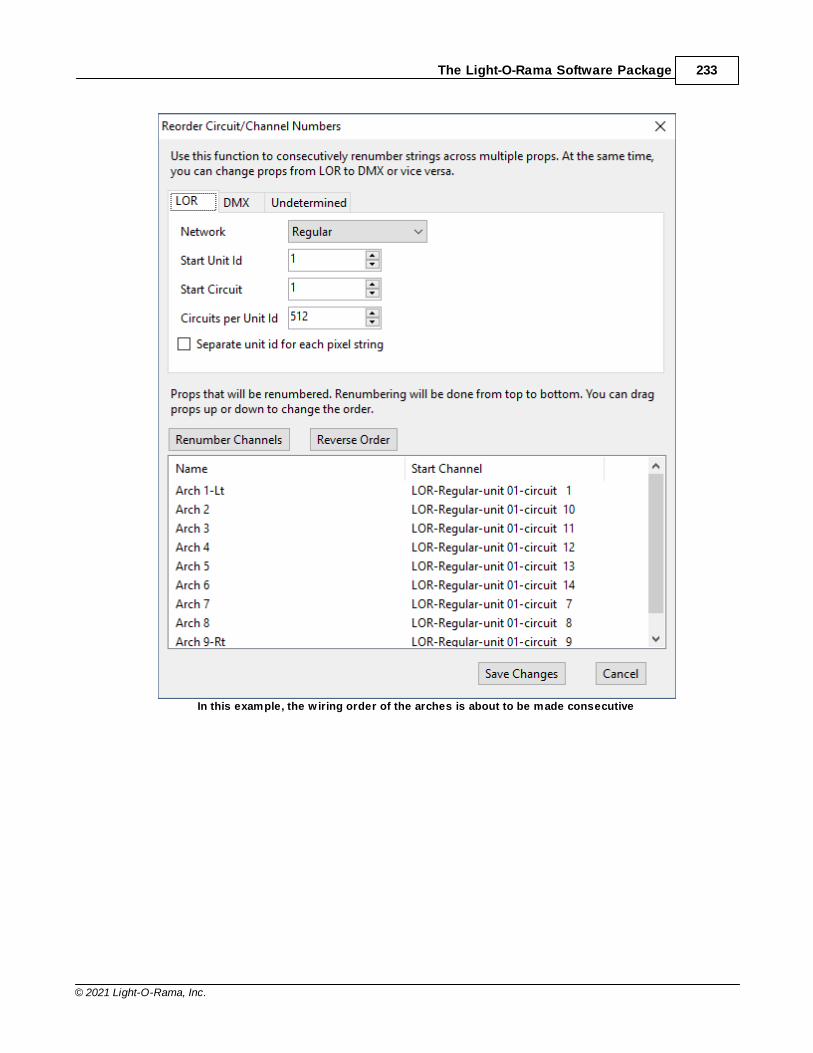
The Light-O-Rama Software Package 233
© 2021 Light-O-Rama, Inc.
In this example, the w iring order of the arches is about to be made consecutive
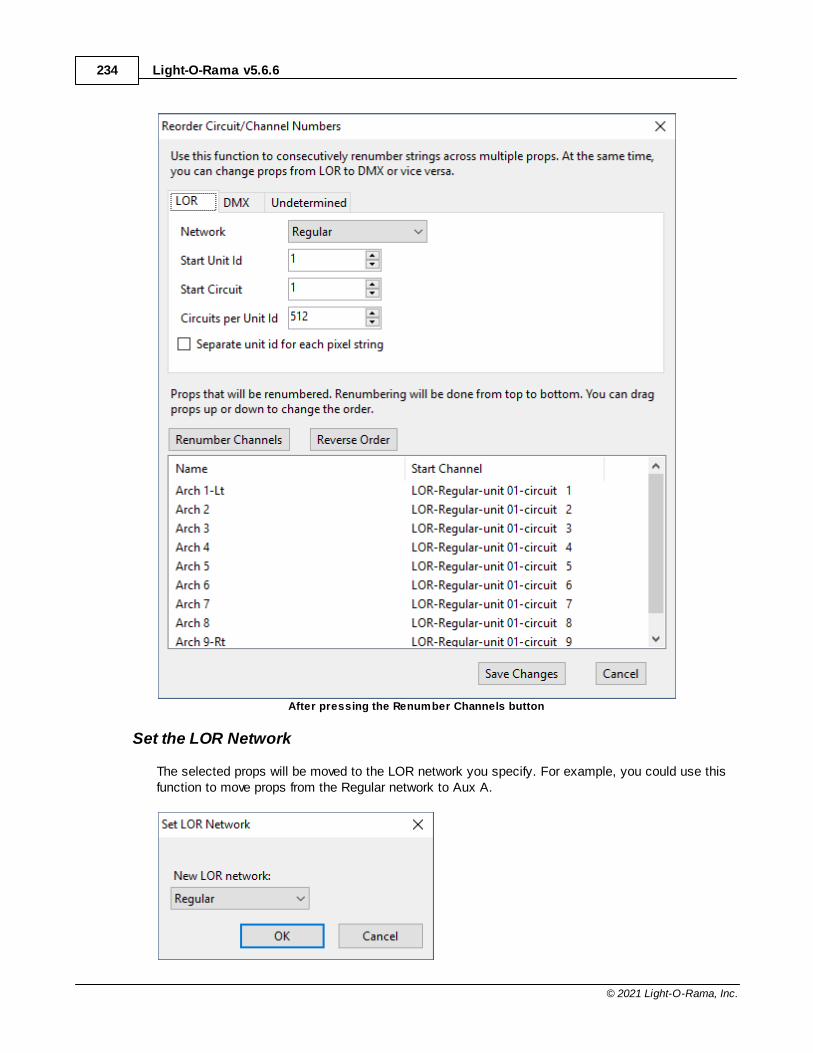
Light-O-Rama v5.6.6234
© 2021 Light-O-Rama, Inc.
After pressing the Renumber Channels button
Set the LOR Network
The selected props will be moved to the LOR network you specify. For example, you could use thisfunction to move props from the Regular network to Aux A.
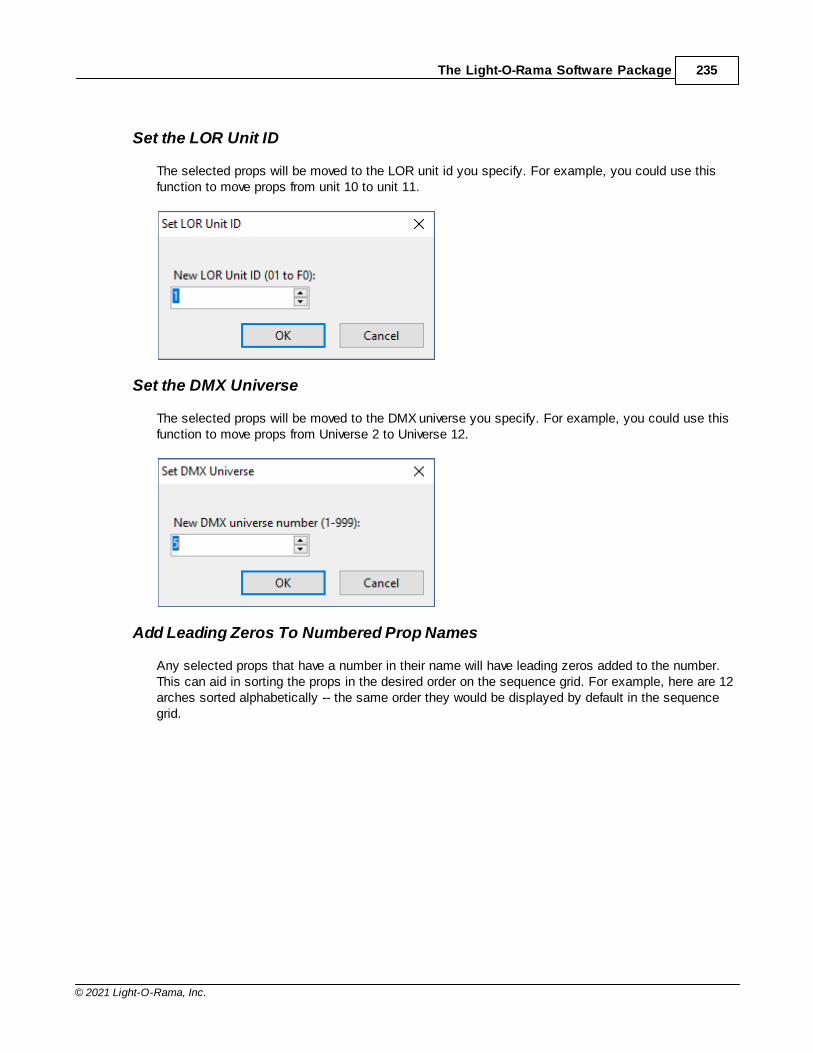
The Light-O-Rama Software Package 235
© 2021 Light-O-Rama, Inc.
Set the LOR Unit ID
The selected props will be moved to the LOR unit id you specify. For example, you could use thisfunction to move props from unit 10 to unit 11.
Set the DMX Universe
The selected props will be moved to the DMX universe you specify. For example, you could use thisfunction to move props from Universe 2 to Universe 12.
Add Leading Zeros To Numbered Prop Names
Any selected props that have a number in their name will have leading zeros added to the number.This can aid in sorting the props in the desired order on the sequence grid. For example, here are 12arches sorted alphabetically -- the same order they would be displayed by default in the sequencegrid.
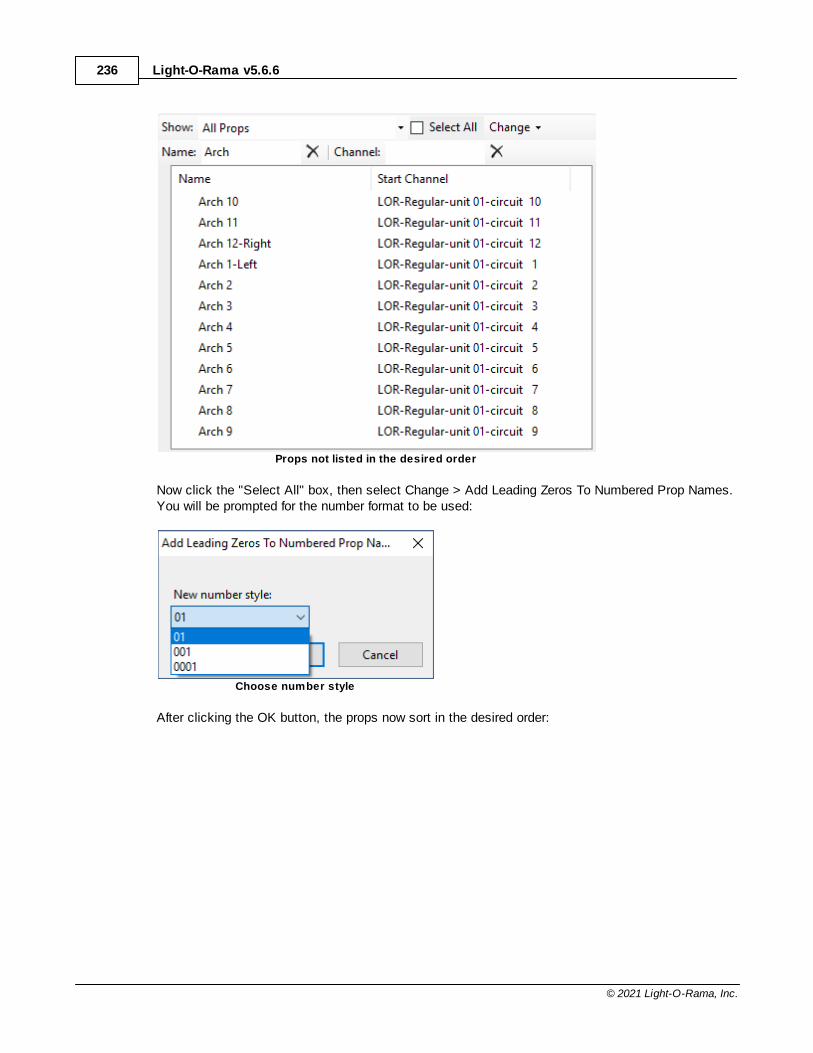
Light-O-Rama v5.6.6236
© 2021 Light-O-Rama, Inc.
Props not listed in the desired order
Now click the "Select All" box, then select Change > Add Leading Zeros To Numbered Prop Names.You will be prompted for the number format to be used:
Choose number style
After clicking the OK button, the props now sort in the desired order:
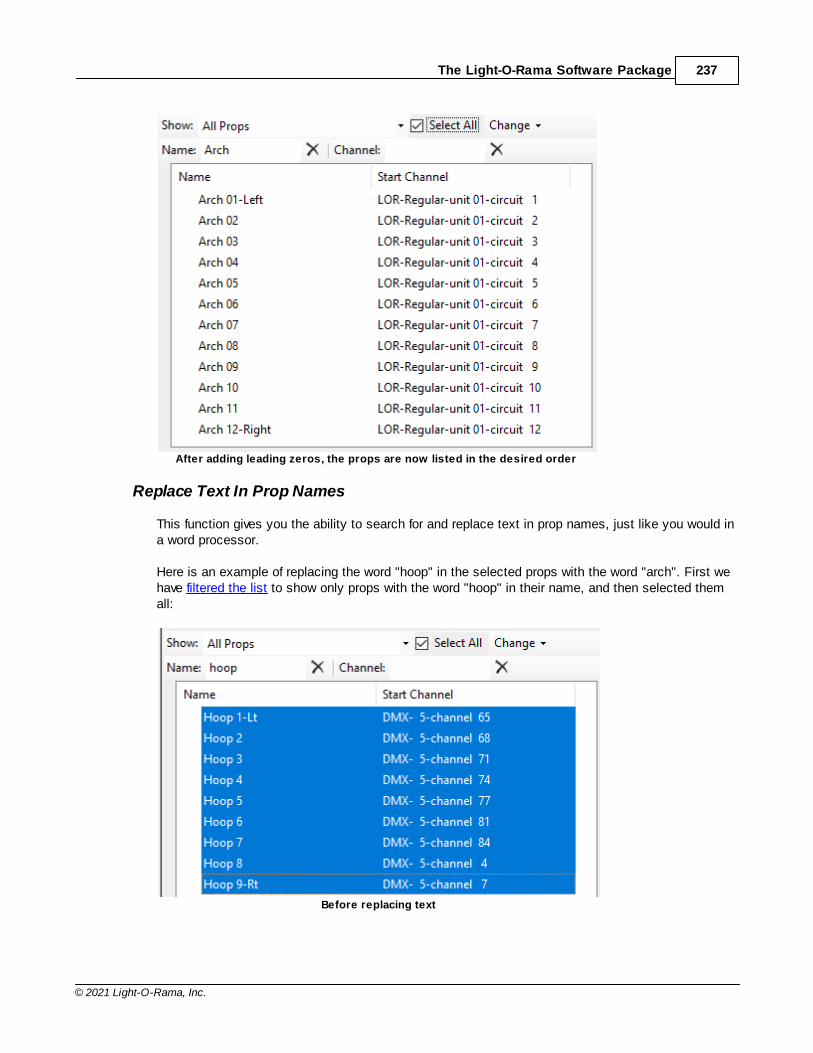
The Light-O-Rama Software Package 237
© 2021 Light-O-Rama, Inc.
After adding leading zeros, the props are now listed in the desired order
Replace Text In Prop Names
This function gives you the ability to search for and replace text in prop names, just like you would ina word processor.
Here is an example of replacing the word "hoop" in the selected props with the word "arch". First wehave filtered the list to show only props with the word "hoop" in their name, and then selected themall:
Before replacing text
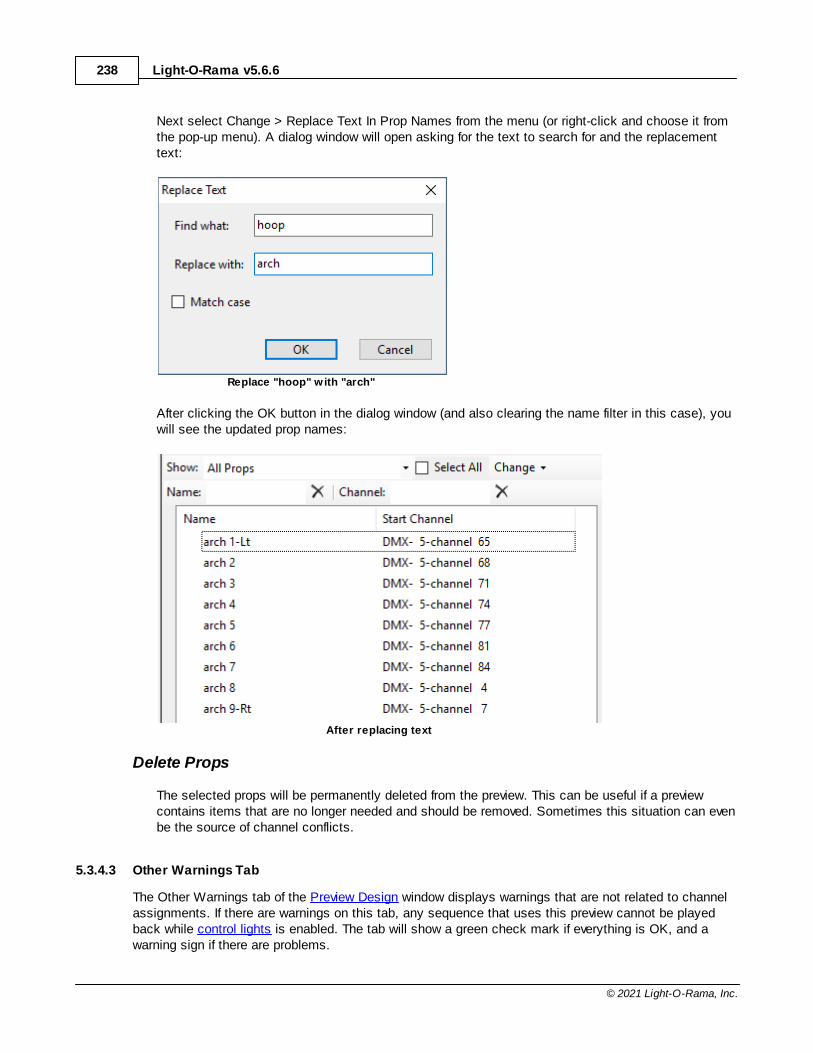
Light-O-Rama v5.6.6238
© 2021 Light-O-Rama, Inc.
Next select Change > Replace Text In Prop Names from the menu (or right-click and choose it fromthe pop-up menu). A dialog window will open asking for the text to search for and the replacementtext:
Replace "hoop" w ith "arch"
After clicking the OK button in the dialog window (and also clearing the name filter in this case), youwill see the updated prop names:
After replacing text
Delete Props
The selected props will be permanently deleted from the preview. This can be useful if a previewcontains items that are no longer needed and should be removed. Sometimes this situation can evenbe the source of channel conflicts.
5.3.4.3 Other Warnings Tab
The Other Warnings tab of the Preview Design window displays warnings that are not related to channelassignments. If there are warnings on this tab, any sequence that uses this preview cannot be playedback while control lights is enabled. The tab will show a green check mark if everything is OK, and awarning sign if there are problems.
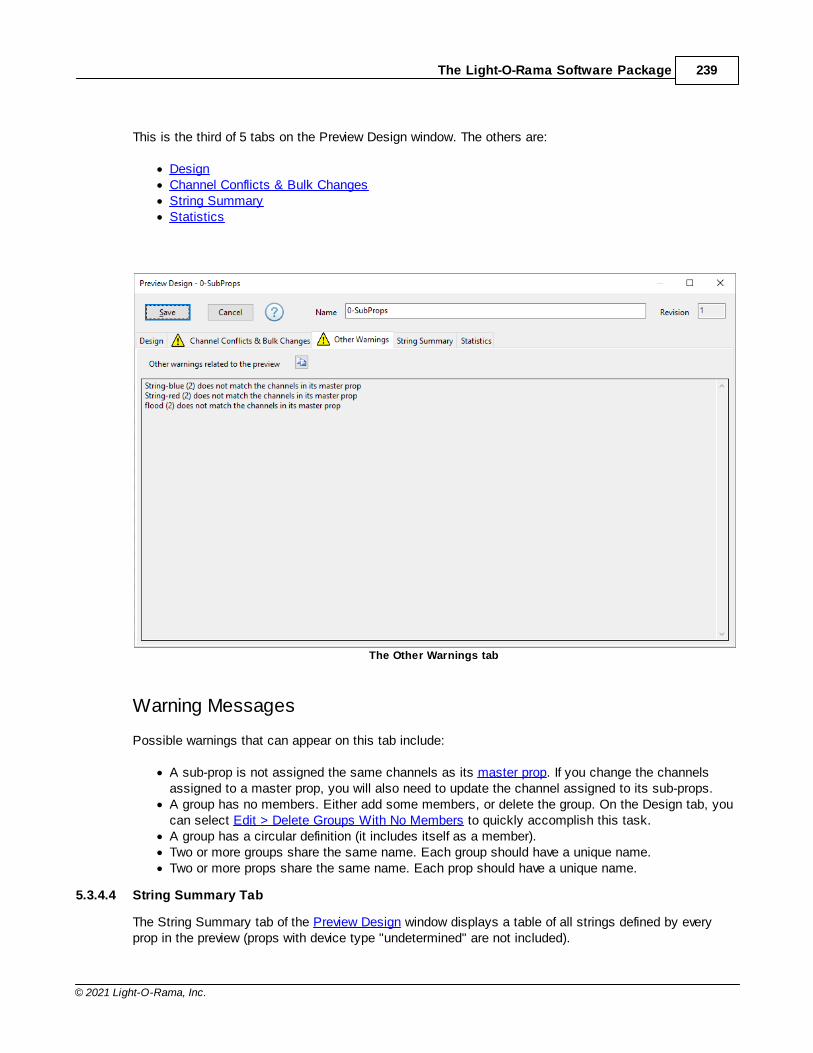
The Light-O-Rama Software Package 239
© 2021 Light-O-Rama, Inc.
This is the third of 5 tabs on the Preview Design window. The others are:
· Design· Channel Conflicts & Bulk Changes· String Summary· Statistics
The Other Warnings tab
Warning Messages
Possible warnings that can appear on this tab include:
· A sub-prop is not assigned the same channels as its master prop. If you change the channelsassigned to a master prop, you will also need to update the channel assigned to its sub-props.
· A group has no members. Either add some members, or delete the group. On the Design tab, youcan select Edit > Delete Groups With No Members to quickly accomplish this task.
· A group has a circular definition (it includes itself as a member).· Two or more groups share the same name. Each group should have a unique name.· Two or more props share the same name. Each prop should have a unique name.
5.3.4.4 String Summary Tab
The String Summary tab of the Preview Design window displays a table of all strings defined by everyprop in the preview (props with device type "undetermined" are not included).
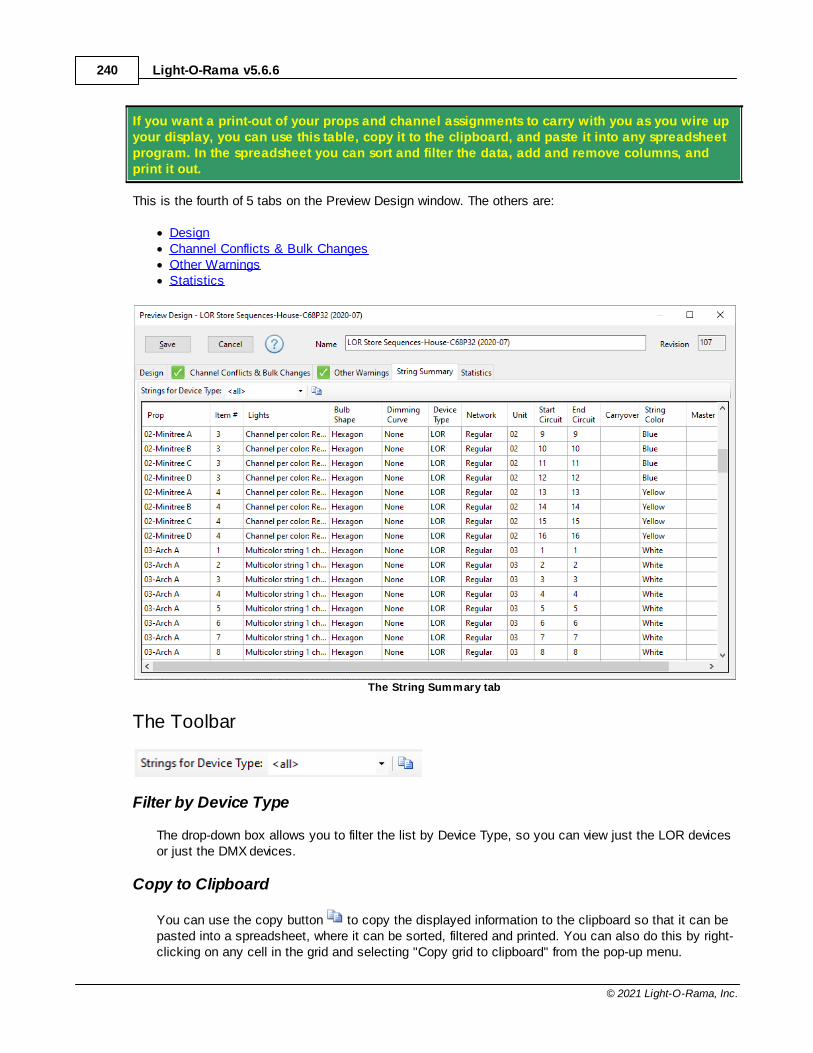
Light-O-Rama v5.6.6240
© 2021 Light-O-Rama, Inc.
If you want a print-out of your props and channel assignments to carry with you as you wire upyour display, you can use this table, copy it to the clipboard, and paste it into any spreadsheetprogram. In the spreadsheet you can sort and filter the data, add and remove columns, andprint it out.
This is the fourth of 5 tabs on the Preview Design window. The others are:
· Design· Channel Conflicts & Bulk Changes· Other Warnings· Statistics
The String Summary tab
The Toolbar
Filter by Device Type
The drop-down box allows you to filter the list by Device Type, so you can view just the LOR devicesor just the DMX devices.
Copy to Clipboard
You can use the copy button to copy the displayed information to the clipboard so that it can bepasted into a spreadsheet, where it can be sorted, filtered and printed. You can also do this by right-clicking on any cell in the grid and selecting "Copy grid to clipboard" from the pop-up menu.
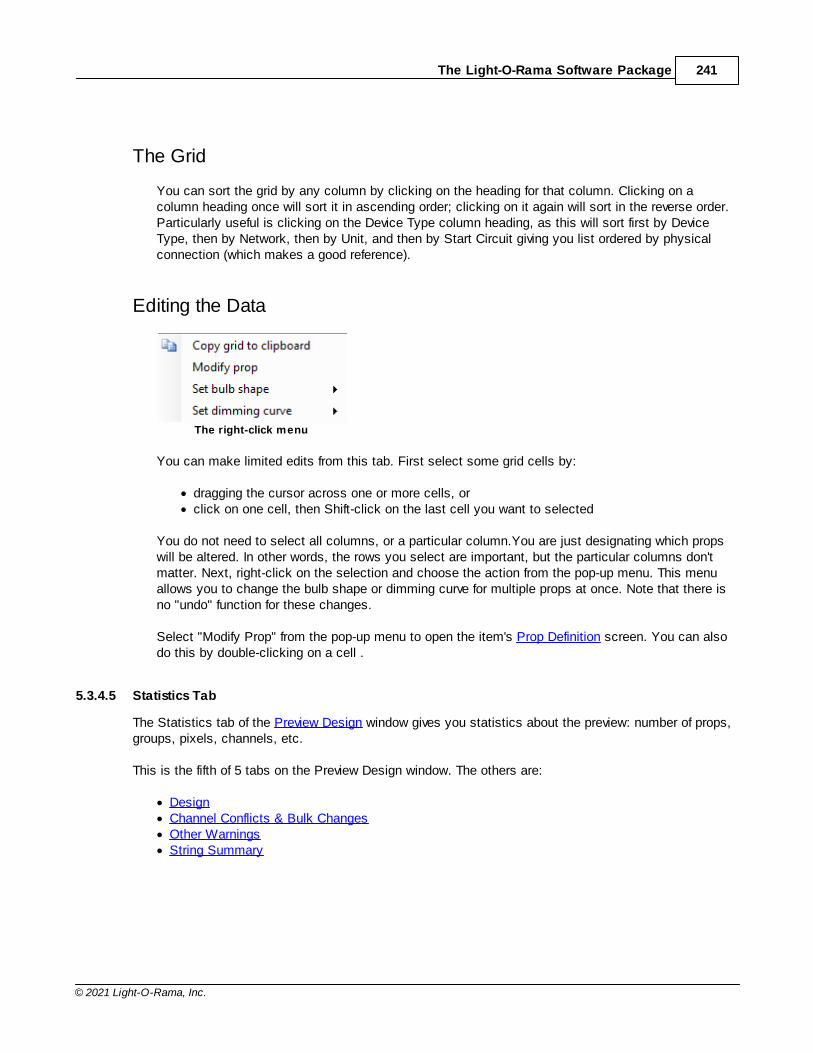
The Light-O-Rama Software Package 241
© 2021 Light-O-Rama, Inc.
The Grid
You can sort the grid by any column by clicking on the heading for that column. Clicking on acolumn heading once will sort it in ascending order; clicking on it again will sort in the reverse order.Particularly useful is clicking on the Device Type column heading, as this will sort first by DeviceType, then by Network, then by Unit, and then by Start Circuit giving you list ordered by physicalconnection (which makes a good reference).
Editing the Data
The right-click menu
You can make limited edits from this tab. First select some grid cells by:
· dragging the cursor across one or more cells, or· click on one cell, then Shift-click on the last cell you want to selected
You do not need to select all columns, or a particular column.You are just designating which propswill be altered. In other words, the rows you select are important, but the particular columns don'tmatter. Next, right-click on the selection and choose the action from the pop-up menu. This menuallows you to change the bulb shape or dimming curve for multiple props at once. Note that there isno "undo" function for these changes.
Select "Modify Prop" from the pop-up menu to open the item's Prop Definition screen. You can alsodo this by double-clicking on a cell .
5.3.4.5 Statistics Tab
The Statistics tab of the Preview Design window gives you statistics about the preview: number of props,groups, pixels, channels, etc.
This is the fifth of 5 tabs on the Preview Design window. The others are:
· Design· Channel Conflicts & Bulk Changes· Other Warnings· String Summary
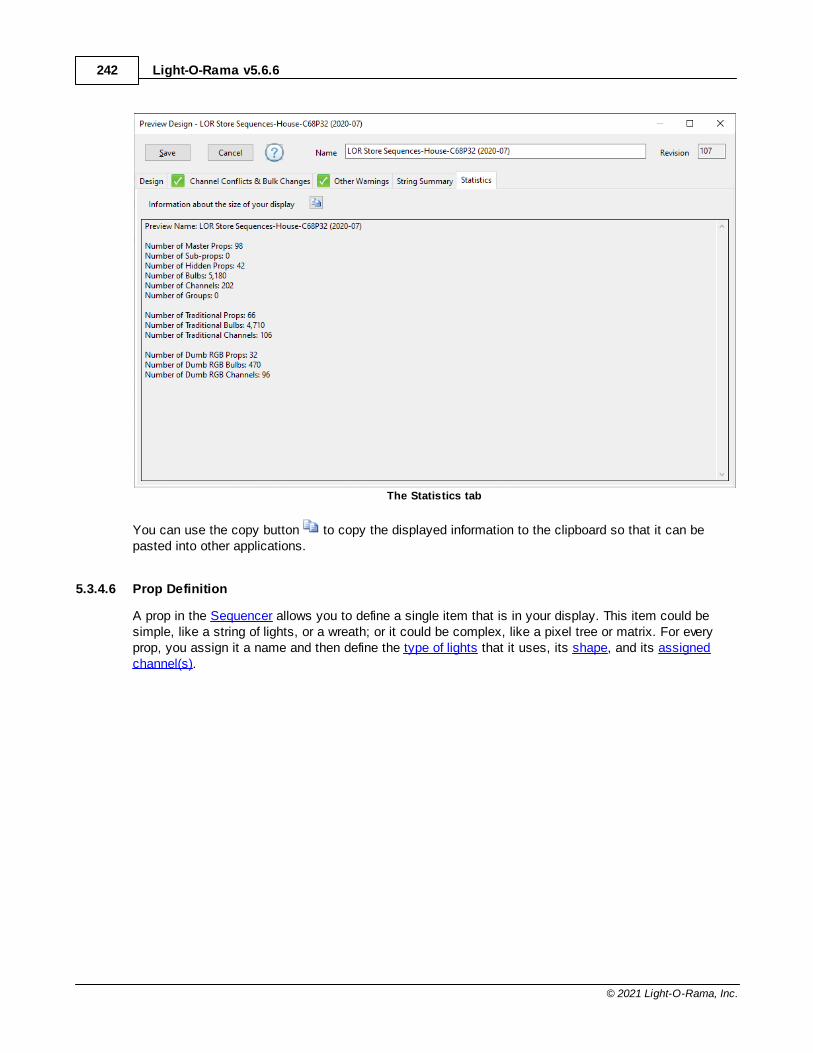
Light-O-Rama v5.6.6242
© 2021 Light-O-Rama, Inc.
The Statistics tab
You can use the copy button to copy the displayed information to the clipboard so that it can bepasted into other applications.
5.3.4.6 Prop Definition
A prop in the Sequencer allows you to define a single item that is in your display. This item could besimple, like a string of lights, or a wreath; or it could be complex, like a pixel tree or matrix. For everyprop, you assign it a name and then define the type of lights that it uses, its shape, and its assignedchannel(s).
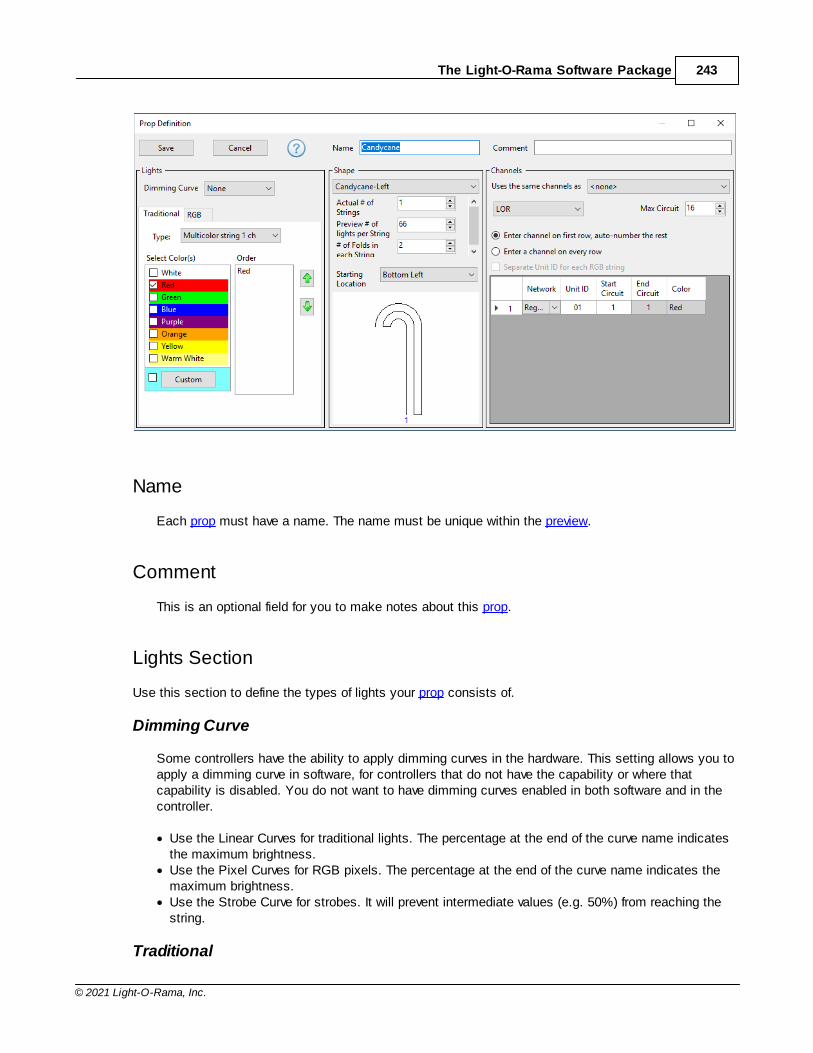
The Light-O-Rama Software Package 243
© 2021 Light-O-Rama, Inc.
Name
Each prop must have a name. The name must be unique within the preview.
Comment
This is an optional field for you to make notes about this prop.
Lights Section
Use this section to define the types of lights your prop consists of.
Dimming Curve
Some controllers have the ability to apply dimming curves in the hardware. This setting allows you toapply a dimming curve in software, for controllers that do not have the capability or where thatcapability is disabled. You do not want to have dimming curves enabled in both software and in thecontroller.
· Use the Linear Curves for traditional lights. The percentage at the end of the curve name indicatesthe maximum brightness.
· Use the Pixel Curves for RGB pixels. The percentage at the end of the curve name indicates themaximum brightness.
· Use the Strobe Curve for strobes. It will prevent intermediate values (e.g. 50%) from reaching thestring.
Traditional
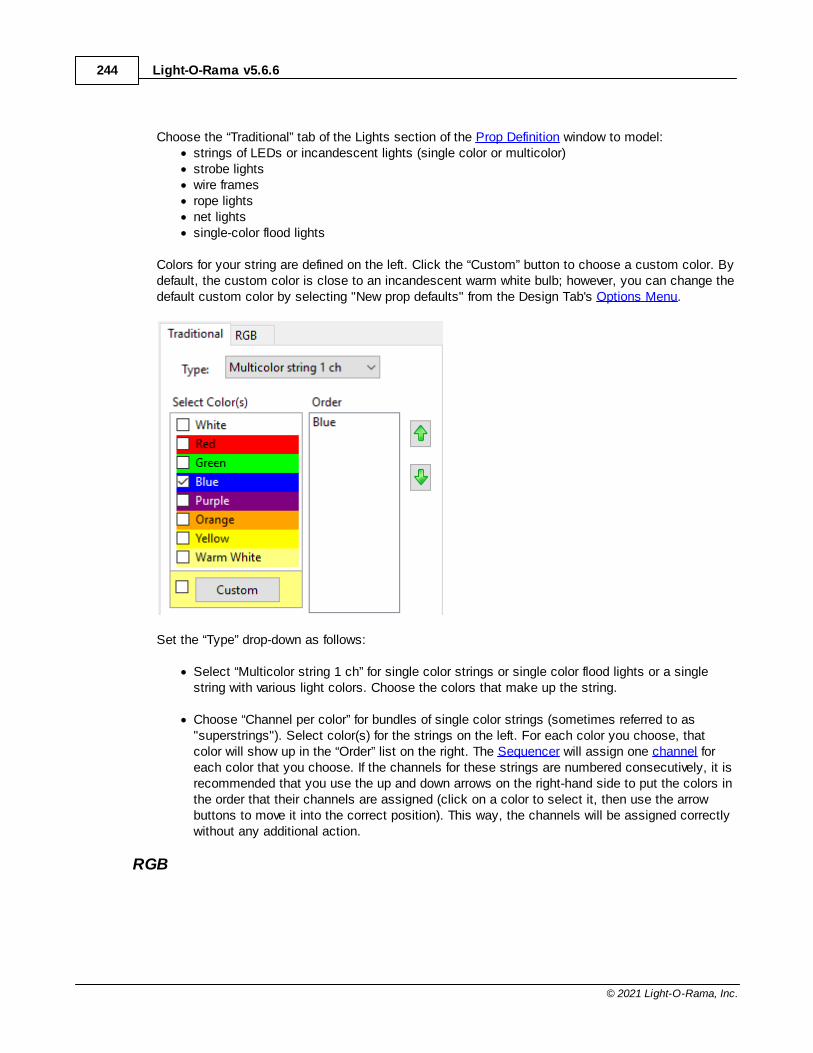
Light-O-Rama v5.6.6244
© 2021 Light-O-Rama, Inc.
Choose the “Traditional” tab of the Lights section of the Prop Definition window to model:· strings of LEDs or incandescent lights (single color or multicolor)· strobe lights· wire frames· rope lights· net lights· single-color flood lights
Colors for your string are defined on the left. Click the “Custom” button to choose a custom color. Bydefault, the custom color is close to an incandescent warm white bulb; however, you can change thedefault custom color by selecting "New prop defaults" from the Design Tab's Options Menu.
Set the “Type” drop-down as follows:
· Select “Multicolor string 1 ch” for single color strings or single color flood lights or a singlestring with various light colors. Choose the colors that make up the string.
· Choose “Channel per color” for bundles of single color strings (sometimes referred to as"superstrings"). Select color(s) for the strings on the left. For each color you choose, thatcolor will show up in the “Order” list on the right. The Sequencer will assign one channel foreach color that you choose. If the channels for these strings are numbered consecutively, it isrecommended that you use the up and down arrows on the right-hand side to put the colors inthe order that their channels are assigned (click on a color to select it, then use the arrowbuttons to move it into the correct position). This way, the channels will be assigned correctlywithout any additional action.
RGB

The Light-O-Rama Software Package 245
© 2021 Light-O-Rama, Inc.
· Choose "RGB Pixels" for Light-O-Rama Cosmic Color Devices and any other pixel-based strips,nodes, bulbs, or panels.
· Use the "Motion Effects Rows" button to define default motion effect rows that will beincorporated into new sequences (this setting has no effect on existing sequences). The numberin parentheses on the button reflects the number of default motion effect rows that have alreadybeen defined for the prop. The dialog for adding default motion rows to a prop works just thesame way as the dialog for adding motion effect rows to an existing sequence. See the MotionEffect Rows Dialog topic for more information.
· Choose "Dumb RGB (3 channel)" for display elements that have a single red, green, and bluechannel. This includes RGB floods and dumb RGB strips and nodes.
· The channel order should be set to reflect the way the red, green, and blue channels arephysically wired. If you are unsure, this may take some experimentation. This setting applies toboth RGB Pixels and Dumb RGB.
Shapes Section
Use this section to define how your prop looks on your computer screen during sequence playback.Defining the shape accurately is also very important for pixel-based props so that motion effects getdisplayed correctly.
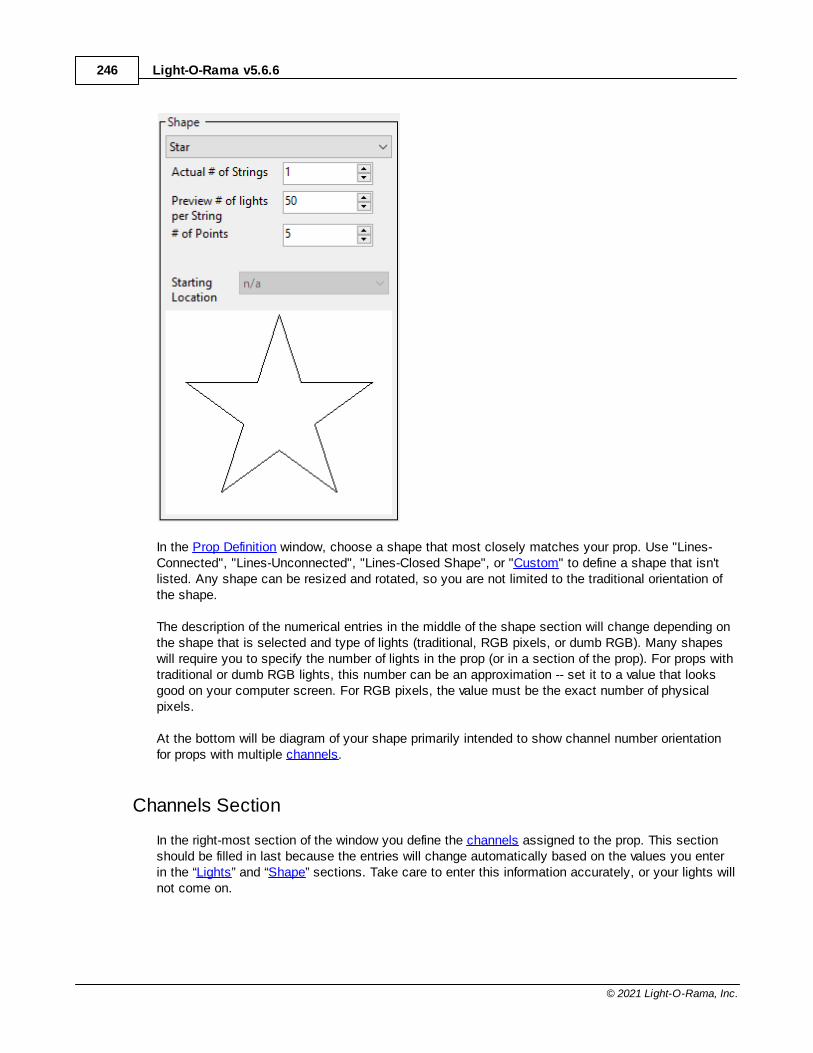
Light-O-Rama v5.6.6246
© 2021 Light-O-Rama, Inc.
In the Prop Definition window, choose a shape that most closely matches your prop. Use "Lines-Connected", "Lines-Unconnected", "Lines-Closed Shape", or "Custom" to define a shape that isn'tlisted. Any shape can be resized and rotated, so you are not limited to the traditional orientation ofthe shape.
The description of the numerical entries in the middle of the shape section will change depending onthe shape that is selected and type of lights (traditional, RGB pixels, or dumb RGB). Many shapeswill require you to specify the number of lights in the prop (or in a section of the prop). For props withtraditional or dumb RGB lights, this number can be an approximation -- set it to a value that looksgood on your computer screen. For RGB pixels, the value must be the exact number of physicalpixels.
At the bottom will be diagram of your shape primarily intended to show channel number orientationfor props with multiple channels.
Channels Section
In the right-most section of the window you define the channels assigned to the prop. This sectionshould be filled in last because the entries will change automatically based on the values you enterin the “Lights” and “Shape” sections. Take care to enter this information accurately, or your lights willnot come on.
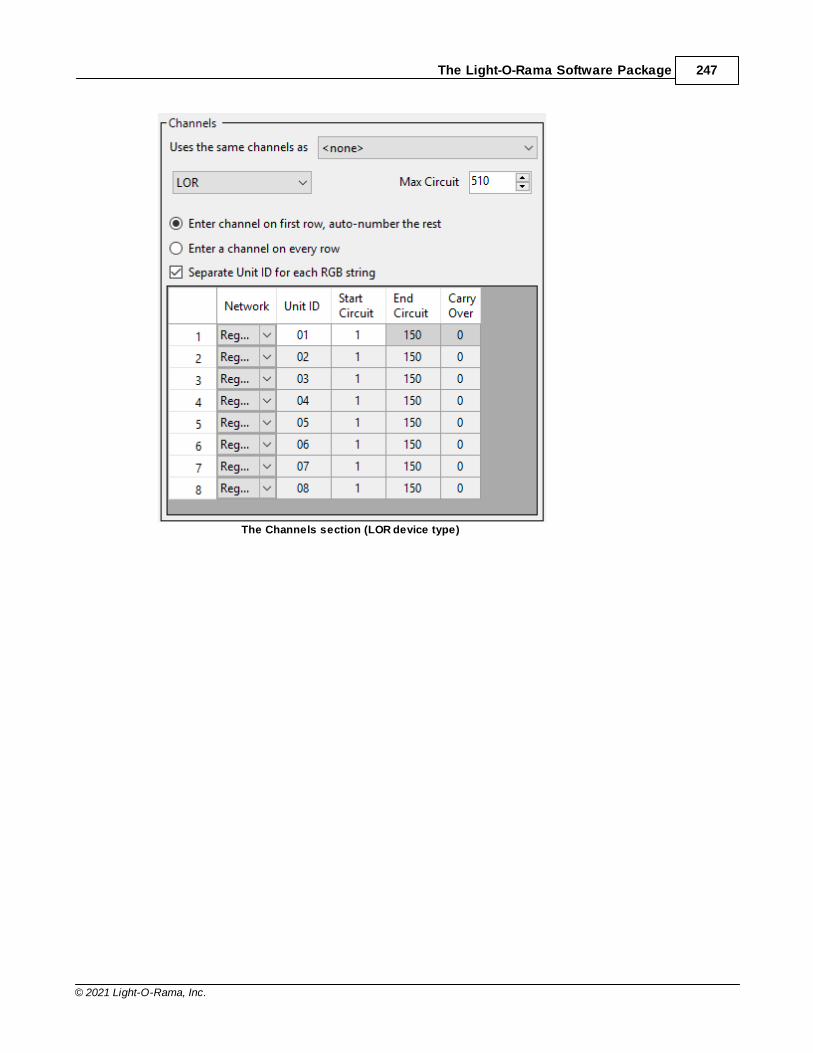
The Light-O-Rama Software Package 247
© 2021 Light-O-Rama, Inc.
The Channels section (LOR device type)
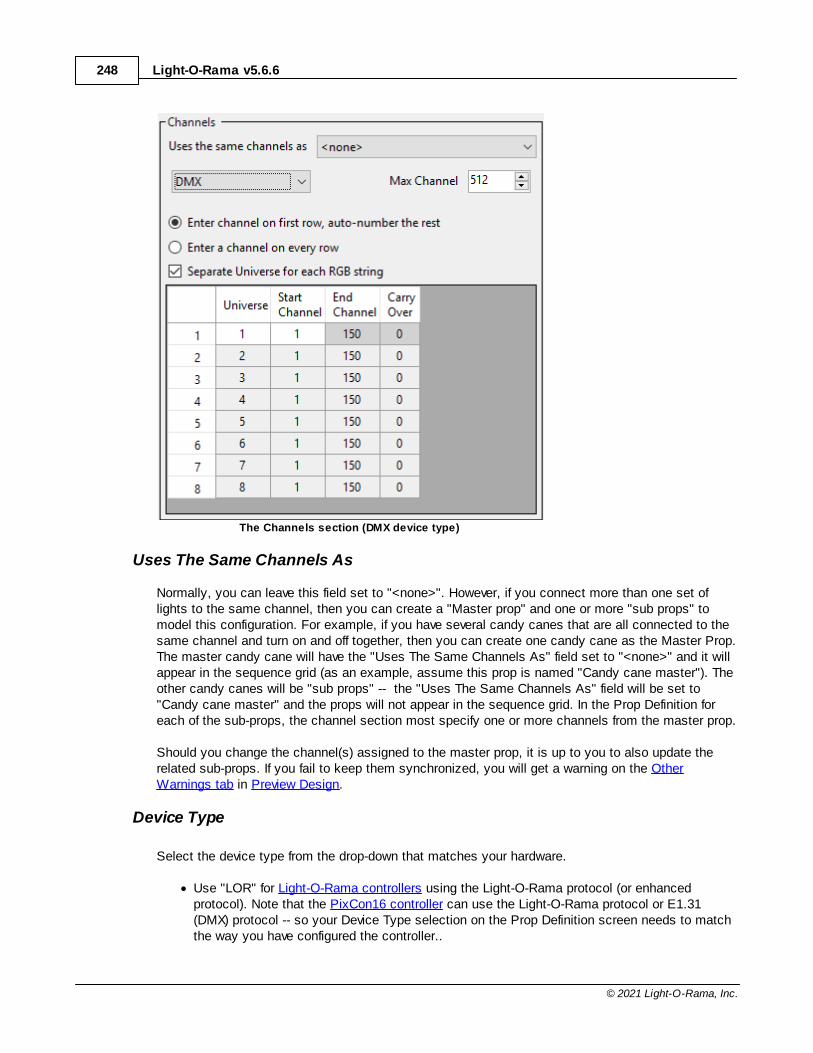
Light-O-Rama v5.6.6248
© 2021 Light-O-Rama, Inc.
The Channels section (DMX device type)
Uses The Same Channels As
Normally, you can leave this field set to "<none>". However, if you connect more than one set oflights to the same channel, then you can create a "Master prop" and one or more "sub props" tomodel this configuration. For example, if you have several candy canes that are all connected to thesame channel and turn on and off together, then you can create one candy cane as the Master Prop.The master candy cane will have the "Uses The Same Channels As" field set to "<none>" and it willappear in the sequence grid (as an example, assume this prop is named "Candy cane master"). Theother candy canes will be "sub props" -- the "Uses The Same Channels As" field will be set to"Candy cane master" and the props will not appear in the sequence grid. In the Prop Definition foreach of the sub-props, the channel section most specify one or more channels from the master prop.
Should you change the channel(s) assigned to the master prop, it is up to you to also update therelated sub-props. If you fail to keep them synchronized, you will get a warning on the OtherWarnings tab in Preview Design.
Device Type
Select the device type from the drop-down that matches your hardware.
· Use "LOR" for Light-O-Rama controllers using the Light-O-Rama protocol (or enhancedprotocol). Note that the PixCon16 controller can use the Light-O-Rama protocol or E1.31(DMX) protocol -- so your Device Type selection on the Prop Definition screen needs to matchthe way you have configured the controller..
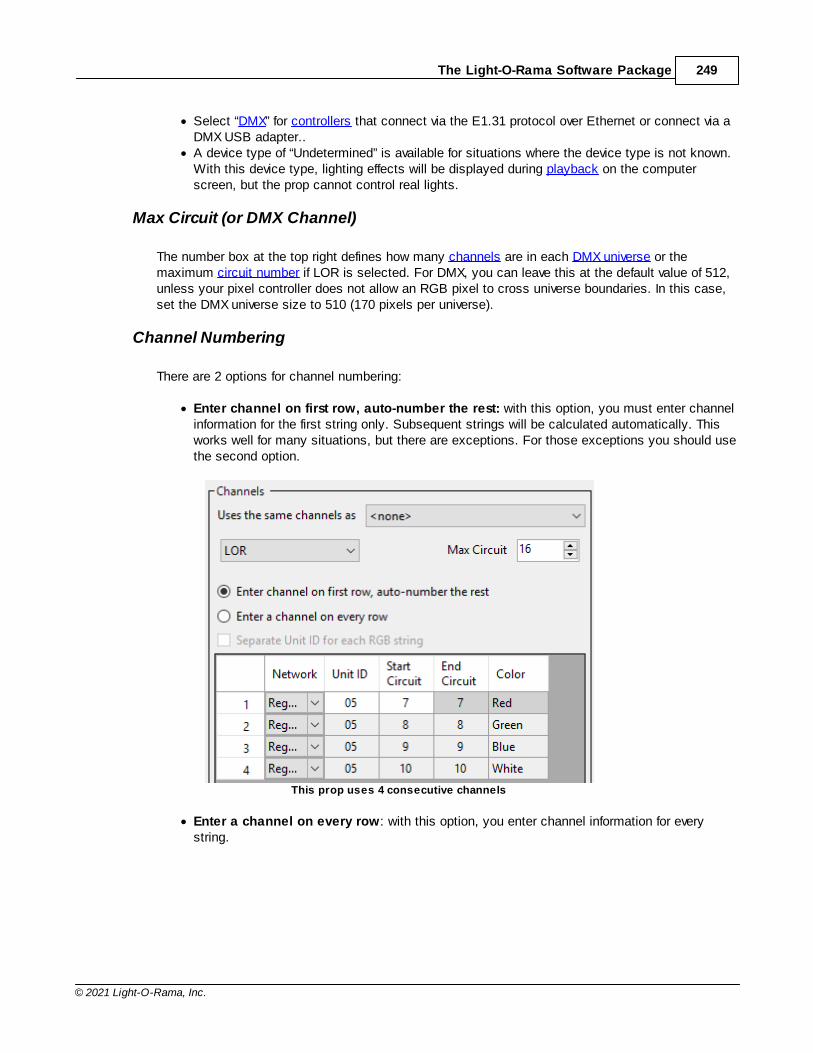
The Light-O-Rama Software Package 249
© 2021 Light-O-Rama, Inc.
· Select “DMX” for controllers that connect via the E1.31 protocol over Ethernet or connect via aDMX USB adapter..
· A device type of “Undetermined” is available for situations where the device type is not known.With this device type, lighting effects will be displayed during playback on the computerscreen, but the prop cannot control real lights.
Max Circuit (or DMX Channel)
The number box at the top right defines how many channels are in each DMX universe or themaximum circuit number if LOR is selected. For DMX, you can leave this at the default value of 512,unless your pixel controller does not allow an RGB pixel to cross universe boundaries. In this case,set the DMX universe size to 510 (170 pixels per universe).
Channel Numbering
There are 2 options for channel numbering:
· Enter channel on first row, auto-number the rest: with this option, you must enter channelinformation for the first string only. Subsequent strings will be calculated automatically. Thisworks well for many situations, but there are exceptions. For those exceptions you should usethe second option.
This prop uses 4 consecutive channels
· Enter a channel on every row: with this option, you enter channel information for everystring.
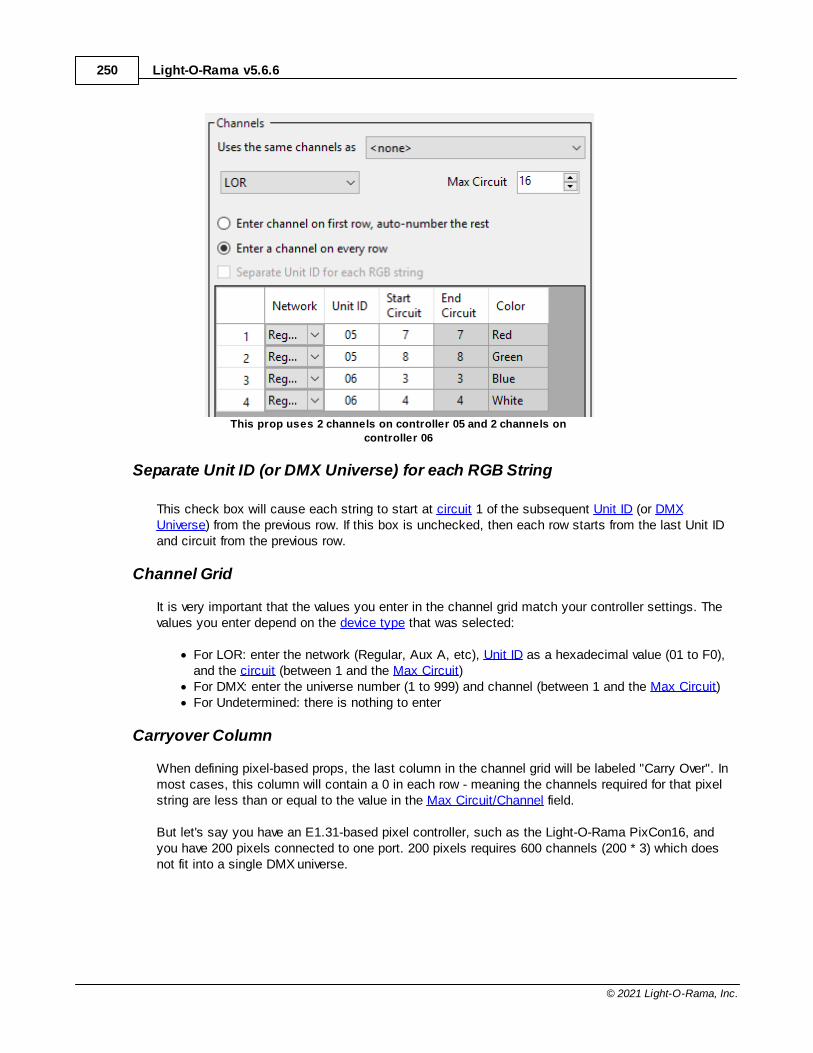
Light-O-Rama v5.6.6250
© 2021 Light-O-Rama, Inc.
This prop uses 2 channels on controller 05 and 2 channels on
controller 06
Separate Unit ID (or DMX Universe) for each RGB String
This check box will cause each string to start at circuit 1 of the subsequent Unit ID (or DMXUniverse) from the previous row. If this box is unchecked, then each row starts from the last Unit IDand circuit from the previous row.
Channel Grid
It is very important that the values you enter in the channel grid match your controller settings. Thevalues you enter depend on the device type that was selected:
· For LOR: enter the network (Regular, Aux A, etc), Unit ID as a hexadecimal value (01 to F0),and the circuit (between 1 and the Max Circuit)
· For DMX: enter the universe number (1 to 999) and channel (between 1 and the Max Circuit)· For Undetermined: there is nothing to enter
Carryover Column
When defining pixel-based props, the last column in the channel grid will be labeled "Carry Over". Inmost cases, this column will contain a 0 in each row - meaning the channels required for that pixelstring are less than or equal to the value in the Max Circuit/Channel field.
But let's say you have an E1.31-based pixel controller, such as the Light-O-Rama PixCon16, andyou have 200 pixels connected to one port. 200 pixels requires 600 channels (200 * 3) which doesnot fit into a single DMX universe.
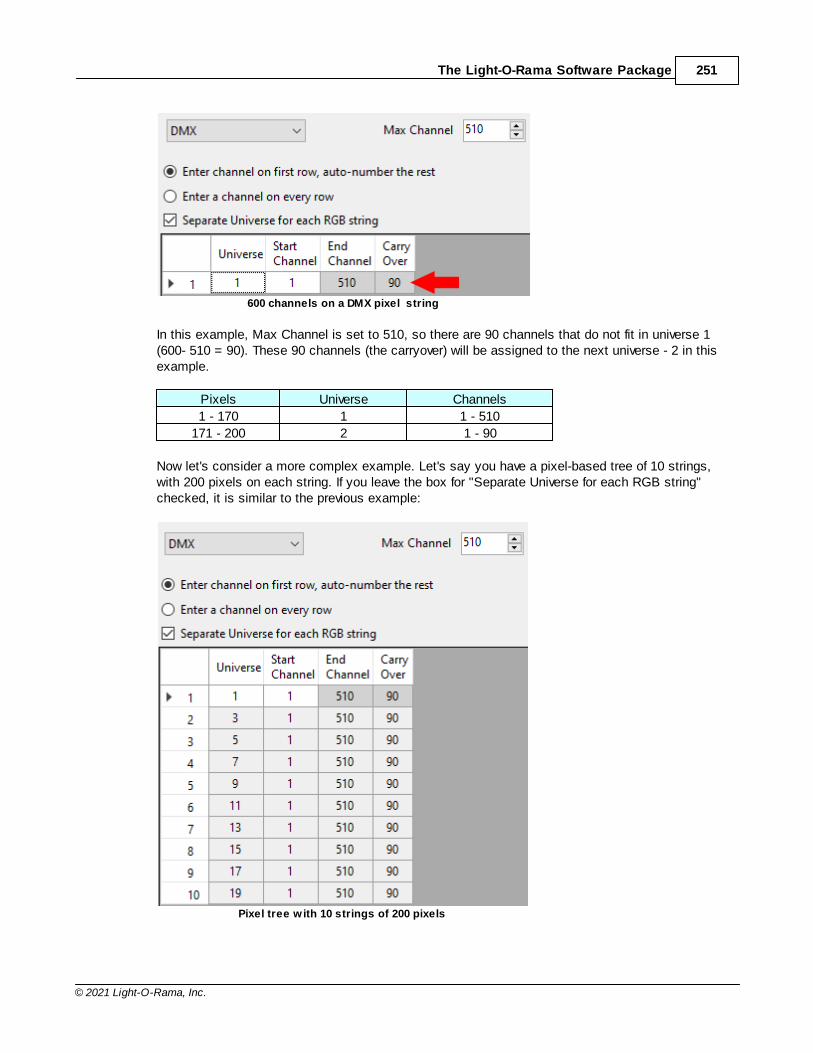
The Light-O-Rama Software Package 251
© 2021 Light-O-Rama, Inc.
600 channels on a DMX pixel string
In this example, Max Channel is set to 510, so there are 90 channels that do not fit in universe 1(600- 510 = 90). These 90 channels (the carryover) will be assigned to the next universe - 2 in thisexample.
Pixels Universe Channels
1 - 170 1 1 - 510
171 - 200 2 1 - 90
Now let's consider a more complex example. Let's say you have a pixel-based tree of 10 strings,with 200 pixels on each string. If you leave the box for "Separate Universe for each RGB string"checked, it is similar to the previous example:
Pixel tree w ith 10 strings of 200 pixels
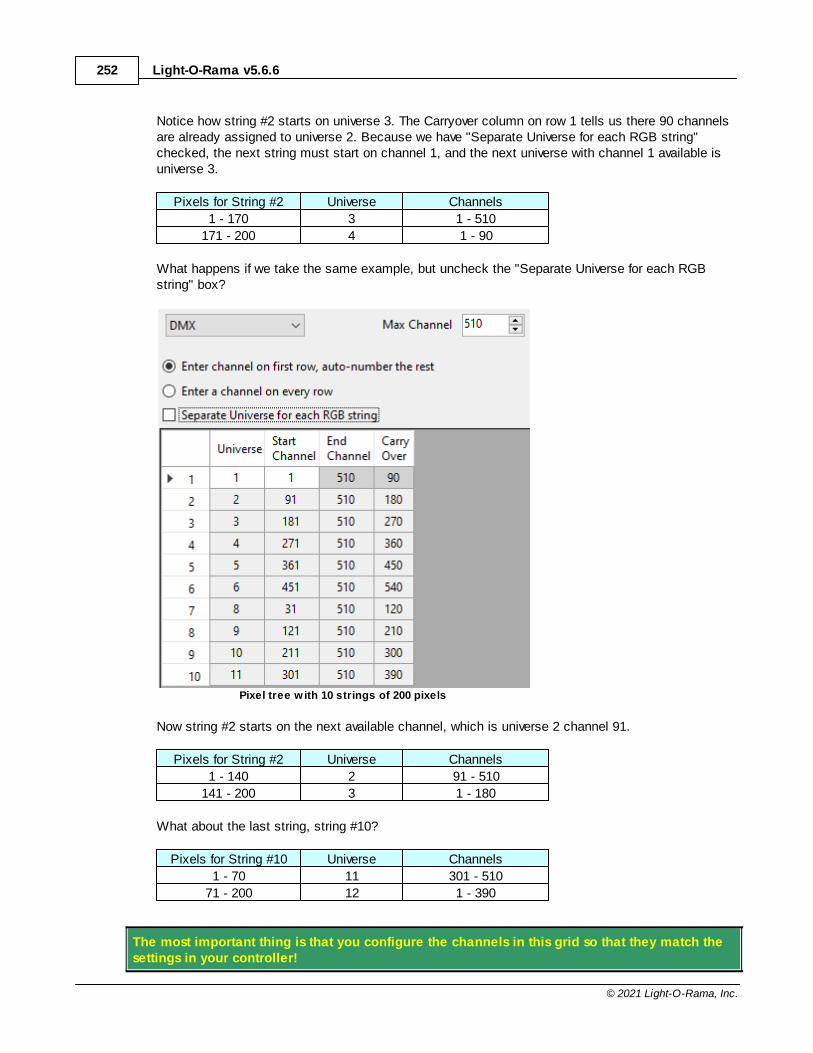
Light-O-Rama v5.6.6252
© 2021 Light-O-Rama, Inc.
Notice how string #2 starts on universe 3. The Carryover column on row 1 tells us there 90 channelsare already assigned to universe 2. Because we have "Separate Universe for each RGB string"checked, the next string must start on channel 1, and the next universe with channel 1 available isuniverse 3.
Pixels for String #2 Universe Channels
1 - 170 3 1 - 510
171 - 200 4 1 - 90
What happens if we take the same example, but uncheck the "Separate Universe for each RGBstring" box?
Pixel tree w ith 10 strings of 200 pixels
Now string #2 starts on the next available channel, which is universe 2 channel 91.
Pixels for String #2 Universe Channels
1 - 140 2 91 - 510
141 - 200 3 1 - 180
What about the last string, string #10?
Pixels for String #10 Universe Channels
1 - 70 11 301 - 510
71 - 200 12 1 - 390
The most important thing is that you configure the channels in this grid so that they match thesettings in your controller!
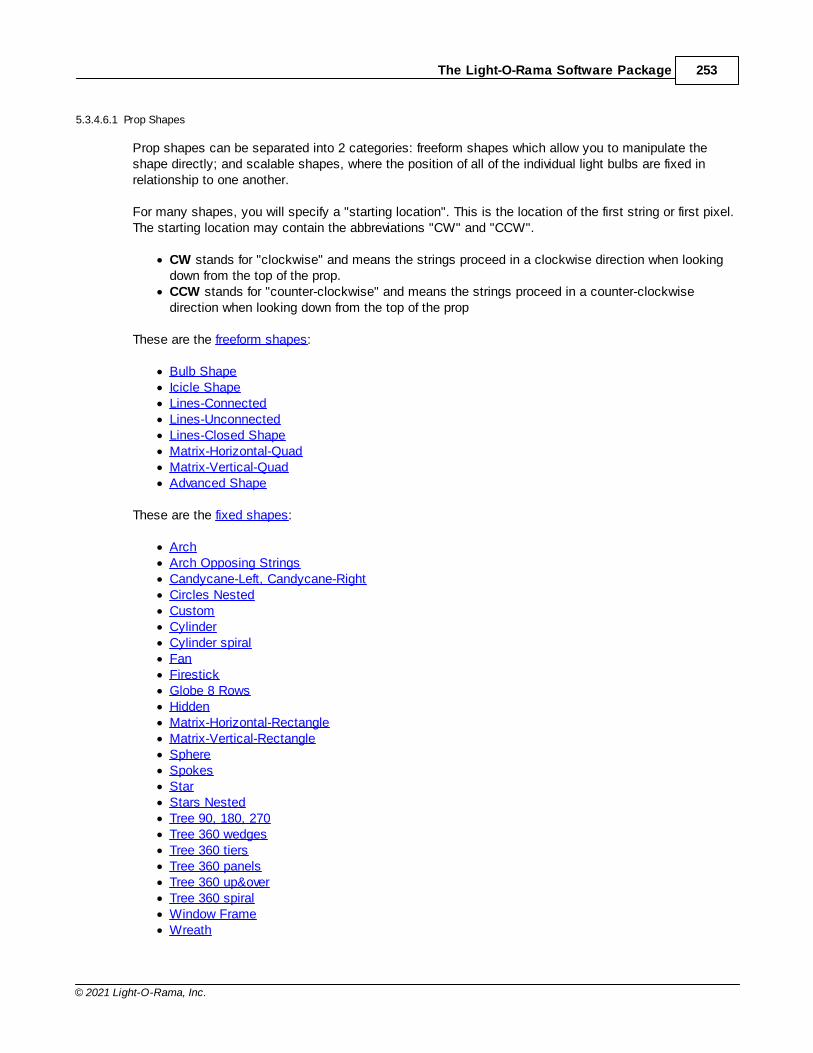
The Light-O-Rama Software Package 253
© 2021 Light-O-Rama, Inc.
5.3.4.6.1 Prop Shapes
Prop shapes can be separated into 2 categories: freeform shapes which allow you to manipulate theshape directly; and scalable shapes, where the position of all of the individual light bulbs are fixed inrelationship to one another.
For many shapes, you will specify a "starting location". This is the location of the first string or first pixel.The starting location may contain the abbreviations "CW" and "CCW".
· CW stands for "clockwise" and means the strings proceed in a clockwise direction when lookingdown from the top of the prop.
· CCW stands for "counter-clockwise" and means the strings proceed in a counter-clockwisedirection when looking down from the top of the prop
These are the freeform shapes:
· Bulb Shape· Icicle Shape· Lines-Connected· Lines-Unconnected· Lines-Closed Shape· Matrix-Horizontal-Quad· Matrix-Vertical-Quad· Advanced Shape
These are the fixed shapes:
· Arch· Arch Opposing Strings· Candycane-Left, Candycane-Right· Circles Nested· Custom· Cylinder· Cylinder spiral· Fan· Firestick· Globe 8 Rows· Hidden· Matrix-Horizontal-Rectangle· Matrix-Vertical-Rectangle· Sphere· Spokes· Star· Stars Nested· Tree 90, 180, 270· Tree 360 wedges· Tree 360 tiers· Tree 360 panels· Tree 360 up&over· Tree 360 spiral· Window Frame· Wreath
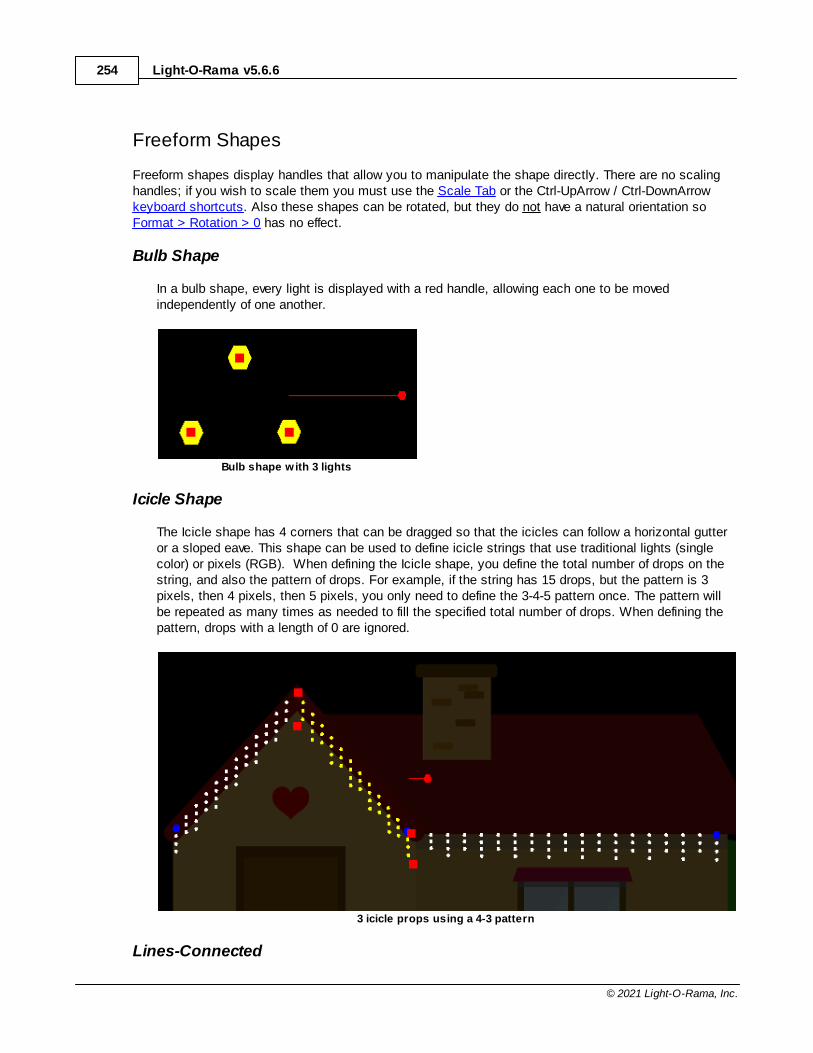
Light-O-Rama v5.6.6254
© 2021 Light-O-Rama, Inc.
Freeform Shapes
Freeform shapes display handles that allow you to manipulate the shape directly. There are no scalinghandles; if you wish to scale them you must use the Scale Tab or the Ctrl-UpArrow / Ctrl-DownArrowkeyboard shortcuts. Also these shapes can be rotated, but they do not have a natural orientation soFormat > Rotation > 0 has no effect.
Bulb Shape
In a bulb shape, every light is displayed with a red handle, allowing each one to be movedindependently of one another.
Bulb shape with 3 lights
Icicle Shape
The Icicle shape has 4 corners that can be dragged so that the icicles can follow a horizontal gutteror a sloped eave. This shape can be used to define icicle strings that use traditional lights (singlecolor) or pixels (RGB). When defining the Icicle shape, you define the total number of drops on thestring, and also the pattern of drops. For example, if the string has 15 drops, but the pattern is 3pixels, then 4 pixels, then 5 pixels, you only need to define the 3-4-5 pattern once. The pattern willbe repeated as many times as needed to fill the specified total number of drops. When defining thepattern, drops with a length of 0 are ignored.
3 icicle props using a 4-3 pattern
Lines-Connected
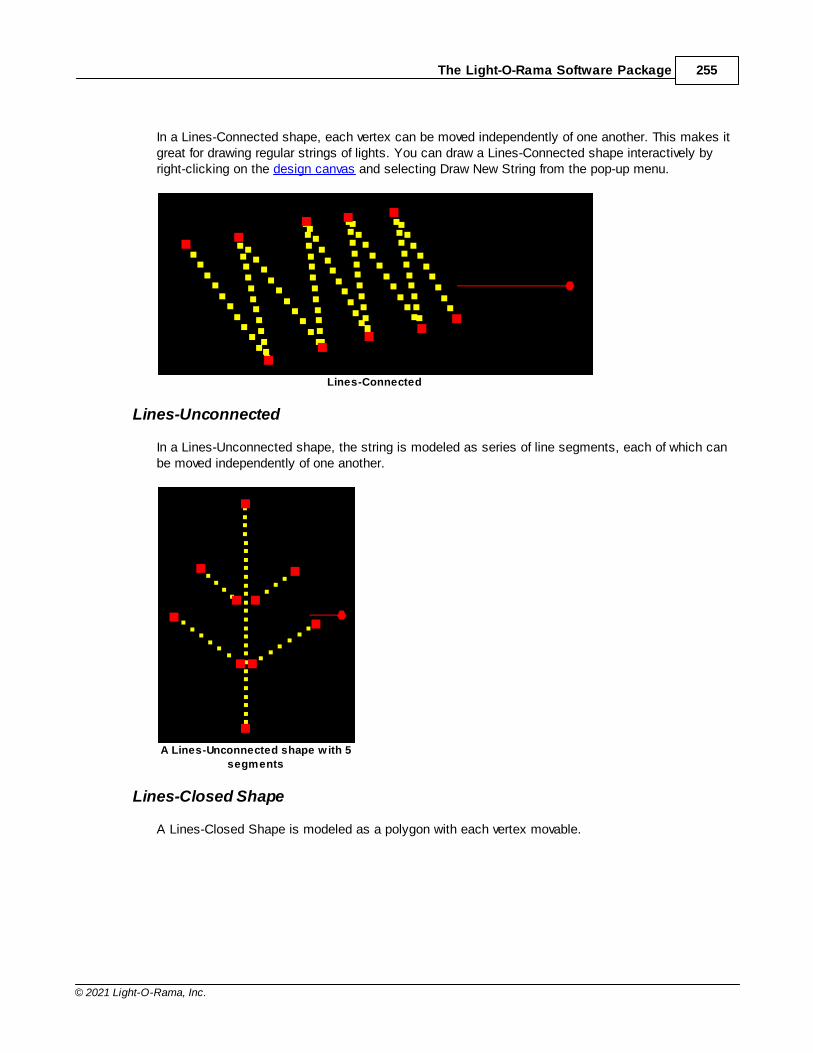
The Light-O-Rama Software Package 255
© 2021 Light-O-Rama, Inc.
In a Lines-Connected shape, each vertex can be moved independently of one another. This makes itgreat for drawing regular strings of lights. You can draw a Lines-Connected shape interactively byright-clicking on the design canvas and selecting Draw New String from the pop-up menu.
Lines-Connected
Lines-Unconnected
In a Lines-Unconnected shape, the string is modeled as series of line segments, each of which canbe moved independently of one another.
A Lines-Unconnected shape with 5
segments
Lines-Closed Shape
A Lines-Closed Shape is modeled as a polygon with each vertex movable.
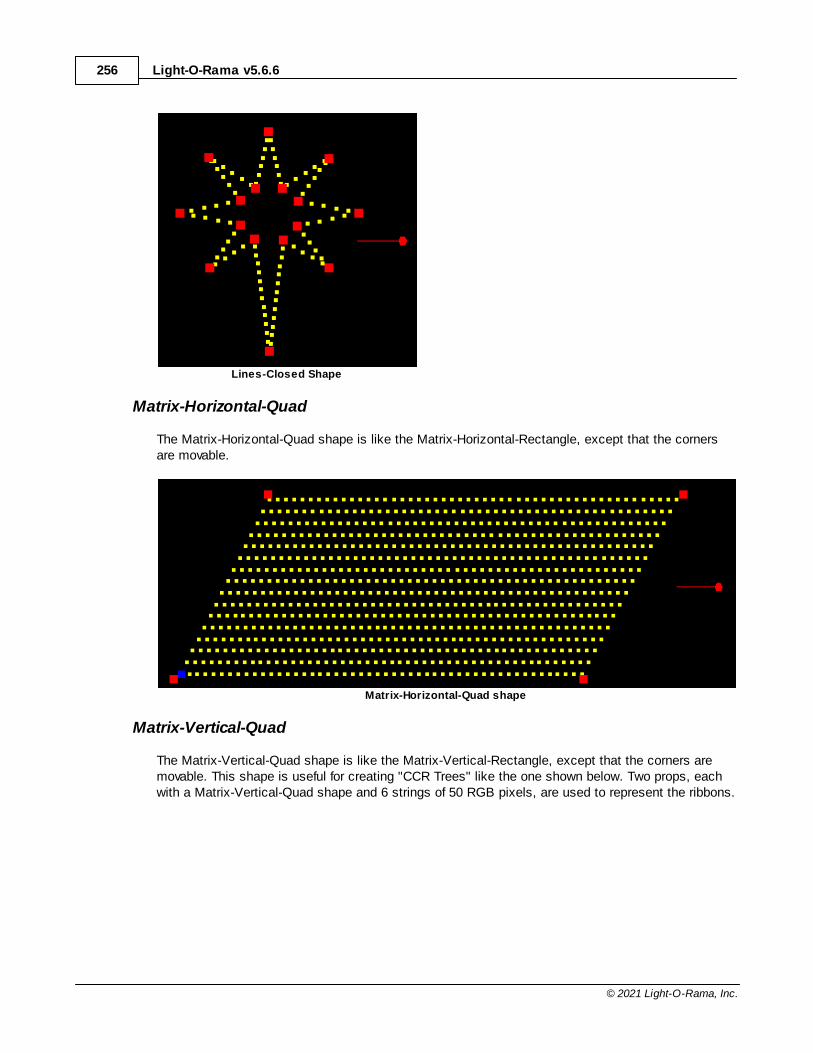
Light-O-Rama v5.6.6256
© 2021 Light-O-Rama, Inc.
Lines-Closed Shape
Matrix-Horizontal-Quad
The Matrix-Horizontal-Quad shape is like the Matrix-Horizontal-Rectangle, except that the cornersare movable.
Matrix-Horizontal-Quad shape
Matrix-Vertical-Quad
The Matrix-Vertical-Quad shape is like the Matrix-Vertical-Rectangle, except that the corners aremovable. This shape is useful for creating "CCR Trees" like the one shown below. Two props, eachwith a Matrix-Vertical-Quad shape and 6 strings of 50 RGB pixels, are used to represent the ribbons.
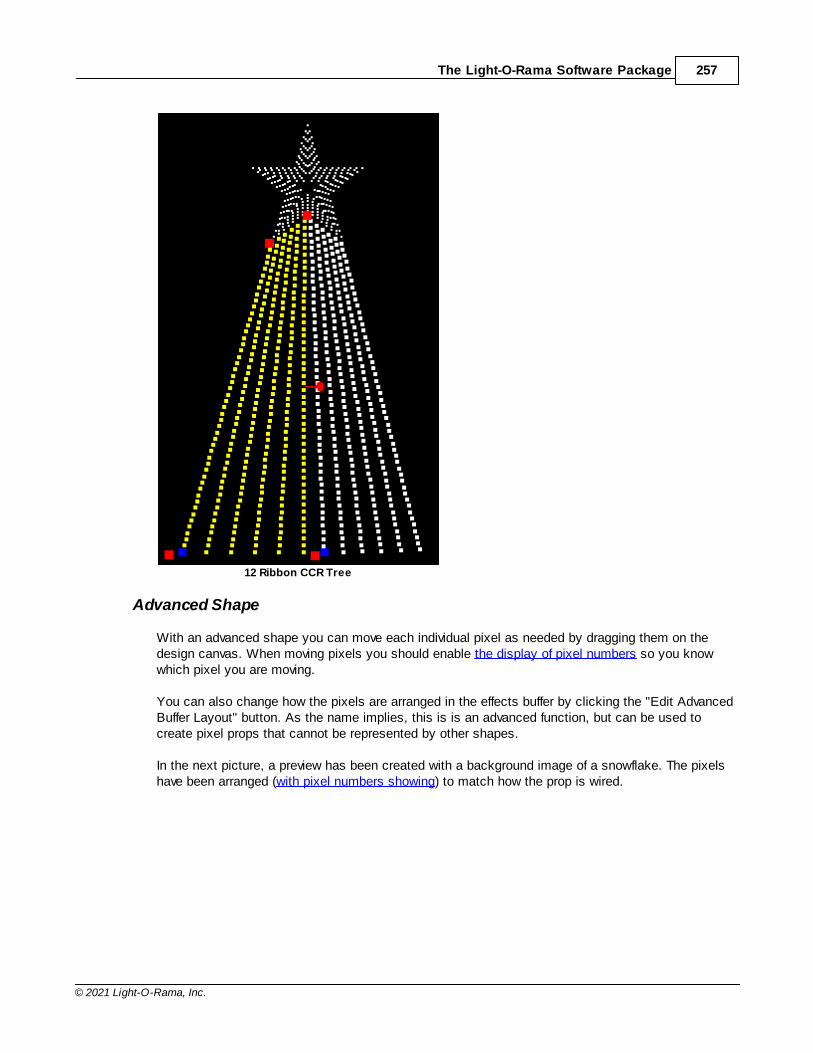
The Light-O-Rama Software Package 257
© 2021 Light-O-Rama, Inc.
12 Ribbon CCR Tree
Advanced Shape
With an advanced shape you can move each individual pixel as needed by dragging them on thedesign canvas. When moving pixels you should enable the display of pixel numbers so you knowwhich pixel you are moving.
You can also change how the pixels are arranged in the effects buffer by clicking the "Edit AdvancedBuffer Layout" button. As the name implies, this is is an advanced function, but can be used tocreate pixel props that cannot be represented by other shapes.
In the next picture, a preview has been created with a background image of a snowflake. The pixelshave been arranged (with pixel numbers showing) to match how the prop is wired.
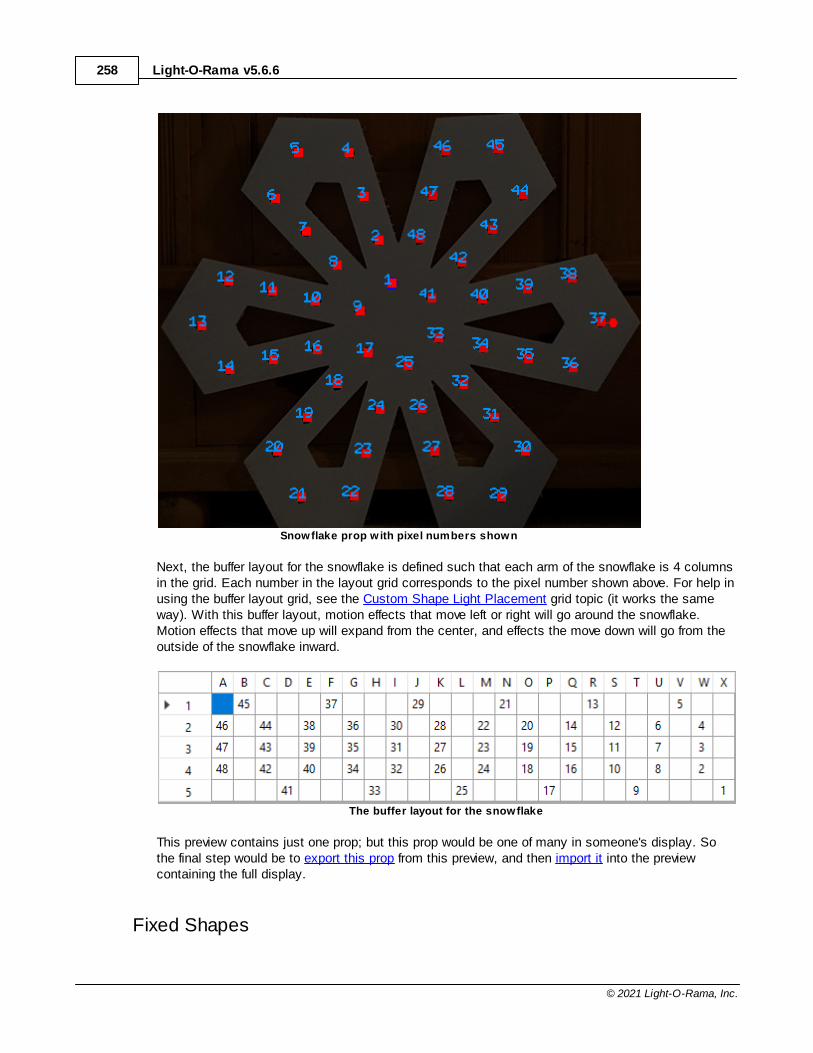
Light-O-Rama v5.6.6258
© 2021 Light-O-Rama, Inc.
Snowflake prop with pixel numbers shown
Next, the buffer layout for the snowflake is defined such that each arm of the snowflake is 4 columnsin the grid. Each number in the layout grid corresponds to the pixel number shown above. For help inusing the buffer layout grid, see the Custom Shape Light Placement grid topic (it works the sameway). With this buffer layout, motion effects that move left or right will go around the snowflake.Motion effects that move up will expand from the center, and effects the move down will go from theoutside of the snowflake inward.
The buffer layout for the snowflake
This preview contains just one prop; but this prop would be one of many in someone's display. Sothe final step would be to export this prop from this preview, and then import it into the previewcontaining the full display.
Fixed Shapes
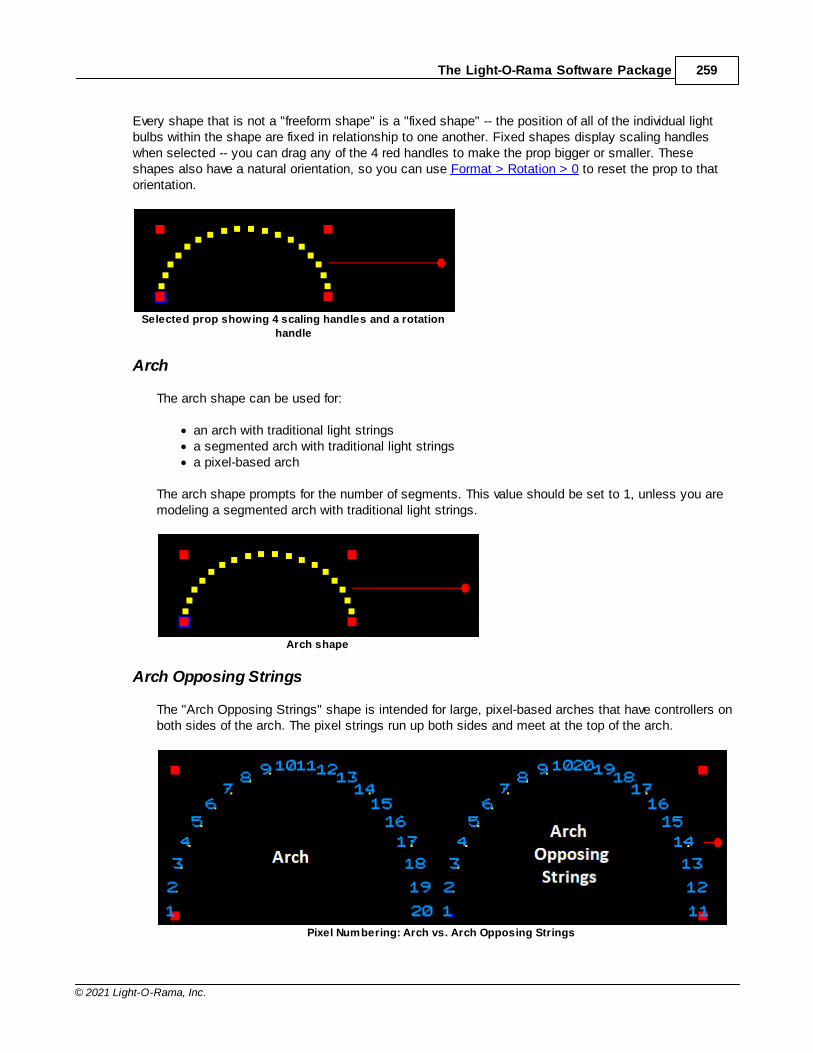
The Light-O-Rama Software Package 259
© 2021 Light-O-Rama, Inc.
Every shape that is not a "freeform shape" is a "fixed shape" -- the position of all of the individual lightbulbs within the shape are fixed in relationship to one another. Fixed shapes display scaling handleswhen selected -- you can drag any of the 4 red handles to make the prop bigger or smaller. Theseshapes also have a natural orientation, so you can use Format > Rotation > 0 to reset the prop to thatorientation.
Selected prop showing 4 scaling handles and a rotation
handle
Arch
The arch shape can be used for:
· an arch with traditional light strings· a segmented arch with traditional light strings· a pixel-based arch
The arch shape prompts for the number of segments. This value should be set to 1, unless you aremodeling a segmented arch with traditional light strings.
Arch shape
Arch Opposing Strings
The "Arch Opposing Strings" shape is intended for large, pixel-based arches that have controllers onboth sides of the arch. The pixel strings run up both sides and meet at the top of the arch.
Pixel Numbering: Arch vs. Arch Opposing Strings
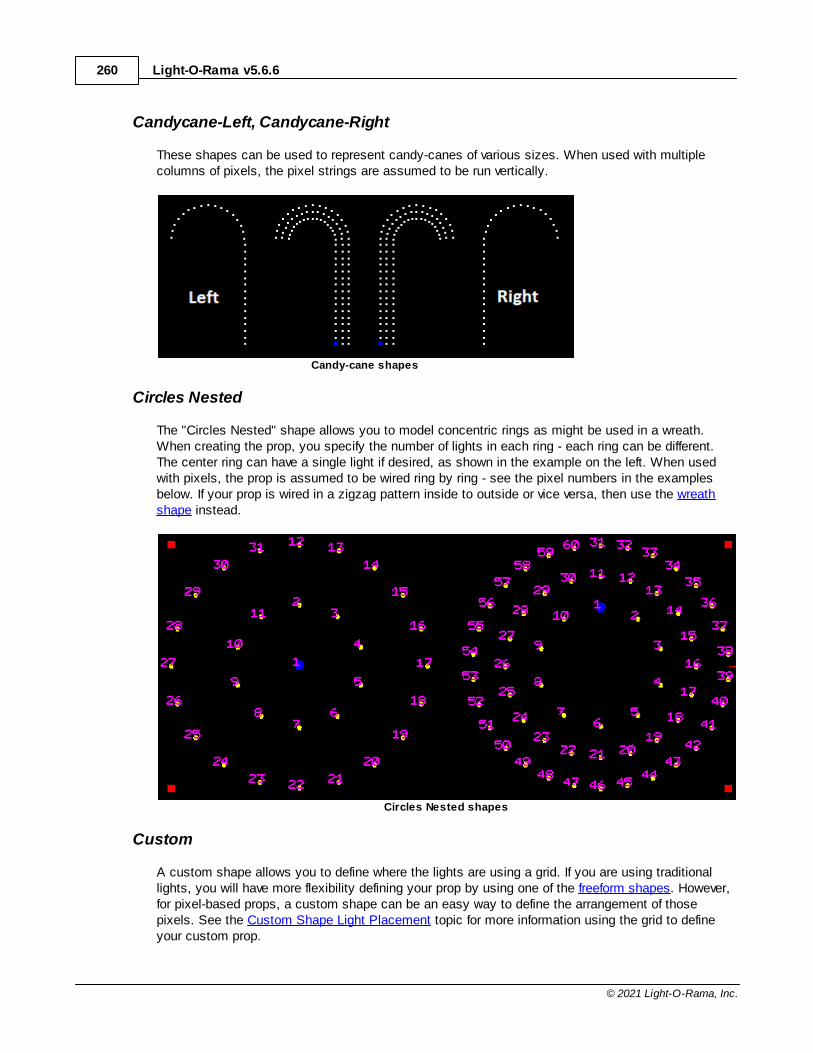
Light-O-Rama v5.6.6260
© 2021 Light-O-Rama, Inc.
Candycane-Left, Candycane-Right
These shapes can be used to represent candy-canes of various sizes. When used with multiplecolumns of pixels, the pixel strings are assumed to be run vertically.
Candy-cane shapes
Circles Nested
The "Circles Nested" shape allows you to model concentric rings as might be used in a wreath.When creating the prop, you specify the number of lights in each ring - each ring can be different.The center ring can have a single light if desired, as shown in the example on the left. When usedwith pixels, the prop is assumed to be wired ring by ring - see the pixel numbers in the examplesbelow. If your prop is wired in a zigzag pattern inside to outside or vice versa, then use the wreathshape instead.
Circles Nested shapes
Custom
A custom shape allows you to define where the lights are using a grid. If you are using traditionallights, you will have more flexibility defining your prop by using one of the freeform shapes. However,for pixel-based props, a custom shape can be an easy way to define the arrangement of thosepixels. See the Custom Shape Light Placement topic for more information using the grid to defineyour custom prop.
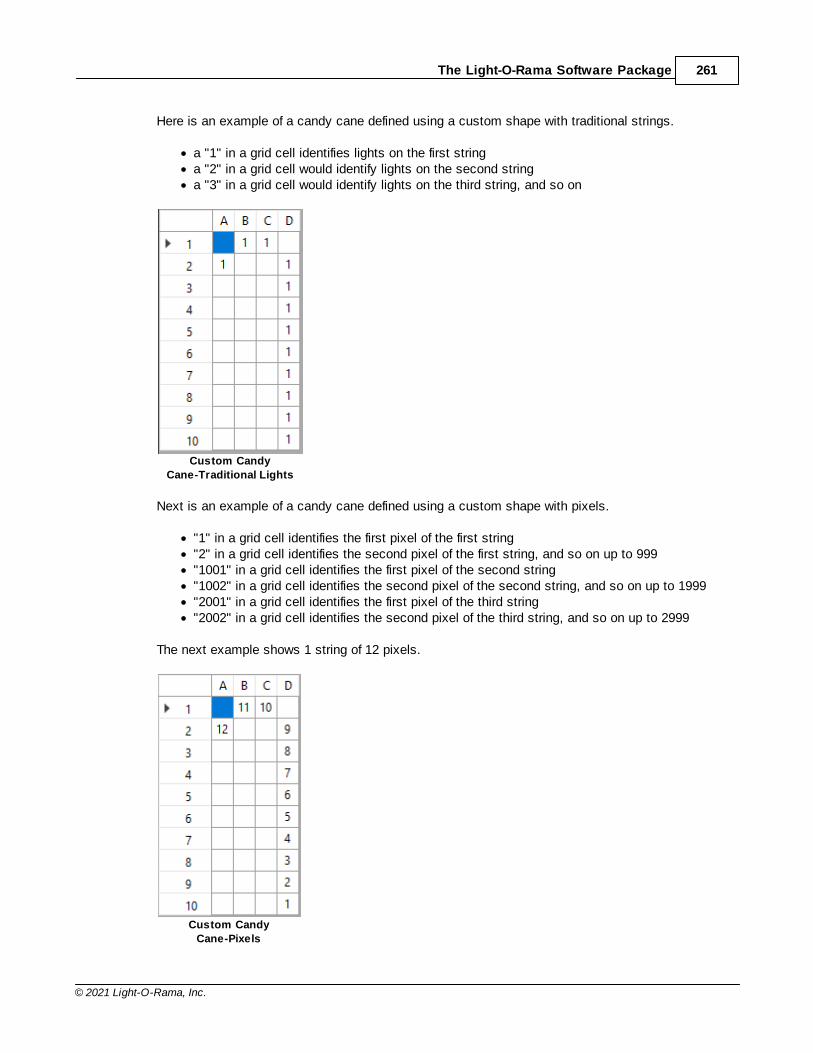
The Light-O-Rama Software Package 261
© 2021 Light-O-Rama, Inc.
Here is an example of a candy cane defined using a custom shape with traditional strings.
· a "1" in a grid cell identifies lights on the first string· a "2" in a grid cell would identify lights on the second string· a "3" in a grid cell would identify lights on the third string, and so on
Custom Candy
Cane-Traditional Lights
Next is an example of a candy cane defined using a custom shape with pixels.
· "1" in a grid cell identifies the first pixel of the first string· "2" in a grid cell identifies the second pixel of the first string, and so on up to 999· "1001" in a grid cell identifies the first pixel of the second string· "1002" in a grid cell identifies the second pixel of the second string, and so on up to 1999· "2001" in a grid cell identifies the first pixel of the third string· "2002" in a grid cell identifies the second pixel of the third string, and so on up to 2999
The next example shows 1 string of 12 pixels.
Custom Candy
Cane-Pixels
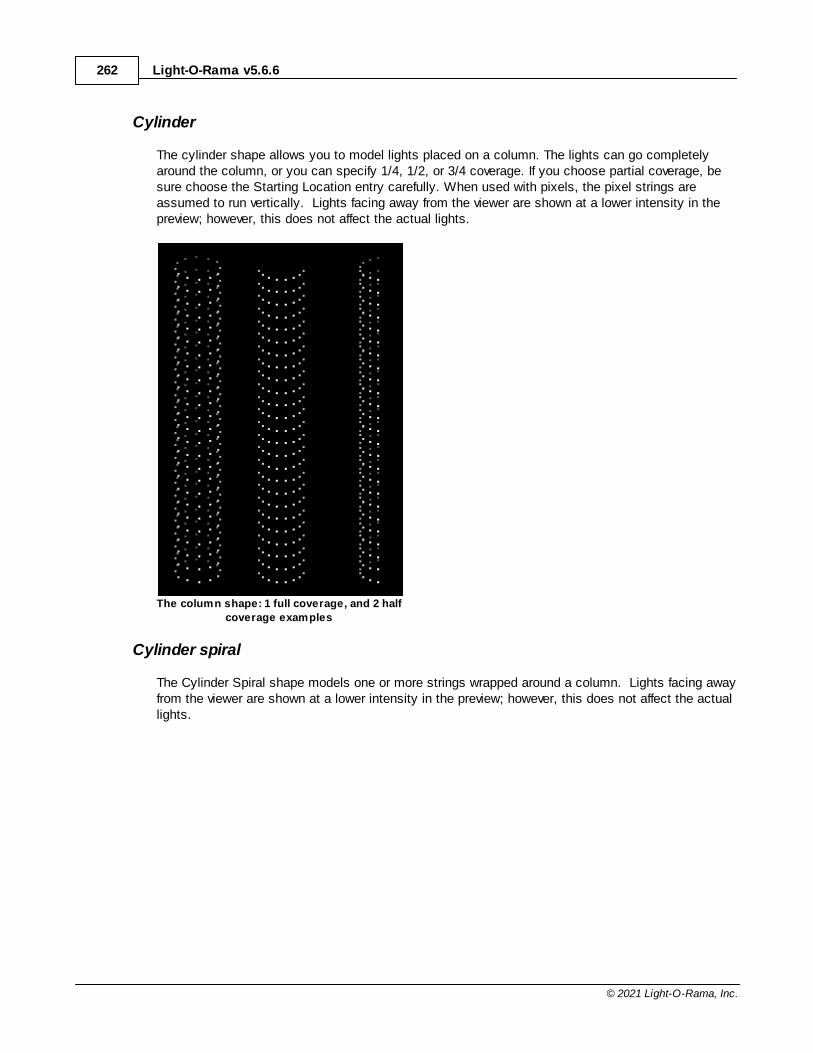
Light-O-Rama v5.6.6262
© 2021 Light-O-Rama, Inc.
Cylinder
The cylinder shape allows you to model lights placed on a column. The lights can go completelyaround the column, or you can specify 1/4, 1/2, or 3/4 coverage. If you choose partial coverage, besure choose the Starting Location entry carefully. When used with pixels, the pixel strings areassumed to run vertically. Lights facing away from the viewer are shown at a lower intensity in thepreview; however, this does not affect the actual lights.
The column shape: 1 full coverage, and 2 half
coverage examples
Cylinder spiral
The Cylinder Spiral shape models one or more strings wrapped around a column. Lights facing awayfrom the viewer are shown at a lower intensity in the preview; however, this does not affect the actuallights.
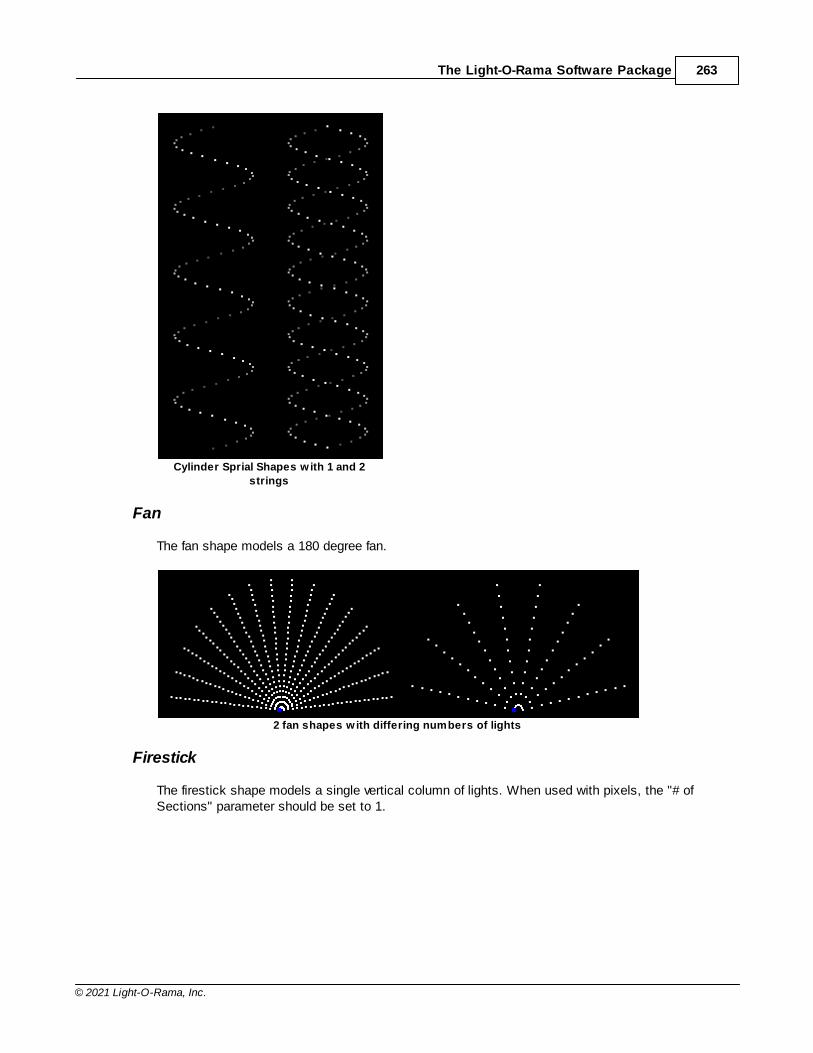
The Light-O-Rama Software Package 263
© 2021 Light-O-Rama, Inc.
Cylinder Sprial Shapes with 1 and 2
strings
Fan
The fan shape models a 180 degree fan.
2 fan shapes with differing numbers of lights
Firestick
The firestick shape models a single vertical column of lights. When used with pixels, the "# ofSections" parameter should be set to 1.
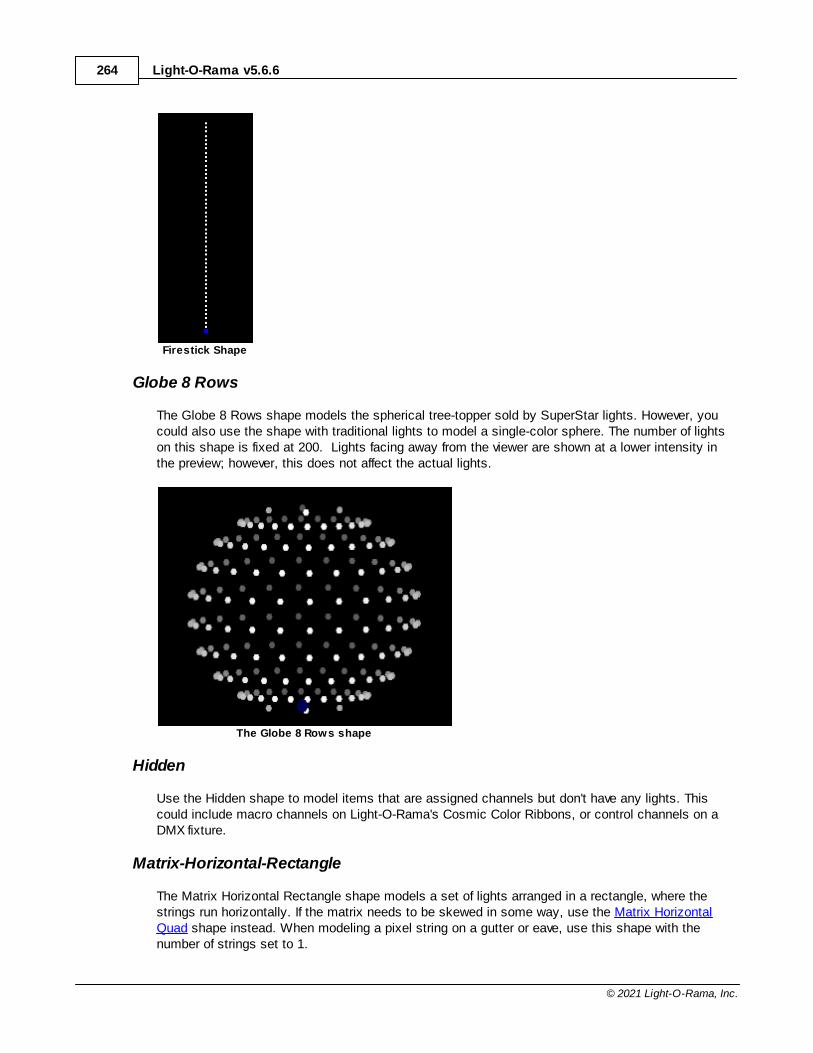
Light-O-Rama v5.6.6264
© 2021 Light-O-Rama, Inc.
Firestick Shape
Globe 8 Rows
The Globe 8 Rows shape models the spherical tree-topper sold by SuperStar lights. However, youcould also use the shape with traditional lights to model a single-color sphere. The number of lightson this shape is fixed at 200. Lights facing away from the viewer are shown at a lower intensity inthe preview; however, this does not affect the actual lights.
The Globe 8 Rows shape
Hidden
Use the Hidden shape to model items that are assigned channels but don't have any lights. Thiscould include macro channels on Light-O-Rama's Cosmic Color Ribbons, or control channels on aDMX fixture.
Matrix-Horizontal-Rectangle
The Matrix Horizontal Rectangle shape models a set of lights arranged in a rectangle, where thestrings run horizontally. If the matrix needs to be skewed in some way, use the Matrix HorizontalQuad shape instead. When modeling a pixel string on a gutter or eave, use this shape with thenumber of strings set to 1.
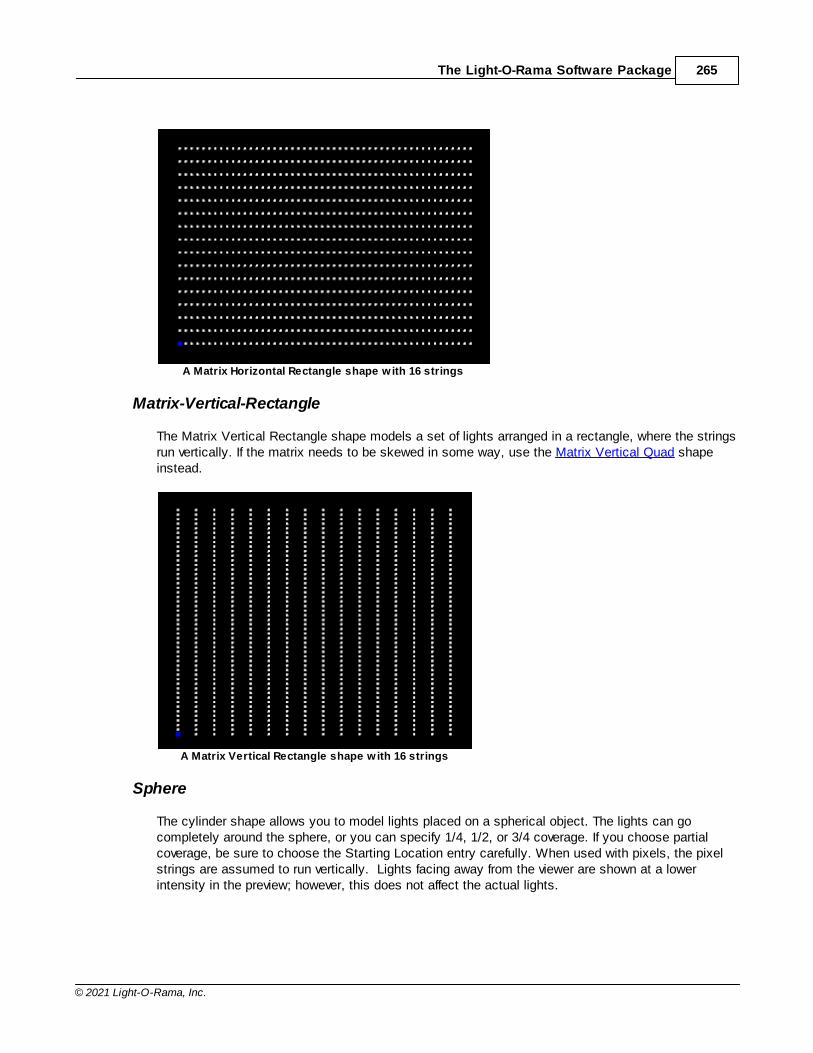
The Light-O-Rama Software Package 265
© 2021 Light-O-Rama, Inc.
A Matrix Horizontal Rectangle shape with 16 strings
Matrix-Vertical-Rectangle
The Matrix Vertical Rectangle shape models a set of lights arranged in a rectangle, where the stringsrun vertically. If the matrix needs to be skewed in some way, use the Matrix Vertical Quad shapeinstead.
A Matrix Vertical Rectangle shape with 16 strings
Sphere
The cylinder shape allows you to model lights placed on a spherical object. The lights can gocompletely around the sphere, or you can specify 1/4, 1/2, or 3/4 coverage. If you choose partialcoverage, be sure to choose the Starting Location entry carefully. When used with pixels, the pixelstrings are assumed to run vertically. Lights facing away from the viewer are shown at a lowerintensity in the preview; however, this does not affect the actual lights.
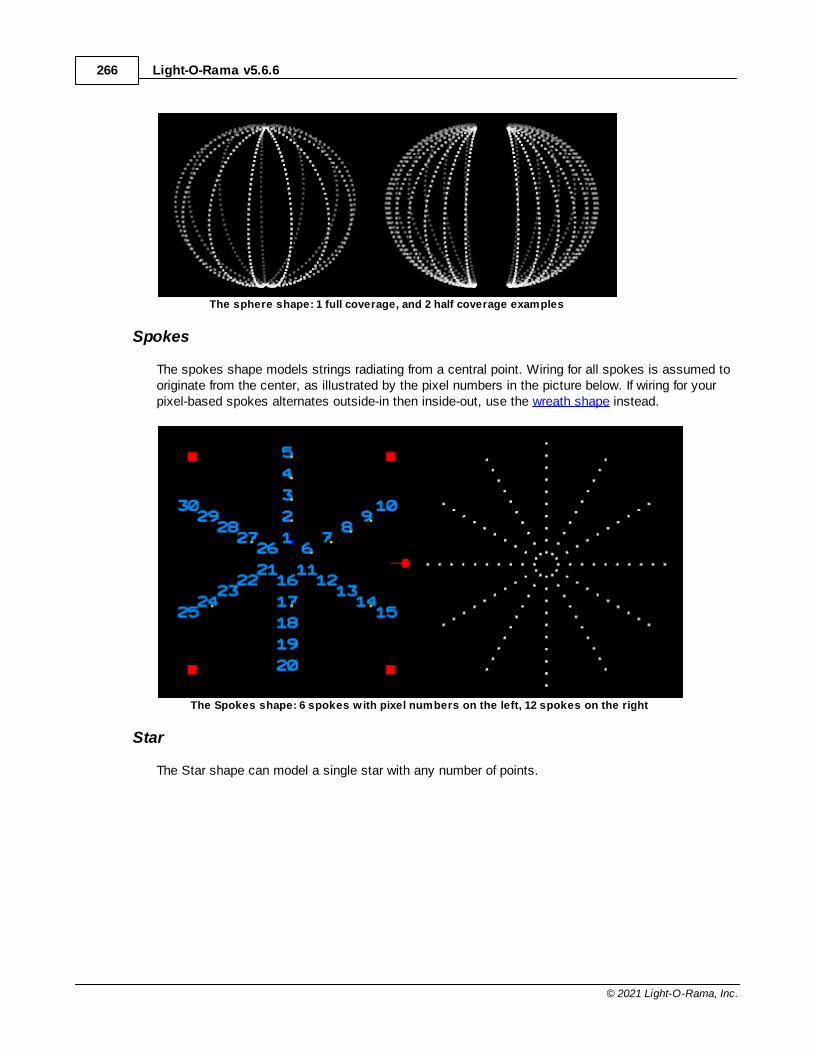
Light-O-Rama v5.6.6266
© 2021 Light-O-Rama, Inc.
The sphere shape: 1 full coverage, and 2 half coverage examples
Spokes
The spokes shape models strings radiating from a central point. Wiring for all spokes is assumed tooriginate from the center, as illustrated by the pixel numbers in the picture below. If wiring for yourpixel-based spokes alternates outside-in then inside-out, use the wreath shape instead.
The Spokes shape: 6 spokes with pixel numbers on the left, 12 spokes on the right
Star
The Star shape can model a single star with any number of points.
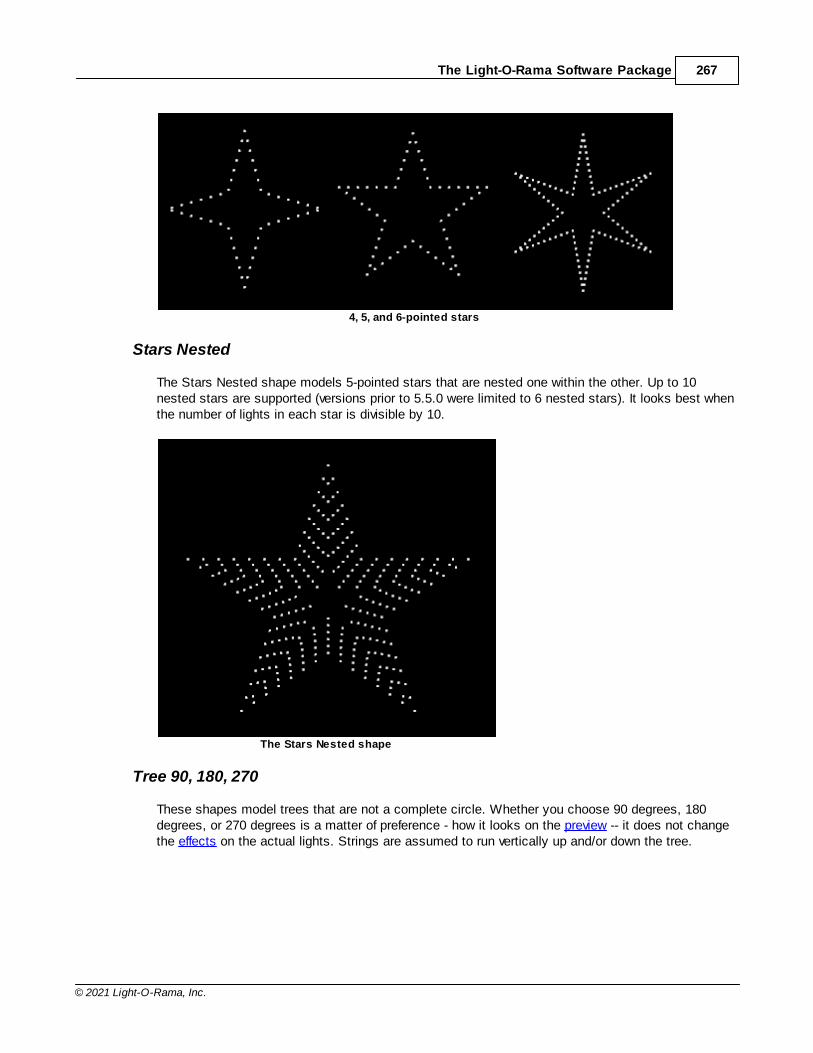
The Light-O-Rama Software Package 267
© 2021 Light-O-Rama, Inc.
4, 5, and 6-pointed stars
Stars Nested
The Stars Nested shape models 5-pointed stars that are nested one within the other. Up to 10nested stars are supported (versions prior to 5.5.0 were limited to 6 nested stars). It looks best whenthe number of lights in each star is divisible by 10.
The Stars Nested shape
Tree 90, 180, 270
These shapes model trees that are not a complete circle. Whether you choose 90 degrees, 180degrees, or 270 degrees is a matter of preference - how it looks on the preview -- it does not changethe effects on the actual lights. Strings are assumed to run vertically up and/or down the tree.
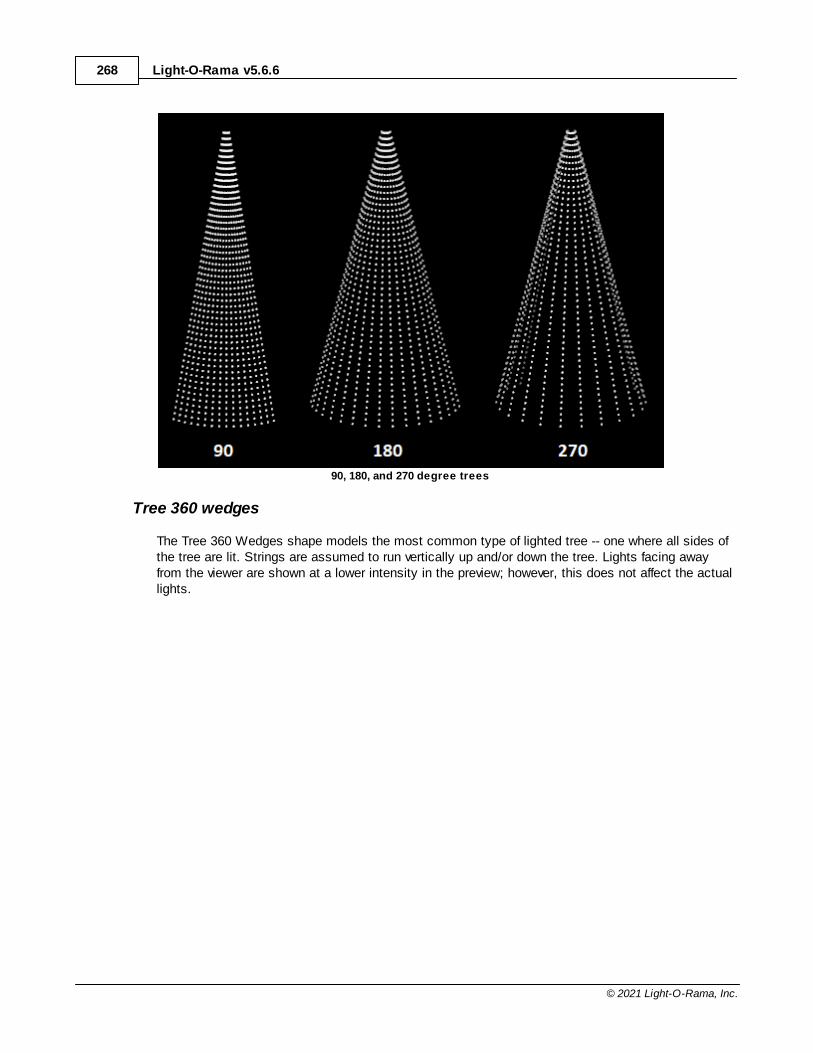
Light-O-Rama v5.6.6268
© 2021 Light-O-Rama, Inc.
90, 180, and 270 degree trees
Tree 360 wedges
The Tree 360 Wedges shape models the most common type of lighted tree -- one where all sides ofthe tree are lit. Strings are assumed to run vertically up and/or down the tree. Lights facing awayfrom the viewer are shown at a lower intensity in the preview; however, this does not affect the actuallights.
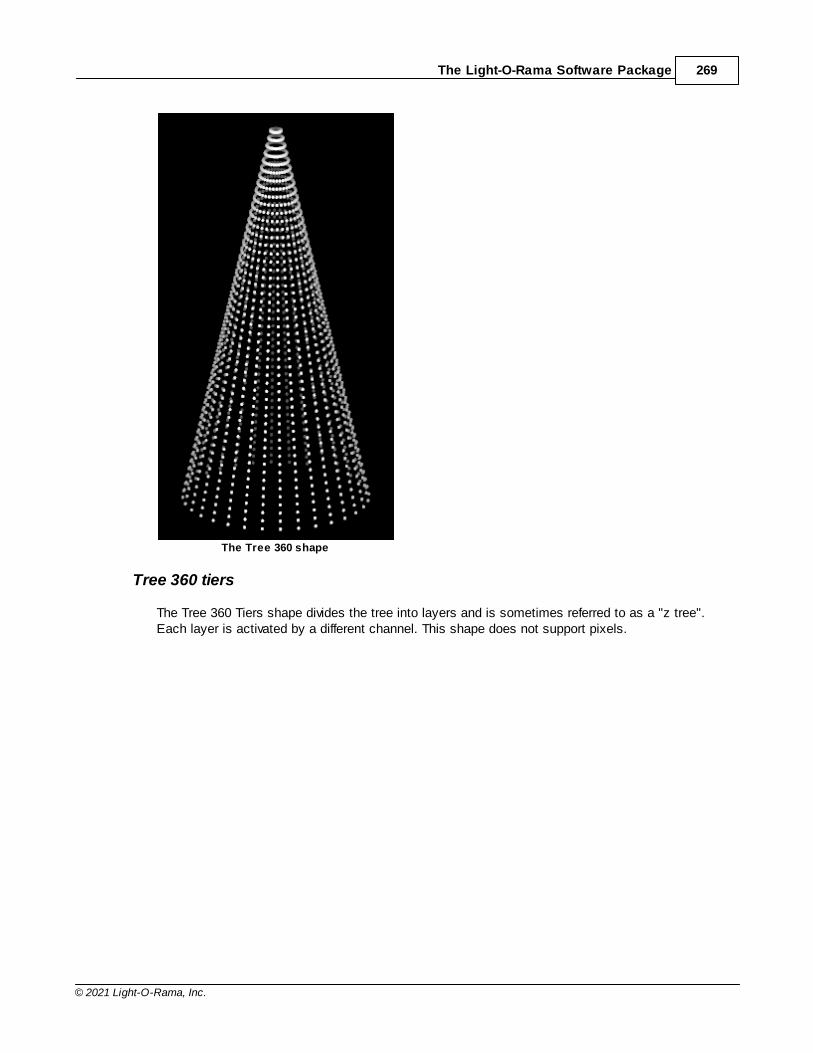
The Light-O-Rama Software Package 269
© 2021 Light-O-Rama, Inc.
The Tree 360 shape
Tree 360 tiers
The Tree 360 Tiers shape divides the tree into layers and is sometimes referred to as a "z tree".Each layer is activated by a different channel. This shape does not support pixels.
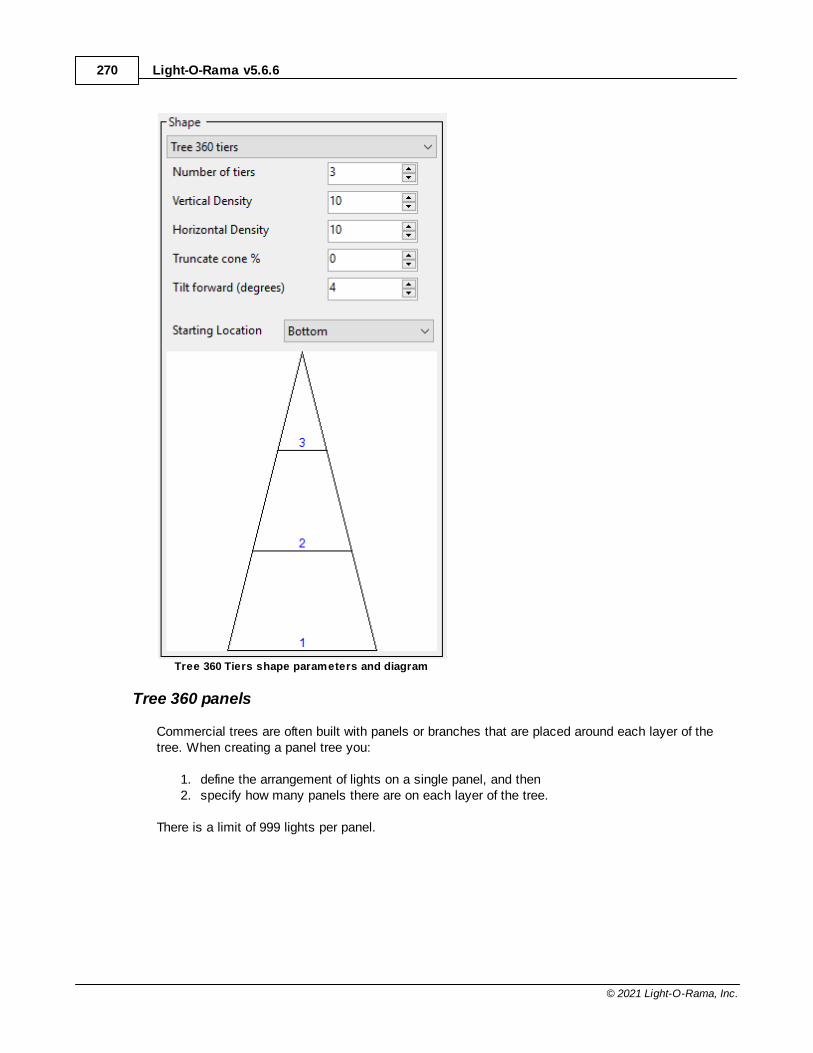
Light-O-Rama v5.6.6270
© 2021 Light-O-Rama, Inc.
Tree 360 Tiers shape parameters and diagram
Tree 360 panels
Commercial trees are often built with panels or branches that are placed around each layer of thetree. When creating a panel tree you:
1. define the arrangement of lights on a single panel, and then 2. specify how many panels there are on each layer of the tree.
There is a limit of 999 lights per panel.
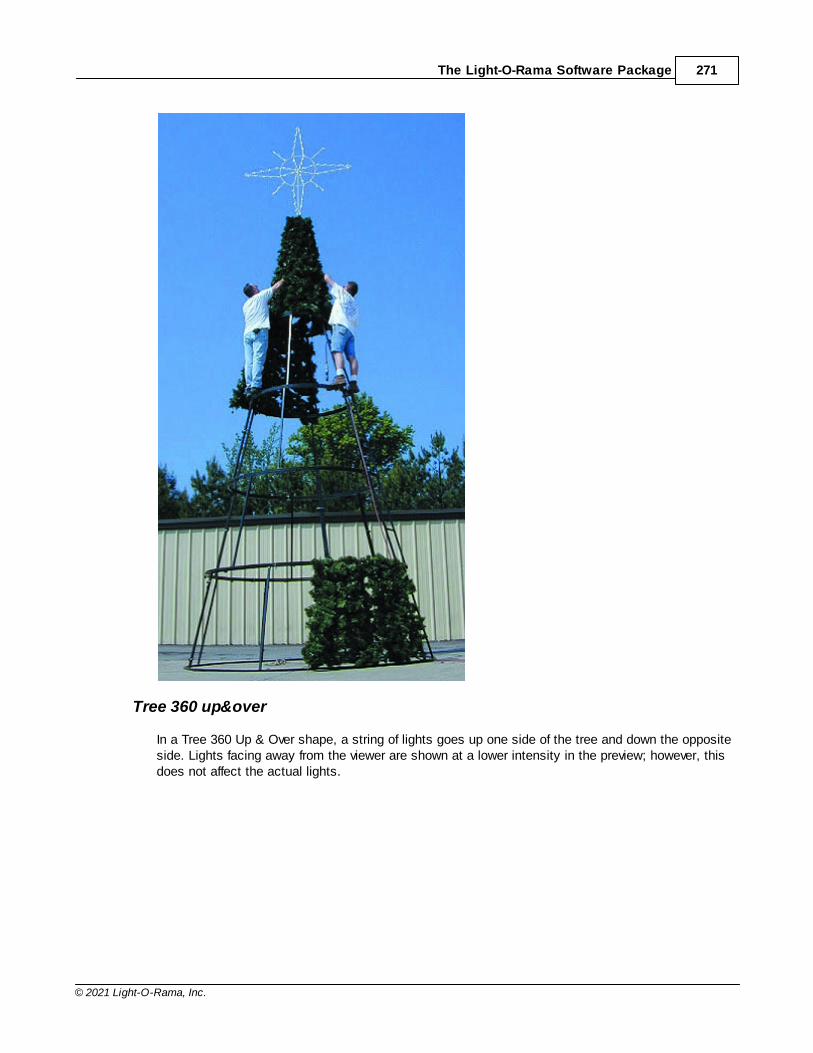
The Light-O-Rama Software Package 271
© 2021 Light-O-Rama, Inc.
Tree 360 up&over
In a Tree 360 Up & Over shape, a string of lights goes up one side of the tree and down the oppositeside. Lights facing away from the viewer are shown at a lower intensity in the preview; however, thisdoes not affect the actual lights.
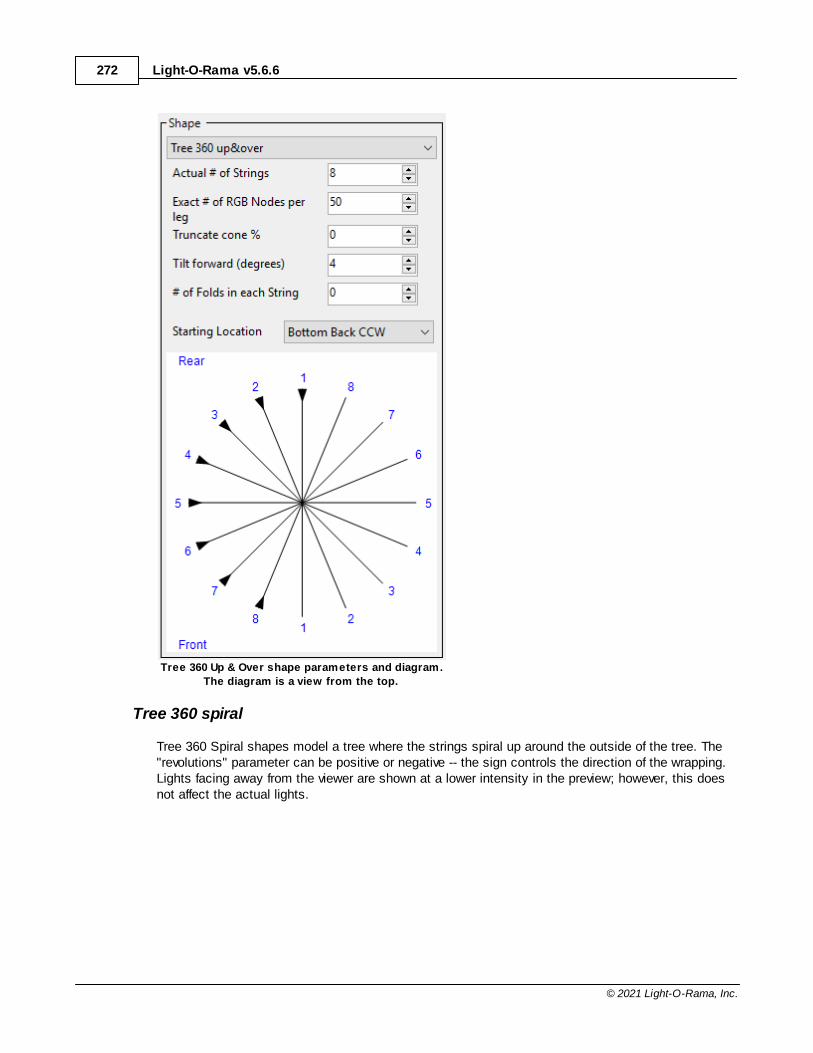
Light-O-Rama v5.6.6272
© 2021 Light-O-Rama, Inc.
Tree 360 Up & Over shape parameters and diagram.
The diagram is a view from the top.
Tree 360 spiral
Tree 360 Spiral shapes model a tree where the strings spiral up around the outside of the tree. The"revolutions" parameter can be positive or negative -- the sign controls the direction of the wrapping.Lights facing away from the viewer are shown at a lower intensity in the preview; however, this doesnot affect the actual lights.
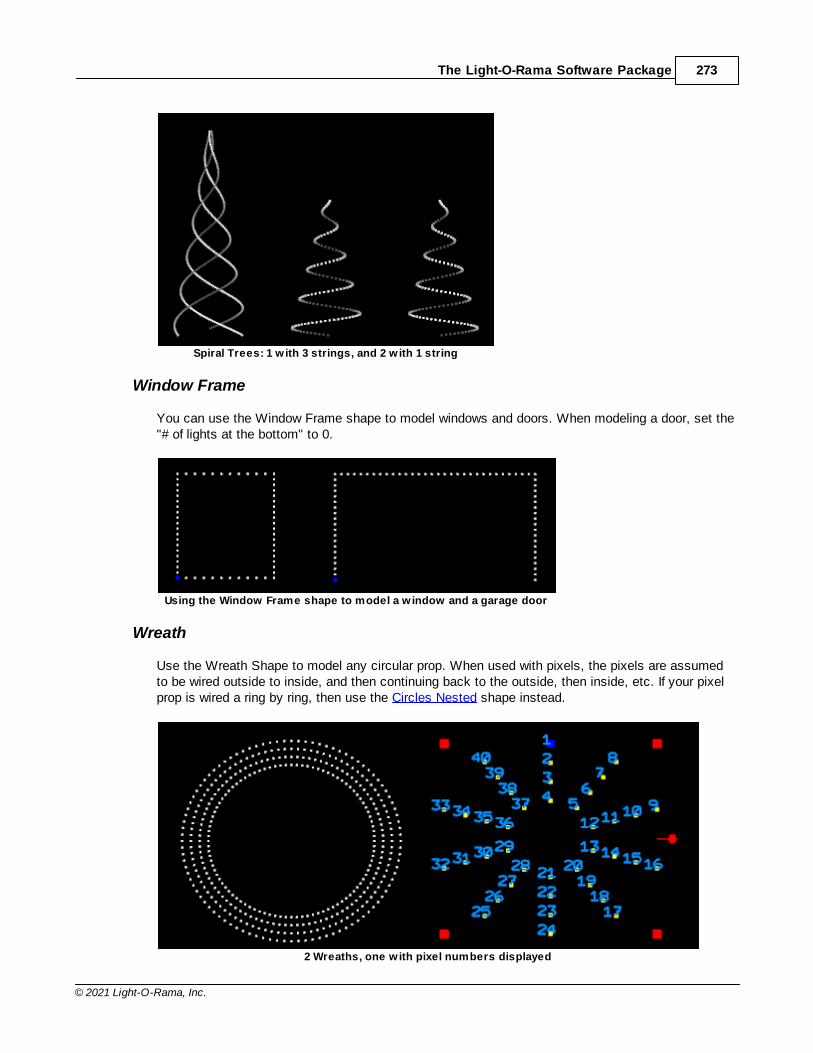
The Light-O-Rama Software Package 273
© 2021 Light-O-Rama, Inc.
Spiral Trees: 1 w ith 3 strings, and 2 w ith 1 string
Window Frame
You can use the Window Frame shape to model windows and doors. When modeling a door, set the"# of lights at the bottom" to 0.
Using the Window Frame shape to model a w indow and a garage door
Wreath
Use the Wreath Shape to model any circular prop. When used with pixels, the pixels are assumedto be wired outside to inside, and then continuing back to the outside, then inside, etc. If your pixelprop is wired a ring by ring, then use the Circles Nested shape instead.
2 Wreaths, one with pixel numbers displayed
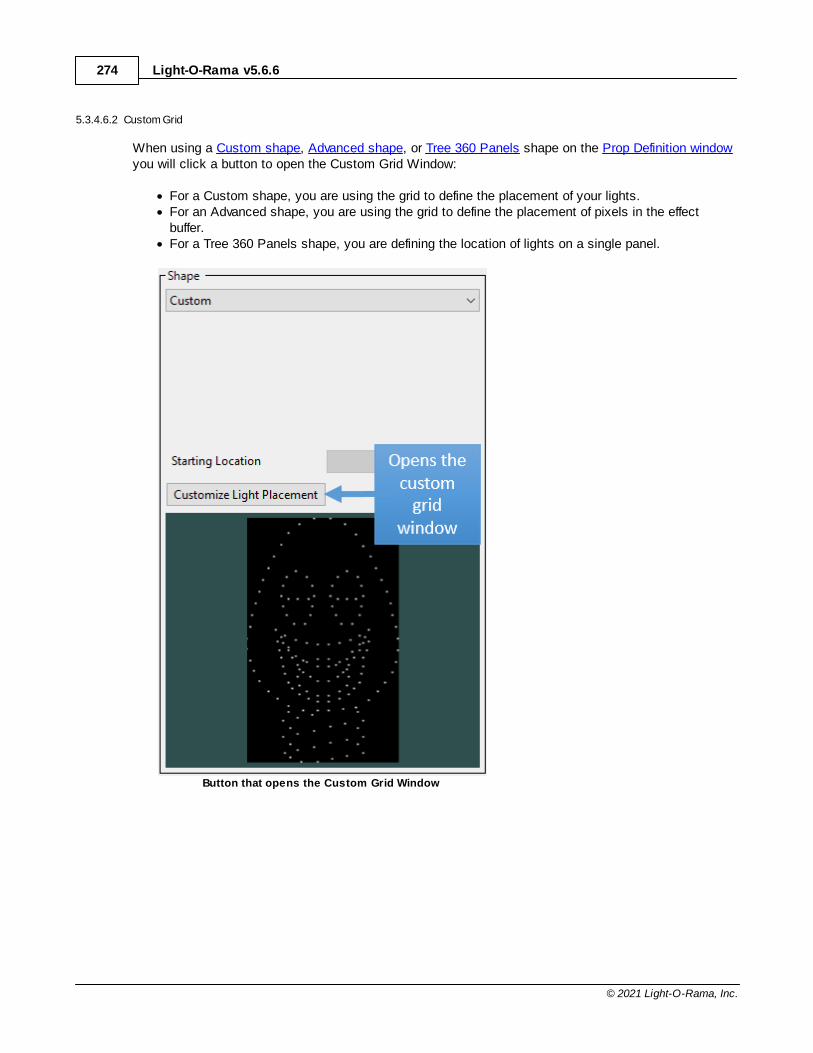
Light-O-Rama v5.6.6274
© 2021 Light-O-Rama, Inc.
5.3.4.6.2 Custom Grid
When using a Custom shape, Advanced shape, or Tree 360 Panels shape on the Prop Definition windowyou will click a button to open the Custom Grid Window:
· For a Custom shape, you are using the grid to define the placement of your lights. · For an Advanced shape, you are using the grid to define the placement of pixels in the effect
buffer.· For a Tree 360 Panels shape, you are defining the location of lights on a single panel.
Button that opens the Custom Grid Window
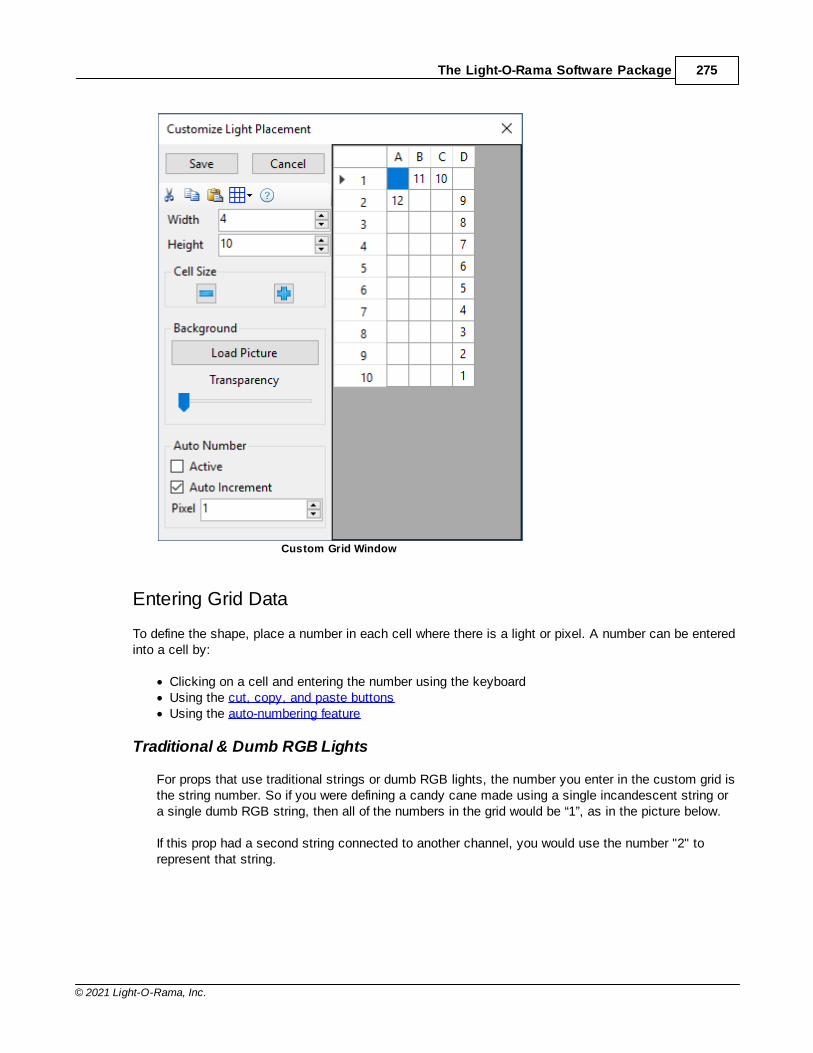
The Light-O-Rama Software Package 275
© 2021 Light-O-Rama, Inc.
Custom Grid Window
Entering Grid Data
To define the shape, place a number in each cell where there is a light or pixel. A number can be enteredinto a cell by:
· Clicking on a cell and entering the number using the keyboard· Using the cut, copy, and paste buttons· Using the auto-numbering feature
Traditional & Dumb RGB Lights
For props that use traditional strings or dumb RGB lights, the number you enter in the custom grid isthe string number. So if you were defining a candy cane made using a single incandescent string ora single dumb RGB string, then all of the numbers in the grid would be “1”, as in the picture below.
If this prop had a second string connected to another channel, you would use the number "2" torepresent that string.
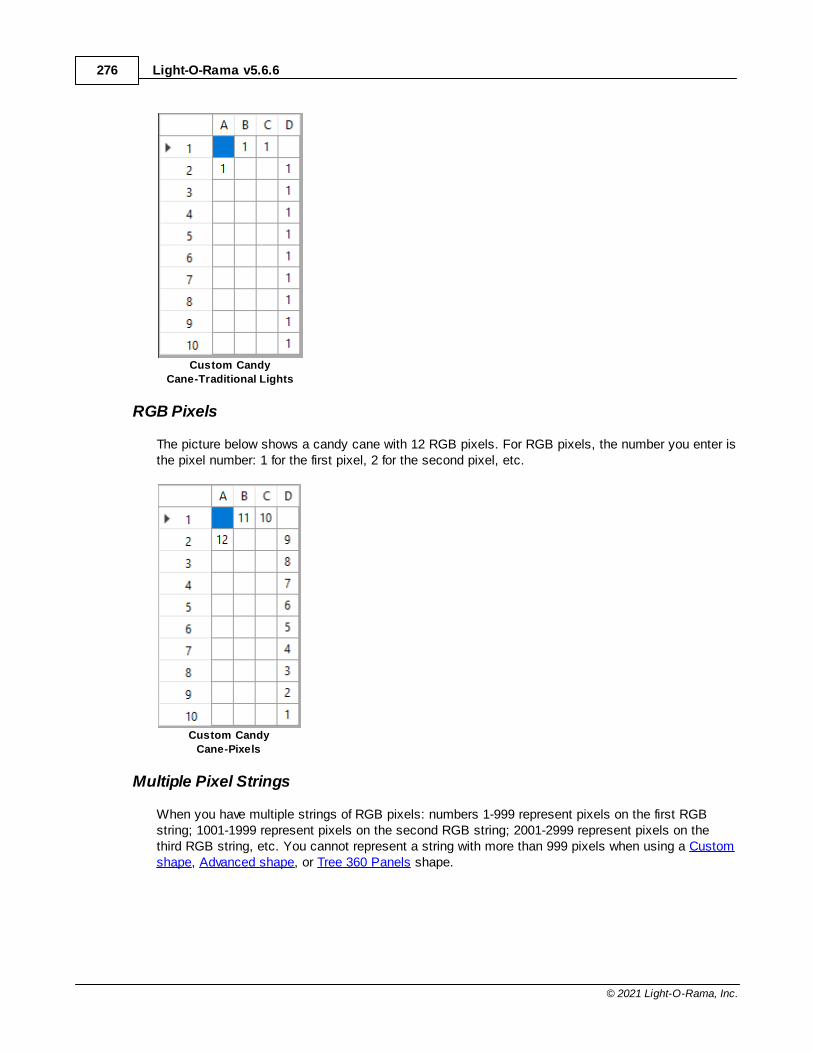
Light-O-Rama v5.6.6276
© 2021 Light-O-Rama, Inc.
Custom Candy
Cane-Traditional Lights
RGB Pixels
The picture below shows a candy cane with 12 RGB pixels. For RGB pixels, the number you enter isthe pixel number: 1 for the first pixel, 2 for the second pixel, etc.
Custom Candy
Cane-Pixels
Multiple Pixel Strings
When you have multiple strings of RGB pixels: numbers 1-999 represent pixels on the first RGBstring; 1001-1999 represent pixels on the second RGB string; 2001-2999 represent pixels on thethird RGB string, etc. You cannot represent a string with more than 999 pixels when using a Customshape, Advanced shape, or Tree 360 Panels shape.
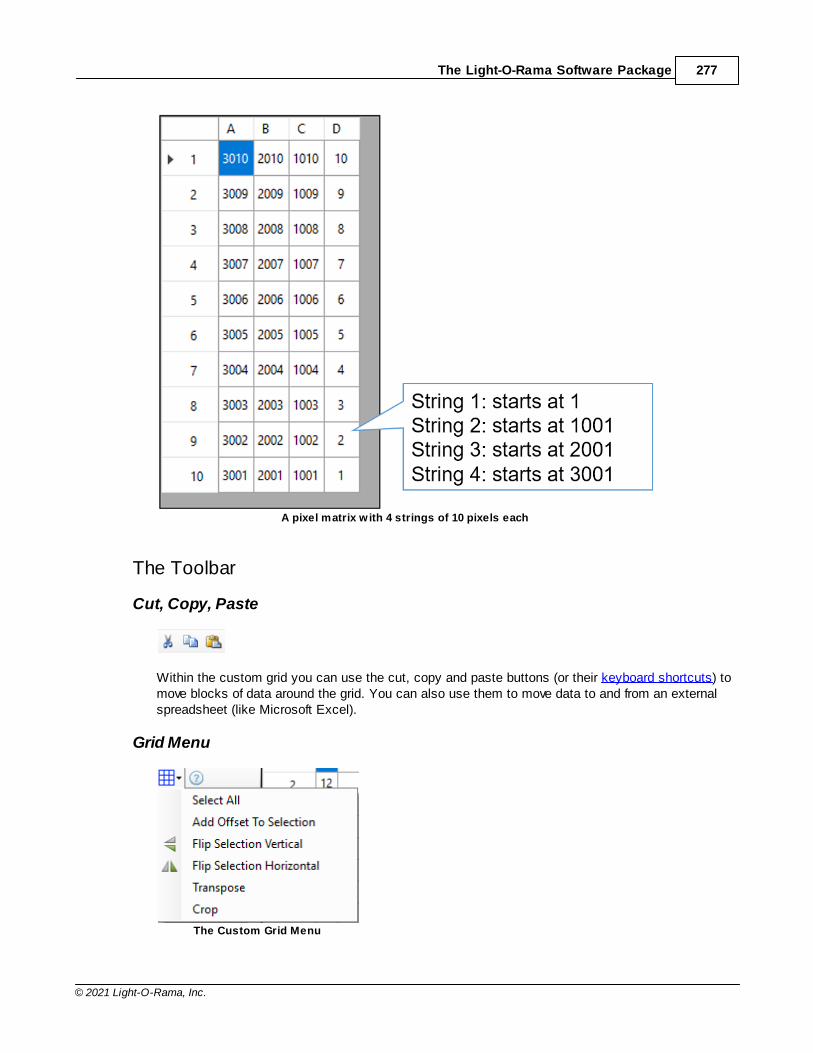
The Light-O-Rama Software Package 277
© 2021 Light-O-Rama, Inc.
A pixel matrix w ith 4 strings of 10 pixels each
The Toolbar
Cut, Copy, Paste
Within the custom grid you can use the cut, copy and paste buttons (or their keyboard shortcuts) tomove blocks of data around the grid. You can also use them to move data to and from an externalspreadsheet (like Microsoft Excel).
Grid Menu
The Custom Grid Menu
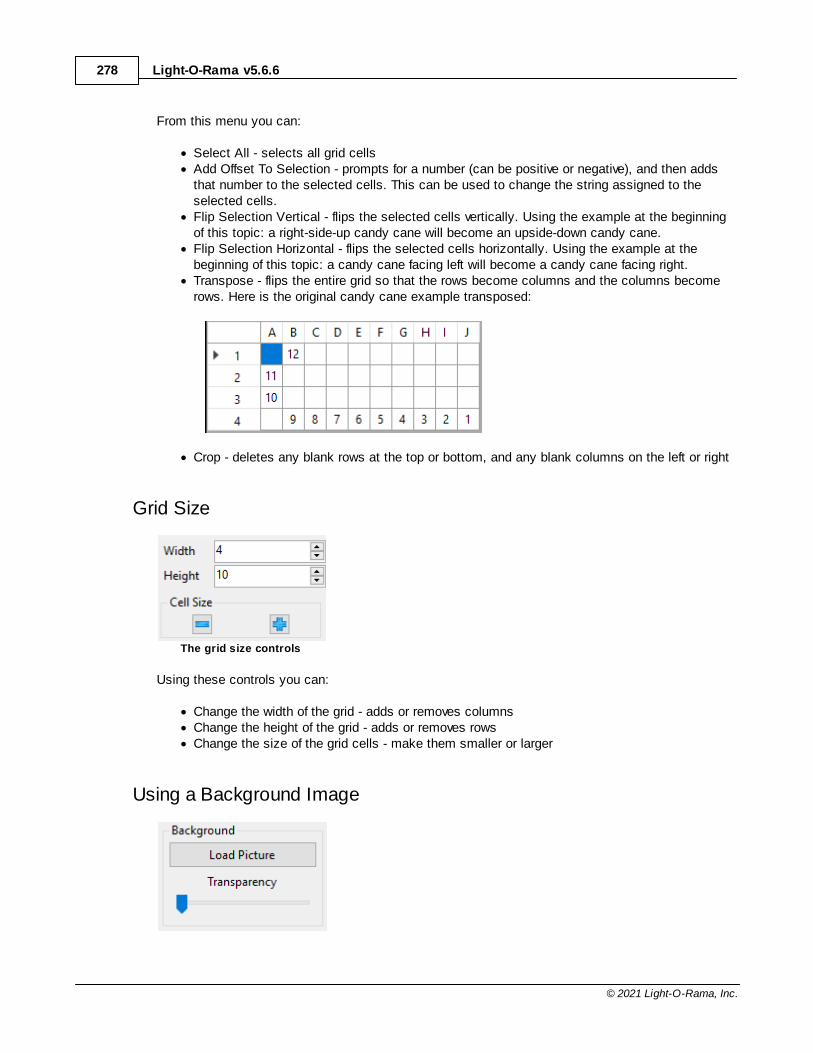
Light-O-Rama v5.6.6278
© 2021 Light-O-Rama, Inc.
From this menu you can:
· Select All - selects all grid cells· Add Offset To Selection - prompts for a number (can be positive or negative), and then adds
that number to the selected cells. This can be used to change the string assigned to theselected cells.
· Flip Selection Vertical - flips the selected cells vertically. Using the example at the beginningof this topic: a right-side-up candy cane will become an upside-down candy cane.
· Flip Selection Horizontal - flips the selected cells horizontally. Using the example at thebeginning of this topic: a candy cane facing left will become a candy cane facing right.
· Transpose - flips the entire grid so that the rows become columns and the columns becomerows. Here is the original candy cane example transposed:
· Crop - deletes any blank rows at the top or bottom, and any blank columns on the left or right
Grid Size
The grid size controls
Using these controls you can:
· Change the width of the grid - adds or removes columns· Change the height of the grid - adds or removes rows· Change the size of the grid cells - make them smaller or larger
Using a Background Image
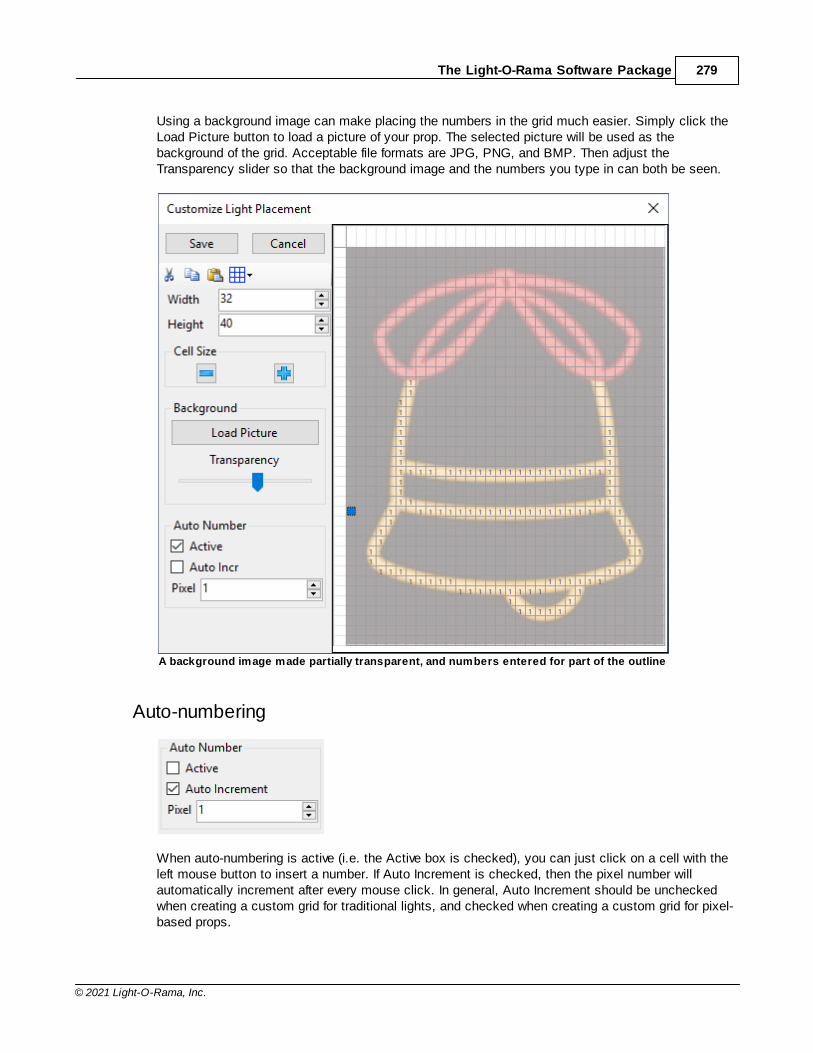
The Light-O-Rama Software Package 279
© 2021 Light-O-Rama, Inc.
Using a background image can make placing the numbers in the grid much easier. Simply click theLoad Picture button to load a picture of your prop. The selected picture will be used as thebackground of the grid. Acceptable file formats are JPG, PNG, and BMP. Then adjust theTransparency slider so that the background image and the numbers you type in can both be seen.
A background image made partially transparent, and numbers entered for part of the outline
Auto-numbering
When auto-numbering is active (i.e. the Active box is checked), you can just click on a cell with theleft mouse button to insert a number. If Auto Increment is checked, then the pixel number willautomatically increment after every mouse click. In general, Auto Increment should be uncheckedwhen creating a custom grid for traditional lights, and checked when creating a custom grid for pixel-based props.
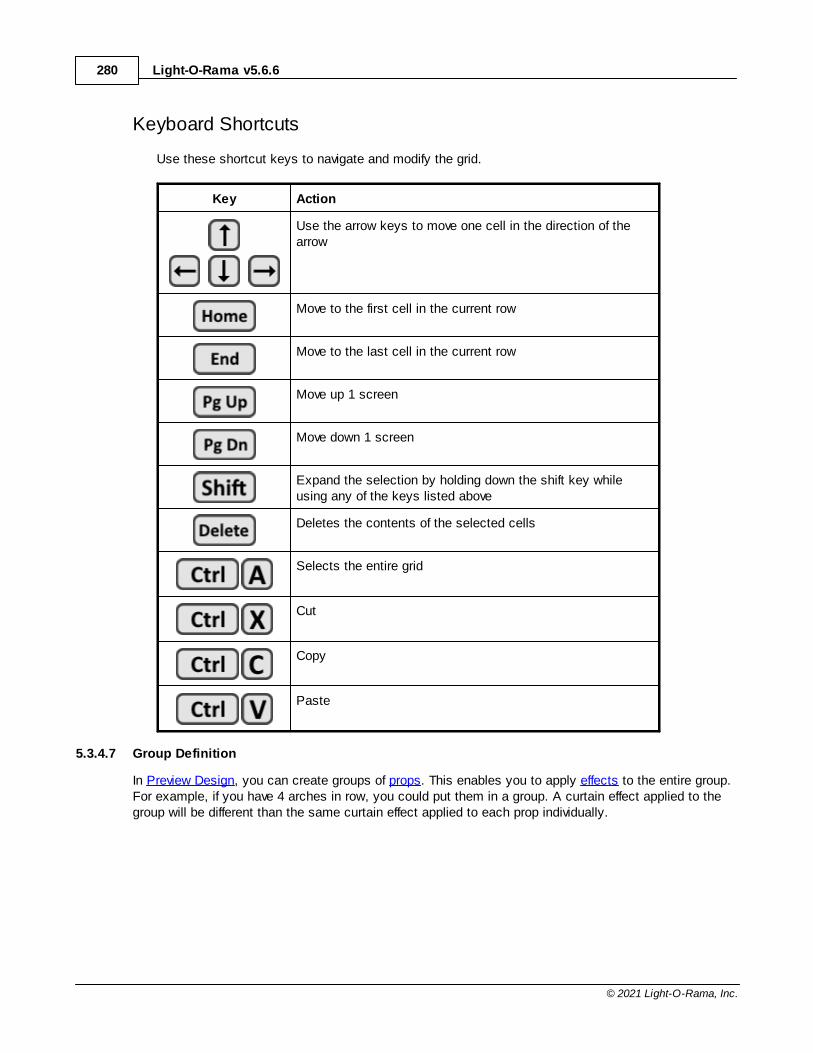
Light-O-Rama v5.6.6280
© 2021 Light-O-Rama, Inc.
Keyboard Shortcuts
Use these shortcut keys to navigate and modify the grid.
Key Action
Use the arrow keys to move one cell in the direction of thearrow
Move to the first cell in the current row
Move to the last cell in the current row
Move up 1 screen
Move down 1 screen
Expand the selection by holding down the shift key whileusing any of the keys listed above
Deletes the contents of the selected cells
Selects the entire grid
Cut
Copy
Paste
5.3.4.7 Group Definition
In Preview Design, you can create groups of props. This enables you to apply effects to the entire group.For example, if you have 4 arches in row, you could put them in a group. A curtain effect applied to thegroup will be different than the same curtain effect applied to each prop individually.
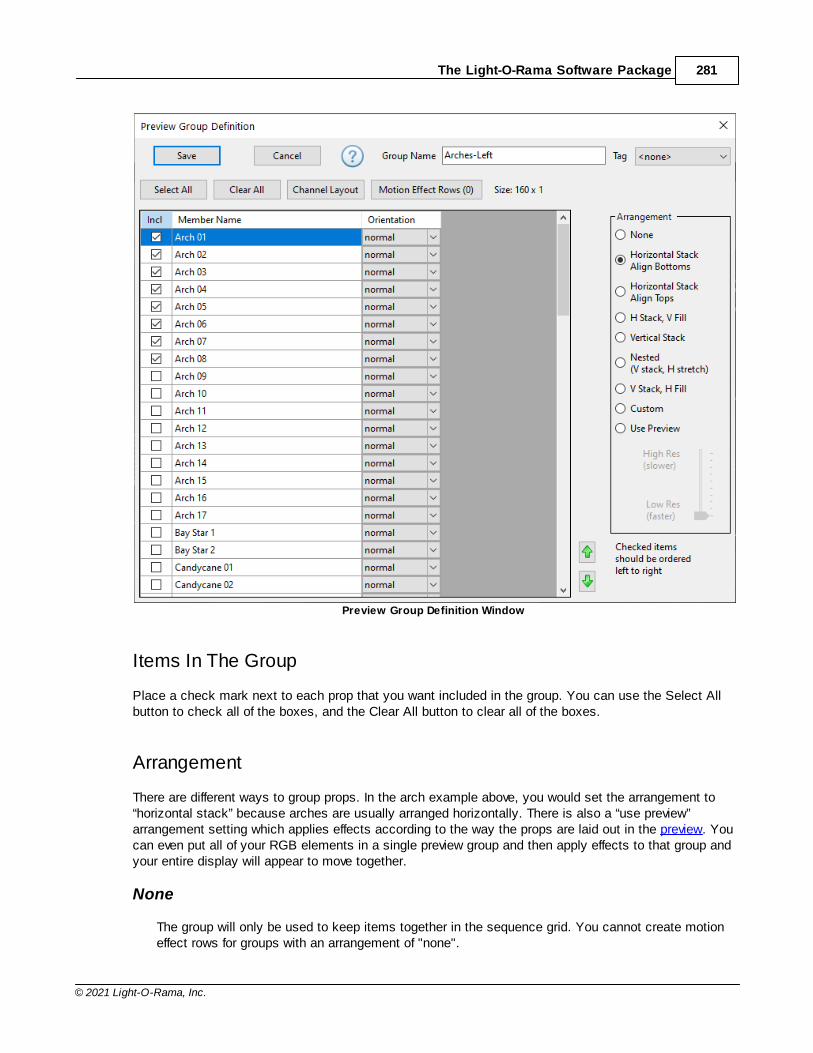
The Light-O-Rama Software Package 281
© 2021 Light-O-Rama, Inc.
Preview Group Definition Window
Items In The Group
Place a check mark next to each prop that you want included in the group. You can use the Select Allbutton to check all of the boxes, and the Clear All button to clear all of the boxes.
Arrangement
There are different ways to group props. In the arch example above, you would set the arrangement to“horizontal stack” because arches are usually arranged horizontally. There is also a “use preview”arrangement setting which applies effects according to the way the props are laid out in the preview. Youcan even put all of your RGB elements in a single preview group and then apply effects to that group andyour entire display will appear to move together.
None
The group will only be used to keep items together in the sequence grid. You cannot create motioneffect rows for groups with an arrangement of "none".
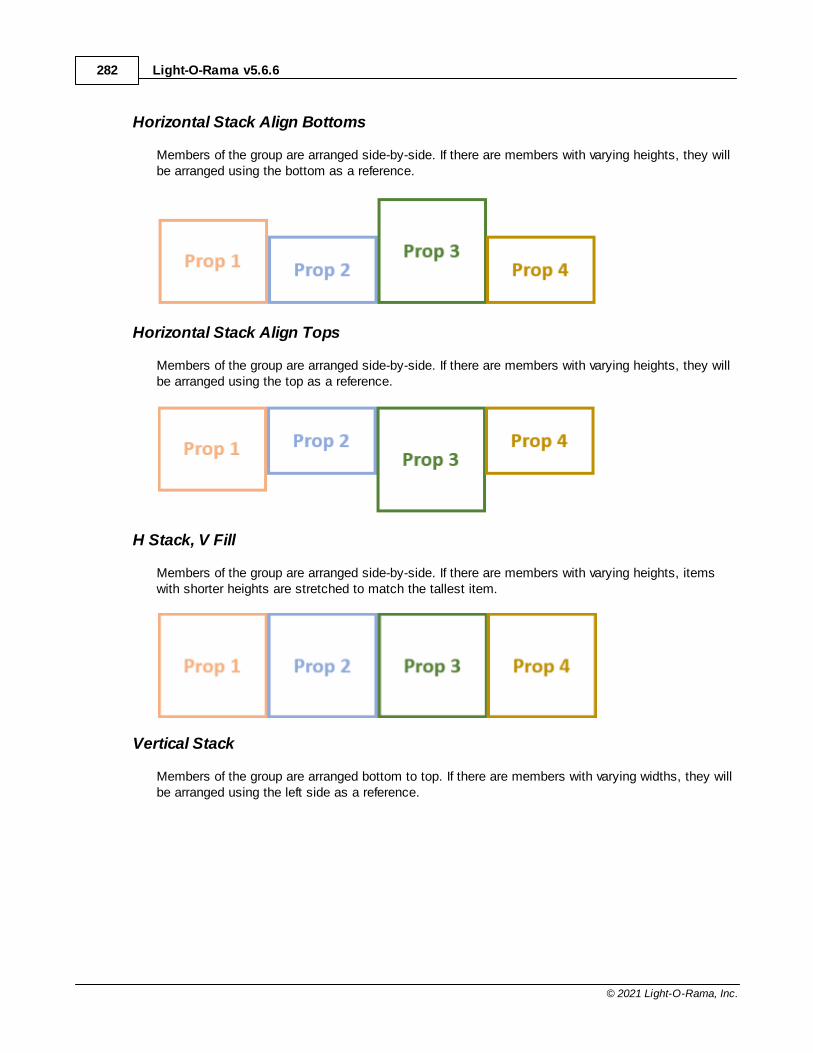
Light-O-Rama v5.6.6282
© 2021 Light-O-Rama, Inc.
Horizontal Stack Align Bottoms
Members of the group are arranged side-by-side. If there are members with varying heights, they willbe arranged using the bottom as a reference.
Horizontal Stack Align Tops
Members of the group are arranged side-by-side. If there are members with varying heights, they willbe arranged using the top as a reference.
H Stack, V Fill
Members of the group are arranged side-by-side. If there are members with varying heights, itemswith shorter heights are stretched to match the tallest item.
Vertical Stack
Members of the group are arranged bottom to top. If there are members with varying widths, they willbe arranged using the left side as a reference.
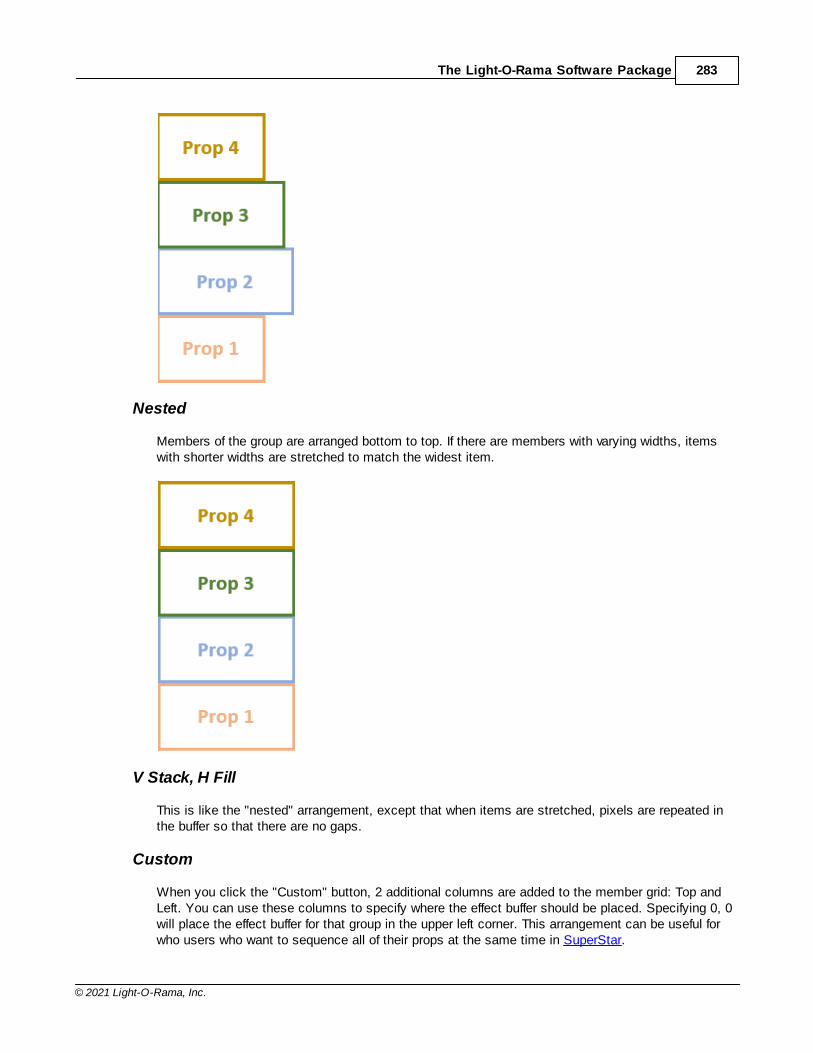
The Light-O-Rama Software Package 283
© 2021 Light-O-Rama, Inc.
Nested
Members of the group are arranged bottom to top. If there are members with varying widths, itemswith shorter widths are stretched to match the widest item.
V Stack, H Fill
This is like the "nested" arrangement, except that when items are stretched, pixels are repeated inthe buffer so that there are no gaps.
Custom
When you click the "Custom" button, 2 additional columns are added to the member grid: Top andLeft. You can use these columns to specify where the effect buffer should be placed. Specifying 0, 0will place the effect buffer for that group in the upper left corner. This arrangement can be useful forwho users who want to sequence all of their props at the same time in SuperStar.

Light-O-Rama v5.6.6284
© 2021 Light-O-Rama, Inc.
Custom Arrangement
Use the "Channel Layout" button to visualize how the props are arranged. Here is a portion of thelayout for the custom arrangement shown above:
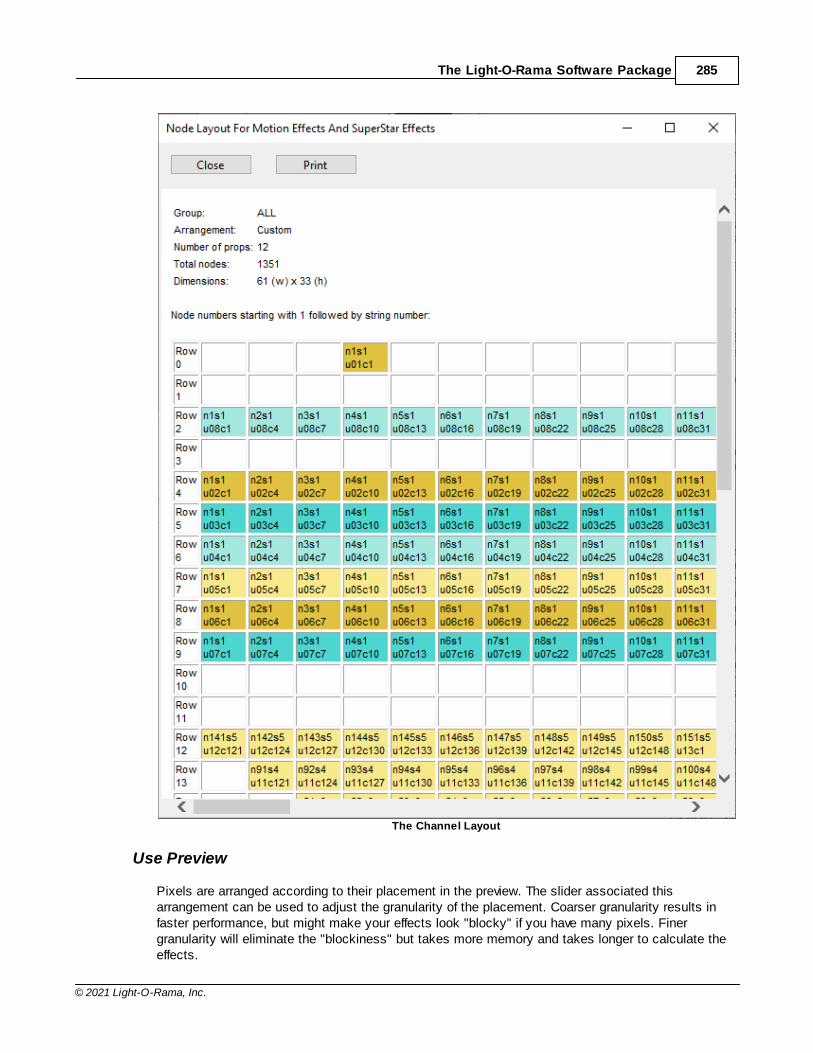
The Light-O-Rama Software Package 285
© 2021 Light-O-Rama, Inc.
The Channel Layout
Use Preview
Pixels are arranged according to their placement in the preview. The slider associated thisarrangement can be used to adjust the granularity of the placement. Coarser granularity results infaster performance, but might make your effects look "blocky" if you have many pixels. Finergranularity will eliminate the "blockiness" but takes more memory and takes longer to calculate theeffects.
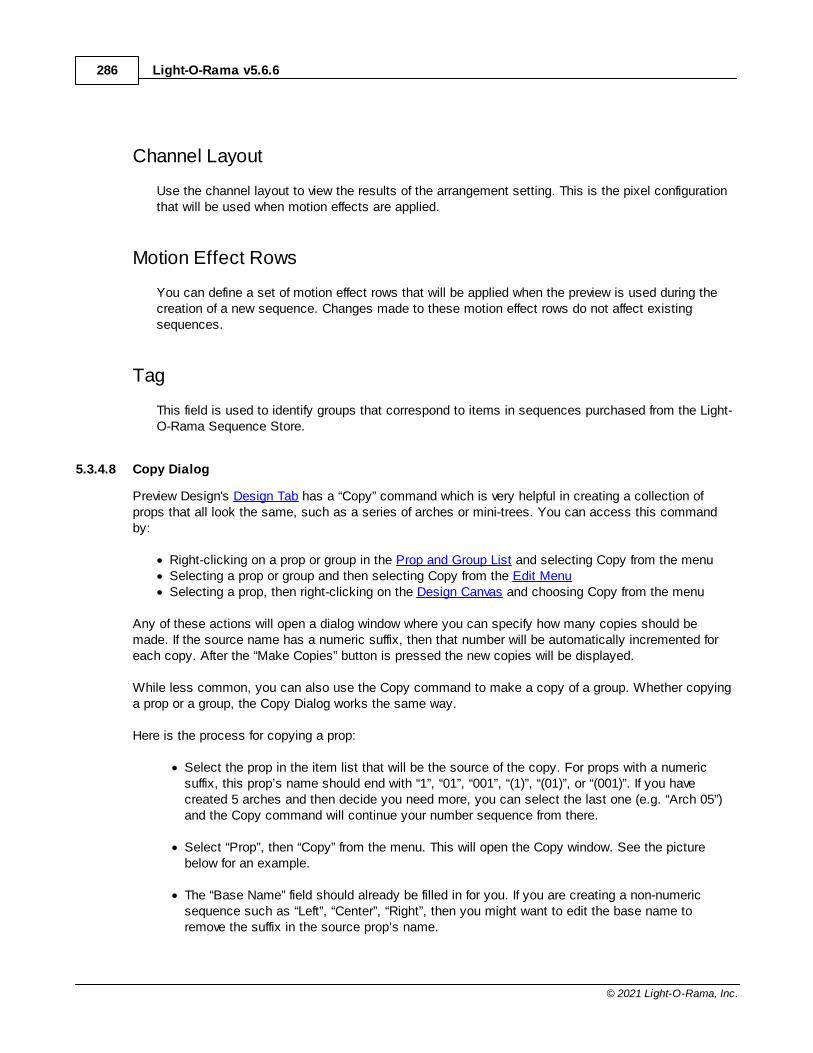
Light-O-Rama v5.6.6286
© 2021 Light-O-Rama, Inc.
Channel Layout
Use the channel layout to view the results of the arrangement setting. This is the pixel configurationthat will be used when motion effects are applied.
Motion Effect Rows
You can define a set of motion effect rows that will be applied when the preview is used during thecreation of a new sequence. Changes made to these motion effect rows do not affect existingsequences.
Tag
This field is used to identify groups that correspond to items in sequences purchased from the Light-O-Rama Sequence Store.
5.3.4.8 Copy Dialog
Preview Design's Design Tab has a “Copy” command which is very helpful in creating a collection ofprops that all look the same, such as a series of arches or mini-trees. You can access this commandby:
· Right-clicking on a prop or group in the Prop and Group List and selecting Copy from the menu· Selecting a prop or group and then selecting Copy from the Edit Menu· Selecting a prop, then right-clicking on the Design Canvas and choosing Copy from the menu
Any of these actions will open a dialog window where you can specify how many copies should bemade. If the source name has a numeric suffix, then that number will be automatically incremented foreach copy. After the “Make Copies” button is pressed the new copies will be displayed.
While less common, you can also use the Copy command to make a copy of a group. Whether copyinga prop or a group, the Copy Dialog works the same way.
Here is the process for copying a prop:
· Select the prop in the item list that will be the source of the copy. For props with a numericsuffix, this prop’s name should end with “1”, “01”, “001”, “(1)”, “(01)”, or “(001)”. If you havecreated 5 arches and then decide you need more, you can select the last one (e.g. “Arch 05”)and the Copy command will continue your number sequence from there.
· Select “Prop”, then “Copy” from the menu. This will open the Copy window. See the picturebelow for an example.
· The “Base Name” field should already be filled in for you. If you are creating a non-numericsequence such as “Left”, “Center”, “Right”, then you might want to edit the base name toremove the suffix in the source prop’s name.
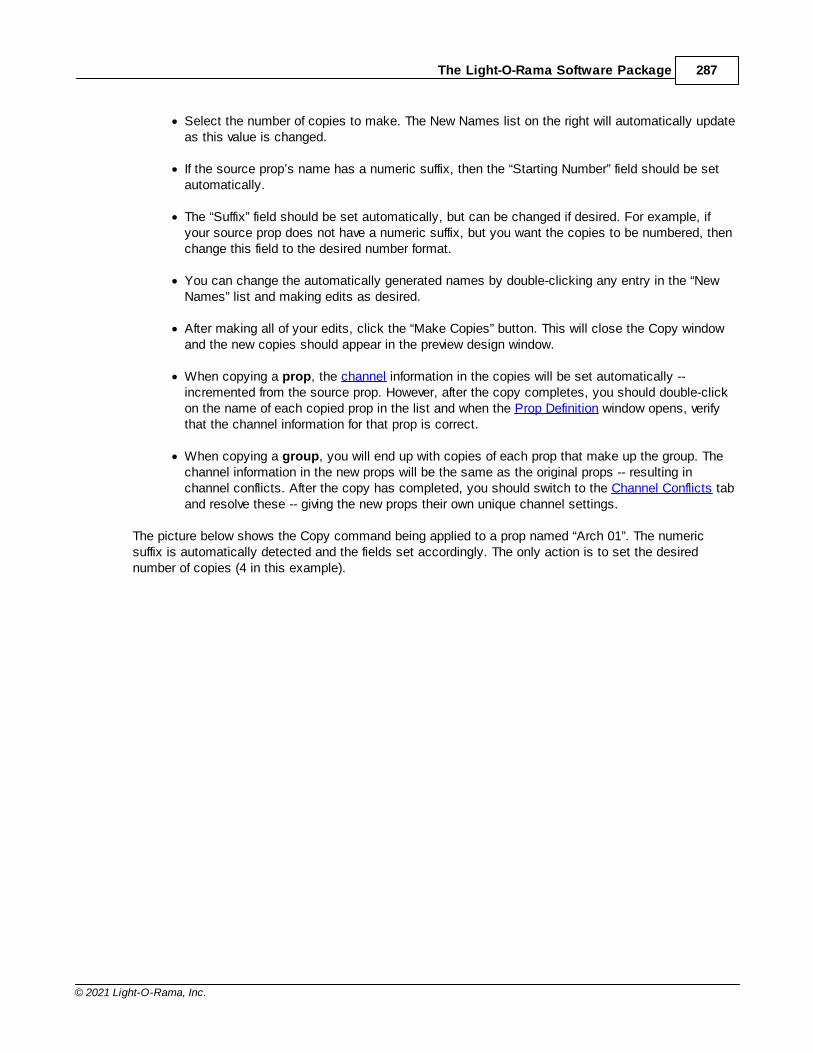
The Light-O-Rama Software Package 287
© 2021 Light-O-Rama, Inc.
· Select the number of copies to make. The New Names list on the right will automatically updateas this value is changed.
· If the source prop’s name has a numeric suffix, then the “Starting Number” field should be setautomatically.
· The “Suffix” field should be set automatically, but can be changed if desired. For example, ifyour source prop does not have a numeric suffix, but you want the copies to be numbered, thenchange this field to the desired number format.
· You can change the automatically generated names by double-clicking any entry in the “NewNames” list and making edits as desired.
· After making all of your edits, click the “Make Copies” button. This will close the Copy windowand the new copies should appear in the preview design window.
· When copying a prop, the channel information in the copies will be set automatically --incremented from the source prop. However, after the copy completes, you should double-clickon the name of each copied prop in the list and when the Prop Definition window opens, verifythat the channel information for that prop is correct.
· When copying a group, you will end up with copies of each prop that make up the group. Thechannel information in the new props will be the same as the original props -- resulting inchannel conflicts. After the copy has completed, you should switch to the Channel Conflicts taband resolve these -- giving the new props their own unique channel settings.
The picture below shows the Copy command being applied to a prop named “Arch 01”. The numericsuffix is automatically detected and the fields set accordingly. The only action is to set the desirednumber of copies (4 in this example).
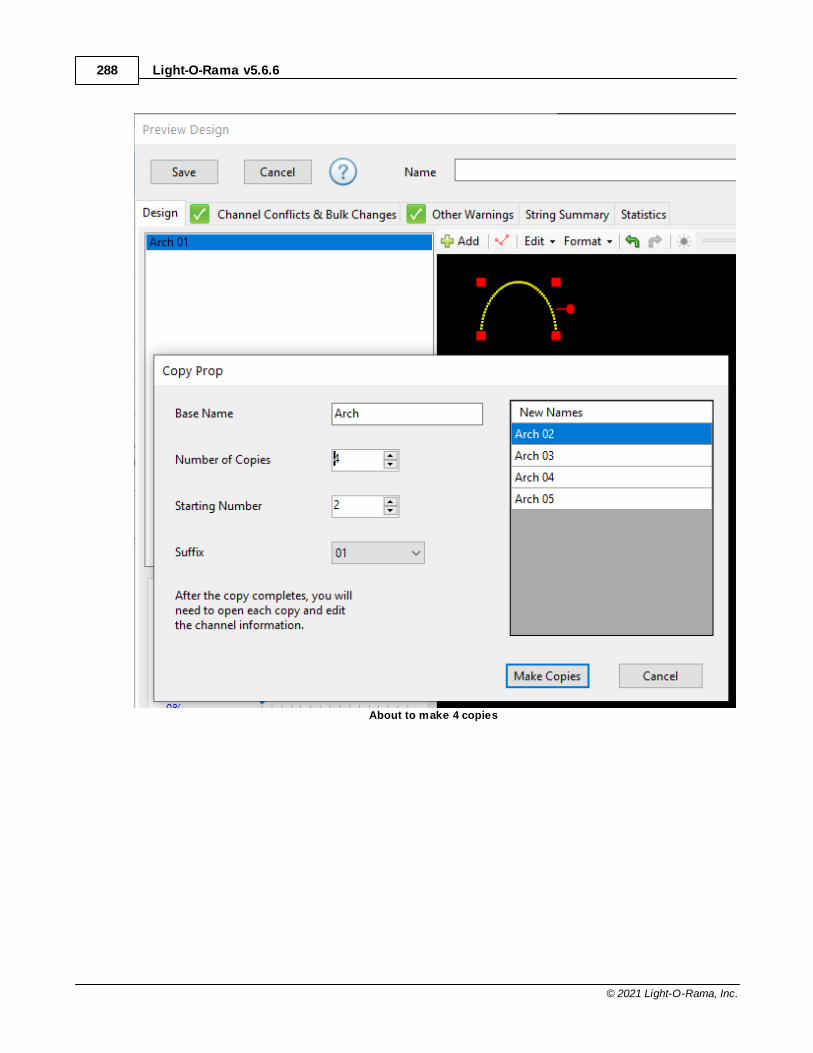
Light-O-Rama v5.6.6288
© 2021 Light-O-Rama, Inc.
About to make 4 copies
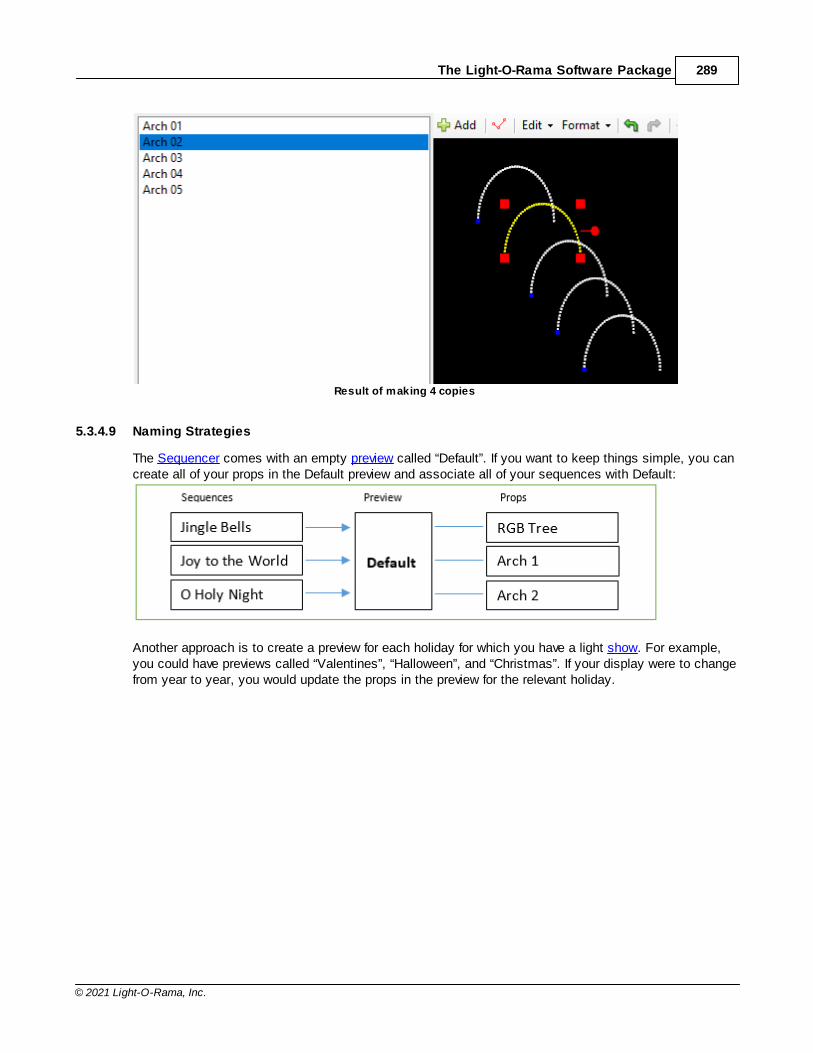
The Light-O-Rama Software Package 289
© 2021 Light-O-Rama, Inc.
Result of making 4 copies
5.3.4.9 Naming Strategies
The Sequencer comes with an empty preview called “Default”. If you want to keep things simple, you cancreate all of your props in the Default preview and associate all of your sequences with Default:
Another approach is to create a preview for each holiday for which you have a light show. For example,you could have previews called “Valentines”, “Halloween”, and “Christmas”. If your display were to changefrom year to year, you would update the props in the preview for the relevant holiday.
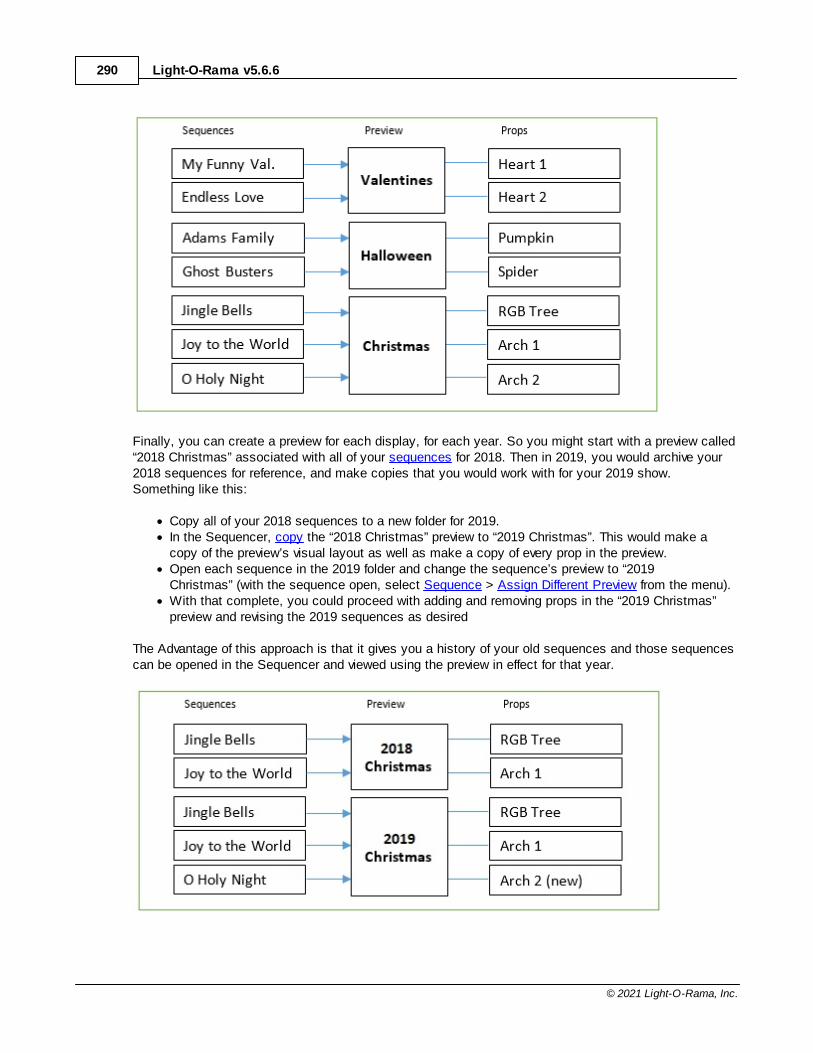
Light-O-Rama v5.6.6290
© 2021 Light-O-Rama, Inc.
Finally, you can create a preview for each display, for each year. So you might start with a preview called“2018 Christmas” associated with all of your sequences for 2018. Then in 2019, you would archive your2018 sequences for reference, and make copies that you would work with for your 2019 show.Something like this:
· Copy all of your 2018 sequences to a new folder for 2019. · In the Sequencer, copy the “2018 Christmas” preview to “2019 Christmas”. This would make a
copy of the preview’s visual layout as well as make a copy of every prop in the preview. · Open each sequence in the 2019 folder and change the sequence’s preview to “2019
Christmas” (with the sequence open, select Sequence > Assign Different Preview from the menu).· With that complete, you could proceed with adding and removing props in the “2019 Christmas”
preview and revising the 2019 sequences as desired
The Advantage of this approach is that it gives you a history of your old sequences and those sequencescan be opened in the Sequencer and viewed using the preview in effect for that year.
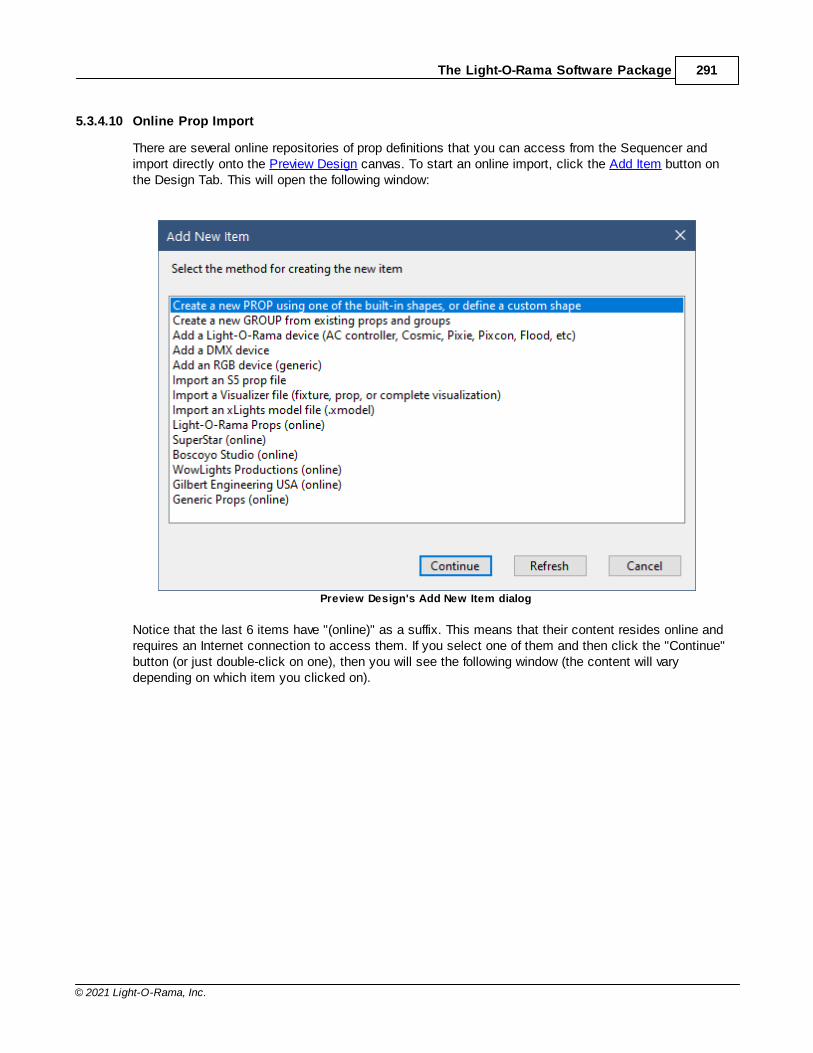
The Light-O-Rama Software Package 291
© 2021 Light-O-Rama, Inc.
5.3.4.10 Online Prop Import
There are several online repositories of prop definitions that you can access from the Sequencer andimport directly onto the Preview Design canvas. To start an online import, click the Add Item button onthe Design Tab. This will open the following window:
Preview Design's Add New Item dialog
Notice that the last 6 items have "(online)" as a suffix. This means that their content resides online andrequires an Internet connection to access them. If you select one of them and then click the "Continue"button (or just double-click on one), then you will see the following window (the content will varydepending on which item you clicked on).
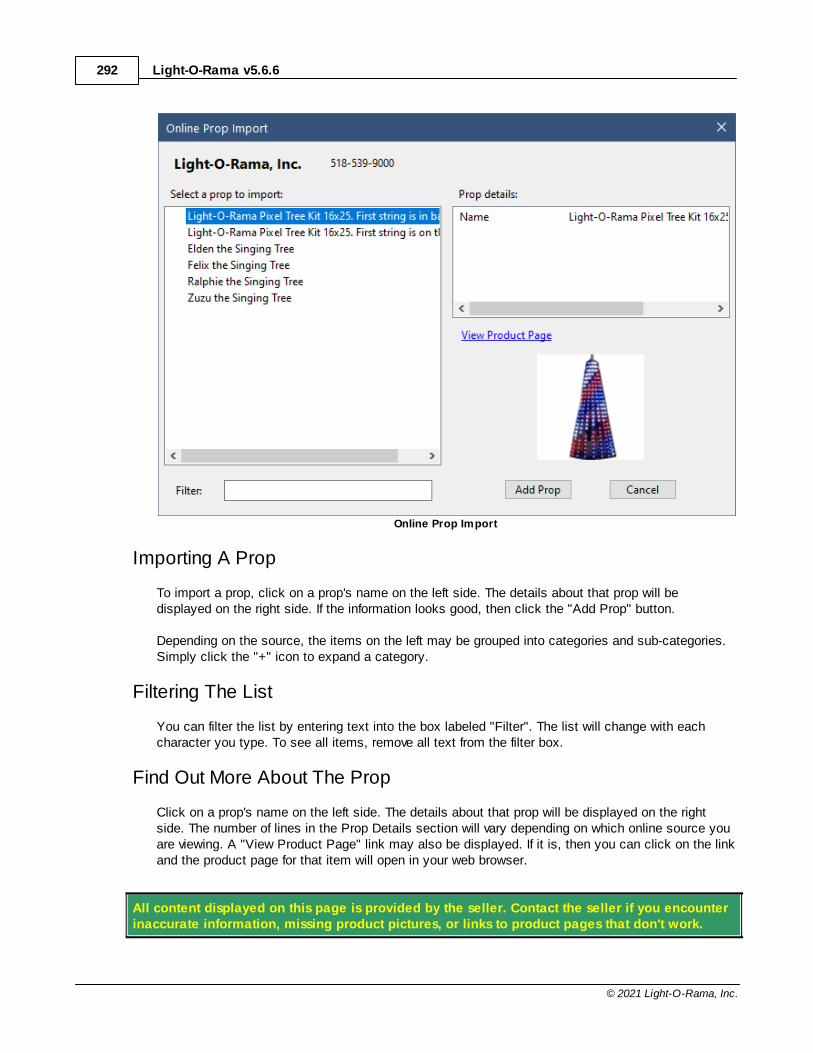
Light-O-Rama v5.6.6292
© 2021 Light-O-Rama, Inc.
Online Prop Import
Importing A Prop
To import a prop, click on a prop's name on the left side. The details about that prop will bedisplayed on the right side. If the information looks good, then click the "Add Prop" button.
Depending on the source, the items on the left may be grouped into categories and sub-categories.Simply click the "+" icon to expand a category.
Filtering The List
You can filter the list by entering text into the box labeled "Filter". The list will change with eachcharacter you type. To see all items, remove all text from the filter box.
Find Out More About The Prop
Click on a prop's name on the left side. The details about that prop will be displayed on the rightside. The number of lines in the Prop Details section will vary depending on which online source youare viewing. A "View Product Page" link may also be displayed. If it is, then you can click on the linkand the product page for that item will open in your web browser.
All content displayed on this page is provided by the seller. Contact the seller if you encounterinaccurate information, missing product pictures, or links to product pages that don't work.
The Light-O-Rama Software Package 293
© 2021 Light-O-Rama, Inc.
5.3.4.11 Layout View
This window displays a printable layout of the selected prop or group with channel information for everystring or pixel. It is very useful for pixel-based props because it shows how the pixels are arranged whenmotion effects are applied.
What is a "node"?
The Layout View displays an arrangement of nodes. A "node" is either:
· a single channel, or· an RGB channel (for Dumb RGB or RGB pixels), or· a group of single-colored strings (a bundle). These are often used for megatrees made of traditional
lights.
Each node is labeled with 2 lines of text:
· "n1s1" means the node 1, string 1· "u01c1" means unit id 01, circuit 1 for LOR devices. "u1c1" means universe 1 channel 1 for DMX
devices.
If the node has multiple channels, only the first channel is listed. Refer back to the Prop Definition screento determine the other channels in the node.
Prop - Single Channel
The shows a sample layout for a prop with a single channel. At the top are the name, shape, string type,and device type used by the prop. This example has single node representing a single channel. Thebottom of the Layout View shows the arrangement of all of the nodes (in this case just 1).
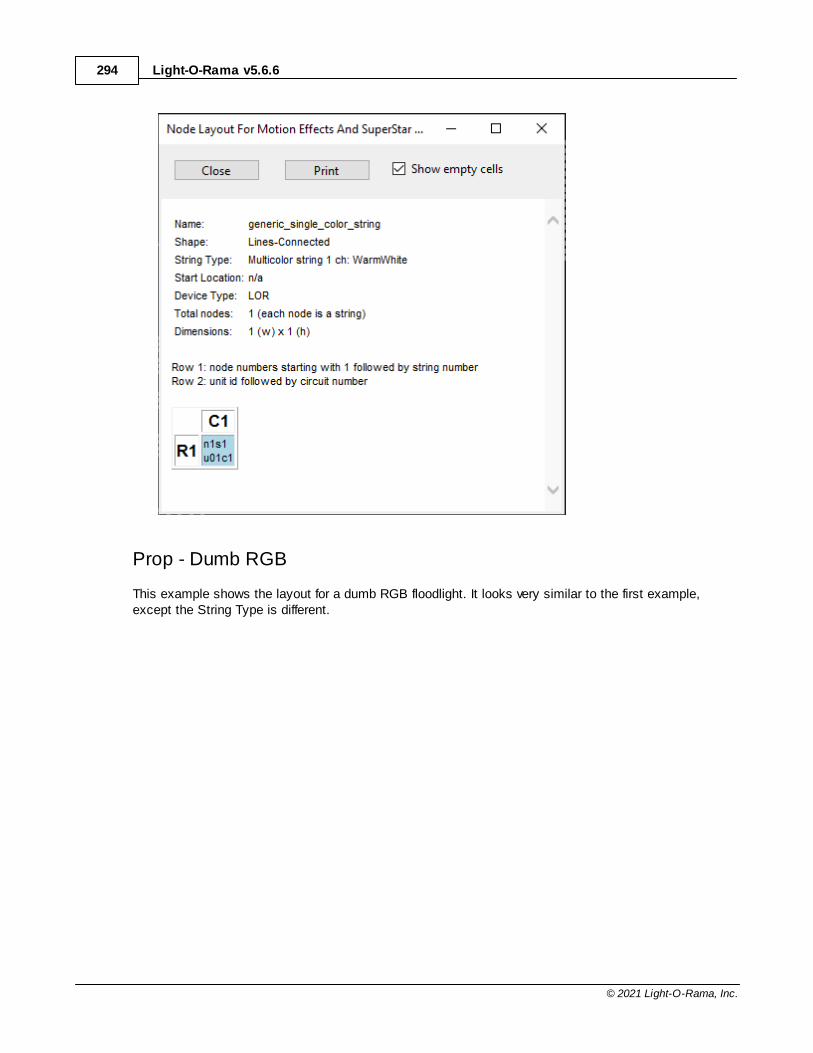
Light-O-Rama v5.6.6294
© 2021 Light-O-Rama, Inc.
Prop - Dumb RGB
This example shows the layout for a dumb RGB floodlight. It looks very similar to the first example,except the String Type is different.
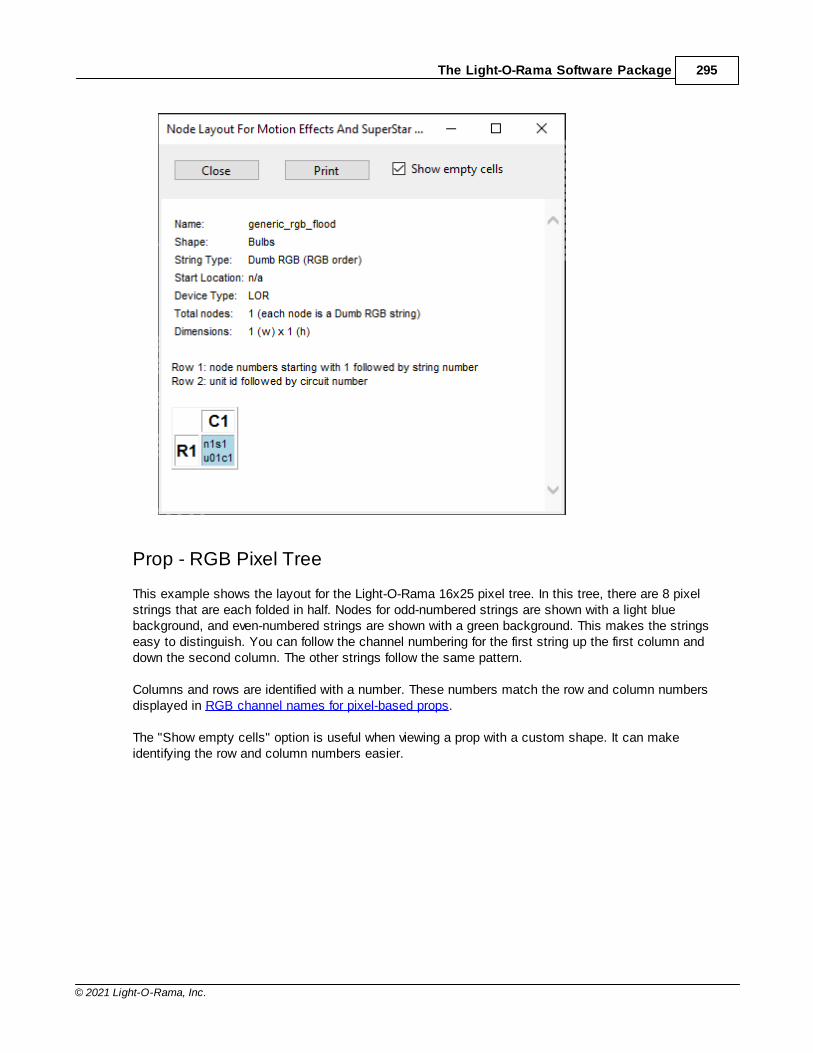
The Light-O-Rama Software Package 295
© 2021 Light-O-Rama, Inc.
Prop - RGB Pixel Tree
This example shows the layout for the Light-O-Rama 16x25 pixel tree. In this tree, there are 8 pixelstrings that are each folded in half. Nodes for odd-numbered strings are shown with a light bluebackground, and even-numbered strings are shown with a green background. This makes the stringseasy to distinguish. You can follow the channel numbering for the first string up the first column anddown the second column. The other strings follow the same pattern.
Columns and rows are identified with a number. These numbers match the row and column numbersdisplayed in RGB channel names for pixel-based props.
The "Show empty cells" option is useful when viewing a prop with a custom shape. It can makeidentifying the row and column numbers easier.
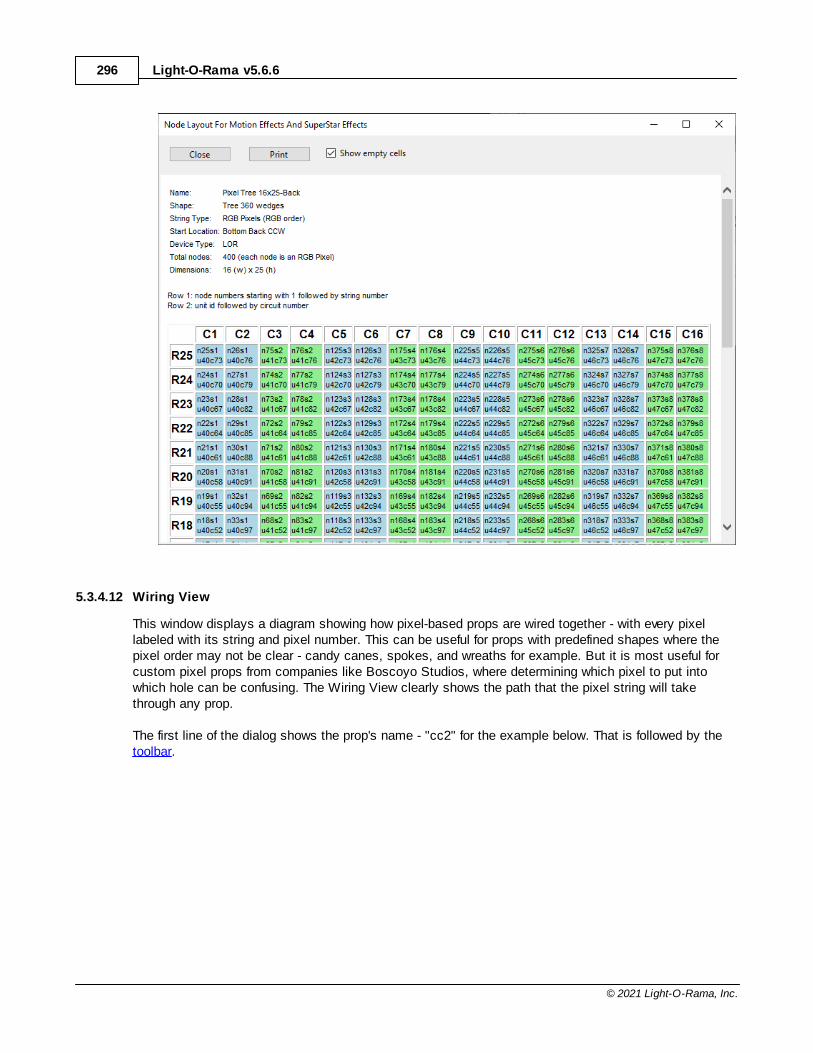
Light-O-Rama v5.6.6296
© 2021 Light-O-Rama, Inc.
5.3.4.12 Wiring View
This window displays a diagram showing how pixel-based props are wired together - with every pixellabeled with its string and pixel number. This can be useful for props with predefined shapes where thepixel order may not be clear - candy canes, spokes, and wreaths for example. But it is most useful forcustom pixel props from companies like Boscoyo Studios, where determining which pixel to put intowhich hole can be confusing. The Wiring View clearly shows the path that the pixel string will takethrough any prop.
The first line of the dialog shows the prop's name - "cc2" for the example below. That is followed by thetoolbar.
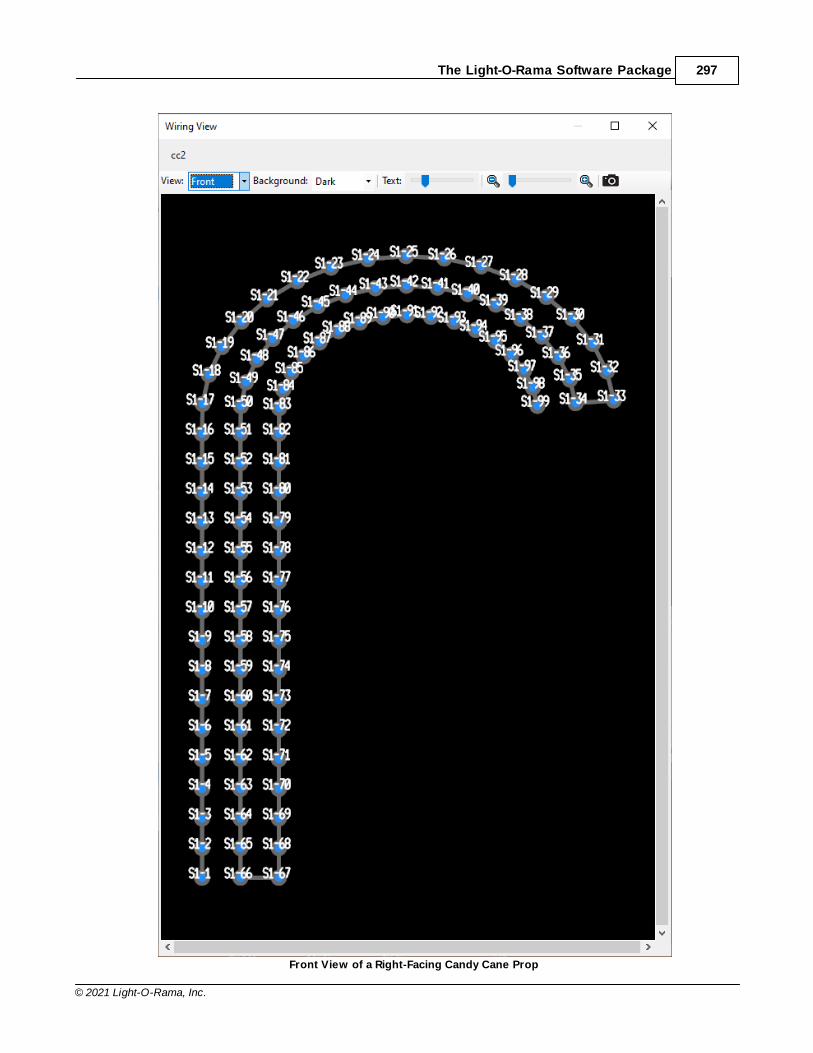
The Light-O-Rama Software Package 297
© 2021 Light-O-Rama, Inc.
Front View of a Right-Facing Candy Cane Prop
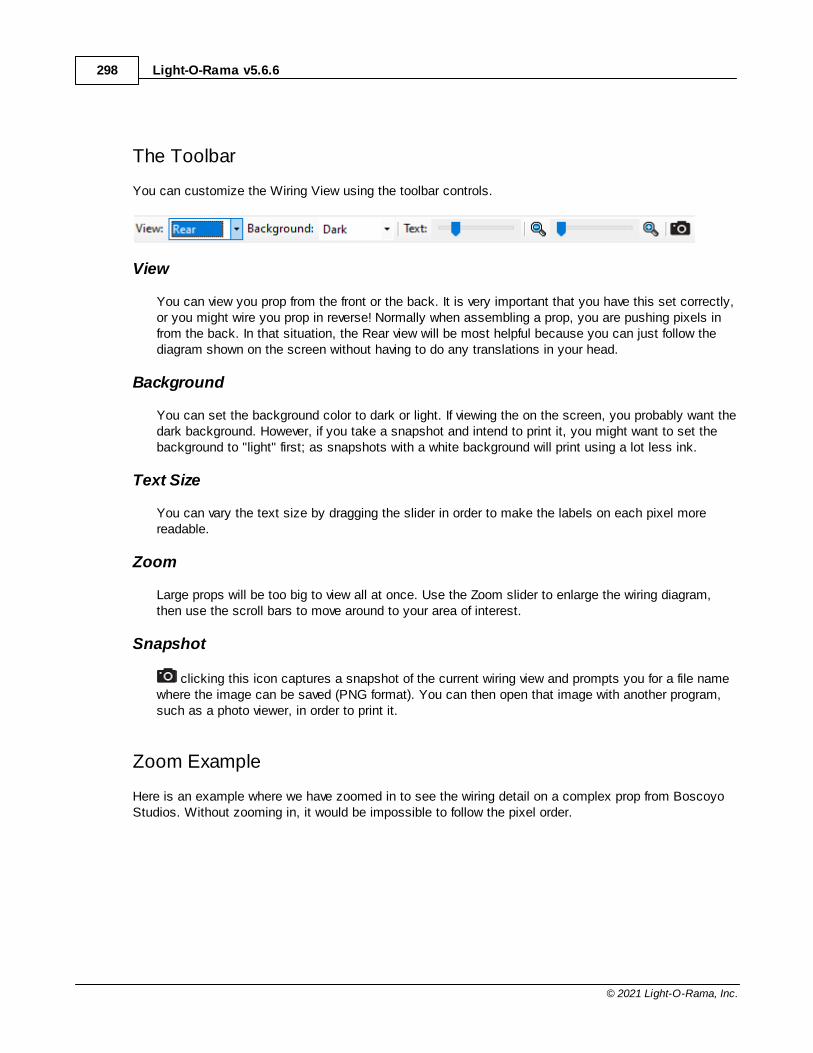
Light-O-Rama v5.6.6298
© 2021 Light-O-Rama, Inc.
The Toolbar
You can customize the Wiring View using the toolbar controls.
View
You can view you prop from the front or the back. It is very important that you have this set correctly,or you might wire you prop in reverse! Normally when assembling a prop, you are pushing pixels infrom the back. In that situation, the Rear view will be most helpful because you can just follow thediagram shown on the screen without having to do any translations in your head.
Background
You can set the background color to dark or light. If viewing the on the screen, you probably want thedark background. However, if you take a snapshot and intend to print it, you might want to set thebackground to "light" first; as snapshots with a white background will print using a lot less ink.
Text Size
You can vary the text size by dragging the slider in order to make the labels on each pixel morereadable.
Zoom
Large props will be too big to view all at once. Use the Zoom slider to enlarge the wiring diagram,then use the scroll bars to move around to your area of interest.
Snapshot
clicking this icon captures a snapshot of the current wiring view and prompts you for a file namewhere the image can be saved (PNG format). You can then open that image with another program,such as a photo viewer, in order to print it.
Zoom Example
Here is an example where we have zoomed in to see the wiring detail on a complex prop from BoscoyoStudios. Without zooming in, it would be impossible to follow the pixel order.
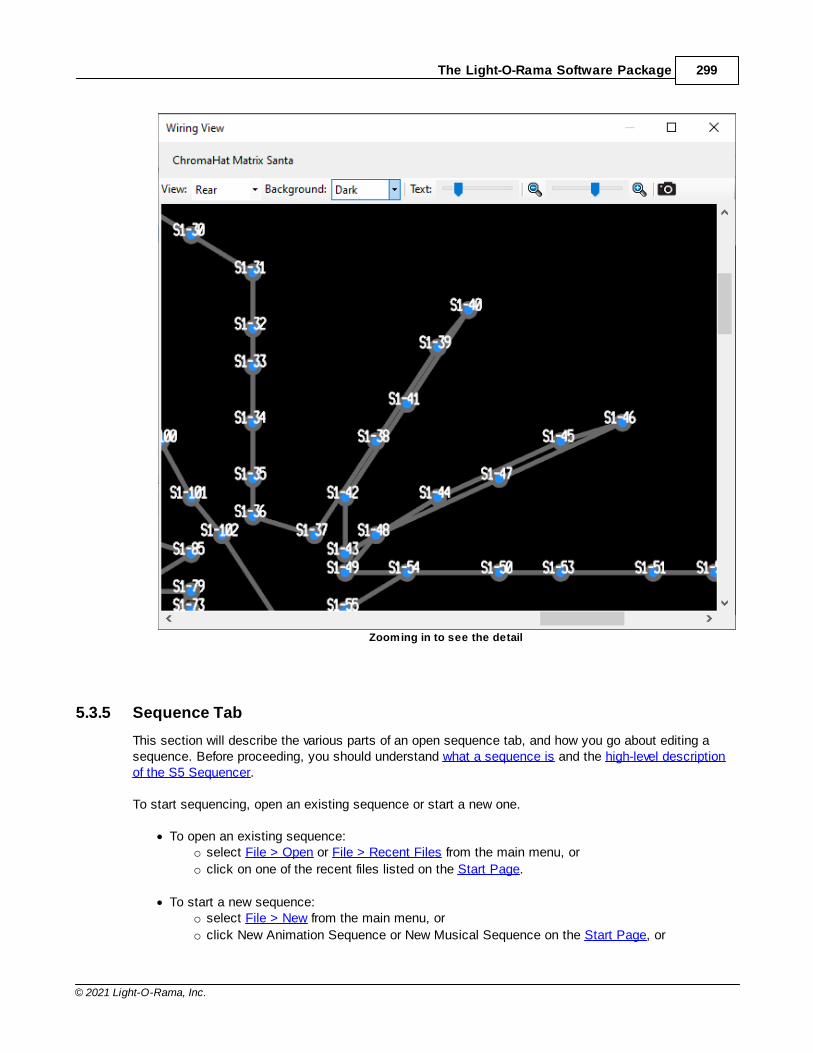
The Light-O-Rama Software Package 299
© 2021 Light-O-Rama, Inc.
Zooming in to see the detail
5.3.5 Sequence Tab
This section will describe the various parts of an open sequence tab, and how you go about editing asequence. Before proceeding, you should understand what a sequence is and the high-level descriptionof the S5 Sequencer.
To start sequencing, open an existing sequence or start a new one.
· To open an existing sequence: o select File > Open or File > Recent Files from the main menu, or
o click on one of the recent files listed on the Start Page.
· To start a new sequence: o select File > New from the main menu, or
o click New Animation Sequence or New Musical Sequence on the Start Page, or

Light-O-Rama v5.6.6300
© 2021 Light-O-Rama, Inc.
o right-click on a preview in the Previews Window and select New Animation Sequence or
New Musical Sequence from the pop-up menu.
The sequence will be displayed in its own tab. Normally, you view only one sequence tab at a time;however, you can view sequences side-by-side as described in the Customizing Window Layouts topic.
The Sequencer w ith an open musical sequence
Each sequence tab has several sections:
· At the very top, the tab displays the sequence name. The name is preceded by an asterisk "*" ifthere are unsaved changes. Hovering your cursor over the tab will display a tool-tip showing the fullpath to the sequence file. After the name is an "X", which when clicked will close the sequence.
· The Toolbars - there are 3 toolbars which contain command buttons for saving, playing, andmodifying the sequence.
· Grid Views and the Grid View Menu - which control the content of the item list· The Timeline - displays the time dimension of the sequence. It shows where you are in your
sequence time-wise. · The Waveform - if this is a musical sequence, the audio waveform can be displayed to help place
effects so that they are synchronized to the music.· Item List - the list of preview props, preview groups, grid view groups, subsequences, archive
props, RGB aggregates, beat channels (in musical sequences), and loops (in animationsequences) shown to the left of the sequence grid.
· Sequence Grid - there is a row in the sequence grid for every item in the item list. Cells in the griddisplay the lighting effects that will happen on an item at various points in time while the sequenceis being played.
· The Status Bar displays the total length of the sequence, as well as information about theselected region of the grid.
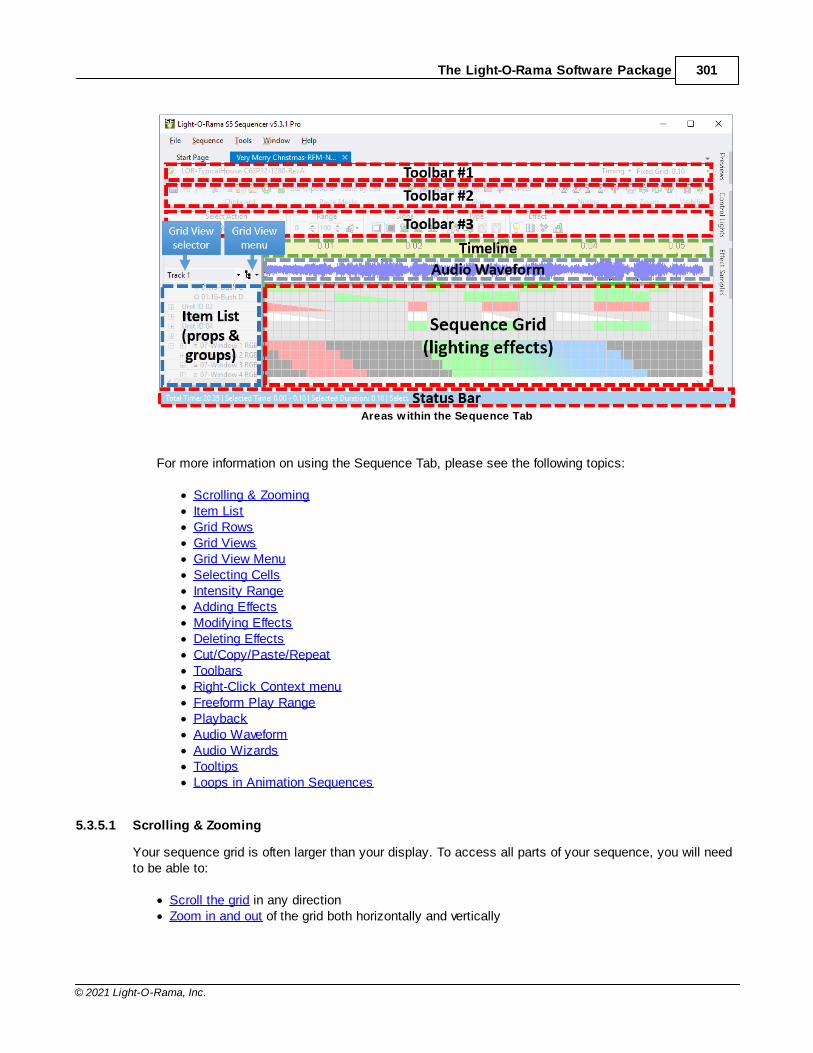
The Light-O-Rama Software Package 301
© 2021 Light-O-Rama, Inc.
Areas within the Sequence Tab
For more information on using the Sequence Tab, please see the following topics:
· Scrolling & Zooming· Item List· Grid Rows· Grid Views· Grid View Menu· Selecting Cells· Intensity Range· Adding Effects· Modifying Effects· Deleting Effects· Cut/Copy/Paste/Repeat· Toolbars· Right-Click Context menu· Freeform Play Range· Playback· Audio Waveform· Audio Wizards· Tooltips· Loops in Animation Sequences
5.3.5.1 Scrolling & Zooming
Your sequence grid is often larger than your display. To access all parts of your sequence, you will needto be able to:
· Scroll the grid in any direction· Zoom in and out of the grid both horizontally and vertically
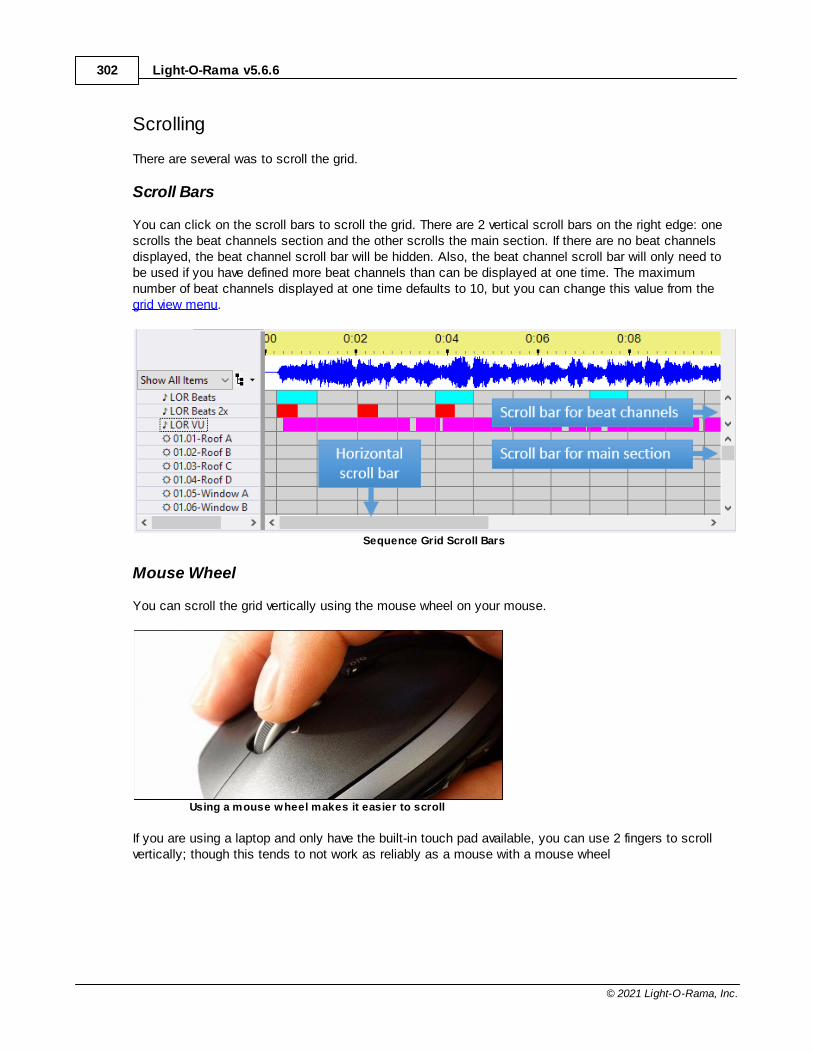
Light-O-Rama v5.6.6302
© 2021 Light-O-Rama, Inc.
Scrolling
There are several was to scroll the grid.
Scroll Bars
You can click on the scroll bars to scroll the grid. There are 2 vertical scroll bars on the right edge: onescrolls the beat channels section and the other scrolls the main section. If there are no beat channelsdisplayed, the beat channel scroll bar will be hidden. Also, the beat channel scroll bar will only need tobe used if you have defined more beat channels than can be displayed at one time. The maximumnumber of beat channels displayed at one time defaults to 10, but you can change this value from thegrid view menu.
Sequence Grid Scroll Bars
Mouse Wheel
You can scroll the grid vertically using the mouse wheel on your mouse.
Using a mouse wheel makes it easier to scroll
If you are using a laptop and only have the built-in touch pad available, you can use 2 fingers to scrollvertically; though this tends to not work as reliably as a mouse with a mouse wheel
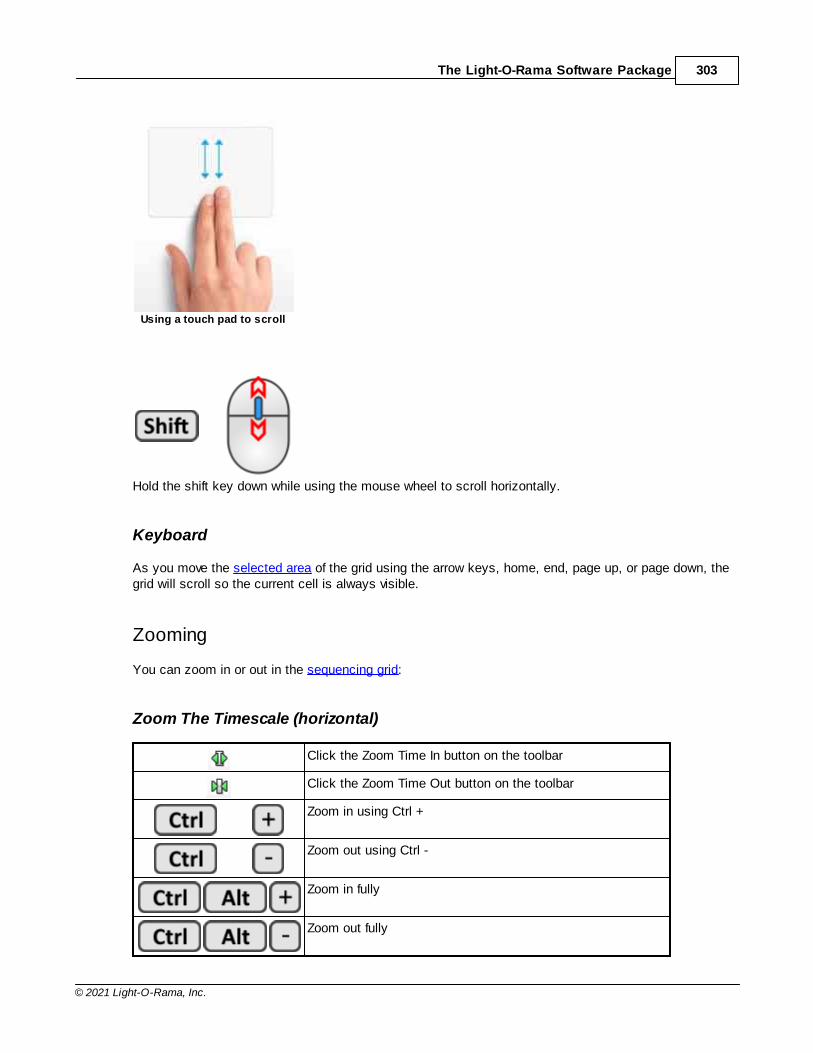
The Light-O-Rama Software Package 303
© 2021 Light-O-Rama, Inc.
Using a touch pad to scroll
Hold the shift key down while using the mouse wheel to scroll horizontally.
Keyboard
As you move the selected area of the grid using the arrow keys, home, end, page up, or page down, thegrid will scroll so the current cell is always visible.
Zooming
You can zoom in or out in the sequencing grid:
Zoom The Timescale (horizontal)
Click the Zoom Time In button on the toolbar
Click the Zoom Time Out button on the toolbar
Zoom in using Ctrl +
Zoom out using Ctrl -
Zoom in fully
Zoom out fully
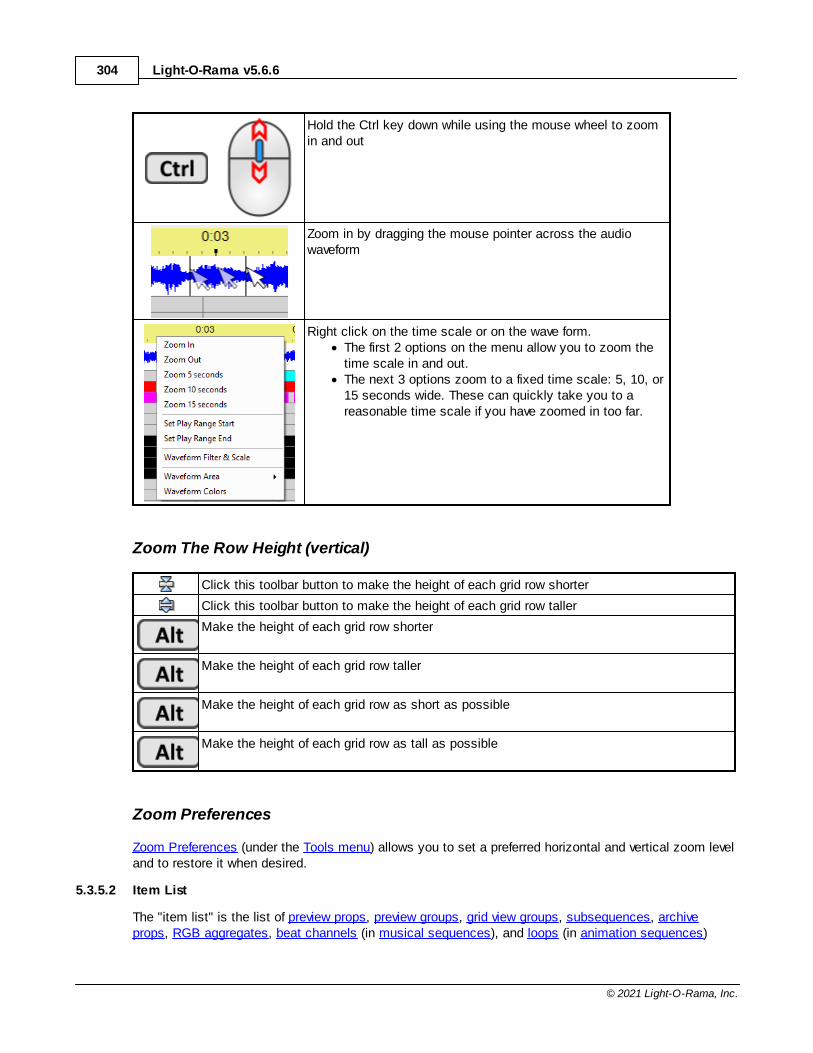
Light-O-Rama v5.6.6304
© 2021 Light-O-Rama, Inc.
Hold the Ctrl key down while using the mouse wheel to zoomin and out
Zoom in by dragging the mouse pointer across the audiowaveform
Right click on the time scale or on the wave form. · The first 2 options on the menu allow you to zoom the
time scale in and out.· The next 3 options zoom to a fixed time scale: 5, 10, or
15 seconds wide. These can quickly take you to areasonable time scale if you have zoomed in too far.
Zoom The Row Height (vertical)
Click this toolbar button to make the height of each grid row shorter
Click this toolbar button to make the height of each grid row taller
Make the height of each grid row shorter
Make the height of each grid row taller
Make the height of each grid row as short as possible
Make the height of each grid row as tall as possible
Zoom Preferences
Zoom Preferences (under the Tools menu) allows you to set a preferred horizontal and vertical zoom leveland to restore it when desired.
5.3.5.2 Item List
The "item list" is the list of preview props, preview groups, grid view groups, subsequences, archiveprops, RGB aggregates, beat channels (in musical sequences), and loops (in animation sequences)
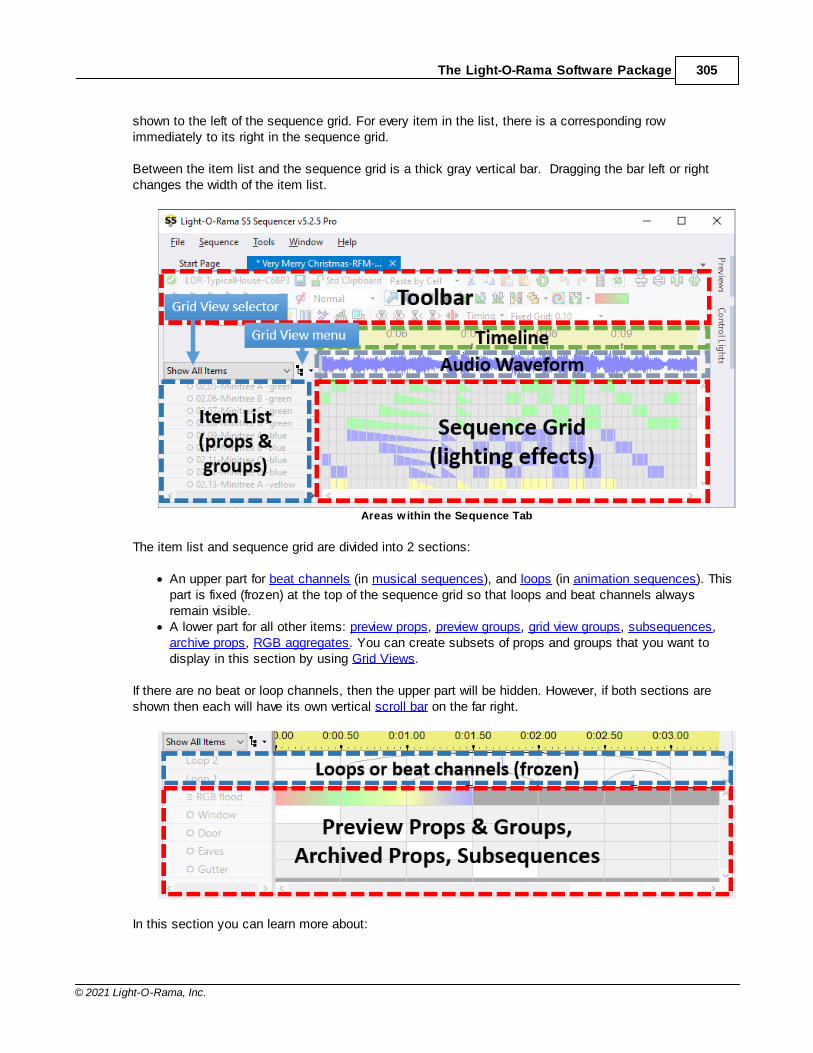
The Light-O-Rama Software Package 305
© 2021 Light-O-Rama, Inc.
shown to the left of the sequence grid. For every item in the list, there is a corresponding rowimmediately to its right in the sequence grid.
Between the item list and the sequence grid is a thick gray vertical bar. Dragging the bar left or rightchanges the width of the item list.
Areas within the Sequence Tab
The item list and sequence grid are divided into 2 sections:
· An upper part for beat channels (in musical sequences), and loops (in animation sequences). Thispart is fixed (frozen) at the top of the sequence grid so that loops and beat channels alwaysremain visible.
· A lower part for all other items: preview props, preview groups, grid view groups, subsequences,archive props, RGB aggregates. You can create subsets of props and groups that you want todisplay in this section by using Grid Views.
If there are no beat or loop channels, then the upper part will be hidden. However, if both sections areshown then each will have its own vertical scroll bar on the far right.
In this section you can learn more about:
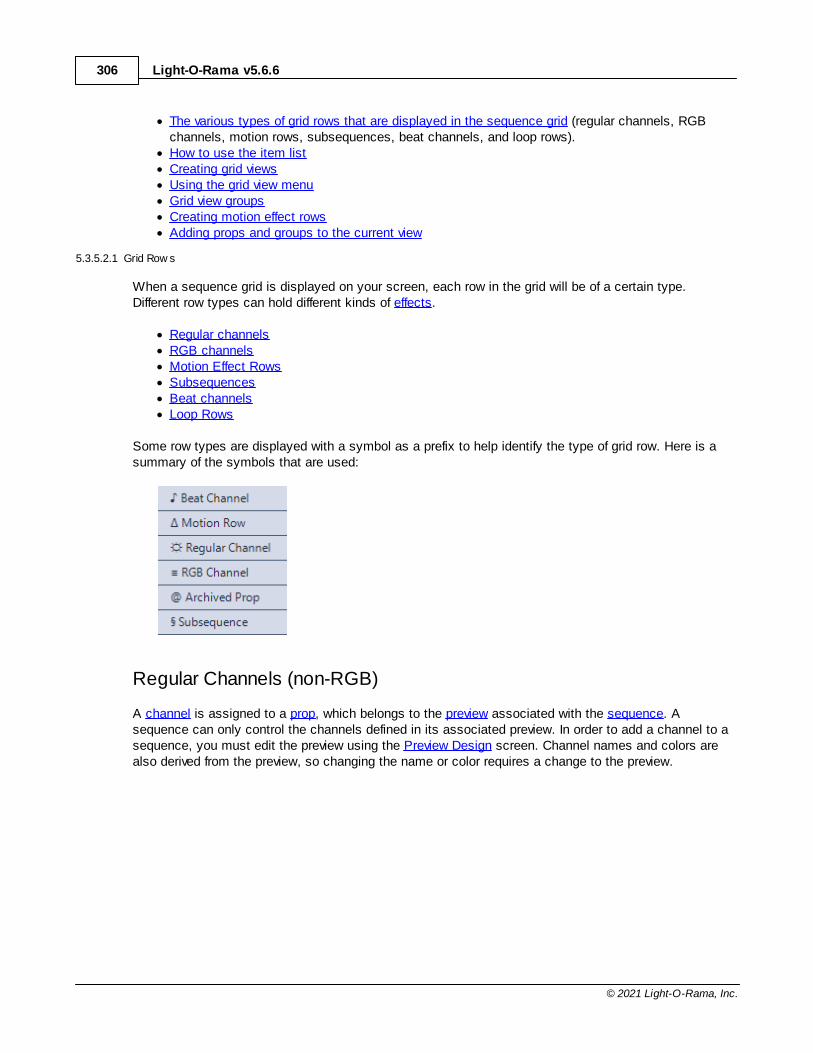
Light-O-Rama v5.6.6306
© 2021 Light-O-Rama, Inc.
· The various types of grid rows that are displayed in the sequence grid (regular channels, RGBchannels, motion rows, subsequences, beat channels, and loop rows).
· How to use the item list· Creating grid views· Using the grid view menu· Grid view groups· Creating motion effect rows· Adding props and groups to the current view
5.3.5.2.1 Grid Row s
When a sequence grid is displayed on your screen, each row in the grid will be of a certain type.Different row types can hold different kinds of effects.
· Regular channels· RGB channels· Motion Effect Rows· Subsequences· Beat channels· Loop Rows
Some row types are displayed with a symbol as a prefix to help identify the type of grid row. Here is asummary of the symbols that are used:
Regular Channels (non-RGB)
A channel is assigned to a prop, which belongs to the preview associated with the sequence. Asequence can only control the channels defined in its associated preview. In order to add a channel to asequence, you must edit the preview using the Preview Design screen. Channel names and colors arealso derived from the preview, so changing the name or color requires a change to the preview.
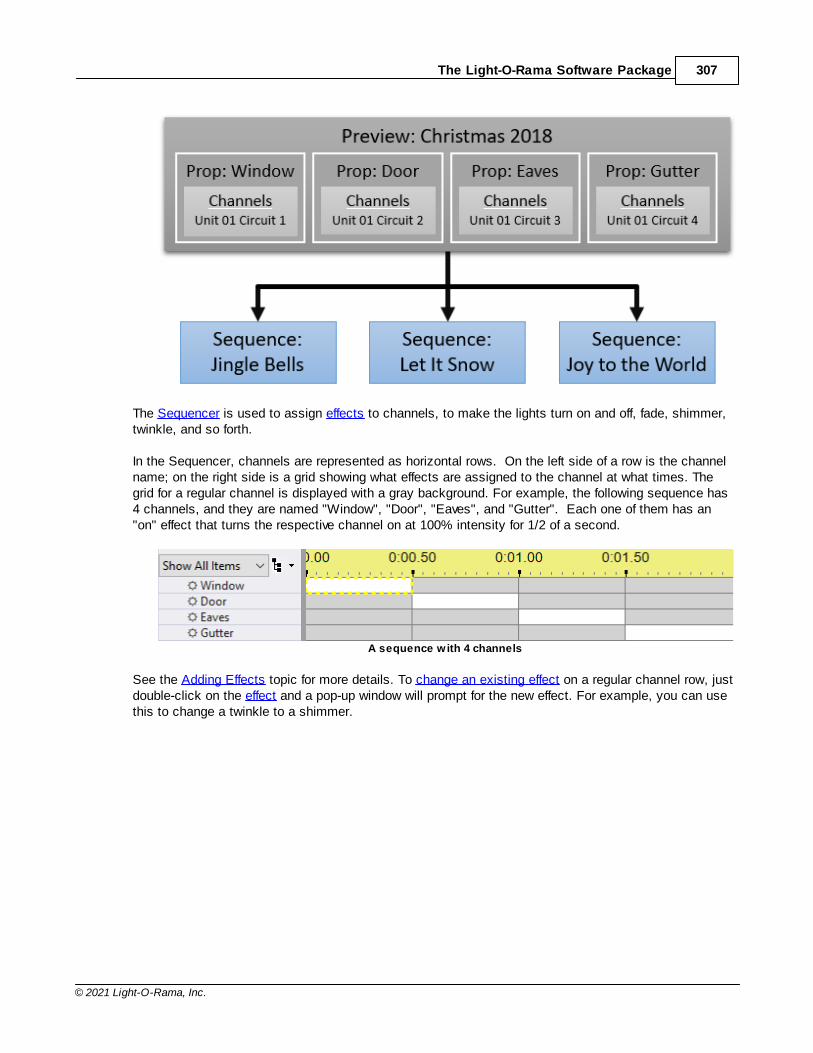
The Light-O-Rama Software Package 307
© 2021 Light-O-Rama, Inc.
The Sequencer is used to assign effects to channels, to make the lights turn on and off, fade, shimmer,twinkle, and so forth.
In the Sequencer, channels are represented as horizontal rows. On the left side of a row is the channelname; on the right side is a grid showing what effects are assigned to the channel at what times. Thegrid for a regular channel is displayed with a gray background. For example, the following sequence has4 channels, and they are named "Window", "Door", "Eaves", and "Gutter". Each one of them has an"on" effect that turns the respective channel on at 100% intensity for 1/2 of a second.
A sequence with 4 channels
See the Adding Effects topic for more details. To change an existing effect on a regular channel row, justdouble-click on the effect and a pop-up window will prompt for the new effect. For example, you can usethis to change a twinkle to a shimmer.
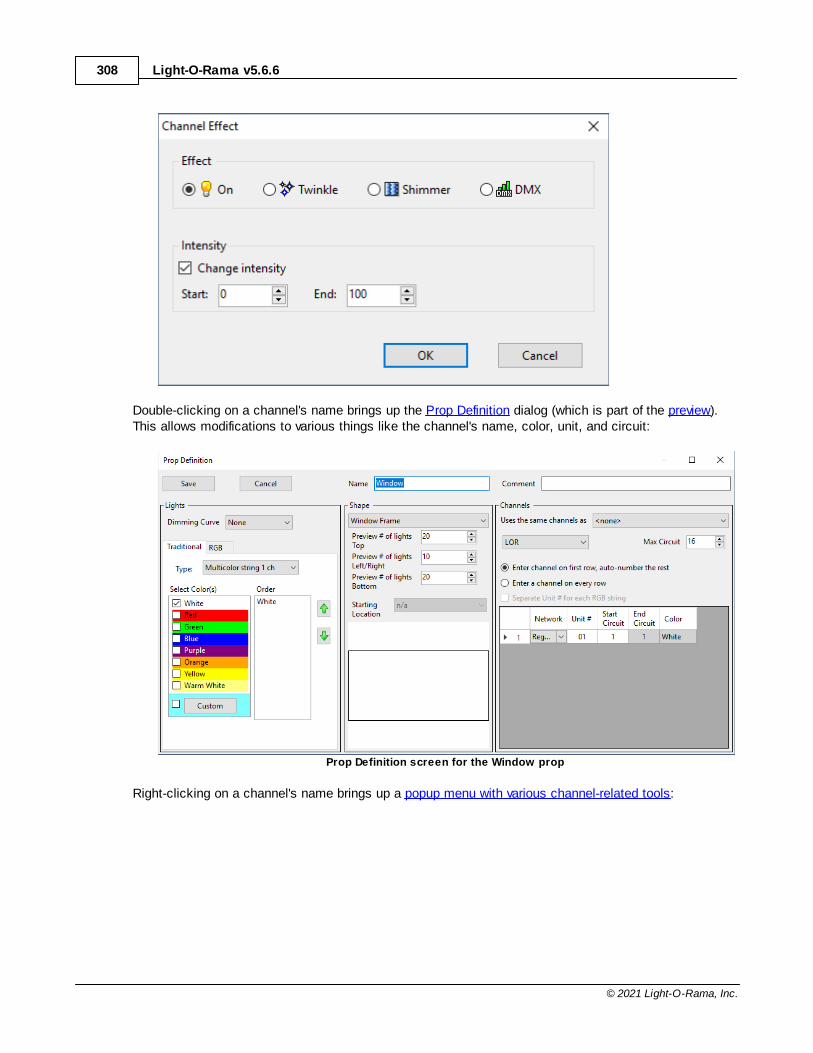
Light-O-Rama v5.6.6308
© 2021 Light-O-Rama, Inc.
Double-clicking on a channel's name brings up the Prop Definition dialog (which is part of the preview). This allows modifications to various things like the channel's name, color, unit, and circuit:
Prop Definition screen for the Window prop
Right-clicking on a channel's name brings up a popup menu with various channel-related tools:
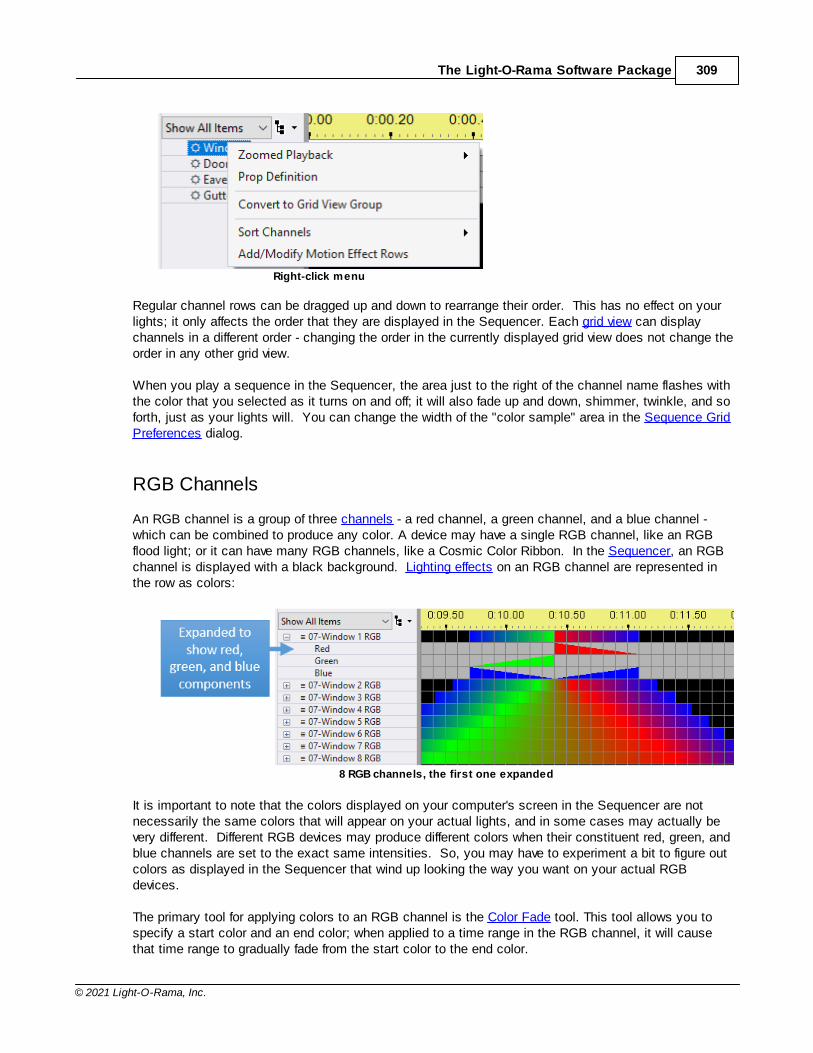
The Light-O-Rama Software Package 309
© 2021 Light-O-Rama, Inc.
Right-click menu
Regular channel rows can be dragged up and down to rearrange their order. This has no effect on yourlights; it only affects the order that they are displayed in the Sequencer. Each grid view can displaychannels in a different order - changing the order in the currently displayed grid view does not change theorder in any other grid view.
When you play a sequence in the Sequencer, the area just to the right of the channel name flashes withthe color that you selected as it turns on and off; it will also fade up and down, shimmer, twinkle, and soforth, just as your lights will. You can change the width of the "color sample" area in the Sequence GridPreferences dialog.
RGB Channels
An RGB channel is a group of three channels - a red channel, a green channel, and a blue channel -which can be combined to produce any color. A device may have a single RGB channel, like an RGBflood light; or it can have many RGB channels, like a Cosmic Color Ribbon. In the Sequencer, an RGBchannel is displayed with a black background. Lighting effects on an RGB channel are represented inthe row as colors:
8 RGB channels, the first one expanded
It is important to note that the colors displayed on your computer's screen in the Sequencer are notnecessarily the same colors that will appear on your actual lights, and in some cases may actually bevery different. Different RGB devices may produce different colors when their constituent red, green, andblue channels are set to the exact same intensities. So, you may have to experiment a bit to figure outcolors as displayed in the Sequencer that wind up looking the way you want on your actual RGBdevices.
The primary tool for applying colors to an RGB channel is the Color Fade tool. This tool allows you tospecify a start color and an end color; when applied to a time range in the RGB channel, it will causethat time range to gradually fade from the start color to the end color.
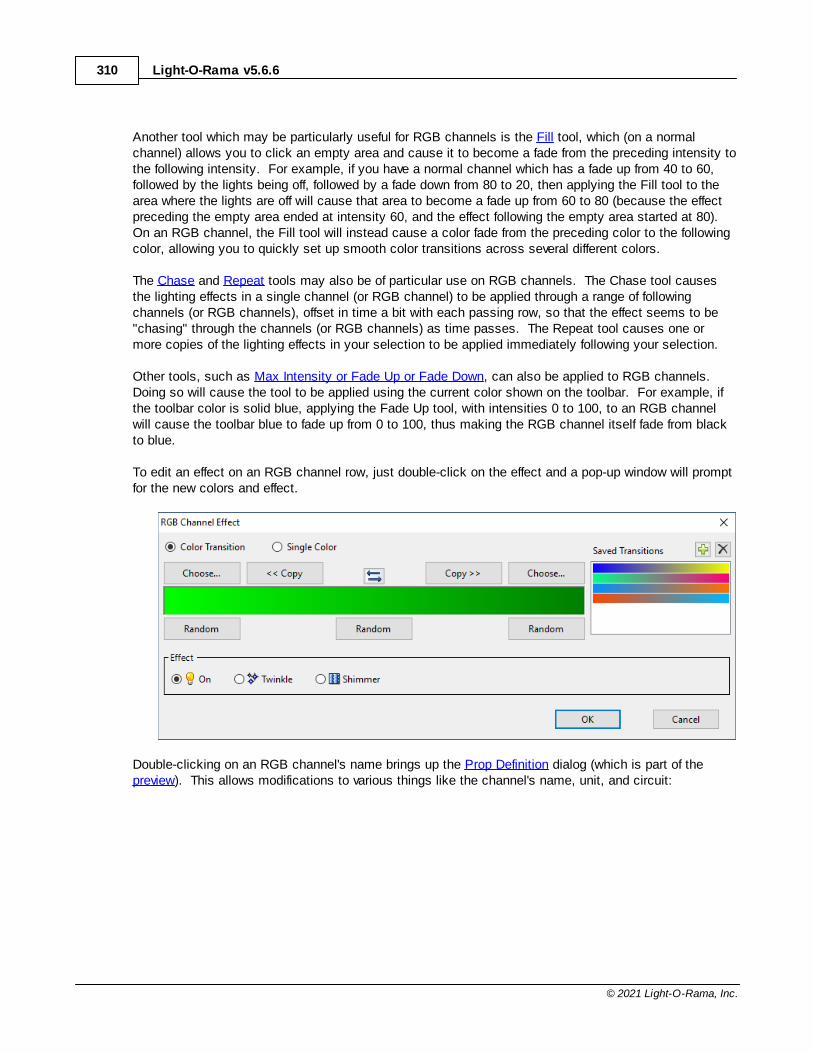
Light-O-Rama v5.6.6310
© 2021 Light-O-Rama, Inc.
Another tool which may be particularly useful for RGB channels is the Fill tool, which (on a normalchannel) allows you to click an empty area and cause it to become a fade from the preceding intensity tothe following intensity. For example, if you have a normal channel which has a fade up from 40 to 60,followed by the lights being off, followed by a fade down from 80 to 20, then applying the Fill tool to thearea where the lights are off will cause that area to become a fade up from 60 to 80 (because the effectpreceding the empty area ended at intensity 60, and the effect following the empty area started at 80). On an RGB channel, the Fill tool will instead cause a color fade from the preceding color to the followingcolor, allowing you to quickly set up smooth color transitions across several different colors.
The Chase and Repeat tools may also be of particular use on RGB channels. The Chase tool causesthe lighting effects in a single channel (or RGB channel) to be applied through a range of followingchannels (or RGB channels), offset in time a bit with each passing row, so that the effect seems to be"chasing" through the channels (or RGB channels) as time passes. The Repeat tool causes one ormore copies of the lighting effects in your selection to be applied immediately following your selection.
Other tools, such as Max Intensity or Fade Up or Fade Down, can also be applied to RGB channels. Doing so will cause the tool to be applied using the current color shown on the toolbar. For example, ifthe toolbar color is solid blue, applying the Fade Up tool, with intensities 0 to 100, to an RGB channelwill cause the toolbar blue to fade up from 0 to 100, thus making the RGB channel itself fade from blackto blue.
To edit an effect on an RGB channel row, just double-click on the effect and a pop-up window will promptfor the new colors and effect.
Double-clicking on an RGB channel's name brings up the Prop Definition dialog (which is part of thepreview). This allows modifications to various things like the channel's name, unit, and circuit:
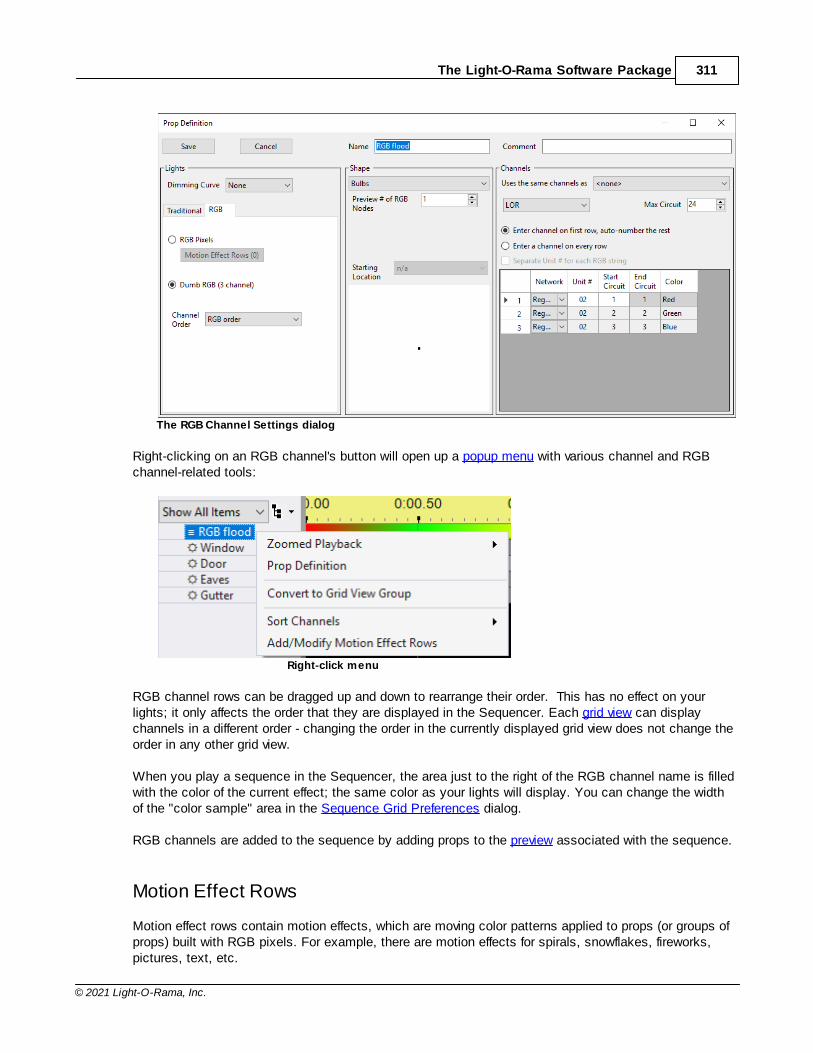
The Light-O-Rama Software Package 311
© 2021 Light-O-Rama, Inc.
The RGB Channel Settings dialog
Right-clicking on an RGB channel's button will open up a popup menu with various channel and RGBchannel-related tools:
Right-click menu
RGB channel rows can be dragged up and down to rearrange their order. This has no effect on yourlights; it only affects the order that they are displayed in the Sequencer. Each grid view can displaychannels in a different order - changing the order in the currently displayed grid view does not change theorder in any other grid view.
When you play a sequence in the Sequencer, the area just to the right of the RGB channel name is filledwith the color of the current effect; the same color as your lights will display. You can change the widthof the "color sample" area in the Sequence Grid Preferences dialog.
RGB channels are added to the sequence by adding props to the preview associated with the sequence.
Motion Effect Rows
Motion effect rows contain motion effects, which are moving color patterns applied to props (or groups ofprops) built with RGB pixels. For example, there are motion effects for spirals, snowflakes, fireworks,pictures, text, etc.
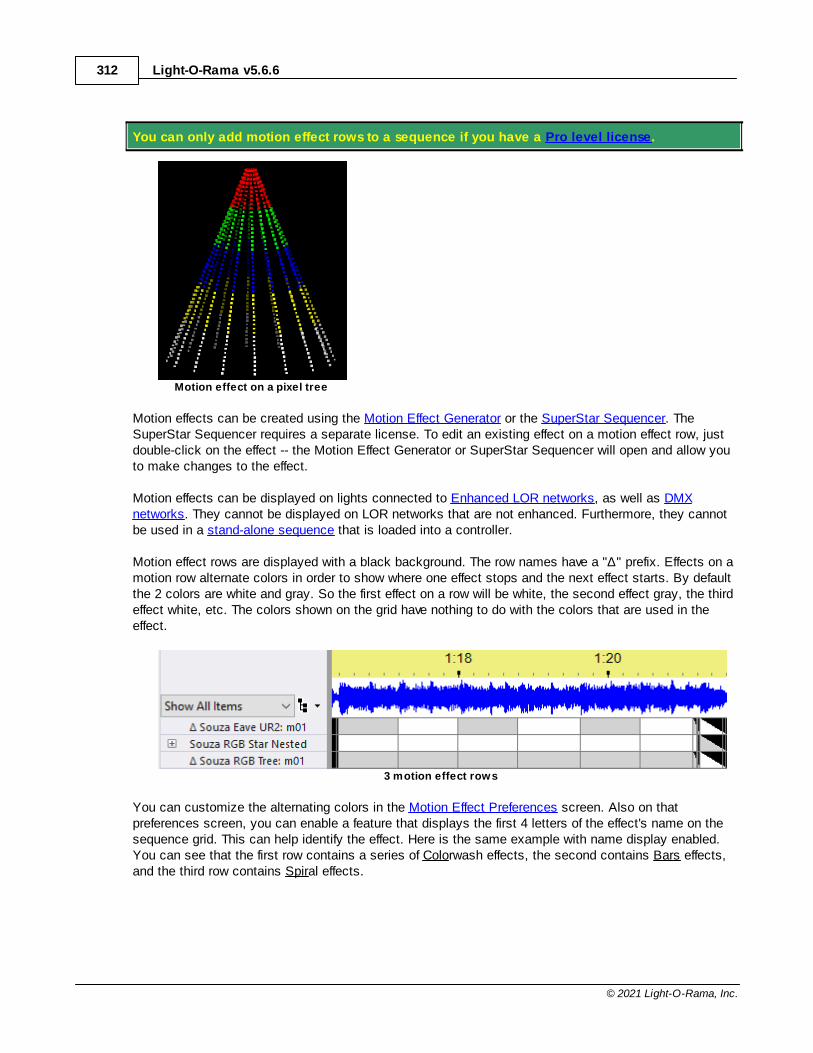
Light-O-Rama v5.6.6312
© 2021 Light-O-Rama, Inc.
You can only add motion effect rows to a sequence if you have a Pro level license.
Motion effect on a pixel tree
Motion effects can be created using the Motion Effect Generator or the SuperStar Sequencer. TheSuperStar Sequencer requires a separate license. To edit an existing effect on a motion effect row, justdouble-click on the effect -- the Motion Effect Generator or SuperStar Sequencer will open and allow youto make changes to the effect.
Motion effects can be displayed on lights connected to Enhanced LOR networks, as well as DMXnetworks. They cannot be displayed on LOR networks that are not enhanced. Furthermore, they cannotbe used in a stand-alone sequence that is loaded into a controller.
Motion effect rows are displayed with a black background. The row names have a "∆" prefix. Effects on amotion row alternate colors in order to show where one effect stops and the next effect starts. By defaultthe 2 colors are white and gray. So the first effect on a row will be white, the second effect gray, the thirdeffect white, etc. The colors shown on the grid have nothing to do with the colors that are used in theeffect.
3 motion effect rows
You can customize the alternating colors in the Motion Effect Preferences screen. Also on thatpreferences screen, you can enable a feature that displays the first 4 letters of the effect's name on thesequence grid. This can help identify the effect. Here is the same example with name display enabled.You can see that the first row contains a series of Colorwash effects, the second contains Bars effects,and the third row contains Spiral effects.
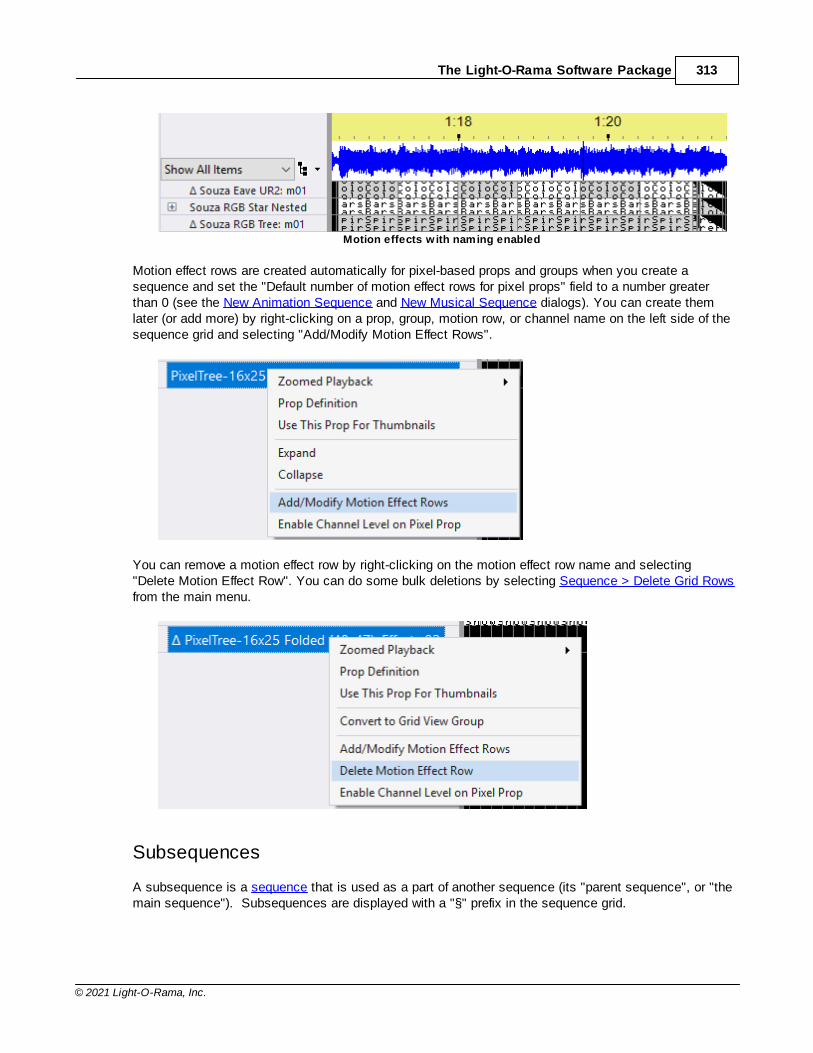
The Light-O-Rama Software Package 313
© 2021 Light-O-Rama, Inc.
Motion effects w ith naming enabled
Motion effect rows are created automatically for pixel-based props and groups when you create asequence and set the "Default number of motion effect rows for pixel props" field to a number greaterthan 0 (see the New Animation Sequence and New Musical Sequence dialogs). You can create themlater (or add more) by right-clicking on a prop, group, motion row, or channel name on the left side of thesequence grid and selecting "Add/Modify Motion Effect Rows".
You can remove a motion effect row by right-clicking on the motion effect row name and selecting"Delete Motion Effect Row". You can do some bulk deletions by selecting Sequence > Delete Grid Rowsfrom the main menu.
Subsequences
A subsequence is a sequence that is used as a part of another sequence (its "parent sequence", or "themain sequence"). Subsequences are displayed with a "§" prefix in the sequence grid.
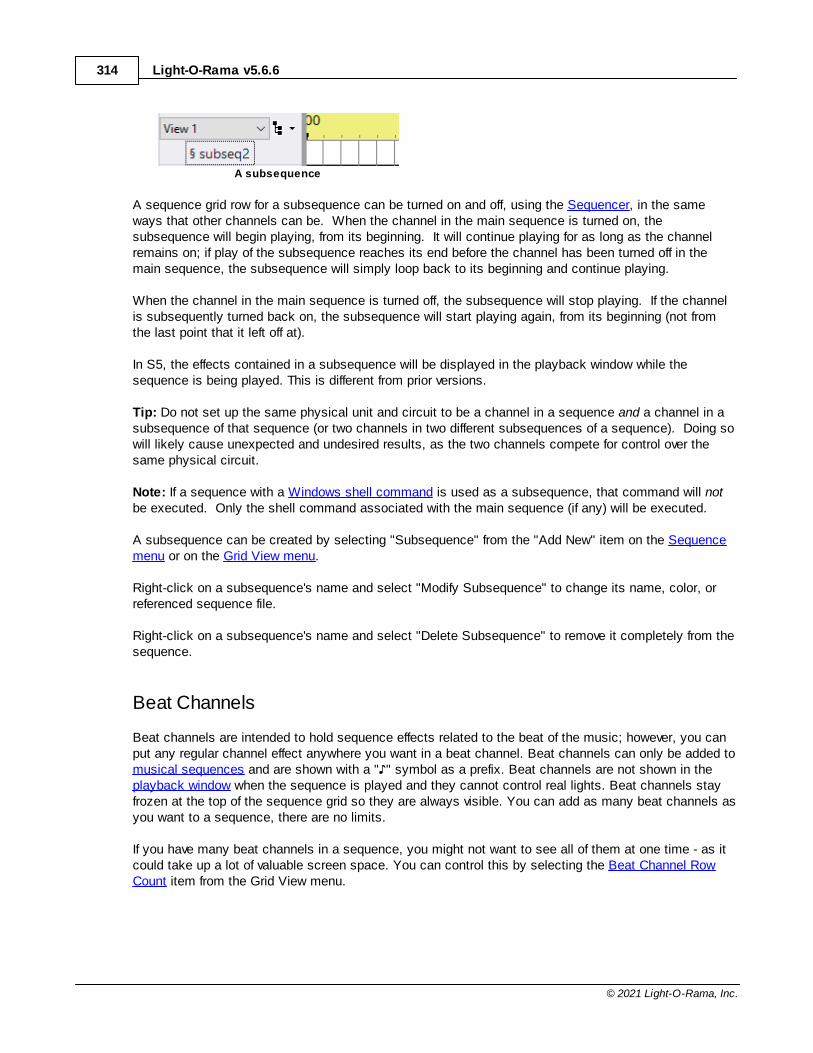
Light-O-Rama v5.6.6314
© 2021 Light-O-Rama, Inc.
A subsequence
A sequence grid row for a subsequence can be turned on and off, using the Sequencer, in the sameways that other channels can be. When the channel in the main sequence is turned on, thesubsequence will begin playing, from its beginning. It will continue playing for as long as the channelremains on; if play of the subsequence reaches its end before the channel has been turned off in themain sequence, the subsequence will simply loop back to its beginning and continue playing.
When the channel in the main sequence is turned off, the subsequence will stop playing. If the channelis subsequently turned back on, the subsequence will start playing again, from its beginning (not fromthe last point that it left off at).
In S5, the effects contained in a subsequence will be displayed in the playback window while thesequence is being played. This is different from prior versions.
Tip: Do not set up the same physical unit and circuit to be a channel in a sequence and a channel in asubsequence of that sequence (or two channels in two different subsequences of a sequence). Doing sowill likely cause unexpected and undesired results, as the two channels compete for control over thesame physical circuit.
Note: If a sequence with a Windows shell command is used as a subsequence, that command will notbe executed. Only the shell command associated with the main sequence (if any) will be executed.
A subsequence can be created by selecting "Subsequence" from the "Add New" item on the Sequencemenu or on the Grid View menu.
Right-click on a subsequence's name and select "Modify Subsequence" to change its name, color, orreferenced sequence file.
Right-click on a subsequence's name and select "Delete Subsequence" to remove it completely from thesequence.
Beat Channels
Beat channels are intended to hold sequence effects related to the beat of the music; however, you canput any regular channel effect anywhere you want in a beat channel. Beat channels can only be added tomusical sequences and are shown with a " " symbol as a prefix. Beat channels are not shown in theplayback window when the sequence is played and they cannot control real lights. Beat channels stayfrozen at the top of the sequence grid so they are always visible. You can add as many beat channels asyou want to a sequence, there are no limits.
If you have many beat channels in a sequence, you might not want to see all of them at one time - as itcould take up a lot of valuable screen space. You can control this by selecting the Beat Channel RowCount item from the Grid View menu.
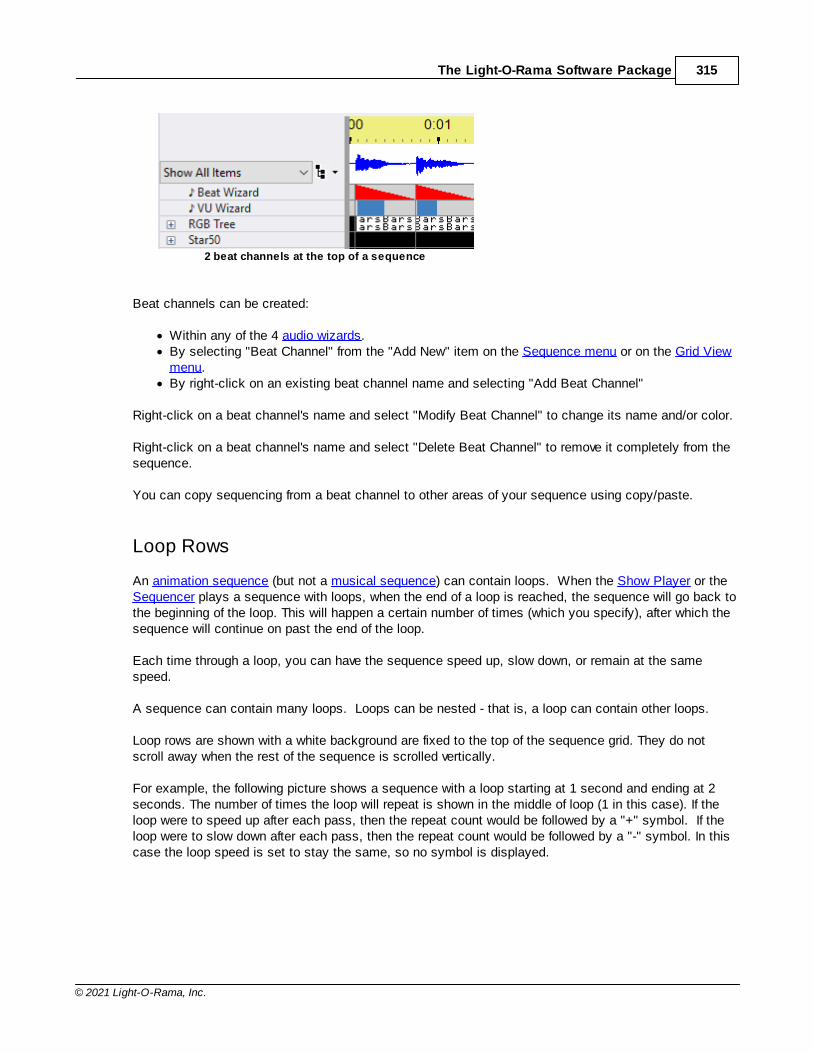
The Light-O-Rama Software Package 315
© 2021 Light-O-Rama, Inc.
2 beat channels at the top of a sequence
Beat channels can be created:
· Within any of the 4 audio wizards.· By selecting "Beat Channel" from the "Add New" item on the Sequence menu or on the Grid View
menu.· By right-click on an existing beat channel name and selecting "Add Beat Channel"
Right-click on a beat channel's name and select "Modify Beat Channel" to change its name and/or color.
Right-click on a beat channel's name and select "Delete Beat Channel" to remove it completely from thesequence.
You can copy sequencing from a beat channel to other areas of your sequence using copy/paste.
Loop Rows
An animation sequence (but not a musical sequence) can contain loops. When the Show Player or theSequencer plays a sequence with loops, when the end of a loop is reached, the sequence will go back tothe beginning of the loop. This will happen a certain number of times (which you specify), after which thesequence will continue on past the end of the loop.
Each time through a loop, you can have the sequence speed up, slow down, or remain at the samespeed.
A sequence can contain many loops. Loops can be nested - that is, a loop can contain other loops.
Loop rows are shown with a white background are fixed to the top of the sequence grid. They do notscroll away when the rest of the sequence is scrolled vertically.
For example, the following picture shows a sequence with a loop starting at 1 second and ending at 2seconds. The number of times the loop will repeat is shown in the middle of loop (1 in this case). If theloop were to speed up after each pass, then the repeat count would be followed by a "+" symbol. If theloop were to slow down after each pass, then the repeat count would be followed by a "-" symbol. In thiscase the loop speed is set to stay the same, so no symbol is displayed.
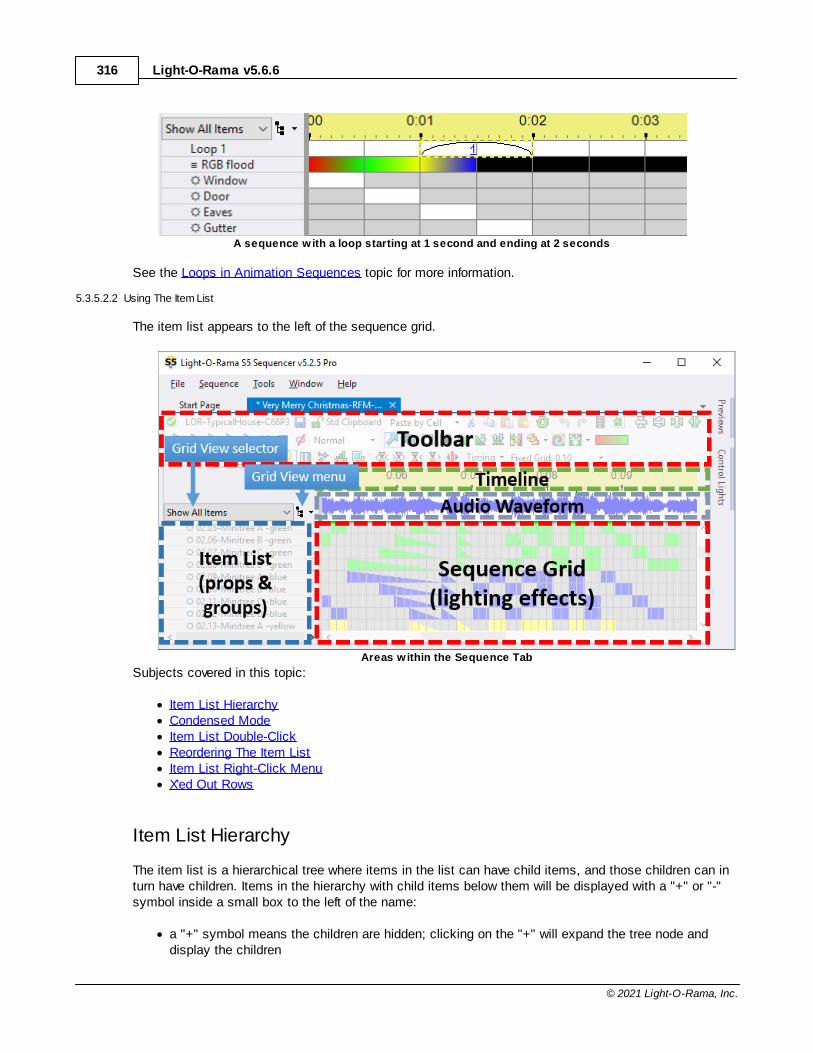
Light-O-Rama v5.6.6316
© 2021 Light-O-Rama, Inc.
A sequence with a loop starting at 1 second and ending at 2 seconds
See the Loops in Animation Sequences topic for more information.
5.3.5.2.2 Using The Item List
The item list appears to the left of the sequence grid.
Areas within the Sequence Tab
Subjects covered in this topic:
· Item List Hierarchy· Condensed Mode· Item List Double-Click· Reordering The Item List· Item List Right-Click Menu· X'ed Out Rows
Item List Hierarchy
The item list is a hierarchical tree where items in the list can have child items, and those children can inturn have children. Items in the hierarchy with child items below them will be displayed with a "+" or "-"symbol inside a small box to the left of the name:
· a "+" symbol means the children are hidden; clicking on the "+" will expand the tree node anddisplay the children
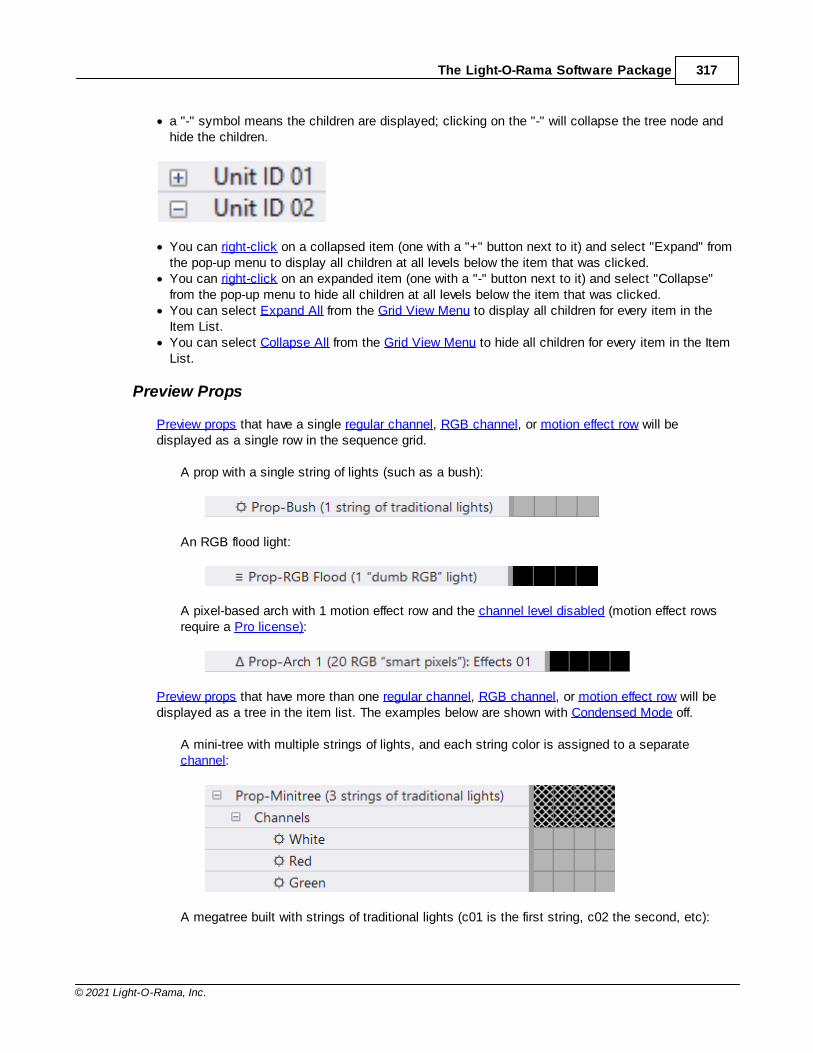
The Light-O-Rama Software Package 317
© 2021 Light-O-Rama, Inc.
· a "-" symbol means the children are displayed; clicking on the "-" will collapse the tree node andhide the children.
· You can right-click on a collapsed item (one with a "+" button next to it) and select "Expand" fromthe pop-up menu to display all children at all levels below the item that was clicked.
· You can right-click on an expanded item (one with a "-" button next to it) and select "Collapse"from the pop-up menu to hide all children at all levels below the item that was clicked.
· You can select Expand All from the Grid View Menu to display all children for every item in theItem List.
· You can select Collapse All from the Grid View Menu to hide all children for every item in the ItemList.
Preview Props
Preview props that have a single regular channel, RGB channel, or motion effect row will bedisplayed as a single row in the sequence grid.
A prop with a single string of lights (such as a bush):
An RGB flood light:
A pixel-based arch with 1 motion effect row and the channel level disabled (motion effect rowsrequire a Pro license):
Preview props that have more than one regular channel, RGB channel, or motion effect row will bedisplayed as a tree in the item list. The examples below are shown with Condensed Mode off.
A mini-tree with multiple strings of lights, and each string color is assigned to a separatechannel:
A megatree built with strings of traditional lights (c01 is the first string, c02 the second, etc):
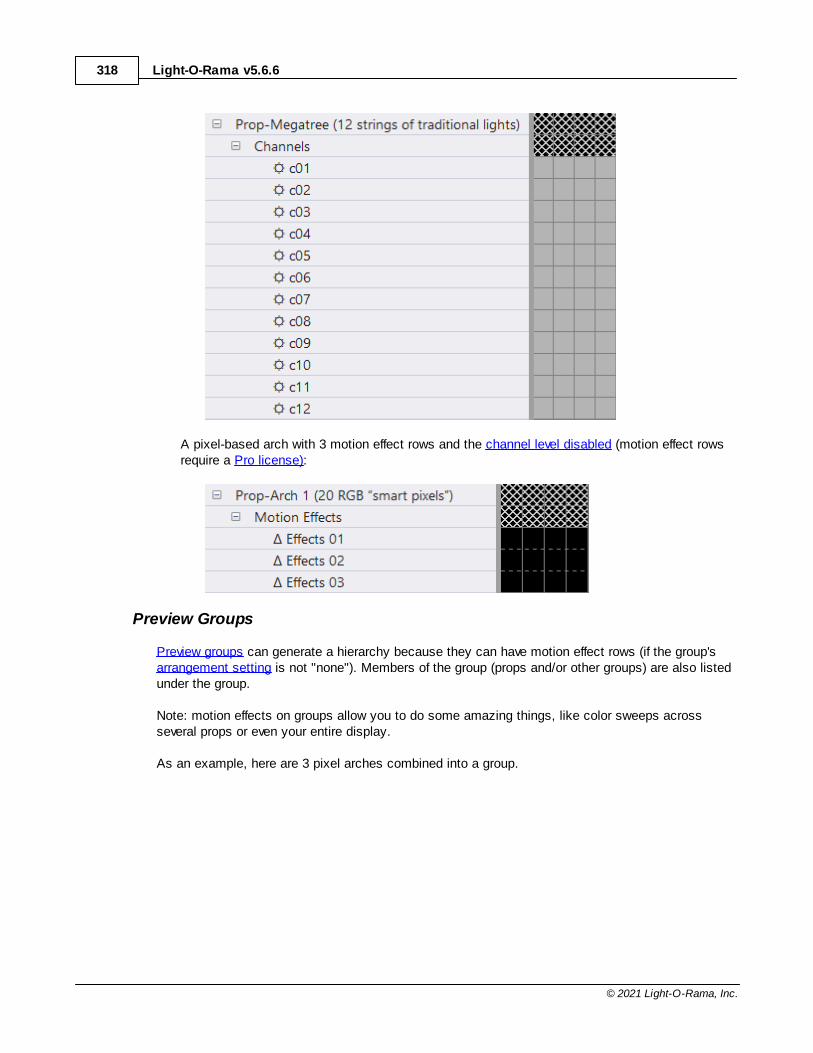
Light-O-Rama v5.6.6318
© 2021 Light-O-Rama, Inc.
A pixel-based arch with 3 motion effect rows and the channel level disabled (motion effect rowsrequire a Pro license):
Preview Groups
Preview groups can generate a hierarchy because they can have motion effect rows (if the group'sarrangement setting is not "none"). Members of the group (props and/or other groups) are also listedunder the group.
Note: motion effects on groups allow you to do some amazing things, like color sweeps acrossseveral props or even your entire display.
As an example, here are 3 pixel arches combined into a group.

The Light-O-Rama Software Package 319
© 2021 Light-O-Rama, Inc.
Group Definition
The first motion effects row is for the group - effects created here will act as if the combined archesare one big prop. This is followed by motion effect rows for each individual prop.
Group displayed in the sequence grid
Grid View Groups
A grid view group is a set of regular channels or RGB channels or Motion Effect rows or beatchannels (or, conceivably, other grid view groups) that is nested together, so that it can be collapseddown to a single row in the sequence grid, or expanded to show all of its members.
In this example, the grid view group "Unit ID 06: Strobes" has been expanded. The other grid viewgroups are collapsed.
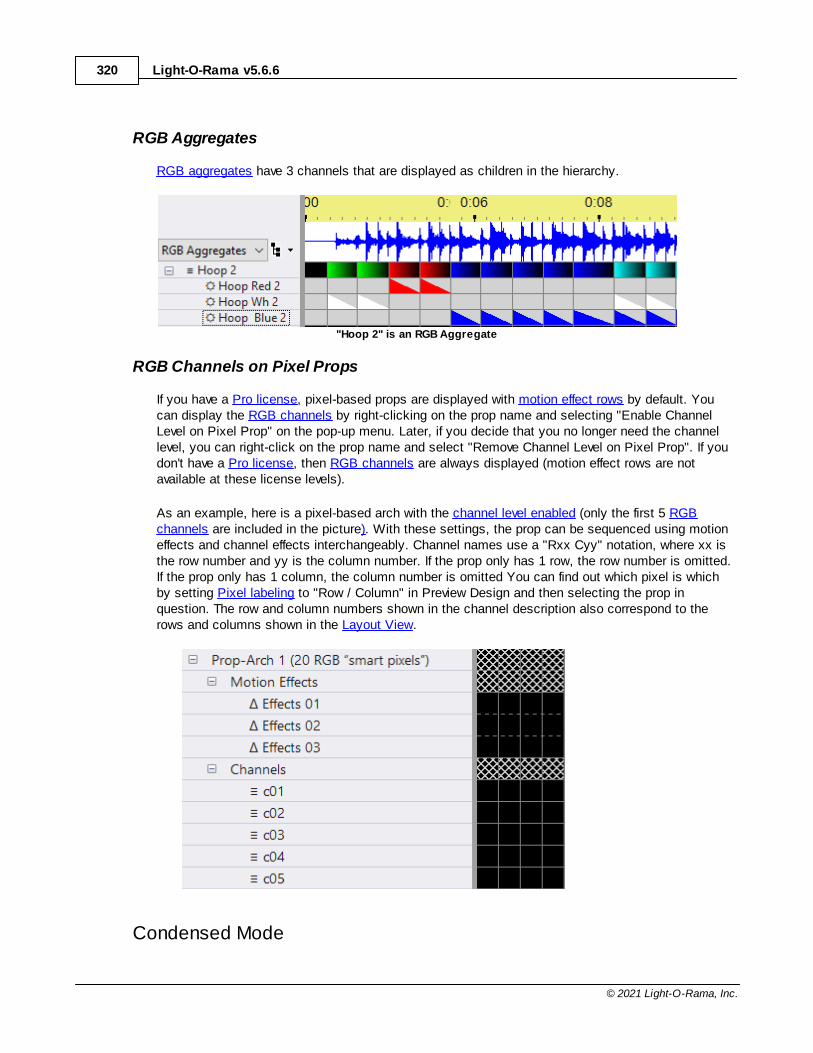
Light-O-Rama v5.6.6320
© 2021 Light-O-Rama, Inc.
RGB Aggregates
RGB aggregates have 3 channels that are displayed as children in the hierarchy.
"Hoop 2" is an RGB Aggregate
RGB Channels on Pixel Props
If you have a Pro license, pixel-based props are displayed with motion effect rows by default. Youcan display the RGB channels by right-clicking on the prop name and selecting "Enable ChannelLevel on Pixel Prop" on the pop-up menu. Later, if you decide that you no longer need the channellevel, you can right-click on the prop name and select "Remove Channel Level on Pixel Prop". If youdon't have a Pro license, then RGB channels are always displayed (motion effect rows are notavailable at these license levels).
As an example, here is a pixel-based arch with the channel level enabled (only the first 5 RGBchannels are included in the picture). With these settings, the prop can be sequenced using motioneffects and channel effects interchangeably. Channel names use a "Rxx Cyy" notation, where xx isthe row number and yy is the column number. If the prop only has 1 row, the row number is omitted.If the prop only has 1 column, the column number is omitted You can find out which pixel is whichby setting Pixel labeling to "Row / Column" in Preview Design and then selecting the prop inquestion. The row and column numbers shown in the channel description also correspond to therows and columns shown in the Layout View.
Condensed Mode
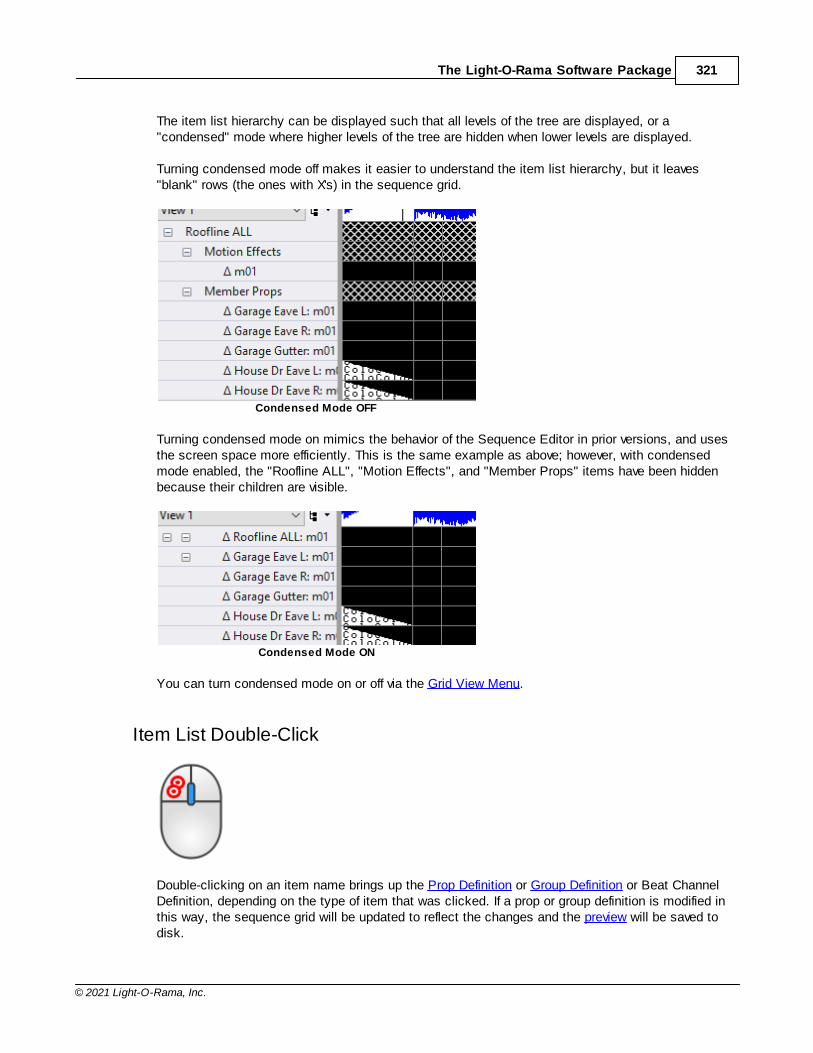
The Light-O-Rama Software Package 321
© 2021 Light-O-Rama, Inc.
The item list hierarchy can be displayed such that all levels of the tree are displayed, or a"condensed" mode where higher levels of the tree are hidden when lower levels are displayed.
Turning condensed mode off makes it easier to understand the item list hierarchy, but it leaves"blank" rows (the ones with X's) in the sequence grid.
Condensed Mode OFF
Turning condensed mode on mimics the behavior of the Sequence Editor in prior versions, and usesthe screen space more efficiently. This is the same example as above; however, with condensedmode enabled, the "Roofline ALL", "Motion Effects", and "Member Props" items have been hiddenbecause their children are visible.
Condensed Mode ON
You can turn condensed mode on or off via the Grid View Menu.
Item List Double-Click
Double-clicking on an item name brings up the Prop Definition or Group Definition or Beat ChannelDefinition, depending on the type of item that was clicked. If a prop or group definition is modified inthis way, the sequence grid will be updated to reflect the changes and the preview will be saved todisk.
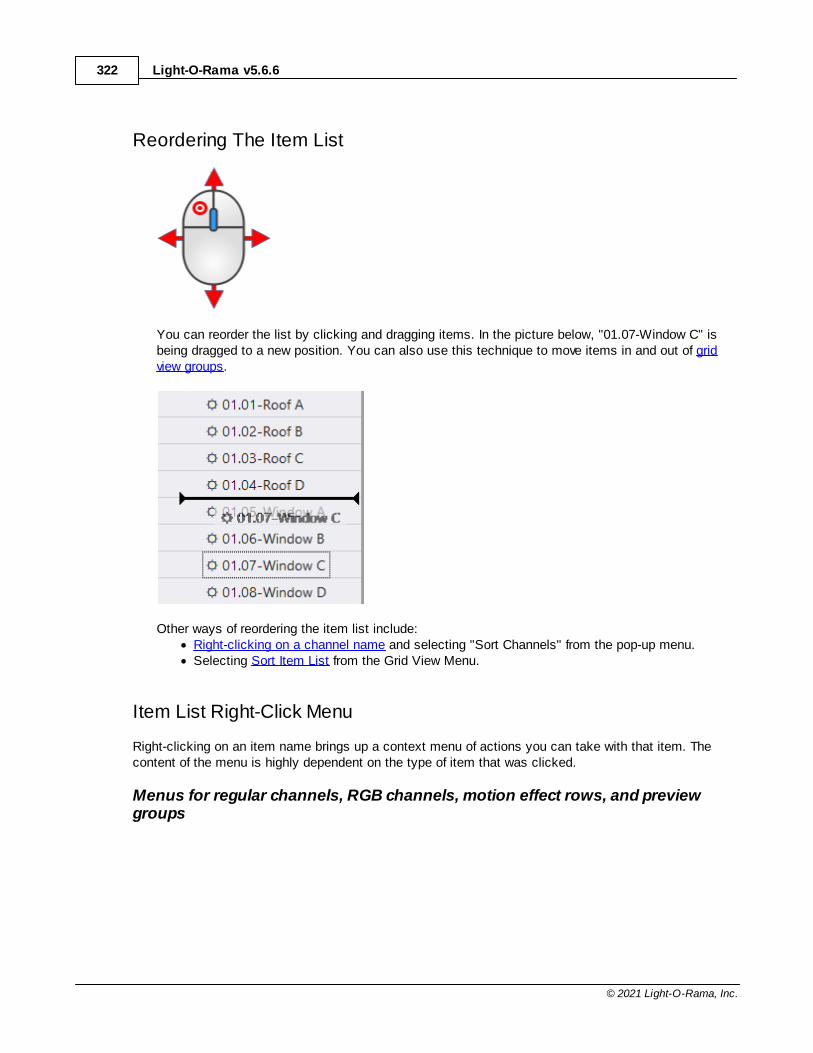
Light-O-Rama v5.6.6322
© 2021 Light-O-Rama, Inc.
Reordering The Item List
You can reorder the list by clicking and dragging items. In the picture below, "01.07-Window C" isbeing dragged to a new position. You can also use this technique to move items in and out of gridview groups.
Other ways of reordering the item list include:· Right-clicking on a channel name and selecting "Sort Channels" from the pop-up menu.· Selecting Sort Item List from the Grid View Menu.
Item List Right-Click Menu
Right-clicking on an item name brings up a context menu of actions you can take with that item. Thecontent of the menu is highly dependent on the type of item that was clicked.
Menus for regular channels, RGB channels, motion effect rows, and previewgroups
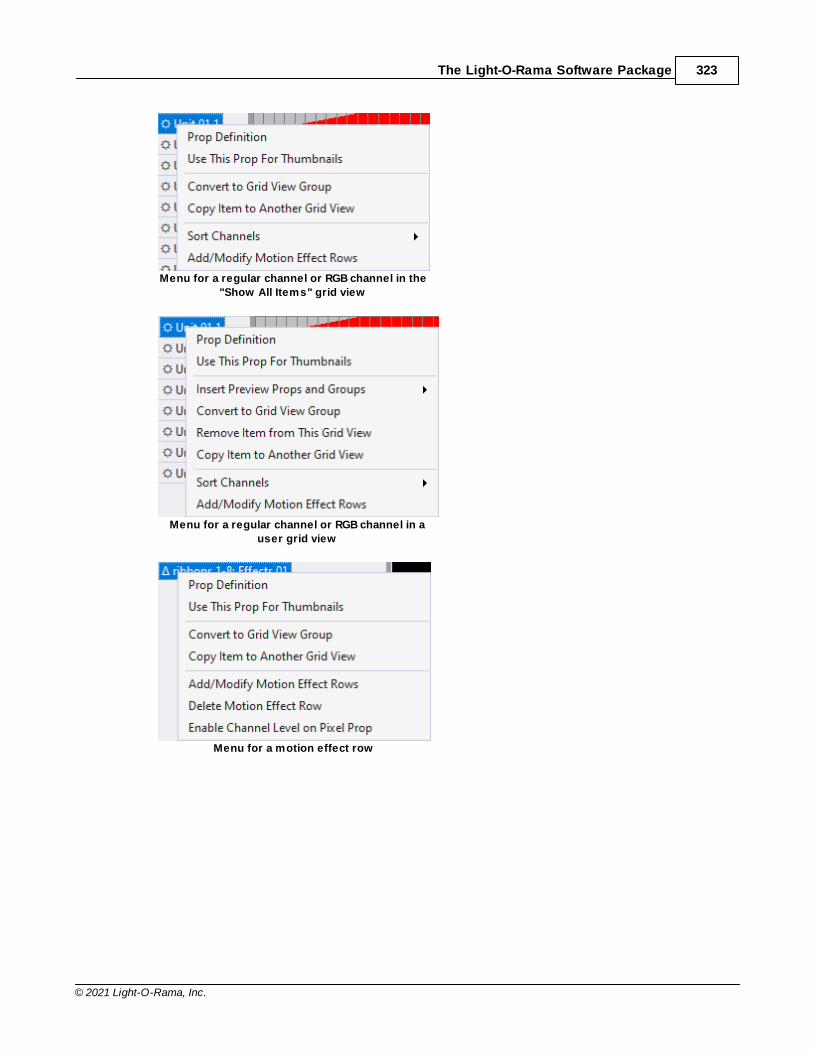
The Light-O-Rama Software Package 323
© 2021 Light-O-Rama, Inc.
Menu for a regular channel or RGB channel in the
"Show All Items" grid view
Menu for a regular channel or RGB channel in a
user grid view
Menu for a motion effect row
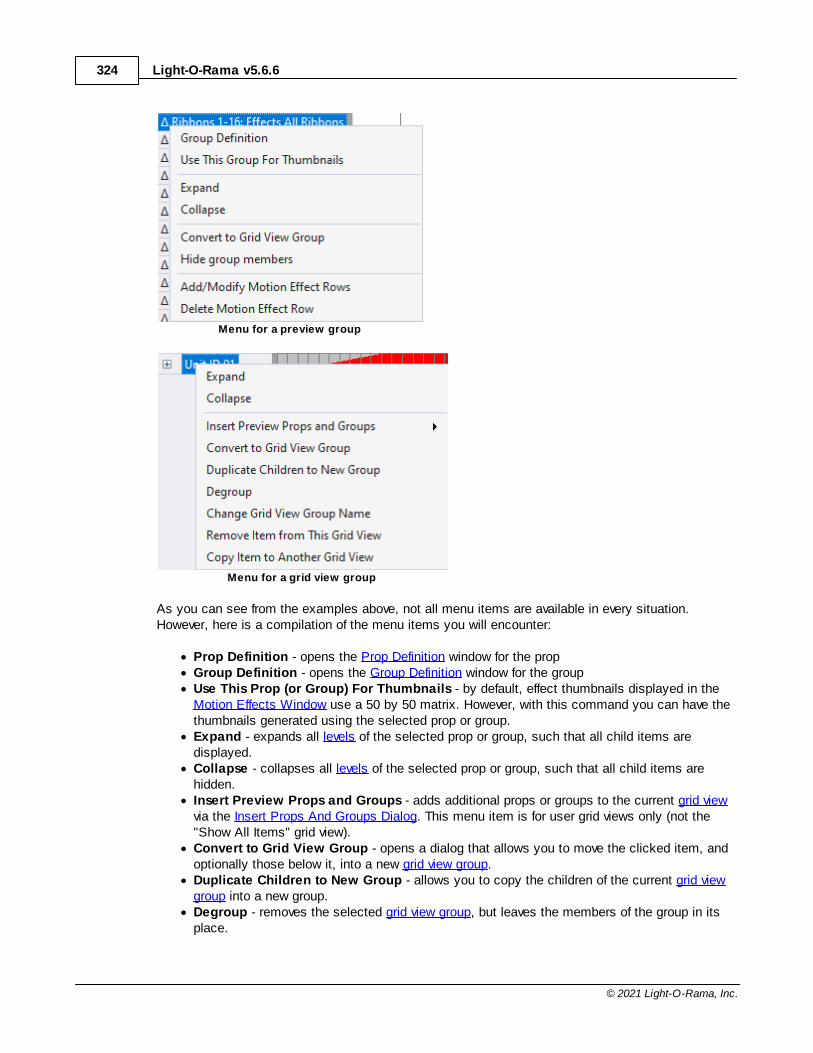
Light-O-Rama v5.6.6324
© 2021 Light-O-Rama, Inc.
Menu for a preview group
Menu for a grid view group
As you can see from the examples above, not all menu items are available in every situation.However, here is a compilation of the menu items you will encounter:
· Prop Definition - opens the Prop Definition window for the prop· Group Definition - opens the Group Definition window for the group· Use This Prop (or Group) For Thumbnails - by default, effect thumbnails displayed in the
Motion Effects Window use a 50 by 50 matrix. However, with this command you can have thethumbnails generated using the selected prop or group.
· Expand - expands all levels of the selected prop or group, such that all child items aredisplayed.
· Collapse - collapses all levels of the selected prop or group, such that all child items arehidden.
· Insert Preview Props and Groups - adds additional props or groups to the current grid viewvia the Insert Props And Groups Dialog. This menu item is for user grid views only (not the"Show All Items" grid view).
· Convert to Grid View Group - opens a dialog that allows you to move the clicked item, andoptionally those below it, into a new grid view group.
· Duplicate Children to New Group - allows you to copy the children of the current grid viewgroup into a new group.
· Degroup - removes the selected grid view group, but leaves the members of the group in itsplace.
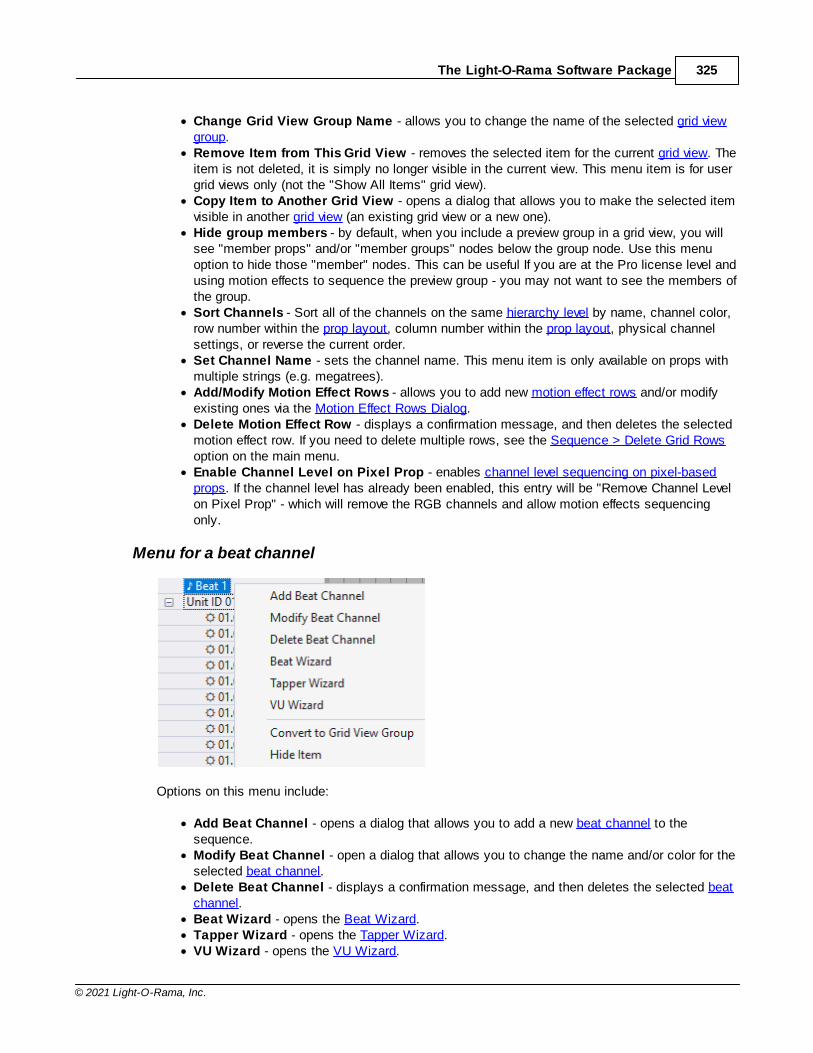
The Light-O-Rama Software Package 325
© 2021 Light-O-Rama, Inc.
· Change Grid View Group Name - allows you to change the name of the selected grid viewgroup.
· Remove Item from This Grid View - removes the selected item for the current grid view. Theitem is not deleted, it is simply no longer visible in the current view. This menu item is for usergrid views only (not the "Show All Items" grid view).
· Copy Item to Another Grid View - opens a dialog that allows you to make the selected itemvisible in another grid view (an existing grid view or a new one).
· Hide group members - by default, when you include a preview group in a grid view, you willsee "member props" and/or "member groups" nodes below the group node. Use this menuoption to hide those "member" nodes. This can be useful If you are at the Pro license level andusing motion effects to sequence the preview group - you may not want to see the members ofthe group.
· Sort Channels - Sort all of the channels on the same hierarchy level by name, channel color,row number within the prop layout, column number within the prop layout, physical channelsettings, or reverse the current order.
· Set Channel Name - sets the channel name. This menu item is only available on props withmultiple strings (e.g. megatrees).
· Add/Modify Motion Effect Rows - allows you to add new motion effect rows and/or modifyexisting ones via the Motion Effect Rows Dialog.
· Delete Motion Effect Row - displays a confirmation message, and then deletes the selectedmotion effect row. If you need to delete multiple rows, see the Sequence > Delete Grid Rowsoption on the main menu.
· Enable Channel Level on Pixel Prop - enables channel level sequencing on pixel-basedprops. If the channel level has already been enabled, this entry will be "Remove Channel Levelon Pixel Prop" - which will remove the RGB channels and allow motion effects sequencingonly.
Menu for a beat channel
Options on this menu include:
· Add Beat Channel - opens a dialog that allows you to add a new beat channel to thesequence.
· Modify Beat Channel - open a dialog that allows you to change the name and/or color for theselected beat channel.
· Delete Beat Channel - displays a confirmation message, and then deletes the selected beatchannel.
· Beat Wizard - opens the Beat Wizard.· Tapper Wizard - opens the Tapper Wizard.· VU Wizard - opens the VU Wizard.
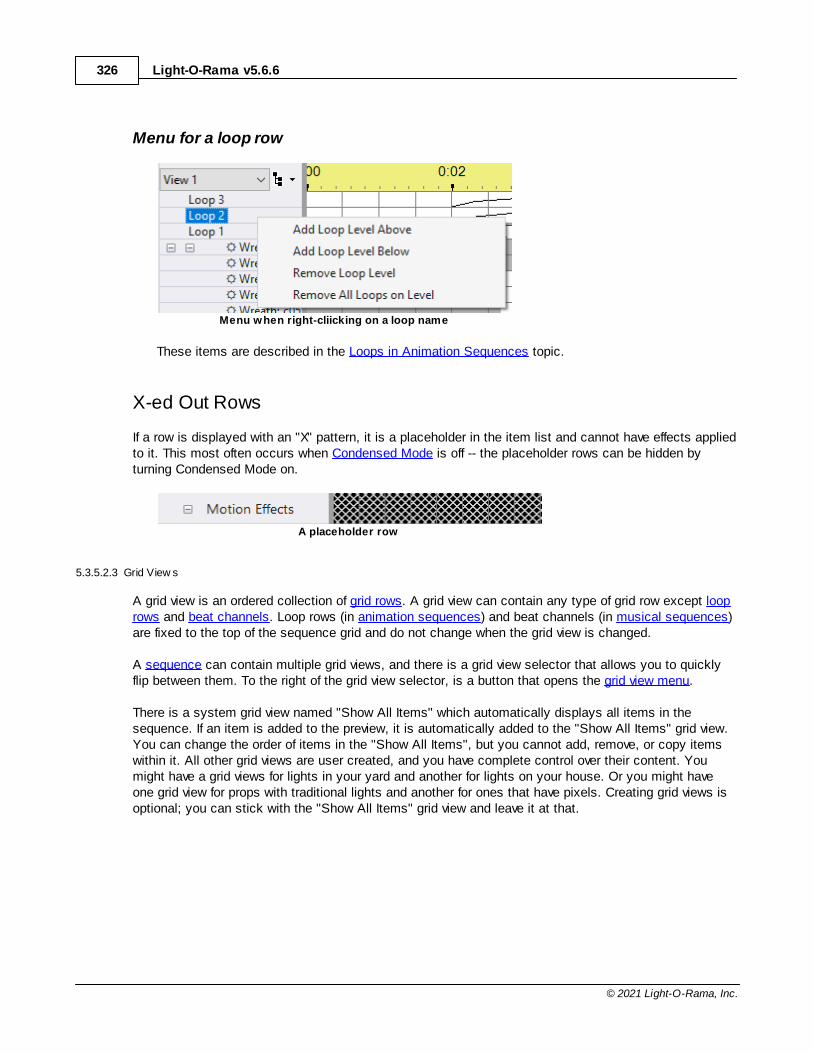
Light-O-Rama v5.6.6326
© 2021 Light-O-Rama, Inc.
Menu for a loop row
Menu when right-cliicking on a loop name
These items are described in the Loops in Animation Sequences topic.
X-ed Out Rows
If a row is displayed with an "X" pattern, it is a placeholder in the item list and cannot have effects appliedto it. This most often occurs when Condensed Mode is off -- the placeholder rows can be hidden byturning Condensed Mode on.
A placeholder row
5.3.5.2.3 Grid View s
A grid view is an ordered collection of grid rows. A grid view can contain any type of grid row except looprows and beat channels. Loop rows (in animation sequences) and beat channels (in musical sequences)are fixed to the top of the sequence grid and do not change when the grid view is changed.
A sequence can contain multiple grid views, and there is a grid view selector that allows you to quicklyflip between them. To the right of the grid view selector, is a button that opens the grid view menu.
There is a system grid view named "Show All Items" which automatically displays all items in thesequence. If an item is added to the preview, it is automatically added to the "Show All Items" grid view.You can change the order of items in the "Show All Items", but you cannot add, remove, or copy itemswithin it. All other grid views are user created, and you have complete control over their content. Youmight have a grid views for lights in your yard and another for lights on your house. Or you might haveone grid view for props with traditional lights and another for ones that have pixels. Creating grid views isoptional; you can stick with the "Show All Items" grid view and leave it at that.
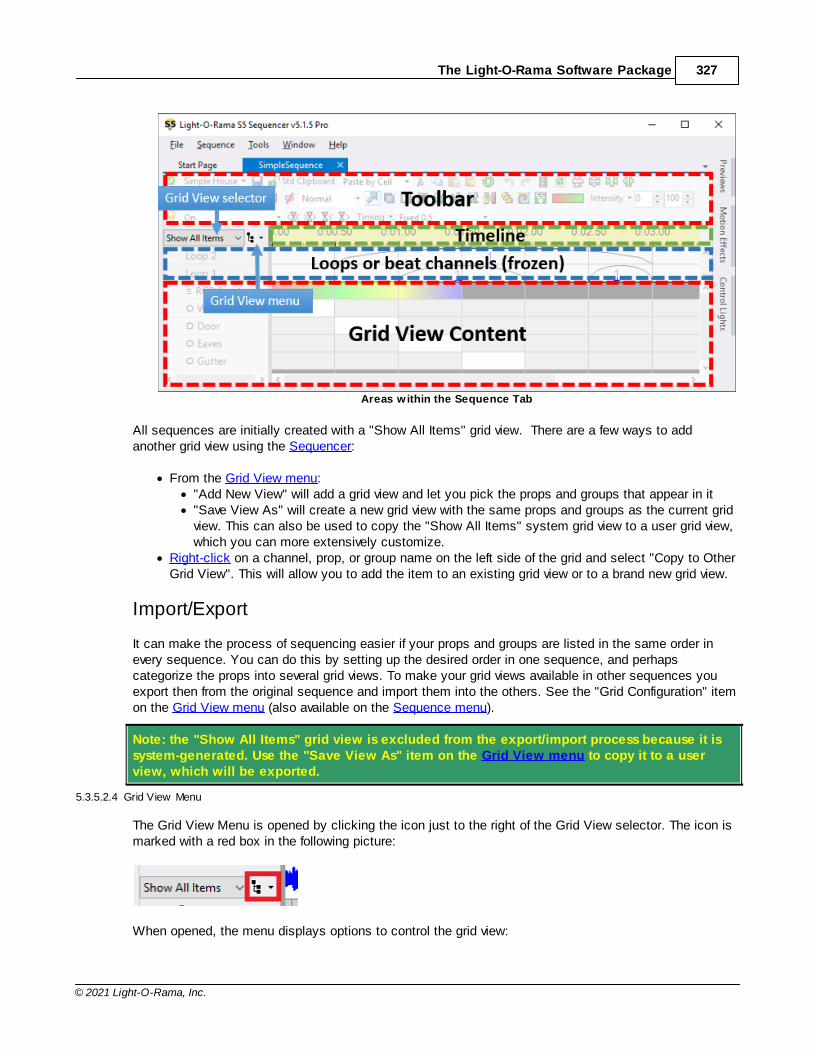
The Light-O-Rama Software Package 327
© 2021 Light-O-Rama, Inc.
Areas within the Sequence Tab
All sequences are initially created with a "Show All Items" grid view. There are a few ways to addanother grid view using the Sequencer:
· From the Grid View menu:· "Add New View" will add a grid view and let you pick the props and groups that appear in it· "Save View As" will create a new grid view with the same props and groups as the current grid
view. This can also be used to copy the "Show All Items" system grid view to a user grid view,which you can more extensively customize.
· Right-click on a channel, prop, or group name on the left side of the grid and select "Copy to OtherGrid View". This will allow you to add the item to an existing grid view or to a brand new grid view.
Import/Export
It can make the process of sequencing easier if your props and groups are listed in the same order inevery sequence. You can do this by setting up the desired order in one sequence, and perhapscategorize the props into several grid views. To make your grid views available in other sequences youexport then from the original sequence and import them into the others. See the "Grid Configuration" itemon the Grid View menu (also available on the Sequence menu).
Note: the "Show All Items" grid view is excluded from the export/import process because it issystem-generated. Use the "Save View As" item on the Grid View menu to copy it to a userview, which will be exported.
5.3.5.2.4 Grid View Menu
The Grid View Menu is opened by clicking the icon just to the right of the Grid View selector. The icon ismarked with a red box in the following picture:
When opened, the menu displays options to control the grid view:
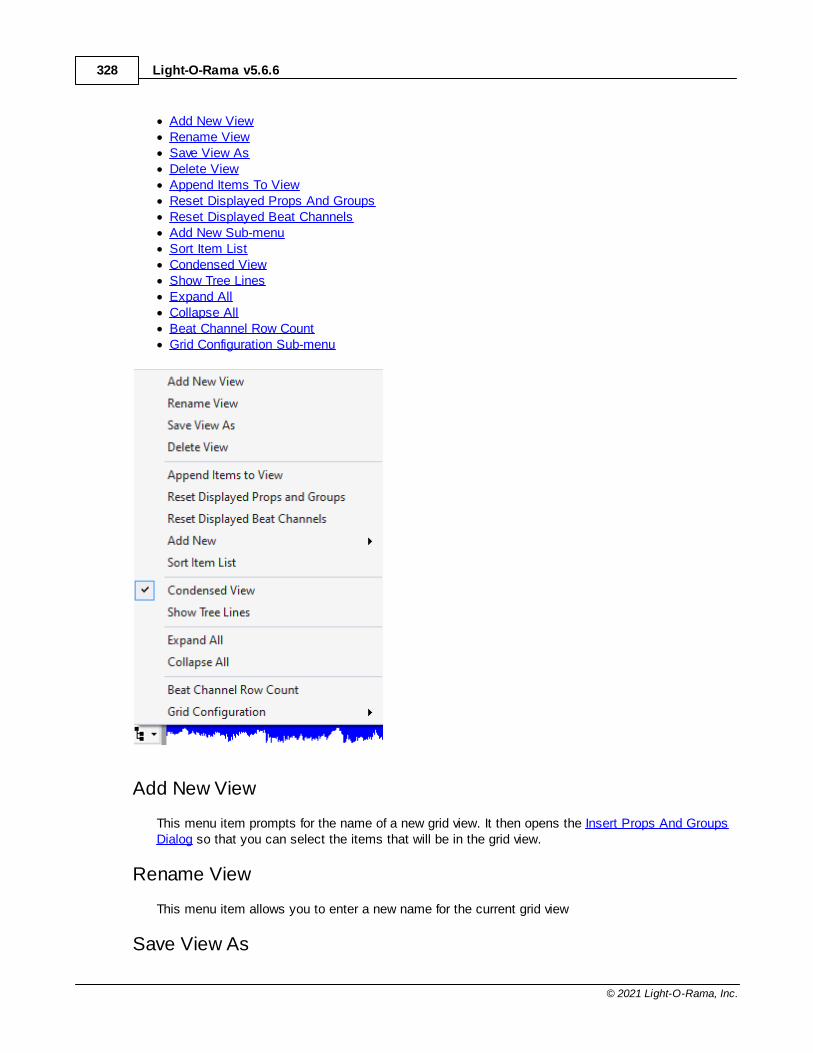
Light-O-Rama v5.6.6328
© 2021 Light-O-Rama, Inc.
· Add New View· Rename View· Save View As· Delete View· Append Items To View· Reset Displayed Props And Groups· Reset Displayed Beat Channels· Add New Sub-menu· Sort Item List· Condensed View· Show Tree Lines· Expand All· Collapse All· Beat Channel Row Count· Grid Configuration Sub-menu
Add New View
This menu item prompts for the name of a new grid view. It then opens the Insert Props And GroupsDialog so that you can select the items that will be in the grid view.
Rename View
This menu item allows you to enter a new name for the current grid view
Save View As
The Light-O-Rama Software Package 329
© 2021 Light-O-Rama, Inc.
This menu item prompts for the name of a new grid view. It then copies the current grid view into thenew one.
Delete View
This menu item displays a confirmation message, and then deletes the current grid view. You cannotdelete the "Show All Items" grid view, as it is system-generated.
Append Items To View
This menu item opens the Insert Props And Groups Dialog, and then appends the selected items tothe bottom of the current grid view. Does not apply to the "Show All Items" grid view.
Reset Displayed Props And Groups
This menu item opens the Insert Props And Groups Dialog, and then replaces the items in thecurrent grid view with the ones selected in the dialog. Does not apply to the "Show All Items" gridview.
Reset Displayed Beat Channels
This menu item opens a dialog that allows you to select amongst the beat channels defined in thesequence. The newly selected beat channels replace any that are currently displayed in the grid.
Add New Sub-menu
This menu item opens a sub-menu that allows you to add a new a loop row, subsequence, beatchannel, or RGB aggregate. "Add New" is also available on the main menu at Sequence > Add New.
Sort Item List
This menu item opens the sort dialog, allowing you to reorder the item list. It sorts the top level of theitem list. For each category of item, click the radio button according to your desired sort priority. "1"means it sorts to the top; "6" means it sorts to the bottom. Items at the same sort priority will beintermixed and sorted together alphabetically.
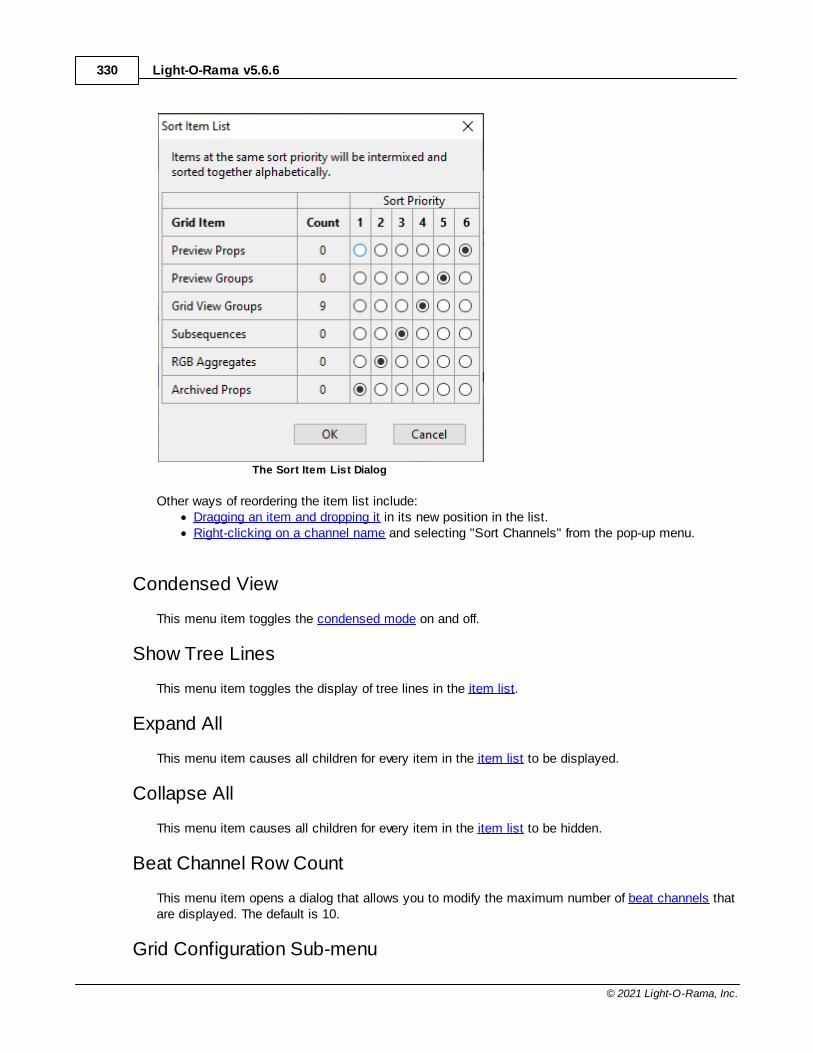
Light-O-Rama v5.6.6330
© 2021 Light-O-Rama, Inc.
The Sort Item List Dialog
Other ways of reordering the item list include:· Dragging an item and dropping it in its new position in the list.· Right-clicking on a channel name and selecting "Sort Channels" from the pop-up menu.
Condensed View
This menu item toggles the condensed mode on and off.
Show Tree Lines
This menu item toggles the display of tree lines in the item list.
Expand All
This menu item causes all children for every item in the item list to be displayed.
Collapse All
This menu item causes all children for every item in the item list to be hidden.
Beat Channel Row Count
This menu item opens a dialog that allows you to modify the maximum number of beat channels thatare displayed. The default is 10.
Grid Configuration Sub-menu
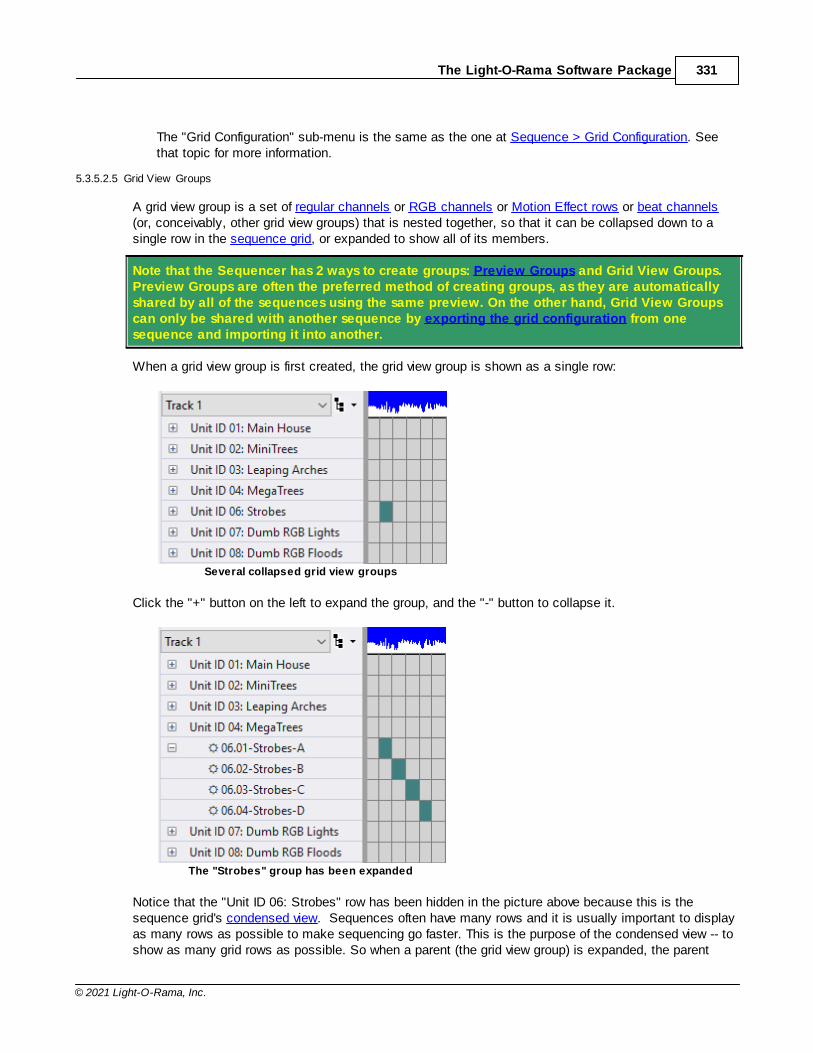
The Light-O-Rama Software Package 331
© 2021 Light-O-Rama, Inc.
The "Grid Configuration" sub-menu is the same as the one at Sequence > Grid Configuration. Seethat topic for more information.
5.3.5.2.5 Grid View Groups
A grid view group is a set of regular channels or RGB channels or Motion Effect rows or beat channels(or, conceivably, other grid view groups) that is nested together, so that it can be collapsed down to asingle row in the sequence grid, or expanded to show all of its members.
Note that the Sequencer has 2 ways to create groups: Preview Groups and Grid View Groups.Preview Groups are often the preferred method of creating groups, as they are automaticallyshared by all of the sequences using the same preview. On the other hand, Grid View Groupscan only be shared with another sequence by exporting the grid configuration from onesequence and importing it into another.
When a grid view group is first created, the grid view group is shown as a single row:
Several collapsed grid view groups
Click the "+" button on the left to expand the group, and the "-" button to collapse it.
The "Strobes" group has been expanded
Notice that the "Unit ID 06: Strobes" row has been hidden in the picture above because this is thesequence grid's condensed view. Sequences often have many rows and it is usually important to displayas many rows as possible to make sequencing go faster. This is the purpose of the condensed view -- toshow as many grid rows as possible. So when a parent (the grid view group) is expanded, the parent
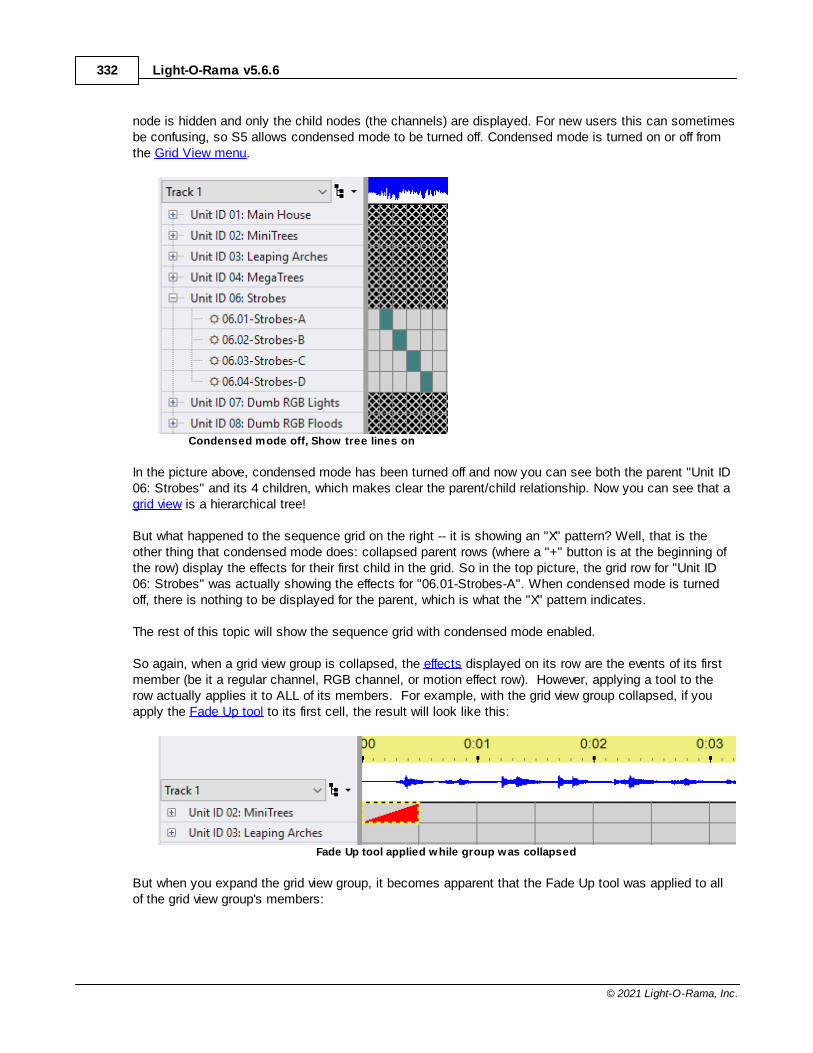
Light-O-Rama v5.6.6332
© 2021 Light-O-Rama, Inc.
node is hidden and only the child nodes (the channels) are displayed. For new users this can sometimesbe confusing, so S5 allows condensed mode to be turned off. Condensed mode is turned on or off fromthe Grid View menu.
Condensed mode off, Show tree lines on
In the picture above, condensed mode has been turned off and now you can see both the parent "Unit ID06: Strobes" and its 4 children, which makes clear the parent/child relationship. Now you can see that agrid view is a hierarchical tree!
But what happened to the sequence grid on the right -- it is showing an "X" pattern? Well, that is theother thing that condensed mode does: collapsed parent rows (where a "+" button is at the beginning ofthe row) display the effects for their first child in the grid. So in the top picture, the grid row for "Unit ID06: Strobes" was actually showing the effects for "06.01-Strobes-A". When condensed mode is turnedoff, there is nothing to be displayed for the parent, which is what the "X" pattern indicates.
The rest of this topic will show the sequence grid with condensed mode enabled.
So again, when a grid view group is collapsed, the effects displayed on its row are the events of its firstmember (be it a regular channel, RGB channel, or motion effect row). However, applying a tool to therow actually applies it to ALL of its members. For example, with the grid view group collapsed, if youapply the Fade Up tool to its first cell, the result will look like this:
Fade Up tool applied while group was collapsed
But when you expand the grid view group, it becomes apparent that the Fade Up tool was applied to allof the grid view group's members:
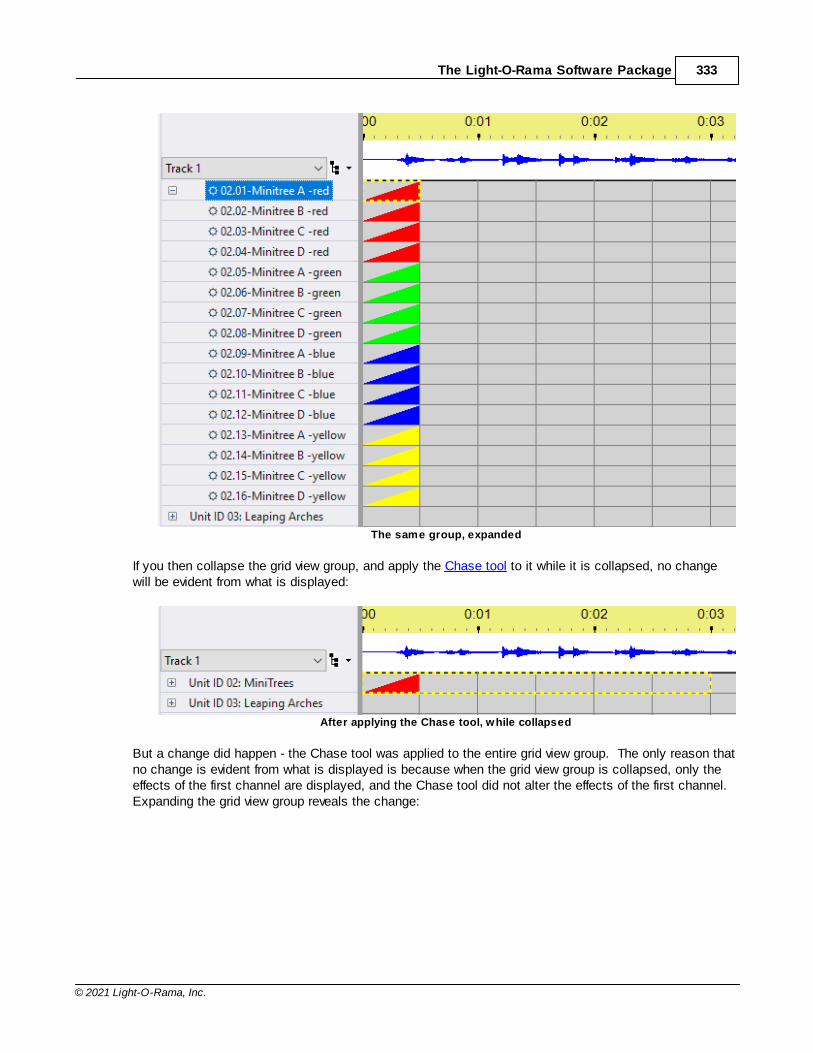
The Light-O-Rama Software Package 333
© 2021 Light-O-Rama, Inc.
The same group, expanded
If you then collapse the grid view group, and apply the Chase tool to it while it is collapsed, no changewill be evident from what is displayed:
After applying the Chase tool, while collapsed
But a change did happen - the Chase tool was applied to the entire grid view group. The only reason thatno change is evident from what is displayed is because when the grid view group is collapsed, only theeffects of the first channel are displayed, and the Chase tool did not alter the effects of the first channel. Expanding the grid view group reveals the change:
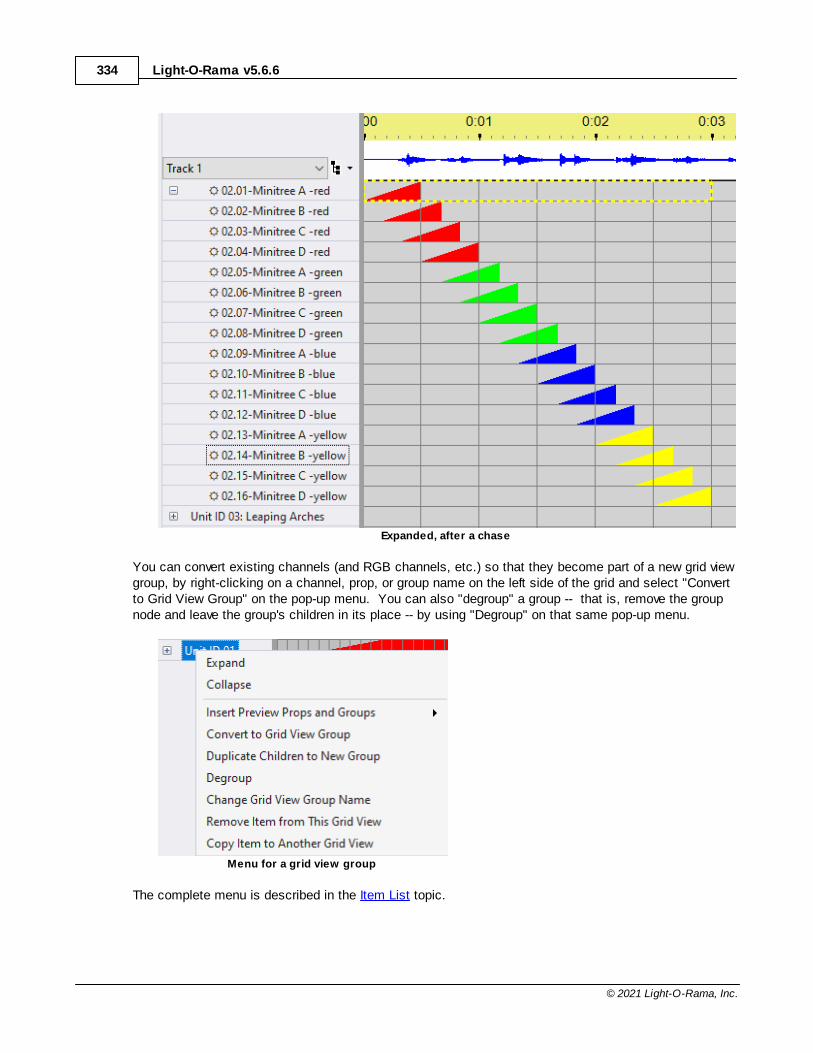
Light-O-Rama v5.6.6334
© 2021 Light-O-Rama, Inc.
Expanded, after a chase
You can convert existing channels (and RGB channels, etc.) so that they become part of a new grid viewgroup, by right-clicking on a channel, prop, or group name on the left side of the grid and select "Convertto Grid View Group" on the pop-up menu. You can also "degroup" a group -- that is, remove the groupnode and leave the group's children in its place -- by using "Degroup" on that same pop-up menu.
Menu for a grid view group
The complete menu is described in the Item List topic.
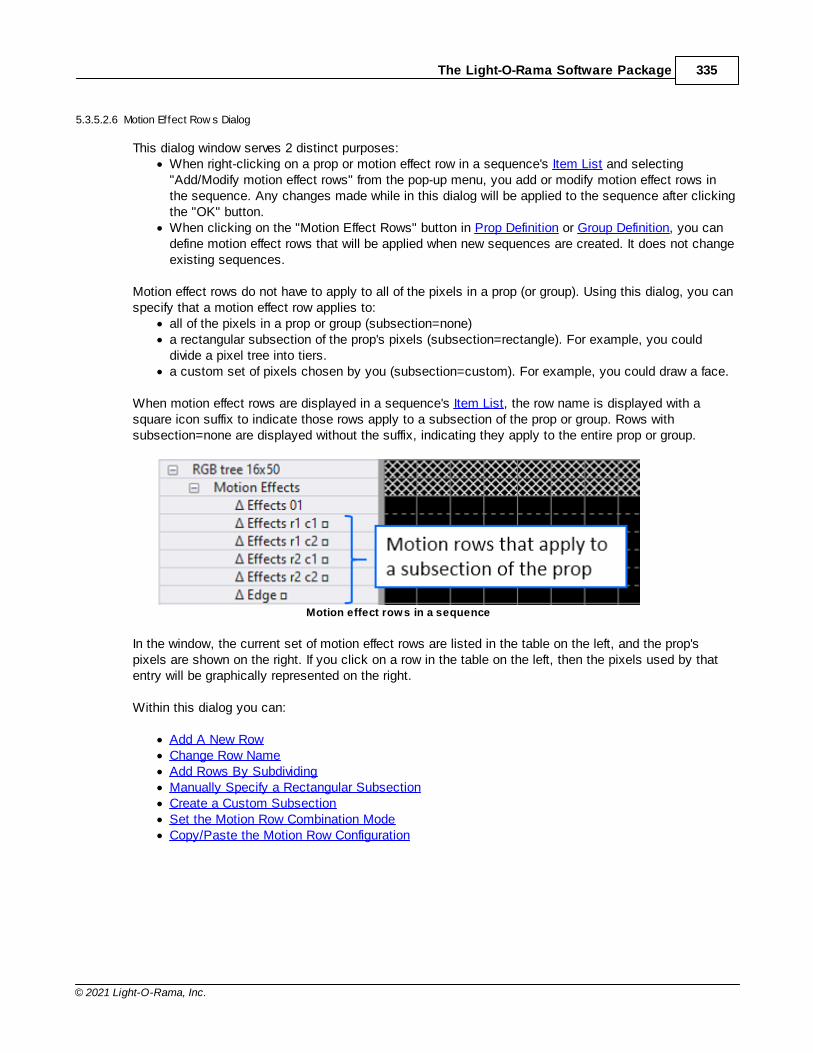
The Light-O-Rama Software Package 335
© 2021 Light-O-Rama, Inc.
5.3.5.2.6 Motion Effect Row s Dialog
This dialog window serves 2 distinct purposes:· When right-clicking on a prop or motion effect row in a sequence's Item List and selecting
"Add/Modify motion effect rows" from the pop-up menu, you add or modify motion effect rows inthe sequence. Any changes made while in this dialog will be applied to the sequence after clickingthe "OK" button.
· When clicking on the "Motion Effect Rows" button in Prop Definition or Group Definition, you candefine motion effect rows that will be applied when new sequences are created. It does not changeexisting sequences.
Motion effect rows do not have to apply to all of the pixels in a prop (or group). Using this dialog, you canspecify that a motion effect row applies to:
· all of the pixels in a prop or group (subsection=none)· a rectangular subsection of the prop's pixels (subsection=rectangle). For example, you could
divide a pixel tree into tiers.· a custom set of pixels chosen by you (subsection=custom). For example, you could draw a face.
When motion effect rows are displayed in a sequence's Item List, the row name is displayed with asquare icon suffix to indicate those rows apply to a subsection of the prop or group. Rows withsubsection=none are displayed without the suffix, indicating they apply to the entire prop or group.
Motion effect rows in a sequence
In the window, the current set of motion effect rows are listed in the table on the left, and the prop'spixels are shown on the right. If you click on a row in the table on the left, then the pixels used by thatentry will be graphically represented on the right.
Within this dialog you can:
· Add A New Row· Change Row Name· Add Rows By Subdividing· Manually Specify a Rectangular Subsection· Create a Custom Subsection· Set the Motion Row Combination Mode· Copy/Paste the Motion Row Configuration
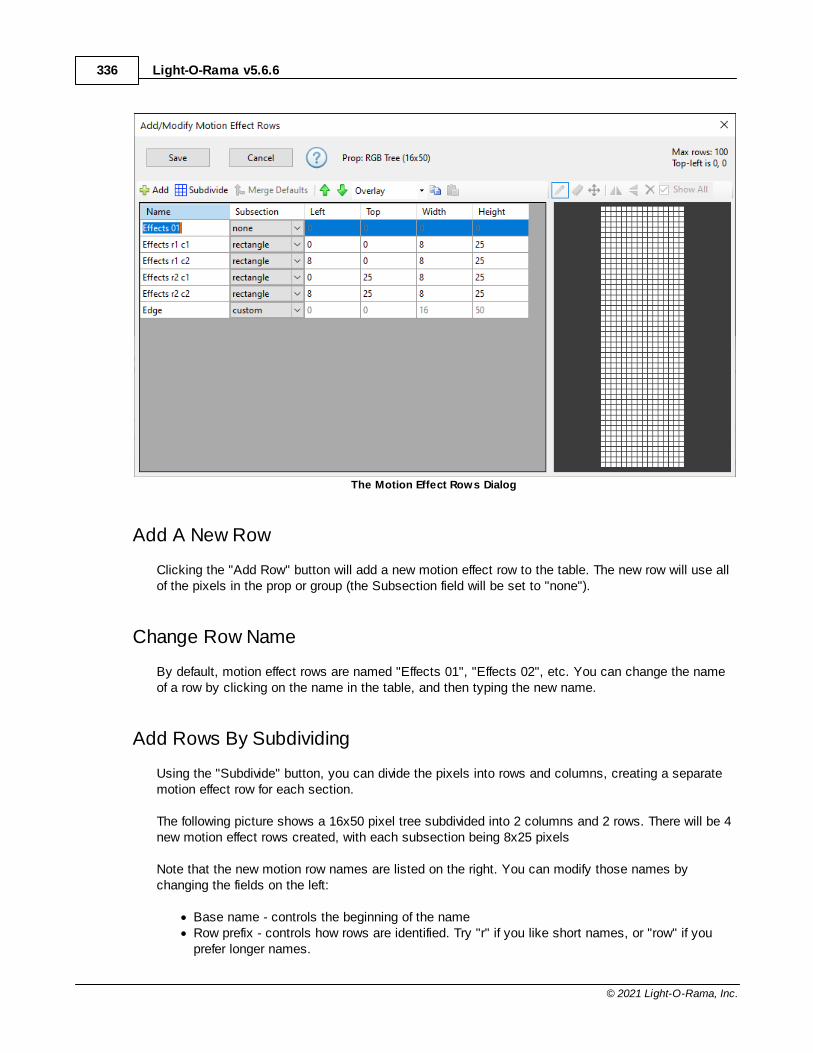
Light-O-Rama v5.6.6336
© 2021 Light-O-Rama, Inc.
The Motion Effect Rows Dialog
Add A New Row
Clicking the "Add Row" button will add a new motion effect row to the table. The new row will use allof the pixels in the prop or group (the Subsection field will be set to "none").
Change Row Name
By default, motion effect rows are named "Effects 01", "Effects 02", etc. You can change the nameof a row by clicking on the name in the table, and then typing the new name.
Add Rows By Subdividing
Using the "Subdivide" button, you can divide the pixels into rows and columns, creating a separatemotion effect row for each section.
The following picture shows a 16x50 pixel tree subdivided into 2 columns and 2 rows. There will be 4new motion effect rows created, with each subsection being 8x25 pixels
Note that the new motion row names are listed on the right. You can modify those names bychanging the fields on the left:
· Base name - controls the beginning of the name· Row prefix - controls how rows are identified. Try "r" if you like short names, or "row" if you
prefer longer names.

The Light-O-Rama Software Package 337
© 2021 Light-O-Rama, Inc.
· Column prefix - controls how columns are identified. Try "c" if you like short names, or "col" ifyou prefer longer names.
· Suffix - controls whether a suffix is added that reflects the total number of rows and/orcolumns being created. This is important if you subdivide a prop multiple times - for exampleinto 2 rows, 4 rows, and 8 rows. Adding a suffix will allow you to identify which motion rowsbelong to which group.
Subdividing a pixel tree into 2 columns and 2 rows
After clicking "OK" in the Create Subsections dialog, this is the result. The "r" in the name stands for"row" and the "c" stands for "column". Notice that clicking on a row in the table graphically displaysthe subsection on the right.
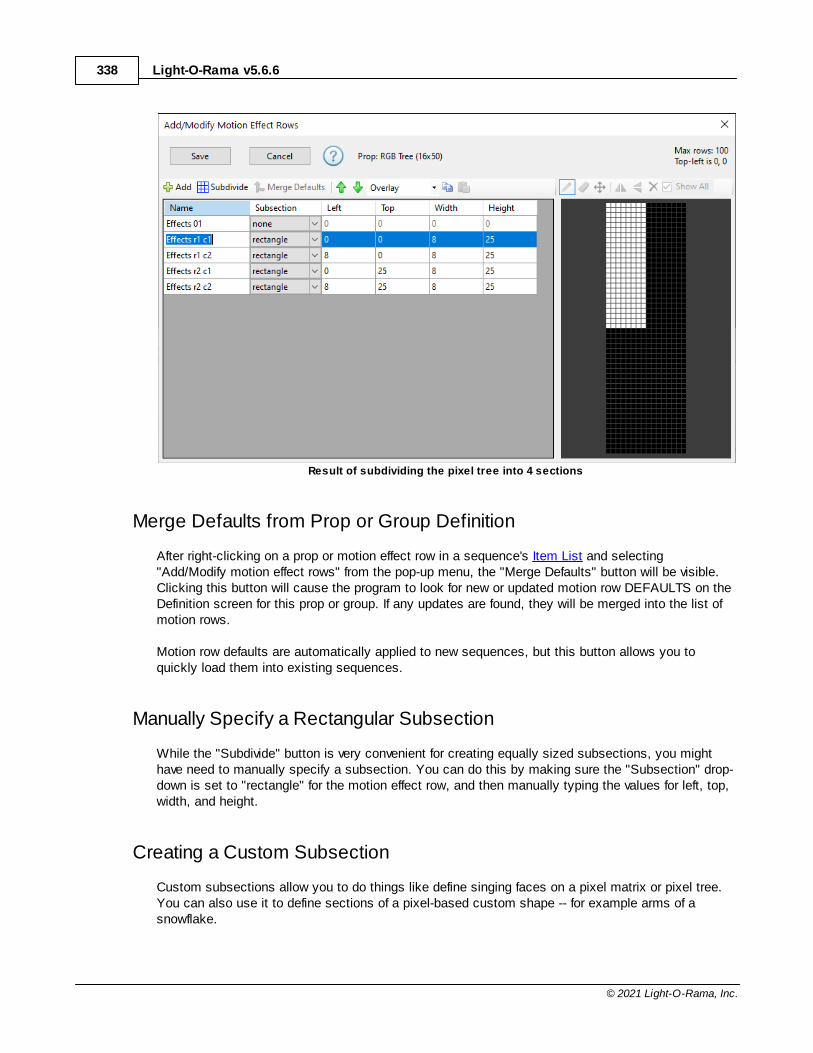
Light-O-Rama v5.6.6338
© 2021 Light-O-Rama, Inc.
Result of subdividing the pixel tree into 4 sections
Merge Defaults from Prop or Group Definition
After right-clicking on a prop or motion effect row in a sequence's Item List and selecting"Add/Modify motion effect rows" from the pop-up menu, the "Merge Defaults" button will be visible.Clicking this button will cause the program to look for new or updated motion row DEFAULTS on theDefinition screen for this prop or group. If any updates are found, they will be merged into the list ofmotion rows.
Motion row defaults are automatically applied to new sequences, but this button allows you toquickly load them into existing sequences.
Manually Specify a Rectangular Subsection
While the "Subdivide" button is very convenient for creating equally sized subsections, you mighthave need to manually specify a subsection. You can do this by making sure the "Subsection" drop-down is set to "rectangle" for the motion effect row, and then manually typing the values for left, top,width, and height.
Creating a Custom Subsection
Custom subsections allow you to do things like define singing faces on a pixel matrix or pixel tree.You can also use it to define sections of a pixel-based custom shape -- for example arms of asnowflake.
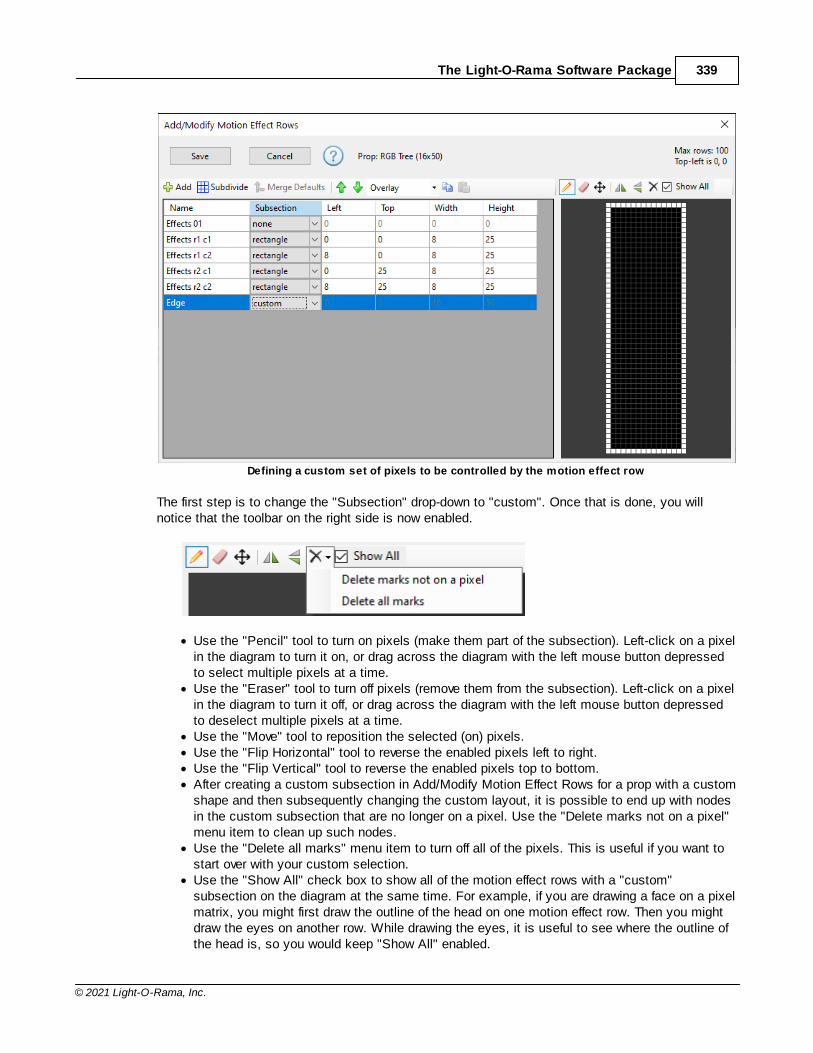
The Light-O-Rama Software Package 339
© 2021 Light-O-Rama, Inc.
Defining a custom set of pixels to be controlled by the motion effect row
The first step is to change the "Subsection" drop-down to "custom". Once that is done, you willnotice that the toolbar on the right side is now enabled.
· Use the "Pencil" tool to turn on pixels (make them part of the subsection). Left-click on a pixelin the diagram to turn it on, or drag across the diagram with the left mouse button depressedto select multiple pixels at a time.
· Use the "Eraser" tool to turn off pixels (remove them from the subsection). Left-click on a pixelin the diagram to turn it off, or drag across the diagram with the left mouse button depressedto deselect multiple pixels at a time.
· Use the "Move" tool to reposition the selected (on) pixels.· Use the "Flip Horizontal" tool to reverse the enabled pixels left to right.· Use the "Flip Vertical" tool to reverse the enabled pixels top to bottom.· After creating a custom subsection in Add/Modify Motion Effect Rows for a prop with a custom
shape and then subsequently changing the custom layout, it is possible to end up with nodesin the custom subsection that are no longer on a pixel. Use the "Delete marks not on a pixel"menu item to clean up such nodes.
· Use the "Delete all marks" menu item to turn off all of the pixels. This is useful if you want tostart over with your custom selection.
· Use the "Show All" check box to show all of the motion effect rows with a "custom"subsection on the diagram at the same time. For example, if you are drawing a face on a pixelmatrix, you might first draw the outline of the head on one motion effect row. Then you mightdraw the eyes on another row. While drawing the eyes, it is useful to see where the outline ofthe head is, so you would keep "Show All" enabled.

Light-O-Rama v5.6.6340
© 2021 Light-O-Rama, Inc.
Motion Row Combination Mode
When this dialog is opened from the sequence grid using the "Add/Modify motion effect rows" right-click menu item, an extra drop-down box is displayed in the middle of the toolbar. When a prop orgroup has more than one motion effect row, this setting controls how the rows are combined.
Motion Row Combination Mode
Blend Mode
In Blend mode, the maximum brightness for each pixel is taken from the effects across all motionrows. This mode is backward compatible with prior versions, including the S4 Pixel Editor.
In the following example, the tree is on the first motion row, Santa is on the second motion row, anda Marquee effect is on the third motion row. Notice that Santa's left arm gets lost in the tree, andthe tree mixes with the marquee effect the bottom. For Picture effects, blend mode doesn't work verywell.
Blend mode
Overlay Mode
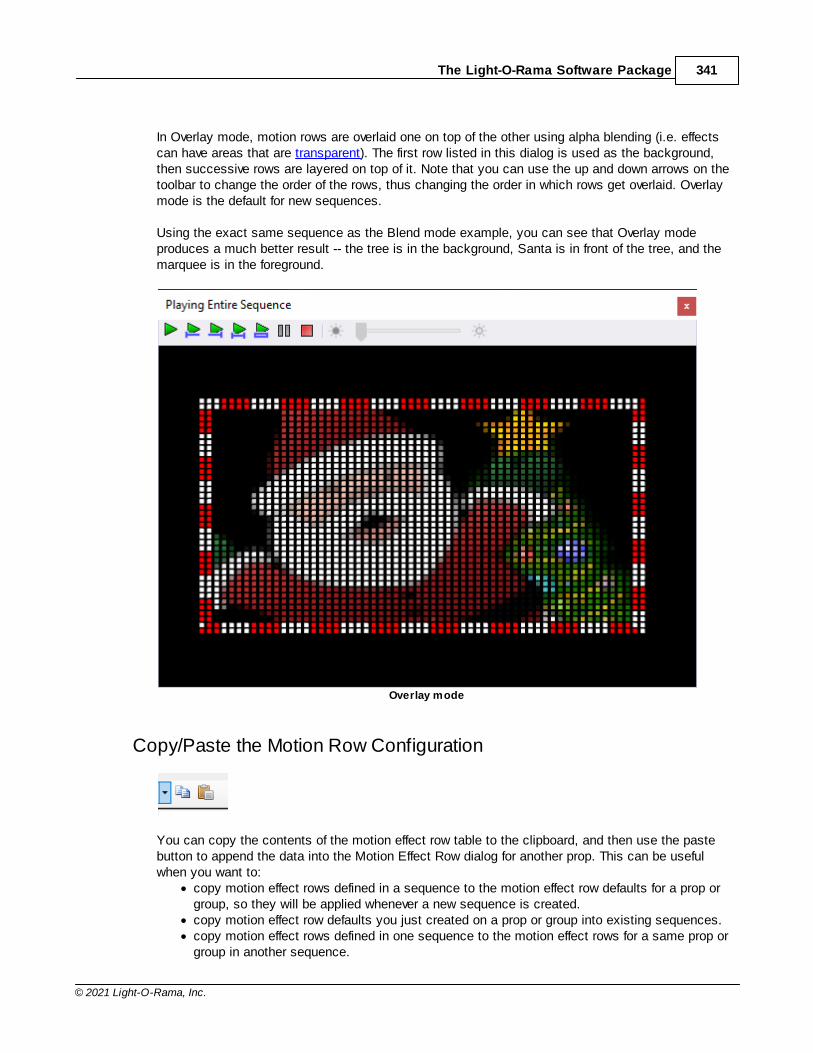
The Light-O-Rama Software Package 341
© 2021 Light-O-Rama, Inc.
In Overlay mode, motion rows are overlaid one on top of the other using alpha blending (i.e. effectscan have areas that are transparent). The first row listed in this dialog is used as the background,then successive rows are layered on top of it. Note that you can use the up and down arrows on thetoolbar to change the order of the rows, thus changing the order in which rows get overlaid. Overlaymode is the default for new sequences.
Using the exact same sequence as the Blend mode example, you can see that Overlay modeproduces a much better result -- the tree is in the background, Santa is in front of the tree, and themarquee is in the foreground.
Overlay mode
Copy/Paste the Motion Row Configuration
You can copy the contents of the motion effect row table to the clipboard, and then use the pastebutton to append the data into the Motion Effect Row dialog for another prop. This can be usefulwhen you want to:
· copy motion effect rows defined in a sequence to the motion effect row defaults for a prop orgroup, so they will be applied whenever a new sequence is created.
· copy motion effect row defaults you just created on a prop or group into existing sequences.· copy motion effect rows defined in one sequence to the motion effect rows for a same prop or
group in another sequence.
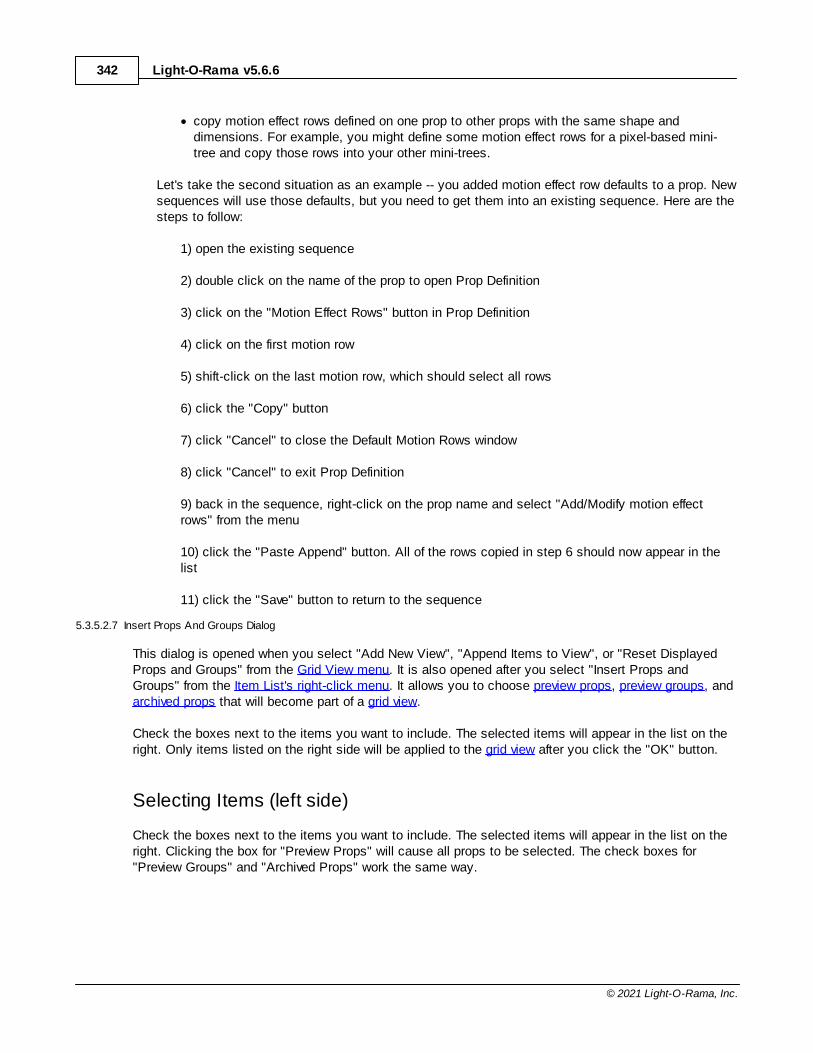
Light-O-Rama v5.6.6342
© 2021 Light-O-Rama, Inc.
· copy motion effect rows defined on one prop to other props with the same shape anddimensions. For example, you might define some motion effect rows for a pixel-based mini-tree and copy those rows into your other mini-trees.
Let's take the second situation as an example -- you added motion effect row defaults to a prop. Newsequences will use those defaults, but you need to get them into an existing sequence. Here are thesteps to follow:
1) open the existing sequence
2) double click on the name of the prop to open Prop Definition
3) click on the "Motion Effect Rows" button in Prop Definition
4) click on the first motion row
5) shift-click on the last motion row, which should select all rows
6) click the "Copy" button
7) click "Cancel" to close the Default Motion Rows window
8) click "Cancel" to exit Prop Definition
9) back in the sequence, right-click on the prop name and select "Add/Modify motion effectrows" from the menu
10) click the "Paste Append" button. All of the rows copied in step 6 should now appear in thelist
11) click the "Save" button to return to the sequence
5.3.5.2.7 Insert Props And Groups Dialog
This dialog is opened when you select "Add New View", "Append Items to View", or "Reset DisplayedProps and Groups" from the Grid View menu. It is also opened after you select "Insert Props andGroups" from the Item List's right-click menu. It allows you to choose preview props, preview groups, andarchived props that will become part of a grid view.
Check the boxes next to the items you want to include. The selected items will appear in the list on theright. Only items listed on the right side will be applied to the grid view after you click the "OK" button.
Selecting Items (left side)
Check the boxes next to the items you want to include. The selected items will appear in the list on theright. Clicking the box for "Preview Props" will cause all props to be selected. The check boxes for"Preview Groups" and "Archived Props" work the same way.
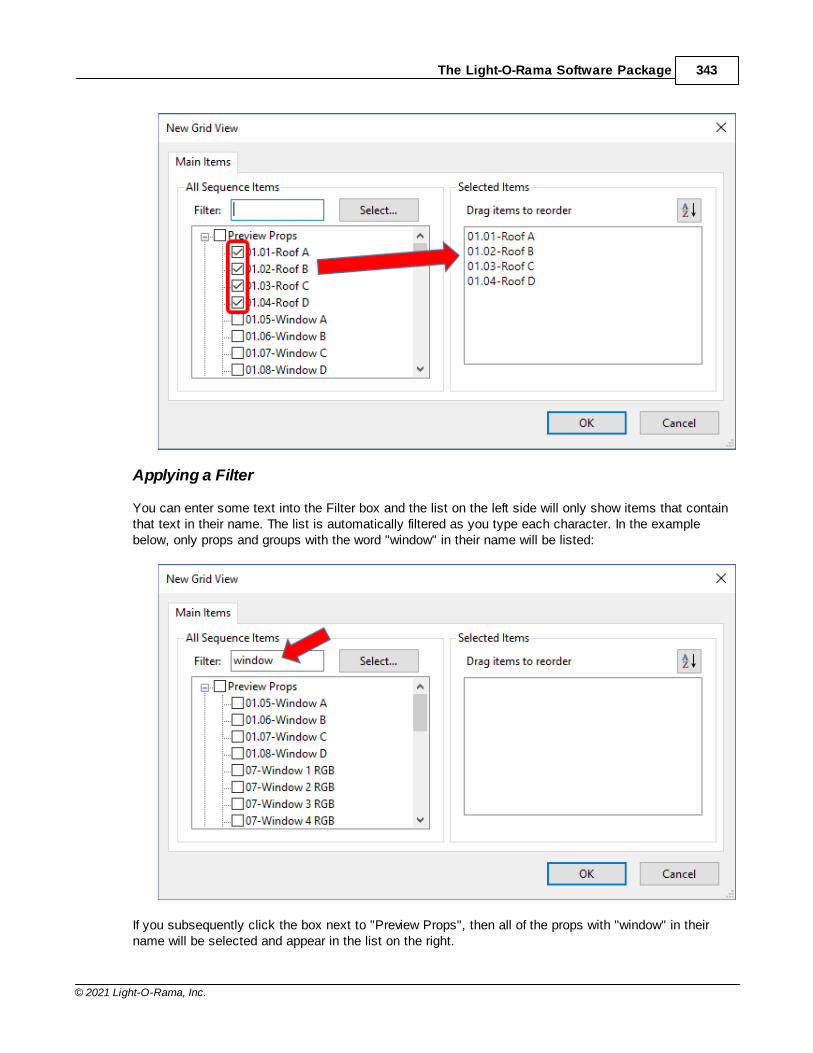
The Light-O-Rama Software Package 343
© 2021 Light-O-Rama, Inc.
Applying a Filter
You can enter some text into the Filter box and the list on the left side will only show items that containthat text in their name. The list is automatically filtered as you type each character. In the examplebelow, only props and groups with the word "window" in their name will be listed:
If you subsequently click the box next to "Preview Props", then all of the props with "window" in theirname will be selected and appear in the list on the right.
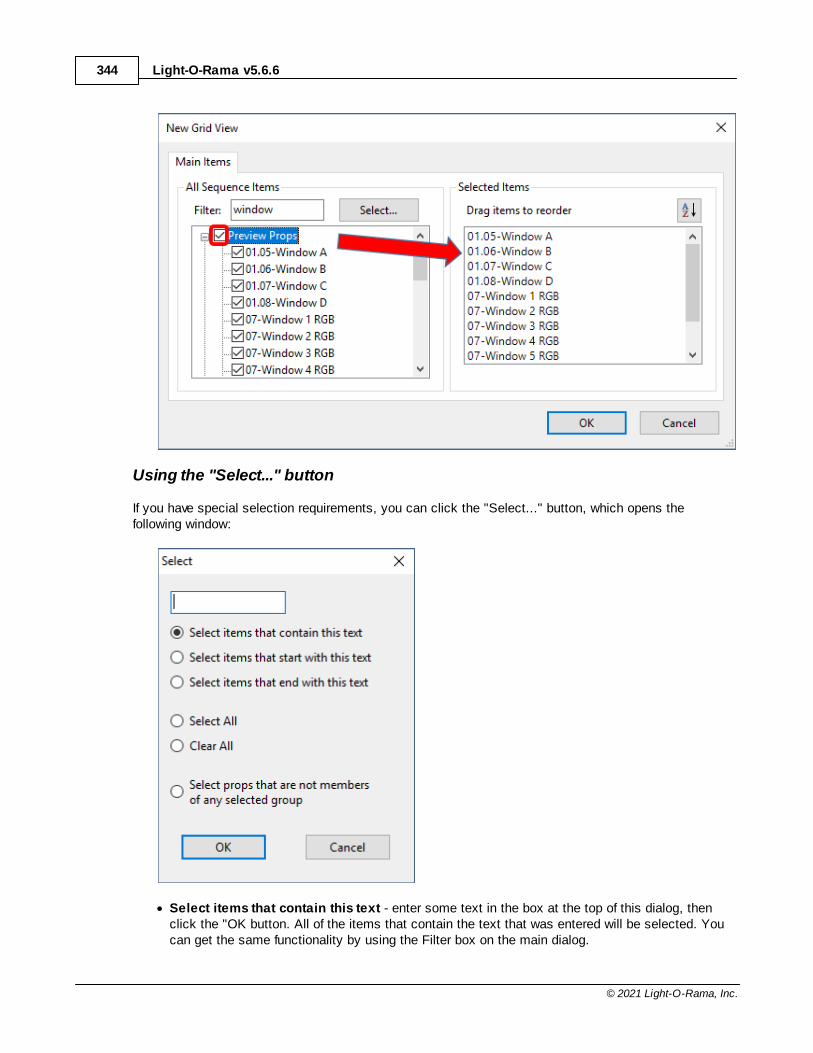
Light-O-Rama v5.6.6344
© 2021 Light-O-Rama, Inc.
Using the "Select..." button
If you have special selection requirements, you can click the "Select..." button, which opens thefollowing window:
· Select items that contain this text - enter some text in the box at the top of this dialog, thenclick the "OK button. All of the items that contain the text that was entered will be selected. Youcan get the same functionality by using the Filter box on the main dialog.
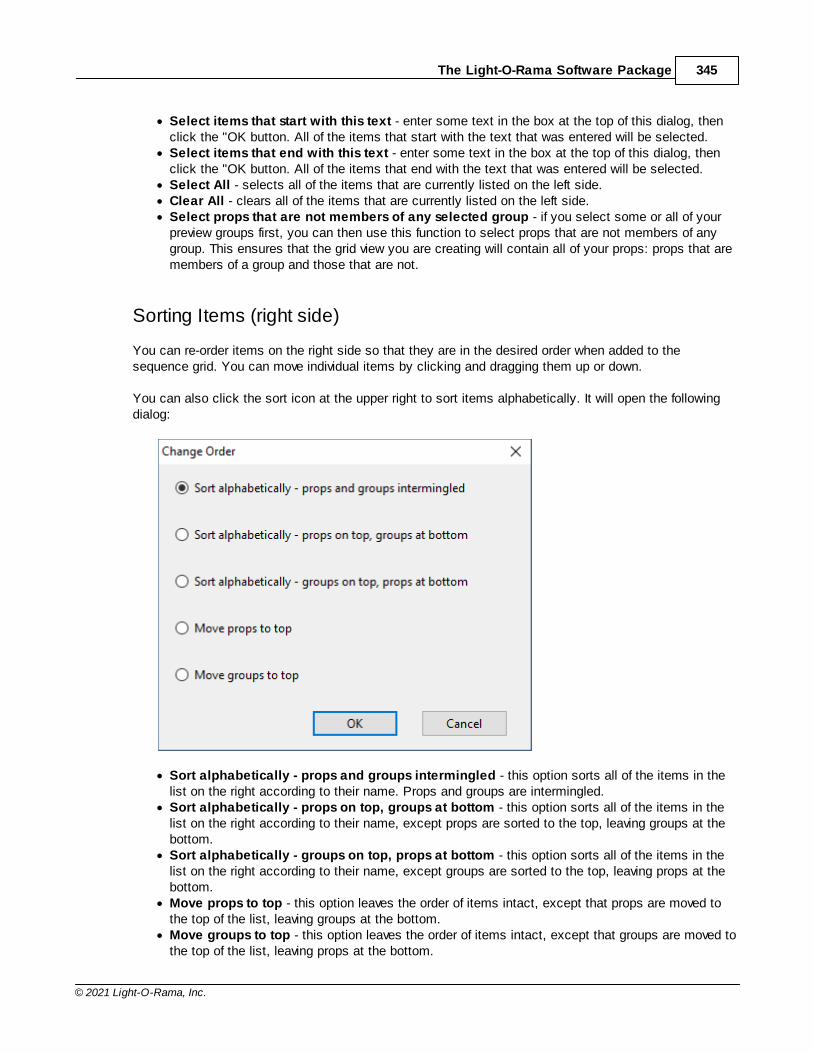
The Light-O-Rama Software Package 345
© 2021 Light-O-Rama, Inc.
· Select items that start with this text - enter some text in the box at the top of this dialog, thenclick the "OK button. All of the items that start with the text that was entered will be selected.
· Select items that end with this text - enter some text in the box at the top of this dialog, thenclick the "OK button. All of the items that end with the text that was entered will be selected.
· Select All - selects all of the items that are currently listed on the left side.· Clear All - clears all of the items that are currently listed on the left side.· Select props that are not members of any selected group - if you select some or all of your
preview groups first, you can then use this function to select props that are not members of anygroup. This ensures that the grid view you are creating will contain all of your props: props that aremembers of a group and those that are not.
Sorting Items (right side)
You can re-order items on the right side so that they are in the desired order when added to thesequence grid. You can move individual items by clicking and dragging them up or down.
You can also click the sort icon at the upper right to sort items alphabetically. It will open the followingdialog:
· Sort alphabetically - props and groups intermingled - this option sorts all of the items in thelist on the right according to their name. Props and groups are intermingled.
· Sort alphabetically - props on top, groups at bottom - this option sorts all of the items in thelist on the right according to their name, except props are sorted to the top, leaving groups at thebottom.
· Sort alphabetically - groups on top, props at bottom - this option sorts all of the items in thelist on the right according to their name, except groups are sorted to the top, leaving props at thebottom.
· Move props to top - this option leaves the order of items intact, except that props are moved tothe top of the list, leaving groups at the bottom.
· Move groups to top - this option leaves the order of items intact, except that groups are moved tothe top of the list, leaving props at the bottom.
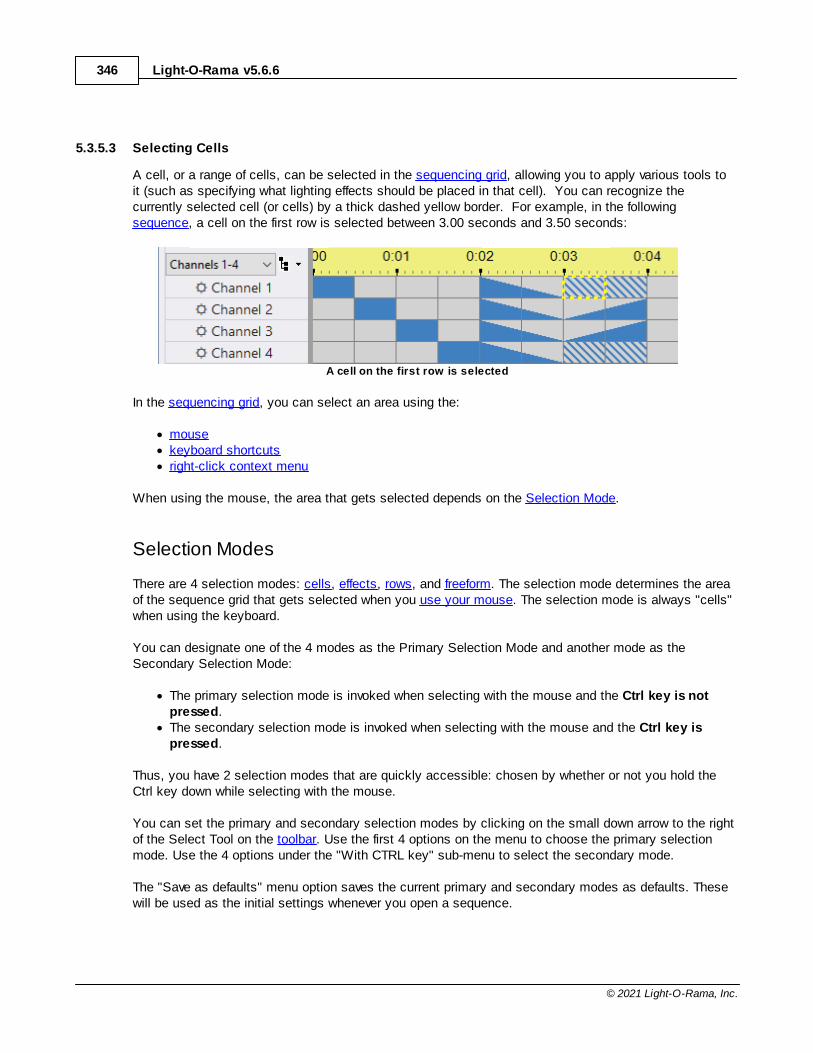
Light-O-Rama v5.6.6346
© 2021 Light-O-Rama, Inc.
5.3.5.3 Selecting Cells
A cell, or a range of cells, can be selected in the sequencing grid, allowing you to apply various tools toit (such as specifying what lighting effects should be placed in that cell). You can recognize thecurrently selected cell (or cells) by a thick dashed yellow border. For example, in the followingsequence, a cell on the first row is selected between 3.00 seconds and 3.50 seconds:
A cell on the first row is selected
In the sequencing grid, you can select an area using the:
· mouse· keyboard shortcuts· right-click context menu
When using the mouse, the area that gets selected depends on the Selection Mode.
Selection Modes
There are 4 selection modes: cells, effects, rows, and freeform. The selection mode determines the areaof the sequence grid that gets selected when you use your mouse. The selection mode is always "cells"when using the keyboard.
You can designate one of the 4 modes as the Primary Selection Mode and another mode as theSecondary Selection Mode:
· The primary selection mode is invoked when selecting with the mouse and the Ctrl key is notpressed.
· The secondary selection mode is invoked when selecting with the mouse and the Ctrl key ispressed.
Thus, you have 2 selection modes that are quickly accessible: chosen by whether or not you hold theCtrl key down while selecting with the mouse.
You can set the primary and secondary selection modes by clicking on the small down arrow to the rightof the Select Tool on the toolbar. Use the first 4 options on the menu to choose the primary selectionmode. Use the 4 options under the "With CTRL key" sub-menu to select the secondary mode.
The "Save as defaults" menu option saves the current primary and secondary modes as defaults. Thesewill be used as the initial settings whenever you open a sequence.
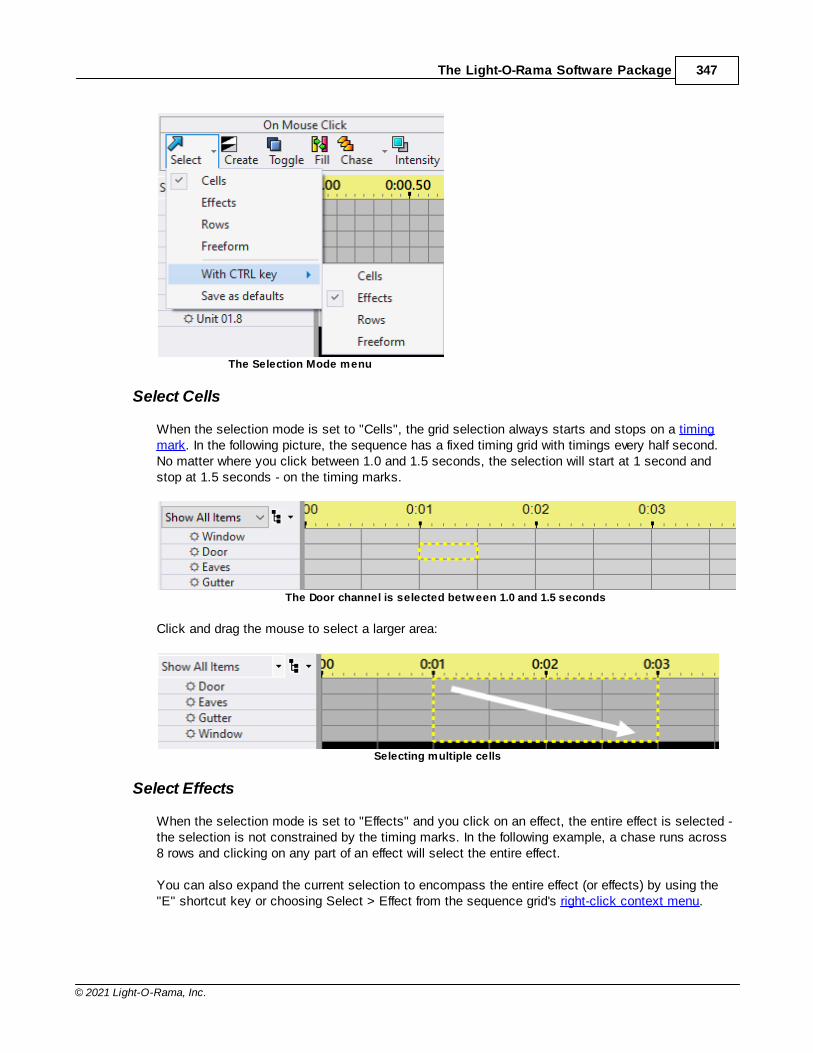
The Light-O-Rama Software Package 347
© 2021 Light-O-Rama, Inc.
The Selection Mode menu
Select Cells
When the selection mode is set to "Cells", the grid selection always starts and stops on a timingmark. In the following picture, the sequence has a fixed timing grid with timings every half second.No matter where you click between 1.0 and 1.5 seconds, the selection will start at 1 second andstop at 1.5 seconds - on the timing marks.
The Door channel is selected between 1.0 and 1.5 seconds
Click and drag the mouse to select a larger area:
Selecting multiple cells
Select Effects
When the selection mode is set to "Effects" and you click on an effect, the entire effect is selected -the selection is not constrained by the timing marks. In the following example, a chase runs across8 rows and clicking on any part of an effect will select the entire effect.
You can also expand the current selection to encompass the entire effect (or effects) by using the"E" shortcut key or choosing Select > Effect from the sequence grid's right-click context menu.
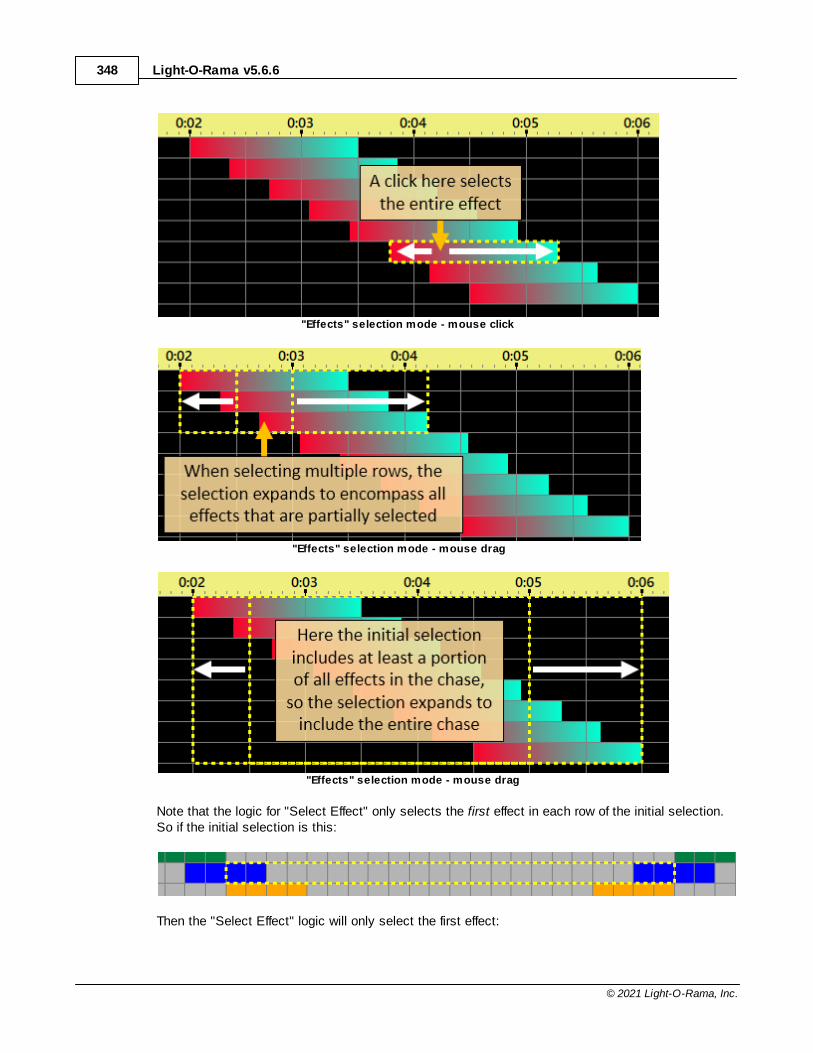
Light-O-Rama v5.6.6348
© 2021 Light-O-Rama, Inc.
"Effects" selection mode - mouse click
"Effects" selection mode - mouse drag
"Effects" selection mode - mouse drag
Note that the logic for "Select Effect" only selects the first effect in each row of the initial selection.So if the initial selection is this:
Then the "Select Effect" logic will only select the first effect:
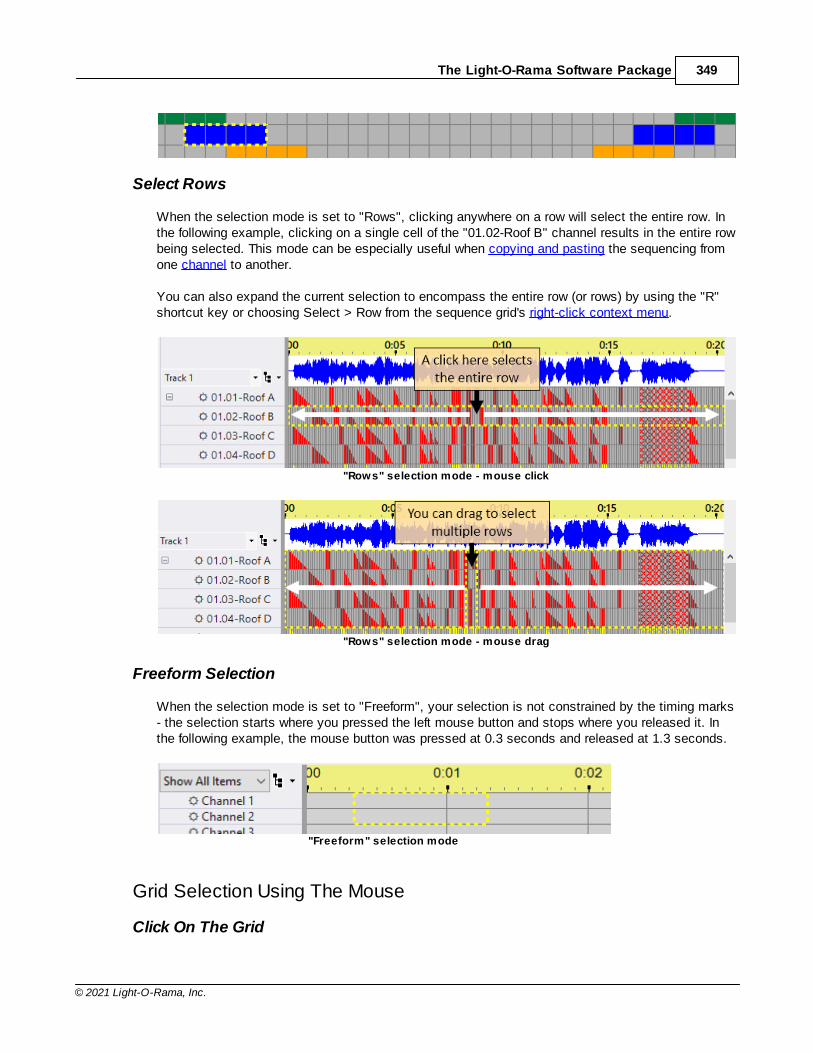
The Light-O-Rama Software Package 349
© 2021 Light-O-Rama, Inc.
Select Rows
When the selection mode is set to "Rows", clicking anywhere on a row will select the entire row. Inthe following example, clicking on a single cell of the "01.02-Roof B" channel results in the entire rowbeing selected. This mode can be especially useful when copying and pasting the sequencing fromone channel to another.
You can also expand the current selection to encompass the entire row (or rows) by using the "R"shortcut key or choosing Select > Row from the sequence grid's right-click context menu.
"Rows" selection mode - mouse click
"Rows" selection mode - mouse drag
Freeform Selection
When the selection mode is set to "Freeform", your selection is not constrained by the timing marks- the selection starts where you pressed the left mouse button and stops where you released it. Inthe following example, the mouse button was pressed at 0.3 seconds and released at 1.3 seconds.
"Freeform" selection mode
Grid Selection Using The Mouse
Click On The Grid
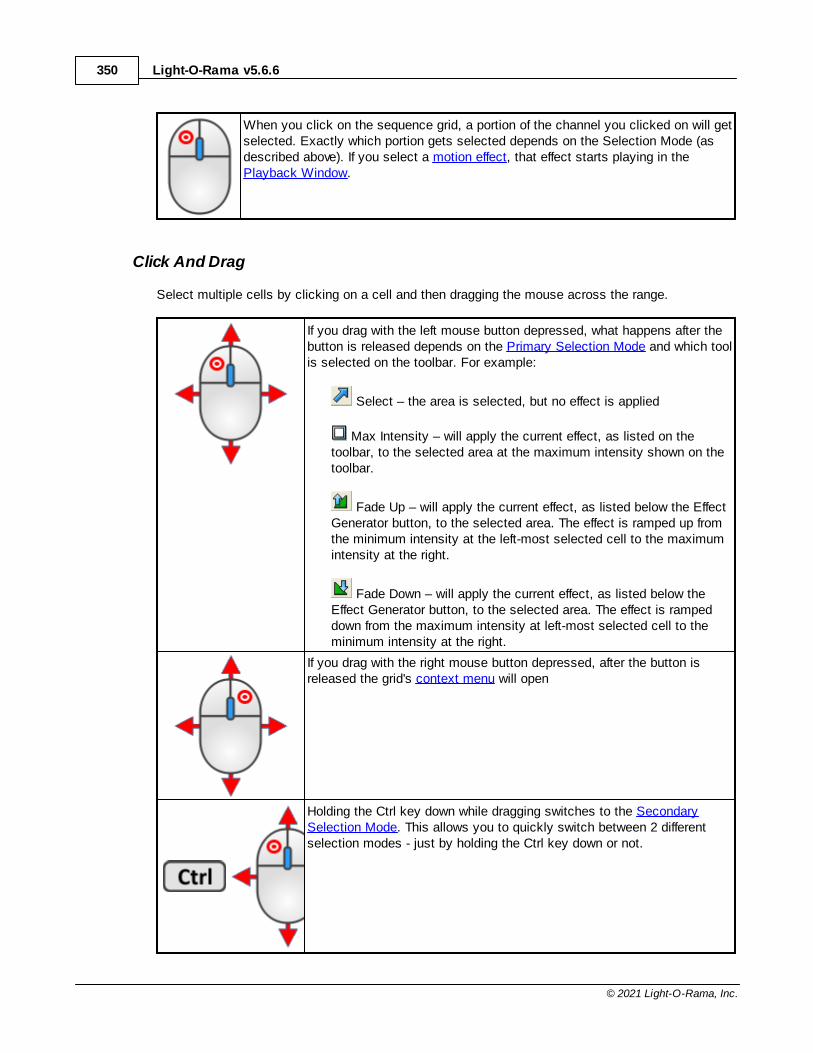
Light-O-Rama v5.6.6350
© 2021 Light-O-Rama, Inc.
When you click on the sequence grid, a portion of the channel you clicked on will getselected. Exactly which portion gets selected depends on the Selection Mode (asdescribed above). If you select a motion effect, that effect starts playing in thePlayback Window.
Click And Drag
Select multiple cells by clicking on a cell and then dragging the mouse across the range.
If you drag with the left mouse button depressed, what happens after thebutton is released depends on the Primary Selection Mode and which toolis selected on the toolbar. For example:
Select – the area is selected, but no effect is applied
Max Intensity – will apply the current effect, as listed on thetoolbar, to the selected area at the maximum intensity shown on thetoolbar.
Fade Up – will apply the current effect, as listed below the EffectGenerator button, to the selected area. The effect is ramped up fromthe minimum intensity at the left-most selected cell to the maximumintensity at the right.
Fade Down – will apply the current effect, as listed below theEffect Generator button, to the selected area. The effect is rampeddown from the maximum intensity at left-most selected cell to theminimum intensity at the right.
If you drag with the right mouse button depressed, after the button isreleased the grid's context menu will open
Holding the Ctrl key down while dragging switches to the SecondarySelection Mode. This allows you to quickly switch between 2 differentselection modes - just by holding the Ctrl key down or not.
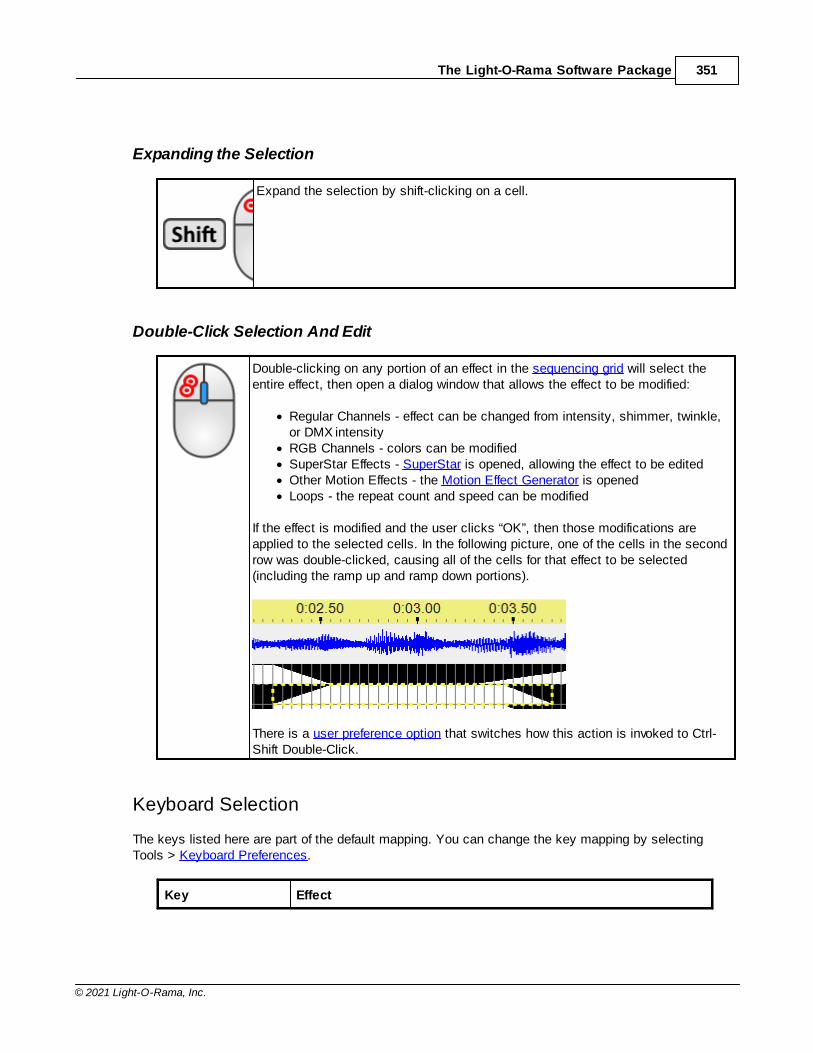
The Light-O-Rama Software Package 351
© 2021 Light-O-Rama, Inc.
Expanding the Selection
Expand the selection by shift-clicking on a cell.
Double-Click Selection And Edit
Double-clicking on any portion of an effect in the sequencing grid will select theentire effect, then open a dialog window that allows the effect to be modified:
· Regular Channels - effect can be changed from intensity, shimmer, twinkle,or DMX intensity
· RGB Channels - colors can be modified· SuperStar Effects - SuperStar is opened, allowing the effect to be edited· Other Motion Effects - the Motion Effect Generator is opened· Loops - the repeat count and speed can be modified
If the effect is modified and the user clicks “OK”, then those modifications areapplied to the selected cells. In the following picture, one of the cells in the secondrow was double-clicked, causing all of the cells for that effect to be selected(including the ramp up and ramp down portions).
There is a user preference option that switches how this action is invoked to Ctrl-Shift Double-Click.
Keyboard Selection
The keys listed here are part of the default mapping. You can change the key mapping by selectingTools > Keyboard Preferences.
Key Effect
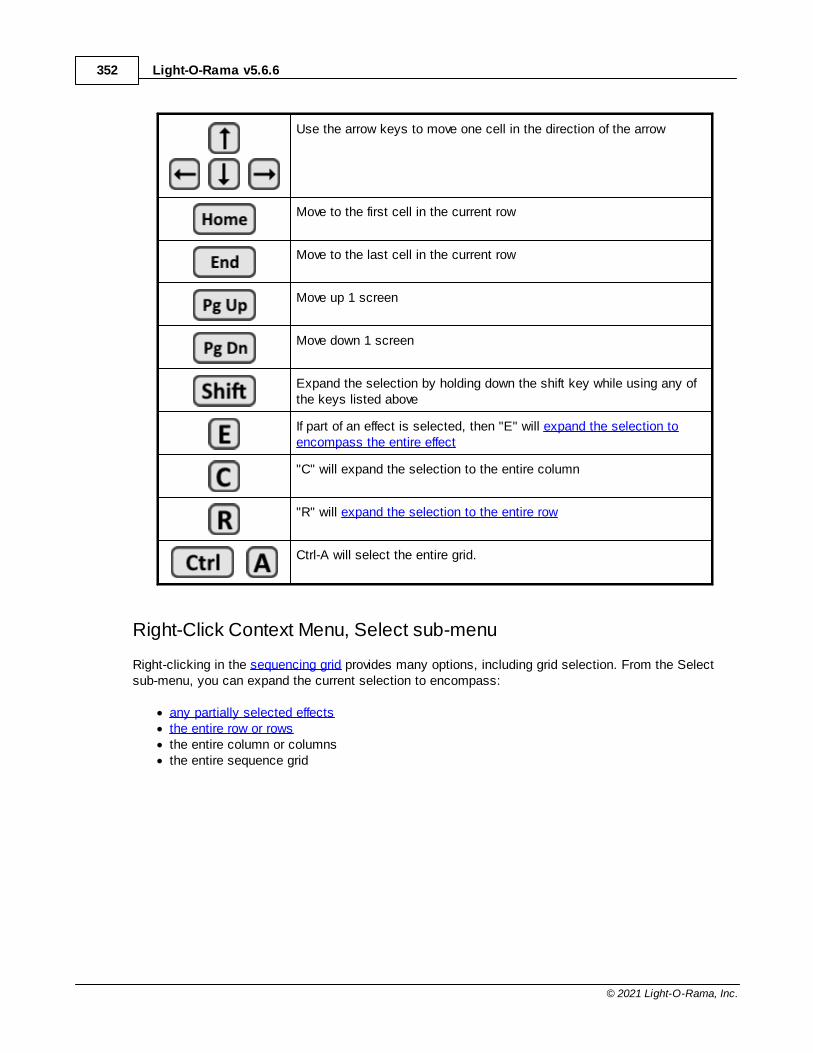
Light-O-Rama v5.6.6352
© 2021 Light-O-Rama, Inc.
Use the arrow keys to move one cell in the direction of the arrow
Move to the first cell in the current row
Move to the last cell in the current row
Move up 1 screen
Move down 1 screen
Expand the selection by holding down the shift key while using any ofthe keys listed above
If part of an effect is selected, then "E" will expand the selection toencompass the entire effect
"C" will expand the selection to the entire column
"R" will expand the selection to the entire row
Ctrl-A will select the entire grid.
Right-Click Context Menu, Select sub-menu
Right-clicking in the sequencing grid provides many options, including grid selection. From the Selectsub-menu, you can expand the current selection to encompass:
· any partially selected effects· the entire row or rows· the entire column or columns· the entire sequence grid
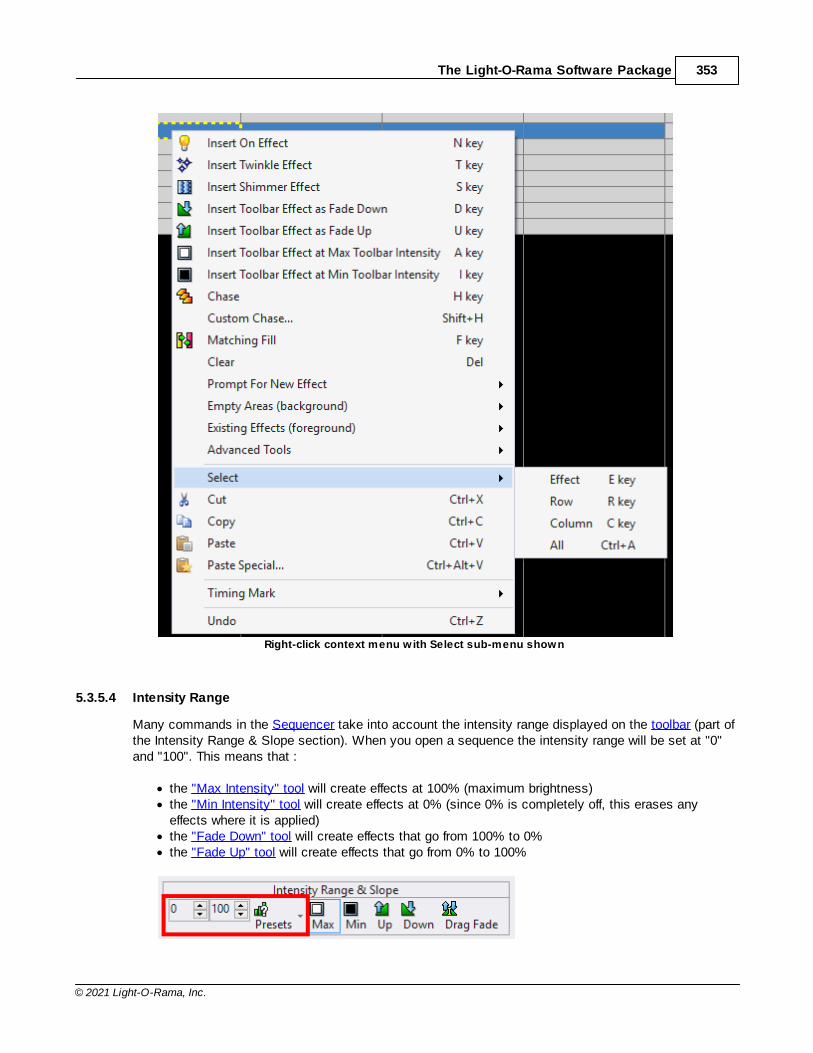
The Light-O-Rama Software Package 353
© 2021 Light-O-Rama, Inc.
Right-click context menu with Select sub-menu shown
5.3.5.4 Intensity Range
Many commands in the Sequencer take into account the intensity range displayed on the toolbar (part ofthe Intensity Range & Slope section). When you open a sequence the intensity range will be set at "0"and "100". This means that :
· the "Max Intensity" tool will create effects at 100% (maximum brightness)· the "Min Intensity" tool will create effects at 0% (since 0% is completely off, this erases any
effects where it is applied)· the "Fade Down" tool will create effects that go from 100% to 0%· the "Fade Up" tool will create effects that go from 0% to 100%
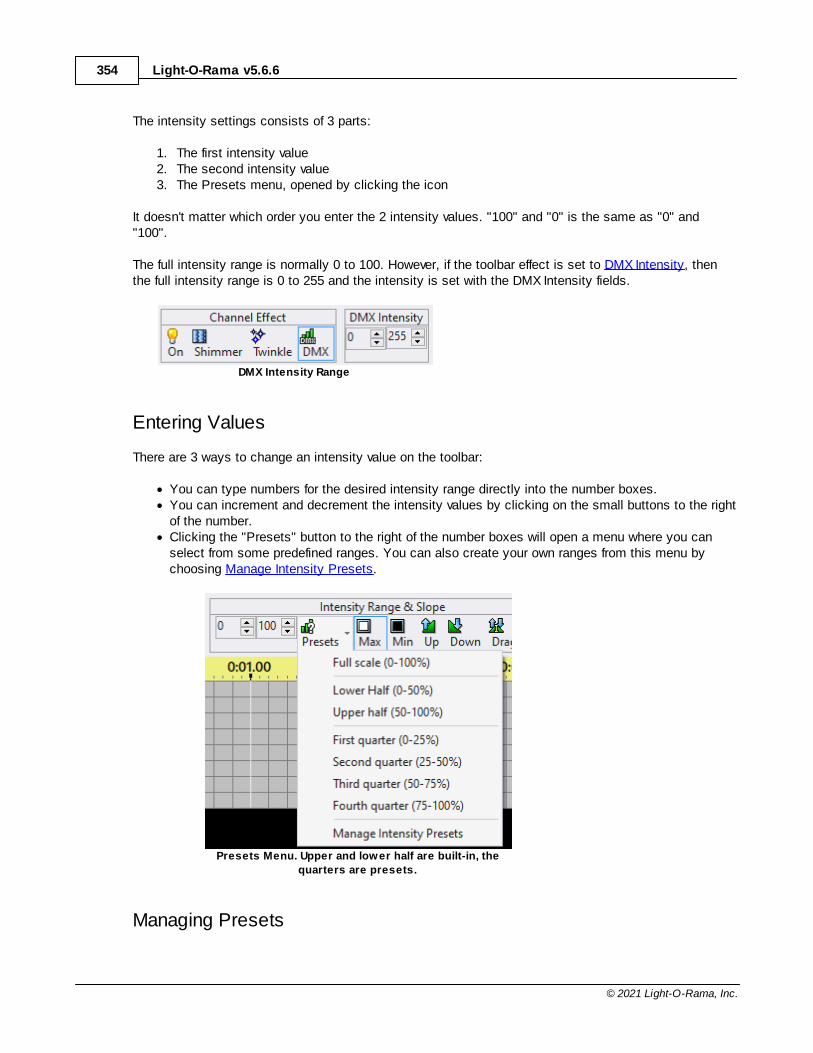
Light-O-Rama v5.6.6354
© 2021 Light-O-Rama, Inc.
The intensity settings consists of 3 parts:
1. The first intensity value2. The second intensity value3. The Presets menu, opened by clicking the icon
It doesn't matter which order you enter the 2 intensity values. "100" and "0" is the same as "0" and"100".
The full intensity range is normally 0 to 100. However, if the toolbar effect is set to DMX Intensity, thenthe full intensity range is 0 to 255 and the intensity is set with the DMX Intensity fields.
DMX Intensity Range
Entering Values
There are 3 ways to change an intensity value on the toolbar:
· You can type numbers for the desired intensity range directly into the number boxes.· You can increment and decrement the intensity values by clicking on the small buttons to the right
of the number.· Clicking the "Presets" button to the right of the number boxes will open a menu where you can
select from some predefined ranges. You can also create your own ranges from this menu bychoosing Manage Intensity Presets.
Presets Menu. Upper and lower half are built-in, the
quarters are presets.
Managing Presets
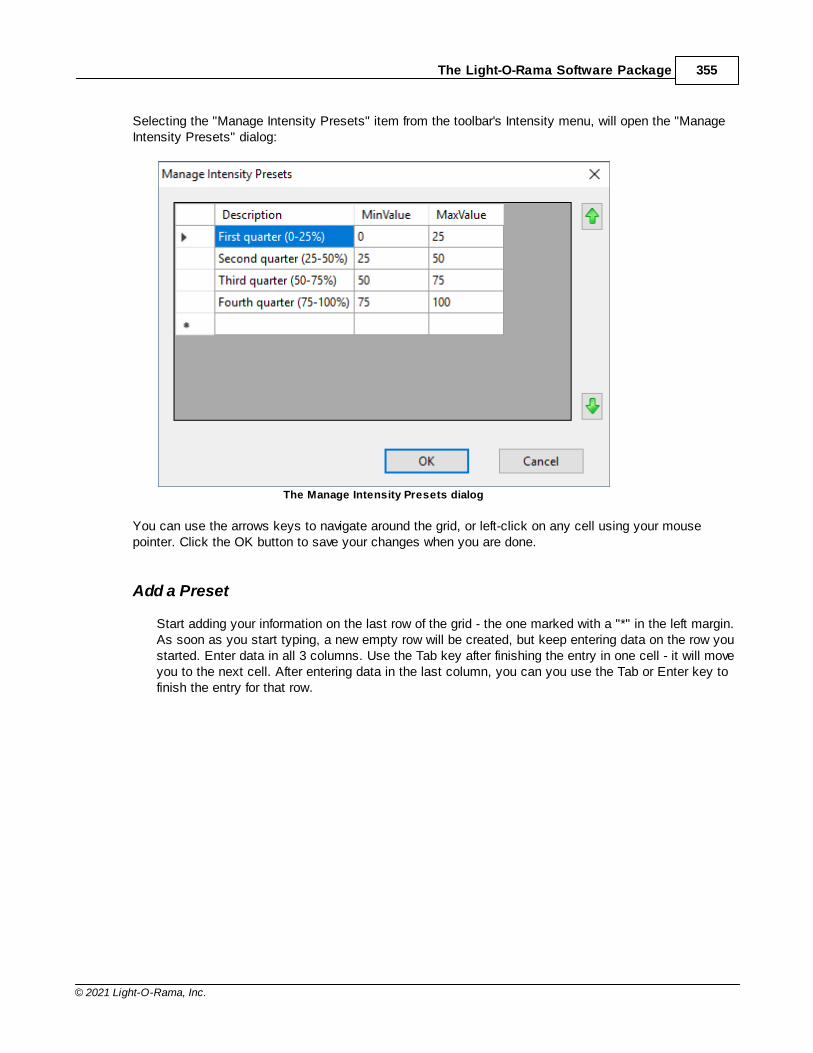
The Light-O-Rama Software Package 355
© 2021 Light-O-Rama, Inc.
Selecting the "Manage Intensity Presets" item from the toolbar's Intensity menu, will open the "ManageIntensity Presets" dialog:
The Manage Intensity Presets dialog
You can use the arrows keys to navigate around the grid, or left-click on any cell using your mousepointer. Click the OK button to save your changes when you are done.
Add a Preset
Start adding your information on the last row of the grid - the one marked with a "*" in the left margin.As soon as you start typing, a new empty row will be created, but keep entering data on the row youstarted. Enter data in all 3 columns. Use the Tab key after finishing the entry in one cell - it will moveyou to the next cell. After entering data in the last column, you can you use the Tab or Enter key tofinish the entry for that row.
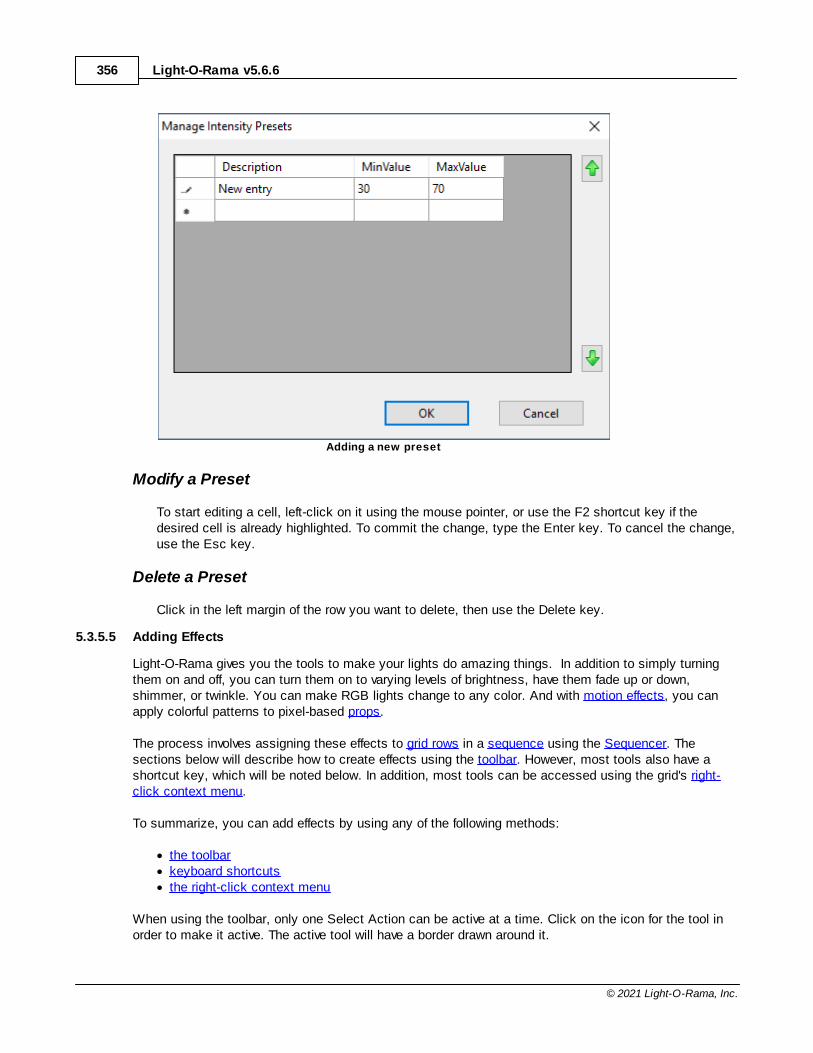
Light-O-Rama v5.6.6356
© 2021 Light-O-Rama, Inc.
Adding a new preset
Modify a Preset
To start editing a cell, left-click on it using the mouse pointer, or use the F2 shortcut key if thedesired cell is already highlighted. To commit the change, type the Enter key. To cancel the change,use the Esc key.
Delete a Preset
Click in the left margin of the row you want to delete, then use the Delete key.
5.3.5.5 Adding Effects
Light-O-Rama gives you the tools to make your lights do amazing things. In addition to simply turningthem on and off, you can turn them on to varying levels of brightness, have them fade up or down,shimmer, or twinkle. You can make RGB lights change to any color. And with motion effects, you canapply colorful patterns to pixel-based props.
The process involves assigning these effects to grid rows in a sequence using the Sequencer. Thesections below will describe how to create effects using the toolbar. However, most tools also have ashortcut key, which will be noted below. In addition, most tools can be accessed using the grid's right-click context menu.
To summarize, you can add effects by using any of the following methods:
· the toolbar· keyboard shortcuts· the right-click context menu
When using the toolbar, only one Select Action can be active at a time. Click on the icon for the tool inorder to make it active. The active tool will have a border drawn around it.
The Light-O-Rama Software Package 357
© 2021 Light-O-Rama, Inc.
· When the Select tool is active, the standard mouse pointer is displayed when you move themouse over the grid, and the mouse can be used to select grid cells.
· When any other tool is active, the mouse pointer specified in Cursor preferences is displayed, andeffects will be placed in cells that are selected.
When using keyboard shortcuts or the right-click context menu to create effects, the Select Action onthe toolbar is ignored.
Basic Operations: Max Intensity, Min Intensity, Fade Up, and Fade Down
To start adding effects to a sequence using the toolbar, the first step is to set the Select Action to"Create". This is important! If you leave the Select Action as "Select", then no effects will be created.
Now set the Intensity Range. The range defaults to 0-100, which is usually fine for starting out. If youwant different values, then type the numbers into the 2 boxes. The order of the numbers does not matter:entering 0 in the first box and 50 in the second has the same effect as entering 50 in the first box and 0in the second. You can use the "Presets" button to quickly set common ranges.
Now choose the "Slope".
Slope Tool Button Action
Max Intensity Applies the selected effect at the maximum value in theintensity range
Min Intensity Applies the selected effect at the minimum value in theintensity range. If the minimum intensity is 0%, this will eraseany existing effects where it is applied.
Fade up Ramps the selected effect from the minimum value in theintensity range to the maximum value in the intensity range
Fade down Ramps the selected effect from the maximum value in theintensity range to the minimum value in the intensity range
Now choose the Effect Type:
Effect Type Description
Channel Effect Simple effects originally meant to control AC-powered lights.However these effects can also be applied to RGB lights and pixels.
Color Fade Applies a color transition to an RGB light. However, these effectswork equally well on RGB pixels.
Motion Effect an effect intended for pixel-based display elements created by theMotion Effect Generator or the SuperStar Sequencer. The motioneffect that will be applied when drawing on the grid is the onecurrently displayed in the Playback Window. Motion Effects can onlybe placed on Motion Effect Rows, and require a Pro level license.Furthermore, motion effects can only be displayed on lightsconnected to Enhanced LOR networks, or DMX networks. Theycannot be displayed on LOR networks that are not enhanced. Lastly,they cannot be used in a stand-alone sequence that is loaded into acontroller.
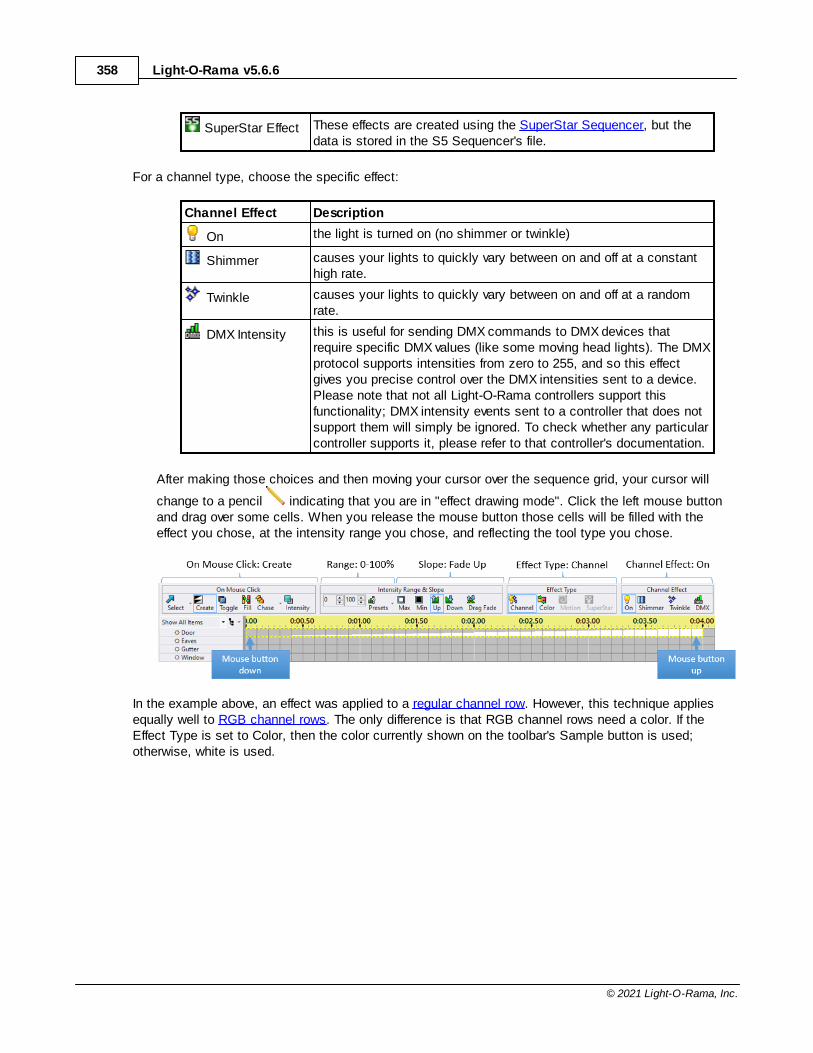
Light-O-Rama v5.6.6358
© 2021 Light-O-Rama, Inc.
SuperStar Effect These effects are created using the SuperStar Sequencer, but thedata is stored in the S5 Sequencer's file.
For a channel type, choose the specific effect:
Channel Effect Description
On the light is turned on (no shimmer or twinkle)
Shimmer causes your lights to quickly vary between on and off at a constanthigh rate.
Twinkle causes your lights to quickly vary between on and off at a randomrate.
DMX Intensity this is useful for sending DMX commands to DMX devices thatrequire specific DMX values (like some moving head lights). The DMXprotocol supports intensities from zero to 255, and so this effectgives you precise control over the DMX intensities sent to a device. Please note that not all Light-O-Rama controllers support thisfunctionality; DMX intensity events sent to a controller that does notsupport them will simply be ignored. To check whether any particularcontroller supports it, please refer to that controller's documentation.
After making those choices and then moving your cursor over the sequence grid, your cursor will
change to a pencil indicating that you are in "effect drawing mode". Click the left mouse buttonand drag over some cells. When you release the mouse button those cells will be filled with theeffect you chose, at the intensity range you chose, and reflecting the tool type you chose.
In the example above, an effect was applied to a regular channel row. However, this technique appliesequally well to RGB channel rows. The only difference is that RGB channel rows need a color. If theEffect Type is set to Color, then the color currently shown on the toolbar's Sample button is used;otherwise, white is used.
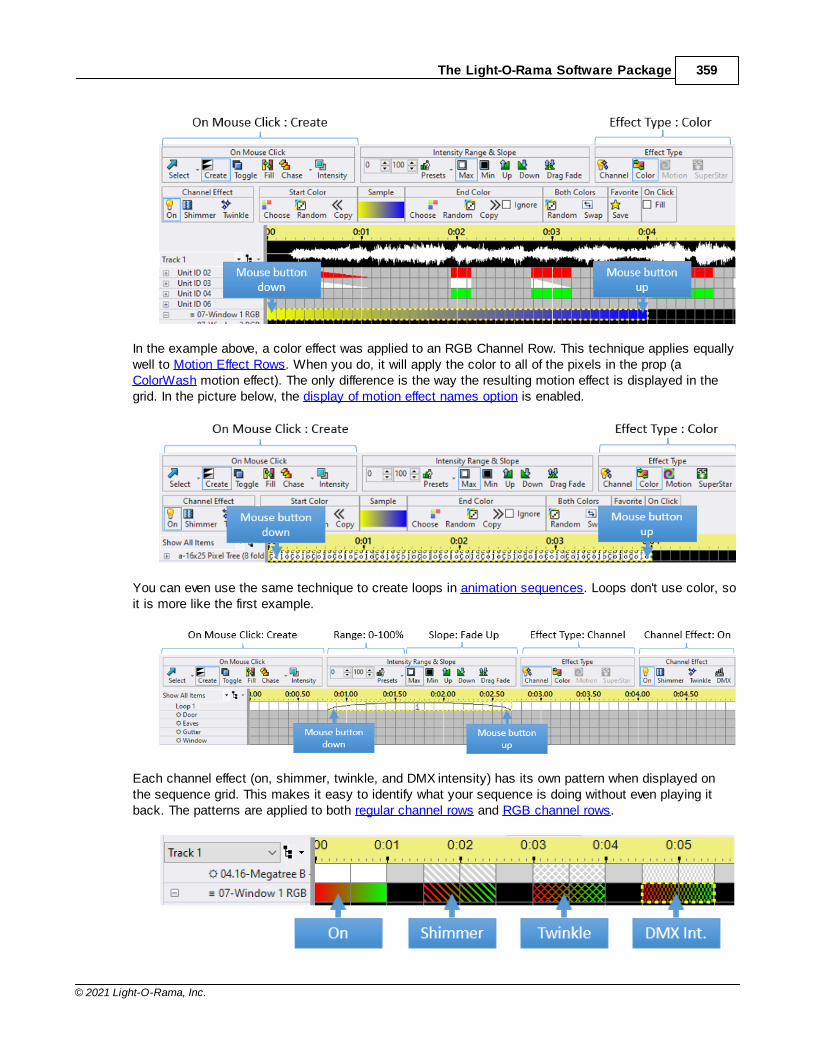
The Light-O-Rama Software Package 359
© 2021 Light-O-Rama, Inc.
In the example above, a color effect was applied to an RGB Channel Row. This technique applies equallywell to Motion Effect Rows. When you do, it will apply the color to all of the pixels in the prop (aColorWash motion effect). The only difference is the way the resulting motion effect is displayed in thegrid. In the picture below, the display of motion effect names option is enabled.
You can even use the same technique to create loops in animation sequences. Loops don't use color, soit is more like the first example.
Each channel effect (on, shimmer, twinkle, and DMX intensity) has its own pattern when displayed onthe sequence grid. This makes it easy to identify what your sequence is doing without even playing itback. The patterns are applied to both regular channel rows and RGB channel rows.
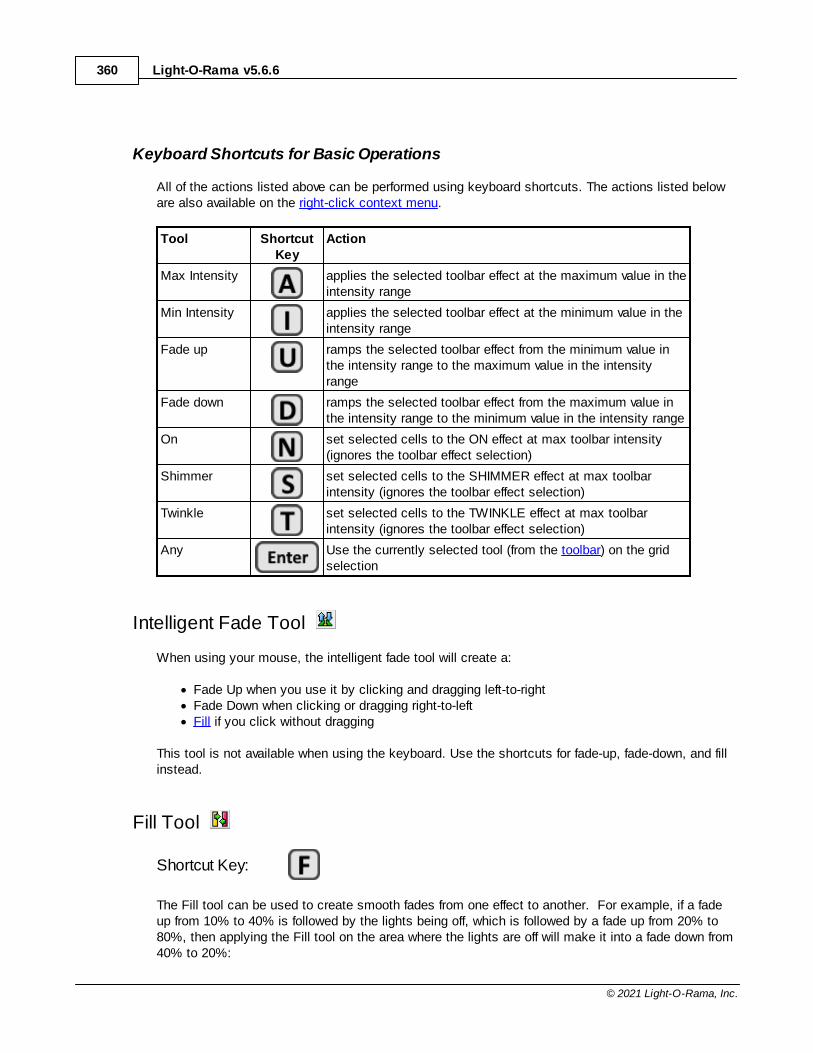
Light-O-Rama v5.6.6360
© 2021 Light-O-Rama, Inc.
Keyboard Shortcuts for Basic Operations
All of the actions listed above can be performed using keyboard shortcuts. The actions listed beloware also available on the right-click context menu.
Tool ShortcutKey
Action
Max Intensity applies the selected toolbar effect at the maximum value in theintensity range
Min Intensity applies the selected toolbar effect at the minimum value in theintensity range
Fade up ramps the selected toolbar effect from the minimum value inthe intensity range to the maximum value in the intensityrange
Fade down ramps the selected toolbar effect from the maximum value inthe intensity range to the minimum value in the intensity range
On set selected cells to the ON effect at max toolbar intensity(ignores the toolbar effect selection)
Shimmer set selected cells to the SHIMMER effect at max toolbarintensity (ignores the toolbar effect selection)
Twinkle set selected cells to the TWINKLE effect at max toolbarintensity (ignores the toolbar effect selection)
Any Use the currently selected tool (from the toolbar) on the gridselection
Intelligent Fade Tool
When using your mouse, the intelligent fade tool will create a:
· Fade Up when you use it by clicking and dragging left-to-right· Fade Down when clicking or dragging right-to-left· Fill if you click without dragging
This tool is not available when using the keyboard. Use the shortcuts for fade-up, fade-down, and fillinstead.
Fill Tool
Shortcut Key:
The Fill tool can be used to create smooth fades from one effect to another. For example, if a fadeup from 10% to 40% is followed by the lights being off, which is followed by a fade up from 20% to80%, then applying the Fill tool on the area where the lights are off will make it into a fade down from40% to 20%:
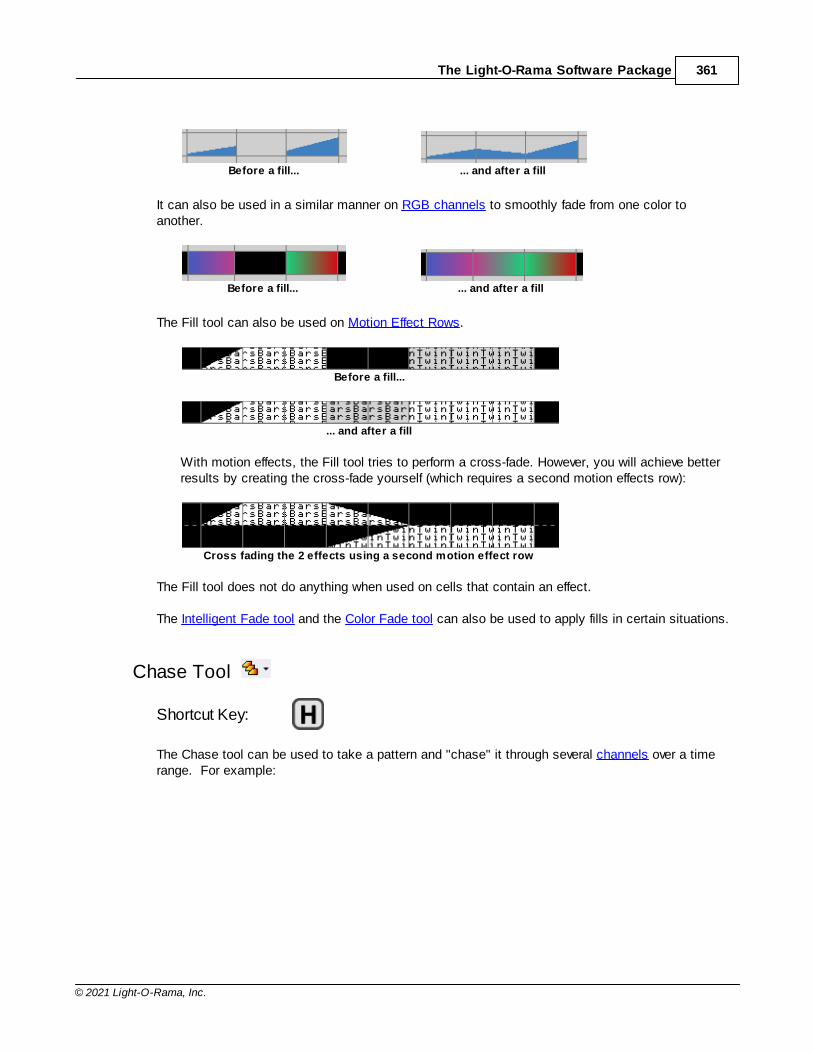
The Light-O-Rama Software Package 361
© 2021 Light-O-Rama, Inc.
Before a fill... ... and after a fill
It can also be used in a similar manner on RGB channels to smoothly fade from one color toanother.
Before a fill... ... and after a fill
The Fill tool can also be used on Motion Effect Rows.
Before a fill...
... and after a fill
With motion effects, the Fill tool tries to perform a cross-fade. However, you will achieve betterresults by creating the cross-fade yourself (which requires a second motion effects row):
Cross fading the 2 effects using a second motion effect row
The Fill tool does not do anything when used on cells that contain an effect.
The Intelligent Fade tool and the Color Fade tool can also be used to apply fills in certain situations.
Chase Tool
Shortcut Key:
The Chase tool can be used to take a pattern and "chase" it through several channels over a timerange. For example:
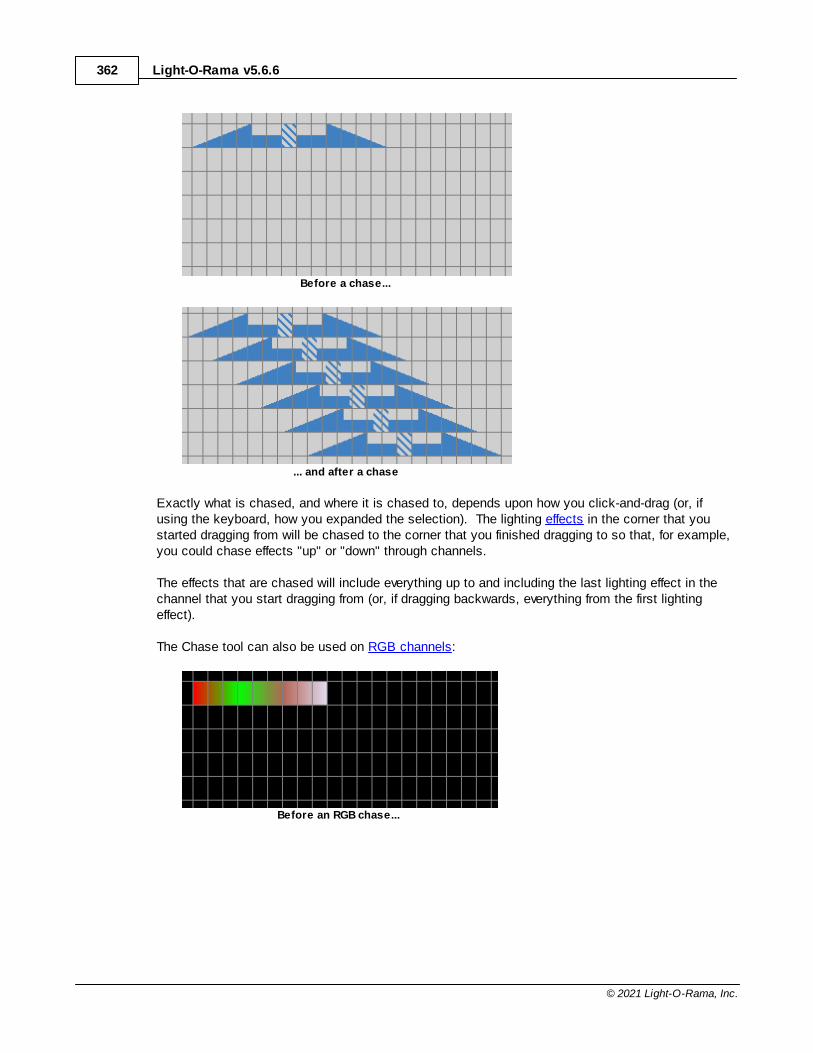
Light-O-Rama v5.6.6362
© 2021 Light-O-Rama, Inc.
Before a chase...
... and after a chase
Exactly what is chased, and where it is chased to, depends upon how you click-and-drag (or, ifusing the keyboard, how you expanded the selection). The lighting effects in the corner that youstarted dragging from will be chased to the corner that you finished dragging to so that, for example,you could chase effects "up" or "down" through channels.
The effects that are chased will include everything up to and including the last lighting effect in thechannel that you start dragging from (or, if dragging backwards, everything from the first lightingeffect).
The Chase tool can also be used on RGB channels:
Before an RGB chase...
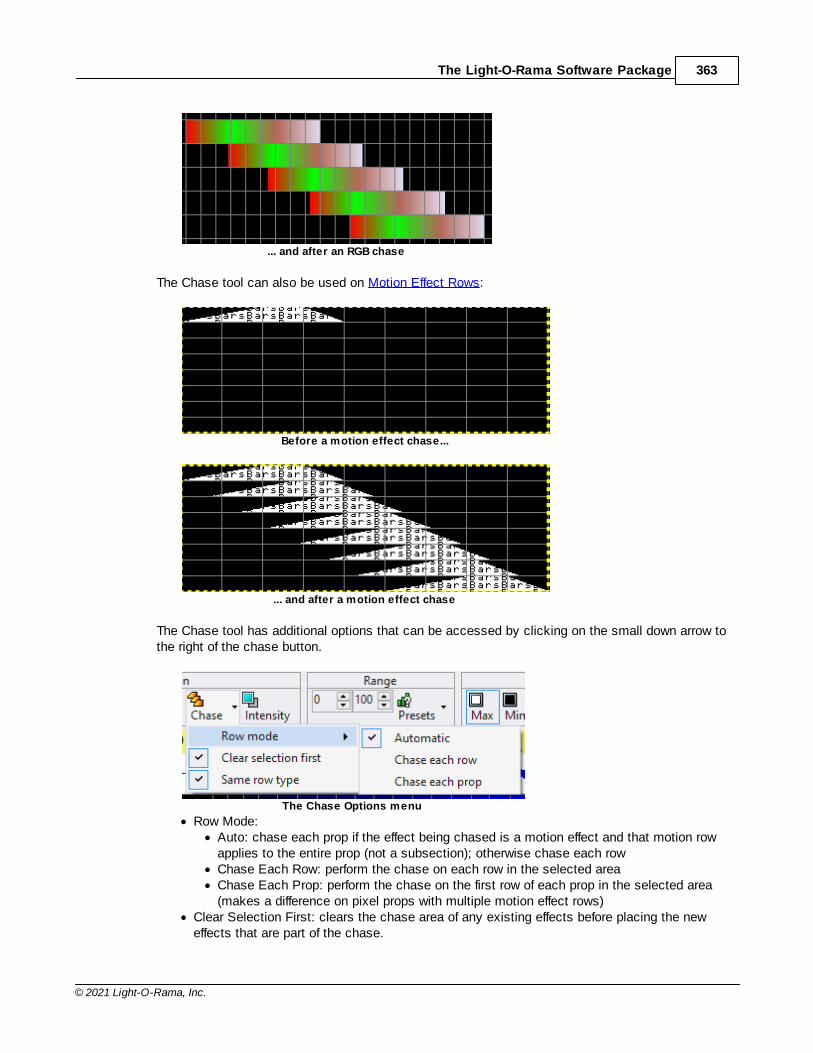
The Light-O-Rama Software Package 363
© 2021 Light-O-Rama, Inc.
... and after an RGB chase
The Chase tool can also be used on Motion Effect Rows:
Before a motion effect chase...
... and after a motion effect chase
The Chase tool has additional options that can be accessed by clicking on the small down arrow tothe right of the chase button.
The Chase Options menu
· Row Mode: · Auto: chase each prop if the effect being chased is a motion effect and that motion row
applies to the entire prop (not a subsection); otherwise chase each row· Chase Each Row: perform the chase on each row in the selected area · Chase Each Prop: perform the chase on the first row of each prop in the selected area
(makes a difference on pixel props with multiple motion effect rows)· Clear Selection First: clears the chase area of any existing effects before placing the new
effects that are part of the chase.
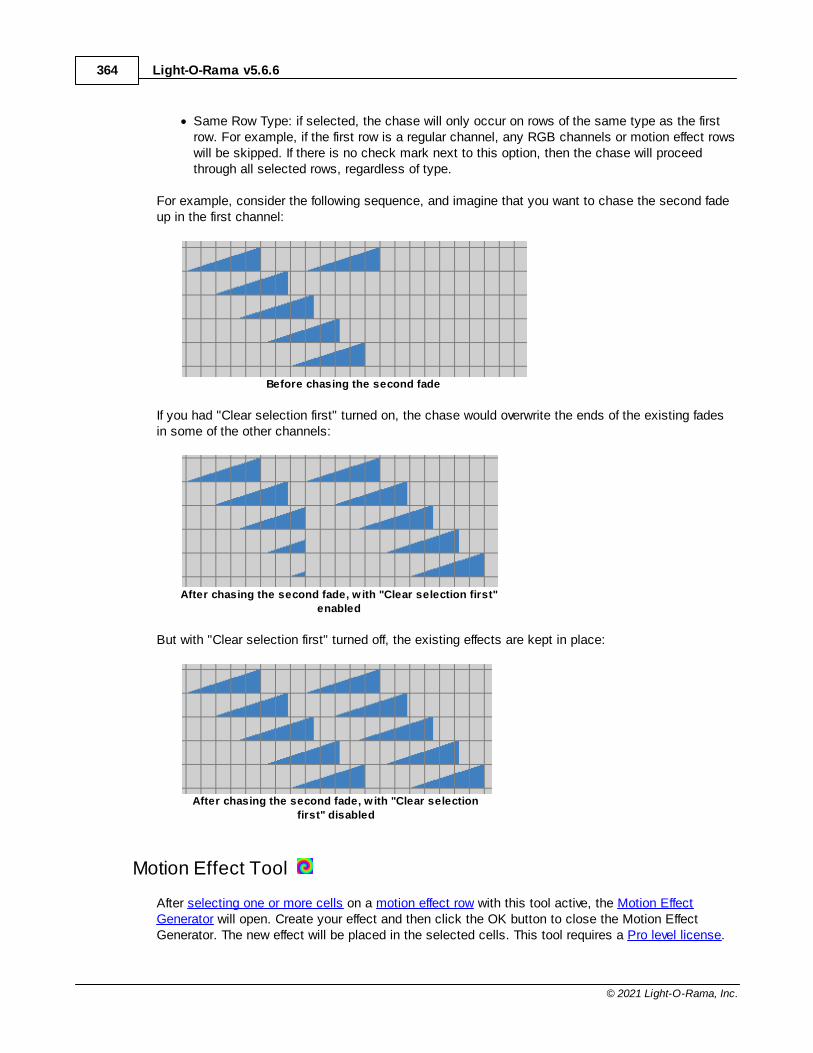
Light-O-Rama v5.6.6364
© 2021 Light-O-Rama, Inc.
· Same Row Type: if selected, the chase will only occur on rows of the same type as the firstrow. For example, if the first row is a regular channel, any RGB channels or motion effect rowswill be skipped. If there is no check mark next to this option, then the chase will proceedthrough all selected rows, regardless of type.
For example, consider the following sequence, and imagine that you want to chase the second fadeup in the first channel:
Before chasing the second fade
If you had "Clear selection first" turned on, the chase would overwrite the ends of the existing fadesin some of the other channels:
After chasing the second fade, w ith "Clear selection first"
enabled
But with "Clear selection first" turned off, the existing effects are kept in place:
After chasing the second fade, w ith "Clear selection
first" disabled
Motion Effect Tool
After selecting one or more cells on a motion effect row with this tool active, the Motion EffectGenerator will open. Create your effect and then click the OK button to close the Motion EffectGenerator. The new effect will be placed in the selected cells. This tool requires a Pro level license.
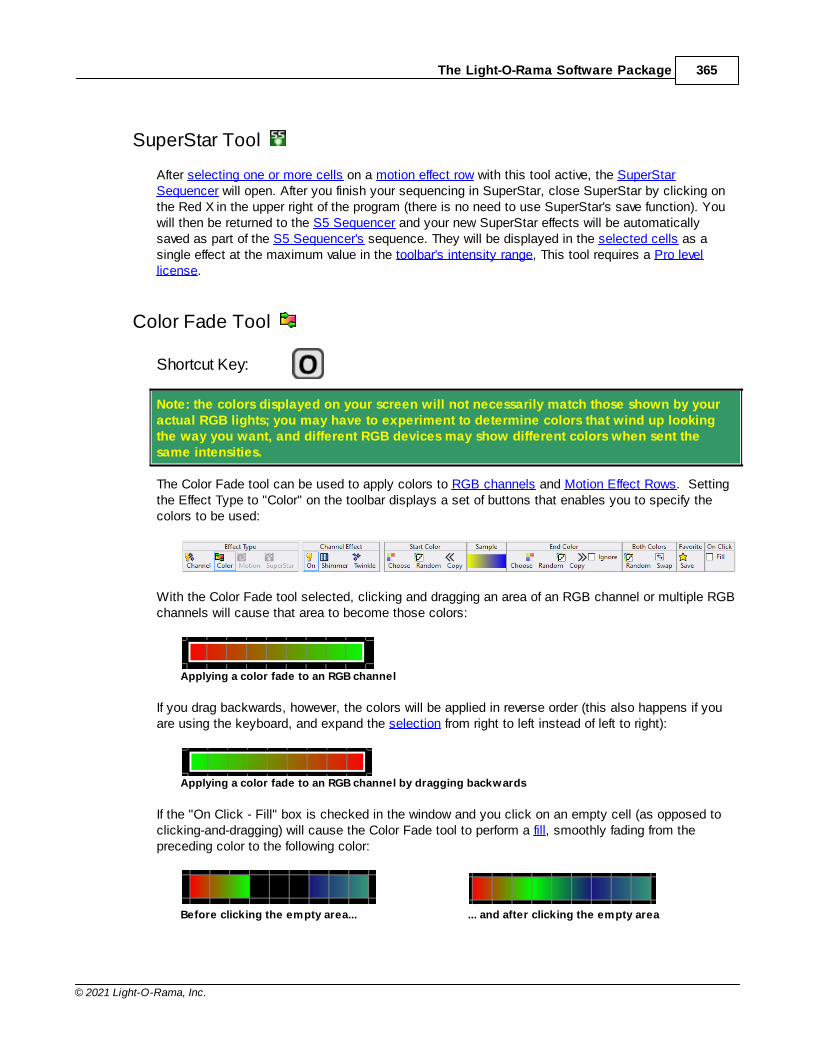
The Light-O-Rama Software Package 365
© 2021 Light-O-Rama, Inc.
SuperStar Tool
After selecting one or more cells on a motion effect row with this tool active, the SuperStarSequencer will open. After you finish your sequencing in SuperStar, close SuperStar by clicking onthe Red X in the upper right of the program (there is no need to use SuperStar's save function). Youwill then be returned to the S5 Sequencer and your new SuperStar effects will be automaticallysaved as part of the S5 Sequencer's sequence. They will be displayed in the selected cells as asingle effect at the maximum value in the toolbar's intensity range, This tool requires a Pro levellicense.
Color Fade Tool
Shortcut Key:
Note: the colors displayed on your screen will not necessarily match those shown by youractual RGB lights; you may have to experiment to determine colors that wind up lookingthe way you want, and different RGB devices may show different colors when sent thesame intensities.
The Color Fade tool can be used to apply colors to RGB channels and Motion Effect Rows. Settingthe Effect Type to "Color" on the toolbar displays a set of buttons that enables you to specify thecolors to be used:
With the Color Fade tool selected, clicking and dragging an area of an RGB channel or multiple RGBchannels will cause that area to become those colors:
Applying a color fade to an RGB channel
If you drag backwards, however, the colors will be applied in reverse order (this also happens if youare using the keyboard, and expand the selection from right to left instead of left to right):
Applying a color fade to an RGB channel by dragging backwards
If the "On Click - Fill" box is checked in the window and you click on an empty cell (as opposed toclicking-and-dragging) will cause the Color Fade tool to perform a fill, smoothly fading from thepreceding color to the following color:
Before clicking the empty area... ... and after clicking the empty area
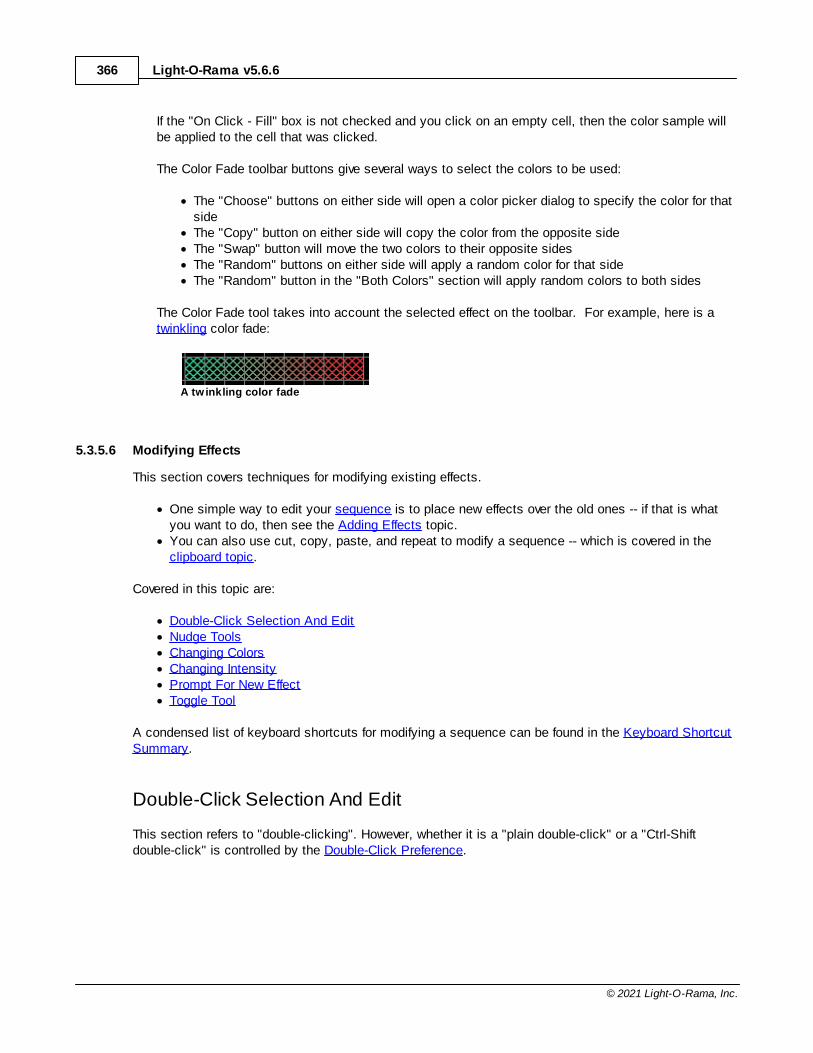
Light-O-Rama v5.6.6366
© 2021 Light-O-Rama, Inc.
If the "On Click - Fill" box is not checked and you click on an empty cell, then the color sample willbe applied to the cell that was clicked.
The Color Fade toolbar buttons give several ways to select the colors to be used:
· The "Choose" buttons on either side will open a color picker dialog to specify the color for thatside
· The "Copy" button on either side will copy the color from the opposite side· The "Swap" button will move the two colors to their opposite sides· The "Random" buttons on either side will apply a random color for that side· The "Random" button in the "Both Colors" section will apply random colors to both sides
The Color Fade tool takes into account the selected effect on the toolbar. For example, here is atwinkling color fade:
A twinkling color fade
5.3.5.6 Modifying Effects
This section covers techniques for modifying existing effects.
· One simple way to edit your sequence is to place new effects over the old ones -- if that is whatyou want to do, then see the Adding Effects topic.
· You can also use cut, copy, paste, and repeat to modify a sequence -- which is covered in theclipboard topic.
Covered in this topic are:
· Double-Click Selection And Edit· Nudge Tools· Changing Colors· Changing Intensity· Prompt For New Effect· Toggle Tool
A condensed list of keyboard shortcuts for modifying a sequence can be found in the Keyboard ShortcutSummary.
Double-Click Selection And Edit
This section refers to "double-clicking". However, whether it is a "plain double-click" or a "Ctrl-Shiftdouble-click" is controlled by the Double-Click Preference.
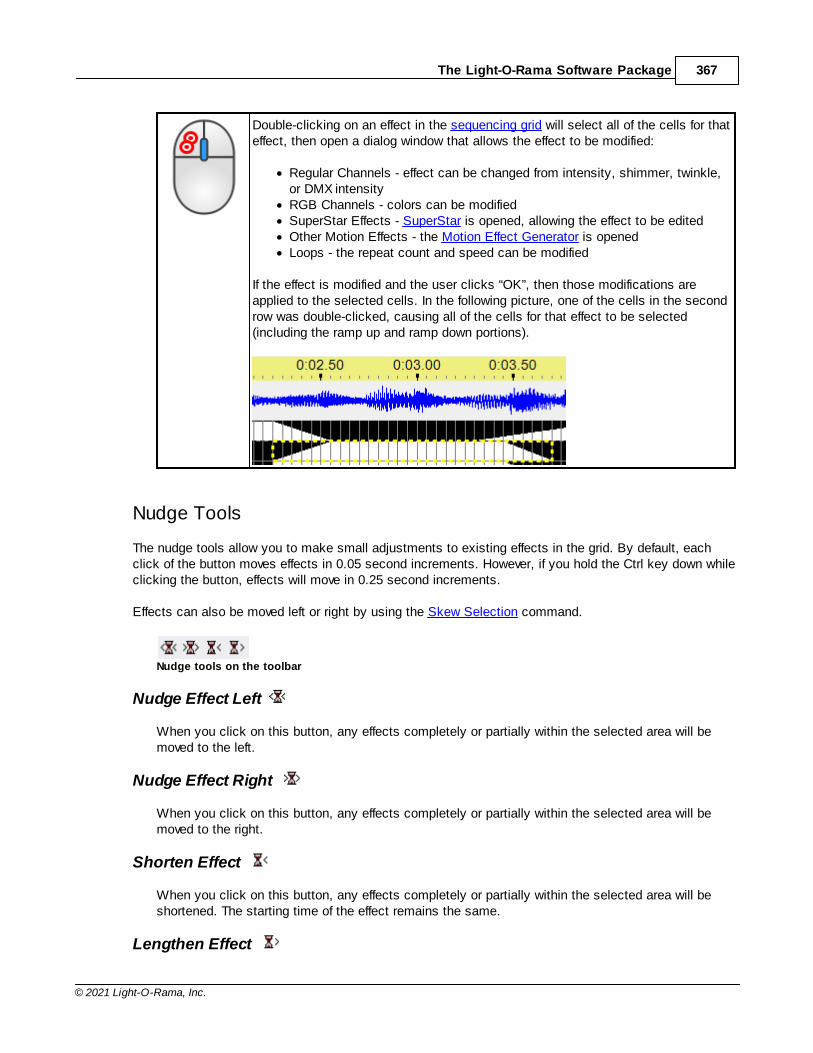
The Light-O-Rama Software Package 367
© 2021 Light-O-Rama, Inc.
Double-clicking on an effect in the sequencing grid will select all of the cells for thateffect, then open a dialog window that allows the effect to be modified:
· Regular Channels - effect can be changed from intensity, shimmer, twinkle,or DMX intensity
· RGB Channels - colors can be modified· SuperStar Effects - SuperStar is opened, allowing the effect to be edited· Other Motion Effects - the Motion Effect Generator is opened· Loops - the repeat count and speed can be modified
If the effect is modified and the user clicks “OK”, then those modifications areapplied to the selected cells. In the following picture, one of the cells in the secondrow was double-clicked, causing all of the cells for that effect to be selected(including the ramp up and ramp down portions).
Nudge Tools
The nudge tools allow you to make small adjustments to existing effects in the grid. By default, eachclick of the button moves effects in 0.05 second increments. However, if you hold the Ctrl key down whileclicking the button, effects will move in 0.25 second increments.
Effects can also be moved left or right by using the Skew Selection command.
Nudge tools on the toolbar
Nudge Effect Left
When you click on this button, any effects completely or partially within the selected area will bemoved to the left.
Nudge Effect Right
When you click on this button, any effects completely or partially within the selected area will bemoved to the right.
Shorten Effect
When you click on this button, any effects completely or partially within the selected area will beshortened. The starting time of the effect remains the same.
Lengthen Effect
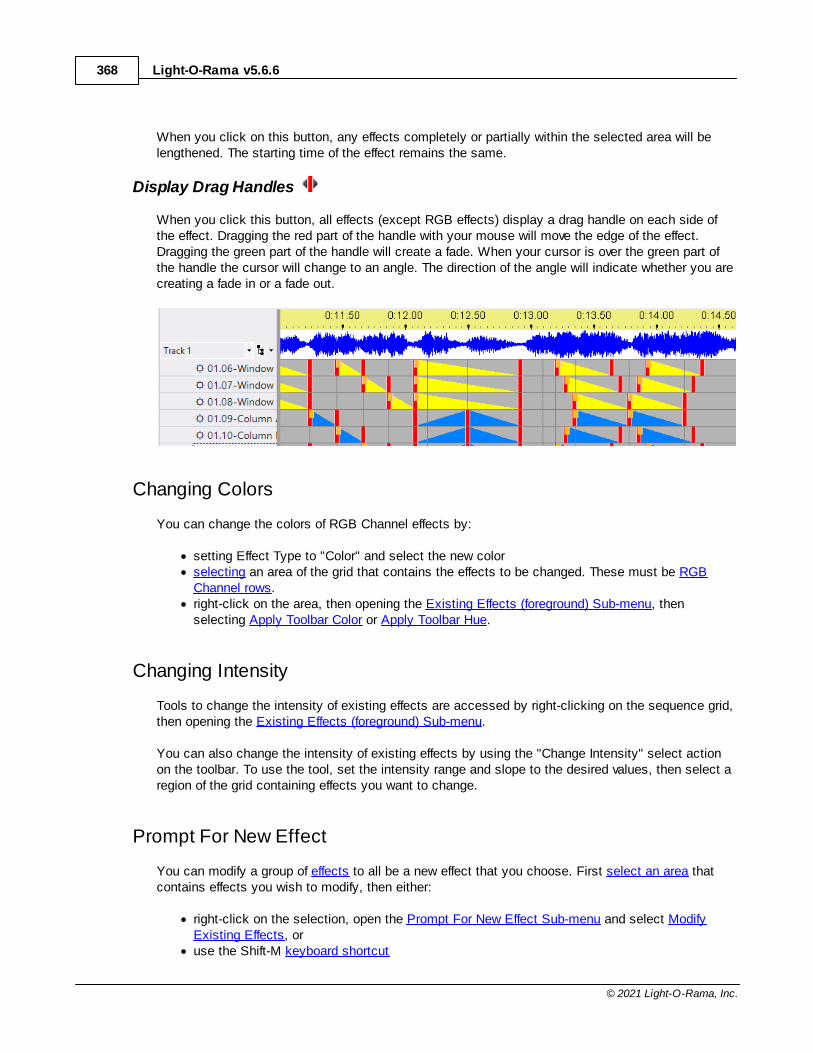
Light-O-Rama v5.6.6368
© 2021 Light-O-Rama, Inc.
When you click on this button, any effects completely or partially within the selected area will belengthened. The starting time of the effect remains the same.
Display Drag Handles
When you click this button, all effects (except RGB effects) display a drag handle on each side ofthe effect. Dragging the red part of the handle with your mouse will move the edge of the effect.Dragging the green part of the handle will create a fade. When your cursor is over the green part ofthe handle the cursor will change to an angle. The direction of the angle will indicate whether you arecreating a fade in or a fade out.
Changing Colors
You can change the colors of RGB Channel effects by:
· setting Effect Type to "Color" and select the new color· selecting an area of the grid that contains the effects to be changed. These must be RGB
Channel rows.· right-click on the area, then opening the Existing Effects (foreground) Sub-menu, then
selecting Apply Toolbar Color or Apply Toolbar Hue.
Changing Intensity
Tools to change the intensity of existing effects are accessed by right-clicking on the sequence grid,then opening the Existing Effects (foreground) Sub-menu.
You can also change the intensity of existing effects by using the "Change Intensity" select actionon the toolbar. To use the tool, set the intensity range and slope to the desired values, then select aregion of the grid containing effects you want to change.
Prompt For New Effect
You can modify a group of effects to all be a new effect that you choose. First select an area thatcontains effects you wish to modify, then either:
· right-click on the selection, open the Prompt For New Effect Sub-menu and select ModifyExisting Effects, or
· use the Shift-M keyboard shortcut
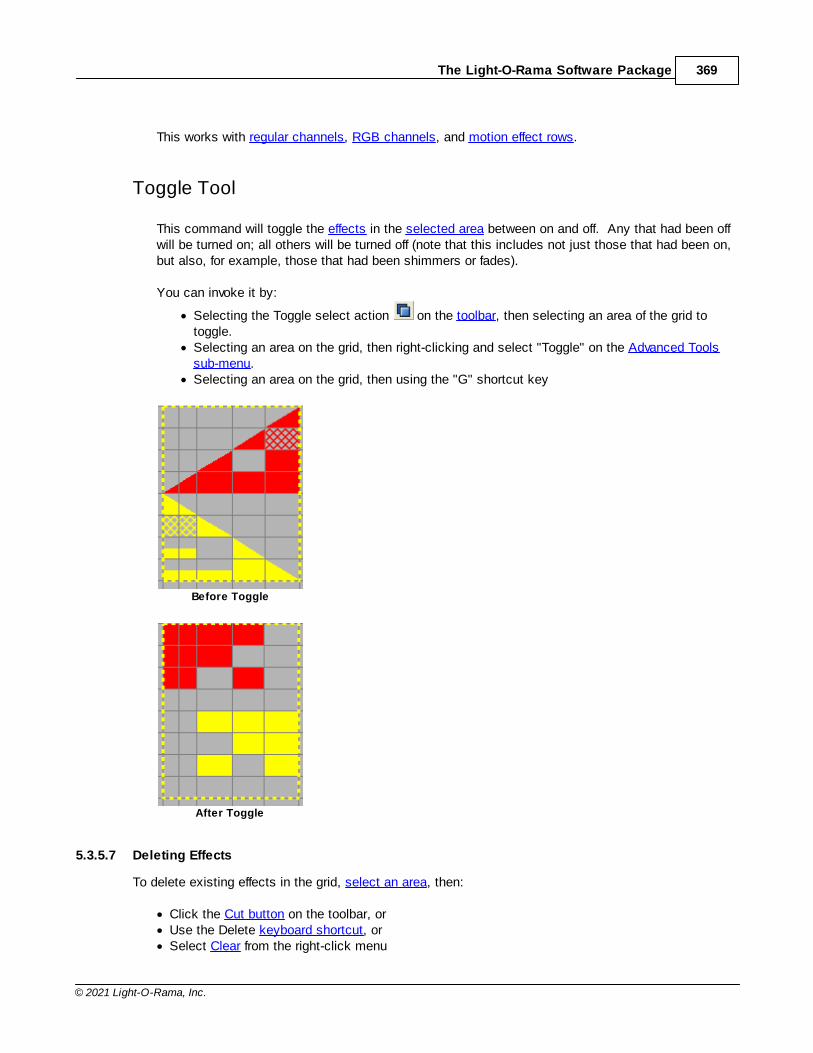
The Light-O-Rama Software Package 369
© 2021 Light-O-Rama, Inc.
This works with regular channels, RGB channels, and motion effect rows.
Toggle Tool
This command will toggle the effects in the selected area between on and off. Any that had been offwill be turned on; all others will be turned off (note that this includes not just those that had been on,but also, for example, those that had been shimmers or fades).
You can invoke it by:
· Selecting the Toggle select action on the toolbar, then selecting an area of the grid totoggle.
· Selecting an area on the grid, then right-clicking and select "Toggle" on the Advanced Toolssub-menu.
· Selecting an area on the grid, then using the "G" shortcut key
Before Toggle
After Toggle
5.3.5.7 Deleting Effects
To delete existing effects in the grid, select an area, then:
· Click the Cut button on the toolbar, or· Use the Delete keyboard shortcut, or· Select Clear from the right-click menu
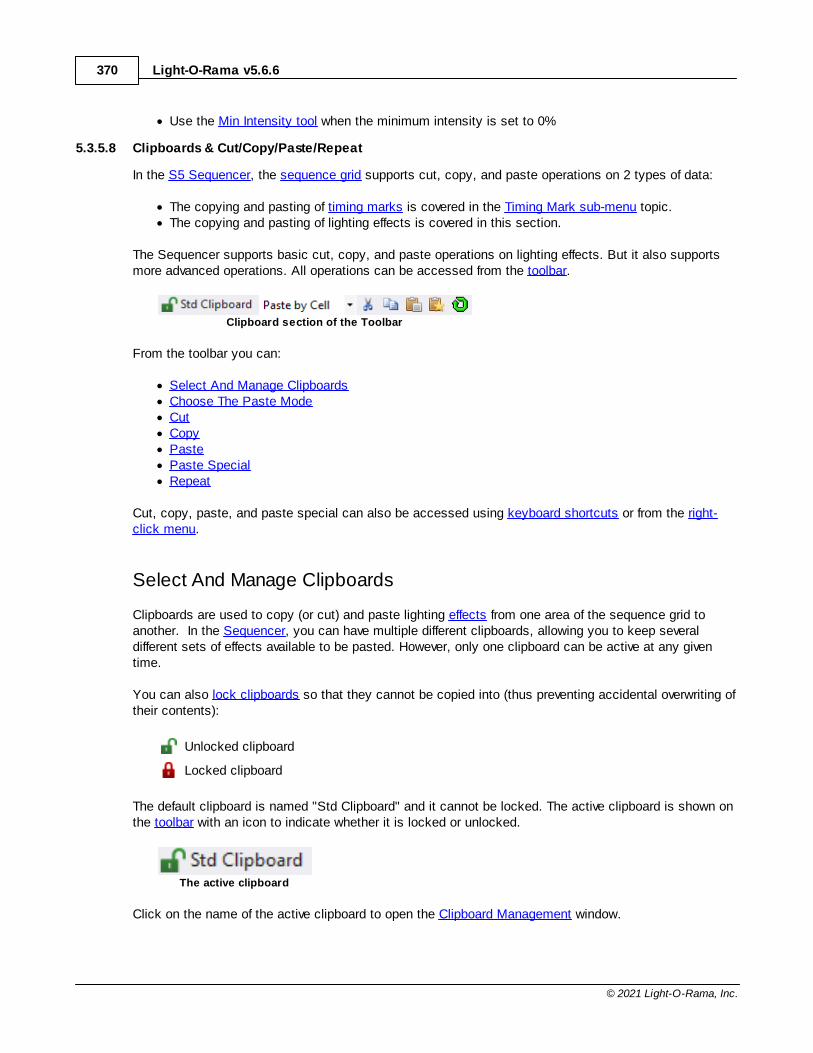
Light-O-Rama v5.6.6370
© 2021 Light-O-Rama, Inc.
· Use the Min Intensity tool when the minimum intensity is set to 0%
5.3.5.8 Clipboards & Cut/Copy/Paste/Repeat
In the S5 Sequencer, the sequence grid supports cut, copy, and paste operations on 2 types of data:
· The copying and pasting of timing marks is covered in the Timing Mark sub-menu topic.· The copying and pasting of lighting effects is covered in this section.
The Sequencer supports basic cut, copy, and paste operations on lighting effects. But it also supportsmore advanced operations. All operations can be accessed from the toolbar.
Clipboard section of the Toolbar
From the toolbar you can:
· Select And Manage Clipboards· Choose The Paste Mode· Cut· Copy· Paste· Paste Special· Repeat
Cut, copy, paste, and paste special can also be accessed using keyboard shortcuts or from the right-click menu.
Select And Manage Clipboards
Clipboards are used to copy (or cut) and paste lighting effects from one area of the sequence grid toanother. In the Sequencer, you can have multiple different clipboards, allowing you to keep severaldifferent sets of effects available to be pasted. However, only one clipboard can be active at any giventime.
You can also lock clipboards so that they cannot be copied into (thus preventing accidental overwriting oftheir contents):
Unlocked clipboard
Locked clipboard
The default clipboard is named "Std Clipboard" and it cannot be locked. The active clipboard is shown onthe toolbar with an icon to indicate whether it is locked or unlocked.
The active clipboard
Click on the name of the active clipboard to open the Clipboard Management window.
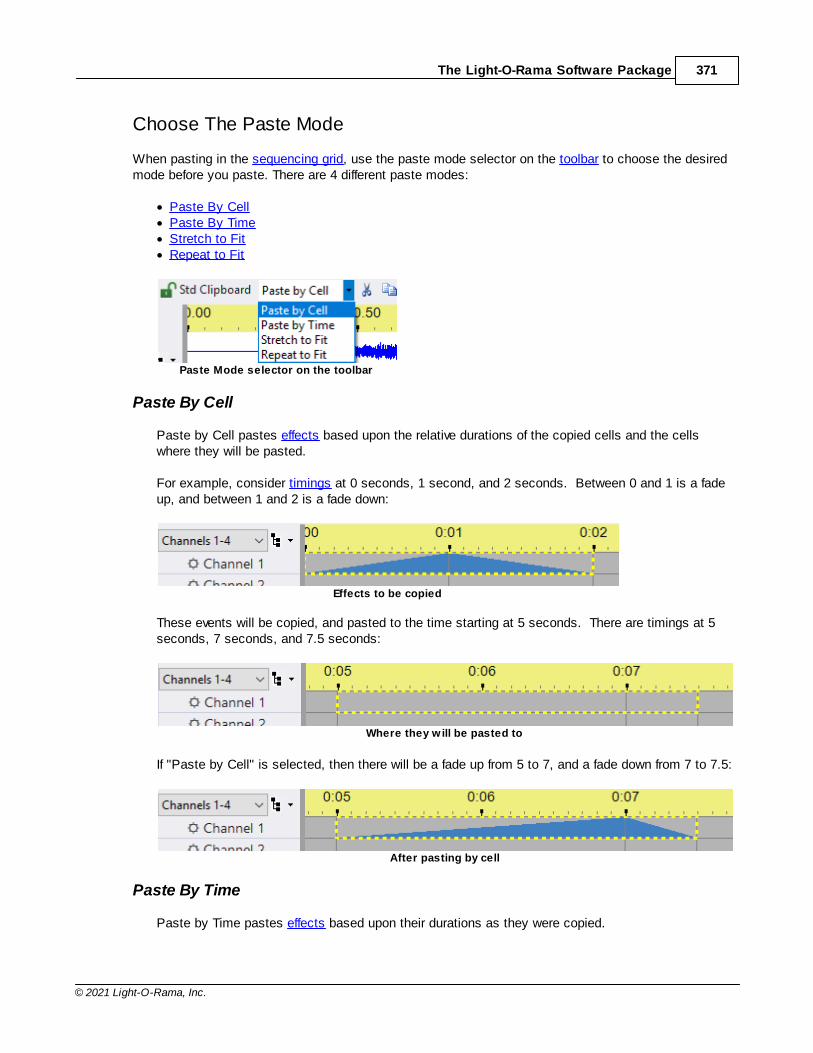
The Light-O-Rama Software Package 371
© 2021 Light-O-Rama, Inc.
Choose The Paste Mode
When pasting in the sequencing grid, use the paste mode selector on the toolbar to choose the desiredmode before you paste. There are 4 different paste modes:
· Paste By Cell· Paste By Time· Stretch to Fit· Repeat to Fit
Paste Mode selector on the toolbar
Paste By Cell
Paste by Cell pastes effects based upon the relative durations of the copied cells and the cellswhere they will be pasted.
For example, consider timings at 0 seconds, 1 second, and 2 seconds. Between 0 and 1 is a fadeup, and between 1 and 2 is a fade down:
Effects to be copied
These events will be copied, and pasted to the time starting at 5 seconds. There are timings at 5seconds, 7 seconds, and 7.5 seconds:
Where they w ill be pasted to
If "Paste by Cell" is selected, then there will be a fade up from 5 to 7, and a fade down from 7 to 7.5:
After pasting by cell
Paste By Time
Paste by Time pastes effects based upon their durations as they were copied.
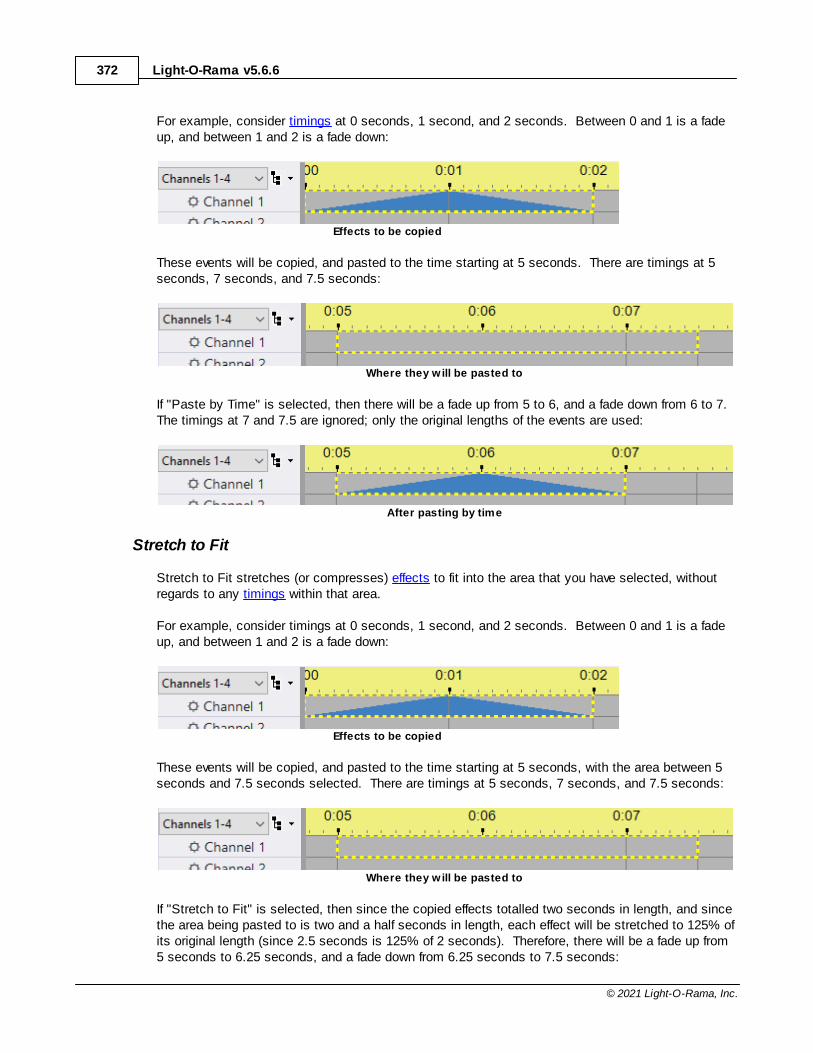
Light-O-Rama v5.6.6372
© 2021 Light-O-Rama, Inc.
For example, consider timings at 0 seconds, 1 second, and 2 seconds. Between 0 and 1 is a fadeup, and between 1 and 2 is a fade down:
Effects to be copied
These events will be copied, and pasted to the time starting at 5 seconds. There are timings at 5seconds, 7 seconds, and 7.5 seconds:
Where they w ill be pasted to
If "Paste by Time" is selected, then there will be a fade up from 5 to 6, and a fade down from 6 to 7. The timings at 7 and 7.5 are ignored; only the original lengths of the events are used:
After pasting by time
Stretch to Fit
Stretch to Fit stretches (or compresses) effects to fit into the area that you have selected, withoutregards to any timings within that area.
For example, consider timings at 0 seconds, 1 second, and 2 seconds. Between 0 and 1 is a fadeup, and between 1 and 2 is a fade down:
Effects to be copied
These events will be copied, and pasted to the time starting at 5 seconds, with the area between 5seconds and 7.5 seconds selected. There are timings at 5 seconds, 7 seconds, and 7.5 seconds:
Where they w ill be pasted to
If "Stretch to Fit" is selected, then since the copied effects totalled two seconds in length, and sincethe area being pasted to is two and a half seconds in length, each effect will be stretched to 125% ofits original length (since 2.5 seconds is 125% of 2 seconds). Therefore, there will be a fade up from5 seconds to 6.25 seconds, and a fade down from 6.25 seconds to 7.5 seconds:
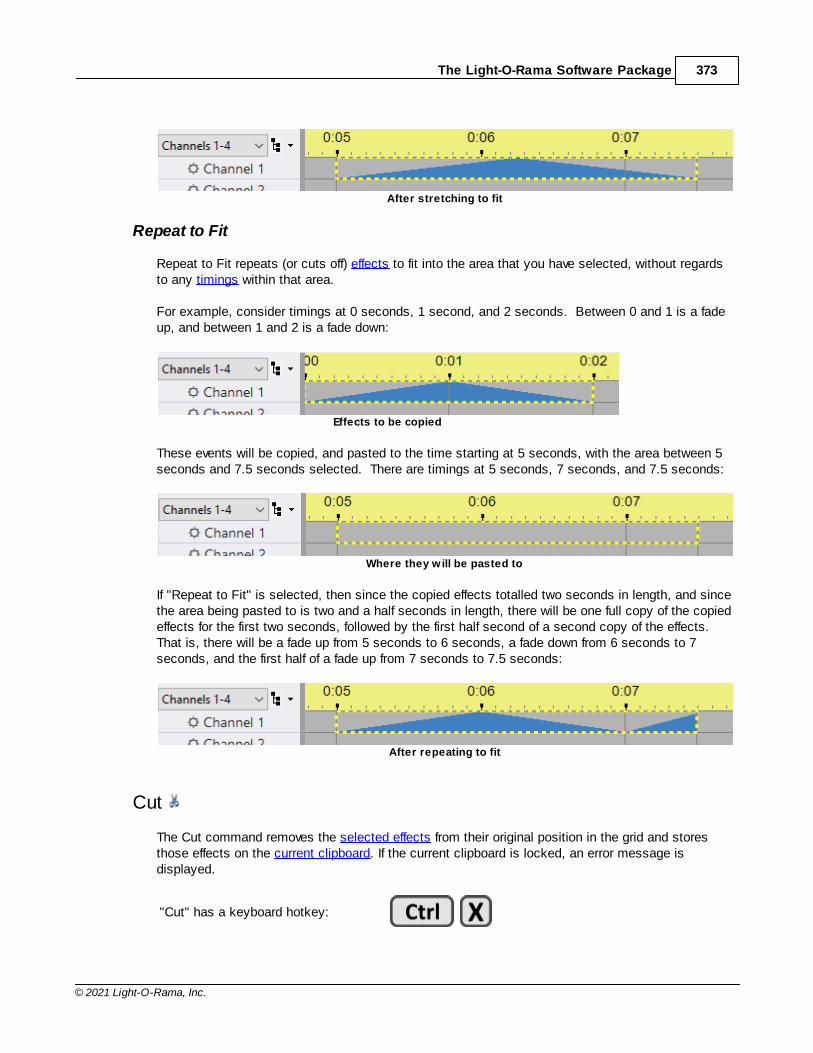
The Light-O-Rama Software Package 373
© 2021 Light-O-Rama, Inc.
After stretching to fit
Repeat to Fit
Repeat to Fit repeats (or cuts off) effects to fit into the area that you have selected, without regardsto any timings within that area.
For example, consider timings at 0 seconds, 1 second, and 2 seconds. Between 0 and 1 is a fadeup, and between 1 and 2 is a fade down:
Effects to be copied
These events will be copied, and pasted to the time starting at 5 seconds, with the area between 5seconds and 7.5 seconds selected. There are timings at 5 seconds, 7 seconds, and 7.5 seconds:
Where they w ill be pasted to
If "Repeat to Fit" is selected, then since the copied effects totalled two seconds in length, and sincethe area being pasted to is two and a half seconds in length, there will be one full copy of the copiedeffects for the first two seconds, followed by the first half second of a second copy of the effects. That is, there will be a fade up from 5 seconds to 6 seconds, a fade down from 6 seconds to 7seconds, and the first half of a fade up from 7 seconds to 7.5 seconds:
After repeating to fit
Cut
The Cut command removes the selected effects from their original position in the grid and storesthose effects on the current clipboard. If the current clipboard is locked, an error message isdisplayed.
"Cut" has a keyboard hotkey:
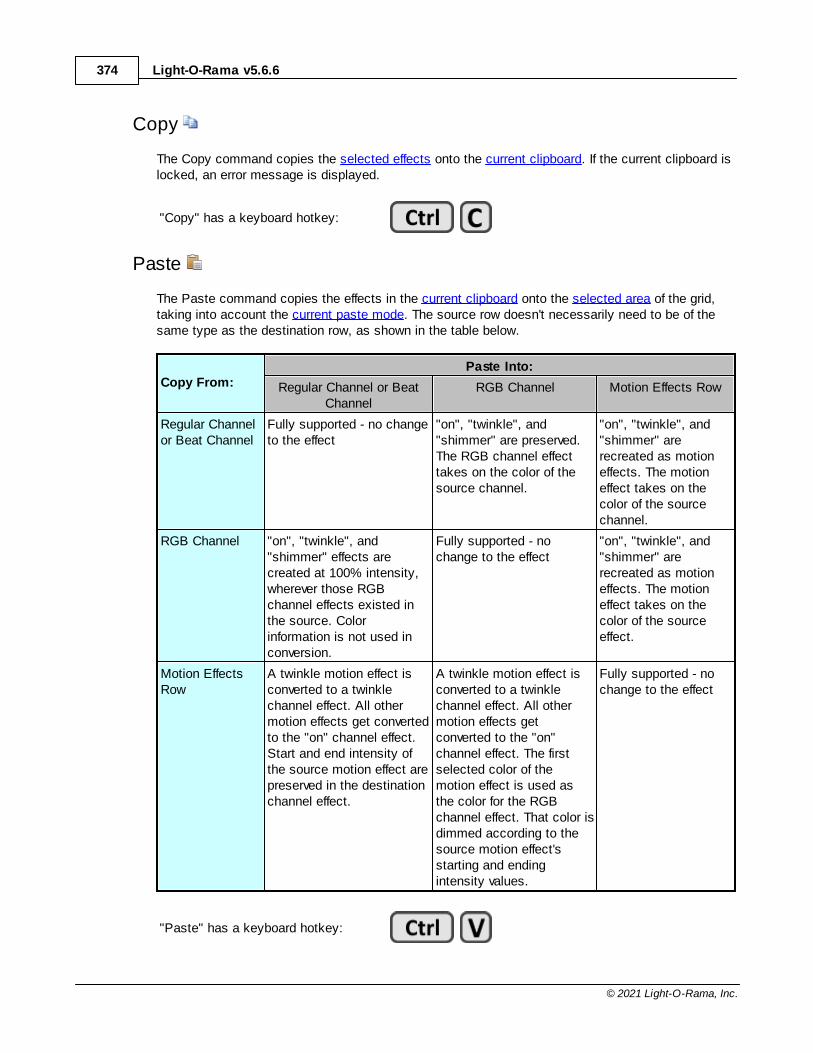
Light-O-Rama v5.6.6374
© 2021 Light-O-Rama, Inc.
Copy
The Copy command copies the selected effects onto the current clipboard. If the current clipboard islocked, an error message is displayed.
"Copy" has a keyboard hotkey:
Paste
The Paste command copies the effects in the current clipboard onto the selected area of the grid,taking into account the current paste mode. The source row doesn't necessarily need to be of thesame type as the destination row, as shown in the table below.
Copy From:Paste Into:
Regular Channel or BeatChannel
RGB Channel Motion Effects Row
Regular Channelor Beat Channel
Fully supported - no changeto the effect
"on", "twinkle", and"shimmer" are preserved.The RGB channel effecttakes on the color of thesource channel.
"on", "twinkle", and"shimmer" arerecreated as motioneffects. The motioneffect takes on thecolor of the sourcechannel.
RGB Channel "on", "twinkle", and"shimmer" effects arecreated at 100% intensity,wherever those RGBchannel effects existed inthe source. Colorinformation is not used inconversion.
Fully supported - nochange to the effect
"on", "twinkle", and"shimmer" arerecreated as motioneffects. The motioneffect takes on thecolor of the sourceeffect.
Motion EffectsRow
A twinkle motion effect isconverted to a twinklechannel effect. All othermotion effects get convertedto the "on" channel effect.Start and end intensity ofthe source motion effect arepreserved in the destinationchannel effect.
A twinkle motion effect isconverted to a twinklechannel effect. All othermotion effects getconverted to the "on"channel effect. The firstselected color of themotion effect is used asthe color for the RGBchannel effect. That color isdimmed according to thesource motion effect'sstarting and endingintensity values.
Fully supported - nochange to the effect
"Paste" has a keyboard hotkey:
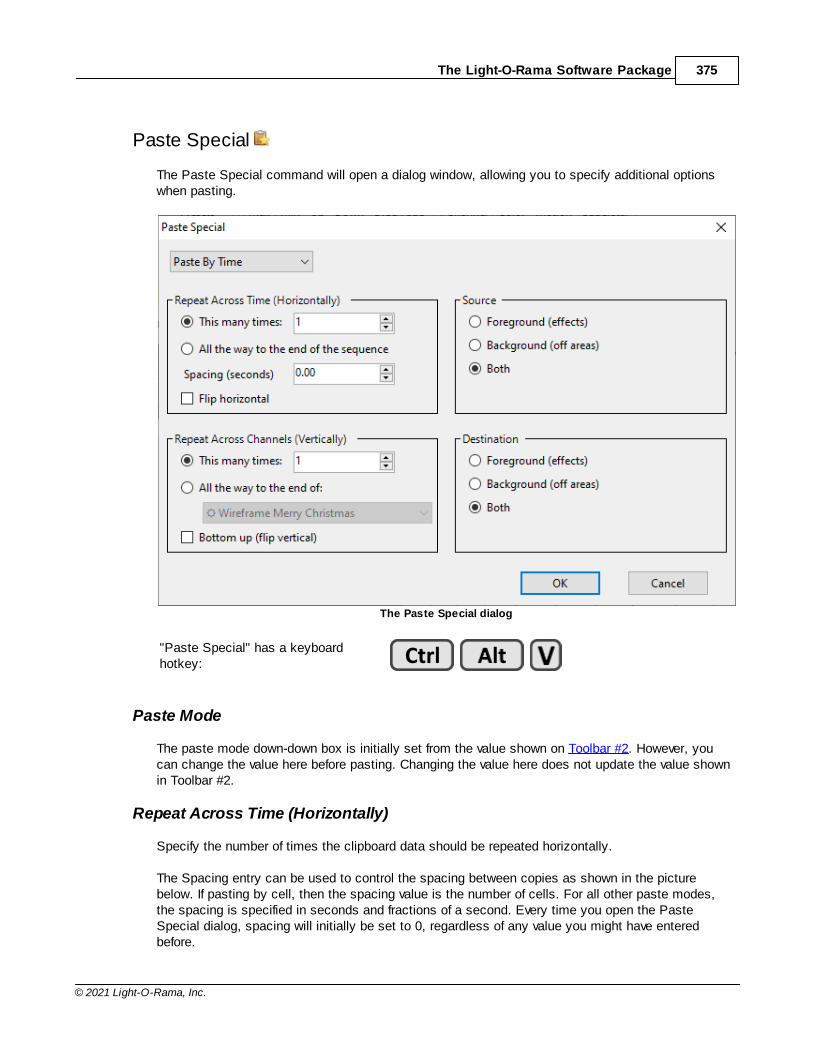
The Light-O-Rama Software Package 375
© 2021 Light-O-Rama, Inc.
Paste Special
The Paste Special command will open a dialog window, allowing you to specify additional optionswhen pasting.
The Paste Special dialog
"Paste Special" has a keyboardhotkey:
Paste Mode
The paste mode down-down box is initially set from the value shown on Toolbar #2. However, youcan change the value here before pasting. Changing the value here does not update the value shownin Toolbar #2.
Repeat Across Time (Horizontally)
Specify the number of times the clipboard data should be repeated horizontally.
The Spacing entry can be used to control the spacing between copies as shown in the picturebelow. If pasting by cell, then the spacing value is the number of cells. For all other paste modes,the spacing is specified in seconds and fractions of a second. Every time you open the PasteSpecial dialog, spacing will initially be set to 0, regardless of any value you might have enteredbefore.
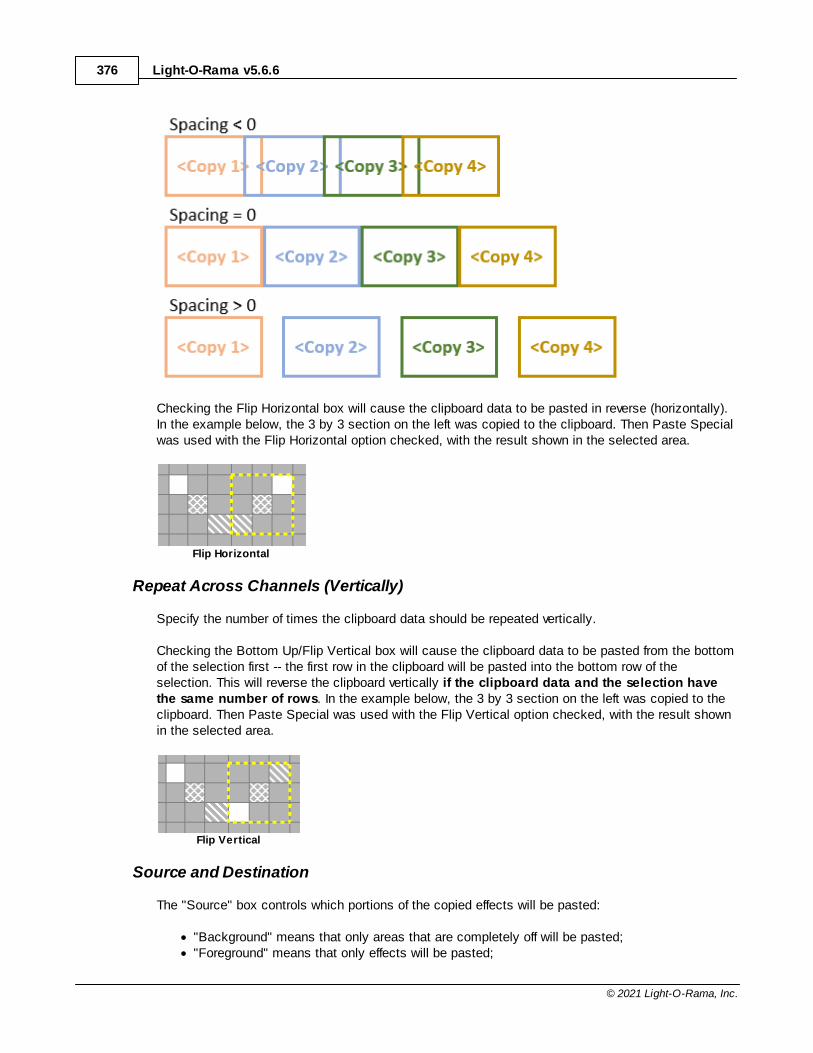
Light-O-Rama v5.6.6376
© 2021 Light-O-Rama, Inc.
Checking the Flip Horizontal box will cause the clipboard data to be pasted in reverse (horizontally).In the example below, the 3 by 3 section on the left was copied to the clipboard. Then Paste Specialwas used with the Flip Horizontal option checked, with the result shown in the selected area.
Flip Horizontal
Repeat Across Channels (Vertically)
Specify the number of times the clipboard data should be repeated vertically.
Checking the Bottom Up/Flip Vertical box will cause the clipboard data to be pasted from the bottomof the selection first -- the first row in the clipboard will be pasted into the bottom row of theselection. This will reverse the clipboard vertically if the clipboard data and the selection havethe same number of rows. In the example below, the 3 by 3 section on the left was copied to theclipboard. Then Paste Special was used with the Flip Vertical option checked, with the result shownin the selected area.
Flip Vertical
Source and Destination
The "Source" box controls which portions of the copied effects will be pasted:
· "Background" means that only areas that are completely off will be pasted; · "Foreground" means that only effects will be pasted;
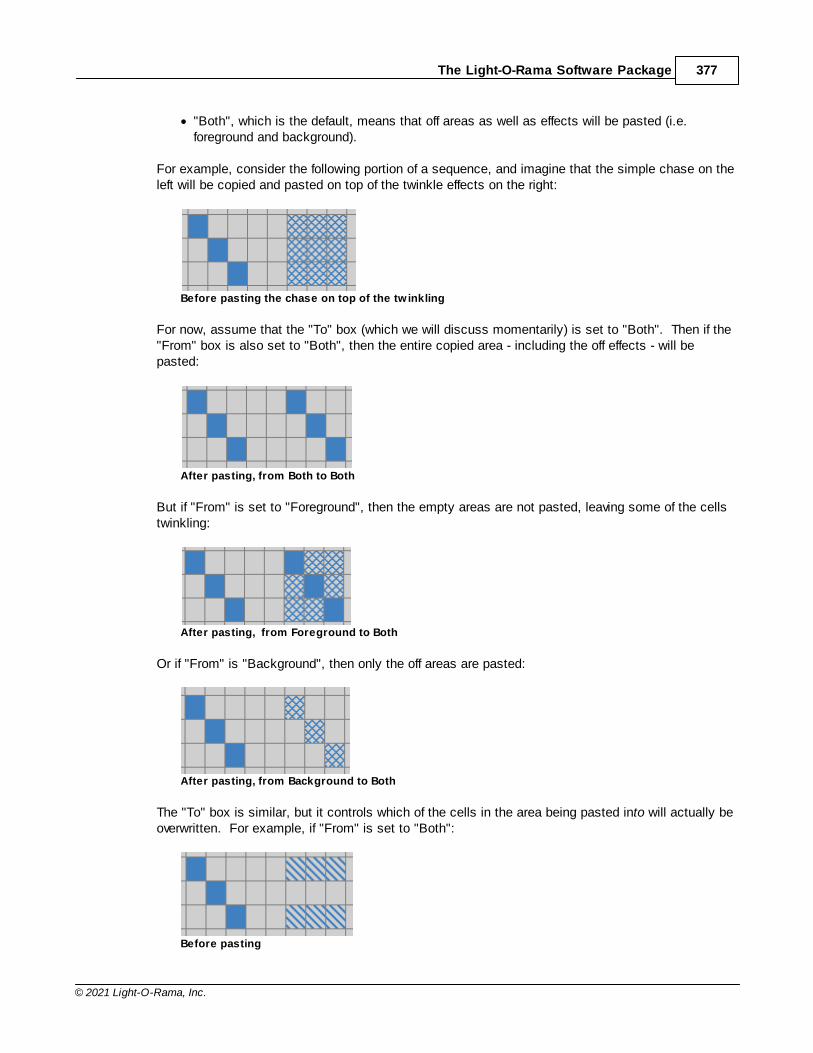
The Light-O-Rama Software Package 377
© 2021 Light-O-Rama, Inc.
· "Both", which is the default, means that off areas as well as effects will be pasted (i.e.foreground and background).
For example, consider the following portion of a sequence, and imagine that the simple chase on theleft will be copied and pasted on top of the twinkle effects on the right:
Before pasting the chase on top of the tw inkling
For now, assume that the "To" box (which we will discuss momentarily) is set to "Both". Then if the"From" box is also set to "Both", then the entire copied area - including the off effects - will bepasted:
After pasting, from Both to Both
But if "From" is set to "Foreground", then the empty areas are not pasted, leaving some of the cellstwinkling:
After pasting, from Foreground to Both
Or if "From" is "Background", then only the off areas are pasted:
After pasting, from Background to Both
The "To" box is similar, but it controls which of the cells in the area being pasted into will actually beoverwritten. For example, if "From" is set to "Both":
Before pasting
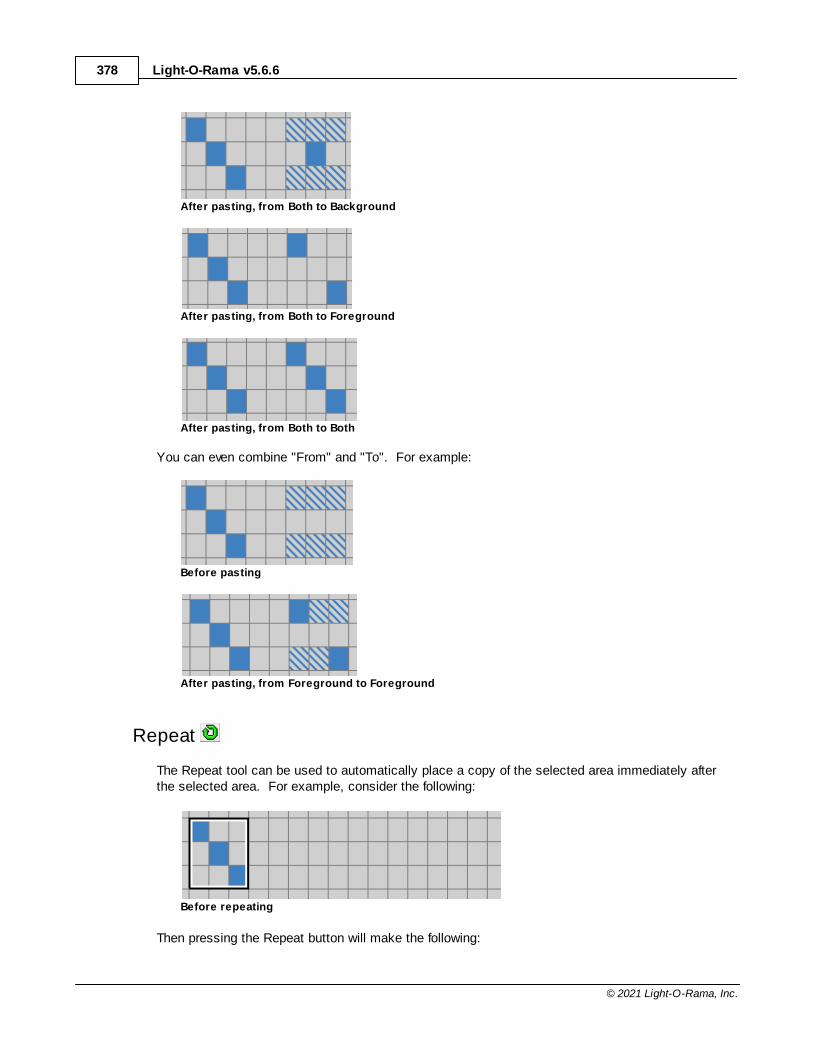
Light-O-Rama v5.6.6378
© 2021 Light-O-Rama, Inc.
After pasting, from Both to Background
After pasting, from Both to Foreground
After pasting, from Both to Both
You can even combine "From" and "To". For example:
Before pasting
After pasting, from Foreground to Foreground
Repeat
The Repeat tool can be used to automatically place a copy of the selected area immediately afterthe selected area. For example, consider the following:
Before repeating
Then pressing the Repeat button will make the following:
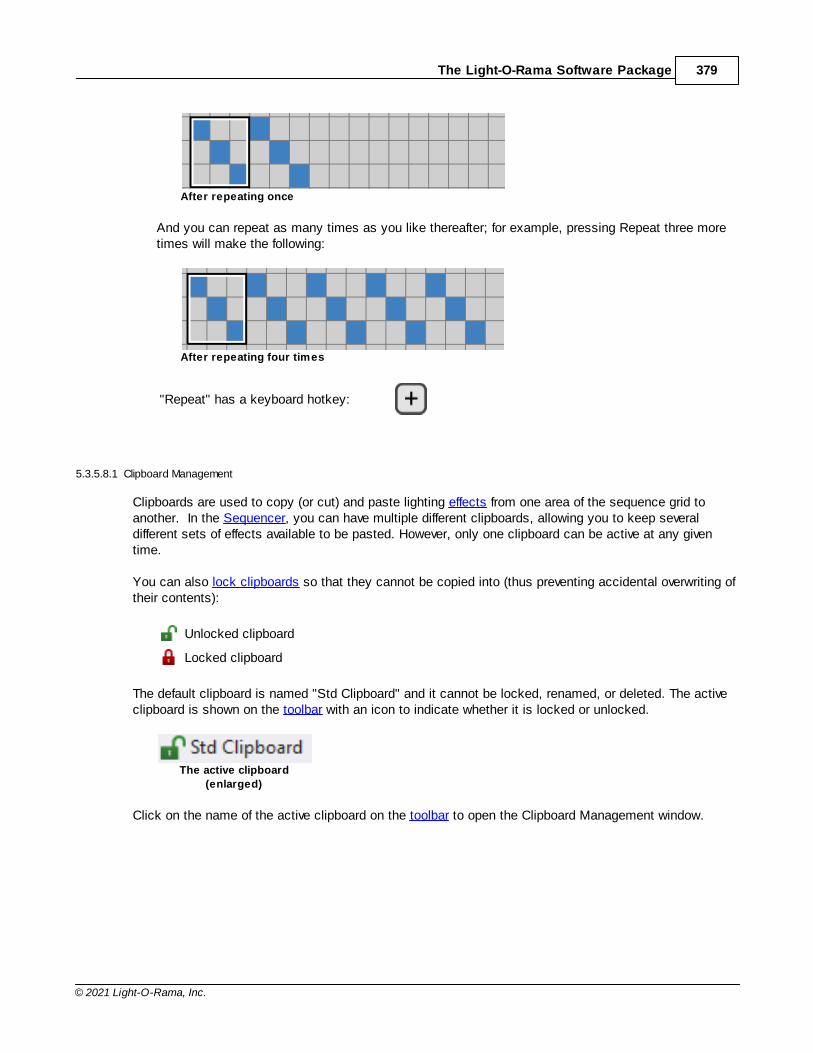
The Light-O-Rama Software Package 379
© 2021 Light-O-Rama, Inc.
After repeating once
And you can repeat as many times as you like thereafter; for example, pressing Repeat three moretimes will make the following:
After repeating four times
"Repeat" has a keyboard hotkey:
5.3.5.8.1 Clipboard Management
Clipboards are used to copy (or cut) and paste lighting effects from one area of the sequence grid toanother. In the Sequencer, you can have multiple different clipboards, allowing you to keep severaldifferent sets of effects available to be pasted. However, only one clipboard can be active at any giventime.
You can also lock clipboards so that they cannot be copied into (thus preventing accidental overwriting oftheir contents):
Unlocked clipboard
Locked clipboard
The default clipboard is named "Std Clipboard" and it cannot be locked, renamed, or deleted. The activeclipboard is shown on the toolbar with an icon to indicate whether it is locked or unlocked.
The active clipboard
(enlarged)
Click on the name of the active clipboard on the toolbar to open the Clipboard Management window.
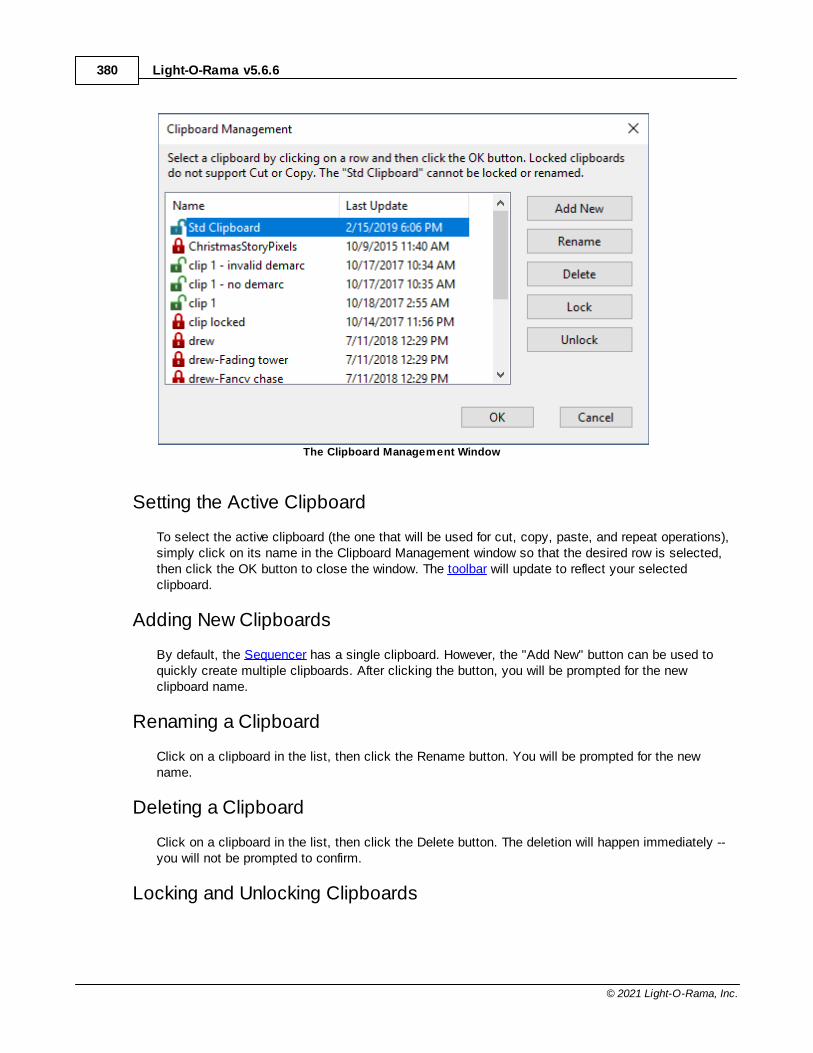
Light-O-Rama v5.6.6380
© 2021 Light-O-Rama, Inc.
The Clipboard Management Window
Setting the Active Clipboard
To select the active clipboard (the one that will be used for cut, copy, paste, and repeat operations),simply click on its name in the Clipboard Management window so that the desired row is selected,then click the OK button to close the window. The toolbar will update to reflect your selectedclipboard.
Adding New Clipboards
By default, the Sequencer has a single clipboard. However, the "Add New" button can be used toquickly create multiple clipboards. After clicking the button, you will be prompted for the newclipboard name.
Renaming a Clipboard
Click on a clipboard in the list, then click the Rename button. You will be prompted for the newname.
Deleting a Clipboard
Click on a clipboard in the list, then click the Delete button. The deletion will happen immediately --you will not be prompted to confirm.
Locking and Unlocking Clipboards
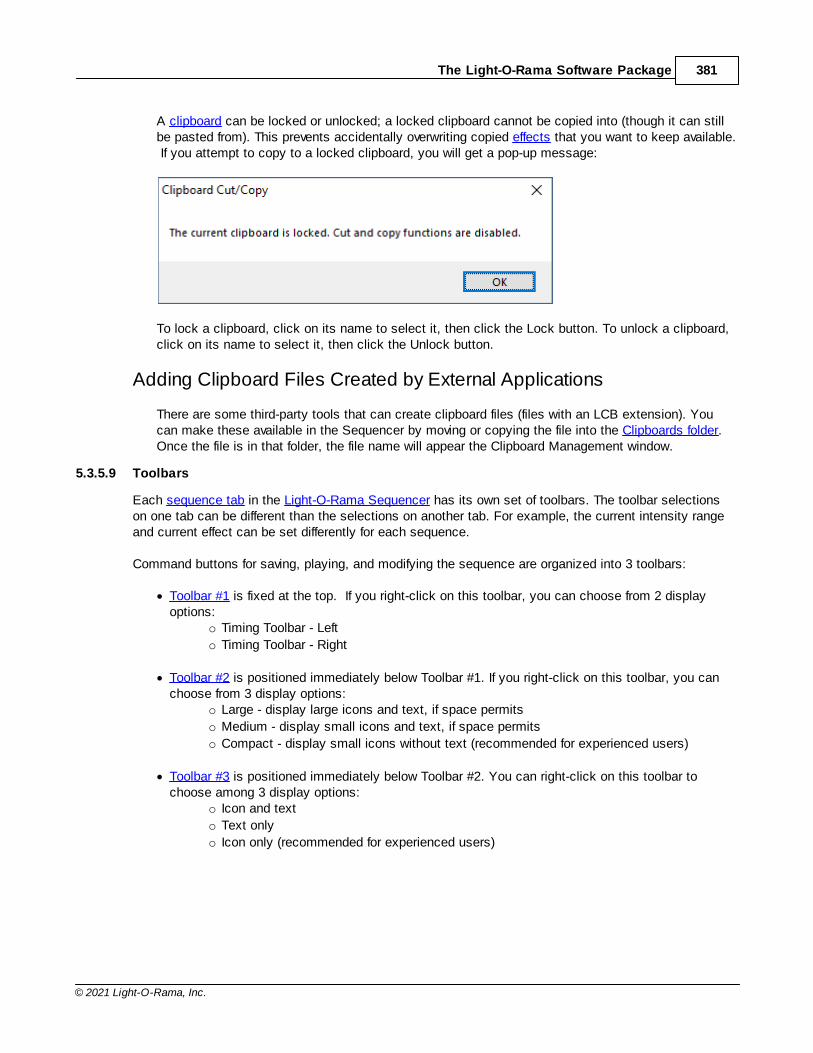
The Light-O-Rama Software Package 381
© 2021 Light-O-Rama, Inc.
A clipboard can be locked or unlocked; a locked clipboard cannot be copied into (though it can stillbe pasted from). This prevents accidentally overwriting copied effects that you want to keep available. If you attempt to copy to a locked clipboard, you will get a pop-up message:
To lock a clipboard, click on its name to select it, then click the Lock button. To unlock a clipboard,click on its name to select it, then click the Unlock button.
Adding Clipboard Files Created by External Applications
There are some third-party tools that can create clipboard files (files with an LCB extension). Youcan make these available in the Sequencer by moving or copying the file into the Clipboards folder.Once the file is in that folder, the file name will appear the Clipboard Management window.
5.3.5.9 Toolbars
Each sequence tab in the Light-O-Rama Sequencer has its own set of toolbars. The toolbar selectionson one tab can be different than the selections on another tab. For example, the current intensity rangeand current effect can be set differently for each sequence.
Command buttons for saving, playing, and modifying the sequence are organized into 3 toolbars:
· Toolbar #1 is fixed at the top. If you right-click on this toolbar, you can choose from 2 displayoptions:
o Timing Toolbar - Left
o Timing Toolbar - Right
· Toolbar #2 is positioned immediately below Toolbar #1. If you right-click on this toolbar, you canchoose from 3 display options:
o Large - display large icons and text, if space permits
o Medium - display small icons and text, if space permits
o Compact - display small icons without text (recommended for experienced users)
· Toolbar #3 is positioned immediately below Toolbar #2. You can right-click on this toolbar tochoose among 3 display options:
o Icon and text
o Text only
o Icon only (recommended for experienced users)
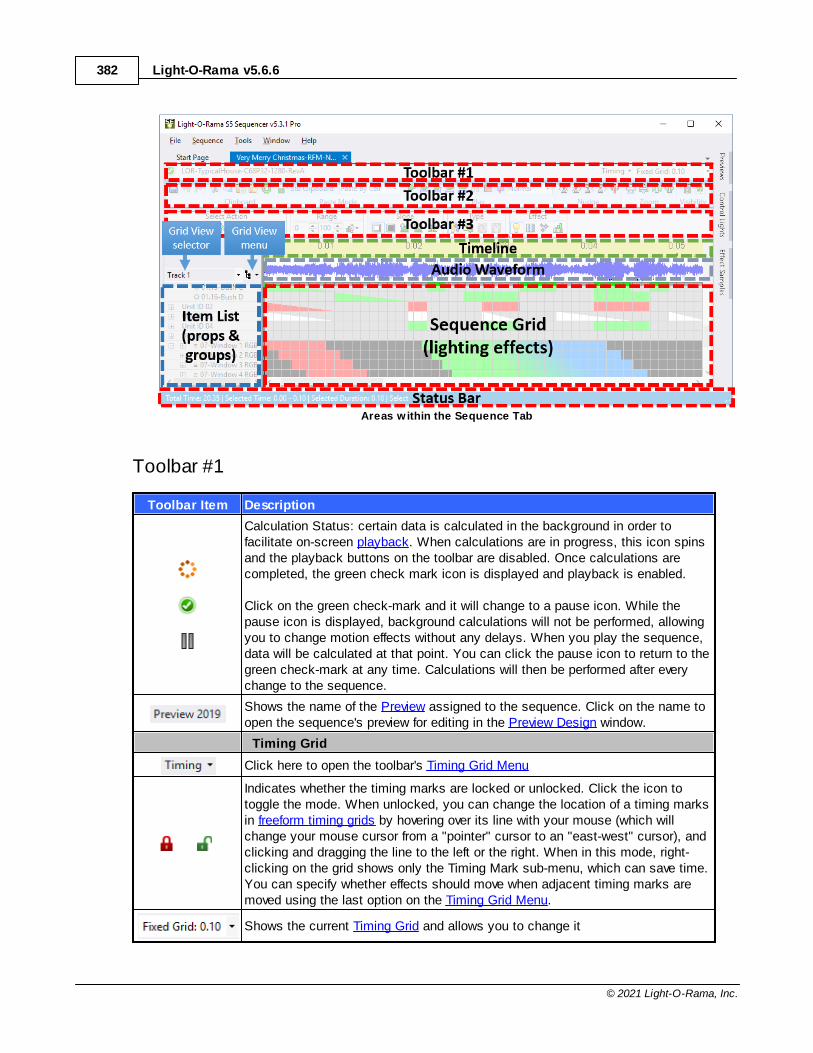
Light-O-Rama v5.6.6382
© 2021 Light-O-Rama, Inc.
Areas within the Sequence Tab
Toolbar #1
Toolbar Item Description
Calculation Status: certain data is calculated in the background in order tofacilitate on-screen playback. When calculations are in progress, this icon spinsand the playback buttons on the toolbar are disabled. Once calculations arecompleted, the green check mark icon is displayed and playback is enabled.
Click on the green check-mark and it will change to a pause icon. While thepause icon is displayed, background calculations will not be performed, allowingyou to change motion effects without any delays. When you play the sequence, data will be calculated at that point. You can click the pause icon to return to thegreen check-mark at any time. Calculations will then be performed after everychange to the sequence.
Shows the name of the Preview assigned to the sequence. Click on the name toopen the sequence's preview for editing in the Preview Design window.
Timing Grid
Click here to open the toolbar's Timing Grid Menu
Indicates whether the timing marks are locked or unlocked. Click the icon totoggle the mode. When unlocked, you can change the location of a timing marksin freeform timing grids by hovering over its line with your mouse (which willchange your mouse cursor from a "pointer" cursor to an "east-west" cursor), andclicking and dragging the line to the left or the right. When in this mode, right-clicking on the grid shows only the Timing Mark sub-menu, which can save time.You can specify whether effects should move when adjacent timing marks aremoved using the last option on the Timing Grid Menu.
Shows the current Timing Grid and allows you to change it
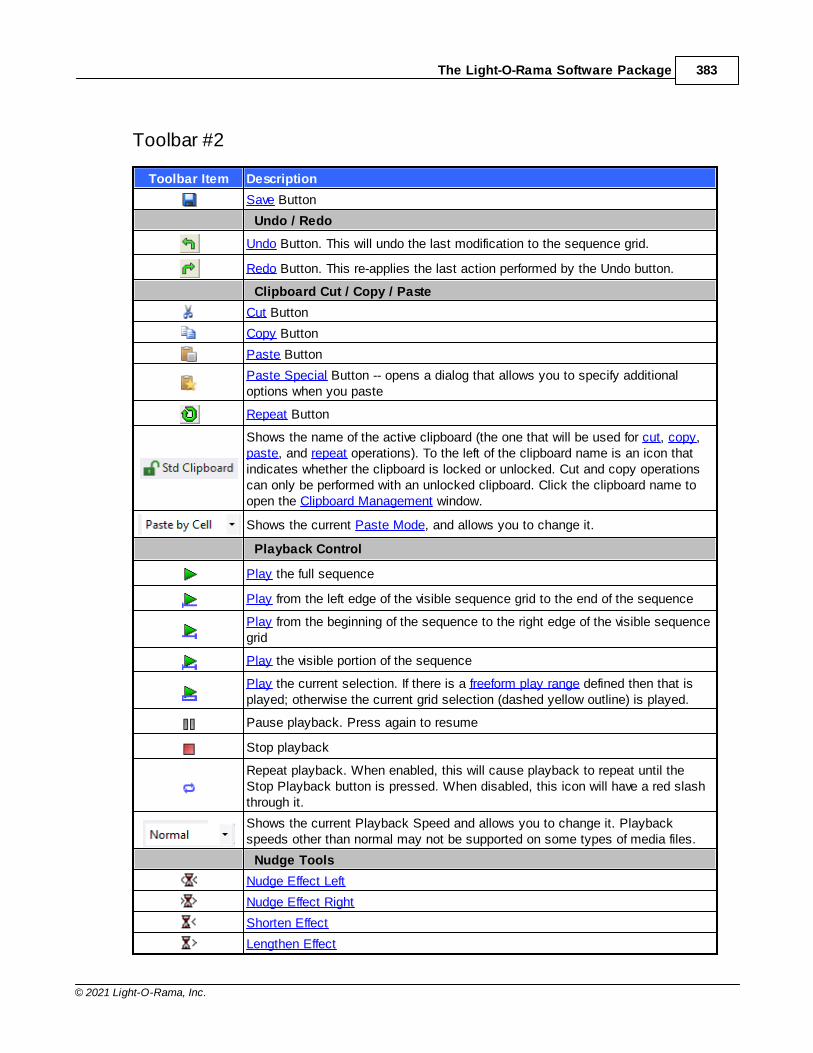
The Light-O-Rama Software Package 383
© 2021 Light-O-Rama, Inc.
Toolbar #2
Toolbar Item Description
Save Button
Undo / Redo
Undo Button. This will undo the last modification to the sequence grid.
Redo Button. This re-applies the last action performed by the Undo button.
Clipboard Cut / Copy / Paste
Cut Button
Copy Button
Paste Button
Paste Special Button -- opens a dialog that allows you to specify additionaloptions when you paste
Repeat Button
Shows the name of the active clipboard (the one that will be used for cut, copy,paste, and repeat operations). To the left of the clipboard name is an icon thatindicates whether the clipboard is locked or unlocked. Cut and copy operationscan only be performed with an unlocked clipboard. Click the clipboard name toopen the Clipboard Management window.
Shows the current Paste Mode, and allows you to change it.
Playback Control
Play the full sequence
Play from the left edge of the visible sequence grid to the end of the sequence
Play from the beginning of the sequence to the right edge of the visible sequencegrid
Play the visible portion of the sequence
Play the current selection. If there is a freeform play range defined then that isplayed; otherwise the current grid selection (dashed yellow outline) is played.
Pause playback. Press again to resume
Stop playback
Repeat playback. When enabled, this will cause playback to repeat until theStop Playback button is pressed. When disabled, this icon will have a red slashthrough it.
Shows the current Playback Speed and allows you to change it. Playbackspeeds other than normal may not be supported on some types of media files.
Nudge Tools
Nudge Effect Left
Nudge Effect Right
Shorten Effect
Lengthen Effect
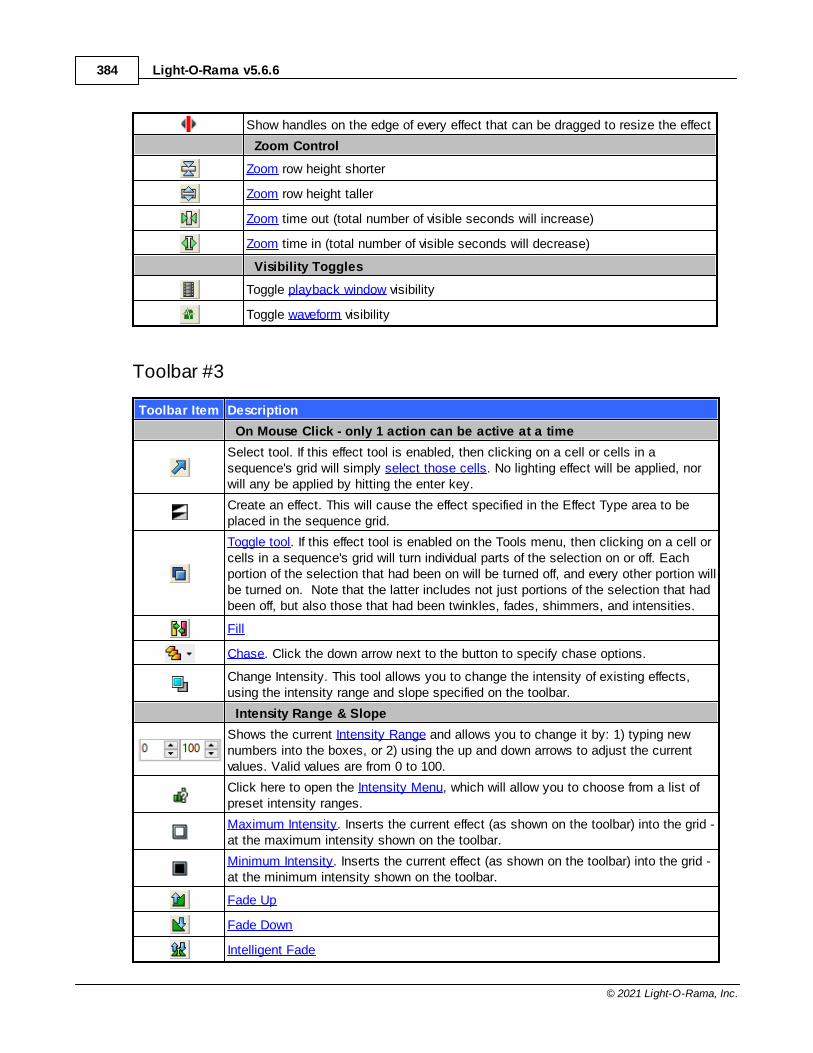
Light-O-Rama v5.6.6384
© 2021 Light-O-Rama, Inc.
Show handles on the edge of every effect that can be dragged to resize the effect
Zoom Control
Zoom row height shorter
Zoom row height taller
Zoom time out (total number of visible seconds will increase)
Zoom time in (total number of visible seconds will decrease)
Visibility Toggles
Toggle playback window visibility
Toggle waveform visibility
Toolbar #3
Toolbar Item Description
On Mouse Click - only 1 action can be active at a time
Select tool. If this effect tool is enabled, then clicking on a cell or cells in asequence's grid will simply select those cells. No lighting effect will be applied, norwill any be applied by hitting the enter key.
Create an effect. This will cause the effect specified in the Effect Type area to beplaced in the sequence grid.
Toggle tool. If this effect tool is enabled on the Tools menu, then clicking on a cell orcells in a sequence's grid will turn individual parts of the selection on or off. Eachportion of the selection that had been on will be turned off, and every other portion willbe turned on. Note that the latter includes not just portions of the selection that hadbeen off, but also those that had been twinkles, fades, shimmers, and intensities.
Fill
Chase. Click the down arrow next to the button to specify chase options.
Change Intensity. This tool allows you to change the intensity of existing effects,using the intensity range and slope specified on the toolbar.
Intensity Range & Slope
Shows the current Intensity Range and allows you to change it by: 1) typing newnumbers into the boxes, or 2) using the up and down arrows to adjust the currentvalues. Valid values are from 0 to 100.
Click here to open the Intensity Menu, which will allow you to choose from a list ofpreset intensity ranges.
Maximum Intensity. Inserts the current effect (as shown on the toolbar) into the grid -at the maximum intensity shown on the toolbar.
Minimum Intensity. Inserts the current effect (as shown on the toolbar) into the grid -at the minimum intensity shown on the toolbar.
Fade Up
Fade Down
Intelligent Fade

The Light-O-Rama Software Package 385
© 2021 Light-O-Rama, Inc.
Effect Type - only 1 effect type can be active at a time
Channel Effect
Color Fade Effect
Motion Effect (only displayed with a Pro license)
SuperStar Effect (only displayed with a Pro license)
The icons that appear next on the toolbar depend on which Effect Type is selected.
Toolbar #3 - Channel Effect
ToolbarItem
Description
Channel Effect - only 1 effect can be active at a time
On effect
Shimmer effect
Twinkle effect
DMX intensity effect. Selecting this effect will cause a pair of numeric entry boxes toappear where you can specify the starting and ending DMX values (0-255)
Toolbar #3 - Color Fade Effect
ToolbarItem
Description
Channel Effect - only 1 effect can be active at a time
On effect
Shimmer effect
Twinkle effect
Start Color
Select the start color
The system chooses a random start color
Copy the end color to the start color
Color Sample
Displays a sample of the color that will be placed in the grid. You can also click on theleft side of the sample to set the start color, or the right side to set the end color.
End Color
Select the end color
The system chooses a random end color
Copy the start color to the end color
When checked, the end color is ignored and only the start color is used. In otherwords, you are specifying a solid color, not a color transition.
Both Colors
The system chooses a random start and end color
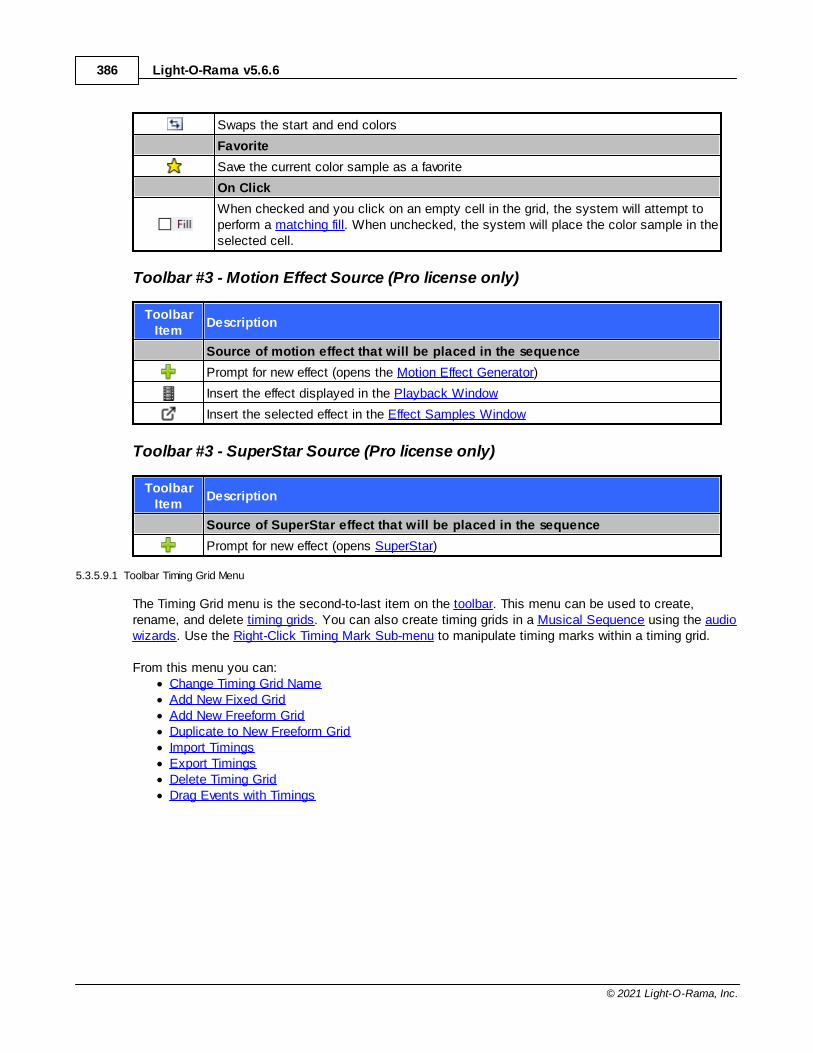
Light-O-Rama v5.6.6386
© 2021 Light-O-Rama, Inc.
Swaps the start and end colors
Favorite
Save the current color sample as a favorite
On Click
When checked and you click on an empty cell in the grid, the system will attempt toperform a matching fill. When unchecked, the system will place the color sample in theselected cell.
Toolbar #3 - Motion Effect Source (Pro license only)
ToolbarItem
Description
Source of motion effect that will be placed in the sequence
Prompt for new effect (opens the Motion Effect Generator)
Insert the effect displayed in the Playback Window
Insert the selected effect in the Effect Samples Window
Toolbar #3 - SuperStar Source (Pro license only)
ToolbarItem
Description
Source of SuperStar effect that will be placed in the sequence
Prompt for new effect (opens SuperStar)
5.3.5.9.1 Toolbar Timing Grid Menu
The Timing Grid menu is the second-to-last item on the toolbar. This menu can be used to create,rename, and delete timing grids. You can also create timing grids in a Musical Sequence using the audiowizards. Use the Right-Click Timing Mark Sub-menu to manipulate timing marks within a timing grid.
From this menu you can:· Change Timing Grid Name· Add New Fixed Grid· Add New Freeform Grid· Duplicate to New Freeform Grid· Import Timings· Export Timings· Delete Timing Grid· Drag Events with Timings
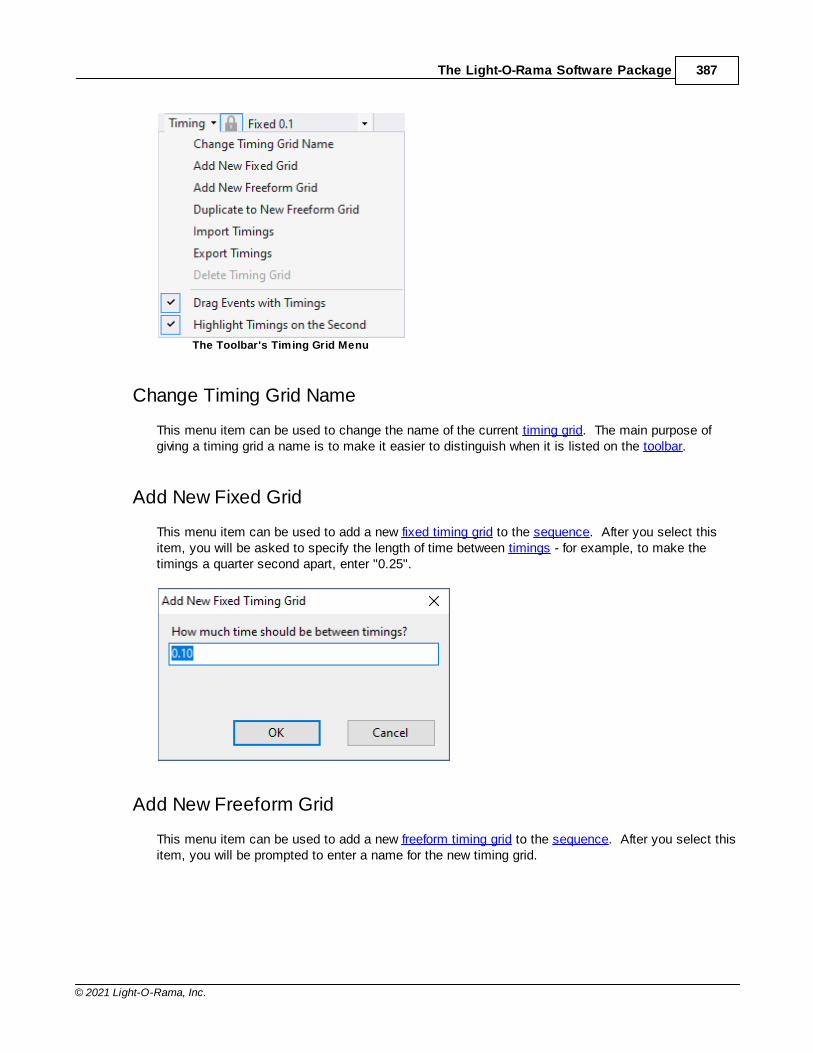
The Light-O-Rama Software Package 387
© 2021 Light-O-Rama, Inc.
The Toolbar's Timing Grid Menu
Change Timing Grid Name
This menu item can be used to change the name of the current timing grid. The main purpose ofgiving a timing grid a name is to make it easier to distinguish when it is listed on the toolbar.
Add New Fixed Grid
This menu item can be used to add a new fixed timing grid to the sequence. After you select thisitem, you will be asked to specify the length of time between timings - for example, to make thetimings a quarter second apart, enter "0.25".
Add New Freeform Grid
This menu item can be used to add a new freeform timing grid to the sequence. After you select thisitem, you will be prompted to enter a name for the new timing grid.
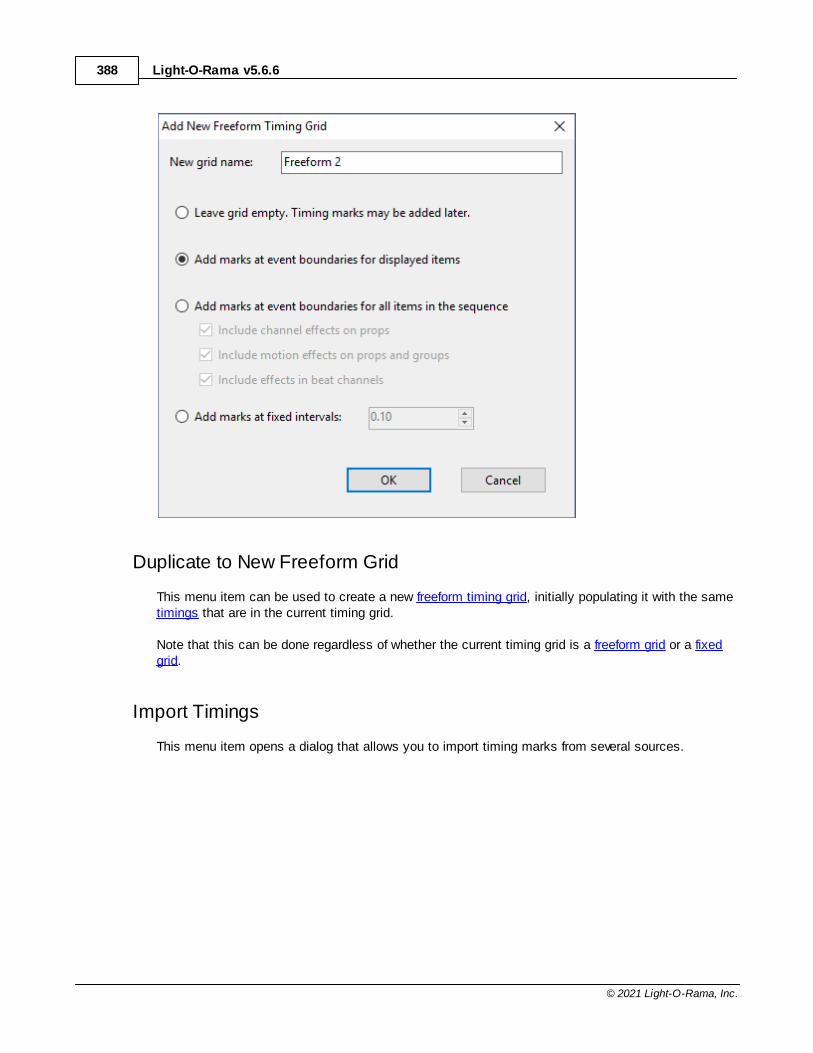
Light-O-Rama v5.6.6388
© 2021 Light-O-Rama, Inc.
Duplicate to New Freeform Grid
This menu item can be used to create a new freeform timing grid, initially populating it with the sametimings that are in the current timing grid.
Note that this can be done regardless of whether the current timing grid is a freeform grid or a fixedgrid.
Import Timings
This menu item opens a dialog that allows you to import timing marks from several sources.
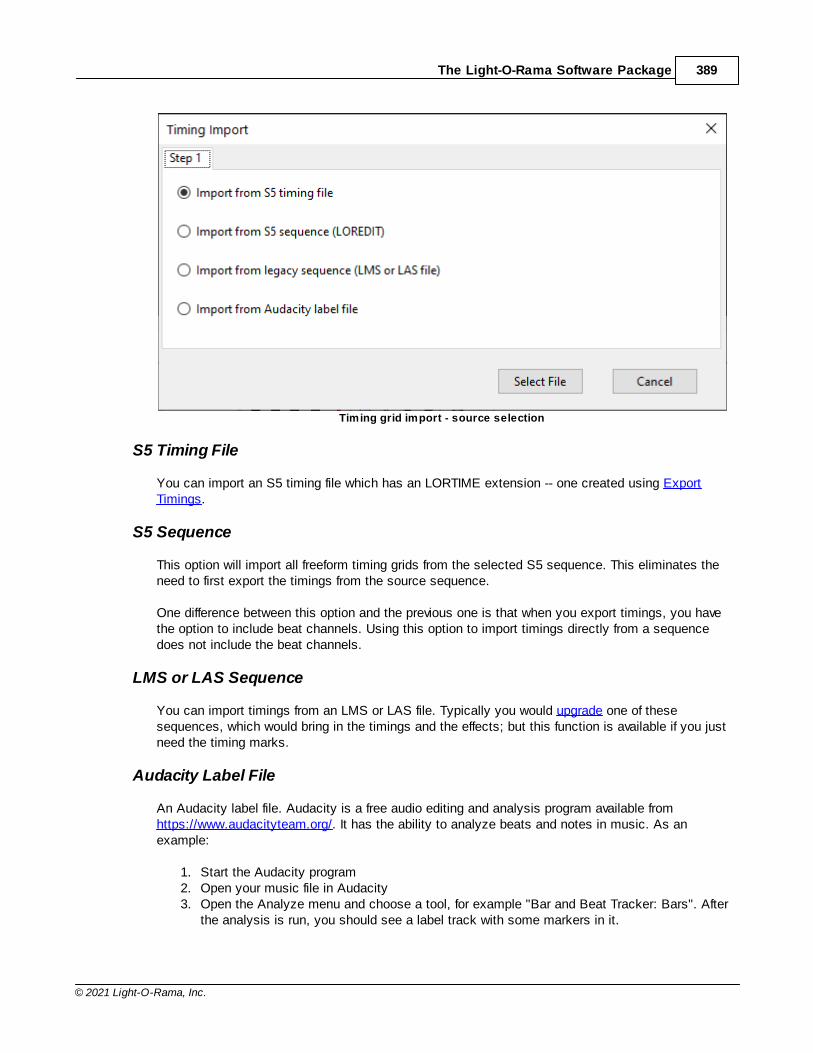
The Light-O-Rama Software Package 389
© 2021 Light-O-Rama, Inc.
Timing grid import - source selection
S5 Timing File
You can import an S5 timing file which has an LORTIME extension -- one created using ExportTimings.
S5 Sequence
This option will import all freeform timing grids from the selected S5 sequence. This eliminates theneed to first export the timings from the source sequence.
One difference between this option and the previous one is that when you export timings, you havethe option to include beat channels. Using this option to import timings directly from a sequencedoes not include the beat channels.
LMS or LAS Sequence
You can import timings from an LMS or LAS file. Typically you would upgrade one of thesesequences, which would bring in the timings and the effects; but this function is available if you justneed the timing marks.
Audacity Label File
An Audacity label file. Audacity is a free audio editing and analysis program available fromhttps://www.audacityteam.org/. It has the ability to analyze beats and notes in music. As anexample:
1. Start the Audacity program2. Open your music file in Audacity3. Open the Analyze menu and choose a tool, for example "Bar and Beat Tracker: Bars". After
the analysis is run, you should see a label track with some markers in it.
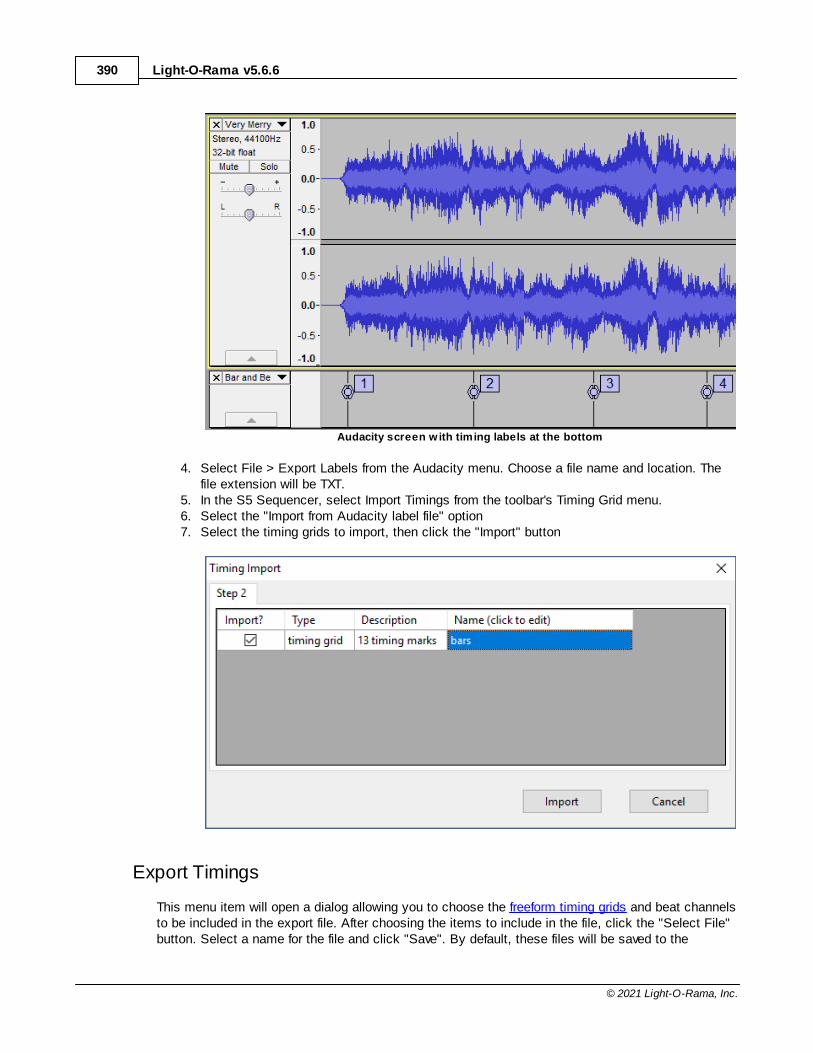
Light-O-Rama v5.6.6390
© 2021 Light-O-Rama, Inc.
Audacity screen with timing labels at the bottom
4. Select File > Export Labels from the Audacity menu. Choose a file name and location. Thefile extension will be TXT.
5. In the S5 Sequencer, select Import Timings from the toolbar's Timing Grid menu.6. Select the "Import from Audacity label file" option7. Select the timing grids to import, then click the "Import" button
Export Timings
This menu item will open a dialog allowing you to choose the freeform timing grids and beat channelsto be included in the export file. After choosing the items to include in the file, click the "Select File"button. Select a name for the file and click "Save". By default, these files will be saved to the
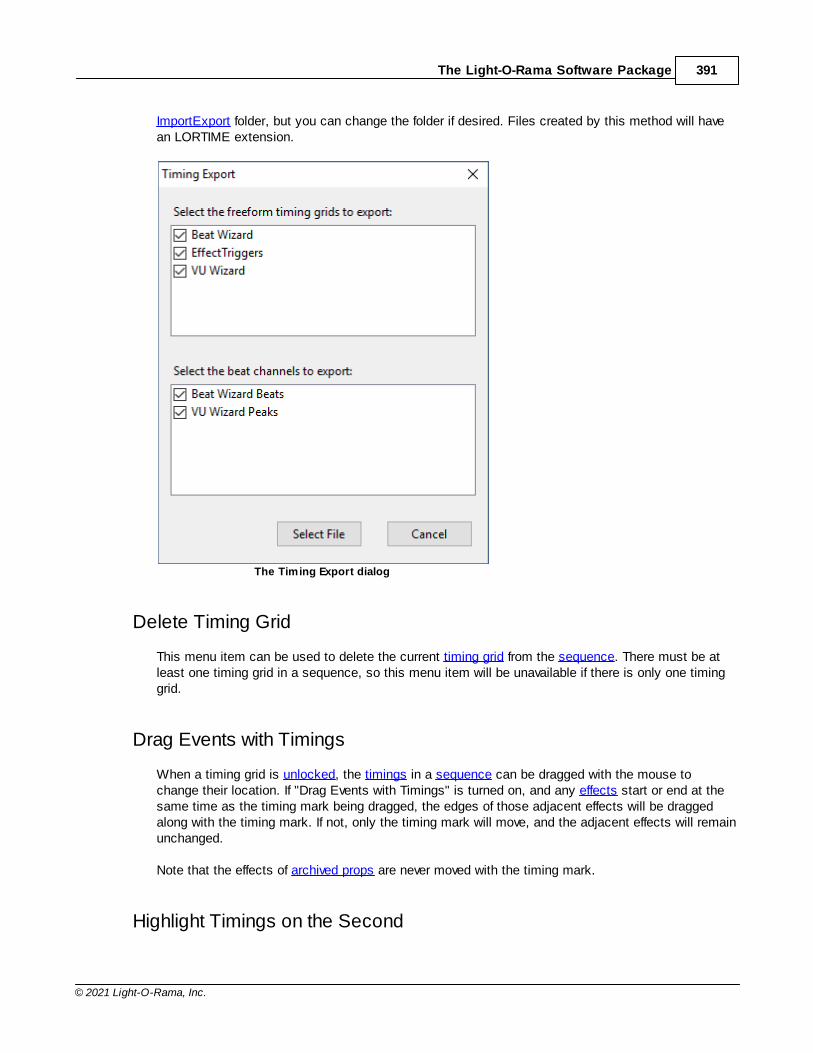
The Light-O-Rama Software Package 391
© 2021 Light-O-Rama, Inc.
ImportExport folder, but you can change the folder if desired. Files created by this method will havean LORTIME extension.
The Timing Export dialog
Delete Timing Grid
This menu item can be used to delete the current timing grid from the sequence. There must be atleast one timing grid in a sequence, so this menu item will be unavailable if there is only one timinggrid.
Drag Events with Timings
When a timing grid is unlocked, the timings in a sequence can be dragged with the mouse tochange their location. If "Drag Events with Timings" is turned on, and any effects start or end at thesame time as the timing mark being dragged, the edges of those adjacent effects will be draggedalong with the timing mark. If not, only the timing mark will move, and the adjacent effects will remainunchanged.
Note that the effects of archived props are never moved with the timing mark.
Highlight Timings on the Second
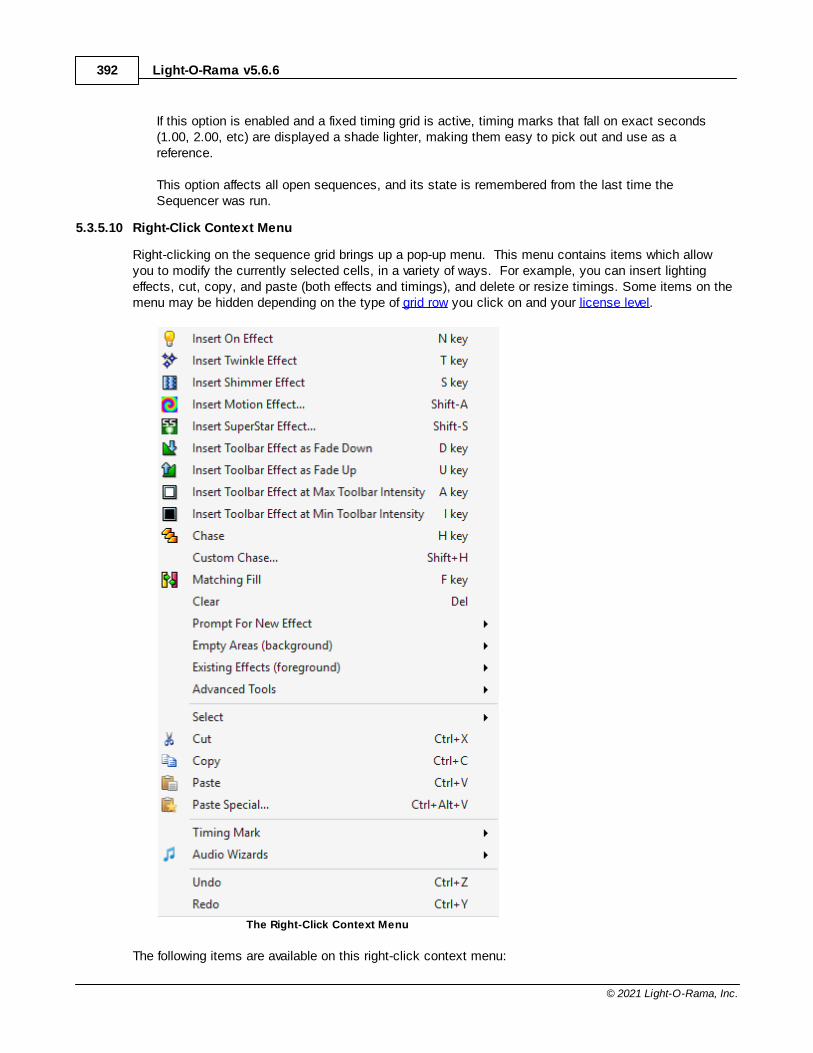
Light-O-Rama v5.6.6392
© 2021 Light-O-Rama, Inc.
If this option is enabled and a fixed timing grid is active, timing marks that fall on exact seconds(1.00, 2.00, etc) are displayed a shade lighter, making them easy to pick out and use as areference.
This option affects all open sequences, and its state is remembered from the last time theSequencer was run.
5.3.5.10 Right-Click Context Menu
Right-clicking on the sequence grid brings up a pop-up menu. This menu contains items which allowyou to modify the currently selected cells, in a variety of ways. For example, you can insert lightingeffects, cut, copy, and paste (both effects and timings), and delete or resize timings. Some items on themenu may be hidden depending on the type of grid row you click on and your license level.
The Right-Click Context Menu
The following items are available on this right-click context menu:
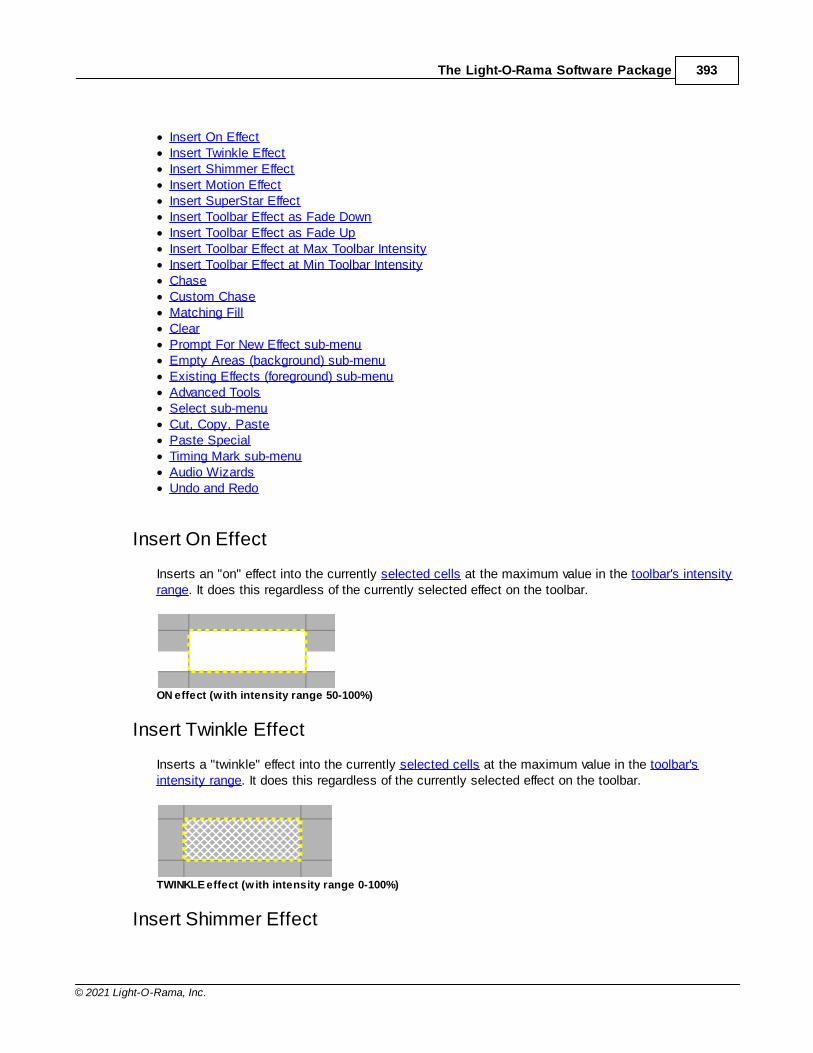
The Light-O-Rama Software Package 393
© 2021 Light-O-Rama, Inc.
· Insert On Effect· Insert Twinkle Effect· Insert Shimmer Effect· Insert Motion Effect· Insert SuperStar Effect· Insert Toolbar Effect as Fade Down· Insert Toolbar Effect as Fade Up· Insert Toolbar Effect at Max Toolbar Intensity· Insert Toolbar Effect at Min Toolbar Intensity· Chase· Custom Chase· Matching Fill· Clear· Prompt For New Effect sub-menu· Empty Areas (background) sub-menu· Existing Effects (foreground) sub-menu· Advanced Tools· Select sub-menu· Cut, Copy, Paste· Paste Special· Timing Mark sub-menu · Audio Wizards· Undo and Redo
Insert On Effect
Inserts an "on" effect into the currently selected cells at the maximum value in the toolbar's intensityrange. It does this regardless of the currently selected effect on the toolbar.
ON effect (w ith intensity range 50-100%)
Insert Twinkle Effect
Inserts a "twinkle" effect into the currently selected cells at the maximum value in the toolbar'sintensity range. It does this regardless of the currently selected effect on the toolbar.
TWINKLE effect (w ith intensity range 0-100%)
Insert Shimmer Effect
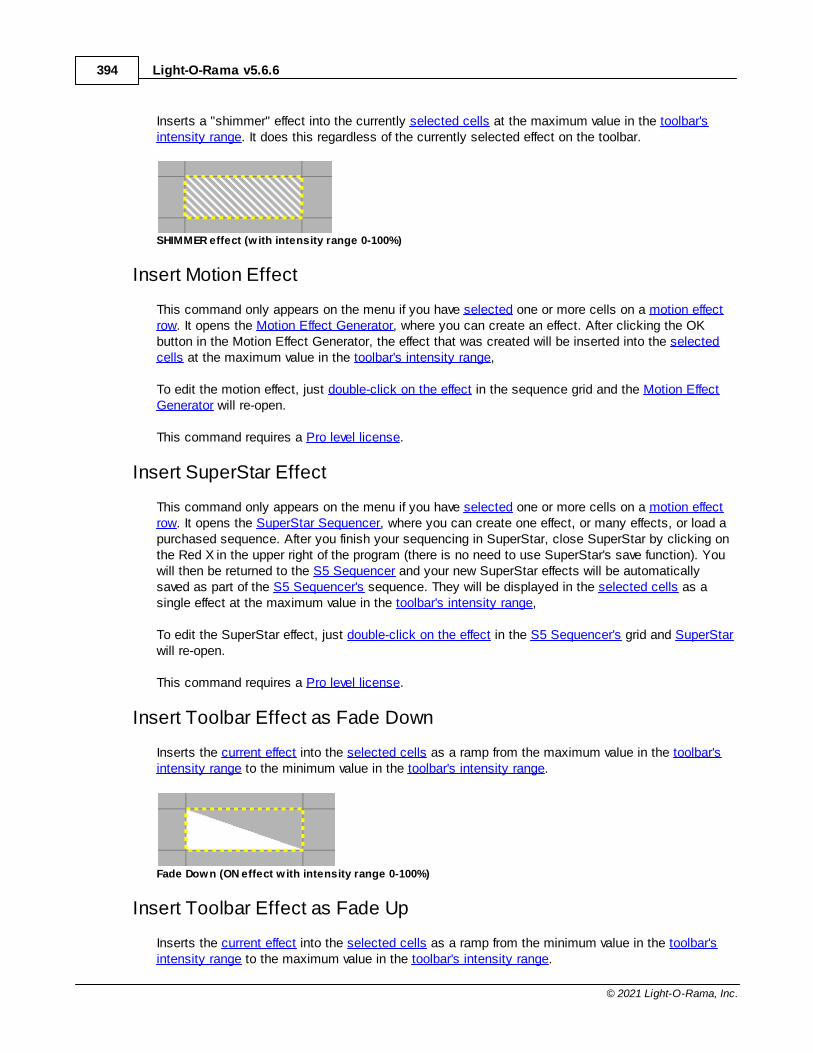
Light-O-Rama v5.6.6394
© 2021 Light-O-Rama, Inc.
Inserts a "shimmer" effect into the currently selected cells at the maximum value in the toolbar'sintensity range. It does this regardless of the currently selected effect on the toolbar.
SHIMMER effect (w ith intensity range 0-100%)
Insert Motion Effect
This command only appears on the menu if you have selected one or more cells on a motion effectrow. It opens the Motion Effect Generator, where you can create an effect. After clicking the OKbutton in the Motion Effect Generator, the effect that was created will be inserted into the selectedcells at the maximum value in the toolbar's intensity range,
To edit the motion effect, just double-click on the effect in the sequence grid and the Motion EffectGenerator will re-open.
This command requires a Pro level license.
Insert SuperStar Effect
This command only appears on the menu if you have selected one or more cells on a motion effectrow. It opens the SuperStar Sequencer, where you can create one effect, or many effects, or load apurchased sequence. After you finish your sequencing in SuperStar, close SuperStar by clicking onthe Red X in the upper right of the program (there is no need to use SuperStar's save function). Youwill then be returned to the S5 Sequencer and your new SuperStar effects will be automaticallysaved as part of the S5 Sequencer's sequence. They will be displayed in the selected cells as asingle effect at the maximum value in the toolbar's intensity range,
To edit the SuperStar effect, just double-click on the effect in the S5 Sequencer's grid and SuperStarwill re-open.
This command requires a Pro level license.
Insert Toolbar Effect as Fade Down
Inserts the current effect into the selected cells as a ramp from the maximum value in the toolbar'sintensity range to the minimum value in the toolbar's intensity range.
Fade Down (ON effect w ith intensity range 0-100%)
Insert Toolbar Effect as Fade Up
Inserts the current effect into the selected cells as a ramp from the minimum value in the toolbar'sintensity range to the maximum value in the toolbar's intensity range.
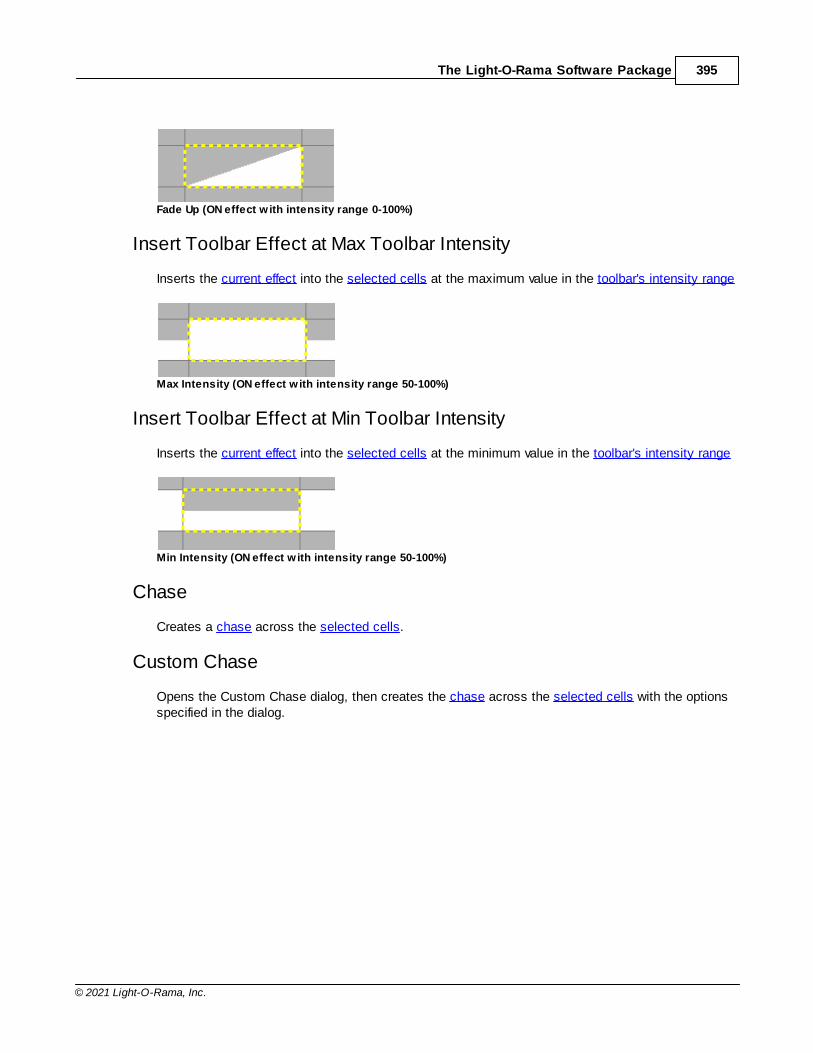
The Light-O-Rama Software Package 395
© 2021 Light-O-Rama, Inc.
Fade Up (ON effect w ith intensity range 0-100%)
Insert Toolbar Effect at Max Toolbar Intensity
Inserts the current effect into the selected cells at the maximum value in the toolbar's intensity range
Max Intensity (ON effect w ith intensity range 50-100%)
Insert Toolbar Effect at Min Toolbar Intensity
Inserts the current effect into the selected cells at the minimum value in the toolbar's intensity range
Min Intensity (ON effect w ith intensity range 50-100%)
Chase
Creates a chase across the selected cells.
Custom Chase
Opens the Custom Chase dialog, then creates the chase across the selected cells with the optionsspecified in the dialog.
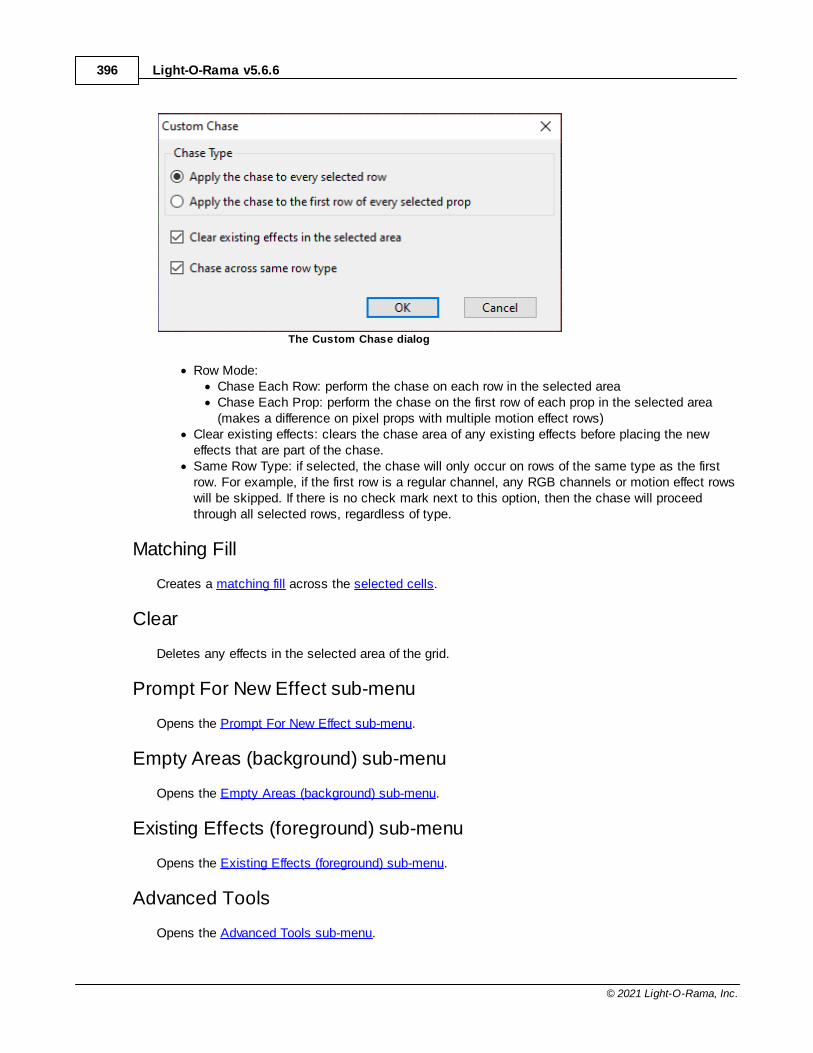
Light-O-Rama v5.6.6396
© 2021 Light-O-Rama, Inc.
The Custom Chase dialog
· Row Mode: · Chase Each Row: perform the chase on each row in the selected area · Chase Each Prop: perform the chase on the first row of each prop in the selected area
(makes a difference on pixel props with multiple motion effect rows)· Clear existing effects: clears the chase area of any existing effects before placing the new
effects that are part of the chase.· Same Row Type: if selected, the chase will only occur on rows of the same type as the first
row. For example, if the first row is a regular channel, any RGB channels or motion effect rowswill be skipped. If there is no check mark next to this option, then the chase will proceedthrough all selected rows, regardless of type.
Matching Fill
Creates a matching fill across the selected cells.
Clear
Deletes any effects in the selected area of the grid.
Prompt For New Effect sub-menu
Opens the Prompt For New Effect sub-menu.
Empty Areas (background) sub-menu
Opens the Empty Areas (background) sub-menu.
Existing Effects (foreground) sub-menu
Opens the Existing Effects (foreground) sub-menu.
Advanced Tools
Opens the Advanced Tools sub-menu.

The Light-O-Rama Software Package 397
© 2021 Light-O-Rama, Inc.
Select sub-menu
This sub-menu displays items to expand the grid selection to encompass:
· the entire effect· the entire row· the entire column· the entire grid
Cut, Copy, Paste
These items perform standard cut, copy, and paste functions. See the Clipboards &Cut/Copy/Paste/Repeat topic for more information.
Paste Special
Opens a dialog window that allows you to select additional options when you are pasting. See theClipboards & Cut/Copy/Paste/Repeat topic for more information.
Timing Mark sub-menu
Opens the Timing Mark sub-menu.
Audio Wizards
Opens a sub-menu that allows you to initiate an Audio Wizard.
Undo and Redo
These allow you to undo and redo changes that you make to a sequence. A wide variety of changescan be undone and redone - changing lighting effects, moving timings, and many more. If there is noaction to be undone, the "Undo" menu item will not be shown. If there is no action to be redone, the"Redo" menu item will not be shown.
There is a limit to how many changes will be remembered for the purposes of undo and redo, so ifyou make many changes to a sequence and then start undoing them all, you may eventually reach apoint where you can't undo any more, even though you haven't undone all of the changes that youmade.
Undo and redo have keyboard shortcuts: Ctrl-Z and Ctrl-Y, respectively.
5.3.5.10.1 Right-Click Prompt For New Effect Sub-menu
A variety of tools for adding new effects are available by right-clicking on the sequence grid and thenopening the "Prompt For New Effect" sub-menu. As the name implies, you will be prompted for the effectfirst, and then the chosen effect will be inserted into the selected area of the grid.
From "Prompt For New Effect" sub-menu you can:
· Create new Fade Down, Fade Up, Max Intensity, or Min Intensity effects· Modify Existing Effects
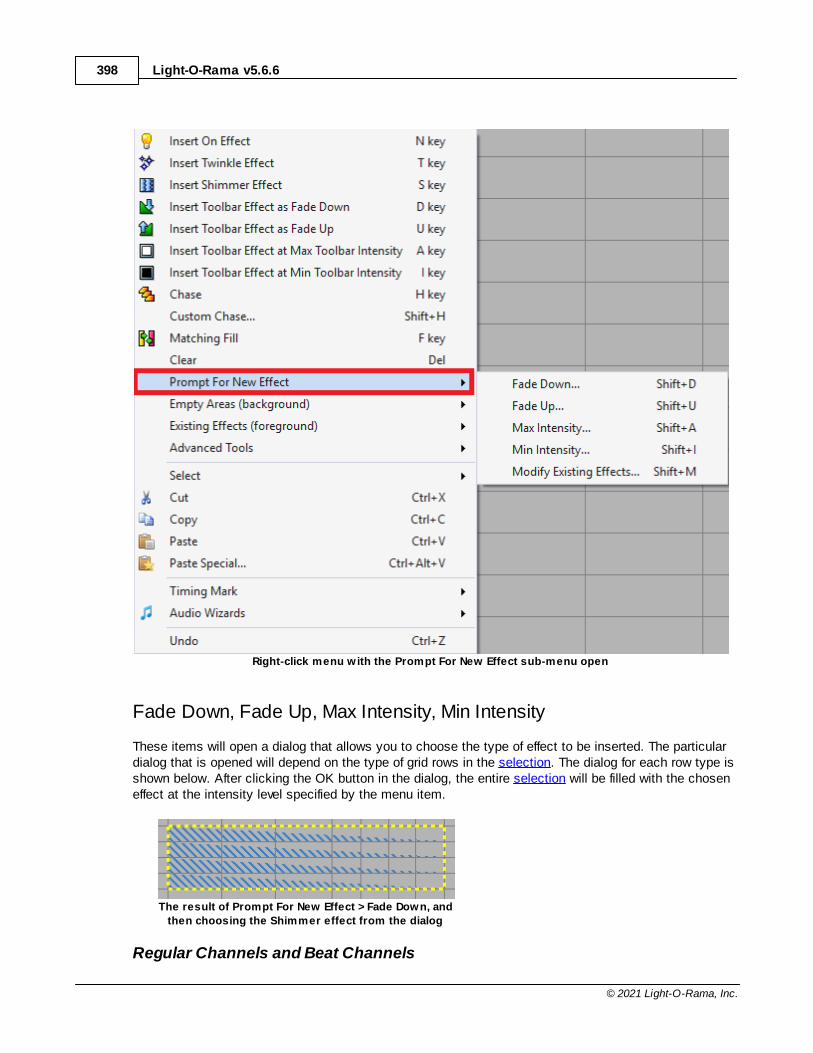
Light-O-Rama v5.6.6398
© 2021 Light-O-Rama, Inc.
Right-click menu with the Prompt For New Effect sub-menu open
Fade Down, Fade Up, Max Intensity, Min Intensity
These items will open a dialog that allows you to choose the type of effect to be inserted. The particulardialog that is opened will depend on the type of grid rows in the selection. The dialog for each row type isshown below. After clicking the OK button in the dialog, the entire selection will be filled with the choseneffect at the intensity level specified by the menu item.
The result of Prompt For New Effect > Fade Down, and
then choosing the Shimmer effect from the dialog
Regular Channels and Beat Channels
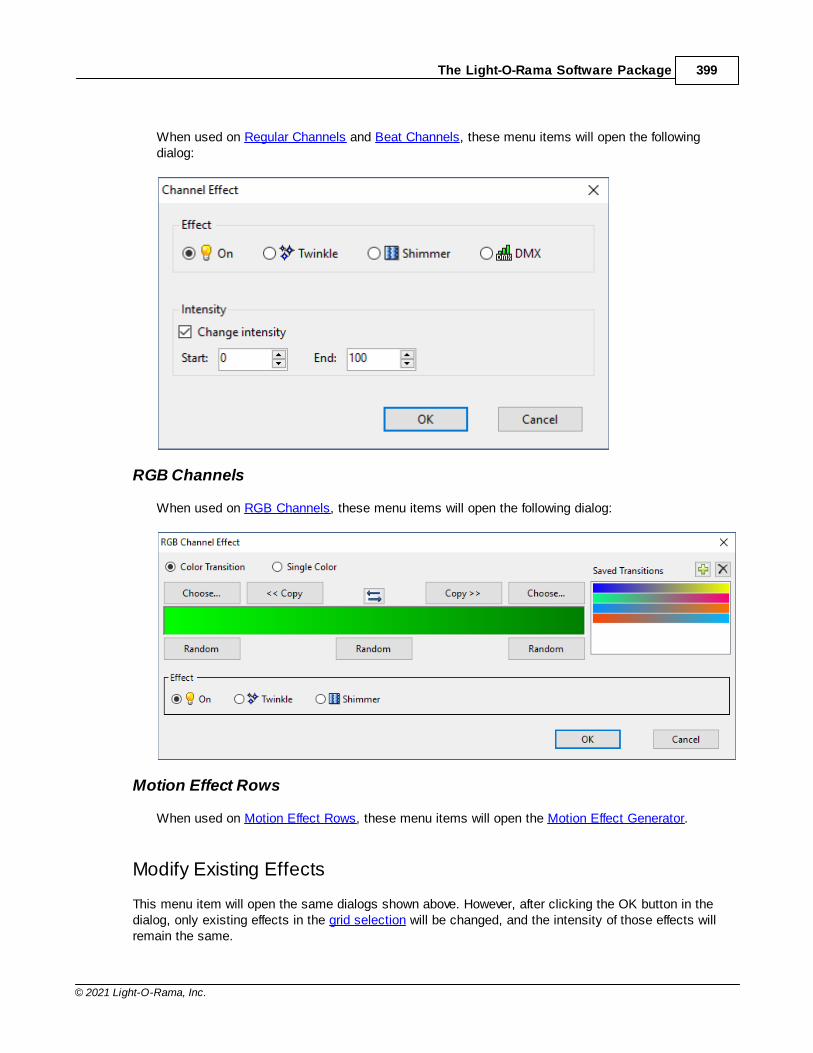
The Light-O-Rama Software Package 399
© 2021 Light-O-Rama, Inc.
When used on Regular Channels and Beat Channels, these menu items will open the followingdialog:
RGB Channels
When used on RGB Channels, these menu items will open the following dialog:
Motion Effect Rows
When used on Motion Effect Rows, these menu items will open the Motion Effect Generator.
Modify Existing Effects
This menu item will open the same dialogs shown above. However, after clicking the OK button in thedialog, only existing effects in the grid selection will be changed, and the intensity of those effects willremain the same.

Light-O-Rama v5.6.6400
© 2021 Light-O-Rama, Inc.
For example, if the grid contained this:
Before Modify Existing Effects
Selecting Prompt For New Effect > Modify Existing Effects, then selecting Shimmer from the dialog,would result in this:
After Modify Existing Effects
5.3.5.10.2 Right-Click Empty Areas (background) Sub-menu
The "Empty Areas (background)" sub-menu contains a list of functions that are applied to empty parts ofthe selected area. These functions do not make any changes to grid cells that already contain effects.
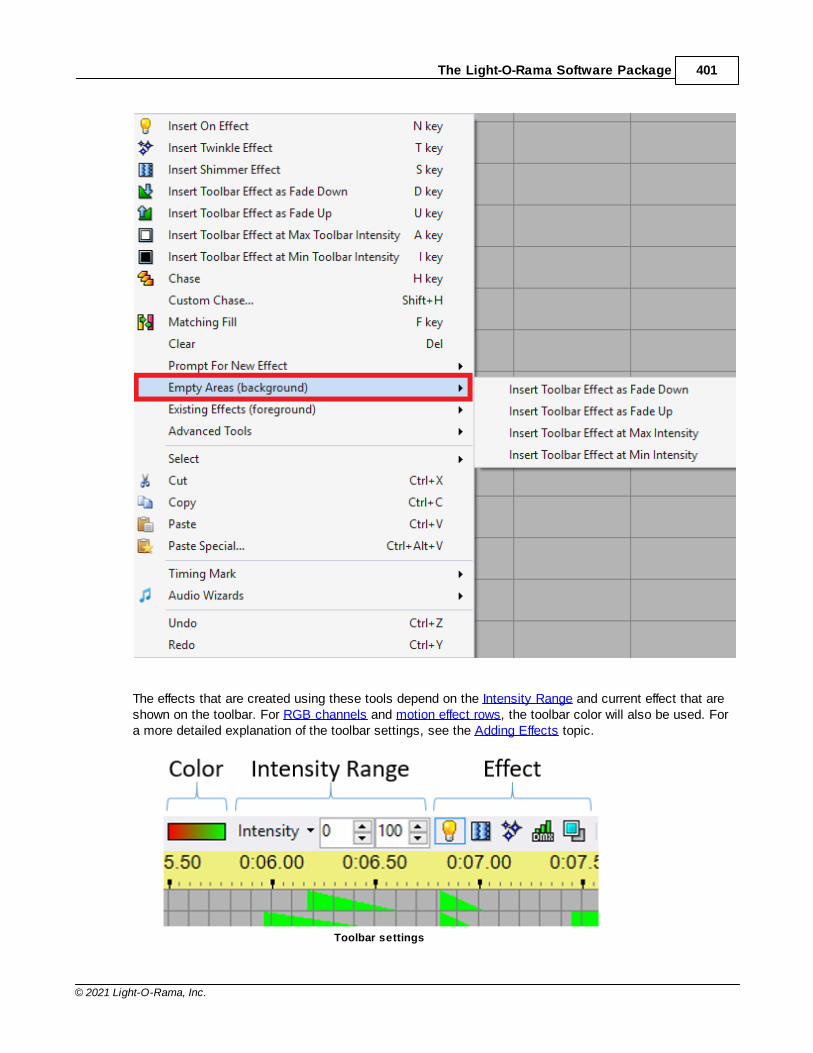
The Light-O-Rama Software Package 401
© 2021 Light-O-Rama, Inc.
The effects that are created using these tools depend on the Intensity Range and current effect that areshown on the toolbar. For RGB channels and motion effect rows, the toolbar color will also be used. Fora more detailed explanation of the toolbar settings, see the Adding Effects topic.
Toolbar settings
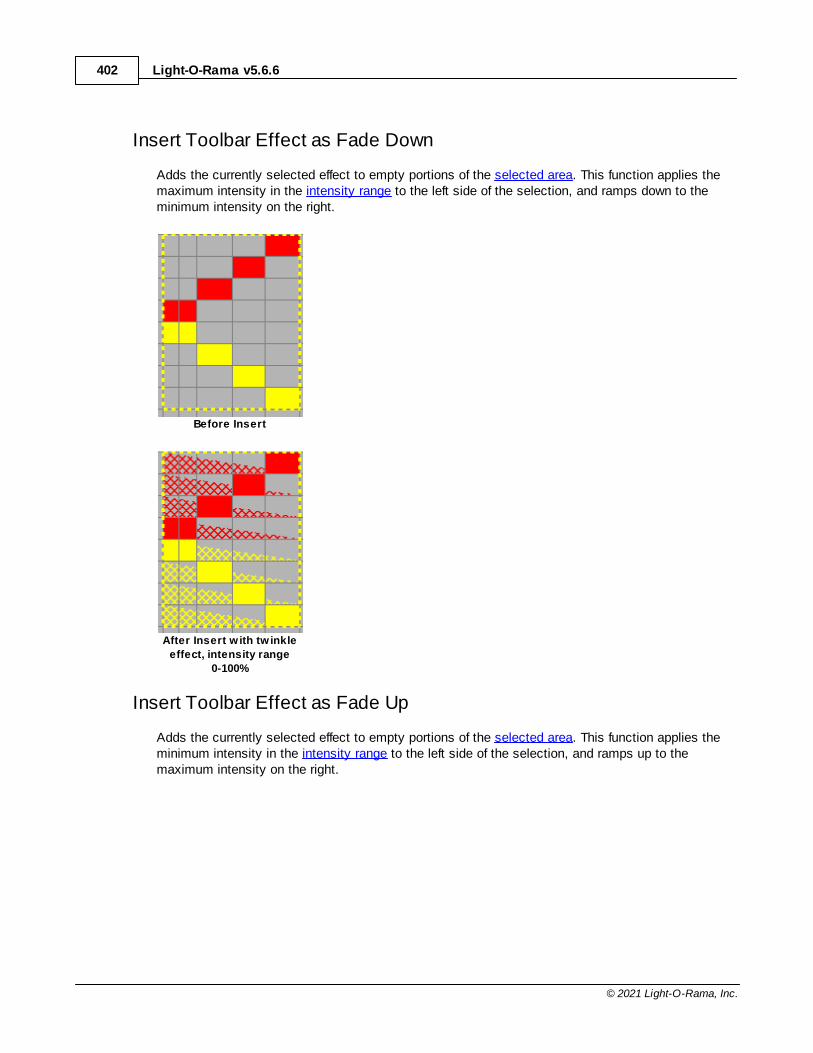
Light-O-Rama v5.6.6402
© 2021 Light-O-Rama, Inc.
Insert Toolbar Effect as Fade Down
Adds the currently selected effect to empty portions of the selected area. This function applies themaximum intensity in the intensity range to the left side of the selection, and ramps down to theminimum intensity on the right.
Before Insert
After Insert w ith tw inkle
effect, intensity range
0-100%
Insert Toolbar Effect as Fade Up
Adds the currently selected effect to empty portions of the selected area. This function applies theminimum intensity in the intensity range to the left side of the selection, and ramps up to themaximum intensity on the right.
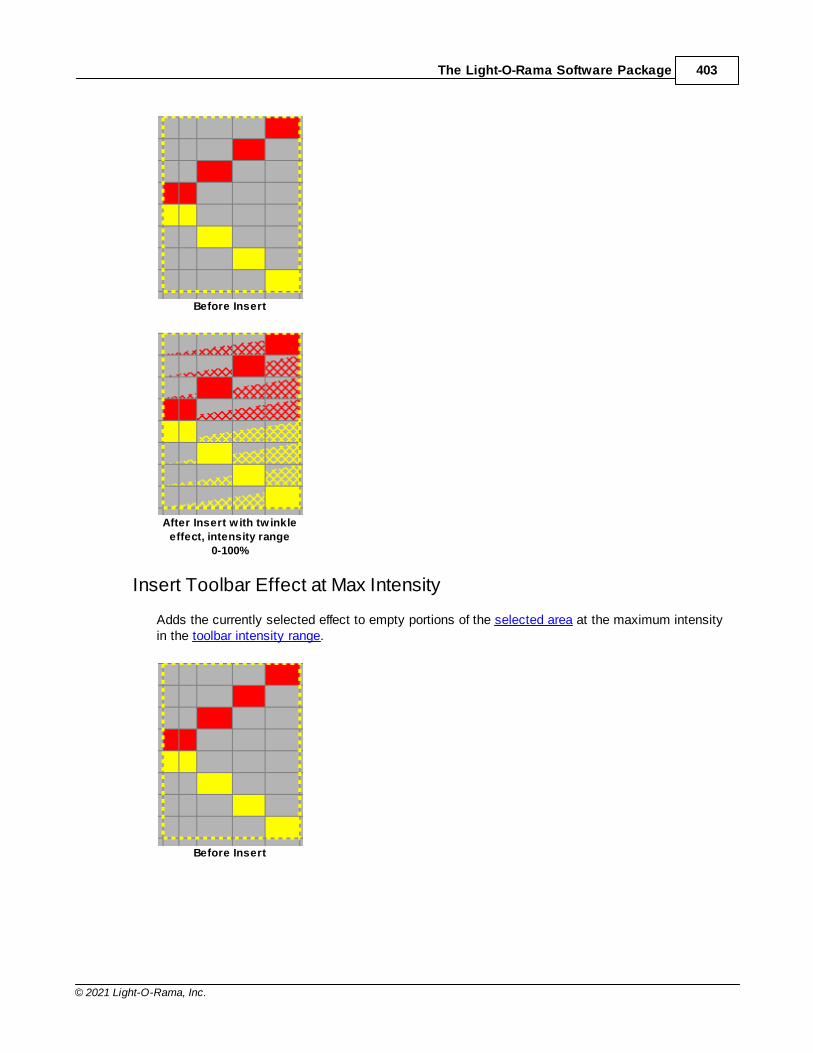
The Light-O-Rama Software Package 403
© 2021 Light-O-Rama, Inc.
Before Insert
After Insert w ith tw inkle
effect, intensity range
0-100%
Insert Toolbar Effect at Max Intensity
Adds the currently selected effect to empty portions of the selected area at the maximum intensityin the toolbar intensity range.
Before Insert
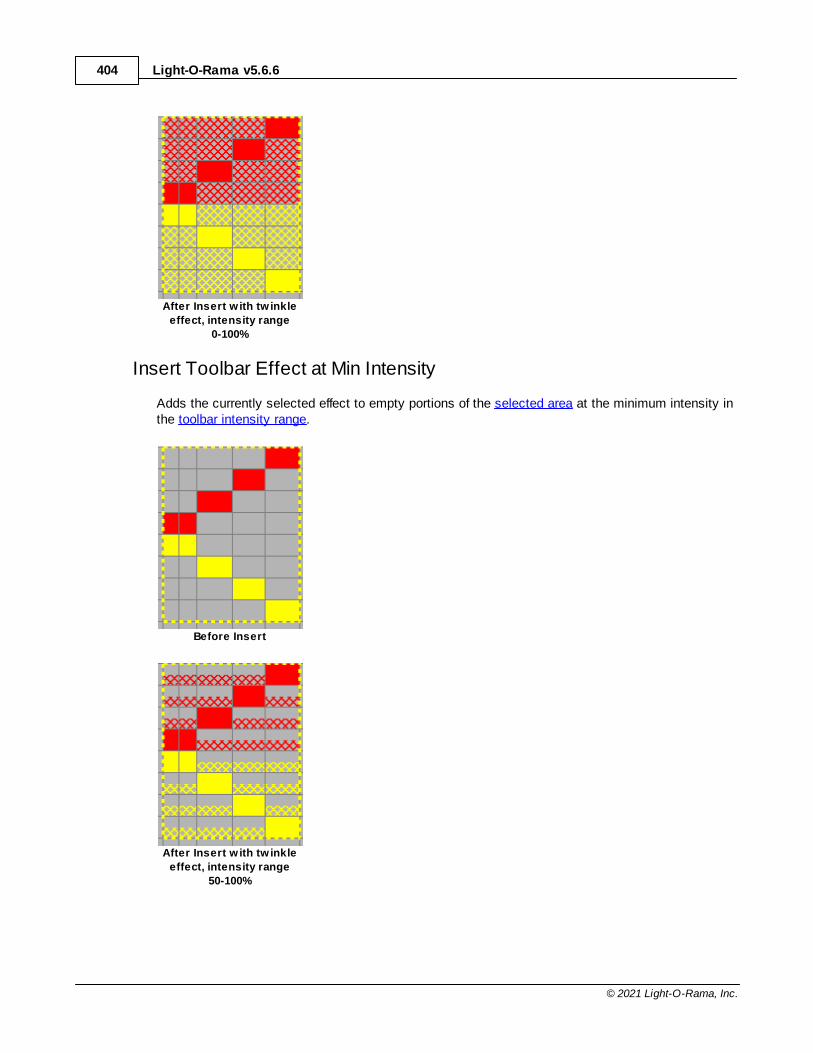
Light-O-Rama v5.6.6404
© 2021 Light-O-Rama, Inc.
After Insert w ith tw inkle
effect, intensity range
0-100%
Insert Toolbar Effect at Min Intensity
Adds the currently selected effect to empty portions of the selected area at the minimum intensity inthe toolbar intensity range.
Before Insert
After Insert w ith tw inkle
effect, intensity range
50-100%
The Light-O-Rama Software Package 405
© 2021 Light-O-Rama, Inc.
5.3.5.10.3 Right-Click Existing Effects (foreground) Sub-menu
The "Existing Effects (foreground)" sub-menu contains a list of functions that are applied to existingeffects in the selected area. These functions do not make any changes to grid cells that are empty.
The available functions are:
· Fade Down Across Selection· Fade Up Across Selection· Fade Down Each Effect· Fade Up Each Effect· Set to Max Intensity· Set to Min Intensity· Apply Toolbar Effect· Apply Toolbar Color (RGB channels only)· Apply Toolbar Hue (RGB channels only)· Lower to Max Intensity (cap)· Raise to Min Intensity (floor)· Increase Intensity· Decrease Intensity· Scale Intensity
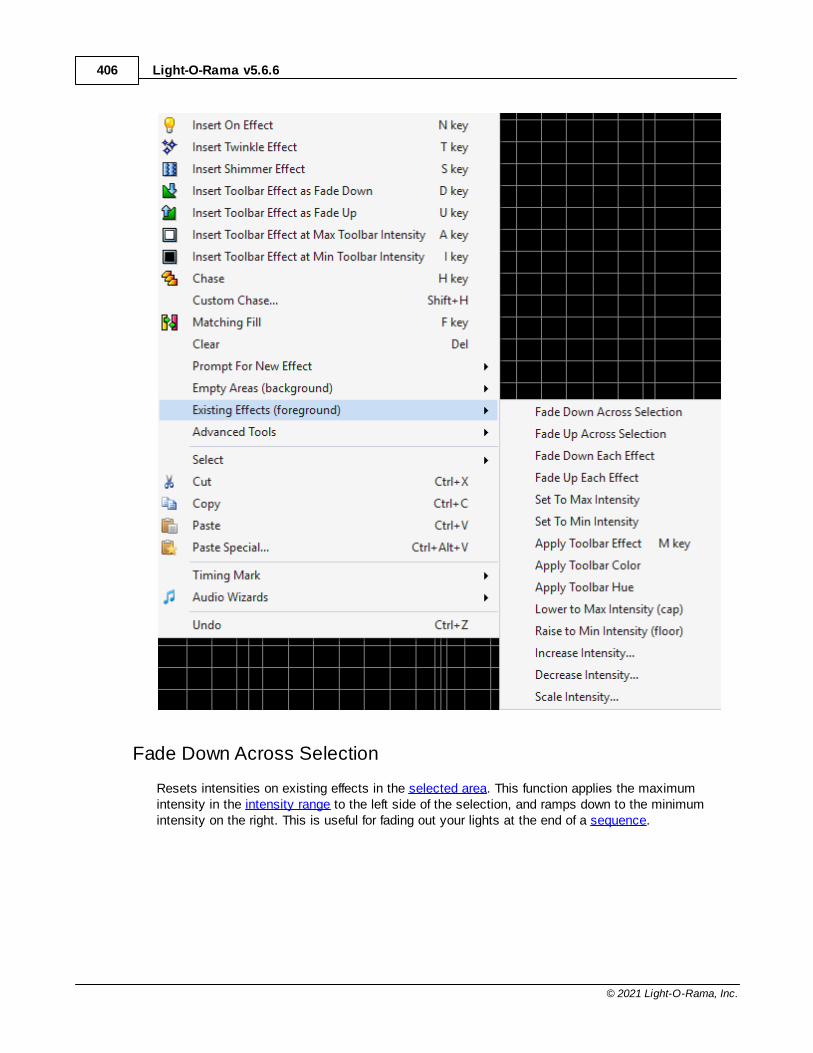
Light-O-Rama v5.6.6406
© 2021 Light-O-Rama, Inc.
Fade Down Across Selection
Resets intensities on existing effects in the selected area. This function applies the maximumintensity in the intensity range to the left side of the selection, and ramps down to the minimumintensity on the right. This is useful for fading out your lights at the end of a sequence.
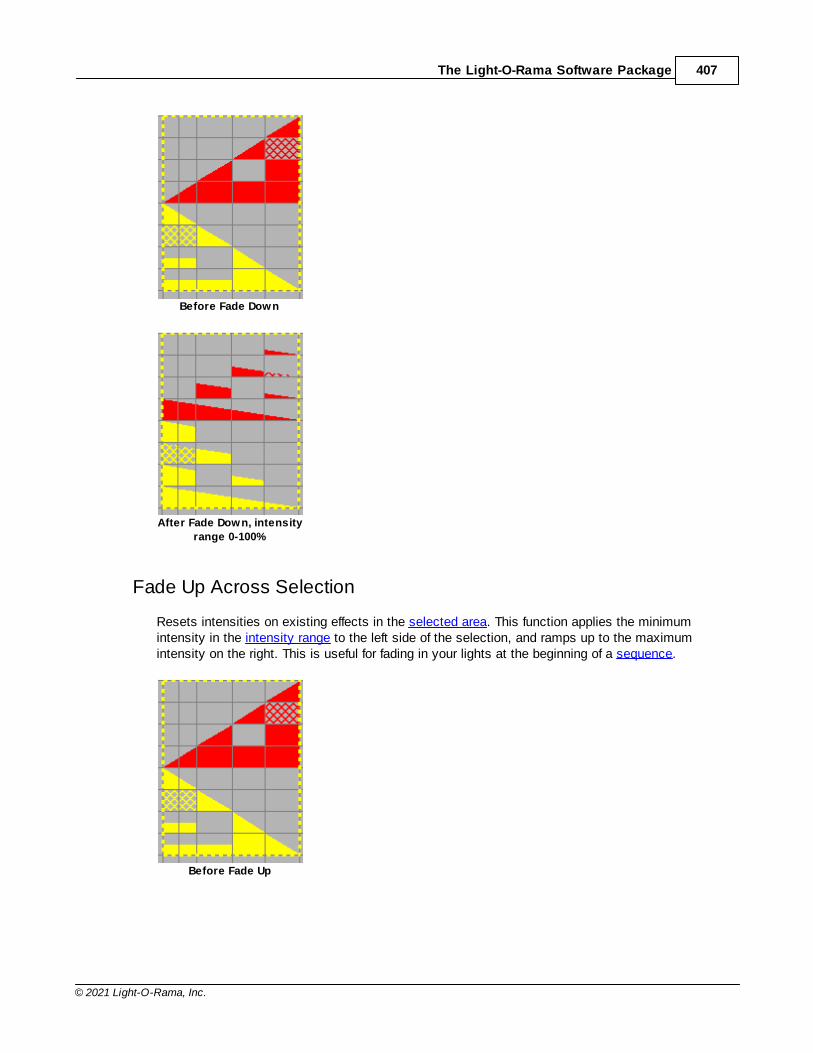
The Light-O-Rama Software Package 407
© 2021 Light-O-Rama, Inc.
Before Fade Down
After Fade Down, intensity
range 0-100%
Fade Up Across Selection
Resets intensities on existing effects in the selected area. This function applies the minimumintensity in the intensity range to the left side of the selection, and ramps up to the maximumintensity on the right. This is useful for fading in your lights at the beginning of a sequence.
Before Fade Up
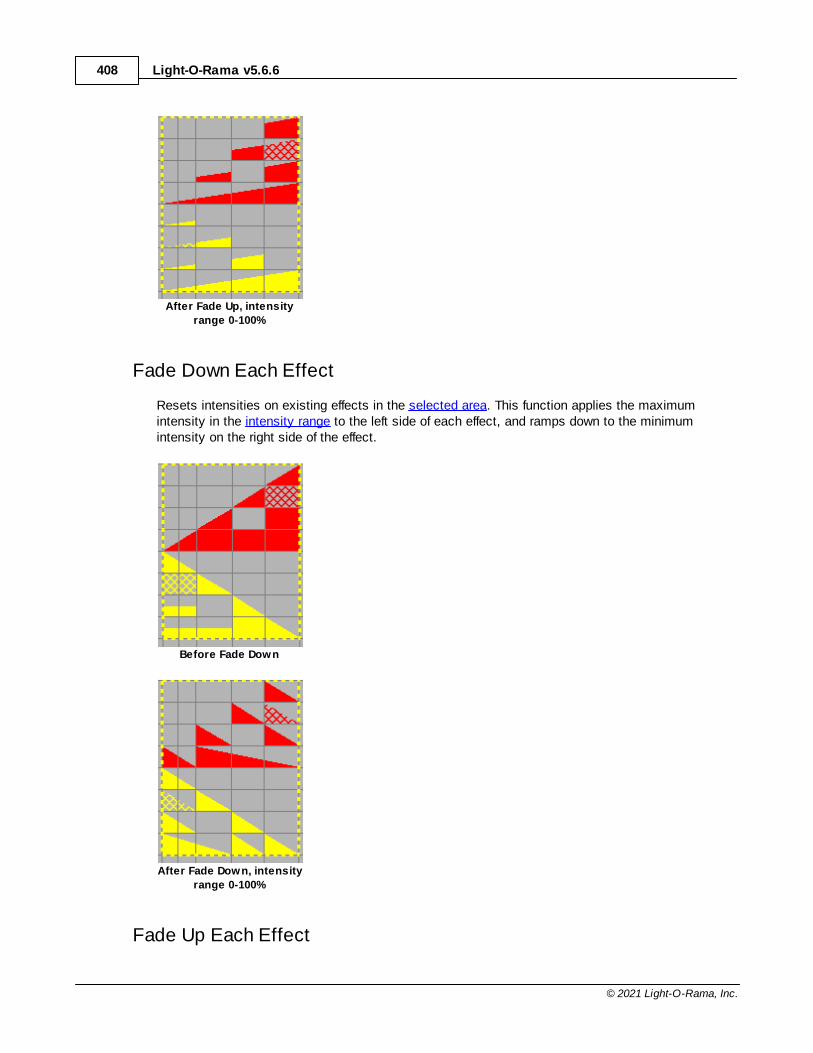
Light-O-Rama v5.6.6408
© 2021 Light-O-Rama, Inc.
After Fade Up, intensity
range 0-100%
Fade Down Each Effect
Resets intensities on existing effects in the selected area. This function applies the maximumintensity in the intensity range to the left side of each effect, and ramps down to the minimumintensity on the right side of the effect.
Before Fade Down
After Fade Down, intensity
range 0-100%
Fade Up Each Effect
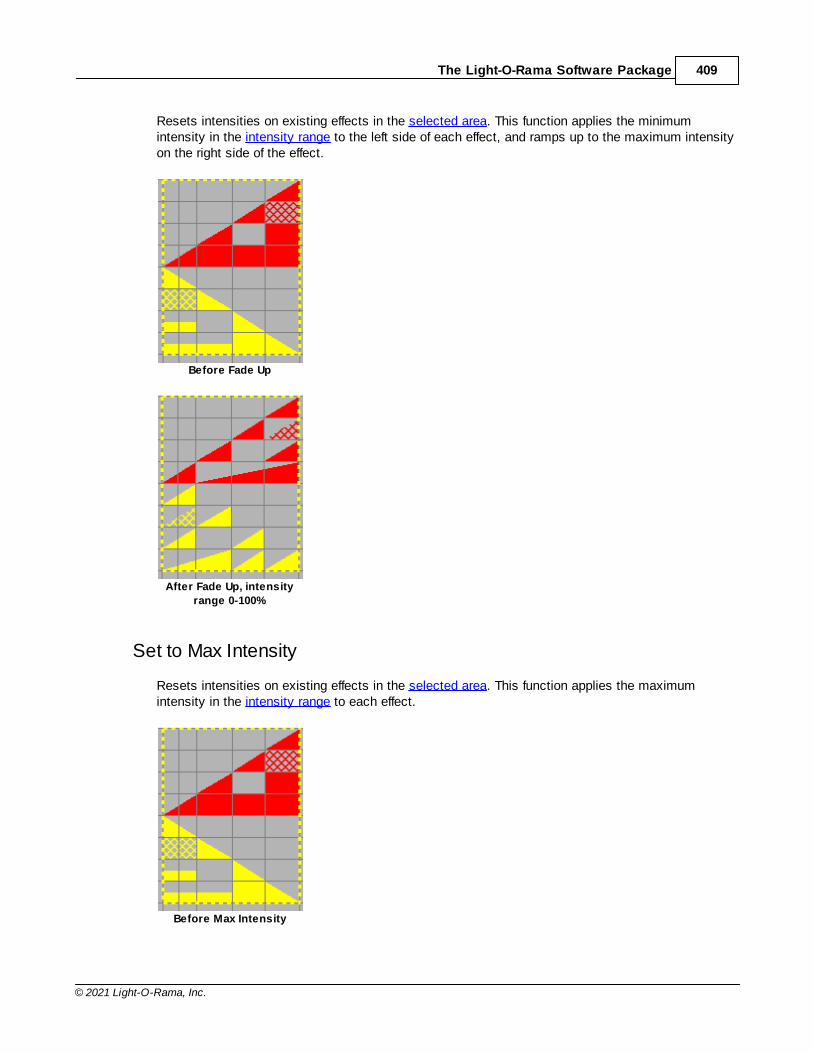
The Light-O-Rama Software Package 409
© 2021 Light-O-Rama, Inc.
Resets intensities on existing effects in the selected area. This function applies the minimumintensity in the intensity range to the left side of each effect, and ramps up to the maximum intensityon the right side of the effect.
Before Fade Up
After Fade Up, intensity
range 0-100%
Set to Max Intensity
Resets intensities on existing effects in the selected area. This function applies the maximumintensity in the intensity range to each effect.
Before Max Intensity
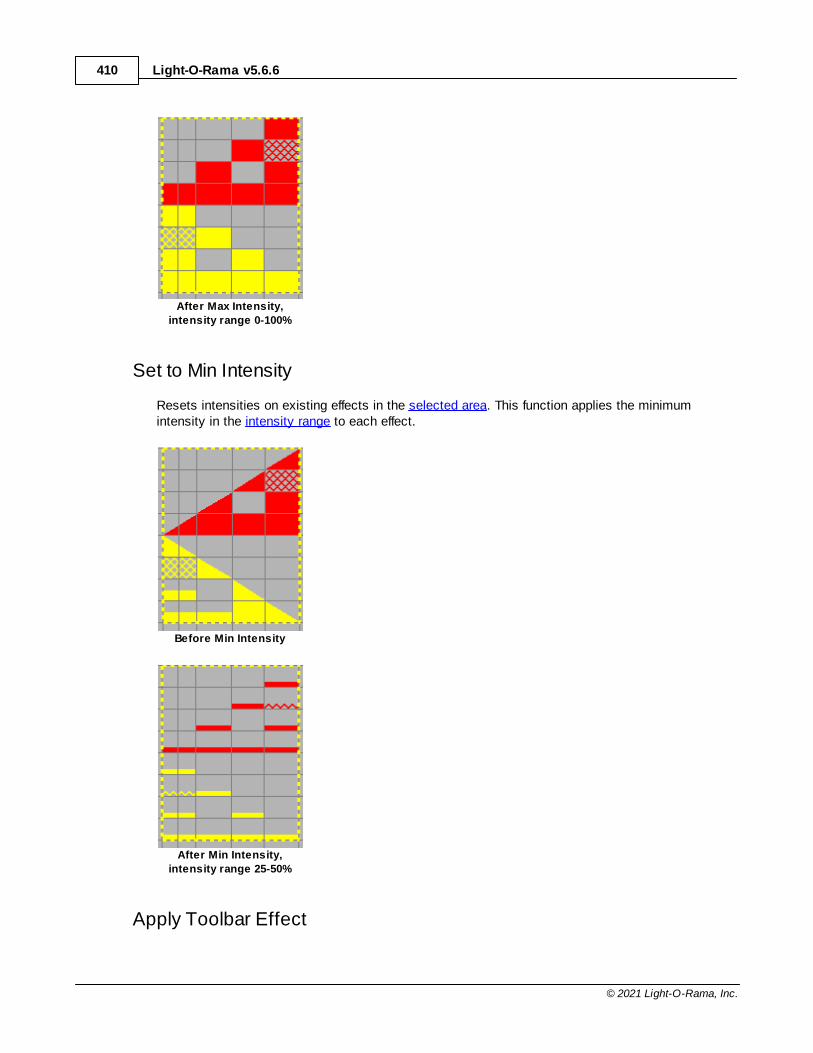
Light-O-Rama v5.6.6410
© 2021 Light-O-Rama, Inc.
After Max Intensity,
intensity range 0-100%
Set to Min Intensity
Resets intensities on existing effects in the selected area. This function applies the minimumintensity in the intensity range to each effect.
Before Min Intensity
After Min Intensity,
intensity range 25-50%
Apply Toolbar Effect
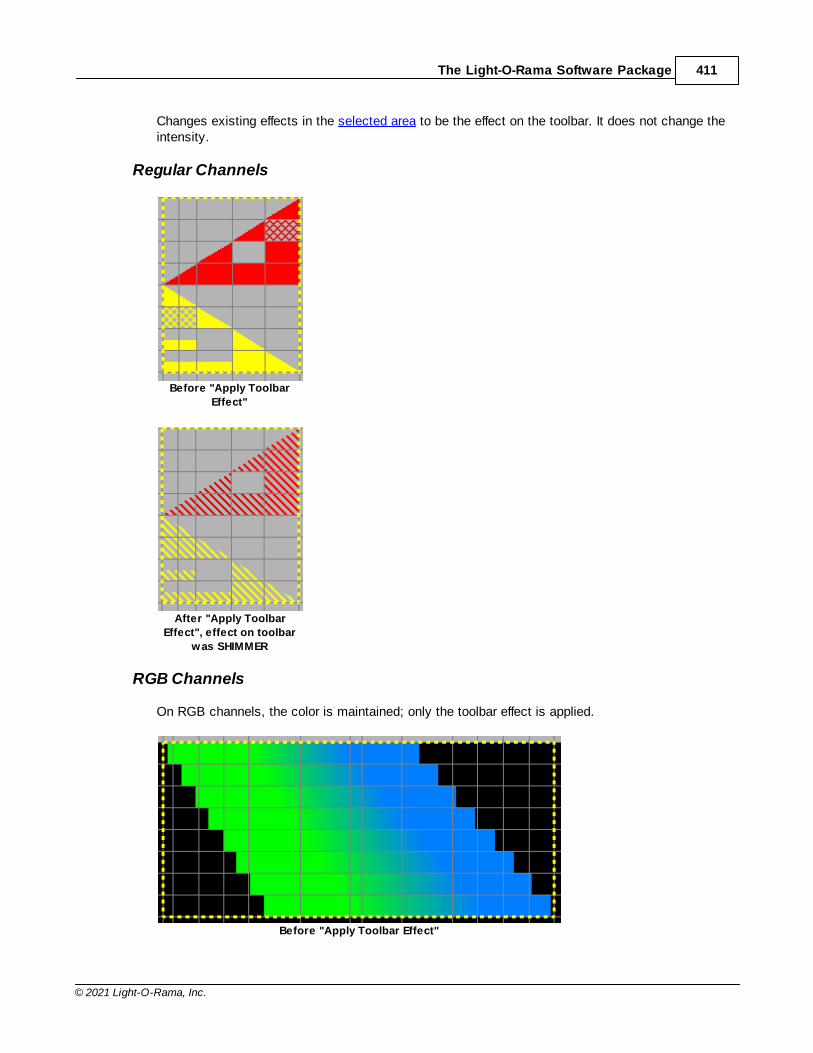
The Light-O-Rama Software Package 411
© 2021 Light-O-Rama, Inc.
Changes existing effects in the selected area to be the effect on the toolbar. It does not change theintensity.
Regular Channels
Before "Apply Toolbar
Effect"
After "Apply Toolbar
Effect", effect on toolbar
was SHIMMER
RGB Channels
On RGB channels, the color is maintained; only the toolbar effect is applied.
Before "Apply Toolbar Effect"
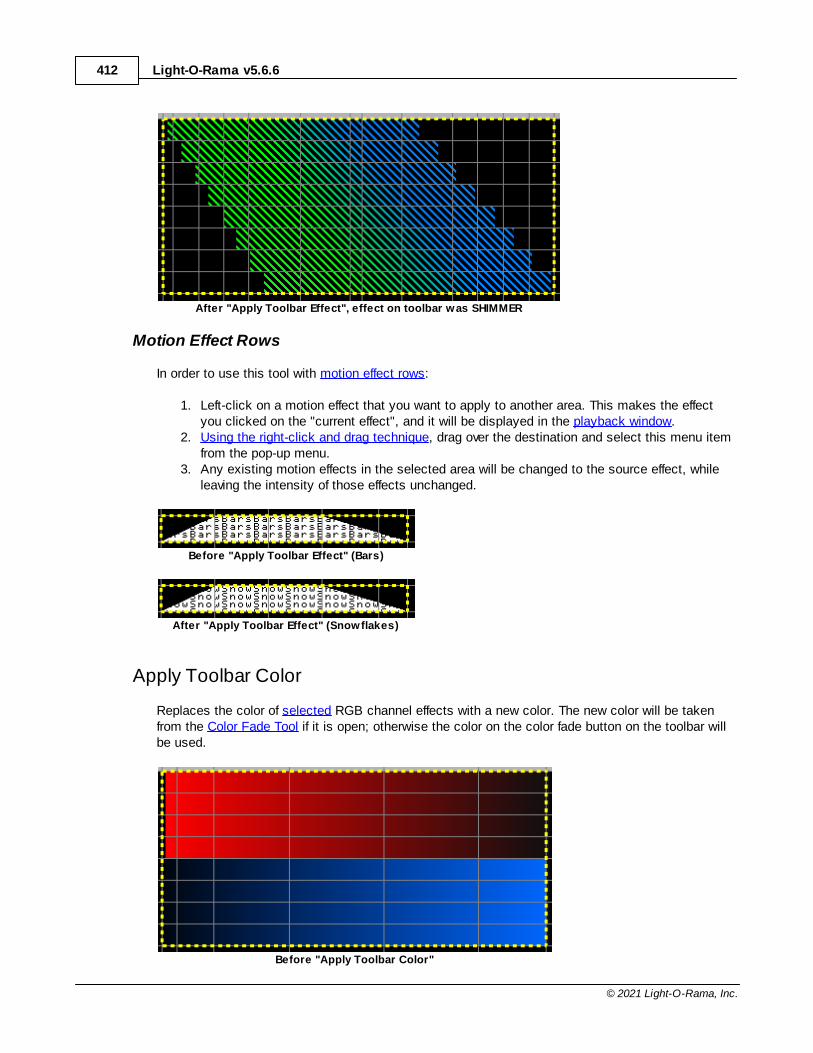
Light-O-Rama v5.6.6412
© 2021 Light-O-Rama, Inc.
After "Apply Toolbar Effect", effect on toolbar was SHIMMER
Motion Effect Rows
In order to use this tool with motion effect rows:
1. Left-click on a motion effect that you want to apply to another area. This makes the effectyou clicked on the "current effect", and it will be displayed in the playback window.
2. Using the right-click and drag technique, drag over the destination and select this menu itemfrom the pop-up menu.
3. Any existing motion effects in the selected area will be changed to the source effect, whileleaving the intensity of those effects unchanged.
Before "Apply Toolbar Effect" (Bars)
After "Apply Toolbar Effect" (Snowflakes)
Apply Toolbar Color
Replaces the color of selected RGB channel effects with a new color. The new color will be takenfrom the Color Fade Tool if it is open; otherwise the color on the color fade button on the toolbar willbe used.
Before "Apply Toolbar Color"
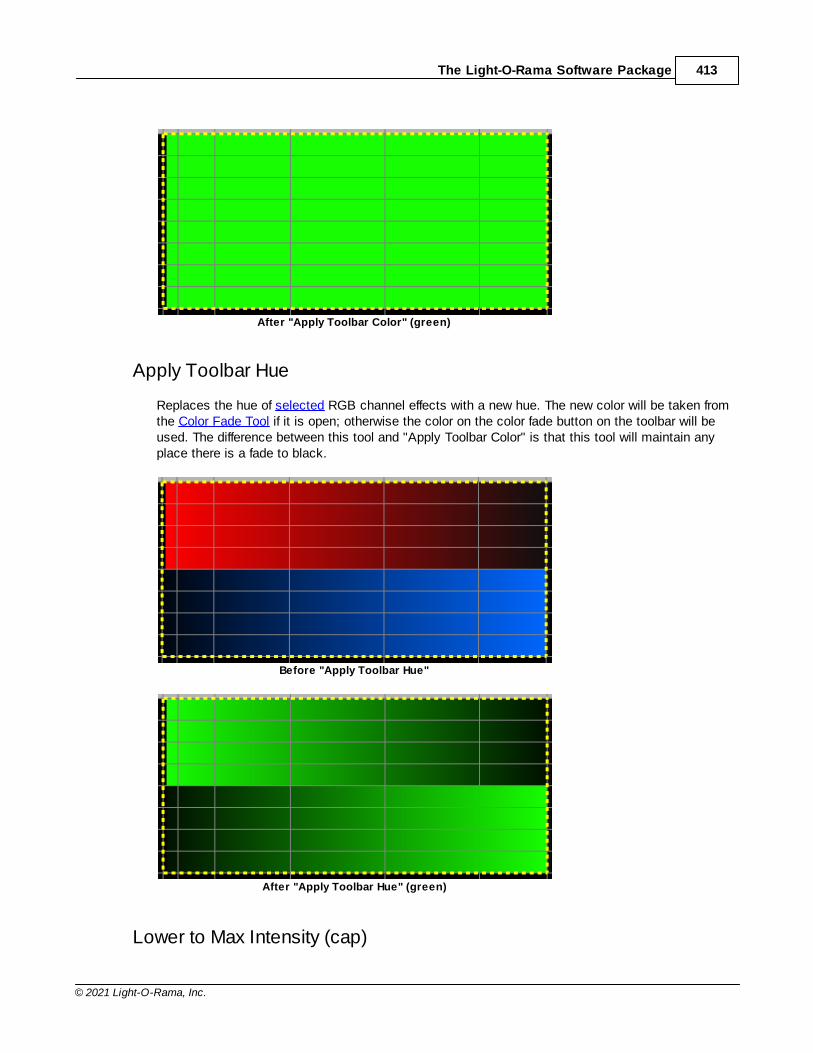
The Light-O-Rama Software Package 413
© 2021 Light-O-Rama, Inc.
After "Apply Toolbar Color" (green)
Apply Toolbar Hue
Replaces the hue of selected RGB channel effects with a new hue. The new color will be taken fromthe Color Fade Tool if it is open; otherwise the color on the color fade button on the toolbar will beused. The difference between this tool and "Apply Toolbar Color" is that this tool will maintain anyplace there is a fade to black.
Before "Apply Toolbar Hue"
After "Apply Toolbar Hue" (green)
Lower to Max Intensity (cap)
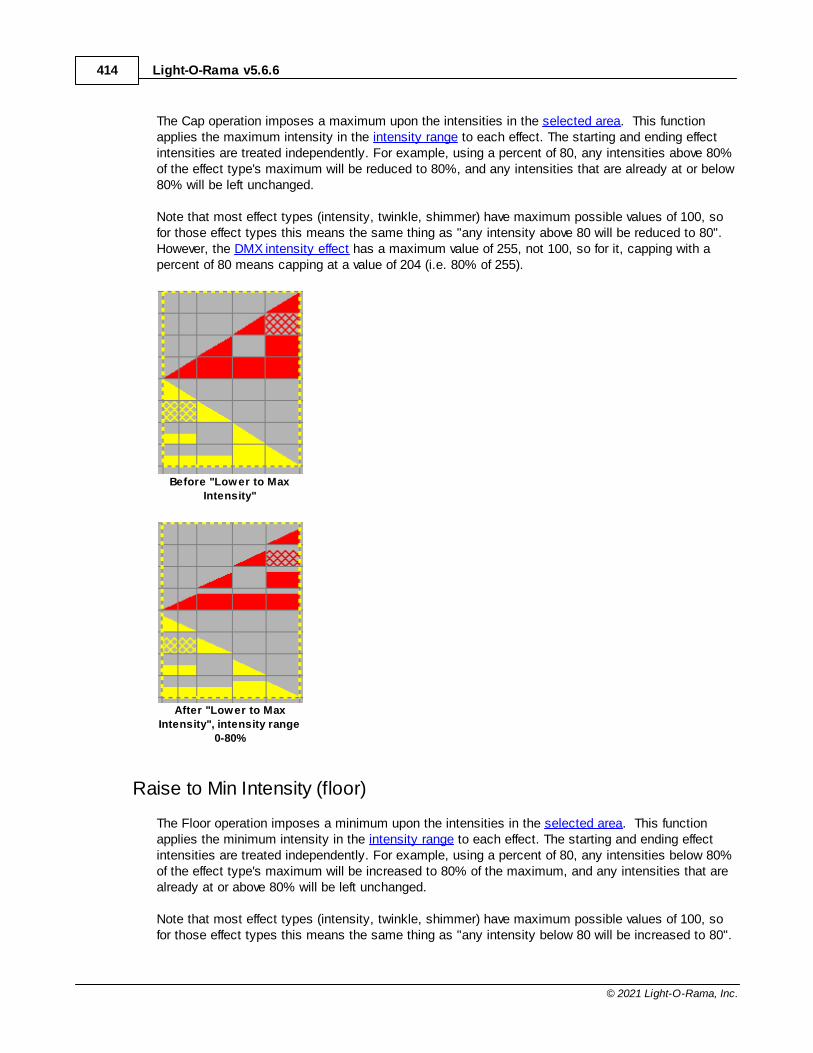
Light-O-Rama v5.6.6414
© 2021 Light-O-Rama, Inc.
The Cap operation imposes a maximum upon the intensities in the selected area. This functionapplies the maximum intensity in the intensity range to each effect. The starting and ending effectintensities are treated independently. For example, using a percent of 80, any intensities above 80%of the effect type's maximum will be reduced to 80%, and any intensities that are already at or below80% will be left unchanged.
Note that most effect types (intensity, twinkle, shimmer) have maximum possible values of 100, sofor those effect types this means the same thing as "any intensity above 80 will be reduced to 80". However, the DMX intensity effect has a maximum value of 255, not 100, so for it, capping with apercent of 80 means capping at a value of 204 (i.e. 80% of 255).
Before "Lower to Max
Intensity"
After "Lower to Max
Intensity", intensity range
0-80%
Raise to Min Intensity (floor)
The Floor operation imposes a minimum upon the intensities in the selected area. This functionapplies the minimum intensity in the intensity range to each effect. The starting and ending effectintensities are treated independently. For example, using a percent of 80, any intensities below 80%of the effect type's maximum will be increased to 80% of the maximum, and any intensities that arealready at or above 80% will be left unchanged.
Note that most effect types (intensity, twinkle, shimmer) have maximum possible values of 100, sofor those effect types this means the same thing as "any intensity below 80 will be increased to 80".
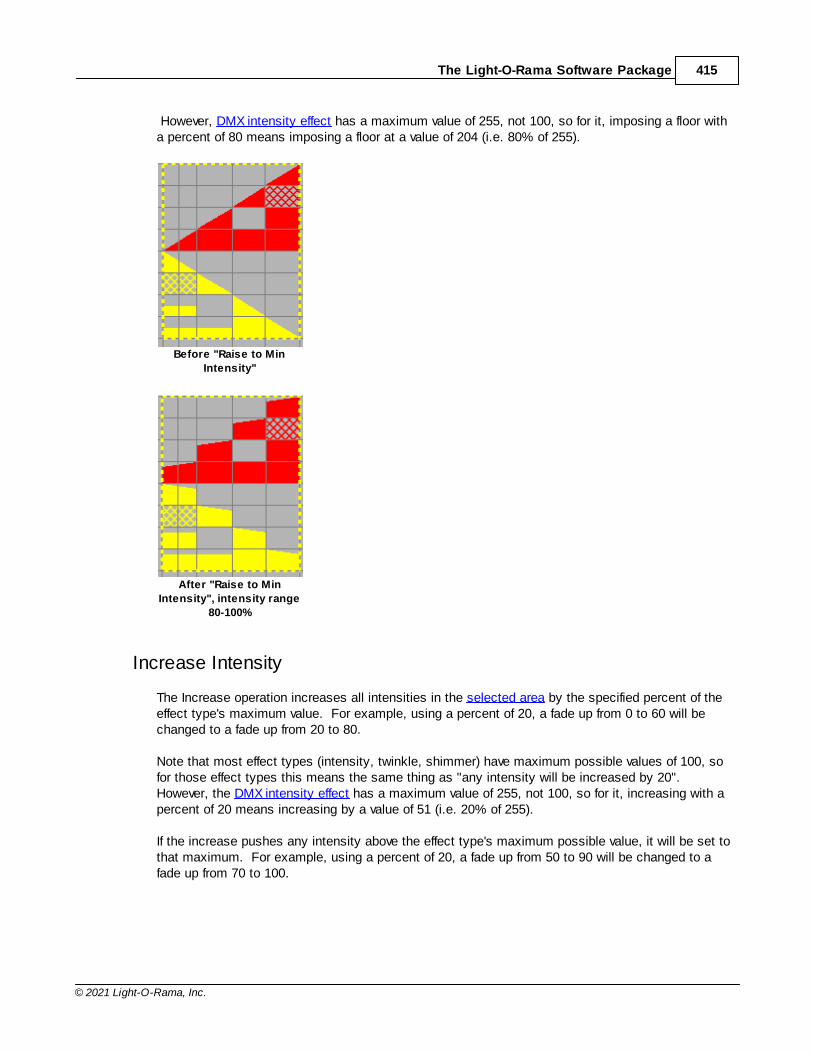
The Light-O-Rama Software Package 415
© 2021 Light-O-Rama, Inc.
However, DMX intensity effect has a maximum value of 255, not 100, so for it, imposing a floor witha percent of 80 means imposing a floor at a value of 204 (i.e. 80% of 255).
Before "Raise to Min
Intensity"
After "Raise to Min
Intensity", intensity range
80-100%
Increase Intensity
The Increase operation increases all intensities in the selected area by the specified percent of theeffect type's maximum value. For example, using a percent of 20, a fade up from 0 to 60 will bechanged to a fade up from 20 to 80.
Note that most effect types (intensity, twinkle, shimmer) have maximum possible values of 100, sofor those effect types this means the same thing as "any intensity will be increased by 20". However, the DMX intensity effect has a maximum value of 255, not 100, so for it, increasing with apercent of 20 means increasing by a value of 51 (i.e. 20% of 255).
If the increase pushes any intensity above the effect type's maximum possible value, it will be set tothat maximum. For example, using a percent of 20, a fade up from 50 to 90 will be changed to afade up from 70 to 100.
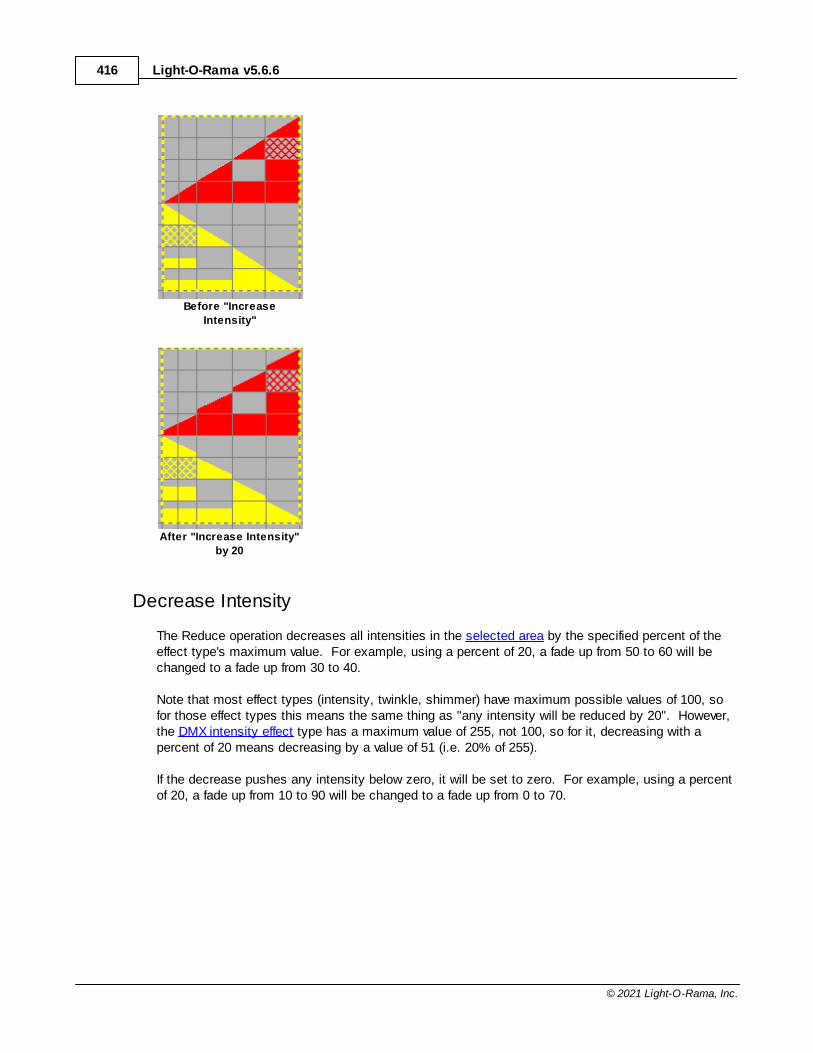
Light-O-Rama v5.6.6416
© 2021 Light-O-Rama, Inc.
Before "Increase
Intensity"
After "Increase Intensity"
by 20
Decrease Intensity
The Reduce operation decreases all intensities in the selected area by the specified percent of theeffect type's maximum value. For example, using a percent of 20, a fade up from 50 to 60 will bechanged to a fade up from 30 to 40.
Note that most effect types (intensity, twinkle, shimmer) have maximum possible values of 100, sofor those effect types this means the same thing as "any intensity will be reduced by 20". However,the DMX intensity effect type has a maximum value of 255, not 100, so for it, decreasing with apercent of 20 means decreasing by a value of 51 (i.e. 20% of 255).
If the decrease pushes any intensity below zero, it will be set to zero. For example, using a percentof 20, a fade up from 10 to 90 will be changed to a fade up from 0 to 70.
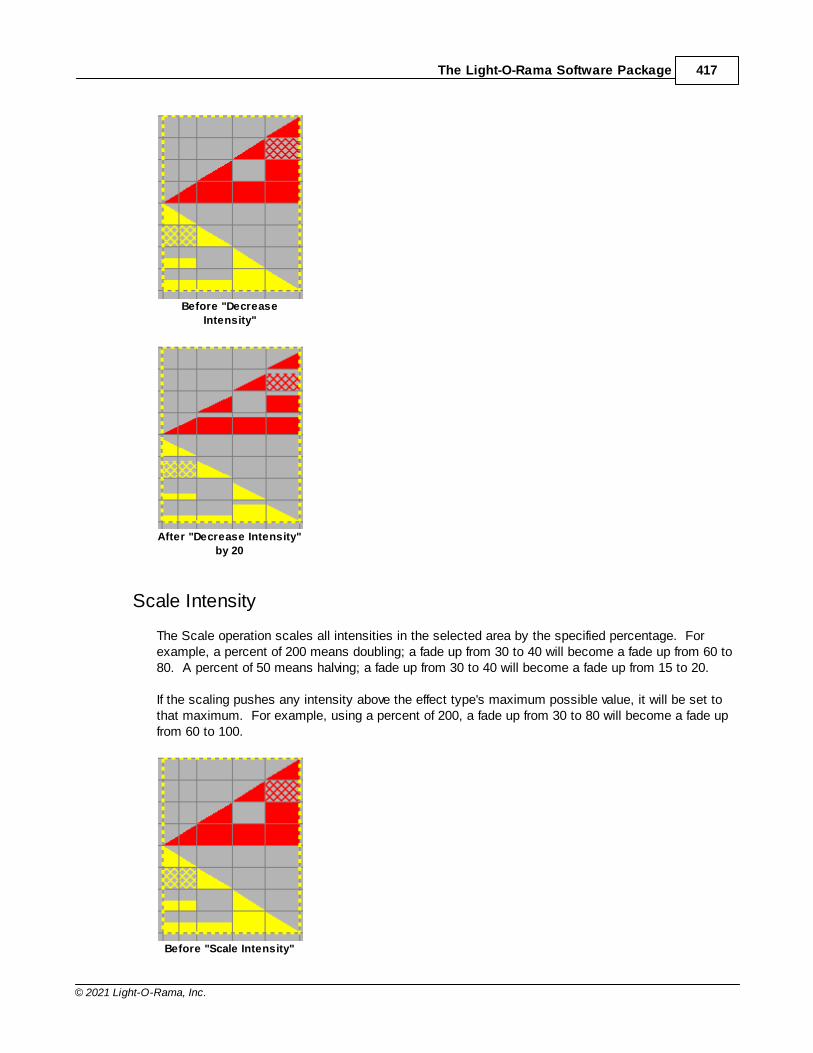
The Light-O-Rama Software Package 417
© 2021 Light-O-Rama, Inc.
Before "Decrease
Intensity"
After "Decrease Intensity"
by 20
Scale Intensity
The Scale operation scales all intensities in the selected area by the specified percentage. Forexample, a percent of 200 means doubling; a fade up from 30 to 40 will become a fade up from 60 to80. A percent of 50 means halving; a fade up from 30 to 40 will become a fade up from 15 to 20.
If the scaling pushes any intensity above the effect type's maximum possible value, it will be set tothat maximum. For example, using a percent of 200, a fade up from 30 to 80 will become a fade upfrom 60 to 100.
Before "Scale Intensity"
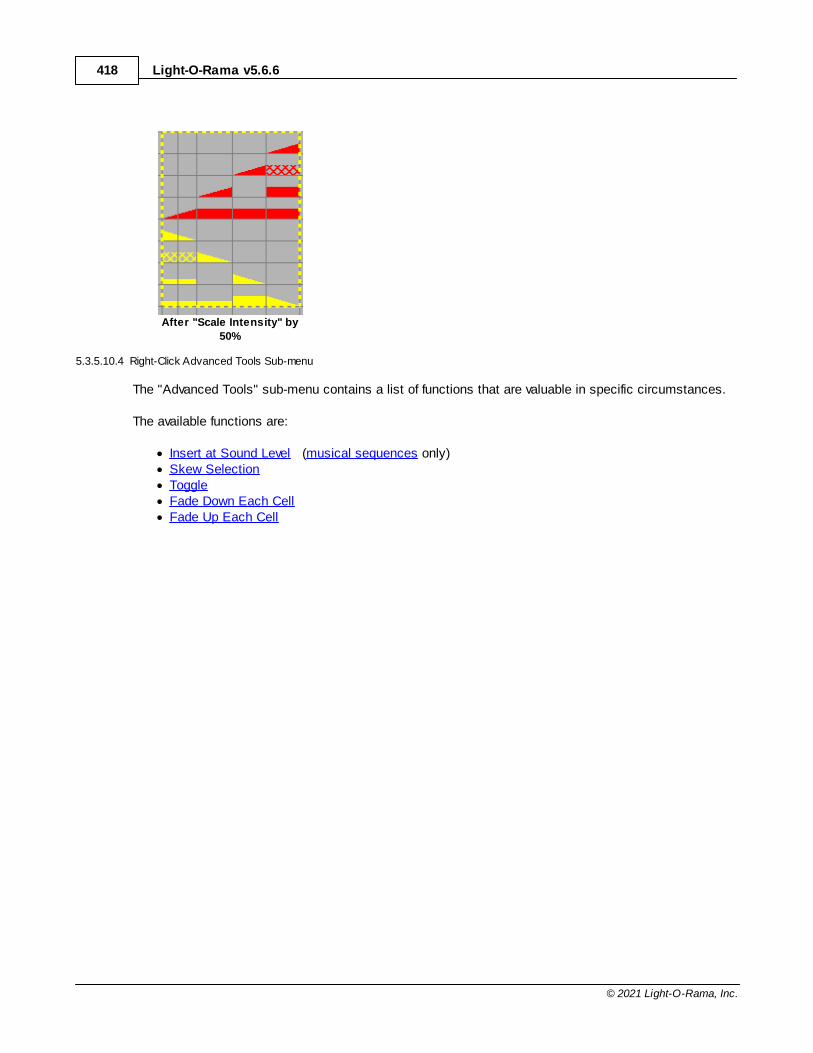
Light-O-Rama v5.6.6418
© 2021 Light-O-Rama, Inc.
After "Scale Intensity" by
50%
5.3.5.10.4 Right-Click Advanced Tools Sub-menu
The "Advanced Tools" sub-menu contains a list of functions that are valuable in specific circumstances.
The available functions are:
· Insert at Sound Level (musical sequences only)· Skew Selection· Toggle· Fade Down Each Cell· Fade Up Each Cell
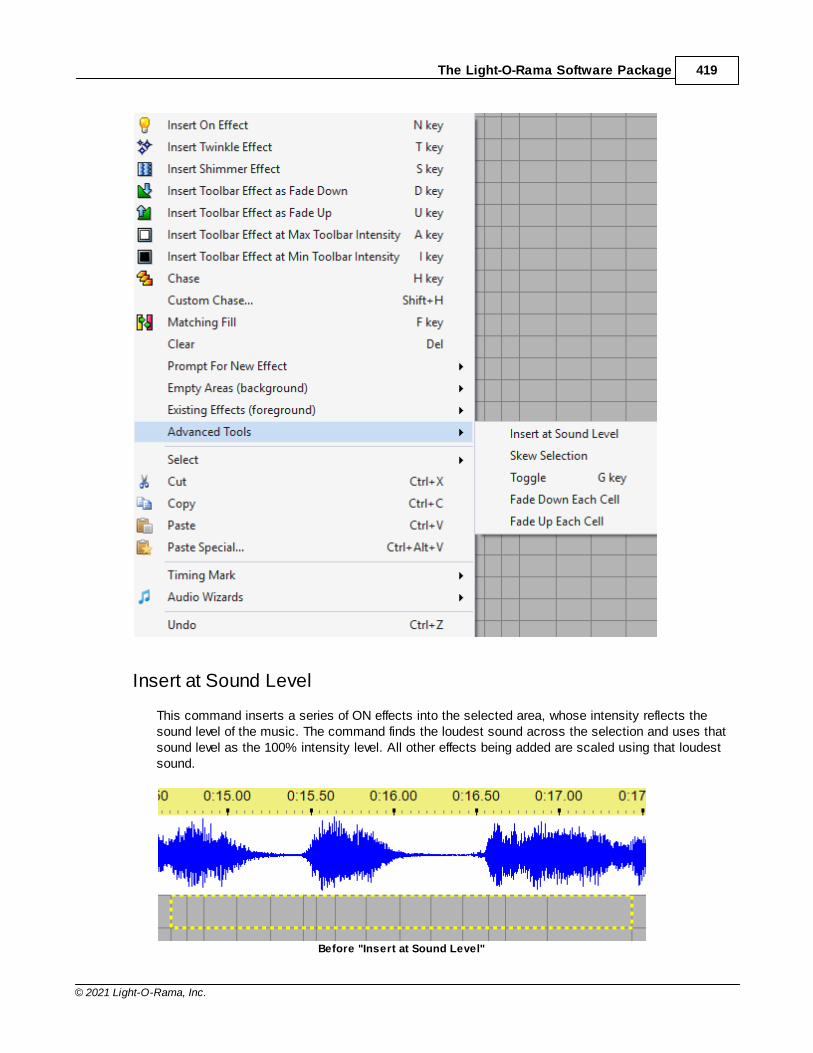
The Light-O-Rama Software Package 419
© 2021 Light-O-Rama, Inc.
Insert at Sound Level
This command inserts a series of ON effects into the selected area, whose intensity reflects thesound level of the music. The command finds the loudest sound across the selection and uses thatsound level as the 100% intensity level. All other effects being added are scaled using that loudestsound.
Before "Insert at Sound Level"
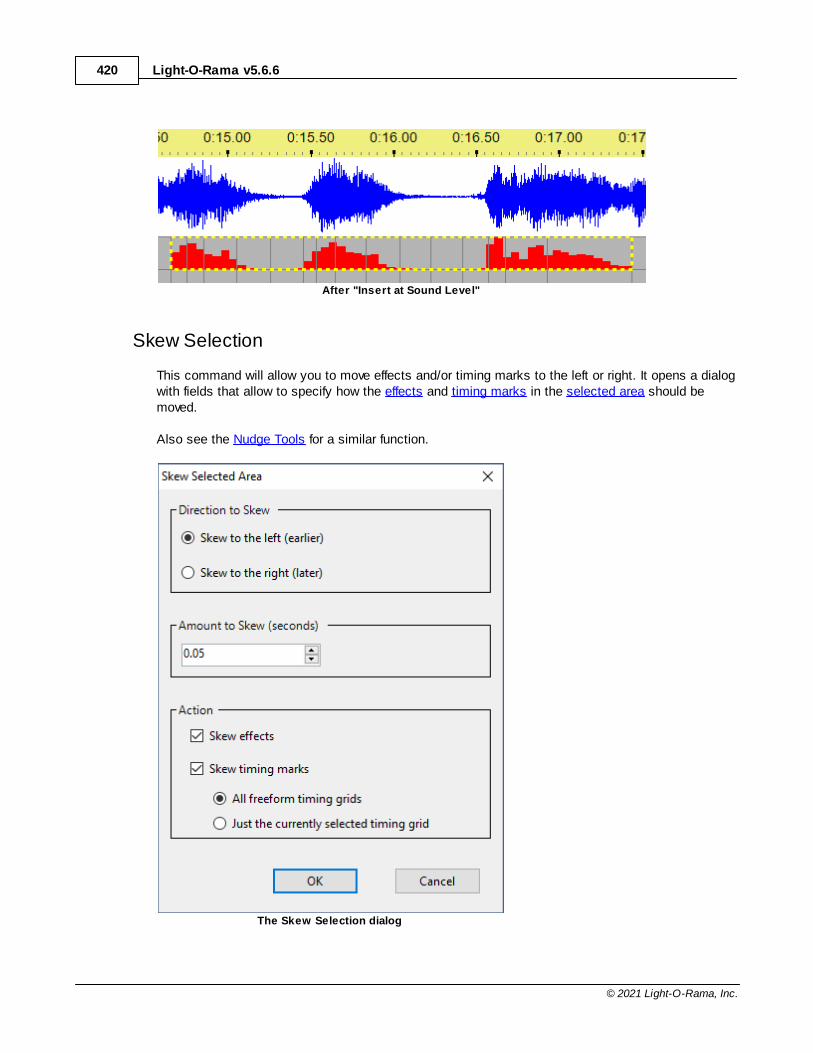
Light-O-Rama v5.6.6420
© 2021 Light-O-Rama, Inc.
After "Insert at Sound Level"
Skew Selection
This command will allow you to move effects and/or timing marks to the left or right. It opens a dialogwith fields that allow to specify how the effects and timing marks in the selected area should bemoved.
Also see the Nudge Tools for a similar function.
The Skew Selection dialog
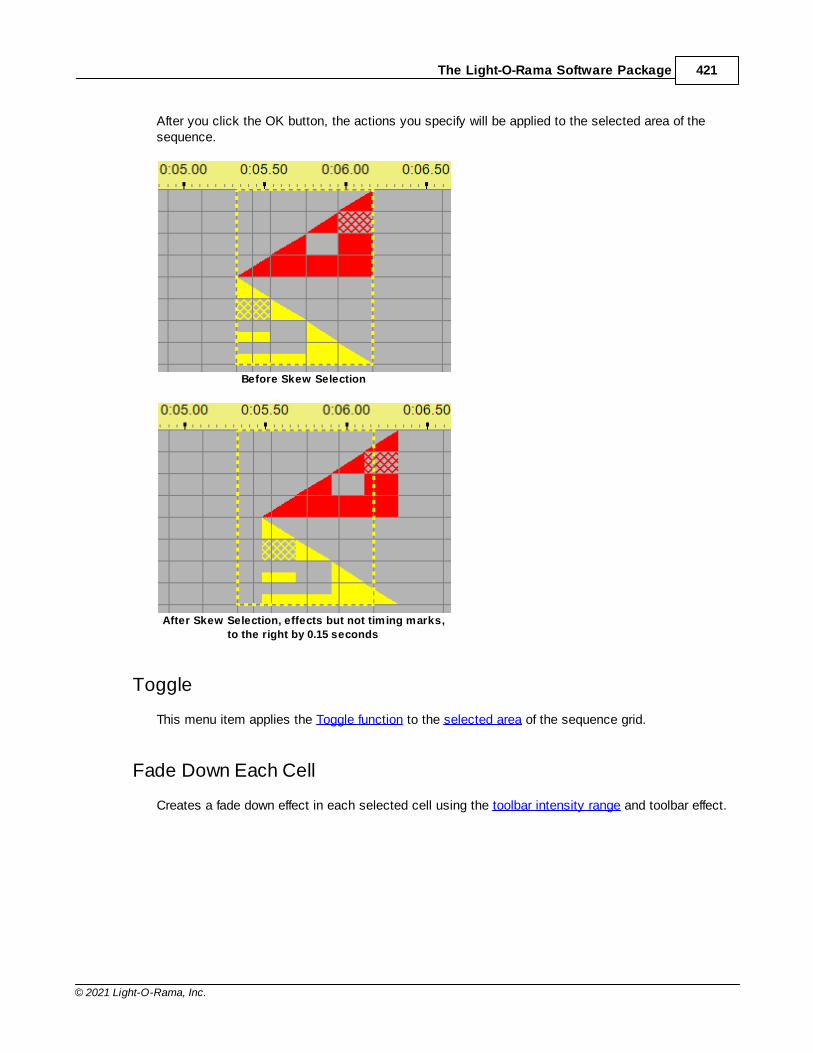
The Light-O-Rama Software Package 421
© 2021 Light-O-Rama, Inc.
After you click the OK button, the actions you specify will be applied to the selected area of thesequence.
Before Skew Selection
After Skew Selection, effects but not timing marks,
to the right by 0.15 seconds
Toggle
This menu item applies the Toggle function to the selected area of the sequence grid.
Fade Down Each Cell
Creates a fade down effect in each selected cell using the toolbar intensity range and toolbar effect.
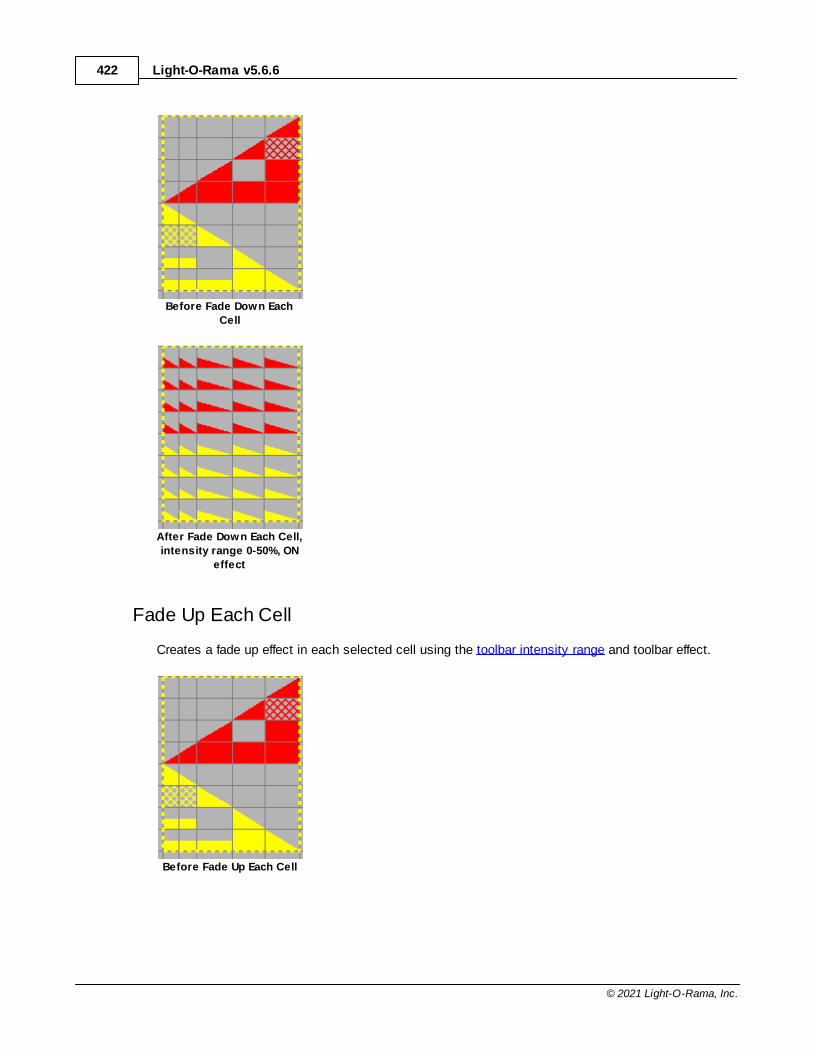
Light-O-Rama v5.6.6422
© 2021 Light-O-Rama, Inc.
Before Fade Down Each
Cell
After Fade Down Each Cell,
intensity range 0-50%, ON
effect
Fade Up Each Cell
Creates a fade up effect in each selected cell using the toolbar intensity range and toolbar effect.
Before Fade Up Each Cell
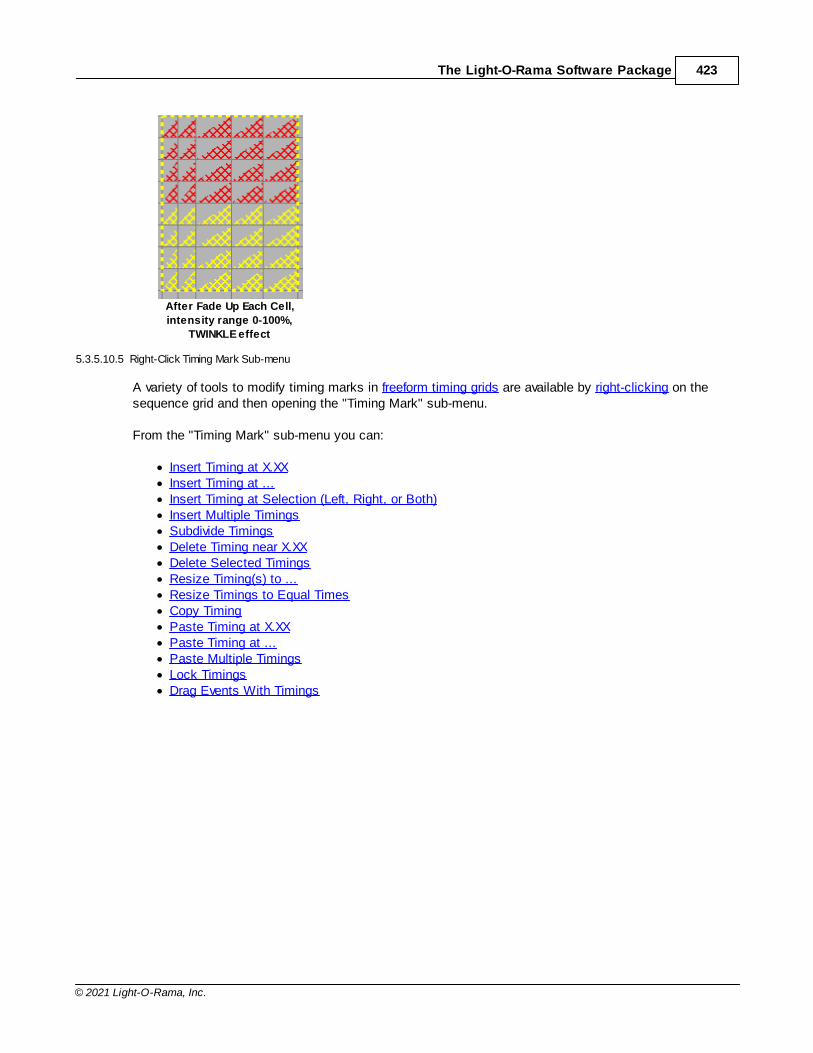
The Light-O-Rama Software Package 423
© 2021 Light-O-Rama, Inc.
After Fade Up Each Cell,
intensity range 0-100%,
TWINKLE effect
5.3.5.10.5 Right-Click Timing Mark Sub-menu
A variety of tools to modify timing marks in freeform timing grids are available by right-clicking on thesequence grid and then opening the "Timing Mark" sub-menu.
From the "Timing Mark" sub-menu you can:
· Insert Timing at X.XX· Insert Timing at ...· Insert Timing at Selection (Left, Right, or Both)· Insert Multiple Timings· Subdivide Timings· Delete Timing near X.XX· Delete Selected Timings· Resize Timing(s) to ...· Resize Timings to Equal Times· Copy Timing· Paste Timing at X.XX· Paste Timing at ...· Paste Multiple Timings· Lock Timings· Drag Events With Timings
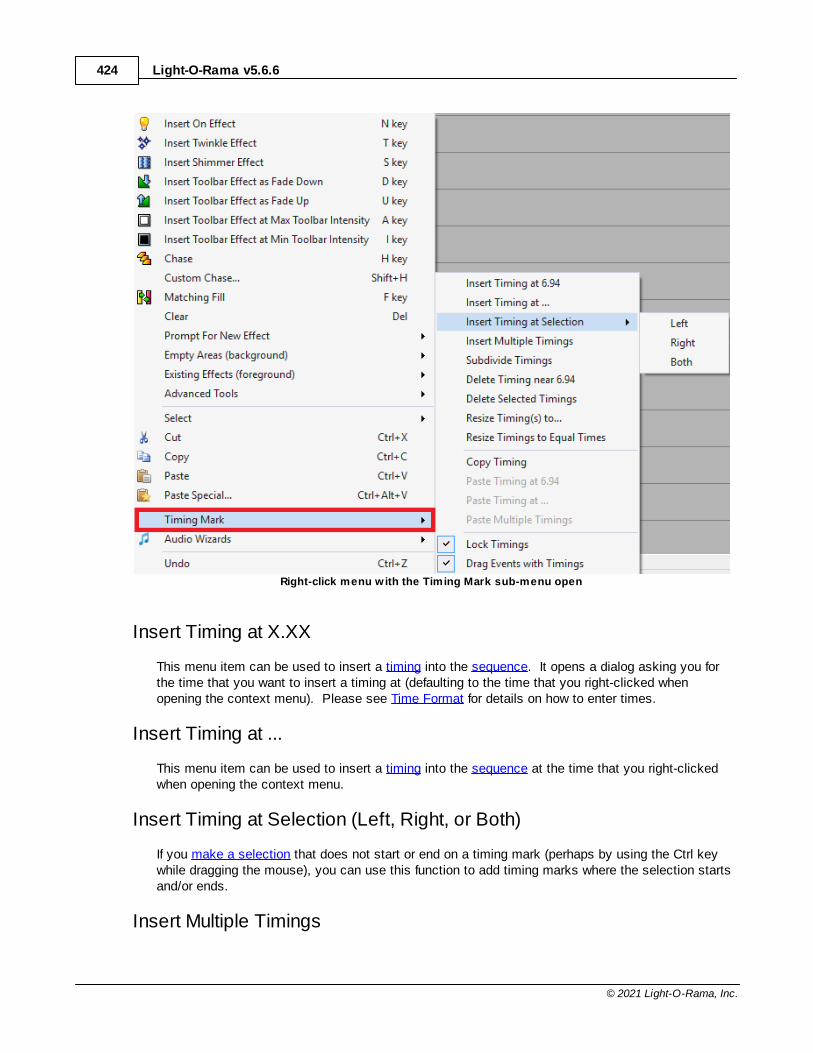
Light-O-Rama v5.6.6424
© 2021 Light-O-Rama, Inc.
Right-click menu with the Timing Mark sub-menu open
Insert Timing at X.XX
This menu item can be used to insert a timing into the sequence. It opens a dialog asking you forthe time that you want to insert a timing at (defaulting to the time that you right-clicked whenopening the context menu). Please see Time Format for details on how to enter times.
Insert Timing at ...
This menu item can be used to insert a timing into the sequence at the time that you right-clickedwhen opening the context menu.
Insert Timing at Selection (Left, Right, or Both)
If you make a selection that does not start or end on a timing mark (perhaps by using the Ctrl keywhile dragging the mouse), you can use this function to add timing marks where the selection startsand/or ends.
Insert Multiple Timings
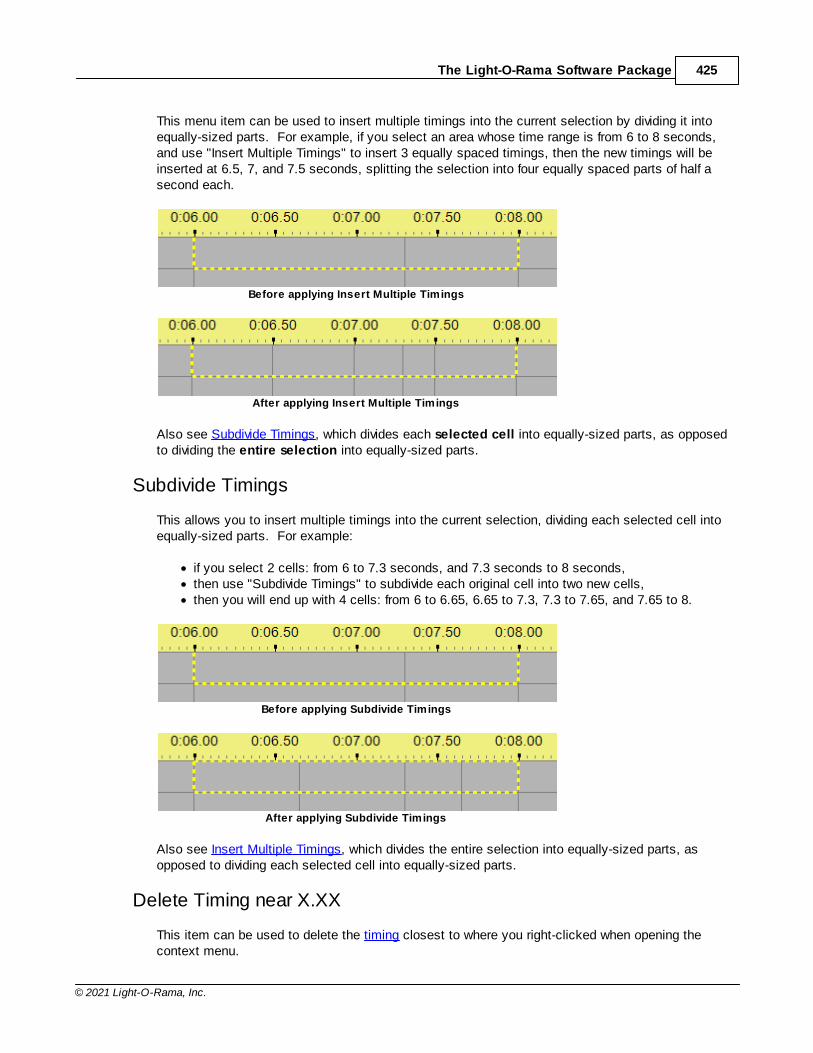
The Light-O-Rama Software Package 425
© 2021 Light-O-Rama, Inc.
This menu item can be used to insert multiple timings into the current selection by dividing it intoequally-sized parts. For example, if you select an area whose time range is from 6 to 8 seconds,and use "Insert Multiple Timings" to insert 3 equally spaced timings, then the new timings will beinserted at 6.5, 7, and 7.5 seconds, splitting the selection into four equally spaced parts of half asecond each.
Before applying Insert Multiple Timings
After applying Insert Multiple Timings
Also see Subdivide Timings, which divides each selected cell into equally-sized parts, as opposedto dividing the entire selection into equally-sized parts.
Subdivide Timings
This allows you to insert multiple timings into the current selection, dividing each selected cell intoequally-sized parts. For example:
· if you select 2 cells: from 6 to 7.3 seconds, and 7.3 seconds to 8 seconds,· then use "Subdivide Timings" to subdivide each original cell into two new cells, · then you will end up with 4 cells: from 6 to 6.65, 6.65 to 7.3, 7.3 to 7.65, and 7.65 to 8.
Before applying Subdivide Timings
After applying Subdivide Timings
Also see Insert Multiple Timings, which divides the entire selection into equally-sized parts, asopposed to dividing each selected cell into equally-sized parts.
Delete Timing near X.XX
This item can be used to delete the timing closest to where you right-clicked when opening thecontext menu.
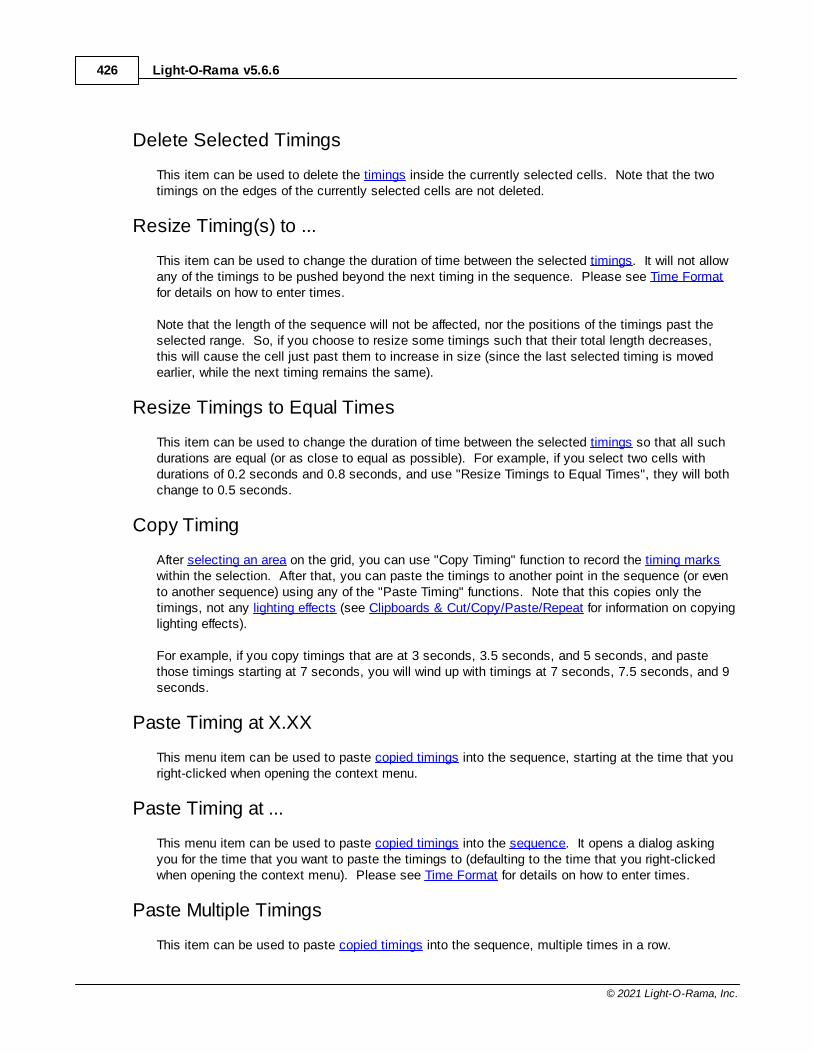
Light-O-Rama v5.6.6426
© 2021 Light-O-Rama, Inc.
Delete Selected Timings
This item can be used to delete the timings inside the currently selected cells. Note that the twotimings on the edges of the currently selected cells are not deleted.
Resize Timing(s) to ...
This item can be used to change the duration of time between the selected timings. It will not allowany of the timings to be pushed beyond the next timing in the sequence. Please see Time Formatfor details on how to enter times.
Note that the length of the sequence will not be affected, nor the positions of the timings past theselected range. So, if you choose to resize some timings such that their total length decreases,this will cause the cell just past them to increase in size (since the last selected timing is movedearlier, while the next timing remains the same).
Resize Timings to Equal Times
This item can be used to change the duration of time between the selected timings so that all suchdurations are equal (or as close to equal as possible). For example, if you select two cells withdurations of 0.2 seconds and 0.8 seconds, and use "Resize Timings to Equal Times", they will bothchange to 0.5 seconds.
Copy Timing
After selecting an area on the grid, you can use "Copy Timing" function to record the timing markswithin the selection. After that, you can paste the timings to another point in the sequence (or evento another sequence) using any of the "Paste Timing" functions. Note that this copies only thetimings, not any lighting effects (see Clipboards & Cut/Copy/Paste/Repeat for information on copyinglighting effects).
For example, if you copy timings that are at 3 seconds, 3.5 seconds, and 5 seconds, and pastethose timings starting at 7 seconds, you will wind up with timings at 7 seconds, 7.5 seconds, and 9seconds.
Paste Timing at X.XX
This menu item can be used to paste copied timings into the sequence, starting at the time that youright-clicked when opening the context menu.
Paste Timing at ...
This menu item can be used to paste copied timings into the sequence. It opens a dialog askingyou for the time that you want to paste the timings to (defaulting to the time that you right-clickedwhen opening the context menu). Please see Time Format for details on how to enter times.
Paste Multiple Timings
This item can be used to paste copied timings into the sequence, multiple times in a row.
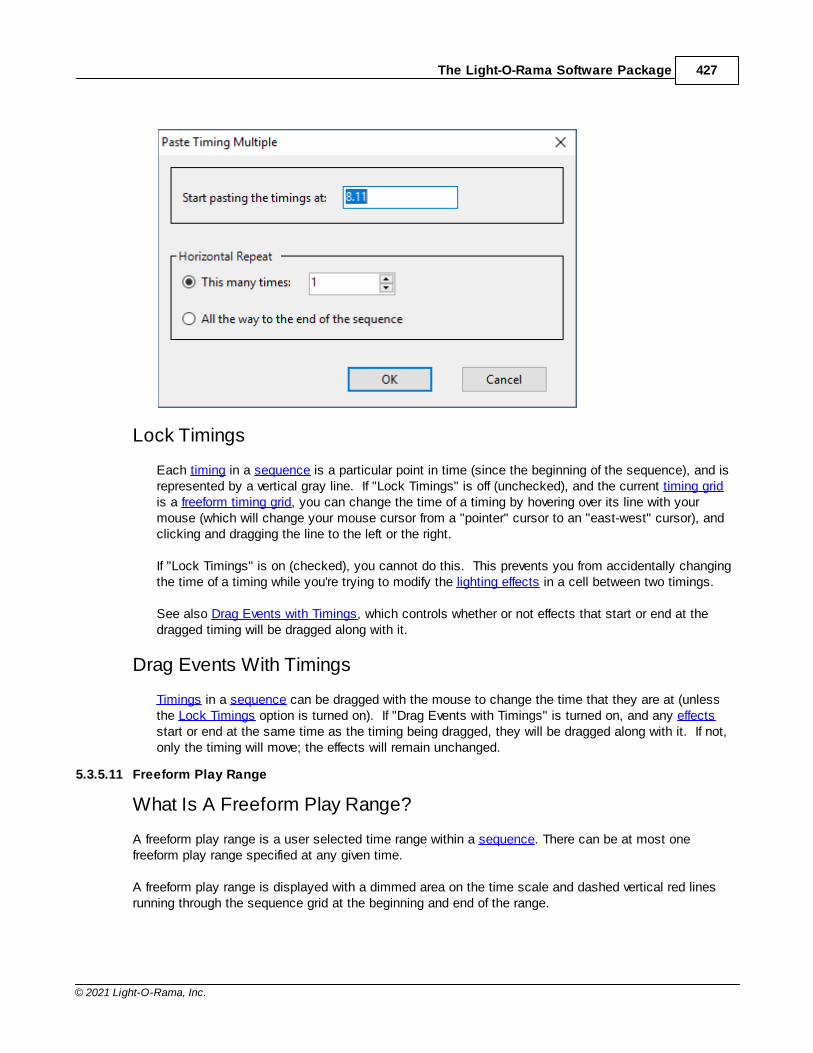
The Light-O-Rama Software Package 427
© 2021 Light-O-Rama, Inc.
Lock Timings
Each timing in a sequence is a particular point in time (since the beginning of the sequence), and isrepresented by a vertical gray line. If "Lock Timings" is off (unchecked), and the current timing gridis a freeform timing grid, you can change the time of a timing by hovering over its line with yourmouse (which will change your mouse cursor from a "pointer" cursor to an "east-west" cursor), andclicking and dragging the line to the left or the right.
If "Lock Timings" is on (checked), you cannot do this. This prevents you from accidentally changingthe time of a timing while you're trying to modify the lighting effects in a cell between two timings.
See also Drag Events with Timings, which controls whether or not effects that start or end at thedragged timing will be dragged along with it.
Drag Events With Timings
Timings in a sequence can be dragged with the mouse to change the time that they are at (unlessthe Lock Timings option is turned on). If "Drag Events with Timings" is turned on, and any effectsstart or end at the same time as the timing being dragged, they will be dragged along with it. If not,only the timing will move; the effects will remain unchanged.
5.3.5.11 Freeform Play Range
What Is A Freeform Play Range?
A freeform play range is a user selected time range within a sequence. There can be at most onefreeform play range specified at any given time.
A freeform play range is displayed with a dimmed area on the time scale and dashed vertical red linesrunning through the sequence grid at the beginning and end of the range.
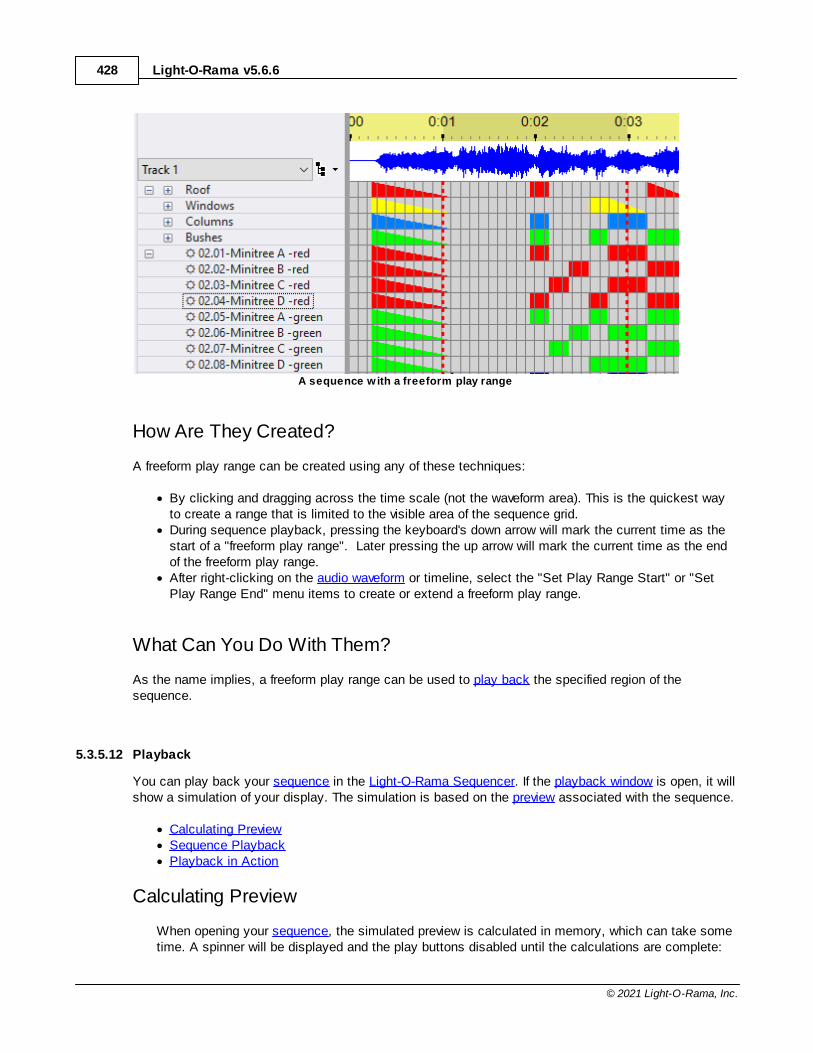
Light-O-Rama v5.6.6428
© 2021 Light-O-Rama, Inc.
A sequence with a freeform play range
How Are They Created?
A freeform play range can be created using any of these techniques:
· By clicking and dragging across the time scale (not the waveform area). This is the quickest wayto create a range that is limited to the visible area of the sequence grid.
· During sequence playback, pressing the keyboard's down arrow will mark the current time as thestart of a "freeform play range". Later pressing the up arrow will mark the current time as the endof the freeform play range.
· After right-clicking on the audio waveform or timeline, select the "Set Play Range Start" or "SetPlay Range End" menu items to create or extend a freeform play range.
What Can You Do With Them?
As the name implies, a freeform play range can be used to play back the specified region of thesequence.
5.3.5.12 Playback
You can play back your sequence in the Light-O-Rama Sequencer. If the playback window is open, it willshow a simulation of your display. The simulation is based on the preview associated with the sequence.
· Calculating Preview· Sequence Playback· Playback in Action
Calculating Preview
When opening your sequence, the simulated preview is calculated in memory, which can take sometime. A spinner will be displayed and the play buttons disabled until the calculations are complete:
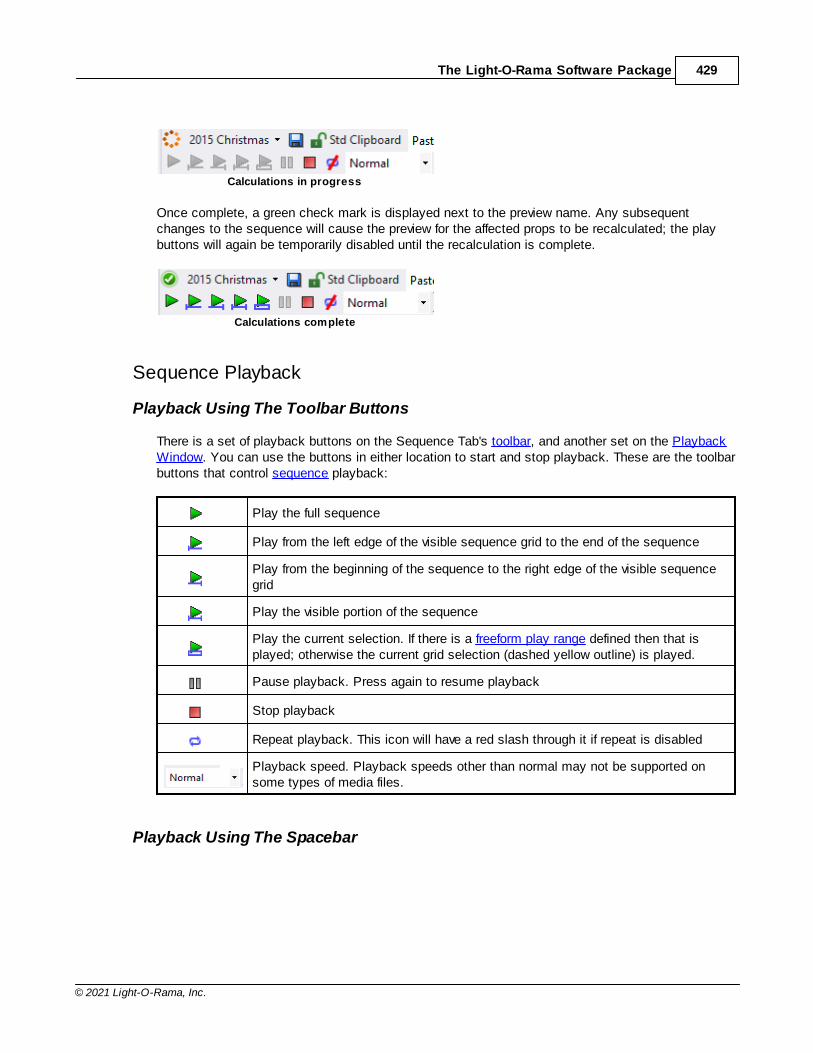
The Light-O-Rama Software Package 429
© 2021 Light-O-Rama, Inc.
Calculations in progress
Once complete, a green check mark is displayed next to the preview name. Any subsequentchanges to the sequence will cause the preview for the affected props to be recalculated; the playbuttons will again be temporarily disabled until the recalculation is complete.
Calculations complete
Sequence Playback
Playback Using The Toolbar Buttons
There is a set of playback buttons on the Sequence Tab's toolbar, and another set on the PlaybackWindow. You can use the buttons in either location to start and stop playback. These are the toolbarbuttons that control sequence playback:
Play the full sequence
Play from the left edge of the visible sequence grid to the end of the sequence
Play from the beginning of the sequence to the right edge of the visible sequencegrid
Play the visible portion of the sequence
Play the current selection. If there is a freeform play range defined then that isplayed; otherwise the current grid selection (dashed yellow outline) is played.
Pause playback. Press again to resume playback
Stop playback
Repeat playback. This icon will have a red slash through it if repeat is disabled
Playback speed. Playback speeds other than normal may not be supported onsome types of media files.
Playback Using The Spacebar
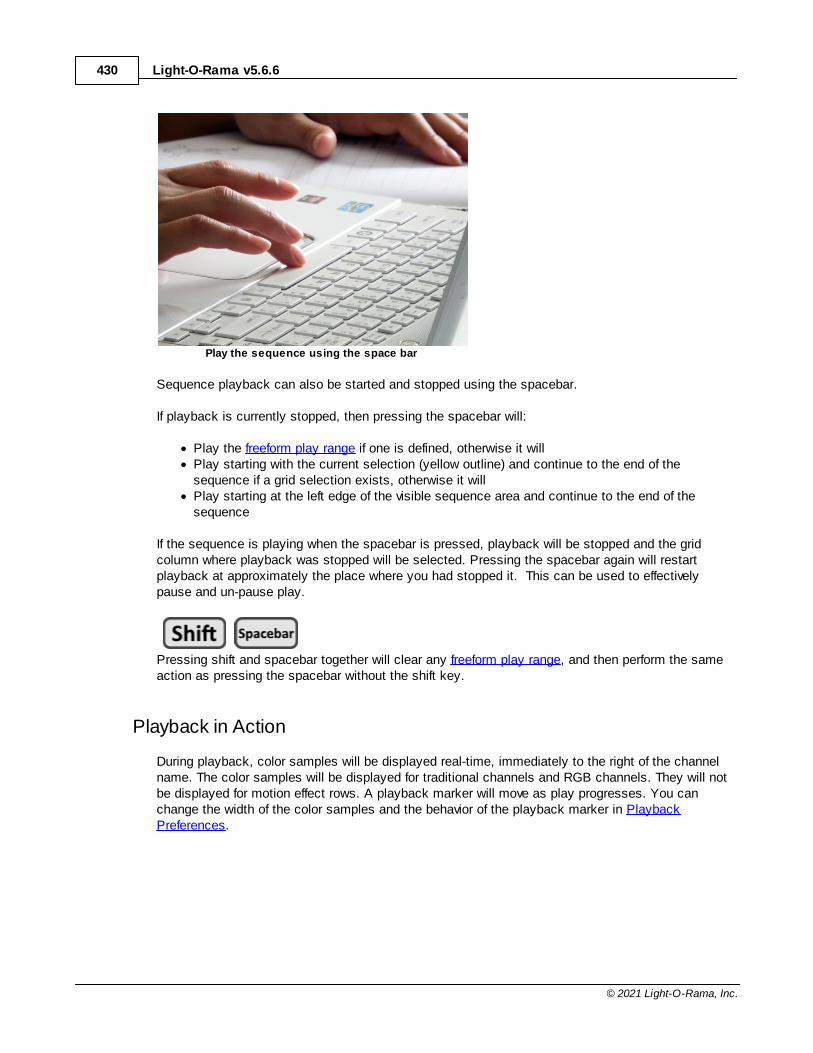
Light-O-Rama v5.6.6430
© 2021 Light-O-Rama, Inc.
Play the sequence using the space bar
Sequence playback can also be started and stopped using the spacebar.
If playback is currently stopped, then pressing the spacebar will:
· Play the freeform play range if one is defined, otherwise it will· Play starting with the current selection (yellow outline) and continue to the end of the
sequence if a grid selection exists, otherwise it will· Play starting at the left edge of the visible sequence area and continue to the end of the
sequence
If the sequence is playing when the spacebar is pressed, playback will be stopped and the gridcolumn where playback was stopped will be selected. Pressing the spacebar again will restartplayback at approximately the place where you had stopped it. This can be used to effectivelypause and un-pause play.
Pressing shift and spacebar together will clear any freeform play range, and then perform the sameaction as pressing the spacebar without the shift key.
Playback in Action
During playback, color samples will be displayed real-time, immediately to the right of the channelname. The color samples will be displayed for traditional channels and RGB channels. They will notbe displayed for motion effect rows. A playback marker will move as play progresses. You canchange the width of the color samples and the behavior of the playback marker in PlaybackPreferences.
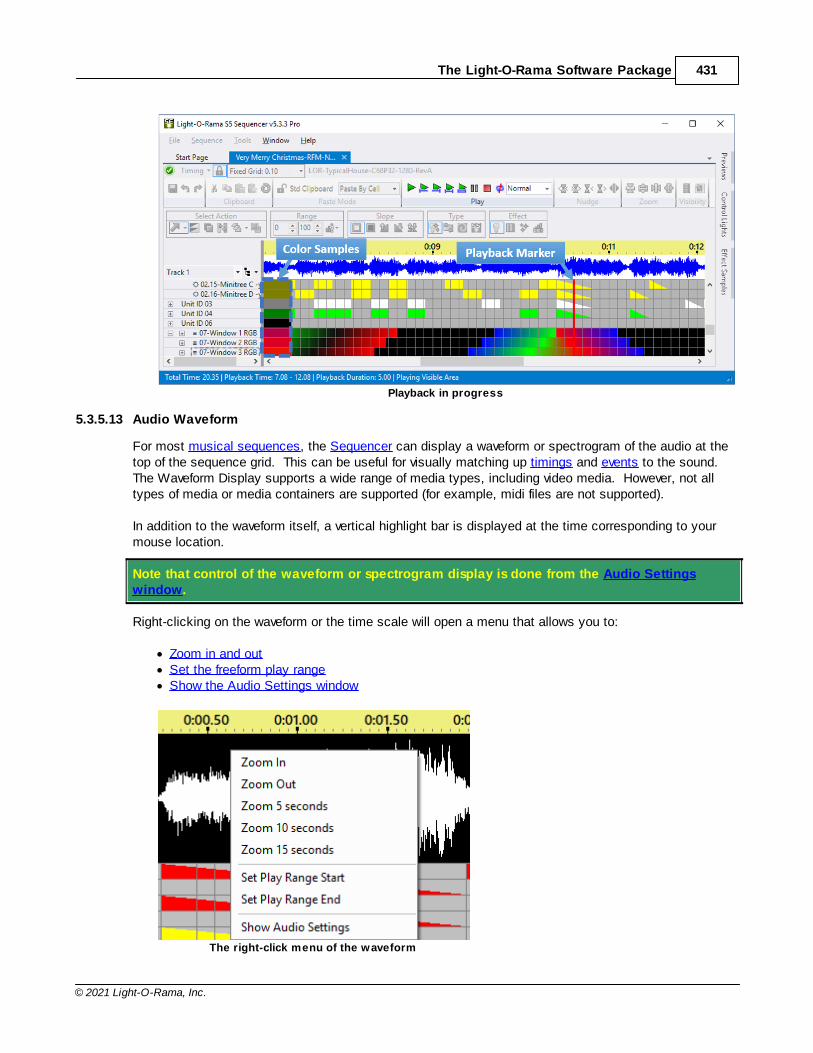
The Light-O-Rama Software Package 431
© 2021 Light-O-Rama, Inc.
Playback in progress
5.3.5.13 Audio Waveform
For most musical sequences, the Sequencer can display a waveform or spectrogram of the audio at thetop of the sequence grid. This can be useful for visually matching up timings and events to the sound. The Waveform Display supports a wide range of media types, including video media. However, not alltypes of media or media containers are supported (for example, midi files are not supported).
In addition to the waveform itself, a vertical highlight bar is displayed at the time corresponding to yourmouse location.
Note that control of the waveform or spectrogram display is done from the Audio Settingswindow.
Right-clicking on the waveform or the time scale will open a menu that allows you to:
· Zoom in and out· Set the freeform play range· Show the Audio Settings window
The right-click menu of the waveform
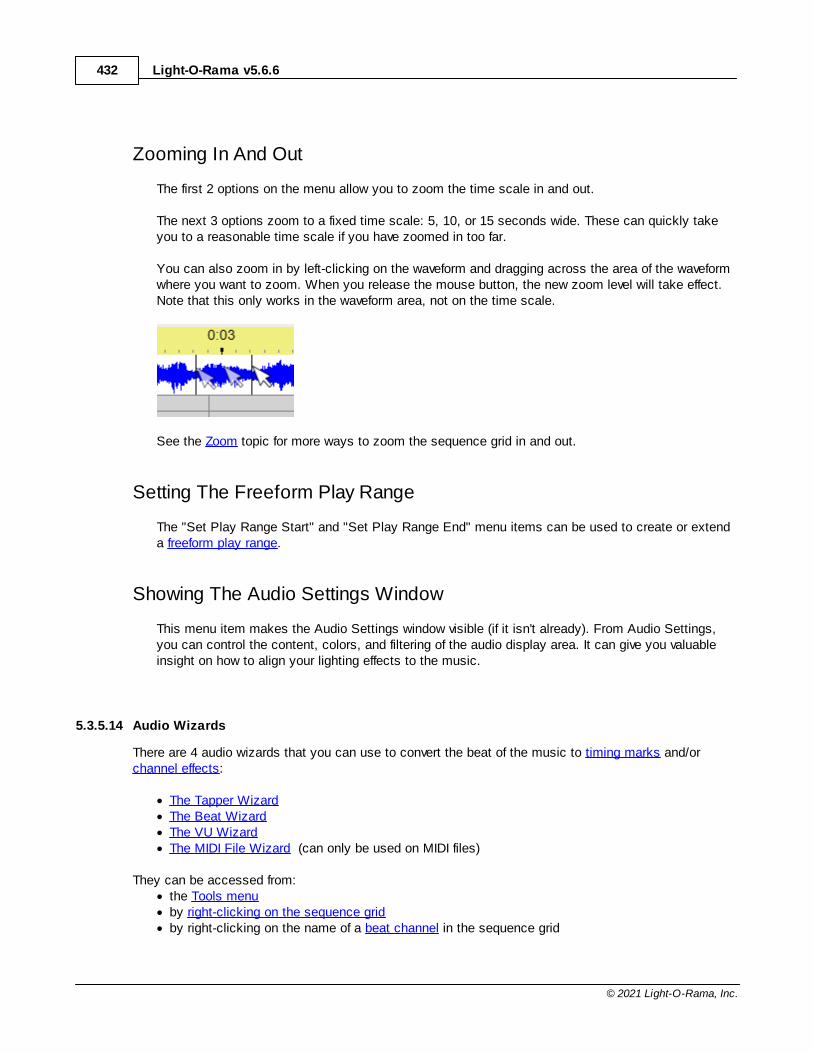
Light-O-Rama v5.6.6432
© 2021 Light-O-Rama, Inc.
Zooming In And Out
The first 2 options on the menu allow you to zoom the time scale in and out.
The next 3 options zoom to a fixed time scale: 5, 10, or 15 seconds wide. These can quickly takeyou to a reasonable time scale if you have zoomed in too far.
You can also zoom in by left-clicking on the waveform and dragging across the area of the waveformwhere you want to zoom. When you release the mouse button, the new zoom level will take effect.Note that this only works in the waveform area, not on the time scale.
See the Zoom topic for more ways to zoom the sequence grid in and out.
Setting The Freeform Play Range
The "Set Play Range Start" and "Set Play Range End" menu items can be used to create or extenda freeform play range.
Showing The Audio Settings Window
This menu item makes the Audio Settings window visible (if it isn't already). From Audio Settings,you can control the content, colors, and filtering of the audio display area. It can give you valuableinsight on how to align your lighting effects to the music.
5.3.5.14 Audio Wizards
There are 4 audio wizards that you can use to convert the beat of the music to timing marks and/orchannel effects:
· The Tapper Wizard· The Beat Wizard· The VU Wizard· The MIDI File Wizard (can only be used on MIDI files)
They can be accessed from:· the Tools menu· by right-clicking on the sequence grid· by right-clicking on the name of a beat channel in the sequence grid
The Light-O-Rama Software Package 433
© 2021 Light-O-Rama, Inc.
5.3.5.14.1 The Tapper Wizard
The Light-O-Rama Sequencer's Tapper Wizard is a tool that lets you populate a musical sequence withtimings and lighting effects simply by tapping along with the song, on your keyboard or your mouse. The Tapper Wizard will remember the moments in the song that you tapped at, and will insert timingsand effects into the sequence at those times.
The Tapper Wizard is available as an option when creating a new musical sequence, and can beaccessed later by selecting Tools > Tapper Wizard from the main menu, by right-clicking on a beatchannel name, or by right-clicking in the sequence grid and opening the Audio Wizards sub-menu.
Note that you can insert timing marks into the sequence grid without using the Tapper Wizard. Simplystart playing the sequence, then use the "T" shortcut key to insert timing marks.
The Tapper Wizard has the following sections and controls:
· Play Options· What to Do with Taps· Input Options· Start and Stop· Play Back· Tap· Apply· Undo and Redo· Apply and Exit· Exit
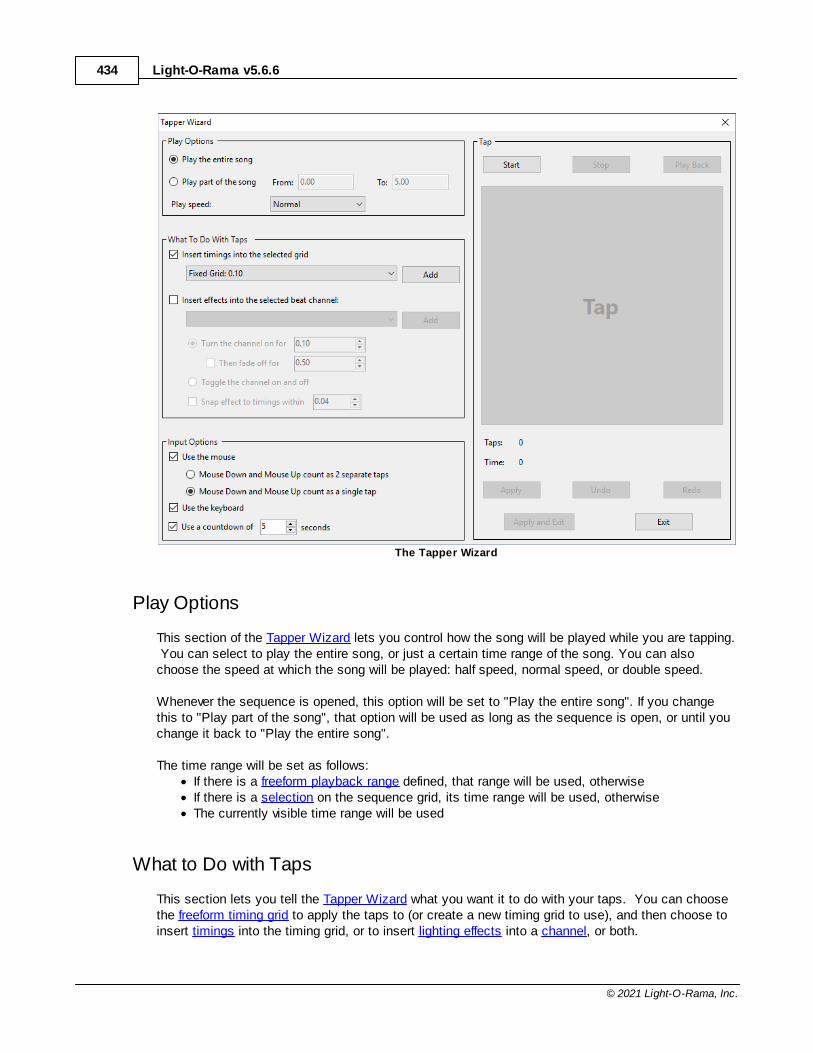
Light-O-Rama v5.6.6434
© 2021 Light-O-Rama, Inc.
The Tapper Wizard
Play Options
This section of the Tapper Wizard lets you control how the song will be played while you are tapping. You can select to play the entire song, or just a certain time range of the song. You can alsochoose the speed at which the song will be played: half speed, normal speed, or double speed.
Whenever the sequence is opened, this option will be set to "Play the entire song". If you changethis to "Play part of the song", that option will be used as long as the sequence is open, or until youchange it back to "Play the entire song".
The time range will be set as follows:· If there is a freeform playback range defined, that range will be used, otherwise· If there is a selection on the sequence grid, its time range will be used, otherwise· The currently visible time range will be used
What to Do with Taps
This section lets you tell the Tapper Wizard what you want it to do with your taps. You can choosethe freeform timing grid to apply the taps to (or create a new timing grid to use), and then choose toinsert timings into the timing grid, or to insert lighting effects into a channel, or both.
The Light-O-Rama Software Package 435
© 2021 Light-O-Rama, Inc.
If you choose to insert lighting effects into a channel, you can either have the channel briefly turn onfor each tap, or you can choose to have it toggle on with one tap, off with the next, on with the third,and so forth. If you choose to have it turn briefly on for each tap, you can additionally choose to haveit fade off after the tap (otherwise it will simply turn off).
You also have the option to "snap to existing events". If you select this option, and you tap at apoint in time that is near an existing timing (with "near" meaning within the number of hundredths ofa second that you specify here), instead of using the exact time that you tapped, the Tapper Wizarduses the time of that timing. This makes it easier to cleanly use the Tapper Wizard multiple timeson the same sequence (for different channels), without introducing minor timing errors based uponyour reaction time.
After you have done your tapping, and used this section to tell the Tapper Wizard what to do withyour taps, click "Apply", or "Apply and Exit" to apply them to the sequence. If you clicked "Apply"rather than "Apply and Exit", then the Tapper Wizard will remain open. At this point, you couldchange your settings in this section to apply your existing taps in a different way (such as to adifferent channel, or with different types of effects), or you could tap again (by hitting "Start" again) tocollect new taps. You could also undo and redo any changes that the Tapper Wizard made to yoursequence.
Input Options
This section of the Tapper Wizard allows you to control how you will tap.
You can use the mouse, or the keyboard, or both.
If you use the mouse, you have two options: pushing the mouse button down and then letting it upcount as two separate taps, or as a single tap. To use the mouse, you must click on the Tapbutton.
If you use the keyboard, you can tap with practically any key, or even multiple keys.
You can also choose whether to use a countdown or not; if you do, then when you start the song (byclicking Start), a countdown will be displayed before the song begins, rather than startingimmediately. This may give you time to get ready after clicking "Start".
Start and Stop
Use these buttons to start playing the song (or to start the countdown before play), and to stop thesong. When the song begins, the Tap button will become enabled. When the song ends, you donot have to use the Stop button; the Stop button is for stopping the song in the middle, for example ifyou are unhappy with the taps that you made.
After the song ends (or after you hit Stop), you can click Start again in order to redo your taps. Thiswill wipe out any previously recorded taps. You will be warned that they will be wiped out, and willbe given an option to cancel.
You can also redo your taps after having applied them to the sequence. This lets you use differentsets of taps for different purposes, all without closing the Tapper Wizard.
Tap
Light-O-Rama v5.6.6436
© 2021 Light-O-Rama, Inc.
While a song is playing, the Tap button is enabled. Every time that you tap (whether by mouse orby keyboard), it will provide feedback by briefly flashing.
Play Back
After you have recorded taps, you can click "Play Back" to play the song over again. The Tap buttonwill flash at the points in time that you tapped. You can use this to double check that you aresatisfied with your taps before entering them into the sequence (by clicking the Apply button); if youare not satisfied with them, you can wipe them out and try again by hitting the Start button again.
Apply
After you have tapped, and have told the Tapper Wizard what to do with the taps, click the Applybutton to apply those taps to your sequence.
Note that you can then change the settings in the "What To Do with Taps" section, and click Applyagain; this will apply the new settings, using the same taps, to the sequence.
Or, you could click Start again, to collect new taps. Your old taps will be deleted when you do this,but any timings or effects that you inserted into the sequence based on them will remain. In thisway, you can use different sets of taps to do different things, all without closing the Tapper Wizard.
Undo and Redo
After applying your taps to the sequence, you can use these buttons to undo and redo any suchapplications, without exiting from the Tapper Wizard.
Apply and Exit
Clicking the Tapper Wizard's Apply and Exit button will apply your taps to the sequence, in themanner that you specify in the "What To Do with Taps" section, and then exit from the TapperWizard.
If you want to apply your taps without exiting the Tapper Wizard, so that you can apply them againusing new settings, or so that you can collect different taps, use the Apply button instead.
Exit
This button simply exits from the Tapper Wizard, without applying your taps to the sequence. Note,though, that if you have already applied your taps (using the Apply button), they will remain in yoursequence; using this button (instead of Apply and Exit) will prevent your taps from being appliedagain.
For example, if you apply your taps, then change the settings in the What To Do with Taps section,and then click Exit, your applied taps, based on your original settings, will remain in the sequence,but your taps will not be reapplied based on the changed settings.
5.3.5.14.2 The Beat Wizard
The Light-O-Rama Sequencer's Beat Wizard can analyze the song associated with a musical sequenceto try to determine its tempo, and can insert timings and lighting effects into the sequence based upon it. These are not necessarily inserted exactly the same distance apart from each other; rather, the Beat
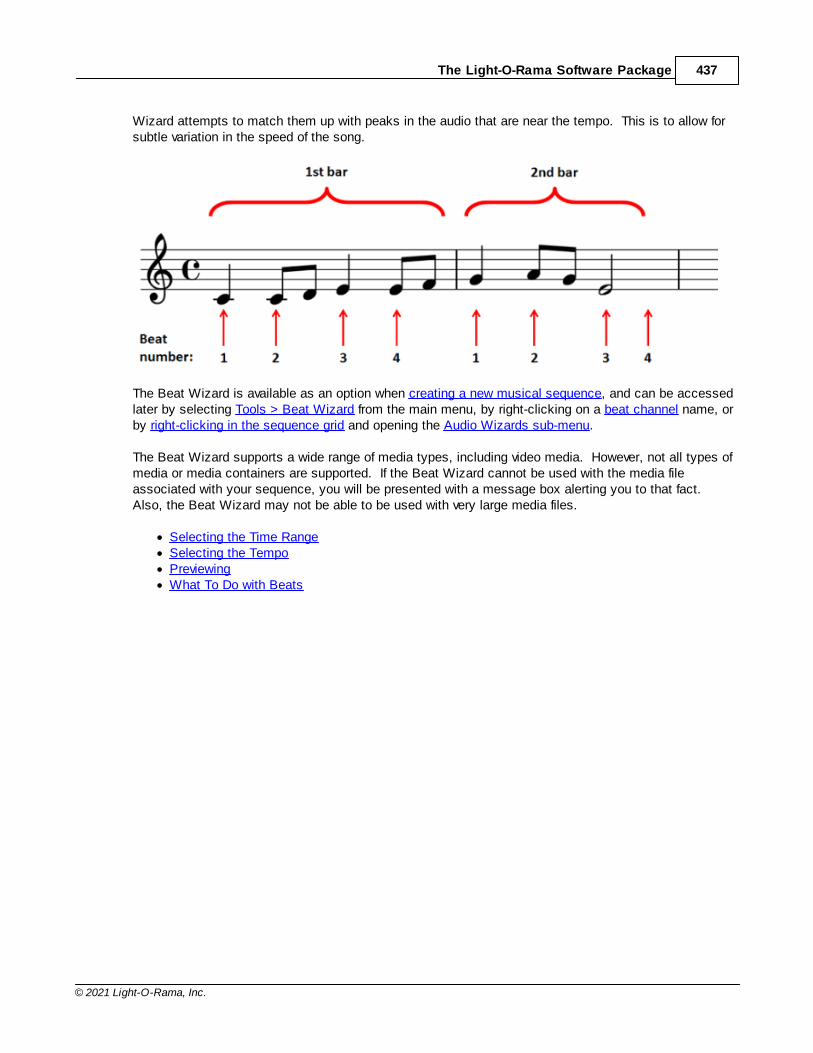
The Light-O-Rama Software Package 437
© 2021 Light-O-Rama, Inc.
Wizard attempts to match them up with peaks in the audio that are near the tempo. This is to allow forsubtle variation in the speed of the song.
The Beat Wizard is available as an option when creating a new musical sequence, and can be accessedlater by selecting Tools > Beat Wizard from the main menu, by right-clicking on a beat channel name, orby right-clicking in the sequence grid and opening the Audio Wizards sub-menu.
The Beat Wizard supports a wide range of media types, including video media. However, not all types ofmedia or media containers are supported. If the Beat Wizard cannot be used with the media fileassociated with your sequence, you will be presented with a message box alerting you to that fact. Also, the Beat Wizard may not be able to be used with very large media files.
· Selecting the Time Range· Selecting the Tempo· Previewing· What To Do with Beats

Light-O-Rama v5.6.6438
© 2021 Light-O-Rama, Inc.
The Beat Wizard
Selecting the Time Range
The Beat Wizard can try to determine the tempo of a song as a whole, or of just a portion of thesong. Use the "Time Range" settings to tell it which to try. If you select a portion of the song, besure to click the "Update" button after changing the "From" or "To" times.
Choosing a portion of the song is useful if the song's tempo changes; the Beat Wizard will be moreaccurate if it only is asked to operate on a section with a near-constant tempo throughout. It mayalso be useful if the Beat Wizard has a problem with a certain portion of a song; if the beats seem offin a particular spot, you may want to try running the Beat Wizard on that spot individually.
The Light-O-Rama Software Package 439
© 2021 Light-O-Rama, Inc.
Whenever the sequence is opened, this option will be set to "Play the entire song". If you changethis to "Play part of the song", that option will be used as long as the sequence is open, or until youchange it back to "Play the entire song".
The time range will be set as follows:· If there is a freeform playback range defined, that range will be used, otherwise· If there is a selection on the sequence grid, its time range will be used, otherwise· The currently visible time range will be used
Selecting the Tempo
The Beat Wizard shows its best guess as to the tempo of the selected portion of the song. You canchoose to use that tempo, or faster or slower related tempos - for example, three times as fast, ortwice as slow. Depending upon the song, one of the related tempos may seem more natural whenyou preview it.
Another use of related tempos is to simply insert more timings, allowing for faster lighting effects tobe used that are still synchronized to the beat of the song. For example, it is unlikely that a "10xFaster" tempo will seem "more natural" in any sense, because it will probably be too quick to countalong with. However, selecting it will, for example, let you set up a lighting effect with ten differentchannels that looks like the lights are quickly chasing each other to the beat of the music.
If a slower related tempo is chosen, you must also choose a "beat offset" to determine which beatsof the "best guess" tempo will be selected: You might feel that the best guess tempo is actuallytwice as fast as it should be - that you would count along to it as "one - and - two - and" instead of"one - two - three - four", for example. If you therefore choose a "2x Slower" tempo, the Beat Wizardwill use only every other beat from its "best guess" tempo, but it doesn't know whether to use everyfirst beat or every second beat. So, you can let it know which to use by selecting the "beat offset".
Previewing
After you choose a tempo to use in the Beat Wizard, you can get an idea of what it will make yourlights look like by using the controls in the "Preview" section. Simply click "Start" to start thepreview.
The boxes to the right of the button will light up sequentially, in time with the tempo. Only the whiteboxes will be used; the greyed out boxes will not. However, you can choose how many white boxesthere are by selecting the radio button under one of the boxes.
This allows you to make the preview section look more natural - for example, the boxes lighting upsequentially in a song that you count along with as "one, two, three, one, two, three" will look mostnatural if you select three boxes - doing so will make the same box light up every time you count thesame number.
Clicking directly in one of the boxes will reset it so that that box lights up at that moment (and theother boxes follow sequentially from there). This is also useful for making the preview seem morenatural - for example, the third box might be lighting up every time that you count "one", and if so, itmight look more natural if you reset it so that the first box lights up at that time instead.
Light-O-Rama v5.6.6440
© 2021 Light-O-Rama, Inc.
None of this has any effect on the timings or lighting effects that will be inserted into the sequencewhen you decide what to do with beats - it is merely to help you see how the selected tempo looksin relation to the song.
Finally, if you are unsatisfied with the selected tempo, simply choose another tempo, or choose adifferent portion of the song to analyze.
What To Do with Beats
When you have selected a time range and a tempo for the Beat Wizard to use, and are satisfied withit after previewing it, you can use the controls in the "What To Do with Beats" section to inserttimings, lighting effects, or both, based upon the selected tempo into the sequence .
If you choose "Turn on a channel every so many beats", you will also have to specify the channel,the number of beats, and a "beat offset". For example, to make a set of four channels chase eachother in time with the beat, you could:
· Select the first channel, four beats, and a beat offset of zero;· Click "Apply";· Select the second channel, four beats, and a beat offset of one;· Click "Apply";· Select the third channel, four beats, and a beat offset of two;· Click "Apply";· Select the fourth channel, four beats, and a beat offset of three;· Click "Apply and Exit".
Note that you can apply multiple effects to different channels, all in the same use of the BeatWizard, by using "Apply" multiple times. You can even apply effects based on different portions ofthe song or different tempos, all without leaving the Beat Wizard.
5.3.5.14.3 The VU Wizard
The Light-O-Rama Sequencer's VU Wizard can analyze the song associated with a musical sequence totry to find peaks in the audio - much like a VU meter - and can insert timings and lighting effects into thesequence based upon them.
The VU Wizard is available as an option when creating a new musical sequence, and can be accessedlater by selecting Tools > VU Wizard from the main menu, by right-clicking on a beat channel name, orby right-clicking in the sequence grid and opening the Audio Wizards sub-menu.
The VU Wizard supports a wide range of media types, including video media. However, not all types ofmedia or media containers are supported. If the VU Wizard cannot be used with the media fileassociated with your sequence, you will be presented with a message box alerting you to that fact. Also, the VU Wizard may not be able to be used with very large media files.
· Selecting a Time Range· Attack and Decay Settings· The Peak Threshold· Preview· What To Do with Peaks
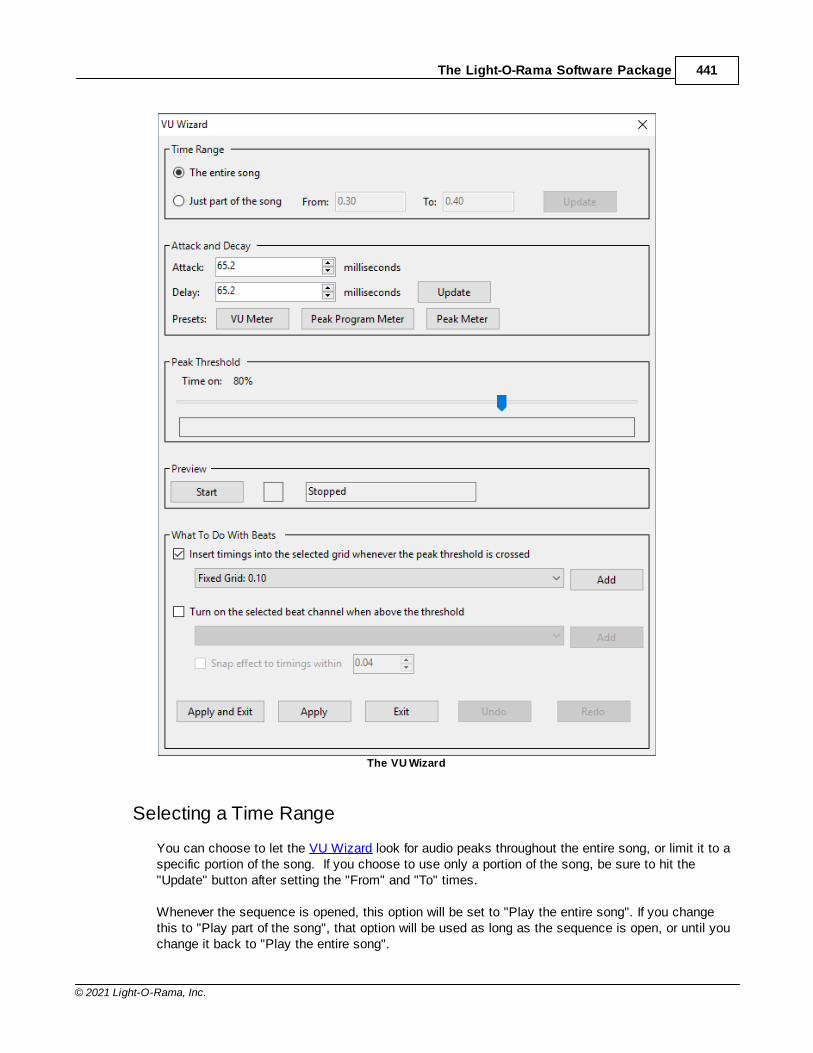
The Light-O-Rama Software Package 441
© 2021 Light-O-Rama, Inc.
The VU Wizard
Selecting a Time Range
You can choose to let the VU Wizard look for audio peaks throughout the entire song, or limit it to aspecific portion of the song. If you choose to use only a portion of the song, be sure to hit the"Update" button after setting the "From" and "To" times.
Whenever the sequence is opened, this option will be set to "Play the entire song". If you changethis to "Play part of the song", that option will be used as long as the sequence is open, or until youchange it back to "Play the entire song".
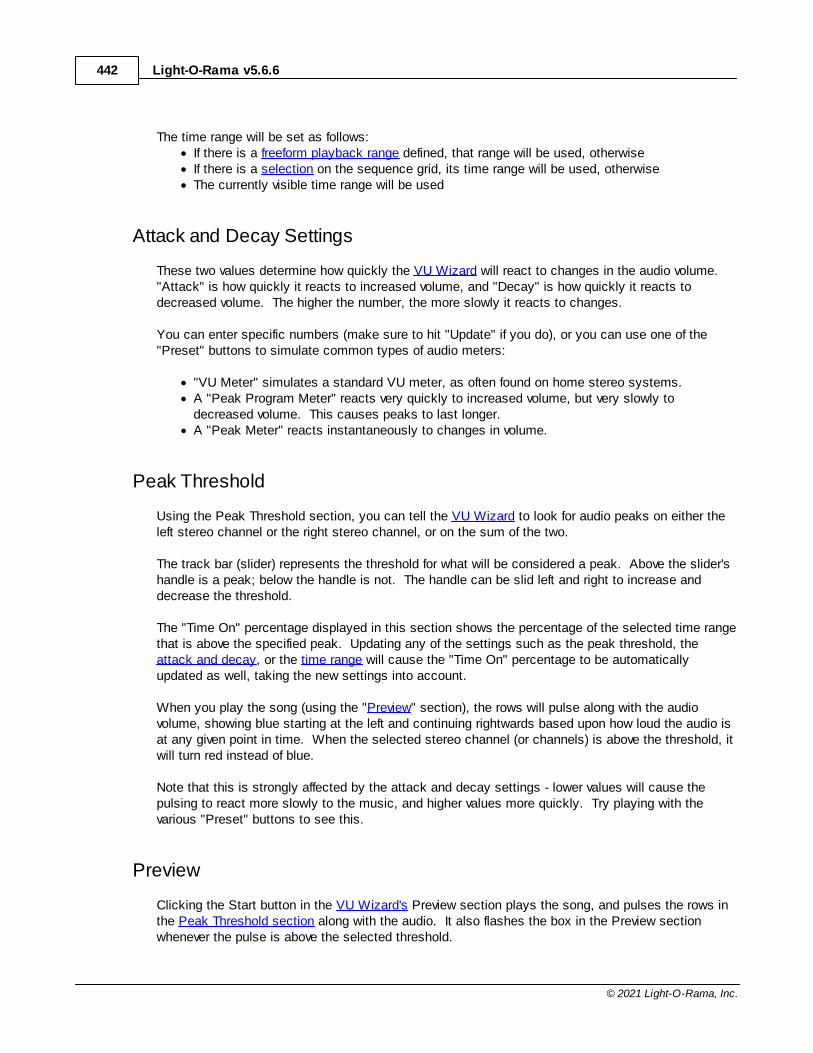
Light-O-Rama v5.6.6442
© 2021 Light-O-Rama, Inc.
The time range will be set as follows:· If there is a freeform playback range defined, that range will be used, otherwise· If there is a selection on the sequence grid, its time range will be used, otherwise· The currently visible time range will be used
Attack and Decay Settings
These two values determine how quickly the VU Wizard will react to changes in the audio volume. "Attack" is how quickly it reacts to increased volume, and "Decay" is how quickly it reacts todecreased volume. The higher the number, the more slowly it reacts to changes.
You can enter specific numbers (make sure to hit "Update" if you do), or you can use one of the"Preset" buttons to simulate common types of audio meters:
· "VU Meter" simulates a standard VU meter, as often found on home stereo systems.· A "Peak Program Meter" reacts very quickly to increased volume, but very slowly to
decreased volume. This causes peaks to last longer.· A "Peak Meter" reacts instantaneously to changes in volume.
Peak Threshold
Using the Peak Threshold section, you can tell the VU Wizard to look for audio peaks on either theleft stereo channel or the right stereo channel, or on the sum of the two.
The track bar (slider) represents the threshold for what will be considered a peak. Above the slider'shandle is a peak; below the handle is not. The handle can be slid left and right to increase anddecrease the threshold.
The "Time On" percentage displayed in this section shows the percentage of the selected time rangethat is above the specified peak. Updating any of the settings such as the peak threshold, theattack and decay, or the time range will cause the "Time On" percentage to be automaticallyupdated as well, taking the new settings into account.
When you play the song (using the "Preview" section), the rows will pulse along with the audiovolume, showing blue starting at the left and continuing rightwards based upon how loud the audio isat any given point in time. When the selected stereo channel (or channels) is above the threshold, itwill turn red instead of blue.
Note that this is strongly affected by the attack and decay settings - lower values will cause thepulsing to react more slowly to the music, and higher values more quickly. Try playing with thevarious "Preset" buttons to see this.
Preview
Clicking the Start button in the VU Wizard's Preview section plays the song, and pulses the rows inthe Peak Threshold section along with the audio. It also flashes the box in the Preview sectionwhenever the pulse is above the selected threshold.
The Light-O-Rama Software Package 443
© 2021 Light-O-Rama, Inc.
You can change both threshold settings and the attack and decay settings during preview, and theVU Wizard will react instantly to such changes. However, only the final settings will be used whenyou apply the peaks to the sequence (using the "What To Do with Peaks" section).
What To Do with Peaks
Once you are satisfied with the peaks found using your chosen attack and decay settings and peakthreshold settings, you can apply the peaks to the sequence using the "What To Do with Peaks"section of the VU Wizard. You can insert a timing every time the threshold is crossed (no matterwhether from below or from above), or turn a selected channel on whenever above the threshold, andoff whenever below, or both.
You can reuse the VU Wizard for multiple channels (and multiple settings) without closing it byclicking "Apply" rather than "Apply and Exit".
5.3.5.14.4 The MIDI File Wizard
The Light-O-Rama Sequencer's MIDI File Wizard can be used to automatically populate beat channelsbased on a the notes in the MIDI file.
The MIDI File Wizard is available (for musical sequences based on MIDI files) as an option when creatinga new musical sequence, or can be accessed later via any of the methods listed in the Audio Wizardstopic.

Light-O-Rama v5.6.6444
© 2021 Light-O-Rama, Inc.
The MIDI Wizard w indow
Select Which Instruments to Include
The window lists all of the instruments used in the song. For each instrument it lists:
· how many total notes are played by the instrument· the number of distinct notes played by the instrument
Check the boxes next to the names of the instruments you wish to include.
Combine Instruments?
Click the radio button that indicates how you want the beat channels created:
· One channel for each note -- combining the notes for all selected instruments· One channel for each note and instrument (this can produce a lot of beat channels)
Channel Color
Choose the color that the new beat channels will use when displayed on the sequence grid.
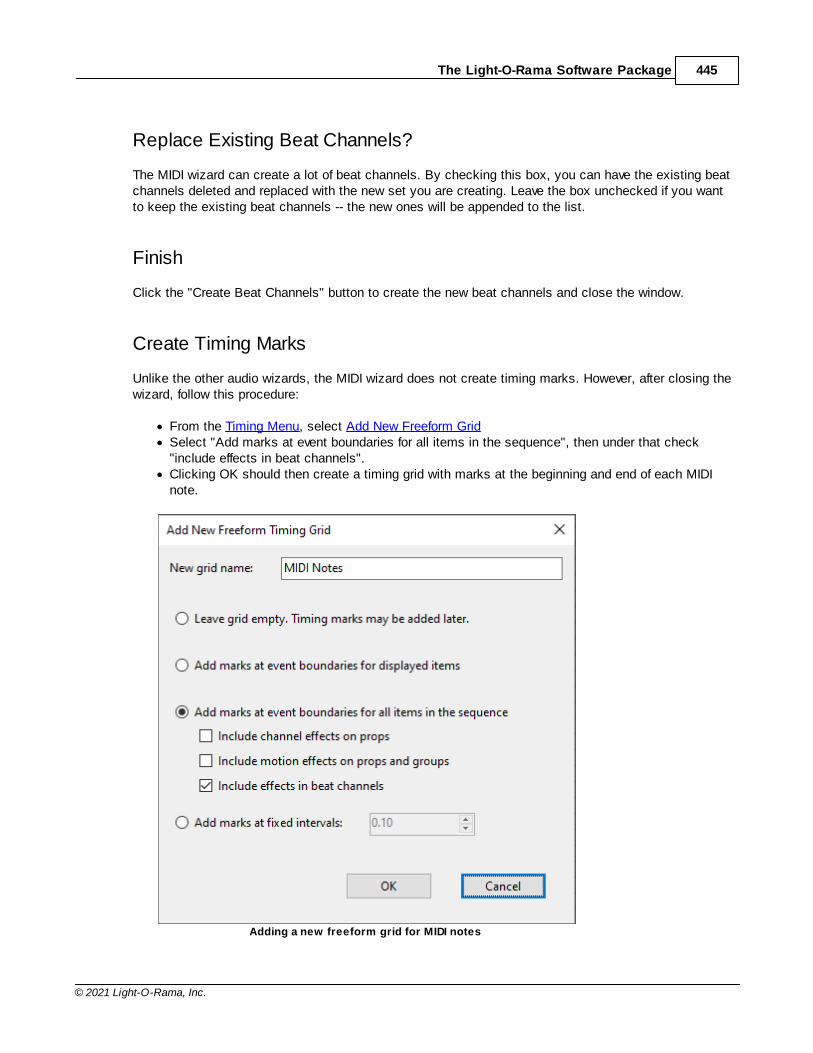
The Light-O-Rama Software Package 445
© 2021 Light-O-Rama, Inc.
Replace Existing Beat Channels?
The MIDI wizard can create a lot of beat channels. By checking this box, you can have the existing beatchannels deleted and replaced with the new set you are creating. Leave the box unchecked if you wantto keep the existing beat channels -- the new ones will be appended to the list.
Finish
Click the "Create Beat Channels" button to create the new beat channels and close the window.
Create Timing Marks
Unlike the other audio wizards, the MIDI wizard does not create timing marks. However, after closing thewizard, follow this procedure:
· From the Timing Menu, select Add New Freeform Grid· Select "Add marks at event boundaries for all items in the sequence", then under that check
"include effects in beat channels".· Clicking OK should then create a timing grid with marks at the beginning and end of each MIDI
note.
Adding a new freeform grid for MIDI notes

Light-O-Rama v5.6.6446
© 2021 Light-O-Rama, Inc.
5.3.5.15 Tooltips
When hovering over a cell in the Sequencer's sequence grid, a tool-tip can be displayed which showsinformation about the grid cell and any effect it might contain.
Tool-tips can be turned on or off. There are also options for how long to hover before they are displayedand how they should be closed. These settings can be changed in Sequence Grid Preferences.
5.3.5.16 Loops in Animation Sequences
An animation sequence (but not a musical sequence) can contain loops. When the Show Player or theSequencer plays a sequence with loops, when the end of a loop is reached, the sequence will go back tothe beginning of the loop. This will happen a certain number of times (which you specify), after which thesequence will continue on past the end of the loop.
Each time through a loop, you can have the sequence speed up, slow down, or remain at the samespeed.
A sequence can contain many loops. Loops can be nested - that is, a loop can contain other loops.
Loop rows are shown with a white background are fixed to the top of the sequence grid. They do notscroll away when the rest of the sequence is scrolled vertically.
For example, the following picture shows a sequence with a loop starting at 1 second and ending at 2seconds. The number of times the loop will repeat is shown in the middle of loop (1 in this case). If theloop were to speed up after each pass, then the repeat count would be followed by a "+" symbol. If theloop were to slow down after each pass, then the repeat count would be followed by a "-" symbol. In thiscase the loop speed is set to stay the same, so no symbol is displayed.

The Light-O-Rama Software Package 447
© 2021 Light-O-Rama, Inc.
A sequence with a loop starting at 1 second and ending at 2 seconds
More than one loop can be in a sequence. For example, here is the same sequence, with a second loopadded, from 2.5 seconds to 3 seconds:
Two loops in a sequence
Subjects covered in this topic:
· Adding a Loop Row· Adding A Loop· Modifying a Loop· Deleting a Loop· Right-Clicking on the Loop Name
Adding a Loop Row
Loops can contain loops; this is represented by having multiple rows of loops. For example, in thefollowing picture, a second loop level has been added, and a loop was put into it from 0.5 seconds to 3seconds, thus containing both of the loops of the lowest loop level.
A loop containing loops
To create a loop row, select "Loop Level" from the "Add New" menu present on both the Sequence menuand the Grid View menu. You can also right-click on the name of an existing loop to add additional
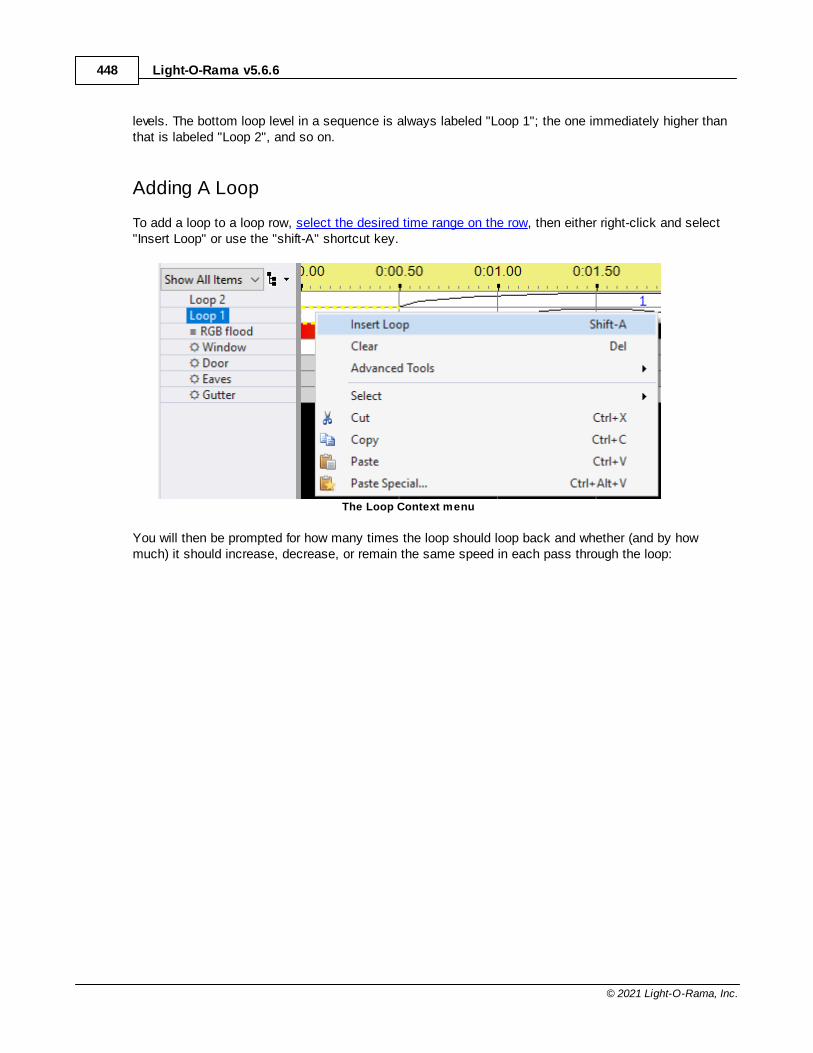
Light-O-Rama v5.6.6448
© 2021 Light-O-Rama, Inc.
levels. The bottom loop level in a sequence is always labeled "Loop 1"; the one immediately higher thanthat is labeled "Loop 2", and so on.
Adding A Loop
To add a loop to a loop row, select the desired time range on the row, then either right-click and select"Insert Loop" or use the "shift-A" shortcut key.
The Loop Context menu
You will then be prompted for how many times the loop should loop back and whether (and by howmuch) it should increase, decrease, or remain the same speed in each pass through the loop:
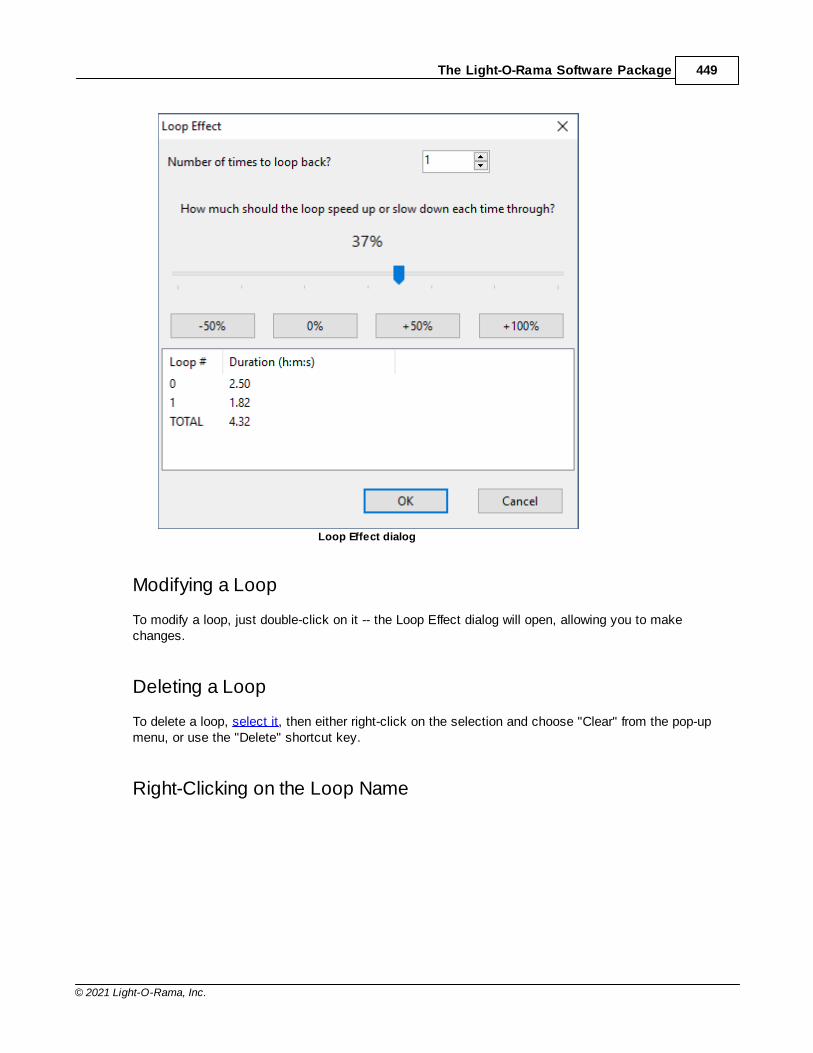
The Light-O-Rama Software Package 449
© 2021 Light-O-Rama, Inc.
Loop Effect dialog
Modifying a Loop
To modify a loop, just double-click on it -- the Loop Effect dialog will open, allowing you to makechanges.
Deleting a Loop
To delete a loop, select it, then either right-click on the selection and choose "Clear" from the pop-upmenu, or use the "Delete" shortcut key.
Right-Clicking on the Loop Name
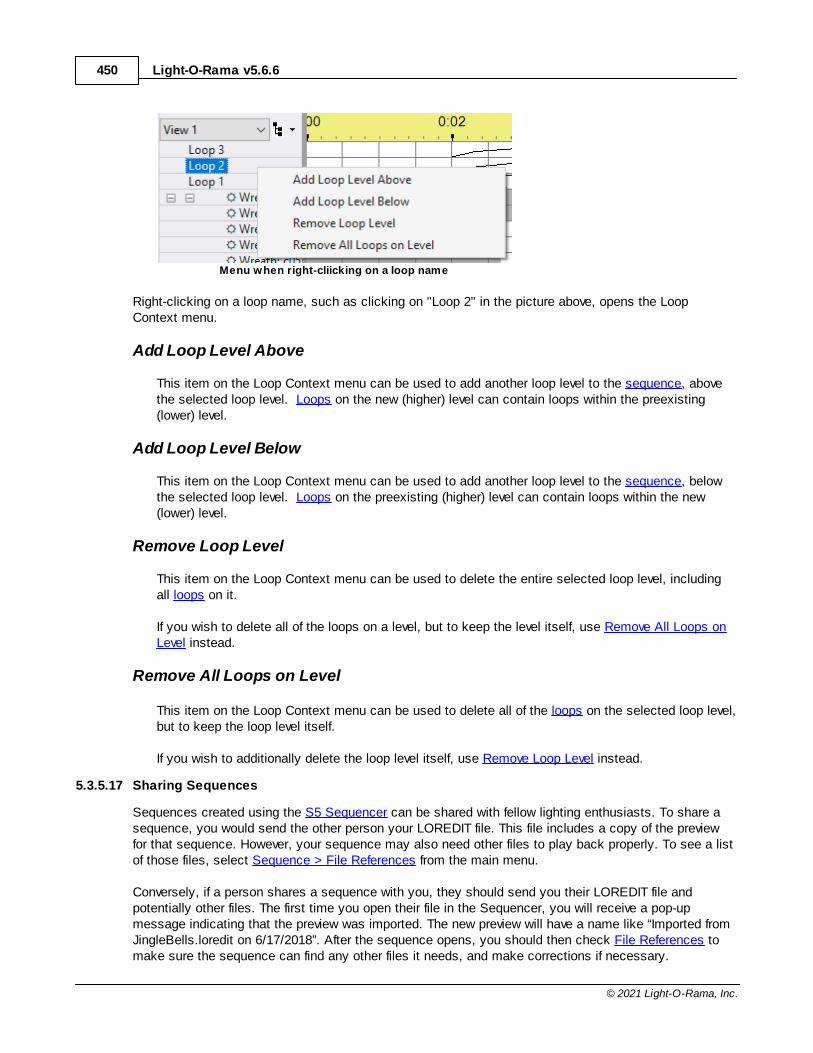
Light-O-Rama v5.6.6450
© 2021 Light-O-Rama, Inc.
Menu when right-cliicking on a loop name
Right-clicking on a loop name, such as clicking on "Loop 2" in the picture above, opens the LoopContext menu.
Add Loop Level Above
This item on the Loop Context menu can be used to add another loop level to the sequence, abovethe selected loop level. Loops on the new (higher) level can contain loops within the preexisting(lower) level.
Add Loop Level Below
This item on the Loop Context menu can be used to add another loop level to the sequence, belowthe selected loop level. Loops on the preexisting (higher) level can contain loops within the new(lower) level.
Remove Loop Level
This item on the Loop Context menu can be used to delete the entire selected loop level, includingall loops on it.
If you wish to delete all of the loops on a level, but to keep the level itself, use Remove All Loops onLevel instead.
Remove All Loops on Level
This item on the Loop Context menu can be used to delete all of the loops on the selected loop level,but to keep the loop level itself.
If you wish to additionally delete the loop level itself, use Remove Loop Level instead.
5.3.5.17 Sharing Sequences
Sequences created using the S5 Sequencer can be shared with fellow lighting enthusiasts. To share asequence, you would send the other person your LOREDIT file. This file includes a copy of the previewfor that sequence. However, your sequence may also need other files to play back properly. To see a listof those files, select Sequence > File References from the main menu.
Conversely, if a person shares a sequence with you, they should send you their LOREDIT file andpotentially other files. The first time you open their file in the Sequencer, you will receive a pop-upmessage indicating that the preview was imported. The new preview will have a name like “Imported fromJingleBells.loredit on 6/17/2018”. After the sequence opens, you should then check File References tomake sure the sequence can find any other files it needs, and make corrections if necessary.

The Light-O-Rama Software Package 451
© 2021 Light-O-Rama, Inc.
5.3.5.18 Mouse Double-Click Speed
The S5 Sequencer responds to both single clicks and double clicks on the sequence grid. Therefore, it isimportant to set your mouse's double-click time carefully -- this setting is what distinguishes a singleclick from a double click. To adjust it in Windows 10, follow these steps (content from Microsoft):
1. Open the Settings app by pressing the Windows logo key + I on the keyboardor via Start Menu > Settings.
2. In the Settings app, select Devices.
3. On the next screen, select Mouse in the left column.4. Under Related settings in the right column, click Additional mouse options.

Light-O-Rama v5.6.6452
© 2021 Light-O-Rama, Inc.
5. In the Mouse Properties window that appears, select the Buttons tab.6. In the Double-click speed section adjust the speed slider to set a more comfortable
speed.
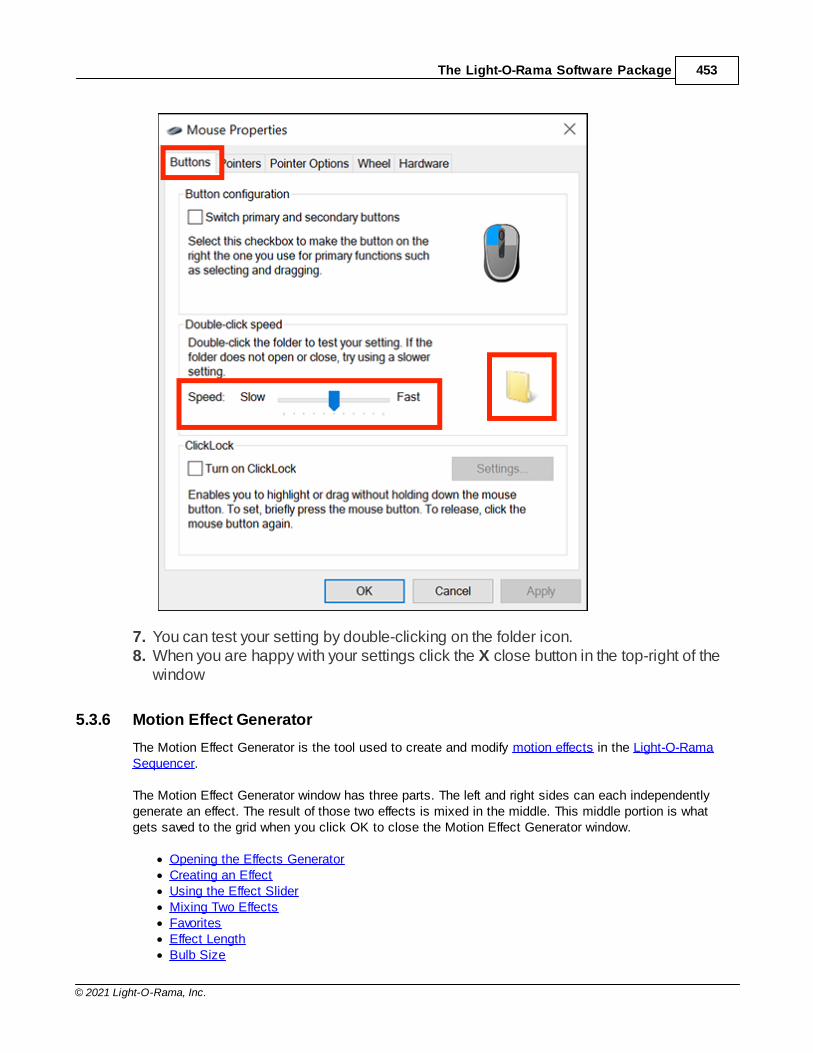
The Light-O-Rama Software Package 453
© 2021 Light-O-Rama, Inc.
7. You can test your setting by double-clicking on the folder icon.8. When you are happy with your settings click the X close button in the top-right of the
window
5.3.6 Motion Effect Generator
The Motion Effect Generator is the tool used to create and modify motion effects in the Light-O-RamaSequencer.
The Motion Effect Generator window has three parts. The left and right sides can each independentlygenerate an effect. The result of those two effects is mixed in the middle. This middle portion is whatgets saved to the grid when you click OK to close the Motion Effect Generator window.
· Opening the Effects Generator· Creating an Effect· Using the Effect Slider· Mixing Two Effects· Favorites· Effect Length· Bulb Size

Light-O-Rama v5.6.6454
© 2021 Light-O-Rama, Inc.
· Motion Effect Reference - a description of every setting for every motion effect
5.3.6.1 Opening the Motion Effect Generator
The Light-O-Rama S5 Sequencer’s Motion Effect Generator can be opened in several ways:
· From the Tools menu. o This menu item can be used when no sequences are open to test effects and optionally save the
one’s you like as favorites. You can do this at any license level. o When a sequence is open, this menu item can be used to place a motion effect into the current
grid selection See the Sequencing topic for more information on how to use the Motion EffectGenerator when editing your sequences. Placing motion effects into a sequence requires the Prolicense level.
· Double-click on a motion effect on the sequence grid. This will select the entire motion effect andthen open the Motion Effect Generator set to this effect. If you make changes and click OK, thechanges will be saved back to the selected effect on the grid. This is the fastest way to modifyexisting motion effects in your sequence.
· Select an empty set of cells on a motion effect row, and then right-click and select Insert MotionEffect from the pop-up menu. Or you can use one of these shortcut keys: shift-A (max intensity),shift-U (ramp up), or shift-D (ramp down). The Effect Generator will open allowing you to choose anew effect. When closed, the new effect will be applied to the selected cells.
· Select a range of cells containing one or more effects on the grid, right-click in the selected area,and choose Prompt For New Effect > Modify Existing Effects from the pop-up menu (or shortcut keyshift-M). In this case, the new effect will overwrite the existing effects in the selection. However, the
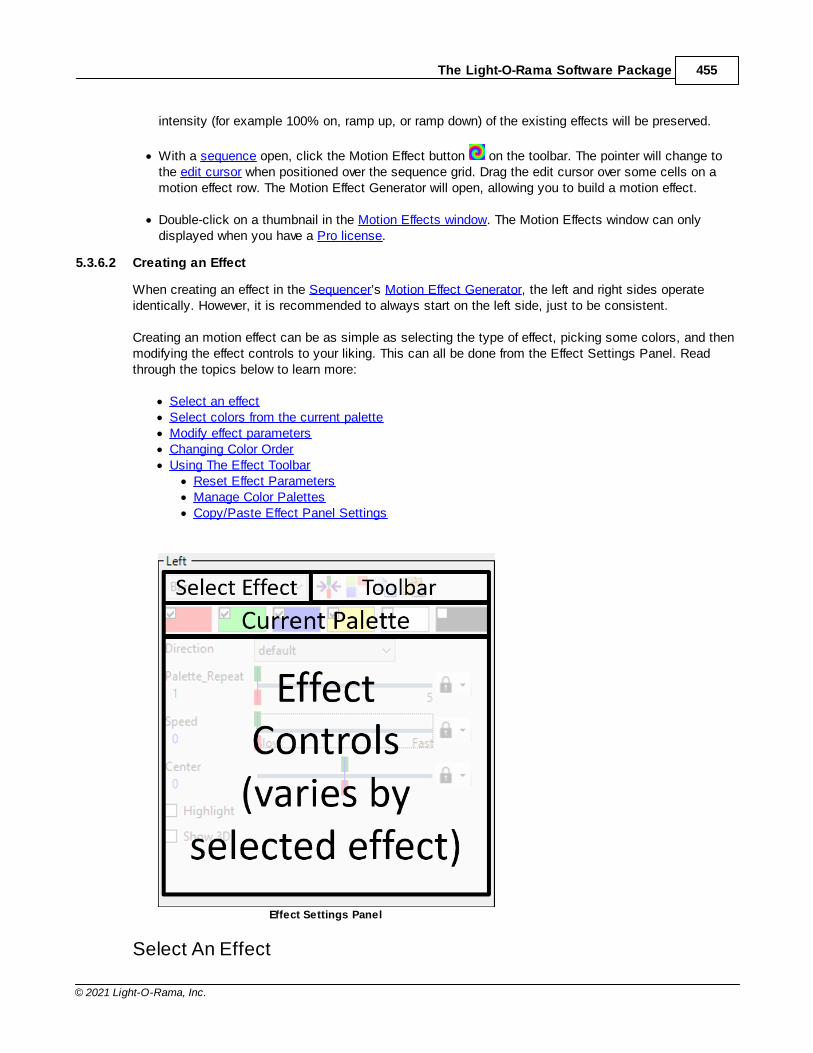
The Light-O-Rama Software Package 455
© 2021 Light-O-Rama, Inc.
intensity (for example 100% on, ramp up, or ramp down) of the existing effects will be preserved.
· With a sequence open, click the Motion Effect button on the toolbar. The pointer will change tothe edit cursor when positioned over the sequence grid. Drag the edit cursor over some cells on amotion effect row. The Motion Effect Generator will open, allowing you to build a motion effect.
· Double-click on a thumbnail in the Motion Effects window. The Motion Effects window can onlydisplayed when you have a Pro license.
5.3.6.2 Creating an Effect
When creating an effect in the Sequencer’s Motion Effect Generator, the left and right sides operateidentically. However, it is recommended to always start on the left side, just to be consistent.
Creating an motion effect can be as simple as selecting the type of effect, picking some colors, and thenmodifying the effect controls to your liking. This can all be done from the Effect Settings Panel. Readthrough the topics below to learn more:
· Select an effect· Select colors from the current palette· Modify effect parameters· Changing Color Order· Using The Effect Toolbar
· Reset Effect Parameters· Manage Color Palettes· Copy/Paste Effect Panel Settings
Effect Settings Panel
Select An Effect

Light-O-Rama v5.6.6456
© 2021 Light-O-Rama, Inc.
The first step in creating an effect is selecting the effect from the drop down list. The list is groupedby effect author/publisher.
See the Motion Effect Reference for detailed information on each effect.
Select Colors From The Current Palette
Choose the colors for the selected effect by clicking the checkboxes next to the desired colors. Notall effects use every chosen color. For example, the Color Wash effect only uses the first selectedcolor. The Picture effect doesn’t use any. If you haven’t selected any check boxes, the color defaultsto white.
The Toolbar and Color Palette
The size of the palette is fixed at 6 entries, but each palette entry can be set to a color of yourchoosing. Simply click on the color (not the check box), and the Select Color Transition window willopen allowing you to choose a previously saved color, a custom color, a random color, ortransparent.
Selecting the Single Color mode will cause the selected color to be used for the entire duration of theeffect. Save the current color by clicking the "+" button at the top right. Select a saved color byclicking on one in the list on the right side. Delete a saved color by clicking on one in the list andthen clicking the "X" button.
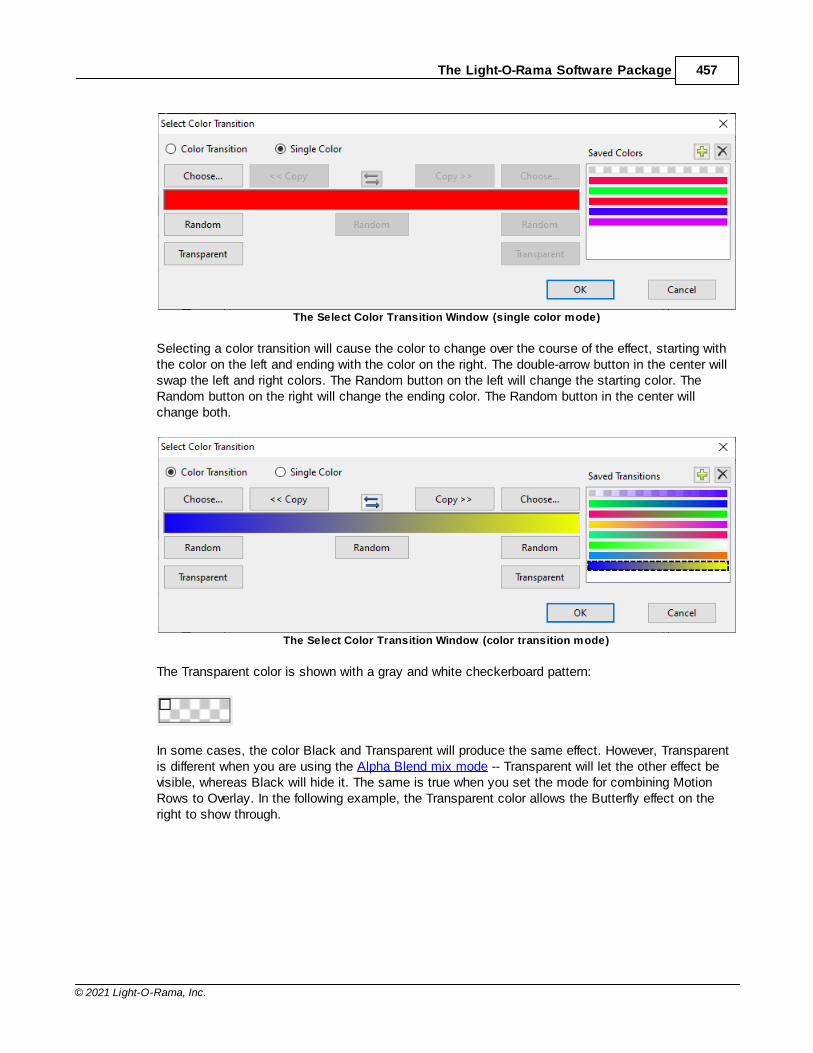
The Light-O-Rama Software Package 457
© 2021 Light-O-Rama, Inc.
The Select Color Transition Window (single color mode)
Selecting a color transition will cause the color to change over the course of the effect, starting withthe color on the left and ending with the color on the right. The double-arrow button in the center willswap the left and right colors. The Random button on the left will change the starting color. TheRandom button on the right will change the ending color. The Random button in the center willchange both.
The Select Color Transition Window (color transition mode)
The Transparent color is shown with a gray and white checkerboard pattern:
In some cases, the color Black and Transparent will produce the same effect. However, Transparentis different when you are using the Alpha Blend mix mode -- Transparent will let the other effect bevisible, whereas Black will hide it. The same is true when you set the mode for combining MotionRows to Overlay. In the following example, the Transparent color allows the Butterfly effect on theright to show through.
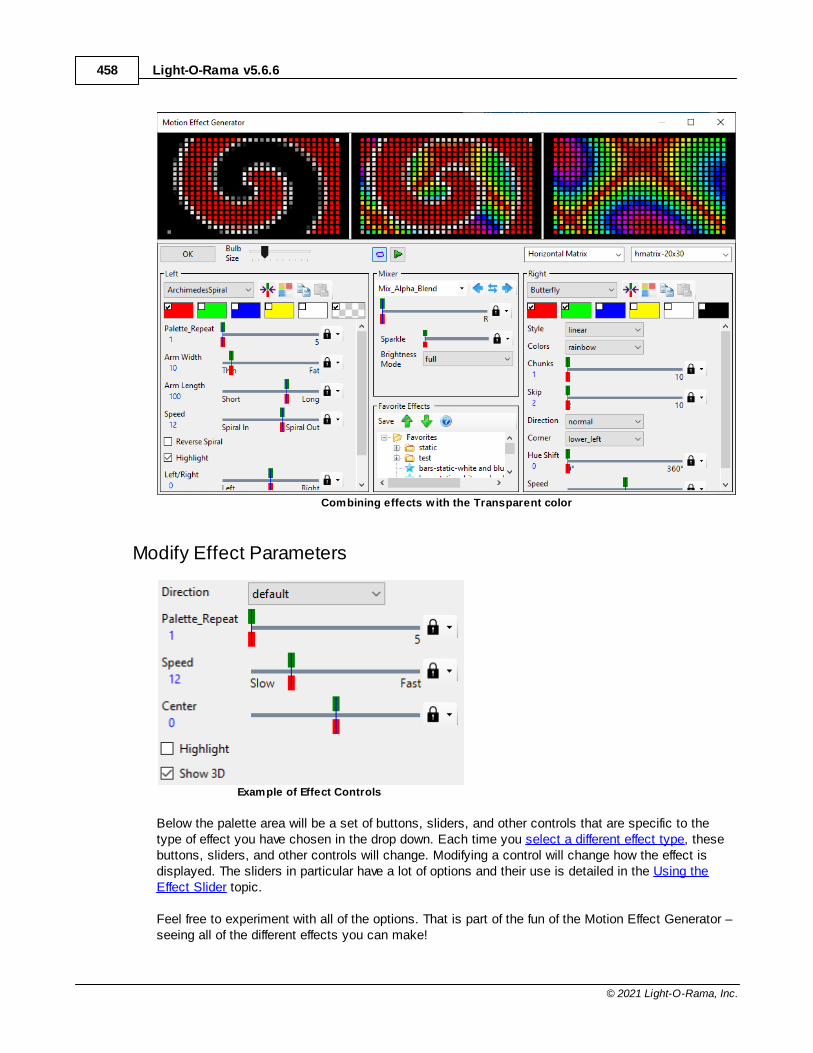
Light-O-Rama v5.6.6458
© 2021 Light-O-Rama, Inc.
Combining effects w ith the Transparent color
Modify Effect Parameters
Example of Effect Controls
Below the palette area will be a set of buttons, sliders, and other controls that are specific to thetype of effect you have chosen in the drop down. Each time you select a different effect type, thesebuttons, sliders, and other controls will change. Modifying a control will change how the effect isdisplayed. The sliders in particular have a lot of options and their use is detailed in the Using theEffect Slider topic.
Feel free to experiment with all of the options. That is part of the fun of the Motion Effect Generator –seeing all of the different effects you can make!
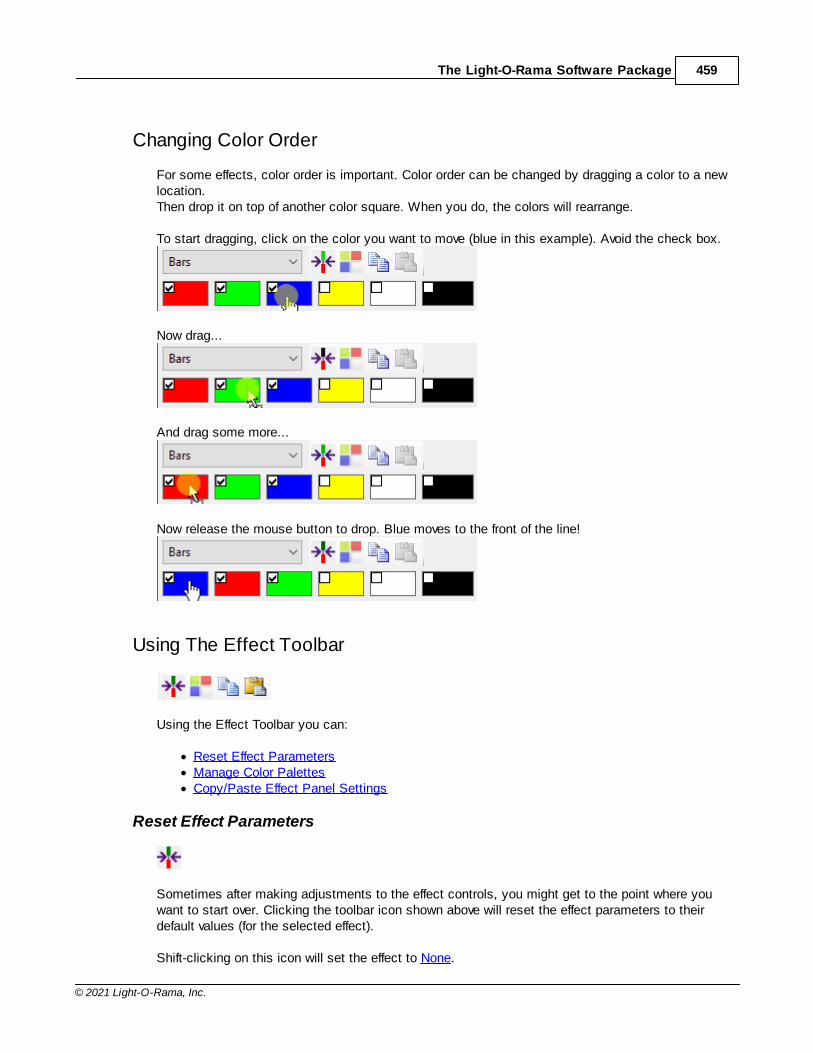
The Light-O-Rama Software Package 459
© 2021 Light-O-Rama, Inc.
Changing Color Order
For some effects, color order is important. Color order can be changed by dragging a color to a newlocation. Then drop it on top of another color square. When you do, the colors will rearrange.
To start dragging, click on the color you want to move (blue in this example). Avoid the check box.
Now drag...
And drag some more...
Now release the mouse button to drop. Blue moves to the front of the line!
Using The Effect Toolbar
Using the Effect Toolbar you can:
· Reset Effect Parameters· Manage Color Palettes· Copy/Paste Effect Panel Settings
Reset Effect Parameters
Sometimes after making adjustments to the effect controls, you might get to the point where youwant to start over. Clicking the toolbar icon shown above will reset the effect parameters to theirdefault values (for the selected effect).
Shift-clicking on this icon will set the effect to None.
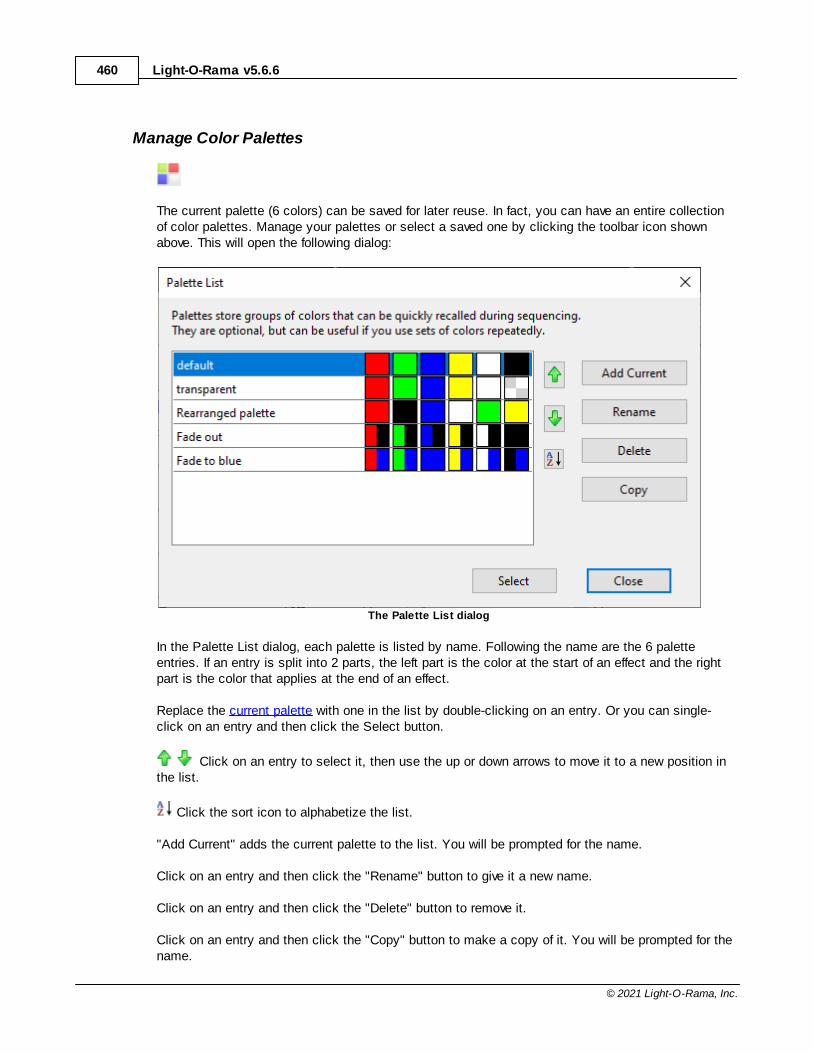
Light-O-Rama v5.6.6460
© 2021 Light-O-Rama, Inc.
Manage Color Palettes
The current palette (6 colors) can be saved for later reuse. In fact, you can have an entire collectionof color palettes. Manage your palettes or select a saved one by clicking the toolbar icon shownabove. This will open the following dialog:
The Palette List dialog
In the Palette List dialog, each palette is listed by name. Following the name are the 6 paletteentries. If an entry is split into 2 parts, the left part is the color at the start of an effect and the rightpart is the color that applies at the end of an effect.
Replace the current palette with one in the list by double-clicking on an entry. Or you can single-click on an entry and then click the Select button.
Click on an entry to select it, then use the up or down arrows to move it to a new position inthe list.
Click the sort icon to alphabetize the list.
"Add Current" adds the current palette to the list. You will be prompted for the name.
Click on an entry and then click the "Rename" button to give it a new name.
Click on an entry and then click the "Delete" button to remove it.
Click on an entry and then click the "Copy" button to make a copy of it. You will be prompted for thename.
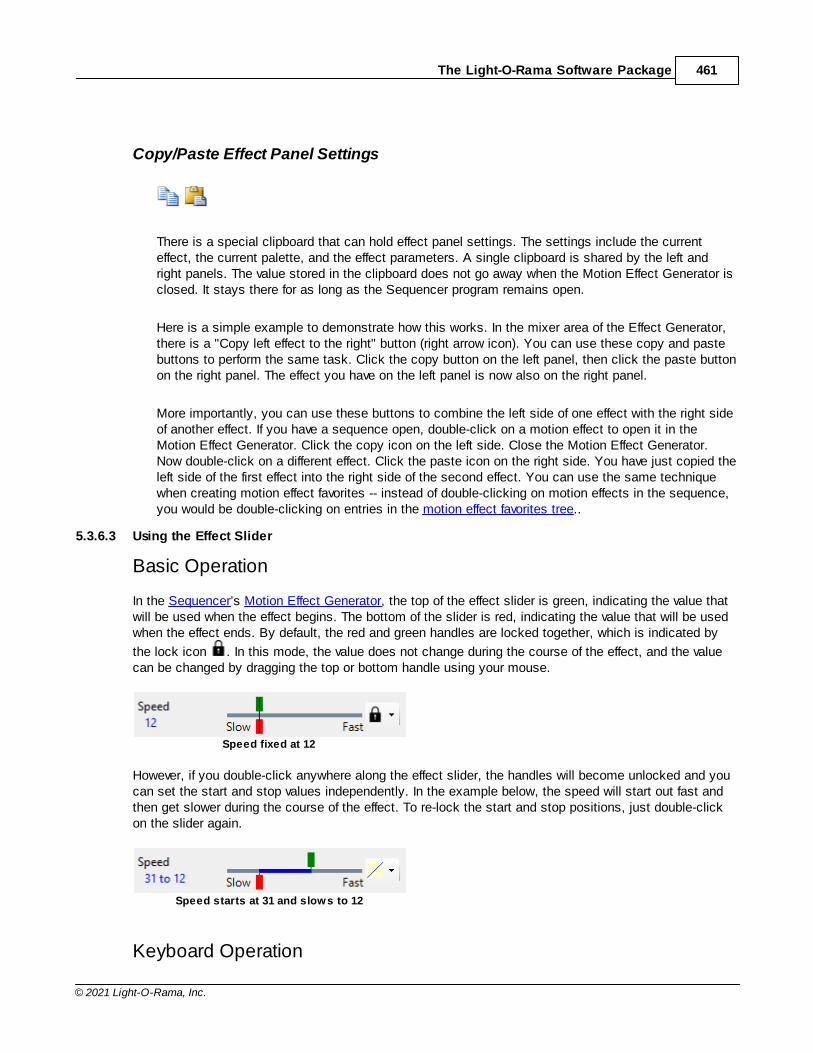
The Light-O-Rama Software Package 461
© 2021 Light-O-Rama, Inc.
Copy/Paste Effect Panel Settings
There is a special clipboard that can hold effect panel settings. The settings include the currenteffect, the current palette, and the effect parameters. A single clipboard is shared by the left andright panels. The value stored in the clipboard does not go away when the Motion Effect Generator isclosed. It stays there for as long as the Sequencer program remains open.
Here is a simple example to demonstrate how this works. In the mixer area of the Effect Generator,there is a "Copy left effect to the right" button (right arrow icon). You can use these copy and pastebuttons to perform the same task. Click the copy button on the left panel, then click the paste buttonon the right panel. The effect you have on the left panel is now also on the right panel.
More importantly, you can use these buttons to combine the left side of one effect with the right sideof another effect. If you have a sequence open, double-click on a motion effect to open it in theMotion Effect Generator. Click the copy icon on the left side. Close the Motion Effect Generator.Now double-click on a different effect. Click the paste icon on the right side. You have just copied theleft side of the first effect into the right side of the second effect. You can use the same techniquewhen creating motion effect favorites -- instead of double-clicking on motion effects in the sequence,you would be double-clicking on entries in the motion effect favorites tree..
5.3.6.3 Using the Effect Slider
Basic Operation
In the Sequencer’s Motion Effect Generator, the top of the effect slider is green, indicating the value thatwill be used when the effect begins. The bottom of the slider is red, indicating the value that will be usedwhen the effect ends. By default, the red and green handles are locked together, which is indicated by
the lock icon . In this mode, the value does not change during the course of the effect, and the valuecan be changed by dragging the top or bottom handle using your mouse.
Speed fixed at 12
However, if you double-click anywhere along the effect slider, the handles will become unlocked and youcan set the start and stop values independently. In the example below, the speed will start out fast andthen get slower during the course of the effect. To re-lock the start and stop positions, just double-clickon the slider again.
Speed starts at 31 and slows to 12
Keyboard Operation
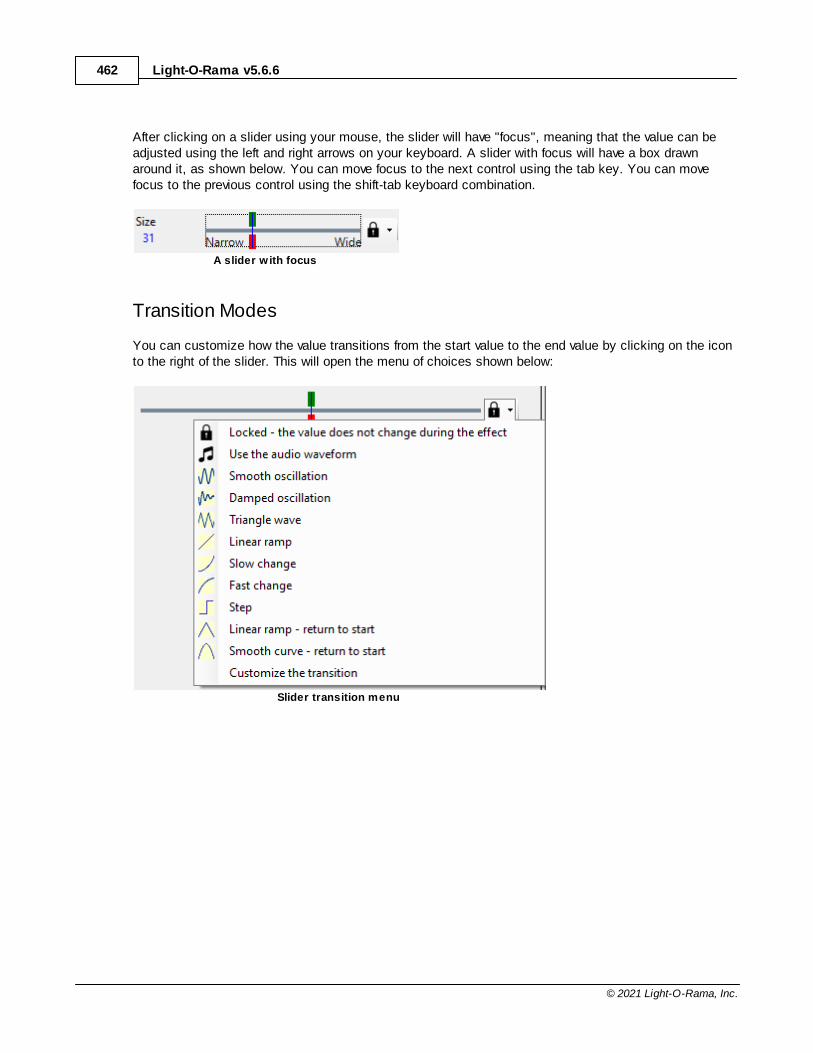
Light-O-Rama v5.6.6462
© 2021 Light-O-Rama, Inc.
After clicking on a slider using your mouse, the slider will have "focus", meaning that the value can beadjusted using the left and right arrows on your keyboard. A slider with focus will have a box drawnaround it, as shown below. You can move focus to the next control using the tab key. You can movefocus to the previous control using the shift-tab keyboard combination.
A slider w ith focus
Transition Modes
You can customize how the value transitions from the start value to the end value by clicking on the iconto the right of the slider. This will open the menu of choices shown below:
Slider transition menu
The Light-O-Rama Software Package 463
© 2021 Light-O-Rama, Inc.
Icon Mode
Slider is locked. The start and end values are always the same.
Slider value changes with the loudness of the music. The startvalue corresponds to low volumes, and the end valuecorresponds to high volumes.
Slider value smoothly oscillates between the start value and theend value (sine wave).
Slider value starts oscillating between the start and end values,but dampens to the mid-point between the start and end valueswhen the effect finishes.
Slider value ramps back and forth between the start and endvalues (triangle wave).
Slider value ramps from the start value to the end value (linear).
The transition starts slowly and then speeds up.
The transition starts quickly and then slows down.
The transition happens all at once (step).
The slider value ramps from start value to end value and thenreturns back to the start value.
The slider value smoothly transitions from start value to endvalue and back to the start value
Customizing the Transition
Opening the slider transition menu and selecting "Customize the transition" (last option) allows you tofurther customize how the transition occurs during the course of the effect. For transitions that oscillate,you can customize the oscillation frequency as shown below:
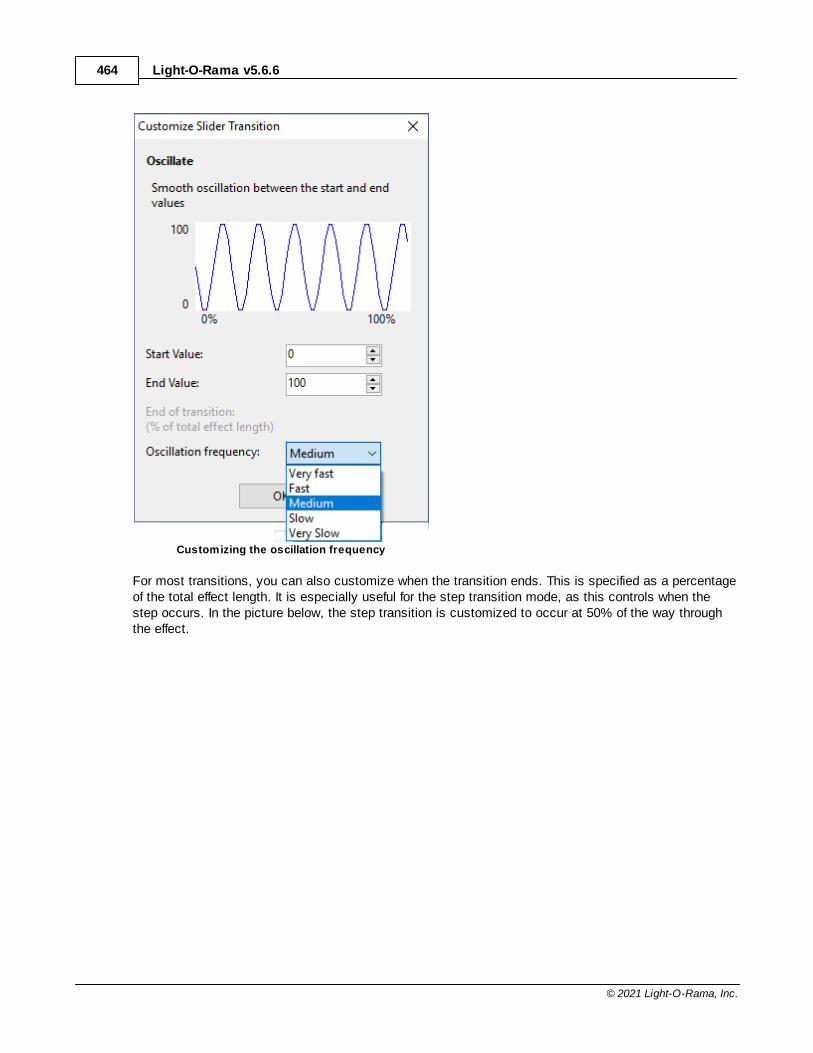
Light-O-Rama v5.6.6464
© 2021 Light-O-Rama, Inc.
Customizing the oscillation frequency
For most transitions, you can also customize when the transition ends. This is specified as a percentageof the total effect length. It is especially useful for the step transition mode, as this controls when thestep occurs. In the picture below, the step transition is customized to occur at 50% of the way throughthe effect.
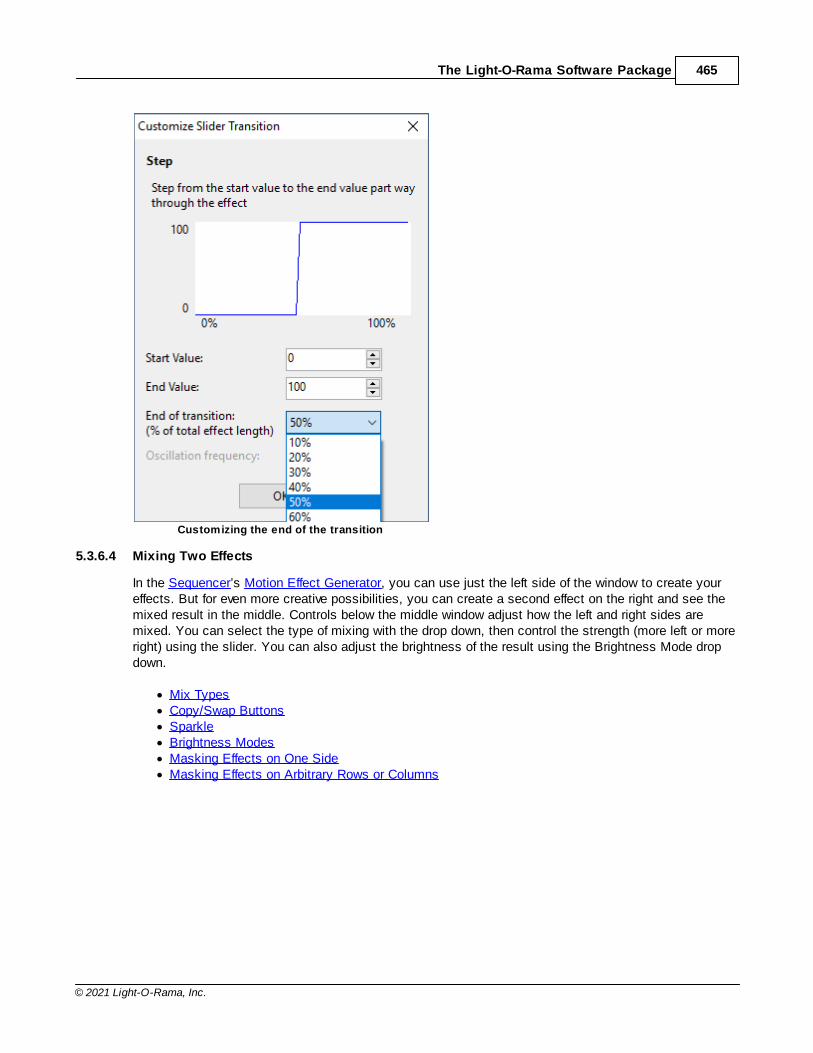
The Light-O-Rama Software Package 465
© 2021 Light-O-Rama, Inc.
Customizing the end of the transition
5.3.6.4 Mixing Two Effects
In the Sequencer’s Motion Effect Generator, you can use just the left side of the window to create youreffects. But for even more creative possibilities, you can create a second effect on the right and see themixed result in the middle. Controls below the middle window adjust how the left and right sides aremixed. You can select the type of mixing with the drop down, then control the strength (more left or moreright) using the slider. You can also adjust the brightness of the result using the Brightness Mode dropdown.
· Mix Types· Copy/Swap Buttons· Sparkle· Brightness Modes· Masking Effects on One Side· Masking Effects on Arbitrary Rows or Columns
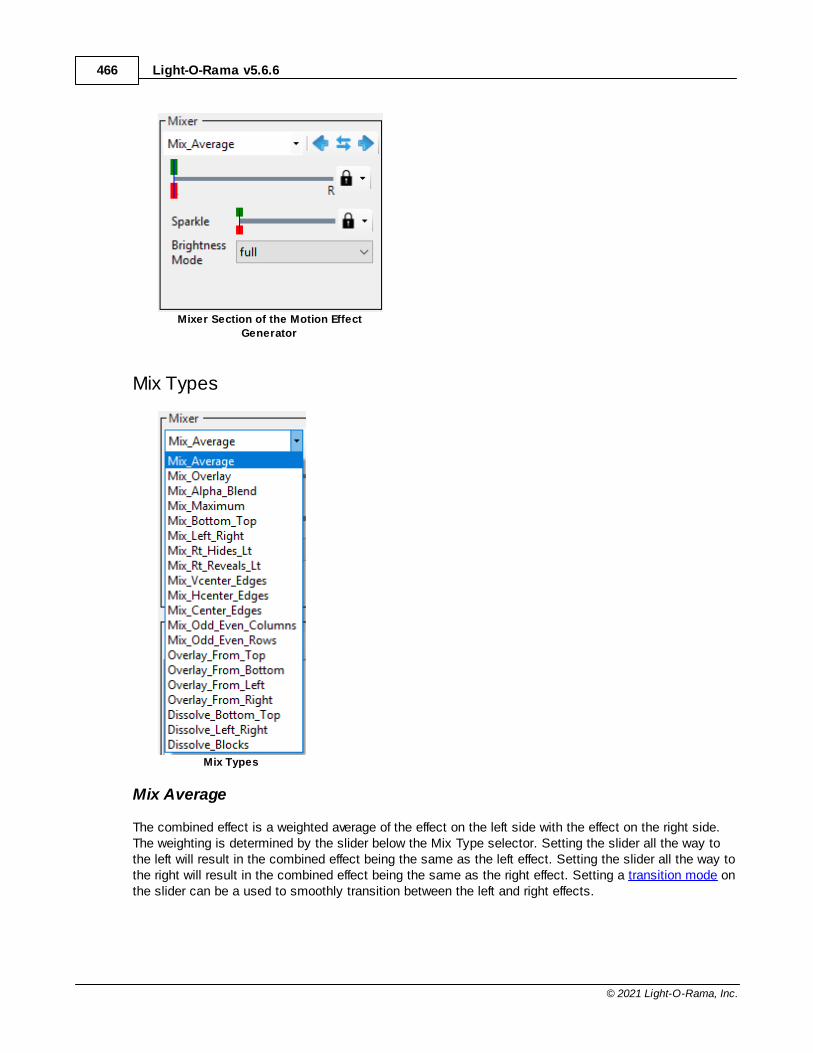
Light-O-Rama v5.6.6466
© 2021 Light-O-Rama, Inc.
Mixer Section of the Motion Effect
Generator
Mix Types
Mix Types
Mix Average
The combined effect is a weighted average of the effect on the left side with the effect on the right side.The weighting is determined by the slider below the Mix Type selector. Setting the slider all the way tothe left will result in the combined effect being the same as the left effect. Setting the slider all the way tothe right will result in the combined effect being the same as the right effect. Setting a transition mode onthe slider can be a used to smoothly transition between the left and right effects.

The Light-O-Rama Software Package 467
© 2021 Light-O-Rama, Inc.
A 50% mix of left and right, leaves both effects dimmed in the combined effect.
Mix Overlay
Areas that are completely black on one side, will be replaced by the corresponding area on the otherside. Areas that are not black on both sides will behave like Mix Average.

Light-O-Rama v5.6.6468
© 2021 Light-O-Rama, Inc.
In Mix Overlay mode, the transparency of the meteor tails is not taken into account.
Mix Alpha Blend
Darkened areas of effects are treated as partially transparent (or completely transparent if black). Thecombined effect overlays the left effect on top of the right effect, blending the areas that are partiallytransparent.
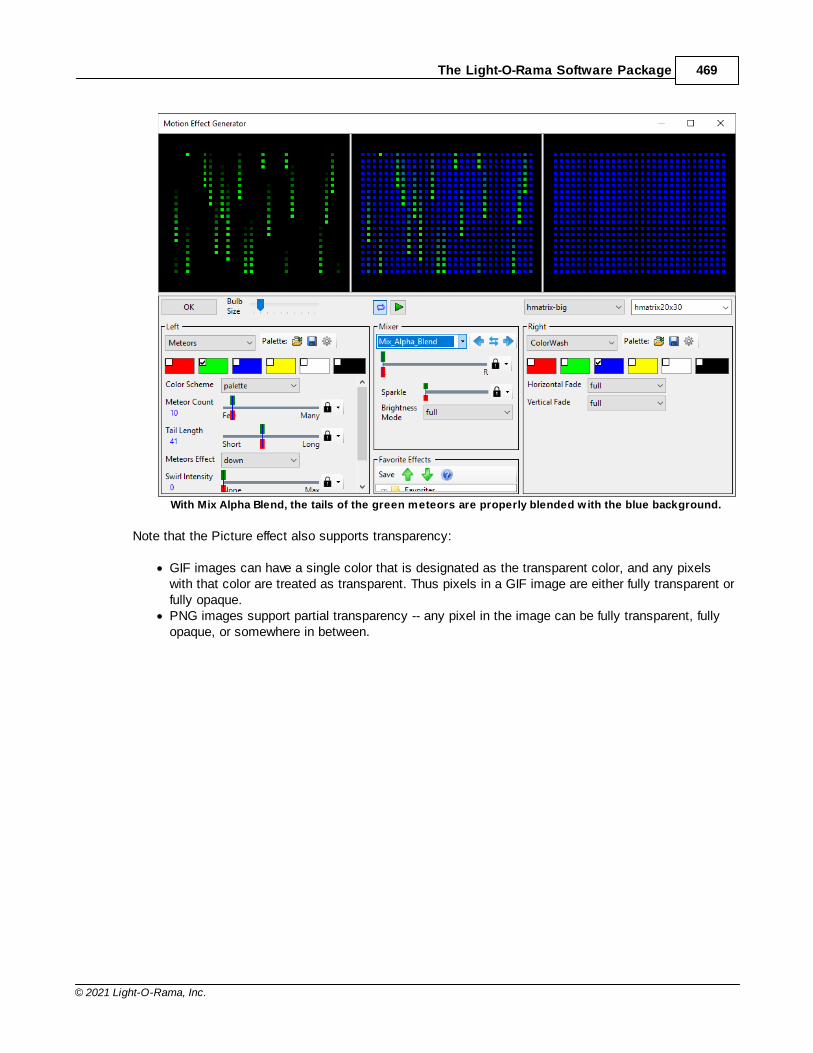
The Light-O-Rama Software Package 469
© 2021 Light-O-Rama, Inc.
With Mix Alpha Blend, the tails of the green meteors are properly blended with the blue background.
Note that the Picture effect also supports transparency:
· GIF images can have a single color that is designated as the transparent color, and any pixelswith that color are treated as transparent. Thus pixels in a GIF image are either fully transparent orfully opaque.
· PNG images support partial transparency -- any pixel in the image can be fully transparent, fullyopaque, or somewhere in between.

Light-O-Rama v5.6.6470
© 2021 Light-O-Rama, Inc.
PNG image blended with a blue color wash. The picture on the left is white across the top and gradually
fades out to black across the bottom; transparency goes from completely transparent on the left to
completely opaque on the right.
Mix Maximum
For each pixel in the combined effect, the pixels from both sides are used to achieve maximumbrightness. This is calculated as the maximum of the red values from each side, the maximum of thegreen values from each side, and the maximum of the blue values from each side.
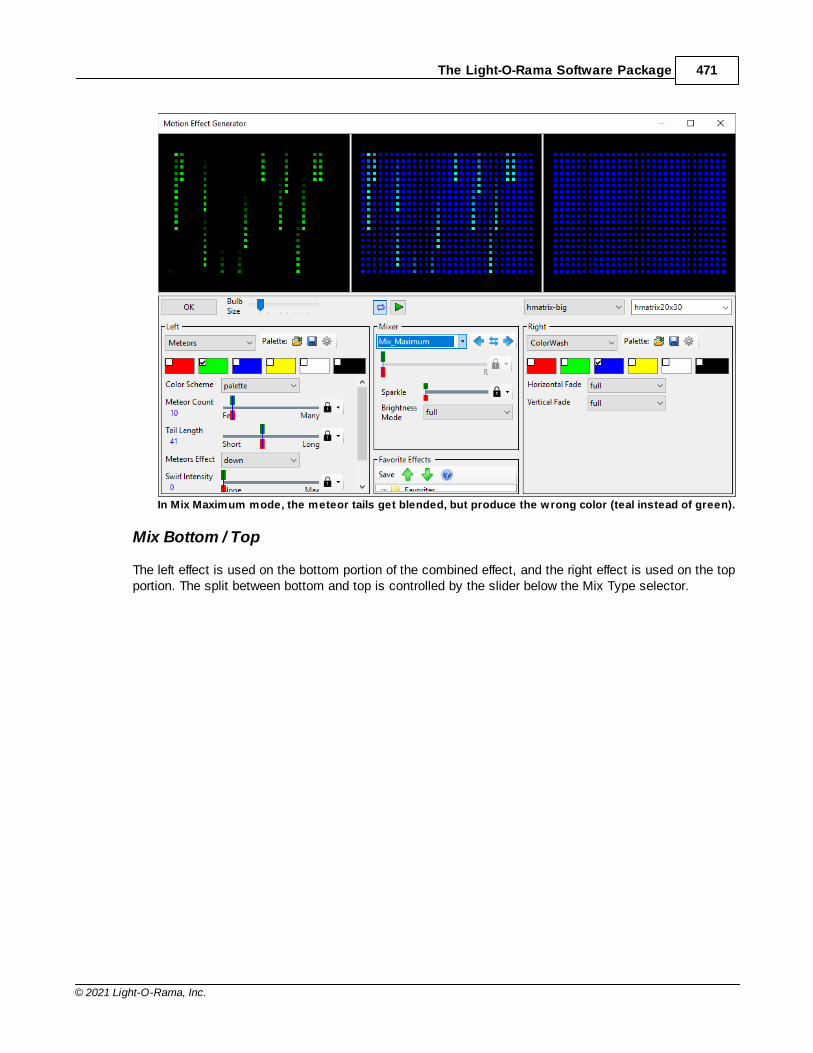
The Light-O-Rama Software Package 471
© 2021 Light-O-Rama, Inc.
In Mix Maximum mode, the meteor tails get blended, but produce the wrong color (teal instead of green).
Mix Bottom / Top
The left effect is used on the bottom portion of the combined effect, and the right effect is used on the topportion. The split between bottom and top is controlled by the slider below the Mix Type selector.

Light-O-Rama v5.6.6472
© 2021 Light-O-Rama, Inc.
Mix Bottom / Top example
Mix Left / Right
The left effect is used on the left portion of the combined effect, and the right effect is used on the rightportion. The split between left and right is controlled by the slider below the Mix Type selector.
Mix Left / Right example
Mix Right Hides Left
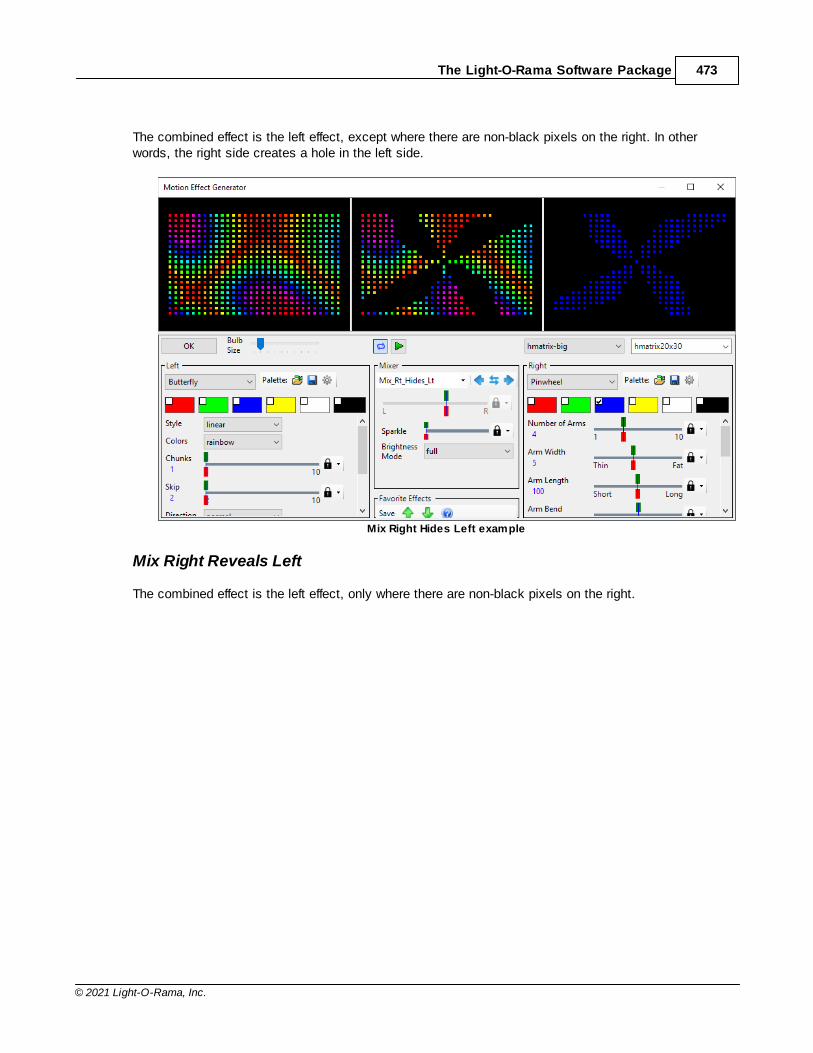
The Light-O-Rama Software Package 473
© 2021 Light-O-Rama, Inc.
The combined effect is the left effect, except where there are non-black pixels on the right. In otherwords, the right side creates a hole in the left side.
Mix Right Hides Left example
Mix Right Reveals Left
The combined effect is the left effect, only where there are non-black pixels on the right.
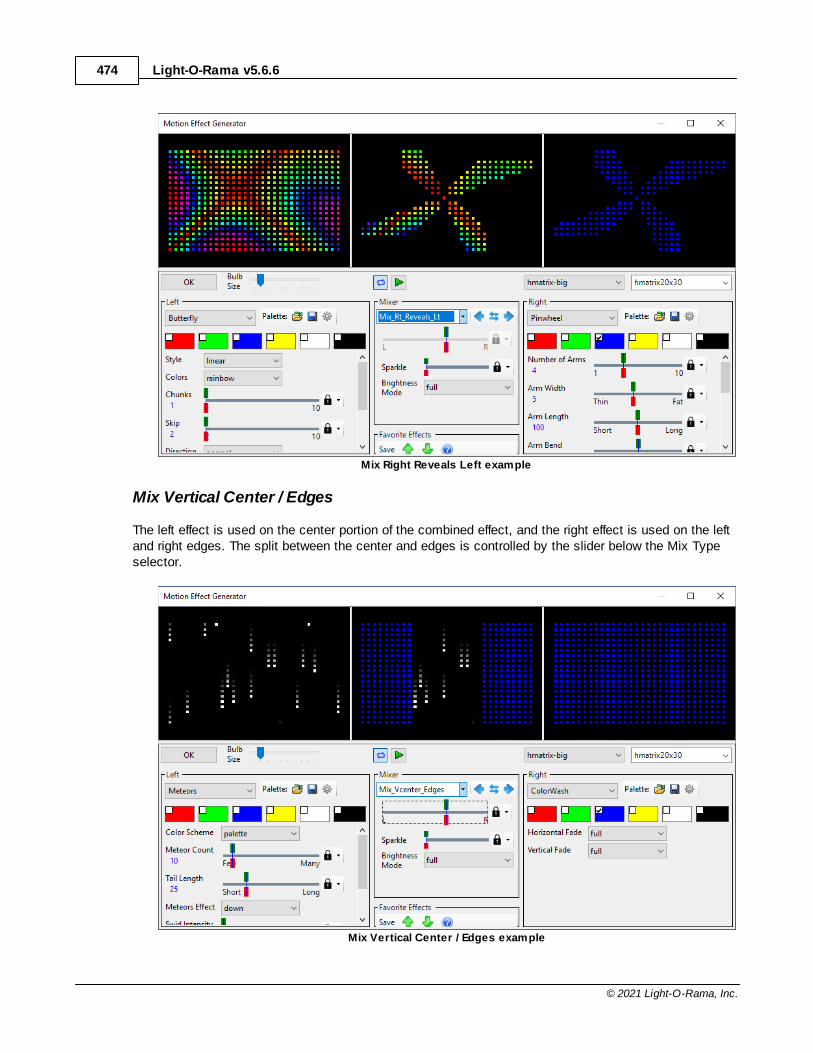
Light-O-Rama v5.6.6474
© 2021 Light-O-Rama, Inc.
Mix Right Reveals Left example
Mix Vertical Center / Edges
The left effect is used on the center portion of the combined effect, and the right effect is used on the leftand right edges. The split between the center and edges is controlled by the slider below the Mix Typeselector.
Mix Vertical Center / Edges example
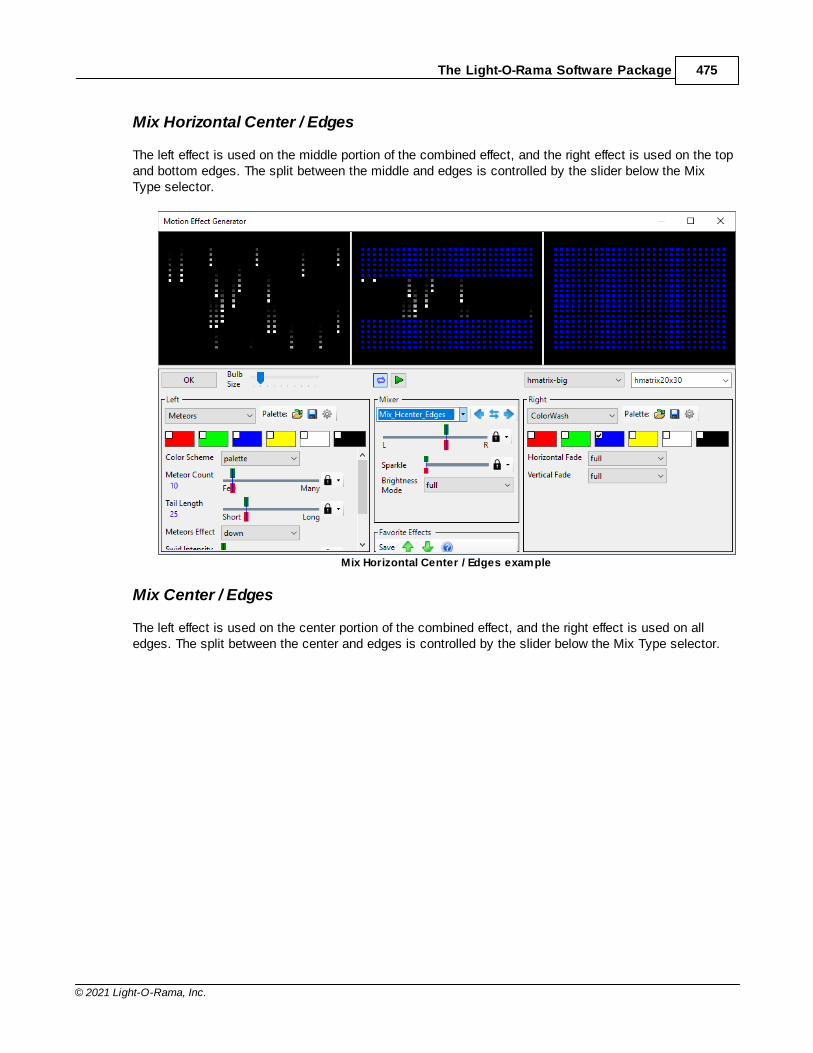
The Light-O-Rama Software Package 475
© 2021 Light-O-Rama, Inc.
Mix Horizontal Center / Edges
The left effect is used on the middle portion of the combined effect, and the right effect is used on the topand bottom edges. The split between the middle and edges is controlled by the slider below the MixType selector.
Mix Horizontal Center / Edges example
Mix Center / Edges
The left effect is used on the center portion of the combined effect, and the right effect is used on alledges. The split between the center and edges is controlled by the slider below the Mix Type selector.
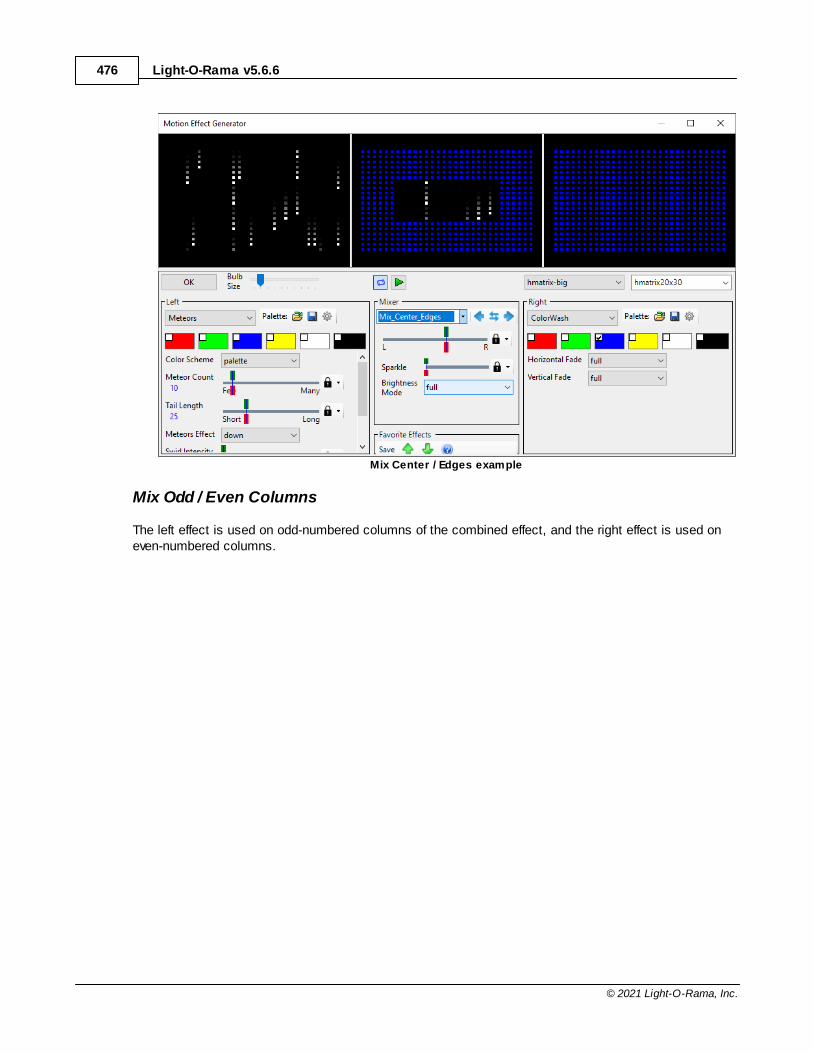
Light-O-Rama v5.6.6476
© 2021 Light-O-Rama, Inc.
Mix Center / Edges example
Mix Odd / Even Columns
The left effect is used on odd-numbered columns of the combined effect, and the right effect is used oneven-numbered columns.
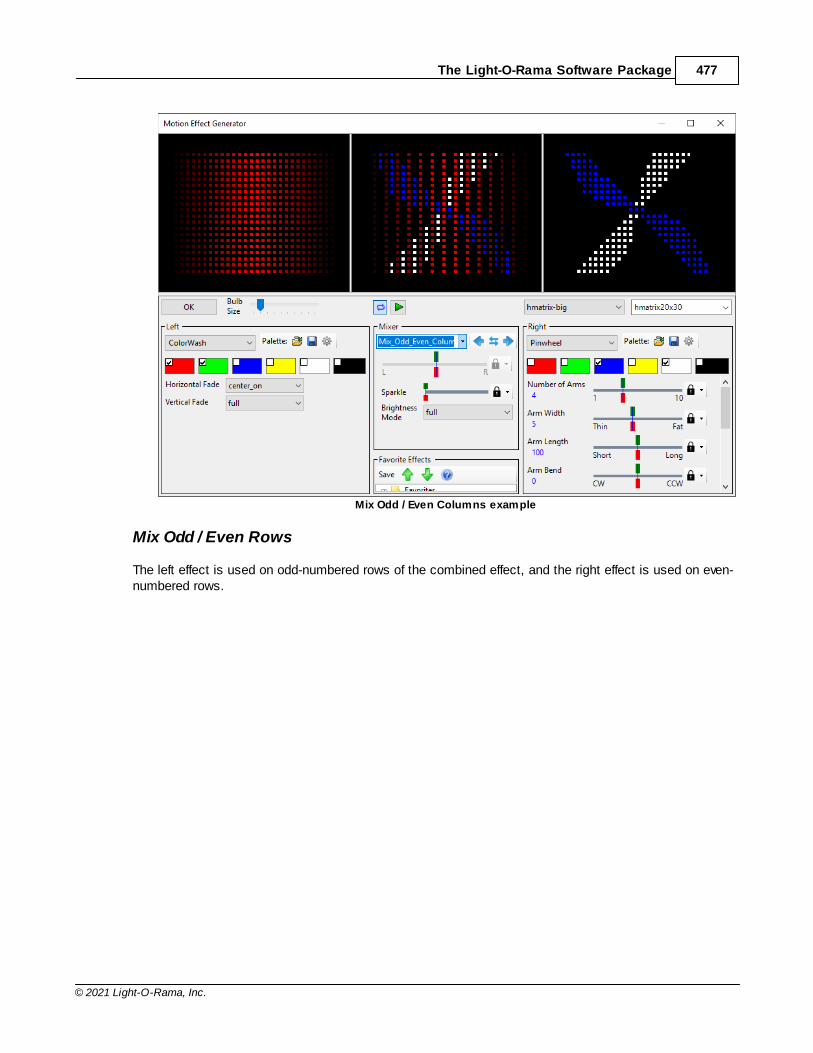
The Light-O-Rama Software Package 477
© 2021 Light-O-Rama, Inc.
Mix Odd / Even Columns example
Mix Odd / Even Rows
The left effect is used on odd-numbered rows of the combined effect, and the right effect is used on even-numbered rows.

Light-O-Rama v5.6.6478
© 2021 Light-O-Rama, Inc.
Mix Odd / Even Rows example
Overlay From Top
This does an alpha blend on the top and the right effect on the bottom. The split between bottom and topis controlled by the slider below the Mix Type selector.

The Light-O-Rama Software Package 479
© 2021 Light-O-Rama, Inc.
Overlay From Top example
Overlay From Bottom
This does an alpha blend on the bottom and the right effect on the top. The split between bottom and topis controlled by the slider below the Mix Type selector.
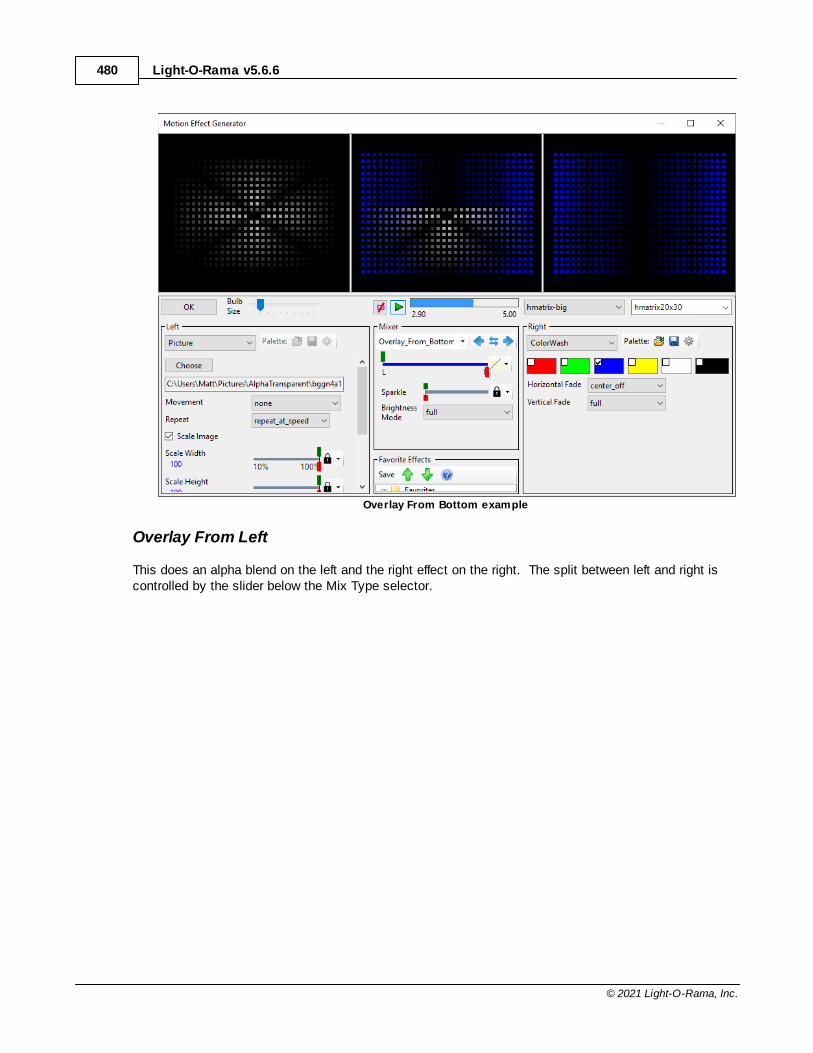
Light-O-Rama v5.6.6480
© 2021 Light-O-Rama, Inc.
Overlay From Bottom example
Overlay From Left
This does an alpha blend on the left and the right effect on the right. The split between left and right iscontrolled by the slider below the Mix Type selector.

The Light-O-Rama Software Package 481
© 2021 Light-O-Rama, Inc.
Overlay From Left example
Overlay From Right
This does an alpha blend on the right and the right effect on the left. The split between left and right iscontrolled by the slider below the Mix Type selector.

Light-O-Rama v5.6.6482
© 2021 Light-O-Rama, Inc.
Overlay From Right example
Dissolve Bottom / Top
This is like Mix Bottom / Top, except that the transition area is blended.
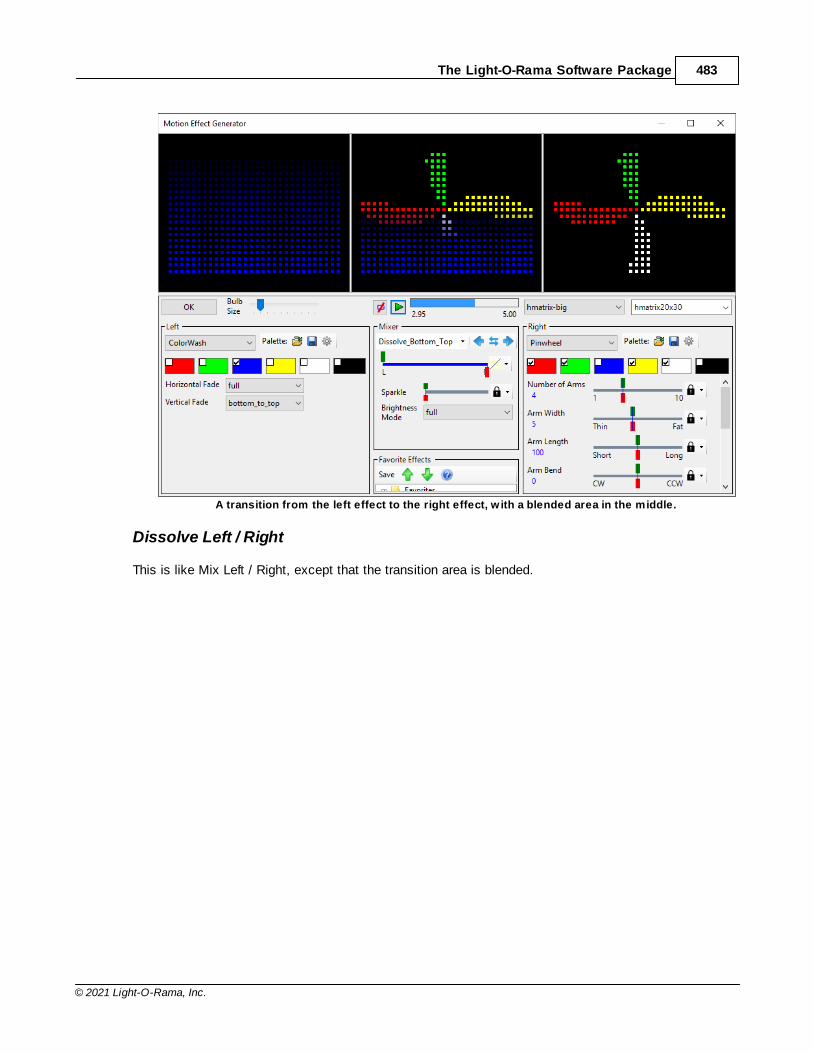
The Light-O-Rama Software Package 483
© 2021 Light-O-Rama, Inc.
A transition from the left effect to the right effect, w ith a blended area in the middle.
Dissolve Left / Right
This is like Mix Left / Right, except that the transition area is blended.
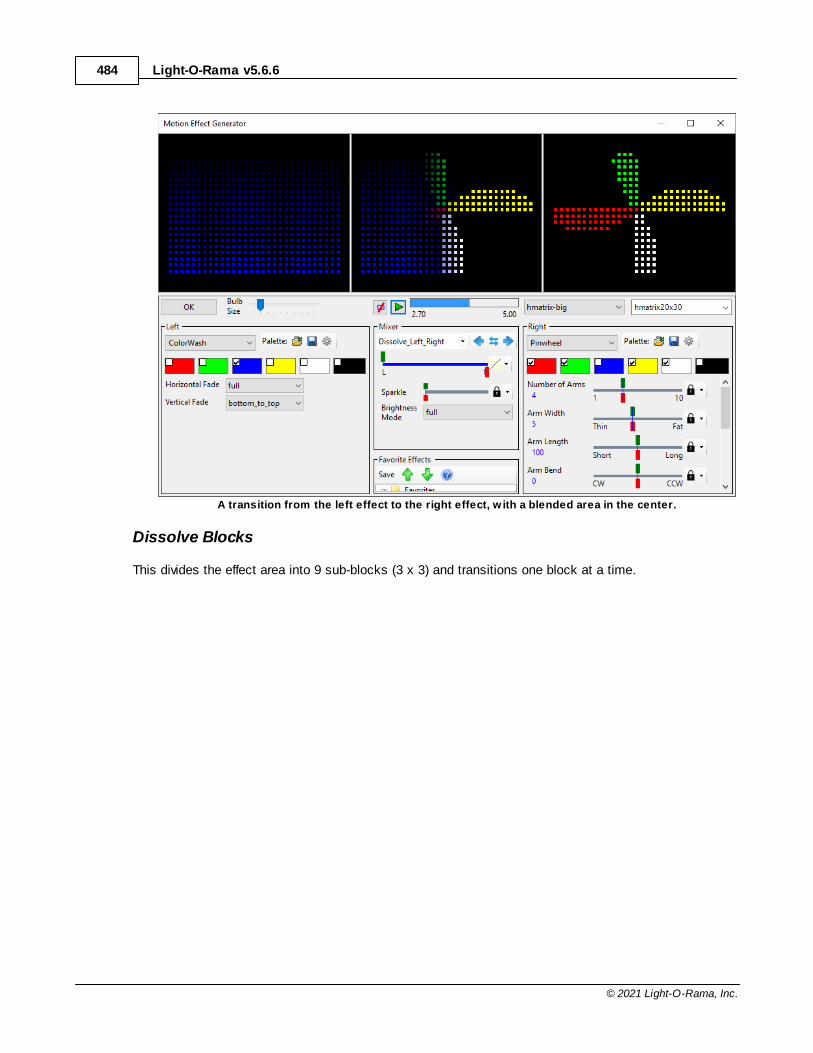
Light-O-Rama v5.6.6484
© 2021 Light-O-Rama, Inc.
A transition from the left effect to the right effect, w ith a blended area in the center.
Dissolve Blocks
This divides the effect area into 9 sub-blocks (3 x 3) and transitions one block at a time.
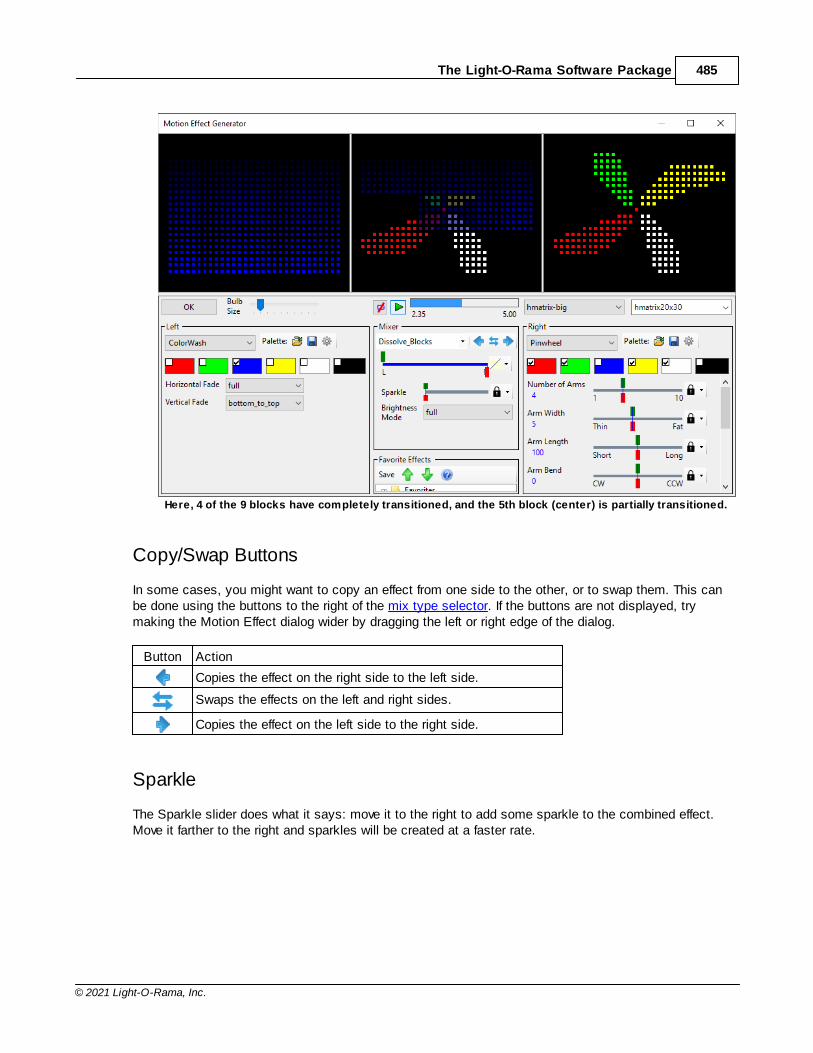
The Light-O-Rama Software Package 485
© 2021 Light-O-Rama, Inc.
Here, 4 of the 9 blocks have completely transitioned, and the 5th block (center) is partially transitioned.
Copy/Swap Buttons
In some cases, you might want to copy an effect from one side to the other, or to swap them. This canbe done using the buttons to the right of the mix type selector. If the buttons are not displayed, trymaking the Motion Effect dialog wider by dragging the left or right edge of the dialog.
Button Action
Copies the effect on the right side to the left side.
Swaps the effects on the left and right sides.
Copies the effect on the left side to the right side.
Sparkle
The Sparkle slider does what it says: move it to the right to add some sparkle to the combined effect.Move it farther to the right and sparkles will be created at a faster rate.
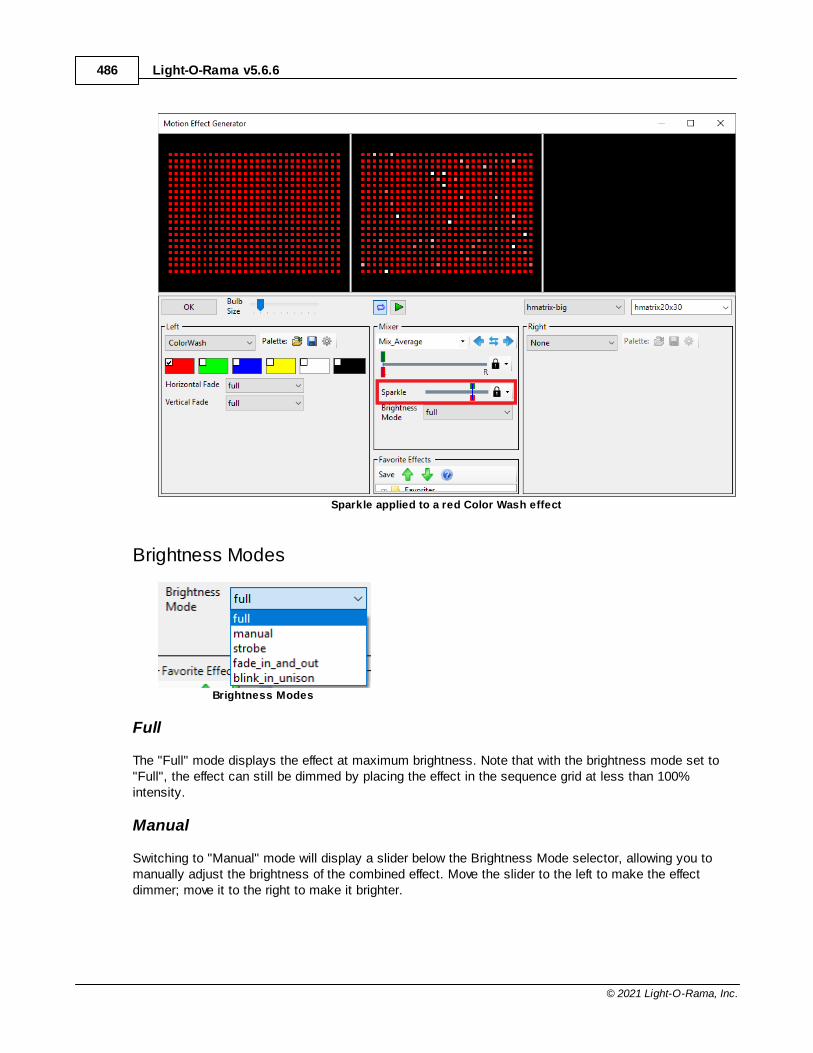
Light-O-Rama v5.6.6486
© 2021 Light-O-Rama, Inc.
Sparkle applied to a red Color Wash effect
Brightness Modes
Brightness Modes
Full
The "Full" mode displays the effect at maximum brightness. Note that with the brightness mode set to"Full", the effect can still be dimmed by placing the effect in the sequence grid at less than 100%intensity.
Manual
Switching to "Manual" mode will display a slider below the Brightness Mode selector, allowing you tomanually adjust the brightness of the combined effect. Move the slider to the left to make the effectdimmer; move it to the right to make it brighter.
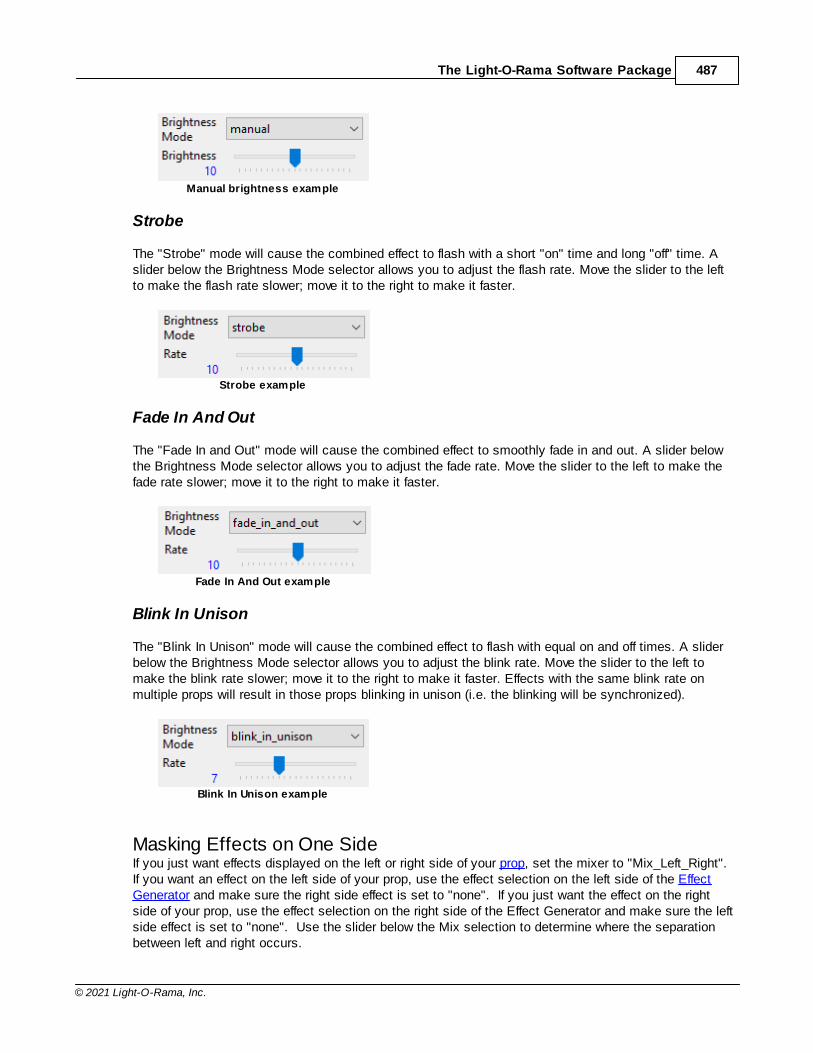
The Light-O-Rama Software Package 487
© 2021 Light-O-Rama, Inc.
Manual brightness example
Strobe
The "Strobe" mode will cause the combined effect to flash with a short "on" time and long "off" time. Aslider below the Brightness Mode selector allows you to adjust the flash rate. Move the slider to the leftto make the flash rate slower; move it to the right to make it faster.
Strobe example
Fade In And Out
The "Fade In and Out" mode will cause the combined effect to smoothly fade in and out. A slider belowthe Brightness Mode selector allows you to adjust the fade rate. Move the slider to the left to make thefade rate slower; move it to the right to make it faster.
Fade In And Out example
Blink In Unison
The "Blink In Unison" mode will cause the combined effect to flash with equal on and off times. A sliderbelow the Brightness Mode selector allows you to adjust the blink rate. Move the slider to the left tomake the blink rate slower; move it to the right to make it faster. Effects with the same blink rate onmultiple props will result in those props blinking in unison (i.e. the blinking will be synchronized).
Blink In Unison example
Masking Effects on One SideIf you just want effects displayed on the left or right side of your prop, set the mixer to "Mix_Left_Right". If you want an effect on the left side of your prop, use the effect selection on the left side of the EffectGenerator and make sure the right side effect is set to "none". If you just want the effect on the rightside of your prop, use the effect selection on the right side of the Effect Generator and make sure the leftside effect is set to "none". Use the slider below the Mix selection to determine where the separationbetween left and right occurs.
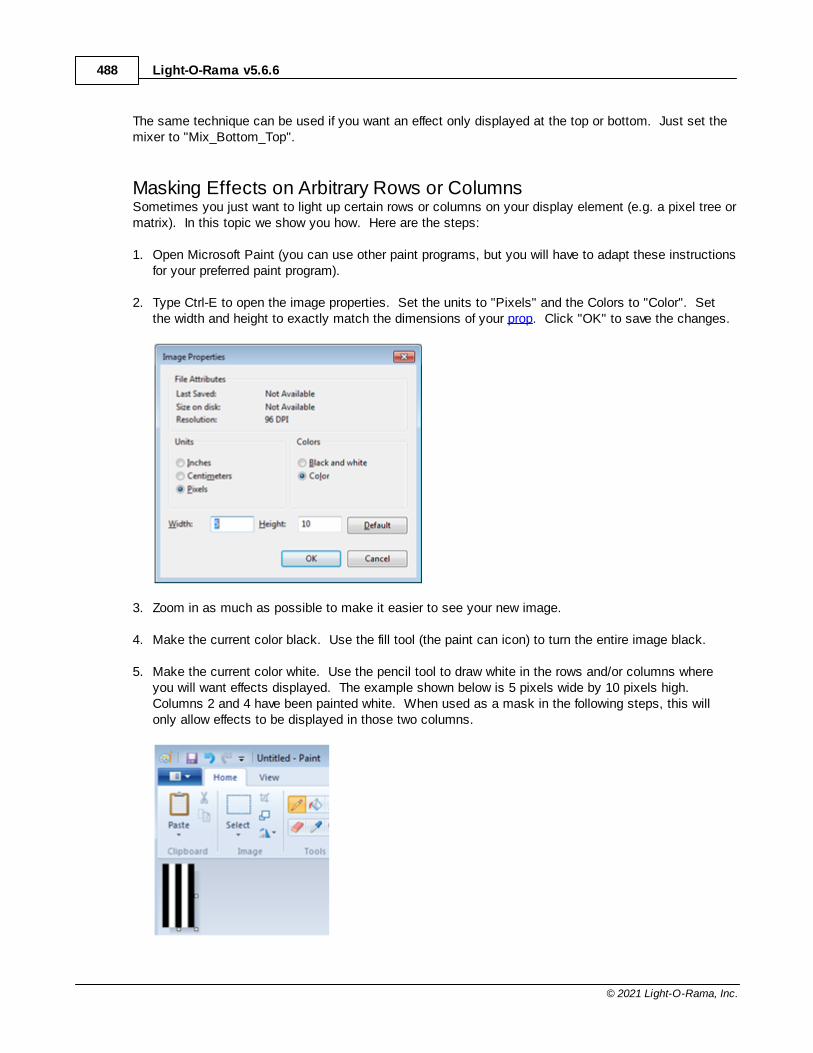
Light-O-Rama v5.6.6488
© 2021 Light-O-Rama, Inc.
The same technique can be used if you want an effect only displayed at the top or bottom. Just set themixer to "Mix_Bottom_Top".
Masking Effects on Arbitrary Rows or ColumnsSometimes you just want to light up certain rows or columns on your display element (e.g. a pixel tree ormatrix). In this topic we show you how. Here are the steps:
1. Open Microsoft Paint (you can use other paint programs, but you will have to adapt these instructionsfor your preferred paint program).
2. Type Ctrl-E to open the image properties. Set the units to "Pixels" and the Colors to "Color". Setthe width and height to exactly match the dimensions of your prop. Click "OK" to save the changes.
3. Zoom in as much as possible to make it easier to see your new image.
4. Make the current color black. Use the fill tool (the paint can icon) to turn the entire image black.
5. Make the current color white. Use the pencil tool to draw white in the rows and/or columns whereyou will want effects displayed. The example shown below is 5 pixels wide by 10 pixels high. Columns 2 and 4 have been painted white. When used as a mask in the following steps, this willonly allow effects to be displayed in those two columns.
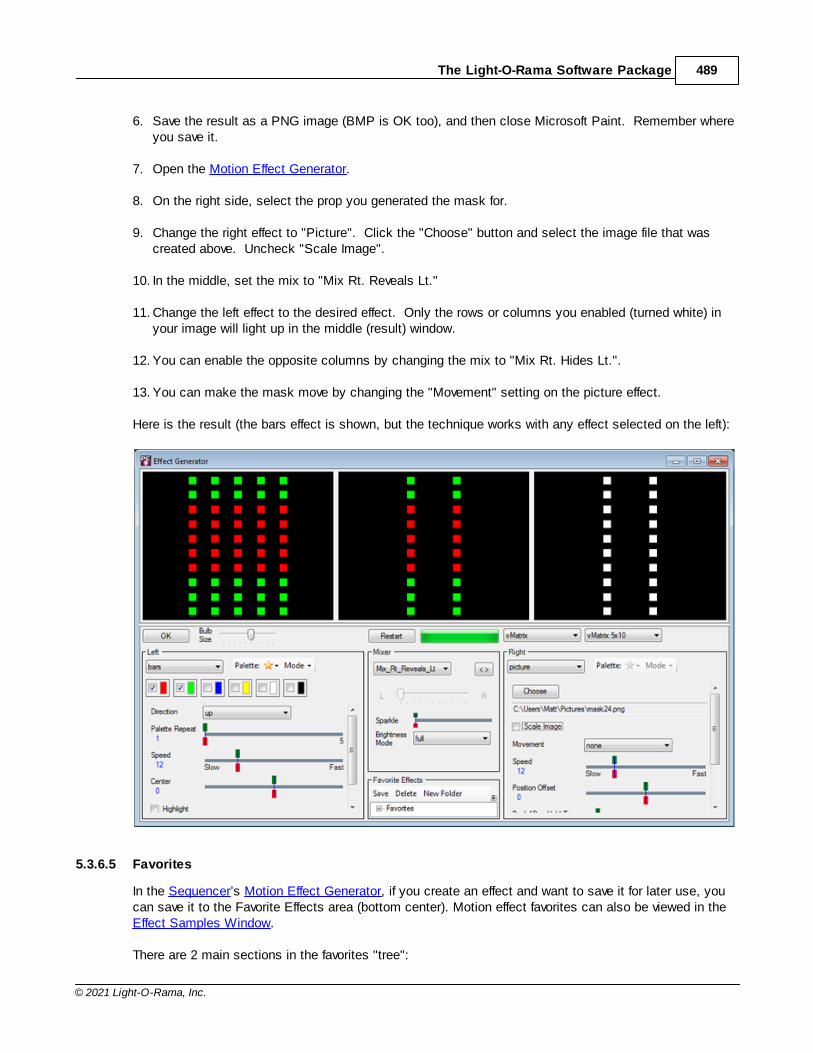
The Light-O-Rama Software Package 489
© 2021 Light-O-Rama, Inc.
6. Save the result as a PNG image (BMP is OK too), and then close Microsoft Paint. Remember whereyou save it.
7. Open the Motion Effect Generator.
8. On the right side, select the prop you generated the mask for.
9. Change the right effect to "Picture". Click the "Choose" button and select the image file that wascreated above. Uncheck "Scale Image".
10. In the middle, set the mix to "Mix Rt. Reveals Lt."
11. Change the left effect to the desired effect. Only the rows or columns you enabled (turned white) inyour image will light up in the middle (result) window.
12. You can enable the opposite columns by changing the mix to "Mix Rt. Hides Lt.".
13. You can make the mask move by changing the "Movement" setting on the picture effect.
Here is the result (the bars effect is shown, but the technique works with any effect selected on the left):
5.3.6.5 Favorites
In the Sequencer’s Motion Effect Generator, if you create an effect and want to save it for later use, youcan save it to the Favorite Effects area (bottom center). Motion effect favorites can also be viewed in theEffect Samples Window.
There are 2 main sections in the favorites "tree":
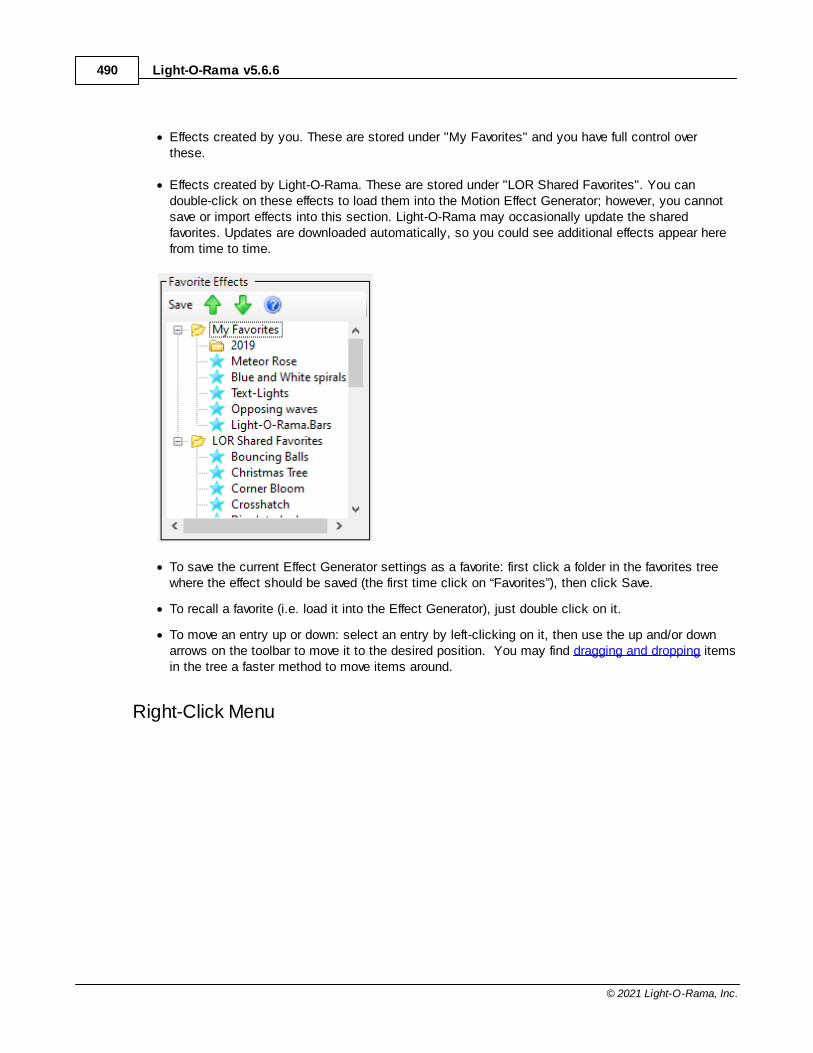
Light-O-Rama v5.6.6490
© 2021 Light-O-Rama, Inc.
· Effects created by you. These are stored under "My Favorites" and you have full control overthese.
· Effects created by Light-O-Rama. These are stored under "LOR Shared Favorites". You candouble-click on these effects to load them into the Motion Effect Generator; however, you cannotsave or import effects into this section. Light-O-Rama may occasionally update the sharedfavorites. Updates are downloaded automatically, so you could see additional effects appear herefrom time to time.
· To save the current Effect Generator settings as a favorite: first click a folder in the favorites treewhere the effect should be saved (the first time click on “Favorites”), then click Save.
· To recall a favorite (i.e. load it into the Effect Generator), just double click on it.
· To move an entry up or down: select an entry by left-clicking on it, then use the up and/or downarrows on the toolbar to move it to the desired position. You may find dragging and dropping itemsin the tree a faster method to move items around.
Right-Click Menu
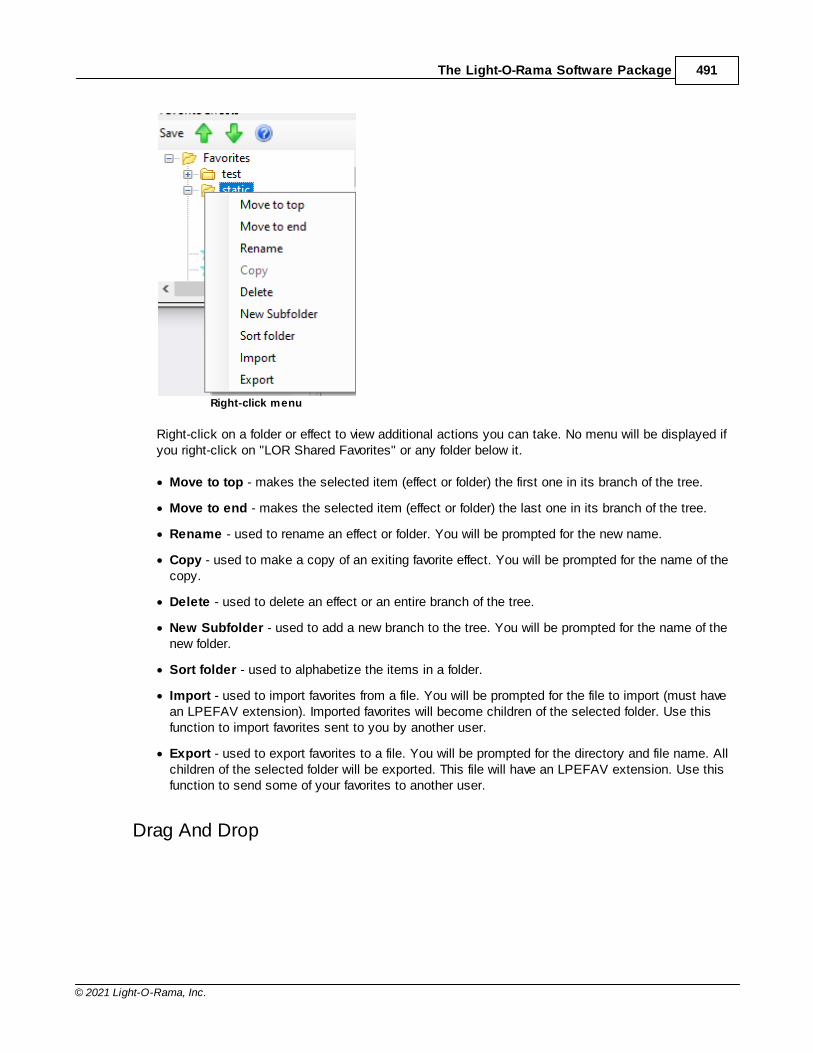
The Light-O-Rama Software Package 491
© 2021 Light-O-Rama, Inc.
Right-click menu
Right-click on a folder or effect to view additional actions you can take. No menu will be displayed ifyou right-click on "LOR Shared Favorites" or any folder below it.
· Move to top - makes the selected item (effect or folder) the first one in its branch of the tree.
· Move to end - makes the selected item (effect or folder) the last one in its branch of the tree.
· Rename - used to rename an effect or folder. You will be prompted for the new name.
· Copy - used to make a copy of an exiting favorite effect. You will be prompted for the name of thecopy.
· Delete - used to delete an effect or an entire branch of the tree.
· New Subfolder - used to add a new branch to the tree. You will be prompted for the name of thenew folder.
· Sort folder - used to alphabetize the items in a folder.
· Import - used to import favorites from a file. You will be prompted for the file to import (must havean LPEFAV extension). Imported favorites will become children of the selected folder. Use thisfunction to import favorites sent to you by another user.
· Export - used to export favorites to a file. You will be prompted for the directory and file name. Allchildren of the selected folder will be exported. This file will have an LPEFAV extension. Use thisfunction to send some of your favorites to another user.
Drag And Drop
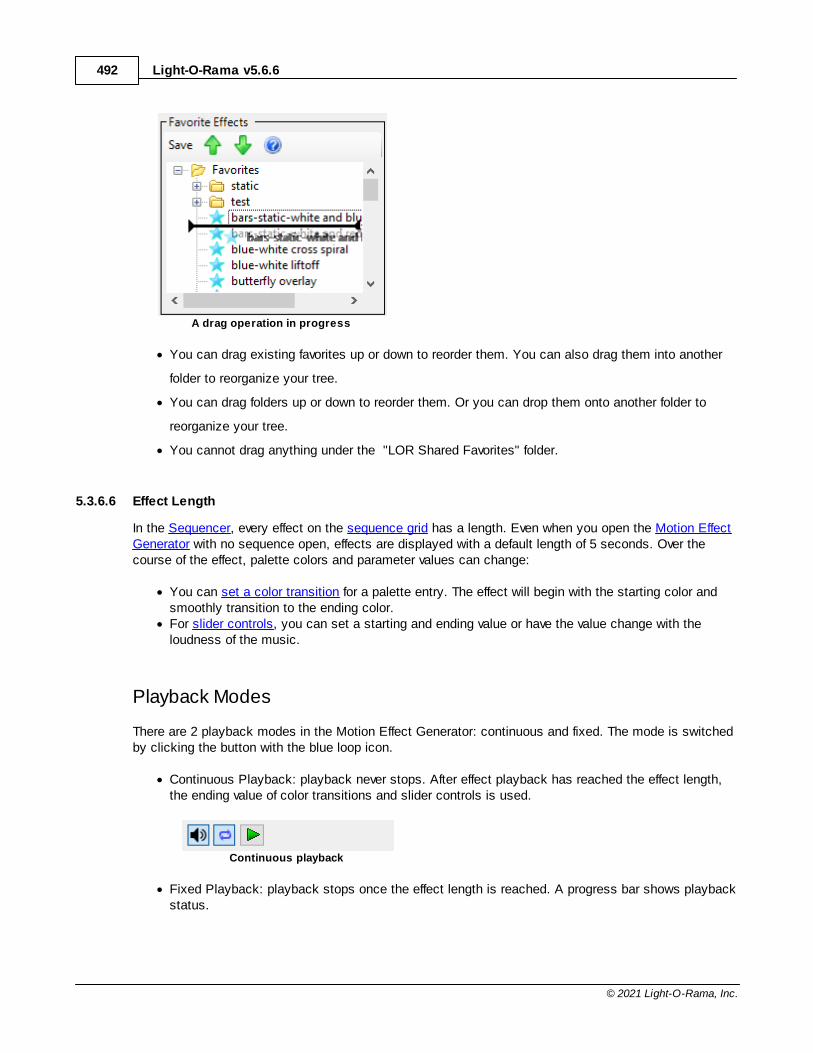
Light-O-Rama v5.6.6492
© 2021 Light-O-Rama, Inc.
A drag operation in progress
· You can drag existing favorites up or down to reorder them. You can also drag them into another
folder to reorganize your tree.
· You can drag folders up or down to reorder them. Or you can drop them onto another folder to
reorganize your tree.
· You cannot drag anything under the "LOR Shared Favorites" folder.
5.3.6.6 Effect Length
In the Sequencer, every effect on the sequence grid has a length. Even when you open the Motion EffectGenerator with no sequence open, effects are displayed with a default length of 5 seconds. Over thecourse of the effect, palette colors and parameter values can change:
· You can set a color transition for a palette entry. The effect will begin with the starting color andsmoothly transition to the ending color.
· For slider controls, you can set a starting and ending value or have the value change with theloudness of the music.
Playback Modes
There are 2 playback modes in the Motion Effect Generator: continuous and fixed. The mode is switchedby clicking the button with the blue loop icon.
· Continuous Playback: playback never stops. After effect playback has reached the effect length,the ending value of color transitions and slider controls is used.
Continuous playback
· Fixed Playback: playback stops once the effect length is reached. A progress bar shows playbackstatus.
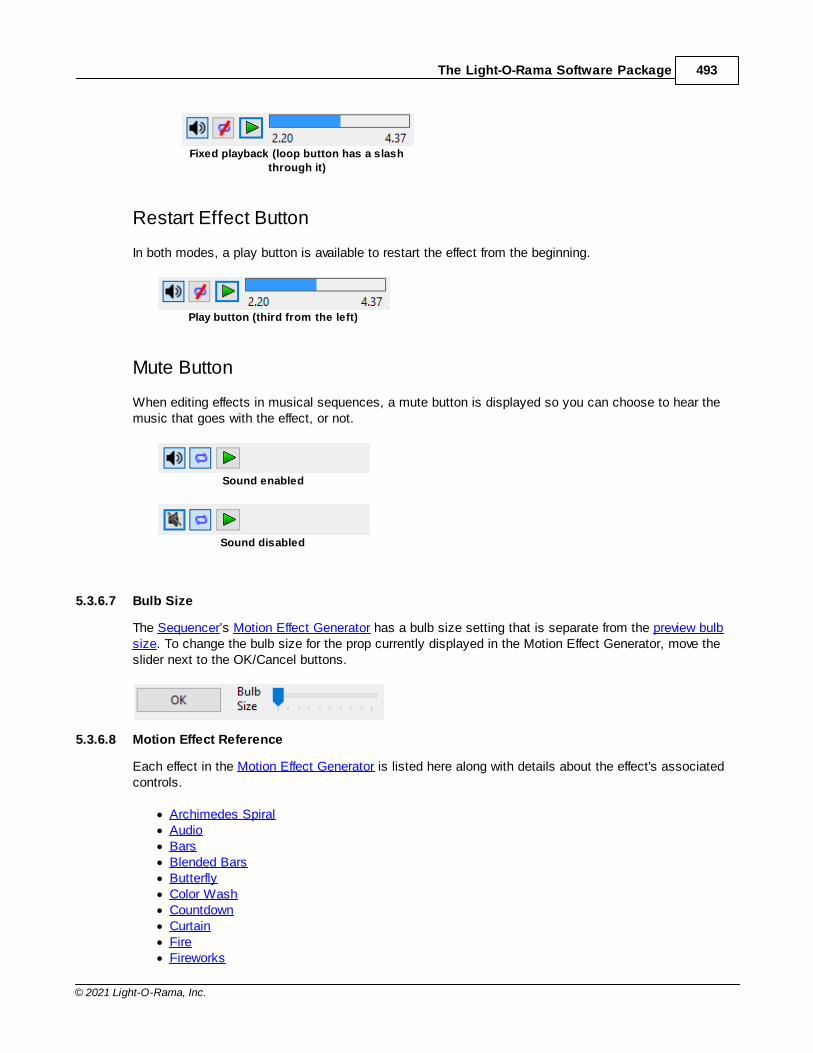
The Light-O-Rama Software Package 493
© 2021 Light-O-Rama, Inc.
Fixed playback (loop button has a slash
through it)
Restart Effect Button
In both modes, a play button is available to restart the effect from the beginning.
Play button (third from the left)
Mute Button
When editing effects in musical sequences, a mute button is displayed so you can choose to hear themusic that goes with the effect, or not.
Sound enabled
Sound disabled
5.3.6.7 Bulb Size
The Sequencer’s Motion Effect Generator has a bulb size setting that is separate from the preview bulbsize. To change the bulb size for the prop currently displayed in the Motion Effect Generator, move theslider next to the OK/Cancel buttons.
5.3.6.8 Motion Effect Reference
Each effect in the Motion Effect Generator is listed here along with details about the effect's associatedcontrols.
· Archimedes Spiral· Audio· Bars· Blended Bars· Butterfly· Color Wash· Countdown· Curtain· Fire· Fireworks
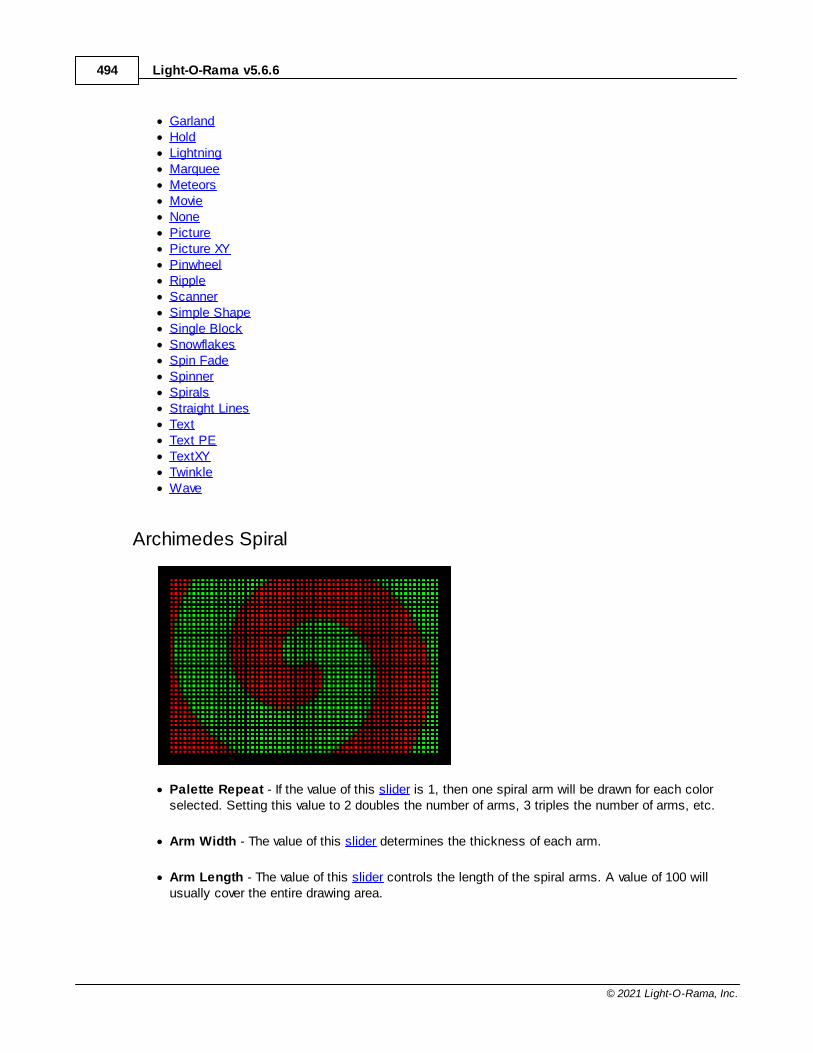
Light-O-Rama v5.6.6494
© 2021 Light-O-Rama, Inc.
· Garland· Hold· Lightning· Marquee· Meteors· Movie· None· Picture· Picture XY· Pinwheel· Ripple· Scanner· Simple Shape· Single Block· Snowflakes· Spin Fade· Spinner· Spirals· Straight Lines· Text· Text PE· TextXY· Twinkle· Wave
Archimedes Spiral
· Palette Repeat - If the value of this slider is 1, then one spiral arm will be drawn for each colorselected. Setting this value to 2 doubles the number of arms, 3 triples the number of arms, etc.
· Arm Width - The value of this slider determines the thickness of each arm.
· Arm Length - The value of this slider controls the length of the spiral arms. A value of 100 willusually cover the entire drawing area.
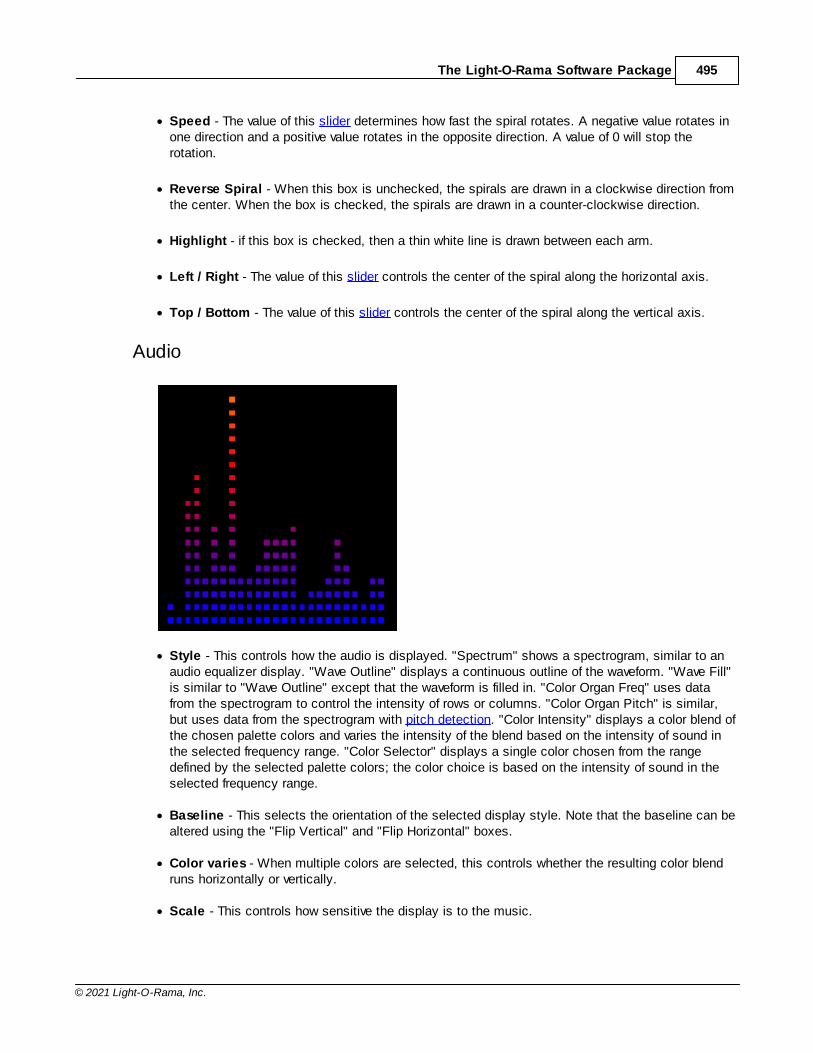
The Light-O-Rama Software Package 495
© 2021 Light-O-Rama, Inc.
· Speed - The value of this slider determines how fast the spiral rotates. A negative value rotates inone direction and a positive value rotates in the opposite direction. A value of 0 will stop therotation.
· Reverse Spiral - When this box is unchecked, the spirals are drawn in a clockwise direction fromthe center. When the box is checked, the spirals are drawn in a counter-clockwise direction.
· Highlight - if this box is checked, then a thin white line is drawn between each arm.
· Left / Right - The value of this slider controls the center of the spiral along the horizontal axis.
· Top / Bottom - The value of this slider controls the center of the spiral along the vertical axis.
Audio
· Style - This controls how the audio is displayed. "Spectrum" shows a spectrogram, similar to anaudio equalizer display. "Wave Outline" displays a continuous outline of the waveform. "Wave Fill"is similar to "Wave Outline" except that the waveform is filled in. "Color Organ Freq" uses datafrom the spectrogram to control the intensity of rows or columns. "Color Organ Pitch" is similar,but uses data from the spectrogram with pitch detection. "Color Intensity" displays a color blend ofthe chosen palette colors and varies the intensity of the blend based on the intensity of sound inthe selected frequency range. "Color Selector" displays a single color chosen from the rangedefined by the selected palette colors; the color choice is based on the intensity of sound in theselected frequency range.
· Baseline - This selects the orientation of the selected display style. Note that the baseline can bealtered using the "Flip Vertical" and "Flip Horizontal" boxes.
· Color varies - When multiple colors are selected, this controls whether the resulting color blendruns horizontally or vertically.
· Scale - This controls how sensitive the display is to the music.
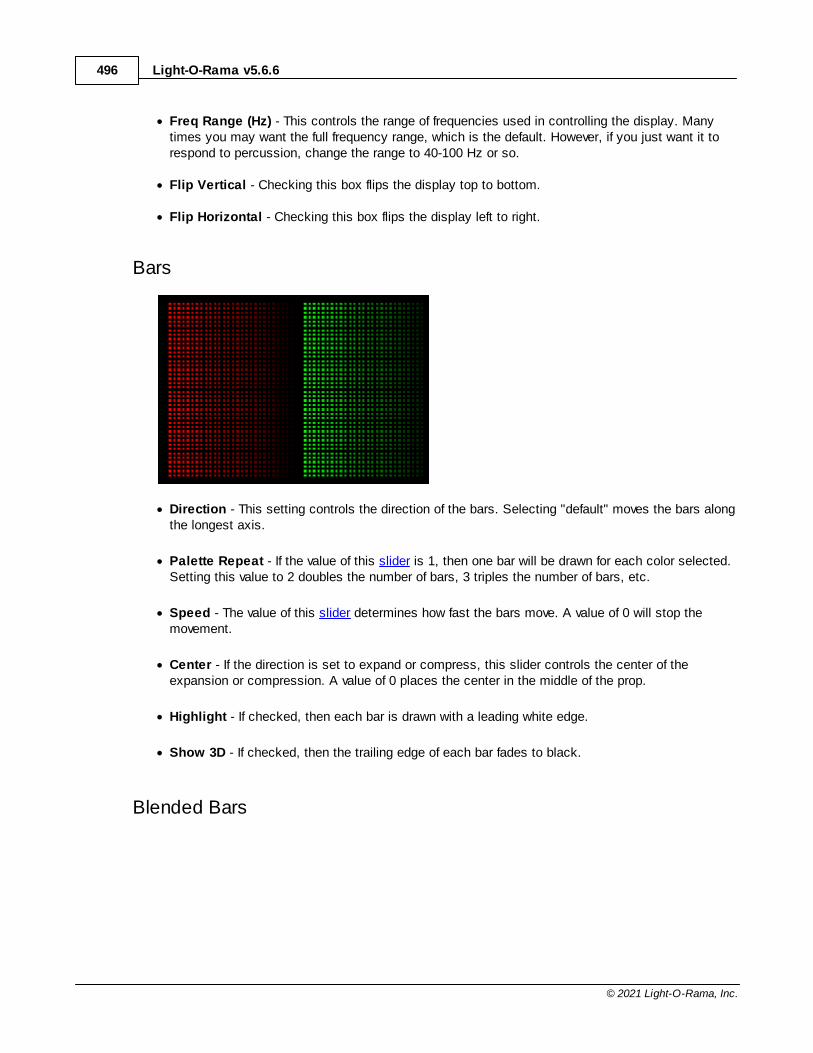
Light-O-Rama v5.6.6496
© 2021 Light-O-Rama, Inc.
· Freq Range (Hz) - This controls the range of frequencies used in controlling the display. Manytimes you may want the full frequency range, which is the default. However, if you just want it torespond to percussion, change the range to 40-100 Hz or so.
· Flip Vertical - Checking this box flips the display top to bottom.
· Flip Horizontal - Checking this box flips the display left to right.
Bars
· Direction - This setting controls the direction of the bars. Selecting "default" moves the bars alongthe longest axis.
· Palette Repeat - If the value of this slider is 1, then one bar will be drawn for each color selected.Setting this value to 2 doubles the number of bars, 3 triples the number of bars, etc.
· Speed - The value of this slider determines how fast the bars move. A value of 0 will stop themovement.
· Center - If the direction is set to expand or compress, this slider controls the center of theexpansion or compression. A value of 0 places the center in the middle of the prop.
· Highlight - If checked, then each bar is drawn with a leading white edge.
· Show 3D - If checked, then the trailing edge of each bar fades to black.
Blended Bars
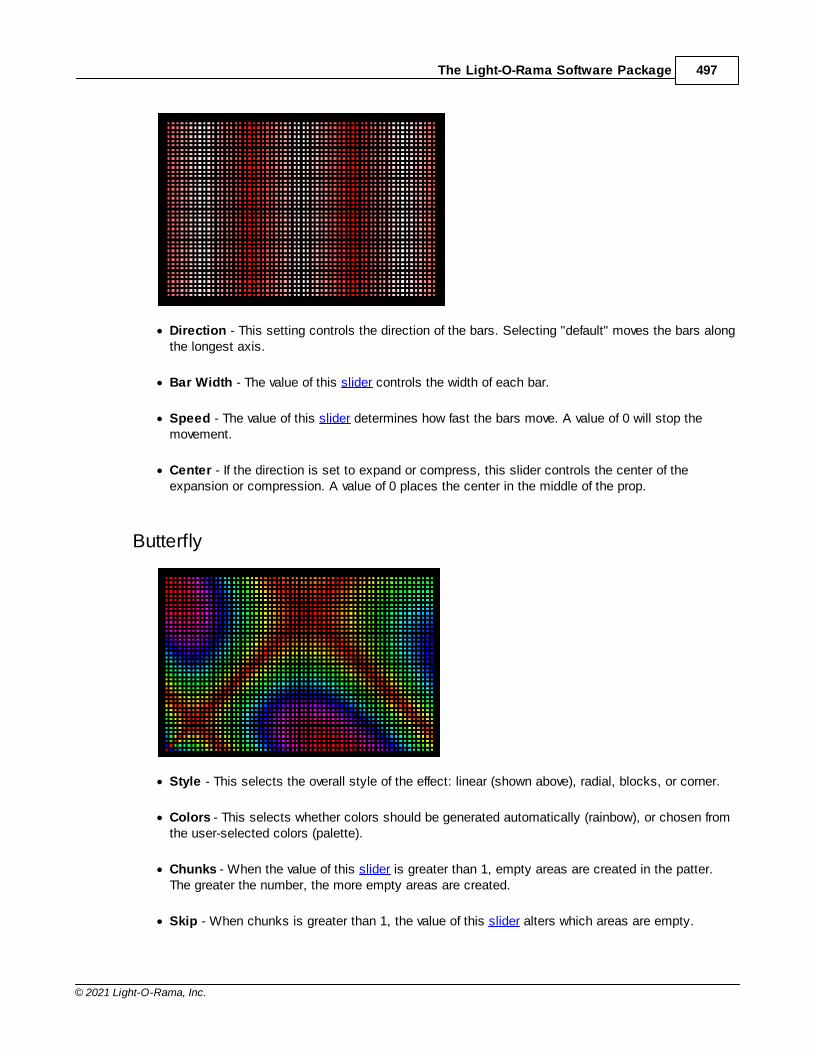
The Light-O-Rama Software Package 497
© 2021 Light-O-Rama, Inc.
· Direction - This setting controls the direction of the bars. Selecting "default" moves the bars alongthe longest axis.
· Bar Width - The value of this slider controls the width of each bar.
· Speed - The value of this slider determines how fast the bars move. A value of 0 will stop themovement.
· Center - If the direction is set to expand or compress, this slider controls the center of theexpansion or compression. A value of 0 places the center in the middle of the prop.
Butterfly
· Style - This selects the overall style of the effect: linear (shown above), radial, blocks, or corner.
· Colors - This selects whether colors should be generated automatically (rainbow), or chosen fromthe user-selected colors (palette).
· Chunks - When the value of this slider is greater than 1, empty areas are created in the patter.The greater the number, the more empty areas are created.
· Skip - When chunks is greater than 1, the value of this slider alters which areas are empty.
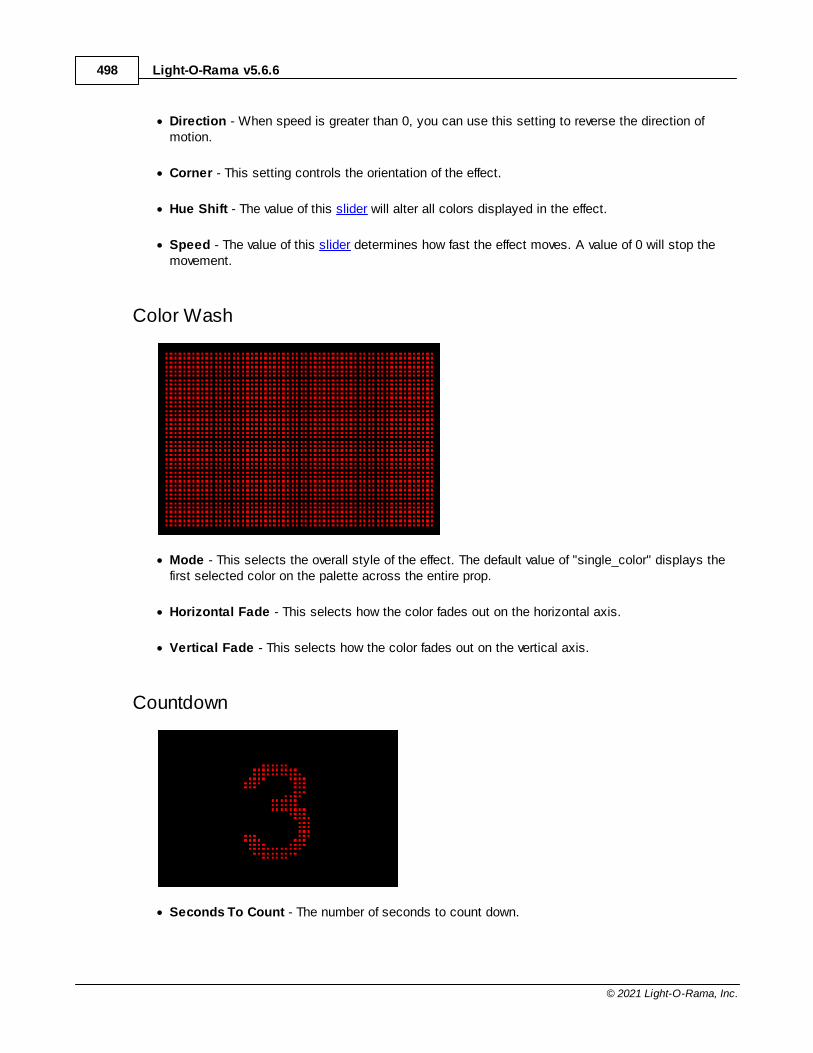
Light-O-Rama v5.6.6498
© 2021 Light-O-Rama, Inc.
· Direction - When speed is greater than 0, you can use this setting to reverse the direction ofmotion.
· Corner - This setting controls the orientation of the effect.
· Hue Shift - The value of this slider will alter all colors displayed in the effect.
· Speed - The value of this slider determines how fast the effect moves. A value of 0 will stop themovement.
Color Wash
· Mode - This selects the overall style of the effect. The default value of "single_color" displays thefirst selected color on the palette across the entire prop.
· Horizontal Fade - This selects how the color fades out on the horizontal axis.
· Vertical Fade - This selects how the color fades out on the vertical axis.
Countdown
· Seconds To Count - The number of seconds to count down.
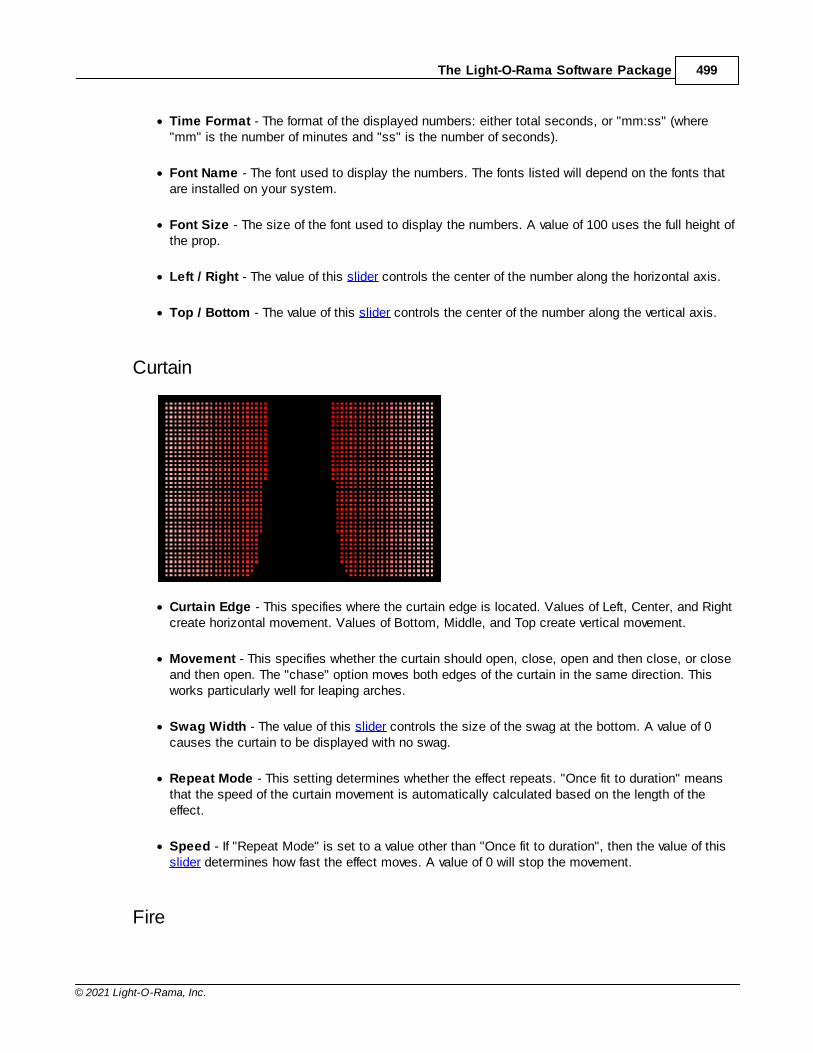
The Light-O-Rama Software Package 499
© 2021 Light-O-Rama, Inc.
· Time Format - The format of the displayed numbers: either total seconds, or "mm:ss" (where"mm" is the number of minutes and "ss" is the number of seconds).
· Font Name - The font used to display the numbers. The fonts listed will depend on the fonts thatare installed on your system.
· Font Size - The size of the font used to display the numbers. A value of 100 uses the full height ofthe prop.
· Left / Right - The value of this slider controls the center of the number along the horizontal axis.
· Top / Bottom - The value of this slider controls the center of the number along the vertical axis.
Curtain
· Curtain Edge - This specifies where the curtain edge is located. Values of Left, Center, and Rightcreate horizontal movement. Values of Bottom, Middle, and Top create vertical movement.
· Movement - This specifies whether the curtain should open, close, open and then close, or closeand then open. The "chase" option moves both edges of the curtain in the same direction. Thisworks particularly well for leaping arches.
· Swag Width - The value of this slider controls the size of the swag at the bottom. A value of 0causes the curtain to be displayed with no swag.
· Repeat Mode - This setting determines whether the effect repeats. "Once fit to duration" meansthat the speed of the curtain movement is automatically calculated based on the length of theeffect.
· Speed - If "Repeat Mode" is set to a value other than "Once fit to duration", then the value of thisslider determines how fast the effect moves. A value of 0 will stop the movement.
Fire
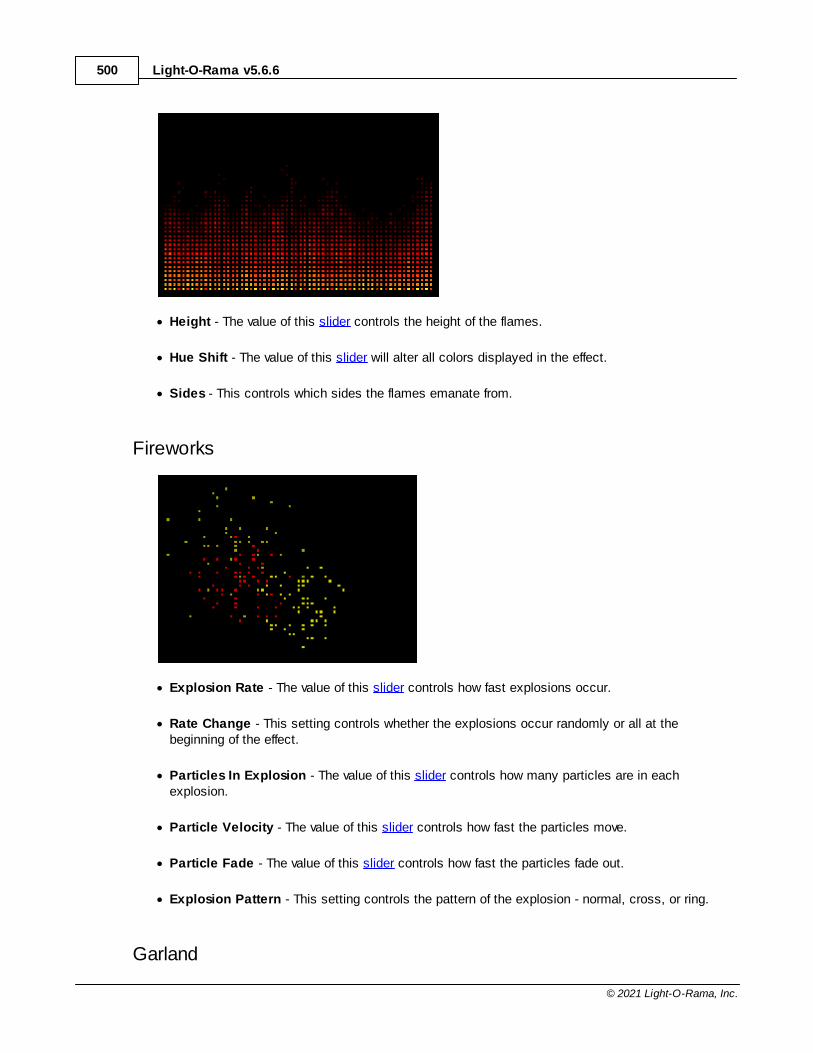
Light-O-Rama v5.6.6500
© 2021 Light-O-Rama, Inc.
· Height - The value of this slider controls the height of the flames.
· Hue Shift - The value of this slider will alter all colors displayed in the effect.
· Sides - This controls which sides the flames emanate from.
Fireworks
· Explosion Rate - The value of this slider controls how fast explosions occur.
· Rate Change - This setting controls whether the explosions occur randomly or all at thebeginning of the effect.
· Particles In Explosion - The value of this slider controls how many particles are in eachexplosion.
· Particle Velocity - The value of this slider controls how fast the particles move.
· Particle Fade - The value of this slider controls how fast the particles fade out.
· Explosion Pattern - This setting controls the pattern of the explosion - normal, cross, or ring.
Garland

The Light-O-Rama Software Package 501
© 2021 Light-O-Rama, Inc.
· Garland Type - The value of this slider selects the shape of the falling garland. A value of 0specifies a straight line.
· Garland Fill - This specifies the direction from which the garlands fill the space.
· Spacing - The value of this slider controls the spacing between each falling garland.
· Repeat Mode - This setting determines whether the effect repeats. "Once fit to duration" meansthat the speed is automatically calculated based on the length of the effect.
· Speed - If "Repeat Mode" is set to a value other than "Once fit to duration", then the value of thisslider determines how fast the garlands fall. A value of 0 will stop the movement.
Hold
· When used in the sequence grid, this effect freezes the effect that immediately precedes it. If thesame effect precedes and follows the hold, the hold effect can appear to stop motion.
Lightning
· Start Position - The value of this slider controls where the bolt originates from (left to right).
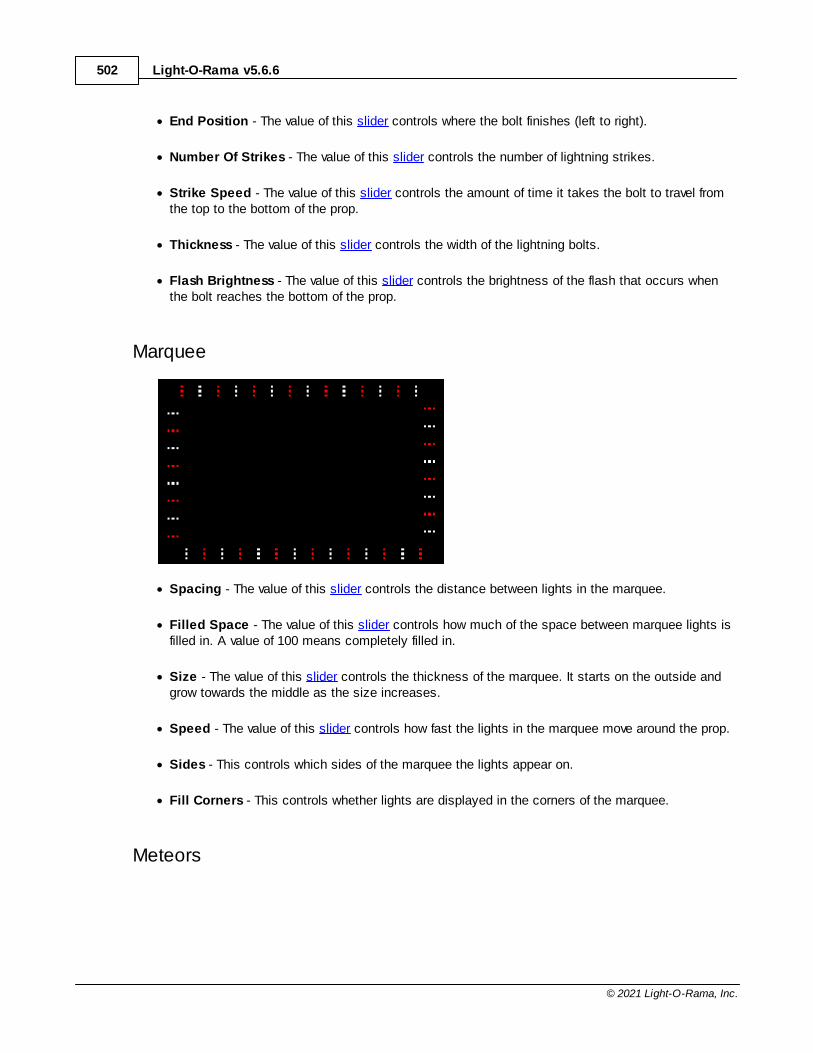
Light-O-Rama v5.6.6502
© 2021 Light-O-Rama, Inc.
· End Position - The value of this slider controls where the bolt finishes (left to right).
· Number Of Strikes - The value of this slider controls the number of lightning strikes.
· Strike Speed - The value of this slider controls the amount of time it takes the bolt to travel fromthe top to the bottom of the prop.
· Thickness - The value of this slider controls the width of the lightning bolts.
· Flash Brightness - The value of this slider controls the brightness of the flash that occurs whenthe bolt reaches the bottom of the prop.
Marquee
· Spacing - The value of this slider controls the distance between lights in the marquee.
· Filled Space - The value of this slider controls how much of the space between marquee lights isfilled in. A value of 100 means completely filled in.
· Size - The value of this slider controls the thickness of the marquee. It starts on the outside andgrow towards the middle as the size increases.
· Speed - The value of this slider controls how fast the lights in the marquee move around the prop.
· Sides - This controls which sides of the marquee the lights appear on.
· Fill Corners - This controls whether lights are displayed in the corners of the marquee.
Meteors
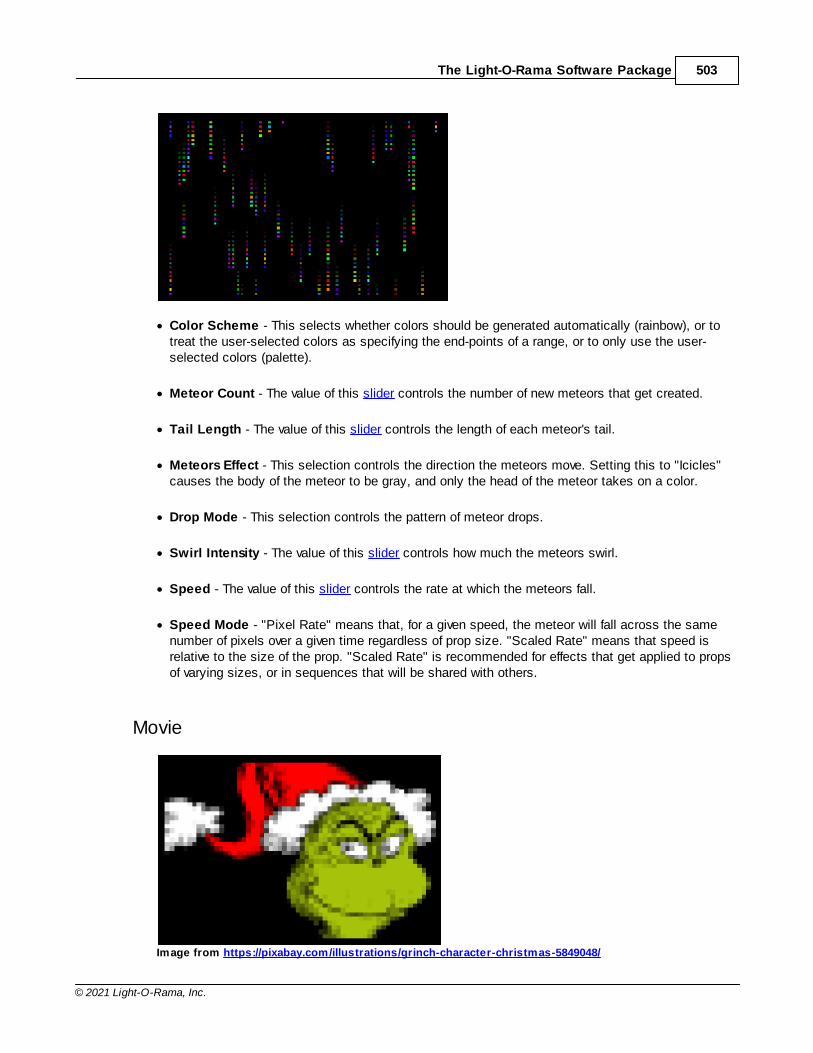
The Light-O-Rama Software Package 503
© 2021 Light-O-Rama, Inc.
· Color Scheme - This selects whether colors should be generated automatically (rainbow), or totreat the user-selected colors as specifying the end-points of a range, or to only use the user-selected colors (palette).
· Meteor Count - The value of this slider controls the number of new meteors that get created.
· Tail Length - The value of this slider controls the length of each meteor's tail.
· Meteors Effect - This selection controls the direction the meteors move. Setting this to "Icicles"causes the body of the meteor to be gray, and only the head of the meteor takes on a color.
· Drop Mode - This selection controls the pattern of meteor drops.
· Swirl Intensity - The value of this slider controls how much the meteors swirl.
· Speed - The value of this slider controls the rate at which the meteors fall.
· Speed Mode - "Pixel Rate" means that, for a given speed, the meteor will fall across the samenumber of pixels over a given time regardless of prop size. "Scaled Rate" means that speed isrelative to the size of the prop. "Scaled Rate" is recommended for effects that get applied to propsof varying sizes, or in sequences that will be shared with others.
Movie
Image from https://pixabay.com/illustrations/grinch-character-christmas-5849048/
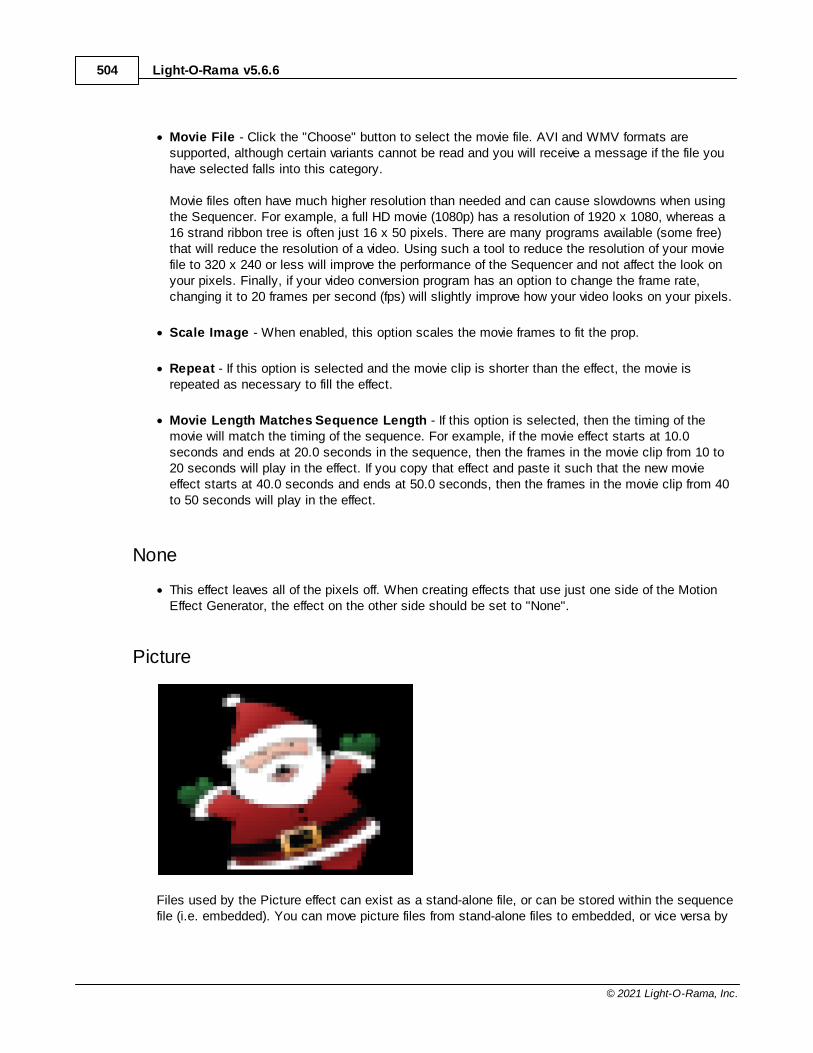
Light-O-Rama v5.6.6504
© 2021 Light-O-Rama, Inc.
· Movie File - Click the "Choose" button to select the movie file. AVI and WMV formats aresupported, although certain variants cannot be read and you will receive a message if the file youhave selected falls into this category.
Movie files often have much higher resolution than needed and can cause slowdowns when usingthe Sequencer. For example, a full HD movie (1080p) has a resolution of 1920 x 1080, whereas a16 strand ribbon tree is often just 16 x 50 pixels. There are many programs available (some free)that will reduce the resolution of a video. Using such a tool to reduce the resolution of your moviefile to 320 x 240 or less will improve the performance of the Sequencer and not affect the look onyour pixels. Finally, if your video conversion program has an option to change the frame rate,changing it to 20 frames per second (fps) will slightly improve how your video looks on your pixels.
· Scale Image - When enabled, this option scales the movie frames to fit the prop.
· Repeat - If this option is selected and the movie clip is shorter than the effect, the movie isrepeated as necessary to fill the effect.
· Movie Length Matches Sequence Length - If this option is selected, then the timing of themovie will match the timing of the sequence. For example, if the movie effect starts at 10.0seconds and ends at 20.0 seconds in the sequence, then the frames in the movie clip from 10 to20 seconds will play in the effect. If you copy that effect and paste it such that the new movieeffect starts at 40.0 seconds and ends at 50.0 seconds, then the frames in the movie clip from 40to 50 seconds will play in the effect.
None
· This effect leaves all of the pixels off. When creating effects that use just one side of the MotionEffect Generator, the effect on the other side should be set to "None".
Picture
Files used by the Picture effect can exist as a stand-alone file, or can be stored within the sequencefile (i.e. embedded). You can move picture files from stand-alone files to embedded, or vice versa by
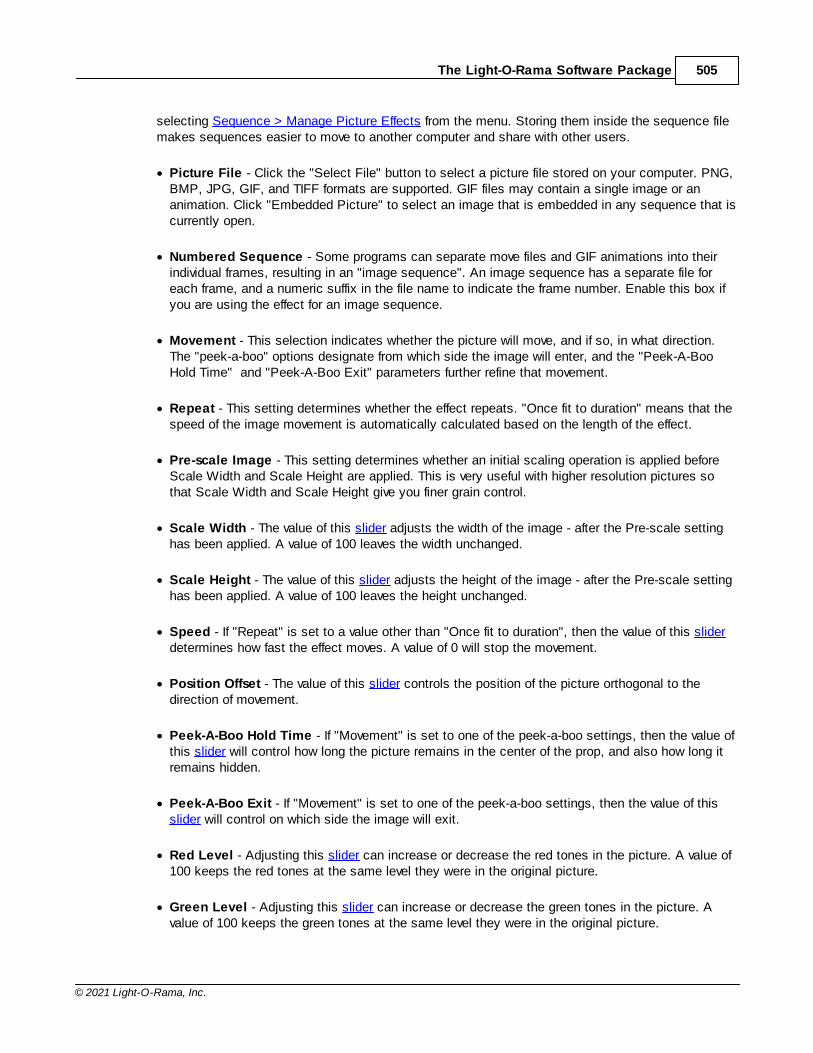
The Light-O-Rama Software Package 505
© 2021 Light-O-Rama, Inc.
selecting Sequence > Manage Picture Effects from the menu. Storing them inside the sequence filemakes sequences easier to move to another computer and share with other users.
· Picture File - Click the "Select File" button to select a picture file stored on your computer. PNG,BMP, JPG, GIF, and TIFF formats are supported. GIF files may contain a single image or ananimation. Click "Embedded Picture" to select an image that is embedded in any sequence that iscurrently open.
· Numbered Sequence - Some programs can separate move files and GIF animations into theirindividual frames, resulting in an "image sequence". An image sequence has a separate file foreach frame, and a numeric suffix in the file name to indicate the frame number. Enable this box ifyou are using the effect for an image sequence.
· Movement - This selection indicates whether the picture will move, and if so, in what direction.The "peek-a-boo" options designate from which side the image will enter, and the "Peek-A-BooHold Time" and "Peek-A-Boo Exit" parameters further refine that movement.
· Repeat - This setting determines whether the effect repeats. "Once fit to duration" means that thespeed of the image movement is automatically calculated based on the length of the effect.
· Pre-scale Image - This setting determines whether an initial scaling operation is applied beforeScale Width and Scale Height are applied. This is very useful with higher resolution pictures sothat Scale Width and Scale Height give you finer grain control.
· Scale Width - The value of this slider adjusts the width of the image - after the Pre-scale settinghas been applied. A value of 100 leaves the width unchanged.
· Scale Height - The value of this slider adjusts the height of the image - after the Pre-scale settinghas been applied. A value of 100 leaves the height unchanged.
· Speed - If "Repeat" is set to a value other than "Once fit to duration", then the value of this sliderdetermines how fast the effect moves. A value of 0 will stop the movement.
· Position Offset - The value of this slider controls the position of the picture orthogonal to thedirection of movement.
· Peek-A-Boo Hold Time - If "Movement" is set to one of the peek-a-boo settings, then the value ofthis slider will control how long the picture remains in the center of the prop, and also how long itremains hidden.
· Peek-A-Boo Exit - If "Movement" is set to one of the peek-a-boo settings, then the value of thisslider will control on which side the image will exit.
· Red Level - Adjusting this slider can increase or decrease the red tones in the picture. A value of100 keeps the red tones at the same level they were in the original picture.
· Green Level - Adjusting this slider can increase or decrease the green tones in the picture. Avalue of 100 keeps the green tones at the same level they were in the original picture.
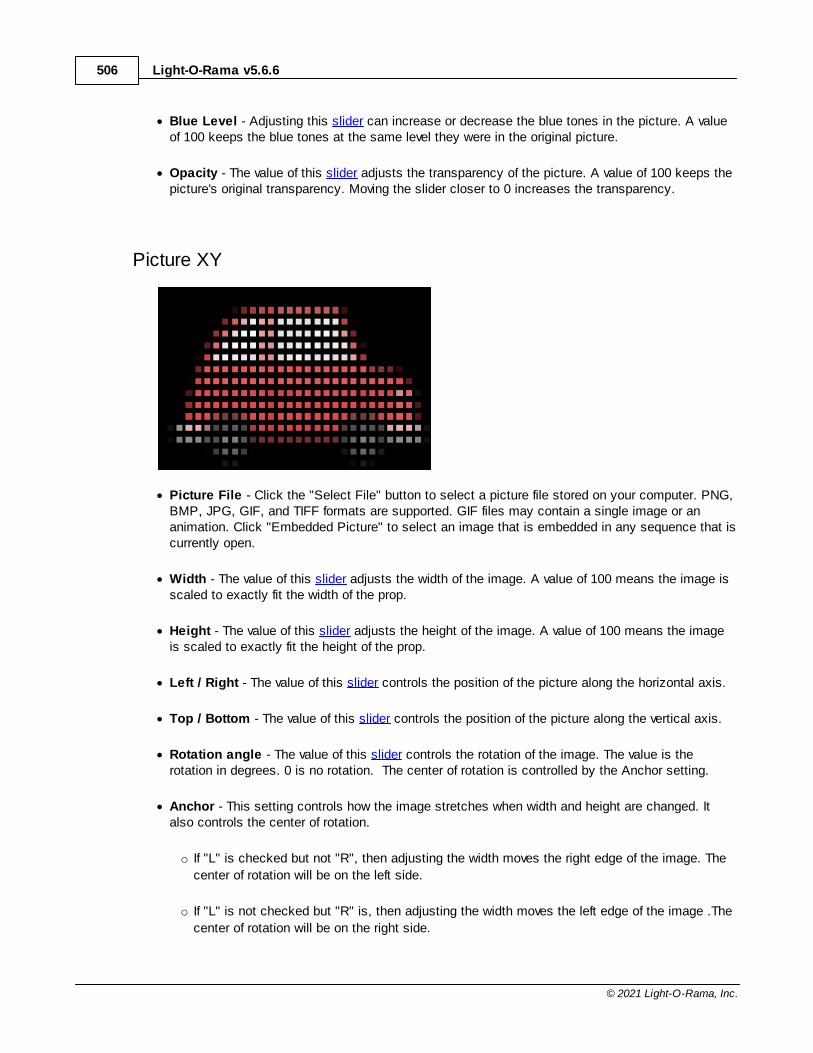
Light-O-Rama v5.6.6506
© 2021 Light-O-Rama, Inc.
· Blue Level - Adjusting this slider can increase or decrease the blue tones in the picture. A valueof 100 keeps the blue tones at the same level they were in the original picture.
· Opacity - The value of this slider adjusts the transparency of the picture. A value of 100 keeps thepicture's original transparency. Moving the slider closer to 0 increases the transparency.
Picture XY
· Picture File - Click the "Select File" button to select a picture file stored on your computer. PNG,BMP, JPG, GIF, and TIFF formats are supported. GIF files may contain a single image or ananimation. Click "Embedded Picture" to select an image that is embedded in any sequence that iscurrently open.
· Width - The value of this slider adjusts the width of the image. A value of 100 means the image isscaled to exactly fit the width of the prop.
· Height - The value of this slider adjusts the height of the image. A value of 100 means the imageis scaled to exactly fit the height of the prop.
· Left / Right - The value of this slider controls the position of the picture along the horizontal axis.
· Top / Bottom - The value of this slider controls the position of the picture along the vertical axis.
· Rotation angle - The value of this slider controls the rotation of the image. The value is therotation in degrees. 0 is no rotation. The center of rotation is controlled by the Anchor setting.
· Anchor - This setting controls how the image stretches when width and height are changed. Italso controls the center of rotation.
o If "L" is checked but not "R", then adjusting the width moves the right edge of the image. The
center of rotation will be on the left side.
o If "L" is not checked but "R" is, then adjusting the width moves the left edge of the image .The
center of rotation will be on the right side.
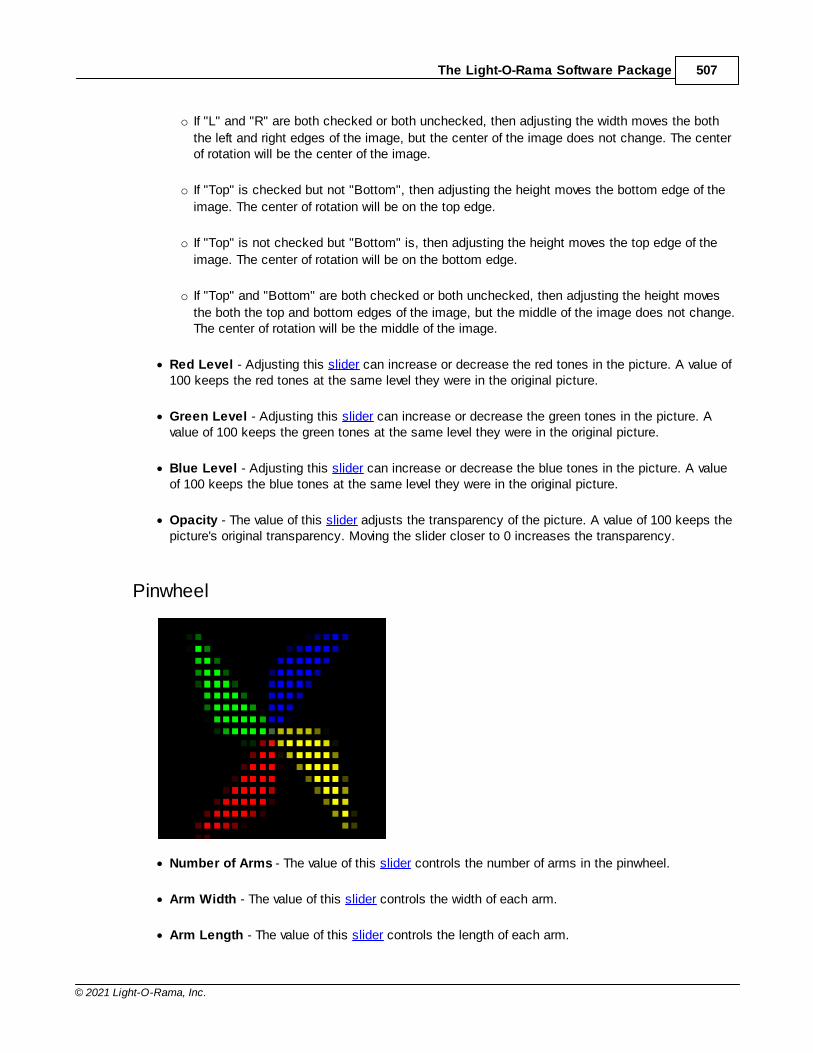
The Light-O-Rama Software Package 507
© 2021 Light-O-Rama, Inc.
o If "L" and "R" are both checked or both unchecked, then adjusting the width moves the both
the left and right edges of the image, but the center of the image does not change. The centerof rotation will be the center of the image.
o If "Top" is checked but not "Bottom", then adjusting the height moves the bottom edge of the
image. The center of rotation will be on the top edge.
o If "Top" is not checked but "Bottom" is, then adjusting the height moves the top edge of the
image. The center of rotation will be on the bottom edge.
o If "Top" and "Bottom" are both checked or both unchecked, then adjusting the height moves
the both the top and bottom edges of the image, but the middle of the image does not change.The center of rotation will be the middle of the image.
· Red Level - Adjusting this slider can increase or decrease the red tones in the picture. A value of100 keeps the red tones at the same level they were in the original picture.
· Green Level - Adjusting this slider can increase or decrease the green tones in the picture. Avalue of 100 keeps the green tones at the same level they were in the original picture.
· Blue Level - Adjusting this slider can increase or decrease the blue tones in the picture. A valueof 100 keeps the blue tones at the same level they were in the original picture.
· Opacity - The value of this slider adjusts the transparency of the picture. A value of 100 keeps thepicture's original transparency. Moving the slider closer to 0 increases the transparency.
Pinwheel
· Number of Arms - The value of this slider controls the number of arms in the pinwheel.
· Arm Width - The value of this slider controls the width of each arm.
· Arm Length - The value of this slider controls the length of each arm.
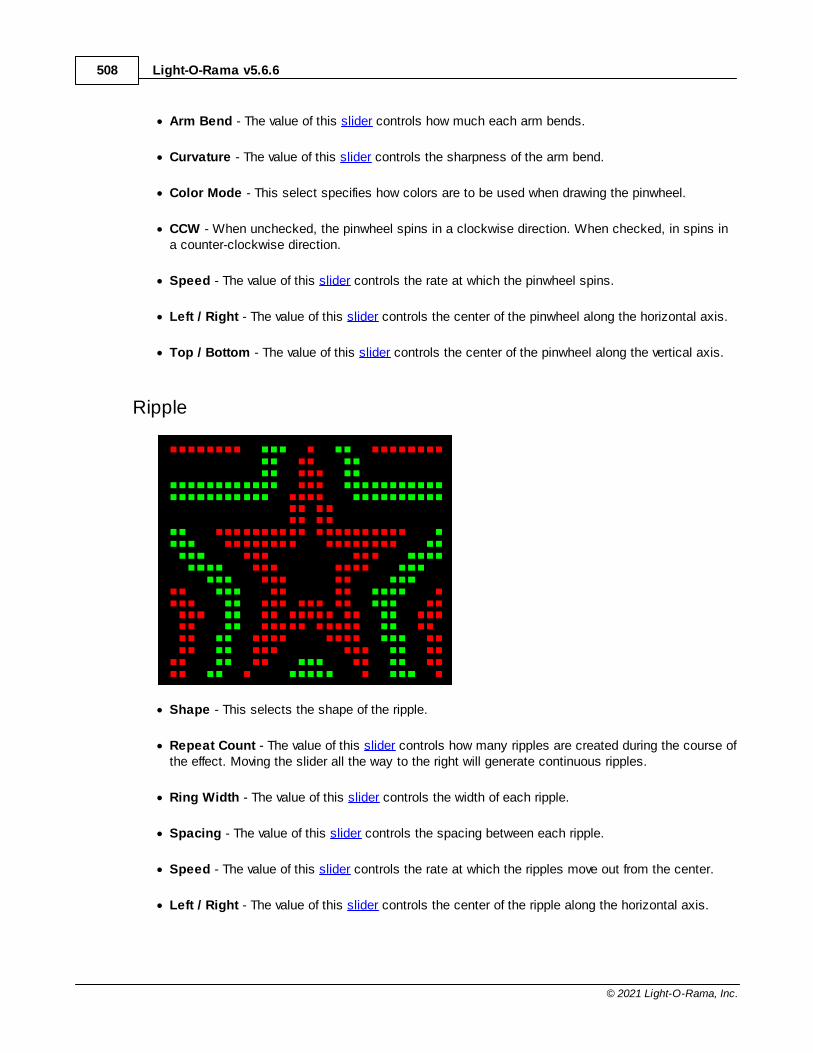
Light-O-Rama v5.6.6508
© 2021 Light-O-Rama, Inc.
· Arm Bend - The value of this slider controls how much each arm bends.
· Curvature - The value of this slider controls the sharpness of the arm bend.
· Color Mode - This select specifies how colors are to be used when drawing the pinwheel.
· CCW - When unchecked, the pinwheel spins in a clockwise direction. When checked, in spins ina counter-clockwise direction.
· Speed - The value of this slider controls the rate at which the pinwheel spins.
· Left / Right - The value of this slider controls the center of the pinwheel along the horizontal axis.
· Top / Bottom - The value of this slider controls the center of the pinwheel along the vertical axis.
Ripple
· Shape - This selects the shape of the ripple.
· Repeat Count - The value of this slider controls how many ripples are created during the course ofthe effect. Moving the slider all the way to the right will generate continuous ripples.
· Ring Width - The value of this slider controls the width of each ripple.
· Spacing - The value of this slider controls the spacing between each ripple.
· Speed - The value of this slider controls the rate at which the ripples move out from the center.
· Left / Right - The value of this slider controls the center of the ripple along the horizontal axis.
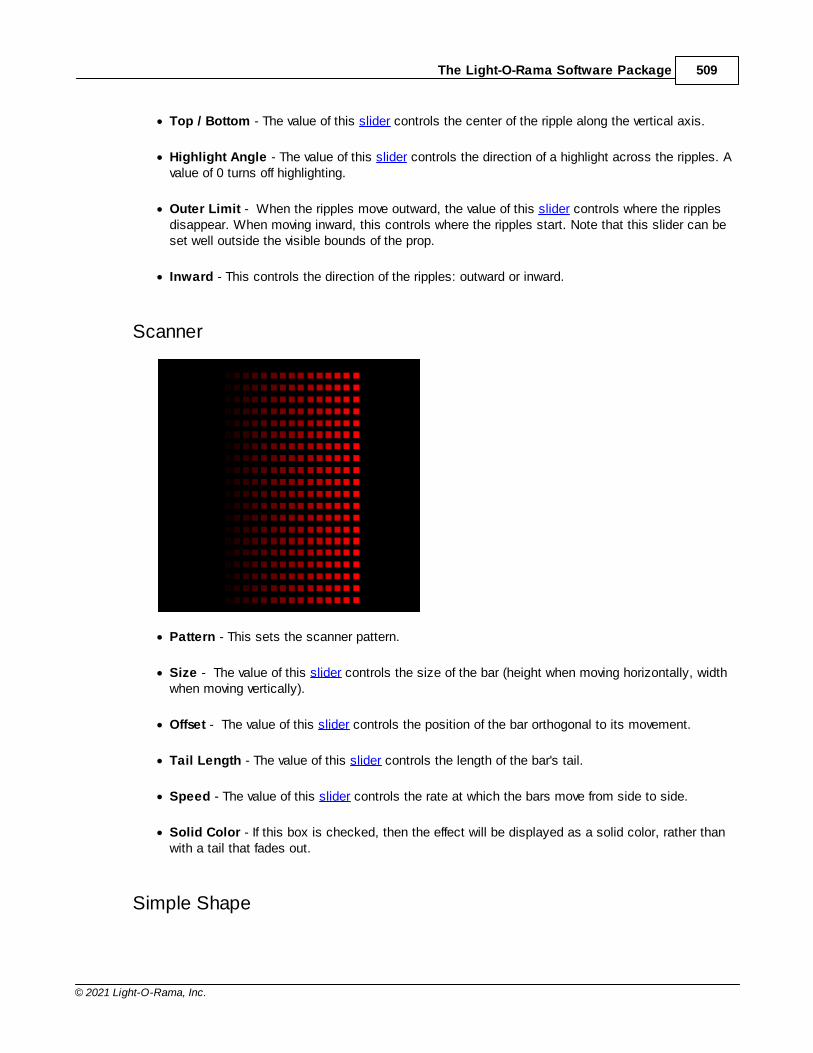
The Light-O-Rama Software Package 509
© 2021 Light-O-Rama, Inc.
· Top / Bottom - The value of this slider controls the center of the ripple along the vertical axis.
· Highlight Angle - The value of this slider controls the direction of a highlight across the ripples. Avalue of 0 turns off highlighting.
· Outer Limit - When the ripples move outward, the value of this slider controls where the ripplesdisappear. When moving inward, this controls where the ripples start. Note that this slider can beset well outside the visible bounds of the prop.
· Inward - This controls the direction of the ripples: outward or inward.
Scanner
· Pattern - This sets the scanner pattern.
· Size - The value of this slider controls the size of the bar (height when moving horizontally, widthwhen moving vertically).
· Offset - The value of this slider controls the position of the bar orthogonal to its movement.
· Tail Length - The value of this slider controls the length of the bar's tail.
· Speed - The value of this slider controls the rate at which the bars move from side to side.
· Solid Color - If this box is checked, then the effect will be displayed as a solid color, rather thanwith a tail that fades out.
Simple Shape
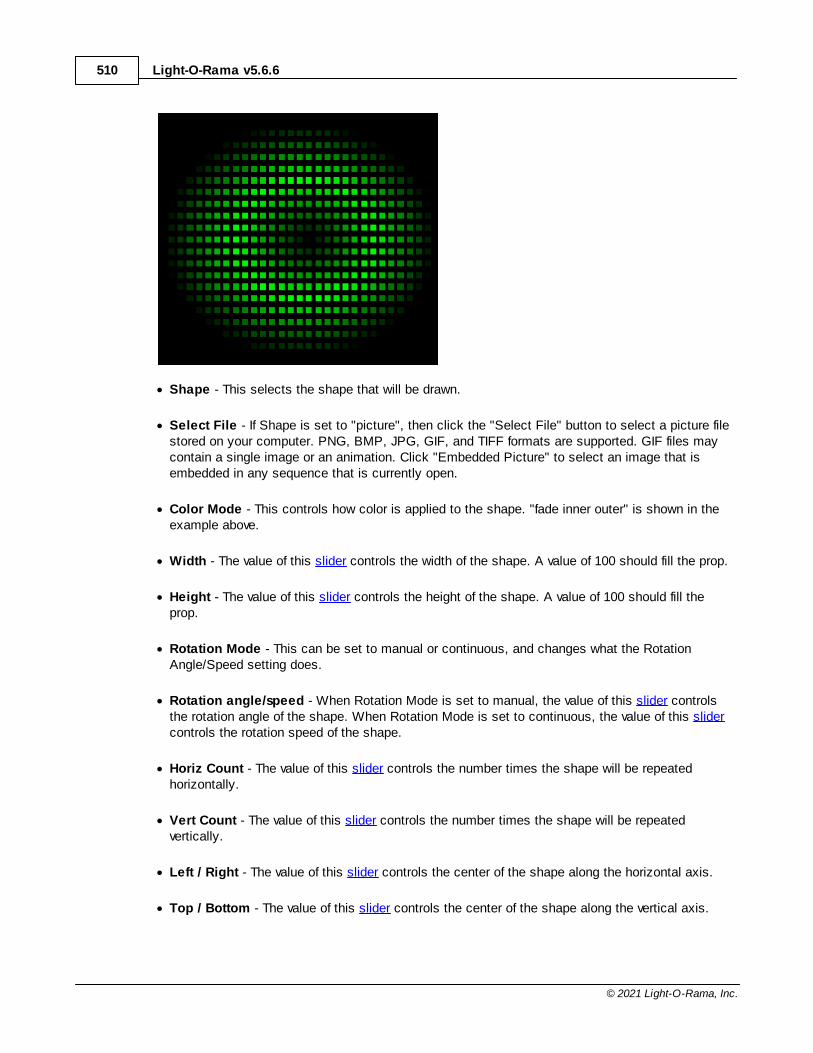
Light-O-Rama v5.6.6510
© 2021 Light-O-Rama, Inc.
· Shape - This selects the shape that will be drawn.
· Select File - If Shape is set to "picture", then click the "Select File" button to select a picture filestored on your computer. PNG, BMP, JPG, GIF, and TIFF formats are supported. GIF files maycontain a single image or an animation. Click "Embedded Picture" to select an image that isembedded in any sequence that is currently open.
· Color Mode - This controls how color is applied to the shape. "fade inner outer" is shown in theexample above.
· Width - The value of this slider controls the width of the shape. A value of 100 should fill the prop.
· Height - The value of this slider controls the height of the shape. A value of 100 should fill theprop.
· Rotation Mode - This can be set to manual or continuous, and changes what the RotationAngle/Speed setting does.
· Rotation angle/speed - When Rotation Mode is set to manual, the value of this slider controlsthe rotation angle of the shape. When Rotation Mode is set to continuous, the value of this slidercontrols the rotation speed of the shape.
· Horiz Count - The value of this slider controls the number times the shape will be repeatedhorizontally.
· Vert Count - The value of this slider controls the number times the shape will be repeatedvertically.
· Left / Right - The value of this slider controls the center of the shape along the horizontal axis.
· Top / Bottom - The value of this slider controls the center of the shape along the vertical axis.
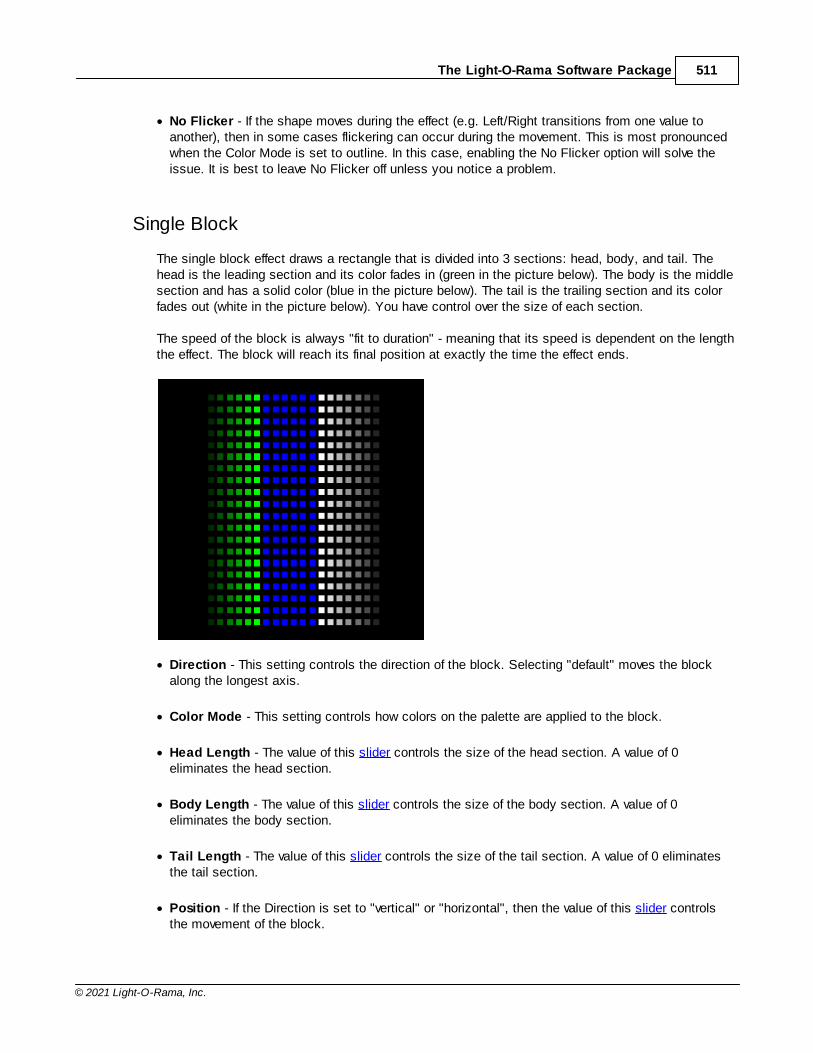
The Light-O-Rama Software Package 511
© 2021 Light-O-Rama, Inc.
· No Flicker - If the shape moves during the effect (e.g. Left/Right transitions from one value toanother), then in some cases flickering can occur during the movement. This is most pronouncedwhen the Color Mode is set to outline. In this case, enabling the No Flicker option will solve theissue. It is best to leave No Flicker off unless you notice a problem.
Single Block
The single block effect draws a rectangle that is divided into 3 sections: head, body, and tail. Thehead is the leading section and its color fades in (green in the picture below). The body is the middlesection and has a solid color (blue in the picture below). The tail is the trailing section and its colorfades out (white in the picture below). You have control over the size of each section.
The speed of the block is always "fit to duration" - meaning that its speed is dependent on the lengththe effect. The block will reach its final position at exactly the time the effect ends.
· Direction - This setting controls the direction of the block. Selecting "default" moves the blockalong the longest axis.
· Color Mode - This setting controls how colors on the palette are applied to the block.
· Head Length - The value of this slider controls the size of the head section. A value of 0eliminates the head section.
· Body Length - The value of this slider controls the size of the body section. A value of 0eliminates the body section.
· Tail Length - The value of this slider controls the size of the tail section. A value of 0 eliminatesthe tail section.
· Position - If the Direction is set to "vertical" or "horizontal", then the value of this slider controlsthe movement of the block.
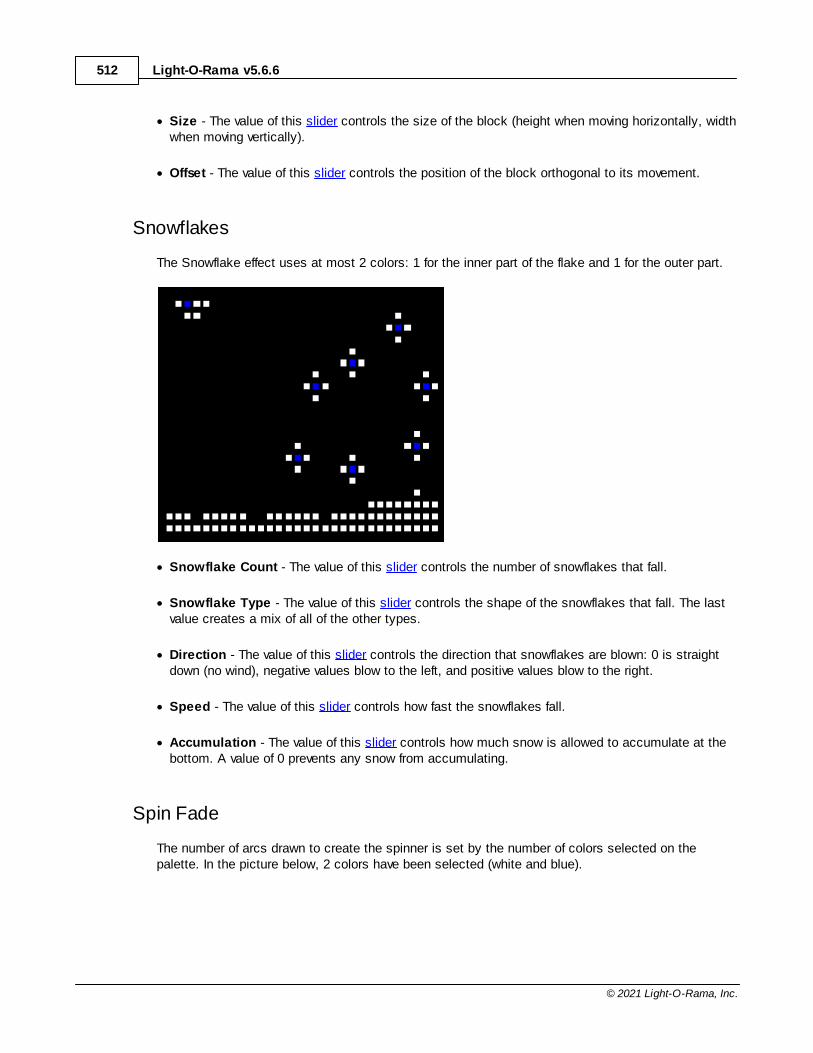
Light-O-Rama v5.6.6512
© 2021 Light-O-Rama, Inc.
· Size - The value of this slider controls the size of the block (height when moving horizontally, widthwhen moving vertically).
· Offset - The value of this slider controls the position of the block orthogonal to its movement.
Snowflakes
The Snowflake effect uses at most 2 colors: 1 for the inner part of the flake and 1 for the outer part.
· Snowflake Count - The value of this slider controls the number of snowflakes that fall.
· Snowflake Type - The value of this slider controls the shape of the snowflakes that fall. The lastvalue creates a mix of all of the other types.
· Direction - The value of this slider controls the direction that snowflakes are blown: 0 is straightdown (no wind), negative values blow to the left, and positive values blow to the right.
· Speed - The value of this slider controls how fast the snowflakes fall.
· Accumulation - The value of this slider controls how much snow is allowed to accumulate at thebottom. A value of 0 prevents any snow from accumulating.
Spin Fade
The number of arcs drawn to create the spinner is set by the number of colors selected on thepalette. In the picture below, 2 colors have been selected (white and blue).
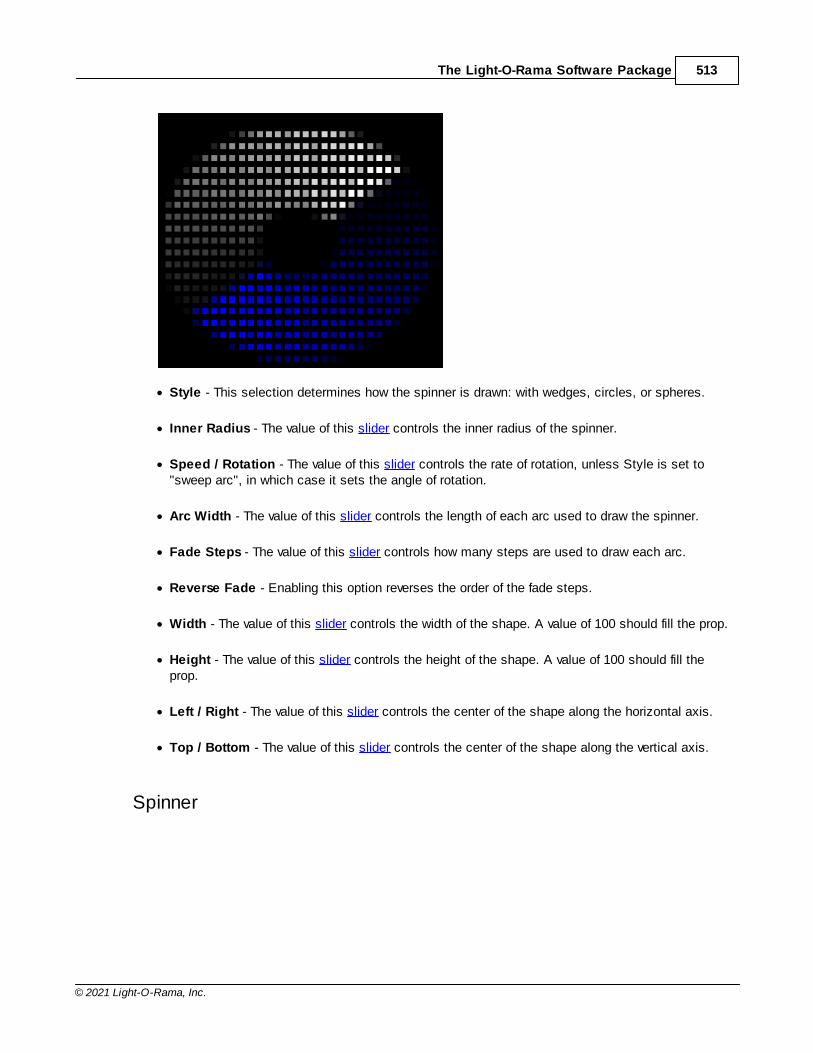
The Light-O-Rama Software Package 513
© 2021 Light-O-Rama, Inc.
· Style - This selection determines how the spinner is drawn: with wedges, circles, or spheres.
· Inner Radius - The value of this slider controls the inner radius of the spinner.
· Speed / Rotation - The value of this slider controls the rate of rotation, unless Style is set to"sweep arc", in which case it sets the angle of rotation.
· Arc Width - The value of this slider controls the length of each arc used to draw the spinner.
· Fade Steps - The value of this slider controls how many steps are used to draw each arc.
· Reverse Fade - Enabling this option reverses the order of the fade steps.
· Width - The value of this slider controls the width of the shape. A value of 100 should fill the prop.
· Height - The value of this slider controls the height of the shape. A value of 100 should fill theprop.
· Left / Right - The value of this slider controls the center of the shape along the horizontal axis.
· Top / Bottom - The value of this slider controls the center of the shape along the vertical axis.
Spinner
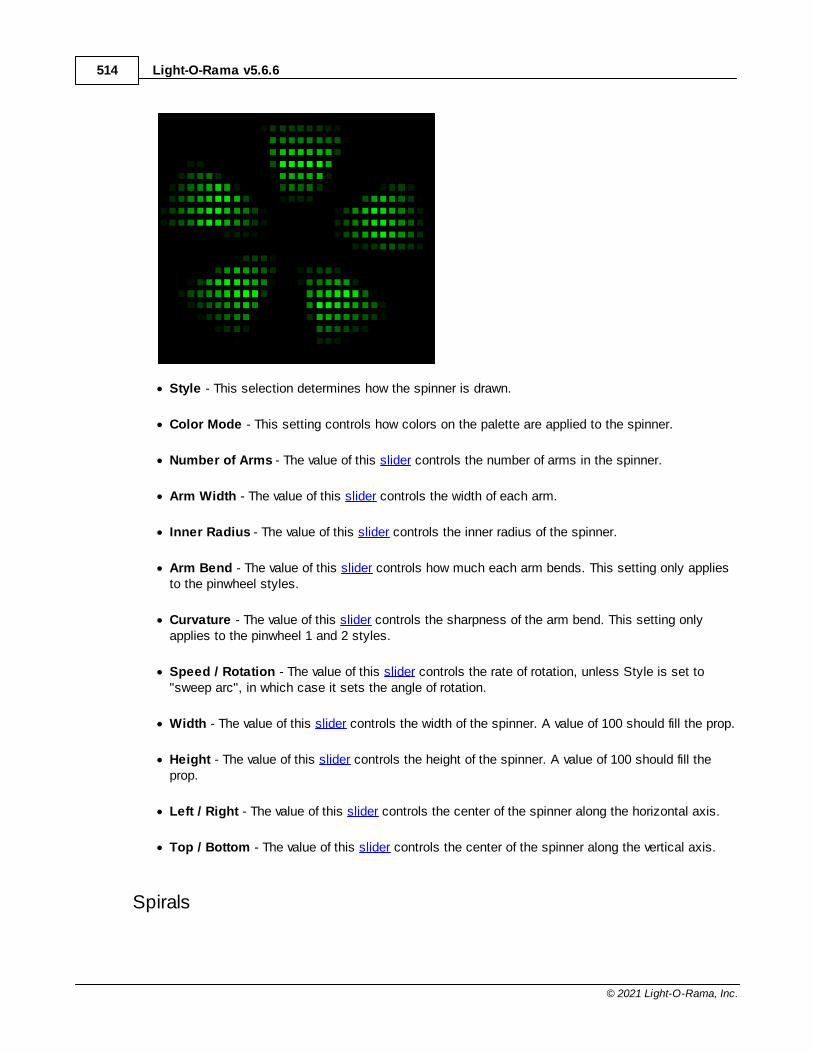
Light-O-Rama v5.6.6514
© 2021 Light-O-Rama, Inc.
· Style - This selection determines how the spinner is drawn.
· Color Mode - This setting controls how colors on the palette are applied to the spinner.
· Number of Arms - The value of this slider controls the number of arms in the spinner.
· Arm Width - The value of this slider controls the width of each arm.
· Inner Radius - The value of this slider controls the inner radius of the spinner.
· Arm Bend - The value of this slider controls how much each arm bends. This setting only appliesto the pinwheel styles.
· Curvature - The value of this slider controls the sharpness of the arm bend. This setting onlyapplies to the pinwheel 1 and 2 styles.
· Speed / Rotation - The value of this slider controls the rate of rotation, unless Style is set to"sweep arc", in which case it sets the angle of rotation.
· Width - The value of this slider controls the width of the spinner. A value of 100 should fill the prop.
· Height - The value of this slider controls the height of the spinner. A value of 100 should fill theprop.
· Left / Right - The value of this slider controls the center of the spinner along the horizontal axis.
· Top / Bottom - The value of this slider controls the center of the spinner along the vertical axis.
Spirals
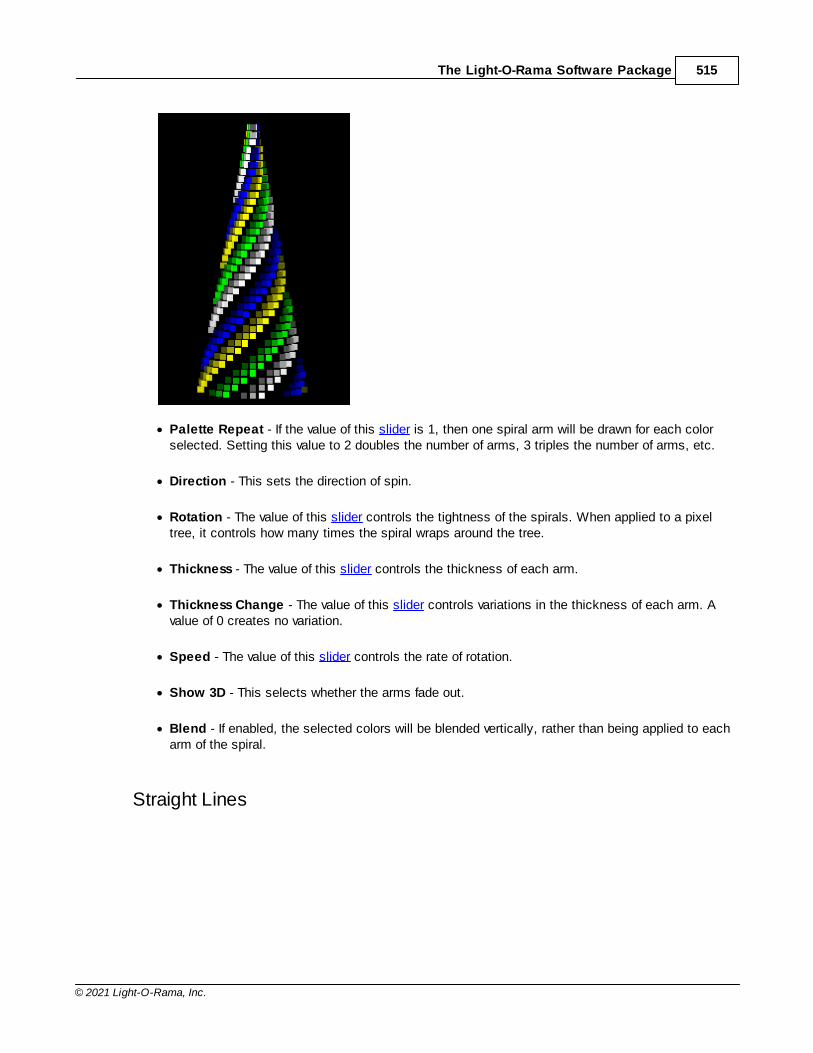
The Light-O-Rama Software Package 515
© 2021 Light-O-Rama, Inc.
· Palette Repeat - If the value of this slider is 1, then one spiral arm will be drawn for each colorselected. Setting this value to 2 doubles the number of arms, 3 triples the number of arms, etc.
· Direction - This sets the direction of spin.
· Rotation - The value of this slider controls the tightness of the spirals. When applied to a pixeltree, it controls how many times the spiral wraps around the tree.
· Thickness - The value of this slider controls the thickness of each arm.
· Thickness Change - The value of this slider controls variations in the thickness of each arm. Avalue of 0 creates no variation.
· Speed - The value of this slider controls the rate of rotation.
· Show 3D - This selects whether the arms fade out.
· Blend - If enabled, the selected colors will be blended vertically, rather than being applied to eacharm of the spiral.
Straight Lines
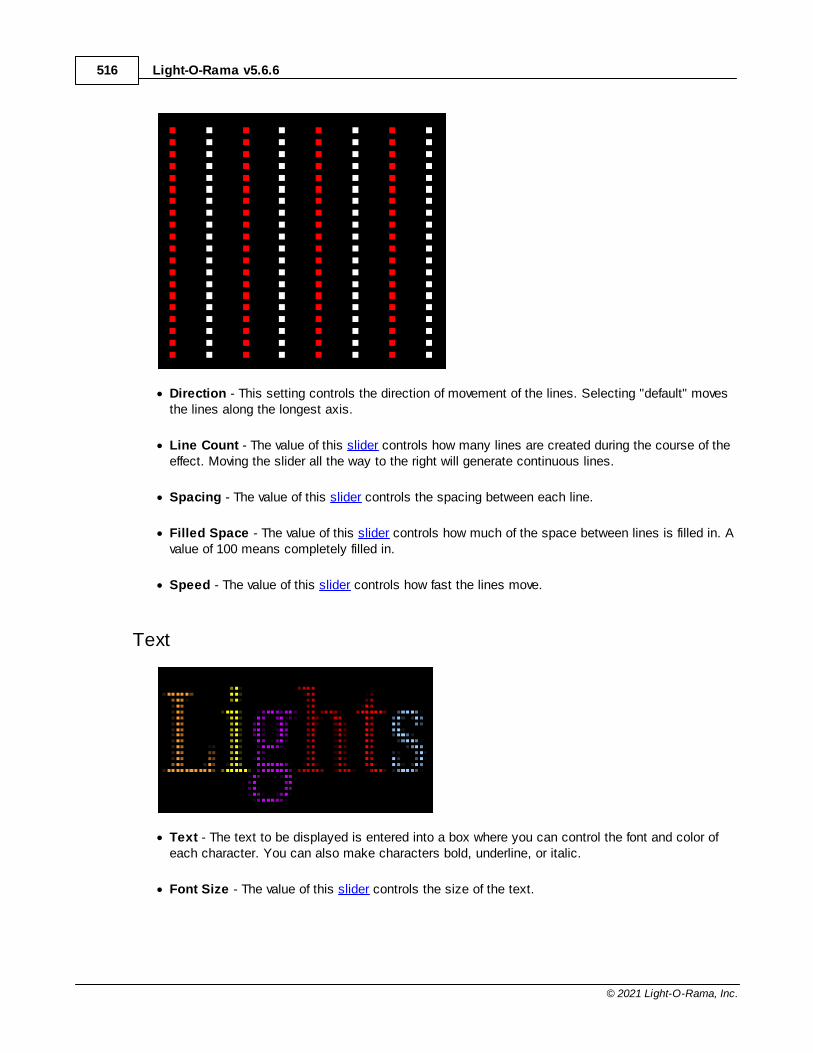
Light-O-Rama v5.6.6516
© 2021 Light-O-Rama, Inc.
· Direction - This setting controls the direction of movement of the lines. Selecting "default" movesthe lines along the longest axis.
· Line Count - The value of this slider controls how many lines are created during the course of theeffect. Moving the slider all the way to the right will generate continuous lines.
· Spacing - The value of this slider controls the spacing between each line.
· Filled Space - The value of this slider controls how much of the space between lines is filled in. Avalue of 100 means completely filled in.
· Speed - The value of this slider controls how fast the lines move.
Text
· Text - The text to be displayed is entered into a box where you can control the font and color ofeach character. You can also make characters bold, underline, or italic.
· Font Size - The value of this slider controls the size of the text.
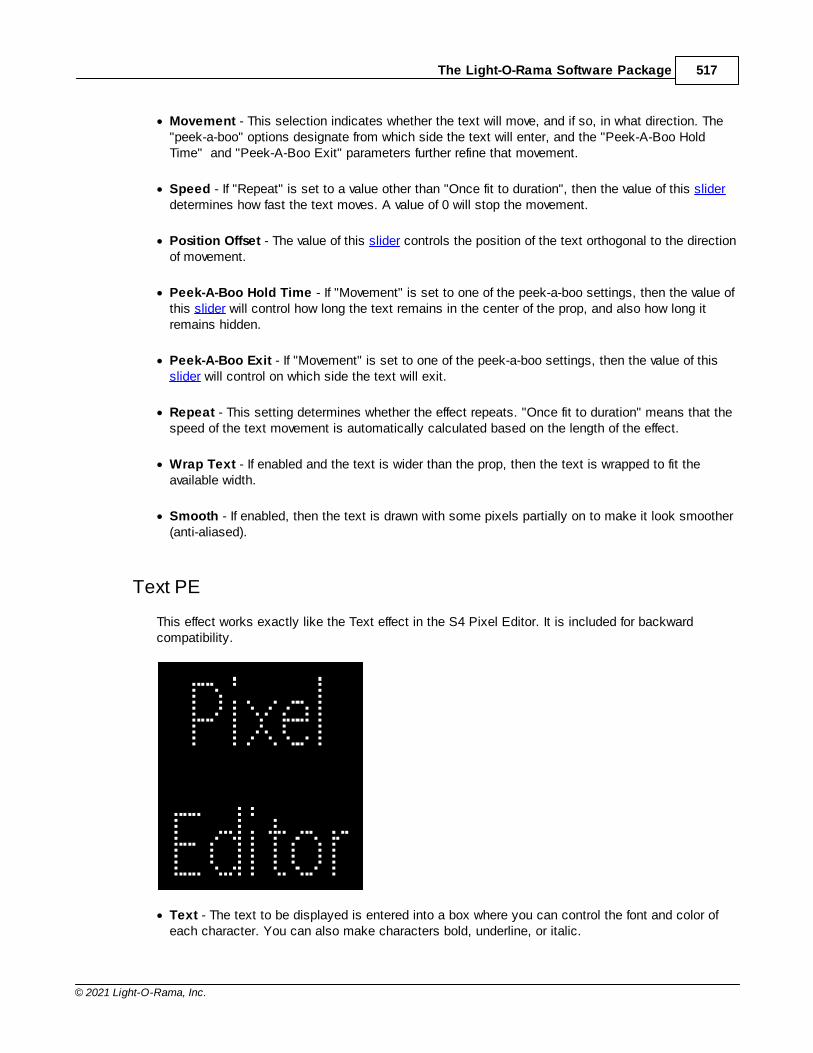
The Light-O-Rama Software Package 517
© 2021 Light-O-Rama, Inc.
· Movement - This selection indicates whether the text will move, and if so, in what direction. The"peek-a-boo" options designate from which side the text will enter, and the "Peek-A-Boo HoldTime" and "Peek-A-Boo Exit" parameters further refine that movement.
· Speed - If "Repeat" is set to a value other than "Once fit to duration", then the value of this sliderdetermines how fast the text moves. A value of 0 will stop the movement.
· Position Offset - The value of this slider controls the position of the text orthogonal to the directionof movement.
· Peek-A-Boo Hold Time - If "Movement" is set to one of the peek-a-boo settings, then the value ofthis slider will control how long the text remains in the center of the prop, and also how long itremains hidden.
· Peek-A-Boo Exit - If "Movement" is set to one of the peek-a-boo settings, then the value of thisslider will control on which side the text will exit.
· Repeat - This setting determines whether the effect repeats. "Once fit to duration" means that thespeed of the text movement is automatically calculated based on the length of the effect.
· Wrap Text - If enabled and the text is wider than the prop, then the text is wrapped to fit theavailable width.
· Smooth - If enabled, then the text is drawn with some pixels partially on to make it look smoother(anti-aliased).
Text PE
This effect works exactly like the Text effect in the S4 Pixel Editor. It is included for backwardcompatibility.
· Text - The text to be displayed is entered into a box where you can control the font and color ofeach character. You can also make characters bold, underline, or italic.
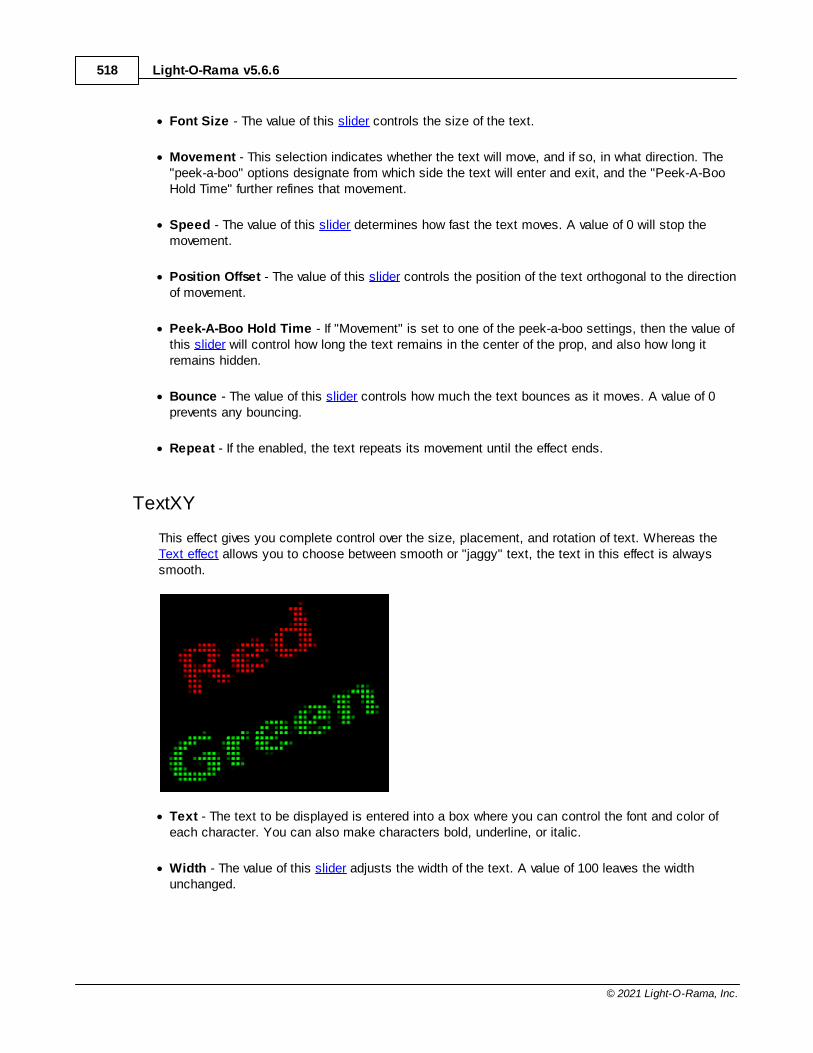
Light-O-Rama v5.6.6518
© 2021 Light-O-Rama, Inc.
· Font Size - The value of this slider controls the size of the text.
· Movement - This selection indicates whether the text will move, and if so, in what direction. The"peek-a-boo" options designate from which side the text will enter and exit, and the "Peek-A-BooHold Time" further refines that movement.
· Speed - The value of this slider determines how fast the text moves. A value of 0 will stop themovement.
· Position Offset - The value of this slider controls the position of the text orthogonal to the directionof movement.
· Peek-A-Boo Hold Time - If "Movement" is set to one of the peek-a-boo settings, then the value ofthis slider will control how long the text remains in the center of the prop, and also how long itremains hidden.
· Bounce - The value of this slider controls how much the text bounces as it moves. A value of 0prevents any bouncing.
· Repeat - If the enabled, the text repeats its movement until the effect ends.
TextXY
This effect gives you complete control over the size, placement, and rotation of text. Whereas theText effect allows you to choose between smooth or "jaggy" text, the text in this effect is alwayssmooth.
· Text - The text to be displayed is entered into a box where you can control the font and color ofeach character. You can also make characters bold, underline, or italic.
· Width - The value of this slider adjusts the width of the text. A value of 100 leaves the widthunchanged.
The Light-O-Rama Software Package 519
© 2021 Light-O-Rama, Inc.
· Height - The value of this slider adjusts the height of the text. A value of 100 leaves the heightunchanged - which should be about the height of the prop (varies slightly depending on the fontused).
· Left / Right - The value of this slider controls the position of the text along the horizontal axis.
· Top / Bottom - The value of this slider controls the position of the text along the vertical axis.
· Rotation angle - The value of this slider controls the rotation of the text. The value is the rotationin degrees. 0 is no rotation. The center of rotation is controlled by the Anchor setting.
· Anchor - This setting controls how the text stretches when width and height are changed. It alsocontrols the center of rotation.
o If "L" is checked but not "R", then adjusting the width moves the right edge of the text. The
center of rotation will be on the left side.
o If "L" is not checked but "R" is, then adjusting the width moves the left edge of the text .The
center of rotation will be on the right side.
o If "L" and "R" are both checked or both unchecked, then adjusting the width moves the both
the left and right edges of the text, but the center of the text does not change. The center ofrotation will be the center of the text.
o If "Top" is checked but not "Bottom", then adjusting the height moves the bottom edge of the
text. The center of rotation will be on the top edge.
o If "Top" is not checked but "Bottom" is, then adjusting the height moves the top edge of the
text. The center of rotation will be on the bottom edge.
o If "Top" and "Bottom" are both checked or both unchecked, then adjusting the height moves
the both the top and bottom edges of the text, but the middle of the text does not change. Thecenter of rotation will be the middle of the text.
· Wrap Text - If enabled and the text is wider than the prop, then the text is wrapped to fit theavailable width.
Twinkle
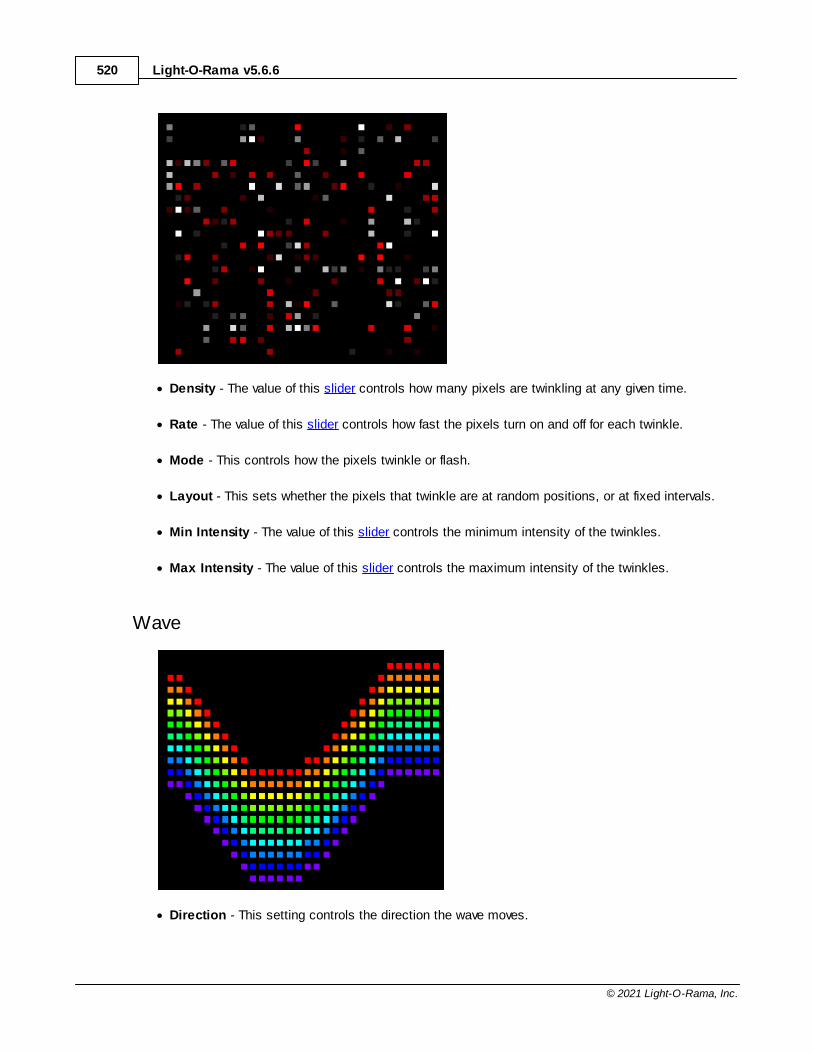
Light-O-Rama v5.6.6520
© 2021 Light-O-Rama, Inc.
· Density - The value of this slider controls how many pixels are twinkling at any given time.
· Rate - The value of this slider controls how fast the pixels turn on and off for each twinkle.
· Mode - This controls how the pixels twinkle or flash.
· Layout - This sets whether the pixels that twinkle are at random positions, or at fixed intervals.
· Min Intensity - The value of this slider controls the minimum intensity of the twinkles.
· Max Intensity - The value of this slider controls the maximum intensity of the twinkles.
Wave
· Direction - This setting controls the direction the wave moves.
The Light-O-Rama Software Package 521
© 2021 Light-O-Rama, Inc.
· Change Colors - This setting controls how colors are applied to the wave.
· Color Mode - This selects whether colors should be generated automatically (rainbow), or takenfrom the selected palette colors.
· Wave Count - This sets how many waves should be drawn.
· Amplitude - The value of this slider controls how tall the waves are.
· Frequency - The value of this slider controls how close together the wave peaks are.
· Thickness - The value of this slider controls the thickness of the waves.
· Speed - The value of this slider controls how fast the wave moves.
5.3.7 Playback Window
The "Playback" window is normally docked to the top of the main Light-O-Rama S5 Sequencer programwindow. It can also be dragged and dropped such that it "floats" outside of the main window.
The playback window has 2 purposes:
1. Display a simulation of your lights during sequence playback2. Display a motion effect when one is selected in the sequence grid
Sequence Playback
The primary purpose of the playback window is to display a simulation of your lights while the sequenceis playing in the Sequencer. If you have a second display monitor, this is a good window to float and dragto the other monitor. That way you can sequence on one monitor and view playback on the other.
Note that there are certain items that are not displayed during sequence playback. These include:· props with a shape of "hidden"· archived props· beat channels
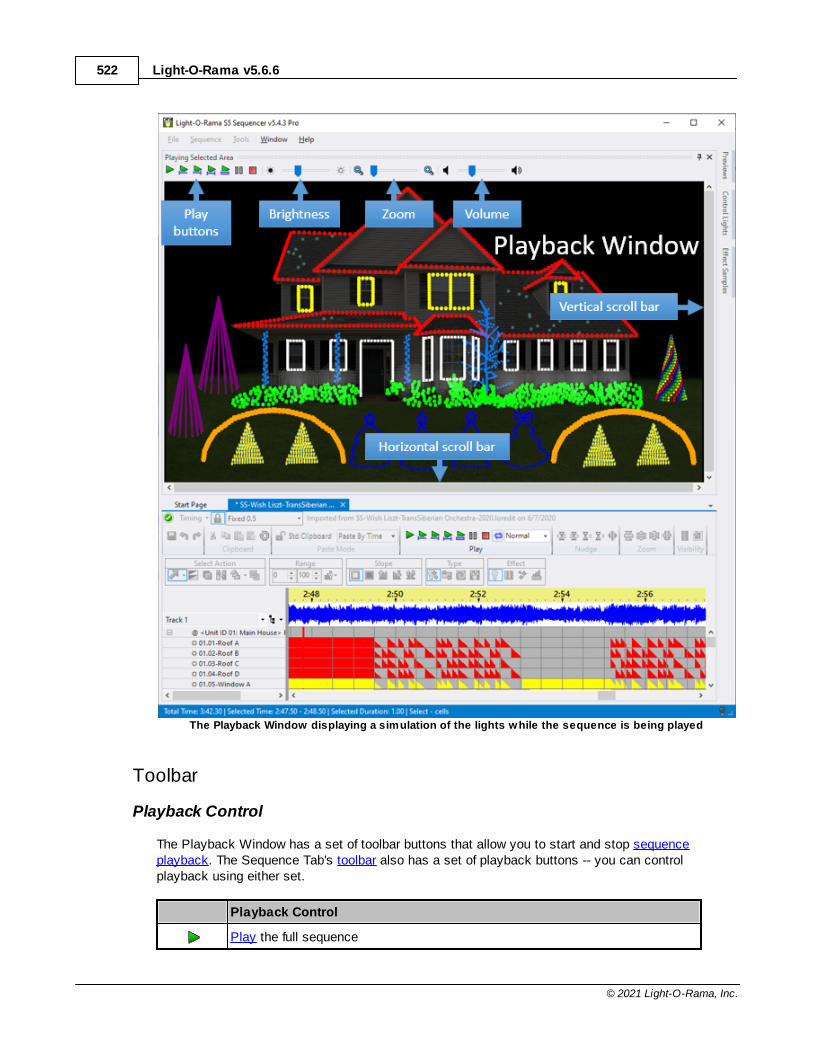
Light-O-Rama v5.6.6522
© 2021 Light-O-Rama, Inc.
The Playback Window displaying a simulation of the lights while the sequence is being played
Toolbar
Playback Control
The Playback Window has a set of toolbar buttons that allow you to start and stop sequenceplayback. The Sequence Tab's toolbar also has a set of playback buttons -- you can controlplayback using either set.
Playback Control
Play the full sequence
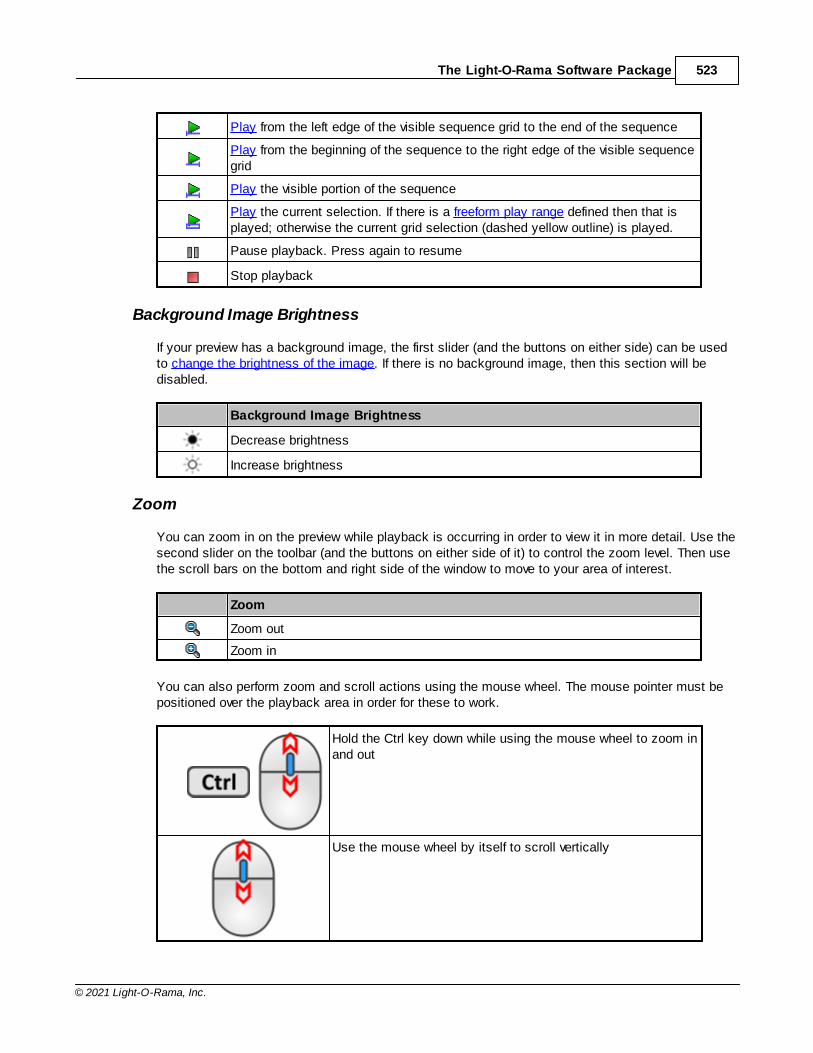
The Light-O-Rama Software Package 523
© 2021 Light-O-Rama, Inc.
Play from the left edge of the visible sequence grid to the end of the sequence
Play from the beginning of the sequence to the right edge of the visible sequencegrid
Play the visible portion of the sequence
Play the current selection. If there is a freeform play range defined then that isplayed; otherwise the current grid selection (dashed yellow outline) is played.
Pause playback. Press again to resume
Stop playback
Background Image Brightness
If your preview has a background image, the first slider (and the buttons on either side) can be usedto change the brightness of the image. If there is no background image, then this section will bedisabled.
Background Image Brightness
Decrease brightness
Increase brightness
Zoom
You can zoom in on the preview while playback is occurring in order to view it in more detail. Use thesecond slider on the toolbar (and the buttons on either side of it) to control the zoom level. Then usethe scroll bars on the bottom and right side of the window to move to your area of interest.
Zoom
Zoom out
Zoom in
You can also perform zoom and scroll actions using the mouse wheel. The mouse pointer must bepositioned over the playback area in order for these to work.
Hold the Ctrl key down while using the mouse wheel to zoom inand out
Use the mouse wheel by itself to scroll vertically
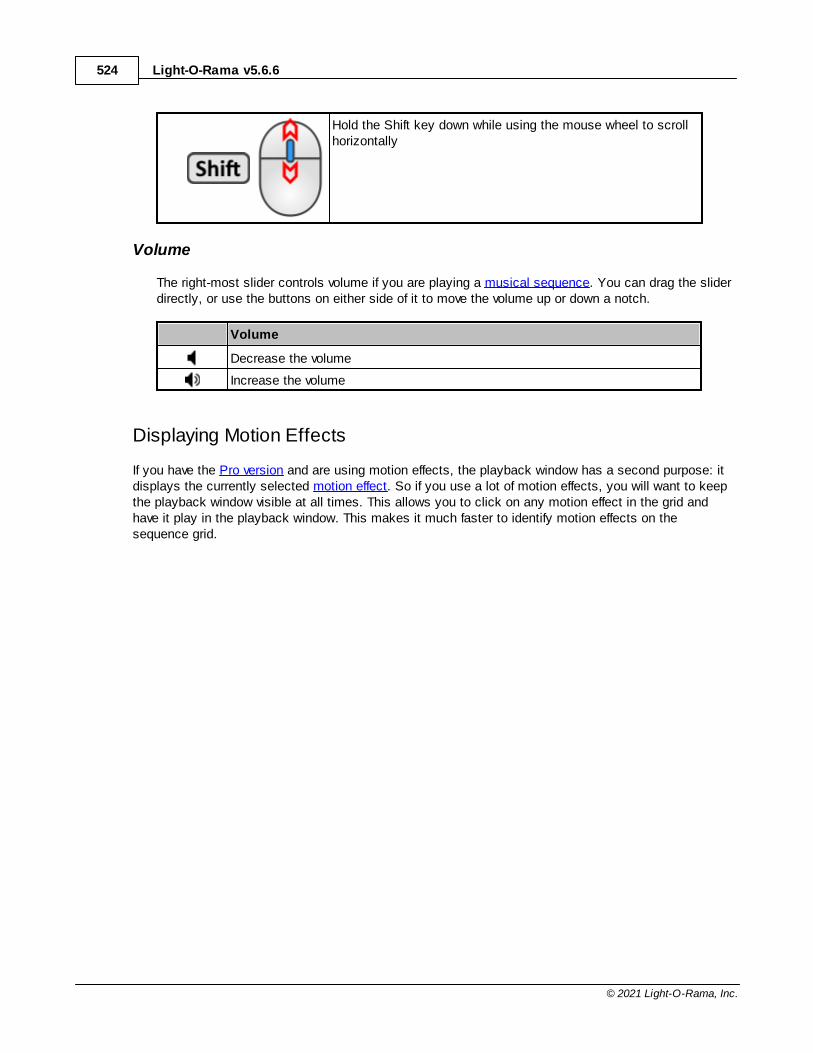
Light-O-Rama v5.6.6524
© 2021 Light-O-Rama, Inc.
Hold the Shift key down while using the mouse wheel to scrollhorizontally
Volume
The right-most slider controls volume if you are playing a musical sequence. You can drag the sliderdirectly, or use the buttons on either side of it to move the volume up or down a notch.
Volume
Decrease the volume
Increase the volume
Displaying Motion Effects
If you have the Pro version and are using motion effects, the playback window has a second purpose: itdisplays the currently selected motion effect. So if you use a lot of motion effects, you will want to keepthe playback window visible at all times. This allows you to click on any motion effect in the grid andhave it play in the playback window. This makes it much faster to identify motion effects on thesequence grid.
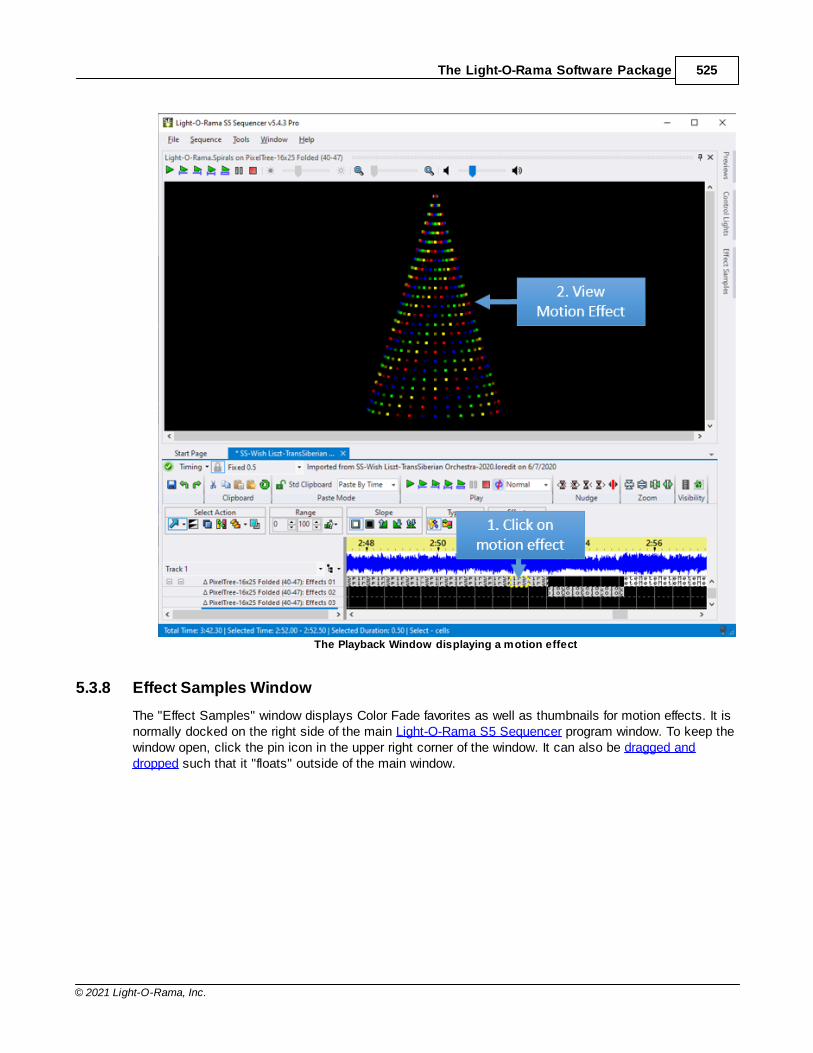
The Light-O-Rama Software Package 525
© 2021 Light-O-Rama, Inc.
The Playback Window displaying a motion effect
5.3.8 Effect Samples Window
The "Effect Samples" window displays Color Fade favorites as well as thumbnails for motion effects. It isnormally docked on the right side of the main Light-O-Rama S5 Sequencer program window. To keep thewindow open, click the pin icon in the upper right corner of the window. It can also be dragged anddropped such that it "floats" outside of the main window.
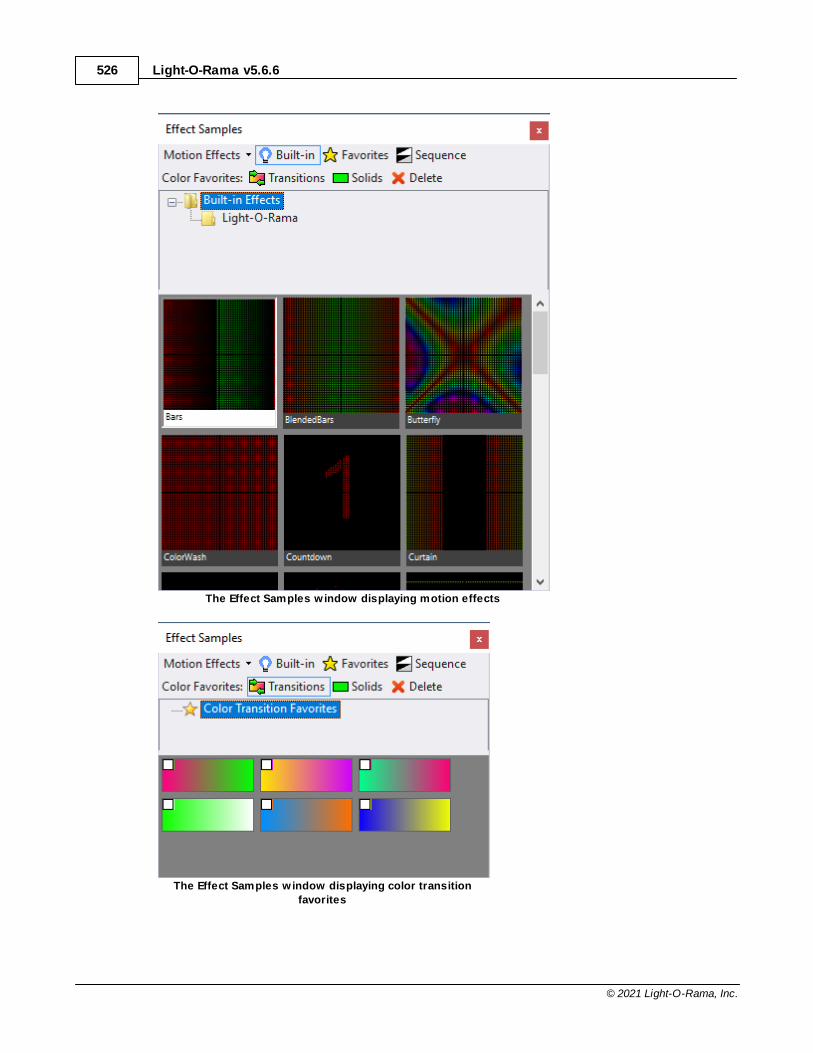
Light-O-Rama v5.6.6526
© 2021 Light-O-Rama, Inc.
The Effect Samples w indow displaying motion effects
The Effect Samples w indow displaying color transition
favorites
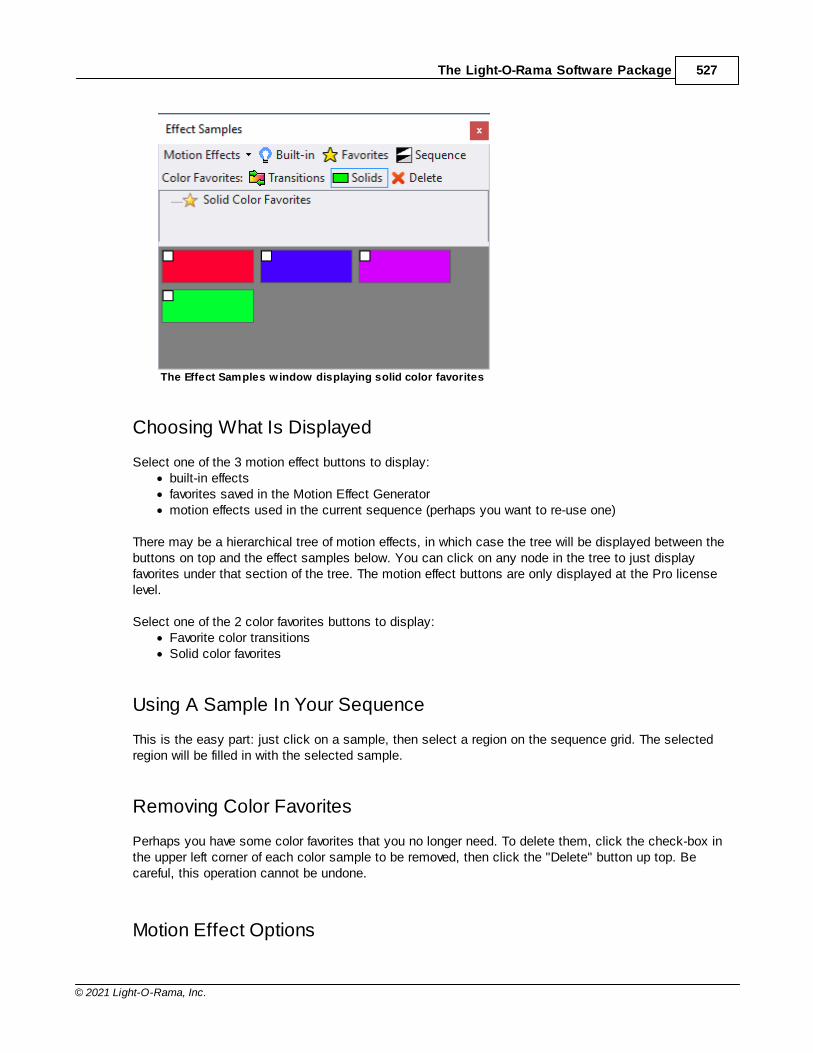
The Light-O-Rama Software Package 527
© 2021 Light-O-Rama, Inc.
The Effect Samples w indow displaying solid color favorites
Choosing What Is Displayed
Select one of the 3 motion effect buttons to display:· built-in effects· favorites saved in the Motion Effect Generator· motion effects used in the current sequence (perhaps you want to re-use one)
There may be a hierarchical tree of motion effects, in which case the tree will be displayed between thebuttons on top and the effect samples below. You can click on any node in the tree to just displayfavorites under that section of the tree. The motion effect buttons are only displayed at the Pro licenselevel.
Select one of the 2 color favorites buttons to display:· Favorite color transitions· Solid color favorites
Using A Sample In Your Sequence
This is the easy part: just click on a sample, then select a region on the sequence grid. The selectedregion will be filled in with the selected sample.
Removing Color Favorites
Perhaps you have some color favorites that you no longer need. To delete them, click the check-box inthe upper left corner of each color sample to be removed, then click the "Delete" button up top. Becareful, this operation cannot be undone.
Motion Effect Options
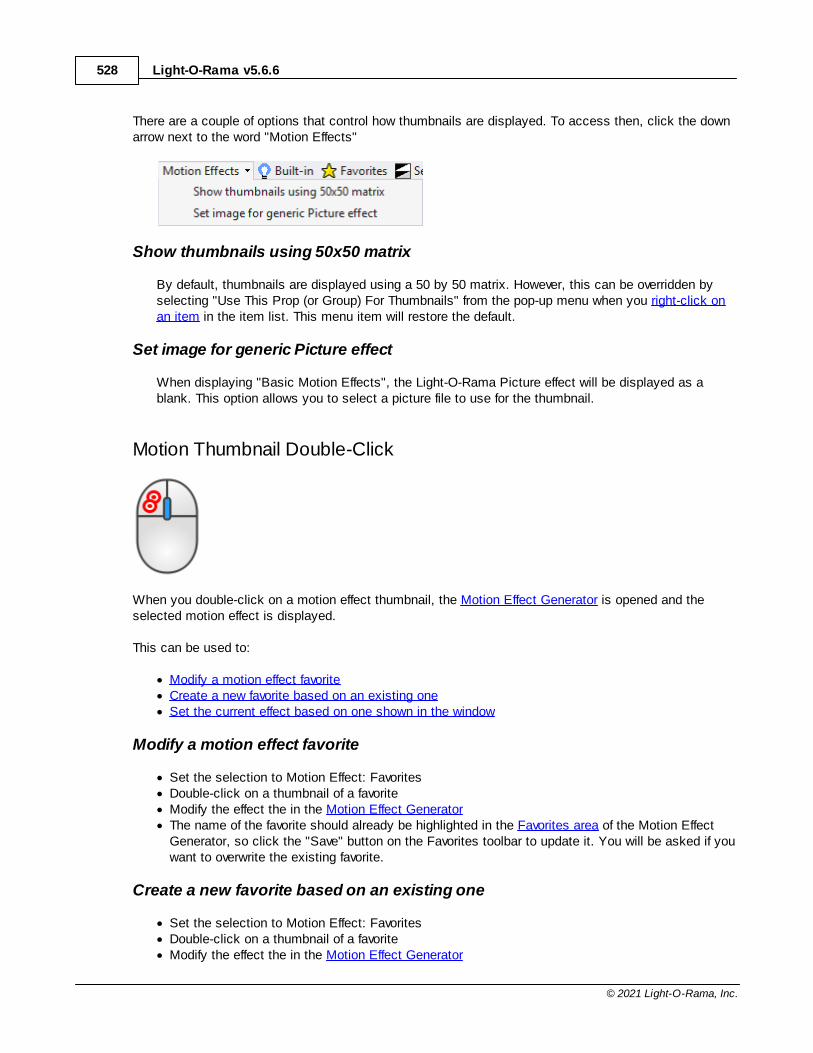
Light-O-Rama v5.6.6528
© 2021 Light-O-Rama, Inc.
There are a couple of options that control how thumbnails are displayed. To access then, click the downarrow next to the word "Motion Effects"
Show thumbnails using 50x50 matrix
By default, thumbnails are displayed using a 50 by 50 matrix. However, this can be overridden byselecting "Use This Prop (or Group) For Thumbnails" from the pop-up menu when you right-click onan item in the item list. This menu item will restore the default.
Set image for generic Picture effect
When displaying "Basic Motion Effects", the Light-O-Rama Picture effect will be displayed as ablank. This option allows you to select a picture file to use for the thumbnail.
Motion Thumbnail Double-Click
When you double-click on a motion effect thumbnail, the Motion Effect Generator is opened and theselected motion effect is displayed.
This can be used to:
· Modify a motion effect favorite· Create a new favorite based on an existing one· Set the current effect based on one shown in the window
Modify a motion effect favorite
· Set the selection to Motion Effect: Favorites· Double-click on a thumbnail of a favorite· Modify the effect the in the Motion Effect Generator· The name of the favorite should already be highlighted in the Favorites area of the Motion Effect
Generator, so click the "Save" button on the Favorites toolbar to update it. You will be asked if youwant to overwrite the existing favorite.
Create a new favorite based on an existing one
· Set the selection to Motion Effect: Favorites· Double-click on a thumbnail of a favorite· Modify the effect the in the Motion Effect Generator
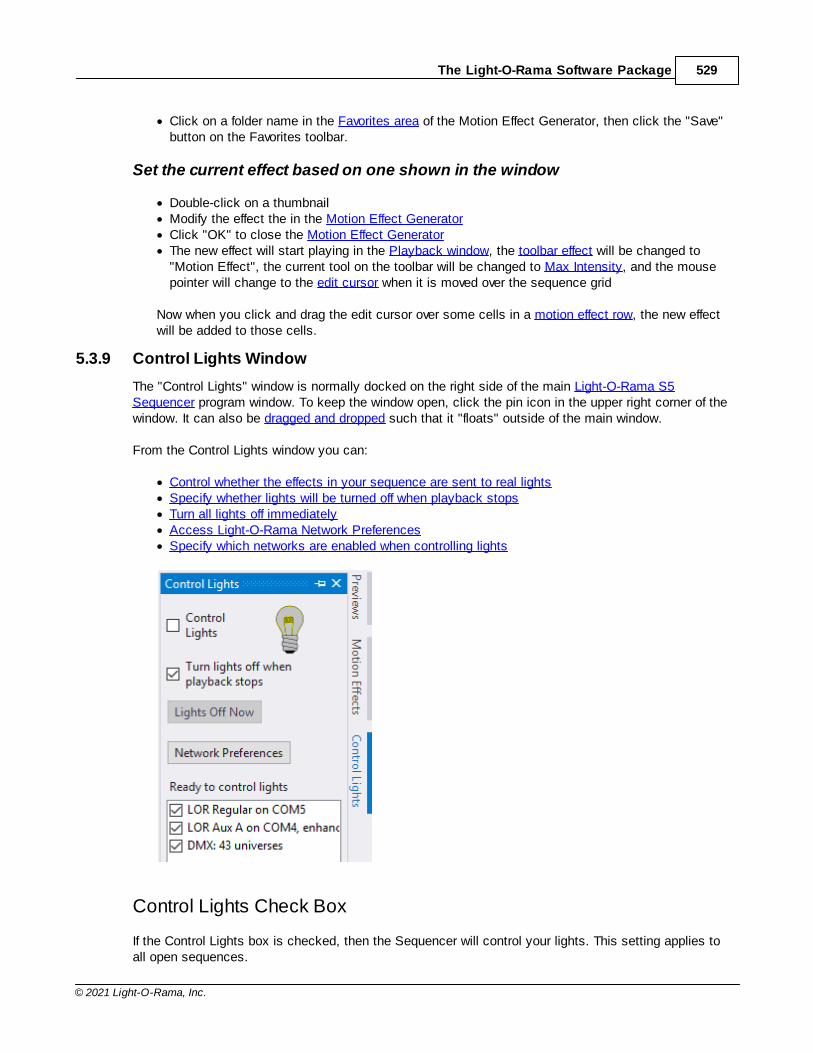
The Light-O-Rama Software Package 529
© 2021 Light-O-Rama, Inc.
· Click on a folder name in the Favorites area of the Motion Effect Generator, then click the "Save"button on the Favorites toolbar.
Set the current effect based on one shown in the window
· Double-click on a thumbnail· Modify the effect the in the Motion Effect Generator· Click "OK" to close the Motion Effect Generator· The new effect will start playing in the Playback window, the toolbar effect will be changed to
"Motion Effect", the current tool on the toolbar will be changed to Max Intensity, and the mousepointer will change to the edit cursor when it is moved over the sequence grid
Now when you click and drag the edit cursor over some cells in a motion effect row, the new effectwill be added to those cells.
5.3.9 Control Lights Window
The "Control Lights" window is normally docked on the right side of the main Light-O-Rama S5Sequencer program window. To keep the window open, click the pin icon in the upper right corner of thewindow. It can also be dragged and dropped such that it "floats" outside of the main window.
From the Control Lights window you can:
· Control whether the effects in your sequence are sent to real lights· Specify whether lights will be turned off when playback stops· Turn all lights off immediately· Access Light-O-Rama Network Preferences· Specify which networks are enabled when controlling lights
Control Lights Check Box
If the Control Lights box is checked, then the Sequencer will control your lights. This setting applies toall open sequences.
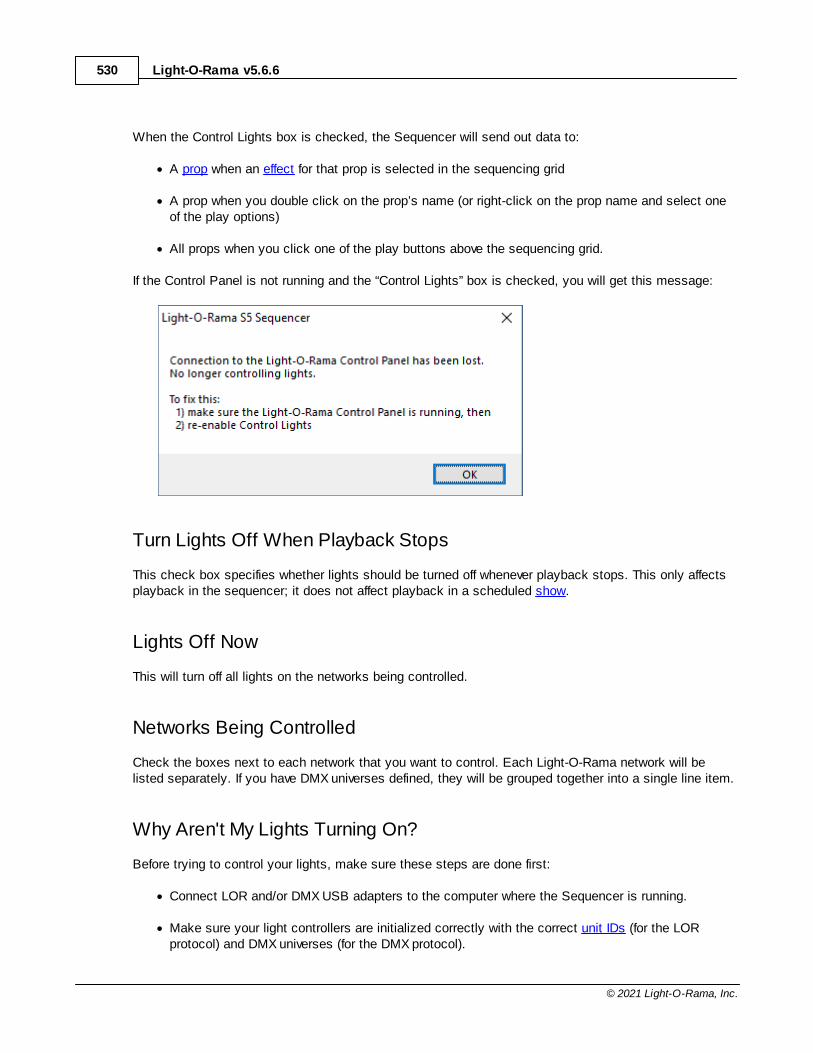
Light-O-Rama v5.6.6530
© 2021 Light-O-Rama, Inc.
When the Control Lights box is checked, the Sequencer will send out data to:
· A prop when an effect for that prop is selected in the sequencing grid
· A prop when you double click on the prop’s name (or right-click on the prop name and select oneof the play options)
· All props when you click one of the play buttons above the sequencing grid.
If the Control Panel is not running and the “Control Lights” box is checked, you will get this message:
Turn Lights Off When Playback Stops
This check box specifies whether lights should be turned off whenever playback stops. This only affectsplayback in the sequencer; it does not affect playback in a scheduled show.
Lights Off Now
This will turn off all lights on the networks being controlled.
Networks Being Controlled
Check the boxes next to each network that you want to control. Each Light-O-Rama network will belisted separately. If you have DMX universes defined, they will be grouped together into a single line item.
Why Aren't My Lights Turning On?
Before trying to control your lights, make sure these steps are done first:
· Connect LOR and/or DMX USB adapters to the computer where the Sequencer is running.
· Make sure your light controllers are initialized correctly with the correct unit IDs (for the LORprotocol) and DMX universes (for the DMX protocol).
The Light-O-Rama Software Package 531
© 2021 Light-O-Rama, Inc.
· Make sure the firmware for your controllers is up-to-date.
· Define the LOR and DMX lighting networks in the Light-O-Rama Network Preferences tool.
· Motion Effects (including SuperStar effects) can only be sent to enhanced LOR networks and DMXnetworks.
· Connect your light controllers to the USB adapters (or to your Ethernet network in the case ofE1.31 devices).
· Ensure all lights and controllers have power.
· Start the Light-O-Rama Control Panel if you haven't already done so. You should see the light bulbicon in the Windows notification area (also called the "system tray") in the lower right corner ofyour screen.
· No shows should be currently scheduled or playing. The light bulb icon in the Windows notificationarea should be red.
· The Hardware Utility should be closed while the Sequencer is running. · Make sure the props you have created in your S5 preview have the correct network, unit IDs, and
circuit numbers defined (they must match the hardware settings).
5.3.10 Audio Settings Window
The Audio Settings window gives you control over the content, colors, and filtering of the audio datadisplayed at the top of the sequence grid. It can give you valuable insight on how to align your lightingeffects to the music.
The "Audio Settings" window is normally docked on the right side of the main Light-O-Rama S5Sequencer program window. To keep the window open, click the pin icon in the upper right corner of thewindow. It can also be dragged and dropped such that it "floats" outside of the main window.
From the Audio Settings window you can:
· Choose the audio data to be displayed· Alter the audio display area's height· Choose the colors used to display the audio data· Scale and filter the waveform· Zoom in on the spectrogram and change its intensity
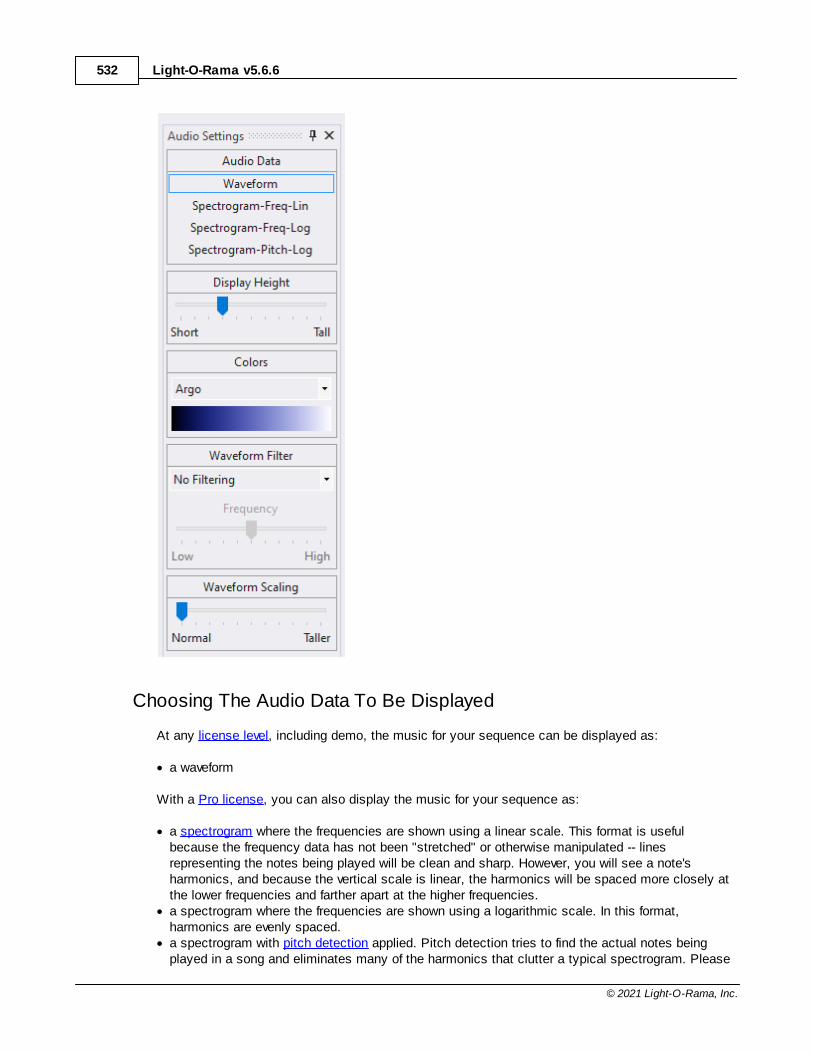
Light-O-Rama v5.6.6532
© 2021 Light-O-Rama, Inc.
Choosing The Audio Data To Be Displayed
At any license level, including demo, the music for your sequence can be displayed as:
· a waveform
With a Pro license, you can also display the music for your sequence as:
· a spectrogram where the frequencies are shown using a linear scale. This format is usefulbecause the frequency data has not been "stretched" or otherwise manipulated -- linesrepresenting the notes being played will be clean and sharp. However, you will see a note'sharmonics, and because the vertical scale is linear, the harmonics will be spaced more closely atthe lower frequencies and farther apart at the higher frequencies.
· a spectrogram where the frequencies are shown using a logarithmic scale. In this format,harmonics are evenly spaced.
· a spectrogram with pitch detection applied. Pitch detection tries to find the actual notes beingplayed in a song and eliminates many of the harmonics that clutter a typical spectrogram. Please
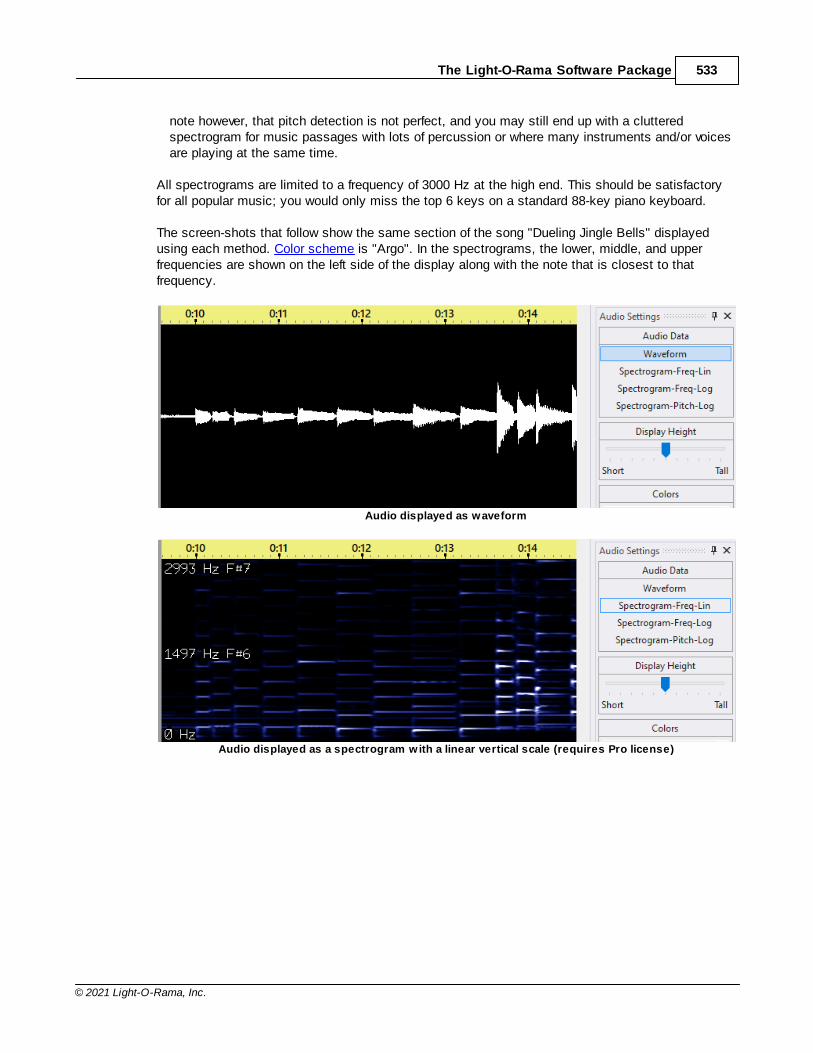
The Light-O-Rama Software Package 533
© 2021 Light-O-Rama, Inc.
note however, that pitch detection is not perfect, and you may still end up with a clutteredspectrogram for music passages with lots of percussion or where many instruments and/or voicesare playing at the same time.
All spectrograms are limited to a frequency of 3000 Hz at the high end. This should be satisfactoryfor all popular music; you would only miss the top 6 keys on a standard 88-key piano keyboard.
The screen-shots that follow show the same section of the song "Dueling Jingle Bells" displayedusing each method. Color scheme is "Argo". In the spectrograms, the lower, middle, and upperfrequencies are shown on the left side of the display along with the note that is closest to thatfrequency.
Audio displayed as waveform
Audio displayed as a spectrogram with a linear vertical scale (requires Pro license)
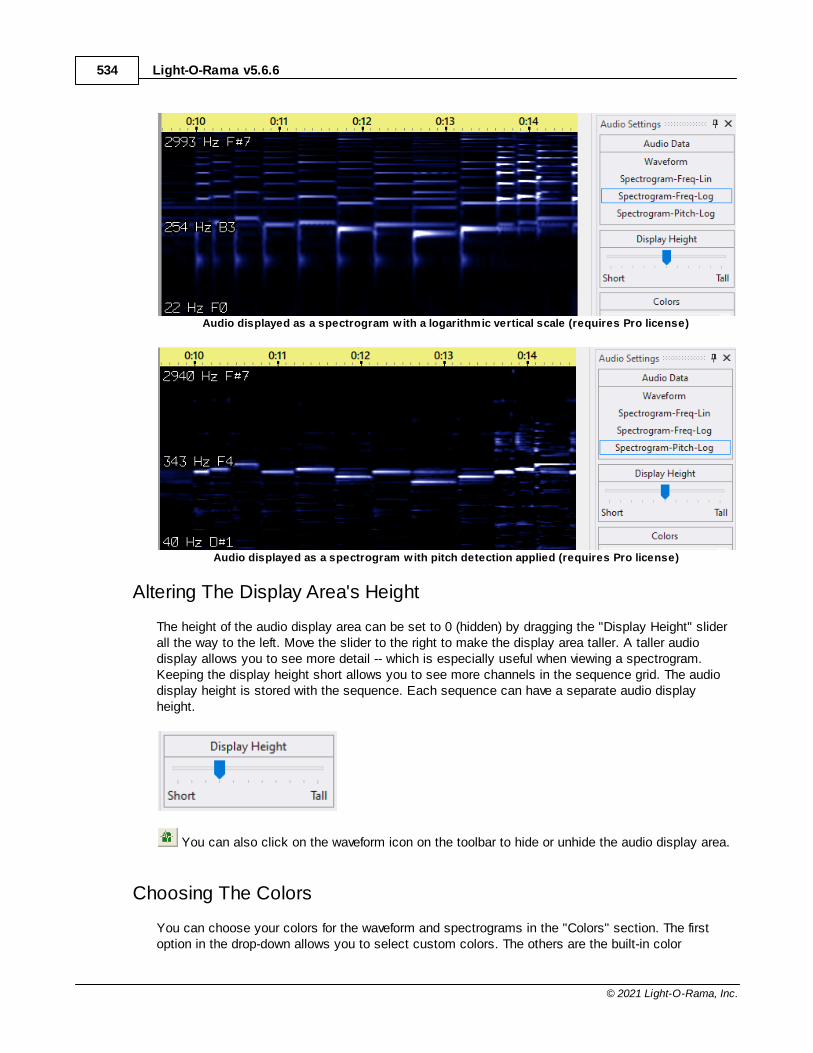
Light-O-Rama v5.6.6534
© 2021 Light-O-Rama, Inc.
Audio displayed as a spectrogram with a logarithmic vertical scale (requires Pro license)
Audio displayed as a spectrogram with pitch detection applied (requires Pro license)
Altering The Display Area's Height
The height of the audio display area can be set to 0 (hidden) by dragging the "Display Height" sliderall the way to the left. Move the slider to the right to make the display area taller. A taller audiodisplay allows you to see more detail -- which is especially useful when viewing a spectrogram.Keeping the display height short allows you to see more channels in the sequence grid. The audiodisplay height is stored with the sequence. Each sequence can have a separate audio displayheight.
You can also click on the waveform icon on the toolbar to hide or unhide the audio display area.
Choosing The Colors
You can choose your colors for the waveform and spectrograms in the "Colors" section. The firstoption in the drop-down allows you to select custom colors. The others are the built-in color
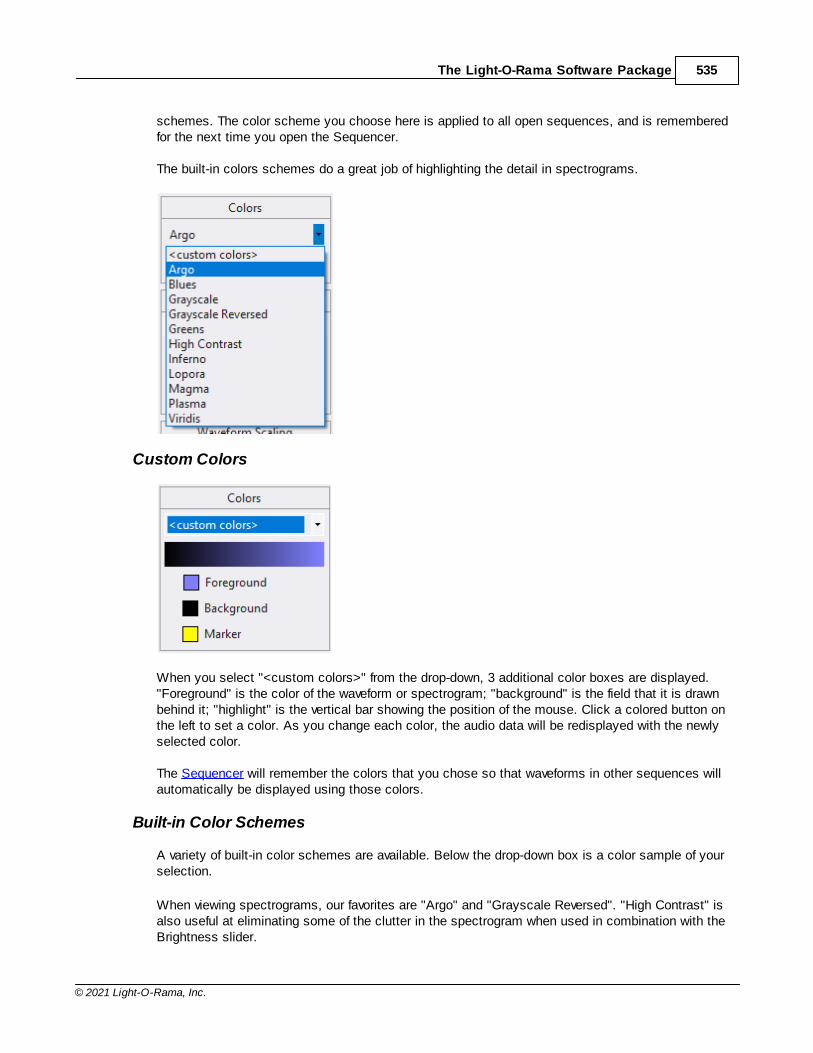
The Light-O-Rama Software Package 535
© 2021 Light-O-Rama, Inc.
schemes. The color scheme you choose here is applied to all open sequences, and is rememberedfor the next time you open the Sequencer.
The built-in colors schemes do a great job of highlighting the detail in spectrograms.
Custom Colors
When you select "<custom colors>" from the drop-down, 3 additional color boxes are displayed."Foreground" is the color of the waveform or spectrogram; "background" is the field that it is drawnbehind it; "highlight" is the vertical bar showing the position of the mouse. Click a colored button onthe left to set a color. As you change each color, the audio data will be redisplayed with the newlyselected color.
The Sequencer will remember the colors that you chose so that waveforms in other sequences willautomatically be displayed using those colors.
Built-in Color Schemes
A variety of built-in color schemes are available. Below the drop-down box is a color sample of yourselection.
When viewing spectrograms, our favorites are "Argo" and "Grayscale Reversed". "High Contrast" isalso useful at eliminating some of the clutter in the spectrogram when used in combination with theBrightness slider.
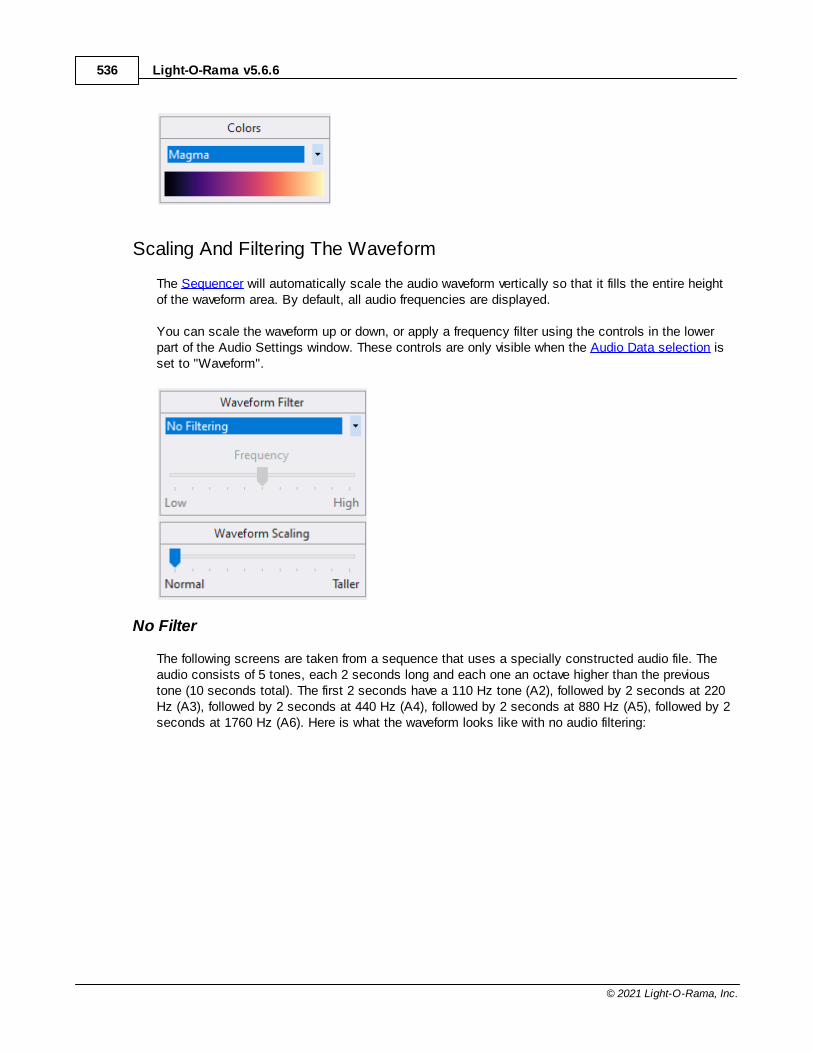
Light-O-Rama v5.6.6536
© 2021 Light-O-Rama, Inc.
Scaling And Filtering The Waveform
The Sequencer will automatically scale the audio waveform vertically so that it fills the entire heightof the waveform area. By default, all audio frequencies are displayed.
You can scale the waveform up or down, or apply a frequency filter using the controls in the lowerpart of the Audio Settings window. These controls are only visible when the Audio Data selection isset to "Waveform".
No Filter
The following screens are taken from a sequence that uses a specially constructed audio file. Theaudio consists of 5 tones, each 2 seconds long and each one an octave higher than the previoustone (10 seconds total). The first 2 seconds have a 110 Hz tone (A2), followed by 2 seconds at 220Hz (A3), followed by 2 seconds at 440 Hz (A4), followed by 2 seconds at 880 Hz (A5), followed by 2seconds at 1760 Hz (A6). Here is what the waveform looks like with no audio filtering:
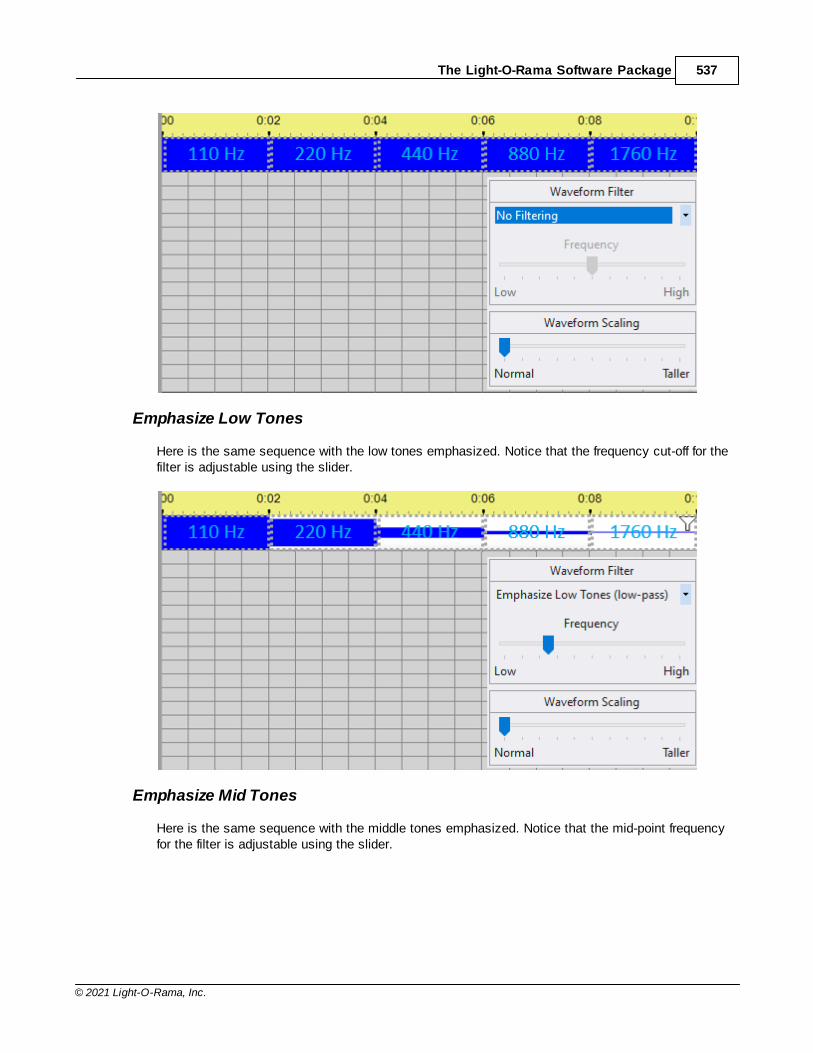
The Light-O-Rama Software Package 537
© 2021 Light-O-Rama, Inc.
Emphasize Low Tones
Here is the same sequence with the low tones emphasized. Notice that the frequency cut-off for thefilter is adjustable using the slider.
Emphasize Mid Tones
Here is the same sequence with the middle tones emphasized. Notice that the mid-point frequencyfor the filter is adjustable using the slider.
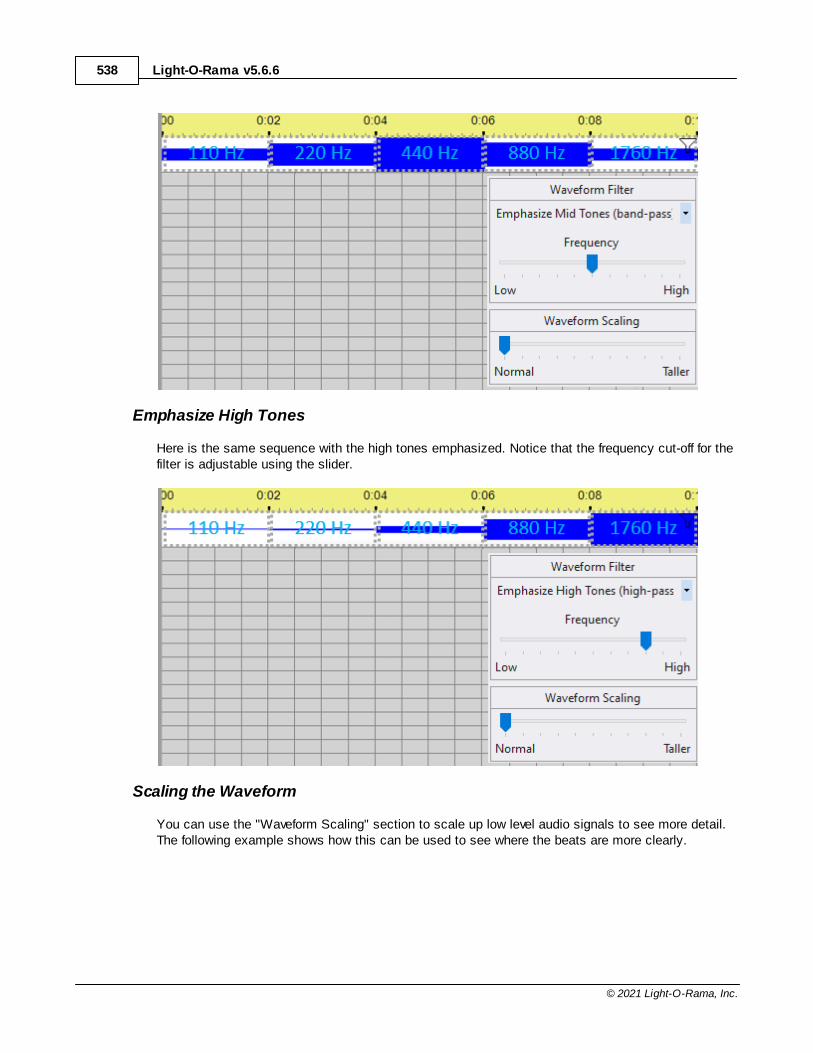
Light-O-Rama v5.6.6538
© 2021 Light-O-Rama, Inc.
Emphasize High Tones
Here is the same sequence with the high tones emphasized. Notice that the frequency cut-off for thefilter is adjustable using the slider.
Scaling the Waveform
You can use the "Waveform Scaling" section to scale up low level audio signals to see more detail.The following example shows how this can be used to see where the beats are more clearly.
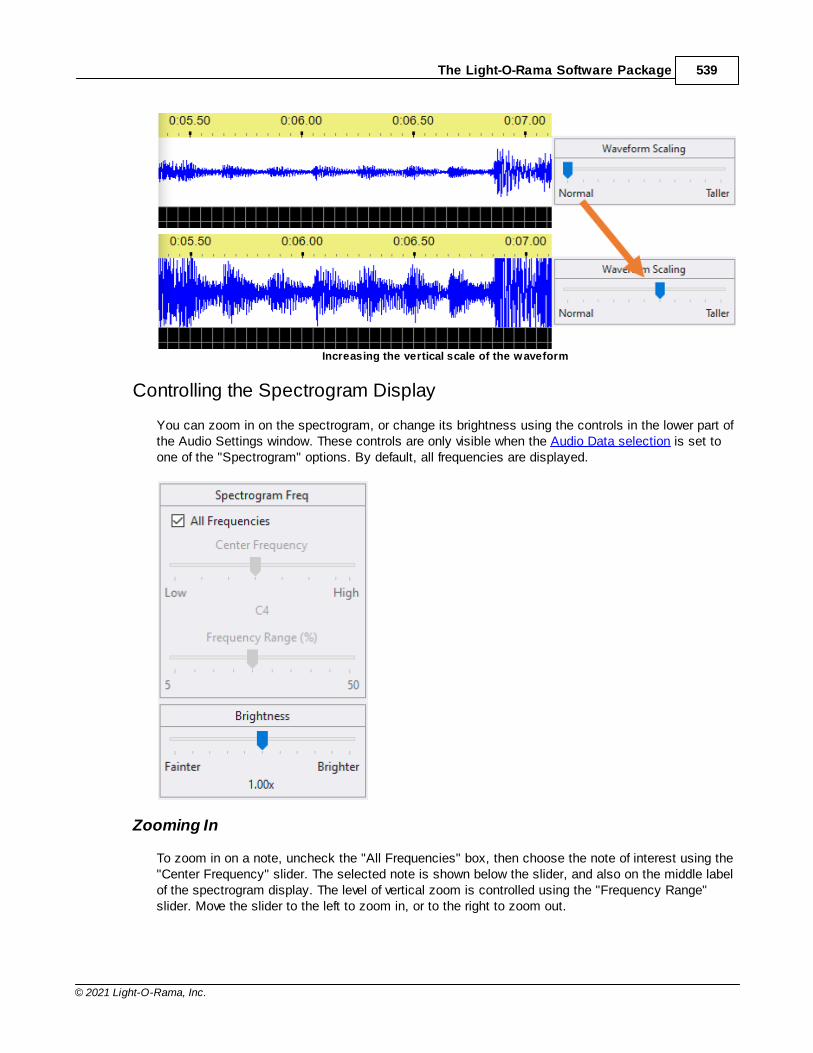
The Light-O-Rama Software Package 539
© 2021 Light-O-Rama, Inc.
Increasing the vertical scale of the waveform
Controlling the Spectrogram Display
You can zoom in on the spectrogram, or change its brightness using the controls in the lower part ofthe Audio Settings window. These controls are only visible when the Audio Data selection is set toone of the "Spectrogram" options. By default, all frequencies are displayed.
Zooming In
To zoom in on a note, uncheck the "All Frequencies" box, then choose the note of interest using the"Center Frequency" slider. The selected note is shown below the slider, and also on the middle labelof the spectrogram display. The level of vertical zoom is controlled using the "Frequency Range"slider. Move the slider to the left to zoom in, or to the right to zoom out.
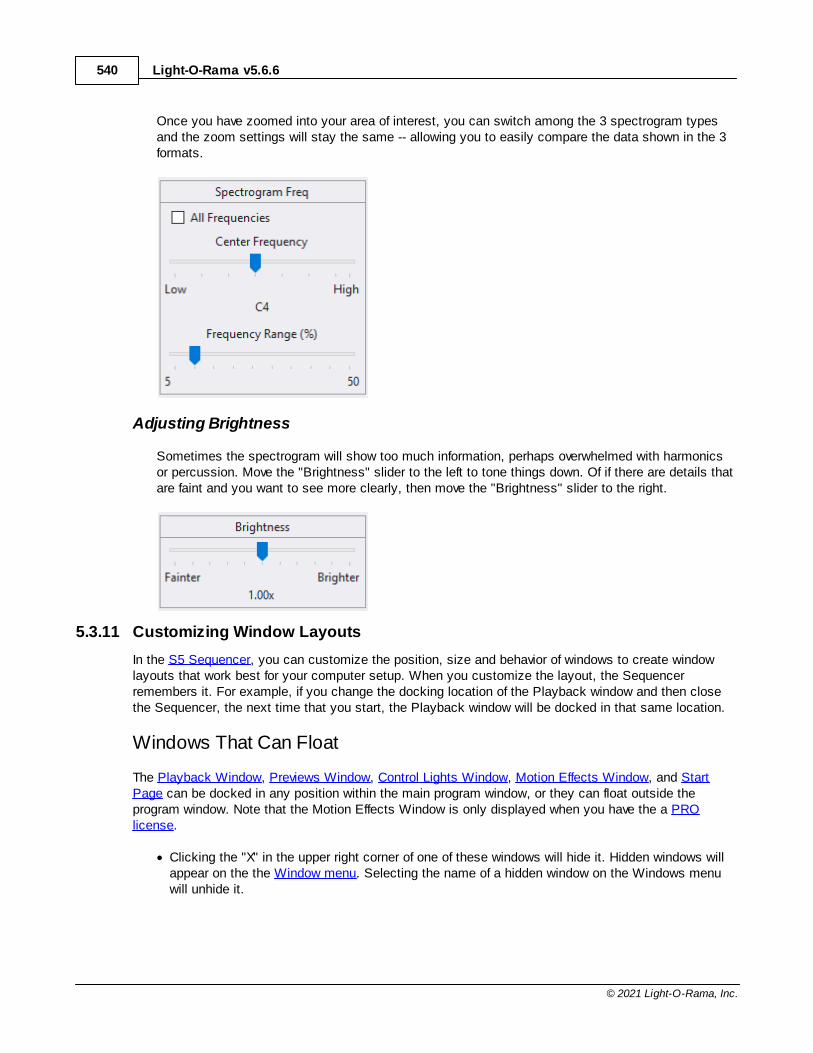
Light-O-Rama v5.6.6540
© 2021 Light-O-Rama, Inc.
Once you have zoomed into your area of interest, you can switch among the 3 spectrogram typesand the zoom settings will stay the same -- allowing you to easily compare the data shown in the 3formats.
Adjusting Brightness
Sometimes the spectrogram will show too much information, perhaps overwhelmed with harmonicsor percussion. Move the "Brightness" slider to the left to tone things down. Of if there are details thatare faint and you want to see more clearly, then move the "Brightness" slider to the right.
5.3.11 Customizing Window Layouts
In the S5 Sequencer, you can customize the position, size and behavior of windows to create windowlayouts that work best for your computer setup. When you customize the layout, the Sequencerremembers it. For example, if you change the docking location of the Playback window and then closethe Sequencer, the next time that you start, the Playback window will be docked in that same location.
Windows That Can Float
The Playback Window, Previews Window, Control Lights Window, Motion Effects Window, and StartPage can be docked in any position within the main program window, or they can float outside theprogram window. Note that the Motion Effects Window is only displayed when you have the a PROlicense.
· Clicking the "X" in the upper right corner of one of these windows will hide it. Hidden windows willappear on the the Window menu. Selecting the name of a hidden window on the Windows menuwill unhide it.
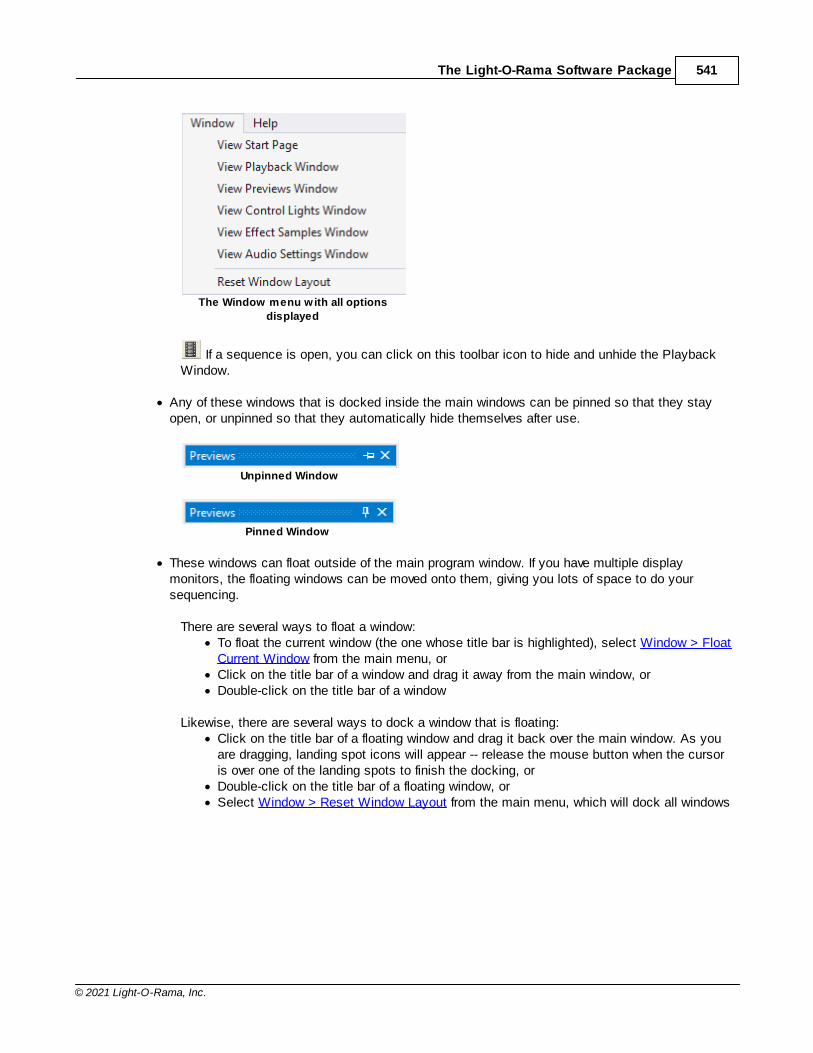
The Light-O-Rama Software Package 541
© 2021 Light-O-Rama, Inc.
The Window menu with all options
displayed
If a sequence is open, you can click on this toolbar icon to hide and unhide the PlaybackWindow.
· Any of these windows that is docked inside the main windows can be pinned so that they stayopen, or unpinned so that they automatically hide themselves after use.
Unpinned Window
Pinned Window
· These windows can float outside of the main program window. If you have multiple displaymonitors, the floating windows can be moved onto them, giving you lots of space to do yoursequencing.
There are several ways to float a window:· To float the current window (the one whose title bar is highlighted), select Window > Float
Current Window from the main menu, or· Click on the title bar of a window and drag it away from the main window, or· Double-click on the title bar of a window
Likewise, there are several ways to dock a window that is floating:· Click on the title bar of a floating window and drag it back over the main window. As you
are dragging, landing spot icons will appear -- release the mouse button when the cursoris over one of the landing spots to finish the docking, or
· Double-click on the title bar of a floating window, or· Select Window > Reset Window Layout from the main menu, which will dock all windows

Light-O-Rama v5.6.6542
© 2021 Light-O-Rama, Inc.
An example w ith 3 floating w indows
Sequence Windows
Sequence windows can only be docked within the main program window; they cannot float or be hidden.Each sequence window has a tab at the top which displays the name of the sequence. Hovering yourcursor over a tab will display a tool-tip with the full path to the sequence file.
· To the right of the name is an "X", which when clicked, will close the sequence. If you close thesequence and there are unsaved changes, you will be asked whether you want those changessaved or discarded.
· While sequence tabs cannot float outside of the main window, the tab can dragged and docked toother sequences. This allows for sequences to be viewed side by side or one below the other.Select Window > Reset Window Layout from the main menu to restore the sequence tabs and allother windows to their default locations.
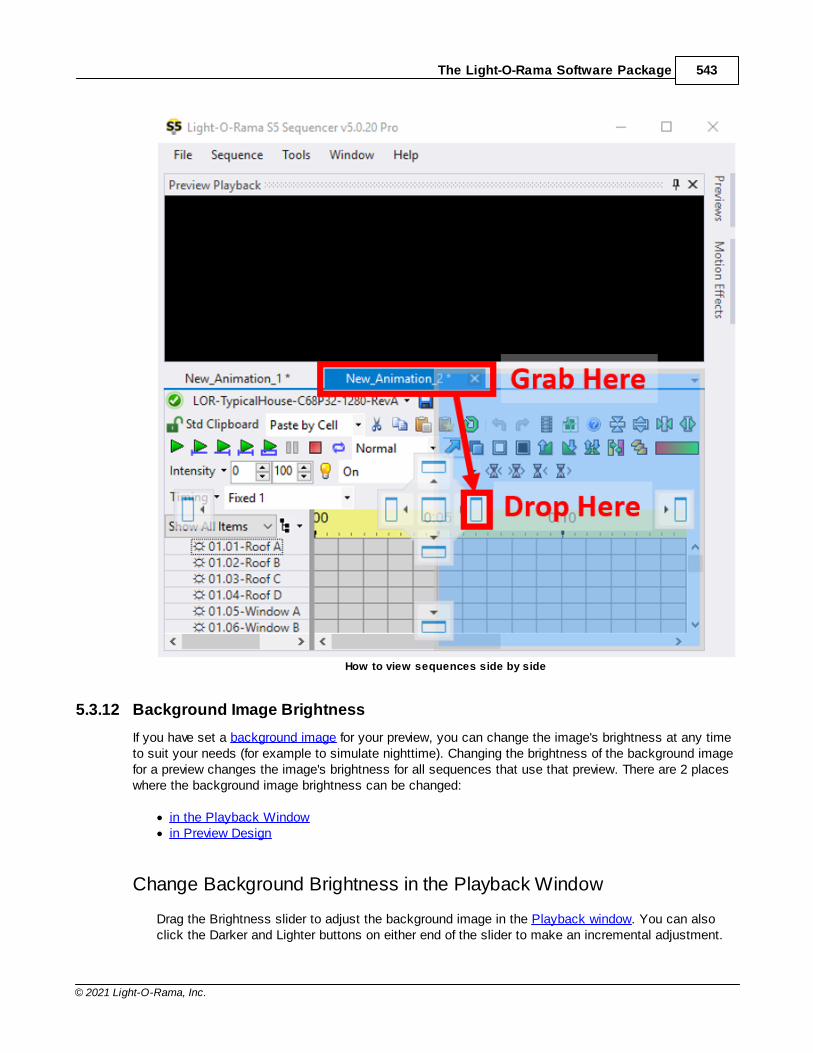
The Light-O-Rama Software Package 543
© 2021 Light-O-Rama, Inc.
How to view sequences side by side
5.3.12 Background Image Brightness
If you have set a background image for your preview, you can change the image's brightness at any timeto suit your needs (for example to simulate nighttime). Changing the brightness of the background imagefor a preview changes the image's brightness for all sequences that use that preview. There are 2 placeswhere the background image brightness can be changed:
· in the Playback Window· in Preview Design
Change Background Brightness in the Playback Window
Drag the Brightness slider to adjust the background image in the Playback window. You can alsoclick the Darker and Lighter buttons on either end of the slider to make an incremental adjustment.
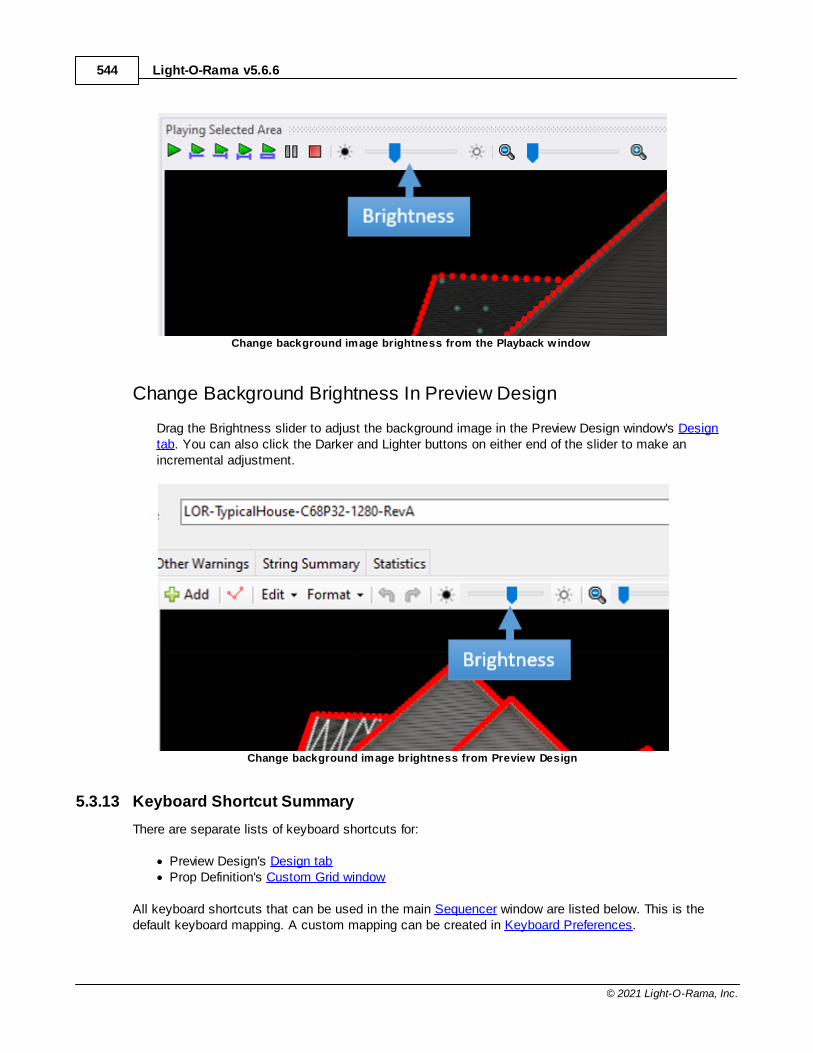
Light-O-Rama v5.6.6544
© 2021 Light-O-Rama, Inc.
Change background image brightness from the Playback window
Change Background Brightness In Preview Design
Drag the Brightness slider to adjust the background image in the Preview Design window's Designtab. You can also click the Darker and Lighter buttons on either end of the slider to make anincremental adjustment.
Change background image brightness from Preview Design
5.3.13 Keyboard Shortcut Summary
There are separate lists of keyboard shortcuts for:
· Preview Design's Design tab· Prop Definition's Custom Grid window
All keyboard shortcuts that can be used in the main Sequencer window are listed below. This is thedefault keyboard mapping. A custom mapping can be created in Keyboard Preferences.
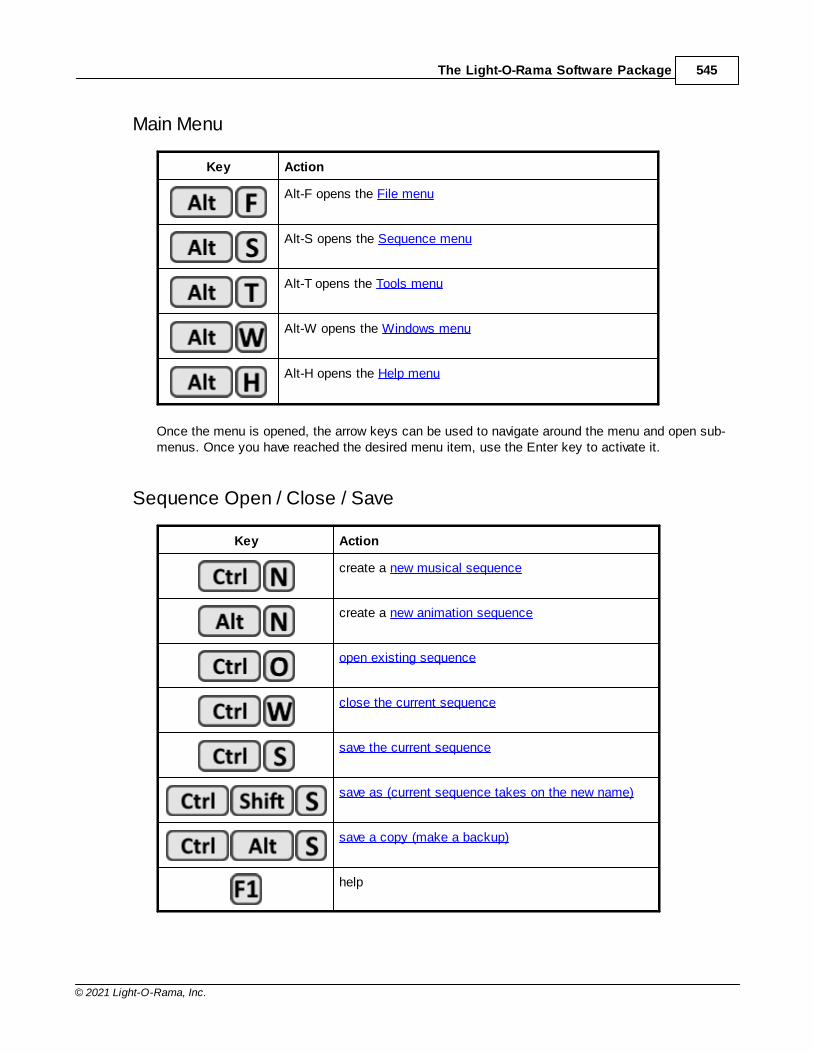
The Light-O-Rama Software Package 545
© 2021 Light-O-Rama, Inc.
Main Menu
Key Action
Alt-F opens the File menu
Alt-S opens the Sequence menu
Alt-T opens the Tools menu
Alt-W opens the Windows menu
Alt-H opens the Help menu
Once the menu is opened, the arrow keys can be used to navigate around the menu and open sub-menus. Once you have reached the desired menu item, use the Enter key to activate it.
Sequence Open / Close / Save
Key Action
create a new musical sequence
create a new animation sequence
open existing sequence
close the current sequence
save the current sequence
save as (current sequence takes on the new name)
save a copy (make a backup)
help
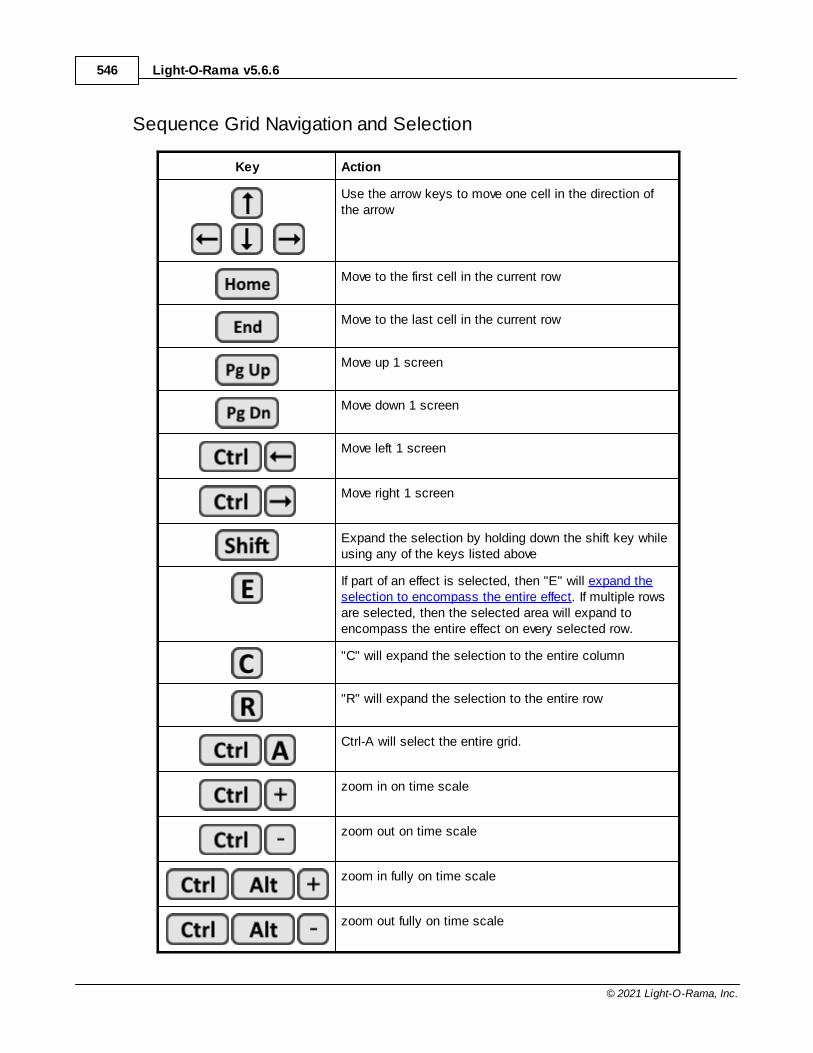
Light-O-Rama v5.6.6546
© 2021 Light-O-Rama, Inc.
Sequence Grid Navigation and Selection
Key Action
Use the arrow keys to move one cell in the direction ofthe arrow
Move to the first cell in the current row
Move to the last cell in the current row
Move up 1 screen
Move down 1 screen
Move left 1 screen
Move right 1 screen
Expand the selection by holding down the shift key whileusing any of the keys listed above
If part of an effect is selected, then "E" will expand theselection to encompass the entire effect. If multiple rowsare selected, then the selected area will expand toencompass the entire effect on every selected row.
"C" will expand the selection to the entire column
"R" will expand the selection to the entire row
Ctrl-A will select the entire grid.
zoom in on time scale
zoom out on time scale
zoom in fully on time scale
zoom out fully on time scale
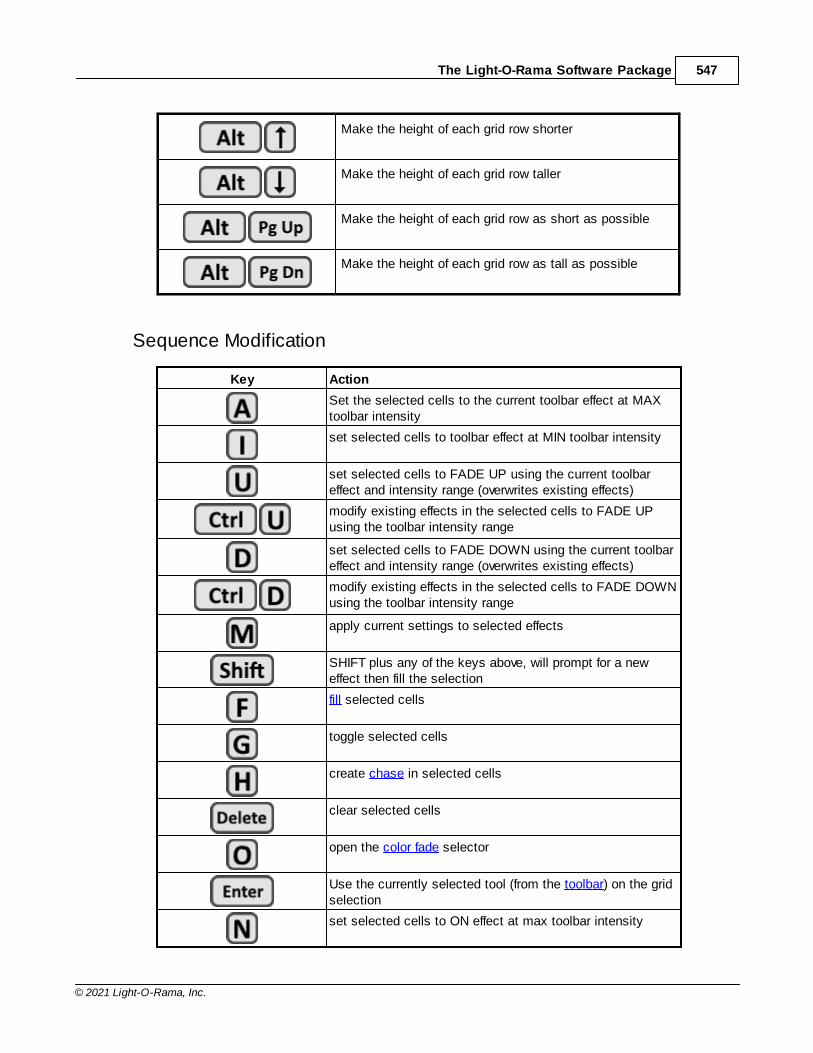
The Light-O-Rama Software Package 547
© 2021 Light-O-Rama, Inc.
Make the height of each grid row shorter
Make the height of each grid row taller
Make the height of each grid row as short as possible
Make the height of each grid row as tall as possible
Sequence Modification
Key Action
Set the selected cells to the current toolbar effect at MAXtoolbar intensity
set selected cells to toolbar effect at MIN toolbar intensity
set selected cells to FADE UP using the current toolbareffect and intensity range (overwrites existing effects)
modify existing effects in the selected cells to FADE UPusing the toolbar intensity range
set selected cells to FADE DOWN using the current toolbareffect and intensity range (overwrites existing effects)
modify existing effects in the selected cells to FADE DOWNusing the toolbar intensity range
apply current settings to selected effects
SHIFT plus any of the keys above, will prompt for a neweffect then fill the selection
fill selected cells
toggle selected cells
create chase in selected cells
clear selected cells
open the color fade selector
Use the currently selected tool (from the toolbar) on the gridselection
set selected cells to ON effect at max toolbar intensity
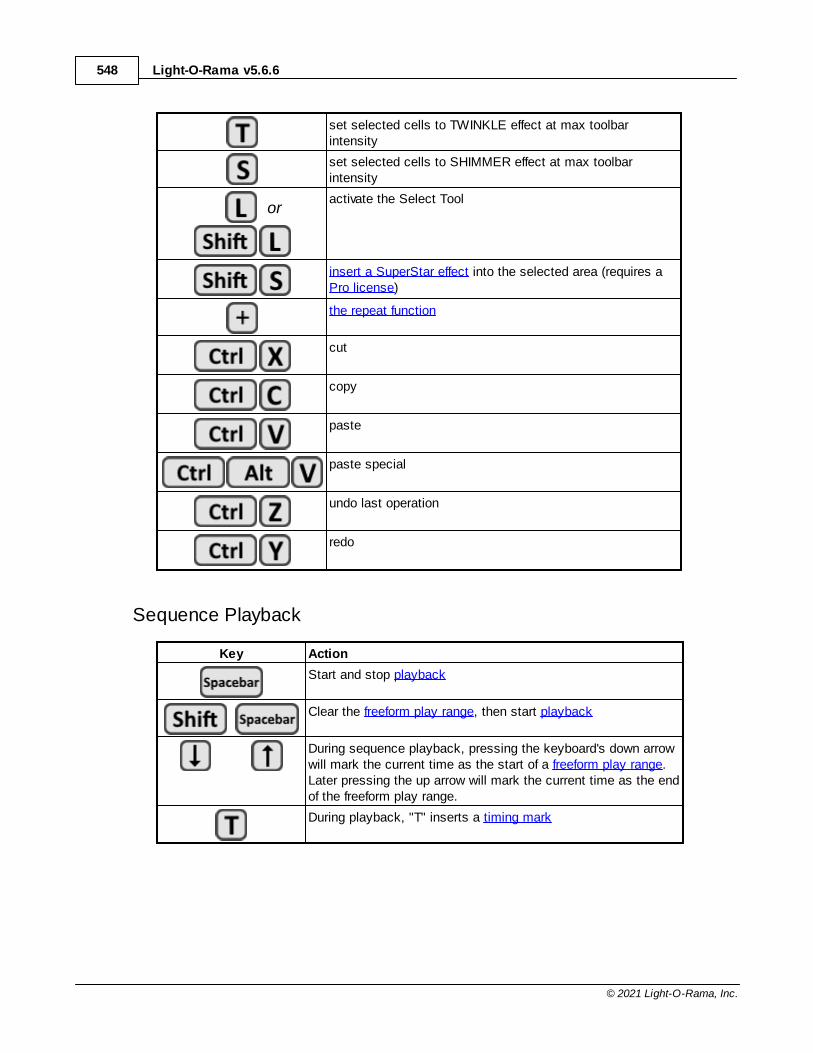
Light-O-Rama v5.6.6548
© 2021 Light-O-Rama, Inc.
set selected cells to TWINKLE effect at max toolbarintensity
set selected cells to SHIMMER effect at max toolbarintensity
oractivate the Select Tool
insert a SuperStar effect into the selected area (requires aPro license)
the repeat function
cut
copy
paste
paste special
undo last operation
redo
Sequence Playback
Key Action
Start and stop playback
Clear the freeform play range, then start playback
During sequence playback, pressing the keyboard's down arrowwill mark the current time as the start of a freeform play range. Later pressing the up arrow will mark the current time as the endof the freeform play range.
During playback, "T" inserts a timing mark
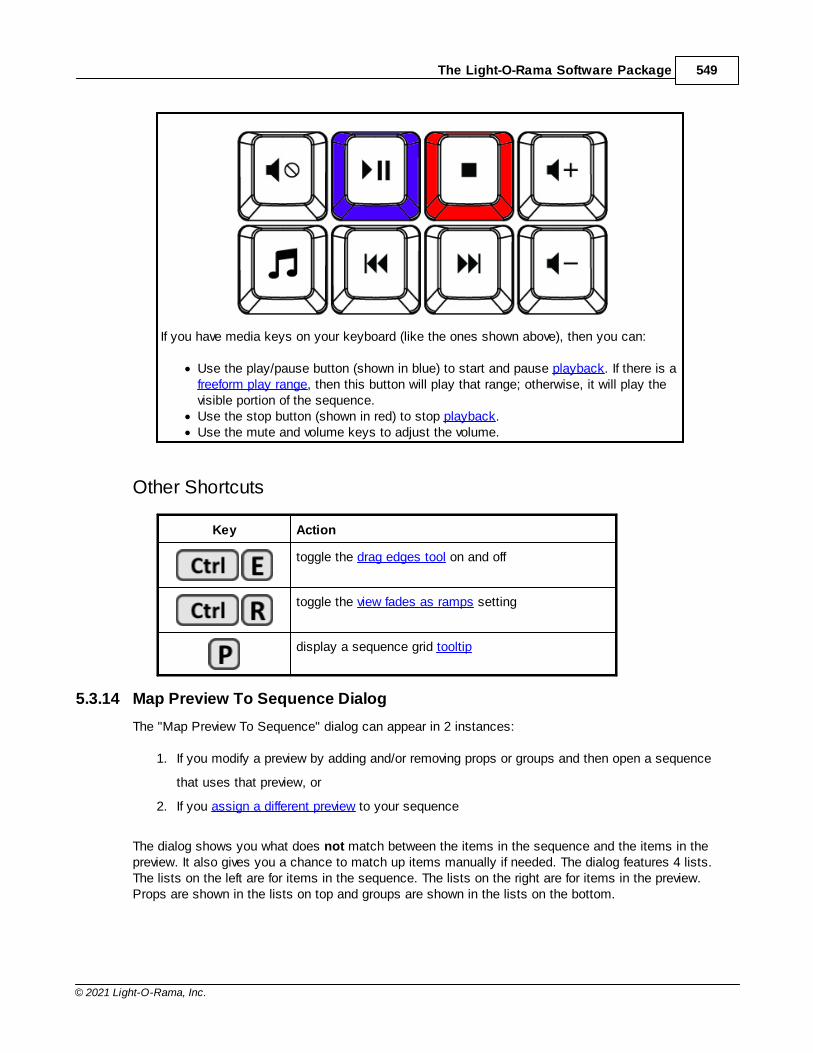
The Light-O-Rama Software Package 549
© 2021 Light-O-Rama, Inc.
If you have media keys on your keyboard (like the ones shown above), then you can:
· Use the play/pause button (shown in blue) to start and pause playback. If there is afreeform play range, then this button will play that range; otherwise, it will play thevisible portion of the sequence.
· Use the stop button (shown in red) to stop playback.· Use the mute and volume keys to adjust the volume.
Other Shortcuts
Key Action
toggle the drag edges tool on and off
toggle the view fades as ramps setting
display a sequence grid tooltip
5.3.14 Map Preview To Sequence Dialog
The "Map Preview To Sequence" dialog can appear in 2 instances:
1. If you modify a preview by adding and/or removing props or groups and then open a sequence
that uses that preview, or
2. If you assign a different preview to your sequence
The dialog shows you what does not match between the items in the sequence and the items in thepreview. It also gives you a chance to match up items manually if needed. The dialog features 4 lists.The lists on the left are for items in the sequence. The lists on the right are for items in the preview.Props are shown in the lists on top and groups are shown in the lists on the bottom.
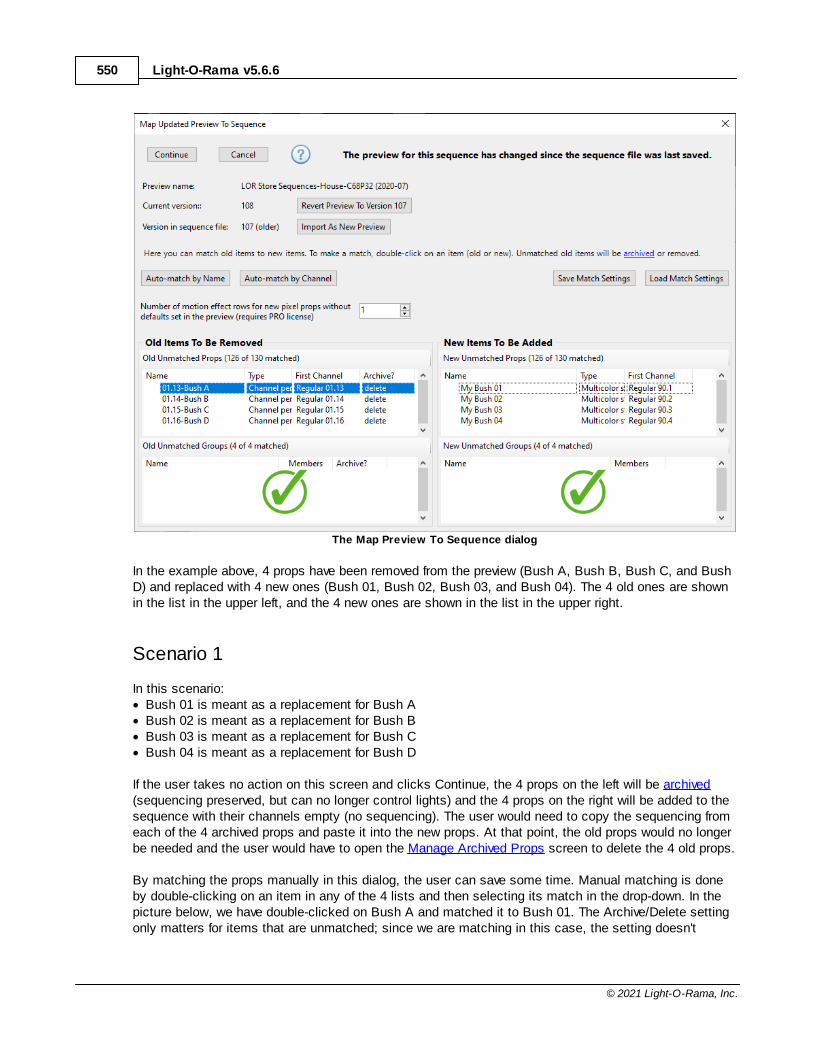
Light-O-Rama v5.6.6550
© 2021 Light-O-Rama, Inc.
The Map Preview To Sequence dialog
In the example above, 4 props have been removed from the preview (Bush A, Bush B, Bush C, and BushD) and replaced with 4 new ones (Bush 01, Bush 02, Bush 03, and Bush 04). The 4 old ones are shownin the list in the upper left, and the 4 new ones are shown in the list in the upper right.
Scenario 1
In this scenario:· Bush 01 is meant as a replacement for Bush A· Bush 02 is meant as a replacement for Bush B· Bush 03 is meant as a replacement for Bush C· Bush 04 is meant as a replacement for Bush D
If the user takes no action on this screen and clicks Continue, the 4 props on the left will be archived(sequencing preserved, but can no longer control lights) and the 4 props on the right will be added to thesequence with their channels empty (no sequencing). The user would need to copy the sequencing fromeach of the 4 archived props and paste it into the new props. At that point, the old props would no longerbe needed and the user would have to open the Manage Archived Props screen to delete the 4 old props.
By matching the props manually in this dialog, the user can save some time. Manual matching is doneby double-clicking on an item in any of the 4 lists and then selecting its match in the drop-down. In thepicture below, we have double-clicked on Bush A and matched it to Bush 01. The Archive/Delete settingonly matters for items that are unmatched; since we are matching in this case, the setting doesn't
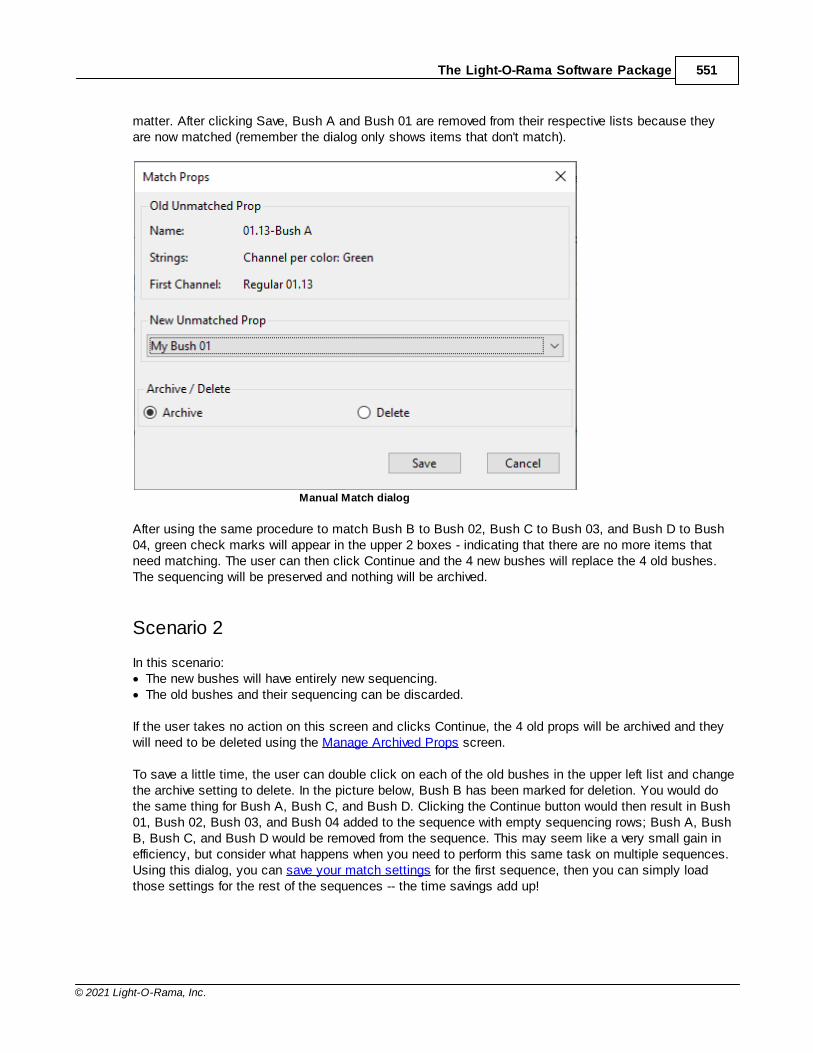
The Light-O-Rama Software Package 551
© 2021 Light-O-Rama, Inc.
matter. After clicking Save, Bush A and Bush 01 are removed from their respective lists because theyare now matched (remember the dialog only shows items that don't match).
Manual Match dialog
After using the same procedure to match Bush B to Bush 02, Bush C to Bush 03, and Bush D to Bush04, green check marks will appear in the upper 2 boxes - indicating that there are no more items thatneed matching. The user can then click Continue and the 4 new bushes will replace the 4 old bushes.The sequencing will be preserved and nothing will be archived.
Scenario 2
In this scenario:· The new bushes will have entirely new sequencing.· The old bushes and their sequencing can be discarded.
If the user takes no action on this screen and clicks Continue, the 4 old props will be archived and theywill need to be deleted using the Manage Archived Props screen.
To save a little time, the user can double click on each of the old bushes in the upper left list and changethe archive setting to delete. In the picture below, Bush B has been marked for deletion. You would dothe same thing for Bush A, Bush C, and Bush D. Clicking the Continue button would then result in Bush01, Bush 02, Bush 03, and Bush 04 added to the sequence with empty sequencing rows; Bush A, BushB, Bush C, and Bush D would be removed from the sequence. This may seem like a very small gain inefficiency, but consider what happens when you need to perform this same task on multiple sequences.Using this dialog, you can save your match settings for the first sequence, then you can simply loadthose settings for the rest of the sequences -- the time savings add up!

Light-O-Rama v5.6.6552
© 2021 Light-O-Rama, Inc.
Bush B has been marked for deletion
Auto-Match By Name
Pressing this button will automatically match items with the exact same name. Case is ignored, so "MyProp" will match "MY PROP". However, this function will fail to match if an item has an extra space in itsname, so "My Prop" will not match "My Prop".
After the auto-match runs, the button will be disabled because there is no use in running this functionmore than once.
Auto-Match By Channel
Pressing this button will automatically match items with the exact same physical channel settings(device type, network, unit id, and circuit).
After the auto-match runs, the button will be disabled because there is no use in running this functionmore than once.
Save And Load Match Settings
Your show may consist of many sequences that share the same preview. To avoid having to create thesame mapping over and over, you can simply save the mapping you create for the first sequence, thenload those settings back in as you update subsequent sequences.
Number Of Motion Effect Rows For New Pixel Props
The Light-O-Rama Software Package 553
© 2021 Light-O-Rama, Inc.
If you have a Pro level license, then you can use motion effects to sequence your props that utilize RGBpixels. You can also have multiple motion effects playing on a prop at the same time. This settingspecifies how many motion effect rows should be created for every new pixel-based prop or group (thenew items listed on the right-hand side). Typically 1 or 2 is a good choice to start. And then you can addmore rows to specific props as your sequencing needs dictate.
Version Numbers
The S5 software maintains a preview version number. The number is incremented by 1 every time thepreview is saved. This screen shows the name of the preview and its version number. It also shows theversion number of the preview stored with the sequence. You can view the current revision number for anypreview on the Preview Design screen.
Import As New Preview
This function is used to import the preview stored in the sequence file as a new preview. The sequenceyou are opening will then be associated with the imported preview. After pressing the button, the screenwill update with the name of the imported preview. The version numbers should then be the same andthere should no unmatched props listed. Next, click the Continue button to open the sequence. Thisaction has no effect on other sequences.
Revert (or Update) Preview
This function is used in the rare case where you have made changes to a preview but want to go back tothe version stored in the sequence file. Using this function will cause you will lose the most recentchanges to the preview, will affect any other sequences associated with that preview.
The button will be labeled "Revert" if the version in the sequence file is older. It will be labeled as"Update" if the version in the sequence file is newer.
5.3.15 Upgrading Sequences
Sequences in the S5 version are stored in a different format and have a different file extension than inprior versions.
S5 Sequences Prior Versions
Musical Sequences LOREDIT LMS
Animation Sequences LOREDIT LAS
Sequence File Extensions
Therefore, sequences created with prior versions must be upgraded. You do this by selecting File >Open from the main menu, and then selecting the LMS or LAS file you want to upgrade. After openingthe file, you will be presented with the following dialog:
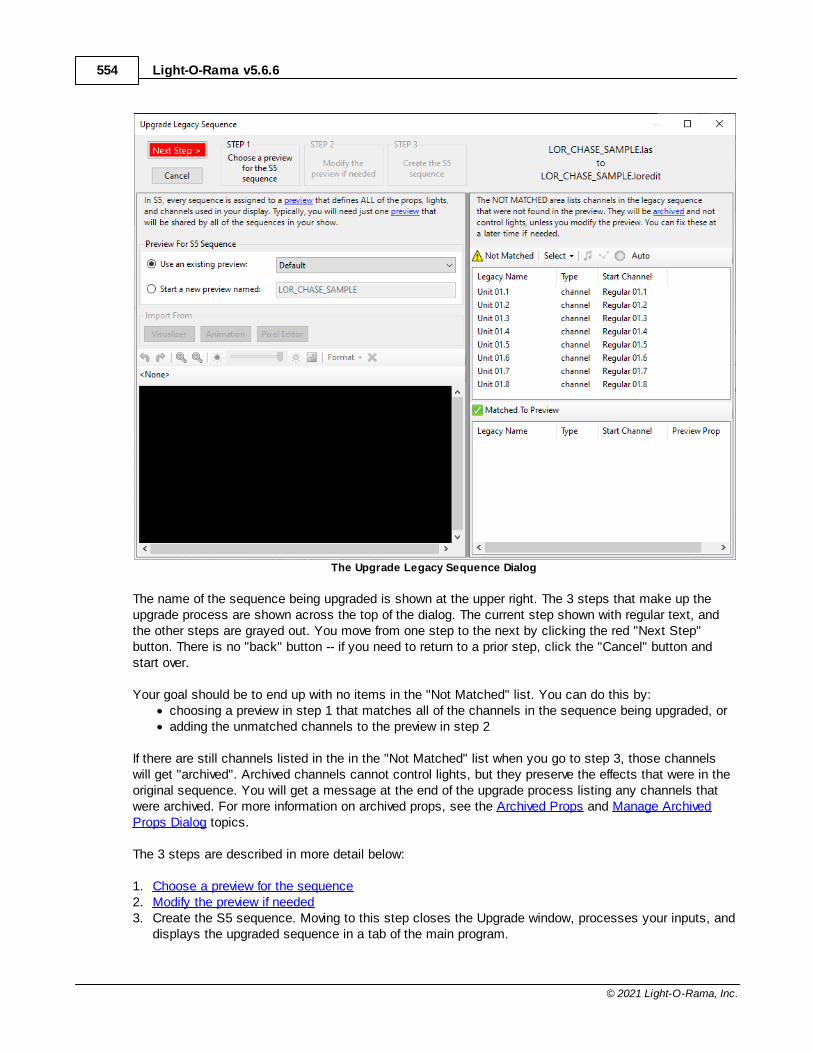
Light-O-Rama v5.6.6554
© 2021 Light-O-Rama, Inc.
The Upgrade Legacy Sequence Dialog
The name of the sequence being upgraded is shown at the upper right. The 3 steps that make up theupgrade process are shown across the top of the dialog. The current step shown with regular text, andthe other steps are grayed out. You move from one step to the next by clicking the red "Next Step"button. There is no "back" button -- if you need to return to a prior step, click the "Cancel" button andstart over.
Your goal should be to end up with no items in the "Not Matched" list. You can do this by:· choosing a preview in step 1 that matches all of the channels in the sequence being upgraded, or· adding the unmatched channels to the preview in step 2
If there are still channels listed in the in the "Not Matched" list when you go to step 3, those channelswill get "archived". Archived channels cannot control lights, but they preserve the effects that were in theoriginal sequence. You will get a message at the end of the upgrade process listing any channels thatwere archived. For more information on archived props, see the Archived Props and Manage ArchivedProps Dialog topics.
The 3 steps are described in more detail below:
1. Choose a preview for the sequence2. Modify the preview if needed3. Create the S5 sequence. Moving to this step closes the Upgrade window, processes your inputs, and
displays the upgraded sequence in a tab of the main program.
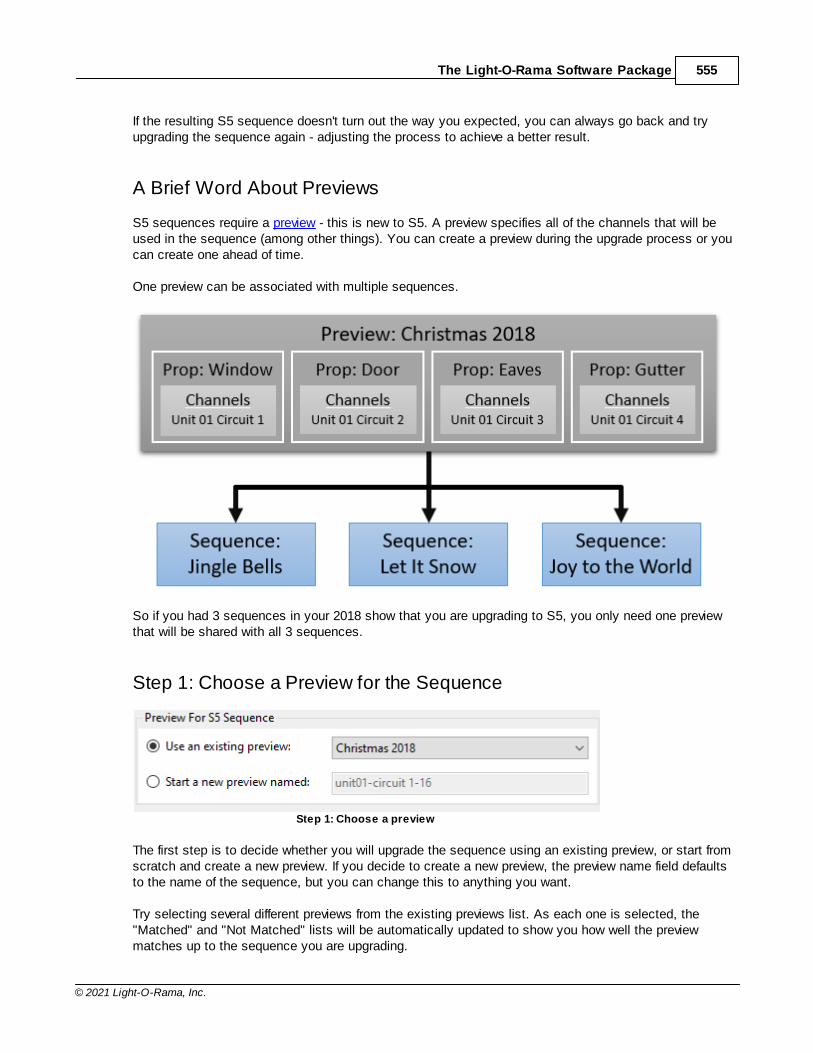
The Light-O-Rama Software Package 555
© 2021 Light-O-Rama, Inc.
If the resulting S5 sequence doesn't turn out the way you expected, you can always go back and tryupgrading the sequence again - adjusting the process to achieve a better result.
A Brief Word About Previews
S5 sequences require a preview - this is new to S5. A preview specifies all of the channels that will beused in the sequence (among other things). You can create a preview during the upgrade process or youcan create one ahead of time.
One preview can be associated with multiple sequences.
So if you had 3 sequences in your 2018 show that you are upgrading to S5, you only need one previewthat will be shared with all 3 sequences.
Step 1: Choose a Preview for the Sequence
Step 1: Choose a preview
The first step is to decide whether you will upgrade the sequence using an existing preview, or start fromscratch and create a new preview. If you decide to create a new preview, the preview name field defaultsto the name of the sequence, but you can change this to anything you want.
Try selecting several different previews from the existing previews list. As each one is selected, the"Matched" and "Not Matched" lists will be automatically updated to show you how well the previewmatches up to the sequence you are upgrading.
Light-O-Rama v5.6.6556
© 2021 Light-O-Rama, Inc.
If you choose to create a new preview, you don't have to start from scratch. You can easily importVisualizer files, an SE block-style animation, and/or a Pixel Editor preview into the new preview to helpyou get a quick start.
If you create a new preview during the upgrade process, you only need to do that for the first sequenceyou upgrade. Subsequent sequences will likely use the same set of channels, so you should select thepreview you created while upgrading the first sequence.
Step 2: Modify The Preview If Needed
Your goal when modifying the preview should be to end up with an empty "Not Matched" list. You canshrink the "Not Matched" list by:
· Importing a Visualizer file, SE animation, and/or Pixel Editor preview that contains channels thatmatch the sequence, or
· Selecting an unmatched channel and drawing it as a light string on the design canvas, or· Selecting an unmatched channel and drawing it as a flood light on the design canvas, or· Selecting one or more unmatched channels and designating them as beat channels· Selecting one or more unmatched channels and having the tool auto-generate props for them
There are many tools on this screen to help you modify your preview. To help keep things organized,we've broken the down this topic into sections:
· Add a background image and adjust its brightness· Importing
· Import a Visualizer file· Import the block-style animation stored in the legacy sequence (if there is one)· Import the Pixel Editor preview (if there is one)
· Unmatched Channels· Select one or more channels· Sort the channel list· Draw a string for the selected channel· Draw a flood light for the selected channel· Auto-generate props for the selected channels· Designate channels as "beat channels" that don't control lights, but mark the beat of the
music· Using the Design Canvas
· Select, move, and resize items on the Design Canvas· Zoom in and out· Align items using the Format menu· Delete items· Undo/Redo
After you have modified the preview here, you can always make further modifications later using thePreview Design tool.
Modify The Preview: Add a Background Image
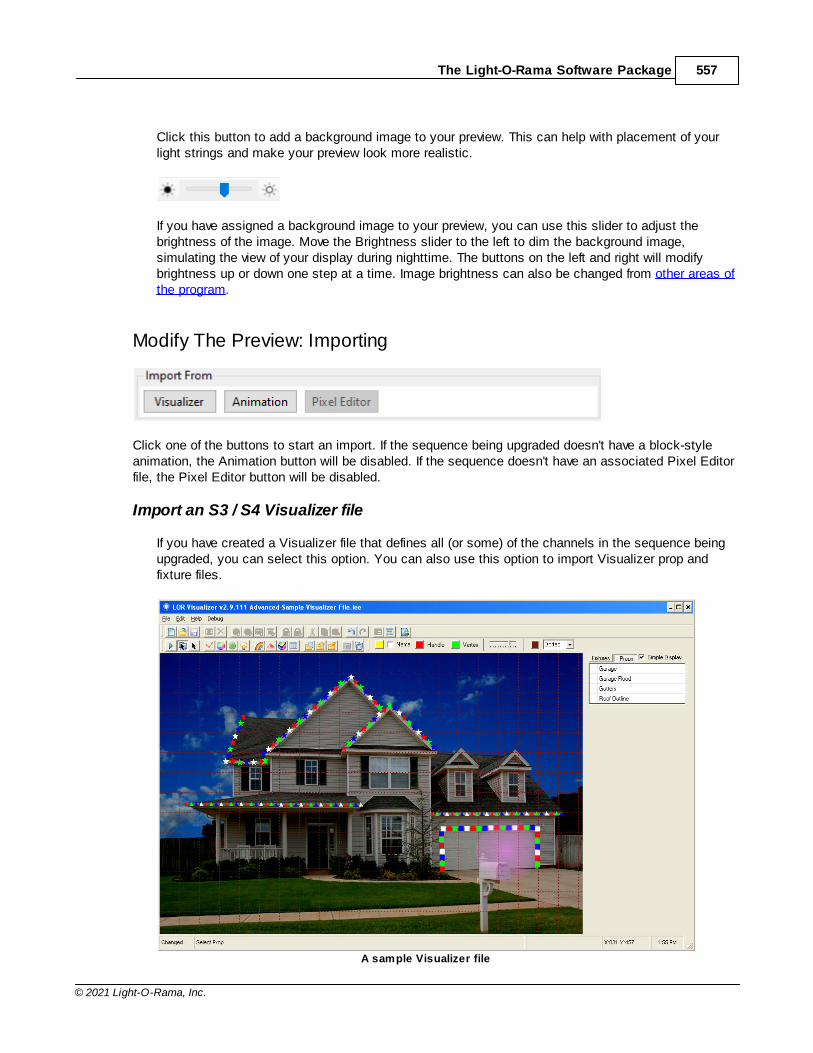
The Light-O-Rama Software Package 557
© 2021 Light-O-Rama, Inc.
Click this button to add a background image to your preview. This can help with placement of yourlight strings and make your preview look more realistic.
If you have assigned a background image to your preview, you can use this slider to adjust thebrightness of the image. Move the Brightness slider to the left to dim the background image,simulating the view of your display during nighttime. The buttons on the left and right will modifybrightness up or down one step at a time. Image brightness can also be changed from other areas ofthe program.
Modify The Preview: Importing
Click one of the buttons to start an import. If the sequence being upgraded doesn't have a block-styleanimation, the Animation button will be disabled. If the sequence doesn't have an associated Pixel Editorfile, the Pixel Editor button will be disabled.
Import an S3 / S4 Visualizer file
If you have created a Visualizer file that defines all (or some) of the channels in the sequence beingupgraded, you can select this option. You can also use this option to import Visualizer prop andfixture files.
A sample Visualizer file
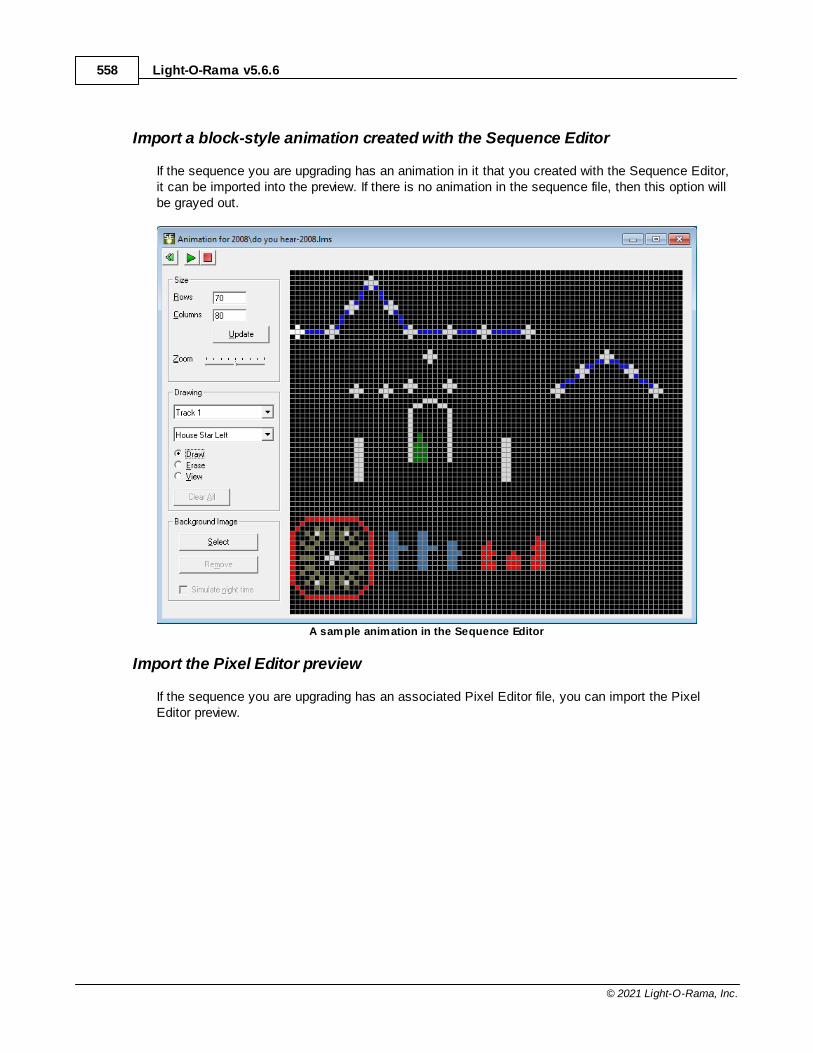
Light-O-Rama v5.6.6558
© 2021 Light-O-Rama, Inc.
Import a block-style animation created with the Sequence Editor
If the sequence you are upgrading has an animation in it that you created with the Sequence Editor,it can be imported into the preview. If there is no animation in the sequence file, then this option willbe grayed out.
A sample animation in the Sequence Editor
Import the Pixel Editor preview
If the sequence you are upgrading has an associated Pixel Editor file, you can import the PixelEditor preview.
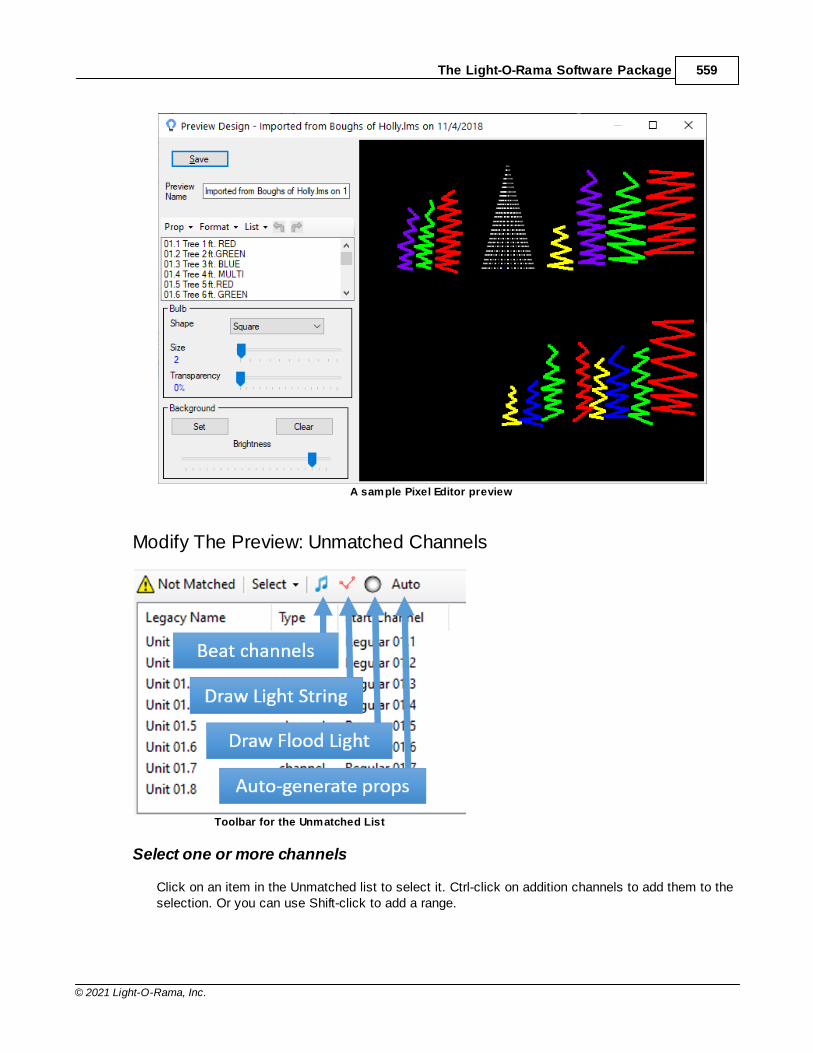
The Light-O-Rama Software Package 559
© 2021 Light-O-Rama, Inc.
A sample Pixel Editor preview
Modify The Preview: Unmatched Channels
Toolbar for the Unmatched List
Select one or more channels
Click on an item in the Unmatched list to select it. Ctrl-click on addition channels to add them to theselection. Or you can use Shift-click to add a range.
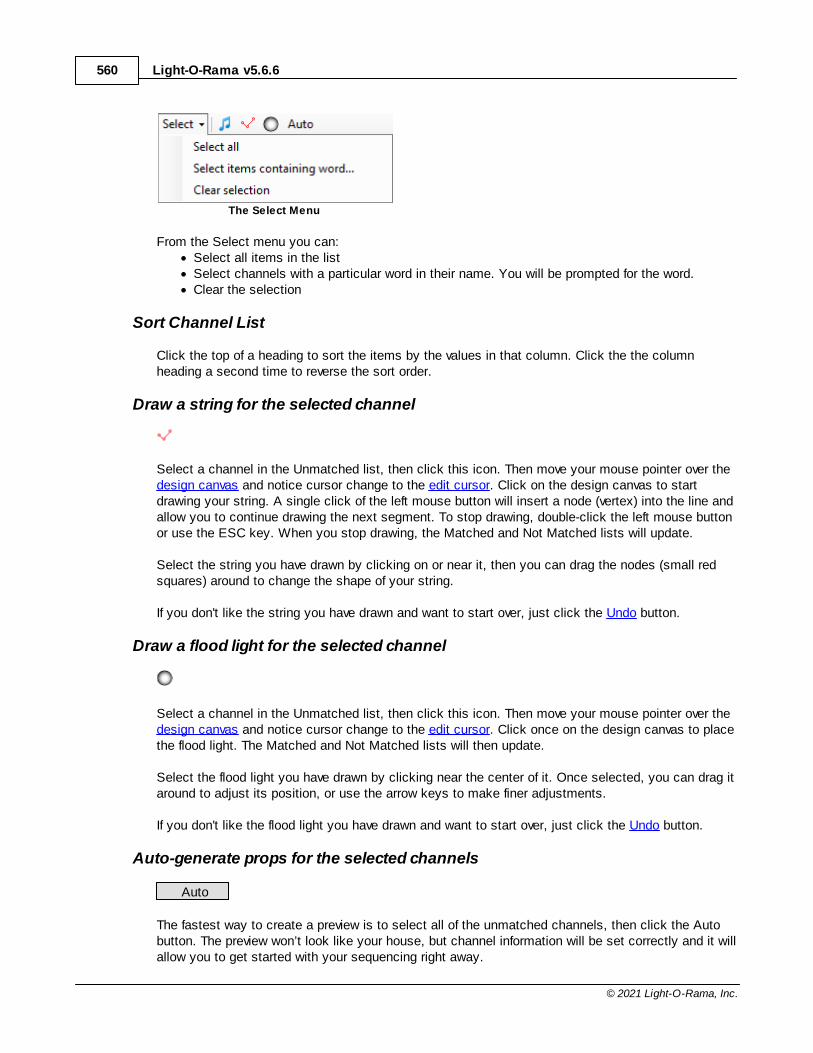
Light-O-Rama v5.6.6560
© 2021 Light-O-Rama, Inc.
The Select Menu
From the Select menu you can:· Select all items in the list· Select channels with a particular word in their name. You will be prompted for the word.· Clear the selection
Sort Channel List
Click the top of a heading to sort the items by the values in that column. Click the the columnheading a second time to reverse the sort order.
Draw a string for the selected channel
Select a channel in the Unmatched list, then click this icon. Then move your mouse pointer over thedesign canvas and notice cursor change to the edit cursor. Click on the design canvas to startdrawing your string. A single click of the left mouse button will insert a node (vertex) into the line andallow you to continue drawing the next segment. To stop drawing, double-click the left mouse buttonor use the ESC key. When you stop drawing, the Matched and Not Matched lists will update.
Select the string you have drawn by clicking on or near it, then you can drag the nodes (small redsquares) around to change the shape of your string.
If you don't like the string you have drawn and want to start over, just click the Undo button.
Draw a flood light for the selected channel
Select a channel in the Unmatched list, then click this icon. Then move your mouse pointer over thedesign canvas and notice cursor change to the edit cursor. Click once on the design canvas to placethe flood light. The Matched and Not Matched lists will then update.
Select the flood light you have drawn by clicking near the center of it. Once selected, you can drag itaround to adjust its position, or use the arrow keys to make finer adjustments.
If you don't like the flood light you have drawn and want to start over, just click the Undo button.
Auto-generate props for the selected channels
Auto
The fastest way to create a preview is to select all of the unmatched channels, then click the Autobutton. The preview won’t look like your house, but channel information will be set correctly and it willallow you to get started with your sequencing right away.
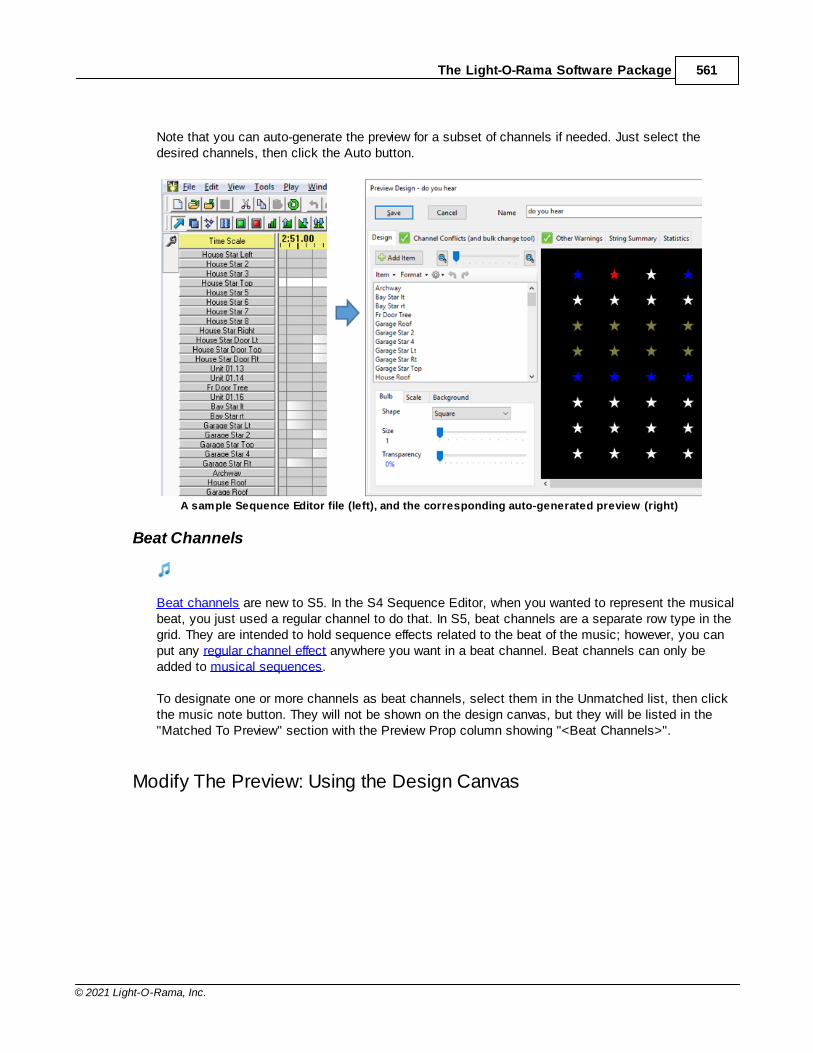
The Light-O-Rama Software Package 561
© 2021 Light-O-Rama, Inc.
Note that you can auto-generate the preview for a subset of channels if needed. Just select thedesired channels, then click the Auto button.
A sample Sequence Editor file (left), and the corresponding auto-generated preview (right)
Beat Channels
Beat channels are new to S5. In the S4 Sequence Editor, when you wanted to represent the musicalbeat, you just used a regular channel to do that. In S5, beat channels are a separate row type in thegrid. They are intended to hold sequence effects related to the beat of the music; however, you canput any regular channel effect anywhere you want in a beat channel. Beat channels can only beadded to musical sequences.
To designate one or more channels as beat channels, select them in the Unmatched list, then clickthe music note button. They will not be shown on the design canvas, but they will be listed in the"Matched To Preview" section with the Preview Prop column showing "<Beat Channels>".
Modify The Preview: Using the Design Canvas
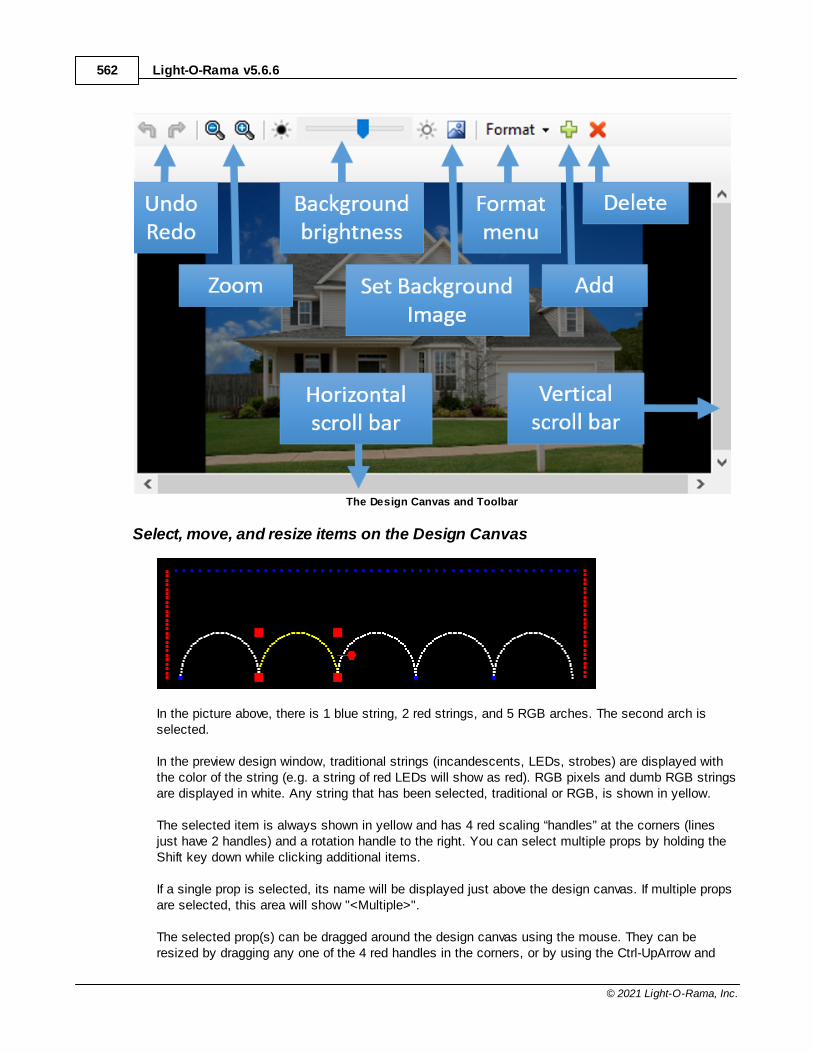
Light-O-Rama v5.6.6562
© 2021 Light-O-Rama, Inc.
The Design Canvas and Toolbar
Select, move, and resize items on the Design Canvas
In the picture above, there is 1 blue string, 2 red strings, and 5 RGB arches. The second arch isselected.
In the preview design window, traditional strings (incandescents, LEDs, strobes) are displayed withthe color of the string (e.g. a string of red LEDs will show as red). RGB pixels and dumb RGB stringsare displayed in white. Any string that has been selected, traditional or RGB, is shown in yellow.
The selected item is always shown in yellow and has 4 red scaling “handles” at the corners (linesjust have 2 handles) and a rotation handle to the right. You can select multiple props by holding theShift key down while clicking additional items.
If a single prop is selected, its name will be displayed just above the design canvas. If multiple propsare selected, this area will show "<Multiple>".
The selected prop(s) can be dragged around the design canvas using the mouse. They can beresized by dragging any one of the 4 red handles in the corners, or by using the Ctrl-UpArrow and
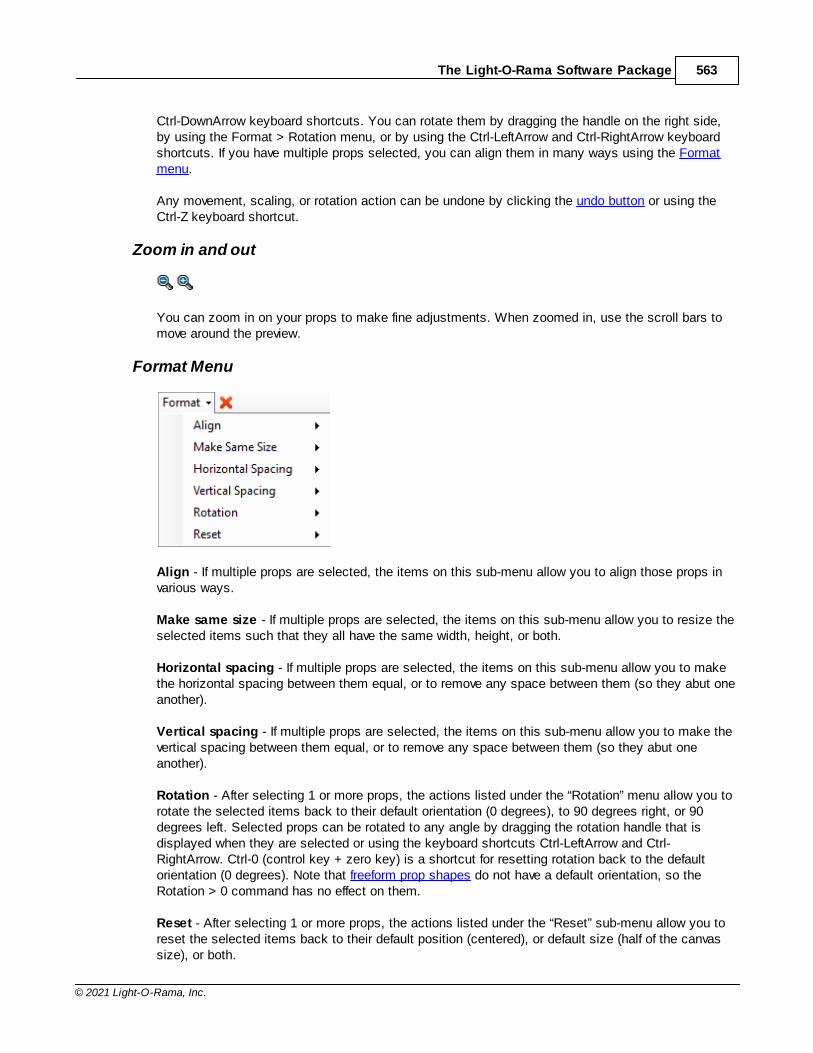
The Light-O-Rama Software Package 563
© 2021 Light-O-Rama, Inc.
Ctrl-DownArrow keyboard shortcuts. You can rotate them by dragging the handle on the right side,by using the Format > Rotation menu, or by using the Ctrl-LeftArrow and Ctrl-RightArrow keyboardshortcuts. If you have multiple props selected, you can align them in many ways using the Formatmenu.
Any movement, scaling, or rotation action can be undone by clicking the undo button or using theCtrl-Z keyboard shortcut.
Zoom in and out
You can zoom in on your props to make fine adjustments. When zoomed in, use the scroll bars tomove around the preview.
Format Menu
Align - If multiple props are selected, the items on this sub-menu allow you to align those props invarious ways.
Make same size - If multiple props are selected, the items on this sub-menu allow you to resize theselected items such that they all have the same width, height, or both.
Horizontal spacing - If multiple props are selected, the items on this sub-menu allow you to makethe horizontal spacing between them equal, or to remove any space between them (so they abut oneanother).
Vertical spacing - If multiple props are selected, the items on this sub-menu allow you to make thevertical spacing between them equal, or to remove any space between them (so they abut oneanother).
Rotation - After selecting 1 or more props, the actions listed under the “Rotation” menu allow you torotate the selected items back to their default orientation (0 degrees), to 90 degrees right, or 90degrees left. Selected props can be rotated to any angle by dragging the rotation handle that isdisplayed when they are selected or using the keyboard shortcuts Ctrl-LeftArrow and Ctrl-RightArrow. Ctrl-0 (control key + zero key) is a shortcut for resetting rotation back to the defaultorientation (0 degrees). Note that freeform prop shapes do not have a default orientation, so theRotation > 0 command has no effect on them.
Reset - After selecting 1 or more props, the actions listed under the “Reset” sub-menu allow you toreset the selected items back to their default position (centered), or default size (half of the canvassize), or both.
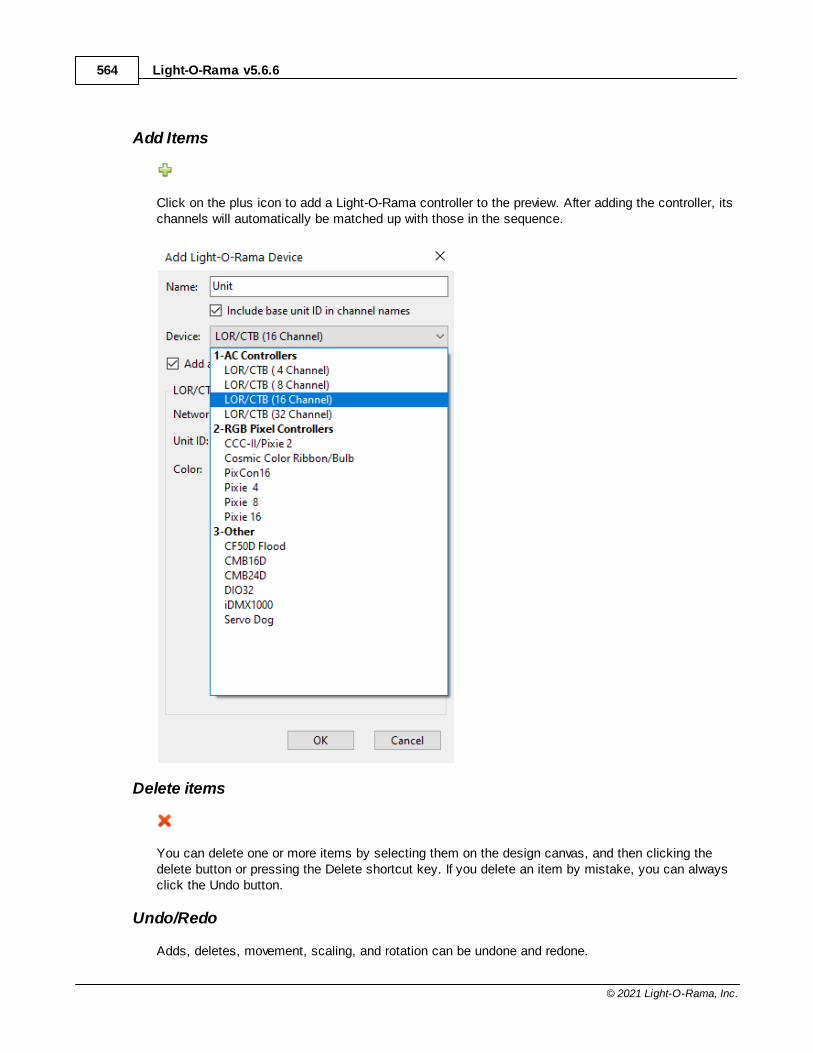
Light-O-Rama v5.6.6564
© 2021 Light-O-Rama, Inc.
Add Items
Click on the plus icon to add a Light-O-Rama controller to the preview. After adding the controller, itschannels will automatically be matched up with those in the sequence.
Delete items
You can delete one or more items by selecting them on the design canvas, and then clicking thedelete button or pressing the Delete shortcut key. If you delete an item by mistake, you can alwaysclick the Undo button.
Undo/Redo
Adds, deletes, movement, scaling, and rotation can be undone and redone.
The Light-O-Rama Software Package 565
© 2021 Light-O-Rama, Inc.
clicking this icon undoes the last operation, and has the keyboard shortcut Ctrl-Z.
clicking this icon reapplies an operation that was previously undone, and has the keyboardshortcut Ctrl-Y.
5.4 SuperStar Sequencer
The Light-O-Rama SuperStar Sequencer can be used as a sort of front end to the Light-O-Rama Sequencer, to create sequences for Cosmic Color Ribbons or other lights visuallyinstead of using a channels-versus-time grid. For more information, please see the followingpages:
· Welcome· Overview· Instant Sequences· Custom Sequences· Summary of Commands and Keyboard Accelerators· Purchased Sequences
5.4.1 Welcome
Launching SuperStar in S5
To launch SuperStar from the S5 Sequencer you must have the Pro license. Once you have the Prolicense you can create motion effect rows. If you do not plan on purchasing the Pro license then it isrecommended that you use S4. The version of SuperStar that is in S4 has all the same features as theversion that is in S5.
Once you have the Pro license then the way to use SuperStar in S5 is to do the following:
1. Select some of all of a motion effect row (To select all of a row do right click on the row andselect “Select” and then select “Row”).
2. Right click on the region you just selected and select Insert SuperStar Effect3. Wait a few seconds and SuperStar will launch.4. Do your sequencing. There are several ways to do your sequencing as listed below:
Load in a Purchased SequenceClick on the “File” menu and select “Open” and open a .sup file that you have purchased. Theeffects will be loaded into the SuperStar screen and you can play them to the screen. Note thatyou should be using a preview that matches the layout that the sequence was designed for.
Instant SequencesCreate sequences in seconds using the “Instant Sequence” feature by simply doing thefollowing:
· Press Ctrl+I to launch the Instant Sequence dialog box, use the 3 buttons in the lower leftof the dialog box
· Click on the “Open Audio File” button to open your audio file· Click on the “Sequence All” button· Click on the “Play/Stop All” button
Light-O-Rama v5.6.6566
© 2021 Light-O-Rama, Inc.
Custom SequencesCreate Super Sequences like the ones at www.superstarlights.comThese sequences were created using scenes, morphs, images, and text actions. Learn moreabout how to do this in the Custom Sequences topic.
Auto SequenceIn the Scene, Morph, Smooth Effects, Image, and Text dialog boxes you can click on the buttonthat has a car on it and add an Auto Sequence Effect. SuperStar will automatically move theeffect with the music. It takes a little longer to learn to do Auto Sequence than Instant Sequencebut it is more versatile and allows individual creativity in applying your effects. For completeinstructions visit the Auto Sequence topic.
5. After doing your sequencing in any of the ways listed in step 4, simply shut down SuperStar byclicking on the Red X in the upper right of the program. You will be returned to the S5 Sequencerand the the sequencing that you did will automatically get saved into the S5 Sequencer. Click onthe “Play” button in the S5 Sequencer and the sequencing will be played to the S5 computerscreen.
6. If you wish to edit your sequencing, double click on the sequencing in the S5 Sequencer motioneffect row, SuperStar will launch and the effects that you saved will be in SuperStar and you canedit the effects and then shut down superstar and those changes will automatically be saved.
5.4.2 Overview
This page gives an overview of the Light-O-Rama SuperStar Sequencer:
· Launching SuperStar in S5· Exporting a sequence· Exporting in the legacy format· Exporting in the new intensity data format· Playing a sequence exported as intensity data· Floating windows
Launching SuperStar in S5
To launch SuperStar from the S5 Sequencer you must have the Pro license. Once you have the Prolicense you can create motion effect rows. Then you do the following:
1. Select some of all of a motion effect row (to select an entire row, right click on the row, openthe “Select” sub-menu, and then select “Row”).
2. Right click on the region you just selected and select “Insert SuperStar Effect”3. Wait a few seconds and SuperStar will launch.4. Do your sequencing5. Shut down SuperStar by clicking on the Red X in the upper right of the program. You will be
returned to the S5 Sequencer and the the sequencing that you did will automatically get
The Light-O-Rama Software Package 567
© 2021 Light-O-Rama, Inc.
saved into the S5 Sequencer. Click on the “Play” button in the S5 Sequencer and thesequencing will be played to the S5 computer screen.
Note:If you have the Demo version of SuperStar the sequence is still saved, but you will not be able toplay the SuperStar Sequencing to the S5 Preview nor will you be able to play the SuperStarsequencing to your actual lights. But everything else in SuperStar will be fully functional.
Exporting a Sequence
In S5, “Export to Sequence Editor” is allowed but not recommended. The only reason youwould use it would be to export the sequence so it can be played in the S4 SequenceEditor.
To export a sequence so you can play it in the S4 Sequencer, click on the File menu and select"Export to Sequence Editor". The "Export to Sequence Editor" dialog box will appear.
· "Export in Legacy Format": Legacy format is the format that was always used prior to the S4release. Use this option to export in the same way that was always used prior to the release ofS4.
· “Include Macro Channels for Cosmic Color Devices”. Light-O-Rama Cosmic Color Devices haveseven macro channels. Superstar does not use the macro channels, but the default is to includethem in the export. If you use copy/paste into a main sequence, the main sequence will have themacro channels and it is important for the source and destination of the copy/paste to match. Ifyou are using RGB pixel devices not made by Light-O-Rama they will not have macro channels. Ifyou are using copy/paste to get the exported sequence into the RGB pixels you will not want themacro channels in the export.
· "Export in New Format (as Intensity Data)": This option will export in the new format as intensitydata. All of the exported data will appear as one line at the bottom of the sequence in theSequencer. The new intensity data format is designed to better support large numbers ofchannels and pixels. The intensity data format is also very handy because it automatically getsmerged in with your main sequence and will play alongside your main sequence. Please note thatyou must have a Pro level license in order to use intensity data.
· "Add Intensity Data to Existing Sequence": Choose this option if you already have a mainsequence and you want to add the exported data to the existing main sequence.
· "Add Intensity Data to New Sequence": Choose this option if you want to add the intensity data toa new sequence. SuperStar will create a new Sequencer sequence with a main body that isempty and will add the intensity data to it. You can then play the sequence. This is a way to playthe exported sequence as a "stand alone"sequence.
Exporting in the Legacy Format
If the name of your SuperStar sequence was “MyAwesomeSequence.sup” then the default name forthe exported sequence will be “MyAwesomeSequence_sup.lms.” You can change the name if youwish.
When use the legacy format you can play it as a stand-alone sequence in the S4 Sequence Editor.
Light-O-Rama v5.6.6568
© 2021 Light-O-Rama, Inc.
Exporting in the New Intensity Data Format
Intensity data gets placed on a line at the bottom of an S4 Sequence Editor sequence. The intensitydata is played alongside the rest of the sequence so it automatically gets merged with the rest of thesequence. Note that the intensity data should not send commands to any of the same channels thatare in the main sequence.
Playing a Sequence Exported as Intensity Data
· Launch the Light-O-Rama S4 Sequence Editor· Click on the “Existing Sequence” tab· Select the file you exported· Click on the “Ok” button· Click on the “Play” button in the Light-O-Rama Sequence Editor
Floating Windows
When using a large number of CCRs, the sequencing grid and/or the visualization in SuperStar canbecome small. You can put the sequencing grid and the visualization each in their own window. That way you can place them where you want, and size them how you want. And if you have twomonitors, you can put one of them in each monitor.
To activate floating windows, click on the "View" menu and select "Floating Windows".
5.4.3 Instant Sequences
Using the Light-O-Rama SuperStar Sequencer, you can now create a sequence in seconds using the"Instant Sequence" feature. This is a first for the home light show industry.
· Creating an instant sequence· Timing map description· Apply different sets of theme, color, and movement to different parts of the song
Creating an Instant Sequence
Click on the Tools menu and select "Instant Sequence..." (or you can press Ctrl+I), which will openthe Instant Sequence dialog. In the lower left of the Instant Sequence dialog, click on the "OpenAudio File" button. Then click on the "Sequence All" button. The effects for a sequence will appearin the time layers. Click on the "Play/Stop All" button.
Was that totally awesome or what! The timing marks were created by analyzing the audio file. Thesequence was created using the timing marks and the theme, color and movement variations thatyou see in the dialog box. Now let's create another sequence:
Click on the "Roll Dice" button to get a random set of theme, color, and movement variations. Clickon the "Sequence All" button; it will ask you if you want to erase the current sequence withoutsaving (answer "Yes"). Click on the "Play/Stop All" button.

The Light-O-Rama Software Package 569
© 2021 Light-O-Rama, Inc.
"Roll Dice" is the easiest way to try different TCM ("theme, color, movement") settings, but you canset them manually also:
· Theme: The theme contains one or more effects. These effects are placed at each trigger. Forexample, "3 Segs" is made of three scenes that will place segments onto the ribbon, withsegments having gaps between them. "1 Morph Full Length" has one morph in it which is alwaysassigned to span the entire length of the ribbon. "Morphs colliding" is two morphs, each morphbeing half the length of the ribbon, with the two morphs coming towards each other and stoppingwhen they meet each other. The best way to see what each morph is is to try it out and play itback.
· Color: This setting controls the colors assigned to the theme:
· Native: The theme uses the colors that the effect was created in. Most themes were createdusing red. If the theme has more than one effect, then it may have other colors. For example,the three segments in "3 Segs" were created using red, green, and blue, and so using Nativefor "3 Segs" will result in all of the effects being red, greeen, and blue.
· RGBW by group: This setting will take each group of effects in the theme and assign red,then green, then blue, then white to them. For example, if using the "3 Segs" theme, all threescenes in the theme will be red the first time the theme is triggered, green the second time,blue the third time, and white the fourth time. The fifth time, it will cycle back to red.
· RGBW by effect: This setting will take each effect in the theme and assign red, then green,then blue, then white to them. For example, if using the "3 Segs" theme, the first time thetheme is triggered, the first scene will be red, the second green, and the third blue. Thesecond time the theme is triggered, the first scene will be white, the second red, and the thirdgreen. The end result is that RGBW by effect results in more colors than RGBW by group. Note that if the theme has only one effect in it, there will be no difference between RGBW bygroup and RGBW by effect.
· Color wheel by group: This works similarly to RGBW by group, except it cycles through 21different shades of colors in the color wheel when assigning a color to the group of effects in atheme.
· Color wheel by effect: This works similar to RGBW by effect except it cycles through 21different shades of colors in the color wheel when assigning a color to individual effects in atheme.
· Custom Colors by group: This works similar to RGBW by group except it cycles through thecustom colors chosen for this TCM. For example, to choose the custom colors for TCM 1click on the “Set Custom Colors 1” button.
· Custom Colors by effect: This works similar to RGBW by effect except it cycles through thecustom colors chosen for this TCM. For example, to choose the custom colors for TCM 1click on the “Set Custom Colors 1” button.
· Red, Orange, Yellow, White, Green, Blue, Purple: Select any of these colors to make alleffects in the theme be that color
· Color by time: This setting can only be used when color is set to RGBW by group, RGBW byeffect, Color wheel by group, or Color wheel by effect. With this setting, you choose a length oftime for all of the effects in the theme to change color. For example, if you select "every 4

Light-O-Rama v5.6.6570
© 2021 Light-O-Rama, Inc.
seconds", then instead of changing color at each trigger, the theme will change every fourseconds.
· Movement: This setting controls the start and end point of the effects in the theme.The first drop-down list is the movement type. The second drop-down list is the movement speed:
· None: The theme will start and end at the same location every time it is triggered. Note that"None" does not mean that the theme will have no movement; it just means that the start andend of its movement does not change.
· Right same row: Move the start and end points of a theme to the right every time it istriggered. When a start or end point reaches the end of the ribbon it wraps around to thebeginning. The themes that contain effects that span the entire length of the ribbon are specialcases. For those effects assigning any movement other than “None” will make them alternatedirections. “1 morph full length” is an example of a theme that always spans the entire lengthof the ribbon.
· Left same row: Same as “Right same row” except the start and end points of the theme moveto the left.
· Up same column: Same as “Right same row” except the start and end points of the thememove up.
· Down same column: Same as “Right same row” except the start and end points of the thememove down.
· Pass by: The start: point is moved at a faster pace than the end point so that it “passes by”the end point.
· Random same row: The start and end points are random on the same row
· Right multi-row: The start and end points move to the right. When the end of a row isreached, the point moves down to the next row. When the end of the bottom row is reached itwraps back up to the top row.
· Left multi-row: The start and end points move to the left. When the left end of the row isreached the point moves up to the next row. When the end of the top row is reach it wrapsdown to the bottom row.
· Up multi-column: The start and end points move up. When the top column is reached itwraps to the next column to the right. When the top of the last column is reached it wraps tothe first column on the left.
· Dn multi-column: The start and end points move down. When the bottom column is reachedit wraps to the next column to the left. When the bottom of the beginning column is reached itwraps to the last column on the right.
· Snake up: The start and end points move to the right and then when the end of the row isreached it moves to the next row up, and then moves to the left until it reaches the beginningof that row and then moves up and starts moving to the right and so on.
· Snake dn: The start and end points move to the right and then when the end of the row isreached it moves to the next row down, and then moves to the left until it reaches the
The Light-O-Rama Software Package 571
© 2021 Light-O-Rama, Inc.
beginning of that row and then moves down and starts moving to the right and so on.
· Random Rows: The start and end points move to random rows. In other words, the start andend points will always be on the same row, but the row they are on will be random.
· Random Points: The start point is at a random location, and the end point is at a randomlocation.
· VU Meter: Makes the triggers behave like a VU Meter at the top of the ribbons. A VU Meter isa meter like what you might see on a stereo that has an equalizer. When using VU Meter asthe movement, you should use “1 Pixel” as the Theme.
· Movement Speed: This is the number of pixels moved at every trigger. For example, a value of1.0 will move 1 pixel every trigger. A value of 0.2 will move 0.2 pixels every trigger, but sincefractional pixel movement cannot be seen on the screen, it will move 1 pixel for every 5 triggers.
· Intensity: This setting controls the intensity of the color assigned to the theme.
· Trigger: This is the trigger type.
· Normal: This is the only trigger type that Instant Sequence originally had. It produces onetrigger every time the strength of the sound at the Frequencies chosen go above and below acertain threshold.
· Rapid Fire: Think of this trigger type as the “scoot along” trigger. This is a new trigger typethat is designed to work better for visualization sequences, especially those with low numbersof channels. Rapid Fire produces a trigger for each of the Frequencies chosen. If there aremany frequencies chosen for a ribbon in the timing map, then many triggers can get produced.The result is that the effects “scoot along” with the music. You should use “1 Pixel” as theTheme when using Rapid Fire. You can use other Themes but realize that since it producesso many triggers, you can end up with thousands of effects. It is recommended to use RapidFire on only one or two of the ribbons.
To get "Rapid Fire" to respond to all frequencies in the song, click on the Timing Map buttonand set "All Freqs" for the row that corresponds to the row assignment of the TCM that isusing "Rapid Fire". For example:
· Set "Rapid Fire" for TCM 1.· In "Row Assignments to TCM (Theme/Color/Movement)", set TCM 1 to Row 1. Set all
other rows to "None".· Click on the "Timing Map" button.· In the Timing Map dialog box, set "All Freqs" under Row 1.· In the Instant Sequence dialog box, click on the "Sequence All" button, then the
"Play/Stop All" button.
Ribbon assignments to TCM: Across the top are the ribbon numbers. On the left is TCM1, TCM2,TCM3, TCM4, and None. By clicking on the grid of circles, you can assign a TCM to each ribbon. For example, if you have four ribbons, you could assign TCM1 to Ribbons 1 and Ribbons 2 byclicking on the two upper left circles. Then you could assign TCM2 to Ribbon 3 and Ribbon 4 byclicking on the circles in the second row that are underneath the numbers 3 and 4. You can choose"Non" to make no effects be assigned to a ribbon.
Light-O-Rama v5.6.6572
© 2021 Light-O-Rama, Inc.
To increase or reduce the number of effects being created, you can change the sensitivity. Do thisby clicking on the "Timing Map" button and changing the Sensitivity setting in the upper left of theTiming Map dialog box. Click on the "Sequence All" button in the "Instant Sequence" dialog box tocreate a new sequence using the new sensitivity setting.
The sensitivity setting may be the only setting that you ever change in the Timing Map dialog box,but if you are adventuresome and want to experiment with the other Timing Map settings, read thenext section.
Timing Map Description
Click on the "Timing Map" button in the Instant Sequence dialog box. A large dialog box entitled"Timing Map" will appear. This dialog box gives you control over the mapping of the frequencyspectrum to the ribbons, which is how the timing marks get created:
· Freq 1 through Freq 32· Beat, Both, Left, Right· Sensitivity· Length of Effects· Extend Length of Effects· Apply Sensitivity as· Default Freq Settings· Change the Timing Map
Freq 1 through Freq 32
Note that there are check marks showing that Freq 1 and Freq 2 are mapped to Ribbon 1. Freq 3and Freq 4 are mapped to Ribbon 2, and so on. On the right side of the dialog box is a pianokeyboard which shows which notes the Freqs map to. The default is to have the low frequenciesassigned to ribbon 1 and asign higher frequencies to each ribbon thereafter, with the highestfrequency assigned to the highest number ribbon that you have.
One reason you might want to change these settings is if your high number ribbons are not gettingmany effects assigned to them. This would happen if the song does not have many high notes in it. So, to get more action on the high number ribbons, you can assign more frequences to them.
Beat, Both, Left, Right
The default setting is "Both", meaning both the left and right channels of the stereo sound will beused when creating effects. You can also set "Left" or "right" to use the left or right channel of thestereo sound. Click on "Beat" to use the beat when creating effects.
Sensitivity
Sensitivity can be set to values from 1 to 10. The default is 5. Setting to a higher number will createmore effects. Setting to a lower number will create fewer effects.
Length of Effects
Length of Effects can be set to values from 1 to 10. The default is 5. Setting to a higher number willmake some of the effects last longer. Setting to a lower number will make some of the effects
The Light-O-Rama Software Package 573
© 2021 Light-O-Rama, Inc.
shorter. You can also think of this as the "Ritalin" setting, in that a higher number will sedatehyperactive sequences and make them more mellow.
Extend Length of Effects
This option extends the length of each effect. The length of each effect will extend up to the start ofthe next effect. This makes the instant sequence less "blinky".
Apply Sensitivity as
· Volume Relative: This is the default. With this setting, the sensitivity is applied by looking at theoverall volume of the song. In essence, it raises and lowers the sensitivity to more nearly matchthe volume of the song at each point in the song. This helps even out the number of effects thatare triggered even in the quieter parts of the song. Note, however, that the quieter parts of thesong will still have fewer effects triggered than the louder parts of the song.
· Freq Relative: With this setting, the sensitivity is applied by looking at the volume for anindividual frequency and adjusting the sensitivity for each frequency to more nearly match thevolume of the song for that frequency at that point in the song. This helps even out the number ofeffects that are triggered for all frequencies. For example, if the song has a strong bass part in itand has some distinctive higher notes that are not as strong, this setting will help trigger thosehigher frequencies even though their volume is weaker. Note that it helps even out the number ofeffects in all frequencies, but the weaker frequencies will still have fewer effects triggered than thelouder frequencies.
· Absolute: With this setting, the sensitivity is applied "as is". In other words, the louder parts ofthe song and the louder frequencies will get triggered more than the weaker parts of the song, andno attempt is made by the software to level out the number of effects that are triggered.
Default Freq Settings
There are seven default freq settings that you can use. For example, click on "Stereo Low to High"and then click on "Set Freq Spectrum", and you will see the check marks and radio buttons changein the timing map so that the left and right channels of the stereo sound are used.
You can choose to "Include Beat" in the generation of effects.
By default, "Set Theme, Color, and Movement" is selected, meaning that when you click on the "SetFreq Spectrum" it will also set some default values for the Theme, Color, and Movement. If you wantto keep the Theme, Color, and Movement settings that you have, then you would uncheck "SetTheme, Color, and Movement".
Change the Timing Map
In the "Default Freq Settings" area, click on "Stereo Low to High", and then click on "Set FreqSpectrum". Go back to the "Instant Sequence" dialog box and click on "Sequence All". It will askyou if you want to overwrite your existing timings; answer "Yes". It will ask you if you want to erasethe existing sequence without saving; answer "Yes". Click on "Play/Stop All".
Notice that the ribbons on the left half have effects applied based on the left stereo channel, and theribbons on the right half have effects applied based on the right stereo channel.
Light-O-Rama v5.6.6574
© 2021 Light-O-Rama, Inc.
Apply Different Sets of Theme, Color and Movement to Different Partsof the Song
By default, you sequence the entire song each time you click on "Sequence All". To add morevariation to your sequence, you can just do a portion of the song. To do this:
· Launch the "Instant Sequence" dialog box by pressing Ctrl+I.· Near the top of the dialog box, click on the "Sequence the Selection Only" radio button.· Use the Rewind or Forward buttons on the toolbar to scroll to the beginning of the region you
want to sequence.· Use a single left mouse click to mark the beginning of the region.· Use the Forward or Fast Forward buttons on the toolbar to scroll to the end of the region you
want to sequence.· Use a single right mouse click to mark the end of the region.· Before clearing the region, it is a good practice to click on "Unique Save As". This button is a
quick way to save the current state of the sequence to a unique file name so that you can goback to it if you need to.
· If the region is not already cleared, click on "Clear Selection without Saving".· Click on "Roll Dice", or set the theme, color, and move variations manually.· Click on "Sequence Selection".
Note that "Clear Selection without Saving" uses the beginning of an effect to decide if it should bedeleted. In other words, all effects whose start time falls within the selection region will be deleted.
5.4.4 Custom Sequences
What you won't see in the Light-O-Rama SuperStar Sequencer is the giant grid that the traditionalSequencer uses; instead, effects are added by:
1. Setting time ranges in the time scale.2. Selecting squares in the Green Pixel grid (also referred to as the sequencing grid).3. Using the Scenes, Morphs, Images, and Text dialog boxes in the Tools menu.
For more information, please refer to the following sections of this help file:
· Creating a Scene· Creating a Morph· Creating an Image Action· Import Image· Creating an Animation· Creating Text· Smooth Effects· Groups of Effects· Select One or More Rows· Transfer Effects from One Sequence to Another· Load/Save Clipboard· Change to 10 Pixels per Ribbon· "Star Rays", "Wide Grid", and "Thin Grid"· The Layout Dialog Box· The Preferences Dialog Box· Configure Controller Unit IDs Using the Light-O-Rama Hardware Utility· Configure Controller Unit IDs in the SuperStar Sequencer· Select All, Select All Left, and Select All Right
The Light-O-Rama Software Package 575
© 2021 Light-O-Rama, Inc.
· Importing a Timing Grid and up to 3 Timing Channels
5.4.4.1 Creating a Scene
In the Light-O-Rama SuperStar Sequencer, a "scene" is a set of pixels that have the same start color,the same end color, a start time, and an end time.
· Initialize the Screen· Launch the Scene Dialog Box· Select Some Pixels in the Pixel Grid· Add the Scene· Play the Scene· Create a Scene that Has an End Color· Play the Scenes· Change Some Settings· Modify a Scene· Play the Scenes Again· Why Did the First Scene Go from Red to Purple to Blue?· Undo and Redo Your Modification· Group Select· Group Modify· Using Group Modify to Clone· Pause and Freeze Frame· Add Some More Scenes of Your Choosing· Save the Scenes You Have Created
Initialize the Screen
Click on the toolbar button with a piece of paper on it. This will do three things: It will clear the pixelgrid, set the Start color as red, and set the time duration to 1.00-2.00 seconds.
Launch the Scene Dialog Box
Click on the Tools menu and select "Scenes". The Scene dialog box will launch. Whenever thescene dialog box is launched, the "Monochrome" mode is automatically selected and the toolbarbutton with a black and red rectangle will depress.
Select Some Pixels in the Pixel grid
While in "Monochrome" mode, you can color pixels in the pixel grid using the left mouse button. You can use single click or click and drag. You can erase pixels in the pixel grid using the rightmouse button. Ctrl + right mouse button will erase the entire grid. Since the Start color is alreadyset to red, the pixels will become red as you select them.
Add the Scene
In the Scene dialog box, click on the "Add" button to add the scene.
Play the Scene
Click on the play button in the toolbar (the button with a triangle pointing to the right). Note that at1.00 seconds, the group of pixels you selected will turn red.
Light-O-Rama v5.6.6576
© 2021 Light-O-Rama, Inc.
Create a Scene that Has an End Color
The default is for the "Start"and "End" color to both be red. Let's change that and create anotherscene:
· Set the start and end time to 2.00 to 3.00 seconds. You can select the time with the mouseby selecting a region in the time scale, or you can type into the fields in the dialog box.
· Color some pixels.· The left red control is already at 100%; the selected pixels will turn red.· Set the right red control to 0%; this represents the "End" color. When you set the "End" color
it does not appear in the pixel grid, but it does appear as a number in the Scene dialog.· Click on the "Add" button to add this scene.
Play the Scenes
Click on the Play button in the toolbar. At 1.00 seconds the first group of pixels will turn red andstay red. At 2.00 seconds, the second group of pixels will turn red and fade to black.
Change Some Settings
In the Scene dialog box, there is a list box listing the scenes you have added. They are listedchronologically by their start times. Select the first scene in the list. Note that the time, colors, andpixels for that scene appear in the main screen. The "End" color for this scene is black. Set 100%Blue for the end color. You can do this with the right Blue color control, or by manually typing 100into the field in the Scene dialog box.
Note: Right click on the colored box above the color controls to bring up a "Color Picker" dialog.
Modify a Scene
Click on the "Modify" button. This will apply the new settings to the currently selected scene.
Play the Scenes Again
Click on the Play button. at 1.00 seconds, the pixels in the first scene will turn red, fade to purple,and then fade to blue by 2.00 seconds. At 2.00 - 3.00 seconds, the second scene will play, sameas it did before.
Why Did the First Scene Go from Red to Purple to Blue?
You probably already figured this out: What you really did was set a red ramp that started at 100 andended at 0. You also set a blue ramp that started at 0 and ended at 100. So in the middle, red wasat 50 and blue was at 50, and the red and blue mix to make purple.
Undo and Redo Your Modification
Click on the Edit menu and select "Undo Scene Modify". Then click on the Edit menu and select"Redo Scene Modify".
The Light-O-Rama Software Package 577
© 2021 Light-O-Rama, Inc.
If you do an Add, Modify, or Delete, and change your mind, you can undo your change. You canundo up to ten actions. After undoing up to ten actions, you can also redo them.
Group Select
There are two ways to use the mouse to select both of the scenes:
1. Click and hold the left mouse button and drag the selection rectangle to contain both of thescenes in the time layer area.
2. Click on the first scene to select it, then press and hold the Ctrl key while clicking on the secondscene.
Group Modify
Set the start color to yellow, by setting 100% red and 100% green (red and green mix to makeyellow). Click on "Group Modify" in the Scene dialog box. A popup box will appear, entitled "SceneGroup Modify".
Because you changed the start color, "Modify Start Color" will already be selected. Click on "OK". Note that the start color of both the scenes has changed to yellow.
Using Group Modify to Clone
Click on "Group Modify" again; because you have not changed anything, none of the boxes areselected. However, you can select any or all of the checkboxes to clone the attributes of the firstscene onto all the selected scenes. For example, select "Modify End Color", then click "OK". TheEnd color will be cloned onto the second scene.
Group Modify is a very powerful tool that can save a lot of time as you fine tune a sequence. Itallows you to change an attribute across an entire group of effects just to see how it looks. As withother features, you can undo and redo a group modify.
Pause and Freeze Frame
To the left of the stop button on the toolbars is the pause button. When you press the pause button,a white line appears at the time selection point. While paused, the rewind and forward keys will stepthrough the sequence in "freeze frame" manner. You can also click anywhere on the timeline toreposition the location of the freeze frame. This is very useful while developing sequences, to bettersee what each frame of the sequence will look like.
Unpause by clicking on the pause button again, or by clicking on the stop button.
Add Some More Scenes of Your Choosing
Go ahead and add some more scenes and play with the different settings. The times of the scenescan overlap. however, scenes that share the same time period should not share the same pixels. This creates a "pixel collision", and currently the results are not predictable (in the future, theSuperStar Sequencer will detect and prevent collisions).
Save the Scenes You Have Created
Light-O-Rama v5.6.6578
© 2021 Light-O-Rama, Inc.
Click on the File menu and select "Save As". Save the scenes you have created as a file named"MyScenes.sup".
5.4.4.2 Creating a Morph
In the Light-O-Rama SuperStar Sequencer, a "Morph" consists of the following:
· Layer: Defines priority if there are collisions (future)· Acceleration: The morph can accelerate as it goes from "State 1" to "State 2"
State 1 and State 2 each consist of:
1. Start point and end point of a line2. Head color3. Time4. Head length
Tail consists of:
1. Color, which can be determined in one of two ways:(a) Start Color and End Color(b) Use the Head Color
2. Time length
Here is an example of how to create a morph:
· Get a new screen· Launch the Morph dialog box· Observe the default settings· Add first morph· Play the morph· Set a simple morph with a different start and end color· Modify the morph· Play the morph· Add a trail length· Modify the current morph· Play the morph again· Change the State 1 line to a vertical line· Change the State 2 line to a vertical line· Set color of the State 2 line to 100% green· Set the time to 2.00 to 3.00· Add a second morph· Play the morph· The morph twist· Save your morph· Morph summary· The length of a morph
Get a new screen
Click on the toolbar button that has a picture of a piece of paper on it.
Launch the Morph dialog box
The Light-O-Rama Software Package 579
© 2021 Light-O-Rama, Inc.
Click on the Tools menu and select Morph. The Morph dialog box will launch, and the Scene dialogbox will automatically be shut down. Whenever the Morph dialog box is launched, the "Morph" modeis automatically selected, and the black toolbar button with horizontal lines on it will be depressed.
Observe the default settings
By default, a red line for State 1 will be at the top of the pixel grid, and a red line for State 2 will be atthe bottom of the pixel grid. The time duration will be 1.00 to 2.00 seconds. The Tail start color willbe red, and the time length will be 1.00 seconds.
Add first morph
Press the "Add" button to add the morph.
Play the morph
On the toolbar, press the Play button. At 1.00 seconds, a red line will start from the top and godown to the bottom, leaving a trail that fades to black in one second.
Set a simple morph with a different start and end color
Leave the start color at red. Set the end color to blue. Set the Tail Time length to 0.00.
Modify the morph
Press the "Modify" button to modify the selected morph.
Play the morph
On the toolbar, press the Play button. At 1.00 seconds, a red line will start from the top and godown to the bottom. The line will change from red to purple and then to blue by the time it reachesthe bottom at 2.00 seconds.
Add a trail length
The trail length defaults to 1. Make the morph leave a trail by typing in a number in the Trail Lengthfield. For this exercise, change the State 1 Trail Length to 2, and change the State 2 Trail Length to10.
Modify the current morph
Click on the "Modify" button. This applies your changes to the currently selected morph in themorph list.
Play the morph again
This time, the morph will leave a trail of two lines at the top, and will change to leaving a trail of 10lines at the bottom.
Light-O-Rama v5.6.6580
© 2021 Light-O-Rama, Inc.
Change the State 1 line to a vertical line
The State 1 line is defined using a click and drag with the left mouse button. Note that one end ofthe State 1 line is labeled "1a"and the other end is labeled "1b". The start of the mouse drag will be"1a" and the end will be "1b". Make a vertical line by dragging on the left side of the pixel grid. Make your selection from top to bottom. When you are done, the top of the line should be labeled"1a", and the bottom of the line should be labeled "1b".
Change the State 2 line to a vertical line
The State 2 line is defined using a click and drag with the right mouse button. Note that one end ofthe State 2 line is labeled "2a" and the other end is labeled "2b". The start of the mouse drag will be"2a" and the end of the drag will be "2b". Make a vertical line by dragging on the right side of thepixel grid. Make your selection from top to bottom. When you are done, the top of the line shouldbe labeled "2a" and the bottom of the line should be labeled "2b".
Set color of the State 2 line to 100% green
The color of the State 2 line is controlled by the right color controls. Set the right Blue control to 0%and the right Green control to 100%. This will change the State 2 line color from blue to green.
Set the time to 2.00 to 3.00
You can do this with the mouse on the time scale, or you can type the values into the dialog box. State 1 time is the start time, and State 2 time is the end time.
Add a second morph
Press the "Add" button to add the second morph.
Play the morph
On the toolbar, press the Play button. At 1.00 seconds, the first morph will play as it did before. At2.00 seconds, the second morph will start from the left and end at the right.
The morph twist
Set the Tail Time Length back to 1.00 seconds. The Tail start color should be 100% red. Redefinethe State 1 line by doing a mouse drag from bottom to top. Now "1a" will be on the bottom, and "1b"will be on the top. Click on the "Modify" button. Play the morph.
This time, the line will twist as it travels across. The effect will be that the line will become shorter inthe middle and then get bigger. This is because as the morph progresses, point "1a" moves to point "2a", and point "1b" moves to point "2b".
Save your morph
Click on the File menu and select "Save As". Save the morphs you have created as a file named"MyMorphs.sup". Note that files can contain any combination of scenes and morphs. In this

The Light-O-Rama Software Package 581
© 2021 Light-O-Rama, Inc.
example, you saved them separately, but you could have saved your scenes and morphs togetherinto a file of any name you choose.
Morph summary
Are morphs cool or what? You can do a lot with morphs. In the exercise, we morphed between twohorizontal lines and between two vertical lines. You can also morph between diagonal lines.
Head Length and Tail Time Length can end up giving similar effects, but are applied differently. HeadLength leaves a head that is a certain number of pixels long. Tail Time Length is applied after theHead effect, and is on for a certain amount of time. Experiment with different Head and Tail TimeLength settings to get a feel for how they work.
Also, realize that when you specify a Tail Time Length to use the Head Color, it means to use thecolors specified for the head. If the State 1 and State 2 head colors are different, then the Tail willuse the appropriate intermediate color for the tail for the length of the tail. When you specify "UseHead Color", the intermediate color is determined by the location of the Tail along the morph,whereas when you specify a start and end color for the Tail in the Tail section, the intermediate coloris determined by the time since the morph started.
Show Entire Head at Start
This setting allows you to start with the entire head being visible from the start. For example, if themorph travels 50 pixels, you can set State 1 Head Length to 50 and set State 2 Head Length to 0,and the morph will be 50 pixels long right from the start, and will get shorter and disappear at theend.
Acceleration
An acceleration of 0 means no acceleration. A positive number means accelerate from a slowerspeed to a faster speed. A negative number means decelerate from a faster speed to a slowerspeed. Try making a morph that travels downward and give it an Acceleration of 5. The morph willlook like gravity is accelerating it downward. Try making a morph that travels upward and give it anAcceleration of -5. The morph will look like gravity is slowing the morph down as it travels upwards.
The length of a morph
Most people won't care about the details of the total length of a morph. But for those that really wantto know, there are three parts to a morph:
1. Root: This is the time for the leading edge of the morph to travel from State 1 to State 2.2. Head Length: The State 2 Head Length will add the length of the head at the end of the morph.
This head will take some time to travel past the end location of the morph.3. Tail Length: The tail length is in seconds, and is applied after the Root and Head.
The length of the Head and the Tail are displayed on the timeline as a narrow rectangle. Note thatonly the root can be selected. Clicking on the head or the tail will not do anything.
Light-O-Rama v5.6.6582
© 2021 Light-O-Rama, Inc.
5.4.4.3 Creating an Image Action
In the Light-O-Rama SuperStar Sequencer, an "image action" will move an image from a start point to anend point. At the end, a ramp can be applied. An image action consists of:
· Layer: Defines priority if there are collisions (future)· Acceleration: The image can accelerate or decelerate as it goes from point A to point B (future)· Image: A bitmap· Start point· End point· Ramp
Ramp consists of:
· Time length· Start color (future)· End color (future)
Here is an example of how to create an image action:
· Get a new screen· Launch the Image Action dialog box· Observe the default settings· Draw an image· Add an image name· Add the image· Observe the default image action values· Type an image action name· Add the image action· Play the image action· Add another image action· Play the image actions· Stop at the right edge· PreRamp and PostRamp· View the image actions on a square grid· Play it again
Get a new screen
Click on the toolbar button that has a picture of a piece of paper on it.
Launch the Image Action dialog box
Click on the Tools menu and select "Images". The Image Action dialog box will launch, and theMorph dialog box will automatically be shut down. Whenever the Image Action dialog box islaunched, the "Draw" mode is automatically selected and the toolbar button with a pencil on it will bedepressed.
Observe the default settings
By default, the left red color control will be set to 100%. The time duration will be 1.00 to 2.00seconds. All pixels in the pixel grid will be black.
The Light-O-Rama Software Package 583
© 2021 Light-O-Rama, Inc.
Draw an image
Leave the left red color control at 100%. Set the left green color control to 100%. The start color willnow be yellow. When drawing an image, only the start color is used; the end color is not used.
Click on the pixel grid to draw a smiley face at the top of the pixel grid. Single clicks will draw onepixel; click and drag will leave a trail of pixels. Right click erases pixels. Ctrl-right click will clear theentire grid.
Add an image name
At the top of the dialog box is the Image group. In the "Name" field of the Image group area, type"Smiley Face".
Add the image
In the Image group at the top of the dialog box, click on the Image "Add" button.
Observe the default image action values
The default start point (x,y) is (0,0), and the default end point (x,y) is (0,50). The default start andend times are 1.00 and 2.00. Leave these settings at their default values.
Type an image action name
In the Image Action group at the bottom of the dialog box, type "Smiley down".
Add the image action
In the Image Action group at the bottom of the dialog box, click on the Image Group "Add" button.
Play the image action
Play the image action. at 1.00 seconds, your image will start from the top and travel downward,disappearing off the bottom of the ribbons.
Add another image action
We will use the same image again, and this time move it horizontally.
For the time, select 2.00 to 3.00. For the start point, type (-12, 10) (enter minus twelve so that thestart point and end point are different). For the end point, type (12, 10). For the Image Action name,type "Smiley right" in the bottom name field. Click on the bottom "Add" button.
Play the image actions
At 1.00 to 2.00 you will see the first image action, which goes from top to bottom. At 2.00 to 3.00,the second image action will move from left to right across the ribbons.
Light-O-Rama v5.6.6584
© 2021 Light-O-Rama, Inc.
Stop at the right edge
Select the image action that goes from left to right. Keep the start point at (-12, 10), but change theend point to (0, 10). At the bottom of the dialog box, enter a "Post Ramp Time" of 1.00. Click theModify button.
Play the image actions and you will see the first image action go from top to bottom. The secondimage action will move from the left to the right edge and then fade for 1.00 seconds at the rightedge.
PreRamp and PostRamp
"PreRamp Time" will fade the image in. Selecting "Make Brighter" with a "PreRampTime" will fadethe image in brighter. It gives the effect of "poof" and the image appears.
"PostRamp Time" will fade the image out. Selecting "Make Brighter" with a "PostRamp Time" willmake the image brighter and then fade to black. It gives the effect of "poof" and the imagedisappears.
View the image actions on a square grid
At the right end of the toolbar are three buttons. If you hover the mouse over the buttons you will seethey are called "Star Rays", "Wide Grid", and "Thin Grid". Currently the "Star Rays" button ispressed. Click on the "Wide Grid" button.
Play it again
Play the image actions again and you will see how they look when the ribbons are parallel to eachother and form a grid of pixels.
5.4.4.4 Import Image
On the right half of the Image Setup dialog box is the Import Image section. This section is used toimport image files such as .jpg, .gif, .bmp, .png, and .ico files. To import an image file, do the following:
· Click on the Tools menu and select "Images..."· In the Import Image section, click on the "Import image File (JPG, GIF, BMP, PNG, ICO, etc)"
button· If you are in CCR Mode, the sequencing grid will become larger and will be 64x50 pixels in size.
This allows you to define a large image if you want. You can manipulate the image by using thefollowing controls:· Move Origin X Y· Squish/Stretch X Y· Rotation Angle· Enlarge/Shrink· Clip Grid Bitmap· Images on a Small Grid· Images on a Grid Larger than Your Actual Lights· Copy/Paste a Portion of an Image
Move Origin X Y
The Light-O-Rama Software Package 585
© 2021 Light-O-Rama, Inc.
This control will move the origin of the image. Use the arrow buttons to move it left, right, up, ordown.
Squish/Stretch X Y
This control will squish or stretch the image in the X or Y direction. Using this control will changethe aspect ratio of the image.
Rotation Angle
Use this control to rotate the image. A positive angle will rotate the image clockwise; a negativeangle will rotate it counterclockwise.
Enlarge/Shrink
Use this control to enlarge or shrink the image.
Clip Grid Bitmap
While manipulating the image, you can click on "Clip Grid Bitmap" and set a clipping rectangle onthe sequencing grid using "Shift + Left Mouse Button". Then when you click on "Set Grid Bitmapfrom Image File", only the pixels within the clipping rectangle will get set.
After you have manipulated the image to the location, angle, and size that you want, click on the"Set Grid Bitmap from Image File" button. This will set the pixels on the sequencing grid torepresent the original imported image. At this point you can manually edit the image if you wish. Note that you can set the color controls to the color of a pixel in the sequencing grid by moving themouse to a pixel and then doing a Shift + Left mouse click. To set a pixel, set the color controls tothe color you want and then click on one or more pixels.
After you have the image the way you want it, type in a name in the Image section and click on the"Add" button in the Image section.
Images on a Small Grid
For example, if you have 12 CCRs and you are in CCR mode, then you have a grid of 12x50 pixels towork with. However, when you import the image, the grid will become larger and will be 64x50 pixelsin size. If you want your image to fit within your 12x50 pixels that you have, then you will need toshrink the imported image and move it to the left so that it will fit within the first 12 columns of pixels. Then you can click on the "Set Grid Bitmap from Image File" button. You can then set the GridMode to "Standard", and the sequencing grid will become the standard size of 12x50 pixels.
Images on a Grid Larger than Your Actual Lights
For example, if you have 12 CCRs and you are in CCR mode, then you have a grid of 12x50 pixels inyour actual display. However, when you import the image, the Grid Mode will automatically be set to"Large" and the grid will become large and will be 64x50 pixels in size. Even though your actuallights are only 12x50 pixels in size, you can create a larger image and move the image through your12x50 pixels. This allows you to display large images on a small grid. To do this, do the following:
Light-O-Rama v5.6.6586
© 2021 Light-O-Rama, Inc.
· In the Import Image section, click on the "Import Image File (JPG, GIF, BMP, PNG, ICO, etc)"button.
· The sequencing grid becomes larger and will be 64x50 pixels in size.· Manipulate the image but keep it large so that it uses most or all of the 64x50 pixels.· Click on the "Set Grid Bitmap from Image File" button.· If you want, manually edit the pixels further.· In the image section, type in a name and click on the "Add" button.
Now you want to add an image action that will move the image through your 12x50 pixels, so do thefollowing:
· Set the Grid Mode to "Standard". This will change the grid to be the size of your actualdisplay.
· In the time ruler at the top of the screen, set the time length to something long, such as 4seconds.
· In the Image Action section, set Start x, y to 12, 0, and set End x, y to -64, 0.· In the Image Action section, click on the "Add" button.· Click on the "Play 8 seconds" button to play the Image Action. You should see the Image
move through your 12 CCRs from right to left.· To make the image move from left to right, set Start x, y to -64, 0, and set End x, y to 12, 0.
Note that these values assume your image is 64 pixels wide. If it is not that wide, then youwould use smaller values.
Copy/Paste a Portion of an Image
Do the following to copy a portion of an image and paste it to another location or to another image.
· Click on the “Tools” menu and select “Image…”· In the upper left of the “Image Setup” dialog box is the list of images. Select an image.· Use Alt + Left Mouse Drag to select a portion of the image. The selection automatically gets
copied.· Use Left Mouse Drag to move the copied portion of the image· Press the “Paste” button in the toolbar to Paste· You can move the selection again and “Paste” multiple times if you want· Once the image appears the way you want, click on the “Modify” button in the Image list· You can also click on the image list and choose a different image, then drag the selection to
the location desired and click on the “Paste” button· Once you are done pasting press the Esc key to cancel the selection
5.4.4.5 Creating an Animation
Using the Light-O-Rama SuperStar Sequencer, you can create an animation using a series of stationaryimages. Here is an example of how to create an animation:
· Load some pre-drawn images· Launch the Image dialog box· Select "Apply x,y in Preview (for animations)"· Add the first image· Add the second image· Add the third image· Add the fourth image· What are those boxes under the timeline?
The Light-O-Rama Software Package 587
© 2021 Light-O-Rama, Inc.
· Check your work· How does cut/copy/paste work?· Copy/paste four images· Image group modify· Copy/paste 8 images· Image group modify· Copy/paste 16 images· Image group modify· Copy/paste 13 images· Image group modify· Play the animation· Nudge the animation to the left· Play on "Wide grid" and "Narrow Grid"· Save your animation· Add an eye to Pac Man· Play it again, Sam
Load some pre-drawn images
Click on the File menu, select "Open...", and open the file "PacManImages.sup", located in the"Samples" directory of your SuperStar Sequences directory. Be sure to load PacManImages.sup,not PacManAnimation.sup.
Launch the Image dialog box
Click on the Tools menu and select "Images...". Click on each image in the image list box to viewthem.
Select "Apply x,y in Preview (for animations)"
Select the checkbox labeled "Apply x,y in Preview (for animations)". This applies the (x,y)coordinate in the preview of the image and it also disables the "End x" and "End y" edit fields (foranimation images, the start (x,y) and end (x,y) are the same).
Add the first image
· In the image list box, select "01 Circle".· In the Time Line, select from 1.00 to 1.10 seconds.· In the Image Action x,y Start, type "0" and "44"· In the Image Action name field, type "Mouth shut".· In the Image Action section, click the "Add" button.
"1.00 Mouth shut" should appear in the Image Action list box.
Remember: If you make a mistake, you can always undo your mistake by clicking on the Edit menuand selecting Undo.
Add the second image
· In the image list box, select "02 Half open".· In the timeline, select from 1.10 to 1.20 seconds.
Light-O-Rama v5.6.6588
© 2021 Light-O-Rama, Inc.
· In the Image Action x,y Start, type "0" and "42".· In the Image Action name field, type "Mouth half open".· In the Image Action section, click the "Add" button.
"1.10 Mouth half open" should appear in the Image Action list box.
Add the third image
· In the image list box, select "03 Full open".· In the timeline, select from 1.20 to 1.30 seconds.· In the Image Action x,y Start, type "0" and "40".· In the Image Action name field, type "Mouth full open".· In the Image Action section, click the "Add" button.
"1.20 Mouth full open" should appear in the Image Action list box.
Add the fourth image
· In the image list box, select "02 Half open".· In the timeline, select from 1.30 to 1.40 seconds.· In the Image Action x,y Start, type "0" and "38".· In the Image Action name field, type "Mouth half shut".· In the Image Action section, click the "Add" button.
"1.30 Mouth half shut" should appear in the Image Action list box.
What are those boxes under the timeline?
Under the yellow timeline, you should see four light gray boxes. These boxes are the four imageactions you just added. Click on the first of the four boxes and it wil highlight the first image action,labeled "Mouth shut". Click on the second and it will highlight the second image action, "Mouth halfopen". You can also highlight the image action in the list box, and it will highlight the correspondingbox under the timeline.
Check your work
It is easy to make a mistake while adding the image actions. Click on the first image action, labeled"Mouth shut", in the image action list box. Use the down arrow key to step through the imageactions. The y coordinate should step through 44, 42, 40, and 38, and the top of the image shouldstep up two pixels each time. If the image is not moving, make sure you have "Apply x,y in Preview(for animations)" selected.
How does cut/copy/paste work?
The fourth, fifth, and sixth buttons on the toolbar are the Cut, Coyp, and Paste buttons. By default,the objects you paste will be placed in the first open layer, so that effects do not end up on top ofeach other. if you wish the pasted objects to stay in their original layers, press the Shift key whileclicking on the Paste button.
Copy/paste four images
The Light-O-Rama Software Package 589
© 2021 Light-O-Rama, Inc.
· Select all four of the light gray boxes under the yellow timeline.· Click on the "Copy" toolbar button. The selected effects will be copied to the clipboard.· Click on the timeline just after the light gray boxes, which will be at 1.40 seconds.· Click on the Paste toolbar button. The effects in the clipboard will be pasted starting at 1.40
seconds.
Remember, if you make a mistake you can click on the Edit menu and select Undo.
Image group modify
· You should now have eight image actions on the timeline. Select the last four.· Click on "Group Modify"; the Image Group Modify dialog box should appear.· Select "Modify x,y".· "Add as Offsets to x,y Positions" should already be selected; leave it selected.· Underneath "Start", type "0" into the left field, and type "-8" into the second field. Click on "OK".
This will subtract 8 from the y coordinate in the selected image actions.· Click on each of the image actions, and you should see your animation move up the screen.
Copy/paste 8 images
Select all of the eight light gray boxes that you now have under the timeline. Click on the timelinejust after the boxes that are already there. Click on Copy, and then Click on Paste.
Image group modify
· You should now have 16 image actions on the timeline. Select the last eight.· Click on "Group Modify"; the Image Group Modify dialog box should appear.· Select "Modify x,y".· "Add as Offsets to x,y Positions" should already be selected; leave it selected.· Underneath "Start", type "0" into the left field, and type "-16" into the second field. Click on "OK".
This will subtract 16 from the y coordinate in the selected image actions.· Click on each of the image actions, and you should see your animation move up the screen.
Copy/paste 16 images
Select all of the 16 light gray boxes that you now have under the timeline. Click on the timeline justafter the boxes that are already there. Click on Copy, and then Click on Paste.
Image group modify
· You should now have 32 image actions on the timeline. Select the last 16.· Click on "Group Modify"; the Image Group Modify dialog box should appear.· Select "Modify x,y".· "Add as Offsets to x,y Positions" should already be selected; leave it selected.· Underneath "Start", type "0" into the left field, and type "-32" into the second field. Click on "OK".
This will subtract 32 from the y coordinate in the selected image actions.· Click on each of the image actions, and you should see your animation move up the screen.
Copy/paste 13 images
Light-O-Rama v5.6.6590
© 2021 Light-O-Rama, Inc.
Select the first 13 light gray boxes that you now have under the timeline. Click on the timeline justafter the boxes that are already there. Click on Copy, and then Click on Paste.
Image group modify
· You should now have 45 image actions on the timeline. Select the last 13.· Click on "Group Modify"; the Image Group Modify dialog box should appear.· Select "Modify x,y".· "Add as Offsets to x,y Positions" should already be selected; leave it selected.· Underneath "Start", type "0" into the left field, and type "-64" into the second field. Click on "OK".
This will subtract 64 from the y coordinate in the selected image actions.· Click on each of the image actions, and you should see your animation move up the screen.
Your animation is now complete.
Play the animation
Click on the Play button. You should see Pac Man chase the red ghost up the ribbons.
Nudge the animation to the left
The chomping sound starts before you see the animation start. To synchronize the appearance ofthe animation with the start of the chomping sound, select all of the image actions under thetimeline. Click on the "Nudge Left" toolbar button (the button with an hourglass and a left arrow onit). All the image actions should move left by 0.05 seconds. Nudge left three or four more times andthe animation should be more in sync with the sound.
Play on "Wide Grid" and "Narrow Grid"
Click on the "Wide Grid" toolbar buton and play the animation.
Click on the "Narrow Grid" toolbar button and play the animation.
Save your animation
Click on the file menu, and select "Save As...". Save the file as "MyPacManAnimation.sup".
Note: There is already a file named PacManAnimation.sup in the Samples directory. You cancompare your animation with this animation.
Well, it was a bit tedious, but it was worth the effort: You now have a cool Pac Man animation!
Add an eye to Pac Man
Even after the image actions are all defined, you can still modify the images that they use. Forexample, you could add an eye to the yellow Pac Man. Note that to change the images, you will beworking in the upper Image section of the image dialog. Do not click on anything in the lower ImageAction section.
· Select "01 Circle" in the Image list box.· Use the right mouse button to erase some pixels on the yellow Pac Man to make an eye.
The Light-O-Rama Software Package 591
© 2021 Light-O-Rama, Inc.
· Click on the Image "Modify" button in the upper Image section (not the lower Image Action"Modify" button).
· Repeat the same process for "02 Half open" from the Image list box.· Repeat the same process for "03 Full open" from the Image list box.
Play it again, Sam
Play the animation again, and you will see the eye in the entire animation.
5.4.4.6 Creating Text
In the Light-O-Rama SuperStar Sequencer, text can be stationary or can move in any direction. At theend of the movement, the text can be stopped and displayed stationary for a specified period of time. Different size fonts can be used, and you can choose the text color or let the text be rainbow colored. Text can be treated as a positive mask or a negative mask. Let's get started!
· Select Wide Grid or Thin Grid· Set Layout to 24 ribbons· Get a new screen· Launch the Text dialog box· Observe the default settings· Add a text action· Play the text action· Change the color of the text· Modify and play the text action· Change Rotation to 0 degrees and set Direction of Motion to left· Try different rotations and directions of motion· Rainbow· Rainbow start color· Change the start color· Try a different font and change the text· Discussion on fonts· Custom fonts· PreRamp and PostRamp· Discussion· What is a text mask?· Try some positive mask text· Apply a background effect· Understanding a positive text mask· It works with morphs too!· Move the morph to the foreground· Negative text masks· Discussion· Applying normal text to the background of a text mask· Summary
Select Wide Grid or Thin Grid
At the right end of the toolbar are three buttons that control how the ribbons are laid out. The textwill be harder to read if you have "Star Rays" selected. Select "Wide Grid" or "Thin Grid" and thetext will be easier to read.
Light-O-Rama v5.6.6592
© 2021 Light-O-Rama, Inc.
Set Layout to 24 ribbons
Click on the Tools menu and select Layout. In the layout dialog box, set the Number of Ribbons to24. We may not actually have 24 ribbons, but for the sake of this exercise, let's pretend we do!
Get a new screen
Click on the toolbar button that has a piece of a paper on it.
Launch the Text dialog box
Click on the Tools menu and select "Text". The Text Setup dialog box will launch. Whenever theText Setup dialog box is launched, "Text" mode is automatically selected and the toolbar button with"ABC" on it will be depressed.
Observe the default settings
By default, the color is white, font is "8-8x8 Thin - System", time duration is 1.00 - 5.00 seconds,text is "ABCDEF", text mode is Normal, rotation is 90 degrees, direction of motion is Up, and Stopat Edge is unselected.
Add a text action
In the Text Action group, click on the "Add" button.
Play the text action
Click on the Play button. You should see "ABCDEF" scroll like a marquee from the bottom to thetop of the ribbons.
Change the color of the text
Currently, the text is white. Leave the red color control at 100, but change the green and blue colorcontrols both to 0. The text preview will now be red.
Modify and play the text action
In the Text Action group, click on Modify, then play the text action again. Red text will scroll fromthe bottom to the top.
Change Rotation to 0 degrees and set Direction of Motion to left
Set Rotation to 0 degrees and set Direction of Motion to Left. Click on Modify, and play the textaction. Red text will scroll from right to left across the ribbons.
Try different rotations and directions of motion
The Light-O-Rama Software Package 593
© 2021 Light-O-Rama, Inc.
You can mix and match the rotation and direction of motion. Try some different combinations. Remember to always click on Modify and then to click on Play to see the results of your newsettings. Also, try "Stop at Edge" to see what it does.
Rainbow
In the Color/Mask group, select Rainbow. Each character of the text now becomes a different color. Click on Modify, and play the text action with rainbow colors.
Rainbow start color
You can set the start color of the rainbow. For this exercise, use the following settings:
· Set Color to Rainbow· Leave Mask at Normal· Set Rotation to 90 Degrees· Set Direction of Motion to Center· Unselect Stop at Edge· Set Start time to 1.00 seconds and End time to 2.00 seconds
Click on Modify and play the text. The rainbow text will be centered on the ribbons and will notmove.
Change the start color
· Set Start time to 2.00 seconds and End time to 3.00 seconds.· Set the start color to orange.· Click on Add. You will now have two text actions.· Click on Play.
The rainbow colors will display with red as the start color from 1.00 to 2.00 seconds, and then thetext will display with orange as the start color from 2.00 to 3.00 seconds.
By continuing to add text actions one after another with different start colors, you can make thecolors move across the characters!
Try a different font and change the text
· Delete any text actions that you currently have. You can do this by clicking on Delete until all textactions in the Text Action list box are gone.
· In the Font list box, select "10-12x12 Bold - System". The text will become larger.· In the Text field in the middle of the dialog box, change "ABCDEF" to "Merry Christmas!"· Set the start time to 1.00 seconds and the end time to 5.00 seconds.· Set Color to Rainbow.· Set Start Color to whatever color you want.· Set Rotation to 270 Degrees.· Set Direction of Motion to Down.· Unselect Stop at Edge.
Click on Add and play the text action. "Merry Christmas!" will scroll from top to bottom in rainbowcharacters.
Light-O-Rama v5.6.6594
© 2021 Light-O-Rama, Inc.
Discussion on fonts
We just used the font "10-12x12 Bold - System". The first number in the name is the pixel height ofa capital letter. The second and third numbers are the character cell width and height. In this fontthere are two pixels reserved for the lower case descenders (for example, the bottom tail of a "y"). This is why the height of the character cell, 12, is greater than the height of a capital letter, 10.
Note that in the smaller fonts, the cell height is the same as the capital letter height. This isbecause there are not enough pixels to reserve room for lower case descenders. In those fonts, thetail of a "y" does not go below the bas line.
As mentioned, the second number is the font character cell width, but realize that this is an averagewidth. The width of any individual character may be different.
Custom fonts
In the font list, there are five system fonts and five custom fonts. The custom fonts are shippedidentical to the system fonts. The only difference is that system fonts are not allowed to bemodified, while the custom fonts are. If you wish to tweak some of the characters in a font, you cando so in any of the custom fonts. For example, let's say we want to make the exclamation pointbigger in the "10-12x12 Bold - Custom" font. To do this, do the following:
· In the central area of the dialog box, select the radio button labeled "Font Character Entry".· In the font list, select "10-12x12 Bold - Custom". It should be the second to last font in the list.
The Modify button in the Chars group will become enabled.· In the Char list, select the "!" character (the second character in the list.· The char cell width is 4; change this to 6 and click on the Modify button immediately below the
Char list. Note that the yellow line indicating the char cell width changed from 4 to 6.· The current "!" character is two pixels wide. Redraw the pixels to make a fatter 4 pixel wide "!"
character.· Click on the Char List Modify button again.· Now click on the Save button immediately below the Font list. This saves your change to a file.· Click on the Text Action Entry radio button.· Type the word "Merry!" as the text.· In the font list, select "10-12x12 Bold - Custom". You should see the new exclamation point that
you customized.
PreRamp and PostRamp
"PreRamp Time" will fade the text in. Selecting "Make Brighter" with a "PreRamp Time" will fade thetext in brighter. It gives the effect of "poof" and the text appears.
"PostRamp Time" will fade the text out. Selecting "Make Brighter" with a "PostRamp Time" willmake the text brighter and then fade to black. It gives the effect of "poof" and the text disappears.
Discussion
You now know how to control many features of a text action. You can move the text, have it standstill, rotate the text, change its color, change the font, and even customize the characters within afont. But there is more.
The Light-O-Rama Software Package 595
© 2021 Light-O-Rama, Inc.
What is a text mask?
In the Color/Mask group, there are three radio buttons, labeled "Normal", "Pos Mask", and "NegMask". So far we have done everything with the "Normal" setting. Normal means that there is nomask applied, and the text will behave normally. "Pos Mask" and "Neg Mask" are advancedfeatures that allow you to apply any effect to the background and/or foreground of text.
Try some positive mask text
· Delete any text actions that you have by clicking on the Delete button until all text actions aregone from the list.
· Set the start time to 1.00 seconds and the end time to 5.00 seconds.· Type the word "Merry" as the text.· Select font "10-12x12 Bold - System".· Set Color/Mask to Choose Color.· Set Color to red by setting red to 100, green to 0, and blue to 0.· Set Pos Mask.· Set Rotation to 270 Degrees.· Click on Add.· Play the text action.
The word "Merry" appears in red in the center of the ribbons. Nothing special yet...
Apply a background effect
· Click on Tools and select Scenes.· Set the start time to 2.00 seconds and the end time to 4.00 seconds.· Set the start and end colors to blue.· Set all the pixels in the pixel grid by pressing the Ctrl key and then clicking with the left mouse
button on the pixel grid. All the pixels in the pixel grid should be blue.· Click on Add.· Play the text action.
You should first see the red "Merry", and then at 2.00 seconds the background should become blue.
Understanding a positive text mask
In the time layer area, there should be a red bar going from 1.00 seconds to 5.00 seconds. This baris the Text mask. Click on this bar and the Text dialog should launch.
There is a box in the lower right area of the dialog box labeled "Mask Diagram". As the diagramshows, the effects above a text mask appear in the background, and the effects below a text maskappear in the foreground. So, let's try moving the scene from the background to the foreground.
· Select the blue bar in the time layers.· Locate the "Move Effects Down" button in the toolbar. It is the fourth button from the right.· The "Move Effects Down" button changes the layer of the effect. Click on it until the scene effect
is below the mask.· Click on Play.
Light-O-Rama v5.6.6596
© 2021 Light-O-Rama, Inc.
This time the scene gets applied to the foreground and the text becomes purple from 2.00 to 4.00seconds. Note: If the scene fails to get applied to the foreground, make sure the Positive Text Maskcolor is set to pure red - i.e. set red to 100, green to 0, and blue to 0.
It works with morphs too!
· Click on the scene and delete it.· Click on the Tools menu and select Morphs. The Morph dialog box will launch.· Set the start time to 2.00 seconds and the end time to 3.00 seconds.· Set the start and end colors to green.· Set the tail time length to 0.50 seconds.· Set the ramp start color to green and leave the ramp end color as black.· Click on Add and then Play.
The text should appear and then the morph will be applied to the background. Text masks are cool!
Move the morph to the foreground
Click on the green bar in the time layers and move it to the other side of the mask. Click on Play.
This time the morph gets applied to the foreground of the text. Note: If the morph fails to get appliedto the foreground, make sure the Positive Text Mask color is set to pure red - i.e. set red to 100,green to 0, and blue to 0.
Negative text masks
We started out using a positive text mask. Let's try a negative text mask.
· Leave the morph on the foreground side of the text mask.· Click on the red bar in the time layers; the Text dialog box appears.· Select "Neg Mask". A message box appears recommending that you set the text color to white
when using negative masks. Answer "Yes" to the message box"; the text color will then beautomatically set to white.
· Click on the Modify button and then Play. This time, you will see nothing until the morph getsapplied to the text foreground.
· Move the morph to the background side of the text mask, and play. This time, you will seenothing until the morph is applied to the background.
Discussion
The weird thing about negative masks is that they are invisible until other effects are applied to theirforeground and/or background. This seems weird at first, but it is the key to their power. You canapply multiple effects on either side of the mask. You can even apply image actions and normal textto the background or foreground. But you cannot apply a mask to a mask.
Applying normal text to the background of a text mask
· Move the morph to the foreground side of the mask.· Set the morph start time to 1.00 and the end time to 2.00.· Increase the tail time to 3.00.· Click on Play. You should see the morph applied to the foreground of the text mask.
The Light-O-Rama Software Package 597
© 2021 Light-O-Rama, Inc.
· Click on the white bar in the time layer area; the Text dialog box is launched.· Type "Christmas" for the text.· Leave Rotation at 270 degrees.· Click on Normal.· Set Direction of Motion to DownRt.· Set the color of the text to red.· Set the start time to 2.00 seconds and the end time to 5.00 seconds.· Click on Add.· The red bar in the time layers represents the normal text you just added. Move it to the
background side of the text mask.· Click on Play.
The morph should play across the word "Merry", and "Christmas" should move across thebackground.
This same sequence is stored as a sample file named "TextMaskMerryChristmas.sup".
Summary
Text masks take some time to learn, but are well worth the effort. With all the other effects, the timelayers were just a way to view the effects. With text masks, the layers have a new meaning. Thistutorial explored only a few of the variety of text effects that are now possible. Cosmic Color Ribbonshave been taken to a whole new level!
5.4.4.7 Smooth Effects
Smooth Effects look best on a large matrix of RGB lights. They are designed to change large areas oflights in a smooth flowing manner. There are four types of smooth effects: Shockwave, Spiral, Fan, andSine Wave.
Shockwave
After launching the Smooth Effects dialog box, click on the "Shockwave" tab.
· Center Point and Radius· Angle· Width· Acceleration
Center Point and Radius (Shockwave)
In the green sequencing grid, there will be a small circle and a line ending with an arrow head. Thesmall circle marks the center of the shockwave. The line ending with an arrow head marks theradius. Click on the "Add" button in the "Smooth Effects" dialog box, and then click on the "Play"button to see the shockwave. You should see a shockwave effect start from the center and endwhere the arrow head was.
To change the center point and radius, do a click and drag with the left mouse button. You canchange the direction and length of the radius with the right mouse button. For example, do a clickand drag with the right mouse button starting at the end of the arrow line and drag towards the center
Light-O-Rama v5.6.6598
© 2021 Light-O-Rama, Inc.
where the circle is. This will make the line start at the outside and go towards the middle with thearrow pointing towards the middle. Add another shockwave effect and play it, and you should see ashockwave start big and contract to a smaller size.
Angle (Shockwave)
The Start Angle and End Angle are grayed out, because Shockwave does not use them.
Width (Shockwave)
There is a Start Width and an End Width. The Start Width is the width of the "leading edge"of theshockwave. The End Width is the width of the "trailing edge" of the shockwave. Click on the Up orDown Arrow buttons next to the Start Width or End Width to change their values.
Acceleration (Shockwave)
Setting a positive number will make the shockwave start slowly and increase in speed as it travels. Setting a negative number will make the shockwave start quickly and slow down as it travels.
Spiral
After launching the Smooth Effects dialog box, click on the "Spiral" tab.
· Center Point and Radius· End Angle· Width· Tail Time Length· Acceleration
Center Point and Radius (Spiral)
In the green sequencing grid, there will be a small circle and a line ending with an arrow head. Thesmall circle marks the center of the spiral. The line ending with an arrow head marks the radius andstart angle. Click on the "Add" button in the "Smooth Effects" dialog box, and then click on the"Play" button to see the spiral. You should see a spiral effect start from the center and end wherethe arrow head was.
To change the center point and radius, do a click and drag with the left mouse button. You canchange the direction and length of the radius with the right mouse button. For example, do a clickand drag with the right mouse button starting at the end of the arow line and drag towards the centerwhere the circle is. This will make the line start at the outside and go towards the middle with thearrow pointing towards the middle. Add another spiral effect and play it. You should see a spiralstart at the outside and spiral inward, ending where the arrow head was.
End Angle (Spiral)
The end angle of the spiral can be changed by changing the value in the End Angle field. Changingthe value of the Revolutions field will also change the value in the End Angle field. The default is anend angle of 360 degrees and 1.00 revolutions. The default setting will make a spiral that travelsclockwise from 0 degrees to 360 degrees. Set Revolutions to 2.00 to make the spiral go around two
The Light-O-Rama Software Package 599
© 2021 Light-O-Rama, Inc.
times. Setting a negative number for End Angle or Revolutions will make the spiral travelcounterclockwise.
Width (Spiral)
There is a Start Width and an End Width. The Start Width is the pixel width at the start of the spiral. The End Width is the pixel width at the end of the spiral.
Tail Time Length (Spiral)
This is the time length the spiral will stay on screen before it erases itself.
Acceleration (Spiral)
Setting a positive number will make the spiral start slowly and increase in speed as it travels. Setting a negative number will make the spiral start quickly and slow down as it travels. Settingacceleration to zero means do not accelerate, but even with acceleration set to zero, spiral effectswill have a natural acceleration if the start width is smaller than the end width, and a naturaldeceleration if the start width is bigger than the end width.
Fan
After launching the Smooth Effects dialog box, click on the "Fan" tab. Fan uses a series of Spiraleffects that can look like a fan.
· Center Point, Radius and Start Angle· Width· Blades· Blade Width· Revolutions Per Second· Element Angle· Element Step Angle· Acceleration· Show Entire Blade at Start
Center Point, Radius and Start Angle (Fan)
In the green sequencing grid, there will be a small circle and a line ending with an arrow head. Thesmall circle marks the center of the fan. The line ending with an arrow head marks the radius andstart angle. Click on the "Add" button in the "Smooth Effects" dialog box, and then click on the"Play" button to see the fan. You should see a fan effect start from the start angle and rotate at thedefault speed of 0.25 revolutions per second.
To change the center point and radius, do a click and drag with the left mouse button. You canchange the direction and length of the radius with the right mouse button. For example, do a clickand drag with the right mouse button, starting at the end of the arrow line, and drag towards thecenter where the circle is. This will make the line start at the outside and go towards the middle withthe arrow pointing towards the middle. Add another fan effect and play it. The fan will start from thestart angle and rotate at the default speed of 0.25 revolutions per second as it did before, except thistime each element of the fan will travel inward instead of outward.
Light-O-Rama v5.6.6600
© 2021 Light-O-Rama, Inc.
Width (Fan)
There is a start width and an end width. The start width is the pixel width of the start of eachelement of the fan. The end width is the pixel width at the end of each element of the fan.
Blades (Fan)
This is the number of blades in the fan. The default is two. You can set the number of blades from 1to 16.
Blade Width (Fan)
This is the width of each blade in the fan. 50% means the blade width will be 50% of the distance tothe next blade. Note that the blades start out being thin and get thicker as they rotate until they getto their Blade Width setting.
Revolutions Per Second (Fan)
This is the rotation speed of the fan. The default is 0.25 revolutions per second. This means it willrotate one quarter of a revolution in one second, meaning it will take four seconds to make one fullrevolution. Positive numbers will rotate clockwise; negative numbers will rotate counterclockwise. With a setting of 0, the fan will build from the center outward and will not rotate.
Element Angle (Fan)
The fan is built using a series of spirals. Each spiral is an element of the fan. Changing the elementangle wil change the angle of each one of the spirals that make up the fan. Setting an angle of 0 willmake straight elements. Setting a large angle will make the fan look sort of like a spinning galaxy.
Element Step Angle (Fan)
This is the spacing between each element of the fan. Each element is a spiral. An element stepangle of 10 means that each spiral will be built at intervals of 10 degrees. Setting a large elementstep angle will add space between the spirals.
Acceleration (Fan)
Setting 0 means do not accelerate. Setting a positive number will make the fan start slow andincrease in speed as it travels. Setting a negative number will make the fan start quickly and slowdown as it travels. Note that if you use acceleration in a fan, the width of the fan will change as itaccelerates or decelerates.
Show Entire Blade at Start (Fan)
This means build the entire width of the blade of the fan all at once, so that the entire blade width isseen from the start to the finish.
Sine Wave
The Light-O-Rama Software Package 601
© 2021 Light-O-Rama, Inc.
After launching the Smooth Effects dialog box, click on the “Sine Wave” tab. Sine Wave produces awiggly line that is known as a sine wave. It can be useful for creating a wiggly line across or down atree that will look like tree garland.
· Start and End· Height· Cycle Angle and Cycles· Width· Tail Time Length· Show Entire Sine Wave at Start· Acceleration· Stretch/Shrink X Y
Start and End (Sine Wave)
In the green sequencing grid will be a small circle and a line ending with an arrow head. The smallcircle marks the start of the sine wave. The tip of the arrow head marks the end of the sine wave. Tochange the start and end do a click and drag with the left mouse button.
Height (Sine Wave)
There is a Start Height and an End Height. The height is also known as the amplitude of the sinewave. Note that you can make the sine wave be a straight line by setting the start and end height to0.
Cycle Angle and Cycles (Sine Wave)
There is a Start Cycle Angle and an End Cycle Angle. The Start Cycle Angle sets how far into thesine wave you will be at the start of the sine wave. One cycle of a sine wave is 360 degrees. Thismeans the “first top hump” is 0-180 degrees and the “second bottom hump” is 180-360 degrees.When you change the End Cycle Angle setting the Cycles setting will automatically change. Also,when you change the Cycles setting the End Cycle Angle setting will automatically change. Insummary, increasing the number of cycles will increase the number of wiggles in the line.
Width (Sine Wave)
There is a Start Width and an End Width. The Start Width is the starting width of the line in pixels.The End Width is the ending width of the line in pixels. Increasing these values makes the linethicker.
Tail Time Length (Sine Wave)
The Tail Time Length is the number of seconds the sine wave stays on the screen.
Show Entire Sine Wave at Start (Sine Wave)
When this setting is unselected the sine wave will get drawn from the start point to the end point.After it is drawn the sine wave will stay still. When this setting is selected the entire sine wave willappear on the screen all at once and then it will wiggle for the duration of the Tail Time Length.
Acceleration (Sine Wave)
Light-O-Rama v5.6.6602
© 2021 Light-O-Rama, Inc.
With Acceleration set to a positive number the sine wave will be drawn slowly at first and will bedrawn faster as time goes on. With Acceleration set to a negative number the sine wave will bedrawn fast at first and will be drawn slower as time goes on.
Stretch/Shrink X Y (Sine Wave)
These settings stretch or shrink in the X and Y direction. This could also be called the aspect ratio.Normally you will want to leave these set at 1.000. These settings will become something other than1.000 if you use the Scale feature in the “Move or Scale Selected Effects” dialog box.
Modify Selected Effects
This dialog box is used to modify attributes that are shared by all types of effects. Currently itsupports modification of the Clip Rectangle in all the effects that are selected. The “Undo” feature isnot supported for this dialog box. So it is a good practice to rename your sequence before performingthis function. That way you will keep the original file before you changed it. So the steps you want tofollow are:
1. Click on the “File” menu and select “Save As” and rename your sequence2. Select the effects you want to modify. To select all effects, click on the “Edit” menu and select
“Select All”3. Click on the “Tools” menu and select “Modify Selected Effects…” or click on the “Modify Selected
Effects” button on the Toolbar4. In the “Modify Selected Effects” dialog box you can choose the types of effects you want
modified. It defaults to all of them being modified.
· Manual Clip RectangleSelect “No Clip” if you do not want the effects to have a clip rectangleSelect “Manual Clip” and then press the “Shft” key while doing a mouse drag on the sequencing grid.This will define the clip rectangle on the sequencing grid. Click on the “Modify Selected Effects”button.
5.4.4.8 Auto Sequence Effects
Auto Sequence effects are a cross between standard effects and Instant Sequence. You create theeffect and then give it Auto Sequence settings and the effect moves and/or blinks with the music. In thelower left of each effect dialog box is and button with an image of an automobile in it. This is the “AutoSequence” button. Click on the “Auto Sequence” button and the “Auto Sequence” dialog box will appear.Click on “Add” in the effect dialog box and you will see an Auto Sequence appear in the time layers.“Auto Sequence” effects have an image of an automobile on them. Click on the “File” menu and select “Open Audio File”.
· Scenes· Morphs· Smooth Effects· Image Actions· Text Actions

The Light-O-Rama Software Package 603
© 2021 Light-O-Rama, Inc.
Scenes
Bring up the “Scene Setup” dialog box.Click on the squares in the green sequencing grid to create the scene pixelsClick on the “Auto Sequence” button in the lower left. The “Auto Sequence” dialog box will appear.Select several seconds on the time ruler Click on the “Add” button in the “Scene Setup” dialog box and an Auto Sequence Scene effect willbe added to the time layersClick on the “Play 8 Seconds” button. You will see the scene move with the music
Morphs
Bring up the “Morph Setup” dialog box.Click on the squares in the green sequencing grid and create a small morph. It will be easier to seethe movements of a small morph.Click on the “Auto Sequence” button in the lower left. The “Auto Sequence” dialog box will appear.Select several seconds on the time ruler Click on the “Add” button in the “Morph Setup” dialog box and an Auto Sequence Scene effect will beadded to the time layersClick on the “Play 8 Seconds” button. You will see the morph move with the music
Smooth Effects
Bring up the “Smooth Effects” dialog box.Click on the “Auto Sequence” button in the lower left. The “Auto Sequence” dialog box will appear.Select several seconds on the time ruler Click on the “Add” button in the “Smooth Effects” dialog box and an Auto Sequence Scene effect willbe added to the time layersClick on the “Play 8 Seconds” button. You will see the smooth effect move with the music
Image Actions
Bring up the “Image Setup” dialog box.Click on the “Auto Sequence” button in the lower left. The “Auto Sequence” dialog box will appear.Select several seconds on the time ruler Click on the “Add” button in the “Image Setup” dialog box and a message box will appear saying,“When adding an Auto Sequence Image Action it is recommended that the start point be 0,0 andend point be 0,0 and "Apply X,Y in Preview (for animations)" be selected. Set start point be 0,0 andend point be 0,0 and select "Apply X,Y in Preview (for animations)" ?”Click on the “Yes” button in the message box and.an Auto Sequence Scene effect will be added tothe time layersClick on the “Play 8 Seconds” button. You will see the Image move with the musicIf you want to change the starting position of the Image you can change to start point and end point.With “Apply X,Y in Preview (for animations)” selected the start point and end point will be forced tobe the same. Having them be the same value is normally what you will want for Auto SequenceImage Actions, otherwise the movement will be “jerky” because every time Auto Sequence movesthe Image Action it will also move from the start point and end point of the effect. If you want themovement to be “jerky” then deselect “Apply X,Y in Preview (for animations)” and make the startpoint and end point be just a few pixels different.
Light-O-Rama v5.6.6604
© 2021 Light-O-Rama, Inc.
Text Actions
Bring up the “Text Setup” dialog box.Click on the “Auto Sequence” button in the lower left. The “Auto Sequence” dialog box will appear.Select several seconds on the time ruler Click on the “Add” button in the “Text Setup” dialog box and a message box will appear saying,“When adding an Auto Sequence Text Action it is recommended that the text be set to the centerand "Apply X,Y in Preview (for text that does not move)" be selected.Set text to the center and select "Apply X,Y in Preview (for text that does not move)" ?”Click on the “Yes” button in the message box and.an Auto Sequence Scene effect will be added tothe time layersClick on the “Play 8 Seconds” button. You will see the Text move with the musicIf you want to change the starting position of the Text you can change to start point and end point.With “Apply X,Y in Preview (for text that does not move)” selected the start point and end point willbe forced to be the same. Having them be the same value is normally what you will want for AutoSequence Text Actions, otherwise the movement will be “jerky” because every time Auto Sequencemoves the Text Action it will also move from the start point and end point of the effect. If you wantthe movement to be “jerky” then unselect “Apply X,Y inPreview (for text that does not move)” andmake the start point and end point be just a few pixels different.
5.4.4.9 Auto Sequence Dialog Box
The Auto Sequence dialog box is launched by clicking on the button with an automobile in it. Theautomobile button will be in the lower left of each of the effect dialog boxes. The Auto Sequence dialogbox has settings that will control the movement and color of the effect as it is moved with the music. Ifthe Auto Sequence dialog box is visible then when you click on the “Add” button of the effect dialog boxthen an Auto Sequence effect will be added to the time layers. The Auto Sequence effect will have apicture of an automobile in it. The following are the settings in the Auto Sequence dialog box.
· Settings· Sensitivity· Trigger Type· Movement· Direction Angle· Speed· Use Native Color of the Effect· Cycle Through Colors Below· Freqs (Frequencies)
· Creating A Sequence using Auto Sequence Effects
Sensitivity
This setting sets the sensitivity to the audio file. It is like a volume control. If you are not gettingmuch movement from the song then try increasing the sensitivity. But if you set it too high it couldalso be less responsive. For most songs, setting the sensitivity to 4, 5, or 6 will work best.
Trigger Type
The Light-O-Rama Software Package 605
© 2021 Light-O-Rama, Inc.
“Rapid Fire” is the default and is typically what you will want to use. The more Freqs you haveselected in the Auto Sequence dialog box, the more triggers will be produced and the effect willmove more“Single Fire” is good if you want slower movement. Even with many Freqs selected only one triggerwill fire. This can be good for effects that have a lot of movement in them such as smooth effects.
Average the Time Length of Effects – Select this option to smooth out the length of effects. Unselectthis option and places where the music is strong to cause effects to linger.
Movement
This is the Movement pattern that will be done on the effects. The movement will happen within theclip rectangle for that effect.Skip Inactive Grid Squares – Select this option to have the movement skip inactive squares on thegreen sequencing gridNo Movement – The effect will happen in the same location every time it is triggeredWrap Around – The effect will move and will wrap around to the other side of the screen when itreaches the each of the clip rectangle for that effect.Ricochet – The effect will move and will bounce off the edges of the clip rectangle for that effect. Themovement is like a billiard ball bouncing off edges of a billiard table.Folding Ricochet – Images will fold on themselves as they bounce off the edges of their cliprectangle.Bounce and Retrace – The effect will move and bounce off the edge of the clip rectangle and willreturn to its original position and will keep going back and forth along that path.Burst and Return – The effect will move until the end of a trigger burst and then will return to itsoriginal position. If the movement goes beyond the edge of the clip rectangle before the end of theburst then it goes back to its original position.Snake Up, Snake Down – The effect will move until it hits the edge of the clip rectangle for thateffect, and then it will move up or down a pixel and reverse direction. This movement is best usedwith direction angles of 0, 90, 180, and 270 degrees. It will make the effect move in path as if it is alawn mower going back and forth until all the region has been mowed and then it reverses directionand keeps mowing. Also, this movement is recommended for displays with traditional lights. Forexample you can make a scene made of one pixel automatically traverse the entire display.
Direction Angle
The setting controls the direction angle of the movement. The angle can be set in 5 degreeincrements. The angle is shown with an orange arrow at the center of the green sequencing grid.Note that this controls only the direction angle. The original location of the effect is controlled by thelocation of the native effect that you create.
Speed
This controls the speed of the movement in pixels. For example, with the speed set at 1.00 the effectwill move one pixel each time it is triggered.
Use Native Color of the Effect
The effect will always be rendered using the native color of the effect.
Light-O-Rama v5.6.6606
© 2021 Light-O-Rama, Inc.
Cycle Through Colors Below
Use this setting to cause the effect to change colors as it moves. You number of colors for it tocycle through can be set to 1-8. Click on a color square and a Color Picker dialog box will appear.Note that even though there are many colors you can choose from, it will always set the color to oneof the 8 basic colors, red, orange, yellow, green, blue, purple, white and black. Also note that whensetting black it is really a very dark gray.
Freqs (Frequencies)
This setting controls the frequencies that the effect will be responsive to. Click and drag with themouse to set or erase multiple freqs. Note that when an instrument in a song plays a musical note,the frequencies are strongest at the note but there can be strong harmonics on either side of thenote as well. The result is that any note played in a song can get “splattered” across the freqspectrum. The “splatter” will be wider with higher sensitivity.These freqs are equivalent to the freqs in the Timing Map dialog box. If you click on the Tools menuand select “Timing Map” you will see the Timing Map dialog box which has a picture of a pianokeyboard and shows how the freqs map to a piano keyboard.
Creating a Sequence using Auto Sequence Effects
You can use different Auto Sequence effects throughout your song. The typical approach is to usethe same set of Auto Sequence effect for 10-30 seconds of a song and change to another set ofAuto Sequence effects at a point where the song changes.In SuperStar you can only see 8 seconds of the song at a time, so if you want to add or modify AutoSequence effects that are longer than 8 seconds then do the following:Select the effects you want to change the time range of. Scroll to the start time that you want andmark it with a left click on the time ruler. Then scroll to the end time that you want and mark it with aright click on the time ruler. Then click on the “Set Group Time Range” button. The “Set Group TimeRange” button is on the toolbar and looks like an hour glass with down arrows on either side of thehour glass.
5.4.4.10 Auto Sequence Singing Faces
This feature can automatically move the mouth of a singing face to match the singing in a song! Toaccess this feature, either:
1. From the “Tools” menu, select “Auto Sequence Singing Faces…”; or2. Click on the “Image Setup” button on the toolbar, then in the “Image Setup” dialog box click on
the “Auto Sequence Singing Faces” button in the lower right of the dialog box
Singing Faces on a Pixel Matrix
In the “Singing Faces” dialog box there are settings for five mouth positions, closed, ¼ open, ½open, ¾ open, and Full Open. The first time you launch the “Singing Face” dialog box default imageswill load and those images will appear in the mouth image settings. The images will default to aposition at the top half of a 16x50 pixel matrix.
The Light-O-Rama Software Package 607
© 2021 Light-O-Rama, Inc.
There is a field that shows the “Audio File to Use to Auto Sequence the Singing Face.” This willdefault to the audio file that is loaded for the sequence you are making. If the words to the song areprominent then you can use this song. Merely click on “Auto Sequence the Singing Face” and it willcreate image effects at the top of the image layers for the singing face. Click on the “Play All” buttonin the toolbar to play the effects that were createdBut normally to get the best results you will want to record the words using your own voice.
Recording your own voice
For best results, make a recording of your own voice by doing the following:
· Plug in some earphones into your computer· Plug in a microphone into your computer· Click on “Start Voice Record”· While listening to the song in the headphones sing or speak the words of the song into the
microphone· When the song reaches the end the recording will stop. The recording will automatically become
the “Audio File to Use to Auto Sequence the Singing Face”· Click on “Auto Sequence the Singing Face”· Click on the “Play All” button in the toolbar to play the sequence
More Singing Faces
· At the top of the “Singing Faces” dialog box is a setting labeled “Which Singing Face?” Tosequence a second singing face set this setting to “2”
· The default images for face 2 will appear in the images for each mouth· You can record your voice using words to a different singer in the song· Click on “Auto Sequence the Singing Face” and effects will appear on the time layers. The effects
for Face 2 will appear below the effects for Face 1.· Click on the “Play All” button to play both faces
To use the default images for more than two faces, click on the “Tools” button and select “Layout.”Set the number of ribbons to 32. You can now do sequencing for face 3 and face 4.
If you want to use 6 singing faces using the default images then set the number of ribbons to 48.
Standard Singing Faces
Standard singing faces have a face with four channels for the mouth. One channel is for the closedmouth, another channel for the half open mouth, another channel for a full open mouth, and achannel for an “O” mouth.
How to use the S5 Sequencer to set up an S5 Preview of one or moreStandard Singing Faces
· In Preview Design, click on the “Add Item” button· In the list of items, select “Light-O-Rama Props (online)”
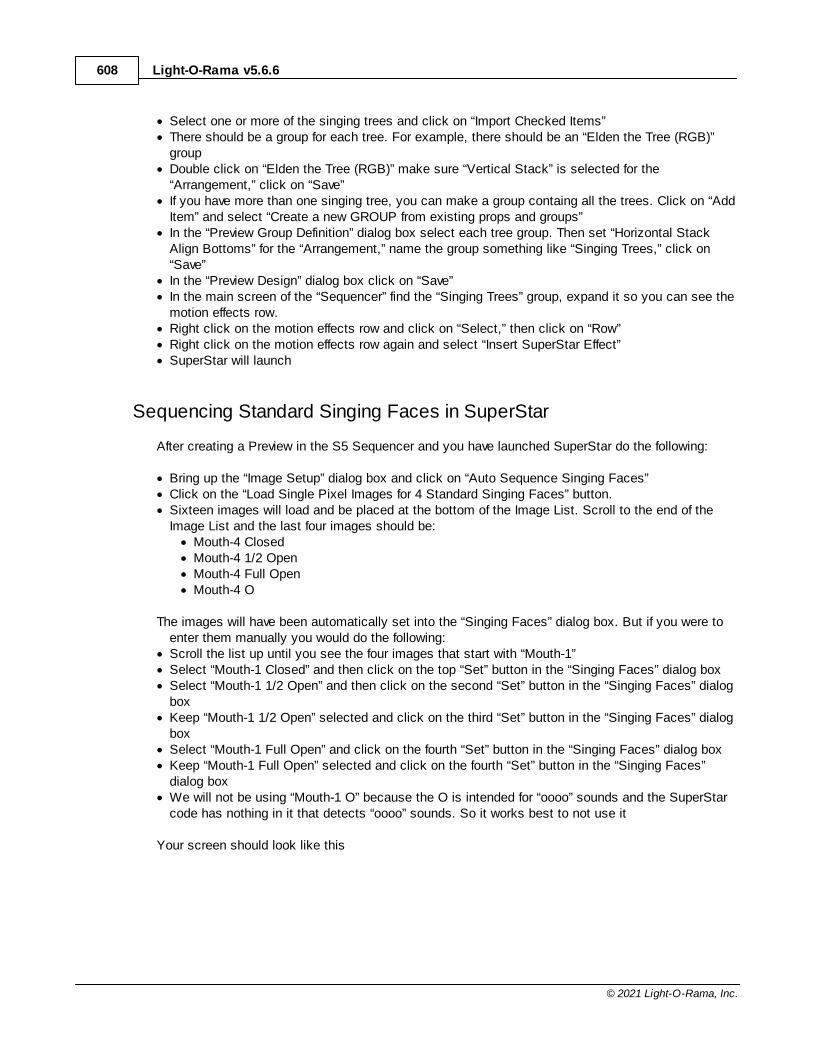
Light-O-Rama v5.6.6608
© 2021 Light-O-Rama, Inc.
· Select one or more of the singing trees and click on “Import Checked Items”· There should be a group for each tree. For example, there should be an “Elden the Tree (RGB)”
group· Double click on “Elden the Tree (RGB)” make sure “Vertical Stack” is selected for the
“Arrangement,” click on “Save”· If you have more than one singing tree, you can make a group containg all the trees. Click on “Add
Item” and select “Create a new GROUP from existing props and groups”· In the “Preview Group Definition” dialog box select each tree group. Then set “Horizontal Stack
Align Bottoms” for the “Arrangement,” name the group something like “Singing Trees,” click on“Save”
· In the “Preview Design” dialog box click on “Save”· In the main screen of the “Sequencer” find the “Singing Trees” group, expand it so you can see the
motion effects row.· Right click on the motion effects row and click on “Select,” then click on “Row”· Right click on the motion effects row again and select “Insert SuperStar Effect”· SuperStar will launch
Sequencing Standard Singing Faces in SuperStar
After creating a Preview in the S5 Sequencer and you have launched SuperStar do the following:
· Bring up the “Image Setup” dialog box and click on “Auto Sequence Singing Faces”· Click on the “Load Single Pixel Images for 4 Standard Singing Faces” button.· Sixteen images will load and be placed at the bottom of the Image List. Scroll to the end of the
Image List and the last four images should be:· Mouth-4 Closed· Mouth-4 1/2 Open· Mouth-4 Full Open· Mouth-4 O
The images will have been automatically set into the “Singing Faces” dialog box. But if you were toenter them manually you would do the following:
· Scroll the list up until you see the four images that start with “Mouth-1”· Select “Mouth-1 Closed” and then click on the top “Set” button in the “Singing Faces” dialog box· Select “Mouth-1 1/2 Open” and then click on the second “Set” button in the “Singing Faces” dialog
box· Keep “Mouth-1 1/2 Open” selected and click on the third “Set” button in the “Singing Faces” dialog
box· Select “Mouth-1 Full Open” and click on the fourth “Set” button in the “Singing Faces” dialog box· Keep “Mouth-1 Full Open” selected and click on the fourth “Set” button in the “Singing Faces”
dialog box· We will not be using “Mouth-1 O” because the O is intended for “oooo” sounds and the SuperStar
code has nothing in it that detects “oooo” sounds. So it works best to not use it
Your screen should look like this
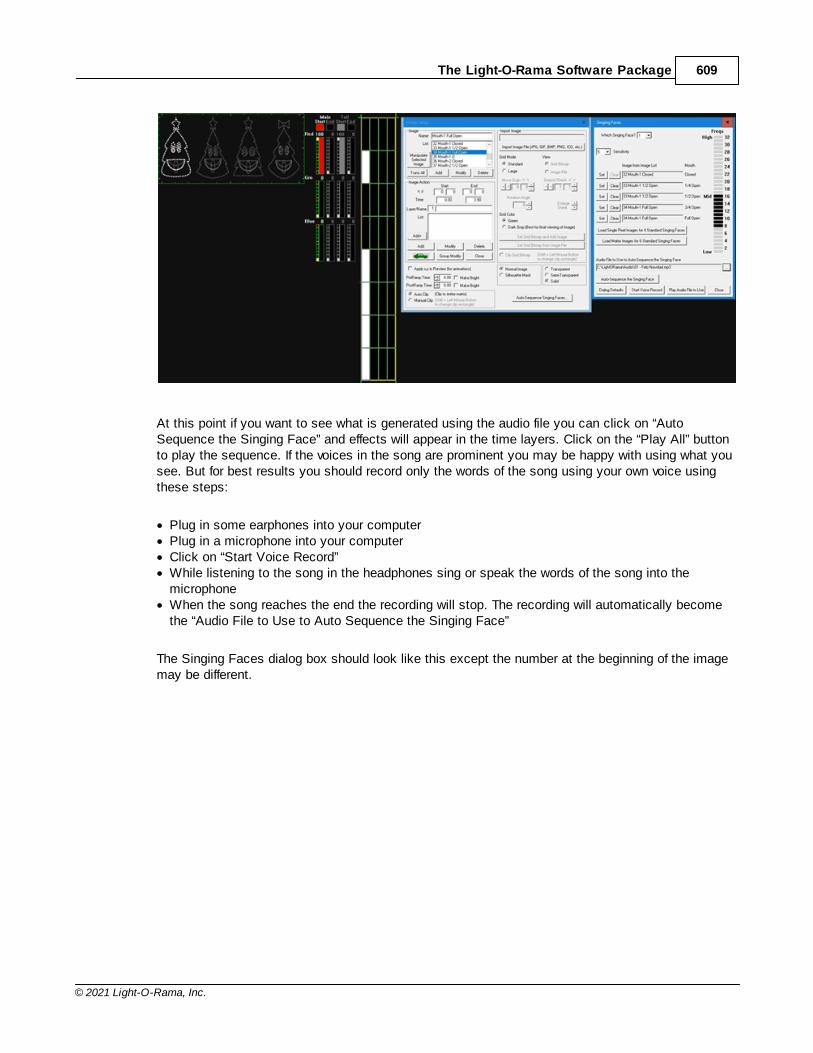
The Light-O-Rama Software Package 609
© 2021 Light-O-Rama, Inc.
At this point if you want to see what is generated using the audio file you can click on “AutoSequence the Singing Face” and effects will appear in the time layers. Click on the “Play All” buttonto play the sequence. If the voices in the song are prominent you may be happy with using what yousee. But for best results you should record only the words of the song using your own voice usingthese steps:
· Plug in some earphones into your computer· Plug in a microphone into your computer· Click on “Start Voice Record”· While listening to the song in the headphones sing or speak the words of the song into the
microphone· When the song reaches the end the recording will stop. The recording will automatically become
the “Audio File to Use to Auto Sequence the Singing Face”
The Singing Faces dialog box should look like this except the number at the beginning of the imagemay be different.
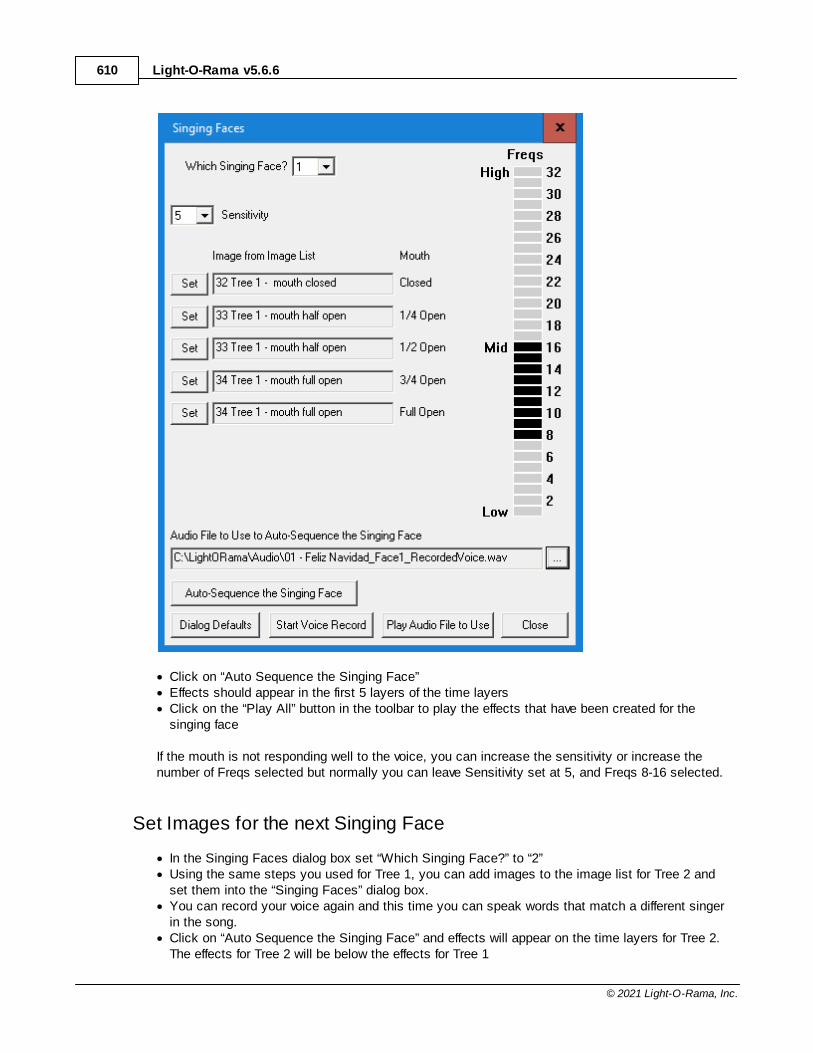
Light-O-Rama v5.6.6610
© 2021 Light-O-Rama, Inc.
· Click on “Auto Sequence the Singing Face”· Effects should appear in the first 5 layers of the time layers· Click on the “Play All” button in the toolbar to play the effects that have been created for the
singing face
If the mouth is not responding well to the voice, you can increase the sensitivity or increase thenumber of Freqs selected but normally you can leave Sensitivity set at 5, and Freqs 8-16 selected.
Set Images for the next Singing Face
· In the Singing Faces dialog box set “Which Singing Face?” to “2”· Using the same steps you used for Tree 1, you can add images to the image list for Tree 2 and
set them into the “Singing Faces” dialog box.· You can record your voice again and this time you can speak words that match a different singer
in the song.· Click on “Auto Sequence the Singing Face” and effects will appear on the time layers for Tree 2.
The effects for Tree 2 will be below the effects for Tree 1
The Light-O-Rama Software Package 611
© 2021 Light-O-Rama, Inc.
· Click on the “Play All” button on the toolbar and both singing faces will play
You can do the same for tree 3 and tree 4
5.4.4.11 Move or Scale Selected Effects
This feature is used to move or scale the selected effects according to the settings in the dialog box. Note that you cannot undo the changes done by this dialog box so it is recommended that you save thesequence to a new name prior to using this dialog box. For example if you are moving all the effects twopixels to the right you would do the following:
1. Click on the File menu and select “Save As” and save the sequence to something like“MySequence_movedRight2Pixels.sup”
2. Click on the Edit menu and select “Select All”3. Leave “Move Origin” selected and set “Left/Right” = 24. Click on the OK button5. Click on any effect and you should see that it has been moved to the right by 2 pixels
This feature is also useful for converting a sequence to different dimensions. For example, if you want tostretch a 12 CCR sequence to be a 16 CCR sequence you would do the following:
1. Click on the File menu and select “Save As” and save the sequence to something like“MySequence_16CCR.sup”
2. Click on the Edit menu and select “Select All”3. Click on “Scale”4. Set:
Source Width = 12 Dest Width = 16
Source Height = 50 Dest Height = 50
5. Click on the Ok button6. Click on any effect and you should see that it has been stretched to fit onto a 16 CCR layout
Selected Effects to Modify
This defaults to all effect types being selected. But if, for example, you only want to modify theselected “Scenes” then you would uncheck all the effect types and leave “Scenes” selected
Move Origin
Select this if you want to move the effects left, right, up, or down, the number of pixels set in theLeft/Right control and the Up/Down control
Scale
Select this if you want to scale the effects. Scale means to stretch or squish. The “Source Width”and “Source Height” is the original width and height of the sequence. The “Dest Width” and “DestHeight” is the destination width and height, or in other words, the width and height that you want thesequence to become.
Do Scene Thinning

Light-O-Rama v5.6.6612
© 2021 Light-O-Rama, Inc.
This setting is used when “Scale” is selected. It is easiest to explain this setting by using theexample of a scene that is random pixels that look like stars in the sky. If you shrink the stars andhave “Do Scene Thinning” selected then some of the stars will get removed or “thinned” out so thatthe density of stars in the shrunken sky stays the same. If you shrink the stars and have “DoScene Thinning” unselected then all of the stars will be kept, and in the shrunken sky the density ofstars will be greater. In the extreme case, if you shrunk the sky a lot then there would be no spacebetween the stars anymore.
Change Intensity
Select this if you want to increase or decrease the intensity of the color of all selected effects. Notethis change is always relative to the current intensities.
For example, if you set 50% then all color intensities will be reduced by 50%. If you then select thesame effects and reduce the intensity by 50% again, then the intensities will be 25% of what theywere before you did any changes.
As another example, if you set 200% then color intensities of 50 and lower will get doubled. Allvalues 50 and greater will become 100. This means that increasing the color intensities by 200% andthen decreasing them by 50% will not necessarily get you back to the original intensities.
Change Orientation
If the orientation of your visualization is different than the orientation of your sequence then you canchange the orientation of the effects in the sequence by using “Change Orientation.”
For example, let us say you have a horizontal sequence designed for a 50 wide by 16 tall horizontaldisplay where the strings of lights run horizontally. But you have a display that is 50 wide by 16 talland the strings of lights run vertically.
The default is for SuperStar to see the display as a vertical display because the strings run vertically.And when the sequence is played, the sequence will look rotated by 90 degrees. So to get it to lookright on the display you can change the orientation by doing the following:
1. Click on the “File” menu and select “Open” and open the sequence2. Click on the “File” menu and select “Save As” and save the sequence to a name such as
“MySequence_horizontal.sup”3. Click on the “Edit” menu and select “Select All”4. Click on the Tools menu and select “Move or Scale Selected Effects”5. Select “Change Orientation”6. Select “Rotate 90° Left (Vert to Horz)7. Click on “OK”
The effects in the sequence should now all be rotated to the right and should play properly to yourdisplay.
Note: Another way to address the problem of orientation of the grid being different than theorientation of the sequence is to change the orientation of the grid. To do this click on “Tools” menuand select “Preferences” and then change the orientation of the grid.
The Light-O-Rama Software Package 613
© 2021 Light-O-Rama, Inc.
5.4.4.12 Groups of Effects
· Make a Group· Ungroup· Expand Group· Compress Group
Make a Group
· Do a right mouse click and drag to select a group of effects (you can add or remove effects bydoing Ctrl+Right mouse click).
· After doing a right mouse click and drag, a popup menu will appear.· In the popup menu, choose "Grouping", and then choose "Group Selected Effects into a Group".· The "Edit Name of Group" dialog box will appear, allowing you to name the group if you wish.· After clicking on "Ok" in the "Edit Name of Group" dialog box, the selected effects will be
compressed into one "Group" effect.
Ungroup
· Do a right mouse click on a group effect.· In the popup menu, shoose "Grouping", and then choose "Ungroup Selected Group into Separate
Effects".· The "Group" effect will disappear, and the grouped effects will become separate effects.
Expand Group
· Do a right mouse click on a "Group" effect.· In the popup menu, choose "Grouping" and then choose "Expand Selected Group". Alternatively,
you can select a "Group"effect and hit the "+" key.· All the other effects in the sequence will become hidden, and only the effects in the group will be
displayed. You can now modify the existing effects, add new effects, or delete effects. Anythingyou do will become the new state of the group.
Compress Group
· While a group is expanded, do a right mouse click anywhere in the time layers.· In the popup menu, choose "Compress Group". Alternatively, you can press the "-" key.· All the effects currently displayed will be compressed back into the group. You will now see the
"Group" effect displayed along with all the other effects in the sequence
5.4.4.13 Select One or More Rows
Open a sequence or create a bunch of effects. Do a right click on a row in the Time Layers. Forexample, you could do a right click on Row 3 in the Time Layers.
In the popup menu that appears, select "Row 3" and then select "Select All", "Select All Left", or "SelectAll Right", and the selection will be applied only to Row 3.
You can also do a right mouse click and drag across more than one row. For example, you could do aright mouse click and drag across Rows 3-6.
Light-O-Rama v5.6.6614
© 2021 Light-O-Rama, Inc.
In the popup menu that appears, select "Rows 3-6" and then select "Select All", "Select All Left", or"Select All Right", and the selection will be applied only to Rows 3-6.
5.4.4.14 Transfer Effects from One Sequence to Another
In the Light-O-Rama SuperStar Sequencer, using the clipboard, you can transfer effects from onesequence to another, as in this example:
· Open the file "JingleBellRock_24sec.sup", located in the Samples directory of the SuperStarSequences directory.
· Scroll to the 16.00 second mark and you will see a stack of six white boxes in the time layers.· Select the stack of boxes.· Click on the Copy button.· Click on the toolbar button with a piece of paper on it. This will do three things: It will clear the
pixel grid, set the start color as red, and set the time duration to 1.00-2.00 seconds.· Click on the Paste button, and the stack of boxes gets pasted to the new file.
5.4.4.15 Load/Save Clipboard
In the Light-O-Rama SuperStar Sequencer, there are 20 sample effects that can be loaded into theclipboard. Once the effects are loaded into the clipboard, you can paste them into your sequence. Anything that you copy to the clipboard can also be saved to a file.
· Start with a new sequence· Launch the Load/Clip dialog box· Load a sample file into the clipboard· Paste the clipboard into your sequence· Play the pasted effects· Save your own clipboard effects· Discussion
Start with a new sequence
Click on the "New" button on the toolbar, which looks like a piece of paper.
Launch the Load/Clip dialog box
Click on the Edit menu, then select Load/Save Clipboard. You can also launch the dialog usingCtrl+B.
Load a sample file into the clipboard
At the top of the dialog box is a list of the saved clip files ("clip" is short for "clipboard"). All of thesample files start with "Sys -", meaning they are a system file that can be loaded but not saved to. Select the "SharkFinForHorizontalRibbons.scb" file, then click on "Load Clipboard from File".
Note that the lower half of the dialog box is now populated. In the description area are thedescription and instructions on how to modify the effects.
Paste the clipboard into your sequence

The Light-O-Rama Software Package 615
© 2021 Light-O-Rama, Inc.
Once the clipboard is loaded, you can paste the effects into your sequence. There are four ways todo this:
1. Use the Paste button in the dialog box.2. Use the Paste button on the toolbar.3. Put the focus on the work area by clicking on the time layers area, and then press Ctrl-V.4. Click on the Edit menu and select Paste.
Play the pasted effects
A shark fin will travel lengthwise across the ribbons, first one direction and then the other. The waterunderneath the shark fin will shimmer.
For demonstration purposes, the shimmering water is done in two different ways: The first time, it isdone with scenes that fade between two intensities. The second time, it is an animation done withimages. The description of this effect in the Load/Save dialog box describes how to modify the sharkfin and the water.
Save your own clipboard effects
Any effects you have modified our created can be saved to file by doing the following:
· Select what you want to save.· Click on the "Copy Effects" button on the toolbar.· Press Ctrl-B to launch the Load/Save Clipboard dialog.· In the Clipboard Name filed, type your filename (such as "MyAwesomeEffects").· Click on the "Save Clipboard to File" button.
Note that your file is now in the list of saved clip files.
Discussion
The load/save of the clipboard is a powerful feature! You can now store and easily transfer effectsfrom one file to another. The shark fin effect shows how a shaded object can be drawn as an imageaction. Artists will have fun with this, and non-artists will be grateful they can copy and paste theseimages!
Currently the SuperStar Sequencer does not support importing .gif or .jpg images. However, realizethat even if you have twelve CCRs, you only have 12x50 pixels to work with. This is very lowresolution by computer standards. Import of images would typically not look good at such lowresolution. The best images will always be those that are carefully tailored to the low resolution thatwe must work with.
5.4.4.16 Change to 10 Pixels per Ribbon
Cosmic Color Ribbons default to having 50 pixels per ribbon. Each pixel is actually a group of threeLEDs with red, green, and blue elements. You will normally want to keep the ribbons in 50 pixel mode.
You can, however, change the number of pixels per ribbon to 25, 10, 5, or 1, using one of the macrocommands built into the ribbons. The reason you may want to do this is to reduce the number ofchannel commands, making the effect more instantaneous. For example, a white morph that goes thefull length of 12 ribbons will generate 12x50x3 = 1800 commands. If the morph is fast, and tries to do
Light-O-Rama v5.6.6616
© 2021 Light-O-Rama, Inc.
this in a short period of time, like 0.4 seconds or less, you may perceive some lag in the ribbons. In afast effect, you will get better results by using 10 pixels per ribbon, because it will use 1/5 the number ofchannel commands and so will eliminate the lag, and since it travels fast, it will still look good in 10 pixelresolution.
Here is an example of how to use both 10 pixel and 50 pixel resolution in the Light-O-Rama SuperStarSequencer:
· Initialize the screen· Launch the Macro dialog box· Add a "10 pixel per ribbon" macro· Add a scene inside the macro region· Add a morph inside the macro region· Add a morph outside the macro region· Try to add a morph that straddles the macro· Discussion
Initialize the screen
Click on the toolbar button with a piece of paper on it. This will do three things: It will clear the pixelgrid, set the start color to red, and set the time duration to 1.00 to 2.00 seconds.
Launch the Macro dialog box
Click on the Tools menu and select Macro.
Add a "10 pixel per ribbon" macro
· Set "Pixels Per Ribbon" to 10.· Set the time duration to 1.00 to 3.00 seconds.· Click on the Add button.
A bracket should appear in time layer 6.
Add a scene inside the macro region
· Click on the Tools menu and select Scene.· Set the time duration to 1.00 to 2.00 seconds.· Set some pixels at the top of the pixel grid.· Click the Add button.
A scene should appear in time layer 1. Note that the scene only has ten pixels per ribbon in thepixel grid. Also note that the ribbons still display as if they were in 50 pixel mode, but when playingthe sequene to the real Cosmic Color Ribbons, they will be in 10 pixel mode.
Add a morph inside the macro region
· Click on the Tools menu and select Morph.· Set the time duration to 2.00 to 3.00 seconds.· Click on the Add button.
The Light-O-Rama Software Package 617
© 2021 Light-O-Rama, Inc.
A morph should appear in time layer 2. Note that the morph has ten pixels per ribbon in the pixelgrid.
Add a morph outside the macro region
· Set the time durationto 5.00 to 6.00 seconds.· Click on the "Add" button.
Note that the morph has 50 pixels per ribbon in the pixel grid.
Try to add a morph that straddles the macro
· Set the time duration to 2.00 to 4.00 seconds.· Click on the Add button.
An error message will appear.
Discussion
When playing the sequence to the Cosmic Color Ribbons, the ten pixel macro will send a command1/100th of a second before the macro time duration to set each ribbon in 10 pixel mode. It will senda command 1/100th of a second after the macro time duration to set each ribbon back to 50 pixelmode. No effects should be active when these commands are sent.
Note that at 32.45 in the sample file CarolOfTheBells.sup, there is a morph that uses 10 pixel mode. In this morph, all the ribbons burst downward into a flash of white. In normal 50 pixel per ribbonmode, this would require 1800 channels to be turned on in a very short period of time. Using 10 pixelper ribbon mode requires only 360 channel commands, and can make the effect moreinstantaneous.
5.4.4.17 "Star Rays", "Wide Grid", and "Thin Grid"
In the Light-O-Rama SuperStar Sequencer, there are three buttons at the right end of the toolbar that willset the ribbons into "Star Rays", "Wide Grid", or "Thin Grid":
Star Rays
In this layout, morphs that come from the top to the bottom should accelerate, and the trail shouldget longer. Typical settings might be a start trail of 2 and an end trail of 12.
Scenes that come from the top to the bottom should get larger. The yellow perspective marks onthe right side of the pixel grid are designed to help you do this.
Wide Grid
This view spaces the ribbons to give square pixels. That is, the space between the ribbons is equalto the height of each pixel. If you are using the ribbons primarily for animations and text, you willprobably use a layout like this.
Thin Grid
Light-O-Rama v5.6.6618
© 2021 Light-O-Rama, Inc.
This view spaces the ribbons closer together. The quality of the animations will improve, but it willtake more ribbons to cover the same amount of area.
5.4.4.18 The Layout Dialog Box
In the Light-O-Rama SuperStar Sequencer, the layout settings get saved into each .sup file. The layoutyou set also gets saved as a default layout. This default layout will be used for new sequences that youcreate.
· CCR Mode· Number of Ribbons (1-24)· Ribbon Orientation· Ribbon Shape· Ribbon Length· Visualization Mode· Visualization Files· Pixel Extender
CCR Mode
In CCR mode, the screen will use the layout you have selected in the lower part of the Layout dialogbox. The unit ID and configuration information will be obtained from the Configuration dialog box, andthis information will be used when exporting the file to the Sequencer.
Number of Ribbons (1-24)
This will set the number of rows of ribbons if in horizontal view, or the number of columns of ribbons ifin vertical view. Note that if you are using half ribbons, this setting is the number of rows, not thenumber of ribbons.
Ribbon Orientation
Setting "Vertical" will display the ribbons vertically in columns.
Setting "Horizontal" will display the ribbons horizontally in rows. Note that the star is not supportedin the horizontal view.
Ribbon Shape
Setting "Straight" will display the ribbons in straight lines. This is the common way to display theribbons.
Setting "Circle" will display the ribbons in circles. The start of the ribbon will be at the left center ofeach circle. This allows for a variety of circular patterns. Sequencing circles can be a challenge, butthe results can be amazing. An example can be seen on the Light-O-Rama website with Deck theHalls for 2 CCRs and for 4 CCRs.
Ribbon Length
Setting "Full" will display the ribbons as a full length 50 pixel ribbon. This is the normal setting.
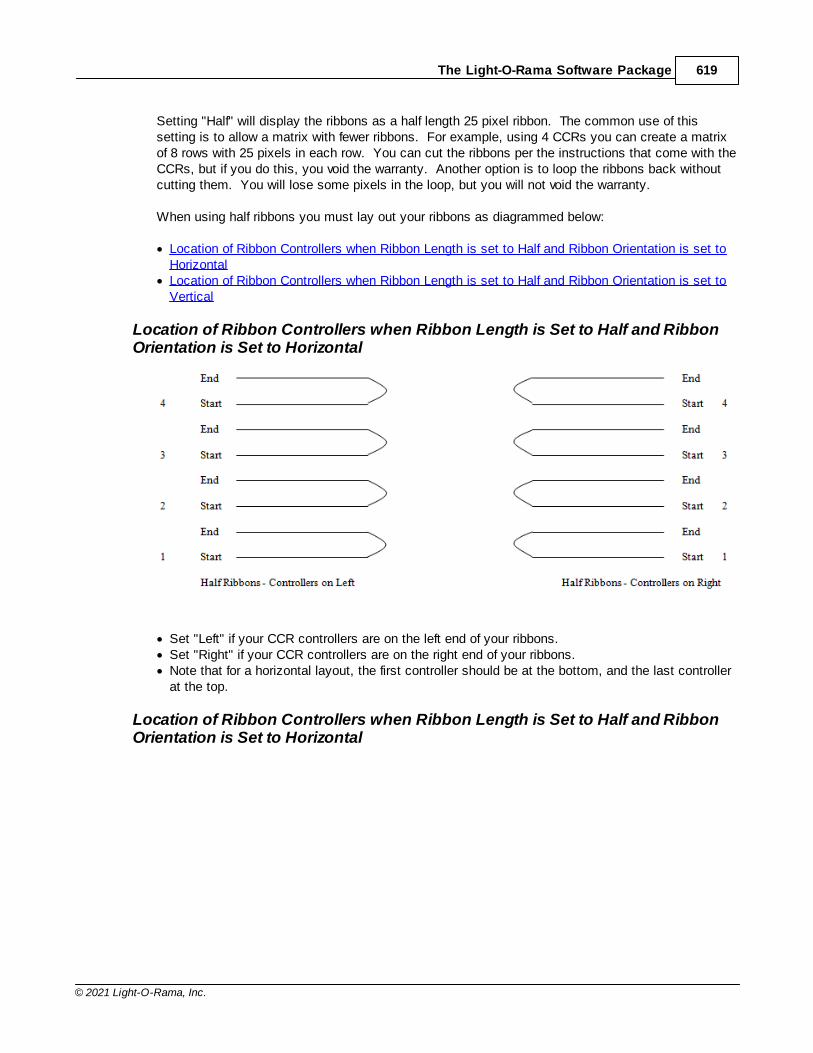
The Light-O-Rama Software Package 619
© 2021 Light-O-Rama, Inc.
Setting "Half" will display the ribbons as a half length 25 pixel ribbon. The common use of thissetting is to allow a matrix with fewer ribbons. For example, using 4 CCRs you can create a matrixof 8 rows with 25 pixels in each row. You can cut the ribbons per the instructions that come with theCCRs, but if you do this, you void the warranty. Another option is to loop the ribbons back withoutcutting them. You will lose some pixels in the loop, but you will not void the warranty.
When using half ribbons you must lay out your ribbons as diagrammed below:
· Location of Ribbon Controllers when Ribbon Length is set to Half and Ribbon Orientation is set toHorizontal
· Location of Ribbon Controllers when Ribbon Length is set to Half and Ribbon Orientation is set toVertical
Location of Ribbon Controllers when Ribbon Length is Set to Half and RibbonOrientation is Set to Horizontal
· Set "Left" if your CCR controllers are on the left end of your ribbons.· Set "Right" if your CCR controllers are on the right end of your ribbons.· Note that for a horizontal layout, the first controller should be at the bottom, and the last controller
at the top.
Location of Ribbon Controllers when Ribbon Length is Set to Half and RibbonOrientation is Set to Horizontal
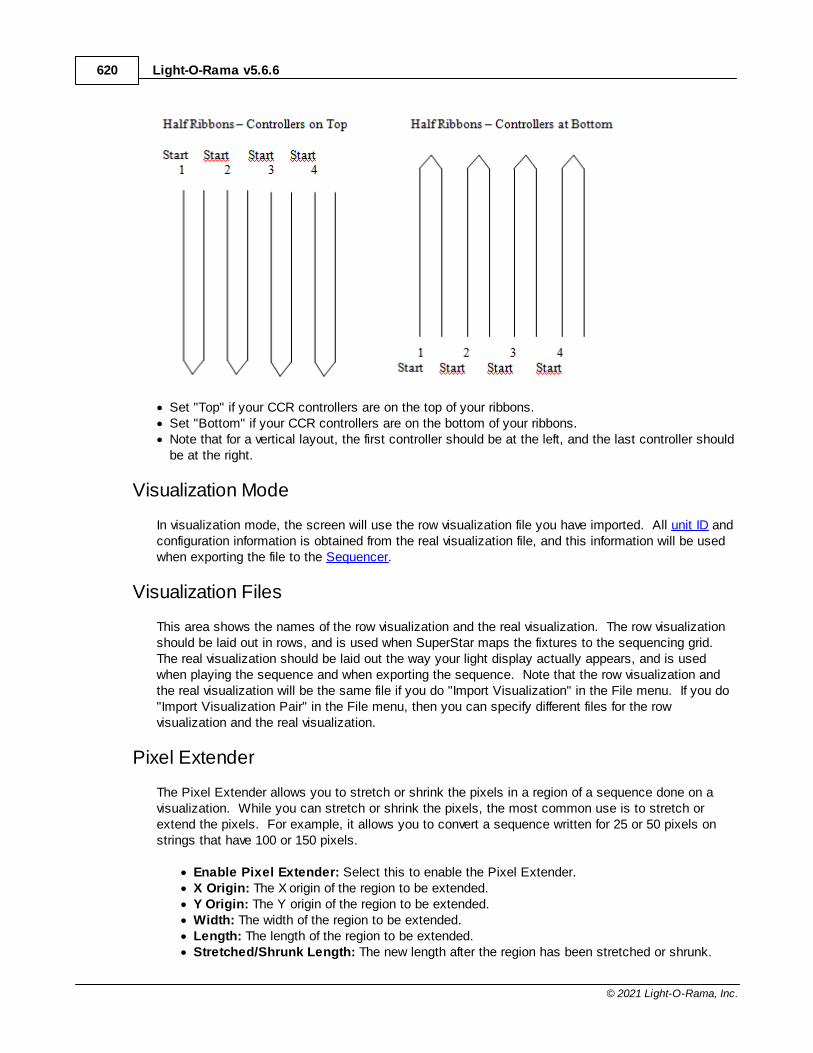
Light-O-Rama v5.6.6620
© 2021 Light-O-Rama, Inc.
· Set "Top" if your CCR controllers are on the top of your ribbons.· Set "Bottom" if your CCR controllers are on the bottom of your ribbons.· Note that for a vertical layout, the first controller should be at the left, and the last controller should
be at the right.
Visualization Mode
In visualization mode, the screen will use the row visualization file you have imported. All unit ID andconfiguration information is obtained from the real visualization file, and this information will be usedwhen exporting the file to the Sequencer.
Visualization Files
This area shows the names of the row visualization and the real visualization. The row visualizationshould be laid out in rows, and is used when SuperStar maps the fixtures to the sequencing grid. The real visualization should be laid out the way your light display actually appears, and is usedwhen playing the sequence and when exporting the sequence. Note that the row visualization andthe real visualization will be the same file if you do "Import Visualization" in the File menu. If you do"Import Visualization Pair" in the File menu, then you can specify different files for the rowvisualization and the real visualization.
Pixel Extender
The Pixel Extender allows you to stretch or shrink the pixels in a region of a sequence done on avisualization. While you can stretch or shrink the pixels, the most common use is to stretch orextend the pixels. For example, it allows you to convert a sequence written for 25 or 50 pixels onstrings that have 100 or 150 pixels.
· Enable Pixel Extender: Select this to enable the Pixel Extender.· X Origin: The X origin of the region to be extended.· Y Origin: The Y origin of the region to be extended.· Width: The width of the region to be extended.· Length: The length of the region to be extended.· Stretched/Shrunk Length: The new length after the region has been stretched or shrunk.
The Light-O-Rama Software Package 621
© 2021 Light-O-Rama, Inc.
Pixel Extender Example
Make a visualization of your CCP Tree that has 50 pixels per strand.
Load the standard sequence made for a CCP Tree with 25 pixels per strand.
Import your visualization of your CCP Tree that has 50 pixels per strand.
Set the Pixel Extender as follows:
· X Origin: 0· Y Origin: 16 (this is because the Globe is at the top of the sequencing grid and the CCP Tree
starts at row 16)· Width: 24· Length: 25· Stretched/Shrunk Length: 50
At this point, you can play the sequence to your visualization and see the stretched pixels play toyour visualization.
5.4.4.19 The Preferences Dialog Box
The Light-O-Rama SuperStar Sequencer has the following choices in the Preferences dialog:
· Color Mode (Balanced vs. Full Range)· Color Temperature (Cool White vs Warm White)· Enable Time Layer Priority Feature· Smooth Ramps· Export Raw Color Values· Grid Orientation· Wrap Around· Display Waveform· Display First 3 Timing Lines
Color Mode (Balanced vs. Full Range)
If you use the Light-O-Rama Hardware Utility to try various setting for the RGB values of CCR pixels, youwill find three important characteristics:
1. The brightness is not linear. For example, a setting of 100 is only a little brighter than a settingof 50, but 50 is significantly brighter than 25.
2. The red, green, and blue elements are not balanced. For example, on a computer screen,setting red to 100 and green to 100 will result in yellow, but on a CCR pixel, it will be more of agreenish yellow. This is because the CCR's green element is stronger than the red element. Setting red and blue to 100 will result in a bluish purple, because the blue element is strongerthan the red element.
3. The LEDs are so bright that the perceived colors will not be as deep as what you see on thecomputer screen. This must be taken into account when comparing the colors on the computerscreen with what you will get on the ribbons. For example, red 100 and green 50 will give a bright
Light-O-Rama v5.6.6622
© 2021 Light-O-Rama, Inc.
orange; red 60 and green 30 will give a dim orange that will show as a muddy orange on thecomputer screen, but on the Cosmic Color Ribbons it will still be a fairly bright orange.
Making the brightness linear
The Light-O-Rama SuperStar Sequencer automatically adjusts the start and end settings to makethem linear. For example, a start setting of 50 in the SuperStar Sequencer will export to a setting of25 in the Sequencer. This gives the proper intensity for the start and end color of an effect. Butrealize that a ramp that goes from 100 to 0 will not go from 100 to 0 smoothly: The hardware willbring the voltage down from 100% to 0% smoothly, but the brightness will go down slowly at first,then quickly at the end. The SuperStar Sequencer simulates this fast drop off when it plays thesequence onto the ribbons. Note that this fast drop off can be solved using the "Smooth Ramps"setting.
Balanced Color Mode
The SuperStar Sequencer defaults to "Balanced Color Mode". In this mode, the red element is usedin its full range, but the green and blue elements are limited to less than full brightness. So, forexample, if you set red to 100 and green to 100, you will get a true yellow on the ribbon.
Full Range Color Mode
To set this mode, go to the Tools menu and select Configuration. When in Full Range Color Mode,the color controls will have the following ranges:
· Red: 0-100· Green: 0-120· Blue: 0-130
In this mode, setting red, green, and blue all to 100 will give the same results as in Balanced ColorMode. Setting red to 100, green to 120, and blue to 130 will give a bluish white. The SuperStarSequencer simulates this color shift, but to do so it must "dim down" the settings that are 100 andbelow in order to support simulation of the colors that are at 100 and above. Realize that eventhough the colors on the screen are dimmed down, the colors on the Cosmic Color Ribbon will notbe.
Go Back to Balanced Color Mode
When going back to Balanced Color Mode, the SuperStar Sequencer advises that any settingsgreater than 100 will automatically be adjusted down to 100. Note that after going into BalancedColor Mode, the next time you click on a color control, a warning box may appear that says "Enteran Integer between 0 and 100." This is a bug which will be fixed in the future. Click "OK" on thewarning box; if another warning immediately appears, click "OK" on that also. These warnings canbe ignored.
Color Temperature (Cool White vs Warm White)
Most Cosmic Color Ribbons have “cool white” LEDs which means they are bluish white when Red,Green, and Blue are completely “on.” But some batches of Cosmic Color ribbons have “warm white”LEDs which means they are a true white when Red, Green and Blue are completely “on.” Although theyare a true white, when held next to a “cool white” pixel that is completely “on” they will look yellowish.
The Light-O-Rama Software Package 623
© 2021 Light-O-Rama, Inc.
The same is true for DMX ribbons and strings. Some of them are “cool white” and some are “warm white.”Choose the setting that matches your particular lights and the colors on the lights will more nearly matchthe colors that you saw on the computer screen when you made the sequence.
Enable Time Layer Priority Feature
When this checkbox is not selected all effects are transparent. This means that effects that whereeffects of different colors overlap the colors will mix. For example, , if a red effect is place on top of agreen effect, in the places where the effects overlap the red and green will mix and will be yellow.
When this checkbox is selected the effects on low time layers will render in front of effects on highertime layers. For example, if you place a morph on time layer 1 and you place a scene on time layer 3,then if the morph goes across the same area as the scene then the morph will render on top of thescene. In other words it will look like the morph is above the scene.
For backward compatibility sequences created before this feature was available will have this featureunselected.
Each of the effect dialog boxes has the options Transparent, Semi-Transparent, and Solid. Their behavioris as follows:
· Transparent – The effects are transparent. For example, if a red effect is place on top of a greeneffect, in the places where the effects overlap the red and green will mix and will be yellow.
· Semi-Transparent – The colors in an effect that are dim will be transparent, but the colors in theeffect that are the full color of the effect will be solid. For example, if a green morph with a tail isplaced above a red scene, then the green head of the morph will be solid but the tail will betransparent. This is probably the setting you will want to use for scenes, morphs, and smootheffects.
· Solid – All colors in the effect will appear solid. This is probably the setting you will want for usewith images, and text.
Smooth Ramps
As discussed in the Color Mode (Balanced vs. Full Range) section, the start and end setting of eachcolor is adjusted by the Light-O-Rama SuperStar Sequencer so that the brightness is linear. However,on a single fade, the SuperStar Sequencer cannot control the rate at which the brightness changes inbetween the start and the end. To get around this, the SuperStar Sequencer can use "smooth ramps". In smooth ramps mode, ramps that are one second long or longer are actually treated as ten shortramps. In this way, the SuperStar Sequencer gains control of the rate of change of the ramp.
The fast change of ramps is not easily perceived for short ramps, but with very long ramps you will noticeit. To see the difference, try the following:
1. Set Smooth Ramps mode
· Click on the Tools menu and select Configuration.· Select Smooth Ramps in the Configuration dialog box.
2. Add a non-smooth ramp
Light-O-Rama v5.6.6624
© 2021 Light-O-Rama, Inc.
· Launch the Scene dialog box.· Select pixels 0-10 on the pixel grid.· Set the time duration to 1.00 to 1.95 seconds.· Set the start color to red = 100.· Set the end color to red = 0.· Click on the Add button.
The scene will be added to layer 1.
3. Add a smooth ramp
· Select pixels 11-20 in the pixel grid.· In the scene dialog box, set the time duration to 1.00 to 2.00 seconds.· Leave the start color at red = 100.· Leave the end color at red = 0.· Click on the Add button.
The scene should be added to layer 2 so that they both are stacked on top of each other.
4. What are we doing?
Both of the scenes cover almost the same time range. The two scenes should be stacked ontop of each other. The pixels you selected should not collide (that is, each scene should turn ona different set of pixels).
5. Observe the difference
Click on the Play button. The first scene added is of a duration less than one second, so theramp will not be smoothed. The second scene is a second long, and so the ramp will besmoothed.
Note that the top pixels (belonging to the first scene) will not drop in brightness as fast as thebottom pixels (belonging to the second scene).
6. Summary
When in Smooth Ramps mode, only ramps 1.00 second long and longer are smoothed. Even ifyou are in Smooth Ramps mode, smoothing is not done for ramps less than 1.00 second. Thisis because the smoothing of short ramps is not easily perceptible to the eye. Realize that anyramp that is smoothed gets chopped up into ten ramps, and thus the number of commands isten times greater, and the length of the exported sequence file is ten times greater for that effect. This is why smoothing of short ramps is not done.
Smooth Ramps mode defaults to off, but you can turn it on, and then the setting gets stored inboth your launch configuration file and in the .sup file. It affects the export of a Light-O-Rama.lms or .las file, and as mentioned, exported files using smoothed ramps will be larger.
Export Raw Color Values
When exporting a sequence, SuperStar will adjust the color values so they appear best on your lights.This is because LED lights require adjusted values in order to get them to best match the colors that you
The Light-O-Rama Software Package 625
© 2021 Light-O-Rama, Inc.
see on the computer screen. The result is that the colors you see in the exported file in the Sequencermay look a bit different than in SuperStar, but they will look good on your actual lights.
If you do not want SuperStar to adjust the exported values, then select “Export Raw Color Values.” Thiswill make the colors in the exported file match what you saw on the computer screen in superstar, butthe colors will not look as good on your actual lights.
Grid Orientation
Use this setting to change the orientation of the sequencing grid between Horizontal and Vertical
Wrap Around
Use this setting to change between Normal and Wrap Around. Wrap Around mode is designed for 360degree trees. When in wrap around mode there will be two copies of the green sequencing grid side byside. This makes it easier to do effects that wrap around the tree.
Display Waveform
With this setting selected the audio waveform will be displayed below the time ruler.
Display First 3 Timing Lines
With this setting selected the first three timing lines of the timings will be displayed below the time ruler.
5.4.4.20 Configure Controller Unit IDs Using the Light-O-Rama Hardware Utility
After purchasing Cosmic Color Ribbons, you must configure them using the Light-O-Rama HardwareUtility. There are instructions on how to do this in the manual that comes with the ribbons. You willassign a unit ID to each controller, the same as you would with any other controller.
In addition, the Hardware Utility has a Cosmic Color Ribbon Configuration screen. Be sure to use thefollowing settings on it:
· Unit ID Mode: Normal (single ID).· Channel Mode: Triples (RGB, RGB, ...)· Resolution: 50 pixels· Strips: 1· DMX Mode: Both macro and RGB channels
The "Standalone Speed" setting does not matter with respect to the Light-O-Rama SuperStarSequencer.
5.4.4.21 Configure Controller Unit IDs in the SuperStar Sequencer
After setting the unit ID for each of your Cosmic Color Ribbons with the Light-O-Rama Hardware Utility,you then must let the Light-O-Rama SuperStar Sequencer know which unit IDs you assigned.
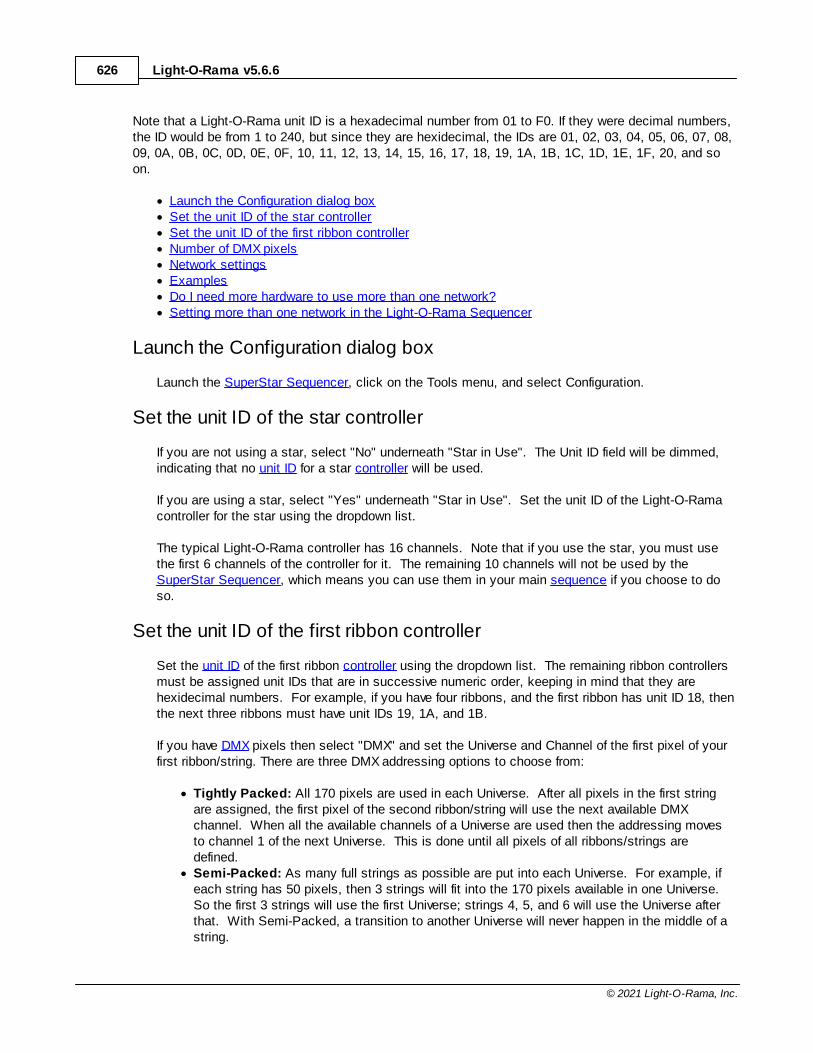
Light-O-Rama v5.6.6626
© 2021 Light-O-Rama, Inc.
Note that a Light-O-Rama unit ID is a hexadecimal number from 01 to F0. If they were decimal numbers,the ID would be from 1 to 240, but since they are hexidecimal, the IDs are 01, 02, 03, 04, 05, 06, 07, 08,09, 0A, 0B, 0C, 0D, 0E, 0F, 10, 11, 12, 13, 14, 15, 16, 17, 18, 19, 1A, 1B, 1C, 1D, 1E, 1F, 20, and soon.
· Launch the Configuration dialog box· Set the unit ID of the star controller· Set the unit ID of the first ribbon controller· Number of DMX pixels· Network settings· Examples· Do I need more hardware to use more than one network?· Setting more than one network in the Light-O-Rama Sequencer
Launch the Configuration dialog box
Launch the SuperStar Sequencer, click on the Tools menu, and select Configuration.
Set the unit ID of the star controller
If you are not using a star, select "No" underneath "Star in Use". The Unit ID field will be dimmed,indicating that no unit ID for a star controller will be used.
If you are using a star, select "Yes" underneath "Star in Use". Set the unit ID of the Light-O-Ramacontroller for the star using the dropdown list.
The typical Light-O-Rama controller has 16 channels. Note that if you use the star, you must usethe first 6 channels of the controller for it. The remaining 10 channels will not be used by theSuperStar Sequencer, which means you can use them in your main sequence if you choose to doso.
Set the unit ID of the first ribbon controller
Set the unit ID of the first ribbon controller using the dropdown list. The remaining ribbon controllersmust be assigned unit IDs that are in successive numeric order, keeping in mind that they arehexidecimal numbers. For example, if you have four ribbons, and the first ribbon has unit ID 18, thenthe next three ribbons must have unit IDs 19, 1A, and 1B.
If you have DMX pixels then select "DMX" and set the Universe and Channel of the first pixel of yourfirst ribbon/string. There are three DMX addressing options to choose from:
· Tightly Packed: All 170 pixels are used in each Universe. After all pixels in the first stringare assigned, the first pixel of the second ribbon/string will use the next available DMXchannel. When all the available channels of a Universe are used then the addressing movesto channel 1 of the next Universe. This is done until all pixels of all ribbons/strings aredefined.
· Semi-Packed: As many full strings as possible are put into each Universe. For example, ifeach string has 50 pixels, then 3 strings will fit into the 170 pixels available in one Universe. So the first 3 strings will use the first Universe; strings 4, 5, and 6 will use the Universe afterthat. With Semi-Packed, a transition to another Universe will never happen in the middle of astring.

The Light-O-Rama Software Package 627
© 2021 Light-O-Rama, Inc.
· Not Packed: Each string has its own universe. This means that each string will start withpixel one of a Universe.
Number of DMX Pixels (10-170)
Set the number of DMX pixels that are in each of your DMX pixel strings. For example, if yourstrings have 150 pixels in each string, set 150, and when the sequence is exported it will expand the50 pixel sequence into 150 pixels. This is an important feature! It makes sequences written for 50pixels transportable to DMX strings of any length between 10 and 170.
Network settings
Generally speaking, Light-O-Rama supports up to 16 Light-O-Rama networks, but the SuperStarSequencer currently only supports up to four of them. The default setting for the SuperStarSequencer is to use one network (the Standard network), with the other three networks (AuxiliaryNetworks A, B, and C) disabled. When using one network (the Standard network), you must set thefirst and last unit IDs that are controlled by the network.
If using more than one network, enable the auxiliary networks you are using and set the first and lastunit IDs controlled by each auxiliary network.
Examples
· Setting up one network for the star and 12 ribbons· Setting up one network for the star, 8 ribbons, and other lights· Setting up four networks with no star, 24 ribbons, and other lights
Setting up one network for the star and 12 ribbons
Let's say we have a star, 12 ribbons, and no other lights. We are controlling the star with a standard16 channel Light-O-Rama controller that has unit ID 01, and the twelve ribbons are controlled by theirrespective controllers with unit IDs 02 through 0D. Then we would use the following settings:
· Star in Use: Yes· Unit ID of Star Controller: "01"· Unit ID of First Ribbon Controller: "02"· Standard Network: Enabled· Standard Network, Unit ID of First and Last Controller: "01" "0D"· Auxilliary Networks: Disabled
Setting up one network for the star, 8 ribbons, and other lights
Let's say we have a star and 8 ribbons, and will be running them alongside other lights. We arecontrolling the star with a standard 16 channel Light-O-Rama controller that has unit ID 01. We alsohave three other 16 channel Light-O-Rama controllers, with unit IDs 02, 03, and 04. The eightribbons are controlled by their respective controllers with unit IDs 05 through 0C. Then we would usethe following settings:
· Star in Use: Yes· Unit ID of Star Controller: "01"· Unit ID of First Ribbon Controller: "05"· Standard Network: Enabled
Light-O-Rama v5.6.6628
© 2021 Light-O-Rama, Inc.
· Standard Network, Unit ID of First and Last Controller: "01" "0C"· Auxiliary Networks: Disabled
Setting up four networks with no star, 24 ribbons, and other lights
Let's say we have no star, but 24 ribbons, and will be running them alongside other lights. We have256 channels for other lights, which are controlled by 16 standard 16 channel Light-O-Ramacontrollers with unit IDs 01 through 10. We have 24 ribbons controlled by their respective controllers,with unit IDs 11 through 28. We want to run the various ribbons on four different networks. Then wecould use the following settings:
· Star in Use: No· Unit ID of Star Controller: Disabled· Unit ID of First Ribbon Controller: "11"· Standard Network: Enabled· Standard Network, Unit ID of First and Last Controller: "01" "10"· Auxiliary Network A: Enabled· Auxiliary Network A, Unit ID of First and Last Controller: "11" "18"· Auxiliary Network B: Enabled· Auxiliary Network B, Unit ID of First and Last Controller: "19" "20"· Auxiliary Network C: Enabled· Auxiliary Network C, Unit ID of First and Last Controller: "21" "28"
Do I need more hardware to use more than one network?
If you have one USB485 connector plugged into one USB port of your computer, then you are usingone network. To use more than one network, you must first purchase other USB485 connectors(one for each additional network). Plug in each USB485 connector to a different USB port on yourcomputer. Then plug in the Cat 5 cable coming from each USB485 connector into the first controllerof the network group you are going to control with that network.
Setting more than one network in the Light-O-Rama Sequencer
· Launch the Light-O-Rama Network Preferences program.· Select a comm port for each network that you plan to use.
5.4.4.22 Select All, Select All Left, and Select All Right
In the Light-O-Rama SuperStar Sequencer, you will find these actions in the Edit menu. "Select All" willselect all effects in the SuperStar sequence; "Select All Left" will select all that are left of the timeselected in the time scale; "Select All Right" will select all to the right of the time selected in the timescale.
Select All is useful for adding some blank space to your SuperStar sequence: If you needed to create asmall amount of blank space at the beginning of a sequence, you could Select All, then use the NudgeRight button. To create a large amount of space, you could Select All, press the Cut button, select atime on the time scale, and then press the Paste button.
Similarly, Select All Right is useful for creating some blank space in the middle of your SuperStarsequence: You could Select All Right, Cut, then Paste at the desired new location.
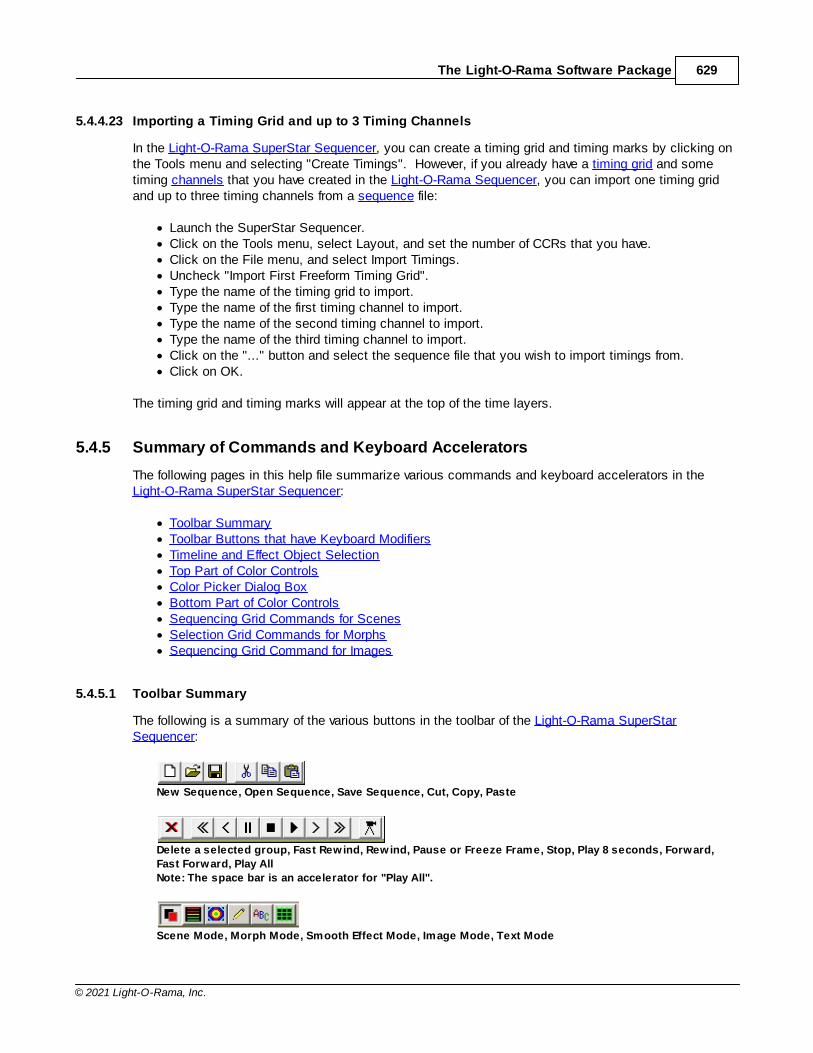
The Light-O-Rama Software Package 629
© 2021 Light-O-Rama, Inc.
5.4.4.23 Importing a Timing Grid and up to 3 Timing Channels
In the Light-O-Rama SuperStar Sequencer, you can create a timing grid and timing marks by clicking onthe Tools menu and selecting "Create Timings". However, if you already have a timing grid and sometiming channels that you have created in the Light-O-Rama Sequencer, you can import one timing gridand up to three timing channels from a sequence file:
· Launch the SuperStar Sequencer.· Click on the Tools menu, select Layout, and set the number of CCRs that you have.· Click on the File menu, and select Import Timings.· Uncheck "Import First Freeform Timing Grid".· Type the name of the timing grid to import.· Type the name of the first timing channel to import.· Type the name of the second timing channel to import.· Type the name of the third timing channel to import.· Click on the "..." button and select the sequence file that you wish to import timings from.· Click on OK.
The timing grid and timing marks will appear at the top of the time layers.
5.4.5 Summary of Commands and Keyboard Accelerators
The following pages in this help file summarize various commands and keyboard accelerators in theLight-O-Rama SuperStar Sequencer:
· Toolbar Summary· Toolbar Buttons that have Keyboard Modifiers· Timeline and Effect Object Selection· Top Part of Color Controls· Color Picker Dialog Box· Bottom Part of Color Controls· Sequencing Grid Commands for Scenes· Selection Grid Commands for Morphs· Sequencing Grid Command for Images
5.4.5.1 Toolbar Summary
The following is a summary of the various buttons in the toolbar of the Light-O-Rama SuperStarSequencer:
New Sequence, Open Sequence, Save Sequence, Cut, Copy, Paste
Delete a selected group, Fast Rewind, Rewind, Pause or Freeze Frame, Stop, Play 8 seconds, Forward,
Fast Forward, Play All
Note: The space bar is an accelerator for "Play All".
Scene Mode, Morph Mode, Smooth Effect Mode, Image Mode, Text Mode
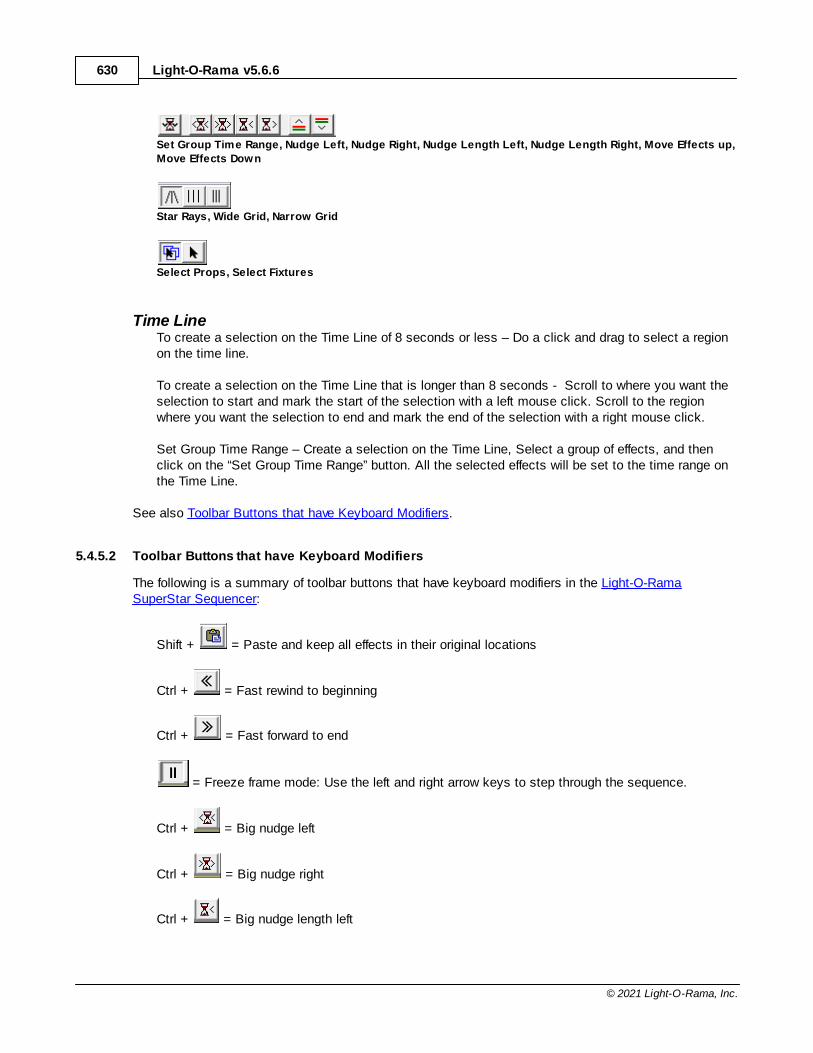
Light-O-Rama v5.6.6630
© 2021 Light-O-Rama, Inc.
Set Group Time Range, Nudge Left, Nudge Right, Nudge Length Left, Nudge Length Right, Move Effects up,
Move Effects Down
Star Rays, Wide Grid, Narrow Grid
Select Props, Select Fixtures
Time LineTo create a selection on the Time Line of 8 seconds or less – Do a click and drag to select a regionon the time line.
To create a selection on the Time Line that is longer than 8 seconds - Scroll to where you want theselection to start and mark the start of the selection with a left mouse click. Scroll to the regionwhere you want the selection to end and mark the end of the selection with a right mouse click.
Set Group Time Range – Create a selection on the Time Line, Select a group of effects, and thenclick on the “Set Group Time Range” button. All the selected effects will be set to the time range onthe Time Line.
See also Toolbar Buttons that have Keyboard Modifiers.
5.4.5.2 Toolbar Buttons that have Keyboard Modifiers
The following is a summary of toolbar buttons that have keyboard modifiers in the Light-O-RamaSuperStar Sequencer:
Shift + = Paste and keep all effects in their original locations
Ctrl + = Fast rewind to beginning
Ctrl + = Fast forward to end
= Freeze frame mode: Use the left and right arrow keys to step through the sequence.
Ctrl + = Big nudge left
Ctrl + = Big nudge right
Ctrl + = Big nudge length left
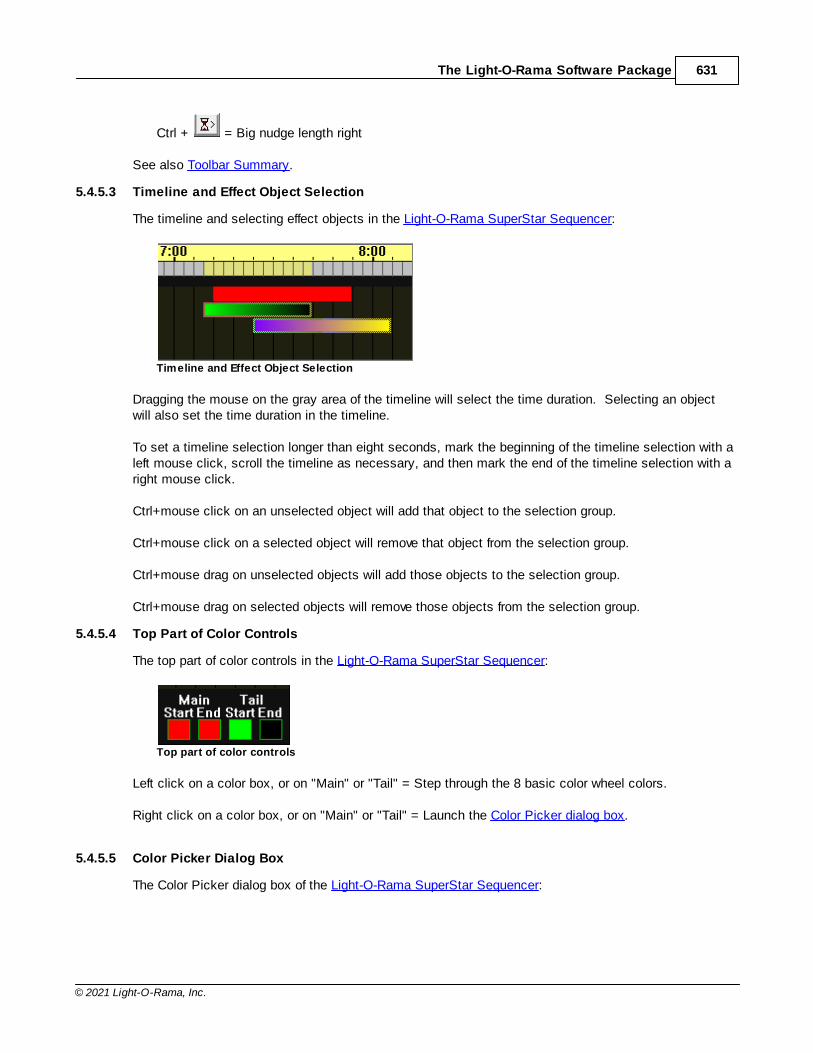
The Light-O-Rama Software Package 631
© 2021 Light-O-Rama, Inc.
Ctrl + = Big nudge length right
See also Toolbar Summary.
5.4.5.3 Timeline and Effect Object Selection
The timeline and selecting effect objects in the Light-O-Rama SuperStar Sequencer:
Timeline and Effect Object Selection
Dragging the mouse on the gray area of the timeline will select the time duration. Selecting an objectwill also set the time duration in the timeline.
To set a timeline selection longer than eight seconds, mark the beginning of the timeline selection with aleft mouse click, scroll the timeline as necessary, and then mark the end of the timeline selection with aright mouse click.
Ctrl+mouse click on an unselected object will add that object to the selection group.
Ctrl+mouse click on a selected object will remove that object from the selection group.
Ctrl+mouse drag on unselected objects will add those objects to the selection group.
Ctrl+mouse drag on selected objects will remove those objects from the selection group.
5.4.5.4 Top Part of Color Controls
The top part of color controls in the Light-O-Rama SuperStar Sequencer:
Top part of color controls
Left click on a color box, or on "Main" or "Tail" = Step through the 8 basic color wheel colors.
Right click on a color box, or on "Main" or "Tail" = Launch the Color Picker dialog box.
5.4.5.5 Color Picker Dialog Box
The Color Picker dialog box of the Light-O-Rama SuperStar Sequencer:
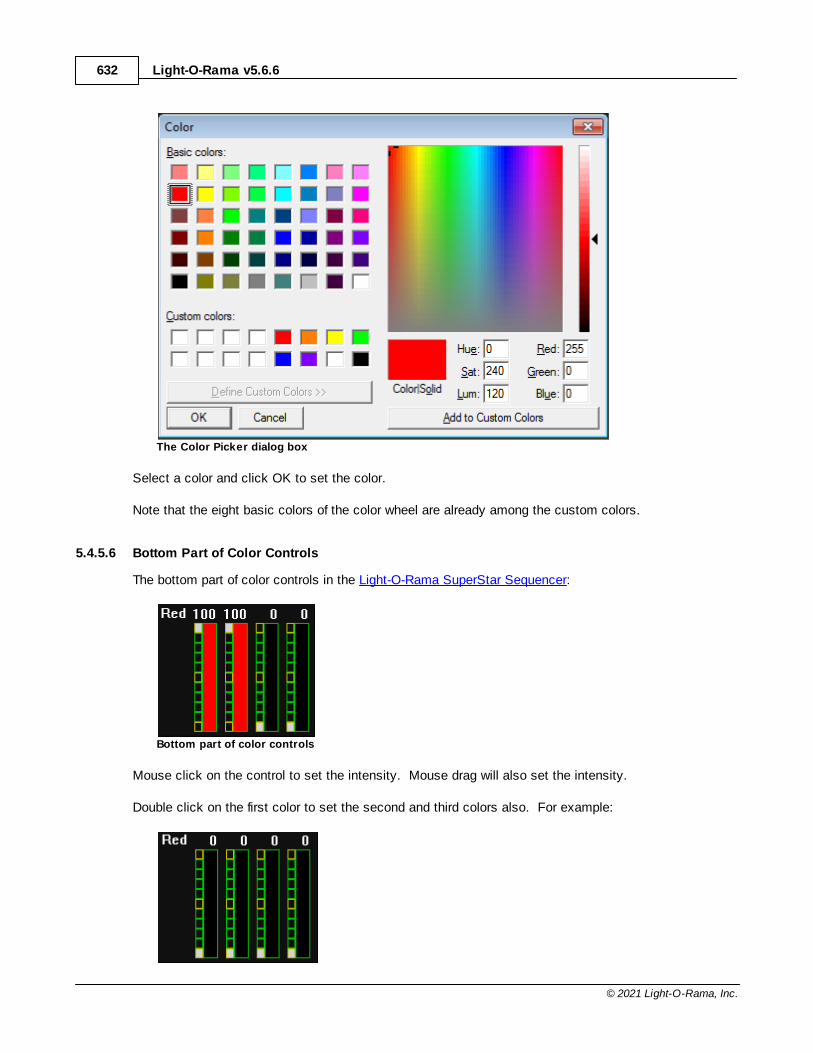
Light-O-Rama v5.6.6632
© 2021 Light-O-Rama, Inc.
The Color Picker dialog box
Select a color and click OK to set the color.
Note that the eight basic colors of the color wheel are already among the custom colors.
5.4.5.6 Bottom Part of Color Controls
The bottom part of color controls in the Light-O-Rama SuperStar Sequencer:
Bottom part of color controls
Mouse click on the control to set the intensity. Mouse drag will also set the intensity.
Double click on the first color to set the second and third colors also. For example:
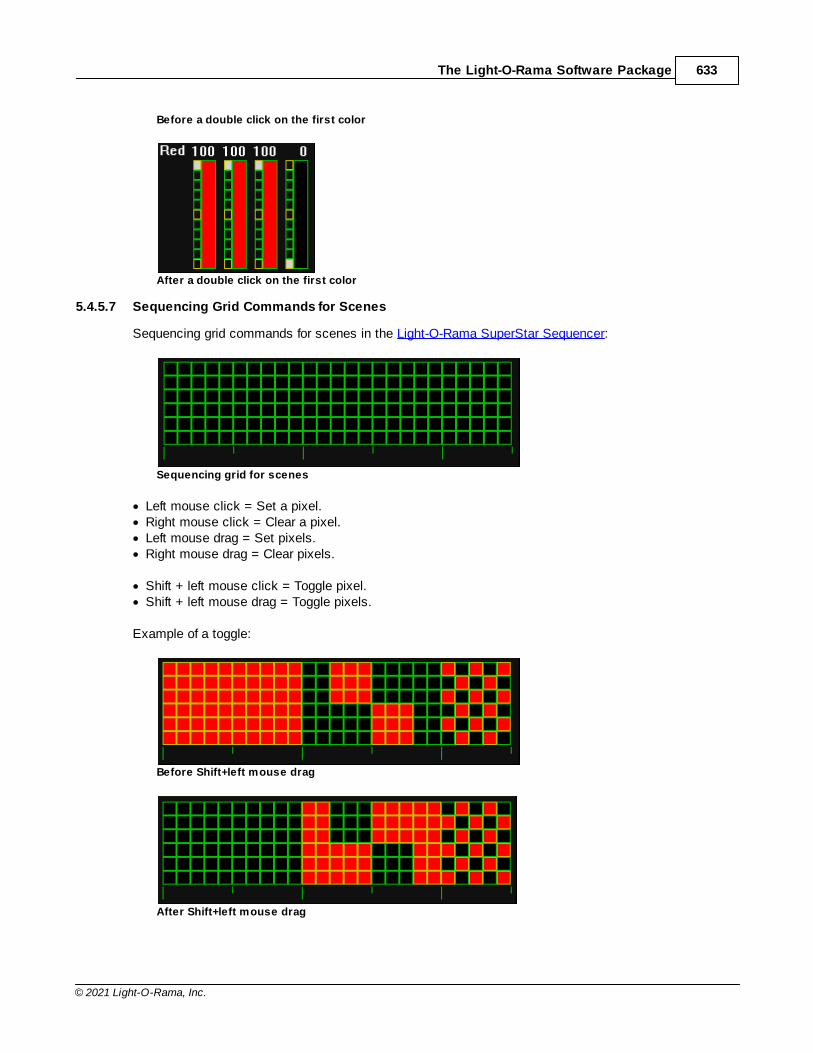
The Light-O-Rama Software Package 633
© 2021 Light-O-Rama, Inc.
Before a double click on the first color
After a double click on the first color
5.4.5.7 Sequencing Grid Commands for Scenes
Sequencing grid commands for scenes in the Light-O-Rama SuperStar Sequencer:
Sequencing grid for scenes
· Left mouse click = Set a pixel.· Right mouse click = Clear a pixel.· Left mouse drag = Set pixels.· Right mouse drag = Clear pixels.
· Shift + left mouse click = Toggle pixel.· Shift + left mouse drag = Toggle pixels.
Example of a toggle:
Before Shift+left mouse drag
After Shift+left mouse drag
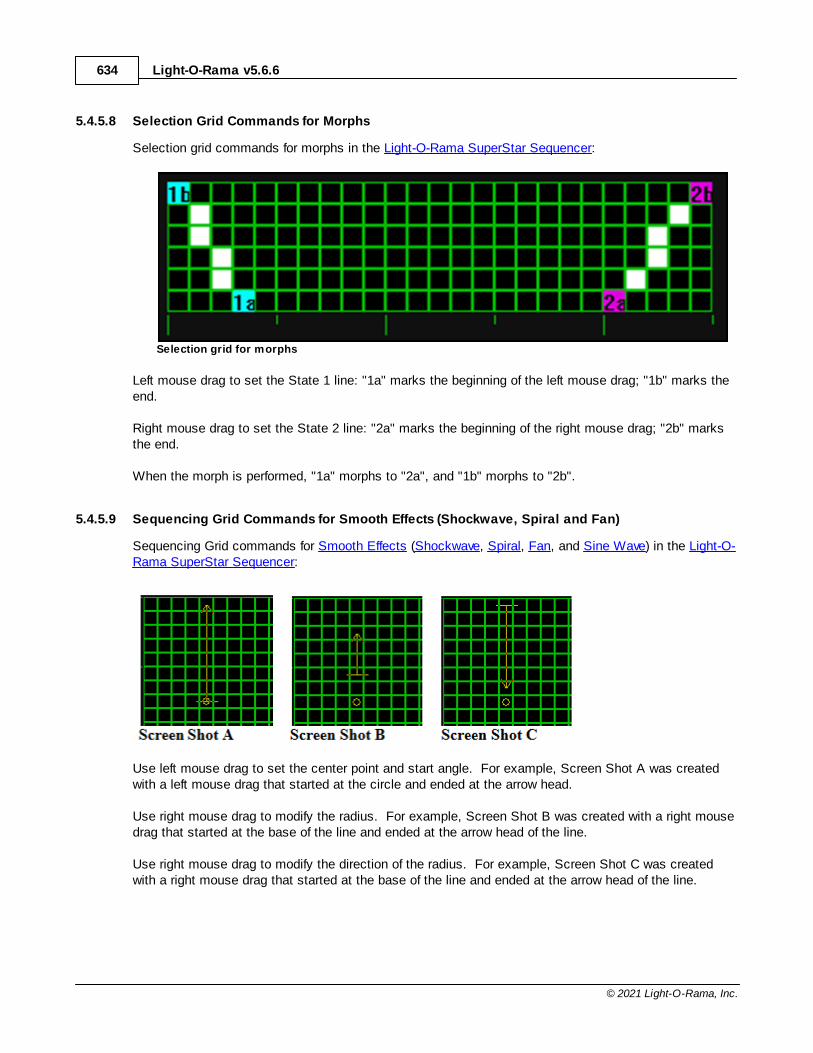
Light-O-Rama v5.6.6634
© 2021 Light-O-Rama, Inc.
5.4.5.8 Selection Grid Commands for Morphs
Selection grid commands for morphs in the Light-O-Rama SuperStar Sequencer:
Selection grid for morphs
Left mouse drag to set the State 1 line: "1a" marks the beginning of the left mouse drag; "1b" marks theend.
Right mouse drag to set the State 2 line: "2a" marks the beginning of the right mouse drag; "2b" marksthe end.
When the morph is performed, "1a" morphs to "2a", and "1b" morphs to "2b".
5.4.5.9 Sequencing Grid Commands for Smooth Effects (Shockwave, Spiral and Fan)
Sequencing Grid commands for Smooth Effects (Shockwave, Spiral, Fan, and Sine Wave) in the Light-O-Rama SuperStar Sequencer:
Use left mouse drag to set the center point and start angle. For example, Screen Shot A was createdwith a left mouse drag that started at the circle and ended at the arrow head.
Use right mouse drag to modify the radius. For example, Screen Shot B was created with a right mousedrag that started at the base of the line and ended at the arrow head of the line.
Use right mouse drag to modify the direction of the radius. For example, Screen Shot C was createdwith a right mouse drag that started at the base of the line and ended at the arrow head of the line.
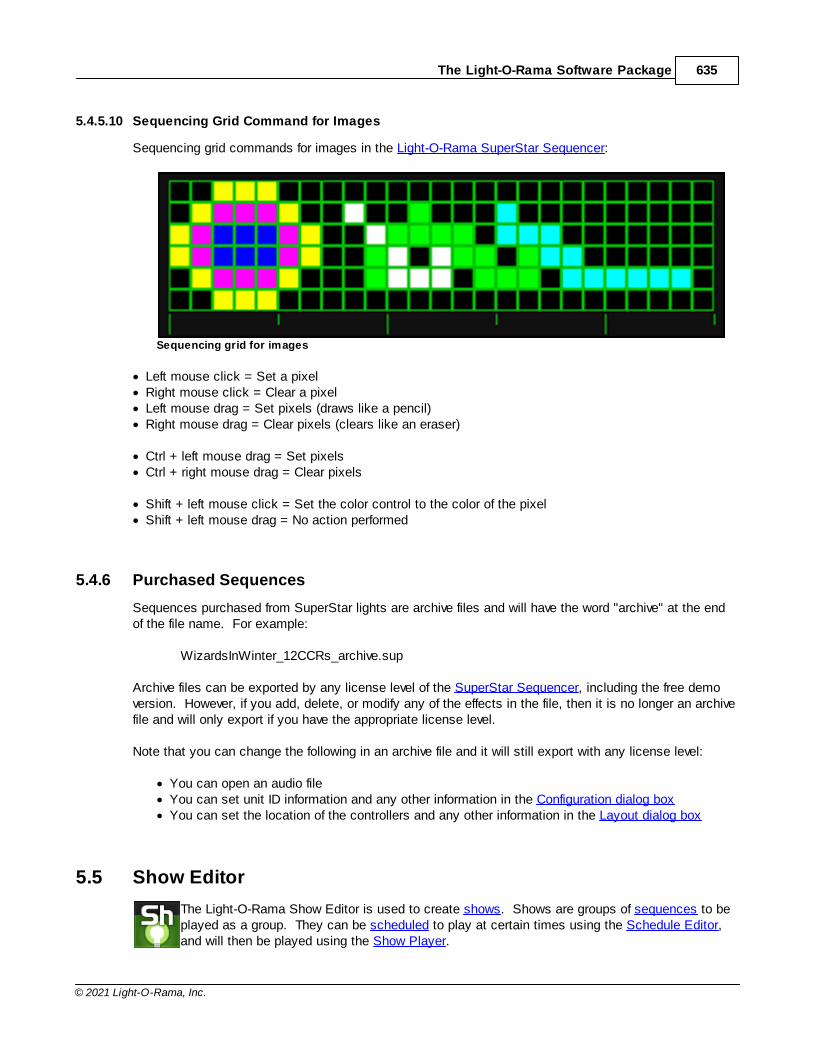
The Light-O-Rama Software Package 635
© 2021 Light-O-Rama, Inc.
5.4.5.10 Sequencing Grid Command for Images
Sequencing grid commands for images in the Light-O-Rama SuperStar Sequencer:
Sequencing grid for images
· Left mouse click = Set a pixel· Right mouse click = Clear a pixel· Left mouse drag = Set pixels (draws like a pencil)· Right mouse drag = Clear pixels (clears like an eraser)
· Ctrl + left mouse drag = Set pixels· Ctrl + right mouse drag = Clear pixels
· Shift + left mouse click = Set the color control to the color of the pixel· Shift + left mouse drag = No action performed
5.4.6 Purchased Sequences
Sequences purchased from SuperStar lights are archive files and will have the word "archive" at the endof the file name. For example:
WizardsInWinter_12CCRs_archive.sup
Archive files can be exported by any license level of the SuperStar Sequencer, including the free demoversion. However, if you add, delete, or modify any of the effects in the file, then it is no longer an archivefile and will only export if you have the appropriate license level.
Note that you can change the following in an archive file and it will still export with any license level:
· You can open an audio file· You can set unit ID information and any other information in the Configuration dialog box· You can set the location of the controllers and any other information in the Layout dialog box
5.5 Show Editor
The Light-O-Rama Show Editor is used to create shows. Shows are groups of sequences to beplayed as a group. They can be scheduled to play at certain times using the Schedule Editor,and will then be played using the Show Player.
Light-O-Rama v5.6.6636
© 2021 Light-O-Rama, Inc.
To start the Show Editor, you can run it from your computer's Start Menu by selecting "All Programs" ->"Light-O-Rama" -> "Light-O-Rama Show Editor". Alternatively, if the Light-O-Rama Control Panel isalready running, you can right-click its icon in your computer's system tray, and select "Show Editor"from the popup menu that will open.
Shows consist of several sections. Each section serves a different purpose - for example, the "startupsection" is a list of sequences that will be played when the show begins, while the "animation section" isa list of animation sequences that will be played throughout most of the show's duration (after startupand before shutdown). All sections are optional.
For details on each of the sections, please refer to the following:
· The Background Section· The Startup Section· The Animation Section· The Musical Section· The Interactive Section· The Shutdown Section
The Show Editor consists of six main tabs, and a toolbar at their top. Each of the tabs is associatedwith one of the six sections of the show (such as "background" and "animation"), while the toolbar hasbuttons to create, open, and save shows.
To add a sequence to a section, click on that section's tab, and then on the large "+" button. This willprompt you for the name of the sequence that you want to add. Similarly, to remove one, select thesequence from the section's list by clicking on its name, and then click the large "-" button.
A sequence can be moved up or down in a section's list by clicking on its name and then on the large uparrow or down arrow buttons. This generally affects the order that the sequences will be played in, butnot always: For example, in the musical section, you can select that the sequences will be played in theorder listed, or in a random shuffle; if you choose the latter, it doesn't matter what order they are listed in. Similarly, in the animation section, you can select that the sequences be played simultaneously (asopposed to sequentially); if you do, their listed order does not matter.
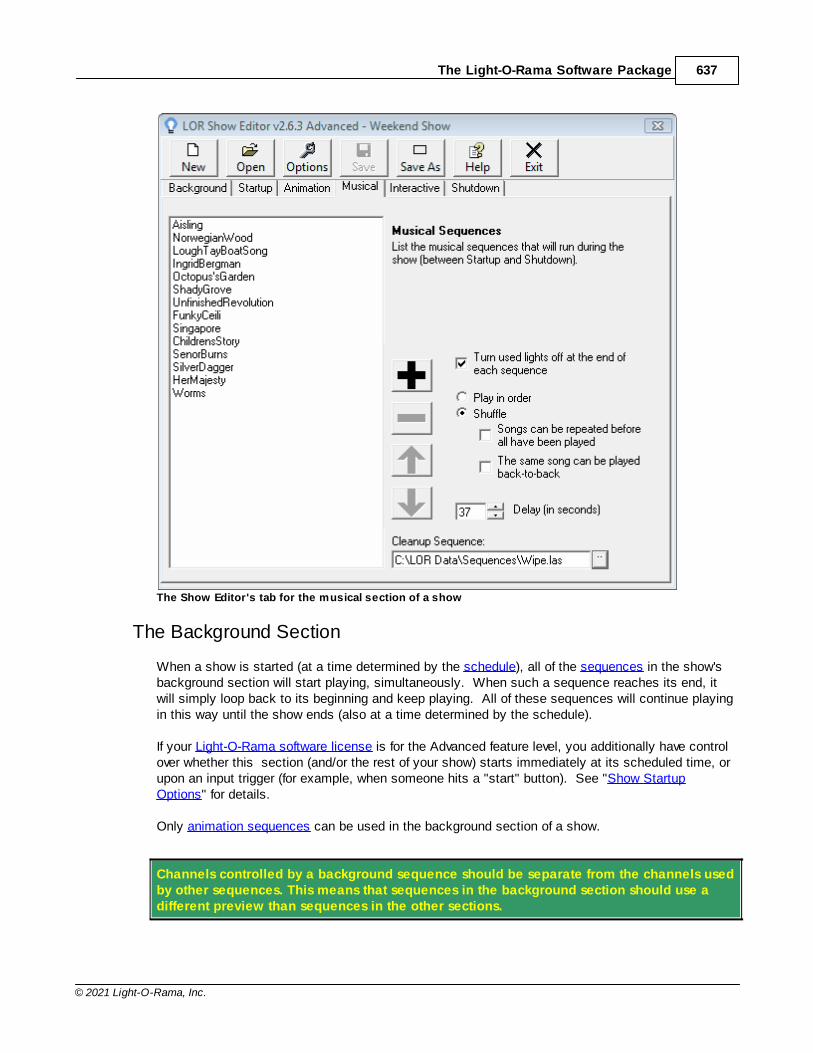
The Light-O-Rama Software Package 637
© 2021 Light-O-Rama, Inc.
The Show Editor's tab for the musical section of a show
The Background Section
When a show is started (at a time determined by the schedule), all of the sequences in the show'sbackground section will start playing, simultaneously. When such a sequence reaches its end, itwill simply loop back to its beginning and keep playing. All of these sequences will continue playingin this way until the show ends (also at a time determined by the schedule).
If your Light-O-Rama software license is for the Advanced feature level, you additionally have controlover whether this section (and/or the rest of your show) starts immediately at its scheduled time, orupon an input trigger (for example, when someone hits a "start" button). See "Show StartupOptions" for details.
Only animation sequences can be used in the background section of a show.
Channels controlled by a background sequence should be separate from the channels usedby other sequences. This means that sequences in the background section should use adifferent preview than sequences in the other sections.
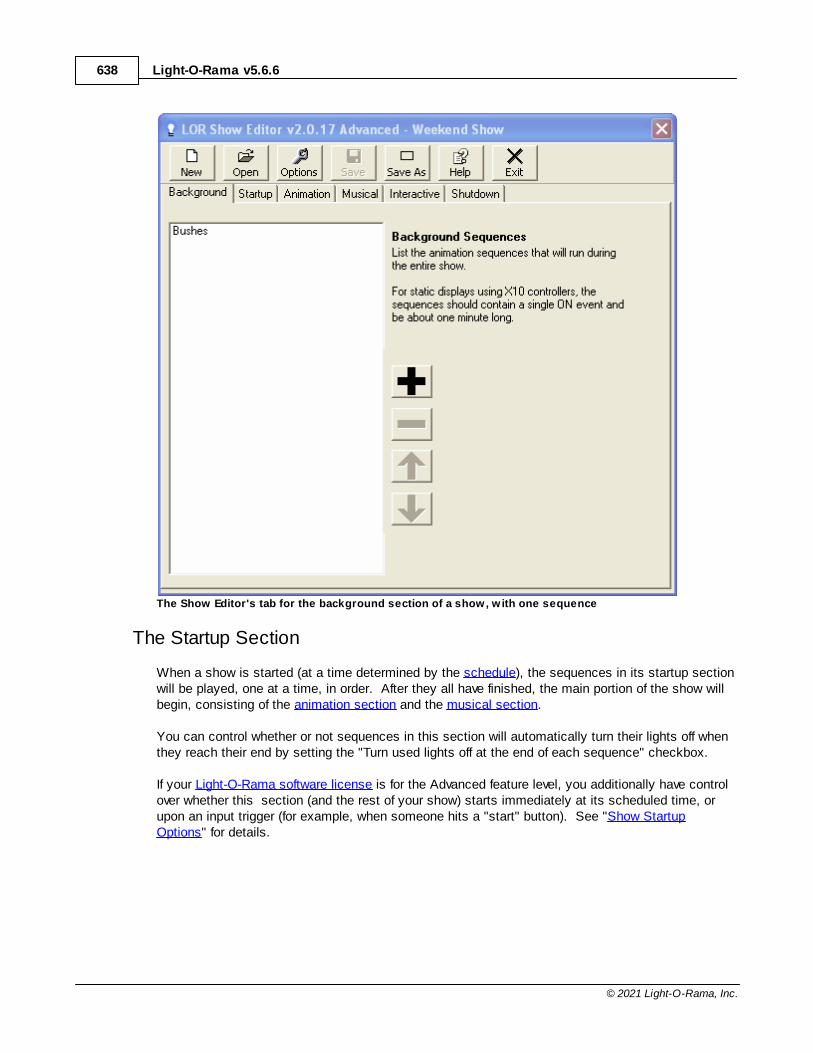
Light-O-Rama v5.6.6638
© 2021 Light-O-Rama, Inc.
The Show Editor's tab for the background section of a show, w ith one sequence
The Startup Section
When a show is started (at a time determined by the schedule), the sequences in its startup sectionwill be played, one at a time, in order. After they all have finished, the main portion of the show willbegin, consisting of the animation section and the musical section.
You can control whether or not sequences in this section will automatically turn their lights off whenthey reach their end by setting the "Turn used lights off at the end of each sequence" checkbox.
If your Light-O-Rama software license is for the Advanced feature level, you additionally have controlover whether this section (and the rest of your show) starts immediately at its scheduled time, orupon an input trigger (for example, when someone hits a "start" button). See "Show StartupOptions" for details.
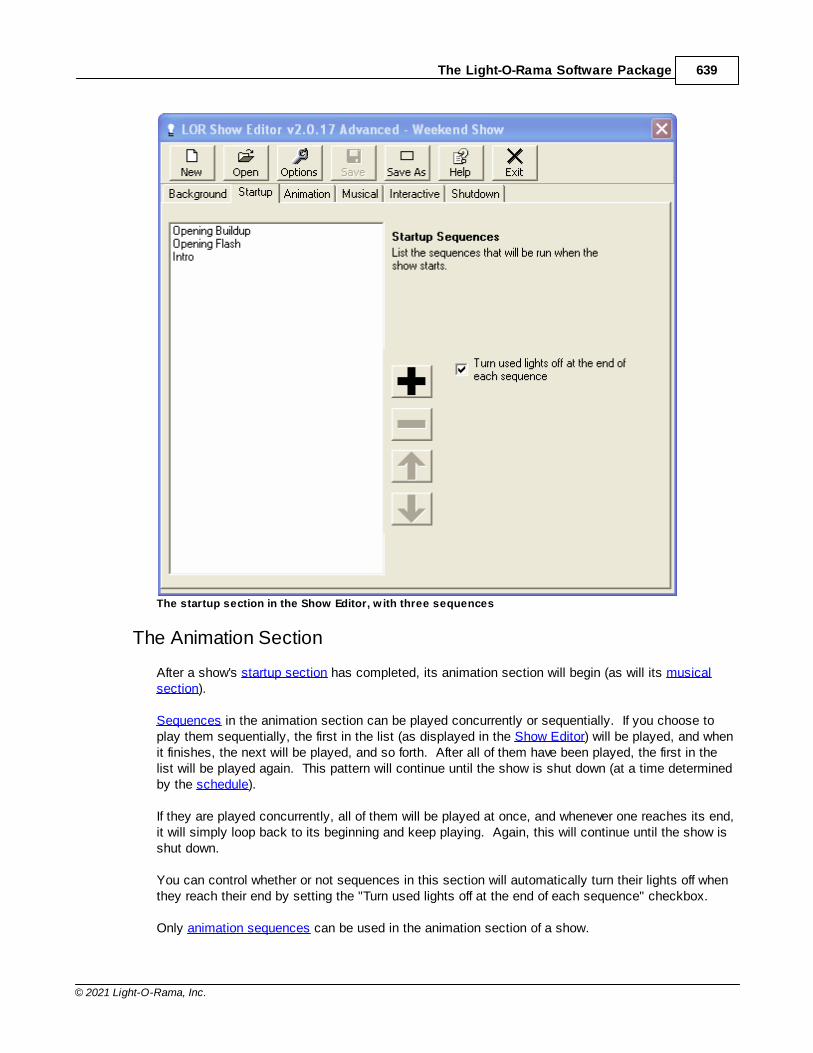
The Light-O-Rama Software Package 639
© 2021 Light-O-Rama, Inc.
The startup section in the Show Editor, w ith three sequences
The Animation Section
After a show's startup section has completed, its animation section will begin (as will its musicalsection).
Sequences in the animation section can be played concurrently or sequentially. If you choose toplay them sequentially, the first in the list (as displayed in the Show Editor) will be played, and whenit finishes, the next will be played, and so forth. After all of them have been played, the first in thelist will be played again. This pattern will continue until the show is shut down (at a time determinedby the schedule).
If they are played concurrently, all of them will be played at once, and whenever one reaches its end,it will simply loop back to its beginning and keep playing. Again, this will continue until the show isshut down.
You can control whether or not sequences in this section will automatically turn their lights off whenthey reach their end by setting the "Turn used lights off at the end of each sequence" checkbox.
Only animation sequences can be used in the animation section of a show.
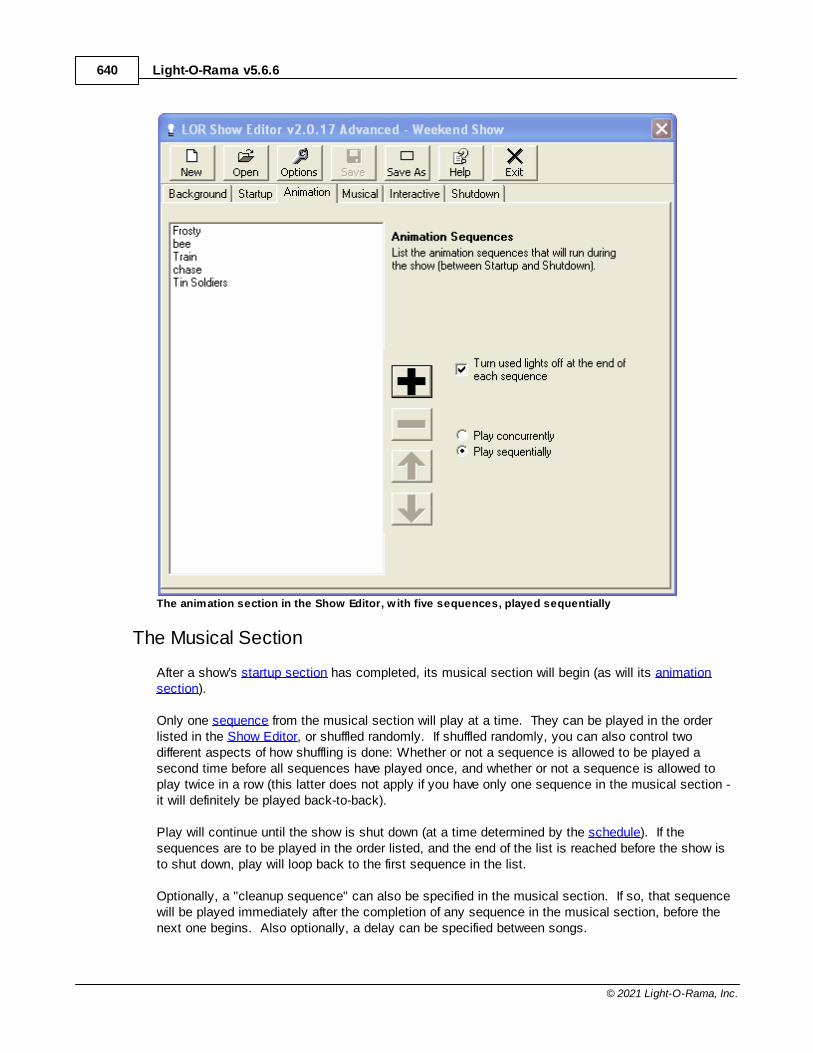
Light-O-Rama v5.6.6640
© 2021 Light-O-Rama, Inc.
The animation section in the Show Editor, w ith five sequences, played sequentially
The Musical Section
After a show's startup section has completed, its musical section will begin (as will its animationsection).
Only one sequence from the musical section will play at a time. They can be played in the orderlisted in the Show Editor, or shuffled randomly. If shuffled randomly, you can also control twodifferent aspects of how shuffling is done: Whether or not a sequence is allowed to be played asecond time before all sequences have played once, and whether or not a sequence is allowed toplay twice in a row (this latter does not apply if you have only one sequence in the musical section -it will definitely be played back-to-back).
Play will continue until the show is shut down (at a time determined by the schedule). If thesequences are to be played in the order listed, and the end of the list is reached before the show isto shut down, play will loop back to the first sequence in the list.
Optionally, a "cleanup sequence" can also be specified in the musical section. If so, that sequencewill be played immediately after the completion of any sequence in the musical section, before thenext one begins. Also optionally, a delay can be specified between songs.
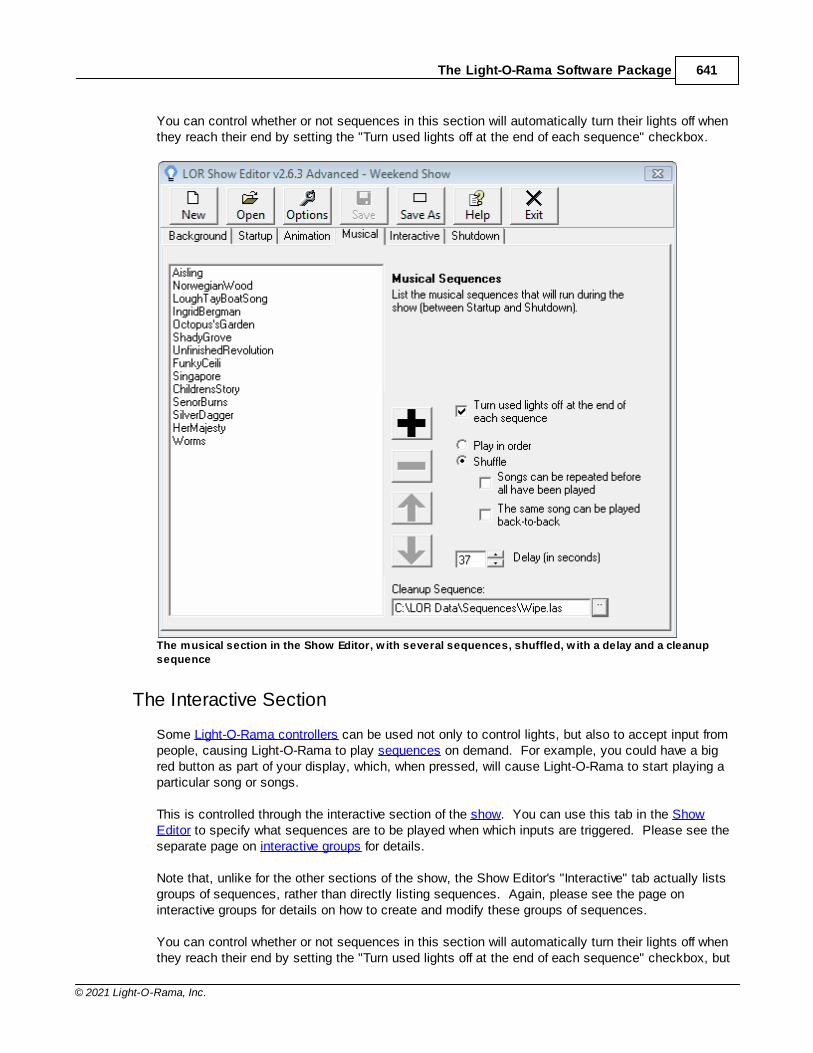
The Light-O-Rama Software Package 641
© 2021 Light-O-Rama, Inc.
You can control whether or not sequences in this section will automatically turn their lights off whenthey reach their end by setting the "Turn used lights off at the end of each sequence" checkbox.
The musical section in the Show Editor, w ith several sequences, shuffled, w ith a delay and a cleanup
sequence
The Interactive Section
Some Light-O-Rama controllers can be used not only to control lights, but also to accept input frompeople, causing Light-O-Rama to play sequences on demand. For example, you could have a bigred button as part of your display, which, when pressed, will cause Light-O-Rama to start playing aparticular song or songs.
This is controlled through the interactive section of the show. You can use this tab in the ShowEditor to specify what sequences are to be played when which inputs are triggered. Please see theseparate page on interactive groups for details.
Note that, unlike for the other sections of the show, the Show Editor's "Interactive" tab actually listsgroups of sequences, rather than directly listing sequences. Again, please see the page oninteractive groups for details on how to create and modify these groups of sequences.
You can control whether or not sequences in this section will automatically turn their lights off whenthey reach their end by setting the "Turn used lights off at the end of each sequence" checkbox, but
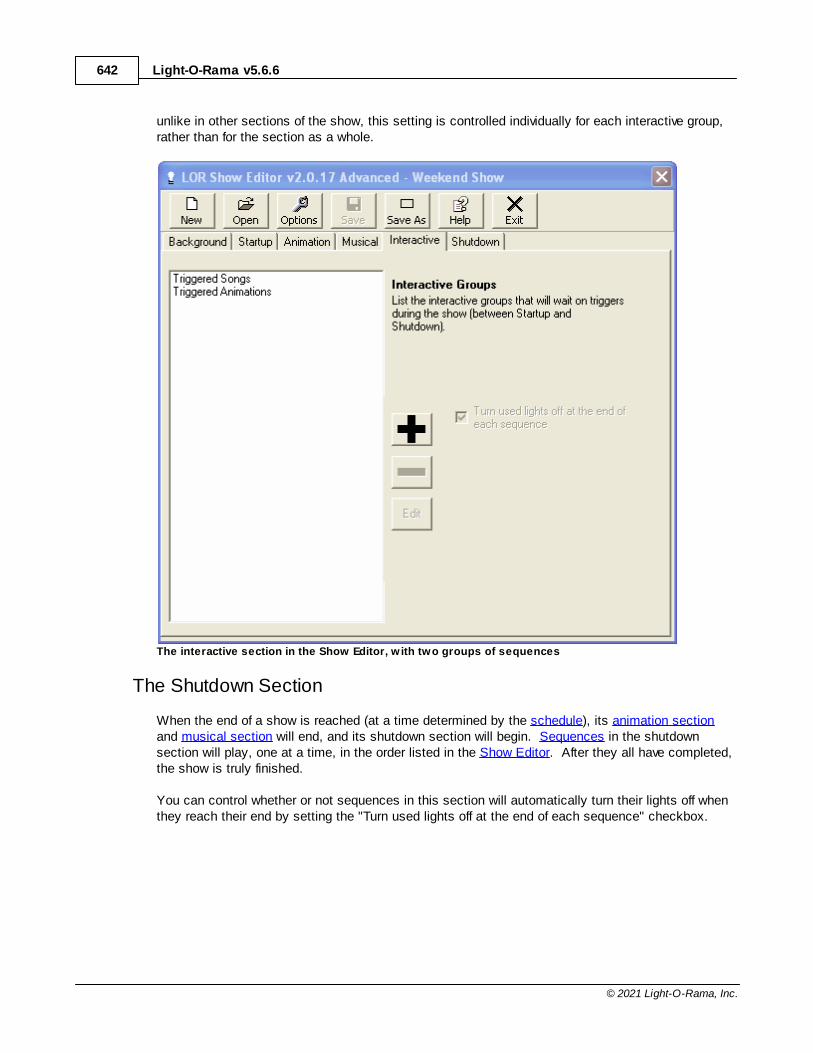
Light-O-Rama v5.6.6642
© 2021 Light-O-Rama, Inc.
unlike in other sections of the show, this setting is controlled individually for each interactive group,rather than for the section as a whole.
The interactive section in the Show Editor, w ith two groups of sequences
The Shutdown Section
When the end of a show is reached (at a time determined by the schedule), its animation sectionand musical section will end, and its shutdown section will begin. Sequences in the shutdownsection will play, one at a time, in the order listed in the Show Editor. After they all have completed,the show is truly finished.
You can control whether or not sequences in this section will automatically turn their lights off whenthey reach their end by setting the "Turn used lights off at the end of each sequence" checkbox.
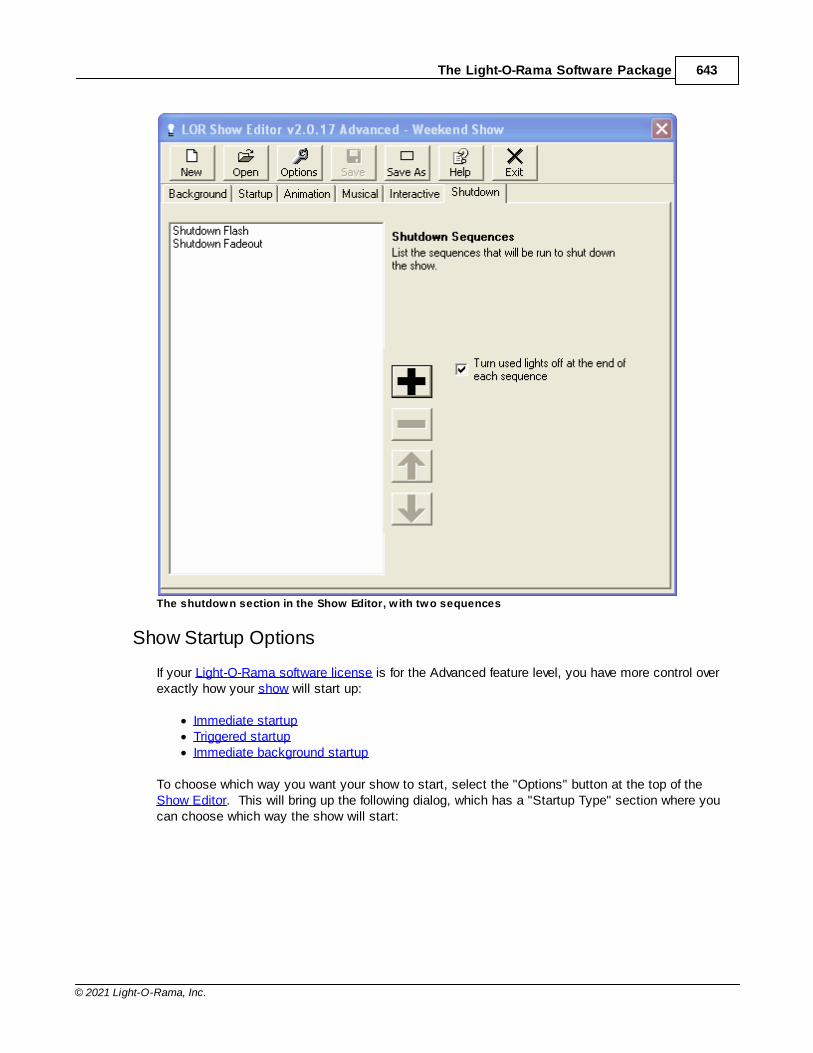
The Light-O-Rama Software Package 643
© 2021 Light-O-Rama, Inc.
The shutdown section in the Show Editor, w ith two sequences
Show Startup Options
If your Light-O-Rama software license is for the Advanced feature level, you have more control overexactly how your show will start up:
· Immediate startup· Triggered startup· Immediate background startup
To choose which way you want your show to start, select the "Options" button at the top of theShow Editor. This will bring up the following dialog, which has a "Startup Type" section where youcan choose which way the show will start:
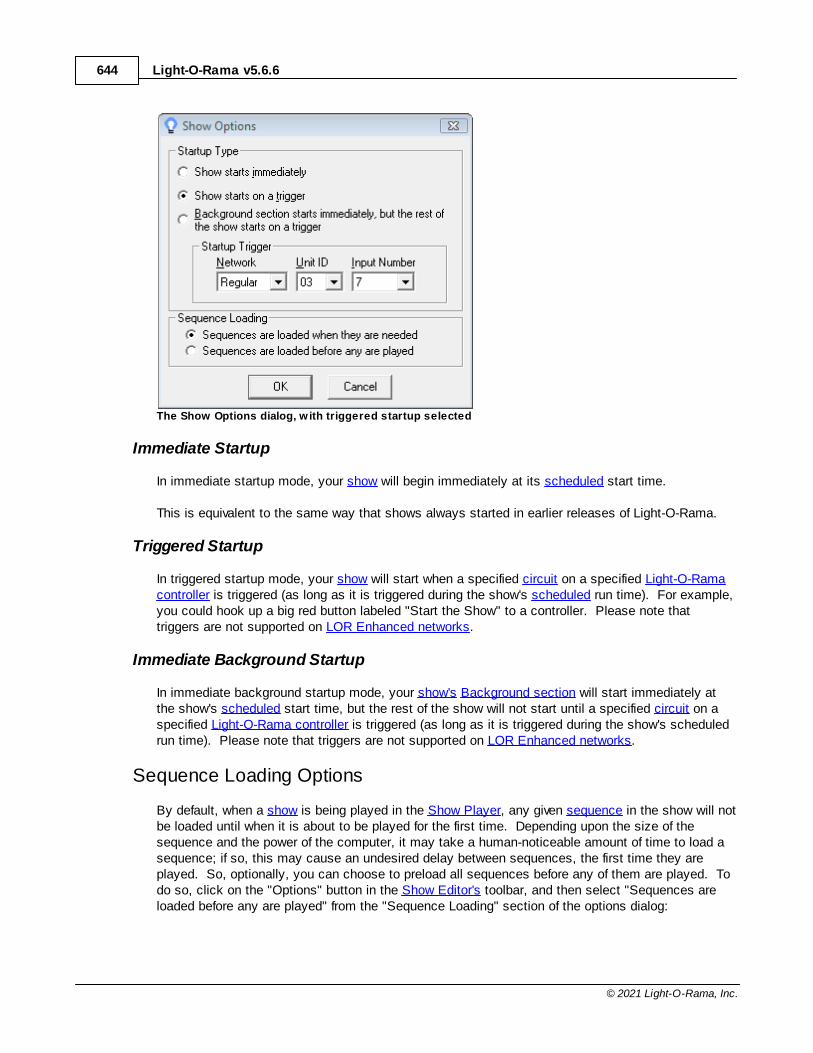
Light-O-Rama v5.6.6644
© 2021 Light-O-Rama, Inc.
The Show Options dialog, w ith triggered startup selected
Immediate Startup
In immediate startup mode, your show will begin immediately at its scheduled start time.
This is equivalent to the same way that shows always started in earlier releases of Light-O-Rama.
Triggered Startup
In triggered startup mode, your show will start when a specified circuit on a specified Light-O-Ramacontroller is triggered (as long as it is triggered during the show's scheduled run time). For example,you could hook up a big red button labeled "Start the Show" to a controller. Please note thattriggers are not supported on LOR Enhanced networks.
Immediate Background Startup
In immediate background startup mode, your show's Background section will start immediately atthe show's scheduled start time, but the rest of the show will not start until a specified circuit on aspecified Light-O-Rama controller is triggered (as long as it is triggered during the show's scheduledrun time). Please note that triggers are not supported on LOR Enhanced networks.
Sequence Loading Options
By default, when a show is being played in the Show Player, any given sequence in the show will notbe loaded until when it is about to be played for the first time. Depending upon the size of thesequence and the power of the computer, it may take a human-noticeable amount of time to load asequence; if so, this may cause an undesired delay between sequences, the first time they areplayed. So, optionally, you can choose to preload all sequences before any of them are played. Todo so, click on the "Options" button in the Show Editor's toolbar, and then select "Sequences areloaded before any are played" from the "Sequence Loading" section of the options dialog:
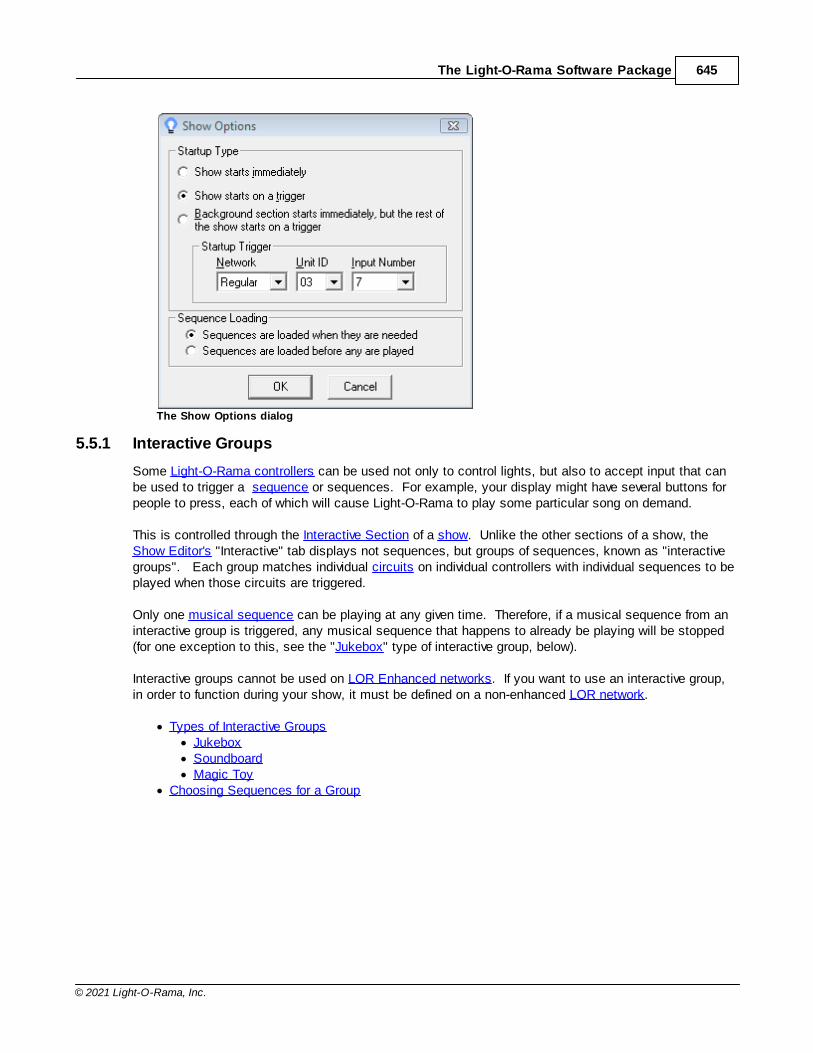
The Light-O-Rama Software Package 645
© 2021 Light-O-Rama, Inc.
The Show Options dialog
5.5.1 Interactive Groups
Some Light-O-Rama controllers can be used not only to control lights, but also to accept input that canbe used to trigger a sequence or sequences. For example, your display might have several buttons forpeople to press, each of which will cause Light-O-Rama to play some particular song on demand.
This is controlled through the Interactive Section of a show. Unlike the other sections of a show, theShow Editor's "Interactive" tab displays not sequences, but groups of sequences, known as "interactivegroups". Each group matches individual circuits on individual controllers with individual sequences to beplayed when those circuits are triggered.
Only one musical sequence can be playing at any given time. Therefore, if a musical sequence from aninteractive group is triggered, any musical sequence that happens to already be playing will be stopped(for one exception to this, see the "Jukebox" type of interactive group, below).
Interactive groups cannot be used on LOR Enhanced networks. If you want to use an interactive group,in order to function during your show, it must be defined on a non-enhanced LOR network.
· Types of Interactive Groups· Jukebox· Soundboard· Magic Toy
· Choosing Sequences for a Group
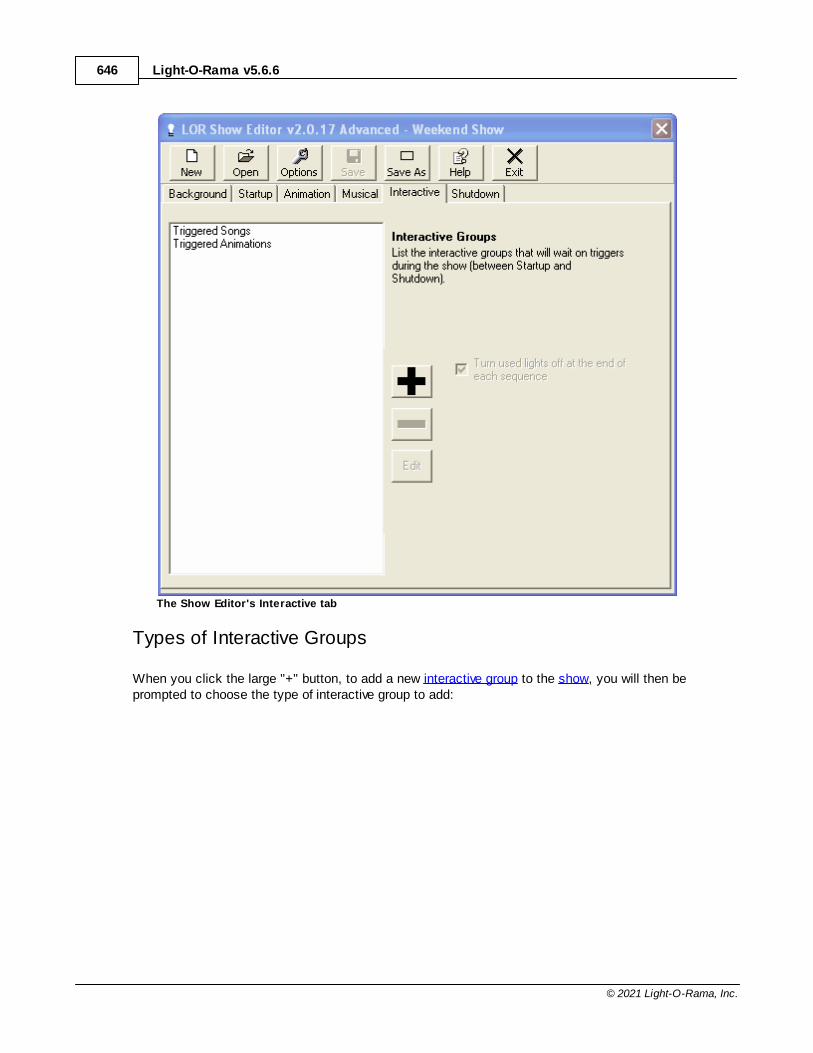
Light-O-Rama v5.6.6646
© 2021 Light-O-Rama, Inc.
The Show Editor's Interactive tab
Types of Interactive Groups
When you click the large "+" button, to add a new interactive group to the show, you will then beprompted to choose the type of interactive group to add:
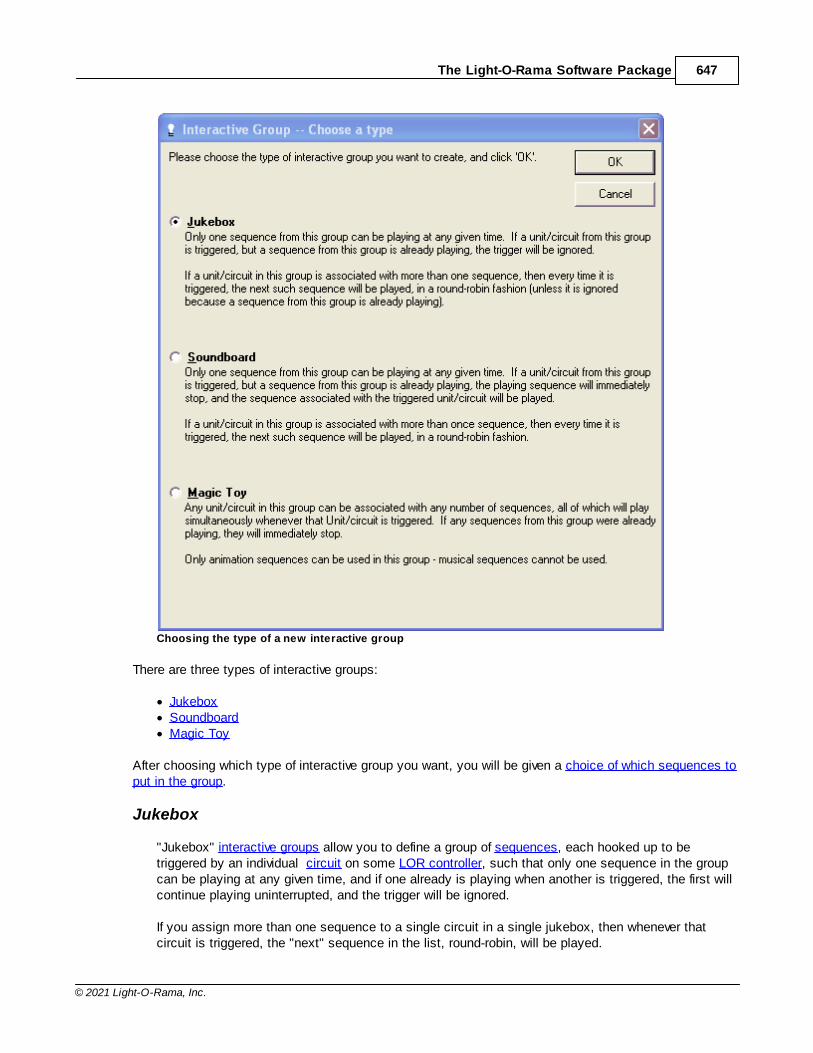
The Light-O-Rama Software Package 647
© 2021 Light-O-Rama, Inc.
Choosing the type of a new interactive group
There are three types of interactive groups:
· Jukebox· Soundboard· Magic Toy
After choosing which type of interactive group you want, you will be given a choice of which sequences toput in the group.
Jukebox
"Jukebox" interactive groups allow you to define a group of sequences, each hooked up to betriggered by an individual circuit on some LOR controller, such that only one sequence in the groupcan be playing at any given time, and if one already is playing when another is triggered, the first willcontinue playing uninterrupted, and the trigger will be ignored.
If you assign more than one sequence to a single circuit in a single jukebox, then whenever thatcircuit is triggered, the "next" sequence in the list, round-robin, will be played.
Light-O-Rama v5.6.6648
© 2021 Light-O-Rama, Inc.
Both musical sequences and animation sequences can be placed into a jukebox interactive group.
Soundboard
"Soundboard" interactive groups are similar to jukebox interactive groups in that only one sequencein the group can be playing at any given time. However, unlike jukebox interactive groups, triggeringa sequence while another sequence from the group is currently playing will cause the playingsequence to stop, and the triggered sequence to start.
If you assign more than one sequence to a single circuit in a single soundboard, then whenever thatcircuit is triggered, the "next" sequence in the list, round-robin, will be played.
Both musical sequences and animation sequences can be placed into a soundboard interactivegroup.
Magic Toy
"Magic toy" interactive groups allow you to set up a group of sequences such that many of them canbe started simultaneously by a single trigger. Any sequences already playing from the group will bestopped when the new set is started.
Only animation sequences (as opposed to musical sequences) can be placed into a magic toyinteractive group.
Choosing Sequences for a Group
After you choose the type of your new interactive group, or upon editing an existing group, you will beshown a list of the triggers for the group:
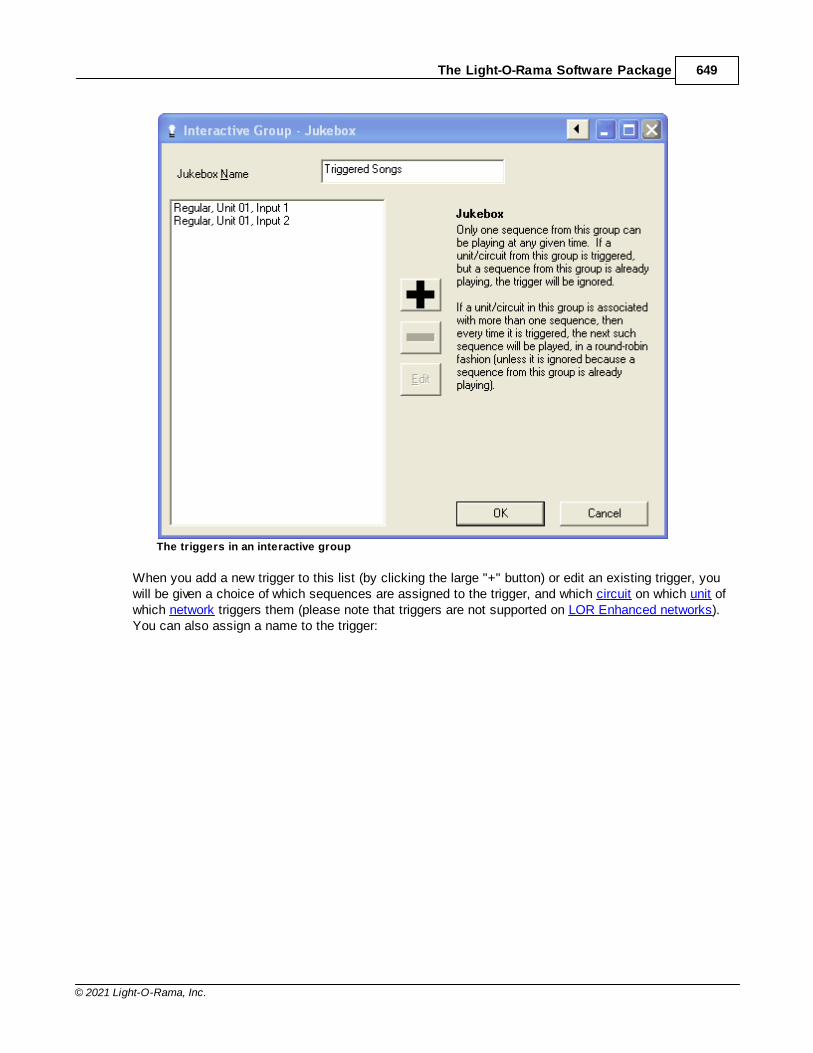
The Light-O-Rama Software Package 649
© 2021 Light-O-Rama, Inc.
The triggers in an interactive group
When you add a new trigger to this list (by clicking the large "+" button) or edit an existing trigger, youwill be given a choice of which sequences are assigned to the trigger, and which circuit on which unit ofwhich network triggers them (please note that triggers are not supported on LOR Enhanced networks). You can also assign a name to the trigger:
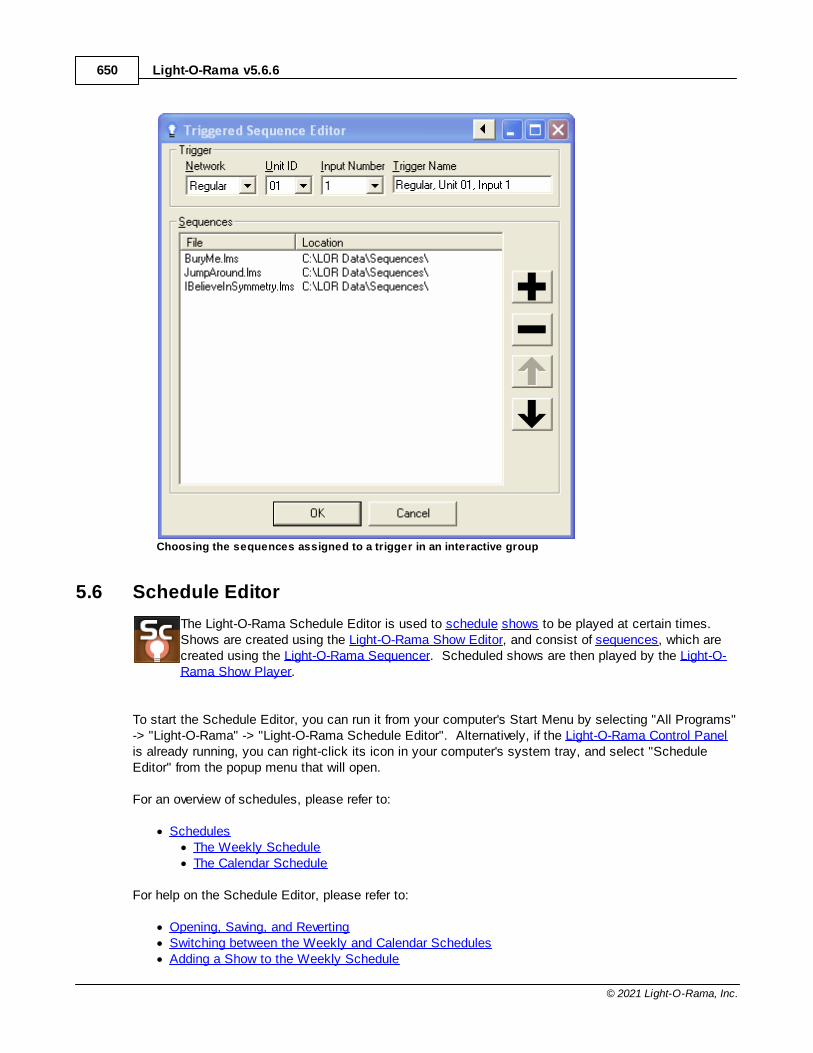
Light-O-Rama v5.6.6650
© 2021 Light-O-Rama, Inc.
Choosing the sequences assigned to a trigger in an interactive group
5.6 Schedule Editor
The Light-O-Rama Schedule Editor is used to schedule shows to be played at certain times. Shows are created using the Light-O-Rama Show Editor, and consist of sequences, which arecreated using the Light-O-Rama Sequencer. Scheduled shows are then played by the Light-O-Rama Show Player.
To start the Schedule Editor, you can run it from your computer's Start Menu by selecting "All Programs"-> "Light-O-Rama" -> "Light-O-Rama Schedule Editor". Alternatively, if the Light-O-Rama Control Panelis already running, you can right-click its icon in your computer's system tray, and select "ScheduleEditor" from the popup menu that will open.
For an overview of schedules, please refer to:
· Schedules· The Weekly Schedule· The Calendar Schedule
For help on the Schedule Editor, please refer to:
· Opening, Saving, and Reverting· Switching between the Weekly and Calendar Schedules· Adding a Show to the Weekly Schedule
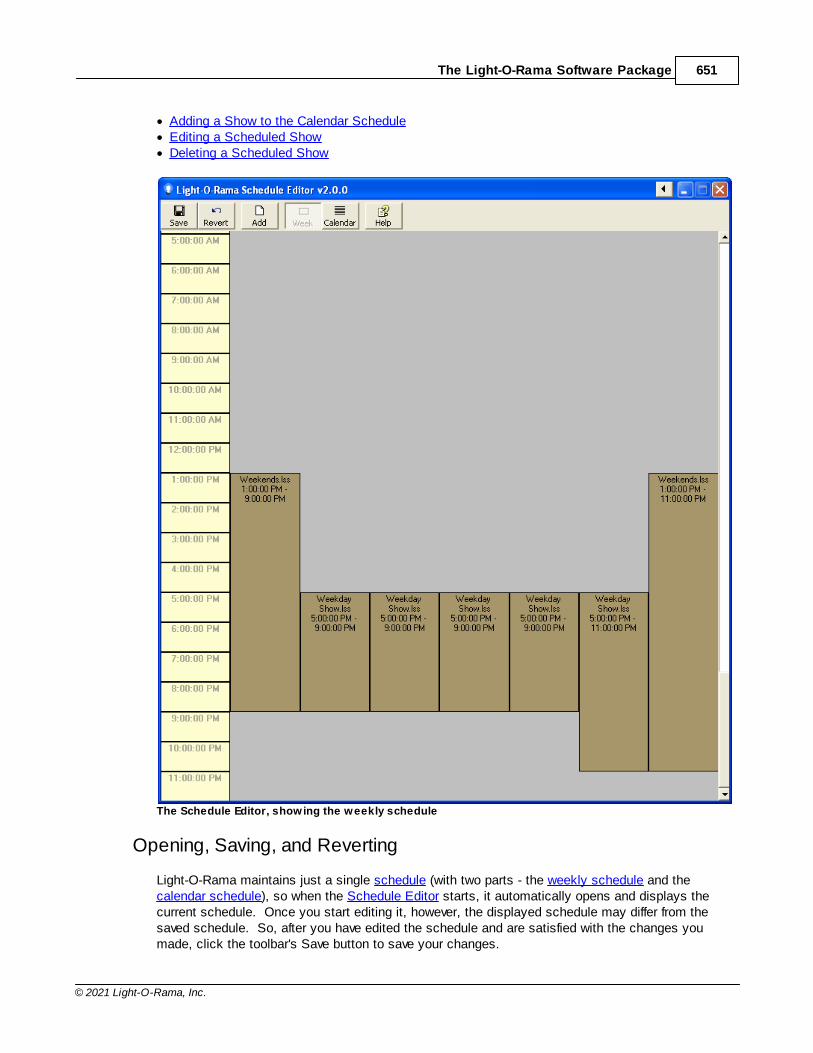
The Light-O-Rama Software Package 651
© 2021 Light-O-Rama, Inc.
· Adding a Show to the Calendar Schedule· Editing a Scheduled Show· Deleting a Scheduled Show
The Schedule Editor, showing the weekly schedule
Opening, Saving, and Reverting
Light-O-Rama maintains just a single schedule (with two parts - the weekly schedule and thecalendar schedule), so when the Schedule Editor starts, it automatically opens and displays thecurrent schedule. Once you start editing it, however, the displayed schedule may differ from thesaved schedule. So, after you have edited the schedule and are satisfied with the changes youmade, click the toolbar's Save button to save your changes.
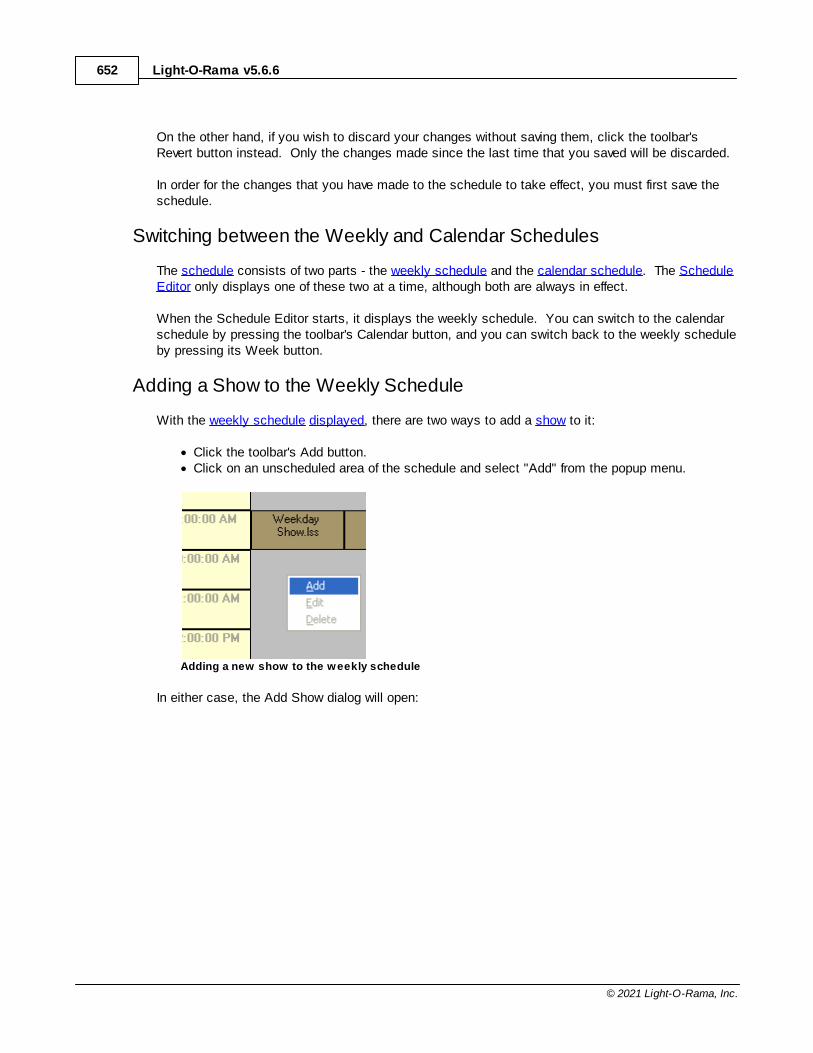
Light-O-Rama v5.6.6652
© 2021 Light-O-Rama, Inc.
On the other hand, if you wish to discard your changes without saving them, click the toolbar'sRevert button instead. Only the changes made since the last time that you saved will be discarded.
In order for the changes that you have made to the schedule to take effect, you must first save theschedule.
Switching between the Weekly and Calendar Schedules
The schedule consists of two parts - the weekly schedule and the calendar schedule. The ScheduleEditor only displays one of these two at a time, although both are always in effect.
When the Schedule Editor starts, it displays the weekly schedule. You can switch to the calendarschedule by pressing the toolbar's Calendar button, and you can switch back to the weekly scheduleby pressing its Week button.
Adding a Show to the Weekly Schedule
With the weekly schedule displayed, there are two ways to add a show to it:
· Click the toolbar's Add button.· Click on an unscheduled area of the schedule and select "Add" from the popup menu.
Adding a new show to the weekly schedule
In either case, the Add Show dialog will open:
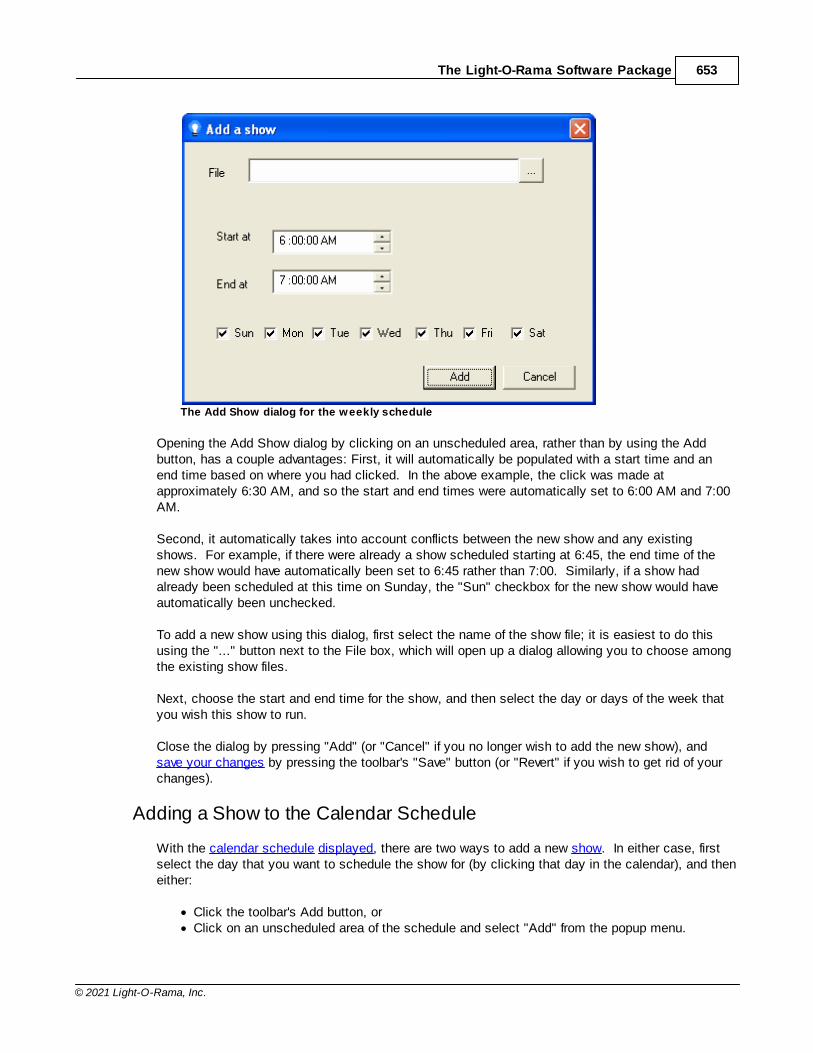
The Light-O-Rama Software Package 653
© 2021 Light-O-Rama, Inc.
The Add Show dialog for the weekly schedule
Opening the Add Show dialog by clicking on an unscheduled area, rather than by using the Addbutton, has a couple advantages: First, it will automatically be populated with a start time and anend time based on where you had clicked. In the above example, the click was made atapproximately 6:30 AM, and so the start and end times were automatically set to 6:00 AM and 7:00AM.
Second, it automatically takes into account conflicts between the new show and any existingshows. For example, if there were already a show scheduled starting at 6:45, the end time of thenew show would have automatically been set to 6:45 rather than 7:00. Similarly, if a show hadalready been scheduled at this time on Sunday, the "Sun" checkbox for the new show would haveautomatically been unchecked.
To add a new show using this dialog, first select the name of the show file; it is easiest to do thisusing the "..." button next to the File box, which will open up a dialog allowing you to choose amongthe existing show files.
Next, choose the start and end time for the show, and then select the day or days of the week thatyou wish this show to run.
Close the dialog by pressing "Add" (or "Cancel" if you no longer wish to add the new show), andsave your changes by pressing the toolbar's "Save" button (or "Revert" if you wish to get rid of yourchanges).
Adding a Show to the Calendar Schedule
With the calendar schedule displayed, there are two ways to add a new show. In either case, firstselect the day that you want to schedule the show for (by clicking that day in the calendar), and theneither:
· Click the toolbar's Add button, or· Click on an unscheduled area of the schedule and select "Add" from the popup menu.
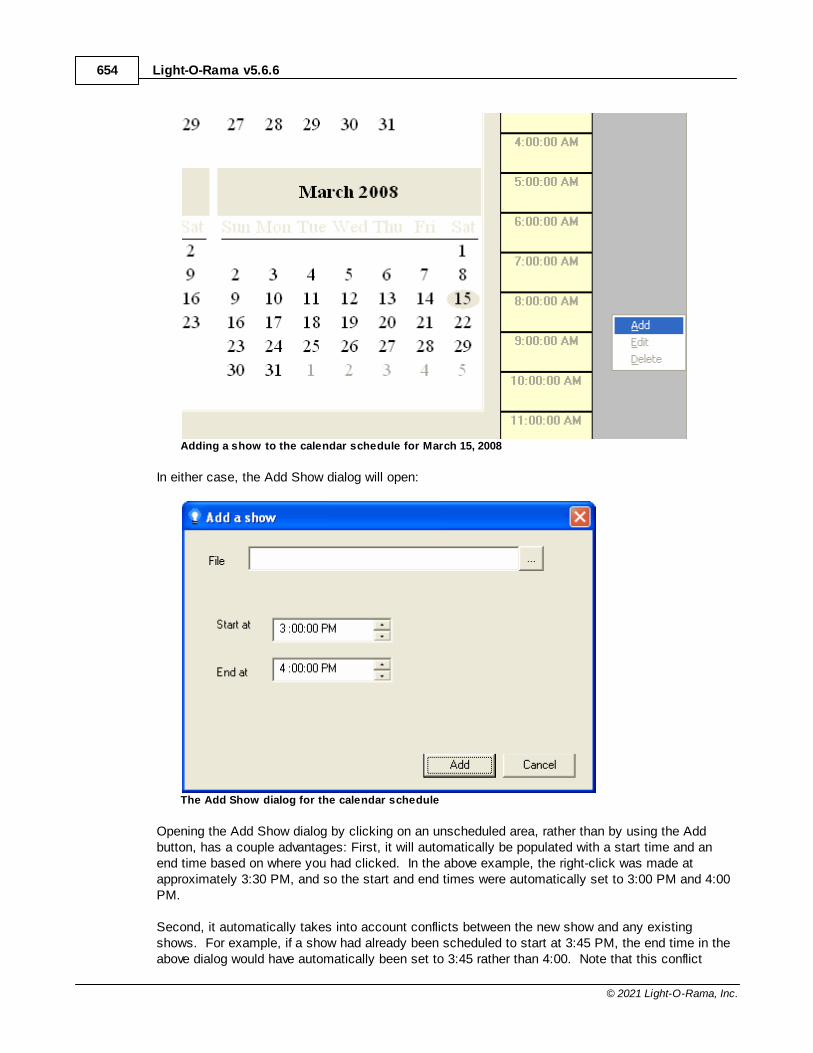
Light-O-Rama v5.6.6654
© 2021 Light-O-Rama, Inc.
Adding a show to the calendar schedule for March 15, 2008
In either case, the Add Show dialog will open:
The Add Show dialog for the calendar schedule
Opening the Add Show dialog by clicking on an unscheduled area, rather than by using the Addbutton, has a couple advantages: First, it will automatically be populated with a start time and anend time based on where you had clicked. In the above example, the right-click was made atapproximately 3:30 PM, and so the start and end times were automatically set to 3:00 PM and 4:00PM.
Second, it automatically takes into account conflicts between the new show and any existingshows. For example, if a show had already been scheduled to start at 3:45 PM, the end time in theabove dialog would have automatically been set to 3:45 rather than 4:00. Note that this conflict
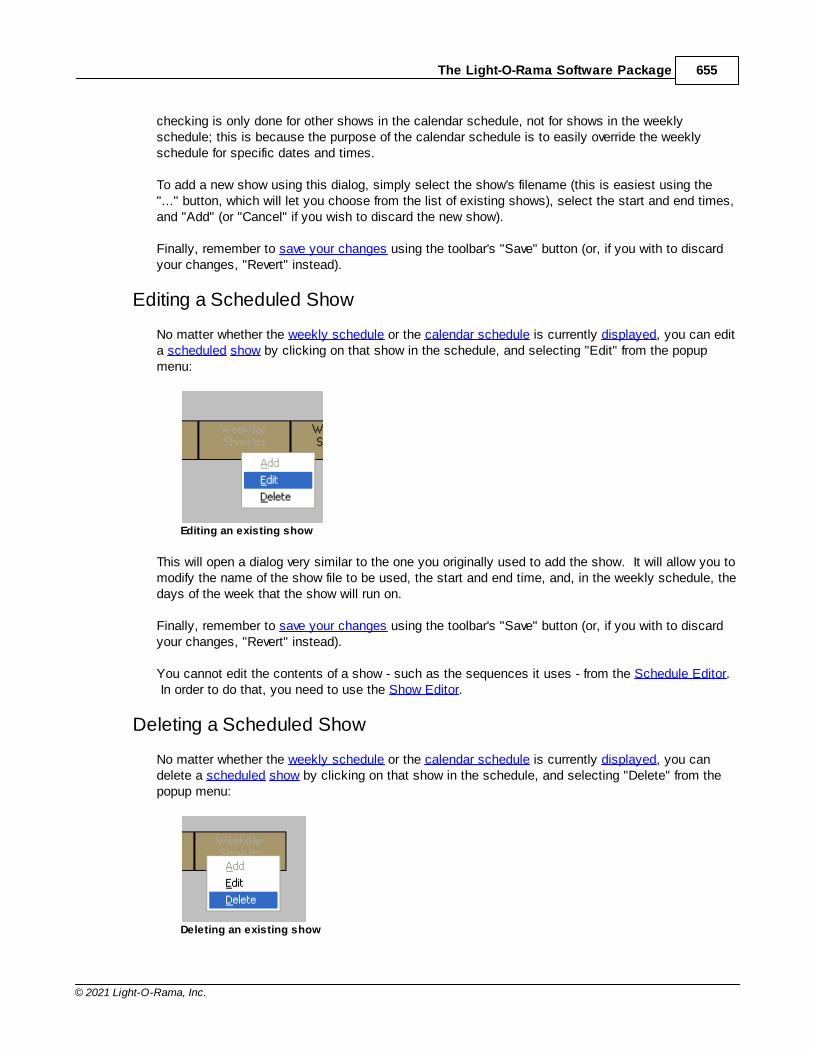
The Light-O-Rama Software Package 655
© 2021 Light-O-Rama, Inc.
checking is only done for other shows in the calendar schedule, not for shows in the weeklyschedule; this is because the purpose of the calendar schedule is to easily override the weeklyschedule for specific dates and times.
To add a new show using this dialog, simply select the show's filename (this is easiest using the"..." button, which will let you choose from the list of existing shows), select the start and end times,and "Add" (or "Cancel" if you wish to discard the new show).
Finally, remember to save your changes using the toolbar's "Save" button (or, if you with to discardyour changes, "Revert" instead).
Editing a Scheduled Show
No matter whether the weekly schedule or the calendar schedule is currently displayed, you can edita scheduled show by clicking on that show in the schedule, and selecting "Edit" from the popupmenu:
Editing an existing show
This will open a dialog very similar to the one you originally used to add the show. It will allow you tomodify the name of the show file to be used, the start and end time, and, in the weekly schedule, thedays of the week that the show will run on.
Finally, remember to save your changes using the toolbar's "Save" button (or, if you with to discardyour changes, "Revert" instead).
You cannot edit the contents of a show - such as the sequences it uses - from the Schedule Editor. In order to do that, you need to use the Show Editor.
Deleting a Scheduled Show
No matter whether the weekly schedule or the calendar schedule is currently displayed, you candelete a scheduled show by clicking on that show in the schedule, and selecting "Delete" from thepopup menu:
Deleting an existing show
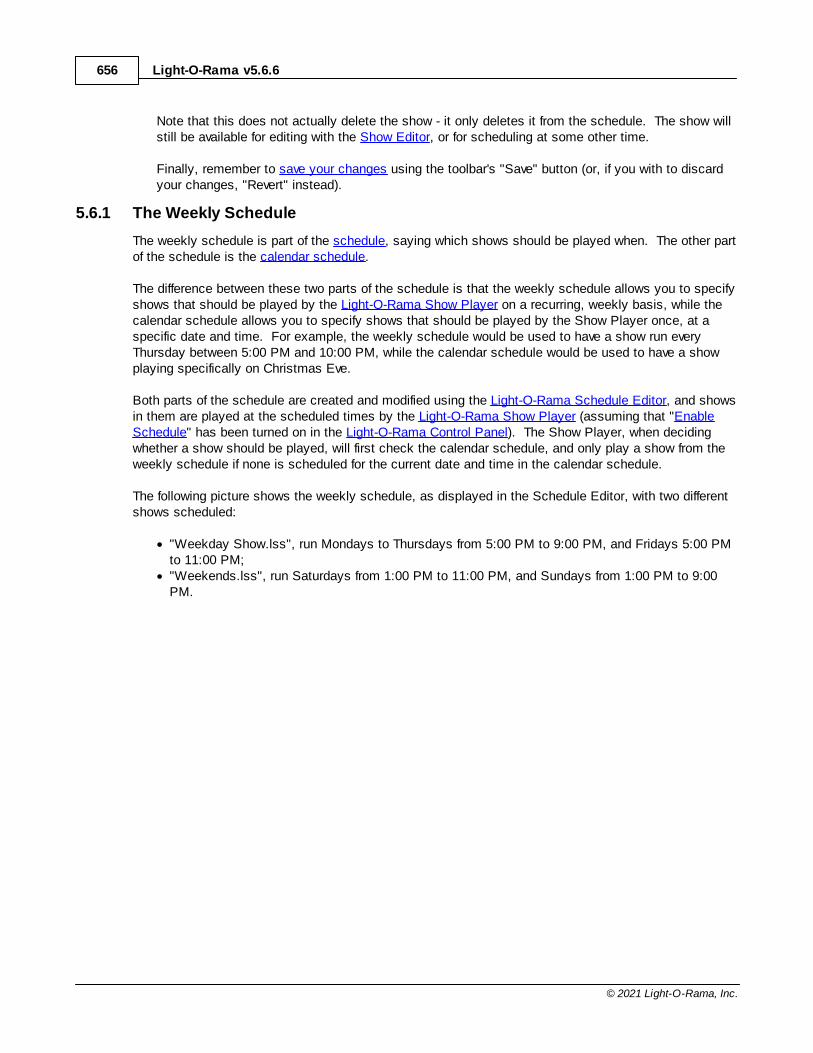
Light-O-Rama v5.6.6656
© 2021 Light-O-Rama, Inc.
Note that this does not actually delete the show - it only deletes it from the schedule. The show willstill be available for editing with the Show Editor, or for scheduling at some other time.
Finally, remember to save your changes using the toolbar's "Save" button (or, if you with to discardyour changes, "Revert" instead).
5.6.1 The Weekly Schedule
The weekly schedule is part of the schedule, saying which shows should be played when. The other partof the schedule is the calendar schedule.
The difference between these two parts of the schedule is that the weekly schedule allows you to specifyshows that should be played by the Light-O-Rama Show Player on a recurring, weekly basis, while thecalendar schedule allows you to specify shows that should be played by the Show Player once, at aspecific date and time. For example, the weekly schedule would be used to have a show run everyThursday between 5:00 PM and 10:00 PM, while the calendar schedule would be used to have a showplaying specifically on Christmas Eve.
Both parts of the schedule are created and modified using the Light-O-Rama Schedule Editor, and showsin them are played at the scheduled times by the Light-O-Rama Show Player (assuming that "EnableSchedule" has been turned on in the Light-O-Rama Control Panel). The Show Player, when decidingwhether a show should be played, will first check the calendar schedule, and only play a show from theweekly schedule if none is scheduled for the current date and time in the calendar schedule.
The following picture shows the weekly schedule, as displayed in the Schedule Editor, with two differentshows scheduled:
· "Weekday Show.lss", run Mondays to Thursdays from 5:00 PM to 9:00 PM, and Fridays 5:00 PMto 11:00 PM;
· "Weekends.lss", run Saturdays from 1:00 PM to 11:00 PM, and Sundays from 1:00 PM to 9:00PM.
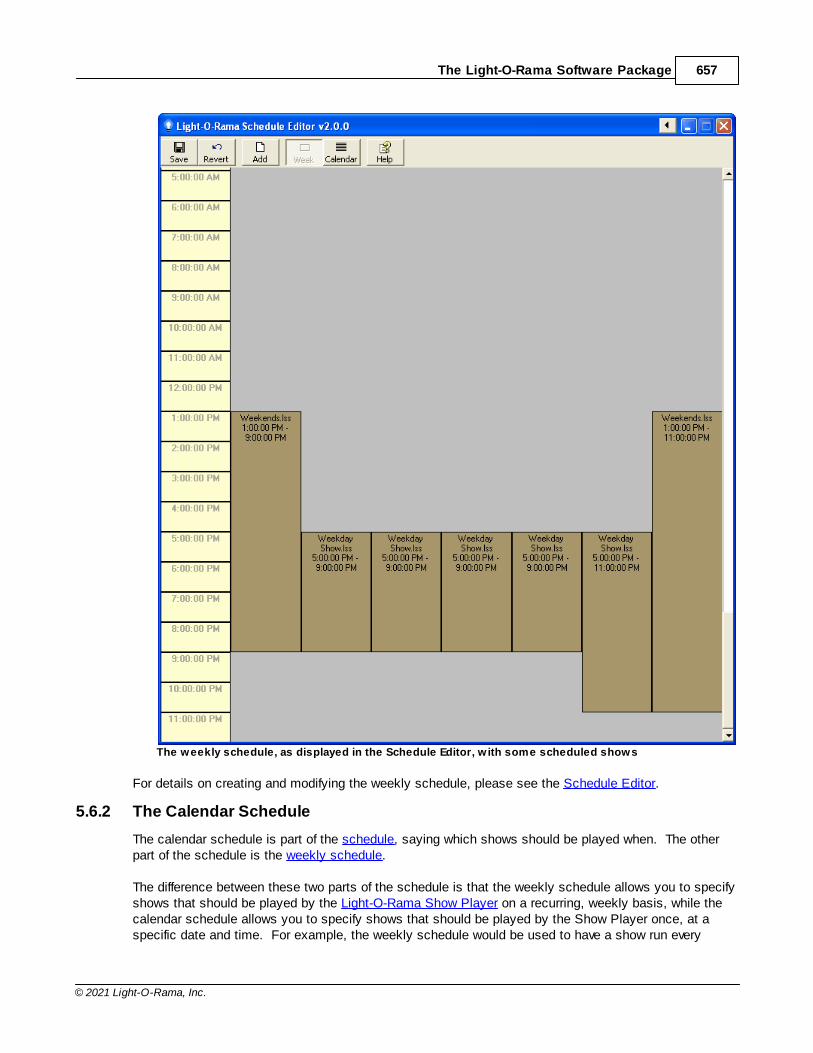
The Light-O-Rama Software Package 657
© 2021 Light-O-Rama, Inc.
The weekly schedule, as displayed in the Schedule Editor, w ith some scheduled shows
For details on creating and modifying the weekly schedule, please see the Schedule Editor.
5.6.2 The Calendar Schedule
The calendar schedule is part of the schedule, saying which shows should be played when. The otherpart of the schedule is the weekly schedule.
The difference between these two parts of the schedule is that the weekly schedule allows you to specifyshows that should be played by the Light-O-Rama Show Player on a recurring, weekly basis, while thecalendar schedule allows you to specify shows that should be played by the Show Player once, at aspecific date and time. For example, the weekly schedule would be used to have a show run every
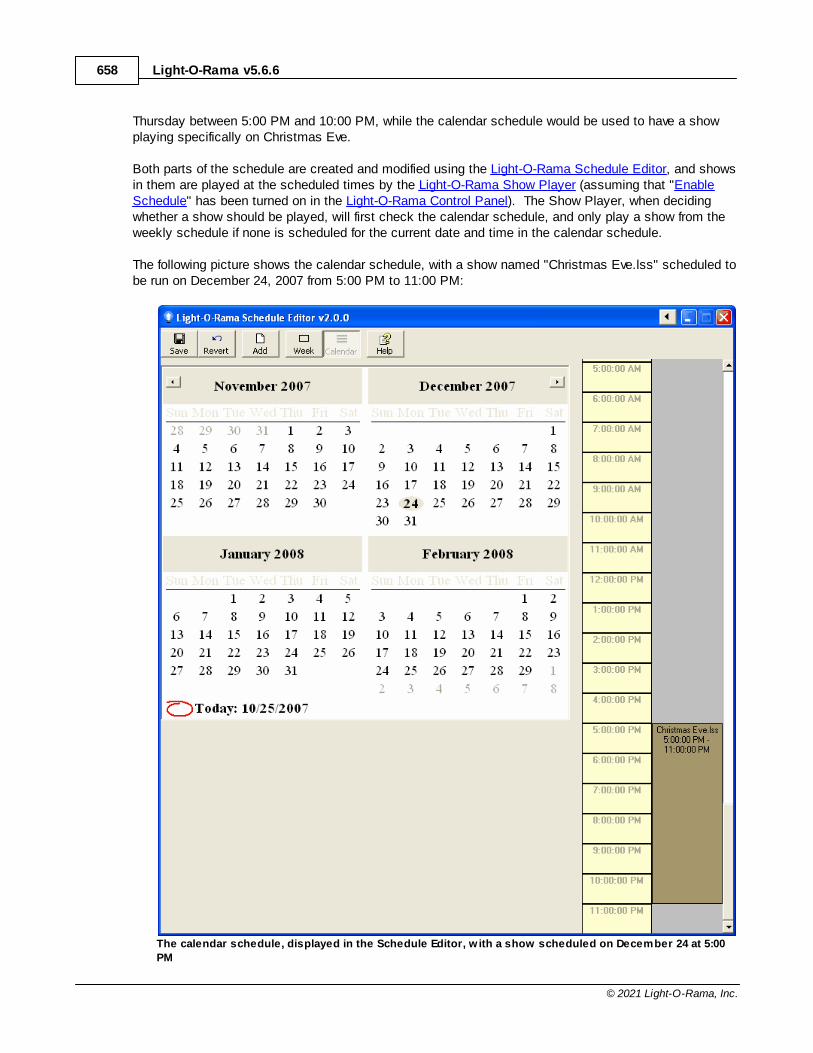
Light-O-Rama v5.6.6658
© 2021 Light-O-Rama, Inc.
Thursday between 5:00 PM and 10:00 PM, while the calendar schedule would be used to have a showplaying specifically on Christmas Eve.
Both parts of the schedule are created and modified using the Light-O-Rama Schedule Editor, and showsin them are played at the scheduled times by the Light-O-Rama Show Player (assuming that "EnableSchedule" has been turned on in the Light-O-Rama Control Panel). The Show Player, when decidingwhether a show should be played, will first check the calendar schedule, and only play a show from theweekly schedule if none is scheduled for the current date and time in the calendar schedule.
The following picture shows the calendar schedule, with a show named "Christmas Eve.lss" scheduled tobe run on December 24, 2007 from 5:00 PM to 11:00 PM:
The calendar schedule, displayed in the Schedule Editor, w ith a show scheduled on December 24 at 5:00
PM
The Light-O-Rama Software Package 659
© 2021 Light-O-Rama, Inc.
For details on creating and modifying the calendar schedule, please see the Schedule Editor.
5.7 LOR Hub
Light-O-Rama Hub (or just Hub for short) is the new location in the LOR Software for all things ShowRelated. LOR Hub will eventually take over all functions of the LOR Show Player, LOR Show Scheduler,Simple Show Builder, and SD Card creation - both simple and advanced.
Hub also enables our new 'MotionPak' technology. When purchasing sequences from the LORSequence Store, you'll also be able to purchase optional additional programming for things like SingingFaces, Pixel Trees, and a host of other LOR Created props. LORHub will then combine the MotionPakwith your sequence to automatically customize it.
Hub is also one of the first fully internet integrated programs from LOR. Hub can help you findsequences and MotionPaks, as well as be dynamically updated to support new props in the future.
Hub is going to be continuously updated for the next several release cycles. Currently LOR Hubsupports the following: All Simple Show Builder functionality (Simple Show Builder has been removed),MotionPak Functionality, new SD Card show functionality.
Hub is not just a replacement for existing LOR programs as it also aims to improve on their functionalityand ease of use. For example in this release is the ability to now EDIT SD cards without the need to re-create an entire show. This allows you to move sequences around on an SD card show, remove some,add new, and update existing ones from the computer. Cards must have been created with Hub or anewer version of Hardware Utility to be edited - not all Hardware Utility MP3 functions are currentlysupported.
Where possible, we try to make things simple and familiar. For example if you have been creatingshows that run from a computer and now wish to start using an MP3 director, you will already be familiarwith how to add sequences and schedule the show.
5.7.1 Creating Shows and SD Cards
Hub is your your one-stop-shop for creating and scheduling all shows - computer and MP3 Directorbased. Currently Hub has replaced all the functionality of the old Simple Show Builder as well as theMP3 tab of the Hardware Utility. If you have previously used SSB or Hardware Utility to create yourshow, you should begin using Hub.
5.7.1.1 Run from Your Computer
For building simple Computer based shows, like the ones that were previously created by Simple ShowBuilder, use the HUB Computer Show Builder. For complex computer-based shows, continue to use theLOR Show Editor and LOR Show Sceduler (which can be accessed from buttons within Hub). In a futurerelease, Hub will incorporate all functions of Show Editor and Show Scheduler.
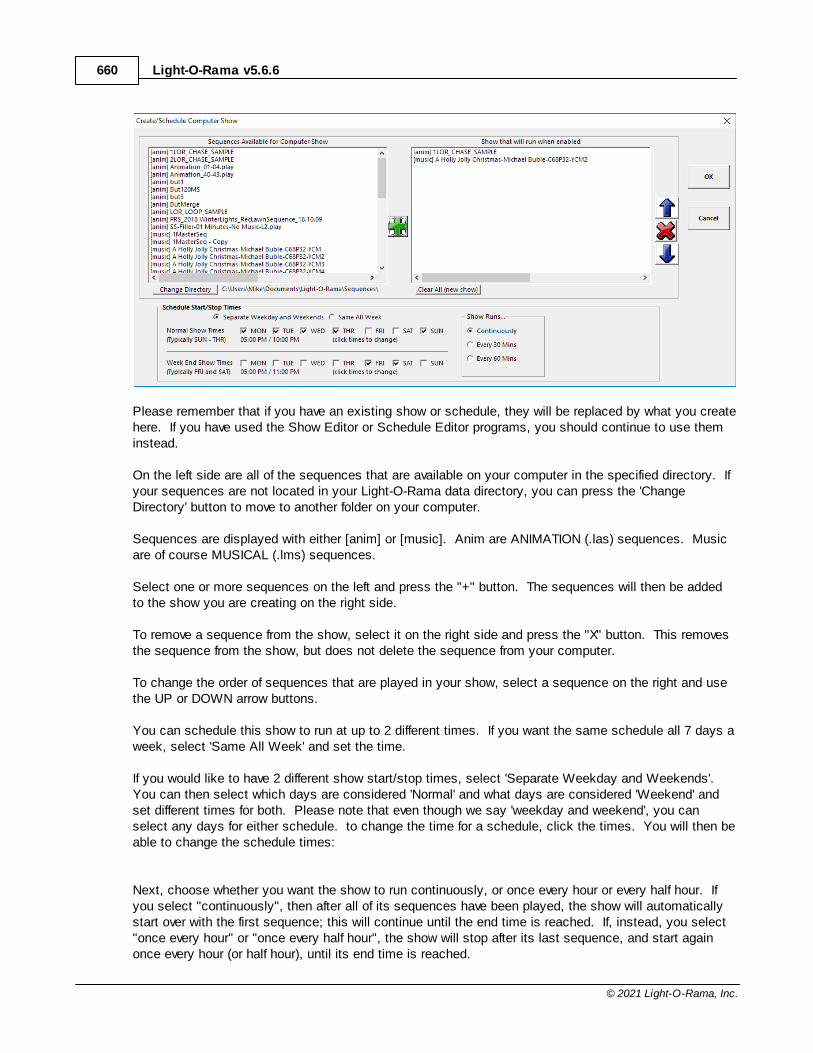
Light-O-Rama v5.6.6660
© 2021 Light-O-Rama, Inc.
Please remember that if you have an existing show or schedule, they will be replaced by what you createhere. If you have used the Show Editor or Schedule Editor programs, you should continue to use theminstead.
On the left side are all of the sequences that are available on your computer in the specified directory. Ifyour sequences are not located in your Light-O-Rama data directory, you can press the 'ChangeDirectory' button to move to another folder on your computer.
Sequences are displayed with either [anim] or [music]. Anim are ANIMATION (.las) sequences. Musicare of course MUSICAL (.lms) sequences.
Select one or more sequences on the left and press the "+" button. The sequences will then be addedto the show you are creating on the right side.
To remove a sequence from the show, select it on the right side and press the "X" button. This removesthe sequence from the show, but does not delete the sequence from your computer.
To change the order of sequences that are played in your show, select a sequence on the right and usethe UP or DOWN arrow buttons.
You can schedule this show to run at up to 2 different times. If you want the same schedule all 7 days aweek, select 'Same All Week' and set the time.
If you would like to have 2 different show start/stop times, select 'Separate Weekday and Weekends'. You can then select which days are considered 'Normal' and what days are considered 'Weekend' andset different times for both. Please note that even though we say 'weekday and weekend', you canselect any days for either schedule. to change the time for a schedule, click the times. You will then beable to change the schedule times:
Next, choose whether you want the show to run continuously, or once every hour or every half hour. Ifyou select "continuously", then after all of its sequences have been played, the show will automaticallystart over with the first sequence; this will continue until the end time is reached. If, instead, you select"once every hour" or "once every half hour", the show will stop after its last sequence, and start againonce every hour (or half hour), until its end time is reached.
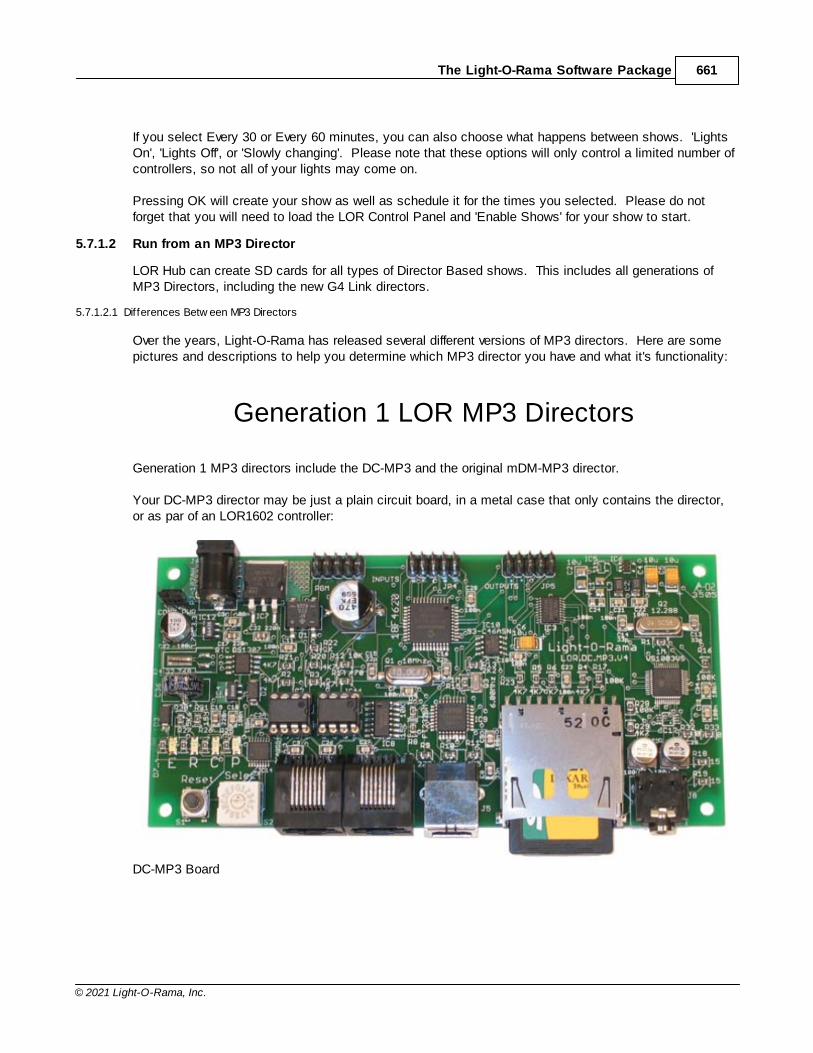
The Light-O-Rama Software Package 661
© 2021 Light-O-Rama, Inc.
If you select Every 30 or Every 60 minutes, you can also choose what happens between shows. 'LightsOn', 'Lights Off', or 'Slowly changing'. Please note that these options will only control a limited number ofcontrollers, so not all of your lights may come on.
Pressing OK will create your show as well as schedule it for the times you selected. Please do notforget that you will need to load the LOR Control Panel and 'Enable Shows' for your show to start.
5.7.1.2 Run from an MP3 Director
LOR Hub can create SD cards for all types of Director Based shows. This includes all generations ofMP3 Directors, including the new G4 Link directors.
5.7.1.2.1 Differences Betw een MP3 Directors
Over the years, Light-O-Rama has released several different versions of MP3 directors. Here are somepictures and descriptions to help you determine which MP3 director you have and what it's functionality:
Generation 1 LOR MP3 Directors
Generation 1 MP3 directors include the DC-MP3 and the original mDM-MP3 director.
Your DC-MP3 director may be just a plain circuit board, in a metal case that only contains the director,or as par of an LOR1602 controller:
DC-MP3 Board
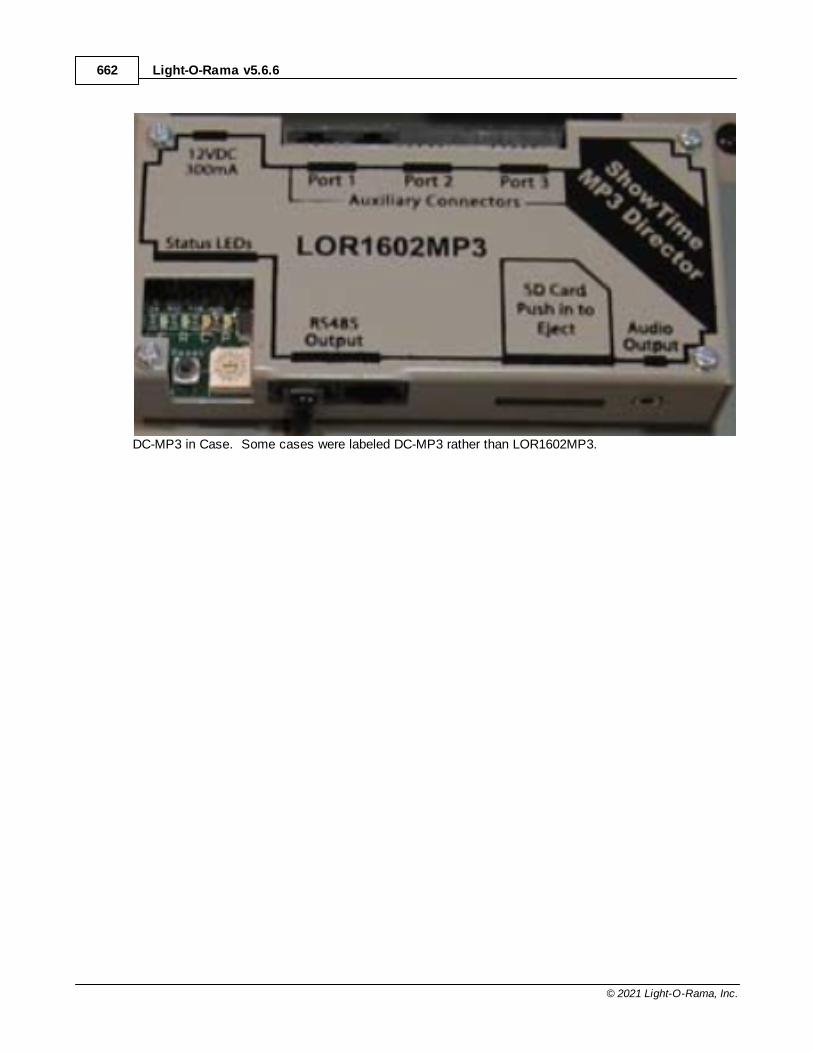
Light-O-Rama v5.6.6662
© 2021 Light-O-Rama, Inc.
DC-MP3 in Case. Some cases were labeled DC-MP3 rather than LOR1602MP3.
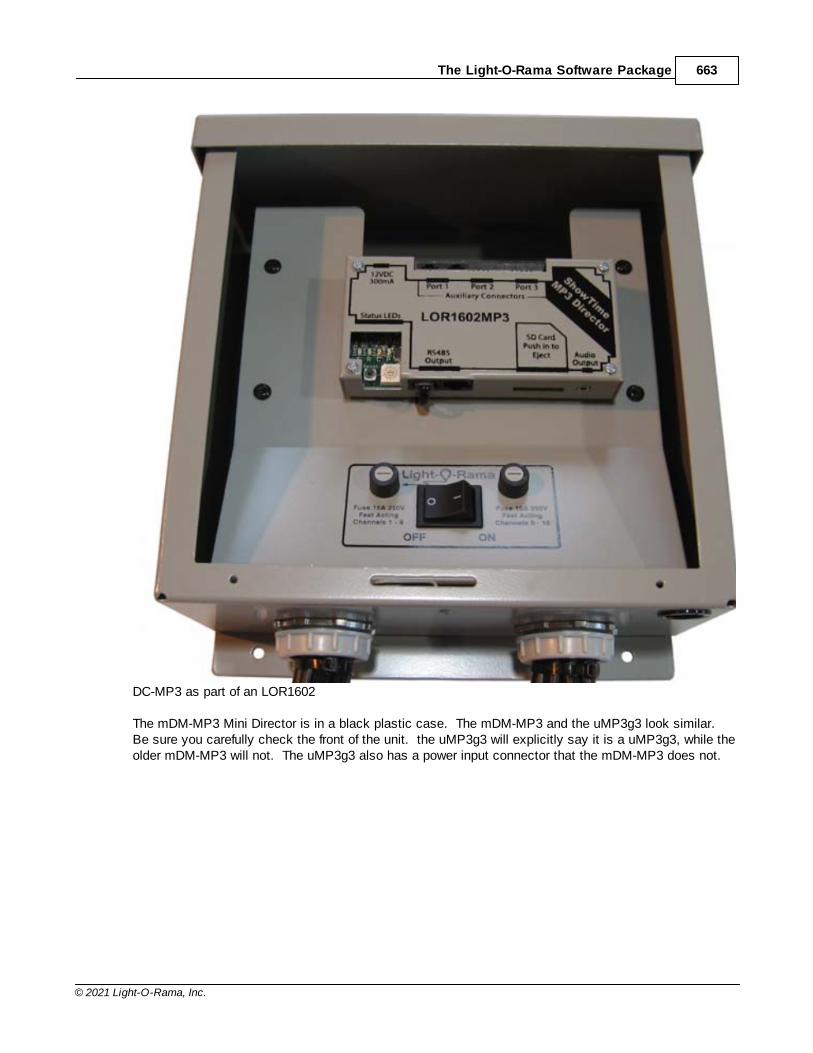
The Light-O-Rama Software Package 663
© 2021 Light-O-Rama, Inc.
DC-MP3 as part of an LOR1602
The mDM-MP3 Mini Director is in a black plastic case. The mDM-MP3 and the uMP3g3 look similar. Be sure you carefully check the front of the unit. the uMP3g3 will explicitly say it is a uMP3g3, while theolder mDM-MP3 will not. The uMP3g3 also has a power input connector that the mDM-MP3 does not.
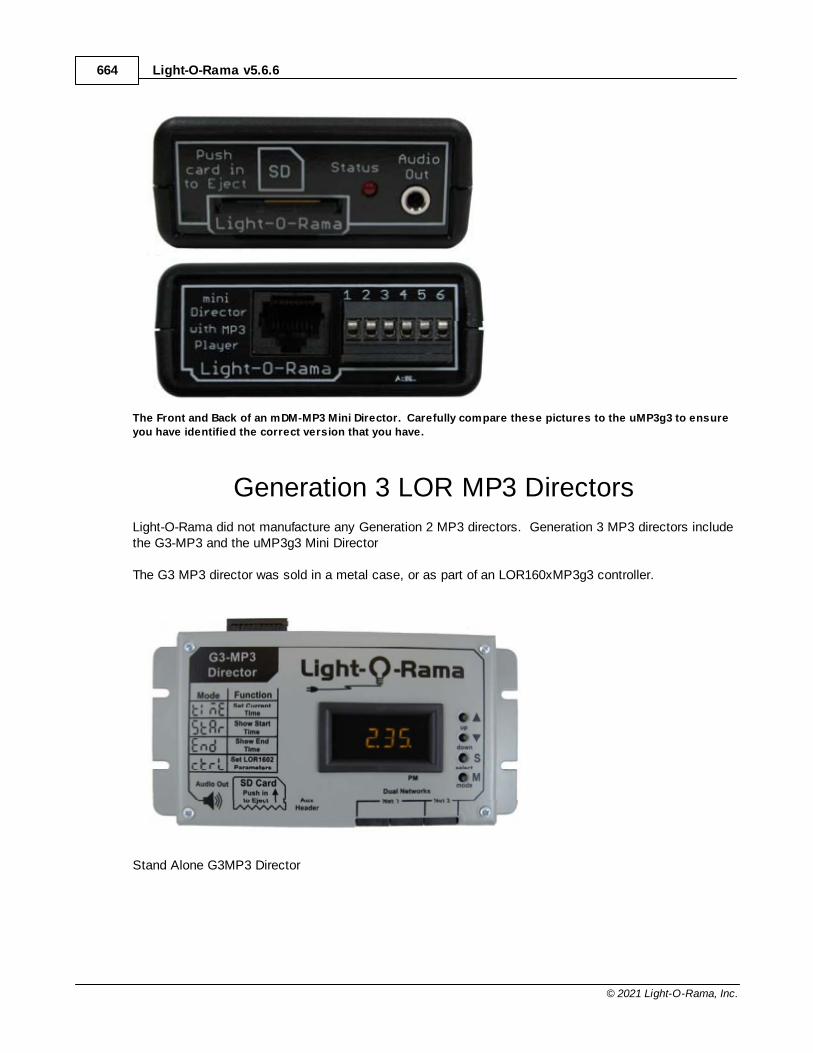
Light-O-Rama v5.6.6664
© 2021 Light-O-Rama, Inc.
The Front and Back of an mDM-MP3 Mini Director. Carefully compare these pictures to the uMP3g3 to ensure
you have identified the correct version that you have.
Generation 3 LOR MP3 Directors
Light-O-Rama did not manufacture any Generation 2 MP3 directors. Generation 3 MP3 directors includethe G3-MP3 and the uMP3g3 Mini Director
The G3 MP3 director was sold in a metal case, or as part of an LOR160xMP3g3 controller.
Stand Alone G3MP3 Director
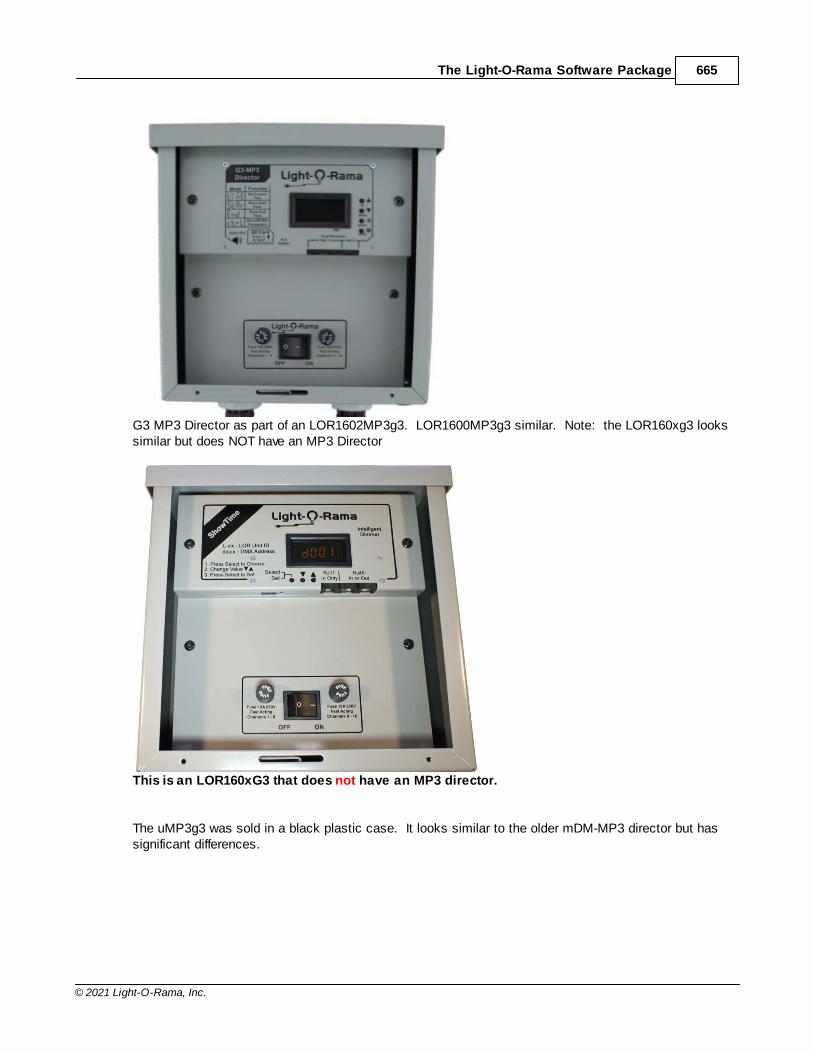
The Light-O-Rama Software Package 665
© 2021 Light-O-Rama, Inc.
G3 MP3 Director as part of an LOR1602MP3g3. LOR1600MP3g3 similar. Note: the LOR160xg3 lookssimilar but does NOT have an MP3 Director
This is an LOR160xG3 that does not have an MP3 director.
The uMP3g3 was sold in a black plastic case. It looks similar to the older mDM-MP3 director but hassignificant differences.
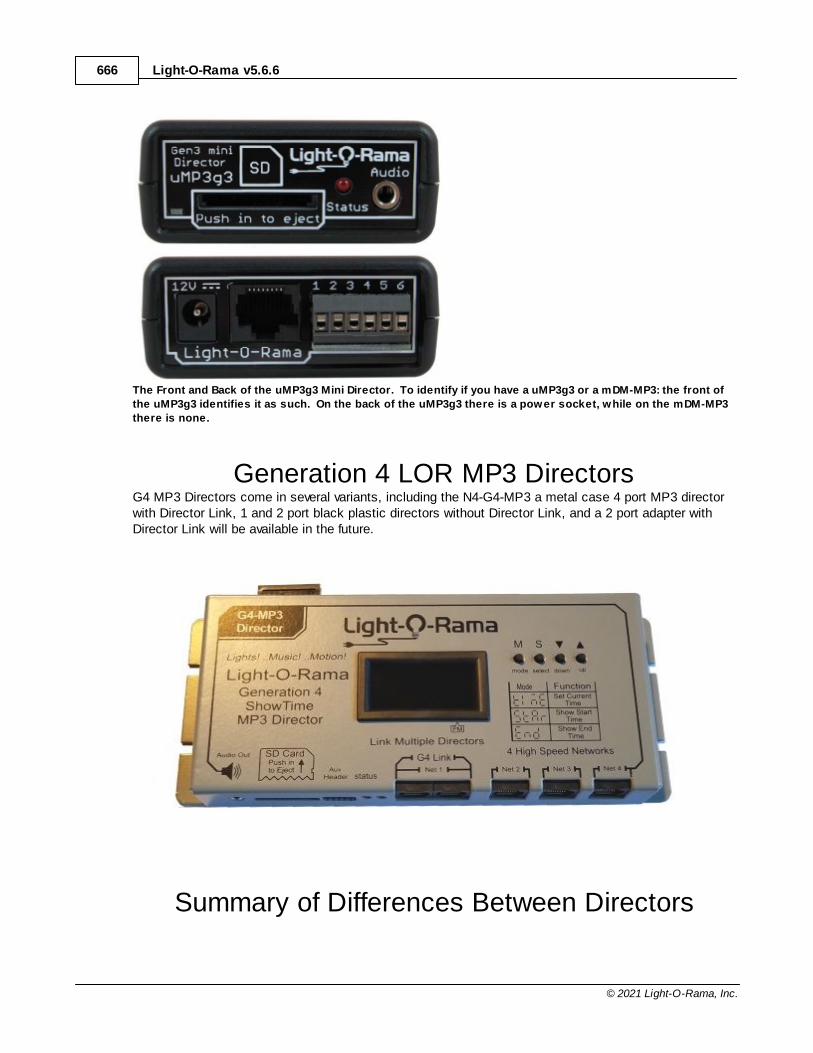
Light-O-Rama v5.6.6666
© 2021 Light-O-Rama, Inc.
The Front and Back of the uMP3g3 Mini Director. To identify if you have a uMP3g3 or a mDM-MP3: the front of
the uMP3g3 identifies it as such. On the back of the uMP3g3 there is a power socket, while on the mDM-MP3
there is none.
Generation 4 LOR MP3 DirectorsG4 MP3 Directors come in several variants, including the N4-G4-MP3 a metal case 4 port MP3 directorwith Director Link, 1 and 2 port black plastic directors without Director Link, and a 2 port adapter withDirector Link will be available in the future.
Summary of Differences Between Directors
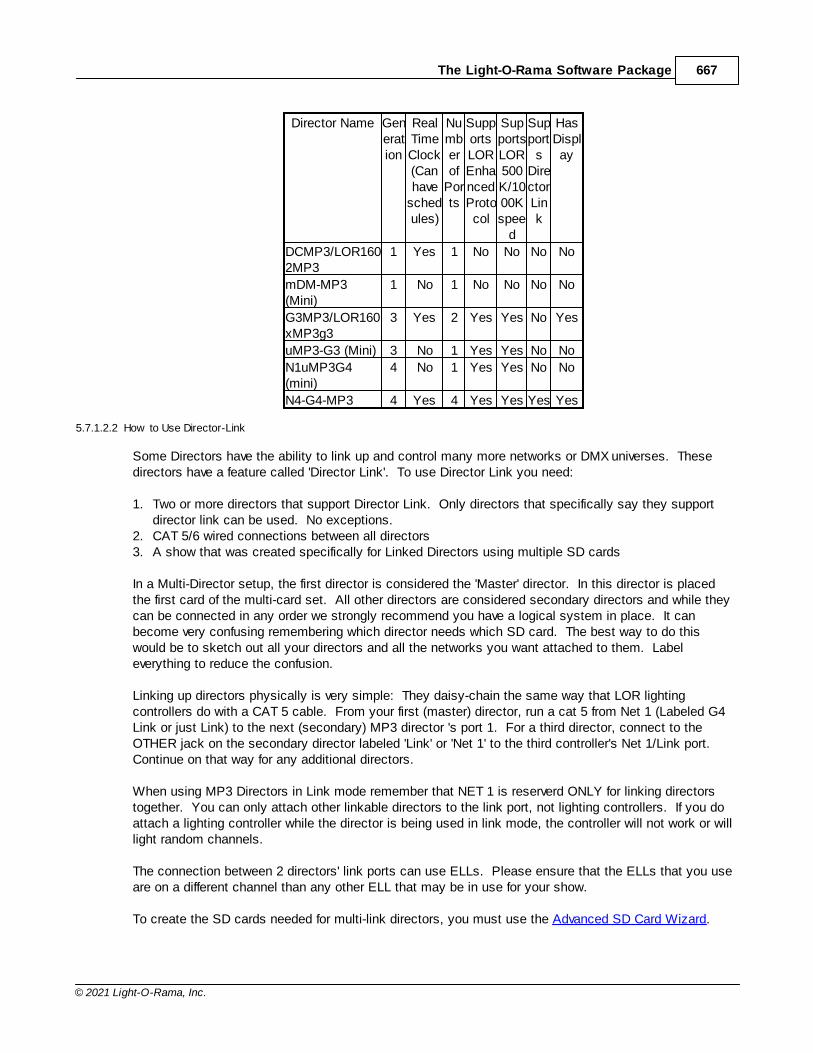
The Light-O-Rama Software Package 667
© 2021 Light-O-Rama, Inc.
Director Name Generation
RealTimeClock(Canhave
schedules)
Numberof
Ports
SupportsLOREnhancedProtocol
SupportsLOR500K/1000Kspee
d
Support
sDirectorLink
HasDisplay
DCMP3/LOR1602MP3
1 Yes 1 No No No No
mDM-MP3(Mini)
1 No 1 No No No No
G3MP3/LOR160xMP3g3
3 Yes 2 Yes Yes No Yes
uMP3-G3 (Mini) 3 No 1 Yes Yes No No
N1uMP3G4(mini)
4 No 1 Yes Yes No No
N4-G4-MP3 4 Yes 4 Yes Yes Yes Yes
5.7.1.2.2 How to Use Director-Link
Some Directors have the ability to link up and control many more networks or DMX universes. Thesedirectors have a feature called 'Director Link'. To use Director Link you need:
1. Two or more directors that support Director Link. Only directors that specifically say they supportdirector link can be used. No exceptions.
2. CAT 5/6 wired connections between all directors3. A show that was created specifically for Linked Directors using multiple SD cards
In a Multi-Director setup, the first director is considered the 'Master' director. In this director is placedthe first card of the multi-card set. All other directors are considered secondary directors and while theycan be connected in any order we strongly recommend you have a logical system in place. It canbecome very confusing remembering which director needs which SD card. The best way to do thiswould be to sketch out all your directors and all the networks you want attached to them. Labeleverything to reduce the confusion.
Linking up directors physically is very simple: They daisy-chain the same way that LOR lightingcontrollers do with a CAT 5 cable. From your first (master) director, run a cat 5 from Net 1 (Labeled G4Link or just Link) to the next (secondary) MP3 director 's port 1. For a third director, connect to theOTHER jack on the secondary director labeled 'Link' or 'Net 1' to the third controller's Net 1/Link port. Continue on that way for any additional directors.
When using MP3 Directors in Link mode remember that NET 1 is reserverd ONLY for linking directorstogether. You can only attach other linkable directors to the link port, not lighting controllers. If you doattach a lighting controller while the director is being used in link mode, the controller will not work or willlight random channels.
The connection between 2 directors' link ports can use ELLs. Please ensure that the ELLs that you useare on a different channel than any other ELL that may be in use for your show.
To create the SD cards needed for multi-link directors, you must use the Advanced SD Card Wizard.
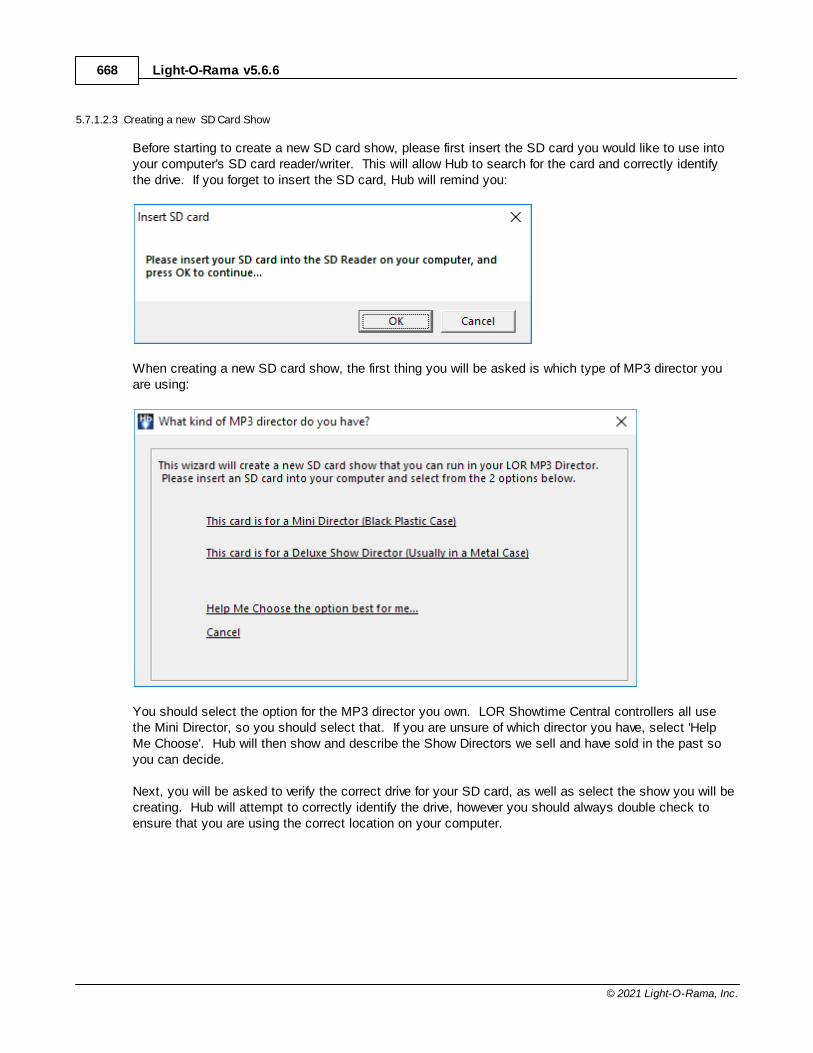
Light-O-Rama v5.6.6668
© 2021 Light-O-Rama, Inc.
5.7.1.2.3 Creating a new SD Card Show
Before starting to create a new SD card show, please first insert the SD card you would like to use intoyour computer's SD card reader/writer. This will allow Hub to search for the card and correctly identifythe drive. If you forget to insert the SD card, Hub will remind you:
When creating a new SD card show, the first thing you will be asked is which type of MP3 director youare using:
You should select the option for the MP3 director you own. LOR Showtime Central controllers all usethe Mini Director, so you should select that. If you are unsure of which director you have, select 'HelpMe Choose'. Hub will then show and describe the Show Directors we sell and have sold in the past soyou can decide.
Next, you will be asked to verify the correct drive for your SD card, as well as select the show you will becreating. Hub will attempt to correctly identify the drive, however you should always double check toensure that you are using the correct location on your computer.
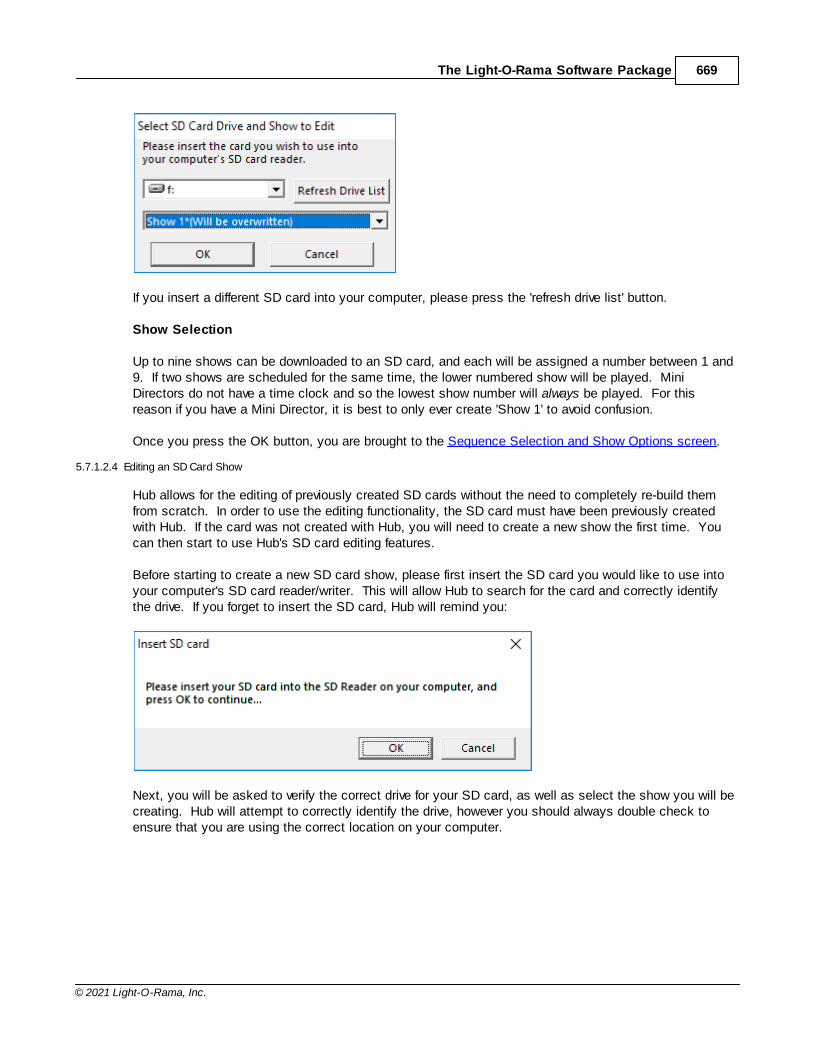
The Light-O-Rama Software Package 669
© 2021 Light-O-Rama, Inc.
If you insert a different SD card into your computer, please press the 'refresh drive list' button.
Show Selection
Up to nine shows can be downloaded to an SD card, and each will be assigned a number between 1 and9. If two shows are scheduled for the same time, the lower numbered show will be played. MiniDirectors do not have a time clock and so the lowest show number will always be played. For thisreason if you have a Mini Director, it is best to only ever create 'Show 1' to avoid confusion.
Once you press the OK button, you are brought to the Sequence Selection and Show Options screen.
5.7.1.2.4 Editing an SD Card Show
Hub allows for the editing of previously created SD cards without the need to completely re-build themfrom scratch. In order to use the editing functionality, the SD card must have been previously createdwith Hub. If the card was not created with Hub, you will need to create a new show the first time. Youcan then start to use Hub's SD card editing features.
Before starting to create a new SD card show, please first insert the SD card you would like to use intoyour computer's SD card reader/writer. This will allow Hub to search for the card and correctly identifythe drive. If you forget to insert the SD card, Hub will remind you:
Next, you will be asked to verify the correct drive for your SD card, as well as select the show you will becreating. Hub will attempt to correctly identify the drive, however you should always double check toensure that you are using the correct location on your computer.
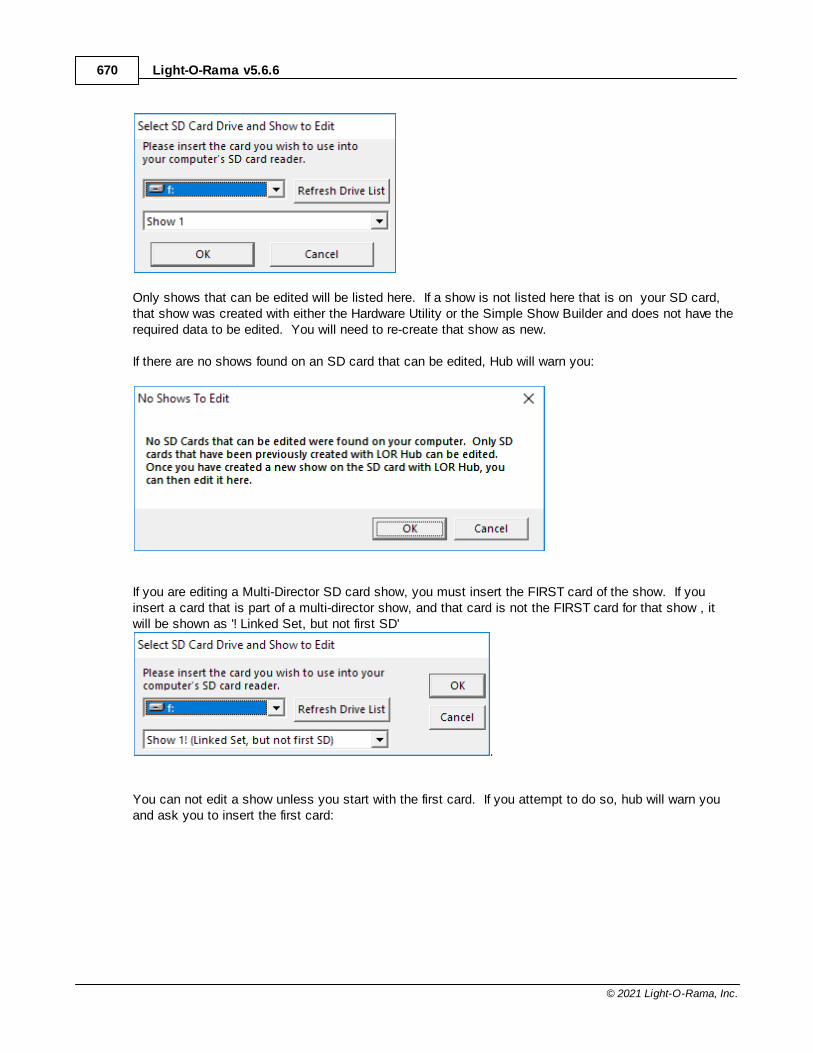
Light-O-Rama v5.6.6670
© 2021 Light-O-Rama, Inc.
Only shows that can be edited will be listed here. If a show is not listed here that is on your SD card,that show was created with either the Hardware Utility or the Simple Show Builder and does not have therequired data to be edited. You will need to re-create that show as new.
If there are no shows found on an SD card that can be edited, Hub will warn you:
If you are editing a Multi-Director SD card show, you must insert the FIRST card of the show. If youinsert a card that is part of a multi-director show, and that card is not the FIRST card for that show , itwill be shown as '! Linked Set, but not first SD'
.
You can not edit a show unless you start with the first card. If you attempt to do so, hub will warn youand ask you to insert the first card:
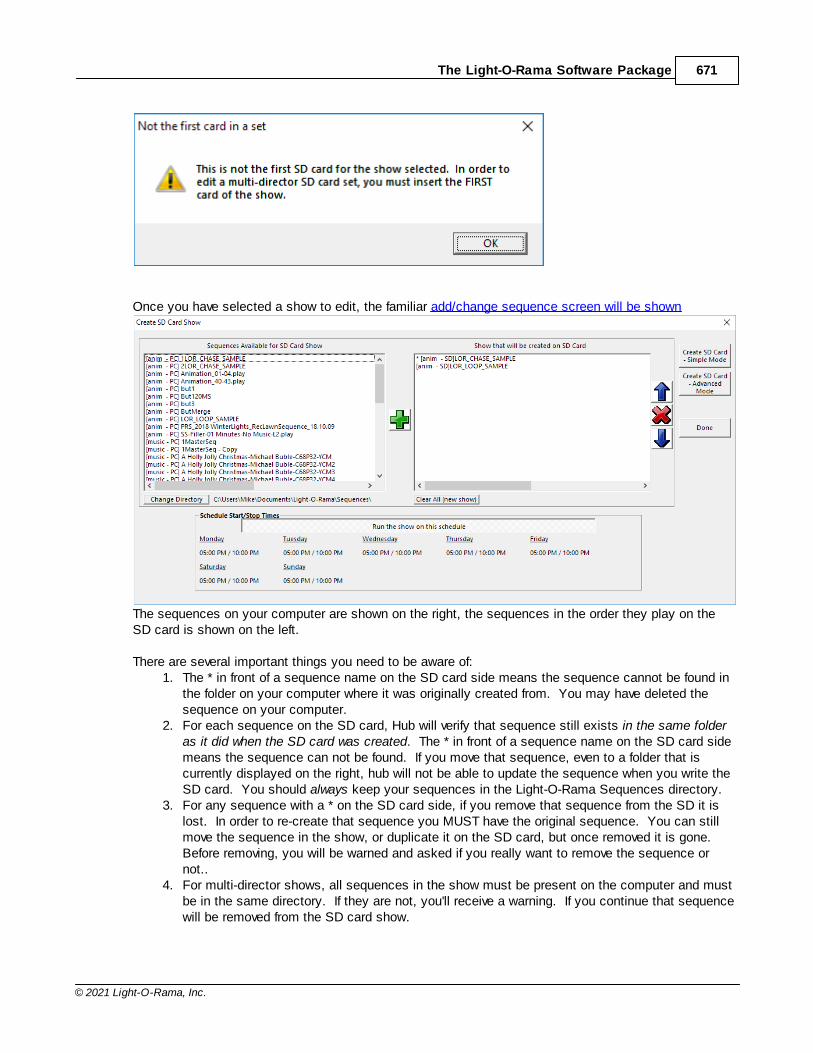
The Light-O-Rama Software Package 671
© 2021 Light-O-Rama, Inc.
Once you have selected a show to edit, the familiar add/change sequence screen will be shown
The sequences on your computer are shown on the right, the sequences in the order they play on theSD card is shown on the left.
There are several important things you need to be aware of:1. The * in front of a sequence name on the SD card side means the sequence cannot be found in
the folder on your computer where it was originally created from. You may have deleted thesequence on your computer.
2. For each sequence on the SD card, Hub will verify that sequence still exists in the same folderas it did when the SD card was created. The * in front of a sequence name on the SD card sidemeans the sequence can not be found. If you move that sequence, even to a folder that iscurrently displayed on the right, hub will not be able to update the sequence when you write theSD card. You should always keep your sequences in the Light-O-Rama Sequences directory.
3. For any sequence with a * on the SD card side, if you remove that sequence from the SD it islost. In order to re-create that sequence you MUST have the original sequence. You can stillmove the sequence in the show, or duplicate it on the SD card, but once removed it is gone. Before removing, you will be warned and asked if you really want to remove the sequence ornot..
4. For multi-director shows, all sequences in the show must be present on the computer and mustbe in the same directory. If they are not, you'll receive a warning. If you continue that sequencewill be removed from the SD card show.
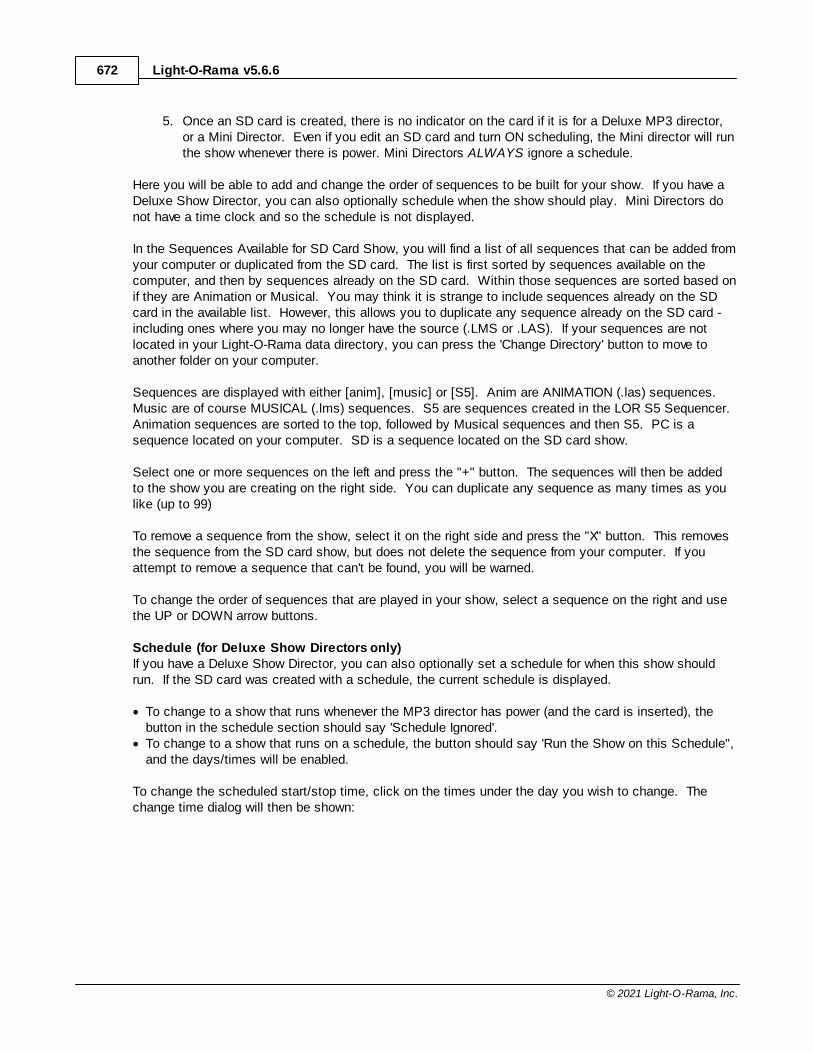
Light-O-Rama v5.6.6672
© 2021 Light-O-Rama, Inc.
5. Once an SD card is created, there is no indicator on the card if it is for a Deluxe MP3 director,or a Mini Director. Even if you edit an SD card and turn ON scheduling, the Mini director will runthe show whenever there is power. Mini Directors ALWAYS ignore a schedule.
Here you will be able to add and change the order of sequences to be built for your show. If you have aDeluxe Show Director, you can also optionally schedule when the show should play. Mini Directors donot have a time clock and so the schedule is not displayed.
In the Sequences Available for SD Card Show, you will find a list of all sequences that can be added fromyour computer or duplicated from the SD card. The list is first sorted by sequences available on thecomputer, and then by sequences already on the SD card. Within those sequences are sorted based onif they are Animation or Musical. You may think it is strange to include sequences already on the SDcard in the available list. However, this allows you to duplicate any sequence already on the SD card -including ones where you may no longer have the source (.LMS or .LAS). If your sequences are notlocated in your Light-O-Rama data directory, you can press the 'Change Directory' button to move toanother folder on your computer.
Sequences are displayed with either [anim], [music] or [S5]. Anim are ANIMATION (.las) sequences. Music are of course MUSICAL (.lms) sequences. S5 are sequences created in the LOR S5 Sequencer.Animation sequences are sorted to the top, followed by Musical sequences and then S5. PC is asequence located on your computer. SD is a sequence located on the SD card show.
Select one or more sequences on the left and press the "+" button. The sequences will then be addedto the show you are creating on the right side. You can duplicate any sequence as many times as youlike (up to 99)
To remove a sequence from the show, select it on the right side and press the "X" button. This removesthe sequence from the SD card show, but does not delete the sequence from your computer. If youattempt to remove a sequence that can't be found, you will be warned.
To change the order of sequences that are played in your show, select a sequence on the right and usethe UP or DOWN arrow buttons.
Schedule (for Deluxe Show Directors only)If you have a Deluxe Show Director, you can also optionally set a schedule for when this show shouldrun. If the SD card was created with a schedule, the current schedule is displayed.
· To change to a show that runs whenever the MP3 director has power (and the card is inserted), thebutton in the schedule section should say 'Schedule Ignored'.
· To change to a show that runs on a schedule, the button should say 'Run the Show on this Schedule",and the days/times will be enabled.
To change the scheduled start/stop time, click on the times under the day you wish to change. Thechange time dialog will then be shown:
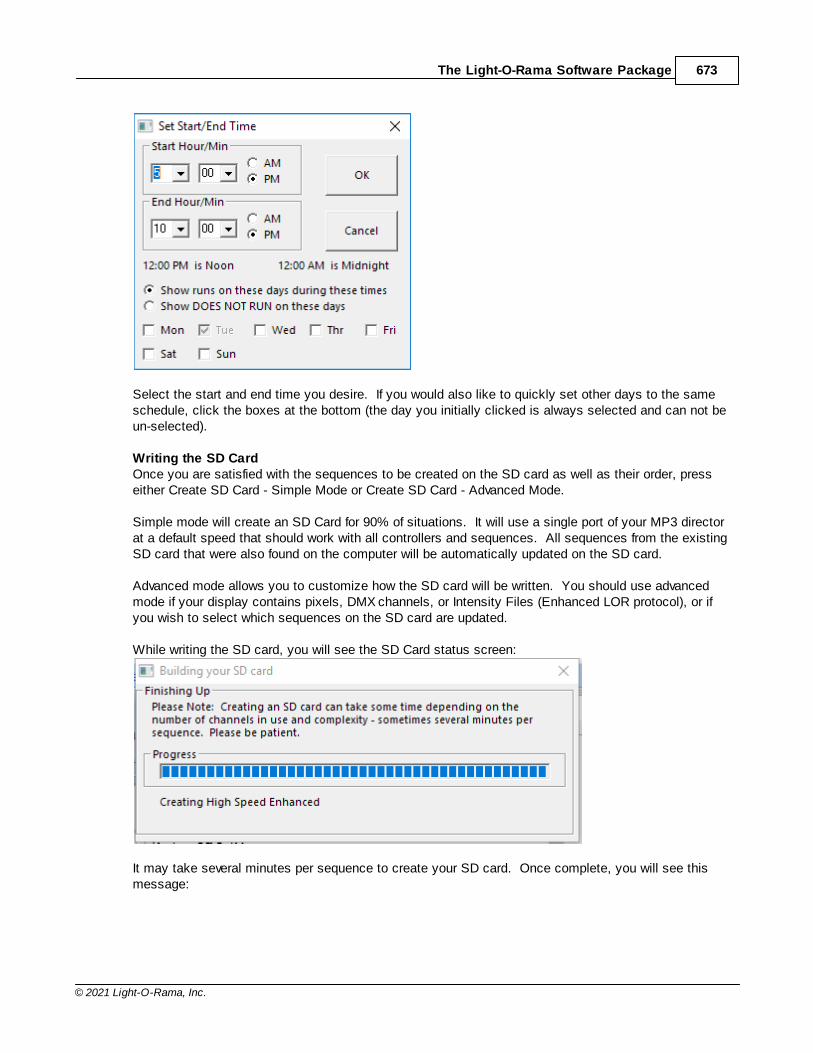
The Light-O-Rama Software Package 673
© 2021 Light-O-Rama, Inc.
Select the start and end time you desire. If you would also like to quickly set other days to the sameschedule, click the boxes at the bottom (the day you initially clicked is always selected and can not beun-selected).
Writing the SD CardOnce you are satisfied with the sequences to be created on the SD card as well as their order, presseither Create SD Card - Simple Mode or Create SD Card - Advanced Mode.
Simple mode will create an SD Card for 90% of situations. It will use a single port of your MP3 directorat a default speed that should work with all controllers and sequences. All sequences from the existingSD card that were also found on the computer will be automatically updated on the SD card.
Advanced mode allows you to customize how the SD card will be written. You should use advancedmode if your display contains pixels, DMX channels, or Intensity Files (Enhanced LOR protocol), or ifyou wish to select which sequences on the SD card are updated.
While writing the SD card, you will see the SD Card status screen:
It may take several minutes per sequence to create your SD card. Once complete, you will see thismessage:
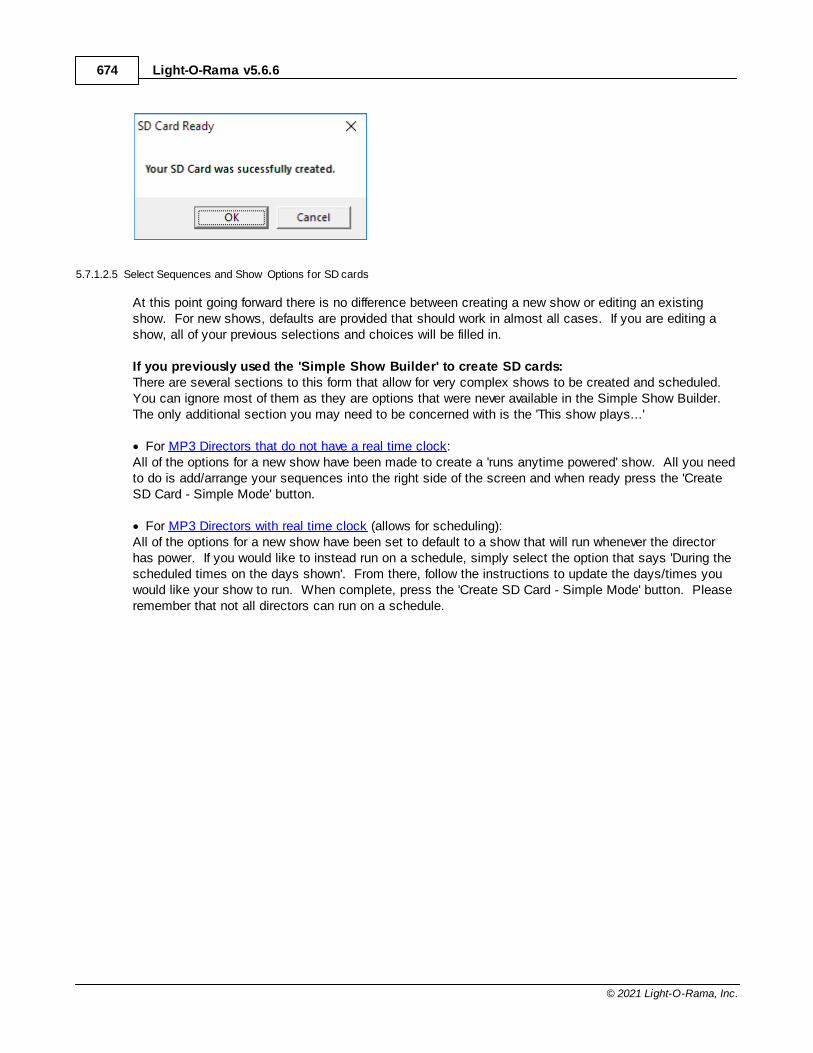
Light-O-Rama v5.6.6674
© 2021 Light-O-Rama, Inc.
5.7.1.2.5 Select Sequences and Show Options for SD cards
At this point going forward there is no difference between creating a new show or editing an existingshow. For new shows, defaults are provided that should work in almost all cases. If you are editing ashow, all of your previous selections and choices will be filled in.
If you previously used the 'Simple Show Builder' to create SD cards:There are several sections to this form that allow for very complex shows to be created and scheduled. You can ignore most of them as they are options that were never available in the Simple Show Builder. The only additional section you may need to be concerned with is the 'This show plays...'
· For MP3 Directors that do not have a real time clock:All of the options for a new show have been made to create a 'runs anytime powered' show. All you needto do is add/arrange your sequences into the right side of the screen and when ready press the 'CreateSD Card - Simple Mode' button.
· For MP3 Directors with real time clock (allows for scheduling):All of the options for a new show have been set to default to a show that will run whenever the directorhas power. If you would like to instead run on a schedule, simply select the option that says 'During thescheduled times on the days shown'. From there, follow the instructions to update the days/times youwould like your show to run. When complete, press the 'Create SD Card - Simple Mode' button. Pleaseremember that not all directors can run on a schedule.
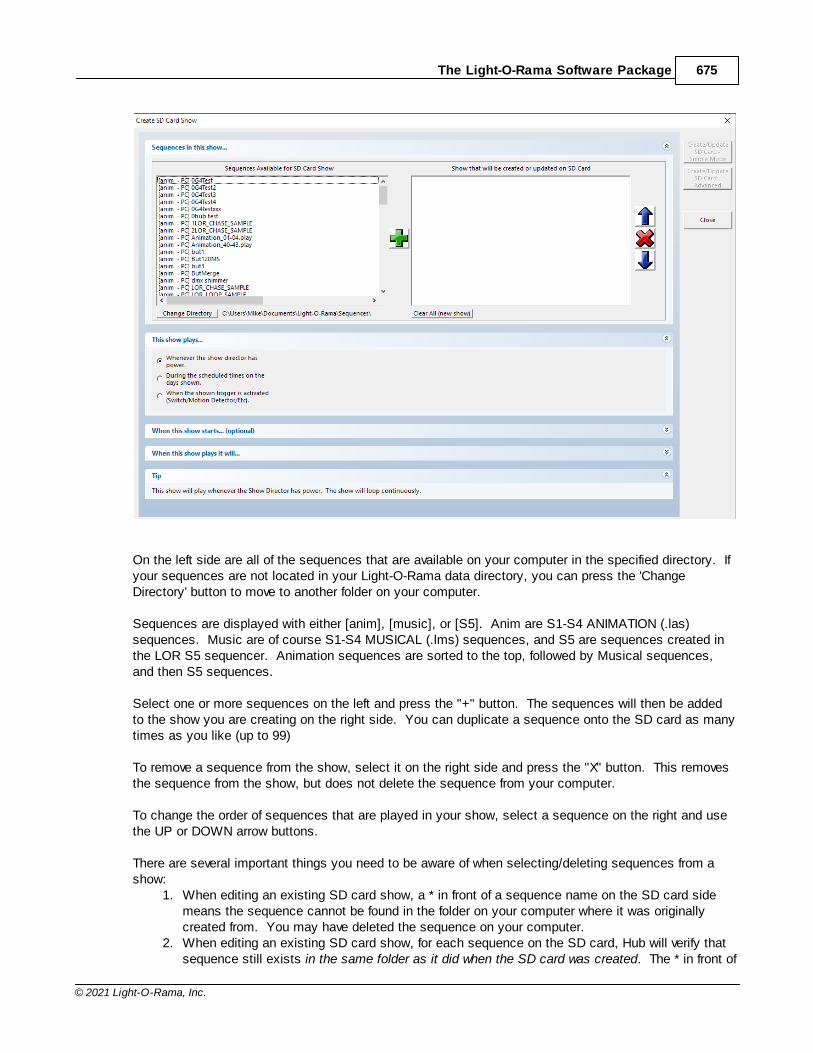
The Light-O-Rama Software Package 675
© 2021 Light-O-Rama, Inc.
On the left side are all of the sequences that are available on your computer in the specified directory. Ifyour sequences are not located in your Light-O-Rama data directory, you can press the 'ChangeDirectory' button to move to another folder on your computer.
Sequences are displayed with either [anim], [music], or [S5]. Anim are S1-S4 ANIMATION (.las)sequences. Music are of course S1-S4 MUSICAL (.lms) sequences, and S5 are sequences created inthe LOR S5 sequencer. Animation sequences are sorted to the top, followed by Musical sequences,and then S5 sequences.
Select one or more sequences on the left and press the "+" button. The sequences will then be addedto the show you are creating on the right side. You can duplicate a sequence onto the SD card as manytimes as you like (up to 99)
To remove a sequence from the show, select it on the right side and press the "X" button. This removesthe sequence from the show, but does not delete the sequence from your computer.
To change the order of sequences that are played in your show, select a sequence on the right and usethe UP or DOWN arrow buttons.
There are several important things you need to be aware of when selecting/deleting sequences from ashow:
1. When editing an existing SD card show, a * in front of a sequence name on the SD card sidemeans the sequence cannot be found in the folder on your computer where it was originallycreated from. You may have deleted the sequence on your computer.
2. When editing an existing SD card show, for each sequence on the SD card, Hub will verify thatsequence still exists in the same folder as it did when the SD card was created. The * in front of
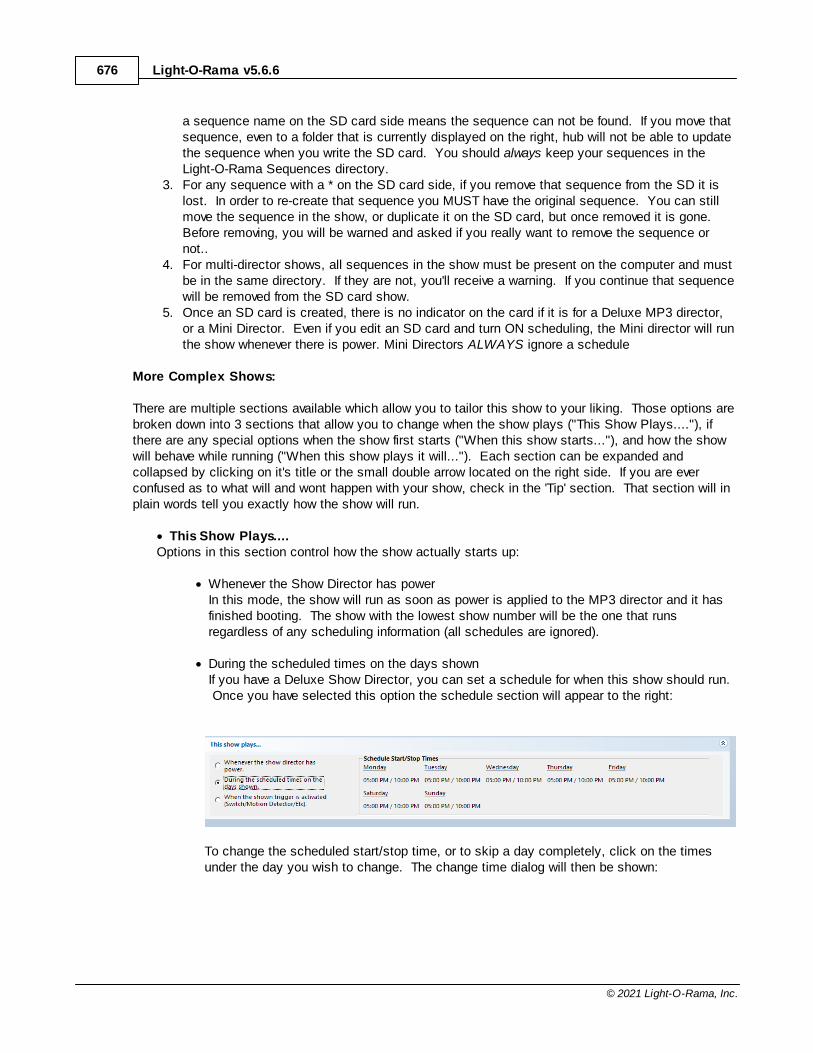
Light-O-Rama v5.6.6676
© 2021 Light-O-Rama, Inc.
a sequence name on the SD card side means the sequence can not be found. If you move thatsequence, even to a folder that is currently displayed on the right, hub will not be able to updatethe sequence when you write the SD card. You should always keep your sequences in theLight-O-Rama Sequences directory.
3. For any sequence with a * on the SD card side, if you remove that sequence from the SD it islost. In order to re-create that sequence you MUST have the original sequence. You can stillmove the sequence in the show, or duplicate it on the SD card, but once removed it is gone. Before removing, you will be warned and asked if you really want to remove the sequence ornot..
4. For multi-director shows, all sequences in the show must be present on the computer and mustbe in the same directory. If they are not, you'll receive a warning. If you continue that sequencewill be removed from the SD card show.
5. Once an SD card is created, there is no indicator on the card if it is for a Deluxe MP3 director,or a Mini Director. Even if you edit an SD card and turn ON scheduling, the Mini director will runthe show whenever there is power. Mini Directors ALWAYS ignore a schedule
More Complex Shows:
There are multiple sections available which allow you to tailor this show to your liking. Those options arebroken down into 3 sections that allow you to change when the show plays ("This Show Plays...."), ifthere are any special options when the show first starts ("When this show starts..."), and how the showwill behave while running ("When this show plays it will..."). Each section can be expanded andcollapsed by clicking on it's title or the small double arrow located on the right side. If you are everconfused as to what will and wont happen with your show, check in the 'Tip' section. That section will inplain words tell you exactly how the show will run.
· This Show Plays....Options in this section control how the show actually starts up:
· Whenever the Show Director has powerIn this mode, the show will run as soon as power is applied to the MP3 director and it hasfinished booting. The show with the lowest show number will be the one that runsregardless of any scheduling information (all schedules are ignored).
· During the scheduled times on the days shownIf you have a Deluxe Show Director, you can set a schedule for when this show should run. Once you have selected this option the schedule section will appear to the right:
To change the scheduled start/stop time, or to skip a day completely, click on the timesunder the day you wish to change. The change time dialog will then be shown:
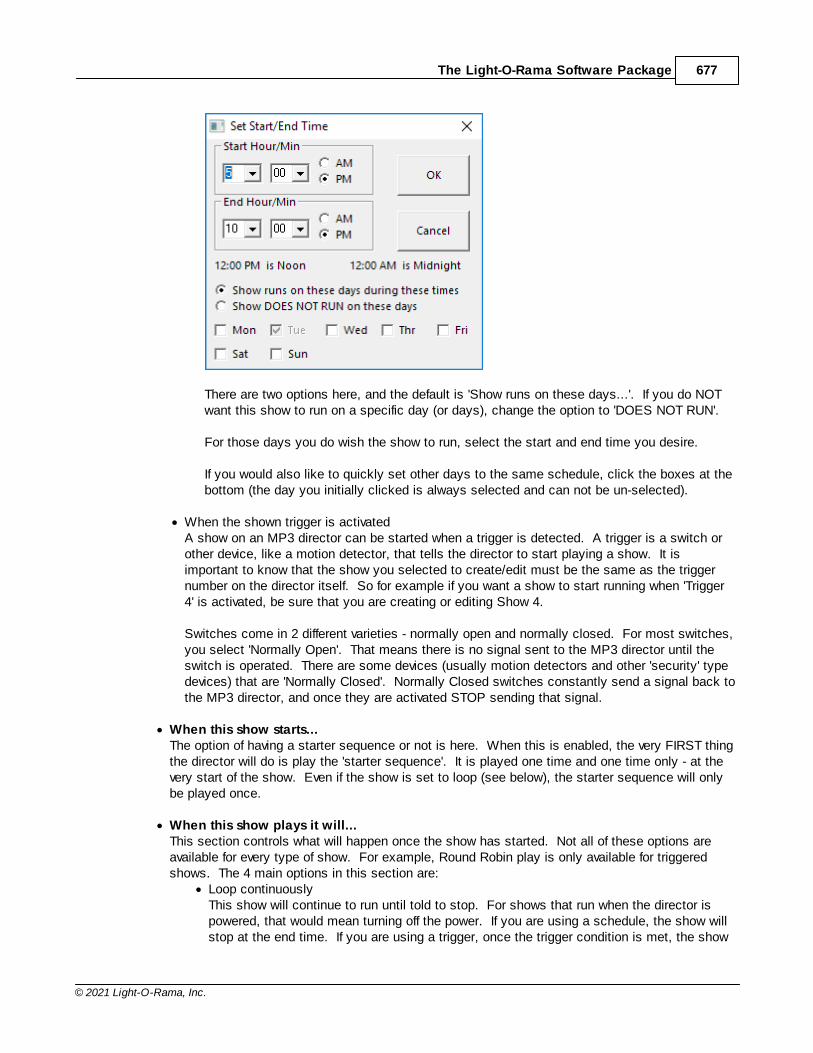
The Light-O-Rama Software Package 677
© 2021 Light-O-Rama, Inc.
There are two options here, and the default is 'Show runs on these days...'. If you do NOTwant this show to run on a specific day (or days), change the option to 'DOES NOT RUN'.
For those days you do wish the show to run, select the start and end time you desire.
If you would also like to quickly set other days to the same schedule, click the boxes at thebottom (the day you initially clicked is always selected and can not be un-selected).
· When the shown trigger is activatedA show on an MP3 director can be started when a trigger is detected. A trigger is a switch orother device, like a motion detector, that tells the director to start playing a show. It isimportant to know that the show you selected to create/edit must be the same as the triggernumber on the director itself. So for example if you want a show to start running when 'Trigger4' is activated, be sure that you are creating or editing Show 4.
Switches come in 2 different varieties - normally open and normally closed. For most switches,you select 'Normally Open'. That means there is no signal sent to the MP3 director until theswitch is operated. There are some devices (usually motion detectors and other 'security' typedevices) that are 'Normally Closed'. Normally Closed switches constantly send a signal back tothe MP3 director, and once they are activated STOP sending that signal.
· When this show starts...The option of having a starter sequence or not is here. When this is enabled, the very FIRST thingthe director will do is play the 'starter sequence'. It is played one time and one time only - at thevery start of the show. Even if the show is set to loop (see below), the starter sequence will onlybe played once.
· When this show plays it will...This section controls what will happen once the show has started. Not all of these options areavailable for every type of show. For example, Round Robin play is only available for triggeredshows. The 4 main options in this section are:
· Loop continuouslyThis show will continue to run until told to stop. For shows that run when the director ispowered, that would mean turning off the power. If you are using a schedule, the show willstop at the end time. If you are using a trigger, once the trigger condition is met, the show
Light-O-Rama v5.6.6678
© 2021 Light-O-Rama, Inc.
will continue to play until powered off.
· Play once from Start to End, then stopThe show will run once from top to bottom and then stop. Usually triggered shows use thisoption, but it can be used with the other two options as well. When used with a triggeredshow, the list plays and then stops at the end waiting again for the trigger signal.
· Repeat Every (10/15/30/60 minutes)This option is only available for MP3 directors that have a real time clock. The show willplay from start to end and then stop. At the time selected the show will start and run againfrom top to bottom. Note that the 'start' time is based on the 'clock' time. That is to saythat a show that is set to run every 15 minutes will run on the hour and then at 15, 30, 45past the hour. You should ensure that your show is no longer than the amount of time youselect here. For example, if you show is 11 minutes long and you select every 10 minutes,the show will simply keep repeating.
· Play the next song in the list (Round Robin).This option is only available for triggered shows. When the trigger is activated, the firstsequence in the list will be played and then the show will stop. Every time after that whenthe trigger is activated the next sequence in the list will play and then will also stop. Oncethe last sequence is reached, the next trigger will start over with the first sequence again.
Depending on your selection above, you may also be able to control what happens with your lightswhile the show is not playing. For every option except 'Loop Continuously' you can select if youlights are ON, OFF, or Running a filler sequence. If you use a filler sequence, the sequence that youselect will loop continuously until the next event occurs. That could be a trigger, a repeat of theshow at X minutes, etc.
Once you have completed the selection of the sequences you want to use in the show, as well as theoptions for that show, move on to creating the SD card by pressing one of the 'Create/Update SD Card'buttons on the right.
§ Simple Mode:When creating a NEW show, this will create a show that works port 1 (or the only port if yourdirector only has one) on your MP3 director. The show will use defaults for all other parametersincluding speed, number of ports, protocol, etc. If you have a non-linkable MINI mp3 director youshould use this button. LOR Hub will verify that there are no errors on in any of the sequencesyou selected and immediately start to write the SD card.
When editing an Existing show, this will update the sequences on the SD card and keep anyparameters as they were.
While writing the SD card, you will see the SD Card status screen:
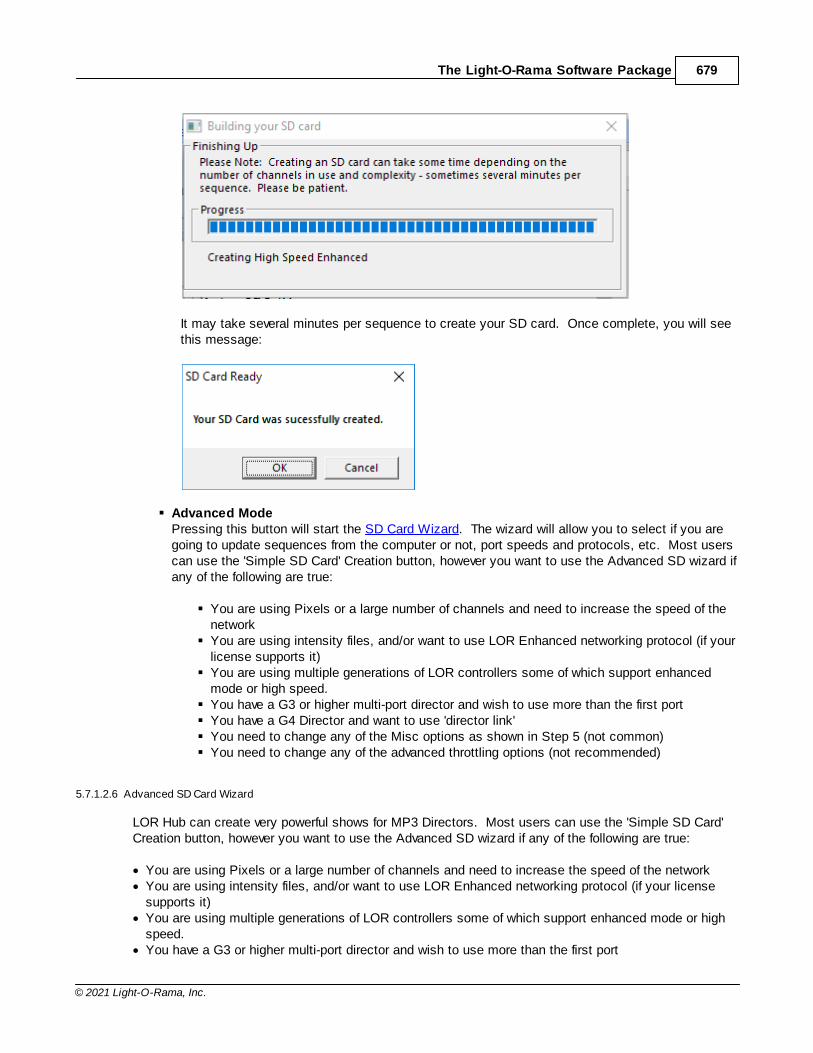
The Light-O-Rama Software Package 679
© 2021 Light-O-Rama, Inc.
It may take several minutes per sequence to create your SD card. Once complete, you will seethis message:
§ Advanced ModePressing this button will start the SD Card Wizard. The wizard will allow you to select if you aregoing to update sequences from the computer or not, port speeds and protocols, etc. Most userscan use the 'Simple SD Card' Creation button, however you want to use the Advanced SD wizard ifany of the following are true:
§ You are using Pixels or a large number of channels and need to increase the speed of thenetwork
§ You are using intensity files, and/or want to use LOR Enhanced networking protocol (if yourlicense supports it)
§ You are using multiple generations of LOR controllers some of which support enhancedmode or high speed.
§ You have a G3 or higher multi-port director and wish to use more than the first port§ You have a G4 Director and want to use 'director link' § You need to change any of the Misc options as shown in Step 5 (not common)§ You need to change any of the advanced throttling options (not recommended)
5.7.1.2.6 Advanced SD Card Wizard
LOR Hub can create very powerful shows for MP3 Directors. Most users can use the 'Simple SD Card'Creation button, however you want to use the Advanced SD wizard if any of the following are true:
· You are using Pixels or a large number of channels and need to increase the speed of the network· You are using intensity files, and/or want to use LOR Enhanced networking protocol (if your license
supports it)· You are using multiple generations of LOR controllers some of which support enhanced mode or high
speed.· You have a G3 or higher multi-port director and wish to use more than the first port
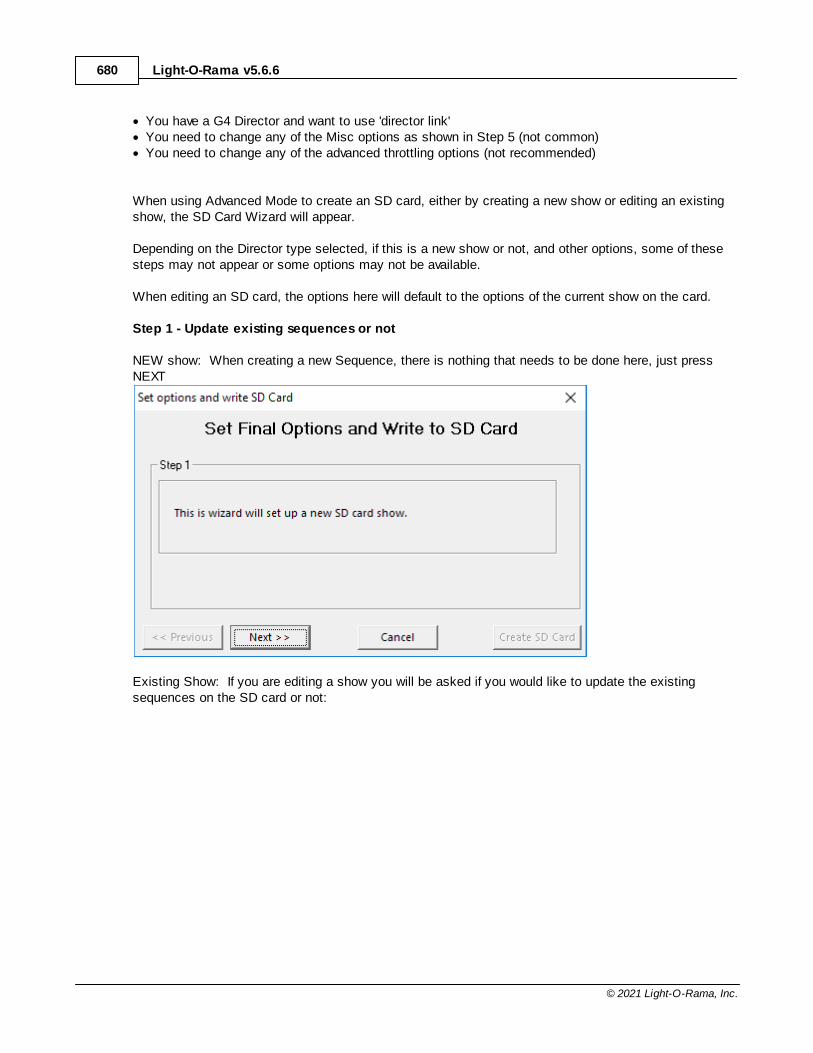
Light-O-Rama v5.6.6680
© 2021 Light-O-Rama, Inc.
· You have a G4 Director and want to use 'director link' · You need to change any of the Misc options as shown in Step 5 (not common)· You need to change any of the advanced throttling options (not recommended)
When using Advanced Mode to create an SD card, either by creating a new show or editing an existingshow, the SD Card Wizard will appear.
Depending on the Director type selected, if this is a new show or not, and other options, some of thesesteps may not appear or some options may not be available.
When editing an SD card, the options here will default to the options of the current show on the card.
Step 1 - Update existing sequences or not
NEW show: When creating a new Sequence, there is nothing that needs to be done here, just pressNEXT
Existing Show: If you are editing a show you will be asked if you would like to update the existingsequences on the SD card or not:
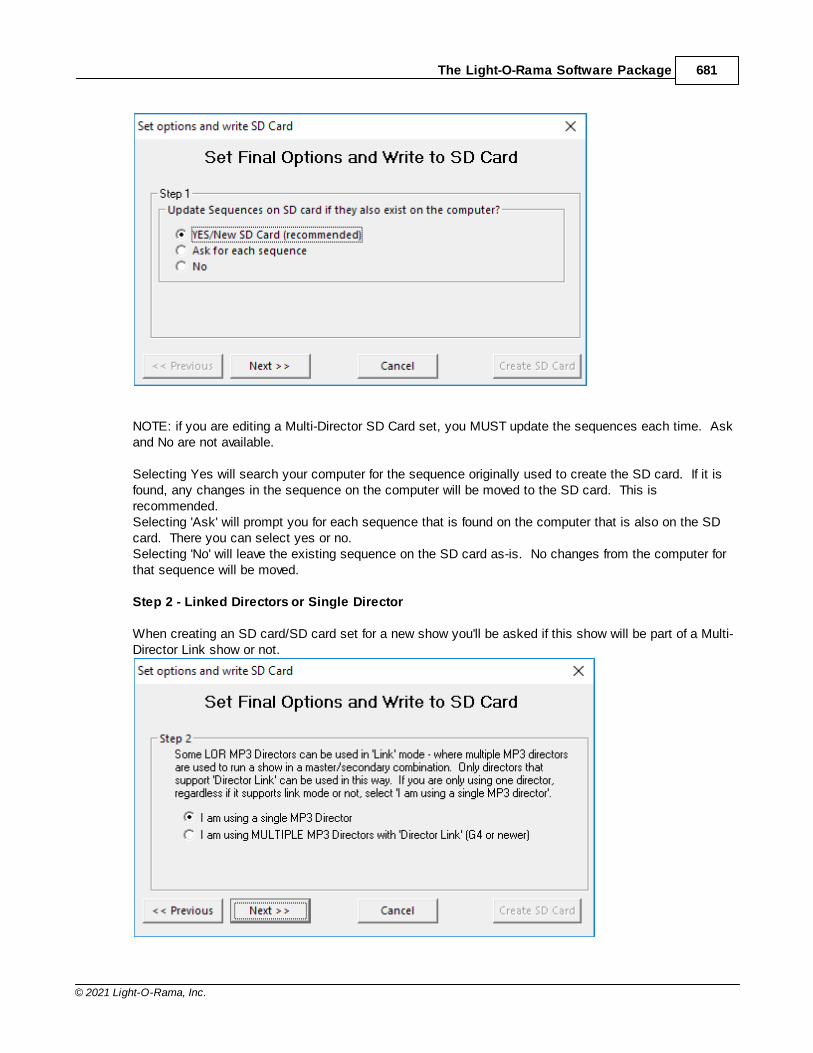
The Light-O-Rama Software Package 681
© 2021 Light-O-Rama, Inc.
NOTE: if you are editing a Multi-Director SD Card set, you MUST update the sequences each time. Askand No are not available.
Selecting Yes will search your computer for the sequence originally used to create the SD card. If it isfound, any changes in the sequence on the computer will be moved to the SD card. This isrecommended.Selecting 'Ask' will prompt you for each sequence that is found on the computer that is also on the SDcard. There you can select yes or no.Selecting 'No' will leave the existing sequence on the SD card as-is. No changes from the computer forthat sequence will be moved.
Step 2 - Linked Directors or Single Director
When creating an SD card/SD card set for a new show you'll be asked if this show will be part of a Multi-Director Link show or not.
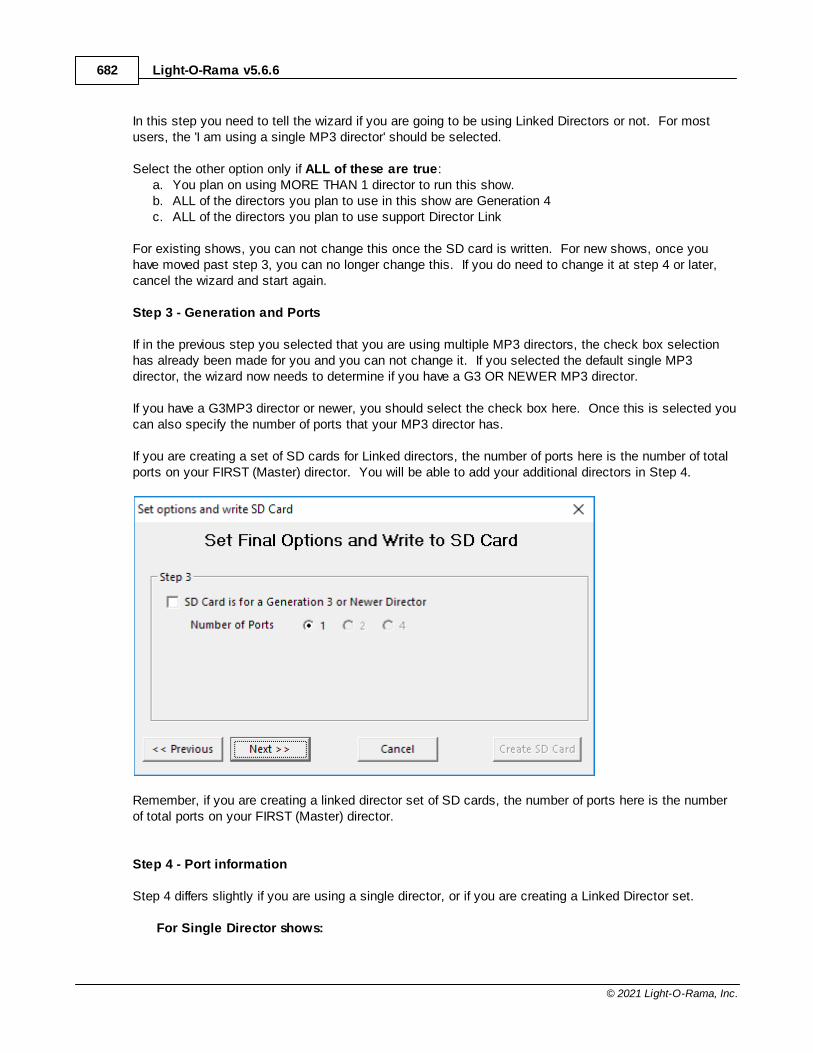
Light-O-Rama v5.6.6682
© 2021 Light-O-Rama, Inc.
In this step you need to tell the wizard if you are going to be using Linked Directors or not. For mostusers, the 'I am using a single MP3 director' should be selected.
Select the other option only if ALL of these are true:a. You plan on using MORE THAN 1 director to run this show.b. ALL of the directors you plan to use in this show are Generation 4c. ALL of the directors you plan to use support Director Link
For existing shows, you can not change this once the SD card is written. For new shows, once youhave moved past step 3, you can no longer change this. If you do need to change it at step 4 or later,cancel the wizard and start again.
Step 3 - Generation and Ports
If in the previous step you selected that you are using multiple MP3 directors, the check box selectionhas already been made for you and you can not change it. If you selected the default single MP3director, the wizard now needs to determine if you have a G3 OR NEWER MP3 director.
If you have a G3MP3 director or newer, you should select the check box here. Once this is selected youcan also specify the number of ports that your MP3 director has.
If you are creating a set of SD cards for Linked directors, the number of ports here is the number of totalports on your FIRST (Master) director. You will be able to add your additional directors in Step 4.
Remember, if you are creating a linked director set of SD cards, the number of ports here is the numberof total ports on your FIRST (Master) director.
Step 4 - Port information
Step 4 differs slightly if you are using a single director, or if you are creating a Linked Director set.
For Single Director shows:
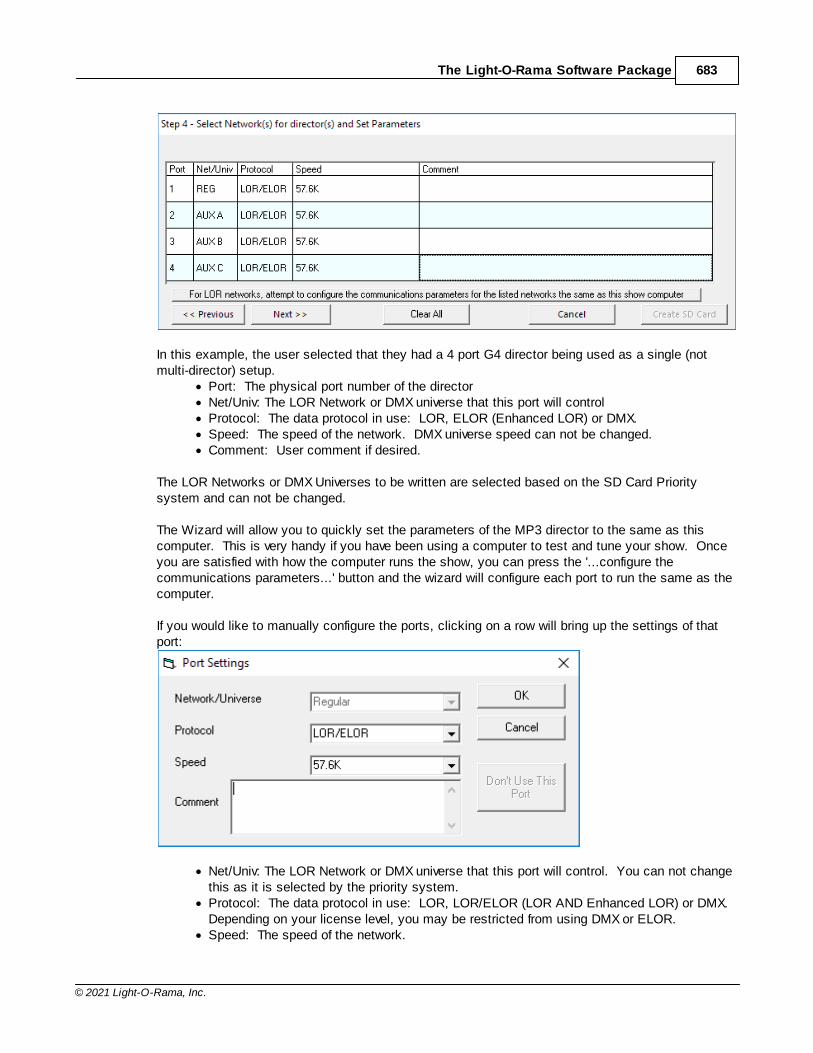
The Light-O-Rama Software Package 683
© 2021 Light-O-Rama, Inc.
In this example, the user selected that they had a 4 port G4 director being used as a single (notmulti-director) setup.
· Port: The physical port number of the director· Net/Univ: The LOR Network or DMX universe that this port will control· Protocol: The data protocol in use: LOR, ELOR (Enhanced LOR) or DMX. · Speed: The speed of the network. DMX universe speed can not be changed.· Comment: User comment if desired.
The LOR Networks or DMX Universes to be written are selected based on the SD Card Prioritysystem and can not be changed.
The Wizard will allow you to quickly set the parameters of the MP3 director to the same as thiscomputer. This is very handy if you have been using a computer to test and tune your show. Onceyou are satisfied with how the computer runs the show, you can press the '...configure thecommunications parameters...' button and the wizard will configure each port to run the same as thecomputer.
If you would like to manually configure the ports, clicking on a row will bring up the settings of thatport:
· Net/Univ: The LOR Network or DMX universe that this port will control. You can not changethis as it is selected by the priority system.
· Protocol: The data protocol in use: LOR, LOR/ELOR (LOR AND Enhanced LOR) or DMX. Depending on your license level, you may be restricted from using DMX or ELOR.
· Speed: The speed of the network.
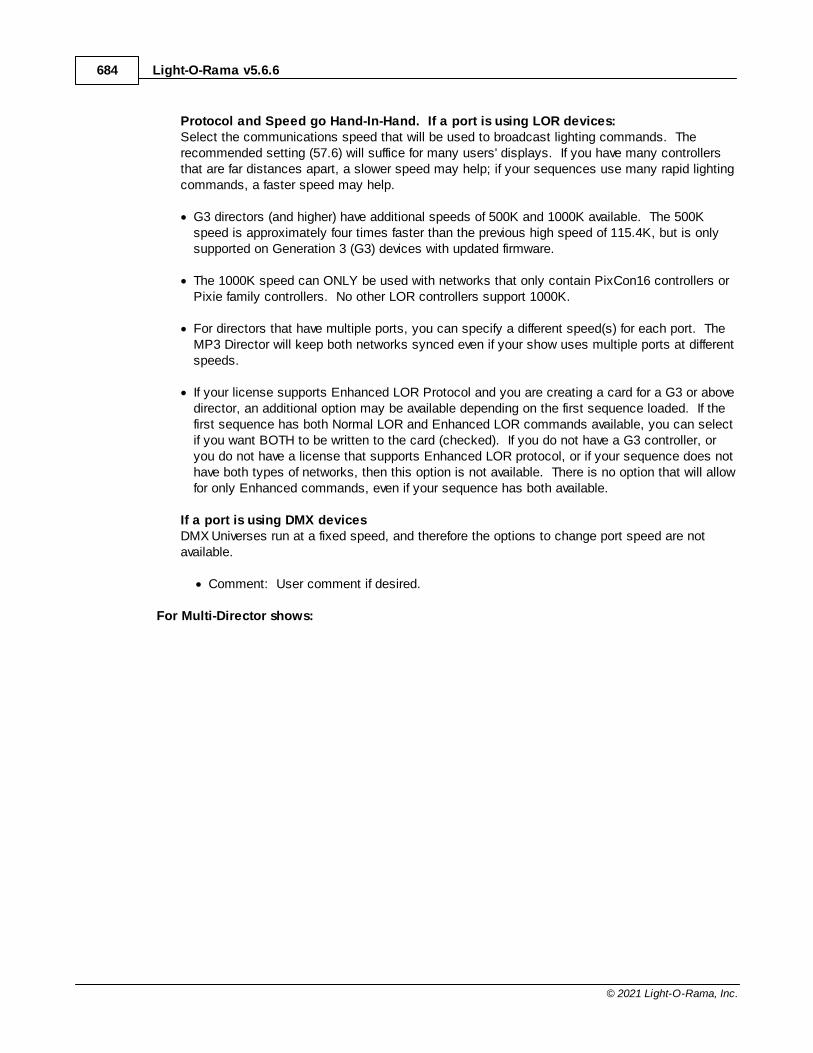
Light-O-Rama v5.6.6684
© 2021 Light-O-Rama, Inc.
Protocol and Speed go Hand-In-Hand. If a port is using LOR devices:Select the communications speed that will be used to broadcast lighting commands. Therecommended setting (57.6) will suffice for many users' displays. If you have many controllersthat are far distances apart, a slower speed may help; if your sequences use many rapid lightingcommands, a faster speed may help.
· G3 directors (and higher) have additional speeds of 500K and 1000K available. The 500Kspeed is approximately four times faster than the previous high speed of 115.4K, but is onlysupported on Generation 3 (G3) devices with updated firmware.
· The 1000K speed can ONLY be used with networks that only contain PixCon16 controllers orPixie family controllers. No other LOR controllers support 1000K.
· For directors that have multiple ports, you can specify a different speed(s) for each port. TheMP3 Director will keep both networks synced even if your show uses multiple ports at differentspeeds.
· If your license supports Enhanced LOR Protocol and you are creating a card for a G3 or abovedirector, an additional option may be available depending on the first sequence loaded. If thefirst sequence has both Normal LOR and Enhanced LOR commands available, you can selectif you want BOTH to be written to the card (checked). If you do not have a G3 controller, oryou do not have a license that supports Enhanced LOR protocol, or if your sequence does nothave both types of networks, then this option is not available. There is no option that will allowfor only Enhanced commands, even if your sequence has both available.
If a port is using DMX devicesDMX Universes run at a fixed speed, and therefore the options to change port speed are notavailable.
· Comment: User comment if desired.
For Multi-Director shows:
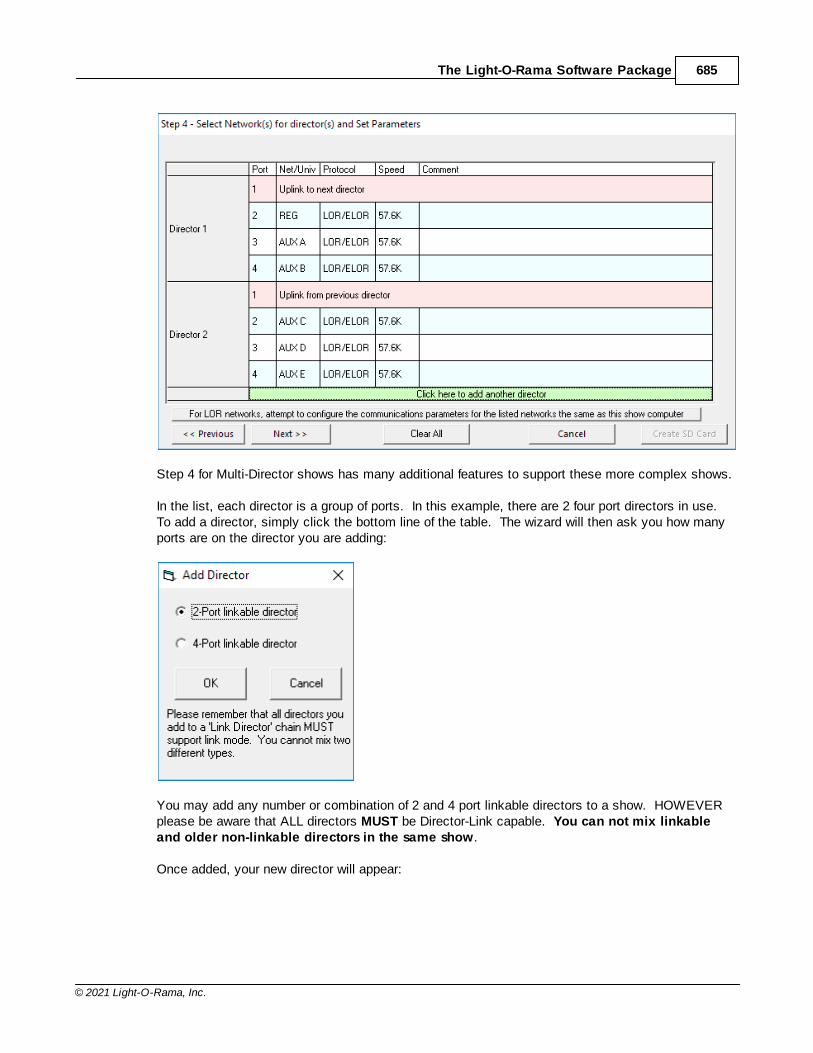
The Light-O-Rama Software Package 685
© 2021 Light-O-Rama, Inc.
Step 4 for Multi-Director shows has many additional features to support these more complex shows.
In the list, each director is a group of ports. In this example, there are 2 four port directors in use. To add a director, simply click the bottom line of the table. The wizard will then ask you how manyports are on the director you are adding:
You may add any number or combination of 2 and 4 port linkable directors to a show. HOWEVERplease be aware that ALL directors MUST be Director-Link capable. You can not mix linkableand older non-linkable directors in the same show.
Once added, your new director will appear:
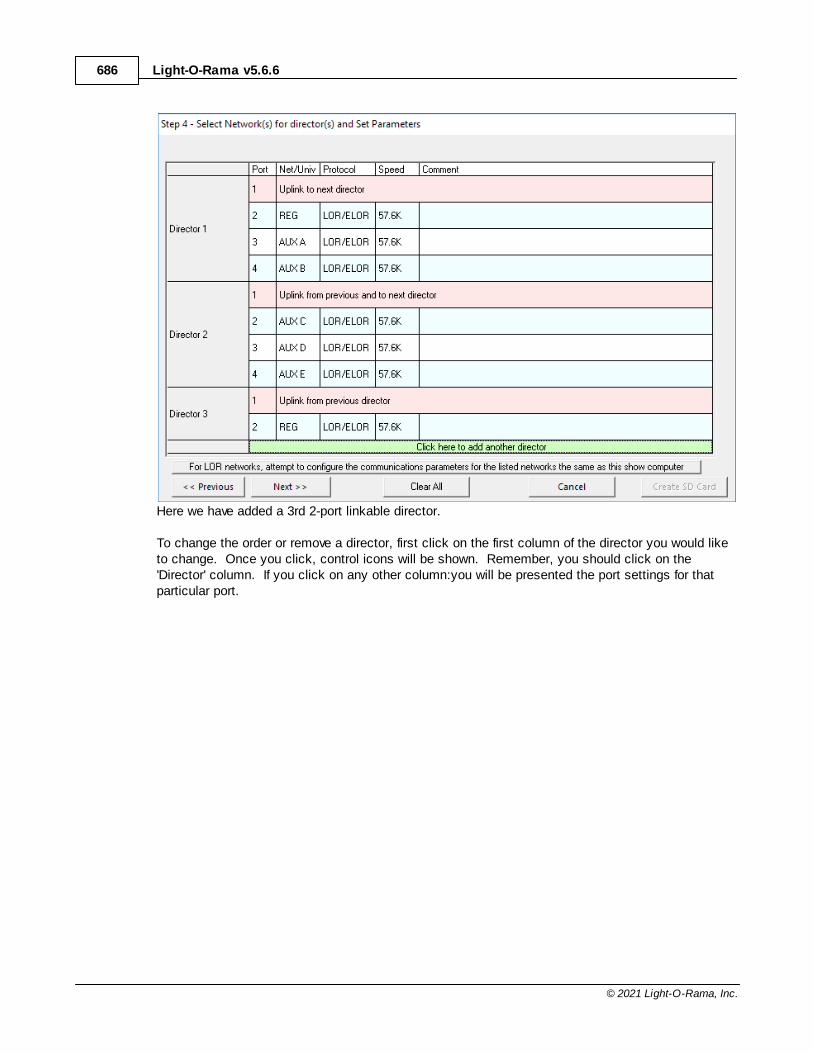
Light-O-Rama v5.6.6686
© 2021 Light-O-Rama, Inc.
Here we have added a 3rd 2-port linkable director.
To change the order or remove a director, first click on the first column of the director you would liketo change. Once you click, control icons will be shown. Remember, you should click on the'Director' column. If you click on any other column:you will be presented the port settings for thatparticular port.
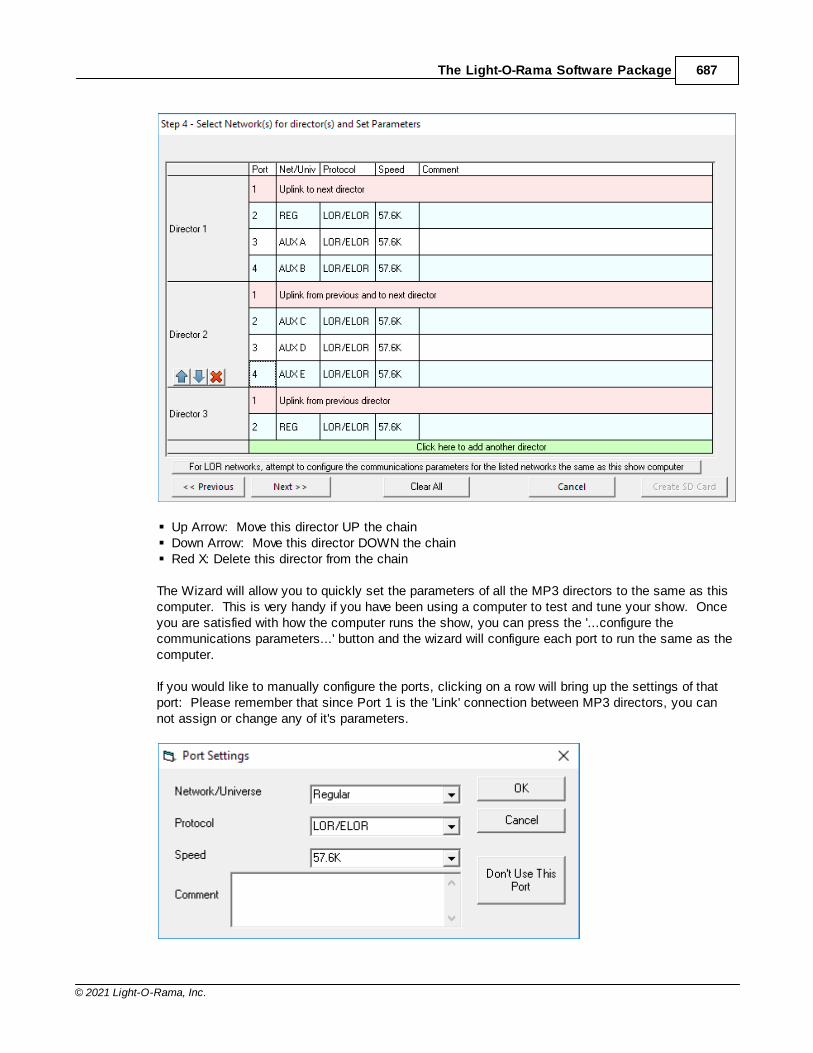
The Light-O-Rama Software Package 687
© 2021 Light-O-Rama, Inc.
§ Up Arrow: Move this director UP the chain§ Down Arrow: Move this director DOWN the chain§ Red X: Delete this director from the chain
The Wizard will allow you to quickly set the parameters of all the MP3 directors to the same as thiscomputer. This is very handy if you have been using a computer to test and tune your show. Onceyou are satisfied with how the computer runs the show, you can press the '...configure thecommunications parameters...' button and the wizard will configure each port to run the same as thecomputer.
If you would like to manually configure the ports, clicking on a row will bring up the settings of thatport: Please remember that since Port 1 is the 'Link' connection between MP3 directors, you cannot assign or change any of it's parameters.
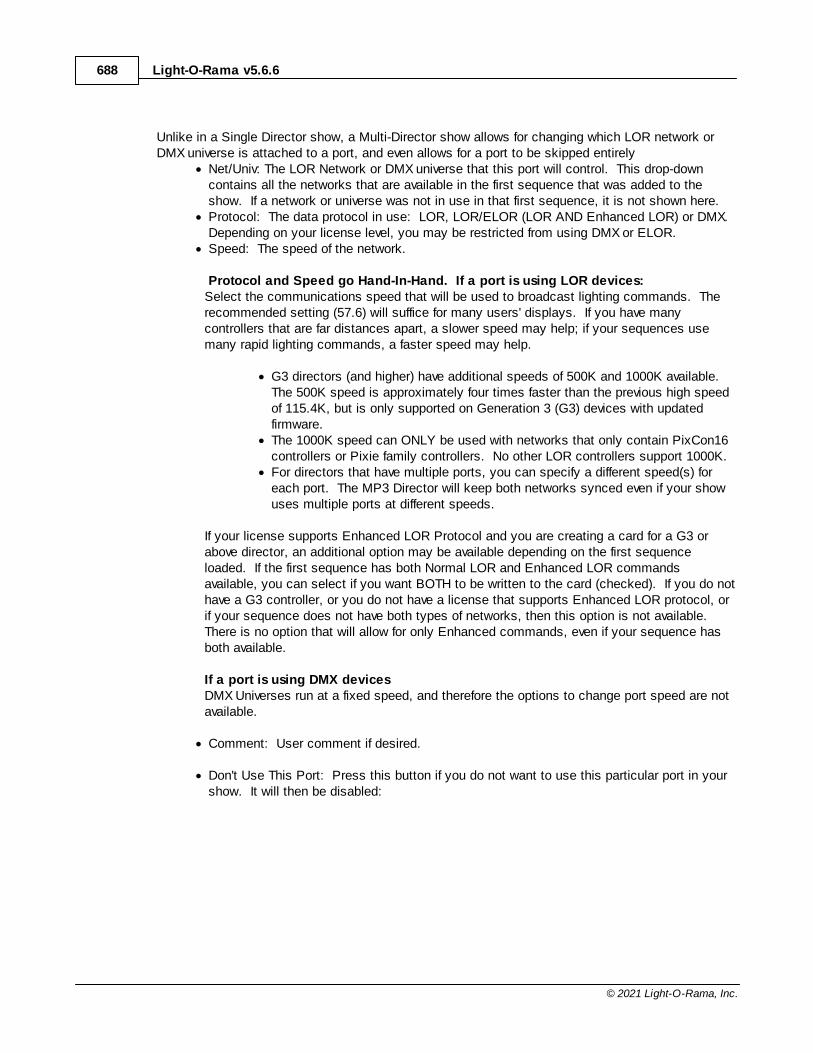
Light-O-Rama v5.6.6688
© 2021 Light-O-Rama, Inc.
Unlike in a Single Director show, a Multi-Director show allows for changing which LOR network orDMX universe is attached to a port, and even allows for a port to be skipped entirely
· Net/Univ: The LOR Network or DMX universe that this port will control. This drop-downcontains all the networks that are available in the first sequence that was added to theshow. If a network or universe was not in use in that first sequence, it is not shown here.
· Protocol: The data protocol in use: LOR, LOR/ELOR (LOR AND Enhanced LOR) or DMX. Depending on your license level, you may be restricted from using DMX or ELOR.
· Speed: The speed of the network.
Protocol and Speed go Hand-In-Hand. If a port is using LOR devices:Select the communications speed that will be used to broadcast lighting commands. Therecommended setting (57.6) will suffice for many users' displays. If you have manycontrollers that are far distances apart, a slower speed may help; if your sequences usemany rapid lighting commands, a faster speed may help.
· G3 directors (and higher) have additional speeds of 500K and 1000K available. The 500K speed is approximately four times faster than the previous high speedof 115.4K, but is only supported on Generation 3 (G3) devices with updatedfirmware.
· The 1000K speed can ONLY be used with networks that only contain PixCon16controllers or Pixie family controllers. No other LOR controllers support 1000K.
· For directors that have multiple ports, you can specify a different speed(s) foreach port. The MP3 Director will keep both networks synced even if your showuses multiple ports at different speeds.
If your license supports Enhanced LOR Protocol and you are creating a card for a G3 orabove director, an additional option may be available depending on the first sequenceloaded. If the first sequence has both Normal LOR and Enhanced LOR commandsavailable, you can select if you want BOTH to be written to the card (checked). If you do nothave a G3 controller, or you do not have a license that supports Enhanced LOR protocol, orif your sequence does not have both types of networks, then this option is not available. There is no option that will allow for only Enhanced commands, even if your sequence hasboth available.
If a port is using DMX devicesDMX Universes run at a fixed speed, and therefore the options to change port speed are notavailable.
· Comment: User comment if desired.
· Don't Use This Port: Press this button if you do not want to use this particular port in yourshow. It will then be disabled:
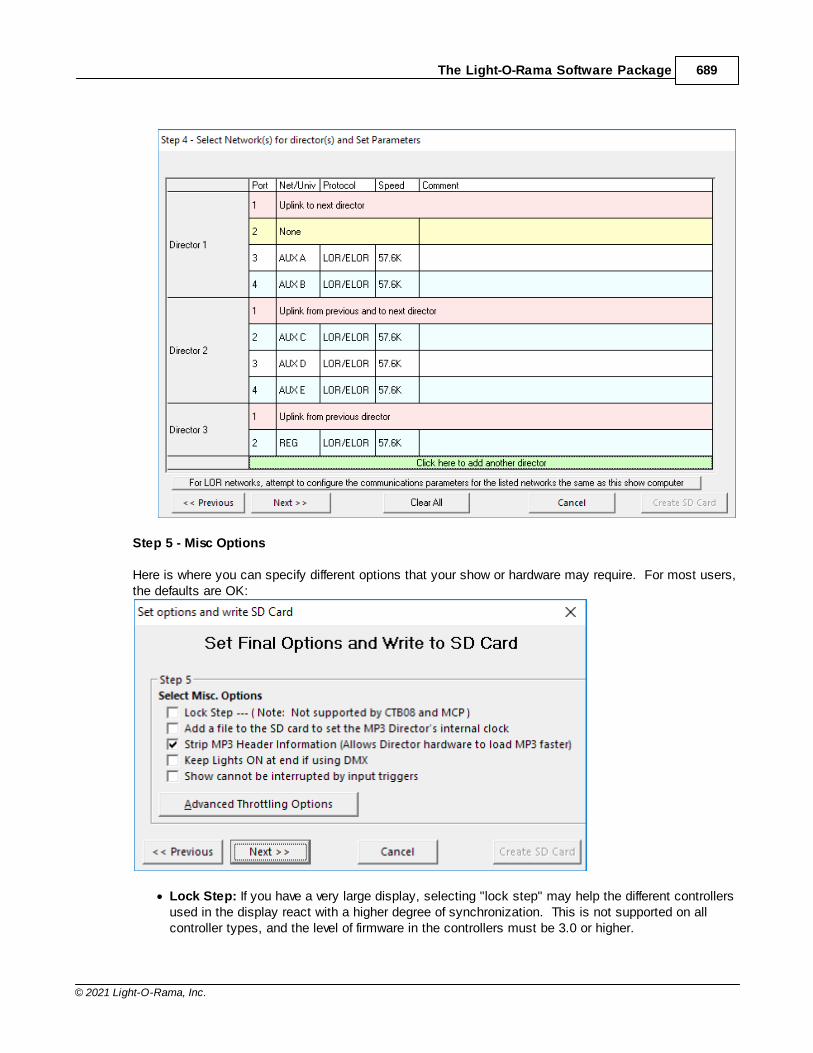
The Light-O-Rama Software Package 689
© 2021 Light-O-Rama, Inc.
Step 5 - Misc Options
Here is where you can specify different options that your show or hardware may require. For most users,the defaults are OK:
· Lock Step: If you have a very large display, selecting "lock step" may help the different controllersused in the display react with a higher degree of synchronization. This is not supported on allcontroller types, and the level of firmware in the controllers must be 3.0 or higher.

Light-O-Rama v5.6.6690
© 2021 Light-O-Rama, Inc.
· Set MP3 player's internal clock: If you wish to add a file to the SD card to set the MP3director's internal clock, check the box that says so. Note that there are also other ways to setthe director's clock.
· Strip MP3 Header Information: Some MP3s may have a large data block before the actualmusic data. For example, an MP3 may have several high-resolution pictures in its ID3 Tags. TheMP3 director will correctly ignore this data, however it does take time to find the actual start of themusic file. Stripping this data will allow the MP3 director to start playing the sequence faster.
· Keep lights ON at end if using DMX: Previously if one or both ports were controlling DMXUniverses the MP3 director would always shut off all the lights. Checking this box will allowchannels in DMX universes controlled by the MP3 director to remain in the last state they weresent. If you leave a light on at the end of a sequence, that light will remain on until the start of thenext sequence.
· Show can not be interrupted by input triggers: Once this show has started on the MP3director, pressing an input will not interrupt the show - it will run to completion.
· Advanced Throttling Options: The advanced options button will bring up an additional windowthat allows you to change parameters which relate to how data will be transmitted from your MP3Director. Unless a specific issue is preventing your MP3 Director from working correctly,you should not change these options.
Step 6 - Ready to Create SD Card/Cards
At this point Hub is ready to create your SD card show or SD card set. Press the Create SD cardbutton, and Hub will start the process. It can take some time to create an SD card show depending onthe complexity of your sequences, number of networks, etc. Once the process is complete, Hub will letyou know.
While writing the SD card, you will see the SD Card status screen:
Multi-Director SD card sets:
Hub will tell you the total number of SD cards that are required for your show. Please remember thatthese cards need to be placed into the correct directors and should be labeled to avoid confusion.
When it is time to change cards, Hub will pause and let you know with a message on screen:

The Light-O-Rama Software Package 691
© 2021 Light-O-Rama, Inc.
Please be aware that there are no checks or validations that happen when changing cards, Hub willoverwrite the show on all subsequent cards without warning.
It may take several minutes per sequence to create your SD card. Once complete, you will see thismessage:
5.7.1.2.6.1 SD Card Priority System
MP3g3 Directors can control DMX Devices
In addition to LOR Devices, G3 and newer Directors can also drive DMX devices on one or bothoutput ports. In order to control DMX devices, your G3 MP3 Director must have at least firmwareversion 5.28.
Network and Universe Priorities
New advanced MP3 Directors, like the Dual Port G3MP3 Director, or G4N4 4-Port can drive 2 or 4separate physical networks of devices. These advanced directors can control LOR devices, DMXdevices, or a combination of them on separate ports. For single (non-linked) directors, LOR Hub willautomatically select which networks and/or universes in your sequence will be used by the director.
Only the ADVANCED level of the LOR software will allow for the creation of DMX output for adirector. All other levels are limited to creating LOR output only. Older Directors, like the DC-MP3-SHOWTIME, are limited to ONLY the LOR REGULAR network.
For Advanced Directors, LOR Hub uses a ‘priority system’ based on the contents of the FIRSTsequence added to the show list. In order to prevent confusion, all sequences that are part of asingle show should use the same preview. Shows that use Director Link use these rules as adefault however the user has the ability to change them as they see fit.
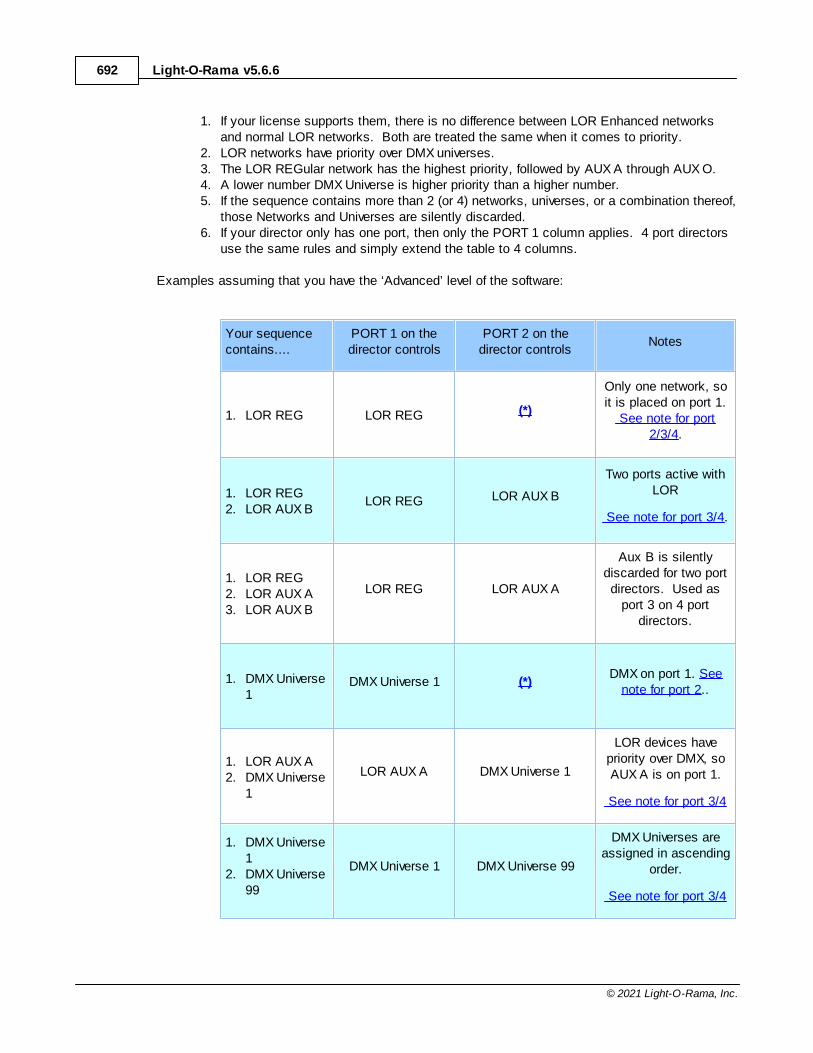
Light-O-Rama v5.6.6692
© 2021 Light-O-Rama, Inc.
1. If your license supports them, there is no difference between LOR Enhanced networksand normal LOR networks. Both are treated the same when it comes to priority.
2. LOR networks have priority over DMX universes. 3. The LOR REGular network has the highest priority, followed by AUX A through AUX O.4. A lower number DMX Universe is higher priority than a higher number.5. If the sequence contains more than 2 (or 4) networks, universes, or a combination thereof,
those Networks and Universes are silently discarded.6. If your director only has one port, then only the PORT 1 column applies. 4 port directors
use the same rules and simply extend the table to 4 columns.
Examples assuming that you have the ‘Advanced’ level of the software:
Your sequencecontains....
PORT 1 on thedirector controls
PORT 2 on thedirector controls
Notes
1. LOR REG LOR REG (*)
Only one network, soit is placed on port 1.
See note for port2/3/4.
1. LOR REG2. LOR AUX B
LOR REG LOR AUX B
Two ports active withLOR
See note for port 3/4.
1. LOR REG2. LOR AUX A3. LOR AUX B
LOR REG LOR AUX A
Aux B is silentlydiscarded for two portdirectors. Used as
port 3 on 4 portdirectors.
1. DMX Universe1
DMX Universe 1 (*)DMX on port 1. See
note for port 2..
1. LOR AUX A2. DMX Universe
1
LOR AUX A DMX Universe 1
LOR devices havepriority over DMX, soAUX A is on port 1.
See note for port 3/4
1. DMX Universe1
2. DMX Universe99
DMX Universe 1 DMX Universe 99
DMX Universes areassigned in ascending
order.
See note for port 3/4
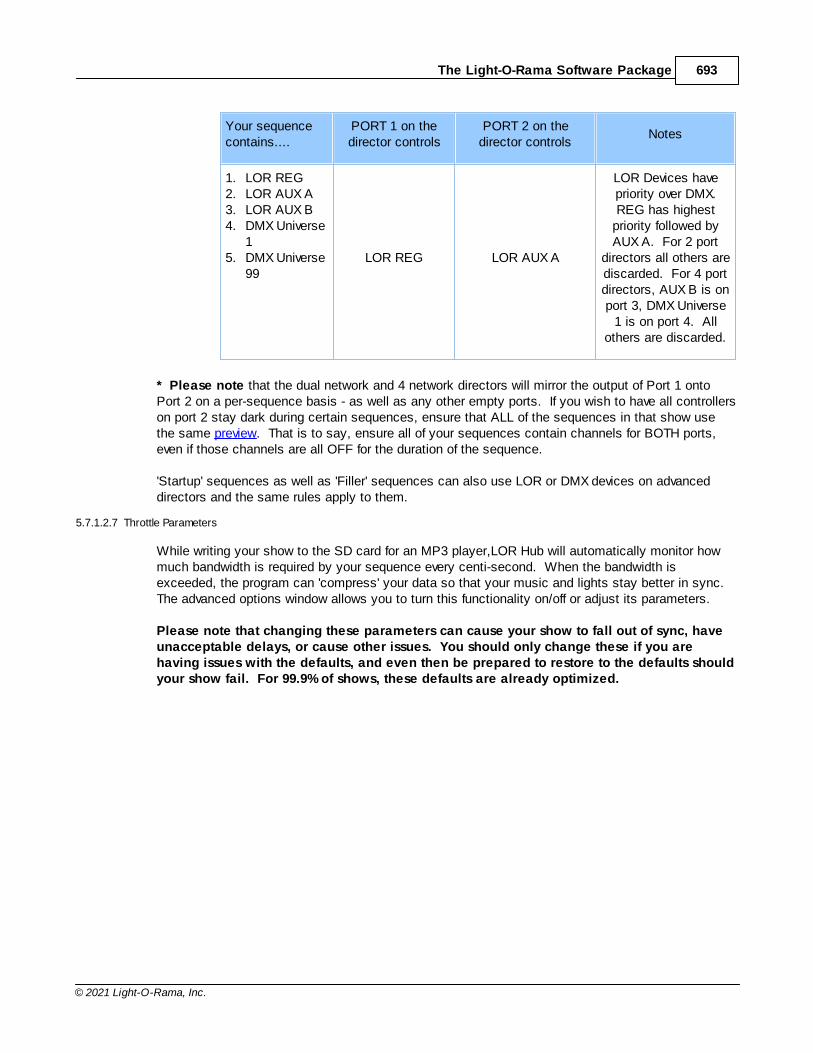
The Light-O-Rama Software Package 693
© 2021 Light-O-Rama, Inc.
Your sequencecontains....
PORT 1 on thedirector controls
PORT 2 on thedirector controls
Notes
1. LOR REG2. LOR AUX A3. LOR AUX B4. DMX Universe
15. DMX Universe
99LOR REG LOR AUX A
LOR Devices havepriority over DMX.REG has highest
priority followed byAUX A. For 2 port
directors all others arediscarded. For 4 portdirectors, AUX B is onport 3, DMX Universe
1 is on port 4. Allothers are discarded.
* Please note that the dual network and 4 network directors will mirror the output of Port 1 ontoPort 2 on a per-sequence basis - as well as any other empty ports. If you wish to have all controllerson port 2 stay dark during certain sequences, ensure that ALL of the sequences in that show usethe same preview. That is to say, ensure all of your sequences contain channels for BOTH ports,even if those channels are all OFF for the duration of the sequence.
'Startup' sequences as well as 'Filler' sequences can also use LOR or DMX devices on advanceddirectors and the same rules apply to them.
5.7.1.2.7 Throttle Parameters
While writing your show to the SD card for an MP3 player,LOR Hub will automatically monitor howmuch bandwidth is required by your sequence every centi-second. When the bandwidth isexceeded, the program can 'compress' your data so that your music and lights stay better in sync. The advanced options window allows you to turn this functionality on/off or adjust its parameters.
Please note that changing these parameters can cause your show to fall out of sync, haveunacceptable delays, or cause other issues. You should only change these if you arehaving issues with the defaults, and even then be prepared to restore to the defaults shouldyour show fail. For 99.9% of shows, these defaults are already optimized.
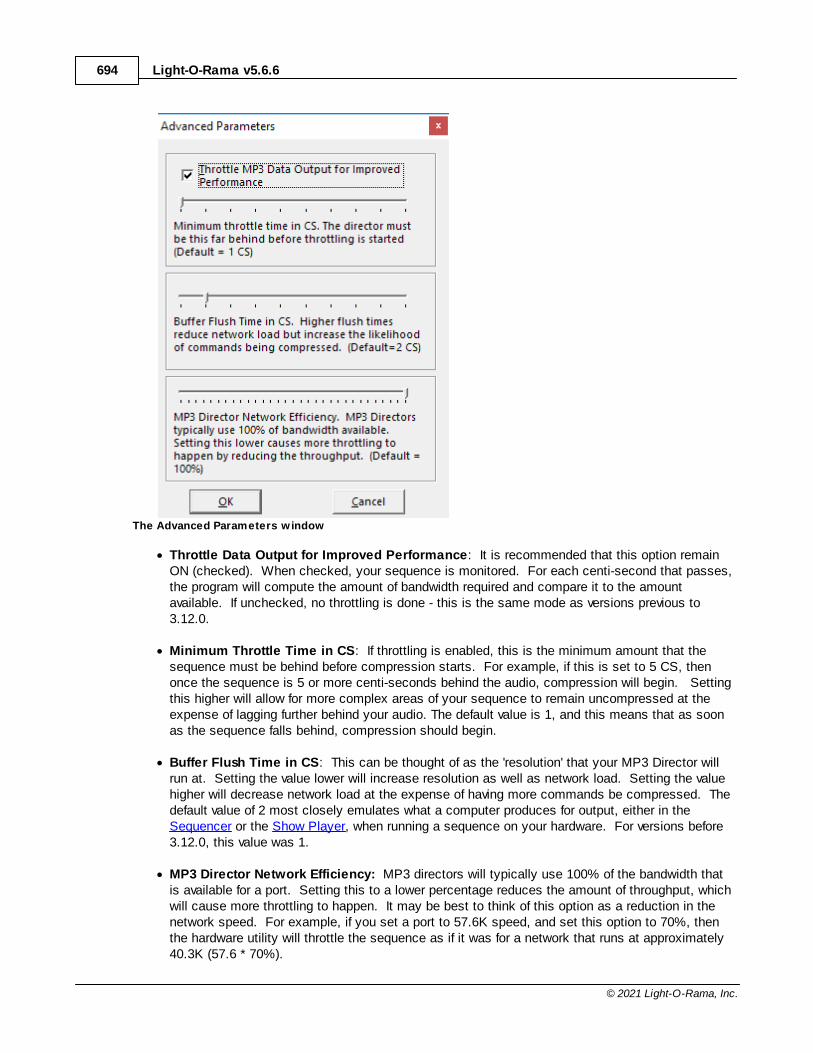
Light-O-Rama v5.6.6694
© 2021 Light-O-Rama, Inc.
The Advanced Parameters w indow
· Throttle Data Output for Improved Performance: It is recommended that this option remainON (checked). When checked, your sequence is monitored. For each centi-second that passes,the program will compute the amount of bandwidth required and compare it to the amountavailable. If unchecked, no throttling is done - this is the same mode as versions previous to3.12.0.
· Minimum Throttle Time in CS: If throttling is enabled, this is the minimum amount that thesequence must be behind before compression starts. For example, if this is set to 5 CS, thenonce the sequence is 5 or more centi-seconds behind the audio, compression will begin. Settingthis higher will allow for more complex areas of your sequence to remain uncompressed at theexpense of lagging further behind your audio. The default value is 1, and this means that as soonas the sequence falls behind, compression should begin.
· Buffer Flush Time in CS: This can be thought of as the 'resolution' that your MP3 Director willrun at. Setting the value lower will increase resolution as well as network load. Setting the valuehigher will decrease network load at the expense of having more commands be compressed. Thedefault value of 2 most closely emulates what a computer produces for output, either in theSequencer or the Show Player, when running a sequence on your hardware. For versions before3.12.0, this value was 1.
· MP3 Director Network Efficiency: MP3 directors will typically use 100% of the bandwidth thatis available for a port. Setting this to a lower percentage reduces the amount of throughput, whichwill cause more throttling to happen. It may be best to think of this option as a reduction in thenetwork speed. For example, if you set a port to 57.6K speed, and set this option to 70%, thenthe hardware utility will throttle the sequence as if it was for a network that runs at approximately40.3K (57.6 * 70%).
The Light-O-Rama Software Package 695
© 2021 Light-O-Rama, Inc.
5.7.2 Applying and Using MotionPaks
MotionPaks are the exciting new way to customize your LOR purchased sequences. MotionPaks allowyou to add programming for custom props that you build or purchase from Light-O-Rama.
For example, LOR sells 'Singing Faces' - ready-to-go items for your display. Once you have purchasedthe hardware prop, you can then go to our sequence store and purchase the programming to make themwork. LOR Hub will then take the MotionPak and combine it with your sequence. You will only everhave to pay for programming you want, saving money.
MotionPaks are a lot like sequences - but they only contain the programming for specific elements. Youuse LOR Hub to combine the MotionPak with the existing Base Sequence
5.7.2.1 LOR Sequences
Sequences are the programs that make your show work. The Light-O-Rama software allows you tocreate your own sequences, or you can purchase ready made sequences from our sequence store.
Purchasing sequences from our sequence store makes having a show a breeze! Our sequences aredesigned to get you off to a fast start and to make you look great! Once you have purchased asequence, you can customize it with MotionPaks - additional programming for additional display items tomake your show unique!
To see what sequences are available, press the 'Shop for Sequences' button in Hub.
5.7.2.2 LOR Hardware Props
While it is possible to create your own Props and use them with MotionPaks, the easiest and fastestway to add a new dimension to your show is to purchase the prop from Light-O-Rama.
Light-O-Rama props are pre-configured to work with MotionPaks and Light-O-Rama sequences right fromthe box. Simply connect your new prop to your existing controllers with a CAT-5 cable, purchase anddownload the MotionPak for each sequence in your show for that prop, press the 'Scan For MotionPaks'button in hub, then 'Do it!'. All of your sequences are updated and it just works!
To see the props available from Light-O-Rama, press the 'Shop for Props/Hardware' button in Hub.
5.7.2.3 LOR MotionPaks
MotionPaks are what bring unique display elements to life. These are not 'sequences' in themselves asthey do not contain the programming for any other part of your show - you will need to already own (orpurchase) the 'Base Sequence' from the Light-O-Rama sequence store.
The 'Base Sequence', usually just called the 'Sequence' contains all the main commands for a particularsong. If a MotionPak is available for that particular sequence, it adds additional programming to makethings like singing faces or pixel trees work. A MotionPak is unique to the sequence it is for, as well asfor the prop it is made to control. For example, you could have the sequence "A Mad RussiansChristmas" by TSO in your show. There could be several different MotionPaks available for thatsequence - one for singing faces, another for a pixel tree, and perhaps even one for a pixel screen. Youonly need to purchase the MotionPak(s) for that sequence for the prop(s) you own. And remember that
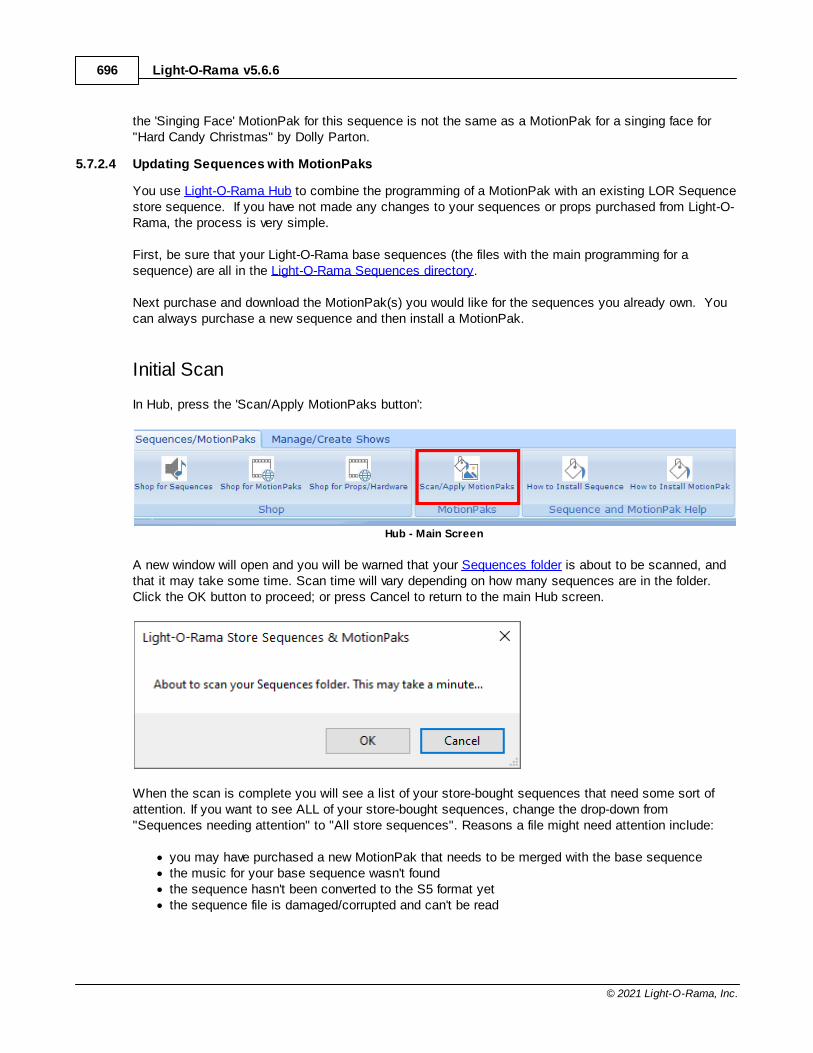
Light-O-Rama v5.6.6696
© 2021 Light-O-Rama, Inc.
the 'Singing Face' MotionPak for this sequence is not the same as a MotionPak for a singing face for"Hard Candy Christmas" by Dolly Parton.
5.7.2.4 Updating Sequences with MotionPaks
You use Light-O-Rama Hub to combine the programming of a MotionPak with an existing LOR Sequencestore sequence. If you have not made any changes to your sequences or props purchased from Light-O-Rama, the process is very simple.
First, be sure that your Light-O-Rama base sequences (the files with the main programming for asequence) are all in the Light-O-Rama Sequences directory.
Next purchase and download the MotionPak(s) you would like for the sequences you already own. Youcan always purchase a new sequence and then install a MotionPak.
Initial Scan
In Hub, press the 'Scan/Apply MotionPaks button':
Hub - Main Screen
A new window will open and you will be warned that your Sequences folder is about to be scanned, andthat it may take some time. Scan time will vary depending on how many sequences are in the folder.Click the OK button to proceed; or press Cancel to return to the main Hub screen.
When the scan is complete you will see a list of your store-bought sequences that need some sort ofattention. If you want to see ALL of your store-bought sequences, change the drop-down from"Sequences needing attention" to "All store sequences". Reasons a file might need attention include:
· you may have purchased a new MotionPak that needs to be merged with the base sequence· the music for your base sequence wasn't found· the sequence hasn't been converted to the S5 format yet· the sequence file is damaged/corrupted and can't be read
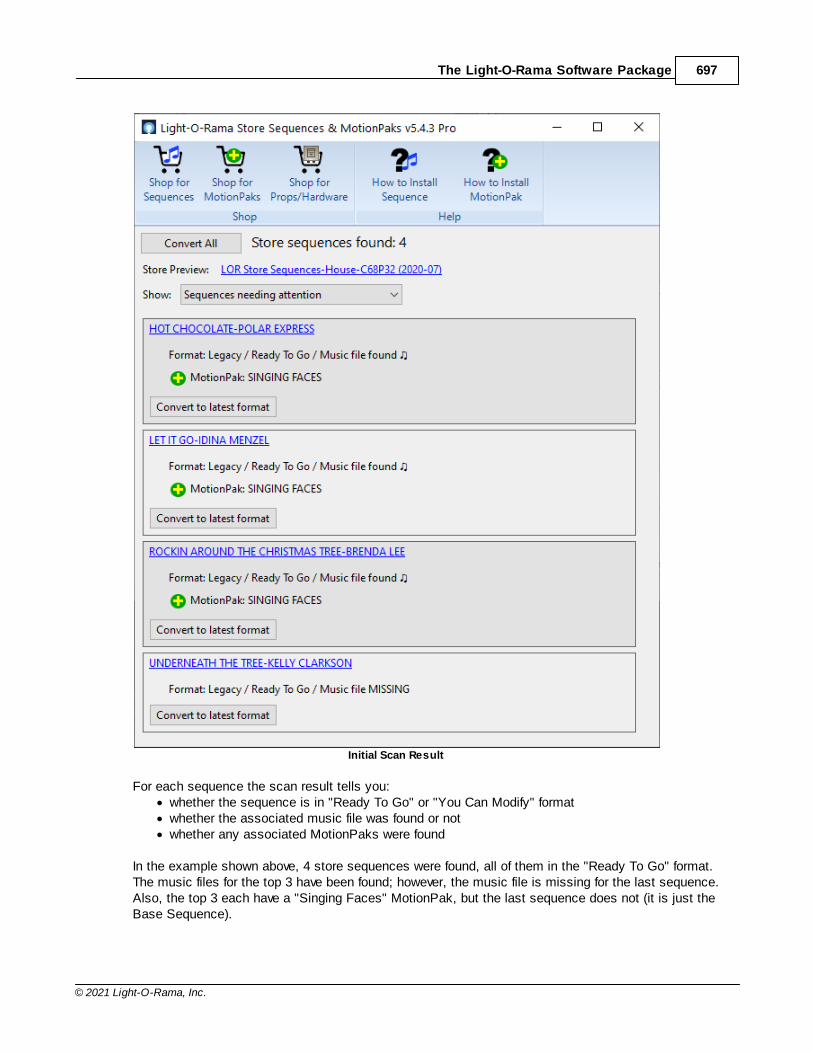
The Light-O-Rama Software Package 697
© 2021 Light-O-Rama, Inc.
Initial Scan Result
For each sequence the scan result tells you: · whether the sequence is in "Ready To Go" or "You Can Modify" format· whether the associated music file was found or not· whether any associated MotionPaks were found
In the example shown above, 4 store sequences were found, all of them in the "Ready To Go" format.The music files for the top 3 have been found; however, the music file is missing for the last sequence.Also, the top 3 each have a "Singing Faces" MotionPak, but the last sequence does not (it is just theBase Sequence).

Light-O-Rama v5.6.6698
© 2021 Light-O-Rama, Inc.
If you want to look for MotionPaks for a song, click on the song title. This will search the Light-O-RamaSequence Store for that song. Click on the search result to see the details for that song. For example, ifyou do this for "UNDERNEATH THE TREE-KELLY CLARKSON", you would see this:
Sequence Store
Here you can see that the "Singing Trees MotionPak" is available for this song. You can purchase it andadd singing faces to this song - so that it will match the others in your collection.
Convert To S5 Format
The next step is to convert all of the sequences to the S5 format. While you can click the "Convert tolatest format" button for each sequence, the fastest way is to click the "Convert All" button at the top.This will convert all listed sequences to the S5 format.
After pressing "Convert All", our screen now shows:
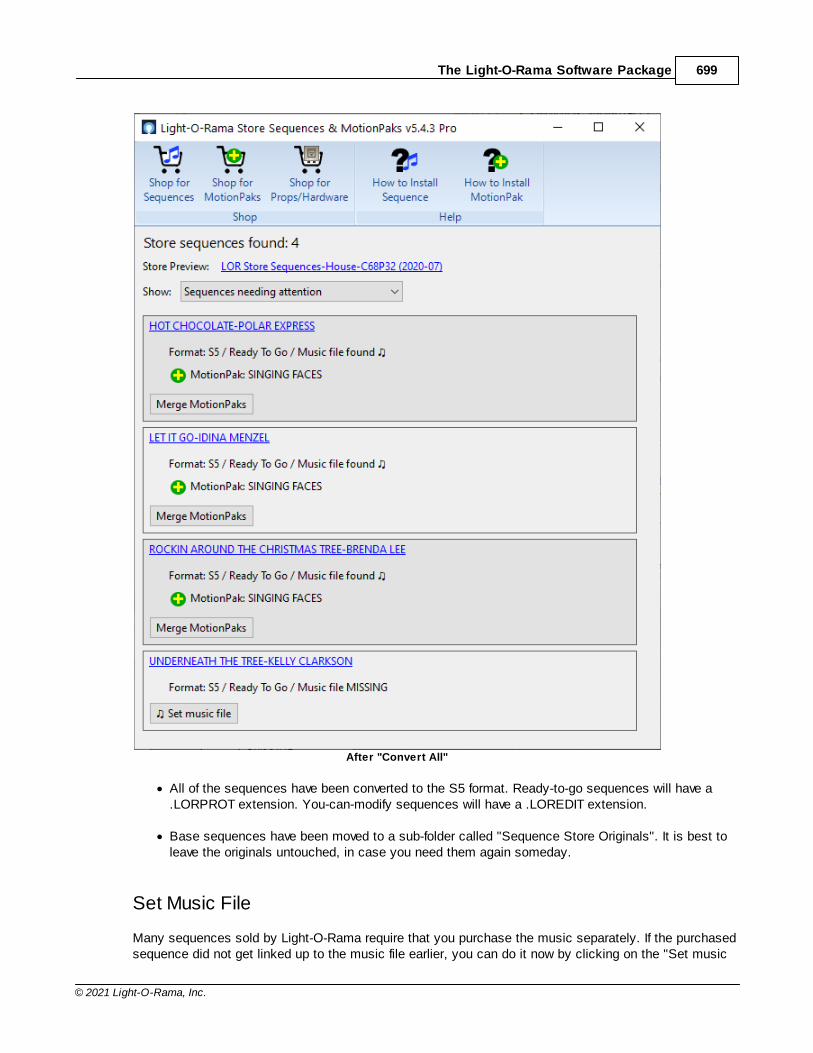
The Light-O-Rama Software Package 699
© 2021 Light-O-Rama, Inc.
After "Convert All"
· All of the sequences have been converted to the S5 format. Ready-to-go sequences will have a.LORPROT extension. You-can-modify sequences will have a .LOREDIT extension.
· Base sequences have been moved to a sub-folder called "Sequence Store Originals". It is best toleave the originals untouched, in case you need them again someday.
Set Music File
Many sequences sold by Light-O-Rama require that you purchase the music separately. If the purchasedsequence did not get linked up to the music file earlier, you can do it now by clicking on the "Set music
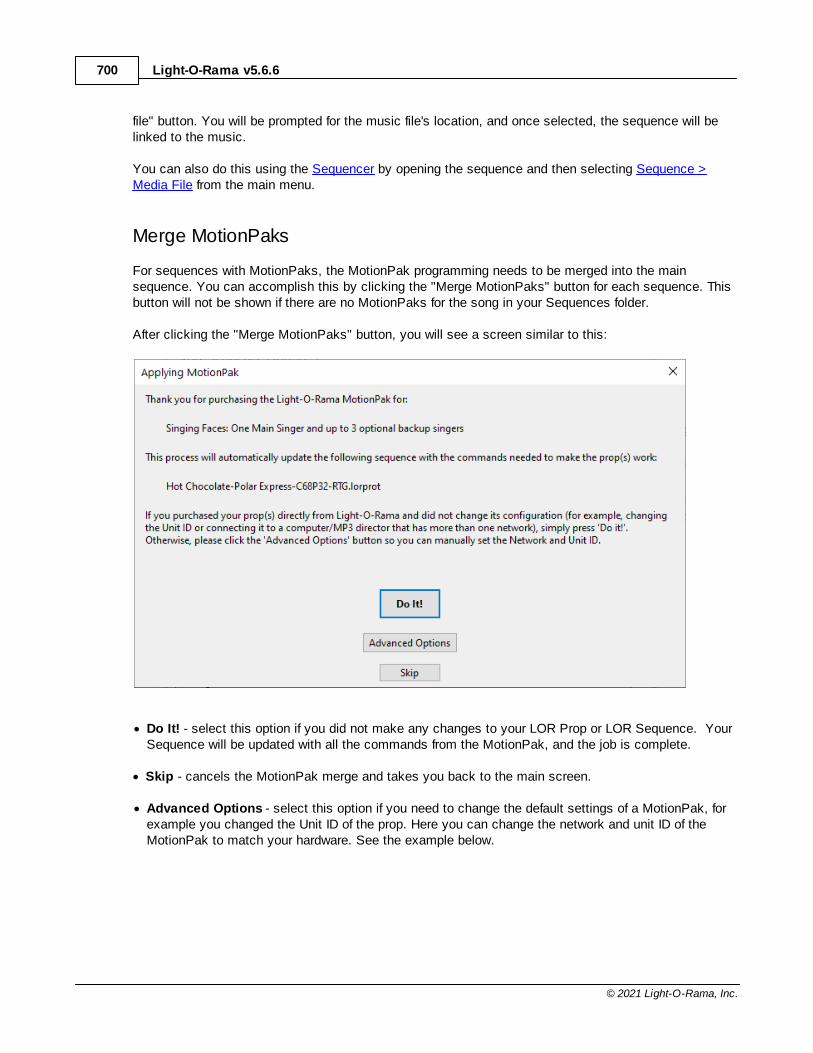
Light-O-Rama v5.6.6700
© 2021 Light-O-Rama, Inc.
file" button. You will be prompted for the music file's location, and once selected, the sequence will belinked to the music.
You can also do this using the Sequencer by opening the sequence and then selecting Sequence >Media File from the main menu.
Merge MotionPaks
For sequences with MotionPaks, the MotionPak programming needs to be merged into the mainsequence. You can accomplish this by clicking the "Merge MotionPaks" button for each sequence. Thisbutton will not be shown if there are no MotionPaks for the song in your Sequences folder.
After clicking the "Merge MotionPaks" button, you will see a screen similar to this:
· Do It! - select this option if you did not make any changes to your LOR Prop or LOR Sequence. YourSequence will be updated with all the commands from the MotionPak, and the job is complete.
· Skip - cancels the MotionPak merge and takes you back to the main screen.
· Advanced Options - select this option if you need to change the default settings of a MotionPak, forexample you changed the Unit ID of the prop. Here you can change the network and unit ID of theMotionPak to match your hardware. See the example below.
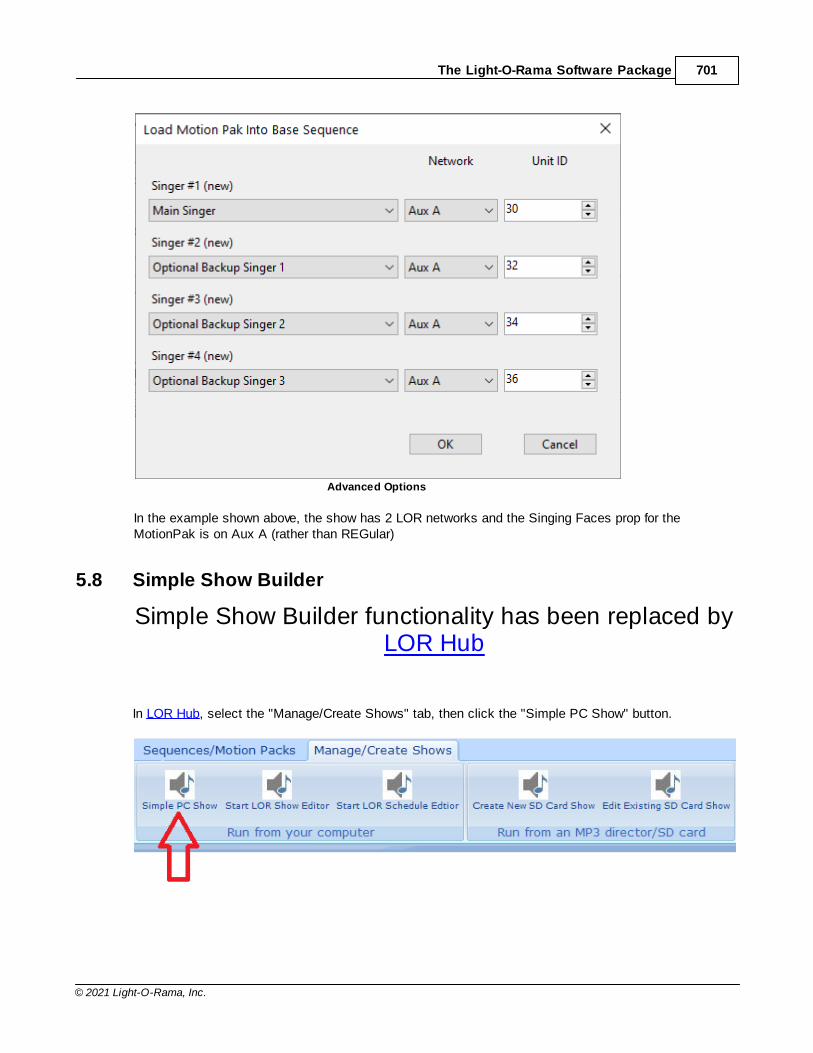
The Light-O-Rama Software Package 701
© 2021 Light-O-Rama, Inc.
Advanced Options
In the example shown above, the show has 2 LOR networks and the Singing Faces prop for theMotionPak is on Aux A (rather than REGular)
5.8 Simple Show Builder
Simple Show Builder functionality has been replaced byLOR Hub
In LOR Hub, select the "Manage/Create Shows" tab, then click the "Simple PC Show" button.
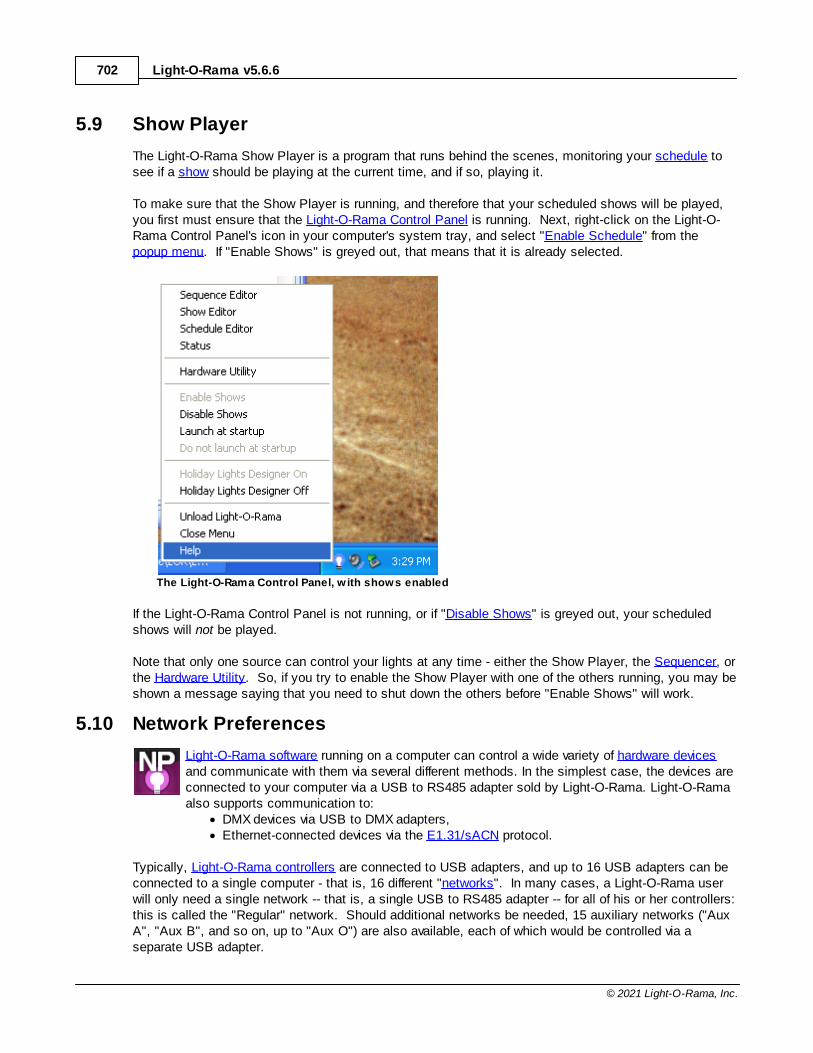
Light-O-Rama v5.6.6702
© 2021 Light-O-Rama, Inc.
5.9 Show Player
The Light-O-Rama Show Player is a program that runs behind the scenes, monitoring your schedule tosee if a show should be playing at the current time, and if so, playing it.
To make sure that the Show Player is running, and therefore that your scheduled shows will be played,you first must ensure that the Light-O-Rama Control Panel is running. Next, right-click on the Light-O-Rama Control Panel's icon in your computer's system tray, and select "Enable Schedule" from thepopup menu. If "Enable Shows" is greyed out, that means that it is already selected.
The Light-O-Rama Control Panel, w ith shows enabled
If the Light-O-Rama Control Panel is not running, or if "Disable Shows" is greyed out, your scheduledshows will not be played.
Note that only one source can control your lights at any time - either the Show Player, the Sequencer, orthe Hardware Utility. So, if you try to enable the Show Player with one of the others running, you may beshown a message saying that you need to shut down the others before "Enable Shows" will work.
5.10 Network Preferences
Light-O-Rama software running on a computer can control a wide variety of hardware devicesand communicate with them via several different methods. In the simplest case, the devices areconnected to your computer via a USB to RS485 adapter sold by Light-O-Rama. Light-O-Ramaalso supports communication to:
· DMX devices via USB to DMX adapters,· Ethernet-connected devices via the E1.31/sACN protocol.
Typically, Light-O-Rama controllers are connected to USB adapters, and up to 16 USB adapters can beconnected to a single computer - that is, 16 different "networks". In many cases, a Light-O-Rama userwill only need a single network -- that is, a single USB to RS485 adapter -- for all of his or her controllers:this is called the "Regular" network. Should additional networks be needed, 15 auxiliary networks ("AuxA", "Aux B", and so on, up to "Aux O") are also available, each of which would be controlled via aseparate USB adapter.
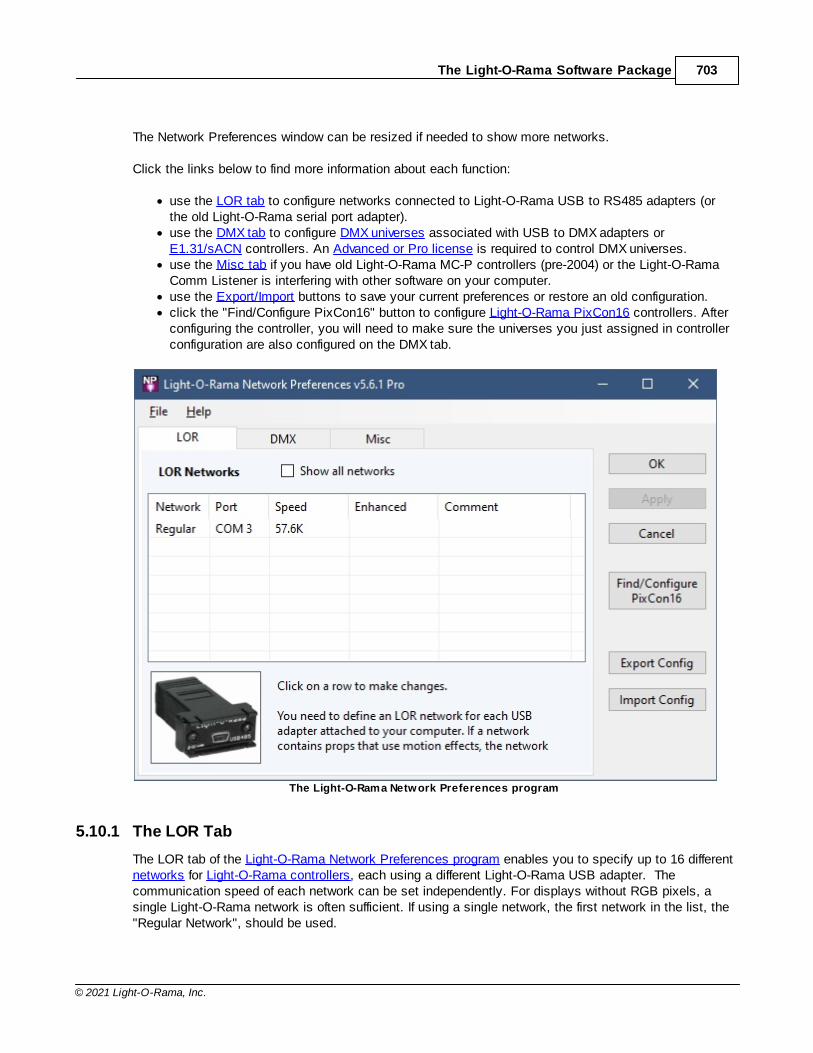
The Light-O-Rama Software Package 703
© 2021 Light-O-Rama, Inc.
The Network Preferences window can be resized if needed to show more networks.
Click the links below to find more information about each function:
· use the LOR tab to configure networks connected to Light-O-Rama USB to RS485 adapters (orthe old Light-O-Rama serial port adapter).
· use the DMX tab to configure DMX universes associated with USB to DMX adapters orE1.31/sACN controllers. An Advanced or Pro license is required to control DMX universes.
· use the Misc tab if you have old Light-O-Rama MC-P controllers (pre-2004) or the Light-O-RamaComm Listener is interfering with other software on your computer.
· use the Export/Import buttons to save your current preferences or restore an old configuration.· click the "Find/Configure PixCon16" button to configure Light-O-Rama PixCon16 controllers. After
configuring the controller, you will need to make sure the universes you just assigned in controllerconfiguration are also configured on the DMX tab.
The Light-O-Rama Network Preferences program
5.10.1 The LOR Tab
The LOR tab of the Light-O-Rama Network Preferences program enables you to specify up to 16 differentnetworks for Light-O-Rama controllers, each using a different Light-O-Rama USB adapter. Thecommunication speed of each network can be set independently. For displays without RGB pixels, asingle Light-O-Rama network is often sufficient. If using a single network, the first network in the list, the"Regular Network", should be used.
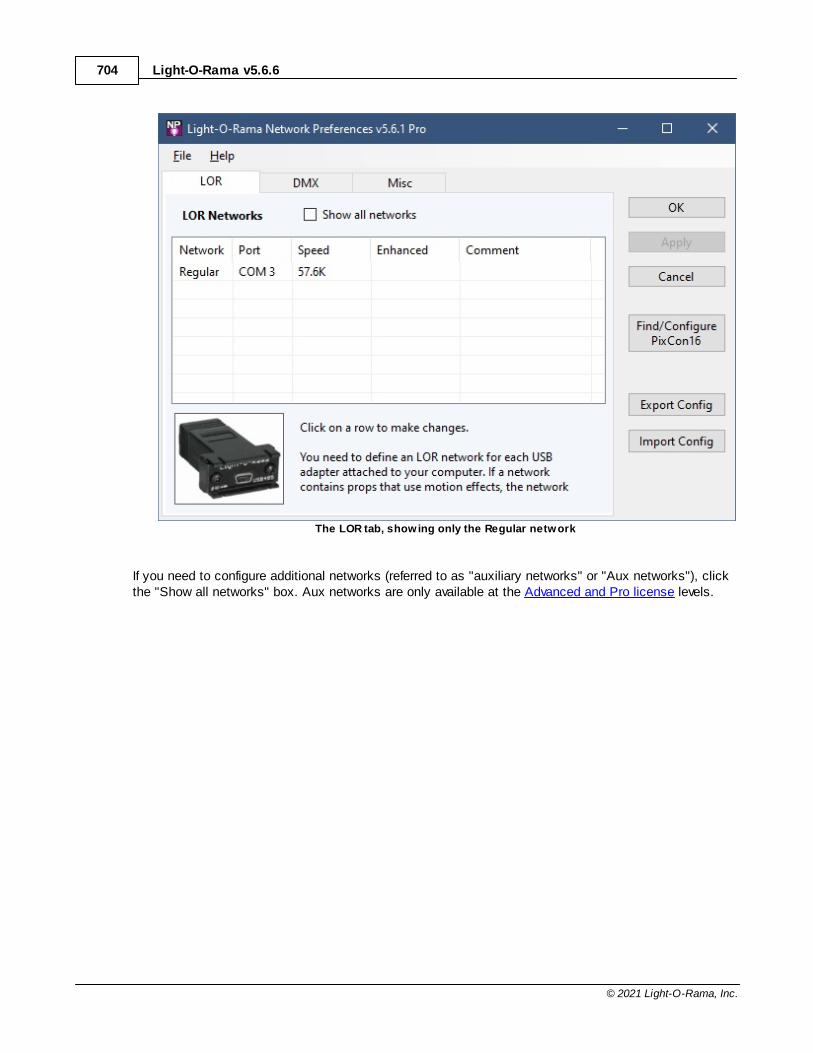
Light-O-Rama v5.6.6704
© 2021 Light-O-Rama, Inc.
The LOR tab, showing only the Regular network
If you need to configure additional networks (referred to as "auxiliary networks" or "Aux networks"), clickthe "Show all networks" box. Aux networks are only available at the Advanced and Pro license levels.
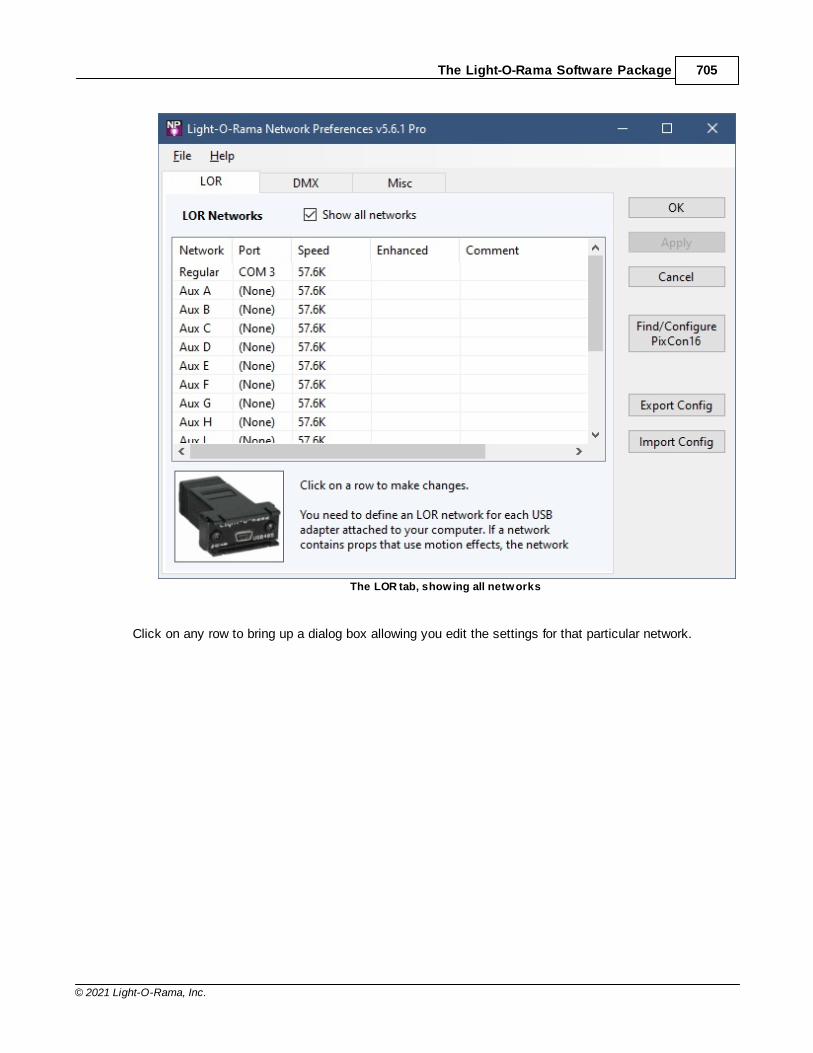
The Light-O-Rama Software Package 705
© 2021 Light-O-Rama, Inc.
The LOR tab, showing all networks
Click on any row to bring up a dialog box allowing you edit the settings for that particular network.
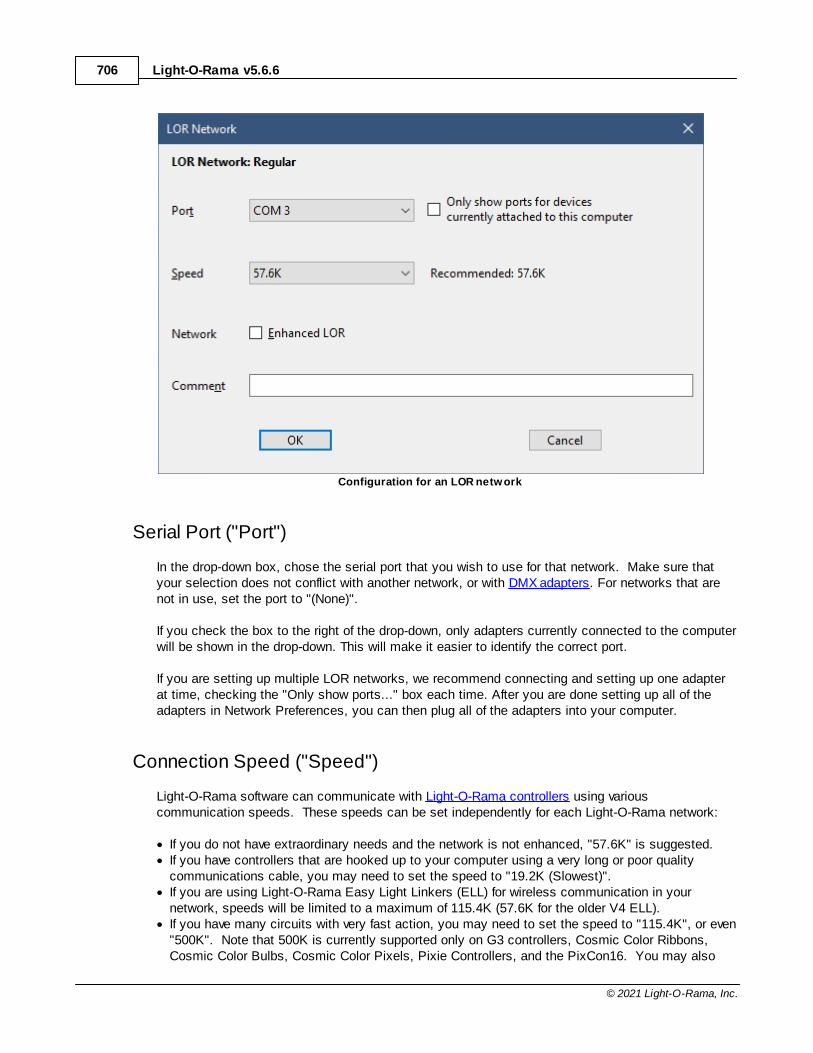
Light-O-Rama v5.6.6706
© 2021 Light-O-Rama, Inc.
Configuration for an LOR network
Serial Port ("Port")
In the drop-down box, chose the serial port that you wish to use for that network. Make sure thatyour selection does not conflict with another network, or with DMX adapters. For networks that arenot in use, set the port to "(None)".
If you check the box to the right of the drop-down, only adapters currently connected to the computerwill be shown in the drop-down. This will make it easier to identify the correct port.
If you are setting up multiple LOR networks, we recommend connecting and setting up one adapterat time, checking the "Only show ports..." box each time. After you are done setting up all of theadapters in Network Preferences, you can then plug all of the adapters into your computer.
Connection Speed ("Speed")
Light-O-Rama software can communicate with Light-O-Rama controllers using variouscommunication speeds. These speeds can be set independently for each Light-O-Rama network:
· If you do not have extraordinary needs and the network is not enhanced, "57.6K" is suggested.· If you have controllers that are hooked up to your computer using a very long or poor quality
communications cable, you may need to set the speed to "19.2K (Slowest)".· If you are using Light-O-Rama Easy Light Linkers (ELL) for wireless communication in your
network, speeds will be limited to a maximum of 115.4K (57.6K for the older V4 ELL).· If you have many circuits with very fast action, you may need to set the speed to "115.4K", or even
"500K". Note that 500K is currently supported only on G3 controllers, Cosmic Color Ribbons,Cosmic Color Bulbs, Cosmic Color Pixels, Pixie Controllers, and the PixCon16. You may also
The Light-O-Rama Software Package 707
© 2021 Light-O-Rama, Inc.
have to upgrade your firmware to use 500K. See our Network Speeds web page for the latestinformation.
· If you are using enhanced LOR, then 500K is the recommended speed.· If this network ONLY contains a combination of Pixie and Pixcon16 controllers running on an
Enhanced LOR Network, you may select 1000K.
Enhanced LOR
Checking this box designates this network as an enhanced network. This optimizes the network forhigh channel counts, such as when using RGB pixels. Motion effects and SuperStar effects can onlybe played on enhanced LOR networks and DMX networks.
A Pro level license is required to use this feature, and the Light-O-Rama Comm Listener must berunning in order for the lights to be controlled. Not all controllers can be used on such a network,and some controllers may require firmware updates before they are able to be used on an enhancednetwork. Also, input triggers are not supported on LOR Enhanced networks.
Comments
Use the comment field as you see fit for notes, etc.
5.10.2 The DMX Tab
The DMX tab of the Light-O-Rama Network Preferences program can be used to configure up to 999separate DMX universes, each using a separate adapter or E1.31 address (although please note that thesoftware and your computer may not be able to adequately drive nearly that many universessimultaneously). For DMX universes that use an adapter, the adapter and the protocol used on eachuniverse can be specified; for those using E1.31, the remote IP address and port can be specified.
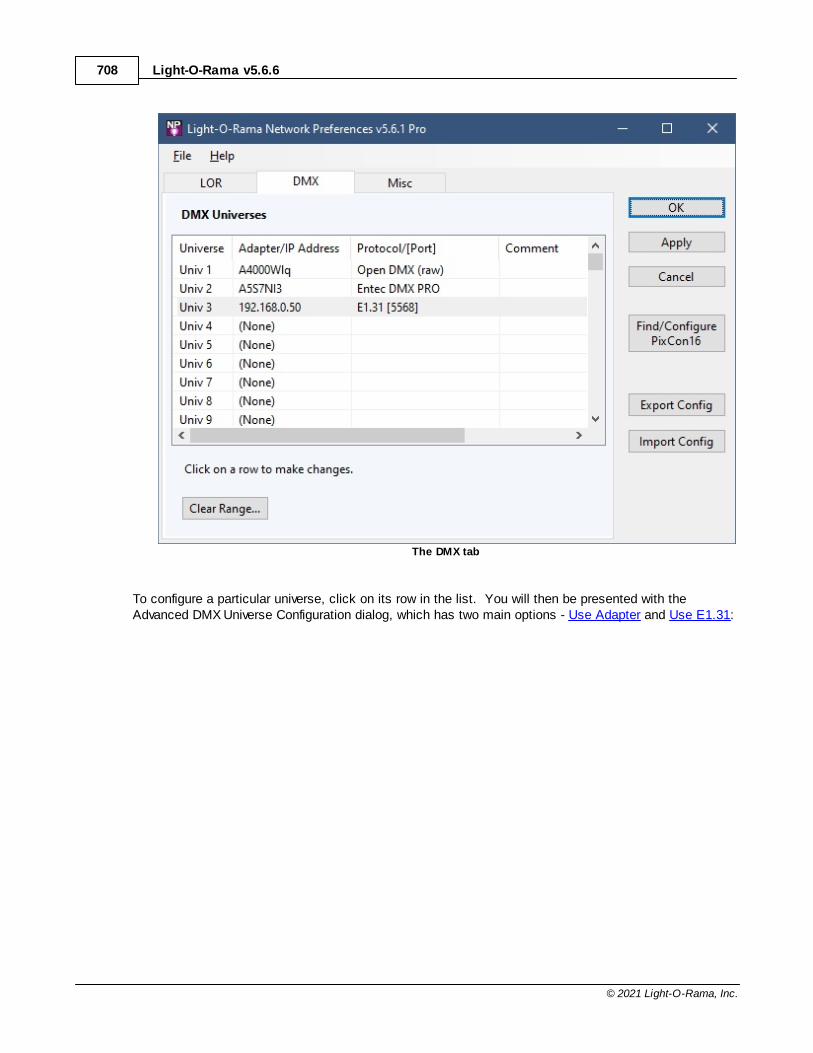
Light-O-Rama v5.6.6708
© 2021 Light-O-Rama, Inc.
The DMX tab
To configure a particular universe, click on its row in the list. You will then be presented with theAdvanced DMX Universe Configuration dialog, which has two main options - Use Adapter and Use E1.31:
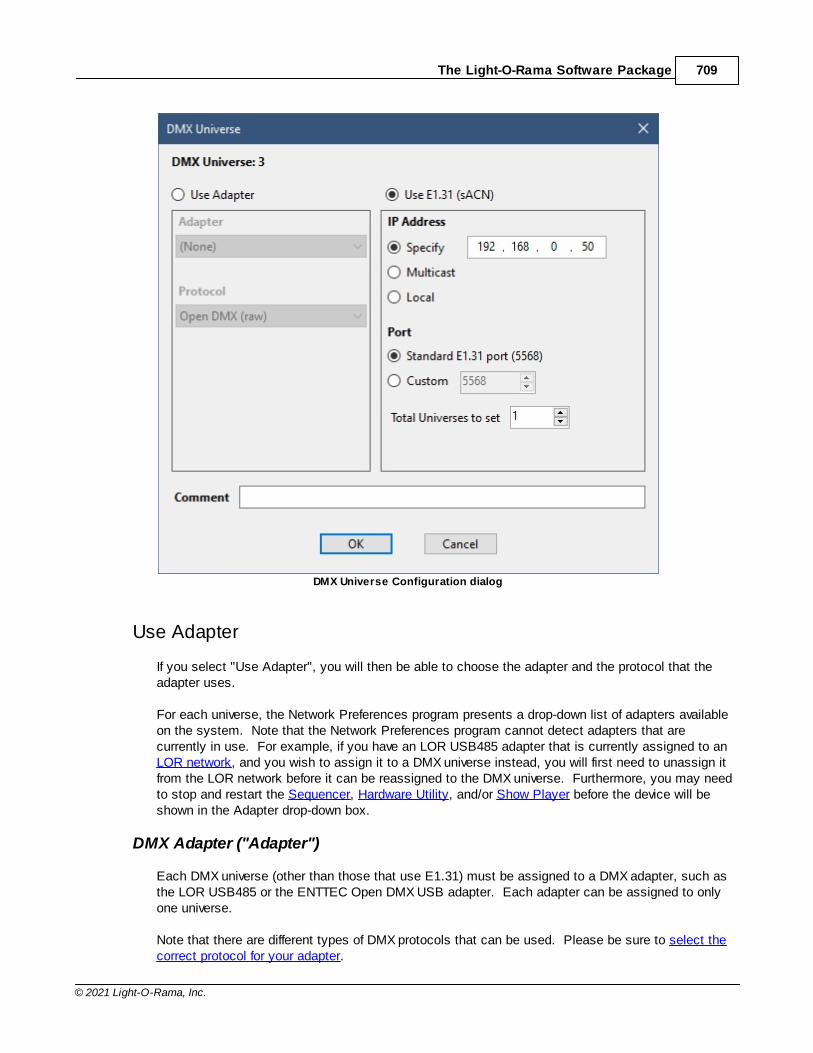
The Light-O-Rama Software Package 709
© 2021 Light-O-Rama, Inc.
DMX Universe Configuration dialog
Use Adapter
If you select "Use Adapter", you will then be able to choose the adapter and the protocol that theadapter uses.
For each universe, the Network Preferences program presents a drop-down list of adapters availableon the system. Note that the Network Preferences program cannot detect adapters that arecurrently in use. For example, if you have an LOR USB485 adapter that is currently assigned to anLOR network, and you wish to assign it to a DMX universe instead, you will first need to unassign itfrom the LOR network before it can be reassigned to the DMX universe. Furthermore, you may needto stop and restart the Sequencer, Hardware Utility, and/or Show Player before the device will beshown in the Adapter drop-down box.
DMX Adapter ("Adapter")
Each DMX universe (other than those that use E1.31) must be assigned to a DMX adapter, such asthe LOR USB485 or the ENTTEC Open DMX USB adapter. Each adapter can be assigned to onlyone universe.
Note that there are different types of DMX protocols that can be used. Please be sure to select thecorrect protocol for your adapter.
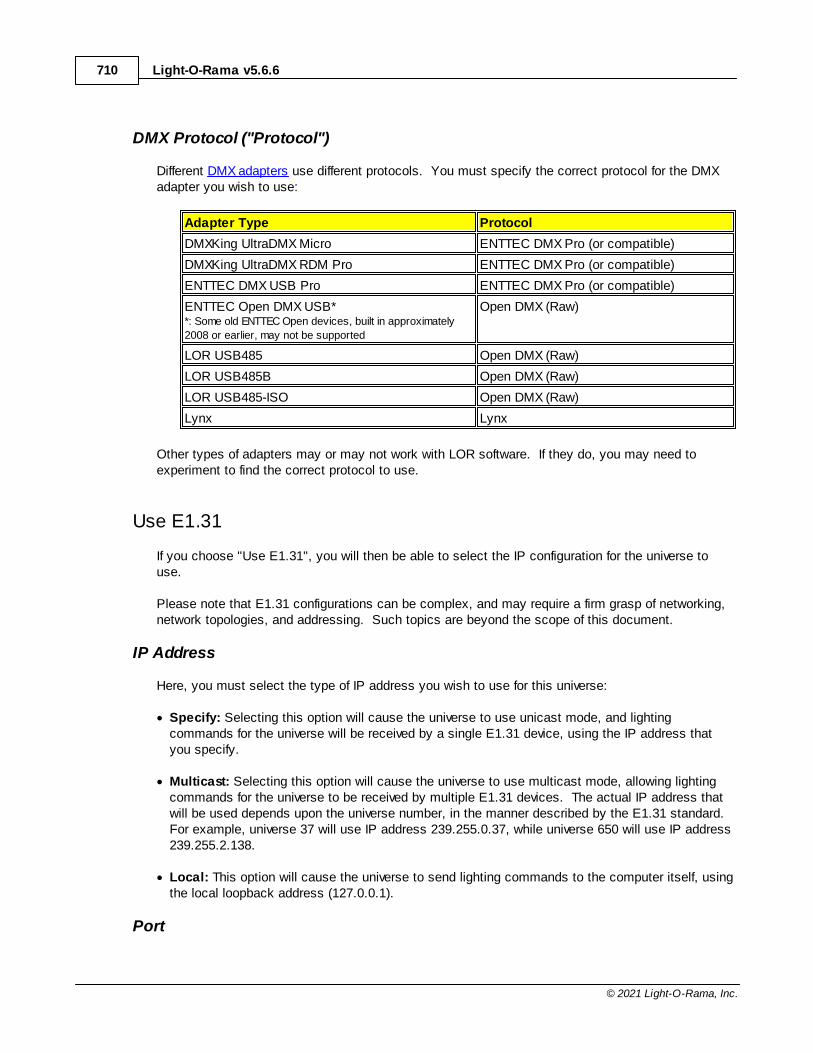
Light-O-Rama v5.6.6710
© 2021 Light-O-Rama, Inc.
DMX Protocol ("Protocol")
Different DMX adapters use different protocols. You must specify the correct protocol for the DMXadapter you wish to use:
Adapter Type Protocol
DMXKing UltraDMX Micro ENTTEC DMX Pro (or compatible)
DMXKing UltraDMX RDM Pro ENTTEC DMX Pro (or compatible)
ENTTEC DMX USB Pro ENTTEC DMX Pro (or compatible)
ENTTEC Open DMX USB**: Some old ENTTEC Open devices, built in approximately
2008 or earlier, may not be supported
Open DMX (Raw)
LOR USB485 Open DMX (Raw)
LOR USB485B Open DMX (Raw)
LOR USB485-ISO Open DMX (Raw)
Lynx Lynx
Other types of adapters may or may not work with LOR software. If they do, you may need toexperiment to find the correct protocol to use.
Use E1.31
If you choose "Use E1.31", you will then be able to select the IP configuration for the universe touse.
Please note that E1.31 configurations can be complex, and may require a firm grasp of networking,network topologies, and addressing. Such topics are beyond the scope of this document.
IP Address
Here, you must select the type of IP address you wish to use for this universe:
· Specify: Selecting this option will cause the universe to use unicast mode, and lightingcommands for the universe will be received by a single E1.31 device, using the IP address thatyou specify.
· Multicast: Selecting this option will cause the universe to use multicast mode, allowing lightingcommands for the universe to be received by multiple E1.31 devices. The actual IP address thatwill be used depends upon the universe number, in the manner described by the E1.31 standard. For example, universe 37 will use IP address 239.255.0.37, while universe 650 will use IP address239.255.2.138.
· Local: This option will cause the universe to send lighting commands to the computer itself, usingthe local loopback address (127.0.0.1).
Port
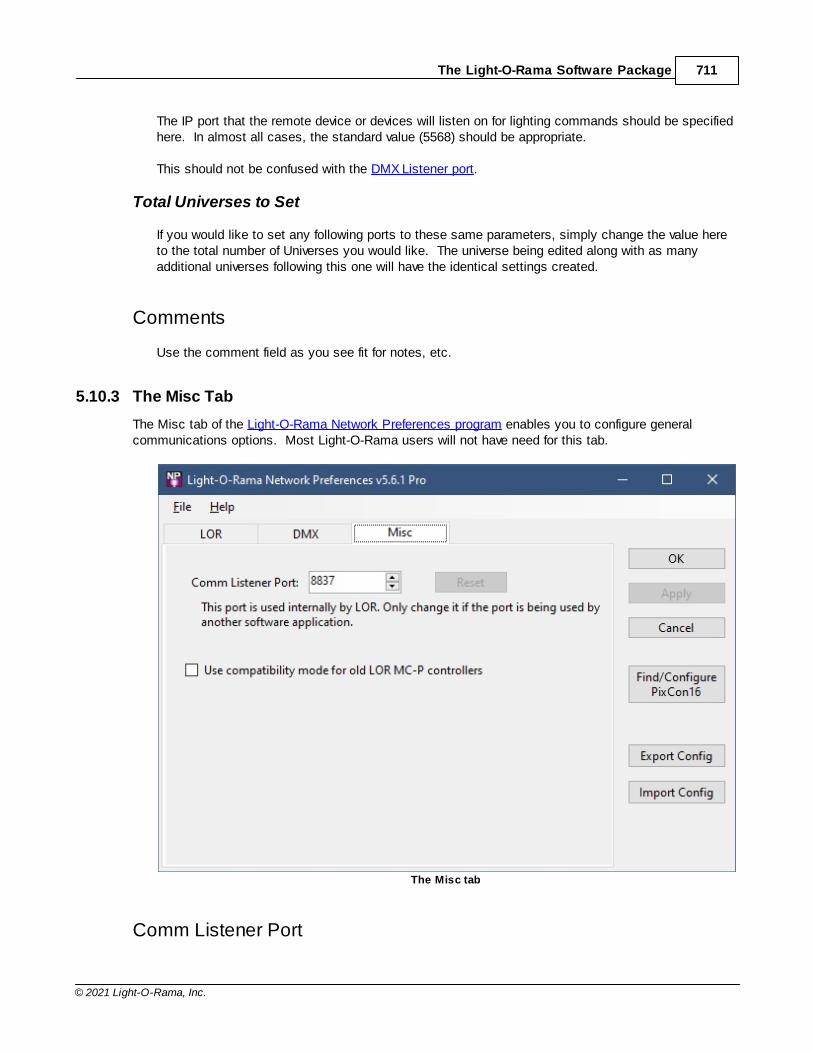
The Light-O-Rama Software Package 711
© 2021 Light-O-Rama, Inc.
The IP port that the remote device or devices will listen on for lighting commands should be specifiedhere. In almost all cases, the standard value (5568) should be appropriate.
This should not be confused with the DMX Listener port.
Total Universes to Set
If you would like to set any following ports to these same parameters, simply change the value hereto the total number of Universes you would like. The universe being edited along with as manyadditional universes following this one will have the identical settings created.
Comments
Use the comment field as you see fit for notes, etc.
5.10.3 The Misc Tab
The Misc tab of the Light-O-Rama Network Preferences program enables you to configure generalcommunications options. Most Light-O-Rama users will not have need for this tab.
The Misc tab
Comm Listener Port
Light-O-Rama v5.6.6712
© 2021 Light-O-Rama, Inc.
This section can be used to configure the IP port that the Light-O-Rama Comm Listener listens onfor lighting commands to be delivered over Enhanced LOR and DMX networks. The default port of8837 should work for nearly all users, but can be changed here if it conflicts with other software onyour computer.
Clicking the Reset button will restore the port setting to the default of 8837.
Use Compatibility Mode for Old MC-P Channel Controllers
If you are using Light-O-Rama MC-P controllers purchased prior to November 15, 2003, they youshould enable Old MC-P compatibility mode by checking this box. If you do not check this box,then you will see odd behavior on circuits 9 through 16 of such controllers.
Old MC-P compatibility mode only affects controllers on the Regular LOR network; those on Auxnetworks are unaffected. Therefore, make sure to put all such controllers on your Regular network.
NOTE: Enabling Old MC-P compatibility mode may have a significant effect oncommunications speed for the regular network. It is therefore strongly recommended that youdo not enable it without reason, and that if you do enable it, you should consider moving any otherLight-O-Rama controllers (which do not need Old MC-P compatibility mode) off of the Regularnetwork, and onto one or more auxiliary networks.
5.10.4 Export/Import
The Advanced and Pro versions of the software can export/import your entire network configuration to afile. This is useful if you would like to have multiple different configurations available, or if you use thesoftware on multiple machines and want to move the configuration between them.
The Import/Export function works on ALL the parameters that can be changed in the NetworkConfiguration program. This includes not only actual network configurations, but also items on the Misctab.
Please be careful when importing a network configuration from another computer. While the hardwareand software give a best-effort to configure themselves the same way across physical machines, that isnot guaranteed. This is especially true of COM port settings, and IP addresses. After importing aconfiguration, you should always check all values to ensure they are correct.
To export your configuration, press the Export button and give the file a name. The exported files arenormally saved in the LOR Data path under "Network\SavedConfigurations". An exported file will havethe .LIV extension.
To import a configuration, press the Import button and select the configuration to import.
5.10.5 PixCon16 Configuration
Open the PixCon16 Configuration page by clicking the "Find/Configure PixCon16" button on the right-hand side of the Network Preferences program. Make sure your PixCon16 controller is powered on andthat it and your computer are connected to the same Ethernet network (the Ethernet connector on thePixCon16 is the silver connector).
The PixCon16 is a little different than other Light-O-Rama controllers when it comes to configuration anduse. All configuration of the board is done while it is connected to a standard LAN. The PixCon16 cannot be configured via the LOR RS485 mode. The PixCon16 however can run (i.e. control lights) in either
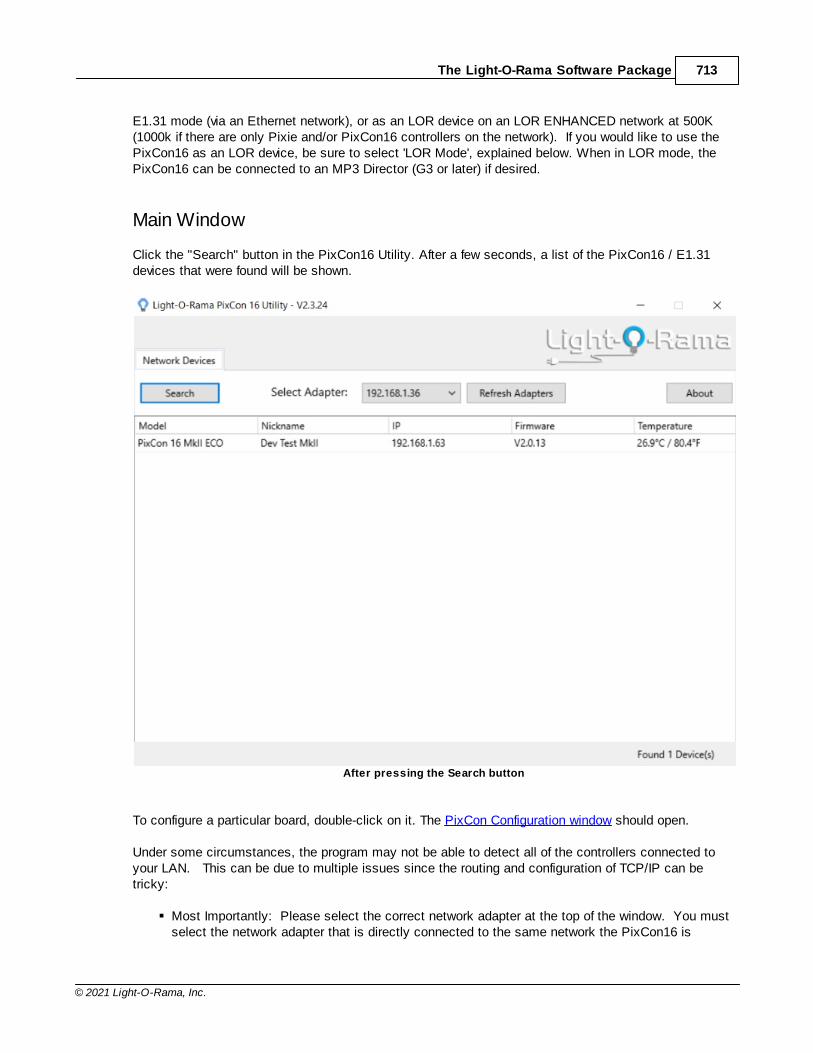
The Light-O-Rama Software Package 713
© 2021 Light-O-Rama, Inc.
E1.31 mode (via an Ethernet network), or as an LOR device on an LOR ENHANCED network at 500K(1000k if there are only Pixie and/or PixCon16 controllers on the network). If you would like to use thePixCon16 as an LOR device, be sure to select 'LOR Mode', explained below. When in LOR mode, thePixCon16 can be connected to an MP3 Director (G3 or later) if desired.
Main Window
Click the "Search" button in the PixCon16 Utility. After a few seconds, a list of the PixCon16 / E1.31devices that were found will be shown.
After pressing the Search button
To configure a particular board, double-click on it. The PixCon Configuration window should open.
Under some circumstances, the program may not be able to detect all of the controllers connected toyour LAN. This can be due to multiple issues since the routing and configuration of TCP/IP can betricky:
§ Most Importantly: Please select the correct network adapter at the top of the window. You mustselect the network adapter that is directly connected to the same network the PixCon16 is
Light-O-Rama v5.6.6714
© 2021 Light-O-Rama, Inc.
connected to.
§ The board may simply have missed the command for it to report in. Pressing "Search" again willusually find the missing controller. It could also be that the network is currently saturated withlighting commands. You should stop any running show before attempting to configure an E1.31device.
§ If this is the first time you are configuring a board, or if you changed the configuration of yournetwork, the device may no longer be at an IP that you are expecting. In that case, you may wantto reset the board to factory specifications. This will then place the board into 'DHCP' mode whereit will request an IP from your network. This requested IP should then be able to be found with theprogram. Please note that resetting the board will clear all of your configuration information, andyou will need to re-configure the board.
After configuring you controller using the PixCon Configuration window, then clicking OK to save yourconfiguration and close the window, the list of controllers in the main window will NOT automaticallyupdate. You will need to press the Search button again. Be patient -- it may take a few seconds for thecontroller to update its configuration and reboot before it is able to respond to a search request.
PixCon Configuration Window
Use this window to configure a specific PixCon16 controller. After changing the settings, click the "OK"button at the bottom of the screen to save the changes; otherwise, click "Cancel" to leave the deviceconfiguration unchanged.
The "PixCon Configuration" window has 5 tabs:
· Network· Control· LEDs· Test· Misc
Network Tab
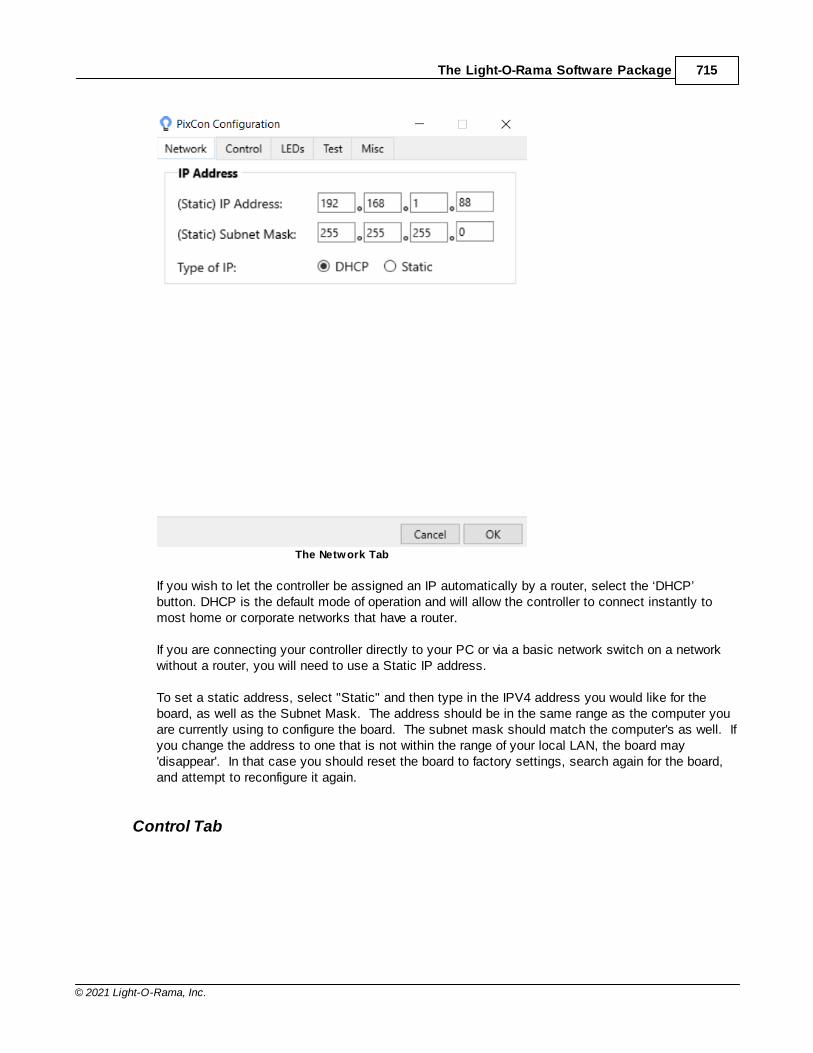
The Light-O-Rama Software Package 715
© 2021 Light-O-Rama, Inc.
The Network Tab
If you wish to let the controller be assigned an IP automatically by a router, select the ‘DHCP’button. DHCP is the default mode of operation and will allow the controller to connect instantly tomost home or corporate networks that have a router.
If you are connecting your controller directly to your PC or via a basic network switch on a networkwithout a router, you will need to use a Static IP address.
To set a static address, select "Static" and then type in the IPV4 address you would like for theboard, as well as the Subnet Mask. The address should be in the same range as the computer youare currently using to configure the board. The subnet mask should match the computer's as well. Ifyou change the address to one that is not within the range of your local LAN, the board may'disappear'. In that case you should reset the board to factory settings, search again for the board,and attempt to reconfigure it again.
Control Tab
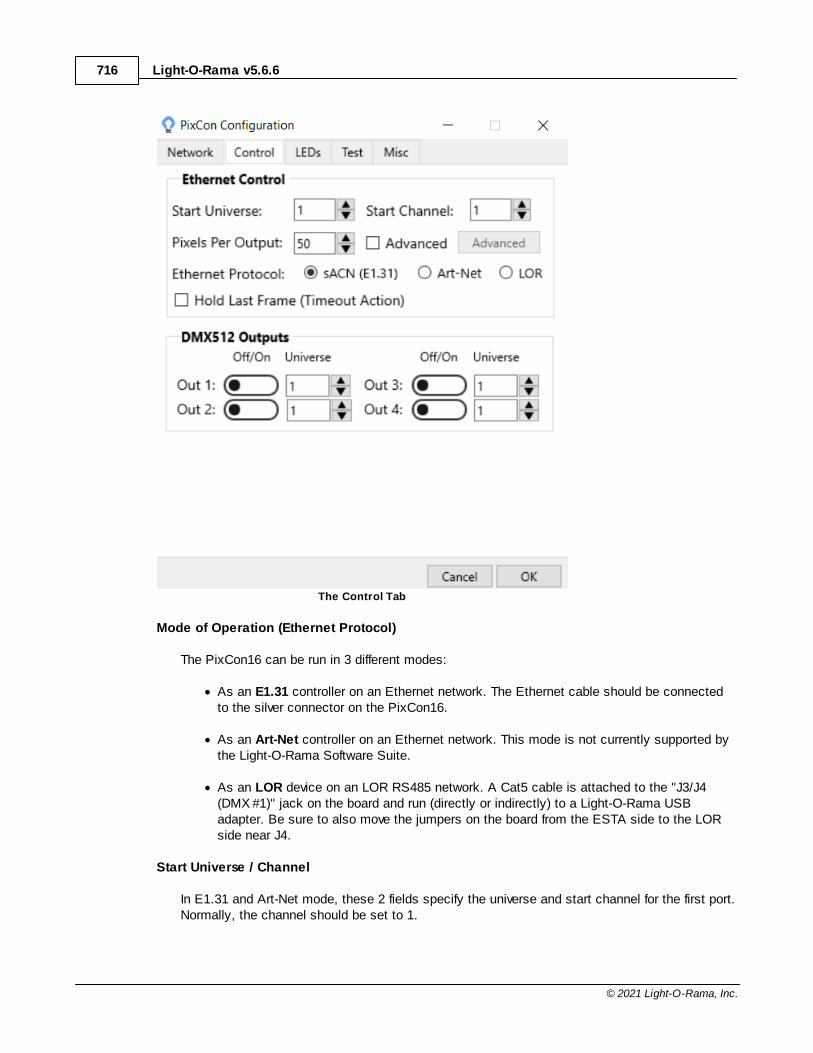
Light-O-Rama v5.6.6716
© 2021 Light-O-Rama, Inc.
The Control Tab
Mode of Operation (Ethernet Protocol)
The PixCon16 can be run in 3 different modes:
· As an E1.31 controller on an Ethernet network. The Ethernet cable should be connectedto the silver connector on the PixCon16.
· As an Art-Net controller on an Ethernet network. This mode is not currently supported bythe Light-O-Rama Software Suite.
· As an LOR device on an LOR RS485 network. A Cat5 cable is attached to the "J3/J4(DMX #1)" jack on the board and run (directly or indirectly) to a Light-O-Rama USBadapter. Be sure to also move the jumpers on the board from the ESTA side to the LORside near J4.
Start Universe / Channel
In E1.31 and Art-Net mode, these 2 fields specify the universe and start channel for the first port.Normally, the channel should be set to 1.
The Light-O-Rama Software Package 717
© 2021 Light-O-Rama, Inc.
In LOR mode, this specifies the Unit Id and Circuit of the first port. Normally, the channel (circuit)should be set to 1. Note that the Unit Id here is in decimal (base 10), whereas the unit id ishexadecimal (base 16) in all other parts of the software. See the Unit Id Values topic for aconversion table.
Pixels Per Output
Enter the number of pixels on the longest string attached to this PixCon16.
DMX512 Outputs
This section allows you to enable/disable the 4 DMX ports available on the board, as well asassign the universe each will control. These ports act as a bridge between E1.31 and a DMXuniverse. By using one or more of these ports, you can eliminate the use of one or more USBDMX adapters. These ports are not active when using the board in LOR mode.
Advanced - OFF
If the "Advanced" box is not checked, then the start universe (or unit id) and channel for ports 2-15 will be automatically assigned.
When using E1.31 mode and Advanced is off, then you should set up your Prop Definitionsimilar to the following picture:· Prop Definition's "Nodes per String" should match the PixCon16 Configuration "Pixels Per
Output".· Prop Definition's device type should be set to "DMX".· Prop Definition's "Max Channel" should be set to 510.· Prop Definition's Universe and Start Channel should match the corresponding PixCon16
Configuration.· Prop Definition's "Enter channel on first row, auto-number the rest" should be selected.· Prop Definition's "Separate Universe for each RGB string" should be unchecked.
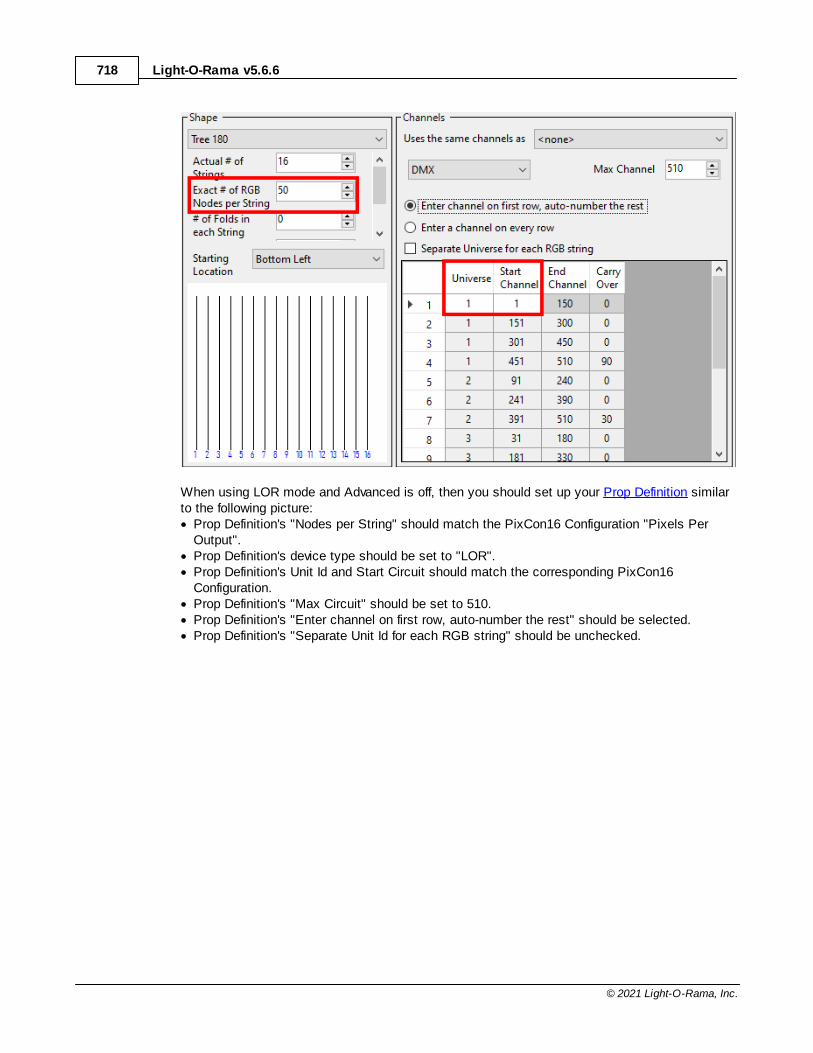
Light-O-Rama v5.6.6718
© 2021 Light-O-Rama, Inc.
When using LOR mode and Advanced is off, then you should set up your Prop Definition similarto the following picture:· Prop Definition's "Nodes per String" should match the PixCon16 Configuration "Pixels Per
Output".· Prop Definition's device type should be set to "LOR".· Prop Definition's Unit Id and Start Circuit should match the corresponding PixCon16
Configuration.· Prop Definition's "Max Circuit" should be set to 510.· Prop Definition's "Enter channel on first row, auto-number the rest" should be selected.· Prop Definition's "Separate Unit Id for each RGB string" should be unchecked.
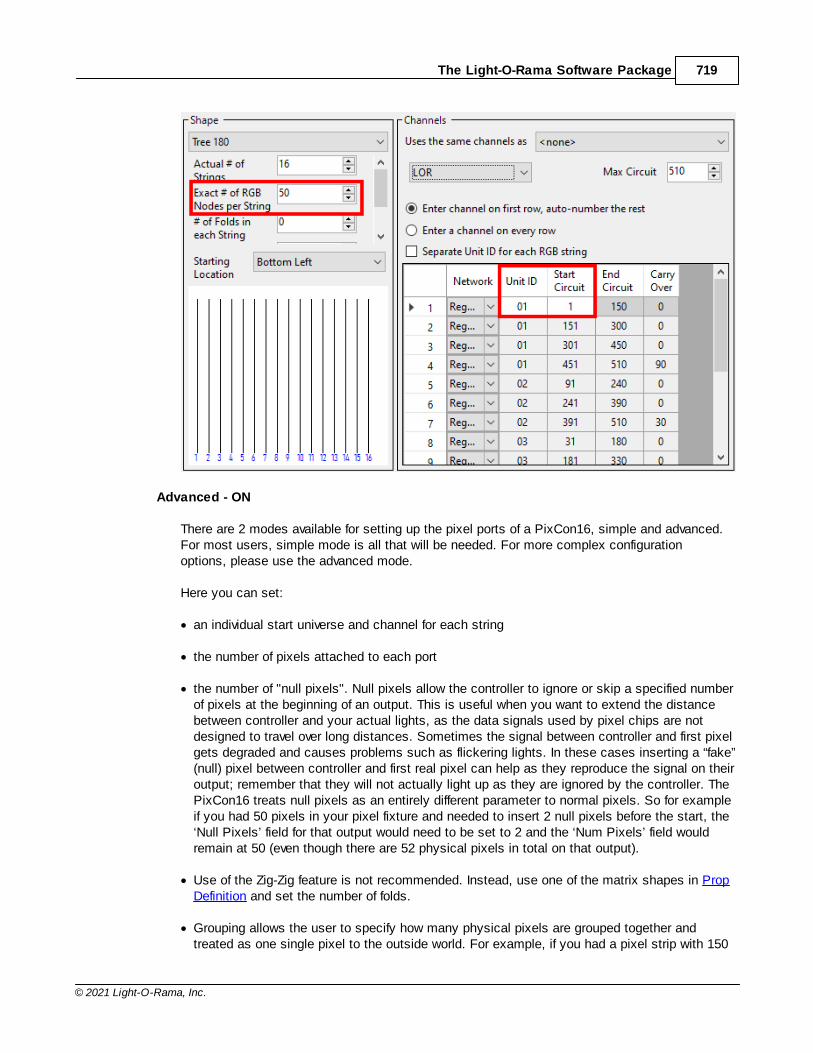
The Light-O-Rama Software Package 719
© 2021 Light-O-Rama, Inc.
Advanced - ON
There are 2 modes available for setting up the pixel ports of a PixCon16, simple and advanced. For most users, simple mode is all that will be needed. For more complex configurationoptions, please use the advanced mode.
Here you can set:
· an individual start universe and channel for each string
· the number of pixels attached to each port
· the number of "null pixels". Null pixels allow the controller to ignore or skip a specified numberof pixels at the beginning of an output. This is useful when you want to extend the distancebetween controller and your actual lights, as the data signals used by pixel chips are notdesigned to travel over long distances. Sometimes the signal between controller and first pixelgets degraded and causes problems such as flickering lights. In these cases inserting a “fake”(null) pixel between controller and first real pixel can help as they reproduce the signal on theiroutput; remember that they will not actually light up as they are ignored by the controller. ThePixCon16 treats null pixels as an entirely different parameter to normal pixels. So for exampleif you had 50 pixels in your pixel fixture and needed to insert 2 null pixels before the start, the‘Null Pixels’ field for that output would need to be set to 2 and the ‘Num Pixels’ field wouldremain at 50 (even though there are 52 physical pixels in total on that output).
· Use of the Zig-Zig feature is not recommended. Instead, use one of the matrix shapes in PropDefinition and set the number of folds.
· Grouping allows the user to specify how many physical pixels are grouped together andtreated as one single pixel to the outside world. For example, if you had a pixel strip with 150
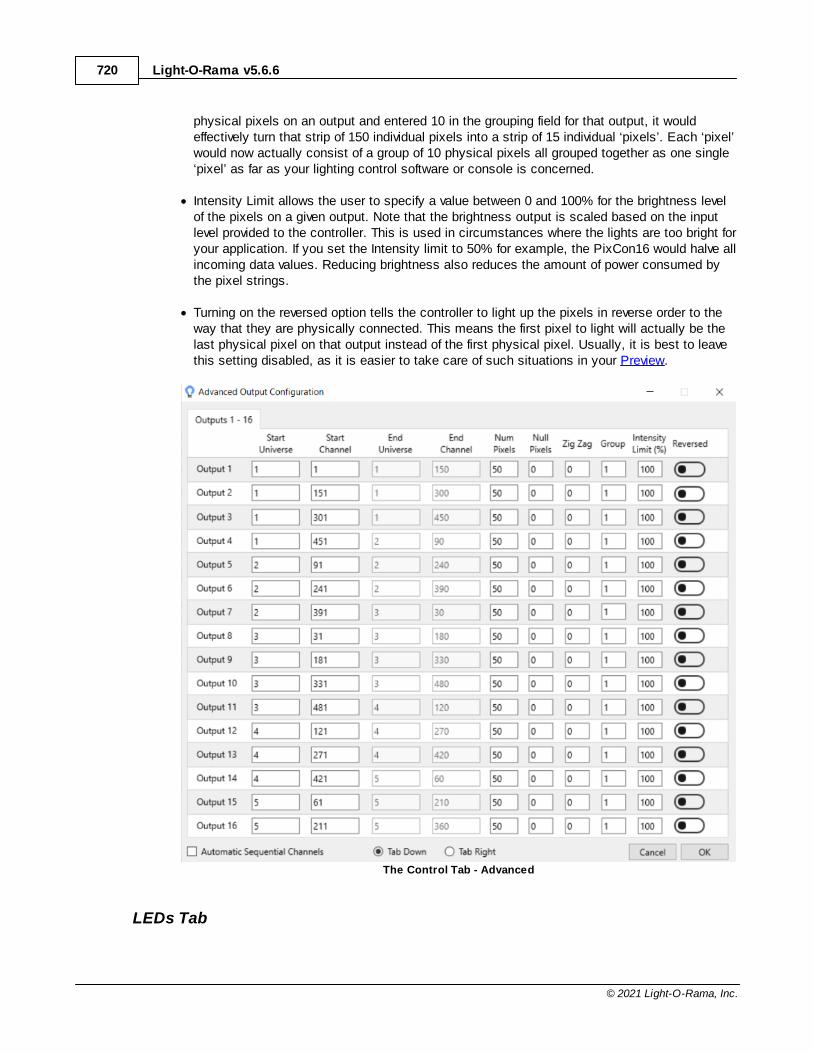
Light-O-Rama v5.6.6720
© 2021 Light-O-Rama, Inc.
physical pixels on an output and entered 10 in the grouping field for that output, it wouldeffectively turn that strip of 150 individual pixels into a strip of 15 individual ‘pixels’. Each ‘pixel’would now actually consist of a group of 10 physical pixels all grouped together as one single‘pixel’ as far as your lighting control software or console is concerned.
· Intensity Limit allows the user to specify a value between 0 and 100% for the brightness levelof the pixels on a given output. Note that the brightness output is scaled based on the inputlevel provided to the controller. This is used in circumstances where the lights are too bright foryour application. If you set the Intensity limit to 50% for example, the PixCon16 would halve allincoming data values. Reducing brightness also reduces the amount of power consumed bythe pixel strings.
· Turning on the reversed option tells the controller to light up the pixels in reverse order to theway that they are physically connected. This means the first pixel to light will actually be thelast physical pixel on that output instead of the first physical pixel. Usually, it is best to leavethis setting disabled, as it is easier to take care of such situations in your Preview.
The Control Tab - Advanced
LEDs Tab
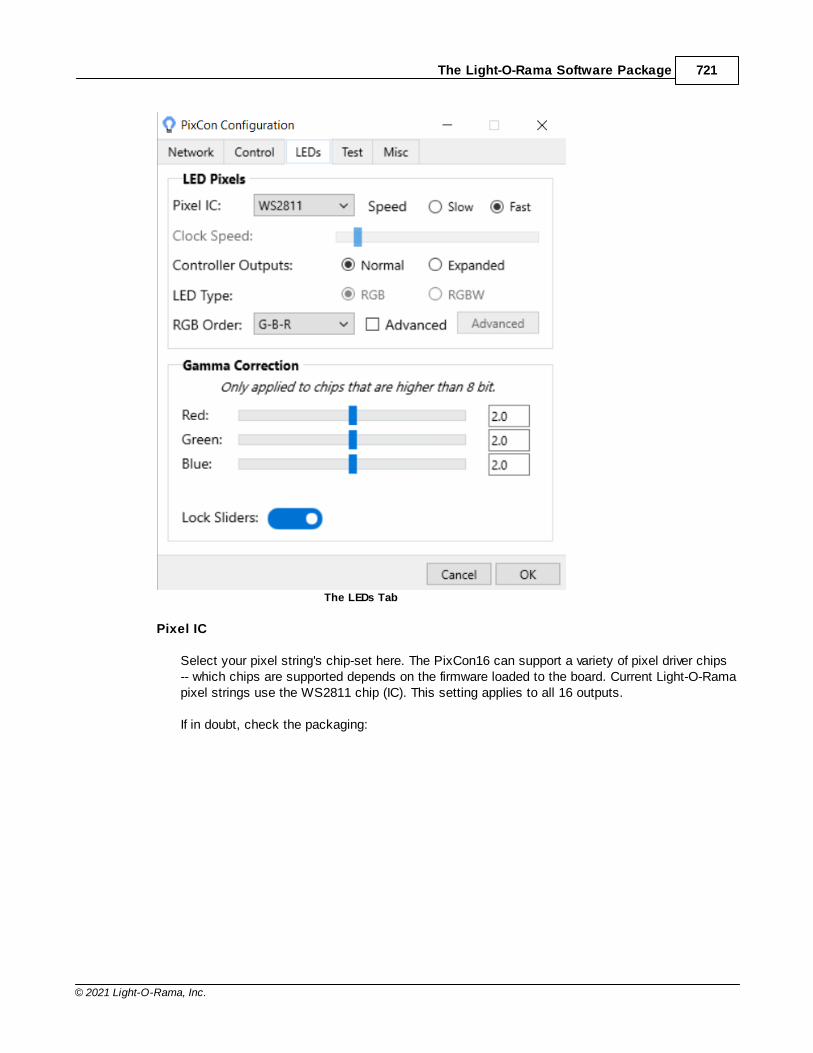
The Light-O-Rama Software Package 721
© 2021 Light-O-Rama, Inc.
The LEDs Tab
Pixel IC
Select your pixel string's chip-set here. The PixCon16 can support a variety of pixel driver chips-- which chips are supported depends on the firmware loaded to the board. Current Light-O-Ramapixel strings use the WS2811 chip (IC). This setting applies to all 16 outputs.
If in doubt, check the packaging:
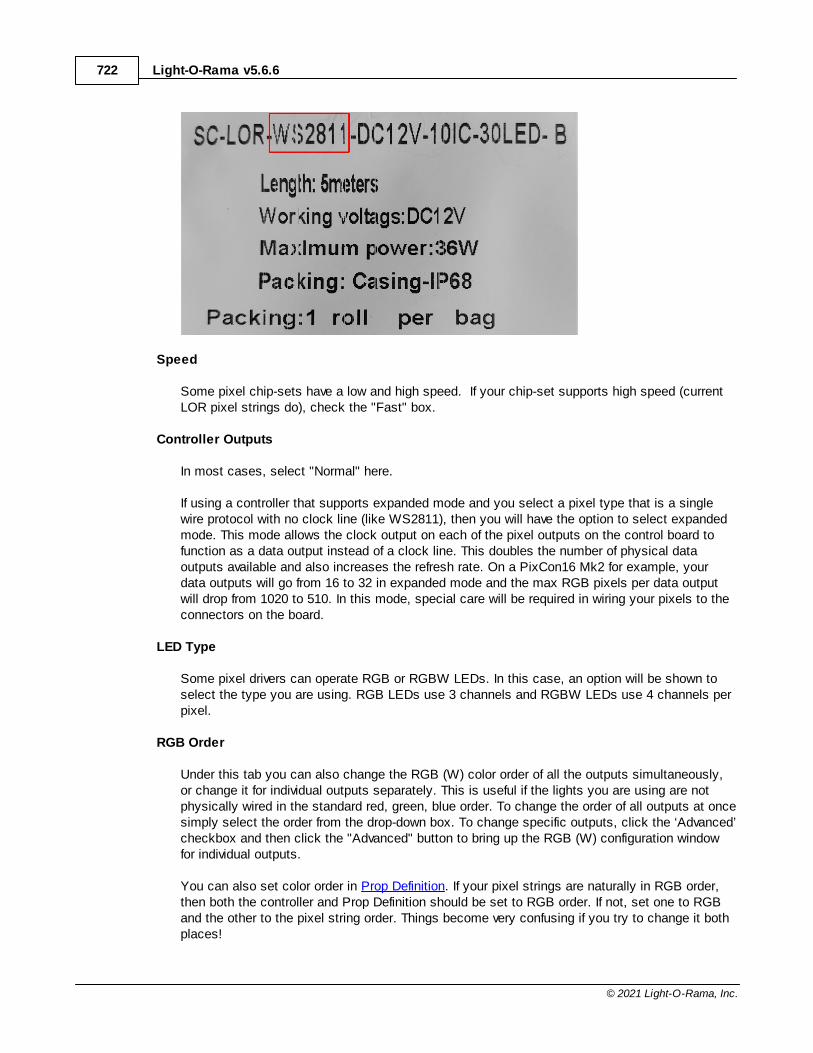
Light-O-Rama v5.6.6722
© 2021 Light-O-Rama, Inc.
Speed
Some pixel chip-sets have a low and high speed. If your chip-set supports high speed (currentLOR pixel strings do), check the "Fast" box.
Controller Outputs
In most cases, select "Normal" here.
If using a controller that supports expanded mode and you select a pixel type that is a singlewire protocol with no clock line (like WS2811), then you will have the option to select expandedmode. This mode allows the clock output on each of the pixel outputs on the control board tofunction as a data output instead of a clock line. This doubles the number of physical dataoutputs available and also increases the refresh rate. On a PixCon16 Mk2 for example, yourdata outputs will go from 16 to 32 in expanded mode and the max RGB pixels per data outputwill drop from 1020 to 510. In this mode, special care will be required in wiring your pixels to theconnectors on the board.
LED Type
Some pixel drivers can operate RGB or RGBW LEDs. In this case, an option will be shown toselect the type you are using. RGB LEDs use 3 channels and RGBW LEDs use 4 channels perpixel.
RGB Order
Under this tab you can also change the RGB (W) color order of all the outputs simultaneously,or change it for individual outputs separately. This is useful if the lights you are using are notphysically wired in the standard red, green, blue order. To change the order of all outputs at oncesimply select the order from the drop-down box. To change specific outputs, click the ‘Advanced’checkbox and then click the "Advanced" button to bring up the RGB (W) configuration windowfor individual outputs.
You can also set color order in Prop Definition. If your pixel strings are naturally in RGB order,then both the controller and Prop Definition should be set to RGB order. If not, set one to RGBand the other to the pixel string order. Things become very confusing if you try to change it bothplaces!
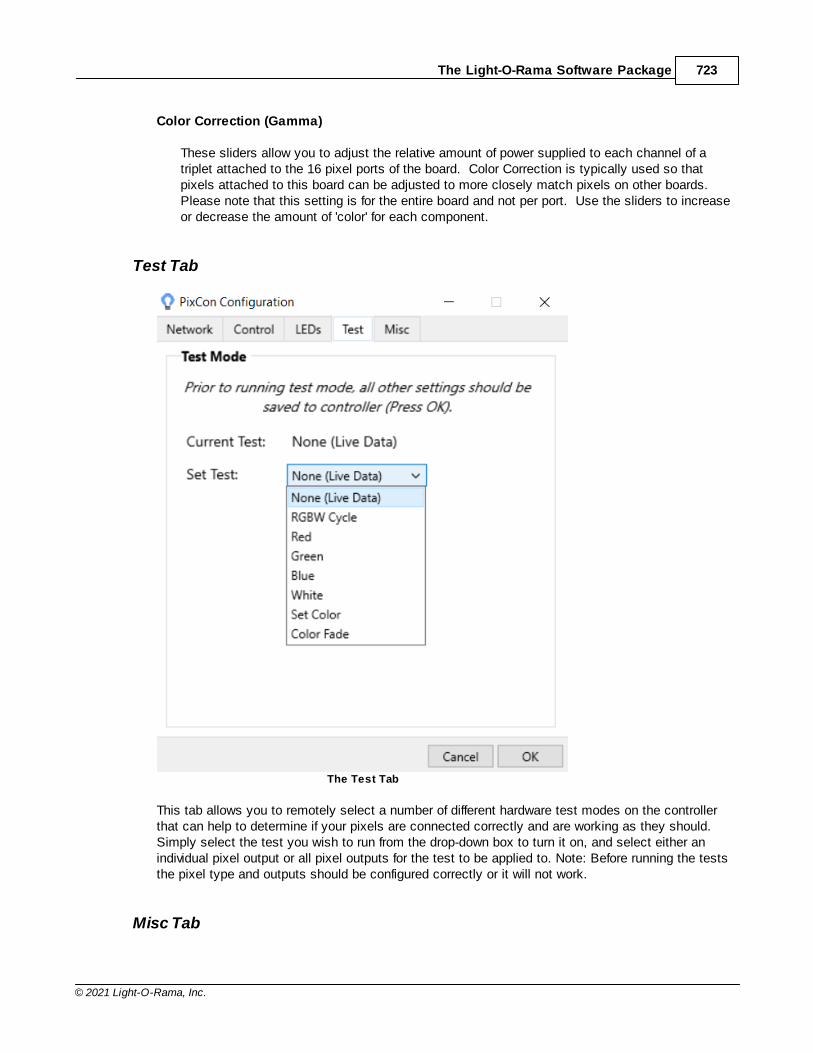
The Light-O-Rama Software Package 723
© 2021 Light-O-Rama, Inc.
Color Correction (Gamma)
These sliders allow you to adjust the relative amount of power supplied to each channel of atriplet attached to the 16 pixel ports of the board. Color Correction is typically used so thatpixels attached to this board can be adjusted to more closely match pixels on other boards. Please note that this setting is for the entire board and not per port. Use the sliders to increaseor decrease the amount of 'color' for each component.
Test Tab
The Test Tab
This tab allows you to remotely select a number of different hardware test modes on the controllerthat can help to determine if your pixels are connected correctly and are working as they should.Simply select the test you wish to run from the drop-down box to turn it on, and select either anindividual pixel output or all pixel outputs for the test to be applied to. Note: Before running the teststhe pixel type and outputs should be configured correctly or it will not work.
Misc Tab
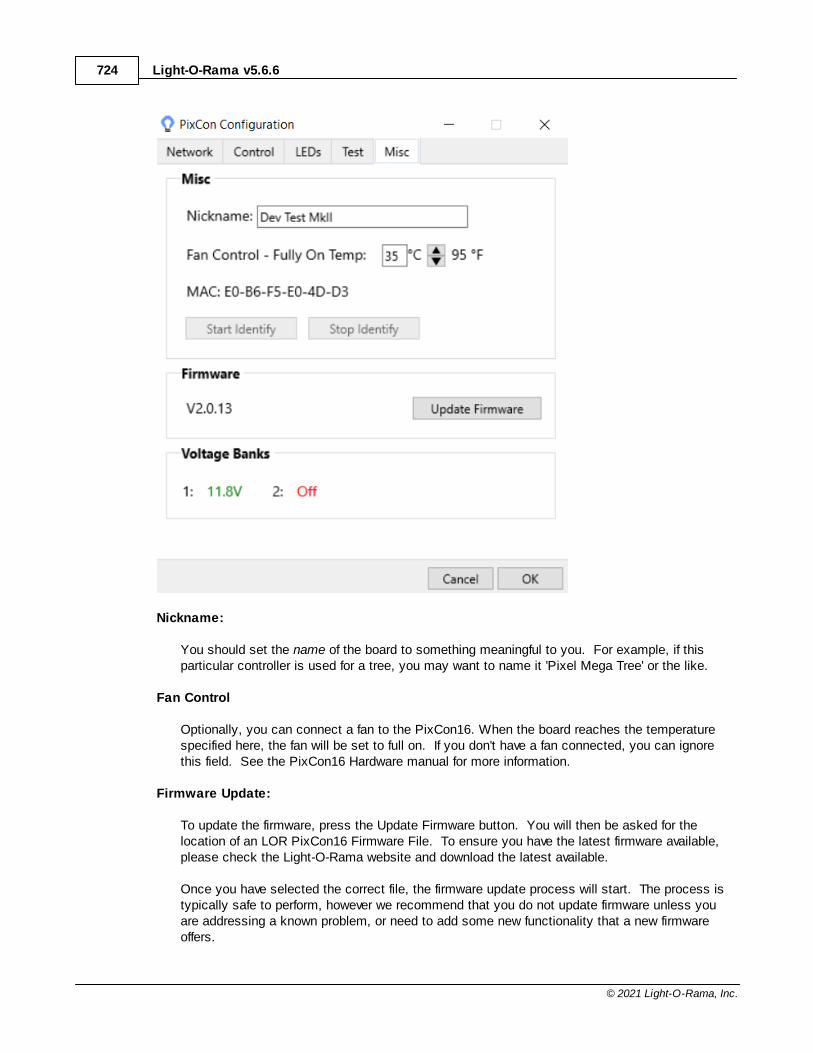
Light-O-Rama v5.6.6724
© 2021 Light-O-Rama, Inc.
Nickname:
You should set the name of the board to something meaningful to you. For example, if thisparticular controller is used for a tree, you may want to name it 'Pixel Mega Tree' or the like.
Fan Control
Optionally, you can connect a fan to the PixCon16. When the board reaches the temperaturespecified here, the fan will be set to full on. If you don't have a fan connected, you can ignorethis field. See the PixCon16 Hardware manual for more information.
Firmware Update:
To update the firmware, press the Update Firmware button. You will then be asked for thelocation of an LOR PixCon16 Firmware File. To ensure you have the latest firmware available,please check the Light-O-Rama website and download the latest available.
Once you have selected the correct file, the firmware update process will start. The process istypically safe to perform, however we recommend that you do not update firmware unless youare addressing a known problem, or need to add some new functionality that a new firmwareoffers.
The Light-O-Rama Software Package 725
© 2021 Light-O-Rama, Inc.
When updating the firmware of a PixCon16, the power and status lights will flash on/off indifferent patterns. Do not power off the board while the update is in progress. If you are unsure ifthe update was applied properly or not, wait a few minutes and then observe the power andstatus lights. This will give the board enough time to reboot and stabilize. Also, pay attentionto any instructions that may be shown on your screen.
Should the update process fail, the board could be in one of several states after the failure: · If the status light is blinking and the power light is solid, this typically means the update was
successful. However, it could also mean the board did not receive or it did not properly startthe update process.
· If the power and status lights are alternating, then the board is currently in the boot-loadermode.
· If the power light is ON but the status light is OFF there was a problem with the firmwareupdate.
In all cases after allowing the board to sit for a few minutes, power it off then back on. The boardshould return to normal operation at that time. If not, please refer to the hardware manual of thePixCon16 for additional troubleshooting information.
5.11 Comm Listener
The LOR Comm Listener is a program that runs in the background, allowing other programs(such as the Sequencer and the Show Player) to control LOR devices that are on LOREnhanced networks, and also to control DMX devices. The Comm Listener must be running inorder for those programs to control such devices.
The LOR Comm Listener is automatically started when the LOR Control Panel is started, unless thelicense level does not support it or if no Listener port is specified in Network Preferences. Also, it isautomatically shut down when the LOR Control Panel is shut down. So, to make sure that you cancontrol your LOR Enhanced devices and DMX devices, make sure that the LOR Control Panel is running.
5.12 Hardware Utility
The Light-O-Rama Hardware Utility is used to manage the hardware that you use to control yourlights. This includes several types of controllers as well as other devices such as Light-O-RamaMP3 Directors and Light-O-Rama wireless devices.
Each of these types has a different tab in the Hardware Utility. When you start the Hardware Utility, thetab for Light-O-Rama controllers is displayed; to access one of the others, simply click its tab.
For details on each, please refer to the following sections:
· Light-O-Rama Controllers· Selecting a Comm Port· Setting Unit IDs· Configuring Units· Testing Units· Downloading Sequences· Firmware Update
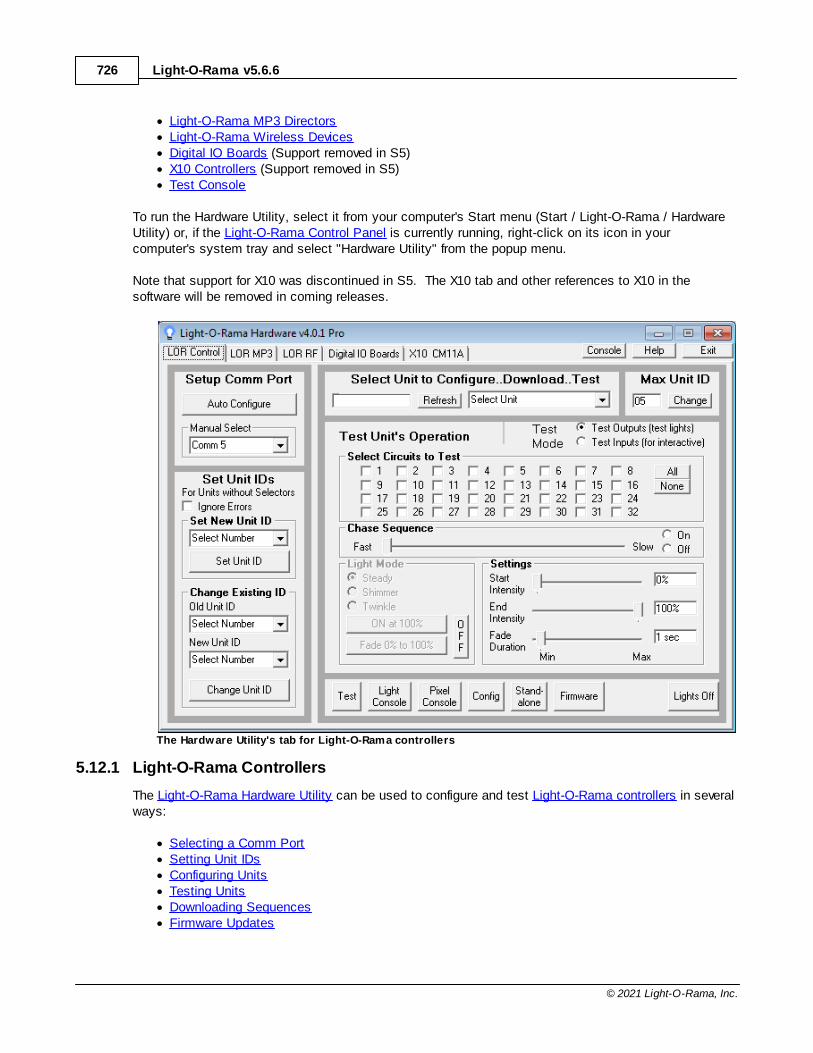
Light-O-Rama v5.6.6726
© 2021 Light-O-Rama, Inc.
· Light-O-Rama MP3 Directors· Light-O-Rama Wireless Devices· Digital IO Boards (Support removed in S5)· X10 Controllers (Support removed in S5)· Test Console
To run the Hardware Utility, select it from your computer's Start menu (Start / Light-O-Rama / HardwareUtility) or, if the Light-O-Rama Control Panel is currently running, right-click on its icon in yourcomputer's system tray and select "Hardware Utility" from the popup menu.
Note that support for X10 was discontinued in S5. The X10 tab and other references to X10 in thesoftware will be removed in coming releases.
The Hardware Utility's tab for Light-O-Rama controllers
5.12.1 Light-O-Rama Controllers
The Light-O-Rama Hardware Utility can be used to configure and test Light-O-Rama controllers in severalways:
· Selecting a Comm Port· Setting Unit IDs· Configuring Units· Testing Units· Downloading Sequences· Firmware Updates
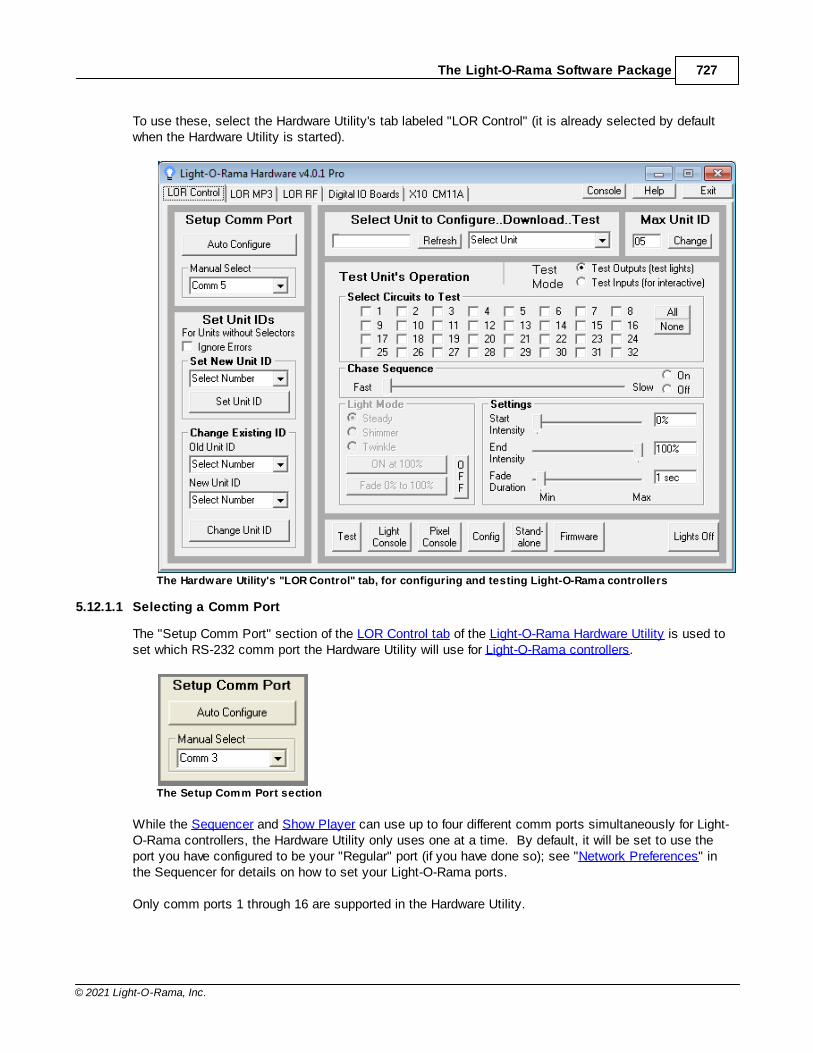
The Light-O-Rama Software Package 727
© 2021 Light-O-Rama, Inc.
To use these, select the Hardware Utility's tab labeled "LOR Control" (it is already selected by defaultwhen the Hardware Utility is started).
The Hardware Utility's "LOR Control" tab, for configuring and testing Light-O-Rama controllers
5.12.1.1 Selecting a Comm Port
The "Setup Comm Port" section of the LOR Control tab of the Light-O-Rama Hardware Utility is used toset which RS-232 comm port the Hardware Utility will use for Light-O-Rama controllers.
The Setup Comm Port section
While the Sequencer and Show Player can use up to four different comm ports simultaneously for Light-O-Rama controllers, the Hardware Utility only uses one at a time. By default, it will be set to use theport you have configured to be your "Regular" port (if you have done so); see "Network Preferences" inthe Sequencer for details on how to set your Light-O-Rama ports.
Only comm ports 1 through 16 are supported in the Hardware Utility.
Light-O-Rama v5.6.6728
© 2021 Light-O-Rama, Inc.
If you know the comm port that it should be using, you can simply select it from the "Manual Select"dropdown box. If you select a port other than your "Regular" port, the Hardware Utility will offer toautomatically change your "Regular" port to be the one that you selected.
If you do not know the comm port to be used, you can ask the Hardware Utility can automatically detectit:
· Connect a Light-O-Rama controller to your PC, for example using an SC485 connector or a USB-RS485 adapter.
· Connect the controller to AC power, and turn it on.· Click on the "Auto Configure" button.
The Hardware Utility should then automatically detect the comm port that you have hooked the controllerup to. If it does not:
· Check the physical connection (such as cables and the SC485 connector).· Check that the controller's power is on.· Ensure that switches or jumpers on the controller are correct.· Ensure that the correct type of cable is used.· Retry the "Auto Configure" button.
If all of the above fails to find the port, then watch the controller's blinking LED light while manuallyselecting different comm ports from the list. Once a comm port is selected, wait about five seconds. Ifthe LED stops blinking, then that is the correct port. If it does not stop blinking, try the next comm portin the list.
If this still does not determine the correct comm port, there may be a problem with the connector or thecontroller.
If "Auto Configure" does not work, but you were able to determine the comm port by manual selection,there may be a problem with the connector. Or, if your computer is an older PC or laptop, there may bea compatibility issue with the computer's communications drivers.
In any case, if you can get the unit's LED to stop blinking, then that controller will most likely work onyour PC.
5.12.1.2 Setting Unit IDs
Each Light-O-Rama controller must have a unique assigned unit ID, identifying this particular controller. The reason for this is that every Light-O-Rama controller in a network can see every lighting commandmessage that is sent over the network, not only the lighting commands sent for that controller. So, all ofthe commands contain a unit ID, and a controller only acts upon a command if the unit ID of thecontroller matches the unit ID of the message.
A unit ID is a two-character field. Each character can have any of the values 0, 1, 2, 3, 4, 5, 6, 7, 8, 9,A, B, C, D, E, and F. For example, a unit ID might be "03", "07", "25", "37", "6B", "C8", or "DA". However, certain values are reserved, and so not allowed (specifically, "00", and "F1" through "FF").
Some Light-O-Rama controllers have selector switches that allow you to directly set their unit IDs. Inthat case, simply use a small screwdriver (making sure that the unit is not attached to power) to dial theswitches to the desired unit ID.
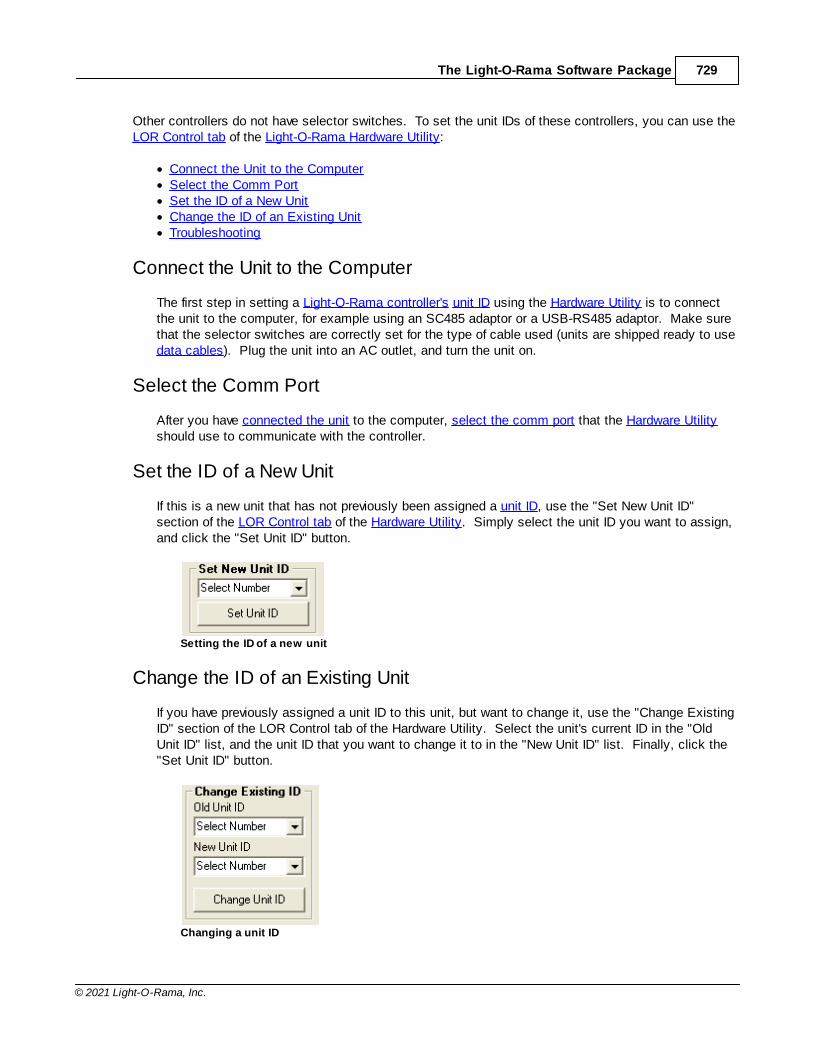
The Light-O-Rama Software Package 729
© 2021 Light-O-Rama, Inc.
Other controllers do not have selector switches. To set the unit IDs of these controllers, you can use theLOR Control tab of the Light-O-Rama Hardware Utility:
· Connect the Unit to the Computer· Select the Comm Port· Set the ID of a New Unit· Change the ID of an Existing Unit· Troubleshooting
Connect the Unit to the Computer
The first step in setting a Light-O-Rama controller's unit ID using the Hardware Utility is to connectthe unit to the computer, for example using an SC485 adaptor or a USB-RS485 adaptor. Make surethat the selector switches are correctly set for the type of cable used (units are shipped ready to usedata cables). Plug the unit into an AC outlet, and turn the unit on.
Select the Comm Port
After you have connected the unit to the computer, select the comm port that the Hardware Utilityshould use to communicate with the controller.
Set the ID of a New Unit
If this is a new unit that has not previously been assigned a unit ID, use the "Set New Unit ID"section of the LOR Control tab of the Hardware Utility. Simply select the unit ID you want to assign,and click the "Set Unit ID" button.
Setting the ID of a new unit
Change the ID of an Existing Unit
If you have previously assigned a unit ID to this unit, but want to change it, use the "Change ExistingID" section of the LOR Control tab of the Hardware Utility. Select the unit's current ID in the "OldUnit ID" list, and the unit ID that you want to change it to in the "New Unit ID" list. Finally, click the"Set Unit ID" button.
Changing a unit ID
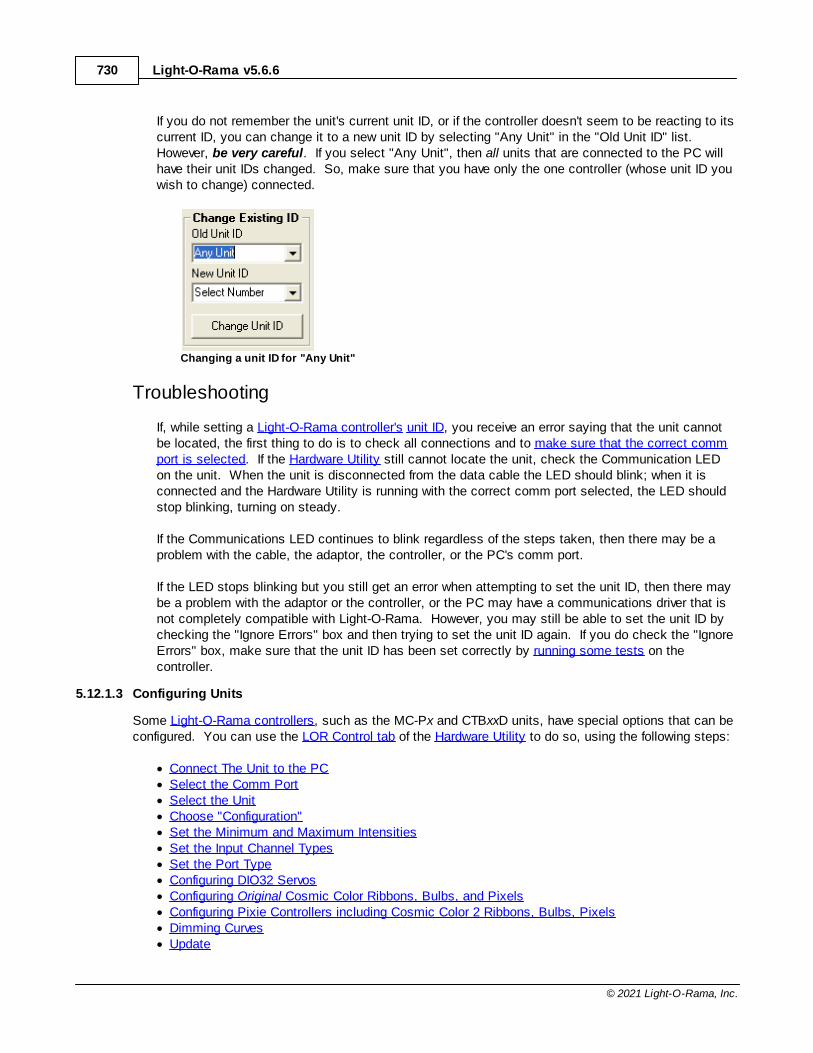
Light-O-Rama v5.6.6730
© 2021 Light-O-Rama, Inc.
If you do not remember the unit's current unit ID, or if the controller doesn't seem to be reacting to itscurrent ID, you can change it to a new unit ID by selecting "Any Unit" in the "Old Unit ID" list. However, be very careful. If you select "Any Unit", then all units that are connected to the PC willhave their unit IDs changed. So, make sure that you have only the one controller (whose unit ID youwish to change) connected.
Changing a unit ID for "Any Unit"
Troubleshooting
If, while setting a Light-O-Rama controller's unit ID, you receive an error saying that the unit cannotbe located, the first thing to do is to check all connections and to make sure that the correct commport is selected. If the Hardware Utility still cannot locate the unit, check the Communication LEDon the unit. When the unit is disconnected from the data cable the LED should blink; when it isconnected and the Hardware Utility is running with the correct comm port selected, the LED shouldstop blinking, turning on steady.
If the Communications LED continues to blink regardless of the steps taken, then there may be aproblem with the cable, the adaptor, the controller, or the PC's comm port.
If the LED stops blinking but you still get an error when attempting to set the unit ID, then there maybe a problem with the adaptor or the controller, or the PC may have a communications driver that isnot completely compatible with Light-O-Rama. However, you may still be able to set the unit ID bychecking the "Ignore Errors" box and then trying to set the unit ID again. If you do check the "IgnoreErrors" box, make sure that the unit ID has been set correctly by running some tests on thecontroller.
5.12.1.3 Configuring Units
Some Light-O-Rama controllers, such as the MC-Px and CTBxxD units, have special options that can beconfigured. You can use the LOR Control tab of the Hardware Utility to do so, using the following steps:
· Connect The Unit to the PC· Select the Comm Port· Select the Unit· Choose "Configuration"· Set the Minimum and Maximum Intensities· Set the Input Channel Types· Set the Port Type· Configuring DIO32 Servos· Configuring Original Cosmic Color Ribbons, Bulbs, and Pixels· Configuring Pixie Controllers including Cosmic Color 2 Ribbons, Bulbs, Pixels· Dimming Curves· Update
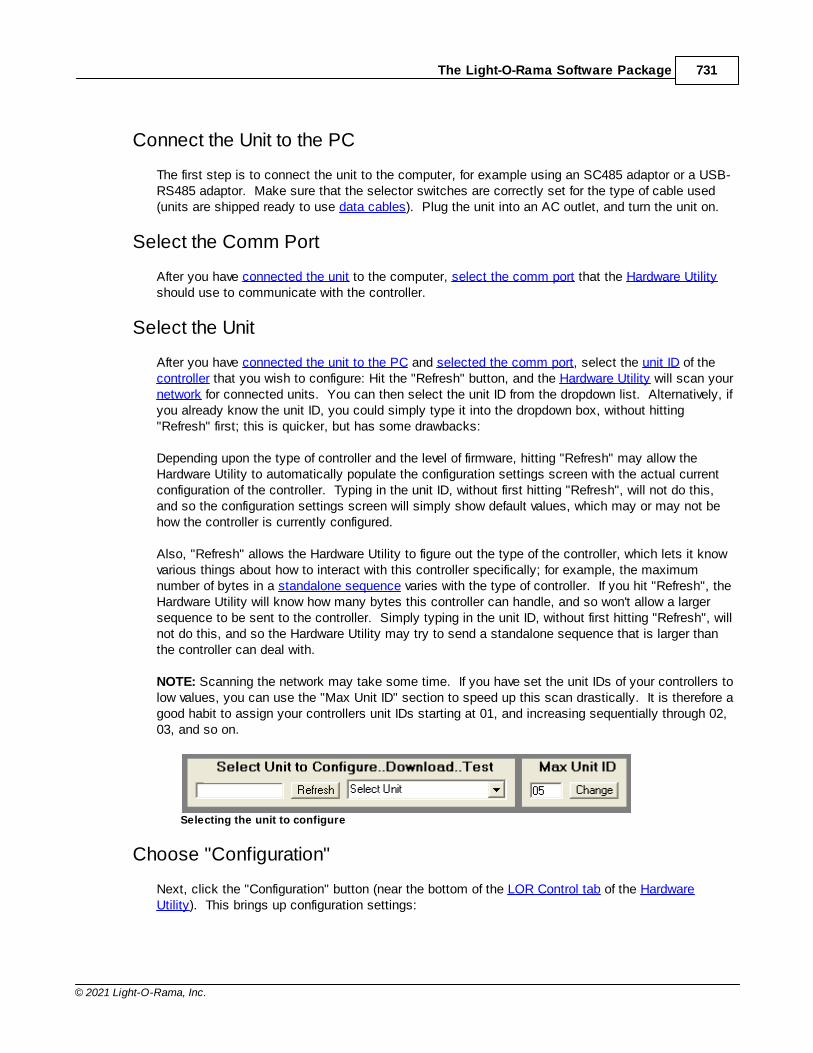
The Light-O-Rama Software Package 731
© 2021 Light-O-Rama, Inc.
Connect the Unit to the PC
The first step is to connect the unit to the computer, for example using an SC485 adaptor or a USB-RS485 adaptor. Make sure that the selector switches are correctly set for the type of cable used(units are shipped ready to use data cables). Plug the unit into an AC outlet, and turn the unit on.
Select the Comm Port
After you have connected the unit to the computer, select the comm port that the Hardware Utilityshould use to communicate with the controller.
Select the Unit
After you have connected the unit to the PC and selected the comm port, select the unit ID of thecontroller that you wish to configure: Hit the "Refresh" button, and the Hardware Utility will scan yournetwork for connected units. You can then select the unit ID from the dropdown list. Alternatively, ifyou already know the unit ID, you could simply type it into the dropdown box, without hitting"Refresh" first; this is quicker, but has some drawbacks:
Depending upon the type of controller and the level of firmware, hitting "Refresh" may allow theHardware Utility to automatically populate the configuration settings screen with the actual currentconfiguration of the controller. Typing in the unit ID, without first hitting "Refresh", will not do this,and so the configuration settings screen will simply show default values, which may or may not behow the controller is currently configured.
Also, "Refresh" allows the Hardware Utility to figure out the type of the controller, which lets it knowvarious things about how to interact with this controller specifically; for example, the maximumnumber of bytes in a standalone sequence varies with the type of controller. If you hit "Refresh", theHardware Utility will know how many bytes this controller can handle, and so won't allow a largersequence to be sent to the controller. Simply typing in the unit ID, without first hitting "Refresh", willnot do this, and so the Hardware Utility may try to send a standalone sequence that is larger thanthe controller can deal with.
NOTE: Scanning the network may take some time. If you have set the unit IDs of your controllers tolow values, you can use the "Max Unit ID" section to speed up this scan drastically. It is therefore agood habit to assign your controllers unit IDs starting at 01, and increasing sequentially through 02,03, and so on.
Selecting the unit to configure
Choose "Configuration"
Next, click the "Configuration" button (near the bottom of the LOR Control tab of the HardwareUtility). This brings up configuration settings:
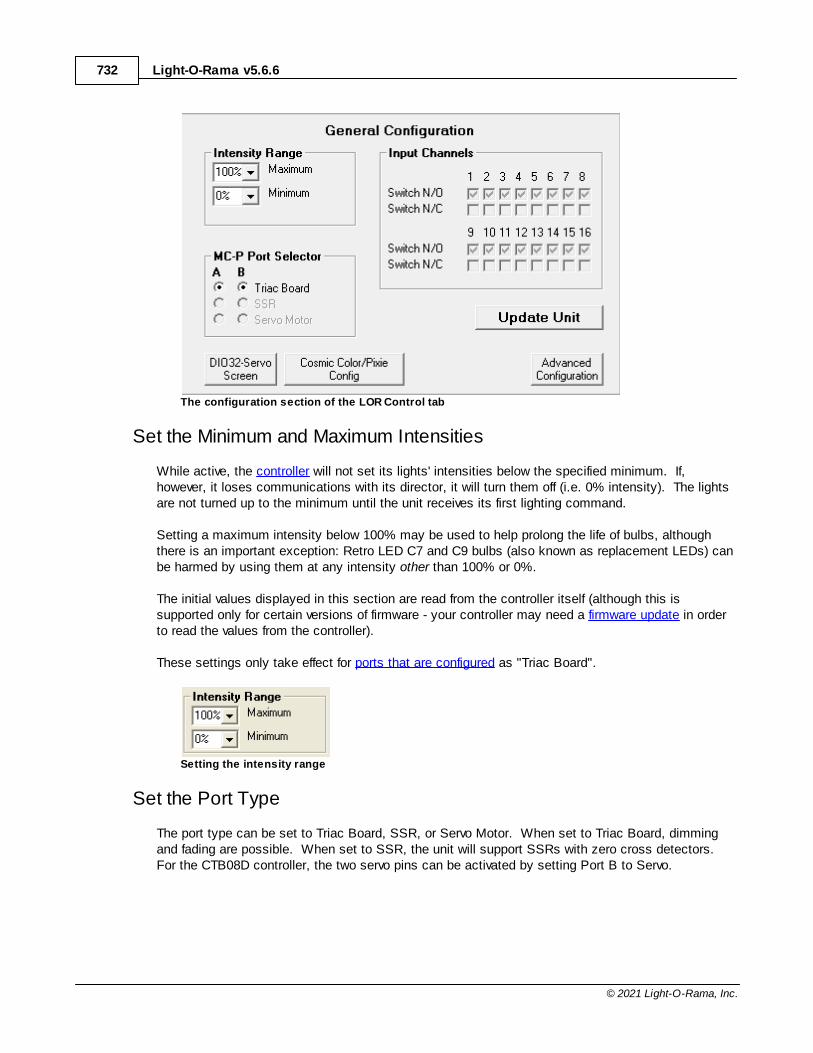
Light-O-Rama v5.6.6732
© 2021 Light-O-Rama, Inc.
The configuration section of the LOR Control tab
Set the Minimum and Maximum Intensities
While active, the controller will not set its lights' intensities below the specified minimum. If,however, it loses communications with its director, it will turn them off (i.e. 0% intensity). The lightsare not turned up to the minimum until the unit receives its first lighting command.
Setting a maximum intensity below 100% may be used to help prolong the life of bulbs, althoughthere is an important exception: Retro LED C7 and C9 bulbs (also known as replacement LEDs) canbe harmed by using them at any intensity other than 100% or 0%.
The initial values displayed in this section are read from the controller itself (although this issupported only for certain versions of firmware - your controller may need a firmware update in orderto read the values from the controller).
These settings only take effect for ports that are configured as "Triac Board".
Setting the intensity range
Set the Port Type
The port type can be set to Triac Board, SSR, or Servo Motor. When set to Triac Board, dimmingand fading are possible. When set to SSR, the unit will support SSRs with zero cross detectors. For the CTB08D controller, the two servo pins can be activated by setting Port B to Servo.
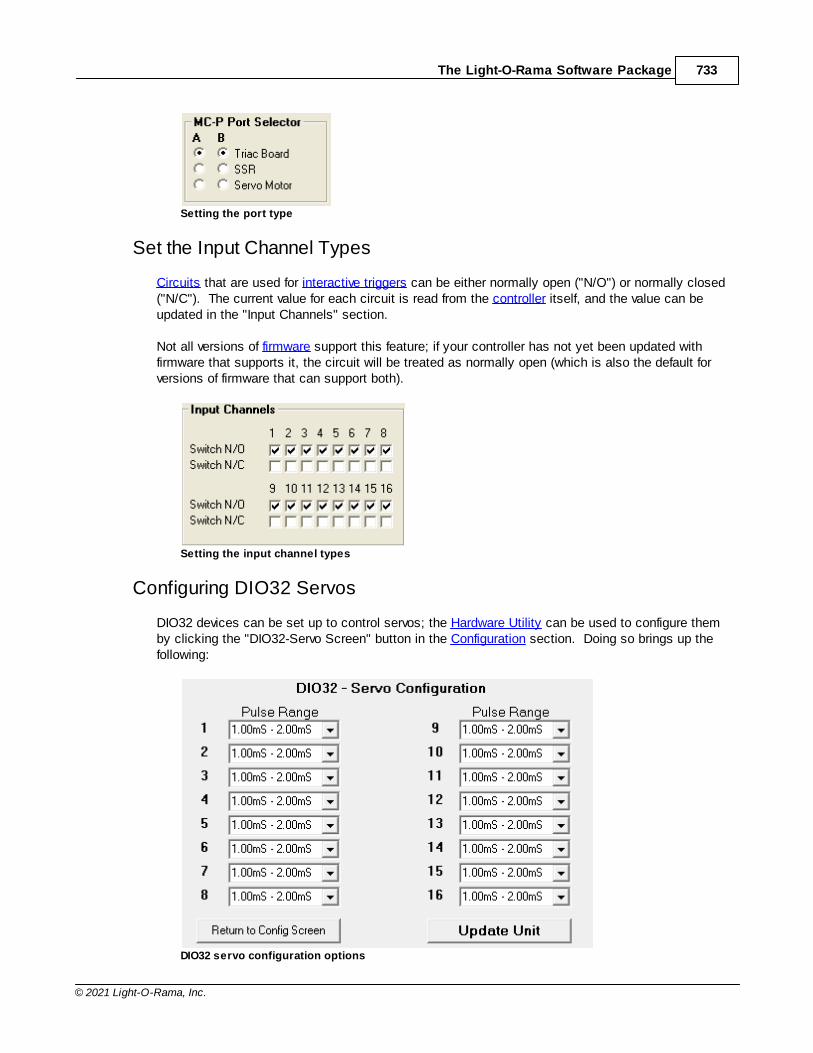
The Light-O-Rama Software Package 733
© 2021 Light-O-Rama, Inc.
Setting the port type
Set the Input Channel Types
Circuits that are used for interactive triggers can be either normally open ("N/O") or normally closed("N/C"). The current value for each circuit is read from the controller itself, and the value can beupdated in the "Input Channels" section.
Not all versions of firmware support this feature; if your controller has not yet been updated withfirmware that supports it, the circuit will be treated as normally open (which is also the default forversions of firmware that can support both).
Setting the input channel types
Configuring DIO32 Servos
DIO32 devices can be set up to control servos; the Hardware Utility can be used to configure themby clicking the "DIO32-Servo Screen" button in the Configuration section. Doing so brings up thefollowing:
DIO32 servo configuration options
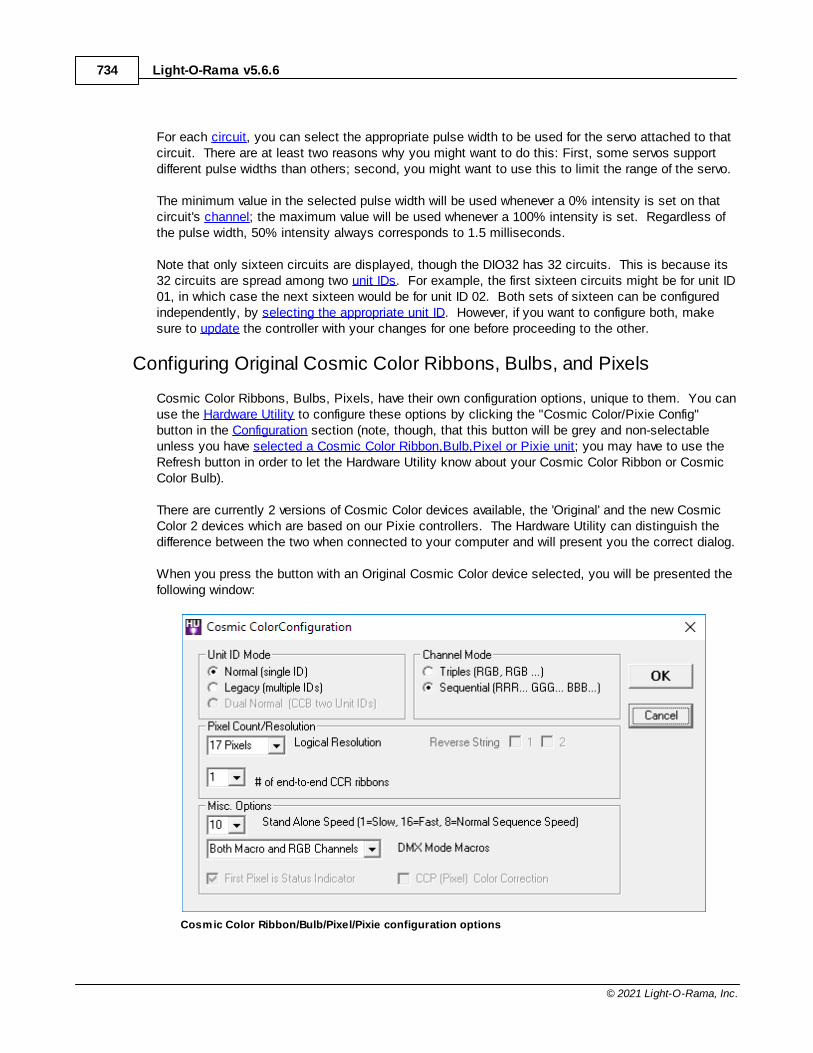
Light-O-Rama v5.6.6734
© 2021 Light-O-Rama, Inc.
For each circuit, you can select the appropriate pulse width to be used for the servo attached to thatcircuit. There are at least two reasons why you might want to do this: First, some servos supportdifferent pulse widths than others; second, you might want to use this to limit the range of the servo.
The minimum value in the selected pulse width will be used whenever a 0% intensity is set on thatcircuit's channel; the maximum value will be used whenever a 100% intensity is set. Regardless ofthe pulse width, 50% intensity always corresponds to 1.5 milliseconds.
Note that only sixteen circuits are displayed, though the DIO32 has 32 circuits. This is because its32 circuits are spread among two unit IDs. For example, the first sixteen circuits might be for unit ID01, in which case the next sixteen would be for unit ID 02. Both sets of sixteen can be configuredindependently, by selecting the appropriate unit ID. However, if you want to configure both, makesure to update the controller with your changes for one before proceeding to the other.
Configuring Original Cosmic Color Ribbons, Bulbs, and Pixels
Cosmic Color Ribbons, Bulbs, Pixels, have their own configuration options, unique to them. You canuse the Hardware Utility to configure these options by clicking the "Cosmic Color/Pixie Config"button in the Configuration section (note, though, that this button will be grey and non-selectableunless you have selected a Cosmic Color Ribbon,Bulb,Pixel or Pixie unit; you may have to use theRefresh button in order to let the Hardware Utility know about your Cosmic Color Ribbon or CosmicColor Bulb).
There are currently 2 versions of Cosmic Color devices available, the 'Original' and the new CosmicColor 2 devices which are based on our Pixie controllers. The Hardware Utility can distinguish thedifference between the two when connected to your computer and will present you the correct dialog.
When you press the button with an Original Cosmic Color device selected, you will be presented thefollowing window:
Cosmic Color Ribbon/Bulb/Pixel/Pixie configuration options
The Light-O-Rama Software Package 735
© 2021 Light-O-Rama, Inc.
For details on these options, please refer to your device's manual (All of our hardware manuals areavailable on our website in PDF format here:http://www1.lightorama.com/documentation/ ). Not alldevices support all options. If a device does not support a particular option, that option is grey andcan not be used. Here is a brief overview of each:
· Unit ID Mode: In "Normal" mode, the Cosmic Color device will be a single unit ID, with 157 circuitIDs for a one-string CCD or 314 for a two-string. In "Legacy" mode, the Cosmic Color device willuse up to ten sequential unit IDs per string (depending upon the configured resolution), with up to16 circuit IDs for each unit ID. In "Dual Normal" mode, which is applicable for two-string CCDs,the device will have two contiguous unit IDs, each having 157 circuit IDs.
· Channel Mode: In "Triples" mode, channels will be arranged red, green, blue, red, green, blue,and so forth. For example, circuit 1 is red for the first pixel; circuit 2 green for the first pixel; circuit3 blue for the first pixel; circuit 4 red for the second pixel; and so on. In "Sequential" mode, all redpixels will come first, then all green pixels, then all blue pixels.
· Resolution: The number of logical pixels that the Cosmic Color device will be. For example,setting it to 50 will give individual control over each of the 50 physical pixels, using 150 channels(one red, one green, and one blue for each pixel), while setting it to 1 will make all of the lights onthe Cosmic Color device act as a single pixel, using three channels (red, green and blue).
· Num of end-to-end connected CCR Ribbons The number of end-to-end connected CosmicColor Ribbons.
· Reverse String #: Reverses the order of the pixels on the ribbon, or string of the Cosmic ColorDevice. Thus, when unchecked, pixel 1 is nearest the controller, and when checked, the highestpixel is nearest the controller.
· Standalone Speed: The speed at which a standalone sequence will run. A value of 8 is normalspeed; higher values are faster, and lower values are slower.
· DMX Mode: Selects how the Cosmic Color device will appear in a DMX universe: just the RGBchannels, just the Macro channels, or both.
· First Pixel is Status Indicator: For Cosmic Color devices, if this field is checked, for the firstminute after the unit is powered up (or until a lighting command is received), the first pixel of theunit will act similarly to the unit's status indicator, blinking on and off if there is no communication,and holding on steady if there is.
· CCP Color Correction: Select this option if you are using Cosmic Color Pixels and notice thatcolors are slightly off, especially when compared to a Cosmic Color Bulb controller.
Configuring Pixie Controllers including Cosmic Color 2 Ribbons, Bulbs,Pixels
Pixie Controllers, Cosmic Color 2 Ribbons, Bulbs, Pixels, have their own configuration optionsunique to them. You can use the Hardware Utility to configure these options by clicking the"Cosmic Color/Pixie Config" button in the Configuration section (note, though, that this button will begrey and non-selectable unless you have selected a Cosmic Color Ribbon,Bulb,Pixel or Pixie unit;
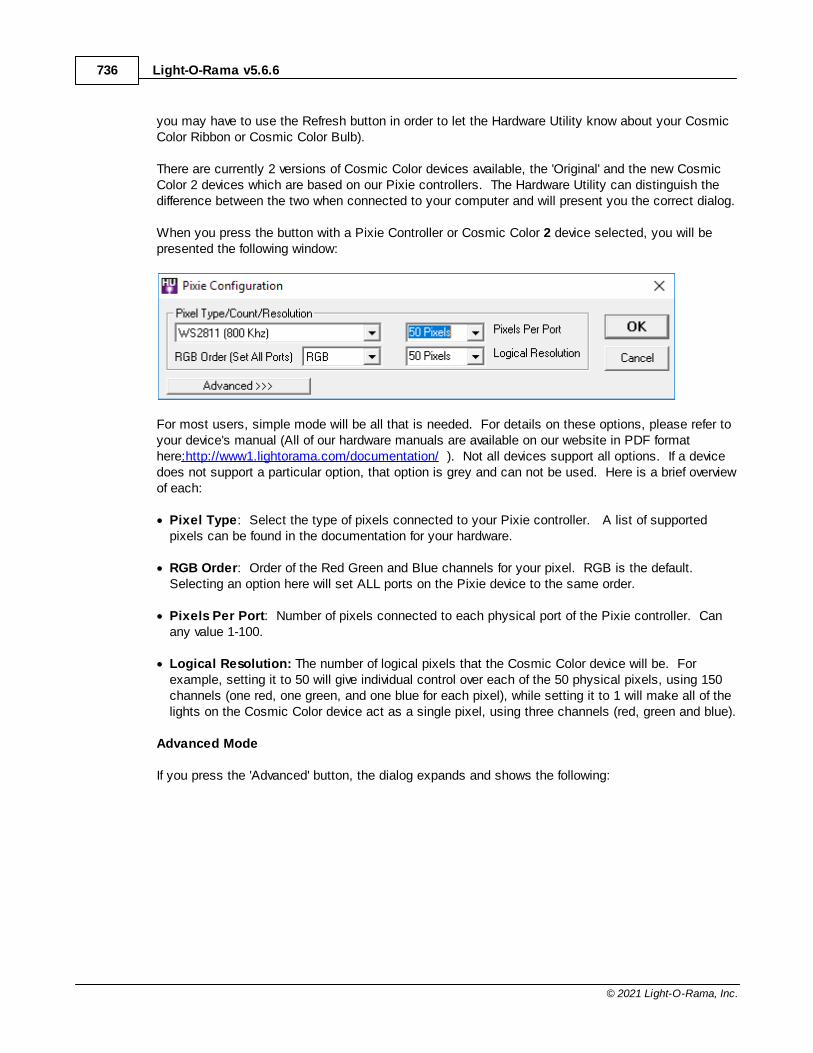
Light-O-Rama v5.6.6736
© 2021 Light-O-Rama, Inc.
you may have to use the Refresh button in order to let the Hardware Utility know about your CosmicColor Ribbon or Cosmic Color Bulb).
There are currently 2 versions of Cosmic Color devices available, the 'Original' and the new CosmicColor 2 devices which are based on our Pixie controllers. The Hardware Utility can distinguish thedifference between the two when connected to your computer and will present you the correct dialog.
When you press the button with a Pixie Controller or Cosmic Color 2 device selected, you will bepresented the following window:
For most users, simple mode will be all that is needed. For details on these options, please refer toyour device's manual (All of our hardware manuals are available on our website in PDF formathere:http://www1.lightorama.com/documentation/ ). Not all devices support all options. If a devicedoes not support a particular option, that option is grey and can not be used. Here is a brief overviewof each:
· Pixel Type: Select the type of pixels connected to your Pixie controller. A list of supportedpixels can be found in the documentation for your hardware.
· RGB Order: Order of the Red Green and Blue channels for your pixel. RGB is the default. Selecting an option here will set ALL ports on the Pixie device to the same order.
· Pixels Per Port: Number of pixels connected to each physical port of the Pixie controller. Canany value 1-100.
· Logical Resolution: The number of logical pixels that the Cosmic Color device will be. Forexample, setting it to 50 will give individual control over each of the 50 physical pixels, using 150channels (one red, one green, and one blue for each pixel), while setting it to 1 will make all of thelights on the Cosmic Color device act as a single pixel, using three channels (red, green and blue).
Advanced Mode
If you press the 'Advanced' button, the dialog expands and shows the following:

The Light-O-Rama Software Package 737
© 2021 Light-O-Rama, Inc.
Port Settings:
In the Port Settings section you will see 1 line for each port that your Pixie has. For example, if youare configuring a Pixie 4, you would only see ports 1-4.
Depending on the firmware your Pixie has, you may not be able to change all of these. Only newerPixie firmware allows for the configuration of by port RGB Order as well as prop selection. If yourversion of the firmware does not support these, they will be grey and you will see a message thatyour firmware does not support them.
Light-O-Rama v5.6.6738
© 2021 Light-O-Rama, Inc.
For each port you can configure:
· RGB Order: Order of the Red Green and Blue channels for your pixel. RGB is the default.Selecting an RGB order effects only that port. That means each port on your Pixie can have adifferent RGB order.
· Reverse: Reverses the order of the pixels on the ribbon, or string connected to that port of thePixie. Thus, when unchecked, pixel 1 is nearest the controller, and when checked, the highestpixel is nearest the controller.
· Prop: Pixie controllers can be configured to run certain available LOR props, like singing faces. Selecting the prop here will allow the pixie to control that prop on that and the next port. If youhave a pixie 16, props are only supported on the first 8 ports. For more information, please seethe manual that came with your LOR prop. For regular operation select 'no prop selected',otherwise select the name of the prop connected to that and the next port.
Misc. Options
In this section on can change some uncommon parameters.
· First Pixel is Status Indicator: For Cosmic Color devices, if this field is checked, for the firstminute after the unit is powered up (or until a lighting command is received), the first pixel of theunit will act similarly to the unit's status indicator, blinking on and off if there is no communication,and holding on steady if there is.
· Standalone Speed: The speed at which a standalone sequence will run. A value of 8 is normalspeed; higher values are faster, and lower values are slower.
· DMX Mode: Selects how the Cosmic Color device will appear in a DMX universe: just the RGBchannels, just the Macro channels, or both.
· Triplet order: In "Triples" mode, channels will be arranged red, green, blue, red, green, blue, andso forth. For example, circuit 1 is red for the first pixel; circuit 2 green for the first pixel; circuit 3blue for the first pixel; circuit 4 red for the second pixel; and so on. In "Sequential" mode, all redpixels will come first, then all green pixels, then all blue pixels. It is recommended that you useTriples mode - some parts of the LOR software do not support Sequential mode.
Dimming Curves
The Hardware Utility's Advanced Configuration screen can be used to set dimming curves for Gen3controllers, or for pre-Gen3 controllers that have Gen3 firmware installed. To get to the AdvancedConfiguration screen, click on the Advanced Configuration button in the Configuration section of theLOR Control tab of the Hardware Utility.
Dimming curves determine the output of a channel versus the intensity setting of that channel. Forexample, the On/Off only curve has the output set at 100% for intensity values greater than 50% (orDMX 128), and the output at 0% for any other intensity value.
Each channel can be configured for a specific dimming curve. Gen3 firmware comes with threecurves: "LOR standard" (which is normal for incandescent lights), "Dim Curve01" (which is a good
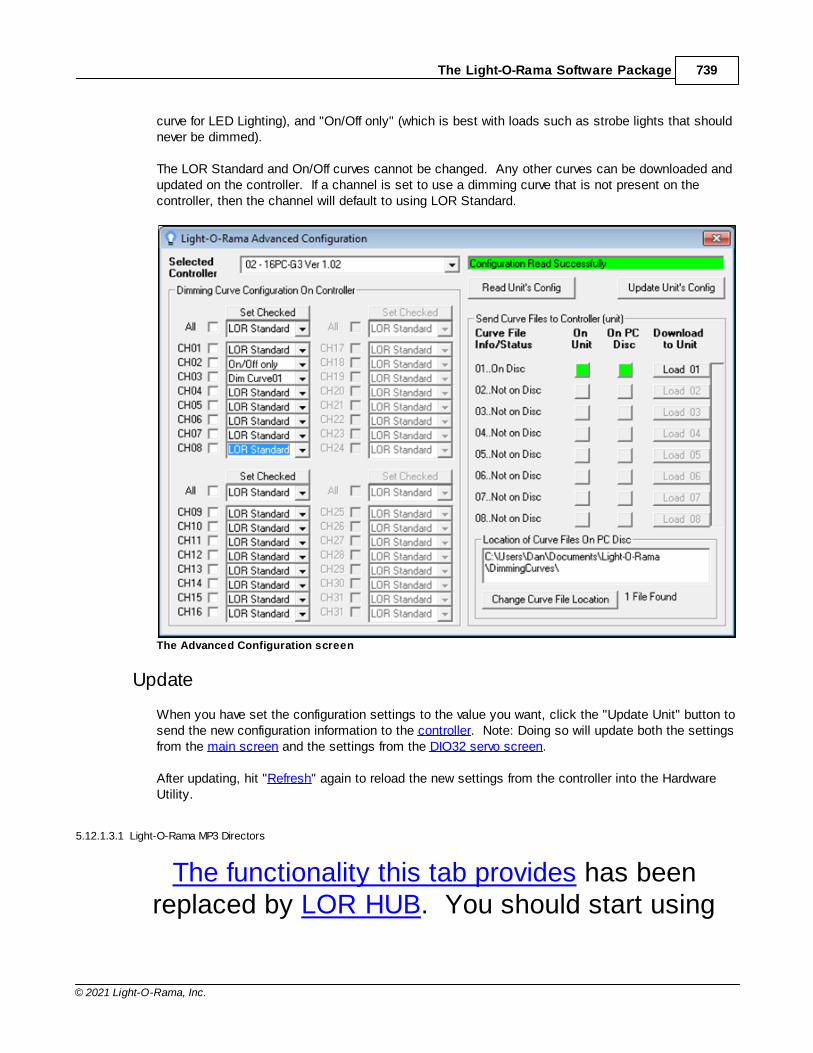
The Light-O-Rama Software Package 739
© 2021 Light-O-Rama, Inc.
curve for LED Lighting), and "On/Off only" (which is best with loads such as strobe lights that shouldnever be dimmed).
The LOR Standard and On/Off curves cannot be changed. Any other curves can be downloaded andupdated on the controller. If a channel is set to use a dimming curve that is not present on thecontroller, then the channel will default to using LOR Standard.
The Advanced Configuration screen
Update
When you have set the configuration settings to the value you want, click the "Update Unit" button tosend the new configuration information to the controller. Note: Doing so will update both the settingsfrom the main screen and the settings from the DIO32 servo screen.
After updating, hit "Refresh" again to reload the new settings from the controller into the HardwareUtility.
5.12.1.3.1 Light-O-Rama MP3 Directors
The functionality this tab provides has beenreplaced by LOR HUB. You should start using
Light-O-Rama v5.6.6740
© 2021 Light-O-Rama, Inc.
LOR Hub for ALL SD creation tasks. This tab willbe removed in a future version of the software.
`The LOR MP3 tab of the Light-O-Rama Hardware Utility can be used to download both musicalsequences and animation sequences to a Light-O-Rama MP3 director (such as an "LOR1602W withShow Director and MP3 Player"), and schedule when those sequences should be played.
Newer Generation 3 MP3 Directors, like the MP3g3 Dual Network Director, can drive both LOR and DMXhardware.
Note, that any loops in an animation sequence will be ignored. Up to nine separate shows can bedownloaded to an MP3 director.
In the future, Light-O-Rama Hub will completely replace this tab of the Hardware Utility.
For details, please refer to the following sections:
· Scheduling/Show Options· Select When Show Plays· Select How Show Plays
· MP3 Player Showlist· MP3g3 Directors can control DMX Devices· Priority of Networks and Universes
· Download the Show· Set the Time
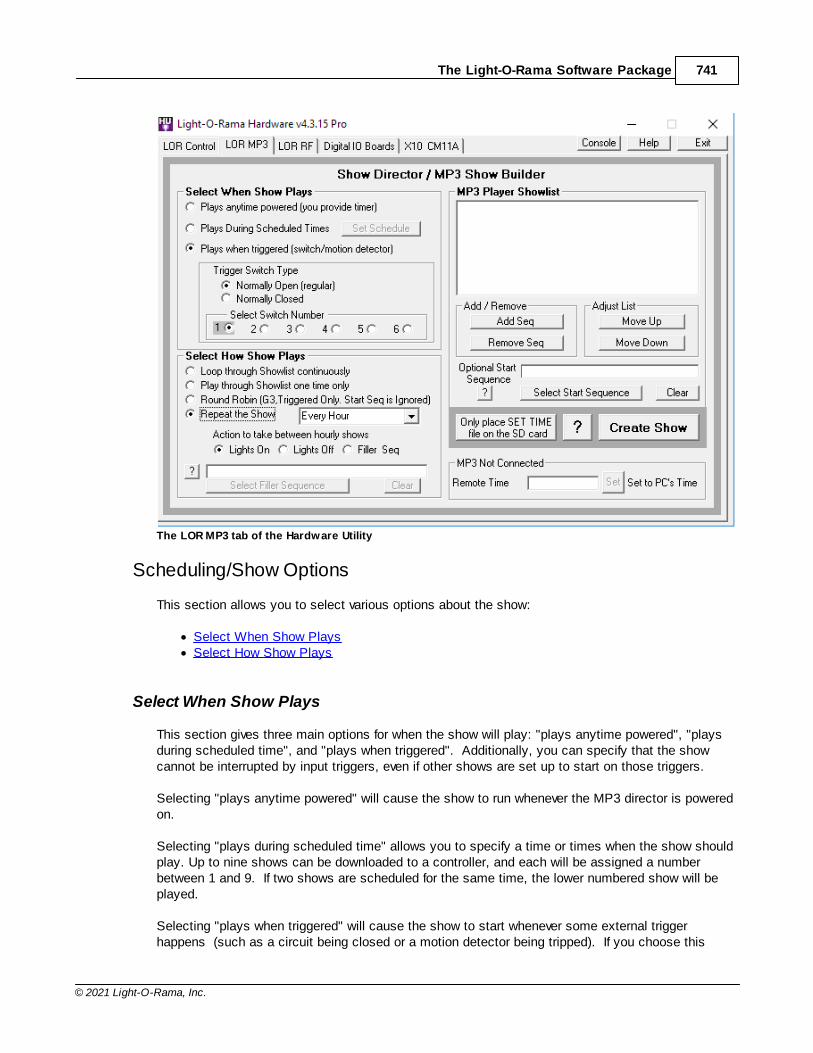
The Light-O-Rama Software Package 741
© 2021 Light-O-Rama, Inc.
The LOR MP3 tab of the Hardware Utility
Scheduling/Show Options
This section allows you to select various options about the show:
· Select When Show Plays· Select How Show Plays
Select When Show Plays
This section gives three main options for when the show will play: "plays anytime powered", "playsduring scheduled time", and "plays when triggered". Additionally, you can specify that the showcannot be interrupted by input triggers, even if other shows are set up to start on those triggers.
Selecting "plays anytime powered" will cause the show to run whenever the MP3 director is poweredon.
Selecting "plays during scheduled time" allows you to specify a time or times when the show shouldplay. Up to nine shows can be downloaded to a controller, and each will be assigned a numberbetween 1 and 9. If two shows are scheduled for the same time, the lower numbered show will beplayed.
Selecting "plays when triggered" will cause the show to start whenever some external triggerhappens (such as a circuit being closed or a motion detector being tripped). If you choose this
Light-O-Rama v5.6.6742
© 2021 Light-O-Rama, Inc.
option, you will be prompted to select the trigger's switch number (up to six switches are supported),and whether the switch is normally open or normally closed.
A normally open switch has its contacts open until you activate it, at which point they close; anormally closed switch has its contacts closed until you activate it, at which point they open. Mostswitches are normally open; motion detectors, however, are typically normally closed. This isbecause they are often used in security systems, where it is important to notice that a wire hasbeen cut.
Select How Show Plays
In this section, you can choose whether the show should loop continuously (that is, when it finishesplaying the last sequence in its list, it will start over at the first), or only one time, or every so often(every hour, half hour, fifteen minutes or ten minutes). If you are using a triggered sequence you canalso select if you would like to run the sequence list in a 'Round Robin'.
If you choose to play the show every so often, you will also be prompted for what the lights should doin between. You can choose to have all your lights on, or off, or else use an animation sequence asa "filler" that will play continuously during the time in between.
If you choose to play the sequences in a Round Robin, only the first sequence in the sequence listwill play. The next time the MP3 director is triggered, it will play the next sequence in the list. Afterplaying the last sequence in the list, the next trigger will start over with the first sequence. Note:Round Robin play can only be used with triggered sequences on G3 MP3 directors with Firmwareversion 5.34 or higher.
MP3 Player Showlist
You can add both musical sequences and animation sequences to the show by clicking the "AddSequence" button. To remove one, click on it to highlight it, and then click the "Remove Sequence"button.
The sequences will be played in the order listed. You can change the order by clicking on asequence to highlight it, and then clicking "Move Up" or "Move Down".
Sequences with subsequences cannot be added to the showlist.
Optionally, you can also specify a "start sequence", which will be played once and only once everytime the show starts up, before the other sequences. This is most useful if you selected that theshow should loop continuously. For example, a show with a start sequence and three sequences inthe showlist will, when "loop continuously" is turned on, first play the start sequence, then the firstsequence of the showlist, then the second, then the third, and then back to the first in the showlist -not back to the start sequence.
Both musical sequences and animation sequences can be used as start sequences.
MP3g3 Directors can control DMX Devices
In addition to LOR Devices, MP3g3 Directors can also drive DMX devices on one or both outputports. In order to control DMX devices, your MP3g3 must have at least firmware version 5.28.
Network and Universe Priorities
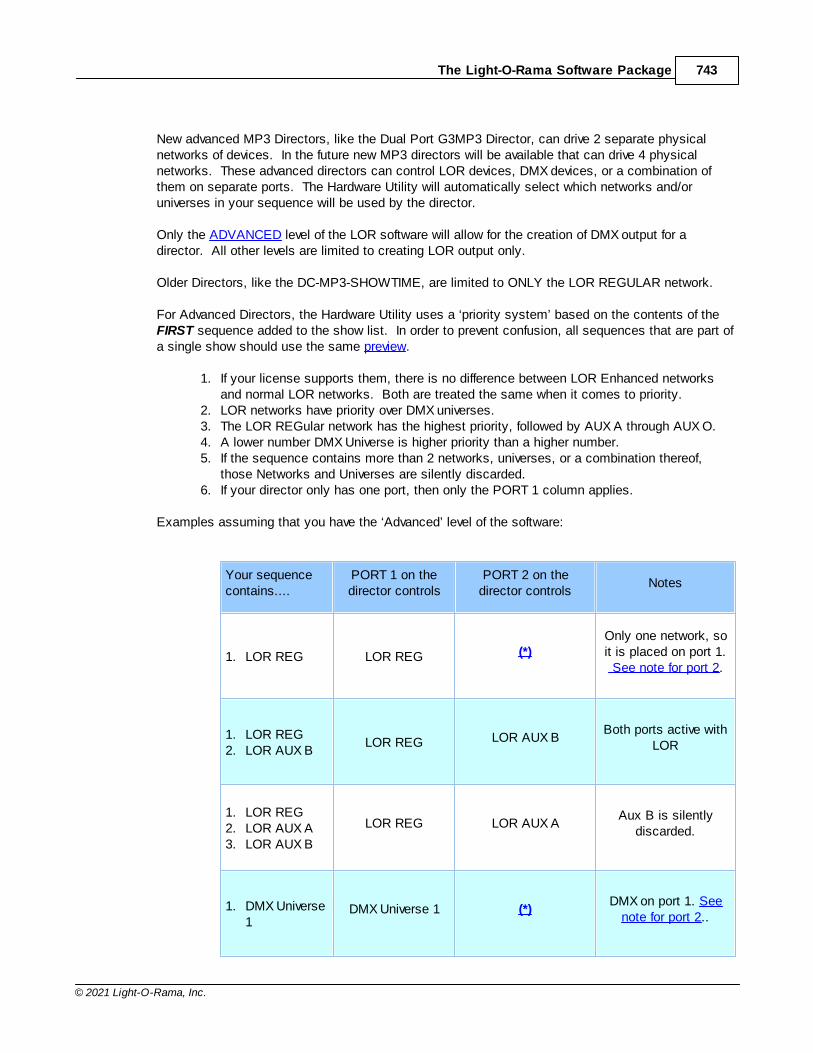
The Light-O-Rama Software Package 743
© 2021 Light-O-Rama, Inc.
New advanced MP3 Directors, like the Dual Port G3MP3 Director, can drive 2 separate physicalnetworks of devices. In the future new MP3 directors will be available that can drive 4 physicalnetworks. These advanced directors can control LOR devices, DMX devices, or a combination ofthem on separate ports. The Hardware Utility will automatically select which networks and/oruniverses in your sequence will be used by the director.
Only the ADVANCED level of the LOR software will allow for the creation of DMX output for adirector. All other levels are limited to creating LOR output only. Older Directors, like the DC-MP3-SHOWTIME, are limited to ONLY the LOR REGULAR network.
For Advanced Directors, the Hardware Utility uses a ‘priority system’ based on the contents of theFIRST sequence added to the show list. In order to prevent confusion, all sequences that are part ofa single show should use the same preview.
1. If your license supports them, there is no difference between LOR Enhanced networksand normal LOR networks. Both are treated the same when it comes to priority.
2. LOR networks have priority over DMX universes. 3. The LOR REGular network has the highest priority, followed by AUX A through AUX O.4. A lower number DMX Universe is higher priority than a higher number.5. If the sequence contains more than 2 networks, universes, or a combination thereof,
those Networks and Universes are silently discarded.6. If your director only has one port, then only the PORT 1 column applies.
Examples assuming that you have the ‘Advanced’ level of the software:
Your sequencecontains....
PORT 1 on thedirector controls
PORT 2 on thedirector controls
Notes
1. LOR REG LOR REG (*)Only one network, soit is placed on port 1. See note for port 2.
1. LOR REG2. LOR AUX B
LOR REG LOR AUX BBoth ports active with
LOR
1. LOR REG2. LOR AUX A3. LOR AUX B
LOR REG LOR AUX AAux B is silently
discarded.
1. DMX Universe1
DMX Universe 1 (*)DMX on port 1. See
note for port 2..
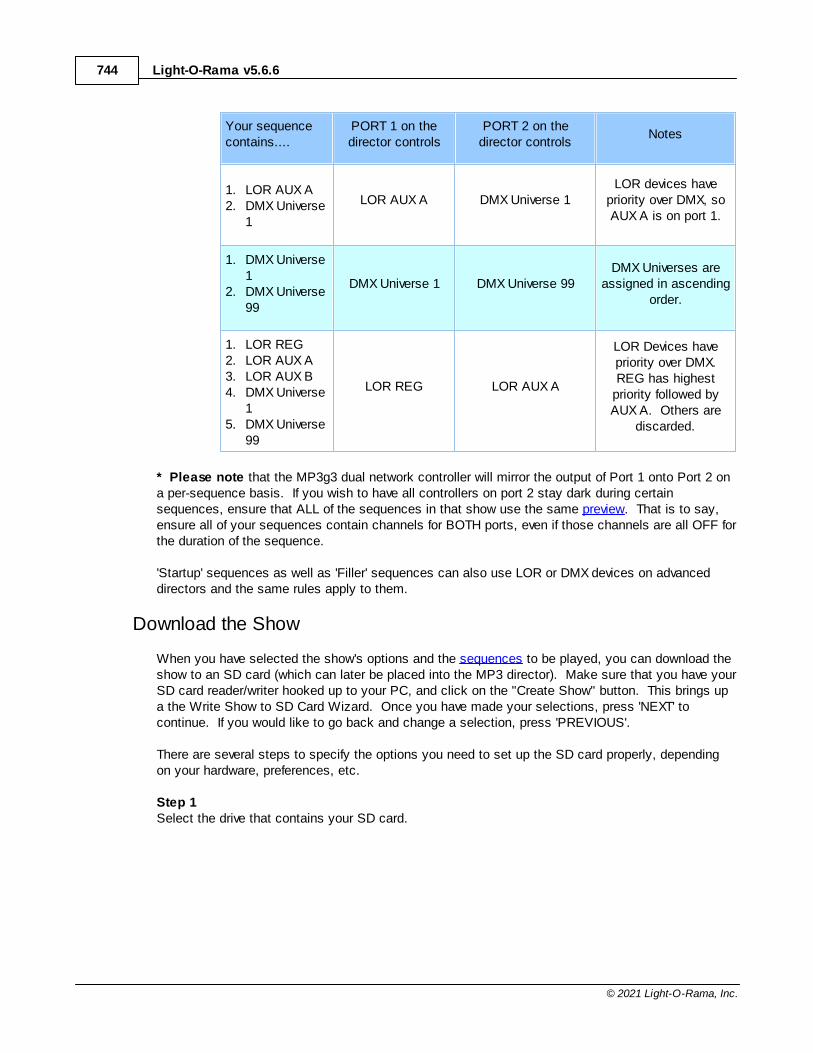
Light-O-Rama v5.6.6744
© 2021 Light-O-Rama, Inc.
Your sequencecontains....
PORT 1 on thedirector controls
PORT 2 on thedirector controls
Notes
1. LOR AUX A2. DMX Universe
1
LOR AUX A DMX Universe 1LOR devices have
priority over DMX, soAUX A is on port 1.
1. DMX Universe1
2. DMX Universe99
DMX Universe 1 DMX Universe 99DMX Universes are
assigned in ascendingorder.
1. LOR REG2. LOR AUX A3. LOR AUX B4. DMX Universe
15. DMX Universe
99
LOR REG LOR AUX A
LOR Devices havepriority over DMX.REG has highest
priority followed byAUX A. Others are
discarded.
* Please note that the MP3g3 dual network controller will mirror the output of Port 1 onto Port 2 ona per-sequence basis. If you wish to have all controllers on port 2 stay dark during certainsequences, ensure that ALL of the sequences in that show use the same preview. That is to say,ensure all of your sequences contain channels for BOTH ports, even if those channels are all OFF forthe duration of the sequence.
'Startup' sequences as well as 'Filler' sequences can also use LOR or DMX devices on advanceddirectors and the same rules apply to them.
Download the Show
When you have selected the show's options and the sequences to be played, you can download theshow to an SD card (which can later be placed into the MP3 director). Make sure that you have yourSD card reader/writer hooked up to your PC, and click on the "Create Show" button. This brings upa the Write Show to SD Card Wizard. Once you have made your selections, press 'NEXT' tocontinue. If you would like to go back and change a selection, press 'PREVIOUS'.
There are several steps to specify the options you need to set up the SD card properly, dependingon your hardware, preferences, etc.
Step 1Select the drive that contains your SD card.
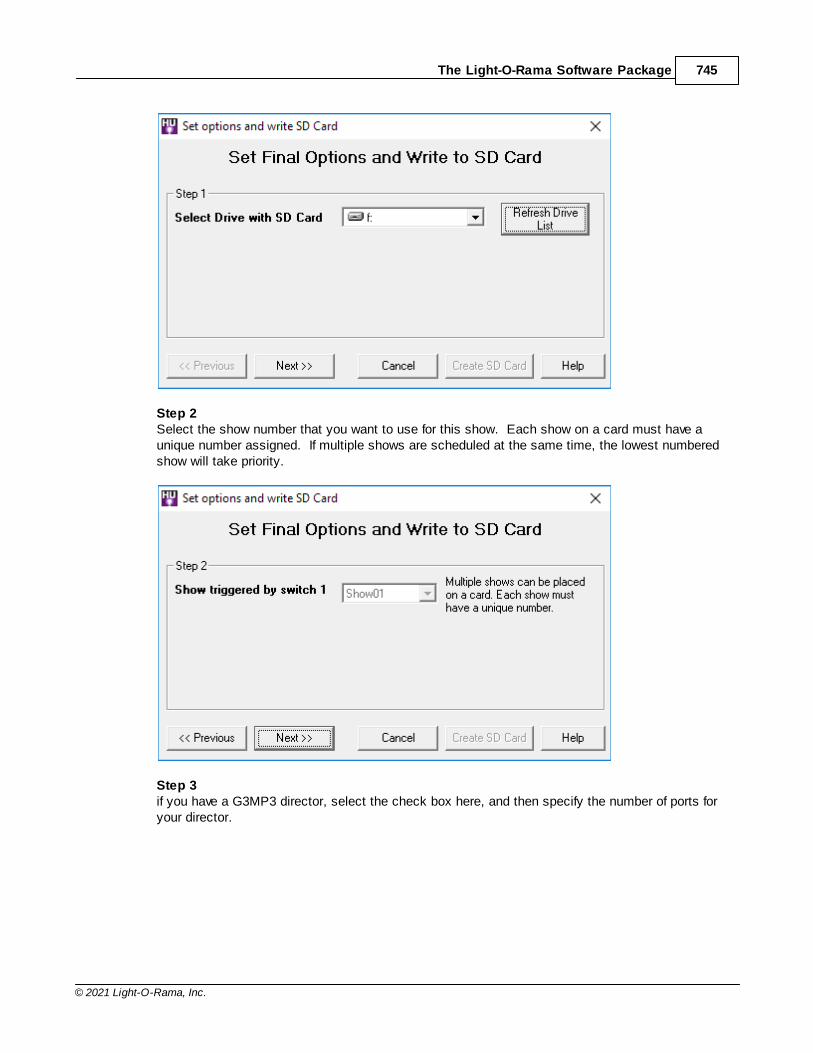
The Light-O-Rama Software Package 745
© 2021 Light-O-Rama, Inc.
Step 2Select the show number that you want to use for this show. Each show on a card must have aunique number assigned. If multiple shows are scheduled at the same time, the lowest numberedshow will take priority.
Step 3if you have a G3MP3 director, select the check box here, and then specify the number of ports foryour director.
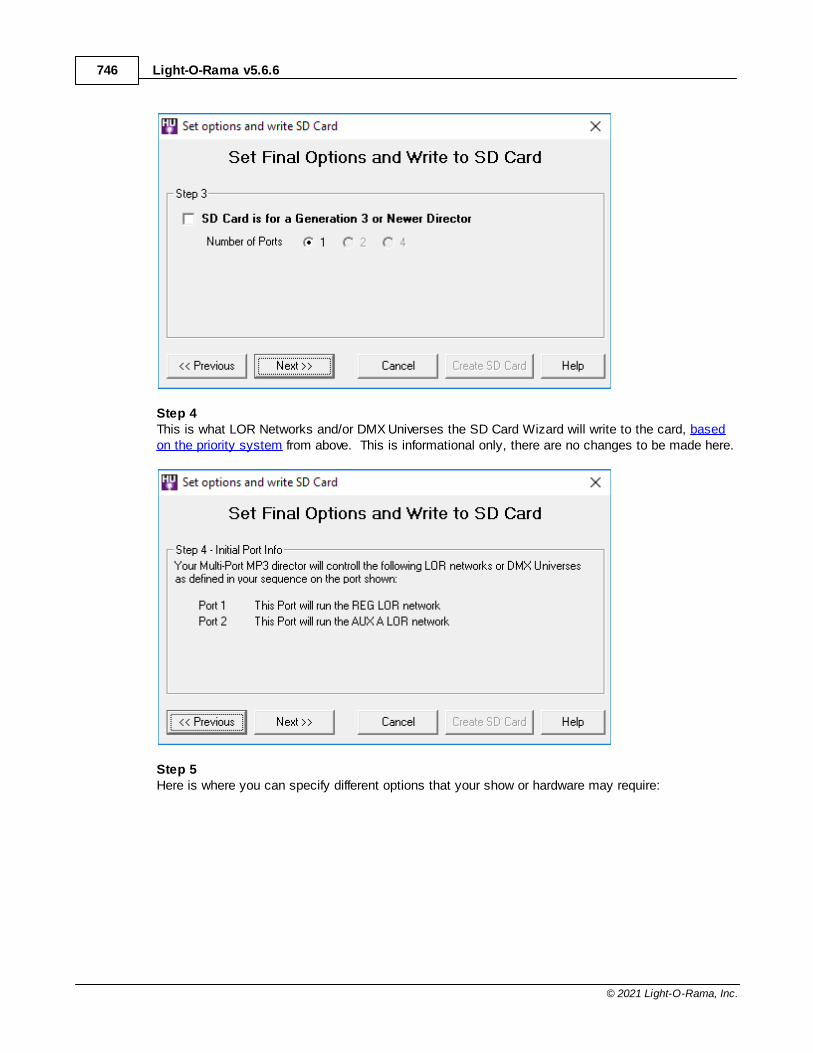
Light-O-Rama v5.6.6746
© 2021 Light-O-Rama, Inc.
Step 4This is what LOR Networks and/or DMX Universes the SD Card Wizard will write to the card, basedon the priority system from above. This is informational only, there are no changes to be made here.
Step 5Here is where you can specify different options that your show or hardware may require:
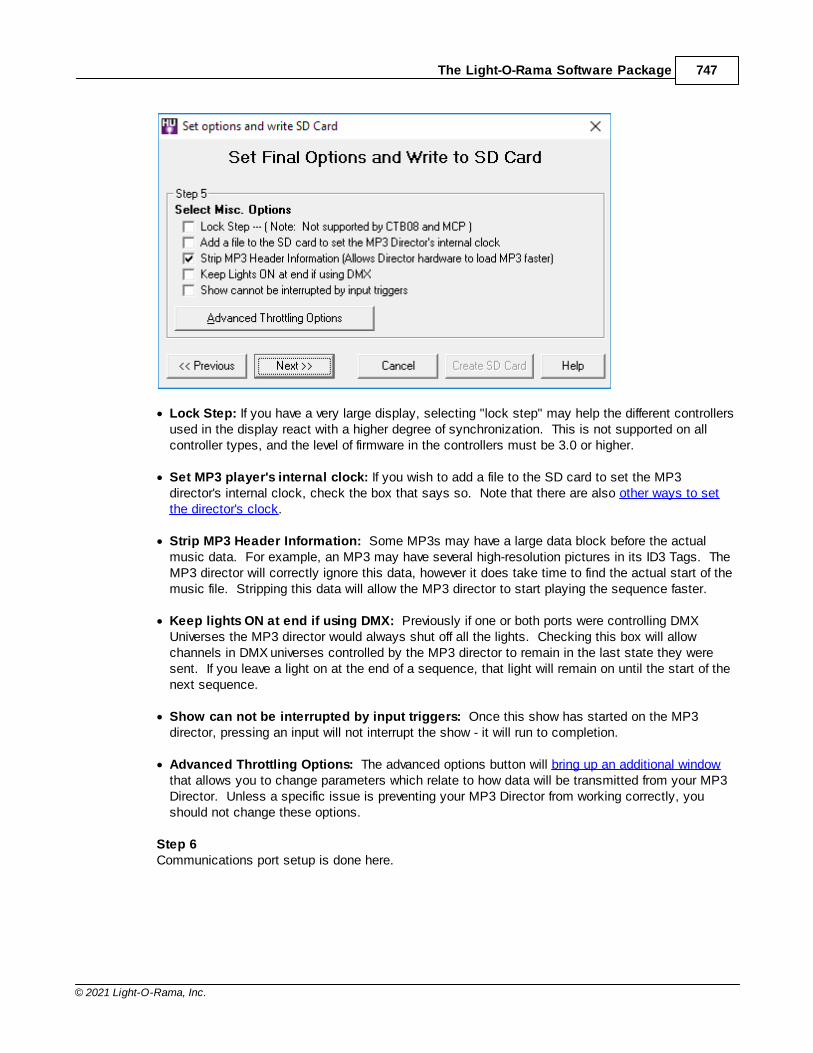
The Light-O-Rama Software Package 747
© 2021 Light-O-Rama, Inc.
· Lock Step: If you have a very large display, selecting "lock step" may help the different controllersused in the display react with a higher degree of synchronization. This is not supported on allcontroller types, and the level of firmware in the controllers must be 3.0 or higher.
· Set MP3 player's internal clock: If you wish to add a file to the SD card to set the MP3director's internal clock, check the box that says so. Note that there are also other ways to setthe director's clock.
· Strip MP3 Header Information: Some MP3s may have a large data block before the actualmusic data. For example, an MP3 may have several high-resolution pictures in its ID3 Tags. TheMP3 director will correctly ignore this data, however it does take time to find the actual start of themusic file. Stripping this data will allow the MP3 director to start playing the sequence faster.
· Keep lights ON at end if using DMX: Previously if one or both ports were controlling DMXUniverses the MP3 director would always shut off all the lights. Checking this box will allowchannels in DMX universes controlled by the MP3 director to remain in the last state they weresent. If you leave a light on at the end of a sequence, that light will remain on until the start of thenext sequence.
· Show can not be interrupted by input triggers: Once this show has started on the MP3director, pressing an input will not interrupt the show - it will run to completion.
· Advanced Throttling Options: The advanced options button will bring up an additional windowthat allows you to change parameters which relate to how data will be transmitted from your MP3Director. Unless a specific issue is preventing your MP3 Director from working correctly, youshould not change these options.
Step 6Communications port setup is done here.
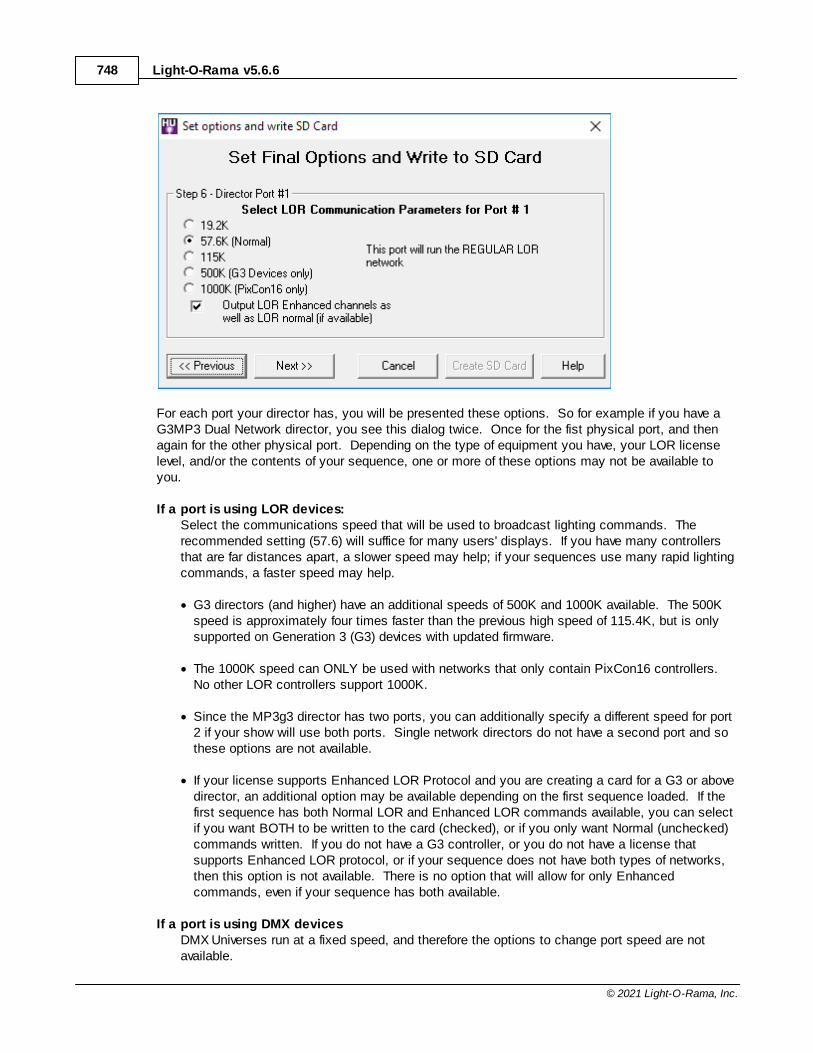
Light-O-Rama v5.6.6748
© 2021 Light-O-Rama, Inc.
For each port your director has, you will be presented these options. So for example if you have aG3MP3 Dual Network director, you see this dialog twice. Once for the fist physical port, and thenagain for the other physical port. Depending on the type of equipment you have, your LOR licenselevel, and/or the contents of your sequence, one or more of these options may not be available toyou.
If a port is using LOR devices:Select the communications speed that will be used to broadcast lighting commands. Therecommended setting (57.6) will suffice for many users' displays. If you have many controllersthat are far distances apart, a slower speed may help; if your sequences use many rapid lightingcommands, a faster speed may help.
· G3 directors (and higher) have an additional speeds of 500K and 1000K available. The 500Kspeed is approximately four times faster than the previous high speed of 115.4K, but is onlysupported on Generation 3 (G3) devices with updated firmware.
· The 1000K speed can ONLY be used with networks that only contain PixCon16 controllers. No other LOR controllers support 1000K.
· Since the MP3g3 director has two ports, you can additionally specify a different speed for port2 if your show will use both ports. Single network directors do not have a second port and sothese options are not available.
· If your license supports Enhanced LOR Protocol and you are creating a card for a G3 or abovedirector, an additional option may be available depending on the first sequence loaded. If thefirst sequence has both Normal LOR and Enhanced LOR commands available, you can selectif you want BOTH to be written to the card (checked), or if you only want Normal (unchecked)commands written. If you do not have a G3 controller, or you do not have a license thatsupports Enhanced LOR protocol, or if your sequence does not have both types of networks,then this option is not available. There is no option that will allow for only Enhancedcommands, even if your sequence has both available.
If a port is using DMX devicesDMX Universes run at a fixed speed, and therefore the options to change port speed are notavailable.
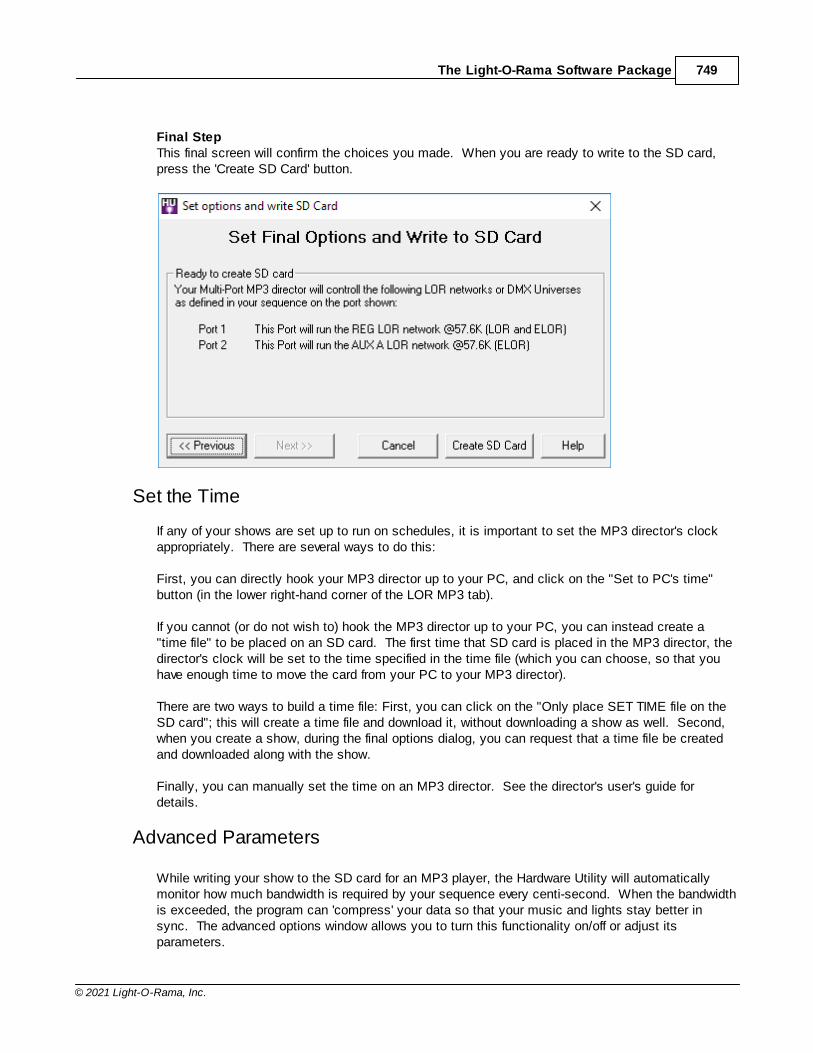
The Light-O-Rama Software Package 749
© 2021 Light-O-Rama, Inc.
Final StepThis final screen will confirm the choices you made. When you are ready to write to the SD card,press the 'Create SD Card' button.
Set the Time
If any of your shows are set up to run on schedules, it is important to set the MP3 director's clockappropriately. There are several ways to do this:
First, you can directly hook your MP3 director up to your PC, and click on the "Set to PC's time"button (in the lower right-hand corner of the LOR MP3 tab).
If you cannot (or do not wish to) hook the MP3 director up to your PC, you can instead create a"time file" to be placed on an SD card. The first time that SD card is placed in the MP3 director, thedirector's clock will be set to the time specified in the time file (which you can choose, so that youhave enough time to move the card from your PC to your MP3 director).
There are two ways to build a time file: First, you can click on the "Only place SET TIME file on theSD card"; this will create a time file and download it, without downloading a show as well. Second,when you create a show, during the final options dialog, you can request that a time file be createdand downloaded along with the show.
Finally, you can manually set the time on an MP3 director. See the director's user's guide fordetails.
Advanced Parameters
While writing your show to the SD card for an MP3 player, the Hardware Utility will automaticallymonitor how much bandwidth is required by your sequence every centi-second. When the bandwidthis exceeded, the program can 'compress' your data so that your music and lights stay better insync. The advanced options window allows you to turn this functionality on/off or adjust itsparameters.
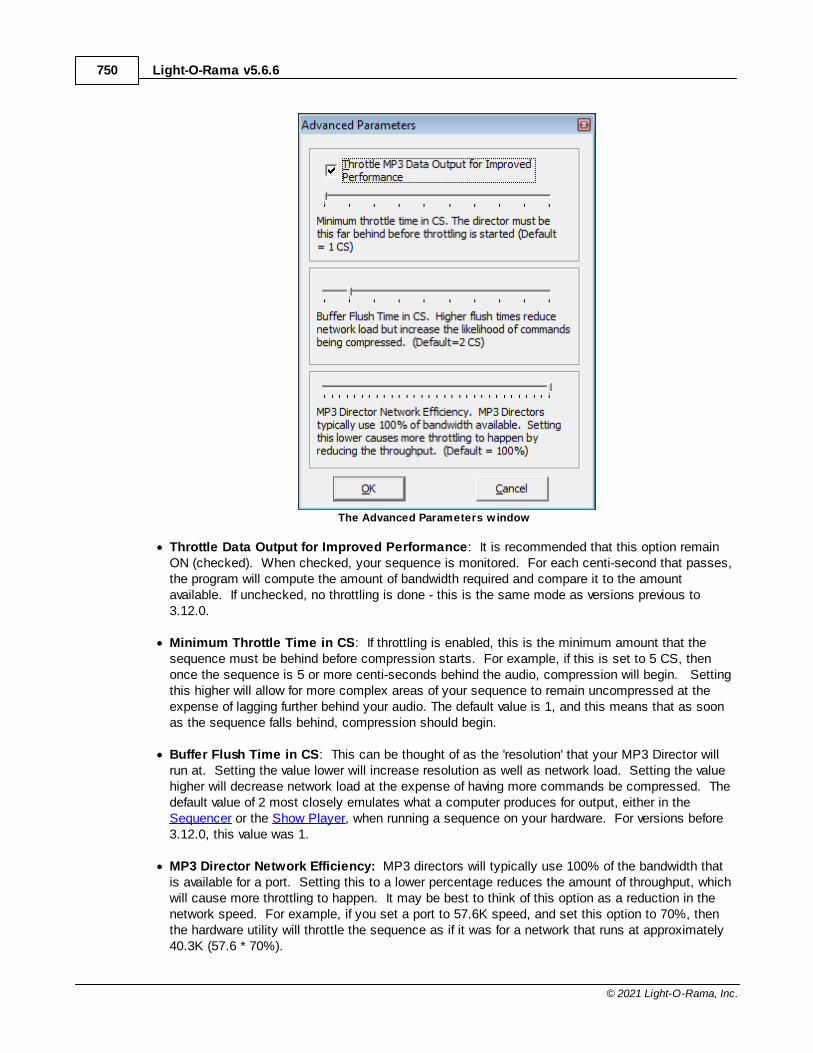
Light-O-Rama v5.6.6750
© 2021 Light-O-Rama, Inc.
The Advanced Parameters w indow
· Throttle Data Output for Improved Performance: It is recommended that this option remainON (checked). When checked, your sequence is monitored. For each centi-second that passes,the program will compute the amount of bandwidth required and compare it to the amountavailable. If unchecked, no throttling is done - this is the same mode as versions previous to3.12.0.
· Minimum Throttle Time in CS: If throttling is enabled, this is the minimum amount that thesequence must be behind before compression starts. For example, if this is set to 5 CS, thenonce the sequence is 5 or more centi-seconds behind the audio, compression will begin. Settingthis higher will allow for more complex areas of your sequence to remain uncompressed at theexpense of lagging further behind your audio. The default value is 1, and this means that as soonas the sequence falls behind, compression should begin.
· Buffer Flush Time in CS: This can be thought of as the 'resolution' that your MP3 Director willrun at. Setting the value lower will increase resolution as well as network load. Setting the valuehigher will decrease network load at the expense of having more commands be compressed. Thedefault value of 2 most closely emulates what a computer produces for output, either in theSequencer or the Show Player, when running a sequence on your hardware. For versions before3.12.0, this value was 1.
· MP3 Director Network Efficiency: MP3 directors will typically use 100% of the bandwidth thatis available for a port. Setting this to a lower percentage reduces the amount of throughput, whichwill cause more throttling to happen. It may be best to think of this option as a reduction in thenetwork speed. For example, if you set a port to 57.6K speed, and set this option to 70%, thenthe hardware utility will throttle the sequence as if it was for a network that runs at approximately40.3K (57.6 * 70%).
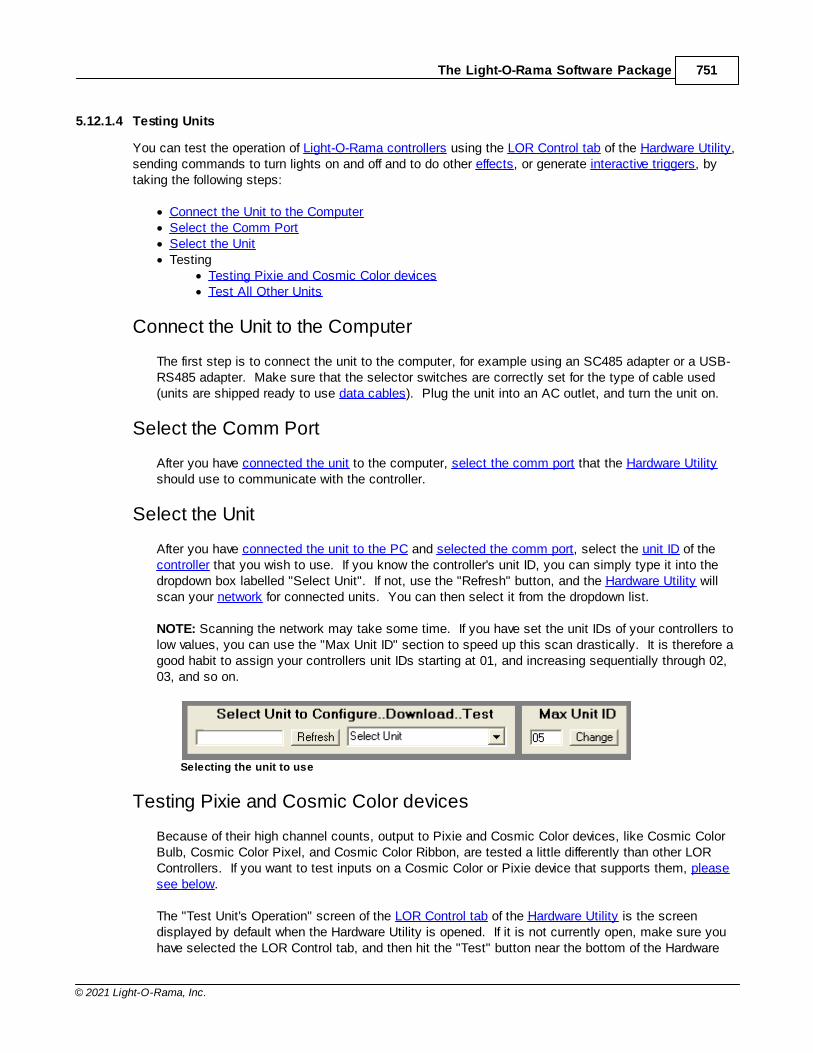
The Light-O-Rama Software Package 751
© 2021 Light-O-Rama, Inc.
5.12.1.4 Testing Units
You can test the operation of Light-O-Rama controllers using the LOR Control tab of the Hardware Utility,sending commands to turn lights on and off and to do other effects, or generate interactive triggers, bytaking the following steps:
· Connect the Unit to the Computer· Select the Comm Port· Select the Unit· Testing
· Testing Pixie and Cosmic Color devices· Test All Other Units
Connect the Unit to the Computer
The first step is to connect the unit to the computer, for example using an SC485 adapter or a USB-RS485 adapter. Make sure that the selector switches are correctly set for the type of cable used(units are shipped ready to use data cables). Plug the unit into an AC outlet, and turn the unit on.
Select the Comm Port
After you have connected the unit to the computer, select the comm port that the Hardware Utilityshould use to communicate with the controller.
Select the Unit
After you have connected the unit to the PC and selected the comm port, select the unit ID of thecontroller that you wish to use. If you know the controller's unit ID, you can simply type it into thedropdown box labelled "Select Unit". If not, use the "Refresh" button, and the Hardware Utility willscan your network for connected units. You can then select it from the dropdown list.
NOTE: Scanning the network may take some time. If you have set the unit IDs of your controllers tolow values, you can use the "Max Unit ID" section to speed up this scan drastically. It is therefore agood habit to assign your controllers unit IDs starting at 01, and increasing sequentially through 02,03, and so on.
Selecting the unit to use
Testing Pixie and Cosmic Color devices
Because of their high channel counts, output to Pixie and Cosmic Color devices, like Cosmic ColorBulb, Cosmic Color Pixel, and Cosmic Color Ribbon, are tested a little differently than other LORControllers. If you want to test inputs on a Cosmic Color or Pixie device that supports them, pleasesee below.
The "Test Unit's Operation" screen of the LOR Control tab of the Hardware Utility is the screendisplayed by default when the Hardware Utility is opened. If it is not currently open, make sure youhave selected the LOR Control tab, and then hit the "Test" button near the bottom of the Hardware
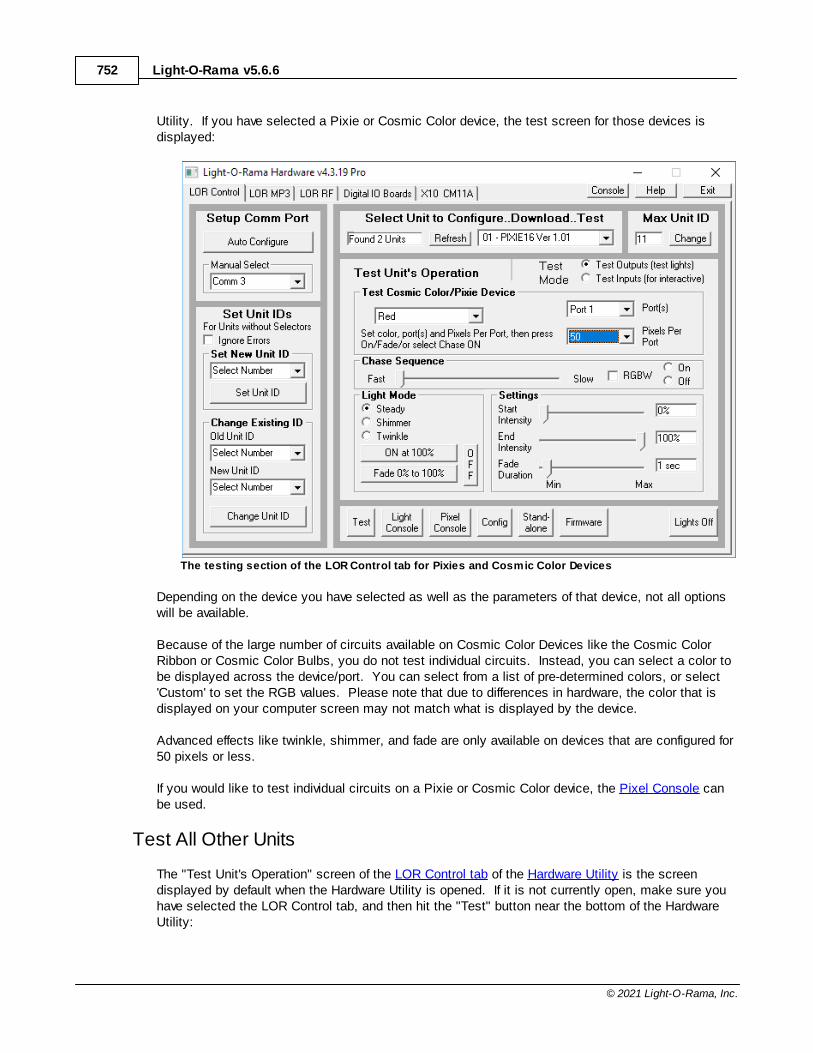
Light-O-Rama v5.6.6752
© 2021 Light-O-Rama, Inc.
Utility. If you have selected a Pixie or Cosmic Color device, the test screen for those devices isdisplayed:
The testing section of the LOR Control tab for Pixies and Cosmic Color Devices
Depending on the device you have selected as well as the parameters of that device, not all optionswill be available.
Because of the large number of circuits available on Cosmic Color Devices like the Cosmic ColorRibbon or Cosmic Color Bulbs, you do not test individual circuits. Instead, you can select a color tobe displayed across the device/port. You can select from a list of pre-determined colors, or select'Custom' to set the RGB values. Please note that due to differences in hardware, the color that isdisplayed on your computer screen may not match what is displayed by the device.
Advanced effects like twinkle, shimmer, and fade are only available on devices that are configured for50 pixels or less.
If you would like to test individual circuits on a Pixie or Cosmic Color device, the Pixel Console canbe used.
Test All Other Units
The "Test Unit's Operation" screen of the LOR Control tab of the Hardware Utility is the screendisplayed by default when the Hardware Utility is opened. If it is not currently open, make sure youhave selected the LOR Control tab, and then hit the "Test" button near the bottom of the HardwareUtility:

The Light-O-Rama Software Package 753
© 2021 Light-O-Rama, Inc.
The testing section of the LOR Control tab
By setting the "Test Mode" appropriately, you can either test output to the controllers - that is, testthat they can control your lights - or test input from your controllers - that is, test that they cangenerate interactive triggers.
Test Outputs (test lights)
To test that your controllers can control your lights, select "Test Outputs (test lights)" as your "TestMode".
After selecting the circuits that you wish to test (by checking their boxes in the "Select Circuits toTest" section), you can send a lighting effect command to those circuits by choosing the "LightMode", "Start Intensity", "End Intensity", and "Fade Duration", and clicking on either the "ON","OFF", or "Fade" buttons. Note: If "ON" is used, the intensity is specified via "End Intensity", not"Start Intensity".
Alternatively, the "Chase Sequence" section can be used to turn the selected circuits on and off insequence.
Test Inputs (for interactive)
To test that your controllers can generate interactive triggers, select "Test Inputs (for interactive)" asyour "Test Mode".
Select the circuits that you want to test. When you trip a trigger for one of those circuits, it shouldshow up as red in this screen.
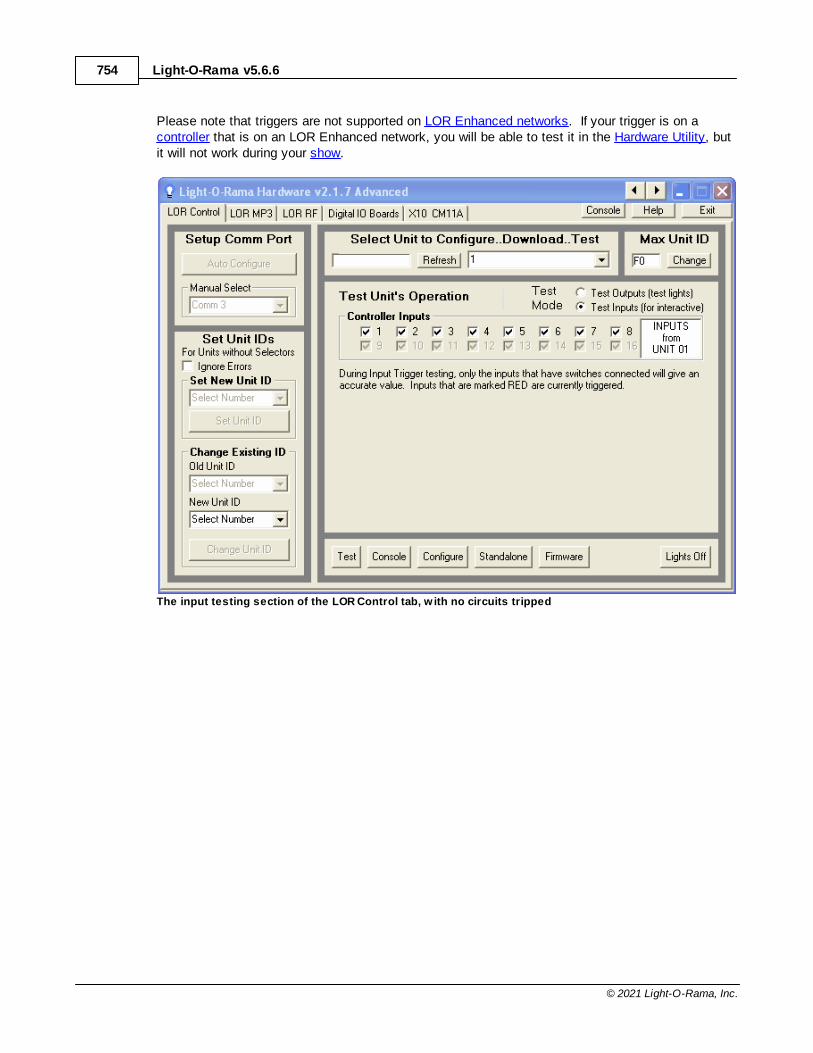
Light-O-Rama v5.6.6754
© 2021 Light-O-Rama, Inc.
Please note that triggers are not supported on LOR Enhanced networks. If your trigger is on acontroller that is on an LOR Enhanced network, you will be able to test it in the Hardware Utility, butit will not work during your show.
The input testing section of the LOR Control tab, w ith no circuits tripped
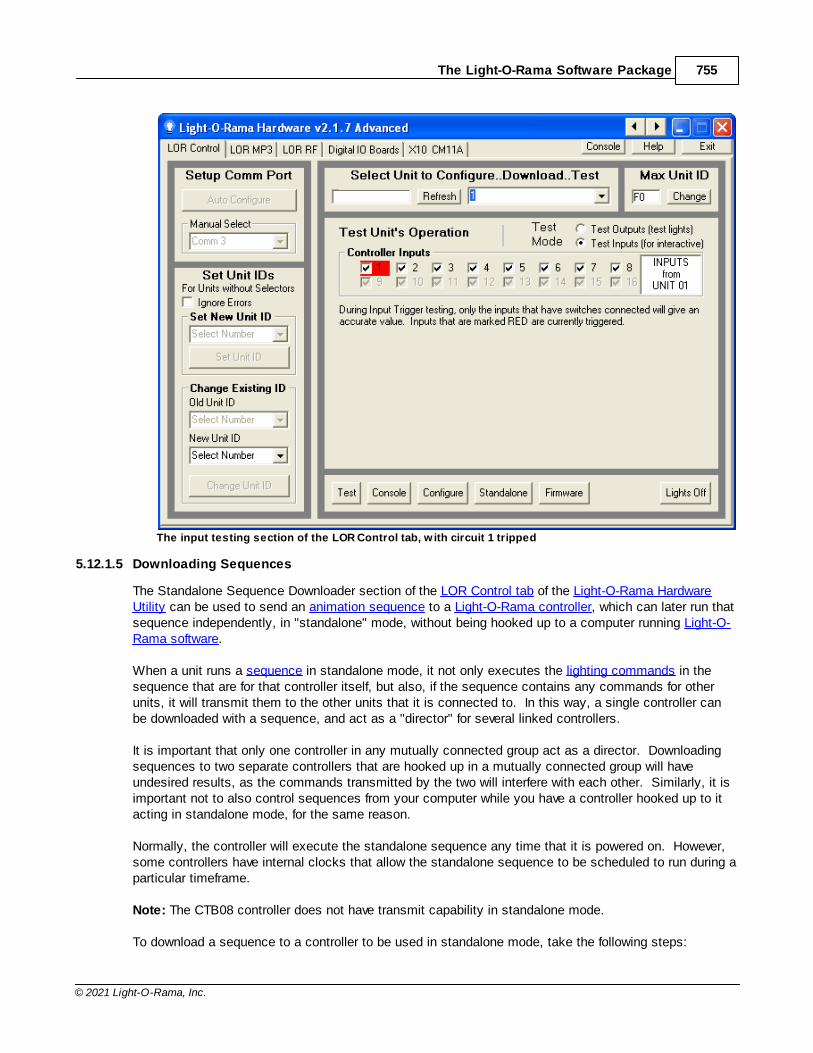
The Light-O-Rama Software Package 755
© 2021 Light-O-Rama, Inc.
The input testing section of the LOR Control tab, w ith circuit 1 tripped
5.12.1.5 Downloading Sequences
The Standalone Sequence Downloader section of the LOR Control tab of the Light-O-Rama HardwareUtility can be used to send an animation sequence to a Light-O-Rama controller, which can later run thatsequence independently, in "standalone" mode, without being hooked up to a computer running Light-O-Rama software.
When a unit runs a sequence in standalone mode, it not only executes the lighting commands in thesequence that are for that controller itself, but also, if the sequence contains any commands for otherunits, it will transmit them to the other units that it is connected to. In this way, a single controller canbe downloaded with a sequence, and act as a "director" for several linked controllers.
It is important that only one controller in any mutually connected group act as a director. Downloadingsequences to two separate controllers that are hooked up in a mutually connected group will haveundesired results, as the commands transmitted by the two will interfere with each other. Similarly, it isimportant not to also control sequences from your computer while you have a controller hooked up to itacting in standalone mode, for the same reason.
Normally, the controller will execute the standalone sequence any time that it is powered on. However,some controllers have internal clocks that allow the standalone sequence to be scheduled to run during aparticular timeframe.
Note: The CTB08 controller does not have transmit capability in standalone mode.
To download a sequence to a controller to be used in standalone mode, take the following steps:
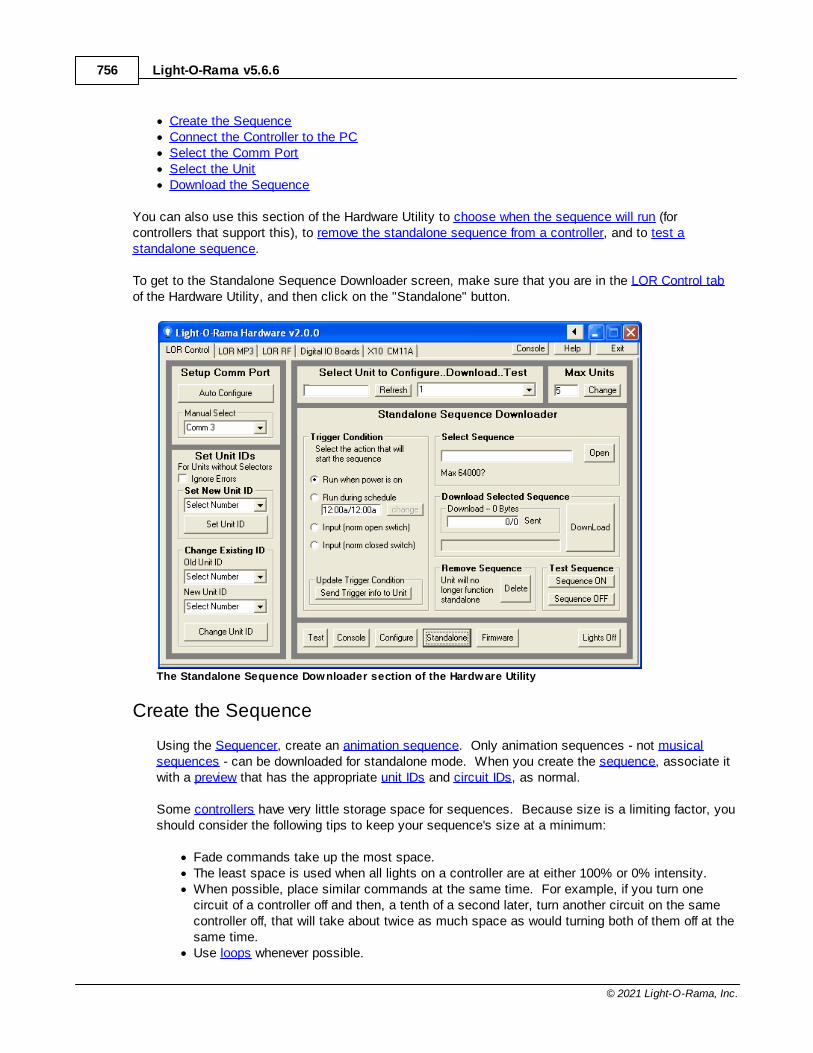
Light-O-Rama v5.6.6756
© 2021 Light-O-Rama, Inc.
· Create the Sequence· Connect the Controller to the PC· Select the Comm Port· Select the Unit· Download the Sequence
You can also use this section of the Hardware Utility to choose when the sequence will run (forcontrollers that support this), to remove the standalone sequence from a controller, and to test astandalone sequence.
To get to the Standalone Sequence Downloader screen, make sure that you are in the LOR Control tabof the Hardware Utility, and then click on the "Standalone" button.
The Standalone Sequence Downloader section of the Hardware Utility
Create the Sequence
Using the Sequencer, create an animation sequence. Only animation sequences - not musicalsequences - can be downloaded for standalone mode. When you create the sequence, associate itwith a preview that has the appropriate unit IDs and circuit IDs, as normal.
Some controllers have very little storage space for sequences. Because size is a limiting factor, youshould consider the following tips to keep your sequence's size at a minimum:
· Fade commands take up the most space.· The least space is used when all lights on a controller are at either 100% or 0% intensity.· When possible, place similar commands at the same time. For example, if you turn one
circuit of a controller off and then, a tenth of a second later, turn another circuit on the samecontroller off, that will take about twice as much space as would turning both of them off at thesame time.
· Use loops whenever possible.
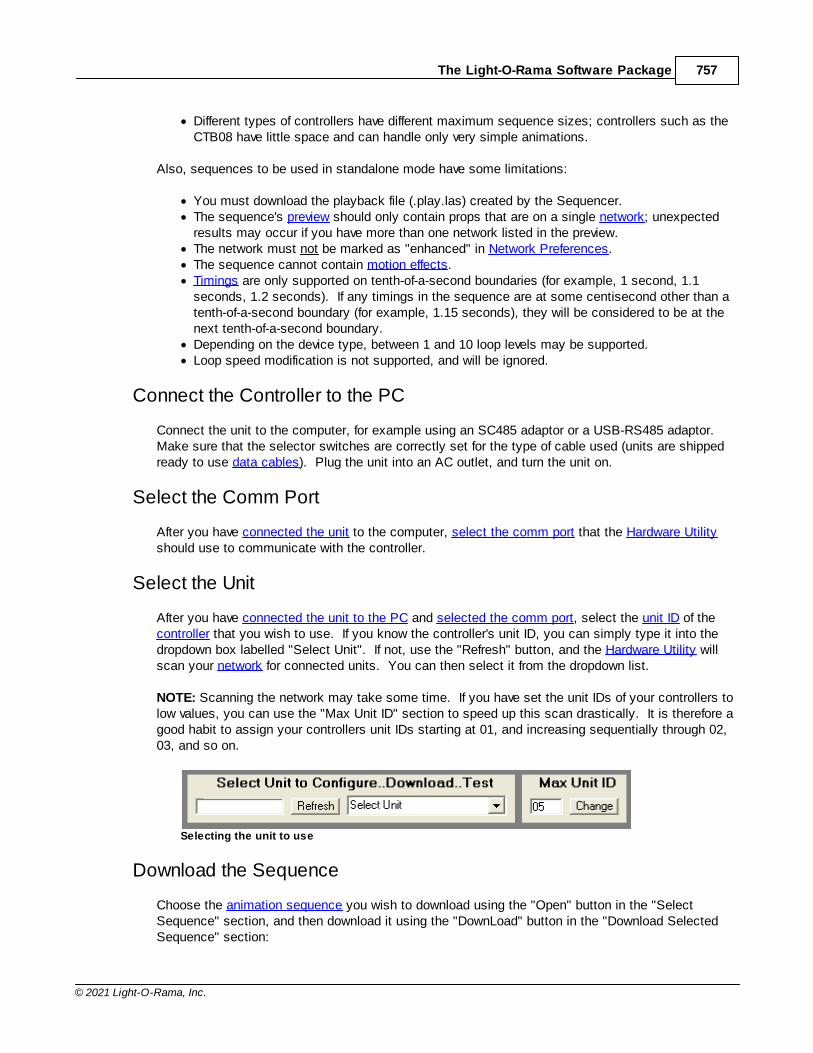
The Light-O-Rama Software Package 757
© 2021 Light-O-Rama, Inc.
· Different types of controllers have different maximum sequence sizes; controllers such as theCTB08 have little space and can handle only very simple animations.
Also, sequences to be used in standalone mode have some limitations:
· You must download the playback file (.play.las) created by the Sequencer.· The sequence's preview should only contain props that are on a single network; unexpected
results may occur if you have more than one network listed in the preview.· The network must not be marked as "enhanced" in Network Preferences.· The sequence cannot contain motion effects.· Timings are only supported on tenth-of-a-second boundaries (for example, 1 second, 1.1
seconds, 1.2 seconds). If any timings in the sequence are at some centisecond other than atenth-of-a-second boundary (for example, 1.15 seconds), they will be considered to be at thenext tenth-of-a-second boundary.
· Depending on the device type, between 1 and 10 loop levels may be supported.· Loop speed modification is not supported, and will be ignored.
Connect the Controller to the PC
Connect the unit to the computer, for example using an SC485 adaptor or a USB-RS485 adaptor. Make sure that the selector switches are correctly set for the type of cable used (units are shippedready to use data cables). Plug the unit into an AC outlet, and turn the unit on.
Select the Comm Port
After you have connected the unit to the computer, select the comm port that the Hardware Utilityshould use to communicate with the controller.
Select the Unit
After you have connected the unit to the PC and selected the comm port, select the unit ID of thecontroller that you wish to use. If you know the controller's unit ID, you can simply type it into thedropdown box labelled "Select Unit". If not, use the "Refresh" button, and the Hardware Utility willscan your network for connected units. You can then select it from the dropdown list.
NOTE: Scanning the network may take some time. If you have set the unit IDs of your controllers tolow values, you can use the "Max Unit ID" section to speed up this scan drastically. It is therefore agood habit to assign your controllers unit IDs starting at 01, and increasing sequentially through 02,03, and so on.
Selecting the unit to use
Download the Sequence
Choose the animation sequence you wish to download using the "Open" button in the "SelectSequence" section, and then download it using the "DownLoad" button in the "Download SelectedSequence" section:
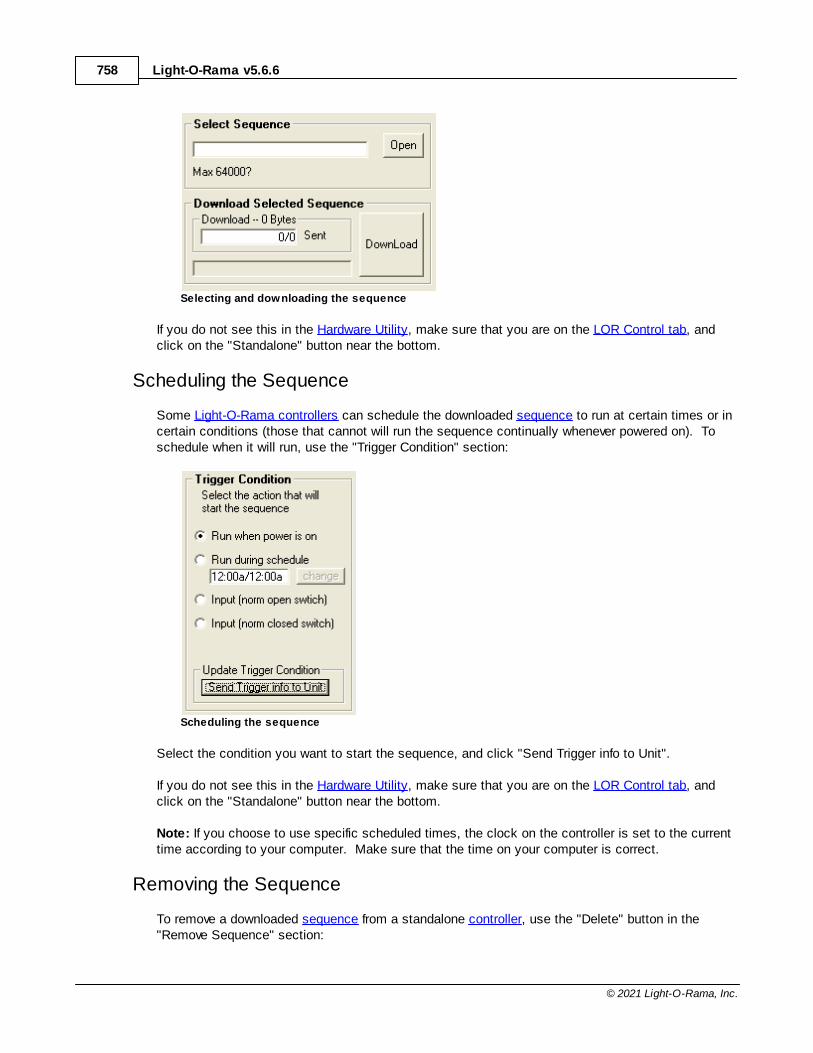
Light-O-Rama v5.6.6758
© 2021 Light-O-Rama, Inc.
Selecting and downloading the sequence
If you do not see this in the Hardware Utility, make sure that you are on the LOR Control tab, andclick on the "Standalone" button near the bottom.
Scheduling the Sequence
Some Light-O-Rama controllers can schedule the downloaded sequence to run at certain times or incertain conditions (those that cannot will run the sequence continually whenever powered on). Toschedule when it will run, use the "Trigger Condition" section:
Scheduling the sequence
Select the condition you want to start the sequence, and click "Send Trigger info to Unit".
If you do not see this in the Hardware Utility, make sure that you are on the LOR Control tab, andclick on the "Standalone" button near the bottom.
Note: If you choose to use specific scheduled times, the clock on the controller is set to the currenttime according to your computer. Make sure that the time on your computer is correct.
Removing the Sequence
To remove a downloaded sequence from a standalone controller, use the "Delete" button in the"Remove Sequence" section:
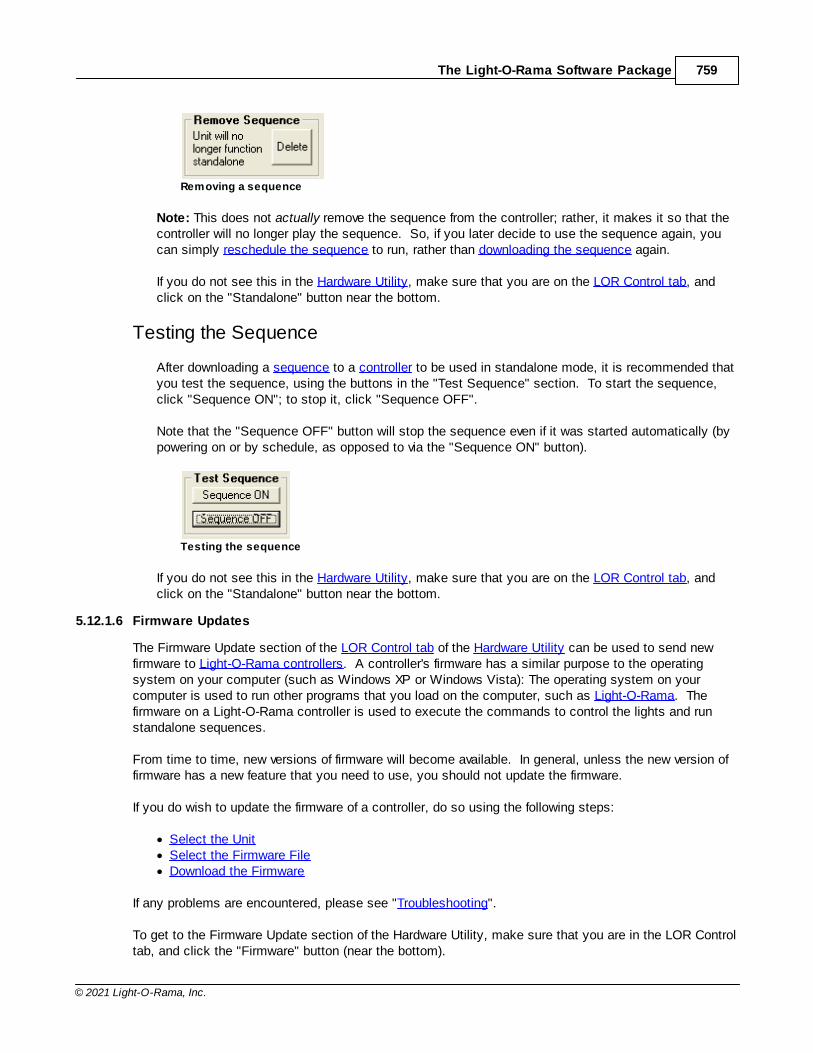
The Light-O-Rama Software Package 759
© 2021 Light-O-Rama, Inc.
Removing a sequence
Note: This does not actually remove the sequence from the controller; rather, it makes it so that thecontroller will no longer play the sequence. So, if you later decide to use the sequence again, youcan simply reschedule the sequence to run, rather than downloading the sequence again.
If you do not see this in the Hardware Utility, make sure that you are on the LOR Control tab, andclick on the "Standalone" button near the bottom.
Testing the Sequence
After downloading a sequence to a controller to be used in standalone mode, it is recommended thatyou test the sequence, using the buttons in the "Test Sequence" section. To start the sequence,click "Sequence ON"; to stop it, click "Sequence OFF".
Note that the "Sequence OFF" button will stop the sequence even if it was started automatically (bypowering on or by schedule, as opposed to via the "Sequence ON" button).
Testing the sequence
If you do not see this in the Hardware Utility, make sure that you are on the LOR Control tab, andclick on the "Standalone" button near the bottom.
5.12.1.6 Firmware Updates
The Firmware Update section of the LOR Control tab of the Hardware Utility can be used to send newfirmware to Light-O-Rama controllers. A controller's firmware has a similar purpose to the operatingsystem on your computer (such as Windows XP or Windows Vista): The operating system on yourcomputer is used to run other programs that you load on the computer, such as Light-O-Rama. Thefirmware on a Light-O-Rama controller is used to execute the commands to control the lights and runstandalone sequences.
From time to time, new versions of firmware will become available. In general, unless the new version offirmware has a new feature that you need to use, you should not update the firmware.
If you do wish to update the firmware of a controller, do so using the following steps:
· Select the Unit· Select the Firmware File· Download the Firmware
If any problems are encountered, please see "Troubleshooting".
To get to the Firmware Update section of the Hardware Utility, make sure that you are in the LOR Controltab, and click the "Firmware" button (near the bottom).
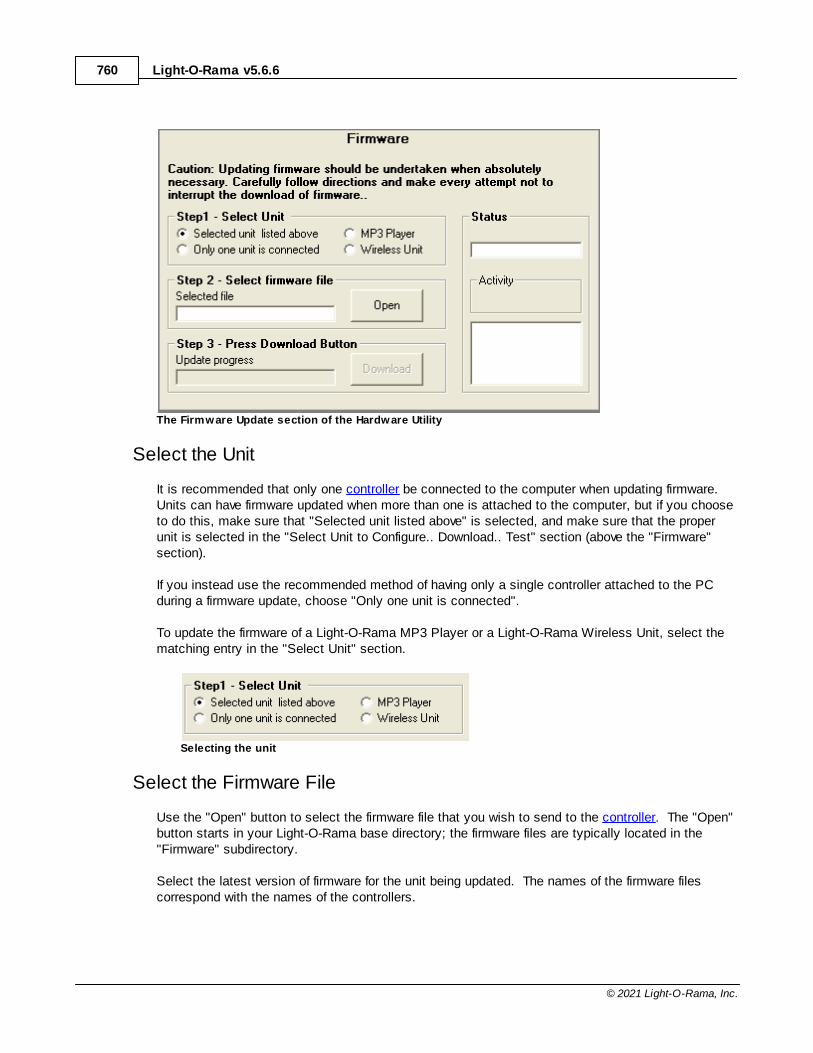
Light-O-Rama v5.6.6760
© 2021 Light-O-Rama, Inc.
The Firmware Update section of the Hardware Utility
Select the Unit
It is recommended that only one controller be connected to the computer when updating firmware. Units can have firmware updated when more than one is attached to the computer, but if you chooseto do this, make sure that "Selected unit listed above" is selected, and make sure that the properunit is selected in the "Select Unit to Configure.. Download.. Test" section (above the "Firmware"section).
If you instead use the recommended method of having only a single controller attached to the PCduring a firmware update, choose "Only one unit is connected".
To update the firmware of a Light-O-Rama MP3 Player or a Light-O-Rama Wireless Unit, select thematching entry in the "Select Unit" section.
Selecting the unit
Select the Firmware File
Use the "Open" button to select the firmware file that you wish to send to the controller. The "Open"button starts in your Light-O-Rama base directory; the firmware files are typically located in the"Firmware" subdirectory.
Select the latest version of firmware for the unit being updated. The names of the firmware filescorrespond with the names of the controllers.
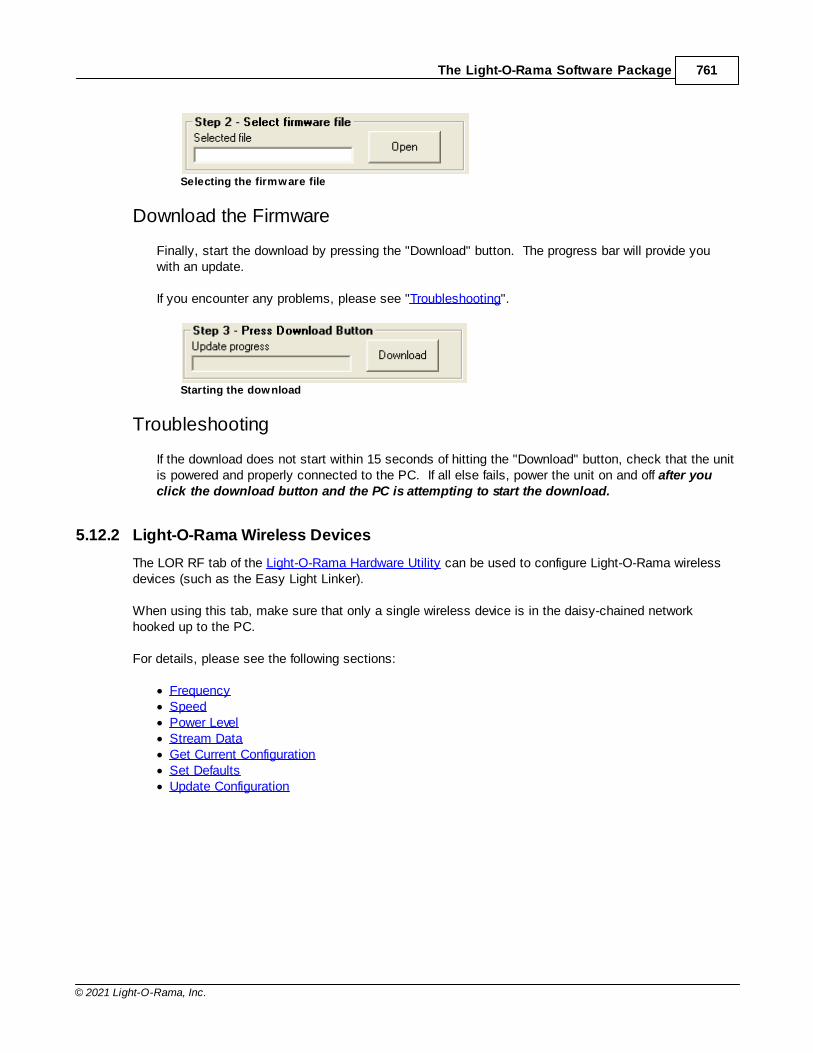
The Light-O-Rama Software Package 761
© 2021 Light-O-Rama, Inc.
Selecting the firmware file
Download the Firmware
Finally, start the download by pressing the "Download" button. The progress bar will provide youwith an update.
If you encounter any problems, please see "Troubleshooting".
Starting the download
Troubleshooting
If the download does not start within 15 seconds of hitting the "Download" button, check that the unitis powered and properly connected to the PC. If all else fails, power the unit on and off after youclick the download button and the PC is attempting to start the download.
5.12.2 Light-O-Rama Wireless Devices
The LOR RF tab of the Light-O-Rama Hardware Utility can be used to configure Light-O-Rama wirelessdevices (such as the Easy Light Linker).
When using this tab, make sure that only a single wireless device is in the daisy-chained networkhooked up to the PC.
For details, please see the following sections:
· Frequency· Speed· Power Level· Stream Data· Get Current Configuration· Set Defaults· Update Configuration
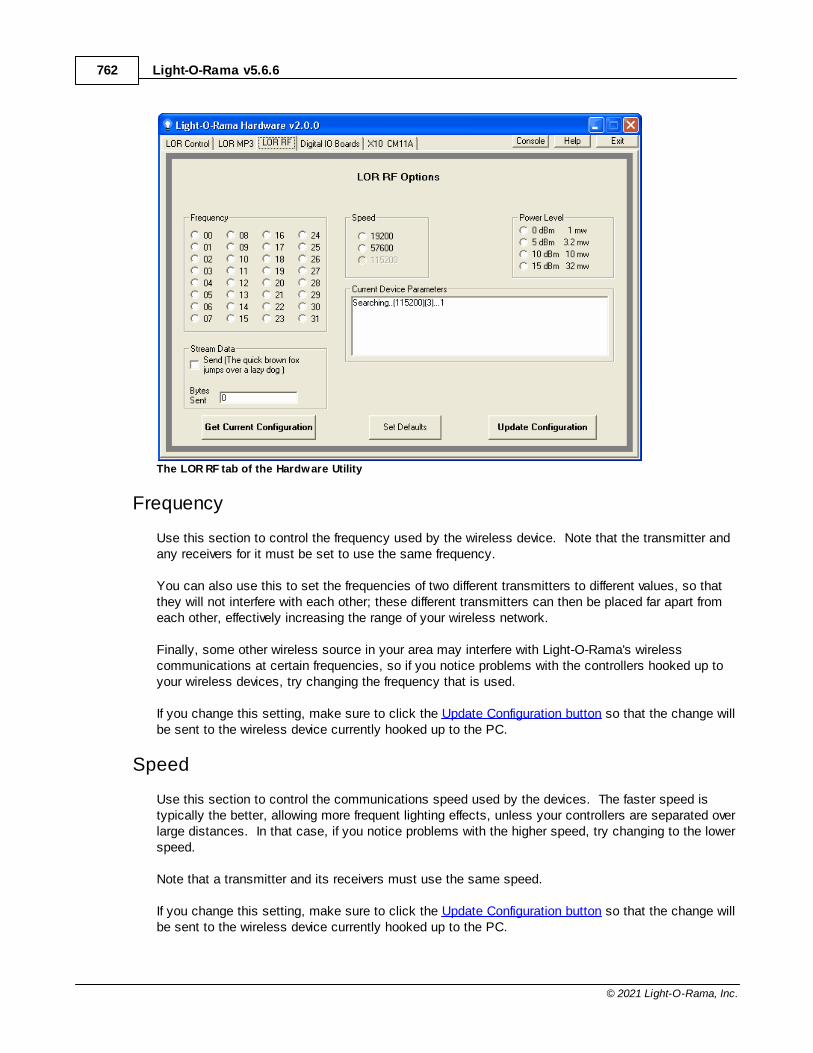
Light-O-Rama v5.6.6762
© 2021 Light-O-Rama, Inc.
The LOR RF tab of the Hardware Utility
Frequency
Use this section to control the frequency used by the wireless device. Note that the transmitter andany receivers for it must be set to use the same frequency.
You can also use this to set the frequencies of two different transmitters to different values, so thatthey will not interfere with each other; these different transmitters can then be placed far apart fromeach other, effectively increasing the range of your wireless network.
Finally, some other wireless source in your area may interfere with Light-O-Rama's wirelesscommunications at certain frequencies, so if you notice problems with the controllers hooked up toyour wireless devices, try changing the frequency that is used.
If you change this setting, make sure to click the Update Configuration button so that the change willbe sent to the wireless device currently hooked up to the PC.
Speed
Use this section to control the communications speed used by the devices. The faster speed istypically the better, allowing more frequent lighting effects, unless your controllers are separated overlarge distances. In that case, if you notice problems with the higher speed, try changing to the lowerspeed.
Note that a transmitter and its receivers must use the same speed.
If you change this setting, make sure to click the Update Configuration button so that the change willbe sent to the wireless device currently hooked up to the PC.
The Light-O-Rama Software Package 763
© 2021 Light-O-Rama, Inc.
Power Level
If your transmitter and receivers are physically close to each other, using too much power mightcause unintended effects. If you notice this, try setting a lower power level.
If you change this setting, make sure to click the Update Configuration button so that the change willbe sent to the wireless device currently hooked up to the PC.
Stream Data
This section continuously streams data. This is mostly for internal testing purposes, and it isunlikely that you will need to use this.
Get Current Configuration
Clicking this button will retrieve the settings (such as frequency) from the wireless device currentlyhooked up to the PC, and display them in the "Current Device Parameters" section.
Set Defaults
Clicking this button will reset the settings (such as frequency) of the wireless device currentlyhooked up to the PC back to their factory defaults.
Update Configuration
After you have changed the frequency, speed, or power level, click this button to send the changesto the wireless device currently hooked up to the PC.
5.12.3 Digital IO Boards
Please note that support for DIO boards was removed with S5.
5.12.4 X10 Controllers
Please note that support for X10 was removed with S5.
5.12.5 Light Console
Clicking on the "Light Console" button of the Light-O-Rama Hardware Utility opens the Test Console. The Test Console can be used to test standard Light-O-Rama controllers, or to configure and test Light-O-Rama iDMX-1000 DMX interface. If you are trying to test RGB based devices, you may want toinstead use the Pixel Console.
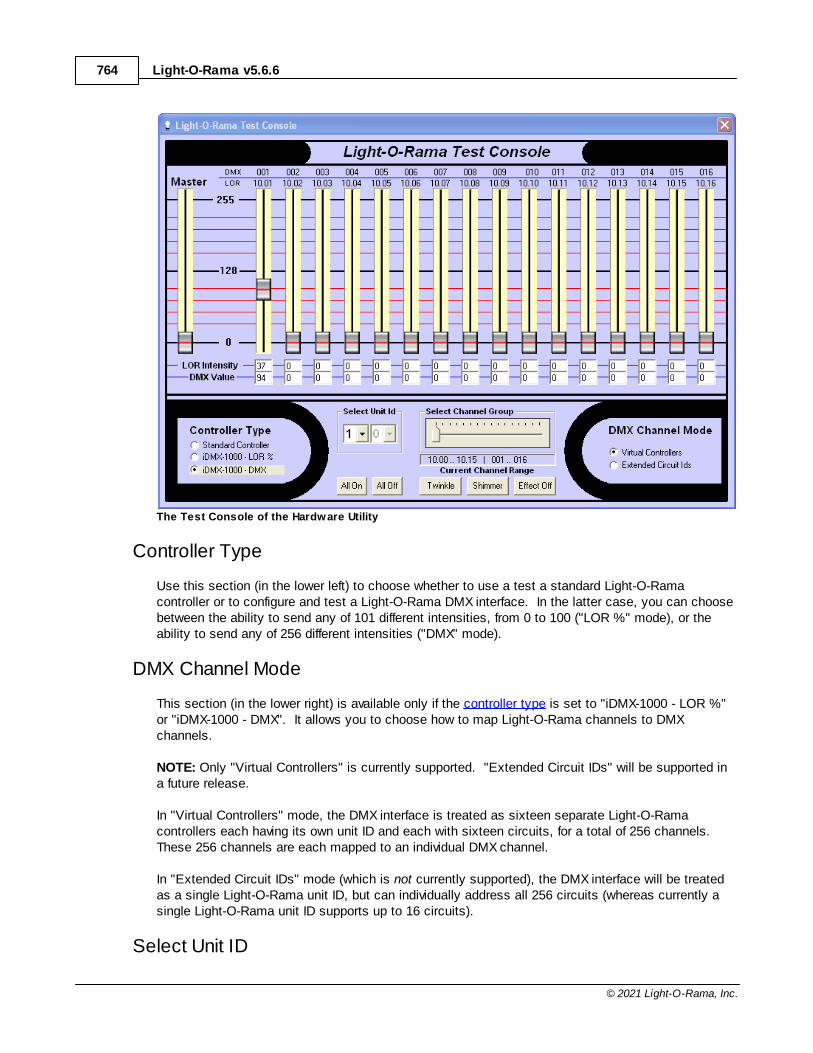
Light-O-Rama v5.6.6764
© 2021 Light-O-Rama, Inc.
The Test Console of the Hardware Utility
Controller Type
Use this section (in the lower left) to choose whether to use a test a standard Light-O-Ramacontroller or to configure and test a Light-O-Rama DMX interface. In the latter case, you can choosebetween the ability to send any of 101 different intensities, from 0 to 100 ("LOR %" mode), or theability to send any of 256 different intensities ("DMX" mode).
DMX Channel Mode
This section (in the lower right) is available only if the controller type is set to "iDMX-1000 - LOR %"or "iDMX-1000 - DMX". It allows you to choose how to map Light-O-Rama channels to DMXchannels.
NOTE: Only "Virtual Controllers" is currently supported. "Extended Circuit IDs" will be supported ina future release.
In "Virtual Controllers" mode, the DMX interface is treated as sixteen separate Light-O-Ramacontrollers each having its own unit ID and each with sixteen circuits, for a total of 256 channels. These 256 channels are each mapped to an individual DMX channel.
In "Extended Circuit IDs" mode (which is not currently supported), the DMX interface will be treatedas a single Light-O-Rama unit ID, but can individually address all 256 circuits (whereas currently asingle Light-O-Rama unit ID supports up to 16 circuits).
Select Unit ID
The Light-O-Rama Software Package 765
© 2021 Light-O-Rama, Inc.
Use this section to select the unit ID.
If the controller type is set to "Standard Controller", or if the DMX channel mode is set to "ExtendedCircuit IDs", both dropdown lists are enabled, with 0 through F available as the choices in each. So,for example, to use unit ID C7, select "C" from the first dropdown list, and "7" from the second.
If the DMX channel mode is set to "Virtual Controllers", only the first dropdown list is enabled. TheDMX interface will use all sixteen unit IDs starting with the value selected there. For example, to useunit IDs 30 through 3F, select "3" in the first dropdown box.
Select Channel Group
A Light-O-Rama DMX interface can support up to 256 DMX channels simultaneously. However, theintensity sliders at the top of the Test Console only show sixteen of them at once (plus the masterslider). To select which sixteen are currently displayed, use the "Select Channel Group" slider withthe controller type set to iDMX-1000.
Set Intensities
The top portion of the Test Console shows sixteen sliders for the intensities of sixteen channels,plus a master slider (on the left) which can be used to slide them all simultaneously.
Above each slider are the Light-O-Rama unit ID and circuit ID associated with that slider. Also, if thecontroller type is set to iDMX-1000, then above those is the corresponding DMX address. Thesevalues depend upon the selections made for the controller type, DMX channel mode, unit ID, andchannel group.
A common use of this is to determine the Light-O-Rama intensities to be used to produce variouseffects on a DMX controller. For example, a DMX controller may be able to turn on red, green, orblue lights; each of these is done by sending the same circuit a different command value. In Light-O-Rama, these are represented as intensities. The Light-O-Rama intensities and the correspondingDMX values are displayed below each slider.
So, for example, you could use this portion of the Test Console to determine that your controllerturns on a blue light when sent a value of 94, which corresponds to a Light-O-Rama intensity of 37%. So, when building a sequence in the Sequencer, you can tell this DMX controller to turn on a bluelight by applying a Set Intensity effect for 37%.
Test Buttons
You can use the various buttons at the bottom of the Test Console to send lighting effect commandsto the controller.
5.12.6 Pixel Console
Clicking on the "Pixel Console" button of the Light-O-Rama Hardware Utility opens the Pixel TestConsole. The Pixel Test Console is best used to test RGB Light-O-Rama controllers. The labels aboveeach group of sliders show the physical pixel number, as well as the LOR channels in use.
The Pixel Console can be used to test DMX and E1.31 RGB devices as long as:
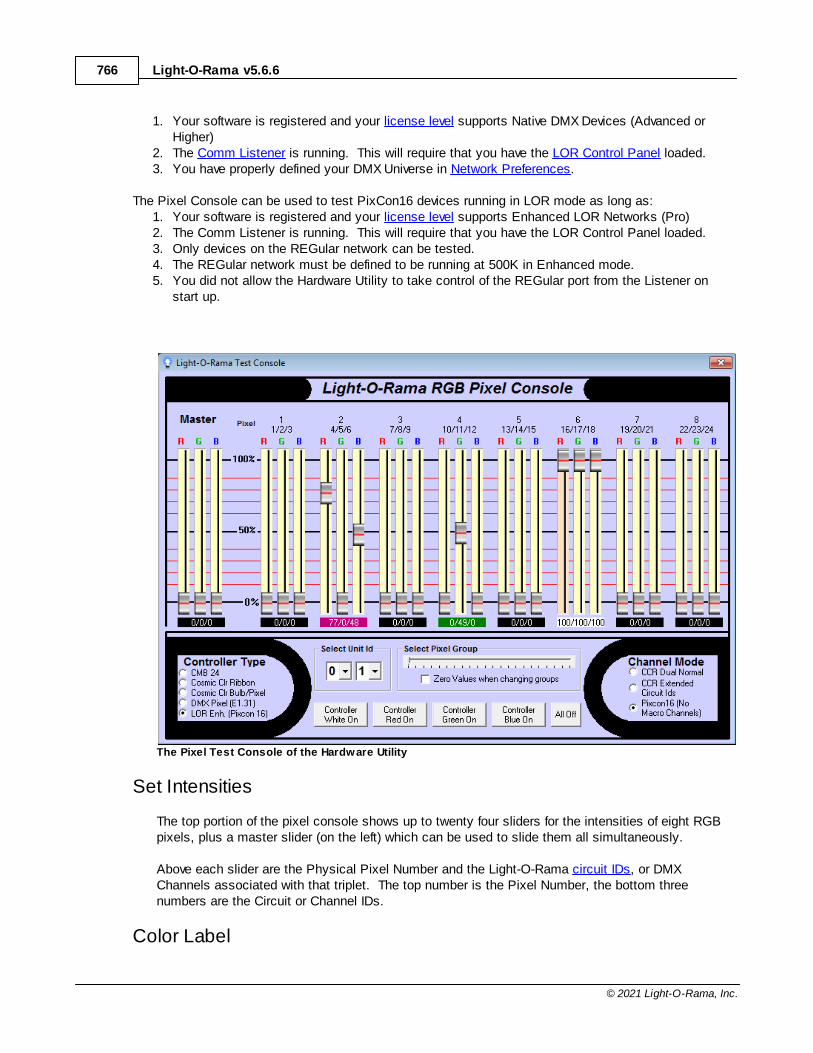
Light-O-Rama v5.6.6766
© 2021 Light-O-Rama, Inc.
1. Your software is registered and your license level supports Native DMX Devices (Advanced orHigher)
2. The Comm Listener is running. This will require that you have the LOR Control Panel loaded.3. You have properly defined your DMX Universe in Network Preferences.
The Pixel Console can be used to test PixCon16 devices running in LOR mode as long as:1. Your software is registered and your license level supports Enhanced LOR Networks (Pro)2. The Comm Listener is running. This will require that you have the LOR Control Panel loaded.3. Only devices on the REGular network can be tested.4. The REGular network must be defined to be running at 500K in Enhanced mode.5. You did not allow the Hardware Utility to take control of the REGular port from the Listener on
start up.
The Pixel Test Console of the Hardware Utility
Set Intensities
The top portion of the pixel console shows up to twenty four sliders for the intensities of eight RGBpixels, plus a master slider (on the left) which can be used to slide them all simultaneously.
Above each slider are the Physical Pixel Number and the Light-O-Rama circuit IDs, or DMXChannels associated with that triplet. The top number is the Pixel Number, the bottom threenumbers are the Circuit or Channel IDs.
Color Label
The Light-O-Rama Software Package 767
© 2021 Light-O-Rama, Inc.
The colored label box under each group of 3 sliders shows an approximate representation of thecolor that will be output by the device. NOTE: colors on your monitor may not exactly match whatyou would see on the actual device. You should always reference what is actually output on thephysical device when selecting color values. Clicking this box will bring up a color selection dialogthat will set the R G and B components automatically. The numbers shown in the box are the LORintensities of each of the sliders, or the DMX Channel values in R/G/B order.
Controller Type
Use this section (in the lower left) to choose whether to use a test a Light-O-Rama CMB24controller, Cosmic Color Ribbon, Cosmic Color Bulb/Pixel device, a DMX universe, or network devicelike the PixCon16 running on the REGular network in LOR Enhanced mode. If your license does notsupport native DMX the DMX and LOR Enh. options are not available. If you license does notsupport Enhanced LOR networks, the LOR Enh. option is not available,
Channel Mode
This section (in the lower right) is available only if the controller type is set to "Cosmic ColorBulb/Pixel" or LOR Enhanced. Set this to match the configuration of your Cosmic Color device or toNo Macro Channels (PixCon16). The No Macro Channels option is only available if you haveselected the LOR Enh (PixCon16) controller type.
Please note that the Pixel Console does not know exactly what device(s) you have connected toyour Enhanced LOR network. If you incorrectly set the channel mode, you may experience strangebehavior on your device. For example, if you have a Cosmic Color device connected to yourEnhanced LOR network, but have specified No Macro Channels (PixCon16) channel mode, resultsare going to be random once you pass channel 150. Always ensure the channel mode matches thedevice you are trying to test.
Select Unit ID/Select Universe
Use this section to select the unit ID. When working with DMX devices, this changes to allowselection of a DMX Universe.
Select Pixel Group
A Light-O-Rama RGB device can support up to 300 channels as 100 pixels, and DMX Universes cansupport up to 510 channels as 170 pixels. Due to screen space limitations, the Pixel Console canonly show sliders for 8 pixels at one time. If your device supports more than 8 pixels, this selector isactive and allows you to set which group of pixels to control.
Zero Values when changing groups
When using the Select Pixel Group slider, the lights for the next selected group will be updated withthe values of the current sliders. However, if you check this box, the sliders will all be set to 0 whenchanging groups.
Test Buttons
You can use the various buttons at the bottom of the Test Console to send lighting effect commandsto the controller. Please remember that while the buttons may refer to 'Controller', Cosmic Color

Light-O-Rama v5.6.6768
© 2021 Light-O-Rama, Inc.
Bulbs or Pixels that are in Dual Normal mode will only update the string the Unit ID corresponds to. Using these buttons with an incorrect Channel Mode selected will produce unintended results.
5.13 ServoDog Utility
The Light-O-Rama ServoDog Utility can be used to configure the Light-O-Rama ServoDog, whichis a fourteen channel digital controller that can perform digital input, digital output, servo controland PWM ("Pulse Width Modulation") dimming.
For details on how to use the ServoDog Utility, please refer to your ServoDog manual. This can bedownloaded from the Light-O-Rama Support page.
The Light-O-Rama ServoDog Utility
5.14 Verifier
The Light-O-Rama Verifier can be used to check for certain types of problems with the way that Light-O-Rama is configured on your machine, and with your schedule, shows, and sequences.
To use the Verifier, simply click its "Verify" button. By default, this will cause it to check for issues inyour Light-O-Rama configuration, your schedule, shows that you have scheduled, and sequences inthose shows. You can also tell it to "Verify a Single Show" or "Verify a Single Sequence"; note, though,that two sequences which each pass "Verify a Single Sequence" without any problems might haveproblems when used together in a single show, so it's always a good idea to do "Verify a Single Show"and especially "Verify Entire Schedule" at least once before going live with your show.
As the Verifier is checking for issues, it will display what it is doing in its "Output Log" tab; when it iscomplete, it will switch to its "Results" tab, showing a list of the issues that it has found:
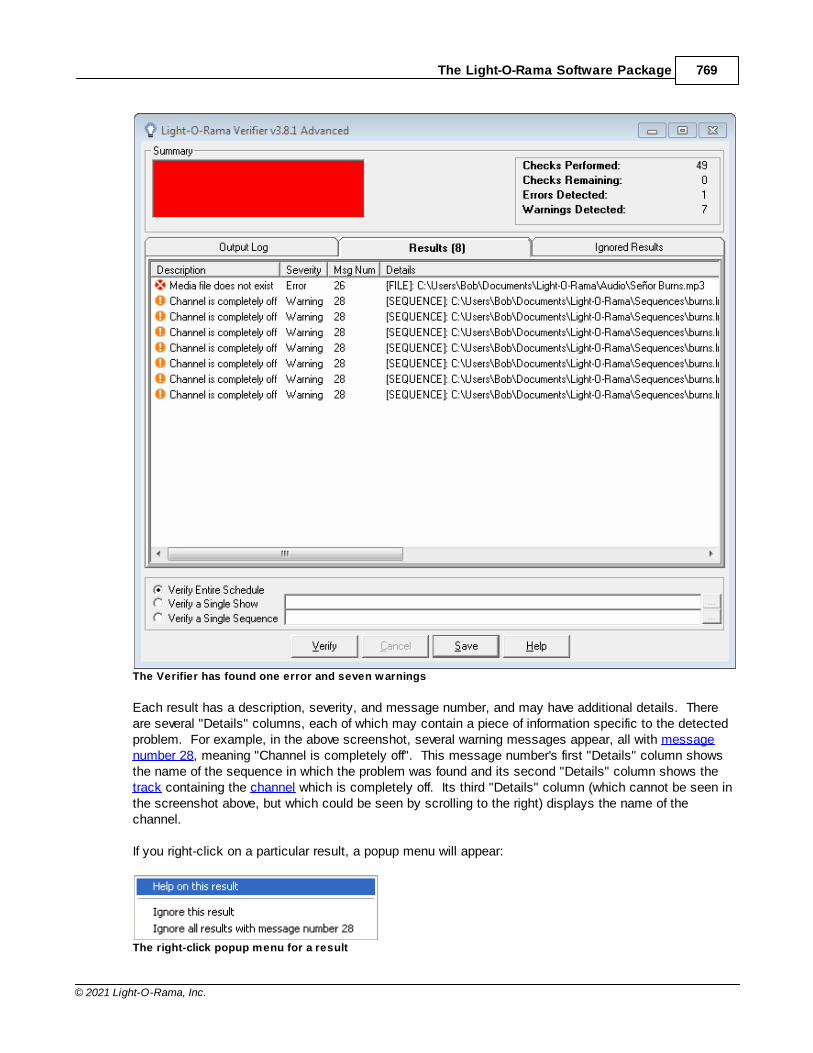
The Light-O-Rama Software Package 769
© 2021 Light-O-Rama, Inc.
The Verifier has found one error and seven warnings
Each result has a description, severity, and message number, and may have additional details. Thereare several "Details" columns, each of which may contain a piece of information specific to the detectedproblem. For example, in the above screenshot, several warning messages appear, all with messagenumber 28, meaning "Channel is completely off". This message number's first "Details" column showsthe name of the sequence in which the problem was found and its second "Details" column shows thetrack containing the channel which is completely off. Its third "Details" column (which cannot be seen inthe screenshot above, but which could be seen by scrolling to the right) displays the name of thechannel.
If you right-click on a particular result, a popup menu will appear:
The right-click popup menu for a result
Light-O-Rama v5.6.6770
© 2021 Light-O-Rama, Inc.
Clicking "Help on this result" simply opens the help file to the page for the result number in question.
The two "ignore" options let you tell the Verifier that you are not interested in seeing this result in thefuture - either it specifically ("Ignore this result") or all results with the same message number ("Ignore allresults with message number 28").
If you ignore a result (or all results with a certain message number), then whenever such results aredetected in the future, they will not count towards the number of errors or warnings which the Verifiersays it detected, and they will be displayed on the Verifier's "Ignored Results" tab instead of the"Results" tab. You can later decide to stop ignoring such results by going to that tab, right-clicking on aresult, and unchecking the ignore option that you had previously selected.
You can also save the list of results to a text file, by clicking the Verifier's "Save" button. Only results onthe "Results" tab will be saved to the file; those on the "Ignored Results" will not be.
Please see the list of Verifier messages for details on the types of problems that the Verifier checks for.
5.14.1 List of Verifier Messages
The following messages can be generated by the Light-O-Rama Verifier. For details on any given one,please refer to its individual help page.
· Message 1 (Info): No errors or warnings found· Message 2 (Warning): Verification cancelled· Message 3 (Error): Light-O-Rama is not fully installed· Message 4 (Error): No registry entry for application path· Message 5 (Error): Application directory does not exist· Message 6 (Warning): Verifier not running from LOR application path· Message 7 (Error): Application file does not exist· Message 8 (Error): Unlicensed LOR demo version used· Message 9 (Warning): Unsupported version of Windows Media Player· Message 10 (Error): No registry entry for user data path· Message 11 (Error): User data directory does not exist· Message 12 (Warning): No registry entry for non-media data path· Message 13 (Warning): Non-media data directory does not exist· Message 14 (Warning): No registry entry for media data path· Message 15 (Warning): Media data directory does not exist· Message 16 (Error): Application file has unexpected version number· Message 17 (Warning): Weekly schedule file does not exist· Message 18 (Warning): Yearly schedule file does not exist· Message 19 (Warning): Calendar scheduling not supported· Message 20 (Warning): No shows are scheduled· Message 21 (Error): Show file does not exist· Message 22 (Error): Error reading show file· Message 23 (Error): Sequence file does not exist· Message 24 (Error): Sequence file cannot be loaded· Message 25 (Warning): Show has no sequences· Message 26 (Error): Media file does not exist· Message 27 (Warning): Conflicting channel settings in sequence· Message 28 (Warning): Channel is completely off· Message 29 (Warning): Sequence is completely off· Message 30 (Warning): Channel is missing settings· Message 31 (Warning): Channel uses undefined comm network
The Light-O-Rama Software Package 771
© 2021 Light-O-Rama, Inc.
· Message 32 (Warning): Channel in tracks of conflicting length· Message 33 (Warning): Musical file used in non-audio section of show· Message 34 (Warning): Subsequences not supported· Message 35 (Warning): Background sequences unsupported· Message 36 (Warning): Startup sequences unsupported· Message 37 (Warning): Shutdown sequences unsupported· Message 38 (Warning): Interactive triggers unsupported· Message 39 (Warning): Unsupported number of tracks· Message 40 (Warning): Shell commands unsupported· Message 41 (Warning): Shell command map file does not exist· Message 42 (Warning): Shell command not set· Message 43 (Warning): Channel conflict· Message 44 (Warning): Old MC-P compatibility enabled· Message 45 (Warning): Channel settings conflict in sequence/intensity file· Message 46 (Warning): Channel settings conflict in intensity file· Message 47 (Warning): Intensity file conflict· Message 48 (Warning): Channel/intensity file conflict· Message 49 (Warning): Intensity file uses undefined comm network· Message 50 (Warning): Intensity files not supported by license level· Message 51 (Warning): Use Compressed Sequences disabled· Message 52 (Warning): Show Player Memory Restarts disabled· Message 53 (Warning): Trigger uses undefined network· Message 54 (Warning): Trigger uses LOR Enhanced network
5.14.1.1 Verifier Messages 1-10
The following are some messages can be generated by the Light-O-Rama Verifier. For details on anygiven one, please refer to its individual help page. To see all possible messages, please refer to the Listof Verifier Messages.
· Message 1 (Info): No errors or warnings found· Message 2 (Warning): Verification cancelled· Message 3 (Error): Light-O-Rama is not fully installed· Message 4 (Error): No registry entry for application path· Message 5 (Error): Application directory does not exist· Message 6 (Warning): Verifier not running from LOR application path· Message 7 (Error): Application file does not exist· Message 8 (Error): Unlicensed LOR demo version used· Message 9 (Warning): Unsupported version of Windows Media Player· Message 10 (Error): No registry entry for user data path
5.14.1.1.1 1: No errors or w arnings found
Message Number: 1Severity: InfoSummary: No errors or warnings found
If the LOR Verifier does not find any errors or warnings (other than those you have told it to ignore), it willoutput this message.
The LOR Verifier
Light-O-Rama v5.6.6772
© 2021 Light-O-Rama, Inc.
List of Verifier Messages
5.14.1.1.2 2: Verif ication cancelled
Message Number: 2Severity: WarningSummary: Verification cancelled
If you hit the cancel button while the LOR Verifier is checking for problems, it will stop checking, displayany issues that it has found to that point, and additionally display this message to warn you that theremay be other issues that it would have found had it not been cancelled.
Note that it may not stop immediately when you hit the cancel button; it may finish its current checkfirst.
The LOR VerifierList of Verifier Messages
5.14.1.1.3 3: Light-O-Rama is not installed
Message Number: 3Severity: ErrorSummary: Light-O-Rama is not fully installed
The installation of Light-O-Rama is not complete. This could occur, for example, if the installation wasinterrupted, or if a registry cleanup utility deleted certain Light-O-Rama entries from your computer'sWindows registry.
If the problem is that the registry entries have been deleted, you can solve it by running the LORPostutility, which is typically automatically run after installation. This utility can be found in the directorywhere you installed your Light-O-Rama program files, which is typically (but not always) C:\ProgramFiles\Light-O-Rama.
Note that the LORPost utility will ask where your Light-O-Rama data files should be stored. If youalready have a "Sequences" directory, and would like to keep your sequences there by default, tell it thedirectory one level above that directory. For example, if your sequences are stored in C:\LOR\Sequences, tell the LORPost utility to store your Light-O-Rama data files in C:\LOR.
Otherwise, try reinstalling Light-O-Rama, or uninstalling and then reinstalling.
The LOR VerifierList of Verifier Messages
5.14.1.1.4 4: No registry entry for application path
Message Number: 4Severity: ErrorSummary: No registry entry for application path
A required Light-O-Rama entry in the Windows registry cannot be found. This could occur, for example,if the installation was interrupted, or if a registry cleanup utility deleted certain Light-O-Rama entries fromyour computer's Windows registry. You will not be able to use Light-O-Rama until this problem isresolved.
The Light-O-Rama Software Package 773
© 2021 Light-O-Rama, Inc.
If the problem is that the registry entries have been deleted, you can solve it by running the LORPostutility, which is typically automatically run after installation. This utility can be found in the directorywhere you installed your Light-O-Rama program files, which is typically (but not always) C:\ProgramFiles\Light-O-Rama.
Note that the LORPost utility will ask where your Light-O-Rama data files should be stored. If youalready have a "Sequences" directory, and would like to keep your sequences there by default, tell it thedirectory one level above that directory. For example, if your sequences are stored in C:\LOR\Sequences, tell the LORPost utility to store your Light-O-Rama data files in C:\LOR.
Otherwise, try reinstalling Light-O-Rama, or uninstalling and then reinstalling.
The LOR VerifierList of Verifier Messages
5.14.1.1.5 5: Application directory does not exist
Message Number: 5Severity: ErrorSummary: Application directory does not existDetails: The name of the directory that is missing
The Windows registry says that the Light-O-Rama program files, such as the Sequencer and theHardware Utility, can be found in a certain directory, but that directory does not actually exist. You willnot be able to use Light-O-Rama until this problem is resolved.
It is suggested to uninstall and reinstall Light-O-Rama.
The LOR VerifierList of Verifier Messages
5.14.1.1.6 6: Verif ier not running from LOR application path
Message Number: 6Severity: WarningSummary: Verifier not running from LOR application pathDetails #1: The name of the directory that LOR program files should be contained inDetails #2: The name of the directory that the Verifier is running from
The various Light-O-Rama program files, such as the Sequencer and the Hardware Utility, are expectedto be found in a certain Windows directory. The Verifier itself is one such program. However, the copy ofthe Verifier that you are running is actually contained in a different directory.
This may not be a problem, for example if you intentionally copied the Verifier to a different directory andran it from there.
However, it might indicate that you are using an old version of the Verifier from a previous installation, andthat old Verifier may not be completely compatible with the current installation. Or, it might be indicativeof a deeper problem with the installation of Light-O-Rama.
It is suggested that you run the Verifier from the same directory where the Light-O-Rama program filesare installed. If you are doing so, and still get this error, consider uninstalling and reinstalling Light-O-Rama.
Light-O-Rama v5.6.6774
© 2021 Light-O-Rama, Inc.
The LOR VerifierList of Verifier Messages
5.14.1.1.7 7: Application f ile does not exist
Message Number: 7Severity: ErrorSummary: Application file does not existDetails: The expected directory and filename of the missing application file
One of the Light-O-Rama program files, such as the Sequencer or the Hardware Utility, cannot be found.
Depending upon exactly what is missing, your shows may still be able to play. However, they may not,and in any case, something is definitely wrong.
It is suggested that you uninstall and reinstall Light-O-Rama.
The LOR VerifierList of Verifier Messages
5.14.1.1.8 8: Unlicensed LOR demo version used
Message Number: 8Severity: ErrorSummary: Unlicensed LOR demo version used
Your Light-O-Rama software has not been registered. Until you register it, it will not actually control yourlights (and will have other limitations as well).
This may have occurred for various reasons - for example, it simply may be that you have not yetpurchased a Light-O-Rama license. If you do have a license, though, you may not have entered it on thiscomputer, or perhaps you have recently installed a new version of Light-O-Rama (in which case yourlicense may or may not be valid for this new version). Or, perhaps your licensing information has beendeleted from the Windows registry, perhaps by a registry cleanup tool.
If you have not yet purchased a license, you can do so from the Light-O-Rama website.
If you have already purchased one, try using it to register Light-O-Rama on this computer. If this doesnot work, perhaps you have already installed Light-O-Rama on the maximum number of computerscovered by your license, or perhaps your license is for an older version of Light-O-Rama than the one thatyou are trying to run.
The LOR VerifierList of Verifier Messages
5.14.1.1.9 9: Unsupported version of Window s Media Player
Message Number: 9Severity: WarningSummary: Unsupported version of Windows Media Player
The Light-O-Rama Software Package 775
© 2021 Light-O-Rama, Inc.
The version of Windows Media Player installed on this computer is older than the minimum versionrequired by Light-O-Rama, or, perhaps, Windows Media Player is not correctly installed.
You may still be able to use Light-O-Rama, but it will (at the very least) be severely limited - for example,musical sequences will not play. It is suggested that you install the latest version of Windows MediaPlayer.
The LOR VerifierList of Verifier Messages
5.14.1.1.10 10: No registry entry for user data path
Message Number: 10Severity: ErrorSummary: No registry entry for user data path
A required Light-O-Rama entry in the Windows registry cannot be found. This could occur, for example,if the installation was interrupted, or if a registry cleanup utility deleted certain Light-O-Rama entries fromyour computer's Windows registry.
Your shows will not run successfully until this problem is resolved.
If the problem is that the registry entries have been deleted, you can solve it by running the LORPostutility, which is typically automatically run after installation. This utility can be found in the directorywhere you installed your Light-O-Rama program files, which is typically (but not always) C:\ProgramFiles\Light-O-Rama.
Note that the LORPost utility will ask where your Light-O-Rama data files should be stored. If youalready have a "Sequences" directory, and would like to keep your sequences there by default, tell it thedirectory one level above that directory. For example, if your sequences are stored in C:\LOR\Sequences, tell the LORPost utility to store your Light-O-Rama data files in C:\LOR.
Otherwise, try reinstalling Light-O-Rama, or uninstalling and then reinstalling.
The LOR VerifierList of Verifier Messages
5.14.1.2 Verifier Messages 11-20
The following are some messages can be generated by the Light-O-Rama Verifier. For details on anygiven one, please refer to its individual help page. To see all possible messages, please refer to the Listof Verifier Messages.
· Message 11 (Error): User data directory does not exist· Message 12 (Warning): No registry entry for non-media data path· Message 13 (Warning): Non-media data directory does not exist· Message 14 (Warning): No registry entry for media data path· Message 15 (Warning): Media data directory does not exist· Message 16 (Error): Application file has unexpected version number· Message 17 (Warning): Weekly schedule file does not exist· Message 18 (Warning): Yearly schedule file does not exist· Message 19 (Warning): Calendar scheduling not supported· Message 20 (Warning): No shows are scheduled
Light-O-Rama v5.6.6776
© 2021 Light-O-Rama, Inc.
5.14.1.2.1 11: User data directory does not exist
Message Number: 11Severity: ErrorSummary: User data directory does not existDetails: The name of the missing directory
The directory that Light-O-Rama expects to find Light-O-Rama data files in does not exist. This couldoccur, for example, if the installation was interrupted, or if a registry cleanup utility deleted certain Light-O-Rama entries from your computer's Windows registry, or if the directory was deleted or renamed.
Your shows will not run successfully until this problem is resolved.
You may be able to solve this problem by running the LORPost utility, which is typically automaticallyrun after installation. This utility can be found in the directory where you installed your Light-O-Ramaprogram files, which is typically (but not always) C:\Program Files\Light-O-Rama.
Note that the LORPost utility will ask where your Light-O-Rama data files should be stored. If youalready have a "Sequences" directory, and would like to keep your sequences there by default, tell it thedirectory one level above that directory. For example, if your sequences are stored in C:\LOR\Sequences, tell the LORPost utility to store your Light-O-Rama data files in C:\LOR.
Otherwise, try reinstalling Light-O-Rama, or uninstalling and then reinstalling.
The LOR VerifierList of Verifier Messages
5.14.1.2.2 12: No registry entry for non-media data path
Message Number: 12Severity: WarningSummary: No registry entry for non-media data path
A required Light-O-Rama entry in the Windows registry cannot be found. This could occur, for example,if the installation was interrupted, or if a registry cleanup utility deleted certain Light-O-Rama entries fromyour computer's Windows registry.
Until this problem is resolved, it is possible that your shows will run successfully, but it is likely that theywill not. Even if the shows themselves do run, certain sequences in them may not.
If the problem is that the registry entries have been deleted, you can solve it by running the LORPostutility, which is typically automatically run after installation. This utility can be found in the directorywhere you installed your Light-O-Rama program files, which is typically (but not always) C:\ProgramFiles\Light-O-Rama.
Note that the LORPost utility will ask where your Light-O-Rama data files should be stored. If youalready have a "Sequences" directory, and would like to keep your sequences there by default, tell it thedirectory one level above that directory. For example, if your sequences are stored in C:\LOR\Sequences, tell the LORPost utility to store your Light-O-Rama data files in C:\LOR.
Otherwise, try reinstalling Light-O-Rama, or uninstalling and then reinstalling.
The LOR Verifier

The Light-O-Rama Software Package 777
© 2021 Light-O-Rama, Inc.
List of Verifier Messages
5.14.1.2.3 13: Non-media data directory does not exist
Message Number: 13Severity: WarningSummary: Non-media data directory does not existDetails: The name of the missing directory
The directory that Light-O-Rama expects to find Light-O-Rama sequence files in does not exist. Thiscould occur, for example, if the installation was interrupted, or if a registry cleanup utility deleted certainLight-O-Rama entries from your computer's Windows registry, or if the directory was deleted or renamed.
Until this problem is resolved, it is possible that your shows will run successfully, but it is likely that theywill not. Even if the shows themselves do run, certain sequences in them may not.
You may be able to solve this problem by running the LORPost utility, which is typically automaticallyrun after installation. This utility can be found in the directory where you installed your Light-O-Ramaprogram files, which is typically (but not always) C:\Program Files\Light-O-Rama.
Note that the LORPost utility will ask where your Light-O-Rama data files should be stored. If youalready have a "Sequences" directory, and would like to keep your sequences there by default, tell it thedirectory one level above that directory. For example, if your sequences are stored in C:\LOR\Sequences, tell the LORPost utility to store your Light-O-Rama data files in C:\LOR.
Otherwise, try reinstalling Light-O-Rama, or uninstalling and then reinstalling.
The LOR VerifierList of Verifier Messages
5.14.1.2.4 14: No registry entry for media data path
Message Number: 14Severity: WarningSummary: No registry entry for media data path
A required Light-O-Rama entry in the Windows registry cannot be found. This could occur, for example,if the installation was interrupted, or if a registry cleanup utility deleted certain Light-O-Rama entries fromyour computer's Windows registry.
Until this problem is resolved, it is possible that your shows will run successfully, but it is likely that theywill not. Even if the shows themselves do run, certain sequences in them may not.
If the problem is that the registry entries have been deleted, you can solve it by running the LORPostutility, which is typically automatically run after installation. This utility can be found in the directorywhere you installed your Light-O-Rama program files, which is typically (but not always) C:\ProgramFiles\Light-O-Rama.
Note that the LORPost utility will ask where your Light-O-Rama data files should be stored. If youalready have a "Sequences" directory, and would like to keep your sequences there by default, tell it thedirectory one level above that directory. For example, if your sequences are stored in C:\LOR\Sequences, tell the LORPost utility to store your Light-O-Rama data files in C:\LOR.
Otherwise, try reinstalling Light-O-Rama, or uninstalling and then reinstalling.
Light-O-Rama v5.6.6778
© 2021 Light-O-Rama, Inc.
The LOR VerifierList of Verifier Messages
5.14.1.2.5 15: Media data directory does not exist
Message Number: 15Severity: WarningSummary: Media data directory does not existDetails: The name of the missing directory
The directory that Light-O-Rama expects to find audio and video files in does not exist. This could occur,for example, if the installation was interrupted, or if a registry cleanup utility deleted certain Light-O-Ramaentries from your computer's Windows registry, or if the directory was deleted or renamed.
Until this problem is resolved, it is possible that your shows will run successfully, but it is likely that theywill not. Even if the shows themselves do run, certain sequences in them may not.
You may be able to solve this problem by running the LORPost utility, which is typically automaticallyrun after installation. This utility can be found in the directory where you installed your Light-O-Ramaprogram files, which is typically (but not always) C:\Program Files\Light-O-Rama.
Note that the LORPost utility will ask where your Light-O-Rama data files should be stored. If youalready have a "Sequences" directory, and would like to keep your sequences there by default, tell it thedirectory one level above that directory. For example, if your sequences are stored in C:\LOR\Sequences, tell the LORPost utility to store your Light-O-Rama data files in C:\LOR.
Otherwise, try reinstalling Light-O-Rama, or uninstalling and then reinstalling.
The LOR VerifierList of Verifier Messages
5.14.1.2.6 16: Application f ile has unexpected version number
Message Number: 16Severity: ErrorSummary: Application file has unexpected version numberDetails #1: The name of the application fileDetails #2: The expected version number of the application fileDetails #3: The actual version number of the application file
A certain Light-O-Rama program file, such as the Sequencer or the Hardware Utility, has a versionnumber other than the one that the Verifier was expecting.
This may be because you are using an old version of the Verifier from a previous installation, and that oldVerifier may not be completely compatible with the current installation. Or, it might be indicative of adeeper problem with the installation of Light-O-Rama.
Make sure that you are running the copy of the Verifier that is in the same directory where your currentversion of Light-O-Rama is installed. If you are doing so, it is suggested that you uninstall and reinstallLight-O-Rama.
The Light-O-Rama Software Package 779
© 2021 Light-O-Rama, Inc.
The LOR VerifierList of Verifier Messages
5.14.1.2.7 17: Weekly schedule f ile does not exist
Message Number: 17Severity: WarningSummary: Weekly schedule file does not existDetails: The name of the missing file
The file which is supposed to contain your weekly schedule does not exist.
If you do not intend to have any shows scheduled via the weekly schedule, this is not an issue; anyshows that you have scheduled via the calendar schedule should play as scheduled. But if you dointend to have shows scheduled via the weekly schedule, they will not be played until this problem isresolved.
Perhaps the file was renamed out of the way, in which case you can rename it back to the expectedname. Or, perhaps it was deleted; check your computer's Recycle Bin. If neither of these is theproblem, then you will have to recreate your weekly schedule via the Schedule Editor or the Simple ShowBuilder.
The LOR VerifierList of Verifier Messages
5.14.1.2.8 18: Yearly schedule f ile does not exist
Message Number: 18Severity: WarningSummary: Yearly schedule file does not existDetails: The name of the missing file
The file which is supposed to contain your calendar schedule does not exist.
If you do not intend to have any shows scheduled via the calendar schedule, this is not an issue; anyshows that you have scheduled via the weekly schedule should play as scheduled. But if you do intendto have shows scheduled via the calendar schedule, they will not be played until this problem isresolved.
Perhaps the file was renamed out of the way, in which case you can rename it back to the expectedname. Or, perhaps it was deleted; check your computer's Recycle Bin. If neither of these is theproblem, then you will have to recreate your weekly schedule via the Schedule Editor or the Simple ShowBuilder.
The LOR VerifierList of Verifier Messages
5.14.1.2.9 19: Calendar scheduling not supported
Message Number: 19Severity: WarningSummary: Calendar scheduling not supportedDetails #1: The date on which a show is scheduled via the calendarDetails #2: The name of the show
Light-O-Rama v5.6.6780
© 2021 Light-O-Rama, Inc.
A show is scheduled via the calendar schedule, but your license does not support calendar scheduling(or you are using the unlicensed demo version of the software). The show will not play at the scheduledtime.
If you already have a license, and have registered Light-O-Rama on this computer, then to get the showto play, you can either upgrade to a higher level license which does support calendar scheduling, or elseremove the show from your calendar schedule and schedule it in your weekly schedule instead.
If you are using the unlicensed demo version, and you have not yet purchased a license, you can do sofrom the Light-O-Rama website.
If you have already purchased one, try using it to register Light-O-Rama on this computer. If this doesnot work, perhaps you have already installed Light-O-Rama on the maximum number of computerscovered by your license, or perhaps your license is for an older version of Light-O-Rama than the one thatyou are trying to run.
The LOR VerifierList of Verifier Messages
5.14.1.2.10 20: No show s are scheduled
Message Number: 20Severity: WarningSummary: No shows are scheduled
You have no shows scheduled. None of your shows will play until you schedule them, via the ScheduleEditor or the Simple Show Builder.
The LOR VerifierList of Verifier Messages
5.14.1.3 Verifier Messages 21-30
The following are some messages can be generated by the Light-O-Rama Verifier. For details on anygiven one, please refer to its individual help page. To see all possible messages, please refer to the Listof Verifier Messages.
· Message 21 (Error): Show file does not exist· Message 22 (Error): Error reading show file· Message 23 (Error): Sequence file does not exist· Message 24 (Error): Sequence file cannot be loaded· Message 25 (Warning): Show has no sequences· Message 26 (Error): Media file does not exist· Message 27 (Warning): Conflicting channel settings in sequence· Message 28 (Warning): Channel is completely off· Message 29 (Warning): Sequence is completely off· Message 30 (Warning): Channel is missing settings
5.14.1.3.1 21: Show file does not exist
Message Number: 21Severity: ErrorSummary: Show file does not exist
The Light-O-Rama Software Package 781
© 2021 Light-O-Rama, Inc.
Details: The name of the missing show file
You have a show scheduled, but the file that is supposed to contain that show does not exist. The showwill not play until this problem is resolved.
If you do not want the show to play, this is not a problem, but you may want to remove it from yourschedule (using the Schedule Editor) so that this error message does not appear in the future.
If you do want the show to play, perhaps its file was renamed, or deleted. If it was renamed, eitherrename it back, or else use the Schedule Editor to point to the new name of the show file instead of theold name. If it was deleted, check your computer's Recycle Bin.
If these suggestions do not resolve the situation, you may have to recreate the show, using the ShowEditor.
The LOR VerifierList of Verifier Messages
5.14.1.3.2 22: Error reading show file
Message Number: 22Severity: ErrorSummary: Error reading show fileDetails: The name of the show file
You have a show scheduled, but the show cannot be loaded. For example, perhaps the show's file hasbecome corrupted. The show will not play until this problem is resolved.
If you have any backups of the show file, check to see if they work. Otherwise, you may have torecreate the show, using the Show Editor.
The LOR VerifierList of Verifier Messages
5.14.1.3.3 23: Sequence f ile does not exist
Message Number: 23Severity: ErrorSummary: Sequence file does not existDetails #1: The name of the missing sequence fileDetails #2: The name of the show file that this sequence is referenced in
One of your scheduled shows refers to a sequence file that does not exist. The sequence will not play inthe show until this problem is resolved.
If you do not want the sequence to play, this is not a problem, but you may want to remove it from theshow (using the Show Editor) so that this message does not appear in the future.
If you do want the sequence to play, perhaps its file was renamed (or placed in a different directory), ordeleted.
If it was renamed (or placed in a different directory), you can either rename it back, or else use the ShowEditor to point to the new name instead of the old one.
Light-O-Rama v5.6.6782
© 2021 Light-O-Rama, Inc.
If it was deleted, check your computers Recycle Bin, or any backups that you may have. Note thatwhenever you change a sequence and save it (using the Sequencer), Light-O-Rama automatically savesa backup copy of the file as it was before your changes, so you may be able to use that backup copy. Itwill be saved to the same directory as the original, with the file extension ".bak" appended to its name. For example, if your sequence is named "MySequence.las", the automatic backup will be named"MySequence.las.bak".
If none of these suggestions help, you may have to recreate the sequence, using the Sequencer.
The LOR VerifierList of Verifier Messages
5.14.1.3.4 24: Sequence f ile cannot be loaded
Message Number: 24Severity: ErrorSummary: Sequence file cannot be loadedDetails: The name of the file
One of your scheduled shows refers to a sequence file that cannot be loaded. For example, perhaps thesequence file has become corrupted. The sequence will not play in the show until this problem isresolved.
If you have any backups of the sequence file, check to see if they work. Note that whenever you changea sequence and save it (using the Sequencer), Light-O-Rama automatically saves a backup copy of thefile as it was before your changes, so you may be able to use that backup copy. It will be saved to thesame directory as the original, with the file extension ".bak" appended to its name. For example, if yoursequence is named "MySequence.las", the automatic backup will be named "MySequence.las.bak".
Otherwise, you may have to recreate the sequence, using the Sequencer.
The LOR VerifierList of Verifier Messages
5.14.1.3.5 25: Show has no sequences
Message Number: 25Severity: WarningSummary: Show has no sequencesDetails: The name of the show file
One of your scheduled shows has no sequences in it. This will not cause any problems - your otherscheduled shows should play fine - but there isn't much point to scheduling a show without sequences,so this probably indicates a mistake.
If you want sequences to play in the scheduled show, use the Show Editor to add the sequences to theshow.
If you do not want any sequences to play in the scheduled show, consider removing the show from yourschedule, using the Schedule Editor, so that this message does not appear in the future.
The Light-O-Rama Software Package 783
© 2021 Light-O-Rama, Inc.
The LOR VerifierList of Verifier Messages
5.14.1.3.6 26: Media f ile does not exist
Message Number: 26Severity: ErrorSummary: Media file does not existDetails #1: The name of the missing media fileDetails #2: The name of the sequence file that refers to the missing media file
One of your scheduled musical sequences refers to an audio file or video file that does not exist. Thesequence will not play until this problem is resolved.
It is possible that the file has been renamed, placed in a different directory, or deleted.
If it has been renamed or placed in a different directory, you can either move it back to its originallocation, or else use the Sequencer to modify the sequence so that it points to its new location.
If it has been deleted, check your computer's Recycle Bin, or for any backups that you may have of thefile.
The LOR VerifierList of Verifier Messages
5.14.1.3.7 27: Conflicting channel settings in sequence
Message Number: 27Severity: WarningSummary: Conflicting channel settings in sequenceDetails #1: The name of the sequence having the conflictDetails #2: The track containing the first conflicting channelDetails #3: The name of the first conflicting channelDetails #4: The track containing the second conflicting channelDetails #5: The name of the second conflicting channel
One of your scheduled sequences contains two different channels that both are set up to control thesame physical string of lights - for example, they are both set up to control circuit 3 of Light-O-Rama unit7 on the regular Light-O-Rama network.
Your sequence will play, but these two channels will fight for control over the lights hooked up to thecircuit, which may have make the lights behave in ways that you weren't expecting.
The cause of this may simply be that one of the two channels is set up with the wrong unit ID, circuitnumber, network, or device type. In this case, use the Sequencer to change the channel's settingsappropriately.
If you do intend both channels to control the same string of lights, the lights may or may not behave asyou expect. The suggested way to do what you probably want is not to have two different channels withthe same settings, but to have a single channel that is contained in two different tracks:
Let's say that you have "Channel A" in the first track, and "Channel B" in the second track. Thesechannels have the same physical settings as each other, but different effect events. Then to change thissituation to the suggested way, use the Sequencer as follows:
Light-O-Rama v5.6.6784
© 2021 Light-O-Rama, Inc.
First, copy Channel A from the first track to the second track.
Next, merge the effect events from Channel B into Channel A, so that Channel A contains the effectevents from both channels.
Finally, delete Channel B.
This will leave you with a single channel - Channel A - which is contained in both tracks, and whichcontains all of the effect events that you wanted for its string of lights. Having this single channel in twotracks, instead of two different channels in the two tracks, will make the lights behave as you probablyexpect.
The LOR VerifierList of Verifier Messages
5.14.1.3.8 28: Channel is completely off
Message Number: 28Severity: WarningSummary: Channel is completely offDetails #1: The sequence containing the channelDetails #2: The track containing the channelDetails #3: The name of the channel
One of your scheduled sequences contains a channel which is completely off for its entire duration.
Consider removing the channel from the sequence, using the Sequencer.
The LOR VerifierList of Verifier Messages
5.14.1.3.9 29: Sequence is completely off
Message Number: 29Severity: WarningSummary: Sequence is completely offDetails: The name of the sequence file
One of your scheduled sequences has no lighting effects for any of its channels, except for having eachof them off for the sequence's entire duration.
This may be intentional - for example, you may have scheduled a musical sequence so that a songplays while your lights are off. Otherwise, consider adding effects to the sequence, or removing thesequence from the show.
The LOR VerifierList of Verifier Messages
5.14.1.3.10 30: Channel is missing settings
Message Number: 30Severity: Warning

The Light-O-Rama Software Package 785
© 2021 Light-O-Rama, Inc.
Summary: Channel is missing settingsDetails #1: The name of the sequence file containing the channelDetails #2: The track containing the channelDetails #3: The name of the channel
One of your scheduled sequences has a channel which is missing a required part of its physical settings- for example, perhaps it does not have a unit ID set.
This may be intentional - for example, perhaps you have a channel that shows the beat of a song, whichyou intend to use to help build other channels rather than to actually control lights when your showplays. If not, though, use the Sequencer to set the channel's settings appropriately.
The LOR VerifierList of Verifier Messages
5.14.1.4 Verifier Messages 31-40
The following are some messages can be generated by the Light-O-Rama Verifier. For details on anygiven one, please refer to its individual help page. To see all possible messages, please refer to the Listof Verifier Messages.
· Message 31 (Warning): Channel uses undefined comm network· Message 32 (Warning): Channel in tracks of conflicting length· Message 33 (Warning): Musical file used in non-audio section of show· Message 34 (Warning): Subsequences not supported· Message 35 (Warning): Background sequences unsupported· Message 36 (Warning): Startup sequences unsupported· Message 37 (Warning): Shutdown sequences unsupported· Message 38 (Warning): Interactive triggers unsupported· Message 39 (Warning): Unsupported number of tracks· Message 40 (Warning): Shell commands unsupported
5.14.1.4.1 31: Channel uses undefined comm netw ork
Message Number: 31Severity: WarningSummary: Channel uses undefined comm networkDetails #1: The sequence that the channel is inDetails #2: The track that that the channel is inDetails #3: The name of the channel
One of your scheduled sequences contains a channel which is set up to use a network which does nothave a comm port defined for it. The channel will not control lights until this issue is resolved.
The channel could be for a Light-O-Rama controller, which can be set up to use one of four differentnetworks.
It is possible that the channel's network (or device type) is simply set incorrectly. For example, perhapsa channel for a Light-O-Rama controller was accidentally set to use the Aux A network, whereas youonly have a comm port assigned to the Regular network. Or perhaps a channel was accidentally set tocontrol a Dasher controller, whereas it was intended to control a Light-O-Rama controller. In cases likethese, use the Sequencer to change the channel's settings in Prop Definition.
Light-O-Rama v5.6.6786
© 2021 Light-O-Rama, Inc.
Another possibility is that you do intend to use the network that the channel has assigned to it, but thatnetwork is not set up to use any comm port on your computer. In this case, use the NetworkPreferences program to specify a comm port for the network to use.
The LOR VerifierList of Verifier Messages
5.14.1.4.2 32: Channel in tracks of conflicting length
Message Number: 32Severity: WarningSummary: Channel in tracks of conflicting lengthDetails #1: The sequence that the channel is inDetails #2: The name of the channelDetails #3: A track that the channel is inDetails #4: Another track that the channel is in
One of your scheduled sequences contains a channel which is in two different tracks, but those tracksare of different lengths. For example, one track is a minute long, while the other is two minutes long.
This will likely cause the lights hooked up to that channel to behave in a way that you don't expect, asdifferent lighting effects from different parts of the same channel could be sent to the lights in an orderthat you were not expecting.
Unless you have done this intentionally, and understand the way that your lights will behave because ofthis, consider using the Sequencer to either remove the channel from one of the tracks or to change thetracks to be of the same length.
The LOR VerifierList of Verifier Messages
5.14.1.4.3 33: Musical f ile used in non-audio section of show
Message Number: 33Severity: WarningSummary: Musical file used in non-audio section of showDetails #1: The sequence fileDetails #2: The show file that refers to the sequenceDetails #3: The section of the show that refers to the sequence
One of your musical sequences is scheduled in a section of a show that does not support audio or video. For example, perhaps a musical sequence is contained in the Background section of the show. Thesequence will play at its scheduled time, but will only control lights; it will not play audio or display video.
Make sure that the sequence is in the section of the show that you intend it to be in. If it is not, use theShow Editor to move it to the appropriate section.
If it is in the section that you intended, consider using an animation sequence instead, to avoid possibleconfusion in the future.
The LOR VerifierList of Verifier Messages
The Light-O-Rama Software Package 787
© 2021 Light-O-Rama, Inc.
5.14.1.4.4 34: Subsequences not supported
Message Number: 34Severity: WarningSummary: Subsequences not supportedDetails #1: The name of the subsequenceDetails #2: The name of the parent sequence containing the subsequenceDetails #3: The name of the channel in the parent sequence referencing the subsequence
One of your scheduled sequences contains a channel set up to be a subsequence, but your licensedoes not support subsequences (or you are using the unlicensed demo version of the software). Theparent sequence will play at its scheduled time, but the subsequence will not.
If you already have a license, and have registered Light-O-Rama on this computer, then to get thesubsequence to play, you would have to upgrade to a higher license level which supports subsequences.
If you are using the unlicensed demo version, and you have not yet purchased a license, you can do sofrom the Light-O-Rama website.
If you have already purchased one, try using it to register Light-O-Rama on this computer. If this doesnot work, perhaps you have already installed Light-O-Rama on the maximum number of computerscovered by your license, or perhaps your license is for an older version of Light-O-Rama than the one thatyou are trying to run.
The LOR VerifierList of Verifier Messages
5.14.1.4.5 35: Background sequences unsupported
Message Number: 35Severity: WarningSummary: Background sequences unsupportedDetails: The name of the show file containing sequences in its Background section
One of your scheduled shows contains sequences in its Background section, but your license does notsupport sequences in this section. The show will play at its scheduled time, but sequences in thissection will not.
If you already have a license, and have registered Light-O-Rama on this computer, then to get thesesequences to play, you would have to either move them to a different section of the show, or elseupgrade to a higher license level which supports this feature.
If you are using the unlicensed demo version, and you have not yet purchased a license, you can do sofrom the Light-O-Rama website.
If you have already purchased one, try using it to register Light-O-Rama on this computer. If this doesnot work, perhaps you have already installed Light-O-Rama on the maximum number of computerscovered by your license, or perhaps your license is for an older version of Light-O-Rama than the one thatyou are trying to run.
The LOR VerifierList of Verifier Messages
Light-O-Rama v5.6.6788
© 2021 Light-O-Rama, Inc.
5.14.1.4.6 36: Startup sequences unsupported
Message Number: 36Severity: WarningSummary: Startup sequences unsupportedDetails: The name of the show file containing sequences in its Startup section
One of your scheduled shows contains sequences in its Startup section, but your license does notsupport sequences in this section. The show will play at its scheduled time, but sequences in thissection will not.
If you already have a license, and have registered Light-O-Rama on this computer, then to get thesesequences to play, you would have to either move them to a different section of the show, or elseupgrade to a higher license level which supports this feature.
If you are using the unlicensed demo version, and you have not yet purchased a license, you can do sofrom the Light-O-Rama website.
If you have already purchased one, try using it to register Light-O-Rama on this computer. If this doesnot work, perhaps you have already installed Light-O-Rama on the maximum number of computerscovered by your license, or perhaps your license is for an older version of Light-O-Rama than the one thatyou are trying to run.
The LOR VerifierList of Verifier Messages
5.14.1.4.7 37: Shutdow n sequences unsupported
Message Number: 37Severity: WarningSummary: Shutdown sequences unsupportedDetails: The name of the show file containing sequences in its Shutdown section
One of your scheduled shows contains sequences in its Shutdown section, but your license does notsupport sequences in this section. The show will play at its scheduled time, but sequences in thissection will not.
If you already have a license, and have registered Light-O-Rama on this computer, then to get thesesequences to play, you would have to either move them to a different section of the show, or elseupgrade to a higher license level which supports this feature.
If you are using the unlicensed demo version, and you have not yet purchased a license, you can do sofrom the Light-O-Rama website.
If you have already purchased one, try using it to register Light-O-Rama on this computer. If this doesnot work, perhaps you have already installed Light-O-Rama on the maximum number of computerscovered by your license, or perhaps your license is for an older version of Light-O-Rama than the one thatyou are trying to run.
The LOR VerifierList of Verifier Messages
The Light-O-Rama Software Package 789
© 2021 Light-O-Rama, Inc.
5.14.1.4.8 38: Interactive triggers unsupported
Message Number: 38Severity: WarningSummary: Interactive triggers unsupportedDetails: The name of the show file using interactive triggers
One of your scheduled shows uses interactive triggers, either in an interactive group or as part of itsstartup options, but your license does not support interactive triggers. The show will play at itsscheduled time, but its interactive triggers will not.
If you already have a license, and have registered Light-O-Rama on this computer, then to get thesetriggers to work, you would have to upgrade to a higher license level which supports subsequences. Ifyour triggers are used for interactive groups, you could also move the sequences in them to a differentsection of the show (but if so, they will play immediately, not upon being triggered).
If you are using the unlicensed demo version, and you have not yet purchased a license, you can do sofrom the Light-O-Rama website.
If you have already purchased one, try using it to register Light-O-Rama on this computer. If this doesnot work, perhaps you have already installed Light-O-Rama on the maximum number of computerscovered by your license, or perhaps your license is for an older version of Light-O-Rama than the one thatyou are trying to run.
The LOR VerifierList of Verifier Messages
5.14.1.4.9 39: Unsupported number of tracks
Message Number: 39Severity: WarningSummary: Unsupported number of tracksDetails #1: The name of the sequence using too many tracksDetails #2: The number of tracks the sequence usesDetails #3: The allowed number of tracks
One of your scheduled sequences uses more tracks than your license supports. The sequence will playat its scheduled time, but its excess tracks will not.
If you already have a license, and have registered Light-O-Rama on this computer, then to get thesetracks to play, you would have to upgrade to a higher license level which supports more tracks.
If you are using the unlicensed demo version, and you have not yet purchased a license, you can do sofrom the Light-O-Rama website.
If you have already purchased one, try using it to register Light-O-Rama on this computer. If this doesnot work, perhaps you have already installed Light-O-Rama on the maximum number of computerscovered by your license, or perhaps your license is for an older version of Light-O-Rama than the one thatyou are trying to run.
The LOR VerifierList of Verifier Messages
Light-O-Rama v5.6.6790
© 2021 Light-O-Rama, Inc.
5.14.1.4.10 40: Shell commands unsupported
Message Number: 40Severity: WarningSummary: Shell commands unsupportedDetails: The name of the sequence using a shell command
One of your scheduled sequences is set up to use a Windows shell command, but your license does notsupport such commands. The sequence will play at its scheduled time, but the command will not beexecuted.
If you already have a license, and have registered Light-O-Rama on this computer, then to get thecommand to execute, you would have to upgrade to a higher license level which supports this feature.
If you are using the unlicensed demo version, and you have not yet purchased a license, you can do sofrom the Light-O-Rama website.
If you have already purchased one, try using it to register Light-O-Rama on this computer. If this doesnot work, perhaps you have already installed Light-O-Rama on the maximum number of computerscovered by your license, or perhaps your license is for an older version of Light-O-Rama than the one thatyou are trying to run.
The LOR VerifierList of Verifier Messages
5.14.1.5 Verifier Messages 41-50
The following are some messages can be generated by the Light-O-Rama Verifier. For details on anygiven one, please refer to its individual help page. To see all possible messages, please refer to the Listof Verifier Messages.
· Message 41 (Warning): Shell command map file does not exist· Message 42 (Warning): Shell command not set· Message 43 (Warning): Channel conflict· Message 44 (Warning): Old MC-P compatibility enabled· Message 45 (Warning): Channel settings conflict in sequence/intensity file· Message 46 (Warning): Channel settings conflict in intensity file· Message 47 (Warning): Intensity file conflict· Message 48 (Warning): Channel/intensity file conflict· Message 49 (Warning): Intensity file uses undefined comm network· Message 50 (Warning): Intensity files not supported by license level
5.14.1.5.1 41: Shell command map file does not exist
Message Number: 41Severity: WarningSummary: Shell command map file does not existDetails: The expected name of the shell command map file
One of your scheduled sequences is set up to use a Windows shell command, but the command mapfile that defines the commands to execute does not exist. The sequence will play at its scheduled time,but the command will not be executed.
The Light-O-Rama Software Package 791
© 2021 Light-O-Rama, Inc.
This could be because you created the sequence on one computer, and moved it to another computer toplay in your show, but did not move the command map file. Light-O-Rama keeps these commands inthe command map file, rather than in the sequences themselves, due to security concerns. Please seeSharing Sequences between Computers, and Security for details.
The LOR VerifierList of Verifier Messages
5.14.1.5.2 42: Shell command not set
Message Number: 42Severity: WarningSummary: Shell command not setDetails: The name of the sequence file with the missing shell command
One of your scheduled sequences is set up to use a Windows shell command, but the command mapfile does not list a command to be executed by that sequence. The sequence will play at its scheduledtime, but no command will be executed.
This could be because you created the sequence on one computer, and moved it to another computer toplay in your show, but did not move the command map file. Light-O-Rama keeps these commands inthe command map file, rather than in the sequences themselves, due to security concerns. Please seeSharing Sequences between Computers, and Security for details.
The LOR VerifierList of Verifier Messages
5.14.1.5.3 43: Channel conflict
Message Number: 43Severity: WarningSummary: Channel conflictDetails #1: The name of the show containing the channel conflictDetails #2: One of the sections of the show containing a sequence with the conflicting channelDetails #3: The sequence file in that section containing the conflicting channelDetails #4: The track in that sequence containing the conflicting channelDetails #5: The name of the conflicting channel in that trackDetails #6: Another section of the show containing a sequence with the conflicting channelDetails #7: The sequence file in that section containing the conflicting channelDetails #8: The track in that sequence containing the conflicting channelDetails #9: The name of the conflicting channel in that track
One of your scheduled shows contains sequences which could possibly play at the same time, butwhich each contain a channel representing the same physical string of lights. For example, perhaps theshow contains one sequence in its Background section, and another in its Musical section, which eachcontain a channel for Light-O-Rama unit 3 circuit 7 on the regular network. Since sequences in theBackground section can play at the same time as those in the Musical section, this is a conflict.
The show, and its sequences, will play at the appropriate times, but the two channels may fight forcontrol over the single string of lights that they are set up to use. This may lead to those lights behavingin a manner that you are not expecting.
Light-O-Rama v5.6.6792
© 2021 Light-O-Rama, Inc.
It is suggested that you use the Sequencer to check whether the channels are set up properly - forexample, perhaps the unit ID of one of the channels was mistakenly set to an incorrect value. Otherwise, consider removing the conflicting channel from one of the sequences, or moving one of thesequences to a different section of the show, where it could not be played at the same time as the othersequence.
The LOR VerifierList of Verifier Messages
5.14.1.5.4 44: Old MC-P compatibility enabled
Message Number: 44Severity: WarningSummary: Old MC-P compatibility enabledDetails #1: The network on which old MC-P compatibility is enabled
One of your networks has old MC-P compatibility enabled. This compatibility mode is required forcertain controllers, but they are rare (Light-O-Rama MC-P controllers purchased prior to November 15,2003). If you do not have any such controllers on this network, there is no reason to have thiscompatibility mode enabled, and in fact it can cause significant overhead on the network, potentiallyleading to lag in your lighting effects. It is suggested to turn this compatibility mode off (unless you havecontrollers that require it), which can be done through the Network Preferences program's "Misc" tab.
The LOR VerifierList of Verifier Messages
5.14.1.5.5 45: Channel settings conflict in sequence/intensity f ile
Message Number: 45Severity: WarningSummary: Channel settings conflict in sequence/intensity fileDetails #1: The sequence having the channel setting conflictDetails #2: The name of the track containing the channel having the settings conflictDetails #3: The name of the channel having the settings conflictDetails #4: The name of the intensity file having the channel settings conflictDetails #5: The range of addresses in the intensity file having the channel settings conflict
One of your sequences has a conflict between a channel defined in the sequence itself and an addressdefined in an intensity file associated with the sequence. For example, perhaps the sequence containsa channel which is set up to control Light-O-Rama unit 25 circuit 3 on the Regular LOR network, and theassociated intensity file has a range of controlled addresses that includes that circuit - for example,perhaps the intensity file controls circuits 1 through 7 on unit 25 on the Regular Light-O-Rama network. In such cases, both the channel and the intensity file will simultaneously attempt to control the samephysical circuit, and the resulting behavior of the lights is unlikely to be what you want or would expect.
To resolve this issue, change the channel and/or address range so that they no longer conflict with eachother. Exactly how to do this depends upon the situation - for example, perhaps the conflict is due to atypo made in the channel's settings (perhaps its unit number is incorrect), in which case change thechannel's settings. Or perhaps the issue should be resolved by changing the address range in theintensity file, or by deleting either the channel or the address range.
The LOR Verifier
The Light-O-Rama Software Package 793
© 2021 Light-O-Rama, Inc.
List of Verifier Messages
5.14.1.5.6 46: Channel settings conflict in intensity f ile
Message Number: 46Severity: WarningSummary: Channel settings conflict in intensity fileDetails #1: The sequence having the channel setting conflictDetails #2: The name of the first intensity file having the channel settings conflictDetails #3: The first range of addresses having the channel settings conflictDetails #4: The name of the second intensity file having the channel settings conflictDetails #5: The second range of addresses having the channel settings conflict
One of your sequences has a conflict between two ranges of addresses controlled by its associatedintensity files. For example, perhaps an intensity file is set up to control DMX universe 8 addresses 20through 40, and also to control DMX universe 8 addresses 39 through 50. In this example, addresses 39and 40 are both set up to be controlled twice, and the resulting behavior on the lights for those twoaddresses is unlikely to be what you would expect.
To resolve this issue, change the intensity file (or files) so that the address ranges do not overlap witheach other.
The LOR VerifierList of Verifier Messages
5.14.1.5.7 47: Intensity File Conflict
Message Number: 47Severity: WarningSummary: Intensity file conflictDetails #1: The show with the conflictDetails #2: The section of the show containing the first sequence with the conflictDetails #3: The name of the first sequence with the conflictDetails #4: The name of the intensity file associated with the first sequence with the conflictDetails #5: The range of addresses for the first side of the conflictDetails #6: The section of the show containing the second sequence with the conflictDetails #7: The name of the second sequence with the conflictDetails #8: The name of the intensity file associated with the second sequence with the conflictDetails #9: The range of addresses for the second side of the conflict
One of your shows contains two separate sequences which could possibly play at the same time aseach other, and those two sequences each have associated intensity files which attempt to control someof the same physical lights as each other. For example, perhaps one intensity file attempts to controlLOR Regular network unit 10 circuits 8 through 12, and the other attempts to control LOR Regularnetwork unit 10 circuits 10 through 15. In this case, both are attempting to control circuits 10, 11, and12 on that unit. If the two sequences actually do wind up playing at the same time as each other, theresulting behavior on the lights attached to those circuits is unlikely to be what you would expect.
How to resolve this issue depends upon the particulars of the situation. For example, perhaps theoverlap is because of a typo in one of the intensity files' settings; perhaps "circuits 10 through 15" shouldhave been "circuits 13 through 15". In this case, change the intensity file. Another possibility is that oneof the sequences might not be in the correct section of the show -- for example perhaps it is in theBackground section but should have been in the Animation section -- in which case the show file shouldbe modified to correct it.
Light-O-Rama v5.6.6794
© 2021 Light-O-Rama, Inc.
The LOR VerifierList of Verifier Messages
5.14.1.5.8 48: Channel/intensity f ile conflict
Message Number: 48Severity: WarningSummary: Channel/intensity file conflictDetails #1: The show with the conflictDetails #2: The section of the show containing the conflicting channelDetails #3: The name of the sequence containing the conflicting channelDetails #4: The name of the track containing the conflicting channelDetails #5: The name of the conflicting channelDetails #6: The section of the show containing the conflicting intensity fileDetails #7: The name of the sequence with the conflicting intensity fileDetails #8: The name of the conflicting intensity fileDetails #9: The range of addresses containing the conflict in the intensity file
One of your shows contains two separate sequences which could possibly play at the same time aseach other, and one of those sequences has a particular channel while the other has an intensity filewhich attempts to control the same physical lights as that channel. For example, perhaps onesequence has a channel that is set up to control LOR Regular network unit 10 circuit 8, while theintensity file attempts to control LOR Regular network unit 10 circuits 5 through 15. In this case, bothare attempting to control circuit 8 on that unit. If the two sequences actually do wind up playing at thesame time as each other, the resulting behavior on the lights attached to that circuit is unlikely to bewhat you would expect.
How to resolve this issue depends upon the particulars of the situation. For example, perhaps theoverlap is because of a typo in one of the intensity files' settings; perhaps "circuits 5 through 15" shouldhave been "circuits 13 through 15". In this case, change the intensity file. Or, similarly, perhaps thechannel's settings are mistaken, in which case those settings should be modified. Another possibility isthat one of the sequences might not be in the correct section of the show -- for example perhaps it is inthe Background section but should have been in the Animation section -- in which case the show fileshould be modified to correct it.
The LOR VerifierList of Verifier Messages
5.14.1.5.9 49: Intensity f ile uses undefined comm netw ork
Message Number: 49Severity: WarningSummary: Intensity file uses undefined comm networkDetails #1: The sequence whose intensity file uses the undefined comm networkDetails #2: The intensity file using the undefined comm networkDetails #3: The undefined comm network being used
One of your sequences uses an intensity file which attempts to control lights on a comm network thathas not been defined. For example, perhaps it attempts to use the LOR Aux A network, but you havenot set up the LOR Aux A network to use any particular COM port. In this case, your sequence willplay, but the lights that attempt to use the undefined network will not be controlled.
The Light-O-Rama Software Package 795
© 2021 Light-O-Rama, Inc.
How to fix this issue depends upon the particulars of the situation. Perhaps the comm network used bythe intensity file is mistaken, in which case the intensity file should be modified to use the correctnetwork. Or perhaps the correct comm network is being used, but that comm network has not been setup via the Light-O-Rama Network Preferences program.
The LOR VerifierList of Verifier Messages
5.14.1.5.10 50: Intensity f iles not supported by license level
Message Number: 50Severity: WarningSummary: Intensity files not supported by license levelDetails #1: The sequence which is attempting to use an intensity file
One of your sequences uses an intensity file, but your license level does not support intensity files. Thesequence will play, but any effects defined in the intensity file itself will not happen on your actualphysical lights.
This issue can be resolved by upgrading your Light-O-Rama license to a level that supports intensityfiles.
The LOR VerifierList of Verifier Messages
5.14.1.6 Verifier Messages 51-60
The following are some messages can be generated by the Light-O-Rama Verifier. For details on anygiven one, please refer to its individual help page. To see all possible messages, please refer to the Listof Verifier Messages.
· Message 51 (Warning): Use Compressed Sequences disabled· Message 52 (Warning): Show Player Memory Restarts disabled· Message 53 (Warning): Trigger uses undefined network· Message 54 (Warning): Trigger uses LOR Enhanced network
5.14.1.6.1 51: Use Compressed Sequences disabled
Message Number: 51Severity: WarningSummary: Use Compressed Sequences disabled
The LOR Control Panel option Use Compressed Sequences is disabled. When enabled, this optioncauses the Show Player to use compressed sequences instead of regular sequences. Loading acompressed sequence is significantly faster than loading a regular sequence, and the behavior of yourlights should be exactly the same no matter whether you use a compressed sequence or the sequencethat that compressed sequence was based on. Thus, enabling this option has the benefit that it maydecrease loading delays in your show, with no drawback.
Unless you have a specific reason to believe that having this option enabled causes problems with yourshow, it is recommended that you enable it. You can do so via the LOR Control Panel's right-clickpopup menu.
Light-O-Rama v5.6.6796
© 2021 Light-O-Rama, Inc.
The LOR VerifierList of Verifier Messages
5.14.1.6.2 52: Show Player Memory Restarts disabled
Message Number: 52Severity: WarningSummary: Show Player Memory Restarts disabled
The LOR Control Panel option Show Player Memory Restarts is disabled. When enabled, this optioncauses the Show Player to automatically shut down and restart in certain situations (not while your showis playing), as a proactive measure to mitigate the effects of possible hypothetical memory leaks.
Unless you have a specific reason to believe that having this option enabled causes problems with yourshow, it is recommended that you enable it. You can do so via the LOR Control Panel's right-clickpopup menu.
The LOR VerifierList of Verifier Messages
5.14.1.6.3 53: Trigger uses undefined netw ork
Message Number: 53Severity: WarningSummary: Trigger uses undefined networkDetails #1: The name of the show containing the triggerDetails #2: The name of the undefined network that the trigger usesDetails #3: The name of the trigger
One of your triggers (either a show startup trigger or an interactive group trigger) uses a network that isnot defined in Network Configuration. The trigger will not function during your show.
There are at least two different reasons why this warning may occur, and how to resolve the issuedepends upon which one is the cause. First, there may be a mistake in the settings of the trigger itself;for example it may be set up to use network Aux B, whereas you intended it to use network Aux A. Inthis case, change the definition of the trigger (either in the show startup options or the interactive group,depending upon what kind of trigger it is). Second, the trigger may be set up to use the intendednetwork, but that network might mistakenly not have a comm port defined for it. In this case, use theNetwork Configuration program to set the configuration of the network.
The LOR VerifierList of Verifier Messages
5.14.1.6.4 54: Trigger uses LOR Enhanced netw ork
Message Number: 54Severity: WarningSummary: Trigger uses LOR Enhanced networkDetails #1: The name of the show containing the triggerDetails #2: The name of the LOR Enhanced network that the trigger usesDetails #3: The name of the trigger
The Light-O-Rama Software Package 797
© 2021 Light-O-Rama, Inc.
One of your triggers (either a show startup trigger or an interactive group trigger) uses an LOR Enhancednetwork. Triggers are not supported on LOR Enhanced networks, and the trigger will not function duringyour show.
There are at least two different reasons why this warning may occur, and how to resolve the issuedepends upon which one is the cause. First, there may be a mistake in the settings of the trigger itself;for example it may be set up to use the Enhanced network Aux B, whereas you intended it to use non-enhanced network Aux A. In this case, change the definition of the trigger (either in the show startupoptions or the interactive group, depending upon what kind of trigger it is). Second, the trigger may beset up to use the intended network, but that network might mistakenly be marked as Enhanced. In thiscase, use the Network Configuration program to change the configuration of the network.
The LOR VerifierList of Verifier Messages
5.15 Sequence Compressor
Compressed sequences are intended for use during shows, as they can be loaded much faster than theirassociated sequences, yet contain all information necessary to play the sequence. The Show Player willtry to create compressed versions of the scheduled sequences (.PLAY.LMS files) when each sequenceis first played, but this can delay the start of the sequence by more than a minute for large sequences(this delay only occurs the first time the sequence is played). To avoid this delay, you can compressyour sequences ahead of time using the Sequence Compressor program.
It can be used to compress all sequences in the entire schedule, or all sequences in a specified show,or a single specified sequence. Simply choose which of those you want to do (and, if appropriate,choose the show or sequence), and click the "Compress" button. The "Output Log" tab will show whatthe Sequence Compressor is doing, as it does it. When the Sequence Compressor finishes, it will opena message box saying so, and the "Results" tab will contain a summary of what has been done. Thesummary will say, for example, how many (and which) sequences were compressed, and give detailsabout any errors or warnings that happened. If desired, the "Save" button can be used to save both theresults summary and the output log to a file.
If some particular sequence already has an up-to-date compressed sequence available, the SequenceCompressor will simply skip that sequence, unless the "Force compression even for sequences that arealready compressed" box is checked.
Please note that not all sequences can be compressed. In particular, any sequence that contains a loopcannot be compressed, nor can any S4 sequence that contains two or more tracks with different timelengths. If such a sequence is encountered, the Sequence Compressor will issue a "warning" about it.
Compressed sequences have a .LCS file extension.
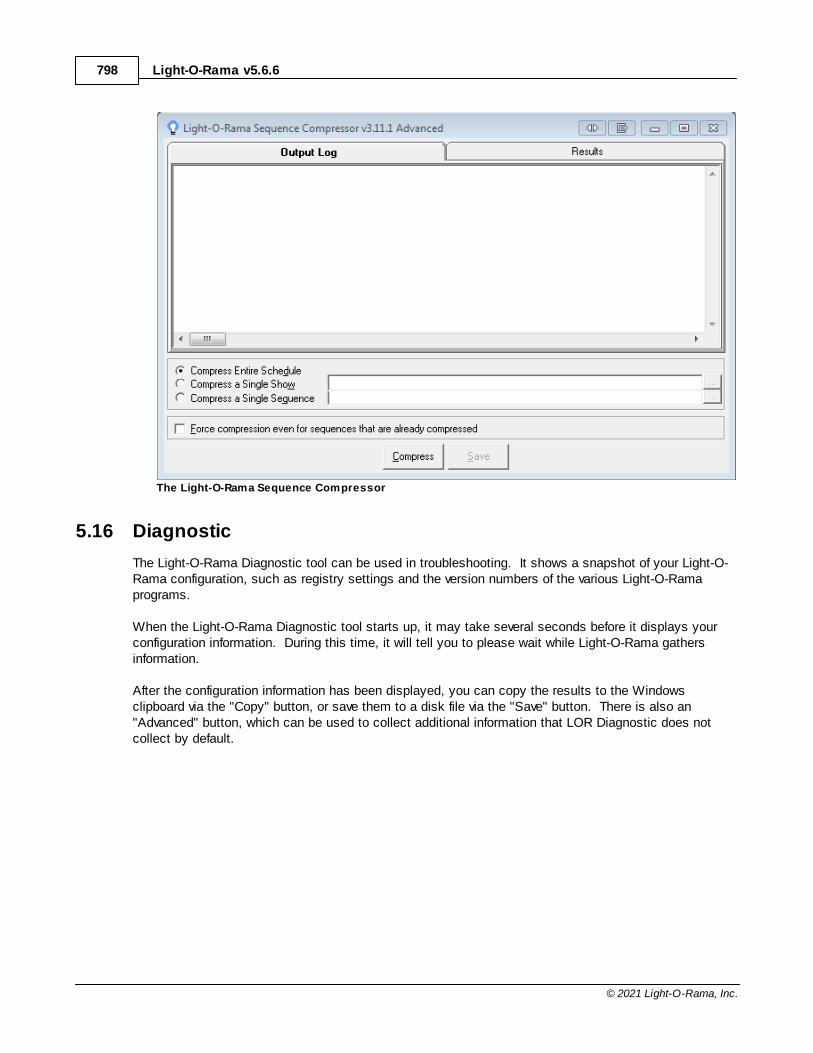
Light-O-Rama v5.6.6798
© 2021 Light-O-Rama, Inc.
The Light-O-Rama Sequence Compressor
5.16 Diagnostic
The Light-O-Rama Diagnostic tool can be used in troubleshooting. It shows a snapshot of your Light-O-Rama configuration, such as registry settings and the version numbers of the various Light-O-Ramaprograms.
When the Light-O-Rama Diagnostic tool starts up, it may take several seconds before it displays yourconfiguration information. During this time, it will tell you to please wait while Light-O-Rama gathersinformation.
After the configuration information has been displayed, you can copy the results to the Windowsclipboard via the "Copy" button, or save them to a disk file via the "Save" button. There is also an"Advanced" button, which can be used to collect additional information that LOR Diagnostic does notcollect by default.
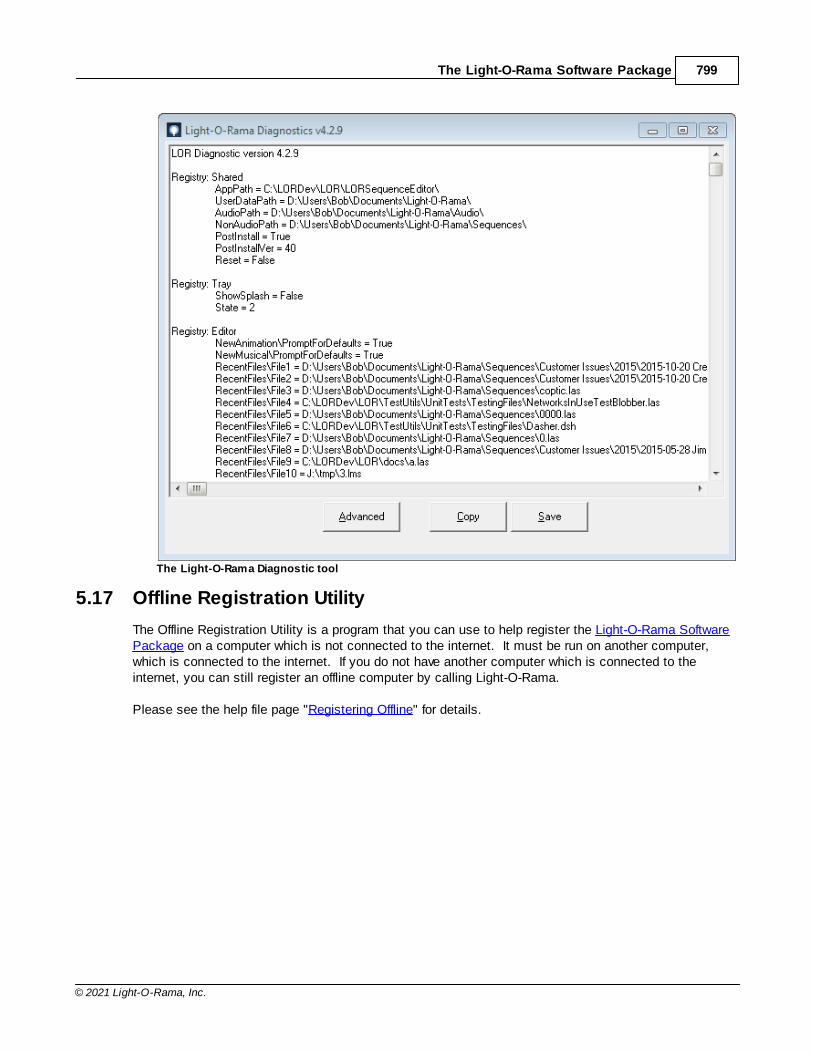
The Light-O-Rama Software Package 799
© 2021 Light-O-Rama, Inc.
The Light-O-Rama Diagnostic tool
5.17 Offline Registration Utility
The Offline Registration Utility is a program that you can use to help register the Light-O-Rama SoftwarePackage on a computer which is not connected to the internet. It must be run on another computer,which is connected to the internet. If you do not have another computer which is connected to theinternet, you can still register an offline computer by calling Light-O-Rama.
Please see the help file page "Registering Offline" for details.
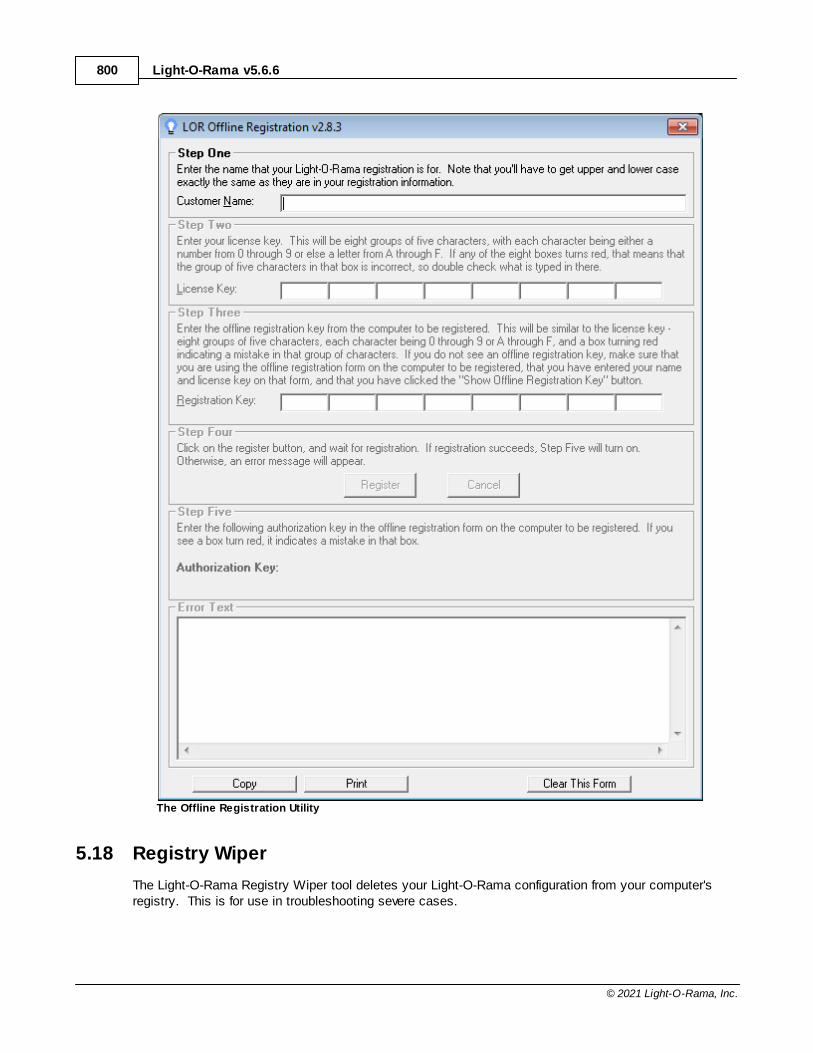
Light-O-Rama v5.6.6800
© 2021 Light-O-Rama, Inc.
The Offline Registration Utility
5.18 Registry Wiper
The Light-O-Rama Registry Wiper tool deletes your Light-O-Rama configuration from your computer'sregistry. This is for use in troubleshooting severe cases.
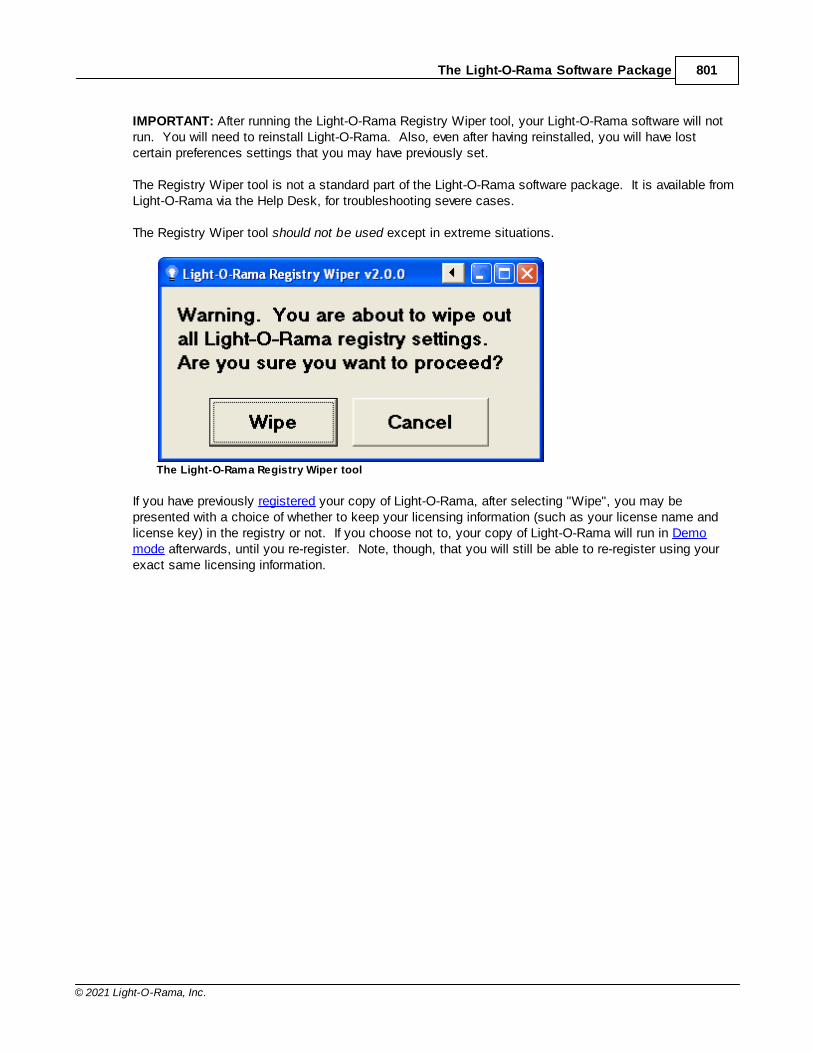
The Light-O-Rama Software Package 801
© 2021 Light-O-Rama, Inc.
IMPORTANT: After running the Light-O-Rama Registry Wiper tool, your Light-O-Rama software will notrun. You will need to reinstall Light-O-Rama. Also, even after having reinstalled, you will have lostcertain preferences settings that you may have previously set.
The Registry Wiper tool is not a standard part of the Light-O-Rama software package. It is available fromLight-O-Rama via the Help Desk, for troubleshooting severe cases.
The Registry Wiper tool should not be used except in extreme situations.
The Light-O-Rama Registry Wiper tool
If you have previously registered your copy of Light-O-Rama, after selecting "Wipe", you may bepresented with a choice of whether to keep your licensing information (such as your license name andlicense key) in the registry or not. If you choose not to, your copy of Light-O-Rama will run in Demomode afterwards, until you re-register. Note, though, that you will still be able to re-register using yourexact same licensing information.
Light-O-Rama v5.6.6802
© 2021 Light-O-Rama, Inc.
Index- A -Add-Ons
Registry Wipe Utility 800
Animation Section (Show) 639
Animation Sequence 81
Loops 446
New Animation Dialog 134
Archived Props 92
Management 158
Audio Wizards 432
Beat Wizard 436
MIDI Wizard 443
Tapper Wizard 433
VU Wizard 440
- B -Background Section (Show) 637
BSOFT Digital IO Cards 763
- C -Cable
Data 9
Phone 9
Calendar Schedule 657
Channel 84
Circuit IDs
Light-O-Rama Controllers 101
Clipboards (Sequencer) 379
Comm Listener 725
Companion Unit 8
Compressed Sequences 91
Control Lights (Sequencer) 529
Preferences 184
Control Panel 115
Disable Shows Gracefully 124
Disable Shows Immediately 124
Enable Schedule 124
Hardware Utility Quicklaunch 123
Launch at Startup 126
Popup Menu 121
Schedule Editor Quicklaunch 123
Sequence Editor Quicklaunch 123
Show Editor Quicklaunch 123
Show On Demand 125
Shut Down Show On Demand 125
Simple Show Builder Quicklaunch 124
Status Window 117
Unload Light-O-Rama 126
Controllers 101
DMX 104
Light-O-Rama 101
PixCon16 104
Pixel Controllers 104
Convert traditional lights to RGB 94
- D -Daisy Chain 8
Data Cable 9
Diagnostic Utility 798
Director Unit 9
Disable Shows Gracefully (Control Panel) 124
Disable Shows Immediately (Control Panel) 124
DMX 763, 765
Comm Listener 725
Controllers 104
- E -Effects (Sequencer) 87
Add 356
Delete 369
Modify 366
Enable Schedule (Control Panel) 124
- F -File Menu (Sequencer) 130
Close 133
Close All Files 133
Exit 134
Export as Protected 132
New 130
Open 131
Open Recent 131
Save 131
Save A Copy 131
Index 803
© 2021 Light-O-Rama, Inc.
File Menu (Sequencer) 130
Save As 131
Firmware Updates 759
Fixed Timing Grids 89
Freeform Timing Grids 89
- G -Getting Help 8
Getting Started 8
- H -Hardware 101
Hardware Utility 725
Configuring Units 730
Digital IO Boards Tab 763
Downloading Sequences 755
Firmware Updates 759
LOR Control Tab 726
LOR MP3 Tab 739
LOR RF Tab 761
Selecting a Comm Port 727
Setting Unit IDs 728
Test Console 763, 765
Testing Units 751
X10 CM11A Tab 763
Help 8
- I -Import Image (SuperStar) 584
Interactive Groups (Show) 645
Jukebox 647
Magic Toy 648
Soundboard 648
Interactive Section (Show) 641
- J -Jukebox 647
- K -Keyboard Shortcuts
Custom Grid 280
Sequencer 544
- L -Launch at Startup (Control Panel) 126
Light-O-Rama Controllers 101
Companion Unit 8
Configuring Units (Hardware Utility) 730
Director Unit 9
Downloading Sequences (Hardware Utility) 755
Firmware Updates (Hardware Utility) 759
Hardware Utility 726
PixCon16 104
Pixel Controllers 104
Setting Unit IDs (Hardware Utility) 728
Testing Units (Hardware Utility) 751
Light-O-Rama Network 102
List of Verifier Messages 770
Loops in Animation Sequences 315
Creating and modifying 446
LOR Control Tab (Hardware Utility) 726
LOR MP3 Tab (Hardware Utility) 739
LOR RF Tab (Hardware Utility) 761
- M -Magic Toy 648
Menu Bar (Sequencer) 129
File Menu 130
Help Menu 199
Sequence Menu 143
Tools Menu 166
Window Menu 197
Motion Effect Generator 453
Bulkb Size 493
Effect Choice 455
Effect Slider 461
Favorites 489
Length 492
Mixing 465
Open 454
Motion Effect Rows
Add/Modify 335
Combination Mode 340
Copy/Paste 341
Custom Subsection 338
Merge Defaults 338
Light-O-Rama v5.6.6804
© 2021 Light-O-Rama, Inc.
Motion Effect Rows
Overview 311
Subdivide 336
MP3 Directors
Hardware Utility 739
Musical Section (Show) 640
Musical Sequence 82
New Musical Sequence Dialog 137
- N -Network 102
Network Preferences 702
PixCon16 Configuration 712
Network Preferences Simple Mode
The DMX Tab 707
The LOR Tab 703
The X10/Dasher Tab 711
New Animation Dialog 134
New Musical Sequence Dialog 137
- P -Phone Cable 9
Preferences (Sequencer) 168
Channel Effects 174
Cursor 180
Editing 180
Motion Effects 172
Playback 171
Preview 176
Save Copy 178
Start Up 184
Themes 194
Tooltips 169
Video 179
Zoom 197
Preview 76
Background Image Brightness 543
Management 203
Preview Design 206
Channel Conflicts & Bulk Changes Tab 228
Copy Prop 286
Design Tab 209
Group Definition 280
Naming 289
Other Warnings Tab 238
Prop Definition 242
Statistics Tab 241
String Summary Tab 239
Prop 76
Archived 92
Archived Props Management 158
Custom Grid 274
Definition 242
Shapes 253
Protected Sequences 91
Creating 132
- R -Registry Wipe Utility 800
RGB Aggregates 94
Management 159
Right-Click Context Menu (Sequencer) 392
Advanced Tools Sub-menu 418
Empty Areas (background) Sub-menu 400
Existing Effects (foreground) Sub-menu 405
Prompt For New Effect Sub-menu 397
Timing Marks Sub-menu 423
- S -Schedule 96
Calendar Schedule 657
Schedule Editor 650
Weekly Schedule 656
Schedule Editor 650
Sequence 71
Animation Sequence 81
Channel 84
Compressed Sequences 91
Musical Sequence 82
Preview 76
Protected Sequences 91
Sequencer 127
Sharing 450
SuperStar Sequencer 565
Timing Grids 88
Upgrade 553
Windows Shell Commands 153
Sequence Compressor 797
Sequencer 127
About 200
Index 805
© 2021 Light-O-Rama, Inc.
Sequencer 127
Add Effects 356
Archived Props Management 158
Audio Wizards 432
Background Image Brightness 543
Beat Channels 314
Beat Wizard 436
Change Colors 368
Change Intensity 368
Channel Background Color 176
Channel Buttons 304
Channel Effect Preferences 174
Clipboard Management 379
Clipboard Selection 370
Closing Sequences 133
Condensed Mode (grid) 320
Control Lights Window 529
Copy 374
Cut 373
Delete Effects 369
Editing Preferences 180
Effect Samples Window 525
File Menu 130
File References 151
Grid Rows 306
Grid View 326
Grid View Group 331
Grid View Menu 327
Help Menu 199
Intensity Range 353
Item List 304
Keyboard Shortcuts 544
Loops in Animation Sequences 446
Main Menu 129
MIDI Wizard 443
Modify Effects 366
Motion Effect Generator 453
Motion Effect Preferences 172
Motion Effect Rows 311, 335
Moving Windows 540
New Animation Dialog 134
New Musical Sequence Dialog 137
Nudge Tools 367
Paste 374
Paste Mode 371
Paste Special 375
Playback 428
Playback Preferences 171
Playback Window 521
Preferences 168
Preview 76
Preview Design 206
Preview Preferences 176
Previews Window 203
Prop Definition 242
Regular Channels (non-RGB) 306
Repeat 378
RGB Aggregates Management 159
RGB Channels 309
RGB Channels on Pixel Props 320
Right-Click Context Menu 392
Save Copy Preferences 178
Saving Changes 131
Scrolling 302
Selecting Cells 346
Sequence Information 149
Sequence Menu 143
Sequence Tab 299
Start Page 201
Start Up Preferences 184
Subsequences 313
Tapper Wizard 433
Themes 194
Time Format 95
Timing Grid Import 388
Timing Grid Toolbar Menu 386
Timing Marks 423
Toggle Tool 369
Toolbar 381
Tools Menu 166
Tooltip Preferences 169
Tooltips 446
Upgrading a Sequence 553
Video Preferences 179
View Fades As Ramps 175
VU Wizard 440
Waveform 431
Window Layout 540
Window Menu 197
Windows Shell Commands 153
Zoom Preferences 197
Zooming 303
ServoDog Utility 768
Shell Commands 153
Show 96, 431
Animation Section 639
Light-O-Rama v5.6.6806
© 2021 Light-O-Rama, Inc.
Show 96, 431
Background Section 637
Immediate Background Startup 644
Immediate Startup 644
Interactive Groups 645
Interactive Section 641
Jukebox 647
Magic Toy 648
Musical Section 640
Show Editor 635
Show On Demand 125
Show Player 702
Shutdown Section 642
Simple Show Builder 701
Soundboard 648
Startup Options 643, 644
Startup Section 638
Triggered Startup 644
Show Editor 635
Show On Demand (Control Panel) 125
Show Player 702
Shut Down Show On Demand (Control Panel) 125
Shutdown Section (Show) 642
Simple Show Builder 701
Software 112
Comm Listener 725
Control Panel 115
Diagnostic Utility 798
Hardware Utility 725
Network Preferences 702
Registry Wipe Utility 800
Schedule Editor 650
Sequence Compressor 797
Sequencer 127
ServoDog Utility 768
Show Editor 635
Show Player 702
Simple Show Builder 701
SuperStar Sequencer 565
Verifier 768
Soundboard 648
Standalone Mode 755
Startup Section (Show) 638
Status Window (Control Panel) 117
SuperStar
ImportImage 584
SuperStar Sequencer 565
Animation 586
Archive Sequences 635
Clipboards 614
Commands 629
Custom Sequences 574
Fan 597
Image Action 582
Importing Timing Grid 629
Instant Sequences 568
Keyboard Accelerators 629
Layout Dialog Box 618
Morph 578
Overview 566
Pixels per Ribbon 615
Purchased Sequences 635
Scene 575
Select All 628
Select All Left 628
Select All Right 628
Shockwave 597
Smooth Effects 597
Spiral 597
Star Rays 617
Text 591
Thin Grid 617
Transfer Effects 614
Unit IDs, Hardware Utility 625
Unit IDs, SuperStar Sequencer 625
Welcome 565
Wide Grid 617
- T -Time Format 95
Timing Grids 88
Editing 423
Fixed 89
Freeform 89
Toolbar Menu 386
Toolbar (Sequencer) 381
Timing Grid Menu 386
- U -Unit 11
Unit IDs
Light-O-Rama Controllers 101
Setting Unit IDs (Hardware Utility) 728
Index 807
© 2021 Light-O-Rama, Inc.
Unload Light-O-Rama (Control Panel) 126
- V -Verifier 768
List of Verifier Messages 770
Video
Display Video 173, 177, 180
Full Screen Mode 180
Preferences 179
- W -Weekly Schedule 656
What's New 13
Window Menu (Sequencer)
Float Current Window 198
Reset Window Layout 199
View Audio Setting Window 198
View Control Lights Window 198
View Effect Samples Window 198
View Playback Window 198
View Previews Window 198
View Start Page 198
Windows Shell Commands 153
Wireless Devices
Hardware Utility 761
- X -X10
Hardware Utility 763
X10 CM11A Tab (Hardware Utility) 763


