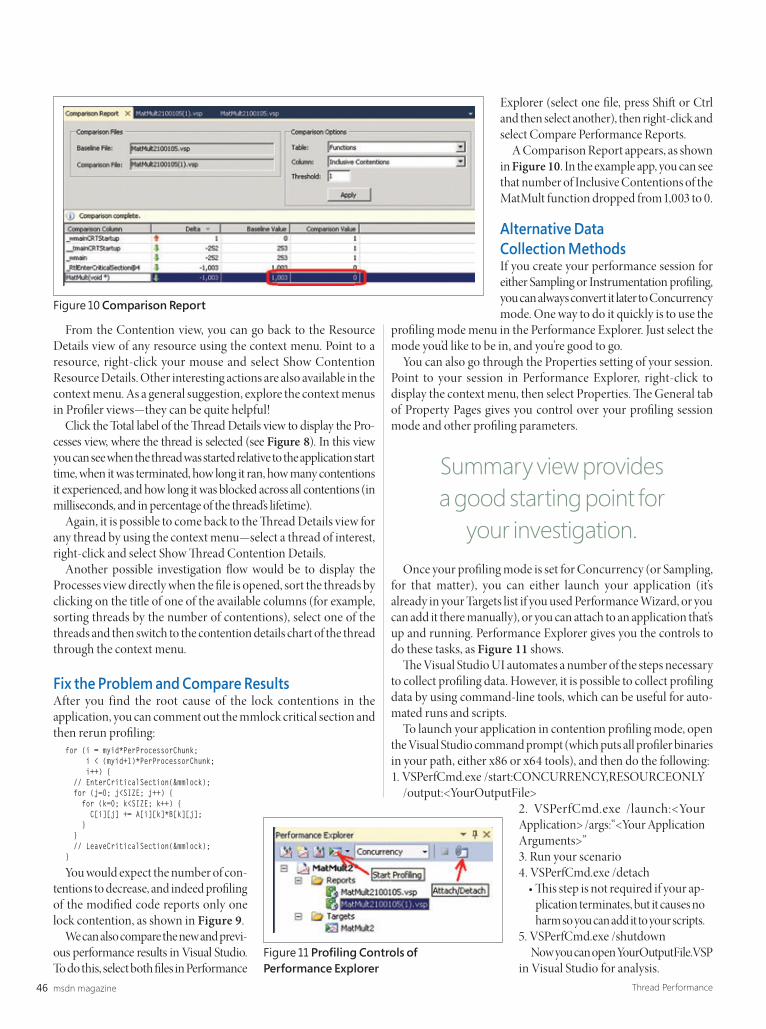
Sure, Visual Studio 2010 has a lot of great functionality—we’re excited that it’s only making our User Interfacecomponents even better! We’re here to help you go
beyond what Visual Studio 2010 gives you so you can createKiller Apps quickly, easily and without breaking a sweat! Go
to infragistics.com/beyondthebox today to expand yourtoolbox with the fastest, best-performing and most powerful
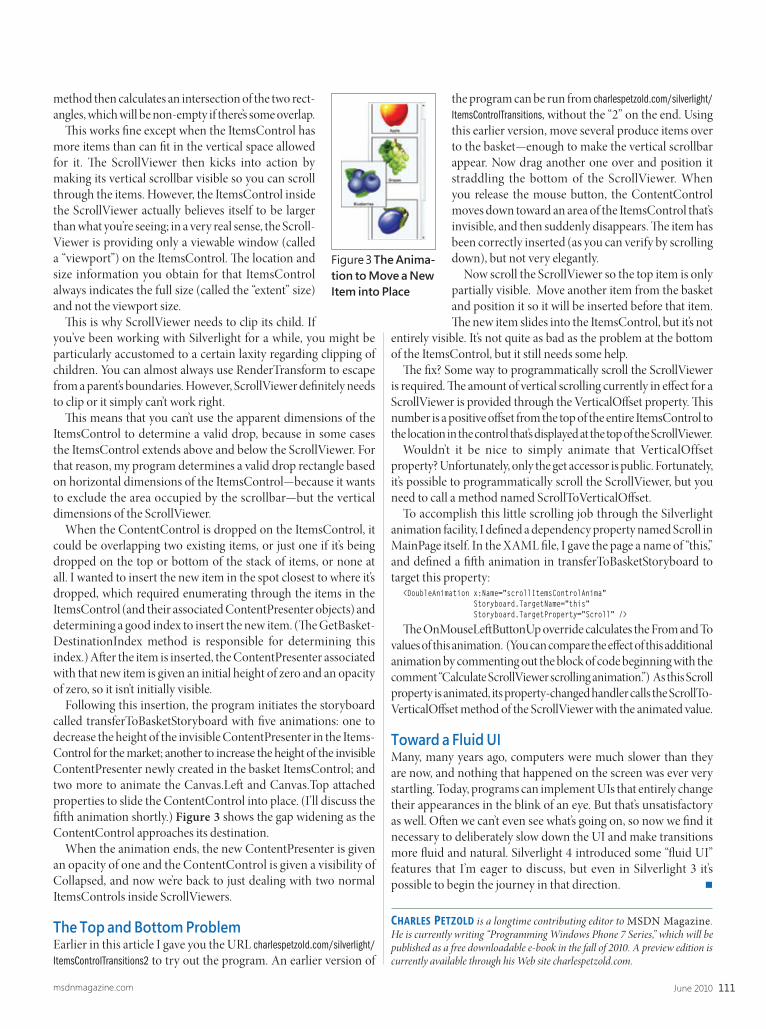
UI controls available. You’ll be surprised by your own strength!
Infragistics India +91-80-6785-1111twitter.com/infragistics
Copyright 1996-2010 Infragistics, Inc. All rights reserved. Infragistics and the Infragistics logo and NetAdvantage are registered trademarks of Infragistics, Inc.
LUCINDA ROWLEY DirectorDIEGO DAGUM Editorial Director/[email protected] GRASSL Site Manager
KEITH WARD Editor in Chief/[email protected] DORSEY Technical EditorDAVID RAMEL Features EditorWENDY GONCHAR Managing EditorMARTI LONGWORTH Associate Managing Editor
SCOTT SHULTZ Creative DirectorJOSHUA GOULD Art DirectorALAN TAO Senior Graphic Designer
CONTRIBUTING EDITORS K. Scott Allen, Dino Esposito, Julie Lerman, Juval Lowy, Dr. James McCaffrey, Ted Neward, Charles Petzold, David S. Platt
Henry Allain President, Redmond Media Group Matt Morollo Vice President, PublishingDoug Barney Vice President, Editorial DirectorMichele Imgrund Director, MarketingTracy Cook Online Marketing Director
Matt Morollo VP, PublishingChris Kourtoglou Regional Sales ManagerWilliam Smith National Accounts DirectorDanna Vedder Microsoft Account ManagerJenny Hernandez-Asandas Director Print ProductionSerena Barnes Production Coordinator/[email protected]
Neal Vitale President & Chief Executive Offi cerRichard Vitale Senior Vice President & Chief Financial Offi cerMichael J. Valenti Executive Vice President
Abraham M. Langer Senior Vice President, Audience Development & Digital MediaChristopher M. Coates Vice President, Finance & AdministrationErik A. Lindgren Vice President, Information Technology & Application DevelopmentCarmel McDonagh Vice President, Attendee MarketingDavid F. Myers Vice President, Event Operations
Jeffrey S. Klein Chairman of the Board
MSDN Magazine (ISSN 1528-4859) is published monthly by 1105 Media, Inc., 9201 Oakdale Avenue, Ste. 101, Chatsworth, CA 91311. Periodicals postage paid at Chatsworth, CA 91311-9998, and at additional mailing offi ces. Annual subscription rates payable in U.S. funds: U.S. $35; Canada $45; International $60. Single copies/back issues: U.S. $10, all others $12. Send orders with payment to: MSDN Magazine, P.O. Box 3167, Carol Stream, IL 60132, e-mail [email protected] or call 847-763-9560. POSTMASTER: Send address changes to MSDN Magazine, P.O. Box 2166, Skokie, IL 60076. Canada Publications Mail Agreement No: 40612608. Return Undeliverable Canadian Addresses to Circulation Dept. or IMS/NJ. Attn: Returns, 310 Paterson Plank Road, Carlstadt, NJ 07072.
Printed in the U.S.A. Reproductions in whole or part prohibited except by written permission. Mail requests to “Permissions Editor,” c/o MSDN Magazine, 16261 Laguna Canyon Road, Ste. 130, Irvine, CA 92618.
Legal Disclaimer: The information in this magazine has not undergone any formal testing by 1105 Media, Inc. and is distributed without any warranty expressed or implied. Implementation or use of any information contained herein is the reader’s sole responsibility. While the information has been reviewed for accuracy, there is no guarantee that the same or similar results may be achieved in all environments. Technical inaccuracies may result from printing errors and/or new developments in the industry.
Media Kits: Direct your Media Kit requests to Matt Morollo, VP Publishing, 508-532-1418 (phone), 508-875-6622 (fax), [email protected]
Reprints: For single article reprints (in minimum quantities of 250-500), e-prints, plaques and posters contact: PARS International, Phone: 212-221-9595, E-mail: [email protected], www.magreprints.com/QuickQuote.asp
List Rental: This publication’s subscriber list, as well as other lists from 1105 Media, Inc., is available for rental. For more information, please contact our list manager, Merit Direct. Phone: 914-368-1000; E-mail: [email protected]; Web: www.meritdirect.com/1105
All customer service inquiries should be sent to [email protected] or call 847-763-9560.
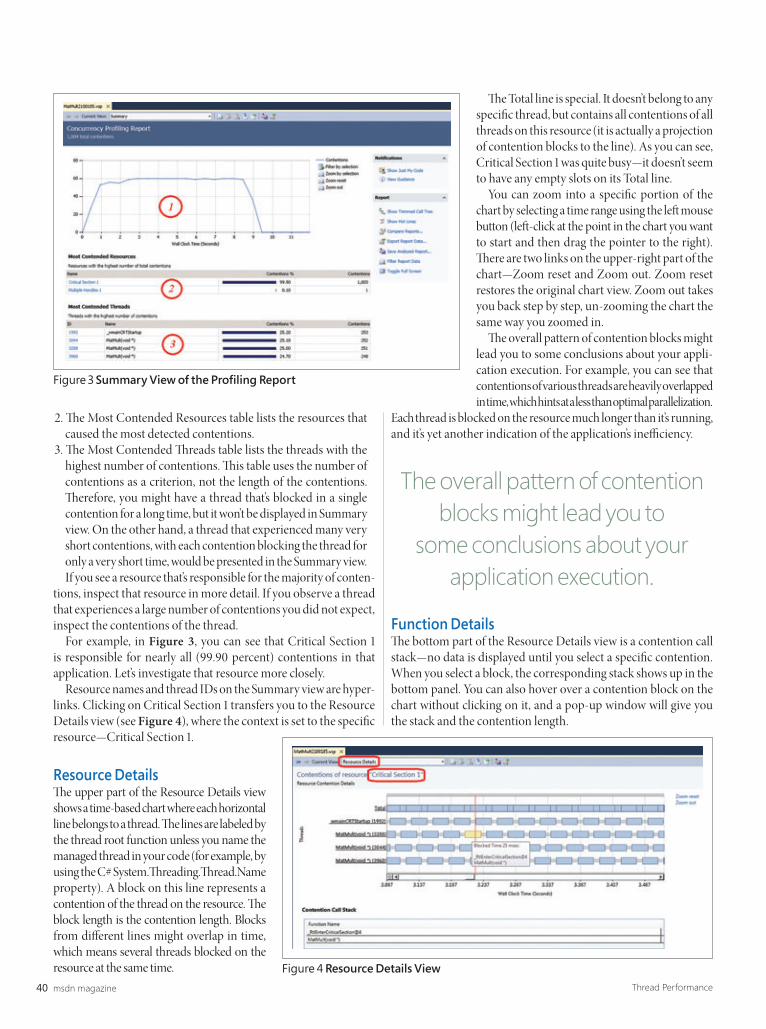
oft en from the minority, making that group seem larger than it is. Th e other possibility, of course, is that the response properly refl ects our readers, and we do need more articles dealing with lower- level topics. Again, this is something we cover in the magazine; the question is how oft en we should dip into that well.
Existing products/technologies vs. new/future products and technologies. Do you prefer more coverage of products and technologies you’re using day-to-day, or more looking-ahead coverage so you can get an idea of what else is out there that you’d like to try out?
Also, remember that we won’t be totally upending the ship if we change a little rigging. What I mean is that any changes we make in our coverage will be gradual and incremental. If we add some more C++ articles, we won’t be doing drastically fewer C# stories, for example. Th is is a fi ne-tuning process, to make sure this is your must-read magazine each month. I encourage you to take a little time when you can and let us know your feelings on these topics. To paraphrase the inimitable Frasier Crane: We’re listening.
One final note: I’ll be at Tech·Ed this June, and would love to chat with you in person. Look for me in the 1105 Media booth, and other places. If you see me, please grab me (gently) so we can talk a bit. I hope I get a chance to speak with many of you there. If you’re unable to make it, be sure to drop me a line at mmeditor@microsoft .com.
We’re All Ears
One of the most important parts of my job as editor in chief is listening to you. As in, You the Readers. Th is magazine’s value is in presenting the kind of information that helps you better do your primary job; for most, that means sharpening your soft ware development skills.
Over the past half-year or so, I’ve been talking to readers, and, especially, reading your e-mail comments about ways to improve the magazine (keep those comments coming to mmeditor@ microsoft .com). I’ve gathered enough information from various sources now to get an idea of what many of you are looking for. Th e next step is to ask you which of these things you’d most like to see in the magazine.
More coverage of non-C# languages. Our core coverage, at least for the foreseeable future, will feature C#. Of course, we do have articles that use other languages like F#, where those languages are the most appropriate to use for a given task. And we have regular coverage of Visual Basic through our Basic Instincts column.
A number of readers, however, have stated their desire to have more regular coverage of C# alternatives, particularly C++.
What do you think: Would you like to see a regular column cover-ing C++ programming, or are you fi ne with the occasional C++, like the one we ran in April on new C++ features in Visual Studio 2010 (msdn.microsoft.com/magazine/ee336130)? Or do you feel we have the right mix?
Articles targeted toward beginning or inexperienced developers. Numerous readers have expressed their frustration that too much of our content is over their heads, and they’d like to see more coverage of basic development or coding practices.
Th is is a tricky problem. Th e reason is that people who are dissatisfi ed with something are much more likely to speak up than those who aren’t. So, even though our coverage is properly targeted toward more-experienced developers, we’re hearing more
Complying with all applicable copyright laws is the responsibility of the user. Without limiting the rights under copyright, you are not permitted to reproduce, store, or introduce into a retrieval system MSDN Magazine or any part of MSDN Magazine. If you have purchased or have otherwise properly acquired a copy of MSDN Magazine in paper format, you are permitted to physically transfer this paper copy in unmodifi ed form. Otherwise, you are not permitted to transmit copies of MSDN Magazine (or any part of MSDN Magazine) in any form or by any means without the express written permission of Microsoft Corporation.
A listing of Microsoft Corporation trademarks can be found at microsoft.com/library/toolbar/3.0/trademarks/en-us.mspx. Other trademarks or trade names mentioned herein are the property of their respective owners.
MSDN Magazine is published by 1105 Media, Inc. 1105 Media, Inc. is an independent company not affi liated with Microsoft Corporation. Microsoft Corporation is solely responsible for the editorial contents of this magazine. The recommendations and technical guidelines in MSDN Magazine are based on specifi c environments and confi gurations. These recommendations or guidelines may not apply to dissimilar confi gurations. Microsoft Corporation does not make any representation or warranty, express or implied, with respect to any code or other information herein and disclaims any liability whatsoever for any use of such code or other information. MSDN Magazine, MSDN, and Microsoft logos are used by 1105 Media, Inc. under license from owner.
Visit us at msdn.microsoft.com/magazine. Questions, comments or suggestions for MSDN Magazine? Send them to the editor: [email protected].
We won’t be totally upending the ship if we change a
Th e reason this works, however, is due to a particular capability off ered by VBScript—late binding. Late binding means that the type of a given object isn’t known until the execution fl ow hits the object. When this happens, the runtime environment fi rst ensures that the member invoked on the object really exists and then invokes it. No preliminary check whatsoever is made before the code is actually executed.
As you may know, a scripting language such as VBScript doesn’t have a compiler. However, Visual Basic (including the CLR version) for years had a similar feature. I confess I frequently envied my Visual Basic colleagues for their ability to more easily use COM objects—oft en valuable building blocks of an application you need to interop with, such as Offi ce. In some cases, in fact, my team ended up writing some portions of our interop code in Visual Basic, even when the entire application was in C#. Should this be surprising? Isn’t polyglot programming a new frontier to reach?
In Visual Basic, the CreateObject function exists for (strong) compatibility reasons. Th e point is that .NET Framework-based languages were designed with early binding in mind. COM interoperability is a scenario addressed by the .NET Framework
C# 4.0, the Dynamic Keyword and COM
I grew up as a C/C++ developer and, especially before the advent of the Microsoft .NET Framework, I oft en chided my colleagues who programmed in Visual Basic for using such a weakly typed language.
There was a time when static typing and strongly typed pro-gramming were the obvious way to soft ware happiness. But things change, and today the communi-ty of C# developers—to which it seems nearly all former C/C++ developers have migrated—oft en feel the distinct need for a much more dynamic programming model. Last month, I introduced some features of dynamic programming that Microsoft makes available through C# 4.0 and Visual Studio 2010. Th is month, I’ll delve deeper into some related scenarios, starting with one of the most compelling reasons for using C# 4.0—easy programming with COM objects within the .NET Framework.
Easy Access to COM ObjectsAn object is said to be dynamic when its structure and behavior aren’t fully described by a statically defi ned type that the compiler knows thoroughly. Admittedly, the word dynamic sounds a bit generic in this context, so let’s look at a simple example. In a scripting language such as VBScript, the following code runs successfully:
Set word = CreateObject("Word.Application")
Th e CreateObject function assumes that the string it gets as an argu-ment is the progID of a registered COM object. It creates an instance of the component and returns its IDispatch automation interface. Th e details of the IDispatch interface are never visible at the level of the scripting language. What matters is that you can write code such as:
Set word = CreateObject("Word.Application")word.Visible = TrueSet doc = word.Documents.Add()Set selection = word.Selectionselection.TypeText "Hello, world"selection.TypeParagraph()doc.SaveAs(fileName)
In this code, you first create a reference to a component that automates the behavior of the underlying Microsoft Office Word application. Next, you make the Word main window visible, add a new document, write some text into it and then save the document somewhere. The code is clear, reads well and, more importantly, works just fine.
CUTTING EDGE DINO ESPOSITO
Code download available at code.msdn.microsoft.com/mag201006CutEdge.
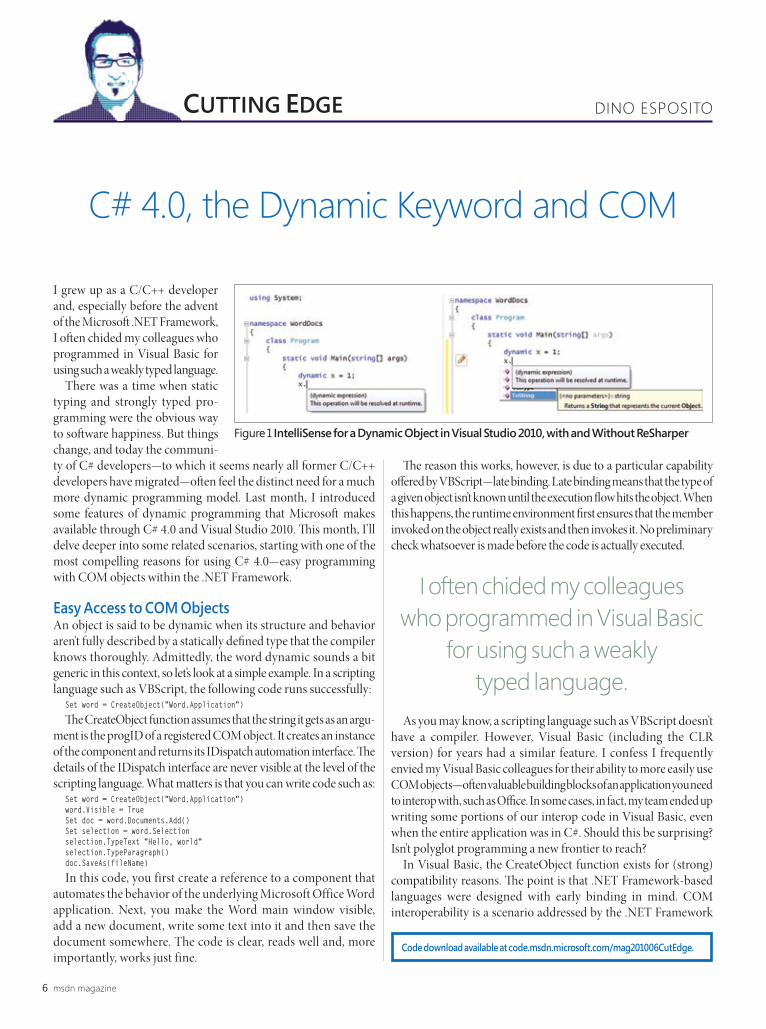
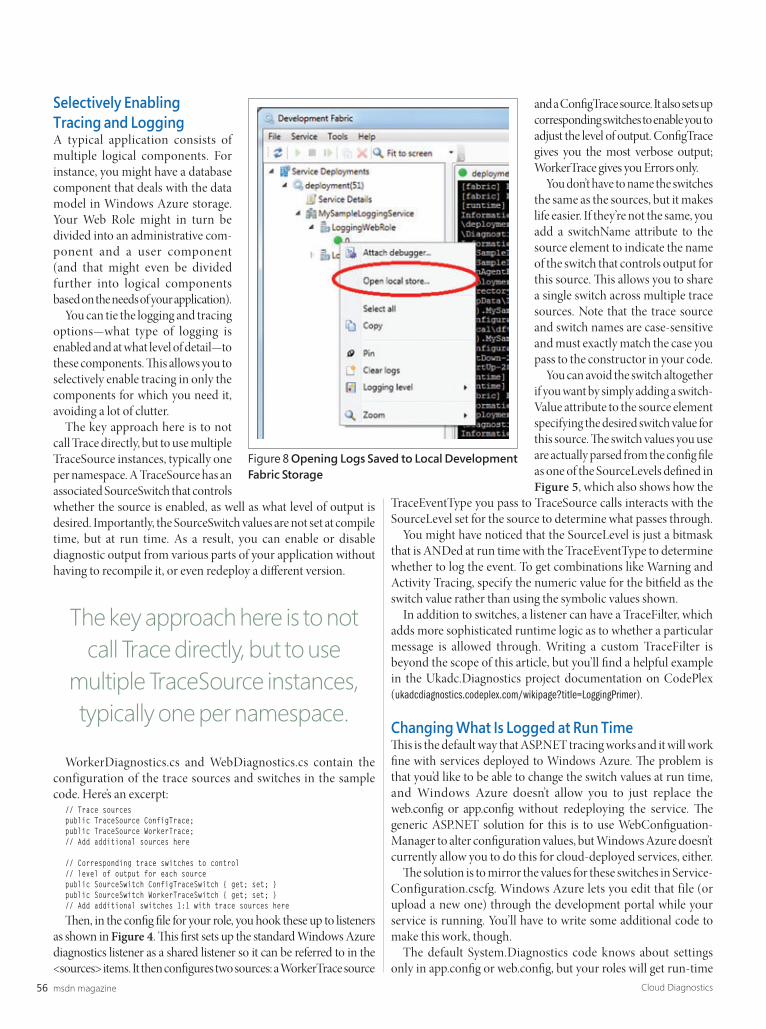
Figure 1 IntelliSense for a Dynamic Object in Visual Studio 2010, with and Without ReSharper
I often chided my colleagues who programmed in Visual Basic
Prices subject to change. Not responsible for typographical errors.
®
programmers.com/theimagingsource
Download a demo today.
NEWRELEASE!
Professional EditionParadise #
T79 02101A02$848.99
programmers.com/ca
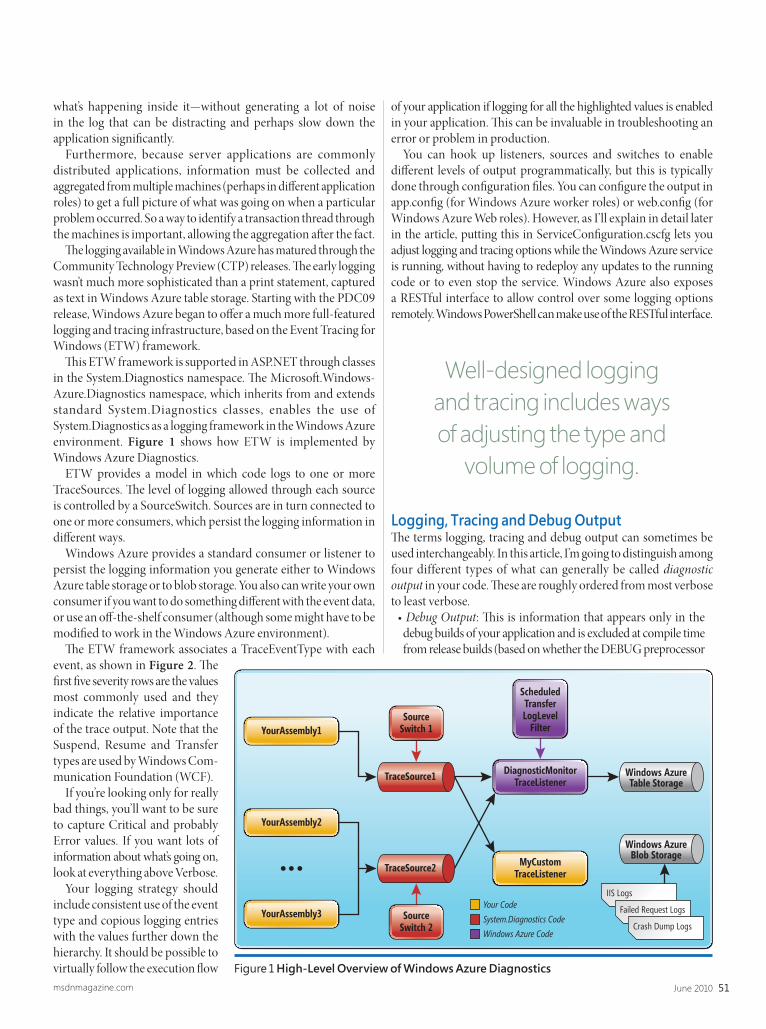
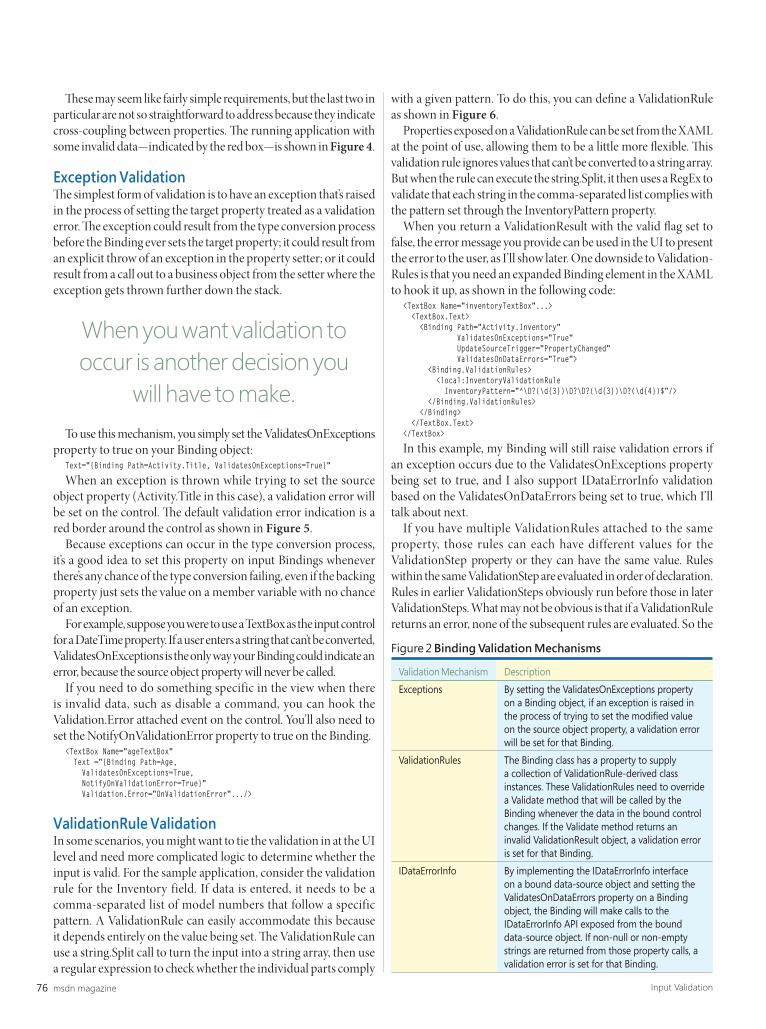
CA ERwin® Data Modeler r7.3 – Product Plus 1 Year Enterprise Maintenanceby CACA ERwin Data Modeler is a data modelingsolution that enables you to create and maintain databases, data warehouses and enterprise data resource models. These models help you visualize data structures so that you can effectively organize, manage and moderate data complexities, database technologies and the deployment environment.
• .NET WinForms control for VB.NET and C#• ActiveX for VB6, Delphi, VBScript/HTML, ASP• File formats DOCX, DOC, RTF, HTML, XML, TXT• PDF and PDF/A export, PDF text import• Tables, headers & footers, text frames,
TX Text Control 15.1Word Processing ComponentsTX Text Control is royalty-free, robust and powerful word processing software in reusable component form.
programmers.com/pragma
Pragma Fortress SSH—SSHServer & Client for Windows by Pragma SystemsContains SSH, SFTP, SCP servers and clients for Windows.• Certified for Windows Server 2008R2• Compatible with Windows 7• High-performance servers with
centralized management• Active Directory & GSSAPI authentication• Supports over 1000 sessions• Offers FIPS mode• Hyper-V and PowerShell support• Runs in Windows 2008R2/2008/2003/7/
Vista/XP/2000
Paradise # P35 04201A01 $550.99
Paradise # P26 04201E01$3,919.99
Paradise # Q13ZM6101A01
List Price:$799.00
Your Price:$599.25
programmers.com/vSphereprogrammers.com/LEAD
LEADTOOLS Recognition SDKby LEAD TechnologiesDevelop robust 32/64 bit document imaging and recognition functionality into your applications with accurate and high-speed multi-threaded Forms, OCR, OMR, and 1D/2D barcode engines.• Supports text, OMR, image, and
barcode fields• Auto-registration and clean-up to
improve recognition results• Provided as both high and low
level interface• Includes comprehensive confidence
reports to assess performanceParadise # L05 26301A01 $3,214.99
Certified for Windows7/2008R2
VMware vSphere Put time back into your day.Your business depends on how you spend your time. You need to manage IT costs without losing time or performance. With proven cost-effective virtualization solutions from VMware, you can:
• Increase the productivity of your existing staff three times over
• Control downtime—whether planned or not
• Save more than 50% on the cost of managing, powering and cooling servers
Make your time (and money) count for more with virtualization from VMware.
VMware Advanced
Acceleration Kit for 6 processors
Paradise # V55 78101A01
$9,234.99
programmers.com/multiedit
Multi-EditX
by Multi Edit Software
Multi-EditX is “The Solution” for your editing needs with support for over 50 languages. Edit plain text, ANY Unicode, hex, XML, HTML, PHP, Java, Javascript,Perl and more! No more file sizelimitations, unlimited line length,any file, any size Multi-EditX is “The Solution”!
Pre-Order Your Copy and Save!
1-49 UsersParadise #
A30Z10101A01$223.20
ActiveReports 6by GrapeCityIntegrate Business Intelligence/Reporting/DataAnalysis into your .NET applications using theNEW ActiveReports 6.
• Fast and Flexible reporting engine
• Data Visualization and Layout Controls suchas Chart, Barcode and Table Cross SectionControls
• Wide range of Export and Preview formatsincluding Windows Forms Viewer, WebViewer, Adobe Flash and PDF
• Royalty-Free Licensing for Web and Windows applications
Professional Ed.Paradise # D03 04301A01 $1,310.99
NEWVERSION
6!
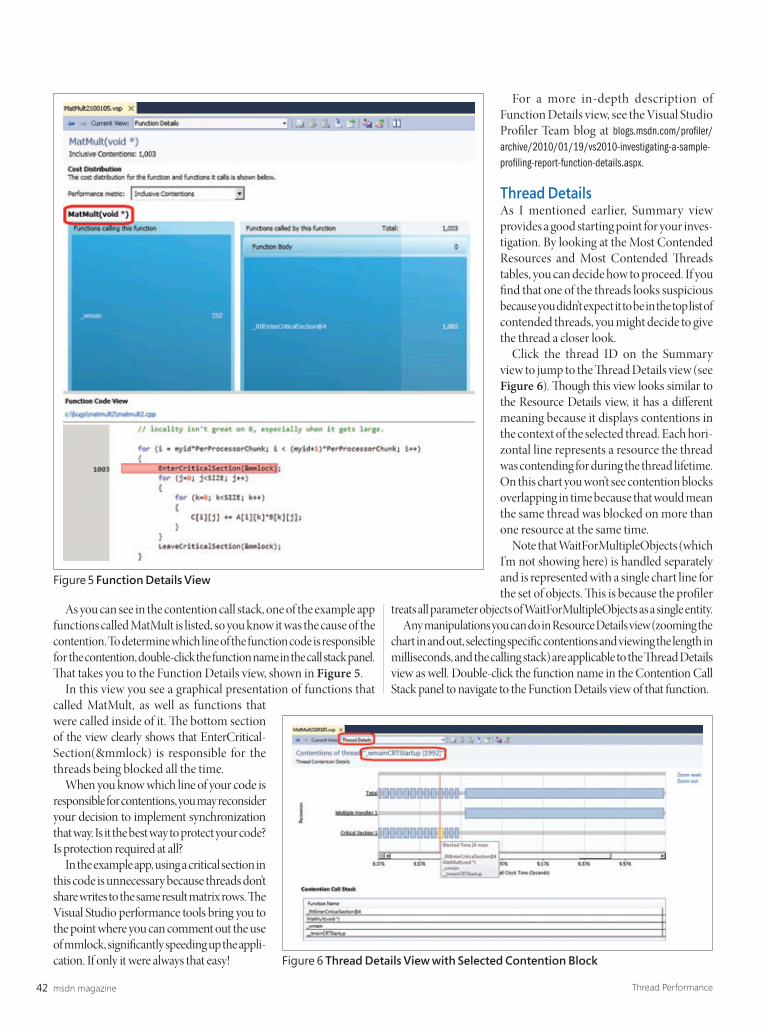
BUILD ON VMWARE ESXiAND VSPHERE for Centralized Management, Continuous Application Availability, and Maximum Operational Efficiency in Your Virtualized Datacenter.Programmer’s Paradise invites you to take advantageof this webinar series sponsored by our TechXtend solutions division.
AdminStudio & ApplicationVirtualization Packby Flexera SoftwareOne Application Software Deployment Tool for Reliable MSI Packaging, ApplicationVirtualization, and Windows 7 Migration. Top choice of Microsoft®, Novell®, LANDesk®
and other software management solutions. Cut MSI packaging time by up to 70%, Deploy software to desktops with 99% success or better. AdminStudio is the only MSI packaging solution to support multiple virtualization formats, including Microsoft®
App-V™, VMware® ThinApp™ and Citrix® XenApp™.
ProfessionalUpgrade from any Active AS
Pro + Silver MtnParadise #
I21 09401S05
$4,228.99
NEWRELEASE!
Extend Your Visual Studio Development to OracleToad Extension for Visual Studio is an Oracle database schema provider that goes beyond online development to offer you:• Easier Oracle development in Visual Studio 2010 • Assure application code is synchronized with the database• Oracle change management for application teams • Team collaboration and Microsoft’s ALM methodology
* Exclusive to MSDN subscribers — from now until 31st July, 2010 programmers.com/toad_VS2010
for Visual StudioToad®
EXTENSION Save 25%!
EXCLUSIVE OFFER FOR MSDN SUBSCRIBERS!
SAVE 25% ON Toad® Extension for Visual Studio 2010*
READY
ComponentOne Studio® EnterpriseThe world’s most complete VS2010-readycomponent suite for developing all layers ofWindows, Web, and Mobile applications.
but never specifi cally supported by languages with keywords and facilities—not until C# 4.0.
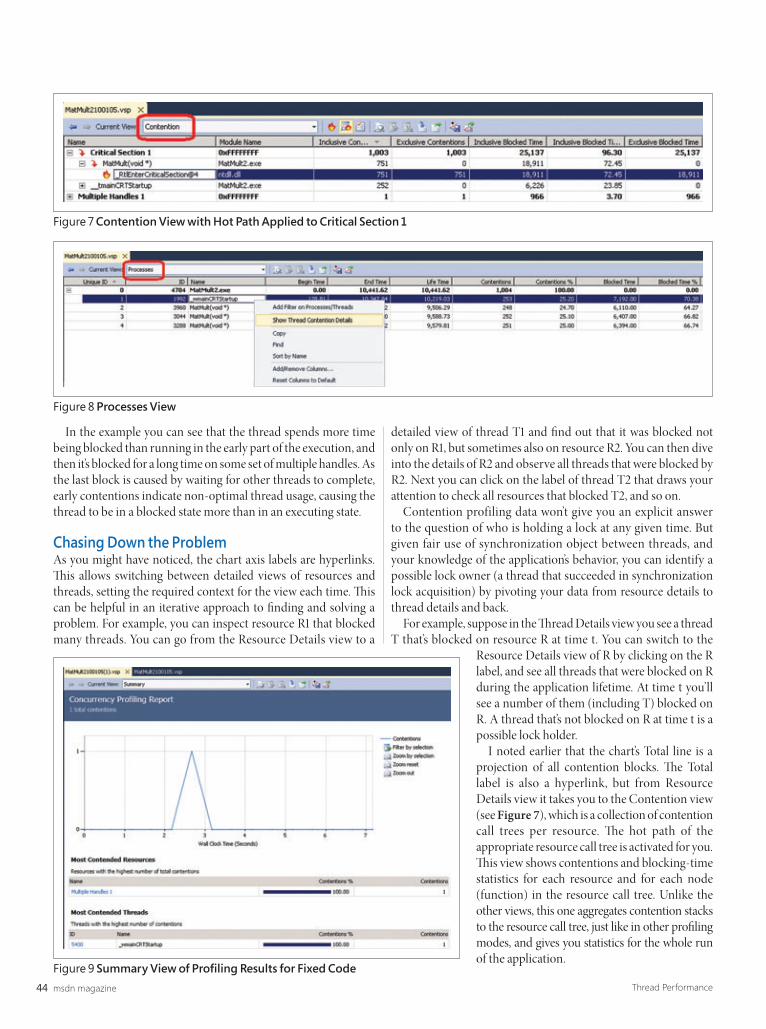
C# 4.0 (and Visual Basic) has dynamic lookup capabilities that indicate late binding is now an approved practice for .NET Frame-work developers. With dynamic lookup, you can code access to methods, properties, indexer properties and fi elds in a way that bypasses static type checking to be resolved at run time.
C# 4.0 also enables optional parameters by recognizing default value in a member declaration. Th is means that when a member with optional parameters is invoked, optional arguments can be omitted. Furthermore, arguments can be passed by name as well as by position. At the end of the day, improved COM binding in C# 4.0
simply means that some common features of scripting languages are now supported by an otherwise static and strongly typed language. Before we look at how you can leverage the new dynamic keyword to operate seamlessly with COM objects, let’s delve a bit deeper into the internal mechanics of dynamic type lookup.
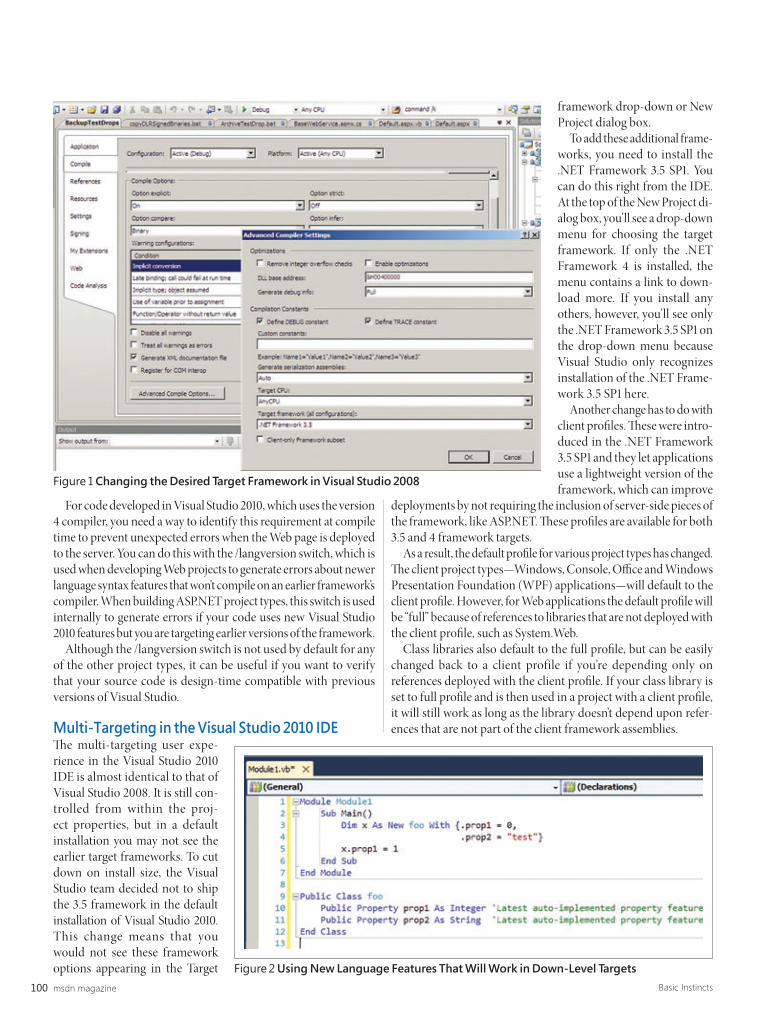
Dynamic Language RuntimeWhen you declare a variable as dynamic in Visual Studio 2010, you have no IntelliSense at all in the default confi guration. Interestingly, if you install an additional tool such as ReSharper 5.0 (jetbrains.com/resharper), you can get some partial information through Intelli Sense about the dynamic object. Figure 1 shows the code editor with and without ReSharper. Th e tool just lists the mem-bers that appear to be defi ned on the dynamic type. At the very minimum, the dynamic object is an instance of System.Object.
Let’s see what happens when the compiler encounters the following code (the code is deliberately trivial to simplify under-standing the implementation details):
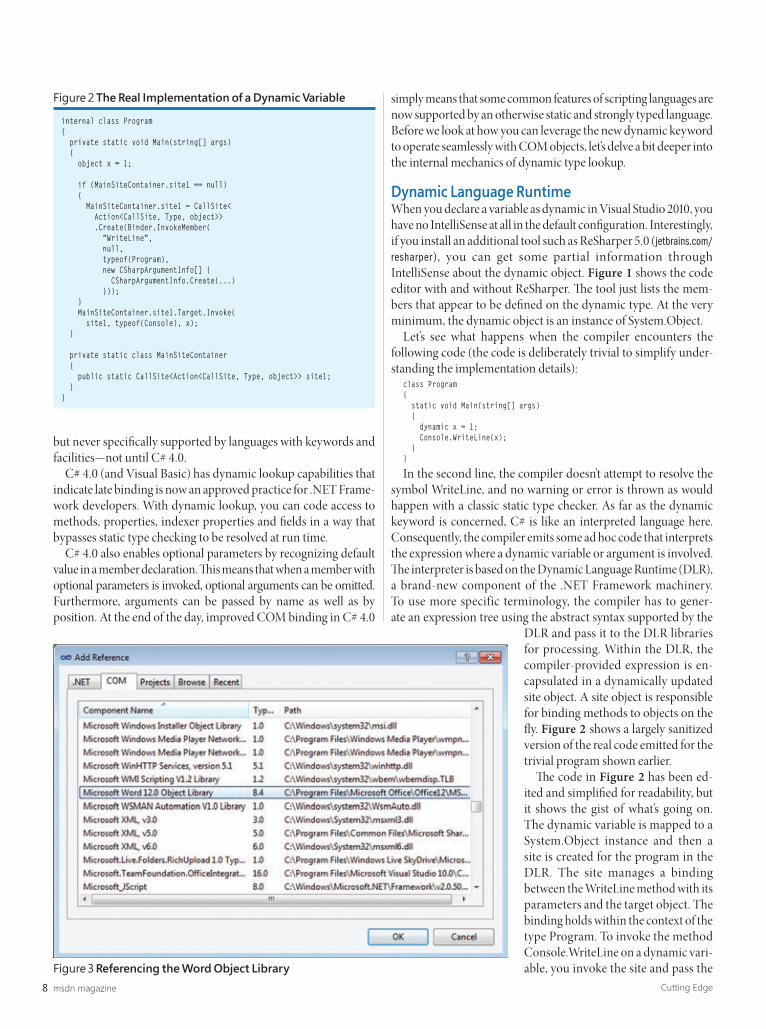
class Program{ static void Main(string[] args) { dynamic x = 1; Console.WriteLine(x); }}
In the second line, the compiler doesn’t attempt to resolve the symbol WriteLine, and no warning or error is thrown as would happen with a classic static type checker. As far as the dynamic keyword is concerned, C# is like an interpreted language here. Consequently, the compiler emits some ad hoc code that interprets the expression where a dynamic variable or argument is involved. Th e interpreter is based on the Dynamic Language Runtime (DLR), a brand-new component of the .NET Framework machinery. To use more specific terminology, the compiler has to gener-ate an expression tree using the abstract syntax supported by the
DLR and pass it to the DLR libraries for processing. Within the DLR, the compiler- provided expression is en-capsulated in a dynamically updated site object. A site object is responsible for binding methods to objects on the fl y. Figure 2 shows a largely sanitized version of the real code emitted for the trivial program shown earlier.
Th e code in Figure 2 has been ed-ited and simplifi ed for readability, but it shows the gist of what’s going on. The dynamic variable is mapped to a System.Object instance and then a site is created for the program in the DLR. The site manages a binding between the WriteLine method with its parameters and the target object. The binding holds within the context of the type Program. To invoke the method Console.WriteLine on a dynamic vari-able, you invoke the site and pass the
internal class Program{ private static void Main(string[] args) { object x = 1;
target object (in this case the Console type) and its parameters (in this case the dynamic variable). Internally, the site will check whether the target object really has a member WriteLine that can accept a parameter like the object currently stored in the variable x. If something goes wrong, the C# runtime just throws RuntimeBinderException.
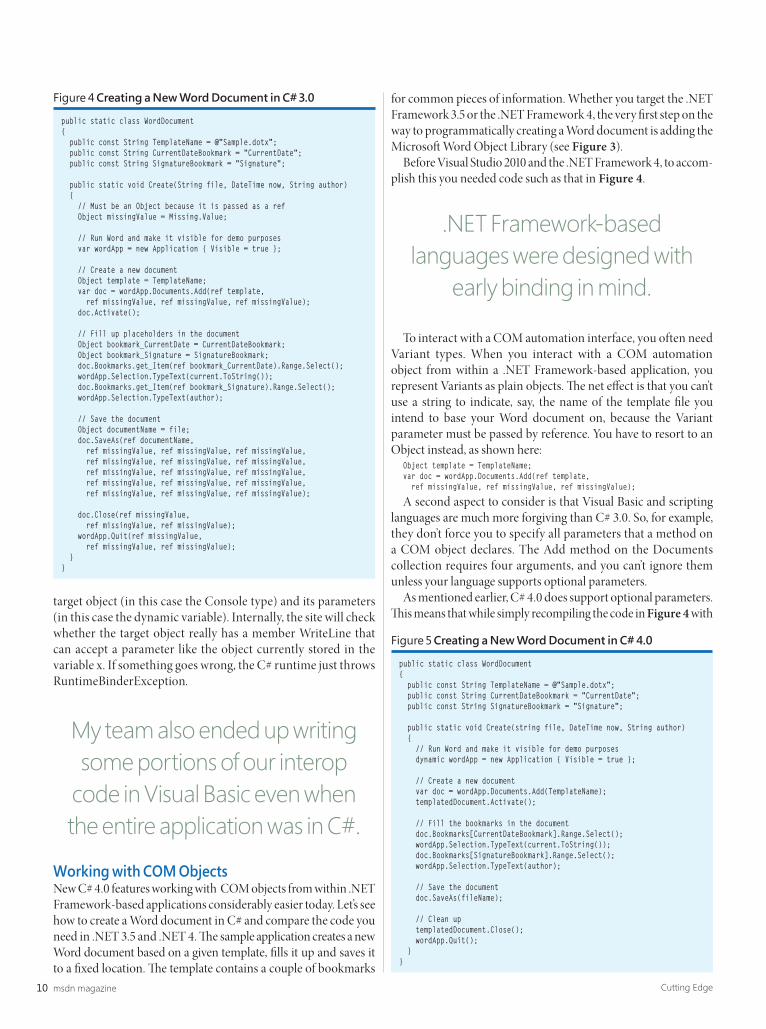
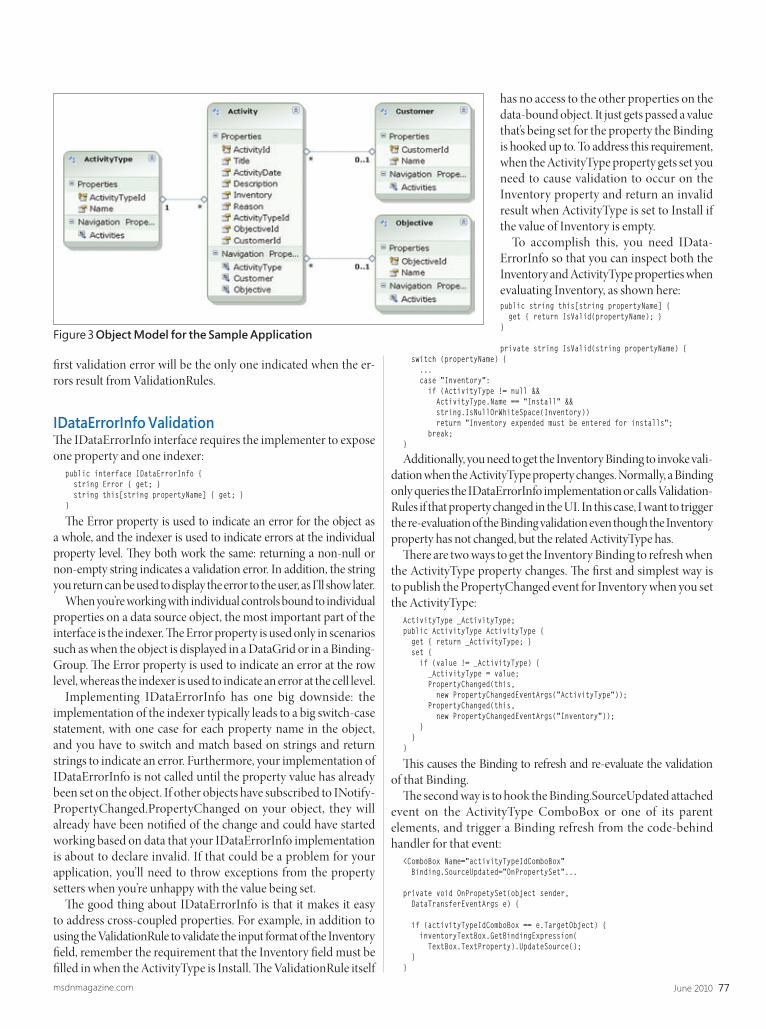
Working with COM ObjectsNew C# 4.0 features working with COM objects from within .NET Framework-based applications considerably easier today. Let’s see how to create a Word document in C# and compare the code you need in .NET 3.5 and .NET 4. Th e sample application creates a new Word document based on a given template, fi lls it up and saves it to a fi xed location. Th e template contains a couple of bookmarks
for common pieces of information. Whether you target the .NET Framework 3.5 or the .NET Framework 4, the very fi rst step on the way to programmatically creating a Word document is adding the Microsoft Word Object Library (see Figure 3).
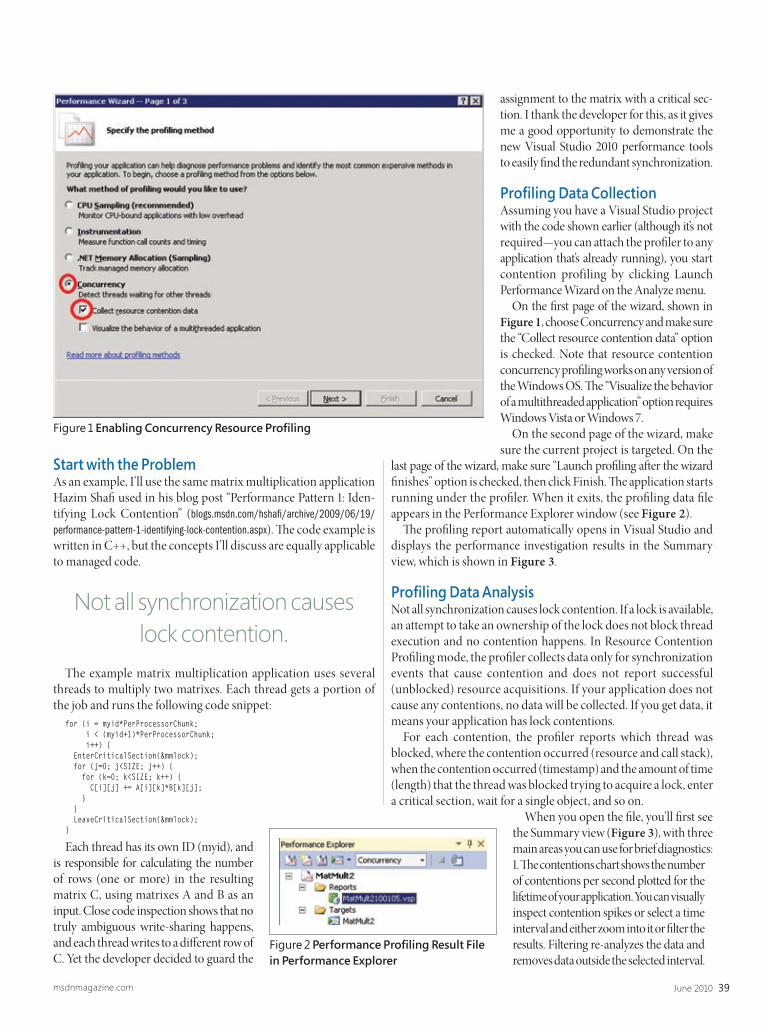
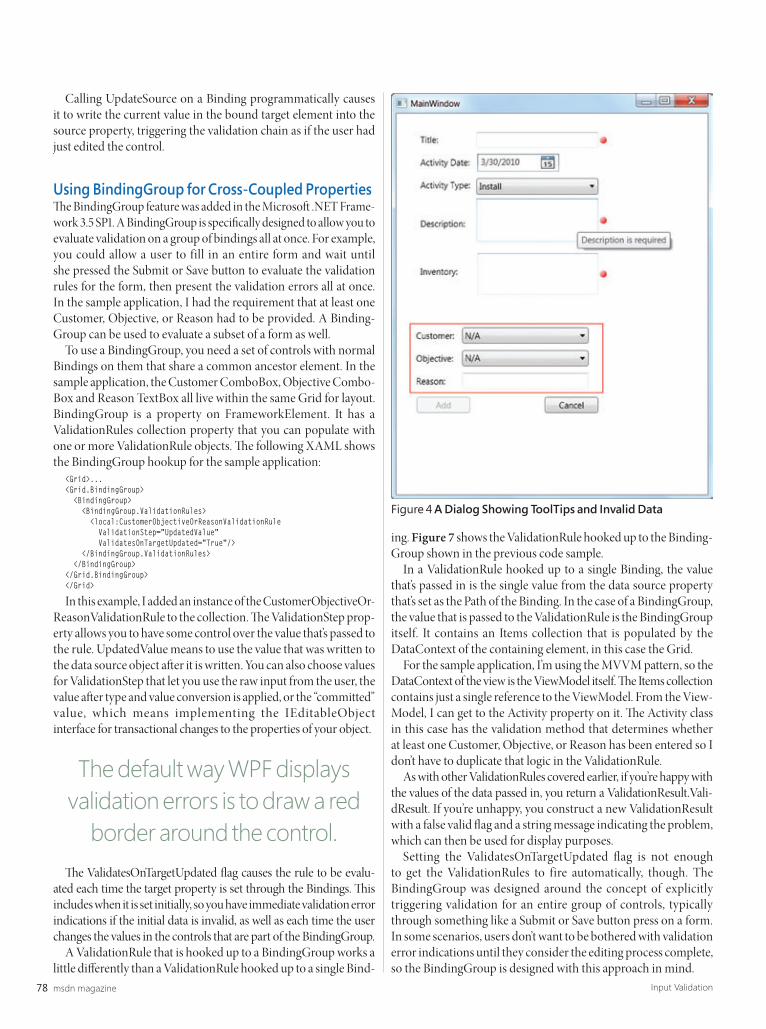
Before Visual Studio 2010 and the .NET Framework 4, to accom-plish this you needed code such as that in Figure 4.
To interact with a COM automation interface, you often need Variant types. When you interact with a COM automation object from within a .NET Framework-based application, you represent Variants as plain objects. Th e net eff ect is that you can’t use a string to indicate, say, the name of the template fi le you intend to base your Word document on, because the Variant parameter must be passed by reference. You have to resort to an Object instead, as shown here:
A second aspect to consider is that Visual Basic and scripting languages are much more forgiving than C# 3.0. So, for example, they don’t force you to specify all parameters that a method on a COM object declares. The Add method on the Documents collection requires four arguments, and you can’t ignore them unless your language supports optional parameters.
As mentioned earlier, C# 4.0 does support optional parameters. Th is means that while simply recompiling the code in Figure 4 with
public static class WordDocument{ public const String TemplateName = @"Sample.dotx"; public const String CurrentDateBookmark = "CurrentDate"; public const String SignatureBookmark = "Signature";
public static void Create(String file, DateTime now, String author) { // Must be an Object because it is passed as a ref Object missingValue = Missing.Value;
// Run Word and make it visible for demo purposes var wordApp = new Application { Visible = true };
// Create a new document Object template = TemplateName; var doc = wordApp.Documents.Add(ref template, ref missingValue, ref missingValue, ref missingValue); doc.Activate();
// Fill up placeholders in the document Object bookmark_CurrentDate = CurrentDateBookmark; Object bookmark_Signature = SignatureBookmark; doc.Bookmarks.get_Item(ref bookmark_CurrentDate).Range.Select(); wordApp.Selection.TypeText(current.ToString()); doc.Bookmarks.get_Item(ref bookmark_Signature).Range.Select(); wordApp.Selection.TypeText(author);
public static class WordDocument{ public const String TemplateName = @"Sample.dotx"; public const String CurrentDateBookmark = "CurrentDate"; public const String SignatureBookmark = "Signature";
public static void Create(string file, DateTime now, String author) { // Run Word and make it visible for demo purposes dynamic wordApp = new Application { Visible = true }; // Create a new document var doc = wordApp.Documents.Add(TemplateName); templatedDocument.Activate();
// Fill the bookmarks in the document doc.Bookmarks[CurrentDateBookmark].Range.Select(); wordApp.Selection.TypeText(current.ToString()); doc.Bookmarks[SignatureBookmark].Range.Select(); wordApp.Selection.TypeText(author);
// Save the document doc.SaveAs(fileName);
// Clean up templatedDocument.Close(); wordApp.Quit(); }}
Figure 5 Creating a New Word Document in C# 4.0
My team also ended up writing some portions of our interop
code in Visual Basic even when the entire application was in C#.
With the new C# 4.0 “Omit ref ” support, the code in Figure 4becomes even simpler and, more importantly, it becomes easier to read and syntactically similar to scripting code. Figure 5 contains the
edited version that compiles well with C# 4.0 and produces the same eff ect as the code in Figure 4.
Th e code in Figure 5 allows you to use plain .NET Framework types to make the call to the COM object. Plus, optional param-eters make it even simpler.
The dynamic keyword and other COM interop features introduced in C# 4.0 don’t make a piece of code necessarily fast-er, but it enables you to write C# code as if it were script. For COM objects, this achievement is probably as important as an increment of performance.
No PIA DeploymentSince the beginning of the .NET Framework, you could wrap a COM object into a managed class and use it from a .NET-based application. For this to happen, you need to use using a primary interop assembly (PIA) provided by the vendor of the COM ob-ject.PIAs are necessary and must be deployed along with client applications. However, more oft en than not, PIAs are too big and wrap up an entire COM API, so packing them with the setup may not be a pleasant experience.
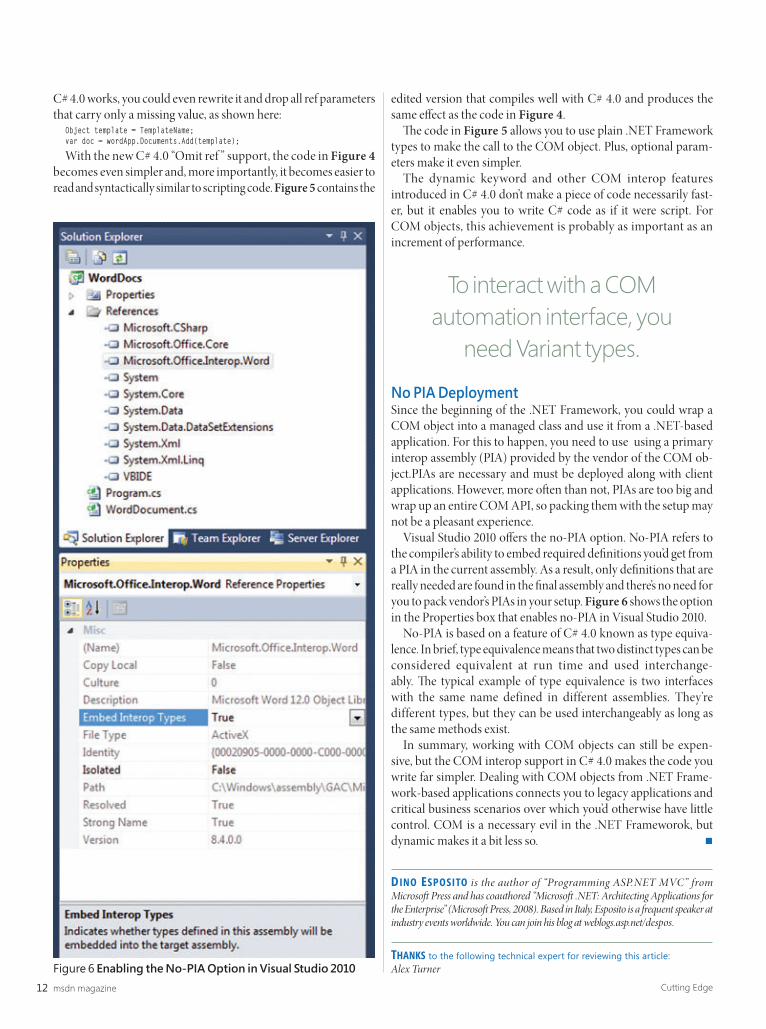
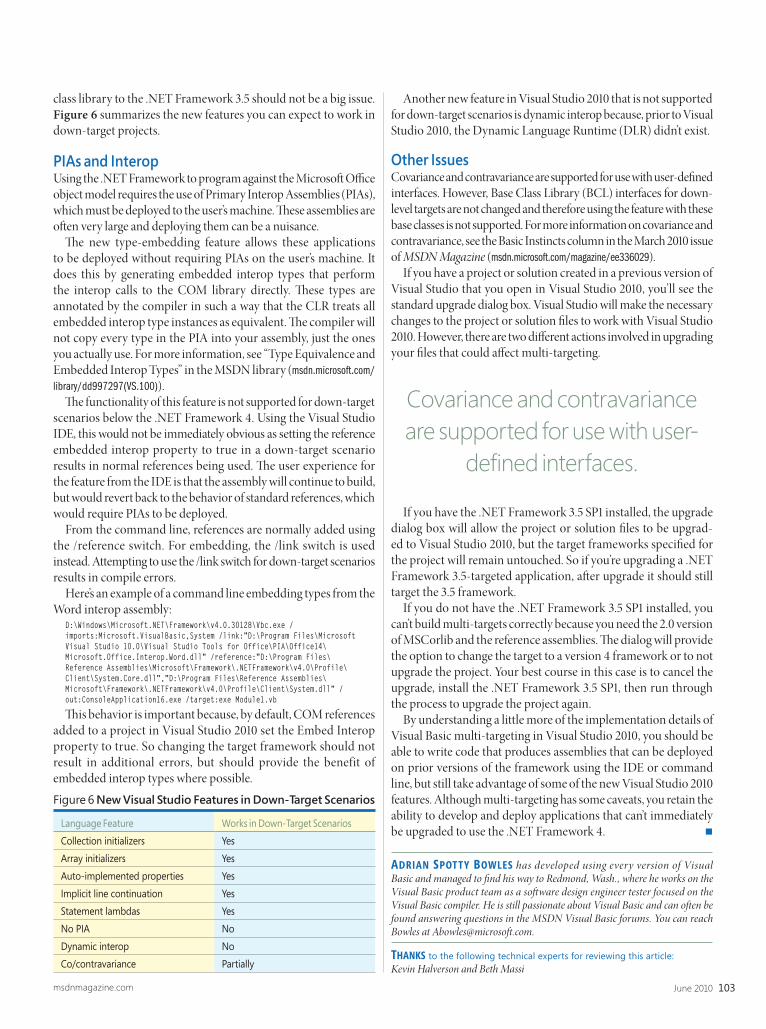
Visual Studio 2010 off ers the no-PIA option. No-PIA refers to the compiler’s ability to embed required defi nitions you’d get from a PIA in the current assembly. As a result, only defi nitions that are really needed are found in the fi nal assembly and there’s no need for you to pack vendor’s PIAs in your setup. Figure 6 shows the option in the Properties box that enables no-PIA in Visual Studio 2010.
No-PIA is based on a feature of C# 4.0 known as type equiva-lence. In brief, type equivalence means that two distinct types can be considered equivalent at run time and used interchange-ably. Th e typical example of type equivalence is two interfaces with the same name defined in different assemblies. They’re different types, but they can be used interchangeably as long as the same methods exist.
In summary, working with COM objects can still be expen-sive, but the COM interop support in C# 4.0 makes the code you write far simpler. Dealing with COM objects from .NET Frame-work-based applications connects you to legacy applications and critical business scenarios over which you’d otherwise have little control. COM is a necessary evil in the .NET Frameworok, but dynamic makes it a bit less so.
DINO ESPOSITO is the author of “Programming ASP.NET MVC” from Microsoft Press and has coauthored “Microsoft .NET: Architecting Applications for the Enterprise” (Microsoft Press, 2008). Based in Italy, Esposito is a frequent speaker at industry events worldwide. You can join his blog at weblogs.asp.net/despos.
THANKS to the following technical expert for reviewing this article: Alex TurnerFigure 6 Enabling the No-PIA Option in Visual Studio 2010
F# leverages the .NET Framework libraries for many tasks, such as accessing data from a rich variety of data sources. .NET libraries can be used from F# in the same way they are used in other .NET languages:
let http url = let req = WebRequest.Create(new Uri(url)) let resp = req.GetResponse() let stream = resp.GetResponseStream() let reader = new StreamReader(stream) reader.ReadToEnd()
F# is also an object-oriented language and can defi ne any .NET class or struct, similar to C# or Visual Basic:
type Point2D(x,y) = member this.X = x member this.Y = y member this.Magnitude = x*x + y*y member this.Translate(dx, dy) = new Point2D(x + dx, y + dy)
In addition, F# supports two special kinds of types: records and discriminated unions. Records provide a simple representation of data values with named fi elds, and discriminated unions are an expressive way to represent types that can have a number of diff erent kinds of values, with diff erent associated data in each kind:
type Person = { Name : string; HomeTown : string; BirthDate : System.DateTime }
type Tree = | Branch of Tree * Tree | Leaf of int
F# on the CLRF# is in many ways a higher-level language than C#, with its type system, syntax and language constructs being further away from the metadata and intermediate language (IL) of the CLR. Th is has a few interesting implications. Most importantly, it means F# developers can oft en solve problems and think about their programs at a higher level,
F# Fundamentals
F# is a new, functional and object-oriented programming language for the Microsoft .NET Framework, and it’s integrated into this year’s release of Microsoft Visual Studio 2010. F# combines simple, suc-cinct syntax with strong static typing, and it scales from lightweight explorative programming in the F# Interactive up to large-scale .NET Framework-based component development with Visual Studio.
F# is designed from the ground up to run on the CLR. As a .NET Framework-based language, F# leverages the rich libraries available on the .NET Framework platform, and can be used to build .NET libraries or implement .NET interfaces. F# also takes advantage of many of the CLR core features, including generics, garbage collec-tion, tail call instructions and the fundamental Common Language Infrastructure (CLI) type system.
Th is article takes a look at some of the core concepts of the F# language and its implementation on top of the CLR.
A Quick Look at F#Let’s start with a brief look at a number of the core language features in F#. For more details on any of these features and the many other interesting concepts in the F# language, see the docu-mentation available via the F# Developer Center at fsharp.net.
Th e most fundamental feature of F# is the let keyword, which binds a value to a name. Let can be used to bind both data and function values, and for both top-level and local bindings:
let data = 12
let f x = let sum = x + 1 let g y = sum + y*y g x
F# provides a few core datatypes and a language syntax for working with structured data, including lists, typed optional values and tuples:
let list1 = ["Bob"; "Jom"]
let option1 = Some("Bob")let option2 = None
let tuple1 = (1, "one", '1')
Th ese pieces of structured data, and others, can be matched against by using F# pattern matching expressions. Pattern matching is similar to using switch statements in C-like languages, but provides a richer way to both match and extract parts out of matched expressions, somewhat akin to the way regular expressions are used for pattern-matching strings:
let person = Some ("Bob", 32)
match person with| Some(name,age) -> printfn "We got %s, age %d" name age| None -> printfn "Nope, got nobody"
CLR INSIDE OUT LUKE HOBAN
Post your questions and comments on the CLR Team blog at blogs.msdn.com/clrteam.
F# is designed from the ground up to run on the CLR.
closer to the domain of the problem at hand. But it also means the F# compiler does more work in mapping F# code onto the CLR, and that the mapping is less direct.
Th e C# 1.0 compiler and the CLR were developed at the same time, and the features of both were closely aligned. Almost all C# 1.0 language constructs have a very direct representation in the CLR type system and in CIL. Th is has become less true in later C# releases as the C# language evolved faster than the CLR it-self. Iterators and anonymous methods were fundamental C# 2.0 language features that didn’t have direct CLR equivalents. In C# 3.0, query expressions and anonymous types followed this trend.
F# takes this a step further. Many of the language constructs don’t have direct IL equivalents, so features like pattern matching expressions get compiled into a rich set of IL instructions used to accomplish the pattern matching effi ciently. F# types such as records and unions automatically generate many of the members needed.
Note, however, that I’m discussing the compilation techniques used by the current F# compiler. Many of these implementation details are not directly visible to the F# developer and could be modifi ed in future versions of the F# compiler for performance optimizations or to enable new features.
Immutable By DefaultTh e basic let binding in F# is similar to var in C#, except for one very important diff erence: you can’t change the value of a let-bound name later. Th at is, values are immutable by default in F#:
let x = 5x <- 6 // error: This value is not mutable
Immutability has big benefi ts for concurrency because there is no need to worry about locking when using immutable state—it can be safely accessed from multiple threads. Immutability also tends to decrease coupling between components. Th e only way for one component to infl uence another is to make an explicit call to the components.
Mutability can be opted into in F#, and is oft en used when calling other .NET libraries, or to optimize particular code paths:
let mutable y = 5y <- 6
Similarly, types in F# are immutable by default: let bob = { Name = "Bob"; HomeTown = "Seattle" }// error: This field is not mutablebob.HomeTown <- "New York"
let bobJr = { bob with HomeTown = "Seattle" }
In this example, when mutation is not available, it’s common to instead use copy-and-update to make a new copy from an old one while changing one or more fi elds. Although a new object is created, it shares many pieces with the original. In this example,
only a single string—“Bob”—is needed. Th is sharing is an important part of the performance of immutability.
Sharing can also be seen in F# collections. For example, the F# list type is a linked-list data structure that can share a tail with other lists.
Because of the copy-and-update and sharing inherent in pro-gramming with immutable objects, the performance profi le of these programs is oft en quite diff erent from typical imperative programs.
Th e CLR plays a big role here. Immutable programming tends to create more short-lived objects as a result of transforming data rather than changing it in place. Th e CLR garbage collector (GC)deals well with these. Short-lived small objects are relatively very cheap due to the generational mark-and-sweep used by the CLR GC.
FunctionsF# is a functional language and, not surprisingly, functions play an important role throughout the language. Functions are a fi rst-class part of the F# type system. For example, the type “char -> int” represents F# functions that take a char and return an int.
Although similar to .NET delegates, F# functions have two important diff erences. First, they’re not nominal. Any function that takes a char and returns an int is of type “char -> int”, whereas multiple differently named delegates may be used to represent functions of this signature, and are not interchangeable.
Second, F# functions are designed to effi ciently support either partial or full application. Partial application is when a function with multiple parameters is given only a subset of the parameters, thus resulting in a new function that takes the remaining parameters.
let add x y = x + y
let add3a = add 3let add3b y = add 3 ylet add3c = fun y -> add 3 y
All fi rst-class F# function values are instances of a type FSharp-Func<, > as defi ned in the F# runtime library, FSharp.Core.dll. When using an F# library from C#, this is the type that all F# function values taken as parameters or returned from methods will have. Th is class looks roughly like the following (if you were defi ning it in C#):
public abstract class FSharpFunc<T, TResult> { public abstract TResult Invoke(T arg);}
Note in particular that all F# functions fundamentally take a single argument and produce a single result. Th is captures the concept of partial application—an F# function with multiple parameters will actually be an instance of a type like:
FSharpFunc<int, FSharpFunc<char, bool>>
Th at is, a function that takes an int and returns another function, which itself takes a char and returns a bool. Th e common case of full application is made fast by using a set of helper types in the F# core library.
When an F# function value is created using a lambda expression (the fun keyword), or as a result of a partial application of anoth-er function (as in the add3a case shown earlier), the F# compiler generates a closure class:
internal class Add3Closure : FSharpFunc<int, int> { public override int Invoke(int arg) { return arg + 3; }}
F# supports two special kinds of types: records and
discriminated unions.
19June 2010msdnmagazine.com
These closures are similar to closures created by the C# and Visual Basic compilers for their lambda expression constructs. Closures are one of the most common compiler-generated constructs on the .NET Framework platform that do not have di-rect CLR-level support. Th ey exist in almost all .NET programming languages and are used especially heavily by F#.
Function objects are common in F#, so the F# compiler uses many optimization techniques to avoid the need to allocate these closures. Using inlining, lambda-lifting, and direct represen-tation as .NET methods when possible, the internal code gen-erated by the F# compiler will oft en look somewhat diff erent than described here.
Type Inference and GenericsOne notable feature of all the code examples so far is the lack of any type annotation. Although F# is a statically typed programming language, explicit type annotations are oft en not needed because F# makes extensive use of type inference.
Type inference will be familiar to C# and Visual Basic developers who use it for local variables, as in this C# 3.0 code:
var name = "John";
Th e let keyword in F# is similar, but type inference in F# goes substantially further, applying also to fi elds, parameters and return types. In the following example, the two fi elds x and y are inferred to have type int, which is the default for the + and * operators used on these values within the body of the type defi nition. Th e Translate method is inferred to have type “Translate : int * int -> Point2D”:
type Point2D(x,y) = member this.X = x member this.Y = y member this.Magnitude = x*x + y*y member this.Translate(dx, dy) = new Point2D(x + dx, y + dy)
Of course, type annotations can be used when needed or desired to tell the F# compiler what type is really expected for a certain value, fi eld or parameter. Th is information will then be used for type inference. For example, you can change the defi nition of Point2D to use fl oat instead of int by adding just a couple of type annotations:
type Point2D(x : float,y : float) = member this.X = x member this.Y = y member this.Magnitude = x*x + y*y member this.Translate(dx, dy) = new Point2D(x + dx, y + dy)
One of the important results of type inference is that functions not tied to a specific type are automatically generalized to be generic functions. So your code will become as generic as possible without you needing to explicitly specify all the generic types. Th is causes generics to play a fundamental role in F#. Th e compositional style of functional programming with F# also encourages small
reusable pieces of functionality, which benefi t greatly from being as generic as possible. Th e ability to author generic functions with-out the complex type annotations is an important feature of F#.
For example, the following map function walks a list of values and generates a new list by applying its argument function f to each element:
let rec map f values = match values with | [] -> [] | x :: rest -> (f x) :: (map f rest)
Note that there are no type annotations needed, but the type inferred for map is “map : ('a -> 'b) -> list<'a> -> list<'b>”. F# is able to infer from the use of pattern matching, and from the use of the parameter f as a function, that the types of the two parameters have a certain shape, but are not completely fi xed. So F# makes the function as generic as possible while still having the types needed by the implementation. Note that generic parameters in F# are indicated using a leading ' character, to distinguish them syntacti-cally from other names.
Don Syme, the designer of F#, was previously the lead researcher and developer on the implementation of generics in the .NET Framework 2.0. The concept of a language like F# critically depends on having generics in the runtime, and Syme’s interest in doing F# came in part from wanting to really take advantage of this CLR feature. F# leverages .NET generics heavily; for example, the implementation of the F# compiler itself has more than 9,000 ge-neric type parameters.
Ultimately, type inference is just a compile-time feature, though, and every piece of F# code gets an inferred type that’s encoded in the CLR metadata for an F# assembly.
Tail CallsImmutability and functional programming tend to encourage the use of recursion as a computational tool in F#. For example, an F# list can be walked and the sum of the squares of the values in the list collected using a simple piece of recursive F# code:
let rec sumOfSquares nums = match nums with | [] -> 0 | n :: rest -> (n*n) + sumOfSquares rest
While recursion is oft en convenient, it can use a lot of space on the call stack because each iteration adds a new stack frame. For suffi ciently large inputs this can even lead to stack-overfl ow exceptions. To avoid this stack growth, recursive code can be written tail-recursively, meaning that recursive calls are always the last thing done, just before the function returns:
let rec sumOfSquaresAcc nums acc = match nums with | [] -> acc | n :: rest -> sumOfSquaresAcc rest (acc + n*n)
F# is in many ways a higher-level language than C#.
Every piece of F# code gets an inferred type that’s encoded
Th e F# compiler implements tail-recursive functions using two techniques that aim to ensure the stack will not grow. For direct tail calls to the same function being defi ned, such as the call to sumOfSquaresAcc, the F# compiler automatically converts the recursive call into a while loop, thus avoiding making any call at all, and generating code very similar to an imperative implementation of the same function.
Tail recursion is not always as simple as this, though, and can instead be a result of multiple mutually recursive functions. In this case, the F# compiler relies on the CLR native support for tail calls.
The CLR has an IL instruction specifically to help with tail recursion: the tail. IL prefi x. Th e tail. instruction tells the CLR it can discard the caller’s method state prior to making the associat-ed call. Th is means that the stack will not grow when taking this call. It also means, at least in principle, that it may be possible for the JIT to make the call effi ciently using just a jump instruction. This is useful for F#, and ensures that tail recursion is safe in almost all cases:
IL_0009: tail.IL_000b: call bool Program/SixThirtyEight::odd(int32)IL_0010: ret
In CLR 4.0, a few key improvements have been made to the treatment of tail calls. Th e x64 JIT had previously implemented tail calls very effi ciently, but using a technique that could not be applied to all cases where the tail. instruction appeared. Th is meant some F# code that ran successfully on x86 platforms would fail with a stack overfl ow on x64 platforms. In CLR 4.0, the x64 JIT extends its effi cient implementation of tail calls to more cases, and also imple-ments the higher-overhead mechanism needed to ensure that tail calls are taken anytime they would be on the x86 JIT.
A detailed account of the CLR 4.0 improvements for tail calls is avail-able on the CLR Code Generation blog (blogs.msdn.com/clrcodegeneration/archive/2009/05/11/tail-call-improvements-in-net-framework-4.aspx).
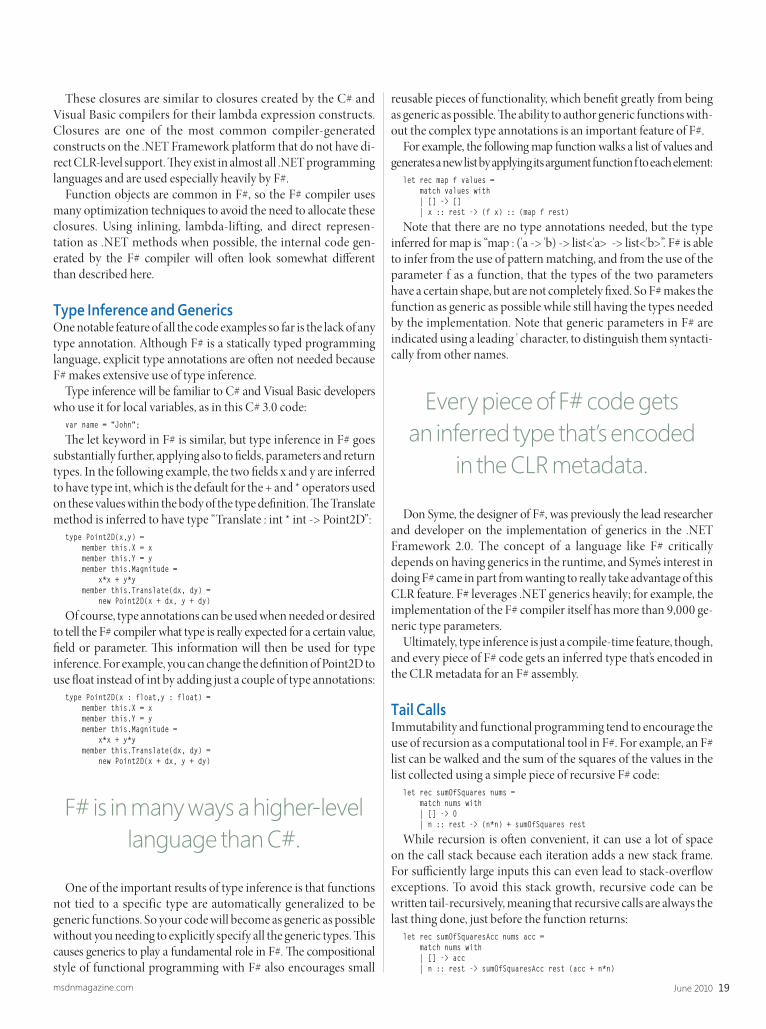
F# InteractiveF# Interactive is a command-line tool and Visual Studio tool window for interactively executing F# code (see Figure 1). Th is tool makes it easy to experiment with data, explore APIs and test application logic using F#.
F# Interactive is made possible by the CLR Refl ection.Emit API. Th is API allows a program to generate new types and members at run time and call into this new code dynamically. F# Interactive uses the F# compiler to compile code the user inputs at the prompt, then uses Reflection.Emit to generate the types, functions and members instead of writing an assembly to disk.
One key result of this approach is that the user code being exe-cuted is fully compiled and fully JITed, including all the useful optimizations in both of these
steps, instead of being an interpreted version of F#. Th at makes the F# Interactive an excellent, high-performance environment for trying out new problem-solving approaches and interactively exploring large datasets.
TuplesTuples in F# provide a simple way to package data and pass it around as a unit, without needing to defi ne new custom types or use complicated parameter schemes such as out parameters to return multiple values.
let printPersonData (name, age) = printfn "%s is %d years old" name age
let bob = ("Bob", 34)
printPersonData bob
let divMod n m = n / m, n % m
let d,m = divMod 10 3
Tuples are simple types, but have a few important properties in F#. Most signifi cantly, they’re immutable. Once constructed, the elements of a tuple cannot be modifi ed. Th is allows tuples to be safely treated as just a combination of their elements. It also enables another important feature of tuples: structural equality. Tuples and other F# types such as lists, options, and user-defi ned records and unions are compared for equality by comparing their elements.
In the .NET Framework 4, tuples are now a core datatype defined in the base class libraries. When targeting the .NET Framework 4, F# uses the System.Tuple type to represent these values. Having support for this core type in mscorlib means F# users can easily share tuples with C# APIs and vice versa.
Although tuples are conceptually simple types, there are many interesting design decisions involved in building the System.Tuple
Figure 1 Executing Code in F# Interactive
F# Interactive is made possible by the CLRRefl ection.Emit API.
type. Matt Ellis covered the design process for Tuple in detail in a recent CLR Inside Out column (msdn.microsoft.com/magazine/dd942829).
OptimizationsBecause F# translates less directly to the CLR instructions, there’s more room for optimization to be done in the F# compiler instead of just relying on the CLR JIT compiler. Th e F# compiler takes advantage of this and implements more signifi cant optimizations in Release mode than the C# and Visual Basic compilers.
One simple example is intermediate tuple elimination. Tuples are frequently used to structure data while it’s being processed. It’s common for tuples to be created and then deconstructed within a single function body. When this happens, there’s an unnecessary allocation of a tuple object. Because the F# compiler knows that creating and deconstructing a tuple can’t have any important side eff ects, it will attempt to avoid allocating the intermediate tuple.
In this example, no tuple object needs to be allocated, as it is used only by being deconstructed in the pattern match expression:
let getValueIfBothAreSame x y = match (x,y) with | (Some a, Some b) when a = b -> Some a |_ -> None
Units of MeasureUnits of measure, like meters and seconds, are commonly used in science, engineering and simulation, and are fundamentally a type system for working with numerical quantities of diff erent kinds. In F#, units of measure are brought into the language’s type system directly so that numerical quantities can be annotated with their units. Th ese units are carried through computations, and errors are reported when units do not match. In the following example, it’s an error to try to add kilograms and seconds, though note that it’s not an error to divide kilograms by seconds.
/// Kilograms[<Measure>] type kg/// Seconds[<Measure>] type s let x = 3.0<kg>//val x : float<kg>
let y = 2.5<s>// val y : float<s>
let z = x / y//val z : float<kg/s>
let w = x + y// Error: "The unit of measure 's' // does not match the unit of measure 'kg'"
Units of measure become a fairly lightweight addition thanks to F# type inference. Using type inference, user-provided unit annotations need to appear only on literals and when accepting data from outside sources. Type inference then propagates these through the program, and checks that all computations are being done correctly according to the units being used.
Although part of the F# type system, units of measure are erased at compilation time. Th is means the resulting .NET assembly does not include the information about units, and the CLR just treats unitized values as their underlying type—thereby incurring no performance overhead. Th is is in contrast to .NET generics, which are fully available at run time.
If, in the future, the CLR were to integrate units of measure into the core CLR type system, F# would be able to expose the unit information so it could be seen from other.NET programming languages.
Get Interactive with F#As you’ve seen, F# provides an expressive, functional, object-oriented and explorative programming language for the .NET Framework. It’s integrated into Visual Studio 2010—including the F# Interactive tools for jumping straight in and experimenting with the language.
Th e language and tools leverage the full breadth of the CLR and introduce some higher-level concepts that are mapped onto the meta-data and IL of the CLR. Yet F# is ultimately just another .NET language and can be easily incorporated as a component of new or existing .NET projects, thanks to the common type system and runtime.
LUKE HOBAN is the program manager for the F# team at Microsoft . Before mov-ing to the F# team, he was the program manager for the C# compiler and worked on C# 3.0 and LINQ.
Once constructed, the elements of a tuple cannot be modifi ed.
Address Scalability Bottlenecks with Distributed Caching
After the explosion of Web applications to accommodate high-traffi c usage, the next big wave has become service-oriented architecture (SOA). SOA is destined to become a standard way for developing extremely scalable applications, and cloud computing platforms like Windows Azure represent a giant leap in moving SOA toward achieving this goal.
SOA allows users to distribute applications to multiple locations, multiple departments within an organization, and multiple busi-nesses across the Internet. Plus, it permits reuse of existing code within an organization and, more importantly, collaboration among diff erent business units.
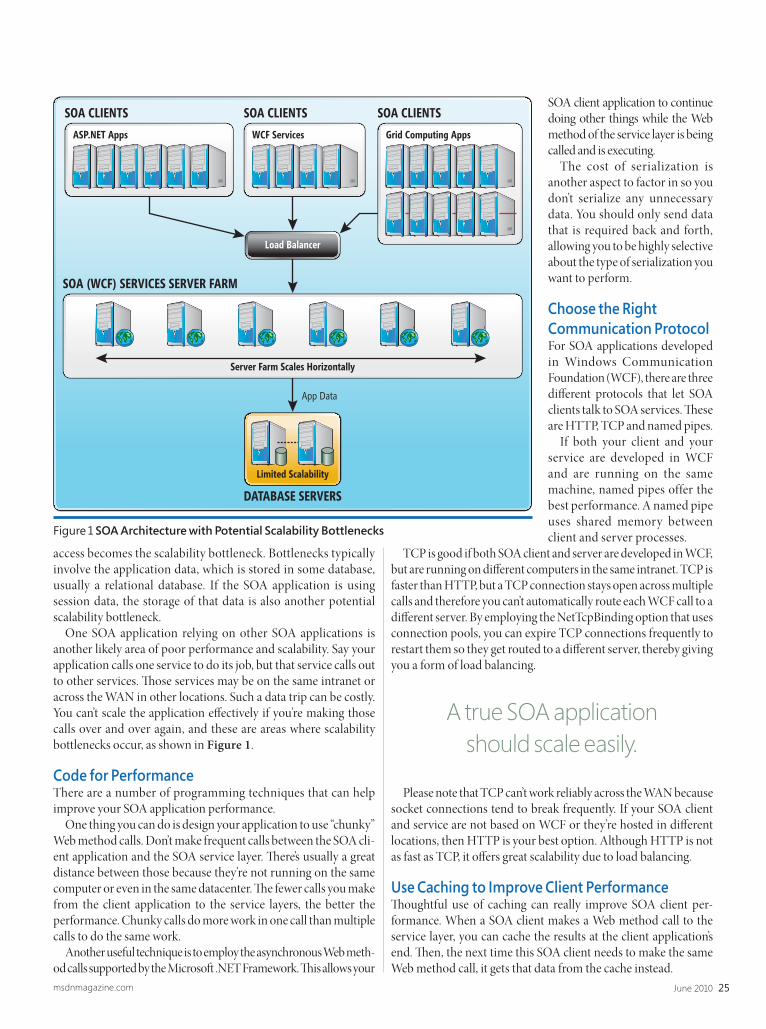
A SOA application is usually deployed in a server farm in a load-balanced environment. Th e goal is to allow the application to han-dle as much load as you throw at it. Th e question thus becomes: What are some of the considerations you should have in mind for improving both performance and scalability of your SOA application?
Iqbal Khan
Although SOA, by design, is intended to provide scalability, there are many issues you must address before you can truly achieve scalability. Some of these issues involve how you code your SOA application, but the most important bottlenecks oft en relate to how you store and access your data. I’ll explore those issues and provide some solutions in this article.
Find Scalability BottlenecksA true SOA application should scale easily as far as the application architecture is concerned. A SOA application has two components: service components and client applications. Th e client application may be a Web application, another service or any other application that relies on the SOA service components to do its job.
One of the key ideas behind SOA is to break up the applica-tion into small chunks so these components can be run on multiple servers as separate services.
Ideally, these services should be stateless as much as possible. Stateless means they don’t retain any data with them across multiple calls, allowing you to run the services on multiple computers. There’s no dependence on where the data was the last time, so there’s no data being kept on any particular server across multiple service calls.
As a result, the architecture of SOA applications is inherently scalable. It can easily grow onto multiple servers and across data-centers. However, as with every other application, SOA applications do have to deal with the data, and that can be a problem. Th is data
This article discusses:• Code for performance
• Choose the right communication protocol
• Using a distributed cache for scalability
• Synchronizing the cache with a database
Technologies discussed:ASP.NET, Windows Communication Foundation
25June 2010msdnmagazine.com
access becomes the scalability bottleneck. Bottlenecks typically involve the application data, which is stored in some database, usually a relational database. If the SOA application is using session data, the storage of that data is also another potential scalability bottleneck.
One SOA application relying on other SOA applications is another likely area of poor performance and scalability. Say your application calls one service to do its job, but that service calls out to other services. Th ose services may be on the same intranet or across the WAN in other locations. Such a data trip can be costly. You can’t scale the application eff ectively if you’re making those calls over and over again, and these are areas where scalability bottlenecks occur, as shown in Figure 1.
Code for PerformanceThere are a number of programming techniques that can help improve your SOA application performance.
One thing you can do is design your application to use “chunky” Web method calls. Don’t make frequent calls between the SOA cli-ent application and the SOA service layer. Th ere’s usually a great distance between those because they’re not running on the same computer or even in the same datacenter. Th e fewer calls you make from the client application to the service layers, the better the performance. Chunky calls do more work in one call than multiple calls to do the same work.
Another useful technique is to employ the asynchronous Web meth-od calls supported by the Microsoft .NET Framework. Th is allows your
SOA client application to continue doing other things while the Web method of the service layer is being called and is executing.
The cost of serialization is another aspect to factor in so you don’t serialize any unnecessary data. You should only send data that is required back and forth, allowing you to be highly selective about the type of serialization you want to perform.
Choose the Right Communication ProtocolFor SOA applications developed in Windows Communication Foundation (WCF), there are three diff erent protocols that let SOA clients talk to SOA services. Th ese are HTTP, TCP and named pipes.
If both your client and your service are developed in WCF and are running on the same machine, named pipes offer the best performance. A named pipe uses shared memory between client and server processes.
TCP is good if both SOA client and server are developed in WCF, but are running on diff erent computers in the same intranet. TCP is faster than HTTP, but a TCP connection stays open across multiple calls and therefore you can’t automatically route each WCF call to a diff erent server. By employing the NetTcpBinding option that uses connection pools, you can expire TCP connections frequently to restart them so they get routed to a diff erent server, thereby giving you a form of load balancing.
Please note that TCP can’t work reliably across the WAN because socket connections tend to break frequently. If your SOA client and service are not based on WCF or they’re hosted in diff erent locations, then HTTP is your best option. Although HTTP is not as fast as TCP, it off ers great scalability due to load balancing.
Use Caching to Improve Client PerformanceTh oughtful use of caching can really improve SOA client per-formance. When a SOA client makes a Web method call to the service layer, you can cache the results at the client application’s end. Th en, the next time this SOA client needs to make the same Web method call, it gets that data from the cache instead.
Figure 1 SOA Architecture with Potential Scalability Bottlenecks
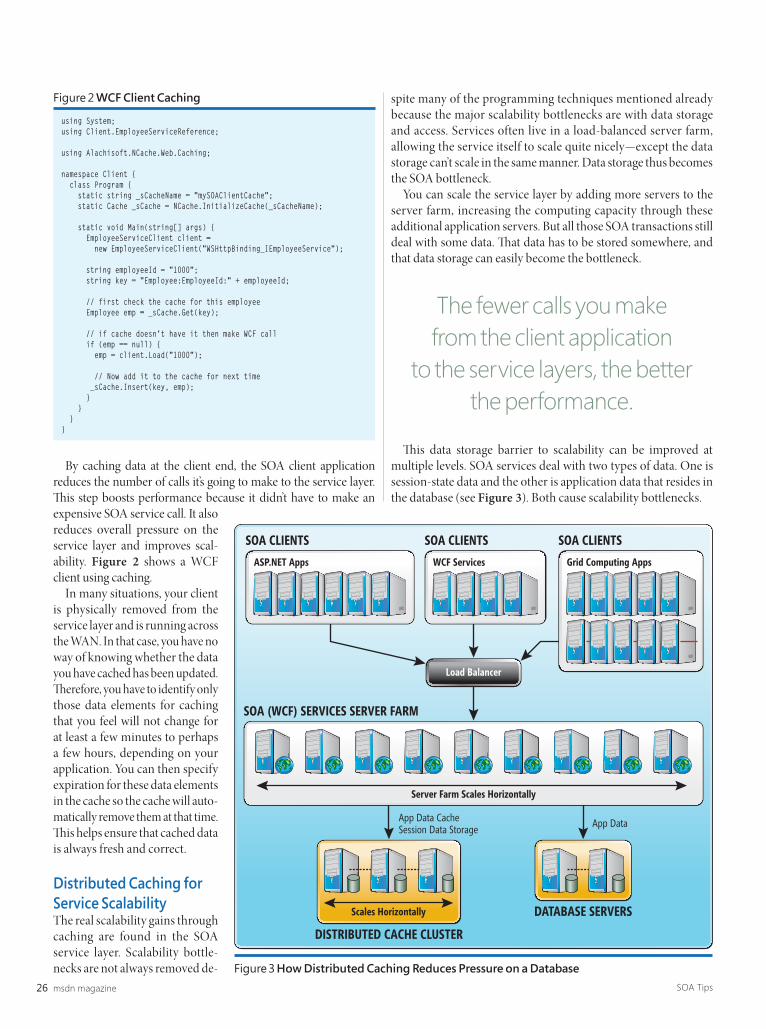
By caching data at the client end, the SOA client application reduces the number of calls it’s going to make to the service layer. Th is step boosts performance because it didn’t have to make an expensive SOA service call. It also reduces overall pressure on the service layer and improves scal-ability. Figure 2 shows a WCF client using caching.
In many situations, your client is physically removed from the service layer and is running across the WAN. In that case, you have no way of knowing whether the data you have cached has been updated. Th erefore, you have to identify only those data elements for caching that you feel will not change for at least a few minutes to perhaps a few hours, depending on your application. You can then specify expiration for these data elements in the cache so the cache will auto-matically remove them at that time. Th is helps ensure that cached data is always fresh and correct.
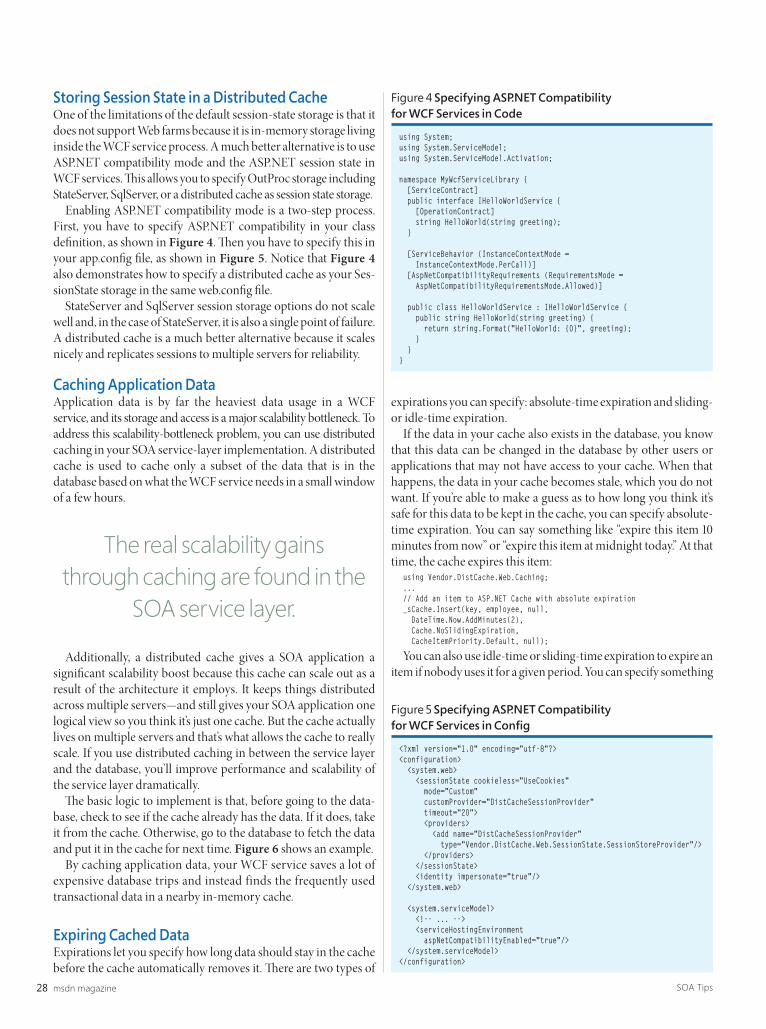
Distributed Caching for Service ScalabilityThe real scalability gains through caching are found in the SOA service layer. Scalability bottle-necks are not always removed de-
spite many of the programming techniques mentioned already because the major scalability bottlenecks are with data storage and access. Services often live in a load-balanced server farm, allowing the service itself to scale quite nicely—except the data storage can’t scale in the same manner. Data storage thus becomes the SOA bottleneck.
You can scale the service layer by adding more servers to the server farm, increasing the computing capacity through these additional application servers. But all those SOA transactions still deal with some data. Th at data has to be stored somewhere, and that data storage can easily become the bottleneck.
Th is data storage barrier to scalability can be improved at multiple levels. SOA services deal with two types of data. One is session-state data and the other is application data that resides in the database (see Figure 3). Both cause scalability bottlenecks.
Figure 3 How Distributed Caching Reduces Pressure on a Database
DATABASE SERVERS
App Data
DISTRIBUTED CACHE CLUSTER
Scales Horizontally
Load Balancer
SOA CLIENTS
ASP.NET Apps
SOA CLIENTS
WCF Services
SOA CLIENTS
Grid Computing Apps
SOA (WCF) SERVICES SERVER FARM
Server Farm Scales Horizontally
App Data CacheSession Data Storage
using System;using Client.EmployeeServiceReference;
using Alachisoft.NCache.Web.Caching;
namespace Client { class Program { static string _sCacheName = "mySOAClientCache"; static Cache _sCache = NCache.InitializeCache(_sCacheName);
static void Main(string[] args) { EmployeeServiceClient client = new EmployeeServiceClient("WSHttpBinding_IEmployeeService");
string employeeId = "1000"; string key = "Employee:EmployeeId:" + employeeId; // first check the cache for this employee Employee emp = _sCache.Get(key);
// if cache doesn't have it then make WCF call if (emp == null) { emp = client.Load("1000");
// Now add it to the cache for next time _sCache.Insert(key, emp); } } }}
Figure 2 WCF Client Caching
The fewer calls you make from the client application
to the service layers, the better the performance.
Storing Session State in a Distributed CacheOne of the limitations of the default session-state storage is that it does not support Web farms because it is in-memory storage living inside the WCF service process. A much better alternative is to use ASP.NET compatibility mode and the ASP.NET session state in WCF services. Th is allows you to specify OutProc storage including StateServer, SqlServer, or a distributed cache as session state storage.
Enabling ASP.NET compatibility mode is a two-step process. First, you have to specify ASP.NET compatibility in your class defi nition, as shown in Figure 4. Th en you have to specify this in your app.confi g fi le, as shown in Figure 5. Notice that Figure 4also demonstrates how to specify a distributed cache as your Ses-sionState storage in the same web.confi g fi le.
StateServer and SqlServer session storage options do not scale well and, in the case of StateServer, it is also a single point of failure. A distributed cache is a much better alternative because it scales nicely and replicates sessions to multiple servers for reliability.
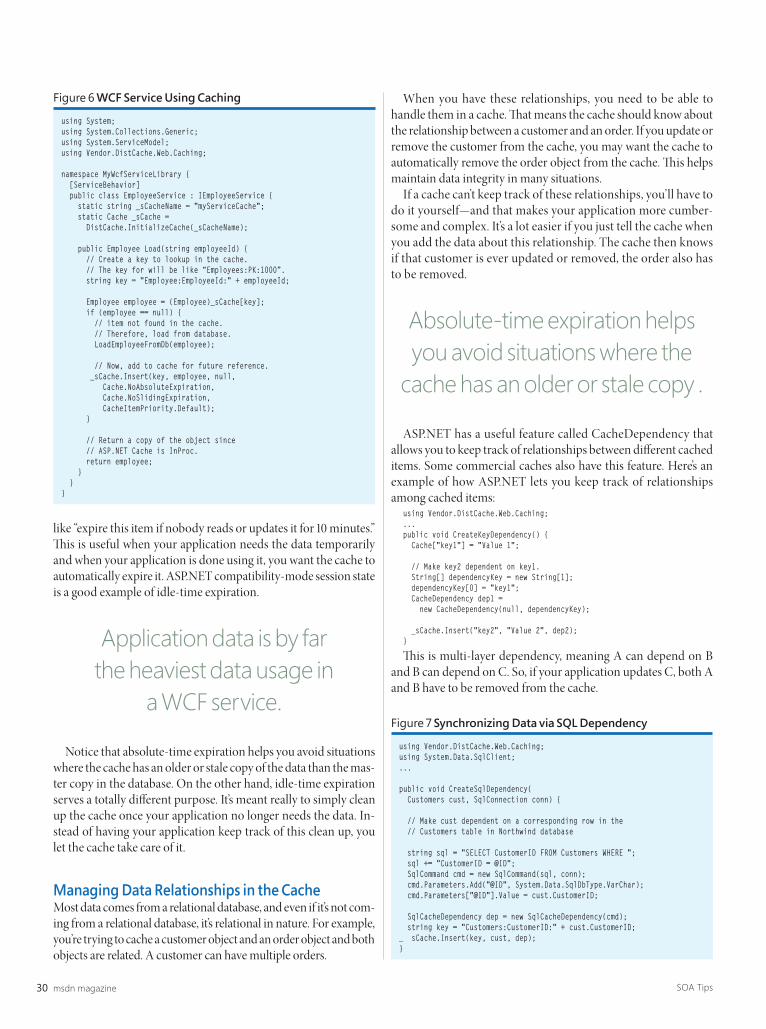
Caching Application DataApplication data is by far the heaviest data usage in a WCF service, and its storage and access is a major scalability bottleneck. To address this scalability-bottleneck problem, you can use distributed caching in your SOA service-layer implementation. A distributed cache is used to cache only a subset of the data that is in the database based on what the WCF service needs in a small window of a few hours.
Additionally, a distributed cache gives a SOA application a signifi cant scalability boost because this cache can scale out as a result of the architecture it employs. It keeps things distributed across multiple servers—and still gives your SOA application one logical view so you think it’s just one cache. But the cache actually lives on multiple servers and that’s what allows the cache to really scale. If you use distributed caching in between the service layer and the database, you’ll improve performance and scalability of the service layer dramatically.
Th e basic logic to implement is that, before going to the data-base, check to see if the cache already has the data. If it does, take it from the cache. Otherwise, go to the database to fetch the data and put it in the cache for next time. Figure 6 shows an example.
By caching application data, your WCF service saves a lot of expensive database trips and instead finds the frequently used transactional data in a nearby in-memory cache.
Expiring Cached DataExpirations let you specify how long data should stay in the cache before the cache automatically removes it. Th ere are two types of
expirations you can specify: absolute-time expiration and sliding- or idle-time expiration.
If the data in your cache also exists in the database, you know that this data can be changed in the database by other users or applications that may not have access to your cache. When that happens, the data in your cache becomes stale, which you do not want. If you’re able to make a guess as to how long you think it’s safe for this data to be kept in the cache, you can specify absolute-time expiration. You can say something like “expire this item 10 minutes from now” or “expire this item at midnight today.” At that time, the cache expires this item:
using Vendor.DistCache.Web.Caching;...// Add an item to ASP.NET Cache with absolute expiration_sCache.Insert(key, employee, null, DateTime.Now.AddMinutes(2), Cache.NoSlidingExpiration, CacheItemPriority.Default, null);
You can also use idle-time or sliding-time expiration to expire an item if nobody uses it for a given period. You can specify something
The real scalability gains through caching are found in the
SOA service layer.
using System;using System.ServiceModel;using System.ServiceModel.Activation;
like “expire this item if nobody reads or updates it for 10 minutes.” Th is is useful when your application needs the data temporarily and when your application is done using it, you want the cache to automatically expire it. ASP.NET compatibility-mode session state is a good example of idle-time expiration.
Notice that absolute-time expiration helps you avoid situations where the cache has an older or stale copy of the data than the mas-ter copy in the database. On the other hand, idle-time expiration serves a totally diff erent purpose. It’s meant really to simply clean up the cache once your application no longer needs the data. In-stead of having your application keep track of this clean up, you let the cache take care of it.
Managing Data Relationships in the CacheMost data comes from a relational database, and even if it’s not com-ing from a relational database, it’s relational in nature. For example, you’re trying to cache a customer object and an order object and both objects are related. A customer can have multiple orders.
When you have these relationships, you need to be able to handle them in a cache. Th at means the cache should know about the relationship between a customer and an order. If you update or remove the customer from the cache, you may want the cache to automatically remove the order object from the cache. Th is helps maintain data integrity in many situations.
If a cache can’t keep track of these relationships, you’ll have to do it yourself—and that makes your application more cumber-some and complex. It’s a lot easier if you just tell the cache when you add the data about this relationship. The cache then knows if that customer is ever updated or removed, the order also has to be removed.
ASP.NET has a useful feature called CacheDependency that allows you to keep track of relationships between diff erent cached items. Some commercial caches also have this feature. Here’s an example of how ASP.NET lets you keep track of relationships among cached items:
using Vendor.DistCache.Web.Caching;...public void CreateKeyDependency() { Cache["key1"] = "Value 1";
// Make key2 dependent on key1. String[] dependencyKey = new String[1]; dependencyKey[0] = "key1"; CacheDependency dep1 = new CacheDependency(null, dependencyKey);
_sCache.Insert("key2", "Value 2", dep2);}
Th is is multi-layer dependency, meaning A can depend on B and B can depend on C. So, if your application updates C, both A and B have to be removed from the cache.
using System;using System.Collections.Generic;using System.ServiceModel;using Vendor.DistCache.Web.Caching;
namespace MyWcfServiceLibrary { [ServiceBehavior] public class EmployeeService : IEmployeeService { static string _sCacheName = "myServiceCache"; static Cache _sCache = DistCache.InitializeCache(_sCacheName);
public Employee Load(string employeeId) { // Create a key to lookup in the cache. // The key for will be like “Employees:PK:1000”. string key = "Employee:EmployeeId:" + employeeId;
Employee employee = (Employee)_sCache[key]; if (employee == null) { // item not found in the cache. // Therefore, load from database. LoadEmployeeFromDb(employee);
// Now, add to cache for future reference. _sCache.Insert(key, employee, null, Cache.NoAbsoluteExpiration, Cache.NoSlidingExpiration, CacheItemPriority.Default); }
// Return a copy of the object since // ASP.NET Cache is InProc. return employee; } }}
Figure 6 WCF Service Using Caching
Application data is by far the heaviest data usage in
a WCF service.
Absolute-time expiration helps you avoid situations where the
cache has an older or stale copy .
using Vendor.DistCache.Web.Caching;using System.Data.SqlClient;...
public void CreateSqlDependency( Customers cust, SqlConnection conn) {
// Make cust dependent on a corresponding row in the // Customers table in Northwind database
string sql = "SELECT CustomerID FROM Customers WHERE "; sql += "CustomerID = @ID"; SqlCommand cmd = new SqlCommand(sql, conn); cmd.Parameters.Add("@ID", System.Data.SqlDbType.VarChar); cmd.Parameters["@ID"].Value = cust.CustomerID;
SqlCacheDependency dep = new SqlCacheDependency(cmd); string key = "Customers:CustomerID:" + cust.CustomerID;_ sCache.Insert(key, cust, dep);}
Synchronizing the Cache with a DatabaseTh e need for database synchroniza-tion arises because the database is really being shared across multiple applications, and not all of those ap-plications have access to your cache. If your WCF service application is the only one updating the database and it can also easily update the cache, you probably don’t need the database-synchronization capability.
But, in a real-life environment, that’s not always the case. Th ird-party applications update data in the database and your cache becomes inconsistent with the database. Syn-chronizing your cache with the data-base ensures that the cache is always aware of these database changes and can update itself accordingly.
Synchronizing with the database usually means invalidating the related cached item from the cache so the next time your appli-cation needs it, it will have to fetch it from the database because the cache doesn’t have it.
ASP.NET has a SqlCacheDependency feature that allows you to synchronize the cache with SQL Server 2005, SQL Server 2008 or Oracle 10g R2 and later—basically any database that supports the CLR. Some of the commercial caches also provide this capability. Figure 7 shows an example of using SQL dependency to synchronize with a relational database.
One capability that ASP.NET does not provide, but some com-mercial solutions do, is polling-based database synchronization. Th is is handy if your DBMS doesn’t support the CLR and you can’t benefi t from SqlCacheDependency. In that case, it would be nice if your cache could poll your database at confi gurable intervals and detect changes in certain rows in a table. If those rows have changed, your cache invalidates their corresponding cached items.
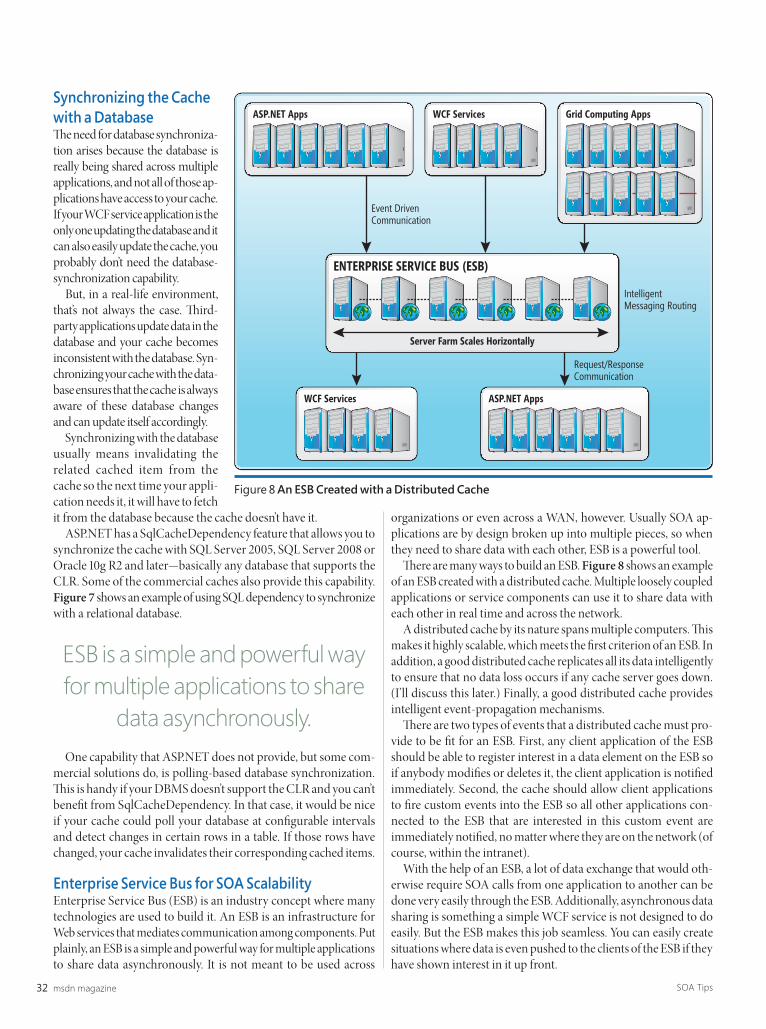
Enterprise Service Bus for SOA ScalabilityEnterprise Service Bus (ESB) is an industry concept where many technologies are used to build it. An ESB is an infrastructure for Web services that mediates communication among components. Put plainly, an ESB is a simple and powerful way for multiple applications to share data asynchronously. It is not meant to be used across
organizations or even across a WAN, however. Usually SOA ap-plications are by design broken up into multiple pieces, so when they need to share data with each other, ESB is a powerful tool.
Th ere are many ways to build an ESB. Figure 8 shows an example of an ESB created with a distributed cache. Multiple loosely coupled applications or service components can use it to share data with each other in real time and across the network.
A distributed cache by its nature spans multiple computers. Th is makes it highly scalable, which meets the fi rst criterion of an ESB. In addition, a good distributed cache replicates all its data intelligently to ensure that no data loss occurs if any cache server goes down. (I’ll discuss this later.) Finally, a good distributed cache provides intelligent event-propagation mechanisms.
Th ere are two types of events that a distributed cache must pro-vide to be fi t for an ESB. First, any client application of the ESB should be able to register interest in a data element on the ESB so if anybody modifi es or deletes it, the client application is notifi ed immediately. Second, the cache should allow client applications to fi re custom events into the ESB so all other applications con-nected to the ESB that are interested in this custom event are immediately notifi ed, no matter where they are on the network (of course, within the intranet).
With the help of an ESB, a lot of data exchange that would oth-erwise require SOA calls from one application to another can be done very easily through the ESB. Additionally, asynchronous data sharing is something a simple WCF service is not designed to do easily. But the ESB makes this job seamless. You can easily create situations where data is even pushed to the clients of the ESB if they have shown interest in it up front.
Figure 8 An ESB Created with a Distributed Cache
ASP.NET Apps WCF Services
ASP.NET AppsWCF Services
Grid Computing Apps
Request/ResponseCommunication
Event DrivenCommunication
IntelligentMessaging Routing
Server Farm Scales Horizontally
ENTERPRISE SERVICE BUS (ESB)
ESB is a simple and powerful way for multiple applications to share
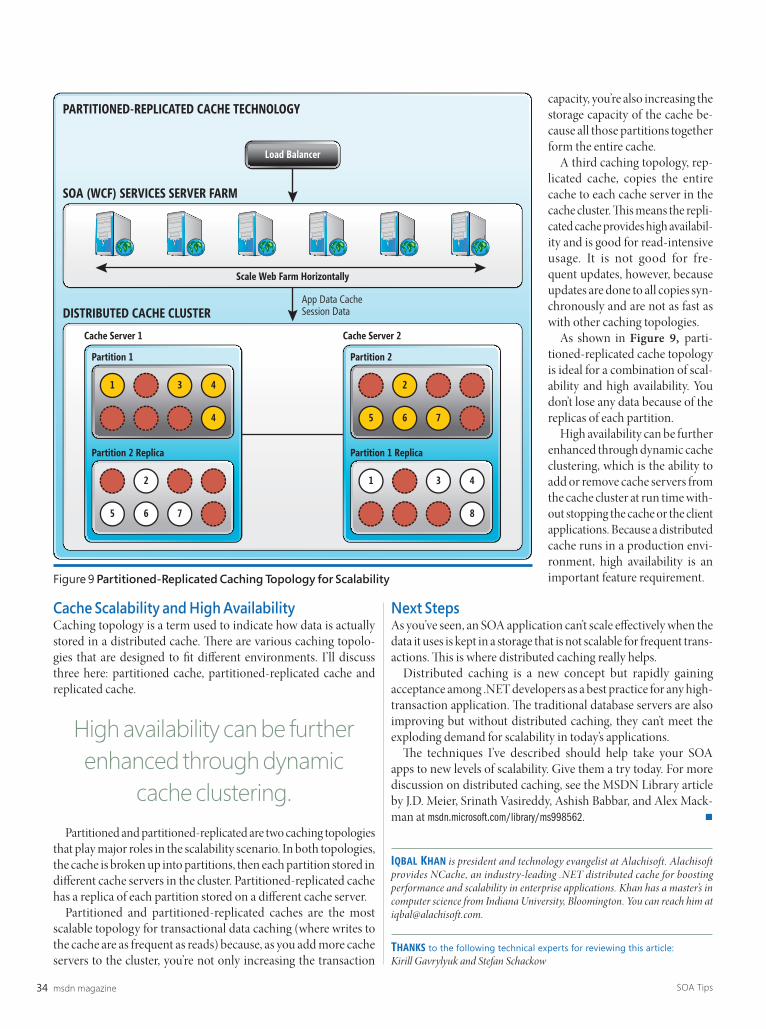
Cache Scalability and High AvailabilityCaching topology is a term used to indicate how data is actually stored in a distributed cache. Th ere are various caching topolo-gies that are designed to fi t diff erent environments. I’ll discuss three here: partitioned cache, partitioned-replicated cache and replicated cache.
Partitioned and partitioned-replicated are two caching topologies that play major roles in the scalability scenario. In both topologies, the cache is broken up into partitions, then each partition stored in diff erent cache servers in the cluster. Partitioned-replicated cache has a replica of each partition stored on a diff erent cache server.
Partitioned and partitioned-replicated caches are the most scalable topology for transactional data caching (where writes to the cache are as frequent as reads) because, as you add more cache servers to the cluster, you’re not only increasing the transaction
capacity, you’re also increasing the storage capacity of the cache be-cause all those partitions together form the entire cache.
A third caching topology, rep-licated cache, copies the entire cache to each cache server in the cache cluster. Th is means the repli-cated cache provides high availabil-ity and is good for read-intensive usage. It is not good for fre-quent updates, however, because updates are done to all copies syn-chronously and are not as fast as with other caching topologies.
As shown in Figure 9, parti-tioned-replicated cache topology is ideal for a combination of scal-ability and high availability. You don’t lose any data because of the replicas of each partition.
High availability can be further enhanced through dynamic cache clustering, which is the ability to add or remove cache servers from the cache cluster at run time with-out stopping the cache or the client applications. Because a distributed cache runs in a production envi-ronment, high availability is an important feature requirement.
Next StepsAs you’ve seen, an SOA application can’t scale eff ectively when the data it uses is kept in a storage that is not scalable for frequent trans-actions. Th is is where distributed caching really helps.
Distributed caching is a new concept but rapidly gaining acceptance among .NET developers as a best practice for any high-transaction application. Th e traditional database servers are also improving but without distributed caching, they can’t meet the exploding demand for scalability in today’s applications.
Th e techniques I’ve described should help take your SOA apps to new levels of scalability. Give them a try today. For more discussion on distributed caching, see the MSDN Library article by J.D. Meier, Srinath Vasireddy, Ashish Babbar, and Alex Mack-man at msdn.microsoft.com/library/ms998562.
IQBAL KHAN is president and technology evangelist at Alachisoft. Alachisoft provides NCache, an industry-leading .NET distributed cache for boosting performance and scalability in enterprise applications. Khan has a master’s in computer science from Indiana University, Bloomington. You can reach him at [email protected].
THANKS to the following technical experts for reviewing this article: Kirill Gavrylyuk and Stefan Schackow
Figure 9 Partitioned-Replicated Caching Topology for Scalability
DISTRIBUTED CACHE CLUSTER
Cache Server 1
Partition 1
Partition 2 Replica
1 3 4
4
2
5 6 7
Cache Server 2
Partition 2
Partition 1 Replica
2
5 6 7
1 3 4
8
Load Balancer
SOA (WCF) SERVICES SERVER FARM
PARTITIONED-REPLICATED CACHE TECHNOLOGY
Scale Web Farm Horizontally
App Data CacheSession Data
High availability can be further enhanced through dynamic
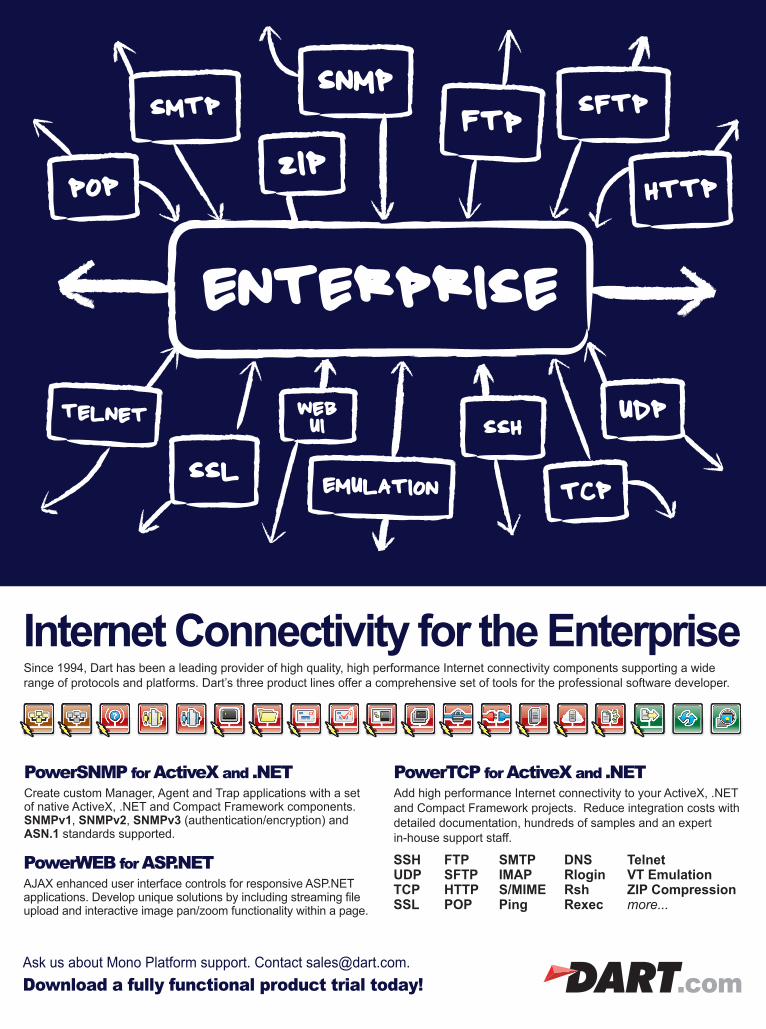
PowerSNMP for ActiveX and .NETCreate custom Manager, Agent and Trap applications with a set of native ActiveX, .NET and Compact Framework components. SNMPv1, SNMPv2, SNMPv3 (authentication/encryption) and ASN.1 standards supported.
Since 1994, Dart has been a leading provider of high quality, high performance Internet connectivity components supporting a wide range of protocols and platforms. Dart’s three product lines offer a comprehensive set of tools for the professional software developer.
PowerWEB for ASP.NETAJAX enhanced user interface controls for responsive ASP.NET applications. Develop unique solutions by including streaming file upload and interactive image pan/zoom functionality within a page.
Download a fully functional product trial today!Ask us about Mono Platform support. Contact [email protected].
PowerTCP for ActiveX and .NETAdd high performance Internet connectivity to your ActiveX, .NET and Compact Framework projects. Reduce integration costs with detailed documentation, hundreds of samples and an expert in-house support staff.
Resource Contention Concurrency Profi ling in Visual Studio 2010
As multicore processors become ever more commonplace, soft ware developers are building multithreaded applications that take advantage of the additional processing capacity to achieve better performance. Using the power of parallel threads, you can split the overall work into separate tasks and execute those tasks in parallel.
Th reads, however, oft en need to communicate with each other to complete a task, and sometimes need to synchronize their behavior if an algorithm or data access requires it. For example, simultaneous write access to the same data should be granted to threads in a mutually exclusive fashion to avoid data corruption.
Synchronization is frequently accomplished through the use of shared synchronization objects, where the thread acquiring the object is granted either shared or exclusive access to the sensitive code or data. When access is no longer required, the thread relin-quishes ownership and other threads can attempt to acquire access. Depending on the type of synchronization used, simultaneous
Maxim Goldin
requests for ownership might allow multiple threads to access shared resources at the same time, or some of the threads might be blocked until the object is released from previous acquisition. Examples include critical sections in C/C++ that use EnterCriticalSection and LeaveCriticalSection access routines, the WaitForSingleObject func-tion in C/C++ and the lock statement and the Monitor class in C#.
Th e choice of synchronization mechanism must be made with care, because improper synchronization between threads can reduce rather than enhance the performance gains that are the objective of multithreading. Th us, it is increasingly important to be able to detect situations where threads are blocked due to lock contentions that make no progress.
Th e performance tools in Visual Studio 2010 include a new profi ling method—resource contention profi ling—that helps you detect concurrency contention among threads. You can fi nd a great fi rst look at this feature in John Robbins’ Wintellect blog post at wintellect.com/CS/blogs/jrobbins/archive/2009/10/19/vs-2010-beta-2-concurrency-
resource-profi ling-in-depth-fi rst-look.aspx. In this article, I walk through a contention-profi ling investigation
and explain the data that can be collected using both the Visual Studio 2010 IDE and command-line tools. I’ll also show you how you can analyze the data in Visual Studio 2010, and you’ll see how to move from one analysis view to another while conducting your contention investigation. Th en I will fi x the code and compare profi ling results of the modifi ed application with the original profi ling results to validate that the fi x reduces the number of contentions.
This article discusses:• Profi ling data collection
Start with the ProblemAs an example, I’ll use the same matrix multiplication application Hazim Shafi used in his blog post “Performance Pattern 1: Iden-tifying Lock Contention” (blogs.msdn.com/hshafi /archive/2009/06/19/
performance-pattern-1-identifying-lock-contention.aspx). Th e code example is written in C++, but the concepts I’ll discuss are equally applicable to managed code.
The example matrix multiplication application uses several threads to multiply two matrixes. Each thread gets a portion of the job and runs the following code snippet:
for (i = myid*PerProcessorChunk; i < (myid+1)*PerProcessorChunk; i++) { EnterCriticalSection(&mmlock); for (j=0; j<SIZE; j++) { for (k=0; k<SIZE; k++) { C[i][j] += A[i][k]*B[k][j]; } } LeaveCriticalSection(&mmlock);}
Each thread has its own ID (myid), and is responsible for calculating the number of rows (one or more) in the resulting matrix C, using matrixes A and B as an input. Close code inspection shows that no truly ambiguous write-sharing happens, and each thread writes to a diff erent row of C. Yet the developer decided to guard the
assignment to the matrix with a critical sec-tion. I thank the developer for this, as it gives me a good opportunity to demonstrate the new Visual Studio 2010 performance tools to easily fi nd the redundant synchronization.
Profi ling Data CollectionAssuming you have a Visual Studio project with the code shown earlier (although it’s not required—you can attach the profi ler to any application that’s already running), you start contention profiling by clicking Launch Performance Wizard on the Analyze menu.
On the fi rst page of the wizard, shown in Figure 1, choose Concurrency and make sure the “Collect resource contention data” option is checked. Note that resource contention concurrency profi ling works on any version of the Windows OS. Th e “Visualize the behavior of a multithreaded application” option requires Windows Vista or Windows 7.
On the second page of the wizard, make sure the current project is targeted. On the
last page of the wizard, make sure “Launch profi ling aft er the wizard fi nishes” option is checked, then click Finish. Th e application starts running under the profi ler. When it exits, the profi ling data fi le appears in the Performance Explorer window (see Figure 2).
Th e profi ling report automatically opens in Visual Studio and displays the performance investigation results in the Summary view, which is shown in Figure 3.
Profi ling Data AnalysisNot all synchronization causes lock contention. If a lock is available, an attempt to take an ownership of the lock does not block thread execution and no contention happens. In Resource Contention Profi ling mode, the profi ler collects data only for synchronization events that cause contention and does not report successful (unblocked) resource acquisitions. If your application does not cause any contentions, no data will be collected. If you get data, it means your application has lock contentions.
For each contention, the profi ler reports which thread was blocked, where the contention occurred (resource and call stack), when the contention occurred (timestamp) and the amount of time (length) that the thread was blocked trying to acquire a lock, enter a critical section, wait for a single object, and so on.
When you open the fi le, you’ll fi rst see the Summary view (Figure 3), with three main areas you can use for brief diagnostics:1. Th e contentions chart shows the number of contentions per second plotted for the lifetime of your application. You can visually inspect contention spikes or select a time interval and either zoom into it or fi lter the results. Filtering re-analyzes the data and removes data outside the selected interval.
F igure 1 Enabling Concurrency Resource Profi ling
Fi gure 2 Performance Profi ling Result File in Performance Explorer
2. Th e Most Contended Resources table lists the resources that caused the most detected contentions.
3. Th e Most Contended Th reads table lists the threads with the highest number of contentions. Th is table uses the number of contentions as a criterion, not the length of the contentions. Th erefore, you might have a thread that’s blocked in a single contention for a long time, but it won’t be displayed in Summary view. On the other hand, a thread that experienced many very short contentions, with each contention blocking the thread for only a very short time, would be presented in the Summary view. If you see a resource that’s responsible for the majority of conten-
tions, inspect that resource in more detail. If you observe a thread that experiences a large number of contentions you did not expect, inspect the contentions of the thread.
For example, in Figure 3, you can see that Critical Section 1 is responsible for nearly all (99.90 percent) contentions in that application. Let’s investigate that resource more closely.
Resource names and thread IDs on the Summary view are hyper-links. Clicking on Critical Section 1 transfers you to the Resource Details view (see Figure 4), where the context is set to the specifi c resource—Critical Section 1.
Resource DetailsTh e upper part of the Resource Details view shows a time-based chart where each horizontal line belongs to a thread. Th e lines are labeled by the thread root function unless you name the managed thread in your code (for example, by using the C# System.Th read ing.Th read.Name property). A block on this line represents a contention of the thread on the resource. Th e block length is the contention length. Blocks from diff erent lines might overlap in time, which means several threads blocked on the resource at the same time.
Th e Total line is special. It doesn’t belong to any specifi c thread, but contains all contentions of all threads on this resource (it is actually a projection of contention blocks to the line). As you can see, Critical Section 1 was quite busy—it doesn’t seem to have any empty slots on its Total line.
You can zoom into a specifi c portion of the chart by selecting a time range using the left mouse button (left -click at the point in the chart you want to start and then drag the pointer to the right). Th ere are two links on the upper-right part of the chart—Zoom reset and Zoom out. Zoom reset restores the original chart view. Zoom out takes you back step by step, un-zooming the chart the same way you zoomed in.
Th e overall pattern of contention blocks might lead you to some conclusions about your appli-cation execution. For example, you can see that contentions of various threads are heavily overlapped in time, which hints at a less than optimal parallelization.
Each thread is blocked on the resource much longer than it’s running, and it’s yet another indication of the application’s ineffi ciency.
Function DetailsTh e bottom part of the Resource Details view is a contention call stack—no data is displayed until you select a specifi c contention. When you select a block, the corresponding stack shows up in the bottom panel. You can also hover over a contention block on the chart without clicking on it, and a pop-up window will give you the stack and the contention length.
Figu re 4 Resource Details View
Fig ure 3 Summary View of the Profi ling Report
The overall pattern of contention blocks might lead you to
some conclusions about your application execution.
As you can see in the contention call stack, one of the example app functions called MatMult is listed, so you know it was the cause of the contention. To determine which line of the function code is responsible for the contention, double-click the function name in the call stack panel. Th at takes you to the Function Details view, shown in Figure 5.
In this view you see a graphical presentation of functions that called MatMult, as well as functions that were called inside of it. Th e bottom section of the view clearly shows that EnterCritical-Section(&mmlock) is responsible for the threads being blocked all the time.
When you know which line of your code is responsible for contentions, you may reconsider your decision to implement synchronization that way. Is it the best way to protect your code? Is protection required at all?
In the example app, using a critical section in this code is unnecessary because threads don’t share writes to the same result matrix rows. Th e Visual Studio performance tools bring you to the point where you can comment out the use of mmlock, signifi cantly speeding up the appli-cation. If only it were always that easy!
For a more in-depth description of Function Details view, see the Visual Studio Profi ler Team blog at blogs.msdn.com/profi ler/
archive/2010/01/19/vs2010-investigating-a-sample-
profi ling-report-function-details.aspx.
Thread Details As I mentioned earlier, Summary view provides a good starting point for your inves-tigation. By looking at the Most Contended Resources and Most Contended Th reads tables, you can decide how to proceed. If you fi nd that one of the threads looks suspicious because you didn’t expect it to be in the top list of contended threads, you might decide to give the thread a closer look.
Click the thread ID on the Summary view to jump to the Th read Details view (see Figure 6). Th ough this view looks similar to the Resource Details view, it has a diff erent meaning because it displays contentions in the context of the selected thread. Each hori-zontal line represents a resource the thread was contending for during the thread lifetime. On this chart you won’t see contention blocks overlapping in time because that would mean the same thread was blocked on more than one resource at the same time.
Note that WaitForMultipleObjects (which I’m not showing here) is handled separately and is represented with a single chart line for the set of objects. Th is is because the profi ler
treats all parameter objects of WaitForMultipleObjects as a single entity.Any manipulations you can do in Resource Details view (zooming the
chart in and out, selecting specifi c contentions and viewing the length in milliseconds, and the calling stack) are applicable to the Th read Details view as well. Double-click the function name in the Contention Call Stack panel to navigate to the Function Details view of that function.
Figur e 5 Function Details View
Figure 6 Thread Details View with Selected Contention Block
Image Formats & Compression: Supports 150+ image formats and compressions including TIFF, EXIF, PDF, JPEG2000, JBIG and CCITT.Display Controls: ActiveX, COM, Win Forms, Web Forms, WPF and Silverlight.Image Processing: 200+ lters, transforms, color conversion and dra ing
functions supporting region of interest and extended grayscale data.OCR/ICR/OMR: Full page or zonal recognition for multithreaded 32 and 64
bit development.Forms Recognition and Processing: Automatically identify forms and
extract user lled data.Barcode: Detect, read and rite 1D and 2D barcodes for multithreaded 32 and
64 bit development.Document Cleanup/Preprocessing: Des e , despec le, hole punch, line
and border removal, inverted text correction and more.PDF and PDF/A: ead and rite searchable PDF ith text, images and
annotations.Annotations: Interactive UI for document mark-up, redaction and image
measurement (including support for DICOM annotations).Medical Web Viewer Framework: Plug-in enabled frame ork to uickly
build high- uality, full-featured, eb-based medical image delivery and vie er applications.Medical Image Viewer: igh level display control ith built-in tools for image
mark-up, indo level, measurement, zoom pan, cine, and UT manipulation.DICOM: Full support for all IOD classes and modalities de ned in the 200
DICOM standard (including Encapsulated PDF CDA and a Data).PACS Communications: Full support for DICOM messaging and secure
communication enabling uick implementation of any DICOM SCU and SCP services.JPIP: Client and Server components for interactive streaming of large images
and associated image data using the minimum possible band idth.Scanning: TWAIN 2.0 and WIA (32 and 64-bit), autodetect optimum driver
settings for high speed scanning.DVD: Play, create, convert and burn DVD images.DVR: Pause, re ind and fast-for ard live capture and UDP or TCP IP streams.Multimedia: Capture, play, stream and convert MPEG, AVI, WMV, MP4, MP3,
OGG, ISO, DVD and more.Enterprise Development: Includes WCF services and WF activities to
create scalable, robust enterprise applications.
Mark-up
DICOM Medical
Form Recognition & Processing
Multimedia
Barcode
Document
ig evel Design ow evel Control
Develop your application ith the same robust imaging technologies used by Microsoft, HP, Sony, Canon, Kodak, GE, Siemens, the US Air Force and Veterans Affairs Hospitals.
EADTOO S provides developers easy access to decades of expertise in color, grayscale, document, medical, vector and multmedia imaging development. Install EADTOO S to eliminate months of research and programming time hile maintaining high levels of uality, performance and functionality.
Silverlight, .NET, WPF, WCF, WF, C API, C++ Class Lib, COM & more!
Free 60 Day Evaluation! www.leadtools.com/msdn 800 637-1840
In the example you can see that the thread spends more time being blocked than running in the early part of the execution, and then it’s blocked for a long time on some set of multiple handles. As the last block is caused by waiting for other threads to complete, early contentions indicate non-optimal thread usage, causing the thread to be in a blocked state more than in an executing state.
Chasing Down the ProblemAs you might have noticed, the chart axis labels are hyperlinks. Th is allows switching between detailed views of resources and threads, setting the required context for the view each time. Th is can be helpful in an iterative approach to fi nding and solving a problem. For example, you can inspect resource R1 that blocked many threads. You can go from the Resource Details view to a
detailed view of thread T1 and fi nd out that it was blocked not only on R1, but sometimes also on resource R2. You can then dive into the details of R2 and observe all threads that were blocked by R2. Next you can click on the label of thread T2 that draws your attention to check all resources that blocked T2, and so on.
Contention profiling data won’t give you an explicit answer to the question of who is holding a lock at any given time. But given fair use of synchronization object between threads, and your knowledge of the application’s behavior, you can identify a possible lock owner (a thread that succeeded in synchronization lock acquisition) by pivoting your data from resource details to thread details and back.
For example, suppose in the Th read Details view you see a thread T that’s blocked on resource R at time t. You can switch to the
Resource Details view of R by clicking on the R label, and see all threads that were blocked on R during the application lifetime. At time t you’ll see a number of them (including T) blocked on R. A thread that’s not blocked on R at time t is a possible lock holder.
I noted earlier that the chart’s Total line is a projection of all contention blocks. Th e Total label is also a hyperlink, but from Resource Details view it takes you to the Contention view (see Figure 7), which is a collection of contention call trees per resource. Th e hot path of the appropriate resource call tree is activated for you. Th is view shows contentions and blocking- time statistics for each resource and for each node (function) in the resource call tree. Unlike the other views, this one aggregates contention stacks to the resource call tree, just like in other profi ling modes, and gives you statistics for the whole run of the application.
Figure 7 Contention View with Hot Path Applied to Critical Section 1
Figure 8 Processes View
Figure 9 Summary View of Profi ling Results for Fixed Code
Why is Amyuni PDFso interesting?
Develop with the fastest PDFconversion on the market, designedto perform in multithreaded and64-bit Windows environments.
License and distribute productsquickly and easily with a PDFtechnology that does not rely onexternal open-source libraries.
Produce accurate and stable PDFdocuments using reliable toolsbuilt by experts with over ten yearsof experience.
Let our experienced consultantshelp you turn your software requirements into customized PDF solutions.
Integrate PDF conversion, creationand editing into your .NET andActiveX applications with just a fewlines of code.
Choose a PDF technology that isintegrated into thousands ofapplications behind millions ofdesktops worldwide.
High-Performance
OEM LicensesExpertise
Rapid IntegrationProven
Customization
We understand the challenges that come with PDF integration.From research and development, through design andimplementation, we work with you every step of the way.
Get 30 days of FREE technical support with your trial download!
USA and CanadaToll Free: 1 866 926 9864Support: (514) 868 9227
From the Contention view, you can go back to the Resource Details view of any resource using the context menu. Point to a resource, right-click your mouse and select Show Contention Resource Details. Other interesting actions are also available in the context menu. As a general suggestion, explore the context menus in Profi ler views—they can be quite helpful!
Click the Total label of the Th read Details view to display the Pro-cesses view, where the thread is selected (see Figure 8). In this view you can see when the thread was started relative to the application start time, when it was terminated, how long it ran, how many contentions it experienced, and how long it was blocked across all contentions (in milliseconds, and in percentage of the thread’s lifetime).
Again, it is possible to come back to the Th read Details view for any thread by using the context menu—select a thread of interest, right-click and select Show Th read Contention Details.
Another possible investigation fl ow would be to display the Processes view directly when the fi le is opened, sort the threads by clicking on the title of one of the available columns (for example, sorting threads by the number of contentions), select one of the threads and then switch to the contention details chart of the thread through the context menu.
Fix the Problem and Compare ResultsAfter you find the root cause of the lock contentions in the application, you can comment out the mmlock critical section and then rerun profi ling:
for (i = myid*PerProcessorChunk; i < (myid+1)*PerProcessorChunk; i++) { // EnterCriticalSection(&mmlock); for (j=0; j<SIZE; j++) { for (k=0; k<SIZE; k++) { C[i][j] += A[i][k]*B[k][j]; } } // LeaveCriticalSection(&mmlock);}
You would expect the number of con-tentions to decrease, and indeed profi ling of the modifi ed code reports only one lock contention, as shown in Figure 9.
We can also compare the new and previ-ous performance results in Visual Studio. To do this, select both fi les in Performance
Explorer (select one fi le, press Shift or Ctrl and then select another), then right-click and select Compare Performance Reports.
A Comparison Report appears, as shown in Figure 10. In the example app, you can see that number of Inclusive Contentions of the MatMult function dropped from 1,003 to 0.
Alternative Data Collection MethodsIf you create your performance session for either Sampling or Instrumentation profi ling, you can always convert it later to Concurrency mode. One way to do it quickly is to use the
profi ling mode menu in the Performance Explorer. Just select the mode you’d like to be in, and you’re good to go.
You can also go through the Properties setting of your session. Point to your session in Performance Explorer, right-click to display the context menu, then select Properties. Th e General tab of Property Pages gives you control over your profi ling session mode and other profi ling parameters.
Once your profi ling mode is set for Concurrency (or Sampling, for that matter), you can either launch your application (it’s already in your Targets list if you used Performance Wizard, or you can add it there manually), or you can attach to an application that’s up and running. Performance Explorer gives you the controls to do these tasks, as Figure 11 shows.
Th e Visual Studio UI automates a number of the steps necessary to collect profi ling data. However, it is possible to collect profi ling data by using command-line tools, which can be useful for auto-mated runs and scripts.
To launch your application in contention profi ling mode, open the Visual Studio command prompt (which puts all profi ler binaries in your path, either x86 or x64 tools), and then do the following:1. VSPerfCmd.exe /start:CONCURRENCY,RESOURCEONLY
/output:<YourOutputFile>2. VSPerfCmd.exe /launch:<Your Application> /args:“<Your Application Arguments>” 3. Run your scenario 4. VSPerfCmd.exe /detach • Th is step is not required if your ap-
plication terminates, but it causes no harm so you can add it to your scripts.
5. VSPerfCmd.exe /shutdownNow you can open YourOutput File.VSP
in Visual Studio for analysis.
Figure 10 Comparison Report
Figure 11 P rofi ling Controls of Performance Explorer
Summary view provides a good starting point for
your investigation.
47June 2010msdnmagazine.com
text menus, or you can switch directly to any available view through a drop-down menu. Figure 12 briefl y describes each of the views.
Th e new resource contention profi ling features in Visual Studio should help you discover performance issues by using thread synchronization in the code, and allow you to improve your application runtime by changing, reducing or eliminating unnecessary synchronization.
MIKE GOLDIN is a senior soft ware design engineer at Microsoft . He has worked on the Visual Studio Engineering team since 2003. He can be reached at mgoldin@microsoft .com, and he blogs at blogs.msdn.com/mgoldin.
THANKS to the following technical experts for reviewing this article: Steve Carroll, Anna Galaeva, Daryush Laqab, Marc Popkin-Paine, Chris Schmich and Colin Th omsen
If you have an application that’s running already, you can attach the profi ler to it using these steps:1. VSPerfCmd.exe /start:CONCURRENCY,RESOURCEONLY
/output:<YourOutputFile>2. VSPerfCmd.exe /attach:<PID or Process Name> 3. Run your scenario 4. VSPerfCmd.exe /detach 5. VSPerfCmd.exe /shutdown
A more detailed explanation of available command-line options can be found at msdn.microsoft.com/library/bb385768(VS.100).
Other Analysis Data ViewsA variety of Visual Studio views let you closely inspect the collected data. Some views give a picture of the application lifetime in whole, while others focus on specifi c contentions—use those you fi nd most valuable.
When you analyze the results of profi ling, you can use transitions from one view to another through hyperlinks, double-clicks or con-
View DescriptionSummary Summary information is presented to serve as a
starting point for your investigation. This is the fi rst view you see, and it opens automatically after a profi ling session is over and the result fi le is ready.
Call Tree An aggregated call tree of all contention stacks. Here you can see which stacks were responsible for your contentions.
Modules A list of modules that contain functions, each resulting in a contention. Each module has a list of relevant functions and the number of detected contentions.
Caller/Callee A three-panel view that presents function F, all functions that call F, and functions that are called by F (only calls resulted in contentions, of course).
Functions A list of all detected functions on any contention stack, with associated data.
Lines The function lines in the source code.Resource Details Details about a specifi c resource (for example, a lock),
showing all threads that were blocked on it during the application lifetime.
Thread Details Details about a specifi c thread, showing all resources (such as locks) the thread was blocked on.
Contention Similar to the call tree view, but here call trees are separated per contention resource. In other words, this view presents a set of call trees, each containing stacks that were blocked on a specifi c resource.
Marks A list of automatically and manually recorded marks, where each mark is associated with its timestamp and the values of Windows counters.
Processes A list of inspected processes, where each process has a list of its threads, and each thread is attributed with the number of contentions it experienced and the summarized length of blocked time.
Function Details Details about a specifi c function, including the functions it calls and collected data.
IPs A list of instruction pointers where contention happened (well, a list of functions like EnterCriticalSection, WaitForSingleObject and so on, because this is where contention actually happens).
Figure 12 Analysis Views
It is possible to collect profi ling data by using command-line
tools, which could be useful for automated runs and scripts.
Like many programmers, when I fi rst started writing code I used print statements for debugging. I didn’t know how to use a debugger and the print statements were a crude but eff ective way to see what my program was doing as it ran. Later, I learned to use a real debugger and dropped the print statements as a debugging tool.
Fast forward to when I started writing code that runs on servers. I found that those print statements now go under the more sophis-ticated heading of “logging and tracing,” essential techniques for any server application programmer.
Even if you could attach a debugger to a production server application—which oft en isn’t possible due to security restric-tions on the machines hosting the application—the types of issues server applications run into aren’t easily revealed with traditional
CLO U D D IAG NOST IC S
Take Control of Logging and Tracing in Windows AzureMike Kelly
This article discusses:• Logging, tracing and debug output
• Tracing and logging in Windows Azure
• Selectively enabling tracing and logging
• Managing logging for a running service
Technologies discussed:Windows Azure, Visual Studio 2010, Windows PowerShell
Code download available at:code.msdn.microsoft.com/mag201006Azure
debuggers. Many server applications are distributed, running on multiple machines, and debugging what’s happening on one machine isn’t always enough to diagnose real-world problems.
Moreover, server applications oft en run under the control of an operations staff that wouldn’t know how to use a traditional debugger—and calling in a developer for every problem isn’t desirable or practical.
In this article I’ll explain some basic logging, tracing and debugging techniques used for server applications. Th en I’ll dive into how these techniques can be employed for your Windows Azure projects. Along the way you’ll see how logging and tracing are used with some real-world applications, and I’ll show you how to use Windows PowerShell to manage diagnostics for a running service.
A Logging StrategyIdeally, any server application—and basically any Web application, including those running under Windows Azure—has a logging and tracing strategy designed in from the beginning. Th e logging information should be robust enough to describe nearly every thing that’s happening within each component. However, just as those print statements I added to my fi rst programs could produce a lot of output, so too can logging. Well-designed logging and tracing thus includes ways of adjusting the type and volume of logging from any component. Th is allows operational staff and developers to focus on a particular misbehaving component, perhaps even on a particular machine, to get much more information on exactly
what’s happening inside it—without generating a lot of noise in the log that can be distracting and perhaps slow down the application signifi cantly.
Furthermore, because server applications are commonly distributed applications, information must be collected and aggregated from multiple machines (perhaps in diff erent application roles) to get a full picture of what was going on when a particular problem occurred. So a way to identify a transaction thread through the machines is important, allowing the aggregation aft er the fact.
Th e logging available in Windows Azure has matured through the Community Technology Preview (CTP) releases. Th e early logging wasn’t much more sophisticated than a print statement, captured as text in Windows Azure table storage. Starting with the PDC09 release, Windows Azure began to off er a much more full-featured logging and tracing infrastructure, based on the Event Tracing for Windows (ETW) framework.
Th is ETW framework is supported in ASP.NET through classes in the System.Diagnostics namespace. Th e Microsoft .Windows-Azure.Diagnostics namespace, which inherits from and extends standard System.Diagnostics classes, enables the use of System.Diagnostics as a logging framework in the Windows Azure environment. Figure 1 shows how ETW is implemented by Windows Azure Diagnostics.
ETW provides a model in which code logs to one or more TraceSources. Th e level of logging allowed through each source is controlled by a SourceSwitch. Sources are in turn connected to one or more consumers, which persist the logging information in diff erent ways.
Windows Azure provides a standard consumer or listener to persist the logging information you generate either to Windows Azure table storage or to blob storage. You also can write your own consumer if you want to do something diff erent with the event data, or use an off -the-shelf consumer (although some might have to be modifi ed to work in the Windows Azure environment).
Th e ETW framework associates a TraceEventType with each event, as shown in Figure 2. Th e fi rst fi ve severity rows are the values most commonly used and they indicate the relative importance of the trace output. Note that the Suspend, Resume and Transfer types are used by Windows Com-munication Foundation (WCF).
If you’re looking only for really bad things, you’ll want to be sure to capture Critical and probably Error values. If you want lots of information about what’s going on, look at everything above Verbose.
Your logging strategy should include consistent use of the event type and copious logging entries with the values further down the hierarchy. It should be possible to virtually follow the execution fl ow
of your application if logging for all the highlighted values is enabled in your application. Th is can be invaluable in troubleshooting an error or problem in production.
You can hook up listeners, sources and switches to enable diff erent levels of output programmatically, but this is typically done through confi guration fi les. You can confi gure the output in app.confi g (for Windows Azure worker roles) or web.confi g (for Windows Azure Web roles). However, as I’ll explain in detail later in the article, putting this in ServiceConfi guration.cscfg lets you adjust logging and tracing options while the Windows Azure service is running, without having to redeploy any updates to the running code or to even stop the service. Windows Azure also exposes a RESTful interface to allow control over some logging options remotely. Windows PowerShell can make use of the RESTful interface.
Logging, Tracing and Debug OutputTh e terms logging, tracing and debug output can sometimes be used interchangeably. In this article, I’m going to distinguish among four different types of what can generally be called diagnostic output in your code. Th ese are roughly ordered from most verbose to least verbose.
• Debug Output: Th is is information that appears only in the debug builds of your application and is excluded at compile time from release builds (based on whether the DEBUG preprocessor
F igure 1 High-Level Overview of Windows Azure Diagnostics
TraceSource2 MyCustomTraceListener
ScheduledTransferLogLevel
Filter
Windows AzureTable StorageTraceSource1 DiagnosticMonitor
TraceListener
YourAssembly1
YourAssembly2
YourAssembly3 SourceSwitch 2
SourceSwitch 1
Your CodeSystem.Diagnostics CodeWindows Azure Code
Windows AzureBlob Storage
IIS Logs
Failed Request Logs
Crash Dump Logs
Well-designed logging and tracing includes ways of adjusting the type and
symbol is defi ned at compile time, which Visual Studio by default defi nes only in debug builds). Typically, debug output includes things like Asserts that you add to help fi nd cases where code is not complying with expected preconditions, leading to bugs, or even dumps of data structures. Adding these helps you debug algorithms during debugging and testing.
• Tracing: Th ese are statements that are intended to help track the fl ow of control and state of the program as it’s executing. Imagine running a debugger, stepping along through code and checking the values of key variables in the Watch window. Tracing statements are intended to replicate that experience in cases where you can’t attach a debugger. Th ey should ideally provide enough context that you can see which path is taken at each control point in the application and sort of follow along in the code from reading the trace statements. Tracing is enabled when the TRACE preprocessor symbol is defi ned at compile time, and can be in both release and debug builds. (By default, Visual Studio defi nes TRACE in both debug and release builds, but you can of course change this.)
• Event Logging: Th ese are statements that are intended to capture
major events in the course of running the application—for instance, the start of a transaction or the addition of an item to a database. Event logging is diff erent from tracing in that it captures major states rather than detailed fl ow of control.
• Error Logging: Th ese are special cases of event logging in which you capture exceptional or potentially dangerous situations. Examples include any caught exception; cases where you can’t access a resource on another machine you expect to be able to access (and which, of course, your application will gracefully handle but would like to note); and cases where errors come back from APIs from which you don’t expect errors.Error logging can also be useful to operations staff in situations
where problems aren’t yet occurring, but indications are that they soon will—for instance, a quota that is nearing its maximum or a transaction that is succeeding but taking more time than usual. Th ese sorts of logging events can help operations staff proactively address problems before they occur, avoiding downtime in the application.
Most good developers have gotten used to including debug output in their applications to help them diagnose problems during development, and many have developed some sort of solution for error logging.
However, you need to be sure you’re considering not just the debug output and error logging options, but also have a robust strategy for tracing and event logging, which can really help diagnose problems that occur only under stressful loads in production environments.
Also, carefully consider whether much of what you now think of as debug output shouldn’t instead be tracing and available in both release and debug builds. A misbehaving application in production will typically be running the release build. If you have the tracing statements present but disabled (as I’ll explain how to do later), you can selectively enable them to get very rich debug-like output from the release build, helping you diagnose problems.
Tracing and Logging in Windows AzureYou can use Windows Azure logging right out of the box—it’s part of the Windows Azure SDK. Th ere are some advantages to using a logging framework like Logger.NET, Enterprise Library, log4net or Ukadc.Diagnostics. These add additional structure to your logging messages and also can help provide some of the confi gurability mentioned earlier. However, most have not been tweaked to work in the Windows Azure environment and some are much more than just a logging framework.
For the sample code for this article, I decided to use just the standard Windows Azure logging and tracing APIs with a thin
Fi gure 3 Logs Persisted in Development Storage
TraceEventType Value MeaningCritical 0x0001 Fatal error or application crashError 0x0002 Recoverable errorWarning 0x0004 Non-critical problem—may be an indication
of more serious problems to comeInformation 0x0008 Informational messageVerbose 0x0010 Debugging trace (such as detailed execution
fl ow information, parameters, and so forth)Start 0x0100 Starting of a logical operationStop 0x0200 Stopping of a logical operationSuspend 0x0400 Suspension of a logical operationResume 0x0800 Resuming a logical operationTransfer 0x1000 Transfer to a new activity
Figure 2 Trace Event Types
The terms logging, tracing and debug output can sometimes be
used interchangeably.
53June 2010msdnmagazine.com
layer on top to provide dynamic confi guration. You will probably fi nd building some helper classes and a framework for your logging and tracing strategy on top of this helpful, or watch for the other frameworks to provide Windows Azure versions.
When you create a new service in Windows Azure using Visual Studio, it’s already enabled to do basic logging. Th e boilerplate Worker Role and Web Role code generated by the Windows Azure templates has the diagnostics listener already confi gured and enabled.
To enable simple logging in a Windows Azure service, start a new project in Visual Studio using the Windows Azure Cloud Service (Visual C#) template. Give the project a name. For my sample I used MSDNSampleLoggingService. Click OK.
Th e New Cloud Service Project wizard will run. In the wizard, add one Worker Role and one Web Role to the project. Rename the Worker Role to LoggingWorkerRole and the Web Role to Logging WebRole, then click OK. Visual Studio will create the project.
At this point, you can explore the generated code. Look at the app.confi g in the LoggingWorkerRole project and note that the following code appears:
This hooks up the standard Windows Azure diagnostics listener to your code, meaning that any logging and tracing you do from the worker role will be directed to the Windows Azure
listener (DiagnosticMonitorTraceListener) unless you change this. You’ll fi nd a similar entry in the web.confi g for the Web Role created for this service.
If you look at the WorkerRole.cs fi le in the worker role project, you’ll also see this line in the OnStart method:
And in the Run method, you’ll see a call to trace:// This is a sample worker implementation. Replace with your logic.Trace.WriteLine("LoggingWorkerRole entry point called", "Information");
Finally, if you look in the ServiceConfi guration.cscfg fi le in the Service root, you’ll see this line for both the Worker Role and the Web Role:
Th is tells the Windows Azure listener which storage account to use for persisting the logging and tracing information. In this case, the logging information will be stored in development storage on your local machine. By switching this to a Windows Azure cloud-storage account, you can have the logs go to cloud storage. Here is an example of the format for that from the sample code provided with this article:
Th e AccountName and AccountKey values need to be customized to your particular Azure account and key. You get this information from the storage account portal for your service at windows.azure.com. AccountName is the fi rst portion of the URL for the table and blob storage endpoints (the part before “.table.core.windows.net”). AccountKey is the base-64 encoded Primary Access Key for your storage account.
Note that because there is a distinct storage account used for diagnostics, you can choose to store your diagnostics information separate from your other application data. To do this, set up a sep-arate storage account by clicking New Service on the portal page,
Off 0x0All 0xFFFF X X X X X X X X X XCritical 0x1 XError 0x3 X XWarning 0x7 X X XInformation 0xF X X X XVerbose 0x1F X X X X XActivityTracing 0xFF00 X X X X X
Figure 5 Tracing Source Levels and TraceEventType
You can use Windows Azure logging right out of the box.
selecting Storage Account, then giving it a name (MyAppLogs, for instance). You might want to set up an affi nity group so the storage for your logs is in the same region as your service.
Now that you’ve taken a quick tour of the tracing code in Windows Azure services, you can run the simple Web Role project you’ve cre-ated. Note that the default listener provided by Windows Azure also directs the output to the Output window in Visual Studio for debug builds, so you’ll see the OnStart message appear in the debug window:
Information: LoggingWorkerRole entry point called
What if you want to look at logs aft er the service runs? By default, Windows Azure does not persist the logs to storage. You can tell it to do so by adding a few lines of code to your role’s OnStart method:
// Transfer logs to storage every minutedmc.Logs.ScheduledTransferPeriod = tsOneMinute;// Transfer verbose, critical, etc. logsdmc.Logs.ScheduledTransferLogLevelFilter = LogLevel.Verbose; // Start up the diagnostic manager with the given configurationDiagnosticMonitor.Start("DiagnosticsConnectionString", dmc);
Adding this code to WorkerRole.cs and rerunning will cause Windows Azure to transfer the logs to development storage every minute. You also can choose to do an on-demand transfer of logs (see the code in admin.aspx.cs in my sample app for how to do this) or use the Windows PowerShell commands described later in this article. Remember that once you transfer logs to storage, you’ll be charged for the storage space and it’s up to you to delete the information when it’s no longer needed.
Once you’ve gotten the logs into Windows Azure storage, you’ll need a tool to look at the storage tables to see the logs. I used Cerebrata’s Cloud Storage Studio (cerebrata.com). Cerebrata has since come out with a tool called Azure Diagnostics Manager, and there are also free tools available on CodePlex (codeplex.com) for looking
at cloud storage and diagnostics. Th e logs are put in a table called WADLogsTable, which you can see in Figure 3.
You’ll notice a couple of things when you look at the logs in storage. First, Windows Azure automatically associates some infor-mation with each logged event: a timestamp, a tick count (which provides more detailed timing with 100-nanosecond granularity), and information about the deployment, role and role instance. Th is allows you to narrow down logs to specifi c instances if you want.
Second, there’s a Level and an EventId associated with each event. Level corresponds to the values in Figure 2—those Trace events logged as Information will have a Level value of 4, while those logged as Error will have a Level of 2. Generic events sent through Trace.WriteLine (as the boilerplate code does) will have Level 5 (Verbose).
Th e EventId is a value you specify. Th e basic Trace.WriteLine call shown earlier doesn’t let you specify it; you have to use other Trace methods to pass the EventId.
Figure 7 Failed Request Logging for LoggingWebRole
Type of Log
Windows Azure Storage Format
Collected by Default? Notes
Windows Azure logs generated from your code
Table ✔ Trace listener must be added to web.confi g or app.confi g fi le as shown in the sample code. Stored in WADLogsTable.
IIS 7.0 logs Blob ✔ Web Roles only. Stored in a Blob container under the path wad-iis-logfi les\<deployment ID>\<web role name>\<role instance>\W3SVC1.
Windows Diagnostic Infrastructure logs
Table ✔ Information about the diagnostics service itself. Stored in WADDiagnosticInfrastructureLogsTable.
Failed request logs Blob Web Roles only. Enable by setting tracing options under system.WebServer settings in web.confi g. Stored in a blob container under the path wad-iis-failedreqlogfi les\<deployment ID>\<web role name>\<role instance>\W3SVC1.
Windows Event logs Table Enable by altering DiagnosticMonitor Confi guration.WindowsEventLog when setting up initial confi guration. Stored in WADWindowsEventLogsTable. Steve Marx’s blog (blog.smarx.com/posts/capturing-
fi ltered-windows-events-with-windows-azure-diagnostics) explains how to use this.Performance counters Table Enable by altering DiagnosticMonitor Confi guration. PerformanceCounters. Stored in
WADPerformanceCountersTable. The sample code Worker Role sets up a performance counter.Crash dumps Blob Enable by calling CrashDumps.EnableCollection. Stored in a blob container under the path wad-crash-
dumps. Because ASP.NET handles most exceptions, this is generally useful only for a Worker Role.Custom error logs Blob Beyond the scope of this article, but see Neil Mackenzie’s blog (nmackenzie.spaces.live.com/blog/
cns!B863FF075995D18A!537.entry) for a helpful example of how to use this.
Selectively Enabling Tracing and LoggingA typical application consists of multiple logical components. For instance, you might have a database component that deals with the data model in Windows Azure storage. Your Web Role might in turn be divided into an administrative com-ponent and a user component (and that might even be divided further into logical components based on the needs of your application).
You can tie the logging and tracing options—what type of logging is enabled and at what level of detail—to these components. Th is allows you to selectively enable tracing in only the components for which you need it, avoiding a lot of clutter.
The key approach here is to not call Trace directly, but to use multiple TraceSource instances, typically one per namespace. A TraceSource has an associated SourceSwitch that controls whether the source is enabled, as well as what level of output is desired. Importantly, the SourceSwitch values are not set at compile time, but at run time. As a result, you can enable or disable diagnostic output from various parts of your application without having to recompile it, or even redeploy a diff erent version.
WorkerDiagnostics.cs and WebDiagnostics.cs contain the configuration of the trace sources and switches in the sample code. Here’s an excerpt:
// Corresponding trace switches to control // level of output for each sourcepublic SourceSwitch ConfigTraceSwitch { get; set; }public SourceSwitch WorkerTraceSwitch { get; set; }// Add additional switches 1:1 with trace sources here
Th en, in the confi g fi le for your role, you hook these up to listeners as shown in Figure 4. Th is fi rst sets up the standard Windows Azure diagnostics listener as a shared listener so it can be referred to in the <sources> items. It then confi gures two sources: a WorkerTrace source
and a Confi gTrace source. It also sets up corresponding switches to enable you to adjust the level of output. Confi gTrace gives you the most verbose output; WorkerTrace gives you Errors only.
You don’t have to name the switches the same as the sources, but it makes life easier. If they’re not the same, you add a switchName attribute to the source element to indicate the name of the switch that controls output for this source. Th is allows you to share a single switch across multiple trace sources. Note that the trace source and switch names are case-sensitive and must exactly match the case you pass to the constructor in your code.
You can avoid the switch altogether if you want by simply adding a switch-Value attribute to the source element specifying the desired switch value for this source. Th e switch values you use are actually parsed from the confi g fi le as one of the SourceLevels defi ned in Figure 5, which also shows how the
TraceEventType you pass to TraceSource calls interacts with the SourceLevel set for the source to determine what passes through.
You might have noticed that the SourceLevel is just a bitmask that is ANDed at run time with the TraceEventType to determine whether to log the event. To get combinations like Warning and Activity Tracing, specify the numeric value for the bitfi eld as the switch value rather than using the symbolic values shown.
In addition to switches, a listener can have a TraceFilter, which adds more sophisticated runtime logic as to whether a particular message is allowed through. Writing a custom TraceFilter is beyond the scope of this article, but you’ll fi nd a helpful example in the Ukadc.Diagnostics project documentation on CodePlex (ukadcdiagnostics.codeplex.com/wikipage?title=LoggingPrimer).
Changing What Is Logged at Run TimeTh is is the default way that ASP.NET tracing works and it will work fi ne with services deployed to Windows Azure. Th e problem is that you’d like to be able to change the switch values at run time, and Windows Azure doesn’t allow you to just replace theweb.confi g or app.confi g without redeploying the service. Th e generic ASP.NET solution for this is to use WebConfi guation-Manager to alter confi guration values, but Windows Azure doesn’t currently allow you to do this for cloud-deployed services, either.
Th e solution is to mirror the values for these switches in Service-Configuration.cscfg. Windows Azure lets you edit that file (or upload a new one) through the development portal while your service is running. You’ll have to write some additional code to make this work, though.
The default System.Diagnostics code knows about settings only in app.confi g or web.confi g, but your roles will get run-time
Figure 8 Opening Logs Saved to Local Development Fabric Storage
The key approach here is to not call Trace directly, but to use
multiple TraceSource instances, typically one per namespace.
notification of changes in ServiceConfiguration.cscfg through the RoleEnvironmentChanging and RoleEnvironmentChanged events. You can then decide whether to recycle (restart) the role or simply update a confi guration value. Th e latter is what you want for tracing switches. Restarting the role may make intermittent prob-lems disappear. Th e sample code for this article shows how to do this by adding a couple of values to ServiceConfi guration.cscfg (note that you have to also edit ServiceDefi nition.csdef, which provides the schema) and adding some code to your roles.
Testing on Development FabricWhat about testing on development fabric, where you don’t have the Windows Azure portal to edit the confi guration as you do for cloud-deployed services? First, determine the deployment ID Windows Azure has assigned to your running development fabric service. You can see this by showing the development fabric UI from the system tray while the service is running. Th is will be a number like 177.1. Go to the directory where your service binaries have been put
by build—typically \bin\debug or \bin\release under your service code. You’ll fi nd the copy of ServiceConfi guration.cscfg that was created when you built the app.
2. Next, using a text editor, edit this fi le to use the tracing switch you want. For instance, in the sample code, change WebTrace from Off to Verbose.
3. Next, in a Windows Azure SDK command prompt (Start | All Programs | Windows Azure SDK v1.1 | Windows Azure SDK Command Prompt), run this command:csrun /update:NNN;ServiceConfiguration.cscfg
NNN is the Windows Azure deployment ID you found earlier. Th is will do in development fabric what clicking the Confi gure button on the Windows Azure development portal does for cloud-deployed services—update the confi guration settings and trigger the events.
Other Diagnostic InformationWhile this article has focused on tabular data that your application logs using System.Diagnostics, Windows Azure can also capture IIS logs and Failed Request Tracing (formerly known as Failed Request Buff ering, or FREB) logs, among others. Some of these are placed into Windows Azure blob storage, some in Windows Azure table storage. Figure 6 lists the available logs and where they’re stored. Note that for those not enabled by default, you typically have to make a change in web.confi g or app.confi g for Windows Azure to collect these logs. Let’s drill into one example not collected by de-fault to show how this works.
As an example, let’s look at how to enable FREB logging from IIS on your Web Role. To see this in action, download the sample code for the MSDNSampleLoggingService provided with this article. Open web.confi g for the LoggingWebRole and fi nd the section labeled <system.webServer>. Notice that the lines shown in Figure 7 have been added to the default Windows Azure web.confi g. Th is results in failure logging for any requests that take longer than 15 seconds or with status codes between 400 and 599 (the failureDefi nitions element).
If you open about.aspx.cs in the LoggingWebRole project, you’ll note that in the PageLoad method I’ve added an arbitrary delay of 18 seconds with this line of code:
System.Threading.Thread.Sleep(18000);
Th is will force the load of this page to be considered a failed request under the defi nition specifi ed earlier.
To see the FREB log, rebuild and deploy the app into the devel-opment fabric and then fi nd the development fabric controller
Windows Azure also will capture IIS logs and FREB logs.
Name DescriptionGet-ActiveTransfers Returns the set of active diagnostic transfers with associated transfer information.Get-CommonConfi gurationLogs Gets the common confi guration values for all logging buffers. This includes the time interval at which changes in
confi guration are polled for and the buffer size allocated for in-memory logs.Get-DiagnosticAwareRoleInstances Returns a list of IDs of active role instances that have a diagnostic monitor running.Get-DiagnosticAwareRoles Lists the set of roles that have successfully started at least one diagnostic monitor.Get-DiagnosticConfi guration Gets the buffer confi guration for the specifi ed buffer name (Logs, Directories, PerformanceCounters,
WindowsEventLogs or DiagnosticInfrastructureLogs).Set-CommonConfi gurationLogs Sets the common confi guration values for all logging buffers.Set-FileBasedLog Sets the buffer confi guration for fi le-based logs.Set-InfrastructureLog Sets the buffer confi guration for the logs generated by the underlying Windows Azure diagnostics infrastructure. The
diagnostic infrastructure logs are useful for troubleshooting the diagnostics system itself.Set-PerformanceCounter Sets the buffer confi guration for performance counter data being collected by your service.Set-WindowsAzureLog Sets the buffer confi guration for basic Windows Azure logs being generated by your service.Set-WindowsEventLog Sets the buffer confi guration for Windows event logs being generated by your service.Start-OnDemandTransfer Starts an on-demand transfer of the specifi ed data buffer. This moves the data to Windows Azure storage (either table
or blob storage).Stop-ActiveTransfer Stops active on-demand transfer, given a transfer ID.
Figure 9 Windows Azure Management Diagnostics Cmdlets
in the notifi cation area of the taskbar (you may have to click the Show Hidden Icons button on the taskbar because it’s oft en hid-den as inactive). Right-click it and select Show Development Fabric UI. While your application is running, this will show information about the application.
Expand the Web Role and right-click on the role instance (0). Select Open local store to open the folder on the local machine where logs are being saved (see Figure 8). Within that folder, the logs are in the \directory\DiagnosticStore folder. Th is is because the Web Role in the sample code is confi gured to store diagnostics information in development storage. If instead you set the DiagnosticsConnectionString to a cloud-storage account, the persisted logs will be in the blob storage associated with that storage account. You can use Cloud Storage Studio to look at the blob storage containers to see the logs.
Managing Diagnostics for a Running ServiceWhile you may deeply instrument your code with logging, you typically don’t want all the logging information persisted into storage while your production service is running. You might want only error and critical information to go to the persisted logs, while more detailed information (logged as Verbose or Informa-tion) is suppressed.
But what if a problem occurs? You don’t want to redeploy a new version of your service or the problem might magically go away—you probably know how effective rebooting can be at making elusive problems disappear.
Instead, it’s more eff ective to increase the amount of informa-tion going to the logging tables or blob storage while allowing the misbehaving code to continue running. Th is is more likely to
reveal the cause of the problem in your application while it’s currently operating.
Earlier I described how to fi ne-tune the details of what logging is passed through to Windows Azure diagnostics for a particular TraceSource. Th at’s a sort of upstream editing of what information gets logged. In this section, I’ll show you the general Windows Azure diagnostics settings that determine how information that passes through a TraceSource gets into persisted storage.
Windows PowerShell cmdlets can manage many aspects of your running Windows Azure services, including diagnostics. You run these from your local machine and they connect over the Internet to the Windows Azure cloud servers running your service, providing information and adjusting parameters. Windows PowerShell is installed with Windows 7 and can be downloaded for Windows Vista from microsoft.com/powershell. Download the Windows Azure Service Management CmdLets from code.msdn.microsoft.com/azurecmdlets and follow the directions for installing them. The Windows Azure diagnostics-related commands are shown in Figure 9.
Figu re 11 Changing Diagnostics Confi guration from Windows PowerShell
Figure 10 Diagnostics Confi guration for a Running Service Using Windows PowerShell
Windows PowerShell cmdlets can manage many aspects of your running Windows Azure services, including diagnostics.
For example, to find the current transfer parameters for a particular role instance, pass the deployment ID (from the Windows Azure developer portal where you deploy the service) and the storage account name and key you used for Diagnostics ConnectionString in the app.confi g or web.confi g for the service role (see Figure 10). No-tice that Windows PowerShell prompts for a couple of missing required parameters—the role instance and the name of the buff er I want. Logs is the standard Windows Azure logs. Th e result shows that the fi lter level is Verbose and a transfer is scheduled every minute.
To change the confi guration for this role, use the Set-Diagnostic-Confi guration cmdlet, as shown in Figure 11. Note that I changed the transfer period from one minute to two minutes and the fi lter from Verbose to Error, meaning that only events logged as Error and Critical will be sent to the persisted storage.
Perhaps the most useful thing you can do remotely from Windows PowerShell is to force a transfer of log information immediately. Figure 12 shows how to do this.
First, I query for any existing on-demand transfer of logs. Th ere is a restriction in the current Windows Azure diagnostics imple-mentation that only one on-demand transfer of a particular type can take place at a time. Seeing that none is in progress, I request one, passing in the deployment ID of the service, the role and instance, the type of log I want transferred and the time interval of data to transfer. (For the log type, Directories means fi le-based logs, including the IIS logs. Logs would be the Windows Azure table-based logs sent through TraceSource.)
I also pass a notifi cation queue name, which is where Windows Azure diagnostics will send a notifi cation that the transfer has
completed. Th rough experimentation, I found that if I didn’t pass a notifi cation queue, the transfer seemed not to happen. I get back a GUID identifying the transfer request. I then query for the request status and see that it’s published, meaning it’s in progress.
Th e current version of the Windows Azure Service Manage-ment CmdLets doesn’t seem to show when the request has been completed, but if you query the blob storage for your diagnostics storage you’ll see the logs pop up in the Containers hierarchy shortly (or in Windows Azure table storage if you requested transfer of information stored in table storage).
Wrapping UpUsing a combination of adjusting confi guration parameters for the TraceSources you defi ne in your code and using the Windows Azure Service Management CmdLets to move information into persisted storage, you should be able to fully control what diagnostic output you get from your Windows Azure services.
Of course, the most important thing you can do to trouble-shoot your production code is to develop a robust strategy for diagnostic output early in development, then follow that strategy throughout coding. The use of TraceSources and the tools that Windows Azure provides for configuring the verbosity of diagnostic output that flows from your application to storage will help you to tap into that to get just the amount of informa-tion you need when a problem arises.
Th ere’s nothing worse than feeling like the code behaving errati-cally on a server is a black box, opaque to you. Solid diagnostics code and the tools described here will let you open the covers of that box and peer inside.
MIKE KELLY is a consultant focused on soft ware development and helping integrate acquisitions to larger corporations. He previously worked for 15 years at Microsoft in a variety of product development roles and as director of Emerging Practices on the Engineering Excellence team. He can be reached at [email protected].
THANKS to the following technical experts for reviewing this article: Sumit Mehrotra, Michael Levin and Matthew Kerner from Microsoft , as well as Neil Mackenzie and Steven Nagy
Figure 12 Using Windows PowerShell to Initiate a Transfer of IIS Logs
If I didn’t pass a notifi cation queue, the transfer seemed not
Microsoft, .NET, ASP.NET, SharePoint, SQL Server and Visual Studio are registered trademarks of Microsoft Corporation in the United States and/or other countries.
Some Nevron components only available for certain platforms. For details visit www.nevron.com or send an email to [email protected].
Encoding Videos Using Microsoft Expression Encoder 3 SDK
In one of my favorite movie scenes of all time, Clark W. Griswold (Chevy Chase in “Christmas Vacation”) gets trapped in his attic while hiding Christmas presents. To keep warm, he dons pink gloves, a green hat and a brown fur stole pulled from a dusty chest. At the bottom of the chest he fi nds home movies from his youth, and passes the time watching them (with tears in his eyes), using an old fi lm projector.
Home movies have come a long way since then, but people still have to deal with one of the same issues: How do I show my movie to friends and family? Sites like YouTube, Vimeo and Facebook make sharing easy; but at 100-plus megabytes per minute for high-defi nition video, getting the data to those sites can be a time-consuming task. Chances are, your portable device, gaming system or home theater media center won’t even play the fi le. To solve these problems, you need to convert the video to another format. Th is process is known as encoding.
Adam Miller
About Expression EncoderTh e Microsoft video encoding tool, Expression Encoder 3, is part of the Expression family of products for creating compel-ling UIs for Web and desktop applications. Expression Encoder comes in free and paid versions; the paid version is part of both Expression Studio 3 Suite ($599) and Expression Web 3 Suite ($149). Th e free download does not support encoding to Silverlight Smooth Streaming or H.264 video or using H.264 video as a source, but it does let you encode to Windows Media Video fi les and it has a nice SDK. Many of the code samples in this article require the paid version of the program; however, all the code samples will build in the free version of the SDK. You’ll just receive an Invalid MediaException or a FeatureNotAvailableException when running.
If you aren’t ready to purchase Expression Suite, you can get started with Expression Encoder by downloading the free version from microsoft.com/expression. It’s also available as part of Expression Professional MSDN Subscription, or Visual Studio Professional with MSDN Premium Subscription. Keep in mind that $149 for a professional video encoding soft ware application with this feature set, wide range of input formats and supported output targets is a relative steal. Similar video encoding solutions can cost upward of $3,000.
No matter which version you choose, you’ll want to install the Encoder 3 QFE. It adds support for additional fi le types and input devices, improves performance in certain situations, and includes minor bug fi xes. Th e QFE installer can be found on the Expression Encoder page on the Microsoft Expression Web site.
This article discusses:• How video encoding works
• Encoding for various types of videos
• Adding Silverlight Smooth Streaming
• Using the Microsoft Expression Encoder 3 SDK
Technologies discussed:C#, Microsoft Expression Encoder 3, Silverlight,Silverlight Smooth Streaming
Supported FormatsTh e following are supported input video formats:
• Windows Media Video (.wmv)• DVD video (.vob)• MPEG (.mpg, .mpeg)• Audio Video Interleave (.avi)• Microsoft Digital Video Recording (.dvr-ms)
Th e paid version adds the following formats (plus a handful of other formats):
• MPEG-4 (.mp4, .m4v)• Quicktime (.mov)• AVC HD (.mts)• Mobile Device Video (.3gp, .3g2)
For the most part, Expression Encoder supports any media fi le Windows Media Player can play. If you want to support even more fi les (and be able to play them in Windows Media Player), you can install a codec pack such as K-Lite Codec Pack (codecguide.com) or Community Combined Codec Pack (cccp-project.net). Both are based on the open source ff dshow project and will add support for VP6-encoded Flash (.flv) files, H.264 video in the Matroska (.mkv) container, and Ogg (.ogg) video fi les.
The free version of Expression Encoder supports only the Microsoft VC-1 as an output codec. However, this still allows you to encode videos for Silverlight (single bitrate only), Xbox 360, Zune and Zune HD. Also, the VC-1 codec is no slouch; its compression is as good (if not better in certain situations) as H.264. Upgrading to the paid version lets you output Silverlight Smooth Streaming video (multi-bitrate) as well as H.264, which means you can encode videos playable on the iPhone, PS3, Flash player (version 10 supports H.264/.mp4) and countless other devices.
Encoding 101Supporting certain output devices requires changing some of the video profi le settings, so you’ll need to understand the basics of video encoding. Re-encoding video is actually the process of decompressing a video and re-compressing it using another codec or manually changing attributes such as size, aspect ratio or frame rate. Although there are lossless compression methods, they’re rarely used because the resulting video fi les are still quite large. So in order to reduce the amount of space necessary to store (and therefore transfer) the video, an algorithm, known as a codec, is used to compress and decompress the video. Th e compressed video stream is then stored according to a specifi cation known as a con-tainer (such as WMV or MP4). Containers and codecs are oft en not an exclusive contract, so although H.264 is the most common codec found in the MP4 container, other codecs could be used.
Bitrate, expressed in kilobits per second, defi nes how much data should be used to store the compressed video. Reducing the bitrate tells the encoder to compress the video at a higher rate, degrading video quality. Th ere are diff erent ways to tell the encoder how to determine the video’s bitrate. Th e simplest way is to use a constant bitrate (CBR), which forces the encoder to use the same amount of data for every second of video. A variable bitrate (VBR) can be used to tell the encoder what the overall bitrate of the fi le should be, but the encoder is allowed to raise or lower the bitrate based
on the amount of data needed for a particular section of the video. Variable constrained bitrate is similar to unconstrained VBR, except that you give not only an average bitrate to use, but also a maximum bitrate that can’t be exceeded.
Variable constrained bitrate is useful when encoding Silverlight Smooth Streaming video. It helps ensure the bitrate doesn’t exceed the client bandwidth, forcing the client to request a lower-quality stream. CBR and VBR indicate the amount of compression to use by specifying an overall video fi le size.
Alternatively, you can tell the encoder to use a quality-based VBR. Instead of specifying the overall size of the video, you specify a percentage of quality (that is, how much data) of the decompressed source video to retain. It takes less data to retain good quality for a cartoon, for example, than for a nature or action-fi lled video. So if you have a high-quality source and your goal is to convert the source to another format and retain optimal quality, consider using quality-based VBR. Th ese defi nitions are just the tip of the iceberg, but they are core to choosing your output settings. You’ll fi nd additional encoding defi nitions throughout this article as they apply to code samples.
Using the SDKTo follow the code samples, you’ll want to use a good-quality video. If you don’t have any high-resolution video lying around, you can get some nice HD videos from microsoft.com/windows/
using Microsoft.Expression.Encoder;
namespace TestApp{ class Program { static void Main(string[] args) { MediaItem src = new MediaItem(@"C:\WMdownloads\AdrenalineRush.wmv"); Job job = new Job(); job.MediaItems.Add(src); job.ApplyPreset(Presets.VC1ZuneHD); job.OutputDirectory = @"C:\EncodedFiles"; job.Encode(); } }}
Figure 1 Creating a Video for Zune HD
Sites like YouTube, Vimeo and Facebook make the act
of sharing easy; but at 100-plus megabytes per minute of high-defi nition video, getting the data to those sites can be a
windowsmedia/musicandvideo/hdvideo/contentshowcase.aspx. I’ll use the Adren-aline Rush video as the source for these examples.
After installing Expression Encoder 3, create a new Visual Studio C# Console Application project. Add references to Microsoft. Expres sion.Encoder.dll and Microsoft.Expression.Encoder. Utilities.dll, located at \Program Files (x86)\Microsoft Expression\Encoder 3\SDK. You’ll also need to add a reference to WindowsBase, which you’ll fi nd in the .NET tab of the Add Ref-erences dialog. Many of the classes used will be in the Microsoft .Expression.Encoder namespace, so add a using statement for it.
Th e fi rst item to instantiate will be a MediaItem object. Th e MediaItem constructor takes a string as the only parameter to the constructor. Pass the path to the fi le you’re using as the source for the encoding project:
MediaItem src = new MediaItem(@"C:\WMdownloads\AdrenalineRush.wmv");
Creating a MediaItem object takes just a second or two. Th e SDK is doing a fair amount of work behind the scenes, though, gathering information about the source video, such as its height, width, frame rate (the frequency that individual images should be displayed on the screen) and duration. Information about the audio stream is also gathered at this time.
Next you create an instance of the Job class (which has only a parameterless constructor), and add your MediaItem to its list of MediaItems. Th e Job class serves as the manager for desired output formats (known as profi les):
Job job = new Job();job.MediaItems.Add(src);
Now you need to tell the job which audio and video profi les to use during encoding; the easiest way is to use one of the profi les defi ned in the UI. To create a video for the Zune HD, for example, you can use the VC1ZuneHD preset:
job.ApplyPreset(Presets.VC1ZuneHD);
Finally, specify an output directory and start the encoding process:job.OutputDirectory = @"C:\EncodedFiles";job.Encode();
Your Program.cs fi le should be similar to Figure 1.Th ere’s one last thing to do before running the application: If
you’re using a 64-bit version of Windows, you’ll need to modify the project to build to x86. In the Visual Studio menu bar, select Project and (Project Name) Properties. In the dialog box that
opens, select the build tab and change the Platform Target from “Any CPU” to “x86.”
You are now ready to run the application and create a video playable on the Zune HD. The encoding process will take a couple minutes to complete and is extremely CPU-intensive. Video encoding benefi ts from being a parallel computed task, so multi-core computers have a big advantage here.
Expression Encoder also includes presets for encoding to online services such as YouTube, Vimeo and Facebook. 720p video recorded from my Panasonic Lumix DMC-ZS3 digital camera consumes about 110MB per minute of recorded video. Converting the video using the YouTube HD preset (also 720p) reduces the video to just 16MB. Th is makes it much more effi cient to upload and store locally. Converting it to an .mp4 file also makes it compatible with many more video editing programs.
Custom SettingsTo manually produce the same output as the VC1ZuneHD preset, you’d need to use code similar to Figure 2 to set the video and audio profi les.
For the code in Figure 2 to compile, you’ll need to add references to Microsoft .Expression.Encoder.Utilities and System.Drawing. Also add using statements for Microsoft .Expression.Encoder. Profi les and System.Drawing. Th e OutputFormat essentially specifi es the container for the output fi le. I say essentially because encoding for Silverlight works just a little bit diff erently (as I’ll discuss shortly).
Th e VideoProfi le specifi es the video codec to use, along with the detailed settings to use when encoding. Similarly, the AudioProfi le specifies the audio codec to use along with its settings. When constructing a VariableConstrainedBitrate, the first parameter specifi es the average bitrate and the second parameter specifi es the maximum bitrate. Th e size setting indicates the box the encoded video should fi t in. Th e correctly scaled size for the Adrenaline Rush video is actually 480x272 to maintain the aspect ratio, but if I entered 480x480 the resulting video still would be 480x272.
Figure 2’s KeyFrameDistance property refers to a video-encoding concept I haven’t yet discussed. Th e way the most video encoding works
MediaItem src = new MediaItem(@"C:\WMdownloads\AdrenalineRush.wmv");src.OutputFormat = new WindowsMediaOutputFormat();
src.OutputFormat.VideoProfile = new AdvancedVC1VideoProfile();src.OutputFormat.VideoProfile.Bitrate = new VariableConstrainedBitrate(1000, 1500);src.OutputFormat.VideoProfile.Size = new Size(480, 272);src.OutputFormat.VideoProfile.FrameRate = 30;src.OutputFormat.VideoProfile.KeyFrameDistance = new TimeSpan(0, 0, 4);
src.OutputFormat.AudioProfile = new WmaAudioProfile();src.OutputFormat.AudioProfile.Bitrate = new VariableConstrainedBitrate(128, 192);src.OutputFormat.AudioProfile.Codec = AudioCodec.WmaProfessional;src.OutputFormat.AudioProfile.BitsPerSample = 24;
Job job = new Job();job.MediaItems.Add(src);job.OutputDirectory = @"C:\EncodedFiles";job.Encode();
Figure 2 Video and Audio Profi le Settings for Zune HD
MediaItem src = new MediaItem(@"C:\WMdownloads\AdrenalineRush.wmv");src.OutputFormat = new WindowsMediaOutputFormat();
src.OutputFormat.VideoProfile = new AdvancedVC1VideoProfile();src.OutputFormat.VideoProfile.KeyFrameDistance = new TimeSpan(0, 0, 2);src.OutputFormat.VideoProfile.SmoothStreaming = true;
src.OutputFormat.VideoProfile.Streams.Clear();src.OutputFormat.VideoProfile.Streams.Add(new StreamInfo(new VariableConstrainedBitrate(2000, 3000), new Size(1280, 720)));src.OutputFormat.VideoProfile.Streams.Add(new StreamInfo(new VariableConstrainedBitrate(1400, 1834), new Size(848, 476)));src.OutputFormat.VideoProfile.Streams.Add(new StreamInfo(new VariableConstrainedBitrate(660, 733), new Size(640, 360)));
src.OutputFormat.AudioProfile = new WmaAudioProfile();src.OutputFormat.AudioProfile.Bitrate = new VariableConstrainedBitrate(128, 192);src.OutputFormat.AudioProfile.Codec = AudioCodec.WmaProfessional;src.OutputFormat.AudioProfile.BitsPerSample = 24;
Job job = new Job();job.MediaItems.Add(src);job.OutputDirectory = @"C:\EncodedFiles";job.Encode();
Copyright 1996-2010 Infragistics, Inc. All rights reserved. Infragistics and the Infragistics logo and NetAdvantage are registered trademarks of Infragistics, Inc.
At Infragistics, we make sure our NetAdvantage for.NET controls make every part of your User Interfacethe very best it can be. That’s why we’ve tested and re-tested to make sure our Data Grids are the veryfastest grids on the market and our Data Chartsoutperform any you’ve ever experienced. Use ourcontrols and not only will you get the fastest loadtimes, but your apps will always look good too. Fastand good-looking…that’s a killer app. Try them foryourself at infragistics.com/wow.
Infragistics Sales 800 231 8588 Infragistics Europe Sales +44 (0) 800 298 9055 Infragistics India +91-80-6785-1111twitter.com/infragistics
is to store only the changes from one frame to the next, rather than the entire picture for each video frame. Key frames are the frames that contain the entire image. Th is code will create key frames ev-ery four seconds. Key frames will be created automatically when there are large changes in the video such as a scene change, but you should also create them at pre-defi ned intervals to support seeking within the movie during playback.
Silverlight Smooth StreamingSilverlight Smooth Streaming dynamically switches the bitrate of the media fi le being played based on current network conditions. A Smooth Streaming project consists of individual videos stored in .ismv fi les, as well as .ism and .ismc metadata fi les that support Smooth Streaming playback.
To create a Silverlight Smooth Streaming project, multiple changes must be made. First, change the KeyFrameDistance to two seconds. Th e video will still play if the KeyFrameDistance is left at four seconds, but you may notice hiccups in playback when the player switches bitrates. Th e Silverlight player will request the video in two-second chunks, so playback is more consistent if there’s a key frame at the beginning of each request. You also need to add the following line:
Setting SmoothStreaming to true tells the encoder to output the videos to .ismv fi les and create the .ism and ismc fi les. Having only one bitrate isn’t really a smooth streaming project, so to create multiple output bitrates, you need to add multiple streams to the VideoProfi le. Do this using code similar to Figure 3.
Here the code specifies three different bitrates and sizes to encode. For optimum quality, the video size needs to shrink as the bi-trate is reduced. When specifying your own bitrates, you can use the IIS Smooth Streaming settings in the Expression Encoder 3 UI. Note that it’s not possible to gain quality by encoding a video at a higher resolu-tion than the source fi le. And it only makes sense to encode at a higher bitrate than the source fi le if using a weaker compression method. If the SDK was able to determine the bitrate of the source fi le, it will be present in the MediaItem’s SourceVideo Profi le property:
int bitrate = ((ConstantBitrate)src.SourceVideoProfile.Bitrate).Bitrate;
If the SDK couldn’t obtain the bitrate of the source fi le, you can get a pretty close estimate based on the fi le size. Here’s the formula:
Approximate bitrate in kb/s = (fi le size in kilobytes * 8 / video duration in seconds) - audio bitrate in kb/s
You can use the System.IO.FileInfo class to get the source-fi le size, and the SDK to get the duration (MediaItem.FileDuration
property) and possibly the audio bitrate. If you don’t know the audio bitrate, use 128 or 160 to estimate (most audio bitrates are between 64 and 192); you may also be able to get the audio bitrate in the Windows Media Player Properties window (Press Alt to show the menu, then File | Properties).
Monitoring ProgressBecause an encoding job can take hours to complete, it’s helpful to be able to see the encoding progress. Th e SDK provides a simple way to monitor the encoding process via an event you can add a handler for:
job.EncodeProgress += new EventHandler<EncodeProgressEventArgs>(OnProgress);
Add a method like the following to handle the event:static void OnProgress(object sender, EncodeProgressEventArgs e){ Console.Clear(); Console.WriteLine((100 * (e.CurrentPass - 1) + e.Progress) / e.TotalPasses + "%");}
Multi-pass encoding is a new concept relevant to this code sample. When using a variable bitrate to encode, the process is done in two steps, known as passes. During the fi rst pass, the source video is analyzed to determine which parts are most complex and would ben-efi t from an increased bitrate. During the second pass, the video is encoded using the information obtained during the fi rst pass. Th us, if you use a constant bitrate, there’s no need to use the CurrentPass or TotalPasses properties of the EncodeProgressEventArgs class.
Combining VideosIf you want to encode only part of a video or combine multiple videos into one, the SDK provides support. To modify the start and stop time for a source media item, you can modify the Clips property. To encode only the fi rst six seconds of a video, use code similar to:
src.Sources[0].Clips[0].StartTime = new TimeSpan(0);src.Sources[0].Clips[0].EndTime = new TimeSpan(0, 0, 6);
To add other videos as source fi les, you can append additional videos to the Sources property of your MediaItem. Th is will encode the source fi les in order to a single output fi le:
MediaItem src = new MediaItem(@"C:\WMdownloads\AdrenalineRush.wmv");src.Sources.Add(new Source(@"C:\WMdownloads\Video2.wmv"));
Live EncodingExpression Encoder also supports encoding from live sources such as a webcam. Th e concept (and code) is similar to encoding video fi les, but you use a diff erent set of classes. Th ese are found in the Microsoft .Expression.Encoder.Live namespace.
using (LiveJob job = new LiveJob()){ LiveDevice videoDevice = job.VideoDevices[0]; LiveDevice audioDevice = job.AudioDevices[0]; LiveDeviceSource liveSource = job.AddDeviceSource(videoDevice, audioDevice); job.ActivateSource(liveSource); WindowsMediaBroadcastOutputFormat outputFormat = new WindowsMediaBroadcastOutputFormat(); outputFormat.BroadcastPort = 8080; job.OutputFormat = outputFormat; Console.WriteLine("Press enter to stop encoding..."); job.StartEncoding(); Console.ReadLine(); Console.WriteLine("Stopping"); job.StopEncoding();}
Figure 4 Encoding Live Video
Silverlight Smooth Streaming dynamically switches the
bitrate of the media fi le being played based on current
network conditions.
Word Processing Components for Windows Forms & ASP.NET www.textcontrol.com
Th e fi rst class to use is LiveJob. LiveJob works like Encoder.Job—it handles the work of encoding the video. However, in a live scenario the OutputFormat is a property of LiveJob instead of a MediaItem object (which is not necessary). When a LiveJob object is instantiated, it will look for video input devices attached to your computer and populate VideoDevices and AudioDevices properties. You can then use these as an input source for the encoder. Figure 4 shows an example.
Th is will start a live encoding session using a webcam (assuming you have one connected) and broadcast it on your local machine on port 8080. To view the live encoding, open Windows Media Player and select File | Open URL and enter mms://localhost:8080. Aft er some buff ering, you should see the video from your web-cam, though you’ll notice a 20- to 30-second lag due to the time it takes to encode and transport the stream. You could potentially use this video as a source for Windows Media Services or IIS Media Services to broadcast to the world.
Additional ToolsIf you aren’t sure whether the encoding settings you’ve chosen will give you the output quality you need, the Expression Encoder 3 UI provides a handy feature called A/B Compare. Th is lets you encode
fi ve seconds of video surrounding the current playback position. Th e encoded video will appear split-screen with your source video (see Figure 5), so you can easily compare the quality of the encoded video with the original.
You can then save the current settings as a user-defi ned preset by clicking Edit | Save current settings as preset. Th e preset will be stored as an XML fi le, which you can use with the SDK:
job.ApplyPreset(@"C:\WMdownloads\NewPreset.xml");
If you’re already thinking about how easy it would be to automate the video conversion process with a console application, take a look at the Convert-Media PowerShell Module for Expression Encoder, available at convertmedia.codeplex.com. Th is PowerShell module wraps the Expression Encoder SDK, providing a command-line encoding interface without writing any code. As with all CodePlex projects, it is open source.
Hopefully you now understand the core terminology related to video encoding and can make educated decisions on which codec and bitrate to use. You also know how to use the Expression Encoder 3 SDK to encode videos for specifi c targets such as Xbox 360, iPhone and Silverlight, as well as live streaming video. So don’t wait to be trapped in your attic like Clark W. Griswold to realize the value of your home videos and forgotten memories. Convert them to a format that will make them accessible to the world.
ADAM MILLER is a soft ware engineer for Nebraska Global in Lincoln, Neb. You can follow Miller’s blog at blog.milrr.com.
THANKS to the following technical expert for reviewing this article: Ben Rush
Figure 5 A/B Compare in Expression Encoder 3
LiveJob works like Encoder.Job—it handles the work of encoding
You’ve got the data, but time, budget and staffconstraints can make it hard to present that valuableinformation in a way that will impress. With Infragistics’NetAdvantage for Silverlight Data Visualization, youcan create Web-based data visualizations anddashboard-driven applications on Microsoft Silverlight(and coming soon for WPF) that will not only impressdecision makers, it actually empowers them. Go toinfragistics.com/sldv today and get inspired to createkiller apps.
Infragistics Sales 800 231 8588 Infragistics Europe Sales +44 (0) 800 298 9055 Infragistics India +91-80-6785-1111twitter.com/infragistics
Copyright 1996-2010 Infragistics, Inc. All rights reserved. Infragistics and the Infragistics logo and NetAdvantage are registered trademarks of Infragistics, Inc.
Microsoft Windows Presentation Foundation (WPF) has a rich data-binding system. In addition to being a key enabler for loose coupling of the UI defi nition from the supporting logic and data through the Model-View-ViewModel (MVVM) pattern, the data-binding system has powerful and fl exible support for busi-ness data-validation scenarios. Th e data-binding mechanisms in WPF include several options for evaluating the validity of input data when you create an editable view. Plus, WPF templating and styling capabilities for controls give you the ability to easily customize the way you indicate validation errors to the user.
To support complex rules and to display validation errors to the user, you generally need to employ a combination of the available validation mechanisms. Even a seemingly simple data input form can present validation challenges when the business rules get complex.
Brian Noyes
Common scenarios involve both simple rules at an individual property level, and cross-coupled properties where the validity of one property depends on the value of another property. However, the validation support in WPF data binding makes it easy to address these challenges.
In this article, you’ll see how to use the IDataErrorInfo interface implementation, ValidationRules, BindingGroups, exceptions, and validation-related attached properties and events to address your data-validation needs. You’ll also see how to customize the display of validation errors with your own ErrorTemplates and ToolTips. For this article, I assume you are already familiar with the basic data-binding capabilities of WPF. For more background on that, see John Papa’s December 2007 MSDN Magazine article, “Data Binding in WPF” (msdn.microsoft.com/magazine/cc163299).
Data Validation OverviewAlmost any time you enter or modify data in an application, you need to ensure that the data is valid before it gets too far away from the source of those changes—in this case, the user. Moreover, you need to give users a clear indication when the data they entered is invalid, and hopefully also give them some indication of how to correct it. Th ese things are fairly easy to do with WPF as long as you know which capability to use and when.
When you use data binding in WPF to present business data, you typically use a Binding object to provide a data pipeline between a single property on a target control and a data source
This article discusses:• Data validation in WPF
• Exceptions and validation rules
• Cross-coupled properties
• Custom validation error display
Technologies discussed:Windows Presentation Foundation
Code download available at:code.msdn.microsoft.com/mag201006WPF
object property. For validation to be relevant, you’re typically doing TwoWay data binding—meaning that, in addition to data fl owing from the source property into the target property for display, the edited data also fl ows from target to source as shown in Figure 1.
Th ere are three mechanisms for determining whether data entered through a data-bound control is valid. Th ese are summarized in Figure 2.
When a user enters or modifi es data in TwoWay data binding, a workfl ow kicks off :
• Data is entered or modifi ed by the user through keystrokes, mouse, touch, or pen interaction with the element, resulting in a change of a property on the element.
• Data is converted to the data-source property type, if needed.• Th e source property value is set.• Th e Binding.SourceUpdated attached event fi res.• Exceptions are caught by the Binding if thrown by the setter
on the data-source property, and can be used to indicate a validation error.
• IDataErrorInfo properties are called on the data source object, if implemented.
• Validation error indications are presented to the user and the Validation.Error attached event fi res.As you can see, there are several points in the process where
validation errors can result, depending on which mechanism you choose. Not shown in the list is where the ValidationRules fi re. Th at’s because they can fi re at various points in the process, depending on the value you set for the ValidationStep property on the ValidationRule, including before type conversion, aft er con-version, aft er the property is updated or when the changed value is committed (if the data object implements IEditableObject). Th e default value is RawProposedValue, which happens before type conversion. Th e point when the data is converted from the target control property type to the data source object property type usually happens implicitly without touching any of your code, such as for a numeric input in a TextBox. Th is type-conversion process can throw exceptions, which should be used to indicate a validation error to the user.
If the value can’t even be written to the source object property, clearly it is invalid input. If you choose to hook up Validation-Rules, they are invoked at the point in the process indicated by the ValidationStep property, and they can return validation errors based on whatever logic is embedded in them or called from them. If the source object property setter throws an exception, that should almost always be treated as a validation error, as with the type conversion case.
Finally, if you implement IDataErrorInfo, the indexer property you add to your data source object for that interface will be called for the property that was being set to see if there is a validation error based on the returned string from that interface. I’ll cover each of these mechanisms in more detail a bit later.
When you want validation to occur is another decision you’ll have to make. Validation happens when the Binding writes the data to the underlying source object property. When validation takes place is specifi ed by the UpdateSourceTrigger property of the Binding, which is set to PropertyChanged for most properties. Some properties, such as TextBox.Text, change the value to
FocusChange, which means that validation happens when the fo-cus leaves the control that’s being used to edit data. Th e value can also be set to Explicit, which means that validation has to be ex-plicitly invoked on the binding. Th e BindingGroup that I discuss later in the article uses Explicit mode.
In validation scenarios, particularly with TextBoxes, you typ-ically want to give fairly immediate feedback to the user. To support that, you should set the UpdateSourceTrigger property on the Binding to PropertyChanged:
It turns out that for many real validation scenarios, you’ll need to leverage more than one of these mechanisms. Each has its pros and cons, based on the kind of validation error you’re concerned with and where the validation logic can reside.
Business Validation ScenarioTo make this more concrete, let’s walk through an editing scenario with a semi-real business context and you’ll see how each of these mechanisms can come into play. Th is scenario and the validation rules are based on a real application I wrote for a customer in which a fairly simple form required the use of almost every validation mechanism due to the supporting business rules for validation. For the simpler application used in this article, I’ll employ each of the mechanisms to demonstrate their use, even though they’re not all explicitly required.
Let’s suppose you need to write an application to support fi eld technicians who perform in-home customer support calls (think the cable guy, but one who also tries to up-sell additional features and services). For each activity the technician performs in the fi eld, he needs to enter an activity report that tells what he did and relates it to several pieces of data. Th e object model is shown in Figure 3.
Th e main piece of data users fi ll out is an Activity object, including a Title, the ActivityDate, an ActivityType (a drop-down selection of predefi ned activity types) and a Description. Th ey also need to relate their activity to one of three possibilities. Th ey need to select either a Customer the activity was performed for from a list of customers assigned to them or an Objective of the company the activity was related to from a list of company objectives, or they can manually enter a Reason if neither a Customer nor an Objective apply for this activity.
Here are the validation rules the application needs to enforce:• Title and Description are required fi elds.• Th e ActivityDate must be no earlier than seven days prior to
the current date and no later than seven days in the future.• If the ActivityType Install is selected, the Inventory field is
required and should indicate the pieces of equipment from the technician’s truck that were expended. Th e inventory items need to be entered as a comma-separated list with an expected model number structure for the input items.
• At least one Customer, Objective or Reason must be provided.
Th ese may seem like fairly simple requirements, but the last two in particular are not so straightforward to address because they indicate cross-coupling between properties. Th e running application with some invalid data—indicated by the red box—is shown in Figure 4.
Exception ValidationTh e simplest form of validation is to have an exception that’s raised in the process of setting the target property treated as a validation error. Th e exception could result from the type conversion process before the Binding ever sets the target property; it could result from an explicit throw of an exception in the property setter; or it could result from a call out to a business object from the setter where the exception gets thrown further down the stack.
To use this mechanism, you simply set the ValidatesOnExceptions property to true on your Binding object:
When an exception is thrown while trying to set the source object property (Activity.Title in this case), a validation error will be set on the control. Th e default validation error indication is a red border around the control as shown in Figure 5.
Because exceptions can occur in the type conversion process, it’s a good idea to set this property on input Bindings whenever there’s any chance of the type conversion failing, even if the backing property just sets the value on a member variable with no chance of an exception.
For example, suppose you were to use a TextBox as the input control for a DateTime property. If a user enters a string that can’t be converted, ValidatesOnExceptions is the only way your Binding could indicate an error, because the source object property will never be called.
If you need to do something specific in the view when there is invalid data, such as disable a command, you can hook the Validation.Error attached event on the control. You’ll also need to set the NotifyOnValidationError property to true on the Binding.
<TextBox Name="ageTextBox" Text ="{Binding Path=Age, ValidatesOnExceptions=True, NotifyOnValidationError=True}" Validation.Error="OnValidationError".../>
ValidationRule ValidationIn some scenarios, you might want to tie the validation in at the UI level and need more complicated logic to determine whether the input is valid. For the sample application, consider the validation rule for the Inventory field. If data is entered, it needs to be a comma-separated list of model numbers that follow a specific pattern. A ValidationRule can easily accommodate this because it depends entirely on the value being set. Th e ValidationRule can use a string.Split call to turn the input into a string array, then use a regular expression to check whether the individual parts comply
with a given pattern. To do this, you can defi ne a ValidationRule as shown in Figure 6.
Properties exposed on a ValidationRule can be set from the XAML at the point of use, allowing them to be a little more fl exible. Th is validation rule ignores values that can’t be converted to a string array. But when the rule can execute the string.Split, it then uses a RegEx to validate that each string in the comma-separated list complies with the pattern set through the InventoryPattern property.
When you return a ValidationResult with the valid fl ag set to false, the error message you provide can be used in the UI to present the error to the user, as I’ll show later. One downside to Validation-Rules is that you need an expanded Binding element in the XAML to hook it up, as shown in the following code:
In this example, my Binding will still raise validation errors if an exception occurs due to the ValidatesOnExceptions property being set to true, and I also support IDataErrorInfo validation based on the ValidatesOnDataErrors being set to true, which I’ll talk about next.
If you have multiple ValidationRules attached to the same property, those rules can each have different values for the ValidationStep property or they can have the same value. Rules within the same ValidationStep are evaluated in order of declaration. Rules in earlier ValidationSteps obviously run before those in later ValidationSteps. What may not be obvious is that if a ValidationRule returns an error, none of the subsequent rules are evaluated. So the
Validation Mechanism DescriptionExceptions By setting the ValidatesOnExceptions property
on a Binding object, if an exception is raised in the process of trying to set the modifi ed value on the source object property, a validation error will be set for that Binding.
ValidationRules The Binding class has a property to supply a collection of ValidationRule-derived class instances. These ValidationRules need to override a Validate method that will be called by the Binding whenever the data in the bound control changes. If the Validate method returns an invalid ValidationResult object, a validation error is set for that Binding.
IDataErrorInfo By implementing the IDataErrorInfo interface on a bound data-source object and setting the ValidatesOnDataErrors property on a Binding object, the Binding will make calls to the IDataErrorInfo API exposed from the bound data-source object. If non-null or non-empty strings are returned from those property calls, a validation error is set for that Binding.
Figure 2 Binding Validation Mechanisms
When you want validation to occur is another decision you
will have to make.
77June 2010msdnmagazine.com
fi rst validation error will be the only one indicated when the er-rors result from ValidationRules.
IDataErrorInfo ValidationTh e IDataErrorInfo interface requires the implementer to expose one property and one indexer:
Th e Error property is used to indicate an error for the object as a whole, and the indexer is used to indicate errors at the individual property level. Th ey both work the same: returning a non-null or non-empty string indicates a validation error. In addition, the string you return can be used to display the error to the user, as I’ll show later.
When you’re working with individual controls bound to individual properties on a data source object, the most important part of the interface is the indexer. Th e Error property is used only in scenarios such as when the object is displayed in a DataGrid or in a Binding-Group. Th e Error property is used to indicate an error at the row level, whereas the indexer is used to indicate an error at the cell level.
Implementing IDataErrorInfo has one big downside: the implementation of the indexer typically leads to a big switch-case statement, with one case for each property name in the object, and you have to switch and match based on strings and return strings to indicate an error. Furthermore, your implementation of IDataErrorInfo is not called until the property value has already been set on the object. If other objects have subscribed to INotify-PropertyChanged.PropertyChanged on your object, they will already have been notifi ed of the change and could have started working based on data that your IDataErrorInfo implementation is about to declare invalid. If that could be a problem for your application, you’ll need to throw exceptions from the property setters when you’re unhappy with the value being set.
Th e good thing about IDataErrorInfo is that it makes it easy to address cross-coupled properties. For example, in addition to using the ValidationRule to validate the input format of the Inventory fi eld, remember the requirement that the Inventory fi eld must be fi lled in when the ActivityType is Install. Th e ValidationRule itself
has no access to the other properties on the data-bound object. It just gets passed a value that’s being set for the property the Binding is hooked up to. To address this requirement, when the ActivityType property gets set you need to cause validation to occur on the Inventory property and return an invalid result when ActivityType is set to Install if the value of Inventory is empty.
To accomplish this, you need IData-ErrorInfo so that you can inspect both the Inventory and ActivityType properties when evaluating Inventory, as shown here:public string this[string propertyName] { get { return IsValid(propertyName); }}
private string IsValid(string propertyName) { switch (propertyName) { ... case "Inventory": if (ActivityType != null && ActivityType.Name == "Install" && string.IsNullOrWhiteSpace(Inventory)) return "Inventory expended must be entered for installs"; break;}
Additionally, you need to get the Inventory Binding to invoke vali-dation when the ActivityType property changes. Normally, a Binding only queries the IDataErrorInfo implementation or calls Validation-Rules if that property changed in the UI. In this case, I want to trigger the re-evaluation of the Binding validation even though the Inventory property has not changed, but the related ActivityType has.
Th ere are two ways to get the Inventory Binding to refresh when the ActivityType property changes. Th e fi rst and simplest way is to publish the PropertyChanged event for Inventory when you set the ActivityType:
ActivityType _ActivityType;public ActivityType ActivityType { get { return _ActivityType; } set { if (value != _ActivityType) { _ActivityType = value; PropertyChanged(this, new PropertyChangedEventArgs("ActivityType")); PropertyChanged(this, new PropertyChangedEventArgs("Inventory")); } }}
Th is causes the Binding to refresh and re-evaluate the validation of that Binding.
Th e second way is to hook the Binding.SourceUpdated attached event on the ActivityType ComboBox or one of its parent elements, and trigger a Binding refresh from the code-behind handler for that event:
Calling UpdateSource on a Binding programmatically causes it to write the current value in the bound target element into the source property, triggering the validation chain as if the user had just edited the control.
Using BindingGroup for Cross-Coupled PropertiesTh e BindingGroup feature was added in the Microsoft .NET Frame-work 3.5 SP1. A BindingGroup is specifi cally designed to allow you to evaluate validation on a group of bindings all at once. For example, you could allow a user to fill in an entire form and wait until she pressed the Submit or Save button to evaluate the validation rules for the form, then present the validation errors all at once. In the sample application, I had the requirement that at least one Customer, Objective, or Reason had to be provided. A Binding-Group can be used to evaluate a subset of a form as well.
To use a BindingGroup, you need a set of controls with normal Bindings on them that share a common ancestor element. In the sample application, the Customer ComboBox, Objective Combo-Box and Reason TextBox all live within the same Grid for layout. BindingGroup is a property on FrameworkElement. It has a ValidationRules collection property that you can populate with one or more ValidationRule objects. Th e following XAML shows the BindingGroup hookup for the sample application:
In this example, I added an instance of the CustomerObjectiveOr-ReasonValidationRule to the collection. Th e ValidationStep prop-erty allows you to have some control over the value that’s passed to the rule. UpdatedValue means to use the value that was written to the data source object aft er it is written. You can also choose values for ValidationStep that let you use the raw input from the user, the value aft er type and value conversion is applied, or the “committed” value, which means implementing the IEditableObject interface for transactional changes to the properties of your object.
Th e ValidatesOnTargetUpdated fl ag causes the rule to be evalu-ated each time the target property is set through the Bindings. Th is includes when it is set initially, so you have immediate validation error indications if the initial data is invalid, as well as each time the user changes the values in the controls that are part of the BindingGroup.
A ValidationRule that is hooked up to a BindingGroup works a little diff erently than a ValidationRule hooked up to a single Bind-
ing. Figure 7 shows the ValidationRule hooked up to the Binding-Group shown in the previous code sample.
In a ValidationRule hooked up to a single Binding, the value that’s passed in is the single value from the data source property that’s set as the Path of the Binding. In the case of a BindingGroup, the value that is passed to the ValidationRule is the BindingGroup itself. It contains an Items collection that is populated by the DataContext of the containing element, in this case the Grid.
For the sample application, I’m using the MVVM pattern, so the DataContext of the view is the ViewModel itself. Th e Items collection contains just a single reference to the ViewModel. From the View-Model, I can get to the Activity property on it. Th e Activity class in this case has the validation method that determines whether at least one Customer, Objective, or Reason has been entered so I don’t have to duplicate that logic in the ValidationRule.
As with other ValidationRules covered earlier, if you’re happy with the values of the data passed in, you return a ValidationResult.Vali-dResult. If you’re unhappy, you construct a new ValidationResult with a false valid fl ag and a string message indicating the problem, which can then be used for display purposes.
Setting the ValidatesOnTargetUpdated fl ag is not enough to get the ValidationRules to fire automatically, though. The BindingGroup was designed around the concept of explicitly triggering validation for an entire group of controls, typically through something like a Submit or Save button press on a form. In some scenarios, users don’t want to be bothered with validation error indications until they consider the editing process complete, so the BindingGroup is designed with this approach in mind.
The default way WPF displays validation errors is to draw a red
border around the control.
Figure 4 A Dialog Showing ToolTips and Invalid Data
(888) 850-9911Sales Hotline - US & Canada:
/update/2010/06
US Headquarters ComponentSource650 Claremore Prof WaySuite 100WoodstockGA 30188-5188USA
In the sample application, I want to provide immediate validation-error feedback to the user any time he changes something in the form. To do that with a BindingGroup, you have to hook the appropriate change event on the individual input controls that are part of the group, and have the event handler for those events trigger the evaluation of the BindingGroup. In the sample application, this means hooking the ComboBox.SelectionChanged event on the two ComboBoxes and the TextBox.TextChanged event on the TextBox. Th ose all can point to a single handling method in the code-behind:
Note that for the validation display, the default red border will be displayed on the FrameworkElement that the Binding-Group resides on, such as the Grid in the sample application, as in Figure 4. You can also alter where the validation indication is displayed by using the Validation.ValidationAdornerSite and Validation.ValidationAdornerSiteFor attached properties. By default, the individual controls will also display red borders for their individual validation errors. In the sample application, I turn those borders off by setting the ErrorTemplate to null through Styles.
With BindingGroup in the .NET Framework 3.5 SP1, you may encounter problems with the proper display of validation errors on initial form load, even if you set the ValidatesOnTargetUpdated property on the ValidationRule. A workaround I found for this was to “jiggle” one of the bound properties in the BindingGroup. In the sample application, you could add and remove a space at the end of whatever text is initially presented in the TextBox in the Loaded event of the view like so:
Th is causes the BindingGroup ValidationRules to fi re since one of the contained Binding properties has changed, causing the valida-tion of each Binding to be called. Th is behavior is fi xed in the .NET Framework 4.0, so there should be no need for the workaround to get initial display of validation errors—just set the ValidatesOn-TargetUpdated property to true on the validation rules.
Validation Error DisplayAs mentioned previously, the default way WPF displays validation errors is to draw a red border around the control. Oft en you’ll want to customize this to display errors in some other way. Moreover, the error message associated with the validation error is not displayed by default. A common requirement is to display the error message in a ToolTip only when the validation error exists. Customizing the validation error displays is fairly easy through a combination of Styles and a set of attached properties associated with validation.
To add a ToolTip that displays the error text is trivial. You just need to defi ne a Style that applies to the input control that sets the ToolTip property on the control to the validation error text whenever there
is a validation error. To support this, there are two attached properties you’ll need to employ: Validation.HasError and Valida-tion.Errors. A Style targeting the TextBox type that sets the ToolTip is shown here:
You can see that the Style just contains a property trigger for the Validation.HasError attached property. Th e HasError property will be set to true when a Binding updates its source object property and the validation mechanisms generate an error. Th at could come from an exception, ValidationRule or IDataErrorInfo call. Th e Style then uses the Validation.Errors attached property, which will contain a collection of error strings if a validation error exists. You can use the CurrentItem property on that collection type to just grab the fi rst string in the collection. Or you could design something that data binds to the collection and displays the ErrorContent property for each item in a list-oriented control.
To change the default validation error display for a control to something other than the red border, you will need to set the Validation. ErrorTemplate attached property to a new template on the control you want to customize. In the sample application, instead of displaying a red border, a small red gradient circle is displayed to the right of each control with an error. To do that, you defi ne a control template that will be used as the ErrorTemplate.
public class InventoryValidationRule : ValidationRule {
public override ValidationResult Validate( object value, CultureInfo cultureInfo) {
if (InventoryPattern == null) return ValidationResult.ValidResult;
if (!(value is string)) return new ValidationResult(false, "Inventory should be a comma separated list of model numbers as a string");
string[] pieces = value.ToString().Split(','); Regex m_RegEx = new Regex(InventoryPattern);
foreach (string item in pieces) { Match match = m_RegEx.Match(item); if (match == null || match == Match.Empty) return new ValidationResult( false, "Invalid input format"); }
return ValidationResult.ValidResult; }
public string InventoryPattern { get; set; }}
Figure 6 ValidationRule to Validate a String Array
To hook up that control template to a control, you just need to set the Validation.ErrorTemplate property for the control, which you can again do through a Style:
Wrap UpIn this article, I’ve shown how you can use the three validation mech-anisms of WPF data binding to address a number of business data validation scenarios. You saw how to use exceptions, Validation-Rules, and the IDataErrorInfo interface to address single property validation, as well as properties whose validation rules depend on the current values of other properties on the control. You also saw how to use BindingGroups to evaluate several Bindings at once, and how to customize the display of errors beyond the defaults of WPF.
Th e sample application for this article has the full set of validation that satisfi es the described business rules in a simple application that uses MVVM to hook up the view to the data supporting it.
BRIAN NOYES is chief architect of IDesign (idesign.net), a Microsoft regional direc-tor and Microsoft MVP. Noyes is an author and a frequent speaker at Microsoft Tech·Ed, DevConnections, DevTeach and other conferences worldwide. Contact him through his blog at briannoyes.net.
THANKS to the following technical expert for reviewing this article: Sam Bent
public class CustomerObjectiveOrReasonValidationRule : ValidationRule {
public override ValidationResult Validate( object value, CultureInfo cultureInfo) {
BindingGroup bindingGroup = value as BindingGroup; if (bindingGroup == null) return new ValidationResult(false, "CustomerObjectiveOrReasonValidationRule should only be used with a BindingGroup");
if (bindingGroup.Items.Count == 1) { object item = bindingGroup.Items[0]; ActivityEditorViewModel viewModel = item as ActivityEditorViewModel; if (viewModel != null && viewModel.Activity != null && !viewModel.Activity.CustomerObjectiveOrReasonEntered()) return new ValidationResult(false, "You must enter one of Customer, Objective, or Reason to a valid entry"); } return ValidationResult.ValidResult; }}
Building Rich Internet Apps with the Open Data Protocol
At PDC09 the Microsoft WCF Data Services team (formerly known as the ADO.NET Data Services team) fi rst unveiled OData, the Open Data Protocol. Th e announcement was in a keynote on the second day of the conference, but that wasn’t where OData started. People familiar with ADO.NET Data Services have been using OData as the data transfer protocol for resource-based applications since ADO.NET Data Services became available in the Microsoft .NET Framework 3.5 SP1. In this article, I’ll explain how developers of Rich Internet Applications (RIAs) can use OData, and I’ll also show the benefi ts of doing so.
I’ll start by answering the No. 1 question I’ve been asked since the unveiling of OData in November: What is it? In very simple terms, OData is a resource-based Web protocol for querying and
Shayne Burgess
updating data. OData defi nes operations on resources using HTTP verbs (PUT, POST, UPDATE and DELETE), and it identifi es those resources using a standard URI syntax. Data is transferred over HTTP using the AtomPub or JSON standards. For AtomPub, the OData protocol defi nes some conventions on the standard to support the exchange of query and schema information. Visit odata.org for more information on OData.
The OData EcosystemIn this article, I’ll introduce a few products, frameworks and Web Services that consume or produce OData feeds. Th e proto-col defi nes the resources and methods that can be operated on and the operations (GET, PUT, POST, MERGE and DELETE, which correspond to read, create, replace, merge and delete) that can be performed on those resources.
In practice this means any client that can consume the OData protocol can operate over any of the producers. It’s not necessary to learn the programming model of a service to program against the service; it’s only necessary to choose the target language to program in.
If, for example, you’re a Silverlight developer who learns the ODa-ta library for that platform, you can program against any OData feed. Beyond the OData library for Silverlight you’ll fi nd libraries for the Microsoft .NET Framework client, AJAX, Java, PHP and Objective-C, with more on the way. Also, Microsoft PowerPivot for Excel supports an OData feed as one of the options for data import to its in-memory analysis engine.
This article discusses:• The OData ecosystem
• What’s new in WCF Data Services
• Using OData with SharePoint
• Consuming Open Government Data Initiative services
• Using OData with Silverlight
• Using OData with PowerPivot
Technologies discussed:OData, Silverlight, WCF Data Services, Entity Framework, SharePoint, Windows Azure Platform, PowerPivot
83June 2010msdnmagazine.com
And just as clients capable of consuming the OData protocol can operate over any of the producers, a service or application created using OData can be consumed by any OData-enabled client. Aft er creating a Web service that exposes relational data as an OData endpoint (or exposes the data in a SharePoint site, tables in Windows Azure or what have you), you can easily build a rich desktop client in the .NET Framework or a rich AJAX-based Web site that consumes the same data.
Th e long-term goal for OData is to have an OData client library for every major technology, programming language and platform so that every client app can consume the wealth of OData feeds. Combined, the producers and consumers of OData create an OData “ecosystem.”
What’s New in WCF Data Services?WCF Data Services, a component of the .NET Framework, is a framework that off ers a turnkey solution for creating OData Web ser-vices and includes a client library with which you can build clients that consume OData feeds. Th e WCF Data Services team recently released an update to the .NET Framework 3.5 SP1 that introduces a host of new features you’ll also fi nd in the .NET Framework 4. Th is is the second version of the Data Services framework. Visit blogs.msdn.com/astoriateam/archive/2010/01/27/data-services-update-for-net-3-5-sp1-available-for-download.aspx, where you’ll fi nd a description and a link for downloading.
Th e WCF Data Services framework is not just a protocol for RIA applications. It was also designed for high-scale service developers and has many features that appeal to them, such as server paging limits, HTTP caching support, stateless services, streaming sup-port and a pluggable provider model. Let’s look at the new features that are generally of most interest to RIA developers.
One of the top feature wishes customers expressed aft er the initial release was the ability to request the number of entities in a set. Th e new “count” feature addresses that need with two parts. First, it lets you request only the count—that is, the number of values a query would return. Second, it adds a query option that tells the service to include a count of the total number of entities in a set when the query result is a partial set (for example, when server paging is enabled).
To enhance the experience when binding data from an OData service, a new type, DataServiceCollection, has been added to the
WCF Data Services client library. It implements change tracking on the items it contains (through the use of the INotifyProperty-Changed and INotifyCollectionChanged interfaces). When it’s bound to a control—a DataGrid in Silverlight, for example—it will track the changes made to the objects and to the collection itself. Th is new collection greatly simplifi es the process of creating OData clients with an interface component.
Another frequently requested feature was the ability to project a subset of the properties of an entity returned in a query result. LINQ support has been added for this through the LINQ Select statement. This has two benefits: It reduces the size of the HTTP responses to queries, and it reduces the memory footprint of the client-side objects. This can be especially useful when you’re developing a client application against a service you don’t own and in which each entity may have many properties of no interest to the client. Later in this article, I’ll demonstrate working with a large, publicly available service that has many entities with numerous properties on each entity. Projections will be useful in the example because it includes only a few needed properties on one entity.
To help you understand the value of the OData ecosystem, we’ll create a Web application that lets visitors browse the site of my fi ctional real estate company, Contoso Ltd., to see the listings of the properties it manages.
Relational DataTh e main data source for the Contoso.com Home Finder application is a SQL Server database that contains information about all of the properties the company is managing and all of the listings (current and previously sold) it has published for those properties.
Since the release of WCF Data Services and the ADO.NET Entity Framework in the .NET Framework 3.5 SP1, it has been easy to expose a relational database as an OData feed. All that’s needed is an Entity Framework model created over the relational data. An OData feed is HTTP-based, so you need a Web site or Web service to host the service.
To create the OData feed over the relational data, the fi rst step is to create an ASP.NET Web application in Visual Studio 2010 to host the OData service. In Visual Studio, select File | New | Project | ASP.NET Web Application. Th is will create the skeleton of a Web service that can be used to host the OData feed.
// The ListingsEntities is the Entity Framework Context that the Service exposespublic class Listings : DataService< ListingsEntities >{ public static void InitializeService(DataServiceConfiguration config) { // These lines set the access rights to "Read Only" for both entity sets config.SetEntitySetAccessRule("Listings", EntitySetRights.AllRead); config.SetEntitySetAccessRule("Properties", EntitySetRights.AllRead);
// There are currently no service operations in the service config.SetServiceOperationAccessRule("MyServiceOperation", ServiceOperationRights.All);
Aft er the Web service is created and confi gured, we’ll create the Entity Framework data model that the OData feed will expose. Visual Studio makes this easy using the Add New Item wizard, which lets you auto-generate a model from an existing database. Figure 1 shows a simple data model created using the Add New Item wizard over the SQL Server data containing the properties and listings managed by Contoso.
Now let’s create a WCF Data Service that exposes this data model as an OData feed. Visual Studio also makes this simple with the WCF Data Service option in the Add New Item wizard. When you select this option, Visual Studio provides a code fi le (in this example the fi le is called Listings.svc.cs) that’s used to confi gure the Data Service.
Th e code in Figure 2 demonstrates how to defi ne a WCF Data Service. Th e Listings class is the service class that’s exposing the Data Service, and it implements the generic DataService<T>. Th e type used to defi ne the DataService<T> in Figure 2 is the Listings-Entities type, which is the Entity Framework context created in Figure 1. Because this class will accept an Entity Framework context, this is a quick and easy way to get a WCF Data Service that exposes relational data up and running. Th e DataService class
isn’t restricted to just working over Entity Framework contexts, however; the class will accept any collection of CLR objects that implements the IQuery able interface. In the .NET Framework 4, a new custom provider model for WCF Data Services has been added that allows a service to be created over almost any data source.
Let’s look a little closer at what else the InitalizeService method in Figure 2is doing. Th e method is calling the Set-EntitySetAccessRule for both of the entity sets the service will expose and setting the access rights to AllRead. Th is tells the service to make both entity sets fully readable but not allow any inserts,
updates or deletes. Th is is a great way to control access to the service. WCF Data Services also support methods called Query Interceptors that allow the service author to configure finer-grained access control for the service on a per-entity-set basis. Set the Listings.svc fi le as the project start page and run the project. A browser window will open and display the service document, as shown in Figure 3.
OData URI ConventionsTh e service document lists the entity sets that are exposed by the ser-vice. Remember, you can access the resources in this service using the powerful URI syntax defi ned as an optional part of the OData protocol. Let’s take a quick look at the URI syntax for this service. To access a feed for each entity set, you append the name of the entity set to the base URI for the service; for example, http://myhost/Listings.svc/Properties would address the set of entities in the Properties entity set.
It’s also possible to address a particular entity individually using its key value; the URI http://myhost/ Listings.svc/Properties(0) would address the property with ID = 0. You can address a relationship from this entity to another entity or set of entities by appending the name of the relationship to the end of the URI, so http://myhost/ Listings.svc/Properties(0)/Listings would access the set of listings associated with the property entity with ID = 0. Using this syntax, it’s possible to navigate through many levels of relationships.
Th e URI syntax also defi nes a number of query options that can be appended to a URI to modify the base query in some way, and
$top=n Restricts the query to the fi rst n entities.$skip=n Skips the fi rst n entities in the set.$inlinecount=allpages Includes the count of all entities of the set in
the result.$fi lter=<expression> An expression can be supplied to restrict
the results returned by the query (example: $fi lter=Status eq 'Available' restricts the results to entities that have a Status property with the value "Available").
$orderby=<expression> Orders the results by a set of properties of the entity
$select=<expression> Specifi es a subset of the properties of the entity to be returned.
$format Specifi es the format of the feed to be returned (ATOM or JSON). This option is not supported in WCF Data Services.
Figure 4 OData Query Options
Figure 3 Service Document for the SharePoint Site
The Open Government Data Initiative is a service built on
the Microsoft Windows Azure platform that makes it easier for government agencies to publish
a wide variety of public data.
85June 2010msdnmagazine.com
each query option is defi ned as a name/value pair. For example, by appending the query option $top=10, you restrict the query to only the fi rst 10 entries in the result. Figure 4 lists all of the query options available in the URI syntax.
Exposing Data from SharePointIn the preceding section I showed you how to expose the data stored in my relational database, the property and listing information for the real estate Web site. Let’s say I also have information about the real estate agents who are selling the properties, but that data is stored in a SharePoint site. Microsoft SharePoint 2010 has the ability to ex-pose all lists and documents within those lists as an OData feed. Th is is great for the real estate site because it means the agent information that company employees have entered is available as an OData
feed that can be included in the listings application I’m building. The users who have processes using the SharePoint interface for entering and updating this data don’t have to change their workfl ow to suit my application. Th e data entered into the company SharePoint site is available in real time to the Listings application that’s being created.
Figure 5 shows the simple SharePoint portal the real estate agents use to record and update their contact information.
When the ADO.NET Data Services Update for the .NET Framework 3.5 SP1 is installed on the SharePoint system, a new HTTP endpoint becomes available for each site that exposes the list data as an OData feed. Because an OData feed is accessed using HTTP, it can be examined by using just Internet Explorer. Figure 6 shows the feed for the agents list in SharePoint.
Consuming Reference Data from OGDIBy default, an OData feed will return an ATOM representation for the feed, and when accessed from a Web browser the result will be an ATOM feed. If the accept header of the request is changed to “application/json,” the result will be the same data as a JSON feed.
The feed in Figure 6 starts with a <feed> element that represents a set of entities. Contained within each feed is a set of <entry> elements, each of which represents a single entity in the feed (the fi rst three entry elements are collapsed to make the whole feed visible in one screen).
In this example, the entity has a con-currency token defi ned on it; as a result, each entity in the feed has an etag prop-erty on it. Th e etag is the token used by the data service to enforce a concurrency check when a change is made to the requested entity. Each entity, formatted using an <entry> tag, consists of a set of
Figure 5 SharePoint Site for Agent Information
Figure 6 Agents Feed from the SharePoint Agent Service
links that contain both the link to be used when editing the entity and the entity’s relationships. Each relationship link points either to another entity or to a set of entities (these are called reference and navigation properties, respectively). Each <entry> element also includes an <m:properties> element that contains the primitive and complex type properties for the entity; the property values consist of the name of the property on the entity and the value for that property.
Th e Open Government Data Initiative (OGDI) is a service built on the Microsoft Windows Azure platform that makes it easi-er for government agencies to publish a wide variety of public data. Th e OGDI project provides a starter kit that can be used by govern-ment agencies to expose their data. For example, the city of Edmon-ton has adopted the starter kit to expose its government data, and a service at ogdisdk.cloudapp.net has a data set with a variety of data about the Washington, D.C., area. Another example is the Microsoft Codename “Dallas” project that aims to make it simple for anyone with a data set to expose the data as a service to the Web. Th is project is also built on the Windows Azure platform and exposes data using OData. Th ese are examples of high-scale services that expose large reference data sets that can be further consumed by Web applications. As I will show, when these services expose their data using OData, it’s simple to consume that data from a variety of applications.
As explained, the OGDI Web site features publicly available data about the Washington, D.C., area. Contoso’s real estate application is used for browsing listings in that area, and it would be helpful for users to have available some of this reference data about the area around a particular property when viewing it. When I create the client for the sample application, I’ll demonstrate how to include the OData feed from the OGDI Web site as one of the sources of data for the application.
Other OData ProducersSo far I’ve shown examples of consuming data from SQL Server, SharePoint and a generic OData service on the Web, but more options exist. Th e cloud-based Windows Azure platform has a table service that exposes data stored in Windows Azure tables, and the API for this is built using OData. As mentioned, the Microsoft Dallas project is a data
marketplace for fi nding and querying data exposed by the Dallas service, and this service exposes its data using the OData protocol. OData producers aren’t just limited to Microsoft products either; IBM recently announced that its WebSphere eXtreme Scale 7.0 product now supports the OData protocol.
Silverlight ClientContoso’s real estate fi nder application now has an ASP.NET Web service that exposes the relational data in SQL Server about the real estate listings and properties managed by the company; a SharePoint site that’s being used to manage the data about company agents; and a government Web service that exposes data about the region around the properties the company is advertising. I want to put all of these sources together into one Silverlight application that can work with this data in a meaningful way.
In Silverlight 3, a WCF Data Services client library is included in the Silverlight SDK that makes it simple for Silverlight applications to communicate with a service that’s OData- enabled. To do this, in Visual Studio from a Silverlight project, right-click the project and select Add Service Reference. Th is walks you through the process of creating a service reference. Th e main input to a service reference is the URI of the service that’s being referenced from the Silverlight application. Figure 7shows an example of adding a service reference to the OGDI sample service.
Th e service reference wizard creates a client-side context class that’s used to interact with the data service. Th e client context
Figure 7 Add Service Reference for the OGDI Sample Service
ceTe Software has been delivering quality software applications and components to our customers for over 10 years. Our DynamicPDF product line has proven our commitment to delivering innovative software components and our ability to respond to the changing needs of software developers. We back our products with a first class support team trained to provide timely, accurate and thorough responses to any support needs.
Easy-to-use Highly efficient Industry leading support Huge feature set
DynamicPDF…Proven .NET Components for Real-Time PDFs
Layout reports in DynamicPDF Designer with its Visual Studio look and feel.
abstracts the details of working with HTTP and URIs away from the client programming model and allows the client developer to think only about C# classes and XAML. Th e client context also includes a LINQ provider implementation and, as a result, LINQ queries on the proxy are supported. Th e Add Service Reference wizard will also generate a set of client proxy classes that mirror the types that are exposed by the referenced service. Aft er creating the OGDI service reference, I will also create a service reference to both the SharePoint and Listings services I created. Th is code shows how to create the contexts that are used to interact with the three OData services:
// OGDI service contextOGDIService.dcDataService OGDIService = new dcDataService(new Uri(OGDIServiceURI));
// SharePoint service contextAgentsReference.AgentsDataContext agentsService = new AgentsReference.AgentsDataContext(new Uri(sharepointServiceURI));
// Listings Service contextListingReference.ListingsEntities listingsService = new ListingReference.ListingsEntities(new Uri(listingsServiceURI));
Figure 8 shows the outline of the Silverlight real estate Home Finder application. Th e application will be hosted in SharePoint so that it’s easily available for my existing users who are used to working in the SharePoint environment.
Figure 9 contains the code for querying the listings service and binding the result to the grid at the top of the Home Finder Silverlight application.
The code in Figure 9 creates a DataServiceCollection that’s a tracked collection and binds the collection to the ItemsSource
property of the main listings grid. Because this collection im-plements change tracking, any changes made to the items in the grid will automatically be reflected on the entities in the listings collection. The changes in the grid can be persisted to the ser-vice by calling the BeginSaveChanges method on the context for the listings service.
In Silverlight, all network calls are made asynchronously, so executing any operations against a service using the WCF Data Services client library involves making the initial call to the op-eration and then writing a separate callback method that’s passed to the method to handle the result of the asynchronous call. To improve this asynchronous experience, a method was added to the Data ServiceCollection class, LoadAsync, which does all the work of handling the asynchronous callback function and loading the results into the collection.
In the Figure 9 code, the collection is bound to a grid before the LoadAsync call is made, and the values won’t be loaded into the col-lection until aft er the asynchronous call completes. Th e collection will raise collection-changed events when the results are returned from the service, and the grid will catch those events and display the results when the asynchronous call completes.
When a listing is selected from the data grid, the SharePoint site needs to be queried to get the information about the agent managing that listing. In this application architecture, a second query is needed because the data sources for the listing type and the agent type are separate and there’s no explicit relationship between the two (if you are a person who thinks in terms of models, this example involves two completely separate models, and the relationship between the models is an artifi cial one created and enforced by the client).
Figure 10 shows how to query the SharePoint service for the agent entity, given the name of the agent. A similar code sequence is used to query the OGDI data for the neighborhood statistics in the chart at the bottom of the Home Finder page. The code up to this point demonstrates only the query capa-bilities of the Silverlight client, but the client isn’t limited to queries only; it has rich capabilities in writing back changes to the service from the client.
OData in PowerPivotPowerPivot is a new in-memory business intelligence tool that’s delivered as an add-in for Microsoft Excel 2010—visit powerpivot.com for more information. Th e tool provides support for importing large data sets from a data source and doing complex data analysis and reporting. PowerPivot can import data from a number of diff erent data sources, including directly from an OData feed. Power-Pivot’s From Data Feeds option (shown in Figure 11), accepts an OData service endpoint as the location of the feed to import.
private void getListings(){ DataServiceCollection<Listing> listings = new DataServiceCollection<Listing>();
listingsGrid.ItemsSource = listings; var query = from listing in listingsService.Listings.Expand("Property") select listing; listings.LoadAsync(query);}
Figure 9 Creating the Client Proxy Contexts
private void GetAgentData(string agentName){ var query = agentsService.Agents.Where(a => a.FullName == agentName) as DataServiceQuery;
query.BeginExecute( AgentQueryCallBack, query);}
private void AgentQueryCallBack(IAsyncResult result){ Dispatcher.BeginInvoke(() => { var queryResult = result.AsyncState as DataServiceQuery<AgentsItem>; if (queryResult != null) { var agents = queryResult.EndExecute(result); this.grdAgent.DataContext = agents.First(); } });}
You have the vision, but time, budget and staffconstraints prevent you from seeing it through. With rich user interface controls like Gantt Charts that Infragistics NetAdvantage® for .NET adds to your Visual Studio 2010 toolbox, you can go to marketfaster with extreme functionality, complete usabilityand the “Wow-factor!” Go to infragistics.com/sparknow to get innovative controls for creating Killer Apps.
Infragistics Sales 800 231 8588 Infragistics Europe Sales +44 (0) 800 298 9055 Infragistics India +91-80-6785-1111twitter.com/infragistics
Copyright 1996-2010 Infragistics, Inc. All rights reserved. Infragistics, the Infragistics logo and NetAdvantage are registered trademarks of Infragistics, Inc. All other trademarks or registered trademarks are the property of their respective owner(s).
Figure 12 shows a chart made from the summary of crime statistics in the OGDI’s Washington, D.C., data feed.
Th e chart in Figure 12, made using the same data set as the real estate application in the previous example, shows a summary of all data for each district. I encourage you to download PowerPivot for Excel 2010 and import data from the OGDI site at ogdi.cloudapp.net/v1/dc, and see for yourself how quickly you’ll be doing rich data analysis over this data.
The Open Data Protocol VisualizerTh e OGDI data service is essentially a “black box” to an external developer who creates an application that consumes the data exposed by the service. Th ankfully, the OGDI service exposes its data using the OData protocol, so there’s no need to know anything about the internal details of the service to interact with it. Th e
programming model for the service is the OData protocol. Th e service endpoint describes the shape of the data and, as I showed you in the pre-vious section, that’s all you need to interact with the service. However, it’s oft en useful to view the shape of the data in the service and get a bet-ter understanding of the relation-ships between parts of the service. Th e Open Data Protocol Visualizer was created for just this purpose. It’s available from the Tools | Extension Manager menu item in Visual Studio 2010. Figure 13 shows two views from the visualizer that display the struc-ture of the OGDI service.
Th e top view in Figure 13 shows the entire service; the bottom view is zoomed in to show only four of the boxes in the display. Th e visual-izer represents entity sets as boxes, and relationships between entities as lines connecting the boxes. It’s clear from the top view in Figure 13 that the OGDI service is entirely fl at and doesn’t contain any relationships at all, as there are no connecting lines between any boxes. Th is is only a characteristics of the OGDI ser-vice and isn’t typical of most OData services. Th e bottom view shows a close- up of four of the entity sets in the service. Just from examining the view, you can determine that the service exposes data about fi re sta-tions, elementary school attendance, dialysis clinics and government locations, as well as the properties and keys for each of those types.
Learning MoreTh is article introduces the Open Data Protocol and the ecosystem that has been built around it, including the WCF Data Services Framework. For more information, visit the Open Data Protocol Web site at odata.org. To learn more about WCF Data Services, see msdn.microsoft.com/data/bb931106 or the WCF Data Services blog at blogs.msdn.com/astoriateam.
SHAYNE BURGESS is a program manager in the Data and Modeling Group at Microsoft , working specifi cally on WCF Data Services and the Open Data Protocol. Burgess regularly blogs on the WCF Data Services team blog at blogs.msdn.com/astoriateam.
THANKS to the following technical experts for reviewing this article: Elisa Flasko and Mike Flasko
Figure 13 Open Data Visualizer Views of the OGDI Sample Service
For more information please visitwww.syncfusion.com
ADVERTISEMENT
VSP2
VISUAL STUDIO PARTNER PROFILE
A Visual Studio 2010 Q&A with Daniel Jebaraj of Syncfusion
Daniel JebarajVice President
Syncfusion
Syncfusion provides a broad range of enterprise-class .NET software components that help developers deliver business innovation in their applications.
Q How do developers typically use Syncfusion controls?A Our customers range from small ISVs to global IT consultancies to Fortune 100 companies. Whether they’re working in Windows Forms, ASP.NET, AS P.NET MVC, WPF, or Silverlight, they use our controls to deliver the elegant user interfaces and sophisticated reports that business users need, in the familiar formats they prefer.
Q When did you fi rst decide to integrate with Visual Studio 2010?A Syncfusion made the decision as soon as the fi rst CTP was available. Visual Studio 2010 was highly anticipated by the .NET developer community and we were eager to support it. The 2010 Volume 2 release of our Essential Studio suite sim-shipped with VS2010 in April and fully supports the new IDE. Q How do you help light up the new functionality of Visual Studio 2010?A Our controls for WPF and Silverlight off er tight integration with the IDE enabling a drag and drop experience for our customers. The VS2010 IDE also off ers tight integration for the development and deployment of ASP.NET MVC applications. We off er a wide set of components for the ASP.NET MVC environment.
Q What sets Syncfusion apart from other component vendors?A As developers ourselves, each decision we make about how our products are built, delivered, and supported is based on our common viewpoint and we uncompromisingly strive for excellence in order to off er the very best value to our customers.
• Built with the future in mind: Syncfusion provides comprehensive support for the latest technologies, including .NET 4, WPF, Silverlight, MVC 2, as well as Windows Forms and SharePoint.
• Full source code available: You can use our components in debug mode at the fl ick of a switch, which is invaluable in improving overall productivity and application quality. With a Source license, you can step directly into our code from within the IDE, just as you would your own code.
• First-rate support: Online, forum-based, and 24x5 phone support at no extra cost ensure that you’ll get the help you need, when you need it—even while you’re evaluating our products with a free 30-day trial.
• Straightforward, fl exible licensing: Our components are licensed on a simple per-developer basis with no royalties, run-time, or server-deployment fees. Each licensed developer may install on multiple personal machines and both Binary and Source licenses are available.
For more detailed information about Syncfusion controls and a free 30-day trial, visit www.syncfusion.com.
You can download the library for free from the CodePlex open source hosting site at codeplex.com/dynamicdatadisplay. I saved my copy in the root directory of my BugGraph project, then added a reference to the DLL in my project by right-clicking on the project name, selecting the Add Reference option and pointing to the DLL fi le in my root directory.
Next, I created my source data. In a production environment, your data could be located in an Excel spreadsheet, a SQL database or an XML fi le. For simplicity, I used a simple text fi le. In the Visual Studio Solution Explorer window, I right-clicked on my project name and selected Add | New Item from the context menu. I then chose the Text File item, renamed the fi le to BugInfo.txt and clicked the Add button. Here’s the dummy data:
Th e fi rst colon-delimited fi eld in each line holds a date, the second contains the number of open bugs on the associated date and the
Generating Graphs with WPF
Generating a graph from a set of test-related data is a common soft ware-development task. In my experience, the most common approach is to import data into an Excel spreadsheet, then produce the graph manually using the Excel built-in graphing features. This works well in most situations, but if the underlying data changes frequently, creating graphs by hand can quickly become tedious. In this month’s column, I’ll show you how to automate the process using Windows Presentation Foundation (WPF) technology. To see where I’m heading, look at Figure 1. The graph shows a count of open versus closed bugs by date, and it was generated on the fl y using a short WPF program that reads data from a simple text fi le.
Th e open bugs, represented by red circles on the blue line, increase rapidly near the beginning of the development effort, then trail off over time— information that might be useful when estimating a zero-bug bounce date. Th e closed bugs (the triangular markers on the green line) steadily increase.
But while the information may be useful, in production envi-ronments development resources are oft en limited, and manually generating such a graph might not be worth the eff ort. But using the technique I’ll explain, creating graphs like this is quick and easy.
In the following sections, I’ll present and describe in detail the C# code that generated the graph in Figure 1. Th is column assumes you have intermediate-level knowledge of C# coding and a very basic familiarity with WPF. But even if you’re new to both, I think you’ll be able to follow the discussion without too much diffi cultly. I’m confi dent you’ll fi nd the technique an interesting and useful addition to your skill set.
Setting up the ProjectI started by launching Visual Studio 2008 and creating a new C# project using the WPF Application template. I selected the .NET Framework 3.5 library from the drop-down control in the upper right-hand area of the New Project dialog box. I named my project BugGraph. Although you can programmatically generate graphs using WPF primitives, I used the convenient DynamicDataDisplay library developed by a Microsoft Research lab.
TEST RUN JAMES MCCAFFREY
Code download available at code.msdn.microsoft.com/mag201006TestRun.
third fi eld shows the number of closed bugs. As you’ll see shortly, the DynamicDataDisplay library can deal with most types of data.
Next I double-clicked on the fi le Window1.xaml to load the UI defi nitions for the project. I added a reference to the graphing library DLL and slightly modifi ed the default Height, Width and Background attributes of the WPF display area, as follows:
Aft er that, I added the key plotting object, shown in Figure 2.Th e ChartPlotter element is the main display object. In the defi ni-
tion for it, I added declarations for a horizontal date axis and a vertical integer axis. Th e default axis type for the DynamicDataDisplay library is a number with a decimal, that is type double in C# terms; no ex-plicit axis declaration is necessary for that type. I also added a header title declaration and axis title declarations. Figure 3 shows my design so far.
Going to the SourceOnce I’d confi gured the static aspects of my project, I was ready to add the code that would read the source data and programmatically gener-
ate my graph. I double-clicked on Window1.xaml.cs in the Solution Ex-plorer window to load the C# fi le into the code editor. Figure 4 lists the entire source code for the program that generated the graph in Figure 1.
I deleted the unnecessary using namespace statements (such as System.Windows.Shapes), which were generated by the Visual Studio template. Th en I added using statements to three namespaces from the DynamicDataDisplay library so I wouldn’t have to fully qualify their names. Next, in the Window1 constructor I added an event for the main program-defi ned routine:
Loaded += new RoutedEventHandler(Window1_Loaded);
Here’s how I began the main routine:private void Window1_Loaded(object sender, RoutedEventArgs e){ List<BugInfo> bugInfoList = LoadBugInfo("..\\..\\BugInfo.txt"); ...
I declared a generic list object, bugInfoList, and populated the list with the dummy data in the file BugInfo.txt by using a program-defi ned helper method named LoadBugInfo. To organize my bug information, I declared a tiny helper class—BugInfo— as
Figure 5 shows.I declared the three data fi elds
as type public for simplicity, rather than as type private combined with get and set Properties. Because Bug-Info is just data, I could’ve used a C# struct instead of a class. Th e LoadBugInfo method opens the BugInfo.txt fi le and iterates through it, parsing each fi eld, then instan-tiates a BugInfo object and stores each BugInfo object into a result List, as shown in Figure 6.
Rather than reading and pro-cessing each line of the data fi le, I could have read all the lines into a string array using the File.ReadAll-Lines method. Notice that both to keep the size of my code small and for clarity, I omitted the normal error-checking you’d perform in a production environment.
Next I declared and assigned values to three arrays, as you can see in Figure 7.
organizing the display data into a set of one-dimensional arrays
is often convenient.
95June 2010msdnmagazine.com
When working with the DynamicDataDisplay library, organizing the display data into a set of one-dimensional arrays is often convenient. As an alternative to my program design, which read data into a list object and then transferred the list data into arrays, I could have read data directly into arrays.
Next I converted my data arrays into special Enumerable-DataSource types:
var datesDataSource = new EnumerableDataSource<DateTime>(dates);datesDataSource.SetXMapping(x => dateAxis.ConvertToDouble(x));
var numberOpenDataSource = new EnumerableDataSource<int>(numberOpen);numberOpenDataSource.SetYMapping(y => y);
var numberClosedDataSource = new EnumerableDataSource<int>(numberClosed);numberClosedDataSource.SetYMapping(y => y);...
For the DynamicDataDisplay library, all data to be graphed must be in a uniform format. I just passed the three arrays of data to the generic EnumerableDataSource constructor. Additionally, the library must be told which axis, x or y, is associated with each data source. Th e SetXMapping and SetYMapping methods
accept method delegates as arguments. Rather than defi ne explicit delegates, I used lambda expressions to create anonymous methods. Th e DynamicDataDisplay library’s fundamental-axis data type is dou-ble. Th e SetXMapping and SetYMapping methods map my particular data type to type double.
On the x-axis, I used the ConvertToDouble method to explicitly convert DateTime data into type double. On the y-axis, I simply wrote y => y (read as “y goes to y”) to implicitly convert the input int y to the output double y. I could have been explicit with my type mapping by writing SetYMapping(y => Convert.ToDouble(y). My choices of x and y for the lambda expressions’ parameters were arbitrary—I could have used any parameter names.
Th e next step was to combine the x-axis and y-axis data sources:CompositeDataSource compositeDataSource1 = new CompositeDataSource(datesDataSource, numberOpenDataSource);
CompositeDataSource compositeDataSource2 = new CompositeDataSource(datesDataSource, numberClosedDataSource);
...
using System;using System.Collections.Generic;using System.Windows;using System.Windows.Media; // Pen
namespace BugGraph{ public partial class Window1 : Window { public Window1() { InitializeComponent(); Loaded += new RoutedEventHandler(Window1_Loaded); }
DateTime[] dates = new DateTime[bugInfoList.Count]; int[] numberOpen = new int[bugInfoList.Count]; int[] numberClosed = new int[bugInfoList.Count];
for (int i = 0; i < bugInfoList.Count; ++i) { dates[i] = bugInfoList[i].date; numberOpen[i] = bugInfoList[i].numberOpen; numberClosed[i] = bugInfoList[i].numberClosed; }
var datesDataSource = new EnumerableDataSource<DateTime>(dates); datesDataSource.SetXMapping(x => dateAxis.ConvertToDouble(x));
var numberOpenDataSource = new EnumerableDataSource<int>(numberOpen); numberOpenDataSource.SetYMapping(y => y);
var numberClosedDataSource = new EnumerableDataSource<int>(numberClosed); numberClosedDataSource.SetYMapping(y => y);
CompositeDataSource compositeDataSource1 = new CompositeDataSource(datesDataSource, numberOpenDataSource); CompositeDataSource compositeDataSource2 = new CompositeDataSource(datesDataSource, numberClosedDataSource);
plotter.AddLineGraph(compositeDataSource1, new Pen(Brushes.Blue, 2), new CirclePointMarker { Size = 10.0, Fill = Brushes.Red }, new PenDescription("Number bugs open"));
plotter.AddLineGraph(compositeDataSource2, new Pen(Brushes.Green, 2), new TrianglePointMarker { Size = 10.0, Pen = new Pen(Brushes.Black, 2.0), Fill = Brushes.GreenYellow }, new PenDescription("Number bugs closed"));
plotter.Viewport.FitToView();
} // Window1_Loaded()
private static List<BugInfo> LoadBugInfo(string fileName) { var result = new List<BugInfo>(); FileStream fs = new FileStream(fileName, FileMode.Open); StreamReader sr = new StreamReader(fs); string line = ""; while ((line = sr.ReadLine()) != null) { string[] pieces = line.Split(':'); DateTime d = DateTime.Parse(pieces[0]); int numopen = int.Parse(pieces[1]); int numclosed = int.Parse(pieces[2]); BugInfo bi = new BugInfo(d, numopen, numclosed); result.Add(bi); } sr.Close(); fs.Close(); return result; }
} // class Window1
public class BugInfo { public DateTime date; public int numberOpen; public int numberClosed;
public BugInfo(DateTime date, int numberOpen, int numberClosed) { this.date = date; this.numberOpen = numberOpen; this.numberClosed = numberClosed; }
Th e screenshot in Figure 1 shows two data series—the number of open bugs and the number of closed bugs—plotted on the same graph. Each composite data source defi nes a data series, so here I needed two individual data sources—one for the number of open bugs and one for the number of closed bugs. With the data all prepared, a single statement actually plotted the data points:
plotter.AddLineGraph(compositeDataSource1, new Pen(Brushes.Blue, 2), new CirclePointMarker { Size = 10.0, Fill = Brushes.Red }, new PenDescription("Number bugs open"));
...
Th e AddLineGraph method accepts a CompositeDataSource, which defi nes the data to be plotted, along with information about ex-actly how to plot it. Here I instructed the plotter object named plotter (defi ned in the Window1.xaml fi le) to do the following: draw a graph using a blue line of thickness 2, place circular markers of size 10 that have red borders and red fi ll, and add the series title Number bugs open. Neat! As one of many alternatives, I could have used
to draw a thin red line with no markers. Or I could have created a dashed line instead of a solid line:
Pen dashedPen = new Pen(Brushes.Magenta, 3);dashedPen.DashStyle = DashStyles.DashDot;plotter.AddLineGraph(compositeDataSource1, dashedPen, new PenDescription("Open bugs"));
My program fi nished by plotting the second data series: ... plotter.AddLineGraph(compositeDataSource2, new Pen(Brushes.Green, 2), new TrianglePointMarker { Size = 10.0, Pen = new Pen(Brushes.Black, 2.0), Fill = Brushes.GreenYellow }, new PenDescription("Number bugs closed"));
plotter.Viewport.FitToView();
} // Window1_Loaded()
Here I instructed the plotter to use a green line with triangular markers that have a black border and a green-yellow fill. The FitToView method scales the graph to the size of the WPF window.
Aft er instructing Visual Studio to build the BugGraph project, I got a BugGraph.exe executable, which can be launched manually or programmatically at any time. I can update the underlying data by simply editing the BugInfo.txt fi le. Because the entire system is based on .NET Framework code, I can easily integrate graphing capability into any WPF project without having to deal with cross-technology issues. And there’s a Silverlight version of the DynamicDataDisplay library so I can add programmatic graphing to Web applications, too.
A Scatter PlotTh e technique I presented in the previous section can be applied to any kind of data, not just test-related data. Let’s take a brief look at another simple but rather impressive example. Th e screenshot in Figure 8 shows 13,509 U.S. cities. You can probably identify where Florida, Texas, Southern California and the Great Lakes are. I obtained the data for the scatter plot from a library of data intended for use with the traveling salesman problem (iwr.uni-heidelberg.de/groups/ comopt/software/TSPLIB95), one of the most famous and widely studied topics in com-puter science. Th e fi le I used, usa13509.tsp.gz, looks like:
DateTime[] dates = new DateTime[bugInfoList.Count]; int[] numberOpen = new int[bugInfoList.Count]; int[] numberClosed = new int[bugInfoList.Count];
for (int i = 0; i < bugInfoList.Count; ++i) { dates[i] = bugInfoList[i].date; numberOpen[i] = bugInfoList[i].numberOpen; numberClosed[i] = bugInfoList[i].numberClosed; } ...
Figure 7 Building Arrays
public class BugInfo { public DateTime date; public int numberOpen; public int numberClosed;
public BugInfo(DateTime date, int numberOpen, int numberClosed) { this.date = date; this.numberOpen = numberOpen; this.numberClosed = numberClosed; }}
Figure 5 The Helper Class BugInfo
private static List<BugInfo> LoadBugInfo(string fileName){ var result = new List<BugInfo>(); FileStream fs = new FileStream(fileName, FileMode.Open); StreamReader sr = new StreamReader(fs); string line = ""; while ((line = sr.ReadLine()) != null) { string[] pieces = line.Split(':'); DateTime d = DateTime.Parse(pieces[0]); int numopen = int.Parse(pieces[1]); int numclosed = int.Parse(pieces[2]); BugInfo bi = new BugInfo(d, numopen, numclosed); result.Add(bi); } sr.Close(); fs.Close(); return result;}
Figure 6 The LoadBugInfo Method
The AddLineGraph method accepts a
CompositeDataSource, which defi nes the data to be plotted, along with information about
Th e fi rst fi eld is a 1-based index ID. Th e second and third fi elds represent coordinates derived from the latitude and longitude of U.S. cities with populations of 500 or greater. I created a new WPF application as described in the previous section, added a text-fi le item to the project and copied the city data to the fi le. I commented out the header lines of the data fi le by prepending double-slash (//) characters to those lines.
To create the scatter plot shown in Figure 8, I only needed to make minor changes to the example presented in the previous section. I modifi ed the MapInfo class members as follows:
public int id; public double lat; public double lon;
Figure 9 shows the key processing loop in the revised Load-MapInfo method.
I had the code check to see if the current line begins with my program-defined comment tokens, and if so, skip over it. Notice that I multiplied the longitude-derived field by -1.0 because longitudes go from east to west (or right to left) along the x-axis. Without the -1.0 factor, my map would be a mirror image of the correct orientation.
When I populated my raw data arrays, all I had to do was ensure I correctly associated latitude and longitude to the y-axis and the x-axis, respectively:
for (int i = 0; i < mapInfoList.Count; ++i){ ids[i] = mapInfoList[i].id; xs[i] = mapInfoList[i].lon; ys[i] = mapInfoList[i].lat;}
If I had reversed the order of the associa-tions, the resulting map would have been tilted on its edge. When I plotted my data, I needed only one small tweak to make a scatter plot instead of a line graph:plotter.AddLineGraph(compositeDataSource, new Pen(Brushes.White, 0), new CirclePointMarker { Size = 2.0, Fill = Brushes.Red }, new PenDescription("U.S. cities"));
By passing a 0 value to the Pen constructor, I specifi ed a 0-width line, which eff ectively removed the line and created a scatter plot rather than a line graph. The resulting graph is pretty cool, and the program that generated the graph took only a few minutes to write. Believe me, I’ve tried many other approaches to plotting geographic data, and
using WPF with the DynamicDataDisplay library is among the best solutions I’ve found.
Graphing Made EasyTh e techniques I’ve presented here can be used to programmatically generate graphs. Th e key to the technique is the DynamicData Display library from Microsoft Research. When used as a standalone tech-nique to generate graphs in a soft ware production environment, the approach is most useful if the underlying data changes frequently. When used in an application as an integrated technique to generate graphs, the approach is most useful with WPF or Silverlight applications. And as those two technologies evolve, I’m sure we’ll see more great visual-display libraries based on them.
DR. JAMES MCCAFFREY works for Volt Information Sciences Inc. where he manages technical training for soft ware engineers working at the Microsoft Redmond, Wash., campus. He has worked on several Microsoft products, including Internet Explorer and MSN Search. McCaff rey is the author of “.NET Test Automation Recipes: A Problem-Solution Approach” (Apress, 2006). He can be reached at jammc@microsoft .com.
THANKS to the following technical experts for reviewing this article: Paul Newson, Paul Koch and Anne Loomis; all of Microsoft Research
while ((line = sr.ReadLine()) != null){ if (line.StartsWith("//")) continue; else { string[] pieces = line.Split(' '); int id = int.Parse(pieces[0]); double lat = double.Parse(pieces[1]); double lon = -1.0 * double.Parse(pieces[2]); MapInfo mi = new MapInfo(id, lat, lon); result.Add(mi); }}
Figure 9 Loop for Scatter Plot
Figure 8 Scatter Plot Example
I’ve tried many other approaches to plotting geographic data,
features to be used for down-targeting and provides a much- simplifi ed development experience.
However, one downside of being able to use Visual Studio 2010 features for down-level targets is that source fi les may not be design-time compatible if used with earlier versions of Visual Studio. Th is may be an issue if you’re sharing source code for projects built using diff erent versions of Visual Studio and targeting diff erent .NET Framework versions.
If you keep the projects within Visual Studio 2010 for all design-time work, you’ll have a better experience. You’ll be able to generate assemblies targeting the .NET Framework 2.0 upward using only Visual Studio 2010 and the .NET Framework 3.5 SP1.
Design-Time CompatibilityNow let’s take a look at an example of a design-time compatibility gotcha. Th e code in Figure 2 uses both implicit line continuation and the auto-implemented property feature, both introduced in Visual Studio 2010. Th is code can be compiled to target any frame-work from 2.0 onward when compiled using Visual Studio 2010. So the generated assembly is runtime-compatible.
However, take this same source code fi le and try compiling using either the 3.5 or 2.0 versions of the compiler—you’ll generate the errors shown in Figure 3.
Th is occurs because the earlier versions of the compiler know nothing about these features and treat this as invalid code. So the source fi les are not design-time compatible. To make this design-time com-patible, you’d have to use only features available in the 3.5 compiler.
Design-time compatibility has implications for Web projects as well. For many Web projects, compilation takes place on the server, and the server, of course, compiles the pages using the target frame-work compiler installed on the server. So if you have a Web page written in Visual Basic targeting the 3.5 compiler, the page would be compiled on the server using the 3.5 version of the Visual Basic Compiler (vbc.exe). Any use of new Visual Studio 2010 language features would fail as the 3.5 compiler knows nothing about them.
Multi-Targeting Visual Basic Applications in Visual Studio 2010
Prior to Visual Studio 2008, writing applications that targeted different versions of the Microsoft .NET Framework required installation of diff erent versions of the Visual Studio development environment. Each installation of Visual Studio off ered a diff erent developer experience and used signifi cant disk space. Moreover, the project fi le format changed between each version of Visual Studio. As a result, you could end up with multiple versions of a project or solution while developing a component for use in projects targeting diff erent .NET Framework versions.
Visual Studio 2008 was the fi rst version to fully support multi-targeting within a single IDE, which allowed developers to write applications targeting diff erent versions of the .NET Framework (2.0, 3.0 and 3.5) using a single Visual Studio installation. The result? A single, consistent developer experience with reduced disk-space requirements.
Multi-targeting in Visual Studio 2008 worked because each of the available frameworks used the same underlying CLR 2.0. Furthermore, each version of the framework built upon the .NET Framework 2.0 foundation, providing additional functionality through the use of referenced assemblies. Ultimately, all used the .NET Framework 3.5 command-line Visual Basic compiler (vbc.exe).
In this article I discuss the 3.5 and 4 compilers, referring to the compilers installed as part of the respective .NET Framework 3.5 and 4 installations. Th e 3.5 compiler is the version shipped with Visual Studio 2008 and Visual Basic 9, while the 4 compiler is the version shipped with Visual Studio 2010 and Visual Basic 10.
So let’s take a look at how multi-targeting works in Visual Studio today, and how you should approach multi-targeting in your projects.
Multi-Targeting in Visual StudioIn Visual Studio 2008, changing the desired target framework was as simple as selecting the target from a drop-down list in the project properties, as shown in Figure 1. Th is added or removed specifi c references required for each framework version and made changing frameworks painless.
For command-line compilation it was simply a matter of changing the reference assemblies used.
Some big changes came with Visual Studio 2010, however. Th e new .NET Framework 4 brings a new version of the CLR. Th is means the approach taken in Visual Studio 2008 is not practical in Visual Studio 2010. As a result, Visual Studio 2010 uses the version 4 compiler for all multi-targeting, even when targeting previous .NET Framework versions. Th is allows many of the newer language
BASIC INSTINCTS SPOTTY BOWLES
Visual Studio 2010 uses the version 4 compiler for
For code developed in Visual Studio 2010, which uses the version 4 compiler, you need a way to identify this requirement at compile time to prevent unexpected errors when the Web page is deployed to the server. You can do this with the /langversion switch, which is used when developing Web projects to generate errors about newer language syntax features that won’t compile on an earlier framework’s compiler. When building ASP.NET project types, this switch is used internally to generate errors if your code uses new Visual Studio 2010 features but you are targeting earlier versions of the framework.
Although the /langversion switch is not used by default for any of the other project types, it can be useful if you want to verify that your source code is design-time compatible with previous versions of Visual Studio.
Multi-Targeting in the Visual Studio 2010 IDETh e multi-targeting user expe-rience in the Visual Studio 2010 IDE is almost identical to that of Visual Studio 2008. It is still con-trolled from within the proj-ect properties, but in a default installation you may not see the earlier target frameworks. To cut down on install size, the Visual Studio team decided not to ship the 3.5 framework in the default installation of Visual Studio 2010. This change means that you would not see these framework options appearing in the Target
framework drop-down or New Project dialog box.
To add these additional frame-works, you need to install the .NET Framework 3.5 SP1. You can do this right from the IDE. At the top of the New Project di-alog box, you’ll see a drop-down menu for choosing the target framework. If only the .NET Framework 4 is installed, the menu contains a link to down-load more. If you install any others, however, you’ll see only the .NET Framework 3.5 SP1 on the drop-down menu because Visual Studio only recognizes installation of the .NET Frame-work 3.5 SP1 here.
Another change has to do with client profi les. Th ese were intro-duced in the .NET Framework 3.5 SP1 and they let applications use a lightweight version of the framework, which can improve
deployments by not requiring the inclusion of server-side pieces of the framework, like ASP.NET. Th ese profi les are available for both 3.5 and 4 framework targets.
As a result, the default profi le for various project types has changed. Th e client project types—Windows, Console, Offi ce and Windows Presentation Foundation (WPF) applications—will default to the client profi le. However, for Web applications the default profi le will be “full” because of references to libraries that are not deployed with the client profi le, such as System.Web.
Class libraries also default to the full profi le, but can be easily changed back to a client profile if you’re depending only on references deployed with the client profi le. If your class library is set to full profi le and is then used in a project with a client profi le, it will still work as long as the library doesn’t depend upon refer-ences that are not part of the client framework assemblies.
Figure 2 Using New Language Features That Will Work in Down-Level Targets
Figure 1 Changing the Desired Target Framework in Visual Studio 2008
101June 2010msdnmagazine.com
By default, none of the references added to the class library project type require a full profi le. However, because they’re deployed with an application, the application deployment profi le is the important setting to ensure full application functionality. If your library depends on references outside of the client scope, both the library and the application using it need to employ the full profi le.
Multi-Targeting Using the Command-Line CompilerTh e version 4 compiler has a number of command-line switches, none of which, unfortunately, controls the target framework so it’s important to understand a little about each of the switches and how they work.
If the .NET Framework 4 is installed, it is possible to build applications using vbc.exe that target earlier versions of the frame-work without having Visual Studio installed on the build machine. Build scripts that call the command-line compiler directly are oft en used in larger development environments. If you’re targeting earlier versions from the command line, this requires fi les installed with the previous framework version you’re targeting, so the best plan is to have both .NET Framework 3.5 SP1 and .NET Framework 4 installed on the machine.
With this in mind, some of the potential switches for multi- targeting are detailed in Figure 4.
Th is table provides a quick description of each switch, but in order to actually create a down-targeted compilation, you’ll need to use a combination—there’s no single multi-target switch. For a version 3.5 target, the most important switch is sdkpath, which you
can use to specify the 2.0 version of MSCorlib. Th en ensure your references point to the correct versions of System.dll, System.core.dll and any other prior target framework assemblies. (Th ese can be found in the %programfi les%\Reference Assemblies\Microsoft \Framework\v3.5 folder.)
You need to specify the noconfi g switch to avoid using the de-fault switches in the version 4 of vbc.rsp, which contains the default settings for compilation. Without adding this critical switch, the compiler would add those default 4 references, imports and so on.
Multi-targeted command-line compilation is best demonstrated by an example. Here I’m simply compiling a simple source fi le, test.vb, to target the .NET Framework 3.5:
Once you have the compiled binary, you can employ a tool such as the MSIL Disassembler (Ildasm.exe) or .NET Refl ector to look at the versions of the references being used. Th is lets you determine whether an executable will run on a desired target framework.
Client-Profi le and Mixed-Target SolutionsEarlier in the article I mentioned that client profi les were the default for most project types. When such applications are deployed, a smaller-footprint framework installation occurs. As part of this deployment you can observe that the command-line compiler is deployed. Th is is the same version of the compiler that’s deployed with the full framework, but there’s a potential gotcha when trying to compile a simple application on a client profi le.
Using this command on a client framework machine would fail because the client frameworks do not ship with a vbc.rsp that contains the default references:
vbc.exe test.vb /out: test.exe
You’d have to either specify all the references and imports statements that would normally be contained in the vbc.rsp fi le or create your own.
Th e bare minimum switches required to compile a Visual Basic application on a client framework installation are:
By including these switches you can compile a basic Visual Basic application. However, you should compile applications on a machine that has the full framework installed.
Mixed-target solutions—class libraries built with the .NET Framework 3.5 used with a client application targeting the .NET framework 4—are supported, but with some caveats. Within the Visual Studio 2010 IDE, if you’re using project ref-erences and are accustomed to the experience they provide,
you can still get this experience if the target frameworks in the project references use the same version of MSCorlib. Figure 5shows the MSCorlib versions and supported framework versions.
So if you’re using a class library targeting MSCorlib 2.0 on the .NET Framework 3.5 application, you are still able to use project references. Similarly, a .NET Framework 4 full-profile class library referenced by a .NET Framework 4 client-profi le Windows appli-cation can have a project reference to the library.
However, if you use a project-to-project reference where a diff erent version of MSCorlib is used, the project reference will be converted into a fi le reference. Th is means you’ll need to manually rebuild the solution when you correct errors. Th e experience will be familiar if you’ve worked with solutions that have multiple refer-enced projects written in both C# and Visual Basic. You lose some of the convenient features available with project references, such as renaming across projects and automatic background compilation.
Th e IDE shields you somewhat from what happens behind the scenes during compilation, but not everyone builds from the IDE. Th e fi le reference will automatically change back to a project reference if the target frameworks are changed so that both use frameworks with a common version of MSCorlib—so it’s not a true fi le reference.
What happens if you use a down-target (3.5) class library within a version 4 application? Th e class library will actually run against the .NET Framework 4. Considerable testing has occurred to ensure that this scenario works at run time with few problems. However, trying to use a 4.0 framework class library on a 3.5 framework application is not supported and will result in a compile-time error if building with either Visual Studio or MSBuild. To use 4.0 framework class libraries in a 3.5 framework-targeted application, however, you would need to down-target the class library to the .NET Framework 3.5.
Keep in mind, though, that with the ability to use the Visual Studio 2010 language features on down-target scenarios, targeting the
MSCorlib version Supported Frameworks Profi les2.0 2.0, 3.0, 3.5 Client and Full Profi les4.0 4 Client and Full Profi les
Figure 5 MSCorlib and Framework Version Compatibility
Switch Descriptionlangversion Provides errors for source code using features that don’t meet the specifi c language version. (9.0 relates to targets up to the .NET Framework
3.5; 10 relates to .NET Framework 4 targets.) This does not actually determine the target framework or CLR being used, but it allows Web projects to identify Visual Studio 2010 features used in down-target scenarios.
vbruntime Although there’s a different version of Microsoft.VisualBasic for the .NET Framework 4, simply trying to specify the 2.0 version of Microsoft.VisualBasic.dll doesn’t work and results in an assembly that’s dependent on the version 4 NetFX.
nostdlib Prevents the standard reference to system.dll from being added to the assembly. Although it is possible to use this option along with a reference to the version of system.dll in the 2.0 framework, the result is still a version 4 assembly.
sdkpath A key option that specifi es which version of MSCorLib.dll and Microsoft.VisualBasic.dll to use if the vbruntime switch does not specify which will be used. However, this is not an explicit reference you’ll typically see in the list of references. Instead, the compiler includes this in its standard references. Adding it is part of the solution for multi-targeting when you want the version 2.0 MSCorLib, not the version 4.
noconfi g Causes the compiler to avoid adding the default references, imports and switches contained in the vbc.rsp fi le, which would otherwise be used.
Figure 4 Command-Line Build Switches to Control Multi-Targeting
The IDE shields you somewhat from what happens behind the
scenes during compilation.
103June 2010msdnmagazine.com
class library to the .NET Framework 3.5 should not be a big issue. Figure 6 summarizes the new features you can expect to work in down-target projects.
PIAs and InteropUsing the .NET Framework to program against the Microsoft Offi ce object model requires the use of Primary Interop Assemblies (PIAs), which must be deployed to the user’s machine. Th ese assemblies are oft en very large and deploying them can be a nuisance.
Th e new type-embedding feature allows these applications to be deployed without requiring PIAs on the user’s machine. It does this by generating embedded interop types that perform the interop calls to the COM library directly. Th ese types are annotated by the compiler in such a way that the CLR treats all embedded interop type instances as equivalent. Th e compiler will not copy every type in the PIA into your assembly, just the ones you actually use. For more information, see “Type Equivalence and Embedded Interop Types” in the MSDN library (msdn.microsoft.com/library/dd997297(VS.100)).
Th e functionality of this feature is not supported for down-target scenarios below the .NET Framework 4. Using the Visual Studio IDE, this would not be immediately obvious as setting the reference embedded interop property to true in a down-target scenario results in normal references being used. Th e user experience for the feature from the IDE is that the assembly will continue to build, but would revert back to the behavior of standard references, which would require PIAs to be deployed.
From the command line, references are normally added using the /reference switch. For embedding, the /link switch is used instead. Attempting to use the /link switch for down-target scenarios results in compile errors.
Here’s an example of a command line embedding types from the Word interop assembly:
D:\Windows\Microsoft.NET\Framework\v4.0.30128\Vbc.exe /imports:Microsoft.VisualBasic,System /link:"D:\Program Files\Microsoft Visual Studio 10.0\Visual Studio Tools for Office\PIA\Office14\Microsoft.Office.Interop.Word.dll" /reference:"D:\Program Files\Reference Assemblies\Microsoft\Framework\.NETFramework\v4.0\Profile\Client\System.Core.dll","D:\Program Files\Reference Assemblies\Microsoft\Framework\.NETFramework\v4.0\Profile\Client\System.dll" /out:ConsoleApplication16.exe /target:exe Module1.vb
Th is behavior is important because, by default, COM references added to a project in Visual Studio 2010 set the Embed Interop property to true. So changing the target framework should not result in additional errors, but should provide the benefit of embedded interop types where possible.
Another new feature in Visual Studio 2010 that is not supported for down-target scenarios is dynamic interop because, prior to Visual Studio 2010, the Dynamic Language Runtime (DLR) didn’t exist.
Other IssuesCovariance and contravariance are supported for use with user-defi ned interfaces. However, Base Class Library (BCL) interfaces for down-level targets are not changed and therefore using the feature with these base classes is not supported. For more information on covariance and contravariance, see the Basic Instincts column in the March 2010 issue of MSDN Magazine (msdn.microsoft.com/magazine/ee336029).
If you have a project or solution created in a previous version of Visual Studio that you open in Visual Studio 2010, you’ll see the standard upgrade dialog box. Visual Studio will make the necessary changes to the project or solution fi les to work with Visual Studio 2010. However, there are two diff erent actions involved in upgrading your fi les that could aff ect multi-targeting.
If you have the .NET Framework 3.5 SP1 installed, the upgrade dialog box will allow the project or solution fi les to be upgrad-ed to Visual Studio 2010, but the target frameworks specifi ed for the project will remain untouched. So if you’re upgrading a .NET Framework 3.5-targeted application, aft er upgrade it should still target the 3.5 framework.
If you do not have the .NET Framework 3.5 SP1 installed, you can’t build multi-targets correctly because you need the 2.0 version of MSCorlib and the reference assemblies. Th e dialog will provide the option to change the target to a version 4 framework or to not upgrade the project. Your best course in this case is to cancel the upgrade, install the .NET Framework 3.5 SP1, then run through the process to upgrade the project again.
By understanding a little more of the imple mentation details of Visual Basic multi-targeting in Visual Studio 2010, you should be able to write code that produces assemblies that can be deployed on prior versions of the framework using the IDE or command line, but still take advantage of some of the new Visual Studio 2010 features. Although multi-targeting has some caveats, you retain the ability to develop and deploy applications that can’t immediately be upgraded to use the .NET Framework 4.
ADRIAN SPOTTY BOWLES has developed using every version of Visual Basic and managed to fi nd his way to Redmond, Wash., where he works on the Visual Basic product team as a soft ware design engineer tester focused on the Visual Basic compiler. He is still passionate about Visual Basic and can oft en be found answering questions in the MSDN Visual Basic forums. You can reach Bowles at Abowles@microsoft .com.
THANKS to the following technical experts for reviewing this article: Kevin Halverson and Beth Massi
Language Feature Works in Down-Target ScenariosCollection initializers YesArray initializers YesAuto-implemented properties YesImplicit line continuation YesStatement lambdas YesNo PIA NoDynamic interop NoCo/contravariance Partially
Figure 6 New Visual Studio Features in Down-Target Scenarios
Covariance and contravariance are supported for use with user-
library or framework. Th e tests do so by providing a lightweight, application-neutral environment for experimentation without the overhead of the application.
With that in mind, let’s create MongoDB-Explore, a Visual C# test project. Add MongoDB.Driver.dll to the list of assembly references and build to make sure everything is good to go. (Building should pick up the one TestMethod that’s generated as part of the project template. It will pass by default, so everything should be good, which means that if the project fails to build, something’s screwed up in the environment. Checking assumptions is always a good thing.)
As tempting as it would be to jump into writing code right away, though, a problem surfaces pretty quickly: MongoDB needs the external server process (mongod.exe) to be running before client code can connect against it and do anything useful. While
Going NoSQL with MongoDB, Part 2
In my previous article, MongoDB’s basics took front and center: getting it installed, running and inserting and fi nding data. However, I covered only the basics—the data objects used were simple name/value pairs. That made sense, because MongoDB’s “sweet spot” includes unstructured and relatively simple data structures. But surely this database can store more than just simple name/value pairs.
In this article, we’ll use a slightly diff erent method to investigate MongoDB (or any technology). Th e procedure, called an exploration test, will help us fi nd a possible bug in the server and, along the way, highlight one of the common issues object-oriented developers will run into when using MongoDB.
In Our Last Episode …First we’ll make sure we’re all on the same page, and we’ll also cover some slightly new ground. Let’s look at MongoDB in a bit more struc-tured fashion than we did in the previous article (msdn.microsoft.com/magazine/ee310029). Rather than just create a simple application and hack on it, let’s kill two birds with one stone and create exploration tests—code segments that look like unit tests but that explore functionality rather than try to verify it.
Writing exploration tests serves several diff erent purposes when investigating a new technology. One, they help discover whether the technology under investigation is inherently testable (with the assumption that if it’s hard to exploration-test, it’s going to be hard to unit-test—a huge red fl ag). Two, they serve as a sort of regression when a new version of the technology under investigation comes out, because they give a heads-up if old functionality no longer works. And three, since tests should be relatively small and granular, exploration tests inherently make learning a technology easier by creating new “what-if ” cases that build on previous cases.
But unlike unit tests, exploration tests aren’t continuously devel-oped alongside the application, so once you consider the technology learned, set the tests aside. Don’t discard them, however—they can also help separate bugs in application code from those in the
THE WORKING PROGRAMMER TED NEWARD
Code download available at code.msdn.microsoft.com/mag201006WorkProg.
namespace MongoDB_Explore{ [TestClass] public class UnitTest1 { private static Process serverProcess;
[ClassInitialize] public static void MyClassInitialize(TestContext testContext) { DirectoryInfo projectRoot = new DirectoryInfo(testContext.TestDir).Parent.Parent; var mongodbbindir = projectRoot.Parent.GetDirectories("mongodb-bin")[0]; var mongod = mongodbbindir.GetFiles("mongod.exe")[0];
var psi = new ProcessStartInfo { FileName = mongod.FullName, Arguments = "--config mongo.config", WorkingDirectory = mongodbbindir.FullName };
serverProcess = Process.Start(psi); } [ClassCleanup] public static void MyClassCleanup() { serverProcess.CloseMainWindow(); serverProcess.WaitForExit(5 * 1000); if (!serverProcess.HasExited) serverProcess.Kill(); }...
Figure 1 Partial Code for Test Initializer and Cleanup
Writing exploration tests serves several different purposes when investigating a new technology.
it’s tempting to simply say “Fine, fi ne, let’s start it and get back to writing code,” there’s a corollary problem. It’s an almost sure bet that at some point, 15 weeks later when looking back at this code, some poor developer (you, me or a teammate) will try to run these tests, see them all fail and lose two or three days trying to fi gure out what’s going on before she thinks to look to see if the server’s running.
Lesson: Try to capture all the dependencies in the tests somehow. Th e issue will arise again during unit-testing, anyway. At that point we’ll need to start from a clean server, make some changes and then undo them all. Th at’s easiest to accomplish by simply stopping and starting the server, so solving it now saves time later.
Th is idea of running something before testing (or aft er, or both) isn’t a new one, and Microsoft Test and Lab Manager projects can have both per-test and per-test-suite initializers and cleanup methods. Th ese are adorned by the custom attributes ClassInitialize and ClassCleanup for per-test-suite bookkeeping and TestInitialize and TestCleanup for per-test bookkeeping. (See “Working with Unit Tests” at msdn.microsoft.com/library/ms182515(v=VS.80) for more details.) Th us, a per-test-suite initializer will launch the mongod.exe process, and the per-test-suite cleanup will shut the process down, as shown in Figure 1.
Th e fi rst time this runs, a dialog box will pop up informing the user that the process is starting. Clicking OK will make the dialog go away ... until the next time the test is run. Once that dialog gets too annoying, fi nd the radio box that says, “Never show this dialog box again” and check it to make the message goes away for good. If
fi rewall soft ware is running, such as Windows Firewall, the dialog will likely make an appearance here also, because the server wants to open a port to receive client connections. Apply the same treatment and everything should run silently. Put a breakpoint on the fi rst line of the cleanup code to verify the server is running, if desired.
Once the server is running, tests can start fi ring—except another problem surfaces: Each test wants to work with its own fresh data-base, but it’s helpful for the database to have some pre-existing data to make testing of certain things (queries, for example) easier. It would be nice if each test could have its own fresh set of pre-existing data. Th at will be the role of the TestInitializer- and TestCleanup-adorned methods.
But before we get to that, let’s look at this quick TestMethod, which tries to ensure that the server can be found, a connection made, and an object inserted, found and removed, to bring the exploration tests up to speed with what we covered in the previous article (see Figure 2).
If this code runs, it trips an assertion and the test fails. In par-ticular, the last assertion around “birthday” is fi red. So apparently, sending a DateTime into the MongoDB database without a time doesn’t round-trip quite correctly. Th e data type goes in as a date with an associated time of midnight but comes back as a date with an associated time of 8 a.m., which breaks the AreEqual assertion at the end of the test.
Th is highlights the usefulness of the exploration test—without it (as is the case, for example, with the code from the previous article), this little MongoDB characteristic might have gone un-noticed until weeks or months into the project. Whether this is a bug in the MongoDB server is a value judgment and not something
[TestMethod]public void ConnectInsertAndRemove(){ Mongo db = new Mongo(); db.Connect();
to be explored right now. Th e point is, the exploration test put the technology under the microscope, helping isolate this “interesting” behavior. That lets developers looking to use the technology make their own decisions as to whether this is a breaking change. Forewarned is forearmed.
Fixing the code so the test passes, by the way, requires the DateTime that comes back from the database to be converted to local time. I brought this up in an online forum, and according to the response from the MongoDB.Driver author, Sam Corder, “All dates going in are converted to UTC but left as UTC coming back out.” So you must either convert the DateTime to UTC time before storing it via DateTime.ToUniversalTime, or else convert any DateTime retrieved from the database to the local time zone via the DateTime.ToLocalTime, by using the following sample code:
Th is in itself highlights one of the great advantages of community eff orts—typically the principals involved are only an e-mail away.
Adding ComplexityDevelopers looking to use MongoDB need to understand that, contrary to initial appearances, it isn’t an object database—that is, it can’t handle arbitrarily complex object graphs without help. Th ere are a few conventions that deal with ways to provide that help, but thus far doing so remains on the developer’s shoulders.
For example, consider Figure 3, a simple collection of objects de-signed to refl ect the storage of a number of documents describing a well-known family. So far so good. In fact, while it’s at it, the test really should query the database for those objects inserted, as shown in Figure 4, just to make sure they’re retrievable. And … the test passes. Awesome.
Actually, that might not be entirely true—readers following along at home and typing in the code might fi nd that the test doesn’t pass aft er all, as it claims that the expected count of objects isn’t matching 2. Th is is because, as databases are expected to do, this one retains state across invocations, and because the test code isn’t explicitly removing those objects, they remain across tests.
This highlights another feature of the document-oriented database: Duplicates are fully expected and allowed. Th at’s why each document, once inserted, is tagged with the implicit_id attribute and given a unique identifi er to be stored within it, which becomes, in eff ect, the document’s primary key.
So, if the tests are going to pass, the database needs to be cleared before each test runs. While it’s pretty easy to just delete the fi les
in the directory where MongoDB stores them, again, having this done automatically as part of the test suite is vastly preferable. Each test can do so manually aft er completion, which could get to be a bit tedious over time. Or the test code can take advantage of the TestInitialize and TestCleanup feature of Microsoft Test and Lab Manager to capture the common code (and why not include the database connect and disconnect logic), as shown in Figure 5.
Th ough the last line of the CleanDatabase method is unneces-sary because the next test will overwrite the fi eld reference with a new Mongo object, sometimes it’s best to make it clear that the reference is no longer good. Caveat emptor. Th e important thing is that the test-dirtied database is dropped, emptying the files MongoDB uses to store the data and leaving everything fresh and sparkly clean for the next test.
As things stand, however, the family model is incomplete—the two people referenced are a couple, and given that, they should have a reference to each other as spouses, as shown here:
peter["spouse"] = lois; lois["spouse"] = peter;
[TestMethod]public void StoreAndCountFamily(){ Mongo db = new Mongo(); db.Connect();
var peter = new Document(); peter["firstname"] = "Peter"; peter["lastname"] = "Griffin";
var lois = new Document(); lois["firstname"] = "Lois"; lois["lastname"] = "Griffin";
var cast = new[] {peter, lois}; db["exploretests"]["familyguy"].Insert(cast); Assert.IsNotNull(peter["_id"]); Assert.IsNotNull(lois["_id"]);
ICursor griffins = db["exploretests"]["familyguy"].Find( new Document().Append("lastname", "Griffin")); int count = 0; foreach (var d in griffins.Documents) count++; Assert.AreEqual(2, count);
db.Disconnect();}
Figure 4 Querying the Database for Objects
private Mongo db;
[TestInitialize]public void DatabaseConnect(){ db = new Mongo(); db.Connect();} [TestCleanup]public void CleanDatabase(){ db["exploretests"].MetaData.DropDatabase();
db.Disconnect(); db = null;}
Figure 5 Taking Advantage of TestInitialize and TestCleanup
Developers looking to use MongoDB need to understand
that, contrary to initial appearances, it isn’t an
Running this in the test, however, produces a StackOverfl ow-Exception—the MongoDB driver serializer doesn’t natively understand the notion of circular references and naively follows the references around ad infi nitum. Oops. Not good.
Fixing this requires you to choose one of two options. With one, the spouse fi eld can be populated with the other document’s _id fi eld (once that document has been inserted) and updated, as shown in Figure 6.
Th ere’s a drawback to the approach, though: It requires that the documents be inserted into the database and their _id values (which are Oid instances, in the MongoDB.Driver parlance) be copied into the spouse fi elds of each object as appropriate. Th en each docu-ment is again updated. Although trips to the MongoDB database are fast in comparison to those with a traditional RDBMS update, this method is still somewhat wasteful.
A second approach is to pre-generate the Oid values for each document, populate the spouse fi elds, and then send the whole batch to the database, as shown in Figure 7.
Th is approach requires only the Insert method, because now the Oid values are known ahead of time. Note, by the way, that the ToString calls on the assertion test are deliberate—this way, the documents are converted to strings before being compared.
What’s really important to notice about the code in Figure 7, though, is that de-referencing the document referenced via the Oid can be relatively diffi cult and tedious because the document-oriented style assumes that documents are more or less stand-alone or hierarchical entities, not a graph of objects. (Note that the .NET driver pro-vides DBRef, which provides a slightly richer way of referencing/dereferencing another document, but it's still not going to make this
into an object-graph-friendly system.) Th us, while it’s certainly possi-ble to take a rich object model and store it into a MongoDB database, it’s not recommended. Stick to storing tightly clustered groups of data, using Word or Excel documents as a guiding metaphor. If something can be thought of as a large document or spreadsheet, then it’s probably a good fi t for MongoDB or some other document-oriented database.
More to ExploreWe’ve fi nished our investigation of MongoDB, but before we wrap up, there are a few more things to explore, including carrying out predicate queries, aggregates, LINQ support and some production administration notes. We’ll tackle that next month. (Th at article is going to be a pretty busy piece!) In the meantime, explore the Mongo DB system, and be sure to drop me an e-mail with suggestions for future columns.
TED NEWARD is a principal with Neward & Associates, an independent fi rm specializing in enterprise .NET Framework and Java platform systems. He has written more than 100 articles, is a C# MVP, INETA speaker and the author or coauthor of a dozen books, including the forthcoming “Professional F# 2.0” (Wrox). He consults and mentors regularly. Reach him at [email protected] and read his blog at blogs.tedneward.com.
THANKS to the following technical expert for reviewing this article: Sam Corder
[TestMethod]public void StoreAndCountFamilyWithOid(){ var peter = new Document(); peter["firstname"] = "Peter"; peter["lastname"] = "Griffin"; peter["_id"] = Oid.NewOid();
var lois = new Document(); lois["firstname"] = "Lois"; lois["lastname"] = "Griffin"; lois["_id"] = Oid.NewOid();
later.) You can use the same concepts presented in this Silverlight program in a WPF program.
The program displays two Items Controls, both contained in ScrollViewers. You can visualize the ItemsControl at the left as a “market” selling produce. Th e one at the right is your “basket.” You use the mouse to pick produce items from the market and move them into the basket. Figure 1 shows the Corn item in transition from market to basket.
Although the Corn item has been moved out of the market, notice the gap in the ItemsControl that continues to indicate the source of the item. If the user releases the mouse button before the dragged item has been positioned over the basket Items-Control, the program animates the item back into the market. Only when the item is dropped into the basket does that gap close, again with an animation. Depending on where the item is dropped, an animated gap opens to receive the item, and the item is animated into position.
Once an item has been moved from the market, it no longer exists there, but that’s a program detail that could easily be changed. No facility exists to remove an item from the basket and move it back into the market, but that feature or something similar could be added fairly easily as well.
Figure 2 shows the bulk of the XAML fi le responsible for the basic layout. (Missing are two storyboards with seven animations that I’ll describe later.)
Th e Resources section contains a DataTemplate for displaying the produce items, and a reference to this resource is set to the ItemsTemplate property of the two ItemsControls.
In addition, a Canvas covers the entire area occupied by the program. You’ll recall from last month’s column how you can use a Canvas to host items that need to “fl oat” over the rest of the UI. Th e only child of this Canvas is a ContentControl, with its Content-Template also set to that DataTemplate. But the Visibility property is set to Collapsed so this ContentControl is initially invisible.
Controls that derive from ContentControl are common in WPF and Silverlight applications, but it’s not oft en you see a ContentControl itself. It turns out to be extremely handy if all you want is to display an object using a DataTemplate. Visually, it’s very much like a single item in an ItemsControl.
The Ins and Outs of ItemsControl
If someone were to ask me what single class most epitomizes the power and fl exibil-ity of Windows Presentation Foundation (WPF) and Silverlight, I’d fi rst say that it’s a stupid question and then, without a mo-ment’s hesitation, respond “DataTemplate.”
A DataTemplate is basically a visual tree of elements and controls. Program-mers use DataTemplates to give a visual appearance to non-visual data objects. Properties of elements in the visual tree are linked to properties of the data objects through bindings. Although the DataTemplate is most commonly used to defi ne the appearance of objects in an ItemsControl or a ListBox (one of the classes that derive from ItemsControl), you can also use a DataTemplate to defi ne the appearance of an object set to the Content property of a ContentControl or a ContentControl derivative, such as a button.
Creating a DataTemplate—or any other type of Framework-Template derivative such as ControlTemplate or Hierarchical-DataTemplate—is one of the few Silverlight programming tasks that can’t be done in code. You need to use XAML. It was once possible to create WPF templates entirely in code using Framework-ElementFactory, but I think I was the only person to actually pub-lish examples (in chapters 11, 13 and 16 of my book, “Applications = Code + Markup” [Microsoft Press, 2006]) and the technique has now been deprecated.
What I want to show you in this article is a variation of drag-and-drop: Th e user simply moves an item from one ItemsControl to another. But my major objective is to implement this whole process with an entirely fl uid look and feel that seems natural, and where nothing suddenly jerks or disappears. Of course, “the natural look” is oft en painstakingly achieved, and any program that strives for fl uidity needs to avoid revealing all the awkward machinations just underneath the surface.
I’ll be using a combination of techniques I showed in last month’s column (“Th inking Outside the Grid,” msdn.microsoft.com/magazine/ff646962) as well a DataTemplate that’s shared among two ItemsControls and a ContentControl—a concept essential to this whole program.
Program LayoutThe downloadable code that accompanies this article contains a single Silverlight project named ItemsControlTransitions, which you can run from my Web site at charlespetzold.com/silverlight/ItemsControlTransitions2. (I’ll explain the “2” at the end of this URL
UI FRONTIERS CHARLES PETZOLD
Code download available at code.msdn.microsoft.com/mag201006UIF.
Th e program begins by loading in a little XML database of some produce—using the same fi les from the ItemsControlPopouts project in last month’s column—and then fi lling up the market ItemsControl with objects of type ProduceItem. Th is class has Name and Photo properties that the DataTemplate references to display each item.
Pulling Items from ItemsControlTh e ItemsControl for the market has a handler set for MouseLeft -Button Down. On receipt of this event, the program needs to dislodge an item from the four-wall confi nes of the ItemsControl and allow it to track the mouse. But the item can’t actually be removed from the ItemsControl or the gap will automatically close up.
As I demonstrated in last month’s column, you can access the ItemContainerGenerator property of an ItemsControl to get a class that can associate each item in an ItemsControl with the visual tree that’s been generated to display that particular item. Th is visual tree has a root element of type ContentPresenter.
My fi rst impulse was to apply a TranslateTransform to the Render-Transform property of the ContentPresenter, to allow it to fl oat outside the ItemsControl. I know from experience, however, that this doesn’t work at all. Th e problem isn’t the ItemsControl itself; the problem is the ScrollViewer, which of necessity clips its children to its interior. (More about the rationale behind this clipping shortly.)
Instead, the program copies the clicked ProduceItem in the Items-Control to the ContentControl, and positions the ContentControl precisely over the ContentPresenter of the clicked item. (The program can obtain the location of the ContentPresenter relative to the Canvas using the always handy TransformToVisual method.) You’ll recall that the XAML fi le sets the Visibility property of the ContentControl to Collapsed, but now the program toggles that property to Visible.
At the same time, the ContentPresenter in the ItemsControl is made invisible. In WPF, you can do this simply by setting the Visibility property to Hidden, which makes the item invisible but otherwise causes the element’s size to be observed for layout purposes. Th e Visibility property in Silverlight doesn’t have a Hidden option, and if you set the Visibility property of the ContentPresenter to Collapsed, the gap will close up. Instead, you can mimic a Visibility setting of Hidden by simply setting the Opacity property to zero. Th e element is still there, but it’s invisible. As you experiment with the program, you’ll discover that the transition from the item in the ItemsControl to the draggable ContentControl is imperceptible.
At this point, the ContentPresenter in the ItemsControl displays nothing but an empty hole, and the ContentControl displaying the item can now be dragged around the screen with the mouse.
The Item DropBack when I was writing books about the Win16 and Win32 APIs, I spent whole chapters showing how to use scroll bars to display more text in a window than can fi t there. Today we simply use a ScrollViewer, and everyone is much happier—me most of all.
Despite its essential role in WPF and Silverlight layout, the Scroll-Viewer can be a little tricky to use at times. It has some peculiarities that can be a little puzzling, and this program reveals one of them. See if you can anticipate the problem.
We left the user moving a produce item around the screen with the mouse. If the user drops the produce item somewhere over the ItemsControl representing the basket, it becomes part of that collection. (More on this process shortly.) Otherwise, the program animates the item back to its origin using two animations in the returnToOriginStoryboard in MainPage.xaml. At the conclusion of the animation, the Opacity property of the ContentPresenter is set to one, the Visibility property of the ContentControl is set to Collapsed, and the drag event is concluded with everything back to normal.
To determine if the produce item is being dropped on the Items-Control, the program calculates a Rect object representing the location and size of the dragged ContentControl and another Rect object representing the location and size of the ItemsControl. In both cases, the program uses the TransformToVisual method to obtain the location of the upper-left corner of the control—the point (0, 0)—relative to the page, and the ActualWidth and Actual Height properties to obtain the control’s size. Th e Rect structure’s Intersect
Figure 2 Partial XAML File Responsible for Basic Layout
111June 2010msdnmagazine.com
method then calculates an intersection of the two rect-angles, which will be non-empty if there’s some overlap.
Th is works fi ne except when the ItemsControl has more items than can fi t in the vertical space allowed for it. Th e ScrollViewer then kicks into action by making its vertical scrollbar visible so you can scroll through the items. However, the ItemsControl inside the ScrollViewer actually believes itself to be larger than what you’re seeing; in a very real sense, the Scroll-Viewer is providing only a viewable window (called a “viewport”) on the ItemsControl. Th e location and size information you obtain for that ItemsControl always indicates the full size (called the “extent” size) and not the viewport size.
Th is is why ScrollViewer needs to clip its child. If you’ve been working with Silverlight for a while, you might be particularly accustomed to a certain laxity regarding clipping of children. You can almost always use RenderTransform to escape from a parent’s boundaries. However, ScrollViewer defi nitely needs to clip or it simply can’t work right.
Th is means that you can’t use the apparent dimensions of the ItemsControl to determine a valid drop, because in some cases the ItemsControl extends above and below the ScrollViewer. For that reason, my program determines a valid drop rectangle based on horizontal dimensions of the ItemsControl—because it wants to exclude the area occupied by the scrollbar—but the vertical dimensions of the ScrollViewer.
When the ContentControl is dropped on the ItemsControl, it could be overlapping two existing items, or just one if it’s being dropped on the top or bottom of the stack of items, or none at all. I wanted to insert the new item in the spot closest to where it’s dropped, which required enumerating through the items in the ItemsControl (and their associated ContentPresenter objects) and determining a good index to insert the new item. (Th e GetBasket-DestinationIndex method is responsible for determining this index.) Aft er the item is inserted, the ContentPresenter associated with that new item is given an initial height of zero and an opacity of zero, so it isn’t initially visible.
Following this insertion, the program initiates the storyboard called transferToBasketStoryboard with fi ve animations: one to decrease the height of the invisible ContentPresenter in the Items-Control for the market; another to increase the height of the invisible ContentPresenter newly created in the basket ItemsControl; and two more to animate the Canvas.Left and Canvas.Top attached properties to slide the ContentControl into place. (I’ll discuss the fi ft h animation shortly.) Figure 3 shows the gap widening as the ContentControl approaches its destination.
When the animation ends, the new ContentPresenter is given an opacity of one and the ContentControl is given a visibility of Collapsed, and now we’re back to just dealing with two normal ItemsControls inside ScrollViewers.
The Top and Bottom ProblemEarlier in this article I gave you the URL charlespetzold.com/silverlight/ItemsControlTransitions2 to try out the program. An earlier version of
the program can be run from charlespetzold.com/silverlight/ItemsControlTransitions, without the “2” on the end. Using this earlier version, move several produce items over to the basket—enough to make the vertical scrollbar appear. Now drag another one over and position it straddling the bottom of the ScrollViewer. When you release the mouse button, the ContentControl moves down toward an area of the ItemsControl that’s invisible, and then suddenly disappears. Th e item has been correctly inserted (as you can verify by scrolling down), but not very elegantly.
Now scroll the ScrollViewer so the top item is only partially visible. Move another item from the basket and position it so it will be inserted before that item. Th e new item slides into the ItemsControl, but it’s not
entirely visible. It’s not quite as bad as the problem at the bottom of the ItemsControl, but it still needs some help.
Th e fi x? Some way to programmatically scroll the ScrollViewer is required. Th e amount of vertical scrolling currently in eff ect for a ScrollViewer is provided through the VerticalOff set property. Th is number is a positive off set from the top of the entire ItemsControl to the location in the control that’s displayed at the top of the ScrollViewer.
Wouldn’t it be nice to simply animate that VerticalOffset property? Unfortunately, only the get accessor is public. Fortunately, it’s possible to programmatically scroll the ScrollViewer, but you need to call a method named ScrollToVerticalOff set.
To accomplish this little scrolling job through the Silverlight animation facility, I defi ned a dependency property named Scroll in MainPage itself. In the XAML fi le, I gave the page a name of “this,” and defi ned a fi ft h animation in transferToBasketStoryboard to target this property:
Th e OnMouseLeft ButtonUp override calculates the From and To values of this animation. (You can compare the eff ect of this additional animation by commenting out the block of code beginning with the comment “Calculate ScrollViewer scrolling animation.”) As this Scroll property is animated, its property-changed handler calls the ScrollTo-VerticalOff set method of the ScrollViewer with the animated value.
Toward a Fluid UIMany, many years ago, computers were much slower than they are now, and nothing that happened on the screen was ever very startling. Today, programs can implement UIs that entirely change their appearances in the blink of an eye. But that’s unsatisfactory as well. Oft en we can’t even see what’s going on, so now we fi nd it necessary to deliberately slow down the UI and make transitions more fl uid and natural. Silverlight 4 introduced some “fl uid UI” features that I’m eager to discuss, but even in Silverlight 3 it’s possible to begin the journey in that direction.
CHARLES PETZOLD is a longtime contributing editor to MSDN Magazine. He is currently writing “Programming Windows Phone 7 Series,” which will be published as a free downloadable e-book in the fall of 2010. A preview edition is currently available through his Web site charlespetzold.com.
Figure 3 The Anima-tion to Move a New Item into Place
context menus, have evolved over time, and they continue to evolve today (the Offi ce Ribbon control, for example). No one ever reads a manual. Users expect a new Windows program to instantly ex-plain itself through its UI, and will dump any that don’t.
We don’t have these standards for the new features of WPF yet, and that’s a real problem. For example, many articles explain how to program animation in WPF. But besides my paper, “Using WPF for Good and Not Evil” (rollthunder.com/SoftwareThatDoesntSuck/ WpfForGoodAndNotEvil.htm), I see no discussions in the Windows community of what information an animation communicates to a user, what eff ects an animation therefore has on the user’s productivity and satisfaction, or any sort of guidelines on where animation should be used and where it shouldn’t. Th at’s why, whenever I teach a class on WPF, I always insist on devoting at least a day to UI design, teaching my clients not just to write WPF code, but to start from the user’s needs and work inward, rather than starting from the toolkit and working outward.
WPF is much more powerful than Windows Forms, as a chainsaw is more powerful than a handsaw. I see great exultation over that power, and the exalters are absolutely correct about its magnitude. But I see zero discussion of the careful thought needed to safely and productively manage that power to make users happier—which is our ultimate goal.
Th is needs to change, and it needs to change now. Aft er four-plus years of experimentation, we ought to have some notion of which usage patterns in WPF make users happier and which accomplish the opposite. With WPF poised to become the mainstream of Windows desktop development, I call on Microsoft to publish UI design guidelines for it; not how to program this or that feature, but when and where and why to use it. A company that manufactures a chainsaw incurs a duty to teach its customers which end of it to hold.
DAVID S. PLATT teaches Programming .NET at Harvard University Extension School and at companies all over the world. He is the author of 11 programming books, including “Why Soft ware Sucks” (Addison-Wesley Professional, 2006) and “Introducing Microsoft .NET” (Microsoft Press, 2002). Microsoft named him a Soft -ware Legend in 2002. He wonders whether he should tape down two of his daughter’s fi ngers so she learns how to count in octal. You can contact him at rollthunder.com.
It takes Microsoft three versions to get a product right, Windows itself being the classic example. Visual Studio 2010 and the Micro-soft .NET Framework 4 represent the third release of Windows Presentation Foundation (WPF) and its tools. Right on schedule, my clients are telling me, “Yeah, looks about ready now, help us learn it, then we’ll try a pilot project.” But newcomers to WPF are oft en distracted by its glitz: Th ey forget that their ultimate goal is making their users happier and more productive, not titillating their own vanity by cramming fl ashy gizmos into a program for the sheer pain of it. Above all, they forget that their program is just one of many that users switch among, all day every day, and that commonality among UIs—in other words, most Windows programs working more or less like each other—is the key to their users’ satisfaction and hence to their programs’ success.
Few people under age 35 remember DOS programs, when UIs had no commonality whatsoever. For example, most DOS programs had no menus, requiring snap-on keyboard templates to remind users of commands. (OK, I guess that’s some commonality.) A few DOS programs contained menus but didn’t show them until the user pressed a specifi c key, and naturally every program used a diff erent key and showed the menu in a diff erent place. Microsoft Word used ESC and the menu appeared below the document; Lotus 1-2-3 used the forward slash ‘/’ and the menu appeared above the document; Farsight (another spreadsheet) used F3. Every user had to (gak!) read the manual (remember those?) to even start poking at a new app, and then had to switch mental command sets every time he switched applications.
The biggest growth driver of the Windows user platform, besides Solitaire, is the standardized UI that its
API encourages. Th e primary control structure is a menu at the top of a program’s window. Key-
board shortcuts are listed on the menu items as a teaching aid, toolbars provide graphic
shortcuts and so on. Th ese standards, like tool tips and right-click