
First EditionJune 2016
© NEC Corporation 2016
Chapter 1 Installing Windows
Installation Guide (Windows)
NEC Scalable Modular Server
DX2000

Documents for This Product
Scalable Modular Server DX2000 Installation Guide (Windows) 2
Documents for This Product
Documents for this product are provided as accompanying booklets ( ) and as electronic manuals ( )
published on the website and stored on the DX2000 Utility Disk ( ).
Safety Precautions and Regulatory Notices
Describes points of caution to ensure the safe use of this server. Read these cautions before using this server.
User’s Guide Chapter 1: General Description Overviews, names, and functions of the server’s parts
Chapter 2: Installation and Connection
Description of installation and connection as the preparation before using this server
Chapter 3: Setup Server module BIOS configurations and summary of DX2000 Utility Disk
Chapter 4: NW Switch Module
Features supported by internal switch module, how to setup switches, and initial settings for network
Chapter 5: Replacing Modules How to replace internal modules
Chapter 6: Appendix Specifications and block diagram of this server
Maintenance Guide Chapter 1: Maintenance Server maintenance, troubleshooting, management tool, and
management utility
Chapter 2: Useful Features Useful features and the detail of server module BIOS settings and DX2000 Utility Disk
Chapter 3: Appendix Error messages and event logs
NW Switch Configuration Guide Description of various settings of the NW switch
NW Switch Command Reference Description of commands used for setting the NW switch and usage
Installation Guide (Windows) Chapter 1: Installing Windows Installation of Windows, and important information for installation
Other documents Detail information such as the operation of EXPRESSSCOPE Engine 3 and Universal RAID Utility is provided.
DX2000 Utility Disk
Contents
Scalable Modular Server DX2000 Installation Guide (Windows) 3
Contents
Documents for This Product .................................................................................................................................. 2
Contents ................................................................................................................................................................ 3
Notations Used in This Document ......................................................................................................................... 5 Notations used in the text ............................................................................................................... 5 Optical disk drive ............................................................................................................................ 5 Hard disk drive ............................................................................................................................... 5 Switch ............................................................................................................................................. 5 Abbreviations of Operating Systems (Windows) ............................................................................ 6
Trademarks ........................................................................................................................................................... 6
Warnings and Additions to This Document ............................................................................................................ 7 Safety precautions .......................................................................................................................... 7
Chapter 1 Installing Windows .............................................................................................................................. 8
1. Introduction ....................................................................................................................................................... 9 1.1 Environment in Which to Install the Windows OS .................................................................... 9 1.2 Terms Used in This Document ............................................................................................... 10 1.3 Setting up the Operating System ........................................................................................... 10 1.4 Preparation for Setup ............................................................................................................ 11
Items required for setup ............................................................................... 11 1.4.1
2. Building a WDS Server ................................................................................................................................... 12 2.1 Adding the Role and Features ............................................................................................... 12 2.2 Configuring a DHCP Server ................................................................................................... 13 2.3 Configuring a WDS Server .................................................................................................... 16
Configuring a WDS server ............................................................................ 16 2.3.1 Adding an installation image ......................................................................... 18 2.3.2 Adding a boot image..................................................................................... 20 2.3.3 Adding a driver package ............................................................................... 21 2.3.4 Setting up the WDS server ........................................................................... 29 2.3.5
2.4 Creating an Answer File for Unattended Installation .............................................................. 32 Installing the Windows Assessment and Deployment Kit (Windows ADK) ... 32 2.4.1 Procedure for creating an answer file for unattended installation ................. 32 2.4.2 Sample for creating an answer file for unattended installation ..................... 35 2.4.3
2.5 Installing IPMI Management Utilities ...................................................................................... 46 Installing IPMIUtil ......................................................................................... 46 2.5.1
2.6 Other Settings ........................................................................................................................ 47 Enabling services related to remote desktop ................................................ 47 2.6.1 Enabling the client logging functionality........................................................ 51 2.6.2
3. Preparing a Device on Which to Install the OS ............................................................................................... 52 3.1 Preparing Network Boot ......................................................................................................... 52
4. Installing the OS from the WDS Server .......................................................................................................... 60 4.1 Preparations Before Installing the OS ................................................................................... 60 4.2 Installation and Operation After Installation Finishes ............................................................. 64
5. Installing the RAS driver ................................................................................................................................. 67
6. Setup of Windows Server 2012 R2 NIC Teaming (LBFO)............................................................................... 68 6.1 Launching the NIC teaming setup tool ................................................................................... 68 6.2 Creating a team ..................................................................................................................... 68 6.3 Notes and restrictions ............................................................................................................ 69
7. Logs Related to OS Installation ...................................................................................................................... 70

Contents
Scalable Modular Server DX2000 Installation Guide (Windows) 4
8. Re-installation ................................................................................................................................................. 71 8.1 Overview of Re-installation .................................................................................................... 71 8.2 Procedure for Re-installing the OS ........................................................................................ 72
Glossary .............................................................................................................................................................. 74
Revision Record .................................................................................................................................................. 75

Notations Used in This Document
Scalable Modular Server DX2000 Installation Guide (Windows) 5
Notations Used in This Document
Notations used in the text
In addition to safety-related symbols urging caution, three other types of notations are used in this document.
These notations have the following meanings.
Important Indicates critical items that must be followed when handling the hardware or operating
software. If the procedures described are not followed, hardware failure, data loss, and other
serious malfunctions could occur.
Note Indicates items that must be confirmed when handling the hardware or operating software.
Tips Indicates information that is helpful to keep in mind when using this server.
Optical disk drive
Optical disk drive described in this document refers to the following.
DVD-ROM drive
DVD Super MULTI drive
Hard disk drive
Unless otherwise stated, hard disk drive described in this document refers to the following.
Hard disk drive (HDD)
Solid state drive (SSD)
Switch
Switch described in this document refers to “switch module”. A switch module is used to connect the LAN port on
the server module to the external LAN.

Trademarks
Scalable Modular Server DX2000 Installation Guide (Windows) 6
Abbreviations of Operating Systems (Windows)
Windows Operating Systems are referred to as follows.
Notations in this document Official names of Windows
Windows Server 2012 R2
Windows Server 2012 R2 Standard
Windows Server 2012 R2 Datacenter
Trademarks
Microsoft, Windows, and Windows Server are registered trademarks or trademarks of Microsoft Corporation in the
United States and other countries.
Intel and Xeon are registered trademarks of Intel Corporation of the United States.
Adobe, the Adobe logo, and Acrobat are trademarks of Adobe Systems Incorporated.
All other product, brand, or trade names used in this publication are the trademarks or registered trademarks of their
respective trademark owners.

Warnings and Additions to This Document
Scalable Modular Server DX2000 Installation Guide (Windows) 7
Warnings and Additions to This Document
1. Unauthorized reproduction of the contents of this document, in part or in its entirety, is prohibited.
2. The contents of this document may change without prior notice.
3. Do not make copies or alter the document content without permission from NEC Corporation.
4. Every effort has been made to ensure the completeness of this document. However, if you have any
concerns, or discover errors or omissions, please contact your retailer.
5. Regardless of article 4, NEC Corporation assumes no responsibility for effects resulting from
operations.
6. The sample values used in this document are not the actual values.
7. This document was created based on the information available at the time of its creation. The
screen images, messages and procedures may differ from the actual screens, messages and
procedures. Substitute as appropriate when content has been modified.
Keep this document nearby so that you may refer to it as necessary.
Safety precautions
Read “Safety Precautions and Regulatory Notices” attached to this server to use this product safely.

Scalable Modular Server DX2000 Installation Guide (Windows) 8
NEC Scalable Modular Server DX2000
Installing Windows
This chapter describes how to install Windows. Read through this chapter to set up the system correctly.
1. Introduction
This section describes the items the user needs to check before starting setup and an overview of the
installation procedure.
2. Building a WDS Server
This section describes how to build a Windows Deployment Services (WDS) server. 3. Preparing a Device on Which to Install the OS
This section describes the device the user needs to prepare to install the OS on. 4. Installing the OS from the WDS Server
This section describes how to install the OS from the WDS server.
5. Installing the RAS driver
This section describes how to install the RAS driver.
6. Setup of Windows Server 2012 R2 NIC Teaming (LBFO)
This section describes how to setup of Windows Server 2012 R2 NIC Teaming (LBFO).
7. Logs Related to OS Installation
This section describes how to check the logs related to OS installation.
8. Re-installation
This section describes how to re-install the OS.

1. Introduction
Scalable Modular Server DX2000 Installation Guide (Windows) 9
Chapter 1 Installing Windows
1. Introduction
Read this document before using the server.
This document is intended for users who have sufficient knowledge about the OS features and how to operate
the OS.
If you have any questions about the operation of the OS, refer to the online help of each OS.
This document mainly explains how to install a Windows OS in the DX2000 by using Windows Deployment
Services (WDS). Be sure to read through this document before starting installation.
1.1 Environment in Which to Install the Windows OS
The environment shown below is required to install a Windows OS on a device by using Windows Deployment
Services (WDS).
Windows Deployment Services (WDS) Server
Hardware Express5800 Series servers
NIC
10GNIC (Install the driver in advance.)
Software Windows Server 2012 R2
Windows Assessment and Deployment Kit (ADK Tool)
IPMI Management Utilities
Device on which to install the OS
Hardware DX2000
NIC
40GNIC
Software Windows Server 2012 R2

1. Introduction
Scalable Modular Server DX2000 Installation Guide (Windows) 10
Chapter 1 Installing Windows
1.2 Terms Used in This Document
The table below explains the terms used in this document.
Terms Description
WDS Abbreviation of Windows Deployment Services.
This service enables installation of Windows OSs via a network without using an OS
installation media and an optical disk drive on the device on which to install the OS.
IPMI Abbreviation of Intelligent Platform Management Interface.
A standard interface used to monitor hardware on the server independently of the system
status and OS installed.
BMC Abbreviation of Baseboard Management Controller.
An IPMI-compliant management controller that provides features to monitor hardware on the
server independently of the system status and OS installed.
SOL Abbreviation of Serial Over LAN.
A mechanism that allows the BMC to UDP-packetize the data output to serial ports and
redirect it to the LAN.
1.3 Setting up the Operating System
Install the OS according to the diagram below.
Installation complete
Installing the OS from the WDS server
Preparing a device on which to install the OS
Building a Windows Deployment Services (WDS) server
Preparation for setup
Start

1. Introduction
Scalable Modular Server DX2000 Installation Guide (Windows) 11
Chapter 1 Installing Windows
1.4 Preparation for Setup
Check the items described in this section that should be prepared before building a Windows Deployment
Services (WDS) server and installing the OS on a device.
Items required for setup 1.4.1
Check that the following items are ready.
A device on which to run Windows Deployment Services (WDS)
A device on which to install the OS (DX2000)
A switch
LAN cables (x 2)
40G-10G branch cable
Driver package
OS installation media
Installation Guide (Windows) (this document)

2. Building a WDS Server
Scalable Modular Server DX2000 Installation Guide (Windows) 12
Chapter 1 Installing Windows
2. Building a WDS Server
2.1 Adding the Role and Features
The following describes the roles to be installed on the WDS server.
Add the server roles according to the following procedure.
1. On the Server Manager screen, click Add roles and features.
2. Select DHCP Server and Windows Deployment Services, and then click Next.
Leave other items as is and continue the procedure according to the wizard.
3. Read the descriptions displayed on the screen, and then click Install.
Important If no static IP address has been set to the WDS server, a warning is output when an
attempt is made to install the role for "DHCP Server". For how to set a static IP
address, see the website below. The static IP address must be set to both LAN
cables and the 10G NIC cable.
Configuring a DHCP server static IP address
http://technet.microsoft.com/en-us/library/cc755277.aspx

2. Building a WDS Server
Scalable Modular Server DX2000 Installation Guide (Windows) 13
Chapter 1 Installing Windows
2.2 Configuring a DHCP Server
1. On the Server Manager screen, click Tools, and then select DHCP.
The administration screen is displayed.
2. Click the WDS server name.
3. Right-click IPv4, and then click New Scope to create a new scope.
4. Create two scopes: one for the BMC on the device on which to install the OS, and the other for 40GNIC.
Specify the scope name and the IP address range according to the wizard. Leave other items as is and
continue the procedure according to the wizard.
Example Name: WDS, IP address range: 192.168.0.100 to 192.168.0.200
Name: WDS2, IP address range: 192.168.1.100 to 192.168.1.200
Scope name and IP address range - 1

2. Building a WDS Server
Scalable Modular Server DX2000 Installation Guide (Windows) 14
Chapter 1 Installing Windows
Scope name and IP address range – 2
Important As the network address specified by using the IP address range, specify the static IP
address specified for LAN cables and the 10GNIC cable on the WDS server. If the
static IP address of the LAN cable on the WDS server is 192.168.0.1/24, for example,
the IP address range of the BMC scope is between 192.168.0.100 and 192.168.0.200. If
the static IP address of the LAN cable on the WDS server is 192.168.1.1/24, for
example, the IP address range of the BMC scope is between 192.168.1.100 and
192.168.1.200.
If a different network address is specified, the IP address cannot be acquired from
the DHCP server.
5. Make sure that the created scopes are displayed on the administration screen.
6. If the flag on the Server Manager screen indicates "Configuration required for DHCP Server at
WDSHOST", click Complete DHCP configuration.

2. Building a WDS Server
Scalable Modular Server DX2000 Installation Guide (Windows) 15
Chapter 1 Installing Windows
7. On the DHCP Post-Install configuration wizard, click Commit.
8. Read the descriptions displayed on the screen, and then click Close.
9. Make sure that the flag on the Server Manager screen indicates "Configuration completed for DHCP
Server at WDSHOST", and then finish the DHCP configuration.

2. Building a WDS Server
Scalable Modular Server DX2000 Installation Guide (Windows) 16
Chapter 1 Installing Windows
2.3 Configuring a WDS Server
Configuring a WDS server 2.3.1
1. On the Server Manager screen, click Tools, and then select Windows Deployment Services.
The administration screen is displayed.
2. Click Servers.
3. Right-click the WDS server name, and then select Configure Server.
4. Continue the procedure according to the wizard.
Select Standalone server, and then click Next.

2. Building a WDS Server
Scalable Modular Server DX2000 Installation Guide (Windows) 17
Chapter 1 Installing Windows
5. Specify the Remote Installation Folder, and then click Next.
Example: E:¥RemoteInstall
6. Select Respond to all client computers (known and unknown) and select the Require
administrator approval for unknown computers check box.
Leave the subsequent items as is and continue the procedure according to the wizard.
When the progress bar appears, wait for the process to complete.
7. If the WDS service fails to start or stops running after installation, on the Server Manager screen, click
WDS, and then Start Services. Make sure that the WDS service starts running (Status indicates
"Running").

2. Building a WDS Server
Scalable Modular Server DX2000 Installation Guide (Windows) 18
Chapter 1 Installing Windows
Adding an installation image 2.3.2
1. Set the OS installation media on the optical disk drive of the WDS server.
2. On the administration screen of Windows Deployment Services, click Servers, and then click the WDS
server name.
3. Right-click Install Images, and then click Add Install Image.
Continue the procedure according to the wizard.
4. On the screen below, specify the install.wim file on the OS installation media, and then click Next.
Example: D:\Sources\install.wim

2. Building a WDS Server
Scalable Modular Server DX2000 Installation Guide (Windows) 19
Chapter 1 Installing Windows
5. Select the operating system to be installed, and then click Next.
Continue the procedure according to the wizard. When the progress bar appears, wait for the process to
complete.
6. After the wizard is complete, make sure that the added installation image is displayed on the
administration screen.

2. Building a WDS Server
Scalable Modular Server DX2000 Installation Guide (Windows) 20
Chapter 1 Installing Windows
Adding a boot image 2.3.3
1. Set the OS installation media on the optical disk drive of the WDS server.
2. On the administration screen of Windows Deployment Services, click Servers, and then click the WDS
server name.
3. Right-click Boot Images, and then click Add Boot Image.
4. On the screen below, specify the boot.wim file on the OS installation media, and then click Next.
Example: D:\Sources\boot.wim
When the progress bar appears, wait for the process to complete.
5. Make sure that the added boot is displayed on the administration screen.

2. Building a WDS Server
Scalable Modular Server DX2000 Installation Guide (Windows) 21
Chapter 1 Installing Windows
Adding a driver package 2.3.4
(1) Adding a driver for Intel LAN(On board LAN)
1. Set the DX2000 drivers disk in ODD drive on Server.
2. On the administration screen of Windows Deployment Services, click Servers, and then click the WDS
server name.
3. Right-click Drivers, and then click Add Driver Package.
4. Select “e1s64x64.inf” from attached media by following screen, and then click Next.
Example: D:\drivers\win\LAN\WS2012R2\INTEL\R207\PROXGB\Winx64\NDIS64\sxb64x64.inf
2. Building a WDS Server
Scalable Modular Server DX2000 Installation Guide (Windows) 22
Chapter 1 Installing Windows
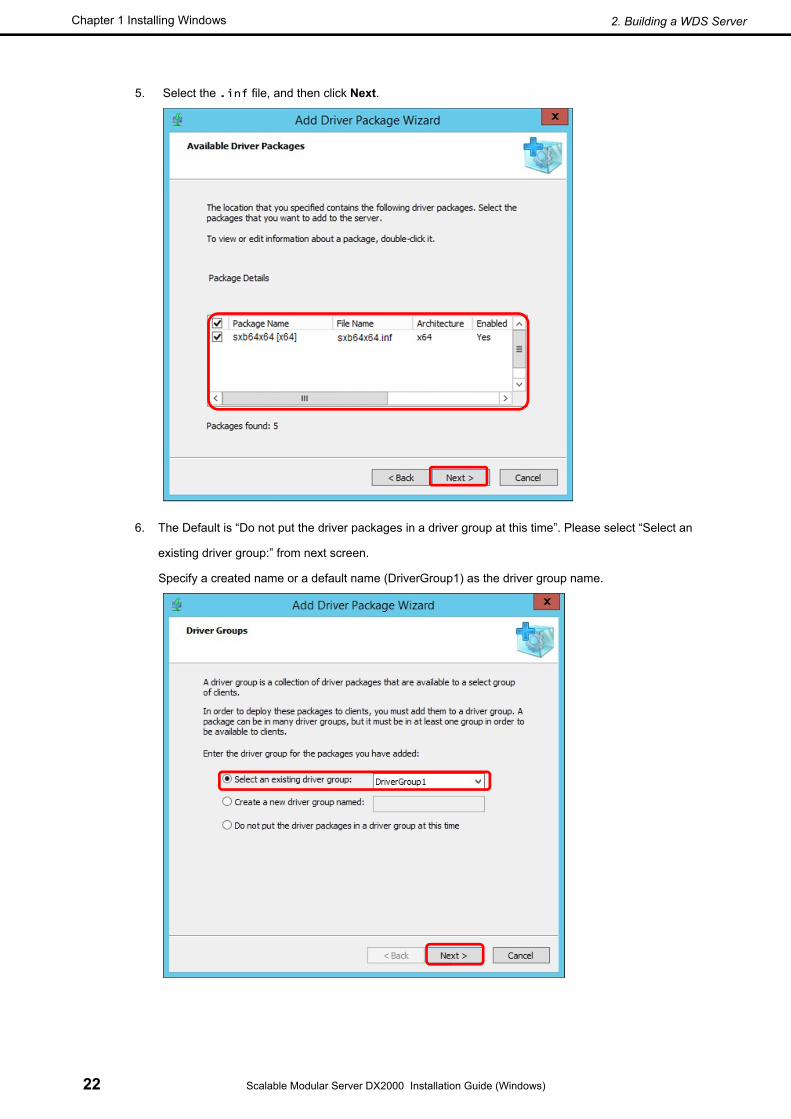
5. Select the .inf file, and then click Next.
6. The Default is “Do not put the driver packages in a driver group at this time”. Please select “Select an
existing driver group:” from next screen.
Specify a created name or a default name (DriverGroup1) as the driver group name.

2. Building a WDS Server
Scalable Modular Server DX2000 Installation Guide (Windows) 23
Chapter 1 Installing Windows
7. On the administration screen of Windows Deployment Services, click Servers, and then click the WDS
server name.
8. Click Boot Images and right-click a boot image listed on the right pane.
Click Add Driver Packages to Image.
9. Driver packages are searched for. Check the drivers displayed for the search result, and then click Next.
The progress bar is displayed. Wait for a while.
10. Make sure that the added driver packages are displayed, and then click Finish.

2. Building a WDS Server
Scalable Modular Server DX2000 Installation Guide (Windows) 24
Chapter 1 Installing Windows
(2) Adding a driver for Intel Chip Set
1. Set attached media of DX2000 in an optical disk driver of WDS server.
2. On the administration screen of Windows Deployment Services, click Servers, and then click the WDS
server name.
3. Right-click Drivers, and then click Add Driver Package.
4. Select the folder of “\drivers\win\chipset\” which locate under attached media, and then click Next.
Example: D: \drivers\win\chipset\

2. Building a WDS Server
Scalable Modular Server DX2000 Installation Guide (Windows) 25
Chapter 1 Installing Windows
5. Then click Next.
6. Select the .inf file, and then click Next.
2. Building a WDS Server
Scalable Modular Server DX2000 Installation Guide (Windows) 26
Chapter 1 Installing Windows
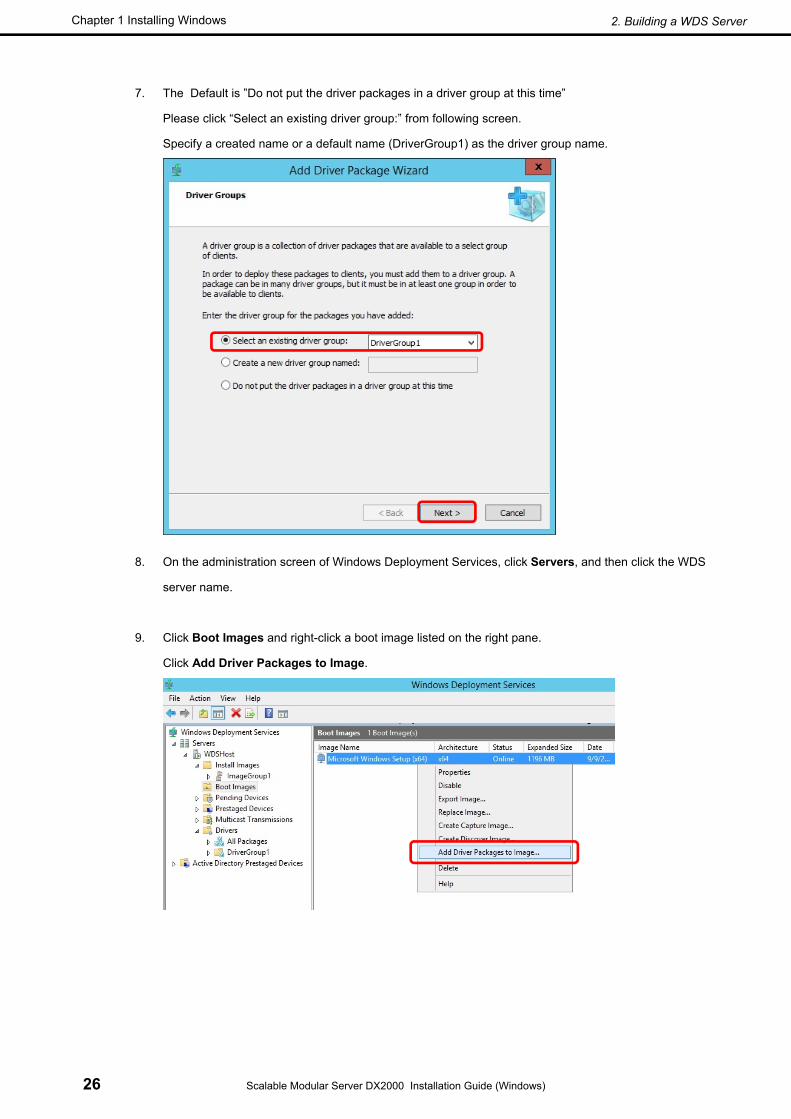
7. The Default is ”Do not put the driver packages in a driver group at this time”
Please click “Select an existing driver group:” from following screen.
Specify a created name or a default name (DriverGroup1) as the driver group name.
8. On the administration screen of Windows Deployment Services, click Servers, and then click the WDS
server name.
9. Click Boot Images and right-click a boot image listed on the right pane.
Click Add Driver Packages to Image.

2. Building a WDS Server
Scalable Modular Server DX2000 Installation Guide (Windows) 27
Chapter 1 Installing Windows
10. Driver packages are searched for. Check the drivers displayed for the search result, and then click Next.
The progress bar is displayed. Wait for a while.
11. Make sure that the added driver packages are displayed, and then click Finish.

2. Building a WDS Server
Scalable Modular Server DX2000 Installation Guide (Windows) 28
Chapter 1 Installing Windows
(3) Adding the RAID controller (N8403-6001) driver (optional)
When using the SAS RAID controller, apply the RAID driver as well as the LAN driver.
1. Set attached media of DX2000 in an optical disk driver of WDS server.
2. On the administration screen of Windows Deployment Services, click Servers, and then click the WDS
server name.
3. Right-click Drivers, and then click Add Driver Package.
4. Select “e1s64x64.inf” from attached media by following screen, and then click Next.
Example: D:\drivers\win\MegaRAID\WS2012R2\megasas2.inf
5. Select the .inf file, and then click Next.
6. Specify a created name or a default name (DriverGroup1) as the driver group name.
7. On the administration screen of Windows Deployment Services, click Servers, and then click the WDS
server name.
8. Click Boot Images and right-click a boot image listed on the right pane.
Click Add Driver Packages to Image.
9. Driver packages are searched for. Check the drivers displayed for the search result, and then click Next.
The progress bar is displayed. Wait for a while.
10. Make sure that the added driver packages are displayed, and then click Finish.

2. Building a WDS Server
Scalable Modular Server DX2000 Installation Guide (Windows) 29
Chapter 1 Installing Windows
Setting up the WDS server 2.3.5
1. On the administration screen of Windows Deployment Services, click Servers, and then click the WDS
server name.
2. Click Properties.
3. On the PXE Response tab, under PXE Response Policy, click Respond to all client computers
(known and unknown).
Select the Require administrator approval for unknown computers check box.

2. Building a WDS Server
Scalable Modular Server DX2000 Installation Guide (Windows) 30
Chapter 1 Installing Windows
4. On the Boot tab, under Unknown clients, click Always continue the PXE boot.
5. On the Client tab, select the Enable unattended installation check box.
In the x64 architecture box, specify an answer file used during unattended installation.
Note For details about the answer file for unattended installation, see Chapter 1, 2.4 Creating an
Answer File for Unattended Installation.

2. Building a WDS Server
Scalable Modular Server DX2000 Installation Guide (Windows) 31
Chapter 1 Installing Windows
6. On the DHCP tab, select the check boxes Do not listen on DHCP ports and Configure DHCP options
to indicate that this is also a PXE server.
7. Click OK.

2. Building a WDS Server
Scalable Modular Server DX2000 Installation Guide (Windows) 32
Chapter 1 Installing Windows
2.4 Creating an Answer File for Unattended Installation
For an answer file for unattended installation, specify mainly the following related to installation of the operating
system.
Disk partitioning
Where to install the OS
Language of the OS to be installed
Computer name (If not specified, WIN-<randomly selected alphanumeric characters> is set.)
Password of Administrator account
Enabling remote desktop
Installing the Windows Assessment and Deployment Kit (Windows ADK) 2.4.1
Install the Windows Assessment and Deployment Kit (ADK) on the WDS server.
If the WDS server is used offline, we recommend that you refer to the following website before installing the kit.
Installing the Windows ADK
http://msdn.microsoft.com/en-us/library/windows/hardware/hh825494.aspx
Procedure for creating an answer file for unattended installation 2.4.2
After the Windows Assessment and Deployment Kit (ADK) is installed, create an answer file for unattended
installation by using Windows System Image Manager.
For the detail of an answer file for unattended installation, refer to 2.4.3 Sample for creating an answer file for
unattended installation.
1. Start Windows System Image Manager (SIM).

2. Building a WDS Server
Scalable Modular Server DX2000 Installation Guide (Windows) 33
Chapter 1 Installing Windows
2. Set the OS installation media on the optical disk drive of the WDS server.
3. On the Windows Image pane, right-click Select a Windows image or catalog file, and then click
Select Windows Image.
4. Specify the install.wim file on the OS installation media (example: D:\Source\install.wim).
Important Copy the install.wim file on the OS installation media (example:
D:\Source\install.wim) to a local disk on the WDS server in advance.
If you directly specify the file on the OS installation media, a write error is output
when creating a catalog file.
5. On the Answer File pane, right-click Create or open an answer file, and then click New Answer File.

2. Building a WDS Server
Scalable Modular Server DX2000 Installation Guide (Windows) 34
Chapter 1 Installing Windows
6. On the Windows Image pane, right-click the same item as the one with the "component name" tag
shown in 2.4.3 Sample of an answer file for unattended installation below. On the displayed menu,
select the item to add the item with the "settings pass" tag including the "component name" tag to the
Answer File pane.
7. Click the item added to the Answer File pane and modify the descriptions on the Properties pane to be
the same as those shown in 2.4.3 Sample of an answer file for unattended installation.
8. After you finish all the settings, save the answer file in the following folder.
E:\RemoteInstall\WdsClientUnattend
Tips This folder is created on the drive on which the OS is installed. Be sure to save the answer
file for unattended installation under RemoteInstall\WdsClientUnattend.
The saved answer file is used in Chapter 1, 2.3.5 Setting up the WDS server and 4.1 Preparations Before
Installing the OS.

2. Building a WDS Server
Scalable Modular Server DX2000 Installation Guide (Windows) 35
Chapter 1 Installing Windows
Sample for creating an answer file for unattended installation 2.4.3
The contents of an answer file for unattended installation may vary depending on the environment (boot mode)
in which the OS is installed. Check the boot mode and see either of the samples of settings shown below.
- UEFI Mode: (1) Sample for UEFI Mode
- Legacy Mode: (2) Sample foe Legacy Mode
(1) Sample for UFEI Mode
Red (1): Items that depend on the operating environment
Blue (2): Items that need to be modified according to the OS and its settings
<?xml version="1.0" encoding="utf-8"?>
<unattend xmlns="urn:schemas-microsoft-com:unattend">
<settings pass="windowsPE">
<component name="Microsoft-Windows-Setup" processorArchitecture="amd64"
publicKeyToken="31bf3856ad364e35" language="neutral" versionScope="nonSxS"
xmlns:wcm="http://schemas.microsoft.com/WMIConfig/2002/State"
xmlns:xsi="http://www.w3.org/2001/XMLSchema-instance">
<DiskConfiguration>
<Disk wcm:action="add">
<CreatePartitions>
<CreatePartition wcm:action="add">
<Order>1</Order>
<Size>100</Size>
<Type>EFI</Type>
</CreatePartition>
<CreatePartition wcm:action="add">
<Order>2</Order>
<Size>128</Size>
<Type>MSR</Type>
</CreatePartition>
<CreatePartition wcm:action="add">
<Order>3</Order>
<Type>Primary</Type>
<Size>30000</Size>
<Extend>false</Extend>
</CreatePartition>
</CreatePartitions>
<ModifyPartitions>
<ModifyPartition wcm:action="add">
<Order>1</Order>
<PartitionID>1</PartitionID>
<Format>FAT32</Format>
Create a disk partition
(1)

2. Building a WDS Server
Scalable Modular Server DX2000 Installation Guide (Windows) 36
Chapter 1 Installing Windows
<Label>System</Label>
</ModifyPartition>
<ModifyPartition wcm:action="add">
<Order>2</Order>
<PartitionID>3</PartitionID>
<Format>NTFS</Format>
<Label>Windows</Label>
</ModifyPartition>
</ModifyPartitions>
<DiskID>0</DiskID>
<WillWipeDisk>true</WillWipeDisk>
</Disk>
<WillShowUI>OnError</WillShowUI>
</DiskConfiguration>
<ImageInstall>
<OSImage>
<InstallTo>
<DiskID>0</DiskID>
<PartitionID>3</PartitionID>
</InstallTo>
</OSImage>
</ImageInstall>
<WindowsDeploymentServices>
<Login>
<Credentials>
<Domain>WIN-XXXXXXXXXXXX</Domain>
<Password>XXXXXXXXXX</Password>
<Username>Administrator</Username>
</Credentials>
</Login>
<ImageSelection>
<InstallImage>
<Filename>install.wim</Filename>
<ImageGroup>ImageGroup1</ImageGroup>
<ImageName>Windows Server 2012 R2 SERVERSTANDARD</ImageName>
</InstallImage>
<InstallTo>
<DiskID>0</DiskID>
<PartitionID>3</PartitionID>
</InstallTo>
</ImageSelection>
</WindowsDeploymentServices>
Where to install the OS
Information of WDS server account <Domain>: WDS server's computer name <Password>: Password <Username>: Account name
Where to install the OS
Information of installation image added to WDS server Note items such as the file name that can be checked on the Windows Deployment Services screen
(1)
(1)
(2)
(2)
(2)

2. Building a WDS Server
Scalable Modular Server DX2000 Installation Guide (Windows) 37
Chapter 1 Installing Windows
<EnableNetwork>true</EnableNetwork>
</component>
<component name="Microsoft-Windows-International-Core-WinPE"
processorArchitecture="amd64" publicKeyToken="31bf3856ad364e35" language="neutral"
versionScope="nonSxS"
xmlns:wcm="http://schemas.microsoft.com/WMIConfig/2002/State"
xmlns:xsi="http://www.w3.org/2001/XMLSchema-instance">
<SetupUILanguage>
<UILanguage>en-US</UILanguage>
<WillShowUI>OnError</WillShowUI>
</SetupUILanguage>
<InputLocale>en-US</InputLocale>
<SystemLocale>en-US</SystemLocale>
<UILanguage>en-US</UILanguage>
<UserLocale>en-US</UserLocale>
</component>
</settings>
<settings pass="specialize">
<component name="Microsoft-Windows-TerminalServices-LocalSessionManager"
processorArchitecture="amd64" publicKeyToken="31bf3856ad364e35" language="neutral"
versionScope="nonSxS"
xmlns:wcm="http://schemas.microsoft.com/WMIConfig/2002/State"
xmlns:xsi="http://www.w3.org/2001/XMLSchema-instance">
<fDenyTSConnections>false</fDenyTSConnections>
</component>
<component name="Networking-MPSSVC-Svc" processorArchitecture="amd64"
publicKeyToken="31bf3856ad364e35" language="neutral" versionScope="nonSxS"
xmlns:wcm="http://schemas.microsoft.com/WMIConfig/2002/State"
xmlns:xsi="http://www.w3.org/2001/XMLSchema-instance">
<FirewallGroups>
<FirewallGroup wcm:action="add"
wcm:keyValue="EnableRemoteDesktop">
<Active>true</Active>
<Group>Remote Desktop</Group>
<Profile>all</Profile>
</FirewallGroup>
</FirewallGroups>
</component>
<component
name="Microsoft-Windows-TerminalServices-RDP-WinStationExtensions"
processorArchitecture="amd64" publicKeyToken="31bf3856ad364e35" language="neutral"
versionScope="nonSxS"
Language of the OS to be installed
Enable Remote Desktop (RDP)
(2)

2. Building a WDS Server
Scalable Modular Server DX2000 Installation Guide (Windows) 38
Chapter 1 Installing Windows
xmlns:wcm="http://schemas.microsoft.com/WMIConfig/2002/State"
xmlns:xsi="http://www.w3.org/2001/XMLSchema-instance">
<UserAuthentication>0</UserAuthentication>
</component>
<component name="Microsoft-Windows-Shell-Setup"
processorArchitecture="amd64" publicKeyToken="31bf3856ad364e35" language="neutral"
versionScope="nonSxS"
xmlns:wcm="http://schemas.microsoft.com/WMIConfig/2002/State"
xmlns:xsi="http://www.w3.org/2001/XMLSchema-instance">
<AutoLogon>
<Password>
<Value>xxxxxxxx</Value>
<PlainText>false</PlainText>
</Password>
<Enabled>true</Enabled>
<LogonCount>2</LogonCount>
<Username>Administrator</Username>
</AutoLogon>
<ProductKey>XXXXX-XXXXX-XXXXXX-XXXXX-XXXXX</ProductKey>
<ComputerName>WDSClient</ComputerName>
</component>
</settings>
<settings pass="oobeSystem">
<component name="Microsoft-Windows-International-Core"
processorArchitecture="amd64" publicKeyToken="31bf3856ad364e35" language="neutral"
versionScope="nonSxS"
xmlns:wcm="http://schemas.microsoft.com/WMIConfig/2002/State"
xmlns:xsi="http://www.w3.org/2001/XMLSchema-instance">
<InputLocale>en-US</InputLocale>
<SystemLocale>en-US</SystemLocale>
<UILanguage>en-US</UILanguage>
<UserLocale>en-US</UserLocale>
</component>
<component name="Microsoft-Windows-Shell-Setup"
processorArchitecture="amd64" publicKeyToken="31bf3856ad364e35" language="neutral"
versionScope="nonSxS"
xmlns:wcm="http://schemas.microsoft.com/WMIConfig/2002/State"
xmlns:xsi="http://www.w3.org/2001/XMLSchema-instance">
<FirstLogonCommands>
<SynchronousCommand wcm:action="add">
<Order>1</Order>
<CommandLine>bcdedit /emssettings BIOS</CommandLine>
Password of OS registered to WDS After an answer file is registered, the password is encrypted and shown as
<PlainTest>false<PlainText>.
Prevent the language setting UI from appearing after the OS is started from the Disk.
Computer name specified for the device on which to install the OS
(2)
(2)
(2)

2. Building a WDS Server
Scalable Modular Server DX2000 Installation Guide (Windows) 39
Chapter 1 Installing Windows
</SynchronousCommand>
<SynchronousCommand wcm:action="add">
<Order>2</Order>
<CommandLine>bcdedit /ems ON</CommandLine>
</SynchronousCommand>
<SynchronousCommand wcm:action="add">
<Order>3</Order>
<CommandLine>netsh advfirewall firewall set rule group="
File and Printer Sharing " new enable=yes</CommandLine>
</SynchronousCommand>
<SynchronousCommand wcm:action="add">
<Order>4</Order>
<CommandLine>netsh advfirewall firewall set rule group="
Remote Desktop " new enable=yes</CommandLine>
</SynchronousCommand>
<SynchronousCommand wcm:action="add">
<Order>5</Order>
<CommandLine>shutdown /L</CommandLine>
</SynchronousCommand>
</FirstLogonCommands>
<OOBE>
<HideEULAPage>true</HideEULAPage>
</OOBE>
<UserAccounts>
<AdministratorPassword>
<Value>xxxxxxxx</Value>
<PlainText>false</PlainText>
</AdministratorPassword>
</UserAccounts>
</component>
</settings>
<cpi:offlineImage
cpi:source="wim:c:/users/administrator/downloads/wds/install.wim#Windows Server
2012 R2 SERVERSTANDARD" xmlns:cpi="urn:schemas-microsoft-com:cpi" />
</unattend>
Enable EMS
*1 Firewall setting for enabling reception of ping
*1 Firewall setting for enabling RDP
Prevent the license agreement UI from appearing after the OS is started from the Disk.
Set the password of the installed OS After an answer file is registered, the password is encrypted and shown as
<PlainTest>false<PlainText>.
(2)
(2)

2. Building a WDS Server
Scalable Modular Server DX2000 Installation Guide (Windows) 40
Chapter 1 Installing Windows
Important A rule for reception over firewall is changed at *1 in Example of an answer file for
unattended installation. The value of the parameter "group" to be passed to the
netsh command must be specified according to the language of the OS.
Specify an appropriate value for "group" according to the table below.
English File and Printer Sharing Remote Desktop
German Datei- und Druckerfreigabe Remotedesktop
French Partage de fichiers et d’imprimantes
(*2)
Bureau à distance
Italian Condivisione file e stampanti Desktop remoto
Spanish Compartir archivos e impresoras Escritorio remoto
Chinese
(simplified)
檔案及印表機共用 遠端桌面
Chinese
(traditional)
文件和打印机共享 远程桌面
Japanese ファイルとプリンターの共有 リモート デスクトップ
Specify the value appropriately, including blank character.
*2 The special character accent (’) used in French differs from a single quotation (‘). If a
character not specified in this manual is input, File and Printer Sharing cannot be
configured. As a result, the device on which the OS is installed is not displayed on the
Network screen on the WDS server, and thus you cannot access the remote desk top
from that screen. In this case, to access the device on which French Windows OS is
installed by using the client IP address that is leased in the scope for 10GNIC via the
remote desk top. For the client IP address to be accessed, the name of the computer
on which the OS is installed (DX2000-Sample, for example) must be displayed in the
Name box.
After login, enable File and Printer Sharing for the firewall. The device can then be
accessed via the remote desktop from the Network screen on the WDS server.

2. Building a WDS Server
Scalable Modular Server DX2000 Installation Guide (Windows) 41
Chapter 1 Installing Windows
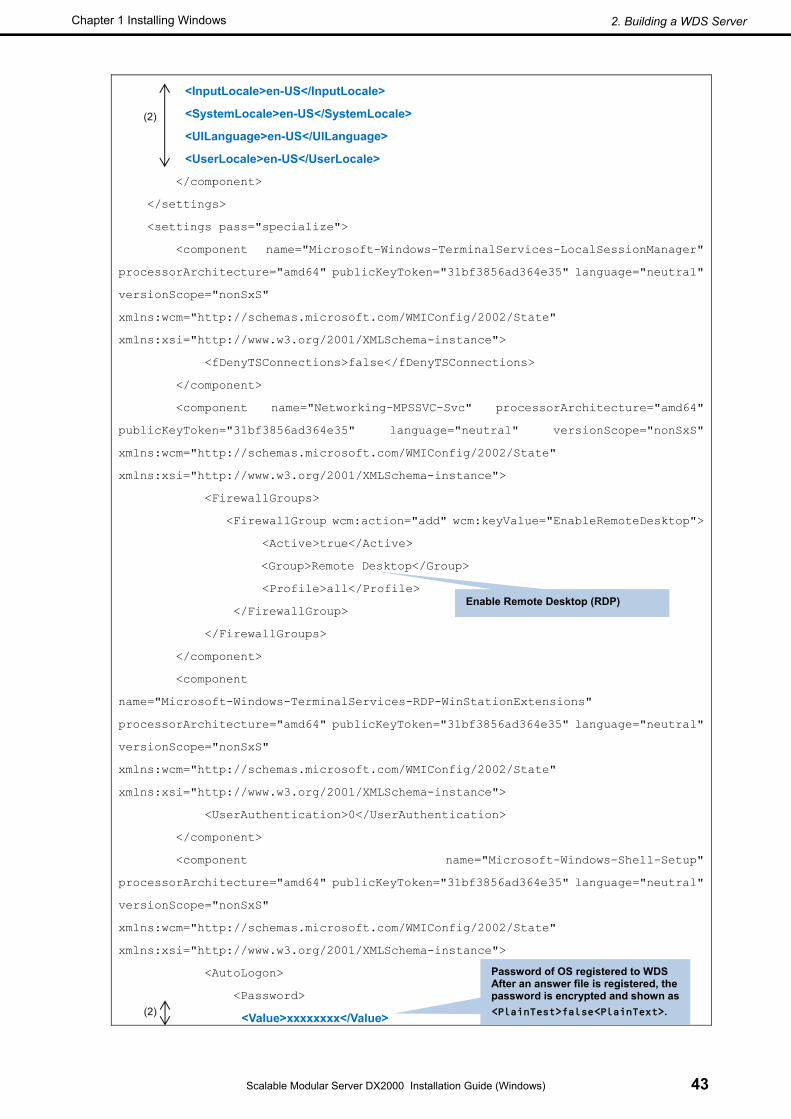
(2) Sample for Legacy
Red (1): Items that depend on the operating environment
Blue (2): Items that need to be modified according to the OS and its settings
<?xml version="1.0" encoding="utf-8"?>
<unattend xmlns="urn:schemas-microsoft-com:unattend">
<settings pass="windowsPE">
<component name="Microsoft-Windows-Setup" processorArchitecture="amd64"
publicKeyToken="31bf3856ad364e35" language="neutral" versionScope="nonSxS"
xmlns:wcm="http://schemas.microsoft.com/WMIConfig/2002/State"
xmlns:xsi="http://www.w3.org/2001/XMLSchema-instance">
<DiskConfiguration>
<Disk wcm:action="add">
<CreatePartitions>
<CreatePartition wcm:action="add">
<Order>1</Order>
<Size>350</Size>
<Type>Primary</Type>
</CreatePartition>
<CreatePartition wcm:action="add">
<Order>2</Order>
<Size>30000</Size>
<Type>Primary</Type>
</CreatePartition>
</CreatePartitions>
<ModifyPartitions>
<ModifyPartition wcm:action="add">
<Order>1</Order>
<PartitionID>1</PartitionID>
<Format>NTFS</Format>
<Label>System</Label>
<Active>true</Active>
</ModifyPartition>
<ModifyPartition wcm:action="add">
<Order>2</Order>
<PartitionID>2</PartitionID>
<Format>NTFS</Format>
<Label>Windows</Label>
</ModifyPartition>
</ModifyPartitions>
<DiskID>0</DiskID>
<WillWipeDisk>true</WillWipeDisk>
Create a disk partition
(1)

2. Building a WDS Server
Scalable Modular Server DX2000 Installation Guide (Windows) 42
Chapter 1 Installing Windows
</Disk>
<WillShowUI>OnError</WillShowUI>
</DiskConfiguration>
<ImageInstall>
<OSImage>
<InstallTo>
<DiskID>0</DiskID>
<PartitionID>2</PartitionID>
</InstallTo>
</OSImage>
</ImageInstall>
<WindowsDeploymentServices>
<Login>
<Credentials>
<Domain>WIN-XXXXXXXXXXXX</Domain>
<Password>XXXXXXXXXX</Password>
<Username>Administrator</Username>
</Credentials>
</Login>
<ImageSelection>
<InstallImage>
<Filename>install.wim</Filename>
<ImageGroup>ImageGroup1</ImageGroup>
<ImageName>Windows Server 2012 R2 SERVERSTANDARD</ImageName>
</InstallImage>
<InstallTo>
<DiskID>0</DiskID>
<PartitionID>2</PartitionID>
</InstallTo>
</ImageSelection>
</WindowsDeploymentServices>
<EnableNetwork>true</EnableNetwork>
</component>
<component name="Microsoft-Windows-International-Core-WinPE"
processorArchitecture="amd64" publicKeyToken="31bf3856ad364e35" language="neutral"
versionScope="nonSxS"
xmlns:wcm="http://schemas.microsoft.com/WMIConfig/2002/State"
xmlns:xsi="http://www.w3.org/2001/XMLSchema-instance">
<SetupUILanguage>
<UILanguage>en-US</UILanguage>
<WillShowUI>OnError</WillShowUI>
</SetupUILanguage>
Where to install the OS
Information of WDS server account <Domain>: WDS server's computer name <Password>: Password <Username>: Account name
Where to install the OS
Information of installation image added to WDS server Note items such as the file name that can be checked on the Windows Deployment Services screen
Language of the OS to be installed
(1)
(2)
(2)
(1)
(2)
(1)
2. Building a WDS Server
Scalable Modular Server DX2000 Installation Guide (Windows) 43
Chapter 1 Installing Windows
<InputLocale>en-US</InputLocale>
<SystemLocale>en-US</SystemLocale>
<UILanguage>en-US</UILanguage>
<UserLocale>en-US</UserLocale>
</component>
</settings>
<settings pass="specialize">
<component name="Microsoft-Windows-TerminalServices-LocalSessionManager"
processorArchitecture="amd64" publicKeyToken="31bf3856ad364e35" language="neutral"
versionScope="nonSxS"
xmlns:wcm="http://schemas.microsoft.com/WMIConfig/2002/State"
xmlns:xsi="http://www.w3.org/2001/XMLSchema-instance">
<fDenyTSConnections>false</fDenyTSConnections>
</component>
<component name="Networking-MPSSVC-Svc" processorArchitecture="amd64"
publicKeyToken="31bf3856ad364e35" language="neutral" versionScope="nonSxS"
xmlns:wcm="http://schemas.microsoft.com/WMIConfig/2002/State"
xmlns:xsi="http://www.w3.org/2001/XMLSchema-instance">
<FirewallGroups>
<FirewallGroup wcm:action="add" wcm:keyValue="EnableRemoteDesktop">
<Active>true</Active>
<Group>Remote Desktop</Group>
<Profile>all</Profile>
</FirewallGroup>
</FirewallGroups>
</component>
<component
name="Microsoft-Windows-TerminalServices-RDP-WinStationExtensions"
processorArchitecture="amd64" publicKeyToken="31bf3856ad364e35" language="neutral"
versionScope="nonSxS"
xmlns:wcm="http://schemas.microsoft.com/WMIConfig/2002/State"
xmlns:xsi="http://www.w3.org/2001/XMLSchema-instance">
<UserAuthentication>0</UserAuthentication>
</component>
<component name="Microsoft-Windows-Shell-Setup"
processorArchitecture="amd64" publicKeyToken="31bf3856ad364e35" language="neutral"
versionScope="nonSxS"
xmlns:wcm="http://schemas.microsoft.com/WMIConfig/2002/State"
xmlns:xsi="http://www.w3.org/2001/XMLSchema-instance">
<AutoLogon>
<Password>
<Value>xxxxxxxx</Value>
Password of OS registered to WDS After an answer file is registered, the password is encrypted and shown as
<PlainTest>false<PlainText>.
Enable Remote Desktop (RDP)
(2)
(2)

2. Building a WDS Server
Scalable Modular Server DX2000 Installation Guide (Windows) 44
Chapter 1 Installing Windows
<PlainText>false</PlainText>
</Password>
<Enabled>true</Enabled>
<LogonCount>2</LogonCount>
<Username>Administrator</Username>
</AutoLogon>
<ProductKey>XXXXX-XXXXX-XXXXXX-XXXXX-XXXXX</ProductKey>
<ComputerName>WDSClient</ComputerName>
</component>
</settings>
<settings pass="oobeSystem">
<component name="Microsoft-Windows-International-Core"
processorArchitecture="amd64" publicKeyToken="31bf3856ad364e35" language="neutral"
versionScope="nonSxS"
xmlns:wcm="http://schemas.microsoft.com/WMIConfig/2002/State"
xmlns:xsi="http://www.w3.org/2001/XMLSchema-instance">
<InputLocale>en-US</InputLocale>
<SystemLocale>en-US</SystemLocale>
<UILanguage>en-US</UILanguage>
<UserLocale>en-US</UserLocale>
</component>
<component name="Microsoft-Windows-Shell-Setup"
processorArchitecture="amd64" publicKeyToken="31bf3856ad364e35" language="neutral"
versionScope="nonSxS"
xmlns:wcm="http://schemas.microsoft.com/WMIConfig/2002/State"
xmlns:xsi="http://www.w3.org/2001/XMLSchema-instance">
<FirstLogonCommands>
<SynchronousCommand wcm:action="add">
<Order>1</Order>
<CommandLine>bcdedit /emssettings BIOS</CommandLine>
</SynchronousCommand>
<SynchronousCommand wcm:action="add">
<Order>2</Order>
<CommandLine>bcdedit /ems ON</CommandLine>
</SynchronousCommand>
<SynchronousCommand wcm:action="add">
<Order>3</Order>
<CommandLine>netsh advfirewall firewall set rule group="
File and Printer Sharing " new enable=yes</CommandLine>
</SynchronousCommand>
<SynchronousCommand wcm:action="add">
<Order>4</Order>
Prevent the language setting UI from appearing after the OS is started from the Disk.
Enable EMS
*1 Firewall setting for enabling reception of ping
Computer name specified for the device on which to install the OS
(2)
(2)

2. Building a WDS Server
Scalable Modular Server DX2000 Installation Guide (Windows) 45
Chapter 1 Installing Windows
<CommandLine>netsh advfirewall firewall set rule group=" Remote
Desktop " new enable=yes</CommandLine>
</SynchronousCommand>
<SynchronousCommand wcm:action="add">
<Order>5</Order>
<CommandLine>shutdown /L</CommandLine>
</SynchronousCommand>
</FirstLogonCommands>
<OOBE>
<HideEULAPage>true</HideEULAPage>
</OOBE>
<UserAccounts>
<AdministratorPassword>
<Value>xxxxxxxx</Value>
<PlainText>false</PlainText>
</AdministratorPassword>
</UserAccounts>
</component>
</settings>
<cpi:offlineImage
cpi:source="wim:c:/users/administrator/downloads/wds/install.wim#Windows Server
2012 R2 SERVERSTANDARD" xmlns:cpi="urn:schemas-microsoft-com:cpi" />
</unattend>
Important A rule for reception over firewall is changed at *1 in Example of an answer file for
unattended installation. The value of the parameter "group" to be passed to the
netsh command must be specified according to the language of the OS.
Specify an appropriate value for "group" according to the table below.
English File and Printer Sharing Remote Desktop
German Datei- und Druckerfreigabe Remotedesktop
French Partage de fichiers et d’imprimantes
(*2)
Bureau à distance
Italian Condivisione file e stampanti Desktop remoto
Spanish Compartir archivos e impresoras Escritorio remoto
Chinese
(simplified)
檔案及印表機共用 遠端桌面
Chinese
(traditional)
文件和打印机共享 远程桌面
Japanese ファイルとプリンターの共有 リモート デスクトップ
Specify the value appropriately, including blank character.
*2 The special character accent (’) used in French differs from a single quotation (‘). If a
character not specified in this manual is input, File and Printer Sharing cannot be
configured. As a result, the device on which the OS is installed is not displayed on the
Network screen on the WDS server, and thus you cannot access the remote desk top
*1 Firewall setting for enabling RDP
Prevent the license agreement UI from appearing after the OS is started from the Disk.
Set the password of the installed OS After an answer file is registered, the password is encrypted and shown as
<PlainTest>false<PlainText>.
(2)
(2)

2. Building a WDS Server
Scalable Modular Server DX2000 Installation Guide (Windows) 46
Chapter 1 Installing Windows
from that screen. In this case, to access the device on which French Windows OS is
installed by using the client IP address that is leased in the scope for 10GNIC via the
remote desk top. For the client IP address to be accessed, the name of the computer
on which the OS is installed (DX2000-Sample, for example) must be displayed in the
Name box.
After login, enable File and Printer Sharing for the firewall. The device can then be
accessed via the remote desktop from the Network screen on the WDS server.
2.5 Installing IPMI Management Utilities
IPMI Management Utilities (IPMIUtil) is used for controlling IPMI-compatible devices.
By using IPMIUtil, the power on/off status of the device and the BIOS screen can be viewed.
I/O devices such as displays, keyboards, and mouse devices cannot be connected to this micro server.
Open the Command Prompt on the WDS server, start IPMIUtil to configure the BIOS settings on the device on
which the OS is installed, and then change the boot priority setting to boot the device by using PXE.
Installing IPMIUtil 2.5.1
1. On the IPMIUtil website (http://ipmiutil.sourceforge.net/), download the latest file.
Example ipmiutil-2.9.6-win64.zip.
2. Unzip the downloaded on the WDS server.
Example C:\Program Files(x86)\sourceforge\ipmiutil

2. Building a WDS Server
Scalable Modular Server DX2000 Installation Guide (Windows) 47
Chapter 1 Installing Windows
2.6 Other Settings
Specify the following settings on the WDS server.
Enabling services related to remote desktop 2.6.1
To display the name of the computer on which to install the OS on the Network screen on the WDS server,
change the settings of the services that run on the WDS server.
After changing the settings, you can access the computer from the Network screen on the WDS server by using
remote desktop.
1. On Control Panel, click System and Security, Administrative Tools, and then Services.
2. Right-click Computer Browser, and then click Properties.
2. Building a WDS Server
Scalable Modular Server DX2000 Installation Guide (Windows) 48
Chapter 1 Installing Windows
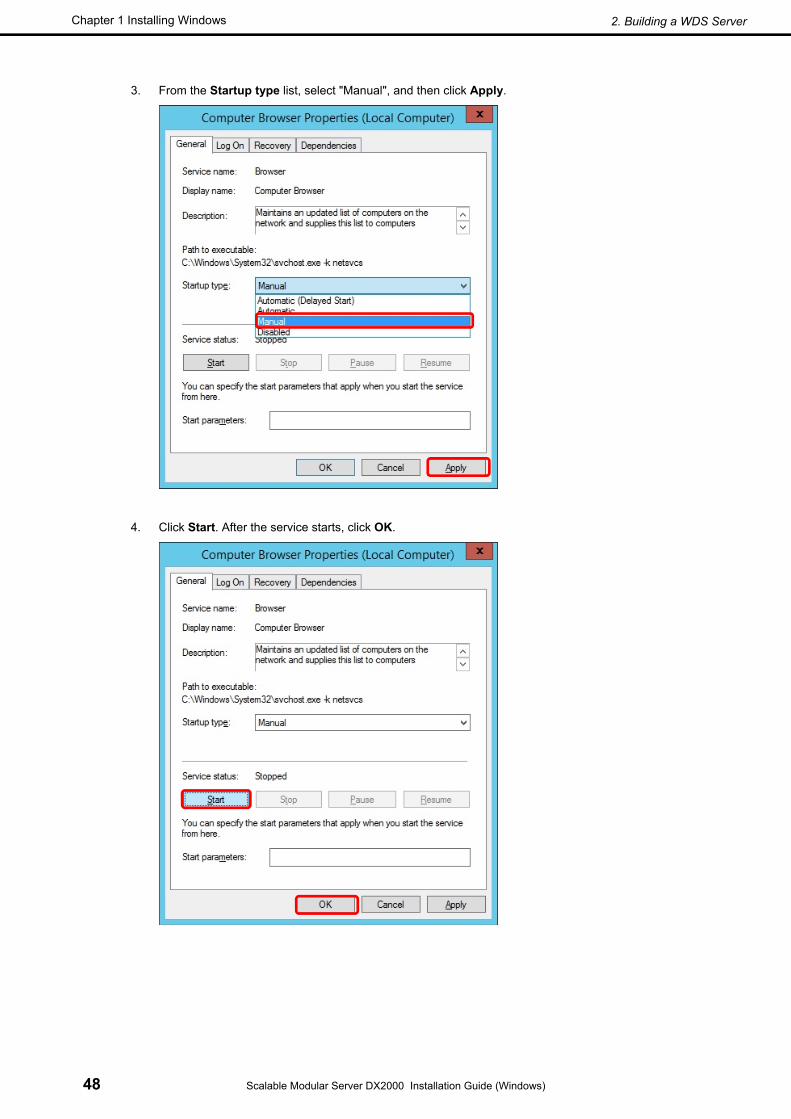
3. From the Startup type list, select "Manual", and then click Apply.
4. Click Start. After the service starts, click OK.

2. Building a WDS Server
Scalable Modular Server DX2000 Installation Guide (Windows) 49
Chapter 1 Installing Windows
5. Right-click Function Discovery Provider Host, and then click Properties.
6. From the Startup type list, select "Manual", and then click OK.
7. Right-click Function Discovery Resource Publication, and then click Properties.
8. From the Startup type list, select "Manual", and then click OK.

2. Building a WDS Server
Scalable Modular Server DX2000 Installation Guide (Windows) 50
Chapter 1 Installing Windows
9. Right-click SSDP Discovery, and then click Properties.
10. From the Startup type list, select "Manual", and then click Apply.
11. Click Start. After the service starts, click OK.

2. Building a WDS Server
Scalable Modular Server DX2000 Installation Guide (Windows) 51
Chapter 1 Installing Windows
12. Right-click UPnP Device Host, and then click Properties.
13. From the Startup type list, select "Manual", and then click OK.
Enabling the client logging functionality 2.6.2
To enable the client logging functionality, start Windows Deployment Services on the WDS server.
1. Execute the Command Prompt as an administrator, and then input the following to enable the client
logging functionality of Windows Deployment Services.
WDSUTIL /Set-Server /WDSClientLogging /Enabled:Yes
2. Input the following to determine the event for which the client log is output by Windows Deployment
Services.
WDSUTIL /Set-Server /WDSClientLogging /LoggingLevel:{None|Errors|Warnings|Info}
Tips If "None" is specified for LoggingLevel, the client logging functionality is disabled.
If "Errors" is specified, only the events that caused an error are logged.
If "Warnings" is specified, the events that caused warnings and errors are logged.
If "Info" is specified, the events that caused Info, warnings, and errors are logged.

3. Preparing a Device on Which to Install the OS
Scalable Modular Server DX2000 Installation Guide (Windows) 52
Chapter 1 Installing Windows
3. Preparing a Device on Which to Install the OS
3.1 Preparing Network Boot
Important IPMIUtil must be installed on the WDS server before starting preparation. If IPMIUtil
has not been installed, see Chapter 1, 2.5 Installing IPMI Management Utilities and
install it.
1. Check MAC address of server module with "MAC address Table".
Please refer to "MAC address Table" which is attached with DX2000 to check with MAC address.
Another confirmation tool is " niclist" management utility, which is stocked in attachment
CD medium "DX2000 Utility Disk". Please similarly refer to "DX2000 maintenance guide" in the
attachment CD medium for use directions.
2. Connect two LAN cables to a switch.
WDS server: Connect the NIC and a switch by using LAN cables
Device on which to install the OS: Connect the NIC (BMC) and a switch by using LAN cables
Tips If the device on which to install the OS has two switch boards, connect the NIC closer to the
power supply by using a LAN cable.
3. Connect a 40G-10G branch cable to the WDS server (10NIC) and the device on which to install the
OS (40GNIC).
Tips The form of the 40G-10G branch cable terminal differs between the 40G side and 10G side.
Check the form of the port before connecting the cable.

3. Preparing a Device on Which to Install the OS
Scalable Modular Server DX2000 Installation Guide (Windows) 53
Chapter 1 Installing Windows
4. Connect a power cable to the device on which to install the OS.
5. Start the DHCP server on the Server Manager screen on the WDS server.
6. On the Server Manager screen, check the IP address assigned by DHCP based on the MAC
address of the server module you checked in step 1.
7. Open two Command Prompt windows as an administrator.
Tips Use the first Command Prompt window for operation.
Use the second Command Prompt window for displaying the BIOS screen.
8. Type as follows in the Command Prompt window for operation.
Move to the folder to which IPMIUtil was extracted in Chapter 1, 2.5 Installing IPMI Management
Utilities.
9. Use the discover command in the Command Prompt window for operation to check whether the
server module is detected as an IPMI device.
Format:
ipmiutil discover –b <detected start IP address> –e <detected end IP address>
>cd "full path for the folder in which IPMIUtil was extracted"
>ipmiutil discover -b 192.168.0.100 -e 192.168.0.110
ipmiutil ver 2.96
idiscover ver 1.9
Discovering IPMI Devices:
01| response from | 192.168.0.101 |
02| response from | 192.168.0.103 |
..................
idiscover: 11 pings sent, 2 responses
ipmiutil discover, completed successfully

3. Preparing a Device on Which to Install the OS
Scalable Modular Server DX2000 Installation Guide (Windows) 54
Chapter 1 Installing Windows
10. Use the health command in the Command Prompt window for operation to check the status of the
server module (chassis_power).
Format: ipmiutil health -N <target IP address> –U Administrator -P
Administrator -J 3 -V 4
11. Run the sol command in the Command Prompt window for displaying BIOS to start Serial over LAN
(SOL).
Format: ipmiutil sol -a -N <target IP address> -U Administrator -P Administrator
-J 3 -V 4
Tips To stop Serial over LAN (SOL), type "~.” by using the keyboard.
>ipmiutil health -N 192.168.0.101 -U Administrator -P Administrator -J 3 -V 4
ipmiutil ver 2.96
ihealth ver 2.96
Opening lanplus connection to node 192.168.0.101 ...
Connected to node 192.168.0.101
BMC manufacturer = 000077 (NEC), product = 06ed
BMC version = 0.03, IPMI v2.0
IPMI driver type = 9 (lan2)
Power State = 05 (S5: soft off)
Selftest status = 0055 (OK)
Chassis Status = 20 01 40 70 (off, see below)
chassis_power = off
pwr_restore_policy = last_state
last_power_event = ACfailed
chassis_intrusion = inactive
front_panel_lockout = inactive
drive_fault = false
cooling_fan_fault = false
FP diag_button_disable = allowed, button enabled
FP reset_button_disable = allowed, button enabled
FP power_button_disable = allowed, button enabled
Power On Hours = 48 hours (2 days)
BMC LAN Channels = 2
Chan 2 AuthTypes = None MD2 MD5 Straight_Passwd OEM
ipmiutil health, completed successfully
>ipmiutil sol -a -N 192.168.0.101 -U Administrator -P Administrator -J 3 -V 4
ipmiutil ver 2.96
isol ver 2.96
Opening lanplus connection to node 192.168.0.101 ...
Connected to node 192.168.0.101
-- BMC version 0.03, IPMI version 2.0
[SOL session is running, use '~.' to end, '~?' for help.]

3. Preparing a Device on Which to Install the OS
Scalable Modular Server DX2000 Installation Guide (Windows) 55
Chapter 1 Installing Windows
12. Run the reset command in the Command Prompt window for operation and turn on the server module.
The command to run differs depending on the status of chassis_power checked in step 10.
Important Be sure to specify appropriate parameters for the reset command.
If you specify a wrong one, the WDS server might stop or restart.
If chassis_power is "off"
Turn on the server module by running the following command:
Format: ipmiutil reset -u -N <target IP address> -U Administrator -P
Administrator -J 3 -V 4
If chassis_power is "on"
Restart the server module by running the following command:
Format: ipmiutil reset –c –N <target IP address> -U Administrator -P
Administrator -J 3 -V 4
>ipmiutil reset -u -N 192.168.0.101 -U Administrator -P Administrator -J 3 -V
4
ipmiutil ver 2.96
ireset ver 2.96
Opening lanplus connection to node 192.168.0.101 ...
Connected to node 192.168.0.101
-- BMC version 0.3, IPMI version 2.0
Power State = 05 (S5: soft off)
ireset: powering up ...
chassis_reset ok
ireset: IPMI_Reset ok
ipmiutil reset, completed successfully
>ipmiutil reset -c -N 192.168.0.101 -U Administrator -P Administrator -J 3 -V
4
ipmiutil ver 2.96
ireset ver 2.96
Opening lanplus connection to node 192.168.0.101 ...
Connected to node 192.168.0.101
-- BMC version 0.3, IPMI version 2.0
Power State = 00 (S0: working)
ireset: power cycling ...
chassis_reset ok
ireset: IPMI_Reset ok
ipmiutil reset, completed successfully

3. Preparing a Device on Which to Install the OS
Scalable Modular Server DX2000 Installation Guide (Windows) 56
Chapter 1 Installing Windows
13. About two minutes after running the command in step 12, the POST screen is displayed in the
Command Prompt window for displaying BIOS. Press the <F2> key.
14. Either of the following is displayed.
□ When the BIOS window is displayed, go to step 17.
□ When an error message is displayed, go to step 15.
15. An error message is displayed after the POST screen ends. Click Close the program.
16. Run the sol command in the Command Prompt window for displaying BIOS to close SOL.
Format: ipmiutil SOL –d –N <target IP address> -U Administrator -P Administrator
-J 3 -V 4
1 Processor(s) Detected, Core(s) per Processor = 4
Genuine Intel(R) CPU @ 1.90GHz
8x256 KB L2 Cache, 12288 KB L3 Cache
16384 MB System RAM Passed
IPMI Base Board Management Controller was detected.
Device ID : 8C Device Revision : 01
IPMI Version : 2.0 Firmware Revision : 00.03
Self Test Result : 5500
Press <F2> SETUP, <F12> Network
>ipmiutil sol -d -N 192.168.0.102 -U Administrator -P Administrator -J 3 -V
4
ipmiutil ver 2.96
isol ver 2.96
Opening lanplus connection to node 192.168.0.102 ...
Connected to node 192.168.0.102
-- BMC version 0.03, IPMI version 2.0
ipmiutil sol, completed successfully

3. Preparing a Device on Which to Install the OS
Scalable Modular Server DX2000 Installation Guide (Windows) 57
Chapter 1 Installing Windows
17. Click the Boot tab on the BIOS window. Press the <Enter> key.
18. Select Boot Mode, and then press the <Enter> key.
19. Check the setting of Boot Option#1.
Select Network, and then press the <Enter> key.
If Network is not set, select Boot Option#1, and then press the <Enter> key.

3. Preparing a Device on Which to Install the OS
Scalable Modular Server DX2000 Installation Guide (Windows) 58
Chapter 1 Installing Windows
20. Select Network, and then press the <Enter> key.
21. Move to the Save & Exit tab. Select Save Change & Exit, and then press the <Enter> key.
22. When Save & Exit Setup is displayed, select Yes, and then press the <Enter> key.

3. Preparing a Device on Which to Install the OS
Scalable Modular Server DX2000 Installation Guide (Windows) 59
Chapter 1 Installing Windows
23. After the server module is restarted, start the micro server by using PXE.
Continue installation by referring to Chapter 1, 4. Installing the OS from the WDS Server.

4. Installing the OS from the WDS Server
Scalable Modular Server DX2000 Installation Guide (Windows) 60
Chapter 1 Installing Windows
4. Installing the OS from the WDS Server
This section describes how to install the OS from the WDS server.
4.1 Preparations Before Installing the OS
Note Complete the procedure shown in Chapter 1, 3.1 Preparing network boot in advance.
1. The status of the device on which to install the OS is "Pending", which means that the device is waiting
for approval to continue booting by using PXE.
Right-click the device whose status is "Pending", and then click Name and Approve.
The Approve Pending Device Wizard screen is displayed.
2. To identify the device on which to install the OS, type the device name in the Device Name box, and
then click Next. Leave the selected option button Create the device in the default OU as is.
Tips The device name is an important key used when re-installing the OS. We recommend that
you specify a name easy to identify as much as possible.

4. Installing the OS from the WDS Server
Scalable Modular Server DX2000 Installation Guide (Windows) 61
Chapter 1 Installing Windows
3. Click Select to the right of the Boot Image box.
4. On the Select Default Boot Image screen, select the boot image added from the OS installation
media, and then click OK.

4. Installing the OS from the WDS Server
Scalable Modular Server DX2000 Installation Guide (Windows) 62
Chapter 1 Installing Windows
5. Make sure that the appropriate boot image is selected, and then click Next.
6. In the Unattend File box, type the unattend file name directly, and then click Next.
Important Be sure to type the unattended installation file name (including extension) starting
from WdsClientUnattend\ as shown in the above screen. Do not use the Browse
and Create New.

4. Installing the OS from the WDS Server
Scalable Modular Server DX2000 Installation Guide (Windows) 63
Chapter 1 Installing Windows
7. Leave the default settings as is and click Finish.
8. Click OK.
9. When the pending device is approved, the status shown in the Status column under Pending
Devices indicates "Approved".
The approved device is added to Prestaged Devices.
Tips If Pending Devices and Prestaged Devices are not displayed, click Refresh, and then
check that these items are displayed.
10. After the device is approved, starting of the device by using PXE continues and the installation of the
OS starts.

4. Installing the OS from the WDS Server
Scalable Modular Server DX2000 Installation Guide (Windows) 64
Chapter 1 Installing Windows
4.2 Installation and Operation After Installation Finishes
No action on your part is required during installation of the Windows OS.
About 30 minutes later, on the Network screen on the WDS server, the name of the device on which to install the
OS is displayed. You can now access the device by using remote desktop.
Access the device on which to install the OS by using remote desktop, according to the following procedure.
1. Open File Explorer on the WDS server, and then click Network.
2. Right-click the device on which to install the OS, and then click Connect with Remote Desktop
Connection.

4. Installing the OS from the WDS Server
Scalable Modular Server DX2000 Installation Guide (Windows) 65
Chapter 1 Installing Windows
3. Type "Administrator" as the user name and the password you specified for the answer file for
unattended installation, and then click OK.
If you want to skip entries on this screen, select the Remember my credentials check box.
Tips If you installed the OS in French or Spanish, you cannot log in to the computer by typing
"Administrator". Type the user name as follows:
For French: "Administrateur"
For Spanish: "Administrador"
4. If the message "The identity of the remote computer cannot be verified. Do you want to connect
anyway?" is displayed, click Yes. If you want to skip this step at the next login, select the Don’t ask
me again for connections to this computer check box.

4. Installing the OS from the WDS Server
Scalable Modular Server DX2000 Installation Guide (Windows) 66
Chapter 1 Installing Windows
Important If the message "Network discovery is turned off. Network Computers and devices are
not visible. Click to change…" is displayed on the Network screen on the WDS
server, run "Turn on network discovery and file sharing" according to the procedure
below.
The name of the device on which to install the OS will then be displayed on the
Network screen on the WDS server.
1. Click the items as instructed on the screen, and click "Turn on network discovery
and file sharing" on the displayed commands.
2. Click "Yes, turn on network discovery and sharing for all public networks".
5. After connection to the device on which to install the OS by using remote desktop is established,
configure the settings required in the environment used and take appropriate actions.
Tips After the OS is installed, disabling Scalable Networking Pack (SNP) is recommended,
because the setting of SNP might affect the system performance.
If you are using Wake On Lan(WOL), please follow the procedure below to change the
settings.
1. Open [Device Manager].
2. Expand [Network adapters] tree, and double-click the target network adapter
to open its Properties.
Example: IntelR Ethernet Connection I354 2.5 GbE Backplane
3. Select the [Advanced] tab, and specify "Enabled" for [Enable PME].
4. Click [OK] to restart the system.
5. Installing the RAS driver
Scalable Modular Server DX2000 Installation Guide (Windows) 67
Chapter 1 Installing Windows
5. Installing the RAS driver
After the operating system is installed, install the RAS driver by the following steps.
Tips When installing the RAS driver, connect to the server module via remote KVM.
Enable the remote drive setting.
(1) PSHED plug-in
1. Mount the media that comes with the DX2000 (DX2000 Utility Disk) on the remote drive.
2. Copy necpspi.zip under the media to a folder, and extract it.
Example: D:\drivers\win\rasdrv\ necpspi.zip
3. Right-click the Start menu, and select Command Prompt (Admin) to start the command prompt
with administrative permissions.
4. Change the current directory of the command prompt to the folder in which the zip file has been
extracted.
5. Enter the following command to install the PSHED plug-in.
dpst_x64.exe –q <Enter>
6. Check that the PSHED plug-in has been installed successfully by the following steps.
Check that "NEC PSHED Plug-In" exists under System devices in Control Panel -> Device
Manager.
Select and right-click "NEC PSHED Plug-In" to display Properties. Check that the device is in
normal state.
Check that the version is "6.1.5.25"
(2) WDT driver
After that, install the WDT driver.
1. Copy necras.zip under the media to a folder, and extract it.
Example: D:\drivers\win\rasdrv\necras.zip
2. Right-click the Start menu, and select Command Prompt (Admin) to start the command prompt
with administrative permissions.
3. Change the current directory of the command prompt to the folder in which the zip file has been
extracted.
4. Enter the following command to install the PSHED plug-in.
dpst_x64.exe –q <Enter>
5. Check that the WDT driver has been installed successfully by the following steps.
Check that "NEC System Management Controller" exists under System devices in Control
Panel -> Device Manager..
Select and right-click "NEC System Management Controller" to display Properties. Check that
the device is in normal state.
Check that the version is "6.1.3.35".

6. Setup of Windows Server 2012 R2 NIC Teaming (LBFO)
Scalable Modular Server DX2000 Installation Guide (Windows) 68
Chapter 1 Installing Windows
6. Setup of Windows Server 2012 R2 NIC Teaming (LBFO)
Set up the network adapter teaming feature as shown below.
6.1 Launching the NIC teaming setup tool
1. Launch Server Manager.
2. Select Local Server.
3. In the Properties window, click Enable or Disable for NIC teaming.
NIC The NIC teaming setup tool will launch.
Tips The NIC teaming setup tool can also be launched by opening the Run dialog box, typing lbfoadmin, and then pressing the <Enter> key.
6.2 Creating a team
Create a team by using the NIC teaming setup tool.
1. In the Servers section, select the name of the server to set up.
If there is only one server connected, the name of the server is selected automatically.
2. In the Teams section, select New Team under Tasks.
3. Type the name of the team to create, and then select the network adapter to include in the team from
the Member adapters list.
4. Click Additional properties.
5. Specify the required settings, and then click OK.
Teaming mode
Static Teaming * Configures static aggregation between the NIC and switches.
Switch Independent Configures teaming on the NIC side without depending on the switch settings.
LACP * Configures dynamic aggregation between the NIC and switches.
* DX2000 is not supported.
Load balancing mode
Address Hash Distributes the load based on IP addresses and port numbers.
Hyper-V Port Distributes the load to each of the virtual switch ports used by the virtual machines.
Dynamic Distributes the load based on IP addresses and port numbers in sending.
Distributes the load same to "Hyper-V Port" in receiving.

6. Setup of Windows Server 2012 R2 NIC Teaming (LBFO)
Scalable Modular Server DX2000 Installation Guide (Windows) 69
Chapter 1 Installing Windows
Standby adapter
Select one adapter to be set to standby mode from the adapters in the team.
Setting all adapters to active mode is also possible.
Primary team interface
Any VLAN ID can be specified for the primary team interface.
6.3 Notes and restrictions
NIC teaming on a guest OS is not supported.
Teaming of virtual NICs on the host OS is not supported in the Hyper-V environment.
When STP (Spanning Tree Protocol) is enabled on network switch ports to which network adapters of the
team are connected, network communications may be disrupted. Disable STP, or configure "PortFast" or
"EdgePort" to the ports.
* About setting the network switch of the connection destination, see the manual of the network switch.
All NICs in the team must be connected to the same subnet.

7. Logs Related to OS Installation
Scalable Modular Server DX2000 Installation Guide (Windows) 70
Chapter 1 Installing Windows
7. Logs Related to OS Installation
Check the logs related to OS installation according to the following procedure.
1. On the Server Manager screen, click Tools, and then Computer Management to open the computer
management screen.
2. Click Event Viewer.
3. Click Applications and Services Logs, Microsoft, Windows, and then
Deployment-Services-Diagnostics.
4. To check the operation performed during installation, click Operational.
The table below shows the representative events in order of occurrence. Use this information for your reference
to know the progress status of OS installation from the WDS server.
In this table, "ClientDeviceID" corresponds to the device ID shown in Pending Devices on the Windows
Deployment Services screen.
Event ID Message Description
4102 The following WDS Client has started: Displayed when setup of Windows OS starts.
4131 The following WDS Client has selected
Image:
Displayed when the edition of the installed
Windows OS or an installation image is
selected according to the language during
setup.
4108 The following WDS Client has started
Image Apply:
Displayed when copying files for installation of
Windows OS starts.
4109 The following WDS Client has ended Image
Apply:
Displayed when copying files for installation of
Windows OS ends.
4110 The following WDS Client has started Post
Apply Actions:
Displayed when installation of Windows OS
features starts.
4111 The following WDS Client has ended Post
Apply Actions:
Displayed when installation of Windows OS
features ends.
4112 The following WDS Client has ended: Displayed when setup of Windows OS ends.

8. Re-installation
Scalable Modular Server DX2000 Installation Guide (Windows) 71
Chapter 1 Installing Windows
8. Re-installation
8.1 Overview of Re-installation
Re-install the OS according to the following procedure.
Installation complete
Installation of the OS (no user action)
Chapter 1, 4.1 Preparations Before Installing the OS
Chapter 1, 3.1 Preparing Network Boot
Chapter 1, 8.2 Procedure for re-installing the OS
Start
Tips If an OS has been installed in the device on which to install the OS, access the device from
the WDS server by using remote desktop, shut down the OS, and then perform
re-installation.

8. Re-installation
Scalable Modular Server DX2000 Installation Guide (Windows) 72
Chapter 1 Installing Windows
8.2 Procedure for Re-installing the OS
Perform the following procedure before starting the device on which to install the OS by using PXE.
1. On the Server Manager screen, click Tools, and then Windows Deployment Services to open the
management screen on the WDS server.
2. Click Prestaged Devices, and delete the device on which to re-install the OS.

8. Re-installation
Scalable Modular Server DX2000 Installation Guide (Windows) 73
Chapter 1 Installing Windows
3. Click Yes.
4. Under Actions, right-click Pending Devices, and then click Delete Approved Devices.
Continue re-installation by referring to Chapter 1, 3.1 Preparing Network Boot and subsequent steps.
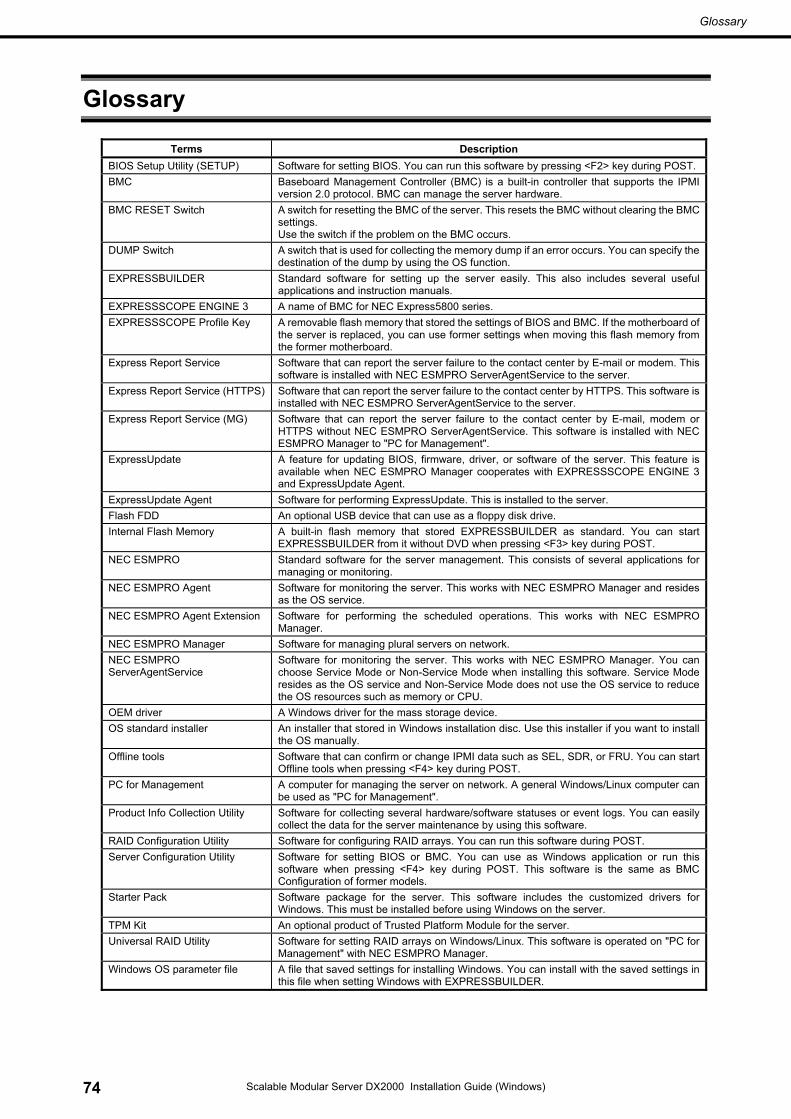
Glossary
Scalable Modular Server DX2000 Installation Guide (Windows) 74
Glossary
Terms Description
BIOS Setup Utility (SETUP) Software for setting BIOS. You can run this software by pressing <F2> key during POST.
BMC Baseboard Management Controller (BMC) is a built-in controller that supports the IPMI version 2.0 protocol. BMC can manage the server hardware.
BMC RESET Switch A switch for resetting the BMC of the server. This resets the BMC without clearing the BMC settings. Use the switch if the problem on the BMC occurs.
DUMP Switch A switch that is used for collecting the memory dump if an error occurs. You can specify the destination of the dump by using the OS function.
EXPRESSBUILDER Standard software for setting up the server easily. This also includes several useful applications and instruction manuals.
EXPRESSSCOPE ENGINE 3 A name of BMC for NEC Express5800 series.
EXPRESSSCOPE Profile Key A removable flash memory that stored the settings of BIOS and BMC. If the motherboard of the server is replaced, you can use former settings when moving this flash memory from the former motherboard.
Express Report Service Software that can report the server failure to the contact center by E-mail or modem. This software is installed with NEC ESMPRO ServerAgentService to the server.
Express Report Service (HTTPS) Software that can report the server failure to the contact center by HTTPS. This software is installed with NEC ESMPRO ServerAgentService to the server.
Express Report Service (MG) Software that can report the server failure to the contact center by E-mail, modem or HTTPS without NEC ESMPRO ServerAgentService. This software is installed with NEC ESMPRO Manager to "PC for Management".
ExpressUpdate A feature for updating BIOS, firmware, driver, or software of the server. This feature is available when NEC ESMPRO Manager cooperates with EXPRESSSCOPE ENGINE 3 and ExpressUpdate Agent.
ExpressUpdate Agent Software for performing ExpressUpdate. This is installed to the server.
Flash FDD An optional USB device that can use as a floppy disk drive.
Internal Flash Memory A built-in flash memory that stored EXPRESSBUILDER as standard. You can start EXPRESSBUILDER from it without DVD when pressing <F3> key during POST.
NEC ESMPRO Standard software for the server management. This consists of several applications for managing or monitoring.
NEC ESMPRO Agent Software for monitoring the server. This works with NEC ESMPRO Manager and resides as the OS service.
NEC ESMPRO Agent Extension Software for performing the scheduled operations. This works with NEC ESMPRO Manager.
NEC ESMPRO Manager Software for managing plural servers on network.
NEC ESMPRO ServerAgentService
Software for monitoring the server. This works with NEC ESMPRO Manager. You can choose Service Mode or Non-Service Mode when installing this software. Service Mode resides as the OS service and Non-Service Mode does not use the OS service to reduce the OS resources such as memory or CPU.
OEM driver A Windows driver for the mass storage device.
OS standard installer An installer that stored in Windows installation disc. Use this installer if you want to install the OS manually.
Offline tools Software that can confirm or change IPMI data such as SEL, SDR, or FRU. You can start Offline tools when pressing <F4> key during POST.
PC for Management A computer for managing the server on network. A general Windows/Linux computer can be used as "PC for Management".
Product Info Collection Utility Software for collecting several hardware/software statuses or event logs. You can easily collect the data for the server maintenance by using this software.
RAID Configuration Utility Software for configuring RAID arrays. You can run this software during POST.
Server Configuration Utility Software for setting BIOS or BMC. You can use as Windows application or run this software when pressing <F4> key during POST. This software is the same as BMC Configuration of former models.
Starter Pack Software package for the server. This software includes the customized drivers for Windows. This must be installed before using Windows on the server.
TPM Kit An optional product of Trusted Platform Module for the server.
Universal RAID Utility Software for setting RAID arrays on Windows/Linux. This software is operated on "PC for Management" with NEC ESMPRO Manager.
Windows OS parameter file A file that saved settings for installing Windows. You can install with the saved settings in this file when setting Windows with EXPRESSBUILDER.

Revision Record
Scalable Modular Server DX2000 Installation Guide (Windows) 75
Revision Record
Date Issued Description
June 2016 Newly created

NEC Scalable Modular Server
DX2000 Installation Guide (Windows)
June 2016
NEC Corporation
7-1 Shiba 5-Chome, Minato-Ku Tokyo 108-8001, Japan
© NEC Corporation 2016
The contents of this manual may not be copied or altered without the prior written permission of NEC Corporation.


