
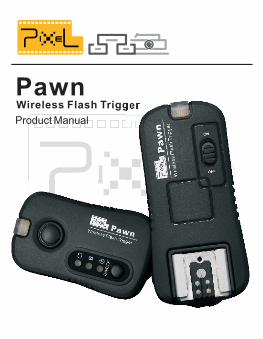
PawnWireless Flash Trigger
Product Manual

Thank you for purchasing high performance Pixel product,
Pawn! Its feature include flashgun trigger, studio light
trigger and wireless shutter control. The flash sync speed
is up to 1/250s. The shutter control mode included single,
continuous, BULB and 4sec delay shooting.
Pawn is using global free channel 2.4GHz and FSK
modulation system to make the performance more stable.
Unique power saving design makes the battery life of the
transmitter and receiver last longer.
Before using this product, you must read carefully and
understand the user manual. Be familiar with the use of
your camera and flashgun so as to ensure you can
operate the Pawn correctly.
Overview
Caution
Make sure the camera and flash are powered off before
installing the Pawn.
As this is an accessory of electronic product, may be
due to external environment matters, the camera or
flashgun cannot be made or lead to normal operation.
However, the possibility is very low.
1.
2.
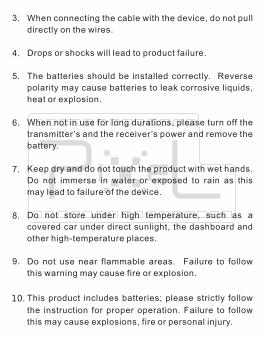
3. When connecting the cable with the device, do not pull
directly on the wires.
Drops or shocks will lead to product failure.
The batteries should be installed correctly. Reverse
polarity may cause batteries to leak corrosive liquids,
heat or explosion.
When not in use for long durations, please turn off the
transmitter ’s and the receiver’s power and remove the
battery.
Keep dry and do not touch the product with wet hands.
Do not immerse in water or exposed to rain as this
may lead to failure of the device.
Do not store under high temperature, such as a
covered car under direct sunlight, the dashboard and
other high-temperature places.
Do not use near flammable areas. Failure to follow
this warning may cause fire or explosion.
This product includes batteries; please strictly follow
the instruction for proper operation. Failure to follow
this may cause explosions, fire or personal injury.
4.
5.
6.
7.
8.
9.
10.
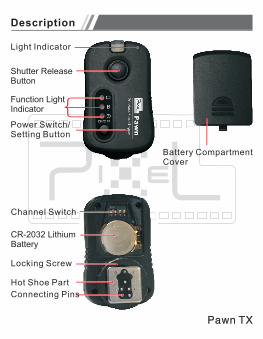
Description
Light Indicator
Shutter Release Button
Function Light Indicator
Power Switch/Setting Button
Channel Switch
CR-20 2 Lithium Battery
3
Locking Screw
Connecting Pins
Hot Shoe Part
Battery Compartment Cover
Pawn TX

Light Indicator
Power Switch
Input/ output socket
Hot Shoe Part
Channel switch
Hot Shoe Nut
Locking Screw
Sticker
Battery Compartment Cover
Pawn RX

Light Indicator : Device power, communication and output status indication. The indicator shows green when half-press the shutter release button and red when full-press.Shutter Release Button: Half-press means the camera
is auto-focusing, and full-press means shooting.
Function Light Indicator: When use as shutter remote, function indicator lights show the shooting mode under setting, press the switch to change the modes: Single/ BULB/ delay. PS: Make sure the shooting mode on both the camera and the transmitter is the same to work
efficiently.
Power/Setting Switch:Press the switch (on transmitter) 2 seconds to turn on the device, meanwhile the function indicator lights up showing the current function mode,
press the switch again to change the unction mode.Channel Setting:There are totally 16 channels and the
channel switch is inside the battery compartment. After setting channel, please double check that the transmitter and its receiver(s) are in the same channel. When using multi-sets Pawn in the same area, please change each sets to different channels. PS: When you get any frequency jamming, please change the channel.Receiver Power Switch: Switch to OFF to turn off the device; switch to ON to turn on the device.
Input/output socket: 1)When use to trigger studio light,
plug studio light connecting cable (2.5mm side) into the socket and the other side into studio light side. 2)When
use as shutter remote controller, plug shutter connecting
cable (3.5mm side) into the receiver socket, and the other

side into camera shutter release socket.Battery Compartment: Loading two AAA batteries.Receiver’s Hot Shoe Nut: for Tripod or other mounting nut.Transmitter Mounting Foot: Input interface connection with camera hot shoe.Sticker: Showing product S/N number, battery type on the sticker.
Features
Using global free 2.4GHz channel and FSK modulation system.
16 selectable channels.
Flash sync speed up to 1/250s.
With flashgun wake-up function, will not miss any shooting opportunity.
Fire the flashgun through hot shoe part and fire the studio light through PC socket.
Can control multiple flashguns and studio lights at the same time.
Shutter function includes single, continuous, bulb and
4-second delay shooting.
Can control multiple cameras for shooting at the same time.

Low-Voltage Design allow using rechargeable batteries.
Maximum distance up to 80 meters.
Extra low standby power consumption :Transmitter Standby Time: 10000 hoursReceiver Standby Time: up to 300 hours
Items Included
Transmitter
Receiver
AAA Lithium Battery
CR-2032 Battery (inside the Transmitter)
1pc
1pc
2pcs
1pc
Please check the listed items below in the package and
contact your dealer if there is any missing.
2.5mm+3.5 connecting cable
2.5mm+ 6.35 connecting cable
1pc
1pc
User Manual 1pc
Receiver Holding Mount
Hot Shoe Protection
1pc
1pc
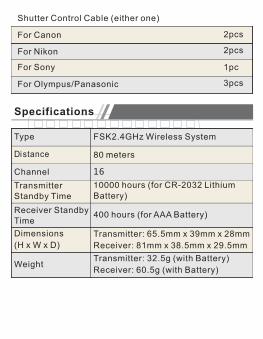
2pcs
1pc
For Nikon
For Sony
For Olympus/Panasonic 3pcs
Shutter Control Cable (either one)
2pcsFor Canon
Specifications
FSK2.4GHz Wireless System
80 meters
16
10000 hours (for CR-2032 Lithium Battery)
400 hours (for AAA Battery)
Transmitter: 65.5mm x 39mm x 28mm
Receiver: 81mm x 38.5mm x 29.5mm
Transmitter: 32.5g (with Battery)
Receiver: 60.5g (with Battery)
Type
Distance
Channel
Transmitter Standby Time
Receiver Standby Time
Dimensions
(H x W x D)
Weight
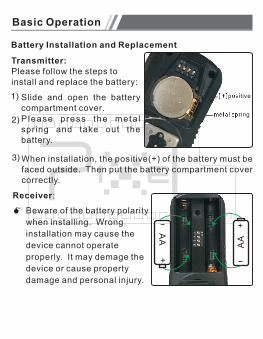
Slide and open the battery compartment cover.Please press the meta l spring and take out the battery.
[+]positive
metal spring
1)
2)
Basic Operation
Battery Installation and Replacement
Transmitter:Please follow the steps to install and replace the battery:
AA
+
-
A
A+
-
Receiver:
When installation, the positive(+) of the battery must be faced outside. Then put the battery compartment cover correctly.
3)
Beware of the battery polarity
when installing. Wrong
installation may cause the
device cannot operate
properly. It may demage the
device or cause property
damage and personal injury.
M
2)
3)
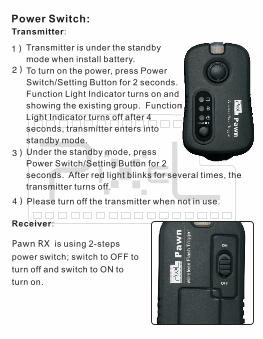
Transmitter:
Transmitter is under the standby
mode when install battery.
To turn on the power, press Power
Switch/Setting Button for 2 seconds.
Function Light Indicator turns on and
showing the existing group. Function
Light Indicator turns off after 4
seconds, transmitter enters into
standby mode.
Under the standby mode, press
Power Switch/Setting Button for 2
seconds. After red light blinks for several times, the
transmitter turns off.
Power Switch:
1)
Receiver:
4)
Pawn RX is using 2-steps
power switch; switch to OFF to
turn off and switch to ON to
turn on.
Please turn off the transmitter when not in use.
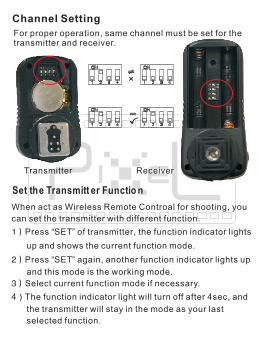
For proper operation, same channel must be set for the transmitter and receiver.
Transmitter Receiver
Channel Setting
Set the Transmitt er Functio n
When act as Wireless Remote Controal for shooting, you
can set the transmitter with different function.
1)Press “SET” of transmitter, the function indicator lights
up and shows the current function mode.
2)Press “SET” again, another function indicator lights up
and this mode is the working mode.
3)Select current function mode if necessary.
4)The function indicator light will turn off after 4sec, and
the transmitter will stay in the mode as your last
selected function.

When the function indicator is turned off, you can check
the current mode by pressing “SET” slightly.
Fire the flashgun
1)Check if all connections are completed. See if all the
power is turned on and the flashgun's parameter is set. 2) Half press the camera shutter release, transmitter
then send out the signal and wake up the “ sleeping”
flashgun (Flash in Standby mode).3) Fully press the camera shutter release, transmitter
then send out flash signal and trigger the flashgun to sync flashing.
When using the transmitter which is not compatible to
camera models; you need to half press the shutter
button of transmitter once, the camera can sync
shooting within one minute. You'll need to half press
the transmitter button again if time exceeds.Some of the flash wake up time may take longer, we suggest to half pressing the button for little bit longer then fully press the button to shoot. Try to avoid fully press the buton till the end.
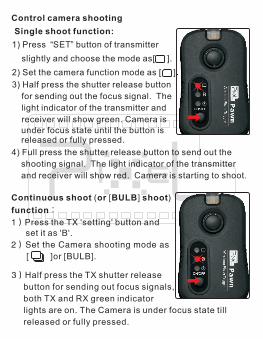
under focus state until the button is released or fully pressed.
1) Press “SET” button of transmitter
slightly and choose the mode as[ ].
2) Set the camera function mode as [ ].
3) Half press the shutter release button
for sending out the focus signal. The
light indicator of the transmitter and
receiver will show green. Camera is
Single shoot function:
Control camera shooting
4) Full press the shutter release button to send out the
shooting signal. The light indicator of the transmitter
and receiver will show red. Camera is starting to shoot.
Continuous shoot (or [BULB] shoot)
function:1)Press the TX 'setting' button and set it as 'B'.
2)Set the Camera shooting mode as
[ ]or [BULB].
3)Half press the TX shutter release
button for sending out focus signals,
both TX and RX green indicator
lights are on. The Camera is under focus state till
released or fully pressed.

4)TX sends out shooting signals while fully pressed. At
the moment TX red light on and flashes but RX red
light on and blinks. The Camera starts to shoot.
5) Repress the RX release button, TX stops sending out
signals and RX stops sending out shooting signals
then the Camera stops shooting.
Delay shoot function:
1)Press“SET”button of transmitter,
and set the function as [ ] .
2)Set the Camera shooting mode as
[ ] .
3)Half press the TX shutter release
button for sending out focus signals,
both TX and RX green indicator
lights are on.The Camera is under
4) Fully press the TX shutter release button for sending
out shooting signals, TX red light on and flashes but
RX red light on and blinks. The Camera starts to
count time.
5) RX indicator light turns off and sends out shooting
signals to the Camera after finishing counting.
focus state till released or fully pressed.

When the focusing mode set as M, the camera will not
focus when half pressing the button.
When the camera focusing mode is set as A, most
cameras when out of focusing, will not shoot even
they get the shooting signal.
Thank you for purchasing PIXEL product and read this
instruction manual carefully. If you have any question
p lease k ind ly contact our loca l dea ler or v is i t
http://www.pixelhk.com.
This instruction manual is updated on 1st October, 2011.
Please contact the PIXEL seller to get the information if
you want to use this product together with other latest
product, which published after this date.
PSM38 V20.02


