Lesson 7 - Working with Themes, Style Sets, Backgrounds, Quick Parts, and Text Boxes Step by Step 1: Format a Document with a Theme • OPEN the Hosting document from the data files for this lesson. 1. On the Design tab, in the Document Formatting group, click Themes; the Themes menu opens, as shown at right. 2. This document has already been preformatted with styles. 3. Place your insertion point over any built- in theme and notice that the document changes to display a live preview of your document. 4. Click the Slice theme and the elements are applied to the document. Scroll down and view the changes in the document. 5. SAVE document as Hosting Term in the lesson folder on your desktop. PAUSE. LEAVE the document open to use in the next exercise. Step by Step 2: Create and Customize a Document Color • USE the document that is open from the previous exercise. 1. In the Document Formatting group, click the Colors button to open the Colors menu (right). The Colors menu contains predefined formatting [1]
Transcript
Lesson 7 - Working with Themes, Style Sets, Backgrounds, Quick Parts, and Text Boxes
Step by Step 1: Format a Document with a Theme
• OPEN the Hosting document from the data files for this lesson.
1. On the Design tab, in the Document Formatting group, click Themes; the Themes menu opens, as shown at right.
2. This document has already been preformatted with styles.
3. Place your insertion point over any built-in theme and notice that the document changes to display a live preview of your document.
4. Click the Slice theme and the elements are applied to the document. Scroll down and view the changes in the document.
5. SAVE document as Hosting Term in the lesson folder on your desktop.
PAUSE. LEAVE the document open to use in the next exercise.
Step by Step 2: Create and Customize a Document Color
• USE the document that is open from the previous exercise.
1. In the Document Formatting group, click the Colors button to open the Colors menu (right). The Colors menu contains predefined formatting colors with four text and background colors, six accent colors, and two hyperlink colors. These colors can be customized and saved with a new name.
2. At the bottom of the Colors menu, click Customize Colors; the Create New Theme Colors dialog box opens (right).
3. In the Name box, replace Custom 1 by typing Corporate [your initials].
4. Click Save; the dialog box closes and you have defined a new custom theme color name based on default colors.
[1]
Lesson 7 - Working with Themes, Style Sets, Backgrounds, Quick Parts, and Text Boxes
5. Click Colors and under the Custom section, place your insertion point over Corporate [your initials]. Right-click the theme name, and then click Edit from the pop-up menu that appears. The Edit Theme Colors dialog box appears.
6. Another Way: You can edit the Colors and Fonts in the Styles group, under Styles or use the shortcut keys, ALT+CTRL+SHIFT+S.
7. In the list of theme colors, click the Accent 2 drop-down arrow to produce a menu of colors for this element.
8. Select Orange, Accent 5.
9. Click Save. You changed the default color to a specific color and created your own custom theme colors for your document.
10. SAVE the document in the lesson folder on your desktop.
PAUSE. LEAVE the document open to use in the next exercise.
Step by Step 3: Create and Customize a Document Font
• USE the document that is open from the previous exercise.
1. Click the Fonts button to produce the Fonts menu (right). In the menu, click Customize Fonts; the Create New Theme Fonts dialog box opens.
2. In the Name box, replace Custom 1 by typing Corporate Fonts [your initials].
3. Change the Heading Font and Body Font to Arial. Notice the preview of your font choices that appears in the Sample pane of the dialog box.
4. Click Save to close the dialog box and apply your font choices to the document.
5. SAVE the document in the lesson folder on your desktop.
PAUSE. LEAVE the document open to use in the next exercise.
Step by Step 4: Create and Customize Document Effects
• USE the document that is open from the previous exercise.
1. Position the insertion point anywhere in the document.
2. Click the Effects button and select Glossy from the menu that appears (right).
[2]
Lesson 7 - Working with Themes, Style Sets, Backgrounds, Quick Parts, and Text Boxes
3. When applying shapes to your document, such as a bevel shape, the shape displays based on the effect you selected. Notice the change in the bevel shape on page 1 next to the second paragraph under the heading Introduction (below).
4. SAVE the document as Hosting Term1 in your desktop in the lesson folder.
PAUSE. LEAVE the document open to use in the next exercise.
Step by Step 5: Apply Paragraph Spacing
• USE the document that is open from the previous exercise.
1. Position the insertion point anywhere in the first paragraph. In the
Document Formatting group, click the Paragraph Spacing button.
2. The built-in menu appears (right).
3. Hover over each of the built-in settings and notice the changes on the whole document. Also, a ScreenTip appears displaying the line and paragraph setting for that option. Select Open.
4. SAVE the document as Hosting Term2 in your desktop in the lesson folder.
PAUSE. LEAVE the document open to use in the next exercise.
Step by Step 6: Apply a Style Set to a Document
• USE the document that is open from the previous exercise.
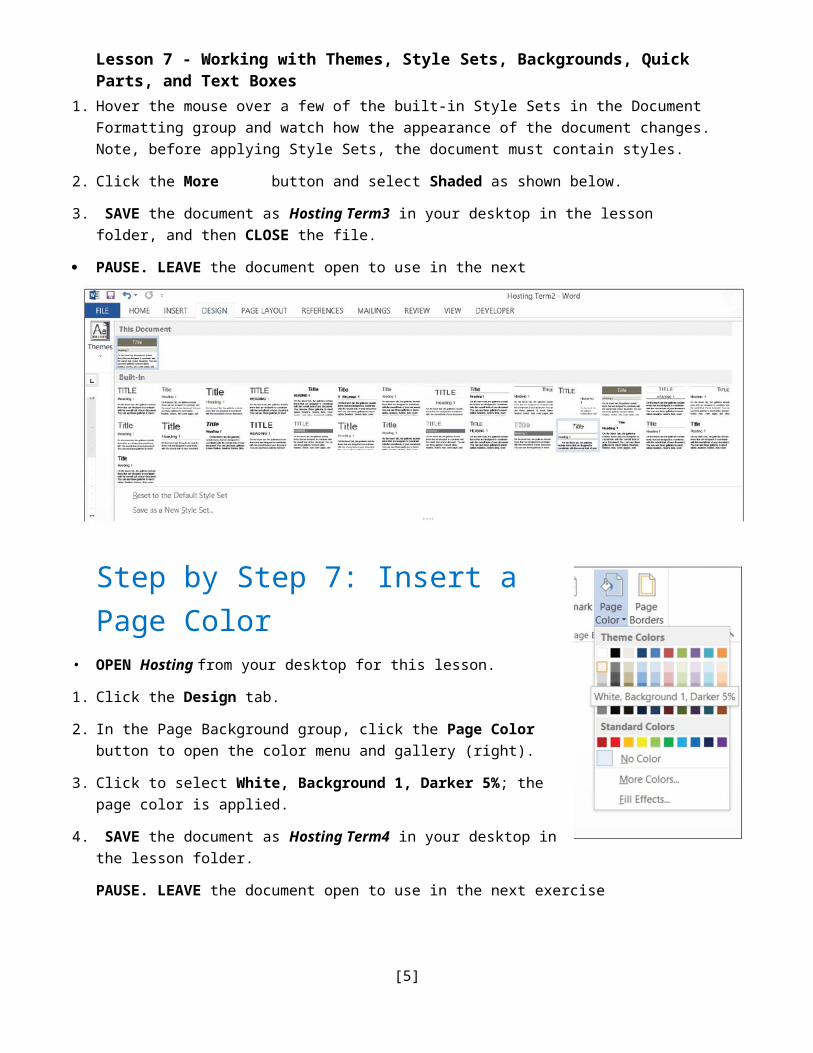
1. Hover the mouse over a few of the built-in Style Sets in the Document Formatting group and watch how the appearance of the document changes. Note, before applying Style Sets, the document must contain styles.
2. Click the More button and select Shaded as shown below.
3. SAVE the document as Hosting Term3 in your desktop in the lesson folder, and then CLOSE the file.
[3]
Lesson 7 - Working with Themes, Style Sets, Backgrounds, Quick Parts, and Text Boxes
PAUSE. LEAVE the document open to use in the next
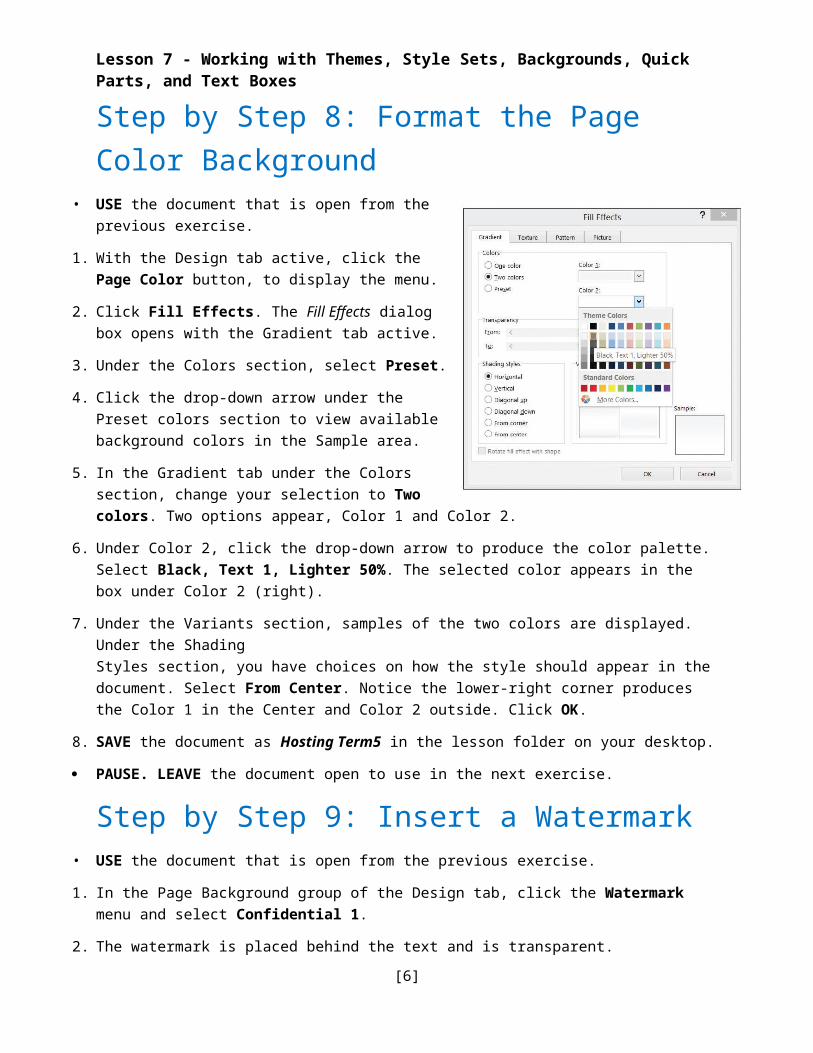
Step by Step 7: Insert a Page Color
• OPEN Hosting from your desktop for this lesson.
1. Click the Design tab.
2. In the Page Background group, click the Page Color button to open the color menu and gallery (right).
3. Click to select White, Background 1, Darker 5%; the page color is applied.
4. SAVE the document as Hosting Term4 in your desktop in the lesson folder.
PAUSE. LEAVE the document open to use in the next exercise
Step by Step 8: Format the Page Color Background
• USE the document that is open from the previous exercise.
1. With the Design tab active, click the Page Color button, to display the menu.
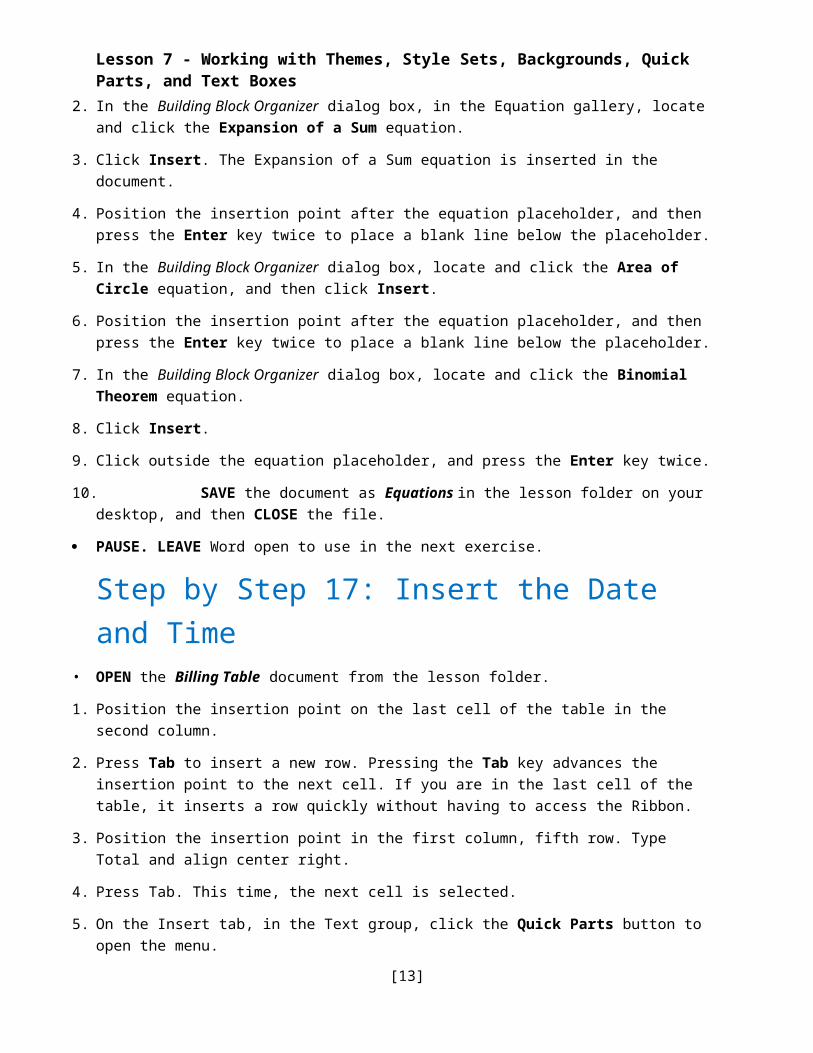
2. Click Fill Effects. The Fill Effects dialog box opens with the Gradient tab active.
3. Under the Colors section, select Preset.
[4]
Lesson 7 - Working with Themes, Style Sets, Backgrounds, Quick Parts, and Text Boxes
4. Click the drop-down arrow under the Preset colors section to view available background colors in the Sample area.
5. In the Gradient tab under the Colors section, change your selection to Two colors. Two options appear, Color 1 and Color 2.
6. Under Color 2, click the drop-down arrow to produce the color palette. Select Black, Text 1, Lighter 50%. The selected color appears in the box under Color 2 (right).
7. Under the Variants section, samples of the two colors are displayed. Under the Shading Styles section, you have choices on how the style should appear in the document. Select From Center. Notice the lower-right corner produces the Color 1 in the Center and Color 2 outside. Click OK.
8. SAVE the document as Hosting Term5 in the lesson folder on your desktop.
PAUSE. LEAVE the document open to use in the next exercise.
Step by Step 9: Insert a Watermark• USE the document that is open from the previous exercise.
1. In the Page Background group of the Design tab, click the Watermark menu and select Confidential 1.
2. The watermark is placed behind the text and is transparent.
3. SAVE the document with the same filename in the lesson folder on your desktop.
• PAUSE. LEAVE the document open to use in the next exercise.
Step by Step 10: Insert a Custom Watermark
• USE the document that is open from the previous exercise.
1. Click the Watermark menu and select Custom Watermark. The Printed Watermark dialog box opens.
2. Select the Text watermark radio button and then click the drop-down arrow next to Text and select Draft. You can customize text watermarks by typing content in the text box or you can select from the drop-down menu.
3. Click the drop-down arrow by Font and select Franklin Gothic Book. This changes the text watermark font.
4. In the Color box, click the drop-down arrow and select Dark Red in the Standard Colors box (right).
5. Click OK. The watermark is inserted on all pages. If you click Apply, the dialog box remains open and you can view your watermark in the document. When you click OK, the dialog box closes and you’re back in the document screen.
6. SAVE the document as Hosting Draft in the lesson folder on your desktop.
[5]
Lesson 7 - Working with Themes, Style Sets, Backgrounds, Quick Parts, and Text Boxes
PAUSE. LEAVE the document open to use in the next exercise.
Step by Step11: Insert an Image Watermark
• USE the document that is open from the previous exercise.
1. Remove the Page Color background, by clicking the Page Color button, and then selecting No Color. The background is removed.
2. Click the Watermark menu and select Custom Watermark. The Printed Watermark dialog box opens.
3. Select the Picture watermark radio button and then click the Select Picture button.
4. Click the Browse button from Select from File, and then locate your lesson folder and select Internet Search.
5. Click Insert to insert the image in the document, and then click OK to close the Printed Watermark dialog box.
6. SAVE the document as Hosting with Image in the lesson folder on your desktop.
PAUSE. LEAVE the document open to use in the next exercise.
Step by Step12: Remove a Watermark
• USE the document that is open from the previous exercise.
1. Open the Watermark menu and select Remove Watermark. The watermark is removed from the document.
2. Click the Undo button.
3. SAVE the document in the lesson folder on your desktop, and then CLOSE the file.
• PAUSE. LEAVE Word open for the next exercise.
Step by Step 13: Add a Page Border
• OPEN the Hosting Term5 document from the lesson folder.
[6]
Lesson 7 - Working with Themes, Style Sets, Backgrounds, Quick Parts, and Text Boxes
1. In the Page Background group of the Design tab, click the Page Borders button. The Borders and Shading dialog box appears with Page Border as the active tab.
2. In the Setting section, click the Shadow option. Notice the Preview area on lower-bottom right side has a shadow effect to the border.
3. Click the drop-down arrow on the Color menu and choose Black Text 1, Lighter 5%. You apply a specific color to the border.
4. Click the drop-down arrow on the Width menu and choose 2 1/4 pt. The width of the border is increased to provide emphasis.
5. Click the drop-down arrow on the Apply To menu and click This Section–First Page Only as shown below. The page border is applied only to the first page of this section.
6. Click OK. Scroll and review your document, and notice that the border does not appear on other pages.
7. Select the bevel shape on page 1 and press Delete. Hint: you need to see a solid border to delete the shape.
8. SAVE the document as Hosting Term6 in the lesson folder on your desktop.
PAUSE. LEAVE the document open to use in the next exercise.
Step by Step 14: Use Built-In Building Blocks
• USE the document that is open from the previous exercise.
1. On the Insert tab, in the Text group, click the Quick Parts button to display the Quick Parts menu, as shown below.
2. Click the Building Blocks Organizer menu option to display the Building Blocks Organizer dialog box, as shown below.
3. Click the Name heading to sort the Building Blocks by name.
4. Scroll down the list and select Confidential 1 Watermark.
5. Click the Insert button. The Confidential watermark appears behind the text on every page.
6. Display the Building Blocks Organizer dialog box.
[7]
Lesson 7 - Working with Themes, Style Sets, Backgrounds, Quick Parts, and Text Boxes
7. Click the Gallery heading to sort the Building Blocks by gallery.
8. Position the insertion point at the beginning of the first paragraph under Introduction.
9. Scroll down and select Austin Pull Quote from the Text Box gallery. Click Insert and a pull quote is inserted in the document as shown below. You can type text in the placeholders or drag and drop text in the area.
10. Under the heading, Introduction, select the second paragraph beginning with Questions or comments . . . .
11. Move the selected text inside the quote area by dragging and dropping.
12. Use the Show/Hide Editing Marks button to delete both line breaks after the first paragraph under Introduction.
13. Select the text box, and the Layout Options button appears on the right side of the text box.
14. Click the Layout Options button to open the menu. Options are
available on laying out the text box in the document.
15. Click the See more … link to open the Layout dialog box.
16. Click the Text Wrapping tab and select Square.
17. Click the Left only radio button under the Wrap text section (right). Click OK.
18. Place your pointer on the hyphenated lines around the quote text box—the pointer changes to four arrows to allow you to drag and drop.
[8]
Lesson 7 - Working with Themes, Style Sets, Backgrounds, Quick Parts, and Text Boxes
Drag the quote to the end of the first paragraph until it wraps around the last seven lines of the paragraph (below).
19. Press Ctrl+End to move the insertion point to the end of the document.
20. Display the Building Blocks Organizer dialog box.
21. Scroll down and select Motion Sidebar from the Text Box gallery.
22. Click Insert. The text box is inserted at the end of the document and positioned on the left side of the document. Your next step is to insert text into the text box.
23. Select the paragraph above Refusal of Service beginning with You and Flatland Hosting further agree . . . When selecting the paragraph, do not select the paragraph mark, because this will avoid displaying the horizontal line in the Text Box twice.
24. Change the font color to white so that it will appear on the sidebar.
25. Drag and drop the selection in the text box.
26. At the top of the text box, delete the [Sidebar Title] placeholder and blank line to move the text up one line.
27. SAVE the document as Hosting Term7 in the lesson folder on your desktop.
PAUSE. LEAVE Word open to use in the next exercise.
Step by Step 15: Insert a Cover Page Using the Built-In Building Blocks
• USE the document that is open from the previous exercise.
1. Click the Building Blocks Organizer to display the dialog box and select Whisp in the Cover Page gallery.
2. Click Insert. The cover page is inserted as page 1.
3. Type the following information in the placeholders:
Year: 20XX (The current date can be selected or you can type the year.)
Document Title: Flatland Hosting Company
Document Subtitle: Guidelines & Agreements
Author Name: A. Becker
4. Remove the placeholders for the Company Name and Company Address.5. SAVE the document as Hosting Term8 in the lesson folder on your desktop, and then CLOSE the file. PAUSE. LEAVE Word open to use in the next exercise.
Step by Step 16: Insert an Equation[9]
Lesson 7 - Working with Themes, Style Sets, Backgrounds, Quick Parts, and Text Boxes
• OPEN a new blank Word document.
1. Open the Quick Parts menu, and then click the Building Blocks Organizer.
2. In the Building Block Organizer dialog box, in the Equation gallery, locate and click the Expansion of a Sum equation.
3. Click Insert. The Expansion of a Sum equation is inserted in the document.
4. Position the insertion point after the equation placeholder, and then press the Enter key twice to place a blank line below the placeholder.
5. In the Building Block Organizer dialog box, locate and click the Area of Circle equation, and then click Insert.
6. Position the insertion point after the equation placeholder, and then press the Enter key twice to place a blank line below the placeholder.
7. In the Building Block Organizer dialog box, locate and click the Binomial Theorem equation.
8. Click Insert.
9. Click outside the equation placeholder, and press the Enter key twice.
10. SAVE the document as Equations in the lesson folder on your desktop, and then CLOSE the file.
PAUSE. LEAVE Word open to use in the next exercise.
Step by Step 17: Insert the Date and Time• OPEN the Billing Table document from the lesson folder.
1. Position the insertion point on the last cell of the table in the second column.
2. Press Tab to insert a new row. Pressing the Tab key advances the insertion point to the next cell. If you are in the last cell of the table, it inserts a row quickly without having to access the Ribbon.
3. Position the insertion point in the first column, fifth row. Type Total and align center right.
4. Press Tab. This time, the next cell is selected.
5. On the Insert tab, in the Text group, click the Quick Parts button to open the menu.
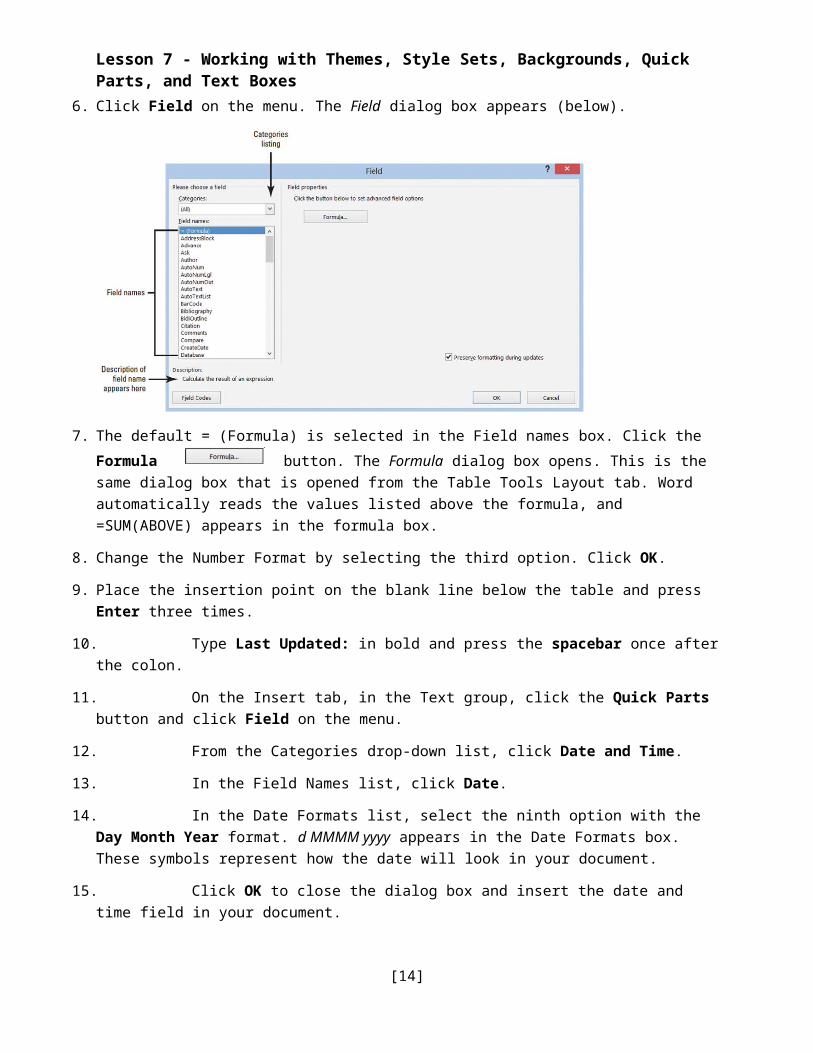
6. Click Field on the menu. The Field dialog box appears (below).
[10]
Lesson 7 - Working with Themes, Style Sets, Backgrounds, Quick Parts, and Text Boxes
7. The default = (Formula) is selected in the Field names box. Click the Formula button. The Formula dialog box opens. This is the same dialog box that is opened from the Table Tools Layout tab. Word automatically reads the values listed above the formula, and =SUM(ABOVE) appears in the formula box.
8. Change the Number Format by selecting the third option. Click OK.
9. Place the insertion point on the blank line below the table and press Enter three times.
10. Type Last Updated: in bold and press the spacebar once after the colon.
11. On the Insert tab, in the Text group, click the Quick Parts button and click Field on the menu.
12. From the Categories drop-down list, click Date and Time.
13. In the Field Names list, click Date.
14. In the Date Formats list, select the ninth option with the Day Month Year format. d MMMM yyyy appears in the Date Formats box. These symbols represent how the date will look in your document.
15. Click OK to close the dialog box and insert the date and time field in your document.
16. The document should look similar to the one shown below, with the exception that the current date will appear.
17. Disable the Show/Hide Editing Marks button.
18. SAVE document as Billing Update in the lesson folder on your desktop.
[11]
Lesson 7 - Working with Themes, Style Sets, Backgrounds, Quick Parts, and Text Boxes
PAUSE. LEAVE the document open to use in the next exercise.
Step by Step 18: Create an AutoText• USE the document that is open from the previous exercise.
1. Position the insertion point on the blank line above the date and type Reviewed by: Hazel Loera.
2. Select Reviewed by: Hazel Loera. To add text to the AutoText, you must first select text. Be careful not to select the paragraph mark.
3. On the Insert tab, in the Text group, click the Quick Parts button and click AutoText on the menu. As shown below, the Save Selection to AutoText gallery is active.
4. Click Save Selection to AutoText Gallery. The Create New Building Block dialog box opens (below).
5. Type the following information into the dialog box:
Name: Reviewed by Hazel Loera
Gallery: Select AutoText.
Category: Select General category or you can create a new category.
6. Type the following text into the dialog box:
Description: The reviewer is the last individual to review all billings before mailing.
7. A description of the building block—this description—appears in the Building Block Organizer.
8. Type the following information into the dialog box:
Save In: Select Normal.
[12]
Lesson 7 - Working with Themes, Style Sets, Backgrounds, Quick Parts, and Text Boxes
This is the template listing of where you would select to save the AutoText. If the extension .dotm appears after Normal, then the extension for known types is enabled allowing you to see the extension in the document title or dialog boxes. The default to save the AutoText is in the Normal format, which is a Macro-Enabled Template.
9. Type the following information into the dialog box:
Options: Select Insert content only.
There are three options to choose from: Insert content in its own page—building block will be placed on separate page with page breaks inserted, Insert content in its own paragraph—the content will be placed in its own paragraph, even if the user’s insertion point is in the middle of a paragraph, and Insert content only—the content will be inserted inline.
10. Click OK.
11. Delete the selected text, Reviewed by Hazel Loera.
12. Type the first four characters, and a ScreenTip appears displaying the AutoText. Press Enter. The AutoText is inserted into your document.
13. Another way to insert the AutoText is to click the Quick Parts button and hover the mouse over AutoText. You should see your text.
14. Click the Quick Part button, and then click Building Blocks Organizer.
The Building Blocks Organizer Gallery should be sorted, and the new AutoText should appear as the first entry as shown on the next slide. Close the Building Blocks Organizer.
15. SAVE the document as Billing Final in the lesson folder on your desktop, and then CLOSE the file.
PAUSE. LEAVE Word open for the next exercise.
[13]
Lesson 7 - Working with Themes, Style Sets, Backgrounds, Quick Parts, and Text Boxes
Step by Step 19: Delete a Building Block• OPEN a blank document.
1. Open the Building Blocks Organizer.
2. Highlight Reviewed by: Hazel Loera.
3. At the bottom of the Building Blocks Organizer dialog box is the Delete button.
4. Click the Delete button. A prompt appears asking “Are you sure you want to delete the selected building block?”
5. Click Yes to close the Building Blocks Organizer.
6. CLOSE the document and do not save.
• PAUSE. LEAVE Word open for the next exercise.
Step by Step 20: Insert a Text Box• OPEN the Hosting document from the data files for this lesson.
1. Position the insertion point after the first paragraph after the Introduction heading.
2. On the Insert tab, in the Text group, click the Text Box button. A menu of built-in quote and sidebar text box styles appears.
3. Click the Simple Text box option. The text box, containing placeholder text, is inserted in the first paragraph.
4. Select the second paragraph beginning with Questions or comments….com and drag and drop in the text box.
5. The Layout Option button appears to the right of the text box.
6. Click the Layout Option button to open the Layout Options menu.
7. Under the Text Wrapping section, select Tight. The text box wraps tightly around the paragraph. You also have the option to type text in the text box.
8. Delete the line break after the first paragraph.
9. Press Ctrl+End to go to the end of the document.
10. Click the Insert tab, in the Text group.
11. Click the Text Box button, and then select Draw Text Box. A crosshair (+) appears.
12. Press and hold the left mouse button to draw a text box in the blank line below the last paragraph under the Refusal of Service heading.
13. Use the Size group in the Format tab to change the width and height to 2.22" wide and .95" in height.
[14]
Lesson 7 - Working with Themes, Style Sets, Backgrounds, Quick Parts, and Text Boxes
14. Select the first sentence under the Refusal of Service heading beginning with Flatland Hosting . . .no refunds. and drag and drop in the text box.
15. Press Ctrl+E to center the text in the text box.
16. Select the text box until you see the move arrow to move the text box and horizontally center—use the ruler as your guide. Your document should resemble the figure below.
17. SAVE the document as Hosting Term9 in the lesson folder on your desktop.
PAUSE. Leave the document open to use in the next exercise.
Step by Step 21: Format a Text Box• USE the document that is open from the previous exercise.
1. Select the text box on page 7.
2. Click the Format tab.
3. In the Arrange group, click the Position button to open the menu, and select Position in Middle Right with Square Text Wrapping from the drop-down menu that appears. The text box is moved slightly down to the right of the document as shown above.
[15]
Lesson 7 - Working with Themes, Style Sets, Backgrounds, Quick Parts, and Text Boxes
4. The text box should still be selected. On the Format tab, in the Shape Styles group, click the More button to display the gallery of styles (below).
5. Click the Intense Effect – Red Accent 2 style from the Shape Styles gallery. The text box is formatted with the preformatted style.
6. Select the text and use the Mini toolbar to change the font color to white.
7. Press Ctrl+Home to return to the beginning of the document.
8. Select the text box.
9. Click the Edit Shape button in the Insert Shape group on the Format tab to display the menu.
10. Click Change Shape to display the Shapes menu as shown at right.
11. Under the Basic Shape section, select the Hexagon shape in the first row, eighth option. The text box shape takes on a hexagon shape.
12. With the text box still selected, in the Size group, change the height to .8" and width to 4".
13. Change the font size to 9 pt. Your document should match the figure below.
14. Select the Hexagon shape, and click the Format tab.
15. In the Shapes Styles group, click the Shapes Effects button to display the menu.
[16]
Lesson 7 - Working with Themes, Style Sets, Backgrounds, Quick Parts, and Text Boxes
16. Click the Bevel to display the additional options in the menu.
17. Under the Bevel section in the first row, click Cool Slant. The shape object acquires more depth and a shadow effect.
18. In the Arrange group, click the Position button and select Position in Middle Left with Square Text Wrapping to reposition the text box.
19. SAVE the document as Hosting Term10 in the lesson folder on your desktop.
PAUSE. LEAVE the document open for the next exercise.
Step by Step 22: Save a Selection to the Text Box Gallery
• USE the document that is open from the previous exercise.
1. Select the Hexagon text.
2. From the Insert tab, click the Text Box button in the Text group. From the menu that appears, choose Save Selection to Text Box Gallery. The Create New Building Block dialog box opens as shown at right.
3. In the Name box, type Hexagon Shape.
4. In the Description box, type Use this shape for questions or comments. Keep the remaining defaults as listed.
5. Click OK. The saved selection for the Hexagon text box is saved in the gallery under the General category.
6. To view, click in a blank area of the document to deselect the text box. In the Text group, click the Text Box button. In the Built-in section, scroll down to the end of the scroll bar as shown above.
7. SAVE the document as Hosting Final in the lesson folder on your desktop.
PAUSE. LEAVE the document open to use in the next exercise.
[17]
Lesson 7 - Working with Themes, Style Sets, Backgrounds, Quick Parts, and Text Boxes
Step by Step 23: Create a Drop Cap• USE the document that is open from the previous exercise.
1. Click the View tab to open the Navigation Pane.
2. Under the Headings tab, click Account Information, select the Y that begins the sentence You agree to notify…
3. Click the Insert tab, and click the Drop Cap button in the Text group. The Drop Cap menu appears, as shown at right.
4. Select Dropped from the menu. A drop cap is inserted and extends down three lines in the paragraph, which is the default line drop length.
5. With the text box still selected, click the Drop Cap button in the Text group to display the Drop Cap menu. Select Drop Cap Options to produce the Drop Cap dialog box. You can use the options in this dialog box to change the position, font, and size of the drop cap. The default settings for Font, number of Lines to drop, and Distance from text are shown above.
6. Click the Font drop-down arrow and change the font to Bookman Old Style.
7. Click OK to apply your changes and close the dialog box.
8. Click outside the drop cap to deselect it. The drop cap font is set to Bookman Old Style for the selected text, whereas the remaining text is unaffected.
9. To provide more emphasis to the Drop Cap, select the Y and change the font color to dark red.
10. SAVE your document in the lesson folder on your desktop.
PAUSE. Leave the document open to use in the next exercise.
Step by Step 24: Insert Special Characters• USE the document that is open from the previous exercise.
1. Press Ctrl+End to move to the end of the document.
2. Press Enter once after the last paragraph under the heading, Refusal of Service.
3. Type Copyright Flatland Hosting 2013. All Rights Reserved.
[18]
Lesson 7 - Working with Themes, Style Sets, Backgrounds, Quick Parts, and Text Boxes
4. Place the insertion point after the t in Copyright and press the Spacebar once.
5. On the Insert tab in the Symbols group, click the Symbol button, and then click More Symbols.
6. Click the Special Characters tab to make it available.The Symbol dialog box is shown below.
7. Select Copyright from the list and click Insert.
8. Click Close. The copyright symbol is inserted in front of the company name followed by the year this document was created.
9. SAVE your document in the lesson folder on your desktop, and then CLOSE the file. As you close Word, a prompt appears stating, You have modified styles, building blocks (such as cover pages or headers), or other content that is stored in “Building Blocks.” Do you want to save changes to “Building Blocks”?
10. Click SAVE. This allows you to continue using the customized text box that you saved.