+ All Categories
Home > Documents > 7. Read Me First 1.

7. Read Me First 1.

Date post: 10-Feb-2022
Category:
Upload: others
View: 1 times
Download: 0 times
Share this document with a friend
2
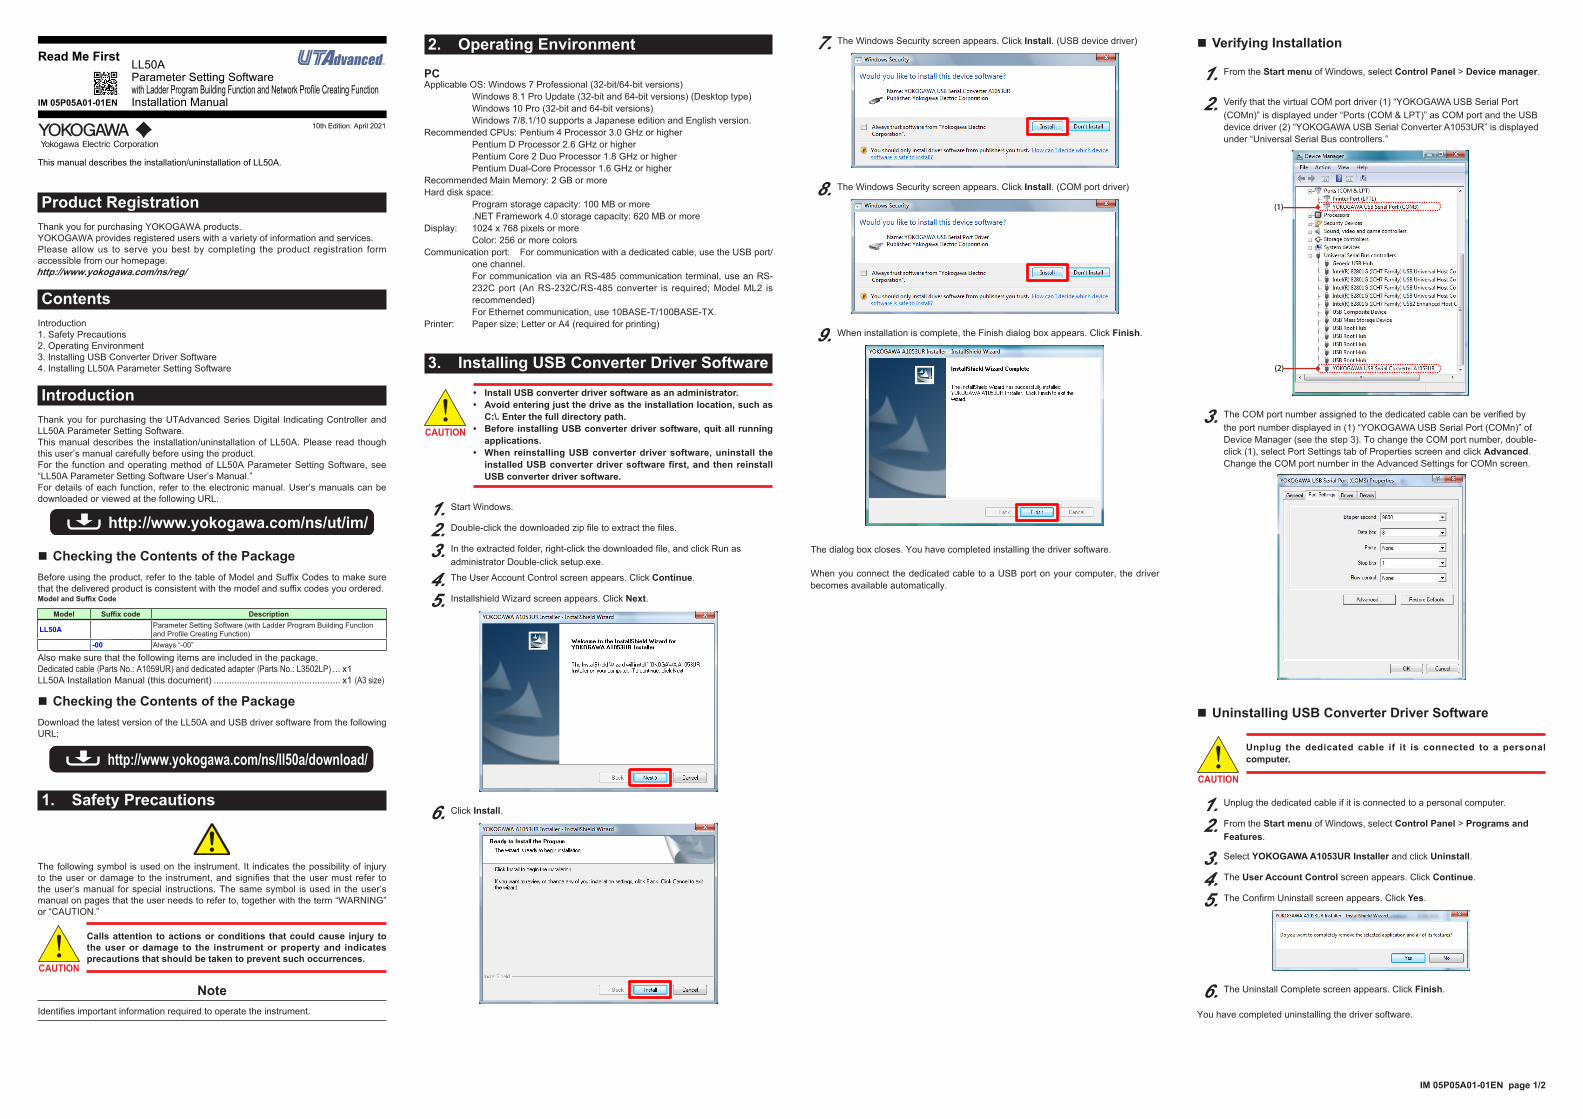
IM 05P05A01-01EN page 1/2 Product Registration Thank you for purchasing YOKOGAWA products. YOKOGAWA provides registered users with a variety of information and services. Please allow us to serve you best by completing the product registration form accessible from our homepage. http://www.yokogawa.com/ns/reg/ Contents Introduction 1. Safety Precautions 2. Operating Environment 3. Installing USB Converter Driver Software 4. Installing LL50A Parameter Setting Software Introduction Thank you for purchasing the UTAdvanced Series Digital Indicating Controller and LL50A Parameter Setting Software. This manual describes the installation/uninstallation of LL50A. Please read though this user’s manual carefully before using the product. For the function and operating method of LL50A Parameter Setting Software, see “LL50A Parameter Setting Software User’s Manual.” For details of each function, refer to the electronic manual. User’s manuals can be downloaded or viewed at the following URL. http://www.yokogawa.com/ns/ut/im/ n Checking the Contents of the Package Before using the product, refer to the table of Model and Suffix Codes to make sure that the delivered product is consistent with the model and suffix codes you ordered. Model and Suffix Code Model Suffix code Description LL50A Parameter Setting Software (with Ladder Program Building Function and Profile Creating Function) -00 Always “-00” Also make sure that the following items are included in the package. Dedicated cable (Parts No.: A1059UR) and dedicated adapter (Parts No.: L3502LP) ... x1 LL50A Installation Manual (this document) ................................................. x1 (A3 size) n Checking the Contents of the Package Download the latest version of the LL50A and USB driver software from the following URL; http://www.yokogawa.com/ns/ll50a/download/ 1. Safety Precautions The following symbol is used on the instrument. It indicates the possibility of injury to the user or damage to the instrument, and signifies that the user must refer to the user’s manual for special instructions. The same symbol is used in the user’s manual on pages that the user needs to refer to, together with the term “WARNING” or “CAUTION.” CAUTION Calls attention to actions or conditions that could cause injury to the user or damage to the instrument or property and indicates precautions that should be taken to prevent such occurrences. Note Identifies important information required to operate the instrument. 2. Operating Environment PC Applicable OS: Windows 7 Professional (32-bit/64-bit versions) Windows 8.1 Pro Update (32-bit and 64-bit versions) (Desktop type) Windows 10 Pro (32-bit and 64-bit versions) Windows 7/8.1/10 supports a Japanese edition and English version. Recommended CPUs: Pentium 4 Processor 3.0 GHz or higher Pentium D Processor 2.6 GHz or higher Pentium Core 2 Duo Processor 1.8 GHz or higher Pentium Dual-Core Processor 1.6 GHz or higher Recommended Main Memory: 2 GB or more Hard disk space: Program storage capacity: 100 MB or more .NET Framework 4.0 storage capacity: 620 MB or more Display: 1024 x 768 pixels or more Color: 256 or more colors Communication port: For communication with a dedicated cable, use the USB port/ one channel. For communication via an RS-485 communication terminal, use an RS- 232C port (An RS-232C/RS-485 converter is required; Model ML2 is recommended) For Ethernet communication, use 10BASE-T/100BASE-TX. Printer: Paper size; Letter or A4 (required for printing) 3. Installing USB Converter Driver Software CAUTION Install USB converter driver software as an administrator. Avoid entering just the drive as the installation location, such as C:\. Enter the full directory path. Before installing USB converter driver software, quit all running applications. When reinstalling USB converter driver software, uninstall the installed USB converter driver software first, and then reinstall USB converter driver software. 1. Start Windows. 2. Double-click the downloaded zip file to extract the files. 3. In the extracted folder, right-click the downloaded file, and click Run as administrator Double-click setup.exe. 4. The User Account Control screen appears. Click Continue. 5. Installshield Wizard screen appears. Click Next. 6. Click Install. 7. The Windows Security screen appears. Click Install. (USB device driver) 8. The Windows Security screen appears. Click Install. (COM port driver) 9. When installation is complete, the Finish dialog box appears. Click Finish. The dialog box closes. You have completed installing the driver software. When you connect the dedicated cable to a USB port on your computer, the driver becomes available automatically. n Verifying Installation 1. From the Start menu of Windows, select Control Panel > Device manager. 2. Verify that the virtual COM port driver (1) “YOKOGAWA USB Serial Port (COMn)” is displayed under “Ports (COM & LPT)” as COM port and the USB device driver (2) “YOKOGAWA USB Serial Converter A1053UR” is displayed under “Universal Serial Bus controllers.” (1) (2) 3. The COM port number assigned to the dedicated cable can be verified by the port number displayed in (1) “YOKOGAWA USB Serial Port (COMn)” of Device Manager (see the step 3). To change the COM port number, double- click (1), select Port Settings tab of Properties screen and click Advanced. Change the COM port number in the Advanced Settings for COMn screen. n Uninstalling USB Converter Driver Software CAUTION Unplug the dedicated cable if it is connected to a personal computer. 1. Unplug the dedicated cable if it is connected to a personal computer. 2. From the Start menu of Windows, select Control Panel > Programs and Features. 3. Select YOKOGAWA A1053UR Installer and click Uninstall. 4. The User Account Control screen appears. Click Continue. 5. The Confirm Uninstall screen appears. Click Yes. 6. The Uninstall Complete screen appears. Click Finish. You have completed uninstalling the driver software. Read Me First IM 05P05A01-01EN 10th Edition: April 2021 LL50A Parameter Setting Software with Ladder Program Building Function and Network Profile Creating Function Installation Manual This manual describes the installation/uninstallation of LL50A.
Transcript

IM 05P05A01-01EN page 1/2

Product RegistrationThank you for purchasing YOKOGAWA products.YOKOGAWA provides registered users with a variety of information and services.Please allow us to serve you best by completing the product registration form accessible from our homepage.http://www.yokogawa.com/ns/reg/

ContentsIntroduction1. Safety Precautions2. Operating Environment3. Installing USB Converter Driver Software4. Installing LL50A Parameter Setting Software

IntroductionThank you for purchasing the UTAdvanced Series Digital Indicating Controller and LL50A Parameter Setting Software.This manual describes the installation/uninstallation of LL50A. Please read though this user’s manual carefully before using the product.For the function and operating method of LL50A Parameter Setting Software, see “LL50A Parameter Setting Software User’s Manual.”For details of each function, refer to the electronic manual. User’s manuals can be downloaded or viewed at the following URL.

http://www.yokogawa.com/ns/ut/im/

n Checking the Contents of the PackageBefore using the product, refer to the table of Model and Suffix Codes to make sure that the delivered product is consistent with the model and suffix codes you ordered.Model and Suffix Code

Model Suffix code Description

LL50A Parameter Setting Software (with Ladder Program Building Function and Profile Creating Function)

-00 Always “-00”

Also make sure that the following items are included in the package.Dedicated cable (Parts No.: A1059UR) and dedicated adapter (Parts No.: L3502LP) ... x1LL50A Installation Manual (this document) ................................................. x1 (A3 size)

n Checking the Contents of the PackageDownload the latest version of the LL50A and USB driver software from the following URL;

http://www.yokogawa.com/ns/ll50a/download/

1. Safety Precautions

The following symbol is used on the instrument. It indicates the possibility of injury to the user or damage to the instrument, and signifies that the user must refer to the user’s manual for special instructions. The same symbol is used in the user’s manual on pages that the user needs to refer to, together with the term “WARNING” or “CAUTION.”

CAUTION

Calls attention to actions or conditions that could cause injury to the user or damage to the instrument or property and indicates precautions that should be taken to prevent such occurrences.

NoteIdentifies important information required to operate the instrument.

2. Operating EnvironmentPCApplicable OS: Windows 7 Professional (32-bit/64-bit versions) Windows 8.1 Pro Update (32-bit and 64-bit versions) (Desktop type) Windows 10 Pro (32-bit and 64-bit versions) Windows 7/8.1/10 supports a Japanese edition and English version.Recommended CPUs: Pentium 4 Processor 3.0 GHz or higher Pentium D Processor 2.6 GHz or higher Pentium Core 2 Duo Processor 1.8 GHz or higher Pentium Dual-Core Processor 1.6 GHz or higherRecommended Main Memory: 2 GB or moreHard disk space: Program storage capacity: 100 MB or more .NET Framework 4.0 storage capacity: 620 MB or moreDisplay: 1024 x 768 pixels or more Color: 256 or more colorsCommunication port: For communication with a dedicated cable, use the USB port/

one channel. For communication via an RS-485 communication terminal, use an RS-

232C port (An RS-232C/RS-485 converter is required; Model ML2 is recommended)

For Ethernet communication, use 10BASE-T/100BASE-TX.Printer: Paper size; Letter or A4 (required for printing)

3. Installing USB Converter Driver Software

CAUTION

• Install USB converter driver software as an administrator.• Avoid entering just the drive as the installation location, such as

C:\. Enter the full directory path.• Before installing USB converter driver software, quit all running

applications.• When reinstalling USB converter driver software, uninstall the

installed USB converter driver software first, and then reinstall USB converter driver software.

1. Start Windows.

2. Double-click the downloaded zip file to extract the files.

3. In the extracted folder, right-click the downloaded file, and click Run as administrator Double-click setup.exe.

4. The User Account Control screen appears. Click Continue.

5. Installshield Wizard screen appears. Click Next.

6. Click Install.

7. The Windows Security screen appears. Click Install. (USB device driver)

8. The Windows Security screen appears. Click Install. (COM port driver)

9. When installation is complete, the Finish dialog box appears. Click Finish.

The dialog box closes. You have completed installing the driver software.

When you connect the dedicated cable to a USB port on your computer, the driver becomes available automatically.

n Verifying Installation

1. From the Start menu of Windows, select Control Panel > Device manager.

2. Verify that the virtual COM port driver (1) “YOKOGAWA USB Serial Port (COMn)” is displayed under “Ports (COM & LPT)” as COM port and the USB device driver (2) “YOKOGAWA USB Serial Converter A1053UR” is displayed under “Universal Serial Bus controllers.”

(1)

(2)

3. The COM port number assigned to the dedicated cable can be verified by the port number displayed in (1) “YOKOGAWA USB Serial Port (COMn)” of Device Manager (see the step 3). To change the COM port number, double-click (1), select Port Settings tab of Properties screen and click Advanced.

Change the COM port number in the Advanced Settings for COMn screen.

n Uninstalling USB Converter Driver Software

CAUTION

Unplug the dedicated cable if it is connected to a personal computer.

1. Unplug the dedicated cable if it is connected to a personal computer.

2. From the Start menu of Windows, select Control Panel > Programs and Features.

3. Select YOKOGAWA A1053UR Installer and click Uninstall.

4. The User Account Control screen appears. Click Continue.

5. The Confirm Uninstall screen appears. Click Yes.

6. The Uninstall Complete screen appears. Click Finish.

You have completed uninstalling the driver software.

Read Me First

IM 05P05A01-01EN

10th Edition: April 2021

LL50AParameter Setting Software with Ladder Program Building Function and Network Profile Creating FunctionInstallation Manual

This manual describes the installation/uninstallation of LL50A.

IM 05P05A01-01EN page 2/2

4. Installing LL50A Parameter Setting Software

CAUTION

• Install the software as an administrator.• Do not set LL50A user file save directory in Program Files folder.

The LL50A will not work properly.• Before installing LL50A Setting Software, quit all running

applications.• Avoid entering just the drive as the installation location, such as

C:\. Enter the full directory path.• When .NET Framework 4.0 is not installed on personal computer,

.NET Framework 4.0 is installed to start LL50A.• When reinstalling LL50A, uninstall the installed LL50A first, and

then reinstall LL50A.

n Installing LL50A Parameter Setting Software

1. Start Windows.

2. Double-click the downloaded zip file to extract the files.

3. In the extracted folder, right-click the downloaded file, and click Run as administrator Double-click setup.exe.

4. When .NET Framework 4.0 is not installed on a personal computer, the license agreement for installing it appears. Click Accept.

5. The message “Copying required files” appears. And then the message “Installing .NET Framework 4.0” appears.

6. The User Account Control screen appears. Click Continue.

7. The message “Please wait while Setup configures the components.” appears.

8. The message “Setup must reboot before proceeding.” may appear. Click Yes.

9. Personal computer reboots. The LL50A Setup Wizard appears. Click Next.

10. The License Agreement for Package Software Product appears. Read this license agreement carefully. If you agree, select I Agree. Click Next.

Note: If I Do Not Agree is selected, you cannot install the LL50A. Click Cancel.

11. The Select Installation Folder screen appears. Select Everyone or Just me. Click Next.

Note When you install the LL50A after "Everyone" is selected, even if other users

log in, it is possible to start LL50A from the Start menu > Programs menu. When you install the LL50A after "Just me" is selected, even if other users log

in, LL50A is not displayed in the Programs.

12. The Setup Type screen appears. Select Complete and click Next. (We recommend choosing Complete.)

Note1: If you chose Complete, go to the procedure 13.Note2: If you chose Custom, continue the procedure as follows: Choose each installation method (*1) of LL50A, or Profile and Setting, then click Next.

(2)(1)

*1: Profile is to install Network Profile Tool. Setting is to install Parameter Setting Tool. (1) On the LL50A, select Entire feature will be installed on local hard drive. (2) On the Profile and Setting, select either Will be installed on local hard drive, or

Entire feature will be unavailable.

13. The Confirm Installation screen appears. Click Next.

14. The message “Installing LL50A” appears. The User Account Control screen appears. Click Allow.

15. Installation begins. When installation is completed, a confirmation message appears. Click Close.

The following icons are appeared on the desktop.

[Setting Tool] [Network Profile Tool]

You have completed installing the LL50A parameter setting software.

n Verifying Installation of LL50A Parameter Setting SoftwareFrom the Start menu of Windows, point to All Programs, then UTAdvanced and verify that the Setting Tool and the Network Profile Tool is registered.

n Uninstalling LL50A Parameter Setting SoftwareFrom the Start menu of Windows, select Control Panel > Programs and Features (*1) > LL50A and uninstall it.The User Account Control screen appears. Click Allow. The LL50A is uninstalled.

*1: From the Start menu of Windows, select Control Panel > Uninstall a program if the control panel's display method is “Control Panel Home.”

www.yokogawa.com/ns

YOKOGAWA ELECTRIC CORPORATIONNetwork Solutions Business Division

2-9-32, Naka-cho Musashino-shi, Tokyo 180-8750 JAPANYOKOGAWA CORPORATION OF AMERICA

Head office and for product sales2 Dart Road, Newnan, Georgia 30265, USA

YOKOGAWA EUROPE B.V.Headquarters

Euroweg 2, 3825 HD Amersfoort, THE NETHERLANDS

All Rights Reserved, Copyright © 2010 Yokogawa Electric Corporation

Waste Electrical and Electronic Equipment (WEEE), DirectiveThis is an explanation of how to dispose of this product based on Waste Electrical and Electronic Equipment (WEEE), Directive. This directive is only valid in the EU.

MarkingThis product complies with the WEEE Directive marking requirement. This marking indicates that you must not discard this electrical/electronic product in domestic household waste.

Product CategoryWith reference to the equipment types in the WEEE directive, this product is classified as a “Small equipment” product.Do not dispose in domestic household waste.When disposing products in the EU, contact your local Yokogawa office in Europe.

Authorised Representative in the EEAYokogawa Europe BV. (Address: Euroweg 2 , 3825 HD Amersfoort, The Netherlands) is the Authorised Representative of Yokogawa Electric Corporation for this Product in the EEA.

Printed ManualLL50A Parameter Setting Software with Ladder Program Building Function and Network Profile Creating Function Installation Manual (IM 05P05A01-01EN)

Electronic ManualYou can download the latest manuals from the following website:URL: http://www.yokogawa.com/ns/ut/im/LL50A Parameter Setting Software with Ladder Program Building Function and Network Profile Creating Function (IM 05P05A01-02EN)

General SpecificationsLL50A Parameter Setting Software with Ladder Program Building Function and Network Profile Creating Function (GS 05P05A01-01EN)

* The last two characters of the manual number and general specification number indicate the language in which the manual is written.

■ QR CodeThe product has a QR Code pasted for efficient plant maintenance work and asset information management. It enables confirming the specifications of purchased products and user’s manuals.For more details, please refer to the following URL.https://www.yokogawa.com/qr-codeQR Code is a registered trademark of DENSO WAVE INCORPORATED.


Recommended