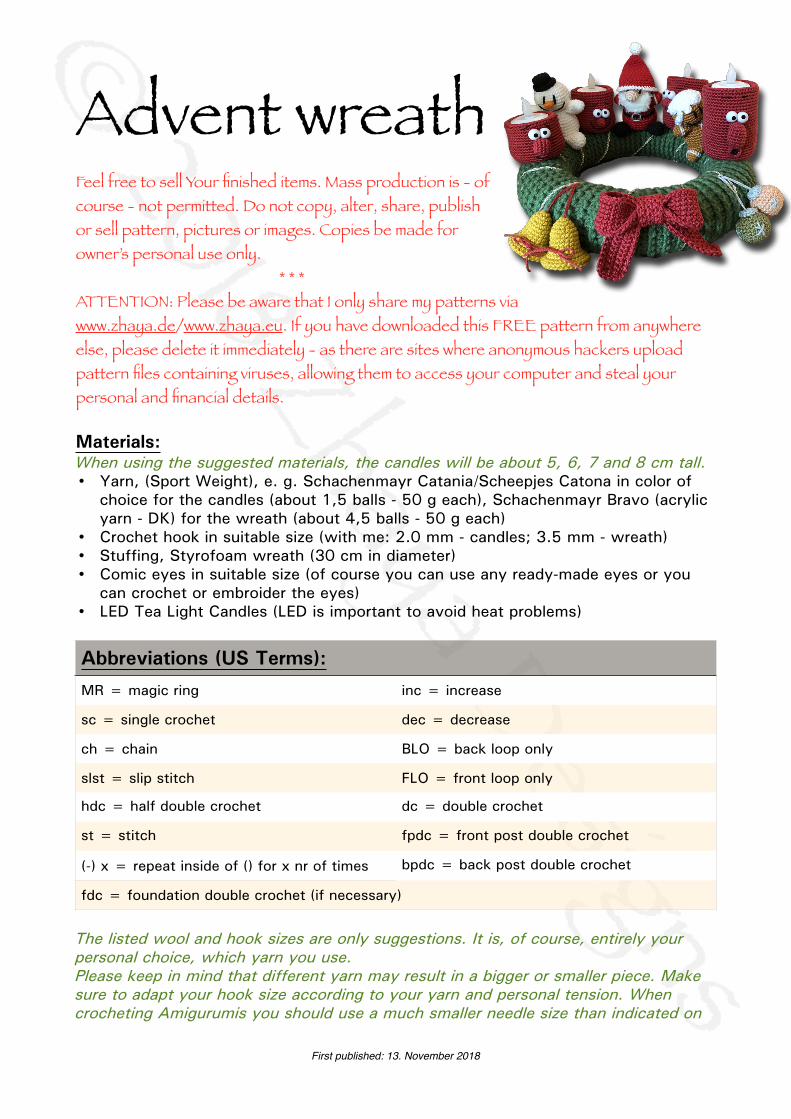
Advent wreath Feel free to sell Your finished items. Mass production is - of course - not permitted. Do not copy, alter, share, publish or sell pattern, pictures or images. Copies be made for owner’s personal use only. * * * ATTENTION: Please be aware that I only share my patterns via www.zhaya.de/www.zhaya.eu. If you have downloaded this FREE pattern from anywhere else, please delete it immediately - as there are sites where anonymous hackers upload pattern files containing viruses, allowing them to access your computer and steal your personal and financial details. Materials: When using the suggested materials, the candles will be about 5, 6, 7 and 8 cm tall. • Yarn, (Sport Weight), e. g. Schachenmayr Catania/Scheepjes Catona in color of choice for the candles (about 1,5 balls - 50 g each), Schachenmayr Bravo (acrylic yarn - DK) for the wreath (about 4,5 balls - 50 g each) • Crochet hook in suitable size (with me: 2.0 mm - candles; 3.5 mm - wreath) • Stuffing, Styrofoam wreath (30 cm in diameter) • Comic eyes in suitable size (of course you can use any ready-made eyes or you can crochet or embroider the eyes) • LED Tea Light Candles (LED is important to avoid heat problems) The listed wool and hook sizes are only suggestions. It is, of course, entirely your personal choice, which yarn you use. Please keep in mind that different yarn may result in a bigger or smaller piece. Make sure to adapt your hook size according to your yarn and personal tension. When crocheting Amigurumis you should use a much smaller needle size than indicated on Abbreviations (US Terms): MR = magic ring inc = increase sc = single crochet dec = decrease ch = chain BLO = back loop only slst = slip stitch FLO = front loop only hdc = half double crochet dc = double crochet st = stitch fpdc = front post double crochet (-) x = repeat inside of () for x nr of times bpdc = back post double crochet fdc = foundation double crochet (if necessary) First published: 13. November 2018
Transcript
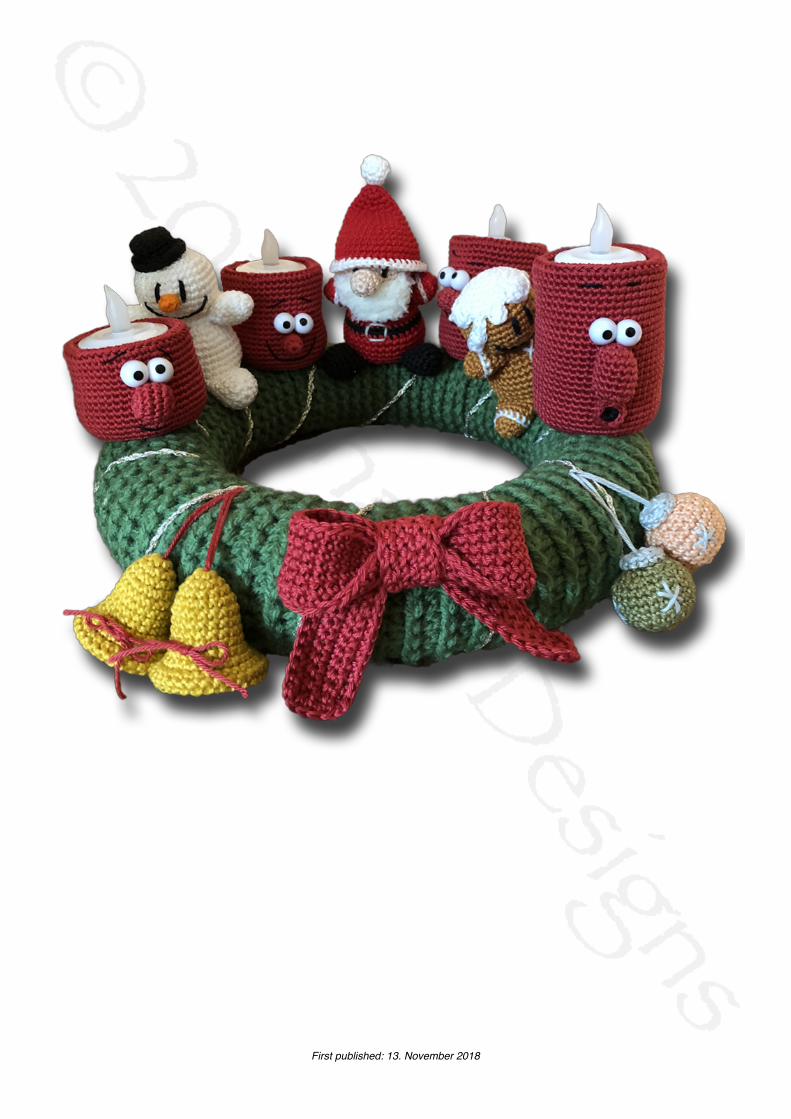
Advent wreath
Feel free to sell Your finished items. Mass production is - of course - not permitted. Do not copy, alter, share, publish or sell pattern, pictures or images. Copies be made for owner’s personal use only.
* * * ATTENTION: Please be aware that I only share my patterns via www.zhaya.de/www.zhaya.eu. If you have downloaded this FREE pattern from anywhere else, please delete it immediately - as there are sites where anonymous hackers upload pattern files containing viruses, allowing them to access your computer and steal your personal and financial details.
Materials: When using the suggested materials, the candles will be about 5, 6, 7 and 8 cm tall. • Yarn, (Sport Weight), e. g. Schachenmayr Catania/Scheepjes Catona in color of
choice for the candles (about 1,5 balls - 50 g each), Schachenmayr Bravo (acrylic yarn - DK) for the wreath (about 4,5 balls - 50 g each)
• Crochet hook in suitable size (with me: 2.0 mm - candles; 3.5 mm - wreath) • Stuffing, Styrofoam wreath (30 cm in diameter) • Comic eyes in suitable size (of course you can use any ready-made eyes or you
can crochet or embroider the eyes) • LED Tea Light Candles (LED is important to avoid heat problems)
The listed wool and hook sizes are only suggestions. It is, of course, entirely your personal choice, which yarn you use. Please keep in mind that different yarn may result in a bigger or smaller piece. Make sure to adapt your hook size according to your yarn and personal tension. When crocheting Amigurumis you should use a much smaller needle size than indicated on
Abbreviations (US Terms):
MR = magic ring inc = increase
sc = single crochet dec = decrease
ch = chain BLO = back loop only
slst = slip stitch FLO = front loop only
hdc = half double crochet dc = double crochet
st = stitch fpdc = front post double crochet
(-) x = repeat inside of () for x nr of times bpdc = back post double crochet
the label or you would use it for other crochet projects so that no holes are made when the piece is stuffed.
Crochet in continuous rounds (spirals), unless otherwise stated.
For help with invisible color changes, increases and decreases, please visit the „Tipps, Tricks and Tutorials“section on my website www.zhaya.de.
For the wreath there is already a pattern here: https://www.zhaya.de/wreath.html. Especially this Advent wreath here is a little bit differently worked, although only slightly. I will explain the differences here :o)
Wreath made with front and back post double crochet stitches: Green (DK), hook size 3.5 mm Crochet in joined rounds (join each round with a slst and chain 3).
Instead of the half double crochet stitches, which I usually use for my wreaths, this time I decided to use front and back post double crochet stitches (alternating between the front and back posts). The upside is that you can crochet in rounds and therefore one sewing step is not necessary. Another plus (at least for me), the wreath becomes a bit more voluminous, I like that. Of course there is also a downside - a lot of thread is used, because somewhere the volume will come from.
Here I used foundation double crochet stitches for the first time. I recently understood this method and think it's great and it's really good for the wreath because you just crochet until the fabric reaches around the outer edge of the polystyrene wreath, join round with a slip stitch. Alternatively you can also use a standard foundation chain, but this should be 2-3 stitches (or more) longer than the circumference of the wreath, as the fabric will shrink a bit, join round with a slip stitch (make sure that the foundation chain is not twisted). Now chain 3 (counts as the first double crochet), then starting in 4th stitch from the hook: dc 1 in each chain. From here you crochet every round the same: • ch 2, alternately 1 front post double crochet, 1 back post double crochet, join
round with a slip stitch
Do this until you have a loop (yes, like a scarf) that is wide enough to sew the first and the last round together on the back of the wreath, some tension is allowed, so that the sides don't reach exactly to each other (I hope you understand what I mean).
Then just put the loop around the wreath and if necessary pin it down a little and sew stitch by stitch carefully, making sure that the exactly opposite stitches are always sewn together (follow the ribs).
Candle: Color of choice (Sport), hook size 2.0 mm The number of rounds may vary depending on the yarn used, hook size and your personal tension. These have to be adapted so that the tea light candle fits in, I will indicate this again in the appropriate places. Also see the following photos. The candle is crocheted top down. 1. sc 7 in MR (7) 2. inc x7 (14) 3. (sc 1, inc) x7 (21) 4. (sc 2, inc) x7 (28) 5. (sc 3, inc) x7 (35) 6. (sc 4, inc) x7 (42) Just continue working more or less rounds in this style until the bottom diameter of the tea light candle is reached. 7. FLO: sc in each st around (42) 8.-14. (7 Rounds) sc in each st around (42) <- work so many rounds until the "potty" is a little higher than the tea light candle The next two rounds cause a bend of 90 degrees each, i.e. 180 degrees in total, i.e. the candle is flipped over here later. 15. BLO: (sc 5, inc) x7 (49) 16. BLO: sc in each st around (49) In the following, the number of rounds depends on how big the candle should be, here too it may be necessary to adapt. I made the first candle a little bigger than the tea light candle and for each additional candle I crocheted 4 rounds more (12, 16, 20 and 24 rounds). 17. -28. (12 Rounds) sc in each st around (49)
If using safety eyes, attach them now in a suitable place. Now the bottom of the candle begins. 29. FLO: (sc 5, dec) x7 (42) 30. (sc 4, dec) x7 (35) 31. (sc 3, dec) x7 (28) For stuffing it is best to insert the tea light candle at the top, then stuff the candle loosely with fibre fill so that no dents are visible anymore. 32. (sc 2, dec) x7 (21) 33. (sc 1, dec) x7 (14) 34. dec x7 (7) Fasten off, close, weave in loose ends. TIP: Thread the yarn tail through a needle, insert the needle at the bottom through the middle, then at the top (in the 1st round) through the middle and a stitch offset back to the bottom, tighten a little so that the bottom curves inwards, then the candle stands without problems.
First published: 13. November 2018
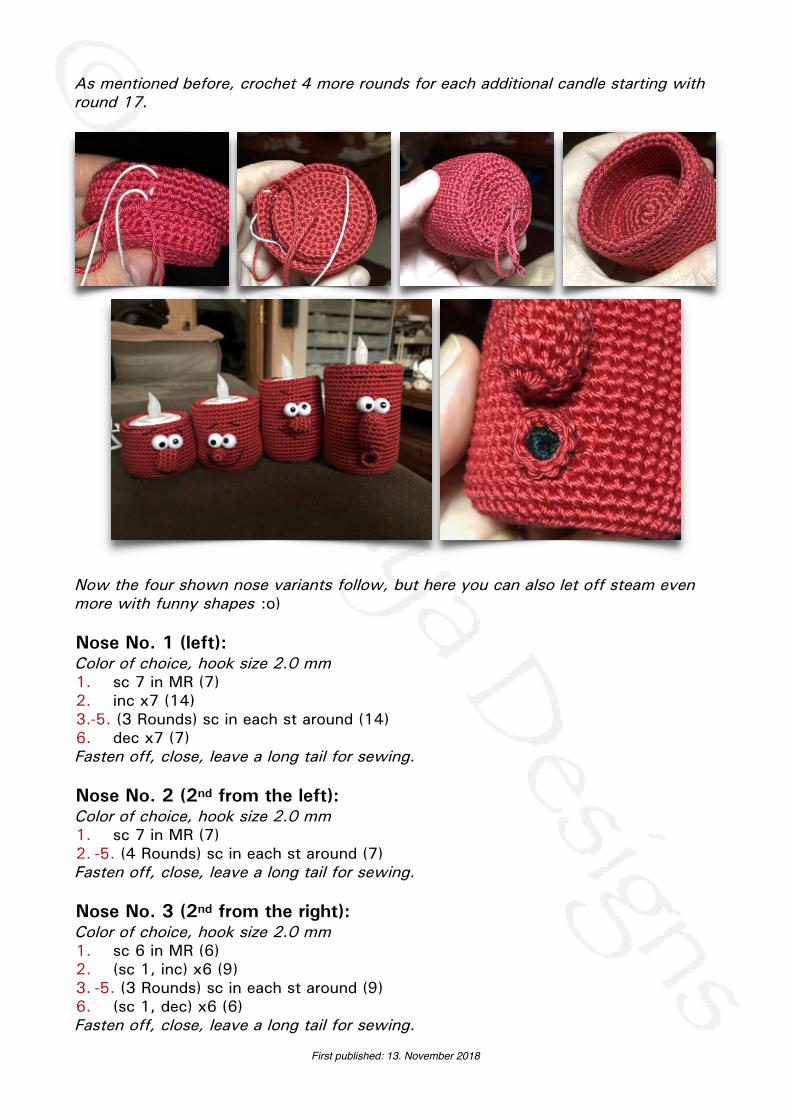
As mentioned before, crochet 4 more rounds for each additional candle starting with round 17.
Now the four shown nose variants follow, but here you can also let off steam even more with funny shapes :o)
Nose No. 1 (left): Color of choice, hook size 2.0 mm 1. sc 7 in MR (7) 2. inc x7 (14) 3.-5. (3 Rounds) sc in each st around (14) 6. dec x7 (7) Fasten off, close, leave a long tail for sewing.
Nose No. 2 (2nd from the left): Color of choice, hook size 2.0 mm 1. sc 7 in MR (7) 2. -5. (4 Rounds) sc in each st around (7) Fasten off, close, leave a long tail for sewing.
Nose No. 3 (2nd from the right): Color of choice, hook size 2.0 mm 1. sc 6 in MR (6) 2. (sc 1, inc) x6 (9) 3. -5. (3 Rounds) sc in each st around (9) 6. (sc 1, dec) x6 (6) Fasten off, close, leave a long tail for sewing.
First published: 13. November 2018
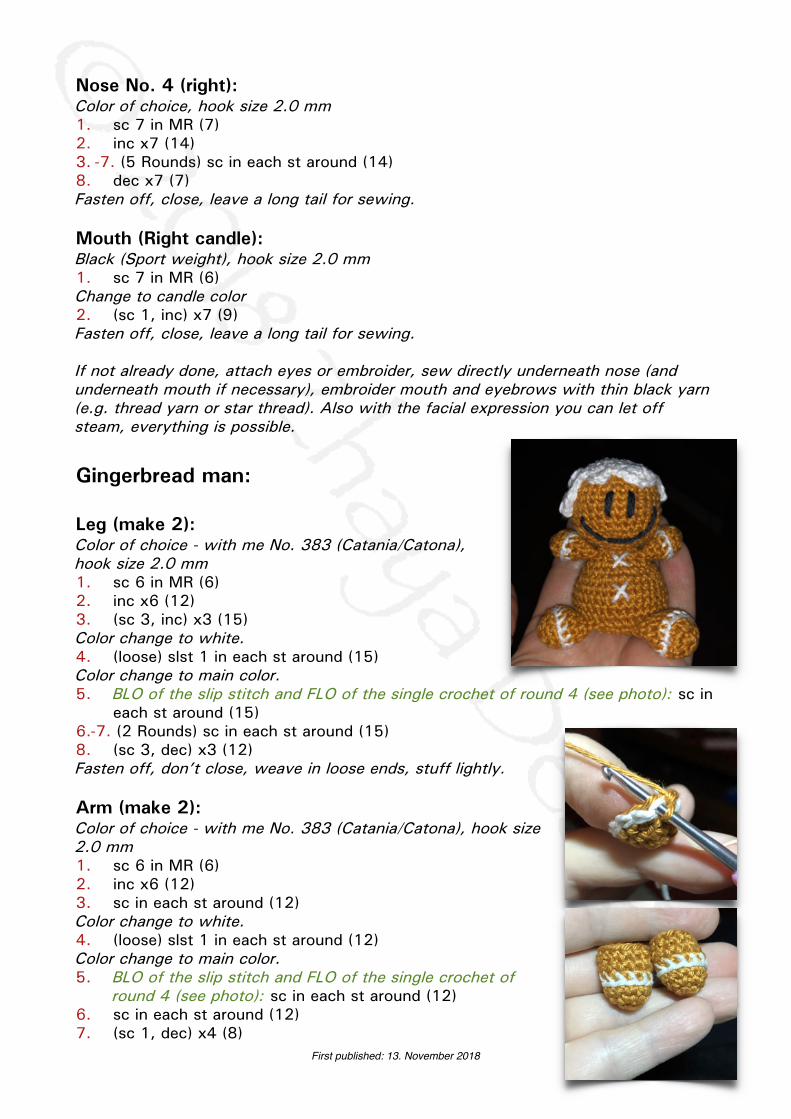
Nose No. 4 (right): Color of choice, hook size 2.0 mm 1. sc 7 in MR (7) 2. inc x7 (14) 3. -7. (5 Rounds) sc in each st around (14) 8. dec x7 (7) Fasten off, close, leave a long tail for sewing.
Mouth (Right candle): Black (Sport weight), hook size 2.0 mm 1. sc 7 in MR (6) Change to candle color 2. (sc 1, inc) x7 (9) Fasten off, close, leave a long tail for sewing.
If not already done, attach eyes or embroider, sew directly underneath nose (and underneath mouth if necessary), embroider mouth and eyebrows with thin black yarn (e.g. thread yarn or star thread). Also with the facial expression you can let off steam, everything is possible.
Gingerbread man:
Leg (make 2): Color of choice - with me No. 383 (Catania/Catona), hook size 2.0 mm 1. sc 6 in MR (6) 2. inc x6 (12) 3. (sc 3, inc) x3 (15) Color change to white. 4. (loose) slst 1 in each st around (15) Color change to main color. 5. BLO of the slip stitch and FLO of the single crochet of round 4 (see photo): sc in
each st around (15) 6.-7. (2 Rounds) sc in each st around (15) 8. (sc 3, dec) x3 (12) Fasten off, don’t close, weave in loose ends, stuff lightly.
Arm (make 2): Color of choice - with me No. 383 (Catania/Catona), hook size 2.0 mm 1. sc 6 in MR (6) 2. inc x6 (12) 3. sc in each st around (12) Color change to white. 4. (loose) slst 1 in each st around (12) Color change to main color. 5. BLO of the slip stitch and FLO of the single crochet of
round 4 (see photo): sc in each st around (12) 6. sc in each st around (12) 7. (sc 1, dec) x4 (8)
First published: 13. November 2018
Fasten off, don’t close, weave in loose ends, stuff lightly.
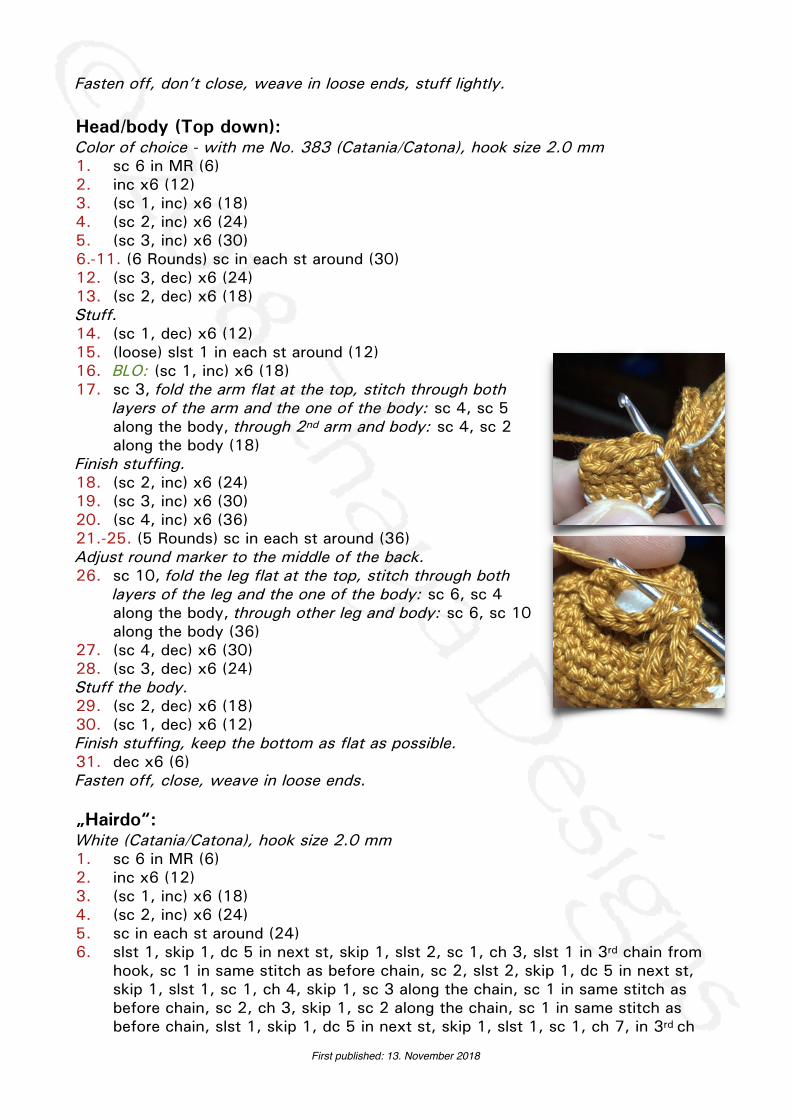
Head/body (Top down): Color of choice - with me No. 383 (Catania/Catona), hook size 2.0 mm 1. sc 6 in MR (6) 2. inc x6 (12) 3. (sc 1, inc) x6 (18) 4. (sc 2, inc) x6 (24) 5. (sc 3, inc) x6 (30) 6.-11. (6 Rounds) sc in each st around (30) 12. (sc 3, dec) x6 (24) 13. (sc 2, dec) x6 (18) Stuff. 14. (sc 1, dec) x6 (12) 15. (loose) slst 1 in each st around (12) 16. BLO: (sc 1, inc) x6 (18) 17. sc 3, fold the arm flat at the top, stitch through both
layers of the arm and the one of the body: sc 4, sc 5 along the body, through 2nd arm and body: sc 4, sc 2 along the body (18)
Finish stuffing. 18. (sc 2, inc) x6 (24) 19. (sc 3, inc) x6 (30) 20. (sc 4, inc) x6 (36) 21.-25. (5 Rounds) sc in each st around (36) Adjust round marker to the middle of the back. 26. sc 10, fold the leg flat at the top, stitch through both
layers of the leg and the one of the body: sc 6, sc 4 along the body, through other leg and body: sc 6, sc 10 along the body (36)
27. (sc 4, dec) x6 (30) 28. (sc 3, dec) x6 (24) Stuff the body. 29. (sc 2, dec) x6 (18) 30. (sc 1, dec) x6 (12) Finish stuffing, keep the bottom as flat as possible. 31. dec x6 (6) Fasten off, close, weave in loose ends.
„Hairdo“: White (Catania/Catona), hook size 2.0 mm 1. sc 6 in MR (6) 2. inc x6 (12) 3. (sc 1, inc) x6 (18) 4. (sc 2, inc) x6 (24) 5. sc in each st around (24) 6. slst 1, skip 1, dc 5 in next st, skip 1, slst 2, sc 1, ch 3, slst 1 in 3rd chain from
hook, sc 1 in same stitch as before chain, sc 2, slst 2, skip 1, dc 5 in next st, skip 1, slst 1, sc 1, ch 4, skip 1, sc 3 along the chain, sc 1 in same stitch as before chain, sc 2, ch 3, skip 1, sc 2 along the chain, sc 1 in same stitch as before chain, slst 1, skip 1, dc 5 in next st, skip 1, slst 1, sc 1, ch 7, in 3rd ch
First published: 13. November 2018
from hook: hdc 2, sc 2, slst 2, sc 1in same stitch as before chain, sc 1, ch 3, hdc in 3rd ch from hook, sc 1 in same stitch as before chain, slst 1
Fasten off, leave a long tail for sewing. Place the „hairdo“ on the head and sew it on.
Embroider eyes and mouth with black thread, buttons with white thread.
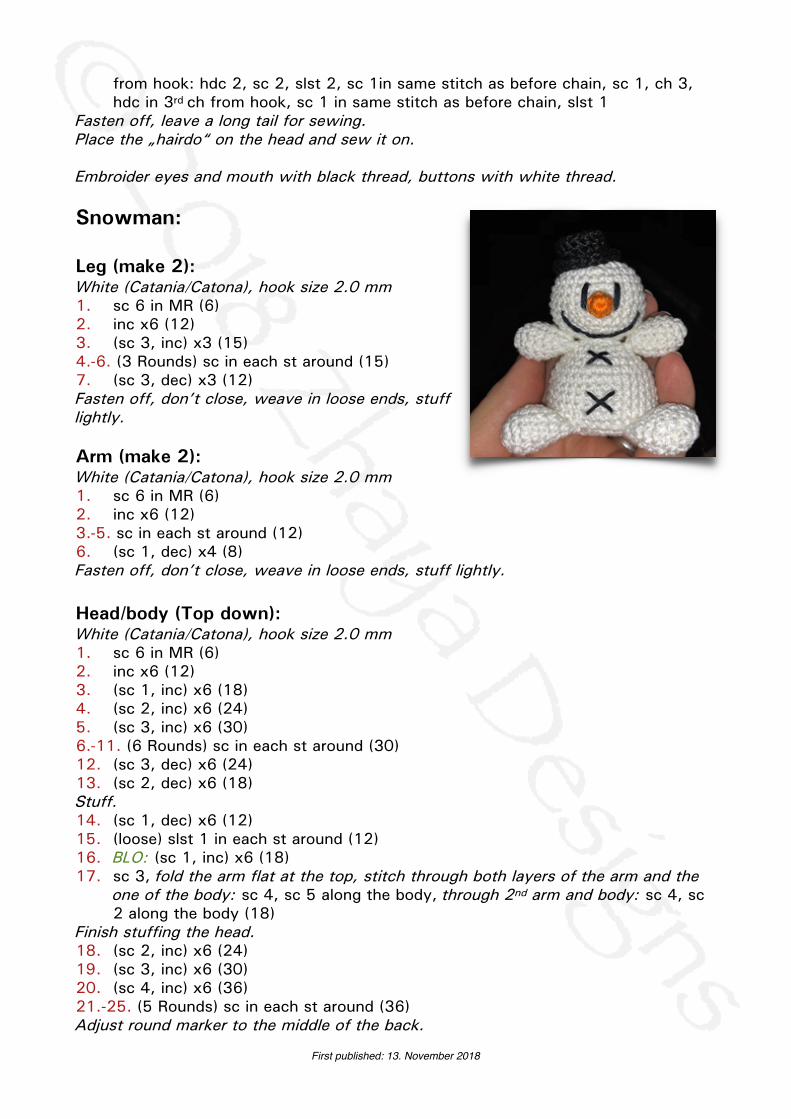
Snowman:
Leg (make 2): White (Catania/Catona), hook size 2.0 mm 1. sc 6 in MR (6) 2. inc x6 (12) 3. (sc 3, inc) x3 (15) 4.-6. (3 Rounds) sc in each st around (15) 7. (sc 3, dec) x3 (12) Fasten off, don’t close, weave in loose ends, stuff lightly.
Arm (make 2): White (Catania/Catona), hook size 2.0 mm 1. sc 6 in MR (6) 2. inc x6 (12) 3.-5. sc in each st around (12) 6. (sc 1, dec) x4 (8) Fasten off, don’t close, weave in loose ends, stuff lightly.
Head/body (Top down): White (Catania/Catona), hook size 2.0 mm 1. sc 6 in MR (6) 2. inc x6 (12) 3. (sc 1, inc) x6 (18) 4. (sc 2, inc) x6 (24) 5. (sc 3, inc) x6 (30) 6.-11. (6 Rounds) sc in each st around (30) 12. (sc 3, dec) x6 (24) 13. (sc 2, dec) x6 (18) Stuff. 14. (sc 1, dec) x6 (12) 15. (loose) slst 1 in each st around (12) 16. BLO: (sc 1, inc) x6 (18) 17. sc 3, fold the arm flat at the top, stitch through both layers of the arm and the
one of the body: sc 4, sc 5 along the body, through 2nd arm and body: sc 4, sc 2 along the body (18)
Finish stuffing the head. 18. (sc 2, inc) x6 (24) 19. (sc 3, inc) x6 (30) 20. (sc 4, inc) x6 (36) 21.-25. (5 Rounds) sc in each st around (36) Adjust round marker to the middle of the back.
First published: 13. November 2018
26. sc 10, fold the leg flat at the top, stitch through both layers of the leg and the one of the body: sc 6, sc 4 along the body, through other leg and body: sc 6, sc 10 along the body (36)
27. (sc 4, dec) x6 (30) 28. (sc 3, dec) x6 (24) Stuff the body. 29. (sc 2, dec) x6 (18) 30. (sc 1, dec) x6 (12) Finish stuffing, keep the bottom as flat as possible. 31. dec x6 (6) Fasten off, close, weave in loose ends.vernähen.
Hat: Black (Catania/Catona), hook size 2.0 mm 1. sc 7 in MR (7) 2. inc x7 (14) 3. BLO: sc in each st around (14) 4.-5. (2 Rounds) sc in each st around (14) 6. FLO: (sc 1, inc) x7 (21) 7. (loose) slst 1 in each st around (21) Fasten off, leave a long tail for sewing. Place the head on the head and sew it on.
Nose: Orange (Catania/Catona), hook size 2.0 mm 1. sc 5 in MR (5) 2. inc x5 (5) Fasten off, leave a long tail for sewing.
Embroider eyes, mouth and buttons with black thread, sew the nose on.
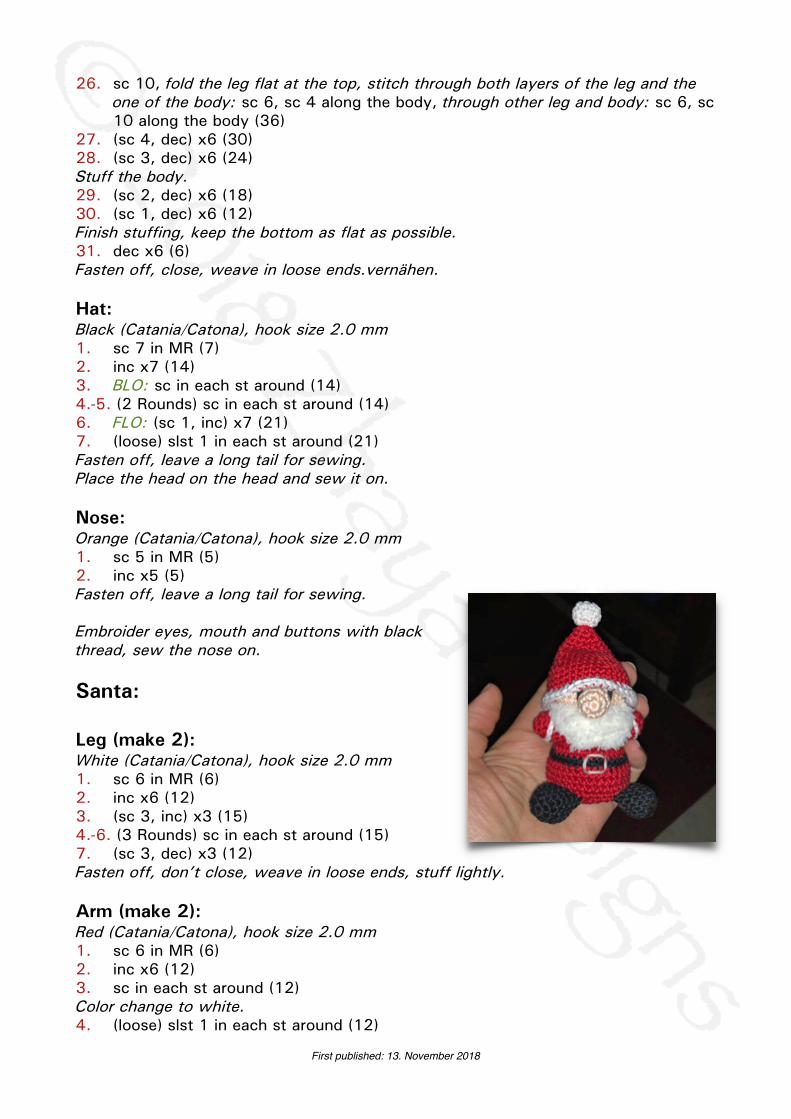
Santa:
Leg (make 2): White (Catania/Catona), hook size 2.0 mm 1. sc 6 in MR (6) 2. inc x6 (12) 3. (sc 3, inc) x3 (15) 4.-6. (3 Rounds) sc in each st around (15) 7. (sc 3, dec) x3 (12) Fasten off, don’t close, weave in loose ends, stuff lightly.
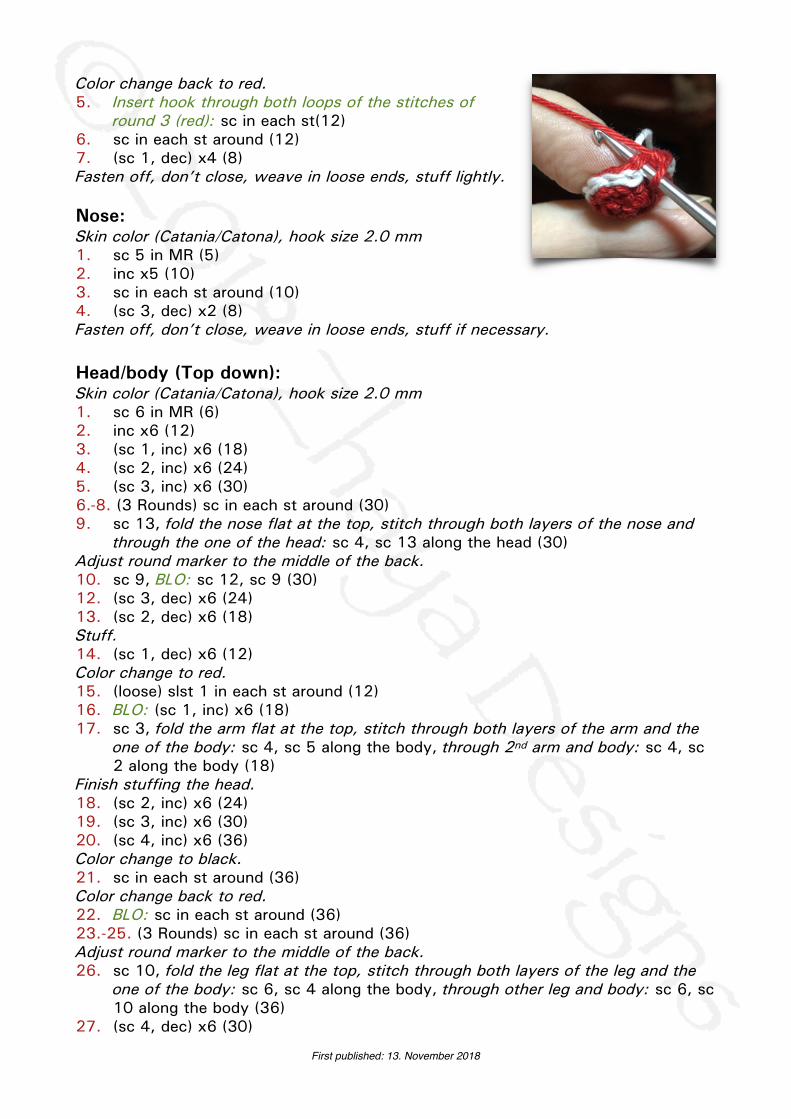
Arm (make 2): Red (Catania/Catona), hook size 2.0 mm 1. sc 6 in MR (6) 2. inc x6 (12) 3. sc in each st around (12) Color change to white. 4. (loose) slst 1 in each st around (12)
First published: 13. November 2018
Color change back to red. 5. Insert hook through both loops of the stitches of
round 3 (red): sc in each st(12) 6. sc in each st around (12) 7. (sc 1, dec) x4 (8) Fasten off, don’t close, weave in loose ends, stuff lightly.
Nose: Skin color (Catania/Catona), hook size 2.0 mm 1. sc 5 in MR (5) 2. inc x5 (10) 3. sc in each st around (10) 4. (sc 3, dec) x2 (8) Fasten off, don’t close, weave in loose ends, stuff if necessary.
Head/body (Top down): Skin color (Catania/Catona), hook size 2.0 mm 1. sc 6 in MR (6) 2. inc x6 (12) 3. (sc 1, inc) x6 (18) 4. (sc 2, inc) x6 (24) 5. (sc 3, inc) x6 (30) 6.-8. (3 Rounds) sc in each st around (30) 9. sc 13, fold the nose flat at the top, stitch through both layers of the nose and
through the one of the head: sc 4, sc 13 along the head (30) Adjust round marker to the middle of the back. 10. sc 9, BLO: sc 12, sc 9 (30) 12. (sc 3, dec) x6 (24) 13. (sc 2, dec) x6 (18) Stuff. 14. (sc 1, dec) x6 (12) Color change to red. 15. (loose) slst 1 in each st around (12) 16. BLO: (sc 1, inc) x6 (18) 17. sc 3, fold the arm flat at the top, stitch through both layers of the arm and the
one of the body: sc 4, sc 5 along the body, through 2nd arm and body: sc 4, sc 2 along the body (18)
Finish stuffing the head. 18. (sc 2, inc) x6 (24) 19. (sc 3, inc) x6 (30) 20. (sc 4, inc) x6 (36) Color change to black. 21. sc in each st around (36) Color change back to red. 22. BLO: sc in each st around (36) 23.-25. (3 Rounds) sc in each st around (36) Adjust round marker to the middle of the back. 26. sc 10, fold the leg flat at the top, stitch through both layers of the leg and the
one of the body: sc 6, sc 4 along the body, through other leg and body: sc 6, sc 10 along the body (36)
27. (sc 4, dec) x6 (30)
First published: 13. November 2018
28. (sc 3, dec) x6 (24) Stuff the body. 29. (sc 2, dec) x6 (18) 30. (sc 1, dec) x6 (12) Finish stuffing, keep the bottom as flat as possible. 31. dec x6 (6) Fasten off, close, weave in loose ends.
For the beard rejoin with white yarn (fluffy yarn is possible, too) in one of the unused loops of round 10, sc 12, ch 1, turn. Crochet in rounds, skip the first stitch in each of the following rows. Make so much rows until you reach the desired length of the beard. Fasten off, weave in loose ends.
Hat: White (Catania/Catona), hook size 2.0 mm 1. sc 6 in MR (6) 2. inc x6 (12) 3.-4. (2 Rounds) sc in each st around (12) 5. dec x6 (6) Color change to red. 6. (sc 1, inc) x3 (9) 7. (sc 2, inc) x3 (12) 8. (sc 3, inc) x3 (15) 9. (sc 4, inc) x3 (18) 10. (sc 5, inc) x3 (21) 11. (sc 6, inc) x3 (24) 12. (sc 7, inc) x3 (27) 13. (sc 8, inc) x3 (30) 14. (sc 9, inc) x3 (36) 15. (sc 10, inc) x3 (39) 16.-18. (3 Rounds) sc in each st around (39) Color change to white. 19. sc in each st around - insert hook 1 round deeper (drop single crochet) (39) Fasten off, leave a long tail for sewing.
Embroider eyes with black yarn, with silver or grey a belt buckle (rectangle). Place the hat on the head and sew it on.
Place the little guys on the wreath and pin or sew them on.
Bell: Color of choice (Catania/Catona), hook size 2.0 mm 1. sc 6 in MR (6) 2. inc x6 (12) 3. sc in each st around (12) 4. (sc 1, inc) x6 (18) 5.-8. (4 Rounds) sc in each st around (18) 9. (sc 2, inc) x6 (24) 10. (sc 3, inc) x6 (30) 11. FLO: sc in each st around (30) 12.-13. (2 Rounds) sc in each st around (30)
First published: 13. November 2018
14. crochet together with the unused back loops of round 11: sc in each st around (30)
Fasten off, weave in loose ends.
Thread the thread of a contrasting color through a needle and insert it around a stitch (see photo), tie the thread to a bow. Put another thread in a loop and knot well at the end, thread this loop from the inside through the middle of the loop ring and pull it upwards (if the knot is too small to hold, just make more knots until it holds).
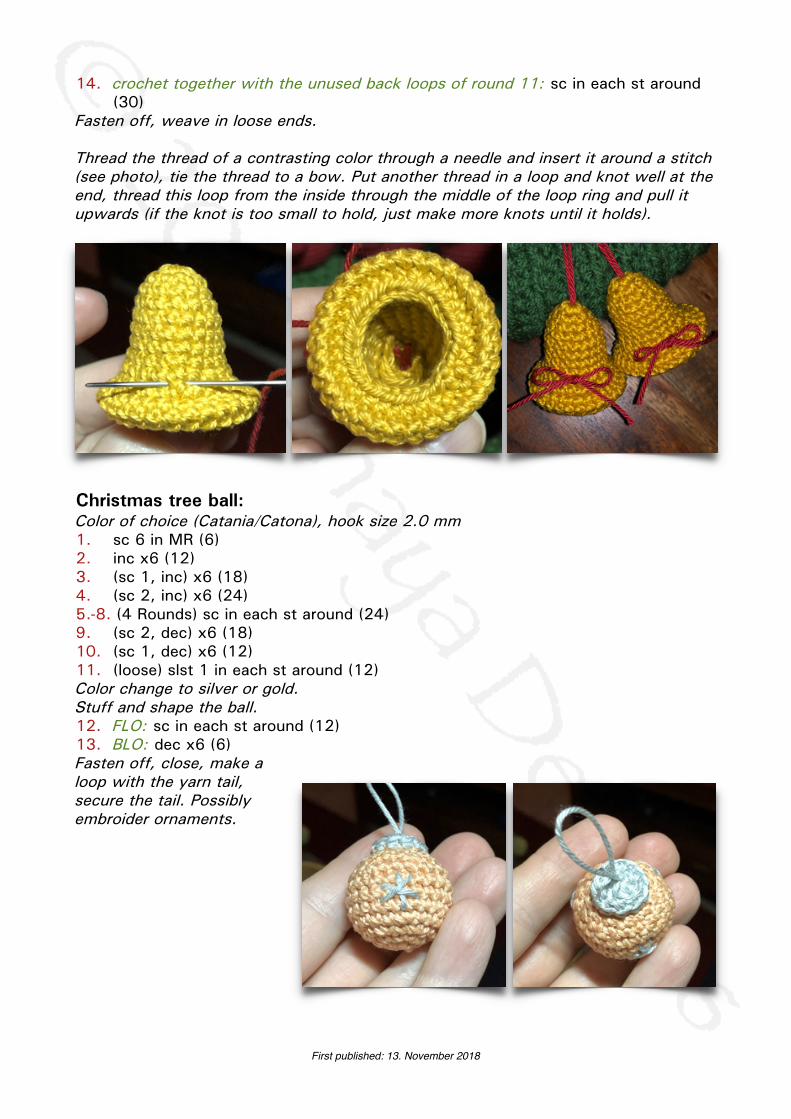
Christmas tree ball: Color of choice (Catania/Catona), hook size 2.0 mm 1. sc 6 in MR (6) 2. inc x6 (12) 3. (sc 1, inc) x6 (18) 4. (sc 2, inc) x6 (24) 5.-8. (4 Rounds) sc in each st around (24) 9. (sc 2, dec) x6 (18) 10. (sc 1, dec) x6 (12) 11. (loose) slst 1 in each st around (12) Color change to silver or gold. Stuff and shape the ball. 12. FLO: sc in each st around (12) 13. BLO: dec x6 (6) Fasten off, close, make a loop with the yarn tail, secure the tail. Possibly embroider ornaments.
First published: 13. November 2018
Bow:
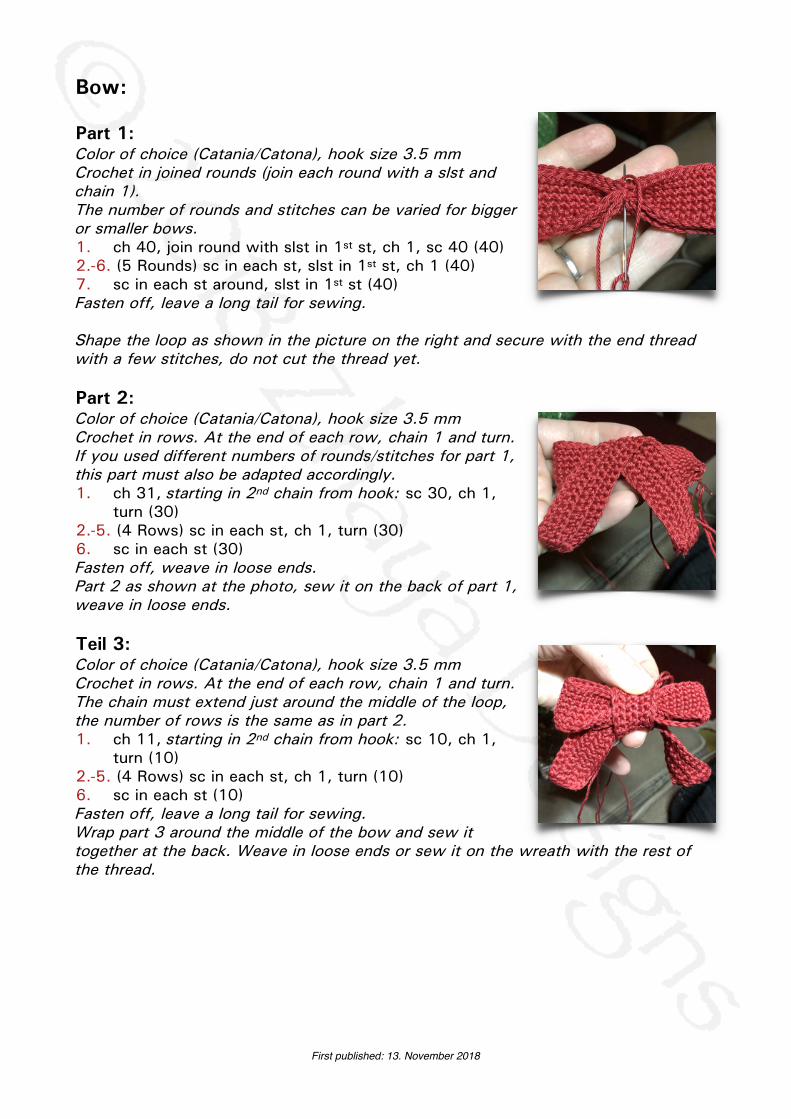
Part 1: Color of choice (Catania/Catona), hook size 3.5 mm Crochet in joined rounds (join each round with a slst and chain 1). The number of rounds and stitches can be varied for bigger or smaller bows. 1. ch 40, join round with slst in 1st st, ch 1, sc 40 (40) 2.-6. (5 Rounds) sc in each st, slst in 1st st, ch 1 (40) 7. sc in each st around, slst in 1st st (40) Fasten off, leave a long tail for sewing.
Shape the loop as shown in the picture on the right and secure with the end thread with a few stitches, do not cut the thread yet. Part 2: Color of choice (Catania/Catona), hook size 3.5 mm Crochet in rows. At the end of each row, chain 1 and turn. If you used different numbers of rounds/stitches for part 1, this part must also be adapted accordingly. 1. ch 31, starting in 2nd chain from hook: sc 30, ch 1,
turn (30) 2.-5. (4 Rows) sc in each st, ch 1, turn (30) 6. sc in each st (30) Fasten off, weave in loose ends. Part 2 as shown at the photo, sew it on the back of part 1, weave in loose ends.
Teil 3: Color of choice (Catania/Catona), hook size 3.5 mm Crochet in rows. At the end of each row, chain 1 and turn. The chain must extend just around the middle of the loop, the number of rows is the same as in part 2. 1. ch 11, starting in 2nd chain from hook: sc 10, ch 1,
turn (10) 2.-5. (4 Rows) sc in each st, ch 1, turn (10) 6. sc in each st (10) Fasten off, leave a long tail for sewing. Wrap part 3 around the middle of the bow and sew it together at the back. Weave in loose ends or sew it on the wreath with the rest of the thread.