Health and Safety for Articulated Rock Truck Owners and Drivers
This publication was produced for articulated rock truck owners and drivers as a guide to safety-related issues in their daily work environment. Interested stakeholders may also refer to or use the information contained in this document to assist them in carrying out their occupational health and safety roles and responsibilities.
WorkSafeBC makes no representations, warranties, or, condition, expressed or implied, that this document is and will remain accurate at all times. WorkSafeBC is not responsible for direct, indirect, special, or consequential damages, however caused, arising from the use of this document and its information. This document does not replace the Occupational Health and Safety Regulation or the Workers Compensation Act.
This document is not intended to explain the many health and safety requirements that apply to industry. Employers and supervisors should always refer to the Act/Regulation and applicable guidelines for specific requirements that apply to their work operations and activities.
Formatted by Flip Productions 2013 LtdVancouver, BC Canada1-888-220-FLIP(3547)www.flipproductions.comMade in Germany by Infoflip Medien GmbH
IF.G.01.00129.A.04
129A04-ART-cover-FINAL.indd 1 2014-12-15 10:11 AM
1 Pre-trip Inspection Report
2 Pre/Post-trip Inspections
3 Inspections: Engine Start Up
4 Inspections: Tractor/Trailer Shut Down
5 Engine & Torque Converter (TC) Lock-up
6 Torque Converter Lock-up: Start from Stop
7 Torque Converter Lock-up: Flat Ground
8 Torque Converter Lock-up: Downhill
9 Weight Hazards
10 Brake Hazards
11 ART General Operation Hazards
12 Safe Work Practices: Brakes/Retarders
13 Safe Work Practices: Articulating/Dumping
14 Safe Work Practices: Reversing
15 Brake Failure Runaway/Topple Over
16 Cab Torque/Bank Recovery/Winter Roads
Articulated rock trucks have been involved in collisions that have resulted in fatalities or serious injury to the operators.
Almost all of these collisions were the result of inexperienced owners placing inexperienced operators at the controls of these machines.
The primary goal of this guide is to give inexperienced articulated rock truck owners and their drivers enough information to operate these machines and their systems properly and safely. Having properly trained operators will reduce and prevent driver injuries and fatalities.
This infoflip explains how to safely operate an articulated rock truck of any make on the steep terrain of British Columbia. However, it is critically important to read, and heed, the manufacturer's operators' equipment manual (OEM) for the specifics on the machine that is being operated.
• Under the Motor Vehicle Act, Commercial Transport Act, Highway Industrial Act and the Occupational Health and Safety Regulation (WorkSafeBC) it is a legal requirement to perform a pre and post trip inspection on equipment to be used. Both inspections must be recorded in writing.
• Under Section 16.3(3) of the Occupational Health and Safety Regulation (OHSR) the records for the piece of equipment must be maintained and available during working hours.
• Under Section 16.34 of the OHSR, the operator must inspect the equipment before the start of operation, report defects to the supervisor or employer, and repair any defects that would affect the safe operation of the piece of equipment.
• Under Section 4.3 of the OHSR the employer is to ensure the machine is safe to operate and is operated in accordance with the manufacturer’s recommendations, which are written in the Original Equipment Manufacturers (OEM) manual that comes with all pieces of equipment. This publication is offered as quick reference guide to operators and the material referenced in it must be verified by the owner of the equipment to ensure that it is relevant to the equipment being operated.
Legal Requirements
129A04-ART-cover-FINAL.indd 2 2014-12-15 10:11 AM
1 Pre-tripInspectionReport
1 Pre-tripInspectionReport
This inspection report is a guide only, as prepared by experts with insight into the causes of incidents, near misses and major repair costs. It should be consulted during inspections.UnitNumber _ _ _ _ _ _ _ _ _Date _ _ _ _ _ _ _ _ _ _ _HourMeter _ _ _ _ _ _ _ _ _ _Operator _ _ _ _ _ _ _ _ _
❒ Night switch/battery hold downs and condition ❒ Fuel level at tank ❒ Engine oil level ❒ Water level ❒ Water system hose clamps ❒ Fan for play ❒ Water pump belt tension and condition ❒ Alternator mounts electrical connections/belts ❒ Air comp mounts belts fittings and clamps ❒ Air intake clamps ❒ Fuel pump/injectors/fuel lines/hose clamps ❒ Oil cooler clamps ❒ Turn on key engage instrument test switch, ❒ Are all warning lights working? ❒ Do you have oil pressure within 10 sec? ❒ Do you have transmission pressure within 10 sec? ❒ Do you have full air pressure? ❒ Are all your brake warning lights out? ❒ Do a compressor test (50-90psi in 3 min)
Warmup(10minuteminimum)
❒ Brake fluid container level ❒ Hydraulic oil level ❒ Tire condition/lug nuts for signs of movement ❒ Underneath for brake water fuel or hydraulic leaks ❒ Steering pin anchor bolts are tight ❒ Steering cylinder guard bolts are tight ❒ Frame for cracks ❒ Condition of hydraulic hoses between tractor and trailer ❒ Transmission fluid level ❒ Hitch for cracks/center pin bolt
❒ Brake fluid ❒ Top and bottom hoist pin condition and lock bolts ❒ Hoist for leaks and condition of hydraulic line ❒ Frame for cracks ❒ Tire condition/lug nuts for signs of damage ❒ Rubber blocks for signs of damage ❒ Inside of wheels for signs of brake fluid leaks ❒ Box hinges for cracks ❒ Box pin locks tight ❒ Tailgate pins and cables
❒ Emergency brake on check that it holds ❒ Machine fueled ❒ Machine greased ❒ Listen for air leaks ❒ Night switch off ❒ Air tanks drained
❒ Grease driveline, check driveline captive flange ❒ Bolts and U-joint cap bolts ❒ Torsion rods and walking beam hangers
Cross members for cracks
I have performed the above checks and consider this machine safe to run. Operator’s signature: _ _ _ _ _ _ _ _ _ _ _ _ _ _ _ _ _
The most important reason to perform a vehicle inspection is your safety, you must ensure that the equipment functions to its maximum capabilities in any environment.
It shows due diligence to have a written pre- and post-trip inspection report that is in duplicate so that it can be filed with the maintenance records of the piece of equipment. This helps to keep on top of minor repair issues that can lead to significant repairs if not remedied, and at the same time replaces any (snag sheet) existing maintenance reports.
Your inspection system must ensure that all items are checked effectively and efficiently. The system described in this guide is similar to the Class One requirement. The inspection is broken down into four components or stages:
1.EngineCompartment(3)2.StartUp(3)3.Tractor/TrailerCheck(4)4.ShutDown(4)Professional operators may have established their own pre- and post-trip inspection procedure that covers the elements of a proper report and may not need to change it.
This guide is a foundation in which to develop a pre- and post-trip inspection report. Your inspection report must have a system in which you can identify required repairs and a method to ensure that this information is directed to the supervisor or mechanic responsible. If the defects are a safety
concern, the machine must not be operated until the repairs are completed.
It is very important that you understand what the lights on the dash represent. Laminate a copy of the dash lights schematic from the OEM manual and attach it to the dash area.
BasicSafetyChecks• Check your gauges during each trip.
• Know where to inspect all the fluid levels.
• Periodically walk around your machine during the shift looking for leaks and loose equipment.
InstrumentPanel
1.
129A04-ART-text-FINAL.indd 2 2014-12-15 10:11 AM
3 Inspections:EngineStartUp
3 Inspections:EngineStartUp
EngineThe engine compartment is the most critical component of the machine and checking it is critical to safety. If the engine quits, you will soon lose control of brakes, retarders, and in some cases, steering.
Electrical: Night switch, Battery and Alternator
Power disruption in any way can affect delivery of fuel to the engine and other electrical components and stop the engine.
The transmission is also a critical component that depends totally on electrical power to function. A disruption of power will cause it to automatically shift into neutral.
Fuel: Tank, Pump, Injectors and Lines
No fuel = No engine. On a grade this could be fatal.
Engine Oil
No oil = Engine failure. Find out where oil is going.
Water System - Level, Hoses, Pump, Belts and FanKeep the engine cool to prevent overheating and failure. If you have to add water, look for the cause. If there is play in the fan, replace the water pump. Pull and twist on the clamps. If they are loose, the hoses will start to leak. Look for worn belts.
Air Compressor
No air = No brakes. The compressor runs off the engine either by a belt or directly off the engine. Check condition and look for signs of fatigue. Air leaks in the system cause the compressor to work harder and shorten its life.
Air Intake
Dirty air = Foreign material in the engine and potential failure. Check the condition of clamps.
Engine and Transmission Oil Coolers
Check clamps for security and leaks. The transmission, in concert with the engine, controls wheel speed on grades.
StartUpEnter the cab and turn the key to “ON” or activate test switch. Ensure the lights are working and you know what each lightrepresents(2).
Starttheengine.Q. Do you have oil pressure within 10 seconds?
Q. Do you have transmission pressure within 10 seconds?
Monitor the air gauge and ensure that the compressor brings the air pressure to maximum before you operate. By law the compressor must build from 50-90psi in 3 minutes with the engine at 1200RPM. Ensure that your vehicle meets or exceeds this standard.
Q. Have all the brake lights gone out?
Warmupfor10minutesWhile the vehicle is warming up you can get out of the cab and start the inspectionofthetractorandtrailer(4).
129A04-ART-text-FINAL.indd 3 2014-12-15 10:11 AM
4 Inspections:Tractor/TrailerShutDown
4 Inspections:Tractor/TrailerShutDown
Tractor/TrailerCheckTo a trained eye, defects will stand out, so be observant. Look for abnormalities during the walk around and check critical stress components. Repeat this any time you exit the vehicle.
Start at the driver's door and walk clockwise around the vehicle checking the following:
All fluid levels
o Brake o Hydraulic o Transmission
For leaks
❐ Hoses & under the vehicle for signs of leaks
Tires, wheels & fasteners: tires are the most important piece of equipment on your vehicle and are only held on by air.
❐ Tire condition & inflation ❐ Wheel nuts are tight ❐ Inside of wheel for signs of leaks
Articulation area
❐ Steering pin anchor bolts ❐ Steering cylinder guard bolts ❐ Tractor-trailer hoses ❐ Hitch and center pin bolts ❐ Top and bottom hoist pins ❐ Hoist for leaks and condition
Structure
o Frame for cracks o Rubber blockso Box hinges and pins o Tailgate if equipped
Weekly
❐ Driveline and suspension componentsThese observations should be made at every opportunity and particularly when the vehicle is being greased. During the greasing process, look for metal in the grease and use your fingers to push, pull and twist on all nuts, bolts and clamps. Very soon any defect on the vehicle will stand out.
Return to the cab of the vehicle and complete the pre-trip inspection report. If there are no defects in need of immediate attention, you may now operate the equipment.
ShutDownAt the end of your shift try to find a level area to park and service the machine, blocking the wheels if there is any grade at all. Once parked, apply the park brake and immediately perform a tugtest(10) to ensure that it holds the vehicle.
Shut the machine off and do a normal walk around listening for air leaks and looking for fluid leaks. Drain the air tanks, top up the fuel, grease the machine and finally turn off the night switch. Regular draining of the air tanks will ensure that moisture is eliminated from the system. When the weather starts to turn cold, moisture in an air-over-hydraulic system can cause all kinds of problems and increased down time.
Complete the post-trip portion of your inspection report and turn in the carbon copy
to the shop for maintenance purposes.
129A04-ART-text-FINAL.indd 4 2014-12-15 10:11 AM
5 Engine&TorqueConverter(TC)Lock-up
5 Engine&TorqueConverter(TC)Lock-up
The transmission has an automatic lock-up in each gear which engages as soon as the torque converter matches road speed with engine RPM.
Lock-up happens when the transmission has shifted itself from running on the torque converter to running itself in lock-up like a conventional truck. In other words, the torque converter has been bypassed and the engine is driving the differentials directly through the driveline. Once shifted in, lock-up will not disengage until the turbine RPM falls below the automatic up-shift RPM. Basically, if the vehicle speed gets too low in the gear selected, it will shift into torque to prevent the engine from stalling just like a standard clutch. Every time you shift gears, the torque converter (clutch) has to take control to match the road speed with the engine RPM in the new gear.
The vehicle should never be operated for any length of time out of lock-up (torque converter mode) as this can heat the transmission rapidly and cause driveline problems.
TorqueConverterLock-UpThe transmission torque converter (6) has two modes of operation. The torque converter mode is used to get the machine started and to ensure the engine does not stall when the machine comes to a stop. Lock-up mode is where the machine should be operating at all other times, other than those noted above. Lock-up mode is achieved via an automatic lock-up clutch in the torque converter.
The automatic clutch will engage in each gear. You want this clutch to be engaged before you start down the hill. If this clutch is not engaged before going downhill you will be in a potential runaway (15) situation, like having the clutch disengaged in a standard transmission. If the wheels are allowed to gain speed faster than the engine RPM, when the lock-up clutch does automatically engage, the effect will be the same as suddenly releasing the clutch on a standard transmission. This will cause the engine to instantly rev up as the speed of the wheels is greater than that of the engine.
If this instant revving startles the operator even for a second from decelerating, on a steep grade the machine will over-rev, causing an up-shift on some machine types. Brake application on a steep grade at this point may not prevent a second over-rev, and up-shift; this will more than double the speed and the machine will now be unstoppable.
Six-WheelDriveOn grades with loose material keep the six-wheel drive engaged; this prevents axle bounce and improves traction even going down hill.
Donot engage the differential locks when traveling in six-wheel drive and negotiating corners as this
will damage the differentials causing a safety hazard if they fail on a steep grade. Also, the four wheels on the trailer will all be powered to push the machine straight ahead and off the corner.
129A04-ART-text-FINAL.indd 5 2014-12-15 10:11 AM
6 TorqueConverterLock-up:StartfromStop
6 TorqueConverterLock-up:StartfromStop
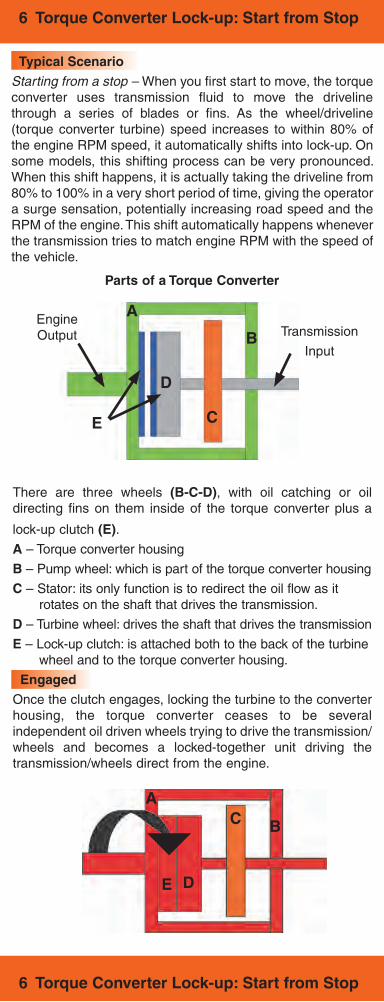
TypicalScenarioStarting from a stop – When you first start to move, the torque converter uses transmission fluid to move the driveline through a series of blades or fins. As the wheel/driveline (torque converter turbine) speed increases to within 80% of the engine RPM speed, it automatically shifts into lock-up. On some models, this shifting process can be very pronounced. When this shift happens, it is actually taking the driveline from 80% to 100% in a very short period of time, giving the operator a surge sensation, potentially increasing road speed and the RPM of the engine. This shift automatically happens whenever the transmission tries to match engine RPM with the speed of the vehicle.
There are three wheels (B-C-D), with oil catching or oil directing fins on them inside of the torque converter plus a
lock-up clutch (E).A– Torque converter housing
B – Pump wheel: which is part of the torque converter housing
C–Stator: its only function is to redirect the oil flow as it rotates on the shaft that drives the transmission.
D – Turbine wheel: drives the shaft that drives the transmission
E – Lock-up clutch: is attached both to the back of the turbine wheel and to the torque converter housing.
EngagedOnce the clutch engages, locking the turbine to the converter housing, the torque converter ceases to be several independent oil driven wheels trying to drive the transmission/wheels and becomes a locked-together unit driving the transmission/wheels direct from the engine.
PartsofaTorqueConverter
Engine Output
A
E
D
C
B Transmission
Input
E D
C B
A
129A04-ART-text-FINAL.indd 6 2014-12-15 10:11 AM
7 TorqueConverterLock-up:FlatGround
7 TorqueConverterLock-up:FlatGround
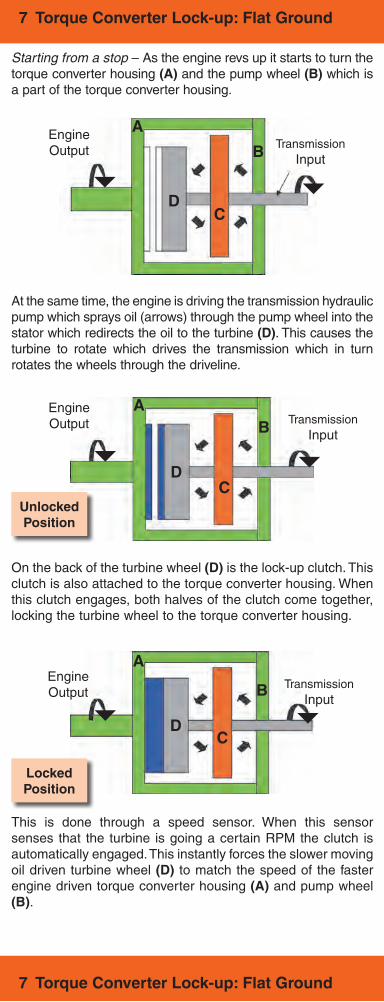
Starting from a stop –As the engine revs up it starts to turn the torque converter housing (A) and the pump wheel (B)which is a part of the torque converter housing.
At the same time, the engine is driving the transmission hydraulic pump which sprays oil (arrows) through the pump wheel into the stator which redirects the oil to the turbine (D). This causes the turbine to rotate which drives the transmission which in turn rotates the wheels through the driveline.
On the back of the turbine wheel (D) is the lock-up clutch. This clutch is also attached to the torque converter housing. When this clutch engages, both halves of the clutch come together, locking the turbine wheel to the torque converter housing.
This is done through a speed sensor. When this sensor senses that the turbine is going a certain RPM the clutch is automatically engaged. This instantly forces the slower moving oil driven turbine wheel (D) to match the speed of the faster engine driven torque converter housing (A) and pump wheel (B).
Engine Output
A
DC
B Transmission Input
Engine Output
A
DC
B Transmission Input
Engine Output
A
DC
B Transmission Input
LockedPosition
UnlockedPosition
129A04-ART-text-FINAL.indd 7 2014-12-15 10:11 AM
8 TorqueConverterLock-up:Downhill
8 TorqueConverterLock-up:Downhill
Starting from a stop – If the machine is starts out on a downhill grade with the engine at idle, the transmission will be running on the torque converter.
The opposite reaction takes place within the torque converter as compared to flat ground (7). The speed of the turbine is no longer driven by oil and engine RPM (because the engine is at idle), but by the speed of the machine's wheels going down the hill, through the transmission.
What remains the same is when the speed sensor for the lock-up clutch senses the proper RPM for the turbine the lock-up clutch will engage. This will lock the now faster turning turbine to the torque converter housing instantly causing the slower moving torque converter housing along with the impeller and the engine, to rev up to match its speed, which is the speed of the wheels going down the hill.
If this instant revving startles the operator even for a second, delaying the applying of the brake, the machine will over-rev, this will effectively double the speed. Remember, doubling the speed on a 25% grade will require 65.5 m (215 ft) to stopaloaded machine (9). The brakes will heat and fail before reaching 65.5 m (215 ft), resulting in a runaway(15).On some machine types the on-board computer automatically up-shifts the transmission to the next highest gear to protect the engine when an over-rev occurs. This of course compounds the likely hood of a runaway(15) on a steep grade due to the increased speed.
SummaryTo prevent a surge in RPM, be prepared, when starting off, to hold the machine in check with the foot brake. Let the engine speed and the wheel speed build up at the same rate by slowly releasing pressure on the foot brake until the lock-up clutch engages, this will let the lock-up engage smoothly, preventing the RPM surge.
Engine
at Idle
D
CB Transmission
Input
A
Engine RPM increases to match wheel speed
D
C
B Transmission Input
A
LockedPosition
UnlockedPosition
129A04-ART-text-FINAL.indd 8 2014-12-15 10:11 AM
Weight (load) is often the main contributing factor in ART incidents. The machine looks deceptively simple, like a big Tonka™ toy, and when empty it is.
However, when loaded it weights as much as a loaded 6-axle logging truck (100,000 lbs.) and only has half of the axles, and therefore, one half of the braking power. Unlike an off-highway logging truck, there are no support systems such as water to cool down the brakes.
This does not mean that the machine is unsafe or that the brakes are inadequate. It simply means that you must know how to properly and safely operate the machine and systems, including the brakes.
The graph below shows the stopping distance in metres for an articulated rock truck at various speeds associated with gear selection. Under each speed the graph shows the stopping distance when the vehicle is:
Unloadedonalevelsurface LoadedonalevelsurfaceUnloadedona24%grade Loadedona24%gradeAll the distance calculations are based on a vehicle in perfect condition operating under perfect environmental conditions.
9 WeightHazards
9 WeightHazards
Sto
pp
ing
Dis
tan
ce
Unlike logging trucks, articulated rock trucks often operate on new subgrade with soft shoulders, not a finished road.
129A04-ART-text-FINAL.indd 9 2014-12-15 10:11 AM
10 BrakeHazards
10 BrakeHazards
Wheelbrakes• There are two independent wheel brake systems, one for
the front (under the cab) and one for the four wheels on the back. If one fails hydraulically, the other will still function.
• Most braking systems are air-over-hydraulic where you need air to deliver the hydraulic fluid to the brakes. This means that if you lose all of the air, neither system will work, but if you lose hydraulic fluid from one system, then that one system will not work.
• Ensure there are no air or brake fluid leaks and walk around the machine periodically during the shift to be sure none have developed.
• Prior to starting your shift, ensure that your air compressor passes the start up test by fanning the brake pedal to exhaust the air down to 50 lbs. It should take no more than 3 minutes for the air compressor, (with the engine at 1200RPM) to build the air back up to 90 lbs.
• Ensure your brake fluid bottles are full and have not gone down from the last shift. In older machines that have drum brakes on the rear, set the slack adjusters if they are 90° or more from the maxi-pot.
• Know the brake warning lights on your dash(2). If your brake warning lights Donot work, donot run the machine. Develop a habit of testing your warning indicators once throughout the day. Theyareyouronlywarning!
• One brake system will not stop a loaded machine on a steep down hill grade. The remaining system will be on all
failure. If this happens, the machine will be out of control and rapidly building speed.
• Your brakes are your life, look after them. Develop safe transmission and engine operations goingdownhill(12).Parkbrakes
The park brake system is the third braking system and is also hydraulically activated, having its own fluid reservoir.There are two basic types of park brakes. Both types double as the emergency brake, but have limited value in this role.1. The older type is a disc-mounted unit on the driveline with
manually adjustable brake pucks.2. The newer type is a disc-mounted unit on the driveline
with a manually adjustable caliper type brake.
the time to prevent engine over-rev. This will cause heat build up in a fairly short distance, resulting in total brake
Donot leave the machine when it is being loaded on any down grade, especially on the park brake system.
Even if this system has the proper adjustment, it will not hold the force of the excavator loading it or the weight of a
full load on steeper down-grades.
Check gauges and indicators frequently!
SafetyTip:TugTest
When parking the machine, always put the machine in gear and give it a little throttle after applying the parking brake to make sure it will hold the machine.
129A04-ART-text-FINAL.indd 10 2014-12-15 10:11 AM
Brakes(10)Although the six-wheel disc brakes are designed to stop the machine when fully loaded going down hill, they are not designed to be in continuous use going down hill. Extended downhill brake application will cause heat build up, resulting in brake failure and a run away machine. Always remember that the brakes only stop the wheels. You need traction between the tires and the road surface to stop.
Transmission(5)Articulated rock trucks have automatic transmissions (no clutch). In place of the clutch they have what is called a torque converter that is located between the transmission and the driveline. The torque converter is an "automatic transmission" clutch.
• When the torque converter is in operation, it is like having the clutch disengaged.
• When the torque converter shifts into lock-up, it is like having the clutch engaged.
You must know how this functions to safely operate the machine. The shifting from torque converter to lock-up can startle a driver when the machine is being operated on grades. The engine and transmission retarders only work when the transmission is in this lock-up mode.
Articulation(13)Almost all the weight, and most of the traction are on the wheels under the box (trailer). Therefore, when turning at higher speeds or in soft or slippery conditions, the trailer can push the machine straight ahead resulting in the entire machine rolling over or being pushed over the bank.
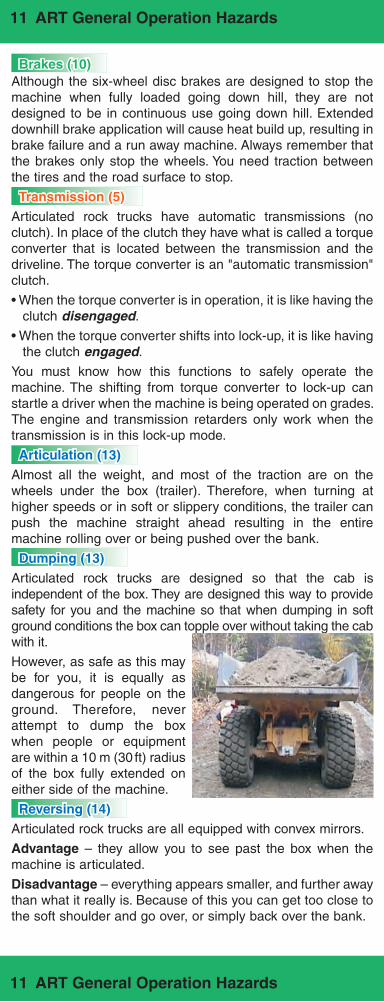
Dumping(13)Articulated rock trucks are designed so that the cab is independent of the box. They are designed this way to provide safety for you and the machine so that when dumping in soft ground conditions the box can topple over without taking the cab with it.
However, as safe as this may be for you, it is equally as dangerous for people on the ground. Therefore, never attempt to dump the box when people or equipment are within a 10 m (30 ft) radius of the box fully extended on either side of the machine.
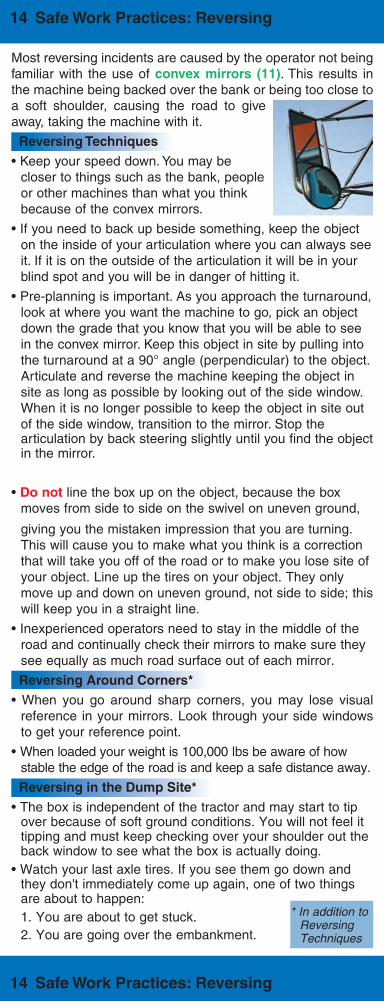
Reversing(14)Articulated rock trucks are all equipped with convex mirrors.
Advantage – they allow you to see past the box when the machine is articulated.
Disadvantage – everything appears smaller, and further away than what it really is. Because of this you can get too close to the soft shoulder and go over, or simply back over the bank.
11 ARTGeneralOperationHazards
11 ARTGeneralOperationHazards
129A04-ART-text-FINAL.indd 11 2014-12-15 10:11 AM
12 SafeWorkPractices:Brakes/Retarders
12 SafeWorkPractices:Brakes/Retarders
Ensure torqueconverterisinlock-up(8) to go downhill.
1. Before the hill, select the proper low gear for the grade and conditions. If unsure of the proper gear select 1st gear.
2. Ensure that the transmission torque converter is in lock-up. If your machine does not have a light to indicate lock-up and you cannot feel the lock-up clutch go in, test it by engaging your retarders. If they are on line, you are in lock-up.
3. If starting off on a hill, hold enough brake pressure on to control the speed build up of the wheels. You must allow the engine time to match the speed of the wheels to make the lock-up clutch engage smoothly, preventing over-rev.
ProperuseoftheBrakesandRetardersPrevent brake fade (failure) with the following techniques.
1. Once you have selected the proper gear for the grade and conditions of the hill and have established torque converter lock-up, engage the retarders, slowly releasing
builds up to 100 RPM below the red line. Donot exceed the red line RPM with the engine retarder on. This can cause the transmission to automatically up-shift in some machine types and can also cause the exhaust valves to strike the pistons in all types. Re-apply the foot brake and take the RPM down to 400-500 RPM below the red line and let the retarders take over again.
3. If the retarders cannot hold back the machine on their own without foot brake pressure for at least 4 seconds, you are in too high of a gear or you have too much load for the grade of the hill. Donot wait for the brakes to heat up, stop immediately and correct the situation.
the foot brake.
2. Let the retarders hold back the machine until the RPM
SafetyTip:ARTsonGrades
. Never fan or pump your brakes in rapid succession, as this will exhaust your air supply and cause brake failure.
. Never be in a gear that requires continuous pressure on the foot brake.
. Never use a higher gear downhill than you use on the same uphill with the same load.
. Neverrely on the retarders to control the speed in a higher gear. If the retarders fail because of a mechanical or electrical fault, you will be in a potential runaway situation.
. On most machine systems engine brake and transmission brake will not function unless the transmission torque converter is in lock-up.
. On older Moxy rock trucks, the engine retarder will come on with or without the torque converter lock-up clutch being engaged. You will only feel positive hold back from the retarder when the lock-up clutch is engaged.
129A04-ART-text-FINAL.indd 12 2014-12-15 10:11 AM
13 SafeWorkPractices:Articulating/Dumping
13 SafeWorkPractices:Articulating/Dumping
ArticulatingWhen turning under load in soft, slippery or high speed conditions, the trailer outweighs the tractor unit. It has more momentum and the potential to push you straight ahead in the direction the trailer tires are pointing, not the direction that the cab tires are trying to go.Donot judge the distance from the edge of the road in relation to the hood of your machine as the machine turns (articulates) from behind your sitting position, and you are sitting on top of the front axle. The front tires are on either side of your sitting position and are therefore much wider than the width of the hood. Learn to think sideways from your sitting position to judge the distance from the edge.Do not let anyone stand on the rear of the fender when articulating the machine as the box and the cab come very close to each other. Anyone standing on the fender steps or between the tractor and trailer units on the ground will be in danger of being seriously injured or killed.Donot let the tire on the outside of the turn go over the bank when articulating a turnaround on a narrow road.
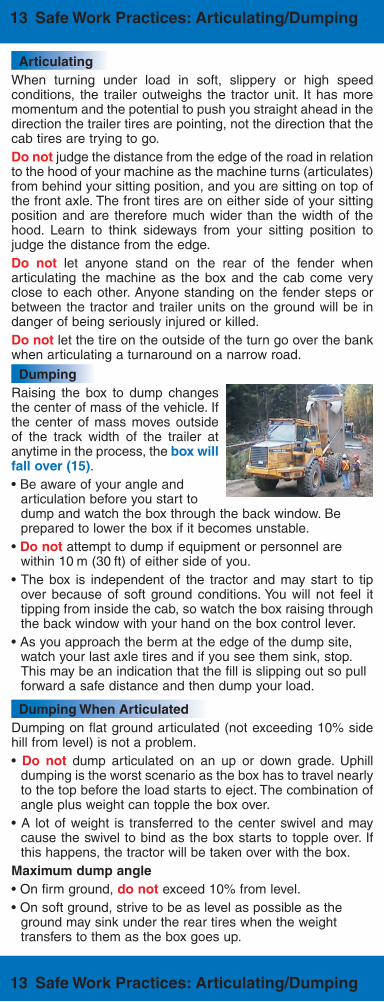
DumpingRaising the box to dump changes the center of mass of the vehicle. If the center of mass moves outside of the track width of the trailer at anytime in the process, the boxwillfallover(15).• Be aware of your angle and
articulation before you start to dump and watch the box through the back window. Be prepared to lower the box if it becomes unstable.
• Donot attempt to dump if equipment or personnel are within 10 m (30 ft) of either side of you.
• The box is independent of the tractor and may start to tip over because of soft ground conditions. You will not feel it tipping from inside the cab, so watch the box raising through the back window with your hand on the box control lever.
• As you approach the berm at the edge of the dump site, watch your last axle tires and if you see them sink, stop. This may be an indication that the fill is slipping out so pull forward a safe distance and then dump your load.
DumpingWhenArticulatedDumping on flat ground articulated (not exceeding 10% side hill from level) is not a problem.• Do not dump articulated on an up or down grade. Uphill
dumping is the worst scenario as the box has to travel nearly to the top before the load starts to eject. The combination of angle plus weight can topple the box over.
• A lot of weight is transferred to the center swivel and may cause the swivel to bind as the box starts to topple over. If this happens, the tractor will be taken over with the box.
Maximumdumpangle• On firm ground, donotexceed 10% from level.• On soft ground, strive to be as level as possible as the
ground may sink under the rear tires when the weight transfers to them as the box goes up.
129A04-ART-text-FINAL.indd 13 2014-12-15 10:11 AM
14 SafeWorkPractices:Reversing
14 SafeWorkPractices:Reversing
giving you the mistaken impression that you are turning. This will cause you to make what you think is a correction that will take you off of the road or to make you lose site of your object. Line up the tires on your object. They only move up and down on uneven ground, not side to side; this will keep you in a straight line.
• Inexperienced operators need to stay in the middle of the road and continually check their mirrors to make sure they see equally as much road surface out of each mirror.
ReversingAroundCorners*• When you go around sharp corners, you may lose visual
reference in your mirrors. Look through your side windows to get your reference point.
• When loaded your weight is 100,000 lbs be aware of how stable the edge of the road is and keep a safe distance away.
ReversingintheDumpSite*• The box is independent of the tractor and may start to tip
over because of soft ground conditions. You will not feel it tipping and must keep checking over your shoulder out the back window to see what the box is actually doing.
• Watch your last axle tires. If you see them go down and they don't immediately come up again, one of two things are about to happen:
1. You are about to get stuck. 2. You are going over the embankment.
• Donot line the box up on the object, because the box moves from side to side on the swivel on uneven ground,
Most reversing incidents are caused by the operator not being familiar with the use of convexmirrors (11). This results in the machine being backed over the bank or being too close to a soft shoulder, causing the road to give away, taking the machine with it.
ReversingTechniques• Keep your speed down. You may be
closer to things such as the bank, people or other machines than what you think because of the convex mirrors.
• If you need to back up beside something, keep the object on the inside of your articulation where you can always see it. If it is on the outside of the articulation it will be in your blind spot and you will be in danger of hitting it.
• Pre-planning is important. As you approach the turnaround, look at where you want the machine to go, pick an object down the grade that you know that you will be able to see in the convex mirror. Keep this object in site by pulling into the turnaround at a 90° angle (perpendicular) to the object. Articulate and reverse the machine keeping the object in site as long as possible by looking out of the side window. When it is no longer possible to keep the object in site out of the side window, transition to the mirror. Stop the articulation by back steering slightly until you find the object in the mirror.
* In addition to Reversing Techniques
129A04-ART-text-FINAL.indd 14 2014-12-15 10:11 AM
15 BrakeFailureRunaway/ToppleOver
15 BrakeFailureRunaway/ToppleOver
RunawayA runaway (brake fade/failure) situation occurs when the braking horsepower of your vehicle is not able to decelerate the vehicle on a given grade. Relying on the foundation brakes to control descent on a grade will cause excessive wear on the braking components and set the stage for a runaway.
The machine’s weight will cause it to speed up extremely fast. After the first 5 seconds the speed will be so high that it will be difficult to stop the machine by any means without injury.
There are only 3 ways of stopping a machine in a runaway situation:
1. Create a situation where you can roll over the box, but not the cab.
2. If the ditch will allow it, drive the machine into it, if the whole machine will rub up against the bank this will stop it.
3. Note any branch roads that go up hill for possible use as a runaway lane.
Pre-planningisessential!If the machine is in a runaway situation, you don't have time to think — only to react. In the preplan you must decide on what your course of action is going to be on all the hills at the job site in the event of a runaway, before you make the first loaded trip. By formulating a plan, you already know what to do if the situation arises and will immediately react to the plan.
Plan each trip and make the appropriate choices with respect to speed, gear selection and use of retarders to reduce/eliminate the possibility of a runaway.
ToppleOverIf the box topples over and there is no speed involved, there is not usually any damage done. However, before attempting to right the box, ensure the following:
• The lift cylinders have not been damaged.
• The rubber blocks or the bolts and brackets that hold the under-carriage to the frame are not damaged or broken.
• All of the hydraulic and electrical lines are still intact between the tractor and trailer.
• As much material is cleaned out of the box as possible.
• The box lever is placed in the down position; make sure the box is pulled or pushed down tight to the frame. This will put the box guides around the frame and prevent the rear box hinges from being twisted as the box is pulled up.
• Use an excavator as it is the best machine when righting the box as the excavator bucket can be placed inside the box in order to pull the box upright.
• If a loader or similar piece of equipment is used, attach a pulling cable to the box lift point at the cab end of the box.
Youmustreactimmediatelyinthissituation
129A04-ART-text-FINAL.indd 15 2014-12-15 10:11 AM
CabTorqueThis happens when there is a lot of the load still resting on the tail of the extended box. If the tractor tires have better traction than the trailer tires, but not sufficient traction to pull the box out from under the load, the torque will be transferred to the tractor, causing it to swivel up onto one wheel. Continued power will topple the cab over onto its side.
ToCorrect• Reduce power to an idle, put the transmission in reverse
and apply sufficient power to reverse-torque the cab back down on both wheels.
• Put the box lever in the down position, or if equipped, in the power down position; carefully try and articulate side to side to release the weight off of the box. If this is not successful, you will need another machine to clear the load away so the rest of the load can eject from the box.
Note: If there is not sufficient traction to reverse-torque the cab down, donot push the machine forward or the cab will topple over. The machine must go or be pulled backward in order for the cab to come down on both wheels.
BankRecoveryThis happens when, in order to get loaded, your machine must be fully articulated on a narrow road with soft shoulders. Since your trailer tires have the weight and therefore the traction, the trailer will want to push straight ahead and drive
your cab tire over the bank.
ToCorrect• Hold sufficient brake pressure from going ahead any further,
put the transmission in reverse, apply a little power for the steering pump, then articulate the tractor in the direction of the tire that is over the bank. This will jack that tire up out of the hole, once that tire is on the road, back up fully articulated. Once you have backed up 2-3 m (8-10 ft), articulate the tractor back to face down the road.
• You will now note that the tractor tire that was over the bank will be about 1 m (3 ft) from the edge. More importantly, your trailer tires will now be pointing down the road - not in the direction of the edge, and you can leave without any further problems.
WinterRoadConditionsArticulated rock trucks are nearly impossible to control in compact snow or icy conditions because of the articulation and the large tires. Do not attempt to go up or down any grades in these conditions without chains.
• If caught on a hill in a storm, park the machine if possible.
• If you cannot park the machine and must go down the hill, dump your load and keep out of the compacted wheel marks of other vehicles
• Keep close to the ditch line, not the bank.
• Be cautious with the use of brakes. Use the fresh snow on the side of the road to help stop.
16 CabTorque/BankRecovery/WinterRoads
16 CabTorque/BankRecovery/WinterRoads
129A04-ART-text-FINAL.indd 16 2014-12-15 10:11 AM
Articulated rock trucks have been involved in collisions that have resulted in fatalities or serious injury to the operators.
Almost all of these collisions were the result of inexperienced owners placing inexperienced operators at the controls of these machines.
The primary goal of this guide is to give inexperienced articulated rock truck owners and their drivers enough information to operate these machines and their systems properly and safely. Having properly trained operators will reduce and prevent driver injuries and fatalities.
This infoflip explains how to safely operate an articulated rock truck of any make on the steep terrain of British Columbia. However, it is critically important to read, and heed, the manufacturer's operators' equipment manual (OEM) for the specifics on the machine that is being operated.
129A04-ART-text-FINAL.indd 17 2014-12-15 10:11 AM
• Under the Motor Vehicle Act, Commercial Transport Act, Highway Industrial Act and the Occupational Health and Safety Regulation (WorkSafeBC) it is a legal requirement to perform a pre and post trip inspection on equipment to be used. Both inspections must be recorded in writing.
• Under Section 16.3(3) of the Occupational Health and Safety Regulation (OHSR) the records for the piece of equipment must be maintained and available during working hours.
• Under Section 16.34 of the OHSR, the operator must inspect the equipment before the start of operation, report defects to the supervisor or employer, and repair any defects that would affect the safe operation of the piece of equipment.
• Under Section 4.3 of the OHSR the employer is to ensure the machine is safe to operate and is operated in accordance with the manufacturer’s recommendations, which are written in the Original Equipment Manufacturers (OEM) manual that comes with all pieces of equipment. This publication is offered as quick reference guide to operators and the material referenced in it must be verified by the owner of the equipment to ensure that it is relevant to the equipment being operated.