65
Basics Guide Guide d’utilisation Guia de conceitos básicos HP Deskjet F2200 All-in-One series

Basics GuideGuide d’utilisationGuia de conceitos básicos
HP Deskjet F2200 All-in-One series
Hewlett-Packard Company noticesThe information contained in this document is subject to change without notice.All rights reserved. Reproduction, adaptation, or translation of this material is prohibited without prior written permission of Hewlett-Packard, except as allowed under copyright laws. The only warranties for HP products and services are set forth in the express warranty statements accompanying such products and services. Nothing herein should be construed as constituting an additional warranty. HP shall not be liable for technical or editorial errors or omissions contained herein.© 2007 Hewlett-Packard Development Company, L.P.
Windows, Windows 2000, and Windows XP are U.S. registered trademarks of Microsoft Corporation. Windows Vista is either a registered trademark or trademark of Microsoft Corporation in the United States and/or other countries. Intel and Pentium are trademarks or registered trademarks of Intel Corporation or its subsidiaries in the United States and other countries.
Avis publiés par la société Hewlett-PackardLes informations contenues dans ce document peuvent faire l'objet de modifications sans préavis.Tous droits réservés. La reproduction, l'adaptation ou la traduction de ce matériel est interdite sans l'accord écrit préalable de Hewlett-Packard, sauf dans les cas permis par la législation relative aux droits d'auteur. Les seules garanties relatives aux produits et services HP sont décrites dans les déclarations de garantie expresse accompagnant lesdits produits et services. Aucun élément de ce document ne constitue une garantie supplémentaire. Hewlett-Packard ne saurait être tenu pour responsable des erreurs ou omissions techniques ou rédactionnelles de ce document.© 2007 Hewlett-Packard Development Company, L.P.Windows, Windows 2000 et Windows XP sont des marques déposées de Microsoft Corporation aux Etats-Unis.Windows Vista est une marque déposée ou une marque de Microsoft Corporation aux Etats-Unis et/ou dans d'autres pays.Intel et Pentium sont des marques ou des marques déposées d'Intel Corporation ou de ses filiales aux Etats-Unis et dans d'autres pays.
Avisos da Hewlett-Packard CompanyAs informações contidas neste documento estão sujeitas a alterações sem aviso prévio.Todos os direitos reservados. É proibida a reprodução, adaptação ou tradução deste material sem a permissão prévia por escrito da Hewlett-Packard, exceto quando permitido pelas leis de direitos autorais. As únicas garantias aos produtos e serviços da HP são aquelas descritas nas declarações de garantia expressa que acompanham os respectivos produtos e serviços. Nada aqui contido deve ser interpretado como garantia adicional. A HP não se responsabiliza por erros técnicos ou editoriais nem por omissões aqui contidos.© 2007 Hewlett-Packard Development Company, L.P.Windows, Windows 2000 e Windows XP são marcas registradas da Microsoft Corporation nos Estados Unidos e/ou em outros países.Windows Vista é uma marca comercial ou marca registrada da Microsoft Corporation nos Estados Unidos e/ou em outros países.Intel e Pentium são marcas comerciais ou marcas registradas da Intel Corporation ou suas subsidiárias nos Estados Unidos e/ou em outros países.
2007
HP Deskjet F2200 All-in-One seriesBasics Guide
English

Contents
1 HP All-in-One overviewThe HP All-in-One at a glance....................................................................................................2Control panel buttons.................................................................................................................3Status light overview...................................................................................................................4Load originals for scanning and copying....................................................................................5Make a copy...............................................................................................................................5Scan an original..........................................................................................................................6
2 Troubleshooting and supportUninstall and reinstall the software.............................................................................................7Hardware setup troubleshooting.................................................................................................7Clear paper jams......................................................................................................................10Print cartridge troubleshooting..................................................................................................10Find more information...............................................................................................................10
Setup Guide........................................................................................................................10Onscreen Help....................................................................................................................10HP Web site........................................................................................................................11
HP support................................................................................................................................11HP support by phone..........................................................................................................11
Phone support period...................................................................................................11After the phone support period.....................................................................................11
Before calling HP Support..................................................................................................11Technical information...............................................................................................................11
System requirements..........................................................................................................12Paper specifications...........................................................................................................12Physical specifications........................................................................................................12Power specifications...........................................................................................................12Environmental specifications..............................................................................................12Regulatory notices..............................................................................................................12
Regulatory model identification number.......................................................................12Warranty.............................................................................................................................13
1
Engl
ish

1 HP All-in-One overviewThe HP Deskjet F2200 All-in-One series is a versatile device that gives you easy-to-usecopying, scanning, and printing. For information about the full range of features andfunctions, see the onscreen Help.
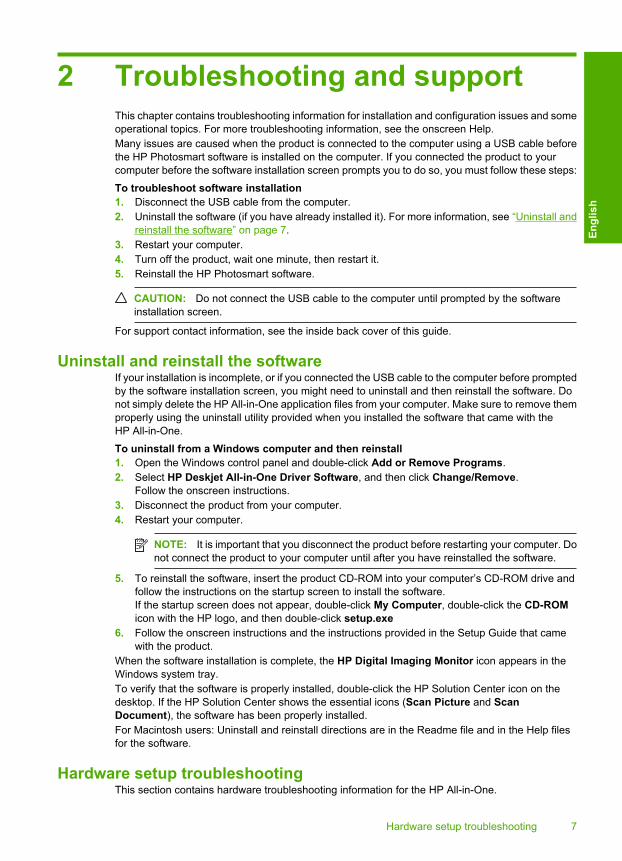
The HP All-in-One at a glance
Label Description
1 Control panel
2 Input tray
3 Tray extender
4 Paper-width guide
5 Print cartridge door
6 Glass
7 Lid backing
8 Rear access door
9 Rear USB port
10 Power connection*
* Use only with the power adapter supplied by HP.
2 HP Deskjet F2200 All-in-One series
English

Control panel buttons
Label Icon Name and Description
1 On: Turns the HP All-in-One on or off. The On button is lit when theHP All-in-One is powered on.
2 Check Print Cartridge lights: Indicates the need to reinsert the specified printcartridge, replace the print cartridge, or close the print cartridge door. TheColor light appears next to the three color drop icons and indicates that theproblem is with the tri-color print cartridge. The Black/Photo light appearsnext to the single black drop icon and indicates that the problem is with theblack or photo print cartridge.
3 Cancel: Stops a print, copy, or scan job. A blinking Paper light next to the Cancel button indicates the need to loadpaper or clear a paper jam. Press any button after a problem is solved toinstruct the HP All-in-One to continue.
4 Scan: Starts scanning the original currently on the glass. The Scan commandis ignored if the HP All-in-One is busy with any other job. The Scan commandfunctions only when the computer is on.
5 Paper Type: Changes the paper type setting to either plain or photo paper.Make sure the appropriate paper type is loaded in the input tray. The defaultpaper type setting is Plain Paper.The Paper Type lights indicate the currently selected paper size and type.
6 Start Copy Black: Starts a black-and-white copy job. Press this buttonmultiple times to specify multiple black copies. The printer will start printingshortly after the number of copies have been selected. The number of copiesto be printed is shown to the right of this button.
7 Start Copy Color: Starts a color copy job. Press this button multiple timesto specify multiple color copies. The printer will start printing shortly after thenumber of copies have been selected. The number of copies to be printed isshown to the right of this button.
Control panel buttons 3
Engl
ish

Status light overviewSeveral indicator lights inform you of the status of the HP All-in-One.
Label Description
1 On light
2 Check Print Cartridge lights
3 Paper light
4 Paper Type lights (for the Paper Type button)
The following table describes common situations and explains what the lights mean.
Light status What it means
All lights are off. The HP All-in-One is turned off. Press the On button to turn on the device.
The On light and one of the PaperType lights are on.
The HP All-in-One is ready for printing, scanning, or copying.
The On light is blinking. The HP All-in-One is busy printing, scanning, copying, or aligning theprint cartridges.
The On light blinks quickly for 3seconds and then is on steady.
You pressed a button while the HP All-in-One is already busy printing,scanning, copying, or aligning the print cartridges.
The On light blinks for 20 secondsand then is steady.
You pressed the Scan button and there was no response from thecomputer.
The Paper light is blinking. • The HP All-in-One is out of paper.• The HP All-in-One has a paper jam.
The Check Print Cartridge light isblinking.
• The print cartridge door is open.• The print cartridges are missing or not seated correctly.• The tape was not removed from the print cartridge.• The print cartridge is not intended for use in this HP All-in-One.
Chapter 1
4 HP Deskjet F2200 All-in-One series
English
Light status What it means
• The print cartridge might be defective.• The print cartridge is low on ink.
The On, Paper, and Check PrintCartridge lights are blinking.
Scanner failure.Turn off the HP All-in-One, then turn it on again. If the problem persists,contact HP Support.
All lights are blinking. The HP All-in-One has a fatal error.1. Turn the HP All-in-One off.2. Unplug the power cord.3. Wait a minute, then plug the power cord back in.4. Turn the HP All-in-One back on.If the problem persists, contact HP Support.
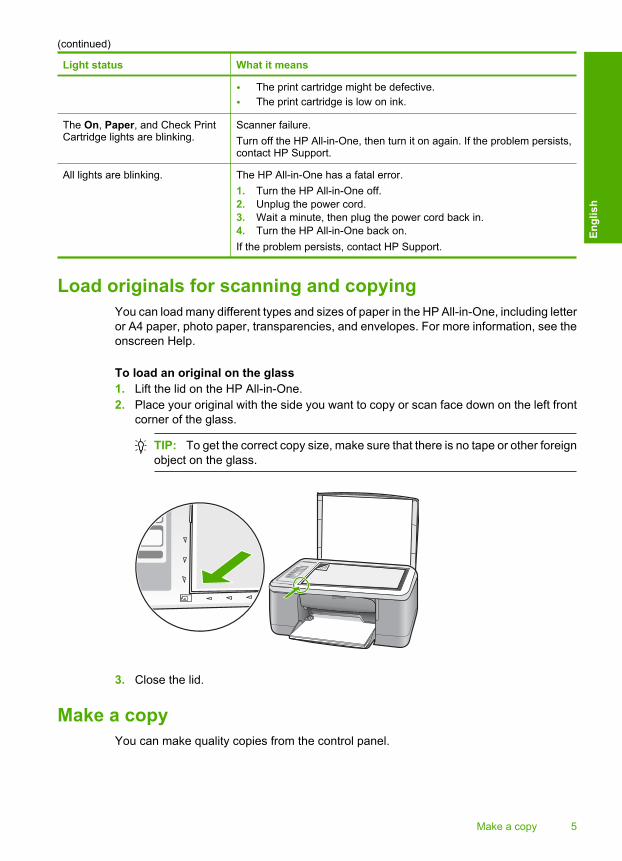
Load originals for scanning and copyingYou can load many different types and sizes of paper in the HP All-in-One, including letteror A4 paper, photo paper, transparencies, and envelopes. For more information, see theonscreen Help.
To load an original on the glass1. Lift the lid on the HP All-in-One.2. Place your original with the side you want to copy or scan face down on the left front
corner of the glass.
TIP: To get the correct copy size, make sure that there is no tape or other foreignobject on the glass.
3. Close the lid.
Make a copyYou can make quality copies from the control panel.
(continued)
Make a copy 5
Engl
ish
To make a copy from the control panel1. Make sure you have paper loaded in the input tray.2. Place your original with the side you want to copy or scan face down on the left front
corner of the glass.3. Press the Paper Type button to set the paper type.4. Press Start Copy Black or Start Copy Color.
Scan an originalFor original documents or images placed on the glass, you can start a scan from yourcomputer or from the HP All-in-One. To use the scan features, the HP All-in-One andcomputer must be connected and turned on. The HP Photosmart Software must also beinstalled and running on your computer prior to scanning.
NOTE: If you are using Windows 2000, use the Windows Scanner wizard instead ofpressing the Scan button.
To scan to a computer1. Place your original with the side you want to copy or scan face down on the left front
corner of the glass.
TIP: For quality copies, ensure that the scanner glass is clean and that there areno foreign materials adhering to it.
2. Press Scan.3. Make any edits to the preview image, and then click Accept when you are finished.
Chapter 1
6 HP Deskjet F2200 All-in-One series
English
2 Troubleshooting and supportThis chapter contains troubleshooting information for installation and configuration issues and someoperational topics. For more troubleshooting information, see the onscreen Help.Many issues are caused when the product is connected to the computer using a USB cable beforethe HP Photosmart software is installed on the computer. If you connected the product to yourcomputer before the software installation screen prompts you to do so, you must follow these steps:
To troubleshoot software installation1. Disconnect the USB cable from the computer.2. Uninstall the software (if you have already installed it). For more information, see “Uninstall and
reinstall the software” on page 7.3. Restart your computer.4. Turn off the product, wait one minute, then restart it.5. Reinstall the HP Photosmart software.
CAUTION: Do not connect the USB cable to the computer until prompted by the softwareinstallation screen.
For support contact information, see the inside back cover of this guide.
Uninstall and reinstall the softwareIf your installation is incomplete, or if you connected the USB cable to the computer before promptedby the software installation screen, you might need to uninstall and then reinstall the software. Donot simply delete the HP All-in-One application files from your computer. Make sure to remove themproperly using the uninstall utility provided when you installed the software that came with theHP All-in-One.
To uninstall from a Windows computer and then reinstall1. Open the Windows control panel and double-click Add or Remove Programs.2. Select HP Deskjet All-in-One Driver Software, and then click Change/Remove.
Follow the onscreen instructions.3. Disconnect the product from your computer.4. Restart your computer.
NOTE: It is important that you disconnect the product before restarting your computer. Donot connect the product to your computer until after you have reinstalled the software.
5. To reinstall the software, insert the product CD-ROM into your computer’s CD-ROM drive andfollow the instructions on the startup screen to install the software.If the startup screen does not appear, double-click My Computer, double-click the CD-ROMicon with the HP logo, and then double-click setup.exe
6. Follow the onscreen instructions and the instructions provided in the Setup Guide that camewith the product.
When the software installation is complete, the HP Digital Imaging Monitor icon appears in theWindows system tray.To verify that the software is properly installed, double-click the HP Solution Center icon on thedesktop. If the HP Solution Center shows the essential icons (Scan Picture and ScanDocument), the software has been properly installed.For Macintosh users: Uninstall and reinstall directions are in the Readme file and in the Help filesfor the software.
Hardware setup troubleshootingThis section contains hardware troubleshooting information for the HP All-in-One.
Hardware setup troubleshooting 7
Engl
ish

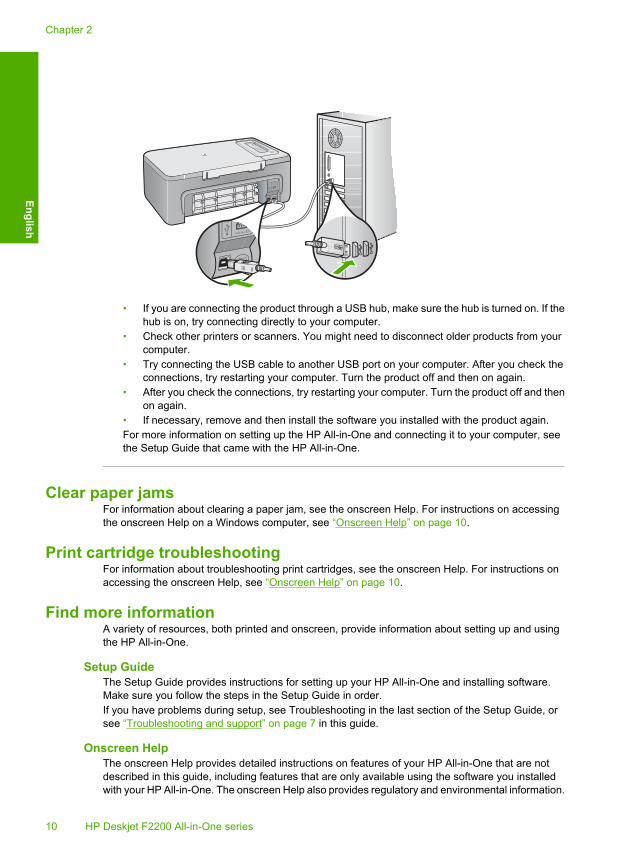
The product will not turn on
Solution• Make sure the power cord is firmly connected to both the product and the power adapter.
Plug the power cord into a power outlet, surge protector, or power strip.
1 Power connection
2 Power cord and adapter
3 Power outlet
• If you are using a power strip, make sure the power strip is on. Or, try plugging the productdirectly into a power outlet.
• Test the power outlet to make sure it is working. Plug in an appliance that you know works,and see if the appliance has power. If not, then there might be a problem with the poweroutlet.
• If you plugged the product into a switched outlet, make sure the outlet is switched on. If itis switched to on but still does not work, then there might be a problem with the power outlet.
Cause: The product was not plugged into a power outlet properly or there was a problem withthe power outlet.
Solution: The product might not respond if you press the On button too quickly. Press theOn button once. It might take a few minutes for the product to turn on. If you press the On buttonagain during this time, you might turn the product off.
CAUTION: If the product still does not turn on, it might have a mechanical failure. Unplugthe product from the power outlet.Contact HP support for service.Go to: www.hp.com/support. If prompted, choose your country/region, and then clickContact HP for information on calling for technical support.
Cause: You pressed the On button too quickly.
I connected the USB cable, but I am having problems using the HP All-in-One withmy computer
Solution: You must first install the software that came with the product before connecting theUSB cable. During installation, do not plug in the USB cable until prompted by the onscreeninstructions. Connecting the USB cable before prompted can cause errors.Once you have installed the software, connecting your computer to the product with a USB cableis straightforward. Simply plug one end of the USB cable into the back of your computer and the
Chapter 2
8 HP Deskjet F2200 All-in-One series
English
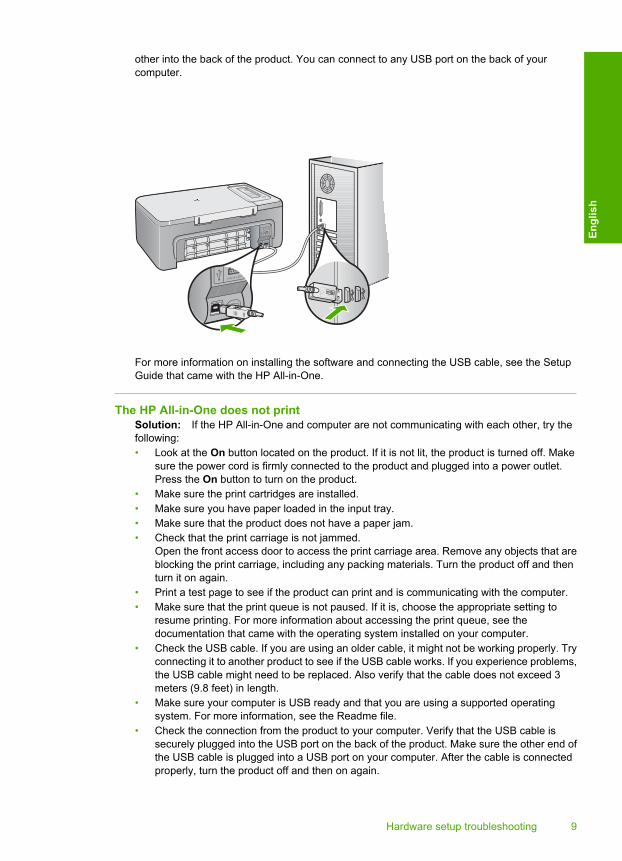
other into the back of the product. You can connect to any USB port on the back of yourcomputer.
For more information on installing the software and connecting the USB cable, see the SetupGuide that came with the HP All-in-One.
The HP All-in-One does not printSolution: If the HP All-in-One and computer are not communicating with each other, try thefollowing:• Look at the On button located on the product. If it is not lit, the product is turned off. Make
sure the power cord is firmly connected to the product and plugged into a power outlet.Press the On button to turn on the product.
• Make sure the print cartridges are installed.• Make sure you have paper loaded in the input tray.• Make sure that the product does not have a paper jam.• Check that the print carriage is not jammed.
Open the front access door to access the print carriage area. Remove any objects that areblocking the print carriage, including any packing materials. Turn the product off and thenturn it on again.
• Print a test page to see if the product can print and is communicating with the computer.• Make sure that the print queue is not paused. If it is, choose the appropriate setting to
resume printing. For more information about accessing the print queue, see thedocumentation that came with the operating system installed on your computer.
• Check the USB cable. If you are using an older cable, it might not be working properly. Tryconnecting it to another product to see if the USB cable works. If you experience problems,the USB cable might need to be replaced. Also verify that the cable does not exceed 3meters (9.8 feet) in length.
• Make sure your computer is USB ready and that you are using a supported operatingsystem. For more information, see the Readme file.
• Check the connection from the product to your computer. Verify that the USB cable issecurely plugged into the USB port on the back of the product. Make sure the other end ofthe USB cable is plugged into a USB port on your computer. After the cable is connectedproperly, turn the product off and then on again.
Hardware setup troubleshooting 9
Engl
ish
• If you are connecting the product through a USB hub, make sure the hub is turned on. If thehub is on, try connecting directly to your computer.
• Check other printers or scanners. You might need to disconnect older products from yourcomputer.
• Try connecting the USB cable to another USB port on your computer. After you check theconnections, try restarting your computer. Turn the product off and then on again.
• After you check the connections, try restarting your computer. Turn the product off and thenon again.
• If necessary, remove and then install the software you installed with the product again.For more information on setting up the HP All-in-One and connecting it to your computer, seethe Setup Guide that came with the HP All-in-One.
Clear paper jamsFor information about clearing a paper jam, see the onscreen Help. For instructions on accessingthe onscreen Help on a Windows computer, see “Onscreen Help” on page 10.
Print cartridge troubleshootingFor information about troubleshooting print cartridges, see the onscreen Help. For instructions onaccessing the onscreen Help, see “Onscreen Help” on page 10.
Find more informationA variety of resources, both printed and onscreen, provide information about setting up and usingthe HP All-in-One.
Setup GuideThe Setup Guide provides instructions for setting up your HP All-in-One and installing software.Make sure you follow the steps in the Setup Guide in order.If you have problems during setup, see Troubleshooting in the last section of the Setup Guide, orsee “Troubleshooting and support” on page 7 in this guide.
Onscreen HelpThe onscreen Help provides detailed instructions on features of your HP All-in-One that are notdescribed in this guide, including features that are only available using the software you installedwith your HP All-in-One. The onscreen Help also provides regulatory and environmental information.
Chapter 2
10 HP Deskjet F2200 All-in-One series
English
To access the onscreen Help• Windows: Click Start > All Programs > HP > Deskjet F2200 All-in-One series > Help.
To install the onscreen Help, insert the software CD in your computer and follow the onscreeninstructions.
• Macintosh: Click Help > Mac Help > Library > HP Product Help.
HP Web siteIf you have Internet access, you can get help and support from the HP Web site at www.hp.com/support. This Web site offers technical support, drivers, supplies, and ordering information.
HP supportYou can contact HP Support by phone and online. Support options and availability vary by product,country/region, and language.
HP support by phoneFor a list of support phone numbers, see the inside back cover of this guide.Support options and availability vary by product, country/region, and language.
Phone support periodOne year of phone support is available in Latin America (including Mexico). To determine the durationof phone support in North America, Eastern Europe, the Middle East, Asia Pacific, and Africa, goto www.hp.com/support.Standard phone company charges apply.
After the phone support periodAfter the phone support period, help is available from HP at an additional cost.Contact your HP dealer or call the support phone number for your country/region to learn more aboutsupport options.
Before calling HP Support1. Make sure that:
a. The HP All-in-One is plugged in and turned on.b. The specified print cartridges are installed correctly.c. The recommended paper is properly loaded in the input tray.
2. Reset the HP All-in-One:a. Turn off the HP All-in-One by pressing the On button.b. Unplug the power cord from the back of the HP All-in-One.c. Plug the power cord back into the HP All-in-One.d. Turn on the HP All-in-One by pressing the On button.
3. Have the following information available:a. Specific name of the HP All-in-One, as it appears on the control panel.b. Print a self-test report. (For more information, see the User Guide.)c. Be prepared to describe your problem in detail.d. Have your serial number and service ID ready, found on the self-test report.e. Be near the HP All-in-One printer when you call HP Support.
Technical informationThe technical specifications and international regulatory information for the HP All-in-One areprovided in this section. For additonal regulatory and environmental specifications, see the onscreenHelp.For additional regulatory and environmental information, including the Declaration of Conformitystatement, see the onscreen Help.
Technical information 11
Engl
ish

System requirementsSoftware system requirements are located in the Readme file.
Paper specifications• Input tray capacity: Plain paper sheets: Up to 80 (75 gsm (20 lb.) paper)• Output tray capacity: Plain paper sheets: Up to 50 (75 gsm (20 lb.) paper)
NOTE: For a complete list of supported media sizes, see the printer software.
Physical specifications• Height: 18.05 cm (7.11 inches)• Width: 42.57 cm (16.76 inches)• Depth: 26.74 cm (10.53 inches)• Weight: 5.27 kg (11 lbs)
Power specifications• Power consumption: 20 watts (average printing)• Input voltage: AC 100 to 240 V ~ 1 A 50–60 Hz• Output voltage: DC 32 V===375 mA, 16 V===500mA• Power supply: 0957-2231, AC 100 to 240 V ~ 1 A 50–60 Hz (±3 Hz)• Power supply: 0957-2248, AC 200 to 240 V (±10%), 50 - 60 Hz (±3 Hz)
NOTE: Use only with the power adapter supplied by HP.
Environmental specifications• Recommended operating temperature range: 15º to 30º C (59º to 86º F)• Allowable operating temperature range: 10º to 35º C (50º to 95º F)• Humidity: 15% to 80% RH non-condensing• Non-operating (Storage) temperature range: –20º to 50º C (–4º to 122º F)• In the presence of high electromagnetic fields, it is possible the output from the HP All-in-One
may be slightly distorted• HP recommends using a USB cable less than or equal to 3 m (10 feet) in length to minimize
injected noise due to potential high electromagnetic fields
Regulatory noticesThe HP All-in-One meets product requirements from regulatory agencies in your country/region. Fora complete listing of regulatory notices, see the onscreen Help.
Regulatory model identification numberFor regulatory identification purposes, your product is assigned a Regulatory Model Number. TheRegulatory Model Number for your product is VCVRA-0706. This regulatory number should not beconfused with the marketing name (HP Deskjet F2200 All-in-One series, etc.) or product numbers(CB683A, etc.).
Chapter 2
12 HP Deskjet F2200 All-in-One series
English
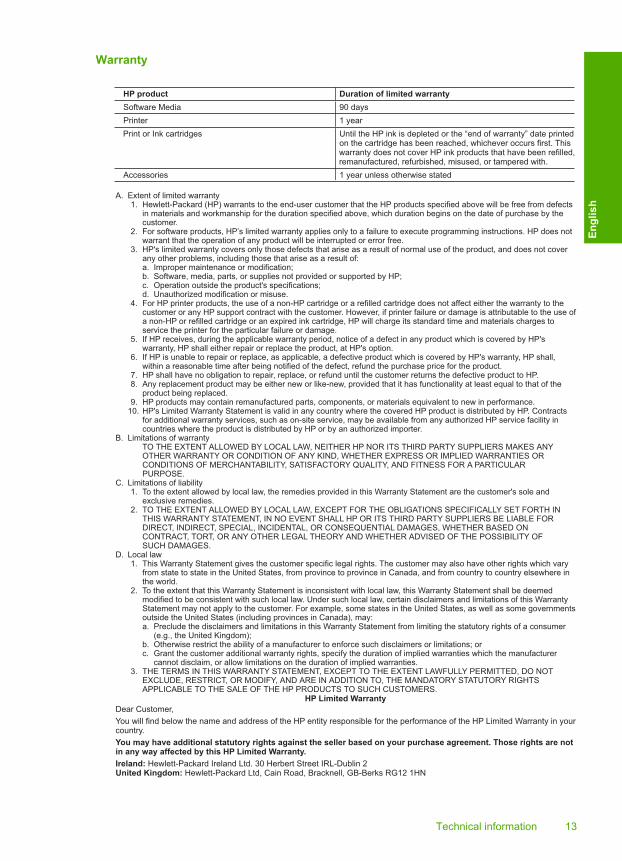
Warranty
A. Extent of limited warranty 1. Hewlett-Packard (HP) warrants to the end-user customer that the HP products specified above will be free from defects
in materials and workmanship for the duration specified above, which duration begins on the date of purchase by the customer.
2. For software products, HP’s limited warranty applies only to a failure to execute programming instructions. HP does not warrant that the operation of any product will be interrupted or error free.
3. HP's limited warranty covers only those defects that arise as a result of normal use of the product, and does not cover any other problems, including those that arise as a result of:
a. Improper maintenance or modification; b. Software, media, parts, or supplies not provided or supported by HP; c. Operation outside the product's specifications; d. Unauthorized modification or misuse. 4. For HP printer products, the use of a non-HP cartridge or a refilled cartridge does not affect either the warranty to the
customer or any HP support contract with the customer. However, if printer failure or damage is attributable to the use of a non-HP or refilled cartridge or an expired ink cartridge, HP will charge its standard time and materials charges to service the printer for the particular failure or damage.
5. If HP receives, during the applicable warranty period, notice of a defect in any product which is covered by HP's warranty, HP shall either repair or replace the product, at HP's option.
6. If HP is unable to repair or replace, as applicable, a defective product which is covered by HP's warranty, HP shall, within a reasonable time after being notified of the defect, refund the purchase price for the product.
7. HP shall have no obligation to repair, replace, or refund until the customer returns the defective product to HP. 8. Any replacement product may be either new or like-new, provided that it has functionality at least equal to that of the
product being replaced. 9. HP products may contain remanufactured parts, components, or materials equivalent to new in performance. 10. HP's Limited Warranty Statement is valid in any country where the covered HP product is distributed by HP. Contracts
for additional warranty services, such as on-site service, may be available from any authorized HP service facility in countries where the product is distributed by HP or by an authorized importer.
B. Limitations of warrantyTO THE EXTENT ALLOWED BY LOCAL LAW, NEITHER HP NOR ITS THIRD PARTY SUPPLIERS MAKES ANY OTHER WARRANTY OR CONDITION OF ANY KIND, WHETHER EXPRESS OR IMPLIED WARRANTIES OR CONDITIONS OF MERCHANTABILITY, SATISFACTORY QUALITY, AND FITNESS FOR A PARTICULAR PURPOSE.
C. Limitations of liability 1. To the extent allowed by local law, the remedies provided in this Warranty Statement are the customer's sole and
exclusive remedies. 2. TO THE EXTENT ALLOWED BY LOCAL LAW, EXCEPT FOR THE OBLIGATIONS SPECIFICALLY SET FORTH IN
THIS WARRANTY STATEMENT, IN NO EVENT SHALL HP OR ITS THIRD PARTY SUPPLIERS BE LIABLE FOR DIRECT, INDIRECT, SPECIAL, INCIDENTAL, OR CONSEQUENTIAL DAMAGES, WHETHER BASED ON CONTRACT, TORT, OR ANY OTHER LEGAL THEORY AND WHETHER ADVISED OF THE POSSIBILITY OF
SUCH DAMAGES.D. Local law 1. This Warranty Statement gives the customer specific legal rights. The customer may also have other rights which vary
from state to state in the United States, from province to province in Canada, and from country to country elsewhere in the world.
2. To the extent that this Warranty Statement is inconsistent with local law, this Warranty Statement shall be deemed modified to be consistent with such local law. Under such local law, certain disclaimers and limitations of this Warranty Statement may not apply to the customer. For example, some states in the United States, as well as some governments outside the United States (including provinces in Canada), may:
a. Preclude the disclaimers and limitations in this Warranty Statement from limiting the statutory rights of a consumer (e.g., the United Kingdom); b. Otherwise restrict the ability of a manufacturer to enforce such disclaimers or limitations; or c. Grant the customer additional warranty rights, specify the duration of implied warranties which the manufacturer
cannot disclaim, or allow limitations on the duration of implied warranties. 3. THE TERMS IN THIS WARRANTY STATEMENT, EXCEPT TO THE EXTENT LAWFULLY PERMITTED, DO NOT
EXCLUDE, RESTRICT, OR MODIFY, AND ARE IN ADDITION TO, THE MANDATORY STATUTORY RIGHTS APPLICABLE TO THE SALE OF THE HP PRODUCTS TO SUCH CUSTOMERS.
HP Limited WarrantyDear Customer,
You will find below the name and address of the HP entity responsible for the performance of the HP Limited Warranty in your country.
You may have additional statutory rights against the seller based on your purchase agreement. Those rights are not in any way affected by this HP Limited Warranty.Ireland: Hewlett-Packard Ireland Ltd. 30 Herbert Street IRL-Dublin 2United Kingdom: Hewlett-Packard Ltd, Cain Road, Bracknell, GB-Berks RG12 1HN
HP product Duration of limited warrantySoftware Media 90 days
Printer 1 year
Print or Ink cartridges Until the HP ink is depleted or the “end of warranty” date printed on the cartridge has been reached, whichever occurs first. This
warranty does not cover HP ink products that have been refilled, remanufactured, refurbished, misused, or tampered with.
Accessories 1 year unless otherwise stated
Technical information 13
Engl
ish

Tout-en-un HP Deskjet série F2200Guide d'utilisation
Fran
çais

Français
Sommaire
1 Présentation de l'appareil HP Tout-en-unL'appareil HP Tout-en-un en un coup d'œil................................................................................2Boutons du panneau de commande...........................................................................................3Présentation des voyants d'état..................................................................................................4Chargement d'originaux pour la numérisation et la copie...........................................................5Création d'une copie...................................................................................................................6Numérisation d'un original..........................................................................................................6
2 Dépannage et assistanceDésinstallation et réinstallation du logiciel..................................................................................7Dépannage de la configuration du matériel................................................................................8Elimination de bourrages papier...............................................................................................10Résolution des problèmes concernant les cartouches d'impression........................................11Recherche d'informations supplémentaires..............................................................................11
Guide de configuration.......................................................................................................11Aide en ligne.......................................................................................................................11Site Web HP.......................................................................................................................11
Assistance HP..........................................................................................................................11Assistance téléphonique HP...............................................................................................11
Période d'assistance téléphonique...............................................................................11Après la période d'assistance téléphonique.................................................................11
Avant de contacter le service d'assistance HP...................................................................12Renseignements techniques....................................................................................................12
Configurations système minimales.....................................................................................12Spécifications relatives au papier.......................................................................................12Spécifications physiques....................................................................................................12Spécifications électriques...................................................................................................12Conditions d'exploitation.....................................................................................................13Déclarations de conformité.................................................................................................13
Numéro d'identification réglementaire de modèle........................................................13Garantie..............................................................................................................................14
1
Fran
çais

1 Présentation del'appareil HP Tout-en-unL'appareil Tout-en-un HP Deskjet série F2200 est un périphérique polyvalent qui vousoffre des fonctions de copie, de numérisation et d'impression faciles à utiliser. Pour plusd'informations sur l'ensemble des fonctionnalités disponibles, reportez-vous à l'aide enligne.
L'appareil HP Tout-en-un en un coup d'œil
Numéro Description
1 Panneau de commande
2 Bac d'alimentation
3 Rallonge du bac
4 Guide de largeur
5 Trappe d'accès aux cartouches d'impression
6 Vitre
7 Intérieur du capot
8 Trappe d'accès arrière
9 Port USB arrière
10 Connexion de l'alimentation*
* Utilisez exclusivement l'adaptateur secteur fourni par HP.
2 Tout-en-un HP Deskjet série F2200
Français
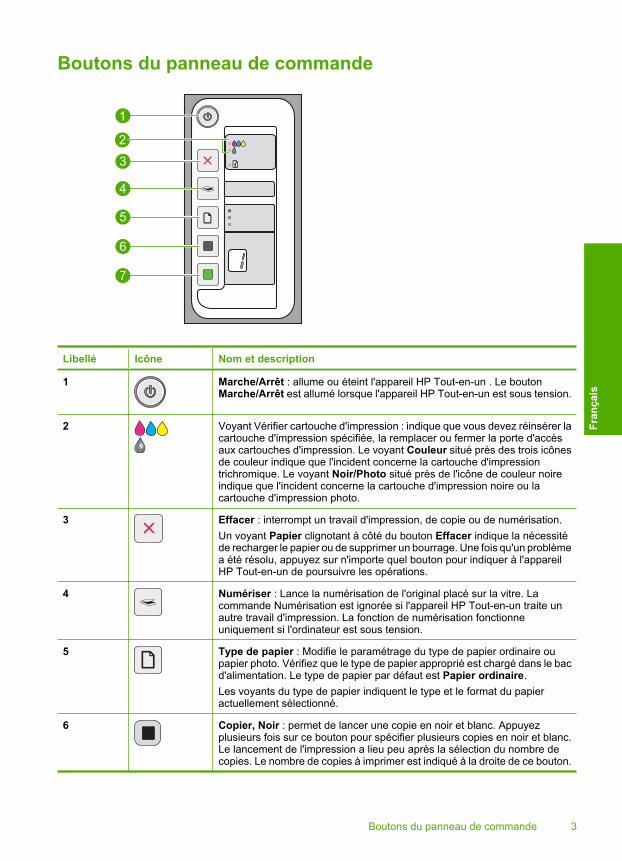
Boutons du panneau de commande
Libellé Icône Nom et description
1 Marche/Arrêt : allume ou éteint l'appareil HP Tout-en-un . Le boutonMarche/Arrêt est allumé lorsque l'appareil HP Tout-en-un est sous tension.
2 Voyant Vérifier cartouche d'impression : indique que vous devez réinsérer lacartouche d'impression spécifiée, la remplacer ou fermer la porte d'accèsaux cartouches d'impression. Le voyant Couleur situé près des trois icônesde couleur indique que l'incident concerne la cartouche d'impressiontrichromique. Le voyant Noir/Photo situé près de l'icône de couleur noireindique que l'incident concerne la cartouche d'impression noire ou lacartouche d'impression photo.
3 Effacer : interrompt un travail d'impression, de copie ou de numérisation. Un voyant Papier clignotant à côté du bouton Effacer indique la nécessitéde recharger le papier ou de supprimer un bourrage. Une fois qu'un problèmea été résolu, appuyez sur n'importe quel bouton pour indiquer à l'appareilHP Tout-en-un de poursuivre les opérations.
4 Numériser : Lance la numérisation de l'original placé sur la vitre. Lacommande Numérisation est ignorée si l'appareil HP Tout-en-un traite unautre travail d'impression. La fonction de numérisation fonctionneuniquement si l'ordinateur est sous tension.
5 Type de papier : Modifie le paramétrage du type de papier ordinaire oupapier photo. Vérifiez que le type de papier approprié est chargé dans le bacd'alimentation. Le type de papier par défaut est Papier ordinaire.Les voyants du type de papier indiquent le type et le format du papieractuellement sélectionné.
6 Copier, Noir : permet de lancer une copie en noir et blanc. Appuyezplusieurs fois sur ce bouton pour spécifier plusieurs copies en noir et blanc.Le lancement de l'impression a lieu peu après la sélection du nombre decopies. Le nombre de copies à imprimer est indiqué à la droite de ce bouton.
Boutons du panneau de commande 3
Fran
çais
Libellé Icône Nom et description
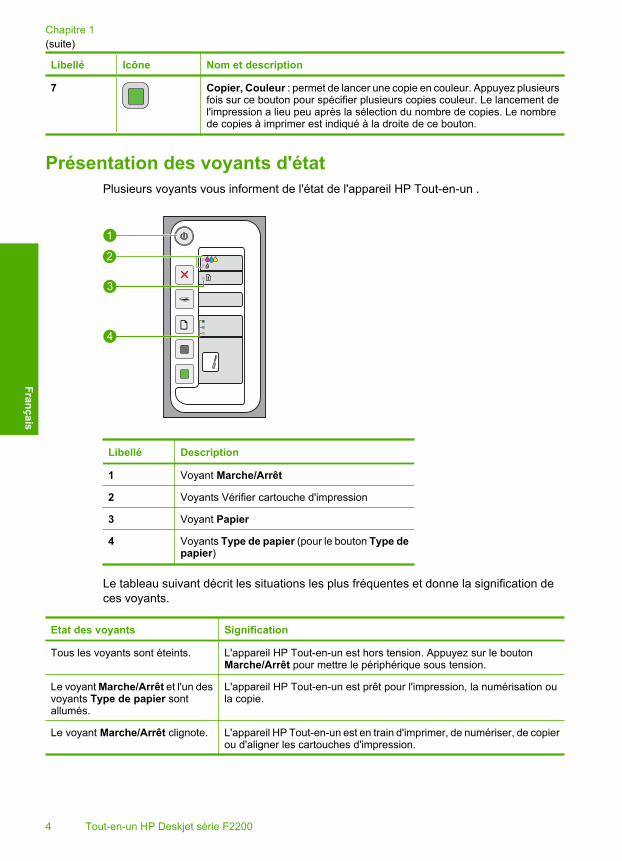
7 Copier, Couleur : permet de lancer une copie en couleur. Appuyez plusieursfois sur ce bouton pour spécifier plusieurs copies couleur. Le lancement del'impression a lieu peu après la sélection du nombre de copies. Le nombrede copies à imprimer est indiqué à la droite de ce bouton.
Présentation des voyants d'étatPlusieurs voyants vous informent de l'état de l'appareil HP Tout-en-un .
Libellé Description
1 Voyant Marche/Arrêt
2 Voyants Vérifier cartouche d'impression
3 Voyant Papier
4 Voyants Type de papier (pour le bouton Type depapier)
Le tableau suivant décrit les situations les plus fréquentes et donne la signification deces voyants.
Etat des voyants Signification
Tous les voyants sont éteints. L'appareil HP Tout-en-un est hors tension. Appuyez sur le boutonMarche/Arrêt pour mettre le périphérique sous tension.
Le voyant Marche/Arrêt et l'un desvoyants Type de papier sontallumés.
L'appareil HP Tout-en-un est prêt pour l'impression, la numérisation oula copie.
Le voyant Marche/Arrêt clignote. L'appareil HP Tout-en-un est en train d'imprimer, de numériser, de copierou d'aligner les cartouches d'impression.
Chapitre 1(suite)
4 Tout-en-un HP Deskjet série F2200
Français

Etat des voyants Signification
Le voyant Marche/Arrêt clignoterapidement pendant 3 secondes etreste ensuite allumé.
Vous avez appuyé sur un bouton pendant que l'appareil HP Tout-en-unétait en train d'imprimer, de numériser, de copier ou d'aligner lescartouches d'impression.
Le voyant Marche/Arrêt clignoterapidement pendant 20 secondes,puis reste allumé fixement.
Vous avez appuyé sur le bouton Numériser mais l'ordinateur n'a renvoyéaucune réponse.
Le voyant de l'appareil Papierclignote.
• L'appareil HP Tout-en-un est à court de papier.• Un bourrage papier est survenu dans l'appareil HP Tout-en-un .
Le voyant Vérifier cartouched'impression clignote.
• La porte d'accès aux cartouches d'impression est ouverte.• Les cartouches d'impression sont manquantes ou ne sont pas
correctement installées.• La bande n'a pas été retirée de la cartouche d'impression.• La cartouche d'impression n'est pas conçue pour être utilisée dans
l'appareil HP Tout-en-un .• La cartouche d'impression est peut-être défectueuse.• La cartouche d'impression est presque vide.
Les voyants Marche/Arrêt,Papier et Vérifier cartouchesd'impression clignotent.
Défaillance du scanner.Mettez l'appareil HP Tout-en-un hors tension, puis à nouveau soustension. Si le problème persiste, contactez le centre d'assistance HP.
Tous les voyants clignotent. L'appareil HP Tout-en-un a subi une erreur fatale.1. Mettez l’appareil HP Tout-en-un hors tension.2. Débranchez le cordon d'alimentation.3. Patientez environ une minute, puis rebranchez le cordon
d'alimentation.4. Remettez l'appareil HP Tout-en-un sous tension.Si le problème persiste, contactez le centre d'assistance HP.
Chargement d'originaux pour la numérisation et la copieVous pouvez charger de nombreux types et formats de papier différents dans l'appareilHP Tout-en-un , y compris du papier au format A4 ou Lettre, du papier photo, destransparents et des enveloppes. Pour plus d'informations, reportez-vous à l'aide en ligne.
Pour positionner un original sur la vitre1. Soulevez le capot de l'appareil HP Tout-en-un .2. Placez l'original en l'alignant sur le coin avant gauche de la vitre, en veillant à ce que
le côté à copier ou à numériser soit orienté vers le bas.
Conseil Pour obtenir la taille de copie correcte, assurez-vous que la vitre estexempte d'adhésif ou de corps étrangers.
(suite)
Chargement d'originaux pour la numérisation et la copie 5
Fran
çais
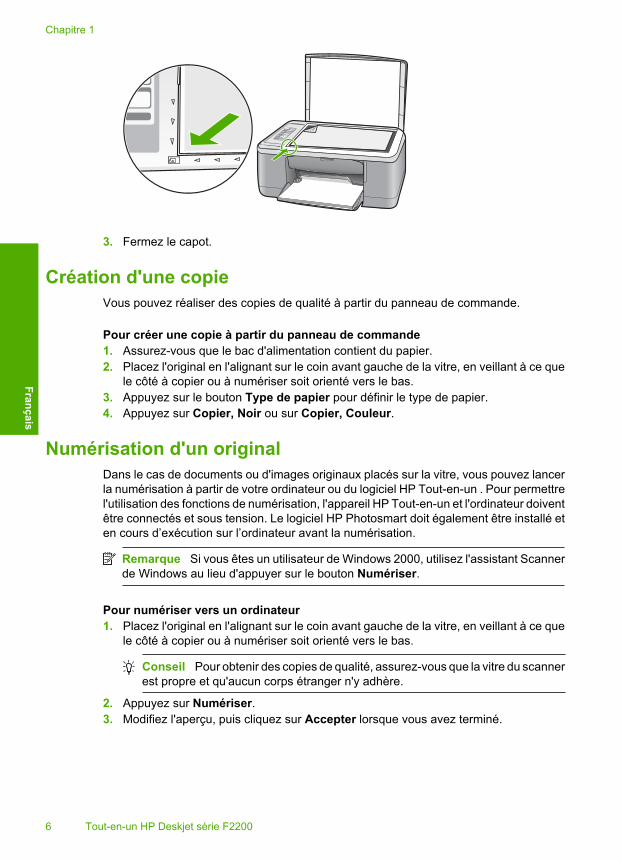
3. Fermez le capot.
Création d'une copieVous pouvez réaliser des copies de qualité à partir du panneau de commande.
Pour créer une copie à partir du panneau de commande1. Assurez-vous que le bac d'alimentation contient du papier.2. Placez l'original en l'alignant sur le coin avant gauche de la vitre, en veillant à ce que
le côté à copier ou à numériser soit orienté vers le bas.3. Appuyez sur le bouton Type de papier pour définir le type de papier.4. Appuyez sur Copier, Noir ou sur Copier, Couleur.
Numérisation d'un originalDans le cas de documents ou d'images originaux placés sur la vitre, vous pouvez lancerla numérisation à partir de votre ordinateur ou du logiciel HP Tout-en-un . Pour permettrel'utilisation des fonctions de numérisation, l'appareil HP Tout-en-un et l'ordinateur doiventêtre connectés et sous tension. Le logiciel HP Photosmart doit également être installé eten cours d’exécution sur l’ordinateur avant la numérisation.
Remarque Si vous êtes un utilisateur de Windows 2000, utilisez l'assistant Scannerde Windows au lieu d'appuyer sur le bouton Numériser.
Pour numériser vers un ordinateur1. Placez l'original en l'alignant sur le coin avant gauche de la vitre, en veillant à ce que
le côté à copier ou à numériser soit orienté vers le bas.
Conseil Pour obtenir des copies de qualité, assurez-vous que la vitre du scannerest propre et qu'aucun corps étranger n'y adhère.
2. Appuyez sur Numériser.3. Modifiez l'aperçu, puis cliquez sur Accepter lorsque vous avez terminé.
Chapitre 1
6 Tout-en-un HP Deskjet série F2200
Français

2 Dépannage et assistanceLe présent chapitre contient des informations sur les problèmes liés à l'installation, à la configurationet à certains aspects de l'utilisation. Pour plus d'informations sur le dépannage, reportez-vous àl'aide en ligne.Plusieurs problèmes peuvent se produire si l'appareil est connecté à l'ordinateur via un câble USBavant l'installation du logiciel HP Photosmart. Si vous avez connecté l'appareil à l'ordinateur avantd'avoir été invité à le faire par le biais de l'écran d'installation du logiciel, procédez comme suit :
Pour dépanner l'installation du logiciel1. Débranchez le câble USB de l'ordinateur.2. Désinstallez le logiciel (si vous l'avez déjà installé). Pour de plus amples renseignements,
voir « Désinstallation et réinstallation du logiciel, » page 7.3. Redémarrez l'ordinateur.4. Mettez le produit hors tension, attendez une minute, puis redémarrez-le.5. Réinstallez le logiciel de l'appareil HP Photosmart.
Attention Ne branchez pas le câble USB avant d'y avoir été invité par le biais de l'écrand'installation du logiciel.
Pour plus d'informations sur le service d'assistance, reportez-vous à la quatrième de couverture dece guide.
Désinstallation et réinstallation du logicielSi l'installation est incomplète ou que vous avez connecté le câble USB à l'ordinateur avant d'y êtreinvité par l'écran d'installation du logiciel, il peut être nécessaire de désinstaller, puis de réinstallerle logiciel. Ne supprimez pas simplement les fichiers de l'application de l'appareil HP Tout-en-un devotre ordinateur. Assurez-vous de les désinstaller à l'aide de l'utilitaire prévu à cet effet, lequel estfourni lors de l'installation du logiciel fourni avec l'appareil HP Tout-en-un .
Désinstallation sur un ordinateur Windows, puis réinstallation1. Ouvrez le Panneau de configuration de Windows et double-cliquez sur Ajout/Suppression de
programmes.2. Sélectionnez Logiciel de pilote HP Deskjet Tout-en-un et cliquez sur Modifier/Supprimer.
Suivez les instructions qui s'affichent à l'écran.3. Déconnectez le produit de l'ordinateur.4. Redémarrez l'ordinateur.
Remarque Il est important de déconnecter l'appareil avant de redémarrer l'ordinateur. Neconnectez pas l'appareil à l'ordinateur avant d'avoir réinstallé le logiciel.
5. Pour réinstaller le logiciel, insérez le CD-ROM dans le lecteur de CD-ROM de l'ordinateur etsuivez les instructions d'installation du logiciel indiquées sur l'écran de démarrage.Si l'écran de démarrage n'apparaît pas, cliquez deux fois sur Poste de travail, puis surl'icône CD-ROM portant le logo HP, et enfin sur setup.exe.
6. Suivez les instructions à l'écran et celles fournies dans le Guide de configuration livré avec leproduit.
Une fois l'installation du logiciel terminée, l'icône HP Digital Imaging Monitor apparaît dans la barred'état système de Windows.Pour vous assurer que le logiciel est correctement installé, cliquez deux fois sur l'icône Centrede solutions HP sur le bureau. Si le Centre de solutions HP affiche les principales icônes (Numériserimage et Numériser document), cela signifie que le logiciel a été correctement installé.Utilisateurs Macintosh : Les instructions de désinstallation et de réinstallation figurent dans le fichierLisezmoi, ainsi que dans les fichiers d'aide du logiciel.
Désinstallation et réinstallation du logiciel 7
Fran
çais

Dépannage de la configuration du matérielCette section contient des informations sur la résolution des problèmes de matériel liés à l'appareilHP Tout-en-un .
L'appareil ne s'allume pas.
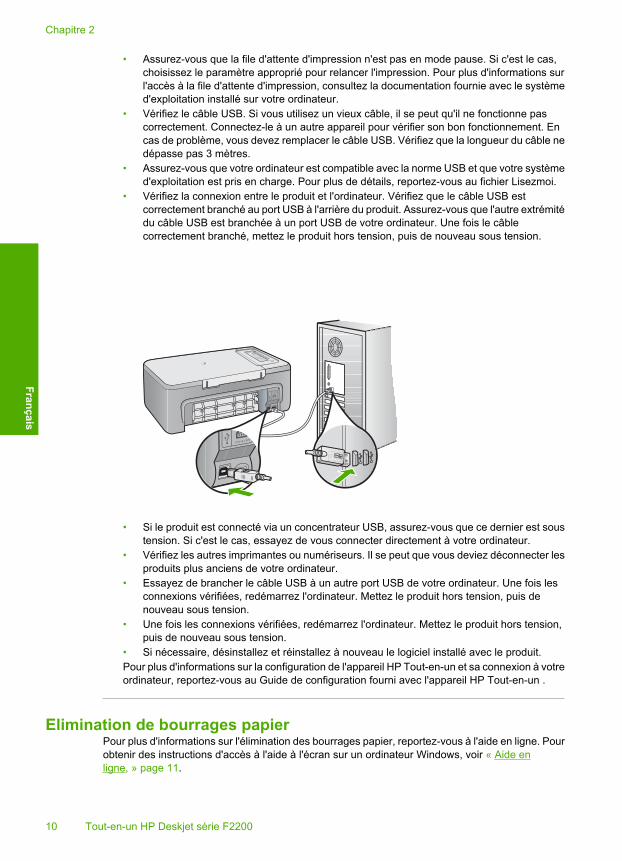
Solution• Assurez-vous que le cordon d'alimentation est correctement branché au produit et à
l'adaptateur secteur. Branchez le cordon d'alimentation à une prise de courant, à unparasurtenseur ou à une prise multiple.
1 Branchement de l'alimentation
2 Cordon d'alimentation et adaptateur secteur
3 Prise de courant
• Si vous utilisez une prise multiple, assurez-vous que l'interrupteur dont elle est équipée esten position de marche. Vous pouvez aussi brancher directement le produit à une prisesecteur.
• Testez la prise d'alimentation pour vérifier qu'elle est en bon état. Branchez un appareil dontvous être sûr du bon fonctionnement et vérifiez s'il est alimenté. Si ce n'est pas le cas, laprise d'alimentation est très certainement défectueuse.
• Si vous avez branché le produit sur une prise à interrupteur, assurez-vous que ce dernierest en position de marche. S'il est sous tension mais ne fonctionne toujours pas, il se peutque la prise de courant ait un problème.
Cause: Le produit n'a pas été correctement branché à une prise d'alimentation, ou unproblème a eu lieu avec la prise électrique.
Solution: Il se peut que le produit ne réponde pas si vous appuyez trop rapidement sur lebouton Marche/Arrêt. Appuyez une fois sur le bouton Marche/Arrêt. Il faut parfois quelquesminutes pour mettre le produit sous tension. Si vous appuyez à nouveau sur le bouton Marche/Arrêt pendant cette période, vous risquez de mettre le produit hors tension.
Attention Si l'appareil ne parvient toujours pas à se mettre sous tension, il est peut-êtreen panne. Débranchez l'appareil de la prise de courant.Contactez l'assistance HP pour la maintenance.Consultez le site : www.hp.com/support. Si le système vous y invite, choisissez votre pays/région, puis cliquez sur Contacter HP pour obtenir des informations sur les appels àl'assistance technique.
Chapitre 2
8 Tout-en-un HP Deskjet série F2200
Français

Cause: Vous avez appuyé sur le bouton Marche/Arrêt trop vite.
J'ai branché le câble USB mais je rencontre des problèmes d'utilisation del'appareil HP Tout-en-un avec mon ordinateur
Solution: Vous devez préalablement installer le logiciel fourni avec le produit avant debrancher le câble USB. Durant l'installation, ne branchez pas le câble USB avant d'y être invitépar les instructions affichées à l'écran. La connexion du câble USB avant l'invite peut engendrerdes erreurs.Une fois le logiciel installé, il est très simple de raccorder votre ordinateur au produit via un câbleUSB. Branchez simplement une extrémité du câble USB à l'arrière de l'ordinateur et l'autre àl'arrière du produit. Vous pouvez effectuer la connexion sur n'importe quel port USB situé àl'arrière de votre ordinateur.
Pour plus d'informations sur l'installation du logiciel et la connexion du câble USB, reportez-vousau Guide de configuration fourni avec l'appareil HP Tout-en-un .
L'appareil HP Tout-en-un n'imprime pasSolution: Si l'appareil HP Tout-en-un et l'ordinateur ne communiquent pas l'un avec l'autre,procédez comme suit :• Vérifiez le bouton Marche/Arrêt de l'appareil. S'il n'est pas allumé, l'appareil est hors
tension. Assurez-vous que le cordon d'alimentation est bien connecté à l'appareil et branchéà une prise de courant. Appuyez sur le bouton Marche/Arrêt pour mettre l'appareil soustension.
• Assurez-vous que les cartouches d’impression sont installées.• Assurez-vous que le bac d'alimentation contient du papier.• Vérifiez qu'aucun bourrage papier n'a lieu dans le produit.• Vérifiez que le chariot d'impression n'est pas bloqué.
Ouvrez la porte d'accès avant afin d'accéder à la zone du chariot d'impression. Retirez lesobjets qui bloquent le chariot d'impression, y compris les éventuels matériaux d'emballage.Mettez le produit hors tension, puis de nouveau sous tension.
• Imprimez une page de test afin de déterminer si le produit peut imprimer et communiqueravec l'ordinateur.
Dépannage de la configuration du matériel 9
Fran
çais
• Assurez-vous que la file d'attente d'impression n'est pas en mode pause. Si c'est le cas,choisissez le paramètre approprié pour relancer l'impression. Pour plus d'informations surl'accès à la file d'attente d'impression, consultez la documentation fournie avec le systèmed'exploitation installé sur votre ordinateur.
• Vérifiez le câble USB. Si vous utilisez un vieux câble, il se peut qu'il ne fonctionne pascorrectement. Connectez-le à un autre appareil pour vérifier son bon fonctionnement. Encas de problème, vous devez remplacer le câble USB. Vérifiez que la longueur du câble nedépasse pas 3 mètres.
• Assurez-vous que votre ordinateur est compatible avec la norme USB et que votre systèmed'exploitation est pris en charge. Pour plus de détails, reportez-vous au fichier Lisezmoi.
• Vérifiez la connexion entre le produit et l'ordinateur. Vérifiez que le câble USB estcorrectement branché au port USB à l'arrière du produit. Assurez-vous que l'autre extrémitédu câble USB est branchée à un port USB de votre ordinateur. Une fois le câblecorrectement branché, mettez le produit hors tension, puis de nouveau sous tension.
• Si le produit est connecté via un concentrateur USB, assurez-vous que ce dernier est soustension. Si c'est le cas, essayez de vous connecter directement à votre ordinateur.
• Vérifiez les autres imprimantes ou numériseurs. Il se peut que vous deviez déconnecter lesproduits plus anciens de votre ordinateur.
• Essayez de brancher le câble USB à un autre port USB de votre ordinateur. Une fois lesconnexions vérifiées, redémarrez l'ordinateur. Mettez le produit hors tension, puis denouveau sous tension.
• Une fois les connexions vérifiées, redémarrez l'ordinateur. Mettez le produit hors tension,puis de nouveau sous tension.
• Si nécessaire, désinstallez et réinstallez à nouveau le logiciel installé avec le produit.Pour plus d'informations sur la configuration de l'appareil HP Tout-en-un et sa connexion à votreordinateur, reportez-vous au Guide de configuration fourni avec l'appareil HP Tout-en-un .
Elimination de bourrages papierPour plus d'informations sur l'élimination des bourrages papier, reportez-vous à l'aide en ligne. Pourobtenir des instructions d'accès à l'aide à l'écran sur un ordinateur Windows, voir « Aide enligne, » page 11.
Chapitre 2
10 Tout-en-un HP Deskjet série F2200
Français
Résolution des problèmes concernant les cartouches d'impressionPour plus d'informations sur le dépannage des cartouches d'impression, reportez-vous à l'aideaffichée à l'écran. Pour plus d'informations sur l'accès à l'aide affichée à l'écran, voir « Aide enligne, » page 11.
Recherche d'informations supplémentairesDiverses ressources, imprimées et en ligne, fournissent des informations sur la configuration etl'utilisation de votre appareil HP Tout-en-un .
Guide de configurationLe Guide de configuration fournit des instructions sur la configuration de votreappareil HP Tout-en-un et l'installation du logiciel. Assurez-vous de suivre les instructions du Guidede configuration dans l'ordre indiqué.Si vous rencontrez des problèmes lors de la configuration, consultez les conseils de dépannagedans la dernière section du Guide de configuration ou reportez-vous au chapitre « Dépannage etassistance, » page 7 du présent guide.
Aide en ligneL'aide affichée à l'écran fournit des instructions détaillées relatives aux fonctionnalités de votreappareil HP Tout-en-un qui ne sont pas décrites dans ce guide, notamment les fonctionnalitésuniquement disponibles via le logiciel que vous avez installé avec l'appareil HP Tout-en-un . L'aideaffichée à l'écran contient également des informations réglementaires et environnementales.
Pour accéder à l'aide affichée à l'écran• Windows : Cliquez sur Démarrer > Tous les programmes > HP > Tout-en-un
HP Deskjet série F2200 > Aide.Pour installer l'aide à l'écran, insérez le CD-ROM du logiciel dans votre ordinateur et suivez lesinstructions affichées à l'écran.
• Macintosh : Cliquez sur Aide > Aide sur le Mac > Bibliothèque > Aide sur le produit HP.
Site Web HPSi vous disposez d'un accès à Internet, vous pouvez obtenir de l'aide sur le site Web HP àl'adresse www.hp.com/support. Vous y trouverez une assistance technique, des pilotes, desfournitures et des informations pour passer des commandes.
Assistance HPVous pouvez contacter le service d'assistance HP par téléphone ou en ligne. Les optionsd'assistance et leur disponibilité varient selon le produit, le pays/la région et la langue.
Assistance téléphonique HPPour obtenir la liste des numéros de téléphone d’assistance, reportez-vous à la troisième decouverture de ce guide.Les options d'assistance et leur disponibilité varient selon le produit, le pays/la région et la langue.
Période d'assistance téléphoniqueLes pays/régions d'Amérique latine (y compris le Mexique) bénéficient d'un an d'assistancetéléphonique. Pour déterminer la durée de l’assistance téléphonique en Amérique du Nord, enEurope de l'est, au Moyen-Orient, dans la région Asie/Pacifique et en Afrique, visitez le sitewww.hp.com/support.Les tarifs standard de l'opérateur sont applicables.
Après la période d'assistance téléphoniqueUne fois la période d'assistance téléphonique expirée, toute aide apportée par HP vous serafacturée.
Assistance HP 11
Fran
çais

Contactez votre revendeur HP ou appelez l'assistance téléphonique de votre pays/région pour plusd'informations sur les options d'assistance disponibles.
Avant de contacter le service d'assistance HP1. Assurez-vous que :
a. L'appareil HP Tout-en-un est branché et sous tension.b. Les cartouches d’impression spécifiées sont correctement installées.c. Le type de papier recommandé est correctement chargé dans le bac d'entrée.
2. Reconfigurez l'appareil HP Tout-en-un :a. Mettez l'appareil HP Tout-en-un hors tension à l'aide du bouton Marche/Arrêt.b. Débranchez le cordon d'alimentation situé à l'arrière de l'appareil HP Tout-en-un .c. Rebranchez-le sur l'appareil HP Tout-en-un .d. Allumez l'appareil HP Tout-en-un à l'aide du bouton Marche/Arrêt.
3. Assurez-vous d'avoir les informations suivantes à portée de main :a. Le nom spécifique de l'appareil HP Tout-en-un tel qu'il apparaît sur le panneau de
commande.b. Imprimez un rapport d'auto-test. Pour plus d'informations, reportez-vous au Guide de
l'utilisateur.c. Soyez prêt à décrire votre problème en détails.d. Relevez le numéro de série et l'identificateur de service de l'appareil en imprimant un rapport
d'auto-test.e. Tenez-vous à proximité de l'appareil HP Tout-en-un au moment de l'appel du service
d'assistance HP.
Renseignements techniquesCette section contient les spécifications techniques et les informations légales internationalesrelatives à l'appareil HP Tout-en-un . Pour obtenir des spécifications réglementaires etenvironnementales complémentaires, consultez l'aide affichée à l'écran.Pour plus d'informations d'ordre réglementaire ou environnemental, y compris la déclaration deconformité, reportez-vous à l'aide en ligne.
Configurations système minimalesLa configuration requise concernant le logiciel est incluse dans le fichier LisezMoi.
Spécifications relatives au papier• Capacité du bac d'alimentation : Feuilles de papier ordinaire : Jusqu'à 80 (grammage papier de
75 g/m²)• Capacité du bac de sortie : Feuilles de papier ordinaire : Jusqu'à 50 (grammage papier de 75 g/
m²)
Remarque Pour obtenir la liste complète des formats de support pris en charge, reportez-vousau logiciel d'impression.
Spécifications physiques• Hauteur : 18,05 cm• Largeur : 42,57 cm• Profondeur : 26,74 cm• Poids : 5,27 kg
Spécifications électriques• Consommation électrique: 20 watts en moyenne durant l'impression• Tension d'entrée : 100 à 240 V CA ~ 1 A 50 à 60 Hz• Tension de sortie : 32 V CC===375 mA, 16 V===500mA
Chapitre 2
12 Tout-en-un HP Deskjet série F2200
Français
• Alimentation : 0957-2231, 100 à 240 V c.a. ~ 1 A 50 à 60 Hz (±3 Hz)• Alimentation : 0957-2248, 200 à 240 V c.a. (±10 %), 50 à 60 Hz (±3 Hz)
Remarque Utilisez uniquement l'adaptateur secteur fourni par HP.
Conditions d'exploitation• Plage de température de fonctionnement recommandée : 15 à 30 ºC• Plage de température de fonctionnement acceptable : 10 à 35 ºC• Humidité : 15 à 80 % d'humidité relative sans condensation• Plage de température hors fonctionnement (stockage) : -20 à 50 ºC• En présence de champs électromagnétiques, la sortie de l'appareil HP Tout-en-un peut être
légèrement déformée.• HP recommande d'utiliser un câble USB de 3 m au maximum afin de réduire les interférences
provoquées par les champs électromagnétiques élevés qui peuvent se produire
Déclarations de conformitéL'appareil Tout-en-un HP respecte les exigences définies par les organismes de réglementation devotre pays/région. Pour obtenir une liste complète des déclarations de conformité auxréglementations, reportez-vous à l'aide en ligne.
Numéro d'identification réglementaire de modèleUn numéro de modèle réglementaire a été attribué à votre produit dans un souci d'identification etde respect de la réglementation. Le numéro de modèle réglementaire de votre produit est leVCVRA-0706. Vous ne devez pas confondre ce numéro réglementaire avec le nom commercial duproduit (Tout-en-un HP Deskjet série F2200, etc.) ou le numéro du produit (CB683A, etc.).
Renseignements techniques 13
Fran
çais

Garantie
Chapitre 2
14 Tout-en-un HP Deskjet série F2200
Français
A. Extension de garantie limitée 1. Hewlett-Packard (HP) garantit au client utilisateur final que les produhits HP décrits précédemment sont exempts de défauts de matériaux
et malfaçons pendant la durée indiquée ci-dessus, à compter de la date d'achat par le client. 2. Pour les logiciels, la garantie limitée HP est valable uniquement en cas d'impossibilité d'exécuter les instructions de programmation. HP ne
garantit pas que le fonctionnement du logiciel ne connaîtra pas d'interruptions ni d'erreurs. 3. La garantie limitée HP ne couvre que les défauts qui apparaissent dans le cadre de l'utilisation normale du produit et ne couvre aucun
autre problème, y compris ceux qui surviennent du fait : a. d'une mauvaise maintenance ou d'une modification ; b. de logiciels, de supports, de pièces ou de consommables non fournis ou non pris en charge par HP ; c. du fonctionnement du produit hors de ses caractéristiques ; ou d. d'une modification non autorisée ou d'une mauvaise utilisation. 4. Pour les imprimantes HP, l'utilisation d'une cartouche d'un autre fournisseur ou d'une cartouche rechargée n'entraîne pas la résiliation de la
garantie ni d'un contrat de support HP. Toutefois, si la panne ou les dégâts peuvent être attribués à l'utilisation d'une cartouche d'un autre fournisseur, d'une cartouche rechargée ou d'une cartouche périmée, HP facturera les montants correspondant au temps et au matériel nécessaires à la réparation de l'imprimante.
5. Si, pendant la période de garantie applicable, HP est informé d'une défaillance concernant un produit couvert par la garantie HP, HP choisira de réparer ou de remplacer le produit défectueux.
6. Si HP est dans l'incapacité de réparer ou de remplacer, selon le cas, un produit défectueux couvert par la garantie HP, HP devra, dans un délai raisonnable après avoir été informé du défaut, rembourser le prix d'achat du produit.
7. HP ne sera tenu à aucune obligation de réparation, de remplacement ou de remboursement tant que le client n'aura pas retourné le produit défectueux à HP.
8. Tout produit de remplacement peut être neuf ou comme neuf, pourvu que ses fonctionnalités soient au moins équivalentes à celles du produit remplacé.
9. Les produits HP peuvent contenir des pièces, des composants ou des matériels reconditionnés équivalents à des neufs en termes de performances.
10. La garantie limitée HP est valable dans tout pays dans lequel le produit HP couvert est distribué par HP. Des contrats apportant des services de garantie supplémentaires, tels que la réparation sur site, sont disponibles auprès des services de maintenance agréés par HP dans les pays dans lequel le produit est distribué par HP ou par un importateur agréé.
B. Restrictions de garantie DANS LA MESURE OÙ LES LOIS LOCALES L'AUTORISENT, HP OU SES FOURNISSEURS TIERS NE FONT AUCUNE AUTRE GARANTIE OU CONDITION, EXPRESSE OU IMPLICITE, EN CE QUI CONCERNE LES PRODUITS HP ET NIENT TOUTE GARANTIE IMPLICITE DE COMMERCIALISATION, DE QUALITÉ SATISFAISANTE OU D'ADAPTATION À UN BUT PARTICULIER.
C. Restrictions de responsabilité 1. Dans la mesure où les lois locales l'autorisent, les recours énoncés dans cette déclaration de garantie constituent les recours exclusifs du
client. 2. DANS LA MESURE OÙ LES LOIS LOCALES L'AUTORISENT, EXCEPTION FAITE DES OBLIGATIONS SPÉCIFIQUEMENT ÉNONCÉES
DANS LA PRÉSENTE DÉCLARATION DE GARANTIE, HP OU SES FOURNISSEURS TIERS NE POURRONT ÊTRE TENUS POUR RESPONSABLES DE DOMMAGES DIRECTS, INDIRECTS, SPÉCIAUX OU ACCIDENTELS, QU'ILS SOIENT BASÉS SUR UN CONTRAT, UN PRÉJUDICE OU TOUTE AUTRE THÉORIE LÉGALE, QUE CES DOMMAGES SOIENT RÉPUTÉS POSSIBLES OU NON.
D. Lois locales 1. Cette déclaration de garantie donne au client des droits juridiques spécifiques. Le client peut également posséder d'autres droits selon les
états des Etats-Unis, les provinces du Canada, et les autres pays ou régions du monde. 2. Si cette déclaration de garantie est incompatible avec les lois locales, elle sera considérée comme étant modifiée pour être conforme à la
loi locale. Selon ces lois locales, certaines renonciations et limitations de cette déclaration de garantie peuvent ne pas s'appliquer au client. Par exemple, certains états des Etats-Unis, ainsi que certains gouvernements hors des Etats-Unis (y compris certaines provinces du Canada), peuvent :
a. exclure les renonciations et limitations de cette déclaration de garantie des droits statutaires d'un client (par exemple au Royaume-Uni); b. restreindre d'une autre manière la possibilité pour un fabricant d'imposer ces renonciations et limitations ; ou c. accorder au client des droits de garantie supplémentaires, spécifier la durée des garanties implicites que le fabricant ne peut nier, ou
ne pas autoriser les limitations portant sur la durée des garanties implicites. 3. EXCEPTÉ DANS LA MESURE AUTORISÉE PAR LA LÉGISLATION, LES TERMES DE LA PRÉSENTE DÉCLARATION DE GARANTIE
N'EXCLUENT, NE LIMITENT NI NE MODIFIENT LES DROITS STATUTAIRES OBLIGATOIRES APPLICABLES À LA VENTE DES PRODUITS HP AUXDITS CLIENTS, MAIS VIENNENT S'Y AJOUTER.
Garantie du fabricant HP
Produit HP Durée de la garantie limitée Supports logiciels 90 jours Imprimante 1 an Cartouches d'encre Jusqu'à épuisement de l'encre HP ou jusqu'à expiration de la
date de garantie imprimée sur la cartouche (selon le cas qui se produira en premier). Cette garantie ne couvre pas les produits utilisant de l'encre HP qui ont été reconditionnés, mal utilisés ou altérés.
Accessoires 1 an, sauf indication contraire
Cher client, Vous trouverez, ci-après, les coordonnées de l’entité HP responsable de l'exécution de la garantie fabricant relative à votre matériel HP dans votre pays.
En vertu de votre contrat d’achat, il se peut que vous disposiez de droits légaux supplémentaires à l’encontre de votre vendeur. Ceux-ci ne sont aucunement affectés par la présente garantie du fabricant HP.
En particulier, si vous êtes un consommateur domicilié en France (départements et territoires d’outre-mer (DOM-TOM) inclus dans la limite des textes qui leur sont applicables), le vendeur reste tenu à votre égard des défauts de conformité du bien au contrat et des vices rédhibitoires hhdans les conditions prévues aux articles 1641 à 1649 du Code civil.
Code de la consommation : "Art. L. 211-4. - Le vendeur est tenu de livrer un bien conforme au contrat et répond des défauts de conformité existant lors de la délivrance. Il répond également des défauts de conformité résultant de l'emballage, des instructions de montage ou de l'installation lorsque celle-ci a été mise à sa charge par le contrat ou a été réalisée sous sa responsabilité."
"Art. L. 211-5. - Pour être conforme au contrat, le bien doit : 1° Etre propre à l'usage habituellement attendu d'un bien semblable et, le cas échéant correspondre à la description donnée par le vendeur et posséder les qualités que celui-ci a présentées à l'acheteur sous forme d'échantillon ou de modèle ; - présenter les qualités qu'un acheteur peut légitimement attendre eu égard aux déclarations publiques faites par le vendeur, par le producteur ou par son représentant, notamment dans la publicité ou l'étiquetage ; 2° Ou présenter les caractéristiques définies d'un commun accord par les parties ou être propre à tout usage spécial recherché par l'acheteur, porté à la connaissance du vendeur et que ce dernier a accepté."
"Art. L.211-12. – L’action résultant du défaut de conformité se prescrit par deux ans à compter de la délivrance du bien. "
Code civil : "Code civil Article 1641 : Le vendeur est tenu de la garantie à raison des défauts cachés de la chose vendue qui la rendent impropre à l’usage auquel on la destine, ou qui diminuent tellement cet usage, que l’acheteur ne l’aurait pas acquise, ou n’en aurait donné qu’un moindre prix, s’il les avait connus.
"Code civil Article 1648 : L’action résultant des vices rédhibitoires doit être intentée par l’acquéreur dans un délai de deux ans à compter de la découverte du vice."
France : Hewlett-Packard France, SAS, 80, rue Camille Desmoulins, 92788 Issy les Moulineaux Cedex 9 Belgique : Hewlett-Packard Belgium BVBA/SPRL, 1, rue de l'Aéronef, B-1140 Brussels Luxembourg : Hewlett-Packard Luxembourg SCA, 7a, rue Robert Stümper, L-2557 Luxembourg-Gasperich

HP Deskjet F2200 All-in-One seriesGuia de conceitos básicos
Port
uguê
s

Português
Conteúdo
1 Visão geral do HP All-in-OneVisão resumida do HP All-in-One...............................................................................................2Botões do painel de controle......................................................................................................3Visão geral das luzes de status..................................................................................................4Carregar originais para digitalização e cópia.............................................................................5Tirar uma cópia...........................................................................................................................6Digitalizar um original.................................................................................................................6
2 Resolução de problemas e suporteDesinstalar e reinstalar o software.............................................................................................7Solução de problemas na configuração do hardware................................................................8Eliminar congestionamentos de papel......................................................................................10Solução de problemas de cartucho de impressão...................................................................11Obter mais informações............................................................................................................11
Guia de configuração.........................................................................................................11Ajuda na tela.......................................................................................................................11Site da HP...........................................................................................................................11
Suporte HP...............................................................................................................................11Suporte HP por telefone.....................................................................................................11
Período de suporte por telefone...................................................................................11Após o término do período de suporte por telefone.....................................................11
Antes de ligar para o Suporte HP.......................................................................................12Informações técnicas................................................................................................................12
Requisitos do sistema........................................................................................................12Especificações de papel.....................................................................................................12Especificações físicas.........................................................................................................12Especificações de energia..................................................................................................12Especificações ambientais.................................................................................................12Notificações sobre regulamentação...................................................................................13
Número de identificação do modelo de regulamentação.............................................13Garantia..............................................................................................................................14
1
Port
uguê
s

1 Visão geral do HP All-in-OneO HP Deskjet F2200 All-in-One series é um dispositivo versátil que facilita cópia,digitalização e impressão. Para informações sobre todos os recursos e funções, consultea Ajuda na tela.
Visão resumida do HP All-in-One
Legenda Descrição
1 Painel de controle
2 Bandeja de entrada
3 Extensão da bandeja
4 Guia de largura do papel
5 Porta do cartucho de impressão
6 Vidro
7 Revestimento da tampa
8 Porta de acesso traseira
9 Porta USB traseira
10 Conexão de alimentação*
* Use apenas com o adaptador de alimentação fornecido pela HP.
2 HP Deskjet F2200 All-in-One series
Português
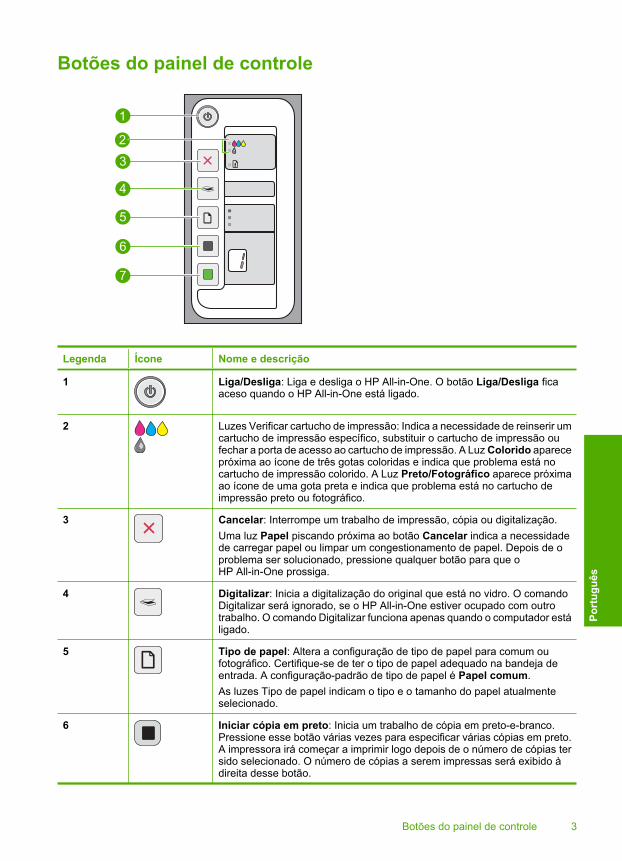
Botões do painel de controle
Legenda Ícone Nome e descrição
1 Liga/Desliga: Liga e desliga o HP All-in-One. O botão Liga/Desliga ficaaceso quando o HP All-in-One está ligado.
2 Luzes Verificar cartucho de impressão: Indica a necessidade de reinserir umcartucho de impressão específico, substituir o cartucho de impressão oufechar a porta de acesso ao cartucho de impressão. A Luz Colorido aparecepróxima ao ícone de três gotas coloridas e indica que problema está nocartucho de impressão colorido. A Luz Preto/Fotográfico aparece próximaao ícone de uma gota preta e indica que problema está no cartucho deimpressão preto ou fotográfico.
3 Cancelar: Interrompe um trabalho de impressão, cópia ou digitalização. Uma luz Papel piscando próxima ao botão Cancelar indica a necessidadede carregar papel ou limpar um congestionamento de papel. Depois de oproblema ser solucionado, pressione qualquer botão para que oHP All-in-One prossiga.
4 Digitalizar: Inicia a digitalização do original que está no vidro. O comandoDigitalizar será ignorado, se o HP All-in-One estiver ocupado com outrotrabalho. O comando Digitalizar funciona apenas quando o computador estáligado.
5 Tipo de papel: Altera a configuração de tipo de papel para comum oufotográfico. Certifique-se de ter o tipo de papel adequado na bandeja deentrada. A configuração-padrão de tipo de papel é Papel comum.As luzes Tipo de papel indicam o tipo e o tamanho do papel atualmenteselecionado.
6 Iniciar cópia em preto: Inicia um trabalho de cópia em preto-e-branco. Pressione esse botão várias vezes para especificar várias cópias em preto.A impressora irá começar a imprimir logo depois de o número de cópias tersido selecionado. O número de cópias a serem impressas será exibido àdireita desse botão.
Botões do painel de controle 3
Port
uguê
s

Legenda Ícone Nome e descrição
7 Iniciar cópia colorida: Inicia um trabalho de cópia colorida. Pressione essebotão várias vezes para especificar várias cópias coloridas. A impressorairá começar a imprimir logo depois de o número de cópias ter sidoselecionado. O número de cópias a serem impressas será exibido à direitadesse botão.
Visão geral das luzes de statusVárias luzes indicadoras informam sobre o status do HP All-in-One.
Etiqueta Descrição
1 Luz Liga/Desliga
2 Luzes Verificar cartucho de impressão
3 Luz Papel
4 Luzes Tipo de papel (para o botão Tipo depapel)
A tabela a seguir descreve situações comuns e explica o significado das luzes.
Status da luz O que significa
Todas as luzes estão apagadas. O HP All-in-One está desligado. Pressione o botão Liga/Desliga paraligar o dispositivo.
A luz Liga/Desliga e uma dasluzes Tipo de papel estão acesas.
O HP All-in-One está pronto para imprimir, digitalizar ou copiar.
A luz Liga/Desliga está piscando. O HP All-in-One está ocupado imprimindo, copiando ou alinhando oscartuchos de impressão.
A luz Liga/Desliga piscarapidamente por 3 segundos e, emseguida, fica acesa.
Você pressionou um botão enquanto o HP All-in-One estava ocupadoimprimindo, digitalizando, copiando ou alinhando os cartuchos deimpressão.
Capítulo 1(continuação)
4 HP Deskjet F2200 All-in-One series
Português

Status da luz O que significa
A luz Liga/Desliga pisca por 20segundos e depois fica acesa.
Você pressionou o botão Digitalizar e não houve resposta docomputador.
A luz Papel está piscando. • O HP All-in-One está sem papel.• O HP All-in-One apresenta um congestionamento de papel.
A luz Verificar cartucho deimpressão está piscando.
• A porta do cartucho de impressão está aberta.• Os cartuchos de impressão estão faltando ou não estão encaixados
corretamente.• A fita não foi removida do cartucho de impressão.• O cartucho de impressão não foi projetado para ser usado neste
HP All-in-One.• O cartucho de impressão pode estar com defeito.• O cartucho de impressão está com pouca tinta.
As luzes Liga/Desliga, Papel eVerificar cartucho de impressãoestão piscando.
Falha do scanner.Desligue e ligue novamente o HP All-in-One. Se o problema persistir,entre em contato com o suporte HP.
Todas as luzes estão piscando. O HP All-in-One apresenta um erro fatal.1. Desligue o HP All-in-One.2. Desconecte o cabo de alimentação.3. Espere um minuto e reconecte o cabo de alimentação.4. Ligue novamente o HP All-in-One.Se o problema persistir, entre em contato com o suporte HP.
Carregar originais para digitalização e cópiaVocê pode carregar tipos e tamanhos diferentes de papel no HP All-in-One, inclusivepapel carta ou A4, papel fotográfico, transparências e envelopes. Para obter maisinformações, consulte a Ajuda na tela.
Para carregar um original no vidro1. Levante a tampa do HP All-in-One.2. Coloque o original com o lado a ser copiado ou digitalizado para baixo, no canto
esquerdo frontal do vidro.
Dica Para que a cópia saia do tamanho correto, certifique-se de que não há fitaou outro objeto estranho no vidro.
(continuação)
Carregar originais para digitalização e cópia 5
Port
uguê
s

3. Feche a tampa.
Tirar uma cópiaÉ possível tirar cópias com qualidade usando o painel de controle.
Para fazer uma cópia usando o painel de controle1. Certifique-se de que haja papel na bandeja de entrada.2. Coloque o original com o lado a ser copiado ou digitalizado para baixo, no canto
esquerdo frontal do vidro.3. Pressione o botão Tipo de papel para definir o tipo de papel.4. Pressione Iniciar cópia em preto ou Iniciar cópia colorida.
Digitalizar um originalPara documentos ou imagens originais colocados no vidro, você poderá iniciar umadigitalização a partir do computador ou do HP All-in-One. Para usar os recursos dedigitalização, o HP All-in-One e o computador precisam estar conectados e ligados. Osoftware do HP Photosmart também deve estar instalado e em execução no computadorantes da digitalização.
Nota Se estiver usando o Windows 2000, use o assistente de digitalização doWindows em vez de pressionar o botão Digitalizar.
Para digitalizar para o computador1. Coloque o original com o lado a ser copiado ou digitalizado para baixo, no canto
esquerdo frontal do vidro.
Dica Para cópias de qualidade, assegure-se de que o vidro do scanner estejalimpo e de que não haja materiais estranhos nele.
2. Pressione Digitalizar.3. Edite a imagem de visualização e, quando terminar, clique em Aceitar.
Capítulo 1
6 HP Deskjet F2200 All-in-One series
Português
2 Resolução de problemas esuporteEste capítulo oferece informações para solução de problemas de instalação e configuração e algunstópicos operacionais. Para mais informações de solução de problemas, consulte a Ajuda na tela.Muitos problemas são causados quando o produto é conectado ao computador utilizando um caboUSB antes de o software HP Photosmart ser instalado no computador. Se você tiver conectado oproduto ao computador antes de a tela de instalação do software solicitar que isso fosse feito, sigaeste procedimento:
Para solucionar problemas na instalação de software1. Desconecte o cabo USB do computador.2. Desinstale o software se você já o tiver instalado. Para mais informações, consulte “Desinstalar
e reinstalar o software” na página 7.3. Reinicie o computador.4. Desligue o equipamento, aguarde um minuto e volte a ligá-lo.5. Reinstale o software HP Photosmart.
Cuidado Não conecte o cabo USB ao computador até que seja solicitado pela tela deinstalação do software.
Para obter informações de contato com o suporte, consulte a contracapa deste guia.
Desinstalar e reinstalar o softwareSe a sua instalação estiver incompleta ou se você conectou o cabo USB no computador antes deser solicitado pela tela de instalação do software, talvez seja necessário desinstalar e reinstalar osoftware. Não basta excluir os arquivos do aplicativo HP All-in-One do computador. Os arquivosdevem ser removidos de forma adequada usando o utilitário de desinstalação fornecido nainstalação do software que acompanha o HP All-in-One.
Para desinstalar o software de um computador com Windows e, em seguida, reinstalá-lo1. Abra o painel de controle do Windows e clique duas vezes em Adicionar ou remover
programas.2. Selecione Driver do HP Deskjet All-in-One e clique em Adicionar/Remover.
Siga as instruções na tela.3. Desconecte o dispositivo do computador.4. Reinicie o computador.
Nota É importante desconectar o produto antes de reiniciar o computador. Não conecteo produto ao computador antes de ter reinstalado o software.
5. Para reinstalar o software, insira o CD-ROM do dispositivo na unidade de CD-ROM docomputador e siga as instruções exibidas na tela para a instalação.Se a tela inicial não for exibida, clique duas vezes em Meu computador, clique duas vezes noícone do CD-ROM com o logotipo da HP e clique duas vezes em setup.exe.
6. Siga as instruções na tela e as instruções fornecidas no Guia de configuração fornecido com oequipamento.
Quando a instalação do software for concluída, o ícone do Monitor de imagem digital HPaparecerá na bandeja do sistema Windows.Para verificar se o software foi instalado de maneira apropriada, clique duas vezes no ícone daCentral de Soluções HP na área de trabalho. Se a Central de Soluções HP mostrar os íconesessenciais (Digitalizar imagem e Digitalizar documento), o software foi instalado corretamente.
Desinstalar e reinstalar o software 7
Port
uguê
s
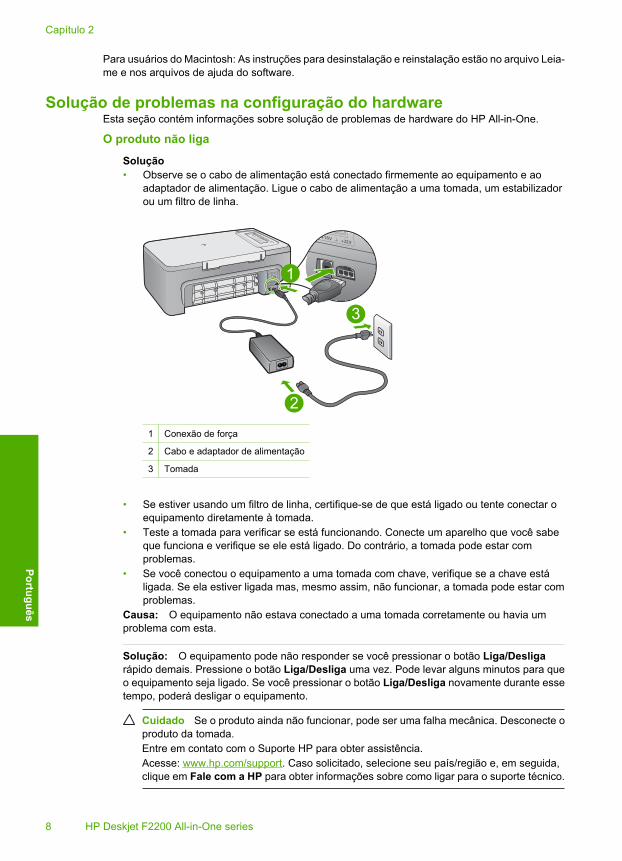
Para usuários do Macintosh: As instruções para desinstalação e reinstalação estão no arquivo Leia-me e nos arquivos de ajuda do software.
Solução de problemas na configuração do hardwareEsta seção contém informações sobre solução de problemas de hardware do HP All-in-One.
O produto não liga
Solução• Observe se o cabo de alimentação está conectado firmemente ao equipamento e ao
adaptador de alimentação. Ligue o cabo de alimentação a uma tomada, um estabilizadorou um filtro de linha.
1 Conexão de força
2 Cabo e adaptador de alimentação
3 Tomada
• Se estiver usando um filtro de linha, certifique-se de que está ligado ou tente conectar oequipamento diretamente à tomada.
• Teste a tomada para verificar se está funcionando. Conecte um aparelho que você sabeque funciona e verifique se ele está ligado. Do contrário, a tomada pode estar comproblemas.
• Se você conectou o equipamento a uma tomada com chave, verifique se a chave estáligada. Se ela estiver ligada mas, mesmo assim, não funcionar, a tomada pode estar comproblemas.
Causa: O equipamento não estava conectado a uma tomada corretamente ou havia umproblema com esta.
Solução: O equipamento pode não responder se você pressionar o botão Liga/Desligarápido demais. Pressione o botão Liga/Desliga uma vez. Pode levar alguns minutos para queo equipamento seja ligado. Se você pressionar o botão Liga/Desliga novamente durante essetempo, poderá desligar o equipamento.
Cuidado Se o produto ainda não funcionar, pode ser uma falha mecânica. Desconecte oproduto da tomada.Entre em contato com o Suporte HP para obter assistência.Acesse: www.hp.com/support. Caso solicitado, selecione seu país/região e, em seguida,clique em Fale com a HP para obter informações sobre como ligar para o suporte técnico.
Capítulo 2
8 HP Deskjet F2200 All-in-One series
Português
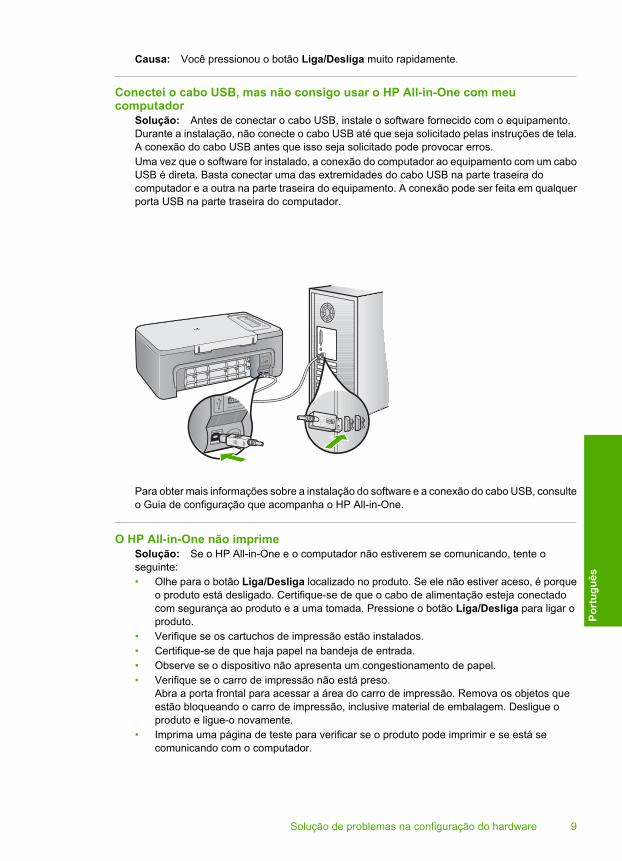
Causa: Você pressionou o botão Liga/Desliga muito rapidamente.
Conectei o cabo USB, mas não consigo usar o HP All-in-One com meucomputador
Solução: Antes de conectar o cabo USB, instale o software fornecido com o equipamento.Durante a instalação, não conecte o cabo USB até que seja solicitado pelas instruções de tela.A conexão do cabo USB antes que isso seja solicitado pode provocar erros.Uma vez que o software for instalado, a conexão do computador ao equipamento com um caboUSB é direta. Basta conectar uma das extremidades do cabo USB na parte traseira docomputador e a outra na parte traseira do equipamento. A conexão pode ser feita em qualquerporta USB na parte traseira do computador.
Para obter mais informações sobre a instalação do software e a conexão do cabo USB, consulteo Guia de configuração que acompanha o HP All-in-One.
O HP All-in-One não imprimeSolução: Se o HP All-in-One e o computador não estiverem se comunicando, tente oseguinte:• Olhe para o botão Liga/Desliga localizado no produto. Se ele não estiver aceso, é porque
o produto está desligado. Certifique-se de que o cabo de alimentação esteja conectadocom segurança ao produto e a uma tomada. Pressione o botão Liga/Desliga para ligar oproduto.
• Verifique se os cartuchos de impressão estão instalados.• Certifique-se de que haja papel na bandeja de entrada.• Observe se o dispositivo não apresenta um congestionamento de papel.• Verifique se o carro de impressão não está preso.
Abra a porta frontal para acessar a área do carro de impressão. Remova os objetos queestão bloqueando o carro de impressão, inclusive material de embalagem. Desligue oproduto e ligue-o novamente.
• Imprima uma página de teste para verificar se o produto pode imprimir e se está secomunicando com o computador.
Solução de problemas na configuração do hardware 9
Port
uguê
s

• Verifique se a fila de impressão do equipamento não está pausada. Se estiver, escolha aconfiguração adequada para continuar a impressão. Para mais informações sobre comoacessar a fila de impressão, consulte a documentação fornecida com o sistema operacionalinstalado no computador.
• Verifique o cabo USB. Se estiver usando um cabo antigo, talvez ele não esteja funcionandocorretamente. Tente conectá-lo a outro produto para verificar se o cabo USB funciona. Seocorrerem problemas, pode ser necessário substituir o cabo USB. Verifique também se ocabo não tem mais de 3 metros de comprimento.
• Certifique-se de que o computador esteja pronto para USB e que você esteja usando umsistema operacional compatível. Para mais informações, consulte o arquivo Leia-me.
• Verifique a conexão do equipamento com o computador. Observe se o cabo USB estáfirmemente conectado à porta USB na parte posterior do equipamento. Confirme se a outraextremidade do cabo USB está conectada a uma porta USB do computador. Quando ocabo estiver conectado corretamente, desligue o equipamento e ligue-o novamente.
• Se você estiver conectando o equipamento por meio de um hub USB, observe se este estáligado. Se estiver, tente estabelecer a conexão diretamente com o computador.
• Verifique se há outras impressoras ou scanners. Talvez seja necessário desconectar osprodutos mais antigos do computador.
• Tente conectar o cabo USB à outra porta USB do computador. Depois de verificar asconexões, tente reinicializar o computador. Desligue o equipamento e ligue-o novamente.
• Depois de verificar as conexões, tente reinicializar o computador. Desligue o equipamentoe ligue-o novamente.
• Se necessário, remova e reinstale o software que você implementou com o equipamento.Para obter mais informações sobre como configurar o HP All-in-One e conectá-lo aocomputador, consulte o Guia de configuração que acompanha o HP All-in-One.
Eliminar congestionamentos de papelPara informações sobre como eliminar um congestionamento de papel, consulte a Ajuda na tela.Para informações sobre como acessar a Ajuda na tela em um computador com Windows, consultea “Ajuda na tela” na página 11.
Capítulo 2
10 HP Deskjet F2200 All-in-One series
Português

Solução de problemas de cartucho de impressãoPara informações sobre como solucionar problemas nos cartuchos de impressão, consulte a Ajudana tela. Para informações sobre como acessar a Ajuda na tela, consulte “Ajuda na tela”na página 11.
Obter mais informaçõesUma variedade de recursos, tanto impressos quanto na tela, fornecem informações sobre aconfiguração e o uso do HP All-in-One.
Guia de configuraçãoO Guia de configuração apresenta instruções para a configuração do HP All-in-One e instalação dosoftware. Certifique-se de seguir as etapas do Guia de configuração na ordem indicada.Se você encontrar problemas durante a configuração, consulte Resolução de problemas na últimaseção do Guia de configuração, ou consulte “Resolução de problemas e suporte” na página 7 nesteguia.
Ajuda na telaA Ajuda na tela fornece instruções detalhadas sobre os recursos do HP All-in-One que não estãodescritos neste guia, incluindo recursos que estão disponíveis apenas com o uso do softwareinstalado com o HP All-in-One. A Ajuda na tela também oferece informações regulatórias eambientais.
Para acessar a Ajuda na tela• Windows: Clique em Iniciar > Todos os programas > HP > Deskjet F2200 All-in-One series
> Ajuda.Para instalar a Ajuda na tela, insira o CD do software no computador e siga as instruções.
• Macintosh: Clique em Ajuda > Ajuda Mac > Biblioteca > Ajuda do produto HP.
Site da HPSe você tiver acesso à Internet, poderá obter ajuda e suporte no site da HP, em www.hp.com/support. Esse site oferece atendimento técnico, drivers, suprimentos e informações sobre pedidos.
Suporte HPVocê pode entrar em contato com o Suporte HP por telefone e internet. As opções de suporte e suadisponibilidade dependem do produto, do país/região e do idioma.
Suporte HP por telefonePara uma lista dos números de telefone do suporte, consulte a contracapa deste guia.As opções de suporte e sua disponibilidade dependem do produto, do país/região e do idioma.
Período de suporte por telefoneUm ano de suporte por telefone para América Latina (incluindo o México). Para averiguar a duraçãodo suporte por telefone na América do Norte, na Europa Oriental, no Oriente Médio, na região Ásia/Pacífico e na África, visite o site www.hp.com/support.As tarifas-padrão telefônicas serão aplicadas.
Após o término do período de suporte por telefoneApós o término do período de suporte por telefone, a HP oferece ajuda por um custo adicional.Entre em contato com seu revendedor HP ou ligue para o telefone de suporte em seu país/região,para saber mais sobre as opções de suporte.
Suporte HP 11
Port
uguê
s

Antes de ligar para o Suporte HP1. Verifique se:
a. O HP All-in-One está conectado à tomada e ligado.b. Os cartuchos de impressão especificados estão corretamente instalados.c. O papel recomendado foi corretamente carregado na bandeja de entrada.
2. Redefina o HP All-in-One:a. Desligue o HP All-in-One pressionando o botão Liga/Desliga.b. Desconecte o cabo de alimentação da parte traseira do HP All-in-One.c. Reconecte o cabo de alimentação ao HP All-in-One.d. Ligue o HP All-in-One pressionando o botão Liga/Desliga.
3. Tenha as seguintes informações à mão:a. O nome específico do HP All-in-One, do jeito que é exibido no painel de controle.b. Imprima um relatório de autoteste. (Para mais informações, consulte o Guia do Usuário.)c. Esteja preparado para descrever o problema detalhadamente.d. Tenha à mão o número de série e o ID de serviço, localizados no relatório de autoteste.e. Esteja próximo ao HP All-in-One quando ligar para o Suporte HP.
Informações técnicasAs especificações técnicas e as informações sobre regulamentações internacionais para oHP All-in-One são fornecidas nessa seção. Para informações regulatórias e ambientais adicionais,consulte a Ajuda na tela.Para obter informações regulatórias e ambientais, incluindo a Declaração de Conformidade,consulte a Ajuda na tela.
Requisitos do sistemaOs requisitos do software do sistema estão localizados no arquivo Leia-me.
Especificações de papel• Capacidade da bandeja de entrada: Folhas de papel comum: Até 80 (papel de 75 gsm)• Capacidade da bandeja de saída: Folhas de papel comum: Até 50 (papel de 75 gsm)
Nota Para uma lista completa dos tamanhos de mídia compatíveis, consulte o software daimpressora.
Especificações físicas• Altura: 18,05 cm• Largura: 42,57 cm• Profundidade: 26,74 cm• Peso: 5,27 kg
Especificações de energia• Consumo de energia: 20 watts (média ao imprimir)• Tensão de entrada: AC 100 a 240 V ~ 1 A 50-60 Hz• Tensão de saída: DC 32 V===375 mA, 16 V===500 mA• Fonte de alimentação: 0957-2231, AC 100 a 240 V ~ 1 A 50-60 Hz (±3 Hz)• Fonte de alimentação: 0957-2248, AC 200 a 240 V (±10%), 50-60 Hz (±3 Hz)
Nota Use apenas com o adaptador de alimentação fornecido pela HP.
Especificações ambientais• Faixa de temperatura operacional recomendada: 15º C a 30º C• Faixa de temperatura operacional permitida: 10º C a 35º C
Capítulo 2
12 HP Deskjet F2200 All-in-One series
Português

• Umidade: Umidade relativa sem condensação de 15% a 80%• Faixa de temperatura não operacional (armazenamento): -20º C a 50º C• Na presença de campos eletromagnéticos altos, é possível que a saída do HP All-in-One seja
levemente distorcida• A HP recomenda a utilização de um cabo USB de até 3 m de comprimento para minimizar o
ruído injetado em razão de campos eletromagnéticos altos
Notificações sobre regulamentaçãoO HP All-in-One atende às exigências de produto das agências de regulamentação em seu país/região. Para obter uma lista completa das notificações sobre regulamentação, consulte a Ajuda natela.
Número de identificação do modelo de regulamentaçãoPara fins de identificação de regulamentação, foi atribuído ao seu produto um Número de Modelode Regulamentação. O Número de Modelo de Regulamentação do seu produto é VCVRA-0706.Esse número de regulamentação não deve ser confundido com o nome comercial (HP DeskjetF2200 All-in-One series, etc.) ou os números do produto (CB683A, etc.).
Informações técnicas 13
Port
uguê
s

Garantia
A. Extensão da garantia limitada 1. A Hewlett-Packard (HP) garante ao cliente final que os produtos HP especificados acima estarão livres de defeitos de
materiais e fabricação pelo período mencionado acima, que se inicia na data da compra pelo cliente. 2. No caso de produtos de software, a garantia limitada HP cobre apenas falhas de execução de instruções de
programação. A HP não garante que a operação de qualquer produto será ininterrupta ou livre de erros. 3. A garantia limitada HP cobre somente os defeitos surgidos como resultado de uso normal do produto, e não cobre
outros problemas, incluindo os que surgirem como resultado de: a. Manutenção ou modificação inadequada; b. Software, mídia, peças ou suprimentos não fornecidos ou aceitos pela HP; c. Operação fora das especificações do produto; d. Modificação não autorizada ou uso indevido. 4. Para produtos de impressoras HP, o uso de um cartucho não-HP ou de um cartucho recondicionado não afeta a
garantia ao cliente nem qualquer contrato de suporte HP com o cliente. No entanto, se uma falha ou um dano da impressora puderem ser atribuídos ao uso de um cartucho não-HP ou recondicionado ou a um cartucho de tinta expirado, a HP cobrará suas taxas padrão referentes a tempo e materiais para fazer a manutenção na impressora quanto à falha ou ao dano em questão.
5. Se a HP for informada, durante o período de garantia aplicável, sobre um defeito em qualquer produto coberto pela garantia HP, poderá optar por substituir ou consertar o produto.
6. Se a HP não puder consertar ou substituir o produto defeituoso coberto pela garantia HP, como for aplicável, ela irá, dentro de um período de tempo razoável após a notificação do defeito, ressarcir o valor pago pelo produto.
7. A HP não tem obrigação de consertar, substituir ou ressarcir o valor pago até o cliente retornar o produto defeituoso à HP. 8. Qualquer produto de reposição pode ser novo ou em estado de novo, desde que a sua funcionalidade seja ao menos
igual àquela do produto que está sendo substituído. 9. Os produtos HP podem conter peças manufaturadas, componentes, ou materiais equivalentes a novos no
desempenho. 10. A Declaração de garantia limitada da HP é válida em qualquer país onde o produto coberto HP for distribuído pela HP.
Contratos para serviços de garantia adicionais, como serviços nas instalações do cliente, podem estar disponíveis em qualquer representante de serviços HP em países onde o produto é distribuído pela HP ou por importador autorizado.
B. Limitações da garantiaDENTRO DOS LIMITES PERMITIDOS PELAS LEIS LOCAIS, NEM A HP NEM OS SEUS FORNECEDORES FAZEM QUALQUER OUTRA GARANTIA OU CONDIÇÃO DE QUALQUER NATUREZA, EXPRESSA OU IMPLÍCITA, GARANTIAS OU CONDIÇÕES IMPLÍCITAS DE COMERCIABILIDADE, QUALIDADE SATISFATÓRIA E ADEQUAÇÃO A UM PROPÓSITO PARTICULAR.
C. Limitações de responsabilidade 1. Para a extensão permitida pela lei local, as soluções fornecidas nesta Declaração de Garantia são as únicas e
exclusivas do cliente. 2. DENTRO DOS LIMITES PERMITIDOS PELAS LEIS LOCAIS, EXCETO PELAS OBRIGAÇÕES ESPECIFICAMENTE
MENCIONADAS NESTA DECLARAÇÃO DE GARANTIA, EM HIPÓTESE ALGUMA A HP OU OS SEUS FORNECEDORES SERÃO RESPONSÁVEIS POR DANOS DIRETOS, INDIRETOS, ESPECIAIS, INCIDENTAIS OU CONSEQÜENCIAIS, SEJAM ELES BASEADOS EM CONTRATO, AÇÃO DE PERDAS E DANOS OU QUALQUER OUTRO RECURSO JURÍDICO, MESMO QUE HP TENHA SIDO AVISADA DA POSSIBILIDADE DE TAIS DANOS.
D. Lei local 1. Esta Declaração de Garantia fornece ao cliente direitos legais específicos. O cliente pode também ter outros direitos
que podem variar de estado para estado nos Estados Unidos, de província para província no Canadá e de país para país em outros lugares no mundo.
2. Na medida em que esta declaração de garantia for inconsistente com as leis locais, deve ser considerada emendada para se tornar consistente com tais leis. Sob elas, certas limitações desta declaração e isenções de responsabilidade podem não ser aplicáveis ao cliente. Por exemplo, alguns estados dos Estados Unidos, assim como alguns governos fora dos EUA (incluindo províncias canadenses), poderão:
a. Impedir que isenções de responsabilidades e limitações nesta Declaração de garantia limitem os direitos legais de um consumidor (por exemplo, Reino Unido);
b. Ou restringir a capacidade de um fabricante para impor tais renúncias ou limitações; ou c. Conceder ao cliente direitos de garantia adicionais, especificar a duração de garantias implícitas das quais
fabricantes não podem isentar-se ou permitir limitações na duração de garantias implícitas. 3. OS TERMOS DESTA DECLARAÇÃO DE GARANTIA, EXCETO PARA OS LIMITES LEGALMENTE PERMITIDOS,
NÃO EXCLUEM, RESTRIGEM OU SE MODIFICAM, E SÃO UM ACRÉSCIMO AOS DIREITOS LEGAIS APLICÁVEIS À VENDA DE PRODUTOS HP A TAIS CLIENTES.
Informações relativas à Garantia Limitada da HPEstimado Cliente,
Anexa à presente declaração encontra-se uma lista das empresas HP de entre as quais consta o nome e morada da empresa responsével pela prestação da Garantia Limitada da HP (garantia do fabricante) no- seu país.
Além da referida garantia do fabricante prestada pela HP, poderá também. Beneficiar, nos termos da legislação em vigor, de outros direitos adicionais de garantia, perante o vendedor, ao abrigo do respectivo Contrato de Compra e Venda.Portugal: Hewlett-Packard Portugal, Lda., Edificio D. Sancho I, Quinta da Fonte, Porto Salvo, 2780-730 Paco de Arcos,
P-Oeiras
Produto HP Duração da garantia limitadaMídia de software 90 dias
Impressora 1 ano
Cartuchos de impressão ou de tinta Até que a tinta HP acabe ou até a data do “fim da garantia” impressa no cartucho, o que ocorrer primeiro. Esta garantia não cobre produtos de tinta HP que tenham sido reabastecidos, refabricados, recondicionados, adulterados ou utilizados de forma incorreta.
Acessórios 1 ano, a não ser que haja outra indicação
Capítulo 2
14 HP Deskjet F2200 All-in-One series
Português
HP Deskjet F2200 All-in-One seriesاألساسيات دليل
عربي

بيعر

المحتويات
HP All-in-One عن عامة فكرة١٢...................................................................................................HP All-in-One جهاز عن سریعة لمحة٣...............................................................................................................................التحكم لوحة أزرار٣.................................................................................................................الحالة مصباح حول عامة نظرة٥...........................................................................................والنسخ الضوئي المسح أجل من أصلية نسخ تحميل٥........................................................................................................................................نسخة عمل٥........................................................................................................................ضوئيا أصلية نسخة مسح
والدعم المشكالت حل٢٧.............................................................................................................تثبيته إعادة ثم البرنامج تثبيت إلغاء٧.............................................................................................................األجهزة بإعداد تتعلق مشكالت حل
١٠.......................................................................................................................الورق انحشارات تحریر١٠.......................................................................................................الطباعة بخرطوشة تتعلق مشكالت حل
١٠..........................................................................................................المعلومات من المزید على الحصول١٠..............................................................................................................................اإلعداد دليل
١٠..........................................................................................................الشاشة على الظاهرة التعليمات١١......................................................................................................................HP لـ الویب موقع
١١........................................................................................................................................HP دعم١١....................................................................................................................الهاتف عبر HP دعم
١١.............................................................................................................الهاتف عبر الدعم فترة١١.................................................................................................الهاتف عبر الدعم فترة انتهاء بعد
١١..................................................................................................................HP بدعم االتصال قبل١١................................................................................................................................الفنية المعلومات
١١...........................................................................................................................النظام متطلبات١٢.........................................................................................................................الورق مواصفات١٢.......................................................................................................................المادیة المواصفات١٢.........................................................................................................................الطاقة مواصفات١٢..........................................................................................................................البيئة مواصفات١٢.....................................................................................................................التنظيمية اإلشعارات١٢.........................................................................................................تنظيمي طراز تعریف رقم١٣...................................................................................................................................الضمان
١ HP Deskjet F2200 All-in-One series
عربي
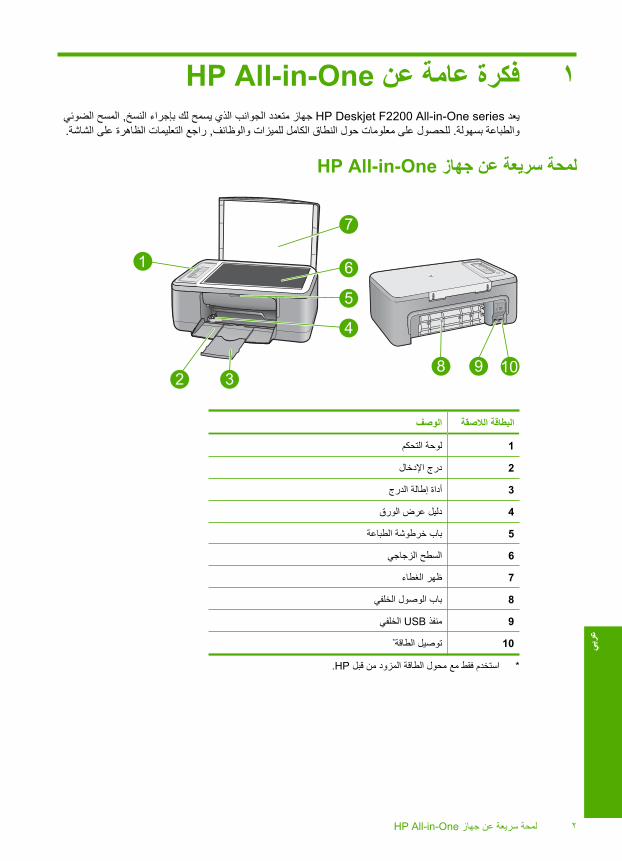
HP All-in-One عن عامة فكرة١الضوئي المسح, النسخ بإجراء لك یسمح الذي الجوانب متعدد جهاز HP Deskjet F2200 All-in-One series یعد
.الشاشة على الظاهرة التعليمات راجع, والوظائف للميزات الكامل النطاق حول معلومات على للحصول. بسهولة والطباعة
HP All-in-One جهاز عن سريعة لمحة
الوصفالالصقة البطاقة
التحكم لوحة1
اإلدخال درج2
الدرج إطالة أداة3
الورق عرض دليل4
الطباعة خرطوشة باب5
الزجاجي السطح6
الغطاء ظهر7
الخلفي الوصول باب8
الخلفي USB منفذ9
*الطاقة توصيل10
.HP قبل من المزود الطاقة محول مع فقط استخدم*
HP All-in-One جهاز عن سریعة لمحة ٢
بيعر

التحكم لوحة أزرار
والوصف االسمالرمزالالصقة البطاقة
جهاز یكون عندما تشغيل زر سيضاء. تشغيله بإیقاف أو HP All-in-One جهاز بتشغيل یقوم: تشغيل1HP All-in-One التشغيل قيد.
تبدیل معينة، طباعة خرطوشة إدخال إعادة ضرورة إلى تشير: الطباعة خرطوشة فحص مصابيح2األلوان نقاط ثالث رموز بجوار األلوان مصباح یقع. الطباعة خرطوشة باب إغالق أو الطباعة خرطوشةرمز بجوار الصورة/األسود مصباح یقع. األلوان ثالثية الطباعة خرطوشة في مشكلة حدوث إلى فيشيرخرطوشة في أو األسود باللون الطباعة خرطوشة في مشكلة حدوث إلى فيشير السوداء الواحدة النقطة.الصور طباعة
.الضوئي المسح أو النسخ, الطباعة مهمة بإیقاف یقوم: األمر إلغاء3.الورق انحشار تحریر أو ورق تحميل ضرورة إلى األمر إلغاء زر بجوار الوامض الورق مصباح یشير.للمتابعة HP All-in-One لتوجيه المشكلة حل بعد زر أي على اضغط
من التجاهل یتم .ضوئيا الزجاجي السطح على حاليا الموجودة األصلية النسخة بمسح یقوم: ضوئي مسح4أمر یعمل. أخرى مهمة أیة بتنفيذ HP All-in-One انشغال حالة في) الضوئي المسح (Scan أمر
Scan) فقط التشغيل قيد الكمبيوتر جهاز آان إذا) الضوئي المسح.
نوع تحميل من تأآد. الصور ورق أو عادي ورق إما إلى الورق نوع إعداد بتغيير یقوم: الورق نوع5.عادي ورق هو الورق لنوع االفتراضي اإلعداد یعد. اإلدخال درج في المناسب الورق.حاليا المحددین الورق ونوع حجم إلى الورق نوع مصابيح تشير
عدة لتحدید مرات عدة الزر هذا على اضغط .واألسود باألبيض نسخ مهمة ببدء یقوم: باألسود النسخ بدء6لتتم النسخ عدد یظهر. النسخ من لعدد تحدیدك بعد قليال وقتا الطباعة ببدء الطابعة تقوم. األسود باللون نسخ
.الزر هذا یمين على طباعته
.ألوان بعدة نسخ لتحدید مرات عدة الزر هذا على اضغط .باأللوان نسخ مهمة ببدء یقوم: باأللوان النسخ بدء7یمين على طباعته لتتم النسخ عدد یظهر. النسخ من لعدد تحدیدك بعد قليال وقتا الطباعة ببدء الطابعة تقوم.الزر هذا
الحالة مصباح حول عامة نظرة.HP All-in-One جهاز بحالة المؤشرات مصابيح من العدید تعلمك
١ الفصل
٣ HP Deskjet F2200 All-in-One series
عربي

الوصفالالصقة البطاقة
تشغيل مصباح1
الطباعة خرطوشة فحص مصابيح2
الورق مصباح3
)الورق نوع لزر (الورق نوع مصابيح4
.المصابيح معنى ویشرح الشائعة الحاالت التالي الجدول یوضح
المعنىالمصباح حالة
.الجهاز لتشغيل تشغيل زر على اضغط. التشغيل إیقاف قيد HP All-in-One جهاز.التشغيل إیقاف قيد المصابيح جميع
الورق نوع مصابيح وأحد تشغيل مصباح یوجد.التشغيل قيد
.النسخ أو الضوئي المسح, الطباعة إلجراء جاهز HP All-in-One جهاز
خرطوشات محاذاة أو, الضوئي المسح, الطباعة إجراء في مشغول HP All-in-One جهاز.تشغيل مصباح یومض.الطباعة
ثم ثوان 3 لمدة بسرعة تشغيل مصباح یومض.بثبات یضاء
المسح, الطباعة إجراء في HP All-in-One جهاز انشغال أثناء زر أي على بالضغط قمت لقد.الطباعة خرطوشات محاذاة أو النسخ, الضوئي
یضاء ثم ثانية 20 لمدة تشغيل مصباح یومض.بثبات
.الكمبيوتر جهاز من استجابة أیة تحدث ولم ضوئي مسح زر على بالضغط قمت لقد
.HP All-in-One جهاز في الورق نفاد تم•.الورق مصباح یومض.HP All-in-One جهاز في للورق انحشار حدث•
.مفتوحا الطباعة خرطوشة باب•.الطباعة خرطوشة فحص مصباح یومض.صحيح بشكل وضعها یتم لم أو مفقودة الطباعة خرطوشات•.الطباعة خرطوشة من الشریط إزالة تتم لم•.هذا HP All-in-One جهاز في لالستخدام معدة غير الطباعة خرطوشة•.الطباعة خرطوشة في خلل أي یكون قد•.الطباعة خرطوشة في الحبر مستوى انخفض•
فحص ومصابيح الورق ,تشغيل مصابيح تومض.الطباعة خرطوشة
.الضوئي الماسح في فشلبدعم اتصل المشكلة، استمرار عند. ثانية تشغيله أعد ثم HP All-in-One جهاز تشغيل بإیقاف قم
HP.
الحالة مصباح حول عامة نظرة ٤
بيعر

المعنىالمصباح حالة
.HP All-in-One جهاز في آبير خطأ یوجد.المصابيح جميع تومض.HP All-in-One جهاز تشغيل بإیقاف قم.١.الطاقة سلك بفصل قم.٢.أخرى مرة الطاقة سلك بتوصيل قم ثم دقيقة، لمدة انتظر.٣.HP All-in-One جهاز تشغيل أعد.٤.HP بدعم اتصل المشكلة، استمرار عند
والنسخ الضوئي المسح أجل من أصلية نسخ تحميل,A4 أو letter بحجم ورق ذلك في بما, HP All-in-One جهاز في المختلفة الورق وأحجام أنواع من الكثير تحميل یمكن.الشاشة على الظاهرة التعليمات راجع المعلومات، من للمزید. وأظرف شفافة أوراق, الصور ورق
الزجاجي السطح على أصلية نسخة لتحميل.HP All-in-One جهاز غطاء ارفع.١من اليسرى األمامية الزاویة في األسفل إلى الضوئي للمسح أو للنسخ المخصص الوجه توجيه مع األصلية النسخة ضع.٢
.الزجاجي السطح
.الزجاجي السطح على غریب عنصر أو شریط وجود عدم من تأآد, الصحيح النسخة حجم على للحصولتلميح
.الغطاء أغلق.٣
نسخة عمل.التحكم لوحة خالل من عالية بجودة نسخ عمل یمكنك
التحكم لوحة خالل من نسخة لعمل.اإلدخال درج في للورق تحميلك من تأآد.١من اليسرى األمامية الزاویة في األسفل إلى الضوئي للمسح أو للنسخ المخصص الوجه توجيه مع األصلية النسخة ضع.٢
.الزجاجي السطح.الورق نوع لضبط الورق نوع زر على اضغط.٣.باأللوان النسخ بدء على أو باألسود النسخ بدء على اضغط.٤
ضوئيا أصلية نسخة مسحأو الكمبيوتر جهاز خالل من الضوئي المسح بدء یمكن, الزجاجي السطح على وضعها تم صور أو أصلية لمستندات بالنسبةالكمبيوتر بجهاز HP All-in-One جهاز توصيل یجب الضوئي، المسح ميزات الستخدام. HP All-in-One خالل من
١ الفصل)تابع(
٥ HP Deskjet F2200 All-in-One series
عربي
المسح إجراء قبل بك الخاص الكمبيوتر جهاز على وتشغيله HP Photosmart برنامج تثبيت أیضا یلزم. وتشغيلهما.الضوئي
Windows معالج استخدام عليك فيجب, Windows 2000 التشغيل لنظام استخدامك حالة فيمالحظةScanner) من الضوئي الماسح Windows (ضوئي مسح زر على الضغط من بدال.
الكمبيوتر جهاز إلى الضوئي المسح إلجراءمن اليسرى األمامية الزاویة في األسفل إلى الضوئي للمسح أو للنسخ المخصص الوجه توجيه مع األصلية النسخة ضع.١
.الزجاجي السطح
.به غریبة مواد التصاق وعدم الزجاجي السطح تنظيف من تأآد, جودة ذات نسخ على للحصولتلميح
.ضوئي مسح على اضغط.٢.االنتهاء عند )قبول (Accept فوق انفر ثم, المعاینة لصورة تحریرات أیة بعمل قم.٣
ضوئيا أصلية نسخة مسح ٦
بيعر
والدعم المشكالت حل٢حل حول المعلومات من للمزید. التشغيل مواضيع وبعض والتكوین التثبيت قضایا حول المشكالت حل حول معلومات الفصل هذا یتضمن
.الشاشة على الظاهرة التعليمات راجع المشكالت،على HP Photosmart برنامج تثبيت یتم أن قبل USB آابل باستخدام بالكمبيوتر المنتج توصيل یتم عندما القضایا من الكثير تحدث
هذه متابعة عليك فيجب بذلك، القيام البرنامج تثبيت شاشة منك تطلب أن قبل بالكمبيوتر المنتج بتوصيل قمت قد آنت إذا. الكمبيوتر:الخطوات
البرنامج بتثبيت تتعلق مشكالت لحل.الكمبيوتر عن USB آابل بفصل قم.١ “تثبيته إعادة ثم البرنامج تثبيت إلغاء” راجع المعلومات، من للمزید). بالفعل بتثبيته قمت قد آنت إذا (البرنامج تثبيت بإلغاء قم.٢
.٧ صفحة في.الكمبيوتر تشغيل أعد.٣.تشغيله أعد ثم واحدة، دقيقة انتظر, المنتج تشغيل بإیقاف قم.٤.HP Photosmart برنامج تثبيت بإعادة قم.٥
.البرنامج تثبيت شاشة بواسطة بذلك مطالبتك تتم حتى الكمبيوتر بجهاز USB آابل بتوصيل تقم التنبيه
.الدليل هذا من الخلفي للغطاء الداخلي الجزء راجع, الدعم مراجعة حول معلومات على للحصول
تثبيته إعادة ثم البرنامج تثبيت إلغاءإلى تحتاج فقد بذلك، القيام البرنامج تثبيت شاشة منك تطلب أن قبل بالكمبيوتر USB آابل بتوصيل قمت إذا أو آامل، غير التثبيت آان إذا
بالطریقة إزالتها من تأآد. الكمبيوتر جهاز من HP All-in-One تطبيق ملفات بحذف ببساطة تقم ال. تثبيته إعادة ثم البرنامج تثبيت إلغاء.HP All-in-One مع المزود البرنامج تثبيت عند المتوفر التثبيت إلغاء أداة باستخدام الصحيحة
التثبيت إعادة ثم Windows التشغيل بنظام يعمل آمبيوتر جهاز خالل من التثبيت إللغاءأو إضافة (Add or Remove Programs فوق مزدوجا نقرا وانقر Windows التشغيل بنظام الخاصة التحكم لوحة افتح.١
)البرامج إزالةانقر ثم, )HP Deskjet All-in-One التشغيل لبرنامج برنامج (HP Deskjet All-in-One Driver Software حدد.٢
.)إزالة/تغيير (Change/Remove فوق.الشاشة على الظاهرة اإلرشادات اتبع
.الكمبيوتر عن المنتج بفصل قم.٣.الكمبيوتر تشغيل أعد.٤
إعادة من تنتهي حتى بالكمبيوتر المنتج بتوصيل تقم ال. الكمبيوتر تشغيل إعادة قبل المنتج بفصل تقوم أن المهم منمالحظة.البرنامج تثبيت
ثم بك الخاص الكمبيوتر جهاز في المضغوطة األقراص محرك إلى بالمنتج الخاص المضوط القرص أدخل, البرنامج تثبيت إلعادة.٥.البرنامج تثبيت أجل من التشغيل بدء شاشة على الظاهرة اإلرشادات اتبع-CD رمز فوق مزدوجا نقرا انقر, )الكمبيوتر (My Computer فوق مزدوجا نقرا انقر, التشغيل بدء شاشة ظهور عدم عند
ROM) شعار یتضمن الذي )المضغوط القرص HP ,فوق مزدوجا نقرا انقر ثم setup.exe..المنتج مع المزود اإلعداد دليل في المتوفرة واإلرشادات الشاشة على الظاهرة اإلرشادات اتبع.٦نظام علبة في )HP لـ الرقمية الصور شاشة (HP Digital Imaging Monitor رمز یظهر البرنامج، تثبيت من االنتهاء عند
Windows.)HP لـ الحلول مرآز (HP Solution Center رمز فوق مزدوجا نقرا انقر, الصحيحة بالطریقة البرنامج تثبيت اآتمال من للتحققضوئيا صورة مسح الضروریة الرموز بعرض) HP لـ الحلول مرآز (HP Solution Center قام إذا. المكتب سطح على الموجود
.صحيح بشكل البرنامج تثبيت إلى یشير فهذا ضوئيا مستند مسحوHelp ملفات وفي Readme ملف في تثبيته وإعادة البرنامج التثبيت بإلغاء الخاصة اإلرشادات توجد: Macintosh لمستخدمي بالنسبة
.بالبرنامج الخاصة) التعليمات(
األجهزة بإعداد تتعلق مشكالت حل.HP All-in-One جهاز بأجهزة تتعلق مشكالت حل معلومات على القسم هذا یحتوي
٧ HP Deskjet F2200 All-in-One series
عربي
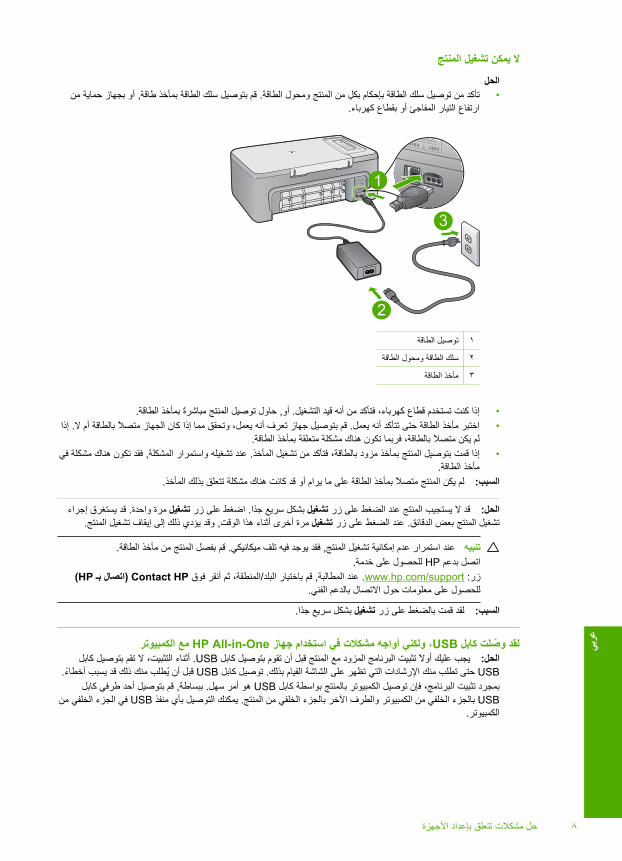
المنتج تشغيل يمكن ال
الحلمن حمایة بجهاز أو, طاقة بمأخذ الطاقة سلك بتوصيل قم. الطاقة ومحول المنتج من بكل بإحكام الطاقة سلك توصيل من تأآد•
.آهرباء بقطاع أو المفاجئ التيار ارتفاع
الطاقة توصيل١
الطاقة ومحول الطاقة سلك٢
الطاقة مأخذ٣
.الطاقة بمأخذ مباشرة المنتج توصيل حاول, أو. التشغيل قيد أنه من فتأآد آهرباء، قطاع تستخدم آنت إذا•إذا. ال أم بالطاقة متصال الجهاز آان إذا مما وتحقق یعمل، أنه تعرف جهاز بتوصيل قم. یعمل أنه تتأآد حتى الطاقة مأخذ اختبر•
.الطاقة بمأخذ متعلقة مشكلة هناك تكون فربما بالطاقة، متصال یكن لمفي مشكلة هناك تكون فقد, المشكلة واستمرار تشغيله عند. المأخذ تشغيل من فتأآد بالطاقة، مزود بمأخذ المنتج بتوصيل قمت إذا•
.الطاقة مأخذ.المأخذ بذلك تتعلق مشكلة هناك آانت قد أو یرام ما على الطاقة بمأخذ متصال المنتج یكن لم:السبب
إجراء یستغرق قد. واحدة مرة تشغيل زر على اضغط. جدا سریع بشكل تشغيل زر على الضغط عند المنتج یستجيب ال قد:الحل.المنتج تشغيل إیقاف إلى ذلك یؤدي وقد, الوقت هذا أثناء أخرى مرة تشغيل زر على الضغط عند. الدقائق بعض المنتج تشغيل
.الطاقة مأخذ من المنتج بفصل قم. ميكانيكي تلف فيه یوجد فقد, المنتج تشغيل إمكانية عدم استمرار عندتنبيه.خدمة على للحصول HP بدعم اتصل)HP بـ اتصال (Contact HP فوق أنقر ثم المنطقة،/البلد باختيار قم, المطالبة عند. www.hp.com/support :زر
.الفني بالدعم االتصال حول معلومات على للحصول
.جدا سریع بشكل تشغيل زر على بالضغط قمت لقد:السبب
الكمبيوتر مع HP All-in-One جهاز استخدام في مشكالت أواجه ولكني ،USB آابل وصلت لقدآابل بتوصيل تقم ال التثبيت، أثناء. USB آابل بتوصيل تقوم أن قبل المنتج مع المزود البرنامج تثبيت أوال عليك یجب:الحل
USB آابل توصيل. بذلك القيام الشاشة على تظهر التي اإلرشادات منك تطلب حتى USB أخطاء یسبب قد ذلك منك یطلب أن قبل.آابل طرفي أحد بتوصيل قم, ببساطة. سهل أمر هو USB آابل بواسطة بالمنتج الكمبيوتر توصيل فإن البرنامج، تثبيت بمجردUSB منفذ بأي التوصيل یمكنك. المنتج من الخلفي بالجزء اآلخر والطرف الكمبيوتر من الخلفي بالجزء USB من الخلفي الجزء في
.الكمبيوتر
األجهزة بإعداد تتعلق مشكالت حل ٨
بيعر
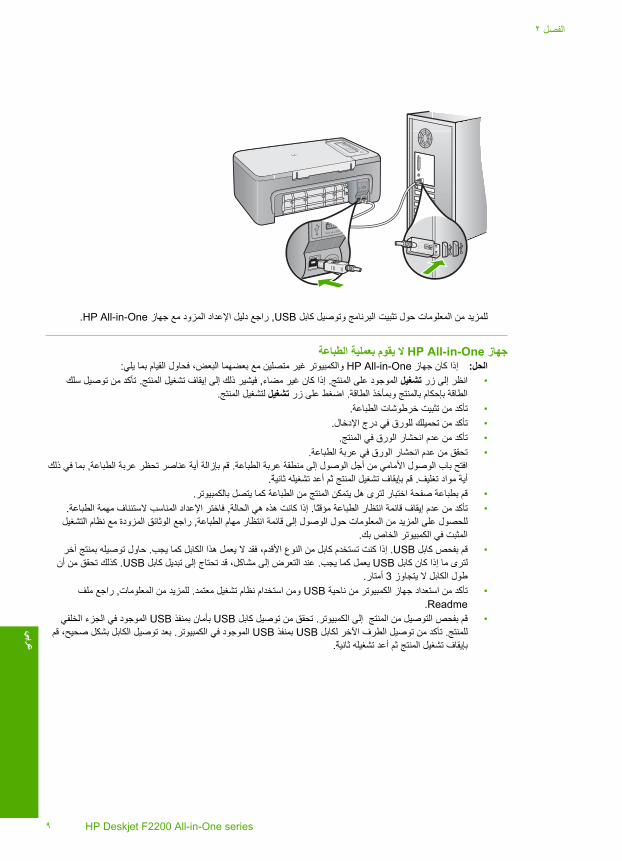
.HP All-in-One جهاز مع المزود اإلعداد دليل راجع, USB آابل وتوصيل البرنامج تثبيت حول المعلومات من للمزید
الطباعة بعملية يقوم ال HP All-in-One جهاز:یلي بما القيام فحاول البعض، بعضهما مع متصلين غير والكمبيوتر HP All-in-One جهاز آان إذا:الحل
سلك توصيل من تأآد. المنتج تشغيل إیقاف إلى ذلك فيشير, مضاء غير آان إذا. المنتج على الموجود تشغيل زر إلى انظر•.المنتج لتشغيل تشغيل زر على اضغط. الطاقة وبمأخذ بالمنتج بإحكام الطاقة
.الطباعة خرطوشات تثبيت من تأآد•.اإلدخال درج في للورق تحميلك من تأآد•.المنتج في الورق انحشار عدم من تأآد•.الطباعة عربة في الورق انحشار عدم من تحقق•
ذلك في بما, الطباعة عربة تحظر عناصر أیة بإزالة قم. الطباعة عربة منطقة إلى الوصول أجل من األمامي الوصول باب افتح.ثانية تشغيله أعد ثم المنتج تشغيل بإیقاف قم. تغليف مواد أیة
.بالكمبيوتر یتصل آما الطباعة من المنتج یتمكن هل لترى اختبار صفحة بطباعة قم•.الطباعة مهمة الستئناف المناسب اإلعداد فاختر, الحالة هي هذه آانت إذا. مؤقتا الطباعة انتظار قائمة إیقاف عدم من تأآد•
التشغيل نظام مع المزودة الوثائق راجع, الطباعة مهام انتظار قائمة إلى الوصول حول المعلومات من المزید على للحصول.بك الخاص الكمبيوتر في المثبت
آخر بمنتج توصيله حاول. یجب آما الكابل هذا یعمل ال فقد األقدم، النوع من آابل تستخدم آنت إذا. USB آابل بفحص قم•أن من تحقق آذلك. USB آابل تبدیل إلى تحتاج قد مشاآل، إلى التعرض عند. یجب آما یعمل USB آابل آان إذا ما لترى.أمتار 3 یتجاوز ال الكابل طول
ملف راجع, المعلومات من للمزید. معتمد تشغيل نظام استخدام ومن USB ناحية من الكمبيوتر جهاز استعداد من تأآد•Readme.
الخلفي الجزء في الموجود USB بمنفذ بأمان USB آابل توصيل من تحقق. الكمبيوتر إلى المنتج من التوصيل بفحص قم•قم صحيح، بشكل الكابل توصيل بعد. الكمبيوتر في الموجود USB بمنفذ USB لكابل اآلخر الطرف توصيل من تأآد. للمنتج.ثانية تشغيله أعد ثم المنتج تشغيل بإیقاف
٢ الفصل
٩ HP Deskjet F2200 All-in-One series
عربي

مباشرة توصيله حاول, التشغيل قيد المحور وجود عند. المحور تشغيل من تأآد ،USB محور خالل من المنتج توصيل عند•.بالكمبيوتر
.الكمبيوتر عن القدیمة المنتجات فصل إلى تحتاج قد. األخرى الضوئية والماسحات الطابعات بفحص قم•إعادة حاول التوصيالت، بفحص القيام بعد. بك الخاص الكمبيوتر في موجود آخر USB بمنفذ USB آابل توصيل حاول•
.ثانية تشغيله أعد ثم المنتج تشغيل بإیقاف قم. الكمبيوتر تشغيل.ثانية تشغيله أعد ثم المنتج تشغيل بإیقاف قم. الكمبيوتر تشغيل إعادة حاول التوصيالت، بفحص القيام بعد•.ثانية تثبيته أعد ثم المنتج مع بتثبيته قمت الذي البرنامج بإزالة فقم ذلك، إلى حاجة هنالك آانت إذا•
جهاز مع المزود اإلعداد دليل راجع بالكمبيوتر، وتوصيله HP All-in-One جهاز إعداد حول المعلومات من للمزیدHP All-in-One.
الورق انحشارات تحريرإلى الوصول حول إرشادات على للحصول. الشاشة على الظاهرة التعليمات راجع الورق، انحشار تحریر حول معلومات على للحصول.١٠ صفحة في “الشاشة على الظاهرة التعليمات” راجع ،Windows تشغيل بنظام یعمل آمبيوتر قي الشاشة على الظاهرة التعليمات
الطباعة بخرطوشة تتعلق مشكالت حلإرشادات على للحصول. الشاشة على الظاهرة التعليمات راجع الطباعة، بخرطوشات تتعلق مشكالت حل حول معلومات على للحصول
.١٠ صفحة في “الشاشة على الظاهرة التعليمات” راجع ،الشاشة على الظاهرة التعليمات إلى الوصول حول
المعلومات من المزيد على الحصول.واستخدامه HP All-in-One جهاز إعداد حول معلومات, الشاشة على وظاهرة مطبوعة, المرجعية المصادر من منوعة تشكيلة توفر
اإلعداد دليلاإلعداد دليل في الموجودة الخطوات اتباع من تأآد. البرنامج وتثبيت HP All-in-One جهاز ضبط حول اإلرشادات یوفر اإلعداد دليل إن
.الترتيب حسب “والدعم المشكالت حل” راجع أو, اإلعداد دليل من قسم آخر في المشكالت حل راجع, اإلعداد عملية أثناء مشكالت إلى التعرض عند.الدليل هذا في ٧ صفحة في
الشاشة على الظاهرة التعليماتبما, هذا المستخدم دليل في وصفها یتم ال التي HP All-in-One جهاز ميزات حول مفصلة إرشادات الشاشة على الظاهرة التعليمات توفرالشاشة على الظاهرة التعليمات توفر آما. فقط HP All-in-One مع بتثبيته قمت الذي البرنامج استخدام عند المتوفرة الميزات ذلك في
.وبيئية تنظيمية معلومات
المعلومات من المزید على الحصول ١٠
بيعر
الشاشة على الظاهرة التعليمات إلى الوصول•Windows: فوق انقر Start) ابدأ( < All Programs) البرامج آافة( < HP < Deskjet F2200
All-in-One series < Help) تعليمات(.الظاهرة اإلرشادات واتبع بك الخاص الكمبيوتر إلى بالبرنامج الخاص المضغوط القرص أدخل, الشاشة على الظاهرة التعليمات لتثبيت.الشاشة على
•Macintosh: فوق انقر Help< Mac Help < Library < HP Product Help.
HP لـ الويب موقعیوفر. www.hp.com/support على HP لـ الویب موقع من الدعم على الحصول فبإمكانك اإلنترنت، بشبكة االتصال إمكانية عند.المنتجات طلب ومعلومات والمستلزمات التشغيل وبرامج الفني الدعم هذا الویب موقع
HP دعم.واللغة المنطقة/والبلد المنتج حسب توفره ومدى الدعم خيارات تختلف. اإلنترنت وعبر الهاتف طریق عن HP بدعم االتصال یمكن
الهاتف عبر HP دعم.الدليل لهذا الداخلية التغطية راجع للدعم، الهاتفية باألرقام قائمة على للحصول.واللغة المنطقة/والبلد المنتج حسب توفره ومدى الدعم خيارات تختلف
الهاتف عبر الدعم فترةفي الهاتف عبر الدعم فترة لمعرفة). المكسيك ذلك في بما (الالتينية أمریكا في واحد عام لمدة مجانا الهاتف عبر الدعم على الحصول یمكن .www.hp.com/support زر وإفریقيا، الهادئ المحيط على المطلة آسيا ودول األوسط والشرق أوروبا وشرق الشمالية أمریكا.الهواتف لشرآة العادیة الرسوم تطبيق یتم
الهاتف عبر الدعم فترة انتهاء بعد.إضافية رسوم دفع مقابل HP قبل من دعم على الحصول یمكن الهاتف، عبر الدعم فترة انتهاء بعد
.الدعم خيارات على للتعرف فيها تقيم التي المنطقة/للبلد المخصص الدعم هاتف برقم اتصل أو HP بموزع اتصل
HP بدعم االتصال قبل:أن من تأآد.١
.التشغيل قيد ویوجد الطاقة بمقبس متصل HP All-in-One جهاز.أ.الصحيحة بالطریقة مثبتة المحددة الطباعة خرطوشات.ب.اإلدخال درج في الصحيحة بالطریقة محمل به الموصى الورق نوع.ج
:HP All-in-One ضبط بإعادة قم.٢.تشغيل زر على بالضغط ،HP All-in-One جهاز تشغيل بإیقاف قم.أ.HP All-in-One لـ الخلفي الجزء عن الطاقة سلك افصل.ب.HP All-in-One بجهاز الطاقة سلك توصيل أعد.ج.تشغيل زر على بالضغط ،HP All-in-One جهاز بتشغيل قم.د
:لدیك التالية المعلومات توفر من تأآد.٣.التحكم لوحة على به یظهر الذي الشكل بنفس جاهزا، بك الخاص HP All-in-One جهاز اسم.أ.)المستخدم دليل راجع المعلومات، من للمزید. (ذاتي اختبار تقریر بطباعة قم.ب.بالتفصيل مشكلتك لوصف مستعدا آن.ج.الذاتي االختبار تقریر في عليهما العثور تم آما, جاهزین الخدمة تعریف ورقم التسلسلي بالرقم احتفظ.د.HP بدعم االتصال عند HP All-in-One طابعة من بالقرب تكون أن یجب.هـ
الفنية المعلوماتتنظيمية مواصفات من المزید على للحصول. HP All-in-One لجهاز الدولية التنظيمية والمعلومات الفنية المواصفات القسم هذا یتناول.الشاشة على الظاهرة التعليمات راجع, وبيئية
.الشاشة على الظاهرة التعليمات انظر التوافق، إعالن ذلك في بما والبيئية التنظيمية المعلومات من مزید على للحصول
النظام متطلبات.Readme ملف في موجودة النظام برنامج متطلبات
٢ الفصل
١١ HP Deskjet F2200 All-in-One series
عربي

الورق مواصفات)الورق من ²م/غم 75( 80 حتى: العادي الورق من ورقات: اإلدخال درج سعة•)الورق من ²م/غم 75( 50 حتى: العادي الورق من ورقات: اإلخراج درج سعة•
.الطابعة برنامج راجع المعتمدة، الوسائط بأحجام آاملة قائمة على للحصولمالحظة
المادية المواصفاتسم 18.05 :االرتفاع•سم 42.57 :العرض•سم 26.74 :العمق•7 :الوزن•
الطاقة مواصفات)العادیة الطباعة (واط 20 :الطاقة استهالك•هرتز A 50-60 1 ~ فولت 240 إلى 100 من متناوب تيار:اإلدخال فولتية•mA 500===فولت mA ,16 375===فولت 32 مستمر تيار: اإلخراج فولتية•)Hz 3±( هرتز A 50-60 1 ~ فولت 240 إلى 100 من متناوب تيار, 2231-0957 :الطاقة مصدر•)Hz 3±( هرتز 60-50 ,)%10±( فولت 240 إلى 200 من متناوب تيار, 2248-0957 :الطاقة مصدر•
.HP قبل من المزود الطاقة محول مع فقط استخدممالحظة
البيئة مواصفاتمئویة درجة 30 إلى 15 :به الموصى التشغيل حرارة درجة مدى•مئویة درجة 35 إلى 10 :به المسموح التشغيل حرارة درجة مدى•متكثفة غير نسبية رطوبة% 80 إلى% 15 :الرطوبة•مئویة درجة 50 إلى 20- :)التخزین (التشغيلية غير الحرارة درجة مدى•طفيف بشكل مشوها HP All-in-One إخراج یكون أن الممكن من عال، آهرومغناطيسي حقل وجود في•مجاالت وجود احتمال عن الناتجة الضوضاء لتقليل ذلك من أقل أو أمتار 3 طوله USB آابل باستخدام HP شرآة توصي•
عالية مغناطيسية
التنظيمية اإلشعاراتآاملة قائمة على للحصول. فيها تقيم التي المنطقة/البلد في التنظيمية الوآاالت من المنتج بمتطلبات HP All-in-One جهاز یفي
.الشاشة على الظاهرة التعليمات راجع, التنظيمية لإلشعارات
تنظيمي طراز تعريف رقمعدم جب. VCVRA-0706 هو بمنتجك یخص الذي للطراز التنظيمي الرقم. للطراز تنظيمي رقم تعيين تم, التنظيمي التعریف ألغراض.)إلخ, CB683A( المنتج أرقام أو) إلخ, HP Deskjet F2200 All-in-One series( التسویق واسم التنظيمي الرقم هذا بين الخلط
الفنية المعلومات ١٢
بيعر
آغ .5 2

الضمان
٢ الفصل
١٣ HP Deskjet F2200 All-in-One series
عربي
أ - حدود الضمان المحدود١- تضمن شركة H P H P Hewlett-Packard في الخامة أو في
H P H P ا من األخطاء.
H P
H P؛ أو
H P H P ٤- بالنسبة لمنتجات H P H P ا
H P بتحH P H P ٥- إذا تلقت شركة
H P H P ٦- إذا تعذر على شركة
. H P H P ٧- ال تتحمل شركة
٩- من الوارد أن تحتوي منتجات H P على أجزاء أو مكونات أو مواد م H P في كل البلدان التي تقوم شركة H P
H P في البلدان التي تقوم شركة H P مثل الخدمة في الموقع - من أي منفذ معتمد لخدمة -
ب - حدود الضمان H P كانت ضمانات أو
ج -١
H P -٢ ا على تعاقد أو على ضرر أو اء كان ذلك قائم
اء . ع د -
مقاطعة إلى مقاطعة أخرى داخل كندا، أو من بلد إلى بلد آخر أو منطقة إلى منطقة أخرى في أي مكان آخر في العالم. ٢- وفي ح ا
٣- H P إلى العمالء وال
HP مدة الضمان محدودمنتج
ا
.
الملحقات
عام واحد
جماربلا طئاسو

الفنية المعلومات ١٤
بيعر

الجزائر
البحرين
℡
℡
مصر
العراق
الكويت
لبنان
قطر
اليمن
ישראל
األردن
عمان
السعوبية
تونس
اإلمارات العربية المتحدة
www.hp.com/support


