● Press ◄ ► KEY to change the setting. ( Be selected value will be blinking)● Press Memory Key to save the change setting.● Press ▲▼ KEY to jump to last or next picture setting.
6. Restore to default value setting:● Press ▼ KEY to jump to restore to default value setting. Will display as follow:
● Press ▲ KEY to jump to last picture setting.● Press Test Key Will display as follow:
● Press ◄ KEY is YES restore the initial default value.● Press ► KEY for not to restore will return to previous screen.
01
Specifications:
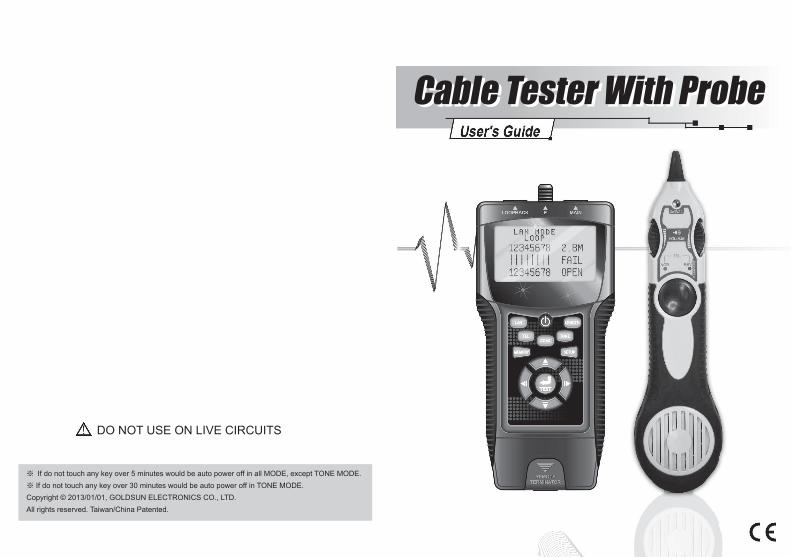
Name Cable Tester With Probe
Display LCD Module (64 mm x 33 mm)
Connector type RJ45, RJ12 ( RJ11 ) & F connector
Button (1) LAN . (2) TEL . (3) COAX . (4) TONE . (5) LENGTH .(6) TEST . (7) POWER . (8) ▲. (9) ▼. (10) ◄. (11) ►. (12) MEMORY. (13) SETUP.
Cable type Shielded or unshielded, CAT -5, CAT-6, CAT-7
Error status Open circuit, short circuit, cross circuit and split pairs
Measure types
Measures cable length via TDR Checks and verifies wire mapGenerates two different tracing tones to help identify users
Cable length & accuracy
Accuracy of the length measurement is ± 5 % length: 1~350 meters (3~1200 feet)
Minimum cable length for testing of
split pairs
1 meter (3 feet)
Power source 9 Volt batteryDetects a low battery condition.
Turns off automatically
Auto-off in any mode and low power consumption for long battery life
22
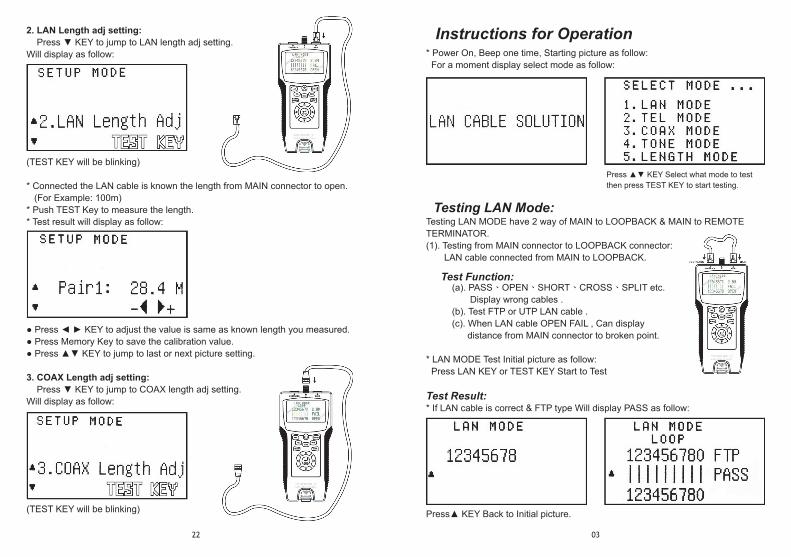
2. LAN Length adj setting: Press ▼ KEY to jump to LAN length adj setting.Will display as follow:
(TEST KEY will be blinking)
* Connected the LAN cable is known the length from MAIN connector to open. (For Example: 100m)* Push TEST Key to measure the length. * Test result will display as follow:
● Press ◄ ► KEY to adjust the value is same as known length you measured.● Press Memory Key to save the calibration value.● Press ▲▼ KEY to jump to last or next picture setting.
3. COAX Length adj setting: Press ▼ KEY to jump to COAX length adj setting.Will display as follow:
(TEST KEY will be blinking)
03
* Power On, Beep one time, Starting picture as follow: For a moment display select mode as follow:
Press ▲▼ KEY Select what mode to test then press TEST KEY to start testing.
Instructions for Operation
Testing LAN Mode:Testing LAN MODE have 2 way of MAIN to LOOPBACK & MAIN to REMOTE TERMINATOR.(1). Testing from MAIN connector to LOOPBACK connector: LAN cable connected from MAIN to LOOPBACK.
Test Function: (a). PASS、OPEN、SHORT、CROSS、SPLIT etc. Display wrong cables . (b). Test FTP or UTP LAN cable . (c). When LAN cable OPEN FAIL , Can display distance from MAIN connector to broken point.
* LAN MODE Test Initial picture as follow: Press LAN KEY or TEST KEY Start to Test
Test Result:* If LAN cable is correct & FTP type Will display PASS as follow:
Press▲ KEY Back to Initial picture.
20
(b). When push the Memory Key again, it will memorize the result of LENGTH Measure. The LCD display will display the result of test with MR-2 pattern a moment then disappear to display the result of test currently.(c). When repeat to push the Memory Key again, it is do memorize the result of LENGTH Measure as step (b)…until 4 sets memory are full also the LCD display will display the result of test with the MR-4 pattern. It is the last sets memory of counter at MR-4. So that the count of sets memory will not increase anymore.
. Review the record of 4 sets memories.(a). To enter memory mode Push the Memory Key and hold on over 3 seconds until the Memory pattern display on the LCD, (b). Push the ▲▼ Key to Review the record of 4 sets memories. Example: The currently display is the memory set (MR-2) of result of LENGTH Measure. Case 1: When Push the ▲ Key it will display the memory set (MR-1) of result of LENGTH Measure. Case 2: When Push the ▼ Key it will display the memory set (MR-3) of result of LENGTH Measure.
05
(2). Testing from MAIN connector to REMOTE terminator connector : LAN cable connected from MAIN to REMOTE terminator.
Test Function : (a). PASS、OPEN、SHORT、CROSS etc. display wrong cables . ( No available SPLIT ) (b). Test FTP or UTP LAN cable . (c). When LAN cable OPEN FAIL , Can display distance from MAIN connector to broken point.
Press LAN KEY or TEST KEY Start to test
Test Result :
* If LAN cable is correct & FTP type will display PASS as follow :
● Display the remote terminator ID number ( For example : ID-1) and Buzzer beeping .
* If LAN cable is OPEN will display FAIL as follow :* If LAN cable is SHORT will display FAIL as follow :
● Display the OPEN LAN cable pair ‘s distance from MAIN connector to broken point , and the open pair’s numbers will be blinking , Display ID-? .● The short pair’s numbers will be blinking.
18
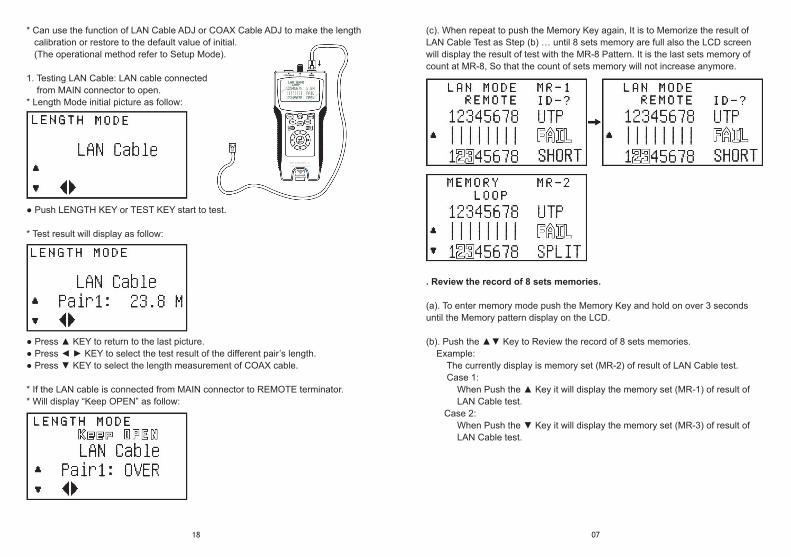
* Can use the function of LAN Cable ADJ or COAX Cable ADJ to make the length calibration or restore to the default value of initial. (The operational method refer to Setup Mode).
1. Testing LAN Cable: LAN cable connected from MAIN connector to open.* Length Mode initial picture as follow:
● Push LENGTH KEY or TEST KEY start to test.
* Test result will display as follow:
● Press ▲ KEY to return to the last picture.● Press ◄ ► KEY to select the test result of the different pair’s length.● Press ▼ KEY to select the length measurement of COAX cable.
* If the LAN cable is connected from MAIN connector to REMOTE terminator.* Will display “Keep OPEN” as follow:
07
(c). When repeat to push the Memory Key again, It is to Memorize the result of LAN Cable Test as Step (b) … until 8 sets memory are full also the LCD screen will display the result of test with the MR-8 Pattern. It is the last sets memory of count at MR-8, So that the count of sets memory will not increase anymore.
. Review the record of 8 sets memories.
(a). To enter memory mode push the Memory Key and hold on over 3 seconds until the Memory pattern display on the LCD.
(b). Push the ▲▼ Key to Review the record of 8 sets memories. Example: The currently display is memory set (MR-2) of result of LAN Cable test. Case 1: When Push the ▲ Key it will display the memory set (MR-1) of result of LAN Cable test. Case 2: When Push the ▼ Key it will display the memory set (MR-3) of result of LAN Cable test.
16
(c). When repeat to push the Memory Key again, It is to Memorize the result of COAX Cable Test as Step (b) … until 4 sets memory are full also the LCD screen will display the result of test with the MR-4 Pattern. It is the last sets memory of count at MR-4, So that the count of sets memory will not increase anymore.
. Review the record of 4 sets memories. (a). To enter memory mode push the Memory Key and hold on over 3 seconds until the Memory pattern display on the LCD.(b). Push the ▲▼ Key to Review the record of 4 sets memories. Example: The currently is display the memory set (MR-2) of result of COAX Cable test. Case 1: When Push the ▲ Key it will display the memory set (MR-1) of result of COAX Cable test. Case 2: When Push the ▼ Key it will display the memory set (MR-3) of result of COAX Cable test. . Erase the record of 4 sets memories. (a). In case of deleting/erasing the stored memory push the Memory Key and hold on over 3 seconds until the Memory pattern display on the LCD, the meaning is it into the Memory Mode.(b). Push the Test Key to entry the function of Erase the record of 4 sets memories. All 4 Sets Memories of result of COAX cable test will be Clear wait for you to decide. Case 1: Push ◄ Key to Clear All 4 sets memories of result of COAX cable test. then the LCD screen will display the MR-0 pattern and waiting for push another function to skip out this function.
09
Testing TEL Mode :
THERE ARE 2 METHODS FOR TESTING TEL CABLE:● METHOD 1 : CONNECT TEL CABLE BETWEEN MAIN AND LOOPBACK FOR TEST. ● METHOD 2 : CONNECT TEL CABLE BETWEEN MAIN WITH TERMINATOR FOR TEST.
TEST FUNCTION (PASS, OPEN, SHORT, CROSS). Original Display in TEL MODE as below:Method.1: Connecting TEL Cable between MAIN with LOOPBACK for test. Connecting the TEL(6C` 4C` 2C)Cable between MAIN with LOOPBACK for test.
● To select the (6C’ 4C’ 2C)type of TEL Cable by Push ▲▼ key in the TEL MODE,● Then Push the TEL Key or TEST key to do the TEL Cable test.After done the TEL Cable test then the message on the LCD as below list:
In case of PASS.TEL(6C` 4C` 2C) test is pass with the message on the LCD as below
14
Case 2: Push ► Key for not to Clear All 8 sets memories of result of TEL cable test then return to the function and message before step (b).
Testing COAX Mode : COAX MODE only can connected from MAIN connector to REMOTE terminator connector .
Test Function : (a). PASS、OPEN、SHORT etc. Display FAIL . (b). When COAX cable OPEN FAIL , Can display distance from MAIN connector to broken point . ( Just for reference )
* COAX MODE test initial picture as follow :
* Press COAX KEY or TEST KEY start to test
11
● Method.2: Connecting TEL Cable between MAIN with TERMINATOR for test.Connecting the TEL(6C` 4C` 2C)Cable between MAIN with TERMINATOR for test.
● To select the (6C’ 4C’ 2C)type of TEL Cable by Push ▲▼ key in the TEL MODE Then Push the TEL Key or TEST key to do the TEL Cable test.After done the TEL Cable test then the message on the LCD as below list:
In case of PASS.TEL(6C` 4C` 2C) test is pass with the message on the LCD as below :
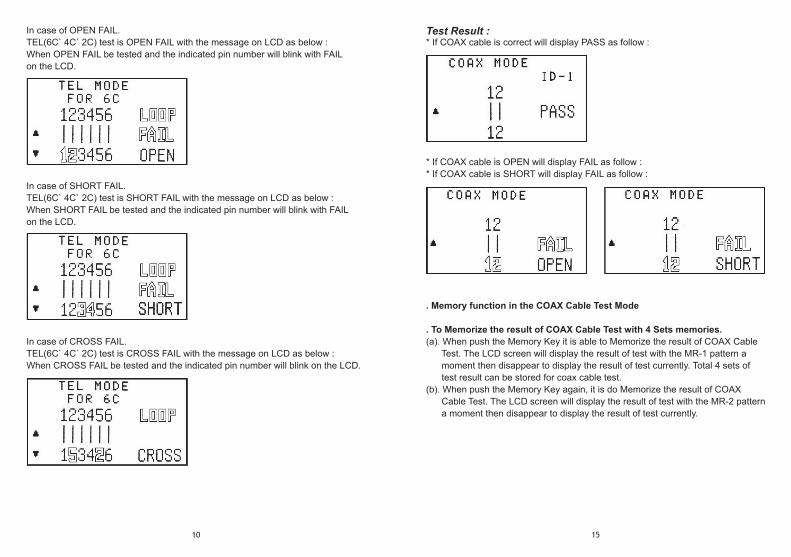
In case of OPEN FAIL. TEL(6C` 4C` 2C) test is OPEN FAIL with the message on LCD as below :When OPEN FAIL be tested and the indicated pin number will blink with FAIL on the LCD.
25
PROBE
23
* Connected the COAX cable is known the length from MAIN connector to open. (For Example: 100m)* Press TEST Key to measure the length. * Test result will display as follow:
● Press ◄ ► KEY to adjust the value is same as known length you measured.● Press Memory Key to save the calibration value.● Press ▲▼ KEY to jump to last or next picture setting.
4. Buzzer ON OFF setting: Press ▼ KEY to jump to buzzer setting. Will display as follow:
● Press ◄ ► KEY to change the setting. ( Be selected value will be blinking)● Press Memory Key to save the change setting.● Press ▲▼ KEY to jump to last or next picture setting.
5. Back Light ON OFF setting: Press ▼ KEY to jump to Back Light setting. Will display as follow:
02
Input protection Protection against excess voltage, transients ringer signal
Physical Dimension
230 mm (L) , 60 mm (W) , 28 mm (H)195 mm (L) , 90 mm (W) , 40 mm (H)
EnvironmentalOperating Temperature: 0° to 50° C ( 32° to 122° F )Storage Temperature: -10° to 60° C (14° to 140° F )Humidity: 10 % to 90 % non-condensing
Accessories F to BNC Adapter * 2 pcs, 9 Volt battery * 2 pcs, RJ45/RJ11 AdapterBelt Clip * 1pcs, BAG * 1pcs
04
● FTP : Shielded : UTP : Unshielded.● 0 : Shielded.● LOOP : LAN cable connected from MAIN connector to LOOPBACK connector.● REMOTE : LAN cable connected from MAIN connector to remote terminator connector.
* If LAN cable is OPEN will display FAIL as follow :
● Display the OPEN LAN cable pair ‘s distance from MAIN connector to broken point , and the open pair’s numbers will be blinking.
* If LAN cable is SHORT will display FAIL as follow :* If LAN cable is CROSS will display FAIL as follow :
● The short pair’s numbers will be blinking.● The CROSS cable’s numbers will be blinking & show different arrangement .
* If LAN cable is SPLIT will display FAIL as follow :
● The SPLIT cable’s numbers will be blinking .
21
. Erase the record of 4 sets memories.(a). In case of deleting/erasing the stored memory push the Memory Key and hold on over 3 seconds until the Memory pattern display on the LCD, the meaning is it into the Memory Mode(b). Push the Test Key to entry the function of Erase the record of 4 sets memories. All 4 sets Memories of result of LENGTH Measure will be clear wait for you to decide. Case 1: Push ◄ Key to clear all 4 sets memories of result of LENGTH Measure, then the LCD screen will display the MR-0 pattern and waiting for push another function to skip out this function. Case 2: Push ► Key for not to clear all 4 sets memories of result of LENGTH Measure then return to the function and message before step (b).
The function of the SETUP MODE:If change the value on SETUP Mode. You must push the Memory Key to save the value. Otherwise the value you set would not save it the memory when power off.If you departed from SETUP Mode, must into the SETUP Mode again & push Memory Key to save the set value.
* Press SETUP KEY will display as follow:1. Unit setting:
● Press ◄ ► KEY to change setting● Press ▲▼ KEY to jump to next picture setting.(Be select value will be blinking)
06
* If LAN cable is CROSS will display FAIL as follow :
● The CROSS cable’s numbers will be blinking & show different arrangement .
(3). Memory function in the LAN Cable Test Mode . To Memorize the result of LAN Cable Test with 8 Sets memories.
(a). When push the Memory Key it is able to Memorize the result of LAN Cable Test. The LCD screen will display the result of test with the MR-1 pattern a moment then disappear to display the result of test currently. Total 8 sets of test result can be stored in LAN cable test.
(b). When push the Memory Key again, it will Memorize the result of LAN Cable Test. The LCD screen will display the result of test with the MR-2 pattern a moment then disappear to display the result of test currently.
19
2. Testing COAX cable: COAX cable connected from MAIN connector to open.* Push ▼ KEY to select the length measurement of COAX cable.* COAX cable initial picture as follow:
* Push LENGTH KEY or TEST KEY start to test.* Test result will display as follow:
* If COAX cable is connected from MAIN connector to REMOTE terminator.* Will display “ keen OPEN ” as follow:
● Press ▲ KEY to return to the last picture.
3. Memory function in the LENGTH Measure Mode of (LAN, COAX) Cable.
Do Memorize the result of LENGTH Measure of (LAN, COAX) Cable with 4 sets memorize have. Total 4 sets memorizes can be shared for LENGTH Measure of (LAN, COAX) test result.(a). When push the Memory Key it is able to Memorize the result of LENGTH Measure. The LCD screen will display the result of test with the MR-1 pattern a moment then disappear to display the result of test currently.
08
. Erase the record of 8 sets memories.
(a). In case of deleting/erasing the stored memory Push the Memory Key and hold on over 3 seconds until the Memory pattern display on the LCD.
(b). Push the Test Key to entry the function of Erase the record of 8 sets memories. All 8 Sets Memories of result of LAN cable test will be Clear wait for you to decide. Case 1: Push ◄ Key to Clear All 8 sets memories of result of LAN cable test. then the LCD screen will display the MR-0 pattern. Case 2: Push ► Key for not to Clear All 8 sets memories of result of LAN cable test.
(4). Battery low when voltage of battery is lower than 6.0V, will display as follow:
The picture will be blinking .
17
Case 2: Push ► Key for not to Clear All 4 sets memories of result of COAX cable test then return to the function and message before step (b).
Function of Tone Mode: Tone Mode:
Transmit audio frequency from cable to detect the cable’s broken point by probe. Push TONE KEY will display as follow:
● Press ◄ ► KEY to select TONER output signal from difference pair. When testing for pair one, the signal output comes from pin one. Press Key ► then it will test for the second pair and so on.● Press ▲▼ KEY to select different audio frequency from TONER. (2 Audio Frequency). Note that there is no memory function for TONE MODE.
Function of Length Mode: Length Mode may connected from MAIN connector to open.Test Function: (a). Can measure the Length of LAN cable or COAX cable. (b). Can memorize the data of test result about LAN cable or COAX cable. (c). Set Mode to calibrate : If the test result of measure length is over error of specification
10
In case of OPEN FAIL.TEL(6C` 4C` 2C) test is OPEN FAIL with the message on LCD as below :When OPEN FAIL be tested and the indicated pin number will blink with FAIL on the LCD.
In case of SHORT FAIL. TEL(6C` 4C` 2C) test is SHORT FAIL with the message on LCD as below :When SHORT FAIL be tested and the indicated pin number will blink with FAIL on the LCD.
In case of CROSS FAIL. TEL(6C` 4C` 2C) test is CROSS FAIL with the message on LCD as below :When CROSS FAIL be tested and the indicated pin number will blink on the LCD.
15
Test Result :* If COAX cable is correct will display PASS as follow :
* If COAX cable is OPEN will display FAIL as follow :* If COAX cable is SHORT will display FAIL as follow :
. Memory function in the COAX Cable Test Mode
. To Memorize the result of COAX Cable Test with 4 Sets memories.(a). When push the Memory Key it is able to Memorize the result of COAX Cable Test. The LCD screen will display the result of test with the MR-1 pattern a moment then disappear to display the result of test currently. Total 4 sets of test result can be stored for coax cable test.(b). When push the Memory Key again, it is do Memorize the result of COAX Cable Test. The LCD screen will display the result of test with the MR-2 pattern a moment then disappear to display the result of test currently.
13
(c). When repeat to push the Memory Key again, It is to Memorize the result of TEL Cable Test as Step (b) … until 8 sets memory are full also the LCD screen will display the result of test with the MR-8 Pattern. It is the last sets memory of count at MR-8, So that the count of sets memory will not increase anymore.
. Review the record of 8 sets memories. (a). To enter memory mode push the Memory Key and hold on over 3 seconds until the Memory pattern display on the LCD. (b). Push the ▲▼ Key to Review the record of 8 sets memories. Example: The currently display is memory set (MR-2) of result of TEL Cable test. Case 1: When Push the ▲ Key it will display the memory set (MR-1) of result of TEL Cable test. Case 2: When Push the ▼ Key it will display the memory set (MR-3) of result of TEL Cable test. Note. Push the ▲ Key it is unable to be decreased at MR-1 because it is top of sets memories. Push the ▼ Key it is unable to be increased at MR-8 because it is bottom of sets memories.
. Erase the record of 8 sets memories. (a) In case of deleting/erasing the stored memory Push the Memory Key and hold on over 3 seconds until the Memory pattern display on the LCD. (b). Push the Test Key to enter the function of Erase the record of 8 sets memories. All 8 Sets Memories of result of TEL cable test will be Clear wait for you to decide. Case 1: Push ◄ Key to Clear All 8 sets memories of result of TEL cable test. then the LCD screen will display the MR-0 pattern and waiting for push another function to skip out this function.
12
In case of SHORT FAIL. TEL(6C` 4C` 2C) test is SHORT FAIL with the message on LCD as below :When SHORT FAIL be tested and the indicated pin number will blink with FAIL on the LCD
In case of CROSS FAIL. TEL(6C` 4C` 2C) test is CROSS FAIL with the message on LCD as below :When CROSS FAIL be tested and the indicated pin number will blink on the LCD.
. Memory function in the TEL Cable Test Mode
. To Memorize the result of TEL Cable Test with 8 Sets memories.(a). When push the Memory Key it is able to Memorize the result of TEL Cable Test. The LCD screen will display the result of test with the MR-1 pattern a moment then disappear to display the result of test currently. Total 8 sets of test result can be stored in LAN cable test.
(b). When push the Memory Key again, it will Memorize the result of TEL Cable Test. The LCD screen will display the result of test with the MR-2 pattern a moment then disappear to display the result of test currently. But the Counter of sets memory will increased one to the next.