53
User’s Guide CASHNET CASHIERING TRAINING MANUAL
User’s Guide CASHNET CASHIERING TRAINING MANUAL
1 | P a g e
Table of Contents Business 49 Policy ......................................................................................................................................... 3
Operator Access ............................................................................................................................................ 5
Log in to CASHNet ......................................................................................................................................... 6
Change Supervisor Password ........................................................................................................................ 6
Set Station Number ....................................................................................................................................... 8
Start a New Batch ....................................................................................................................................... 10
Processing a Transaction ............................................................................................................................. 11
New Transaction ..................................................................................................................................... 11
Retrieving the Customer or Department Information ........................................................................ 12
Item Codes .......................................................................................................................................... 12
Retrieving an Item Code...................................................................................................................... 13
Adding an Item Code ........................................................................................................................... 14
Reviewing Line Items .......................................................................................................................... 15
Adding Additional Line Items .............................................................................................................. 15
Editing/Deleting Line Items ................................................................................................................. 16
Payment Tender ...................................................................................................................................... 17
Cash Payment Tender ......................................................................................................................... 18
Check Payment Tender ....................................................................................................................... 18
Credit Card Terminal Payment Tender ............................................................................................... 19
Transaction Completed ........................................................................................................................... 21
Back Office Cashiering (BOC) ...................................................................................................................... 22
Processing Back Office Cashiering Transactions ..................................................................................... 22
Back Office Cashiering Default Values ................................................................................................ 22
Back Office Cashiering Transactions ................................................................................................... 24
Back Office Cashiering Batch Selection ............................................................................................... 27
Balancing & Closing the Batch- Checkout ................................................................................................... 28
Checkout Screen ..................................................................................................................................... 28
Batch is Successfully Closed .................................................................................................................... 29
Finding Transactions ................................................................................................................................... 30
Emailing Receipts ........................................................................................................................................ 32
Adding Comments ....................................................................................................................................... 34
2 | P a g e
Voiding a Transaction.................................................................................................................................. 36
Processing a Void .................................................................................................................................... 36
Transaction Voided ................................................................................................................................. 39
Refunds ....................................................................................................................................................... 39
Cash & Check Refunds ............................................................................................................................ 39
Credit Card Refunds ................................................................................................................................ 39
Credit Card Refunds via eCommerce Sites.......................................................................................... 40
Credit Card Refunds via credit card terminal ...................................................................................... 42
Notifications ................................................................................................................................................ 43
CASHNet Reports ........................................................................................................................................ 44
Preparing the Bank of America Deposit ...................................................................................................... 45
Complete the deposit Slip ....................................................................................................................... 45
Bagging the Deposit ................................................................................................................................ 46
Dunbar Service ............................................................................................................................................ 48
Requesting Dunbar Service ..................................................................................................................... 48
Verifying the Deposit Sent to Bank of America .......................................................................................... 48
Processing Checks with a Check Scanner/Check Reader ............................................................................ 49
Additional Assistance .................................................................................................................................. 52
3 | P a g e
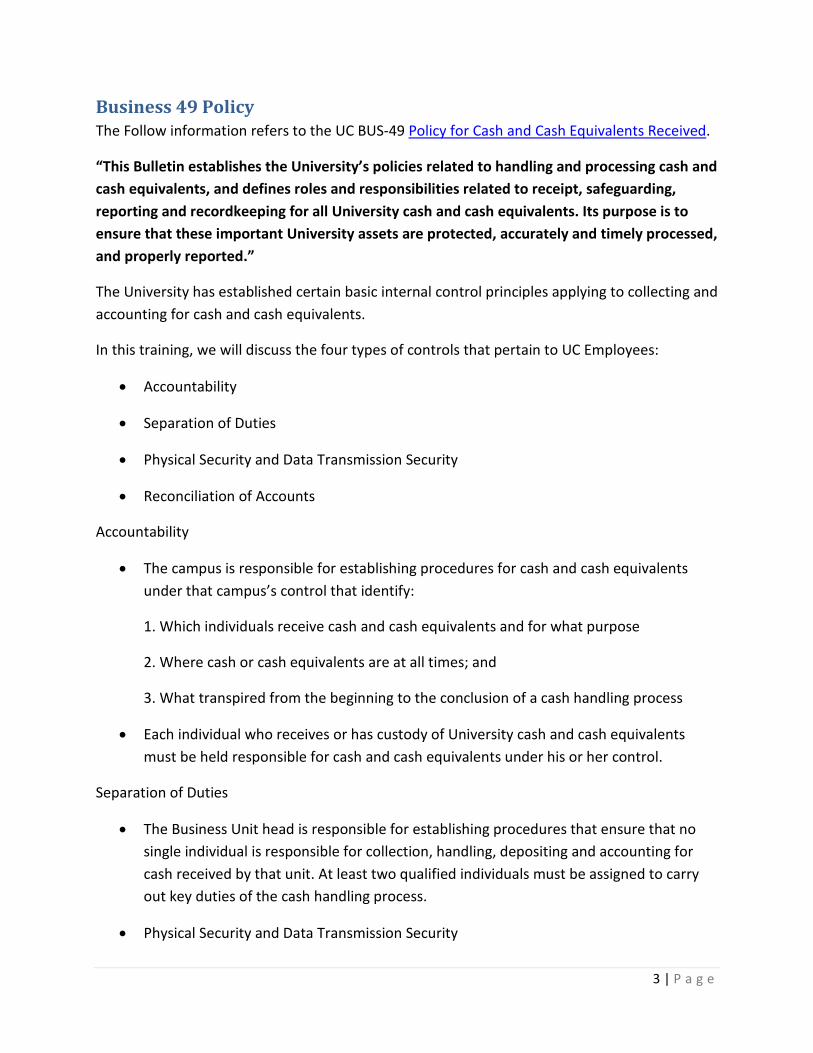
Business 49 Policy The Follow information refers to the UC BUS-49 Policy for Cash and Cash Equivalents Received.
“This Bulletin establishes the University’s policies related to handling and processing cash and cash equivalents, and defines roles and responsibilities related to receipt, safeguarding, reporting and recordkeeping for all University cash and cash equivalents. Its purpose is to ensure that these important University assets are protected, accurately and timely processed, and properly reported.”
The University has established certain basic internal control principles applying to collecting and accounting for cash and cash equivalents.
In this training, we will discuss the four types of controls that pertain to UC Employees:
• Accountability
• Separation of Duties
• Physical Security and Data Transmission Security
• Reconciliation of Accounts
Accountability
• The campus is responsible for establishing procedures for cash and cash equivalents under that campus’s control that identify:
1. Which individuals receive cash and cash equivalents and for what purpose
2. Where cash or cash equivalents are at all times; and
3. What transpired from the beginning to the conclusion of a cash handling process
• Each individual who receives or has custody of University cash and cash equivalents must be held responsible for cash and cash equivalents under his or her control.
Separation of Duties
• The Business Unit head is responsible for establishing procedures that ensure that no single individual is responsible for collection, handling, depositing and accounting for cash received by that unit. At least two qualified individuals must be assigned to carry out key duties of the cash handling process.
• Physical Security and Data Transmission Security
4 | P a g e
• The Business Unit head is responsible for establishing procedures that ensure that at all times:
1. Individuals who handle cash and cash equivalents are protected from physical harm.
2. Cash and cash equivalents in the custody of the unit are protected from loss.
3. Technology resources involved in processing cash and cash equivalents (i.e., hardware and confidential personal information) are protected from loss, corruption, or compromise to confidentiality.
Reconciliation of Accounts
• The campus is responsible for establishing procedures to ensure that:
1. Cash and cash equivalents collected and reported as deposited are deposited to authorized University bank accounts in an accurate and timely manner.
2. General ledger recordings/transactions are accurate.
5 | P a g e
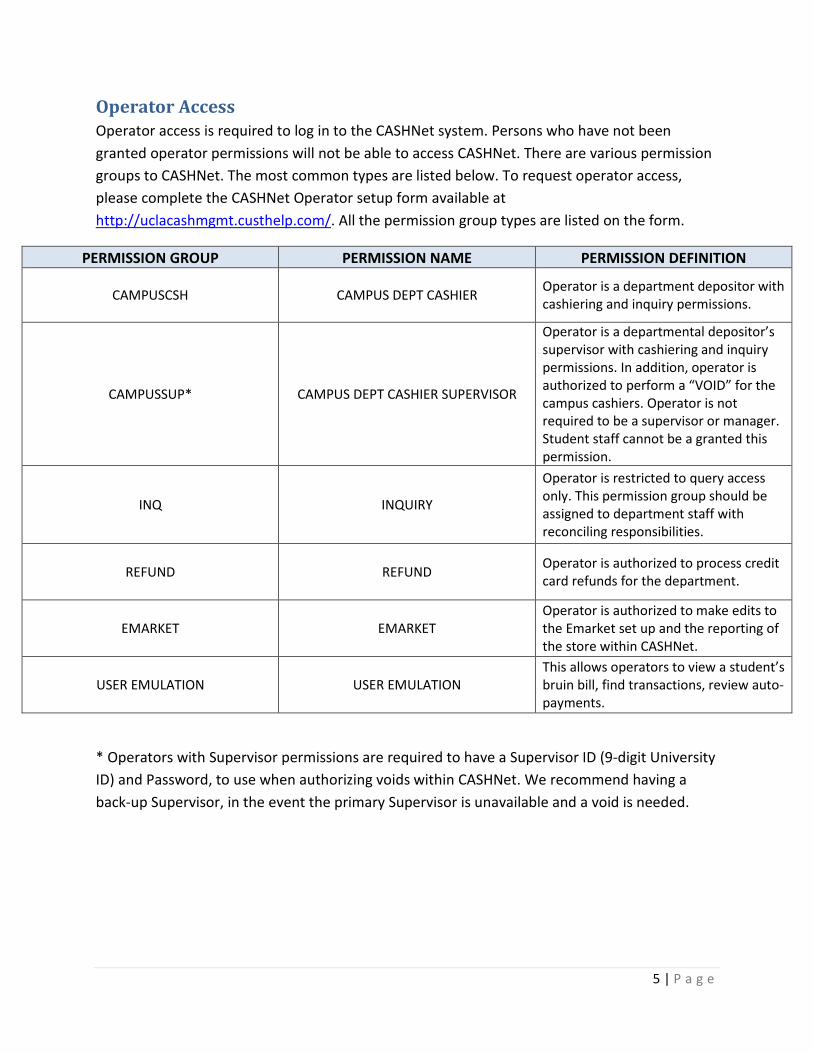
Operator Access Operator access is required to log in to the CASHNet system. Persons who have not been granted operator permissions will not be able to access CASHNet. There are various permission groups to CASHNet. The most common types are listed below. To request operator access, please complete the CASHNet Operator setup form available at http://uclacashmgmt.custhelp.com/. All the permission group types are listed on the form.
PERMISSION GROUP PERMISSION NAME PERMISSION DEFINITION
CAMPUSCSH CAMPUS DEPT CASHIER Operator is a department depositor with cashiering and inquiry permissions.
CAMPUSSUP* CAMPUS DEPT CASHIER SUPERVISOR
Operator is a departmental depositor’s supervisor with cashiering and inquiry permissions. In addition, operator is authorized to perform a “VOID” for the campus cashiers. Operator is not required to be a supervisor or manager. Student staff cannot be a granted this permission.
INQ INQUIRY
Operator is restricted to query access only. This permission group should be assigned to department staff with reconciling responsibilities.
REFUND REFUND Operator is authorized to process credit card refunds for the department.
EMARKET EMARKET Operator is authorized to make edits to the Emarket set up and the reporting of the store within CASHNet.
USER EMULATION USER EMULATION This allows operators to view a student’s bruin bill, find transactions, review auto-payments.
* Operators with Supervisor permissions are required to have a Supervisor ID (9-digit University ID) and Password, to use when authorizing voids within CASHNet. We recommend having a back-up Supervisor, in the event the primary Supervisor is unavailable and a void is needed.
6 | P a g e
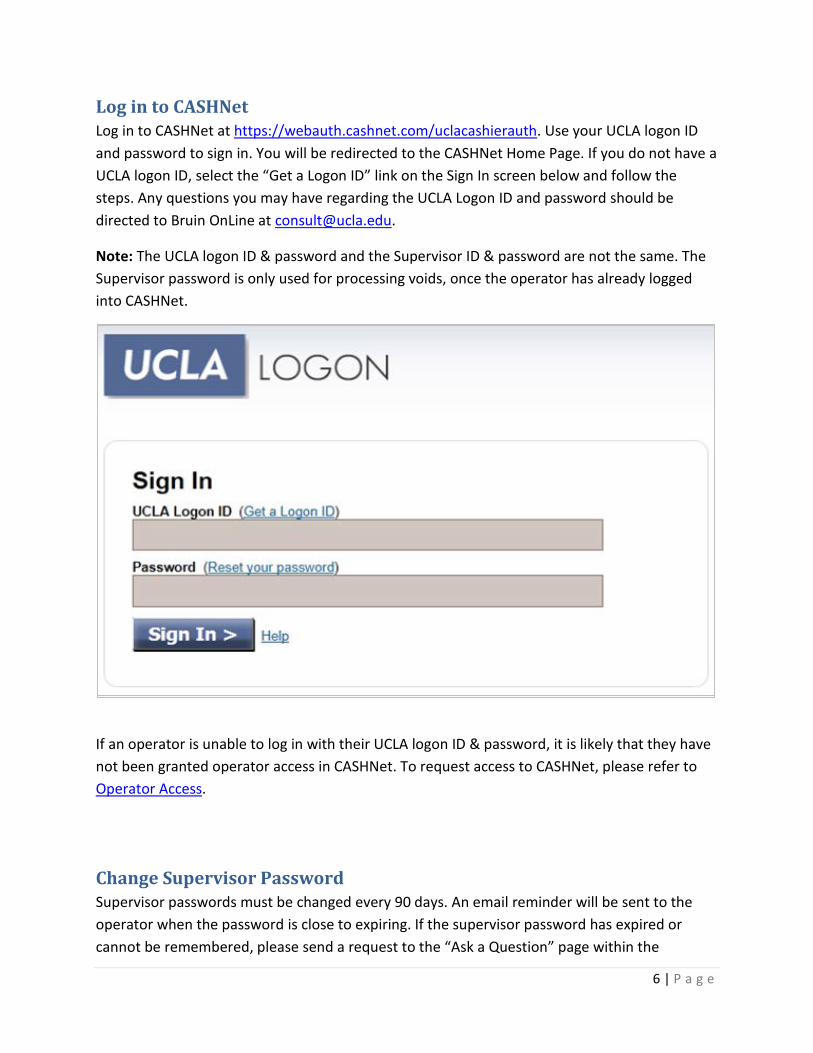
Log in to CASHNet Log in to CASHNet at https://webauth.cashnet.com/uclacashierauth. Use your UCLA logon ID and password to sign in. You will be redirected to the CASHNet Home Page. If you do not have a UCLA logon ID, select the “Get a Logon ID” link on the Sign In screen below and follow the steps. Any questions you may have regarding the UCLA Logon ID and password should be directed to Bruin OnLine at [email protected].
Note: The UCLA logon ID & password and the Supervisor ID & password are not the same. The Supervisor password is only used for processing voids, once the operator has already logged into CASHNet.
If an operator is unable to log in with their UCLA logon ID & password, it is likely that they have not been granted operator access in CASHNet. To request access to CASHNet, please refer to Operator Access.
Change Supervisor Password Supervisor passwords must be changed every 90 days. An email reminder will be sent to the operator when the password is close to expiring. If the supervisor password has expired or cannot be remembered, please send a request to the “Ask a Question” page within the
7 | P a g e
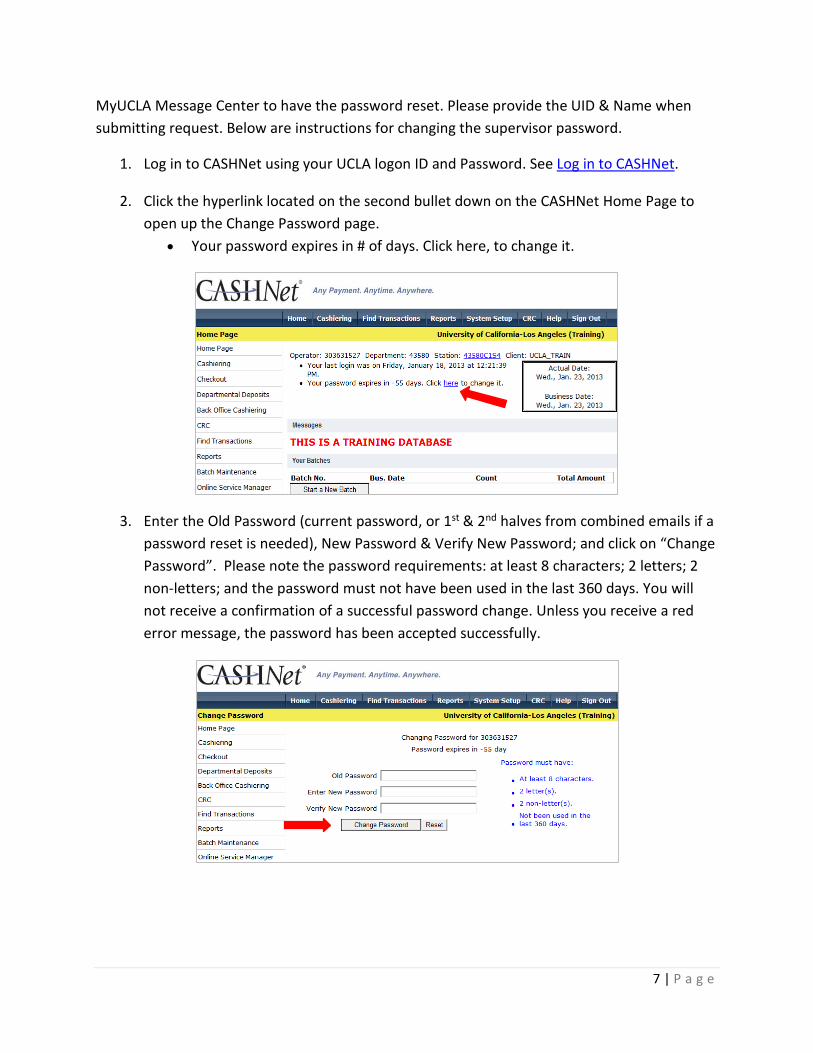
MyUCLA Message Center to have the password reset. Please provide the UID & Name when submitting request. Below are instructions for changing the supervisor password.
1. Log in to CASHNet using your UCLA logon ID and Password. See Log in to CASHNet.
2. Click the hyperlink located on the second bullet down on the CASHNet Home Page to open up the Change Password page.
• Your password expires in # of days. Click here, to change it.
3. Enter the Old Password (current password, or 1st & 2nd halves from combined emails if a password reset is needed), New Password & Verify New Password; and click on “Change Password”. Please note the password requirements: at least 8 characters; 2 letters; 2 non-letters; and the password must not have been used in the last 360 days. You will not receive a confirmation of a successful password change. Unless you receive a red error message, the password has been accepted successfully.

8 | P a g e
Set Station Number It is important for the station number be set to a station that is assigned to your department. If upon logging in, the station is set to 000, it will need to be changed before processing transactions. Station 000 is the default station and should not be used. To set the station number to one that is assigned to your department, follow the steps below.
1. Click on the Station number hyperlink on the CASHNet Home page.
2. Enter “4” followed by your 4-digit department code and click on the binoculars.
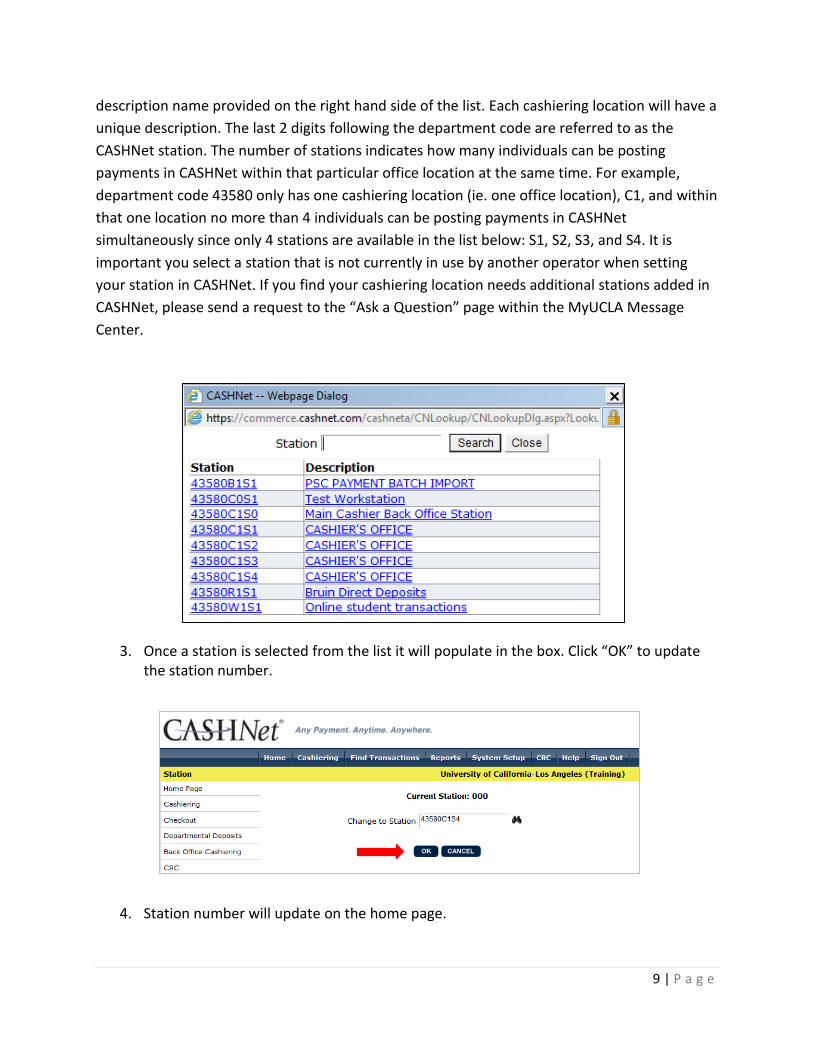
A list of available stations for your department will appear. The first 2 digits following the 5-digit department code are referred to as the CASHNet location. The letter indicates the location type. There are two types of locations you may see when selecting a station: C and E. You will only ever be selecting one of the locations that begin with a C. The C stands for a cashiering location which coincides with the physical location of your office. If your department has multiple office locations that accept payments, you will see one cashiering location for each office location starting with C1 for the first location, C2 for the second location, C3 for the third location, and so on and so forth. You will be able to identify the appropriate location using the
9 | P a g e
description name provided on the right hand side of the list. Each cashiering location will have a unique description. The last 2 digits following the department code are referred to as the CASHNet station. The number of stations indicates how many individuals can be posting payments in CASHNet within that particular office location at the same time. For example, department code 43580 only has one cashiering location (ie. one office location), C1, and within that one location no more than 4 individuals can be posting payments in CASHNet simultaneously since only 4 stations are available in the list below: S1, S2, S3, and S4. It is important you select a station that is not currently in use by another operator when setting your station in CASHNet. If you find your cashiering location needs additional stations added in CASHNet, please send a request to the “Ask a Question” page within the MyUCLA Message Center.
3. Once a station is selected from the list it will populate in the box. Click “OK” to update the station number.
4. Station number will update on the home page.
10 | P a g e
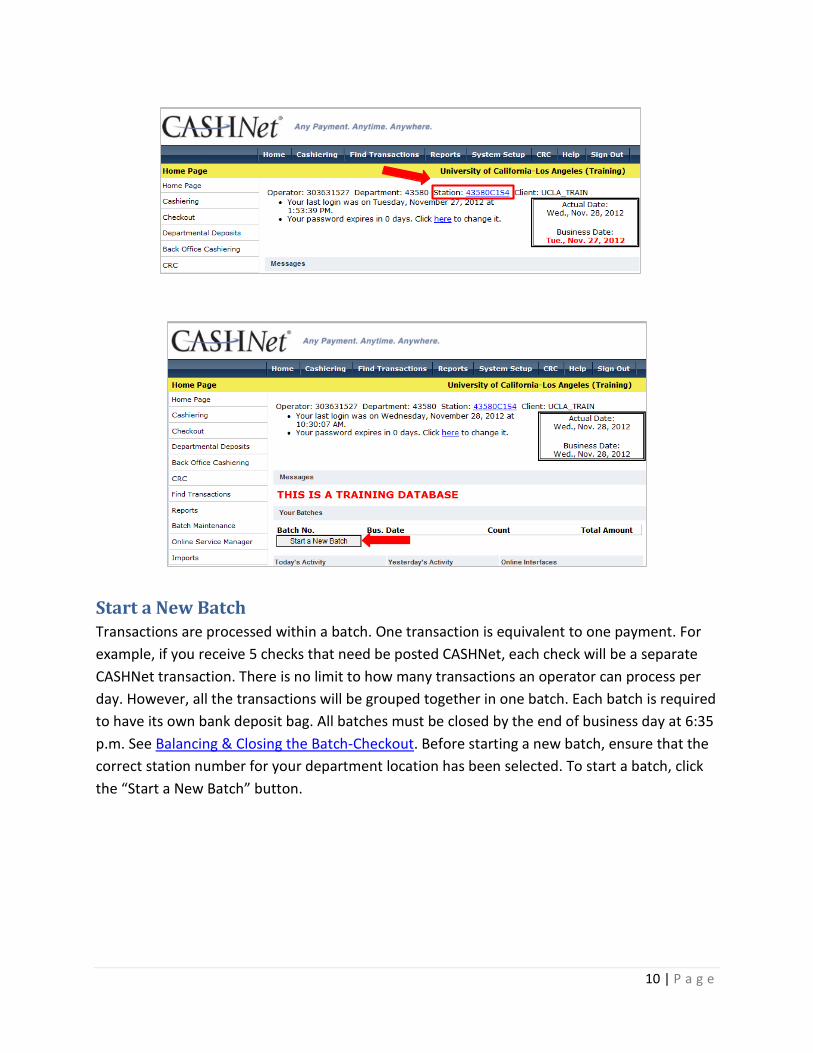
Start a New Batch Transactions are processed within a batch. One transaction is equivalent to one payment. For example, if you receive 5 checks that need be posted CASHNet, each check will be a separate CASHNet transaction. There is no limit to how many transactions an operator can process per day. However, all the transactions will be grouped together in one batch. Each batch is required to have its own bank deposit bag. All batches must be closed by the end of business day at 6:35 p.m. See Balancing & Closing the Batch-Checkout. Before starting a new batch, ensure that the correct station number for your department location has been selected. To start a batch, click the “Start a New Batch” button.
11 | P a g e
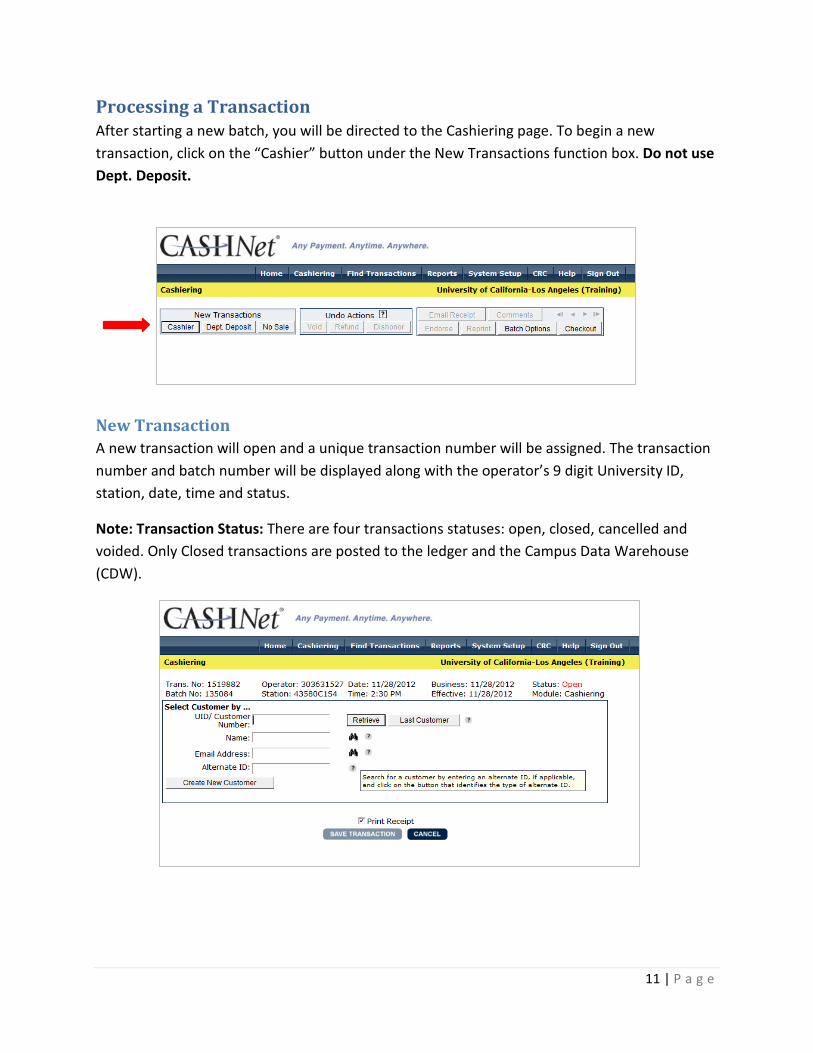
Processing a Transaction After starting a new batch, you will be directed to the Cashiering page. To begin a new transaction, click on the “Cashier” button under the New Transactions function box. Do not use Dept. Deposit.
New Transaction A new transaction will open and a unique transaction number will be assigned. The transaction number and batch number will be displayed along with the operator’s 9 digit University ID, station, date, time and status.
Note: Transaction Status: There are four transactions statuses: open, closed, cancelled and voided. Only Closed transactions are posted to the ledger and the Campus Data Warehouse (CDW).
12 | P a g e
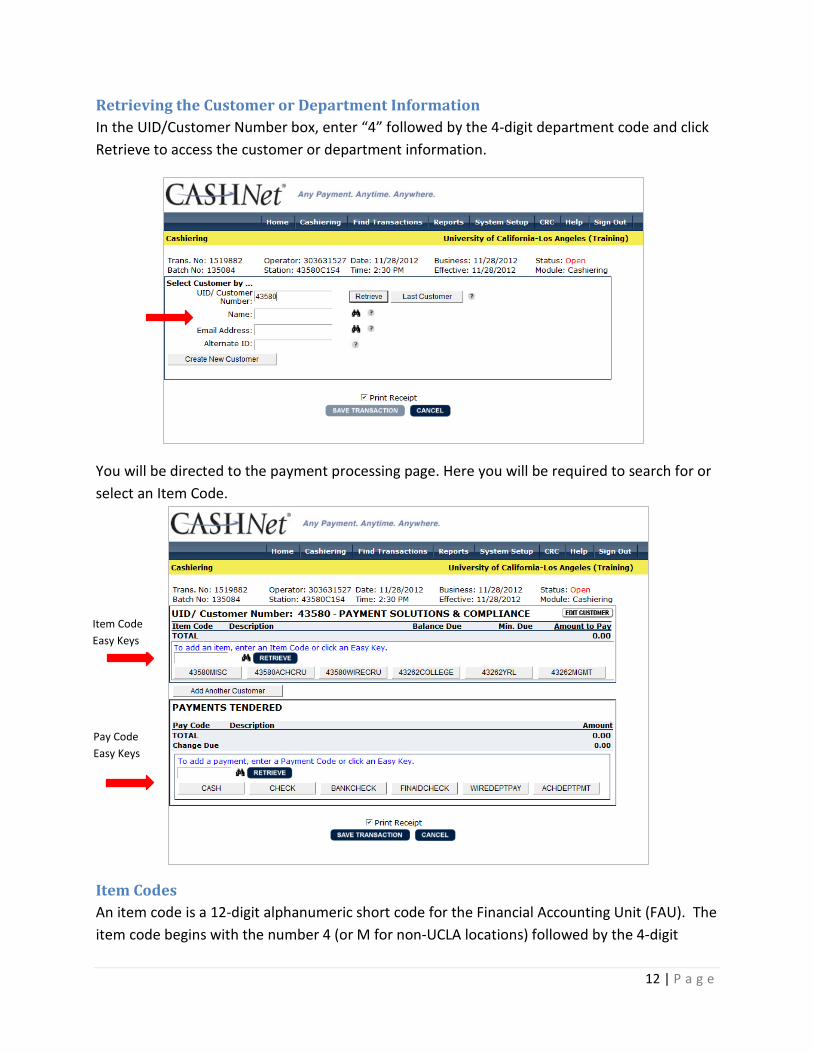
Retrieving the Customer or Department Information In the UID/Customer Number box, enter “4” followed by the 4-digit department code and click Retrieve to access the customer or department information.
You will be directed to the payment processing page. Here you will be required to search for or select an Item Code.
Item Codes An item code is a 12-digit alphanumeric short code for the Financial Accounting Unit (FAU). The item code begins with the number 4 (or M for non-UCLA locations) followed by the 4-digit
Item Code Easy Keys
Pay Code Easy Keys
13 | P a g e
department code. The remaining seven digits can be alphanumeric based on the department needs.
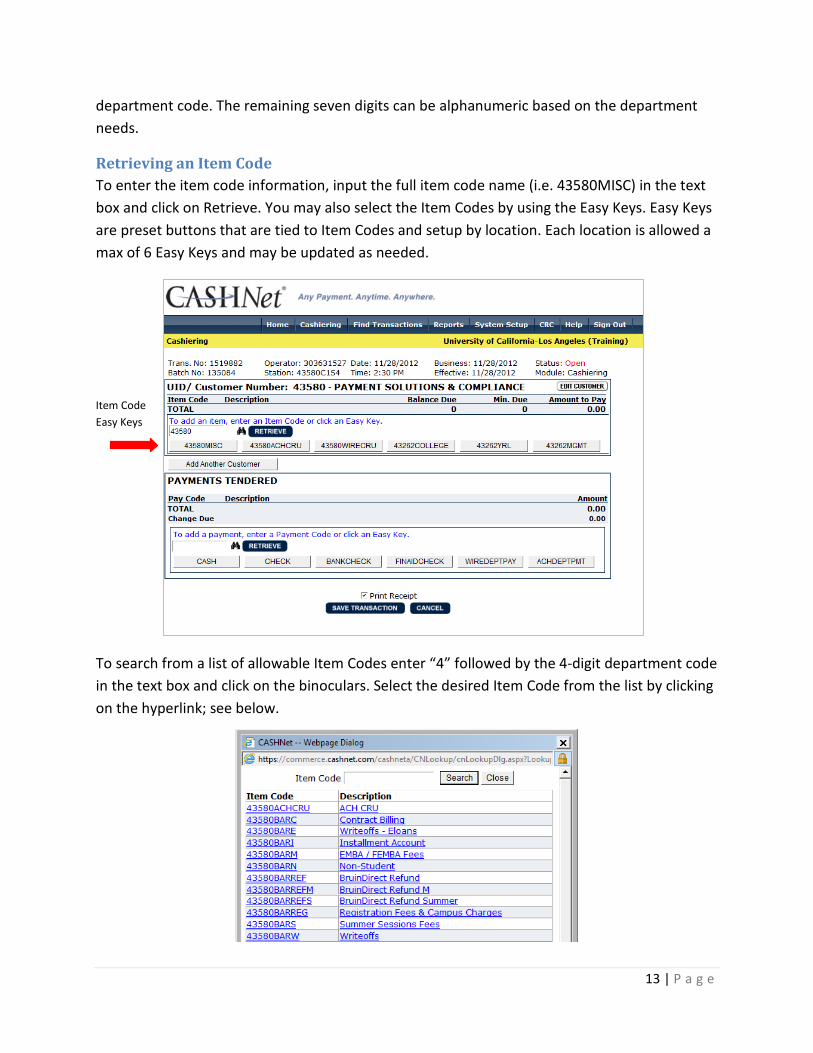
Retrieving an Item Code To enter the item code information, input the full item code name (i.e. 43580MISC) in the text box and click on Retrieve. You may also select the Item Codes by using the Easy Keys. Easy Keys are preset buttons that are tied to Item Codes and setup by location. Each location is allowed a max of 6 Easy Keys and may be updated as needed.
To search from a list of allowable Item Codes enter “4” followed by the 4-digit department code in the text box and click on the binoculars. Select the desired Item Code from the list by clicking on the hyperlink; see below.
Item Code Easy Keys

14 | P a g e
Adding an Item Code Once the Item Code is selected, you will proceed with entering the remaining fields.
1. Enter the Amount. 2. Enter an Explanation. This field is optional and will not appear on the GL. This is simply
used as a reference tool to record additional text regarding the transaction. 3. Enter or verify the FAU to ensure that the fields are properly completed. FAU’s are
validated in the Financial System (FS). If the FAU is not valid or information is missing, an error message will display in red.
4. 5. Click on “Add Item” once all fields are completed.
Note: FAU field information must be entered in CAPS. The system will return an error message if lower case is used. No foreign characters are allowed. Examples of foreign characters are: #, @, ~, etc. There should not be any spaces in the Reference field.
3.
4.
1. 2.
15 | P a g e
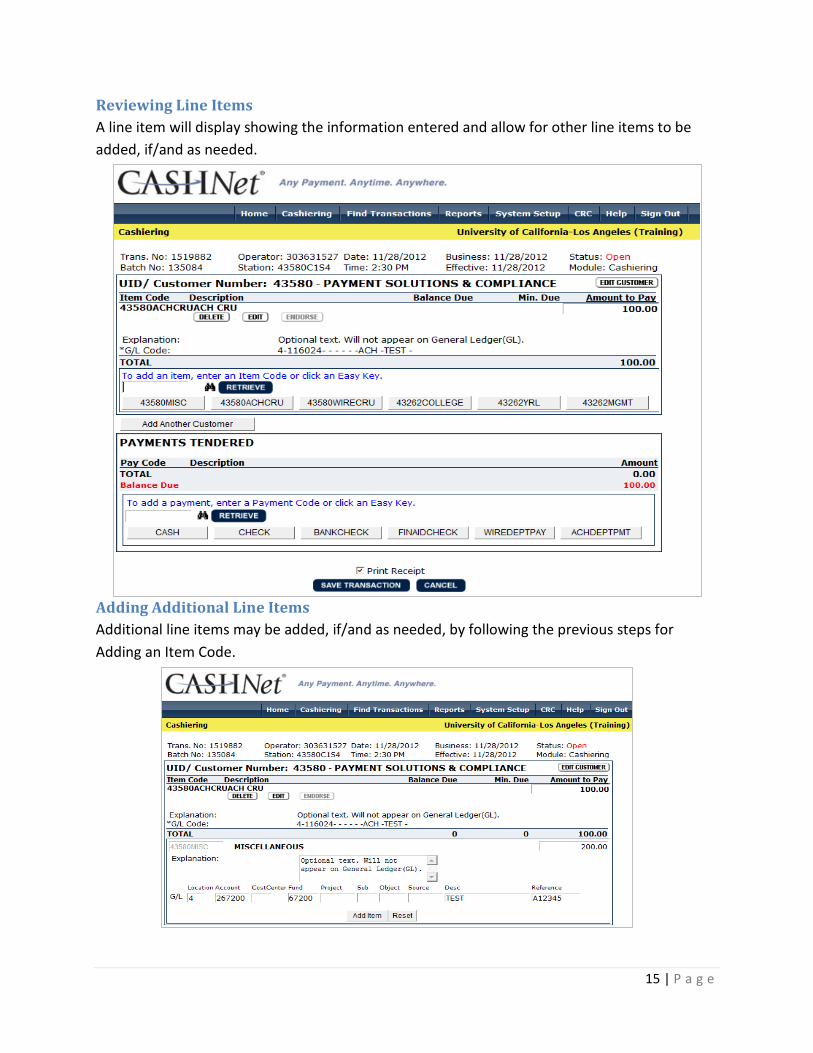
Reviewing Line Items A line item will display showing the information entered and allow for other line items to be added, if/and as needed.
Adding Additional Line Items Additional line items may be added, if/and as needed, by following the previous steps for Adding an Item Code.

16 | P a g e
Editing/Deleting Line Items You may Edit and/or Delete individual line items if needed only while the status of the transaction is Open. To Edit, click on “Edit” to make any modifications to the line item. Click on “Update Item” to update the changes. To Delete, click on “Delete” to delete a single line item.

17 | P a g e
Payment Tender Pay Codes are the acceptable payment tender types. Before entering the pay code, ensure that the information in the line items is correct. The Balance Due is displayed as line items are entered. Pay Codes can also be set up as Easy Keys. Search for or Select the appropriate Pay Code based on the payment tender type. Enter the cash, check or credit card payment amount. Ensure that the pay code amount balances to the Balance Due and click on “Add Payment”. The transaction status will immediately change to Closed. Note: Multiple payment codes may not be used in a single transaction.
Click on “Cashier” to start another transaction within the same batch.
Pay Code Easy Keys
Cashier
18 | P a g e
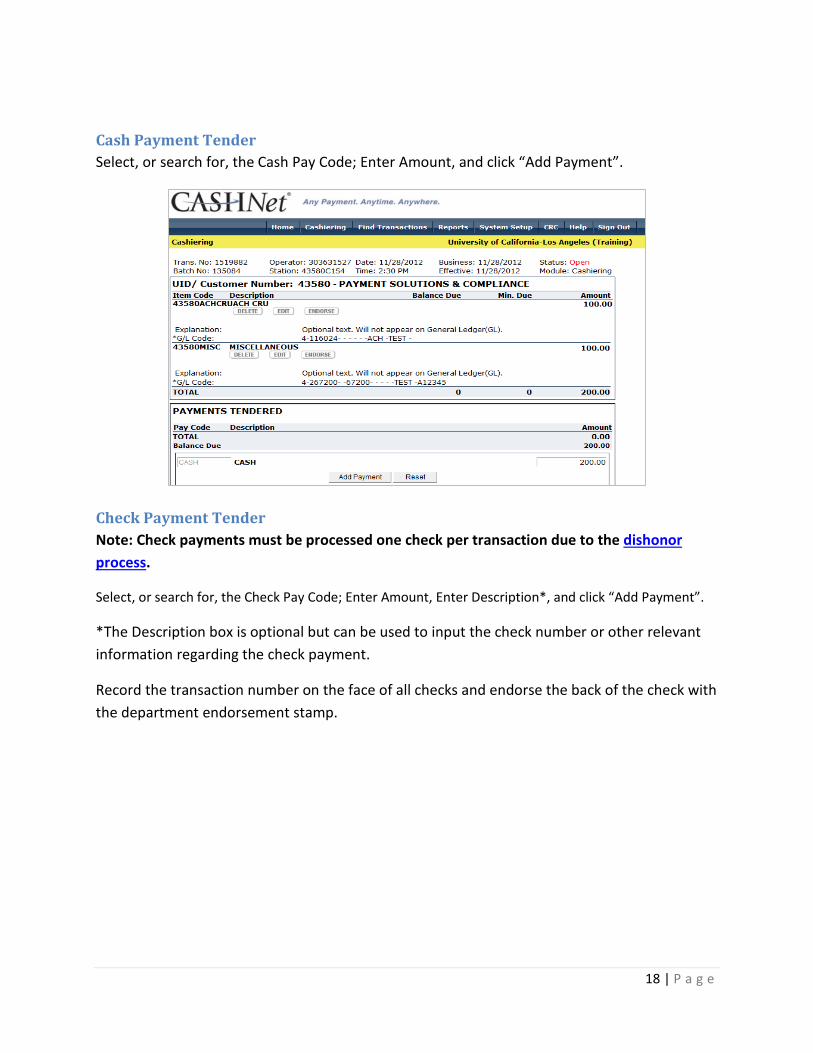
Cash Payment Tender Select, or search for, the Cash Pay Code; Enter Amount, and click “Add Payment”.
Check Payment Tender Note: Check payments must be processed one check per transaction due to the dishonor process.
Select, or search for, the Check Pay Code; Enter Amount, Enter Description*, and click “Add Payment”.
*The Description box is optional but can be used to input the check number or other relevant information regarding the check payment.
Record the transaction number on the face of all checks and endorse the back of the check with the department endorsement stamp.
19 | P a g e
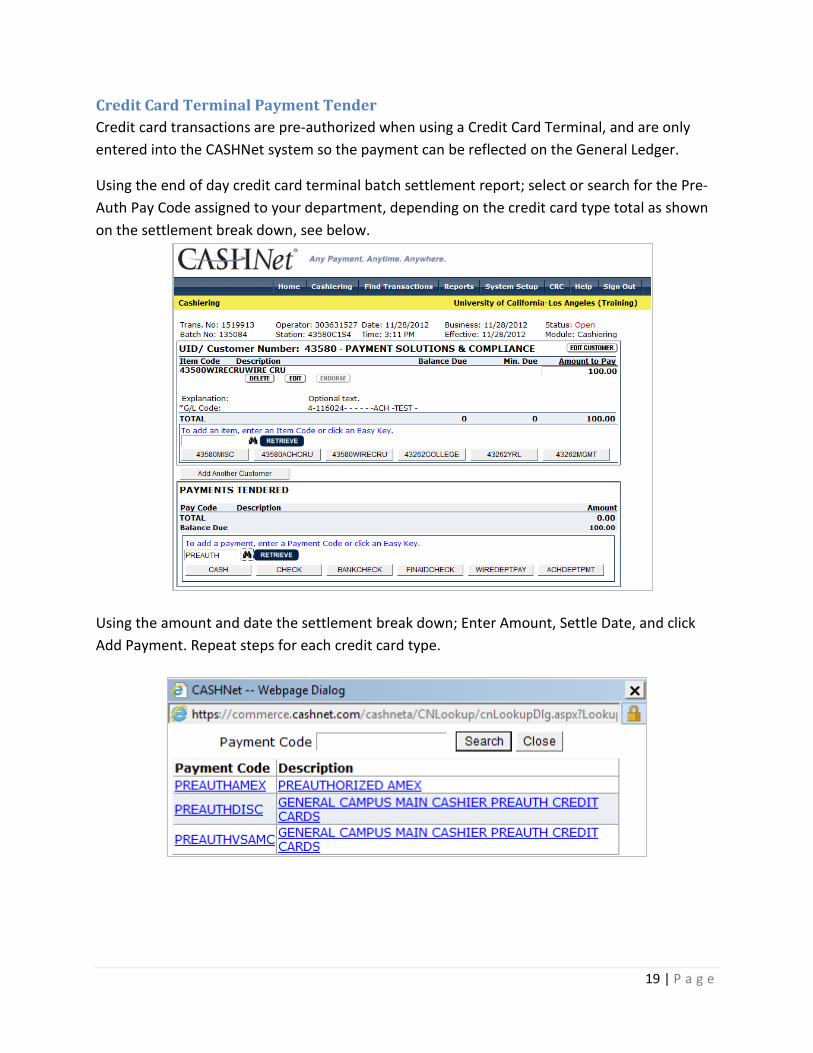
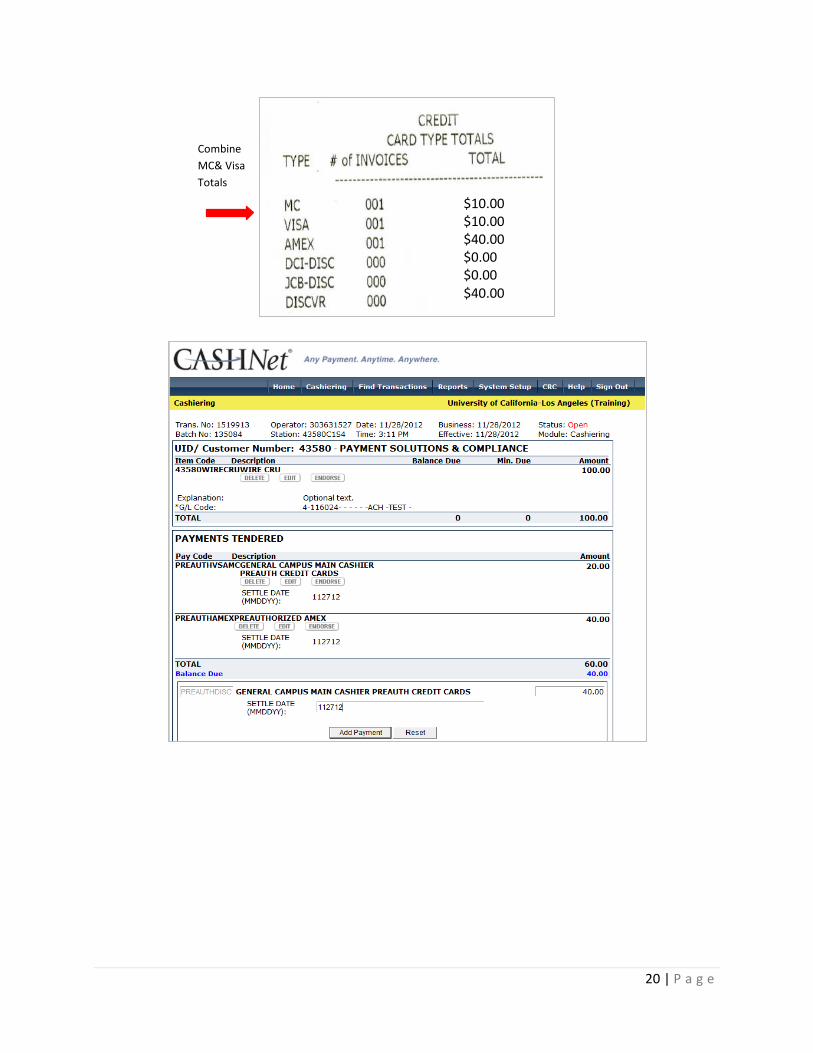
Credit Card Terminal Payment Tender Credit card transactions are pre-authorized when using a Credit Card Terminal, and are only entered into the CASHNet system so the payment can be reflected on the General Ledger.
Using the end of day credit card terminal batch settlement report; select or search for the Pre-Auth Pay Code assigned to your department, depending on the credit card type total as shown on the settlement break down, see below.
Using the amount and date the settlement break down; Enter Amount, Settle Date, and click Add Payment. Repeat steps for each credit card type.
20 | P a g e
Combine MC& Visa Totals
$10.00 $10.00 $40.00 $0.00 $0.00 $40.00

21 | P a g e
Transaction Completed The transaction is complete once the total Balance Due is applied and the Change Due is 0.00. The transaction Status will update from Open to Closed. Only Closed transactions are posted to the Financial System (FS) and to the Campus Data Warehouse (CDW).
Status: Closed
Change Due is 0.00
22 | P a g e
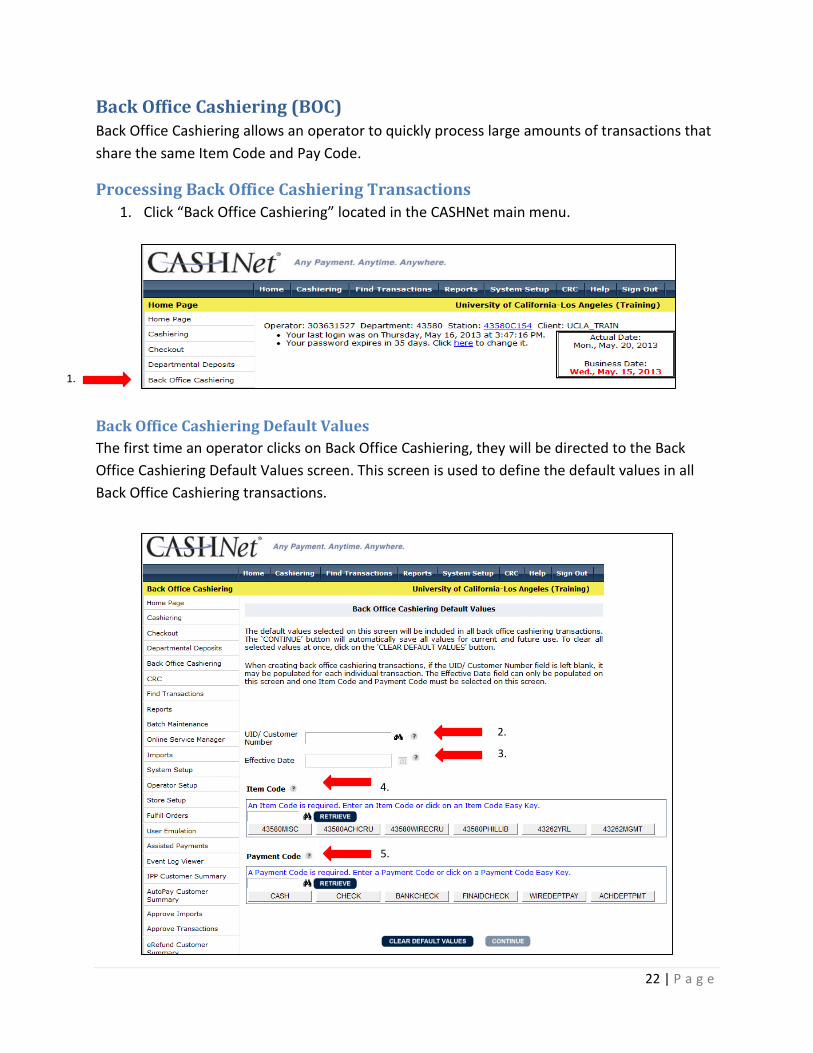
Back Office Cashiering (BOC) Back Office Cashiering allows an operator to quickly process large amounts of transactions that share the same Item Code and Pay Code.
Processing Back Office Cashiering Transactions 1. Click “Back Office Cashiering” located in the CASHNet main menu.
Back Office Cashiering Default Values The first time an operator clicks on Back Office Cashiering, they will be directed to the Back Office Cashiering Default Values screen. This screen is used to define the default values in all Back Office Cashiering transactions.
1.
3.
4.
2.
5.

23 | P a g e
2. Enter Customer Number (4+4-digit department code) 3. Enter Effective Date (Only if the effective date of Back Office Cashiering transactions
should be different than the business date at the time the transactions are submitted) 4. Enter an Item Code or click on an Item Code Easy Key. Only one Item Code may be
selected. * 5. Enter a Payment Code or click on a Payment Code Easy Key. Only one Payment Code
may be selected. *
* If the selected Item Code and Payment Code allow changes, change the fields that should be shared by all transactions. If a field should be changed for each individual transaction, check the “Allow Change During Entry” checkbox. We recommend checking the box to Allow Changes.
6. Click “Continue” to save all values. You will be directed to the Back Office Cashiering Transactions Click the “Clear Default Values” button to cancel. Default values can be changed at any time.
Note: If an operator previously defined values on this screen, they will be directed to the Back Office Cashiering Batch Selection screen.
6.
24 | P a g e
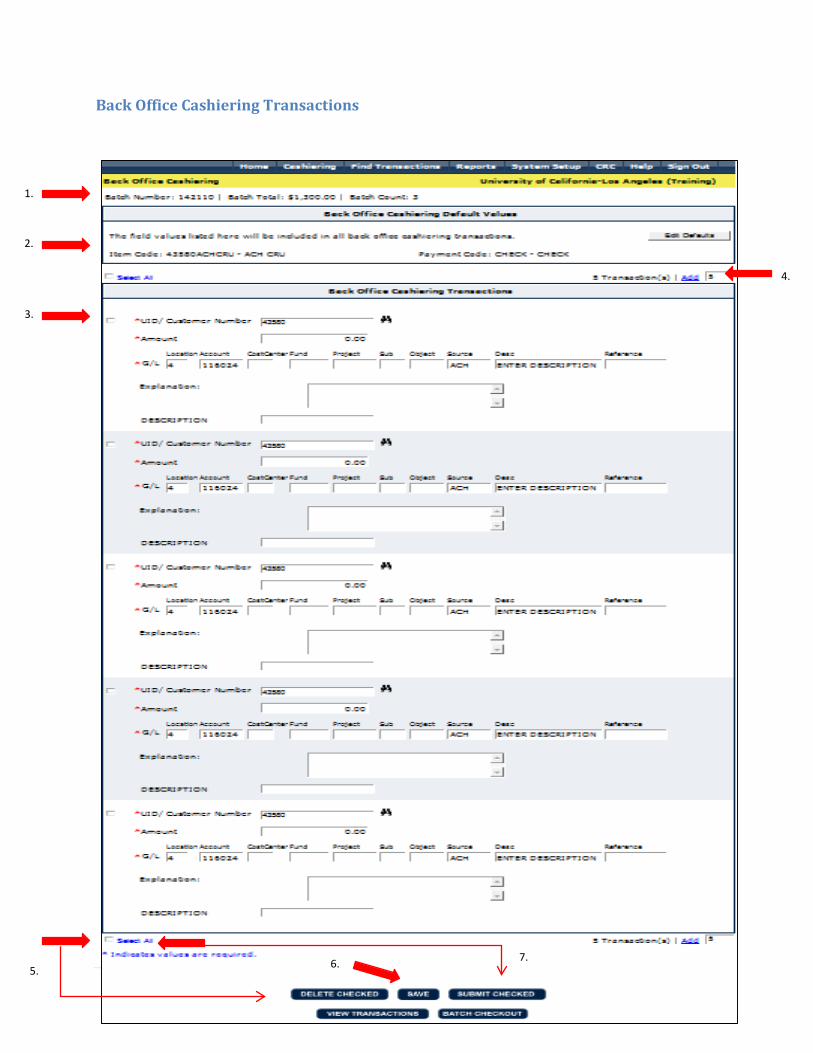
Back Office Cashiering Transactions
1.
2.
3.
4.
5. 6. 7.

25 | P a g e
1. The selected batch number and its total dollar amount and transaction count will display
at the top of the screen. 2. The Back Office Cashiering Default Values section will list the default field values
selected to be included in all Back Office Cashiering transactions. If any values should be changed, click on “Edit Defaults” to transfer back to the Back Office Cashiering Default Values screen.
3. The Back Office Cashiering Transactions section will initially include 5 transaction sections with all Item and Payment Code fields that had their Allow Change During Entry checkbox checked. This is where an operator will enter the remaining information for each transaction that needs to be submitted.
4. The Add button located in the top and bottom right-hand corners of this section can be used at any time to add transaction sections. Additional transaction sections will be added with the same default values entered on the Back Office Cashiering Default Values.
5. If any transaction sections should be deleted, click on the section’s checkbox and then click on the “Delete Checked” button located at the bottom of the screen. When the confirmation pop-up window appears, click “Yes, continue” to delete the section(s).
6. The Save button allows an operator to save all values selected or entered into transactions sections that have not been submitted. However, all required field must first be populated. If you are ready to submit, instead of Saving, you can proceed to step 7 to submit.
7. When a transaction section is ready to be submitted, check the section’s checkbox and click “Submit Checked” located at the bottom of the screen.
8. A pop-up window will show the record count and total of the transactions being submitted; click “OK”. The transaction section count and batch total amount and count fields will automatically recalculate. At this point, a transaction number, business date, effective date and current date and time is assigned to each section submitted.
8.
26 | P a g e
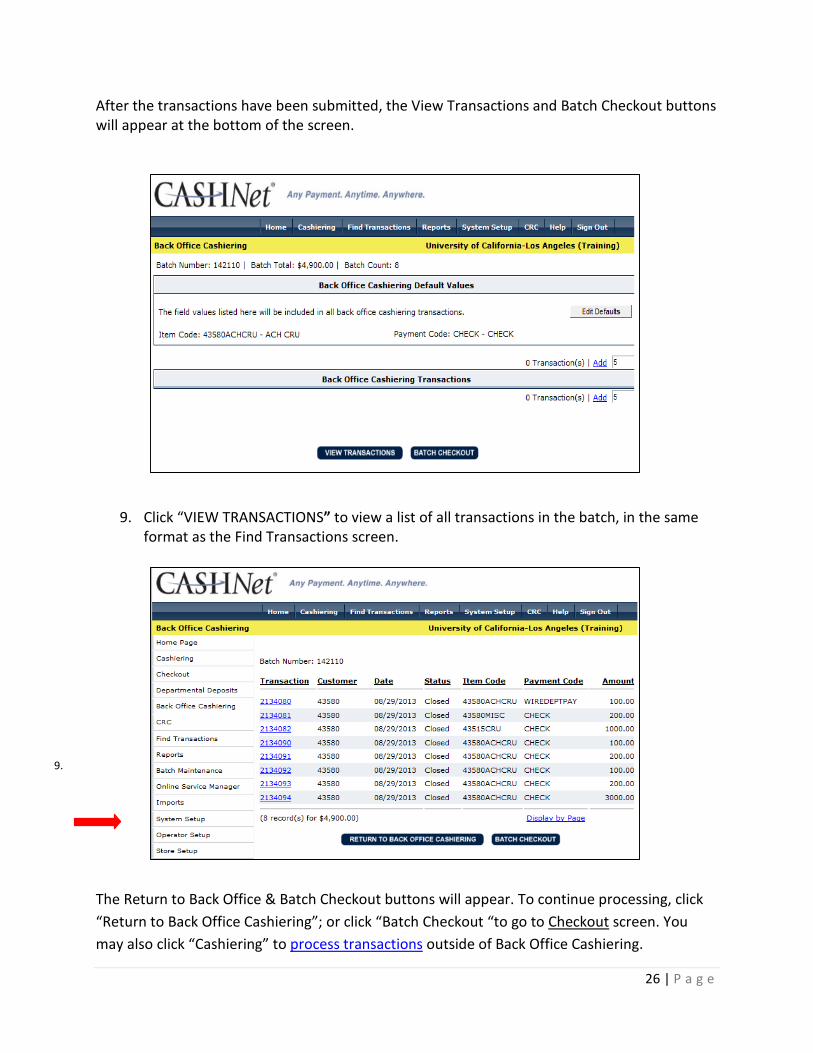
After the transactions have been submitted, the View Transactions and Batch Checkout buttons will appear at the bottom of the screen.
9. Click “VIEW TRANSACTIONS” to view a list of all transactions in the batch, in the same format as the Find Transactions screen.
The Return to Back Office & Batch Checkout buttons will appear. To continue processing, click “Return to Back Office Cashiering”; or click “Batch Checkout “to go to Checkout screen. You may also click “Cashiering” to process transactions outside of Back Office Cashiering.
9.

27 | P a g e
Back Office Cashiering Batch Selection The Back Office Cashiering Batch Selection screen appears after clicking on the Continue button located on the Back Office Cashiering Default Values screen; or if default values were previously defined, immediately after clicking on the main menu Back Office Cashiering link. If you are currently using a batch, Your Current Open Batch will appear, listing the batch number, business date, transaction count and total amount. To continue using the batch, click “Continue”. A Start a New Batch button will always appear on this screen. Click on this button to open and use a new batch if a batch is not currently in use.
After selecting or starting a new batch, the Back Office Cashiering Transactions screen will appear.

28 | P a g e
Balancing & Closing the Batch- Checkout Once all transactions for the day have been completed in CASHNet, the operator must balance & close the batch. All batches must be closed by the end of business day at 6:35 p.m. Click the “Checkout” button to begin balancing the cashier batch.
Checkout Screen Enter total count or total dollar amount by denomination to record Cash payment type. Click anywhere on the page to record the amount entered. The information entered will update the Cash totals in the Drawer Balance column. Proceed by entering the total checks, total credit card, debit cards, etc. The goal is to ensure that the Drawer Balance equals the System Balance total. Click “Continue” once the Drawer Balance and System Balance match. This will close out the batch. It is unnecessary to enter a Deposit Slip # box.
NOTE: DO NOT proceed with the Checkout if the Drawer Balance & System Balance does not match. It is possible there is an error in the transactions. Go to “Find Transactions”, to locate the transactions error. A void may be required to correct the error.
Checkout

29 | P a g e
Batch is Successfully Closed After clicking “Continue”, the system provides a message stating that the “Batch Closed Successfully”. The operator now has the option to start a new batch or sign out. Always click on “Sign Out” to exit the system.
Once the batch is successfully closed, the Bank of America deposit must be prepared if depositing cash and/or checks.

30 | P a g e
Finding Transactions The Find Transactions tab is used to locate transactions of any status for the purpose of reviewing transactions, and to complete voids and refunds.
Click on the “Find Transactions” function, located on the blue ribbon on the CASHNet home page.
1. Enter the batch or transaction number, or any other search criteria available, and click “Find”. The more search criteria fields entered, the fewer the query results.
31 | P a g e
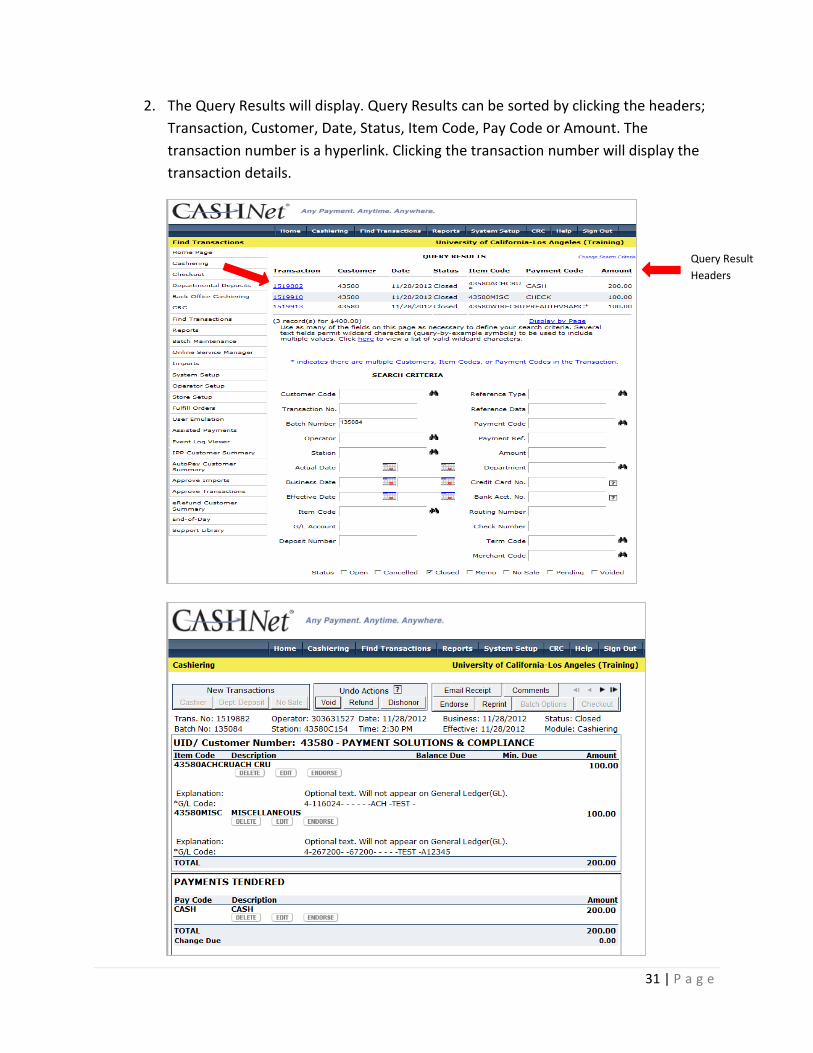
2. The Query Results will display. Query Results can be sorted by clicking the headers; Transaction, Customer, Date, Status, Item Code, Pay Code or Amount. The transaction number is a hyperlink. Clicking the transaction number will display the transaction details.
Query Result Headers
32 | P a g e
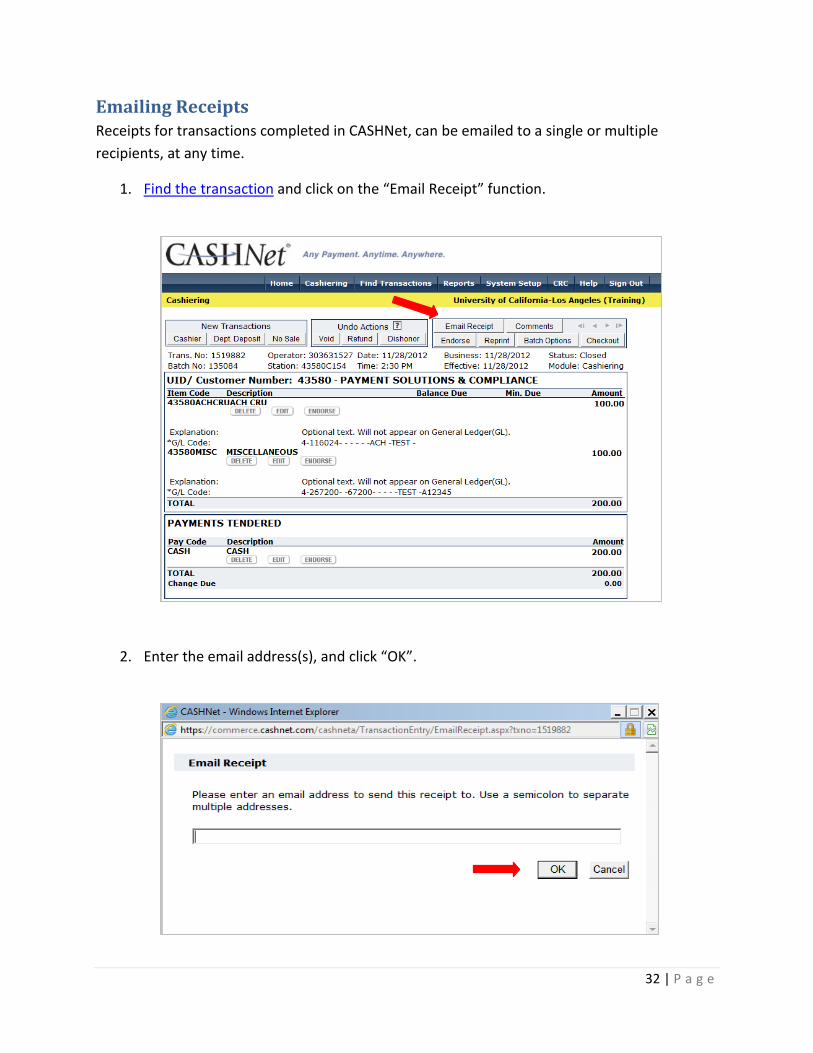
Emailing Receipts Receipts for transactions completed in CASHNet, can be emailed to a single or multiple recipients, at any time.
1. Find the transaction and click on the “Email Receipt” function.
2. Enter the email address(s), and click “OK”.

33 | P a g e
3. A pop up will confirm that the email receipt was sent. Click “OK” to proceed.
4. The recipient will receive an email similar to the one below with the details of the transaction.

34 | P a g e
Adding Comments Comments can be added to any transaction for any reason. Most commonly the Comment section is used when voids and refunds are required.
The processing cashier must add a comment to transactions that require a void or refund, for audit purposes, to justify the reason for the void; i.e. wrong FAU, wrong amount, wrong payment tender, etc. Follow the steps below to add a Comment.
1. Click on the “Comments” function.
2. Click “New Comment”.

35 | P a g e
3. Type the justification in the text box and click “Save”. Click “Close” to return to the transaction display.
4. Click “Close” to return to the transaction display.
36 | P a g e
Voiding a Transaction Voids must be completed on the same day, before the cashier batch is closed, and before the end of business day closes at 6:35p.m. Supervisor Permissions and a Password are required for processing voids. Note: Supervisors cannot void their own transactions.
CASHIER SUPERVISOR Find the transaction, see Find Transaction. Find the transaction, see Find Transaction.
Click on the transaction number hyperlink to display the entire transaction.
Click on the transaction number hyperlink to display the entire transaction.
Add Comment, see Adding Comment. Cashier must add a comment to justify the reason for the void.
Verify Comment. Supervisors should not approve voids if a justification is not added in the Comment box.
Send void request to supervisor. Provide Batch #, Trans # & Amount.
Void Trans. See Processing a Void.
Reprocess transaction, if necessary or close batch once void is complete.
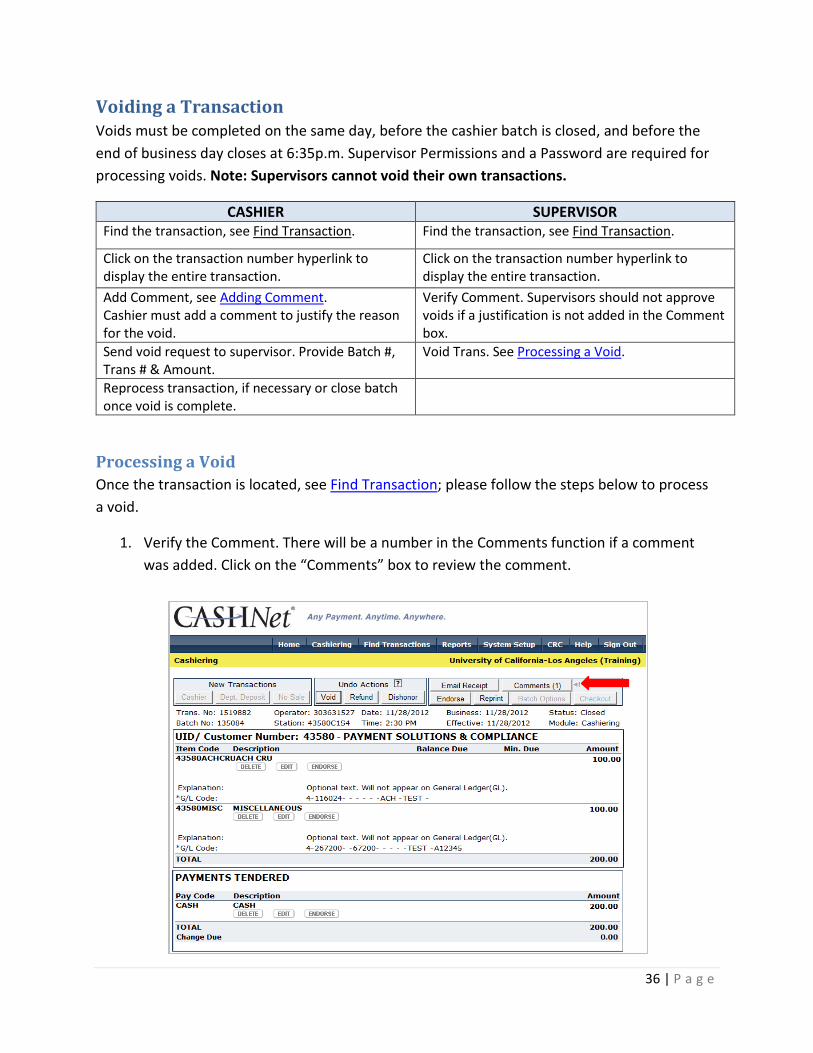
Processing a Void Once the transaction is located, see Find Transaction; please follow the steps below to process a void.
1. Verify the Comment. There will be a number in the Comments function if a comment was added. Click on the “Comments” box to review the comment.

37 | P a g e
2. Click the “Void” button under the Undo Actions function box.
3. A “Process Void?” pop up message will appear after you select Void. Click “OK” to continue.

38 | P a g e
4. A second pop up will appear requiring the supervisor to enter their Supervisor ID & Password. The Supervisor must enter their 9 digit University ID and the CASHNet assigned password to approve the void. The UCLA login ID and password combination does not work to authorize voids. If the supervisor password has expired or cannot be remembered, please see Changing Supervisor Password for instructions.
In the event you receive the pop up below, click “OK” to continue. Proceed with the above step.
39 | P a g e
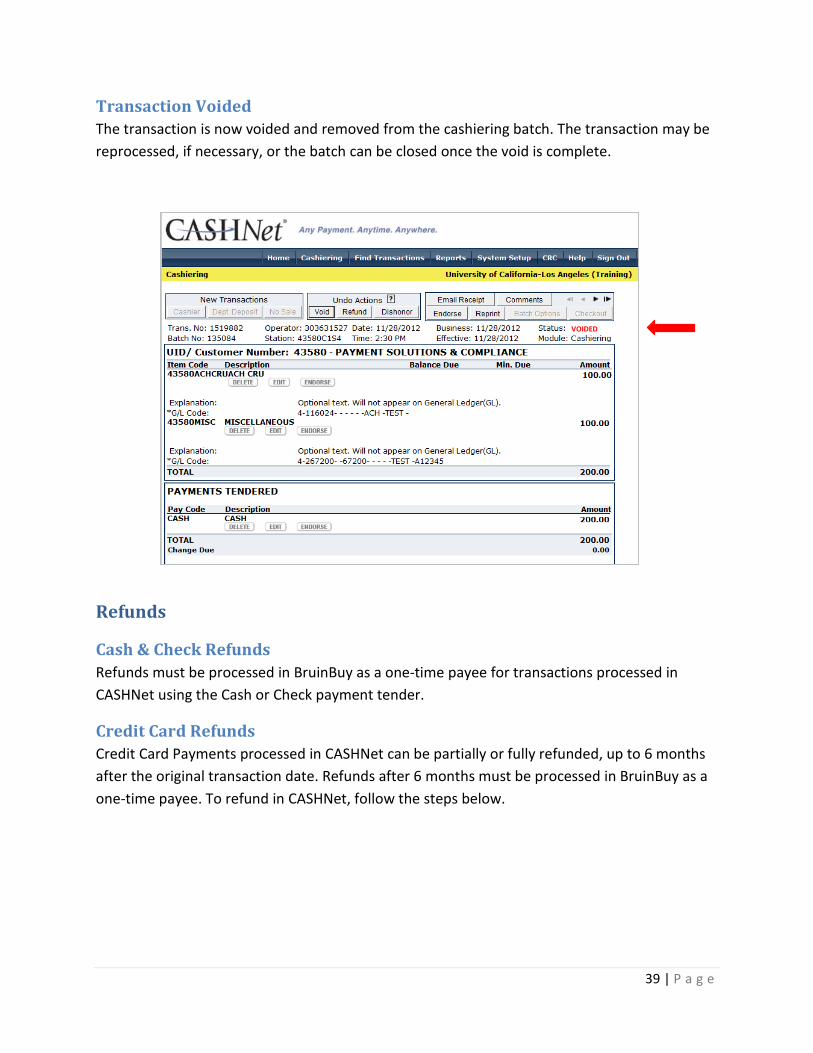
Transaction Voided The transaction is now voided and removed from the cashiering batch. The transaction may be reprocessed, if necessary, or the batch can be closed once the void is complete.
Refunds
Cash & Check Refunds Refunds must be processed in BruinBuy as a one-time payee for transactions processed in CASHNet using the Cash or Check payment tender.
Credit Card Refunds Credit Card Payments processed in CASHNet can be partially or fully refunded, up to 6 months after the original transaction date. Refunds after 6 months must be processed in BruinBuy as a one-time payee. To refund in CASHNet, follow the steps below.
VOIDED VOIDED
40 | P a g e
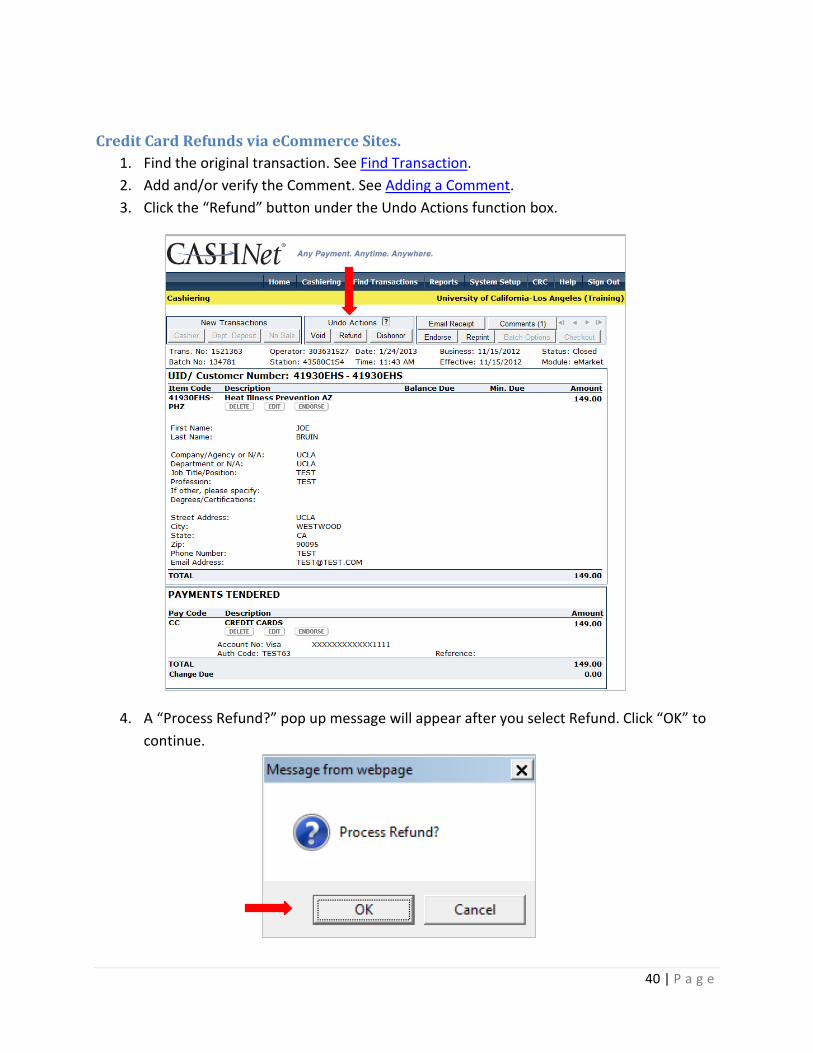
Credit Card Refunds via eCommerce Sites. 1. Find the original transaction. See Find Transaction. 2. Add and/or verify the Comment. See Adding a Comment. 3. Click the “Refund” button under the Undo Actions function box.
4. A “Process Refund?” pop up message will appear after you select Refund. Click “OK” to continue.
41 | P a g e
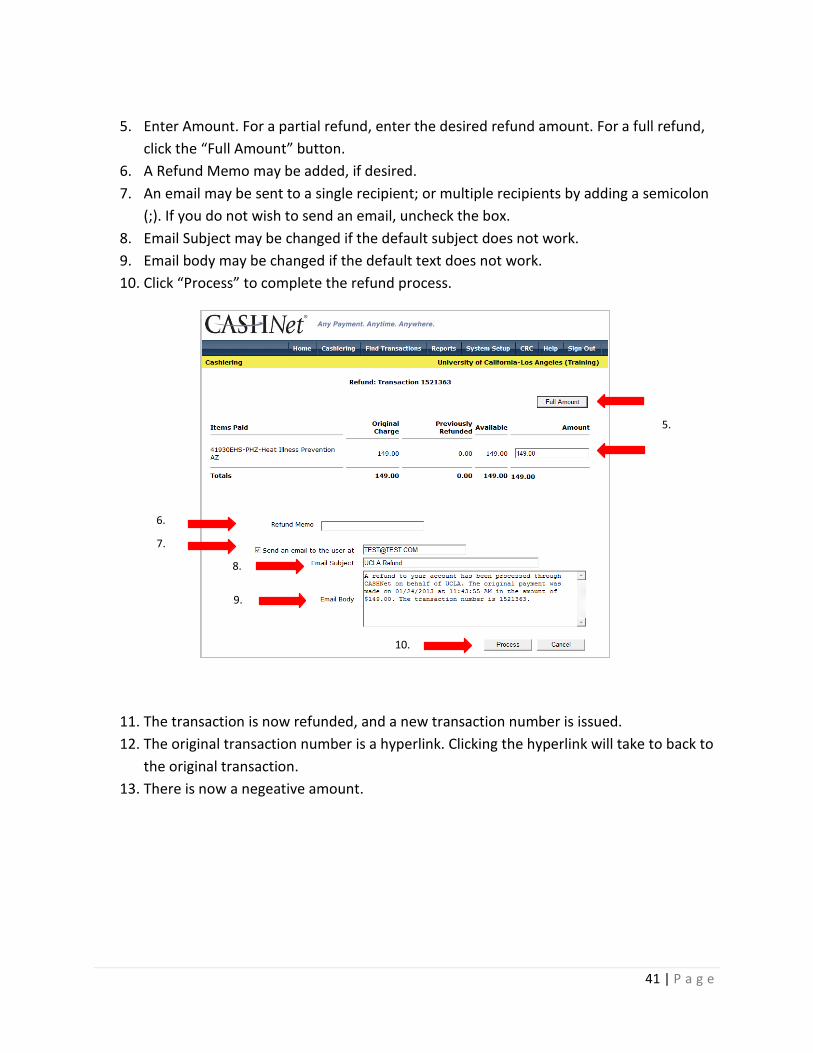
5. Enter Amount. For a partial refund, enter the desired refund amount. For a full refund,
click the “Full Amount” button. 6. A Refund Memo may be added, if desired. 7. An email may be sent to a single recipient; or multiple recipients by adding a semicolon
(;). If you do not wish to send an email, uncheck the box. 8. Email Subject may be changed if the default subject does not work. 9. Email body may be changed if the default text does not work. 10. Click “Process” to complete the refund process.
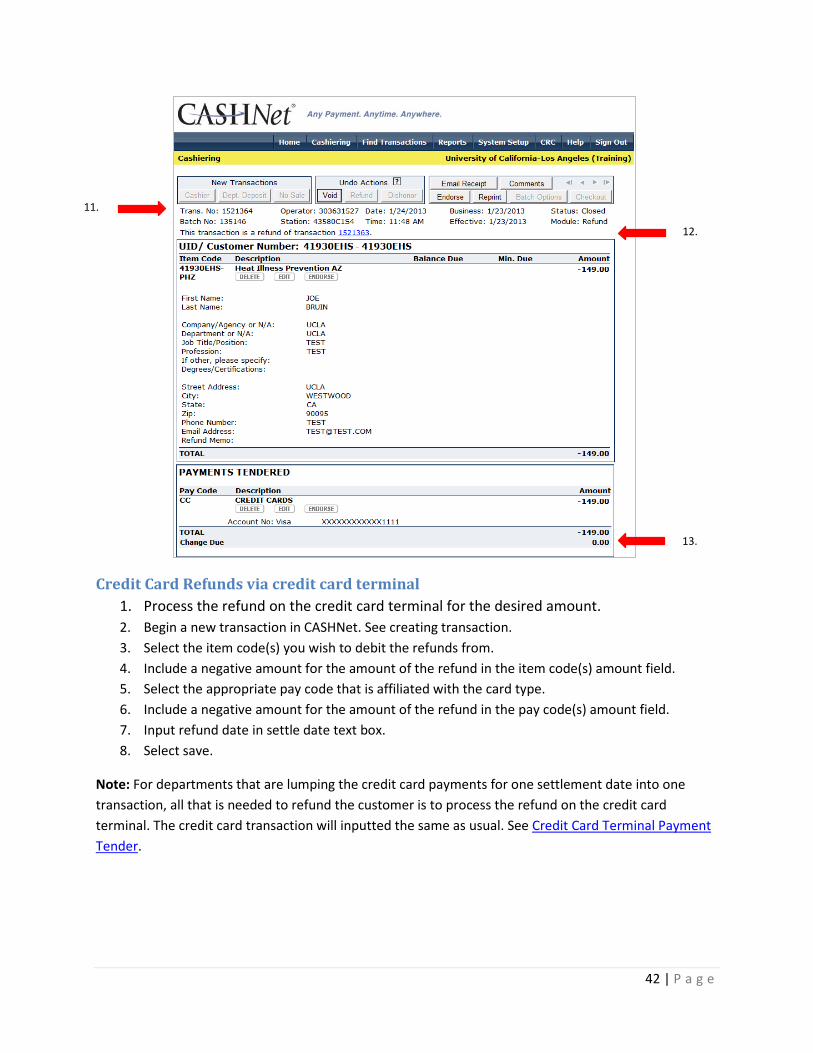
11. The transaction is now refunded, and a new transaction number is issued. 12. The original transaction number is a hyperlink. Clicking the hyperlink will take to back to
the original transaction. 13. There is now a negeative amount.
10.
6.
8.
9.
7.
5.
42 | P a g e
Credit Card Refunds via credit card terminal 1. Process the refund on the credit card terminal for the desired amount. 2. Begin a new transaction in CASHNet. See creating transaction. 3. Select the item code(s) you wish to debit the refunds from. 4. Include a negative amount for the amount of the refund in the item code(s) amount field. 5. Select the appropriate pay code that is affiliated with the card type. 6. Include a negative amount for the amount of the refund in the pay code(s) amount field. 7. Input refund date in settle date text box. 8. Select save.
Note: For departments that are lumping the credit card payments for one settlement date into one transaction, all that is needed to refund the customer is to process the refund on the credit card terminal. The credit card transaction will inputted the same as usual. See Credit Card Terminal Payment Tender.
12.
11.
13.
43 | P a g e
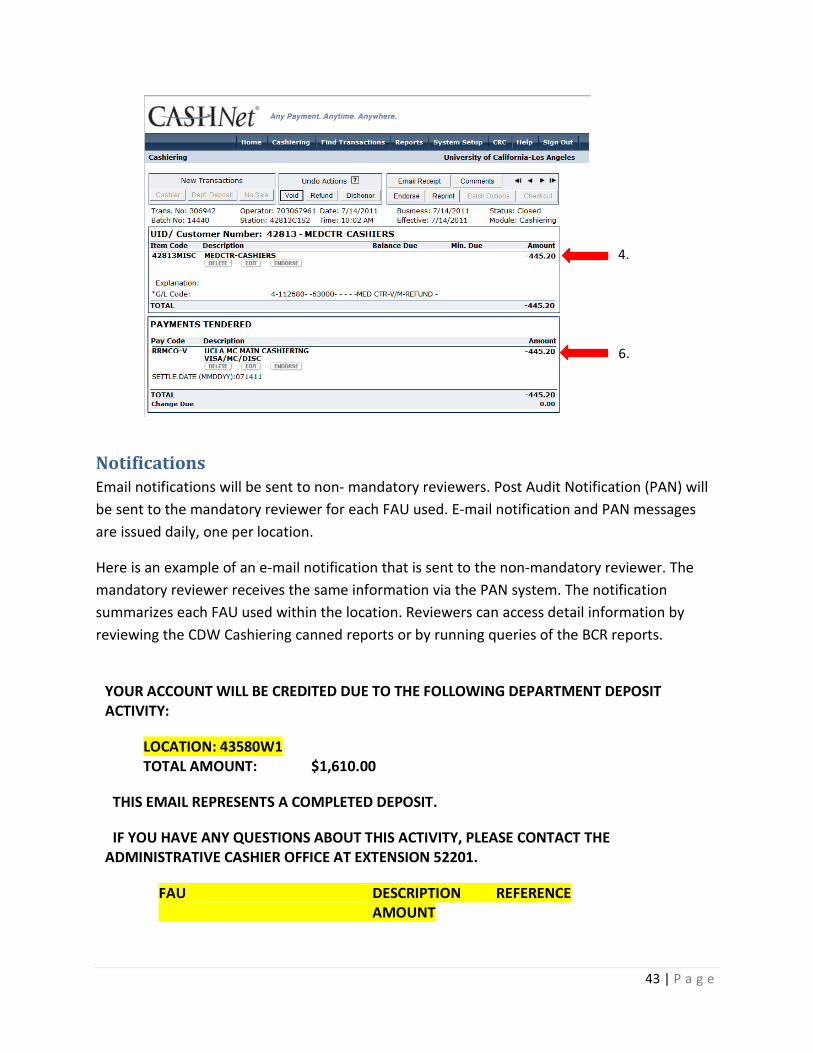
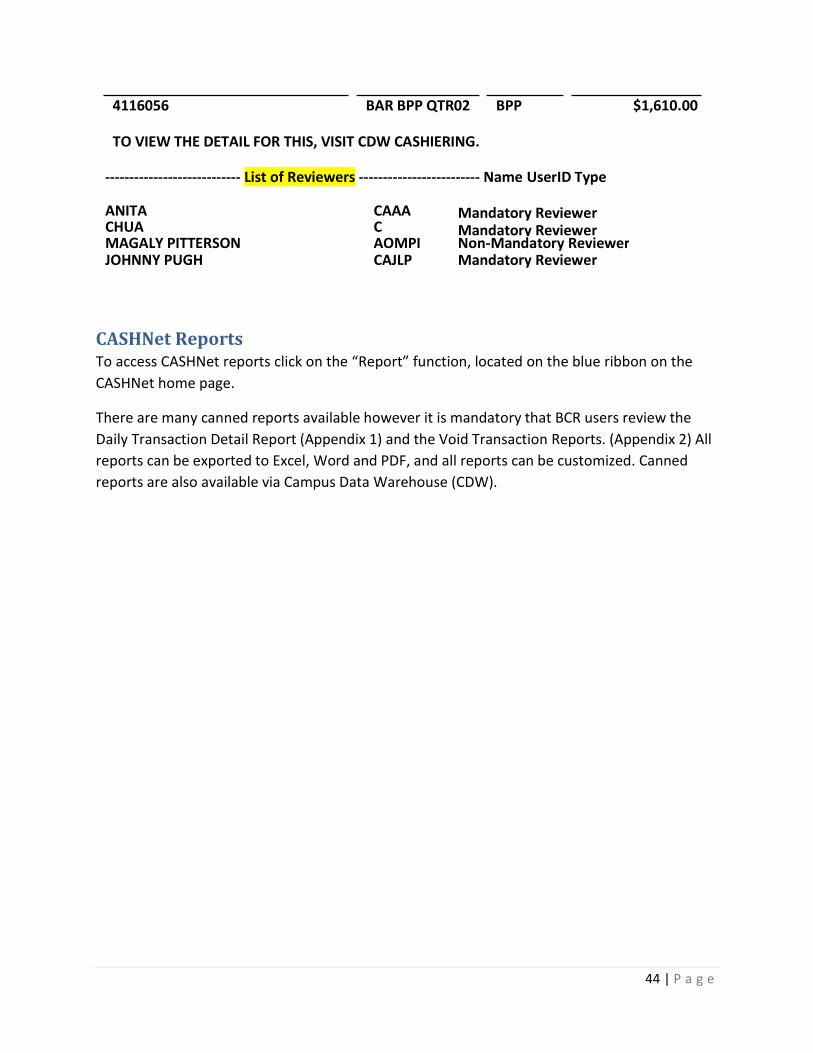
Notifications Email notifications will be sent to non- mandatory reviewers. Post Audit Notification (PAN) will be sent to the mandatory reviewer for each FAU used. E-mail notification and PAN messages are issued daily, one per location.
Here is an example of an e-mail notification that is sent to the non-mandatory reviewer. The mandatory reviewer receives the same information via the PAN system. The notification summarizes each FAU used within the location. Reviewers can access detail information by reviewing the CDW Cashiering canned reports or by running queries of the BCR reports.
YOUR ACCOUNT WILL BE CREDITED DUE TO THE FOLLOWING DEPARTMENT DEPOSIT ACTIVITY:
LOCATION: 43580W1 TOTAL AMOUNT: $1,610.00
THIS EMAIL REPRESENTS A COMPLETED DEPOSIT.
IF YOU HAVE ANY QUESTIONS ABOUT THIS ACTIVITY, PLEASE CONTACT THE
ADMINISTRATIVE CASHIER OFFICE AT EXTENSION 52201.
FAU DESCRIPTION REFERENCE AMOUNT
4.
6.
44 | P a g e
4116056 BAR BPP QTR02 BPP $1,610.00
TO VIEW THE DETAIL FOR THIS, VISIT CDW CASHIERING.
---------------------------- List of Reviewers ------------------------- Name UserID Type
ANITA CHUA
CAAAC
Mandatory Reviewer Mandatory Reviewer
MAGALY PITTERSON JOHNNY PUGH
AOMPI CAJLP
Non-Mandatory Reviewer Mandatory Reviewer
CASHNet Reports To access CASHNet reports click on the “Report” function, located on the blue ribbon on the CASHNet home page.
There are many canned reports available however it is mandatory that BCR users review the Daily Transaction Detail Report (Appendix 1) and the Void Transaction Reports. (Appendix 2) All reports can be exported to Excel, Word and PDF, and all reports can be customized. Canned reports are also available via Campus Data Warehouse (CDW).
45 | P a g e
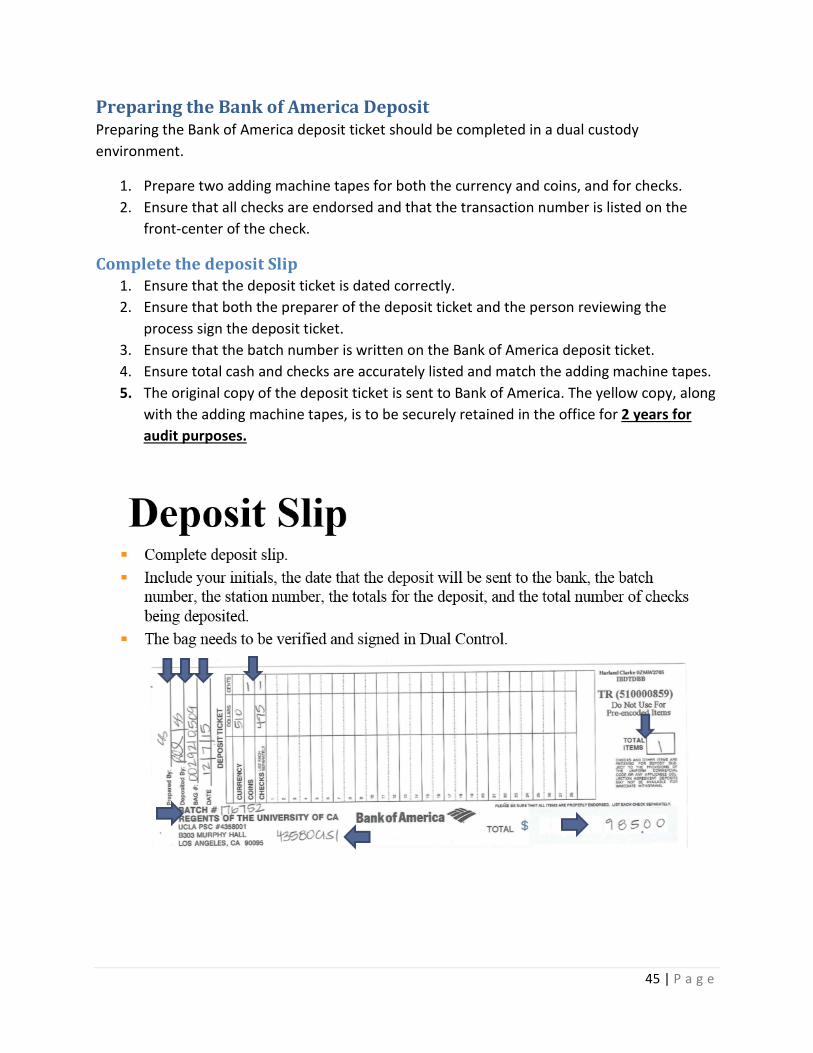
Preparing the Bank of America Deposit
Preparing the Bank of America deposit ticket should be completed in a dual custody environment.
1. Prepare two adding machine tapes for both the currency and coins, and for checks. 2. Ensure that all checks are endorsed and that the transaction number is listed on the
front-center of the check.
Complete the deposit Slip 1. Ensure that the deposit ticket is dated correctly. 2. Ensure that both the preparer of the deposit ticket and the person reviewing the
process sign the deposit ticket. 3. Ensure that the batch number is written on the Bank of America deposit ticket. 4. Ensure total cash and checks are accurately listed and match the adding machine tapes. 5. The original copy of the deposit ticket is sent to Bank of America. The yellow copy, along
with the adding machine tapes, is to be securely retained in the office for 2 years for audit purposes.

46 | P a g e
Bagging the Deposit 1. Strap currency that has less than 100 bills of any denomination using the reversed white
side of a currency strap or 2 rubber bands placing one on each side. Please note, do not use any paper clips with currency.
2. Place Cash and/or Checks in the bag, along with the original copy of the deposit ticket and the adding machine tape.
a. CASH should be separated from CHECKS 3. Count coins/cash by denominations and sum each denomination with a total amount
using a calculator tape with 2 copies. Sign your initials in dual control. a. You can also use an excel document showcasing the denominations, totals and
total sum. 4. Ensure that the Deposit Type is indicated on the deposit bag. 5. Ensure that the Customer Name & Store/Location # is recorded exactly how they are
specified on the deposit ticket. If the Customer Name & Store/Location do not match the deposit ticket the deposit will be returned.
6. Ensure the deposit amount is recorded correctly using the breakdown in the Deposit Said To Contain section.
7. Seal the bag. 8. Complete the armored courier book with the bag number and amount and place the bar
code next to the bag number. 9. Store the sealed tamper evident bag in the department safe until the armored courier
staff picks up the deposit.

47 | P a g e
48 | P a g e
Dunbar Service
Requesting Dunbar Service 1. Schedule armored courier pick up. Please send a request to the “Ask a Question” page
within the MyUCLA Message Center. Submit your request by 2p.m. the prior business day to ensure next day services.
a. How do I schedule a Dunbar pick-up from the FAQ Page? 2. Ensure that the armored courier staff signs for the bag before they leave the
department with the deposit.
Verifying the Deposit Sent to Bank of America To verify that your deposit was received at Bank of America, go to: http://ga.accounting.ucla.edu/banking/ . Click on the current day report.
Click on the hyperlink beside the date that represents the next business day after your deposit was delivered to Bank of America. For example: click on March 16 if your deposit was delivered to Bank of America on March 15
The Bank of America Report with the entire University deposit activity is now available. Look for your department four-digit code with six zeros proceeding under the “Customer Reference” column. The amount of the deposit is displayed under the “Customer Deposit Credit” column. Allow at least 48 hours for your deposit to post and if it is not recorded, report the missing deposit to Payment Solutions & Compliance (PSC) at extension 45333.
49 | P a g e
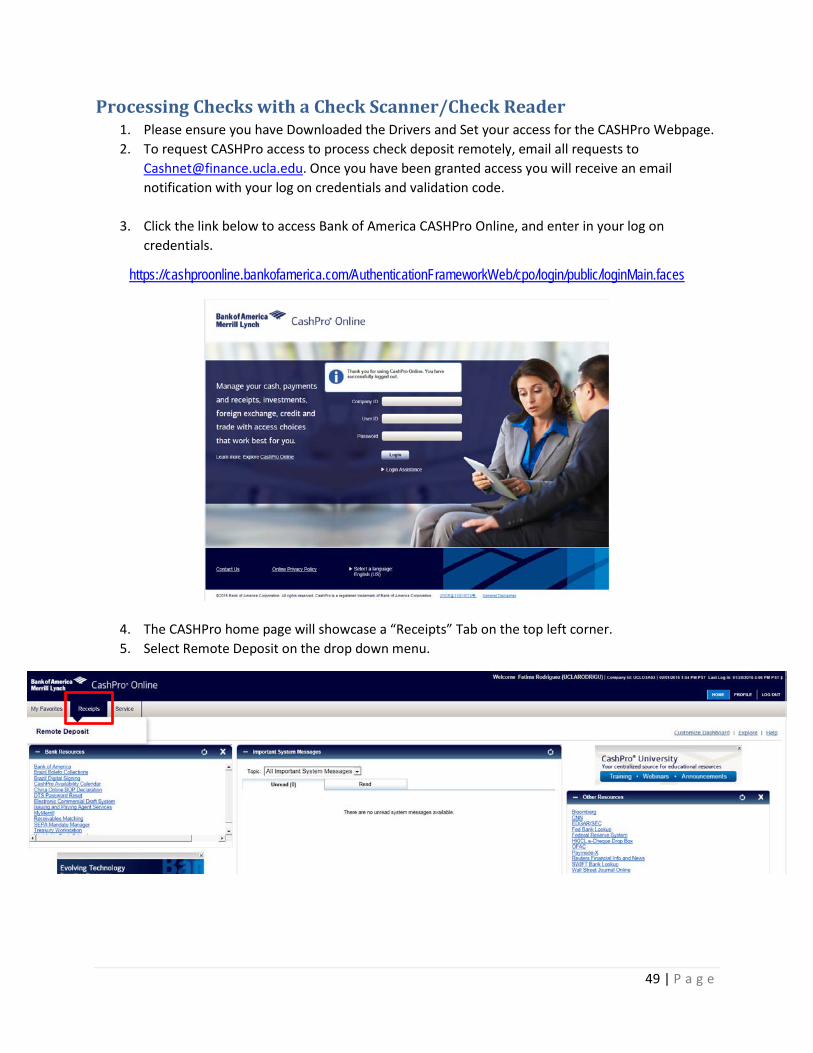
Processing Checks with a Check Scanner/Check Reader 1. Please ensure you have Downloaded the Drivers and Set your access for the CASHPro Webpage. 2. To request CASHPro access to process check deposit remotely, email all requests to
[email protected]. Once you have been granted access you will receive an email notification with your log on credentials and validation code.
3. Click the link below to access Bank of America CASHPro Online, and enter in your log on credentials.
https://cashproonline.bankofamerica.com/AuthenticationFrameworkWeb/cpo/login/public/loginMain.faces
4. The CASHPro home page will showcase a “Receipts” Tab on the top left corner. 5. Select Remote Deposit on the drop down menu.
50 | P a g e
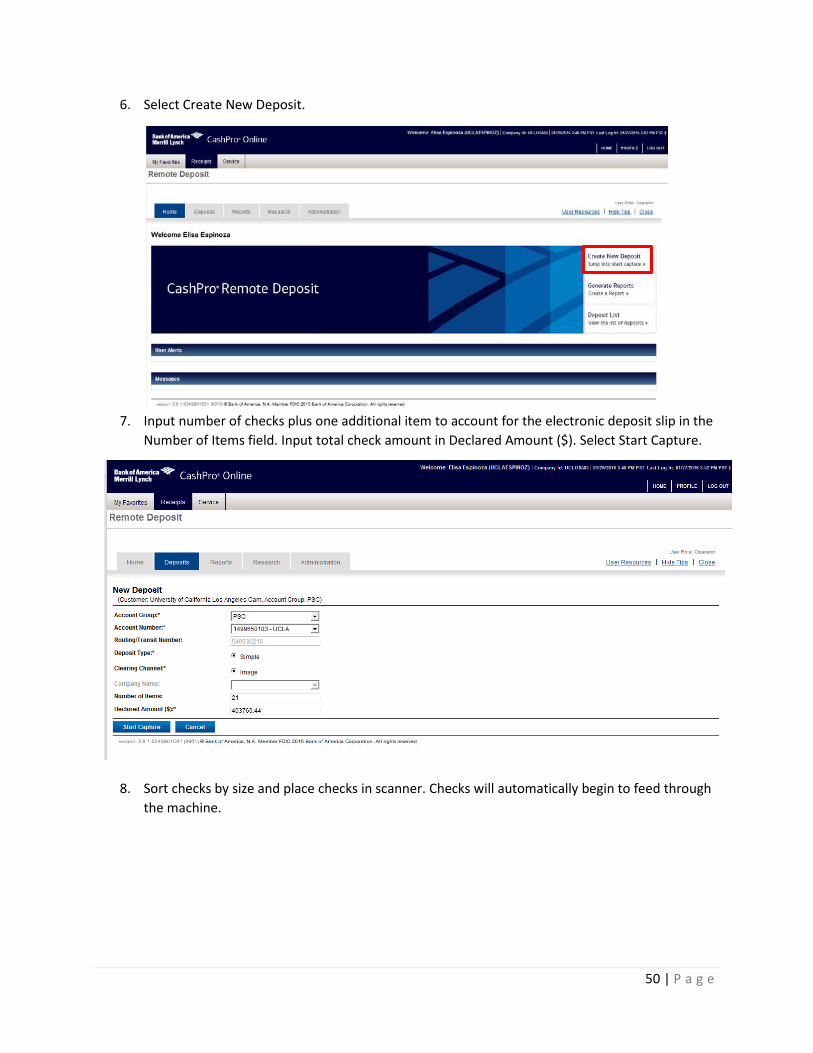
6. Select Create New Deposit.
7. Input number of checks plus one additional item to account for the electronic deposit slip in the Number of Items field. Input total check amount in Declared Amount ($). Select Start Capture.
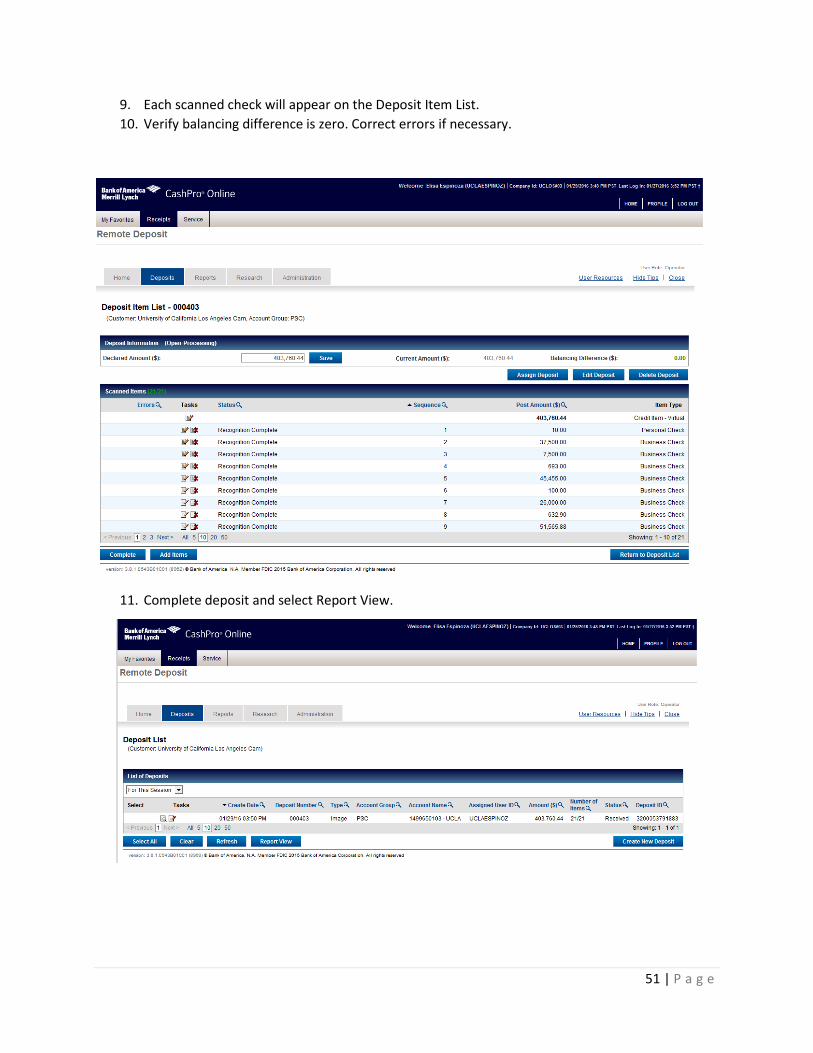
8. Sort checks by size and place checks in scanner. Checks will automatically begin to feed through
the machine.
51 | P a g e
9. Each scanned check will appear on the Deposit Item List. 10. Verify balancing difference is zero. Correct errors if necessary.
11. Complete deposit and select Report View.
52 | P a g e
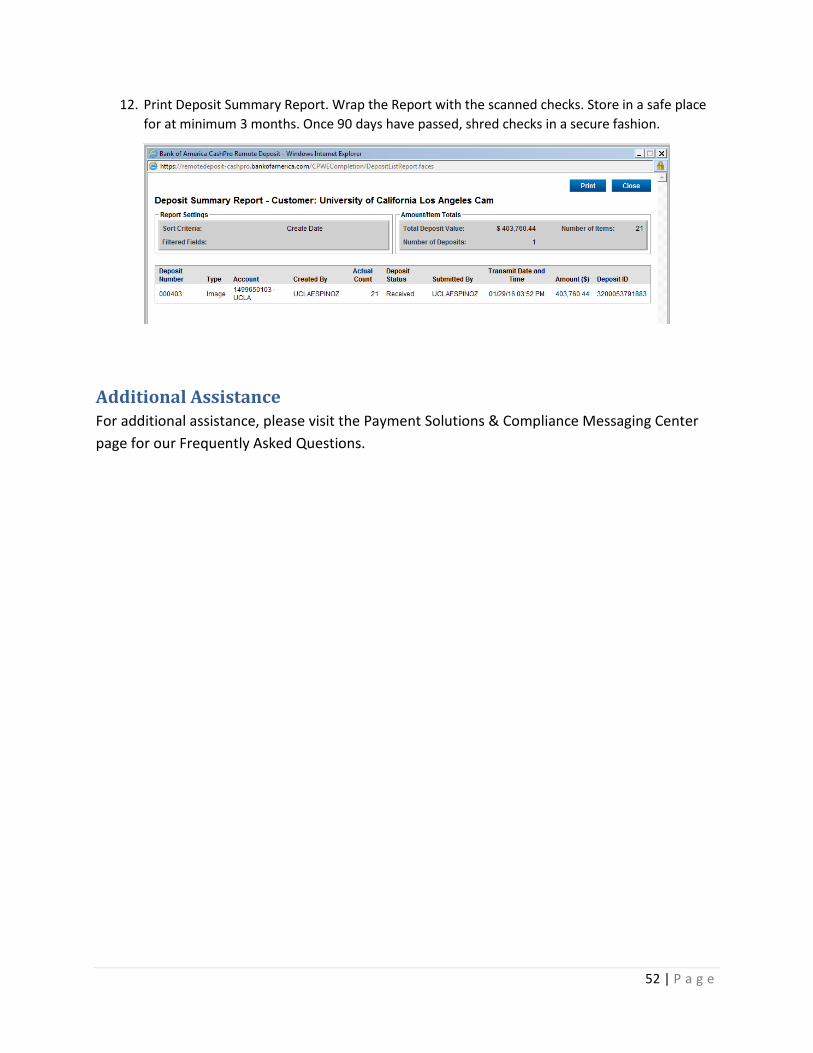
12. Print Deposit Summary Report. Wrap the Report with the scanned checks. Store in a safe place for at minimum 3 months. Once 90 days have passed, shred checks in a secure fashion.
Additional Assistance For additional assistance, please visit the Payment Solutions & Compliance Messaging Center page for our Frequently Asked Questions.


