Table of Contents 1 CryoPod™ Carrier Function and Description ...................... 1 1.1 General Safety ................................................... 1 1.2 Use As Intended ............................................... 2 1.3 Package Components ...................................... 2 1.4 Unpacking .........................................................3 1.5 Specifications ....................................................3 2 Product Registration & Support ..........................................3 2.1 Registration .......................................................3 2.2 Service & Support .............................................3 2.3 Ordering Information....................................... 4 CryoPod ™ Carrier Instructions for Use 3 Instrument Overview........................................................... 4 4 Instrument Set Up............................................................... 4 5 Manual LN2 Filling .............................................................. 6 6 Instrument Operation ......................................................... 6 7 Log Data Software: Installation and Set Up ........................ 7 8 Troubleshooting: Service and Error Codes ..........................8 9 Care and Cleaning ............................................................... 9 9.1 Exterior and Interior Maintenance................... 9 9.2 Changing LN2 Absorbent Pads ....................... 9 10 Glossary of Terms and Definitions .................................... 10 1. CryoPod™ Carrier Function and Description CryoPod™ Carrier (Item No. BCS-514) is a portable liquid nitrogen (LN2) based system that is designed to provide over four hours of < -150°C temperature stability for the handling and transport of cryogenic biospecimens. The system’s battery powered electronic module displays cryogenic chamber temperature, date, time, instrument identification, alarm(s) and log status. An accessory kit is included for manual LN2 filling. The cryogenic chamber consists of an anodized metal basket that is seated on the LN2 absorbent pad assembly for maximum thermal conductivity. When fully charged with LN2 and loaded with one cryobox or 1-2 small bag cassettes, the CryoPod™ Carrier weighs less than 15 pounds (6.8 kg). A built-in handle and compact footprint allows the system to be easily hand-carried over short distances such as around a laboratory or campus. 1.1 General Safety CryoPod™ Carrier is intended for the exclusive use by trained and experienced laboratory personnel. CryoPod™ Carrier users are advised to comply with applicable organizational standard operating procedures, industry safety guidelines, and local, regional, national and international laws and regulations. Please read all instructions prior to use. 1.1.1. WARNING: CryoPod™ Carrier is NOT intended for use as a cryogenic shipper. Do NOT use as such. 1.1.2. WARNING: Do not remove exterior shell of the unit unless instructed to do so by an authorized BioCision representative. Doing so without authorization will void your limited warranty. 1.1.3. WARNING: Do not remove the electronic module. If the module is experiencing technical issues, contact BioCision technical support for assistance. 1.1.4. CAUTION: Do not place CryoPod™ Carrier near or immerse in water or other liquids. 1.1.5. CAUTION: Do not place CryoPod™ Carrier above typical laboratory bench level (maximum height 42 inches or 106.7 cm) to minimize risk of tipping or knocking the unit over. 1.1.6. CAUTION: Do not stack objects on top of CryoPod™ Carrier as this may impede the release of nitrogen gas from the system. 1.1.7. CAUTION: Do not sit down on, push down on, or place any objects on top of the CryoPod™ Carrier, including the lid, rim and handle, to prevent unnecessary mechanical stress on plastic and foam components. 1.1.8. CAUTION: Cryogenic chamber sides and top edges can be extremely cold; use personal protective equipment such as cryogenic gloves when retrieving biospecimen contents from the unit. 1.1.9. CAUTION: Manually fill only with LN2, keeping water and other liquids out of the inner chamber containing the absorbent pads. 1.1.10. Do not attempt to download temperature data via the mini-USB port without BioCision supplied CryoPod™ Log Data Software. Do not reconfigure CryoPod™ Carrier firmware, unless instructed to do so by an authorized BioCision representative. 1.1.11. Ensure that the unit is placed securely on a level surface, free from vibrations when filling, loading, handling and unloading biospecimens, and changing absorbent pads or batteries. 1.1.12. Handle CryoPod™ Carrier with extreme care at all times to avoid damaging, cracking, hitting, shaking, swinging, tipping,
Transcript
Table of Contents1 CryoPod™ Carrier Function and Description ......................1 1.1 General Safety ...................................................1 1.2 Use As Intended ............................................... 2 1.3 Package Components ...................................... 2 1.4 Unpacking .........................................................3 1.5 Specifi cations ....................................................32 Product Registration & Support ..........................................3 2.1 Registration .......................................................3 2.2 Service & Support .............................................3 2.3 Ordering Information ....................................... 4
CryoPod™ Carrier Instructions for Use
3 Instrument Overview........................................................... 44 Instrument Set Up ............................................................... 45 Manual LN2 Filling .............................................................. 66 Instrument Operation ......................................................... 67 Log Data Software: Installation and Set Up ........................78 Troubleshooting: Service and Error Codes ..........................89 Care and Cleaning ............................................................... 9 9.1 Exterior and Interior Maintenance ................... 9 9.2 Changing LN2 Absorbent Pads ....................... 910 Glossary of Terms and Defi nitions ....................................10
1. CryoPod™ Carrier Function and Description CryoPod™ Carrier (Item No. BCS-514) is a portable liquid nitrogen (LN2) based system that is designed to provide over four hours of < -150°C temperature stability for the handling and transport of cryogenic biospecimens. The system’s battery powered electronic module displays cryogenic chamber temperature, date, time, instrument identifi cation, alarm(s) and log status. An accessory kit is included for manual LN2 fi lling. The cryogenic chamber consists of an anodized metal basket that is seated on the LN2 absorbent pad assembly for maximum thermal conductivity. When fully charged with LN2 and loaded with one cryobox or 1-2 small bag cassettes, the CryoPod™ Carrier weighs less than 15 pounds (6.8 kg). A built-in handle and compact footprint allows the system to be easily hand-carried over short distances such as around a laboratory or campus.
1.1 General SafetyCryoPod™ Carrier is intended for the exclusive use by trained and experienced laboratory personnel. CryoPod™ Carrier users are advised to comply with applicable organizational standard operating procedures, industry safety guidelines, and local, regional, national and international laws and regulations.
Please read all instructions prior to use.
1.1.1. WARNING: CryoPod™ Carrier is NOT intended for use as a cryogenic shipper. Do NOT use as such.1.1.2. WARNING: Do not remove exterior shell of the unit unless instructed to do so by an authorized BioCision
representative. Doing so without authorization will void your limited warranty.1.1.3. WARNING: Do not remove the electronic module. If the module is experiencing technical issues, contact BioCision
technical support for assistance.1.1.4. CAUTION: Do not place CryoPod™ Carrier near or immerse in water or other liquids.1.1.5. CAUTION: Do not place CryoPod™ Carrier above typical laboratory bench level (maximum height 42 inches or 106.7 cm)
to minimize risk of tipping or knocking the unit over.1.1.6. CAUTION: Do not stack objects on top of CryoPod™ Carrier as this may impede the release of nitrogen gas from the
system.1.1.7. CAUTION: Do not sit down on, push down on, or place any objects on top of the CryoPod™ Carrier, including the lid, rim
and handle, to prevent unnecessary mechanical stress on plastic and foam components.1.1.8. CAUTION: Cryogenic chamber sides and top edges can be extremely cold; use personal protective equipment such as
cryogenic gloves when retrieving biospecimen contents from the unit.1.1.9. CAUTION: Manually fi ll only with LN2, keeping water and other liquids out of the inner chamber containing the
absorbent pads.1.1.10. Do not attempt to download temperature data via the mini-USB port without BioCision supplied CryoPod™ Log
Data Software. Do not reconfi gure CryoPod™ Carrier fi rmware, unless instructed to do so by an authorized BioCision representative.
1.1.11. Ensure that the unit is placed securely on a level surface, free from vibrations when fi lling, loading, handling and unloading biospecimens, and changing absorbent pads or batteries.
1.1.12. Handle CryoPod™ Carrier with extreme care at all times to avoid damaging, cracking, hitting, shaking, swinging, tipping,
Page 2
toppling, overturning and dropping the system.1.1.13. Do NOT hand-carry more than one (1) CryoPod™ Carrier at a time to minimize risk of dropping the unit.1.1.14. Confi rm internal temperature is safe for handling by checking the LCD display before removing the CryoPod™ Carrier lid for
any reason.1.1.15. Ensure the unit is powered off before attempting to change batteries. Ensure there is no LN2 remaining before changing
LN2 absorbent pads.1.1.16. Reference section 5 for proper fi lling instructions. Do not overfi ll.
Personal Safety Guidelines1.1.16. To avoid injury and cold burns, use extreme care whenever working with LN2, or handling any objects that have come in
contact with LN2.1.1.17. Cover all exposed skin to protect against LN2 exposure.1.1.18. Suitable safety attire, proper shoes, and personal protective equipment such as face shield, cryogenic gloves and apron are
highly recommended.1.1.19. Seek immediate medical attention for any cold burns or injuries sustained due to LN2 exposure.1.1.20. Immediately remove any clothing or safety attire on which LN2 has been spilled.
LN2 Safety Guidelines1.1.21 DANGER: DO NOT store or use LN2 containers in areas that have poor ventilation. Nitrogen gas will deplete oxygen in
the air, possibly leading to asphyxiation or even death. 1.1.22 Do not overfi ll LN2 vessels.1.1.23 Do not tightly seal LN2 container or prevent nitrogen gas from escaping.
1.2 Use As IntendedIf the CryoPod™ Carrier is used in a manner not specifi ed by BioCision, LLC, the product may not operate as stated, and the warranty made be voided.
1.3 Package Components
The CryoPod™ Carrier contains the following components:
Item Quantity Photo
CryoPod™ Carrier assembled base and lid 1
“AA” Alkaline Batteries 3
Manual Fill Kit (includes funnel and fi ll sensor) 1
L-wrench, 2.5 1
USB Cable (6ft USB 2.0 A-Male Micro-B Male) 1
Instructions For Use (IFU), Part No. 20085 1
Limited Product Warranty, Part No. 20088 1
Page 3
Additional components to be provided by the user• Liquid nitrogen (3L is needed for a full charge)• Dewar flask with handle Recommendation: Taylor Wharton’s Liquid Dewar LD4, www.taylorwharton.com.• Personal protective equipment (i.e. cryogenic gloves, safety glasses, lab coat)• PC with minimum of Windows 7, 64-bit for CryoPod™ Log Data Software• Accessories to store biospecimens such as cryoboxes or cryogenic vial racks
1.4 UnpackingCarefully lift out the CryoPod™ Carrier using the unit’s built in handle. Product documentation, manual fill kit, and all other components can be found in the accessory box. If you are missing any components, please contact BioCision Technical Support at [email protected], or +1.415.785.8516 / 1.888.478.2221.
1.5 Specifications
Hold Time at < -150 °C > 4 hours with lid on, > 1 hour with lid off
Capacity One 2” cryobox, or 2-3 small cassettes
LN2 fill volume (full charge) ~3 L
Maximum data log hours 50 hours
Temperature acquisition and data logging rate 60 seconds
Display temperature range and accuracy -199 to 49°C, ±5°C
Display temperature increments 1°C
Operating Environment 15 to 35°C (59 – 95°F), 18 to 23°C (64 – 73°F)
Expected Battery Life Over 2 years with normal use
External Dimensions (L x W x H) 33.7 x 32.2 x 25.7 cm (13.3 x 12.7 x 10.1 in)
Internal Basket Dimensions (L x W x H) 19.9 x 18.6 x 7.8 cm (7.9 x 7.3 x 3.1 in)
Weight 4.1 kg (9 lbs) without LN25.9 kg (13 lbs) fully charged with 3L LN2, no samples
Compliance CE, RoHS, WEEE, FCC, EN 61010, EN 61326
2. Product Registration & Support
2.1 RegistrationPlease register your CryoPod™ Carrier at www.biocision.com/registration to be notified of product updates. You will be directed to a link for CryoPod™ Log Data Software download after successful registration.
2.2 Service & SupportContact BioCision technical support at +1.415.785.8516 / 1.888.478.2221 or at [email protected] for assistance.
Page 4
2.3 Ordering Information
Item No. Description
BCS-514 CryoPod™ Carrier (includes Green Lid and Manual Fill Kit)
BCS-516 CryoPod™ Manual Fill Kit (includes Funnel and Fill Sensor)
BCS-517 CryoPod™ LN2 Absorbent Pads (4/pk)
BCS-519 CryoPod™ Basket Insert for Cryobox
BCS-544GY CryoPod™ Carrier Lid, grey
BCS-544G CryoPod™ Carrier Lid, green
BCS-544O CryoPod™ Carrier Lid, orange
BCS-544PK CryoPod™ Carrier Lid, pink
BCS-544P CryoPod™ Carrier Lid, purple
3. Instrument Overview
4. Instrument Assembly and Set Up • Remove the cover from the electronic module using the built-in clip and insert 3 “AA” batteries into the battery compartment,
noting proper orientation. Replace cover. CAUTION: Batteries could explode or leak if installed improperly, exposing the user to burns and other risks.• Turn on the unit by pressing the POWER button(A). Once the LCD display completes its start-up sequence, 8 operating
parameters will need to be confi rmed. These steps will need to be carried out on a new unit, when parameters are updated, and after battery changes.
• Hold SET button (B) down for 3 seconds to enter Set Mode. “SET” will display on the LCD. To toggle between each parameter, press SET button (B) again.
To ensure uncompromised sample handling, two alarm settings are available. Program Alarm 1 to desired warning set point, which will trigger when the chamber warms up and reaches this temperature.
Adjust temperature by 1°C increments using DOWN/UP buttons.Default: -155°C
DOWN (C)UP (D)
Single beep every 30 seconds.Pressing the Up button can silence alarm.
Add LN2 as needed. Alarm will automatically reset when unit temperature is at least 5°C colder than warning set point.
Alarm 1 (Warning) Set On/Of
The alarm can be enabled or disabled.
Toggle between Off and On using DOWN/UP buttons.Default: On
DOWN (C)UP (D)
N/A *Note LCD display will have red backlight if alarm is triggered
Alarm 2 (Critical) Program Temperature
Program Alarm 2 to desired critical set point, which will trigger when the chamber warms up and reaches this temperature.
Adjust temperature by 1°C increments using DOWN/UP buttons.Default: -140°C
DOWN (C)UP (D)
Triple beep sequence every 10 seconds.Pressing the UP button can silence alarm.
Add LN2 immediately, or transfer samples to avoid compromise if no LN2 available. Alarm will automatically reset when unit temperature is at least 5°C colder than critical set point.
Alarm 2 (Critical) Set On/Off
The alarm can be enabled or disabled.
Toggle between Off and On using DOWN/UP buttons.Default: On
DOWN (C)UP (D)
N/A *Note LCD display will have red backlight if alarm is triggered
System Alarms Set On/Of
All alarms can be simultaneously enabled or disabled.
Toggle between Off and On using DOWN/UP buttons.Default: On (Bell on LCD)
DOWN (C)UP (D)
N/A *Note LCD display will have red backlight if alarm is triggered
StandbyProgram Temperature
Power saving mode. LCD will remain lit and temperature visible, while the chamber continues to warm up until it reaches -20°C, at which point the unit will power off.
Adjust temperature by 1°C increments using Down/Up buttons.Default: -120°C
DOWN (C)UP (D)
N/A
IDAssign system ID
3 digit alphanumeric system ID. Assign each CryoPod a unique system ID code to track units and downloadable temperature log data.
Adjust each digit by using DOWN/UP buttons. Toggle between each digit by using the SET button.
SET (B)DOWN (C)UP (D)
N/A
Low Mem Set On/Off
CryoPod™ Carrier can store up to 50 hours of log data. Low memory indicates there is less than 6 hours of recordable space remaining. Existing log data must be downloaded to free up space.
Toggle between Off and On using DOWN/UP buttons.Default: On
DOWN (C)UP (D)
N/A Temperature log data can be downloaded onto a PC via the included USB cable and external CryoPod™ Log Data software.
Time The current time can be programmed. This setting is critical if you will be utilizing the temperature log data.
Adjust each digit by using DOWN/UP buttons. Toggle between each digit by using the SET button.Format: HH:MM AM/PM
SET (B)DOWN (C)UP (D)
N/A N/A
Date The current date can be programmed. This setting is critical if you will be utilizing the temperature log data.
Adjust each digit by using DOWN/UP buttons. Toggle between each digit by using the SET button.Format: MM:DD:YY
SET (B)DOWN (C)UP (D)
N/A N/A
Page 6
• Once all parameters are programmed, hold SET button (B) down for 3 seconds to save parameter settings.
5. Manual LN2 Filling
Steps LCD Display Photo
1.Ensure the unit is powered OFF and cryogenic chamber basket is empty.
N/A
2. Insert funnel into the front left corner of the unit. Ensure funnel is fully inserted and firmly seated to avoid tipping.
N/A
3. Insert the fill sensor in the back right corner diagonally opposite the funnel. The notched underside should line up with chamber basket edge. Sensor should be fully lowered.
N/A
4. Fill a Dewar flask with liquid nitrogen. Approximately 3L in total will be needed.
N/A
5. Slowly pour ~2L LN2 into the funnel, ensuring that the funnel is never more than half full at all times. Stop pouring when the sensor rod starts to bob up and down and the blue fill line is visible.
N/A
6. Turn ON the unit by pressing the Power button (A).
7. Wait approximately 15 minutes until the temperature reaches -150°C.
LCD will reflect cooling chamber temperature
8. Slowly pour additional ~1L of LN2 into the funnel, ensuring that the funnel is never more than half full at all times. Stop pouring when the sensor rod stops bouncing and the bottom of the blue fill bar is visible.
9. Remove funnel and fill sensor using cryogenic gloves. Place lid on unit. Allow 10-15 minutes for chamber temperature to equilibrate. When the CryoPod™ Carrier reaches -170°C or below, the unit is ready for use.
LCD will reflect chamber temperature < -170°C
6. Instrument Operation NOTE: Temperature log data is automatically recorded when chamber temperature is below -20°C.
• Retrieve biospecimens from cryostorage and promptly transfer to a fully charged, pre-chilled CryoPod™ Carrier’s cryogenic chamber.
• To log biospecimen entry into the chamber, press button (C) for 3 seconds. A log event will be registered in the data file, and “LOG” will be displayed on the LCD.
• Transport CryoPod Carrier with biospecimens to destination.• When biospecimens are removed from the chamber, press button (C) for 3 seconds. Another log event will be registered in the
data file, and “LOG” will no longer be displayed on the LCD.• If no further transport is needed and no additional LN2 is added, the remaining LN2 can be allowed to boil off. Turn off system
alarms to prevent alarms from triggering. Once the chamber temperature warms up to -20°C, the unit will automatically power off.
Page 7
7. CryoPod™ Log Data Software: Installation and Set Up Minimum PC requirements: Windows 7, 64-bit.
Double-click software installer on your desktop.
After software is installed, launch the software by double-clicking on the software desktop icon.
Establishing hardware connections
CryoPod™ Log Data Software Interface
Using the included USB cable, connect PC to CryoPod™ Carrier. The software will automatically detect the unit.If the unit is not automatically detected, or if you wish to re-establish connection, click on “Re-Read Data”.
When a connection has been established and data synced, the top fields will auto-populate with information extracted from the CryoPod™ Carrier.
Downloading temperature log data
1. Create a destination folder on your PC for the CryoPod™ log data.
2. Indicate your preferred Field Separator (Comma/Tab), and whether you want all temperature data, or just new data.Click “Write Temperature Data File” to start process.
Page 8
3. Navigate to the destination folder created in step 1.
4. A dialog box will pop-up stating that the Log File is being created. Upon completion, the window on the right side will display your file location.
5. When done, simply close out the window by exiting the software.
8. Troubleshooting: Service and Error Codes
Indicator / Symbol Description
Alarm ALARM text and alarm number with red backlight will display if alarm is triggered
Empty (outline) battery indicator
A full charge has three (3) solid bars. Two (2) bars = 50%. One (1) bar = 25%. Outline only = <13%
CaL Displayed in the ID field, this indicates a temperature display issue. Contact Technical Support for further steps.
HI Cryogenic chamber temperature is above 49°C; no data is recorded
HL The connection point between thermocouple wires and the instrument electronics module (“cold junction”) is above its operating limit of 49 °C; “Not valid” temperature will be reported in the log file
Key Displayed in the three (3) digits ID Code area; this indicates one or more keys are lodged in a depressed position.
LL The connection point between thermocouple wires and the instrument electronics module (“cold junction”) is below its operating limit of 49°C; “Not valid” temperature will be reported in the log file.
LO Chamber temperature is below -199°C; “Not valid” temperature will be reported in the log file.
Low Memory Available memory is running low, and will only record up to 6 additional hours of log data when first displayed. Log data should be downloaded immediately to free up space.
not SET (Date/Time)
“not SET” indicates that the date/time are not set; if time is not set, “not SET” is displayed at all times.
OFF OFF indicates that the internal basket is above -20°C. If OFF is displayed while unit is on, unit will turn OFF automatically within one (1) minute if no button activity is detected.
OP Service issue: Thermocouple detachment detected. Contact Technical Support for resolution.
Page 9
Service SERVICE message indicates a technical support issue such as thermocouple detachment (OP) or corrupted temperature correlation (TMP), stuck key (KEY), EPROM reading error (EP), thermocouple chip error (TIC). Contact Technical Support. Message will automatically turn OFF if issue is resolved.
TMP Displayed in the three (3) digit ID Code area, this indicates the pre-loaded data needed for temperature indication is corrupted
9. Care and Cleaning
9.1 Exterior and Interior MaintenanceNOTE: Before cleaning, ensure unit is off, and chamber has returned to room temperature. Do not clean unit with ketone solvents.
• Exterior shell – Clean only with a soft, non-abrasive laboratory wipe moistened with 70% alcohol before and after each use.• Foam lid – Clean with water and mild soap. Rinse and dry thoroughly. Do not autoclave. Maximum temperature exposure: 60°C.
Avoid prolonged exposure to UV light sources.• Interior chamber basket – Wipe down with 70% alcohol. If needed, the chamber basket can be removed from the unit and
washed with water and mild soap or autoclaved. To remove and re-install the chamber basket, use the provided hex tool located in the accessory box.
• Electronic module and LCD – Clean with a soft, non-abrasive laboratory wipe moistened with 70% alcohol, taking care not to saturate the USB port or button edges.
• Internal foam absorbent pad – This component cannot be disinfected. If the absorbent pad becomes dirty or contaminated, replace with new pads. Directions are provided below in section 9.2. Before placing absorbent pad assembly back into the unit, wipe interior down with 70% alcohol.
9.2 Changing LN2 Absorbent Pads• The foam absorbent pads should be changed every twelve months, or more frequently as needed.• Confirm chamber temperature is at room temperature before proceeding. • Remove lid and use the provided L-wrench to unscrew the screws securing the chamber basket to the liner. Place in a secure
location for basket re-installation.• Lift the chamber basket out carefully, thoroughly clean with mild soap and water, rinse, dry and wipe with 70% alcohol. Set aside.• Retrieve two new foam absorbent pads. These are sold separately in packs of 4 (BCS-517).• Carefully lift out absorbent pad assembly and discard used pads. Thoroughly clean metal conductor with mild soap and water,
rinse, dry and wipe with 70% alcohol. Allow to dry.• Assemble new absorbent pads and metal conductor in the same configuration; the metal conductor flanges slides into the slots
in the foam pads.• Carefully place the absorbent pad assembly back into the unit, ensuring proper orientation. Failure to orient the absorbent pad
assembly correctly will impede LN2 filling, and may negatively impact hold time performance.• Re-install chamber basket, noting proper orientation by ensuring the slots in the basket are facing the front of the unit. Assemble
washers by sliding the split washer onto screw followed by the flat washer. Replace and manually tighten with L-wrench. Do NOT over-tighten.
Absorbent Pad Assembly
1
2
3
4
1. Position conductor with side flanges facing down. 2. Place foam pads with slits facing you, and cut corner to your top right.3. Slide conductor into the slits.4. Seat whole assembly into the base of the CryoPod™ Carrier with cut corner in top right.
Page 10
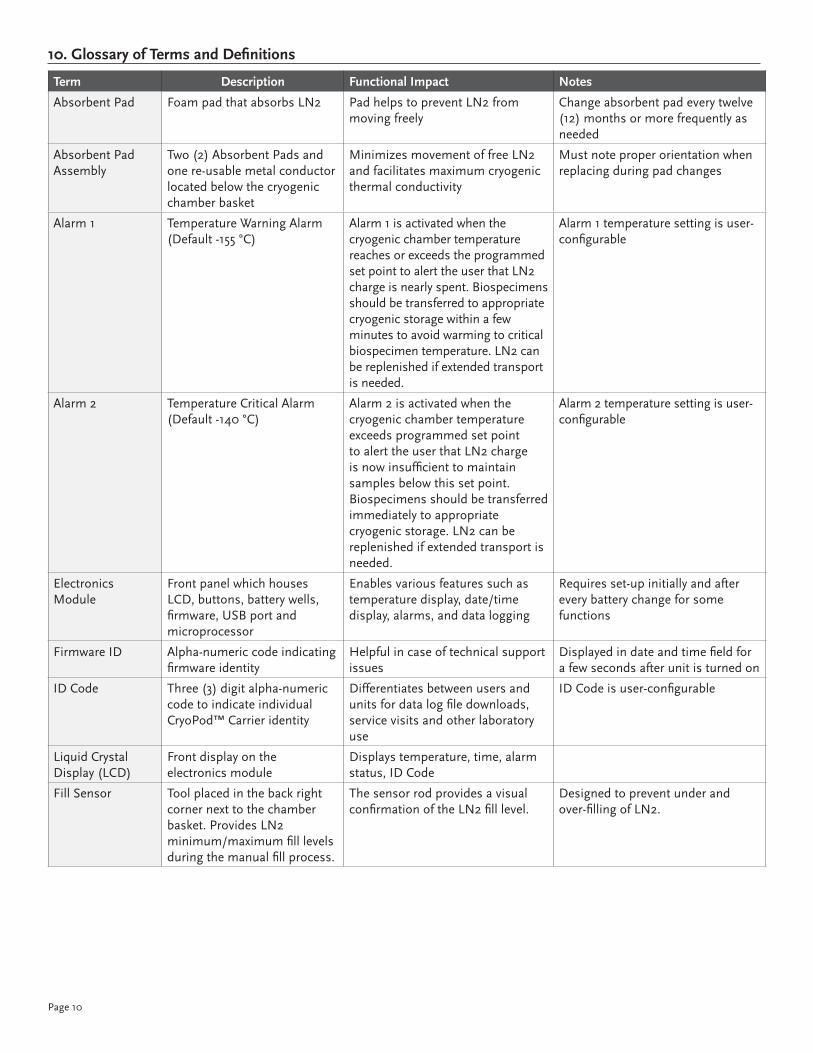
10. Glossary of Terms and Definitions
Term Description Functional Impact Notes
Absorbent Pad Foam pad that absorbs LN2 Pad helps to prevent LN2 from moving freely
Change absorbent pad every twelve (12) months or more frequently as needed
Absorbent Pad Assembly
Two (2) Absorbent Pads and one re-usable metal conductor located below the cryogenic chamber basket
Minimizes movement of free LN2 and facilitates maximum cryogenic thermal conductivity
Must note proper orientation when replacing during pad changes
Alarm 1 Temperature Warning Alarm (Default -155 °C)
Alarm 1 is activated when the cryogenic chamber temperature reaches or exceeds the programmed set point to alert the user that LN2 charge is nearly spent. Biospecimens should be transferred to appropriate cryogenic storage within a few minutes to avoid warming to critical biospecimen temperature. LN2 can be replenished if extended transport is needed.
Alarm 1 temperature setting is user-configurable
Alarm 2 Temperature Critical Alarm (Default -140 °C)
Alarm 2 is activated when the cryogenic chamber temperature exceeds programmed set point to alert the user that LN2 charge is now insufficient to maintain samples below this set point. Biospecimens should be transferred immediately to appropriate cryogenic storage. LN2 can be replenished if extended transport is needed.
Alarm 2 temperature setting is user-configurable
Electronics Module
Front panel which houses LCD, buttons, battery wells, firmware, USB port and microprocessor
Enables various features such as temperature display, date/time display, alarms, and data logging
Requires set-up initially and after every battery change for some functions
Firmware ID Alpha-numeric code indicating firmware identity
Helpful in case of technical support issues
Displayed in date and time field for a few seconds after unit is turned on
ID Code Three (3) digit alpha-numeric code to indicate individual CryoPod™ Carrier identity
Differentiates between users and units for data log file downloads, service visits and other laboratory use
ID Code is user-configurable
Liquid Crystal Display (LCD)
Front display on the electronics module
Displays temperature, time, alarm status, ID Code
Fill Sensor Tool placed in the back right corner next to the chamber basket. Provides LN2 minimum/maximum fill levels during the manual fill process.
The sensor rod provides a visual confirmation of the LN2 fill level.
Designed to prevent under and over-filling of LN2.
Page 11
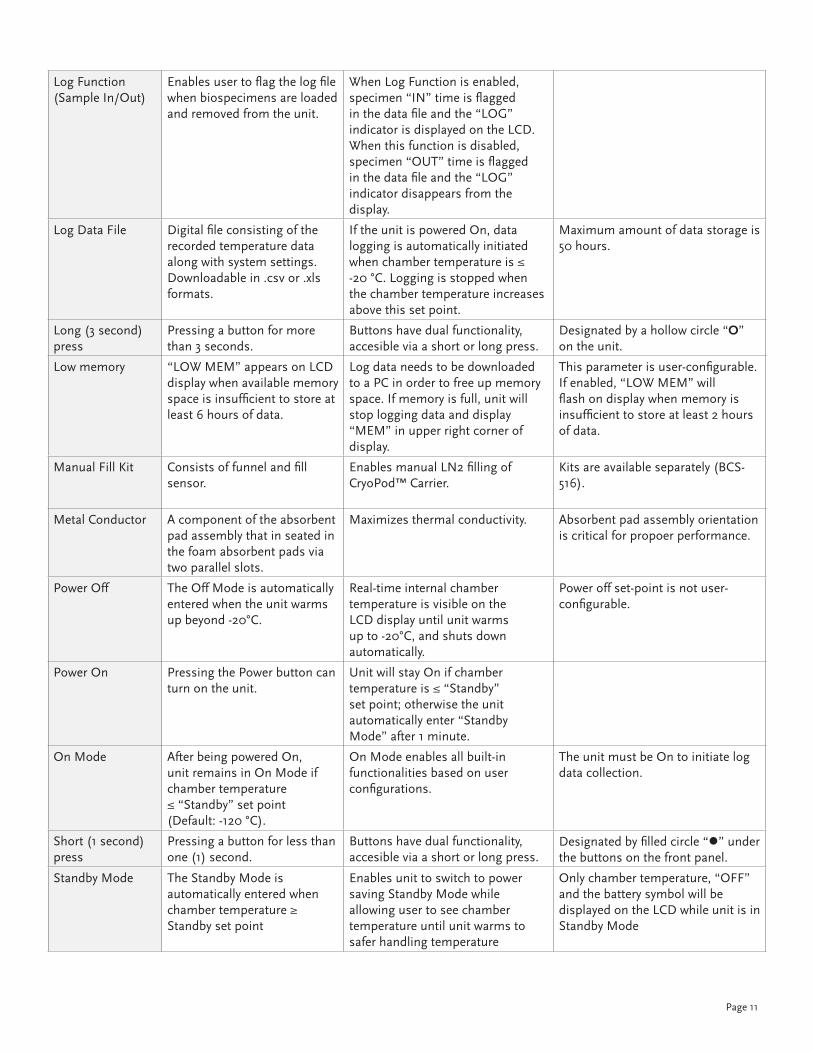
Log Function (Sample In/Out)
Enables user to flag the log file when biospecimens are loaded and removed from the unit.
When Log Function is enabled, specimen “IN” time is flagged in the data file and the “LOG” indicator is displayed on the LCD. When this function is disabled, specimen “OUT” time is flagged in the data file and the “LOG” indicator disappears from the display.
Log Data File Digital file consisting of the recorded temperature data along with system settings. Downloadable in .csv or .xls formats.
If the unit is powered On, data logging is automatically initiated when chamber temperature is ≤ -20 °C. Logging is stopped when the chamber temperature increases above this set point.
Maximum amount of data storage is 50 hours.
Long (3 second) press
Pressing a button for more than 3 seconds.
Buttons have dual functionality, accesible via a short or long press.
Designated by a hollow circle “O” on the unit.
Low memory “LOW MEM” appears on LCD display when available memory space is insufficient to store at least 6 hours of data.
Log data needs to be downloaded to a PC in order to free up memory space. If memory is full, unit will stop logging data and display “MEM” in upper right corner of display.
This parameter is user-configurable. If enabled, “LOW MEM” will flash on display when memory is insufficient to store at least 2 hours of data.
Manual Fill Kit Consists of funnel and fill sensor.
Enables manual LN2 filling of CryoPod™ Carrier.
Kits are available separately (BCS-516).
Metal Conductor A component of the absorbent pad assembly that in seated in the foam absorbent pads via two parallel slots.
Maximizes thermal conductivity. Absorbent pad assembly orientation is critical for propoer performance.
Power Off The Off Mode is automatically entered when the unit warms up beyond -20°C.
Real-time internal chamber temperature is visible on the LCD display until unit warms up to -20°C, and shuts down automatically.
Power off set-point is not user-configurable.
Power On Pressing the Power button can turn on the unit.
Unit will stay On if chamber temperature is ≤ “Standby” set point; otherwise the unit automatically enter “Standby Mode” after 1 minute.
On Mode After being powered On, unit remains in On Mode if chamber temperature ≤ “Standby” set point (Default: -120 °C).
On Mode enables all built-in functionalities based on user configurations.
The unit must be On to initiate log data collection.
Short (1 second) press
Pressing a button for less than one (1) second.
Buttons have dual functionality, accesible via a short or long press.
Designated by filled circle “l” under the buttons on the front panel.
Standby Mode The Standby Mode is automatically entered when chamber temperature ≥ Standby set point
Enables unit to switch to power saving Standby Mode while allowing user to see chamber temperature until unit warms to safer handling temperature
Only chamber temperature, “OFF” and the battery symbol will be displayed on the LCD while unit is in Standby Mode


![Visker, Rudi [1994] Dropping- The](https://static.documents.pub/doc/80x56/577cd0841a28ab9e78927851/visker-rudi-1994-dropping-the.jpg)