5
Doña Ana County, NM Map Help Map Features Introduction 1. Toolbar 2. Zoom Control Buttons 3. Map/Legend Tabs 4. Layer Control 5. Parcel Search Tools 6. Selected Feature Attributes

Doña Ana County, NM Map Help
Map Features Introduction
1. Toolbar
2. Zoom Control Buttons
3. Map/Legend Tabs
4. Layer Control
5. Parcel Search Tools
6. Selected Feature Attributes

Toolbar
The map toolbar allows the user to zoom in/out and pan the map, as well as identify parcels, measure
features on the map and produce a print friendly map.
Zoom In – This tool allows the user to zoom in to a selected area on the map
To use this tool click the left mouse button and while holding the mouse button down, drag a
rectangle around the area you wish to zoom to on the map. Release the button and the map
will zoom to the area within the rectangle you created.
Zoom Out – This tool allows the user to zoom out in a selected area of the map
Similar to the zoom in tool, when this tool is selected you can click the left mouse button and
while holding the mouse button down, drag a rectangle on the map and release the button.
The map will zoom out proportionally to the size of the rectangle you created. The smaller the rectangle
you draw, the more the map will zoom out.
Previous Zoom – This tool allows the user to change the map to the previous zoom level
Clicking this button will return the map to the previous zoom area or zoom level.
Next Zoom – This tool allows the user to change the map to the previous zoom level
Clicking this button will return the map to the next zoom area or zoom level. If you have
zoomed in to an area on the map and then panned the map or zoomed, clicking this button
will return the map to the area it showed before the previous pan or zoom action.
Pan – This tool allows the user to pan, or move the map
When this tool is selected you can click on the map, and while holding the mouse button,
pan or move the map in the direction you move the mouse.
Identify – This tool allows users to identify features on the map
When this tool is selected the user can click on a parcel in the map to display information
about that parcel. When the parcel is clicked it will be highlighted and attributes will be
displayed in a table shown the Selected Feature Attributes area of the page.
Measure Distance Tool – This tool allows the user to measure linear distances on the map
When this tool is selected click on the map at the location you want to begin the
measurement. Move the cursor to the place you want to end the measurement and double
click. The length of measurement will be displayed in a window. It is also possible to measure a path
using this tool. Click the map at the location you want to start measuring from. Move the pointer to a
location along the path and click that location. A node will be added to the measure line at that
location. To continue measuring the path, move the pointer to the next location along the path and

click that location. Another node will be added to the measure line at that location. Continue to the
end of the path and double click the final location to display the total length of the path.
Measure Area Tool – This tool allows the user to measure the area of a polygon on the map
When this tool is selected click on the map at the location you want to begin the
measurement. Move the pointer to a corner of the area you want to measure and click the
map at that location. A node will be added at that location. Continue measuring the area by moving the
pointer to the next corner of the area you want to measure and clicking the map at that location.
Repeat the process as many times as necessary to make a complete polygon around the area you want
to measure. When you have completely enclosed the area, double click the final point to complete the
polygon and display the resulting area measurement.
Clear Graphics – This button allows the user to clear graphics and selected features
Clicking this button will clear any graphics on the map, such as measurement lines and
polygons or highlighted parcels. It will also clear any parcel attributes that are displayed in
the Selected Features Attributes area of the page.
Print – This button allows the user to create a printer friendly map for printing
When this button is clicked a window will open prompting the user to enter a title for their
map. Enter the title you wish and click the “Submit” button. A new browser window will
open to display a map in a printer friendly format. If a parcel is selected when the print page is created
the print page will also include the attributes of the selected parcel.
Zoom Control Buttons The zoom control buttons allow the user to zoom in and out on the map. Clicking the “+”
button will zoom in one level at the center of the map. Clicking the “-“ button will zoom out
one level at the center of the map.
Map/Legend Tabs The Map/Legend tabs allow the user to switch back and forth
between displaying the map tab, which displays the layer visibility
and parcel search tools, and the legend tab, which displays a
graphical key to elements currently visible in the map.
Layer Control The layer control area allows the user to select which layers are currently visible in the map. Each layer
has a check box next to the layer name. When the check box is checked the layer will be visible in the
map. Note that some layers, such as the address labels and aerial photos, will only display in the map
when specific zoom levels are reached. So, if the layer is checked to be visible, but it is not displaying on
the map you may need to zoom in before the layer is visible.
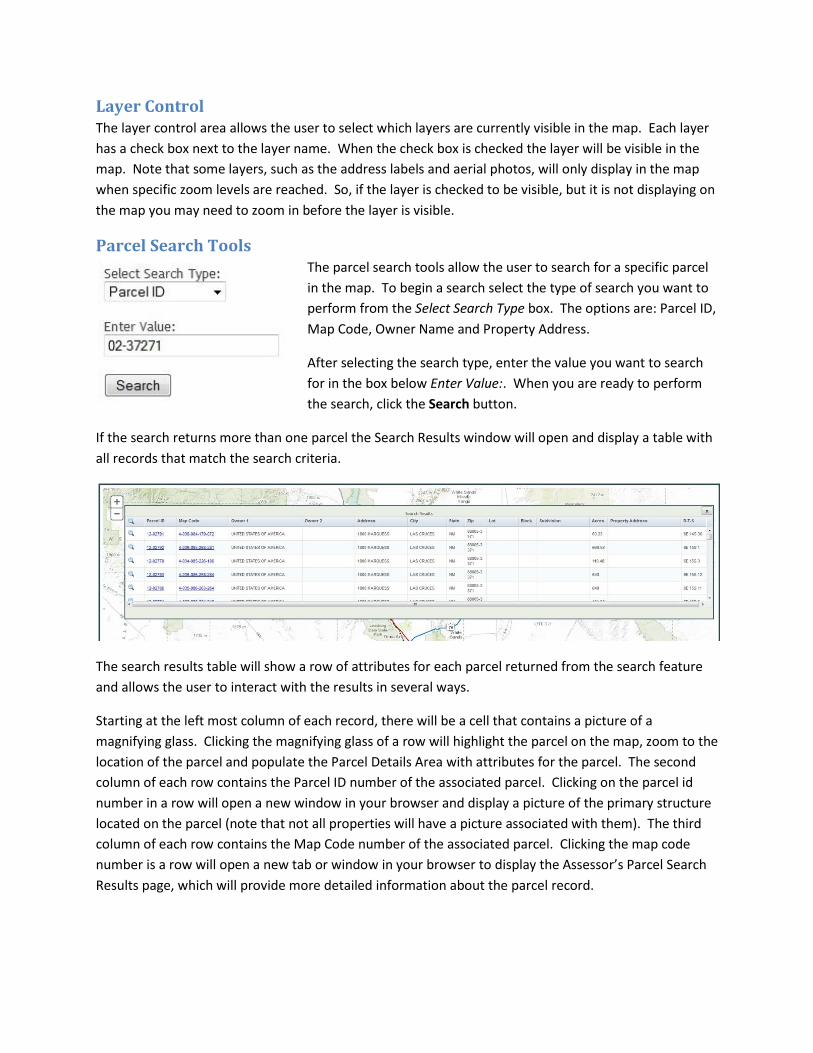
Parcel Search Tools The parcel search tools allow the user to search for a specific parcel
in the map. To begin a search select the type of search you want to
perform from the Select Search Type box. The options are: Parcel ID,
Map Code, Owner Name and Property Address.
After selecting the search type, enter the value you want to search
for in the box below Enter Value:. When you are ready to perform
the search, click the Search button.
If the search returns more than one parcel the Search Results window will open and display a table with
all records that match the search criteria.
The search results table will show a row of attributes for each parcel returned from the search feature
and allows the user to interact with the results in several ways.
Starting at the left most column of each record, there will be a cell that contains a picture of a
magnifying glass. Clicking the magnifying glass of a row will highlight the parcel on the map, zoom to the
location of the parcel and populate the Parcel Details Area with attributes for the parcel. The second
column of each row contains the Parcel ID number of the associated parcel. Clicking on the parcel id
number in a row will open a new window in your browser and display a picture of the primary structure
located on the parcel (note that not all properties will have a picture associated with them). The third
column of each row contains the Map Code number of the associated parcel. Clicking the map code
number is a row will open a new tab or window in your browser to display the Assessor’s Parcel Search
Results page, which will provide more detailed information about the parcel record.

Notes about search types and search values – For Parcel ID and Map Code searches, simply enter the
parcel’s ID number or map code in the value box. Parcel ID numbers are in the format ##-#####
(example: 02-37271). Map code numbers are in the format #-###-###-###=### (example: 4-005-135-
120-360).
When performing Owner Name searches there is no special format that the owner name needs to be in.
The owner name is not case sensitive and may be entered first name first or first name last. For example:
Jane Doe, JANE DOE, jane doe, Doe Jane, DOE JANE and doe jane will all return the same results.
When performing a Property Address search it is usually best to enter the value without including the
street suffix and street prefix. For example: if you are looking for 845 N Motel Blvd, enter the value 845
Motel. Any matching results will be displayed in the Search Results Area. It is also possible to just enter
a street name and get the results for all addresses on that street. For example: if you enter Motel in the
value box the search will return all records that contain the value Motel in the property address.
Selected Feature Attributes
When a single parcel is selected the Selected Feature Attributes table will be displayed. The following
list explains which details are displayed in the table.
Parcel ID – the unique ID number assigned to the parcel (Clicking on the displayed parcel id
number will open a new tab or window in your browser to display a picture of the primary
structure located on the property if one is available.)
Map Code – the unique Map Code number assigned to the parcel (Clicking on the displayed map
code number will open a new tab or window in your browser and display the Assessor’s Parcel
Search Results, which will give more detailed information about the parcel record.)
Name – the name of the property owner
Address – the mailing address of the property owner
Subdivision – the name of the subdivision the property is located in
Condo Name – the name of the Condominium the property is located in
Condo Unit – the unit number of the Condominium the property is in
Mobile Homes – the number of mobile homes located on the property
Clerk Record – the most recent document related to the property filed at the County Clerk’s
Office
Property Address – the physical address of the primary structure on the property (also referred
to as the 911 address)
Acres – the recorded acreage of the parcel


