Faculty/Staff Getting Started Guide MyPLAN Easier than ever to connect with your students. MyPLAN (Personal Learning and Advising Network) gives you a convenient way to track your students – raising flags when you observe a pattern of behavior that concerns you, ensuring that the people on campus who can intervene are aware, and allowing students to schedule appointments with you or someone else who can help. In addition, MyPLAN allows advisors to keep notes of their advising sessions that are visible to advisors across campus. Getting started is easy. MyPLAN will automatically display all students that you have been assigned or are enrolled in your courses. Depending on your role with students, you will have options of raising flags, reviewing flags, or recording advising sessions. Welcome to MyPLAN. at’s it. Simple for you. Empowering for your students. Customize Your Appointment Preferences 1. Go to Profile > Appointment Preferences. 2. Select your Minimum Appointment Length. 3. Select your Scheduling Deadline – e.g., if appointments must be made by 5 p.m. the day before. 4. Establish My Locations so students know where they can meet with you. 5. Delegate Calendar Managers – colleagues who can see your calendar and make any edits/deletes. 6. Click the Save button. You can enter information under your ‘Institutional Profile’ that will allow students to search for and contact you through MyPLAN. Your contact information is imported from SAP through the campus LDAP, and you are able to enter additional information that details your specific interests (e.g. nanoscience, adolescent risk behavior, etc.). When students conduct a search, the search pulls from your name as well as the biography. For example, if a student was interested in connecting to a faculty that conducted research on ‘nanoscience,’ they could search for ‘nanosci- ence,’ and if this text was entered in your profile, your name would appear through their search. e more detailed your profile, the easier it will be for students to contact you. Setup Your Profile 1. Login to MyUNL/Blackboard and click the MyPLAN link. 2. Click the Profile link at the top. 3. Enter your contact information and how you prefer to be reached. 4. Upload your photo to help a student put a face to your name. Select the Upload Photo link. Browse for a photo on your desktop (JPEG, GIF, PNG). Click the Upload Now button. 5. Complete the General Overview and My Biography sections so students can learn more about you. 6. Click the Save button. Students are currently using MyPLAN to schedule appointments. You can specify the location and duration of your available appointment times. In addition, you can set a scheduling deadline and delegate others who can manage your calendar.
Transcript
Faculty/Staff Getting Started GuideMyPLANEasier than ever to connect with your students.
MyPLAN (Personal Learning and Advising Network) gives you a convenient way to track your students – raising flags when you observe a pattern of behavior that concerns you, ensuring that the people on campus who can intervene are aware, and allowing students to schedule appointments with you or someone else who can help. In addition, MyPLAN allows advisors to keep notes of their advising sessions that are visible to advisors across campus. Getting started is easy. MyPLAN will automatically display all students that you have been assigned or are enrolled in your courses. Depending on your role with students, you will have options of raising flags, reviewing flags, or recording advising sessions.
Welcome to MyPLAN.
That’s it. Simple for you. Empowering for your students.
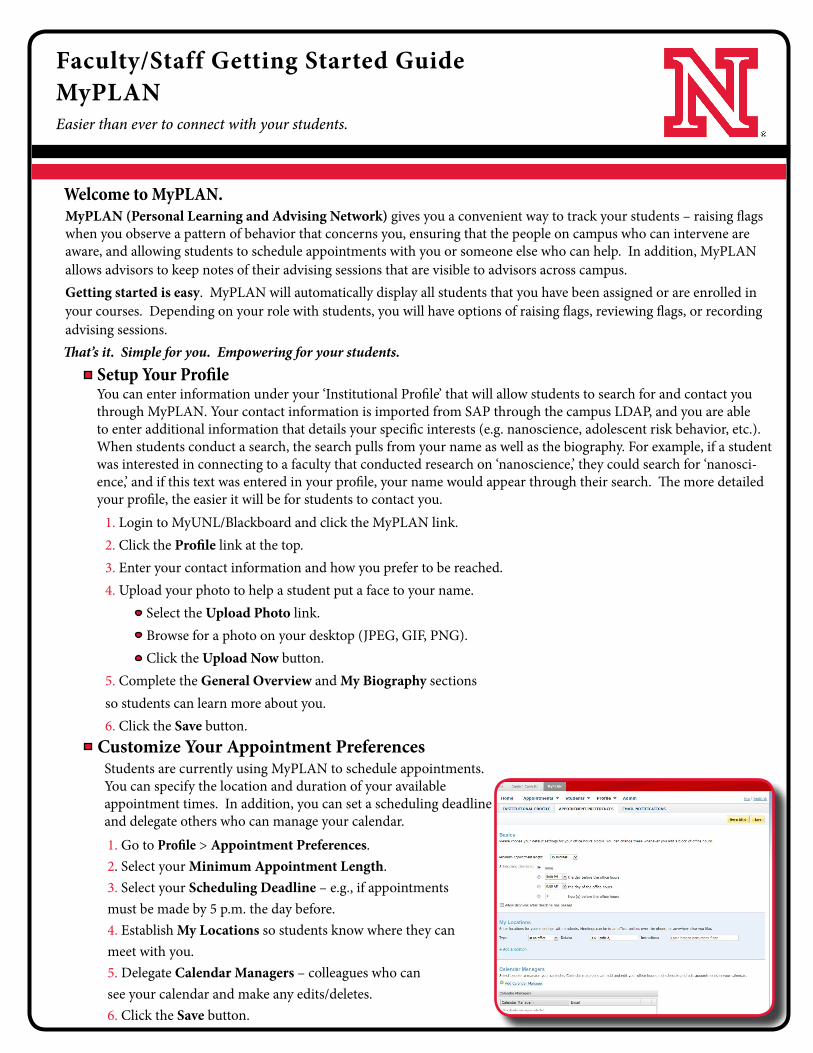
Customize Your Appointment Preferences
1. Go to Profile > Appointment Preferences.2. Select your Minimum Appointment Length.3. Select your Scheduling Deadline – e.g., if appointments must be made by 5 p.m. the day before.4. Establish My Locations so students know where they can meet with you. 5. Delegate Calendar Managers – colleagues who can see your calendar and make any edits/deletes.6. Click the Save button.
You can enter information under your ‘Institutional Profile’ that will allow students to search for and contact you through MyPLAN. Your contact information is imported from SAP through the campus LDAP, and you are able to enter additional information that details your specific interests (e.g. nanoscience, adolescent risk behavior, etc.). When students conduct a search, the search pulls from your name as well as the biography. For example, if a student was interested in connecting to a faculty that conducted research on ‘nanoscience,’ they could search for ‘nanosci-ence,’ and if this text was entered in your profile, your name would appear through their search. The more detailed your profile, the easier it will be for students to contact you.
Setup Your Profile
1. Login to MyUNL/Blackboard and click the MyPLAN link. 2. Click the Profile link at the top.
3. Enter your contact information and how you prefer to be reached.4. Upload your photo to help a student put a face to your name. Select the Upload Photo link. Browse for a photo on your desktop (JPEG, GIF, PNG). Click the Upload Now button. 5. Complete the General Overview and My Biography sections so students can learn more about you.6. Click the Save button.
Students are currently using MyPLAN to schedule appointments. You can specify the location and duration of your available appointment times. In addition, you can set a scheduling deadline and delegate others who can manage your calendar.
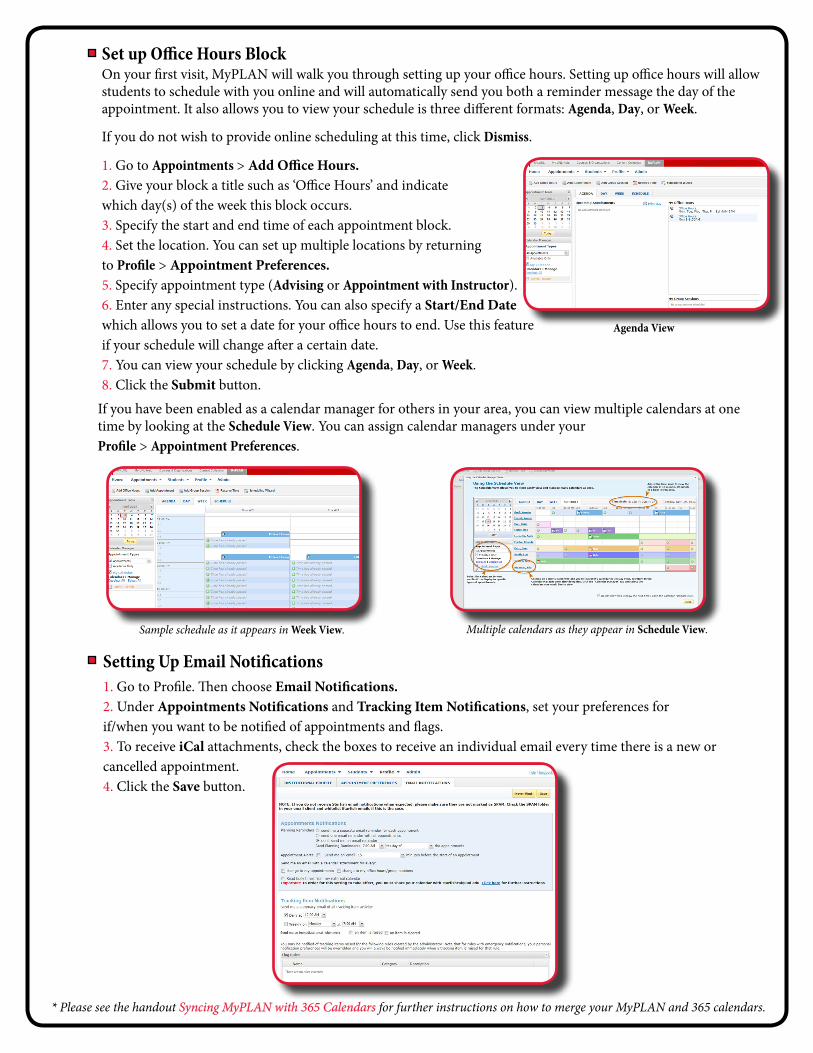
Set up Office Hours Block
1. Go to Appointments > Add Office Hours.2. Give your block a title such as ‘Office Hours’ and indicate which day(s) of the week this block occurs.3. Specify the start and end time of each appointment block.4. Set the location. You can set up multiple locations by returning to Profile > Appointment Preferences.5. Specify appointment type (Advising or Appointment with Instructor). 6. Enter any special instructions. You can also specify a Start/End Date which allows you to set a date for your office hours to end. Use this feature if your schedule will change after a certain date. 7. You can view your schedule by clicking Agenda, Day, or Week.8. Click the Submit button.
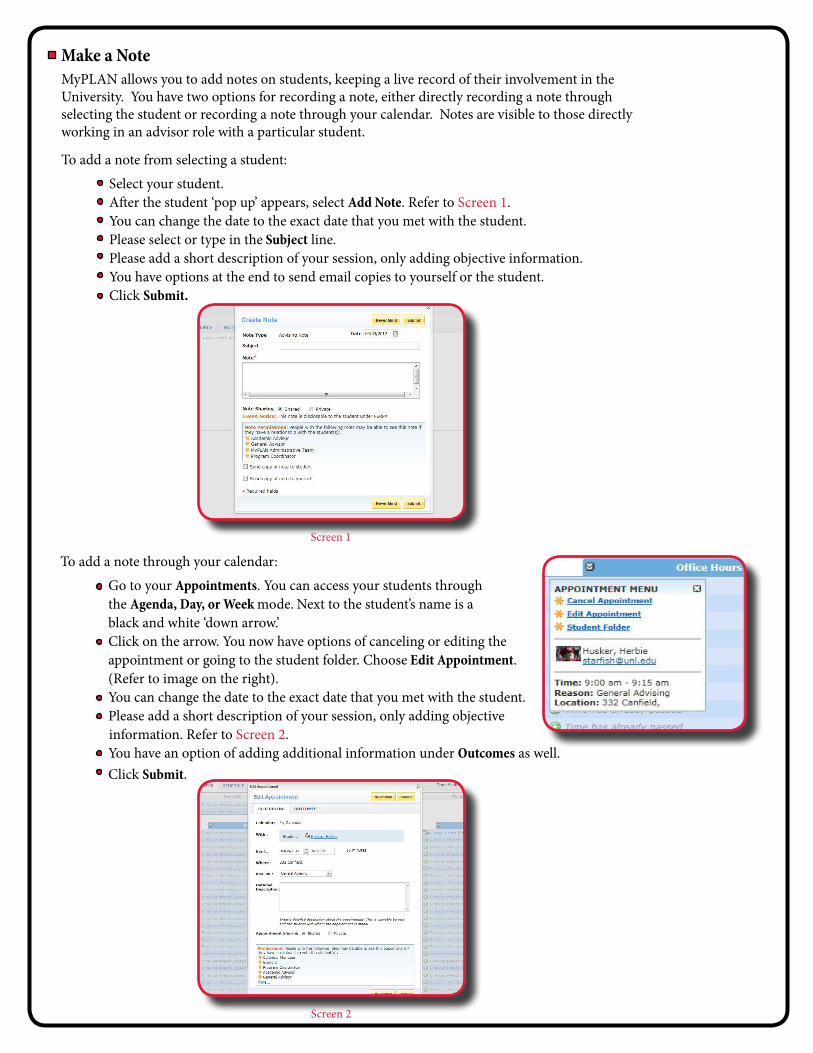
If you have been enabled as a calendar manager for others in your area, you can view multiple calendars at one time by looking at the Schedule View. You can assign calendar managers under your Profile > Appointment Preferences.
On your first visit, MyPLAN will walk you through setting up your office hours. Setting up office hours will allow students to schedule with you online and will automatically send you both a reminder message the day of the appointment. It also allows you to view your schedule is three different formats: Agenda, Day, or Week.
If you do not wish to provide online scheduling at this time, click Dismiss.
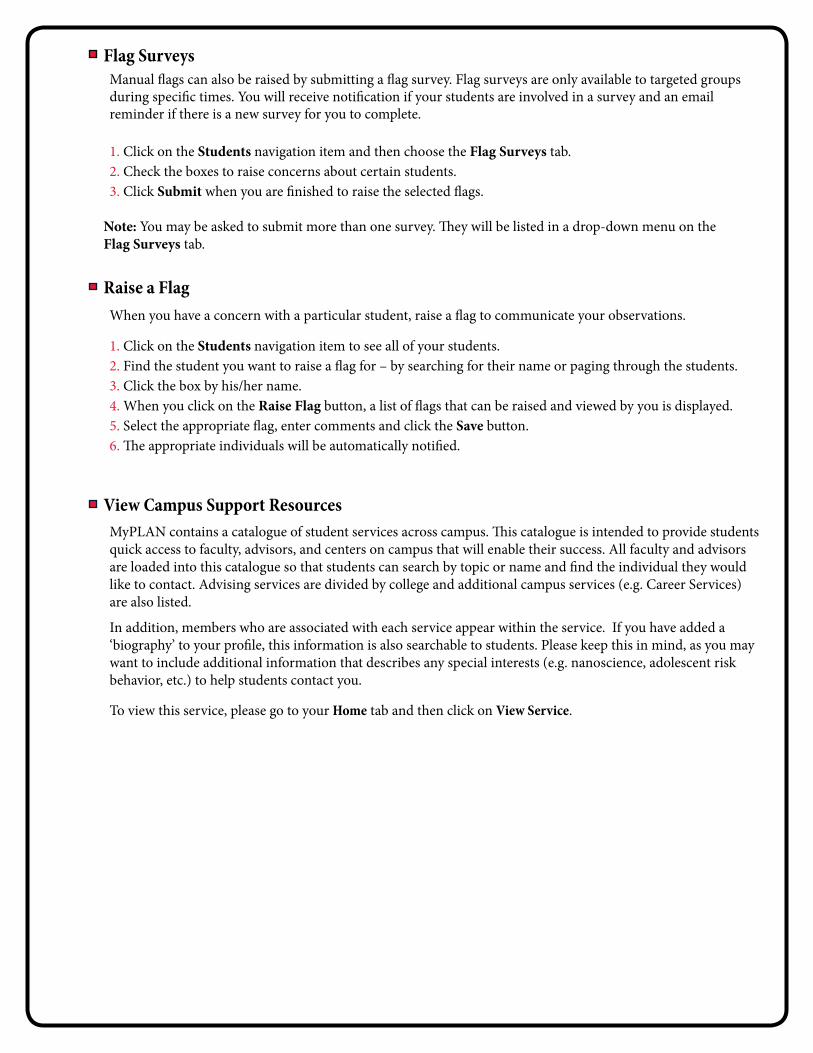
Setting Up Email Notifications 1. Go to Profile. Then choose Email Notifications.2. Under Appointments Notifications and Tracking Item Notifications, set your preferences for if/when you want to be notified of appointments and flags.3. To receive iCal attachments, check the boxes to receive an individual email every time there is a new or cancelled appointment.4. Click the Save button.
Sample schedule as it appears in Week View.
* Please see the handout Syncing MyPLAN with 365 Calendars for further instructions on how to merge your MyPLAN and 365 calendars.
Multiple calendars as they appear in Schedule View.
Agenda View
View a Student Folder Currently, advisors have full access to student folders and instructors have a limited access to a student folder.
1. From your Students list, click the hyperlink of a student’s name. Anywhere you see a student’s name as a link it will take you to his or her folder.2. This brings you to the student’s folder. Depending on your level of access, you will find information on…
Appointments (past/upcoming) Grades (past/current) Notes (you added/shared with you) Tracking history (raised/cleared)
Courses and Networks3. From the student folder you can…
Raise a flag. Add a note. Email a student.
View Your Students List1. Click Students in the top frame navigation.2. Search for a student by… Typing the student’s name into the Search field. Choosing your Connection to them.3. To organize your students list by flag, select the Tracking tab. You can sort the list by flag name and/or flag status. You can clear or comment on flags from here.
Herbie’s student folder.
Screen 1
Screen 2
MyPLAN allows you to add notes on students, keeping a live record of their involvement in the University. You have two options for recording a note, either directly recording a note through selecting the student or recording a note through your calendar. Notes are visible to those directly working in an advisor role with a particular student.
To add a note from selecting a student:
Select your student. After the student ‘pop up’ appears, select Add Note. Refer to Screen 1. You can change the date to the exact date that you met with the student. Please select or type in the Subject line. Please add a short description of your session, only adding objective information. You have options at the end to send email copies to yourself or the student. Click Submit.
Make a Note
To add a note through your calendar:
Go to your Appointments. You can access your students through the Agenda, Day, or Week mode. Next to the student’s name is a
black and white ‘down arrow.’ Click on the arrow. You now have options of canceling or editing the appointment or going to the student folder. Choose Edit Appointment.(Refer to image on the right).
You can change the date to the exact date that you met with the student. Please add a short description of your session, only adding objective information. Refer to Screen 2.
You have an option of adding additional information under Outcomes as well. Click Submit.
Flag SurveysManual flags can also be raised by submitting a flag survey. Flag surveys are only available to targeted groupsduring specific times. You will receive notification if your students are involved in a survey and an email reminder if there is a new survey for you to complete.
1. Click on the Students navigation item and then choose the Flag Surveys tab.2. Check the boxes to raise concerns about certain students.3. Click Submit when you are finished to raise the selected flags.
Note: You may be asked to submit more than one survey. They will be listed in a drop-down menu on the Flag Surveys tab.
Raise a FlagWhen you have a concern with a particular student, raise a flag to communicate your observations.
1. Click on the Students navigation item to see all of your students.2. Find the student you want to raise a flag for – by searching for their name or paging through the students.3. Click the box by his/her name.4. When you click on the Raise Flag button, a list of flags that can be raised and viewed by you is displayed.5. Select the appropriate flag, enter comments and click the Save button.6. The appropriate individuals will be automatically notified.
View Campus Support ResourcesMyPLAN contains a catalogue of student services across campus. This catalogue is intended to provide students quick access to faculty, advisors, and centers on campus that will enable their success. All faculty and advisors are loaded into this catalogue so that students can search by topic or name and find the individual they would like to contact. Advising services are divided by college and additional campus services (e.g. Career Services) are also listed.
In addition, members who are associated with each service appear within the service. If you have added a ‘biography’ to your profile, this information is also searchable to students. Please keep this in mind, as you may want to include additional information that describes any special interests (e.g. nanoscience, adolescent risk behavior, etc.) to help students contact you.
To view this service, please go to your Home tab and then click on View Service.
Frequently Asked Questions
How do I cancel my office hours for one week? Edit and cancel options will be shown when you click the icon on your dashboard or calendar. When you click on Cancel, select Occurrence to change just the current week’s office hours. Students who have appointments during this time will be notified of the cancellation.
How do I get more detail on a student? Anytime you see a student’s name as a hyperlink, in an email, on your dashboard or throughout various Web pages, this hyperlink takes you to the student’s folder. The stu-dent folder contains a) the student’s contact information, b) any appointment history with you, c) the grades recorded in the student’s online grade book, d) notes recorded by you or shared with you, and e) flags raised in MyPLAN.
How do I change how and when I am emailed by MyPLAN? MyPLAN will email you a calendar appointment for each appointment you have the next day, and a daily summary of flag activity for your students. You can change these settings by clicking Profile, and navigating to the Email Notifications tab.
It is the policy of the University of Nebraska–Lincoln not to discriminate based upon age, race, ethnicity, color, national origin, gender, sex, pregnancy, disability, sexual orientation, genetic information, veteran’s status, marital status, religion or political affiliation.
What if I need more help?Contact the Help Desk at 402-472-3970 (or if you’re outside of Lincoln, toll free at 866-472-3970) or via email at http://is.unl.edu/myplansupport.For more information you can also visit https://myplan.unl.edu.