49
1 The University of British Columbia Faculty of Forestry Forestry 351 Interior Field School Reference Package August 24 – 31, 2019
1
The University of British Columbia
Faculty of Forestry
Forestry 351
Interior Field School
Reference Package
August 24 – 31, 2019

2
Working in Groups
A Cautionary Tale…
This is a story about a team of 4 students named Everybody, Somebody, Anybody and Nobody.
There was an important FRST 211 lab project to be done and Everybody was asked to do it.
Everybody was sure Somebody would do it.
Anybody could have done it but Nobody did it.
Somebody got angry about that because it was Everybody’s job.
Everybody thought Anybody could do it, but Nobody realized that Everybody wouldn’t do it.
It ends up that Everybody blames Somebody when Nobody did what Anybody could have done.
Conclusion? This team did very poorly on their FRST 211 lab project.
How to Avoid the Fate of Everybody, Somebody, Anybody and Nobody…
Tips for Working in Groups (http://www.speaking.pitt.edu/student/groups/smallgrouptips.html)
Working together in a group can be a great experience or a terrible one. Which way it goes depends, to a large
extent, on the quality of the communication among group members and the respect they show for each other.
Here are a few guidelines for making your group work successful.
1. Work hard. For all activities, do your share and a little bit more. Be responsible, and then add a little extra to
bring the standards of the group up and make its success more likely.
2. Be inclusive. Bring every member of the group in on discussions, decision making, and activities. Give
everyone a chance to speak, listen to them, and give serious consideration to what they are saying. Cooperate.
3. Take turns. Don’t be the leader all the time. Don’t be a follower all the time. Don’t talk too much--listen to
others. Don’t just listen to others—share your opinions too.
4. Be nice. Avoid personal criticism. Make sure you understand what someone is saying before you weigh in
with your opinion about it. Give them the benefit of the doubt.
5. Be timely. Show up promptly for meetings. Meet all deadlines. When you’re late, you waste people’s time
and make them mad. People depend on you. Get it done on time.
6. Don’t be an enabler. If you’ve got somebody who isn’t doing their work, hold them responsible as a group.
Everyone needs to do their part.
7. Stay focused on the task. Make your meetings count. Don’t drift into irrelevant subjects. Be mindful about
what you need to accomplish.
8. Improve the mood of the group. Be positive. Be fun. Be appreciative of other people. Be full of good ideas.
Do your part to make the environment a good one.
9. Don’t cast blame unfairly. If there is a problem in the group, begin by asking what you have done (or not
done) to contribute to that problem—and what you might do to fix it. If there is conflict, try to work it out
through respectful talk with each other (not e-mail, a horrible conflict medium). Try to understand the other
person’s point of view as you discuss the issue.

3
TABLE OF CONTENTS
TOPIC PAGE
Introduction to Alex Fraser Research Forest 4-5
Mensuration
Measuring basal area with a prism 6
Estimating basal area with your thumb 7
Measuring diameter at breast height (DBH) 7
Table of basal area by DBH 8
Equations for tree volume 8
Measuring tree height 9
Topographic Maps: Orienteering and Field work 10-13
Map Orientation and Declination with a Compass 13-14
Topographic Relief: Elevation, Slope Aspect and Angle 15-17
Ecology
Plants of the ICH zone at Gavin Lake 18
Synopsis of tree silvics 19
Identifying forest sites 20
Nested plots and converting plot circumference to area 21
Tree species codes 21
Tree, snag and log classification 22
Tree height classification 22
Estimating plant cover 23
Soil texture key 25
Soil order key and explanation of horizon codes 26-27
Soil humus form key 27
Terms in soil moisture and nutrient regime keys 28
Soil nutrient regime (SNR) key 28
Soil moisture regime (SMR) key 29
BEC Zones
Vegetation summary table comparing BEC zones 30
IDFxm Introduction and vegetation table 31
IDFxm Landscape profile 32
IDFxm Edatopic grid 33
IDFdk3 Introduction and vegetation table 35
IDFdk3 Landscape profile 36
IDFdk3 Edatopic grid 37
SBSdw1 Introduction and vegetation table 39
SBSdw1 Landscape profile 40
SBSdw1 Edatopic grid 41
ICHmk3 Introduction and vegetation table 43
ICHmk3 Landscape profile 44
ICHmk3 Edatopic grid 45
Fuel Hazards and Fire Severity 46
Forestry Glossary 47-49
4
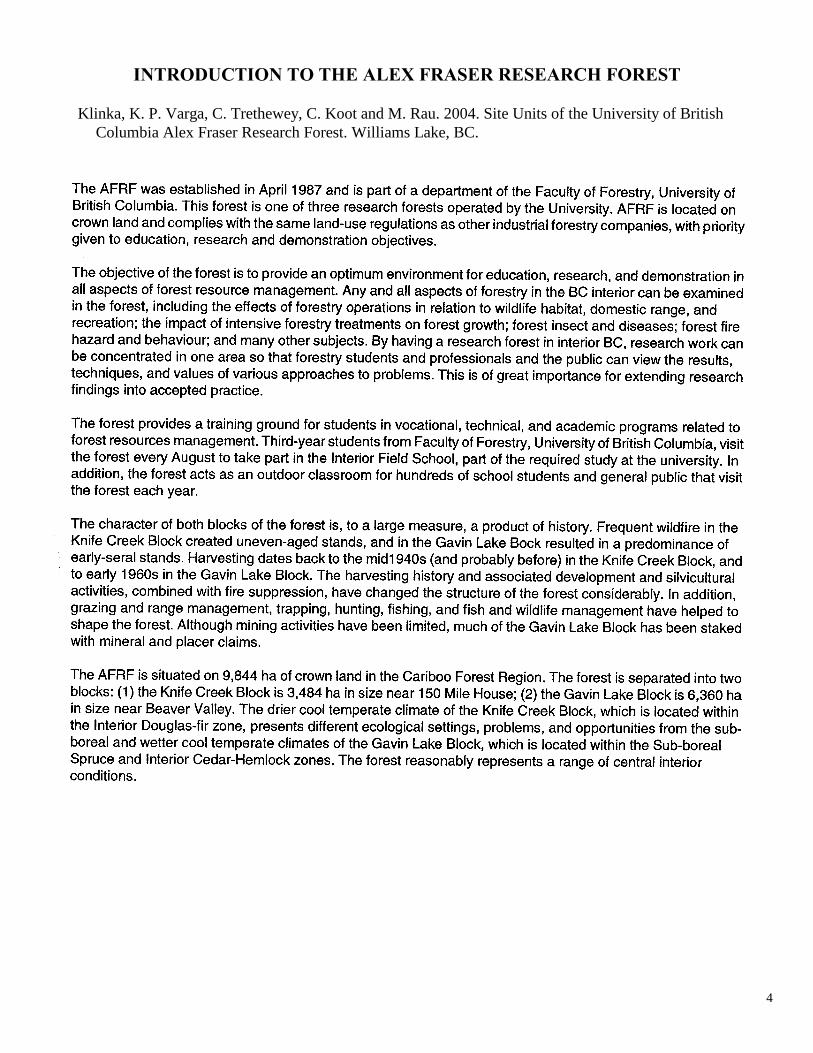
INTRODUCTION TO THE ALEX FRASER RESEARCH FOREST
Klinka, K. P. Varga, C. Trethewey, C. Koot and M. Rau. 2004. Site Units of the University of British
Columbia Alex Fraser Research Forest. Williams Lake, BC.
5
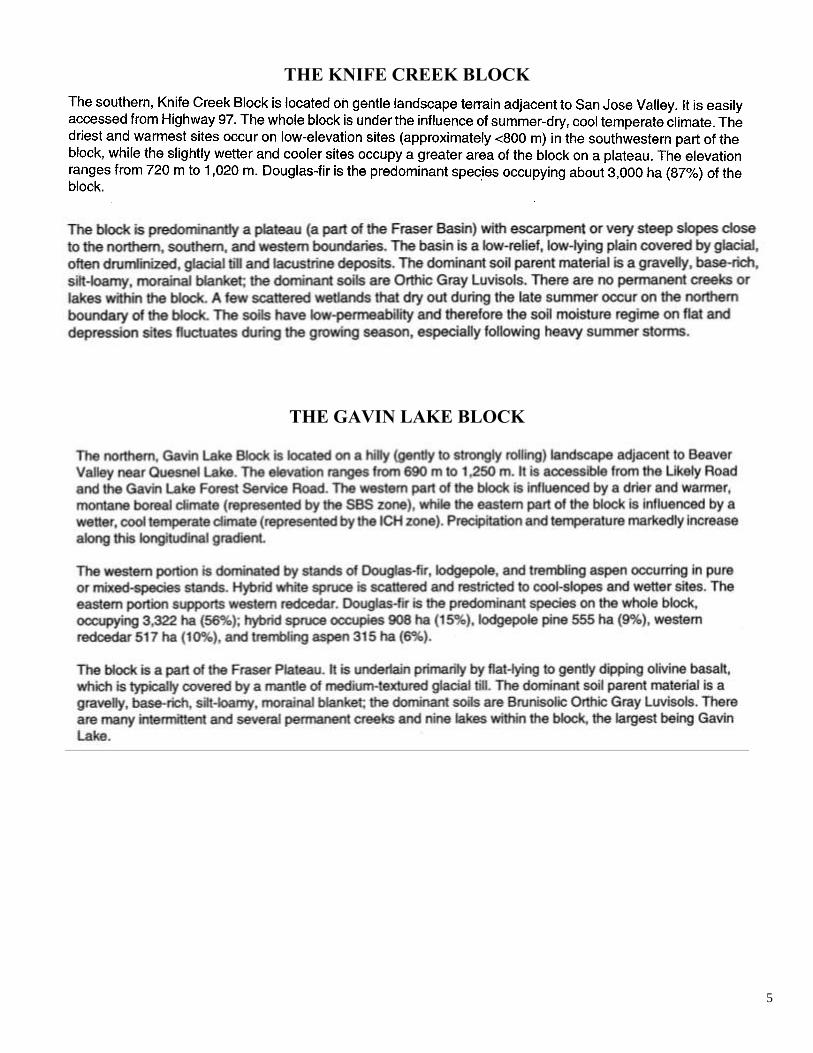
THE KNIFE CREEK BLOCK
THE GAVIN LAKE BLOCK

6
Mensuration Measuring stand basal area with a prism http://oregonstate.edu/instruct/bot440/wilsomar/Content/HTM-trees.htm
Another way to measure stand basal area is the prism method that combines tree size and tree density, the two
components of stand basal area. A stand of large trees has more basal area than a stand of small trees of the
same density. If the trees are more dense, the stand basal area is greater, even if the trees were the same size as
before. The prism method works by using angles of sight to determine contributions to stand basal area.
Check to see if a tree is a “hit” by looking at its trunk both
through the prism and just over the prism. The image
through the prism will appear offset from the image over the
prism. If the two images of the tree trunk overlap, the tree is
big or close that it is a hit. If the tree trunks do not overlap,
the tree is too small or too far away--it's a miss. Be sure
you're determining all this at "breast height" on the tree.
The process is to scan the stand by rotating around the
sample location point, counting hits (and ignoring misses).
Notice that a tree can be a hit by being very large or, if small,
very close to the measurement point.
This method is a very good estimate of stand basal area is simply the number of "hits" multiplied by a
coefficient. This coefficient is called the basal area factor, and is larger for wider angles and smaller for
narrower angles. The formula is
Stand basal area = (number of hits) × (basal area factor).
The basal area factor is shown on the prism you are using. In general, the basal area factor is reported in English
units, ft2/ac, unless it has a special code, like "4M." In that case, the units are metric, m2/ha. Most angles used
in the field have BAFs of 2-10 m2/ha.
In this example, the brownish disks represent tree trunks. The
sample location is point near the middle. Tree #1 is a "hit," but
tree #4 (exactly the same size as tree #1) is a "miss." Altogether 7
trees are hits (1, 3, 5, 8, 9, 10, and 11). Trees 2, 4, 6, and 7 are too
small and/or too far away to be counted as hits.
The basal area factor (BAF) for this fixed angle is 6 m2/ha.
So the stand basal area in the diagram is calculated as:
SBA = (7 hits) × (6 m2/ha per hit) = 42 m2/ha.
A good practice is to select a BAF so you get 8-12 hits.
This method is advantageous because it is very fast because you
stay at one sample location point and you do not need to establish
a plot or randomly select trees to sample. Also, there are no
definite borders to the sample; big trees far away can be hits, but
small trees can be misses even if they are close.

7
Estimating basal area with your thumb
Procedures for calibrating your thumb as a relascope:
1. Move to the ground marker in front of one of the calibration cards
2. Hold your arm out straight with your thumb sticking up
3. Keep your eye over the plot centre (e.g. spike in the ground 10 m away
from the calibration sign). Note: this is different from using a prism, since
a prism would be held over the plot centre
4. Compare the widest part of your thumb to the calibration sign
5. Read the Basal Area Factor (BAF) of your thumb directly off the sign.
Estimate to the nearest 0.5 m2/ha
To estimate basal area: Sweep your thumb around a plot centre. Talley the
number of trees for which your thumb is the same or narrower than the
tree trunk at 1.3m abover the ground. Multiply the number of trees you
tally by your BAF
BAF
3 4 5 6 7 8
BAF = 3Orangeline
1.3 m
IN OUT
Measuring diameter at breast height of trees http://oregonstate.edu/instruct/bot440/wilsomar/Content/HTM-trees.htm
The diameter at breast height, or DBH, is the diameter of the tree's trunk at 1.3m above the ground. Because tree
trunks are usually almost circular in cross-section, you can calculate diameter indirectly by measuring
circumference. Special measuring tapes are available that do the geometry for you. These "diameter tapes" are
marked on one side in centimeters, on the other the diameter of a circle with a given circumference.
The first step in using these diameter tapes is to calibrate "breast height" on your body – measure 1.3m from the
ground and mark this using masking tape. This will save time in the field.
Start using the tape to measure DBH by attaching its end at the proper breast-height, then stretching the tape
around the trunk at breast height. You read diameter from the point that the tape overlaps zero on the tape. The
photographs show the process, which is really very simple. The diameter of the tree below is 55.6cm.
A common mistake is using the wrong side of the tape. Remember, one side measures distance, just like any
other tape. Don't use that side! Use the side that shows diameter when the tape is wrapped around the tree trunk.
DBH can be used to calculate tree basal area, the cross-sectional area of a tree's trunk at breast height. Again
assuming a circular trunk, basal area (BA) is a simple function of diameter:

8
Table of tree basal area by DBH
Basal area (m2 per tree)
DBH (tenths of cm)
0.0 0.1 0.2 0.3 0.4 0.5 0.6 0.7 0.8 0.9
DBH (cm)
1 0.00008 0.00010 0.00011 0.00013 0.00015 0.00018 0.00020 0.00023 0.00025 0.00028
2 0.00031 0.00035 0.00038 0.00042 0.00045 0.00049 0.00053 0.00057 0.00062 0.00066
3 0.00071 0.00075 0.00080 0.00086 0.00091 0.00096 0.00102 0.00108 0.00113 0.00119
4 0.00126 0.00132 0.00139 0.00145 0.00152 0.00159 0.00166 0.00173 0.00181 0.00189
5 0.00196 0.00204 0.00212 0.00221 0.00229 0.00238 0.00246 0.00255 0.00264 0.00273
6 0.00283 0.00292 0.00302 0.00312 0.00322 0.00332 0.00342 0.00353 0.00363 0.00374
7 0.00385 0.00396 0.00407 0.00419 0.00430 0.00442 0.00454 0.00466 0.00478 0.00490
8 0.00503 0.00515 0.00528 0.00541 0.00554 0.00567 0.00581 0.00594 0.00608 0.00622
9 0.00636 0.00650 0.00665 0.00679 0.00694 0.00709 0.00724 0.00739 0.00754 0.00770
10 0.00785 0.00801 0.00817 0.00833 0.00849 0.00866 0.00882 0.00899 0.00916 0.00933
11 0.00950 0.00968 0.00985 0.01003 0.01021 0.01039 0.01057 0.01075 0.01094 0.01112
12 0.01131 0.01150 0.01169 0.01189 0.01208 0.01227 0.01247 0.01267 0.01287 0.01307
13 0.01327 0.01348 0.01368 0.01389 0.01410 0.01431 0.01453 0.01474 0.01496 0.01517
14 0.01539 0.01561 0.01584 0.01606 0.01629 0.01651 0.01674 0.01697 0.01720 0.01744
15 0.01767 0.01791 0.01815 0.01839 0.01863 0.01887 0.01911 0.01936 0.01961 0.01986
16 0.02011 0.02036 0.02061 0.02087 0.02112 0.02138 0.02164 0.02190 0.02217 0.02243
17 0.02270 0.02297 0.02325 0.02351 0.02378 0.02405 0.02433 0.02461 0.02488 0.02516
18 0.02545 0.02573 0.02620 0.02630 0.02659 0.02688 0.02717 0.02746 0.02776 0.02806
19 0.02835 0.02865 0.02895 0.02926 0.02956 0.02986 0.03017 0.03048 0.03079 0.03110
20 0.03142 0.03174 0.03205 0.03237 0.03269 0.03301 0.03333 0.03365 0.03398 0.03431
Equations for the volume of a tree
You can estimate the volume of a tree by assuming it is cone-shaped. The formula for a cone is:
V = BAtree (0.333 height)
where, V = volume in m3, BAtree is basal area of the tree in m2 and height is measured in m
Usually DBH is measured in cm, the formula for basal area of tree (BAtree) is:
BAtree = 3.14156 (DBH/(2*100))2
You can use a similar approach to estimate tree volume per hectare:
Vha = BAha (0.333 Ht)
Where, Vha = volume per hectare in m3, BAha is basal area per hectare in m2 from a prism sweep and
Ht is the average height of the trees in the stand in m
In reality, trees are more bullet-shaped than cone-shaped. The following equations calculate gross tree volume
inside the bark from BBH measured outside the bark (D) in cm and total tree height in m. Species-specific
coefficients are used to account for differences in shape. In the final step, log10V is converted to volume in m3.
Subalpine fir log10V = -4.292929 + 1.87293 log10D + 0.998274 log10H
Interior spruce log10V = -4.294193 + 1.85859 log10D + 1.00779 log10H
Lodgepole pine log10V = -4.349504 + 1.82276 log10D + 1.10912 log10H
and, volume = 10(log10V)

9
Measuring tree height with a Suunto clinometer and meter tape
Sample calculation:
In case you love trigonometry… http://bigtrees.forestry.ubc.ca/measuring-trees/height-measurements/
Working on level ground
Calculating tree height requires the use of basic
trigonometry: h = Tan A x d, where h is the tree
height, d is the distance from tree, and A is the angle
to the top of the tree. Since your measurements will be
made at eye level, you need to know your eye height
(height of your eye above the ground). The equation
then becomes h = Tan A x d + eye height.
Working on steep terrain
On very steep terrain it is almost impossible to
accurately determine your horizontal distance from the
tree. In situations where the ground is sloped (up or
down) more than 6 degrees (10% slope) you will need
to measure slope distance. Once you measure slope
angle and slope distance, horizontal distance can be
calculated.

10
TOPOGRAPHIC MAPS: ORIENTEERING AND FIELD WORK
OBJECTIVES
To identify and understand the kind of information available in a topographic map
To recognize and interpret standard map symbols
To apply the latitude/longitude and UTM coordinate systems to identify and describe locations
To define three types of map scales: representative-fraction, linear, and verbal
To use map scales to convert map distances to real world distances
To measure and follow directions using a compass bearing or azimuth
To differentiate between magnetic and true north and to compensate for magnetic declination when orienteering or
sailing
To use the topographic map to interpret landform relief and elevations using contour lines
To describe relief in terms of slope aspect and gradient or slope angle
To calculate and express slope angles and stream gradients in percent, degrees or m per k
INTRODUCTION
A topographic map is an essential tool for all foresters and essential when conducting field work safely and efficiently.
The intention of this exercise is to review the fundamental elements of topographic maps so that you can accurately
interpret a mapped area and orient yourself on the map.
What are topographic maps?
A topographic map is a detailed and accurate representation of cultural and natural features on the ground. National
Topographic Systems (NTS) maps have been produced for all areas of Canada and are archived by the Centre for
Topographic Information of Natural Resources Canada (http://maps.nrcan.gc.ca/).
A topographic map is a representation of both natural physical features (such as rivers, vegetation, and relief) and
features built by humans (roads, buildings). It is important to note that a map is drawn by a cartographer and therefore
differs from the kind of visual image that is given by an aerial photograph. Reference information, including map
location, scale, contour intervals, magnetic declination, publishing agency and year of publication, are provided on the
margins of the map. Cartographers use standardized symbols to make maps easy to read and to represent a large number
and variety of features. A complete list of cartographic symbols is available on the margins or the back side of the map
sheet.
USING COORDINATE SYSTEMS
Coordinate systems are used to effectively communicate locations on a map. On Canadian NTS sheets, there are two
kinds of coordinate systems:
Geographic Grid, commonly understood as latitude and longitude, which describes location in degrees, minutes and
seconds.
Universal Transverse Mercator (UTM), which measures distance in metres

11
GEOGRAPHIC GRID
Because the earth is a sphere, a grid system using degrees and angles (like with a circle) was designed to be able to
describe an exact location on earth. This geographic grid coordinate system is formed by parallels of latitude drawn east-
west parallel to the Equator, and by meridians of longitude drawn north-south between the North and South Poles.
Latitude: ranges from 0 (Equator) to 90N (North
Pole) and 90S (South Pole). When describing
latitude, you must specify whether a point is N or S of
the Equator.
Longitude: ranges from 0 (Prime Meridian) to 180E
and 180W (International Date Line). When
describing longitude, you must specify whether a point
is E or W of the Prime Meridian
(from Christopherson, R.W. and G.L. Hobbs. Applied Physical
Geography: Geosystems in the Laboratory 2nd ed. Prentice Hall
©1998).
Latitude and longitude are given in degrees (), followed by increasingly specific units of minutes () and seconds ().
There are 60 seconds in a minute and 60 minutes in a degree. Latitude (N/S) is always stated before longitude (E/W).
Latitude and longitude coordinates are provided for each corner of an NTS map. Black and white bars along the margins
of the map indicate minutes.
The geographic grid coordinates for Vancouver (to the nearest degree) are:
49N 123 W
The geographic grid coordinates for the UBC Forest Science Centre (to the nearest second) are:
4915’55”N 12315’58” W
UTM: Universal Transverse Mercator
An alternative coordinate system is the Universal Transverse Mercator (UTM). This system was designed to accurately
project large landmasses, such as Canada, on a flat map surface. The UTM grid system is well suited for quickly
identifying points on the map, and is more accurate than latitude and longitude when depicting large areas.
The Universal Transverse
Mercator grid covering North
and South America (left)
Grid zone designation and 100
000 m square identification of
the UTM grid (right)
(from Christopherson, R.W. and G.L.
Hobbs. Applied Physical Geography:
Geosystems in the Laboratory 2nd ed.
Prentice Hall ©1998)

12
The UTM system places a rectangular grid over a map and uses the metric system to precisely describe different locations
within the grid. Each rectangle, called a quadrilateral or grid zone, measures 6 longitude by 8 latitude. Nested within
the quadrilaterals are squares measuring 100,000 m by 100,000 m and 100 m by 100 m. The quadrilateral and 100,000 m
square reference codes are given on the map margins and indicate location of the map on Earth.
A 6-digit number identifies specific locations or the 100 m square reference code. Determining a location with UTM is
similar to a finding a point on a mathematical graph by using x and y coordinates. In the case of UTM, the x-coordinate
is geographically along the blue lines oriented east-west on the NTS map, while the y-coordinate is read from the north-
south blue lines. These coordinates are stated as Eastings and Northings. A UTM location is written as six digits. The
first three digits are for the Easting: the first and second digits are read from the map and the third digit is estimated. The
last three digits represent the Northing. When writing UTM locations, it may help to remember to “Read Easting First.”
Example of method used to give a UTM reference to the nearest 100m
Easting: Read number on grid line immediately left of the point = 97
Estimate tenths of a square from this line eastward to the point = 5
Northing: Read number on grid line immediately below the point = 98
Estimate tenths of a square from this line northward to the point = 4
UTM 6-digit reference code: 975984
Full UTM reference code is 11U NF 975 984
MAP SCALE
The relationship between distances on the ground and distances on a map is specified by scale. Scale can take various
forms (representative fraction, linear, verbal), but it is always a ratio between the representation on the map and the
actual distance on the ground.
Graphic or Linear Scale: Most maps provide a graphic (also known as bar or linear) scale to visually illustrate the
relationship between the distance on the map and the distance on the actual ground. This allows you to use a ruler to
measure the distance between two points on the map that can be taken to the graphic scale on the map to calculate the real
world distance. An advantage of the graphic scale is that its representative value holds true if the map is stretched or
enlarged due to reproduction processes. (Note: this only is true with this kind of scale.)
Verbal Scale: The scale on a map is sometimes depicted using words, such as, “One centimetre equals one kilometre.”
This means that one centimetre on the map equals one kilometre on the earth’s surface.
Representative Fraction (RF): The RF scale specifies the ratio of the units on the map to units on the real ground. For
example, all Canadian NTS maps are either 1:50,000 or 1:250,000. For 1:50,000 maps, 1 unit of distance on the map is
equal to 50,000 of the same units of distance on the Earth’s surface.
Example calculations using RF scale:
1 cm on the map = 50 000 cm on the ground
= 0.5 km on the ground (since 100,000 cm = 1 km)
OR
10 cm on the map = 500 000 cm on the ground
= 5.0 km on the ground

13
Large-Scale vs. Small-Scale Maps
The scale of a map influences both the total area that it can represent, and the amount of detail the map shows. Think of
the scale as a ratio value, so that 1:50,000 is half the size of 1:25,000. The 1:50,000 map is a smaller-scale map – it
represents a larger area but less detail.
Maps with scales from 1:600,000 to 1:100,000,000 or smaller are known as small-scale maps; 1:600,000 to 1:75,000 are
medium scale maps; and 1:75,000 or larger are large-scale maps.
Map of Stanley Park and English Bay with scale of
1:50,000. In this smaller-scale map a relatively large
area is depicted but with little detail.
Map of Stanley Park and English Bay with scale of
1:25,000. In this larger-scale map a relatively small
area is depicted but great detail.
MAP ORIENTATION AND DECLINATION WITH THE COMPASS
Compass Bearings and Azimuth
All Canadian NTS maps are oriented so that north is toward the top of the map, and south is toward the bottom. For
review, the common bearings of a compass are North (N), East (E), South (S) and West (W). These compass directions
can also be equated to degrees (azimuth). Note that North is 0or 360, East is 90, South is 180 and West is 270.
Bearings and azimuth in
degrees of a compass
Magnetic Declination
In the margin of maps, you will see a
diagram that suggests that there is more than
one north. There are two lines stemming
from one common point. Pointing straight
up is True North (TN, where the meridians
of longitude lines converge), the reference
point for true geographic north. There is
another line pointing to Magnetic North
(MN) that is the north to which your
compass points. MN is located roughly in
the Northwest Territories of Canada and is
moving poleward at an average speed of 24
km per year. The amount of declination
therefore depends on the year and your
location. Magnetic declination is the
difference between TN (the north on your
map) and MN (where your compass points).
(after Christopherson, R.W. and G.L.
Hobbs. Applied Physical Geography:
Geosystems in the Laboratory 2nd ed.
Prentice Hall ©1998).

14
Example calculation of magnetic declination
Based on the diagram above: in 1974, the magnetic north was 25 44’ East of TN. The amount of declination has been
decreasing by 2.8’ annually.
From 1974 to 2002 (2019 – 1974) = 45 years.
During that time, declination has decreased a total of 28 x 2.8’ = 126’ = 26’0”
Thus, the magnetic declination in 2019 = 25 44’ – 2 6’ 0” = 23 38’ East of TN
Orienteering and Field Work: Compass Azimuth Corrected for Magnetic Declination
If you want to travel from one point on the map to another using a compass, you need to compensate for magnetic
declination to be sure that you are on the right track! First you must establish what year the map was produced and
calculate the rate of declination for the current year. If the MN is to the right of the TN, you must subtract the rate of
declination from your compass bearing. If MN is to the left of TN, its value must be added to your bearing. Another
helpful way to remember when to add or when to subtract the rate of declination is,
“East is least, West is best.”
Reading compass bearings on a map using a protractor (a) and a
magnetic compass (b). (from Busch, R.M. (ed.), Laboratory Manual in
Physical Geography, 3rd Ed. MacMillan Publ. Co. © 1993)
Example determination of a compass bearing corrected for magnetic declination:
Draw a straight line from the start point (“A”) to the point where you would like to go (“B”). Extend the line to the
border of the map (recall: the edges of the map line up with TN).
At border, align the protractor or compass and calculate angle between the border of the map and the line you wish to
travel. Remember, N = 0 and E = 90. In Figure 1.10, azimuth is 42
Next you need to compensate for magnetic declination. For example, if you have calculated the magnetic declination to
be 24 25’ to the right of TN (see Figure 1.9 and calculations), then declination must be subtracted from the azimuth:
42 – 24 25’ = 1735’
In this example, you would therefore set your compass to approximately 1735’ to arrive at your desired destination.

15
TOPOGRAPHIC RELIEF
Topographic maps provide a method of expressing relief of a landform on the land surface. These land features can be
shown on a topographic map by several ways: hill shading, altitude tints, hachures, and contours. The first three methods
provide a strong visual impression of the relief. While these techniques provide the user with a sense of height they lack
a definable elevation from which the user can make measurements. Topographic contours convey both relief and
measures of elevation of landforms. In this exercise you will learn to read and interpret topographic contours.
Contour Lines
A contour is an imaginary line that joins points of
equal elevation above sea level. Contour lines on a map
are the graphic representation of ground contours,
drawn for each of a series of specified elevations, such
as 10, 20, 30, 40 metres above sea level (masl). The
resulting line pattern not only gives a visual impression
of topography, but also supplies accurate information
about elevations and slopes.
(from Strahler, A.H. and A.N. Strahler. Modern
Physical Geography 4th ed. J. Wiley and Sons, Inc.
©1992)
Contour Interval
The contour interval is the vertical distance between adjacent contours. It is indicated on the margin at the bottom of an
NTS map – always check the contour interval of a map. The interval remains constant over the entire map and is selected
by the mapmaker to clearly display the dominant terrain features in the mapped area. Every fifth contour line is an index
contour. The index contours are the easiest contours to see because they are in bold print and have elevation numbers
inserted along the line.
Elevation
Knowing how to determine elevation from a topography map is essential. Exact elevation is provided for points along
contour lines, index contours and benchmarks. A bench mark is prominent landmark or peak that has been precisely
surveyed and is marked on the map with the elevation printed beside it. For points located between successive contours,
elevation is estimated by interpolation, assuming a uniform change in elevation between the two contour lines.
Examples of elevations determined from contour lines
and benchmarks. The contour interval is 100 m. The
elevation of benchmark A is 1750 masl and the
elevation of B, along the contour line, is 1300 masl.
The elevations of C and D are determined by
interpolation. C lies half way between contour lines
1100 and 1200, thus its estimated elevation is 1150
masl. D lies about one-fifth of the distance between
contour lines 1000 and 1100, thus its extimated
elevation is 1020 masl.
(from Strahler, A.H. and A.N. Strahler. Modern
Physical Geography 4th ed. J. Wiley and Sons, Inc.
©1992)

16
Slope Aspect
Most land surfaces are sloping and can be described according to the aspect and angle of the slope. Aspect is the compass
direction that a slope faces. By convention, aspect is measured from the top of the slope toward the bottom of the slope. Example: The slope aspect of the mountains on the north shore of Vancouver is south or north ? Example: The slope aspect of the Point Grey Cliffs, located between the Museum of Anthropology and Wreck Beach, is
south or north ? To measure aspect, a straight line is drawn perpendicular to the contour lines of the slope and the compass direction of
the line is measured.
Gradient and Slope Angle
Gradient measures the steepness of the landscape. Understanding gradient is critical in physical geography as slope
gradient is a critical factor underlying geomorphic processes such as mass movements, river and glacier flow. It is also
critical when choosing uphill hiking routes or downhill ski runs!!
Elevation and slope attributes of an island.
On a topographic map, steep slopes are represented by close
contour lines, while a gentle slope has widely spaced contours.
Test yourself:
Which slope is steeper B-A or B-C?
What is the slope aspect of each of the two slopes?
(after Strahler, A.H. and A.N. Strahler. Modern Physical
Geography 4th ed. J. Wiley and Sons, Inc. ©1992)
Hints for successfully interpreting contour lines:
1. The elevation value of any given contour line is the multiple
of the contour interval.
2. Contour lines never touch or cross one another, except when
the topography being portrayed is a vertical wall.
3. Every contour forms a closed polygon, either within or
beyond the limits of the map. In the latter case, the ends of
the contour will extend to the edge of the map.
4. Uniformly spaced contours indicate a uniform slope.
Widely spaced contours indicate a gentle slope. Contours
that are close together indicate a steep slope.
5. Contours form a “V” along a stream course, with the base of
the “V” pointing upstream.
6. Contours also form a “V” along a ridge or ‘spur’, but the base of the “V” points down the ridge.
7. A contour that forms a closed polygon within the limits of the map represents a hill or rise. If closed contours
are hatchured, they represent a depression. The hatches are directed into the depression.
8. The elevation of a hilltop, unless noted by a bench mark, is estimated. It is somewhere between the value of
the highest contour below the peak and the value of the next contour above the peak (that does not appear on
the map).
9. The elevation of a depression contour is the same as that of the adjacent lower contour, unless otherwise
indicated.

17
Calculating Slope Angle
Slope angle is the change in elevation per unit of horizontal distance.
It can be expressed in two ways:
Percent slope = rise x 100 = vertical distance x 100
run horizontal distance
where: vertical distance is difference between the elevations of the top and bottom of the slope, and horizontal distance is
measured on the map and converted to distance on the ground using the map scale.
Note: Always measure rise and run in the same units
Degree slope = slope angle in degrees = arctangent of the rise / run ratio
the arctangent can be determined using your calculator (arctan, invtan or tan-1 functions)
or you can use this table to determine angle in degrees from the slope tangent (rise / run)
Tangent table for determining slope in degrees
TAN TAN TAN TAN TAN TAN
1 0.02 10 0.18 19 0.34 28 0.53 37 0.75 46 1.04
2 0.03 11 0.19 20 0.36 29 0.55 38 0.78 47 1.07
3 0.05 12 0.21 21 0.38 30 0.58 39 0.81 48 1.11
4 0.07 13 0.23 22 0.40 31 0.60 40 0.84 49 1.15
5 0.09 14 0.25 23 0.42 32 0.62 41 0.87 50 1.19
6 0.11 15 0.27 24 0.45 33 0.65 42 0.90 51 1.23
7 0.12 16 0.29 25 0.47 34 0.67 43 0.93 52 1.28
8 0.14 17 0.31 26 0.49 35 0.70 44 0.97 53 1.33
9 0.16 18 0.32 27 0.51 36 0.73 45 1.00 54 1.38
Note: Both percent slope and degree slope are commonly used. For gentle terrain, where slope is 45or 100%, then
slope is usually described in percent. For steep terrain, with slopes > 45 then slope is expressed in degrees.
Example for calculating slope angle: Peak to Valley Race at Whistler, BC
The Peak to Valley race starts at the Saddle on Little Whistler Peak (2115
masl) and ends at the bottom of the Dave Murray Downhill run at Whistler
Creekside (739 masl). The vertical drop of 1443 m is more than five times the
average vertical of a GS race!!
1. Calculate the rise = net vertical change in elevation from the highest point
(2115 masl) to the lowest point (739 masl)
Rise = 2115 – 739 = 1443 m
2. Calculate the run = the horizontal distance between the start and the finish,
the two points of interest. On my map, the distance 10 cm. The map scale is
1:50,000. Run = 10 x 50,000 = 500,000 cm = 5000 m or 5 km
3. Calculate percent slope = rise / run x 100 = 1443 m / 5000 m x 100 = 29%
4. Calculate degree slope = arctangent of the rise / run ratio = 1443 m / 5000 m = 0.29
arctangent of 0.29 = 16º (either from the table or by calculator)

18
Ecology Plant identification in the ICH zone – Gavin Lake
Scientific Name Common name SMR SNR Key Identifying Features
Shrubs
Alnus incana mountain alder wet-moist med
Cornus stolonifera red-osier dogwood wet-moist med
Linnaea borealis twinflower fresh-moist poor-med
Lonicera involucrata black twinberry wet rich
Oplopanax horridus devil's club wet rich
Paxistima myrsinites falsebox fresh poor
Ribes lacustre black gooseberry fresh-moist rich
Rubus parviflorus thimbleberry fresh rich
Rubus pubescens trailing raspberry fresh-wet rich
Sambucus racemosa red elderberry moist-wet rich
Sorbus scopulina western mountain-ash fresh-moist med
Symphoricarpos albus common snowberry fresh-moist rich
Viburnum edule highbush-cranberry moist rich
Herbs
Actaea rubra baneberry moist-wet rich
Adenocaulon bicolor pathfinder fresh-moist rich
Aquilegia formosa red columbine fresh-moist rich
Aralia nudicaulis wild sarsaparilla fresh-moist rich
Aster conspicuus showy aster fresh-moist rich
Cornus canadensis bunchberry dry-wet poor-rich
Fragaria vesca wood strawberry fresh-moist med
Galium triflorum sweet-scented bedstraw moist rich
Goodyera oblongifolia rattlesnake-plantain fresh poor
Heracleum lanatum cow-parsnip moist-wet rich
Osmorhiza chilensis mountain sweet-cicely moist rich
Petasites palmatus palmate coltsfoot wet rich
Smilacina stellata star-flowered false solomon's seal fresh-moist med-rich
Smilacina racemosa false solomon's-seal fresh-moist med-rich
Streptopus amplexifolius clasping twistedstalk fresh-moist rich
Streptopus roseus rosy twistedstalk fresh-moist rich
Thalictrum occidentale western meadowrue fresh-moist rich
Tiarella trifoliata three-leaved foamflower fresh-moist rich
Viola canadensis Canada violet fresh-moist med-rich
Ferns and allies
Athyrium filix-femina lady fern moist-wet rich
Dryopteris expansa spiny wood fern moist-wet rich
Equisetum arvense common horsetail wet medium
Gymnocarpium dryopteris oak fern moist-wet rich
Mosses and lichens
Ptilium crista-castrensis knight's plume dry-moist poor
Dicranum fuscescens curly heron's-bill moss dry-moist poor
Peltigera spp. pelt lichens dry-moist rich-poor
Pleurozium schreberi red-stemmed feathermoss dry-moist poor-med
Plagiomnium sp leafy moss moist-wet med

19

20

21
Nested Plots following the National Forest Inventory Protocol
Area of circular plots and conversion to 1 ha (10000m2): Radius (m) 1.784 3.568 3.989 5.642 7.979 9.772 11.284 12.616 13.820 14.927 15.958 16.926 17.841
Area (ha) 0.001 0.004 0.005 0.010 0.020 0.030 0.040 0.050 0.060 0.070 0.080 0.090 0.100
Multiplier 1000 250 200 100 50 33.3 25 20 16.7 14.3 12.5 11.1 10
Tree species codes used in BC, common names and scientific names (in Latin): Broadleaved trees
Act black cottonwood Populus balsamifera ssp. trichocarpa
Acb balsam poplar Populus balsamifera ssp. balsamifera
At trembling aspen Populus tremuloides
Dr red alder Alnus rubra
Ep common paper birch Betula papyrifera
Mb bigleaf maple Acer macrophyllum
Qg Garry oak Quercus garryana
Conifers
Ba amabilis fir Abies amabilis
Bg grand fir Abies grandis
Bl subalpine fir Abies lasiocarpa
Bp noble fir Abies procera
Cw western redcedar Thuja plicata
Fd Douglas-fir Pseudotsuga menziesii
Hm mountain hemlock Tsuga mertensiana
Hw western hemlock Tsuga heterophylla
Lt tamarack Larix laricina
Lw western larch Larix occidentalis
Pa whitebark pine Pinus albicaulis
Pl lodgepole pine Pinus contorta
Pw western white pine Pinus monticola
Py ponderosa pine Pinus ponderosa
Sb black spruce Picea mariana
Se Englemann spruce Picea engelmannii
Ss Sitka spruce Picea sitchensis
Sw white spruce Picea glauca
Sx hybrid spruce Picea hybrids
Sxs hybrid Sitka spruce Picea sitchensis x glauca
Sxw hybrid white spruce Picea engelmannii x glauca
Yc yellow-cedar Cupressus nootkatensis

22
Tree, snag and log classes (after Maser et al. 1979, Bartels et al. 1985)
Class 1 Class 2 Class 3 Class 4 Class 5
Foliage Present Absent Absent Absent Absent
Twigs Present Absent Absent Absent Absent
Bark Intact Intact Trace Detached or absent
Detached or absent
Texture Intact Intact to
partly soft
Hard large
pieces
Small, soft blocky
pieces
Soft and powdery
Shape Round Round Round Round to oval Oval
Color of Wood Original color Original color Original to
faded
Light brown to reddish
brown
Red brown to dark
brown
Portion of tree on
ground
Tree elevated on
support points
Tree elevated on
support points but
sagging slightly
Tree sagging
near ground
All of tree on ground All of tree on
ground
Tree height classes https://openoregon.pressbooks.pub/forestmeasurements/chapter/5-3-crown-classes/
Height class (aka crown class) is a term used to describe the position of an individual tree in the forest canopy.
Dominant trees Crowns extend above the general level of the canopy; largest,
fullest crowns; receive full light from above and some light from the sides.
Codominant trees Crowns make up the general level of the canopy; receive direct
light from above, but little or no light from the sides; shorter than dominants.
Intermediate trees Crowns are subordinate; receive some direct light from
above, but no direct light from the sides; crowns narrow and/or one-sided; short
Suppressed trees Crowns are below the general level of canopy; receive no direct
light; short, sparse, narrow crowns; very short
Stage 1
Live
Stage 2
Declining
Stage 3
Dead
Stage 4
Loose bark Stage 5
Clean
Stage 6
Broken
Stage 7
Decomposed
Stage 8
Down
material
Stage 9
Stump
Log Decay Class 1 Log Decay Class 2 Log Decay Class 3 Log Decay Class 4 Log Decay Class 5

23
Visually estimating plant cover http://oregonstate.edu/instruct/bot440/wilsomar/Content/HTM-perarea.htm
To estimate plant cover, use the "zone of influence" approach. Delineate an imaginary boundary around a plant's
crown, then estimate the cover of the zone instead of trying to account for each leaf, stem, and gap.
The outlines show the zones of influence of two plants:
Top plant: relatively simple in outline, with a few simple leaves
clustered together. The zone and the plant border are nearly identical.
Bottom plant: Strongly dissected leaves in a fan-shape rosette are
simplified in the outline of the zone of influence. Nevertheless, estimate
the cover of the area inside the zone.
Hints for success:
Do your best to estimate to single digits (do not round to 5s or 10s)
Work as a team and cross-calibrate with one another
Practice using the visual guides below

24

25
Soil Texture Key Modified from S.J. Thien. 1979. A flow diagram for teaching texture by feel analysis. Journal of Agronomic Education. 8:54-55.

26

27
Explanation of soil horizon codes
Humus Form Classification

28
Soil Nutrient Regime Key

29
Soil Moisture Regime Key

30
Vegetation Summary Tables – Comparison among BEC Zones
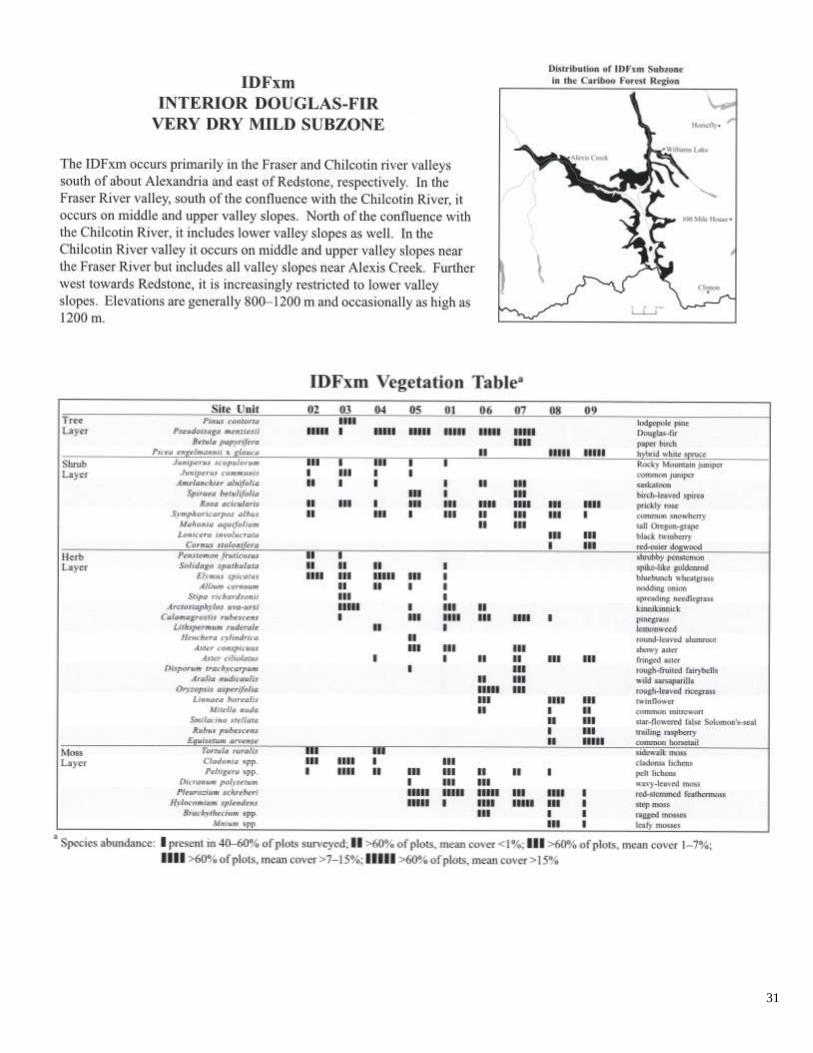
31

32
IDFxm Landscape Profile

33
IDFxm Subzone and IDFxm-IDFdk3 Transition Edatopic Grid

34

35

36
IDFdk3 Landscape Profile

37
IDFdk3 Variant Edatopic Grid

38

39

40
SBSdw1 Landscape Profile

41
SBSdw1 Variant Edatopic Grid

42

43

44
ICHmk3 Landscape Profile
45
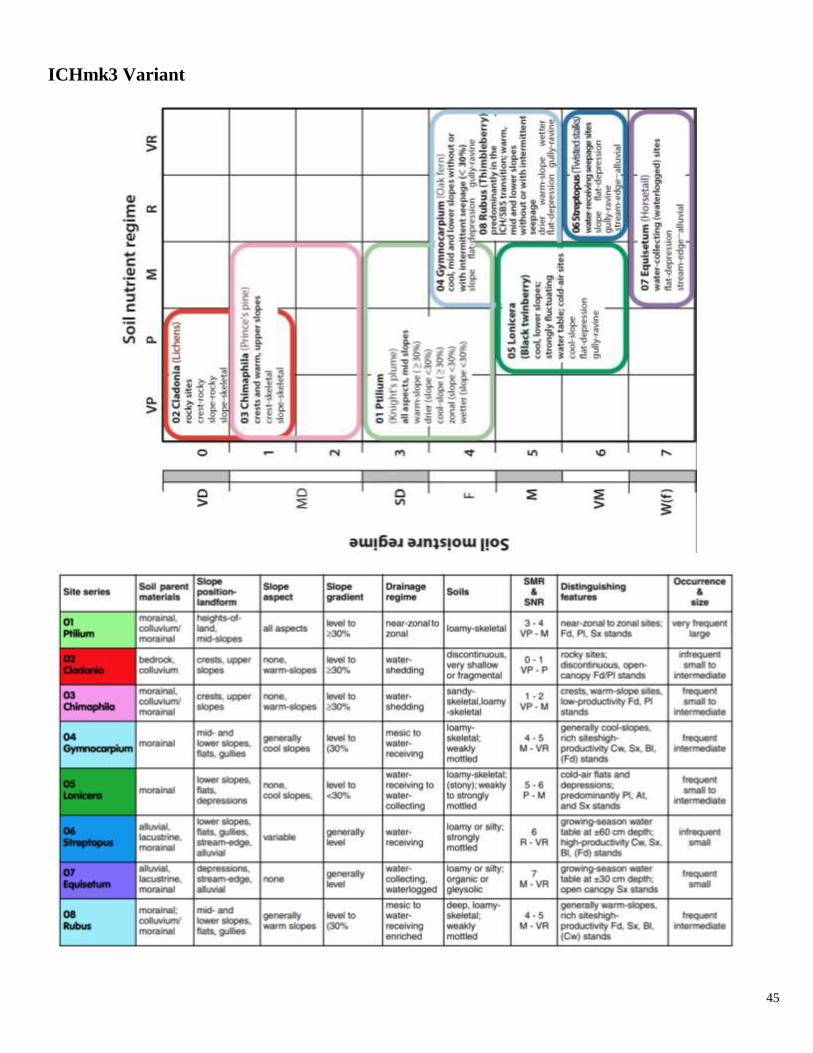
ICHmk3 Variant

46
Fuel Hazards and Fire Severity

47
Forestry and Operations Glossary
AAC – allowable annual cut, the volume of timber that can be harvested from an area of land each year
Air Tankers – either fixed or rotary winged, land-based aircraft designed specifically to drop fire retardant over a fire
Aspect – the direction the slope is facing – north, south, east or west or any point in between
ATV – All Terrain Vehicle
Bird dog – a small, fast, highly, maneuverable aircraft that precedes an air tanker drop. It consists of a pilot and an air
attack officer who assesses the fire behavior and strategizes the effective use of fire retardant.
Brown rot – decay characterized by degradation of cellulose but not lignin in cell walls of wood such that wood appears
brownish and not fibrous
Bucker – a person who cuts trees into specified lengths
Bucking – the act of cutting a felled tree into specified log lengths
BUI – Build-up Index – indicates the amount of fuel available for combustion
Cable yarding – either high-lead, in which a simple loop of cable runs from the yarder out through pulley blocks
anchored to stumps at the far end of the cut or skyline, in which a carriage, pulled by hauling cables, runs along a
skyline cable, providing vertical lift to the logs.
Candling – is a fire that temporarily runs from the ground to the canopy of a single or small group of trees
Cat (crawler tractor, bulldozer) –a tracked machine with a front-mounted blade used for pushing dirt and construction
Cattleguard – is an obstacle placed in a road’s surface to prevent the passage of livestock from a fenced enclosure
Choker – a noose of cable (or rope) used for skidding logs
Cold trailing - is the careful and methodical inspection of burned areas using bare hands to ensure no fire exists – cold to
the touch
Commercial thinning- a.k.a. “thinning from below” is a stand tending technique that removes low-vigour trees of
merchantable size from a stand. The residual stand will continue to grow until harvest at a later point in time
Control line – a combination of human caused and natural barriers from which to take control action on a fire
Conversion factor - the ratio of volume to weight expressed as m3/tonne
Cubic meter - m3
Culvert – a plastic or corrugated metal pipe that drains water from one side of a road to the other
Cut-to-Length or CTL harvest system – trees are felled and processed (topped and limbed) at the stump (location tree
is cut from)
Danger Class – using a combination of BUI and FWI indicates the potential risk of the occurrence of a wildfire for a
given area
Danger trees – any tree, for whatever reason, that has been assessed as a hazard to surrounding workers
Deck – as in ‘a deck of logs’ are logs in a pile usually sorted by species, grade, product
Drip torch – is a burning tool. It contains a mixture of diesel and gas and drips the ignited fuel onto the vegetation.
Drought Code (DC) – moisture condition in the 10 – 20 cm duff layer
Duff (forest floor)– the dead and decomposing organic layer that lies above the soil layer
Duff Moisture Code (DMC) - moisture condition in the 5 – 10 cm duff layer
ETV – Emergency Transport Vehicle (ambulance)
Excavator (hoe) – is a piece of heavy construction equipment consisting of a cab, boom and bucket on a rotating
platform over a tracked under-carriage.
Facultative parasite - an organism that may live as a parasite or lead an independent existence.
Faller – a person who cuts a tree down
Feller-buncher – a harvesting machine that cuts a tree and then piles it in bunches
Feller-processor – a harvesting machine in a cut-to-length harvest operation that cuts a tree and then processes (bucks,
sorts and piles) the tree into specified log lengths at the stump
Felling – the act of cutting down a standing tree
Fine Fuel Moisture Code (FFMC) - moisture condition in the surface litter
Fire retardant – a fertilizer-based mix of water, clay and colouring agent used to retard the growth of a fire until a
ground crew can extinguish the fire.
Fire Weather Index (FWI) – indicates potential fire intensity
Fireline - a trail cut to mineral soil to prevent the spread of a ground or surface fire

48
Forwarder – a wheeled machine used in a cut-to-length harvest operation to move logs from the bush to roadside, differs
from a skidder in that it carries the logs as opposed to dragging the logs along the ground
Free-to-grow (free-growing)- the point at which a stand meets reforestation, species composition, and height
requirements, and is free from competition. It is at this point that a forest company has met its reforestation obligations
Front-end loader – typically a wheeled (or tracked) machine that uses a grapple to load logs onto a logging truck
Fruiting body (or basidiocarps) - multicellular structure specialized for reproduction and containing spores, e.g. conks
and mushrooms
Grade – the longitudinal slope of a road surface
Grades – as in ‘log grades’ is classifying logs based on quality
Grapple – vertical, horizontal or rotating, mechanical arms that grip a tree or logs
Hand tank pump – a metal or plastic backpack tank which holds 18 liters of water. It has a manually operated pump and
is typically used for cooling hot spots.
Hauling – refers to the transportation of logs from the bush to the mill
Hectare – a unit of area, 10,000 m2 or 100 m x 100 m
House logs- are logs used for building log homes
Hypersensitive reaction (in trees) – compartmentalization of wounds (mechanical or insect) or fungal infection with
resin and natural chemicals
Hyphae - threads of structurally and nutritionally connected cells of fungi
Infection centre – small pockets to larger assemblages of trees demonstrating symptoms of pathogenic fungi. Trees may
be dead or symptomatic in the centre while trees along the perimeter show symptoms of initial infection
Initial Spread Index (ISI) – relative fire spread after ignition
Inoculum – spores or mycelia (in the case of fungi) that initiate infection
Ladder fuels – any fuel which will carry a ground or surface fire to the canopy e.g. long grass/dead branches
Landing – a cleared area used for processing and loading of logs
Leave tree- is a tree planned to be left after harvest for a variety of reasons including seed source and wildlife habitat
Log loader – a high mounted cab, boom and grapple mounted on a tracked under-carriage used specifically to load logs
Mop-up – is the suppression task as soon as the fire, or any part of it, is under control
Mycelium – filamentous mass of fungal hyphae
Obligate parasite - An organism that lives in or on another species (host) from which it derives nutrients and cannot lead
an independent nonparasitic existence
OSB-Orientated stand board-chips that are glued and pressed to form a sheet (similar to plywood)
Pathogen - an agent that causes disease. Some fungi are pathogenic to trees
Pathogenicity - ability of an organism to cause disease in its host
Peelers or veneer logs – are logs that will be used for the manufacture of veneer (thin sheets when glued together form
plywood)
Population – is the aggregate of all loads of timer scaled at a scale site owned by the same holder within a forest region
to be sampled in a 12-month period for which estimates of volumes for timber marks, grades and species can be made.
PPE – personal protective equipment
Provincial Crown land- public land, land owned by the people of British Columbia and is the source of most timber in
this province. Forest license holders are charged with forest management and are regulated according to provincial
legislation
Precommercial thinning- a.k.a. “spacing” is a stand tending technique that removes non-merchantable trees in order to
reduce competition and improve the spacing of a stand
Pulaski – a fire fighting tool that is a combination of an axe and grubbing tool
Pulp – a low value log that is mechanically or chemically reduced to its cellulose fibres—typically for paper production.
Relative Humidity (RH) - is the ratio of actual to maximum amount of water vapor in the air at a given temperature
Rhizomorph- root-like organization of hyphae that allows greater potential for environmental exploration and nutrient
transport (looks like black shoelaces).
Right-of-way, also R/W or RoW – is a cleared strip of land through which a road, fence, hydro or gas transmission line,
etc extend
Roadside – the area adjacent to a road used for sorting and loading of logs, alternative to using a landing
Salvage – as in ‘salvage logging’ is the harvesting method to recover dead or dying timber that will still yield a forest
product

49
Sample load – a randomly chosen weight sample that will be piece scaled to derive a conversion factor to be applied to
that stratum
Sawlogs – logs that will used for the manufacture of dimension lumber
Scaling – measuring the length and diameter of logs and calculating defects to determine the firmwood content (volume)
Signs – the physical appearance of a pathogen, e.g. fungal fruiting body, rhizomorph, mycelial fan
Skid trail – a temporary trail for repetitive use by skidders or forwarders to remove trees or logs from the stump to a
landing or roadside. Stumps are cut low but not removed.
Skidder – a wheeled or tracked machine (line or grapple) that drags whole trees or logs from the stump to a processing
area
Skidding – the act of dragging logs or trees from the bush
Slash – debris left on the ground after harvesting once the logs are removed
Slashing – cutting of damaged and unwanted specimens remaining in the understorey immediately following harvesting
Sleeper – a smouldering fire hidden in deep duff or rotten wood, roots, etc that may remain undetected for days or weeks
with no visible smoke or flame
Slope – the angle of the ground measured from the horizontal
Snags – dead or dying standing trees
Sorts – piles of logs sorted by any of species, grade, length and product or any combination of these
Spore – a single- to multi-cellular reproductive body in a fungus often persistent for long durations and distributed by
wind
Spot fires – small fires < 0.1 hectare in size or fires (of any size) caused by dropped embers ahead of a large, fast moving
fire
Spur road – a branch of a main or secondary road
Stratification- is the classification of an area into defined zones based on microclimate and stand structure
Stratum – a subdivision of a weight scale population into groups of truckloads that have similar qualities (e.g., timber
mark, stumpage value, and ownership or quality)
Stem decay – wood decay in stems of living trees, including root and butt rot. Trees that have stem decay located within
the inner wood can survive for many years but will die quickly if infected by pathogenic fungi that kill the cambium.
Stumpage – the price that must be paid to the provincial government for trees harvested on Crown land.
Symptoms – change in appearance of host tissues in response to disease, e.g. tree crown thinning, resinosis, and decay in
response to stem decay
Tenure – The agreement with the government that allows a private company, community, or individual to harvest timber
or range livestock on public land.
Timber mark – identifies the specific cutting authority or geographic location where the timber was harvested
Timber type- a group of trees that differs from surrounding trees in species composition and/or stand structure
Tonne – a unit of mass, 1000 kg
Tracks – a continuous tread of steel plates (caterpillar track) driven by two or more wheels (sprockets) providing traction
on heavy equipment. A pair of tracks with driving mechanism (but not engine) is known as the under-carriage.
Value added Log (Specialty log) – a high value log sorted for its quality features-typically a round house log or timber
log for the manufacture of squared timbers.
Weigh scaling – is a sampling method where all truckloads are weighed and samples are selected at random to determine
volume and grade.
White rot – decay characterized by degradation of all components in cell walls of wood such that the wood appears
whitish and fibrous
Widowmaker – an over-head hazard consisting of a dead branch or tree top that has broken off the main stem of the tree
and remains suspended in the branches – may become dislodged with a gust of wind or movement of the tree
Wildlife tree patches- are groups of trees within or adjacent to a cutblock that are selected to be left for wildlife habitat
and to maintain stand-level biodiversity
Windthrow, also blowdown – trees blown over (uprooted) by strong winds
Yarder - is a piece of harvesting equipment which uses a system of cables to pull or fly logs from the stump to the
landing or roadside
Yarding – moving logs from the stump to a landing or roadside by means of a cable system – can also be applied to
winching and helicopter logging.


