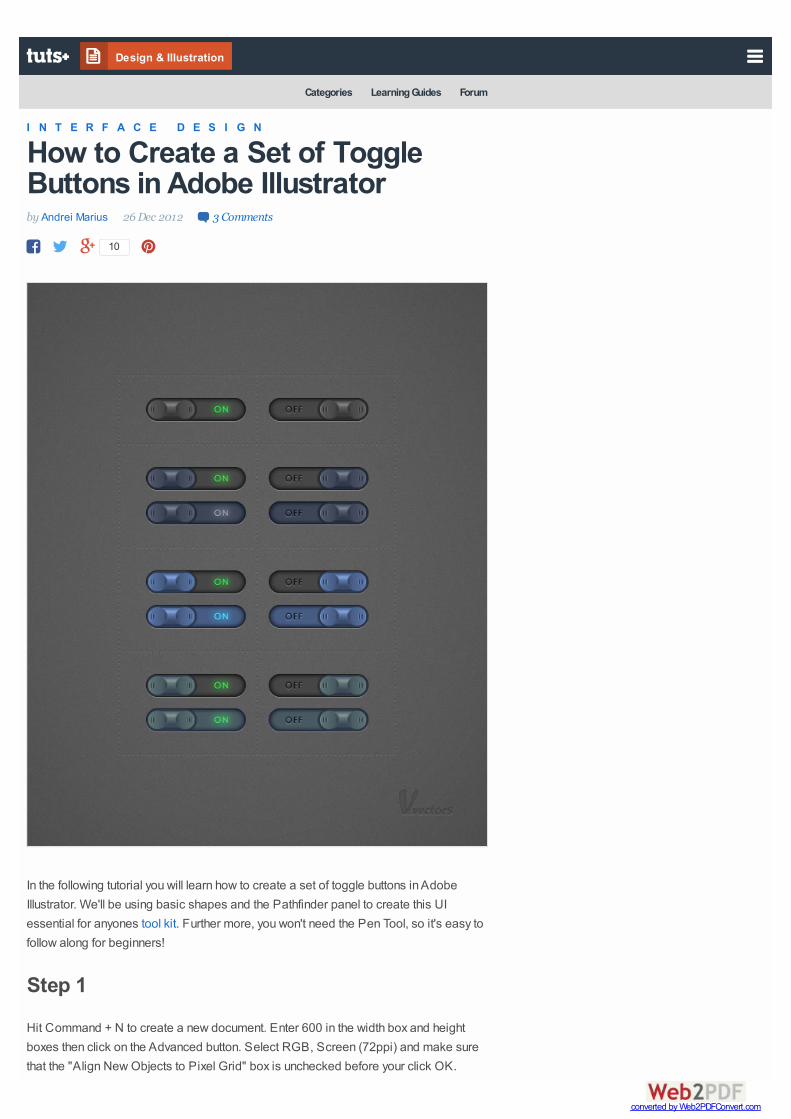
In the following tutorial you will learn how to create a set of toggle buttons in AdobeIllustrator. We'll be using basic shapes and the Pathfinder panel to create this UIessential for anyones tool kit. Further more, you won't need the Pen Tool, so it's easy tofollow along for beginners!
30
Categories Learning Guides Forum Design & Illustration In the following tutorial you will learn how to create a set of toggle buttons in Adobe Illustrator. We'll be using basic shapes and the Pathfinder panel to create this UI essential for anyones tool kit . Further more, you won't need the Pen Tool, so it's easy to follow along for beginners! Step 1 Hit Command + N to create a new document. Enter 600 in the width box and height boxes then click on the Advanced button. Select RGB, Screen (72ppi) and make sure that the "Align New Objects to Pixel Grid" box is unchecked before your click OK. I N T E R F A C E D E S I G N How to Create a Set of Toggle Buttons in Adobe Illustrator by Andrei Marius 26 Dec 2012 3 Comments 10 converted by Web2PDFConvert.com
Transcript
Categories Learning Guides Forum
Design & Illustration
In the following tutorial you will learn how to create a set of toggle buttons in AdobeIllustrator. We'll be using basic shapes and the Pathfinder panel to create this UIessential for anyones tool kit. Further more, you won't need the Pen Tool, so it's easy tofollow along for beginners!
Step 1
Hit Command + N to create a new document. Enter 600 in the width box and heightboxes then click on the Advanced button. Select RGB, Screen (72ppi) and make surethat the "Align New Objects to Pixel Grid" box is unchecked before your click OK.
I N T E R F A C E D E S I G N
How to Create a Set of ToggleButtons in Adobe Illustratorby Andrei Marius 26 Dec 2012 3 Comments
Enable the Grid (View > Show Grid) and the Snap to Grid (View > Snap to Grid).
Next, you need a grid every 5px. Go to Edit > Preferences > Guides > Grid, enter 5 inthe Gridline every box and 1 in the Subdivisions box. You can also open the Info panel(Window > Info) for a live preview with the size and position of your shapes. Do notforget to replace the unit of measurement to pixels from Edit > Preferences > Unit >General. Al these options will significantly increase your work speed.
Step 2
Using the Rectangle Tool (M), create a 215 by 255px shape, fill it with R=70 G=70B=70 and go to Effect > Stylize > Rounded Corners. Enter a 15px radius, click OK andgo to Object > Expand Appearance.
Disable the Snap to Grid (View > Snap to Grid) then go to Edit > Preferences >General and make sure that the Keyboard Increment is set at 1px. Reselect the shapemade in the previous step and make two copies in front (Control + C > Control + F >Control + F). Select the top copy and move it 1px down using the down arrow from yourkeyboard. Reselect both copies, open the Pathfinder panel and click on the MinusFront button. Fill the resulting shape with R=20 G=20 B=20.
Reselect the rounded rectangle made in the second step and focus on the Appearancepanel. First, select the fill and go to Effect > Stylize > Inner Glow. Enter the data shownbelow, click OK then go to Effect > Stylize > Drop Shadow. Again, enter the datashown in the following image and click OK. Make sure that your shape is still selected,return to the Appearance panel and add a 5pt, black stroke. Select its, lower itsOpacity to 5% and align it to inside. Keep focusing on the Appearance panel and adda second stroke for your shape using the Add New Stroke button. Select this newstroke, set its color at black, make it 2pt wide, lower its Opacity to 20% and align it toinside.
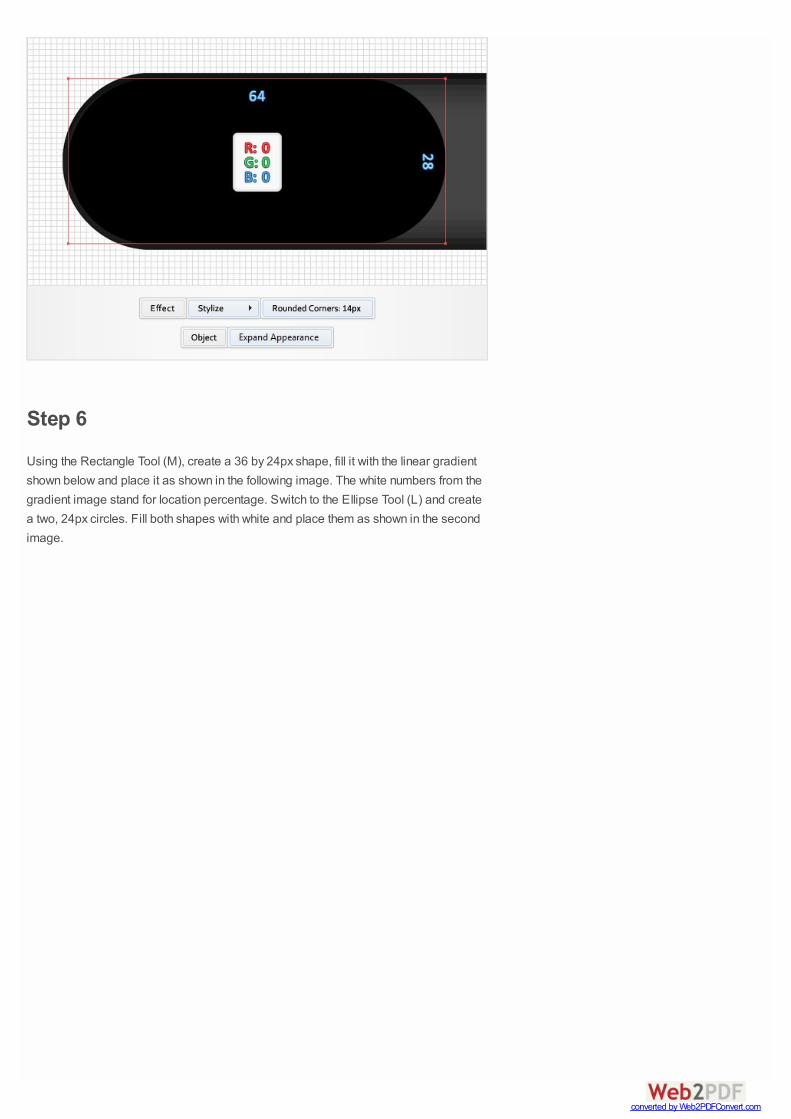
Enable the Snap to Grid (View > Snap to Grid). For the following steps you will need agrid every 1px. So, go to Edit > Preferences > Guides & Grid and enter 1 in theGridline every box. Using the Rectangle Tool (M), create a 64 by 28px shape, fill it withblack, place it as shown in the following image and go to Effect > Stylize > RoundedCorners. Enter a 14px radius, click OK and go to Object > Expand Appearance.
Using the Rectangle Tool (M), create a 36 by 24px shape, fill it with the linear gradientshown below and place it as shown in the following image. The white numbers from thegradient image stand for location percentage. Switch to the Ellipse Tool (L) and createa two, 24px circles. Fill both shapes with white and place them as shown in the secondimage.
Reselect the three shapes made in the previous step and duplicate them (Control + C> Control + F). Select these copies and click on the Minus Front button from thePathfinder panel. Move to the Layers panel, double click on the resulting shape andname it "Top".
Reselect "Top" along with the right, white circle and duplicate them (Control + C >Control + F). Select the copy of the circle and move it 1px to the left using the left arrowfrom your keyboard. Reselect both copies and click on the Intersect button from thePathfinder panel. Fill the resulting shape with the linear gradient shown below andchange its Blending Mode to Soft Light. Again, the white numbers from the gradientimage stand for location percentage while the yellow zeros stand for Opacitypercentage.
Reselect "Top" along with the left, white circle and duplicate them (Control + C >Control + F). Select the copy of the circle and move it 1px to the right using the rightarrow from your keyboard. Reselect both copies and click on the Intersect button fromthe Pathfinder panel. Fill the resulting shape with the linear gradient shown below andchange its Blending Mode to Soft Light.
Reselect "Top" and make a copy in front (Control + C > Control + F). Using theRectangle Tool (M), create a 20 by 4px shape and place it as shown in the secondimage. Select this new rectangle along with the copy made in the beginning of the stepand click on the Intersect button from the Pathfinder panel. Fill the resulting shape withwhite and lower its Opacity to 10%.
Reselect "Top" and make a copy in front (Control + C > Control + F). Using theRectangle Tool (M), create a 36 by 3px shape and place it as shown in the secondimage. Select this new rectangle along with the copy made in the beginning of the stepand click on the Intersect button from the Pathfinder panel. Fill the resulting shape withblack and lower its Opacity to 20%.
Reselect the black rounded rectangle made in the fifth step and duplicate it (Control +C > Control + F). Select this new copy along with the two, white circle and click on theMinus Front button from the Pathfinder panel. Fill the resulting shape with R=45 G=45B=45.
Reselect the black rounded rectangle made in the fifth step and go to Effect > Stylize >Drop Shadow. Enter the data shown in the left window, click OK and go again to Effect> Stylize > Drop Shadow. Enter the data shown in the right window and click OK.
Using the Ellipse Tool (L), create a new 24px circle, fill it with the first linear gradientand place it as shown in the first image. Select this new shape and make two copies infront (Control + C > Control + F > Control + F). Select the top copy and move it 1px tothe right. Reselect both copies and click on the Minus Front button from the Pathfinderpanel. Fill the resulting shape with the linear gradient shown in the third image andlower its Opacity to 15%.
Reselect the circle made in the previous step and make two copies in front (Control +C > Control + F > Control + F). Select the top copy and move it 1px to the left. Reselectboth copies and click on the Minus Front button from the Pathfinder panel. Fill theresulting shape with the linear gradient shown in the third image and lower its Opacityto 15%.
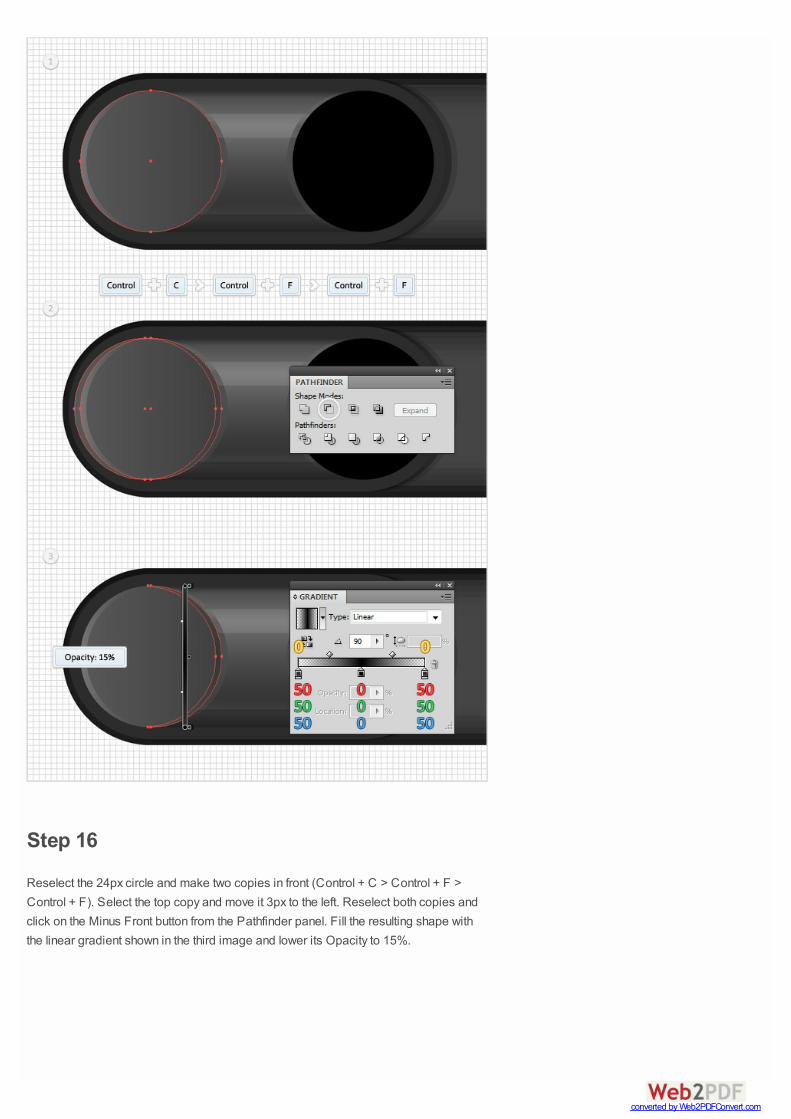
Reselect the 24px circle and make two copies in front (Control + C > Control + F >Control + F). Select the top copy and move it 3px to the left. Reselect both copies andclick on the Minus Front button from the Pathfinder panel. Fill the resulting shape withthe linear gradient shown in the third image and lower its Opacity to 15%.
Using the Rectangle Tool (M) and create two, 1 by 6px shapes, one black and the otherwhite. Place them as shown in the first image and go to Effect > Stylize > RoundedCorners. Enter a 0.5px radius, click OK and go to Effect > Distort & Transform >Transform. Enter the data shown in the second image and click OK.
Reselect the black rounded rectangle made in the previous step and go to Object >Expand Appearance. Turn the resulting group of shapes into a Compound Path(Object > Compound Path > Make), fill it with R=120 G=120 B=120 and change theBlending Mode to Multiply.
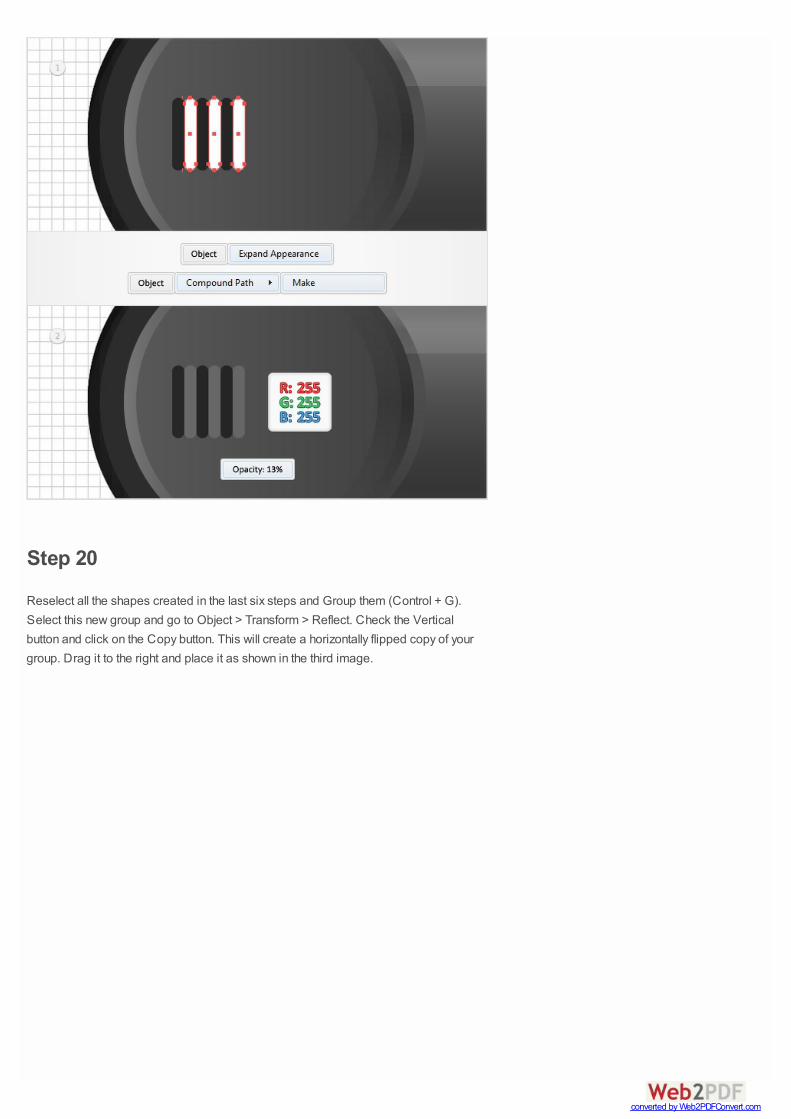
Reselect the white rounded rectangle made in the seventeenth step and go to Object >Expand Appearance. Turn the resulting group of shapes into a Compound Path(Object > Compound Path > Make) and lower its Opacity to 13%.
Reselect all the shapes created in the last six steps and Group them (Control + G).Select this new group and go to Object > Transform > Reflect. Check the Verticalbutton and click on the Copy button. This will create a horizontally flipped copy of yourgroup. Drag it to the right and place it as shown in the third image.
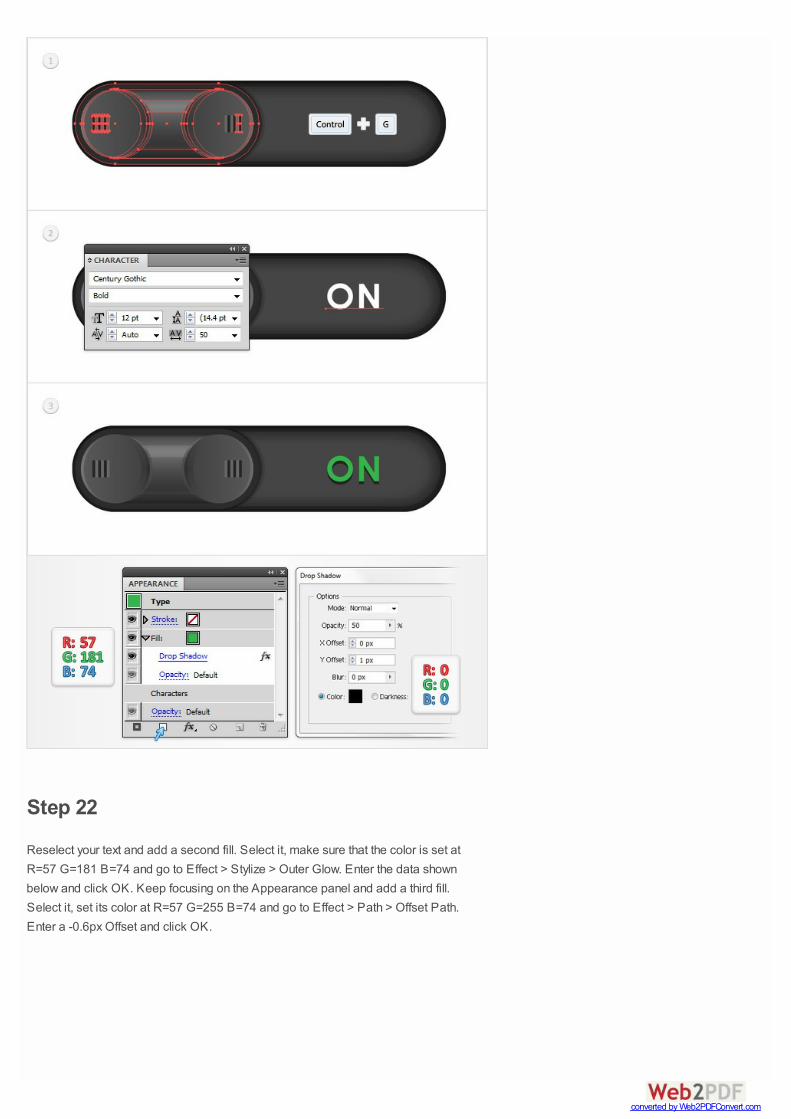
Select all the shapes created in the last 15 steps (the shapes that make up the button)and group them (Control + G). Move to the Layers panel and name this new group"Button". Disable the Snap to Grid (View > Snap to Grid). With the Type Tool (T), add"ON" as shown in second image. Use the "Century Gothic" font with the style set atBold and the size set at 12pt. Select this text, focus on the Appearance panel and adda new fill using the Add New Fill button. Select it, set its color at R=57 G=181 B=74and go to Effect > Stylize > Drop Shadow. Enter the data shown below and click OK.
Reselect your text and add a second fill. Select it, make sure that the color is set atR=57 G=181 B=74 and go to Effect > Stylize > Outer Glow. Enter the data shownbelow and click OK. Keep focusing on the Appearance panel and add a third fill.Select it, set its color at R=57 G=255 B=74 and go to Effect > Path > Offset Path.Enter a -0.6px Offset and click OK.
Select all the shapes created so far and group them (Control + G). Make a copy of thisnew group and move it to the right as show in the second image. Focus on this newgroup and remove the text. Next, select the "Button" and move it 64px to the right.Focus on the Layers panel and drill down into your "Button" group. Select the bottom,black rounded rectangle and focus on the Appearance panel. Open the two DropShadow effects and inverse the X Offset (simply replace 1px with -1px).
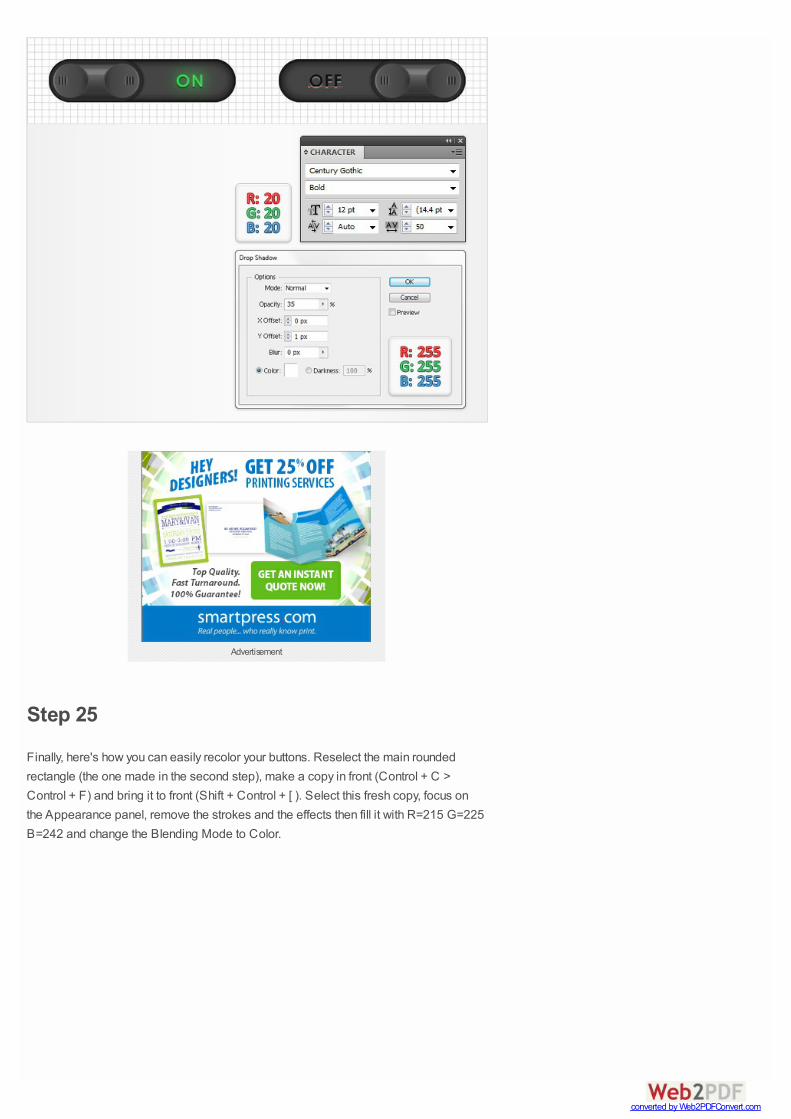
Keep focusing on the second group made in the previous step and add the "OFF". Setits color at R=20 G=20 B=20 and use the "Century Gothic" font with the style set atBold and the size set at 12pt. Also, add the discrete Drop Shadow shown in thefollowing image.
Finally, here's how you can easily recolor your buttons. Reselect the main roundedrectangle (the one made in the second step), make a copy in front (Control + C >Control + F) and bring it to front (Shift + Control + [ ). Select this fresh copy, focus onthe Appearance panel, remove the strokes and the effects then fill it with R=215 G=225B=242 and change the Blending Mode to Color.
I'm a self taught vector artist trying to make a living doing something that I like. I spend most of my time working in Adobe Illustrator, avoiding the Pen Tooland struggling to find the perfect colors. You can find all my vector experiments at this little website dedicate to Illustrator, VforVectors.com.
Vector Avatar Creation for Beginners $15
Create a Copper Pipe Text Effect in Adobe IllustratorDesign & Illustration
How to Create a Detailed Bullet Chain Pattern Brush in Adobe IllustratorDesign & Illustration
How to Create a Twisted Balloon Text Effect in Adobe IllustratorDesign & Illustration