51
IBM Electronic Service Agent for iSeries and AS/400e 06/19/02 IBM Electronic Service Agent for iSeries and AS/400e Screen Shot Guide and Expert Guide Release 5.1

IBM Electronic Service Agent for iSeries and AS/400e 06/19/02
IBM Electronic Service Agent for iSeries and AS/400e
Screen Shot Guide and Expert Guide Release 5.1

IBM Electronic Service Agent for iSeries and AS/400e 6/19/02
2
SECOND Edition (June 2002) This edition applies to release 5.1 of Electronic Service Agent for iSeries and AS/400e Screen Shot Guide and to all subsequent releases and modifications until otherwise indicted in new editions. Copyright © 1992, 1993, 1994, 1995, 1996, 1997, 1999, 2000, 2001 International Business Machines Corporation (IBM). All Rights Reserved. No part of this computer software (or documentation) may be reproduced or transmitted in any form or in any way, or by any means, without written permission from the International Business Machines Corporation.

IBM Electronic Service Agent for iSeries and AS/400e 6/19/02
3
Contents
Introduction .………………………………………………………… 4 Chapter 2. Requirements …………………………………………... 5 Requirements for Hardware problem reporting ……………………………… 6 Requirements for System inventory collection and transmission ……………. 8 Requirements for the Connection to IBM……….………………………………11 Chapter 3. Prerequisites …………………………………………… 13 If you require assistance ………………………………………………………… 16 Chapter 4. How do I Obtain Electronic Service Agent? ………… 25 Preload …………………………………………………………………………… 25 CD ………………………………………………………………………………… 26 Chapter 5. How do I Install and Set up Electronic Service Agent?. 27 Chapter 5.5. Expert Guide for Install and Set up ………………. 49

IBM Electronic Service Agent for iSeries and AS/400e 6/19/02
4
V5R1 Screen Shot and Expert Guide Introduction Important! This guide is provided as a supplement to the V5R1 IBM Electronic Service Agent for iSeries and AS/400e User Guide, for Chapters 2 through 5 only! It contains multiple example screen-shots, as well as the 'Dial-up Connection using the AT&T Global Network Services (AGNS)' connection path / option that is used when you run the Universal Connection Wizard. This guide is available at http://publib.boulder.ibm.com/as400_sd/sdsadoc.html Note: ‘Dial-up connection using AT&T Global Network Services’ - This connection is made across the AT&T Global Network Service (AGNS), which provides a secure connection between the customer and IBM. Authentication occurs when a connection is made to AGNS. At that time, AGNS assigns an IP address to the customer’s Point-to-Point Protocol (PPP) client. This new edition includes Chapter 5.5, which is an ‘Expert Guide for Install and Set Up of Electronic Service Agent’ for customers who are very familiar with product installations and Operations Navigator functions. Chapter 5.5 does not have screen shots. You may use Chapters 2 through 5 or Chapter 5.5 to set up Electronic Service Agent based on your expertise.

IBM Electronic Service Agent for iSeries and AS/400e 6/19/02
5
Chapter 2. Requirements
This section presents the necessary requirements, broken down by function (Hardware problem reporting and System inventory collection and transmission), for Electronic Service Agent. Note: HPR is a Hardware Problem Reporting prerequisite, and SCT is a System Inventory Collection and Transmission prerequisite.

IBM Electronic Service Agent for iSeries and AS/400e 6/19/02
6
REQUIREMENTS for Hardware problem reporting:
If the following requirements are not met, you cannot set up Hardware problem reporting. If you would also like System inventory collection and transmission set up, reference section ‘REQUIREMENTS for System inventory collection and transmission’.
��Date format - Verify the date format (system value QDATFMT) is something other
than JUL (Julian). To check or change this system value, type WRKSYSVAL QDATFMT on an iSeries or AS/400e command line and press Enter. Important! If the date format is JUL (Julian), and you do not want to change this, you cannot continue with the installation.
System Value - QDATFMT
System Value - QDATFMT

IBM Electronic Service Agent for iSeries and AS/400e 6/19/02
7
��Problem log filter - Verify that hardware problem reporting (Service Director) can have use of the problem log filter (system value QPRBFTR). To check this system value, type WRKSYSVAL QPRBFTR on an iSeries or AS/400e command line and press Enter. Important! If system value QPRBFTR is set to something other than *NONE or SDFILTER and you do not want to change this, you cannot continue with the installation.
System Value - QPRBFTR
System Value - QPRBFTR
��Modem –
��If you plan to ONLY install and set up Hardware problem reporting, go to the ‘REQUIREMENTS for the Connection to IBM’ section on page 11.
��If you plan to install and set up System inventory collection and transmission,
in addition to Hardware problem reporting, go to the ‘REQUIREMENTS for System inventory collection and transmission’ section on page 8.

IBM Electronic Service Agent for iSeries and AS/400e 6/19/02
8
REQUIREMENTS for System inventory collection and transmission: If the following requirements are not met, you cannot set up System inventory collection and transmission. If you would still like Hardware problem reporting set up, see section ‘REQUIREMENTS for Hardware problem reporting’. ��Personal Computer (PC) - Verify that a PC is attached to the iSeries or AS/400e. ��Client Access Express –
��iSeries or AS/400e • Client Access Express for Windows V5R1 (5722-XE1) must be
installed. Use command DSPSFWRSC to verify.
��PC • Client Access Express for Windows V5R1 must be installed (CD
publication number SK3T-4098). For information on installing and configuring Client Access Express, see: http://publib.boulder.ibm.com/html/as400/infocenter.html. Select V5R1 and a language and click GO. Expand Client Access Express from the navigation bar. (During the install, choose the ‘Full’ install option from the ‘Type of Installation’ window.) Note: Ensure you have set up TCP/IP on your PC as described in the information provided. You can choose to do this now or after the next bullet (install the latest service pack) below. Note: You will use Operations Navigator, a function of Client Access, to configure the communications connection.
• The latest V5R1 Client Access service pack must be installed. The
service pack contains the Universal Connection Wizard, which will be used to configure your Universal Connection. The service packs are available for download at: http://www.ibm.com/servers/eserver/iseries/clientaccess/. Select Service Packs from the Navigation bar. Note: To check your current service pack level (from your PC), click Start from the task bar, select Settings, click Control Panel and double-click Client Access. The service level, found under the General tab, shows the latest service pack installed.

IBM Electronic Service Agent for iSeries and AS/400e 6/19/02
9
��QRETSVRSEC – Verify that system value QRETSVRSEC on your iSeries or AS/400e is set to ‘1’. To check this system value, type WRKSYSVAL QRETSVRSEC on an iSeries or AS/400e command line and press Enter. If system value QRETSVRSEC is NOT set to ‘1’ and you do not want to change this, you cannot continue with the installation. Note: If you changed system value QRETSVRSEC to a ‘1’, remember this for reference in a future chapter.
System Value - QRETSVRSEC
System Value - QRETSVRSEC
IBM Electronic Service Agent for iSeries and AS/400e 6/19/02
10
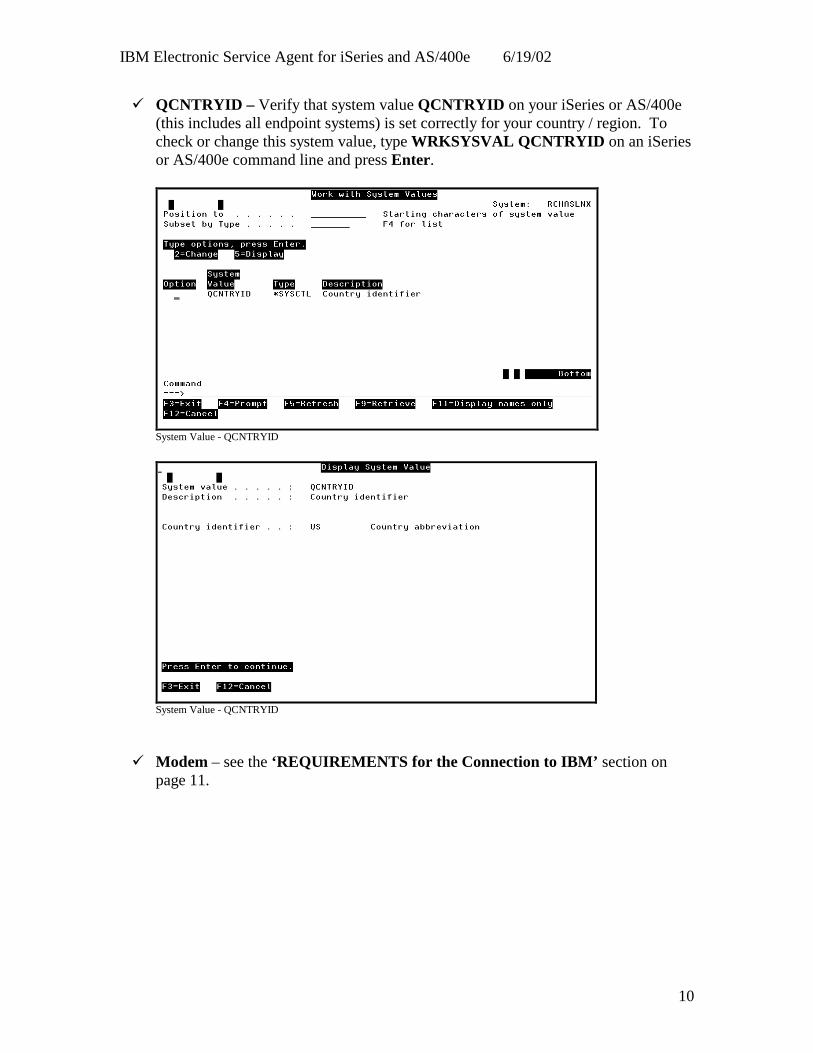
��QCNTRYID – Verify that system value QCNTRYID on your iSeries or AS/400e (this includes all endpoint systems) is set correctly for your country / region. To check or change this system value, type WRKSYSVAL QCNTRYID on an iSeries or AS/400e command line and press Enter.
System Value - QCNTRYID
System Value - QCNTRYID
��Modem – see the ‘REQUIREMENTS for the Connection to IBM’ section on
page 11.

IBM Electronic Service Agent for iSeries and AS/400e 6/19/02
11
REQUIREMENTS for the Connection to IBM: The connection to IBM for System inventory collection and transmission is made using TCP/IP through Universal Connection. If you need additional information to determine which option you would like to use for your TCP/IP connection (e.g. Dial up connection using AT&T Global Network), see the iSeries Universal Connection for Electronic Support & Electronic Services Redbook at: http://www.redbooks.ibm.com/redpieces/pdfs/sg246224.pdf The connection to IBM for Hardware problem reporting is made using the ECS link with either SDLC or TCP/IP on your iSeries or AS/400e.
��To configure ECS with SDLC, see: http://publib.boulder.ibm.com/html/as400/infocenter.html. (Select V5R1 and a language and click GO. Expand Systems Management, expand Getting started with iSeries, expand Making your system operational, expand Adding electronic customer support and select Configuring SNA connection to electronic customer support).
��To configure ECS with TCP/IP, see:
http://publib.boulder.ibm.com/html/as400/infocenter.html. (Select V5R1 and a language and click GO. Expand Systems Management, expand Getting started with iSeries, expand Making your system operational, expand Adding electronic customer support and select Configuring Universal Connection).
For additional information on Universal Connection, see the iSeries Universal Connection for Electronic Support & Electronic Services Redbook at: http://www.redbooks.ibm.com/redpieces/pdfs/sg246224.pdf
The rest of the information in this chapter is related to modems. If you determined that you would be using a modem for your connection(s), see the following modem requirements. You will then be directed to Chapter 3. ‘Prerequisites’. ��Modem(s) - Verify that a modem(s) with an attached phone line is available: Note: An internal modem (2771) is shipped with new V5R1 systems.

IBM Electronic Service Agent for iSeries and AS/400e 6/19/02
12
The following table can be used to help determine the functions that can be set up depending on your modem(s). Additional information is located below the table.
Hardware problem reporting
(formerly Service Director) System inventory collection and transmission
Synchronous X Asynchronous (includes the 2771 internal modem) X * X
Dual model X X * If this modem is to be used for Hardware problem reporting, ECS must also be configured to use TCP/IP. Synchronous – If you only have a synchronous modem (examples: IBM 7855, IBM 7857, or IBM 7858), only Hardware problem reporting can be setup.
Asynchronous – (includes the 2771 internal modem) If you have an asynchronous modem (examples: 2771 internal, IBM 7855, IBM 7857, or IBM 7858), both Hardware problem reporting and System inventory collection and transmission can be set up.
Note: If you will be using a non-IBM modem, any asynchronous modem that supports the RS232 serial interface and the V.34/V.42 protocol (V.90 is optional) can be used for this function. Typically, the default modem setting DSR (Data Set Ready) must be overridden. For an iSeries or AS/400e system to detect a hang-up, DSR must be set to follow CD (Carrier Detect). Refer to the modem manual for more information.
Dual model - If you have a dual model modem (example: IBM 7852-400 - this modem supports switching between synchronous and asynchronous modes), both Hardware problem reporting and System inventory collection and transmission can be set up.

IBM Electronic Service Agent for iSeries and AS/400e 6/19/02
13
Chapter 3. Prerequisites
If you are setting up Hardware problem reporting, reference the HPR items that follow. If you are setting up System inventory collection and transmission, reference the SCT items that follow. �� (HPR and SCT)
Verify OS/400 is V5R1.
To check the OS/400, type DSPSFWRSC on an iSeries or AS/400e command line and press Enter. Press F11 to display libraries/releases.
Display Software Resources
�� (HPR and SCT)
You must have *ALLOBJ, *IOSYSCFG and *SECADM special authorities in your iSeries or AS/400 user profile to setup Electronic Service Agent.
To check your special authorities, type DSPUSRPRF user profile on an iSeries or AS/400e command line and press Enter. Important! A user without *ALLOBJ authority would need to have specific authority to these objects to setup Electronic Service Agent AND to collect and send inventory information to IBM. See Appendix A. (in the V5R1 IBM Electronic Service Agent User Guide) for the specific authorities required.

IBM Electronic Service Agent for iSeries and AS/400e 6/19/02
14
Display User Profile
Display User Profile

IBM Electronic Service Agent for iSeries and AS/400e 6/19/02
15
�� (HPR) Verify the Work with Contact Information (WRKCNTINF) is filled in with the customer’s information. To check or change this information, type WRKCNTINF on a command line and press Enter. From the Work with Support Contact Information menu, type the option number to Work with local service information and press Enter.
Work with Support Contact Information
Work with Support Contact Information
IBM Electronic Service Agent for iSeries and AS/400e 6/19/02
16
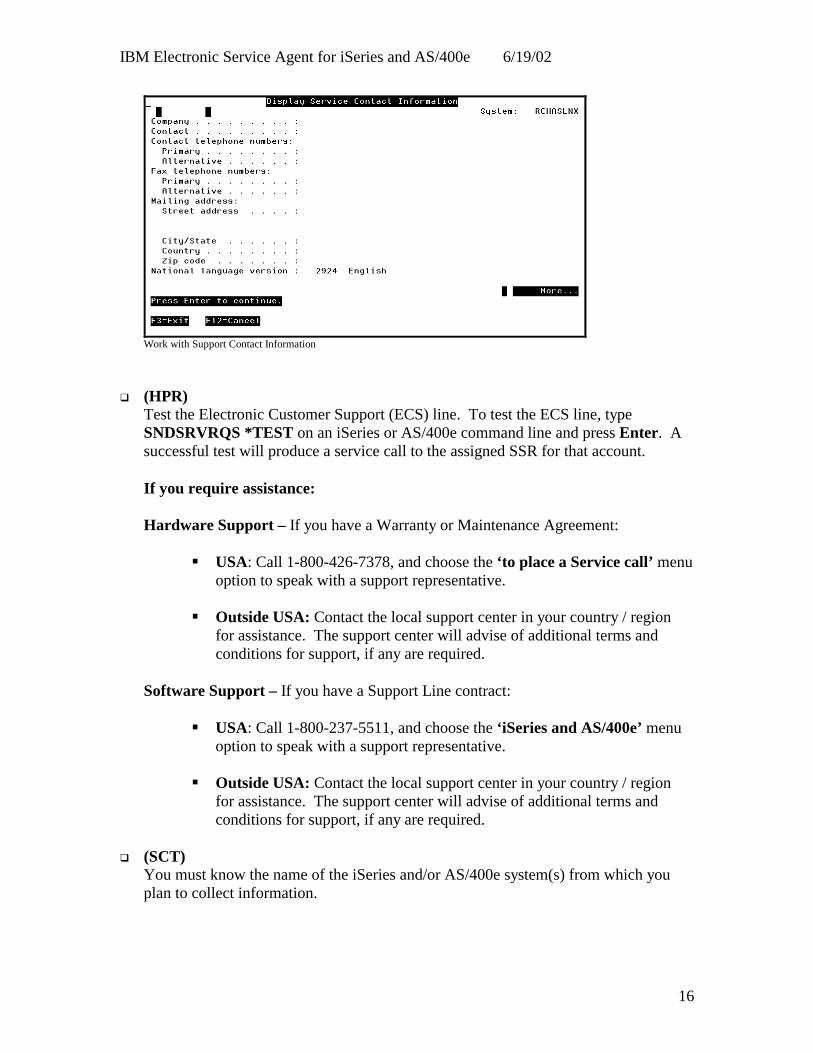
Work with Support Contact Information
�� (HPR)
Test the Electronic Customer Support (ECS) line. To test the ECS line, type SNDSRVRQS *TEST on an iSeries or AS/400e command line and press Enter. A successful test will produce a service call to the assigned SSR for that account.
If you require assistance:
Hardware Support – If you have a Warranty or Maintenance Agreement:
��USA: Call 1-800-426-7378, and choose the ‘to place a Service call’ menu option to speak with a support representative.
��Outside USA: Contact the local support center in your country / region for assistance. The support center will advise of additional terms and conditions for support, if any are required.
Software Support – If you have a Support Line contract:
��USA: Call 1-800-237-5511, and choose the ‘iSeries and AS/400e’ menu option to speak with a support representative.
��Outside USA: Contact the local support center in your country / region for assistance. The support center will advise of additional terms and conditions for support, if any are required.
�� (SCT)
You must know the name of the iSeries and/or AS/400e system(s) from which you plan to collect information.

IBM Electronic Service Agent for iSeries and AS/400e 6/19/02
17
�� (SCT) Verify that TCP/IP is started on the iSeries or AS/400e. TCP/IP must be started if you plan to send system inventory information to IBM. If TCP/IP is not running OR if you do not know if TCP/IP is running on the system, type STRTCP on an iSeries or AS/400e command line and press Enter to start it.
�� (SCT) Ensure you use an appropriate installed adapter.
Note: Only PPP connections are supported in OS/400 V5R1. Note: At V5R1 there are two types of connections: AT&T dial and VPN. The AT&T dial is not supported via ISDN; you can only use ISDN if you use the VPN connectivity and your ISP supports ISDN connections.
Determine if you have one of the following required adapters – you will use this information in a later step:
��2699* : Two-line WAN IOA. Note: This IOA requires either a 2629 LAN/WAN/Workstation IOP or a MFIOP.
��2720* : PCI WAN/Twinaxial IOA ��2721* : PCI Two-line WAN IOA ��2745* : PCI Two-line WAN IOA (replaces IOA 2721) ��2750 : PCI ISDN Basic Rate Interface U IOA (2-wire interface) ��2751 : PCI ISDN Basic Rate Interface S/T IOA (4-wire interface) ��2761 : Eight-port analog modem IOA ��2771 : Two-port WAN IOA, with a V.90 integrated modem on port 1 and a
standard communications interface on port 2. To use port 2 of the 2771 adapter, an external modem or ISDN terminal adapter with the appropriate cable is required.
��2772 : Two port V.90 integrated modem WAN IOA * These adapters require an external V.24 modem, or ISDN terminal adapter, and the appropriate cable.
�� (SCT)
You must have V5R1 AS/400 Toolbox for Java (5722-JC1) installed. To check, type DSPSFWRSC on an iSeries or AS/400e command line and press Enter. Press F11 to display libraries/releases. Note: This is a preloaded licensed product. If you upgraded your system to V5R1, this product can be found on one of the CDs that came with your software upgrade package. Use command RSTLICPGM to install this product.

IBM Electronic Service Agent for iSeries and AS/400e 6/19/02
18
�� (SCT) You must have V5R1 IBM Developer Kit for Java [Base with at least one of Options 3, 4 or 5] (5722-JV1) installed. To check, type DSPSFWRSC on an iSeries or AS/400e command line and press Enter. Press F11 to display libraries/releases. Note: This is a preloaded licensed product (Base with Options 3 and 4). If you upgraded your system to V5R1, this product can be found on one of the CDs that came with your software upgrade package. Use command RSTLICPGM to install this product.
�� (SCT) You must order PTF number SF66595 for Electronic Service Agent for iSeries and AS/400e (5798RZG) using your normal PTF order process (FAX, ECS, or the AS/400 web site). Note: You will be instructed to load and apply this PTF and its associated requisite PTF(s) later in this document:
If you require assistance:
��USA: Dial 1-800-237-5511, and choose the AS/400 menu option to speak with a support representative.
��Outside USA: Contact the local support center in your country / region for assistance. The support center will advise of additional terms and conditions for support, if any are required.
�� (SCT) You must select which system you want to use as your ‘Central’ system on your PC. Note: Central system refers to the 'system' that will be calling out and /or the 'system' that will be having other systems' inventory collected. For additional information on AS/400 NetServer, see: http://www.ibm.com/servers/eserver/iseries/netserver/ For additional information on Management Central, see: http://www.iseries.ibm.com/sftsol/mgmtcentral.htm ��To see what systems (connections) currently exist, do this:
1. Open Client Access (icon on your PC desktop).

IBM Electronic Service Agent for iSeries and AS/400e 6/19/02
19
2. Open AS400 Operations Navigator.
OR (icon on PC desktop)

IBM Electronic Service Agent for iSeries and AS/400e 6/19/02
20
3. Expand My Connections.
If you do not see the system (connection) that you want to use as your ‘Central’ system in this list, do this:
A. Right-click on My Connections and select Add Connection.

IBM Electronic Service Agent for iSeries and AS/400e 6/19/02
21
B. Continue through the Operations Navigator Add Connection wizard to add the system (connection) you want to use as your ‘Central’ system.
Note: XZW1814 is a ‘user’ system default.

IBM Electronic Service Agent for iSeries and AS/400e 6/19/02
22
��To select the system you want to use as your ‘Central’ system, do this:
1. Right-click on Management Central and select Change Central System.
IBM Electronic Service Agent for iSeries and AS/400e 6/19/02
23
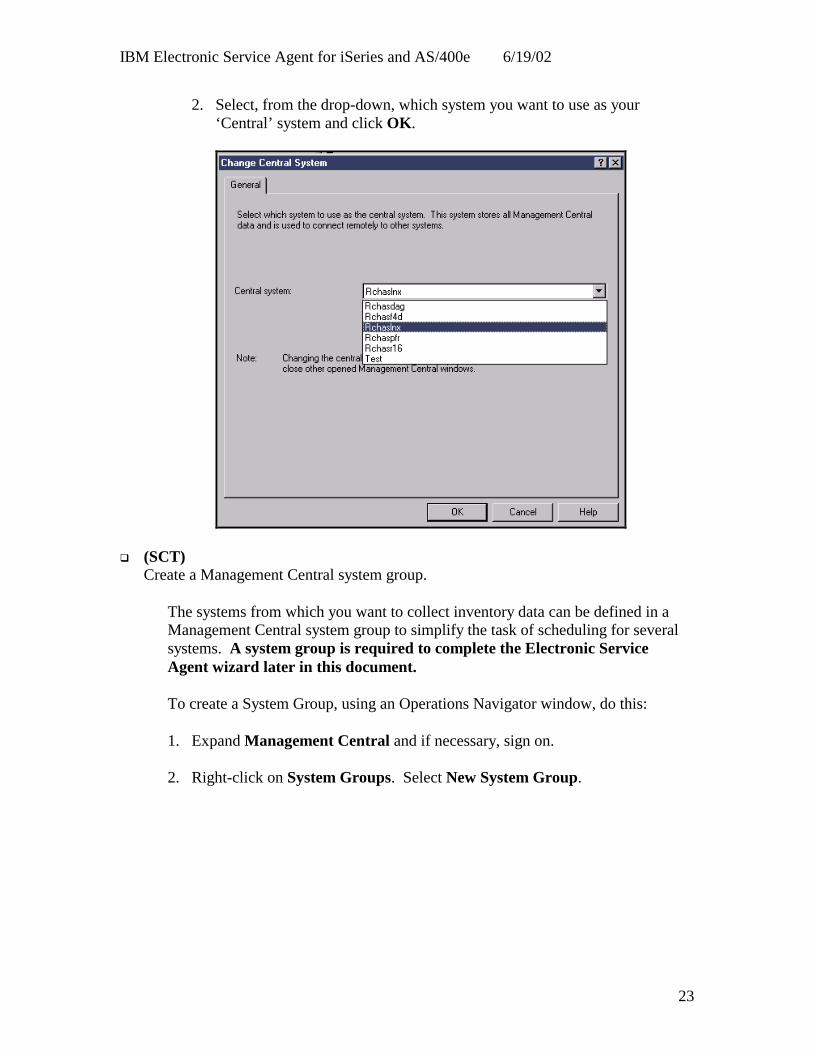
2. Select, from the drop-down, which system you want to use as your ‘Central’ system and click OK.
�� (SCT) Create a Management Central system group.
The systems from which you want to collect inventory data can be defined in a Management Central system group to simplify the task of scheduling for several systems. A system group is required to complete the Electronic Service Agent wizard later in this document.
To create a System Group, using an Operations Navigator window, do this:
1. Expand Management Central and if necessary, sign on.
2. Right-click on System Groups. Select New System Group.

IBM Electronic Service Agent for iSeries and AS/400e 6/19/02
24
3. Enter a Name and Description for this new system group. Select endpoint systems from the Available systems list and use the Add button to add them to the list of Selected systems. Click OK.

IBM Electronic Service Agent for iSeries and AS/400e 6/19/02
25
Chapter 4. How do I obtain Electronic Service Agent?
There are two ways to obtain Electronic Service Agent: Preload
To determine if Electronic Service Agent has been preloaded on your iSeries or AS/400e system, do this:
A. Type DSPSFWRSC on an iSeries or AS/400e command line and press Enter.
A list of software resources is displayed.
Display Software Resources
B. Press F11 to display libraries/releases. Press Page Down until you locate
product ID 5798RZG under the Resource ID column. Check the Release column associated with the Resource ID to determine the Service Director/Electronic Service Agent release. (For example, V5R1M0 signifies 5.1). Press Enter.

IBM Electronic Service Agent for iSeries and AS/400e 6/19/02
26
��If Electronic Service Agent 5.1 is installed, continue to Chapter 5. ‘How do I Install and Set up Electronic Service Agent?’.
��If Electronic Service Agent 4.5 or below is installed OR if Electronic Service
Agent is not installed, continue below, in this section, to obtain an Electronic Service Agent 5.1 CD (SK3T-4116-00).
CD
U.S - Customers: At V5R1, Electronic Service Agent is now shipped with the operating system upgrade package. It is not on the operating system CD's, it is an individual CD (SK3T-4116-00).
SSRs: Call 1-800-879-2755, take option 1 for the National Publications Support Center to order the Electronic Service Agent 5.1 CD (SK3T-4116-00).
Outside U.S. - At V5R1, Electronic Service Agent is now shipped with the operating system upgrade package. It is not on the operating system CD's, it is an individual CD (SK3T-4116-00).
Once you locate / receive the CD, continue to Chapter 5. ‘How do I Install and Set up Electronic Service Agent?’ on page 27 or Chapter 5.5. ‘Expert Guide for Install and Set up of Electronic Service Agent’ on page 49.

IBM Electronic Service Agent for iSeries and AS/400e 6/19/02
27
Chapter 5. How do I Install and Set up Electronic Service Agent?
HPR (Hardware problem reporting) – To install and setup only Hardware problem reporting, follow steps 1 – 10 in this section. SCT (System inventory collection and transmission) – To install and setup only System inventory collection and transmission, follow steps 1 – 4 [read step 4 carefully], and proceed with steps 10 - 34. HPR and SCT – To install and setup both Hardware problem reporting and System inventory collection and transmission, follow all the steps in this section.
1. Using a 5250 emulator, sign on to the system designated as your ‘central system’ in Management Central.
System Sign On
2.
��If Electronic Service Agent was obtained as a preloaded product, type GO SERVICE on an iSeries or AS/400e command line and press Enter. Continue with step 4 in this section.
��If Electronic Service Agent was obtained on a CD, insert the CD into the CD-
ROM device on your iSeries or AS/400e. Continue with step 3 in this section.
IBM Electronic Service Agent for iSeries and AS/400e 6/19/02
28
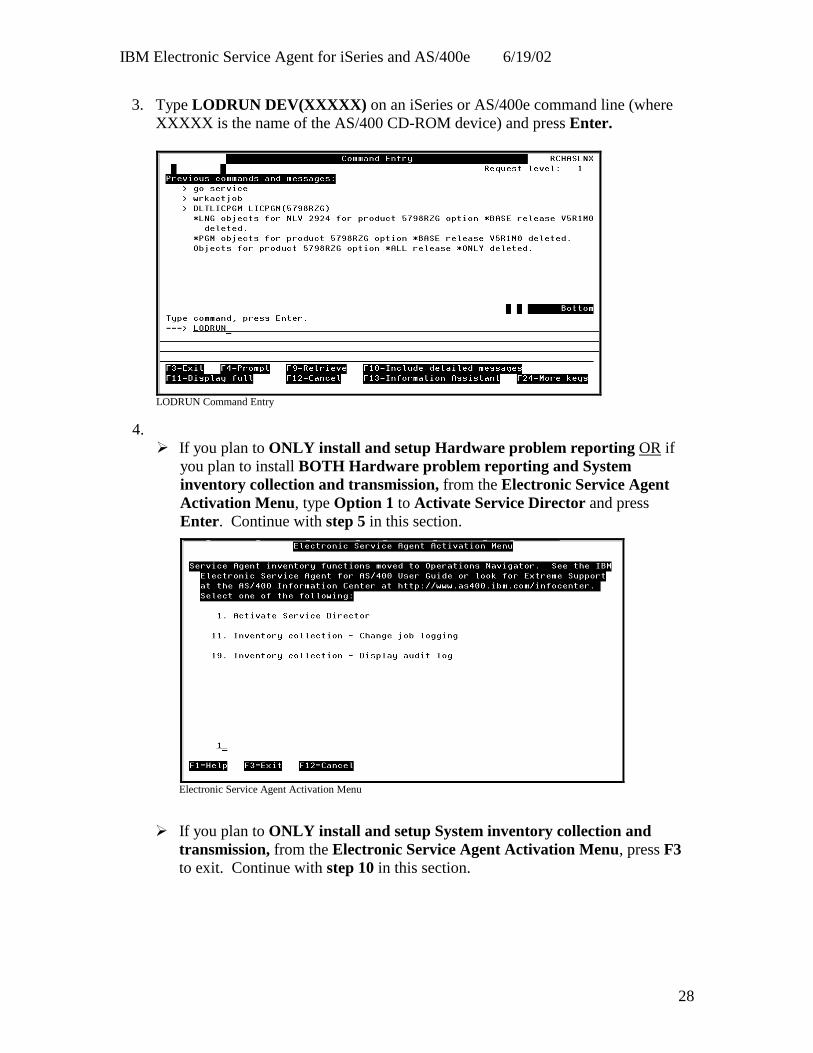
3. Type LODRUN DEV(XXXXX) on an iSeries or AS/400e command line (where XXXXX is the name of the AS/400 CD-ROM device) and press Enter.
LODRUN Command Entry
4. ��If you plan to ONLY install and setup Hardware problem reporting OR if
you plan to install BOTH Hardware problem reporting and System inventory collection and transmission, from the Electronic Service Agent Activation Menu, type Option 1 to Activate Service Director and press Enter. Continue with step 5 in this section.
Electronic Service Agent Activation Menu
��If you plan to ONLY install and setup System inventory collection and
transmission, from the Electronic Service Agent Activation Menu, press F3 to exit. Continue with step 10 in this section.

IBM Electronic Service Agent for iSeries and AS/400e 6/19/02
29
5. Read the International License Agreement for Services Programs. Press F6 to accept this agreement to proceed!
International License Agreement for Services Programs
6. From the AS/400 Service Director Activation display, enter the activation password and press Enter.
To obtain the activation password:
• Primary: Contact IBM hardware service. (In the U.S., dial 1-800-IBM-SERV and place a Service call to have your Systems Service Representative [SSR] contact you with the activation password).
• Secondary: IBM support center.
Activation

IBM Electronic Service Agent for iSeries and AS/400e 6/19/02
30
7. Change the parameter values on the Change Service Director display to meet the needs of your operating environment. It is recommended to set the ‘Report problem automatically’ parameter to *YES. It is required to set the ‘Replace problem log filter’ parameter to *REPLACE. Verify the ‘Autostart Service Director’ parameter is set to *YES – use the page down key to locate this parameter. Press Enter.
Change Service Director Settings
Change Service Director Settings
Note: Subsystem QSVCDRCTR must be active for Electronic Service Agent to function properly. Electronic Service Agent adds autostart job entry QYSDAJE to the QSYS/QSYSWRK subsystem description, which automatically starts this subsystem at IPL time. Specifying *YES for the Autostart Service Director parameter will do this.

IBM Electronic Service Agent for iSeries and AS/400e 6/19/02
31
8. From the AS/400 Enhanced Service Director Function Test display, press F3 to exit and bypass this test. After the appropriate PTF(s) are applied to the system (in a later step), you can perform this test. To do this, type GO SERVICE from an iSeries or AS/400e command line, press Enter and choose the option to Send a Service Director Test Problem.
Function Test
9. A SERVICE AGENT screen is displayed. Press F12 twice to exit.
Service Agent Screen
IBM Electronic Service Agent for iSeries and AS/400e 6/19/02
32
10. Load and apply PTF SF66595 for product 5798RZG. (This is the PTF you ordered in Chapter 3. ‘Prerequisites’). Note: You must apply this PTF and its associated requisite PTF(s) together.
Important! If you plan to ONLY install and setup Hardware problem reporting, the install and setup is complete.
If you require assistance: USA: Dial 1-800-237-5511, and choose the AS/400 menu option to speak with a support representative. Outside USA: Contact the local support center in your country / region for assistance. The support center will advise of additional terms and conditions for support, if any are required.
11. The Service Agent system inventory and collection setup and connections must be configured using Client Access. Open Client Access (on your PC).
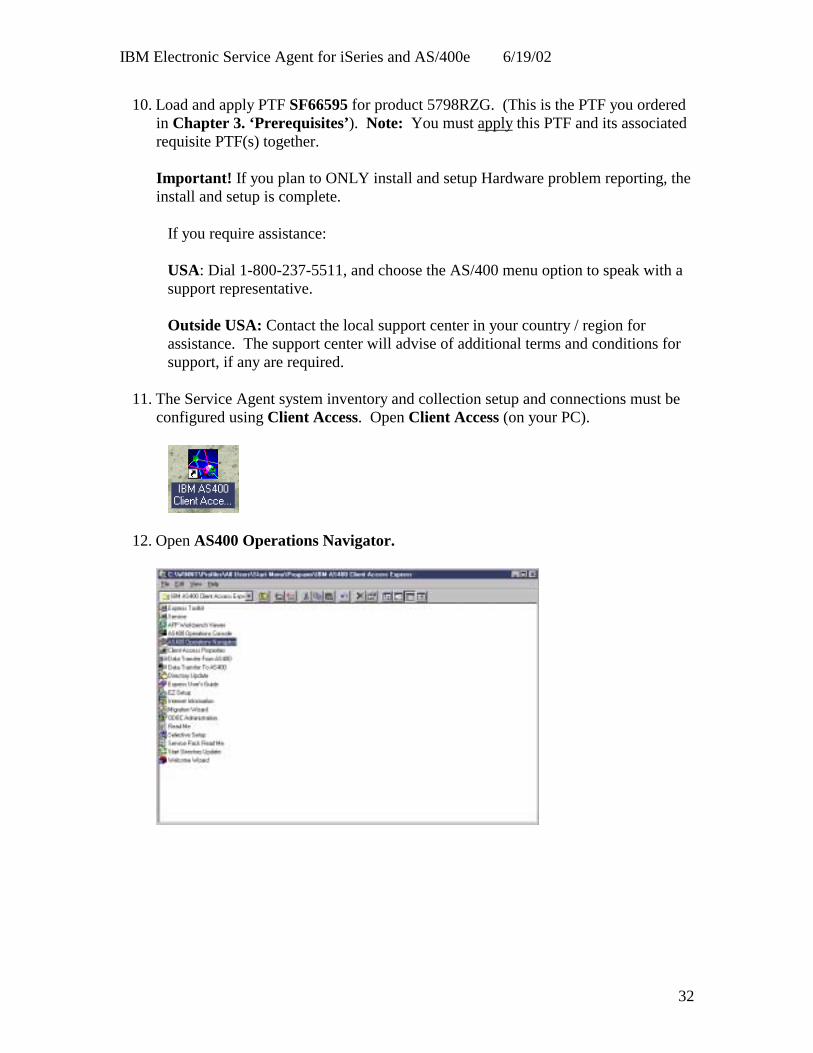
12. Open AS400 Operations Navigator.

IBM Electronic Service Agent for iSeries and AS/400e 6/19/02
33
OR
For additional information on Operations Navigator, see: http://www.ibm.com/servers/eserver/iseries/oper_nav/
For additional information on AS/400 NetServer, see: http://www.ibm.com/servers/eserver/iseries/netserver/
13. Install the Electronic Service Agent Plug-in.
A. Open File from the AS/400 Operations Navigator window and select Install Plug-ins.

IBM Electronic Service Agent for iSeries and AS/400e 6/19/02
34
B. Select the system that is your central system in Management Central (the selected central system’s OS/400 must be at V5R1) and click OK. Sign on, if necessary.
If you are presented with an Install Plug-ins window. Read the information displayed and click Add to LMHOSTS.
For additional information on AS/400 NetServer, see: http://www.ibm.com/servers/eserver/iseries/netserver/
C. From the Plug-in Selection window, check (to select) Electronic Service Agent and click Next.
Note: If Electronic Service Agent is not an option, it is already installed. Click Cancel. Click Exit Setup.
D. From the Start Copying Files window, click Next.
E. From the Setup Complete window, click Finish.
14. Expand Management Central. If necessary, sign on.

IBM Electronic Service Agent for iSeries and AS/400e 6/19/02
35
15. Right-click on Extreme Support and select Configuration. From the Extreme Support Configuration wizard – Welcome screen, click Next.

IBM Electronic Service Agent for iSeries and AS/400e 6/19/02
36
16. Select Send collected data to IBM for service and support. De-select Receive fixes from IBM and report problems to IBM. Click Next.
17. The Connection Not Found window will display if a connection has not already been set up. Click Next.
Important! If the Universal Connection was previously configured, the Connection Not Found window (as well as the Configure Universal Connection Wizard) will NOT display. If you have already configured the Universal Connection and would like to change an existing connection profile or delete and create a new one, do this:
A. Open Client Access. B. Open AS400 Operations Navigator. C. Expand My Connections. Go to the system connection under ‘My
Connections’ that is your central system in Management Central and sign on, if necessary.
D. Expand Network. E. Expand Remote Access Services. F. Right-click on Originator Connection Profiles and select Universal
Connection Wizard.

IBM Electronic Service Agent for iSeries and AS/400e 6/19/02
37
18. The Configure Universal Connection Welcome window will display. Click Next.

IBM Electronic Service Agent for iSeries and AS/400e 6/19/02
38
19. The Service Information window will display. This allows for service contact information to be entered. The first three fields are required to be filled in. This screen updates the same information as Work with contact information (WRKCNTINF) option 2 via a 5250 emulation screen. If that information has already been entered on the system, these parameters will be pre-filled. Click Next.
20. The Address window will display. Fill in the address where the iSeries or AS/400e system machine service contact is located. There are pull down options for Country, National language version, and media for PTF’s. Media for PTF’s allows you to select automatic selection or CD-ROM. Click Next.

IBM Electronic Service Agent for iSeries and AS/400e 6/19/02
39
21. The Location window will display. Fill in your country and state or province. The check box titled My location is not in the list is only checked if a country is not listed. Click Next.
Note: The Country window will display only if the box My location is not in the list is checked. Hemisphere specification is used to lookup default nodes for the application.

IBM Electronic Service Agent for iSeries and AS/400e 6/19/02
40
22. The next screen will prompt for the Connection Type. There are four choices. A dial-up connection using ATT Global Network Services (AGNS), a dial-up connection using an Internet Service Provider, a direct connection to the Internet and a multi-hop connection to the Internet. Choose dial-up connection using ATT Global Network Services (AGNS). Click Next.
23. The Hardware Resource window will display. There are three radio buttons that can
be selected that will give different resource views. Select the resource that will be used for the AGNS connection. Either a resource with an internal modem or one that has an external modem attached can be selected. Click Next.
Note: Only PPP connections are supported in OS/400 V5R1. Reference the ‘Prerequisites’ section for the list of appropriate adapters.

IBM Electronic Service Agent for iSeries and AS/400e 6/19/02
41
Note: After selecting a resource, a line description needs to be provided.
��If multiple PPP lines exist for the resource that was selected, a choice is given between an existing line or a new one can be created. The Choose Line window will display if this is your situation.
��If only one line exists for the selected resource, that line will be used and there will not be an option (window) to select or create a line description.
24. The Line Description window will display if no line descriptions exist for the
resource selected. It will prompt to create a new line. The default line name is QESPPLIN. A different name can be used if preferred. Click Next.

IBM Electronic Service Agent for iSeries and AS/400e 6/19/02
42
25. The Phone Number window will display. This prompts you to select the primary phone number that will be used for the connection to IBM. The country and state or province fields will be pre-filled with the values that were specified earlier. If the fields are not correct, change them to what they should be. If there are special dial prefixes that need to be used, these should be input at this time, as suggested by the instruction at the bottom of the screen. Click Next.
Note: If you are unable to find an appropriate phone number, you can identify a number by accessing this web site and clicking on your appropriate country / region:
Internet: http://www.attbusiness.net/hlpctr/accessnum.html

IBM Electronic Service Agent for iSeries and AS/400e 6/19/02
43
26. The Backup Phone number window will display to select a backup phone number for contacting IBM. It is important to select a backup phone number to ensure that you will get connected. The 800 numbers (USA Only) may be selected, but if at all possible should not be used for the primary number. Click Next.
Note: The Modem window (requesting a modem name) will display if the resource selected does not contain an internal modem. There is a pull down menu for the modem selection. If the desired modem (the modem must be PPP capable) is not listed, you may create a new modem definition. This is done through Operations Navigator by expanding Network and right-clicking on the modem folder that is listed under Remote Access Services.

IBM Electronic Service Agent for iSeries and AS/400e 6/19/02
44
27. The Summary window will display upon completing all of the configuration screens. The summary screen will list the choices that have been made. Click Next.
28. The Extreme Support Configuration – Setup window will display. This will begin set up for the System inventory and collection function of Electronic Service Agent. Click Next.

IBM Electronic Service Agent for iSeries and AS/400e 6/19/02
45
29. The Electronic Service Agent – Welcome window will display. This wizard helps you set up the collecting and sending of your system information to IBM. Read the entire window and then, click Next.
30. The Select System Groups window will display. Select the system groups that will be used to collect the information that will be sent to IBM. You were advised to set up your system group(s) earlier in the ‘Prerequisite’ section. Click Next.

IBM Electronic Service Agent for iSeries and AS/400e 6/19/02
46
33. The Collect Inventory window will display. Select the inventory you would like to collect and send to IBM. To maximize IBM’s ability to service you, you are recommended to select all inventories, except Users and Groups. Then, select the ‘Send Electronic Service Agent inventory to IBM’ action in the lower pane to run. Click Schedule.
32. From the Management Central Scheduler window, schedule the frequency (‘daily’ is recommended), date, and time to collect and send the inventory to IBM. Click OK.
Note: The Advanced Job Scheduler is a separate ‘optional’ licensed program (5722-JS1) that you can install and use to schedule tasks and jobs. This scheduling tool provides more calendar features and offers greater control over scheduled events. The Advanced Job Scheduler is NOT required by Electronic Service Agent. The Management Central Scheduler is the default and is what Electronic Service Agent will use in its documentation. Note: The recommended frequency is daily. Your inventory collection will run as you have specified under ‘When to run’ and ‘Date and Time to start’. When the inventory collection is finished, the data will be sent to IBM.

IBM Electronic Service Agent for iSeries and AS/400e 6/19/02
47
33. The Electronic Service Agent – Summary window will display. Click Next.
Note: You can view your inventory collection information by expanding Management Central and selecting Scheduled Tasks.

IBM Electronic Service Agent for iSeries and AS/400e 6/19/02
48
34. The Extreme Support Configuration – Summary window will display. Click Finish. The setup of your selected Extreme Support functions is complete.
Note: Subsystem QSVCDRCTR must be active for Electronic Service Agent to function properly. Electronic Service Agent adds autostart job entry QYSDAJE to the QSYS/QSYSWRK subsystem description, which automatically starts this subsystem at IPL time.
Important! For information on how to verify your collection scheduled task(s), change your inventory selections, verify that your information was sent to IBM and more, reference Chapter 7. ‘Panels – System inventory collection and transmission’ in the V5R1 IBM Electronic Service Agent User Guide.
The setup of your selected Extreme Support function using Chapters 2 through 5 is complete.

IBM Electronic Service Agent for iSeries and AS/400e 6/19/02
49
Chapter 5.5. Expert Guide for Install and Set up of Electronic Service Agent
The following pre-requisites must be satisfied to use this chapter. You must be familiar with the use of iSeries commands, PTF maintenance, Operations Navigator, Management Central, Installing Plug-ins and use of Configuration Wizards. The OS/400 products 5722XE1, 5722JV1 and 5722JC1 must be installed. The system value QRETSVRSEC must be set to 1 and the system value QCNTRYID is set correctly for your country / region. Client Access Express for Windows V5R1 with the latest Service Pack must be installed on a PC and connected to the iSeries or AS/400e. You must use a *SECOFR user class profile which is not QSECOFR for installation and setup. The local contact information (WRKCNTINF) is correct and up to date. Electronic Customer Support (ECS) is configured and operational. HPR and SCT – To install and setup both Hardware problem reporting and System inventory collection and transmission, follow all the steps in this section.
��To obtain an Electronic Service Agent CD, refer to the CD section of Chapter
4 on page 26. If Electronic Service Agent was obtained on a CD, insert the CD into the CD-ROM device on your iSeries or AS/400e. Continue with step 1 in this section.
��To determine if Electronic Service Agent was preloaded, refer to the Preload
section of Chapter 4 on page 25. If Electronic Service Agent was obtained as a preloaded product, continue with step 2 in this section.
1. Type RSTLICPGM LICPGM(5798RZG) DEV(XXXXX) on an iSeries or AS/400e command line (where XXXXX is the name of the AS/400 CD-ROM device) and press Enter.

IBM Electronic Service Agent for iSeries and AS/400e 6/19/02
50
2. Order, load and apply PTF SF66595 for product 5798RZG. Note: You must apply this PTF and its associated requisite PTF(s) together.
3. Type GO SERVICE on an iSeries or AS/400e command line and press Enter.
4. From the Electronic Service Agent Activation Menu, type Option 1 to Activate
Service Director and press Enter.
5. Read the International License Agreement for Services Programs. Press F6 to accept this agreement to proceed!
6. From the AS/400 Service Director Activation display, enter the activation
password and press Enter.
To obtain the activation password:
• U.S. - You can get this activation password from your Hardware Service Representative (SSR) by calling 1-800-IBM-SERV and placing a Service call. Your Hardware Service Representative (SSR) will call you and give you the activation password for the current day over the phone.
• Outside U.S. - Contact the local support center in your country / region
for assistance.
7. Change the parameter values on the Change Service Director display to meet the needs of your operating environment. It is recommended to set the ‘Report problem automatically’ parameter to *YES. It is required to set the ‘Replace problem log filter’ parameter to *REPLACE. Verify the ‘Autostart Service Director’ parameter is set to *YES – use the page down key to locate this parameter. Press Enter.
8. From the AS/400 Enhanced Service Director Function Test display, press Enter to send a test problem with no error log id or F3 to exit and bypass this test.
9. A SERVICE AGENT screen is displayed. Press F12 twice to exit.
10. Open AS400 Operations Navigator. 11. Install the Electronic Service Agent Plug-in. Open File from the AS/400
Operations Navigator window and select Install Plug-ins. 12. Expand Management Central. If necessary, sign on.

IBM Electronic Service Agent for iSeries and AS/400e 6/19/02
51
13. Right-click on Extreme Support and select Configuration. From the Extreme Support Configuration wizard – Welcome screen, click Next.
14. Select Send collected data to IBM for service and support. De-select Receive
fixes from IBM and report problems to IBM. Click Next.
15. The Connection Not Found window will display if a connection has not already been set up. Click Next.
16. The Configure Universal Connection Welcome window will display. Click Next.
Step through the Universal Connection wizard to meet the needs of your operating environment for Service Agent.
Note: If you are unable to find an appropriate AGNS phone number, you can identify a number by accessing this web site and clicking on your appropriate country / region:
Internet: http://www.attbusiness.net/hlpctr/accessnum.html
Important! If the Universal Connection was previously configured, the Connection Not Found window (as well as the Configure Universal Connection Wizard) will NOT display.
17. After the Universal Connection wizard has been completed, the Extreme Support Configuration Wizard will continue. Step through the Extreme Support Wizard to meet the needs of your operating environment for Service Agent.
The setup of your selected Extreme Support function using Chapter 5.5 is complete.


